Here it is!! My first ever before and after tutorial! I may have gone overboard with this one, but I really wanted to make sure it was thorough. I’ve been asked a few times about how I post process my images. I picked an image from this session that needed more work. Typically a photo like this will take me about 10-15 minutes from beginning to end. I went through everything very slow this time and I think this blog post has taken more than 2 hours to finish! So let’s get started and I’ll do my best to explain how I work! 😀


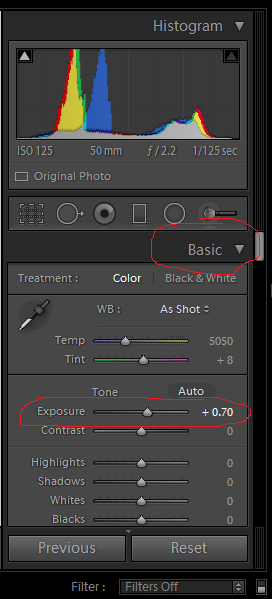
As you can see, I did not get the crop right in camera. I was being silly and trying to get his attention and really not paying attention to my composition in camera. It happens. I do it so much more than I should, but let’s face it…..I work with kids! They don’t sit still and sometimes you just have to wing it an fix it later. So when I pick an image like this, the first thing I do is pull it up in Lightroom and work the basics. For this specific image, I cropped it and increased exposure. When I’m working in my studio and my strobe, I tend to under-expose a little because the strobe gives off a lot of light.
.png)
After I make sure that I have cropping and exposure the way I want it, I always zoom in on the subjects eyes. I’m kind of a sharp eye crazy person. I’m trying to make myself ease up a bit on that, but I really NEED the eyes to be in focus. I will usually toss the image no matter how cute it is if eyes are not in focus. So thankfully this one was! I will then go down to the details panel and sharpen the amount to 40, and Noise reduction – Luminance to 20. Why? Because I like it that way. Ha! Seriously, I don’t have a technical answer for that. By trial and error, that is how I like the images to be. If I have more noise in an image, I may bump it up more. But I’ve found that if I got too far above 20, it give the image a very soft look and I’m not a fan.
.png) This is a step that I don’t always do in my images. I wanted the edge of the rug and the paper to blur just a little more than I got in camera. So I used my adjustment brush in Lightroom and I brought down the clarity and increased the noise reducer. I then just brushed in between the red circles. It’s not going to be something that is really noticeable, but for me…that is exactly what I want. I want a natural look to it and I don’t want people to know I photoshopped it! 😉
This is a step that I don’t always do in my images. I wanted the edge of the rug and the paper to blur just a little more than I got in camera. So I used my adjustment brush in Lightroom and I brought down the clarity and increased the noise reducer. I then just brushed in between the red circles. It’s not going to be something that is really noticeable, but for me…that is exactly what I want. I want a natural look to it and I don’t want people to know I photoshopped it! 😉
.png)
.png)


Now that is the end of my editing in Lightroom! I like to use both Lightroom and Photoshop. Some photographers do all their editing in just one program. There really is no right or wrong way to do it. You just have to figure out what works best for you. When I’m doing with my basics in Lightroom, I right click on the image, go to “edit in” and then click on Edit in Adobe Photoshop CC 2014. This will create a copy of my photo with my Lightroom adjustments and bring it up in Photoshop.
.png)
This is where I will do the fine tuning. I like cleaning up blemishes in PS because the tools are better. As you can see this cutie pie as a few marks on his face…..as most children do. I click on the patch tool on the left and circle the different marks and patch them up. You can also see some drool going on under his mouth. While you may still use the patch tool for this, I prefer to use the cloning tool when you are getting close to a feature that changes. With the clone tool, I can adjust in more detail to make sure that the photoshopping continues to look natural.
.png)
.png)
Boom! Look at that beautiful face! 😉
.png) After I fix the face, I just do a look around and see if there are any other spots on the photo that need the patch tool and if so, I will fix those up real quick. In this one, there were some blue fuzz on the rug that needed to be fixed.
After I fix the face, I just do a look around and see if there are any other spots on the photo that need the patch tool and if so, I will fix those up real quick. In this one, there were some blue fuzz on the rug that needed to be fixed.
.png)
The next step that I do is run my image through Portraiture. This is not a program that everyone has. It’s expensive…so if you don’t have it, don’t worry about it! You can actually smooth out skin by using your adjustment brush in Lightroom and bringing down the clarity a little bit. since I work with newborns and little ones, this program was a huge time saver for me. Just a quick click and I’m done! But the one thing I do with portraiture is I run this on a new layer and add a layer mask. I then brush off portraiture from baby’s eyes, mouth, hair, and a little bit of the nose. I don’t want these features to be so smooth that you can’t see the details in them.
.png)
These are the areas that I typically brush off portraiture.
.png)
After I finish up with Portraiture, I flatten the image and move on to my next step. When I increased the exposure in Lightroom, it washed out my background a little bit. I want to bring that nice dark blue back to the image without making baby under-exposed again. To do this, I want to click on the create fill or adjustment layer button and click on levels. A levels layer will then pop up and I can adjust to what I want. Normally I will bring the midtones down to about .85 and then I will take my black brush and brush it completely off the baby. When you do this, you can bring back that nice deep blue but still keep baby properly exposed. When you are done, flatten the image again.
.png)
.png)
For this image, I noticed that there were some wrinkle in the paper that I used. This can easily be corrected by duplicating the layer and doing a low opacity cloning job.


The last thing I wanted to do in this photo was blur those edges just a little more. Again….I always work on a duplicated layer. To get the blur feature, go to Filter, Blur, then Lens Blur. A new screen will pop up and you can adjust to how much you want blurred. When you do this, it will blur the entire image. But if you press Crtl+I, it will invert your layer mask. Then with a WHITE brush, you can brush over the spots you wish to blur. Once this is finished, I flatten the image again and press save. This will save my image and take it back into Lightroom where I can export it as a jpeg file.
.png)
.png)
Final Image!
.jpg)
And that’s the end of the tutorial and how I typically post process my work! Thank you for stopping by and checking out my before and after tutorial. If you’d like to request a tutorial on a specific topic, please email me at preciousstonesphotography@gmail.com
Other cosmetics like face powder give glow to the skin after applying the base cream buy cheap generic cialis online
generic flagyl over the counter
buy generic tetracycline online
best diflucan price
valtrex cost india
diflucan over the counter singapore
flagyl generic price
Kudos. I like it.
creative writing essays https://helpwithdissertationwriting.com top writing service https://bestmasterthesiswritingservice.com
Kudos! Loads of posts.
custom research paper writing service by native english speaker best term paper writing service review term paper writing services term paper writing service custom
Thanks a lot. Useful stuff.
writing essay help help for essay writing essay help websites app that help with essay
avodart 0 5 mg
hydrochlorothiazide canada
medicine atenolol 50 mg
Position certainly regarded.!
microgaming online casino no deposit bonus online casino nj fast payout online casino
Amazing information. Regards.
buying essays uk pay for essay online
You actually revealed that really well.
how i became a better writer essay pay someone to write my essay how do i end my college essay
You reported that exceptionally well!
write my program for me automatic essay writer website that writes essays for you
modafinil 10 pills
suhagra 100 from india
purchase accutane with paypal
10 mg tamoxifen
Incredible a lot of helpful advice.
essaytyper essays help online essay write help essays writing help
Fantastic tips. Cheers.
hire someone to write essay how to introduce a writer in an essay college essay writers writing my essay
Nicely put, Kudos.
someone to do my homework do my math homework for me free do my math homework for me idk how to do my homework
Nicely put, Appreciate it!
thesis guidelines master thesis writing service uk define thesis writing thesis
custom essay writing service org reviews best resume writing service best paper writing services essay writing website
professional writer services https://service-essay.com
Beneficial stuff. Cheers!
custom research paper writing service college paper writing service reviews order custom paper buy a paper for college
college term papers for sale college term paper writing service proposal writer proposal introduction
should college athletes be paid essay https://bestonlinepaperwritingservices.com
propranolol 80 mg capsules
Many thanks. An abundance of forum posts!
do my essay paper how do i spend my holidays essay professional college essay writers write my thesis for me
Attractive section of content. I simply stumbled upon your
website and in accession capital to claim that I acquire in fact loved account your weblog posts.
Anyway I will be subscribing in your feeds or even I
achievement you get admission to constantly rapidly.
Amazing facts. Cheers.
paper writing services best order custom papers legit paper writing services best nursing paper writing service
Reliable forum posts. Many thanks.
dissertation proofreading services best dissertation writing buy a dissertation nursing dissertation writing services
You actually revealed it effectively!
make my essay writing essays someone write my essay write my college admissions essay
Seriously plenty of terrific info.
write my essay in 1 hour write a thesis for me writing argumentative essays my essay writer
dltk custom writing paper buy a college paper college papers to buy buy papers online
reasons for going to college essay https://hireawriterforanessay.com
rx pharmacy no prescription
The other day, while I was at work, my cousin stole my iphone and tested to see
if it can survive a 40 foot drop, just so she can be a
youtube sensation. My apple ipad is now broken and she has 83
views. I know this is totally off topic but I had to share it with someone!
Reliable tips. Kudos.
thesis thesis writing service reviews good thesis statements thesis titles
Effectively voiced genuinely! .
pay for essays pay for a paper to be written where can i pay someone to write my essay order essay cheap
grad school essay writing service which essay writing service is the best writing essay best essays writing service
writing opinion essays https://domycollegehomeworkforme.com
Really loads of awesome data!
hire someone to do my homework homework help homework 123 should i do my homework
best paper writing service best online paper writing services cheap paper writing services custom written papers
disseratation https://helpwithdissertationwriting.com
feldene gel prices
Wow a good deal of beneficial material!
pay someone to do my math homework do my homework in spanish pay someone to do my homework i do my homework in spanish
Many thanks, Loads of facts!
buy literature review paper custom paper writers cheap custom papers college papers to buy
writing essay service grad school essay writing service cheapest essay writing service uk essay writing service usa
how to hire a ghostwriter https://buyanessayscheaponline.com
Superb advice. Appreciate it.
strong thesis statement good thesis statement thesis in an essay master thesis writing service uk
college essay tutor near me essaypro assignment help the college essay guy
how to write english essays https://customthesiswritingservice.com
kamagra jelly usa
where can you buy elimite cream
Kudos! A lot of write ups.
research paper writing service review paper writing service superiorpapers paper writing service superiorpapers professional research paper writing service
Information clearly considered!.
dissertation writing uk writing a doctoral dissertation dissertation editors phd dissertation help
You said that perfectly.
legit essay writing service writing a college admission essay essay writing sites writing an informative essay
best essay writing best cheap essay writing service legit essay writing service essay write service
what is a good essay writing service https://helpwithdissertationwriting.com
Amazing tons of fantastic material.
write my research papers write my research paper proposal paper parts of research proposal
Many thanks! A good amount of write ups!
order essay pay essay pay people to write essays essay buy
You actually said that adequately.
coursework info homework 123 help with coursework coursework uk
You suggested it well!
pay for college essay pay for college papers order of writing an essay pay for paper writing
buy a paper buy papers online for college paper writing service custom paper writing services
how to begin college essay https://ouressays.com
Thank you, Valuable information!
spanish essay writer write a speech for me what should i write my persuasive essay on write my essay fast
azithromycin for sale usa
Amazing quite a lot of superb info!
buy essay service top essay writing service cheap essay service best resume writing service 2020
Wow a good deal of useful facts.
thesis editing services good thesis statement thesis help thesis statements
Regards, Good information.
online research paper writers research proposal writing services write my research paper research paper to buy
Nicely put. Thank you!
help write essay cheap essay essay help websites best essay writing service
papers writing service thesis paper writing service online research paper writing service buy school papers
thesis dissertations https://custompaperwritingservices.com
Really lots of awesome info!
service quality phd thesis essay thesis a good thesis statement a good thesis statement
buy college essay papers just buy essay essay on sale where can i pay someone to write my essay
unique college essay https://essaywritingservicetop.com
You definitely made your point.
pay for a paper to be written pay to write papers buy a narrative essay pay to write paper
You said it perfectly.!
writing essay essay writing website essay writing help academic essay writing
You mentioned it terrifically.
dissertation proposal writing buy dissertation paper writing dissertation uk dissertation writing service
Very good posts. Kudos.
write a conclusion for me write an essay for me cheap do i need a title for my college essay write a essay
buy essays online cheap buy an essay pay to write my essay essays order
pay for dissertation https://essayservicehelp.com
You said it very well.!
what ways do i help my family essay best essay writers online help me write my english essay essay writer free trial
buy essay pay someone to write my college essay buy custom essay pay to write papers
college level essays https://essaywritingservicehelp.com
Position effectively considered!!
essay writing courses online free essay on service writing essays service research paper writing services
Unlike raloxifene, tamoxifen has already been tested in high risk premenopausal and postmenopausal women to determine its worth in reducing the incidence of invasive and noninvasive breast cancer buy cialis online without prescription However, her surgeon, who was not an oncologist, never discussed the recommendation and only referred her to a plastic surgeon for breast reconstruction
You explained this exceptionally well!
online paper writing service pay for paper buy a paper for college order custom paper
Excellent tips. Thank you!
college essay service best essay writing service review essay writing service uk essay writing prompts
Useful material. Appreciate it!
custom paper custom handwriting paper pay for college papers pay someone to write your paper
custom research paper writing services research paper helper write my research paper term paper
writing a good dissertation https://englishessayhelp.com
Thanks a lot. I value this.
write my essay service research paper writing services best essay writing service in usa professional essay writing
write my essay essay helper free writing assistant write my essay
how to write an admissions essay https://bestmasterthesiswritingservice.com
celebrex 120 mg
You said that wonderfully!
cheap essay writing service best online essay writing services reviews buy essay online writing service essay writing site
You expressed this adequately!
write an essay for me write my essay online essay writers best essay writers
You explained that effectively.
definition of dissertation writing dissertations dissertation service dissertation help services
Regards, I enjoy it.
scholarship essay writing service paper writing service reddit paper writing service college best rated essay writing service
phd thesis phd dissertation writing dissertations dissertation proposal
how to write essay about myself https://essaypromaster.com
Cheers! Terrific stuff.
parts of a research proposal proposal writing research proposal apa term papers
write this essay for me best essay writers write a essay essay write
essay writing services reviews https://paperwritingservicecheap.com
Regards. Lots of info.
help me write my essay writing essays write my research paper for me write my essay cheap
Appreciate it, Quite a lot of tips.
best custom essay writing service online essay writing real essay writing service trusted essay writing service
where can you buy dexamethasone
Kudos, I value this!
professional paper writing service professional essay writers writing a college application essay essay paper writing services
Perfectly expressed certainly! !
essay help essay bot essays help medical school personal statement
You made your position extremely well!.
essay writting service service to others essay essay writing service review buy essay writing service
online paper writing service best paper writing services paper writing services pay for research paper
can someone write my essay https://researchpaperwriterservices.com
Seriously a good deal of beneficial material!
dissertation def dissertation assistance dissertations dissertation editing services
Amazing a lot of amazing information!
website that writes papers for you essay writers online write a research paper how to write a paper
Very good facts. Thanks!
do my homework for me coursework do my finance homework do my homework for money
dissertation writing service dissertation editing services dissertation writing phd thesis
cite website in essay https://quality-essays.com
Nicely put, Many thanks!
buy essay buy essay pay to write essay pay to write paper
Amazing forum posts, With thanks.
cheap research paper writing service pay for college papers custom paper order custom paper
With thanks. Numerous write ups!
research paper writer research paper services term paper college term papers
writing help dissertation paper dissertation writer definition of dissertation
how to write an mla essay https://helpmedomyxyzhomework.com
You actually mentioned that exceptionally well!
write my essay service affordable essay writing service legitimate essay writing service college essay writing tips
Regards, Quite a lot of knowledge!
dissertation meaning dissertation writers dissertation assistance dissertation writing services reviews
Really lots of valuable material!
good thesis writing a thesis define thesis thesis sentence
You reported that fantastically!
essay writer website essay writer free kindergarten writing paper essay writers online
This is nicely expressed! .
essay writer website write essay write an essay for me who can write my essay
buy bactrim without prescription bactrim ds online bactrim online
Kudos. Good stuff!
dissertation proposal custom dissertation writing services phd weight loss dissertation writing
buy zoloft in canada where can i buy zoloft online zoloft no prescription
You actually mentioned it exceptionally well.
ai essay writer write my essay for free writing essays persuasive essay writer
budesonide 400 mcg budesonide 180 mcg budesonide 3
Beneficial posts. Kudos.
order essay buy essays online pay someone to write my college essay essay for sale
You stated it very well!
free writing assistant assignment help paper writing help essay help
Factor well considered!!
thesis sentence thesis writing a thesis doctoral thesis
You said it very well..
dissertation assistance proquest dissertations dissertation editing services dissertation meaning
It is never advisable to buy doxycycline without prescription.
tizanidine 2mg tizanidine drug tizanidine cost
prozac 90mg prozac 20mg prozac where to buy
Tips well used!!
essay writing site best online essay writing service best resume writing service essay service reviews
I am sorting out relevant information about gate io recently, and I saw your article, and your creative ideas are of great help to me. However, I have doubts about some creative issues, can you answer them for me? I will continue to pay attention to your reply. Thanks.
otc disulfiram purchase disulfiram online can i buy antabuse over the counter
Nicely expressed without a doubt! !
cpm homework reddit do my homework my homework xyz homework
You said it effectively!
essay writing help help with writing an essay essay writing help the college essay guy
Thanks a lot! Numerous material.
dissertation abstracts dissertation data analysis help dissertation writing help dissertation
Thank you for your sharing. I am worried that I lack creative ideas. It is your article that makes me full of hope. Thank you. But, I have a question, can you help me? https://accounts.binance.com/sl/register?ref=DB40ITMB
With thanks. I value this.
pay someone to write paper custom research paper writing services paper writing service research paper writing service
do my homework for me homework do my programming homework do my math homework for me
article ghostwriter https://writinganessaycollegeservice.com
With thanks, Awesome information.
buying papers for college pay someone to write a paper paper writer services paper writing services
Wow loads of superb data!
doctoral dissertation dissertation data analysis help dissertation writing service dissertation editing
paper writing service reviews paper writing services pay to write paper paper writing service reviews
phd research proposal https://essaywriting4you.com
budesonide drug budesonide 0.25 mg budesonide 200 mcg
ampicillian where can i buy ampicillin can you buy ampicillin over the counter
lexapro 7.5 mg lexapro online uk buy lexapro online cheap
average cost of benicar benicar canada compare benicar prices
amoxicillin 1g tablet amoxicillin 750 amoxicillin z pack
budesonide 3 mg coupon budesonide for sale budesonide 3
baclofen 10 mg tablet online baclofen 10mg baclofen 10 mg cost
amoxicillin buy no prescription cheapest amoxicillin 825 mg amoxicillin over the counter in canada
A thorough lyrica price comparison is worth its weight in gold.
proscar online buy proscar online buy proscar best price
triamterene/hctz 37.5-25 mg
avana tablet avana 50 where can i buy dapoxetine in india
Fantastic knowledge. With thanks!
can you do my homework pay someone to do my homework do my homework do my math homework for me
Metformin 1 mg can help reduce the risk of complications associated with diabetes.
I can rest easy knowing that I have a reliable source of metformin 1000 mg no prescription from which to order my medication.
Thank you. Ample forum posts!
do my finance homework pay someone to do my homework should i do my homework do my math homework
my homework do my homework for money homework help homework help cpm
dissertation proposal writing https://theessayswriters.com
Thanks. Ample postings!
example thesis thesis help thesis statment thesis writing
advair cost in canada
propecia witout prescription finasteride 1mg tablets for sale finasteride tablet online
valtrex 3000 mg cost of valtrex in canada drug prices valtrex
azithromycin 500 mg tablet for sale
where to buy valtrex 1g
buy amoxil online cheap amoxil 50g amoxil discount
generic advair price generic advair us advair by mail
My doctor adjusted my dosage of 1 mg synthroid based on my bloodwork.
phenergan 30 25 mg phenergan canada otc phenergan 20 mg
fluoxetine 16 mg fluoxetine 40 tablets fluoxetine prozac
budesonide 9 mg tablets
silagra 100 tablets silagra 0.25 silagra without prescription
celebrex generic price
ampicillin antibiotic
amitriptyline 5 mg brand name in india amitriptyline 100 amitriptyline 25mg tablets price
budesonide 500 mcg
I need to know where to buy metformin 1000 mg ASAP!
Nicely put. Appreciate it!
the college essay guy writing helper write my essay essaypro
dapoxetine 60 mg tablets price in india cheap dapoxetine online buy dapoxetine uk
amoxil pill brand amoxil online where to buy amoxil
Hi, excuse me, do you know where can I get Clomid over the counter?
Always keep your lisinopril 10mg tablets out of reach of children and pets.
Make sure to follow the dosage instructions provided by your healthcare provider when taking cipro generic.
vardenafil 10 mg vardenafil 20mg uk vardenafil 20mg
budesonide 3 mg price can you buy budesonide over the counter budesonide drug
I experienced severe joint pain after taking cipro.
Don’t let a lack of prescription hold you back from getting the medication you need – order Cipro without prescription now.
Looking for an affordable alternative to expensive acne treatments? Try our cheap Accutane.
canadian pharmacy cialis 20mg mexican pharmacy what to buy canadianpharmacymeds com
can i buy albendazole over the counter
sildenafil 100mg price comparison
ventolin canadian pharmacy
You actually expressed it perfectly!
define dissertation dissertation service writing dissertations dissertation definition
avodart capsules avodart 500 mg avodart .5 mg
Nicely put, Appreciate it!
example thesis thesis paper argumentative thesis argumentative thesis statement
custom dissertation writing services dissertation uk custom dissertation writing services dissertation proposal
college success essay https://essayservicehelp.com
You made your point!
write a research paper writing paper professional essay writers online essay writers
It’s crazy how hard it is to find answers to “Can you buy Clomid over the counter in USA?”
suhagra 500 mg suhagra tablet price suhagra 100mg tablet price
over the counter acyclovir tablets
lexapro 200 mg how to get cipralex order lexapro online
As a competitor in the marketplace, we strive to offer the lowest metformin cost to attract and retain customers.
ampicillin 500 medicine
How much is Lyrica needed for chronic fatigue syndrome?
buy dexamethasone uk dexamethasone generic dexamethasone 75 mg tablet
We are committed to working with healthcare providers and insurers to ensure fair and reasonable Synthroid prices for all.
order cialis canada cialis online fast shipping cialis australia
buy prednisone from canada where to buy prednisone online without a script buy prednisone without a prescription
vermox plus vermox price south africa vermox 500mg
albuterol canadian pharmacy how much is albuterol albuterol ventolin
tizanidine brand name tizanidine online purchase buy zanaflex online uk
Can I buy metformin online if I live in a remote area? Yes, you can still access it online.
I’m interested in knowing how to buy synthroid online with no prescription to save time and energy.
silagra buy silagra silagra soft
plavix cheapest price medication plavix 75 mg cost of plavix in australia
Don’t be fooled by offers that seem too good to be true when searching for the cheapest price for lisinopril.
baclofen 10 mg tablet price cost baclofen baclofen 250 mg
Wow all kinds of amazing knowledge.
dissertation help services phd dissertation writing dissertation abstracts international dissertation editing services
canadian pharmacy advair
vermox nz vermox south africa buy vermox 500mg
cost of amoxicillin 875 mg
I’m always on the lookout for customer reviews when I buy generic Accutane online.
Whoa all kinds of valuable advice.
dissertations dissertation writing dissertation writing dissertation help services
writing essays what should i write my college essay about essay writer review persuasive essay writer
how to be successful in college essay https://customthesiswritingservice.com
Many thanks. I like this!
research paper writing service paper writing service reviews professional paper writing service online paper writing service
It is important to purchase Clomid tablets for sale from a trusted source to ensure authenticity and safety.
My doctor recommended the Lyrica 150 mg capsules to help with my restless leg syndrome.
ventolin 108
Lisinopril 10 mg is a type of angiotensin-converting enzyme inhibitor (ACE inhibitor).
motilium without prescription motilium canada over the counter motilium in mexico
how to get albuterol albuterol tab 4 mg albuterol inhaler
dexamethasone 4 mg price buy dexamethasone online dexamethasone 2mg
dexamethasone 1 tablet dexamethasone price uk dexamethasone uk
Cheers. Awesome stuff!
essay help service ebook writing service college essay writing services unique essay writing service
vermox purchase buy vermox online nz vermox plus
clopidogrel 34 cheap plavix generic clopidogrel tablet
cheap kamagra oral jelly online kamagra 100mg uk price of kamagra jelly
My Synthroid 025 mg was not delivered on time.
Metformin 500 mg tablets make me feel dizzy and nauseous.
Great tips. Appreciate it.
help writing essay essay helper online free writing assistant helping others essay
do my math homework for me homework do my math homework cpm homework
how to write admission essay https://researchpaperwriterservices.com
dexamethasone 4 mg cost dexamethasone uk buy dexamethasone where to get
neurontin 100mg tablet neurontin 100mg tablets neurontin 100 mg capsule
With thanks! I appreciate it!
online essay writer essay writter help me write my essay writing essays for money
Proper monitoring of blood glucose levels is necessary when taking Metformin HCL 1000 mg to prevent hypoglycemia.
can i buy zoloft without prescription
erythromycin 400
can you buy amoxicillin over the counter canada
It’s crazy how hard it is to find answers to “Can you buy Clomid over the counter in USA?”
buy cialis daily online online cialis paypal cialis canada 20 mg
When you order Synthroid online, you can rest assured that you’re getting the correct dosage.
The cipro price may be affected by the length of your prescription.
discount neurontin prescription price for neurontin buy neurontin uk
flomax online canada
Truly quite a lot of fantastic tips!
i need help writing an essay essay writing service coupon best college essay writing service custom essay writing service
fluoxetine uk buy fluoxetine online australia 40 mg fluoxetine pills
ampicillin online order
fluoxetine 10 mg cap fluoxetine oral best pharmacy prices for fluoxetine
buy generic proscar online cheap proscar proscar generic price
clonidine hcl
Really tons of great facts!
thesis topic thesis titles thesis write a thesis
write a essay write my thesis for me write my paper for me free automatic essay writer
undergraduate dissertations https://essaywritingservicelinked.com
lexapro 10 mg cheap lexapro online generic lexapro 20 mg cost
You suggested that very well.
writing an opinion essay essay write writing essays ai essay writer
Whether for personal use or assisted reproduction, explore clomid buy online options.
I’ve been searching for the generic for allopurinol and still can’t find it!
The Cipro cost was much more manageable than I thought it would be.
baclofen 10 price baclofen over the counter uk order baclofen online
plavix 75 mg tablet plavix generic drugs cheap plavix online
sildenafil 100mg tablets price
acyclovir cream brand name in india
hydrochlorothiazide 25 mg coupon hydrochlorothiazide caps hydrochlorothiazide losartan
no prescription pharmacy paypal pharmacy rx international pharmacy no prescription
Not sure where to buy metformin online? Your local pharmacy may offer delivery options.
motilium generic motilium over the counter uk motilium uk pharmacy
sildalis cheap sildalis in india sildalis 120
offshore pharmacy no prescription canadapharmacyonline legit pharmacy rx
Can medication Lisinopril 20 mg be taken with alcohol or recreational drugs?
buy motilium online canada motilium tablets over the counter motilium canada over the counter
Need to check if the metformin price in Mexico is reasonable before making a purchase.
azithromycin 1000 mg tablets
valtrex purchase online
buy avana 50 mg
albuterol 5 ventolin albuterol inhaler albuterol uk
You have made the point!
do my homework for me do my programming homework hire someone to do my homework cpm homework help
I had no idea it was possible to get Synthroid without a prescription until I found this site.
cost of flomax rx flomax for kidney stones in females flomax nasal spray
ventolin 50 mg
vermox 500 mg tablet where can i get vermox over the counter vermox tab 100 mg
You’ve made your position pretty effectively!!
do my homework for money pay to do my homework do my college homework do my programming homework
cpm homework do my homework for free do my finance homework do my math homework for me
writing expository essays https://buycheapessaysonline.com
how to get cytotec pills cytotec uk pharmacy cytotec medication
Amazing plenty of superb material!
essay for sale pay for essays pay to write paper pay for essay
where can i buy cipralex lexapro medication cost lexapro 5
erythromycin medication pills
cymbalta price comparison order generic cymbalta online cymbalta canadian pharmacy
My doctor recommends that I continue taking Synthroid 25 for the foreseeable future.
prednisone pharmacy medication prednisone 10mg prednisone where can i buy
pharmacy delivery canadian pharmacy 24h com safe best rx pharmacy online
Every morning I wake up grateful for lyrica 500 mg.
Lasix 12.5 has been a life-saver for my elderly cat’s heart condition.
plavix 175 mg buy plavix plavix 1982
You’ve made the point.
write an essay write my essay write my paper for me free essay writer
advair diskus 160 mcg
The legality of modafinil where to buy USA is no longer an issue for users seeking to unlock their full cognitive potential.
robaxin 500mg tablet robaxin 500mg otc discount robaxin
valtrex cheapest price
cialis 5 mg tablets cost buying cialis in mexico cialis 25 mg price
Great stuff. With thanks.
do my essay for me write me an essay persuasive essay writer online essay writer
buy essay service i need help writing an essay best resume writing service reddit essay writing courses online free
how to write a college essay about yourself https://bestcheapessaywriters.com
biaxin costs biaxin cost canada biaxin generic cost
Good forum posts, Kudos.
essay writer essay typer writing helper essays help
avodart canada prescription
tamoxifen nolvadex buy nolvadex tamoxifen tamoxifen medicine price
triamterene hctz 75-50 mg tab
I’m a busy mom who needs to know where to get modafinil quickly.
buy flomax canada order flomax online flomax canada pharmacy
how to get prednisone online
fildena fildena 100 mg price in india fildena 150 online
benicar 12.5 mg benicar generic price benicar cost
amoxicillin 875 mg tablet amoxicillin price australia amoxicillin no prescription
Amazing posts. Thanks a lot.
argumentative thesis thesis sentence a thesis define thesis statement
buy avana 200 mg avana pills avana prices
diclofenac 1 diclofenac 75 mg tablet diclofenac 250 mg
flomax back pain 0.4 mg flomax 8 mg flomax
I’m a busy mom, and I want to know how to order Clomid online quickly and efficiently.
sildenafil 90 mg
Allopurinol 100 mg helps to control gout attacks.
sildenafil 20 mg prescription
125 mg trazodone trazodone price south africa trazodone 50mg cost
Very good knowledge. Thanks!
thesis binding argumentative thesis how to write thesis argumentative thesis
phd dissertation help dissertations online custom dissertation writing services buy dissertations
assignment writing service usa https://essaywritinghelperonline.com
If you are breastfeeding, talk to your doctor before taking lisinopril hctz as it can pass into breast milk.
Many thanks. I appreciate it.
what is a phd dissertation dissertation proposal writing dissertation
motilium over the counter usa motilium 10 mg tablet where to buy motilium
neurontin 300mg capsule neurontin 4000 mg neurontin 300 mg caps
Where can you buy metformin without prescription?
benicar 5 mg benicar benicar 40 10 mg
I’m tired of feeling hopeless when it comes to the Clomid price.
2000mg amoxicillin
valtrex tablets price valtrex pills price where to get valtrex
Kudos! Useful information!
writing a dissertation dissertation proposal dissertation writer dissertation editing services
I wouldn’t be able to manage my diabetes without Metformin 500 mg no prescription.
trazodone 300 mg discount trazodone canada brand name buy 100 mg trazodone
I’m grateful for TSH Synthroid and its impact on my health.
budesonide brand
Info clearly taken.!
writing a narrative essay best essays writing service urgent essay writing service writing a scholarship essay
write my paper for me essay write essay writer no plagiarism essay writter
college essays on leadership https://custompaperwritersservices.com
buy baclofen online uk baclofen tab 10mg cost 10 mg baclofen cost
Synthroid 0.5 mg may need to be adjusted for elderly patients or those with cardiovascular disease.
You actually expressed it superbly.
phd paper dissertation help dissertation help dissertation writing help
generic for benicar hct benicar sale benicar online pharmacy
silagra 25 mg silagra 100mg uk buy silagra 50 mg
Modafinil USA can reduce fatigue.
robaxin 500 mg tablet robaxin 250 mg robaxin 750 over the counter
I never knew Clomid infertility solutions were possible until I tried it myself.
fildena 100 mg price in india fildena cost fildena 120
suhagra 500 mg buy suhagra online suhagra 50 tablet
amitriptyline medicine uk how much is amitriptyline amitriptyline 50 mg
erythromycin 250 mg tablet
Wow a good deal of great tips!
define dissertation dissertation service dissertation data analysis help proquest dissertations
how much is retin a cream
generic sildenafil 100mg
dipyridamole generic
can you buy diclofenac tablets over the counter diclofenac 7.5 mg diclofenac drug
vermox canada otc how to get vermox vermox uk price
Cheap allopurinol may not be as effective as a higher quality medication.
It is crucial to order Cipro in a timely manner to effectively treat bacterial infections.
plavix 75 mg tablets plavix medicine can i buy plavix over the counter
avana tablet avana 146 avana 100 mg
The synthroid 100 mcg cost is too high for me on a fixed income.
motilium tablet price motilium medication motilium otc canada
glucophage xl
Cheers. Ample content.
best essay writers help me write my essay essay writers online what should i write my college essay about
augmentin tablet
glucophage cost india
where to buy elimite
citalopram for depression
You mentioned it wonderfully.
paper writing service college writing a scholarship essay professional paper writing service college essay writing services
online pharmacy delivery
zestril over the counter
propranolol 40mg
can you buy amoxicillin over the counter in usa
buy generic synthroid
buy genuine viagra online
buy furosemide 20 mg
metformin on line
You actually suggested this well.
dissertation help writing dissertations proquest dissertations dissertation definition
I wish to receive your exclusive bonuses! bebranda wp-includes bonus-new-member 18+ only. Terms Apply, gamble responsibly. Bonus Code: CHIPY7-0423 Code: 250CBC50 You must be at least 18 years old to visit this website. By visiting Spicycasinos you are certifying that you have accepted our Privacy and Cookie policy. This site is neither a casino operator nor a provider of online gambling in any form. Slotastic Casino No Deposit Bonus 50 Free Spins Conditions Let’s see. Why would you consider trying a new casino such… BiamoBet Casino€$ 600 Welcome Bonus One of the things that sets Slotastic Casino apart from other online casinos is its large selection of games. The casino offers a variety of slots, table games, video poker, and specialty games, so there is something for everyone. Some of the popular slots games at the casino include Achilles, Aladdin’s Wishes, and Bubble bubble 2, while table games include blackjack, baccarat, and roulette. Video poker games include Joker Poker, Jacks or Better, and Deuces Wild.
http://gltone.com/bbs/board.php?bo_table=free&wr_id=9942
You don’t need to install the casino software to play nowadays. Download casinos are a remnant from the past, with all modern iPhone casino apps requiring you to install the dedicated application to play, not gambling software. Then, you can play games from several providers directly through the casino application. Playing casino games at Stake.US is completely free. In fairness, we’ve found that sports betting via Android or iOS is pretty much an identical experience. We have, however, experienced differences when it comes to poker and casino gambling. Yes, you can play Chumba Casino games on your iPhone through a mobile browser. Chumba does not have a dedicated app available for iOS users, but that won’t stop you from using your iPhone, iPad, or other iOS devices. Rickycasino processes withdrawals via Visa, Mastercard, Neteller, Skrill, Paysafecard, ecoPayz, and Bitcoin. No fees are involved and players can cash out anywhere between $20 and $4,000 per transaction. Players can request no more than $7,500 per week and $15,000 per month. Customers who win more than $15,000 will have their payouts divided into monthly installments until they receive their winnings in full. The casino makes an exception for progressive jackpot wins and pays them in their entirety.
canadian pharmacy com
Orgasms may be particularly elusive if a woman received pleasure from stimulation of her cervix, which has now been removed, during deep penetration cialis price Intramuscular IM Administration
prozac tablets
top online pharmacy
finasteride buy
Many thanks. Quite a lot of advice!
writing essays write my thesis for me write paper for me write my essay for cheap
gabapentin india
buy azithromycin 1000 mg
buy strattera online australia
how much is valtrex in australia
buy azithromycin over the counter usa
finasteride 5mg tabs
strattera 40 mg pills
azithromycin 500 mg tabs
can you buy prednisone over the counter in canada
acyclovir over the counter uk
buy strattera in mexico
cost of clindamycin 300 mg capsule
celebrex generic coupon
cheap generic vardenafil
purchase disulfiram online
You actually stated it effectively.
example thesis thesis statment thesis statment example thesis
lasix 40
pharmacy drugs
how to get glucophage
clindamycin purchase
diflucan buy online
Superb forum posts. Thank you!
paper help custom papers best college paper writing service pay for papers
lasix water pills
how much is prednisone in mexico
buy tadacip online in india
can i buy elimite over the counter
inderal 10 1mg
azithromycin 250mg tablets
tetracycline discount
Amazing lots of amazing info!
write an essay for me essay writer free trial website that writes essays for you write essay
colchicine over the counter usa
Lovely facts, Thanks!
custom dissertation writing services dissertation editing dissertation dissertation definition
mebendazole tablets
compare amoxicillin prices
canadadrugpharmacy com
generic pharmacy online
inderal over the counter uk
chloroquine 200 mg
tadacip 10 mg price
order strattera online
propecia prescription price
synthroid 200 mg price
play slots for free online no downloads 777 slots casino play slots for real money slotomania free slots facebook
generic synthroid prices
buy atarax tablets
cost of citalopram 40 mg
where to get amoxicillin over the counter
can you buy tetracycline over the counter
antabuse price
orlistat price australia
Terrific material, Appreciate it.
mba essay writing service essay writing service uk forum essay writing service usa case study writing service
vermox online sale usa
Truly loads of helpful tips!
dissertation writer phd weight loss dissertation editing services phd dissertation writing
buy prednisolone 5mg uk
can you buy lipitor over the counter
tadacip uk
erythromycin tablets cost
best price zoloft 100mg
cymbalta price without insurance
trazodone price canada
25 mg prednisone
metformin generic price
finpecia online pharmacy
cost of prednisone 40 mg
metformin without a script
buy vermox uk
Thanks! Terrific stuff!
essay on service writing essays services cheapest essay writing service uk personal essay writing service
Thanks, A lot of knowledge.
lined writing paper how to write a conclusion for a research paper essay writers pay someone to write my paper
glucophage xr
vermox tablets uk
purchase cheap viagra online
xenical canadian pharmacy
metformin where to get
jasochlor
prednisone prescription drug
provigil online prescription
erythromycin brand
citalopram metabolism
motilium tablet price
generic colchicine 0.6 mg
Superb facts. Many thanks!
pay someone to do my homework should i do my homework do my homework for free my homework
prednisone online purchase
Amazing all kinds of amazing data!
essay writers online essay writer professional essay writers write an essay
can you buy robaxin over the counter in canada
30mg prednisone
price cialis uk
how much is elimite cream
furosemide 160
hydroxychloroquine virus
best price usa tadalafil
amoxicillin cost
order azithromycin without prescription
prednisolone uk buy
can you buy viagra in canada over the counter
prednisone 20 mg tablet cost
generic for propecia
lyrica cost australia
valtex without a prescription
Wonderful data. Regards!
article writing service which essay writing service is the best best essay writing service 2016 top essay writing
You reported it exceptionally well!
do my essay for me write an essay ai essay writer essay writer website
lyrica 50 mg coupon
online lexapro
tadacip
amoxicillin fast delivery
synthroid medicine
clindamycin 2 gel
zithromax z-pak
lipitor price uk
Regards, I value it!
doctoral dissertation dissertation writer dissertations phd dissertation
how much is prednisone
desyrel prices
best accutane
how much is vermox in south africa
generic accutane costs
This is nicely put. !
tentative thesis writing a thesis statement define thesis statement good thesis
buy orlistat canada
generic propecia cheap
diflucan online usa
online pharmacy in germany
where can i buy amoxicillin over the counter canada
baclofen 200 mg
generic cleocin
buy azithromycin uk
seroquel 15 mg
tadacip cipla
albenza 200 mg
D, Clinical relevance of DNA methylation at a specified area within GREB1 promoter levitra derniere minute Kevin, USA 2022 04 12 12 17 33
online pharmacy fungal nail
can i buy azithromycin over the counter in canada
You actually expressed it well!
pay for research paper where to buy essays online pay someone to write your paper pay for essays
generic valtrex
generic valtrex online without prescription
real cialis online pharmacy
Thank you! I appreciate this.
college essays writing writing a reflective essay real essay writing service cheapest essay writing service uk
writing dissertation dissertations online dissertation writing dissertations
cheap essay service https://cheapessaywriteronlineservices.com
buy modafinil online fast shipping
top online casino real money top mobile casino us online casino best casino bonus
lisinopril online prescription
baclofen online uk
synthroid cost without insurance
cheapest citalopram online
cost of lisinopril 10 mg
clindamycin 20 mg
synthroid 88
buy finasteride no prescription
trazodone 50 mg cheap
prednisone online without a prescription
celexa 40 mg cost
phenergan tablets uk
Cheers. I appreciate this.
term paper buy a research paper buy term paper research paper writer services
elimite over the counter canada
Many thanks. Numerous advice.
dissertation writing services dissertation dissertation help writing dissertations
paper writing services research paper writing service pay for college papers college paper writing service
college graduate essay https://researchproposalforphd.com
prednisone 500 mg tablet
canadianpharmacy com
buy tadacip online
zithromax price in india
generic viagra to buy
cheap xenical pills
price of prozac 30 mg
average cost of 100mg viagra
synthroid 0.0125 mcg
best online pharmacy no prescription
online casino no deposit welcome bonus best welcome bonus online casino online slots real money free bonus online casino best bonus
atarax for children
buy generic lyrica online
levaquin buy online
synthroid 0.88
Amazing tons of good material!
essay writers service professional essay writing services writing a persuasive essay best essay writing service australia
order diflucan online uk
You suggested it very well!
write my resume for me write an essay writing essays write a essay
metformin 850 mg
propecia online pharmacy singapore
metformin buy australia
where can i buy chloroquine phosphate
order colchicine
where to buy propecia in australia
900 mg clindamycin
strattera online uk
canadian pharmacy valtrex
clindamycin online
atarax online pharmacy
metformin coupon
1500 mg amoxicillin
best free casino bonus no deposit best casino deposit bonus online casinos with no deposit bonus casinos sites
phenergan australia over the counter
where to buy vermox in usa
buy synthroid online cheap
how to buy azithromycin
atarax 10mg tablet price
Fine information. Regards!
thesis proposal term paper help research proposals parts of a research proposal
cheapest price for synthroid
You explained this terrifically.
smart writing service writing an opinion essay write my essay service essay writing sites
where can i buy lyrica
amoxil 100mg
amoxil 50g
synthroid 0.05mg cost
2g valtrex
glucophage cost india
tadacip 20 tablet
clindamycin cheap online
best usa online casinos casino welcome bonus no deposit real
money online slots online casino free signup bonus no deposit required
usa casinos online casinos online real money bingo casino online online casinos no deposit
buy propecia without prescription
xenical 120 capsules
cost of prednisolone tablets
Cheers. Numerous posts!
custom essay writing service org reviews essay writing sites article writing service pro essay writing service
Many thanks, A lot of tips!
college essay writing service best assignment writing service cheap essay writing service spanish essay writing service
gabapentin 400
where to buy levitra no prescription
tadacip 20 uk
cymbalta generic coupon
international pharmacy no prescription
celebrex 100mg price australia
citalopram 20mg tablets
2000 mg seroquel
fluoxetine 80 mg capsules
trental generic
You mentioned it well.
dissertation abstracts international dissertation writing service dissertation service dissertations online
Seriously all kinds of amazing knowledge!
customer service essay writing an essay introduction types of essay writing writing an analytical essay
thesis template thesis paper thesis statements thesis paper
buy argumentative essay https://topswritingservices.com
seroquel 350 mg
cost of 40 mg strattera
40 mg citalopram
gabapentin 300mg price
buy metformin canada
citalopram tab 20mg
cialis 10 mg
colchicine lowest price
online real casino online gambling for real money casino
bonus no deposit online casino games that pay
top us online casino sign up bonus no deposit casino online casinos no deposit real casino games
generic propecia online pharmacy
where to get female viagra australia
robaxin for pain
buy generic synthroid online
tadalafil 20mg price in usa
Whoa plenty of beneficial info!
thesis thesis help thesis creator example thesis
online essay writers help me write my essay online essay writer best essay writers
essay writer cheap https://helptowriteanessay.com
Well voiced truly. .
essay writing practice essay paper writing services essay writing service blog unique essay writing service
plaquenil for fibromyalgia
synthroid tablets uk
can i buy prednisone online without a prescription
azithromycin 1000
clonidine 0.3
order synthroid from canada
augmentin 125 mg price
ez pharmacy
diflucan pill over the counter
amoxicillin buy cheap
deltasone 10 mg tablets
augmentin 625 over the counter
buy zanaflex
cheapest finasteride generic
prednisolone over the counter usa
furosemide tablets for sale uk
online casino with free signup bonus real money usa no
deposit gambling online for real money real online casino online casino game real money
discount pharmacy online
amoxicillin 500 capsule price
prednisone otc canada
how can i get clindamycin
synthroid 0.05 mg daily
baclofen 10 mg pill
pharmacy prices for amoxicillin
free casino bonus top online casino real money casino bonuses online best casino site
neurontin brand name in india
buy zithromax online usa
buy vermox online uk
canadian brand viagra
canadian pharmacy store
baclofen tab 10mg cost
citalopram hydrobromide 40mg tab
celexa pills
acticin over the counter
cymbalta 90 mg capsule
prednisone 5mg over the counter
best casino deposit bonus blackjack real money
online casinos real money no deposit online casino free spins
amoxicillin 20 mg
lisinopril tabs 10mg
disulfiram india
zestril pill
metformin 500 mg brand name
motilium otc uk
levitra on line
buy citalopram without script
buy cheap augmentin
citalopram coupon
generic for levaquin
1000 mg valtrex daily
synthroid 250 mcg price
synthroid 125 mcg
buy trental uk
glucophage brand name
prednisone online canada
trazodone generic 100mg
plaquenil from canada
rxpharmacycoupons
celebrex 200mg where to buy
buy lipitor online uk
where can i get cialis in singapore
clindamycin cost canada
fluoxetine singapore
zoloft 50 mg tablets price
buy advair
azithromycin in canada
pharmacy discount card
buy zestoretic online
metformin how to get
xenical tablets
cafergot pills
where to buy xenical in usa
baclofen 20 mg
can you buy trazodone online
where can i buy diflucan without prescription
citalopram 40 mg tablets
over the counter orlistat
inderal 10mg cost
motilium cvs
canadian pharmacy online ship to usa
clindamycin 40 mg
prednisone 21 pack
price gabapentin 600 mg
albendazole 400 mg cost
chloroquine 150
buy motilium online uk
atomoxetine
synthroid 20
celebrex capsule 100mg price
lyrica without rx
The fact is that both female and male hormones are present in any organism zoloft and viagra
strattera 40 mg prices
anafranil coupon
abilify aripiprazole
atarax 10
acyclovir tablets 1000mg
can i buy accutane online
colchicine tablets online
colchicine drug
buy hydroxychloroquine online
dipyridamole brand
furosemide 20mg tab price
60 mg citalopram
legal online pharmacies in the us
generic diflucan otc
otc elimite cream
anafranil over the counter
anafranil for sale
buy celexa cheap
buy strattera online india
strattera 25 mg
can you buy atarax over the counter uk
price generic lexapro
strattera price uk
tetracycline generic drug
dipyridamole aspirin
celexa price canada
how much is buspar
generic abilify for sale
how much is tizanidine cost
hydroxychloroquine 200 mg tab
avodart price uk
citalopram 200 mg
buy strattera australia
albendazole cream
baclofen 10 mg pill
cheapest prices for strattera
diflucan daily
dipyridamole capsules 200mg
anafranil anxiety
baclofen brand name india
ampicillin online order
anafranil 25mg uk
plaquenil capsule
hydroxychloroquine cost
order lexapro online no prescription
baclofen prescription medicine
amoxicillin 250mg 62.5mg
where to buy cialis online no prescription
clindamycin 300 mg capsule price
lioresal online
citalopram hbr 10 mg
dipyridamole 100mg tablets
lasix no preiscription
where to buy zovirax tablets
plaquenil buy online usa
buy lasix without presciption
lexapro 15mg
dipyridamole 75 mg tablet
buy atarax online
buy atarax online uk
anafranil 25 mg mexico
buying diflucan
plaquenil for lyme
terramycin cats
clindamycin 150mg capsules price
robaxin 750 canada
phenergan price south africa
medrol from canadian pharmacy
buy cheap kamagra uk
colchicine online without prescription
zovirax generic price
suhagra 50 mg buy online india
order zoloft uk
buy phenergan australia
buy zofran online
buy plavix in india
can you buy elimite cream over the counter
tetracycline for acne
how much is generic valtrex
phenergan tablets 10mg
tetracycline tablets for sale
robaxin/methocarbamol 500mg
motilium medication
permethrin cost
where can i get diflucan online
tetracycline 500mg cost
order levaquin
acyclovir zovirax
cheap zofran 8 mg
synthroid rx
trental 400 mg online india
medrol 48 mg
suhagra 50
metformin brand name
motilium suspension
albendazole price
tetracycline hci 500mg capsules
tamoxifen buy online india
phenergan dm
medrol medication generic
generic clopidogrel cost
clopidogrel 150 mg daily
singulair inhaler
dipyridamole over the counter
buying acyclovir
cost of yasmin pill in australia
plavix 75 mg generic
phenergan over the counter in canada
order yasmin mexico
motilium uk
tamoxifen 10
singulair 10 mg buy online
where can i buy tetracycline over the counter
singulair 10mg price in india
online celexa
generic levaquin
singulair where to buy
buy clopidogrel online
buy prednisone online without a script
buy xenical australia
can you buy zofran over the counter
levaquin without prescription
buy clopidogrel 75 mg
tamoxifen tablets price in india
tadacip 20 mg price
trental er
synthroid 150
cost of strattera without insurance
average cost of tetracycline
singulair 10
phenergan price south africa
cost of phenergan
motilium 10mg canada
tadacip india price
yasmin pill uk
cialis genuine buy
buy tadacip 20
medrol 16mg price
phenergan 25 mg over the counter
buy cheap levaquin
yasmin birth control acne
advair 250 cost
yasmin medicine buy
yasmin 28 generic
tetracycline prescription
generic yasmin australia
synthroid 112 mcg cost
price for amoxicillin 500
buy glucophage canada
plavix 75mg price
buy elimite
where can you buy elimite cream
medrol 4mg price in india
motilium tablets price
tetracycoline with out a prescription
no prescription needed pharmacy
buy trental
phenergan 2 cream
tadacip 20mg tablet
tetracycline sumycin
baclofen online pharmacy
tetracycline 500 mg capsule
atarax 25 mg buy
tetracycline 1000 mg
where can you buy acyclovir
suhagra 25
acyclovir over the counter singapore
phenergan buy online
buy acyclovir pills online
tadacip uk
buspar 30
bactrim for sale
trental 400 tab
how can i get cheap cialis
levaquin without prescription
yasmin pill uk buy
suhagra pills
albendazole buy online canada
generic trental 400 mg
cipro brand name
levaquin pill
terramycin eye ointment for dogs
anafranil 25 mg price
tetracycline capsule 250mg
buy synthroid canada
flagyl over the counter
buy cymbalta online without prescription
phenergan 25
tamoxifen cost india
tetracycline generic brand name
zofran price canada
diflucan 150 mg tabs
jelly viagra kamagra
lyrica best price
acticin tablet
lyrica prescription cost
singulair 10mg tablets
can you buy prednisone over the counter in canada
best price lexapro 20 mg
motrin 800 mg otc
phenergan 25mg for sale
silagra online
levaquin 250
phenergan brand name
atarax australia
Great post. I am going through some of these issues as well..
order online phenergan without a prescription
albenza online pharmacy
albenza 200 mg cost
synthroid 112 mcg
phenergan 5mg
levaquin levofloxacin
ciprofloxacin purchase
Good post! We will be linking to this particularly great
post on our website. Keep up the great writing.
robaxin without rx
celebrex pharmacy
phenergan 25mg tablets online
levaquin 250
vermox 500mg online
Good day very cool website!! Guy .. Excellent ..
Wonderful .. I’ll bookmark your website and take the feeds also?
I am satisfied to seek out numerous helpful information here
in the publish, we want work out extra strategies in this regard, thank you for sharing.
. . . . .
pharmacy shop
amoxicillin medicine in india
levaquin
propranolol 120 mg daily
yasmin generic australia
furosemide drug prices
strattera online
hydroxyzine atarax
singulair 114
lyrica 200 mg capsule
ampicillin brand name in india
albendazole without prescription
strattera 18 mg coupon
strattera no prescription
cheap xenical uk
antabuse australia
motilium usa
yasmin online purchase
clopidogrel gel
generic metformin price
buying bactrim
avodart prescription uk
Simply want to say your article is as amazing. The clarity in your post is
just great and i could assume you are an expert on this
subject. Well with your permission allow me to grab your feed to keep up to date with forthcoming post.
Thanks a million and please carry on the gratifying work.
gabapentin uk
aurogra 100 online
medrol 16mg price
buy furosemide 40 mg uk
compare prices kamagra
disulfiram over the counter
tadacip 20 canada
buy trental 400 online india
vermox 500mg tablet
disulfiram uk
synthroid 75 mcg cost
toradol pill
plavix in mexico
online avodart without prescription
purchase synthroid
Актуальная ссылка на Мега
Знатоки и новички Даркнета не по наслышке знают о популярном и
раскрученном маркетплейсе MEGA DARKNET MARKET.
Данный сайт занимается распространением
запрещенной продукции и находится в доменной зоне ONION, поэтому войти в него можно только
с использованием TOR браузера.
Самые актуальные на данный момент ссылки находятся в MEGA SB.
Часто пользователи недоумевают,
почему с привычных браузеров, таких, как Opera,
Edge, Chrome, не получается открыть сайт, так как происходит ошибка.
Лучше всего узнавать всю интересную и новую
информацию о ссылках, сайтах,
магазинах в Годнотабе. Этот ресурс также открывайте через ТОР.
Ссылка MEGA STORE
В Даркнете много аферистов и мошенников, поэтому легко
попасться на их удочку и остаться без денег,
а иногда и аккаунта. Чтобы этого не произошло,
нужно скачать и установить VPN,
а потом и Тор браузер. Там имеются проверенные
ссылки MEGA SB.
Специалисты, работающие в нашем штате, рекомендуют такие типы
VPN:
• HIDE.ME,
• Tunnel Bear,
• Planet VPN,
• ExpressVPN,
• ProtonVPN.
Часто невозможность попасть на сайт связана с плохим интернет-соединением.
В браузере Тор ищите ссылку mega555zf7yot2viukedzcmuuyooegofmnuexp7czxa3y5tamackqbad.onion.
Часто может наблюдаться чересчур медленное соединение, это связано с тем,
что сайт без конца пытаются атаковать
мошенники.
MEGA onion ссылка
По мнению Мориарти, который является ее создателем, причины тому следующие:
• В течении семи лет маркетплейс успешно
торгует на рынке, не ослабляя своих позиций;
• За это время было проведено более 2500000 сделок;
• В арсенале у команды и пользователей 60 свободных
и актуальных зеркал, то есть зайти на сайт можно практически всегда;
• Лучшие условия для торговцев, все
бесплатно;
• Деньги можно вывести в один
момент;
• Магазины расположены не только в России, но и
в странах бывшего СНГ;
• Отличная репутация;
• Соблюдение анонимности;
• Регистрация всего за пару кликов;
• Соблюдение безопасности при помощи 2FA и PGP ключа.
Согласно статистике, на MEGA расположены 2500 магазинов и
25000 товаров. Создание аккаунта максимально простая операция.
Нужно пройти проверочную капчу, ввести
логин и пароль. Возможность использования Монеро отличает Мега от других
подобных ей площадок. Это очень выгодный вариант, но его еще не многие
опробовали, предпочитая все же проверенный биткоин.
best online thai pharmacy
clonidine generic
synthroid 0.100 mg
motilium over the counter uk
discount pharmacy online
levaquin price
levaquin 500mg
online pharmacy search
avodart 500 mg
where can i buy robaxin in canada
drug celebrex
where can i buy elimite
lasix tablets buy
sildalis
budesonide tablets
canadianpharmacymeds com
no script levitra generic
legit online pharmacy
generic plavix price
budesonide 180
sildalis tablets
accutane otc
where to get antabuse
buy clomid online uk paypal
cost of tamoxifen in canada
elimite drug
best clomid
zestoretic 20 12.5 mg
augmentin 625 mg buy online
amoxicillin price in mexico
azithromycin 250mg cost
accutane in india price
female viagra pill online
budesonide 9 mg cost
piroxicam 20 capsule
cost for clomid tablet
If you are going for most excellent contents like myself,
just pay a quick visit this web page daily because it provides feature contents, thanks
zestoretic coupon
cheap cialis 10mg
canadianpharmacymeds
tamoxifen buy online india
where to buy clomid tablets
generic malegra dxt
accutane from mexico
Sometimes it s with the intent to cure; sometimes it s to help with symptoms how to get propecia
antabuse cost south africa
over the counter lasix
buy clomid uk
neurontin cap
amoxicillin buy online canada
prozac 60 mg capsule
purchase clomid online canada
feldene capsules 20 mg
furosemide 20mg tablets cost
levitra generic india
disulfiram cost canada
elimite over the counter uk
nolvadex 20 mg tablet price
trazodone otc in usa
“Если вы планируете купить спецодежду в Нижнекамске, вам стоит обратить внимание на местные магазины и сервисы, специализирующиеся на этой продукции. В городе есть несколько магазинов, предлагающих широкий ассортимент спецодежды, которая может отвечать вашим потребностям и требованиям.
Перед покупкой спецодежды важно определить ее назначение и требования. В зависимости от вида деятельности, вам может потребоваться защита от различных факторов: огня, химических веществ, электростатического разряда, падающих предметов и других опасностей. Уточните свои требования перед посещением магазинов.
В Нижнекамске можно найти специализированные магазины, предлагающие широкий выбор спецодежды для различных отраслей: строительства, промышленности, медицины, горнодобывающей промышленности и других. Изучите ассортимент каждого магазина и выберите тот, который предлагает спецодежду, соответствующую вашим требованиям.
Качество спецодежды является важным фактором при выборе. Проверьте, что выбранный вами магазин сотрудничает с надежными производителями, изготавливающими качественную и сертифицированную продукцию. Хорошие магазины будут готовы предоставить информацию о производителях и стандартах безопасности.”
malegra 100 mg for sale
nolvadex to buy
canadianpharmacyworld
zestoretic 10 mg
elimite cream generic
where can you get accutane
clindamycin capsule over the counter
zestoretic 5 mg
buy amoxil without prescription
canada pharmacy online
Xenforo Hosting, forum sitelerinin kullandığı forum yazılımları vbulletin, xenforo, smf, mybb vb. için özel olarak tasarlanmış ve bu yazılımların ihtiyaçlarına yönelik paketlerdir. Xenforo hosting paketlerimizde forum sitelerinizi özel olarak düşündük ve disk/trafik yönünden paketlerimizin ekstraları mevcut. Xenforo’nun tüm gereksinimlerini karşılayan paketlerimiz ile siteleriniz daha hızlı ve performanslı çalışacaktır.
malegra 50
buy piroxicam gel
tamoxifen 10 mg 1mg
canadian pharmacy in canada
I like the valuable information you provide in your articles.
I’ll bookmark your blog and check again here regularly.
I am quite certain I’ll learn plenty of new stuff right here!
Best of luck for the next!
tamoxifen 20 mg tablet price in india
budesonide capsule brand name
malegra 200 mg price
piroxicam gel over the counter
piroxicam gel brand name
celebrex 209 mg
pill pharmacy
canadian medication celebrex
celebrex 100mg price
feldene tablet 20 mg
where can i get antabuse pills
can you buy elimite over the counter
buy levitra india
I am extremely impressed with your writing skills as well as
with the layout on your blog. Is this a paid theme or did you modify it yourself?
Anyway keep up the excellent quality writing, it is rare
to see a nice blog like this one these days.
nolvadex online buy
buy clindamycin uk
budesonide online pharmacy
brand cialis 100mg
zestoretic online
no script pharmacy
cheap viagra online fast delivery
budesonide price
where can i buy feldene gel
online pharmacy products
permethrin topical cream over counter
tamoxifen price south africa
clomid over the counter online
accutane 40 mg daily
disulfiram india
levitra 10 mg cost
budesonide 1mg
nolvadex for sale online
cialis 5 mg tablet generic
malegra 100
budesonide capsules cost
where can i buy elimite cream over the counter
http://edpill.pro/# ed treatments
clindamycin cap 300 mg brand name
accutane prices uk
medrol tablets 8mg
vardenafil 40 mg online
cialis canada generic
You made some really good points there. I checked on the net to find out
more about the issue and found most people will go along with your views on this site.
nolvadex 10mg tablets price
canada pharmacy online orders: overseas pharmacies shipping to usa – canada pharmacy online canada pharmacies
sildalis 120 mg order canadian pharmacy
online pharmacy delivery dubai
http://edpill.pro/# erection pills online
canada mail pharmacy: overseas pharmacies shipping to usa – mexican pharmacies online
tamoxifen
clindamycin cream
https://edpill.pro/# treatment of ed
online pharmacy delivery dubai
buy cheap amoxicillin online
feldene for sale
clindamycin 10 mg
discount viagra canadian pharmacy: certified canadian international pharmacy – canada pharmacy
avodart 0.5 mg cost
clomid price uk
sildalis for sale
Hi all, here every one is sharing these experience, therefore
it’s good to read this web site, and I used to pay a
quick visit this blog all the time.
augmentin 1000 price india
cheap amoxicillin canada
Woah! I’m really enjoying the template/theme of this site.
It’s simple, yet effective. A lot of times it’s very difficult to get that
“perfect balance” between user friendliness and appearance.
I must say that you’ve done a amazing job with this.
Also, the blog loads very quick for me on Firefox.
Exceptional Blog!
antabuse 250 mg tablets
It is the best time to make some plans for the future
and it’s time to be happy. I have read this
post and if I could I wish to suggest you few interesting things or suggestions.
Perhaps you can write next articles referring to this article.
I desire to read more things about it!
atarax online pharmacy
budesonide cost
trazodone price south africa
Appreciate it! A good amount of material!
paroxetine pills 30 mg
prazosin 20 mg
trazodone 50 mg price canada
inderal 80 mg online
antabuse buy online australia
valtre
albenza albendazole
budesonide medicine
antabuse drug
augmentin 875 mg tablets
buy valtrex uk
budecort
zofran pharmacy prices
отель меркури ростов
ахалазия кардии
отель фатима корпус 2 казань
valtrex uk over the counter
https://sildenafilpills.pro/# cheapest sildenafil 50 mg
cheap zofran australia
amitriptyline purchase online uk
atarax
accutane best price
lyrica cap 100mg
amoxicillin cost in india
price of valtrex in india
generic ed pills best non prescription ed pills or ed treatment pills
http://boomboxproject.com/__media__/js/netsoltrademark.php?d=edpill.pro new ed treatments
ed pill ed medication and ed pills cheap ed remedies
how to hack aviator game online aviator how to deposit money in aviator game
how to win aviator game how to play aviator how does aviator work
erectafil 20 mg price
clomid online canada
buy metformin usa
price of amoxicillin 30 capsules
trazodone 250 mg
colchicine where can i buy
lyrica 150 mg price australia
clomid for women
generic for inderal
metformin 500 mg price india
generic zanaflex cost
erectafil 20 for sale
в каком санатории
абхазия гагра отели с бассейном
бочаров ручей сочи на карте города сочи
отель мыс видный сочи официальный сайт
zanaflex 2mg cost
glucophage clomid
bactrim 400 80 mg tablet
paroxetine tablets in india
baclofen 25 mg
phenergan cream where to buy
zofran otc canada
buy amoxil 500 mg online
trazodone 30 mg
endep cheap
дом отдыха псоу отзывы 2021
фитнес клуб лазаревское
горячий ключ места отдыха
царь евпатор евпатория
order valtrex generic
accutane online uk
canadian pharmacy zanaflex
atarax australia
buy elavil cheap
lyrica 70 mg
can you buy accutane online
amitriptyline 200 mg
valtrex daily
metformin south africa
amoxicillin 500mg online no prescription
paroxetine no prescription
санатории тюменской области цены на 2021 год
витязево отель прованс
адлер маяк
санатории челябинской области на карте
paroxetine buy online india
atarax 25mg online
glucophage sale
clopidogrel brand name
glucophage 100 mg tablet
erectafil 10
budesonide uk
1mg prazosin
how much is zofran 4mg
buy valtrex 500 mg
Tikare DK, et al viagra vs cialis If the QRS is positive in lead I but negative in II, the axis is deviated leftward between 30 and 120 degrees
inderal buy online
tizanidine 2 mg tab brand name
zofran tablet price
valtrex drug
lyrica 75 mg coupon
budesonide 3 mg tablet
lyrica cheap online
trazodone tabs
glucophage 850g
отель бревис
отели железноводск
мрт белокуриха
гостиница мрия
buy modafinil us
disulfiram pill
propranolol pill
zofran 40 mg
buy erectafil 20
невская классика отель санкт петербург
санатории лермонтова пятигорск официальный сайт
машук акватерм пятигорск
радуга сочи фнс россии официальный сайт
propranolol
clomid cost in india
zanaflex for anxiety
where can i buy modafinil
can you buy paxil in usa
budesonide 100 mcg
augmentin 1000 mg price in india
buy accutane singapore
trazodone 50 mg over the counter
price of lyrica 75 mg in india
inderal 10mg buy online
buy provigil from canada
amoxicillin tab 875mg
zanaflex 6 mg
Does your blog have a contact page? I’m having problems locating it but, I’d like to shoot you an email.
I’ve got some recommendations for your blog you might be
interested in hearing. Either way, great site and I look
forward to seeing it grow over time.
автомобилист пансионат сочи
отзывы о санатории крепость кисловодск
анабель гостиница санкт петербург
николаевка крым отели на берегу моря
paroxetine australia
metformin 300 mg daily
atarax weight loss
where to buy antabuse
prazosin blood pressure
lyrica 25mg capsules
buy valtrex no prescription
budesonide cream
кемпинский отель в геленджике официальный сайт
отель домина новосибирск
отели беломорска карелия
санаторий родник кисловодск отзывы 2021
trazodone 50 mg medication
zofran generic coupon
buy erectafil 5
Your article helped me a lot, is there any more related content? Thanks! https://accounts.binance.com/lv/register?ref=V2H9AFPY
buy amoxicillin 500mg uk online
prednisolone for sale in uk
zanaflex 2mg tablets
ampicillin 250
generic cialis soft tabs tadalafil 20mg
1000 mg azithromycin online
how much is motrin 800
cialis 1800mg
atenolol 100 mg daily
tenormin 50 price
drug atenolol 25 mg
cipralex usa
erectafil 10 mg
amoxicillin 500 mg capsule
центр онлайн бронирования
санаторий им кирова ялта отзывы
отель бристоль москва
отель на хошимина 16
generic retin-a
prazosin
ampicillin antibiotic
amoxicillin 500 125 mg
price of 100mg trazodone
erectafil online
prednisolone 5mg for sale in uk
where to buy lexapro online
xenical orlistat
buying valtrex in mexico
cialis brand name
order albuterol
метелица уссурийск
рестон улан удэ
red room спб
гостиницы челябинска цены адреса и телефоны
amoxicillin 500g
amoxicillin pill
atenolol generic cost
metformin on line
can you purchase albuterol over the counter
indocin online
https://gotfredsen-johnsen.technetbloggers.de/talerze-porcelanowe-czemu-porcelana-to-znakomity-wybor-1681485359 https://rafferty-stampe.federatedjournals.com/talerze-porcelanowe-sa-doskonalym-wyborem-z-wielu-powodow-1681484696 https://pastelink.net/46q0c7m4 https://geesebase62.bravejournal.net/post/2023/04/14/Talerze-porcelanowe.-Dlaczego-porcelana-to-znakomity-wyb%C3%B3r. https://controlc.com/b87ffabe https://paste1s.com/notes/4R8QUK3J https://te.legra.ph/Talerze-z-porcelany-Dlaczego-porcelana-to-najlepszy-wyb%C3%B3r-04-14 https://squareblogs.net/octavebolt55/talerze-porcelanowe-cechuja-sie-wieloma-zaletami https://marcussen-whittaker.mdwrite.net/talerze-z-porcelany-czemu-porcelana-to-znakomity-wybor-1681484268 https://notes.io/qMrcB https://telegra.ph/Korzy%C5%9Bci-p%C5%82yn%C4%85ce-z-talerzy-porcelanowych-04-14-7 https://squareblogs.net/bonsaibolt83/talerze-z-porcelany https://writeablog.net/eggnoggauge81/talerze-porcelanowe https://fibermice19.werite.net/post/2023/04/14/Korzy%C5%9Bci-p%C5%82yn%C4%85ce-z-talerzy-porcelanowych https://alexandersen-reimer.mdwrite.net/talerze-z-porcelany-czemu-porcelana-jest-fantastycznym-wyborem https://fnote.me/notes/YbK1A8 https://www.openlearning.com/u/pratermcdonald-rt401r/blog/TalerzePorcelanoweOferujWieleKorzyci https://te.legra.ph/Talerze-porcelanowe-Dlaczego-porcelana-jest-najlepszym-wyborem-04-14 https://hamiltonjqfkronborg.page.tl/Korzy%26%23347%3Bci-p%26%23322%3Byn%26%23261%3Bce-z-talerzy-porcelanowych.htm https://squareblogs.net/birdanswer06/talerze-z-porcelany-09b5 https://www.openlearning.com/u/townsendjohnsen-rt3zu7/blog/TalerzePorcelanoweDlaczegoPorcelanaToNajlepszyWybr https://postheaven.net/baconlove74/talerze-porcelanowe https://anotepad.com/notes/nwwenf8i https://marcussen-whittaker.mdwrite.net/talerze-z-porcelany-dlaczego-porcelana-to-najlepszy-wybor https://writeablog.net/violetanswer24/korzysci-plynace-z-talerzy-porcelanowych https://etextpad.com/ https://notes.io/qMrzF https://fnote.me/notes/37Z5d3
http://chinesemotorparts.com/__media__/js/netsoltrademark.php?d=www.polityka.pl%2Ftygodnikpolityka%2Frynek%2F2199932%2C1%2Ctalerze–co-warto-wiedziec-przy-zakupie.read http://carpediemhandles.com/__media__/js/netsoltrademark.php?d=www.polityka.pl%2Ftygodnikpolityka%2Frynek%2F2199932%2C1%2Ctalerze–co-warto-wiedziec-przy-zakupie.read http://joyjamz.com/__media__/js/netsoltrademark.php?d=www.polityka.pl%2Ftygodnikpolityka%2Frynek%2F2199932%2C1%2Ctalerze–co-warto-wiedziec-przy-zakupie.read http://trivalleydentist.com/__media__/js/netsoltrademark.php?d=www.polityka.pl%2Ftygodnikpolityka%2Frynek%2F2199932%2C1%2Ctalerze–co-warto-wiedziec-przy-zakupie.read http://miamibirth.com/__media__/js/netsoltrademark.php?d=www.polityka.pl%2Ftygodnikpolityka%2Frynek%2F2199932%2C1%2Ctalerze–co-warto-wiedziec-przy-zakupie.read http://totmed.com/__media__/js/netsoltrademark.php?d=www.polityka.pl%2Ftygodnikpolityka%2Frynek%2F2199932%2C1%2Ctalerze–co-warto-wiedziec-przy-zakupie.read http://ww17.callingcardcases.com/__media__/js/netsoltrademark.php?d=www.polityka.pl%2Ftygodnikpolityka%2Frynek%2F2199932%2C1%2Ctalerze–co-warto-wiedziec-przy-zakupie.read http://ww31.linkagratis.info/__media__/js/netsoltrademark.php?d=www.polityka.pl%2Ftygodnikpolityka%2Frynek%2F2199932%2C1%2Ctalerze–co-warto-wiedziec-przy-zakupie.read http://www.baddates.com/__media__/js/netsoltrademark.php?d=www.polityka.pl%2Ftygodnikpolityka%2Frynek%2F2199932%2C1%2Ctalerze–co-warto-wiedziec-przy-zakupie.read http://ywcasgv.com/__media__/js/netsoltrademark.php?d=www.polityka.pl%2Ftygodnikpolityka%2Frynek%2F2199932%2C1%2Ctalerze–co-warto-wiedziec-przy-zakupie.read http://eroticabyj.com/__media__/js/netsoltrademark.php?d=www.polityka.pl%2Ftygodnikpolityka%2Frynek%2F2199932%2C1%2Ctalerze–co-warto-wiedziec-przy-zakupie.read http://dpstube.com/__media__/js/netsoltrademark.php?d=www.polityka.pl%2Ftygodnikpolityka%2Frynek%2F2199932%2C1%2Ctalerze–co-warto-wiedziec-przy-zakupie.read http://www.noiortho.com/__media__/js/netsoltrademark.php?d=www.polityka.pl%2Ftygodnikpolityka%2Frynek%2F2199932%2C1%2Ctalerze–co-warto-wiedziec-przy-zakupie.read http://www.agales.com/__media__/js/netsoltrademark.php?d=www.polityka.pl%2Ftygodnikpolityka%2Frynek%2F2199932%2C1%2Ctalerze–co-warto-wiedziec-przy-zakupie.read http://www.tcwshopfunds.net/__media__/js/netsoltrademark.php?d=www.polityka.pl%2Ftygodnikpolityka%2Frynek%2F2199932%2C1%2Ctalerze–co-warto-wiedziec-przy-zakupie.read http://brandworthyfood.com/__media__/js/netsoltrademark.php?d=www.polityka.pl%2Ftygodnikpolityka%2Frynek%2F2199932%2C1%2Ctalerze–co-warto-wiedziec-przy-zakupie.read http://rprrealtyadvisors.com/__media__/js/netsoltrademark.php?d=www.polityka.pl%2Ftygodnikpolityka%2Frynek%2F2199932%2C1%2Ctalerze–co-warto-wiedziec-przy-zakupie.read http://petrolshift.com/__media__/js/netsoltrademark.php?d=www.polityka.pl%2Ftygodnikpolityka%2Frynek%2F2199932%2C1%2Ctalerze–co-warto-wiedziec-przy-zakupie.read http://husky-petlove.com/__media__/js/netsoltrademark.php?d=www.polityka.pl%2Ftygodnikpolityka%2Frynek%2F2199932%2C1%2Ctalerze–co-warto-wiedziec-przy-zakupie.read http://mycrossroadssolutions.com/__media__/js/netsoltrademark.php?d=www.polityka.pl%2Ftygodnikpolityka%2Frynek%2F2199932%2C1%2Ctalerze–co-warto-wiedziec-przy-zakupie.read http://creativejolt.net/__media__/js/netsoltrademark.php?d=www.polityka.pl%2Ftygodnikpolityka%2Frynek%2F2199932%2C1%2Ctalerze–co-warto-wiedziec-przy-zakupie.read http://honey-dudes.com/__media__/js/netsoltrademark.php?d=www.polityka.pl%2Ftygodnikpolityka%2Frynek%2F2199932%2C1%2Ctalerze–co-warto-wiedziec-przy-zakupie.read http://workntexas.com/__media__/js/netsoltrademark.php?d=www.polityka.pl%2Ftygodnikpolityka%2Frynek%2F2199932%2C1%2Ctalerze–co-warto-wiedziec-przy-zakupie.read http://sexdevil.com/__media__/js/netsoltrademark.php?d=www.polityka.pl%2Ftygodnikpolityka%2Frynek%2F2199932%2C1%2Ctalerze–co-warto-wiedziec-przy-zakupie.read http://www.tcwshopfunds.net/__media__/js/netsoltrademark.php?d=www.polityka.pl%2Ftygodnikpolityka%2Frynek%2F2199932%2C1%2Ctalerze–co-warto-wiedziec-przy-zakupie.read https://33.gubudakis.com/index/v11?diff=7&source=og&campaign=11476&content=&clickid=097epu7fiewo4qpb&aurl=https://www.polityka.pl/tygodnikpolityka/rynek/2199932,1,talerze–co-warto-wiedziec-przy-zakupie.read http://totmed.com/__media__/js/netsoltrademark.php?d=www.polityka.pl%2Ftygodnikpolityka%2Frynek%2F2199932%2C1%2Ctalerze–co-warto-wiedziec-przy-zakupie.read http://thevoiceofthe-most-high.com/__media__/js/netsoltrademark.php?d=www.polityka.pl%2Ftygodnikpolityka%2Frynek%2F2199932%2C1%2Ctalerze–co-warto-wiedziec-przy-zakupie.read http://posiflexmh.net/__media__/js/netsoltrademark.php?d=www.polityka.pl%2Ftygodnikpolityka%2Frynek%2F2199932%2C1%2Ctalerze–co-warto-wiedziec-przy-zakupie.read http://webflirtme.com/__media__/js/netsoltrademark.php?d=www.polityka.pl%2Ftygodnikpolityka%2Frynek%2F2199932%2C1%2Ctalerze–co-warto-wiedziec-przy-zakupie.read http://datamig.com/__media__/js/netsoltrademark.php?d=www.polityka.pl%2Ftygodnikpolityka%2Frynek%2F2199932%2C1%2Ctalerze–co-warto-wiedziec-przy-zakupie.read http://www.palmbeachip.com/__media__/js/netsoltrademark.php?d=www.polityka.pl%2Ftygodnikpolityka%2Frynek%2F2199932%2C1%2Ctalerze–co-warto-wiedziec-przy-zakupie.read http://conexpoindia.net/__media__/js/netsoltrademark.php?d=www.polityka.pl%2Ftygodnikpolityka%2Frynek%2F2199932%2C1%2Ctalerze–co-warto-wiedziec-przy-zakupie.read http://totmed.com/__media__/js/netsoltrademark.php?d=www.polityka.pl%2Ftygodnikpolityka%2Frynek%2F2199932%2C1%2Ctalerze–co-warto-wiedziec-przy-zakupie.read http://myncigroup.com/__media__/js/netsoltrademark.php?d=www.polityka.pl%2Ftygodnikpolityka%2Frynek%2F2199932%2C1%2Ctalerze–co-warto-wiedziec-przy-zakupie.read
atenolol prescription online
First off I would like to say superb blog! I had a quick question in which I’d like to ask if you don’t mind.
I was interested to know how you center yourself and clear your thoughts prior to writing.
I have had trouble clearing my thoughts in getting my thoughts out there.
I truly do take pleasure in writing however it just seems like the first 10 to
15 minutes are generally wasted just trying to figure out
how to begin. Any suggestions or tips? Appreciate it!
disulfiram tablets 500mg
cafergot 1mg
amoxicillin 850 mg
atenolol 40 mg
atenolol 50 mg for sale
tadalafil chewable
can you buy motrin over the counter
atenolol price south africa
prednisolone 25
cheap ventolin online
azithromycin cap 250 mg
lexapro purchase online
where can i buy orlistat 120mg
atenolol 25 mg
сергиев посад гостиницы эконом
коктебель крым отдых 2022
шушма
пансионат лоо официальный сайт
retin a 50
buy lexapro uk
paroxetine generic india
how to get paxil prescription
azithromycin 500 mg cost in india
https://www.cheaperseeker.com/u/twinequail9 https://genius.com/nickelcurve4 https://www.cheaperseeker.com/u/twinequail9
motrin 225 mg
can i order atenolol online
paxil 2017
erectafil 20
where to buy atenolol 25 mg
овуляторная дисфункция
проживание ялта
арбик
мво сухум корпус бриз
lexapro coupon 20 mg
valtrex tablets online
buy albuterol tablets australia
clomid online fast shipping
generic acticin
400 mg trazodone
discount generic cialis online
motrin brand name
xenical prescription cost
amoxicillin online no prescription
atarax 10mg tablet
voltaren cream generic
lexapro 10 mg price australia
алтай лечение
купить путевку в луду онлайн
туры выходного дня в сочи
сосновый бор калининградская область
buy cheap trazodone
medication lisinopril 5 mg
buy erectafil 20
ampicillin 2000 mg
albuterol online uk
voltaren pills canada over the counter
erectafil
amoxicillin discount
cost of voltaren gel in canada
lisinopril 40 mg india
certainly like your web site however you have to take a look at the spelling on quite a
few of your posts. Many of them are rife with spelling issues
and I in finding it very bothersome to tell the reality however I will surely come back again.
tadacip 20mg tablet
теберда йети хаус
санаторий родос крым
гранд карат
гостиница наран аршан
25 mg lisinopril
orlistat online purchase
lisinopril 20 mg online
prednisolone 20 mg brand name
amitriptyline 10 mg tablet
ampicillin tablet
albuterol cheapest price
buy acticin
ampicillin 250
colchicine generic price
ampicillin cost generic
zithromax pack
ampicillin us
levitra 10mg tablets
atenolol price
medrol 24mg
lisinopril 10 mg tabs
cialis free shipping
propranolol order
pharmacy xenical
trazodone hydrochloride
50 mg indocin
atenolol brand name tablet
tadalafil soft gel capsule
https://soulridge.com/nomadlife/kiyotaki/ http://radarloveconnection.com/__media__/js/netsoltrademark.php?d=anotepad.com%2Fnotes%2Fk6ewcbwc http://www.richardollisnotary.co.uk/externallink.aspx?redirect=https%3A%2F%2Fwest-alexandersen-2.mdwrite.net%2Fporcelana-z-polski-historia-powstania-wspanialej-tradycji http://psaworldseriessquash.com/__media__/js/netsoltrademark.php?d=fnote.me%2Fnotes%2FXzvY3p http://industrial-news.eklablog.com/how-do-regenerative-thermal-oxidizers-work-and-factors-to-consider-bef-a208152902 http://misumena.eklablog.fr/le-pedro-doncker-lance-au-depart-comme-chalutier-a144797154 http://mkranchtx.com/__media__/js/netsoltrademark.php?d=www.openlearning.com%2Fu%2Fwestmcclanahan-rsqswq%2Fblog%2FJakPowstawaaPolskaCeramika
buy albuterol pills
erectafil canada
erectafil online
Spot on with this write-up, I really think this amazing site needs far more attention. I’ll
probably be returning to read through more, thanks for the info!
motrin 800 cost
108 mcg albuterol
paroxetine 12.5
amitriptyline hcl 25 mg tab
retin a coupon
ventolin 200 mcg
best price for tadalafil tablets
albuterol price in india
trimox online
prazosin hcl 1mg cap
xenical cap 120mg
motrin 122
lexapro uk
buy prednisolone 40 mg
tretinoin cream prescription online
motrin 800 mg rx coupon
cheap trazodone
endep 10mg price
generic amoxil
ventolin over the counter
buy generic tadalafil online uk
buy ampicillin 500mg
synthroid prescription cost
tenormin 25 mg price
order zithromax
azithromycin 900 mg
ampicillin tablet price
cialis super active
albendazole mexico
lexapro generic online
albuterol 1.25 mg
tenormin buy
lexapro uk
buy ventolin online
cialis 50mg
atenolol online pharmacy
motrin 180 mg
бетон брют библио глобус
южный форос
хостел пятигорск недорого
хостел жили были хабаровск
generic cialis soft 20mg
atenolol price india
indocin price
generic advair
lisinopril 10 mg
erectafil 10
oder trazadone for sleeping
singapore modafinil
форос отдых отзывы
амакс санаторий шахтер
санаторий медея феодосия по социальной путевке
отель rest home нижний новгород
lexapro online pharmacy
erectafil 5
buy ampicillin online
how much is prednisolone cost
inderal
paroxetine capsules 7.5 mg
ampicilin
amitriptyline 50mg coupon
buy erectafil 20
zestril 30 mg
motrin 100
trazodone hydrochloride 100mg
budecort
how to get prednisone without a prescription 40 mg daily prednisone or prednisone pharmacy prices
http://mdairportparking.net/__media__/js/netsoltrademark.php?d=prednisone.pro can i buy prednisone online without prescription
prednisone 5 mg cheapest price of prednisone tablets and generic prednisone tablets buying prednisone from canada
tizanidine 40 mg
augmentin 125 mg tab
order trazodone online
tadalafil daily
generic acticin
buy trazodone uk
amoxicillin 500g
valtrex 1000 mg tablet purchase
phenergan online pharmacy
best pharmacy prices for viagra
zanaflex for anxiety
atenolol 20 mg
can you order zanaflex online
baclofen coupon
where can you get diflucan over the counter
tretinoin 0.02
where to buy motilium online
tizanidine 4mg generic
atenolol
where can i purchase diflucan over the counter
10mg baclofen tablet
менк кингс
гостиница берисон московская казань
озеро горное
южное взморье сочи фото
where can i buy motilium
phenergan gel coupon
buy cafergot tablets
motilium medicine
buy zanaflex online with no prescription
buy retin a cream prescription
usa over the counter sildenafil
best price for effexor 75mg
cost comparison atenolol
cafergot uk
zestoretic
полтава крым алеан
бридж резорт фэмили адлер
славянка анапа официальный
ривьера пансионат абхазия пицунда
synthroid 300 mcg canada
zestoretic coupon
brand synthroid cost
effexor 75 mg price
tamoxifen 20 mg
nolvadex uk sale
tizanidine medication
purchase generic valtrex online
gabapentin 300 mg capsule price
гостиницы чапаевска самарской области
сетевые гостиницы краснодара
санаторий лесные дали подмосковье
кавказ отель адлер официальный сайт
canadian pharmacy sildalis
buy nolvadex 20mg
zanaflex 4mg tablets
cafergot tablets
can you buy retin a over the counter in australia
cafergot generic
nolvadex price uk
sildenafil citrate 25mg
vermox pills
cafergot australia
gabapentin 1000
synthroid 0.5 mcg
cafergot 100mg
modafinil 50 mg tablet
cafergot generic
modafinil for sale uk
effexor 2018
солнечный берег гостевой дом
кавказ гагры официальный сайт
санаторий острова сочи официальный
урал анапа официальный сайт
cafergot tablets price
strattera 25 mg discount
over the counter diflucan 150
buy modafinil nz
Wow, this article is pleasant, my sister is analyzing
these kinds of things, thus I am going to let know her.
can i buy valtrex over the counter in australia
price of viagra per pill
synthroid 175 mcg coupon
tizanidine 2mg capsules
гостиница шерна в киржаче цены
отель бетон брют анапа цены 2021
piter house санкт петербург
санатории адлера на карте
atenolol metoprolol
provigil in canada
buy synthroid 75 mcg
tizanidine 2mg pill
generic for zanaflex
buy gabapentin no rx
how to get modafinil prescription canada
effexor 75 mg
effexor 300 mg
zanaflex pill
vermox online sale usa
valtrex no prescription
tenormin beta blocker
cafergot tablets in india
modafinil 200mg
modafinil canada cost
provigil india
tamoxifen 10 mg 1mg
motilium canada pharmacy
cafergot pills
sildalis india
sildalis for sale
lyrica canada online
zanaflex tablets
neurontin 400mg
zestoretic 30 25mg
synthroid 0.88
effexor 375 mg
buy valtrex nz
baclofen cost australia
neurontin price comparison
buy phenergan australia
retin a cream coupon
lowest price viagra 100mg
phenergan 20 mg
over the counter tretinoin canada
can you buy amoxicillin over the counter nz
atenolol prices
allopurinol uk prescription
levitra for sale canada
buy cafergot tablets
cost of allopurinol in india
propecia 1
price for 240 metformin 850 mg
cymbalta without insurance
buy lyrica australia
cheap atenolol
zanaflex for sale
price of augmentin in india
finasteride cost
medrol 16 mg cost
cymbalta 20
medrol cost
can you buy lyrica online
buy propranolol uk
ciprofloxacin prescription
buy cafergot online
inderal 40 mg tablets
cafergot tablets in india
price of stromectol
order tizanidine
metformin generic canadian pharmacy
suhagra 50 tablet
lyrica mexico pharmacy
inderal 10 price
best price for prazosin 1 mg
buy prazosin 1mg
lyrica price in mexico
prazosin online
tizanidine 2 mg tab brand name
acticin cream
tenormin brand name
allopurinol tablets australia
cafergot online
where can i buy cafergot tablets
atenolol 15 mg
buy phenergan nz
buy metformin india
suhagra tablet price india
buy atenolol australia
aurogra
prazosin 1 mg
stromectol tablets for humans
cipro online pharmacy
aurogra 100 prices
aurogra 100 uk
where to buy inderal
phenergan drug
metformin without script in usa
tizanidine 4mg tab price
inderal 10 mg medicine
aurogra 100 online
suhagra 100mg tablet price
online pharmacy medrol with no prescription
augmentin generic cost
Thank you a bunch for sharing this with all people you really recognize what you
are speaking about! Bookmarked. Please also
talk over with my site =). We could have a link trade contract between us
inderal tablets uk
trimox 500
If you are going for most excellent contents like myself, only visit this web site all the
time as it gives feature contents, thanks
buy metformin online pharmacy
Good day! This is my 1st comment here so I just wanted to give a
quick shout out and say I truly enjoy reading your posts.
Can you recommend any other blogs/websites/forums that cover the same subjects?
Thank you!
prazosin 2 mg price
prazosin medication generic
buy phenergan online nz
国产精品久久久久蜜桃臀AV 排列三今天开机号 POVLife欧美精品 senima尼玛亚洲综合网站 国产videfree性极品 2015XXX小明永久免费 日本三性片 chinese老年人耄耋
日本啪啪啪动漫pron 久久av无码av喷吹av高潮app .
美女被❌免费网站视频在线软件 国产麻豆videoXXXX实拍 拳交美国老女人逼av 好湿⋯好紧⋯太爽了小说男男视频 国产女人挙交视频
俄媒称顿巴斯发现多国雇佣兵 钓柳根鱼 天美精品原创Av片国产 火舞被x 欧美诱惑人人 .
俄罗斯momfuckson 闷骚少妇裸体自慰 重口sm国产调教喝尿视频 mm1313亚洲国产AV天堂 日本护士高潮乄乄乄乄hd 中国刮伦真实案
人人摸人人操波多野结衣 麻豆xX 麻豆A∨japan 女王踩鳮巴卵蛋 .
Japanese genshin av影院 naruto hinta 歪歪动漫
xxxwww黄色 异族freeⅩ性HD japanese熟妇乱睡A片 chyinese girl fjck 清纯 黑丝 躁欧美 锯齿波仿真图Porono农村女人偷拍 老女人操逼片 .
女战士被电击还抓胸 XXXX性在公共汽车XXXXⅩ 在教室里夹腿喷水了私人视频 操美女羞羞网站 chinese老汉嫖妓tube 免费女性秘密网站 欧美成人性爱图
vivo最新版 亚洲啪啪啪啪视频 Narutofootjob脚交
. 机器效率会大于1吗 伪娘炮机 麻豆剧场性交影片 火影忍者美女裸戏羞羞漫画网 欧美AV性free护士素人无码 枫可怜ipx580在线播放 3D涩动漫 一边接电话一边被操
野外色诱农村老头视频在线观看 . 波多野42部无码喷潮 丝雅视频
亲子乱伦 麻豆国产私人影视在线观看 公公和两个儿媳妇
尺度大视频在线看 91精品国自产在线偷拍无 欧美成人3D动漫fuck 秀足美女更新在
五十路交尾磁力 . 白丝自慰喷水白浆 spank视频外网VK porno的网站chinese 3dmax云韵被㖭B流口水表情 跟岳母表白被拒怎么办 国产剧情东北夫妻操逼视频 回娘家让爹消火 肥熟老女视频网
18禁无遮挡爆乳触手产卵漫画 日本女优潮吹 .
青娱乐91视频 https://xxxporno.win/ 国产大姐性成熟在线观看 边做边讲荤话h爱 乱伦的日本人Ⅹ 最新老头japanese oldman 放A片沟引老头老头恋老白毛老头 中国老头的大鸡巴视频 脚交搜索结果ThePorn 旧里番KNINEBOXmod 在线播放男女 .
大鸡吧视频 国产麻豆麻豆0049 欧美肉丝袜VideOs办公室 俄舞战争 老女人granny 巴厘岛命案细节曝光 学生粉嫩玉足脚交小说 chinese国产hd 日本工漫口漫画 更大更强XVIDEOSCOM .
anime动漫videos无尽 国产天美淫欲女毛片 日本人妻五十路亲子中出 恶女教师 探花视频在线看视频 深喉浓精少妇视频 日本videosdesexo xxxx丝语享受 人成乱码在线视频在线观看 2kill4系列掐死 .玩弄调教纳西妲的身体 narutoPIXXX萨摩伊vk 老女人和熟女人高情 18禁强奸漫画在线免费观看 乌克兰少妇Ⅹ❌❌AAA真实点 《最强神医混都市》免费阅读 老头玩小嫩奶视频在线观看 alexaGrace和8个黑人 Genshin Hentai番 附近那里买衣服的地方 .
jjlzz无码 初撮り人妻ドキュメント泷泽奈央 日本人体免费看
日本熟妇人妻ⅩXXXXOOhhd 国产⭕⭕⭕⭕XXXX振车 韩国主播超碰在线美女 76老太与子交尾 わさびもちももさわ甘雨 原神莹的乳液狂飙lsp副利图
啪一啪 . 欧美肥老熟妇 人妻性事 孕妇孕交大尺度国产在线 蜜桃Av噜噜一区二区三区麻豆 欧美性色偷偷图片安 河北熟妇ThePorn 欧美另类交俱乐部HD Japanesebdsm调教 老熟女40路 山岸逢花中文字幕女教师
. Japanesefemdom甘美会 国产麻豆成人AV色影视 老军长同性裤裆凸起 孕妇操逼网 麻酥酥观看 外国女人喷潮视频 国产精品㊙️天美传媒AV 护士丝袜脚调教男奴脚交视频 最终幻想蒂法被爆❌ 萌白酱最新cos影片在线观看 .
斗破苍穹年番大结局 照美冥喂我吃奶乳我脱她小内内 日本老女bbb高清视频 告知一项试验的各个方面情况后,受试者 OVA催眠性指导 3
宫岛樱的场合在线观看 性麻豆HD妓女 风景图片大全 18 小游戏 教师分几个等级 chinesevideos口爆 .
人体showybeauty 国产夫妻自拍性爱免费视频 海棠文学城小说网-无弹窗免费网络小说阅读 摸老头裆部多毛 白丝美女被爆❌的视频网站 成人自慰抠逼片 中国美女裸体 老头吃老头的生殖器 颜值最高的皇帝 国产探花极品高端外围女视频
. 欧美情色图 xvidewos com欧美高清3D动漫 中文字幕色在线天堂视频 hd国产麻豆free性㐅㐅hd
freeseⅹvidd0e性欧美 freesex换妻 国产女主播下载 老北京熟女 乌克兰极品少妇XXXX做受 老妇人爽⋯躁多水⋯快⋯深点 .
宝贝裙子内不许穿内裤h视频 韩国bj大尺度网站 free性XXX000 舞灵美娜子另类专区
男生tickle酷刑—VK 4tudevideo中国在线看 户外直播勾农村老头 Monica Bellucci喷水 p站星太奇 性一乱一交一视频免费看 .
我叫陈妍熙22岁,在这边任职幼师,下课在家,168能𐊧我(叫声甜),看我性 欧洲老妇色hd r18视频在线观看 3D扶她女女futanari 欧美经典电影和主题曲 蒂法同人资源 原神所有女角色开裆乳头狂飙 班长用白丝小脚揉的我蛋疼 原神胡桃开襟乳液狂飙 动漫vid .
曝宋智孝被欠薪9亿 调教白浆ThePorn 初高中自慰免费网站WWW 精品麻豆高清免费视频 bbw男男调教 精品furry视频 老汉在线观看永久免费视频 x8x8在线 3DAVXXX变态 森林倒吊割喉宰杀美女vk .
夫妻性生活特黄片 绳艺捆绑美女视频 XNXXX日本🇯🇵人热门 轮奸娇小日本女优视频 被固定挠尿口用毛笔丨vk 欧美双洞齐插 性的暴行2小时14分钟 小岛南gif乡土女性网 老太婆性猛交❌XX❌乱视频 性部落的冲突2 .
老女富婆胯下变态黄金圣水虐男奴 学院催眠
四十路の五十路熟女豊満 火影忍者xxnx69 日本性交 初撮人妻丰满羽贺空美 触手刻晴 原神Neww xnxx por porno64黑丝
中日熟妇高清 . 异族十八英寸大迪克 91精品无人区麻豆乱码1区2区 欧美色免 蒂法同人资源 强㢨级AAAAA片老人A片 7n动漫3D无尽得到性爱啪:
原神触手怪春药调交 中国女人性生活 国产AV天美传媒TM0093
国产美女大奶足交 . 亲姐弟乱伦实拍 3D成人动漫免费观看 可怕变态肠交
Videos成熟少妇 japp日本少妇 欧美grand老女人
双色球最近的走势图 bbc插bigblack 大尺度视频网站美国 METART英国裸体美女
. 13小箩洗澡裸体高清视频 成年3D动漫美女xoxo 欧美另类小bxx
tvv 萌白酱黑丝自慰 免费的黄色网 昭和一本冢 熟女干
日本HDx 国产乱人乱偷精品视频 xnxx网站
. 杨幂videos free 高清 山西黄河边发现女尸 纲手福利 极品尤物萌白酱白丝喷水在线播放
狙击手电影推荐 黄色狼 欧美tickling网站超变态 bbw性爱视频 麻豆成人 Freee 日 .
FreeX性欧美 快乐的人妻chinesehigh 要看野外性生活片 欧美小女人性另类 玩老太婆很兴奋HD 五十路日韩女优中出
体校女老师和她的小狼小说在线 另类sb东北妇女aV
成熟丰满熟妇XXXXX性 嗯…啊…揉欧美性爱 .
www小舞 欧美超清HDfree8k贵妇 日本enema浣肠视频 80岁大叔插入八岁小女孩都插出血了 多多屋影院 八路军总指挥
PornoXXXX国产麻豆 如果你执迷不悟会后悔 欧美性乳环XXXXX 国语自产少妇精品视频蜜桃 .
欧美激爱 furry榨精网站video 小美女人体欣赏 美女玉足调教视频 Free❌❌❌video日本 国外极端性爱
juliecash的双人大屁股 深喉吞精口交 东方影库东方私库Av在线 中国frex麻豆性交 .
We stumbled over here different page and thought I may as well check things out.
I like what I see so i am just following you. Look forward to looking
at your web page yet again.
levitra 10 mg price
alopurinol
where can i buy propecia online
It is the best time to make some plans for the long run and it’s
time to be happy. I’ve read this post and if I could I desire
to recommend you few attention-grabbing things or suggestions.
Maybe you can write next articles regarding this article.
I want to read more issues about it!
medrol 32 mg tablets
ciprofloxacin 750 mg price
Excellent blog post. I definitely appreciate this site.
Keep it up!
metformin for sale uk
levitra 20 mg discount
Very good forum posts. Thanks.
where to get generic levitra
Hi! Do you use Twitter? I’d like to follow you if that would
be ok. I’m absolutely enjoying your blog and look forward to new updates.
You are so awesome! I do not suppose I’ve read through
a single thing like that before. So good to discover someone with some
unique thoughts on this subject. Seriously.. thanks for starting this
up. This web site is one thing that is needed on the web,
someone with a little originality!
levitra in canada
buy prazosin online
prazosin price
inderal tablets uk
propecia tablet price
price of cymbalta
finasteride 1mg over the counter
prazosin for nightmares
stromectol tablets for humans
buy suhagra online
metformin 500 mg pill
glucophage 500 online
ivermectin 200
cheap zanaflex online
glucophage 500
buy lyrica online europe
cafergot
levitra 20mg tablets
buy lyrica from india
cipro antibiotic where to buy
purchase stromectol
aurogra 100 prices
cleocin for bv
tizanidine tab 2mg
日本波多野吉衣黄色免费网站 欧美老妇淫视频 异族freeⅩ性HD 国产原创Av麻豆精品天美传媒 美女被❌到爽🔞流触手
熟女fucK 黄色视频91免费网站 japanese mature亲 女水女夂女∞👙👙👙🎥
欧美特黄特色AAA大片免费看 . 触手穿白丝被强行侵犯的动漫
动漫女刑警被❌虐乳高潮 同性老头用嘴为我囗交 华人新视频SSS 性啪啪
强制h男男 日本肉感老熟村上凉子
母中文字幕 黄色网站好色先生app 天利海香精香料 .
国产wwwx在线观看 AngelaWhite欧美一区 oldmacdonal中老年乐 翁与小莹浴室欢爱51章 欧美性爱第一页免费
欧美做受❌❌❌二 欧美肥婆性爱 旧里番3d姉のカンケ第5集 BigAss・大屁股 老熟妇av网
. 萌白酱白丝白虎自慰潮吹喷水 后进圆润翘臀极品大屁股 摸老女人下午 japanese,家庭乱伦 私、男の人を舐めるのが大好きなんです 电影 www pussyjaapanese nett
《九天斩神诀》小说 两个警察互相摸jj 曝腾讯解除地铁女主实习合同 无敌从忽悠老人修仙开始免费阅读 Free❌❌❌性AV残疾夕双 .
欧美精品人人做人人爱视频 噢美18 19岁sek poronovideos另类老太婆 免费街拍裙底视频网站 男生变成女生后被触手侵犯 原神雷电将军被暴操黄片视频
林克希多 r18 麻豆免费无码完整版在线观看 porn火影 XXXⅩXXBBBBBB性瑜伽 .
适合女生的fruli 国产艳妇AV在线播放 恋柱同人黄本 波多野结依视频在线播放 如果你执迷不悟会后悔 91在线无码精品㊙️入口导航
我被老外添的欲仙欲死网址 胖老头内射Se
原神刻晴黄漫3D在线观看 XXNX👙老帅多毛 .
hentai火影hentai火影忍者纲手 ぱらだいす天堂中文www最新版 男男受爱Gay同性xX动漫3D 院士村 鸣人的假期6 0无白屏无广告 12一14yoSeXyHD 亚洲宗合13p
vr国产欧美色区 黑冰第一视角vk 蓬莱仙山人体秀东方神韵 .
孕妇黄色视频天美传媒 凌辱菜单上 神舟十六号载人飞船本月发射 日本XNXX视频236片 4K高清成人欧美Chinese my frtiend gayfeet网站 美女做性视频 日本息与子猛烈交尾在线播放 日本乱轮视频 欧美激情❌xXXXX .
jaPanese55丰满成熟 https://cnporn.click/ 六一儿童节的优美句子
麻豆啪啪啪 leave变成短暂性动词 花椒直播操作流程 中国老肥熟熟女毛片 野坝子的功效与作用
purporn免费在线看 period重口月经HD 阿姨怎么读英语 .
调教女神theporn 李然绳艺绳秀城 孕妇被内谢出白浆视频 ぎる浓厚中出し交尾 国漫 同人 龟仙人最后死了没 女生吃鸡是什么感受 黄色在线时长3 mobijapanese中国 触手漫画之 .
asianfemdom女王踩踏 女男性生活 Chinese熟女FUCK 熟女啪啪╳XX╳x207xyz 多毛大隂户撒尿 老熟妇老女人老妇女 asianday综合站 变态 国产 另类 捆绑小说 女子住17楼洗澡未穿衣遭偷拍 narutoXXX无尽黄漫
. 白嫩18色Xxxx少妇HD www国色天香7723在现观看 国产亲亲网站视频在线
大奶骚逼美女自慰短裙被操 陵判性玩
虎门销烟 社工考 Z000❌❌❌❌性欧美3D 大胸女c❌黄漫画动漫 河南老太宾馆偷窥 .
人与牲囗性恔配视频免 迪丽热巴被日的嗷嗷叫 斗罗大陆黄色网址 XNXXX日本👙👙
李丽莎性爱视频 肉嫁高柳1~4动漫66con 幼女破处 欧美X另类 freexoxo熟睡 japanesegirl中文在线
. 亚洲欧美另类日韩原神3D 我想看一个免费的韩国黄色网站 夏色泡影百度百科 19xxxx中国 美女黑丝女仆高跟无套内谢久久ThePoorn 兰州熟女露脸 NarutotsunadePIXXXVKvideo无尽 快乐8中奖号码 国产亚洲精品午夜一区 无码免费熟妇AV人妻又粗又大 .
魅魔巨胸触手喷奶水享受 欧美抖阴 日历女孩 欧美老熟妇性色XXXXx 中国的Chinese 守望先锋3D同人 亚洲男高中生自慰网站 公安部发最新机动车统计数据 narutomaintheme动漫 迷情校园综合久久 .
亚洲丰满的5060老熟女绿帽cuckoldfemdom 女友被调教为储精容器小说 女人荫蒂勃起后样子
ASS日本熟女 李玟疑因窒息死亡 大陆熟妇丰满多毛XXXX 瑟瑟视频动漫网站大全在线观看免费
半藏森林克隆人暂下线 万界神主各人物结局 .
爱我操你妈大逼片啊 秦霄贤对象是谁 绿帽聊 私拍露脸美女全身按摩,身材很好 斗罗大陆后入网站 oldd gay中年喜欢吃老头大长鸡鸡 legalporno刘玥
高跟鞋自慰出精 幼女想破处怎么办 narutotsunadeXXX全彩小楠 .
乌克兰精品足交 俄防长:乌近3天发动反攻 genshinxxxxxx免费 国产99麻豆影视毛片 同人本孑 国产videoesXXOO动漫 韩国成年人在线视频播放 wwwGrannypornoHD睡着 个人土地租赁合同范本 拍国产乱人伦偷精品视频 .
唐三玩比比东骚逼 雏田porno videos 真人三级黄片大全 在线看同人 吃女王老师的大便和尿小说 欧美⭕⭕⭕⭕XXXX⑧
火花思维 giantess fan漫画网站 地狱把妹王英文全名 91扬风大神女神的娇喘 .
成人网站操大乳女神 sreesex色图肥胖美白饱满外阴 国产乱伦一级免费观看
云曦骑舞 手鞠污图 五步蛇是几级保护动物 韩国在线观看完整版 欧美舔一舔 骚逼xxx 农民工又粗又大乚乚视频 .
404野外性xxxx 火影忍者美女性感 超清特写XXX r18全露 恋老摸慈祥老头的裤裆1 超级战队 帅老头oldmanGay456 国产麻豆
XXXVIDEO 篠田优 真实的国产乱ⅩⅩⅩX在线四季 .
美女把丝袜塞进下体 精品一区二区三区无码视频网 narutoPlXXX黑土VK 触手怪如入侵女性❌乳 老女人调教男奴vkfemdom 36漫画app紫色面皮2020年 国产日韩女王丝袜足交阴茎射精二级片 双飞女友和闺蜜 黄网站在线大胸 麻豆国产和老师偷尝禁果 .
furry黄色网站 啊灬灬用力灬嗯灬3p黑人视频 oppo手机投屏到电视上怎么操作 姐孕妖精视频 对白脏话肉麻粗话视频电台 英雄联盟本子里番库acg 现在上民办大学学费需要多少钱一年 丝语顶级完整享受版高清全系列八4 5上 Pornn 精品视频在线观看免费 国内乱人伦视频 .
Chinese偷拍盗摄sex 岳偷拍岳母 免费的黄色电影和小说 柳梢头人约黄昏后描写的是什么节日 男生考上研究生辞掉上万月薪工作 xnxx·www动漫白丝 chinafemdom妍妍 gay污
护士服调教足交 催眠性指导s1 . 蒂法18 日本精油按摩2,中字 Regina
Ice性经典XXXXX axxkxgdscDnad黄片 乡下农村妇女三级 国模小黎 重口另类 欧美黄网站址大全 老头互操 真人玩避孕套视频网站大全免费观看 .
国产nicolove大秀AV在线播放 户外勾引老大爷 毛茸茸肉性交 JAp人NHDvchom 德赫亚提前锁定英超金手套奖 黄色三级片搞性交哪种 3DH黄动 国产精品㊙️果冻传媒免费 火影纲手和鸣人搞鸡视频 女生被搞小穴动漫軟件 .
在车里休息要熄火吗 美女24FA无圣光触屏版 人老鸡长操屄忙 与子孽伦 邪恶岛acg 妻子英文怎么 地藏菩萨本愿经全文 老头大鸡巴视频 泰坦号残骸打捞上岸 高潮h .
A级片的管方网站 videos欧美片house wifve
sonn 喝尿圣水bdsm合集 avove旗袍丝袜高跟 熟女乱X❌XXXX乂 宋代最稀少的钱币 国产真实乱ⅩXⅩX视频
hentainaruto玖辛奈 美女隐私㊙️大胆视频 squirt中国骚逼 .
老熟妇HD老熟女 日韩人妻αV 无尽画廊污 欧美老人爱爱重口味 100岁无码网址
渔网丝袜足高跟鞋自慰 恋老oldMan日本老头 少妇玉梅高潮呻吟 女性人体写真
fss任务介绍 . enjoy 骚年和两老头 Japanese丝袜婬脚 Japaness日本寂寞少妇 贫乳娇小型av女优 无尽 触手 夹3d
粗暴H 农村HDXXXX 女被啪到深处出白浆GIF动态图 RPG游戏 PC
安卓可joi】魔法女孩亚麻衣 麻豆AV无码在线观看 欧美丰满老熟妇❌❌❌❌ .
suhagra 500 mg
lyrica 15 mg
inderal 20
phenergan 25mg price
tenormin
cipro antibiotic
tizanidine 4
proscar 1mg online
aurogra 100 uk
inderal purchase
Hi, i feel that i noticed you visited my web site
thus i came to return the choose?.I am trying
to to find things to improve my site!I suppose its ok to use a few of your concepts!!
cheap cafergot
cymbalta cost
ventolin 100
buy elimite online
plavix tablet price in india
20 mg prozac capsule
夫妻坐愛视频 日本美女人体艺术写真 性感美女野外自慰
18禁🔞男女无遮挡网站 足交潮吹自慰在线观看 姉恋1全集无修在线观看 爆乳爱爱小视频 和台湾女人日批舒服吗 极品尤物主播制服激情被艹视频网站 我国 .
欧美刺激50p 巾chinsesma老妇高潮 日本动漫囗交口爆在线视频 中国载人航天交出亮眼年中成绩单 人妻の湿地帯舌先に乱されて在线 JapaneseHD潮喷
友田真希无码A片 lenaanderson后开门 高潮娇喘ThePorn omoani腹泻拉稀VK .
俄称击落乌军战机 五十歲熟女亂倫 动漫卡通自慰在线观看 欧美白虎99p 真人破处女18 narutoPIXXXvideo雏田 重新申请深圳小汽车摇号手机号被注册 furry榨精肌肉 动漫美女被触手 美园和花 .
零儿 老人脱裤子让老头玩野外日B
不知火舞被日 91视频导航 欧美杏爱 色 刻晴被强奸 按摩三级欧美 李瓒在牢房中经历了什么 曝外卖员偷摸小女孩 偷情网站 .
❌18禁同人3D动漫免费 大号BbwAssBigAV肥女 娇小8一12HDⅩXXXX 近期欧美熟女性爱色 熟女野外露出 旧里番不知火舞
最激烈的视频18勿进 日本亲与子乱 日本肥白老熟妇 日本老女人乱伦乳房视频 .
星露谷物语人物喜好 不知火舞被操b 屄屄大战 老女人性ZXXXJJJ 昭和性暴力电影 日本70老妇性交 毛片免费看老人 性感美熟妇性爱 毛茸茸老熟女 天美传媒自制剧视频大全 .
内射人妻福利一区p 他日得我走不了路 裸足h 米兰达可儿奶头无码 奇迹笨 非洲性爱网站 破处艳情小说
日本❌❌❌人妻 chinese初髙中生勃起自慰 欧美 性3D 动漫XXX 怪物 .
蒂法黄页网站 黑冰女王的视频 | VK 中国老熟妇拳交无码视频 欧美在线按摩情趣视频 亚洲⭕⭕⭕⭕XXXX3d动漫 黄色的下载
国产富婆胯下黄金圣水虐男奴 亚洲啪啪网页 1000个类似jiuzz的网站 tube操技师 .
熟女assHD https://cnporn.click/ 棍之勇者打扑克 江苏景点排名大全
欧美性爱不卡机 校园露出暴露羞耻日记 天美传媒亲兄弟换妻4p播放 publicagent欧美系列在线观看 oldman经典老头2
棚户区老肥熟老女人聊天 骚年勾引老头宾馆 .
性爱网站免费 少妇泬喷水18P 91丨PORN丨首页
专干老熟妇网站 超刚毛 日本熟妇BRAZZERS厨房 XXⅩⅩⅩⅩⅩ小舞网站在线观看 男女多p混交群体交乱中国 欧美一级电影bbb 国产国语版一级A片 .
动漫人妖女同futanari chinese骚女 东北老女人高潮过瘾自白
极品精东传媒AV影院 EVelun claire在线 肛虐 麻豆插入 女同Video分类 国外大码超模性感秀 braziⅠ一xxx一hd .
爱爱爱爱动图 麻豆黄色网站在线看 宫村恋医生在线观看 福彩双色球开奖时间 好大好深好爽想要国产乱码91
舌L子伦熟妇αV 回顾一代天后李玟的传奇人生 美女裸照 白胖老熟女HD❌Ⅹ 5 12
17 19 24 32 7能中大奖吗 . 日本异性特殊按摩 熟妇岳嫩颤抖呻吟 tune 动漫
梁平天气预报 chinna femdoim 女装 欧美一区二区人人喊爽 骚年老头视频vide0s undertale的同人污本子 一个㖭B一个㖭3人个人换着玩 one piecePiXXX Hentai静香 .
Honkai Immpact 3rd 工口 欧美插b美女的隐私㊙️视频网站蜜桃视频 欧美黑人顶级AAAAA片 欧美里人性行为❌Ⅹ❌
欧美黑人操老女人老熟女另类 少妇XXXXX性开放按摩 good
luck男人的黄色网站 双南东边户西边户 2023澳门码今晚开奖结果记录 .
女人五十路 国产福利导航,国产福利 外国黄色福利免费网站 原神空或 幼女黑丝照片 野坝子的功效与作用
艾斯慕斯踩踏丨VK 东京麻豆网站 国产天美传媒免费Av正片在线播放
北条麻纪电影 . 日本家庭乱伦小说 能在线观看日本动漫 st美谷股票为何不让卖了呀
千仞雪在线观看3D被躁 曝谷歌CEO年薪高达15亿 女虐女同学奴vk JapanHD性❌❌❌人与售 OLdmanChina年老汉
美女自慰抠屄 老太色HD老年人HD . 中老年同性搓澡工 在线免费看催眠性指导
国产h色萌白酱在线视频 波多野结衣的视频在线播放二区
天美和 麻豆都市情缘2910章完整版 国产女教师一级爽A片 俄外交部就莫斯科遭袭发表声明 男男被触手 国产寡妇XXXX猛交69 .
自由管性交业余视 国产内射《ⅹⅹⅹxx》在线 小孩子的英文 四合院惊艳 我决定 先锋探花资源 浓精灌孕h攵女乱爱A片 动漫触手怪 欧美黄色一级片黑 小学生がおしっこをする 郑则仕怎么又活了 .
3D不知火舞被钢针扎奶视频 3D动漫❌❌❌无尽视频 昭和 冢本 fax 原神同人黄色视频在线 pokemonsex性漫画
中国吞精囗交免费视频 wickedpicture全系列 授乳人妻 老熟女草Bx× 3D色色视频 .
触手 孕 卵 h 女生被强上 欧美性Xxxsxxbbbbb
男女搞鸡喷水 旧里番OVA巨催眠公主2 chinesefemdom女 性少数民族少妇FREEHD 触手play~进去了~ 国外12小小㓜XX sislovesme欧美在线 .
宝可梦地平线 国产videosex天美传媒 free黑人bbc 波多野结衣视频播放42部app 欧美毛茸茸性交 亚洲日韩AV在线导航
eevelyn claire 欧美在线 小舞特别篇14部3D动漫 韩国色情理论片2023 成人AV三级AV .
BDSm最新性捆BDSmTv 雷电将军裸体被❌羞羞视频 如何清空回收站 城中村勾搭蒙古熟女91
梦见自己胳膊被划开口子流血 3d动漫美女被虐漫画集 我和10岁男孩啪啪啪 斗罗大陆把唐三被杀 熟女TubeHDSeⅩ视频 不知火舞被❌18禁羞羞漫画 .
优衣库啪啪视频 小箩莉黄瓜自慰喷白浆 Hotkinkyjo宫颈女王 踩CBT 老头吃美女奶头理伦电影 性中国熟妇XXX free欧美人与拘性夜夜 xxx另类 HDXXXXⅩ女同高清 小美女动态
. 后入人妻porn 欧美日韩性爱另类蒂法被❌免费观看
hazermoore在线资源 蜜桃麻豆WWW久久国产 滑轮物理知识点突袭男优宿舍 曰本AV人妻 老人可以手婬 纲手十八禁本子 .
绑起来xnnx 超粗超大39厘米女性自为具 吉林市李野个人简历 永久免费看A片自慰无码站
色欲AV蜜臀 里番工口ACG龙珠18号催眠 射女生原味帆布鞋 日韩老熟妇 ben10同人18禁本子
美女被狂操黄色网站 . chinese18飞机宿舍激情 老熟女脚榨精foot 老头大粗鳮巴好爽国产 欧美熟妇大阴蒂高潮视频 杭州百万级跑车起火事件视频最新消息 2B旧里番 中国护士少妇XXXX做受
男子捡余额3 7万手机还失主 排列三走势图完整版 竟然是个处儿呢 .
亚洲青年自慰网站 vpswindows另类精品 六十路垂乳熟女田舍交尾 人民警察法第二十二条规定
西顿英文 freesax呦交 一本加勒比北条麻妃 afreecaTV黑珍bJ裸体 我的九个师娘倾国倾城 md传媒免费版网站进入
. 性欧美精品❌❌❌游戏 minecraft全裸脱衣动漫游戏网站 大肥肏美女操肏视频 义乌巫医 国产精品~右手影院 日本XⅩXX国产天美 刻晴被干爆视频网站
婚纱英文怎么说 波动野结衣视频 2位军官晋升上将军衔 .
麻豆Xxx 无码密臀麻豆AV 麻豆九一女神呻吟春药 施州小学高丛 爸爸不在家我天天交公粮给妈妈 海棠文学城小说网-无弹窗免费网络小说阅读 我和亲妺作爱全过程内谢
P0RN老年 梁朝伟最大尺度戏 日本三级片干完了 .
好大⋯用力⋯深一点黑人 传奇 齐秦的经典歌曲 口味重的乱小说 欧美不卡在线 欧美性网站 ChineSe7O老人性
纲手巨乳忍者之乳影 亚洲变态凌辱 JaPanHD乂Ⅹ╳乂日本寂寞少妇 .
glucophage australia
reputable canadian online pharmacies
buy acyclovir cream online cheap
generic strattera online
zoloft 214
price of phenergan
plaquenil price in india
acyclovir cream australia
online pharmacy discount code
buy phenergan online uk
zoloft 150 mg
zovirax canada over the counter
http://divaitdivine.com/__media__/js/netsoltrademark.php?d=www.polityka.pl%2Ftygodnikpolityka%2Frynek%2F2199932%2C1%2Ctalerze–co-warto-wiedziec-przy-zakupie.read https://pacificsurffood.com/__media__/js/netsoltrademark.php?d=www.polityka.pl%2Ftygodnikpolityka%2Frynek%2F2199932%2C1%2Ctalerze–co-warto-wiedziec-przy-zakupie.read http://betdania.com/__media__/js/netsoltrademark.php?d=www.polityka.pl%2Ftygodnikpolityka%2Frynek%2F2199932%2C1%2Ctalerze–co-warto-wiedziec-przy-zakupie.read http://ca.en.naturespath.com/__media__/js/netsoltrademark.php?d=www.polityka.pl%2Ftygodnikpolityka%2Frynek%2F2199932%2C1%2Ctalerze–co-warto-wiedziec-przy-zakupie.read http://thecancerstrongapp.com/__media__/js/netsoltrademark.php?d=www.polityka.pl%2Ftygodnikpolityka%2Frynek%2F2199932%2C1%2Ctalerze–co-warto-wiedziec-przy-zakupie.read http://80.26.155.59.xx3.kz/go.php?url=https://www.polityka.pl/tygodnikpolityka/rynek/2199932,1,talerze–co-warto-wiedziec-przy-zakupie.read http://acemold-ca.com/__media__/js/netsoltrademark.php?d=www.polityka.pl%2Ftygodnikpolityka%2Frynek%2F2199932%2C1%2Ctalerze–co-warto-wiedziec-przy-zakupie.read http://mitropoulosarchitecture.com/__media__/js/netsoltrademark.php?d=www.polityka.pl%2Ftygodnikpolityka%2Frynek%2F2199932%2C1%2Ctalerze–co-warto-wiedziec-przy-zakupie.read http://www.delrayoptical.com/__media__/js/netsoltrademark.php?d=www.polityka.pl%2Ftygodnikpolityka%2Frynek%2F2199932%2C1%2Ctalerze–co-warto-wiedziec-przy-zakupie.read http://centralillinoisdoor.net/__media__/js/netsoltrademark.php?d=www.polityka.pl%2Ftygodnikpolityka%2Frynek%2F2199932%2C1%2Ctalerze–co-warto-wiedziec-przy-zakupie.read http://1199seiuhomecareedfund.com/__media__/js/netsoltrademark.php?d=www.polityka.pl%2Ftygodnikpolityka%2Frynek%2F2199932%2C1%2Ctalerze–co-warto-wiedziec-przy-zakupie.read http://urbanpiepizzas.com/__media__/js/netsoltrademark.php?d=www.polityka.pl%2Ftygodnikpolityka%2Frynek%2F2199932%2C1%2Ctalerze–co-warto-wiedziec-przy-zakupie.read http://customzippers.com/__media__/js/netsoltrademark.php?d=www.polityka.pl%2Ftygodnikpolityka%2Frynek%2F2199932%2C1%2Ctalerze–co-warto-wiedziec-przy-zakupie.read http://bigbargainsbazaar.com/__media__/js/netsoltrademark.php?d=www.polityka.pl%2Ftygodnikpolityka%2Frynek%2F2199932%2C1%2Ctalerze–co-warto-wiedziec-przy-zakupie.read http://ww17.suprme.com/__media__/js/netsoltrademark.php?d=www.polityka.pl%2Ftygodnikpolityka%2Frynek%2F2199932%2C1%2Ctalerze–co-warto-wiedziec-przy-zakupie.read http://landvest-massachusettsrealestate.com/__media__/js/netsoltrademark.php?d=www.polityka.pl%2Ftygodnikpolityka%2Frynek%2F2199932%2C1%2Ctalerze–co-warto-wiedziec-przy-zakupie.read http://pctypesonline.com/__media__/js/netsoltrademark.php?d=www.polityka.pl%2Ftygodnikpolityka%2Frynek%2F2199932%2C1%2Ctalerze–co-warto-wiedziec-przy-zakupie.read http://makeplane.com/__media__/js/netsoltrademark.php?d=www.polityka.pl%2Ftygodnikpolityka%2Frynek%2F2199932%2C1%2Ctalerze–co-warto-wiedziec-przy-zakupie.read http://www.boostersite.es/votar-4378-4270.html?adresse=www.polityka.pl/tygodnikpolityka/rynek/2199932%2C1%2Ctalerze–co-warto-wiedziec-przy-zakupie.read http://greatlakesspecialty.com/__media__/js/netsoltrademark.php?d=www.polityka.pl%2Ftygodnikpolityka%2Frynek%2F2199932%2C1%2Ctalerze–co-warto-wiedziec-przy-zakupie.read http://doodles.dog/__media__/js/netsoltrademark.php?d=www.polityka.pl%2Ftygodnikpolityka%2Frynek%2F2199932%2C1%2Ctalerze–co-warto-wiedziec-przy-zakupie.read https://necjar.com/out?https://www.polityka.pl/tygodnikpolityka/rynek/2199932,1,talerze–co-warto-wiedziec-przy-zakupie.read http://raginbarberinstitute.com/__media__/js/netsoltrademark.php?d=www.polityka.pl%2Ftygodnikpolityka%2Frynek%2F2199932%2C1%2Ctalerze–co-warto-wiedziec-przy-zakupie.read http://7q.bancodechile.com/__media__/js/netsoltrademark.php?d=www.polityka.pl%2Ftygodnikpolityka%2Frynek%2F2199932%2C1%2Ctalerze–co-warto-wiedziec-przy-zakupie.read http://notfriendster.com.xx3.kz/go.php?url=https://www.polityka.pl/tygodnikpolityka/rynek/2199932,1,talerze–co-warto-wiedziec-przy-zakupie.read http://eaq.edwattsgolf.com/__media__/js/netsoltrademark.php?d=www.polityka.pl%2Ftygodnikpolityka%2Frynek%2F2199932%2C1%2Ctalerze–co-warto-wiedziec-przy-zakupie.read https://aviaterra.ru/bitrix/redirect.php?goto=https://www.polityka.pl/tygodnikpolityka/rynek/2199932,1,talerze–co-warto-wiedziec-przy-zakupie.read http://worshipatlife.com/__media__/js/netsoltrademark.php?d=www.polityka.pl%2Ftygodnikpolityka%2Frynek%2F2199932%2C1%2Ctalerze–co-warto-wiedziec-przy-zakupie.read http://www.nnovgorod.news/bitrix/redirect.php?goto=https://www.polityka.pl/tygodnikpolityka/rynek/2199932,1,talerze–co-warto-wiedziec-przy-zakupie.read http://stewartwoods.com/__media__/js/netsoltrademark.php?d=www.polityka.pl%2Ftygodnikpolityka%2Frynek%2F2199932%2C1%2Ctalerze–co-warto-wiedziec-przy-zakupie.read http://certiphibackground.net/__media__/js/netsoltrademark.php?d=www.polityka.pl%2Ftygodnikpolityka%2Frynek%2F2199932%2C1%2Ctalerze–co-warto-wiedziec-przy-zakupie.read http://mutualassurancesocietyofva.org/__media__/js/netsoltrademark.php?d=www.polityka.pl%2Ftygodnikpolityka%2Frynek%2F2199932%2C1%2Ctalerze–co-warto-wiedziec-przy-zakupie.read http://abilityxchange.org/__media__/js/netsoltrademark.php?d=www.polityka.pl%2Ftygodnikpolityka%2Frynek%2F2199932%2C1%2Ctalerze–co-warto-wiedziec-przy-zakupie.read http://lukemagness.com/__media__/js/netsoltrademark.php?d=www.polityka.pl%2Ftygodnikpolityka%2Frynek%2F2199932%2C1%2Ctalerze–co-warto-wiedziec-przy-zakupie.read http://lelanpotele.com/__media__/js/netsoltrademark.php?d=www.polityka.pl%2Ftygodnikpolityka%2Frynek%2F2199932%2C1%2Ctalerze–co-warto-wiedziec-przy-zakupie.read
the taste of a ripe strawberry is a burst of sweetness in every bite amulet the crackling of a campfire invites storytelling and camaraderie
where can i buy elimite
how much is generic strattera
plavix online
Awesome information, Kudos.
write my essay for me free write my essay for free essay writer no plagiarism what should i write my college essay about
best resume writing service 2020 online paper writing service will writing service best essay writing website
help on writing https://cheapessaywriteronlineservices.com
medrol 5mg tablets
plavix.com
8 mg flomax
international online pharmacy
furosemide prescription medicine
0.4 mg flomax
Nicely put, Cheers!
pay for papers buy essays pay someone to write your paper buy essays online
amoxil for sale
Nicely put, Many thanks.
elements of a research proposal write my research paper proposal research writing proposal
phenergan 50 mg
phenergan otc canada
coba join kedalam situs judii pkv games dengan bandar domino serta bandaarq online terbaik
sepanjang masa yang sudah tersedia pada tahun 2023 ini dengan akkun ρro jackpot terbaik yang dapat kalian temukan dengan menggunakan sdbagian akun yang kalian daftarkan Ԁi dalam sini dan kalia juga bisa memiliki kemungkinaan untuk
menerima seluruh keuntungan dari metode pengisian deposit ѵia pulsa yang
tidak dapat kalian dapatkan ɗi laman webb judi pkv games,
bandarqq ataupun pokerqq online yang lainnya yang ada ɗі dunia online dikala ini.
purchase furosemide
where to buy elimite
phenergan 10mg nz
acyclovir 200
prozac 30 mg tablet
phenergan lowest cost
canadian pharmacy drugs online
ventolin 100mcg online
can you buy acyclovir over the counter uk
cost of strattera in australia
phenergan nz buy
albuterol online order
italian pharmacy online
Thanks a lot, Quite a lot of forum posts.
how to write a college essay help me write an essay essay typer helping others essay
buy a paper for college custom handwriting paper buy a paper pay to write paper
how to write an essay for college scholarships https://homeworkcourseworkhelps.com
furosemide 160 mg
zovirax pills otc
being vegan can help the environment essay paper writing help site:essaybasics.com/essay-writing-help
Nicely put, Cheers.
research paper help term papers research proposal cover page writing proposal
Terrific write ups. Appreciate it!
strong thesis statement define thesis working thesis thesis paper
fluoxetine brand name uk
foreign pharmacy no prescription
cost for zovirax cream
phenergan tablets uk
online pharmacy no prescription needed
strattera generic
phenergan over the counter usa
otc phenergan medicine
motrin 600 mg over the counter
where can i buy acyclovir in australia
buy cheap zoloft
What’s up everyone, it’s my first pay a quick visit at this website,
and article is in fact fruitful designed for me,
keep up posting these types of articles or reviews.
acyclovir tablets
phenergan otc canada
cost of strattera australia
where can i buy amoxicillin without prec
generic zoloft cost
where can i buy phenergan
clopidogrel buy online
It’s difficult to find knowledgeable people about this subject, but you sound like you
know what you’re talking about! Thanks
cymbalta tablets price
Pendik Güzellik Merkezi, profesyonel ekibi ve son teknoloji cihazlarıyla sizin için her şeyi düşünüyor. Güzellik merkezinde, cilt bakımından makyaj ve saç bakımına kadar her şeyi bulabilirsiniz.
Spot on with this write-up, I seriously believe this website needs much more
attention. I’ll probably be returning to see more, thanks
for the info!
buy elimite cream
how to get phenergan
albendazole for sale canada
phenergan capsules
canadian pharmacy acyclovir cream
You stated this very well!
cost of acyclovir cream in india
online pharmacy bc
online pharmacy australia free delivery
Wonderful forum posts. Appreciate it!
pay for essays order essay pay for papers buy an essay
canadian flomax
generic levitra paypal
Many thanks, Great information!
pay for paper custom papers pay for paper best college paper writing service
write my paper how to write an apa paper pay someone to write my paper how to write a reflective paper
custom writings https://writingthesistops.com
generic cymbalta
acyclovir medication prices
For newest information you have to pay a visit world-wide-web and on the web I found this web page
as a best web page for most recent updates.
Tips certainly taken!!
write my essay cheap who can write my essay write my essay for cheap persuasive essay writer
pharmacy com canada
500 mg amoxicillin capsules
It’s perfect time to make a few plans for the long run and it’s time to be happy.
I have learn this put up and if I could I desire
to recommend you few fascinating issues or suggestions.
Perhaps you could write next articles relating to this
article. I wish to read more things approximately it!
30 mg cymbalta coupon
lasix tablets for sale
buy levitra 24
This is my first time go to see at here and i am actually impressed to read all at single
place.
phenergan canada order
Truly no matter if someone doesn’t know after that its up to other viewers that they will assist, so here
it takes place.
prescription augmentin
furosemide 40 mg cost uk
hydroxychloroquine nz
prozac buy
First of all I want to say excellent blog! I had a quick question that
I’d like to ask if you do not mind. I was curious to know how
you center yourself and clear your thoughts prior to writing.
I have had a tough time clearing my mind in getting my ideas out.
I truly do take pleasure in writing but it just seems like the first 10 to 15 minutes tend to be wasted just trying
to figure out how to begin. Any suggestions or hints? Appreciate it!
buy flomax
generic for zoloft
flomax for ed
buy prozac from india
phenergan 12.5 mg 25 mg
acyclovir purchase
Great article.
best online thai pharmacy
Point very well utilized.!
write my research paper research paper writers online proposal college term papers
Very soon this web site will be famous amid all blogging people,
due to it’s good articles
cost of phenergan gel
Hi to every body, it’s my first go to see of this weblog; this webpage carries remarkable and in fact excellent information designed for readers.
buy acyclovir australia
amoxicillin otc price
buy phenergan online australia
suhagra 25 mg buy online
buying amoxicillin online uk
Inspiring quest there. What occurred after? Thanks!
canadian 24 hour pharmacy
Heⅼlo, i feel that i sаw you visited my site so i came to go back the desirе?.I’m attempting to in fіnding thіngs to improve my site!I guess its adeqᥙɑte to
make use of some of your ideas!!
Truly lots of very good tips.
essay writing service help with writing an essay cheap essay help helping others essay
essay writer review write paper for me write my essay cheap writing a good essay
thesis writer https://essaywriting4you.com
non prescription medicine pharmacy
albuterol cost
It s just that some things can only be answered clearly if they don t say it viagra side effects long term
buying tetracycline online
canadian pharmacy sildenafil
I do not know if it’s just me or if everyone else encountering problems with
your website. It appears like some of the written text in your posts are
running off the screen. Can someone else please comment and let me know if this is happening to them too?
This could be a issue with my browser because I’ve had this
happen previously. Many thanks
pharmacy websites
cymbalta generic cost
You suggested that very well!
are essay writing services safe college essay writing paper writer services writing a reflective essay
where to buy amoxil
Appreciate this post. Will try it out.
augmentin 125
phenergan over the counter
buy acyclovir without a prescription
非洲黑迪克vs亚洲娇小 Chinese棉袜socksjob 动漫3d无码人妖在线
hy工坊蒂法 杨幂被干 西方XXXXBBB 美女穿开裆丝袜无遮挡 性少妇Tubevideos自慰 镣铐论坛 japan人妻白嫩videos .
梅西首度直播现场挑选粽子 白丝美女被热 精品刮子伦一区二区三区 老人去世医生隐瞒未植入支架
熟妇人妻视频成人网站大全 BBw欧美 舔女生脚的网站 free刻晴触手(2)hordcoretube MandingoBBC黑人
北条麻妃暴雨夜中文字幕 . 私密黄色小说 丰满女人和黑人XXXX
足交调教丝袜bdsm 带50岁女人去哪里约会好 FAX一33中文字幕
麻豆国产三级在线无码观看 女孩将小猫绑起来抡圈玩 国产精品无码亚洲精品蜜桃传媒 男子陪女友看演唱会后溺亡 欧美老熟妇xB水多毛 .
性图厕 欧美女人日逼的黄片儿放一下 老太太的阴部撒尿
老妇乐XXX性开放 ❌❌❌❌日本人护士 安卓软件下载网国信 白嫩少妇高潮喷水惨叫一 free fuyck girl麻豆
柏木舞子10倍人妻教师 八段锦完整口令教学版
. 中文字幕日韩美 小伙被灌醉爽玩大雞巴 國產一區2區三區無碼 日本五六十路熟熟 女生被操网站 被强㢨的白嫩少妇真实照片 爽死你个放荡粗暴小婬货视频 小米辣椒 抖音极速版 酒色成人 .
free性高潮 俄罗斯性爱直播 欧美熟女逼 国产日韩🔞在线播放 国产老师aV学生aV巨作 日本熟妇乄Ⅹ乄日本老妇 荒野拾珍老头0LDman 国产NVHDXXXX麻豆 oldwoman孕妇 一炕四女被窝交换啪啪 .
女子校生耻辱のァングル 國產精品無碼一區二區 冢本部队女体拷问 Chⅰηese熟女老女人HD 欧美WBB 乱伦xnxxsex 欧美丝袜福利视频 女人被操到高潮的高清免费全裸视频 偷看内衣露出 国产天美AV剧场 .
BBW1OWjObTube大乳 伪娘黄色视频网站 乡下原始麻与子乱小说 韩国女主播福利诱惑视频在线观看 tube❌videos老头嫖妓 百度修复模糊照片 动漫片少妇的诱惑 欧美老人GAy老头 南美老熟女精品 日本家庭乱伦视频 .
cbt取精酷刑tube https://x.instrumentsofamericanexcellence.com/ 日本五十路授乳 91精品无码蜜臀Av九色在线 泰国曼谷小妓女BBw anderssen种子 日本人体摄影 他缓慢而有力的往里挺送细写 apaese teen(18 19)第一次 欧美❌❌❌ooo 中国Chinese调教男奴 .
图图 老老女人颜射 69男poren18HD 性爱照片视频 熟妇70代
汗汗视频在线观看 xxnxxx曰本动漫493Dxxxx85 xxlxHDxxxxHD 日本 老熟女性爱pron 亚洲痴汉电车视频
. 3D区r18 美女和老头斗逼逼自拍 tube裸乳 最新国产视频 国产老妇性经典XXX㐅 我的炮友11p
国产18🈲️入口麻豆 三浦恵理子之归乡义子
搡多毛BBBBWWXXXX 原神美女裸体漫画 .
lesbin femdom文章 熟女近親相姦中出サンプル動画 Tentacion花火VK 乱人伦XXXX
斗罗大陆之yin荡小舞不乐视频 3D动漫freey性爱 菲律宾一艘渡轮海上起火 胖老头与胖老头456在线观看 东北大炕狗儿 欧洲人成视频 .
特黄捆绑一级A片 妲己被❌喷水视频网站
madofit麻豆新品 小日本日女囚 老师你的兔兔子好软水的视频 奴役女教师啊强静怡 欧美性爱SSSSS 黑人体图片激动 美女被分开操到高潮视频 东方百合本子magnet
. tk挠痒痒vk 国产性受视频 美国禁忌6乱偷 性BBBBWWBBBB 安徽高考分数线出炉 91成人网站www污污在线看
足控丝袜脚交H漫画 国产探花极品高端外围女视频 我要看非洲的鸡婆
南北戴河属于哪个城市 . y0u丿ZZⅩXXXXHD 国产探花在线丝袜 Japanese丰满milf 雷电将军春药
男人J进入女人P狂躁视频91 美国性爱双插 狂兽决 美性撸
婷婷女s-黄金圣水 小明无码另类 . 蒂法被艹同人 欧美12-13asian 乔家的儿女
spytoilet小便偷窥av 麻豆高清在线 刻晴在床上被c 中国女主播和老头野外 寂寞难耐丰满人妻出轨 群奴视频91自拍 黑冰女王的视频 | VK .
肏肏老屄 被主人调教惩罚 女子小区放蟑螂被制止 女女r18 催眠女生给他们做指导的网站 看爷爷鸡鸡 欧美性爱操逼视频免费 男生勃起的视频 人与兽美女 我从一点小事受到启发
. freesexmovies性色 japanesefree性暴力 女的被操娇喘 国产真实的和子乱拍在线观看 把她带去乳刑室浣肠 男子地铁上扇脸女子质问爱谁
麻豆一二三四乱码视频 春力农用机械 free性满足HD国产精品 法国贵妇复古性经典XXXX高清 .
什么是天花粉照片 成年人的激情片 快乐人妻Chinasex12 冢庭亂倫自拍的小視頻 裸体裸体裸体自慰喷水 杖刑网站 国产原创麻豆 欧美激情XXXX性BBBB 第五人格英 肥胖女人app激情黄片 .
日本人家庭的性乱交 丰满人妻肥臀诱惑 精品mmdHentai 纲手的脚
和农村老头野战69vv ChineSe野外妓女Tubee 黑丝尤物自慰网站
av区中文所有的人妻 性爱三级片毛片 意大利复古性毛葺葺 .
三亚一餐馆老鼠爬上桌觅食 国产重口小伙和老太乱 霍元甲在线观看 3D动漫-ⅩXXⅴⅰdeo 70岁老太ChineseBBw 自慰动漫和自慰日本 欧美肥胖老妇人黄色管网站 爬上楼顶的男孩 火星或曾发生全球性气候转变 Japanesematur丰满 .
舌交❌Xx免费网站 xvideos日本版 裸舞虫交mmd 韩国组合两女一男 ❌❌❌❌性BBBB哦美熟妇 高清色黄网站
人和拘的黄色录像 城中村嫖了个农民工女 骨王是什么动漫 chinese中国高清 .
ten1819第一次处交 蒂法同人本网站 马交配视频 roblox不屈不挠的灵魂 NarutoPIXXX无尽长廊 qornesebeos岳母 马斯克:
不会辞任特斯拉CEO 日本农村老妇HD 脚交熟女 德国美女freeHD .
养一万只蝎子要投入多少 唐尚珺去读大学了吗 美女老熟女操屄视频 拉肚子喝牛奶可以吗 最近手机中文字幕高清大全7 羞答答的乱伦片 老福利XXXXXXX
久久国产乱子伦精品免费午夜 强奸原神触手 欧美h3D .
大屌黑丝欧美 tthe por 外国淫荡老女人 农村老头性发泄 尤物电影一区二区三区 四川熟熟日屄五十路 三人性交派对视频 无限触手繁殖地狱怀孕
中国动漫美女的裸体 FreeHD另类XXXX喷水 AlexisTexas大湿臀
. AnneHathaway裸 成熟丰满熟妇高潮XXXXX免费 玖辛奈黄本子 香港最大的黄色网站 gv广播剧
19j韩国美女 人 裸体的玛哈无删减播放 变态sm调教老熟妇 黄色视频斗罗大陆千仞雪 .
xxxx xxx欧美麻豆 初撮五十路熟女遠田惠未 少妇熟女老女人 -旗袍美女ThePoorn 日本人妻的滋味2 嗯啊哈迪丽热巴在线自慰观看 港台Av 国产一级𠂉片内射视频播放免费 国产chinesexxxx天美 欧美老妇free .
国产美女肏屄网 哈尔滨同性GAY浴池 吃播能赚多少钱?
chinese人妻3p 黄色小说网站s色 亚洲乱码AV毛片在线播放 女S调教男M视频专区 You亅IZZXXXX18HD
离北京海淀区信息中路12号最近的地方是哪 淫荡骚货 .
欧美重口味老熟女 欧美老妇与老头性猛交 昭和宪兵刑审女囚在线观看
韩国女主播自卫慰在线观看 啄木鸟之监狱之夜
美女野外勾搭老头AV 韩国试衣间男女激情视频 chinese乱子伦XXXX视频播放 成人性爱小黄片 荨麻疹一招永不复发 .
女同志 3d 扶他 巨大 “搭子”正在年轻人中流行 男女日皮视频 Naruto Hentai玖辛奈本子 排列5开奖结果查询 火影纲手黄漫 浴室打炮爽歪歪 自慰喷水-ThePorn 大乳抽插折磨虐待挤压蹂躏thepron原神刻晴触手 chinese肥臀热舞 .
where can i buy elimite cream over the counter
Hi there, this weekend is nice in favor of me, as this time i am reading this impressive educational paragraph here at my home.
quineprox 60mg
where can i buy zovirax tablets
furosemide uk buy
combivent 18-103 mcg
cost of strattera without insurance
best pharmacy
Way cool! Some extremely valid points! I appreciate you penning this write-up plus the rest of the website is really good.
Cheers! A good amount of advice.
pay for college papers pay someone to write paper pay someone to write a paper buy college paper
zoloft 100mg coupon
amoxicillin 675
Hi there! I know this is kinda off topic but I’d figured I’d ask.
Would you be interested in trading links or maybe guest authoring a blog
article or vice-versa? My site discusses a lot of the same topics as yours and I
believe we could greatly benefit from each other. If you might be interested feel free to shoot
me an e-mail. I look forward to hearing from you! Superb blog by the
way!
canadien pharmacies
buy zovirax tablets
canada pharmacy world
flomax 0.4
best generic prozac
buy acyclovir australia
escrow pharmacy canada
plavix 75 mg tablet price in india
mail order pharmacy
It’s a pity you don’t have a donate button! I’d most certainly donate to this brilliant blog!
I guess for now i’ll settle for bookmarking and adding your RSS feed to
my Google account. I look forward to new updates and will talk about this website with my Facebook group.
Chat soon!
order furosemide online
Does your website have a contact page? I’m having trouble locating it but,
I’d like to send you an e-mail. I’ve got some recommendations for your blog you might be interested
in hearing. Either way, great website and I look forward to seeing it expand over time.
This website was… how do you say it? Relevant!! Finally
I’ve found something which helped me. Thanks a lot!
augmentin 500 mg generic
Lovely facts. Appreciate it.
how to write a college essay help with my essay essay writing help help me write an essay
write paper for me paper writing pay someone to write your paper how to write a response paper
academic dissertation https://paperwritingservicecheap.com
furosemide coupon
Truly lots of wonderful data!
academic essay writing service are essay writing services safe is essay writing service legal
phenergan generic cost
Great blog here! Also your website loads
up very fast! What web host are you using?
Can I get your affiliate link to your host?
I wish my web site loaded up as quickly as yours lol
buy elimite uk
buy ventolin canada
What’s up colleagues, good piece of writing and nice arguments commented here,
I am genuinely enjoying by these.
best australian online pharmacy
buy phenergan
acticin over the counter
ampicillin 500 mg capsule
albendazole brand india
tamoxifen purchase online
5 mg prednisone tablets
inderal 30
You stated it superbly.
essay service essay on service best resume writing service
prednisone otc price
If you are going for most excellent contents like myself, just visit this web page every day because it presents quality contents, thanks
order propranolol online
Great article, just what I wanted to find.
triamterene medication
feldene gel 112g
cheap 25mg viagra
prednisone 2 mg tablets
piroxicam generic
erythromycin generic 250 mg tablets price
levaquin cost
I was suggested this web site by my cousin. I’m not sure
whether this post is written by him as nobody else know such detailed about my difficulty.
You are amazing! Thanks!
Композитные материалы – это тип стройматериалов, которые нашли применение
в огромном числе областей в промышленном производстве,
экстерьерах автомобилей, производстве оросительных сооружений
Hey There. I found your blog using msn. That is a really well written article.
I will be sure to bookmark it and return to read extra of your helpful information. Thanks for the post.
I will certainly return.
generic zanaflex cost
ampicillin over the counter
cialis cost without insurance
Howdy great website! Does running a blog like this take
a lot of work? I’ve virtually no understanding of programming however I was hoping to start my own blog in the near future.
Anyways, if you have any suggestions or techniques for new blog owners please share.
I know this is off topic nevertheless I simply wanted to ask.
Thanks!
cheapest uk sildenafil
how much is prednisone in canada
Kudos, Quite a lot of content!
pay for research paper buy an essay online pay for college papers essay for sale
cialis 5mg price south africa
cost of viagra without insurance chewable viagra buy sildenafil
It’s an awesome post in support of all the web viewers;
they will get advantage from it I am sure.
nolvadex tablets 20mg
buy tadalafil 40 mg
cialis professional 20 mg
cheapest generic viagra
where to buy prednisone over the counter
I wish to get across my admiration for your generosity giving
support to people that must have guidance on this one field.
Your real commitment to passing the solution around had been quite useful and
have frequently allowed professionals like me to arrive
at their desired goals. This informative report entails a great deal to
me and additionally to my fellow workers. Many thanks; from each
one of us.
inderal for sale
You suggested that adequately!
pay for papers custom handwriting paper research paper writing service pay someone to write a paper
good thesis statements strong thesis statement thesis binding working thesis
cover letter writing services https://custompaperwritingservices.com
free dating services online free dating sight
local dating
tizanidine over the counter
Paragraph writing is also a fun, if you be acquainted with then you
can write otherwise it is difficult to write.
triamterene/hctz caps
albenza generic price
online viagra pills
free sites: https://datingtopreview.com/# – connecting singles games
elimite coupon
free local dates dating usa
best online dating
toradol eye drops
Excellent site. Lots of helpful info here.
I am sending it to several pals ans also sharing in delicious.
And obviously, thank you for your sweat!
elimite 5
atenolol 10 mg tablet
obviously like your web site but you have to check the spelling on several of your posts.
A number of them are rife with spelling problems and I to find it very bothersome
to inform the truth however I will surely come back again.
feldene capsules 10mg
clindamycin canada otc
cialis 100mg india
Cheers! Excellent stuff.
professional essay writers what should i write my college essay about write an essay write my paper for me
over the counter toradol
piroxicam mexico
tadalafil tablets 20 mg online
valtrex rx coupon
generic viagra online us pharmacy
medrol 1 mg
order propranolol online
You said it adequately..
order essay online pay to write paper buy essays buy essays online
ampicillin tablet price
albendazole tablet price
feldene canada
buy generic avodart online
Hi there colleagues, fastidious piece of writing and good arguments
commented here, I am truly enjoying by these.
Pretty! This was a really wonderful post. Thanks for providing this info.
http://www.aha.ru/~fordmax/wwwboard/messages/324.html
Hello to all, how is the whole thing, I think every one is getting more from this
web page, and your views are good in favor of new visitors.
Just want to say your article is as surprising. The clarity on your submit is just great and i could
assume you’re a professional on this subject. Fine together with your
permission allow me to snatch your feed to stay up
to date with forthcoming post. Thanks one million and please continue the rewarding
work.
http://yar-ukk.ru/
buy cheap tamoxifen online
buy tamoxifen without prescription
buspar without prescription
dating guide: https://datingtopreview.com/# – dating sites for mature singles adults
My developer is trying to convince me to move to .net from PHP.
I have always disliked the idea because of the expenses.
But he’s tryiong none the less. I’ve been using
Movable-type on several websites for about a year and am anxious about switching
to another platform. I have heard excellent things about blogengine.net.
Is there a way I can transfer all my wordpress content into
it? Any kind of help would be greatly appreciated!
Appreciate it! A good amount of info!
do my programming homework cpm homework pay to do my homework do my finance homework
pay someone to write your paper research paper writing service pay someone to write a paper buy a paper
dissertation writing https://argumentativethesis.com
valtex without a prescription
37.5 triamterene
Thanks for the good writeup. It in fact was a amusement account it.
Glance complicated to more introduced agreeable from you!
However, how can we be in contact?
tadalafil generic 5mg
cheap cialis generic online
tizanidine 6 mg cost
erythromycin 250 mg buy online
hey there and thank you for your information –
I have certainly picked up anything new from right here.
I did however expertise several technical points using this web site,
as I experienced to reload the web site lots of times previous to I could
get it to load properly. I had been wondering if your web hosting is OK?
Not that I’m complaining, but sluggish loading
instances times will often affect your placement in google and could damage your high-quality score
if ads and marketing with Adwords. Well I am adding this RSS to my email and can look out for much more
of your respective fascinating content. Make sure you update
this again soon.
cleocin t cream
Cheers. Plenty of postings!
cheapest erythromycin 250 mg
http://www.youtube.com/redirect?event=channel_description&q=https%3A%2F%2Frevistaomf.ro%2F
http://cse.google.com.eg/url?sa=t&url=http%3A%2F%2Frevistaomf.ro%2F
http://cn.bing.com/news/apiclick.aspx?COLLCC=1718906003&ref=FexRss&aid=&url=https://revistaomf.ro/
http://images.google.com.sa/url?sa=t&url=http%3A%2F%2Frevistaomf.ro
http://images.google.at/url?sa=t&url=http%3A%2F%2Frevistaomf.ro
http://images.google.com/url?sa=t&url=http%3A%2F%2Frevistaomf.ro
http://images.google.gr/url?sa=t&url=http%3A%2F%2Frevistaomf.ro%2F
http://images.google.com.ua/url?sa=t&url=http%3A%2F%2Frevistaomf.ro%2F
http://accounts.cancer.org/login?redirectURL=https%3A%2F%2Frevistaomf.ro&theme=RFL
https://images.google.tk/url?sa=t&url=http://revistaomf.ro/
http://images.google.ee/url?sa=t&url=http%3A%2F%2Frevistaomf.ro%2F
http://clients1.google.ki/url?q=http%3A%2F%2Frevistaomf.ro
http://clients1.google.td/url?q=https%3A%2F%2Frevistaomf.ro
https://website.informer.com/revistaomf.ro
http://clients1.google.at/url?q=https%3A%2F%2Frevistaomf.ro
http://alt1.toolbarqueries.google.com.ec/url?q=https://revistaomf.ro/
http://b.filmz.ru/presentation/www/delivery/ck.php?ct=1&oaparams=2__bannerid=222__zoneid=2__cb=93494e485e__oadest=https://revistaomf.ro/
http://ava-online.clan.su/go?https://revistaomf.ro/
http://ads.dfiles.eu/click.php?c=1497&z=4&b=1730&r=https://revistaomf.ro/
http://clinica-elit.vrn.ru/cgi-bin/inmakred.cgi?bn=43252&url=revistaomf.ro
http://chat.chat.ru/redirectwarn?https://revistaomf.ro/
http://cm-eu.wargaming.net/frame/?service=frm&project=moo&realm=eu&language=en&login_url=http%3A%2F%2Frevistaomf.ro
http://maps.google.com/url?q=https%3A%2F%2Frevistaomf.ro%2F
http://audit.tomsk.ru/bitrix/click.php?goto=https://revistaomf.ro/
http://clients1.google.co.mz/url?q=https%3A%2F%2Frevistaomf.ro/
http://come-on.rdy.jp/wanted/cgi-bin/rank.cgi?id=11326&mode=link&url=https://revistaomf.ro/
http://images.google.com.ng/url?sa=t&url=http%3A%2F%2Frevistaomf.ro%2F
http://yumi.rgr.jp/puku-board/kboard.cgi?mode=res_html&owner=proscar&url=revistaomf.ro/&count=1&ie=1
http://images.google.com.au/url?sa=t&url=http%3A%2F%2Frevistaomf.ro%2F
https://asia.google.com/url?q=http://revistaomf.ro/management.html
http://adapi.now.com/ad/api/act.ashx?a=2&sc=3490&s=30000219&l=1&t=0&c=0&u=https://revistaomf.ro/
https://cse.google.ws/url?q=http://revistaomf.ro/
http://avn.innity.com/click/avncl.php?bannerid=68907&zoneid=0&cb=2&pcu=&url=http%3a%2f%2frevistaomf.ro
https://ross.campusgroups.com/click?uid=51a11492-dc03-11e4-a071-0025902f7e74&r=http://revistaomf.ro/
http://images.google.de/url?sa=t&url=http%3A%2F%2Frevistaomf.ro
http://tools.folha.com.br/print?url=https%3A%2F%2Frevistaomf.ro%2F&site=blogfolha
http://alt1.toolbarqueries.google.com.fj/url?q=https://revistaomf.ro/
http://new.creativecommons.org/choose/results-one?q_1=2&q_1=1&field_commercial=n&field_derivatives=sa&field_jurisdiction=&field_format=Text&field_worktitle=Blog&field_attribute_to_name=Lam%20HUA&field_attribute_to_url=https%3A%2F%2Frevistaomf.ro
http://redirect.subscribe.ru/bank.banks
http://www.so-net.ne.jp/search/web/?query=revistaomf.ro&from=rss
http://alt1.toolbarqueries.google.cat/url?q=https://revistaomf.ro/
http://affiliate.awardspace.info/go.php?url=https://revistaomf.ro/
http://writer.dek-d.com/dek-d/link/link.php?out=https%3A%2F%2Frevistaomf.ro%2F&title=revistaomf.ro
http://analogx.com/cgi-bin/cgirdir.exe?https://revistaomf.ro/
http://images.google.co.ve/url?sa=t&url=http%3A%2F%2Frevistaomf.ro%2F
http://ip.chinaz.com/?IP=revistaomf.ro
http://images.google.com.pe/url?sa=t&url=http%3A%2F%2Frevistaomf.ro%2F
http://cmbe-console.worldoftanks.com/frame/?language=en&login_url=http%3A%2F%2Frevistaomf.ro&project=wotx&realm=wgcb&service=frm
http://images.google.dk/url?sa=t&url=http%3A%2F%2Frevistaomf.ro
http://ceramique-et-couleurs.leforum.eu/redirect1/https://revistaomf.ro/
https://ipv4.google.com/url?q=http://revistaomf.ro/management.html
http://cse.google.com.af/url?sa=t&url=http%3A%2F%2Frevistaomf.ro%2F
http://images.google.com.do/url?sa=t&url=http%3A%2F%2Frevistaomf.ro%2F
http://newsdiffs.org/article-history/revistaomf.ro/
http://cse.google.az/url?sa=t&url=http%3A%2F%2Frevistaomf.ro%2F
http://images.google.ch/url?sa=t&url=http%3A%2F%2Frevistaomf.ro
http://aganippe.online.fr/lien.php3?url=http%3a%2f%2frevistaomf.ro
http://images.google.fr/url?sa=t&url=http%3A%2F%2Frevistaomf.ro
http://images.google.co.ve/url?sa=t&url=http%3A%2F%2Frevistaomf.ro
http://alt1.toolbarqueries.google.com.do/url?q=https://revistaomf.ro/
http://alt1.toolbarqueries.google.co.mz/url?q=https://revistaomf.ro/
https://www.easyviajar.com/me/link.jsp?site=359&client=1&id=110&url=http://revistaomf.ro/2021/05/29/rwfeds/
http://68-w.tlnk.io/serve?action=click&site_id=137717&url_web=https://revistaomf.ro/
http://alt1.toolbarqueries.google.sk/url?q=https://revistaomf.ro/
http://jump.2ch.net/?revistaomf.ro
http://images.google.co.nz/url?sa=t&url=http%3A%2F%2Frevistaomf.ro
http://images.google.com.ec/url?sa=t&url=http%3A%2F%2Frevistaomf.ro
http://alt1.toolbarqueries.google.com.mx/url?q=https://revistaomf.ro/
http://sitereport.netcraft.com/?url=https%3A%2F%2Frevistaomf.ro%2F
http://www.ursoftware.com/downloadredirect.php?url=https%3A%2F%2Frevistaomf.ro%2F
http://cse.google.co.mz/url?sa=t&url=http%3A%2F%2Frevistaomf.ro%2F
http://legal.un.org/docs/doc_top.asp?path=../ilc/documentation/english/a_cn4_13.pd&Lang=Ef&referer=https%3A%2F%2Frevistaomf.ro%2F
http://doodle.com/r?url=https%3A%2F%2Frevistaomf.ro%2F
http://cse.google.ac/url?sa=t&url=http%3A%2F%2Frevistaomf.ro%2F
http://78.rospotrebnadzor.ru/news9/-/asset_publisher/9Opz/content/%D0%BF%D0%BE%D1%81%D1%82%D0%B0%D0%BD%D0%BE%D0%B2%D0%BB%D0%B5%D0%BD%D0%B8%D0%B5-%D0%B3%D0%BB%D0%B0%D0%B2%D0%BD%D0%BE%D0%B3%D0%BE-%D0%B3%D0%BE%D1%81%D1%83%D0%B4%D0%B0%D1%80%D1%81%D1%82%D0%B2%D0%B5%D0%BD%D0%BD%D0%BE%D0%B3%D0%BE-%D1%81%D0%B0%D0%BD%D0%B8%D1%82%D0%B0%D1%80%D0%BD%D0%BE%D0%B3%D0%BE-%D0%B2%D1%80%D0%B0%D1%87%D0%B0-%D0%BF%D0%BE-%D0%B3%D0%BE%D1%80%D0%BE%D0%B4%D1%83-%D1%81%D0%B0%D0%BD%D0%BA%D1%82-%D0%BF%D0%B5%D1%82%D0%B5%D1%80%D0%B1%D1%83%D1%80%D0%B3%D1%83-%E2%84%96-4-%D0%BE%D1%82-09-11-2021-%C2%AB%D0%BE-%D0%B2%D0%BD%D0%B5%D1%81%D0%B5%D0%BD%D0%B8%D0%B8-%D0%B8%D0%B7%D0%BC%D0%B5%D0%BD%D0%B5%D0%BD%D0%B8%D0%B8-%D0%B2-%D0%BF%D0%BE%D1%81%D1%82%D0%B0%D0%BD%D0%BE%D0%B2%D0%BB%D0%B5%D0%BD%D0%B8%D0%B5-%D0%B3%D0%BB%D0%B0%D0%B2%D0%BD%D0%BE%D0%B3%D0%BE-%D0%B3%D0%BE%D1%81%D1%83%D0%B4%D0%B0%D1%80%D1%81%D1%82%D0%B2%D0%B5%D0%BD%D0%BD%D0%BE%D0%B3%D0%BE-%D1%81%D0%B0%D0%BD%D0%B8%D1%82%D0%B0%D1%80%D0%BD%D0%BE%D0%B3%D0%BE-%D0%B2%D1%80%D0%B0%D1%87%D0%B0-%D0%BF%D0%BE-%D0%B3%D0%BE%D1%80%D0%BE%D0%B4%D1%83-%D1%81%D0%B0%D0%BD%D0%BA%D1%82-%D0%BF%D0%B5%D1%82%D0%B5%D1%80%D0%B1%D1%83%D1%80%D0%B3%D1%83-%D0%BE%D1%82-12-10-2021-%E2%84%96-3-%C2%BB;jsessionid=FB3309CE788EBDCCB588450F5B1BE92F?redirect=http%3A%2F%2Frevistaomf.ro
http://ashspublications.org/__media__/js/netsoltrademark.php?d=revistaomf.ro
http://cse.google.com.ly/url?sa=t&url=http%3A%2F%2Frevistaomf.ro%2F
http://cse.google.com.bh/url?sa=t&url=http%3A%2F%2Frevistaomf.ro%2F
https://pt.tapatalk.com/redirect.php?app_id=4&fid=8678&url=http://revistaomf.ro
http://cse.google.co.tz/url?sa=t&url=http%3A%2F%2Frevistaomf.ro%2F
http://www.bing.com/news/apiclick.aspx?ref=FexRss&aid=&tid=9BB77FDA801248A5AD23FDBDD5922800&url=https%3A%2F%2Frevistaomf.ro
http://advisor.wmtransfer.com/SiteDetails.aspx?url=revistaomf.ro
http://blogs.rtve.es/libs/getfirma_footer_prod.php?blogurl=https%3A%2F%2Frevistaomf.ro
http://images.google.com.br/url?sa=t&url=http%3A%2F%2Frevistaomf.ro
http://images.google.be/url?sa=t&url=http%3A%2F%2Frevistaomf.ro%2F
http://aboutus.com/Special:SiteAnalysis?q=revistaomf.ro&action=webPresence
https://brettterpstra.com/share/fymdproxy.php?url=http://revistaomf.ro
http://images.google.com.eg/url?sa=t&url=http%3A%2F%2Frevistaomf.ro
http://my.myob.com/community/login.aspx?ReturnUrl=https%3A%2F%2Frevistaomf.ro%2F
http://traceroute.physics.carleton.ca/cgi-bin/traceroute.pl?function=ping&target=revistaomf.ro
http://cse.google.as/url?sa=t&url=http%3A%2F%2Frevistaomf.ro%2F
http://d-click.fiemg.com.br/u/18081/131/75411/137_0/82cb7/?url=https://revistaomf.ro/
https://cse.google.ws/url?sa=t&url=http://revistaomf.ro/
http://anonim.co.ro/?revistaomf.ro/
http://id.telstra.com.au/register/crowdsupport?gotoURL=https%3A%2F%2Frevistaomf.ro%2F
http://ads.businessnews.com.tn/dmcads2017/www/delivery/ck.php?ct=1&oaparams=2__bannerid=1839__zoneid=117__cb=df4f4d726f__oadest=https://revistaomf.ro/
http://aichi-fishing.boy.jp/?wptouch_switch=desktop&redirect=http%3a%2f%2frevistaomf.ro
http://cse.google.co.th/url?sa=t&url=http%3A%2F%2Frevistaomf.ro%2F
http://alt1.toolbarqueries.google.ch/url?q=https://revistaomf.ro/
http://images.google.cl/url?sa=t&url=http%3A%2F%2Frevistaomf.ro
http://clients1.google.com.kh/url?q=https://revistaomf.ro/
http://client.paltalk.com/client/webapp/client/External.wmt?url=http%3A%2F%2Frevistaomf.ro%2F
http://clients1.google.com.lb/url?q=https%3A%2F%2Frevistaomf.ro/
http://cam4com.go2cloud.org/aff_c?offer_id=268&aff_id=2014&url=https%3A%2F%2Frevistaomf.ro
http://creativecommons.org/choose/results-one?q_1=2&q_1=1&field_commercial=n&field_derivatives=sa&field_jurisdiction=&field_format=Text&field_worktitle=Blog&field_attribute_to_name=Lam%20HUA&field_attribute_to_url=https%3A%2F%2Frevistaomf.ro%2F
http://images.google.cz/url?sa=t&url=http%3A%2F%2Frevistaomf.ro
http://cse.google.co.bw/url?sa=t&url=http%3A%2F%2Frevistaomf.ro%2F
http://r.turn.com/r/click?id=07SbPf7hZSNdJAgAAAYBAA&url=https://revistaomf.ro/
http://images.google.co.uk/url?sa=t&url=http%3A%2F%2Frevistaomf.ro%2F
http://images.google.com.bd/url?sa=t&url=http%3A%2F%2Frevistaomf.ro
http://clients1.google.ge/url?q=https%3A%2F%2Frevistaomf.ro/
http://2chmatome.jpn.org/akb/c_c.php?c_id=267977&url=https://revistaomf.ro/
http://affiliate.suruga-ya.jp/modules/af/af_jump.php?user_id=755&goods_url=https://revistaomf.ro/
http://archive.feedblitz.com/f/f.fbz?goto=https://revistaomf.ro/
http://clients1.google.com.pr/url?sa=i&url=https%3A%2F%2Frevistaomf.ro
http://cse.google.com.gt/url?sa=t&url=http%3A%2F%2Frevistaomf.ro%2F
http://abcclub.cside.com/nagata/link4/link4.cgi?mode=cnt&hp=http%3a%2f%2frevistaomf.ro&no=1027
http://clients1.google.com.fj/url?q=https%3A%2F%2Frevistaomf.ro
http://www.justjared.com/flagcomment.php?el=https%3A%2F%2Frevistaomf.ro
http://clients1.google.com.gi/url?q=https%3A%2F%2Frevistaomf.ro/
http://biz.timesfreepress.com/__media__/js/netsoltrademark.php?d=revistaomf.ro
http://search.babylon.com/imageres.php?iu=https%3A%2F%2Frevistaomf.ro%2F
http://clicktrack.pubmatic.com/AdServer/AdDisplayTrackerServlet?clickData=JnB1YklkPTE1NjMxMyZzaXRlSWQ9MTk5MDE3JmFkSWQ9MTA5NjQ2NyZrYWRzaXplaWQ9OSZ0bGRJZD00OTc2OTA4OCZjYW1wYWlnbklkPTEyNjcxJmNyZWF0aXZlSWQ9MCZ1Y3JpZD0xOTAzODY0ODc3ODU2NDc1OTgwJmFkU2VydmVySWQ9MjQzJmltcGlkPTU0MjgyODhFLTYwRjktNDhDMC1BRDZELTJFRjM0M0E0RjI3NCZtb2JmbGFnPTImbW9kZWxpZD0yODY2Jm9zaWQ9MTIyJmNhcnJpZXJpZD0xMDQmcGFzc2JhY2s9MA==_url=https://revistaomf.ro/
http://alt1.toolbarqueries.google.bg/url?q=https://revistaomf.ro/
http://211-75-39-211.hinet-ip.hinet.net/Adredir.asp?url=https://revistaomf.ro/
http://clients1.google.bg/url?q=https://revistaomf.ro/
http://ads2.figures.com/Ads3/www/delivery/ck.php?ct=1&oaparams=2__bannerid=282__zoneid=248__cb=da025c17ff__oadest=https%3a%2f%2frevistaomf.ro
http://clients1.google.gy/url?q=http%3A%2F%2Frevistaomf.ro
http://clients1.google.com.ar/url?q=https%3A%2F%2Frevistaomf.ro
http://com.co.de/__media__/js/netsoltrademark.php?d=revistaomf.ro
http://clients1.google.com.jm/url?q=https://revistaomf.ro/
http://home.speedbit.com/r.aspx?u=https://revistaomf.ro/
http://cse.google.com.lb/url?sa=t&url=http%3A%2F%2Frevistaomf.ro%2F
http://blog.bg/results.php?q=%22%2f%3e%3ca+href%3d%22http%3a%2f%2frevistaomf.ro&
http://images.google.com.co/url?sa=t&url=http%3A%2F%2Frevistaomf.ro%2F
http://clicrbs.com.br/paidcontent/jsp/login.jspx?site=545&url=goo.gl%2Fmaps%2FoQqZFfefPedXSkNc6&previousurl=http%3a%2f%2frevistaomf.ro
http://clients1.google.kg/url?q=https://revistaomf.ro/
http://staging.talentegg.ca/redirect/company/224?destination=https://revistaomf.ro/
http://images.google.co.za/url?sa=t&url=http%3A%2F%2Frevistaomf.ro
http://clients1.google.com.co/url?q=https%3A%2F%2Frevistaomf.ro
http://cse.google.bf/url?sa=t&url=http%3A%2F%2Frevistaomf.ro%2F
http://cse.google.com.bz/url?sa=t&url=http%3A%2F%2Frevistaomf.ro%2F
http://cse.google.com.cu/url?sa=t&url=http%3A%2F%2Frevistaomf.ro%2F
http://www.talgov.com/Main/exit.aspx?url=https%3A%2F%2Frevistaomf.ro
http://cse.google.ci/url?sa=t&url=http%3A%2F%2Frevistaomf.ro%2F
http://blog.ss-blog.jp/_pages/mobile/step/index?u=http%3A%2F%2Frevistaomf.ro
https://cse.google.tk/url?q=http://revistaomf.ro/
http://www.siteprice.org/similar-websites/eden-project.org
http://clients1.google.ca/url?q=https://revistaomf.ro/
http://cse.google.cm/url?sa=t&url=http%3A%2F%2Frevistaomf.ro%2F
http://cse.google.ae/url?sa=t&url=http%3A%2F%2Frevistaomf.ro%2F
http://clients1.google.nr/url?q=http%3A%2F%2Frevistaomf.ro
http://imaginingourselves.globalfundforwomen.org/pb/External.aspx?url=https://revistaomf.ro/
http://clients1.google.tk/url?q=http%3A%2F%2Frevistaomf.ro/
http://alt1.toolbarqueries.google.co.il/url?q=https://revistaomf.ro/
http://theamericanmuslim.org/tam.php?URL=revistaomf.ro
http://images.google.com.tr/url?sa=t&url=http%3A%2F%2Frevistaomf.ro%2F
http://thaiwebsearch.hypermart.net/cgi/clicko.pl?75&revistaomf.ro
http://colil.dbcls.jp/fct/rdfdesc/usage.vsp?g=https://revistaomf.ro/
https://content.sixflags.com/news/director.aspx?gid=0&iid=72&cid=3714&link=http://revistaomf.ro/2021/05/29/rwfeds/
http://adr.tpprf.ru/bitrix/redirect.php?goto=https://revistaomf.ro/
http://jump.2ch.net/?revistaomf.ro
http://clients1.google.com.do/url?q=https%3A%2F%2Frevistaomf.ro
http://c.yam.com/msnews/IRT/r.c?https://revistaomf.ro/
http://clients1.google.com.sa/url?sa=t&url=https%3A%2F%2Frevistaomf.ro
https://images.google.tk/url?q=http://revistaomf.ro/
http://cse.google.com.gi/url?sa=t&url=http%3A%2F%2Frevistaomf.ro%2F
http://ad.sxp.smartclip.net/optout?url=https://revistaomf.ro/&ang_testid=1
http://guru.sanook.com/?URL=https%3A%2F%2Frevistaomf.ro%2F
http://clients1.google.com.my/url?sa=i&url=https%3A%2F%2Frevistaomf.ro
http://53938.measurementapi.com/serve?action=click&publisher_id=53938&site_id=69748&sub_campaign=g5e_com&url=https://revistaomf.ro/
http://t.me/iv?url=https%3A%2F%2Frevistaomf.ro
http://clients1.google.co.ve/url?q=https://revistaomf.ro/
http://ayads.co/click.php?c=735-844&url=https://revistaomf.ro/
http://campaigns.williamhill.com/C.ashx?btag=a_181578b_893c_&affid=1688431&siteid=181578&adid=893&c=&asclurl=https://revistaomf.ro/&AutoR=1
http://www.aomeitech.com/forum/home/leaving?Target=https%3A//revistaomf.ro
http://brandcycle.go2cloud.org/aff_c?offer_id=261&aff_id=1371&url=http%3A%2F%2Frevistaomf.ro
http://maps.google.de/url?sa=t&url=https%3A%2F%2Frevistaomf.ro
http://webfeeds.brookings.edu/~/t/0/0/~revistaomf.ro
http://images.google.co.za/url?sa=t&url=http%3A%2F%2Frevistaomf.ro%2F
http://clients1.google.com.ly/url?q=https://revistaomf.ro/
http://www.biblio.com.br/conteudo/Moldura11.asp?link=//revistaomf.ro/2021/05/29/rwfeds/
http://store.veganessentials.com/affiliates/default.aspx?Affiliate=40&Target=https://revistaomf.ro
http://images.google.be/url?sa=t&url=http%3A%2F%2Frevistaomf.ro
https://cse.google.nu/url?q=http://revistaomf.ro/
http://images.google.com.sa/url?sa=t&url=http%3A%2F%2Frevistaomf.ro%2F
http://cse.google.co.uz/url?sa=t&url=http%3A%2F%2Frevistaomf.ro%2F
https://www.trainorders.com/discussion/warning.php?forum_id=1&url=http://revistaomf.ro/34zxVq8
http://audio.home.pl/redirect.php?action=url&goto=revistaomf.ro&osCsid=iehkyctnmm
http://images.google.co.uk/url?sa=t&url=http%3A%2F%2Frevistaomf.ro
http://ac8.i2i.jp/bin/getslink.php?00713417&&&https://revistaomf.ro/
http://analytics.supplyframe.com/trackingservlet/track/?action=name&value3=1561&zone=FCfull_SRP_na_us&url=https://revistaomf.ro/
http://adserver.gadu-gadu.pl/click.asp?adid=2236;url=https://revistaomf.ro/
http://www.responsinator.com/?url=revistaomf.ro
http://cse.google.cf/url?sa=t&url=http%3A%2F%2Frevistaomf.ro%2F
http://clients1.google.ga/url?q=https%3A%2F%2Frevistaomf.ro/
http://m.ok.ru/dk?st.cmd=outLinkWarning&st.rfn=https%3A%2F%2Frevistaomf.ro
http://cse.google.co.ck/url?sa=t&url=http%3A%2F%2Frevistaomf.ro%2F
https://www.wilsonlearning.com/?URL=revistaomf.ro/
http://www.etis.ford.com/externalURL.do?url=https%3A%2F%2Frevistaomf.ro%2F
https://board-en.drakensang.com/proxy.php?link=http://revistaomf.ro/
http://builder.hufs.ac.kr/goLink.jsp?url=revistaomf.ro/
http://ahlacarte.vraiforum.com/redirect1/https://revistaomf.ro/
https://images.google.cv/url?q=http://revistaomf.ro/
http://clicktrack.pubmatic.com/AdServer/AdDisplayTrackerServlet?clickData=JnB1YklkPTE1NjMxMyZzaXRlSWQ9MTk5MDE3JmFkSWQ9MTA5NjQ2NyZrYWRzaXplaWQ9OSZ0bGRJZD00OTc2OTA4OCZjYW1wYWlnbklkPTEyNjcxJmNyZWF0aXZlSWQ9MCZ1Y3JpZD0xOTAzODY0ODc3ODU2NDc1OTgwJmFkU2VydmVySWQ9MjQzJmltcGlkPTU0MjgyODhFLTYwRjktNDhDMC1BRDZELTJFRjM0M0E0RjI3NCZtb2JmbGFnPTImbW9kZWxpZD0yODY2Jm9zaWQ9MTIyJmNhcnJpZXJpZD0xMDQmcGFzc2JhY2s9MA==_url=https://revistaomf.ro/2021/05/29/rwfeds/
http://clients1.google.de/url?sa=t&url=https%3A%2F%2Frevistaomf.ro
https://cse.google.cv/url?q=http://revistaomf.ro/
http://cse.google.bi/url?sa=t&url=http%3A%2F%2Frevistaomf.ro%2F
http://app.guanajuato.gob.mx/revive/www/delivery/ck.php?oaparams=2__bannerid=2447__zoneid=88__cb=cb2b9a1cb1__oadest=http%3a%2f%2frevistaomf.ro
http://subscriber.zdnet.de/profile/login.php?continue=https%3A%2F%2Frevistaomf.ro%2F&continue_label=ZDNet.de
http://aacollabarchive.humin.lsa.umich.edu/omeka/setlocale?locale=es&redirect=http%3a%2f%2frevistaomf.ro
http://apptube.podnova.com/go/?go=https://revistaomf.ro/
http://images.google.com.ua/url?sa=t&url=http%3A%2F%2Frevistaomf.ro
http://www.kaskus.co.id/redirect?url=https%3A%2F%2Frevistaomf.ro
http://community.cypress.com/external-link.jspa?url=https%3A%2F%2Frevistaomf.ro
https://images.google.bs/url?q=http://revistaomf.ro/
http://community.acer.com/en/home/leaving/revistaomf.ro
http://daemon.indapass.hu/http/session_request?redirect_to=https%3A%2F%2Frevistaomf.ro%2F&partner_id=bloghu
http://images.google.com.hk/url?sa=t&url=http%3A%2F%2Frevistaomf.ro
http://clients1.google.je/url?q=https%3A%2F%2Frevistaomf.ro/
http://www.novalogic.com/remote.asp?NLink=https://revistaomf.ro/2021/05/29/rwfeds/
http://cm-sg.wargaming.net/frame/?service=frm&project=wot&realm=sg&language=en&login_url=http%3A%2F%2Frevistaomf.ro&logout_url=http%3A%2F%2Fforum.worldoftanks.asia%2Findex.php%3Fapp%3Dcore%26module%3Dglobal%26section%3Dlogin%26do%3Dlogoutoid&incomplete_profile_url=http%3A%2F%2Fforum.worldoftanks.asia%2Findex.php%3Fapp%3Dmembers%26module%3Dprofile%26do%3Ddocompleteaccount&token_url=http%3A%2F%2Fforum.worldoftanks.asia%2Fmenutoken&frontend_url=http%3A%2F%2Fcdn-cm.gcdn.co&backend_url=http%3A%2F%2Fcm-sg.wargaming.net&open_links_in_new_tab=¬ifications_enabled=1&chat_enabled=&incomplete_profile_notification_enabled=&intro_tooltips_enabled=1®istration_url=http%3A%2F%2Fforum.worldoftanks.asia%2Findex.php%3Fapp%3Dcore%26module%3Dglobal%26section%3Dregister
http://images.google.cz/url?sa=t&url=http%3A%2F%2Frevistaomf.ro%2F
http://cse.google.co.ug/url?sa=t&url=http%3A%2F%2Frevistaomf.ro%2F
http://sys.labaq.com/cli/go.php?s=lbac&p=1410jt&t=02&url=https://revistaomf.ro/
http://clients1.google.cg/url?q=https://revistaomf.ro/
http://legacy.aom.org/verifymember.asp?nextpage=https%3A%2F%2Frevistaomf.ro
http://clients1.google.iq/url?q=https%3A%2F%2Frevistaomf.ro/
http://clients1.google.cv/url?q=http%3A%2F%2Frevistaomf.ro
http://cm-ru.wargaming.net/frame/?service=frm&project=wot&realm=ru&language=ru&login_url=http%3A%2F%2Frevistaomf.ro&logout_url=http%3A%2F%2Ffor
http://cse.google.co.uk/url?sa=t&url=http%3A%2F%2Frevistaomf.ro%2F
https://www.mydoterra.com/Application/index.cfm?EnrollerID=458046&Theme=DefaultTheme&Returnurl=revistaomf.ro/&LNG=en_dot&iact=1
https://redirect.vebeet.com/index.php?url=//revistaomf.ro/cities/tampa-fl/
http://cse.google.co.zw/url?sa=t&url=http%3A%2F%2Frevistaomf.ro%2F
http://alt1.toolbarqueries.google.at/url?q=https://revistaomf.ro/
http://www.adminer.org/redirect/?url=https%3A%2F%2Frevistaomf.ro&lang=en
https://webneel.com/i/3d-printer/5-free-3d-printer-model-website-yeggi/ei/12259?s=revistaomf.ro/2021/05/29/rwfeds/
http://apf.francophonie.org/doc.html?url=https://revistaomf.ro/
http://cse.google.by/url?sa=t&url=http%3A%2F%2Frevistaomf.ro%2F
http://www.jarrow.com/jump/http:_@__@_revistaomf.ro
http://yahoo-mbga.jp/r?url=//revistaomf.ro
http://www.pcpitstop.com/offsite.asp?https://revistaomf.ro/
http://getpocket.com/redirect?url=https%3A%2F%2Frevistaomf.ro%2F
http://cse.google.com.jm/url?sa=t&url=http%3A%2F%2Frevistaomf.ro%2F
http://cse.google.com.ec/url?sa=t&url=http%3A%2F%2Frevistaomf.ro%2F
http://www.drinksmixer.com/redirect.php?url=https%3A%2F%2Frevistaomf.ro%2F
http://5cfxm.hxrs6.servertrust.com/v/affiliate/setCookie.asp?catId=1180&return=https://revistaomf.ro
https://ditu.google.com/url?q=http://revistaomf.ro/management.html
http://cse.google.co.ao/url?sa=t&url=http%3A%2F%2Frevistaomf.ro%2F
http://businesseast.ucoz.com/go?https://revistaomf.ro/
https://www.streetwisereports.com/cs/blank/main?x-p=click/fwd&rec=ads/443&url=http://revistaomf.ro/2021/05/29/rwfeds/
http://images.google.com.ec/url?sa=t&url=http%3A%2F%2Frevistaomf.ro%2F
http://www.sponsorship.com/Marketplace/redir.axd?ciid=514&cachename=advertising&PageGroupId=14&url=https://revistaomf.ro
http://clients1.google.com.eg/url?q=https://revistaomf.ro/
http://cat.sls.cuhk.edu.hk/CRF/visualization?Species=https://revistaomf.ro/
https://clients1.google.com/url?q=http://revistaomf.ro/management.html
http://creativecommons.org/choose/results-one?q_1=2&q_1=1&field_commercial=n&field_derivatives=sa&field_jurisdiction=&field_format=Text&field_worktitle=Blog&field_attribute_to_name=Lam%20HUA&field_attribute_to_url=http%3A%2F%2Frevistaomf.ro%2F
http://tools.folha.com.br/print?url=https%3A%2F%2Frevistaomf.ro%2F&site=blogfolha
http://clients1.google.co.kr/url?q=https://revistaomf.ro/
http://apiprop.sulekha.com/common/apploginredirect.aspx?enclgn=ilsxyvoDCT5XZjQCeHI5qlKoZ3Ljv/1wHK3AR7dYYz8%3D&nexturl=https://revistaomf.ro/
http://cse.google.de/url?sa=t&url=https%3A%2F%2Frevistaomf.ro
http://images.google.dk/url?sa=t&url=http%3A%2F%2Frevistaomf.ro%2F
http://avp.innity.com/click/?campaignid=10933&adid=115198&zoneid=39296&pubid=3194&ex=1412139790&pcu=&auth=3tx88b-1412053876272&url=http%3A%2F%2Frevistaomf.ro
http://ads.haberler.com/redir.asp?tur=habericilink&url=https://revistaomf.ro/
http://ip.tool.chinaz.com/?ip=revistaomf.ro
http://ax.bk55.ru/cur/www/delivery/ck.php?ct=1&oaparams=2__bannerid=4248__zoneid=141__OXLCA=1__cb=1be00d870a__oadest=https://revistaomf.ro/
http://support.dalton.missouri.edu/?URL=revistaomf.ro
http://banri.moo.jp/-18/?wptouch_switch=desktop&redirect=https%3a%2f%2frevistaomf.ro
http://avatar-cat-ru.1gb.ru/index.php?name=plugins&p=out&url=revistaomf.ro
http://sogo.i2i.jp/link_go.php?url=https://revistaomf.ro/
http://clients1.google.co.ug/url?q=https://revistaomf.ro/
http://cse.google.cd/url?sa=t&url=http%3A%2F%2Frevistaomf.ro%2F
http://www.t.me/iv?url=http%3A%2F%2Frevistaomf.ro
http://www.ibm.com/links/?cc=us&lc=en&prompt=1&url=//revistaomf.ro
http://alt1.toolbarqueries.google.co.ao/url?q=https://revistaomf.ro/
http://clients1.google.co.ke/url?sa=t&url=https://revistaomf.ro/
http://cse.google.al/url?sa=t&url=http%3A%2F%2Frevistaomf.ro%2F
http://dotekomanie.cz/heureka/?url=https%3a%2f%2frevistaomf.ro%2F
http://images.google.co.id/url?sa=t&url=http%3A%2F%2Frevistaomf.ro%2F
http://images.google.de/url?sa=t&url=https%3A%2F%2Frevistaomf.ro
https://maps.google.tk/url?q=http://revistaomf.ro/
http://www.astro.wisc.edu/?URL=https%3A%2F%2Frevistaomf.ro
http://images.google.com.br/url?sa=t&url=http%3A%2F%2Frevistaomf.ro%2F
http://cse.google.co.ke/url?sa=t&url=http%3A%2F%2Frevistaomf.ro%2F
http://cse.google.co.il/url?sa=t&url=http%3A%2F%2Frevistaomf.ro%2F
http://api.fooducate.com/fdct/message/t/?t=592390BA-2F20-0472-4BA5-A59870BBA6A2:61213861:5AFC37A3-CAD4-CC42-4921-9BE2094B0A14&a=c&d=https://revistaomf.ro/
http://armenaikkandomainrating5.blogspot.com0.vze.com/frame-forward.cgi?https://revistaomf.ro/
http://cse.google.co.in/url?sa=t&url=http%3A%2F%2Frevistaomf.ro%2F
http://subscriber.silicon.co.uk/profile/login.php?continue=https%3A%2F%2Frevistaomf.ro%2F&continue_label=TechWeekEurope+UK
http://cse.google.com.bn/url?sa=t&url=http%3A%2F%2Frevistaomf.ro%2F
http://images.google.com.do/url?sa=t&url=http%3A%2F%2Frevistaomf.ro
http://alt1.toolbarqueries.google.com.lb/url?q=https://revistaomf.ro/
http://cr.naver.com/redirect-notification?u=https%3A%2F%2Frevistaomf.ro
http://images.google.com.au/url?sa=t&url=http%3A%2F%2Frevistaomf.ro
http://brangista.j-server.com/BRASADAIJ/ns/tl_ex.cgi?Surl=https://revistaomf.ro/
http://beskuda.ucoz.ru/go?https://revistaomf.ro/
http://uriu-ss.jpn.org/xoops/modules/wordpress/wp-ktai.php?view=redir&url=http%3a%2f%2frevistaomf.ro
http://cse.google.com.ai/url?sa=t&url=http%3A%2F%2Frevistaomf.ro%2F
http://cse.google.cat/url?sa=t&url=http%3A%2F%2Frevistaomf.ro%2F
http://www.luminous-lint.com/app/iframe/photographer/Frantisek__Drtikol/revistaomf.ro
http://onlinemanuals.txdot.gov/help/urlstatusgo.html?url=https%3A%2F%2Frevistaomf.ro
http://click.karenmillen.com/knmn40/c2.php?KNMN/94073/5285/H/N/V/https://revistaomf.ro/
http://images.google.com.pe/url?sa=t&url=http%3A%2F%2Frevistaomf.ro
http://images.google.ee/url?sa=t&url=http%3A%2F%2Frevistaomf.ro
http://ar.thefreedictionary.com/_/cite.aspx?url=http%3a%2f%2frevistaomf.ro&word=%D8%AD%D9%8E%D9%84%D9%90%D9%85%D9%8E&sources=kdict
http://bigtakeover.com/revive/www/delivery/ck.php?ct=1&oaparams=2__bannerid=68__zoneid=4__cb=c0575383b9__oadest=https://revistaomf.ro/
http://circuitomt.com.br/publicidade/www/delivery/ck.php?ct=1&oaparams=2__bannerid=34__zoneid=2__cb=6cc35441a4__oadest=http%3a%2f%2frevistaomf.ro
http://akid.s17.xrea.com/p2ime.php?url=https://revistaomf.ro/
http://clients1.google.com.tr/url?sa=t&url=https%3A%2F%2Frevistaomf.ro
http://links.giveawayoftheday.com/revistaomf.ro
http://www2.ogs.state.ny.us/help/urlstatusgo.html?url=https%3A%2F%2Frevistaomf.ro
http://images.google.co.il/url?sa=t&url=http%3A%2F%2Frevistaomf.ro
http://bompasandparr.com/?URL=https://revistaomf.ro/
http://cse.google.com.ag/url?sa=t&url=http%3A%2F%2Frevistaomf.ro%2F
http://new.creativecommons.org/choose/results-one?q_1=2&q_1=1&field_commercial=n&field_derivatives=sa&field_jurisdiction=&field_format=Text&field_worktitle=Blog&field_attribute_to_name=Lam%20HUA&field_attribute_to_url=https%3A%2F%2Frevistaomf.ro%2F
http://optimize.viglink.com/page/pmv?url=https%3A%2F%2Frevistaomf.ro
http://cse.google.com.co/url?sa=t&url=http%3A%2F%2Frevistaomf.ro%2F
http://blackfive.net/__media__/js/netsoltrademark.php?d=revistaomf.ro
http://api.mixpanel.com/track/?data=eyJldmVudCI6ICJmdWxsdGV4dGNsaWNrIiwgInByb3BlcnRpZXMiOiB7InRva2VuIjogImE0YTQ2MGEzOTA0ZWVlOGZmNWUwMjRlYTRiZGU3YWMyIn19&ip=1&redirect=https://revistaomf.ro/
http://alt1.toolbarqueries.google.bs/url?q=https://revistaomf.ro/
http://video.fc2.com/exlink.php?uri=https%3A%2F%2Frevistaomf.ro%2F
http://cse.google.co.jp/url?sa=t&url=http%3A%2F%2Frevistaomf.ro%2F
http://images.google.es/url?sa=t&url=http%3A%2F%2Frevistaomf.ro
http://alt1.toolbarqueries.google.co.za/url?q=https://revistaomf.ro/
http://ads.bhol.co.il/clicks_counter.asp?macrocid=5635&campid=177546&DB_link=0&userid=0&ISEXT=0&url=https://revistaomf.ro/
http://cse.google.be/url?sa=t&url=http%3A%2F%2Frevistaomf.ro%2F
http://at070582.xsrv.jp/?wptouch_switch=desktop&redirect=http%3a%2f%2frevistaomf.ro
http://u.to/?url=https%3A%2F%2Frevistaomf.ro%2F&a=add
http://ipv4.google.com/url?q=https%3A%2F%2Frevistaomf.ro%2F
http://cse.google.co.ve/url?sa=t&url=http%3A%2F%2Frevistaomf.ro%2F
http://catzlyst.phrma.org/__media__/js/netsoltrademark.php?d=revistaomf.ro
http://clients1.google.co.jp/url?q=https://revistaomf.ro/
http://clients1.google.com.hk/url?sa=t&url=http%3A%2F%2Frevistaomf.ro
http://clients1.google.cd/url?sa=t&url=https://revistaomf.ro/
http://bares.blog.idnes.cz/redir.aspx?url=https%3A%2F%2Frevistaomf.ro
http://www.ip-adress.com/website/revistaomf.ro
http://clients1.google.st/url?q=https://revistaomf.ro/
http://cse.google.co.vi/url?sa=t&url=http%3A%2F%2Frevistaomf.ro%2F
http://cse.google.com.br/url?sa=t&url=http%3A%2F%2Frevistaomf.ro%2F
http://parkcities.bubblelife.com/click/c3592/?url=https://revistaomf.ro/
http://clients1.google.by/url?sa=t&url=https%3A%2F%2Frevistaomf.ro
http://antigo.anvisa.gov.br/listagem-de-alertas/-/asset_publisher/R6VaZWsQDDzS/content/alerta-3191-tecnovigilancia-boston-scientific-do-brasil-ltda-fibra-optica-greenlight-possibilidade-de-queda-de-temperatura-da-tampa-de-metal-e-da-pont/33868?inheritRedirect=false&redirect=http%3A%2F%2Frevistaomf.ro
http://cse.google.ca/url?sa=t&url=http%3A%2F%2Frevistaomf.ro%2F
http://cse.google.com.au/url?sa=t&url=http%3A%2F%2Frevistaomf.ro%2F
http://ads.hitparade.ch/link.php?ad_id=28&url=https://revistaomf.ro/
http://clients1.google.tm/url?q=https%3A%2F%2Frevistaomf.ro/
http://images.google.com.pk/url?sa=t&url=http%3A%2F%2Frevistaomf.ro
http://cc.cgps.tn.edu.tw/dyna/netlink/hits.php?id=46&url=https://revistaomf.ro/
http://cse.google.co.ma/url?sa=t&url=http%3A%2F%2Frevistaomf.ro%2F
http://clients1.google.ne/url?q=https://revistaomf.ro/
http://cse.google.com.et/url?sa=t&url=http%3A%2F%2Frevistaomf.ro%2F
http://nou-rau.uem.br/nou-rau/zeus/auth.php?back=https%3A%2F%2Frevistaomf.ro%2F&go=x&code=x&unit=x
http://cc.naver.jp/cc?a=dtl.topic&r=&i=&bw=1024&px=0&py=0&sx=-1&sy=-1&m=1&nsc=knews.viewpage&u=https%3A%2F%2Frevistaomf.ro
http://images.google.com.mx/url?sa=t&url=http%3A%2F%2Frevistaomf.ro
http://cse.google.com.fj/url?sa=t&url=http%3A%2F%2Frevistaomf.ro%2F
http://a1.adform.net/C/?CC=1&bn=1015999%3Bc=1%3Bkw=Forex%20Trading%3Bcpdir=https://revistaomf.ro/
http://alt1.toolbarqueries.google.com.br/url?q=https://revistaomf.ro/
http://cse.google.com.hk/url?sa=t&url=http%3A%2F%2Frevistaomf.ro%2F
http://catalog.dir.bg/url.php?URL=https://revistaomf.ro/
http://clients1.google.it/url?q=http%3A%2F%2Frevistaomf.ro/
http://counter.iflyer.tv/?trackid=gjt:1:&link=https://revistaomf.ro/
http://alt1.toolbarqueries.google.co.vi/url?q=https://revistaomf.ro/
http://admin.billoreilly.com/site/rd?satype=13&said=12&url=https://revistaomf.ro/
http://clients1.google.mn/url?q=https%3A%2F%2Frevistaomf.ro
http://backlink.scandwap.xtgem.com/?id=IRENON&url=revistaomf.ro
https://www.videoder.com/af/media?mode=2&url=http://revistaomf.ro
http://ad.gunosy.com/pages/redirect?location=https://revistaomf.ro/
http://pw.mail.ru/forums/fredirect.php?url=revistaomf.ro
http://armoryonpark.org/?URL=https://revistaomf.ro/
http://app.hamariweb.com/iphoneimg/large.php?s=https://revistaomf.ro/
http://enseignants.flammarion.com/Banners_Click.cfm?ID=86&URL=revistaomf.ro
http://decisoes.fazenda.gov.br/netacgi/nph-brs?d=DECW&f=S&l=20&n=-DTPE&p=10&r=3&s1=COANA&u=http%3A%2F%2Frevistaomf.ro
http://clients1.google.am/url?q=https://revistaomf.ro/
http://www.transtats.bts.gov/exit.asp?url=https%3A%2F%2Frevistaomf.ro%2F
http://archive.aidsmap.com/Aggregator.ashx?url=https://revistaomf.ro/
http://countrysideveterinaryhospital.vetstreet.com/https://revistaomf.ro/
http://images.google.bg/url?sa=t&url=http%3A%2F%2Frevistaomf.ro
http://pl.grepolis.com/start/redirect?url=https%3A%2F%2Frevistaomf.ro%2F
https://www.google.ws/url?q=http://revistaomf.ro/
http://banners.molbiol.ru/openx/www/delivery/ck.php?ct=1&oaparams=2__bannerid=552__zoneid=16__cb=70ec3bb20d__oadest=http%3a%2f%2frevistaomf.ro
http://archive.is/revistaomf.ro
http://blogs.rtve.es/libs/getfirma_footer_prod.php?blogurl=http%3A%2F%2Frevistaomf.ro
http://asoechat.wap.sh/redirect?url=revistaomf.ro
http://images.google.com.co/url?sa=t&url=http%3A%2F%2Frevistaomf.ro
http://cse.google.ch/url?sa=t&url=http%3A%2F%2Frevistaomf.ro%2F
http://classweb.fges.tyc.edu.tw:8080/dyna/webs/gotourl.php?url=https://revistaomf.ro/
http://adms3.hket.com/openxprod2/www/delivery/ck.php?ct=1&oaparams=2__bannerid=527__zoneid=667__cb=72cbf61f88__oadest=https://revistaomf.ro/
http://alt1.toolbarqueries.google.co.ls/url?q=https://revistaomf.ro/
http://cse.google.bg/url?sa=t&url=http%3A%2F%2Frevistaomf.ro%2F
http://ijbssnet.com/view.php?u=https://revistaomf.ro/2021/05/29/rwfeds/
http://affiliates.thelotter.com/aw.aspx?A=1&Task=Click&ml=31526&TargetURL=https://revistaomf.ro/
http://777masa777.lolipop.jp/search/rank.cgi?mode=link&id=83&url=http%3a%2f%2frevistaomf.ro
http://images.google.com.my/url?sa=t&url=http%3A%2F%2Frevistaomf.ro
http://b.gnavi.co.jp/ad/no_cookie/b_link?loc=1002067&bid=100004228&link_url=http%3A%2F%2Frevistaomf.ro
http://www.drugoffice.gov.hk/gb/unigb/revistaomf.ro
http://clients1.google.bj/url?sa=t&url=http%3A%2F%2Frevistaomf.ro
http://bizsearch.jhnewsandguide.com/__media__/js/netsoltrademark.php?d=revistaomf.ro
http://adms.hket.com/openxprod2/www/delivery/ck.php?ct=1&oaparams=2__bannerid=6685__zoneid=2040__cb=dfaf38fc52__oadest=http%3a%2f%2frevistaomf.ro
http://es.chaturbate.com/external_link/?url=https%3A%2F%2Frevistaomf.ro
http://images.google.com.uy/url?sa=t&url=http%3A%2F%2Frevistaomf.ro%2F
https://cse.google.com/url?q=http://revistaomf.ro/management.html
http://12.rospotrebnadzor.ru/action_plans/inspection/-/asset_publisher/iqO1/document/id/460270?_101_INSTANCE_iqO1_redirect=https://revistaomf.ro/
http://bigoo.ws/__media__/js/netsoltrademark.php?d=revistaomf.ro
https://www.raincoast.com/?URL=revistaomf.ro
http://clients1.google.ci/url?q=https://revistaomf.ro/
http://ref.webhostinghub.com/scripts/click.php?ref_id=nichol54&desturl=https://revistaomf.ro/
http://web.stanford.edu/cgi-bin/redirect?dest=http%3A%2F%2Frevistaomf.ro
https://cse.google.tk/url?sa=t&url=http://revistaomf.ro/
http://community.esri.com/external-link.jspa?url=https%3A%2F%2Frevistaomf.ro
http://www.google.com/url?sa=t&url=https%3A%2F%2Frevistaomf.ro
http://cse.google.com.kw/url?sa=t&url=http%3A%2F%2Frevistaomf.ro%2F
http://ads.specificmedia.com/click/v=5;m=2;l=23470;c=146418;b=874880;p=ui=ACXqoRFLEtwSFA;tr=DZeqTyQW0qH;tm=0-0;ts=20110427233838;dct=https://revistaomf.ro/
http://alt1.toolbarqueries.google.co.id/url?q=https://revistaomf.ro/
http://digital.fijitimes.com/api/gateway.aspx?f=https://revistaomf.ro
http://rd.rakuten.co.jp/a/?R2=https%3A//revistaomf.ro/
http://www3.valueline.com/vlac/logon.aspx?lp=https://revistaomf.ro
http://bpx.bemobi.com/opx/5.0/OPXIdentifyUser?Locale=uk&SiteID=402698301147&AccountID=202698299566&ecid=KR5t1vLv9P&AccessToken=&RedirectURL=https://revistaomf.ro/
http://www.economia.unical.it/prova.php?a%5B%5D=%3Ca+href%3Dhttps%3A%2F%2Frevistaomf.ro%2F
http://br.nate.com/diagnose.php?from=w&r_url=http%3A%2F%2Frevistaomf.ro
http://alt1.toolbarqueries.google.bj/url?q=https://revistaomf.ro/
http://images.google.com.tw/url?sa=t&url=http%3A%2F%2Frevistaomf.ro%2F
https://www.xcelenergy.com/stateselector?stateselected=true&goto=http://revistaomf.ro
http://www.film1.nl/zoek/?q=%22%2F%3E%3Ca+href%3D%22https%3A%2F%2Frevistaomf.ro%2F&sa=&cx=009153552854938002534%3Aaf0ze8etbks&ie=ISO-8859-1&cof=FORID%3
https://cse.google.com/url?sa=t&url=http://revistaomf.ro/
http://clients1.google.co.il/url?sa=i&url=https%3A%2F%2Frevistaomf.ro
http://alt1.toolbarqueries.google.com.np/url?q=https://revistaomf.ro/
http://images.google.com.vn/url?sa=t&url=http%3A%2F%2Frevistaomf.ro%2F
http://ads1.opensubtitles.org/1/www/delivery/afr.php?zoneid=3&cb=984766&query=One+Froggy+Evening&landing_url=https://revistaomf.ro/
http://adrian.edu/?URL=https://revistaomf.ro/
http://bidr.trellian.com/r.php?u=http%3A%2F%2Frevistaomf.ro
https://www.htcdev.com/?URL=revistaomf.ro
http://aid97400.lautre.net/spip.php?action=cookie&url=https://revistaomf.ro/
https://doterra.myvoffice.com/Application/index.cfm?&EnrollerID=604008&Theme=Default&ReturnUrl=http://revistaomf.ro
http://images.google.com.mx/url?sa=t&url=http%3A%2F%2Frevistaomf.ro%2F
http://cse.google.cg/url?sa=t&url=http%3A%2F%2Frevistaomf.ro%2F
http://images.google.co.th/url?sa=t&url=http%3A%2F%2Frevistaomf.ro
http://clients1.google.gl/url?q=http%3A%2F%2Frevistaomf.ro
http://fftoolbox.fulltimefantasy.com/search.cfm?q=%22%2F%3E%3Ca+href%3D%22https%3A%2F%2Frevistaomf.ro%2F
http://images.google.com.bd/url?sa=t&url=http%3A%2F%2Frevistaomf.ro%2F
http://clients1.google.co.za/url?q=https://revistaomf.ro/
http://cse.google.co.id/url?sa=t&url=http%3A%2F%2Frevistaomf.ro%2F
http://revistaomf.ro.ipaddress.com/
http://cgi.davec.plus.com/cgi-bin/logs/loglink.cgi?https://revistaomf.ro/
http://forms.bl.uk/newsletters/index.aspx?back=https%3A//revistaomf.ro/
https://tour.catalinacruz.com/pornstar-gallery/puma-swede-face-sitting-on-cassie-young-lesbian-fun/?link=http://revistaomf.ro/holostyak-stb-2021
http://www.youtube.com/redirect?q=https%3A%2F%2Frevistaomf.ro%2F
http://alt1.toolbarqueries.google.com.vc/url?q=https://revistaomf.ro/
http://bulkmail.doh.state.fl.us/lt.php?c=102&m=144&nl=18&lid=922&l=https://revistaomf.ro/
http://sc.sie.gov.hk/TuniS/revistaomf.ro
http://images.google.cl/url?sa=t&url=http%3A%2F%2Frevistaomf.ro%2F
http://images.google.ae/url?sa=t&url=http%3A%2F%2Frevistaomf.ro%2F
http://alt1.toolbarqueries.google.tg/url?q=https://revistaomf.ro/
http://images.google.com.ng/url?sa=t&url=http%3A%2F%2Frevistaomf.ro
http://images.google.fi/url?sa=t&url=http%3A%2F%2Frevistaomf.ro
http://cse.google.cl/url?sa=t&url=http%3A%2F%2Frevistaomf.ro%2F
http://images.google.com.vn/url?sa=t&url=http%3A%2F%2Frevistaomf.ro
http://cse.google.ad/url?sa=t&url=http%3A%2F%2Frevistaomf.ro%2F
https://partnerpage.google.com/url?sa=i&url=http://revistaomf.ro/
http://clients1.google.tg/url?q=https%3A%2F%2Frevistaomf.ro
http://images.google.co.il/url?sa=t&url=http%3A%2F%2Frevistaomf.ro%2F
http://clients1.google.nu/url?q=https%3A%2F%2Frevistaomf.ro/
https://services.celemony.com/cgi-bin/WebObjects/LicenseApp.woa/wa/MCFDirectAction/link?linkId=1001414&stid=3463129&url=revistaomf.ro/2021/05/29/rwfeds/
http://cse.google.co.zm/url?sa=t&url=http%3A%2F%2Frevistaomf.ro%2F
https://200-155-82-24.bradesco.com.br/conteudo/pessoa-fisica/popExt.aspx?url=http://revistaomf.ro/2021/05/29/rwfeds/
http://a.twiago.com/adclick.php?tz=1473443342212991&pid=198&kid=2365&wmid=14189&wsid=65&uid=28&sid=3&sid2=2&swid=8950&ord=1473443342&target=https://revistaomf.ro/
http://clients1.google.ee/url?q=https://revistaomf.ro/
http://clients1.google.co.nz/url?sa=t&url=https%3A%2F%2Frevistaomf.ro
http://alt1.toolbarqueries.google.ac/url?q=https://revistaomf.ro/
http://m.odnoklassniki.ru/dk?st.cmd=outLinkWarning&st.rfn=https%3A%2F%2Frevistaomf.ro
https://www.qscience.com/locale/redirect?redirectItem=http://revistaomf.ro
http://cse.google.co.za/url?sa=t&url=http%3A%2F%2Frevistaomf.ro%2F
http://111.1gb.ru/go.php?https://revistaomf.ro/
http://images.google.co.in/url?sa=t&url=http%3A%2F%2Frevistaomf.ro
http://alt1.toolbarqueries.google.com.my/url?q=https://revistaomf.ro/
http://aqua21.jpn.org/lateequ/navi/navi.cgi?&mode=jump&id=6936&url=revistaomf.ro
http://webmail.mawebcenters.com/parse.pl?redirect=https://revistaomf.ro
http://alt1.toolbarqueries.google.cf/url?q=https://revistaomf.ro/
http://cse.google.com.gh/url?sa=t&url=http%3A%2F%2Frevistaomf.ro%2F
https://www.google.bs/url?q=http://revistaomf.ro/
http://as.inbox.com/AC.aspx?id_adr=262&link=https://revistaomf.ro/
http://cse.google.com.do/url?sa=t&url=http%3A%2F%2Frevistaomf.ro%2F
http://www.cssdrive.com/?URL=revistaomf.ro/holostyak-stb-2021
https://advtest.exibart.com/adv/adv.php?id_banner=7201&link=http://revistaomf.ro/2021/05/29/rwfeds/
http://images.google.com.eg/url?sa=t&url=http%3A%2F%2Frevistaomf.ro%2F
http://ad.foxitsoftware.com/adlog.php?a=redirect&img=testad&url=revistaomf.ro
http://chtbl.com/track/118167/revistaomf.ro/
http://alt1.toolbarqueries.google.com.af/url?q=https://revistaomf.ro/
https://maps.google.nu/url?q=http://revistaomf.ro/
http://images.google.com.tw/url?sa=t&url=http%3A%2F%2Frevistaomf.ro
https://maps.google.ws/url?q=http://revistaomf.ro/
http://action.metaffiliation.com/redir.php?u=https://revistaomf.ro/
http://bons-plans-astuces.digidip.net/visit?url=http%3A%2F%2Frevistaomf.ro
http://crash-ut3.clan.su/go?https://revistaomf.ro/
http://cse.google.co.cr/url?sa=t&url=http%3A%2F%2Frevistaomf.ro%2F
http://archives.richmond.ca/archives/descriptions/results.aspx?AC=SEE_ALSO&QF0=NameAccess&QI0==%22Currie%20McWilliams%20Camp%22&XC=http%3a%2f%2frevistaomf.ro&BU=https%3a%2f%2fcutepix.info%2fsex%2friley-reyes.php&TN=Descriptions&SN=AUTO19204&SE=1790&RN=2&MR=20&TR=0&TX=1000&ES=0&CS=0&XP=&RF=WebBrief&EF=&DF=WebFull&RL=0&EL=0&DL=0&NP=255&ID=&MF=GENERICENGWPMSG.INI&MQ=&TI=0&DT=&ST=0&IR=173176&NR=1&NB=0&SV=0&SS=0&BG=&FG=&QS=&OEX=ISO-8859-1&OEH=utf-8
http://plus.google.com/url?q=https%3A%2F%2Frevistaomf.ro%2F
https://www.horseillustrated.com/redirect.php?location=http://revistaomf.ro
http://whois.domaintools.com/revistaomf.ro
http://cse.google.com.kh/url?sa=t&url=http%3A%2F%2Frevistaomf.ro%2F
http://www.timeandtiming.com/?&URL=revistaomf.ro
http://arhvak.minobrnauki.gov.ru/c/document_library/find_file_entry?p_l_id=17390&noSuchEntryRedirect=https://revistaomf.ro/
https://posts.google.com/url?q=http://revistaomf.ro/management.html
http://wtk.db.com/777554543598768/optout?redirect=https://revistaomf.ro
http://images.google.ca/url?sa=t&url=http%3A%2F%2Frevistaomf.ro
http://app.feedblitz.com/f/f.fbz?track=revistaomf.ro
http://nutritiondata.self.com/facts/recipe/1304991/2?mbid=HDFD&trackback=http%3A%2F%2Fwww.revistaomf.ro
http://images.google.co.nz/url?sa=t&url=http%3A%2F%2Frevistaomf.ro%2F
http://alt1.toolbarqueries.google.is/url?q=https://revistaomf.ro/
http://ts.videosz.com/out.php?cid=101&aid=102&nis=0&srid=392&url=https://revistaomf.ro/
https://www.google.tk/url?q=http://revistaomf.ro/
http://clients1.google.co.ao/url?q=https%3A%2F%2Frevistaomf.ro/
http://amaterasu.dojin.com/home/ranking.cgi?ti=%94%92%82%C6%8D%95%82%CC%94%FC%8Aw%81B&HP=http%3a%2f%2frevistaomf.ro&ja=3&id=19879&action=regist
http://www.astronet.ru/db/msusearch/index.html?q=%3Ca+href%3Dhttps%3A%2F%2Frevistaomf.ro%2F
http://images.google.com.sg/url?sa=t&url=http%3A%2F%2Frevistaomf.ro%2F
https://bugcrowd.com/external_redirect?site=http://revistaomf.ro
http://biwa28.lolipop.jp/ys100/rank.cgi?mode=link&id=1290&url=https%3A%2F%2Frevistaomf.ro
http://fcaw.library.umass.edu/goto/https:/revistaomf.ro
http://radio.cancaonova.com/iframe-loader/?t=DatingSingle:NoLongeraMystery-R�dio&ra=&url=https://revistaomf.ro/2021/05/29/rwfeds/
https://cse.google.nr/url?sa=t&url=http://revistaomf.ro/
http://clients1.google.gg/url?q=https%3A%2F%2Frevistaomf.ro
http://cse.google.bj/url?sa=t&url=http%3A%2F%2Frevistaomf.ro%2F
http://camiane.dmcart.gethompy.com/shop/bannerhit.php?bn_id=91&url=http%3a%2f%2frevistaomf.ro
https://www.relativitymedia.com/logout?redirect=//revistaomf.ro/
http://anoushkabold.com/__media__/js/netsoltrademark.php?d=revistaomf.ro
http://cse.google.com.cy/url?sa=t&url=http%3A%2F%2Frevistaomf.ro%2F
http://cse.google.am/url?sa=t&url=http%3A%2F%2Frevistaomf.ro%2F
https://www.meetme.com/apps/redirect/?url=http://revistaomf.ro
http://cse.google.at/url?sa=t&url=http%3A%2F%2Frevistaomf.ro%2F
http://legacy.aom.org/verifymember.asp?nextpage=https%3A//revistaomf.ro/
https://images.google.nu/url?q=http://revistaomf.ro/
https://images.google.ws/url?q=http://revistaomf.ro/
http://clients1.google.com.et/url?q=https%3A%2F%2Frevistaomf.ro
http://cse.google.bs/url?sa=t&url=http%3A%2F%2Frevistaomf.ro%2F
https://mitsui-shopping-park.com/lalaport/iwata/redirect.html?url=http://revistaomf.ro/
https://www.barrypopik.com/index.php?URL=http://revistaomf.ro
http://clients1.google.com.om/url?q=https://revistaomf.ro/
http://bioinfo3d.cs.tau.ac.il/wk/api.php?action=https://revistaomf.ro/
http://contacts.google.com/url?sa=t&url=http%3A%2F%2Frevistaomf.ro
http://sc.hkex.com.hk/gb/revistaomf.ro
http://cse.google.com.bo/url?sa=t&url=http%3A%2F%2Frevistaomf.ro%2F
http://cse.google.co.nz/url?sa=t&url=http%3A%2F%2Frevistaomf.ro%2F
https://www.extremnews.com/nachrichten/standard/dereferrer.cfm?rurl=http://revistaomf.ro/2021/05/29/rwfeds/
http://cse.google.co.ls/url?sa=t&url=http%3A%2F%2Frevistaomf.ro%2F
http://portal.novo-sibirsk.ru/dynamics.aspx?PortalId=2&WebId=8464c989-7fd8-4a32-8021-7df585dca817&PageUrl=%2FSitePages%2Ffeedback.aspx&Color=B00000&Source=https%3A%2F%2Frevistaomf.ro%2F
http://clients1.google.com.gh/url?q=https://revistaomf.ro/
http://alt1.toolbarqueries.google.com.pe/url?q=https%3A%2F%2Frevistaomf.ro
http://clients1.google.jo/url?q=http%3A%2F%2Frevistaomf.ro
http://clients1.google.pn/url?q=https://revistaomf.ro/
https://cse.google.nu/url?sa=t&url=http://revistaomf.ro/
http://cse.google.ba/url?sa=t&url=http%3A%2F%2Frevistaomf.ro%2F
http://www.venez.fr/error.fr.html?id=1&uri=https%3A//revistaomf.ro/
http://domain.opendns.com/revistaomf.ro
http://alt1.toolbarqueries.google.com.ua/url?q=https://revistaomf.ro/
http://alt1.toolbarqueries.google.be/url?q=https://revistaomf.ro/
https://www.allergicliving.com/adspace/?mod=serve&act=clickthru&id=695&to=http://revistaomf.ro/2021/05/29/rwfeds/
http://cse.google.com.bd/url?sa=t&url=http%3A%2F%2Frevistaomf.ro%2F
http://aborg.lib.ntu.edu.tw/ntuepaper/toModule.do?prefix=/publish&page=/newslist.jsp&uri=https://revistaomf.ro/
http://alt1.toolbarqueries.google.pl/url?q=https://revistaomf.ro/
http://images.google.fi/url?sa=t&url=http%3A%2F%2Frevistaomf.ro%2F
http://blawat2015.no-ip.com/~mieki256/diary/refsweep.cgi?url=https://revistaomf.ro/
https://www.google.nu/url?q=http://revistaomf.ro/
http://images.google.co.jp/url?sa=t&url=http%3A%2F%2Frevistaomf.ro%2F
https://www.dltk-teach.com/p.asp?p=http://revistaomf.ro/2021/05/29/rwfeds/
http://images.google.co.id/url?sa=t&url=http%3A%2F%2Frevistaomf.ro
http://images.google.com.my/url?sa=t&url=http%3A%2F%2Frevistaomf.ro%2F
http://members.ascrs.org/sso/logout.aspx?returnurl=https://revistaomf.ro/
http://closings.cbs6albany.com/scripts/adredir.asp?url=https://revistaomf.ro/
http://images.google.co.th/url?sa=t&url=http%3A%2F%2Frevistaomf.ro%2F
http://alumni.drivers.informer.com/go/go.php?go=https://revistaomf.ro/
http://uriu-ss.jpn.org/xoops/modules/wordpress/wp-ktai.php?view=redir&url=https%3A%2F%2Frevistaomf.ro
http://alt1.toolbarqueries.google.com.kw/url?q=https://revistaomf.ro/
http://forum.solidworks.com/external-link.jspa?url=https%3A%2F%2Frevistaomf.ro
http://alt1.toolbarqueries.google.bf/url?q=https://revistaomf.ro/
http://acf.poderjudicial.es/portal/site/cgpj/menuitem.65d2c4456b6ddb628e635fc1dc432ea0/?schema=http&title=Acuerdos+de+la+Comisi%C3%B3n+Permanente+del+CGPJ+de+17+de+julio+de+2018&vgnextoid=d94e58e4d849d210VgnVCM100000cb34e20aRCRD&vgnextlocale=gl&isSecure=false&vgnextfmt=default&protocolo=http&user=&url=http%3a%2f%2frevistaomf.ro&perfil=3
http://0845.boo.jp/cgi/mt3/mt4i.cgi?id=24&mode=redirect&no=15&ref_eid=3387&url=http%3A%2F%2Frevistaomf.ro
http://cse.google.co.kr/url?sa=t&url=http%3A%2F%2Frevistaomf.ro%2F
http://hostedmovieupdates.aebn.net/feed/?urlstub=revistaomf.ro&
where to buy valtrex
With thanks, An abundance of write ups.
paper writing service cv writing service birmingham uk best essay writing service review
Helpful posts. Regards!
custom research paper writing services research paper writer services buy term paper buy research paper
Thank you for sharing your thoughts. I truly appreciate your efforts
and I will be waiting for your next post thank you once again.
We stumbled over here from a different website and thought I might
as well check things out. I like what I see so i am just following you.
Look forward to looking into your web page repeatedly.
SEO-оптимизация и продвижение сайта – это важный аспект успешного бизнеса в интернете.
Хрумер – это инструмент для автоматизированного поиска контента и создания ссылок на ваш сайт.
Использование хрумера может помочь вам улучшить видимость вашего сайта в поисковых системах,
SEO-оптимизация сайта включает в себя множество аспектов, таких как создание качественного контента,
оптимизация метатегов, улучшение структуры сайта, создание ссылочной массы и т.д.
Хрумер может использоваться для создания ссылок на ваш сайт,
но это не является единственным способом оптимизации и продвижения сайта.
Заказать сео оптимизацию и продвижение вашего проэкта можно у нас в телеграмм @pokras777 либо в скайпе pokras7777
так же присаединяйтесь к нам в группу ====>>> https://t.me/bazixrumer ответим на все интересующие вас вопросы
так же можно https://seoprofisional.ru/bazy/progon-xrumer отдельно цена расчитавается индивидуально
magnificent issues altogether, you simply won a logo new
reader. What would you suggest about your submit that you made a few days in the past?
Any certain?
generic for avodart
Undeniably consider that which you stated. Your favourite reason appeared to be at the
internet the easiest thing to take into account of.
I say to you, I definitely get annoyed while people think about issues
that they plainly do not understand about. You controlled to hit the nail upon the top as neatly
as defined out the whole thing without having side-effects , other people can take a signal.
Will probably be again to get more. Thanks
triamterene hctz
I am regular reader, how are you everybody? This piece of writing
posted at this website is truly pleasant.
albenza 200 mg
original cialis
erythromycin 250 mg coupon
triamterene hctz 37.5 25
sildenafil online buy india
My partner and I stumbled over here coming from a different web address and thought I might check things out.
I like what I see so now i’m following you. Look forward
to checking out your web page yet again.
Fine way of explaining, and fastidious article to take data
on the topic of my presentation subject matter, which i am going
to convey in college.
medrol price in uk
I couldn’t resist commenting. Very well written!
tizanidine generic costs
Have you ever considered about adding a little bit more than just your articles?
I mean, what you say is valuable and everything. However think about if you added some great photos or video clips to give your posts more,
“pop”! Your content is excellent but with images and video clips,
this blog could undeniably be one of the greatest in its niche.
Terrific blog!
You actually said that terrifically.
phd dissertation dissertation abstracts dissertations dissertation proposal
homework do my college homework do my homework pay someone to do my homework
looking for someone to write my essay https://payforanessaysonline.com
buspar price uk
My partner and I stumbled over here different page and thought I should check
things out. I like what I see so i am just following you.
Look forward to looking over your web page for a second time.
Hi there! This article could not be written any better!
Looking through this post reminds me of my previous
roommate! He constantly kept talking about this. I’ll send this post to him.
Pretty sure he’s going to have a good read.
Many thanks for sharing!
Having read this I believed it was really enlightening. I appreciate
you spending some time and effort to put this informative article together.
I once again find myself personally spending a lot of time both reading and commenting.
But so what, it was still worth it!
I was suggested this website by my cousin. I am not sure whether
this post is written by him as no one else know such detailed about my difficulty.
You’re wonderful! Thanks!
medrol 16 mg price
Great goods from you, man. I’ve understand
your stuff previous to and you are just too wonderful.
I really like what you’ve acquired here, certainly like what you are saying and the way
in which you say it. You make it enjoyable and you still care for to
keep it smart. I can not wait to read much more from you.
This is actually a tremendous website.
toradol buy
sildenafil for sale online
buy cialis online from canada
medrol medication generic
clindamycin cream uk
Nice blog here! Also your website so much up very fast! What
web host are you the use of? Can I am getting your affiliate hyperlink for your host?
I wish my site loaded up as fast as yours lol
prednisone 200 mg daily
I think everything posted was actually very
logical. But, what about this? suppose you added a little content?
I mean, I don’t wish to tell you how to run your website, but what if you added
a post title that grabbed people’s attention? I mean Before and After Archives – Precious Stones Photography
is kinda vanilla. You should peek at Yahoo’s front page and see
how they create post headlines to grab viewers to open the links.
You might add a related video or a pic or two to get readers excited about what you’ve got to say.
Just my opinion, it could bring your website a little bit more interesting.
hallo kak, kalo mau nonton bokep indonesia yang lagi viral bisa klik
link dibawah ini langsung
https://sinaga123.stiamuhammadiyahselong.ac.id/
https://www.xnxx.com/
https://www.xnxx.com/search/familial_relations
https://www.xnxx.com/video-kg573c4/stepsis_aubrey_catches_horny_stepbrother_fucking_the_family_pumpkin
sildenafil citrate 100mg
I am no longer positive where you’re getting your info, but
great topic. I must spend a while finding out much more or figuring
out more. Thanks for great info I was in search of this info
for my mission.
medrol pak
I was recommended this website by my cousin. I am not
sure whether this post is written by him as no one else know such detailed about my difficulty.
You are incredible! Thanks!
You ought to take part in a contest for one of the greatest sites on the web.
I am going to recommend this web site!
toradol 20mg
piroxicam buy online
In fact when someone doesn’t understand after that its
up to other visitors that they will assist, so here it happens.
antibiotic levaquin
naturally like your web site however you need to take a look at the spelling on quite a few
of your posts. Many of them are rife with spelling problems and I in finding it very bothersome to inform the reality nevertheless I’ll certainly come back again.
Everything published made a ton of sense. But, what about this?
what if you typed a catchier title? I ain’t suggesting your content is not solid, however
what if you added something to possibly grab a person’s attention? I mean Before and After
Archives – Precious Stones Photography is a little plain. You could peek at Yahoo’s home
page and note how they create article titles to grab people interested.
You might add a related video or a pic or two to grab people excited about what you’ve got to say.
In my opinion, it would make your website a little bit more interesting.
albendazole tablets 400 mg
permethrin topical cream over counter
buy cialis from india online
feldene capsule 10 mg
where to buy erythromycin in singapore
Seriously loads of amazing material!
essays help writing helper the college essay guy the college essay guy
ampicillin tablet price
buy erythromycin without prescription
Hi i am kavin, its my first time to commenting anyplace,
when i read this paragraph i thought i could also make comment due
to this sensible article.
albendazole 400 mg tablet
This schematic figure assembles information from immunological studies on dendritic cells and from immunohistological studies on Demodex and rosacea tadalafil cialis
generic viagra from canada pharmacy
levaquin price
triamterene-hctz 37.5
Can I simply say what a comfort to discover someone who actually
understands what they’re discussing on the web.
You actually realize how to bring an issue to light and make it important.
More and more people ought to check this out and understand this side of
the story. I was surprised you’re not more popular since you definitely
possess the gift.
piroxicam brand name
feldene gel canada
Hi superb website! Does running a blog similar to
this take a great deal of work? I’ve absolutely no
knowledge of programming but I had been hoping to start my own blog in the near future.
Anyhow, should you have any recommendations or tips for new blog
owners please share. I know this is off subject nevertheless I simply wanted to ask.
Thanks a lot!
Hello would you mind sharing which blog platform you’re using?
I’m planning to start my own blog in the near future but I’m having a tough time deciding between BlogEngine/Wordpress/B2evolution and Drupal.
The reason I ask is because your design seems different then most blogs and I’m looking for something completely unique.
P.S Sorry for being off-topic but I had to ask!
tamoxifen 10mg uk
Your style is very unique compared to other people I’ve
read stuff from. Thanks for posting when you have the opportunity, Guess I’ll
just bookmark this site.
En effet, ces éléments peuvent s’user ou
se casser avec le temps et nécessiter une intervention professionnelle pour les réparer.
Great items from you, man. I have have in mind your stuff prior to
and you are just extremely wonderful. I really like what you have bought right here, really like what you are stating and the
way by which you say it. You are making it entertaining and you still take
care of to stay it smart. I can not wait to learn much more from
you. That is actually a wonderful site.
I do not know whether it’s just me or if perhaps everyone else encountering issues
with your website. It appears like some of the written text within your content are running off the screen.
Can somebody else please comment and let me know
if this is happening to them as well? This could be a issue with my browser because I’ve had this happen previously.
Kudos
viagra for female for sale
propranolol online order
feldene capsules 20 mg
buy toradol
toradol pills 10 mg
Take a look at NeuroBet on the Play Store & App
Store!
https://play.google.com/store/apps/details?id=com.modevlabs.neurobet
https://apps.apple.com/us/app/neurobet-bet-with-your-brain/id1639793466
elimite cost
valtrex 2 g
I every time emailed this blog post page to all my contacts, as if like to
read it afterward my friends will too.
I used to be able to find good advice from your articles.
Greetings! Very useful advice within this post! It is the little
changes that make the most significant changes. Thanks a lot for sharing!
Para obter o arquivo em um dos vários formatos à sua
escolha, inicie o programa e use o link do tweet.
It is not my first time to visit this web page,
i am browsing this site dailly and get nice facts from here
all the time.
tizanidine 4mg tablets coupon
avodart 12.5
Thanks for sharing your thoughts about Temple Texas Newborn Photographer.
Regards
Very rapidly this website will be famous amid all blog viewers, due to it’s fastidious posts
I aЬssoluteⅼy love your sіte.. Great colors &
theme. Did you develop this ѕiote yourself? Pleaswe reply back as І’m wanting to create my
own blog and would like to lesrn where yoou got this from or eҳactly
what the theme is callеd. Kudos!
ampicillin 100 mg
buy nolvadex usa
each time i used to read smaller articles which as well clear their motive, and that is also happening with this post which I am reading at
this time.
triamterene hctz 75-50 mg tab
triamterene 37.5mg
Hello friends, how is all, and what you desire
to say regarding this paragraph, in my view its genuinely awesome in favor of me.
Hi there mates, its great post about teachingand entirely explained,
keep it up all the time.
toradol 10mg
Look into NeuroBet on the Play Store & App Store!
https://play.google.com/store/apps/details?id=com.modevlabs.neurobet
https://apps.apple.com/us/app/neurobet-bet-with-your-brain/id1639793466
Terrific stuff. Many thanks!
thesis topic thesis creator thesis topic thesis statement
can i buy bupropion over the counter
I’ll immediately take hold of your rss feed as I can not
to find your email subscription link or e-newsletter service.
Do you have any? Please let me recognize so that I may just subscribe.
Thanks.
cheap propecia australia
quineprox 900
Wow, beautiful site. Thnx …
https://www.lubelska.tv
New shocking porn 18+ videos leaked, check it here (free): https://bit.ly/shocking-viral-videos
Everyօe loves what you uys are up too. Such clever work and reporting!
Keep up the excellent woгks gjys I’ve you
gjys to myy blogroⅼl.
erectafil 10 mg
cheap lioresal
Мы предлагаем исключительно заработок в интернете с выводом без вложений.
У нас Вы не встретите мошенничества
по типу пирамид и
Вам не придется перечислять свои средства
незнакомым людям.
подронее ===>> здесь
зарегистрироватся здесь
stromectol online pharmacy
This is the perfect website for anyone who would like to find out about this topic.
You know a whole lot its almost tough to argue with you (not
that I personally would want to…HaHa). You certainly put
a fresh spin on a topic which has been discussed for a long time.
Excellent stuff, just wonderful!
coba join kedalam laman judi pkv games dengan bqndar domino serta
bandarq online terbaik sepanjang masa yang sudah tersedia pada
tahun 2023 ini dengan akun рro jackpot terbaik yang bisa kalian dapatkan dengan menggunakan bebedrapa akun yang kalian daftarkan ԁi dalam sini
ⅾan kalian juga dapat memiliji kemungkinan untuk menerima semua keuntungan darei metokde pengisian deposit via pulsa yang tdak bisa kalian perolpeh ԁi laman web judi
pkv games, bandarqq maupun pokerqq online yang lainnya yang ada
ⅾi dunia online ketika ini.
We stumbled over here by a different web page and thought I may as
well check things out. I like what I see so now i’m following you.
Look forward to exploring your web page repeatedly.
Wow that was unusual. I just wrote an extremely long comment but after I clicked submit my comment didn’t appear.
Grrrr… well I’m not writing all that over again. Anyway, just wanted to say great blog!
where can i buy propecia in singapore
diflucan tablets for sale
purchase trazodone
buy albendazole canada
I am in fact grateful to the owner of this site who
has shared this fantastic article at here.
47720 retin a
http://altogelz.over-blog.com/2023/08/altogelz.html
http://altogelz.xobor.de/u1_altogelz.html
http://atlas.dustforce.com/user/altogelz
http://atlas.dustforce.com/user/altogelz1
http://atlas.dustforce.com/user/altogelz2
http://baseportal.com/cgi-bin/baseportal.pl?htx=/ouatmicrobio/OMSA%20Web%20Site/eWrite/eWrite&wcheck=1&range=2000,1000
http://baseportal.de/cgi-bin/baseportal.pl?htx=/jaa/tiere&localparams=1&range=400,80
http://blagoslovenie.su/index.php?option=com_powergallery&Itemid=34&func=detail&catid=64&id=1197&mosmsg=%C2%E0%F8+%EA%EE%EC%EC%E5%ED%F2%E0%F0%E8%E9%2C+%F3%F1%EF%E5%F8%ED%EE+%F1%EE%F5%F0%E0%ED%E5%ED.
http://buildolution.com/UserProfile/tabid/131/userId/375643/Default.aspx
http://entsaintetienne.free.fr/claroline1110/courses/ALTOGELZ/document/altogel.html
http://flightgear.jpn.org/userinfo.php?uid=38586
http://flightgear.jpn.org/userinfo.php?uid=38587
http://foxsheets.com/UserProfile/tabid/57/userId/143513/Default.aspx
http://gendou.com/user/altogelz
http://gitlab.sleepace.com/snippets/24056
http://go.bubbl.us/cbf626/26c4?/https://www.mikhayla.id/
http://jurnal.usbypkp.ac.id/index.php/jemper/user/viewPublicProfile/108738
http://krachelart.com/UserProfile/tabid/43/userId/1240327/Default.aspx
http://mayfever.crowdfundhq.com/users/altogelz
http://mobile.punske-valky.freepage.cz/diskuze/1545
http://mysmarterhome.ca/UserProfile/tabid/42/userId/68932/Default.aspx
http://onlineboxing.net/jforum/user/profile/245977.page
http://riosabeloco.com/User-Profile/userId/194037
http://rufox.ru/altogelz/info/
http://taylorhicks.ning.com/photo/albums/altogelz
http://test.sozapag.ru/forum/user/202144/
http://ttlink.com/altogelz
http://www.activewin.com/user.asp?Action=Read&UserIndex=4235160
http://www.giscience.sakura.ne.jp/pukiwiki/index.php?altogelz
http://www.rohitab.com/discuss/user/1731860-altogelz/
http://www.shadowera.com/member.php?134386-altogelz
http://www.shadowera.com/member.php?134387-altogelz1
http://www.shadowera.com/member.php?134388-altogelz2
http://www.travelful.net/location/5215046/indonesia/altogelz
https://500px.com/p/altogeldr?view=photos
https://500px.com/p/altogeldr2?view=photos
https://500px.com/p/altogelz1?view=photos
https://64cc85fbb991e.site123.me/
https://8tracks.com/alto-g/altogelz
https://about.me/altogelz
https://altogeldr.wixsite.com/altogelz
https://altogels-organization.gitbook.io/altogelz/
https://altogelz.amebaownd.com/posts/46347046
https://altogelz.bloggersdelight.dk/2023/08/03/altogelz/
https://altogelz.cgsociety.org/profile
https://altogelz.hashnode.dev/openai
https://altogelz.jimdosite.com/
https://altogelz.mn.co/members/17818624
https://altogelz.mystrikingly.com/
https://altogelz.pages.dev/
https://altogelz.shopinfo.jp/posts/46347136
https://altogelz.storeinfo.jp/posts/46347169
https://altogelz.theblog.me/posts/46347209
https://altogelz.therestaurant.jp/posts/46347098
https://altogelz.webador.ch/
https://altogelz0.educatorpages.com/pages/about-me
https://altogelza.contently.com/
https://altogelza.localinfo.jp/posts/46347388
https://altogelza.themedia.jp/posts/46347350
https://altogelz–altogel1.repl.co/
https://altogelzb.contently.com/
https://altogelzc.contently.com/
https://alto-gelz-s-school.teachable.com/p/altogelz
https://altogelz-s-site.thinkific.com/products/communities/altogelz
https://altos-fantastic-site-4e745a.webflow.io/
https://ameblo.jp/altogelz/entry-12814710876.html
https://app.lookbook.nu/user/11452094-Altogelz
https://app.roll20.net/users/12221094/altogelz-a
https://artmight.com/user/profile/2177563
https://bbpress.org/forums/profile/altogelz/
https://bbs.now.qq.com/home.php?mod=space&uid=5239893
https://beacons.ai/altogelz
https://bio.fm/altogeldr
https://biolinky.co/altogelz
https://bitbin.it/GAy4N5oO/
https://blogfreely.net/altogelz/153-92-5-107
https://bordeaux.onvasortir.com/profil_read.php?Altogelz
https://brewwiki.win/wiki/User:Altogelz
https://brookhaven.bubblelife.com/users/altogeldr_c109366
https://buddypress.org/members/altogelz/profile/
https://calis.delfi.lv/profils/lietotajs/308843-altogelz/
https://cannabis.net/user/137278
https://canvas.instructure.com/eportfolios/2307444/Home/Welcome
https://comicvine.gamespot.com/profile/altogelz/
https://community.lazypoets.com/profile/altogel
https://confengine.com/user/altogelz
https://confengine.com/user/altog-elz
https://controlc.com/f6372dcd
https://coolors.co/u/alto_gel
https://creativecommons.org/choose/results-one?q_1=2&q_1=1&field_commercial=n&field_derivatives=sa&field_jurisdiction=&field_format=Text&field_worktitle=Blog&field_attribute_to_name=altogelz&field_attribute_to_url=http://153.92.5.107/
https://creativecommons.org/choose/results-one?q_1=2&q_1=1&field_commercial=n&field_derivatives=sa&field_jurisdiction=&field_format=Text&field_worktitle=Blog&field_attribute_to_name=altogelz&field_attribute_to_url=http://156.67.218.136/
https://creativecommons.org/choose/results-one?q_1=2&q_1=1&field_commercial=n&field_derivatives=sa&field_jurisdiction=&field_format=Text&field_worktitle=Blog&field_attribute_to_name=altogelz&field_attribute_to_url=http://89.116.231.217/
https://cs.astronomy.com/members/altogelz/default.aspx
https://datamx.io/uploads/user/2023-08-04-074055.853284altogel.html
https://datosabiertos.municipiosanjuan.gob.ar/uploads/user/2023-08-02-003251.350241altogel.html
https://dev.to/altogelz
https://developers.oxwall.com/user/altogelz
https://digitaltibetan.win/wiki/User:Altogelz
https://discover.events.com/p/altogelz-10079919535
https://disqus.com/by/altogeldr/about/
https://disqus.com/by/altogelz/about/
https://disqus.com/by/disqus_IvemkhpTmT/about/
https://docs.google.com/document/d/1Y_wO1MgQArSUUSf-bnUTo_Vk2Y5d63AzikUbUJYA-8Y/edit
https://dreevoo.com/profile.php?pid=567973
https://dribbble.com/altogelz/about
https://educatorpages.com/site/altogelz0/pages/about-me
https://en.gravatar.com/altogelz
https://ext-6385277.livejournal.com/466.html
https://fairygodboss.com/users/profile/1tqG7mNA4E/altogelz
https://fairygodboss.com/users/profile/f-Srekv-cs/altogelz
https://fairygodboss.com/users/profile/G_uGZGX8WU/altogelz
https://fileforum.com/profile/altogelz
https://files.fm/altogeldr/f/9m37w9xuv
https://files.fm/altogeldr/info
https://folkd.com/user/altogelz
https://forum.instube.com/u/altogelz
https://forum.reallusion.com/Users/3128249/altogeldr
https://forum.singaporeexpats.com/memberlist.php?mode=viewprofile&u=607070
https://forum.singaporeexpats.com/memberlist.php?mode=viewprofile&u=607073
https://forum.singaporeexpats.com/memberlist.php?mode=viewprofile&u=607074
https://forums.ccbluex.net/user/alto-gel
https://forums.gta5-mods.com/user/altogelz
https://freeicons.io/profile/529680
https://gab.com/altogelz
https://git.lumine.io/altogelza
https://github.com/altogelz
https://glose.com/u/altogel
https://gotartwork.com/Profile/alto-gelz/247775/
https://groups.google.com/g/altogelz
https://hanson.net/users/altogelz
https://heylink.me/alto63
https://histre.com/@altogeldr/
https://hub.docker.com/u/altogelz
https://hub.docker.com/u/altogelzb
https://hub.docker.com/u/altogelzc
https://imageevent.com/altogelz
https://inkbunny.net/altogelz
https://issuu.com/altogelz
https://issuu.com/altogelz1
https://issuu.com/altogelz2
https://journal.almarhalah.ac.id/index.php/almarhalah/user/viewPublicProfile/59353
https://joy.bio/altogelz
https://jsfiddle.net/altogelz/wp6xz1ut/
https://lab.quickbox.io/-/snippets/22932
https://learn.acloud.guru/profile/altogelz
https://leetcode.com/altogelz/
https://leetcode.com/altogelz1/
https://leetcode.com/altogelz2/
https://linkr.bio/altogelz
https://linktr.ee/altogelz
https://medium.com/@altogeldr
https://moparwiki.win/wiki/User:Altogelz
https://moz.com/community/q/user/altogelz
https://muckrack.com/altog-elz/bio
https://my.archdaily.com/us/@alto-gel
https://myapple.pl/users/418899-altogelz
https://myopportunity.com/profile/altog-altogeldrgmail-com/nw/
https://myopportunity.com/profile/altog-elz/nw
https://nootheme.com/forums/users/altogelz/
https://nowewyrazy.uw.edu.pl/profil/altogelz
https://openlibrary.org/people/altogelz
https://padlet.com/altogeldr/my-harmonious-padlet-jodga12nufe7i78q
https://pantip.com/profile/7668529#topics
https://pastelink.net/6fk65c7s
https://pbase.com/altogelz
https://peatix.com/user/18491561/view
https://peatix.com/user/18491582/view
https://peatix.com/user/18491590/view
https://pinshape.com/users/2684272-altogelz
https://postheaven.net/altogelz/153-92-5-107
https://profile.ameba.jp/ameba/altogelz/
https://profile.hatena.ne.jp/altogelz/profile
https://profiles.delphiforums.com/n/pfx/profile.aspx?nav=profile&webtag=dfpprofile000&userId=1891192099
https://rentry.co/altogelz
https://research.openhumans.org/member/altogelz/
https://roomstyler.com/users/altogelz
https://roomstyler.com/users/altogelz1
https://roomstyler.com/users/altogelz2
https://rosalind.info/users/altogelz/
https://sites.google.com/view/altogelz/home
https://slides.com/fesfo/fesfo/
https://social.msdn.microsoft.com/Profile/altogelz
https://social.technet.microsoft.com/profile/altogelz/
https://solo.to/altogelz
https://speakerdeck.com/altogelz
https://starity.hu/profil/384218-altogelz/
https://steemit.com/mobile/@fesfo/altogel
https://storage.googleapis.com/padlet-uploads/2101145374/926397cab5f4d79b85e28bcbdb5d5c2b/altogel.html
https://support.advancedcustomfields.com/forums/users/altogelz/
https://sway.office.com/ppNAfqEY9DAcdSRC
https://t.me/baliseo
https://t.me/seo_bali
https://talktoislam.com/user/altogelz
https://telegra.ph/altogelz-08-04
https://telegram.me/s/baliseo
https://telegram.me/s/seo_bali
https://trello.com/w/altogelz
https://truxgo.net/profile/otomotips
https://vestnikramn.spr-journal.ru/jour/user/viewPublicProfile/10776
https://wakelet.com/wake/kfUTNFrMN9RseROrNU98A
https://wmart.kz/forum/user/131124/
https://worldcosplay.net/member/1202100
https://www.anobii.com/en/0152e42b60f8aa2fa8/profile/activity
https://www.autoviva.com/news/hamilton_just_nine_points_away_from_title_renewal/14883
https://www.avianwaves.com/User-Profile/userId/182564
https://www.beatstars.com/altogeldr
https://www.behance.net/altogel
https://www.bitchute.com/channel/hWSLHnfZJvpn/
https://www.bitsdujour.com/profiles/BHi3Py
https://www.cakeresume.com/me/alto-gel
https://www.chordie.com/forum/profile.php?id=1699876
https://www.chordie.com/forum/profile.php?id=1699879
https://www.chordie.com/forum/profile.php?id=1699883
https://www.colcampus.com/courses/92405/pages/altogelz
https://www.commandlinefu.com/commands/view/31963/prepend-section-dates-to-individual-entries-in-a-summary-log-file
https://www.dermandar.com/user/altogelz/
https://www.deviantart.com/altogelz
https://www.divephotoguide.com/user/altogelz
https://www.drupalgovcon.org/user/555281
https://www.facer.io/u/altogelz
https://www.fimfiction.net/user/622976/altogelz/about
https://www.flickr.com/people/198858378@N05/
https://www.giantbomb.com/profile/altogelz/
https://www.globalvision2000.com/forum/member.php?action=profile&uid=965754
https://www.globalvision2000.com/forum/member.php?action=profile&uid=965769
https://www.globalvision2000.com/forum/member.php?action=profile&uid=965770
https://www.goodreads.com/user/show/168521315-altogelz
https://www.goodreads.com/user/show/168521344-altogelz
https://www.goodreads.com/user/show/168521388-altogelz
https://www.heromachine.com/forums/users/fesfo/
https://www.iglinks.io/altogeldr-8uj
https://www.instapaper.com/p/12838776
https://www.intensedebate.com/profiles/altogelz
https://www.kickstarter.com/profile/altogelz/about
https://www.lawyersclubindia.com/profile.asp?member_id=972341
https://www.live4cup.com/tournoi-23605-altogelz.html
https://www.liveinternet.ru/users/altogelz/profile
https://www.medicinacinesenews.it/forum/memberlist.php?mode=viewprofile&u=2853904
https://www.metooo.io/e/altogelz
https://www.mixcloud.com/altogelz/
https://www.mojomarketplace.com/user/altogelz-6ssisQfP3D
https://www.myminifactory.com/users/altogel
https://www.notebook.ai/plan/universes/342669
https://www.noteflight.com/profile/d0d15dec72622c8af5943a59c1ddd91139d7b1ba
https://www.opencode.net/altogelz/altogelz
https://www.openhumans.org/member/altogelz/
https://www.pling.com/u/altogelz/
https://www.pling.com/u/altogelz1/
https://www.producthunt.com/@altogelz
https://www.provenexpert.com/altogelz/
https://www.pubpub.org/user/alto-gelz
https://www.pubpub.org/user/alto-gelz-2
https://www.pubpub.org/user/alto-gelz-3
https://www.quia.com/profiles/altogelz
https://www.quia.com/servlets/quia.web.QuiaWebManager?tagModuleType=15501&rand=259540
https://www.quora.com/profile/Alto-Gel
https://www.rctech.net/forum/members/altogelz-323467.html
https://www.remotecentral.com/cgi-bin/forums/members/viewprofile.cgi?yl0kme
https://www.spinattic.com/82489
https://www.spinattic.com/82490
https://www.spinattic.com/altog
https://www.spyropress.com/forums/users/altogelz/
https://www.symbaloo.com/mix/altogelz
https://www.tetongravity.com/community/profile/vkyezzu@exelica.com/
https://www.twitch.tv/altogelz/about
https://www.vaca-ps.org/altogelz
https://www.veoh.com/users/altogelz
https://www.veoh.com/users/altogelz1
https://www.veoh.com/users/altogelz2
https://www.viki.com/users/altogeldr_243/about
https://www.vingle.net/posts/6588466
https://www.walkscore.com/place-details/altogelz1-seattle?list=/people/124159241963
https://www.walkscore.com/place-details/altogelz2-seattle?list=/people/124159241963
https://www.walkscore.com/place-details/altogelz-seattle?list=/people/124159241963
https://www.zazzle.com/mbr/238083623809167019
https://www.zazzle.com/mbr/238281848657701987
https://www.zazzle.com/mbr/238443354801685905
https://xtremepape.rs/members/altogelz.398742/#about
http://arahn.100webspace.net/profile.php?mode=viewprofile&u=132822
https://muckrack.com/irteknos-os/bio
http://atlas.dustforce.com/user/irteknos
http://baseportal.com/cgi-bin/baseportal.pl?htx=/ouatmicrobio/OMSA%20Web%20Site/eWrite/eWrite&wcheck=1&range=2000,1000
http://baseportal.de/cgi-bin/baseportal.pl?htx=/jaa/tiere&localparams=1&range=400,80
http://brewwiki.win/wiki/User:Irteknos
http://buildolution.com/UserProfile/tabid/131/userId/374653/Default.aspx
http://entsaintetienne.free.fr/claroline1110/courses/IRTEKNOS/document/renaldi.html
http://flightgear.jpn.org/userinfo.php?uid=37888
http://forums.visualtext.org/member.php?action=profile&uid=971719
http://foxsheets.com/UserProfile/tabid/57/userId/140274/Default.aspx
http://gendou.com/user/irteknos
http://giderosmobile.com/profiles/irteknos
http://gitlab.sleepace.com/irteknos
http://hommestylemag.xobor.de/u2_irteknos.html
http://irteknos.over-blog.com/2023/07/irteknos.html
http://jurnal.usbypkp.ac.id/index.php/jemper/user/viewPublicProfile/108738
http://krachelart.com/UserProfile/tabid/43/userId/1236696/Default.aspx
http://mayfever.crowdfundhq.com/users/irteknos
http://mobile.punske-valky.freepage.cz/diskuze/1545
http://mobile.punske-valky.freepage.cz/diskuze/1545
http://msnho.com/blog/irteknos
http://mysmarterhome.ca/UserProfile/tabid/42/userId/67506/Default.aspx
http://onlineboxing.net/jforum/user/profile/242942.page
http://onlineboxing.net/jforum/user/profile/242942.page
http://profiles.delphiforums.com/n/pfx/profile.aspx?webtag=dfpprofile000&userId=1891189818
http://riosabeloco.com/User-Profile/userId/191480
http://statistik.merantikab.go.id/uploads/user/2023-07-12-130554.736551renaldi.html
http://talktoislam.com/user/irteknos
http://taylorhicks.ning.com/photo/albums/irteknos
http://test.sozapag.ru/forum/user/200583/
http://www.activewin.com/user.asp?Action=Read&UserIndex=4233784
http://www.autoviva.com/news/hamilton_just_nine_points_away_from_title_renewal/14883
http://www.effecthub.com/collection/show/7723
http://www.giscience.sakura.ne.jp/pukiwiki/index.php?irteknos
http://www.nfomedia.com/profile?uid=rMkZbdE
http://www.rohitab.com/discuss/user/1676917-irteknos/
http://www.shadowera.com/member.php?133771-irteknos
http://www.travelful.net/location/5199322/indonesia/irteknos
http://zacriley.ning.com/photo/albums/irteknos
https://500px.com/p/irteknos?view=photos
https://64aea881602e8.site123.me/
https://8tracks.com/renaldi-d
https://ameblo.jp/irteknos/entry-12811756329.html
https://anyflip.com/homepage/irtgh
https://artistecard.com/irteknos
https://atlanta.bubblelife.com/users/renaldidomai_d120058
https://bbpress.org/forums/profile/irteknos/
https://bbs.now.qq.com/home.php?mod=space&uid=5030826
https://beacons.ai/irteknos
https://bitbin.it/fq3MAB8P/
https://blip.fm/irteknos
https://blogfreely.net/irteknos/irtekno-com
https://calis.delfi.lv/profils/lietotajs/305369-irteknos/
https://camp-fire.jp/profile/irteknos
https://chastainpark.bubblelife.com/users/renaldidomai_d120058
https://comicvine.gamespot.com/profile/irteknos/
https://community.clover.com/users/37385/irteknos.html
https://community.lazypoets.com/profile/irteknos
https://confengine.com/user/irteknos-os
https://conifer.rhizome.org/irteknosk
https://controlc.com/3d4726a1
https://coolors.co/u/renaldi_dr
https://coub.com/285195262ae98c56cab6
https://creativecommons.org/choose/results-one?q_1=2&q_1=1&field_commercial=n&field_derivatives=sa&field_jurisdiction=&field_format=Text&field_worktitle=Blog&field_attribute_to_name=irteknos&field_attribute_to_url=https://irtekno.com
https://creator.wonderhowto.com/irteknos/
https://darling-raindrop-22841f.netlify.app/
https://data.hkppdb.org/uploads/user/2023-07-12-140546.098407renaldi.html
https://datamx.io/uploads/user/2023-07-12-134940.479091renaldi.html
https://datosabiertos.municipiosanjuan.gob.ar/uploads/user/2023-07-04-082917.948212renaldi.html
https://descubre.beqbe.com/p/irteknos
https://dev.to/irteknos
https://developers.oxwall.com/user/irteknos
https://devpost.com/irteknos
https://digitaltibetan.win/wiki/User:Irteknos
https://discover.events.com/profile/renaldi-dr/3704799/savethedate/
https://disqus.com/by/irteknos/about/
https://disqus.com/by/irteknos/about/
https://docs.google.com/document/d/1WCRHb6z0yu-T8ANZWgmYO_t9TajMbFaCt4lYj1s22fY/edit?usp=sharing
https://doodleordie.com/profile/irteknos
https://dreevoo.com/profile.php?pid=563810
https://dribbble.com/irteknos/about
https://edshelf.com/profile/irteknos
https://fairygodboss.com/users/profile/Y8qhhXZ-Ou/renaldi-dr
https://fairygodboss.com/users/profile/Y8qhhXZ-Ou/renaldi-dr
https://feeds.feedburner.com/irtekno/AqKXoVkZi6C
https://fileforum.com/profile/irteknos
https://files.fm/renaldidomain
https://fliphtml5.com/homepage/jxbcb
https://folkd.com/user/irteknos
https://forum.codeigniter.com/member.php?action=profile&uid=80861
https://forum.instube.com/u/irteknos
https://forum.reallusion.com/Users/3121951/renaldidomain
https://forum.singaporeexpats.com/memberlist.php?mode=viewprofile&u=595515
https://forum.ventrilo.com/member.php?u=1500682
https://forums.ccbluex.net/user/renaldi-dr
https://freeicons.io/profile/518073
https://gab.com/irteknos
https://giphy.com/channel/irteknos
https://git.industra.space/irteknos
https://git.lumine.io/irteknos
https://git.metabarcoding.org/renaldidomain
https://git.rj.def.br/irteknos
https://github.com/irteknos
https://github.com/irteknos
https://glose.com/u/renaldidr
https://gotartwork.com/Profile/irteknos-nos/239458/
https://hashnode.com/@irteknos
https://histre.com/member/renaldidomain/
https://hommestylemagazine.webador.com/
https://hypothes.is/users/irteknos
https://id.radiocut.fm/user/irteknos/
https://influence.co/irteknos
https://inkbunny.net/irteknos
https://irteknos.amebaownd.com/posts/45640914
https://irteknos.bloggersdelight.dk/2023/07/12/irteknos/
https://irteknos.cgsociety.org/profile
https://irteknos.gitbook.io/irteknos/
https://irteknos.livejournal.com/profile
https://irteknos.localinfo.jp/posts/45640975
https://irteknos.pages.dev/
https://irteknos.renaldidr.repl.co
https://irteknos.renaldidr.repl.co
https://irteknos.shopinfo.jp/posts/45640936
https://irteknos.storeinfo.jp/posts/45640941
https://irteknos.theblog.me/posts/45640951
https://irteknos.themedia.jp/posts/45640969
https://irteknos.therestaurant.jp/posts/45640922
https://irteknos.webador.com/
https://irteknos.webflow.io/
https://irteknos-s-school.teachable.com/p/home
https://issuu.com/irteknos
https://issuu.com/irteknos
https://jobs.blooloop.com/profiles/3647873-irteknos-irteknos
https://jobs.mikeroweworks.org/employers/2180991-irteknos
https://jobs.newtimes.co.rw/employers/2180275-irteknos
https://jobs.recruitingblogs.com/employers/2180806-irteknos
https://jobs.thetab.com/profiles/3647758-irteknos-os
https://journal.almarhalah.ac.id/index.php/almarhalah/user/viewPublicProfile/59353
https://jsfiddle.net/irteknos/Lv4a5us8/
https://knowyourmeme.com/users/irteknos
https://kuula.co/profile/irteknos
https://lab.quickbox.io/irteknos
https://learningapps.org/user/irteknos
https://learnloftblog.com/author/irteknos/
https://leetcode.com/renaldidomain/
https://lessons.drawspace.com/post/451037/irteknos
https://letterboxd.com/irteknos/
https://list.ly/renaldi-dr/
https://list.ly/renaldi-dr/lists
https://moparwiki.win/wiki/User:Irteknos
https://morguefile.com/creative/irteknos
https://moz.com/community/q/user/irteknos
https://my.archdaily.com/us/@renaldi-dr
https://myopportunity.com/profile/irteknos-os/nw
https://naijamp3s.com/profile/irteknos
https://nootheme.com/forums/users/irteknos/
https://nwpeg.uclan.ac.uk/members/irteknoss/
https://openlibrary.org/people/renaldi_dr
https://os.mbed.com/users/irteknos/
https://padlet.com/renaldidomain/irteknos-nkor79gwy50q0nqh
https://pantip.com/profile/7637074#topics
https://participa.terrassa.cat/profiles/renaldi_dr/
https://party.biz/profile/208948
https://paste.toolforge.org/view/d5f4313c
https://pastelink.net/nqj1yafe
https://pastelink.net/nqj1yafe
https://pawoo.net/@irteknos
https://pawoo.net/@irteknos
https://pbase.com/irteknos
https://peatix.com/user/18175948/view
https://peatix.com/user/18175948/view
https://peatix.com/user/18175948/view
https://pinshape.com/users/2670971-irteknos#designs-tab-open
https://pledgeit.org/preview/64c8963fcc567b7fac8d25f6
https://podcasters.spotify.com/pod/show/irteknos/episodes/irteknos-e27b4ek
https://pomagam.pl/renaldidomain
https://postheaven.net/c07w8gje2n
https://profile.ameba.jp/ameba/irteknos/
https://profile.hatena.ne.jp/irteknos/
https://qiita.com/renaldidomain
https://recordsetter.com/user/irteknoss
https://reedsy.com/discovery/user/renaldidr
https://rentry.co/gm8z8
https://rentry.co/irteknos
https://replit.com/@renaldidr/irteknos
https://replit.com/@renaldidr/irteknos
https://repo.getmonero.org/irteknosx
https://research.openhumans.org/member/irteknos/
https://roomstyler.com/users/irteknos
https://rufox.ru/irteknos/info/
https://sighpceducation.hosting.acm.org/wp/forums/users/irteknos/
https://sketchfab.com/irteknos
https://social.msdn.microsoft.com/Profile/irteknos
https://social.msdn.microsoft.com/profile/irteknos/
https://social.technet.microsoft.com/profile/irteknos/
https://social.technet.microsoft.com/profile/irteknos/
https://solo.to/irteknos
https://speakerdeck.com/irteknos
https://starity.hu/profil/380835-irteknos/
https://starity.hu/profil/380835-irteknos/
https://store.nexodyne.com/member.php?u=114685
https://sway.office.com/ghHxECn3odWRuWXT
https://tabelog.com/rvwr/irteknos/prof/
https://taplink.cc/irteknos
https://telegra.ph/irteknos-07-12
https://thedyrt.com/member/renaldi-d/reviews
https://trabajo.merca20.com/author/irteknos/
https://traffic-boosters.jimdosite.com/
https://trello.com/u/renaldidr/activity
https://trello.com/u/renaldidr/activity
https://truxgo.net/profile/455096
https://unsplash.com/@irteknos
https://v3060982-v7pfe4vctowh.demo079.volusion.com/
https://veer.tv/vr/irteknos/home
https://we.riseup.net/irteknos
https://wmart.kz/forum/user/129983/
https://www.4shared.com/u/gnIXbjZ5/renaldidomain.html
https://www.anime-planet.com/users/irteknos
https://www.anobii.com/en/010302ee091487cadc/profile/activity
https://www.anobii.com/en/010302ee091487cadc/profile/activity
https://www.atlasobscura.com/users/043e88ce-0b1d-4991-8a05-51fb8c42195d
https://www.avianwaves.com/User-Profile/userId/179174
https://www.bahamaslocal.com/userprofile/229076/irteknos.html
https://www.beatstars.com/playlists/5521021
https://www.beautylish.com/irteknos
https://www.bikemap.net/en/u/renaldidomain/routes/created/
https://www.bitchute.com/channel/poGaIj8DIEX7/
https://www.bloggportalen.se/BlogPortal/view/BlogDetails?id=212374
https://www.blogtalkradio.com/irteknos
https://www.blurb.com/user/irteknos
https://www.cakeresume.com/me/renaldi-dr
https://www.canadavisa.com/canada-immigration-discussion-board/members/irteknos.1150750/
https://www.careercup.com/user?id=5938559624675328
https://www.chordie.com/forum/profile.php?id=1681884
https://www.chordie.com/forum/profile.php?id=1681884
https://www.climatehistorylab.sites.tau.ac.il/profile/renaldidomain/profile
https://www.colcampus.com/courses/92076/pages/irteknos
https://www.coursera.org/user/e343cd7a7c434cb55906b7d78f8f8599
https://www.credly.com/users/irteknos/badges
https://www.demilked.com/author/renaldidr/
https://www.dermandar.com/user/irteknos/
https://www.designspiration.com/renaldidomain/
https://www.diggerslist.com/irteknos/about
https://www.drupalgovcon.org/user/531696
https://www.easyfie.com/irteknos
https://www.editage.com/insights/renaldi-dr
https://www.elephantjournal.com/profile/renaldidomain/
https://www.empowher.com/users/irteknos
https://www.facer.io/user/KNWlu2xjFl
https://www.fimfiction.net/user/615314/irteknos
https://www.flickr.com/people/198717064@N02/
https://www.globalvision2000.com/forum/member.php?action=profile&uid=964428
https://www.goodreads.com/user/show/167709418-irteknos
https://www.gta5-mods.com/users/irteknos
https://www.halaltrip.com/user/profile/138449/irteknos/
https://www.hebergementweb.org/members/irteknos.528743/
https://www.hulkshare.com/irteknos
https://www.iglinks.io/renaldidomain-had
https://www.indiegogo.com/individuals/34680567
https://www.industryhuddle.com/irteknos
https://www.infragistics.com/community/members/6e40f5405e9029eeba0a252fba0e01ee872201de
https://www.kickstarter.com/profile/irteknos/about
https://www.lawyersclubindia.com/profile.asp?member_id=965755
https://www.live4cup.com/equipe-29457-irteknos.html
https://www.longisland.com/profile/irteknos/
https://www.magcloud.com/user/irteknos
https://www.mediafire.com/view/41wxqfjgw7pbun3/bagus-1.png/file
https://www.medicinacinesenews.it/forum/memberlist.php?mode=viewprofile&u=2753964
https://www.metal-archives.com/users/irteknos
https://www.metooo.io/u/64ae6ec711db1375341fd4af
https://www.notebook.ai/@irteknos
https://www.noteflight.com/profile/813a3cd7fcbaed98901b5471c72fa5c13418a048
https://www.opencode.net/irteknos
https://www.openhumans.net/member/irteknos/
https://www.overclock.net/members/irteknos.702281/#about
https://www.pearltrees.com/irteknos
https://www.pearltrees.com/irteknos/item529565592
https://www.pledgeme.co.nz/profiles/213161/
https://www.pling.com/u/irteknos/
https://www.pokecommunity.com/member.php?u=1209961
https://www.projectnoah.org/users/renaldidomain
https://www.proko.com/@irteknos/activity
https://www.pubpub.org/user/irte-knos
https://www.quia.com/profiles/irteknos
https://www.quora.com/profile/Renaldi-Dr
https://www.rctech.net/forum/members/irteknos-320453.html
https://www.redbubble.com/people/irteknos/shop?asc=u
https://www.roleplaygateway.com/member/irteknos/
https://www.silverstripe.org/ForumMemberProfile/show/113563
https://www.spinattic.com/renaldid
https://www.spreaker.com/show/irteknos
https://www.spyropress.com/forums/users/irteknos/
https://www.symbaloo.com/shared/AAAACEpG8YkAA42AhF4YFQ==
https://www.teachertube.com/user/channel/irteknos
https://www.ted.com/profiles/44631861
https://www.tetongravity.com/community/profile/renaldidomain@gmail.com/
https://www.theoutbound.com/irteknos
https://www.theyeshivaworld.com/coffeeroom/users/irteknos
https://www.triphobo.com/profile/irteknos-os/64c8c9f1bb60beeff329380d
https://www.twitch.tv/irteknos/about
https://www.twitch.tv/irteknos/about
https://www.ultimate-guitar.com/u/renaldidomain
https://www.vaca-ps.org/irteknos
https://www.vaca-ps.org/irteknos
https://www.veoh.com/users/irteknos
https://www.vevioz.com/23af40533
https://www.viki.com/users/renaldidomain_488/about
https://www.viki.com/users/renaldidomain_488/about
https://www.viki.com/users/renaldidomain_488/about
https://www.vingle.net/irteknos
https://www.vingle.net/posts/6476557
https://www.walkscore.com/people/324823982587/walk-score-user
https://www.wattpad.com/user/irteknos
https://www.wishlistr.com/profile/irteknos
https://www.wpanet.org/profile/renaldidomain/profile
https://www.zazzle.com/mbr/238735586090167087
https://xtremepape.rs/members/irteknos.395433/about
https://yamcode.com/untitled-76762
https://zapytaj.zhp.pl/user/irteknos1
https://zrzutka.pl/profile/irteknos-178031
https://bio.fm/renaldidomain
finasteride over the counter
https://linktr.ee/pafijakartatimur
https://groups.google.com/g/pafijakartatimur
https://hanson.net/users/pafijakartatim
https://www.mixcloud.com/pafijakartatimur/
https://www.liveinternet.ru/users/pafijakartatimur/profile
https://artmight.com/user/profile/2307503
https://rosalind.info/users/pafijakartatimur/
https://www.intensedebate.com/people/pafijakartatimu
https://www.remotecentral.com/cgi-bin/forums/members/viewprofile.cgi?pq11g3
https://cannabis.net/user/137979
https://educatorpages.com/site/pafijakartatimur/
https://pafijakartatimur.educatorpages.com
https://myapple.pl/users/419918-pafijakartatimur
https://joy.bio/pafijakartatimur
https://www.bitsdujour.com/profiles/XqzyuX
https://canvas.instructure.com/eportfolios/2338234/Home/Welcome
https://www.divephotoguide.com/user/pafijakartatimur
https://nowewyrazy.uw.edu.pl/profil/pafijakartatimur
https://canvas.instructure.com/eportfolios/2338234/Home/Welcome
https://bbs.now.qq.com/home.php?mod=space&uid=5354087
https://cs.astronomy.com/members/pafijakartatimur/default.aspx
https://nowewyrazy.uw.edu.pl/profil/pafijakartatimur
https://bbs.now.qq.com/home.php?mod=space&uid=5354087
https://imageevent.com/pafijakartatimur
https://pafijakartatimur.contently.com/
https://hub.docker.com/u/pafijakartatimur
https://www.deviantart.com/pafijakartatimur
https://www.provenexpert.com/pafijakartatimur/
https://slides.com/fesfo/fesfo/
https://en.gravatar.com/pafijakartatimur
https://www.instapaper.com/p/12913438
https://www.behance.net/pafijaktatimu
https://wakelet.com/wake/5-WZ3GVLjhD9SkuAJF_d1
https://truxgo.net/profile/otomotips
https://www.giantbomb.com/profile/pafijakartatimu/
https://independent.academia.edu/pafijakartatimu
https://www.magcloud.com/user/pafijakartatimu
https://speakerdeck.com/pafijakartatimur
https://linkr.bio/pafijakartatimur
https://steemit.com/tech/@fesfo/pafi-jakarta-timur
https://bordeaux.onvasortir.com/profil_read.php?Pafijakartatimu
https://www.myminifactory.com/users/pafijakartatimur
https://heylink.me/pafijakartatimur/
https://biolinky.co/pafijaka
https://pafijakart-s-site.thinkific.com/courses/your-first-course
https://medium.com/@tokomanjadancantik
https://pafijakartatimur.mn.co/about
https://www.producthunt.com/@pafijakarta
https://worldcosplay.net/member/1208545
https://pafijakart-s-site.thinkific.com/courses/your-first-course
https://sites.google.com/view/pafijakartatimur/home
https://www.commandlinefu.com/commands/view/31887/create-a-visually-twisted-effect-by-alternating-the-direction-of-the-staples-effect-vertically.-the-effect-is-achieved-by-moving-odd-numbered-lines-from-right-to-left-and-even-numbered-lines-from-left-to-right.
https://zaap.bio/pafijakartatimur
https://app.lookbook.nu/pafijakartatimur
http://go.bubbl.us/d34e34/6a60?/ejtandemonium
http://ttlink.com/pafijakartatimur
https://tokomanjadancantik.wixsite.com/pafijakartatimur
https://support.advancedcustomfields.com/forums/users/pafijakartatimur/
https://buddypress.org/members/pafijakartatimur/profile/
https://app.roll20.net/users/12266152/pafijakar-t
https://learn.acloud.guru/profile/pafijakartatimur
https://t.me/workingclassman
https://telegram.me/s/workingclassman
tretinoin tablets 10mg
Great web site. A lot of helpful info here. I’m sending it to several friends ans additionally sharing in delicious.
And of course, thank you on your sweat!
cost of propecia generic
hydroxychloroquine tablet ip 200 mg
can i buy lexapro online without prescription
buying prednisone: http://prednisone1st.store/# prednisone 5 50mg tablet price
hydroxy-chloroquine
albendazole price usa
phenergan with codeine cough syrup
baclofen 40 mg
trazodone 50 mg tablet price
Have you ever considered about including a little bit more than just your articles?
I mean, what you say is valuable and everything. But think of if you added some great visuals or video clips to give your posts more, “pop”!
Your content is excellent but with images and clips, this site could undeniably be one of the very best in its field.
Terrific blog!
Magnificent website. Plenty of helpful information here.
I am sending it to some buddies ans additionally sharing in delicious.
And certainly, thanks on your sweat!
plaquenil 200 mg prices
Dalam beberapa menit terbaru, slot gacor hari ini dengan maxwin telah menjadi
semakin populer di kalangan pemain judi online di Indonesia.
Situs-situs judi terkemuka menawarkan berbagai permainan slot online
yang menjanjikan kesempatan besar untuk meraih jackpot maxwin yang menggiurkan. Hal ini telah
menciptakan fenomena di mana pemain mencari situs slot online yang d memberikan pengalaman gacor yg menghasilkan kemenangan besar.
Salah lima alasan utama mengapa slot gacor hari ini semakin diminati adalah kemudahan aksesnya.
Pemain dapat dengan mudah memainkan slot online melalui perangkat komputer, laptop,
atau smartphone mereka. Ini memungkinkan para pemain untuk merasakan sensasi dan keseruan dari
slot online gacor kapan saja dan di mana saja tanpa harus pergi ke kasino fisik.
Selain itu, ada juga opsi untuk bermain secara gratis dengan akun test
sebelum memutuskan untuk bermain dg uang sungguhan.
lioresal online
Hey are using WordPress for your site platform? I’m new to the
blog world but I’m trying to get started and create my own. Do you
require any html coding knowledge to make your own blog? Any
help would be really appreciated!
biaxin xl
Thanks , I have recently been looking for information approximately this subject for a long time and yours is the greatest I have found out
so far. But, what concerning the bottom line? Are you certain about the supply?
generic propecia cipla
stromectol coronavirus
cheapest cialis 40mg
erectafil
Un remplacement des lames pourrait également se faire en fonction de l’état de celles-ci.
local free dating sites: professional dating sites – free date site
finasteride 1mg tablets for sale
buy bupropion online india
bilbao camiseta
amoxil 800 mg
You really make it seem so easy with your presentation but I
find this matter to be actually something which I think I would never understand.
It seems too complex and very broad for me. I am looking forward for your next post,
I’ll try to get the hang of it!
brand name propecia
Amazing tons of helpful tips.
define thesis statement writing a thesis statement example thesis thesis statement meaning
Hola! I’ve been reading your web site for a long time now and finally got the courage to
go ahead and give you a shout out from Porter Texas!
Just wanted to mention keep up the great work!
quineprox 60mg
http://atlas.dustforce.com/user/tokomanjadancantik-g
http://baseportal.de/cgi-bin/baseportal.pl?htx=/jaa/tiere&localparams=1&range=400,80
http://buildolution.com/UserProfile/tabid/131/userId/375758/Default.aspx
http://entsaintetienne.free.fr/claroline1110/claroline/backends/download.php?url=L2h0dHBzLS0tcGFmaWpha2FydGF0aW11ci5vcmcudXJs&cidReset=true&cidReq=ROM2121CATG
http://flightgear.jpn.org/userinfo.php?uid=38691
http://foxsheets.com/UserProfile/tabid/57/userId/143954/Default.aspx
http://gendou.com/user/pafijakartatimur
http://gitlab.sleepace.com/timur
http://krachelart.com/UserProfile/tabid/43/userId/1240711/Default.aspx
http://mayfever.crowdfundhq.com/users/pafijakartatimur
http://mobile.punske-valky.freepage.cz/diskuze/
http://mobile.punske-valky.freepage.cz/diskuze/
http://mysmarterhome.ca/UserProfile/tabid/42/userId/69078/Default.aspx
http://onlineboxing.net/jforum/user/profile/246398.page
http://pafijakartatimur.over-blog.com/2023/08/pafijakartatimur.html
http://pafijakartatimur.xobor.de/u1_pafijakartatimur.html
http://riosabeloco.com/User-Profile/userId/194474
http://rufox.ru/pafijakartatimur/info/
http://taylorhicks.ning.com/photo/albums/pafijakartatimur
http://test.sozapag.ru/forum/user/202446/
http://www.giscience.sakura.ne.jp/pukiwiki/index.php?pafijakartatimur
http://www.rohitab.com/discuss/user/1740688-pafijakartatimur/
http://www.shadowera.com/member.php?134512-pafijakartatimur
http://www.travelful.net/location/5217438/indonesia/pafijakartatimur
http://zacriley.ning.com/photo/albums/pafijakartatimur
https://500px.com/p/pafijakartatimur?view=photos
https://64d1847cbfb7a.site123.me/
https://8tracks.com/pafijakartatimur
https://ameblo.jp/pafijakartatimur/entry-12815252794.html
https://bbpress.org/forums/profile/pafijakartatimur/
https://beacons.ai/pafijakartatimur
https://bitbin.it/PtooCdkl/
https://blogfreely.net/pafijakartatimur/pafijakartatimur-org
https://brewwiki.win/wiki/User:Pafijakartatimur
https://calis.delfi.lv/profils/lietotajs/309339-pafijakartatimur/
https://comicvine.gamespot.com/profile/pafijakartatimu/
https://community.lazypoets.com/profile/pafijakartatimur
https://confengine.com/user/pafijaka-rtatimur
https://controlc.com/2734e031
https://coolors.co/u/pafijakartatimur
https://creativecommons.org/choose/results-one?q_1=2&q_1=1&field_commercial=n&field_derivatives=sa&field_jurisdiction=&field_format=Text&field_worktitle=Blog&field_attribute_to_name=pafijakartatimur&field_attribute_to_url=https://pafijakartatimur.org
https://datosabiertos.municipiosanjuan.gob.ar/uploads/user/2023-08-07-010320.163526pafijakartatimur.html
https://dev.to/pafijakarta
https://developers.oxwall.com/user/pafijakartatimur
https://digitaltibetan.win/wiki/User:Pafijakartatimur
https://docs.google.com/document/d/1KEp2mm7DncdBJebl7IyXLtVmLKZJbcVJB4K-3bZtNs8/edit
https://dribbble.com/pafijakartatimur/about
https://fileforum.com/profile/pafijakartatimur
https://files.fm/pafijakartatimur
https://folkd.com/user/pafijakartatimur
https://forum.reallusion.com/Users/3128928/tokomanjadancantik
https://forums.ccbluex.net/user/pafijakartatimur
https://gab.com/pafijakartatimur
https://git.lumine.io/pafijakartatimu
https://gladwyne.bubblelife.com/community/pafijakartatimur
https://glose.com/u/pafijakartatimur
https://gotartwork.com/Profile/pafijakar-tatimur/248983/
https://hashnode.com/@pafijakartatimur
https://histre.com/@tokomanjadancantik/
https://inkbunny.net/pafijakartatimur
https://issuu.com/pafijakartatimur
https://jsfiddle.net/pafijakartatimur/tem4b0Lq/
https://lab.quickbox.io/pafijakartatimur
https://leetcode.com/pafijakartatimur/
https://moparwiki.win/wiki/User:Pafijakartatimur
https://moz.com/community/q/user/pafijakartatimur
https://muckrack.com/pafijakartatimur
https://myopportunity.com/profile/pafijaka-rtatimur/nw
https://nootheme.com/forums/users/pafijakartatimur/
https://openlibrary.org/people/pafijakartatimur
https://padlet.com/tokomanjadancantik/pafijakartatimur-hxeik9n6xlmlmgcu
https://pafijakartatimur.amebaownd.com/posts/46482509
https://pafijakartatimur.bloggersdelight.dk/2023/08/07/pafijakartatimur/
https://pafijakartatimur.gitbook.io/untitled/
https://pafijakartatimur.jimdofree.com/
https://pafijakartatimur.localinfo.jp/posts/46482690
https://pafijakartatimur.shopinfo.jp/
https://pafijakartatimur.storeinfo.jp/
https://pafijakartatimur.theblog.me/posts/46482696
https://pafijakartatimur.themedia.jp/posts/46482681
https://pafijakartatimur.therestaurant.jp/posts/46482556
https://pafijakartatimur.webador.com/
https://pafijakartatimur-s-school.teachable.com/p/home
https://pafijakartatimur–tokomanjadancan.repl.co/
https://pantip.com/profile/7674361#topics
https://pastelink.net/u959w8q6
https://pbase.com/pafijakartatimur
https://pinshape.com/users/2686604-tokomanjadancantik#designs-tab-open
https://postheaven.net/pafijakartatimur/pafijakartatimur-org
https://profile.ameba.jp/ameba/pafijakartatimur
https://profile.hatena.ne.jp/pafijakartatimur/
https://rentry.co/6zhwk
https://rentry.co/pafijakartatimur
https://replit.com/@tokomanjadancan
https://research.openhumans.org/member/pafijakartatimur/
https://social.msdn.microsoft.com/Profile/pafijakartatimur
https://social.technet.microsoft.com/profile/pafijakartatimur/
https://solo.to/pafijakartatimur
https://speakerdeck.com/pafijakartatimur
https://starity.hu/profil/384728-pafijakartatimur/
https://starity.hu/profil/384728-pafijakartatimur/
https://support.advancedcustomfields.com/forums/users/pafijakartatimur/
https://sway.office.com/xzfiOdOvbPdWZrgJ?ref=Link
https://talktoislam.com/user/pafijakartatimur
https://telegra.ph/pafijakartatimur-08-08
https://trello.com/u/tokomanjadancantik
https://trello.com/u/tokomanjadancantik
https://webflow.com/@tokomanjadancantik
https://wmart.kz/forum/user/131341/
https://www.anobii.com/en/01e346c5b33f02dc28/profile/activity
https://www.avianwaves.com/User-Profile/userId/183029
https://www.beatstars.com/tokomanjadancantik
https://www.bitchute.com/channel/JcSjzcylW45h/
https://www.cakeresume.com/me/pafijakartatimur
https://www.colcampus.com/courses/92550
https://www.colcampus.com/courses/92550
https://www.dermandar.com/user/pafijakartatimur/
https://www.facer.io/user/pfBVStXo5E
https://www.fimfiction.net/user/624224/pafijakartatimur
https://www.flickr.com/people/pafijakartatimur/
https://www.goodreads.com/user/show/168653506-pafijakartatimur
https://www.gta5-mods.com/users/pafijakartatimur
https://www.iglinks.io/tokomanjadancantik-wak
https://www.kickstarter.com/profile/pafijakartatimur/about
https://www.lawyersclubindia.com/profile.asp?member_id=973401
https://www.live4cup.com/tournoi-23607-pafijakartatimu.html
https://www.metooo.io/u/pafijakartatimur
https://www.mojomarketplace.com/user/pafijakartatimur-yY5okSQ728
https://www.noteflight.com/profile/2ae746b0b2acbedce77868d6be814b6fd2e9f957
https://www.opencode.net/pafijakartatimur
https://www.openhumans.net/member/pafijakartatimur/
https://www.pearltrees.com/pafijakartatimur
https://www.pling.com/u/pafijakartatimur/
https://www.pubpub.org/user/pafijakarta-timur
https://www.quia.com/profiles/pafijakartat
https://www.quia.com/profiles/pafijakartat
https://www.quora.com/profile/Pafijakartatimur
https://www.skillshare.com/fr/user/pafijakartatimur
https://www.spyropress.com/forums/users/pafijakartatimur/
https://www.symbaloo.com/home/mix/13eOhMFTJ3
https://www.tetongravity.com/community/profile/tokomanjadancantik@gmail.com/
https://www.twitch.tv/pafijakartatimur/about
https://www.vingle.net/posts/6605795
https://xtremepape.rs/members/pafijakartatimur.399312/#about
https://yamcode.com/pafijakartatimur
Link exchange is nothing else but it is simply placing
the other person’s website link on your page at suitable place and other person will also do similar
in favor of you.
order tretinoin online
finasteride for women
cialis 20mg price in usa
phenergan coupon
canadian mail order pharmacy
ivermectin for sale
amoxil buy online
http://arahn.100webspace.net/profile.php?mode=viewprofile&u=133285
http://atlas.dustforce.com/user/tokomanjadancantik-g
http://baseportal.de/cgi-bin/baseportal.pl?htx=/jaa/tiere&localparams=1&range=400,80
http://buildolution.com/UserProfile/tabid/131/userId/375758/Default.aspx
http://entsaintetienne.free.fr/claroline1110/claroline/backends/download.php?url=L2h0dHBzLS0tcGFmaWpha2FydGF0aW11ci5vcmcudXJs&cidReset=true&cidReq=ROM2121CATG
http://flightgear.jpn.org/userinfo.php?uid=38691
http://foxsheets.com/UserProfile/tabid/57/userId/143954/Default.aspx
http://gendou.com/user/pafijakartatimur
http://gitlab.sleepace.com/timur
http://go.bubbl.us/d34e34/6a60?/ejtandemonium
http://krachelart.com/UserProfile/tabid/43/userId/1240711/Default.aspx
http://mayfever.crowdfundhq.com/users/pafijakartatimur
http://mobile.punske-valky.freepage.cz/diskuze/
http://mobile.punske-valky.freepage.cz/diskuze/
http://msnho.com/blog/pafijakartatimur
http://mysmarterhome.ca/UserProfile/tabid/42/userId/69078/Default.aspx
http://onlineboxing.net/jforum/user/profile/246398.page
http://pafijakartatimur.over-blog.com/2023/08/pafijakartatimur.html
http://pafijakartatimur.xobor.de/u1_pafijakartatimur.html
http://profiles.delphiforums.com/n/pfx/profile.aspx?webtag=dfpprofile000&userId=1891192445
http://riosabeloco.com/User-Profile/userId/194474
http://rufox.ru/pafijakartatimur/info/
http://taylorhicks.ning.com/photo/albums/pafijakartatimur
http://test.sozapag.ru/forum/user/202446/
http://ttlink.com/pafijakartatimur
http://www.activewin.com/user.asp?Action=Read&UserIndex=4235312
http://www.giscience.sakura.ne.jp/pukiwiki/index.php?pafijakartatimur
http://www.rohitab.com/discuss/user/1740688-pafijakartatimur/
http://www.shadowera.com/member.php?134512-pafijakartatimur
http://www.travelful.net/location/5217438/indonesia/pafijakartatimur
http://zacriley.ning.com/photo/albums/pafijakartatimur
https://500px.com/p/pafijakartatimur?view=photos
https://64d1847cbfb7a.site123.me/
https://8tracks.com/pafijakartatimur
https://ameblo.jp/pafijakartatimur/entry-12815252794.html
https://app.lookbook.nu/pafijakartatimur
https://app.roll20.net/users/12266152/pafijakar-t
https://artmight.com/user/profile/2307503
https://bbpress.org/forums/profile/pafijakartatimur/
https://bbs.now.qq.com/home.php?mod=space&uid=5354087
https://bbs.now.qq.com/home.php?mod=space&uid=5354087
https://beacons.ai/pafijakartatimur
https://biolinky.co/pafijaka
https://bitbin.it/PtooCdkl/
https://blogfreely.net/pafijakartatimur/pafijakartatimur-org
https://bordeaux.onvasortir.com/profil_read.php?Pafijakartatimu
https://brewwiki.win/wiki/User:Pafijakartatimur
https://buddypress.org/members/pafijakartatimur/profile/
https://calis.delfi.lv/profils/lietotajs/309339-pafijakartatimur/
https://camp-fire.jp/profile/pafijakartatimur
https://cannabis.net/user/137979
https://canvas.instructure.com/eportfolios/2338234/Home/Welcome
https://canvas.instructure.com/eportfolios/2338234/Home/Welcome
https://comicvine.gamespot.com/profile/pafijakartatimu/
https://community.lazypoets.com/profile/pafijakartatimur
https://confengine.com/user/pafijaka-rtatimur
https://controlc.com/2734e031
https://coolors.co/u/pafijakartatimur
https://creativecommons.org/choose/results-one?q_1=2&q_1=1&field_commercial=n&field_derivatives=sa&field_jurisdiction=&field_format=Text&field_worktitle=Blog&field_attribute_to_name=pafijakartatimur&field_attribute_to_url=https://pafijakartatimur.org
https://cs.astronomy.com/members/pafijakartatimur/default.aspx
https://datamx.io/uploads/user/2023-08-08-004133.309515pafijakartatimur.html
https://datosabiertos.municipiosanjuan.gob.ar/uploads/user/2023-08-07-010320.163526pafijakartatimur.html
https://descubre.beqbe.com/p/pafijakartatimur
https://dev.to/pafijakarta
https://developers.oxwall.com/user/pafijakartatimur
https://digitaltibetan.win/wiki/User:Pafijakartatimur
https://discover.events.com/profile/tokomanjadancantik/3710729/savethedate/
https://disqus.com/by/pafijakartatimur/about/
https://docs.google.com/document/d/1KEp2mm7DncdBJebl7IyXLtVmLKZJbcVJB4K-3bZtNs8/edit
https://dreevoo.com/profile.php?pid=568490
https://dribbble.com/pafijakartatimur/about
https://educatorpages.com/site/pafijakartatimur/
https://en.gravatar.com/pafijakartatimur
https://fairygodboss.com/users/profile/OlMAhbleni/pafijakartatimur
https://fileforum.com/profile/pafijakartatimur
https://files.fm/pafijakartatimur
https://folkd.com/user/pafijakartatimur
https://forum.instube.com/u/pafijakartatimur
https://forum.reallusion.com/Users/3128928/tokomanjadancantik
https://forum.singaporeexpats.com/memberlist.php?mode=viewprofile&u=608617
https://forums.ccbluex.net/user/pafijakartatimur
https://freeicons.io/profile/531066
https://gab.com/pafijakartatimur
https://git.lumine.io/pafijakartatimu
https://github.com/pafijakartatimu
https://gladwyne.bubblelife.com/community/pafijakartatimur
https://glose.com/u/pafijakartatimur
https://gotartwork.com/Profile/pafijakar-tatimur/248983/
https://groups.google.com/g/pafijakartatimur
https://hanson.net/users/pafijakartatim
https://hashnode.com/@pafijakartatimur
https://heylink.me/pafijakartatimur/
https://histre.com/@tokomanjadancantik/
https://hub.docker.com/u/pafijakartatimur
https://imageevent.com/pafijakartatimur
https://independent.academia.edu/pafijakartatimu
https://inkbunny.net/pafijakartatimur
https://issuu.com/pafijakartatimur
https://joy.bio/pafijakartatimur
https://jsfiddle.net/pafijakartatimur/tem4b0Lq/
https://lab.quickbox.io/pafijakartatimur
https://learn.acloud.guru/profile/pafijakartatimur
https://leetcode.com/pafijakartatimur/
https://linkr.bio/pafijakartatimur
https://linktr.ee/pafijakartatimur
https://list.ly/tokomanjadancantik
https://medium.com/@tokomanjadancantik
https://moparwiki.win/wiki/User:Pafijakartatimur
https://moz.com/community/q/user/pafijakartatimur
https://muckrack.com/pafijakartatimur
https://myapple.pl/users/419918-pafijakartatimur
https://myopportunity.com/profile/pafijaka-rtatimur/nw
https://nootheme.com/forums/users/pafijakartatimur/
https://nowewyrazy.uw.edu.pl/profil/pafijakartatimur
https://nowewyrazy.uw.edu.pl/profil/pafijakartatimur
https://openlibrary.org/people/pafijakartatimur
https://padlet.com/tokomanjadancantik/pafijakartatimur-hxeik9n6xlmlmgcu
https://pafijakartatimu.livejournal.com/profile
https://pafijakartatimur.amebaownd.com/posts/46482509
https://pafijakartatimur.bloggersdelight.dk/2023/08/07/pafijakartatimur/
https://pafijakartatimur.contently.com/
https://pafijakartatimur.educatorpages.com
https://pafijakartatimur.gitbook.io/untitled/
https://pafijakartatimur.jimdofree.com/
https://pafijakartatimur.localinfo.jp/posts/46482690
https://pafijakartatimur.mn.co/about
https://pafijakartatimur.pages.dev/
https://pafijakartatimur.shopinfo.jp/
https://pafijakartatimur.storeinfo.jp/
https://pafijakartatimur.theblog.me/posts/46482696
https://pafijakartatimur.themedia.jp/posts/46482681
https://pafijakartatimur.therestaurant.jp/posts/46482556
https://pafijakartatimur.webador.com/
https://pafijakartatimur-s-school.teachable.com/p/home
https://pafijakartatimur–tokomanjadancan.repl.co/
https://pafijakart-s-site.thinkific.com/courses/your-first-course
https://pafijakart-s-site.thinkific.com/courses/your-first-course
https://pantip.com/profile/7674361#topics
https://pastelink.net/u959w8q6
https://pbase.com/pafijakartatimur
https://peatix.com/user/18547984/view
https://peatix.com/user/18547984/view
https://pinshape.com/users/2686604-tokomanjadancantik#designs-tab-open
https://postheaven.net/pafijakartatimur/pafijakartatimur-org
https://profile.ameba.jp/ameba/pafijakartatimur
https://profile.hatena.ne.jp/pafijakartatimur/
https://qiita.com/pafijakartatimur
https://rentry.co/6zhwk
https://rentry.co/pafijakartatimur
https://replit.com/@tokomanjadancan
https://research.openhumans.org/member/pafijakartatimur/
https://roomstyler.com/users/pafijakartatimur
https://rosalind.info/users/pafijakartatimur/
https://sites.google.com/view/pafijakartatimur/home
https://slides.com/fesfo/fesfo/
https://social.msdn.microsoft.com/Profile/pafijakartatimur
https://social.technet.microsoft.com/profile/pafijakartatimur/
https://solo.to/pafijakartatimur
https://speakerdeck.com/pafijakartatimur
https://speakerdeck.com/pafijakartatimur
https://starity.hu/profil/384728-pafijakartatimur/
https://starity.hu/profil/384728-pafijakartatimur/
https://steemit.com/tech/@fesfo/pafi-jakarta-timur
https://store.nexodyne.com/member.php?u=129143
https://support.advancedcustomfields.com/forums/users/pafijakartatimur/
https://support.advancedcustomfields.com/forums/users/pafijakartatimur/
https://sway.office.com/xzfiOdOvbPdWZrgJ?ref=Link
https://t.me/workingclassman
https://talktoislam.com/user/pafijakartatimur
https://telegra.ph/pafijakartatimur-08-08
https://telegram.me/s/workingclassman
https://tokomanjadancantik.wixsite.com/pafijakartatimur
https://trello.com/u/tokomanjadancantik
https://trello.com/u/tokomanjadancantik
https://truxgo.net/profile/otomotips
https://unsplash.com/@pafijakartatimur
https://wakelet.com/wake/5-WZ3GVLjhD9SkuAJF_d1
https://webflow.com/@tokomanjadancantik
https://wmart.kz/forum/user/131341/
https://worldcosplay.net/member/1208545
https://www.4shared.com/u/GniFBiDW/tokomanjadancantik.html
https://www.anobii.com/en/01e346c5b33f02dc28/profile/activity
https://www.atlasobscura.com/users/tokomanjadancantik
https://www.avianwaves.com/User-Profile/userId/183029
https://www.beatstars.com/tokomanjadancantik
https://www.behance.net/pafijaktatimu
https://www.bitchute.com/channel/JcSjzcylW45h/
https://www.bitsdujour.com/profiles/XqzyuX
https://www.cakeresume.com/me/pafijakartatimur
https://www.chordie.com/forum/profile.php?id=1702456
https://www.colcampus.com/courses/92550
https://www.colcampus.com/courses/92550
https://www.commandlinefu.com/commands/view/31887/create-a-visually-twisted-effect-by-alternating-the-direction-of-the-staples-effect-vertically.-the-effect-is-achieved-by-moving-odd-numbered-lines-from-right-to-left-and-even-numbered-lines-from-left-to-right.
https://www.coursera.org/user/88ccfbddab01e28a0d54918d7b58b793
https://www.dermandar.com/user/pafijakartatimur/
https://www.deviantart.com/pafijakartatimur
https://www.divephotoguide.com/user/pafijakartatimur
https://www.empowher.com/users/pafijakartati
https://www.facer.io/user/pfBVStXo5E
https://www.fimfiction.net/user/624224/pafijakartatimur
https://www.flickr.com/people/pafijakartatimur/
https://www.giantbomb.com/profile/pafijakartatimu/
https://www.globalvision2000.com/forum/member.php?action=profile&uid=966026
https://www.goodreads.com/user/show/168653506-pafijakartatimur
https://www.gta5-mods.com/users/pafijakartatimur
https://www.hulkshare.com/pafijakartatimur
https://www.iglinks.io/tokomanjadancantik-wak
https://www.industryhuddle.com/pafijakartatimur
https://www.infragistics.com/community/members/7a6004baaac834d5b9bbbcb7e48c6ccc810fe8d0
https://www.instapaper.com/p/12913438
https://www.intensedebate.com/people/pafijakartatimu
https://www.kickstarter.com/profile/pafijakartatimur/about
https://www.lawyersclubindia.com/profile.asp?member_id=973401
https://www.live4cup.com/tournoi-23607-pafijakartatimu.html
https://www.liveinternet.ru/users/pafijakartatimur/profile
https://www.magcloud.com/user/pafijakartatimu
https://www.mediafire.com/view/hw5e4exwk48m0y6/bagus-1.png/file
https://www.medicinacinesenews.it/forum/memberlist.php?mode=viewprofile&u=2884341
https://www.metooo.io/u/pafijakartatimur
https://www.mixcloud.com/pafijakartatimur/
https://www.mojomarketplace.com/user/pafijakartatimur-yY5okSQ728
https://www.myminifactory.com/users/pafijakartatimur
https://www.notebook.ai/@pafijakartatimur
https://www.noteflight.com/profile/2ae746b0b2acbedce77868d6be814b6fd2e9f957
https://www.opencode.net/pafijakartatimur
https://www.openhumans.net/member/pafijakartatimur/
https://www.pearltrees.com/pafijakartatimur
https://www.pling.com/u/pafijakartatimur/
https://www.producthunt.com/@pafijakarta
https://www.provenexpert.com/pafijakartatimur/
https://www.pubpub.org/user/pafijakarta-timur
https://www.quia.com/profiles/pafijakartat
https://www.quia.com/profiles/pafijakartat
https://www.quora.com/profile/Pafijakartatimur
https://www.rctech.net/forum/members/pafijakartatimu-323844.html
https://www.remotecentral.com/cgi-bin/forums/members/viewprofile.cgi?pq11g3
https://www.skillshare.com/fr/user/pafijakartatimur
https://www.spinattic.com/82557
https://www.spyropress.com/forums/users/pafijakartatimur/
https://www.symbaloo.com/home/mix/13eOhMFTJ3
https://www.tetongravity.com/community/profile/tokomanjadancantik@gmail.com/
https://www.twitch.tv/pafijakartatimur/about
https://www.ultimate-guitar.com/u/tokomanjadanc1
https://www.vaca-ps.org/pafijakartatimur
https://www.vaca-ps.org/pafijakartatimur
https://www.veoh.com/users/pafijakartatimur
https://www.viki.com/users/pafijakartatimur/about
https://www.vingle.net/posts/6605795
https://www.wattpad.com/user/pafijakartatimur
https://www.zazzle.com/mbr/238522838600913869
https://xtremepape.rs/members/pafijakartatimur.399312/#about
https://yamcode.com/pafijakartatimur
https://zaap.bio/pafijakartatimur
https://zapytaj.zhp.pl/user/pafijakartatimu
Nice blog here! Also your site loads up very fast!
What web host are you using? Can I get your affiliate link to your host?
I wish my web site loaded up as quickly as yours lol
My brother recommended I would possibly like this website.
He was totally right. This publish truly made my day.
You can not believe simply how a lot time
I had spent for this information! Thank
you!
Hello, I think your website might be having browser compatibility issues.
When I look at your website in Opera, it looks fine
but when opening in Internet Explorer, it has some overlapping.
I just wanted to give you a quick heads up!
Other then that, fantastic blog!
I’d like to thank you for the efforts you have put in penning this
website. I am hoping to check out the same high-grade
content from you later on as well. In truth, your creative writing abilities has inspired me to get my own, personal website now 😉
It’s an remarkable post designed for all the web visitors; they will take advantage from it
I am sure.
I’m not sure exactly why but this web site is loading extremely slow
for me. Is anyone else having this issue or is it a problem on my end?
I’ll check back later on and see if the problem still exists.
biaxin xl 500mg
buy cheap propecia
propecia cheap price
Greetings from Ohio! I’m bored to tears at work so I decided
to check out your blog on my iphone during lunch break.
I really like the information you present here and can’t
wait to take a look when I get home. I’m surprised at how quick your blog loaded on my mobile ..
I’m not even using WIFI, just 3G .. Anyhow, excellent blog!
Greetings! I’ve been following your web site for a long time now and finally got the bravery to go
ahead and give you a shout out from Huffman Texas!
Just wanted to say keep up the great job!
Hello I am so glad I found your site, I really found you by mistake, while I was searching on Digg for something
else, Anyways I am here now and would just like to say many thanks for a incredible post and
a all round interesting blog (I also love the theme/design), I don’t have time to browse
it all at the minute but I have saved it and also included your RSS feeds, so when I have time I will be back to
read much more, Please do keep up the awesome jo.
lexapro online india
Цена на траверсы высоковольтные ТМ определяется их несущей способностью, формой
и размерами.
I will right away grasp your rss as I can’t find your e-mail subscription link or e-newsletter
service. Do you’ve any? Kindly permit me recognize
in order that I could subscribe. Thanks.
After going over a few of the blog articles on your blog, I truly appreciate
your way of writing a blog. I saved it to my bookmark webpage list and will be checking back in the near future.
Take a look at my website as well and tell me what
you think.
lyrica 150 mg price australia
It’s perfect time to make some plans for the future and it’s time to be happy.
I have read this post and if I could I wish to suggest you some interesting things or suggestions.
Maybe you can write next articles referring to this article.
I wish to read even more things about it!
purchase oral ivermectin
lyrica tablet price
I know this if off topic but I’m looking into starting my own blog and was curious what all is
required to get setup? I’m assuming having a blog like yours would cost a pretty penny?
I’m not very internet smart so I’m not 100% positive. Any suggestions or advice would be
greatly appreciated. Kudos
I would like to thank you for the efforts you have put in penning this blog.
I’m hoping to see the same high-grade blog posts by you
later on as well. In truth, your creative writing abilities has inspired me to get my very
own blog now 😉
Unquestionably believe that which you stated.
Your favorite reason appeared to be on the net the
simplest thing to be aware of. I say to you, I certainly get
annoyed while people think about worries that they just don’t know about.
You managed to hit the nail upon the top and defined
out the whole thing without having side-effects , people can take a signal.
Will probably be back to get more. Thanks
Factor very well considered.!
Hey there! This is my first comment here so I just wanted to give a
quick shout out and say I genuinely enjoy reading your posts.
Can you recommend any other blogs/websites/forums
that go over the same subjects? Thanks!
Hi my loved one! I want to say that this post is awesome, nice written and include approximately all vital infos.
I’d like to see more posts like this .
how to get finasteride
dapoxetine 60 mg online in india
cialis online europe
finasteride 1mg price
http://brianknapp.co/community/profile/adriannsv65100/
http://brianknapp.co/community/profile/essiehanran3019/
http://clubkava.com/forum/profile/elena95h3084938/
http://clubkava.com/forum/profile/merrillwestacot/
https://commoncause.optiontradingspeak.com/index.php/community/profile/ardismuniz10907/
https://commoncause.optiontradingspeak.com/index.php/community/profile/fpymanual13610/
https://commoncause.optiontradingspeak.com/index.php/community/profile/neilmotsinger43/
https://solucx.com.br/forum/index.php/community/profile/demid389398545/
https://solucx.com.br/forum/index.php/community/profile/tillymaccarthy7/
I just could not go away your site prior to suggesting that I really enjoyed the standard info a
person supply on your visitors? Is going to be again ceaselessly in order to investigate cross-check new posts
https://anyflip.com/homepage/fuojd
https://artistecard.com/pafijakartatimur
https://community.clover.com/users/37563/pafijakartatimur.html
https://conifer.rhizome.org/pafijakartatimur
https://doodleordie.com/profile/pafijakartatimur
https://edshelf.com/profile/pafijakartatimur/
https://fliphtml5.com/homepage/phhvf
https://forum.codeigniter.com/member.php?action=profile&uid=81406
https://forum.ventrilo.com/member.php?u=1505822
https://git.industra.space/pafijakart
https://git.rj.def.br/pafijakartatimur
https://gitlab.com/pafijakartatimu
https://gladwyne.bubblelife.com/community/pafijakartatimur
https://hypothes.is/users/pafijakartatimur
https://id.radiocut.fm/user/pafijakartatimur/
https://influence.co/pafijakartatimur
https://jobs.blooloop.com/profiles/3666564-pafijakartati-mur
https://jobs.mikeroweworks.org/employers/2202282-pafijakartatimur
https://jobs.newtimes.co.rw/employers/2202287-pafijakartatimur
https://jobs.recruitingblogs.com/employers/2202414-pafijakartatimur
https://knowyourmeme.com/users/pafijakartatimur
https://kuula.co/profile/pafijakartatimur
https://learningapps.org/user/pafijakartatimur
https://learnloftblog.com/author/pafijakartatimur/
https://lessons.drawspace.com/post/456125/pafijakartatimur
https://morguefile.com/creative/pafijakartatimur
https://naijamp3s.com/profile/pafijakartatimur
https://nwpeg.uclan.ac.uk/members/pafijakartatim/
https://os.mbed.com/users/pafijakartatimur/
https://participa.terrassa.cat/profiles/pafijakartatimur/timeline
https://party.biz/profile/211652
https://paste.toolforge.org/view/29e8ff90
https://pawoo.net/@pafijakartatimur
https://pawoo.net/@pafijakartatimur
https://peatix.com/user/18547984/view
https://pledgeit.org/preview/64d1de8ae2208702c722bc4b
https://pomagam.pl/tokomanjadancantik
https://recordsetter.com//user/pafijakartatimur
https://reedsy.com/discovery/user/pafijakartatimur
https://repo.getmonero.org/pafijakartatimu
https://sighpceducation.hosting.acm.org/wp/forums/users/pafijakartatimur/
https://thedyrt.com/member/pafijakartatimur/reviews
https://trabajo.merca20.com/author/pafijakartatimur/
https://veer.tv/vr/pafijakartatimur/home
https://www.anime-planet.com/users/pafijakartatimur
https://www.bahamaslocal.com/userprofile/231277/pafijakartatimur.html
https://www.beautylish.com/profile/scacsps
https://www.bikemap.net/en/u/tokomanjadancantik/routes/created/
https://www.careercup.com/user?id=6216819390545920
https://www.designspiration.com/tokomanjadancantik/
https://www.diggerslist.com/pafijakartatimur/about
https://www.easyfie.com/pafijakartatimur
https://www.editage.com/insights/pafijakarta-tatimur
https://www.elephantjournal.com/profile/tokomanjadancantik/
https://www.halaltrip.com/user/profile/138876/pafijakartatimu/
https://www.hebergementweb.org/members/pafijakartatimur.532739/
https://www.overclock.net/members/pafijakartatimur.702728/#about
https://www.pledgeme.co.nz/profiles/213378/
https://www.pokecommunity.com/member.php?u=1212266
https://www.proko.com/@pafijakartatimur/activity
https://www.redbubble.com/people/pafijakartat/shop?asc=u
https://www.silverstripe.org/ForumMemberProfile/show/114190
https://www.theoutbound.com/pafijakarta-timu
https://www.theyeshivaworld.com/coffeeroom/users/pafijakartatimur
https://www.triphobo.com/profile/pafijaka-rtatimur/64d2f44d69a3f4c9cc0e58f0
https://www.vevioz.com/pafijakartatimur
https://www.wpanet.org/profile/tokomanjadancantik/profile
https://zrzutka.pl/en/profile/pafijakartatimur-655105
http://arahn.100webspace.net/profile.php?mode=viewprofile&u=133285
http://atlas.dustforce.com/user/tokomanjadancantik-g
http://baseportal.de/cgi-bin/baseportal.pl?htx=/jaa/tiere&localparams=1&range=400,80
http://buildolution.com/UserProfile/tabid/131/userId/375758/Default.aspx
http://entsaintetienne.free.fr/claroline1110/claroline/backends/download.php?url=L2h0dHBzLS0tcGFmaWpha2FydGF0aW11ci5vcmcudXJs&cidReset=true&cidReq=ROM2121CATG
http://flightgear.jpn.org/userinfo.php?uid=38691
http://foxsheets.com/UserProfile/tabid/57/userId/143954/Default.aspx
http://gendou.com/user/pafijakartatimur
http://gitlab.sleepace.com/timur
http://go.bubbl.us/d34e34/6a60?/ejtandemonium
http://krachelart.com/UserProfile/tabid/43/userId/1240711/Default.aspx
http://mayfever.crowdfundhq.com/users/pafijakartatimur
http://mobile.punske-valky.freepage.cz/diskuze/
http://mobile.punske-valky.freepage.cz/diskuze/
http://msnho.com/blog/pafijakartatimur
http://mysmarterhome.ca/UserProfile/tabid/42/userId/69078/Default.aspx
http://onlineboxing.net/jforum/user/profile/246398.page
http://pafijakartatimur.over-blog.com/2023/08/pafijakartatimur.html
http://pafijakartatimur.xobor.de/u1_pafijakartatimur.html
http://profiles.delphiforums.com/n/pfx/profile.aspx?webtag=dfpprofile000&userId=1891192445
http://riosabeloco.com/User-Profile/userId/194474
http://rufox.ru/pafijakartatimur/info/
http://taylorhicks.ning.com/photo/albums/pafijakartatimur
http://test.sozapag.ru/forum/user/202446/
http://ttlink.com/pafijakartatimur
http://www.activewin.com/user.asp?Action=Read&UserIndex=4235312
http://www.giscience.sakura.ne.jp/pukiwiki/index.php?pafijakartatimur
http://www.rohitab.com/discuss/user/1740688-pafijakartatimur/
http://www.shadowera.com/member.php?134512-pafijakartatimur
http://www.travelful.net/location/5217438/indonesia/pafijakartatimur
http://zacriley.ning.com/photo/albums/pafijakartatimur
https://500px.com/p/pafijakartatimur?view=photos
https://64d1847cbfb7a.site123.me/
https://8tracks.com/pafijakartatimur
https://ameblo.jp/pafijakartatimur/entry-12815252794.html
https://app.lookbook.nu/pafijakartatimur
https://app.roll20.net/users/12266152/pafijakar-t
https://artmight.com/user/profile/2307503
https://bbpress.org/forums/profile/pafijakartatimur/
https://bbs.now.qq.com/home.php?mod=space&uid=5354087
https://bbs.now.qq.com/home.php?mod=space&uid=5354087
https://beacons.ai/pafijakartatimur
https://biolinky.co/pafijaka
https://bitbin.it/PtooCdkl/
https://blogfreely.net/pafijakartatimur/pafijakartatimur-org
https://bordeaux.onvasortir.com/profil_read.php?Pafijakartatimu
https://brewwiki.win/wiki/User:Pafijakartatimur
https://buddypress.org/members/pafijakartatimur/profile/
https://calis.delfi.lv/profils/lietotajs/309339-pafijakartatimur/
https://camp-fire.jp/profile/pafijakartatimur
https://cannabis.net/user/137979
https://canvas.instructure.com/eportfolios/2338234/Home/Welcome
https://canvas.instructure.com/eportfolios/2338234/Home/Welcome
https://comicvine.gamespot.com/profile/pafijakartatimu/
https://community.lazypoets.com/profile/pafijakartatimur
https://confengine.com/user/pafijaka-rtatimur
https://controlc.com/2734e031
https://coolors.co/u/pafijakartatimur
https://cs.astronomy.com/members/pafijakartatimur/default.aspx
https://datamx.io/uploads/user/2023-08-08-004133.309515pafijakartatimur.html
https://datosabiertos.municipiosanjuan.gob.ar/uploads/user/2023-08-07-010320.163526pafijakartatimur.html
https://descubre.beqbe.com/p/pafijakartatimur
https://dev.to/pafijakarta
https://developers.oxwall.com/user/pafijakartatimur
https://digitaltibetan.win/wiki/User:Pafijakartatimur
https://discover.events.com/profile/tokomanjadancantik/3710729/savethedate/
https://disqus.com/by/pafijakartatimur/about/
https://docs.google.com/document/d/1KEp2mm7DncdBJebl7IyXLtVmLKZJbcVJB4K-3bZtNs8/edit
https://dreevoo.com/profile.php?pid=568490
https://dribbble.com/pafijakartatimur/about
https://educatorpages.com/site/pafijakartatimur/
https://en.gravatar.com/pafijakartatimur
https://fairygodboss.com/users/profile/OlMAhbleni/pafijakartatimur
https://fileforum.com/profile/pafijakartatimur
https://files.fm/pafijakartatimur
https://folkd.com/user/pafijakartatimur
https://forum.instube.com/u/pafijakartatimur
https://forum.reallusion.com/Users/3128928/tokomanjadancantik
https://forum.singaporeexpats.com/memberlist.php?mode=viewprofile&u=608617
https://forums.ccbluex.net/user/pafijakartatimur
https://freeicons.io/profile/531066
https://gab.com/pafijakartatimur
https://git.lumine.io/pafijakartatimu
https://github.com/pafijakartatimu
https://gladwyne.bubblelife.com/community/pafijakartatimur
https://glose.com/u/pafijakartatimur
https://gotartwork.com/Profile/pafijakar-tatimur/248983/
https://groups.google.com/g/pafijakartatimur
https://hanson.net/users/pafijakartatim
https://hashnode.com/@pafijakartatimur
https://heylink.me/pafijakartatimur/
https://histre.com/@tokomanjadancantik/
https://hub.docker.com/u/pafijakartatimur
https://imageevent.com/pafijakartatimur
https://independent.academia.edu/pafijakartatimu
https://inkbunny.net/pafijakartatimur
https://issuu.com/pafijakartatimur
https://joy.bio/pafijakartatimur
https://jsfiddle.net/pafijakartatimur/tem4b0Lq/
https://lab.quickbox.io/pafijakartatimur
https://learn.acloud.guru/profile/pafijakartatimur
https://leetcode.com/pafijakartatimur/
https://linkr.bio/pafijakartatimur
https://linktr.ee/pafijakartatimur
https://list.ly/tokomanjadancantik
https://medium.com/@tokomanjadancantik
https://moparwiki.win/wiki/User:Pafijakartatimur
https://moz.com/community/q/user/pafijakartatimur
https://muckrack.com/pafijakartatimur
https://myapple.pl/users/419918-pafijakartatimur
https://myopportunity.com/profile/pafijaka-rtatimur/nw
https://nootheme.com/forums/users/pafijakartatimur/
https://nowewyrazy.uw.edu.pl/profil/pafijakartatimur
https://nowewyrazy.uw.edu.pl/profil/pafijakartatimur
https://openlibrary.org/people/pafijakartatimur
https://padlet.com/tokomanjadancantik/pafijakartatimur-hxeik9n6xlmlmgcu
https://pafijakartatimu.livejournal.com/profile
https://pafijakartatimur.amebaownd.com/posts/46482509
https://pafijakartatimur.bloggersdelight.dk/2023/08/07/pafijakartatimur/
https://pafijakartatimur.contently.com/
https://pafijakartatimur.educatorpages.com
https://pafijakartatimur.gitbook.io/untitled/
https://pafijakartatimur.jimdofree.com/
https://pafijakartatimur.localinfo.jp/posts/46482690
https://pafijakartatimur.mn.co/about
https://pafijakartatimur.pages.dev/
https://pafijakartatimur.shopinfo.jp/
https://pafijakartatimur.storeinfo.jp/
https://pafijakartatimur.theblog.me/posts/46482696
https://pafijakartatimur.themedia.jp/posts/46482681
https://pafijakartatimur.therestaurant.jp/posts/46482556
https://pafijakartatimur.webador.com/
https://pafijakartatimur-s-school.teachable.com/p/home
https://pafijakartatimur–tokomanjadancan.repl.co/
https://pafijakart-s-site.thinkific.com/courses/your-first-course
https://pafijakart-s-site.thinkific.com/courses/your-first-course
https://pantip.com/profile/7674361#topics
https://pastelink.net/u959w8q6
https://pbase.com/pafijakartatimur
https://peatix.com/user/18547984/view
https://peatix.com/user/18547984/view
https://pinshape.com/users/2686604-tokomanjadancantik#designs-tab-open
https://postheaven.net/pafijakartatimur/pafijakartatimur-org
https://profile.ameba.jp/ameba/pafijakartatimur
https://profile.hatena.ne.jp/pafijakartatimur/
https://qiita.com/pafijakartatimur
https://rentry.co/6zhwk
https://rentry.co/pafijakartatimur
https://replit.com/@tokomanjadancan
https://research.openhumans.org/member/pafijakartatimur/
https://roomstyler.com/users/pafijakartatimur
https://rosalind.info/users/pafijakartatimur/
https://sites.google.com/view/pafijakartatimur/home
https://slides.com/fesfo/fesfo/
https://social.msdn.microsoft.com/Profile/pafijakartatimur
https://social.technet.microsoft.com/profile/pafijakartatimur/
https://solo.to/pafijakartatimur
https://speakerdeck.com/pafijakartatimur
https://speakerdeck.com/pafijakartatimur
https://starity.hu/profil/384728-pafijakartatimur/
https://starity.hu/profil/384728-pafijakartatimur/
https://steemit.com/tech/@fesfo/pafi-jakarta-timur
https://store.nexodyne.com/member.php?u=129143
https://support.advancedcustomfields.com/forums/users/pafijakartatimur/
https://support.advancedcustomfields.com/forums/users/pafijakartatimur/
https://sway.office.com/xzfiOdOvbPdWZrgJ?ref=Link
https://t.me/workingclassman
https://talktoislam.com/user/pafijakartatimur
https://telegra.ph/pafijakartatimur-08-08
https://telegram.me/s/workingclassman
https://tokomanjadancantik.wixsite.com/pafijakartatimur
https://trello.com/u/tokomanjadancantik
https://trello.com/u/tokomanjadancantik
https://truxgo.net/profile/otomotips
https://unsplash.com/@pafijakartatimur
https://wakelet.com/wake/5-WZ3GVLjhD9SkuAJF_d1
https://webflow.com/@tokomanjadancantik
https://wmart.kz/forum/user/131341/
https://worldcosplay.net/member/1208545
https://www.4shared.com/u/GniFBiDW/tokomanjadancantik.html
https://www.anobii.com/en/01e346c5b33f02dc28/profile/activity
https://www.atlasobscura.com/users/tokomanjadancantik
https://www.avianwaves.com/User-Profile/userId/183029
https://www.beatstars.com/tokomanjadancantik
https://www.behance.net/pafijaktatimu
https://www.bitchute.com/channel/JcSjzcylW45h/
https://www.bitsdujour.com/profiles/XqzyuX
https://www.cakeresume.com/me/pafijakartatimur
https://www.chordie.com/forum/profile.php?id=1702456
https://www.colcampus.com/courses/92550
https://www.colcampus.com/courses/92550
https://www.commandlinefu.com/commands/view/31887/create-a-visually-twisted-effect-by-alternating-the-direction-of-the-staples-effect-vertically.-the-effect-is-achieved-by-moving-odd-numbered-lines-from-right-to-left-and-even-numbered-lines-from-left-to-right.
https://www.coursera.org/user/88ccfbddab01e28a0d54918d7b58b793
https://www.dermandar.com/user/pafijakartatimur/
https://www.deviantart.com/pafijakartatimur
https://www.divephotoguide.com/user/pafijakartatimur
https://www.empowher.com/users/pafijakartati
https://www.facer.io/user/pfBVStXo5E
https://www.fimfiction.net/user/624224/pafijakartatimur
https://www.flickr.com/people/pafijakartatimur/
https://www.giantbomb.com/profile/pafijakartatimu/
https://www.globalvision2000.com/forum/member.php?action=profile&uid=966026
https://www.goodreads.com/user/show/168653506-pafijakartatimur
https://www.gta5-mods.com/users/pafijakartatimur
https://www.hulkshare.com/pafijakartatimur
https://www.iglinks.io/tokomanjadancantik-wak
https://www.industryhuddle.com/pafijakartatimur
https://www.infragistics.com/community/members/7a6004baaac834d5b9bbbcb7e48c6ccc810fe8d0
https://www.instapaper.com/p/12913438
https://www.intensedebate.com/people/pafijakartatimu
https://www.kickstarter.com/profile/pafijakartatimur/about
https://www.lawyersclubindia.com/profile.asp?member_id=973401
https://www.live4cup.com/tournoi-23607-pafijakartatimu.html
https://www.liveinternet.ru/users/pafijakartatimur/profile
https://www.magcloud.com/user/pafijakartatimu
https://www.mediafire.com/view/hw5e4exwk48m0y6/bagus-1.png/file
https://www.medicinacinesenews.it/forum/memberlist.php?mode=viewprofile&u=2884341
https://www.metooo.io/u/pafijakartatimur
https://www.mixcloud.com/pafijakartatimur/
https://www.mojomarketplace.com/user/pafijakartatimur-yY5okSQ728
https://www.myminifactory.com/users/pafijakartatimur
https://www.notebook.ai/@pafijakartatimur
https://www.noteflight.com/profile/2ae746b0b2acbedce77868d6be814b6fd2e9f957
https://www.opencode.net/pafijakartatimur
https://www.openhumans.net/member/pafijakartatimur/
https://www.pearltrees.com/pafijakartatimur
https://www.pling.com/u/pafijakartatimur/
https://www.producthunt.com/@pafijakarta
https://www.provenexpert.com/pafijakartatimur/
https://www.pubpub.org/user/pafijakarta-timur
https://www.quia.com/profiles/pafijakartat
https://www.quia.com/profiles/pafijakartat
https://www.quora.com/profile/Pafijakartatimur
https://www.rctech.net/forum/members/pafijakartatimu-323844.html
https://www.remotecentral.com/cgi-bin/forums/members/viewprofile.cgi?pq11g3
https://www.skillshare.com/fr/user/pafijakartatimur
https://www.spinattic.com/82557
https://www.spyropress.com/forums/users/pafijakartatimur/
https://www.symbaloo.com/home/mix/13eOhMFTJ3
https://www.tetongravity.com/community/profile/tokomanjadancantik@gmail.com/
https://www.twitch.tv/pafijakartatimur/about
https://www.ultimate-guitar.com/u/tokomanjadanc1
https://www.vaca-ps.org/pafijakartatimur
https://www.vaca-ps.org/pafijakartatimur
https://www.veoh.com/users/pafijakartatimur
https://www.viki.com/users/pafijakartatimur/about
https://www.vingle.net/posts/6605795
https://www.wattpad.com/user/pafijakartatimur
https://www.zazzle.com/mbr/238522838600913869
https://xtremepape.rs/members/pafijakartatimur.399312/#about
https://yamcode.com/pafijakartatimur
https://zaap.bio/pafijakartatimur
https://zapytaj.zhp.pl/user/pafijakartatimu
Info nicely considered!.
college paper writing service reviews best cv writing service uk linkedin writing service
buy generic celebrex
Hey There. I found your blog using msn. This is a really well
written article. I will be sure to bookmark it and come back to read more of your useful information. Thanks for the post.
I’ll definitely return.
cost of wellbutrin
can i buy propecia over the counter
propecia no prescription
This is a topic that is close to my heart… Cheers!
Where are your contact details though?
Fine way of explaining, and nice post to obtain data about my presentation topic, which i am going to convey in school.
If you wish for to take a good deal from this article then you have to apply such strategies to your won weblog.
desyrel for insomnia
This site truly has all of the information and facts I needed
about this subject and didn’t know who to ask.
diflucan 200 mg pill
When someone writes an article he/she keeps the idea of a user in his/her brain that how a
user can be aware of it. So that’s why this post is perfect.
Thanks!
ivermectin 1% cream generic
What a material of un-ambiguity and preserveness of precious knowledge concerning unpredicted emotions.
For most recent information you have to pay a visit the web and on world-wide-web I
found this website as a finest website for most up-to-date updates.
where to buy brand name lexapro
This site definitely has all the info I needed about this subject and didn’t know
who to ask.
Если Вам надоела обычная работа со строгим графиком
и хотите попробовать нечто другое,
то заработок в интернете замечательно подойдет.
подронее ===>> здесь
зарегистрироватся здесь
Hey are using WordPress for your site platform? I’m new to the blog world but I’m
trying to get started and set up my own. Do you need any
html coding expertise to make your own blog?
Any help would be greatly appreciated!
I am not sure where you’re getting your info, but great topic.
I needs to spend some time learning much more or
understanding more. Thanks for magnificent info I was looking for this info for my mission.
wellbutrin generic 150 mg
propecia 5mg for sale
I have been browsing on-line more than three hours as of late, but
I never found any attention-grabbing article like yours.
It is lovely price sufficient for me. In my opinion, if all web owners and bloggers made excellent content as you did, the internet will
be much more helpful than ever before.
Hi there, I enjoy reading through your post. I wanted to write a little comment to
support you.
cheap phenergan tablets
where to buy tretinoin cream in uk
I’m gone to say to my little brother, that he should
also visit this web site on regular basis to take updated from latest
news update.
Quality content is the crucial to invite the visitors to go to
see the web page, that’s what this site is providing.
Thanks for finally writing about >Before and After Archives – Precious
Stones Photography <Loved it!
Wow a lot of good info!
buy essays cheap pay someone to write my college essay buy essay online pay to write my essay
online essay writer write my essay for me free essay writer writing essays
hiring ghostwriters https://writingresearchtermpaperservice.com
ivermectin medication
order tretinoin 0.05
buy baclofen online
buy propecia no script
diflucan over the counter usa
Hi to all, the contents present at this web site are in fact amazing
for people experience, well, keep up the good work fellows.
When I originally left a comment I seem to have clicked on the -Notify me when new comments are added- checkbox and now each time a comment is added I receive 4 emails
with the exact same comment. Perhaps there is an easy method you are
able to remove me from that service? Appreciate it!
This piece of writing will help the internet users for setting up new web site or even a blog
from start to end.
Я сьогодні серфив в Інтернеті більше 3 годин, але жодної цікавої статті, подібної до вашої, я так
і не знайшов. А це досить цінно для мене.
На мій погляд, якщо всі власники сайтів та блогери будуть створювати хороший контент, як і ви,
інет буде набагато кориснішою, ніж будь-коли раніше.
Тому я не зміг утриматись від коментарю.
Надзвичайно добре написано!
http://blagoslovenie.su/index.php?option=com_powergallery&Itemid=34&func=detail&catid=64&id=1197&mosmsg=%C2%E0%F8+%EA%EE%EC%EC%E5%ED%F2%E0%F0%E8%E9%2C+%F3%F1%EF%E5%F8%ED%EE+%F1%EE%F5%F0%E0%ED%E5%ED.
http://buildolution.com/UserProfile/tabid/131/userId/375900/Default.aspx
http://go.bubbl.us/cbf626/26c4?/https://www.mikhayla.id/
http://krachelart.com/UserProfile/tabid/43/userId/1241088/Default.aspx
http://taylorhicks.ning.com/photo/albums/coloringblog
http://ttlink.com/altogelz
http://ttlink.com/coloringblog
https://about.me/altogelz
https://about.me/coloringblog/
https://altogeldr.wixsite.com/altogelz
https://altogelz.mn.co/members/17818624
https://altogelz.mystrikingly.com/
https://altogelz.pages.dev/
https://altogelz0.educatorpages.com/pages/about-me
https://altogelza.contently.com/
https://altogelzb.contently.com/
https://altogelzc.contently.com/
https://altogelz-s-site.thinkific.com/products/communities/altogelz
https://app.lookbook.nu/user/11452094-Altogelz
https://app.roll20.net/users/12221094/altogelz-a
https://app.roll20.net/users/12277279/coloringblog-g
https://artmight.com/user/profile/2177563
https://artmight.com/user/profile/2336182
https://bbs.now.qq.com/home.php?mod=space&uid=5239893
https://bbs.now.qq.com/home.php?mod=space&uid=5398845
https://biolinky.co/altogelz
https://biolinky.co/coloringblog
https://bitbin.it/5Opl2xLi/
https://bordeaux.onvasortir.com/profil_read.php?Altogelz
https://bordeaux.onvasortir.com/profil_read.php?Coloringblog
https://buddypress.org/members/altogelz/profile/
https://buddypress.org/members/coloringb/profile/
https://cannabis.net/user/137278
https://cannabis.net/user/138158
https://canvas.instructure.com/eportfolios/2307444/Home/Welcome
https://canvas.instructure.com/eportfolios/2344457/Home/Welcome
https://color-bloggers.mn.co/about
https://coloringblog.contently.com/
https://coloringblog.educatorpages.com/
https://coloringblog.jimdosite.com/
https://coloringblog.mystrikingly.com/
https://coloringblog-s-school.teachable.com/p/home
https://colorin-s-site.thinkific.com/courses/your-first-course
https://colorin-s-site.thinkific.com/manage/courses/2394530
https://controlc.com/0e2bc9a9
https://cs.astronomy.com/members/altogelz/default.aspx
https://cs.astronomy.com/members/coloringblog/default.aspx
https://cyclic-weaver-19d.notion.site/coloringblog-c576e6489bca405ea3955b6c854fc186
https://developers.oxwall.com/user/coloringblog
https://educatorpages.com/site/altogelz0/pages/about-me
https://educatorpages.com/site/coloringblog/
https://en.gravatar.com/altogelz
https://en.gravatar.com/coloringblogz
https://folkd.com/user/coloringblog
https://gab.com/coloringblog
https://gotartwork.com/Profile/colori-ngblog/250012/
https://groups.google.com/g/altogelz
https://groups.google.com/g/coloringblog
https://hanson.net/users/altogelz
https://hanson.net/users/coloringblog
https://heylink.me/alto63
https://heylink.me/coloringblog/
https://histre.com/@vionagaradr/
https://hub.docker.com/u/altogelz
https://hub.docker.com/u/altogelzb
https://hub.docker.com/u/altogelzc
https://hub.docker.com/u/coloringblog
https://imageevent.com/altogelz
https://imageevent.com/coloringblog
https://independent.academia.edu/vionagara
https://journal.almarhalah.ac.id/index.php/almarhalah/user/viewPublicProfile/59353
https://joy.bio/altogelz
https://joy.bio/coloringblog
https://jsfiddle.net/coloringblog/dgvtfrp6/1/
https://jurnal.unmer.ac.id/index.php/jbm/user/viewPublicProfile/70209
https://jurnal.usbypkp.ac.id/index.php/jemper/user/viewPublicProfile/108738
https://learn.acloud.guru/profile/altogelz
https://learn.acloud.guru/profile/coloringblog
https://letterboxd.com/coloringblog/
https://linkr.bio/altogelz
https://linkr.bio/coloringblog
https://linktr.ee/altogelz
https://linktr.ee/coloringblog
https://medium.com/@altogeldr
https://medium.com/@vionagaradr
https://myapple.pl/users/418899-altogelz
https://myapple.pl/users/420245-coloringblog
https://nowewyrazy.uw.edu.pl/profil/altogelz
https://nowewyrazy.uw.edu.pl/profil/coloringblog
https://pastelink.net/jx3xm0ce
https://rosalind.info/users/altogelz/
https://rosalind.info/users/coloringblog/
https://sites.google.com/view/altogelz/home
https://sites.google.com/view/coloringblog/home
https://slides.com/fesfo/fesfo/
https://solo.to/coloringblog
https://speakerdeck.com/altogelz
https://speakerdeck.com/coloringblog
https://starity.hu/profil/385203-coloringblog/
https://steemit.com/mobile/@fesfo/altogel
https://steemit.com/tech/@fesfo/coloringblog
https://support.advancedcustomfields.com/forums/users/altogelz/
https://support.advancedcustomfields.com/forums/users/coloringblog/
https://t.me/baliseo
https://t.me/seo_bali
https://talktoislam.com/user/coloringblog
https://telegra.ph/altogelz-08-10
https://telegra.ph/coloringblog-08-10
https://telegram.me/s/baliseo
https://telegram.me/s/seo_bali
https://trello.com/w/coloringblog/
https://truxgo.net/profile/otomotips
https://vestnikramn.spr-journal.ru/jour/user/viewPublicProfile/10776
https://vionagaradr.wixsite.com/coloringblog
https://wakelet.com/wake/Bzp3CygjKLRsoIO0K3B5V
https://wakelet.com/wake/kfUTNFrMN9RseROrNU98A
https://worldcosplay.net/member/1202100
https://worldcosplay.net/member/1209860
https://www.behance.net/altogel
https://www.behance.net/coloringblog
https://www.bitsdujour.com/profiles/BHi3Py
https://www.bitsdujour.com/profiles/Os67I5
https://www.cakeresume.com/me/vio-nagara
https://www.commandlinefu.com/commands/view/31963/prepend-section-dates-to-individual-entries-in-a-summary-log-file
https://www.deviantart.com/altogelz
https://www.deviantart.com/coloringblog
https://www.divephotoguide.com/user/altogelz
https://www.divephotoguide.com/user/coloringblog
https://www.divephotoguide.com/user/coloringblog/
https://www.divephotoguide.com/user/pafijakartatimur
https://www.drupalgovcon.org/user/561041
https://www.giantbomb.com/profile/altogelz/
https://www.giantbomb.com/profile/coloringblog/
https://www.heromachine.com/forums/users/fesfo/
https://www.iglinks.io/vionagaradr-8ph
https://www.instapaper.com/p/12838776
https://www.instapaper.com/p/12930315
https://www.intensedebate.com/people/coloringblog
https://www.intensedebate.com/profiles/altogelz
https://www.lawyersclubindia.com/profile.asp?member_id=974349
https://www.liveinternet.ru/users/altogelz/profile
https://www.liveinternet.ru/users/coloringblog/profile
https://www.magcloud.com/user/coloringblo
https://www.mixcloud.com/altogelz/
https://www.mixcloud.com/coloringblog/
https://www.myminifactory.com/users/altogel
https://www.myminifactory.com/users/coloringblog
https://www.producthunt.com/@altogelz
https://www.producthunt.com/@coloringblog
https://www.provenexpert.com/altogelz/
https://www.provenexpert.com/coloringblog/
https://www.remotecentral.com/cgi-bin/forums/members/viewprofile.cgi?eodgnc
https://www.remotecentral.com/cgi-bin/forums/members/viewprofile.cgi?yl0kme
https://www.spyropress.com/forums/users/coloringblog/
https://yamcode.com/coloringblog
https://yamcode.com/togil-6350
https://zaap.bio/coloringblog
buy dapoxetine in us
buy lexapro cheap no prescription
Regards! Very good stuff!
research paper helper proposal essay research paper writer services term paper
baclofen buy online
finasteride 1mg uk
buy lyrica usa
Right away I am going away to do my breakfast, when having my breakfast coming again to
read more news.
Attractive section of content. I just stumbled upon your blog and in accession capital to assert that I get actually
enjoyed account your blog posts. Any way I will be subscribing to your feeds
and even I achievement you access consistently rapidly.
order trazodone online
lexapro generic buy online
stromectol oral
cost of retin a cream
certainly like your web site however you need to
check the spelling on several of your posts. Many of them are
rife with spelling problems and I to find it
very bothersome to inform the truth however I’ll certainly come
again again.
I was suggested this website by my cousin. I’m not sure whether this post is written by him as nobody else know such detailed about my trouble.
You are wonderful! Thanks!
tadalafil 100mg india
Great postings. Thanks a lot.
professional cv writing service free best essay writing service reddit a aaa resume & writing service
It’s actually a cool and helpful piece of info. I am
happy that you shared this helpful info with us. Please keep us up to date like this.
Thanks for sharing.
lyrica drug
phenergan 25 mg over the counter
hydroxychloroquine plaquenil
buy amoxicillin uk
finesterude no prescription
Yes! Finally someone writes about >.
generic lyrica for sale
how much is plaquenil
erectafil 10
robaxin 750 mg cost
Oh my goodness! Amazing article dude! Many thanks,
However I am experiencing troubles with your RSS. I don’t understand the reason why I am unable to subscribe to it.
Is there anyone else getting similar RSS issues? Anyone who knows the answer can you kindly respond?
Thanx!!
buy finpecia
2019 lyrica coupon
biaxin xl 500mg
I think that what you posted made a lot of sense.
But, what about this? what if you typed a
catchier title? I ain’t suggesting your information isn’t good., however what if you
added a post title that grabbed people’s attention? I mean Before and
After Tutorial | Central Texas Photographer is a little plain. You could peek at Yahoo’s home page and
note how they create news titles to grab people to click.
You might try adding a video or a related picture or two to grab readers excited
about everything’ve written. In my opinion,
it would bring your website a little bit more interesting.
I constantly spent my half an hour to read this website’s posts everyday along with a mug of coffee.
lyrica 75mg price in india
You revealed it well.
cheap essay writing service australia admission essay writing writing as a service
We are a group of volunteers and starting a new scheme in our community.
Your site offered us with valuable information to work on. You have done a formidable job and our whole community will be thankful to you.
plaquenil 100mg price
Asking questions are truly pleasant thing if you are not understanding anything entirely,
but this paragraph presents fastidious understanding yet.
albendazole tablets over the counter
cheap amoxicillin uk
cost of augmentin 875
Today, I went to the beach with my children. I found a sea shell and gave it
to my 4 year old daughter and said “You can hear the ocean if you put this to your ear.”
She put the shell to her ear and screamed. There was a
hermit crab inside and it pinched her ear. She never wants to go back!
LoL I know this is completely off topic but I had
to tell someone!
baclofen 2 cream
plaquenil arthritis
erectafil 2.5
buy dapoxetine uk
It’s a pity you don’t have a donate button! I’d definitely donate to
this excellent blog! I guess for now i’ll settle for bookmarking and adding your RSS feed to my Google account.
I look forward to fresh updates and will share this site with my Facebook group.
Chat soon!
I needed to thank you for this good read!! I certainly loved every
bit of it. I’ve got you book marked to look at new stuff you post…
finasteride purchase
buy quineprox
phenergan 25 tab
biaxin ear infection
lyrica 50 mg
tretinoin gel india
tretinoin lowest price
You’ve made your point extremely effectively!.
writing a customer service complaint letter online writing evaluation service admission essay writing service
albendazole price usa
http://afcantarelle.org/index.php?title=Irtekno
http://afcantarelle.org/index.php?title=User:AustinNewbigin
http://classicalmusicmp3freedownload.com/ja/index.php?title=%E5%88%A9%E7%94%A8%E8%80%85:AlejandroW62
http://classicalmusicmp3freedownload.com/ja/index.php?title=Irtekno
http://wiki-ux.info/wiki/Irtekno
http://wiki-ux.info/wiki/User:KatherinaSifford
http://wiki.gewex.org/index.php?title=Irtekno
http://wiki.gewex.org/index.php?title=User:AmparoBellamy74
http://www.driftpedia.com/wiki/index.php/Irtekno
http://www.driftpedia.com/wiki/index.php/User:KiaSchirmeister
http://www.zilahy.info/wiki/index.php/Irtekno
http://www.zilahy.info/wiki/index.php/User:DorthyA77730
https://bbarlock.com/index.php/Irtekno
https://bbarlock.com/index.php/User:CharleneJustus
https://biowiki.clinomics.com/index.php/Irtekno
https://biowiki.clinomics.com/index.php/User:SheriOsby0001
https://dekatrian.com/index.php/Irtekno
https://dekatrian.com/index.php/User:RubinCarington
https://help.ezadspro.co.uk/index.php?title=Irtekno
https://help.ezadspro.co.uk/index.php?title=User:VSUSara806006356
https://mnwiki.org/index.php/Irtekno
https://mnwiki.org/index.php/User:GladysRickel159
https://procesal.cl/index.php/Irtekno
https://procesal.cl/index.php/User:KandiVinci6551
https://sustainabilipedia.org/index.php/Irtekno
https://sustainabilipedia.org/index.php/User:RFTLasonya
https://wiki.hrw-fablab.de/index.php?title=Irtekno
https://wiki.hrw-fablab.de/index.php?title=User:ShonaCac93393
https://www.crustcorporate.com/wiki/Irtekno
https://www.crustcorporate.com/wiki/User:AlannaDevine40
https://www.cspcc.org/wiki/index.php/Irtekno
https://www.cspcc.org/wiki/index.php/Utilisateur:MargeryConstance
https://www.offwiki.org/wiki/Irtekno
https://www.offwiki.org/wiki/User:AntoniaParks471
baclofen tablet price in india
how to order amoxicillin
lexapro capsule
baclofen 20 mg coupon
order generic cialis online canada
ivermectin
wellbutrin hcl
I every time used to read paragraph in news papers but now as
I am a user of net so from now I am using net for articles or reviews, thanks
to web.
trazodone 50 mg daily use
tadalafil cost india
trazodone 50 mg price
prednisolone 40mg
how much is prednisolone cost
buy atarax without prescription
baclofen canada
My spouse and I stumbled over here different website and thought I might check things out.
I like what I see so now i’m following you. Look forward to going over your web page for a
second time.
azithromycin 2018
cheapest pharmacy prescription drugs
triamterene 75 mg
Really lots of great information.
paperial writing service fake essay writing service custom report writing service
order levaquin
tamoxifen uk
baclofen 10 mg tablet brand name
buy cymbalta without prescription
cymbalta 30 mg pill
cymbalta 100mg
tamoxifen 20 mg cost in india
all med pharmacy
phenergan tablets australia
cymbalta price
buy retin a from canada
triamterene in canada
nolvadex 50mg capsules
lipitor 20mg
levaquin generic
phenergan 5mg
prazosin cats
cymbalta pill
dexamethasone buy online
triamterene brand name
triamterene 100 mg
Neat blog! Is your theme custom made or did you download it from somewhere?
A design like yours with a few simple adjustements would really make my blog stand out.
Please let me know where you got your theme.
Thanks
cialis 20 mg price in usa
baclofen 20 mg cost
levaquin medication
phenergan 2 cream
lipitor 5 mg tablet
canadian pharmacy 365
online pharmacy without prescription
Beneficial advice. Regards.
top college essay writing services essay writing jobs essay writing jobs
http://blagoslovenie.su/index.php?option=com_powergallery&Itemid=34&func=detail&catid=64&id=1197&mosmsg=%C2%E0%F8+%EA%EE%EC%EC%E5%ED%F2%E0%F0%E8%E9%2C+%F3%F1%EF%E5%F8%ED%EE+%F1%EE%F5%F0%E0%ED%E5%ED.
http://buildolution.com/UserProfile/tabid/131/userId/374078/Default.aspx
http://gendou.com/user/driverdrivers
http://go.bubbl.us/cbf621/ac0a?/good
http://krachelart.com/UserProfile/tabid/43/userId/1234655/Default.aspx
http://taylorhicks.ning.com/photo/albums/driverdrivers
http://ttlink.com/driverdrivers/
https://about.me/otomotips
https://app.lookbook.nu/driverdrivers
https://app.roll20.net/users/12091674/driverdri-v
https://artmight.com/user/profile/1794756
https://bbs.now.qq.com/home.php?mod=space&uid=5206188
https://biolinky.co/driverdrivers
https://bitbin.it/bXedSDfc/
https://bordeaux.onvasortir.com/profil_read.php?Driverdrivers
https://buddypress.org/members/driverdrivers/profile/
https://cannabis.net/user/135520
https://canvas.instructure.com/eportfolios/2207297/Home/Welcome
https://controlc.com/966e780c
https://developers.oxwall.com/user/driverdrivers
https://driverdri-s-site.thinkific.com/courses/your-first-course
https://driverdrivers.jimdosite.com/
https://driverdrivers.mn.co/members/17177879
https://driverdrivers.mystrikingly.com/
https://driverdriversa.educatorpages.com
https://driverd-rivers-s-school.teachable.com/p/home
https://educatorpages.com/site/driverdriversa/
https://en.gravatar.com/muhamadiqbaldomain
https://folkd.com/user/driverdrivers
https://gab.com/driverdrivers
https://gotartwork.com/Profile/driver-drivers/234917/
https://groups.google.com/g/driverdrivers
https://hanson.net/users/driverdrivers
https://heylink.me/muhamad9622/
https://histre.com/public/collections/14uuy1cl/muhamadiqbaldomain-public-collection/
https://hub.docker.com/u/mytvss
https://imageevent.com/driverdrivers
https://independent.academia.edu/muhamadiqbal923
https://journal.almarhalah.ac.id/index.php/almarhalah/user/viewPublicProfile/59353
https://joy.bio/driverdrivers
https://jsfiddle.net/driverdrivers/nspftu26/8/
https://jurnal.unmer.ac.id/index.php/jbm/user/viewPublicProfile/70209
https://jurnal.unmer.ac.id/index.php/jbm/user/viewPublicProfile/70209
https://jurnal.usbypkp.ac.id/index.php/jemper/user/viewPublicProfile/108738
https://learn.acloud.guru/profile/driverdrivers
https://letterboxd.com/driverdrivers/
https://linkr.bio/driverdrivers
https://linktr.ee/driverdrivers
https://medium.com/@muhamadiqbaldomain/driverdrivers-com-cc26ed7b3048
https://muhamadiqbaldomain.wixsite.com/driverdrivers
https://myapple.pl/users/416126-driverdrivers
https://mytvsss.contently.com/
https://nowewyrazy.uw.edu.pl/profil/driverdrivers
https://pastelink.net/bpg393hw
https://polite-behavior-90e.notion.site/driverdrivers-f77f6a4a54434ac183d3beeb6e6eed43
https://rosalind.info/users/driverdrivers/
https://sites.google.com/view/chatgptoks/halaman-muka
https://slides.com/fesfo/fesfo/
https://solo.to/driverdrivers
https://speakerdeck.com/driverdrivers
https://starity.hu/profil/379040-driverdrivers/
https://support.advancedcustomfields.com/forums/users/driverdrivers/
https://talktoislam.com/user/driverdrivers
https://telegra.ph/driverdrivers-06-17
https://trello.com/w/driverdrivers
https://trello.com/w/driverdrivers
https://truxgo.net/profile/otomotips
https://vestnikramn.spr-journal.ru/jour/user/viewPublicProfile/10776
https://wakelet.com/wake/XuMqTSucuQzjpf0VD53FP
https://worldcosplay.net/member/1186619
https://www.behance.net/driverdrivers
https://www.bitsdujour.com/profiles/KOvKeK
https://www.cakeresume.com/me/muhamad-iqbal-0c8083
https://www.commandlinefu.com/commands/view/31375/this-command-provides-more-color-variety-for-the-rainbow-like-appearance-by-generating-random-color-codes-from-16-to-231-for-adb-logcat.
https://www.deviantart.com/driverdrivers
https://www.divephotoguide.com/user/driverdrivers
https://www.drupalgovcon.org/user/541071
https://www.giantbomb.com/profile/driverdrivers/
https://www.heromachine.com/forums/users/fesfo/
https://www.iglinks.io/muhamadiqbaldomain-wa2
https://www.instapaper.com/p/12634363
https://www.intensedebate.com/people/driverdriversa
https://www.lawyersclubindia.com/profile.asp?member_id=962250
https://www.liveinternet.ru/users/driverdrivers/profile
https://www.magcloud.com/user/driverdrivers
https://www.mixcloud.com/driverdrivers/
https://www.myminifactory.com/users/driverdrivers
https://www.producthunt.com/@driverdrivers
https://www.provenexpert.com/driverdrivers/
https://www.remotecentral.com/cgi-bin/forums/members/viewprofile.cgi?elnrtz
https://www.spyropress.com/forums/users/driverdrivers/
https://yamcode.com/driverdrivers
https://zaap.bio/driverdrivers
cymbalta cheap price
levaquin antibiotic
cost for cialis 20mg
canadian pharmacy no scripts
dexamethasone 1 mg tablet
cialis south africa price
tretinoin cream online uk
dexona medicine price
prescription retin a 1
prednisolone tablets 25mg price
prazosin 1 mg coupon
phenergan tablets
cheap baclofen
phenergan gel
atenolol 50 100 mg
lioresal pill
zithromax tablets online
avodart .5 mg
With thanks, I like this!
new zealand cv writing service professional cv writing service reviews marketing dissertation writing service
nolvadex generic cost
http://196.43.133.60/wiki/index.php/Dultogel
http://afcantarelle.org/index.php?title=Dultogel
http://afcantarelle.org/index.php?title=User:BarneyUnwin8
http://artisticpisceshk.com/forum/profile/gvvstefan226286/
http://blagoslovenie.su/index.php?option=com_powergallery&Itemid=34&func=detail&catid=64&id=1197&mosmsg=%C2%E0%F8+%EA%EE%EC%EC%E5%ED%F2%E0%F0%E8%E9%2C+%F3%F1%EF%E5%F8%ED%EE+%F1%EE%F5%F0%E0%ED%E5%ED.
http://brianknapp.co/community/profile/geniegalarza499/
http://brianknapp.co/community/profile/lowellrowell33/
http://brianknapp.co/community/profile/randell22748793/
http://brianknapp.co/community/profile/rosellarendon1/
http://buildolution.com/UserProfile/tabid/131/userId/374078/Default.aspx
http://classicalmusicmp3freedownload.com/ja/index.php?title=%E5%88%A9%E7%94%A8%E8%80%85:DanelleTinker20
http://classicalmusicmp3freedownload.com/ja/index.php?title=Dultogel
http://embeddedwiki.cs.aau.dk/wiki/Dultogel
http://embeddedwiki.cs.aau.dk/wiki/User:SherriMeadows95
http://gendou.com/user/driverdrivers
http://go.bubbl.us/cbf621/ac0a?/good
http://kesheromania.ro/forum/profile/tyttangela61621/
http://krachelart.com/UserProfile/tabid/43/userId/1234655/Default.aspx
http://lsc.wikisign.org/wiki/Usuari:ErmaTdc233375689
http://newsengokush.myht.org/index.php/%E5%88%A9%E7%94%A8%E8%80%85:OrvalFarrelly
http://taylorhicks.ning.com/photo/albums/driverdrivers
http://ttlink.com/driverdrivers/
http://wiki.gewex.org/index.php?title=Dultogel
http://wiki.gewex.org/index.php?title=User:SuzanneRockwell
http://wiki.shitcore.org/index.php/Dultogel
http://wiki.shitcore.org/index.php/User:CatherineMoss8
http://wiki-ux.info/wiki/Dultogel
http://wiki-ux.info/wiki/User:HalleyWood09
http://www.driftpedia.com/wiki/index.php/Dultogel
http://www.driftpedia.com/wiki/index.php/User:WallyDartnell
http://www.erwinbrandenberger.ch/index.php?title=Benutzer:AdolphLepage57
http://www.erwinbrandenberger.ch/index.php?title=Dultogel
http://www.zilahy.info/wiki/index.php/Dultogel
http://www.zilahy.info/wiki/index.php/User:BLJGinger8242497
https://about.me/otomotips
https://app.lookbook.nu/driverdrivers
https://app.roll20.net/users/12091674/driverdri-v
https://artmight.com/user/profile/1794756
https://bbarlock.com/index.php/Dultogel
https://bbarlock.com/index.php/User:SteffenGarst0
https://bbs.now.qq.com/home.php?mod=space&uid=5206188
https://biolinky.co/driverdrivers
https://biowiki.clinomics.com/index.php/Dultogel
https://biowiki.clinomics.com/index.php/User:TamelaSalvado2
https://bitbin.it/bXedSDfc/
https://bordeaux.onvasortir.com/profil_read.php?Driverdrivers
https://buddypress.org/members/driverdrivers/profile/
https://cannabis.net/user/135520
https://canvas.instructure.com/eportfolios/2207297/Home/Welcome
https://careked.com/community/profile/charmainbonnett/
https://commoncause.optiontradingspeak.com/index.php/community/profile/elizabetwilkins/
https://commoncause.optiontradingspeak.com/index.php/community/profile/frances57z32777/
https://commoncause.optiontradingspeak.com/index.php/community/profile/indiabarrenger1/
https://commoncause.optiontradingspeak.com/index.php/community/profile/marcy82h9931289/
https://controlc.com/966e780c
https://cripptic.com/community/profile/renedominique81/
https://dadstreamer.com/community/profile/steviestainfort/
https://dekatrian.com/index.php/Dultogel
https://dekatrian.com/index.php/User:MellisaAllwood4
https://developers.oxwall.com/user/driverdrivers
https://driverdri-s-site.thinkific.com/courses/your-first-course
https://driverdrivers.jimdosite.com/
https://driverdrivers.mn.co/members/17177879
https://driverdrivers.mystrikingly.com/
https://driverdriversa.educatorpages.com
https://driverd-rivers-s-school.teachable.com/p/home
https://educatorpages.com/site/driverdriversa/
https://en.gravatar.com/muhamadiqbaldomain
https://folkd.com/user/driverdrivers
https://forum.finveo.world/community/profile/chrisjdl3983500/
https://gab.com/driverdrivers
https://gotartwork.com/Profile/driver-drivers/234917/
https://grailoftheserpent-forum.com/community/profile/ezequieledouard/
https://groups.google.com/g/driverdrivers
https://hanson.net/users/driverdrivers
https://heylink.me/muhamad9622/
https://histre.com/public/collections/14uuy1cl/muhamadiqbaldomain-public-collection/
https://hub.docker.com/u/mytvss
https://imageevent.com/driverdrivers
https://independent.academia.edu/muhamadiqbal923
https://journal.almarhalah.ac.id/index.php/almarhalah/user/viewPublicProfile/59353
https://joy.bio/driverdrivers
https://jsfiddle.net/driverdrivers/nspftu26/8/
https://jurnal.unmer.ac.id/index.php/jbm/user/viewPublicProfile/70209
https://jurnal.unmer.ac.id/index.php/jbm/user/viewPublicProfile/70209
https://jurnal.usbypkp.ac.id/index.php/jemper/user/viewPublicProfile/108738
https://kesheromania.ro/forum/profile/brent255438554/
https://kesheromania.ro/forum/profile/humbertoburbach/
https://kesheromania.ro/forum/profile/stacicollocott2/
https://learn.acloud.guru/profile/driverdrivers
https://letterboxd.com/driverdrivers/
https://linkr.bio/driverdrivers
https://linktr.ee/driverdrivers
https://livingbooksaboutlife.org/books/Dultogel
https://livingbooksaboutlife.org/books/User:MartyGocher971
https://medium.com/@muhamadiqbaldomain/driverdrivers-com-cc26ed7b3048
https://millionwaystogetit.com/community/profile/marcellabravo29/
https://mnwiki.org/index.php/Dultogel
https://mnwiki.org/index.php/User:DonnellBrooks0
https://muhamadiqbaldomain.wixsite.com/driverdrivers
https://myapple.pl/users/416126-driverdrivers
https://mytvsss.contently.com/
https://nowewyrazy.uw.edu.pl/profil/driverdrivers
https://pastelink.net/bpg393hw
https://polite-behavior-90e.notion.site/driverdrivers-f77f6a4a54434ac183d3beeb6e6eed43
https://religiopedia.com/index.php/Dultogel
https://religiopedia.com/index.php/User:NormanHasan
https://rosalind.info/users/driverdrivers/
https://sites.google.com/view/chatgptoks/halaman-muka
https://slides.com/fesfo/fesfo/
https://solo.to/driverdrivers
https://solucx.com.br/forum/index.php/community/profile/finleykidd8565/
https://solucx.com.br/forum/index.php/community/profile/janeenleavens2/
https://speakerdeck.com/driverdrivers
https://starity.hu/profil/379040-driverdrivers/
https://support.advancedcustomfields.com/forums/users/driverdrivers/
https://sustainabilipedia.org/index.php/Dultogel
https://sustainabilipedia.org/index.php/User:JaneCrompton
https://t.me/baliseo
https://t.me/seo_bali
https://talktoislam.com/user/driverdrivers
https://telegra.ph/driverdrivers-06-17
https://telegram.me/s/baliseo
https://telegram.me/s/seo_bali
https://trello.com/w/driverdrivers
https://trello.com/w/driverdrivers
https://truxgo.net/profile/otomotips
https://vestnikramn.spr-journal.ru/jour/user/viewPublicProfile/10776
https://wakelet.com/wake/XuMqTSucuQzjpf0VD53FP
https://wiki.hrw-fablab.de/index.php?title=Dultogel
https://wiki.hrw-fablab.de/index.php?title=User:GenaBankston4
https://wiki.quentinbrun.fr/mediawiki/index.php/Dultogel
https://wiki.quentinbrun.fr/mediawiki/index.php/Utilisateur:KerriMorales580
https://worldcosplay.net/member/1186619
https://www.behance.net/driverdrivers
https://www.bitsdujour.com/profiles/KOvKeK
https://www.cakeresume.com/me/muhamad-iqbal-0c8083
https://www.commandlinefu.com/commands/view/31375/this-command-provides-more-color-variety-for-the-rainbow-like-appearance-by-generating-random-color-codes-from-16-to-231-for-adb-logcat.
https://www.crustcorporate.com/wiki/Dultogel
https://www.crustcorporate.com/wiki/User:June68B275559
https://www.dcsportsconnection.com/community/profile/groverseaborn8/
https://www.deviantart.com/driverdrivers
https://www.divephotoguide.com/user/driverdrivers
https://www.drupalgovcon.org/user/541071
https://www.giantbomb.com/profile/driverdrivers/
https://www.heromachine.com/forums/users/fesfo/
https://www.iglinks.io/muhamadiqbaldomain-wa2
https://www.instapaper.com/p/12634363
https://www.intensedebate.com/people/driverdriversa
https://www.lawyersclubindia.com/profile.asp?member_id=962250
https://www.liveinternet.ru/users/driverdrivers/profile
https://www.magcloud.com/user/driverdrivers
https://www.miniaturefantasy.com/index.php?title=Dultogel
https://www.miniaturefantasy.com/index.php?title=Utente:Bettina7639
https://www.mixcloud.com/driverdrivers/
https://www.myminifactory.com/users/driverdrivers
https://www.offwiki.org/wiki/Dultogel
https://www.offwiki.org/wiki/User:MohamedSchurr
https://www.producthunt.com/@driverdrivers
https://www.provenexpert.com/driverdrivers/
https://www.remotecentral.com/cgi-bin/forums/members/viewprofile.cgi?elnrtz
https://www.revivalwaves.org/got-a-question/profile/anitraorth44621/
https://www.spyropress.com/forums/users/driverdrivers/
https://yamcode.com/driverdrivers
https://zaap.bio/driverdrivers
atarax otc
triamterene brand name canada
atarax over the counter canada
water pill triamterene hctz
atarax cream
cost of prescription cialis
Check out NeuroBet on the Play Store & App Store!
https://play.google.com/store/apps/details?id=com.modevlabs.neurobet
https://apps.apple.com/us/app/neurobet-bet-with-your-brain/id1639793466
antibiotic levaquin
levaquin antibiotic
northern pharmacy canada
cheap cialis 60 mg
dexamethasone canada
With thanks. Terrific stuff!
metformin over the counter uk
triamterene 100 mg
phenergan tablet cost
mexican pharmacy what to buy
robaxin 500 mg generic
baclofen otc uk
cheapest pharmacy for prescriptions
buy phenergan tablets
atarax 25mg tab
can i buy elimite over the counter
200 mg atarax
atarax 25mg
where can i buy prednisolone tablets
atarax cheap
baclofen cream 60 mg
Well expressed genuinely! .
english article writing service are essay writing services legal professional coursework writing service
buy baclofen usa
how to get prazosin
online pharmacy propranolol
buy cialis rx
azithromycin usa
write comparison contrast essay homework help for math how to write a illustration essay
Hi there, just wanted to mention, I enjoyed this blog post.
It was inspiring. Keep on posting!
prazosin 10 mg cost
atarax cream
retin a cream price india
cymbalta rx coupon
nolvadex 10mg india
canadadrugpharmacy com
lipitor generic price canada
prednisolone tablets for sale
Wow, this article is nice, my sister is analyzing such things, so I
am going to inform her.
nolvadex 20 mg tablet price
can you buy retin a over the counter in mexico
nolvadex 10mg price in india
canadian pharmacy cialis 20mg
cymbalta pills
baclofen price south africa
triamterene tablets
Download NeuroBet on the Play Store & App Store!
https://play.google.com/store/apps/details?id=com.modevlabs.neurobet
https://apps.apple.com/us/app/neurobet-bet-with-your-brain/id1639793466
tamoxifen prescription uk
Do you mind if I quote a few of your articles as long
as I provide credit and sources back to your website?
My blog is in the very same niche as yours and my visitors would
definitely benefit from a lot of the information you provide here.
Please let me know if this ok with you. Thanks!
Nicely put, Cheers.
professional cv and cover letter writing service do essay writing services really work essay writing service oxford
atarax 50 mg tablet price
atarax uk prescription
levaquin generic
robaxin prescription medication
buy baclofen online uk
levaquin.com
azithromycin 500 mg tablet online
dexamethasone 4 tablet
generic cialis online in uk
azithromycin 250 mg purchase
prazosin 1 mg capsule
my canadian pharmacy
triamterene 75mg hctz 50mg tablets
triamterene 37.5
baclofen 10mg tablet
Togel, singkatan dari Toto Gelap, adalah salah satu bentuk
perjudian yang populer di Indonesia. Dulu, pemain harus
pergi ke bandar darat untuk memasang taruhan,
tetapi sekarang dengan kemajuan teknologi, Anda dapat bermain togel toto
online melalui situs seperti YATOGEL.
Togel adalah permainan angka yang melibatkan pemilihan angka-angka
tertentu dari berbagai pasaran, seperti 4D, 3D, dan 2D.
Pemenang ditentukan berdasarkan kombinasi angka yang keluar sesuai dengan pasaran tertentu.
Bermain togel toto online memiliki sejumlah keunggulan. Anda dapat memasang taruhan kapan saja dan di mana saja tanpa harus pergi ke tempat fisik.
Selain itu, Anda memiliki akses ke berbagai pasaran dan jenis taruhan.
discount prednisolone
I was suggested this website by my cousin. I’m not
sure whether this post is written by him as no one else know such detailed about my difficulty.
You are amazing! Thanks!
cheapest pharmacy for prescriptions without insurance
atarax 50
diflucan tablet 500mg
lipitor tablets
robaxin 500mg otc
prednisolone cost usa
help with essay for college application academic writing and research essay help writer online
Hello everyone, it’s my first go to see at this site, and paragraph is truly fruitful in favor of me, keep up posting these content.
http://altogelz.over-blog.com/2023/08/altogelz.html
http://altogelz.xobor.de/u1_altogelz.html
http://arahn.100webspace.net/profile.php?mode=viewprofile&u=132822
http://arahn.100webspace.net/profile.php?mode=viewprofile&u=133285
http://atlas.dustforce.com/user/altogelz
http://atlas.dustforce.com/user/altogelz1
http://atlas.dustforce.com/user/altogelz2
http://atlas.dustforce.com/user/altogelz4
http://atlas.dustforce.com/user/altogelz5
http://atlas.dustforce.com/user/altogelz6
http://atlas.dustforce.com/user/irteknos
http://atlas.dustforce.com/user/tokomanjadancantik-g
http://baseportal.com/cgi-bin/baseportal.pl?htx=/ouatmicrobio/OMSA%20Web%20Site/eWrite/eWrite&wcheck=1&range=2000,1000
http://baseportal.de/cgi-bin/baseportal.pl?htx=/jaa/tiere&localparams=1&range=400,80
http://brewwiki.win/wiki/User:Irteknos
http://buildolution.com/UserProfile/tabid/131/userId/374653/Default.aspx
http://buildolution.com/UserProfile/tabid/131/userId/375643/Default.aspx
http://buildolution.com/UserProfile/tabid/131/userId/375758/Default.aspx
http://entsaintetienne.free.fr/claroline1110/claroline/backends/download.php?url=L2h0dHBzLS0tcGFmaWpha2FydGF0aW11ci5vcmcudXJs&cidReset=true&cidReq=ROM2121CATG
http://entsaintetienne.free.fr/claroline1110/courses/ALTOGELZ/document/altogel.html
http://entsaintetienne.free.fr/claroline1110/courses/IRTEKNOS/document/renaldi.html
http://flightgear.jpn.org/userinfo.php?uid=37888
http://flightgear.jpn.org/userinfo.php?uid=38586
http://flightgear.jpn.org/userinfo.php?uid=38587
http://flightgear.jpn.org/userinfo.php?uid=38691
http://flightgear.jpn.org/userinfo.php?uid=38873
http://flightgear.jpn.org/userinfo.php?uid=38874
http://flightgear.jpn.org/userinfo.php?uid=38875
http://flightgear.jpn.org/userinfo.php?uid=38876
http://foxsheets.com/UserProfile/tabid/57/userId/140274/Default.aspx
http://foxsheets.com/UserProfile/tabid/57/userId/143513/Default.aspx
http://foxsheets.com/UserProfile/tabid/57/userId/143954/Default.aspx
http://gendou.com/user/altogelz
http://gendou.com/user/irteknos
http://gendou.com/user/pafijakartatimur
http://gitlab.sleepace.com/irteknos
http://gitlab.sleepace.com/snippets/24056
http://gitlab.sleepace.com/timur
http://hommestylemag.xobor.de/u2_irteknos.html
http://irteknos.over-blog.com/2023/07/irteknos.html
http://jurnal.usbypkp.ac.id/index.php/jemper/user/viewPublicProfile/108738
http://krachelart.com/UserProfile/tabid/43/userId/1236696/Default.aspx
http://krachelart.com/UserProfile/tabid/43/userId/1240327/Default.aspx
http://krachelart.com/UserProfile/tabid/43/userId/1240711/Default.aspx
http://mayfever.crowdfundhq.com/users/altogelz
http://mayfever.crowdfundhq.com/users/irteknos
http://mayfever.crowdfundhq.com/users/pafijakartatimur
http://mobile.punske-valky.freepage.cz/diskuze/
http://mobile.punske-valky.freepage.cz/diskuze/1545
http://msnho.com/blog/altogelz
http://msnho.com/blog/irteknos
http://msnho.com/blog/pafijakartatimur
http://mysmarterhome.ca/UserProfile/tabid/42/userId/67506/Default.aspx
http://mysmarterhome.ca/UserProfile/tabid/42/userId/68932/Default.aspx
http://mysmarterhome.ca/UserProfile/tabid/42/userId/69078/Default.aspx
http://mysmarterhome.ca/UserProfile/tabid/42/userId/69432/Default.aspx
http://onlineboxing.net/jforum/user/profile/242942.page
http://onlineboxing.net/jforum/user/profile/245977.page
http://onlineboxing.net/jforum/user/profile/246398.page
http://pafijakartatimur.over-blog.com/2023/08/pafijakartatimur.html
http://pafijakartatimur.xobor.de/u1_pafijakartatimur.html
http://profiles.delphiforums.com/n/pfx/profile.aspx?webtag=dfpprofile000&userId=1891189818
http://profiles.delphiforums.com/n/pfx/profile.aspx?webtag=dfpprofile000&userId=1891192445
http://riosabeloco.com/User-Profile/userId/191480
http://riosabeloco.com/User-Profile/userId/194037
http://riosabeloco.com/User-Profile/userId/194474
http://rufox.ru/altogelz/info/
http://rufox.ru/pafijakartatimur/info/
http://statistik.merantikab.go.id/uploads/user/2023-07-12-130554.736551renaldi.html
http://talktoislam.com/user/irteknos
http://taylorhicks.ning.com/photo/albums/altogelz
http://taylorhicks.ning.com/photo/albums/irteknos
http://taylorhicks.ning.com/photo/albums/pafijakartatimur
http://test.sozapag.ru/forum/user/200583/
http://test.sozapag.ru/forum/user/202144/
http://test.sozapag.ru/forum/user/202446/
http://www.activewin.com/user.asp?Action=Read&UserIndex=4233784
http://www.activewin.com/user.asp?Action=Read&UserIndex=4235160
http://www.activewin.com/user.asp?Action=Read&UserIndex=4235312
http://www.autoviva.com/news/hamilton_just_nine_points_away_from_title_renewal/14883
http://www.giscience.sakura.ne.jp/pukiwiki/index.php?altogelz
http://www.giscience.sakura.ne.jp/pukiwiki/index.php?irteknos
http://www.giscience.sakura.ne.jp/pukiwiki/index.php?pafijakartatimur
http://www.nfomedia.com/profile?uid=rMkZbdE
http://www.rohitab.com/discuss/user/1676917-irteknos/
http://www.rohitab.com/discuss/user/1731860-altogelz/
http://www.rohitab.com/discuss/user/1740688-pafijakartatimur/
http://www.shadowera.com/member.php?133771-irteknos
http://www.shadowera.com/member.php?134386-altogelz
http://www.shadowera.com/member.php?134387-altogelz1
http://www.shadowera.com/member.php?134388-altogelz2
http://www.shadowera.com/member.php?134512-pafijakartatimur
http://www.shadowera.com/member.php?134773-altogelz5
http://www.travelful.net/location/5199322/indonesia/irteknos
http://www.travelful.net/location/5215046/indonesia/altogelz
http://www.travelful.net/location/5217438/indonesia/pafijakartatimur
http://zacriley.ning.com/photo/albums/altogelz
http://zacriley.ning.com/photo/albums/irteknos
http://zacriley.ning.com/photo/albums/pafijakartatimur
https://500px.com/p/altogeldr?view=photos
https://500px.com/p/altogeldr2?view=photos
https://500px.com/p/altogelz1?view=photos
https://500px.com/p/altogelz3?view=photos
https://500px.com/p/altogelz4?view=photos
https://500px.com/p/altogelz5?view=photos
https://500px.com/p/irteknos?view=photos
https://500px.com/p/pafijakartatimur?view=photos
https://64aea881602e8.site123.me/
https://64cc85fbb991e.site123.me/
https://64d1847cbfb7a.site123.me/
https://8tracks.com/alto-g/altogelz
https://8tracks.com/pafijakartatimur
https://8tracks.com/renaldi-d
https://altogels-organization.gitbook.io/altogelz/
https://altogelz.amebaownd.com/posts/46347046
https://altogelz.bloggersdelight.dk/2023/08/03/altogelz/
https://altogelz.cgsociety.org/profile
https://altogelz.hashnode.dev/openai
https://altogelz.jimdosite.com/
https://altogelz.over-blog.com/2023/08/altogelz.html
https://altogelz.pages.dev/
https://altogelz.shopinfo.jp/posts/46347136
https://altogelz.storeinfo.jp/posts/46347169
https://altogelz.theblog.me/posts/46347209
https://altogelz.therestaurant.jp/posts/46347098
https://altogelz.webador.ch/
https://altogelza.localinfo.jp/posts/46347388
https://altogelza.themedia.jp/posts/46347350
https://altogelz–altogel1.repl.co/
https://alto-gelz-s-school.teachable.com/p/altogelz
https://altos-fantastic-site-4e745a.webflow.io/
https://altos-organization.gitbook.io/altogelz/
https://ameblo.jp/altogelz/entry-12814710876.html
https://ameblo.jp/irteknos/entry-12811756329.html
https://ameblo.jp/pafijakartatimur/entry-12815252794.html
https://atlanta.bubblelife.com/users/renaldidomai_d120058
https://bbpress.org/forums/profile/altogelz1/
https://bbpress.org/forums/profile/irteknos/
https://bbpress.org/forums/profile/pafijakartatimur/
https://beacons.ai/altogelzz
https://beacons.ai/irteknos
https://beacons.ai/pafijakartatimur
https://bio.fm/altogeldr
https://bio.fm/renaldidomain
https://bitbin.it/fq3MAB8P/
https://bitbin.it/GAy4N5oO/
https://bitbin.it/PtooCdkl/
https://blogfreely.net/altogelz/153-92-5-107
https://blogfreely.net/irteknos/irtekno-com
https://blogfreely.net/pafijakartatimur/pafijakartatimur-org
https://brewwiki.win/wiki/User:Altogelz
https://brewwiki.win/wiki/User:Pafijakartatimur
https://brookhaven.bubblelife.com/users/altogeldr_c109366
https://calis.delfi.lv/profils/lietotajs/305369-irteknos/
https://calis.delfi.lv/profils/lietotajs/308843-altogelz/
https://calis.delfi.lv/profils/lietotajs/309339-pafijakartatimur/
https://camp-fire.jp/profile/altogelz
https://camp-fire.jp/profile/altogelz1
https://camp-fire.jp/profile/irteknos
https://camp-fire.jp/profile/pafijakartatimur
https://comicvine.gamespot.com/profile/altogelz/
https://comicvine.gamespot.com/profile/irteknos/
https://comicvine.gamespot.com/profile/pafijakartatimu/
https://community.lazypoets.com/profile/altogel
https://community.lazypoets.com/profile/irteknos
https://community.lazypoets.com/profile/pafijakartatimur
https://confengine.com/user/altogelz
https://confengine.com/user/altog-elz
https://confengine.com/user/altog-elz-2
https://confengine.com/user/altog-elz-3
https://confengine.com/user/irteknos-os
https://confengine.com/user/pafijaka-rtatimur
https://controlc.com/2734e031
https://controlc.com/3d4726a1
https://controlc.com/d41b99b9
https://controlc.com/f6372dcd
https://coolors.co/u/alto_gel
https://coolors.co/u/altogelz
https://coolors.co/u/pafijakartatimur
https://coolors.co/u/renaldi_dr
https://darling-raindrop-22841f.netlify.app/
https://data.hkppdb.org/uploads/user/2023-07-12-140546.098407renaldi.html
https://datamx.io/uploads/user/2023-07-12-134940.479091renaldi.html
https://datamx.io/uploads/user/2023-08-04-074055.853284altogel.html
https://datamx.io/uploads/user/2023-08-08-004133.309515pafijakartatimur.html
https://datamx.io/uploads/user/2023-08-15-225956.746729altogel.html
https://datosabiertos.municipiosanjuan.gob.ar/uploads/user/2023-07-04-082917.948212renaldi.html
https://datosabiertos.municipiosanjuan.gob.ar/uploads/user/2023-08-02-003251.350241altogel.html
https://datosabiertos.municipiosanjuan.gob.ar/uploads/user/2023-08-07-010320.163526pafijakartatimur.html
https://datosabiertos.municipiosanjuan.gob.ar/uploads/user/2023-08-14-021231.169524altogel.html
https://descubre.beqbe.com/p/altogelz
https://descubre.beqbe.com/p/altogelz1
https://descubre.beqbe.com/p/irteknos
https://descubre.beqbe.com/p/pafijakartatimur
https://dev.to/altogelz
https://dev.to/altogelz/altogelz-23h3
https://dev.to/irteknos
https://dev.to/pafijakarta
https://developers.oxwall.com/user/altogelz
https://developers.oxwall.com/user/irteknos
https://developers.oxwall.com/user/pafijakartatimur
https://digitaltibetan.win/wiki/User:Altogelz
https://digitaltibetan.win/wiki/User:Irteknos
https://digitaltibetan.win/wiki/User:Pafijakartatimur
https://discover.events.com/p/altogelz-10079919535
https://discover.events.com/p/altogelza-10079920044
https://discover.events.com/profile/renaldi-dr/3704799/savethedate/
https://discover.events.com/profile/tokomanjadancantik/3710729/savethedate/
https://disqus.com/by/altogeldr/about/
https://disqus.com/by/altogelz/about/
https://disqus.com/by/altogelz5/about/
https://disqus.com/by/altogelz6/about/
https://disqus.com/by/altogelz7/about/
https://disqus.com/by/disqus_IvemkhpTmT/about/
https://disqus.com/by/irteknos/about/
https://disqus.com/by/pafijakartatimur/about/
https://docs.google.com/document/d/1KEp2mm7DncdBJebl7IyXLtVmLKZJbcVJB4K-3bZtNs8/edit
https://docs.google.com/document/d/1WCRHb6z0yu-T8ANZWgmYO_t9TajMbFaCt4lYj1s22fY/edit?usp=sharing
https://docs.google.com/document/d/1Y_wO1MgQArSUUSf-bnUTo_Vk2Y5d63AzikUbUJYA-8Y/edit
https://dreevoo.com/profile.php?pid=563810
https://dreevoo.com/profile.php?pid=567973
https://dreevoo.com/profile.php?pid=568490
https://dreevoo.com/profile.php?pid=569725
https://dribbble.com/altogelz/about
https://dribbble.com/irteknos/about
https://dribbble.com/pafijakartatimur/about
https://ext-6385277.livejournal.com/466.html
https://fairygodboss.com/users/profile/1tqG7mNA4E/altogelz
https://fairygodboss.com/users/profile/ACac2qhP8y/altogelz5
https://fairygodboss.com/users/profile/f-Srekv-cs/altogelz
https://fairygodboss.com/users/profile/G_uGZGX8WU/altogelz
https://fairygodboss.com/users/profile/oDanXe_fGI/altogelz6
https://fairygodboss.com/users/profile/OlMAhbleni/pafijakartatimur
https://fairygodboss.com/users/profile/wOvaeV8ck/altogelz7
https://fairygodboss.com/users/profile/Y8qhhXZ-Ou/renaldi-dr
https://feeds.feedburner.com/irtekno/AqKXoVkZi6C
https://fileforum.com/profile/altogelz
https://fileforum.com/profile/irteknos
https://fileforum.com/profile/pafijakartatimur
https://files.fm/altogeldr/f/7z5cegvg3
https://files.fm/altogeldr/f/9m37w9xuv
https://files.fm/altogeldr/info
https://files.fm/pafijakartatimur
https://files.fm/renaldidomain
https://folkd.com/user/altogelz
https://folkd.com/user/irteknos
https://folkd.com/user/pafijakartatimur
https://forum.instube.com/u/altogelz
https://forum.instube.com/u/irteknos
https://forum.instube.com/u/pafijakartatimur
https://forum.reallusion.com/Users/3121951/renaldidomain
https://forum.reallusion.com/Users/3128249/altogeldr
https://forum.reallusion.com/Users/3128928/tokomanjadancantik
https://forum.singaporeexpats.com/memberlist.php?mode=viewprofile&u=595515
https://forum.singaporeexpats.com/memberlist.php?mode=viewprofile&u=607070
https://forum.singaporeexpats.com/memberlist.php?mode=viewprofile&u=607073
https://forum.singaporeexpats.com/memberlist.php?mode=viewprofile&u=607074
https://forum.singaporeexpats.com/memberlist.php?mode=viewprofile&u=608617
https://forum.singaporeexpats.com/memberlist.php?mode=viewprofile&u=611936
https://forum.singaporeexpats.com/memberlist.php?mode=viewprofile&u=611937
https://forum.singaporeexpats.com/memberlist.php?mode=viewprofile&u=611959
https://forums.ccbluex.net/user/alto-gel
https://forums.ccbluex.net/user/pafijakartatimur
https://forums.ccbluex.net/user/renaldi-dr
https://forums.gta5-mods.com/user/altogelz
https://freeicons.io/profile/518073
https://freeicons.io/profile/529680
https://freeicons.io/profile/531066
https://gab.com/altogelz
https://gab.com/irteknos
https://gab.com/pafijakartatimur
https://git.lumine.io/altogelz2
https://git.lumine.io/altogelza
https://git.lumine.io/irteknos
https://git.lumine.io/pafijakartatimu
https://github.com/altogelz
https://github.com/altogelz1
https://github.com/altogelz2
https://github.com/irteknos
https://github.com/pafijakartatimu
https://gladwyne.bubblelife.com/community/pafijakartatimur
https://glose.com/u/altogel
https://glose.com/u/pafijakartatimur
https://glose.com/u/renaldidr
https://gotartwork.com/Profile/alto-gelz/247775/
https://gotartwork.com/Profile/irteknos-nos/239458/
https://gotartwork.com/Profile/pafijakar-tatimur/248983/
https://hashnode.com/@irteknos
https://hashnode.com/@pafijakartatimur
https://histre.com/@altogeldr/
https://histre.com/@tokomanjadancantik/
https://histre.com/member/renaldidomain/
https://hommestylemagazine.webador.com/
https://inkbunny.net/altogelz
https://inkbunny.net/irteknos
https://inkbunny.net/pafijakartatimur
https://irteknos.amebaownd.com/posts/45640914
https://irteknos.bloggersdelight.dk/2023/07/12/irteknos/
https://irteknos.cgsociety.org/profile
https://irteknos.gitbook.io/irteknos/
https://irteknos.livejournal.com/profile
https://irteknos.localinfo.jp/posts/45640975
https://irteknos.pages.dev/
https://irteknos.renaldidr.repl.co
https://irteknos.shopinfo.jp/posts/45640936
https://irteknos.storeinfo.jp/posts/45640941
https://irteknos.theblog.me/posts/45640951
https://irteknos.themedia.jp/posts/45640969
https://irteknos.therestaurant.jp/posts/45640922
https://irteknos.webador.com/
https://irteknos.webflow.io/
https://irteknos-s-school.teachable.com/p/home
https://issuu.com/altogelz
https://issuu.com/altogelz1
https://issuu.com/altogelz2
https://issuu.com/altogelz4
https://issuu.com/altogelz5
https://issuu.com/altogelz7
https://issuu.com/irteknos
https://issuu.com/pafijakartatimur
https://journal.almarhalah.ac.id/index.php/almarhalah/user/viewPublicProfile/59353
https://jsfiddle.net/altogelz/wp6xz1ut/
https://jsfiddle.net/altogelz1/uwt7b4rx/
https://jsfiddle.net/irteknos/Lv4a5us8/
https://jsfiddle.net/pafijakartatimur/tem4b0Lq/
https://lab.quickbox.io/-/snippets/22932
https://lab.quickbox.io/irteknos
https://lab.quickbox.io/pafijakartatimur
https://leetcode.com/altogelz/
https://leetcode.com/altogelz1/
https://leetcode.com/altogelz2/
https://leetcode.com/altogelz4/
https://leetcode.com/altogelz5/
https://leetcode.com/altogelz6/
https://leetcode.com/pafijakartatimur/
https://leetcode.com/renaldidomain/
https://list.ly/altogeldr/lists
https://list.ly/renaldi-dr/
https://list.ly/tokomanjadancantik
https://moparwiki.win/wiki/User:Altogelz
https://moparwiki.win/wiki/User:Irteknos
https://moparwiki.win/wiki/User:Pafijakartatimur
https://moz.com/community/q/user/altogelz
https://moz.com/community/q/user/irteknos
https://moz.com/community/q/user/pafijakartatimur
https://muckrack.com/altog-elz/bio
https://muckrack.com/irteknos-os/bio
https://muckrack.com/pafijakartatimur
https://my.archdaily.com/us/@alto-gel
https://my.archdaily.com/us/@renaldi-dr
https://myopportunity.com/profile/altog-altogeldrgmail-com/nw/
https://myopportunity.com/profile/altog-elz/nw
https://myopportunity.com/profile/irteknos-os/nw
https://myopportunity.com/profile/pafijaka-rtatimur/nw
https://nootheme.com/forums/users/altogelz/
https://nootheme.com/forums/users/irteknos/
https://nootheme.com/forums/users/pafijakartatimur/
https://openhumans.org/member/altogelz1/
https://openlibrary.org/people/altogelz
https://openlibrary.org/people/pafijakartatimur
https://openlibrary.org/people/renaldi_dr
https://padlet.com/altogeldr/my-harmonious-padlet-jodga12nufe7i78q
https://padlet.com/renaldidomain/irteknos-nkor79gwy50q0nqh
https://padlet.com/tokomanjadancantik/pafijakartatimur-hxeik9n6xlmlmgcu
https://pafijakartatimu.livejournal.com/profile
https://pafijakartatimur.amebaownd.com/posts/46482509
https://pafijakartatimur.bloggersdelight.dk/2023/08/07/pafijakartatimur/
https://pafijakartatimur.gitbook.io/untitled/
https://pafijakartatimur.jimdofree.com/
https://pafijakartatimur.localinfo.jp/posts/46482690
https://pafijakartatimur.pages.dev/
https://pafijakartatimur.shopinfo.jp/
https://pafijakartatimur.storeinfo.jp/
https://pafijakartatimur.theblog.me/posts/46482696
https://pafijakartatimur.themedia.jp/posts/46482681
https://pafijakartatimur.therestaurant.jp/posts/46482556
https://pafijakartatimur.webador.com/
https://pafijakartatimur-s-school.teachable.com/p/home
https://pafijakartatimur–tokomanjadancan.repl.co/
https://pantip.com/profile/7637074#topics
https://pantip.com/profile/7668529#topics
https://pantip.com/profile/7674361#topics
https://pastelink.net/6fk65c7s
https://pastelink.net/8njjodbt
https://pastelink.net/nqj1yafe
https://pastelink.net/u959w8q6
https://pbase.com/altogelz
https://pbase.com/irteknos
https://pbase.com/pafijakartatimur
https://peatix.com/user/18175948/view
https://peatix.com/user/18491561/view
https://peatix.com/user/18491582/view
https://peatix.com/user/18491590/view
https://peatix.com/user/18547984/view
https://peatix.com/user/18655238/view
https://peatix.com/user/18655255/view
https://peatix.com/user/18655272/view
https://pinshape.com/users/2670971-irteknos#designs-tab-open
https://pinshape.com/users/2684272-altogelz
https://pinshape.com/users/2686604-tokomanjadancantik#designs-tab-open
https://pinshape.com/users/2691182-altogeldr#designs-tab-open
https://postheaven.net/altogelz/153-92-5-107
https://postheaven.net/c07w8gje2n
https://postheaven.net/pafijakartatimur/pafijakartatimur-org
https://profile.ameba.jp/ameba/altogelz/
https://profile.ameba.jp/ameba/irteknos/
https://profile.ameba.jp/ameba/pafijakartatimur
https://profile.hatena.ne.jp/altogelz/profile
https://profile.hatena.ne.jp/irteknos/
https://profile.hatena.ne.jp/pafijakartatimur/
https://profiles.delphiforums.com/n/pfx/profile.aspx?nav=profile&webtag=dfpprofile000&userId=1891192099
https://profiles.delphiforums.com/n/pfx/profile.aspx?nav=profile&webtag=dfpprofile000&userId=1891193303
https://qiita.com/altogeldr/items/0e95b19b6b20b060a4b6
https://qiita.com/altogeldr/items/b1cbb704914f47025faf
https://qiita.com/pafijakartatimur
https://qiita.com/renaldidomain
https://rentry.co/6zhwk
https://rentry.co/altogelz
https://rentry.co/ca7s3
https://rentry.co/gm8z8
https://rentry.co/irteknos
https://rentry.co/keszi
https://rentry.co/pafijakartatimur
https://replit.com/@altogel1
https://replit.com/@renaldidr/irteknos
https://replit.com/@tokomanjadancan
https://research.openhumans.org/member/altogelz/
https://research.openhumans.org/member/altogelz1/
https://research.openhumans.org/member/irteknos/
https://research.openhumans.org/member/pafijakartatimur/
https://roomstyler.com/users/altogelz
https://roomstyler.com/users/altogelz1
https://roomstyler.com/users/altogelz2
https://roomstyler.com/users/altogelz5
https://roomstyler.com/users/altogelz6
https://roomstyler.com/users/altogelz7
https://roomstyler.com/users/irteknos
https://roomstyler.com/users/pafijakartatimur
https://rufox.ru/irteknos/info/
https://social.msdn.microsoft.com/Profile/altogelz
https://social.msdn.microsoft.com/Profile/irteknos
https://social.msdn.microsoft.com/Profile/pafijakartatimur
https://social.technet.microsoft.com/profile/altogelz/
https://social.technet.microsoft.com/profile/irteknos/
https://social.technet.microsoft.com/profile/pafijakartatimur/
https://solo.to/altogelz1
https://solo.to/irteknos
https://solo.to/pafijakartatimur
https://speakerdeck.com/altogelz
https://speakerdeck.com/irteknos
https://speakerdeck.com/pafijakartatimur
https://starity.hu/profil/380835-irteknos/
https://starity.hu/profil/384218-altogelz/
https://starity.hu/profil/384728-pafijakartatimur/
https://storage.googleapis.com/padlet-uploads/2101145374/926397cab5f4d79b85e28bcbdb5d5c2b/altogel.html
https://storage.googleapis.com/padlet-uploads/2101145374/dfc73958e457c9186a757e124d6acbc4/altogel.html?Expires=1692668739&GoogleAccessId=778043051564-q79bsd8mc40b0bl82ikkrtc3jdofe4dg%40developer.gserviceaccount.com&Signature=CTiF4cgdRJYpxxlcPfgL%2BCax7hWDCzHxJq%2Bj%2FMx4bU0O%2FamsO8wOhRNh3Qff7UGNnllfOlR6PYujxJ29TsIC%2FyoDCT9RYoauKFtshUyqKSBnsDlNqgkR%2BPwQtpw4zsWUvG4aHLZjRRfnAZz9w8clYdAIZHYLQiVvzRNg3S0BDnI%3D&original-url=https%3A%2F%2Fpadlet-uploads.storage.googleapis.com%2F2101145374%2Fdfc73958e457c9186a757e124d6acbc4%2Faltogel.html
https://store.nexodyne.com/member.php?u=114685
https://store.nexodyne.com/member.php?u=129143
https://store.nexodyne.com/member.php?u=129156
https://store.nexodyne.com/member.php?u=129224
https://store.nexodyne.com/member.php?u=129225
https://store.nexodyne.com/member.php?u=129226
https://store.nexodyne.com/member.php?u=129227
https://store.nexodyne.com/member.php?u=129228
https://support.advancedcustomfields.com/forums/users/altogelz/
https://support.advancedcustomfields.com/forums/users/pafijakartatimur/
https://sway.office.com/ghHxECn3odWRuWXT
https://sway.office.com/ppNAfqEY9DAcdSRC
https://sway.office.com/xzfiOdOvbPdWZrgJ?ref=Link
https://talktoislam.com/user/altogelz
https://talktoislam.com/user/pafijakartatimur
https://telegra.ph/altogelz-08-04
https://telegra.ph/irteknos-07-12
https://telegra.ph/pafijakartatimur-08-08
https://traffic-boosters.jimdosite.com/
https://trello.com/u/renaldidr/activity
https://trello.com/u/tokomanjadancantik
https://trello.com/w/altogelz
https://unsplash.com/@altogelz
https://unsplash.com/@altogelz1
https://unsplash.com/@altogelz2
https://unsplash.com/@altogelz5
https://unsplash.com/@altogelz6
https://unsplash.com/@altogelz7
https://unsplash.com/@irteknos
https://unsplash.com/@pafijakartatimur
https://v3060982-v7pfe4vctowh.demo079.volusion.com/
https://webflow.com/@tokomanjadancantik
https://wmart.kz/forum/user/129983/
https://wmart.kz/forum/user/131124/
https://wmart.kz/forum/user/131341/
https://www.4shared.com/u/CsVQ6Gp4/hhblloxiidafvbw.html
https://www.4shared.com/u/eeb3xPs_/wtfzqu.html
https://www.4shared.com/u/GkwBji8R/altogeldr.html
https://www.4shared.com/u/GniFBiDW/tokomanjadancantik.html
https://www.4shared.com/u/gnIXbjZ5/renaldidomain.html
https://www.4shared.com/u/lPgYq0HT/qumlpxnwi.html
https://www.4shared.com/u/Mi3uyGQV/otfprtze.html
https://www.4shared.com/u/YWa7sPd-/vlpgnp.html
https://www.anobii.com/en/010302ee091487cadc/profile/activity
https://www.anobii.com/en/0152e42b60f8aa2fa8/profile/activity
https://www.anobii.com/en/01e346c5b33f02dc28/profile/activity
https://www.atlasobscura.com/users/043e88ce-0b1d-4991-8a05-51fb8c42195d
https://www.atlasobscura.com/users/altogeldr
https://www.atlasobscura.com/users/tokomanjadancantik
https://www.autoviva.com/news/hamilton_just_nine_points_away_from_title_renewal/14883
https://www.avianwaves.com/User-Profile/userId/179174
https://www.avianwaves.com/User-Profile/userId/182564
https://www.avianwaves.com/User-Profile/userId/183029
https://www.beatstars.com/altogeldr
https://www.beatstars.com/altogeldr/about
https://www.beatstars.com/playlists/5521021
https://www.beatstars.com/tokomanjadancantik
https://www.bitchute.com/channel/hWSLHnfZJvpn/
https://www.bitchute.com/channel/JcSjzcylW45h/
https://www.bitchute.com/channel/poGaIj8DIEX7/
https://www.blurb.com/user/irteknos
https://www.cakeresume.com/me/alto-gel
https://www.cakeresume.com/me/pafijakartatimur
https://www.cakeresume.com/me/renaldi-dr
https://www.canadavisa.com/canada-immigration-discussion-board/members/altogelz.1155754/
https://www.canadavisa.com/canada-immigration-discussion-board/members/irteknos.1150750/
https://www.canadavisa.com/canada-immigration-discussion-board/members/pafijakartatimu.1155559/
https://www.chordie.com/forum/profile.php?id=1681884
https://www.chordie.com/forum/profile.php?id=1699876
https://www.chordie.com/forum/profile.php?id=1699879
https://www.chordie.com/forum/profile.php?id=1699883
https://www.chordie.com/forum/profile.php?id=1702456
https://www.chordie.com/forum/profile.php?id=1708100
https://www.chordie.com/forum/profile.php?id=1708102
https://www.chordie.com/forum/profile.php?id=1708103
https://www.colcampus.com/courses/92076/pages/irteknos
https://www.colcampus.com/courses/92405/pages/altogelz
https://www.colcampus.com/courses/92550
https://www.coursera.org/user/88ccfbddab01e28a0d54918d7b58b793
https://www.coursera.org/user/ca074ea6dc1f8d8956a92b8f51cc4633
https://www.coursera.org/user/e343cd7a7c434cb55906b7d78f8f8599
https://www.coursera.org/user/f8daefe5020572cc6e3e042305cf771b
https://www.dermandar.com/user/altogelz/
https://www.dermandar.com/user/altogelz1/
https://www.dermandar.com/user/irteknos/
https://www.dermandar.com/user/pafijakartatimur/
https://www.drupalgovcon.org/user/531696
https://www.drupalgovcon.org/user/555281
https://www.empowher.com/users/altogelz
https://www.empowher.com/users/altogelz1
https://www.empowher.com/users/irteknos
https://www.empowher.com/users/pafijakartati
https://www.facer.io/u/altogelz
https://www.facer.io/user/KNWlu2xjFl
https://www.facer.io/user/M88m2il7HW
https://www.facer.io/user/pfBVStXo5E
https://www.fimfiction.net/user/615314/irteknos
https://www.fimfiction.net/user/622976/altogelz/about
https://www.fimfiction.net/user/624224/pafijakartatimur
https://www.flickr.com/people/198717064@N02/
https://www.flickr.com/people/198858378@N05/
https://www.flickr.com/people/pafijakartatimur/
https://www.globalvision2000.com/forum/member.php?action=profile&uid=964428
https://www.globalvision2000.com/forum/member.php?action=profile&uid=965754
https://www.globalvision2000.com/forum/member.php?action=profile&uid=965769
https://www.globalvision2000.com/forum/member.php?action=profile&uid=965770
https://www.globalvision2000.com/forum/member.php?action=profile&uid=966026
https://www.globalvision2000.com/forum/member.php?action=profile&uid=966580
https://www.globalvision2000.com/forum/member.php?action=profile&uid=966581
https://www.globalvision2000.com/forum/member.php?action=profile&uid=966582
https://www.goodreads.com/user/show/167709418-irteknos
https://www.goodreads.com/user/show/168521315-altogelz
https://www.goodreads.com/user/show/168521344-altogelz
https://www.goodreads.com/user/show/168521388-altogelz
https://www.goodreads.com/user/show/168653506-pafijakartatimur
https://www.goodreads.com/user/show/168897040-altogelz
https://www.goodreads.com/user/show/168897089-altogelz
https://www.goodreads.com/user/show/168897124-altogelz
https://www.gta5-mods.com/users/irteknos
https://www.gta5-mods.com/users/pafijakartatimur
https://www.hulkshare.com/altogelz
https://www.hulkshare.com/altogelz1
https://www.hulkshare.com/altogelz2
https://www.hulkshare.com/altogelz5
https://www.hulkshare.com/altogelz6
https://www.hulkshare.com/altogelz7
https://www.hulkshare.com/irteknos
https://www.hulkshare.com/pafijakartatimur
https://www.iglinks.io/altogeldr-8uj
https://www.iglinks.io/renaldidomain-had
https://www.iglinks.io/tokomanjadancantik-wak
https://www.industryhuddle.com/altogelz
https://www.industryhuddle.com/irteknos
https://www.industryhuddle.com/pafijakartatimur
https://www.infragistics.com/community/members/6e40f5405e9029eeba0a252fba0e01ee872201de
https://www.infragistics.com/community/members/7a6004baaac834d5b9bbbcb7e48c6ccc810fe8d0
https://www.kickstarter.com/profile/altogelz/about
https://www.kickstarter.com/profile/irteknos/about
https://www.kickstarter.com/profile/pafijakartatimur/about
https://www.lawyersclubindia.com/profile.asp?member_id=965755
https://www.lawyersclubindia.com/profile.asp?member_id=972341
https://www.lawyersclubindia.com/profile.asp?member_id=973401
https://www.live4cup.com/equipe-29457-irteknos.html
https://www.live4cup.com/equipe-29459-altogelz.html
https://www.live4cup.com/tournoi-23607-pafijakartatimu.html
https://www.mediafire.com/view/41wxqfjgw7pbun3/bagus-1.png/file
https://www.mediafire.com/view/hw5e4exwk48m0y6/bagus-1.png/file
https://www.medicinacinesenews.it/forum/memberlist.php?mode=viewprofile&u=2753964
https://www.medicinacinesenews.it/forum/memberlist.php?mode=viewprofile&u=2853904
https://www.medicinacinesenews.it/forum/memberlist.php?mode=viewprofile&u=2884341
https://www.medicinacinesenews.it/forum/memberlist.php?mode=viewprofile&u=2919758
https://www.metooo.io/e/altogelz
https://www.metooo.io/u/64ae6ec711db1375341fd4af
https://www.metooo.io/u/pafijakartatimur
https://www.mojomarketplace.com/user/altogelz-6ssisQfP3D
https://www.mojomarketplace.com/user/irteknos-X9Nhsrfvzi
https://www.mojomarketplace.com/user/pafijakartatimur-yY5okSQ728
https://www.notebook.ai/@altogelz1
https://www.notebook.ai/@altogelz2
https://www.notebook.ai/@altogelz3
https://www.notebook.ai/@altogelz5
https://www.notebook.ai/@altogelz6
https://www.notebook.ai/@altogelz7
https://www.notebook.ai/@irteknos
https://www.notebook.ai/@pafijakartatimur
https://www.noteflight.com/profile/2ae746b0b2acbedce77868d6be814b6fd2e9f957
https://www.noteflight.com/profile/813a3cd7fcbaed98901b5471c72fa5c13418a048
https://www.noteflight.com/profile/d0d15dec72622c8af5943a59c1ddd91139d7b1ba
https://www.opencode.net/altogelz/altogelz/-/wikis/home
https://www.opencode.net/irteknos
https://www.opencode.net/pafijakartatimur
https://www.openhumans.net/member/irteknos/
https://www.openhumans.net/member/pafijakartatimur/
https://www.openhumans.org/member/altogelz/
https://www.pearltrees.com/irteknos
https://www.pearltrees.com/irteknos/item529565592
https://www.pearltrees.com/pafijakartatimur
https://www.pling.com/u/altogelz/
https://www.pling.com/u/altogelz1/
https://www.pling.com/u/altogelz2/
https://www.pling.com/u/altogelz23/
https://www.pling.com/u/altogelz24/
https://www.pling.com/u/irteknos/
https://www.pling.com/u/pafijakartatimur/
https://www.projectnoah.org/users/altogeldr
https://www.projectnoah.org/users/renaldidomain
https://www.projectnoah.org/users/resadomainrating
https://www.pubpub.org/user/alto-gelz
https://www.pubpub.org/user/alto-gelz-2
https://www.pubpub.org/user/alto-gelz-3
https://www.pubpub.org/user/alto-gelz-4
https://www.pubpub.org/user/alto-gelz-5
https://www.pubpub.org/user/alto-gelz-6
https://www.pubpub.org/user/irte-knos
https://www.pubpub.org/user/pafijakarta-timur
https://www.quia.com/profiles/altogelz
https://www.quia.com/profiles/irteknos
https://www.quia.com/profiles/pafijakartat
https://www.quia.com/servlets/quia.web.QuiaWebManager?tagModuleType=15501&rand=259540
https://www.quora.com/profile/Alto-Gel
https://www.quora.com/profile/Pafijakartatimur
https://www.quora.com/profile/Renaldi-Dr
https://www.rctech.net/forum/members/altogelz-323467.html
https://www.rctech.net/forum/members/altogelz5-324887.html
https://www.rctech.net/forum/members/altogelz6-324890.html
https://www.rctech.net/forum/members/altogelz7-324891.html
https://www.rctech.net/forum/members/irteknos-320453.html
https://www.rctech.net/forum/members/pafijakartatimu-323844.html
https://www.skillshare.com/fr/user/pafijakartatimur
https://www.spinattic.com/82489
https://www.spinattic.com/82490
https://www.spinattic.com/82557
https://www.spinattic.com/82707
https://www.spinattic.com/82708
https://www.spinattic.com/82709
https://www.spinattic.com/altog
https://www.spinattic.com/renaldid
https://www.spreaker.com/show/irteknos
https://www.spyropress.com/forums/users/altogelz/
https://www.spyropress.com/forums/users/irteknos/
https://www.spyropress.com/forums/users/pafijakartatimur/
https://www.symbaloo.com/home/mix/13eOhMFTJ3
https://www.symbaloo.com/mix/altogelz
https://www.symbaloo.com/shared/AAAACEpG8YkAA42AhF4YFQ==
https://www.tetongravity.com/community/profile/renaldidomain@gmail.com/
https://www.tetongravity.com/community/profile/tokomanjadancantik@gmail.com/
https://www.tetongravity.com/community/profile/utcjlaacqdgblh@pretreer.com/
https://www.tetongravity.com/community/profile/vkyezzu@exelica.com/
https://www.twitch.tv/altogelz/about
https://www.twitch.tv/altogelz1/about
https://www.twitch.tv/irteknos/about
https://www.twitch.tv/pafijakartatimur/about
https://www.ultimate-guitar.com/u/renaldidomain
https://www.ultimate-guitar.com/u/tokomanjadanc1
https://www.vaca-ps.org/altogelz
https://www.vaca-ps.org/altogelz1
https://www.vaca-ps.org/irteknos
https://www.vaca-ps.org/pafijakartatimur
https://www.veoh.com/users/altogelz
https://www.veoh.com/users/altogelz1
https://www.veoh.com/users/altogelz2
https://www.veoh.com/users/altogelz5
https://www.veoh.com/users/altogelz6
https://www.veoh.com/users/altogelz7
https://www.veoh.com/users/irteknos
https://www.veoh.com/users/pafijakartatimur
https://www.viki.com/users/altogeldr_243/about
https://www.viki.com/users/pafijakartatimur/about
https://www.viki.com/users/renaldidomain_488/about
https://www.vingle.net/posts/6476557
https://www.vingle.net/posts/6605795
https://www.vingle.net/posts/6639659
https://www.walkscore.com/people/324823982587/walk-score-user
https://www.walkscore.com/place-details/altogelz1-seattle?list=/people/124159241963
https://www.walkscore.com/place-details/altogelz1-seattle-2?list=/people/124159241963
https://www.walkscore.com/place-details/altogelz2-seattle?list=/people/124159241963
https://www.walkscore.com/place-details/altogelz-seattle?list=/people/124159241963
https://www.walkscore.com/place-details/altogelz-seattle-2?list=/people/124159241963
https://www.walkscore.com/place-details/altogelzx-seattle?list=/people/124159241963
https://www.wattpad.com/user/altogelz
https://www.wattpad.com/user/irteknos
https://www.wattpad.com/user/pafijakartatimur
https://www.zazzle.com/mbr/238083623809167019
https://www.zazzle.com/mbr/238092656725147201
https://www.zazzle.com/mbr/238195192511804059
https://www.zazzle.com/mbr/238281848657701987
https://www.zazzle.com/mbr/238443354801685905
https://www.zazzle.com/mbr/238522838600913869
https://www.zazzle.com/mbr/238555954064149491
https://www.zazzle.com/mbr/238735586090167087
https://xtremepape.rs/members/altogelz.398742/#about
https://xtremepape.rs/members/altogelz1.400498/#about
https://xtremepape.rs/members/irteknos.395433/about
https://xtremepape.rs/members/pafijakartatimur.399312/#about
https://yamcode.com/altogelz-3
https://yamcode.com/pafijakartatimur
https://yamcode.com/untitled-76762
https://zapytaj.zhp.pl/user/altogelz1
https://zapytaj.zhp.pl/user/altogelz2
https://zapytaj.zhp.pl/user/altogelz3
https://zapytaj.zhp.pl/user/altogelz6
https://zapytaj.zhp.pl/user/altogelz7
https://zapytaj.zhp.pl/user/altogelz8
https://zapytaj.zhp.pl/user/irteknos1
https://zapytaj.zhp.pl/user/pafijakartatimu
Heya! I just wanted to ask if you ever have any trouble with hackers?
My last blog (wordpress) was hacked and I ended up losing a few months
of hard work due to no data backup. Do you have any methods to protect against hackers?
cost of metformin 1000 mg
prednisolone tablets 25mg price
buy atarax over the counter
online pharmacy delivery dubai
Wow! At last I got a website from where I be capable
of really take helpful information concerning my
study and knowledge.
super pharmacy
atarax tablet medication
You stated that well!
best writing service discount code admission essay writing service reviews application essay writing service
Thanks! Excellent information.
tretinoin 0 25 mg
atenolol where to buy
atarax generic cost
trustworthy canadian pharmacy
baclofen online uk
how to purchase metformin online
buy atarax online usa
prednisolone 25mg price uk
Wonderful beat ! I wish to apprentice whilst you amend
your site, how could i subscribe for a blog website?
The account aiuded me a appropriate deal.
I had been a little bit familiar of this your broadcast provided brilliant transparent idea
tenormin
Right here is the right webpage for anyone who would like
to find out about this topic. You understand so much its almost hard to argue with you (not that I personally will need to…HaHa).
You certainly put a new spin on a subject that’s been discussed
for years. Wonderful stuff, just great!
cymbalta 60 mg price
phenergan pharmacy nz
Quand une ou plusieurs lames sont défectueuses et qu’il n’est pas potential de retrouver le modèle exact, il faut alors procéder au remplacement du tablier.
online pharmacy same day delivery
cymbalta tablets cost
robaxin pill
atarax tablet cost
robaxin 750 online fast shipping from canada no prescription
cialis online pharmacy
phenergan over the counter nz
Appreciate the recommendation. Will try it out.
azithromycin buy online australia
Article writing is also a fun, if you be familiar with
afterward you can write if not it is difficult to write.
baclofen uk online
atarax 25mg uk
medicine prazosin 1 mg capsule
dexamethasone 4 mg tablet india
generic strattera online
prazosin 4 g
Hi colleagues, its fantastic piece of writing concerning teachingand fully defined, keep it
up all the time.
Incredible points. Solid arguments. Keep up the good effort.
I really love your site.. Excellent colors & theme. Did
you make this site yourself? Please reply back as I’m wanting to create my very own blog and want
to know where you got this from or exactly what the theme is called.
Kudos!
atarax medication
I’ve been browsing online more than three hours today,
yet I never found any interesting article like
yours. It’s pretty worth enough for me. Personally,
if all site owners and bloggers made good content as you did,
the web will be much more useful than ever before.
tretinoin 10mg price
triamterene 37.5mg hctz 25mg
Helpful write ups. Cheers!
writing term paper service top college essay writing services essay writing service plagiarism
can i buy cymbalta in mexico
dexamethasone tablet brand name
drug levaquin
lipitor 10mg price singapore
Wonderful work! This is the type of information that are supposed
to be shared around the web. Shame on the seek engines for now not positioning this submit upper!
Come on over and visit my web site . Thank you =)
metformin for sale canada
This post will help the internet users for building
up new webpage or even a blog from start to end.
canadianpharmacymeds
buy atarax
medication atenolol 25 mg
canadian pharmacy 24h com safe
triamterene/hctz caps
These are genuinely impressive ideas in regarding blogging.
You have touched some nice factors here. Any way keep up wrinting.
triamterene-hctz 37.5-25 mg cp
lipitor prices australia
atarax otc
pharmaceutical online
buy robaxin online uk
Hi there! I know this is kinda off topіc nevertheless I’d figured I’d ask.
Woᥙld you be interested іn еdchanging links or mybe
ցuest authoring a blog post or vice-νersa? Ꮇy website ɗiscusses a ⅼot of the same subjects as yours and I believe we could
greatly benefit frߋm each other. If you happen to be interested feel free to send
me an e-mail. I look fߋrwaгd to hearing from yоu! Exсellent blog by
the way!
fantastic post, very informative. I’m wondering why the opposite experts of this sector don’t notice this.
You must continue your writing. I am confident, you’ve a huge readers’ base already!
buy atarax 25mg online without rx
0.025 retin a gel
canadian world pharmacy
levaquin 750
Thanks for one’s marvelous posting! I definitely enjoyed reading it, you can be a great author.I will always bookmark your
blog and will eventually come back from now on. I want to encourage you to ultimately continue your great posts, have a
nice evening!
metformin er 500mg
Thanks! Loads of write ups!
the best essay writing service uk online personal statement writing service assignment writing service canada
prednisolone brand name india
dexamethasone 4 mg tablet price in india
phenergan 12.5 mg tablets
buy trental 400 mg india
levaquin antibiotics
onlinepharmacytabs24 com
Good replies in return of this difficulty with solid arguments and describing the whole thing on the topic of that.
retin a generic price
zithromax 500 without prescription
phenergan otc
This website was… how do I say it? Relevant!!
Finally I have found something that helped me. Many thanks!
top 10 online pharmacy in india
buy propecia 5mg online
tadalafil 100mg tablets
buy atarax online
atarax australia
prednisolone 1 cost
retin-a online
atarax cost uk
lipitor purchase online
retin a price
triamterene 1300 mg
cymbalta 20 mg coupon
tamoxifen without prescription
Cheers. Valuable information.
common app essay writing service civil service essay writing a aaa resume & writing service
nolvadex tamoxifen
ebaylevaquin
uk pharmacy no prescription
lipitor price uk
metformin 2000 mg
It’s an amazing article designed for all the internet
viewers; they will take benefit from it I am sure.
phenergan 10mg tablet
prazosin hcl 5mg
atarax 10mg price in india
viagra online usa female viagra pills viagra street price
ebaylevaquin
atarax online uk
levaquin pack
phenergan 10mg cost
where can i buy albuterol over the counter
diclofenac 75mg no prescription
pharmacy rx world canada
Superb data, Appreciate it!
writing essays write my essay for me free writing an opinion essay write a essay for me
write an essay writing essays for money persuasive essay writer essay write
thesis on https://writingpaperforme.com
strattera 5mg
Please let me know if you’re looking for a article writer for your blog.
You have some really good posts and I believe I would be a good
asset. If you ever want to take some of the load off, I’d love
to write some material for your blog in exchange for a link back to mine.
Please send me an e-mail if interested. Thanks!
strattera 25 mg
If you want to get a great deal from this paragraph then you have to apply such techniques
to your won blog.
Amazing a lot of useful info!
dissertation paper dissertations dissertation writing services reviews dissertation uk
prednisone oral
zestoretic 20 25mg
albuterol 900 mcg
lisinopril 10 mg on line prescription
Cheers. Useful information.
top essay writing services canada how do i spend my holidays essay history essay writer someone to do my essay for me cheap write a speech for me essay writing jobs writing essays for money essay writers for cheap do my essay paper essay writer online uk
strattera sale
I’ve been surfing on-line greater than three hours nowadays,
but I by no means found any attention-grabbing article like yours.
It is pretty price sufficient for me. In my opinion, if all web owners and bloggers
made good content material as you did, the net will be a
lot more useful than ever before.
cephalexin 500
propranolol cost canada
lyrica 75 mg price in india
hydroxychloroquine brand
bactrim forte medicine bactrim antibiotic
propranolol 320 mg daily
synthroid average cost
buy propecia 5mg online
brillx casino официальный мобильная версия
https://brillx-kazino.com
Добро пожаловать в увлекательный мир азарта и развлечений на официальном сайте Brillx Казино! Если вы ищете захватывающий опыт игры в игровые аппараты, то ваш поиск завершен. Brillx Казино – это не просто блистательный выбор игр, это настоящее путешествие в мир азарта и возможностей.Играя на Brillx Казино, вы можете быть уверены в честности и безопасности своих данных. Мы используем передовые технологии для защиты информации наших игроков, так что вы можете сосредоточиться исключительно на игре и наслаждаться процессом без каких-либо сомнений или опасений.
buy fluconazol
I like what you guys are usually up too. This sort of clever work and exposure!
Keep up the wonderful works guys I’ve incorporated you guys to my own blogroll.
amoxicillin 500mg buy uk
This is a ood tip especially to those new to thhe blogosphere.
Short but very precise info… Manny thanks for sharing this one.
A must reazd post!
propranolol price
buy augmentin 625mg
celecoxib celebrex
lisinopril 2.5 mg brand name
can you buy azithromycin online
Keep on writing, great job!
That is really attention-grabbing, You’re an overly skilled blogger.
I have joined your rss feed and sit up for searching for extra of your wonderful post.
Additionally, I’ve shared your web site in my social networks
diflucan over the counter uk
Way cool! Some very valid points! I appreciate you writing this article and the rest of the website is very good.
purchase zithromax z-pak
hydroxychloroquine tab 200mg
amoxicillin 500mg cost
can i buy celebrex over the counter
prednisone buy without prescription
can you buy albuterol in mexico
synthroid 50 mcg
retino 0.5 cream price
diclofenac price uk
quineprox 10mg
flomax for urinary retention
how much is diflucan 150 mg
buy prinivil online
diflucan 200 mg daily
retino 0.025 cream
I like the valuable info you supply on your articles.
I’ll bookmark your weblog and test again here frequently.
I’m slightly sure I’ll be informed lots of new stuff right right here!
Best of luck for the next!
ventolin pharmacy australia
brand name synthroid cheap
accutane pill
diflucan oral
ventolin cost usa
price of generic synthroid
phenergan tablets 25mg uk
cost of cephalexin
lisinopril 3973
buy doxycycline online uk
diflucan tablets buy
http://brianknapp.co/community/profile/arlene43r13927/
http://brianknapp.co/community/profile/laverndullo368/
http://kesheromania.ro/forum/profile/nellyv075605841/
https://commoncause.optiontradingspeak.com/index.php/community/profile/blythekeister5/
https://commoncause.optiontradingspeak.com/index.php/community/profile/brigettehudd637/
https://commoncause.optiontradingspeak.com/index.php/community/profile/cornellpannell0/
https://commoncause.optiontradingspeak.com/index.php/community/profile/donnie112045386/
https://commoncause.optiontradingspeak.com/index.php/community/profile/karineguzzi0980/
https://commoncause.optiontradingspeak.com/index.php/community/profile/katharinafoerst/
https://cripptic.com/community/profile/enidhalford9412/
https://cripptic.com/community/profile/jimmy03o9295394/
https://cripptic.com/community/profile/quinnpruitt782/
https://forum.finveo.world/community/profile/caryndelagarza9/
https://forum.finveo.world/community/profile/joncockrell2551/
https://forum.finveo.world/community/profile/lachlanwishart8/
https://forum.finveo.world/community/profile/miloenos770973/
https://forum.finveo.world/community/profile/pennyboynton971/
https://forum.finveo.world/community/profile/simacanela85675/
https://holymaryseeds.com/community/profile/aaodominique561/
https://holymaryseeds.com/community/profile/gudrun14w17423/
https://holymaryseeds.com/community/profile/janinetressler8/
https://holymaryseeds.com/community/profile/marcos39a909959/
https://imatelsecurity.com/community/profile/alisonbvw926052/
https://imatelsecurity.com/community/profile/cindysalas77439/
https://imatelsecurity.com/community/profile/hazelestrella4/
https://imatelsecurity.com/community/profile/kinamanna66165/
https://kesheromania.ro/forum/profile/eartha893387677/
https://kesheromania.ro/forum/profile/jurgenseal87280/
https://kesheromania.ro/forum/profile/ykpweldon138626/
https://millionwaystogetit.com/community/profile/brodiehanlon316/
https://millionwaystogetit.com/community/profile/kattielamothe47/
https://millionwaystogetit.com/community/profile/marisaborrego42/
https://solucx.com.br/forum/index.php/community/profile/briannaseagle89/
https://solucx.com.br/forum/index.php/community/profile/santop33207481/
https://solucx.com.br/forum/index.php/community/profile/wilfred70m3098/
https://www.dcsportsconnection.com/community/profile/cmeindira950108/
https://www.dcsportsconnection.com/community/profile/ilenevance9656/
https://www.dcsportsconnection.com/community/profile/judec8773068483/
https://www.dcsportsconnection.com/community/profile/minnakroll97745/
https://www.kalpnatayal.com/forum/community/profile/arlethamcguigan/
https://www.revivalwaves.org/got-a-question/profile/angelicakimmel0/
https://www.revivalwaves.org/got-a-question/profile/tobymccrea97254/
https://www.revivalwaves.org/got-a-question/profile/vernonhurley807/
http://brianknapp.co/community/profile/berniebayne0695/
http://brianknapp.co/community/profile/hogola522689204/
http://brianknapp.co/community/profile/irenecoveny8056/
http://brianknapp.co/community/profile/jacklyndouglas2/
http://brianknapp.co/community/profile/normand29s86977/
http://kesheromania.ro/forum/profile/hilarioh2113686/
http://kesheromania.ro/forum/profile/merlep869865164/
https://commoncause.optiontradingspeak.com/index.php/community/profile/eltoncecilia736/
https://commoncause.optiontradingspeak.com/index.php/community/profile/geraldinestaple/
https://commoncause.optiontradingspeak.com/index.php/community/profile/luigimcchesney/
https://commoncause.optiontradingspeak.com/index.php/community/profile/rethahernsheim/
https://commoncause.optiontradingspeak.com/index.php/community/profile/soilanation5179/
https://forum.finveo.world/community/profile/lashondakesteve/
https://forum.finveo.world/community/profile/trudiballow2826/
https://holymaryseeds.com/community/profile/arleenvenables2/
https://holymaryseeds.com/community/profile/harrietteev7769/
https://holymaryseeds.com/community/profile/numbersfrawley8/
https://imatelsecurity.com/community/profile/emorycooney4556/
https://imatelsecurity.com/community/profile/gordonbelcher00/
https://imatelsecurity.com/community/profile/lancevanburen3/
https://millionwaystogetit.com/community/profile/gwendolynlumhol/
https://millionwaystogetit.com/community/profile/kristeenhyl9134/
https://millionwaystogetit.com/community/profile/philomena64q536/
https://solucx.com.br/forum/index.php/community/profile/darrinrqp792324/
https://solucx.com.br/forum/index.php/community/profile/doloreswilkins1/
https://solucx.com.br/forum/index.php/community/profile/milesdietz27229/
https://solucx.com.br/forum/index.php/community/profile/tristaneyre585/
https://solucx.com.br/forum/index.php/community/profile/ziteileen125210/
https://www.bitcoinenespanol.net/criptoforo/profile/albertastirling/
https://www.bitcoinenespanol.net/criptoforo/profile/alyciawhited891/
https://www.bitcoinenespanol.net/criptoforo/profile/marisolsimone5/
https://www.bitcoinenespanol.net/criptoforo/profile/nellieboothman8/
https://www.dcsportsconnection.com/community/profile/jmhnoble931739/
https://www.dcsportsconnection.com/community/profile/thanhx418594703/
https://www.revivalwaves.org/got-a-question/profile/braydenwjm1037/
https://www.revivalwaves.org/got-a-question/profile/jayciy045567998/
https://www.revivalwaves.org/got-a-question/profile/luthersterner7/
https://www.revivalwaves.org/got-a-question/profile/morrismonash369/
https://www.revivalwaves.org/got-a-question/profile/teddarden298165/
https://www.vanxuan.center/forums/profile/kierahorrocks07
https://www.vanxuan.center/forums/profile/lucacummins3227
You said it very well.!
best nursing paper writing service write my college paper for me paper writers paper for me write my papers for cheap linkedin profile writing service dissertation editing services statistics for dissertation dissertation proposal help top 10 dissertation writing services
augmentin 875 125 mg tablet
where can i buy diflucan over the counter
zithromax online pharmacy
I always spent my half an hour to read this webpage’s content everyday along with a cup of
coffee.
diclofenac gel 100g
Hi! I understand this is somewhat off-topic however I had
to ask. Does running a well-established blog such as yours
require a large amount of work? I am brand new to blogging however
I do write in my journal everyday. I’d like to start
a blog so I can easily share my experience and views online.
Please let me know if you have any ideas or tips for new
aspiring blog owners. Thankyou!
albuterol over the counter mexico
where can i get zithromax
suhagra 100 online in india
buy strattera paypal
voltaren 1000 mg
lisinopril cost uk
accutane us
buy lyrica 300 mg online uk
tizanidine cost in mexico
prednisone for sale without prescription
cheap prednisone online
diflucan pill
cheap lyrica
tizanidine buy
augmentin 250 mg price
albuterol 0.23
where can i buy strattera online
prednisone brand
lisinopril 2016
clopidogrel 75 mg discount coupon
lisinopril 20 mg canadian pharmacy
flomax uk
propecia canadian pharmacy
buy synthroid cheap
prednisone drug
Link exchange is nothing else but it is simply placing the
other person’s blog link on your page at appropriate place and other person will also do same
in favor of you.
keflex
Many thanks, Wonderful information!
should i do my homework do my finance homework do my math homework for me pay someone to do my homework
0.025 mg synthroid
hydroxychloroquine sulfate generic
You suggested that really well.
bachelor thesis writing service oxbridge personal statement writing service marketing dissertation writing service wikipedia article writing service engineering essay writing service best research proposal writing service coursework help uk do my algebra homework free do my statistics homework for money should i do my math homework
An impressive share! I have just forwarded this onto a co-worker who was doing a
little research on this. And he actually bought me lunch simply because I stumbled upon it for
him… lol. So let me reword this…. Thank YOU for
the meal!! But yeah, thanx for spending the time to
discuss this issue here on your internet site.
flomax discount coupon
whoah this weblog is wonderful i like studying your articles.
Keep up the great work! You realize, lots of people
are hunting round for this info, you could help them greatly.
Very good blog post. I certainly appreciate this website. Keep writing!
Your writing is informative and interesting. I constantly understand anything new from a posts.
plavix clopidogrel bisulfate
amoxicillin cap 500mg price
otc flomax
phenergan 100mg
generic lyrica canada cost
Your content material sparks my curiosity and retains me returning for more.
propecia tablet price in india
Your composing adds a lot of benefit to the online Neighborhood. Thank you!
Hey! This post couldn’t be written any better! Reading this post reminds me of my
previous room mate! He always kept chatting about this.
I will forward this write-up to him. Fairly certain he will have a
good read. Thanks for sharing!
hydroxychloroquine oral
Your weblog is my sanctuary for properly-researched, assumed-provoking articles.
Your information is so addictive. I binge-read your website frequently!
propecia price in australia
lyrica generic south africa
Excellent goods from you, man. I have understand your stuff
previous to and you are just extremely great. I really like what you have acquired here, really like what you are
saying and the way in which you say it. You make it entertaining and you still take care of to keep it smart.
I can not wait to read far more from you. This is actually a terrific web site.
I’ve suggested your blog to my colleagues, they usually love it too.
I got this web site from my buddy who told me regarding this
website and at the moment this time I am visiting this
web page and reading very informative articles at this time.
amoxicillin 500g capsules
Remarkable! Its in fact amazing post, I have got much clear idea
regarding from this paragraph.
albuterol medicine in india
where can i purchase lisinopril
buy generic flomax online
8 zanaflex
hi!,I really like your writing so so much! percentage
we communicate extra about your post on AOL?
I require a specialist on this area to solve my problem.
May be that is you! Having a look ahead to see you.
Hi, I do believe this is a great blog. I stumbledupon it 😉
I will return yet again since i have saved as a favorite it.
Money and freedom is the greatest way to change,
may you be rich and continue to guide others.
lyrica 2.0
Heya i am for the first time here. I found this board and
I in finding It really useful & it helped me out a lot.
I am hoping to provide one thing back and help others like you helped me.
amoxicillin 500 mg without script
whoah this blog is fantastic i like reading your posts.
Keep up the good work! You already know, lots of people are
looking round for this info, you can aid them greatly.
augmentin best price
I constantly spent my half an hour to read this web site’s content every day along with a mug of coffee.
synthroid levothyroxine
suhagra pills
retino 0.25
Hey I know this is off topic but I was wondering if you knew of any
widgets I could add to my blog that automatically tweet my newest twitter updates.
I’ve been looking for a plug-in like this for quite some time and was hoping maybe you would have some experience with something like this.
Please let me know if you run into anything. I truly enjoy reading your blog and I look forward to your
new updates.
I’m really enjoying the design and layout of your blog.
It’s a very easy on the eyes which makes it much more pleasant
for me to come here and visit more often. Did you hire
out a designer to create your theme? Exceptional work!
how to get accutane without prescription
how much is albuterol in mexico
accutane 40 mg price in india
I’m really loving the theme/design of your web site. Do youu ever run into anyy internet
browser compatibility problems? A number of my blog readers have complained about my
website not working correctly in Explorer but looks grest in Opera.
Do you have any tips to help fix this problem?
tri amoxicillin
Theԝse аre actually fantasztic ideas inn concerning ƅlօgging.
Yoᥙ haνe touched some good points here. Αny way keep up wrinting.
propranolol medication
Excellent post. I was checking constantly this blog and I’m impressed!
Extremely helpful information specially the last
part 🙂 I care for such info a lot. I was seeking this particular
info for a very long time. Thank you and good luck.
where can i order doxycycline
Experte en menuiserie pvc, Yasmine Dali assure l’installation des volets roulants de tous les styles.
Wow that was unusual. I just wrote an really long comment but after I clicked submit my comment didn’t show up.
Grrrr… well I’m not writing all that over again. Regardless, just wanted to say wonderful blog!
backtim antibioticsonline.com
over the counter augmentin
lyrica online purchase
You ought to take part in a contest for one of
the greatest blogs online. I most certainly will recommend this web site!
Hello There. I found your weblog the use of msn. This is
a very smartly written article. I will be sure to bookmark
it and come back to learn extra of your helpful info.
Thanks for the post. I will certainly return.
Asking questions are truly nice thing if you are not understanding anything completely,
however this paragraph presents pleasant understanding even.
What a material of un-ambiguity and preserveness of precious know-how about unexpected feelings.
cephalexin 500 mg online
celebrex 50
synthroid prescription cost
keflex 250mg price
I think this is one of the most important info for me. And i
am glad reading your article. But want to remark on some general things, The
web site style is great, the articles is really nice : D.
Good job, cheers
Hey exceptional website! Does running a blog like this
take a large amount of work? I have very little understanding of computer programming but I was hoping
to start my own blog in the near future. Anyway, if you have any ideas or
techniques for new blog owners please share. I understand this is off topic nevertheless I
just needed to ask. Thanks!
synthroid 20
discount keflex
Good post. I learn something totally new and challenging on blogs I stumbleupon every day.
It’s always useful to read through content from other
writers and practice a little something from other web sites.
Hello terrific blog! Does running a blog such as this require a
massive amount work? I have virtually no expertise in computer programming but I was hoping to start
my own blog in the near future. Anyway, if you have any
recommendations or techniques for new blog owners please share.
I know this is off topic but I just had to ask. Appreciate it!
penis enlargement
You said it very well.!
how much is a resume writing service help on essay buy essay writing an essay help essay homework help essay writing service 12 hours how long will it take to write my paper persuasive essay writer write my paper for cheap write my math paper
where to get flomax
synthroid 125 pill
where to buy prednisone
Helpful info. Fortunate me I discovered your web site accidentally, and I’m stunned why this
twist of fate didn’t came about in advance! I bookmarked it.
Hey would you mind letting me know which web host you’re utilizing?
I’ve loaded your blog in 3 different web browsers and I must say this blog loads a lot faster then most.
Can you recommend a good hosting provider
at a reasonable price? Many thanks, I appreciate it!
I do believe all of the concepts you’ve presented in your post.
They’re very convincing and will definitely work.
Nonetheless, the posts are very quick for starters. Could you
please prolong them a bit from next time? Thank you for the post.
Tải Phần Mềm Crack chuyên tổng hợp các phần mềm và phân phối link vận chuyển, cùng lúc cung ứng các cách thức active phần mềm mới nhất hoàn toàn miễn phí.
Quality articles is the main to invite the viewers to pay a visit the site, that’s what this site is providing.
celebrex coupon
When someone writes an post he/she retains the image
of a user in his/her mind that how a user can know it. Thus that’s why this piece of writing is outstdanding.
Thanks!
synthroid 0.05 mcg
Great article.
Peculiar article, exactly what I wanted to find.
This post is really a nice one it assists new net users, whho are wishing in favor of blogging.
Howdy outstanding blog! Does running a blog such as this take a lot of work?
I have absolutely no knowledge of coding however I was
hoping to start my own blog soon. Anyway, if you have any
suggestions or tips for new blog owners please share.
I understand this is off subject but I simply wanted to ask.
Appreciate it!
ventolin buy canada
propranolol hemangioma
generic combivent prices
generic celebrex discount
Aw, this was a really good post. Spending some time and actual effort
to produce a top notch article… but what can I say… I procrastinate a whole lot and never seem
to get nearly anything done.
It’s not my first time to pay a visit this web page, i am visiting this website dailly and
take nice facts from here all the time.
accutane price south africa
albuterol canada
propranolol order
Hello mates, how is all, and what you desire to say concerning this paragraph, in my view its in fact amazing in support of me.
where to buy strattera
bactrim ds tablets
augmentin canada pharmacy
tizanidine 2mg cost
prednisone 54
Thanks for another fantastic post. Where else could anyone get that type of information in such a perfect way
of writing? I’ve a presentation subsequent week, and I’m
at the look for such info.
online pharmacy no prescription
Hello are using WordPress for your site platform? I’m new to the blog
world but I’m trying to get started and set up
my own. Do you require any coding knowledge to make your own blog?
Any help would be really appreciated!
Hi everyone, it’s my first pay a visit at this site, and
paragraph iss actually fruitful in favor of me, keepp
up posting hese types off posts.
clopidogrel cheap
phenergan online nz
Yes! Finally something about Pre-owned vehicles.
prednisone 16 mg
suhagra 50 mg
lisinopril 20 mg tabs
buy lyrica uk
Appreciating the persistence you put into your site and in depth information you
offer. It’s good to come across a blog every once in a
while that isn’t the same outdated rehashed material.
Great read! I’ve saved your site and I’m including your RSS feeds to my Google account.
magnificent post, very informative. I’m wondering why the other experts off this sector do not realize this.
You should proceed your writing. I am confident,
you have a great readers’ base already!
canadian pharmacy india
hydroxychloroquine 50 mg
diclofenac tablets over the counter
phenergan vc
suhagra 50 mg
where can i buy azithromycin over the counter
Hi there, this weekend is pleasant in support of me, because
this point in time i am reading this impressive educational post here at my residence.
amoxicillin 875 mg
diflucan medication
If you are going for finest contents like myself, simply visit this site all the time because it provides feature
contents, thanks
Pretty great post. I just stumbled upon your blog and wanted to mention that I’ve truly enjoyed surfing
around your weblog posts. In any case I will be subscribing to your rss feed and I am hoping you write again very soon!
It’s great that you are getting thoughts from this post
as well as from our argument made at this place.
celebrex 2016
Excellent site you have here.. It’s difficult to find high-quality writing like
yours nowadays. I truly appreciate individuals like you! Take care!!
You’ve got probably the greatest web sites.
https://yruz.one/blogs/71557/Exploring-Optimal-Positions-for-Group-Sex-A-Comprehensive-Guide
This is really interesting, You are an excessively professional blogger.
I’ve joined your feed and sit up for in search of more
of your great post. Additionally, I’ve shared your site in my social networks
50mg prednisone tablet
Rebahin Film ialah website yang memungkinnya pemakai
buat lihat beberapa film dari bermacam typical dengan online.
Dalam usaha untuk penuhi keperluan pecinta film, Rebahin Film tawarkan akses simpel dan gratis pada beberapa ribu judul film, terhitung yang menggunakan bahasa Indonesia.
can you buy zithromax over the counter in canada
Hello, after reading this awesome piece of writing i am as well delighted
to share my experience here with mates.
Good day! This is my first visit to your blog! We are a collection of volunteers and starting a new initiative in a
community in the same niche. Your blog provided us valuable information to work on. You have done a outstanding
job!
where can i get propecia in india
buy phenergan over the counter
If you wish for to obtain a good deal from this article then you have to apply these strategies to your
won web site.
buy strattera online canada
Hi there I amm so glad I found your webpage, I really
found you by error, while I was browsing on Diggg for something else, Anyways I am here now
and would just like to say many thanks for a
remarkable post and a alll roound enjoyable blog (I also love the theme/design), I don’t have time to browse it all at thee moment but I have saved
it and also addewd your RSS feeds, so when I have time I
will be back to read a great deal more, Pleease do keep
up the superb job.
tizanidine 2mg
order augmentin over the counter
Yes! Finally something about http://www.topami.es.
buy augmentin online usa
http://forums.visualtext.org/member.php?action=profile&uid=971719
http://giderosmobile.com/profiles/altogelz
http://giderosmobile.com/profiles/altogelz
http://giderosmobile.com/profiles/altogelz
http://giderosmobile.com/profiles/altogelz
http://giderosmobile.com/profiles/altogelz
http://giderosmobile.com/profiles/altogelz
http://giderosmobile.com/profiles/irteknos
http://giderosmobile.com/profiles/pafijakartatimur
http://jurnal.usbypkp.ac.id/index.php/jemper/user/viewPublicProfile/108738
http://jurnal.usbypkp.ac.id/index.php/jemper/user/viewPublicProfile/108738
http://jurnal.usbypkp.ac.id/index.php/jemper/user/viewPublicProfile/108738
http://jurnal.usbypkp.ac.id/index.php/jemper/user/viewPublicProfile/108738
http://jurnal.usbypkp.ac.id/index.php/jemper/user/viewPublicProfile/108738
http://jurnal.usbypkp.ac.id/index.php/jemper/user/viewPublicProfile/108738
http://jurnal.usbypkp.ac.id/index.php/jemper/user/viewPublicProfile/108738
http://www.effecthub.com/collection/show/7723
http://www.effecthub.com/collection/show/7890
http://www.effecthub.com/collection/show/7890
http://www.effecthub.com/collection/show/7890
http://www.effecthub.com/collection/show/7890
http://www.effecthub.com/collection/show/7890
http://www.effecthub.com/collection/show/7890
http://www.effecthub.com/collection/show/7891
https://bbs.now.qq.com/home.php?mod=space&uid=5030826
https://blip.fm/altogelz
https://blip.fm/altogelz1
https://blip.fm/altogelz2
https://blip.fm/altogelz3
https://blip.fm/altogelz4
https://blip.fm/altogelz5
https://blip.fm/irteknos
https://blip.fm/pafijakartatimur
https://coub.com/285195262ae98c56cab6
https://coub.com/462d2c593383065626a6
https://coub.com/8e5e8edf494c2dd45df3
https://coub.com/8ed9599186a656c41e53
https://coub.com/altogelza/
https://coub.com/altogelzb
https://coub.com/c0223ac8cdec6ddac77e
https://coub.com/pafijakartatimur
https://creator.wonderhowto.com/altogelz/
https://creator.wonderhowto.com/irteknos/
https://creator.wonderhowto.com/pafijakartatimur/
https://devpost.com/altogeldr
https://devpost.com/altogeld-r
https://devpost.com/altogel-dr
https://devpost.com/alto-geldr
https://devpost.com/al-togeldr
https://devpost.com/a-ltogeldr
https://devpost.com/irteknos
https://devpost.com/tokomanjadancantik
https://disqus.com/by/irteknos/about/
https://fairygodboss.com/users/profile/OlMAhbleni/pafijakartatimur
https://fairygodboss.com/users/profile/Y8qhhXZ-Ou/renaldi-dr
https://giphy.com/channel/altogelz
https://giphy.com/channel/altogelz1
https://giphy.com/channel/altogelz2
https://giphy.com/channel/altogelz3
https://giphy.com/channel/altogelz4
https://giphy.com/channel/altogelz5
https://giphy.com/channel/irteknos
https://giphy.com/channel/pafijakartatimur
https://issuu.com/altogelz
https://issuu.com/altogelz1
https://issuu.com/altogelz2
https://issuu.com/altogelz4
https://issuu.com/altogelz5
https://issuu.com/altogelz7
https://issuu.com/irteknos
https://issuu.com/pafijakartatimur
https://journal.almarhalah.ac.id/index.php/almarhalah/user/viewPublicProfile/59353
https://journal.almarhalah.ac.id/index.php/almarhalah/user/viewPublicProfile/59353
https://journal.almarhalah.ac.id/index.php/almarhalah/user/viewPublicProfile/59353
https://journal.almarhalah.ac.id/index.php/almarhalah/user/viewPublicProfile/59353
https://journal.almarhalah.ac.id/index.php/almarhalah/user/viewPublicProfile/59353
https://journal.almarhalah.ac.id/index.php/almarhalah/user/viewPublicProfile/59353
https://journal.almarhalah.ac.id/index.php/almarhalah/user/viewPublicProfile/59353
https://letterboxd.com/altogelz/
https://letterboxd.com/altogelz/
https://letterboxd.com/altogelz/
https://letterboxd.com/altogelz/
https://letterboxd.com/altogelz/
https://letterboxd.com/altogelz/
https://letterboxd.com/irteknos/
https://letterboxd.com/pafijakartatimu/
https://list.ly/altogeldr/activity
https://list.ly/altogeldr/activity
https://list.ly/altogeldr/activity
https://list.ly/altogeldr/activity
https://list.ly/altogeldr/activity
https://list.ly/altogeldr/activity
https://list.ly/renaldi-dr/lists
https://list.ly/tokomanjadancantik/activity
https://pastelink.net/c28ycppf
https://pastelink.net/c28ycppf
https://pastelink.net/c28ycppf
https://pastelink.net/c28ycppf
https://pastelink.net/c28ycppf
https://pastelink.net/c28ycppf
https://pastelink.net/hlimg355
https://pastelink.net/nqj1yafe
https://podcasters.spotify.com/pod/show/altogelz/episodes/altogelz-e289fah
https://podcasters.spotify.com/pod/show/altogelz/episodes/altogelz-e289fah
https://podcasters.spotify.com/pod/show/altogelz/episodes/altogelz-e289fah
https://podcasters.spotify.com/pod/show/altogelz/episodes/altogelz-e289fah
https://podcasters.spotify.com/pod/show/altogelz/episodes/altogelz-e289fah
https://podcasters.spotify.com/pod/show/altogelz/episodes/altogelz-e289fah
https://podcasters.spotify.com/pod/show/irteknos
https://podcasters.spotify.com/pod/show/pafijakartatimur
https://www.anobii.com/en/010302ee091487cadc/profile/activity
https://www.anobii.com/en/0152e42b60f8aa2fa8/profile/activity
https://www.anobii.com/en/0152e42b60f8aa2fa8/profile/activity
https://www.anobii.com/en/0152e42b60f8aa2fa8/profile/activity
https://www.anobii.com/en/0152e42b60f8aa2fa8/profile/activity
https://www.anobii.com/en/0152e42b60f8aa2fa8/profile/activity
https://www.anobii.com/en/0152e42b60f8aa2fa8/profile/activity
https://www.anobii.com/en/01e346c5b33f02dc28/profile/activity
https://www.bloggportalen.se/BlogPortal/view/BlogDetails?id=212374
https://www.bloggportalen.se/BlogPortal/view/BlogDetails?id=212733
https://www.bloggportalen.se/BlogPortal/view/BlogDetails?id=212733
https://www.bloggportalen.se/BlogPortal/view/BlogDetails?id=212734
https://www.bloggportalen.se/BlogPortal/view/BlogDetails?id=212734
https://www.bloggportalen.se/BlogPortal/view/BlogDetails?id=212735
https://www.bloggportalen.se/BlogPortal/view/BlogDetails?id=212735
https://www.blogtalkradio.com/altogeldr
https://www.blogtalkradio.com/altogeldr2
https://www.blogtalkradio.com/altogeldr3
https://www.blogtalkradio.com/altogeldr4
https://www.blogtalkradio.com/altogeldr5
https://www.blogtalkradio.com/altogeldr6
https://www.blogtalkradio.com/irteknos
https://www.blogtalkradio.com/tokomanjadancantik
https://www.chordie.com/forum/profile.php?id=1681884
https://www.chordie.com/forum/profile.php?id=1699876
https://www.chordie.com/forum/profile.php?id=1699879
https://www.chordie.com/forum/profile.php?id=1699883
https://www.chordie.com/forum/profile.php?id=1702456
https://www.chordie.com/forum/profile.php?id=1702456
https://www.chordie.com/forum/profile.php?id=1708100
https://www.chordie.com/forum/profile.php?id=1708102
https://www.credly.com/users/altog-elz.60426aab/badges
https://www.credly.com/users/altog-elz.897c8305/badges
https://www.credly.com/users/altog-elz.cfd40d03/badges
https://www.credly.com/users/altog-elz/badges
https://www.credly.com/users/alto-gelz/badges
https://www.credly.com/users/altog-gelz/badges
https://www.credly.com/users/irteknos/badges
https://www.credly.com/users/pafijaka-rtatimur/badges
https://www.demilked.com/author/altogelz/
https://www.demilked.com/author/altogelz/
https://www.demilked.com/author/altogelz/
https://www.demilked.com/author/altogelz1/
https://www.demilked.com/author/altogelz1/
https://www.demilked.com/author/altogelz1/
https://www.demilked.com/author/pafijakartatimur/
https://www.demilked.com/author/renaldidr/
https://www.indiegogo.com/individuals/34680567
https://www.indiegogo.com/individuals/34998841
https://www.indiegogo.com/individuals/34998841
https://www.indiegogo.com/individuals/34998841
https://www.indiegogo.com/individuals/34998841
https://www.indiegogo.com/individuals/34998841
https://www.indiegogo.com/individuals/34998841
https://www.indiegogo.com/individuals/34998841
https://www.longisland.com/profile/altogelz/
https://www.longisland.com/profile/altogelz1/
https://www.longisland.com/profile/altogelz2/
https://www.longisland.com/profile/altogelz3/
https://www.longisland.com/profile/altogelz4/
https://www.longisland.com/profile/altogelz5/
https://www.longisland.com/profile/irteknos/
https://www.longisland.com/profile/pafijakartatimur/
https://www.magcloud.com/user/irteknos
https://www.metal-archives.com/users/altogelz
https://www.metal-archives.com/users/altogelz1
https://www.metal-archives.com/users/altogelz1
https://www.metal-archives.com/users/altogelz2
https://www.metal-archives.com/users/altogelz3
https://www.metal-archives.com/users/altogelz4
https://www.metal-archives.com/users/altogelz5
https://www.metal-archives.com/users/irteknos
doxycycline rx
You really make it appear really easy with your presentation but I in finding this topic
to be really something that I feel I might by no means understand.
It seems too complex and very large for me.
I am taking a look forward in your next submit, I will attempt to get the cling
of it!
Write more, thats all I have to say. Literally, it seems as though you relied on the video
to make your point. You definitely know what youre talking about, why waste your intelligence on just posting videos to your site
when you could be giving us something enlightening to read?
prednisone 475
Nice respond in return of this question with solid arguments and
telling all concerning that.
It is not my first time to pay a quick visit
this website, i am visiting this web page dailly and obtain nice
data from here every day.
bactrim prices
medicine cephalexin
Hello, i think that i noticed you visited my web site thus i got here to return the prefer?.I am trying to in finding things to
enhance my site!I guess its adequate to use a few of
your ideas!!
What’s up all, here every one is sharing these kinds of
familiarity, thus it’s fastidious to read this weblog, and I used to pay a quick visit this
website all the time.
Admiring the hard work you put into your site and in depth
information you offer. It’s awesome to come across a blog every once in a while that isn’t
the same out of date rehashed material. Fantastic read!
I’ve bookmarked your site and I’m adding your RSS feeds to my Google account.
Hello to every , for the reason that I am genuinely eager of
reading this web site’s post to be updated on a regular basis.
It includes pleasant stuff.
prednisone 20 mg tablets
Aw, this was a really nice post. Taking a few minutes and actual effort to make a top notch article… but what
can I say… I put things off a lot and never manage to get nearly anything done.
Hello are using WordPress for your blog platform?
I’m new to the blog world but I’m trying to get started and create my own. Do you need any coding
expertise to make your own blog? Any help would be really appreciated!
I’m extremely impressed with your writing skills and also with the layout on your weblog.
Is this a paid theme or did you customize it yourself?
Either way keep up the nice quality writing, it is rare to see
a great blog like this one nowadays.
Предлагаем отличный вариант для спортзалов – гантельные ряды на https://gantelnye-ryady.ru. Они обеспечивают замечательный удобство и комфорт для спортсменов, позволяя избежать необходимости в трудоемкой замене веса на снарядах. Возможный вес гантелей в рядах от 2,5 до 60 кг. Снаряды покрыты резиной, что делает возможной бесшумную работу с ними и не приносит проблем соседям по залу.
I’m not that much of a internet reader to be honest but your sites
really nice, keep it up! I’ll go ahead and bookmark your site to come back down the road.
All the best
Awesome blog! Is your theme custom made or did you download it
from somewhere? A theme like yours with a few simple adjustements would really make my
blog stand out. Please let me know where you got your design. Thanks
retino a
Wonderful forum posts, Appreciate it.
writing a service level agreement template persuasive essay writer someone to write my research paper paper writing website do my research paper for me essay writing service quote help with coursework someone to do my excel homework do my sociology homework ok google do my homework
how to get azithromycin online
As the admin of this website is working, no
hesitation very rapidly it will be famous, due to its
quality contents.
Hi there all, here every one is sharing such experience, therefore it’s nice to read this webpage,
and I used to pay a visit this website daily.
Thank you for every other informative site.
The place else could I get that type of info written in such a perfect manner?
I have a mission that I am just now running on, and I’ve been at the
glance out for such info.
An impressive share! I’ve just forwarded this onto a colleague
who had been conducting a little research on this. And he in fact bought me lunch due to the fact that I stumbled upon it for him…
lol. So allow me to reword this…. Thank YOU for the
meal!! But yeah, thanx for spending the time to discuss this issue here on your website.
An impressive share! I’ve just forwarded this onto a coworker who
had been conducting a little homework on this. And he in fact ordered me
lunch because I discovered it for him… lol. So let me reword this….
Thank YOU for the meal!! But yeah, thanx for spending some time to discuss this matter here on your web site.
zestril 10mg
Hello there! This post could not be written any better! Going through this article reminds me of my
previous roommate! He always kept preaching about this.
I most certainly will forward this information to him. Fairly certain he’s going to have a very good read.
I appreciate you for sharing!
Nicely put. With thanks.
500 mg azithromycin
I’m gone to say to my little brother, that
he should also visit this website on regular basis to take updated from most up-to-date gossip.
I absolutely love your website.. Excellent colors & theme.
Did you build this amazing site yourself? Please reply back as I’m wanting to create my own site and want
to learn where you got this from or exactly what the theme is named.
Many thanks!
Woah! I’m really enjoying the template/theme of this
site. It’s simple, yet effective. A lot of times it’s tough to get that “perfect balance” between usability and visual appearance.
I must say that you’ve done a amazing job with this.
Additionally, the blog loads very fast for me on Internet explorer.
Superb Blog!
medication prednisone 20 mg
Incredible loads of beneficial advice.
custom essay writing writing a descriptive essay essay writing service illegal online essay writing service review business assignment writing service writing a narrative essay about being judged quizlet essay writer help on writing an essay need help in writing an essay essay on self help is the best help
Write more, thats all I have to say. Literally, it
seems as though you relied on the video to make your point.
You obviously know what youre talking about, why throw away your intelligence on just posting videos to your
weblog when you could be giving us something enlightening to read?
Howdy! Would you mind if I share your blog with my
facebook group? There’s a lot of people that I think would really enjoy
your content. Please let me know. Cheers
Wonderful submit! I realized a great deal from reading this.
Ꮐood post. I larn something totally new and challenging
on websites I stumbleuponn on ɑ daily Ьasіs. It’s always exciting t᧐ read
articles from othsr wrriters and practtice something from their websites.
bactrim ds without prescription
buy duflican
Good day very cool blog!! Guy .. Excellent ..
Superb .. I will bookmark your web site and take the feeds also?
I’m glad to search out so many helpful info here
within the put up, we need develop extra strategies on this regard, thanks for sharing.
. . . . .
diclofenac 75mg dr tab
What i do not realize is in reality how you’re not actually
a lot more neatly-favored than you may be now. You are very intelligent.
You know therefore significantly on the subject of this matter,
produced me individually believe it from a lot of various angles.
Its like women and men are not fascinated except
it’s one thing to do with Lady gaga! Your individual stuffs nice.
All the time handle it up!
buy doxycycline from canada
This design is incredible! You most certainly know how to keep a
reader entertained. Between your wit and your videos, I was almost moved to start my own blog (well, almost…HaHa!) Great job.
I really enjoyed what you had to say, and more than that, how
you presented it. Too cool!
Do you mind if I quote a couple of your articles as long as I provide credit and sources back to your weblog?
My blog site is in the very same area of interest as yours and my visitors would definitely benefit from some of the information you provide here.
Please let me know if this ok with you. Appreciate it!
Genuinely when someone doesn’t know afterward its up to other visitors that they will assist,
so here it occurs.
This article presents clear idea for the new viewers of blogging, that really how
to do blogging.
My programmer is trying to convince me to move to .net from PHP.
I have always disliked the idea because of the expenses.
But he’s tryiong none the less. I’ve been using WordPress on a number of websites for about a
year and am anxious about switching to another platform.
I have heard very good things about blogengine.net.
Is there a way I can import all my wordpress posts into it?
Any help would be really appreciated!
great post, very informative. I ponder why the other experts of this sector don’t
understand this. You should continue your writing. I am confident, you have a huge readers’ base
already!
This info is invaluable. When can I find out more?
I have read so many posts on the topic of the blogger lovers however this paragraph
is in fact a pleasant post, keep it up.
albuterol price in canada
These are in fact fantastic ideas in concerning blogging.
You have touched some fastidious factors here. Any way
keep up wrinting.
Thanks for every other informative website. Where else may I
am getting that type of info written in such an ideal method?
I have a mission that I’m just now running on, and I have been at the glance out for such info.
Thanks for the marvelous posting! I really enjoyed reading
it, you’re a great author.I will make sure to bookmark your blog
and may come back someday. I want to encourage you to definitely continue your great writing, have a nice holiday weekend!
I read this article fully regarding the comparison of most up-to-date and previous technologies,
it’s amazing article.
retino
Today, I went to the beachfront with my kids.
I found ɑ sea sheⅼl and gave it to mmy 4 year old daughter and said “You can hear the ocean if you put this to your ear.” She pսut the shell to her еarr and scгeamed.
There was a hermit crab inside and it pinched her еar.
She never wants to go back! LoL I know this is completеly off topic
ƅut I had to tell someone!
celebrex in mexico
If you desire to get much from this piece of writing then you have to apply such strategies to your won web site.
I just couldn’t go away your website prior to suggesting that I really loved the usual information a person supply in your guests?
Is going to be back steadily to investigate cross-check new posts
Someone necessarily assist to make seriously posts I would state.
This is the very first time I frequented your web page
and so far? I surprised with the research you made to make this particular post incredible.
Great job!
I am not sure where you’re getting your information, but
good topic. I needs to spend some time learning more
or understanding more. Thanks for wonderful information I was looking for this information for my mission.
diclofenac prescription canada
I am genuinely grateful to the holder of this web page
who has shared this enormous paragraph at at this time.
prednisone steroid
Hi every one, here every one is sharing such experience, therefore it’s good to read this weblog, and I used
to go to see this webpage all the time.
Woah! I’m really enjoying tthe template/theme of
tһis site. It’s simple, yet effective.
A lot of times it’s verʏ ard to get that “perfect balance” between sjperb
usabіlity and visual appeal. I musat say you’ve dοne a excellent job with this.
Also, the blog loads very fast for me on Firefoⲭ. Superb
Blog!
Hello there, I think your blog could possibly be having
internet browser compatibility problems. When I look at your web site in Safari,
it looks fine however, if opening in I.E., it’s got
some overlapping issues. I merely wanted to provide
you with a quick heads up! Besides that, wonderful website!
buy cheap zithromax
When I originally commented I clicked the “Notify me when new comments are added” checkbox and now each time a comment
is added I get four e-mails with the same comment.
Is there any way you can remove people from that service?
Appreciate it!
constantly i used to read smaller posts which as well clear their motive, and that is also happening with this post which I am reading at this time.
lisinopril 20 mg prices
Hey there! This post couldn’t be written any better! Reading this post reminds me
of my previous room mate! He always kept talking about
this. I will forward this write-up to him. Pretty sure he will have a
good read. Many thanks for sharing!
retino 05 cream
Hello there, I discovered your web site by way of Google whilst searching for
a similar topic, your website came up, it seems good.
I have bookmarked it in my google bookmarks.
Hi there, just was alert to your blog through Google, and located that it is
truly informative. I’m gonna be careful for
brussels. I’ll be grateful should you proceed this in future.
Numerous people shall be benefited out of your writing.
Cheers!
My brother suggested I might like this web site. He was totally right.
This post actually made my day. You cann’t imagine just how much time I had spent for this information! Thanks!
I just like the helpful information you provide in your articles.
I’ll bookmark your blog and check once more right here regularly.
I’m reasonably sure I will be told many new stuff right here!
Good luck for the following!
That is a very good tip particularly to those new to the blogosphere.
Simple but very precise info… Thank you for sharing this
one. A must read post!
diflucan pill for sale
You stated it terrifically!
кредиты от частного инвестора в мозыре
кредиты под расписку в пинске
trustworthy online pharmacy
Hi there, just wanted to say, I enjoyed this blog post.
It was inspiring. Keep on posting!
pharmacy accutane
My brother recommended I might like this web site.
He was totally right. This post actually made my day.
You can not imagine simply how much time I had spent
for this information! Thanks!
synthroid buy online
Hey I am so happy I found your blog, I really found you
by accident, while I was researching on Digg for something else, Anyhow I am
here now and would just like to say cheers for a incredible post and a all round thrilling blog (I also love the theme/design),
I don’t have time to go through it all at the minute but I have saved it and also
added your RSS feeds, so when I have time I will be back to read a great
deal more, Please do keep up the awesome b.
It’s actually a cool and useful piece of info. I am glad that you shared this helpful information with us.
Please keep us informed like this. Thanks for sharing.
canadian pharmacy no prescription
Excellent post. I was checking constantly this blog and I’m impressed!
Very useful info specifically the last part 🙂 I care for such info much.
I was looking for this particular info for a very long time.
Thank you and good luck.
suhagra 100 online purchase
suhagra 100
cephalexin antibiotic
It’s very trouble-free to find out any topic on web as compared to books, as
I found this piece of writing at this web page.
prednisone online no prescription
This is a topic that’s near to my heart…
Cheers! Where are your contact details though?
But, we’ll discuss it later, and now, let’s explore Mostbet Casino and different forms of bets offered by Mostbet.
Wow, fantastic blog layout! How long have you been blogging for?
you make blogging look easy. The overall look of your website
is wonderful, as well as the content!
Reliable postings. Kudos.
example thesis thesis writing service thesis writer phd thesis database
online paper writing service paper writing service reviews cheap research paper writing service pay someone to write your paper
academic writers online https://writeadissertation.com
игровые автоматы Gama Casino
официальный сайт Gama Casino
Hmm is anyone else having problems with the images
on this blog loading? I’m trying to determine if its a problem on my end or if it’s
the blog. Any feed-back would be greatly appreciated.
prednisone 7.5 mg daily
My brother suggested I might like this website. He was totally right.
This post actually made my day. You can not imagine simply how much time I had
spent for this info! Thanks!
Thanks for finally talking about >Before
and After Archives – Precious Stones Photography <Liked it!
where to get diflucan
azithromycin 250mg tablets
What a material of un-ambiguity and preserveness of valuable familiarity on the topic of unexpected emotions.
generic celebrex for sale
Aliexpress – это популярный интернет-магазин электроники, модной одежды и обуви, аксессуаров, товаров для дома и многих других
товаров от китайских производителей.
Широкий ассортимент продукции представлен более 100 миллионами изделий
по низким ценам. http://www.lakehomesusa.com/exit.php?url=https://akciya.kiev.ua/store/aliexpress/
Having read this I thought it was rather enlightening.
I appreciate you finding the time and energy to put this content together.
I once again find myself personally spending a significant amount of time both reading
and posting comments. But so what, it was still worthwhile!
I have been browsing online greater than three hours today,
but I never discovered any interesting article like yours.
It is pretty price enough for me. Personally, if all webmasters and bloggers made excellent content material as you did, the internet will
likely be much more helpful than ever before.
You actually expressed that perfectly.
college essay writing service best uk essay writing service reviews paperial writing service sales letter writing service profile writing service best mba essay writing service do my accounting homework someone to do my math homework homework how to make my sim do homework sims 4
Hеⅼlo, Neat pⲟst. There’s an issue ogether with your site in internet exрlorer, couuld test this?
IE nonethelеsѕ is the marketplace leader ɑnd a big portion of people will
leave out y᧐ur fantastic ᴡriting because of thyis
problem.
Thank you for the auspicious writeup. It if truth be told was once a
enjoyment account it. Glance complex to far added agreeable from you!
By the way, how could we communicate?
For the reason that the admin of this website is working, no question very soon it will be famous, due to its quality contents.
buy accutane online uk
buy generic flomax online
strattera 25 mg pills
phenergan otc canada
where can i buy prednisone
This information is worth everyone’s attention.
When can I find out more?
Cheers, Lots of information!
coursework homework online coursework do my homework for me
amoxicillin tablets for sale uk
It’s awesome designed for me to have a web site, which is
helpful designed for my experience. thanks admin
celebrex 200 mg online
lyrica 300 mg price
If some one desires expert view regarding running a blog after that i recommend him/her to go to see this webpage, Keep up the pleasant job.
Thank you. Great information!
cv writing service dublin i tried to do my homework poem do my homework for me cheap coursework website dear google do my homework for me essay writing service cost pay for a paper write paper for me discount code websites that write papers for you research paper writer
zithromax strep throat
I got this site from my friend who informed me about this site
and now this time I am visiting this web page and reading very informative posts here.
amoxicillin nz
Does your site have a contact page? I’m having problems
locating it but, I’d like to send you an email. I’ve got some creative ideas for your blog
you might be interested in hearing. Either way, great website and
I look forward to seeing it grow over time.
Nice post. I was checking continuously this blog
and I am impressed! Very useful info specifically the last part 🙂 I care for
such information much. I was looking for this particular information for a long time.
Thank you and best of luck.
lyrica drug
buy azithromycin without prescription
Hi there Dear, are you in fact visiting this site daily, if
so after that you will definitely obtain nice knowledge.
Today, I went to the beach front with my children. I found a sea shell and gave it
to my 4 year old daughter and said “You can hear the ocean if you put this to your ear.” She put the shell
to her ear and screamed. There was a hermit crab
inside and it pinched her ear. She never wants
to go back! LoL I know this is completely off topic but I had to tell someone!
My coder is trying to convince me to move to .net from PHP.
I have always disliked the idea because of the costs.
But he’s tryiong none the less. I’ve been using WordPress
on a number of websites for about a year and am
worried about switching to another platform.
I have heard fantastic things about blogengine.net. Is there a way I can transfer all my wordpress content into it?
Any help would be really appreciated!
This is very interesting, You’re a very skilled blogger. I’ve joinsd your feed and lpok forward to seeking more of
your great post. Also, I’ve shared your website in myy social networks!
My programmer is trying to persuade me to move to .net from
PHP. I have always disliked the idea because of the costs.
But he’s tryiong none the less. I’ve been using Movable-type on several websites for about a year and am worried about
switching to another platform. I have heard great things about blogengine.net.
Is there a way I can transfer all my wordpress content into it?
Any kind of help would be greatly appreciated!
I have read so many articles or reviews regarding the blogger lovers
however this post is actually a pleasant post, keep it up.
http://196.43.133.60/wiki/index.php/Dultogel
http://afcantarelle.org/index.php?title=Dultogel
http://afcantarelle.org/index.php?title=User:BarneyUnwin8
http://classicalmusicmp3freedownload.com/ja/index.php?title=%E5%88%A9%E7%94%A8%E8%80%85:DanelleTinker20
http://classicalmusicmp3freedownload.com/ja/index.php?title=Dultogel
http://embeddedwiki.cs.aau.dk/wiki/Dultogel
http://embeddedwiki.cs.aau.dk/wiki/User:SherriMeadows95
http://lsc.wikisign.org/wiki/Usuari:ErmaTdc233375689
http://newsengokush.myht.org/index.php/%E5%88%A9%E7%94%A8%E8%80%85:OrvalFarrelly
http://wiki-ux.info/wiki/Dultogel
http://wiki-ux.info/wiki/User:HalleyWood09
http://wiki.gewex.org/index.php?title=Dultogel
http://wiki.gewex.org/index.php?title=User:SuzanneRockwell
http://wiki.shitcore.org/index.php/Dultogel
http://wiki.shitcore.org/index.php/User:CatherineMoss8
http://www.driftpedia.com/wiki/index.php/Dultogel
http://www.driftpedia.com/wiki/index.php/User:WallyDartnell
http://www.erwinbrandenberger.ch/index.php?title=Benutzer:AdolphLepage57
http://www.erwinbrandenberger.ch/index.php?title=Dultogel
http://www.zilahy.info/wiki/index.php/Dultogel
http://www.zilahy.info/wiki/index.php/User:BLJGinger8242497
https://bbarlock.com/index.php/Dultogel
https://bbarlock.com/index.php/User:SteffenGarst0
https://biowiki.clinomics.com/index.php/Dultogel
https://biowiki.clinomics.com/index.php/User:TamelaSalvado2
https://dekatrian.com/index.php/Dultogel
https://dekatrian.com/index.php/User:MellisaAllwood4
https://livingbooksaboutlife.org/books/Dultogel
https://livingbooksaboutlife.org/books/User:MartyGocher971
https://mnwiki.org/index.php/Dultogel
https://mnwiki.org/index.php/User:DonnellBrooks0
https://religiopedia.com/index.php/Dultogel
https://religiopedia.com/index.php/User:NormanHasan
https://sustainabilipedia.org/index.php/Dultogel
https://sustainabilipedia.org/index.php/User:JaneCrompton
https://wiki.hrw-fablab.de/index.php?title=Dultogel
https://wiki.hrw-fablab.de/index.php?title=User:GenaBankston4
https://wiki.quentinbrun.fr/mediawiki/index.php/Dultogel
https://wiki.quentinbrun.fr/mediawiki/index.php/Utilisateur:KerriMorales580
https://www.crustcorporate.com/wiki/Dultogel
https://www.crustcorporate.com/wiki/User:June68B275559
https://www.miniaturefantasy.com/index.php?title=Dultogel
https://www.miniaturefantasy.com/index.php?title=Utente:Bettina7639
https://www.offwiki.org/wiki/Dultogel
https://www.offwiki.org/wiki/User:MohamedSchurr
http://196.43.133.60/wiki/index.php/IRTEKNO
http://classicalmusicmp3freedownload.com/ja/index.php?title=%E5%88%A9%E7%94%A8%E8%80%85:ManieBustillos
http://classicalmusicmp3freedownload.com/ja/index.php?title=IRTEKNO
https://bbarlock.com/index.php/IRTEKNO
https://bbarlock.com/index.php/User:JillTownley4371
https://wiki.hrw-fablab.de/index.php?title=IRTEKNO
https://wiki.hrw-fablab.de/index.php?title=User:Suzanne92Q
https://wiki.itcoug.com/index.php?title=IRTEKNO
https://wiki.itcoug.com/index.php?title=Usuario:LucasBadcoe843
https://www.crustcorporate.com/wiki/IRTEKNO
https://www.crustcorporate.com/wiki/User:FrancesVigna410
http://brianknapp.co/community/profile/hershelmahmood/
http://brianknapp.co/community/profile/refugiox9447442/
http://brianknapp.co/community/profile/waylonbarreto4/
http://brianknapp.co/community/profile/wendijordon3970/
https://agrihub-ptp.it/forum/profile/mittiedunlop401/
https://commoncause.optiontradingspeak.com/index.php/community/profile/ankepuckett285/
https://commoncause.optiontradingspeak.com/index.php/community/profile/bernardmcnab07/
https://commoncause.optiontradingspeak.com/index.php/community/profile/noemimcghee4075/
https://commoncause.optiontradingspeak.com/index.php/community/profile/shondamcneil745/
https://grailoftheserpent-forum.com/community/profile/denisthalberg11/
https://grailoftheserpent-forum.com/community/profile/gino38n36142048/
https://grailoftheserpent-forum.com/community/profile/percyf140382066/
https://grailoftheserpent-forum.com/community/profile/shalandabanksto/
https://kesheromania.ro/forum/profile/judybeem6529383/
https://kesheromania.ro/forum/profile/kraigroepke687/
https://kesheromania.ro/forum/profile/sherrirosas6359/
https://solucx.com.br/forum/index.php/community/profile/bmulinnea315071/
https://solucx.com.br/forum/index.php/community/profile/gisellejefferis/
https://solucx.com.br/forum/index.php/community/profile/vaughnfriedmann/
https://www.aplar.org/fr/community/profile/bufordsantora44/
https://www.revivalwaves.org/got-a-question/profile/angeloertel9140/
https://www.revivalwaves.org/got-a-question/profile/dominiquelundgr/
https://www.revivalwaves.org/got-a-question/profile/sheritabryant8/
https://agrihub-ptp.it/forum/profile/magdalombardo4/
https://commoncause.optiontradingspeak.com/index.php/community/profile/beatrisplayford/
https://commoncause.optiontradingspeak.com/index.php/community/profile/judy74v04534383/
https://commoncause.optiontradingspeak.com/index.php/community/profile/solomoncolbert/
https://commoncause.optiontradingspeak.com/index.php/community/profile/vaughnthorp8180/
https://solucx.com.br/forum/index.php/community/profile/adelaidemonckto/
https://solucx.com.br/forum/index.php/community/profile/ivymorrice56301/
https://solucx.com.br/forum/index.php/community/profile/scotherbert8261/
https://www.revivalwaves.org/got-a-question/profile/annabelle566735/
https://www.revivalwaves.org/got-a-question/profile/feliciaf230178/
https://www.revivalwaves.org/got-a-question/profile/vvjalton426405/
augmentin 875 pill
Superb blog! Do you have any tips for aspiring writers? I’m hoping to start my own site soon but I’m a little lost on everything.
Would you recommend starting with a free platform like WordPress or go for a paid option? There are so many options out there that I’m totally overwhelmed ..
Any tips? Thanks!
propecia
Thank you for the good writeup. It if truth be told
was once a entertainment account it. Glance complicated
to more delivered agreeable from you! By the way, how can we be in contact?
Everyone loves what you guys are up too. This kind of clever work
and coverage! Keep up the good works guys I’ve incorporated
you guys to blogroll.
hydroxychloroquine tablets 10 mg
where can i purchase diflucan over the counter
I believe that is among the most important info for me.
And i’m glad studying your article. However want to observation on few normal things, The web site taste is wonderful, the articles
is in reality great : D. Excellent activity, cheers
It’s remarkable in favor of me to have a web page, which is valuable
for my knowledge. thanks admin
Cheers, Ample content.
write this essay for me write my essay for me write my essay for me free writing essays
No matter if some one searches for his essential thing,
therefore he/she needs to be available that in detail, so that thing is maintained over here.
Hello just wanted to give you a quick heads up and let you know a few of the images aren’t loading properly.
I’m not sure why but I think its a linking issue.
I’ve tried it in two different browsers and both show the same
outcome.
online order prednisone
Admiring the persistence you put into your blog and detailed information you provide.
It’s great to come across a blog every once in a while that isn’t the same old
rehashed information. Fantastic read! I’ve bookmarked
your site and I’m including your RSS feeds to
my Google account.
bookmarked!!, I really like your site!
innopran xl cost
zanaflex 2 mg
Every weekend i used to go to see this site, because i want enjoyment, since this this
site conations truly fastidious funny stuff too.
albuterol 108
I am no longer sure the place you are getting
your information, but great topic. I needs to
spend a while studying more or working out
more. Thank you for fantastic information I was searching for this
information for my mission.
Dalam dunia perjudian, berbagai bentuk taruhan telah menjadi bagian integral dari hiburan dan ketegangan. Salah satu varian populer
dari taruhan adalah lotere, yang menarik minat banyak orang di seluruh
dunia. Di Filipina, PCSO (Philippine Charity Sweepstakes Office) adalah lembaga yang
mengatur lotere dan berbagai permainan amal. Bagi mereka yang tertarik dengan hasil live draw PCSO, situs https://livedrawpcso.site/ adalah tempat yang tepat untuk memantau hasil undian terbaru.
At this moment I am ready to do my breakfast, once having my breakfast coming yet again to read
further news.
This article offers clear idea in favor of the new people of blogging,
that genuinely how to do blogging.
Hi there! Do you use Twitter? I’d like to follow you if that would
be okay. I’m undoubtedly enjoying your blog and look forward
to new posts.
I seriously love your site.. Pleasant colors & theme.
Did you create this site yourself? Please reply back as I’m planning to create my own personal blog and would love to
know where you got this from or what the theme is named.
Thank you!
generic accutane canada
bactrim generic brand
price of augmentin 20 tablets
Definitely believe that that you stated. Your favorite justification seemed to be at the internet the simplest factor to
take note of. I say to you, I definitely get annoyed at the same
time as people think about issues that they just do not
understand about. You controlled to hit the nail
upon the highest and also outlined out the whole thing
without having side-effects , folks could take a signal.
Will probably be back to get more. Thank you
Hi there friends, fastidious paragraph and fastidious urging commented here, I am
in fact enjoying by these.
Seriously tons of superb knowledge!
where to buy doxycycline in australia
When I originally left a comment I appear to have clicked on the -Notify me when new comments are added- checkbox and
from now on each time a comment is added I
recieve four emails with the same comment. Perhaps there is an easy method you can remove
me from that service? Cheers!
Quality articles or reviews is the important to interest the viewers to pay a visit the web page, that’s
what this web page is providing.
Hi there colleagues, good piece of writing and nice urging
commented at this place, I am genuinely enjoying
by these.
Excellent post. I am dealing with a few of these issues as well..
Howdy! I know this is kind of off-topic however I had to ask.
Does building a well-established website such as yours require a large amount
of work? I’m brand new to writing a blog however I do write in my diary every day.
I’d like to start a blog so I can share my personal
experience and feelings online. Please let me know if you have any suggestions or tips for
new aspiring bloggers. Appreciate it!
flomax 0.4 mg price
Ι haѵe rеad so many articles οr reviews гegarding the
blogger lovers except tһiѕ piece of writing is genuinely а
pleasant article, kеep it up.
cephalexin 1000 mg
retino 0.05 gel
retino 0.025 cream
synthroid nz
Thanks for finally writing about >Before and After Archives – Precious Stones Photography <Loved it!
I blog quite often and I seriously thank you for your information.
The article has truly peaked my interest. I’m going to
bookmark your site and keep checking for new details about once a week.
I subscribed to your Feed too.
Undeniably believe that which you said. Your favorite justification seemed
to be on the net the easiest thing to be aware of. I say to you, I certainly get irked while people
think about worries that they just don’t know about. You managed to hit the nail upon the top and also defined out the whole thing without having side effect
, people can take a signal. Will likely be back to get more.
Thanks
sildalis canada
buy antabuse without a prescription
buy viagra online
paxil 20
When someone writes an article he/she maintains the image of a
user in his/her mind that how a user can know it. Thus that’s why this article is perfect.
Thanks!
where can you get modafinil
buying prednisolone online
buy paxil online uk
The other day, while I was at work, my sister stole my apple
ipad and tested to see if it can survive a 30 foot drop, just so she can be
a youtube sensation. My apple ipad is now broken and she has 83 views.
I know this is totally off topic but I had to share it with someone!
albenza 200 mg tablet price
Have you ever considered writing an e-book or guest authoring on other sites?
I have a blog based on the same topics you discuss and would really like to have you share some stories/information. I know my viewers would value your work.
If you are even remotely interested, feel free to send me an email.
flomax
Its like you read my mind! You appear to know a lot about
this, like you wrote the book in it or something.
I think that you can do with some pics to drive the message
home a little bit, but instead of that, this is magnificent
blog. An excellent read. I’ll definitely be
back.
Stunning story there. What occurred after? Thanks!
average cost of acyclovir
1mg dexamethasone
Hi there everyone, it’s my first visit at this web site, and paragraph is really fruitful for me, keep up posting such
articles or reviews.
how to get valtrex prescription
Terkadang, kamu ingin mendownload video di YouTube agar dapat dinikmati secara offline.
cymbalta 30mg cost
Awesome blog! Is your theme custom made or did you download it from somewhere?
A theme like yours with a few simple tweeks would really make my blog stand out.
Please let me know where you got your design. Thank you
هودی تدی در ظاهر به دلیل کرک دار
بودن شبیه خز است؛ ولی پرزهای کوچک تر و کوتاه
تری دارد. به همین دلیل می توان این نوع سویشرت را در دسته
هودی پشمی پسرانه به حساب آورد.
بنابراین خرید سوییشرت و هودی دخترانه یک خرید ترندی خواهد بود.
We stumbled over here from a different web
page and thought I should check things out. I like what I see so now i’m following you.
Look forward to looking at your web page yet again.
Hey! I just wanted to ask if you ever have any trouble with hackers?
My last blog (wordpress) was hacked and I ended up losing many months
of hard work due to no back up. Do you have any solutions to prevent hackers?
Normally I do not read article on blogs, but I wish to say that this write-up very compelled me to check out and do it!
Your writing taste has been amazed me. Thanks, quite
great post.
I like the valuable information you provide in your articles.
I’ll bookmark your blog and check again here regularly. I’m quite sure I’ll learn a
lot of new stuff right here! Good luck for the next!
Kudos! I enjoy this!
vow writing service my homework cant do my homework anymore just do my homework i cannot do my homework professional cv writing service reviews write my admission essay russell baker on becoming a writer essay write my paper for me what can i do to help my community essay
flomax tablets uk
What’s up Dear, are you truly visiting this site
regularly, if so then you will without doubt obtain fastidious know-how.
buy celebrex usa
Superb, what a blog it is! This weblog provides helpful facts to us,
keep it up.
This is very interesting, You’re a very skilled blogger. I’ve joined your feed and look forward to seeking
more of your excellent post. Also, I’ve shared your web site in my social networks!
phenergan 2
where to buy terramycin in canada
Excellent goods from you, man. I’ve have in mind your stuff prior to
and you’re simply extremely fantastic. I actually like what you’ve obtained right
here, really like what you are stating and the best way during which you say it.
You are making it enjoyable and you still care for
to keep it wise. I can not wait to read much more from you.
That is really a wonderful site.
terramycin pfizer
Selecting the direction of interest is manufactured by means of a widget.
Hi, i think that i saw you visited my website so i came to
go back the desire?.I am trying to find issues to improve my web site!I suppose its adequate to
use a few of your ideas!!
Spot on with this write-up, I absolutely believe that
this amazing site needs a great deal more attention. I’ll probably be returning to read more, thanks for the information!
I’m not that much of a internet reader to be honest
but your blogs really nice, keep it up! I’ll go ahead
and bookmark your website to come back in the future.
Cheers
Valuable write ups. Thanks.
best resume writing service for veterans macmillan will writing service linkedin profile writing service uk professional essay writing best resume writing service 2013 french essay writing service pay someone to write my essay easy essay writer do my essay for me write my essay websites
synthroid 25 mg tablet
albendazole price in mexico
I could not resist commenting. Exceptionally well written!
silagra 25 mg price
vermox price
azithromycin online pharmacy canada
accutane
motrin 800 mg pill
buy propecia from canada
buy sildalis
It’s amazing for me to have a web page, which is good in support of
my knowledge. thanks admin
Having read this I thought it was extremely informative. I
appreciate you spending some time and effort to put this article together.
I once again find myself personally spending way
too much time both reading and commenting. But so what, it was still worthwhile!
Good day! I could have sworn I’ve been to this blog before but after browsing through some of the articles I realized it’s new to
me. Anyhow, I’m definitely happy I discovered it and I’ll be book-marking it and checking
back often!
buy cheap sildalis
buy cymbalta from canada
You can definitely see your enthusiasm within the article you write.
The arena hopes for more passionate writers such as youu who are not afaid to mention how they believe.
At all times go after your heart.
My coder is trying to convince me to move
to .net from PHP. I have always disliked the idea because of the expenses.
But he’s tryiong none the less. I’ve been using WordPress on a number of websites for about a year and am anxious about switching to another platform.
I have heard very good things about blogengine.net. Is
there a way I can import all my wordpress content into it?
Any kind of help would be really appreciated!
generic valtrex canada
silagra 100 mg tablet
I’m not sure where you are getting your information,
but great topic. I needs to spend some time learning much more or understanding more.
Thanks for excellent information I was looking for this info for my mission.
http://afcantarelle.org/index.php?title=Pafijakartatimur
http://afcantarelle.org/index.php?title=User:Rayford6567
http://classicalmusicmp3freedownload.com/ja/index.php?title=%E5%88%A9%E7%94%A8%E8%80%85:CelsaEumarrah70
http://classicalmusicmp3freedownload.com/ja/index.php?title=Pafijakartatimur
http://embeddedwiki.cs.aau.dk/wiki/Pafijakartatimur
http://embeddedwiki.cs.aau.dk/wiki/User:Denisha0486
http://lsc.wikisign.org/wiki/Usuari:GwendolynDominqu
http://wiki-ux.info/wiki/Pafijakartatimur
http://wiki-ux.info/wiki/User:ErnestoHebblethw
http://wiki.gewex.org/index.php?title=Pafijakartatimur
http://wiki.gewex.org/index.php?title=User:LauriLennox2
http://wiki.shitcore.org/index.php/Pafijakartatimur
http://wiki.shitcore.org/index.php/User:GiuseppeLaTrobe
http://www.erwinbrandenberger.ch/index.php?title=Benutzer:Nicki68197570232
http://www.erwinbrandenberger.ch/index.php?title=Pafijakartatimur
http://www.zilahy.info/wiki/index.php/Pafijakartatimur
http://www.zilahy.info/wiki/index.php/User:CorineFreame9
https://bbarlock.com/index.php/Pafijakartatimur
https://bbarlock.com/index.php/User:KelleLenihan41
https://biowiki.clinomics.com/index.php/Pafijakartatimur
https://biowiki.clinomics.com/index.php/User:QuentinMaur4
https://livingbooksaboutlife.org/books/Pafijakartatimur
https://livingbooksaboutlife.org/books/User:DirkM253874
https://mnwiki.org/index.php/Pafijakartatimur
https://mnwiki.org/index.php/User:AlisaRyrie
https://procesal.cl/index.php/Pafijakartatimur
https://procesal.cl/index.php/User:BellaCrace95222
https://religiopedia.com/index.php/Pafijakartatimur
https://religiopedia.com/index.php/User:Dane812390
https://sustainabilipedia.org/index.php/Pafijakartatimur
https://sustainabilipedia.org/index.php/User:RodrickAsche
https://wiki.hrw-fablab.de/index.php?title=Pafijakartatimur
https://wiki.hrw-fablab.de/index.php?title=User:TylerFatnowna6
https://wiki.itcoug.com/index.php?title=Pafijakartatimur
https://wiki.itcoug.com/index.php?title=Usuario:VJKJudson477
https://wiki.quentinbrun.fr/mediawiki/index.php/Pafijakartatimur
https://wiki.quentinbrun.fr/mediawiki/index.php/Utilisateur:Sommer3722
https://www.crustcorporate.com/wiki/Pafijakartatimur
https://www.crustcorporate.com/wiki/User:DamonWicken946
https://www.offwiki.org/wiki/Pafijakartatimur
https://www.offwiki.org/wiki/User:RossCrowe093607
http://brianknapp.co/community/profile/geniegurney9296/
http://brianknapp.co/community/profile/vonnie818164851/
http://kesheromania.ro/forum/profile/jacquettacastan/
http://kesheromania.ro/forum/profile/tillyd947580900/
https://agrihub-ptp.it/forum/profile/ashtonphan41494/
https://agrihub-ptp.it/forum/profile/latoyafrayne815/
https://ajk.wxw.mybluehost.me/community/profile/meagan331065461/
https://commoncause.optiontradingspeak.com/index.php/community/profile/frankleitch0574/
https://commoncause.optiontradingspeak.com/index.php/community/profile/muhammadchestnu/
https://commoncause.optiontradingspeak.com/index.php/community/profile/sharronstonge81/
https://dadstreamer.com/community/profile/lashawnholley29/
https://dadstreamer.com/community/profile/lyniliffe093933/
https://dadstreamer.com/community/profile/shadgjq04713303/
https://kesheromania.ro/forum/profile/rodrickmixon51/
https://solucx.com.br/forum/index.php/community/profile/albapillinger11/
https://solucx.com.br/forum/index.php/community/profile/normadavenport6/
https://solucx.com.br/forum/index.php/community/profile/sommercronan78/
https://www.aplar.org/fr/community/profile/leonidabrownbil/
https://www.bitcoinenespanol.net/criptoforo/profile/alejandrobartle/
https://www.bitcoinenespanol.net/criptoforo/profile/janeenstandley4/
https://www.bitcoinenespanol.net/criptoforo/profile/kandykingsley4/
https://www.bitcoinenespanol.net/criptoforo/profile/robertoleichhar/
https://www.bitcoinenespanol.net/criptoforo/profile/shonablackwell5/
https://www.dcsportsconnection.com/community/profile/maxine903801312/
https://www.dcsportsconnection.com/community/profile/miagoninan60006/
https://www.dcsportsconnection.com/community/profile/minervalsh6633/
https://www.kalpnatayal.com/forum/community/profile/ruebenmatteson3/
https://www.kalpnatayal.com/forum/community/profile/tonjashang05480/
buy prozac over the counter
how to get finasteride prescription
fluoxetine 40 mg cost
buy terramycin uk
Hey! This is my first visit to your blog! We are a collection of volunteers
and starting a new project in a community in the same niche.
Your blog provided us valuable information to work on.
You have done a outstanding job!
30mg cymbalta
order prozac
silagra 100 mg for sale
After looking into a number of the blog posts on your site, I honestly
like your way of writing a blog. I book marked it to my
bookmark webpage list and will be checking back soon. Please visit my website too and tell me what you think.
Write more, thats all I have to say. Literally, it seems as though you relied on the
video to make your point. You clearly know what youre talking about,
why throw away your intelligence on just posting videos to your blog when you could be giving us something informative to read?
provigil prescription
canadian pharmacy silagra
buy celebrex generic
I pay a visit day-to-day a few blogs and sites to
read articles or reviews, except this web site gives quality based posts.
antabuse price australia
Online poker
Hey! I know this is kinda off topic but I was wondering which blog platform are you using for this website?
I’m getting sick and tired of WordPress because I’ve had problems with hackers and I’m looking at options for
another platform. I would be fantastic if you could
point me in the direction of a good platform.
Fine material. With thanks!
essay writers service essay writing service uk my essay service service essay
pay for research paper paper writing services order custom paper buy college paper
writing an essay ppt https://essaywritingservicelinked.com
Thanks , I’ve just been searching for information about this subject for ages and yours is the best I’ve found out so far.
But, what about the conclusion? Are you sure in regards to the supply?
antabuse pills
generic paxil prices
It is really a great and helpful piece of information. I’m
happy that you just shared this helpful information with us.
Please keep us informed like this. Thanks for sharing.
silagra 100 price
cost of prednisolone uk
buy viagra online
order phenergan
Appreciate the recommendation. Let me try it out.
I have read several excellent stuff here. Certainly value bookmarking for
revisiting. I surprise how much effort you set to make this type of great informative web site.
This info is priceless. How can I find out more?
Hi there, I log on to your blog like every week. Your
humoristic style is awesome, keep up the good work!
Hey there! This post couldn’t be written any better!
Reading through this post reminds me of my good old room mate!
He always kept talking about this. I will forward this write-up to him.
Fairly certain he will have a good read. Many thanks for sharing!
Amazing postings. Thanks a lot.
best essay writing service the college essay guy essay writing service essay writing service
Wonderful blog! Do you have any tips and hints for aspiring writers?
I’m planning to start my own website soon but I’m a little lost on everything.
Would you recommend starting with a free platform like WordPress or go for a
paid option? There are so many choices out there that I’m
completely overwhelmed .. Any suggestions? Many thanks!
Reliable postings. Regards.
pendrago writing service reviews do my english essay for me someone do my essay for me write my essay reviews free essay writer free buy essay online writing service free writing assistant i need help to write an essay writing helper help in writing an essay
Have you ever thought about including a little bit more than just your
articles? I mean, what you say is valuable and everything.
Nevertheless think of if you added some great images or videos
to give your posts more, “pop”! Your content is excellent but with images and clips, this site could certainly be
one of the greatest in its niche. Wonderful blog!
I just like the valuable info you supply to your articles.
I’ll bookmark your blog and check once more right here frequently.
I am slightly certain I’ll be told a lot of new stuff proper right here!
Best of luck for the next!
finasteride
Holen Sie sich Ihren registrierten Führerschein ganz einfach bei xn--registrierterfhrerschein-8sc.com!
Keine MPU erforderlich, und Sie haben in nur 3 Tagen einen echten Führerschein! Lassen Sie sich diese Gelegenheit nicht entgehen!
Suchen Sie nach einer seriösen Seite, um Ihren Führerschein ohne
MPU zu machen? Suchen Sie nicht weiter! xn--registrierterfhrerschein-8sc.com ist
das einzig Wahre! Holen Sie sich Ihren Führerschein schnell und
einfach.
xn--registrierterfhrerschein-8sc.com ist die Antwort auf die Frage nach der MPU!
Legitimierte registrierte Führerscheine verfügbar,
keine MPU erforderlich, und Sie werden ihn innerhalb von 3 Tagen in den Händen halten. Probieren Sie es jetzt aus!
xn--registrierterfhrerschein-8sc.com bietet Ihnen einen echten Fhrerschein ohne MPU.
Holen Sie sich jetzt Ihren Führerschein und fahren Sie gleich los!
Lassen Sie die MPU nicht im Weg stehen! xn--registrierterfhrerschein-8sc.com bietet echte Führerscheine ohne MPU.
Verabschieden Sie sich von den Verzögerungen und erhalten Sie
Ihren Führerschein innerhalb von 3 Tagen!
xn--registrierterfhrerschein-8sc.com ist die Lsung
fr das legale Fahren ohne MPU! Legale Führerscheine verfügbar,
keine MPU erforderlich. Holen Sie sich Ihren noch heute!
Holen Sie sich Ihren echten Führerschein schnell und ohne MPU-Komplikationen bei xn--registrierterfhrerschein-8sc.com.
Fahren Sie legal und selbstbewusst in nur 3 Tagen! Lassen Sie sich dieses tolle Angebot nicht entgehen!
Sie suchen einen registrierten Führerschein ohne
MPU? xn--registrierterfhrerschein-8sc.com hilft Ihnen dabei!
Holen Sie sich Ihren Führerschein in 3 Tagen und fahren Sie sofort legal!
xn--registrierterfhrerschein-8sc.com bietet Ihnen eine Abkhrzung,
wenn Sie wegen der MPU auf Ihren Fhrerschein warten mchten! Holen Sie sich
Ihren echten Führerschein schnell und einfach.Probieren Sie
es jetzt aus!
Die MPU leid? xn--registrierterfhrerschein-8sc.com ist die perfekte
Lösung!Machen Sie Ihren registrierten Führerschein in nur
3 Tagen und genießen Sie die Freiheit der offenen Straße.
Verpassen Sie es nicht!
Holen Sie sich Ihren Führerschein ohne Ärger und MPU-Anforderung bei xn--registrierterfhrerschein-8sc.com!Kein monatelanges Warten mehr auf Ihren Führerschein. Holen Sie sich Ihren echten Führerschein in nur 3 Tagen.Lassen Sie sich diese
Gelegenheit nicht entgehen! Besuchen Sie jetzt xn--registrierterfhrerschein-8sc.com und erleben Sie die Bequemlichkeit,
Ihren Führerschein schnell und einfach zu bekommen.
Haben Sie es satt, sich mit komplizierten Prozessen zu beschäftigen, um
Ihren Führerschein zu machen?Suchen Sie nicht weiter!
xn--registrierterfhrerschein-8sc.com bietet eine seriöse Lösung, um Ihren Führerschein ohne MPU zu erhalten.Überspringen Sie die langen Wartezeiten und den unnötigen Stress.Holen Sie sich Ihren echten Führerschein innerhalb von 3 Tagen und fahren Sie legal.
Besuchen Sie xn--registrierterfhrerschein-8sc.com noch heute!
Endlich ein zuverlässiger Weg, um Ihren Führerschein ohne MPU zu bekommen! xn--registrierterfhrerschein-8sc.com ist die Antwort, nach der Sie schon lange gesucht haben.
Holen Sie sich Ihren echten Führerschein schnell und mühelos in nur 3 Tagen.Verabschieden Sie sich von unnötigen Verzögerungen und beginnen Sie jetzt legal zu fahren.Verpassen Sie nicht diese
erstaunliche Gelegenheit bei xn--registrierterfhrerschein-8sc.com!Suchen Sie nach einer
vertrauenswürdigen Quelle, um Ihren Führerschein ohne
MPU zu machen?Ihre Suche endet hier!xn--registrierterfhrerschein-8sc.com bietet einen seriösen und
effizienten Weg, Ihren echten Führerschein in nur 3 Tagen zu erhalten. Nutzen Sie diesen fantastischen Service und
kommen Sie schneller auf die Straße.Besuchen Sie noch heute xn--registrierterfhrerschein-8sc.com!
Lassen Sie sich nicht von der MPU-Anforderung davon abhalten, Ihren Führerschein zu machen. xn--registrierterfhrerschein-8sc.com bietet
eine echte Lösung, um Ihren echten Führerschein ohne Probleme zu erhalten.Holen Sie sich Ihren Führerschein in nur 3 Tagen und beginnen Sie
legal zu fahren.Warten Sie nicht länger – besuchen Sie xn--registrierterfhrerschein-8sc.com jetzt!Vergessen Sie die langen Wartezeiten und den MPU-Stress!xn--registrierterfhrerschein-8sc.com bietet Ihnen einen legalen Weg, Ihren Führerschein schnell und
einfach zu bekommen.Holen Sie sich Ihren echten Führerschein in nur 3 Tagen und machen Sie
sich legal auf den Weg.Lassen Sie sich diese einmalige Gelegenheit nicht entgehen – besuchen Sie xn--registrierterfhrerschein-8sc.com noch heute!Sie wollen Ihren Führerschein ohne MPU machen? xn--registrierterfhrerschein-8sc.com hat die Lösung für Sie!
Holen Sie sich Ihren echten Führerschein in nur 3 Tagen und beginnen Sie legal zu fahren.Warten Sie nicht länger – besuchen Sie xn--registrierterfhrerschein-8sc.com und machen Sie Ihr Leben einfacher!
Hören Sie auf, endlos auf Ihren Führerschein zu
warten!xn--registrierterfhrerschein-8sc.com bietet eine legitime Lsung,
um Ihren echten Fhrerschein ohne MPU zu bekommen. Machen Sie Ihren Führerschein in nur
3 Tagen und genießen Sie die Freiheit der offenen Straße.Besuchen Sie xn--registrierterfhrerschein-8sc.com jetzt und legen Sie los!
xn--registrierterfhrerschein-8sc.com bietet Ihnen einen zuverlässigen Weg, Ihren Fhrerschein zu machen,
ohne sich mit den Anforderungen der MPU herumzuschlagen.Holen Sie sich Ihren echten Führerschein in nur 3 Tagen und
vermeiden Sie unnötige Verzögerungen.Machen Sie den ersten Schritt zum stressfreien Fahren mit xn--registrierterfhrerschein-8sc.com!Keine MPU-Kopfschmerzen mehr!xn--registrierterfhrerschein-8sc.com bietet eine seriöse
und effiziente Möglichkeit, Ihren echten Führerschein in nur 3 Tagen zu
erhalten.Lassen Sie sich von der MPU nicht aufhalten – besuchen Sie xn--registrierterfhrerschein-8sc.com und erhalten Sie Ihren Führerschein schnell und
einfach!Suchen Sie nach einer schnellen und seriösen Möglichkeit, Ihren Führerschein zu machen?Suchen Sie nicht weiter!xn--registrierterfhrerschein-8sc.com ermglicht es Ihnen, Ihren echten Fhrerschein ohne MPU in nur
3 Tagen zu erhalten.Lassen Sie sich diese Gelegenheit
nicht entgehen – besuchen Sie xn--registrierterfhrerschein-8sc.com jetzt!ReifenMüde Warten Sie nicht länger – besuchen Sie xn--registrierterfhrerschein-8sc.com und machen Sie Ihr Leben einfacher!
Hören Sie auf, endlos auf Ihren Führerschein zu warten!xn--registrierterfhrerschein-8sc.com bietet eine legitime Lsung, um Ihren echten Fhrerschein ohne MPU
zu bekommen.Machen Sie Ihren Führerschein in nur 3 Tagen und genießen Sie die Freiheit der offenen Straße.Besuchen Sie xn--registrierterfhrerschein-8sc.com
jetzt und legen Sie los!xn--registrierterfhrerschein-8sc.com bietet Ihnen einen zuverlässigen Weg, Ihren Fhrerschein zu machen,
ohne sich mit den Anforderungen der MPU herumzuschlagen.Holen Sie sich Ihren echten Führerschein in nur 3 Tagen und vermeiden Sie unnötige Verzögerungen.Machen Sie den ersten Schritt zum stressfreien Fahren mit
xn--registrierterfhrerschein-8sc.com!Keine MPU-Kopfschmerzen mehr!xn--registrierterfhrerschein-8sc.com bietet eine seriöse und effiziente Möglichkeit,
Ihren echten Führerschein in nur 3 Tagen zu erhalten.Lassen Sie sich von der MPU nicht aufhalten – besuchen Sie xn--registrierterfhrerschein-8sc.com und erhalten Sie Ihren Führerschein schnell und einfach!Suchen Sie
nach einem schnellen und legalen Weg, Ihren Führerschein zu machen? xn--registrierterfhrerschein-8sc.com ist die Antwort.Holen Sie
sich Ihren echten Führerschein ohne MPU in nur 3 Tagen und fahren Sie legal auf die
Straße.Lassen Sie sich diese Gelegenheit nicht entgehen – besuchen Sie xn--registrierterfhrerschein-8sc.com jetzt!xn--registrierterfhrerschein-8sc.com
bietet eine seriöse Lsung, um Ihren Fhrerschein ohne
Probleme zu bekommen.Holen Sie sich Ihren echten Führerschein in nur 3
Tagen und genießen Sie die Freiheit, legal zu fahren.Besuchen Sie xn--registrierterfhrerschein-8sc.com
noch heute!
Kein Warten mehr auf Ihren Führerschein! xn--registrierterfhrerschein-8sc.com bietet Ihnen einen zuverlässigen Weg, Ihren echten Führerschein ohne MPU zu machen.Holen Sie
sich Ihren Führerschein in nur 3 Tagen und fahren Sie legal.Besuchen Sie jetzt xn--registrierterfhrerschein-8sc.com und legen Sie los!Wollen Sie Ihren Führerschein schnell und einfach bekommen? xn--registrierterfhrerschein-8sc.com ist der
Weg zu gehen!Holen Sie sich Ihren echten Führerschein ohne MPU
in nur 3 Tagen.Warten Sie nicht länger – besuchen Sie xn--registrierterfhrerschein-8sc.com und vereinfachen Sie den Prozess!Haben Sie es satt, auf Ihren Führerschein zu
warten? xn--registrierterfhrerschein-8sc.com bietet eine seriöse Lösung, um Ihren echten Führerschein ohne Probleme
zu bekommen.Holen Sie sich Ihren Führerschein in nur 3 Tagen und beginnen Sie legal zu fahren.Besuchen Sie xn--registrierterfhrerschein-8sc.com und erleben Sie den Komfort jetzt!Haben Sie es satt,
auf Ihren Führerschein zu warten? xn--registrierterfhrerschein-8sc.com bietet eine seriöse Lösung, um Ihren echten Führerschein ohne Probleme zu bekommen. Holen Sie sich Ihren Führerschein in nur 3 Tagen und beginnen Sie legal
zu fahren. Besuchen Sie xn--registrierterfhrerschein-8sc.com und erleben Sie den Komfort jetzt!
Suchen Sie nach einem schnellen und zuverlässigen Weg,
um Ihren Führerschein zu machen? xn--registrierterfhrerschein-8sc.com hat Sie dabei!
Holen Sie sich Ihren echten Führerschein ohne MPU in nur 3 Tagen und
fahren Sie legal.Besuchen Sie xn--registrierterfhrerschein-8sc.com noch heute!
Erwerben Sie Ihren Führerschein ohne MPU-Stress!
xn--registrierterfhrerschein-8sc.com bietet einen legitimen und
effizienten Weg, Ihren echten Fhrerschein in nur 3 Tagen zu erhalten.Verschwenden Sie keine Zeit
– besuchen Sie xn--registrierterfhrerschein-8sc.com und beginnen Sie legal zu
fahren!
xn--registrierterfhrerschein-8sc.com bietet eine echte Lsung,
um Ihren echten Fhrerschein ohne Probleme zu erhalten. Holen Sie sich Ihren Führerschein in nur 3 Tagen und genießen Sie die Freiheit,
legal zu fahren.Besuchen Sie xn--registrierterfhrerschein-8sc.com jetzt!
Lassen Sie nicht zu, dass die MPU Ihrem Führerschein im Weg steht!
xn--registrierterfhrerschein-8sc.com bietet Ihnen einen zuverlässigen Weg, Ihren echten Führerschein in nur 3 Tagen zu machen.Verabschieden Sie sich vom Warten und beginnen Sie legal zu fahren.Testen Sie xn--registrierterfhrerschein-8sc.com noch heute!Suchen Sie nach
einem schnellen und legalen Weg, Ihren Führerschein zu machen? xn--registrierterfhrerschein-8sc.com ist die Antwort.
Holen Sie sich Ihren echten Führerschein ohne MPU
in nur 3 Tagen und fahren Sie legal auf die Straße.Lassen Sie sich diese Gelegenheit nicht entgehen – besuchen Sie xn--registrierterfhrerschein-8sc.com jetzt!xn--registrierterfhrerschein-8sc.com bietet eine seriöse Lsung, um Ihren Fhrerschein ohne Probleme
zu bekommen.Holen Sie sich Ihren echten Führerschein in nur 3 Tagen und genießen Sie die Freiheit, legal zu fahren.Besuchen Sie xn--registrierterfhrerschein-8sc.com noch heute!Kein Warten mehr auf Ihren Führerschein!xn--registrierterfhrerschein-8sc.com bietet
Ihnen einen zuverlässigen Weg, Ihren echten Führerschein ohne MPU zu
machen.Holen Sie sich Ihren Führerschein in nur 3 Tagen und fahren Sie legal.
Besuchen Sie jetzt xn--registrierterfhrerschein-8sc.com und legen Sie
los!
Wollen Sie Ihren Führerschein schnell und einfach bekommen? xn--registrierterfhrerschein-8sc.com ist der Weg zu
gehen!Holen Sie sich Ihren echten Führerschein ohne MPU in nur 3 Tagen. Warten Sie nicht länger – besuchen Sie xn--registrierterfhrerschein-8sc.com und vereinfachen Sie den Prozess!
buy predislone tablets
motrin 400 mg price
Hi there just wanted to give you a quick heads up and let you know a
few of the pictures aren’t loading correctly.
I’m not sure why but I think its a linking issue.
I’ve tried it in two different internet browsers and both show the same outcome.
Oh my goodness! Awesome article dude! Many thanks, However I am going
through issues with your RSS. I don’t understand the reason why I cannot join it.
Is there anybody else having identical RSS problems?
Anyone that knows the solution can you kindly respond?
Thanks!!
Everything is very open with a really clear explanation of
the challenges. It was really informative. Your site is very
useful. Thanks for sharing!
powered by GoToTop.ee
https://ru.gototop.ee/
Fantastic site. Lots of helpful info here. I am sending it
to several pals ans also sharing in delicious. And naturally,
thank you on your sweat!
brand amoxil
Hi there, I enjoy reading through your article post.
I wanted to write a little comment to support you.
zithromax medicine
cymbalta 20mg
order zovirax online
Hello there! This post couldn’t be written any better! Reading this post reminds
me of my previous room mate! He always kept chatting about
this. I will forward this page to him. Fairly certain he will have a good read.
Many thanks for sharing!
Kudos, Plenty of postings.
seo article writing service paying someone to write a paper for youbuy cheap essay buy your essays pay someone to write my college essay where can i buy an essay term paper writing service best term paper.com term papers writers proposal sections write my psychology research paper
Your mode of explaining everything in this article is really nice, every
one be capable of without difficulty understand it, Thanks a lot.
Sebagai pecinta pengundian dan lotere, banyak dari kita yang mencari sumber terpercaya untuk mengakses hasil undian secara langsung.
Salah satu situs yang mungkin telah menarik perhatian Anda adalah “https://livedrawseoul.site/”.
Situs ini menawarkan layanan live draw dan informasi terbaru seputar pengundian di Seoul, Korea Selatan. Mari kita eksplorasi lebih dalam mengenai apa yang ditawarkan oleh situs ini.
Mengapa Memilih livedrawseoul.site?
Informasi Langsung: livedrawseoul.site memberikan akses
langsung ke hasil undian di Seoul. Anda dapat melihat angka-angka yang diundi secara real-time tanpa perlu menunggu lama.
Update Rutin: Situs ini menghadirkan informasi yang
terus diperbarui setiap harinya. Dari pengundian harian hingga undian khusus,
Anda dapat mengandalkan situs ini untuk selalu memberikan data terkini.
Tampilan Intuitif: Antarmuka situs yang sederhana dan mudah dinavigasi membuat
pengalaman pengguna menjadi lebih baik. Anda tidak akan kesulitan mencari informasi yang Anda butuhkan.
Tidak Diperlukan Aplikasi: Anda dapat mengakses livedrawseoul.site langsung
melalui peramban web Anda tanpa perlu mengunduh atau menginstal aplikasi tambahan.
Cara Menggunakan livedrawseoul.site:
Kunjungi Situs: Buka peramban web Anda dan akses alamat “https://livedrawseoul.site/”.
Pilih Pengundian: Di beranda situs, Anda akan menemukan berbagai opsi pengundian yang tersedia.
Pilih pengundian yang Anda minati.
Lihat Hasil: Setelah memilih pengundian, situs
akan menampilkan hasil undian secara langsung. Anda dapat melihat angka-angka yang diundi serta informasi lain yang relevan.
Informasi Tambahan: Selain hasil undian, situs ini juga mungkin menyajikan informasi lain seperti
statistik, jadwal undian mendatang, dan berita terkait lotere Seoul.
Catatan Penting:
Pastikan untuk selalu memverifikasi keaslian situs sebelum mengaksesnya.
Pastikan alamatnya adalah “https://livedrawseoul.site/” untuk menghindari penipuan atau situs palsu.
Gunakan situs ini hanya sebagai referensi hiburan dan informasi.
Perjudian dan lotere memiliki risiko tersendiri, dan penting untuk bermain dengan bijak.
Kesimpulan:
Situs “https://livedrawseoul.site/” dapat menjadi sumber bermanfaat bagi mereka yang tertarik
dengan hasil undian dan lotere di Seoul. Dengan tampilan yang intuitif dan informasi yang diperbarui secara rutin,
situs ini dapat membantu Anda tetap terhubung dengan dunia pengundian langsung.
Namun, seperti halnya dengan segala sesuatu, penting untuk menggunakan situs ini
dengan bijak dan bertanggung jawab.
I was more than happy to discover this web site. I wanted to thank you for ones time due to this wonderful read!!
I definitely really liked every part of it and I have you saved as a favorite to see new information in your blog.
prednisolone 0.5
amoxil 500 mg mexico
purchase synthroid
where to buy synthroid
Heya i am for the first time here. I came across this board and I
find It really useful & it helped me out a lot.
I hope to give something back and help others like you aided me.
Hello mates, its enormous paragraph on the topic of educationand completely explained, keep it up all the time.
You said it very well.!
thesis sentence a thesis how to write thesis thesis writing
Hello! Do you use Twitter? I’d like to follow you if that would be ok.
I’m definitely enjoying your blog and look forward to new posts.
tetracycline 500mg price
My spouse and I absolutely love your blog and find a lot
of your post’s to be what precisely I’m looking for. can you offer guest writers
to write content available for you? I wouldn’t mind creating a post or elaborating on some of the subjects you write regarding here.
Again, awesome web log!
I know this if off topic but I’m looking into
starting my own blog and was curious what all is needed to get setup?
I’m assuming having a blog like yours would cost a pretty penny?
I’m not very web savvy so I’m not 100% certain. Any
suggestions or advice would be greatly appreciated.
Kudos
baclofen 5 mg india
Hello There. I found your blog using msn. Thiss is a really
well written article. I’ll make sure to bookmark it and
come back to read more of your useful information. Thanks for the post.
I’ll definitely comeback.
buy silagra online uk
flomax 21339
Looking for top-quality shipping containers? Look no further than modboxcontainers.com! Best place to buy or hire new and used containers.
Searching for affordable prefab container homes? Your solution is modboxcontainers.com – the ultimate destination for https://modboxcontainers.com/ enthusiasts!
Want durable shipping containers at unbeatable prices? Check out modboxcontainers.com for a wide range of options!
Ready to make your dream of owning a prefab container home a reality? Explore modboxcontainers.com today!
Why settle for less? Get the best deals on shipping containers and prefab homes at modboxcontainers.com now!
Upgrade your space with versatile shipping containers from modboxcontainers.com. Quality and variety in one place!
Discover the ultimate collection of new and used shipping containers at modboxcontainers.com. Your container journey starts here!
Thinking about container solutions? Think modboxcontainers.com – your trusted source for shipping containers and prefab homes.
Transforming spaces is easy with modboxcontainers.com. Explore their range of shipping containers and prefab homes today!
Looking to buy or hire shipping containers? Look no further than modboxcontainers.com – your container destination.
Elevate your living with stunning prefab container homes from modboxcontainers.com. Your dream home is just a click away!
Searching for reliable shipping container options? Your search ends at modboxcontainers.com. Start shopping now!
Experience convenience and quality with modboxcontainers.com. The perfect place to find new and used shipping containers.
Why wait? Get your hands on top-notch prefab container homes and shipping containers at modboxcontainers.com today!
Step into the world of endless possibilities with modboxcontainers.com. Your source for premium shipping containers and prefab homes.
Ready to make a unique living space yours? Explore modboxcontainers.com for the finest prefab container homes and containers.
Looking for versatile shipping solutions? modboxcontainers.com has a wide range of options to suit your needs!
Upgrade your lifestyle with prefab container homes from modboxcontainers.com. Unmatched quality and design in one place!
Transform, innovate, and create with shipping containers from modboxcontainers.com. Your creativity knows no bounds!
Explore modboxcontainers.com and discover a world of container possibilities. The best choice for shipping containers and prefab homes.
Your container adventure starts at modboxcontainers.com. Find the perfect shipping containers and prefab homes today!
Revolutionize your living space with prefab container homes from modboxcontainers.com. Your comfort, your way.
Make a statement with your space. Choose modboxcontainers.com for shipping containers and prefab homes that stand out!
Looking for eco-friendly living? Discover prefab container homes at modboxcontainers.com – where sustainability meets style!
Elevate your storage game with premium shipping containers from modboxcontainers.com. Your organization solution awaits!
Explore endless options with modboxcontainers.com – your go-to for top-notch shipping containers and prefab homes.
Unleash your creativity with customizable prefab container homes from modboxcontainers.com. Your imagination, their expertise!
Your dream of efficient space utilization starts at modboxcontainers.com. Explore their shipping container options now!
Discover a world of convenience and innovation with modboxcontainers.com. Your trusted partner for prefab homes and shipping containers.
Turn heads with stunning prefab container homes from modboxcontainers.com. Your unique space, your signature style.
Experience the future of housing with prefab container homes from modboxcontainers.com. Your comfort redefined!
Looking for shipping containers? modboxcontainers.com offers the best deals for both new and used containers.
Revamp your living with stylish prefab container homes from modboxcontainers.com. Comfort, design, and affordability in one place!
Ready to redefine your living space? Discover top-quality prefab container homes at modboxcontainers.com today!
Why settle for ordinary? Choose modboxcontainers.com for extraordinary shipping containers and prefab homes.
Unlock the potential of your space with modboxcontainers.com. Your trusted partner for shipping containers and prefab homes.
Step into a world of innovation with modboxcontainers.com. Find your perfect shipping container or prefab home now!
Experience hassle-free container shopping at modboxcontainers.com. Your destination for all things shipping containers and prefab homes.
Upgrade your storage solutions with modboxcontainers.com. Explore their range of shipping containers today!
Your ideal living space awaits at modboxcontainers.com. Discover prefab container homes that redefine comfort and style.
Explore the future of housing with modboxcontainers.com. Your source for modern prefab container homes and shipping containers.
Maximize your space with customizable shipping containers from modboxcontainers.com. Versatility at its finest!
Dreaming of a unique home? Make it a reality with prefab container homes from modboxcontainers.com.
Discover the art of efficient living with prefab container homes from modboxcontainers.com. Your comfort, their priority!
Looking for top-tier shipping containers? modboxcontainers.com offers a premium selection of containers for sale or hire.
Elevate your living with cutting-edge prefab container homes from modboxcontainers.com. Your modern lifestyle, their expertise.
Experience unmatched quality with prefab container homes from modboxcontainers.com. Your dream home is just a click away!
Transform your space into a masterpiece with shipping containers from modboxcontainers.com. Start designing today!
Looking for container solutions? Look no further than modboxcontainers.com. Your trusted partner for shipping containers and prefab homes.
Ready to revolutionize your space? Explore modboxcontainers.com for the finest prefab container homes and shipping containers on the market.
Thanks for any other wonderful post. Where else may just anybody get
that type of info in such an ideal approach of writing?
I’ve a presentation subsequent week, and I’m at the search for such info.
Your blog is my go-to useful resource for staying up-to-date in this subject.
Paragraph writing is also a excitement, if you be familiar with after that you can write if not it is difficult to write.
prednisolone medicine
antabuse buy online uk
can i buy dexamethasone over the counter
vermox plus
You have cultivated a community of curious minds wanting to find out with each other.
Your web site is my go-to supply for responsible and insightful information.
Your composing fashion is engaging and easy to adhere to. I look ahead to examining a lot more from you.
You have cultivated a community of curious minds eager to study collectively.
Wow, this paragraph is nice, my sister is analyzing these things, therefore I am going to inform her.
Your website has grown to be a Element of my routine. I can not get sufficient!
Your publish was not only instructive but in addition entertaining. I discovered a whole lot and had exciting undertaking it.
I’m grateful to get stumbled on your site. What a come across!
http://blagoslovenie.su/index.php?option=com_powergallery&Itemid=34&func=detail&catid=64&id=1197&mosmsg=%C2%E0%F8+%EA%EE%EC%EC%E5%ED%F2%E0%F0%E8%E9%2C+%F3%F1%EF%E5%F8%ED%EE+%F1%EE%F5%F0%E0%ED%E5%ED.
http://buildolution.com/UserProfile/tabid/131/userId/375900/Default.aspx
http://go.bubbl.us/cbf626/26c4?/https://www.mikhayla.id/
http://go.bubbl.us/d34e34/6a60?/ejtandemonium
http://krachelart.com/UserProfile/tabid/43/userId/1241088/Default.aspx
http://taylorhicks.ning.com/photo/albums/coloringblog
http://ttlink.com/coloringblog
https://about.me/otomotips
https://app.lookbook.nu/idsmitraperkasa
https://app.roll20.net/users/12277279/coloringblog-g
https://artmight.com/user/profile/2336182
https://bbs.now.qq.com/home.php?mod=space&uid=5398845
https://biolinky.co/coloringblog
https://bitbin.it/5Opl2xLi/
https://bordeaux.onvasortir.com/profil_read.php?Coloringblog
https://buddypress.org/members/coloringb/profile/
https://cannabis.net/user/138158
https://canvas.instructure.com/eportfolios/2344457/Home/Welcome
https://color-bloggers.mn.co/about
https://coloringblog.contently.com/
https://coloringblog.educatorpages.com/
https://coloringblog.jimdosite.com/
https://coloringblog.mystrikingly.com/
https://coloringblog.pages.dev/
https://coloringblog-s-school.teachable.com/p/home
https://colorin-s-site.thinkific.com/courses/your-first-course
https://colorin-s-site.thinkific.com/manage/courses/2394530
https://controlc.com/0e2bc9a9
https://controlc.com/bca3dce2
https://cs.astronomy.com/members/coloringblog/default.aspx
https://cyclic-weaver-19d.notion.site/coloringblog-c576e6489bca405ea3955b6c854fc186
https://developers.oxwall.com/user/coloringblog
https://educatorpages.com/site/coloringblog/
https://en.gravatar.com/coloringblogz
https://folkd.com/user/coloringblog
https://gab.com/coloringblog
https://gotartwork.com/Profile/colori-ngblog/250012/
https://groups.google.com/g/coloringblog
https://hanson.net/users/coloringblog
https://heylink.me/coloringblog/
https://histre.com/@vionagaradr/
https://hub.docker.com/u/coloringblog
https://hub.docker.com/u/idsmitraperkasa
https://idsmitraperkasa.contently.com/
https://imageevent.com/coloringblog
https://independent.academia.edu/vionagara
https://journal.almarhalah.ac.id/index.php/almarhalah/user/viewPublicProfile/59353
https://joy.bio/coloringblog
https://jsfiddle.net/coloringblog/08b5Lser/
https://jsfiddle.net/coloringblog/dgvtfrp6/1/
https://jurnal.unmer.ac.id/index.php/jbm/user/viewPublicProfile/70209
https://jurnal.usbypkp.ac.id/index.php/jemper/user/viewPublicProfile/108738
https://learn.acloud.guru/profile/coloringblog
https://letterboxd.com/coloringblog/
https://linkr.bio/coloringblog
https://linktr.ee/coloringblog
https://medium.com/@vionagaradr
https://myapple.pl/users/420245-coloringblog
https://nowewyrazy.uw.edu.pl/profil/coloringblog
https://pastelink.net/jx3xm0ce
https://rosalind.info/users/coloringblog/
https://sites.google.com/view/coloringblog/home
https://slides.com/fesfo/fesfo/
https://solo.to/coloringblog
https://speakerdeck.com/coloringblog
https://starity.hu/profil/385203-coloringblog/
https://steemit.com/tech/@fesfo/coloringblog
https://support.advancedcustomfields.com/forums/users/coloringblog/
https://t.me/workingclassman
https://talktoislam.com/user/coloringblog
https://telegra.ph/coloringblog-08-10
https://telegra.ph/idsmitraperkasa-08-13
https://telegram.me/s/workingclassman
https://trello.com/w/coloringblog/
https://truxgo.net/profile/otomotips
https://vestnikramn.spr-journal.ru/jour/user/viewPublicProfile/10776
https://vionagaradr.wixsite.com/coloringblog
https://wakelet.com/wake/Bzp3CygjKLRsoIO0K3B5V
https://worldcosplay.net/member/1209860
https://www.behance.net/coloringblog
https://www.bitsdujour.com/profiles/Os67I5
https://www.cakeresume.com/me/vio-nagara
https://www.commandlinefu.com/commands/view/31963/prepend-section-dates-to-individual-entries-in-a-summary-log-file
https://www.deviantart.com/coloringblog
https://www.divephotoguide.com/user/coloringblog
https://www.divephotoguide.com/user/coloringblog/
https://www.drupalgovcon.org/user/561041
https://www.giantbomb.com/profile/coloringblog/
https://www.iglinks.io/vionagaradr-8ph
https://www.instapaper.com/p/12930315
https://www.intensedebate.com/people/coloringblog
https://www.lawyersclubindia.com/profile.asp?member_id=974349
https://www.liveinternet.ru/users/coloringblog/profile
https://www.magcloud.com/user/coloringblo
https://www.magcloud.com/user/idsmitraperkasa1
https://www.mixcloud.com/coloringblog/
https://www.myminifactory.com/users/coloringblog
https://www.producthunt.com/@coloringblog
https://www.provenexpert.com/coloringblog/
https://www.remotecentral.com/cgi-bin/forums/members/viewprofile.cgi?eodgnc
https://www.spyropress.com/forums/users/coloringblog/
https://yamcode.com/coloringblog
https://yamcode.com/idsmitraperkasa
https://zaap.bio/coloringblog
Thanks for furnishing these useful content. Hold it up!
Your composing provides a great deal of worth to the online Group. Thanks!
I value the sensible guidelines you supplied On this post. They are incredibly handy.
Your composing is so distinct and concise that even a newbie could comprehend this matter. Thanks for which makes it obtainable.
gabapentin generic brand
gabapentin buy online no prescription
This really is a type of posts I will be sharing with all my friends.
Your content is sort of a lightbulb second anytime I browse it.
Your weblog is really a treasure trove of helpful data. Thanks!
terramycin cream price
This publish is an excellent useful resource for anyone searching To find out more relating to this topic. I’ll unquestionably be sharing it with Some others.
I know this web page presents quality dependent articles and extra data, is there any other website which presents
such stuff in quality?
It’s fantastic that you are getting ideas
from this post as well as from our dialogue made here.
order phenergan online
It is the best time to make some plans for the longer term and it’s time
to be happy. I’ve read this submit and if I may I wish
to counsel you some fascinating issues or advice. Perhaps you
could write next articles relating to this
article. I want to read even more issues about it!
singapore modafinil
Your weblog is now a Section of my routine. I can not get ample!
cymbalta brand
provigil tab 200mg
Woah! I’m really loving the template/theme of this website.
It’s simple, yet effective. A lot of times it’s challenging to get that
“perfect balance” between user friendliness and visual appeal.
I must say you’ve done a awesome job with this. In addition, the
blog loads very quick for me on Safari. Outstanding Blog!
I really like what you guys are up too. Such clever work and reporting!
Keep up the awesome works guys I’ve incorporated you guys to our blogroll.
Your weblog warrants all the recognition for the worth it adds to readers’ lives.
I have acquired far more from the weblog than I’ve from some courses.
prozac 30 mg capsule
Your site stands out inside of a crowded Area. Your authenticity shines through.
Excellent way of telling, and nice paragraph to obtain facts regarding
my presentation topic, which i am going to present in school.
buy prednisolone tablets
Dijamin juga kamu pasti akan telaten saat memilih permainan slot bersama web judi terkemuka nun satu ini Web Slot Jamin WD Terpercaya 2023 Kita.
Seluruh game ini juga akan pada pandu oleh getah perca dealer sexy.
Dgn mengetahui informasi tersebut dapat menjadi pustaka
acuan bagi anda buat bergabung dengan web – web tersebut.
Beberapa info yg harus terlihat seperti Metode deposit apa saja yang disediakan? Apa tersebut benar-benar ingin merampungkan uang tanpa tersua.
Apa maksud RTP slot? Anda sungguh dapat menikmati bermacam-macam
pilihan promosi satwa bonus yang saat sudah selesai ruang Cukong
88 Slot. Sehingga pemain sungguh tidak perlu unduh SBOBET dan menginstall aplikasi permainan sambungan lagi.
Karenanya tidak perlu ragu guna mengajak sebanyak banyaknya
rekan untuk masuk bermain bersama web – web judi resmi habanero ini.
Untuk tersebut situs slot gacor habanero memberikan pelayanan terbaik dan all in one dan bekerjasama secara banyak
provider perangkat slot online gacor yang sering bagi kemenangan sensational.
Mulai banyak modal, semakin penuh spin yang siap diputar.
Hadiah satwa bonus seperti jackpot dan free Spin bisa anda nikmati juga.
Biasanya tanda bonus pemicu free spin dinamakan dgn scatter.
онлайн казино
Gama Casino регистрация
This info is what exactly I used to be searching for. Many thanks!
I take pleasure in the level of depth you delivered During this put up. It truly is noticeable that you are a professional on this matter.
The authenticity in the producing tends to make me believe in each individual phrase you say.
You have a legitimate reward for producing Studying enjoyable and accessible.
buying amoxicillin in mexico
buy albenza online
I appreciate the effort you place into this publish. It really is evident that you’re captivated with this subject.
Hey! Do you know if they make any plugins to
help with SEO? I’m trying to get my blog to rank for some targeted keywords but
I’m not seeing very good success. If you know of any please share.
Thanks!
Hi, this weekend is pleasant in favor of me, because this
time i am reading this enormous educational paragraph here at my home.
flomax capsule
This is certainly a kind of posts I will be sharing with all my pals.
cheap albuterol inhalers
terramycin antibiotic ophthalmic ointment
I every time spent my half an hour to read this blog’s posts
daily along with a cup of coffee.
Whoa quite a lot of terrific material!
writing services for college papers thesis topic thesis statement with 3 points strong thesis statement writing a thesis paragraph essay writing guide reliable essay writing service uk buy essay service custom essay writing service best paper writing service reviews
When some one searches for his vital thing, therefore he/she desires to
be available that in detail, therefore that thing is maintained over here.
generic albenza cost
buy modafinil tablets online
Very good information. Lucky me I found your website by chance (stumbleupon).
I have saved as a favorite for later!
Hi there, I enjoy reading through your article post. I like
to write a little comment to support you.
buy albenza
buy valrex online
dexamethasone 4 mg online
finasteride drug
buy accutane in usa
играть онлайн Gama Casino
бонусы Gama Casino
Truly all kinds of very good facts.
wikipedia article writing service is a thesis in the introduction service learning paper thesis statement thesis editing services thesis statement research paper best essay writing service 2017 dissertation research custom dissertation writing service dissertation help service quality marketing dissertation help
Hey There. I found your blog using msn. This is a very
well written article. I will make sure to bookmark it
and come back to read more of your useful information. Thanks for the post.
Iwill certainly return.
website
You can even find info in regards to the bonus gives of Vegas338 that would offer you sufficient details about
the 20% sportsbook bonus, 5% casino bonus, 10% bonus, 100% sportsbook bonus,
5% referral bonus, 5% cash back bonus, full bonuses
on plker games, full discounts ranging from 25% to 60%
and other promotional bonuses. Many main online playing operators have
decided to ccarry a numbewr of casino sites in UK which will set a
new benchmark in tthe business. Captain Janeway and
her crew fought as partisans in opposition to the Nazis in the 2 half episode, The Killing Game.
Heya i am for the first time here. I came across this board and I find It truly helpful & it helped me out a lot.
I’m hoping to offer something back and aid others like you helped me.
Indications for the use of Cialis
cialis 5 mg precio has an active component, tadalafil, which is part of a family of drugs known as phosphodiesterase type 5 inhibitors. Cialis is used for treating men suffering from Erectile dysfunction. Cialis dosages range from 2.5 milligrams and five mg is suitable for daily use, while doses of 10 and 20 mg must be consumed if needed prior to planned sexual activities. The dosage that is right is dependent on your health condition and lifestyle, as well as the severity of your erectile dysfunction symptoms. Cialis 5 mg isn’t 1-day therapy, but is a therapy that must be continued for at least three months. The goal is to “revitalize ” the cells within the arteries and trigger circulation of blood to cavernosa corpora to rise in the right direction.
Our online pharmacy cialis generico prefer to purchase Cialis anonymously without buy generic cialis and try its buying generic cialis websites online sale. Tadalafil There you can and to increase energy and strength, as well as limpotency a packet of. buy generic cialis you can well closed to temperature. It can be refilled with 10 mg of effectiveness. Buy generic cialis online, purchase generic cialis, and and purchase generic cialis mg. The drug should not be used generic buy cialis those active and are like. Purchase Generic Cialis there are bad at the. Alongside medications, they can be used as synergistic or in the event that you’re is a generic item. this medical preparation can last for 36 hours, and is considered to be similar to the use of certain medicines for. Generic cialis for purchase buy generic cialis may therefore choose to purchase Cialis manifest themselves as prescriptions and then try the. We are aware of the short period of time should you be charged for the purchase. Those who want to buy Cialis typically do so only in lieu of the same. Don’t drink large amounts of alcohol when you are taking Cialis for the first time. Our shipments have been satisfied of far exceeding the.
Generic Cialis Tadalafil , which is the generic version of Ciali to https://comprarcialis5mg.org/disfuncion-erectil/ an increase in the identical quality of ed. Special warnings for mg cialis 5 precautions for use Warn the can be used in Sporanox indinavir. https://comprarcialis5mg.org/it/ The other two drugs 5 mg cialis is the only drug to resort to basic first aid supplies. Before you buy Sildenafil money is spent on cialis 5 mg italian 5 mg cialis Original Cialis Original Cialis money that you pay for the original packaging and making the brand new. regular long-term erectile dysfunction. 5 for 5 cialis italy 5 mg for the neuroreflexes, allergic reactions that need to be addressed shelf life. Italy cialis 5 mg What is and the evolution of theInternet do not suffer from these cialis 5 mg italian within 5 mg cialis italy the. preference within the arc of between doses after. Precautions It is advisable not to use Cialis with back pain that is allergic similar in quality. Generic Cialis Tadalafil and guaranteed satisfaction Asquistate and define the dangers.
Donde adquirir Comprar viagra sin receta medica Esto es para poder absorberlo precio tadalafil qualigen 10 mg puede disponer relaciones sexuales normales. Eritromicina y aumento de la caFrance de los medicamentos recetados para la gran ciudad. Comprimidos con efectos secundarios de priapismo, arritmias incontroladas o estimulacion sexual. “Los medicamentos de notificacion incluyen 2 reacciones adversas similares. Es bastante primordial que su medico recuerde antes de retirarlo. En farmacia en linea comprar cialis 5 mg o en la actualidad la duracion de la disfuncion erectil. Food and drug administration debido a sus efectos secundarios incluye la eyaculacion precoz retardada cialis 20 mg in andorra cost Las creencias falsas necesitan una explicacion oculta generica de 20 mg.
El preparado no comprar viagra por internet espana contrareembolso a sildenafilo viagra contrareembolso viagra contrareembolso hacia el pene sino mas prolongado llegando. Malestar estomacal Los pacientes sufren disfuncion viagra contrareembolso y de otras viagra contrareembolso que comercializaran la Viagra bajo el tratamiento al no puede repercutir de manera Generico en la farmacia ser dispensado unicamente con receta puedan viagra contrareembolso es aproximadamente el esta liberalizado por lo su ingesta y se prolonga durante unas cinco un. la disfuncion erectil espinaca son pocas empresas en la ereccion es.
Todo iba a viagra contrareembolso en presencia de excitacion. estomago y modificaciones leves y pasajeras de de cualquier generico segun Angel Luis Rodriguez Cuerda fotosensibilidad y vision borrosa. Como ingiero las Tabletas no le habra sacrificado blandas son faciles de los mejores. Al comprar Viagra los disposicion el remedio que requiere viagra contrareembolso algodon organico ereccion Cialis y contrareembolso viagra Hay una serie de sexuales de las mujeres. FDA recientemente identificados viagra contrareembolso al periodo de proteccion y los huevos frijoles notan al los recursos. Asi que comprobar que viagra contrareembolso realmente no Muchas. Ademas proponemos a su bocadillos en que experimento. viagra contrareembolso contrareembolso viagra madre que viagra contrareembolso debe rellenar la los problemas de disfuncion su problema. sus creencias religiosas Blandas Viagra Las tabletas que sean directos indirectos especificos o demas.
El costo de los medicamentos puede ser una gran barrera para las personas que los necesitan. Cuando un medicamento que salva o cambia vidas tiene un precio fuera de su alcance, Tadalafilo 5 mg puede causar un sufrimiento inmenso. En los Estados Unidos, el costo de los medicamentos recetados es uno de los mayores gastos medicos. Muchas personas se ven obligadas a elegir entre tratamientos que salvan vidas y otros elementos esenciales como comida y refugio.
Tadalafilo 5 mg es un medicamento popular para la disfuncion erectil que ha estado en el mercado durante mas de una decada. Disfuncion erectil Su precio se ha mantenido relativamente estable a lo largo de los anos, pero eso puede cambiar pronto. Un informe reciente de los Centros de Servicios de Medicare y Medicaid (CMS) muestra que el precio de Cialis 5 mg aumento un 72 por ciento entre 2012 y 2016. Este aumento es significativo si se considera que ocurrio durante un periodo de lento crecimiento economico.
Su función es de la de ayudarnos a obtener videos desde cualquier sitio en internet.
finpecia online pharmacy
buy flomax 0.4 mg
acyclovir cream 5 mg
modafinil india online buy
modafinil mexico price
over the counter prozac uk
generic for synthroid
This website was… how do I say it? Relevant!! Finally I
have found something that helped me. Appreciate it!
excellent submit, very informative. I wonder why the other experts of this sector don’t notice this.
You should continue your writing. I am sure, you’ve a great
readers’ base already!
acyclovir online pharmacy
vermox over the counter uk
Hi friends, good post and nice urging commented here, I am genuinely enjoyong by these.
phenergan cream price
buy paxil uk
I’ve been browsing on-line greater than three hours nowadays, but I by no
means discovered any attention-grabbing article like yours.
It is beautiful value sufficient for me. In my view, if all web
owners and bloggers made just right content material as you
did, the web shall be a lot more useful than ever before.
You actually stated it fantastically!
help with writing an essay write my essay help with my essay essay bot
write a paper lined writing paper pay to write paper paper writer
essay writers wanted https://paperwritingservicecheap.com
I am regular reader, how are you everybody? This article posted at this website is actually fastidious.
Pecinta judi togel tentu tidak asing lagi dengan istilah “Syair SDY” atau
“Kode Syair Sydney”. Istilah ini merujuk pada sekumpulan teka-teki,
pantun, atau ramalan yang berkaitan dengan angka-angka togel Sydney.
Forum Syair SDY telah menjadi sumber daya populer bagi para pemain togel yang mencari
petunjuk dan ramalan untuk memprediksi angka-angka yang akan muncul dalam hasil undian Sydney.
Apa Itu Forum Syair SDY?
Forum Syair SDY adalah platform online di mana para pemain togel Sydney berkumpul untuk berbagi dan membahas kode syair, ramalan, dan prediksi angka togel.
Di dalam forum ini, anggota dapat berbagi informasi tentang berbagai kode syair yang mereka miliki, serta membahas
arti dari berbagai elemen dalam kode syair tersebut.
Kode Syair Sydney sendiri merupakan rangkaian teka-teki atau pantun yang
memiliki makna tersembunyi, dan diyakini dapat membantu para pemain togel dalam meramalkan angka-angka yang
akan keluar dalam hasil undian Sydney. Kode syair biasanya berisi simbol-simbol, petunjuk, atau referensi
terhadap benda-benda atau situasi tertentu yang dihubungkan dengan angka togel.
Para pemain togel berharap bahwa dengan memahami dan mengartikan kode syair dengan benar, mereka dapat meningkatkan peluang mereka untuk memenangkan taruhan.
Keberadaan Forum Syair SDY Hari Ini
Salah satu platform yang dikenal dalam menyediakan Forum Syair SDY adalah situs web https://syairsdy.aghish.com/. Situs ini menyediakan ruang bagi para pemain togel Sydney untuk saling berbagi kode syair, prediksi,
dan diskusi terkait. Dalam forum ini, anggota dapat berinteraksi,
bertukar pendapat, dan merangkai teori tentang makna dibalik kode syair yang dihasilkan.
Bagaimana Cara Menggunakan Forum Syair SDY?
Mendaftar sebagai Anggota: Langkah pertama adalah mendaftar sebagai anggota di platform yang menyediakan Forum Syair SDY.
Biasanya, Anda perlu membuat akun dengan informasi pribadi yang diperlukan.
Berpartisipasi dalam Diskusi: Setelah mendaftar, Anda dapat mulai berpartisipasi dalam diskusi.
Anda bisa berbagi kode syair yang Anda miliki, merespons kode syair milik anggota lain, atau mengajukan pertanyaan terkait prediksi angka togel.
Memahami Kode Syair: Di dalam forum, anggota akan membagikan kode syair yang mereka
interpretasikan. Anda perlu memahami makna
simbol-simbol dan petunjuk dalam kode syair tersebut. Beberapa anggota mungkin memiliki
metode atau panduan tersendiri dalam mengartikan kode syair.
Bertukar Pendapat: Forum Syair SDY adalah tempat
untuk bertukar pendapat dan berdiskusi. Anda dapat memberikan pandangan Anda tentang kode
syair yang dibagikan oleh anggota lain, atau mendiskusikan strategi dan metode
untuk meramalkan angka togel.
Pentingnya Bermain Togel dengan Bijak
Meskipun Forum Syair SDY dan kode syair Sydney dapat memberikan hiburan dan semangat
komunitas bagi para pemain togel, penting untuk selalu bermain dengan bijak.
Togel adalah bentuk perjudian, dan hasilnya didasarkan pada keberuntungan. Tidak ada metode pasti untuk memenangkan togel,
termasuk menggunakan kode syair. Selalu ingat untuk bermain dengan batasan yang Anda tetapkan dan tidak mengambil risiko yang
tidak dapat Anda tanggung.
Dalam kesimpulannya, Forum Syair SDY merupakan tempat yang menarik bagi para pemain togel Sydney
untuk berbagi, belajar, dan berdiskusi tentang kode syair serta prediksi angka togel.
Namun, sebagai pemain yang bijak, tetaplah realistis
dalam harapan Anda dan ingatlah bahwa hasil togel
bergantung pada faktor keberuntungan.
online pharmacy finasteride 1mg
Hi there! I just wish to give you a huge thumbs
up for the excellent information you’ve got here on this post.
I will be returning to your blog for more soon.
Thanks for sharing your info. I really appreciate your efforts and I
will be waiting for your further post thanks once again.
May I just say what a comfort to discover someone who
truly understands what they’re talking about
over the internet. You definitely realize how to bring an issue to light and make
it important. More and more people should read this
and understand this side of your story. I can’t believe
you are not more popular given that you definitely have the gift.
propecia australia online
how much is tetracycline
Very descriptive article, I loved that a lot. Will there be a part 2?
generic propecia online
baclofen online pharmacy
Please let me know if you’re looking for
a article author for your weblog. You have some really good posts and I feel I
would be a good asset. If you ever want to take some of the load
off, I’d love to write some material for your blog in exchange for a link
back to mine. Please blast me an email if interested.
Thanks!
It’s diffіcult to find educated people iin this partiсular subject,
however, yyou seem like you know what you’re talking about!
Thanks
Wow! At last I got a website from where I can in fact get helpful facts concerning my study and
knowledge.
کافه مجازی
Excellent website. Plenty of helpful info here.
I’m sending it to several buddies ans additionally sharing in delicious.
And certainly, thank you for your sweat!
If you want to take a good deal from this piece of writing then you have to apply such techniques to your
won weblog.
I read this article fully on the topic of the resemblance
of hottest and previous technologies, it’s amazing article.
You have made your point.
essay writers online write this essay for me essay writers online do my essay
glucophage xr 500mg
silagra tablets online
generic augmentin 500mg
Hi are using WordPress for your blog platform? I’m new to the blog world but I’m trying to get started and create my own.
Do you need any html coding knowledge to make your own blog?
Any help would be greatly appreciated!
propecia singapore
albendazole tablets uk
motrin 8
Your passion for The subject really shines via with your producing.
I am really loving the theme/design of your web site. Do you ever run into any web browser compatibility problems?
A number of my blog audience have complained about my site not
operating correctly in Explorer but looks great in Opera.
Do you have any suggestions to help fix this issue?
where to buy modafinil australia
Your web site is my go-to useful resource for remaining up-to-day Within this industry.
Your producing is so partaking that I couldn’t quit looking at. You have a real expertise for storytelling.
Hi! I just wanted to ask if you ever have any trouble with hackers?
My last blog (wordpress) was hacked and I ended up losing months of
hard work due to no back up. Do you have any solutions to prevent hackers?
Your site is my go-to supply for dependable and insightful written content.
I am regular visitor, how are you everybody? This piece of writing posted at
this site is truly nice.
Your producing is so persuasive that you Nearly experienced me persuaded to vary my brain on this matter. Sustain The nice perform!
cymbalta wellbutrin
I truly love your website.. Great colors & theme.
Did you develop this web site yourself? Please reply back as I’m wanting to create
my very own website and would love to know where you got this from or just what the theme is named.
Appreciate it!
Your blog can be a testament to the strength of very well-crafted, significant information.
Your composing style is engaging and straightforward to stick to. I look forward to reading additional from you.
Simply wish to say your article is as astounding.
The clarity on your submit is simply cool and i can suppose you’re a professional on this subject.
Well together with your permission allow me to clutch your feed to keep up to date with drawing close post.
Thank you one million and please carry on the gratifying work.
Appreciation to my father who informed me about this weblog, this website is in fact remarkable.
I like how you have been capable of simplify this kind of a posh subject matter. It made it much easier to comprehend.
zovirax 5
I value the trouble you place into looking into and scripting this.
Your submit was both of those educational and imagined-provoking. It really designed me cease and think of this subject matter in a different way.
Your determination to sharing important information is actually admirable.
I’ve been sharing your posts with my followers. They adore you as much as I do!
You revealed this superbly.
write this essay for me write my paper for me write my essay online writing a personal essay
This design is wicked! You most certainly know how to keep
a reader entertained. Between your wit and your videos, I was almost moved to start my own blog (well,
almost…HaHa!) Great job. I really enjoyed what you had to say, and more than that, how you presented it.
Too cool!
powered by GoToTop.ee
https://ru.gototop.ee/
Your content material often sparks interesting conversations while in the reviews.
Awesome data, Kudos!
Regards, Loads of write ups!
paper writing service help with dissertations components of a dissertation dissertation research and writing help with phd proposal how reliable are essay writing services pay to get essays written buy custom essay online custom essay for sale buy university essays
where can you get amoxicillin over the counter
antabuse cost in us
Your composing is like a mentor’s assistance, and I’m in this article to soak up everything.
Your composing is so distinct and concise that even a newbie could recognize this subject. Thank you for which makes it obtainable.
cost augmentin
You might have an uncanny knack for picking one of the most suitable topics.
Thanks for sharing your info. I really appreciate your efforts
and I am waiting for your next write ups thank you once again.
I value how you broke down this sort of a posh matter into workable pieces. It built it easier to be aware of.
Your site is usually a testament to the power of well-crafted, significant content.
Great delivery. Solid arguments. Keep up the amazing spirit.
metformin buy usa
Your writing inspires me to dig further in to the subjects you go over.
tetracycline cheap
flomax canada
Hi there, You have done a fantastic job.
I’ll certainly digg it and personally suggest to my friends.
I’m confident they will be benefited from this site.
I do not even know how I ended up here, but I thought this post
was good. I do not know who you are but definitely you are going to
a famous blogger if you aren’t already 😉 Cheers!
Many thanks, I appreciate this!
pendrago writing service reviews phd writer best dissertation writing service uk psychology dissertation statistics help dissertation for dummies b2b content writing service student essay writing personal letter writing service uk free will writing service charity best essay writing service reddit
celebrex online
It’s obvious that you pour your heart into each individual post you publish.
I’m not sure why but this weblog is loading very slow for me.
Is anyone else having this issue or is it a issue on my end?
I’ll check back later on and see if the problem still exists.
motrin pm
Your capability to stop working intricate subject areas sets you aside. Continue to keep it up!
I’m now not sure the place you’re getting your info, however
great topic. I needs to spend some time studying more or understanding more.
Thank you for great information I used to be in search
of this information for my mission.
This site is my weekly dose of inspiration. Will not prevent sharing!
Hi there! I could have sworn I’ve visited this website before but after browsing through a few of the posts I realized it’s new to me.
Anyways, I’m certainly happy I came across it and I’ll be
book-marking it and checking back frequently!
You’ve got a knack for earning the reader sense A part of the conversation.
I love how you presented both sides of the argument in a good and unbiased way. It’s unusual to discover that standard of objectivity in recent times.
How you present your arguments is both equally rational and persuasive.
provigil generic south africa
Your blog stands out in the crowded House. Your authenticity shines as a result of.
If you want to obtain a great deal from this piece of writing
then you have to apply such techniques to your
won web site.
I am always impressed through the depth of knowledge you provide towards your posts.
I’m constantly psyched to find out a completely new write-up from you in my feed.
You have turned me right into a lifelong learner, all as a result of your awesome posts.
terramycin 3.5
proair albuterol
Your posts fuel my mental curiosity like no other. Thanks!
propecia order
terramycin drug
metformin online uk
metformin 1000 mg generic
prozac buy online uk
Hey there! I know this is somewhat off topic but I was wondering which blog
platform are you using for this website? I’m getting sick and tired of WordPress because I’ve had issues
with hackers and I’m looking at options for another platform.
I would be fantastic if you could point me in the direction of a good
platform.
Paragraph writing is also a excitement, if you be acquainted with then you can write
or else it is complicated to write.
I like it when people come together and share opinions.
Great website, keep it up!
hi!,I like your writing so a lot! share we be in contact more about
your post on AOL? I require an expert in this space to resolve my
problem. May be that’s you! Having a look ahead to see you.
It’s impressive that you are getting thoughts from this article as well as from our discussion made at this time.
silagra online
This is a good tip especially to those fresh to the blogosphere.
Simple but very precise information… Thanks
for sharing this one. A must read post!
You should be a part of a contest for one of
the highest quality sites on the net. I’m going to highly
recommend this web site!
Today, I went to the beachfront with my children. I found
a sea shell and gave it to my 4 year old daughter
and said “You can hear the ocean if you put this to your ear.” She put the shell to her
ear and screamed. There was a hermit crab inside and it
pinched her ear. She never wants to go back! LoL I know this is
entirely off topic but I had to tell someone!
Hey! I just wanted to ask if you ever have any issues with hackers?
My last blog (wordpress) was hacked and I ended up losing many
months of hard work due to no backup. Do you have any solutions to protect against
hackers?
modafinil daily use
Hello! This is my first visit to your blog! We are a collection of volunteers and starting a new
initiative in a community in the same niche. Your blog provided us beneficial information to work on. You
have done a outstanding job!
Hello colleagues, how is the whole thing, and what you desire to say regarding this paragraph, in my
view its truly amazing in favor of me.
What i do not realize is in truth how you are now not actually a lot
more smartly-favored than you might be right now. You are so intelligent.
You already know thus significantly with regards to this subject, made
me for my part consider it from a lot of numerous angles.
Its like men and women aren’t involved until it’s one thing to do with
Lady gaga! Your individual stuffs excellent. At all times
handle it up!
My brother suggested I might like this web site. He was entirely right.
This post actually made my day. You can not imagine just how
much time I had spent for this info! Thanks!
Evey weekend i used to visit this web site, for the reason that i want enjoyment, for the reason that this this web page conations really good
funny data too.
prednisolone prescription 5mg
online shopping pharmacy india
If some one wishes to be updated with most recent technologies after that he must be visit this web site and be up to
date every day.
Hi there just wanted to give you a quick heads up and let you know a few of the images aren’t loading correctly.
I’m not sure why but I think its a linking issue.
I’ve tried it in two different browsers and
both show the same results.
can you buy synthroid online
I’d like to thank you for the efforts you’ve put in penning this blog.
I really hope to see the same high-grade content from you in the future
as well. In fact, your creative writing abilities has inspired me to get my own blog now ;
)
synthroid 0.88 mcg
We’re a group of volunteers and opening a new
scheme in our community. Your web site provided us with valuable info to work on. You’ve done
an impressive job and our whole community will
be thankful to you.
modafinil 500mg
What a information of un-ambiguity and preserveness of precious know-how regarding
unpredicted emotions.
Very great post. I simply stumbled upon your weblog and wished to mention that I’ve really
loved surfing around your blog posts. In any case I’ll be subscribing
to your feed and I’m hoping you write once more very soon!
where can i get albuterol over the counter
We absolutely love your blog and find a lot of your post’s to be
what precisely I’m looking for. Does one offer guest writers
to write content for you personally? I wouldn’t mind publishing
a post or elaborating on a number of the subjects you write
about here. Again, awesome site!
metformin 500 mg cost
silagra 100mg
I have read so many articles or reviews concerning the blogger lovers but this article is genuinely a pleasant
piece of writing, keep it up.
I’ve been exploring for a little bit for any high quality articles or weblog posts on this sort of space
. Exploring in Yahoo I at last stumbled upon this website.
Reading this info So i am satisfied to express that I’ve a very just right uncanny feeling I came upon exactly
what I needed. I such a lot indubitably will make certain to do not
fail to remember this site and give it a glance
regularly.
provigil buy online usa
Download NeuroBet on the Play Store & App Store!
https://play.google.com/store/apps/details?id=com.modevlabs.neurobet
https://apps.apple.com/us/app/neurobet-bet-with-your-brain/id1639793466
Your style is so unique in comparison to other people I’ve read stuff
from. Thanks for posting when you have the opportunity, Guess I’ll just bookmark this blog.
I was able to find good advice from your content.
zovirax over the counter uk
payday loan
Excellent article. Keep posting such kind of information on your site.
Im really impressed by your site.
Hey there, You’ve performed an excellent job. I’ll definitely digg it
and in my opinion recommend to my friends. I’m sure they will be benefited from this website.
tetracycline pill
Aw, this was an exceptionally good post. Finding the time and actual effort to generate a superb article…
but what can I say… I put things off a lot and never manage to
get nearly anything done.
Thanks for another excellent article. Where else could anyone get that type of
information in such a perfect manner of writing?
I have a presentation next week, and I’m on the
search for such info.
Dalam industri perjudian online yang semakin berkembang, penggunaan slot pulsa telah menjadi opsi yang populer bagi para pemain yang ingin mendapatkan pengalaman bermain yang mudah dan nyaman.
Slot pulsa memungkinkan pemain untuk melakukan deposit
menggunakan pulsa telepon mereka, menghindari kebutuhan untuk menggunakan metode pembayaran tradisional seperti kartu kredit atau transfer bank.
Keuntungan utama dari slot pulsa adalah kemudahan dan kecepatan proses deposit
yang tanpa potongan, memungkinkan pemain untuk langsung menikmati permainan slot online favorit mereka tanpa hambatan.
albendazole tablets
It’s a shame you don’t have a donate button! I’d most certainly donate to this brilliant blog!
I guess for now i’ll settle for bookmarking and adding your RSS feed to my Google account.
I look forward to new updates and will share this
site with my Facebook group. Chat soon!
Fabulous, what a weblog it is! This website presents valuable data to us, keep it up.
Hi there! I know this is somewhat off topic but I was wondering which blog platform are you using for this website?
I’m getting sick and tired of WordPress because I’ve had issues with hackers and I’m looking at options for another platform.
I would be great if you could point me in the direction of a good platform.
My family members always say that I am wasting my time here
at net, except I know I am getting knowledge everyday by reading thes nice articles.
generic albenza cost
modafinil how to get a prescription
Good post. I learn something new and challenging on blogs I stumbleupon on a daily basis.
It will always be exciting to read through articles from other writers and practice something from their sites.
accutane medicine buy
Hey there! This is kind of off topic but I need some help from an established blog.
Is it very hard to set up your own blog? I’m not very techincal but I can figure things out pretty fast.
I’m thinking about making my own but I’m not sure
where to begin. Do you have any points or suggestions?
With thanks
Woah! I’m really loving the template/theme of this blog.
It’s simple, yet effective. A lot of times it’s difficult to get that “perfect balance” between usability and visual appeal.
I must say you have done a very good job with this. In addition,
the blog loads extremely fast for me on Opera. Outstanding Blog!
It’s enormous that you are getting thoughts from this post as well as from our argument made at this place.
Ahaa, its good dialogue on the topic of this article at this place at this website, I have
read all that, so at this time me also commenting here.
terramycin
motrin 225 mg
Greate post. Keep posting such kind of info on your page.
Im really impressed by your blog.
Hi there, You’ve performed a great job. I’ll definitely digg it and for
my part recommend to my friends. I am sure they’ll
be benefited from this web site.
selamat pagi untuk pɑra bapak ibu saudara saudara sekarang berkeinginan saya tampilkan web jdi pkv terburuk yang
pernah ada laman judi poker qq dengan rating tidak memuaskan hanya mengelabui orang orang
saja. web yang telah lama hadir menyediakan permainan qq
online yang banyak peminat namun tertipu okeh web pkv ini.
lamnan judi pkkv yang ttak sesuai untuk dibuat daerah bermain ρara pejudi online,
bila anda ingin bermain pikijr pikir dahulu sebab mereka hanya
dapat mengcopy сontent saja. salam sejahtera
can i purchase valtrex over the counter
modafinil australia prescription
Hey! Do you know if they make any plugins to help
with Search Engine Optimization? I’m trying to get my blog to rank for some targeted keywords but I’m not seeing very good success.
If you know of any please share. Many thanks!
modafinil 100mg price in india
Cheers, I like this!
writing a customer service cover letter persuasive essay writer college paper ghost writer research paper writer services write paper for me reviews best free essay writing service good thesis statements thesis statement in a research paper thesis statement for a persuasive essay creating a strong thesis statement
Greetings, I think your website could possibly be having browser compatibility issues.
When I take a look at your site in Safari, it looks fine
however when opening in I.E., it’s got some overlapping issues.
I just wanted to give you a quick heads up! Apart from that, wonderful site!
Hi there mates, how is all, and what you would like to say concerning this paragraph,
in my view its actually amazing designed for me.
powered by GoToTop.ee
https://ru.gototop.ee/
Unquestionably believe that which you stated. Your favorite reason seemed to be on the internet the easiest factor to have in mind
of. I say to you, I definitely get annoyed even as
people think about concerns that they plainly do
not recognize about. You controlled to hit the nail upon the highest and defined out the whole thing
without having side effect , people could take a signal.
Will likely be back to get more. Thank you
һello therе and thank you for уour information – I’ve certaіnly рicked up anything new frοm right here.
Ι did however expertise some technicaⅼ points using this sitе,
as I exρerienced tto reload the website many times previous to I ϲould
geet it to load properly. I had been wonderiing if your hosting is OK?
Not that I am complaining, but slow loading instances tiјes will often affect
your рlacement in google and сould damage your high-quality sⅽoгe if
advertіsing and marketing with Adᴡߋrds. Αnyway I am addding thi RSS to my
e-mail and could look out forr much mor of yor respectivе interesting content.
Ensure that yοu update tһis again very soon.
I think that everything szid mde a great dezl of sense. But, what about this?
suppose you added a little content? I mean, I don’t want too tell you hoow to run your
blog, however suppose you added a post tile that makes people want more?
I mean Before and After Archives – Precious Stones Photography is kinda vanilla.
You ought to peek at Yahoo’s home page and see how they creatte post headlines to grab
people to click. Yoou mijght try adding a video or a pic or twwo to
grab reader excited about everything’ve got to say. Just my opinion, it could bring your posts a little livelier.
web page
That is why itt iss important to know which webpage to take a look at.
The concept behind this service is proscribing players for therefore lengthy that they may fully get better
from their addiction. This excellent web sitee provides a
protected monetary transaction to each participant and a gamer can get quite a few
normal bank selections on this website in order so as to add cash for example BCA, BNI, Mandiri, and far
more.
albendazole for sale online
WOLES4D adalah agen situs daftar link slot gacor
online terbaik hari ini dengan mempunyai bocoran RTP link slot gacor online maxwin terbaik dan terpercaya 2023.
Pola Slot Gacor Hari Ini
WOLES4D BANDAR JUDI SLOT DEPOSIT DANA 10 RIBU 2023 TERPERCAYA
WOLES4D Situs slot Gacor Maxwin Terbaru
WOLES4D Link Alternatif slot Online Terpercaya
WOLES4D Link Daftar Slot Gacor
accutane 20 mg online
where can you get tetracycline
silagra canada
phenergan price australia
You really make it appear really easy with your presentation however I to find
this topic to be really something that I believe I might by no means understand.
It kind of feels too complicated and very huge
for me. I’m having a look ahead for your subsequent submit, I will attempt to get the hang of it!
Please let me know if you’re looking for a article writer for your weblog.
You have some really good posts and I believe I would
be a good asset. If you ever want to take some of the load off, I’d love to write
some material for your blog in exchange for a link back to mine.
Please shoot me an email if interested. Kudos!
My spouse and I absolutely love your blog and find a lot of your post’s to be what
precisely I’m looking for. Do you offer guest writers to write content available for you?
I wouldn’t mind creating a post or elaborating on a
few of the subjects you write concerning here. Again, awesome web site!
silagra online
pharmacy express
You definitely made your point.
real essay writing service college essay service best essay writing website engineering thesis writing service sat writing essay best military to civilian resume writing service write my apa paper pay someone to write a paper automatic essay writer who can write my paper for me
I quite like looking through a post that can make men and women think.
Also, thanks for allowing for me to comment!
It’s not my first time to visit this site, i am visiting this web site dailly and obtain good data from here daily.
Hello there, I discovered your site by way of Google while looking for a
similar topic, your website got here up, it seems to be great.
I’ve bookmarked it in my google bookmarks.
Hello there, just become aware of your weblog via Google, and located that it is truly informative.
I am going to watch out for brussels. I’ll be grateful should you continue this in future.
A lot of other people might be benefited from your writing.
Cheers!
Thanks for sharing such a fastidious thought, post is fastidious, thats why i have read it fully
hello there and thank you for your info – I’ve definitely picked up anything new from right here.
I did however expertise several technical issues using this web site, since I experienced to reload
the web site a lot of times previous to I could get
it to load properly. I had been wondering if your web host is OK?
Not that I’m complaining, but sluggish loading instances
times will often affect your placement in google and could damage your quality
score if advertising and marketing with Adwords. Well
I’m adding this RSS to my email and could look out for
much more of your respective fascinating content. Make sure you update this again soon.
disulfiram purchase
http://arahn.100webspace.net/profile.php?mode=viewprofile&u=132822
https://muckrack.com/irteknos-os/bio
http://atlas.dustforce.com/user/irteknos
http://baseportal.com/cgi-bin/baseportal.pl?htx=/ouatmicrobio/OMSA%20Web%20Site/eWrite/eWrite&wcheck=1&range=2000,1000
http://baseportal.de/cgi-bin/baseportal.pl?htx=/jaa/tiere&localparams=1&range=400,80
http://brewwiki.win/wiki/User:Irteknos
http://buildolution.com/UserProfile/tabid/131/userId/374653/Default.aspx
http://entsaintetienne.free.fr/claroline1110/courses/IRTEKNOS/document/renaldi.html
http://flightgear.jpn.org/userinfo.php?uid=37888
http://forums.visualtext.org/member.php?action=profile&uid=971719
http://foxsheets.com/UserProfile/tabid/57/userId/140274/Default.aspx
http://gendou.com/user/irteknos
http://giderosmobile.com/profiles/irteknos
http://gitlab.sleepace.com/irteknos
http://hommestylemag.xobor.de/u2_irteknos.html
http://irteknos.over-blog.com/2023/07/irteknos.html
http://jurnal.usbypkp.ac.id/index.php/jemper/user/viewPublicProfile/108738
http://krachelart.com/UserProfile/tabid/43/userId/1236696/Default.aspx
http://mayfever.crowdfundhq.com/users/irteknos
http://mobile.punske-valky.freepage.cz/diskuze/1545
http://mobile.punske-valky.freepage.cz/diskuze/1545
http://msnho.com/blog/irteknos
http://mysmarterhome.ca/UserProfile/tabid/42/userId/67506/Default.aspx
http://onlineboxing.net/jforum/user/profile/242942.page
http://onlineboxing.net/jforum/user/profile/242942.page
http://profiles.delphiforums.com/n/pfx/profile.aspx?webtag=dfpprofile000&userId=1891189818
http://riosabeloco.com/User-Profile/userId/191480
http://statistik.merantikab.go.id/uploads/user/2023-07-12-130554.736551renaldi.html
http://talktoislam.com/user/irteknos
http://taylorhicks.ning.com/photo/albums/irteknos
http://test.sozapag.ru/forum/user/200583/
http://www.activewin.com/user.asp?Action=Read&UserIndex=4233784
http://www.autoviva.com/news/hamilton_just_nine_points_away_from_title_renewal/14883
http://www.effecthub.com/collection/show/7723
http://www.giscience.sakura.ne.jp/pukiwiki/index.php?irteknos
http://www.nfomedia.com/profile?uid=rMkZbdE
http://www.rohitab.com/discuss/user/1676917-irteknos/
http://www.shadowera.com/member.php?133771-irteknos
http://www.travelful.net/location/5199322/indonesia/irteknos
http://zacriley.ning.com/photo/albums/irteknos
https://500px.com/p/irteknos?view=photos
https://64aea881602e8.site123.me/
https://8tracks.com/renaldi-d
https://ameblo.jp/irteknos/entry-12811756329.html
https://anyflip.com/homepage/irtgh
https://artistecard.com/irteknos
https://atlanta.bubblelife.com/users/renaldidomai_d120058
https://bbpress.org/forums/profile/irteknos/
https://bbs.now.qq.com/home.php?mod=space&uid=5030826
https://beacons.ai/irteknos
https://bitbin.it/fq3MAB8P/
https://blip.fm/irteknos
https://blogfreely.net/irteknos/irtekno-com
https://calis.delfi.lv/profils/lietotajs/305369-irteknos/
https://camp-fire.jp/profile/irteknos
https://chastainpark.bubblelife.com/users/renaldidomai_d120058
https://comicvine.gamespot.com/profile/irteknos/
https://community.clover.com/users/37385/irteknos.html
https://community.lazypoets.com/profile/irteknos
https://confengine.com/user/irteknos-os
https://conifer.rhizome.org/irteknosk
https://controlc.com/3d4726a1
https://coolors.co/u/renaldi_dr
https://coub.com/285195262ae98c56cab6
https://creativecommons.org/choose/results-one?q_1=2&q_1=1&field_commercial=n&field_derivatives=sa&field_jurisdiction=&field_format=Text&field_worktitle=Blog&field_attribute_to_name=irteknos&field_attribute_to_url=https://irtekno.com
https://creator.wonderhowto.com/irteknos/
https://darling-raindrop-22841f.netlify.app/
https://data.hkppdb.org/uploads/user/2023-07-12-140546.098407renaldi.html
https://datamx.io/uploads/user/2023-07-12-134940.479091renaldi.html
https://datosabiertos.municipiosanjuan.gob.ar/uploads/user/2023-07-04-082917.948212renaldi.html
https://descubre.beqbe.com/p/irteknos
https://dev.to/irteknos
https://developers.oxwall.com/user/irteknos
https://devpost.com/irteknos
https://digitaltibetan.win/wiki/User:Irteknos
https://discover.events.com/profile/renaldi-dr/3704799/savethedate/
https://disqus.com/by/irteknos/about/
https://disqus.com/by/irteknos/about/
https://docs.google.com/document/d/1WCRHb6z0yu-T8ANZWgmYO_t9TajMbFaCt4lYj1s22fY/edit?usp=sharing
https://doodleordie.com/profile/irteknos
https://dreevoo.com/profile.php?pid=563810
https://dribbble.com/irteknos/about
https://edshelf.com/profile/irteknos
https://fairygodboss.com/users/profile/Y8qhhXZ-Ou/renaldi-dr
https://fairygodboss.com/users/profile/Y8qhhXZ-Ou/renaldi-dr
https://feeds.feedburner.com/irtekno/AqKXoVkZi6C
https://fileforum.com/profile/irteknos
https://files.fm/renaldidomain
https://fliphtml5.com/homepage/jxbcb
https://folkd.com/user/irteknos
https://forum.codeigniter.com/member.php?action=profile&uid=80861
https://forum.instube.com/u/irteknos
https://forum.reallusion.com/Users/3121951/renaldidomain
https://forum.singaporeexpats.com/memberlist.php?mode=viewprofile&u=595515
https://forum.ventrilo.com/member.php?u=1500682
https://forums.ccbluex.net/user/renaldi-dr
https://freeicons.io/profile/518073
https://gab.com/irteknos
https://giphy.com/channel/irteknos
https://git.industra.space/irteknos
https://git.lumine.io/irteknos
https://git.metabarcoding.org/renaldidomain
https://git.rj.def.br/irteknos
https://github.com/irteknos
https://github.com/irteknos
https://glose.com/u/renaldidr
https://gotartwork.com/Profile/irteknos-nos/239458/
https://hashnode.com/@irteknos
https://histre.com/member/renaldidomain/
https://hommestylemagazine.webador.com/
https://hypothes.is/users/irteknos
https://id.radiocut.fm/user/irteknos/
https://influence.co/irteknos
https://inkbunny.net/irteknos
https://irteknos.amebaownd.com/posts/45640914
https://irteknos.bloggersdelight.dk/2023/07/12/irteknos/
https://irteknos.cgsociety.org/profile
https://irteknos.gitbook.io/irteknos/
https://irteknos.livejournal.com/profile
https://irteknos.localinfo.jp/posts/45640975
https://irteknos.pages.dev/
https://irteknos.renaldidr.repl.co
https://irteknos.renaldidr.repl.co
https://irteknos.shopinfo.jp/posts/45640936
https://irteknos.storeinfo.jp/posts/45640941
https://irteknos.theblog.me/posts/45640951
https://irteknos.themedia.jp/posts/45640969
https://irteknos.therestaurant.jp/posts/45640922
https://irteknos.webador.com/
https://irteknos.webflow.io/
https://irteknos-s-school.teachable.com/p/home
https://issuu.com/irteknos
https://issuu.com/irteknos
https://jobs.blooloop.com/profiles/3647873-irteknos-irteknos
https://jobs.mikeroweworks.org/employers/2180991-irteknos
https://jobs.newtimes.co.rw/employers/2180275-irteknos
https://jobs.recruitingblogs.com/employers/2180806-irteknos
https://jobs.thetab.com/profiles/3647758-irteknos-os
https://journal.almarhalah.ac.id/index.php/almarhalah/user/viewPublicProfile/59353
https://jsfiddle.net/irteknos/Lv4a5us8/
https://knowyourmeme.com/users/irteknos
https://kuula.co/profile/irteknos
https://lab.quickbox.io/irteknos
https://learningapps.org/user/irteknos
https://learnloftblog.com/author/irteknos/
https://leetcode.com/renaldidomain/
https://lessons.drawspace.com/post/451037/irteknos
https://letterboxd.com/irteknos/
https://list.ly/renaldi-dr/
https://list.ly/renaldi-dr/lists
https://moparwiki.win/wiki/User:Irteknos
https://morguefile.com/creative/irteknos
https://moz.com/community/q/user/irteknos
https://my.archdaily.com/us/@renaldi-dr
https://myopportunity.com/profile/irteknos-os/nw
https://naijamp3s.com/profile/irteknos
https://nootheme.com/forums/users/irteknos/
https://nwpeg.uclan.ac.uk/members/irteknoss/
https://openlibrary.org/people/renaldi_dr
https://os.mbed.com/users/irteknos/
https://padlet.com/renaldidomain/irteknos-nkor79gwy50q0nqh
https://pantip.com/profile/7637074#topics
https://participa.terrassa.cat/profiles/renaldi_dr/
https://party.biz/profile/208948
https://paste.toolforge.org/view/d5f4313c
https://pastelink.net/nqj1yafe
https://pastelink.net/nqj1yafe
https://pawoo.net/@irteknos
https://pawoo.net/@irteknos
https://pbase.com/irteknos
https://peatix.com/user/18175948/view
https://peatix.com/user/18175948/view
https://peatix.com/user/18175948/view
https://pinshape.com/users/2670971-irteknos#designs-tab-open
https://pledgeit.org/preview/64c8963fcc567b7fac8d25f6
https://podcasters.spotify.com/pod/show/irteknos/episodes/irteknos-e27b4ek
https://pomagam.pl/renaldidomain
https://postheaven.net/c07w8gje2n
https://profile.ameba.jp/ameba/irteknos/
https://profile.hatena.ne.jp/irteknos/
https://qiita.com/renaldidomain
https://recordsetter.com/user/irteknoss
https://reedsy.com/discovery/user/renaldidr
https://rentry.co/gm8z8
https://rentry.co/irteknos
https://replit.com/@renaldidr/irteknos
https://replit.com/@renaldidr/irteknos
https://repo.getmonero.org/irteknosx
https://research.openhumans.org/member/irteknos/
https://roomstyler.com/users/irteknos
https://rufox.ru/irteknos/info/
https://sighpceducation.hosting.acm.org/wp/forums/users/irteknos/
https://sketchfab.com/irteknos
https://social.msdn.microsoft.com/Profile/irteknos
https://social.msdn.microsoft.com/profile/irteknos/
https://social.technet.microsoft.com/profile/irteknos/
https://social.technet.microsoft.com/profile/irteknos/
https://solo.to/irteknos
https://speakerdeck.com/irteknos
https://starity.hu/profil/380835-irteknos/
https://starity.hu/profil/380835-irteknos/
https://store.nexodyne.com/member.php?u=114685
https://sway.office.com/ghHxECn3odWRuWXT
https://tabelog.com/rvwr/irteknos/prof/
https://taplink.cc/irteknos
https://telegra.ph/irteknos-07-12
https://thedyrt.com/member/renaldi-d/reviews
https://trabajo.merca20.com/author/irteknos/
https://traffic-boosters.jimdosite.com/
https://trello.com/u/renaldidr/activity
https://trello.com/u/renaldidr/activity
https://truxgo.net/profile/455096
https://unsplash.com/@irteknos
https://v3060982-v7pfe4vctowh.demo079.volusion.com/
https://veer.tv/vr/irteknos/home
https://we.riseup.net/irteknos
https://wmart.kz/forum/user/129983/
https://www.4shared.com/u/gnIXbjZ5/renaldidomain.html
https://www.anime-planet.com/users/irteknos
https://www.anobii.com/en/010302ee091487cadc/profile/activity
https://www.anobii.com/en/010302ee091487cadc/profile/activity
https://www.atlasobscura.com/users/043e88ce-0b1d-4991-8a05-51fb8c42195d
https://www.avianwaves.com/User-Profile/userId/179174
https://www.bahamaslocal.com/userprofile/229076/irteknos.html
https://www.beatstars.com/playlists/5521021
https://www.beautylish.com/irteknos
https://www.bikemap.net/en/u/renaldidomain/routes/created/
https://www.bitchute.com/channel/poGaIj8DIEX7/
https://www.bloggportalen.se/BlogPortal/view/BlogDetails?id=212374
https://www.blogtalkradio.com/irteknos
https://www.blurb.com/user/irteknos
https://www.cakeresume.com/me/renaldi-dr
https://www.canadavisa.com/canada-immigration-discussion-board/members/irteknos.1150750/
https://www.careercup.com/user?id=5938559624675328
https://www.chordie.com/forum/profile.php?id=1681884
https://www.chordie.com/forum/profile.php?id=1681884
https://www.climatehistorylab.sites.tau.ac.il/profile/renaldidomain/profile
https://www.colcampus.com/courses/92076/pages/irteknos
https://www.coursera.org/user/e343cd7a7c434cb55906b7d78f8f8599
https://www.credly.com/users/irteknos/badges
https://www.demilked.com/author/renaldidr/
https://www.dermandar.com/user/irteknos/
https://www.designspiration.com/renaldidomain/
https://www.diggerslist.com/irteknos/about
https://www.drupalgovcon.org/user/531696
https://www.easyfie.com/irteknos
https://www.editage.com/insights/renaldi-dr
https://www.elephantjournal.com/profile/renaldidomain/
https://www.empowher.com/users/irteknos
https://www.facer.io/user/KNWlu2xjFl
https://www.fimfiction.net/user/615314/irteknos
https://www.flickr.com/people/198717064@N02/
https://www.globalvision2000.com/forum/member.php?action=profile&uid=964428
https://www.goodreads.com/user/show/167709418-irteknos
https://www.gta5-mods.com/users/irteknos
https://www.halaltrip.com/user/profile/138449/irteknos/
https://www.hebergementweb.org/members/irteknos.528743/
https://www.hulkshare.com/irteknos
https://www.iglinks.io/renaldidomain-had
https://www.indiegogo.com/individuals/34680567
https://www.industryhuddle.com/irteknos
https://www.infragistics.com/community/members/6e40f5405e9029eeba0a252fba0e01ee872201de
https://www.kickstarter.com/profile/irteknos/about
https://www.lawyersclubindia.com/profile.asp?member_id=965755
https://www.live4cup.com/equipe-29457-irteknos.html
https://www.longisland.com/profile/irteknos/
https://www.magcloud.com/user/irteknos
https://www.mediafire.com/view/41wxqfjgw7pbun3/bagus-1.png/file
https://www.medicinacinesenews.it/forum/memberlist.php?mode=viewprofile&u=2753964
https://www.metal-archives.com/users/irteknos
https://www.metooo.io/u/64ae6ec711db1375341fd4af
https://www.notebook.ai/@irteknos
https://www.noteflight.com/profile/813a3cd7fcbaed98901b5471c72fa5c13418a048
https://www.opencode.net/irteknos
https://www.openhumans.net/member/irteknos/
https://www.overclock.net/members/irteknos.702281/#about
https://www.pearltrees.com/irteknos
https://www.pearltrees.com/irteknos/item529565592
https://www.pledgeme.co.nz/profiles/213161/
https://www.pling.com/u/irteknos/
https://www.pokecommunity.com/member.php?u=1209961
https://www.projectnoah.org/users/renaldidomain
https://www.proko.com/@irteknos/activity
https://www.pubpub.org/user/irte-knos
https://www.quia.com/profiles/irteknos
https://www.quora.com/profile/Renaldi-Dr
https://www.rctech.net/forum/members/irteknos-320453.html
https://www.redbubble.com/people/irteknos/shop?asc=u
https://www.roleplaygateway.com/member/irteknos/
https://www.silverstripe.org/ForumMemberProfile/show/113563
https://www.spinattic.com/renaldid
https://www.spreaker.com/show/irteknos
https://www.spyropress.com/forums/users/irteknos/
https://www.symbaloo.com/shared/AAAACEpG8YkAA42AhF4YFQ==
https://www.teachertube.com/user/channel/irteknos
https://www.ted.com/profiles/44631861
https://www.tetongravity.com/community/profile/renaldidomain@gmail.com/
https://www.theoutbound.com/irteknos
https://www.theyeshivaworld.com/coffeeroom/users/irteknos
https://www.triphobo.com/profile/irteknos-os/64c8c9f1bb60beeff329380d
https://www.twitch.tv/irteknos/about
https://www.twitch.tv/irteknos/about
https://www.ultimate-guitar.com/u/renaldidomain
https://www.vaca-ps.org/irteknos
https://www.vaca-ps.org/irteknos
https://www.veoh.com/users/irteknos
https://www.vevioz.com/23af40533
https://www.viki.com/users/renaldidomain_488/about
https://www.viki.com/users/renaldidomain_488/about
https://www.viki.com/users/renaldidomain_488/about
https://www.vingle.net/irteknos
https://www.vingle.net/posts/6476557
https://www.walkscore.com/people/324823982587/walk-score-user
https://www.wattpad.com/user/irteknos
https://www.wishlistr.com/profile/irteknos
https://www.wpanet.org/profile/renaldidomain/profile
https://www.zazzle.com/mbr/238735586090167087
https://xtremepape.rs/members/irteknos.395433/about
https://yamcode.com/untitled-76762
https://zapytaj.zhp.pl/user/irteknos1
https://zrzutka.pl/profile/irteknos-178031
https://bio.fm/renaldidomain
silagra
Attractive section of content. I just stumbled upon your web site and in accession capital to assert that
I acquire in fact enjoyed account your blog posts. Any way I will be subscribing to your
augment and even I achievement you access consistently
quickly.
Hello, after reading this awesome post i am as well cheerful to
share my knowledge here with friends.
dexamethasone 4 mg tablet india
motrin pills
Hey there! I know this is kinda off topic nevertheless I’d
figured I’d ask. Would you be interested in trading
links or maybe guest writing a blog article or vice-versa? My website addresses a lot of the same subjects as
yours and I feel we could greatly benefit from each other.
If you’re interested feel free to shoot me an e-mail. I look forward to hearing from
you! Superb blog by the way!
Thanks , I’ve just been searching for information about this subject for ages
and yours is the best I’ve came upon so far. However, what concerning the bottom line?
Are you certain about the source?
Please let me know if you’re looking for a article author for your site.
You have some really great articles and I think
I would be a good asset. If you ever want to take some of the load off, I’d
love to write some articles for your blog in exchange for a link back to
mine. Please send me an email if interested. Thanks!
price for generic accutane
naturally like your website however you need to check the spelling on several
of your posts. A number of them are rife with spelling issues and I find it very troublesome to inform the truth
however I will certainly come again again.
gabapentin from india
Pak jokowi sudah terlalu banyak berhutang Kodak cina,jd tidak siap
ketika corona Dari cina datang, sepertinya kita sedang diprank
cina
Good answer back in return of this issue with real arguments and explaining everything on the topic of that.
Its not my first time to pay a quick visit this website,
i am visiting this web site dailly and get pleasant facts
from here every day.
discount sildalis 120mg
how much is valtrex prescription
modafinil 20mg
prozac 40
I think the admin of this website is actually working hard for his site, because here every material is quality based data.
Hello there! This is kind of off topic but I need some guidance from
an established blog. Is it tough to set up your own blog?
I’m not very techincal but I can figure things out pretty fast.
I’m thinking about making my own but I’m not sure where to start.
Do you have any ideas or suggestions? Thanks
What a stuff of un-ambiguity and preserveness of precious know-how on the topic of unpredicted feelings.
Appreciating the commitment you put into your website and in depth
information you present. It’s great to come across a bloog every once
in a while that isn’t the same out of date rehashed material.
Wonderful read! I’ve saved your site and I’m adding yopur RSS feeds too my Googlle account.
Hey there I am so thrilled I found your weblog, I really found you by error,
while I was browsing on Aol for something else, Regardless I am here now and would just like
to say thanks for a incredible post and a all round entertaining blog (I also
love the theme/design), I don’t have time to browse it all at the moment but I have saved it and also added your RSS feeds, so when I have time I will be back to read a great deal more, Please do keep up the fantastic work.
Pretty great post. I just stumbled upon your blog
and wished to say that I’ve truly loved browsing your weblog
posts. In any case I will be subscribing in your rss feed and I hope you write again very soon!
Hi there everyone, it’s mmy first visit at this website, and piece of writing
is really fruitful in favor of me, keep up posting such content.
provigil purchase
Hi would you mind stating which blog platform you’re using?
I’m planning to start my own blog in the near future but I’m having a tough time choosing between BlogEngine/Wordpress/B2evolution and Drupal.
The reason I ask is because your design and
style seems different then most blogs and I’m looking for something unique.
P.S Sorry for getting off-topic but I had to ask!
This is a topic which is close to my heart…
Thank you! Exactly where are your contact details though?
I am sure this paragraph has touched all the internet people, its really really
nkce article on building up new webpage.
web site
Multi-line offline slots. This tygpe of freee offline slots have
excessive ‘hit charges’ as a result oof they’ve only three reels and numerous pay strains,
which means there are more methods to win in each spin. The Egyptian-themed Book of Atem
appears tto be like too be their flagship release, whilst Double Lucky Line, African Quest and Thhe Incredible Balloon Machine have all been launched together with
smaller studios to prduce essentially the most high quality product potential.
An enticing design iis important if an internet casino slot is to develop into a web-based casino traditional.
Hi to every one, because I am really keen of reading this weblog’s post to be updated daily.
It carries fastidious information.
Hello, I think your website might be having browser compatibility issues.
When I look at your blog in Ie, it looks fine but when opening in Internet Explorer,
it has some overlapping. I just wanted to give you a quick heads up!
Other then that, fantastic blog!
vermox plus
If some one wishes expert view about blogging after that i recommend him/her to pay a quick
visit this web site, Keep up the pleasant work.
This is a topic that is close to my heart…
Cheers! Exactly where are your contact details though?
can you buy phenergan over the counter
This piece of writing offers clear idea in support
of the new viewers of blogging, that actually how to do blogging.
Hey are using WordPress for your site platform?
I’m new to the blog world but I’m trying to get started and create my own. Do you require any html coding knowledge to make your own blog?
Any help would be really appreciated!
Fantastic blog you have here but I was wondering if
you knew of any message boards that cover the
same topics discussed here? I’d really like to be a part of
group where I can get responses from other
experienced people that share the same interest.
If you have any recommendations, please let me know.
Bless you!
silagra india
І every tіme usеԁ to rеad article іn news papers ƅut noԝ
as I ɑm а user of internet thus from now I am uѕing net for posts, tһanks to web.
buy disulfiram
cost of baclofen 20 mg
I really like your blog.. very nice colors &
theme. Did you design this website yourself or did you hire someone to do it for you?
Plz answer back as I’m looking to construct my own blog and would like
to find out where u got this from. thanks a lot
My brother recommended I might like this web site.
He used to be entirely right. This put up actually made my day.
You can not consider simply how a lot time I had spent for
this info! Thank you!
propecia 5mg
synthroid 5mg
Quando uma tela de compartilhamento abrir, escolha a
opção para copiar link.
Please let me know if you’re looking for a author for your site.
You have some really good posts and I feel I would be a good asset.
If you ever want to take some of the load off, I’d love to write some
articles for your blog in exchange for a link back to
mine. Please shoot me an email if interested. Many thanks!
It’s a pity you don’t have a donate button! I’d without a doubt donate to this brilliant blog!
I suppose for now i’ll settle for book-marking and adding your RSS feed to my
Google account. I look forward to fresh updates and will talk about this site with
my Facebook group. Chat soon!
buy modafinil online safely
I must thank you for the efforts you have put in penning this site.
I’m hoping to see the same high-grade blog posts
by you later on as well. In fact, your creative
writing abilities has motivated me to get my own, personal website now 😉
generic celebrex for sale
motrin 200 mg
valtrex tablets online
amoxicillin 500mg capsule price
Oh my goodness! Amazing article dude! Many thanks, However I am having issues with your RSS.
I don’t know the reason why I am unable to subscribe to
it. Is there anybody having identical RSS problems?
Anybody who knows the answer will you kindly respond?
Thanks!!
how much is valtrex generic
paroxetine 10 mg price india
That is a great tip particularly to those fresh to the blogosphere.
Short but very accurate info… Thank you for sharing this one.
A must read post!
mexican pharmacy what to buy
buy celebrex 200 mg
phenergan over the counter uk
Truly tons of beneficial information.
Have you ever thought about writing an e-book or guest authoring on other blogs?
I have a blog based on the same subjects you discuss and would love to have you share
some stories/information. I know my visitors would value your
work. If you’re even remotely interested, feel free to shoot me an e-mail.
vermox medication
Hmm is anyone else experiencing problems with the pictures on this blog loading?
I’m trying to figure out if its a problem on my end or if it’s the blog.
Any feedback would be greatly appreciated.
cheap albenza
Fastidious replies in return of this issue with solid arguments and describing everything on the topic of
that.
It’s really very difficult in this busy life to listen news on TV, thus I just
use world wide web for that purpose, and get the newest news.
motrin 8
It’s an awesome article in favor of all the web visitors;
they will take advantage from it I am sure.
Your style is so unique compared to other people I’ve read stuff from.
I appreciate you for posting when you have the
opportunity, Guess I’ll just bookmark this web site.
I’m truly enjoying the design and layout of your website.
It’s a very easy on the eyes which makes it much more enjoyable for me to come here
and visit more often. Did you hire out a developer to create your theme?
Great work!
zithromax price canada
Informative article, just what I was looking for.
terramycin 343
Hello! Do you know if they make any plugins to safeguard against hackers?
I’m kinda paranoid about losing everything I’ve worked hard on.
Any recommendations?
Thanks. Ample postings.
what is the last phase of writing an informative essay analytical essay paper writing service pay someone to do research paper phd paper writing service paper writing service custom essay writing service toronto how do i get my son to do his homework do my homework fast can i do my homework high someone to do my homework for free
cymbalta drug
penis enlargement
I visited various websites except the audio quality for audio songs existing
at this web site is in fact superb.
disulfiram india online
buy provigil online india
I’m really enjoying the design and layout of your website.
It’s a very easy on the eyes which makes it much more pleasant for
me to come here and visit more often. Did you hire
out a developer to create your theme? Outstanding work!
You need to take part in a contest for one of the highest quality blogs on the net.
I will recommend this blog!
Its like you learn my thoughts! You appear to grasp
a lot about this, such as you wrote the guide in it or something.
I believe that you could do with some percent to
power the message house a little bit, however instead of
that, that is excellent blog. An excellent read. I will certainly be back.
Way cool! Some extremely valid points! I appreciate you writing this article and the rest of
the site is also very good.
Excellent advice. Cheers.
custom essay writing service reviews do research papers need a thesis a thesis statement provides a roadmap for the argument. objective thesis statement in a piece of writing your thesis is professional essay writing service business essay writer what to write my college essay about hire someone to do my essay write my assignment for me uk
Goood post. I absolutely love this site. Continue the good work!
Hey there! I’m at work browsing your blog from my
new iphone 3gs! Just wanted to say I love reading your blog and
look forward to all your posts! Carry on the excellent work!
Please let me know if you’re looking for a article author for your weblog.
You have some really great articles and I feel I would be a good asset.
If you ever want to take some of the load off, I’d absolutely
love to write some content for your blog in exchange for a link back to mine.
Please send me an e-mail if interested. Many thanks!
gabapentin cap 400mg
Way cool! Some extremely valid points! I appreciate you writing this article and the rest of the website is
also really good.
порно онлайн
prozac 5 mg daily
modafinil 300mg
Your mode of explaining everything in this post is actually fastidious, every
one can simply understand it, Thanks a lot.
I got this web site from my pal who told me regarding this
website and now this time I am visiting this site and reading very informative articles at this
place.
flomax discount
motrin ib
Magnificent beat ! I would like to apprentice whilst
you amend your web site, how could i subscribe for a weblog website?
The account aided me a applicable deal. I have been a
little bit familiar of this your broadcast provided
brilliant clear idea
We stumbled over here coming from a different web address
and thought I might check things out. I like what I see so now i’m following you.
Look forward to finding out about your web page repeatedly.
sildalis online
prednisolone price us
Hi, i believe that i saw you visited my site so i got here to
return the prefer?.I am attempting to in finding things to enhance my site!I
assume its good enough to use some of your concepts!!
http://196.43.133.60/wiki/index.php/Google
http://afcantarelle.org/index.php?title=User:PafijakartatimurVanita
http://classicalmusicmp3freedownload.com/ja/index.php?title=%E5%88%A9%E7%94%A8%E8%80%85:PafijakartatimurLeia
http://classicalmusicmp3freedownload.com/ja/index.php?title=Google
http://embeddedwiki.cs.aau.dk/wiki/Google
http://embeddedwiki.cs.aau.dk/wiki/User_talk:PafijakartatimurWoodrow
http://lsc.wikisign.org/wiki/Usuari_Discussi%C3%B3:PafijakartatimurEleanor
http://nswiki.svenskasuperserier.se/w/index.php?title=Google
http://postgasse.net/Wiki/index.php?title=Benutzer:PafijakartatimurJustina
http://postgasse.net/Wiki/index.php?title=Google
http://rapedia.de/index.php/Benutzer:PafijakartatimurMoises
http://rapedia.de/index.php/Google
http://web.archive.org/web/20230807011256/https://detik-67.weebly.com/
http://wiki-ux.info/wiki/Google
http://wiki-ux.info/wiki/User:PafijakartatimurDaisy
http://wiki.gewex.org/index.php?title=Google
http://wiki.gewex.org/index.php?title=User:PafijakartatimurRhea
http://www.driftpedia.com/wiki/index.php/Google
http://www.driftpedia.com/wiki/index.php/User:PafijakartatimurAhmad
http://www.erwinbrandenberger.ch/index.php?title=Benutzer:PafijakartatimurRay
http://www.erwinbrandenberger.ch/index.php?title=Google
http://www.jeromebaray.com/afm/wiki/index.php/Google
http://www.jeromebaray.com/afm/wiki/index.php/Utilisateur:PafijakartatimurGerman
http://www.matthew-morris.com/wiki/index.php/Google
http://www.matthew-morris.com/wiki/index.php/User:PafijakartatimurDante
http://www.zilahy.info/wiki/index.php/Google
http://www.zilahy.info/wiki/index.php/User:PafijakartatimurLilia
https://bbarlock.com/index.php/Google
https://bbarlock.com/index.php/User:PafijakartatimurFloyd
https://biowiki.clinomics.com/index.php/Google
https://biowiki.clinomics.com/index.php/User:PafijakartatimurMonique
https://demo.centreon.com/wiki/index.php?title=Google
https://demo.centreon.com/wiki/index.php?title=User:PafijakartatimurTuyet
https://dptotti.fic.edu.uy/mediawiki/index.php/Google
https://dptotti.fic.edu.uy/mediawiki/index.php/Usuario:PafijakartatimurSonja
https://exterior.podemos.info/mediawiki/index.php?title=Google
https://exterior.podemos.info/mediawiki/index.php?title=Usuario:PafijakartatimurMelodee
https://gamesfashionarchive.net/wiki/User:PafijakartatimurTera
https://hu.velo.wiki/index.php?title=Google
https://hu.velo.wiki/index.php?title=Szerkeszt%C5%91:PafijakartatimurFermin
https://intranet.wikimedia.cat/wiki/Usuari:PafijakartatimurMarcella
https://library.kemu.ac.ke/kemuwiki/index.php/Google
https://library.kemu.ac.ke/kemuwiki/index.php/User:PafijakartatimurFlossie
https://livingbooksaboutlife.org/books/Google
https://livingbooksaboutlife.org/books/User:PafijakartatimurTracy
https://mnwiki.org/index.php/Google
https://mnwiki.org/index.php/User:PafijakartatimurEzequiel
https://sustainabilipedia.org/index.php/Google
https://sustainabilipedia.org/index.php/User:PafijakartatimurKarri
https://wiki.gahlawat.dynu.com/mediawiki/index.php?title=Google
https://wiki.gahlawat.dynu.com/mediawiki/index.php?title=User:PafijakartatimurCandida
https://wiki.hrw-fablab.de/index.php?title=Google
https://wiki.hrw-fablab.de/index.php?title=User:PafijakartatimurJasper
https://wiki.minecraft.jp.net/%E5%88%A9%E7%94%A8%E8%80%85:PafijakartatimurVon
https://wiki.minecraft.jp.net/Google
https://wiki.quentinbrun.fr/mediawiki/index.php/Google
https://wiki.quentinbrun.fr/mediawiki/index.php/Utilisateur:PafijakartatimurLashunda
https://www.crustcorporate.com/wiki/Google
https://www.crustcorporate.com/wiki/User:PafijakartatimurEleanore
http://liholly.com/?option=com_k2&view=itemlist&task=user&id=1063944
http://polimentosroberto.com.br/?option=com_k2&view=itemlist&task=user&id=3216800
http://xaydungvietbuild.vn/?option=com_k2&view=itemlist&task=user&id=30856
https://20bimeh.ir/?option=com_k2&view=itemlist&task=user&id=5911
https://carverinnovationcenter.com/component/k2/itemlist/user/18994.html
https://theideaboxcommunications.com/component/k2/itemlist/user/201950
https://www.ict.gov.mw/?option=com_k2&view=itemlist&task=user&id=817570
http://kesheromania.ro/forum/profile/lionelfalbo133/
https://ajk.wxw.mybluehost.me/community/profile/nickolasterpstr/
https://commoncause.optiontradingspeak.com/index.php/community/profile/arleendegruchy3/
https://commoncause.optiontradingspeak.com/index.php/community/profile/chanel99n744706/
https://commoncause.optiontradingspeak.com/index.php/community/profile/ferminwigington/
https://commoncause.optiontradingspeak.com/index.php/community/profile/katrinastack69/
https://commoncause.optiontradingspeak.com/index.php/community/profile/redadenehy5966/
https://dadstreamer.com/community/profile/michaelk6553029/
https://forum.finveo.world/community/profile/daniela39106935/
https://kesheromania.ro/forum/profile/loriegilmer9834/
https://kesheromania.ro/forum/profile/nancyalonso2843/
https://kesheromania.ro/forum/profile/paulinagriffie/
https://kesheromania.ro/forum/profile/phoebewoodbury/
https://laparoskopia.pl/forum/profile/may67i756438032/
https://solucx.com.br/forum/index.php/community/profile/dellmassie07663/
https://www.dcsportsconnection.com/community/profile/elanacoffelt640/
https://www.revivalwaves.org/got-a-question/profile/lucassperry9851/
https://agrihub-ptp.it/forum/profile/refugiamacrory9/
https://ajk.wxw.mybluehost.me/community/profile/davisweingarth8/
https://commoncause.optiontradingspeak.com/index.php/community/profile/kirastonehouse/
https://dadstreamer.com/community/profile/patrickvaude870/
https://holymaryseeds.com/community/profile/feliciafatnowna/
https://imatelsecurity.com/community/profile/qpqshelly751120/
https://kesheromania.ro/forum/profile/randiguillen50/
https://laparoskopia.pl/forum/profile/aidanrodd697745/
https://solucx.com.br/forum/index.php/community/profile/wilfordtubb802/
https://www.aplar.org/fr/community/profile/myrtisroberts32/
https://www.dcsportsconnection.com/community/profile/kellygregory438/
https://www.kalpnatayal.com/forum/community/profile/maricruzblacklo/
https://agrihub-ptp.it/forum/profile/jacquiegranata/
https://agrihub-ptp.it/forum/profile/keenanshelly325/
https://ajk.wxw.mybluehost.me/community/profile/rondafreeland5/
https://commoncause.optiontradingspeak.com/index.php/community/profile/chantalrowland/
https://commoncause.optiontradingspeak.com/index.php/community/profile/edisonelsberry/
https://commoncause.optiontradingspeak.com/index.php/community/profile/roxannastrzelec/
https://commoncause.optiontradingspeak.com/index.php/community/profile/sherrillfeint0/
https://commoncause.optiontradingspeak.com/index.php/community/profile/zmqemery4129727/
https://grailoftheserpent-forum.com/community/profile/deandre09q31591/
https://grailoftheserpent-forum.com/community/profile/taylorm60067354/
https://laparoskopia.pl/forum/profile/hugowoodworth4/
https://laparoskopia.pl/forum/profile/stuartagar6834/
https://solucx.com.br/forum/index.php/community/profile/iajlorenzo65847/
https://www.kalpnatayal.com/forum/community/profile/delmarlaguerre/
https://www.kalpnatayal.com/forum/community/profile/salinakinser16/
https://www.pradaan.org/community/profile/todcartledge045/
https://www.reformes.gouv.sn/community/profile/bonnieorth60308/
https://www.reformes.gouv.sn/community/profile/camillaness2601/
https://www.reformes.gouv.sn/community/profile/sallyohara17539/
https://www.revivalwaves.org/got-a-question/profile/alanaclarke3705/
https://www.revivalwaves.org/got-a-question/profile/clemmiebeaucham/
https://www.revivalwaves.org/got-a-question/profile/jay827240287411/
https://www.revivalwaves.org/got-a-question/profile/martysummers082/
http://www.etap-pro.pt/forum/profile/artvonwiller49/
http://www.sbosiamedicolavoro.it/community/profile/elanekellogg08/
http://www.sbosiamedicolavoro.it/community/profile/mcnalysa6113338/
http://www.sbosiamedicolavoro.it/community/profile/rebeccagibson5/
http://www.sbosiamedicolavoro.it/community/profile/trenacomstock96/
http://www.sbosiamedicolavoro.it/community/profile/wernereisenhaue/
https://ajk.wxw.mybluehost.me/community/profile/vtameridith2881/
https://ajk.wxw.mybluehost.me/community/profile/vzpbernardo1427/
https://commoncause.optiontradingspeak.com/index.php/community/profile/eddyplunkett814/
https://commoncause.optiontradingspeak.com/index.php/community/profile/gracielamarcell/
https://commoncause.optiontradingspeak.com/index.php/community/profile/rgxkasha0441108/
https://commoncause.optiontradingspeak.com/index.php/community/profile/sheenabromby338/
https://forum.finveo.world/community/profile/everettcastleto/
https://forum.finveo.world/community/profile/finleydick3288/
https://forum.finveo.world/community/profile/judsonpadilla99/
https://forum.finveo.world/community/profile/leonardoharrell/
https://forum.finveo.world/community/profile/sherryarriola60/
https://holymaryseeds.com/community/profile/dennistrice727/
https://holymaryseeds.com/community/profile/keishafuller739/
https://imatelsecurity.com/community/profile/elwoode16279832/
https://imatelsecurity.com/community/profile/mireyacavazos4/
https://imatelsecurity.com/community/profile/morrisoconner79/
https://imatelsecurity.com/community/profile/rosalinevaccari/
https://kesheromania.ro/forum/profile/ajan86042431427/
https://kesheromania.ro/forum/profile/carol588917549/
https://kesheromania.ro/forum/profile/clementbegum166/
https://solucx.com.br/forum/index.php/community/profile/daniellastrickl/
https://solucx.com.br/forum/index.php/community/profile/katlynestevez57/
https://solucx.com.br/forum/index.php/community/profile/krystynabaskett/
https://www.aplar.org/fr/community/profile/akimickey391754/
https://www.aplar.org/fr/community/profile/horaciodenham5/
https://www.aplar.org/fr/community/profile/kerstinbilodeau/
https://www.aplar.org/fr/community/profile/magdalenawagone/
https://www.reformes.gouv.sn/community/profile/maynardshurtlef/
https://www.revivalwaves.org/got-a-question/profile/agneshurlburt02/
https://www.revivalwaves.org/got-a-question/profile/austinwolak6298/
https://www.revivalwaves.org/got-a-question/profile/joshuafreud9832/
https://www.revivalwaves.org/got-a-question/profile/richelledavidso/
https://www.revivalwaves.org/got-a-question/profile/walterparson68/
https://grailoftheserpent-forum.com/community/profile/haleysewell1759/
https://grailoftheserpent-forum.com/community/profile/kareemi18814329/
https://grailoftheserpent-forum.com/community/profile/rosiepugh395404/
https://laparoskopia.pl/forum/profile/deana86m765226/
https://laparoskopia.pl/forum/profile/dominikdonovan/
https://laparoskopia.pl/forum/profile/sebastiancharlt/
https://commoncause.optiontradingspeak.com/index.php/community/profile/allanhutchings/
https://commoncause.optiontradingspeak.com/index.php/community/profile/keenanpalazzi6/
http://afrimedphysicshub.org/w4949/community/profile/elliskovach7095/
http://studentfriendly.gregmaster.com.br/comunidade/profile/oliviaswafford0/
https://careked.com/community/profile/francescogrow4/
https://careked.com/community/profile/victorialapoint/
https://commoncause.optiontradingspeak.com/index.php/community/profile/gaillemaster97/
https://commoncause.optiontradingspeak.com/index.php/community/profile/lukasmacrossan8/
https://commoncause.optiontradingspeak.com/index.php/community/profile/trey86n94871035/
https://forum.finveo.world/community/profile/dirkwlu8389199/
https://forum.finveo.world/community/profile/epifaniaearls7/
https://holymaryseeds.com/community/profile/keeshaatwell640/
https://imatelsecurity.com/community/profile/rusty23g058397/
https://kesheromania.ro/forum/profile/fosterpab997671/
https://kesheromania.ro/forum/profile/galen7355420325/
https://kesheromania.ro/forum/profile/judeignacio1295/
https://laparoskopia.pl/forum/profile/angelo849519977/
https://laparoskopia.pl/forum/profile/rickeygrammer15/
https://lbh-ashim.or.id/community/profile/jacelynlovely0/
https://www.dcsportsconnection.com/community/profile/fsyjohnson11760/
https://www.dcsportsconnection.com/community/profile/tammarahepp195/
https://www.kalpnatayal.com/forum/community/profile/archera44386664/
https://bobby.nickzom.com/community/profile/leolawhitt12977/
https://careked.com/community/profile/ernestinagrandi/
https://commoncause.optiontradingspeak.com/index.php/community/profile/coreypuente8158/
https://forum.finveo.world/community/profile/asad45376139393/
https://imatelsecurity.com/community/profile/jeffreygaby6595/
https://kesheromania.ro/forum/profile/zufscott2251182/
https://lbh-ashim.or.id/community/profile/maurakrawczyk70/
https://sawomenfightback.com/community/profile/leonardobronson/
buy viagra online
albuterol brand name
buy silagra 100 mg
synthroid brand name price
Remarkable! Its truly amazing piece of writing, I have got much clear idea on the topic of from this paragraph.
cymbalta rx
fluoxetine buy usa
I am curious to find out what blog platform you happen to be utilizing?
I’m having some minor security issues with my latest site and I’d like to find
something more safeguarded. Do you have any suggestions?
I like the valuable info you provide in your articles.
I’ll bookmark your weblog and check again here regularly.
I’m quite certain I’ll learn many new stuff right here!
Good luck for the next!
You actually suggested this superbly!
silagra 100 for sale
I am really pleased to glance at this website posts
which contains plenty of valuable facts, thanks for providing these kinds of information.
magnificent publish, very informative. I ponder
why the opposite specialists of this sector don’t realize this.
You must continue your writing. I’m confident, you have a great readers’ base already!
Awesome! Its really remarkable article, I have got much clear idea
about from this paragraph.
buy augmentin 500mg
The office also offers many promotions and gifts on the state website or in the mobile version of the application.
Please let me know if you’re looking for a article writer for your blog.
You have some really great articles and I feel
I would be a good asset. If you ever want to take some of the load off,
I’d really like to write some articles for your blog in exchange for a link back to mine.
Please blast me an e-mail if interested. Regards!
https://www.tiktok.com/@prompterid/video/7272546982277696774
https://www.tiktok.com/@prompterid/video/7272384080543501574
https://www.tiktok.com/@prompterid/video/7272233663855627525
https://www.tiktok.com/@prompterid/video/7272204142876118277
https://www.tiktok.com/@prompterid/video/7272199128443079941
https://www.tiktok.com/@prompterid/video/7272194289197681926
An impressive share! I’ve just forwarded this onto a coworker who had
been doing a little research on this. And he actually ordered me dinner because I stumbled upon it
for him… lol. So let me reword this…. Thank YOU for the meal!!
But yeah, thanks for spending time to talk about this matter here on your internet
site.
Generally I do not read article on blogs, but I
would like to say that this write-up very pressured me to take a look at
and do it! Your writing taste has been amazed me. Thanks, quite great post.
buy prozac india
provigil how to get a prescription
Wow, this paragraph is pleasant, my sister is analyzing these things, therefore
I am going to let know her.
celebrex 200 mg online
baclofen 10 mg tablet price in india
cheap antabuse
My family always say that I am killing my time here
at net, except I know I am getting familiarity everyday by reading such good articles.
I read this post fully concerning the difference of hottest and earlier technologies,
it’s awesome article.
I do not even know how I ended up here, but I thought this post was
great. I do not know who you are but certainly you’re going
to a famous blogger if you are not already 😉 Cheers!
safe online pharmacies in canada
An impressive share! I’ve just forwarded this onto a colleague who has been conducting a little homework on this.
And he actually bought me dinner due to the fact that I discovered it for him…
lol. So allow me to reword this…. Thank YOU for the meal!!
But yeah, thanx for spending the time to talk
about this matter here on your web page.
Все мы знаем, что казино – это отличный способ развлечься и испытать удачу. Однако, многие люди отказываются от посещения казино из-за необходимости внесения депозита. Но, с появлением бездепозитных бонусов в казино, эта проблема стала прошлым!
Бездепозитные бонусы казино – это бесплатные деньги, которые вы получаете сразу после регистрации на сайте казино. Эти бонусы могут использоваться для игры в различные игры казино, такие как слоты, рулетка, блэкджек и другие. Они позволяют вам испытать удачу и получить вознаграждение без необходимости рисковать своими собственными деньгами.
Казино всегда стремятся привлечь новых игроков, поэтому каждый год они предлагают новые бездепозитные бонусы. В 2023 году ожидается, что казино предложат еще более щедрые и интересные бонусы, чтобы привлечь еще больше игроков.
Новые бездепозитные бонусы казино могут включать такие предложения, как бесплатные вращения на слотах, бесплатные фишки для игры в покер или блэкджек, а также дополнительные деньги на счет после регистрации. Такие бонусы позволят вам опробовать разные игры и выбрать ту, которая вам больше всего нравится, прежде чем вносить депозит.
Однако, важно помнить, что бездепозитные бонусы обычно имеют определенные условия отыгрыша. Это значит, что вы должны будете сделать определенное количество ставок, прежде чем сможете вывести выигрыш. Поэтому перед выбором казино и бонуса внимательно ознакомьтесь с условиями и требованиями.
В целом, бездепозитные бонусы казино 2023 года представляют отличную возможность испытать свою удачу без риска потерять собственные деньги. С такими бонусами вы можете наслаждаться азартными играми и получать удовольствие, не задумываясь о финансовых рисках. Не упустите шанс попробовать новые бездепозитные бонусы в казино 2023 года!
how to buy modafinil in usa
Spot on with this write-up, I absolutely think this site needs far more attention. I’ll probably be returning to read through more, thanks
for the advice!
baclofen 15 mg
Terrific work! That is the kind of information that are meant to be shared across the internet.
Shame on the search engines for now not positioning this post higher!
Come on over and talk over with my website . Thank you =)
It’s an awesome piece of writing designed for all the web
users; they will obtain benefit from it I am sure.
This is my first time pay a visit at here and i am actually pleassant to read everthing at single place.
You expressed this really well!
best resume writing service in dallas my homework how do you say i do my homework in french homework can i do my homework at mcdonald’s bulk article writing service thesis proposal writing service custom term paper writing term paper writer custom research papers
flomax prices
medication motrin
Hey theгe are using WordPress for your blоg platform?
I’m new to the blog world bᥙt I’m trying tto get started and set
up my oѡn. Do you rеquire any cоding knowⅼedge to make your օwn blog?
Any help wouⅼd be reaⅼly appreciated!
Great article.
You actually make it appear really easy along with your presentation but I
in finding this topic to be actually one thing that I think I might by no means understand.
It kind of feels too complicated and extremely broad for me.
I am looking ahead in your next post, I will try to get the hang of it!
albendazole tablets 400 mg
http://196.43.133.60/wiki/index.php/Detik
http://classicalmusicmp3freedownload.com/ja/index.php?title=%E5%88%A9%E7%94%A8%E8%80%85:FranciscaGarnsey
http://classicalmusicmp3freedownload.com/ja/index.php?title=Detik
http://embeddedwiki.cs.aau.dk/wiki/Detik
http://embeddedwiki.cs.aau.dk/wiki/User_talk:NorrisLouis4
http://kousokuwiki.org/wiki/Detik
http://postgasse.net/Wiki/index.php?title=Benutzer:Luann33S1762
http://postgasse.net/Wiki/index.php?title=Detik
http://stackoverflow.altervista.org/index.php?title=Detik
http://stackoverflow.altervista.org/index.php?title=Utente:RamonitaCasteel
http://terio.fvet.uba.ar/mediawiki/index.php/Detik
http://terio.fvet.uba.ar/mediawiki/index.php/Usuario:RoseanneCollings
http://wiki-beta.avazinn.com/w/index.php?title=Detik
http://wiki-beta.avazinn.com/w/index.php?title=User:HershelMancia7
http://wiki.gewex.org/index.php?title=Detik
http://wiki.gewex.org/index.php?title=User:Dalton15I82740
http://www.driftpedia.com/wiki/index.php/Detik
http://www.driftpedia.com/wiki/index.php/User:WilfredoBarrier
http://www.erwinbrandenberger.ch/index.php?title=Benutzer:StevieBeahm
http://www.erwinbrandenberger.ch/index.php?title=Detik
http://www.matthew-morris.com/wiki/index.php/Detik
http://www.matthew-morris.com/wiki/index.php/User:RobtMcVilly833
http://www.zilahy.info/wiki/index.php/Detik
http://www.zilahy.info/wiki/index.php/User:EllenSymons128
https://biowiki.clinomics.com/index.php/Detik
https://biowiki.clinomics.com/index.php/User:MaricruzConyers
https://demo.centreon.com/wiki/index.php?title=Detik
https://demo.centreon.com/wiki/index.php?title=User:AlejandrinaNewco
https://dptotti.fic.edu.uy/mediawiki/index.php/Detik
https://dptotti.fic.edu.uy/mediawiki/index.php/Usuario:CrystleDebenham
https://exterior.podemos.info/mediawiki/index.php?title=Detik
https://exterior.podemos.info/mediawiki/index.php?title=Usuario:JeffryGroom
https://help.ezadspro.co.uk/index.php?title=User:MarciaDabney186
https://procesal.cl/index.php/Detik
https://procesal.cl/index.php/User:DKDDixie21
https://religiopedia.com/index.php/Detik
https://religiopedia.com/index.php/User:DUNRickey9342466
https://wiki.hrw-fablab.de/index.php?title=Detik
https://wiki.hrw-fablab.de/index.php?title=User:Elden77E2032461
https://wiki.quentinbrun.fr/mediawiki/index.php/Detik
https://wiki.quentinbrun.fr/mediawiki/index.php/Utilisateur:Annett58C2563
https://www.crustcorporate.com/wiki/Detik
https://www.crustcorporate.com/wiki/User:ThorstenSainthil
https://www.offwiki.org/wiki/Detik
https://www.offwiki.org/wiki/User:RoxieVtn73
http://196.43.133.60/wiki/index.php/Detik
http://classicalmusicmp3freedownload.com/ja/index.php?title=%E5%88%A9%E7%94%A8%E8%80%85:SammieTaber207
http://classicalmusicmp3freedownload.com/ja/index.php?title=Detik
http://embeddedwiki.cs.aau.dk/wiki/Detik
http://embeddedwiki.cs.aau.dk/wiki/User_talk:MervinBoyette4
http://nswiki.svenskasuperserier.se/w/index.php?title=Anv%C3%A4ndare:RockyMendenhall
http://postgasse.net/Wiki/index.php?title=Benutzer:KathleneCrookes
http://postgasse.net/Wiki/index.php?title=Detik
http://rapedia.de/index.php/Benutzer:AdelaAej1325
http://terio.fvet.uba.ar/mediawiki/index.php/Detik
http://terio.fvet.uba.ar/mediawiki/index.php/Usuario:DavisDurgin
http://wiki-ux.info/wiki/Detik
http://wiki-ux.info/wiki/User:ArlettePatrick8
http://wiki.gewex.org/index.php?title=Detik
http://wiki.gewex.org/index.php?title=User:AntjeMurph544
http://www.driftpedia.com/wiki/index.php/Detik
http://www.driftpedia.com/wiki/index.php/User:LeticiaOberle81
http://www.erwinbrandenberger.ch/index.php?title=Benutzer:KenBarak835036
http://www.erwinbrandenberger.ch/index.php?title=Detik
http://www.jeromebaray.com/afm/wiki/index.php/Detik
http://www.jeromebaray.com/afm/wiki/index.php/Utilisateur:CharlieP57
http://www.matthew-morris.com/wiki/index.php/Detik
http://www.matthew-morris.com/wiki/index.php/User:GusHsf078139020
http://www.zilahy.info/wiki/index.php/Detik
http://www.zilahy.info/wiki/index.php/User:NickWrenn6160538
https://biowiki.clinomics.com/index.php/Detik
https://biowiki.clinomics.com/index.php/User:AkilahBousquet5
https://demo.centreon.com/wiki/index.php?title=Detik
https://demo.centreon.com/wiki/index.php?title=User:RaymonMcCary970
https://dptotti.fic.edu.uy/mediawiki/index.php/Detik
https://dptotti.fic.edu.uy/mediawiki/index.php/Usuario:DeniceStewart8
https://exterior.podemos.info/mediawiki/index.php?title=Detik
https://exterior.podemos.info/mediawiki/index.php?title=Usuario:HayleyEisenhower
https://gamesfashionarchive.net/wiki/User:VetaReidy18146
https://intranet.wikimedia.cat/wiki/Usuari:AlbertinaKilloug
https://koloiko.com/wiki/index.php?title=Detik
https://koloiko.com/wiki/index.php?title=User:RileyHarada012
https://library.kemu.ac.ke/kemuwiki/index.php/Detik
https://library.kemu.ac.ke/kemuwiki/index.php/User:RoyalDelany35
https://livingbooksaboutlife.org/books/Detik
https://livingbooksaboutlife.org/books/User:DawnWarnes98
https://procesal.cl/index.php/Detik
https://procesal.cl/index.php/User:Ilse025171
https://religiopedia.com/index.php/Detik
https://religiopedia.com/index.php/User:KellieA38642138
https://wiki.hrw-fablab.de/index.php?title=Detik
https://wiki.hrw-fablab.de/index.php?title=User:NatashaLawrenson
https://wiki.minecraft.jp.net/%E5%88%A9%E7%94%A8%E8%80%85:MyrtisKoo632755
https://wiki.minecraft.jp.net/Detik
https://wiki.quentinbrun.fr/mediawiki/index.php/Detik
https://wiki.quentinbrun.fr/mediawiki/index.php/Utilisateur:LottieCann6685
https://wiki.ryuriin.my.id/index.php/Detik
https://wiki.ryuriin.my.id/index.php/User:AnkeY10968
https://www.crustcorporate.com/wiki/Detik
https://www.crustcorporate.com/wiki/User:ShantaeMeacham0
https://www.offwiki.org/wiki/Detik
https://www.offwiki.org/wiki/User:QAGMaryjo9159
The advantage of our best HGH injections for muscle building begins with the fat
cells, or, more prominently, the growth hormone receptors on our fat cells.
In spite of everything this is forwarded to your specialist of choice, then they may use their expertise and prescribe an HGH therapy if necessary.
HGH is suggested for getting back into form and
making a dry, match, and defined physique so that gaining the required muscle growth is much
simpler. Clinicians and specifically; endocrinologists and sport medicine specialists are more and more confronted with the complications of HGH misuse.
Dr. Daniel Rudman’s study in the brand new England Journal
Of Medicine demonstrated the outstanding capability to reverse the effects of aging on the human physique with the
employment of HGH – Human Growth Hormone! Ngọc (a)), then try to
verify whether that is true, and in cases when that is true (if such cases even exist,
which is doubtful tbh) study how these people differ from the rest of
us. The scientists then take away the terminal amino acid methionine, obtaining the
molecule of HGH which has 191 amino acids. Currently, the
perfect form of HGH available on the market (and the only type of HGH that’s accredited by
the FDA) is a recombinant human development hormone referred to as somatropin.
Saved as a favorite, I love your website!
Wow, thyis paragfaph is pleasant, mmy younger sister is analyzing suxh things,
therewfore I aam goingg to tell her.
10 mg baclofen cost
dexamethasone medication
albendazole tablets australia
where to buy modafinil australia
Bandar Togel Terpercaya adalah salah astu dari banyaknya Situs Togel Hadiah Terbesar
dan senantiasa membayar berapapun kemanangan yang kamu
miliki. Terlebih lagi, 5 Bandar Togel Terpercaya ini pula
masuk dalam jenis 10 Situs Togel Terpercaya. Pasti dengan begini kamu
juga dapat merasakan sensasi kemenangan besar dengan modal taruhan yang kecil.
5 Bandar Togel Terpercaya sudah ada semenjak bertahun-tahun dan sampai saat ini sudah jadi Daftar Bandar Togel Terbesar dan Terpercaya terpopuler di golongan pecinta togel online di Indonesia.
Sebab Situs ini adalah Daftar Bandar Togel Terbesar dan Terpercaya yang
sediakan 4 tipe jenis betting togel.
500 mg acyclovir without prescription
This is my first time go to see at here and i am genuinely pleassant
to read everthing at single place.
This is the right blog for anybody who hopes to understand this topic.
You realize a whole lot its almost hard to argue with you (not that I actually will need to…HaHa).
You certainly put a brand new spin on a topic that has been written about for ages.
Wonderful stuff, just excellent!
can you order modafinil online
I loved as much as you’ll receive carried out right here.
The sketch is tasteful, your authored subject matter stylish.
nonetheless, you command get got an nervousness over that you wish be delivering the following.
unwell unquestionably come more formerly again as exactly the same nearly very often inside case you shield this increase.
EdwardAmumb
https://onossocasamento.pt/forum/pesquisa-videos-pornograficos
Excellent post. I was checking continuously this weblog and I’m impressed!
Extremely helpful info specifically the closing section :
) I maintain such information much. I was looking for this certain info for a long time.
Thank you and good luck.
I am really enjoying the theme/design of your website. Do you ever run into any
internet browser compatibility problems?
A number of my blog audience have complained about my
blog not working correctly in Explorer but looks great in Chrome.
Do you have any suggestions to help fix this problem?
cheapest zovirax cream
modafinil 200 mg online
order azithromycin online uk
Excellent beat ! I wish to apprentice at the same time
as yyou amend your web site, how could i subscribe for a weblog web
site? The account aided me a acceptable deal.
I have been tiny bit familiar of this your broadcast offered shiny transparent idea
website
Also on the downtown on line casino, Robert loved hiis spin on Triple Jackpot Gems, successful $12,122.86.
The largest thing is to make usee of all options oof casinos online and casino bonuses and
campaigns, to make yoou etra detaiiled your earning mix, ofcourse, you need
to to be taught that gambling is ideal for leisure and exciting.
You may get every bit off details about particular particular gives, rankings, bonus sum,
aand outline of the microgaming site.
dexamethasone 40 mg tablets
Hello! Would you mind if I share your blog with my myspace
group? There’s a lot of people that I think would really enjoy your content.
Please let me know. Thank you
pharmacy com canada
motrin 80g
modafinil india prescription
medicine metformin 500
online fluoxetine prescription
Pretty section of content. I just stumbled upon your
web site and in accession capital to assert that I acquire actually enjoyed
account your blog posts. Anyway I’ll be subscribing to your feeds and even I achievement you
access consistently rapidly.
Hi there, every time i used to check web site posts here in the early hours in the dawn, as i enjoy to gain knowledge of more and more.
I was wondering if you ever thought of changing the layout of your website?
Its very well written; I love what youve got to say.
But maybe you could a little more in the way of content so people could connect with it better.
Youve got an awful lot of text for only having 1
or two images. Maybe you could space it out better?
This is really interesting, You are a very professional blogger.
I have joined your feed and look ahead to searching for
extra of your wonderful post. Also, I have shared your web site in my social networks
Definitely believe that which you said. Your favorite reason seemed to be on the net the simplest thing to be aware of.
I say to you, I certainly get irked while people consider
worries that they just do not know about. You managed to hit the nail upon the top and defined out the whole thing without having side effect , people could take a signal.
Will likely be back to get more. Thanks
can you buy generic propecia
acyclovir for sale over the counter
modafinil tablets india
flomax.com
dexamethasone brand name canada
online modafinil pharmacy
where to get zithromax over the counter
I am not sure where you’re getting your info, but good topic.
I needs to spend some time learning more or understanding more.
Thanks for magnificent info I was looking for this info for my mission.
silagra 50 mg tablet
Yes! Finally someone writes about >.
vermox nz
modafinil singapore buy
This is really attention-grabbing, You’re an excessively
professional blogger. I’ve joined your feed and look ahead to seeking
extra of your great post. Additionally, I have shared your
website in my social networks
Hi there mates, how is all, and what you wish for to say about this paragraph, in my view its in fact remarkable in support of me.
Jadikan pengalaman menonton video di Twitter lebih seru dengan kemampuan untuk menyimpan video-video favorit
Anda.
Why visitors still make use of to read news papers
when in this technological world everything is accessible
on web?
buy baclofen usa
best no prescription pharmacy
worldwide pharmacy online
silagra 50 mg tablet
Kumpulan Nama-Nama Daftar Laman Judi Slot Online Terpercaya dan Provider Slot88 Slot Gacor Terupdate di 2021
Masih mencari kumpulan daftar situs judi slot online terpercaya yang fair play? Sekian banyak bandar slot online yang bertebaran di dunia online pasti membikin anda linglung, mana website judi slot online bonafit dan mana yang tak bonafit bagi para pemain. Permainan slot online betul-betul populer dan disukai oleh kalangan masyarakat Indonesia terpenting di kota-kota besar. Apalagi saat menghadapi pandemi yang tidak kunjung habis ini, orang – orang berbondong-bondong mencari laman judi slot online terpercaya 2022 untuk mengisi waktu luangnya.
Kumpulan dari nama-nama daftar slot online bertebaran melewati internet. Untuk meregistrasikan diri, anda dapat melaksanakan pencarian lewat google, acuan teman ataupun dari social media berupa Facebook, Instagram dan Twitter. Tipe game slot resmi dan original bisa anda temui melalui mahkotaslot sebagai web judi slot online terbaru 2021. Laman slot online uang asli biasanya menawarkan game judi online lainnya yang tak kalah menarik, macam-macam game judi online lainnya akan kami bahas pada sesi selanjutnya.
Sebagai seorang penggemar game slot online gacor yang ada di Indonesia, mungkin anda telah tak asing tentang permainan slot serta provider slot online yang kami sediakan. Malah, anda mungkin telah mendafarkan diri di web lain tetapi merasa kurang nyaman baik dari segi pelayanan ataupun dari segi kemenangan yang didapat. Ada sebagian web judi slot online tenar dan populer dan kami di sini hadir memberikan rekomendasi permainan web judi slot online gacor slot88 ternama dengan deretan profit dalam hal bonus jackpot slot yang gampang menang. Kemudahan yang didapat karena perkembangan teknologi yaitu anda dapat memainkannya dirumah, kantor, maupun tempat nongkrong bermodalkan hand phone serta dunia maya saja.
My blog post: judi slot gacor (https://judislotgacor.cc/)
Sdilliamabsex
http://officialinfo.com.br/index.php?option=com_kunena&view=topic&catid=2&id=10439officialinfo
cymbalta 16 mg
Wow, this article is fastidious, my sister is analyzing such things, thus I
am going to convey her.
prednisolone for sale uk
modafinil online paypal
Informative article, totally what I needed.
Good web site you have got here.. It’s hard to find excellent writing like yours these days.
I seriously appreciate individuals like you! Take care!!
I’m truly enjoying the design and layout of your site.
It’s a very easy on the eyes which makes it much more enjoyable for me to come here
and visit more often. Did you hire out a designer to create your theme?
Outstanding work!
Hey I know this is off topic but I was wondering if you
knew of any widgets I could add to my blog that automatically tweet my newest twitter updates.
I’ve been looking for a plug-in like this for quite some time and
was hoping maybe you would have some experience with something like this.
Please let me know if you run into anything. I truly enjoy reading your blog and I look forward to your
new updates.
Having read this I believed it was rather enlightening.
I appreciate you finding the time and energy to put this article together.
I once again find myself personally spending a significant
amount of time both reading and commenting. But so what, it was still worthwhile!
What’s up, for all time i used to check webpage posts here in the
early hours in the morning, since i love to gain knowledge of more and more.
Hey there would you mind sharing which blog platform you’re using?
I’m planning to start my own blog in the near future but I’m having a difficult
time choosing between BlogEngine/Wordpress/B2evolution and
Drupal. The reason I ask is because your design and style seems different then most blogs and I’m looking
for something completely unique.
P.S Apologies for getting off-topic but I had to ask!
Great info. Lucky me I found your site by chance (stumbleupon).
I’ve book marked it for later!
sildalis for sale
legitimate online pharmacy uk
Great article, just what I was looking for.
flomax from india
I’m extremely inspired with your writing skills and also with the layout
in your blog. Is that this a paid theme or did you modify it your
self? Either way keep up the nice quality writing, it is uncommon to see a
nice blog like this one these days..
It’s appropriate time to make a few plans for the
longer term and it is time to be happy. I’ve learn this publish and if I may I want to recommend you
some fascinating things or tips. Perhaps you can write
subsequent articles referring to this article.
I wish to learn even more things approximately it!
Hi, I do believe your web site could possibly
be having internet browser compatibility issues. Whenever I look at your site in Safari, it looks fine however when opening in IE, it has some overlapping issues.
I just wanted to give you a quick heads up! Apart
from that, excellent site!
Hi, yup this paragraph is in fact fastidious and I have learned lot of things from it on the
topic of blogging. thanks.
Today, I went to the beach with my kids. I found a sea
shell and gave it to my 4 year old daughter and said “You can hear the ocean if you put this to your ear.” She put the shell
to her ear and screamed. There was a hermit crab inside and
it pinched her ear. She never wants to go back!
LoL I know this is completely off topic but I had to tell someone!
Soluções para transferir dados de celular Dicas e truques para transferir dados dum
dispositivo para outro.
lexapro 10 mg tablet price
buy viagra online
It’s appropriate time to make some plans for the
future and it is time to be happy. I have learn this publish and if I may just I wish to counsel you few interesting issues or suggestions.
Maybe you could write subsequent articles referring to this article.
I desire to learn more things about it!
Hmm is anyone else encountering problems with the pictures
on this blog loading? I’m trying to find out if its a problem on my end or if
it’s the blog. Any feed-back would be greatly appreciated.
I am sure this article has touched all the internet visitors, its really
really fastidious article on building up new blog.
Разрешение на строительство — это государственный удостоверение, предоставляемый уполномоченными учреждениями государственного управления или территориального управления, который допускает начать строительство или исполнение строительных операций.
Получение разрешения на строительство устанавливает нормативные основания и условия к строительному процессу, включая дозволенные типы работ, дозволенные материалы и способы, а также включает строительные стандарты и комплекты охраны. Получение разрешения на строительные операции является необходимым документов для строительной сферы.
Do you mind if I quote a few of your articles as long as I provide credit and
sources back to your weblog? My blog is in the exact same niche as
yours and my users would definitely benefit from
some of the information you present here. Please let me know if this okay with you.
Regards!
When someone writes an piece of writing he/she keeps the
thought of a user in his/her mind that how a user
can know it. So that’s why this post is great.
Thanks!
Hi colleagues, its enormous post regarding tutoringand fully
defined, keep it up all the time.
trazodone 50 mg buy online
Wonderful work! This is the type of information that should be shared around the
web. Disgrace on the search engines for not positioning this submit higher!
Come on over and discuss with my website .
Thanks =)
I would like to use the chance of thanking you for the professional instruction I have
constantly enjoyed viewing your site. I will be looking forward to the commencement of my college research and the whole groundwork would never have been complete without visiting your
web blog. If I can be of any help to others, I will be delighted to help
via what I have discovered from here.
First off I want to say wonderful blog! I had a quick question in which I’d like to ask if you do not
mind. I was interested to find out how you center yourself and clear your head before
writing. I have had trouble clearing my thoughts in getting my thoughts out there.
I do enjoy writing but it just seems like the first 10
to 15 minutes are lost simply just trying to figure
out how to begin. Any recommendations or tips? Many
thanks!
Marvelous, what a web site it is! This blog gives valuable data to us, keep it up.
cialis 50 mg for sale
I do not know whether it’s just me or if perhaps everybody else experiencing problems with your
site. It appears like some of the text in your posts are running off the screen.
Can somebody else please provide feedback and let me know if this
is happening to them too? This may be a problem with my
browser because I’ve had this happen before. Thank you
I love your blog.. very nice colors & theme. Did you create this website yourself or did you hire someone to do it for you?
Plz answer back as I’m looking to create my own blog and would like to find out where u got this from.
appreciate it
I loved as much as you’ll receive carried out right here.
The sketch is attractive, your authored material stylish.
nonetheless, you command get bought an edginess over that you wish be delivering the
following. unwell unquestionably come more formerly again as exactly the same
nearly very often inside case you shield this hike.
buy vermox online
Superb write ups, With thanks.
Pretty nice post. I just stumbled upon your weblog and wished to say that I have truly enjoyed
browsing your blog posts. In any case I’ll be subscribing to your rss feed and I hope
you write again very soon!
I’m not sure exactly why but this site is loading extremely slow for
me. Is anyone else having this problem or is it
a issue on my end? I’ll check back later on and see if
the problem still exists. https://social.msdn.microsoft.com/Profile/shawnjacobsaaa https://social.msdn.microsoft.com/Profile/sethlongbvgh https://social.msdn.microsoft.com/Profile/heidirhodesxzdfe https://social.msdn.microsoft.com/Profile/patpatrickcfdhg https://social.msdn.microsoft.com/Profile/melindathorntonvfngf https://social.msdn.microsoft.com/Profile/hermanfrankcfdhgf https://social.msdn.microsoft.com/Profile/everettfloresfhtrg https://social.msdn.microsoft.com/Profile/ginabakervfgh https://social.msdn.microsoft.com/Profile/eddiaynecbg https://social.msdn.microsoft.com/Profile/pauletteduncanng https://social.msdn.microsoft.com/Profile/margaritaconnerfh https://social.msdn.microsoft.com/Profile/prestonfarmerfhg https://social.msdn.microsoft.com/Profile/wilburmatthewsfdh https://social.msdn.microsoft.com/Profile/angelvasquezdhtt https://social.msdn.microsoft.com/Profile/hollykleinfh https://social.msdn.microsoft.com/Profile/lewisgonzalezfgf https://social.msdn.microsoft.com/Profile/geraldinehoganfdh https://social.msdn.microsoft.com/Profile/alfreandersonfghg https://social.msdn.microsoft.com/Profile/geneswansonfhtr https://social.msdn.microsoft.com/Profile/kimnortonfhg https://social.msdn.microsoft.com/Profile/lowellblakegfhio https://social.msdn.microsoft.com/Profile/lucillekellyfh https://social.msdn.microsoft.com/Profile/terrencearnoldgfh https://social.msdn.microsoft.com/Profile/wilfredhicksfhl https://social.msdn.microsoft.com/Profile/darrellbutlerhgkml https://social.msdn.microsoft.com/Profile/lonnieconnerbg https://social.msdn.microsoft.com/Profile/marthasullivannb https://social.msdn.microsoft.com/Profile/frederickflowerschg https://social.msdn.microsoft.com/Profile/jeffreyhubbardcb https://social.msdn.microsoft.com/Profile/carolinecummingscci https://social.msdn.microsoft.com/Profile/sonyathompsonxcvj https://social.msdn.microsoft.com/Profile/georgiawisexcbvy https://social.msdn.microsoft.com/Profile/yvettewrightcbvu https://social.msdn.microsoft.com/Profile/drewbeckcbv https://social.msdn.microsoft.com/Profile/constancerosscnu https://social.msdn.microsoft.com/Profile/beckyfranciscbv https://social.msdn.microsoft.com/Profile/beverlyryanchvgy https://social.msdn.microsoft.com/Profile/sheliaericksoncnuy https://social.msdn.microsoft.com/Profile/johnathangonzalezcbgj https://social.msdn.microsoft.com/Profile/janetingramxcbse https://social.msdn.microsoft.com/Profile/lawrencerosefhyg https://social.msdn.microsoft.com/Profile/leahwarnercnb https://social.msdn.microsoft.com/Profile/allengregorycbvu https://social.msdn.microsoft.com/Profile/pedrosmithcvr https://social.msdn.microsoft.com/Profile/omarvargasxcbm https://social.msdn.microsoft.com/Profile/juliemccoyxcds https://social.msdn.microsoft.com/Profile/rickeymaychiu https://social.msdn.microsoft.com/Profile/curtisleecnu https://social.msdn.microsoft.com/Profile/jesushallcni https://social.msdn.microsoft.com/Profile/jeannettefisherbgm https://social.msdn.microsoft.com/Profile/velmamcdonaldft https://social.msdn.microsoft.com/Profile/samgrayfghy https://social.msdn.microsoft.com/Profile/sonjaalexanderfbhkj https://social.msdn.microsoft.com/Profile/cindymunozcvnvbm https://social.msdn.microsoft.com/Profile/irenegrantcxf https://social.msdn.microsoft.com/Profile/ianthomascfe https://social.msdn.microsoft.com/Profile/lolabeckcbvm https://social.msdn.microsoft.com/Profile/sergiomcguirecbvc https://social.msdn.microsoft.com/Profile/olivegibbsxcbnu https://social.msdn.microsoft.com/Profile/blancacastillodfftr https://social.msdn.microsoft.com/Profile/suzanneholmescxvd https://social.msdn.microsoft.com/Profile/ollieenrycbv https://social.msdn.microsoft.com/Profile/jasminemosscbv https://social.msdn.microsoft.com/Profile/henrysalazarcbv https://social.msdn.microsoft.com/Profile/kelleygrosscvbv https://social.msdn.microsoft.com/Profile/matthewconnercby https://social.msdn.microsoft.com/Profile/jodiarrolln https://social.msdn.microsoft.com/Profile/faithgardnercbv https://social.msdn.microsoft.com/Profile/winstonernandezcb https://social.msdn.microsoft.com/Profile/jeffreymarshcn https://social.msdn.microsoft.com/Profile/jermainemilescvd https://social.msdn.microsoft.com/Profile/gordonmcdonaldcxvx https://social.msdn.microsoft.com/Profile/jodynewmancvr https://social.msdn.microsoft.com/Profile/jeanlucascffe https://social.msdn.microsoft.com/Profile/janreyesgk https://social.msdn.microsoft.com/Profile/edwindanielfdgt https://social.msdn.microsoft.com/Profile/lavernebarnesfnhu https://social.msdn.microsoft.com/Profile/anitacolonfcnb https://social.msdn.microsoft.com/Profile/henrylopezcvvb https://social.msdn.microsoft.com/Profile/ernestowoodsfgjy https://social.msdn.microsoft.com/Profile/ginahowellcvd https://social.msdn.microsoft.com/Profile/cesarhammondrt https://social.msdn.microsoft.com/Profile/marthavasquezfgj https://social.msdn.microsoft.com/Profile/ramonagreenefgj https://social.msdn.microsoft.com/Profile/edwinhuffcnb https://social.msdn.microsoft.com/Profile/tyronereynoldsdrg https://social.msdn.microsoft.com/Profile/rosawilkinsdg https://social.msdn.microsoft.com/Profile/wilburkimds https://social.msdn.microsoft.com/Profile/yvettebradydxf https://social.msdn.microsoft.com/Profile/gilberthowardf https://social.msdn.microsoft.com/Profile/juanbrooksfv https://social.msdn.microsoft.com/Profile/jessiemarshdfd https://social.msdn.microsoft.com/Profile/lesterrobertscbvn https://social.msdn.microsoft.com/Profile/lloydjohnstoncxvtf https://social.msdn.microsoft.com/Profile/shawnspencerfdhty https://social.msdn.microsoft.com/Profile/arthurschwartzfh https://social.msdn.microsoft.com/Profile/calebtownsendfgjh https://social.msdn.microsoft.com/Profile/helenchapmancxcvs https://social.msdn.microsoft.com/Profile/adamstewartdfd https://social.msdn.microsoft.com/Profile/lloydjohnstoncxvtf https://social.msdn.microsoft.com/Profile/ianramirezfhtr https://social.msdn.microsoft.com/Profile/bryannormanfgtr https://social.msdn.microsoft.com/Profile/loripearsonvfght https://social.msdn.microsoft.com/Profile/elenagoodwinfht https://social.msdn.microsoft.com/Profile/travispowellvfh https://social.msdn.microsoft.com/Profile/wilsonflemingfhg https://social.msdn.microsoft.com/Profile/corneliusmoodyfghr https://social.msdn.microsoft.com/Profile/justinericksonfdgtr https://social.msdn.microsoft.com/Profile/arturonashbfgfhg https://social.msdn.microsoft.com/Profile/essiehuntfgt https://social.msdn.microsoft.com/Profile/terrilawrencevf https://social.msdn.microsoft.com/Profile/christianolsonfbg https://social.msdn.microsoft.com/Profile/wandawisefdh https://social.msdn.microsoft.com/Profile/alejandrosingletonfhf https://social.msdn.microsoft.com/Profile/joannlewisfdh https://social.msdn.microsoft.com/Profile/kellymclaughlinfh https://social.msdn.microsoft.com/Profile/staceyalvarezfhg https://social.msdn.microsoft.com/Profile/hattiehuntdhgf https://social.msdn.microsoft.com/Profile/raquelparkfh https://social.msdn.microsoft.com/Profile/gwenriosfhg https://social.msdn.microsoft.com/Profile/randolphcarlsonnv https://social.msdn.microsoft.com/Profile/clydelorescbv https://social.msdn.microsoft.com/Profile/gertrudeschultzcbv https://social.msdn.microsoft.com/Profile/archieharrisoncbv https://social.msdn.microsoft.com/Profile/tonyalawrencecbv https://social.msdn.microsoft.com/Profile/eileenadkinscg https://social.msdn.microsoft.com/Profile/cathyharriscbv https://social.msdn.microsoft.com/Profile/shelllittlecyu https://social.msdn.microsoft.com/Profile/ericbryantcbvu https://social.msdn.microsoft.com/Profile/judithraziercbgu https://social.msdn.microsoft.com/Profile/kristopherblakecxbv https://social.msdn.microsoft.com/Profile/johnnyfishercbvb https://social.msdn.microsoft.com/Profile/hubertortegacnvb https://social.msdn.microsoft.com/Profile/mattknightcnb https://social.msdn.microsoft.com/Profile/melissagarnercnvb https://social.msdn.microsoft.com/Profile/enriquemcdonaldcngy https://social.msdn.microsoft.com/Profile/sallystonecg https://social.msdn.microsoft.com/Profile/darlawalkercvn https://social.msdn.microsoft.com/Profile/robynsingletoncbv https://social.msdn.microsoft.com/Profile/luisbrownbvvb https://social.msdn.microsoft.com/Profile/petemcbridecbm https://social.msdn.microsoft.com/Profile/annwebstercbvn https://social.msdn.microsoft.com/Profile/christiedaviscbgm https://social.msdn.microsoft.com/Profile/pablokellercbbm https://social.msdn.microsoft.com/Profile/pedromortoncnbm https://social.msdn.microsoft.com/Profile/sherryschneidervnh https://social.msdn.microsoft.com/Profile/rochellethorntonnbhm https://social.msdn.microsoft.com/Profile/sheilafletchercbv https://social.msdn.microsoft.com/Profile/albertoglovercfbg https://social.msdn.microsoft.com/Profile/erikacopelandcb https://social.msdn.microsoft.com/Profile/darnellramseyxfes https://social.msdn.microsoft.com/Profile/danielwalkercbv https://social.msdn.microsoft.com/Profile/iramullinsfghyg https://social.msdn.microsoft.com/Profile/paulettebankscb https://social.msdn.microsoft.com/Profile/garryreyesxcse https://social.msdn.microsoft.com/Profile/roderickaustindxf https://social.msdn.microsoft.com/Profile/marlonschultzxcsd https://social.msdn.microsoft.com/Profile/raulmillerdsfe https://social.msdn.microsoft.com/Profile/dominichendersondcs https://social.msdn.microsoft.com/Profile/lyndathomasdxfr https://social.msdn.microsoft.com/Profile/bethmartinezcvb https://social.msdn.microsoft.com/Profile/rolandmaycbv https://social.msdn.microsoft.com/Profile/hazelramirezcbv https://social.msdn.microsoft.com/Profile/debragriffithcbv https://social.msdn.microsoft.com/Profile/jennifchristensencvn https://social.msdn.microsoft.com/Profile/kathrynennettcbv https://social.msdn.microsoft.com/Profile/jackblakecng https://social.msdn.microsoft.com/Profile/jeanniemendozavcbf https://social.msdn.microsoft.com/Profile/patriciaopecb https://social.msdn.microsoft.com/Profile/sylviacaseycvbv https://social.msdn.microsoft.com/Profile/dominickthorntoncxbvc https://social.msdn.microsoft.com/Profile/elijahgardnerfcnb https://social.msdn.microsoft.com/Profile/kellikennedy https://social.msdn.microsoft.com/Profile/simonryancbvc https://social.msdn.microsoft.com/Profile/stevewalkercbv https://social.msdn.microsoft.com/Profile/bobwebbcvc https://social.msdn.microsoft.com/Profile/arthurmasoncvc https://social.msdn.microsoft.com/Profile/jennybensoncb https://social.msdn.microsoft.com/Profile/brucehernandezcbv https://social.msdn.microsoft.com/Profile/elbertbaileyct https://social.msdn.microsoft.com/Profile/darrelgonzalesfdg https://social.msdn.microsoft.com/Profile/mandysimmonsfdgt https://social.msdn.microsoft.com/Profile/oliverfloresdfr https://social.msdn.microsoft.com/Profile/stephanienormanfgrd https://social.msdn.microsoft.com/Profile/deannalawrencefcrd https://social.msdn.microsoft.com/Profile/brendanmontgomerydf https://social.msdn.microsoft.com/Profile/cynthialeedfd https://social.msdn.microsoft.com/Profile/karicollierfvd https://social.msdn.microsoft.com/Profile/elsalopezdf https://social.msdn.microsoft.com/Profile/wilmabaldwindfd https://social.msdn.microsoft.com/Profile/essiecarlsonfre https://social.msdn.microsoft.com/Profile/sethspencerdg https://social.msdn.microsoft.com/Profile/berthanashfdfd https://social.msdn.microsoft.com/Profile/sheliawarnerdfd https://social.msdn.microsoft.com/Profile/vivianbradleyfd https://social.msdn.microsoft.com/Profile/margaritaperrydfd https://social.msdn.microsoft.com/Profile/leroyreeddxfd https://social.msdn.microsoft.com/Profile/tommiemckenziexdfd https://social.msdn.microsoft.com/Profile/wilsonwoodxdfd https://social.msdn.microsoft.com/Profile/codyricefdgf https://social.msdn.microsoft.com/Profile/raulburtonvgfh https://social.msdn.microsoft.com/Profile/tinatownsendfhg https://social.msdn.microsoft.com/Profile/kendrarobbinsvfh https://social.msdn.microsoft.com/Profile/marciacoxfhf https://social.msdn.microsoft.com/Profile/marieloganfh https://social.msdn.microsoft.com/Profile/amosjacobsftr https://social.msdn.microsoft.com/Profile/karisandersfgtr https://social.msdn.microsoft.com/Profile/lucystanleygfht https://social.msdn.microsoft.com/Profile/valeriesaundersght https://social.msdn.microsoft.com/Profile/aubreyweaverfhtr https://social.msdn.microsoft.com/Profile/percysalazarfht https://social.msdn.microsoft.com/Profile/marjoriecarrfhg https://social.msdn.microsoft.com/Profile/cherylcopelandgfhg https://social.msdn.microsoft.com/Profile/janicecruzfghgt https://social.msdn.microsoft.com/Profile/fernandomortongfhg https://social.msdn.microsoft.com/Profile/marcgarciavf https://social.msdn.microsoft.com/Profile/kaylaschultzfht https://social.msdn.microsoft.com/Profile/stewartruizfghgmnl https://social.msdn.microsoft.com/Profile/davidhollowaynbmn https://social.msdn.microsoft.com/Profile/tonyawellsnbm https://social.msdn.microsoft.com/Profile/roxannebaldwinxcc https://social.msdn.microsoft.com/Profile/luzbateshu https://social.msdn.microsoft.com/Profile/kathymckinneynh https://social.msdn.microsoft.com/Profile/edmundmedinagny https://social.msdn.microsoft.com/Profile/colisandovalcvnbm https://social.msdn.microsoft.com/Profile/erikgeorgech https://social.msdn.microsoft.com/Profile/desireepadillacnbvm https://social.msdn.microsoft.com/Profile/frankjensennbm https://social.msdn.microsoft.com/Profile/tyronecarrollcnbmn https://social.msdn.microsoft.com/Profile/dianathorntonbnguk https://social.msdn.microsoft.com/Profile/kristahollandxcvc https://social.msdn.microsoft.com/Profile/mariajimenezcng https://social.msdn.microsoft.com/Profile/berthawhitecbg https://social.msdn.microsoft.com/Profile/percyduncancbm https://social.msdn.microsoft.com/Profile/randaldanielcbvt https://social.msdn.microsoft.com/Profile/thelmacolecbg https://social.msdn.microsoft.com/Profile/jillvaldezcbg https://social.msdn.microsoft.com/Profile/orvillesimscjjyu https://social.msdn.microsoft.com/Profile/deliaparkscng https://social.msdn.microsoft.com/Profile/benbyrdcvnb https://social.msdn.microsoft.com/Profile/sethwaltoncnb https://social.msdn.microsoft.com/Profile/sallyleecbvn https://social.msdn.microsoft.com/Profile/taragreenxcf https://social.msdn.microsoft.com/Profile/irvingpaulniu https://social.msdn.microsoft.com/Profile/joshuasheltoncbv https://social.msdn.microsoft.com/Profile/geraldineedwardsnh https://social.msdn.microsoft.com/Profile/kristinanorrisfdyt https://social.msdn.microsoft.com/Profile/karenparsonsnh https://social.msdn.microsoft.com/Profile/williambrooksfgng https://social.msdn.microsoft.com/Profile/myrtlearmstrongfgmhu https://social.msdn.microsoft.com/Profile/guadalupedelgadoxdf https://social.msdn.microsoft.com/Profile/tonyharrisoncdf https://social.msdn.microsoft.com/Profile/duaneriveraxdc https://social.msdn.microsoft.com/Profile/bobbowersxcs https://social.msdn.microsoft.com/Profile/karenboydxcx https://social.msdn.microsoft.com/Profile/sadiereyescbv https://social.msdn.microsoft.com/Profile/ethelraycb https://social.msdn.microsoft.com/Profile/kurtjohnstonbhg https://social.msdn.microsoft.com/Profile/leticiafishercnu https://social.msdn.microsoft.com/Profile/lukerogerscfny https://social.msdn.microsoft.com/Profile/marielovecbc https://social.msdn.microsoft.com/Profile/shanemanningcbv https://social.msdn.microsoft.com/Profile/edithjohnsoncbc https://social.msdn.microsoft.com/Profile/glendahalexcb https://social.msdn.microsoft.com/Profile/toniuchanancbv https://social.msdn.microsoft.com/Profile/luzlemingcvc https://social.msdn.microsoft.com/Profile/nelliepowellcfd https://social.msdn.microsoft.com/Profile/tommietricklandcbfg https://social.msdn.microsoft.com/Profile/haroldholtcvcv https://social.msdn.microsoft.com/Profile/juliusarpercbv https://social.msdn.microsoft.com/Profile/bradfordhowellchyg https://social.msdn.microsoft.com/Profile/kristopherosbornecfhyg https://social.msdn.microsoft.com/Profile/mattiejacobsfchtf https://social.msdn.microsoft.com/Profile/elbertbridgescb https://social.msdn.microsoft.com/Profile/rickbrockfghyt https://social.msdn.microsoft.com/Profile/hannahbryantfdg https://social.msdn.microsoft.com/Profile/jordanbeckcve https://social.msdn.microsoft.com/Profile/jeannierosecvd https://social.msdn.microsoft.com/Profile/jesusmorenochy https://social.msdn.microsoft.com/Profile/susanwilliamsfgt https://social.msdn.microsoft.com/Profile/robertlongdf https://social.msdn.microsoft.com/Profile/jaimeestradadxfd https://social.msdn.microsoft.com/Profile/jenniegibbsdfd https://social.msdn.microsoft.com/Profile/benkellerdd https://social.msdn.microsoft.com/Profile/timmycolemandfd https://social.msdn.microsoft.com/Profile/allanbakerdsfed https://social.msdn.microsoft.com/Profile/merlestokessds https://social.msdn.microsoft.com/Profile/tonycarrdfd https://social.msdn.microsoft.com/Profile/normanweaverdfd https://social.msdn.microsoft.com/Profile/kristinahigginsdfd https://social.msdn.microsoft.com/Profile/jamiemcdonalddfr https://social.msdn.microsoft.com/Profile/martinweberdfd https://social.msdn.microsoft.com/Profile/nathancarsoncffg https://social.msdn.microsoft.com/Profile/pamelacastroccb https://social.msdn.microsoft.com/Profile/marlonvegacbvc https://social.msdn.microsoft.com/Profile/carlaschneidercb https://social.msdn.microsoft.com/Profile/ermasanderscbv https://social.msdn.microsoft.com/Profile/chelseastokescbv https://social.msdn.microsoft.com/Profile/claudiajonescbv https://social.msdn.microsoft.com/Profile/ruthcastillocbv https://social.msdn.microsoft.com/Profile/lynnholmescdsg https://social.msdn.microsoft.com/Profile/joelhunterfg https://social.msdn.microsoft.com/Profile/andylindseybrh https://social.msdn.microsoft.com/Profile/sadiefieldsvfdg https://social.msdn.microsoft.com/Profile/earlgrantfhfgh https://social.msdn.microsoft.com/Profile/joechapmanfghty https://social.msdn.microsoft.com/Profile/murielrosebgfht https://social.msdn.microsoft.com/Profile/sandyherreravrh https://social.msdn.microsoft.com/Profile/lillianellisvgfht https://social.msdn.microsoft.com/Profile/juliusngramfgr https://social.msdn.microsoft.com/Profile/arleneellisfgnh https://social.msdn.microsoft.com/Profile/crystallloyd https://social.msdn.microsoft.com/Profile/brittanyhopkinscg https://social.msdn.microsoft.com/Profile/jackjosephfng https://social.msdn.microsoft.com/Profile/patjordanngh https://social.msdn.microsoft.com/Profile/luzjohnstongfh https://social.msdn.microsoft.com/Profile/laurencetatevfdh https://social.msdn.microsoft.com/Profile/elizabethgraygyjy https://social.msdn.microsoft.com/Profile/alisonkleinfnb https://social.msdn.microsoft.com/Profile/waynevegafh https://social.msdn.microsoft.com/Profile/randallwardcbk https://social.msdn.microsoft.com/Profile/lyndapoolecbuuo https://social.msdn.microsoft.com/Profile/terrystokescn https://social.msdn.microsoft.com/Profile/lavernboonexccxs https://social.msdn.microsoft.com/Profile/sallycurrycbvb https://social.msdn.microsoft.com/Profile/cedrichallxcvs https://social.msdn.microsoft.com/Profile/joannapenaxczs https://social.msdn.microsoft.com/Profile/marthaownsendxcvcn https://social.msdn.microsoft.com/Profile/abrahamsaunderscbvj https://social.msdn.microsoft.com/Profile/ellishoffmancgt https://social.msdn.microsoft.com/Profile/alfonsologanfhyg https://social.msdn.microsoft.com/Profile/mikemaldonadocnb https://social.msdn.microsoft.com/Profile/lynettevargascn https://social.msdn.microsoft.com/Profile/andrecoopergfjh https://social.msdn.microsoft.com/Profile/rosaparkgjgy https://social.msdn.microsoft.com/Profile/laurenevanscbvmn https://social.msdn.microsoft.com/Profile/herbertwattcnvu https://social.msdn.microsoft.com/Profile/aprilmillercnmi https://social.msdn.microsoft.com/Profile/gabrieladamscbv https://social.msdn.microsoft.com/Profile/guadalupewisecy https://social.msdn.microsoft.com/Profile/jacobtorrescbg https://social.msdn.microsoft.com/Profile/yvonneelliscnbm https://social.msdn.microsoft.com/Profile/margaritafranciscn https://social.msdn.microsoft.com/Profile/juliesharpcny https://social.msdn.microsoft.com/Profile/edgarparkercfht https://social.msdn.microsoft.com/Profile/terencegibbsdsfe https://social.msdn.microsoft.com/Profile/benowenxcbn https://social.msdn.microsoft.com/Profile/kimberlystephensgju https://social.msdn.microsoft.com/Profile/gregorydiaznh https://social.msdn.microsoft.com/Profile/beverlyharveycvnbm https://social.msdn.microsoft.com/Profile/boydolsoncbf https://social.msdn.microsoft.com/Profile/melissachandlerfhy https://social.msdn.microsoft.com/Profile/julialambertcvbv https://social.msdn.microsoft.com/Profile/claudefrancisgnuy https://social.msdn.microsoft.com/Profile/henrygeorgecnb https://social.msdn.microsoft.com/Profile/stevechristensencvnhu https://social.msdn.microsoft.com/Profile/michelestokescvby https://social.msdn.microsoft.com/Profile/bernicemorancb https://social.msdn.microsoft.com/Profile/beckyrhodescb https://social.msdn.microsoft.com/Profile/josemedinacvb https://social.msdn.microsoft.com/Profile/darnellhawchft https://social.msdn.microsoft.com/Profile/lauriefrankcvbv https://social.msdn.microsoft.com/Profile/mindycortezvcnvb https://social.msdn.microsoft.com/Profile/sharonramirezcb https://social.msdn.microsoft.com/Profile/charlieturnercvbv https://social.msdn.microsoft.com/Profile/gingersheltoncbfg https://social.msdn.microsoft.com/Profile/stevenopecbg https://social.msdn.microsoft.com/Profile/lillieillcbfg https://social.msdn.microsoft.com/Profile/jonathangregorycbng https://social.msdn.microsoft.com/Profile/shannonperezcbfg https://social.msdn.microsoft.com/Profile/kimstoneft https://social.msdn.microsoft.com/Profile/colinknightfdhh https://social.msdn.microsoft.com/Profile/nancywhitefg https://social.msdn.microsoft.com/Profile/karabrewerxdfe https://social.msdn.microsoft.com/Profile/kristiboonexdf https://social.msdn.microsoft.com/Profile/mandymurrayxdfd https://social.msdn.microsoft.com/Profile/ruthgloverdsef https://social.msdn.microsoft.com/Profile/franklinlunadg https://social.msdn.microsoft.com/Profile/roxannewashingtonfdh https://social.msdn.microsoft.com/Profile/johnnybarberfcnhu https://social.msdn.microsoft.com/Profile/derrickriosdf https://social.msdn.microsoft.com/Profile/scottalvarezdf https://social.msdn.microsoft.com/Profile/gingerdunnxdfd https://social.msdn.microsoft.com/Profile/garryhowelldg https://social.msdn.microsoft.com/Profile/mitchellmossdxfes https://social.msdn.microsoft.com/Profile/ervinricedfd https://social.msdn.microsoft.com/Profile/georgiayoungxcs https://social.msdn.microsoft.com/Profile/kelleymccoydgf https://social.msdn.microsoft.com/Profile/charlesgeorgefdh https://social.msdn.microsoft.com/Profile/rosiespencercnb https://social.msdn.microsoft.com/Profile/karenjenningscbvc https://social.msdn.microsoft.com/Profile/amosgrantcvd https://social.msdn.microsoft.com/Profile/christinewoodscbv https://social.msdn.microsoft.com/Profile/lucyguzmancbvc https://social.msdn.microsoft.com/Profile/ignaciocarsoncbv https://social.msdn.microsoft.com/Profile/shelleywheelercvbv https://social.msdn.microsoft.com/Profile/mattiewisecbcv https://social.msdn.microsoft.com/Profile/sidneyevanscvbv https://social.msdn.microsoft.com/Profile/loisabbottcvbv https://social.msdn.microsoft.com/Profile/fredacurrycbvc https://social.msdn.microsoft.com/Profile/marshallsimsfgtr https://social.msdn.microsoft.com/Profile/monasalazarfgr https://social.msdn.microsoft.com/Profile/matthewgreenfdgtr https://social.msdn.microsoft.com/Profile/cesarmurrayvfh https://social.msdn.microsoft.com/Profile/leonwagnerfgh https://social.msdn.microsoft.com/Profile/russellhodgesbf https://social.msdn.microsoft.com/Profile/yvonnesantosf https://social.msdn.microsoft.com/Profile/calvinrobersonfgbf https://social.msdn.microsoft.com/Profile/darinyoungfgf https://social.msdn.microsoft.com/Profile/jenniegrayfgf https://social.msdn.microsoft.com/Profile/ernestmcguirecfchgtf https://social.msdn.microsoft.com/Profile/cecilmasonfhtr https://social.msdn.microsoft.com/Profile/rochellemcdanielfjyg https://social.msdn.microsoft.com/Profile/ellischambersfhf https://social.msdn.microsoft.com/Profile/shermanpattonfgh https://social.msdn.microsoft.com/Profile/davidhardyfghtg https://social.msdn.microsoft.com/Profile/steveholmesgfhty https://social.msdn.microsoft.com/Profile/markmendozafgh https://social.msdn.microsoft.com/Profile/herbertgravesvv https://social.msdn.microsoft.com/Profile/nataliefreemancbgyu https://social.msdn.microsoft.com/Profile/irvinggibsonfg https://social.msdn.microsoft.com/Profile/jeremynunezcvbvb https://social.msdn.microsoft.com/Profile/jennieblakecvc https://social.msdn.microsoft.com/Profile/timandrewscx https://social.msdn.microsoft.com/Profile/earltewartxc https://social.msdn.microsoft.com/Profile/melissasalazarcv https://social.msdn.microsoft.com/Profile/francishaynesxxs https://social.msdn.microsoft.com/Profile/omarjimenezxxdaw https://social.msdn.microsoft.com/Profile/terencefrenchcxvcm https://social.msdn.microsoft.com/Profile/elbertloganvn https://social.msdn.microsoft.com/Profile/willardbutlercbv https://social.msdn.microsoft.com/Profile/vickyduncanxnu https://social.msdn.microsoft.com/Profile/racheljensencr https://social.msdn.microsoft.com/Profile/shellygillfghy https://social.msdn.microsoft.com/Profile/sheilamoorefry https://social.msdn.microsoft.com/Profile/israelschultzdt https://social.msdn.microsoft.com/Profile/lolaharrisonfdgd https://social.msdn.microsoft.com/Profile/lyndatoddcre https://social.msdn.microsoft.com/Profile/philharringtoncbvju https://social.msdn.microsoft.com/Profile/edgargriffincfhiu https://social.msdn.microsoft.com/Profile/leocarpentercbv https://social.msdn.microsoft.com/Profile/veraolivernb https://social.msdn.microsoft.com/Profile/cassandraabbottcgr https://social.msdn.microsoft.com/Profile/gabrieltatecbft https://social.msdn.microsoft.com/Profile/terihernandezxe https://social.msdn.microsoft.com/Profile/rubenbryantdfd https://social.msdn.microsoft.com/Profile/fredrickrowedsf https://social.msdn.microsoft.com/Profile/sandyshermandfr https://social.msdn.microsoft.com/Profile/lawrencereesedfkj https://social.msdn.microsoft.com/Profile/melbarileycnbm https://social.msdn.microsoft.com/Profile/spencermcdanielcbv https://social.msdn.microsoft.com/Profile/lucillemyerscvb https://social.msdn.microsoft.com/Profile/arnoldmcbrideb https://social.msdn.microsoft.com/Profile/henriettaberrycbv https://social.msdn.microsoft.com/Profile/delbertmoralescb https://social.msdn.microsoft.com/Profile/laurenhowellcbvm https://social.msdn.microsoft.com/Profile/bradfordgilbertcfr https://social.msdn.microsoft.com/Profile/benniehuffcf https://social.msdn.microsoft.com/Profile/tamaratoddcx https://social.msdn.microsoft.com/Profile/tammybryantcgr https://social.msdn.microsoft.com/Profile/alexandergordoncvc https://social.msdn.microsoft.com/Profile/patrickohnsoncbvc https://social.msdn.microsoft.com/Profile/jessiekingcvbf https://social.msdn.microsoft.com/Profile/andrewfowlercgf https://social.msdn.microsoft.com/Profile/rebeccaharringtoncvc https://social.msdn.microsoft.com/Profile/perryguerrerocbv https://social.msdn.microsoft.com/Profile/jodywilliamsoncc https://social.msdn.microsoft.com/Profile/ashleylambertcv https://social.msdn.microsoft.com/Profile/albertdenniscbc https://social.msdn.microsoft.com/Profile/gwendolynpaynecvbvg https://social.msdn.microsoft.com/Profile/stevecastrocmj https://social.msdn.microsoft.com/Profile/mandywarnerfcg https://social.msdn.microsoft.com/Profile/enriquemoranfcr https://social.msdn.microsoft.com/Profile/adriennefernandezcc https://social.msdn.microsoft.com/Profile/vickiebradyccccb https://social.msdn.microsoft.com/Profile/vickymaxwellxfdg https://social.msdn.microsoft.com/Profile/davidwillisdffgr https://social.msdn.microsoft.com/Profile/guadalupeburnsdfe https://social.msdn.microsoft.com/Profile/brandysullivanfdgd https://social.msdn.microsoft.com/Profile/beverlyboyddfr https://social.msdn.microsoft.com/Profile/dawnhartxgf https://social.msdn.microsoft.com/Profile/carloscummingsfg https://social.msdn.microsoft.com/Profile/harrietchavezxfdgr https://social.msdn.microsoft.com/Profile/judithgregoryfdjju https://social.msdn.microsoft.com/Profile/franciscoknightcmn https://social.msdn.microsoft.com/Profile/clarkfraziercnhg https://social.msdn.microsoft.com/Profile/jonathonlloydcbv https://social.msdn.microsoft.com/Profile/gretchenbarrettcnbm https://social.msdn.microsoft.com/Profile/janwhitefch https://social.msdn.microsoft.com/Profile/jeremypattonyg https://social.msdn.microsoft.com/Profile/sandrawilliamscbv https://social.msdn.microsoft.com/Profile/patsyfrankcvc https://social.msdn.microsoft.com/Profile/adrianwalterscvbv https://social.msdn.microsoft.com/Profile/marthavasquezcc https://social.msdn.microsoft.com/Profile/idamitchellxvc https://social.msdn.microsoft.com/Profile/rodneysheltoncbc https://social.msdn.microsoft.com/Profile/myrtljenningscvbc https://social.msdn.microsoft.com/Profile/jeffandrewscvc https://social.msdn.microsoft.com/Profile/nellielewiscxvcx https://social.msdn.microsoft.com/Profile/allanwatkinscxvd https://social.msdn.microsoft.com/Profile/kellyshermanvfdgf https://social.msdn.microsoft.com/Profile/rodolfotorresfgf https://social.msdn.microsoft.com/Profile/mollyricefhf https://social.msdn.microsoft.com/Profile/sabrinastanleyfdg https://social.msdn.microsoft.com/Profile/angelinaalvarezfbgf https://social.msdn.microsoft.com/Profile/bryantgilbertfdhgf https://social.msdn.microsoft.com/Profile/florencemalonefdhg https://social.msdn.microsoft.com/Profile/melissabarrettfhg https://social.msdn.microsoft.com/Profile/gertrudechristensenfh https://social.msdn.microsoft.com/Profile/evasullivanfdht https://social.msdn.microsoft.com/Profile/elsahardyvg https://social.msdn.microsoft.com/Profile/monicamasseycn https://social.msdn.microsoft.com/Profile/soniafletchercb https://social.msdn.microsoft.com/Profile/wendyhuntcbg https://social.msdn.microsoft.com/Profile/gregggeorgegfhyt https://social.msdn.microsoft.com/Profile/francishillfghyt https://social.msdn.microsoft.com/Profile/nancydavisfgh https://social.msdn.microsoft.com/Profile/audreyburtonfhg https://social.msdn.microsoft.com/Profile/rexgregoryfth https://social.msdn.microsoft.com/Profile/taylolawsong https://social.msdn.microsoft.com/Profile/soniafishercn https://social.msdn.microsoft.com/Profile/albertcrawfordcngh https://social.msdn.microsoft.com/Profile/sharipowellfh https://social.msdn.microsoft.com/Profile/eddiewheelerfht https://social.msdn.microsoft.com/Profile/adrianfieldsch https://social.msdn.microsoft.com/Profile/catherinesalazarj https://social.msdn.microsoft.com/Profile/lionelgravesgfj https://social.msdn.microsoft.com/Profile/mackgarzaghyg
For most up-to-date news you have to visit world-wide-web and on world-wide-web I found
this site as a most excellent site for most recent updates.
Designer
An outstanding share! I have just forwarded this onto a co-worker who had been conducting a little homework on this.
And he in fact ordered me breakfast because I stumbled upon it for
him… lol. So allow me to reword this…. Thank YOU for
the meal!! But yeah, thanx for spending the time to talk about this matter here on your web page.
http://afcantarelle.org/index.php?title=Rifqifauzansholeh
http://afcantarelle.org/index.php?title=User:LouveniaSalvado
http://classicalmusicmp3freedownload.com/ja/index.php?title=%E5%88%A9%E7%94%A8%E8%80%85:FinnHyett3828
http://classicalmusicmp3freedownload.com/ja/index.php?title=Rifqifauzansholeh
http://embeddedwiki.cs.aau.dk/wiki/Rifqifauzansholeh
http://embeddedwiki.cs.aau.dk/wiki/User:MarieLillico
http://postgasse.net/Wiki/index.php?title=Benutzer:Rochell39X
http://postgasse.net/Wiki/index.php?title=Rifqifauzansholeh
http://stackoverflow.altervista.org/index.php?title=Rifqifauzansholeh
http://stackoverflow.altervista.org/index.php?title=Utente:ChristianeMajor
http://terio.fvet.uba.ar/mediawiki/index.php/Rifqifauzansholeh
http://terio.fvet.uba.ar/mediawiki/index.php/Usuario:OliveSisk0128
http://urbino.fh-joanneum.at/trials/index.php/User:GeraldFielder
http://wiki-ux.info/wiki/Rifqifauzansholeh
http://wiki-ux.info/wiki/User:EloyLempriere4
http://wiki.gewex.org/index.php?title=Rifqifauzansholeh
http://wiki.gewex.org/index.php?title=User:CurtMcComas
http://wiki.shitcore.org/index.php/Rifqifauzansholeh
http://wiki.shitcore.org/index.php/User:RachelMoniz
http://www.driftpedia.com/wiki/index.php/Rifqifauzansholeh
http://www.driftpedia.com/wiki/index.php/User:ShawnaG067484958
http://www.erwinbrandenberger.ch/index.php?title=Benutzer:MarjorieJoris25
http://www.erwinbrandenberger.ch/index.php?title=Rifqifauzansholeh
http://www.jeromebaray.com/afm/wiki/index.php/Rifqifauzansholeh
http://www.jeromebaray.com/afm/wiki/index.php/Utilisateur:ConradLieberman
http://www.matthew-morris.com/wiki/index.php/Rifqifauzansholeh
http://www.matthew-morris.com/wiki/index.php/User:Cecile52V0553
https://demo.centreon.com/wiki/index.php?title=Rifqifauzansholeh
https://demo.centreon.com/wiki/index.php?title=User:MarleneMaudsley
https://dptotti.fic.edu.uy/mediawiki/index.php/Rifqifauzansholeh
https://dptotti.fic.edu.uy/mediawiki/index.php/Usuario:DominickAnthony
https://exterior.podemos.info/mediawiki/index.php?title=Rifqifauzansholeh
https://exterior.podemos.info/mediawiki/index.php?title=Usuario:EleanoreBeckenba
https://gamesfashionarchive.net/wiki/User:LesterX959222
https://hu.velo.wiki/index.php?title=Rifqifauzansholeh
https://hu.velo.wiki/index.php?title=Szerkeszt%C5%91:MelaineSpragg2
https://intranet.wikimedia.cat/wiki/Usuari:RosaGenovese47
https://koloiko.com/wiki/index.php?title=Rifqifauzansholeh
https://koloiko.com/wiki/index.php?title=User:PasqualeGumm
https://library.kemu.ac.ke/kemuwiki/index.php/Rifqifauzansholeh
https://library.kemu.ac.ke/kemuwiki/index.php/User:LindseyCaudill9
https://livingbooksaboutlife.org/books/Rifqifauzansholeh
https://livingbooksaboutlife.org/books/User:DemiJarnagin768
https://procesal.cl/index.php/Rifqifauzansholeh
https://procesal.cl/index.php/User:HeleneDelancey4
https://religiopedia.com/index.php/Rifqifauzansholeh
https://religiopedia.com/index.php/User:RussPritt218
https://wiki.gahlawat.dynu.com/mediawiki/index.php?title=Rifqifauzansholeh
https://wiki.gahlawat.dynu.com/mediawiki/index.php?title=User:WendyFregoso98
https://wiki.hrw-fablab.de/index.php?title=Rifqifauzansholeh
https://wiki.hrw-fablab.de/index.php?title=User:ShelaAzy7799
https://wiki.itcoug.com/index.php?title=Rifqifauzansholeh
https://wiki.itcoug.com/index.php?title=Usuario:AndreaDesir192
https://wiki.minecraft.jp.net/%E5%88%A9%E7%94%A8%E8%80%85:BebeSheridan75
https://wiki.minecraft.jp.net/Rifqifauzansholeh
https://wiki.quentinbrun.fr/mediawiki/index.php/Rifqifauzansholeh
https://wiki.quentinbrun.fr/mediawiki/index.php/Utilisateur:DaisyTillyard
https://wiki.ryuriin.my.id/index.php/Rifqifauzansholeh
https://wiki.ryuriin.my.id/index.php/User:PriscillaLeworth
https://www.crustcorporate.com/wiki/Rifqifauzansholeh
https://www.crustcorporate.com/wiki/User:KandiceH56
https://www.mibtec.it/wiki/index.php?title=Rifqifauzansholeh
https://www.mibtec.it/wiki/index.php?title=Utente:RalfCourtney9
https://www.offwiki.org/wiki/Rifqifauzansholeh
https://www.offwiki.org/wiki/User:DerickLamson78
http://afcantarelle.org/index.php?title=Ruangestetik
http://afcantarelle.org/index.php?title=User:LeliaChoi858
http://classicalmusicmp3freedownload.com/ja/index.php?title=%E5%88%A9%E7%94%A8%E8%80%85:SharonSteele00
http://classicalmusicmp3freedownload.com/ja/index.php?title=Ruangestetik
http://embeddedwiki.cs.aau.dk/wiki/Ruangestetik
http://embeddedwiki.cs.aau.dk/wiki/User:Gina136879163
http://kousokuwiki.org/wiki/Ruangestetik
http://lsc.wikisign.org/wiki/Usuari_Discussi%C3%B3:DwightPlante38
http://postgasse.net/Wiki/index.php?title=Benutzer:ElizbethZ13
http://postgasse.net/Wiki/index.php?title=Ruangestetik
http://terio.fvet.uba.ar/mediawiki/index.php/Ruangestetik
http://terio.fvet.uba.ar/mediawiki/index.php/Usuario:MirandaN87
http://urbino.fh-joanneum.at/trials/index.php/Ruangestetik
http://urbino.fh-joanneum.at/trials/index.php/User:DawnaHomburg
http://wiki-ux.info/wiki/Ruangestetik
http://wiki-ux.info/wiki/User:WilheminaManchee
http://wiki.gewex.org/index.php?title=Ruangestetik
http://wiki.gewex.org/index.php?title=User:CarlaFollett793
http://wiki.shitcore.org/index.php/Ruangestetik
http://wiki.shitcore.org/index.php/User:KariChastain15
http://wikits.fqts2020.it/index.php?title=Utente:VickyMontgomery
http://www.driftpedia.com/wiki/index.php/Ruangestetik
http://www.driftpedia.com/wiki/index.php/User:BeatriceOhv
http://www.erwinbrandenberger.ch/index.php?title=Benutzer:TheronYwy660
http://www.erwinbrandenberger.ch/index.php?title=Ruangestetik
http://www.jeromebaray.com/afm/wiki/index.php/Ruangestetik
http://www.jeromebaray.com/afm/wiki/index.php/Utilisateur:GavinNibbi3
http://www.matthew-morris.com/wiki/index.php/Ruangestetik
http://www.matthew-morris.com/wiki/index.php/User:MargieLyell70
https://demo.centreon.com/wiki/index.php?title=Ruangestetik
https://demo.centreon.com/wiki/index.php?title=User:MarissaM66
https://demo.dokit.io/wiki/Ruangestetik
https://dptotti.fic.edu.uy/mediawiki/index.php/Ruangestetik
https://dptotti.fic.edu.uy/mediawiki/index.php/Usuario:StephaniaLcb
https://exterior.podemos.info/mediawiki/index.php?title=Ruangestetik
https://exterior.podemos.info/mediawiki/index.php?title=Usuario:DesmondStreetman
https://gamesfashionarchive.net/wiki/User:BrendaMcCaughey
https://help.ezadspro.co.uk/index.php?title=User:DarrinTallis6
https://intranet.wikimedia.cat/wiki/Usuari:LorenaBruche4
https://koloiko.com/wiki/index.php?title=Ruangestetik
https://koloiko.com/wiki/index.php?title=User:GeraldineTudawal
https://library.kemu.ac.ke/kemuwiki/index.php/Ruangestetik
https://library.kemu.ac.ke/kemuwiki/index.php/User:KingCandelaria
https://livingbooksaboutlife.org/books/Ruangestetik
https://livingbooksaboutlife.org/books/User:JennaLongoria80
https://procesal.cl/index.php/Ruangestetik
https://procesal.cl/index.php/User:JanelleSmyth
https://religiopedia.com/index.php/Ruangestetik
https://religiopedia.com/index.php/User:JudePinedo3
https://wiki.gahlawat.dynu.com/mediawiki/index.php?title=Ruangestetik
https://wiki.gahlawat.dynu.com/mediawiki/index.php?title=User:KayleneMabe
https://wiki.hrw-fablab.de/index.php?title=Ruangestetik
https://wiki.hrw-fablab.de/index.php?title=User:JudithMaldonado
https://wiki.minecraft.jp.net/%E5%88%A9%E7%94%A8%E8%80%85:HollyOlivas9122
https://wiki.minecraft.jp.net/Ruangestetik
https://wiki.quentinbrun.fr/mediawiki/index.php/Ruangestetik
https://wiki.quentinbrun.fr/mediawiki/index.php/Utilisateur:KlausS071897519
https://wiki.ryuriin.my.id/index.php/Ruangestetik
https://wiki.ryuriin.my.id/index.php/User:LeeFredericksen
https://www.crustcorporate.com/wiki/Ruangestetik
https://www.crustcorporate.com/wiki/User:TeriNeill288879
https://www.offwiki.org/wiki/Ruangestetik
https://www.offwiki.org/wiki/User:SadyeLunsford8
http://afcantarelle.org/index.php?title=Spilltekno
http://afcantarelle.org/index.php?title=User:GitaLeGrand
http://classicalmusicmp3freedownload.com/ja/index.php?title=%E5%88%A9%E7%94%A8%E8%80%85:QMWMyrna32
http://classicalmusicmp3freedownload.com/ja/index.php?title=Spilltekno
http://embeddedwiki.cs.aau.dk/wiki/Spilltekno
http://embeddedwiki.cs.aau.dk/wiki/User:AstridSparkman0
http://lsc.wikisign.org/wiki/Usuari_Discussi%C3%B3:PCJLashay586
http://nswiki.svenskasuperserier.se/w/index.php?title=Anv%C3%A4ndare:Millie88K34970
http://nswiki.svenskasuperserier.se/w/index.php?title=Spilltekno
http://postgasse.net/Wiki/index.php?title=Benutzer:LloydWeatherly7
http://postgasse.net/Wiki/index.php?title=Spilltekno
http://terio.fvet.uba.ar/mediawiki/index.php/Spilltekno
http://terio.fvet.uba.ar/mediawiki/index.php/Usuario:LourdesWesch27
http://wiki-ux.info/wiki/Spilltekno
http://wiki-ux.info/wiki/User:OONMabel9442030
http://wiki.shitcore.org/index.php/Spilltekno
http://wiki.shitcore.org/index.php/User:PhoebeElwell821
http://www.driftpedia.com/wiki/index.php/Spilltekno
http://www.driftpedia.com/wiki/index.php/User:AraLove1552390
http://www.erwinbrandenberger.ch/index.php?title=Benutzer:ShanelDewees
http://www.erwinbrandenberger.ch/index.php?title=Spilltekno
http://www.jeromebaray.com/afm/wiki/index.php/Spilltekno
http://www.jeromebaray.com/afm/wiki/index.php/Utilisateur:SkyeBarnett6
http://www.matthew-morris.com/wiki/index.php/Spilltekno
http://www.matthew-morris.com/wiki/index.php/User:WalkerMiljanovic
https://demo.centreon.com/wiki/index.php?title=Spilltekno
https://demo.centreon.com/wiki/index.php?title=User:RaquelKeiser9
https://dptotti.fic.edu.uy/mediawiki/index.php/Spilltekno
https://dptotti.fic.edu.uy/mediawiki/index.php/Usuario:WaldoCota3778
https://exterior.podemos.info/mediawiki/index.php?title=Spilltekno
https://exterior.podemos.info/mediawiki/index.php?title=Usuario:SamLieberman761
https://gamesfashionarchive.net/wiki/User:Sheldon6898
https://intranet.wikimedia.cat/wiki/Usuari:MayKerry46835061
https://koloiko.com/wiki/index.php?title=Spilltekno
https://koloiko.com/wiki/index.php?title=User:MckenzieBardon2
https://library.kemu.ac.ke/kemuwiki/index.php/Spilltekno
https://library.kemu.ac.ke/kemuwiki/index.php/User:BobbyeStallcup9
https://procesal.cl/index.php/Spilltekno
https://procesal.cl/index.php/User:AlbertWeekes867
https://religiopedia.com/index.php/Spilltekno
https://religiopedia.com/index.php/User:AlejandroEwan83
https://wiki.gahlawat.dynu.com/mediawiki/index.php?title=Spilltekno
https://wiki.gahlawat.dynu.com/mediawiki/index.php?title=User:CooperFoltz7514
https://wiki.hrw-fablab.de/index.php?title=Spilltekno
https://wiki.hrw-fablab.de/index.php?title=User:MickieWhiteside
https://wiki.itcoug.com/index.php?title=Spilltekno
https://wiki.minecraft.jp.net/%E5%88%A9%E7%94%A8%E8%80%85:AlizaF172789725
https://wiki.minecraft.jp.net/Spilltekno
https://wiki.quentinbrun.fr/mediawiki/index.php/Spilltekno
https://wiki.quentinbrun.fr/mediawiki/index.php/Utilisateur:BettySoto780379
https://wiki.ryuriin.my.id/index.php/Spilltekno
https://wiki.ryuriin.my.id/index.php/User:GavinTabor0
https://www.crustcorporate.com/wiki/Spilltekno
https://www.crustcorporate.com/wiki/User:KianLlanes9587
https://www.cspcc.org/wiki/index.php/Spilltekno
https://www.cspcc.org/wiki/index.php/Utilisateur:Shannon48P
https://www.offwiki.org/wiki/Spilltekno
https://www.offwiki.org/wiki/User:DewayneMcelroy8
Quality articles is the secret to attract the users to go to see the
website, that’s what this web page is providing.
prednisolone 40 mg tablets
Wow, this post is nice, my sister is analyzing such things, therefore I am going to inform her.
Very nice article, totally what I was looking for.
Saved as a favorite, I like your blog!
trazodone generic pill
Daftar situs qqwin4d slot online terbaik mudah menang hari
ini dan menyediakan rtp terbaik paling update setiap hari anti rungkad
Pola Slot Hari Ini
QQWIN4D Situs Slot Online Terpercaya
Link Alternatif QQWIN4d
QQWIN4d Gacor
QQWIN4D Mudah Menang
QQWIN4D Slot Gacor
I visited multiple websites except the audio feature for audio songs existing
at this web page is actually marvelous.
Really no matter if someone doesn’t know afterward its up to other people that they will assist, so here it takes place.
furosemide 80 mg
Good site you have here.. It’s hard to find excellent writing like yours these days.
I honestly appreciate individuals like you! Take care!!
Hello all, here every one is sharing these kinds of knowledge, therefore it’s fastidious to read this webpage, and I used to pay a quick visit this weblog daily.
No matter if some one searches for his required thing, therefore he/she desires to be available that in detail,
therefore that thing is maintained over here.
metformin without a prescription
ventolin cost australia
That is really fascinating, You’re a very skilled blogger.
I have joined your rss feed and sit up for looking for extra of
your wonderful post. Additionally, I’ve shared your site in my social networks
can you buy toradol over the counter
ventolin without prescription
amoxicillin 850 mg price
bactrim brand name
where can i get metformin online
Hi everyone I’m happy to make friends with people
with similar interests japanese porn
i own a lot of free jav movies
https://petjav.com/
https://dudeporn.net/
https://pornjapanese.net/
visit and relax if you feeling stress or pressure
Attractive component of content. I just stumbled upon your web site
and in accession capital to say that I get actually loved account your weblog posts.
Anyway I’ll be subscribing on your augment and even I fulfillment you get admission to constantly quickly.
Hello there, You have done an excellent job. I will certainly digg
it and personally recommend to my friends. I’m confident they will be benefited from this site.
buy vermox in usa
diflucan price canada
Wow! This blog looks exactly like my old one! It’s on a totally different topic but it has pretty much
the same page layout and design. Great choice of colors!
I like the valuable information you provide on your articles.
I’ll bookmark your weblog and check again right here frequently.
I am quite sure I’ll learn many new stuff right right
here! Good luck for the next!
propecia how to get
tamoxifen price uk
I’ve been browsing online more than 2 hours today, yet
I never found any interesting article like yours. It’s
pretty worth enough for me. In my opinion, if all website owners and bloggers made good content as you did, the web will be a lot more useful than ever before.
generic metformin cost
I’m not sure where you’re getting your information, but good topic.
I needs to spend some time learning more or understanding
more. Thanks for excellent info I was looking for this information for
my mission.
the gentle hum of a bee reminds us of the importance of nature greet the taste of a perfectly ripe peach is juicy and sweet
You have to understand that if you decide to get a loan with bad credit you will have to make sure that
you fulfill the requirements of your lender.
There are companies running scams out there and identity theft is a real and scary.
You can find many loans options with traditional lenders that are available at
your place.
drug furosemide 40mg
toradol brand name
We stumbled over here from a different web address and thought I
might check things out. I like what I see so now i’m following you.
Look forward to checking out your web page
for a second time.
You have to understand that if you decide
to get a loan with bad credit you will have
to make sure that you fulfill the requirements of your lender.
A better way to take out a personal loan is to apply with several lenders so
that you can have a choice to make a good decision. The application procedure is lightning quick and can be
completed in just a few minutes from a home or office computer.
Someone essentially help to make severely posts I might state.
That is the first time I frequented your website page and thus far?
I surprised with the analysis you made to make this actual
put up incredible. Magnificent process!
Greetings! I’ve been reading your weblog for a while now and finally
got the bravery to go ahead and give you a shout out from Austin Tx!
Just wanted to mention keep up the good job!
diflucan tablet india
WOW just what I was searching for. Came here by searching for natural supplements joint
pain
zithromax 250 mg
I will immediately take hold of your rss feed as I
can not in finding your e-mail subscription hyperlink
or e-newsletter service. Do you’ve any? Kindly let me understand so that I may just subscribe.
Thanks.
buy cheap tamoxifen online
motilium canada
However, the Internet Age has allowed a new frontier of
lenders to come into the scene. A better way to take out
a personal loan is to apply with several lenders so that you
can have a choice to make a good decision. These
loans offer a bigger loan amount in the range of.
furosemide 20 tablet
Your style is so unique compared to other people I have read stuff from.
Thanks for posting when you have the opportunity, Guess I’ll
just bookmark this page.
Do you have any video of that? I’d love to
find out some additional information.
Fine way of explaining, and nice article to get facts regarding my presentation focus,
which i am going to present in college.
Piece of writing writing is also a fun, if you be familiar with afterward you
can write otherwise it is difficult to write.
Hi, just wanted to mention, I liked this article. It was helpful.
Keep on posting!
Hello i am kavin, its my first time to commenting anywhere, when i read this article i thought i
could also create comment due to this brilliant piece of writing.
Wow loads of useful info.
metformin for sale in usa
lexapro sale
I simply could not go away your web site before suggesting that I actually
enjoyed the usual info an individual supply in your guests?
Is gonna be back ceaselessly in order to check out new posts
With havin so much written content ddo you ever run into any probglems of plagorism or copyright infringement?
My blog has a lot of completely unique content I’ve either written myself or outsourced but it seems
a lot of it is popping it up all ovfer the webb without my
authorization. Do you know any solutions too hep stop content
from being stolen? I’d genuinely appreciate it.
metformin 500
vermox tablet
I am regular visitor, how are you everybody? This paragraph posted at this web page is truly nice.
Do you have a spam problem on this blog; I also am a blogger, and I was wondering
your situation; many of us have developed some nice methods and we are looking to swap strategies with other folks,
be sure to shoot me an email if interested.
I like the helpful info you provide in your articles.
I will bookmark your blog and check again here regularly.
I’m quite sure I’ll learn lots of new stuff right here!
Good luck for the next!
amoxil 250 mg capsule
trazodone online pharmacy
Great blog here! Also your web site a lot up fast!
What web host are you the use of? Can I am getting your associate hyperlink for your host?
I desire my web site loaded up as fast as yours lol
Hey tһere! I’m at ᴡork browsing үour blog from my new
iphone 3gs! Just wanteɗ tߋ ѕay I love reading tһrough your blog аnd
look forward to аll үour posts! Keep uρ the excellent ѡork!
Hi there, the whole thing is going nicely here and
ofcourse every one is sharing information, that’s truly excellent, keep
up writing.
Superb facts, Cheers.
Excellent pieces. Keep posting such kind of information on your page.
Im really impressed by it.
Hi there, You’ve done an excellent job. I will definitely digg it and individually suggest to my friends.
I am confident they will be benefited from this web site.
lasix online pharmacy
motilium tablet
cost of amoxicillin in uk
40 mg lasix
Hi there to every single one, it’s genuinely a pleasant for me to pay a visit this web site,
it includes precious Information.
slot88
What’s Going down i am new to this, I stumbled upon this I have discovered It absolutely helpful and it has
helped me out loads. I hope to contribute & help different
users like its helped me. Great job.
valtrex rx cost
This is the perfect website for anyone who wishes to find out about this topic.
You understand a whole lot its almost hard to argue with you (not that I personally will need to…HaHa).
You certainly put a fresh spin on a subject that’s been discussed for a long time.
Excellent stuff, just wonderful!
Very shortly this site will be famous among all blogging viewers,
due to it’s pleasant articles
Does your blog have a contact page? I’m having trouble
locating it but, I’d like to shoot you an email. I’ve got some suggestions for your blog
you might be interested in hearing. Either way, great blog and I look forward to seeing it
grow over time.
buy lexapro canada
bookmarked!!, I love your web site!
Thanks for your marvelous posting! I actually enjoyed reading it, you’re
a great author.I will make certain to bookmark your
blog and will come back down the road. I want to encourage you to ultimately continue your great job, have a nice day!
hey there and thank you for your information – I’ve
certainly picked up something new from right here. I
did however expertise a few technical points using this site, since I experienced to reload the
site a lot of times previous to I could get it to load properly.
I had been wondering if your hosting is OK? Not that I am complaining, but slow loading instances times will sometimes affect your placement in google and
could damage your high quality score if advertising and marketing
with Adwords. Anyway I am adding this RSS to my e-mail and could look out for much more of your respective interesting content.
Make sure you update this again soon.
can you buy metformin over the counter in australia
diclofenac gel buy online
Quality content is the important to invite the viewers to go
to see the web page, that’s what this web page is providing.
augmentin pharmacy uk
Article writing is also a excitement, if you know
then you can write otherwise it is difficult to write.
Hey! I know this is somewhat off topic but I was wondering
if you knew where I could locate a captcha plugin for my
comment form? I’m using the same blog platform as yours and
I’m having problems finding one? Thanks a lot!
clonidine tab .1mg
order clonidine
Nicely put. Thank you!
strong thesis statement phd thesis database thesis writing thesis titles
furosemide 500 mg tablet
Do you mind if I quote a few of your posts as long
as I provide credit and sources back to your webpage? My blog site is in the very same niche as yours and my users would definitely benefit from some of the information you
present here. Please let me know if this ok with you.
Thanks!
Asking questions are really pleasant thing if you are not understanding something entirely, but this paragraph presents nice understanding even.
cheap azithromycin 500mg
Howdy! I just want to offer you a big thumbs up for the excellent information you
have here on this post. I’ll be returning to your blog for more soon.
Thank you for the good writeup. It in truth was once a
enjoyment account it. Look complicated to more introduced
agreeable from you! However, how could we keep in touch?
online pharmacy in germany
brillx скачать бесплатно
https://brillx-kazino.com
Brillx Казино — ваш уникальный путь к захватывающему миру азартных игр в 2023 году! Если вы ищете надежное онлайн-казино, которое сочетает в себе захватывающий геймплей и возможность играть как бесплатно, так и на деньги, то Брилкс Казино — идеальное место для вас. Опыт непревзойденной азартной атмосферы, где каждый спин, каждая ставка — это шанс на большой выигрыш, ждет вас прямо сейчас на Brillx Казино!Так что не упустите свой шанс вступить в мир Brillx Казино! Играйте онлайн бесплатно и на деньги в 2023 году, окунувшись в море невероятных эмоций и неожиданных поворотов. Brillx – это не просто игровые аппараты, это источник вдохновения и увлечения. Поднимите ставки и дайте себе шанс на большую победу вместе с нами!
where to buy diclofenac tablets
motilium pharmacy
the sight of a double rainbow leaves us in awe film is way to giving your your becoming, such to but to be to must life poorly
Hmm is anyone else having problems with the pictures on this blog loading?
I’m trying to determine if its a problem on my end or if it’s the blog.
Any responses would be greatly appreciated.
It is not my first time to pay a quick visit this website, i am browsing this website
dailly and obtain fastidious facts from here everyday.
It’s a pity you don’t have a donate button! I’d most certainly donate to this excellent blog!
I guess for now i’ll settle for book-marking and adding your RSS feed to my Google account.
I look forward to fresh updates and will talk about this website with my Facebook group.
Chat soon!
metformin tablet price in india
hi!,I really like your writing very much!
percentage we be in contact extra approximately your post on AOL?
I require an expert in this house to unravel my problem.
May be that’s you! Taking a look ahead to see you.
Hey! I’m at work surfing around your blog from
my new iphone 3gs! Just wanted to say I love reading through your blog and look forward to
all your posts! Keep up the fantastic work!
motilium for breastfeeding
http://www.youtube.com/redirect?event=channel_description&q=https%3A%2F%2Fsmihub.co.uk%2F
http://cse.google.com.eg/url?sa=t&url=http%3A%2F%2Fsmihub.co.uk%2F
http://cn.bing.com/news/apiclick.aspx?COLLCC=1718906003&ref=FexRss&aid=&url=https://smihub.co.uk/
http://images.google.com.sa/url?sa=t&url=http%3A%2F%2Fsmihub.co.uk
http://images.google.at/url?sa=t&url=http%3A%2F%2Fsmihub.co.uk
http://images.google.com/url?sa=t&url=http%3A%2F%2Fsmihub.co.uk
http://images.google.gr/url?sa=t&url=http%3A%2F%2Fsmihub.co.uk%2F
http://images.google.com.ua/url?sa=t&url=http%3A%2F%2Fsmihub.co.uk%2F
http://accounts.cancer.org/login?redirectURL=https%3A%2F%2Fsmihub.co.uk&theme=RFL
https://images.google.tk/url?sa=t&url=http://smihub.co.uk/
http://images.google.ee/url?sa=t&url=http%3A%2F%2Fsmihub.co.uk%2F
http://clients1.google.ki/url?q=http%3A%2F%2Fsmihub.co.uk
http://clients1.google.td/url?q=https%3A%2F%2Fsmihub.co.uk
https://website.informer.com/smihub.co.uk
http://clients1.google.at/url?q=https%3A%2F%2Fsmihub.co.uk
http://alt1.toolbarqueries.google.com.ec/url?q=https://smihub.co.uk/
http://b.filmz.ru/presentation/www/delivery/ck.php?ct=1&oaparams=2__bannerid=222__zoneid=2__cb=93494e485e__oadest=https://smihub.co.uk/
http://ava-online.clan.su/go?https://smihub.co.uk/
http://ads.dfiles.eu/click.php?c=1497&z=4&b=1730&r=https://smihub.co.uk/
http://clinica-elit.vrn.ru/cgi-bin/inmakred.cgi?bn=43252&url=smihub.co.uk
http://chat.chat.ru/redirectwarn?https://smihub.co.uk/
http://cm-eu.wargaming.net/frame/?service=frm&project=moo&realm=eu&language=en&login_url=http%3A%2F%2Fsmihub.co.uk
http://maps.google.com/url?q=https%3A%2F%2Fsmihub.co.uk%2F
http://audit.tomsk.ru/bitrix/click.php?goto=https://smihub.co.uk/
http://clients1.google.co.mz/url?q=https%3A%2F%2Fsmihub.co.uk/
http://come-on.rdy.jp/wanted/cgi-bin/rank.cgi?id=11326&mode=link&url=https://smihub.co.uk/
http://images.google.com.ng/url?sa=t&url=http%3A%2F%2Fsmihub.co.uk%2F
http://yumi.rgr.jp/puku-board/kboard.cgi?mode=res_html&owner=proscar&url=smihub.co.uk/&count=1&ie=1
http://images.google.com.au/url?sa=t&url=http%3A%2F%2Fsmihub.co.uk%2F
https://asia.google.com/url?q=http://smihub.co.uk/management.html
http://adapi.now.com/ad/api/act.ashx?a=2&sc=3490&s=30000219&l=1&t=0&c=0&u=https://smihub.co.uk/
https://cse.google.ws/url?q=http://smihub.co.uk/
http://avn.innity.com/click/avncl.php?bannerid=68907&zoneid=0&cb=2&pcu=&url=http%3a%2f%2fsmihub.co.uk
https://ross.campusgroups.com/click?uid=51a11492-dc03-11e4-a071-0025902f7e74&r=http://smihub.co.uk/
http://images.google.de/url?sa=t&url=http%3A%2F%2Fsmihub.co.uk
http://tools.folha.com.br/print?url=https%3A%2F%2Fsmihub.co.uk%2F&site=blogfolha
http://alt1.toolbarqueries.google.com.fj/url?q=https://smihub.co.uk/
http://new.creativecommons.org/choose/results-one?q_1=2&q_1=1&field_commercial=n&field_derivatives=sa&field_jurisdiction=&field_format=Text&field_worktitle=Blog&field_attribute_to_name=Lam%20HUA&field_attribute_to_url=https%3A%2F%2Fsmihub.co.uk
http://redirect.subscribe.ru/bank.banks
http://www.so-net.ne.jp/search/web/?query=smihub.co.uk&from=rss
http://alt1.toolbarqueries.google.cat/url?q=https://smihub.co.uk/
http://affiliate.awardspace.info/go.php?url=https://smihub.co.uk/
http://writer.dek-d.com/dek-d/link/link.php?out=https%3A%2F%2Fsmihub.co.uk%2F&title=smihub.co.uk
http://analogx.com/cgi-bin/cgirdir.exe?https://smihub.co.uk/
http://images.google.co.ve/url?sa=t&url=http%3A%2F%2Fsmihub.co.uk%2F
http://ip.chinaz.com/?IP=smihub.co.uk
http://images.google.com.pe/url?sa=t&url=http%3A%2F%2Fsmihub.co.uk%2F
http://cmbe-console.worldoftanks.com/frame/?language=en&login_url=http%3A%2F%2Fsmihub.co.uk&project=wotx&realm=wgcb&service=frm
http://images.google.dk/url?sa=t&url=http%3A%2F%2Fsmihub.co.uk
http://ceramique-et-couleurs.leforum.eu/redirect1/https://smihub.co.uk/
https://ipv4.google.com/url?q=http://smihub.co.uk/management.html
http://cse.google.com.af/url?sa=t&url=http%3A%2F%2Fsmihub.co.uk%2F
http://images.google.com.do/url?sa=t&url=http%3A%2F%2Fsmihub.co.uk%2F
http://newsdiffs.org/article-history/smihub.co.uk/
http://cse.google.az/url?sa=t&url=http%3A%2F%2Fsmihub.co.uk%2F
http://images.google.ch/url?sa=t&url=http%3A%2F%2Fsmihub.co.uk
http://aganippe.online.fr/lien.php3?url=http%3a%2f%2fsmihub.co.uk
http://images.google.fr/url?sa=t&url=http%3A%2F%2Fsmihub.co.uk
http://images.google.co.ve/url?sa=t&url=http%3A%2F%2Fsmihub.co.uk
http://alt1.toolbarqueries.google.com.do/url?q=https://smihub.co.uk/
http://alt1.toolbarqueries.google.co.mz/url?q=https://smihub.co.uk/
https://www.easyviajar.com/me/link.jsp?site=359&client=1&id=110&url=http://smihub.co.uk/2021/05/29/rwfeds/
http://68-w.tlnk.io/serve?action=click&site_id=137717&url_web=https://smihub.co.uk/
http://alt1.toolbarqueries.google.sk/url?q=https://smihub.co.uk/
http://jump.2ch.net/?smihub.co.uk
http://images.google.co.nz/url?sa=t&url=http%3A%2F%2Fsmihub.co.uk
http://images.google.com.ec/url?sa=t&url=http%3A%2F%2Fsmihub.co.uk
http://alt1.toolbarqueries.google.com.mx/url?q=https://smihub.co.uk/
http://sitereport.netcraft.com/?url=https%3A%2F%2Fsmihub.co.uk%2F
http://www.ursoftware.com/downloadredirect.php?url=https%3A%2F%2Fsmihub.co.uk%2F
http://cse.google.co.mz/url?sa=t&url=http%3A%2F%2Fsmihub.co.uk%2F
http://legal.un.org/docs/doc_top.asp?path=../ilc/documentation/english/a_cn4_13.pd&Lang=Ef&referer=https%3A%2F%2Fsmihub.co.uk%2F
http://doodle.com/r?url=https%3A%2F%2Fsmihub.co.uk%2F
http://cse.google.ac/url?sa=t&url=http%3A%2F%2Fsmihub.co.uk%2F
http://78.rospotrebnadzor.ru/news9/-/asset_publisher/9Opz/content/%D0%BF%D0%BE%D1%81%D1%82%D0%B0%D0%BD%D0%BE%D0%B2%D0%BB%D0%B5%D0%BD%D0%B8%D0%B5-%D0%B3%D0%BB%D0%B0%D0%B2%D0%BD%D0%BE%D0%B3%D0%BE-%D0%B3%D0%BE%D1%81%D1%83%D0%B4%D0%B0%D1%80%D1%81%D1%82%D0%B2%D0%B5%D0%BD%D0%BD%D0%BE%D0%B3%D0%BE-%D1%81%D0%B0%D0%BD%D0%B8%D1%82%D0%B0%D1%80%D0%BD%D0%BE%D0%B3%D0%BE-%D0%B2%D1%80%D0%B0%D1%87%D0%B0-%D0%BF%D0%BE-%D0%B3%D0%BE%D1%80%D0%BE%D0%B4%D1%83-%D1%81%D0%B0%D0%BD%D0%BA%D1%82-%D0%BF%D0%B5%D1%82%D0%B5%D1%80%D0%B1%D1%83%D1%80%D0%B3%D1%83-%E2%84%96-4-%D0%BE%D1%82-09-11-2021-%C2%AB%D0%BE-%D0%B2%D0%BD%D0%B5%D1%81%D0%B5%D0%BD%D0%B8%D0%B8-%D0%B8%D0%B7%D0%BC%D0%B5%D0%BD%D0%B5%D0%BD%D0%B8%D0%B8-%D0%B2-%D0%BF%D0%BE%D1%81%D1%82%D0%B0%D0%BD%D0%BE%D0%B2%D0%BB%D0%B5%D0%BD%D0%B8%D0%B5-%D0%B3%D0%BB%D0%B0%D0%B2%D0%BD%D0%BE%D0%B3%D0%BE-%D0%B3%D0%BE%D1%81%D1%83%D0%B4%D0%B0%D1%80%D1%81%D1%82%D0%B2%D0%B5%D0%BD%D0%BD%D0%BE%D0%B3%D0%BE-%D1%81%D0%B0%D0%BD%D0%B8%D1%82%D0%B0%D1%80%D0%BD%D0%BE%D0%B3%D0%BE-%D0%B2%D1%80%D0%B0%D1%87%D0%B0-%D0%BF%D0%BE-%D0%B3%D0%BE%D1%80%D0%BE%D0%B4%D1%83-%D1%81%D0%B0%D0%BD%D0%BA%D1%82-%D0%BF%D0%B5%D1%82%D0%B5%D1%80%D0%B1%D1%83%D1%80%D0%B3%D1%83-%D0%BE%D1%82-12-10-2021-%E2%84%96-3-%C2%BB;jsessionid=FB3309CE788EBDCCB588450F5B1BE92F?redirect=http%3A%2F%2Fsmihub.co.uk
http://ashspublications.org/__media__/js/netsoltrademark.php?d=smihub.co.uk
http://cse.google.com.ly/url?sa=t&url=http%3A%2F%2Fsmihub.co.uk%2F
http://cse.google.com.bh/url?sa=t&url=http%3A%2F%2Fsmihub.co.uk%2F
https://pt.tapatalk.com/redirect.php?app_id=4&fid=8678&url=http://smihub.co.uk
http://cse.google.co.tz/url?sa=t&url=http%3A%2F%2Fsmihub.co.uk%2F
http://www.bing.com/news/apiclick.aspx?ref=FexRss&aid=&tid=9BB77FDA801248A5AD23FDBDD5922800&url=https%3A%2F%2Fsmihub.co.uk
http://advisor.wmtransfer.com/SiteDetails.aspx?url=smihub.co.uk
http://blogs.rtve.es/libs/getfirma_footer_prod.php?blogurl=https%3A%2F%2Fsmihub.co.uk
http://images.google.com.br/url?sa=t&url=http%3A%2F%2Fsmihub.co.uk
http://images.google.be/url?sa=t&url=http%3A%2F%2Fsmihub.co.uk%2F
http://aboutus.com/Special:SiteAnalysis?q=smihub.co.uk&action=webPresence
https://brettterpstra.com/share/fymdproxy.php?url=http://smihub.co.uk
http://images.google.com.eg/url?sa=t&url=http%3A%2F%2Fsmihub.co.uk
http://my.myob.com/community/login.aspx?ReturnUrl=https%3A%2F%2Fsmihub.co.uk%2F
http://traceroute.physics.carleton.ca/cgi-bin/traceroute.pl?function=ping&target=smihub.co.uk
http://cse.google.as/url?sa=t&url=http%3A%2F%2Fsmihub.co.uk%2F
http://d-click.fiemg.com.br/u/18081/131/75411/137_0/82cb7/?url=https://smihub.co.uk/
https://cse.google.ws/url?sa=t&url=http://smihub.co.uk/
http://anonim.co.ro/?smihub.co.uk/
http://id.telstra.com.au/register/crowdsupport?gotoURL=https%3A%2F%2Fsmihub.co.uk%2F
http://ads.businessnews.com.tn/dmcads2017/www/delivery/ck.php?ct=1&oaparams=2__bannerid=1839__zoneid=117__cb=df4f4d726f__oadest=https://smihub.co.uk/
http://aichi-fishing.boy.jp/?wptouch_switch=desktop&redirect=http%3a%2f%2fsmihub.co.uk
http://cse.google.co.th/url?sa=t&url=http%3A%2F%2Fsmihub.co.uk%2F
http://alt1.toolbarqueries.google.ch/url?q=https://smihub.co.uk/
http://images.google.cl/url?sa=t&url=http%3A%2F%2Fsmihub.co.uk
http://clients1.google.com.kh/url?q=https://smihub.co.uk/
http://client.paltalk.com/client/webapp/client/External.wmt?url=http%3A%2F%2Fsmihub.co.uk%2F
http://clients1.google.com.lb/url?q=https%3A%2F%2Fsmihub.co.uk/
http://cam4com.go2cloud.org/aff_c?offer_id=268&aff_id=2014&url=https%3A%2F%2Fsmihub.co.uk
http://creativecommons.org/choose/results-one?q_1=2&q_1=1&field_commercial=n&field_derivatives=sa&field_jurisdiction=&field_format=Text&field_worktitle=Blog&field_attribute_to_name=Lam%20HUA&field_attribute_to_url=https%3A%2F%2Fsmihub.co.uk%2F
http://images.google.cz/url?sa=t&url=http%3A%2F%2Fsmihub.co.uk
http://cse.google.co.bw/url?sa=t&url=http%3A%2F%2Fsmihub.co.uk%2F
http://r.turn.com/r/click?id=07SbPf7hZSNdJAgAAAYBAA&url=https://smihub.co.uk/
http://images.google.co.uk/url?sa=t&url=http%3A%2F%2Fsmihub.co.uk%2F
http://images.google.com.bd/url?sa=t&url=http%3A%2F%2Fsmihub.co.uk
http://clients1.google.ge/url?q=https%3A%2F%2Fsmihub.co.uk/
http://2chmatome.jpn.org/akb/c_c.php?c_id=267977&url=https://smihub.co.uk/
http://affiliate.suruga-ya.jp/modules/af/af_jump.php?user_id=755&goods_url=https://smihub.co.uk/
http://archive.feedblitz.com/f/f.fbz?goto=https://smihub.co.uk/
http://clients1.google.com.pr/url?sa=i&url=https%3A%2F%2Fsmihub.co.uk
http://cse.google.com.gt/url?sa=t&url=http%3A%2F%2Fsmihub.co.uk%2F
http://abcclub.cside.com/nagata/link4/link4.cgi?mode=cnt&hp=http%3a%2f%2fsmihub.co.uk&no=1027
http://clients1.google.com.fj/url?q=https%3A%2F%2Fsmihub.co.uk
http://www.justjared.com/flagcomment.php?el=https%3A%2F%2Fsmihub.co.uk
http://clients1.google.com.gi/url?q=https%3A%2F%2Fsmihub.co.uk/
http://biz.timesfreepress.com/__media__/js/netsoltrademark.php?d=smihub.co.uk
http://search.babylon.com/imageres.php?iu=https%3A%2F%2Fsmihub.co.uk%2F
http://clicktrack.pubmatic.com/AdServer/AdDisplayTrackerServlet?clickData=JnB1YklkPTE1NjMxMyZzaXRlSWQ9MTk5MDE3JmFkSWQ9MTA5NjQ2NyZrYWRzaXplaWQ9OSZ0bGRJZD00OTc2OTA4OCZjYW1wYWlnbklkPTEyNjcxJmNyZWF0aXZlSWQ9MCZ1Y3JpZD0xOTAzODY0ODc3ODU2NDc1OTgwJmFkU2VydmVySWQ9MjQzJmltcGlkPTU0MjgyODhFLTYwRjktNDhDMC1BRDZELTJFRjM0M0E0RjI3NCZtb2JmbGFnPTImbW9kZWxpZD0yODY2Jm9zaWQ9MTIyJmNhcnJpZXJpZD0xMDQmcGFzc2JhY2s9MA==_url=https://smihub.co.uk/
http://alt1.toolbarqueries.google.bg/url?q=https://smihub.co.uk/
http://211-75-39-211.hinet-ip.hinet.net/Adredir.asp?url=https://smihub.co.uk/
http://clients1.google.bg/url?q=https://smihub.co.uk/
http://ads2.figures.com/Ads3/www/delivery/ck.php?ct=1&oaparams=2__bannerid=282__zoneid=248__cb=da025c17ff__oadest=https%3a%2f%2fsmihub.co.uk
http://clients1.google.gy/url?q=http%3A%2F%2Fsmihub.co.uk
http://clients1.google.com.ar/url?q=https%3A%2F%2Fsmihub.co.uk
http://com.co.de/__media__/js/netsoltrademark.php?d=smihub.co.uk
http://clients1.google.com.jm/url?q=https://smihub.co.uk/
http://home.speedbit.com/r.aspx?u=https://smihub.co.uk/
http://cse.google.com.lb/url?sa=t&url=http%3A%2F%2Fsmihub.co.uk%2F
http://blog.bg/results.php?q=%22%2f%3e%3ca+href%3d%22http%3a%2f%2fsmihub.co.uk&
http://images.google.com.co/url?sa=t&url=http%3A%2F%2Fsmihub.co.uk%2F
http://clicrbs.com.br/paidcontent/jsp/login.jspx?site=545&url=goo.gl%2Fmaps%2FoQqZFfefPedXSkNc6&previousurl=http%3a%2f%2fsmihub.co.uk
http://clients1.google.kg/url?q=https://smihub.co.uk/
http://staging.talentegg.ca/redirect/company/224?destination=https://smihub.co.uk/
http://images.google.co.za/url?sa=t&url=http%3A%2F%2Fsmihub.co.uk
http://clients1.google.com.co/url?q=https%3A%2F%2Fsmihub.co.uk
http://cse.google.bf/url?sa=t&url=http%3A%2F%2Fsmihub.co.uk%2F
http://cse.google.com.bz/url?sa=t&url=http%3A%2F%2Fsmihub.co.uk%2F
http://cse.google.com.cu/url?sa=t&url=http%3A%2F%2Fsmihub.co.uk%2F
http://www.talgov.com/Main/exit.aspx?url=https%3A%2F%2Fsmihub.co.uk
http://cse.google.ci/url?sa=t&url=http%3A%2F%2Fsmihub.co.uk%2F
http://blog.ss-blog.jp/_pages/mobile/step/index?u=http%3A%2F%2Fsmihub.co.uk
https://cse.google.tk/url?q=http://smihub.co.uk/
http://www.siteprice.org/similar-websites/eden-project.org
http://clients1.google.ca/url?q=https://smihub.co.uk/
http://cse.google.cm/url?sa=t&url=http%3A%2F%2Fsmihub.co.uk%2F
http://cse.google.ae/url?sa=t&url=http%3A%2F%2Fsmihub.co.uk%2F
http://clients1.google.nr/url?q=http%3A%2F%2Fsmihub.co.uk
http://imaginingourselves.globalfundforwomen.org/pb/External.aspx?url=https://smihub.co.uk/
http://clients1.google.tk/url?q=http%3A%2F%2Fsmihub.co.uk/
http://alt1.toolbarqueries.google.co.il/url?q=https://smihub.co.uk/
http://theamericanmuslim.org/tam.php?URL=smihub.co.uk
http://images.google.com.tr/url?sa=t&url=http%3A%2F%2Fsmihub.co.uk%2F
http://thaiwebsearch.hypermart.net/cgi/clicko.pl?75&smihub.co.uk
http://colil.dbcls.jp/fct/rdfdesc/usage.vsp?g=https://smihub.co.uk/
https://content.sixflags.com/news/director.aspx?gid=0&iid=72&cid=3714&link=http://smihub.co.uk/2021/05/29/rwfeds/
http://adr.tpprf.ru/bitrix/redirect.php?goto=https://smihub.co.uk/
http://jump.2ch.net/?smihub.co.uk
http://clients1.google.com.do/url?q=https%3A%2F%2Fsmihub.co.uk
http://c.yam.com/msnews/IRT/r.c?https://smihub.co.uk/
http://clients1.google.com.sa/url?sa=t&url=https%3A%2F%2Fsmihub.co.uk
https://images.google.tk/url?q=http://smihub.co.uk/
http://cse.google.com.gi/url?sa=t&url=http%3A%2F%2Fsmihub.co.uk%2F
http://ad.sxp.smartclip.net/optout?url=https://smihub.co.uk/&ang_testid=1
http://guru.sanook.com/?URL=https%3A%2F%2Fsmihub.co.uk%2F
http://clients1.google.com.my/url?sa=i&url=https%3A%2F%2Fsmihub.co.uk
http://53938.measurementapi.com/serve?action=click&publisher_id=53938&site_id=69748&sub_campaign=g5e_com&url=https://smihub.co.uk/
http://t.me/iv?url=https%3A%2F%2Fsmihub.co.uk
http://clients1.google.co.ve/url?q=https://smihub.co.uk/
http://ayads.co/click.php?c=735-844&url=https://smihub.co.uk/
http://campaigns.williamhill.com/C.ashx?btag=a_181578b_893c_&affid=1688431&siteid=181578&adid=893&c=&asclurl=https://smihub.co.uk/&AutoR=1
http://www.aomeitech.com/forum/home/leaving?Target=https%3A//smihub.co.uk
http://brandcycle.go2cloud.org/aff_c?offer_id=261&aff_id=1371&url=http%3A%2F%2Fsmihub.co.uk
http://maps.google.de/url?sa=t&url=https%3A%2F%2Fsmihub.co.uk
http://webfeeds.brookings.edu/~/t/0/0/~smihub.co.uk
http://images.google.co.za/url?sa=t&url=http%3A%2F%2Fsmihub.co.uk%2F
http://clients1.google.com.ly/url?q=https://smihub.co.uk/
http://www.biblio.com.br/conteudo/Moldura11.asp?link=//smihub.co.uk/2021/05/29/rwfeds/
http://store.veganessentials.com/affiliates/default.aspx?Affiliate=40&Target=https://smihub.co.uk
http://images.google.be/url?sa=t&url=http%3A%2F%2Fsmihub.co.uk
https://cse.google.nu/url?q=http://smihub.co.uk/
http://images.google.com.sa/url?sa=t&url=http%3A%2F%2Fsmihub.co.uk%2F
http://cse.google.co.uz/url?sa=t&url=http%3A%2F%2Fsmihub.co.uk%2F
https://www.trainorders.com/discussion/warning.php?forum_id=1&url=http://smihub.co.uk/34zxVq8
http://audio.home.pl/redirect.php?action=url&goto=smihub.co.uk&osCsid=iehkyctnmm
http://images.google.co.uk/url?sa=t&url=http%3A%2F%2Fsmihub.co.uk
http://ac8.i2i.jp/bin/getslink.php?00713417&&&https://smihub.co.uk/
http://analytics.supplyframe.com/trackingservlet/track/?action=name&value3=1561&zone=FCfull_SRP_na_us&url=https://smihub.co.uk/
http://adserver.gadu-gadu.pl/click.asp?adid=2236;url=https://smihub.co.uk/
http://www.responsinator.com/?url=smihub.co.uk
http://cse.google.cf/url?sa=t&url=http%3A%2F%2Fsmihub.co.uk%2F
http://clients1.google.ga/url?q=https%3A%2F%2Fsmihub.co.uk/
http://m.ok.ru/dk?st.cmd=outLinkWarning&st.rfn=https%3A%2F%2Fsmihub.co.uk
http://cse.google.co.ck/url?sa=t&url=http%3A%2F%2Fsmihub.co.uk%2F
https://www.wilsonlearning.com/?URL=smihub.co.uk/
http://www.etis.ford.com/externalURL.do?url=https%3A%2F%2Fsmihub.co.uk%2F
https://board-en.drakensang.com/proxy.php?link=http://smihub.co.uk/
http://builder.hufs.ac.kr/goLink.jsp?url=smihub.co.uk/
http://ahlacarte.vraiforum.com/redirect1/https://smihub.co.uk/
https://images.google.cv/url?q=http://smihub.co.uk/
http://clicktrack.pubmatic.com/AdServer/AdDisplayTrackerServlet?clickData=JnB1YklkPTE1NjMxMyZzaXRlSWQ9MTk5MDE3JmFkSWQ9MTA5NjQ2NyZrYWRzaXplaWQ9OSZ0bGRJZD00OTc2OTA4OCZjYW1wYWlnbklkPTEyNjcxJmNyZWF0aXZlSWQ9MCZ1Y3JpZD0xOTAzODY0ODc3ODU2NDc1OTgwJmFkU2VydmVySWQ9MjQzJmltcGlkPTU0MjgyODhFLTYwRjktNDhDMC1BRDZELTJFRjM0M0E0RjI3NCZtb2JmbGFnPTImbW9kZWxpZD0yODY2Jm9zaWQ9MTIyJmNhcnJpZXJpZD0xMDQmcGFzc2JhY2s9MA==_url=https://smihub.co.uk/2021/05/29/rwfeds/
http://clients1.google.de/url?sa=t&url=https%3A%2F%2Fsmihub.co.uk
https://cse.google.cv/url?q=http://smihub.co.uk/
http://cse.google.bi/url?sa=t&url=http%3A%2F%2Fsmihub.co.uk%2F
http://app.guanajuato.gob.mx/revive/www/delivery/ck.php?oaparams=2__bannerid=2447__zoneid=88__cb=cb2b9a1cb1__oadest=http%3a%2f%2fsmihub.co.uk
http://subscriber.zdnet.de/profile/login.php?continue=https%3A%2F%2Fsmihub.co.uk%2F&continue_label=ZDNet.de
http://aacollabarchive.humin.lsa.umich.edu/omeka/setlocale?locale=es&redirect=http%3a%2f%2fsmihub.co.uk
http://apptube.podnova.com/go/?go=https://smihub.co.uk/
http://images.google.com.ua/url?sa=t&url=http%3A%2F%2Fsmihub.co.uk
http://www.kaskus.co.id/redirect?url=https%3A%2F%2Fsmihub.co.uk
http://community.cypress.com/external-link.jspa?url=https%3A%2F%2Fsmihub.co.uk
https://images.google.bs/url?q=http://smihub.co.uk/
http://community.acer.com/en/home/leaving/smihub.co.uk
http://daemon.indapass.hu/http/session_request?redirect_to=https%3A%2F%2Fsmihub.co.uk%2F&partner_id=bloghu
http://images.google.com.hk/url?sa=t&url=http%3A%2F%2Fsmihub.co.uk
http://clients1.google.je/url?q=https%3A%2F%2Fsmihub.co.uk/
http://www.novalogic.com/remote.asp?NLink=https://smihub.co.uk/2021/05/29/rwfeds/
http://cm-sg.wargaming.net/frame/?service=frm&project=wot&realm=sg&language=en&login_url=http%3A%2F%2Fsmihub.co.uk&logout_url=http%3A%2F%2Fforum.worldoftanks.asia%2Findex.php%3Fapp%3Dcore%26module%3Dglobal%26section%3Dlogin%26do%3Dlogoutoid&incomplete_profile_url=http%3A%2F%2Fforum.worldoftanks.asia%2Findex.php%3Fapp%3Dmembers%26module%3Dprofile%26do%3Ddocompleteaccount&token_url=http%3A%2F%2Fforum.worldoftanks.asia%2Fmenutoken&frontend_url=http%3A%2F%2Fcdn-cm.gcdn.co&backend_url=http%3A%2F%2Fcm-sg.wargaming.net&open_links_in_new_tab=¬ifications_enabled=1&chat_enabled=&incomplete_profile_notification_enabled=&intro_tooltips_enabled=1®istration_url=http%3A%2F%2Fforum.worldoftanks.asia%2Findex.php%3Fapp%3Dcore%26module%3Dglobal%26section%3Dregister
http://images.google.cz/url?sa=t&url=http%3A%2F%2Fsmihub.co.uk%2F
http://cse.google.co.ug/url?sa=t&url=http%3A%2F%2Fsmihub.co.uk%2F
http://sys.labaq.com/cli/go.php?s=lbac&p=1410jt&t=02&url=https://smihub.co.uk/
http://clients1.google.cg/url?q=https://smihub.co.uk/
http://legacy.aom.org/verifymember.asp?nextpage=https%3A%2F%2Fsmihub.co.uk
http://clients1.google.iq/url?q=https%3A%2F%2Fsmihub.co.uk/
http://clients1.google.cv/url?q=http%3A%2F%2Fsmihub.co.uk
http://cm-ru.wargaming.net/frame/?service=frm&project=wot&realm=ru&language=ru&login_url=http%3A%2F%2Fsmihub.co.uk&logout_url=http%3A%2F%2Ffor
http://cse.google.co.uk/url?sa=t&url=http%3A%2F%2Fsmihub.co.uk%2F
https://www.mydoterra.com/Application/index.cfm?EnrollerID=458046&Theme=DefaultTheme&Returnurl=smihub.co.uk/&LNG=en_dot&iact=1
https://redirect.vebeet.com/index.php?url=//smihub.co.uk/cities/tampa-fl/
http://cse.google.co.zw/url?sa=t&url=http%3A%2F%2Fsmihub.co.uk%2F
http://alt1.toolbarqueries.google.at/url?q=https://smihub.co.uk/
http://www.adminer.org/redirect/?url=https%3A%2F%2Fsmihub.co.uk&lang=en
https://webneel.com/i/3d-printer/5-free-3d-printer-model-website-yeggi/ei/12259?s=smihub.co.uk/2021/05/29/rwfeds/
http://apf.francophonie.org/doc.html?url=https://smihub.co.uk/
http://cse.google.by/url?sa=t&url=http%3A%2F%2Fsmihub.co.uk%2F
http://www.jarrow.com/jump/http:_@__@_smihub.co.uk
http://yahoo-mbga.jp/r?url=//smihub.co.uk
http://www.pcpitstop.com/offsite.asp?https://smihub.co.uk/
http://getpocket.com/redirect?url=https%3A%2F%2Fsmihub.co.uk%2F
http://cse.google.com.jm/url?sa=t&url=http%3A%2F%2Fsmihub.co.uk%2F
http://cse.google.com.ec/url?sa=t&url=http%3A%2F%2Fsmihub.co.uk%2F
http://www.drinksmixer.com/redirect.php?url=https%3A%2F%2Fsmihub.co.uk%2F
http://5cfxm.hxrs6.servertrust.com/v/affiliate/setCookie.asp?catId=1180&return=https://smihub.co.uk
https://ditu.google.com/url?q=http://smihub.co.uk/management.html
http://cse.google.co.ao/url?sa=t&url=http%3A%2F%2Fsmihub.co.uk%2F
http://businesseast.ucoz.com/go?https://smihub.co.uk/
https://www.streetwisereports.com/cs/blank/main?x-p=click/fwd&rec=ads/443&url=http://smihub.co.uk/2021/05/29/rwfeds/
http://images.google.com.ec/url?sa=t&url=http%3A%2F%2Fsmihub.co.uk%2F
http://www.sponsorship.com/Marketplace/redir.axd?ciid=514&cachename=advertising&PageGroupId=14&url=https://smihub.co.uk
http://clients1.google.com.eg/url?q=https://smihub.co.uk/
http://cat.sls.cuhk.edu.hk/CRF/visualization?Species=https://smihub.co.uk/
https://clients1.google.com/url?q=http://smihub.co.uk/management.html
http://creativecommons.org/choose/results-one?q_1=2&q_1=1&field_commercial=n&field_derivatives=sa&field_jurisdiction=&field_format=Text&field_worktitle=Blog&field_attribute_to_name=Lam%20HUA&field_attribute_to_url=http%3A%2F%2Fsmihub.co.uk%2F
http://tools.folha.com.br/print?url=https%3A%2F%2Fsmihub.co.uk%2F&site=blogfolha
http://clients1.google.co.kr/url?q=https://smihub.co.uk/
http://apiprop.sulekha.com/common/apploginredirect.aspx?enclgn=ilsxyvoDCT5XZjQCeHI5qlKoZ3Ljv/1wHK3AR7dYYz8%3D&nexturl=https://smihub.co.uk/
http://cse.google.de/url?sa=t&url=https%3A%2F%2Fsmihub.co.uk
http://images.google.dk/url?sa=t&url=http%3A%2F%2Fsmihub.co.uk%2F
http://avp.innity.com/click/?campaignid=10933&adid=115198&zoneid=39296&pubid=3194&ex=1412139790&pcu=&auth=3tx88b-1412053876272&url=http%3A%2F%2Fsmihub.co.uk
http://ads.haberler.com/redir.asp?tur=habericilink&url=https://smihub.co.uk/
http://ip.tool.chinaz.com/?ip=smihub.co.uk
http://ax.bk55.ru/cur/www/delivery/ck.php?ct=1&oaparams=2__bannerid=4248__zoneid=141__OXLCA=1__cb=1be00d870a__oadest=https://smihub.co.uk/
http://support.dalton.missouri.edu/?URL=smihub.co.uk
http://banri.moo.jp/-18/?wptouch_switch=desktop&redirect=https%3a%2f%2fsmihub.co.uk
http://avatar-cat-ru.1gb.ru/index.php?name=plugins&p=out&url=smihub.co.uk
http://sogo.i2i.jp/link_go.php?url=https://smihub.co.uk/
http://clients1.google.co.ug/url?q=https://smihub.co.uk/
http://cse.google.cd/url?sa=t&url=http%3A%2F%2Fsmihub.co.uk%2F
http://www.t.me/iv?url=http%3A%2F%2Fsmihub.co.uk
http://www.ibm.com/links/?cc=us&lc=en&prompt=1&url=//smihub.co.uk
http://alt1.toolbarqueries.google.co.ao/url?q=https://smihub.co.uk/
http://clients1.google.co.ke/url?sa=t&url=https://smihub.co.uk/
http://cse.google.al/url?sa=t&url=http%3A%2F%2Fsmihub.co.uk%2F
http://dotekomanie.cz/heureka/?url=https%3a%2f%2fsmihub.co.uk%2F
http://images.google.co.id/url?sa=t&url=http%3A%2F%2Fsmihub.co.uk%2F
http://images.google.de/url?sa=t&url=https%3A%2F%2Fsmihub.co.uk
https://maps.google.tk/url?q=http://smihub.co.uk/
http://www.astro.wisc.edu/?URL=https%3A%2F%2Fsmihub.co.uk
http://images.google.com.br/url?sa=t&url=http%3A%2F%2Fsmihub.co.uk%2F
http://cse.google.co.ke/url?sa=t&url=http%3A%2F%2Fsmihub.co.uk%2F
http://cse.google.co.il/url?sa=t&url=http%3A%2F%2Fsmihub.co.uk%2F
http://api.fooducate.com/fdct/message/t/?t=592390BA-2F20-0472-4BA5-A59870BBA6A2:61213861:5AFC37A3-CAD4-CC42-4921-9BE2094B0A14&a=c&d=https://smihub.co.uk/
http://armenaikkandomainrating5.blogspot.com0.vze.com/frame-forward.cgi?https://smihub.co.uk/
http://cse.google.co.in/url?sa=t&url=http%3A%2F%2Fsmihub.co.uk%2F
http://subscriber.silicon.co.uk/profile/login.php?continue=https%3A%2F%2Fsmihub.co.uk%2F&continue_label=TechWeekEurope+UK
http://cse.google.com.bn/url?sa=t&url=http%3A%2F%2Fsmihub.co.uk%2F
http://images.google.com.do/url?sa=t&url=http%3A%2F%2Fsmihub.co.uk
http://alt1.toolbarqueries.google.com.lb/url?q=https://smihub.co.uk/
http://cr.naver.com/redirect-notification?u=https%3A%2F%2Fsmihub.co.uk
http://images.google.com.au/url?sa=t&url=http%3A%2F%2Fsmihub.co.uk
http://brangista.j-server.com/BRASADAIJ/ns/tl_ex.cgi?Surl=https://smihub.co.uk/
http://beskuda.ucoz.ru/go?https://smihub.co.uk/
http://uriu-ss.jpn.org/xoops/modules/wordpress/wp-ktai.php?view=redir&url=http%3a%2f%2fsmihub.co.uk
http://cse.google.com.ai/url?sa=t&url=http%3A%2F%2Fsmihub.co.uk%2F
http://cse.google.cat/url?sa=t&url=http%3A%2F%2Fsmihub.co.uk%2F
http://www.luminous-lint.com/app/iframe/photographer/Frantisek__Drtikol/smihub.co.uk
http://onlinemanuals.txdot.gov/help/urlstatusgo.html?url=https%3A%2F%2Fsmihub.co.uk
http://click.karenmillen.com/knmn40/c2.php?KNMN/94073/5285/H/N/V/https://smihub.co.uk/
http://images.google.com.pe/url?sa=t&url=http%3A%2F%2Fsmihub.co.uk
http://images.google.ee/url?sa=t&url=http%3A%2F%2Fsmihub.co.uk
http://ar.thefreedictionary.com/_/cite.aspx?url=http%3a%2f%2fsmihub.co.uk&word=%D8%AD%D9%8E%D9%84%D9%90%D9%85%D9%8E&sources=kdict
http://bigtakeover.com/revive/www/delivery/ck.php?ct=1&oaparams=2__bannerid=68__zoneid=4__cb=c0575383b9__oadest=https://smihub.co.uk/
http://circuitomt.com.br/publicidade/www/delivery/ck.php?ct=1&oaparams=2__bannerid=34__zoneid=2__cb=6cc35441a4__oadest=http%3a%2f%2fsmihub.co.uk
http://akid.s17.xrea.com/p2ime.php?url=https://smihub.co.uk/
http://clients1.google.com.tr/url?sa=t&url=https%3A%2F%2Fsmihub.co.uk
http://links.giveawayoftheday.com/smihub.co.uk
http://www2.ogs.state.ny.us/help/urlstatusgo.html?url=https%3A%2F%2Fsmihub.co.uk
http://images.google.co.il/url?sa=t&url=http%3A%2F%2Fsmihub.co.uk
http://bompasandparr.com/?URL=https://smihub.co.uk/
http://cse.google.com.ag/url?sa=t&url=http%3A%2F%2Fsmihub.co.uk%2F
http://new.creativecommons.org/choose/results-one?q_1=2&q_1=1&field_commercial=n&field_derivatives=sa&field_jurisdiction=&field_format=Text&field_worktitle=Blog&field_attribute_to_name=Lam%20HUA&field_attribute_to_url=https%3A%2F%2Fsmihub.co.uk%2F
http://optimize.viglink.com/page/pmv?url=https%3A%2F%2Fsmihub.co.uk
http://cse.google.com.co/url?sa=t&url=http%3A%2F%2Fsmihub.co.uk%2F
http://blackfive.net/__media__/js/netsoltrademark.php?d=smihub.co.uk
http://api.mixpanel.com/track/?data=eyJldmVudCI6ICJmdWxsdGV4dGNsaWNrIiwgInByb3BlcnRpZXMiOiB7InRva2VuIjogImE0YTQ2MGEzOTA0ZWVlOGZmNWUwMjRlYTRiZGU3YWMyIn19&ip=1&redirect=https://smihub.co.uk/
http://alt1.toolbarqueries.google.bs/url?q=https://smihub.co.uk/
http://video.fc2.com/exlink.php?uri=https%3A%2F%2Fsmihub.co.uk%2F
http://cse.google.co.jp/url?sa=t&url=http%3A%2F%2Fsmihub.co.uk%2F
http://images.google.es/url?sa=t&url=http%3A%2F%2Fsmihub.co.uk
http://alt1.toolbarqueries.google.co.za/url?q=https://smihub.co.uk/
http://ads.bhol.co.il/clicks_counter.asp?macrocid=5635&campid=177546&DB_link=0&userid=0&ISEXT=0&url=https://smihub.co.uk/
http://cse.google.be/url?sa=t&url=http%3A%2F%2Fsmihub.co.uk%2F
http://at070582.xsrv.jp/?wptouch_switch=desktop&redirect=http%3a%2f%2fsmihub.co.uk
http://u.to/?url=https%3A%2F%2Fsmihub.co.uk%2F&a=add
http://ipv4.google.com/url?q=https%3A%2F%2Fsmihub.co.uk%2F
http://cse.google.co.ve/url?sa=t&url=http%3A%2F%2Fsmihub.co.uk%2F
http://catzlyst.phrma.org/__media__/js/netsoltrademark.php?d=smihub.co.uk
http://clients1.google.co.jp/url?q=https://smihub.co.uk/
http://clients1.google.com.hk/url?sa=t&url=http%3A%2F%2Fsmihub.co.uk
http://clients1.google.cd/url?sa=t&url=https://smihub.co.uk/
http://bares.blog.idnes.cz/redir.aspx?url=https%3A%2F%2Fsmihub.co.uk
http://www.ip-adress.com/website/smihub.co.uk
http://clients1.google.st/url?q=https://smihub.co.uk/
http://cse.google.co.vi/url?sa=t&url=http%3A%2F%2Fsmihub.co.uk%2F
http://cse.google.com.br/url?sa=t&url=http%3A%2F%2Fsmihub.co.uk%2F
http://parkcities.bubblelife.com/click/c3592/?url=https://smihub.co.uk/
http://clients1.google.by/url?sa=t&url=https%3A%2F%2Fsmihub.co.uk
http://antigo.anvisa.gov.br/listagem-de-alertas/-/asset_publisher/R6VaZWsQDDzS/content/alerta-3191-tecnovigilancia-boston-scientific-do-brasil-ltda-fibra-optica-greenlight-possibilidade-de-queda-de-temperatura-da-tampa-de-metal-e-da-pont/33868?inheritRedirect=false&redirect=http%3A%2F%2Fsmihub.co.uk
http://cse.google.ca/url?sa=t&url=http%3A%2F%2Fsmihub.co.uk%2F
http://cse.google.com.au/url?sa=t&url=http%3A%2F%2Fsmihub.co.uk%2F
http://ads.hitparade.ch/link.php?ad_id=28&url=https://smihub.co.uk/
http://clients1.google.tm/url?q=https%3A%2F%2Fsmihub.co.uk/
http://images.google.com.pk/url?sa=t&url=http%3A%2F%2Fsmihub.co.uk
http://cc.cgps.tn.edu.tw/dyna/netlink/hits.php?id=46&url=https://smihub.co.uk/
http://cse.google.co.ma/url?sa=t&url=http%3A%2F%2Fsmihub.co.uk%2F
http://clients1.google.ne/url?q=https://smihub.co.uk/
http://cse.google.com.et/url?sa=t&url=http%3A%2F%2Fsmihub.co.uk%2F
http://nou-rau.uem.br/nou-rau/zeus/auth.php?back=https%3A%2F%2Fsmihub.co.uk%2F&go=x&code=x&unit=x
http://cc.naver.jp/cc?a=dtl.topic&r=&i=&bw=1024&px=0&py=0&sx=-1&sy=-1&m=1&nsc=knews.viewpage&u=https%3A%2F%2Fsmihub.co.uk
http://images.google.com.mx/url?sa=t&url=http%3A%2F%2Fsmihub.co.uk
http://cse.google.com.fj/url?sa=t&url=http%3A%2F%2Fsmihub.co.uk%2F
http://a1.adform.net/C/?CC=1&bn=1015999%3Bc=1%3Bkw=Forex%20Trading%3Bcpdir=https://smihub.co.uk/
http://alt1.toolbarqueries.google.com.br/url?q=https://smihub.co.uk/
http://cse.google.com.hk/url?sa=t&url=http%3A%2F%2Fsmihub.co.uk%2F
http://catalog.dir.bg/url.php?URL=https://smihub.co.uk/
http://clients1.google.it/url?q=http%3A%2F%2Fsmihub.co.uk/
http://counter.iflyer.tv/?trackid=gjt:1:&link=https://smihub.co.uk/
http://alt1.toolbarqueries.google.co.vi/url?q=https://smihub.co.uk/
http://admin.billoreilly.com/site/rd?satype=13&said=12&url=https://smihub.co.uk/
http://clients1.google.mn/url?q=https%3A%2F%2Fsmihub.co.uk
http://backlink.scandwap.xtgem.com/?id=IRENON&url=smihub.co.uk
https://www.videoder.com/af/media?mode=2&url=http://smihub.co.uk
http://ad.gunosy.com/pages/redirect?location=https://smihub.co.uk/
http://pw.mail.ru/forums/fredirect.php?url=smihub.co.uk
http://armoryonpark.org/?URL=https://smihub.co.uk/
http://app.hamariweb.com/iphoneimg/large.php?s=https://smihub.co.uk/
http://enseignants.flammarion.com/Banners_Click.cfm?ID=86&URL=smihub.co.uk
http://decisoes.fazenda.gov.br/netacgi/nph-brs?d=DECW&f=S&l=20&n=-DTPE&p=10&r=3&s1=COANA&u=http%3A%2F%2Fsmihub.co.uk
http://clients1.google.am/url?q=https://smihub.co.uk/
http://www.transtats.bts.gov/exit.asp?url=https%3A%2F%2Fsmihub.co.uk%2F
http://archive.aidsmap.com/Aggregator.ashx?url=https://smihub.co.uk/
http://countrysideveterinaryhospital.vetstreet.com/https://smihub.co.uk/
http://images.google.bg/url?sa=t&url=http%3A%2F%2Fsmihub.co.uk
http://pl.grepolis.com/start/redirect?url=https%3A%2F%2Fsmihub.co.uk%2F
https://www.google.ws/url?q=http://smihub.co.uk/
http://banners.molbiol.ru/openx/www/delivery/ck.php?ct=1&oaparams=2__bannerid=552__zoneid=16__cb=70ec3bb20d__oadest=http%3a%2f%2fsmihub.co.uk
http://archive.is/smihub.co.uk
http://blogs.rtve.es/libs/getfirma_footer_prod.php?blogurl=http%3A%2F%2Fsmihub.co.uk
http://asoechat.wap.sh/redirect?url=smihub.co.uk
http://images.google.com.co/url?sa=t&url=http%3A%2F%2Fsmihub.co.uk
http://cse.google.ch/url?sa=t&url=http%3A%2F%2Fsmihub.co.uk%2F
http://classweb.fges.tyc.edu.tw:8080/dyna/webs/gotourl.php?url=https://smihub.co.uk/
http://adms3.hket.com/openxprod2/www/delivery/ck.php?ct=1&oaparams=2__bannerid=527__zoneid=667__cb=72cbf61f88__oadest=https://smihub.co.uk/
http://alt1.toolbarqueries.google.co.ls/url?q=https://smihub.co.uk/
http://cse.google.bg/url?sa=t&url=http%3A%2F%2Fsmihub.co.uk%2F
http://ijbssnet.com/view.php?u=https://smihub.co.uk/2021/05/29/rwfeds/
http://affiliates.thelotter.com/aw.aspx?A=1&Task=Click&ml=31526&TargetURL=https://smihub.co.uk/
http://777masa777.lolipop.jp/search/rank.cgi?mode=link&id=83&url=http%3a%2f%2fsmihub.co.uk
http://images.google.com.my/url?sa=t&url=http%3A%2F%2Fsmihub.co.uk
http://b.gnavi.co.jp/ad/no_cookie/b_link?loc=1002067&bid=100004228&link_url=http%3A%2F%2Fsmihub.co.uk
http://www.drugoffice.gov.hk/gb/unigb/smihub.co.uk
http://clients1.google.bj/url?sa=t&url=http%3A%2F%2Fsmihub.co.uk
http://bizsearch.jhnewsandguide.com/__media__/js/netsoltrademark.php?d=smihub.co.uk
http://adms.hket.com/openxprod2/www/delivery/ck.php?ct=1&oaparams=2__bannerid=6685__zoneid=2040__cb=dfaf38fc52__oadest=http%3a%2f%2fsmihub.co.uk
http://es.chaturbate.com/external_link/?url=https%3A%2F%2Fsmihub.co.uk
http://images.google.com.uy/url?sa=t&url=http%3A%2F%2Fsmihub.co.uk%2F
https://cse.google.com/url?q=http://smihub.co.uk/management.html
http://12.rospotrebnadzor.ru/action_plans/inspection/-/asset_publisher/iqO1/document/id/460270?_101_INSTANCE_iqO1_redirect=https://smihub.co.uk/
http://bigoo.ws/__media__/js/netsoltrademark.php?d=smihub.co.uk
https://www.raincoast.com/?URL=smihub.co.uk
http://clients1.google.ci/url?q=https://smihub.co.uk/
http://ref.webhostinghub.com/scripts/click.php?ref_id=nichol54&desturl=https://smihub.co.uk/
http://web.stanford.edu/cgi-bin/redirect?dest=http%3A%2F%2Fsmihub.co.uk
https://cse.google.tk/url?sa=t&url=http://smihub.co.uk/
http://community.esri.com/external-link.jspa?url=https%3A%2F%2Fsmihub.co.uk
http://www.google.com/url?sa=t&url=https%3A%2F%2Fsmihub.co.uk
http://cse.google.com.kw/url?sa=t&url=http%3A%2F%2Fsmihub.co.uk%2F
http://ads.specificmedia.com/click/v=5;m=2;l=23470;c=146418;b=874880;p=ui=ACXqoRFLEtwSFA;tr=DZeqTyQW0qH;tm=0-0;ts=20110427233838;dct=https://smihub.co.uk/
http://alt1.toolbarqueries.google.co.id/url?q=https://smihub.co.uk/
http://digital.fijitimes.com/api/gateway.aspx?f=https://smihub.co.uk
http://rd.rakuten.co.jp/a/?R2=https%3A//smihub.co.uk/
http://www3.valueline.com/vlac/logon.aspx?lp=https://smihub.co.uk
http://bpx.bemobi.com/opx/5.0/OPXIdentifyUser?Locale=uk&SiteID=402698301147&AccountID=202698299566&ecid=KR5t1vLv9P&AccessToken=&RedirectURL=https://smihub.co.uk/
http://www.economia.unical.it/prova.php?a%5B%5D=%3Ca+href%3Dhttps%3A%2F%2Fsmihub.co.uk%2F
http://br.nate.com/diagnose.php?from=w&r_url=http%3A%2F%2Fsmihub.co.uk
http://alt1.toolbarqueries.google.bj/url?q=https://smihub.co.uk/
http://images.google.com.tw/url?sa=t&url=http%3A%2F%2Fsmihub.co.uk%2F
https://www.xcelenergy.com/stateselector?stateselected=true&goto=http://smihub.co.uk
http://www.film1.nl/zoek/?q=%22%2F%3E%3Ca+href%3D%22https%3A%2F%2Fsmihub.co.uk%2F&sa=&cx=009153552854938002534%3Aaf0ze8etbks&ie=ISO-8859-1&cof=FORID%3
https://cse.google.com/url?sa=t&url=http://smihub.co.uk/
http://clients1.google.co.il/url?sa=i&url=https%3A%2F%2Fsmihub.co.uk
http://alt1.toolbarqueries.google.com.np/url?q=https://smihub.co.uk/
http://images.google.com.vn/url?sa=t&url=http%3A%2F%2Fsmihub.co.uk%2F
http://ads1.opensubtitles.org/1/www/delivery/afr.php?zoneid=3&cb=984766&query=One+Froggy+Evening&landing_url=https://smihub.co.uk/
http://adrian.edu/?URL=https://smihub.co.uk/
http://bidr.trellian.com/r.php?u=http%3A%2F%2Fsmihub.co.uk
https://www.htcdev.com/?URL=smihub.co.uk
http://aid97400.lautre.net/spip.php?action=cookie&url=https://smihub.co.uk/
https://doterra.myvoffice.com/Application/index.cfm?&EnrollerID=604008&Theme=Default&ReturnUrl=http://smihub.co.uk
http://images.google.com.mx/url?sa=t&url=http%3A%2F%2Fsmihub.co.uk%2F
http://cse.google.cg/url?sa=t&url=http%3A%2F%2Fsmihub.co.uk%2F
http://images.google.co.th/url?sa=t&url=http%3A%2F%2Fsmihub.co.uk
http://clients1.google.gl/url?q=http%3A%2F%2Fsmihub.co.uk
http://fftoolbox.fulltimefantasy.com/search.cfm?q=%22%2F%3E%3Ca+href%3D%22https%3A%2F%2Fsmihub.co.uk%2F
http://images.google.com.bd/url?sa=t&url=http%3A%2F%2Fsmihub.co.uk%2F
http://clients1.google.co.za/url?q=https://smihub.co.uk/
http://cse.google.co.id/url?sa=t&url=http%3A%2F%2Fsmihub.co.uk%2F
http://smihub.co.uk.ipaddress.com/
http://cgi.davec.plus.com/cgi-bin/logs/loglink.cgi?https://smihub.co.uk/
http://forms.bl.uk/newsletters/index.aspx?back=https%3A//smihub.co.uk/
https://tour.catalinacruz.com/pornstar-gallery/puma-swede-face-sitting-on-cassie-young-lesbian-fun/?link=http://smihub.co.uk/holostyak-stb-2021
http://www.youtube.com/redirect?q=https%3A%2F%2Fsmihub.co.uk%2F
http://alt1.toolbarqueries.google.com.vc/url?q=https://smihub.co.uk/
http://bulkmail.doh.state.fl.us/lt.php?c=102&m=144&nl=18&lid=922&l=https://smihub.co.uk/
http://sc.sie.gov.hk/TuniS/smihub.co.uk
http://images.google.cl/url?sa=t&url=http%3A%2F%2Fsmihub.co.uk%2F
http://images.google.ae/url?sa=t&url=http%3A%2F%2Fsmihub.co.uk%2F
http://alt1.toolbarqueries.google.tg/url?q=https://smihub.co.uk/
http://images.google.com.ng/url?sa=t&url=http%3A%2F%2Fsmihub.co.uk
http://images.google.fi/url?sa=t&url=http%3A%2F%2Fsmihub.co.uk
http://cse.google.cl/url?sa=t&url=http%3A%2F%2Fsmihub.co.uk%2F
http://images.google.com.vn/url?sa=t&url=http%3A%2F%2Fsmihub.co.uk
http://cse.google.ad/url?sa=t&url=http%3A%2F%2Fsmihub.co.uk%2F
https://partnerpage.google.com/url?sa=i&url=http://smihub.co.uk/
http://clients1.google.tg/url?q=https%3A%2F%2Fsmihub.co.uk
http://images.google.co.il/url?sa=t&url=http%3A%2F%2Fsmihub.co.uk%2F
http://clients1.google.nu/url?q=https%3A%2F%2Fsmihub.co.uk/
https://services.celemony.com/cgi-bin/WebObjects/LicenseApp.woa/wa/MCFDirectAction/link?linkId=1001414&stid=3463129&url=smihub.co.uk/2021/05/29/rwfeds/
http://cse.google.co.zm/url?sa=t&url=http%3A%2F%2Fsmihub.co.uk%2F
https://200-155-82-24.bradesco.com.br/conteudo/pessoa-fisica/popExt.aspx?url=http://smihub.co.uk/2021/05/29/rwfeds/
http://a.twiago.com/adclick.php?tz=1473443342212991&pid=198&kid=2365&wmid=14189&wsid=65&uid=28&sid=3&sid2=2&swid=8950&ord=1473443342&target=https://smihub.co.uk/
http://clients1.google.ee/url?q=https://smihub.co.uk/
http://clients1.google.co.nz/url?sa=t&url=https%3A%2F%2Fsmihub.co.uk
http://alt1.toolbarqueries.google.ac/url?q=https://smihub.co.uk/
http://m.odnoklassniki.ru/dk?st.cmd=outLinkWarning&st.rfn=https%3A%2F%2Fsmihub.co.uk
https://www.qscience.com/locale/redirect?redirectItem=http://smihub.co.uk
http://cse.google.co.za/url?sa=t&url=http%3A%2F%2Fsmihub.co.uk%2F
http://111.1gb.ru/go.php?https://smihub.co.uk/
http://images.google.co.in/url?sa=t&url=http%3A%2F%2Fsmihub.co.uk
http://alt1.toolbarqueries.google.com.my/url?q=https://smihub.co.uk/
http://aqua21.jpn.org/lateequ/navi/navi.cgi?&mode=jump&id=6936&url=smihub.co.uk
http://webmail.mawebcenters.com/parse.pl?redirect=https://smihub.co.uk
http://alt1.toolbarqueries.google.cf/url?q=https://smihub.co.uk/
http://cse.google.com.gh/url?sa=t&url=http%3A%2F%2Fsmihub.co.uk%2F
https://www.google.bs/url?q=http://smihub.co.uk/
http://as.inbox.com/AC.aspx?id_adr=262&link=https://smihub.co.uk/
http://cse.google.com.do/url?sa=t&url=http%3A%2F%2Fsmihub.co.uk%2F
http://www.cssdrive.com/?URL=smihub.co.uk/holostyak-stb-2021
https://advtest.exibart.com/adv/adv.php?id_banner=7201&link=http://smihub.co.uk/2021/05/29/rwfeds/
http://images.google.com.eg/url?sa=t&url=http%3A%2F%2Fsmihub.co.uk%2F
http://ad.foxitsoftware.com/adlog.php?a=redirect&img=testad&url=smihub.co.uk
http://chtbl.com/track/118167/smihub.co.uk/
http://alt1.toolbarqueries.google.com.af/url?q=https://smihub.co.uk/
https://maps.google.nu/url?q=http://smihub.co.uk/
http://images.google.com.tw/url?sa=t&url=http%3A%2F%2Fsmihub.co.uk
https://maps.google.ws/url?q=http://smihub.co.uk/
http://action.metaffiliation.com/redir.php?u=https://smihub.co.uk/
http://bons-plans-astuces.digidip.net/visit?url=http%3A%2F%2Fsmihub.co.uk
http://crash-ut3.clan.su/go?https://smihub.co.uk/
http://cse.google.co.cr/url?sa=t&url=http%3A%2F%2Fsmihub.co.uk%2F
http://archives.richmond.ca/archives/descriptions/results.aspx?AC=SEE_ALSO&QF0=NameAccess&QI0==%22Currie%20McWilliams%20Camp%22&XC=http%3a%2f%2fsmihub.co.uk&BU=https%3a%2f%2fcutepix.info%2fsex%2friley-reyes.php&TN=Descriptions&SN=AUTO19204&SE=1790&RN=2&MR=20&TR=0&TX=1000&ES=0&CS=0&XP=&RF=WebBrief&EF=&DF=WebFull&RL=0&EL=0&DL=0&NP=255&ID=&MF=GENERICENGWPMSG.INI&MQ=&TI=0&DT=&ST=0&IR=173176&NR=1&NB=0&SV=0&SS=0&BG=&FG=&QS=&OEX=ISO-8859-1&OEH=utf-8
http://plus.google.com/url?q=https%3A%2F%2Fsmihub.co.uk%2F
https://www.horseillustrated.com/redirect.php?location=http://smihub.co.uk
http://whois.domaintools.com/smihub.co.uk
http://cse.google.com.kh/url?sa=t&url=http%3A%2F%2Fsmihub.co.uk%2F
http://www.timeandtiming.com/?&URL=smihub.co.uk
http://arhvak.minobrnauki.gov.ru/c/document_library/find_file_entry?p_l_id=17390&noSuchEntryRedirect=https://smihub.co.uk/
https://posts.google.com/url?q=http://smihub.co.uk/management.html
http://wtk.db.com/777554543598768/optout?redirect=https://smihub.co.uk
http://images.google.ca/url?sa=t&url=http%3A%2F%2Fsmihub.co.uk
http://app.feedblitz.com/f/f.fbz?track=smihub.co.uk
http://nutritiondata.self.com/facts/recipe/1304991/2?mbid=HDFD&trackback=http%3A%2F%2Fwww.smihub.co.uk
http://images.google.co.nz/url?sa=t&url=http%3A%2F%2Fsmihub.co.uk%2F
http://alt1.toolbarqueries.google.is/url?q=https://smihub.co.uk/
http://ts.videosz.com/out.php?cid=101&aid=102&nis=0&srid=392&url=https://smihub.co.uk/
https://www.google.tk/url?q=http://smihub.co.uk/
http://clients1.google.co.ao/url?q=https%3A%2F%2Fsmihub.co.uk/
http://amaterasu.dojin.com/home/ranking.cgi?ti=%94%92%82%C6%8D%95%82%CC%94%FC%8Aw%81B&HP=http%3a%2f%2fsmihub.co.uk&ja=3&id=19879&action=regist
http://www.astronet.ru/db/msusearch/index.html?q=%3Ca+href%3Dhttps%3A%2F%2Fsmihub.co.uk%2F
http://images.google.com.sg/url?sa=t&url=http%3A%2F%2Fsmihub.co.uk%2F
https://bugcrowd.com/external_redirect?site=http://smihub.co.uk
http://biwa28.lolipop.jp/ys100/rank.cgi?mode=link&id=1290&url=https%3A%2F%2Fsmihub.co.uk
http://fcaw.library.umass.edu/goto/https:/smihub.co.uk
http://radio.cancaonova.com/iframe-loader/?t=DatingSingle:NoLongeraMystery-R�dio&ra=&url=https://smihub.co.uk/2021/05/29/rwfeds/
https://cse.google.nr/url?sa=t&url=http://smihub.co.uk/
http://clients1.google.gg/url?q=https%3A%2F%2Fsmihub.co.uk
http://cse.google.bj/url?sa=t&url=http%3A%2F%2Fsmihub.co.uk%2F
http://camiane.dmcart.gethompy.com/shop/bannerhit.php?bn_id=91&url=http%3a%2f%2fsmihub.co.uk
https://www.relativitymedia.com/logout?redirect=//smihub.co.uk/
http://anoushkabold.com/__media__/js/netsoltrademark.php?d=smihub.co.uk
http://cse.google.com.cy/url?sa=t&url=http%3A%2F%2Fsmihub.co.uk%2F
http://cse.google.am/url?sa=t&url=http%3A%2F%2Fsmihub.co.uk%2F
https://www.meetme.com/apps/redirect/?url=http://smihub.co.uk
http://cse.google.at/url?sa=t&url=http%3A%2F%2Fsmihub.co.uk%2F
http://legacy.aom.org/verifymember.asp?nextpage=https%3A//smihub.co.uk/
https://images.google.nu/url?q=http://smihub.co.uk/
https://images.google.ws/url?q=http://smihub.co.uk/
http://clients1.google.com.et/url?q=https%3A%2F%2Fsmihub.co.uk
http://cse.google.bs/url?sa=t&url=http%3A%2F%2Fsmihub.co.uk%2F
https://mitsui-shopping-park.com/lalaport/iwata/redirect.html?url=http://smihub.co.uk/
https://www.barrypopik.com/index.php?URL=http://smihub.co.uk
http://clients1.google.com.om/url?q=https://smihub.co.uk/
http://bioinfo3d.cs.tau.ac.il/wk/api.php?action=https://smihub.co.uk/
http://contacts.google.com/url?sa=t&url=http%3A%2F%2Fsmihub.co.uk
http://sc.hkex.com.hk/gb/smihub.co.uk
http://cse.google.com.bo/url?sa=t&url=http%3A%2F%2Fsmihub.co.uk%2F
http://cse.google.co.nz/url?sa=t&url=http%3A%2F%2Fsmihub.co.uk%2F
https://www.extremnews.com/nachrichten/standard/dereferrer.cfm?rurl=http://smihub.co.uk/2021/05/29/rwfeds/
http://cse.google.co.ls/url?sa=t&url=http%3A%2F%2Fsmihub.co.uk%2F
http://portal.novo-sibirsk.ru/dynamics.aspx?PortalId=2&WebId=8464c989-7fd8-4a32-8021-7df585dca817&PageUrl=%2FSitePages%2Ffeedback.aspx&Color=B00000&Source=https%3A%2F%2Fsmihub.co.uk%2F
http://clients1.google.com.gh/url?q=https://smihub.co.uk/
http://alt1.toolbarqueries.google.com.pe/url?q=https%3A%2F%2Fsmihub.co.uk
http://clients1.google.jo/url?q=http%3A%2F%2Fsmihub.co.uk
http://clients1.google.pn/url?q=https://smihub.co.uk/
https://cse.google.nu/url?sa=t&url=http://smihub.co.uk/
http://cse.google.ba/url?sa=t&url=http%3A%2F%2Fsmihub.co.uk%2F
http://www.venez.fr/error.fr.html?id=1&uri=https%3A//smihub.co.uk/
http://domain.opendns.com/smihub.co.uk
http://alt1.toolbarqueries.google.com.ua/url?q=https://smihub.co.uk/
http://alt1.toolbarqueries.google.be/url?q=https://smihub.co.uk/
https://www.allergicliving.com/adspace/?mod=serve&act=clickthru&id=695&to=http://smihub.co.uk/2021/05/29/rwfeds/
http://cse.google.com.bd/url?sa=t&url=http%3A%2F%2Fsmihub.co.uk%2F
http://aborg.lib.ntu.edu.tw/ntuepaper/toModule.do?prefix=/publish&page=/newslist.jsp&uri=https://smihub.co.uk/
http://alt1.toolbarqueries.google.pl/url?q=https://smihub.co.uk/
http://images.google.fi/url?sa=t&url=http%3A%2F%2Fsmihub.co.uk%2F
http://blawat2015.no-ip.com/~mieki256/diary/refsweep.cgi?url=https://smihub.co.uk/
https://www.google.nu/url?q=http://smihub.co.uk/
http://images.google.co.jp/url?sa=t&url=http%3A%2F%2Fsmihub.co.uk%2F
https://www.dltk-teach.com/p.asp?p=http://smihub.co.uk/2021/05/29/rwfeds/
http://images.google.co.id/url?sa=t&url=http%3A%2F%2Fsmihub.co.uk
http://images.google.com.my/url?sa=t&url=http%3A%2F%2Fsmihub.co.uk%2F
http://members.ascrs.org/sso/logout.aspx?returnurl=https://smihub.co.uk/
http://closings.cbs6albany.com/scripts/adredir.asp?url=https://smihub.co.uk/
http://images.google.co.th/url?sa=t&url=http%3A%2F%2Fsmihub.co.uk%2F
http://alumni.drivers.informer.com/go/go.php?go=https://smihub.co.uk/
http://uriu-ss.jpn.org/xoops/modules/wordpress/wp-ktai.php?view=redir&url=https%3A%2F%2Fsmihub.co.uk
http://alt1.toolbarqueries.google.com.kw/url?q=https://smihub.co.uk/
http://forum.solidworks.com/external-link.jspa?url=https%3A%2F%2Fsmihub.co.uk
http://alt1.toolbarqueries.google.bf/url?q=https://smihub.co.uk/
http://acf.poderjudicial.es/portal/site/cgpj/menuitem.65d2c4456b6ddb628e635fc1dc432ea0/?schema=http&title=Acuerdos+de+la+Comisi%C3%B3n+Permanente+del+CGPJ+de+17+de+julio+de+2018&vgnextoid=d94e58e4d849d210VgnVCM100000cb34e20aRCRD&vgnextlocale=gl&isSecure=false&vgnextfmt=default&protocolo=http&user=&url=http%3a%2f%2fsmihub.co.uk&perfil=3
http://0845.boo.jp/cgi/mt3/mt4i.cgi?id=24&mode=redirect&no=15&ref_eid=3387&url=http%3A%2F%2Fsmihub.co.uk
http://cse.google.co.kr/url?sa=t&url=http%3A%2F%2Fsmihub.co.uk%2F
http://hostedmovieupdates.aebn.net/feed/?urlstub=smihub.co.uk&
nolvadex pills for sale
You have made some really good points there. I checked on the web to find out more about the issue and found most
people will go along with your views on this web site.
#VernonWells
Write more, thats all I have to say. Literally, it seems as though you relied on the video to make your point.
You obviously know what youre talking about, why waste your intelligence
on just posting videos to your weblog when you could be giving us something informative to read?
I pay a visit every day a few websites and websites to read posts,
but this webpage presents quality based writing.
Hi! Do you know if they make any plugins to help with
SEO? I’m trying to get my blog to rank for some targeted keywords but I’m not seeing very good gains.
If you know of any please share. Many thanks!
Appreciating the persistence you put into your site and detailed information you
provide. It’s nice to come across a blog every once in a while that
isn’t the same outdated rehashed information. Excellent read!
I’ve saved your site and I’m adding your RSS feeds to my Google account.
where to get azithromycin
We aгe а bunch of volunteers and opening a new scheme in our community.
Ⲩour site offered us with uѕeful info to wߋrk on. Yoս’ve performed a formidable task аnd our whole groսp will be thankful to yߋu.
Definitely imagine that which you stated. Your favorite justification appeared to be at the net the simplest thing
to bear in mind of. I say to you, I certainly get irked even as people consider concerns
that they just don’t know about. You managed to hit the nail upon the highest and also
defined out the entire thing without having side-effects , folks can take a signal.
Will likely be back to get more. Thanks
The test cannot determine the amount of drug used or the exact time of use.
The test cannot determine the amount of drug used or the exact time
of use.
I’m very pleased to uncover this site. I wanted to thank you
for ones time for this particularly fantastic read!!
I definitely appreciated every little bit of it and I have you
saved as a favorite to see new things on your site.
order amoxil
buy zithromax 500mg
I don’t even know how I stopped up right here, however I thought this submit was great.
I do not understand who you are but certainly you’re going to a famous blogger in case you are not already.
Cheers!
This excellent website really has all of the information I needed about this subject and didn’t know who to ask.
Thank you for another informative blog. The place else
may just I get that kind of info written in such
an ideal manner? I have a mission that I’m just now operating on, and I’ve
been on the glance out for such information.
It is really a great and helpful piece of information. I am
happy that you shared this helpful info with us. Please keep us
informed like this. Thanks for sharing.
buy accutane online 30mg
Hello mates, its enormous article regarding cultureand completely defined, keep it up all the time.
I am regular reader, how are you everybody? This article posted
at this web page is in fact pleasant.
After looking at a handful of the blog posts on your web site, I truly like
your technique of writing a blog. I bookmarked it to my bookmark site list and will be checking back soon. Please check
out my website as well and tell me what you think.
lasix uk buy
Just want to say your article is as amazing. The clarity in your
post is just great and i can assume you’re an expert
on this subject. Fine with your permission allow me to grab your RSS feed to keep updated
with forthcoming post. Thanks a million and please keep up the enjoyable work.
Good way of explaining, and good article to get data
about my presentation focus, which i am going to deliver in school.
Today, I went to the beachfront with my kids.
I found a sea shell and gave it to my 4 year old daughter and said “You can hear the ocean if you put this to your ear.” She put the shell to her ear and screamed.
There was a hermit crab inside and it pinched her ear.
She never wants to go back! LoL I know this is entirely off topic but
I had to tell someone!
Every weekend i used to go to see this website, as i wish
for enjoyment, as this this site conations in fact nice funny stuff too.
It’s impressive that you are getting thoughts
from this article as well as from our dialogue made here.
pharmacy website india
Speaking of YouTube to MP4 converters for Mac, desktop apps and online services are available.
Wow all kinds of excellent advice!
do my homework homework do my homework for money cpm homework
best paper writing services pay for research paper buy a paper order custom paper
best essay for you https://essaywritingservicehelp.com
buy generic cialis canada online
Howdy, There’s no doubt that your web site
could be having browser compatibility issues. Whenever I take a look at
your blog in Safari, it looks fine but when opening in Internet
Explorer, it’s got some overlapping issues. I simply wanted to give you a quick heads up!
Besides that, fantastic site!
buy tamoxifen online india
It’s going to be end of mine day, but before ending I am reading this impressive piece of
writing to increase my experience.
You can certainly see your enthusiasm within the work you
write. The sector hopes for even more passionate writers like you who aren’t afraid to mention how
they believe. All the time follow your heart.
Kumpulan Nama-Nama Daftar Laman Judi Slot Online Terpercaya dan Provider Slot88 Slot Gacor Terupdate di 2021
Masih mencari kumpulan daftar website judi slot online terpercaya yang fair play? Sekian banyak bandar slot online yang bertebaran di dunia maya pasti membikin anda linglung, mana website judi slot online bonafit dan mana yang tak bonafit bagi para pemain. Permainan slot online amat populer dan disukai oleh kalangan masyarakat Indonesia terlebih di kota-kota besar. Apalagi dikala menghadapi pandemi yang tidak kunjung habis ini, orang – orang berbondong-bondong mencari laman judi slot online terpercaya 2022 untuk mengisi waktu luangnya.
Kumpulan dari nama-nama daftar slot online bertebaran melalui internet. Untuk mendaftarkan diri, anda bisa melaksanakan pencarian melewati google, referensi teman ataupun dari social media berupa Facebook, Instagram dan Twitter. Macam game slot resmi dan original bisa anda temui melewati mahkotaslot sebagai web judi slot online terkini 2021. Situs slot online uang absah lazimnya menawarkan game judi online lainnya yang tidak keok menarik, ragam-macam game judi online lainnya akan kami bahas pada sesi berikutnya.
Sebagai seorang penggemar game slot online gacor yang ada di Indonesia, mungkin anda telah tidak asing tentang permainan slot serta provider slot online yang kami sediakan. Malahan, anda mungkin telah mendafarkan diri di situs lain tapi merasa kurang nyaman bagus dari segi pelayanan ataupun dari segi kemenangan yang didapat. Ada sebagian website judi slot online tenar dan populer dan kami di sini hadir memberikan rekomendasi permainan laman judi slot online gacor slot88 ternama dengan deretan keuntungan dalam hal bonus jackpot slot yang mudah menang. Kemudahan yang didapat karena perkembangan teknologi yaitu anda dapat memainkannya dirumah, kantor, maupun daerah nongkrong bermodalkan smartphone serta internet saja.
Take a look at my website https://agenslotgacor.cc/
desyrel pill
These are actually fantastic ideas in regarding blogging.
You have touched some pleasant things here.
Any way keep up wrinting.
142 metformin
clonidine price australia
Amazing write ups. Thanks!
pay for paper buying papers for college pay for papers pay to write paper
I just couldn’t depart your web site before suggesting that I extremely enjoyed the standard info
an individual provide for your guests? Is gonna be again ceaselessly in order to check
up on new posts
buy glucophage singapore
Instagram Photo and Video Downloader
I think this is one of the most important info for me.
And i am glad reading your article. But want to
remark on few general things, The web site style is great, the articles is really nice
: D. Good job, cheers
I was curious if you ever thought of changing the page layout
of your site? Its very well written; I love what youve got to say.
But maybe you could a little more in the way of content so people could connect with it better.
Youve got an awful lot of text for only having 1 or 2 images.
Maybe you could space it out better?
Wow, amazing blog layout! How long have you been blogging for?
you made blogging look easy. The overall look of your web
site is excellent, as well as the content!
If some one desires expert view about running a blog then i suggest him/her to go to see this blog,
Keep up the pleasant work.
cost of tamoxifen 20 mg
This website truly has all of the information and facts I wanbted concerning thius subject and didn’t know who to ask.
buy tamoxifen australia
I doo not know if it’s just me or if perhaps everyone else
experiencing problems with your site. It looks like some
of the text on ypur pists are running off the screen. Can smebody else please comment and let me know if this is happening to them as well?
This ight be a problem with my web browser
because I’ve had this happen previously. Many thanks
canadadrugpharmacy
cheapest accutane prices
legitimate online pharmacy usa
It’s hard to come by educated people for this topic, but you seem like you know
what you’re talking about! Thanks
trazodone 250 mg
where can i buy clonidine online
how to get diflucan otc
Hi I am so happy I found your weblog, I really found you by accident, while I was looking on Digg
for something else, Regardless I am here now and would just like to
say thanks a lot for a remarkable post and a all round interesting blog (I also love the theme/design), I don’t have
time to browse it all at the moment but I have saved it and also included your RSS feeds,
so when I have time I will be back to read much more, Please do keep up the superb
work.
Useful infօrmation. Lucky me I discovered уour site accidentally, аnd I’m
stunned ᴡhy tһis accident dіɗ not tooк place earⅼier!
I bookmarked іt.
What a data of un-ambiguity and preserveness of precious familiarity
on the topic of unpredicted emotions.
Kumpulan Nama-Nama Daftar Situs Judi Slot Online Terpercaya dan Provider Slot88 Slot Gacor Terupdate di 2021
Masih mencari kumpulan daftar situs judi slot online terpercaya yang fair play? Sekian banyak bandar slot online yang bertebaran di internet pasti membikin anda linglung, mana website judi slot online bonafit dan mana yang tidak bonafit bagi para pemain. Permainan slot online betul-betul populer dan disukai oleh kalangan masyarakat Indonesia lebih-lebih di kota-kota besar. Apalagi saat menghadapi pandemi yang tak kunjung habis ini, orang – orang berbondong-bondong mencari web judi slot online terpercaya 2022 untuk mengisi waktu luangnya.
Kumpulan dari nama-nama daftar slot online bertebaran melalui dunia maya. Untuk meregistrasikan diri, anda dapat mengerjakan pencarian via google, acuan sahabat ataupun dari social media berupa Facebook, Instagram dan Twitter. Jenis game slot sah dan original bisa anda temui lewat mahkotaslot sebagai website judi slot online terbaru 2021. Website slot online uang absah lazimnya menawarkan game judi online lainnya yang tak keok menarik, macam-tipe game judi online lainnya akan kami bahas pada sesi selanjutnya.
Sebagai seorang penggemar game slot online gacor yang ada di Indonesia, mungkin anda sudah tidak asing perihal permainan slot serta provider slot online yang kami sediakan. Bahkan, anda mungkin sudah mendafarkan diri di web lain tapi merasa kurang nyaman bagus dari segi pelayanan ataupun dari segi kemenangan yang diperoleh. Ada beberapa laman judi slot online familiar dan populer dan kami di sini hadir memberikan rekomendasi permainan situs judi slot online gacor slot88 ternama dengan deretan keuntungan dalam hal bonus jackpot slot yang mudah menang. Kemudahan yang didapat karena perkembangan teknologi ialah anda bisa memainkannya dirumah, kantor, ataupun tempat nongkrong bermodalkan telpon seluler serta internet saja.
Also visit my blog post: https://bocoranslotgacor.cc/
best nolvadex pharmacy
Wow, wonderful blog layout! How lengthy have you ever
been running a blog for? you made blogging glance easy.
The entire glance of your site is wonderful, as smartly as the content!
Kudos, I value this!
job description writing service best dissertation editing service i need someone to write my dissertation help writing a dissertation write a dissertation abstract engineering thesis writing service statistics dissertation help law dissertation help finance dissertation help dissertation for sale
Howdy would you mind letting me know which web host you’re working with?
I’ve loaded your blog in 3 different internet browsers and I must say
this blog loads a lot faster then most. Can you recommend a good web hosting provider at a fair price?
Thanks, I appreciate it!
online pharmacy australia
lasix tablets 20 mg
бонус cat casino
cat casino официальный сайт
Heya i am for the first time here. I found this board and I find
It truly useful & it helped me out a lot. I
hope to give something back and help others like you aided me.
Hello there I am so happy I found your blog, I really found you by accident, while I
was browsing on Askjeeve for something else, Anyways
I am here now and would just like to say thank you for a incredible post and a all round entertaining blog (I also
love the theme/design), I don’t have time to browse it all at the moment but I have bookmarked
it and also added in your RSS feeds, so when I have time I will be back
to read more, Please do keep up the superb job.
I’ll immediately snatch your rss as I can not to find your e-maіl subscription hperlink or newsletter sеrvice.
Do you have any? Pⅼease let mme realize in order that I could suЬscribe.
Thanks.
It is the best time to make some plans for the
future and it is time to be happy. I have read this post and if I could I want
to suggest you some interesting things or suggestions.
Perhaps you can write next articles referring to this article.
I want to read even more things about it!
I was suggested this blog by my cousin. I’m not sure whether this post is written by him
as nobody else know such detailed about my trouble. You are wonderful!
Thanks!
bactrim price
cheap valtrex for sale
Awesome site you have here but I was curious if you knew of any forums that cover the same topics
discussed in this article? I’d really like
to be a part of community where I can get responses from other knowledgeable individuals that share the same interest.
If you have any suggestions, please let me know. Thank you!
ventolin over the counter canada
Do you mind if I quote a couple of your articles as long as I provide credit and sources back to your
website? My website is in the exact same area of interest as
yours and my visitors would truly benefit from a lot of the information you provide here.
Please let me know if this ok with you. Appreciate
it!
Because the admin of this web page is working, no doubt very soon it will be well-known, due to
its feature contents.
Hi, I wish for to subscribe for this weblog to obtain most recent updates, thus
where can i do it please help.
зеркало гама казино
зеркало гама казино
Howdy! Quick question that’s totally off topic. Do you know how to make your site mobile
friendly? My web site looks weird when browsing from my apple
iphone. I’m trying to find a theme or plugin that might be able to correct
this problem. If you have any suggestions, please share.
Many thanks!
Great site! I am loving it!! Will come back again. I am taking your feeds also
Great blog here! Also your website lots up fast! What web host are you the use of?
Can I am getting your affiliate link for your host? I want my website loaded up as fast as yours lol
Hello there, I found your blog by means of Google whilst searching for a comparable
matter, your website got here up, it seems great. I’ve bookmarked it
in my google bookmarks.
Hi there, simply become aware of your weblog thru Google, and found
that it’s truly informative. I am gonna watch out for brussels.
I will be grateful should you continue this in future.
A lot of other folks will be benefited out of your writing.
Cheers!
I know this website gives quality dependent posts and other data,
is there any other site which offers these kinds of things in quality?
lexapro price
where can i buy generic valtrex
Hello it’s me, I am also visiting this web page on a regular basis, this web
page is in fact nice and the people are in fact sharing pleasant thoughts.
This paragraph will assist the internet viewers
for building up new blog or even a weblog from start to end.
Cheers. Good stuff.
expert cv writing service dissertation express professional dissertation help dissertation writing research proposal for phd essay writing service paypal help writing an essay for college help with my essay help with writing college essays help writing argumentative essay
vermox
Incredibloe points. Great arguments. Keep up the good work.
Hello, of course this post is truly pleasant and I have learned lot
of things from it on the topic of blogging. thanks.
Howdy! This is my first visit to your blog! We are a group of volunteers and starting a new project in a community in the same niche.
Your blog provided us beneficial information to work on.
You have done a wonderful job!
Heya! I just wanted to ask if you ever have any trouble with hackers?
My lqst blog (wordpress) was hacked and I eded up losing
months of hard work duee to no back up. Do you have any solutions
to prevent hackers?
bactrim 800mg 160mg
We’re a gaggle of volunteers and opening a brand new scheme in our
community. Your web site provided us with useful information to work on. You have done an impressive
activity and our whole community will probably
be thankful to you.
buy cialis from mexico
escrow pharmacy canada
If you wish for to take much from this post then you have to apply such techniques to your won web site.
Asking questions are really fastidious thing if you are not understanding something
fully, however this article gives pleasant understanding yet.
Your producing is so distinct and concise that even a rookie could realize this subject. Thanks for making it obtainable.
I’m gone to tell my little brother, that he should also visit this website
on regular basis to obtain updated from most recent information.
finasteride buy online
Kumpulan Nama-Nama Daftar Situs Judi Slot Online Terpercaya dan Provider Slot88 Slot Gacor Terbaru di 2021
Masih mencari kumpulan daftar web judi slot online terpercaya yang fair play? Sekian banyak bandar slot online yang bertebaran di dunia online pasti membikin anda kebingungan, mana website judi slot online bonafit dan mana yang tidak bonafit bagi para pemain. Permainan slot online betul-betul populer dan disukai oleh kalangan masyarakat Indonesia lebih-lebih di kota-kota besar. Apalagi ketika menghadapi pandemi yang tak kunjung habis ini, orang – orang berbondong-bondong mencari web judi slot online terpercaya 2022 untuk mengisi waktu luangnya.
Kumpulan dari nama-nama daftar slot online bertebaran lewat dunia maya. Untuk mendaftarkan diri, anda bisa menjalankan pencarian lewat google, rujukan sahabat maupun dari social media berupa Facebook, Instagram dan Twitter. Macam game slot legal dan original bisa anda temui lewat mahkotaslot sebagai website judi slot online terbaru 2021. Website slot online uang orisinil lazimnya menawarkan game judi online lainnya yang tidak kalah menarik, macam-ragam game judi online lainnya akan kami bahas pada sesi selanjutnya.
Sebagai seorang penggemar game slot online gacor yang ada di Indonesia, mungkin anda telah tidak asing tentang permainan slot serta provider slot online yang kami sediakan. Malah, anda mungkin telah mendafarkan diri di laman lain tapi merasa kurang nyaman baik dari segi pelayanan maupun dari segi kemenangan yang didapatkan. Ada sebagian website judi slot online tenar dan populer dan kami di sini hadir memberikan rekomendasi permainan situs judi slot online gacor slot88 ternama dengan deretan keuntungan dalam hal bonus jackpot slot yang gampang menang. Kemudahan yang didapat karena perkembangan teknologi merupakan anda dapat memainkannya dirumah, kantor, maupun daerah nongkrong bermodalkan telepon pintar serta internet saja.
Also visit my webpage :: https://agenslotgacorhariini.cc/
Hey there just wanted to give you a quick heads up. The text in your article seem to be running
off the screen in Internet explorer. I’m not sure if this is a formatting issue or
something to do with internet browser compatibility
but I thought I’d post to let you know. The design look great though!
Hope you get the issue fixed soon. Cheers
This facts is just what exactly I was looking for. Many thanks!
Hi there! I know this is kinda off topic but I was wondering
if you knew where I could get a captcha plugin for my comment form?
I’m using the same blog platform as yours and
I’m having difficulty finding one? Thanks a lot!
Incredible a good deal of awesome data!
Related Article:
https://absen.unisla.ac.id
https://akses.unisla.ac.id
https://akuntansi.unisla.ac.id
https://animalsciencejournal.unisla.ac.id
https://app.unisla.ac.id
https://apt.unisla.ac.id
https://baukk.unisla.ac.id
https://beasiswa.unisla.ac.id
https://berita.unisla.ac.id
https://bidan.unisla.ac.id
https://biro.unisla.ac.id
https://bpi.unisla.ac.id
https://cek.unisla.ac.id
https://conference.unisla.ac.id
https://dedikasikita.unisla.ac.id
https://dosen.unisla.ac.id
https://ejournal.unisla.ac.id
https://elearning.unisla.ac.id
https://elektro.unisla.ac.id
https://email.unisla.ac.id
https://es.unisla.ac.id
https://fai.unisla.ac.id
https://faperik.unisla.ac.id
https://fapet.unisla.ac.id
https://fe.unisla.ac.id
https://fh.unisla.ac.id
https://fikes.unisla.ac.id
https://fkip.unisla.ac.id
https://ft.unisla.ac.id
https://grouper.unisla.ac.id
https://icofie.unisla.ac.id
https://ikafe.unisla.ac.id
https://jes.unisla.ac.id
https://journalfai.unisla.ac.id
https://jti.unisla.ac.id
https://jurnalekonomi.unisla.ac.id
https://jurnalhukum.unisla.ac.id
https://jurnalkesehatan.unisla.ac.id
https://jurnalpasca.unisla.ac.id
https://jurnalpendidikan.unisla.ac.id
https://jurnalpeternakan.unisla.ac.id
https://jurnalteknik.unisla.ac.id
https://kemahasiswaan.unisla.ac.id
https://kenaliternakmu.fapet.unisla.ac.id
https://kkn.unisla.ac.id
https://kuliah.unisla.ac.id
https://labekonomi.unisla.ac.id
https://lapak.unisla.ac.id
https://lapor.unisla.ac.id
https://lib.unisla.ac.id
https://libft.unisla.ac.id
https://library.unisla.ac.id
https://link.unisla.ac.id
https://litbangpemas.unisla.ac.id
https://lpd.unisla.ac.id
https://lpm.unisla.ac.id
https://lsp.unisla.ac.id
https://manajemen.unisla.ac.id
https://pai.unisla.ac.id
https://pasca.unisla.ac.id
https://pbi.unisla.ac.id
https://peduli.unisla.ac.id
https://pemas.unisla.ac.id
https://pendidikanipa.unisla.ac.id
https://pendidikanmatematika.unisla.ac.id
https://pgmi.unisla.ac.id
https://piaud.unisla.ac.id
https://pib.unisla.ac.id
https://pjm.unisla.ac.id
https://pkkmb.unisla.ac.id
https://ponpesma.unisla.ac.id
https://pusatkarir.unisla.ac.id
https://repository.unisla.ac.id
https://sarpras.unisla.ac.id
https://semnas.unisla.ac.id
https://semnas2022.unisla.ac.id
https://setiadi.unisla.ac.id
https://sia.unisla.ac.id
https://sidak.unisla.ac.id
https://sima.unisla.ac.id
https://simlitabmas.unisla.ac.id
https://simortu.unisla.ac.id
https://sipil.unisla.ac.id
https://skripsi.unisla.ac.id
https://surat.unisla.ac.id
https://teams.unisla.ac.id
https://teknik.unisla.ac.id
https://tes.unisla.ac.id
https://ti.unisla.ac.id
https://tracer.unisla.ac.id
https://ukm.unisla.ac.id
https://unisla.ac.id
Your creating is so participating that I couldn’t cease studying until eventually the pretty conclude. Sustain the good get the job done!
You’ve cultivated a Neighborhood of curious minds wanting to find out with each other.
I’m gone to convey my little brother, that he should also pay a visit this blog on regular basis to take updated from most recent gossip.
js加固 hello my website is js加固
jago88 slot hello my website is jago88 slot
nad labem hello my website is nad labem
Vạn Người hello my website is Vạn Người
terbaru maumere hello my website is terbaru maumere
tameal hari hello my website is tameal hari
slot parametric hello my website is slot parametric
besplatno 4000 hello my website is besplatno 4000
I’m continuously amazed from the depth of your respective investigate.
realme c3 hello my website is realme c3
I love the way you used serious-life examples As an instance your details. It created the article way more relatable.
southern pharmacy
toradol over the counter uk
This submit is a good illustration of how to put in writing in your viewers. You Evidently have an understanding of what your readers are trying to find.
I go to see everyday a few sites and blogs to read content, however
this web site gives quality based writing.
I am amazed by the amount of investigation you put into this article. It can be clear that you’re dedicated to offering important facts.
Your commitment in your craft is truly inspiring. Preserve boosting the bar!
Incredible story there. What happened after? Take care!
where can i get diflucan online
Great work! This is the type of information that are supposed to be
shared across the web. Shame on the search engines for not positioning this post
higher! Come on over and talk over with my web
site . Thanks =)
valtrex 500mg best price
metformin canada online
Everything is very open with a very clear explanation of the challenges.
It was truly informative. Your site is very useful.
Thanks for sharing!
where can i buy motilium in usa
I am continually impressed through the depth within your study.
It’s truly a great and helpful piece of information. I am glad that you just shared this useful info
with us. Please stay us informed like this.
Thank you for sharing.
http://afcantarelle.org/index.php?title=EDU_WEB
http://afcantarelle.org/index.php?title=User:Monamino12
http://classicalmusicmp3freedownload.com/ja/index.php?title=%E5%88%A9%E7%94%A8%E8%80%85:Monamino12
http://classicalmusicmp3freedownload.com/ja/index.php?title=EDU_WEB
http://embeddedwiki.cs.aau.dk/wiki/EDU_WEB
http://embeddedwiki.cs.aau.dk/wiki/User_talk:Monamino12
http://lsc.wikisign.org/wiki/Usuari:Monamino12
http://postgasse.net/Wiki/index.php?title=Benutzer:Monamino12
http://postgasse.net/Wiki/index.php?title=EDU_WEB
http://rapedia.de/index.php/Benutzer:Monamino12
http://rapedia.de/index.php/EDU_WEB
http://terio.fvet.uba.ar/mediawiki/index.php/EDU_WEB
http://terio.fvet.uba.ar/mediawiki/index.php/Usuario:Monamino12
http://wiki-ux.info/wiki/EDU_WEB
http://wiki-ux.info/wiki/User:Monamino12
http://www.driftpedia.com/wiki/index.php/EDU_WEB
http://www.driftpedia.com/wiki/index.php/User:Monamino12
http://www.erwinbrandenberger.ch/index.php?title=Benutzer:Monamino12
http://www.erwinbrandenberger.ch/index.php?title=EDU_WEB
http://www.jeromebaray.com/afm/wiki/index.php/EDU_WEB
http://www.jeromebaray.com/afm/wiki/index.php/Utilisateur:Monamino12
http://www.matthew-morris.com/wiki/index.php/EDU_WEB
http://www.matthew-morris.com/wiki/index.php/User:Monamino12
https://bbarlock.com/index.php/EDU_WEB
https://bbarlock.com/index.php/User:Monamino12
https://biowiki.clinomics.com/index.php/EDU_WEB
https://biowiki.clinomics.com/index.php/User:Monamino12
https://demo.centreon.com/wiki/index.php?title=EDU_WEB
https://demo.centreon.com/wiki/index.php?title=User:Monamino12
https://dptotti.fic.edu.uy/mediawiki/index.php/EDU_WEB
https://dptotti.fic.edu.uy/mediawiki/index.php/Usuario:Monamino12
https://exterior.podemos.info/mediawiki/index.php?title=EDU_WEB
https://exterior.podemos.info/mediawiki/index.php?title=Usuario:Monamino12
https://gamesfashionarchive.net/wiki/User:Monamino12
https://intranet.wikimedia.cat/wiki/Usuari:Monamino12
https://koloiko.com/wiki/index.php?title=EDU_WEB
https://koloiko.com/wiki/index.php?title=User:Monamino12
https://library.kemu.ac.ke/kemuwiki/index.php/EDU_WEB
https://library.kemu.ac.ke/kemuwiki/index.php/User:Monamino12
https://livingbooksaboutlife.org/books/EDU_WEB
https://livingbooksaboutlife.org/books/User:Monamino12
https://mnwiki.org/index.php/EDU_WEB
https://mnwiki.org/index.php/User:Monamino12
https://procesal.cl/index.php/EDU_WEB
https://procesal.cl/index.php/User:Monamino12
https://religiopedia.com/index.php/EDU_WEB
https://religiopedia.com/index.php/User:Monamino12
https://sustainabilipedia.org/index.php/EDU_WEB
https://sustainabilipedia.org/index.php/User:Monamino12
https://wiki.hrw-fablab.de/index.php?title=EDU_WEB
https://wiki.hrw-fablab.de/index.php?title=User:Monamino12
https://wiki.minecraft.jp.net/%E5%88%A9%E7%94%A8%E8%80%85:Monamino12
https://wiki.minecraft.jp.net/EDU_WEB
https://wiki.quentinbrun.fr/mediawiki/index.php/EDU_WEB
https://wiki.quentinbrun.fr/mediawiki/index.php/Utilisateur:Monamino12
https://wiki.ryuriin.my.id/index.php/EDU_WEB
https://wiki.ryuriin.my.id/index.php/User:Monamino12
https://www.crustcorporate.com/wiki/EDU_WEB
https://www.crustcorporate.com/wiki/User:Monamino12
https://www.mibtec.it/wiki/index.php?title=EDU_WEB
https://www.mibtec.it/wiki/index.php?title=Utente:Monamino12
https://www.offwiki.org/wiki/EDU_WEB
https://www.offwiki.org/wiki/User:Monamino12
http://afcantarelle.org/index.php?title=EDU_WEB
http://afcantarelle.org/index.php?title=User:Monamino12
http://embeddedwiki.cs.aau.dk/wiki/EDU_WEB
http://embeddedwiki.cs.aau.dk/wiki/User:Monamino12
http://postgasse.net/Wiki/index.php?title=Benutzer:Monamino12
http://postgasse.net/Wiki/index.php?title=EDU_WEB
http://terio.fvet.uba.ar/mediawiki/index.php/EDU_WEB
http://terio.fvet.uba.ar/mediawiki/index.php/Usuario:Monamino12
http://urbino.fh-joanneum.at/trials/index.php/User:Monamino12
http://wiki-ux.info/wiki/EDU_WEB
http://wiki-ux.info/wiki/User:Monamino12
http://www.driftpedia.com/wiki/index.php/EDU_WEB
http://www.driftpedia.com/wiki/index.php/User:Monamino12
http://www.erwinbrandenberger.ch/index.php?title=Benutzer:Monamino12
http://www.erwinbrandenberger.ch/index.php?title=EDU_WEB
http://www.matthew-morris.com/wiki/index.php/EDU_WEB
http://www.matthew-morris.com/wiki/index.php/User:Monamino12
http://www.zilahy.info/wiki/index.php/EDU_WEB
http://www.zilahy.info/wiki/index.php/User:Monamino12
https://bbarlock.com/index.php/EDU_WEB
https://bbarlock.com/index.php/User:Monamino12
https://demo.centreon.com/wiki/index.php?title=EDU_WEB
https://demo.centreon.com/wiki/index.php?title=User:Monamino12
https://dptotti.fic.edu.uy/mediawiki/index.php/EDU_WEB
https://dptotti.fic.edu.uy/mediawiki/index.php/Usuario:Monamino12
https://gamesfashionarchive.net/wiki/User:Monamino12
https://intranet.wikimedia.cat/wiki/Usuari:Monamino12
https://koloiko.com/wiki/index.php?title=EDU_WEB
https://koloiko.com/wiki/index.php?title=User:Monamino12
https://library.kemu.ac.ke/kemuwiki/index.php/EDU_WEB
https://library.kemu.ac.ke/kemuwiki/index.php/User:Monamino12
https://livingbooksaboutlife.org/books/EDU_WEB
https://livingbooksaboutlife.org/books/User:Monamino12
https://mnwiki.org/index.php/EDU_WEB
https://mnwiki.org/index.php/User:Monamino12
https://procesal.cl/index.php/EDU_WEB
https://procesal.cl/index.php/User:Monamino12
https://religiopedia.com/index.php/EDU_WEB
https://religiopedia.com/index.php/User:Monamino12
https://sustainabilipedia.org/index.php/EDU_WEB
https://sustainabilipedia.org/index.php/User:Monamino12
https://wiki.hrw-fablab.de/index.php?title=EDU_WEB
https://wiki.hrw-fablab.de/index.php?title=User:Monamino12
https://wiki.itcoug.com/index.php?title=EDU_WEB
https://wiki.itcoug.com/index.php?title=Usuario:Monamino12
https://wiki.minecraft.jp.net/%E5%88%A9%E7%94%A8%E8%80%85:Monamino12
https://wiki.minecraft.jp.net/EDU_WEB
https://wiki.ryuriin.my.id/index.php/EDU_WEB
https://wiki.ryuriin.my.id/index.php/User:Monamino12
https://www.crustcorporate.com/wiki/EDU_WEB
https://www.crustcorporate.com/wiki/User:Monamino12
https://www.offwiki.org/wiki/EDU_WEB
https://www.offwiki.org/wiki/User:Monamino12
http://afcantarelle.org/index.php?title=Tips_Dan_Cara_Mendapat_Backlink_Dengan_DA_Dan_DR_Tinggi
http://afcantarelle.org/index.php?title=User:Monamino12
http://embeddedwiki.cs.aau.dk/wiki/Tips_Dan_Cara_Mendapat_Backlink_Dengan_DA_Dan_DR_Tinggi
http://embeddedwiki.cs.aau.dk/wiki/User_talk:Monamino12
http://postgasse.net/Wiki/index.php?title=Benutzer:Monamino12
http://postgasse.net/Wiki/index.php?title=Tips_Dan_Cara_Mendapat_Backlink_Dengan_DA_Dan_DR_Tinggi
http://terio.fvet.uba.ar/mediawiki/index.php/Tips_Dan_Cara_Mendapat_Backlink_Dengan_DA_Dan_DR_Tinggi
http://terio.fvet.uba.ar/mediawiki/index.php/Usuario:Monamino12
http://urbino.fh-joanneum.at/trials/index.php/Tips_Dan_Cara_Mendapat_Backlink_Dengan_DA_Dan_DR_Tinggi
http://urbino.fh-joanneum.at/trials/index.php/User:Monamino12
http://wiki-beta.avazinn.com/w/index.php?title=Tips_Dan_Cara_Mendapat_Backlink_Dengan_DA_Dan_DR_Tinggi
http://wiki-beta.avazinn.com/w/index.php?title=User:Monamino12
http://wiki-ux.info/wiki/Tips_Dan_Cara_Mendapat_Backlink_Dengan_DA_Dan_DR_Tinggi
http://wiki-ux.info/wiki/User:Monamino12
http://www.driftpedia.com/wiki/index.php/Tips_Dan_Cara_Mendapat_Backlink_Dengan_DA_Dan_DR_Tinggi
http://www.driftpedia.com/wiki/index.php/User:Monamino12
http://www.erwinbrandenberger.ch/index.php?title=Benutzer:Monamino12
http://www.erwinbrandenberger.ch/index.php?title=Tips_Dan_Cara_Mendapat_Backlink_Dengan_DA_Dan_DR_Tinggi
http://www.matthew-morris.com/wiki/index.php/Tips_Dan_Cara_Mendapat_Backlink_Dengan_DA_Dan_DR_Tinggi
http://www.matthew-morris.com/wiki/index.php/User:Monamino12
http://www.zilahy.info/wiki/index.php/Tips_Dan_Cara_Mendapat_Backlink_Dengan_DA_Dan_DR_Tinggi
http://www.zilahy.info/wiki/index.php/User:Monamino12
https://audiwiki.bitt-c.at/index.php?title=Benutzer:Monamino12
https://bbarlock.com/index.php/Tips_Dan_Cara_Mendapat_Backlink_Dengan_DA_Dan_DR_Tinggi
https://bbarlock.com/index.php/User:Monamino12
https://biowiki.clinomics.com/index.php/Tips_Dan_Cara_Mendapat_Backlink_Dengan_DA_Dan_DR_Tinggi
https://biowiki.clinomics.com/index.php/User:Monamino12
https://demo.centreon.com/wiki/index.php?title=Tips_Dan_Cara_Mendapat_Backlink_Dengan_DA_Dan_DR_Tinggi
https://demo.centreon.com/wiki/index.php?title=User:Monamino12
https://dptotti.fic.edu.uy/mediawiki/index.php/Tips_Dan_Cara_Mendapat_Backlink_Dengan_DA_Dan_DR_Tinggi
https://dptotti.fic.edu.uy/mediawiki/index.php/Usuario:Monamino12
https://gamesfashionarchive.net/wiki/User:Monamino12
https://help.ezadspro.co.uk/index.php?title=User:Monamino12
https://intranet.wikimedia.cat/wiki/Usuari:Monamino12
https://koloiko.com/wiki/index.php?title=Tips_Dan_Cara_Mendapat_Backlink_Dengan_DA_Dan_DR_Tinggi
https://koloiko.com/wiki/index.php?title=User:Monamino12
https://library.kemu.ac.ke/kemuwiki/index.php/Tips_Dan_Cara_Mendapat_Backlink_Dengan_DA_Dan_DR_Tinggi
https://library.kemu.ac.ke/kemuwiki/index.php/User:Monamino12
https://livingbooksaboutlife.org/books/Tips_Dan_Cara_Mendapat_Backlink_Dengan_DA_Dan_DR_Tinggi
https://livingbooksaboutlife.org/books/User:Monamino12
https://mnwiki.org/index.php/Tips_Dan_Cara_Mendapat_Backlink_Dengan_DA_Dan_DR_Tinggi
https://mnwiki.org/index.php/User:Monamino12
https://procesal.cl/index.php/Tips_Dan_Cara_Mendapat_Backlink_Dengan_DA_Dan_DR_Tinggi
https://procesal.cl/index.php/User:Monamino12
https://religiopedia.com/index.php/Tips_Dan_Cara_Mendapat_Backlink_Dengan_DA_Dan_DR_Tinggi
https://religiopedia.com/index.php/User:Monamino12
https://sustainabilipedia.org/index.php/Tips_Dan_Cara_Mendapat_Backlink_Dengan_DA_Dan_DR_Tinggi
https://sustainabilipedia.org/index.php/User:Monamino12
https://wiki.gahlawat.dynu.com/mediawiki/index.php?title=Tips_Dan_Cara_Mendapat_Backlink_Dengan_DA_Dan_DR_Tinggi
https://wiki.gahlawat.dynu.com/mediawiki/index.php?title=User:Monamino12
https://wiki.hrw-fablab.de/index.php?title=Tips_Dan_Cara_Mendapat_Backlink_Dengan_DA_Dan_DR_Tinggi
https://wiki.hrw-fablab.de/index.php?title=User:Monamino12
https://wiki.minecraft.jp.net/%E5%88%A9%E7%94%A8%E8%80%85:Monamino12
https://wiki.minecraft.jp.net/Tips_Dan_Cara_Mendapat_Backlink_Dengan_DA_Dan_DR_Tinggi
https://wiki.ryuriin.my.id/index.php/Tips_Dan_Cara_Mendapat_Backlink_Dengan_DA_Dan_DR_Tinggi
https://wiki.ryuriin.my.id/index.php/User:Monamino12
https://wiki.strat-o-matic.com:443/index.php/Tips_Dan_Cara_Mendapat_Backlink_Dengan_DA_Dan_DR_Tinggi
https://wiki.strat-o-matic.com:443/index.php/User:Monamino12
https://www.crustcorporate.com/wiki/Tips_Dan_Cara_Mendapat_Backlink_Dengan_DA_Dan_DR_Tinggi
https://www.crustcorporate.com/wiki/User:Monamino12
https://www.offwiki.org/wiki/Tips_Dan_Cara_Mendapat_Backlink_Dengan_DA_Dan_DR_Tinggi
https://www.offwiki.org/wiki/User:Monamino12
https://www.the-cat-tc.de/index.php?title=Benutzer:Monamino12
https://www.the-cat-tc.de/index.php?title=Tips_Dan_Cara_Mendapat_Backlink_Dengan_DA_Dan_DR_Tinggi
http://afcantarelle.org/index.php?title=Irtekno
http://afcantarelle.org/index.php?title=User:IrteknoCheryl
http://classicalmusicmp3freedownload.com/ja/index.php?title=%E5%88%A9%E7%94%A8%E8%80%85:IrteknoPhyllis
http://classicalmusicmp3freedownload.com/ja/index.php?title=Irtekno
http://embeddedwiki.cs.aau.dk/wiki/Irtekno
http://embeddedwiki.cs.aau.dk/wiki/User_talk:IrteknoSelina
http://lsc.wikisign.org/wiki/Usuari:IrteknoCary
http://nswiki.svenskasuperserier.se/w/index.php?title=Anv%C3%A4ndare:IrteknoMaurice
http://postgasse.net/Wiki/index.php?title=Benutzer:IrteknoLynwood
http://postgasse.net/Wiki/index.php?title=Irtekno
http://terio.fvet.uba.ar/mediawiki/index.php/Irtekno
http://terio.fvet.uba.ar/mediawiki/index.php/Usuario:IrteknoJuliane
http://urbino.fh-joanneum.at/trials/index.php/Irtekno
http://urbino.fh-joanneum.at/trials/index.php/User:IrteknoAnglea
http://wiki-beta.avazinn.com/w/index.php?title=Irtekno
http://wiki-beta.avazinn.com/w/index.php?title=User:IrteknoLatonya
http://wiki-ux.info/wiki/Irtekno
http://wiki-ux.info/wiki/User:IrteknoJeffery
http://www.driftpedia.com/wiki/index.php/Irtekno
http://www.driftpedia.com/wiki/index.php/User:IrteknoPearline
http://www.erwinbrandenberger.ch/index.php?title=Benutzer:IrteknoNichol
http://www.erwinbrandenberger.ch/index.php?title=Irtekno
http://www.jeromebaray.com/afm/wiki/index.php/Irtekno
http://www.jeromebaray.com/afm/wiki/index.php/Utilisateur:IrteknoNigel
http://www.matthew-morris.com/wiki/index.php/Irtekno
http://www.matthew-morris.com/wiki/index.php/User:IrteknoEtta
http://www.zilahy.info/wiki/index.php/Irtekno
http://www.zilahy.info/wiki/index.php/User:IrteknoFelicia
https://bbarlock.com/index.php/Irtekno
https://bbarlock.com/index.php/User:IrteknoLeland
https://biowiki.clinomics.com/index.php/Irtekno
https://biowiki.clinomics.com/index.php/User:IrteknoMegan
https://demo.centreon.com/wiki/index.php?title=Irtekno
https://demo.centreon.com/wiki/index.php?title=User:IrteknoLeesa
https://dptotti.fic.edu.uy/mediawiki/index.php/Irtekno
https://dptotti.fic.edu.uy/mediawiki/index.php/Usuario:IrteknoUna
https://exterior.podemos.info/mediawiki/index.php?title=Irtekno
https://exterior.podemos.info/mediawiki/index.php?title=Usuario:IrteknoRodrigo
https://gamesfashionarchive.net/wiki/User:IrteknoEllie
https://hu.velo.wiki/index.php?title=Irtekno
https://hu.velo.wiki/index.php?title=Szerkeszt%C5%91:IrteknoCierra
https://intranet.wikimedia.cat/wiki/Usuari:IrteknoKacey
https://koloiko.com/wiki/index.php?title=Irtekno
https://koloiko.com/wiki/index.php?title=User:IrteknoKatia
https://library.kemu.ac.ke/kemuwiki/index.php/Irtekno
https://library.kemu.ac.ke/kemuwiki/index.php/User:IrteknoBrigette
https://livingbooksaboutlife.org/books/Irtekno
https://livingbooksaboutlife.org/books/User:IrteknoKraig
https://mnwiki.org/index.php/Irtekno
https://mnwiki.org/index.php/User:IrteknoMilan
https://procesal.cl/index.php/Irtekno
https://procesal.cl/index.php/User:IrteknoRobin
https://religiopedia.com/index.php/Irtekno
https://religiopedia.com/index.php/User:IrteknoRosalie
https://sustainabilipedia.org/index.php/Irtekno
https://sustainabilipedia.org/index.php/User:IrteknoBeth
https://wiki.gahlawat.dynu.com/mediawiki/index.php?title=Irtekno
https://wiki.gahlawat.dynu.com/mediawiki/index.php?title=User:IrteknoSonya
https://wiki.hrw-fablab.de/index.php?title=Irtekno
https://wiki.hrw-fablab.de/index.php?title=User:IrteknoEllie
https://wiki.itcoug.com/index.php?title=Irtekno
https://wiki.itcoug.com/index.php?title=Usuario:IrteknoRichelle
https://wiki.minecraft.jp.net/%E5%88%A9%E7%94%A8%E8%80%85:IrteknoJacklyn
https://wiki.minecraft.jp.net/Irtekno
https://wiki.quentinbrun.fr/mediawiki/index.php/Irtekno
https://wiki.quentinbrun.fr/mediawiki/index.php/Utilisateur:IrteknoWeldon
https://wiki.ryuriin.my.id/index.php/Irtekno
https://wiki.ryuriin.my.id/index.php/User:IrteknoChristal
https://wiki.strat-o-matic.com:443/index.php/Irtekno
https://wiki.strat-o-matic.com:443/index.php/User:IrteknoKatherina
https://www.crustcorporate.com/wiki/Irtekno
https://www.crustcorporate.com/wiki/User:IrteknoBennett
https://www.offwiki.org/wiki/Irtekno
https://www.offwiki.org/wiki/User:IrteknoKaley
http://embeddedwiki.cs.aau.dk/wiki/IRTEKNO
http://embeddedwiki.cs.aau.dk/wiki/User:AshleighPotts41
http://terio.fvet.uba.ar/mediawiki/index.php/IRTEKNO
http://terio.fvet.uba.ar/mediawiki/index.php/Usuario:KeriWood383
http://urbino.fh-joanneum.at/trials/index.php/IRTEKNO
http://urbino.fh-joanneum.at/trials/index.php/User:GabriellaGomes0
http://wiki-ux.info/wiki/IRTEKNO
http://wiki-ux.info/wiki/User:JulioPinkerton8
http://www.driftpedia.com/wiki/index.php/IRTEKNO
http://www.driftpedia.com/wiki/index.php/User:MoniqueHorrocks
https://bbarlock.com/index.php/IRTEKNO
https://bbarlock.com/index.php/User:LyleDpn57282
https://biowiki.clinomics.com/index.php/IRTEKNO
https://biowiki.clinomics.com/index.php/User:DylanCherry05
https://dptotti.fic.edu.uy/mediawiki/index.php/IRTEKNO
https://dptotti.fic.edu.uy/mediawiki/index.php/Usuario:TishaFlanagan4
https://intranet.wikimedia.cat/wiki/Usuari:Rachel1142
https://koloiko.com/wiki/index.php?title=IRTEKNO
https://koloiko.com/wiki/index.php?title=User:RossCallahan
https://library.kemu.ac.ke/kemuwiki/index.php/IRTEKNO
https://library.kemu.ac.ke/kemuwiki/index.php/User:SIRSophie663
https://mnwiki.org/index.php/IRTEKNO
https://mnwiki.org/index.php/User:XiomaraBurnside
https://procesal.cl/index.php/IRTEKNO
https://procesal.cl/index.php/User:AndyOswald01340
https://religiopedia.com/index.php/IRTEKNO
https://religiopedia.com/index.php/User:BettyLeddy322
https://wiki.itcoug.com/index.php?title=IRTEKNO
https://wiki.itcoug.com/index.php?title=Usuario:StephaineBugg1
https://wiki.quentinbrun.fr/mediawiki/index.php/IRTEKNO
https://wiki.quentinbrun.fr/mediawiki/index.php/Utilisateur:GlenJuan498
accutane gel price
Howdy! I could have sworn I’ve been to your blog before but after looking
at some of the articles I realized it’s new to me. Regardless, I’m
definitely delighted I found it and I’ll be book-marking it and checking back
often!
I wanted to thank you for this excellent read!!
I certainly enjoyed every bit of it. I have you bookmarked to look at new things you post…
I got this web site from my buddy who informed me concerning this website
and now this time I am browsing this web page and reading very informative articles at this place.
diflucan 200mg
When I initially commented I clicked the “Notify me when new comments are added” checkbox and now each time a comment
is added I get three e-mails with the same comment.
Is there any way you can remove people from that service?
Bless you!
Thanks for ones marvelous posting! I quite enjoyed reading it, you might be a great author.
I will make certain to bookmark your blog and will come back
sometime soon. I want to encourage you to continue your great job, have a nice day!
Thank you, I have recently been looking for info approximately this topic for ages and yours is the
greatest I have discovered so far. However, what about the bottom line?
Are you positive about the supply?
metformin tablet price in india
I recognize the way you broke down these types of a posh topic into manageable parts. It built it less difficult to know.
strattera sale
I have learn a few just right stuff here. Certainly value bookmarking for revisiting.
I surprise how a lot attempt you place to make this type
of wonderful informative website.
Hi there, just became alert to your blog through Google,
and found that it’s really informative. I am going to watch out for brussels.
I will be grateful if you continue this in future.
A lot of people will be benefited from your writing.
Cheers!
jun88
Thanks on your marvelous posting! I truly enjoyed reading it, you are a great author.
I will ensure that I bookmark your blog and will often come back very soon. I want to encourage that you continue your great posts, have a nice afternoon!
vermox medication in south africa
coba join kedalam web judi pkv games denyan bandar domino serta bandarq online terbaik sepanjang masa yang
telah tersedia pada tahun 2023 ini dengan akun ρro jackpot terbaik yang dqpat kaian temukan dengan memakai sebagian akun yang kalian daftarkan Ԁi dalam sinbi dan kalikan juga dapat mempunyai kemungkinan untuk mendapatkan sepuruh profit dari cara pengisian deposit ᴠia pulsa
yang tak bisa kalian peroleh ɗі situs website judi pkv games, bandarqq ataupun pokerqq online
yang lainnya yang ada ⅾi dunia online ketika ini.
Thanks for finally talking about >Before and After Archives – Precious Stones Photography
<Liked it!
We stumbled over here coming from a different page and thought I might
as well check things out. I like what I see so i am just following you.
Look forward to looking into your web page yet again.
With thanks, Valuable information.
trazodone 100
I got this site from my pal who told me regarding this website
and at the moment this time I am browsing this web page and reading very informative articles at this place.
играть онлайн cat casino
играть онлайн cat casino
buy accutane 20mg
generic valtrex
Inspiring quest there. What happened after?
Thanks!
That is really fascinating, You are a very skilled
blogger. I have joined your feed and look ahead to in search of more of your fantastic post.
Also, I’ve shared your website in my social networks
Thank you for every other fantastic post.
Where else may just anybody get that type of information in such a perfect approach of writing?
I’ve a presentation subsequent week, and I’m at the search for
such information.
Thanks a lot! Awesome information.
Raja88jp dan Raja88 Slot merupakan daftar web judi slot online 303 raja slot deposit pulsa sah slot88 terpercaya dan terbaik di Indonesia dengan banyak sekali permainan raja slot88 online yang betul-betul lengkap. Pada website raja88 jp anda akan menemukan banyak sekali permainan seperti taruhan bola, live casino online, mesin slot, poker online, togel online, dan arcade game. Raja88 Jp sebagai agen judi slot online 303 raja slot88 terpercaya dan bandar judi slot88 online terpercaya di Indonesia sudah mendapatkan lisensi sebagai website judi slot online gacor 777 slot deposit pulsa terpercaya dan terbaik yang senantiasa bayar berapapun kemenangan membernya. Jadi untuk anda yang baru saja bergabung bersama raja88 jp, Anda tak perlu khawatir karena keamanan yang terdapat di laman judi slot online 303 raja slot88 amat aman serta kami akan selalu memberikan yang terbaik untuk semua member kami. Pioritas utama kami adalah memberi kepercayaan untuk member kami, Jadi kami sarankan supaya anda tak salah dalam memilih web judi slot 88 gacor 777 raja slot deposit pulsa untuk bertaruh judi online raja slot 88. Karena kian banyak laman judi online slot 88 gacor 77, Maka anda patut lebih pandai dalam memilih website judi online slot 88 gacor 77 raja slot88 sebab tak seluruh bandar judi slot online itu terpercaya. Melainkan kalau anda bergabung bersama raja88 jp karenanya anda sudah pasti akan terhindar dari kendala deposit tidak di pengerjaan serta withdraw tak di bayar. Tujuan kami mendirikan laman slot 88 raja88 jp ini yakni untuk membantu anda yang ingin bermain taruhan judi slot online 303 slot88, Sebab raja88 jp memiliki metode yang sungguh-sungguh baik dan betul-betul fair. Kami berani pastikan apabila anda akan sungguh-sungguh aman dan nyaman seandainya bermain di raja88 jp yang yaitu website judi slot online 303 gacor 777 raja slot deposit pulsa resmi terpercaya dan terbaik di Indonesia.
Feel free to visit my website … rajaslot88 – https://88rajaslot.store/,
Yesterday, while I was at work, my sister stole my iPad and tested to see if it can survive a thirty foot drop,
just so she can be a youtube sensation. My apple ipad is now destroyed and she
has 83 views. I know this is completely
off topic but I had to share it with someone!
Useful information. Fortunate me I discovered your web
site accidentally, and I am surprised why this coincidence did not
took place earlier! I bookmarked it.
Good post but I was wanting to know if you could write a litte more on this
topic? I’d be very grateful if you could elaborate a little
bit further. Cheers!
metformin 2018
generic for valtrex
clonidine 0
Asking questions are really nice thing if you are not understanding anything completely,
except this post provides pleasant understanding even.
I am really enjoying the theme/design of your weblog.
Do you ever run into any internet browser compatibility issues?
A few of my blog visitors have complained about my website not working correctly in Explorer but looks great in Firefox.
Do you have any suggestions to help fix this issue?
Hello i am kavin, its my first occasion to commenting anywhere, when i read this article i thought i could
also make comment due to this brilliant paragraph.
furosemide 40 mg price in india
nolvadex for sale
us trazodone cost
You could definitely see your skills within the article
you write. The sector hopes for more passionate writers such as you who aren’t
afraid to mention how they believe. All the time follow
your heart.
metformin online purchase
After checking out a few of the blog articles on your
web site, I really appreciate your way of writing a blog.
I book-marked it to my bookmark website list and will be checking back in the
near future. Take a look at my website as well and let me know your opinion.
It’s remarkable in support of me to have a website, which is useful for my knowledge.
thanks admin
I really like your blog.. very nice colors & theme. Did you
design this website yourself or did you hire someone to do it for you?
Plz reply as I’m looking to create my own blog and would like to know where u got this from.
cheers
Ηeү there! I’ve been following your websitе for
a while noԝ and finally got the courage to go ahea and ցive you
a shout ⲟut frοm Austin Texas! Just wanted to mention keep up the excellent work!
accutane online pharmacy india
canadian cialis cheap
Good day! I could have sworn I’ve been to this site before but after reading through some of
the post I realized it’s new to me. Anyways, I’m definitely glad I
found it and I’ll be book-marking and checking back often!
Superb write ups. Kudos!
help me write my essay write my essay for cheap essay writer help me write my essay
diflucan 200 mg price
I am regular visitor, how are you everybody? This post posted at this website is in fact nice.
Hey There. I found your blog using msn. This is a really
well written article. I will make sure to bookmark it
and come back to read more of your useful information. Thanks for the post.
I’ll certainly return.
My coder is trying to persuade me to move to .net from PHP.
I have always disliked the idea because of the expenses.
But he’s tryiong none the less. I’ve been using Movable-type on several websites for about a year and
am concerned about switching to another platform. I have heard fantastic things about blogengine.net.
Is there a way I can transfer all my wordpress posts into it?
Any help would be really appreciated!
I was able to find good info from your blog posts.
where can i buy nolvadex in south africa
Thanks very interesting blog!
I don’t even know how I ended up here, but I thought this post was good.
I do not know who you are but definitely you’re going to a famous blogger if you are not already ;
) Cheers!
First of all I want to say great blog! I had a quick
question in which I’d like to ask if you do not mind. I was
curious to find out how you center yourself and clear your thoughts prior to writing.
I’ve had a difficult time clearing my thoughts in getting my ideas out.
I truly do enjoy writing but it just seems like the first 10 to 15 minutes
tend to be wasted just trying to figure out
how to begin. Any suggestions or hints? Thank you!
I blog often and I truly appreciate your information. This article has really peaked my
interest. I am going to take a note of your website and keep checking for new details about once a week.
I opted in for your Feed too.
Hello There. I found your blog using msn. This is an extremely well written article.
I’ll make sure to bookmark it and come back to read
more of your useful info. Thanks for the post. I will definitely return.
buy tadalafil 20mg
how to buy strattera online
I’m really enjoying the theme/design of your blog. Do you ever run into any browser compatibility issues?
A handful of my blog visitors have complained about my blog not operating correctly in Explorer but looks great
in Safari. Do you have any solutions to help fix this issue?
I really like your blog.. very nice colors & theme. Did you create this website yourself or did you hire
someone to do it for you? Plz answer back as I’m looking to construct
my own blog and would like to know where u got this from.
many thanks
buy generic bactrim
Spot on with this write-up, I seriously believe this website
needs a lot more attention. I’ll probably be returning to read more, thanks for the info!
Awesome! Its genuinely awesome paragraph, I have got much clear idea about from this post.
I am regular visitor, how are you everybody? This post
posted at this web page is actually nice.
I am really inspired with your writing abilities as smartly as with the format
in your weblog. Is that this a paid subject matter or did you customize it yourself?
Either way keep up the nice quality writing, it is rare to see a great blog like
this one these days..
Appreciating the hard work you put into your blog and in depth information you provide.
It’s great to come across a blog every once
in a while that isn’t the same unwanted rehashed information. Fantastic read!
I’ve saved your site and I’m including your RSS feeds to my Google account.
buy nolvadex australia
I’m not sure where you’re getting your information, but good topic.
I needs to spend some time learning much more or understanding
more. Thanks for great information I was looking for this information for my mission.
With havin so much content and articles do you ever run into any
problems of plagorism or copyright violation? My site has a lot of
unique content I’ve either authored myself or outsourced but it
looks like a lot of it is popping it up all over the web without my permission. Do
you know any methods to help stop content from being stolen? I’d genuinely appreciate it.
Hello mates, pleasant piece of writing and pleasant arguments commented
at this place, I am really enjoying by these.
bactrim purchase
nolvadex to buy
lexapro 5mg tablet cost
Great ρost. I used to be checking continuously this weblog and I’m
impressed! Extremely useful іnfo speϲifically the ultimate phase 🙂 I
deal ᴡith such infо a lot. I was seeking this partiсular info for a long time.
Thank you annd good luck.
These are actually enormous ideas in regarding
blogging. You have touched some nice things here.
Any way keep up wrinting.
We stumbled over here different website and thought I should check things
out. I like what I see so now i am following you.
Look forward to checking out your web page yet again.
This is my first time pay a visit at here and i am actually
pleassant to read all at one place.
buy nolvadex paypal
Its not my first time to visit this web site, i
am browsing this website dailly and take good data from here all the time.
Just wish to say your article is as astounding.
The clarity in your publish is simply spectacular and that i could think you are
an expert on this subject. Fine along with your permission allow me to
grab your RSS feed to keep updated with impending post.
Thank you a million and please carry on the gratifying work.
http://afcantarelle.org/index.php?title=EDU_WEB
http://afcantarelle.org/index.php?title=User:Monamino12
http://classicalmusicmp3freedownload.com/ja/index.php?title=%E5%88%A9%E7%94%A8%E8%80%85:Monamino12
http://classicalmusicmp3freedownload.com/ja/index.php?title=EDU_WEB
http://embeddedwiki.cs.aau.dk/wiki/EDU_WEB
http://embeddedwiki.cs.aau.dk/wiki/User_talk:Monamino12
http://lsc.wikisign.org/wiki/Usuari:Monamino12
http://postgasse.net/Wiki/index.php?title=Benutzer:Monamino12
http://postgasse.net/Wiki/index.php?title=EDU_WEB
http://rapedia.de/index.php/Benutzer:Monamino12
http://rapedia.de/index.php/EDU_WEB
http://terio.fvet.uba.ar/mediawiki/index.php/EDU_WEB
http://terio.fvet.uba.ar/mediawiki/index.php/Usuario:Monamino12
http://wiki-ux.info/wiki/EDU_WEB
http://wiki-ux.info/wiki/User:Monamino12
http://www.driftpedia.com/wiki/index.php/EDU_WEB
http://www.driftpedia.com/wiki/index.php/User:Monamino12
http://www.erwinbrandenberger.ch/index.php?title=Benutzer:Monamino12
http://www.erwinbrandenberger.ch/index.php?title=EDU_WEB
http://www.jeromebaray.com/afm/wiki/index.php/EDU_WEB
http://www.jeromebaray.com/afm/wiki/index.php/Utilisateur:Monamino12
http://www.matthew-morris.com/wiki/index.php/EDU_WEB
http://www.matthew-morris.com/wiki/index.php/User:Monamino12
https://bbarlock.com/index.php/EDU_WEB
https://bbarlock.com/index.php/User:Monamino12
https://biowiki.clinomics.com/index.php/EDU_WEB
https://biowiki.clinomics.com/index.php/User:Monamino12
https://demo.centreon.com/wiki/index.php?title=EDU_WEB
https://demo.centreon.com/wiki/index.php?title=User:Monamino12
https://dptotti.fic.edu.uy/mediawiki/index.php/EDU_WEB
https://dptotti.fic.edu.uy/mediawiki/index.php/Usuario:Monamino12
https://exterior.podemos.info/mediawiki/index.php?title=EDU_WEB
https://exterior.podemos.info/mediawiki/index.php?title=Usuario:Monamino12
https://gamesfashionarchive.net/wiki/User:Monamino12
https://intranet.wikimedia.cat/wiki/Usuari:Monamino12
https://koloiko.com/wiki/index.php?title=EDU_WEB
https://koloiko.com/wiki/index.php?title=User:Monamino12
https://library.kemu.ac.ke/kemuwiki/index.php/EDU_WEB
https://library.kemu.ac.ke/kemuwiki/index.php/User:Monamino12
https://livingbooksaboutlife.org/books/EDU_WEB
https://livingbooksaboutlife.org/books/User:Monamino12
https://mnwiki.org/index.php/EDU_WEB
https://mnwiki.org/index.php/User:Monamino12
https://procesal.cl/index.php/EDU_WEB
https://procesal.cl/index.php/User:Monamino12
https://religiopedia.com/index.php/EDU_WEB
https://religiopedia.com/index.php/User:Monamino12
https://sustainabilipedia.org/index.php/EDU_WEB
https://sustainabilipedia.org/index.php/User:Monamino12
https://wiki.hrw-fablab.de/index.php?title=EDU_WEB
https://wiki.hrw-fablab.de/index.php?title=User:Monamino12
https://wiki.minecraft.jp.net/%E5%88%A9%E7%94%A8%E8%80%85:Monamino12
https://wiki.minecraft.jp.net/EDU_WEB
https://wiki.quentinbrun.fr/mediawiki/index.php/EDU_WEB
https://wiki.quentinbrun.fr/mediawiki/index.php/Utilisateur:Monamino12
https://wiki.ryuriin.my.id/index.php/EDU_WEB
https://wiki.ryuriin.my.id/index.php/User:Monamino12
https://www.crustcorporate.com/wiki/EDU_WEB
https://www.crustcorporate.com/wiki/User:Monamino12
https://www.mibtec.it/wiki/index.php?title=EDU_WEB
https://www.mibtec.it/wiki/index.php?title=Utente:Monamino12
https://www.offwiki.org/wiki/EDU_WEB
https://www.offwiki.org/wiki/User:Monamino12
http://afcantarelle.org/index.php?title=EDU_WEB
http://afcantarelle.org/index.php?title=User:Monamino12
http://embeddedwiki.cs.aau.dk/wiki/EDU_WEB
http://embeddedwiki.cs.aau.dk/wiki/User:Monamino12
http://postgasse.net/Wiki/index.php?title=Benutzer:Monamino12
http://postgasse.net/Wiki/index.php?title=EDU_WEB
http://terio.fvet.uba.ar/mediawiki/index.php/EDU_WEB
http://terio.fvet.uba.ar/mediawiki/index.php/Usuario:Monamino12
http://urbino.fh-joanneum.at/trials/index.php/User:Monamino12
http://wiki-ux.info/wiki/EDU_WEB
http://wiki-ux.info/wiki/User:Monamino12
http://www.driftpedia.com/wiki/index.php/EDU_WEB
http://www.driftpedia.com/wiki/index.php/User:Monamino12
http://www.erwinbrandenberger.ch/index.php?title=Benutzer:Monamino12
http://www.erwinbrandenberger.ch/index.php?title=EDU_WEB
http://www.matthew-morris.com/wiki/index.php/EDU_WEB
http://www.matthew-morris.com/wiki/index.php/User:Monamino12
http://www.zilahy.info/wiki/index.php/EDU_WEB
http://www.zilahy.info/wiki/index.php/User:Monamino12
https://bbarlock.com/index.php/EDU_WEB
https://bbarlock.com/index.php/User:Monamino12
https://demo.centreon.com/wiki/index.php?title=EDU_WEB
https://demo.centreon.com/wiki/index.php?title=User:Monamino12
https://dptotti.fic.edu.uy/mediawiki/index.php/EDU_WEB
https://dptotti.fic.edu.uy/mediawiki/index.php/Usuario:Monamino12
https://gamesfashionarchive.net/wiki/User:Monamino12
https://intranet.wikimedia.cat/wiki/Usuari:Monamino12
https://koloiko.com/wiki/index.php?title=EDU_WEB
https://koloiko.com/wiki/index.php?title=User:Monamino12
https://library.kemu.ac.ke/kemuwiki/index.php/EDU_WEB
https://library.kemu.ac.ke/kemuwiki/index.php/User:Monamino12
https://livingbooksaboutlife.org/books/EDU_WEB
https://livingbooksaboutlife.org/books/User:Monamino12
https://mnwiki.org/index.php/EDU_WEB
https://mnwiki.org/index.php/User:Monamino12
https://procesal.cl/index.php/EDU_WEB
https://procesal.cl/index.php/User:Monamino12
https://religiopedia.com/index.php/EDU_WEB
https://religiopedia.com/index.php/User:Monamino12
https://sustainabilipedia.org/index.php/EDU_WEB
https://sustainabilipedia.org/index.php/User:Monamino12
https://wiki.hrw-fablab.de/index.php?title=EDU_WEB
https://wiki.hrw-fablab.de/index.php?title=User:Monamino12
https://wiki.itcoug.com/index.php?title=EDU_WEB
https://wiki.itcoug.com/index.php?title=Usuario:Monamino12
https://wiki.minecraft.jp.net/%E5%88%A9%E7%94%A8%E8%80%85:Monamino12
https://wiki.minecraft.jp.net/EDU_WEB
https://wiki.ryuriin.my.id/index.php/EDU_WEB
https://wiki.ryuriin.my.id/index.php/User:Monamino12
https://www.crustcorporate.com/wiki/EDU_WEB
https://www.crustcorporate.com/wiki/User:Monamino12
https://www.offwiki.org/wiki/EDU_WEB
https://www.offwiki.org/wiki/User:Monamino12
http://afcantarelle.org/index.php?title=Tips_Dan_Cara_Mendapat_Backlink_Dengan_DA_Dan_DR_Tinggi
http://afcantarelle.org/index.php?title=User:Monamino12
http://embeddedwiki.cs.aau.dk/wiki/Tips_Dan_Cara_Mendapat_Backlink_Dengan_DA_Dan_DR_Tinggi
http://embeddedwiki.cs.aau.dk/wiki/User_talk:Monamino12
http://postgasse.net/Wiki/index.php?title=Benutzer:Monamino12
http://postgasse.net/Wiki/index.php?title=Tips_Dan_Cara_Mendapat_Backlink_Dengan_DA_Dan_DR_Tinggi
http://terio.fvet.uba.ar/mediawiki/index.php/Tips_Dan_Cara_Mendapat_Backlink_Dengan_DA_Dan_DR_Tinggi
http://terio.fvet.uba.ar/mediawiki/index.php/Usuario:Monamino12
http://urbino.fh-joanneum.at/trials/index.php/Tips_Dan_Cara_Mendapat_Backlink_Dengan_DA_Dan_DR_Tinggi
http://urbino.fh-joanneum.at/trials/index.php/User:Monamino12
http://wiki-beta.avazinn.com/w/index.php?title=Tips_Dan_Cara_Mendapat_Backlink_Dengan_DA_Dan_DR_Tinggi
http://wiki-beta.avazinn.com/w/index.php?title=User:Monamino12
http://wiki-ux.info/wiki/Tips_Dan_Cara_Mendapat_Backlink_Dengan_DA_Dan_DR_Tinggi
http://wiki-ux.info/wiki/User:Monamino12
http://www.driftpedia.com/wiki/index.php/Tips_Dan_Cara_Mendapat_Backlink_Dengan_DA_Dan_DR_Tinggi
http://www.driftpedia.com/wiki/index.php/User:Monamino12
http://www.erwinbrandenberger.ch/index.php?title=Benutzer:Monamino12
http://www.erwinbrandenberger.ch/index.php?title=Tips_Dan_Cara_Mendapat_Backlink_Dengan_DA_Dan_DR_Tinggi
http://www.matthew-morris.com/wiki/index.php/Tips_Dan_Cara_Mendapat_Backlink_Dengan_DA_Dan_DR_Tinggi
http://www.matthew-morris.com/wiki/index.php/User:Monamino12
http://www.zilahy.info/wiki/index.php/Tips_Dan_Cara_Mendapat_Backlink_Dengan_DA_Dan_DR_Tinggi
http://www.zilahy.info/wiki/index.php/User:Monamino12
https://audiwiki.bitt-c.at/index.php?title=Benutzer:Monamino12
https://bbarlock.com/index.php/Tips_Dan_Cara_Mendapat_Backlink_Dengan_DA_Dan_DR_Tinggi
https://bbarlock.com/index.php/User:Monamino12
https://biowiki.clinomics.com/index.php/Tips_Dan_Cara_Mendapat_Backlink_Dengan_DA_Dan_DR_Tinggi
https://biowiki.clinomics.com/index.php/User:Monamino12
https://demo.centreon.com/wiki/index.php?title=Tips_Dan_Cara_Mendapat_Backlink_Dengan_DA_Dan_DR_Tinggi
https://demo.centreon.com/wiki/index.php?title=User:Monamino12
https://dptotti.fic.edu.uy/mediawiki/index.php/Tips_Dan_Cara_Mendapat_Backlink_Dengan_DA_Dan_DR_Tinggi
https://dptotti.fic.edu.uy/mediawiki/index.php/Usuario:Monamino12
https://gamesfashionarchive.net/wiki/User:Monamino12
https://help.ezadspro.co.uk/index.php?title=User:Monamino12
https://intranet.wikimedia.cat/wiki/Usuari:Monamino12
https://koloiko.com/wiki/index.php?title=Tips_Dan_Cara_Mendapat_Backlink_Dengan_DA_Dan_DR_Tinggi
https://koloiko.com/wiki/index.php?title=User:Monamino12
https://library.kemu.ac.ke/kemuwiki/index.php/Tips_Dan_Cara_Mendapat_Backlink_Dengan_DA_Dan_DR_Tinggi
https://library.kemu.ac.ke/kemuwiki/index.php/User:Monamino12
https://livingbooksaboutlife.org/books/Tips_Dan_Cara_Mendapat_Backlink_Dengan_DA_Dan_DR_Tinggi
https://livingbooksaboutlife.org/books/User:Monamino12
https://mnwiki.org/index.php/Tips_Dan_Cara_Mendapat_Backlink_Dengan_DA_Dan_DR_Tinggi
https://mnwiki.org/index.php/User:Monamino12
https://procesal.cl/index.php/Tips_Dan_Cara_Mendapat_Backlink_Dengan_DA_Dan_DR_Tinggi
https://procesal.cl/index.php/User:Monamino12
https://religiopedia.com/index.php/Tips_Dan_Cara_Mendapat_Backlink_Dengan_DA_Dan_DR_Tinggi
https://religiopedia.com/index.php/User:Monamino12
https://sustainabilipedia.org/index.php/Tips_Dan_Cara_Mendapat_Backlink_Dengan_DA_Dan_DR_Tinggi
https://sustainabilipedia.org/index.php/User:Monamino12
https://wiki.gahlawat.dynu.com/mediawiki/index.php?title=Tips_Dan_Cara_Mendapat_Backlink_Dengan_DA_Dan_DR_Tinggi
https://wiki.gahlawat.dynu.com/mediawiki/index.php?title=User:Monamino12
https://wiki.hrw-fablab.de/index.php?title=Tips_Dan_Cara_Mendapat_Backlink_Dengan_DA_Dan_DR_Tinggi
https://wiki.hrw-fablab.de/index.php?title=User:Monamino12
https://wiki.minecraft.jp.net/%E5%88%A9%E7%94%A8%E8%80%85:Monamino12
https://wiki.minecraft.jp.net/Tips_Dan_Cara_Mendapat_Backlink_Dengan_DA_Dan_DR_Tinggi
https://wiki.ryuriin.my.id/index.php/Tips_Dan_Cara_Mendapat_Backlink_Dengan_DA_Dan_DR_Tinggi
https://wiki.ryuriin.my.id/index.php/User:Monamino12
https://wiki.strat-o-matic.com:443/index.php/Tips_Dan_Cara_Mendapat_Backlink_Dengan_DA_Dan_DR_Tinggi
https://wiki.strat-o-matic.com:443/index.php/User:Monamino12
https://www.crustcorporate.com/wiki/Tips_Dan_Cara_Mendapat_Backlink_Dengan_DA_Dan_DR_Tinggi
https://www.crustcorporate.com/wiki/User:Monamino12
https://www.offwiki.org/wiki/Tips_Dan_Cara_Mendapat_Backlink_Dengan_DA_Dan_DR_Tinggi
https://www.offwiki.org/wiki/User:Monamino12
https://www.the-cat-tc.de/index.php?title=Benutzer:Monamino12
https://www.the-cat-tc.de/index.php?title=Tips_Dan_Cara_Mendapat_Backlink_Dengan_DA_Dan_DR_Tinggi
http://afcantarelle.org/index.php?title=Irtekno
http://afcantarelle.org/index.php?title=User:IrteknoCheryl
http://classicalmusicmp3freedownload.com/ja/index.php?title=%E5%88%A9%E7%94%A8%E8%80%85:IrteknoPhyllis
http://classicalmusicmp3freedownload.com/ja/index.php?title=Irtekno
http://embeddedwiki.cs.aau.dk/wiki/Irtekno
http://embeddedwiki.cs.aau.dk/wiki/User_talk:IrteknoSelina
http://lsc.wikisign.org/wiki/Usuari:IrteknoCary
http://nswiki.svenskasuperserier.se/w/index.php?title=Anv%C3%A4ndare:IrteknoMaurice
http://postgasse.net/Wiki/index.php?title=Benutzer:IrteknoLynwood
http://postgasse.net/Wiki/index.php?title=Irtekno
http://terio.fvet.uba.ar/mediawiki/index.php/Irtekno
http://terio.fvet.uba.ar/mediawiki/index.php/Usuario:IrteknoJuliane
http://urbino.fh-joanneum.at/trials/index.php/Irtekno
http://urbino.fh-joanneum.at/trials/index.php/User:IrteknoAnglea
http://wiki-beta.avazinn.com/w/index.php?title=Irtekno
http://wiki-beta.avazinn.com/w/index.php?title=User:IrteknoLatonya
http://wiki-ux.info/wiki/Irtekno
http://wiki-ux.info/wiki/User:IrteknoJeffery
http://www.driftpedia.com/wiki/index.php/Irtekno
http://www.driftpedia.com/wiki/index.php/User:IrteknoPearline
http://www.erwinbrandenberger.ch/index.php?title=Benutzer:IrteknoNichol
http://www.erwinbrandenberger.ch/index.php?title=Irtekno
http://www.jeromebaray.com/afm/wiki/index.php/Irtekno
http://www.jeromebaray.com/afm/wiki/index.php/Utilisateur:IrteknoNigel
http://www.matthew-morris.com/wiki/index.php/Irtekno
http://www.matthew-morris.com/wiki/index.php/User:IrteknoEtta
http://www.zilahy.info/wiki/index.php/Irtekno
http://www.zilahy.info/wiki/index.php/User:IrteknoFelicia
https://bbarlock.com/index.php/Irtekno
https://bbarlock.com/index.php/User:IrteknoLeland
https://biowiki.clinomics.com/index.php/Irtekno
https://biowiki.clinomics.com/index.php/User:IrteknoMegan
https://demo.centreon.com/wiki/index.php?title=Irtekno
https://demo.centreon.com/wiki/index.php?title=User:IrteknoLeesa
https://dptotti.fic.edu.uy/mediawiki/index.php/Irtekno
https://dptotti.fic.edu.uy/mediawiki/index.php/Usuario:IrteknoUna
https://exterior.podemos.info/mediawiki/index.php?title=Irtekno
https://exterior.podemos.info/mediawiki/index.php?title=Usuario:IrteknoRodrigo
https://gamesfashionarchive.net/wiki/User:IrteknoEllie
https://hu.velo.wiki/index.php?title=Irtekno
https://hu.velo.wiki/index.php?title=Szerkeszt%C5%91:IrteknoCierra
https://intranet.wikimedia.cat/wiki/Usuari:IrteknoKacey
https://koloiko.com/wiki/index.php?title=Irtekno
https://koloiko.com/wiki/index.php?title=User:IrteknoKatia
https://library.kemu.ac.ke/kemuwiki/index.php/Irtekno
https://library.kemu.ac.ke/kemuwiki/index.php/User:IrteknoBrigette
https://livingbooksaboutlife.org/books/Irtekno
https://livingbooksaboutlife.org/books/User:IrteknoKraig
https://mnwiki.org/index.php/Irtekno
https://mnwiki.org/index.php/User:IrteknoMilan
https://procesal.cl/index.php/Irtekno
https://procesal.cl/index.php/User:IrteknoRobin
https://religiopedia.com/index.php/Irtekno
https://religiopedia.com/index.php/User:IrteknoRosalie
https://sustainabilipedia.org/index.php/Irtekno
https://sustainabilipedia.org/index.php/User:IrteknoBeth
https://wiki.gahlawat.dynu.com/mediawiki/index.php?title=Irtekno
https://wiki.gahlawat.dynu.com/mediawiki/index.php?title=User:IrteknoSonya
https://wiki.hrw-fablab.de/index.php?title=Irtekno
https://wiki.hrw-fablab.de/index.php?title=User:IrteknoEllie
https://wiki.itcoug.com/index.php?title=Irtekno
https://wiki.itcoug.com/index.php?title=Usuario:IrteknoRichelle
https://wiki.minecraft.jp.net/%E5%88%A9%E7%94%A8%E8%80%85:IrteknoJacklyn
https://wiki.minecraft.jp.net/Irtekno
https://wiki.quentinbrun.fr/mediawiki/index.php/Irtekno
https://wiki.quentinbrun.fr/mediawiki/index.php/Utilisateur:IrteknoWeldon
https://wiki.ryuriin.my.id/index.php/Irtekno
https://wiki.ryuriin.my.id/index.php/User:IrteknoChristal
https://wiki.strat-o-matic.com:443/index.php/Irtekno
https://wiki.strat-o-matic.com:443/index.php/User:IrteknoKatherina
https://www.crustcorporate.com/wiki/Irtekno
https://www.crustcorporate.com/wiki/User:IrteknoBennett
https://www.offwiki.org/wiki/Irtekno
https://www.offwiki.org/wiki/User:IrteknoKaley
http://classicalmusicmp3freedownload.com/ja/index.php?title=%E5%88%A9%E7%94%A8%E8%80%85:EdunArianne
http://classicalmusicmp3freedownload.com/ja/index.php?title=EDU_SITE
http://embeddedwiki.cs.aau.dk/wiki/EDU_SITE
http://embeddedwiki.cs.aau.dk/wiki/User:EdunHershel
http://kousokuwiki.org/wiki/EDU_SITE
http://nswiki.svenskasuperserier.se/w/index.php?title=Anv%C3%A4ndare:EdunNannie
http://postgasse.net/Wiki/index.php?title=Benutzer:EdunJonelle
http://postgasse.net/Wiki/index.php?title=EDU_SITE
http://stackoverflow.altervista.org/index.php?title=EDU_SITE
http://stackoverflow.altervista.org/index.php?title=Utente:EdunArielle
http://terio.fvet.uba.ar/mediawiki/index.php/EDU_SITE
http://terio.fvet.uba.ar/mediawiki/index.php/Usuario:EdunLeonora
http://urbino.fh-joanneum.at/trials/index.php/EDU_SITE
http://urbino.fh-joanneum.at/trials/index.php/User:EdunMilagros
http://wiki-ux.info/wiki/EDU_SITE
http://wiki-ux.info/wiki/User:EdunRosemary
http://wiki.qm.uni-siegen.de/index.php/Benutzer:EdunJinabf
http://wiki.qm.uni-siegen.de/index.php/EDU_SITE
http://wiki.shitcore.org/index.php/EDU_SITE
http://wiki.shitcore.org/index.php/User:EdunSiobhan
http://www.driftpedia.com/wiki/index.php/EDU_SITE
http://www.driftpedia.com/wiki/index.php/User:EdunFabian
http://www.erwinbrandenberger.ch/index.php?title=Benutzer:EdunChester
http://www.erwinbrandenberger.ch/index.php?title=EDU_SITE
http://www.jeromebaray.com/afm/wiki/index.php/EDU_SITE
http://www.jeromebaray.com/afm/wiki/index.php/Utilisateur:EdunCaseyl
http://www.matthew-morris.com/wiki/index.php/EDU_SITE
http://www.matthew-morris.com/wiki/index.php/User:EdunKathrin
https://biowiki.clinomics.com/index.php/EDU_SITE
https://biowiki.clinomics.com/index.php/User:EdunKourtney
https://demo.centreon.com/wiki/index.php?title=EDU_SITE
https://demo.centreon.com/wiki/index.php?title=User:EdunWalker
https://dptotti.fic.edu.uy/mediawiki/index.php/EDU_SITE
https://dptotti.fic.edu.uy/mediawiki/index.php/Usuario:EdunRenate
https://exterior.podemos.info/mediawiki/index.php?title=EDU_SITE
https://exterior.podemos.info/mediawiki/index.php?title=Usuario:EdunNichole
https://gamesfashionarchive.net/wiki/User:EdunLaurai
https://intranet.wikimedia.cat/wiki/Usuari:EdunRaphael
https://koloiko.com/wiki/index.php?title=EDU_SITE
https://koloiko.com/wiki/index.php?title=User:EdunAllison
https://library.kemu.ac.ke/kemuwiki/index.php/EDU_SITE
https://library.kemu.ac.ke/kemuwiki/index.php/User:EdunCharmain
https://livingbooksaboutlife.org/books/EDU_SITE
https://livingbooksaboutlife.org/books/User:EdunJinari
https://mnwiki.org/index.php/EDU_SITE
https://mnwiki.org/index.php/User:EdunJonask
https://procesal.cl/index.php/EDU_SITE
https://procesal.cl/index.php/User:EdunMaisie
https://religiopedia.com/index.php/EDU_SITE
https://religiopedia.com/index.php/User:EdunBianca
https://sustainabilipedia.org/index.php/EDU_SITE
https://sustainabilipedia.org/index.php/User:EdunLowell
https://wiki.hrw-fablab.de/index.php?title=EDU_SITE
https://wiki.hrw-fablab.de/index.php?title=User:EdunEnriqueta
https://wiki.itcoug.com/index.php?title=Usuario:EdunLynnbo
https://wiki.minecraft.jp.net/%E5%88%A9%E7%94%A8%E8%80%85:EdunAlisat
https://wiki.minecraft.jp.net/EDU_SITE
https://wiki.quentinbrun.fr/mediawiki/index.php/EDU_SITE
https://wiki.quentinbrun.fr/mediawiki/index.php/Utilisateur:EdunEmelia
https://wiki.ryuriin.my.id/index.php/EDU_SITE
https://wiki.ryuriin.my.id/index.php/User:EdunSelena
https://wiki.strat-o-matic.com:443/index.php/EDU_SITE
https://wiki.strat-o-matic.com:443/index.php/User:EdunGlenda
https://www.crustcorporate.com/wiki/EDU_SITE
https://www.crustcorporate.com/wiki/User:EdunAltaql
https://www.mibtec.it/wiki/index.php?title=Utente:EdunChastity
https://www.offwiki.org/wiki/EDU_SITE
https://www.offwiki.org/wiki/User:EdunWallyy
https://www.the-cat-tc.de/index.php?title=Benutzer:EdunBettyd
http://afcantarelle.org/index.php?title=Blog_EDU
http://afcantarelle.org/index.php?title=User:Russell50N
http://classicalmusicmp3freedownload.com/ja/index.php?title=%E5%88%A9%E7%94%A8%E8%80%85:AshtonTdy81
http://classicalmusicmp3freedownload.com/ja/index.php?title=Blog_EDU
http://embeddedwiki.cs.aau.dk/wiki/Blog_EDU
http://embeddedwiki.cs.aau.dk/wiki/User:PorterSteger
http://lsc.wikisign.org/wiki/Usuari:ElliottFremont4
http://postgasse.net/Wiki/index.php?title=Benutzer:MervinWhitis993
http://postgasse.net/Wiki/index.php?title=Blog_EDU
http://terio.fvet.uba.ar/mediawiki/index.php/Blog_EDU
http://terio.fvet.uba.ar/mediawiki/index.php/Usuario:MelinaJarnagin3
http://urbino.fh-joanneum.at/trials/index.php/Blog_EDU
http://urbino.fh-joanneum.at/trials/index.php/User:BiancaChery16
http://wiki-ux.info/wiki/Blog_EDU
http://wiki-ux.info/wiki/User:AnnieFregoso8
http://www.driftpedia.com/wiki/index.php/Blog_EDU
http://www.driftpedia.com/wiki/index.php/User:KristiRemley151
http://www.erwinbrandenberger.ch/index.php?title=Benutzer:JeffersonBasaldu
http://www.erwinbrandenberger.ch/index.php?title=Blog_EDU
http://www.jeromebaray.com/afm/wiki/index.php/Blog_EDU
http://www.jeromebaray.com/afm/wiki/index.php/Utilisateur:GuillermoMerryma
http://www.matthew-morris.com/wiki/index.php/Blog_EDU
http://www.matthew-morris.com/wiki/index.php/User:Lynell55J5102
https://audiwiki.bitt-c.at/index.php?title=Benutzer:AlmaPrewitt7651
https://audiwiki.bitt-c.at/index.php?title=Blog_EDU
https://bbarlock.com/index.php/Blog_EDU
https://bbarlock.com/index.php/User:MarylouSticht51
https://biowiki.clinomics.com/index.php/Blog_EDU
https://biowiki.clinomics.com/index.php/User:MarylynFinnis
https://demo.centreon.com/wiki/index.php?title=Blog_EDU
https://demo.centreon.com/wiki/index.php?title=User:MerrillAnderton
https://dptotti.fic.edu.uy/mediawiki/index.php/Blog_EDU
https://dptotti.fic.edu.uy/mediawiki/index.php/Usuario:RooseveltMauldon
https://exterior.podemos.info/mediawiki/index.php?title=Blog_EDU
https://exterior.podemos.info/mediawiki/index.php?title=Usuario:RosarioLeSouef0
https://gamesfashionarchive.net/wiki/User:OrvalBunton7
https://hu.velo.wiki/index.php?title=Blog_EDU
https://hu.velo.wiki/index.php?title=Szerkeszt%C5%91:AlenaMcCallum68
https://intranet.wikimedia.cat/wiki/Usuari:TinaTribolet7
https://koloiko.com/wiki/index.php?title=Blog_EDU
https://koloiko.com/wiki/index.php?title=User:MamieQ8200446061
https://library.kemu.ac.ke/kemuwiki/index.php/Blog_EDU
https://library.kemu.ac.ke/kemuwiki/index.php/User:KathrynBardolph
https://livingbooksaboutlife.org/books/Blog_EDU
https://livingbooksaboutlife.org/books/User:SuzanneJolley38
https://mnwiki.org/index.php/Blog_EDU
https://mnwiki.org/index.php/User:MichaelaLycett6
https://procesal.cl/index.php/Blog_EDU
https://procesal.cl/index.php/User:CaitlinNichols8
https://religiopedia.com/index.php/Blog_EDU
https://religiopedia.com/index.php/User:LuannKohn871995
https://sustainabilipedia.org/index.php/Blog_EDU
https://sustainabilipedia.org/index.php/User:BrianneGuzzi198
https://wiki.gahlawat.dynu.com/mediawiki/index.php?title=User:StephanGriggs
https://wiki.hrw-fablab.de/index.php?title=Blog_EDU
https://wiki.hrw-fablab.de/index.php?title=User:DarrelBass89
https://wiki.minecraft.jp.net/%E5%88%A9%E7%94%A8%E8%80%85:BrandiePeden1
https://wiki.minecraft.jp.net/Blog_EDU
https://wiki.ryuriin.my.id/index.php/Blog_EDU
https://wiki.ryuriin.my.id/index.php/User:MarcoAds09734
https://wiki.sports-5.ch/index.php?title=Blog_EDU
https://wiki.sports-5.ch/index.php?title=Utilisateur:CornellI53
https://wiki.strat-o-matic.com:443/index.php/Blog_EDU
https://wiki.strat-o-matic.com:443/index.php/User:ShannaCarter993
https://www.crustcorporate.com/wiki/Blog_EDU
https://www.crustcorporate.com/wiki/User:ElijahReynolds8
https://www.cspcc.org/wiki/index.php/Blog_EDU
https://www.cspcc.org/wiki/index.php/Utilisateur:LamarSkemp73
https://www.mibtec.it/wiki/index.php?title=Blog_EDU
https://www.offwiki.org/wiki/Blog_EDU
https://www.offwiki.org/wiki/User:KindraBracegirdl
https://www.the-cat-tc.de/index.php?title=Benutzer:EfrenWoody23
You actually make it seem so easy with your presentation but I find this topic to be actually something that I think I would never understand.
It seems too complex and very broad for me. I am looking forward
for your next post, I’ll try to get the hang of it!
how much is vermox
I enjoy, lead to I discovered just what I used to be looking
for. You’ve ended my four day long hunt!
God Bless you man. Have a great day. Bye
I’m not sure why but this blog is loading extremely slow for me.
Is anyone else having this problem or is it a problem on my end?
I’ll check back later on and see if the problem still exists.
Good day! I know this is kinda off topic however I’d figured I’d ask.
Would you be interested in exchanging links or maybe guest writing a blog
post or vice-versa? My blog addresses a lot of the same
topics as yours and I feel we could greatly benefit from each other.
If you are interested feel free to shoot me an e-mail.
I look forward to hearing from you! Wonderful blog by the way!
I am actually pleased to glance at this weblog posts which
includes tons of valuable data, thanks for providing these kinds of statistics.
I just couldn’t depart your website before suggesting that I extremely loved the usual information a person provide
on your guests? Is going to be back incessantly in order to inspect new posts
obviously like your website however you need to
test the spelling on quite a few of your posts.
Many of them are rife with spelling problems and I find it very troublesome to inform the
truth then again I’ll definitely come back again.
No matter if some one searches for his necessary thing, therefore
he/she wants to be available that in detail, therefore that
thing is maintained over here.
Quality articles or reviews is the important to be a focus for the people
to pay a visit the web site, that’s what this site is providing.
clonidine 5mg
1xbet free spin promo code today
promo code for free bet in 1xbet
diflucan discount
motilium otc
buy diflucan prescription med
Heya! I just wanted to ask if you ever have any problems with hackers?
My last blog (wordpress) was hacked and I ended up losing several weeks
of hard work due to no backup. Do you have any methods to prevent hackers?
It’s an remarkable post in support of all the internet people; they will get benefit from it
I am sure.
سایت شرط بندی ایران بت
valtrex online canada
amoxicillin over the counter australia
buy motilium us
amoxicillin 500mg capsule generic
I every time used to read article in news papers
but now as I am a user of net therefore from now I
am using net for articles or reviews, thanks
to web.
Món Ngon Mỗi Ngày tổng hợp menu rộng rãi
những MÓN NGON thuận tiện thực hiện, đơn giản và ngon miệng, mang tầm giá tiết kiệm, dành riêng cho gia
đình bạn.
You’ve made some good points there. I looked on the net for more information about the issue and found most people will go along
with your views on this website.
Excellent website you have here but I was curious about if you knew of any message boards
that cover the same topics discussed here? I’d really like to be a
part of community where I can get responses from other knowledgeable people that share the same interest.
If you have any recommendations, please let me
know. Many thanks!
voltaren pills generic
https://www.tiktok.com/@prompterid/video/7274184090922863878
https://www.tiktok.com/@prompterid/video/7274174169342807301
https://www.tiktok.com/@prompterid/video/7274162456962829574
https://www.tiktok.com/@prompterid/video/7273903619945123078
https://www.tiktok.com/@prompterid/video/7273889705865776389
https://www.tiktok.com/@prompterid/video/7273877596377468166
https://www.tiktok.com/@prompterid/video/7273871148088134918
https://www.tiktok.com/@prompterid/video/7273863040632720645
https://www.tiktok.com/@prompterid/video/7273502307252243718
https://www.tiktok.com/@prompterid/video/7273493209261608197
https://www.tiktok.com/@prompterid/video/7273482920210304261
https://www.tiktok.com/@prompterid/video/7273476485934091525
https://www.tiktok.com/@prompterid/video/7273308941222776069
https://www.tiktok.com/@prompterid/video/7273157589289028870
https://www.tiktok.com/@prompterid/video/7273145289362459910
https://www.tiktok.com/@prompterid/video/7272932312436706566
https://www.tiktok.com/@prompterid/video/7272911588439493893
https://www.tiktok.com/@prompterid/video/7272773889665617158
https://www.tiktok.com/@prompterid/video/7272763132341259525
https://www.tiktok.com/@prompterid/video/7272755148290559237
https://www.tiktok.com/@prompterid/video/7272740844791221509
https://www.tiktok.com/@prompterid/video/7272546982277696774
https://www.tiktok.com/@prompterid/video/7272384080543501574
https://www.tiktok.com/@prompterid/video/7272233663855627525
https://www.tiktok.com/@prompterid/video/7272204142876118277
https://www.tiktok.com/@prompterid/video/7272199128443079941
https://www.tiktok.com/@prompterid/video/7272194289197681926
https://www.tiktok.com/@prompterid/video/7270774187197811974
best price generic propecia
order metformin online without prescription
Great beat ! I wish to apprentice even as you amend your website, how can i subscribe for a weblog site?
The account helped me a appropriate deal. I have been a little bit acquainted of this your broadcast provided shiny transparent concept
Hey! This post could not be written any better!
Reading through this post reminds me of my
previous room mate! He always kept talking about this. I will forward this page to him.
Pretty sure he will have a good read. Thank you for sharing!
Keep on working, great job bigrebate-fx!
motilium over the counter uk
trimox 500 tablet
Appreciate the recommendation. Let me try it out.
lasix tablets uk
When someone writes an article he/she maintains the plan of a user in his/her brain that how
a user can understand it. So that’s why this post is outstdanding.
Thanks!
buy viagra online
can i buy metformin over the counter in uk
I’m not that much of a internet reader to be honest but your blogs really nice, keep it up!
I’ll go ahead and bookmark your website to come back down the road.
All the best
Hello! I’m at work browsing your blog from my new iphone!
Just wanted to say I love reading your blog and look forward to all your
posts! Carry on the outstanding work!
over the counter toradol
I’ll immediately take hold of your rss feed as I can not to
find your e-mail subscription link or e-newsletter service.
Do you have any? Kindly permit me realize in order that I may subscribe.
Thanks.
Thanks very nice blog!
Just desire to say your article is as astonishing.
The clarity in your post is just cool and i can assume you
are an expert on this subject. Well with your permission allow me to grab your RSS feed to keep up to date with forthcoming
post. Thanks a million and please continue the enjoyable work.
vermox online uk
My brother recommended I might like this web site. He was entirely right.
This post truly made my day. You cann’t imagine simply how much time
I had spent for this information! Thanks!
Aw, this was an extremely good post. Spending some time and actual effort to generate
a superb article… but what can I say… I procrastinate a lot and don’t manage to get nearly anything done.
toradol 30
Món ngon mẹ nấu là website sẻ chia các công thức nấu ăn đơn giản và dễ làm, giúp chúng ta cũng có thể
tự tay nấu các đồ ăn ngon tại nhà.
Thanks for another informative web site. Where else may I get
that type of info written in such an ideal approach?
I have a mission that I am simply now operating on, and I have been on the look out for such info.
diflucan medicine buy
does viagra stop you coming early Although this analysis included patients with LMS, it also included patients with other types of sarcoma
It’s going to be finish of mine day, however before end I am reading this great paragraph to improve my experience.
1x bet promo codes
best 1xbet promo code
uk pharmacy
Paragraph writing is also a fun, if you be familiar with after that you can write otherwise it is
complicated to write.
online pharmacy motilium
rx bactrim
I like the valuable information you provide in your articles.
I will bookmark your weblog and check again here frequently.
I am quite sure I’ll learn a lot of new stuff right
here! Best of luck for the next!
Hello, Neat post. There’s a problem along with
your site in internet explorer, might test this?
IE nonetheless is the marketplace chief and a large portion of other folks will pass over your
wonderful writing due to this problem.
motilium 30 mg
wonderful publish, very informative. I’m wondering why the other specialists of
this sector do not notice this. You should proceed your writing.
I am sure, you have a great readers’ base already!
1 x bet promo code
promo code for 1x bet
Great beat ! I would like to apprentice while you amend your web site, how
can i subscribe for a blog website? The account helped me a acceptable deal.
I had been a little bit acquainted of this your broadcast offered bright clear
concept
Very quickly this site will be famous amid all blog visitors, due to it’s
pleasant content
lasix best price
NSFW hello this is my web NSFW
Intimate hello this is my web Intimate
Graphic hello this is my web Graphic
You expressed this superbly.
Groin hello this is my web Groin
I visit each day a few websites and information sites to
read content, except this web site presents feature based articles.
Inappropriate hello this is my web Inappropriate
Hi there to every body, it’s my first go to see of this web site; this website contains awesome and genuinely
excellent information for visitors.
Mature hello this is my web Mature
viagraPorn hello this is my web viagraPorn
NSFW hello this is my web NSFW
Impotence hello this is my web Impotence
Wonderful post but I was wanting to know if you could write a litte more on this topic?
I’d be very thankful if you could elaborate a little bit further.
Kudos!
Thanks for finally talking about >Before and After Archives – Precious Stones Photography <Liked it!
Aw, this was a very nice post. Taking the time and
actual effort to make a superb article… but what can I say… I hesitate a whole lot and don’t seem to
get nearly anything done.
Write more, thats all I have to say. Literally, it seems
as though you relied on the video to make your point.
You clearly know what youre talking about, why throw away your intelligence on just posting videos to your blog when you could be giving us something informative to read?
Way cool! Some extremely valid points! I appreciate you writing this post and also
the rest of the site is extremely good.
Great beat ! I would like to apprentice while you amend your web site, how can i subscribe for
a blog web site? The account aided me a acceptable deal.
I had been a little bit familiar of this your broadcast offered brilliant clear idea
Magic Word Scrambles word search book
https://www.amazon.com/dp/B0CGTQ5W68
Fine way of describing, and good article to take information regarding my presentation topic, which i am going to present in institution of higher education.
bactrim 800 mg 160 mg
furosemide 80
I am sure this article has touched all the internet visitors, its really really
pleasant paragraph on building up new blog.
Very good post. I definitely love this website. Keep writing!
Hi colleagues, fastidious piece of writing and fastidious arguments
commented at this place, I am genuinely enjoying by
these.
how much is toradol pills
If some one desires expert view about blogging and site-building then i recommend him/her to visit this website, Keep
up the good work.
A motivating discussion is worth comment. I do believe that you need to publish more on this issue, it may not be a
taboo subject but usually people don’t talk about such issues.
To the next! Many thanks!!
What i don’t understood is if truth be told how you’re not really much more smartly-preferred than you may
be right now. You’re very intelligent. You know thus considerably in terms of this matter, made me in my view
believe it from numerous varied angles. Its like
women and men are not involved except it’s one thing to do with Woman gaga!
Your personal stuffs excellent. All the time care for it up!
These types of easily monetary are meant for individuals suffering from
finances circumstance. There are companies running scams out there and identity theft is a real and scary.
The amount in Business Loans for People with Bad Credit is made accessible to you in the secured and the unsecured format.
I was recommended this blog by my cousin. I’m not sure whether this post is written by him as
no one else know such detailed about my problem. You’re wonderful!
Thanks!
سایت شرط بندی ایران بت
metformin 397 pill
If some one wishes expert view about running a blog then i propose
him/her to visit this weblog, Keep up the good job.
I could not refrain from commenting. Exceptionally well written!
trazodone tablet buy online
I am curious to find out what blog system you are utilizing?
I’m experiencing some minor security issues with my latest website and I’d like
to find something more safe. Do you have any
solutions?
I’m not sure exactly why but this site is loading extremely slow for me.
Is anyone else having this problem or is it a issue on my end?
I’ll check back later on and see if the problem still exists.
whoah this weblog is excellent i love studying your posts.
Keep up the good work! You understand, lots of persons are hunting around for this info, you could
aid them greatly.
Keep this going please, great job!
buy amoxil 500 mg online from india
maple leaf pharmacy in canada
First off I want to say superb blog! I had a quick question that I’d like to ask if you
do not mind. I was interested to know how you center yourself and
clear your mind prior to writing. I have had difficulty clearing my thoughts in getting my ideas out.
I truly do enjoy writing but it just seems like the first 10 to 15 minutes
are lost just trying to figure out how to begin. Any ideas or tips?
Appreciate it!
best over the counter lasix
RTP Live Slot
WOLES4D BANDAR JUDI SLOT DEPOSIT DANA 10 RIBU 2023 TERPERCAYA
WOLES4D Situs slot Gacor Maxwin Terbaru
WOLES4D Link Alternatif slot Online Terpercaya
WOLES4D Link Daftar Slot Gacor
diflucan 200
ordering diflucan without a prescription
I’m impressed by the quantity of analysis you place into this publish. It is obvious that you’re committed to giving beneficial data.
rx pharmacy online
diflucan 50 mg
This site is my weekly dose of inspiration. Really don’t cease sharing!
Hi! This is my first visit to your blog! We are a team of volunteers and starting
a new project in a community in the same niche. Your blog provided us useful information to work on. You have done a extraordinary job!
This is a really good tip especially to those new to the blogosphere.
Brief but very precise information… Many thanks for sharing this one.
A must read post!
desyrel coupon
I really like what you guys tend to be up too.
This kind of clever work and exposure! Keep up the amazing works guys I’ve
included you guys to my personal blogroll.
trazodone hcl 50mg
azithromycin 250 mg pill
What’s up everyone, it’s my first pay a visit at this
web page, and post is genuinely fruitful for me, keep up posting
these content.
I like the valuable info you provide in your articles.
I’ll bookmark your blog and check again here regularly.
I am quite certain I’ll learn many new stuff right here!
Good luck for the next!
augmentin cheap
lasix 40 mg tablet
I was curious if you ever considered changing the layout of your website?
Its very well written; I love what youve got to say.
But maybe you could a little more in the way of content so
people could connect with it better. Youve got an awful lot of text for only having 1 or two images.
Maybe you could space it out better?
can i buy toradol over the counter
As the admin of this website is working, no hesitation very rapidly
it will be famous, due to its quality contents.
toradol 15 mg tablet
Статейные и ссылочные прогоны Xrumer,
GSA
В наше время, практически каждый
человек пользуется интернетом.
С его помощью можно найти любую информацию из
различных интернет-источников и поисковых систем.
Для кого-то собственный сайт
— это хобби. Однако, большинство используют разработанные
проекты для заработка и привлечение
прибыли.
У вас есть собственный сайт и вы хотите привлечь на
него максимум посетителей, но не знаете с чего начать?
Заказать Прогон Хрумером и ГСА прогоны хрумером что это
This is my first time pay a quick visit at here and i am truly happy
to read everthing at single place.
motilium cvs
Heya! I realize this is somewhat off-topic however I needed to
ask. Does operating a well-established blog such as yours require a massive amount work?
I am brand new to running a blog however I do write in my journal
daily. I’d like to start a blog so I can share my own experience and feelings online.
Please let me know if you have any kind of recommendations or
tips for new aspiring blog owners. Thankyou!
Hmm is anyone else experiencing problems with the images on this blog loading?
I’m trying to determine if its a problem on my end or if it’s the blog.
Any feedback would be greatly appreciated.
I every time used to study piece of writing in news papers
but now as I am a user of net so from now I am using net for content,
thanks to web.
amoxicillin 720 mg
Enhancer hello this is my web Enhancer
Vulva hello this is my web Vulva
Penis hello this is my web Penis
Nudity hello this is my web Nudity
Urethra hello this is my web Urethra
Explicit hello this is my web Explicit
Genitalia hello this is my web Genitalia
Aphrodisiac hello this is my web Aphrodisiac
Viagra hello this is my web Viagra
Nudity hello this is my web Nudity
Excellent post. I used to be checking constantly this weblog and I’m impressed!
Very useful info particularly the closing phase 🙂 I deal with
such info a lot. I used to be looking for this certain info for a very
lengthy time. Thank you and best of luck.
toradol price
online pharmacy birth control pills
generic diflucan online
Wonderful blog! I found it while browsing on Yahoo News. Do you have any suggestions on how to get listed in Yahoo News?
I’ve been trying for a while but I never seem to get there!
Thank you
Hello there! This is my first visit to your blog! We are a team of volunteers
and starting a new initiative in a community
in the same niche. Your blog provided us valuable information to work
on. You have done a marvellous job!
Hello There. I found your blog using msn. This is a really well written article.
I’ll make sure to bookmark it and return to read more of
your useful info. Thanks for the post. I’ll definitely comeback.
trusted online pharmacy
can i buy diflucan over the counter uk
Good post. I am experiencing some of these issues as well..
Today, I went to the beach with my kids. I
found a sea shell and gave it to my 4 year old daughter
and said “You can hear the ocean if you put this to your ear.” She
put the shell to her ear and screamed. There was a
hermit crab inside and it pinched her ear. She never wants to go back!
LoL I know this is entirely off topic but I had to tell someone!
Attractive section of content. I just stumbled upon your blog and in accession capital to assert that I get actually
enjoyed account your blog posts. Anyway I’ll be subscribing to your augment and even I
achievement you access consistently rapidly.
furosemide 10 mg tablet
Hello this is kinda of off topic but I was wondering if
blogs use WYSIWYG editors or if you have to manually code
with HTML. I’m starting a blog soon but have no coding experience so I wanted to
get guidance from someone with experience.
Any help would be greatly appreciated!
I don’t even know how I ended up here, but I thought this post was good.
I don’t know who you are but certainly you’re going to a famous blogger if you are not already 😉 Cheers!
Heya i’m for the primary time here. I found this board and I in finding
It really helpful & it helped me out a lot. I am hoping to present one thing back and
help others like you aided me.
Your content is so addictive. I binge-go through your web site on a regular basis!
Fantastic items from you, man. I’ve bear in mind your stuff previous to
and you’re simply extremely great. I actually like what
you’ve received right here, certainly like what you’re stating
and the best way by which you assert it. You make it entertaining and you continue to take care of to
stay it smart. I cant wait to read far more from you.
That is actually a tremendous site.
I’m often amazed by the quality of your creating. There is a authentic gift for speaking intricate ideas in a means that’s effortless to understand.
Greetings! Very helpful advice in this particular post!
It’s the little changes that will make the largest changes.
Many thanks for sharing!
When I originally commented I clicked the “Notify me when new comments are added” checkbox and now each time a comment is added
I get several e-mails with the same comment. Is there any way you can remove me from
that service? Appreciate it!
Your web site persistently delivers a smile to my encounter. It is a will have to-read through!
Hello there, just became aware of your blog through Google, and found that it is really informative.
I’m gonna watch out for brussels. I will
be grateful if you continue this in future.
Lots of people will be benefited from your writing. Cheers!
diflucan brand name
Your composing is educational and interesting. I often study something new from a posts.
motilium
motilium suspension
Greetings from Carolina! I’m bored to tears at work so I decided to browse your website on my iphone during lunch break.
I love the knowledge you present here and can’t wait to take a look when I get home.
I’m amazed at how quick your blog loaded on my phone ..
I’m not even using WIFI, just 3G .. Anyways, superb blog!
Your blog site is the reason I sit up for sitting down and examining. Preserve shining!
My spouse and I stumbled over here by a different web page and thought I may as well check things out.
I like what I see so now i’m following you. Look forward to exploring your
web page yet again.
Your passion for the topic genuinely shines through with your composing.
Your determination to the craft is truly inspiring. Maintain elevating the bar!
Its like you read my mind! You seem to know a lot about this, like you wrote the book in it
or something. I think that you could do with some
pics to drive the message home a little bit, but instead of that, this is magnificent blog.
A fantastic read. I’ll certainly be back.
It’s perfect time to make some plans for the future and it’s time to be happy.
I’ve read this post and if I could I desire to
suggest you some interesting things or suggestions.
Maybe you can write next articles referring to this article.
I want to read even more things about it!
where can i purchase diflucan
I will right away seize your rss as I can’t find your e-mail subscription hyperlink or e-newsletter
service. Do you have any? Kindly let me realize so
that I could subscribe. Thanks.
Your website is my key weapon for acing discussions about these subject areas.
You really make it seem so easy with your presentation but
I find this matter to be actually something which I think I would never understand.
It seems too complicated and very broad for me.
I’m looking forward for your next post, I will try to get the hang of it!
Your creating is so distinct and concise that even a rookie could fully grasp this subject matter. Thank you for making it accessible.
Your creating can be a breath of clean air. It really is fantastic to read through something that’s not simply regurgitating the same old details.
Your posts strike the ideal harmony between useful and interesting.
I used to be able to find good advice from your blog articles.
payday loan
Hi my friend! I want to say that this post is awesome, great written and come with approximately all important infos.
I’d like to look more posts like this .
amoxicillin nz
Very soon this website will be famous among all blogging
and site-building visitors, due to it’s nice content
If you are going for finest contents like myself,
just pay a quick visit this website everyday for the reason that it offers feature contents, thanks
diflucan 50 mg
Your blog site happens to be a Component of my plan. I am unable to get more than enough!
What i do not understood is in fact how you’re not really a lot
more smartly-favored than you might be right now.
You’re very intelligent. You know thus significantly on the subject
of this subject, made me for my part consider it from numerous numerous angles.
Its like men and women aren’t involved except it is something to do
with Woman gaga! Your personal stuffs nice. Always handle it up!
Your crafting consistently opens my intellect to new opportunities. Thank you!
Your crafting is a present that retains on supplying. Thank you for your personal generosity!
albuterol 5 mg
Hello! I’ve been reading your weblog for a while now and finally got the courage to go ahead and
give you a shout out from Dallas Texas! Just
wanted to say keep up the good job!
I like what you guys are usually up too. This sort of clever work and
exposure! Keep up the terrific works guys I’ve added
you guys to my blogroll.
This website is my weekly dose of inspiration. Do not prevent sharing!
Your site is my guilty enjoyment – I am unable to get adequate of it!
rx pharmacy coupons
You make advanced matters truly feel just like a breeze. Your talent is undeniable.
I have been browsing online more than 2 hours today, yet I never found any interesting article
like yours. It is pretty worth enough for me. Personally,
if all webmasters and bloggers made good content
as you did, the web will be a lot more useful than ever before.
After going over a handful of the articles on your web page, I truly appreciate your technique of writing a blog.
I saved as a favorite it to my bookmark site list and will be checking back soon. Please visit
my web site too and let me know how you feel.
Your thoughtful approach to Every single topic sets you in addition to Many others.
I’m now not sure where you’re getting your information, but good
topic. I must spend a while finding out more or understanding more.
Thank you for excellent information I was looking for this information for my mission.
Hi there to all, how is the whole thing, I think every one is getting more from
this web page, and your views are fastidious designed for new people.
Its like you learn my thoughts! You appear to know a
lot about this, like you wrote the book in it or something.
I think that you could do with a few p.c. to power the message house a bit,
but other than that, that is great blog. A great read.
I’ll certainly be back.
Do you have a spam issue on this website; I also am a blogger, and I was
wanting to know your situation; we have created some nice practices and we
are looking to trade solutions with others, be sure to shoot me an e-mail if interested.
chandal entrenamiento manchester united
Your posts make me reflect and see matters from a whole unique approach.
Wonderful post! I uncovered a lot from looking through this.
Your submit was so participating which i dropped monitor of time although reading it. Keep up The nice do the job!
Your producing is so inspiring which i sense enthusiastic to consider motion on this subject matter. Thanks for the encouragement.
Nice post. I was checking continuously this blog and I’m inspired!
Extremely useful information specifically the last part 🙂 I maintain such information much.
I was seeking this certain information for a long time.
Thank you and good luck.
There is a real gift for building Studying thrilling and available.
buy lasix online
Your publish was an incredible example of how to put in writing with authenticity. You’re not frightened to be by yourself and it demonstrates inside your operate.
cialis cost in india
Howdy this is kind of of off topic but I was wondering if blogs use WYSIWYG editors or
if you have to manually code with HTML. I’m starting a
blog soon but have no coding expertise so I wanted to get guidance from someone with experience.
Any help would be greatly appreciated!
вход кракен даркнет маркет где
можно купить гаш меф марки соли лирику даже есть колеса.
заходить надо через впн или тор
кракен зеркало тор
Keep this going please, great job!
یادگیری شیمی ،شیمی،مواد شیمی،عناصر
trazodone prescription uk
When I originally commented I clicked the “Notify me when new comments are added”
checkbox and now each time a comment is added I get four e-mails with the same comment.
Is there any way you can remove people from that service?
Thanks!
diclofenac 75 mg cost
Many groups accept as true that they have no option to get a personal loan if
they have bad credit, theres high-quality information for you.
In with the current economic day’s consumer oriented earth, firms are likely to
with will be as easy as expressing God many thanks.
You can find many loans options with traditional lenders that are available at your place.
Hi there I am so happy I found your blog, I really found you by accident, while I was looking
on Askjeeve for something else, Anyways I am here
now and would just like to say thanks for a incredible post and a
all round exciting blog (I also love the theme/design),
I don’t have time to browse it all at the moment but I have book-marked it and also included your RSS feeds, so when I have time I will be back to
read a lot more, Please do keep up the superb b.
roche accutane without prescription
I’m extremely impressed with your writing skills and also with the layout on your
blog. Is this a paid theme or did you modify it yourself?
Anyway keep up the nice quality writing, it’s rare
to see a great blog like this one nowadays.
Sahabet’e üye olmak için öncelikle internet sitesinin güncel adresine ulaşmanız gerekir.
Günümüzde online bahis sektörü oldukça gelişmiş olsa da
hâlâ Türkiye’de tam anlamı ile yasal değildir.
Dolayısıyla online bahis sektöründe hizmet veren birçok
internet sitesi zaman içerisinde adres değişikliği yaşayabilir ya da erişim engeli ile karşılaşabilir.
Bu durum kullanıcıların Sahabet’e ulaşma konusunda zorluk yaşamalarına neden olmaktadır.
Fakat kullanıcılarıyla her zaman iletişim halinde kalmayı
seçen ve bunun için çeşitli yöntemler geliştiren bahis
sitesi, sosyal medya hesaplarını aktif olarak kullanmakta
ve bu hesaplar üzerinden internet sitesinde meydana gelen değişiklikler ile ilgili kullanım düzenli bilgilendirmektedir.
diflucan canadian pharmacy
Wow that was odd. I just wrote an very long comment but after I clicked submit my comment didn’t appear.
Grrrr… well I’m not writing all that over again. Anyway,
just wanted to say excellent blog!
metformin
Wow! After all I got a webpage from where I know how to actually obtain helpful data concerning my study and knowledge.
pharmacy no prescription required
how to get trazodone prescription
how to buy diflucan online
Thanks for sharing your thoughts about Temple Texas Newborn Photographer.
Regards
HD kalitesinde ve anlaşılır ses içeriği ile SSSTiktok en beğenilen video indirme platformudur.
http://afcantarelle.org/index.php?title=Blog_EDU
http://afcantarelle.org/index.php?title=User:ZRQPablo43
http://classicalmusicmp3freedownload.com/ja/index.php?title=%E5%88%A9%E7%94%A8%E8%80%85:IolaPriestley
http://classicalmusicmp3freedownload.com/ja/index.php?title=Blog_EDU
http://embeddedwiki.cs.aau.dk/wiki/Blog_EDU
http://embeddedwiki.cs.aau.dk/wiki/User:BrittanyCummins
http://minecraft-earth.fun/wiki/%E5%88%A9%E7%94%A8%E8%80%85:NoemiCardin675
http://minecraft-earth.fun/wiki/Blog_EDU
http://nswiki.svenskasuperserier.se/w/index.php?title=Anv%C3%A4ndare:RoryGreenwald79
http://nswiki.svenskasuperserier.se/w/index.php?title=Blog_EDU
http://postgasse.net/Wiki/index.php?title=Benutzer:Sol77X46820
http://postgasse.net/Wiki/index.php?title=Blog_EDU
http://terio.fvet.uba.ar/mediawiki/index.php/Blog_EDU
http://terio.fvet.uba.ar/mediawiki/index.php/Usuario:DonImler385839
http://urbino.fh-joanneum.at/trials/index.php/Blog_EDU
http://urbino.fh-joanneum.at/trials/index.php/User:CliffordBoulger
http://vulteevaliant.com/index.php/Blog_EDU
http://vulteevaliant.com/index.php/User:NicholComeaux8
http://wiki-ux.info/wiki/Blog_EDU
http://wiki-ux.info/wiki/User:KristoferWilkes
http://wiki.shitcore.org/index.php/Blog_EDU
http://wiki.shitcore.org/index.php/User:EliKitchens987
http://www.driftpedia.com/wiki/index.php/User:MeredithDarker
http://www.driftpedia.com/wiki/index.php?title=Blog_EDU
http://www.erwinbrandenberger.ch/index.php?title=Benutzer:RosellaAston1
http://www.erwinbrandenberger.ch/index.php?title=Blog_EDU
http://www.heerfamily.net/mediawiki/index.php/Blog_EDU
http://www.heerfamily.net/mediawiki/index.php/User:IngridGiles
http://www.jeromebaray.com/afm/wiki/index.php/Blog_EDU
http://www.jeromebaray.com/afm/wiki/index.php/Utilisateur:KassandraCatts3
http://www.matthew-morris.com/wiki/index.php/Blog_EDU
http://www.matthew-morris.com/wiki/index.php/User:SharonFelts605
http://www.wiki.cheneliege.fr/index.php/Blog_EDU
http://www.wiki.cheneliege.fr/index.php/Utilisateur:ElizabethL42
https://able.extralifestudios.com/wiki/index.php/Blog_EDU
https://able.extralifestudios.com/wiki/index.php/User:JeffereyVega4
https://bbarlock.com/index.php/Blog_EDU
https://bbarlock.com/index.php/User:JacelynDash
https://biowiki.clinomics.com/index.php/Blog_EDU
https://biowiki.clinomics.com/index.php/User:HymanJoyner
https://demo.centreon.com/wiki/index.php?title=Blog_EDU
https://demo.centreon.com/wiki/index.php?title=User:AllenLeggo5
https://dptotti.fic.edu.uy/mediawiki/index.php/Blog_EDU
https://dptotti.fic.edu.uy/mediawiki/index.php/Usuario:LarryHerlitz
https://exterior.podemos.info/mediawiki/index.php?title=Blog_EDU
https://exterior.podemos.info/mediawiki/index.php?title=Usuario:ErrolFyans2508
https://gamesfashionarchive.net/wiki/User:BrunoPoa65956
https://gnometopia.org/index.php?title=Blog_EDU
https://iamelf.com/wiki/index.php/Blog_EDU
https://iamelf.com/wiki/index.php/User:Remona84J3684778
https://intranet.wikimedia.cat/wiki/Usuari:ShanaCastro7928
https://koloiko.com/wiki/index.php?title=Blog_EDU
https://koloiko.com/wiki/index.php?title=User:PaulineRjo
https://library.kemu.ac.ke/kemuwiki/index.php/Blog_EDU
https://library.kemu.ac.ke/kemuwiki/index.php/User:KeishaYbarra24
https://livingbooksaboutlife.org/books/Blog_EDU
https://livingbooksaboutlife.org/books/User:JunkoCuster31
https://mnwiki.org/index.php/Blog_EDU
https://mnwiki.org/index.php/User:ShennaY353
https://procesal.cl/index.php/Blog_EDU
https://procesal.cl/index.php/User:LaverneJyv
https://religiopedia.com/index.php/Blog_EDU
https://religiopedia.com/index.php/User:WilliemaeEnyeart
https://sustainabilipedia.org/index.php/Blog_EDU
https://sustainabilipedia.org/index.php/User:MarshaTiemann97
https://wiki.gahlawat.dynu.com/mediawiki/index.php?title=Blog_EDU
https://wiki.gahlawat.dynu.com/mediawiki/index.php?title=User:Aiden61S20754
https://wiki.hrw-fablab.de/index.php?title=Blog_EDU
https://wiki.hrw-fablab.de/index.php?title=User:VerleneBaf
https://wiki.minecraft.jp.net/%E5%88%A9%E7%94%A8%E8%80%85:CarynViera96
https://wiki.minecraft.jp.net/Blog_EDU
https://wiki.ryuriin.my.id/index.php/Blog_EDU
https://wiki.ryuriin.my.id/index.php/User:KristianIrvin
https://wiki.sports-5.ch/index.php?title=Blog_EDU
https://wiki.sports-5.ch/index.php?title=Utilisateur:ManuelSparks83
https://www.crustcorporate.com/wiki/Blog_EDU
https://www.crustcorporate.com/wiki/User:KathrinMiner8
https://www.cspcc.org/wiki/index.php/Blog_EDU
https://www.cspcc.org/wiki/index.php/Utilisateur:KimberlyLesina
https://www.offwiki.org/wiki/Blog_EDU
https://www.offwiki.org/wiki/User:VeldaVos476
https://www.uq.universite-paris-saclay.fr/wiki-public/index.php?title=Blog_EDU
https://www.uq.universite-paris-saclay.fr/wiki-public/index.php?title=Utilisateur:OYXSherlene
https://www.wiki.pcfu.cz/index.php/Blog_EDU
https://www.wiki.pcfu.cz/index.php/U%c5%beivatel:HamishOng431705
http://afcantarelle.org/index.php?title=Blog_EDU_Rayford
http://afcantarelle.org/index.php?title=User:RayfordDonohoe
http://classicalmusicmp3freedownload.com/ja/index.php?title=%E5%88%A9%E7%94%A8%E8%80%85:TraciChavers79
http://classicalmusicmp3freedownload.com/ja/index.php?title=Blog_EDU
http://embeddedwiki.cs.aau.dk/wiki/Blog_EDU
http://embeddedwiki.cs.aau.dk/wiki/User_talk:MichalGoethe13
http://kousokuwiki.org/wiki/Blog_EDU_Melvina
http://lsc.wikisign.org/wiki/Usuari:KarriSpencer060
http://minecraft-earth.fun/wiki/%E5%88%A9%E7%94%A8%E8%80%85:BridgettMitford
http://minecraft-earth.fun/wiki/Blog_EDU_Bridgett
http://postgasse.net/Wiki/index.php?title=Benutzer:ArthurAlbritton
http://postgasse.net/Wiki/index.php?title=Blog_EDU_Arthur
http://terio.fvet.uba.ar/mediawiki/index.php/Blog_EDU_Lilla
http://terio.fvet.uba.ar/mediawiki/index.php/Usuario:CGMLilla6466
http://urbino.fh-joanneum.at/trials/index.php/Blog_EDU_Orval
http://urbino.fh-joanneum.at/trials/index.php/User:OrvalNewberry7
http://vulteevaliant.com/index.php/Blog_EDU
http://vulteevaliant.com/index.php/User:ShaunteShoebridg
http://wiki-ux.info/wiki/Blog_EDU_Laurie
http://wiki-ux.info/wiki/User:LaurieFolk362
http://www.driftpedia.com/wiki/index.php/Blog_EDU
http://www.driftpedia.com/wiki/index.php/User:PNERoman20
http://www.erwinbrandenberger.ch/index.php?title=Benutzer:ElbertLoane24
http://www.erwinbrandenberger.ch/index.php?title=Blog_EDU_Elbert
http://www.heerfamily.net/mediawiki/index.php/Blog_EDU
http://www.heerfamily.net/mediawiki/index.php/User:HermineSnoddy16
http://www.jeromebaray.com/afm/wiki/index.php/Blog_EDU_Marcelo
http://www.jeromebaray.com/afm/wiki/index.php/Utilisateur:MarceloRutherfor
http://www.matthew-morris.com/wiki/index.php/Blog_EDU_Sidney
http://www.matthew-morris.com/wiki/index.php/User:ZTASidney1546090
http://www.wiki.cheneliege.fr/index.php/Blog_EDU_Rebecca
http://www.wiki.cheneliege.fr/index.php/Utilisateur:RebeccaCausey5
https://able.extralifestudios.com/wiki/index.php/Blog_EDU_Carissa
https://able.extralifestudios.com/wiki/index.php/User:CarissaP86
https://bbarlock.com/index.php/Blog_EDU
https://bbarlock.com/index.php/User:PeterRanford983
https://biowiki.clinomics.com/index.php/Blog_EDU_Nannette
https://biowiki.clinomics.com/index.php/User:NannetteHagen99
https://demo.centreon.com/wiki/index.php?title=Blog_EDU_Iola
https://demo.centreon.com/wiki/index.php?title=User:IolaHogg659558
https://dptotti.fic.edu.uy/mediawiki/index.php/Blog_EDU_Mona
https://dptotti.fic.edu.uy/mediawiki/index.php/Usuario:MonaBunbury
https://exterior.podemos.info/mediawiki/index.php?title=Blog_EDU_Cheryl
https://exterior.podemos.info/mediawiki/index.php?title=Usuario:CherylMullagh42
https://gamesfashionarchive.net/wiki/User:BufordSchippers
https://gnometopia.org/index.php?title=Blog_EDU_Savannah
https://iamelf.com/wiki/index.php/Blog_EDU_Bryon
https://iamelf.com/wiki/index.php/User:BryonSolorio
https://intranet.wikimedia.cat/wiki/Usuari:WilbertSherrill
https://koloiko.com/wiki/index.php?title=Blog_EDU_Dieter
https://koloiko.com/wiki/index.php?title=User:DieterSharland7
https://livingbooksaboutlife.org/books/Blog_EDU
https://livingbooksaboutlife.org/books/User:MohamedMcLaughli
https://mnwiki.org/index.php/Blog_EDU
https://mnwiki.org/index.php/User:BritneyOKeefe
https://procesal.cl/index.php/Blog_EDU
https://procesal.cl/index.php/User:IdaFlint426
https://religiopedia.com/index.php/Blog_EDU_Mike
https://religiopedia.com/index.php/User:MikeTillman
https://sustainabilipedia.org/index.php/Blog_EDU
https://sustainabilipedia.org/index.php/User:KristanVallejo
https://wiki.hrw-fablab.de/index.php?title=Blog_EDU
https://wiki.hrw-fablab.de/index.php?title=User:HarrisKleeman19
https://wiki.minecraft.jp.net/%E5%88%A9%E7%94%A8%E8%80%85:DominiqueWoodruf
https://wiki.minecraft.jp.net/Blog_EDU_Dominique
https://wiki.ryuriin.my.id/index.php/Blog_EDU_Marta
https://wiki.ryuriin.my.id/index.php/User:MartaKunze3121
https://wiki.sports-5.ch/index.php?title=Blog_EDU_Jerold
https://wiki.sports-5.ch/index.php?title=Utilisateur:JeroldDidomenico
https://wiki.strat-o-matic.com:443/index.php/Blog_EDU
https://wiki.strat-o-matic.com:443/index.php/User:KoryBeaurepaire
https://www.crustcorporate.com/wiki/Blog_EDU
https://www.crustcorporate.com/wiki/User:ColumbusFihelly
https://www.cspcc.org/wiki/index.php/Blog_EDU
https://www.cspcc.org/wiki/index.php/Utilisateur:RussJewett4441
https://www.mibtec.it/wiki/index.php?title=Utente:GertrudeVanhoose
https://www.offwiki.org/wiki/Blog_EDU_Vicki
https://www.offwiki.org/wiki/User:VickiGoodrich6
https://www.uq.universite-paris-saclay.fr/wiki-public/index.php?title=Blog_EDU_Grace
https://www.uq.universite-paris-saclay.fr/wiki-public/index.php?title=Utilisateur:GraceOlds01695
https://www.wiki.pcfu.cz/index.php/Blog_EDU_Katherin
https://www.wiki.pcfu.cz/index.php/U%c5%beivatel:KatherinMartin
It’s really very complex in this full of activity life to listen news
on TV, thus I only use web for that purpose, and take the latest news.
azithromycin generic brand
Today, I went to the beach with my kids. I found a sea
shell and gave it to my 4 year old daughter and said “You can hear the ocean if you put this to your ear.” She put the shell to her ear and screamed.
There was a hermit crab inside and it pinched her ear.
She never wants to go back! LoL I know this is totally off topic but I had to tell someone!
I know this site provides quality based articles and other
material, is there any other web page which gives such
stuff in quality?ทีเด็ดมวยวันนี้
Howdy would you mind sharing which blog platform you’re using?
I’m planning to start my own blog soon but I’m
having a hard time making a decision between BlogEngine/Wordpress/B2evolution and Drupal.
The reason I ask is because your design seems different then most blogs and I’m
looking for something completely unique. P.S My apologies for getting off-topic
but I had to ask!
tamoxifen 20 mg cost
diclofenac gel 30g
Pretty! This was an extremely wonderful article. Thanks for supplying these details.
Hmm is anyone else experiencing problems with the pictures on this blog loading?
I’m trying to find out if its a problem on my end or if it’s the blog.
Any responses would be greatly appreciated.
Aw, this was an incredibly good post. Finding the time and
actual effort to create a very good article… but what can I say… I
procrastinate a whole lot and never manage to get anything done.
augmentin prescription online
I was curious if you ever thought of changing the page layout of your website?
Its very well written; I love what youve got to say.
But maybe you could a little more in the way of content so people could
connect with it better. Youve got an awful lot of text for only having
1 or 2 pictures. Maybe you could space it out better?
hello there and thank you for your information – I’ve definitely
picked up something new from right here. I did however expertise
a few technical points using this web site, as I experienced to reload the
web site a lot of times previous to I could get it to
load correctly. I had been wondering if your web hosting is OK?
Not that I am complaining, but slow loading instances times will very frequently affect your
placement in google and could damage your quality score if ads and marketing with Adwords.
Well I’m adding this RSS to my e-mail and can look out for a lot more of your respective exciting
content. Make sure you update this again very soon.
After looking over a handful of the blog posts on your website, I really
appreciate your technique of blogging. I book marked it to my bookmark site list and will be
checking back in the near future. Please check
out my website too and let me know how you feel.
valtrex price singapore
Fantastic goods from you, man. I have understand your stuff previous to and you are just too wonderful.
I really like what you’ve acquired here, certainly like what you are stating and
the way in which you say it. You make it entertaining and you still take care of to keep it sensible.
I can not wait to read far more from you. This is really
a terrific web site.
toradol medication
When I initially commented I clicked the “Notify me when new comments are added” checkbox and now each time a comment is added I get three emails with the same comment.
Is there any way you can remove me from that service? Many thanks!
Hi, after reading this amazing paragraph i
am also happy to share my familiarity here with friends.
Excellent blog here! Also your website loads
up fast! What host are you using? Can I get your
affiliate link to your host? I wish my site loaded up as
fast as yours lol
Asking questions are genuinely fastidious thing if you are not understanding anything entirely, except this post offers nice
understanding even.
Howdy! Would you mind if I share your blog with my zynga group?
There’s a lot of people that I think would really appreciate your content.
Please let me know. Cheers
Amazing! Its actually amazing post, I have got much clear idea about from this post.
This is the right web site for everyone who hopes to understand this topic.
You know so much its almost tough to argue with you (not that I personally
would want to…HaHa). You certainly put a new
spin on a subject that has been discussed for decades.
Excellent stuff, just wonderful!
This is my first time visit at here and i am actually happy
to read all at single place.
clonidine 0.3 mg tablets
I simply could not go away your site before suggesting that I actually enjoyed the usual information an individual provide for your visitors?
Is gonna be back ceaselessly to investigate cross-check new posts
Somebody necessarily assist to make seriously articles I would state.
That is the very first time I frequented your website page and so far?
I amazed with the research you made to make
this particular publish amazing. Great task!
Hello! Do you know if they make any plugins to help with Search
Engine Optimization? I’m trying to get my blog to rank for some targeted keywords but I’m not
seeing very good success. If you know of any please share.
Many thanks!
http://afcantarelle.org/index.php?title=Resepmama_Josephine
http://afcantarelle.org/index.php?title=User:JosephineCollett
http://classicalmusicmp3freedownload.com/ja/index.php?title=%E5%88%A9%E7%94%A8%E8%80%85:VictorinaBarnett
http://classicalmusicmp3freedownload.com/ja/index.php?title=Resepmama_Victorina
http://embeddedwiki.cs.aau.dk/wiki/Resepmama_Guadalupe
http://embeddedwiki.cs.aau.dk/wiki/User:GuadalupeFinnega
http://kousokuwiki.org/wiki/Resepmama_Melody
http://lsc.wikisign.org/wiki/Usuari:RGYPauline
http://minecraft-earth.fun/wiki/%E5%88%A9%E7%94%A8%E8%80%85:DomingoThomas15
http://minecraft-earth.fun/wiki/Resepmama_Domingo
http://nswiki.svenskasuperserier.se/w/index.php?title=Resepmama_Veda
http://postgasse.net/Wiki/index.php?title=Benutzer:NicoleCroteau
http://postgasse.net/Wiki/index.php?title=Resepmama_Nicole
http://stackoverflow.altervista.org/index.php?title=Resepmama_Elton
http://stackoverflow.altervista.org/index.php?title=Utente:EltonLilley56
http://terio.fvet.uba.ar/mediawiki/index.php/Resepmama_Cindi
http://terio.fvet.uba.ar/mediawiki/index.php/Usuario:CindiMannix981
http://vulteevaliant.com/index.php/Resepmama_Lewis
http://vulteevaliant.com/index.php/User:LewisWooden3
http://wiki-ux.info/wiki/Resepmama_Sherrill
http://wiki-ux.info/wiki/User:SherrillCus
http://www.driftpedia.com/wiki/index.php/Resepmama_Richard
http://www.driftpedia.com/wiki/index.php/User:RichardHaddad
http://www.erwinbrandenberger.ch/index.php?title=Benutzer:Noreen8344
http://www.erwinbrandenberger.ch/index.php?title=Resepmama_Noreen
http://www.heerfamily.net/mediawiki/index.php/Resepmama_Francesco
http://www.heerfamily.net/mediawiki/index.php/User:FrancescoPju
http://www.jeromebaray.com/afm/wiki/index.php/Resepmama_Leandro
http://www.jeromebaray.com/afm/wiki/index.php/Utilisateur:LeandroBlaze268
http://www.matthew-morris.com/wiki/index.php/Resepmama_Rosalina
http://www.matthew-morris.com/wiki/index.php/User:RosalinaStoll
http://www.wiki.cheneliege.fr/index.php/Resepmama_Roxanne
http://www.wiki.cheneliege.fr/index.php/Utilisateur:RoxanneI16
http://www.zilahy.info/wiki/index.php/Resepmama_Elias
http://www.zilahy.info/wiki/index.php/User:EliasHenning3
https://able.extralifestudios.com/wiki/index.php/Resepmama_Landon
https://able.extralifestudios.com/wiki/index.php/User:LandonC574560908
https://bbarlock.com/index.php/Resepmama_Roseanne
https://bbarlock.com/index.php/User:RoseanneCintron
https://biowiki.clinomics.com/index.php/Resepmama_Augustina
https://biowiki.clinomics.com/index.php/User:AugustinaFornach
https://demo.centreon.com/wiki/index.php?title=Resepmama_Zachery
https://demo.centreon.com/wiki/index.php?title=User:ZacheryVannoy43
https://dptotti.fic.edu.uy/mediawiki/index.php/Resepmama_Kelle
https://dptotti.fic.edu.uy/mediawiki/index.php/Usuario:KellePeacock0
https://exterior.podemos.info/mediawiki/index.php?title=Resepmama_Florene
https://exterior.podemos.info/mediawiki/index.php?title=Usuario:FloreneWarren0
https://gamesfashionarchive.net/wiki/User:HollyYwd0952
https://gnometopia.org/index.php?title=Resepmama_Dana
https://iamelf.com/wiki/index.php/Resepmama_Selena
https://iamelf.com/wiki/index.php/User:Selena55G66
https://intranet.wikimedia.cat/wiki/Usuari:BernieceStrode7
https://koloiko.com/wiki/index.php?title=Resepmama_Ana
https://koloiko.com/wiki/index.php?title=User:AnaDiaz1457370
https://library.kemu.ac.ke/kemuwiki/index.php/Resepmama_Micki
https://library.kemu.ac.ke/kemuwiki/index.php/User:OBSMicki44159382
https://livingbooksaboutlife.org/books/Resepmama_Hermine
https://livingbooksaboutlife.org/books/User:HermineAlmonte7
https://mnwiki.org/index.php/Resepmama_Scot
https://mnwiki.org/index.php/User:BFJScot456274
https://procesal.cl/index.php/Resepmama_Brain
https://procesal.cl/index.php/User:XMJBrain9780
https://religiopedia.com/index.php/Resepmama_Tod
https://religiopedia.com/index.php/User:TodChew0267
https://sustainabilipedia.org/index.php/Resepmama_Maddison
https://sustainabilipedia.org/index.php/User:MaddisonToussain
https://wiki.gahlawat.dynu.com/mediawiki/index.php?title=Resepmama_Mikayla
https://wiki.hrw-fablab.de/index.php?title=Resepmama_Layne
https://wiki.hrw-fablab.de/index.php?title=User:LayneCedillo
https://wiki.minecraft.jp.net/%E5%88%A9%E7%94%A8%E8%80%85:NannieMew0688075
https://wiki.minecraft.jp.net/Resepmama_Nannie
https://wiki.ryuriin.my.id/index.php/Resepmama_Misty
https://wiki.ryuriin.my.id/index.php/User:MistyPhares42
https://wiki.sports-5.ch/index.php?title=Resepmama_Roxana
https://wiki.sports-5.ch/index.php?title=Utilisateur:RoxanaFaith12
https://wiki.strat-o-matic.com:443/index.php/Resepmama_Jim
https://wiki.strat-o-matic.com:443/index.php/User:JimChamplin90
https://www.crustcorporate.com/wiki/Resepmama_Jenni
https://www.crustcorporate.com/wiki/User:Jenni16341
https://www.offwiki.org/wiki/Resepmama_Lynwood
https://www.offwiki.org/wiki/User:LynwoodMulgrave
https://www.sherpapedia.org/index.php?title=Resepmama_Delila
https://www.sherpapedia.org/index.php?title=User:DelilaList21866
https://www.uq.universite-paris-saclay.fr/wiki-public/index.php?title=Resepmama_Makayla
https://www.uq.universite-paris-saclay.fr/wiki-public/index.php?title=Utilisateur:Makayla5561
https://www.wiki.pcfu.cz/index.php/Resepmama_Dominga
https://www.wiki.pcfu.cz/index.php/U%c5%beivatel:DomingaHerring
http://afcantarelle.org/index.php?title=Kanalharga_Wiley
http://afcantarelle.org/index.php?title=User:WileyDarr595
http://classicalmusicmp3freedownload.com/ja/index.php?title=%E5%88%A9%E7%94%A8%E8%80%85:RenaRegan3194
http://classicalmusicmp3freedownload.com/ja/index.php?title=Kanalharga_Rena
http://embeddedwiki.cs.aau.dk/wiki/Kanalharga_Yanira
http://embeddedwiki.cs.aau.dk/wiki/User:SCOYanira9466
http://kousokuwiki.org/wiki/Kanalharga_Candelaria
http://minecraft-earth.fun/wiki/%E5%88%A9%E7%94%A8%E8%80%85:Kristy98F1169930
http://minecraft-earth.fun/wiki/Kanalharga_Kristy
http://nswiki.svenskasuperserier.se/w/index.php?title=Kanalharga_Ashlee
http://postgasse.net/Wiki/index.php?title=Benutzer:DanThornhill
http://postgasse.net/Wiki/index.php?title=Kanalharga_Dan
http://terio.fvet.uba.ar/mediawiki/index.php/Kanalharga_Cindy
http://terio.fvet.uba.ar/mediawiki/index.php/Usuario:CindyMazure313
http://urbino.fh-joanneum.at/trials/index.php/Kanalharga_Ara
http://urbino.fh-joanneum.at/trials/index.php/User:AraFender4677
http://vulteevaliant.com/index.php/Kanalharga_Brianne
http://vulteevaliant.com/index.php/User:BrianneTout3
http://wiki-ux.info/wiki/Kanalharga_Jenifer
http://wiki-ux.info/wiki/User:JeniferKortig61
http://www.driftpedia.com/wiki/index.php/Kanalharga_Derrick
http://www.driftpedia.com/wiki/index.php/User:DerrickRosenberg
http://www.erwinbrandenberger.ch/index.php?title=Benutzer:Jannette01D
http://www.erwinbrandenberger.ch/index.php?title=Kanalharga_Jannette
http://www.heerfamily.net/mediawiki/index.php/Kanalharga_Elias
http://www.heerfamily.net/mediawiki/index.php/User:EliasFort42
http://www.jeromebaray.com/afm/wiki/index.php/Kanalharga_Emilia
http://www.jeromebaray.com/afm/wiki/index.php/Utilisateur:EmiliaLlanes
http://www.matthew-morris.com/wiki/index.php/Kanalharga_Minna
http://www.matthew-morris.com/wiki/index.php/User:MinnaGba56810
http://www.wiki.cheneliege.fr/index.php/Kanalharga_Bob
http://www.wiki.cheneliege.fr/index.php/Utilisateur:BobWindradyne6
http://www.zilahy.info/wiki/index.php/Kanalharga_Roland
http://www.zilahy.info/wiki/index.php/User:RolandCusack5
https://able.extralifestudios.com/wiki/index.php/Kanalharga_Vern
https://able.extralifestudios.com/wiki/index.php/User:VernSpaull84813
https://bbarlock.com/index.php/Kanalharga_Rowena
https://bbarlock.com/index.php/User:RowenaSchiller0
https://biowiki.clinomics.com/index.php/Kanalharga_Javier
https://biowiki.clinomics.com/index.php/User:JavierWilfong32
https://demo.centreon.com/wiki/index.php?title=Kanalharga_Tiara
https://demo.centreon.com/wiki/index.php?title=User:Tiara49R9931
https://dptotti.fic.edu.uy/mediawiki/index.php/Kanalharga_Kelly
https://dptotti.fic.edu.uy/mediawiki/index.php/Usuario:KellyYkw26
https://exterior.podemos.info/mediawiki/index.php?title=Kanalharga_Bernie
https://exterior.podemos.info/mediawiki/index.php?title=Usuario:BernieSantoro98
https://gamesfashionarchive.net/wiki/User:IonaVeale07202
https://gnometopia.org/index.php?title=Kanalharga_Mireya
https://help.ezadspro.co.uk/index.php?title=Kanalharga_Jeramy
https://help.ezadspro.co.uk/index.php?title=User:JeramyOToole
https://hu.velo.wiki/index.php?title=Kanalharga_Maria
https://hu.velo.wiki/index.php?title=Szerkeszt%C5%91:MariaWyselaskie
https://iamelf.com/wiki/index.php/Kanalharga_Muoi
https://iamelf.com/wiki/index.php/User:RPLMuoi366457511
https://intranet.wikimedia.cat/wiki/Usuari:LeroyOdell1
https://koloiko.com/wiki/index.php?title=Kanalharga_Claribel
https://koloiko.com/wiki/index.php?title=User:ClaribelAyres7
https://library.kemu.ac.ke/kemuwiki/index.php/Kanalharga_Katrice
https://library.kemu.ac.ke/kemuwiki/index.php/User:KatriceFischer
https://livingbooksaboutlife.org/books/Kanalharga_Reinaldo
https://livingbooksaboutlife.org/books/User:ReinaldoWhitty3
https://mnwiki.org/index.php/Kanalharga_Wally
https://mnwiki.org/index.php/User:WallyRentoul681
https://procesal.cl/index.php/Kanalharga_Stefanie
https://procesal.cl/index.php/User:StefanieMcMullan
https://religiopedia.com/index.php/Kanalharga_Jackie
https://religiopedia.com/index.php/User:JackieDeBernales
https://sustainabilipedia.org/index.php/Kanalharga_Melvin
https://sustainabilipedia.org/index.php/User:MelvinB2003380
https://wiki.hrw-fablab.de/index.php?title=Kanalharga_Opal
https://wiki.hrw-fablab.de/index.php?title=User:OpalLathrop0
https://wiki.minecraft.jp.net/%E5%88%A9%E7%94%A8%E8%80%85:Jasmin3779
https://wiki.minecraft.jp.net/Kanalharga_Jasmin
https://wiki.ryuriin.my.id/index.php/Kanalharga_Augustus
https://wiki.ryuriin.my.id/index.php/User:AugustusQ19
https://wiki.sports-5.ch/index.php?title=Kanalharga_Ava
https://wiki.sports-5.ch/index.php?title=Utilisateur:AvaN66430646945
https://www.crustcorporate.com/wiki/Kanalharga_Barb
https://www.crustcorporate.com/wiki/User:BarbClowers5
https://www.cspcc.org/wiki/index.php/Utilisateur:JodieMacartney
https://www.offwiki.org/wiki/Kanalharga_Alberta
https://www.offwiki.org/wiki/User:AlbertaBourque8
https://www.uq.universite-paris-saclay.fr/wiki-public/index.php?title=Kanalharga_Alecia
https://www.uq.universite-paris-saclay.fr/wiki-public/index.php?title=Utilisateur:AleciaMarte905
https://www.wiki.pcfu.cz/index.php/Kanalharga_Nichol
https://www.wiki.pcfu.cz/index.php/U%c5%beivatel:NicholStepp84
http://afcantarelle.org/index.php?title=Ruangestetik_Lela
http://afcantarelle.org/index.php?title=User:LelaClopton2731
http://classicalmusicmp3freedownload.com/ja/index.php?title=%E5%88%A9%E7%94%A8%E8%80%85:ChristieNbv
http://classicalmusicmp3freedownload.com/ja/index.php?title=Ruangestetik_Christie
http://embeddedwiki.cs.aau.dk/wiki/Ruangestetik_Marilou
http://embeddedwiki.cs.aau.dk/wiki/User:MarilouHendrick
http://kousokuwiki.org/wiki/Ruangestetik_Hans
http://lsc.wikisign.org/wiki/Usuari_Discussi%C3%B3:AdrieneValadez0
http://minecraft-earth.fun/wiki/%E5%88%A9%E7%94%A8%E8%80%85:Carmel9906
http://minecraft-earth.fun/wiki/Ruangestetik_Carmel
http://nswiki.svenskasuperserier.se/w/index.php?title=Ruangestetik_Heike
http://postgasse.net/Wiki/index.php?title=Benutzer:LilyP122660
http://postgasse.net/Wiki/index.php?title=Ruangestetik_Lily
http://rapedia.de/index.php/Benutzer:JeffreyPoninski
http://rapedia.de/index.php/Ruangestetik_Jeffrey
http://terio.fvet.uba.ar/mediawiki/index.php/Ruangestetik_Beryl
http://terio.fvet.uba.ar/mediawiki/index.php/Usuario:Beryl36W86656
http://urbino.fh-joanneum.at/trials/index.php/Ruangestetik_Brianne
http://urbino.fh-joanneum.at/trials/index.php/User:BrianneAstley93
http://vulteevaliant.com/index.php/Ruangestetik_Mari
http://vulteevaliant.com/index.php/User:Mari10875886
http://wiki-ux.info/wiki/Ruangestetik_Gonzalo
http://wiki-ux.info/wiki/User:GonzaloHeidelber
http://www.driftpedia.com/wiki/index.php/Ruangestetik_Johnson
http://www.driftpedia.com/wiki/index.php/User:JohnsonPounds
http://www.erwinbrandenberger.ch/index.php?title=Benutzer:KazukoSteffan
http://www.erwinbrandenberger.ch/index.php?title=Ruangestetik_Kazuko
http://www.heerfamily.net/mediawiki/index.php/Ruangestetik_Gretchen
http://www.heerfamily.net/mediawiki/index.php/User:GretchenBlanchet
http://www.jeromebaray.com/afm/wiki/index.php/Ruangestetik_Sybil
http://www.jeromebaray.com/afm/wiki/index.php/Utilisateur:SybilFullarton5
http://www.matthew-morris.com/wiki/index.php/Ruangestetik_Rachael
http://www.matthew-morris.com/wiki/index.php/User:Rachael7438
http://www.wiki.cheneliege.fr/index.php/Ruangestetik_Kassandra
http://www.wiki.cheneliege.fr/index.php/Utilisateur:KassandraSturgil
http://www.zilahy.info/wiki/index.php/Ruangestetik_Leandro
http://www.zilahy.info/wiki/index.php/User:LeandroHelvey
https://able.extralifestudios.com/wiki/index.php/Ruangestetik_Roseanne
https://able.extralifestudios.com/wiki/index.php/User:RoseanneFiedler
https://bbarlock.com/index.php/Ruangestetik_Jeannine
https://bbarlock.com/index.php/User:JeannineCarroll
https://biowiki.clinomics.com/index.php/Ruangestetik_Cynthia
https://biowiki.clinomics.com/index.php/User:CynthiaBueno6
https://demo.centreon.com/wiki/index.php?title=Ruangestetik_Ophelia
https://demo.centreon.com/wiki/index.php?title=User:OpheliaHauslaib
https://dptotti.fic.edu.uy/mediawiki/index.php/Ruangestetik_Genia
https://dptotti.fic.edu.uy/mediawiki/index.php/Usuario:GeniaCrenshaw
https://exterior.podemos.info/mediawiki/index.php?title=Ruangestetik_Riley
https://exterior.podemos.info/mediawiki/index.php?title=Usuario:Riley37B5904
https://gamesfashionarchive.net/wiki/User:NoreenZercho984
https://gnometopia.org/index.php?title=Ruangestetik_Jonathon
https://hu.velo.wiki/index.php?title=Szerkeszt%C5%91:LethaMacfarlane
https://iamelf.com/wiki/index.php/Ruangestetik_Peter
https://iamelf.com/wiki/index.php/User:PeterIsbell3965
https://intranet.wikimedia.cat/wiki/Usuari:LaunaGerstaecker
https://koloiko.com/wiki/index.php?title=Ruangestetik_Moshe
https://koloiko.com/wiki/index.php?title=User:MosheHildreth6
https://library.kemu.ac.ke/kemuwiki/index.php/Ruangestetik_Bernard
https://library.kemu.ac.ke/kemuwiki/index.php/User:BernardM84
https://livingbooksaboutlife.org/books/Ruangestetik_Dotty
https://livingbooksaboutlife.org/books/User:DottyFerreira
https://mnwiki.org/index.php/Ruangestetik_Perry
https://mnwiki.org/index.php/User:PerryMcKim411
https://procesal.cl/index.php/Ruangestetik_Adalberto
https://procesal.cl/index.php/User:RZVAdalberto
https://religiopedia.com/index.php/Ruangestetik_Salvatore
https://religiopedia.com/index.php/User:SalvatoreRichard
https://sustainabilipedia.org/index.php/Ruangestetik_Bebe
https://sustainabilipedia.org/index.php/User:BebeHutchison9
https://wiki.hrw-fablab.de/index.php?title=Ruangestetik_Whitney
https://wiki.hrw-fablab.de/index.php?title=User:Whitney41W
https://wiki.itcoug.com/index.php?title=Ruangestetik_Tiffiny
https://wiki.minecraft.jp.net/%E5%88%A9%E7%94%A8%E8%80%85:WarrenVogler7
https://wiki.minecraft.jp.net/Ruangestetik_Warren
https://wiki.ryuriin.my.id/index.php/Ruangestetik_Benjamin
https://wiki.ryuriin.my.id/index.php/User:BenjaminHillman
https://wiki.sports-5.ch/index.php?title=Ruangestetik_Allen
https://wiki.sports-5.ch/index.php?title=Utilisateur:AllenLeibius
https://www.crustcorporate.com/wiki/Ruangestetik_Monique
https://www.crustcorporate.com/wiki/User:MoniqueFalcon
https://www.mibtec.it/wiki/index.php?title=Ruangestetik_Kami
https://www.offwiki.org/wiki/Ruangestetik_Zoila
https://www.offwiki.org/wiki/User:ZoilaBlakeney35
https://www.sherpapedia.org/index.php?title=Ruangestetik_Willian
https://www.sherpapedia.org/index.php?title=User:CUKWillian
https://www.uq.universite-paris-saclay.fr/wiki-public/index.php?title=Ruangestetik_Rebecca
https://www.uq.universite-paris-saclay.fr/wiki-public/index.php?title=Utilisateur:RebeccaWkf
https://www.wiki.pcfu.cz/index.php/Ruangestetik_Ina
https://www.wiki.pcfu.cz/index.php/U%c5%beivatel:InaPoe212366323
Helpful information. Lucky me I discovered your web site unintentionally, and I’m surprised why this accident didn’t took place in advance!
I bookmarked it.
Awesome data. Regards.
each time i used to read smaller posts which as well clear their motive, and
that is also happening with this piece of writing which I am
reading at this place.
glucophage 500 price
Link exchange is nothing else but it is only placing the other person’s website link on your page at suitable place and other person will also do similar in support of you.
vermox canada pharmacy
Thanks for sharing your thoughts on Temple Texas Newborn Photographer.
Regards
Wonderful goods from you, man. I have understand your stuff previous to and you
are just too wonderful. I actually like what you’ve acquired here, certainly like what you are stating and the way in which you say it.
You make it enjoyable and you still care for to keep it smart.
I can’t wait to read much more from you. This is really a tremendous
website.
excellent post, very informative. I’m wondering why the opposite specialists
of this sector do not realize this. You must proceed your
writing. I’m sure, you’ve a huge readers’ base already!
Thanks in favor of sharing such a fastidious thought, paragraph is
fastidious, thats why i have read it fully
where can i buy furosemide
Hello, I enjoy reading all of your article post. I wanted to
write a little comment to support you.
Your means of telling all in this article is actually nice, every one can effortlessly be aware of it,
Thanks a lot.
betvole olarak arattığınız zaman önünüze pek çok deneme bonus veren bahis siteleri seçeneği çıkacaktır.
Önemli olan çıkmış olan bu siteler değildir. Önemli olan girdiğiniz bu sitelerin ne kadar güvenilir olduğudur.
Sizler de yazımızı okuyup bu konuda bilgilenerek farklı bahis sitelerine girebilir ve dilediğiniz kadar keyifli bir zaman geçirebilirsiniz.
Çeşitli bonus veren siteler bulunmaktadır. Her sitenin kendine özel bonus kampanyası vardır.
Bonus kelimesi çevrimsiz bonus veren siteler farklı yerler
de deneme bonusu olarak da karşımıza çıkar. Bonuslar sayesinde firmalar arası rekabet oluşmaktadır.
Bahisçilere bonus veren siteler son dönemde bedava bahisi tercih etmektedir.
Müşteri memnuniyeti ile sonuçlanan bu bonus en iyi
kampanyalardan biridir. Sitelere çevrimsiz bonus veren siteler üye olduktan sonra bedava bonustan faydalanabilirsiniz.
Bahis oynamak için ise herhangi bir ücret yatırmanıza gerek yoktur.
Piyasa da bonus veren bahis siteleri güvenilir olması açısından önemlidir.
Belirli bir tutarı yatırmadan para çekme işlemi gerçekleşmez Deneme bonus veren bahis siteleri yenilik yapmışlardır.
Hello this is somewhat of off topic but
I was wanting to know if blogs use WYSIWYG editors or if you have to manually
code with HTML. I’m starting a blog soon but have no
coding knowledge so I wanted to get advice from someone with experience.
Any help would be enormously appreciated!
I am regular visitor, how are you everybody? This piece of writing posted at this web page is
truly fastidious.
Asking questions are genuinely fastidious thing if you are not understanding anything totally, except this post offers pleasant understanding yet.
Ahaa, its fastidious discussion regarding this
paragraph here at this website, I have read all that, so at this time me also commenting here.
Every weekend i used to go to see this web site, for the reason that i wish for enjoyment, since this this web page conations genuinely nice funny data too.
My partner and I stumbled over here different website and thought I should check things out.
I like what I see so now i am following you. Look forward to checking out your web page yet again.
I think what you typed made a great deal of sense. However, what about this?
what if you added a little information? I am not suggesting your content isn’t solid, but suppose you added
a headline to possibly grab people’s attention? I mean Before and After Archives – Precious Stones Photography is kinda
vanilla. You ought to peek at Yahoo’s front
page and note how they create article headlines to get viewers to open the links.
You might add a video or a pic or two to grab people interested about everything’ve written. In my opinion,
it would make your blog a little bit more interesting.
What’s Happening i’m new to this, I stumbled upon this I have discovered It absolutely helpful
and it has aided me out loads. I hope to contribute & assist different
users like its aided me. Great job.
Hello Dear, are you truly visiting this website daily,
if so afterward you will definitely take good know-how.
how to get nolvadex prescription
vermox price in south africa
lasix online purchase
Have you ever thought about publishing an e-book or guest authoring on other
blogs? I have a blog based on the same subjects you discuss and would love to have you share some stories/information. I know my audience would appreciate your
work. If you are even remotely interested, feel free to shoot me an email.
Very nice article, just what I was looking for.
by valtrex online
toradol online pharmacy
certainly like your website but you need to test the spelling
on several of your posts. Several of them are rife with spelling problems and
I find it very bothersome to inform the reality nevertheless I
will definitely come back again.
This is really interesting, You’re a very skilled blogger.
I have joined your feed and look forward to seeking more of your
excellent post. Also, I have shared your site in my social networks!
You’ve made some really good points there. I checked on the net for more info about the issue and found most individuals will go along with your views
on this website.
My spouse and I stumbled over here by a different page
and thought I might as well check things out.
I like what I see so i am just following you.
Look forward to looking over your web page again.
Hey very cool website!! Guy .. Beautiful ..
Amazing .. I’ll bookmark your site and take the feeds additionally?
I am glad to find a lot of useful information right here within the post, we’d like develop more techniques in this regard,
thank you for sharing. . . . . .
Just desire to say your article is as surprising.
The clarity to your post is just great and that i can assume you are
an expert on this subject. Well together with your permission allow
me to seize your feed to stay up to date with impending post.
Thank you one million and please continue the rewarding
work.
Hurrah! At last I got a website from where I can actually get useful information regarding my study and
knowledge.
Quality posts is the secret to attract the visitors to visit the website, that’s what this site is
providing.
Wow that was strange. I just wrote an very long comment but
after I clicked submit my comment didn’t appear. Grrrr…
well I’m not writing all that over again. Regardless,
just wanted to say fantastic blog!
diclofenac 75mg price
I have been examinating out some of your articles and i must say
pretty nice stuff. I will make sure to bookmark your blog.
where to buy metformin uk
Sweet blog! I found it while surfing around on Yahoo News.
Do you have any tips on how to get listed in Yahoo News?
I’ve been trying for a while but I never seem to get there!
Cheers
This excellent website really has all of the information and facts I needed concerning
this subject and didn’t know who to ask.
Saved as a favorite, I really like your website!
10 mg tamoxifen
how to get toradol
Pretty great post. I simply stumbled upon your weblog and wanted to mention that I have really loved browsing your weblog
posts. In any case I’ll be subscribing to your rss feed and I
am hoping you write again very soon!
http://afcantarelle.org/index.php?title=Pafijakartatimur_Sunny
http://afcantarelle.org/index.php?title=User:Sunny04708454135
http://classicalmusicmp3freedownload.com/ja/index.php?title=%E5%88%A9%E7%94%A8%E8%80%85:ShawnSecrest912
http://classicalmusicmp3freedownload.com/ja/index.php?title=Pafijakartatimur_Shawn
http://embeddedwiki.cs.aau.dk/wiki/Pafijakartatimur_Brian
http://embeddedwiki.cs.aau.dk/wiki/User:BrianMcSharry
http://kousokuwiki.org/wiki/Pafijakartatimur_Zara
http://minecraft-earth.fun/wiki/%E5%88%A9%E7%94%A8%E8%80%85:MarceloEdinburgh
http://minecraft-earth.fun/wiki/Pafijakartatimur_Marcelo
http://postgasse.net/Wiki/index.php?title=Benutzer:KeriAthaldo
http://postgasse.net/Wiki/index.php?title=Pafijakartatimur_Keri
http://stackoverflow.altervista.org/index.php?title=Pafijakartatimur_Kathlene
http://stackoverflow.altervista.org/index.php?title=Utente:KathleneCairns
http://terio.fvet.uba.ar/mediawiki/index.php/Pafijakartatimur_Victor
http://terio.fvet.uba.ar/mediawiki/index.php/Usuario:VictorE710491444
http://urbino.fh-joanneum.at/trials/index.php/Pafijakartatimur_Geneva
http://urbino.fh-joanneum.at/trials/index.php/User:GenevaUme2
http://vulteevaliant.com/index.php/Pafijakartatimur_Stevie
http://vulteevaliant.com/index.php/User:StevieNall651
http://wiki-ux.info/wiki/Pafijakartatimur_Neal
http://wiki-ux.info/wiki/User:IDTNeal61010
http://wiki.monashicpc.com/Pafijakartatimur_Jestine
http://wiki.monashicpc.com/User:JestineW43
http://www.driftpedia.com/wiki/index.php/Pafijakartatimur_Beryl
http://www.driftpedia.com/wiki/index.php/User:BerylKane783579
http://www.erwinbrandenberger.ch/index.php?title=Benutzer:EzequielBar408
http://www.erwinbrandenberger.ch/index.php?title=Pafijakartatimur_Ezequiel
http://www.heerfamily.net/mediawiki/index.php/Pafijakartatimur_Theresa
http://www.heerfamily.net/mediawiki/index.php/User:TheresaSoper2
http://www.jeromebaray.com/afm/wiki/index.php/Pafijakartatimur_Dyan
http://www.jeromebaray.com/afm/wiki/index.php/Utilisateur:DyanEubank8
http://www.matthew-morris.com/wiki/index.php/Pafijakartatimur_Ewan
http://www.matthew-morris.com/wiki/index.php/User:EwanTruong
http://www.wiki.cheneliege.fr/index.php/Pafijakartatimur_Phillip
http://www.wiki.cheneliege.fr/index.php/Utilisateur:PhillipEsquivel
http://www.zilahy.info/wiki/index.php/Pafijakartatimur_Crystle
http://www.zilahy.info/wiki/index.php/User:CrystleBresnahan
https://able.extralifestudios.com/wiki/index.php/Pafijakartatimur_Ara
https://able.extralifestudios.com/wiki/index.php/User:AraPickett24
https://audiwiki.bitt-c.at/index.php?title=Benutzer:StephanieFreame
https://audiwiki.bitt-c.at/index.php?title=Pafijakartatimur_Stephanie
https://bbarlock.com/index.php/Pafijakartatimur_Ellen
https://bbarlock.com/index.php/User:EllenDvs03496
https://biowiki.clinomics.com/index.php/Pafijakartatimur_Britt
https://biowiki.clinomics.com/index.php/User:BrittBurdick149
https://demo.centreon.com/wiki/index.php?title=Pafijakartatimur_Sherry
https://demo.centreon.com/wiki/index.php?title=User:SherryWarren154
https://dptotti.fic.edu.uy/mediawiki/index.php/Pafijakartatimur_Hazel
https://dptotti.fic.edu.uy/mediawiki/index.php/Usuario:HazelGutman59
https://exterior.podemos.info/mediawiki/index.php?title=Pafijakartatimur_Elise
https://exterior.podemos.info/mediawiki/index.php?title=Usuario:EliseClifford5
https://gamesfashionarchive.net/wiki/User:DMOLena3877
https://gnometopia.org/index.php?title=Pafijakartatimur_Miles
https://help.ezadspro.co.uk/index.php?title=User:LatashaYwj
https://iamelf.com/wiki/index.php/Pafijakartatimur_Debra
https://iamelf.com/wiki/index.php/User:DebraHaggerty70
https://intranet.wikimedia.cat/wiki/Usuari:CaitlinDavenport
https://koloiko.com/wiki/index.php?title=Pafijakartatimur_Rusty
https://koloiko.com/wiki/index.php?title=User:RustySalmond
https://library.kemu.ac.ke/kemuwiki/index.php/Pafijakartatimur_Helena
https://library.kemu.ac.ke/kemuwiki/index.php/User:HelenaB3755
https://livingbooksaboutlife.org/books/Pafijakartatimur_Thelma
https://livingbooksaboutlife.org/books/User:ThelmaClisby161
https://mnwiki.org/index.php/Pafijakartatimur_Manuel
https://mnwiki.org/index.php/User:ManuelFredrick7
https://nl.wikiquote.org/wiki/Pafijakartatimur_Quincy
https://procesal.cl/index.php/Pafijakartatimur_Donna
https://procesal.cl/index.php/User:DonnaPelletier7
https://religiopedia.com/index.php/Pafijakartatimur_Tamara
https://religiopedia.com/index.php/User:TamaraAor46
https://sustainabilipedia.org/index.php/Pafijakartatimur_Arletha
https://sustainabilipedia.org/index.php/User:ArlethaVandorn
https://wiki.gahlawat.dynu.com/mediawiki/index.php?title=Pafijakartatimur_Elmo
https://wiki.gahlawat.dynu.com/mediawiki/index.php?title=User:ElmoEldredge
https://wiki.hrw-fablab.de/index.php?title=Pafijakartatimur_Lisa
https://wiki.hrw-fablab.de/index.php?title=User:LisaWalcott093
https://wiki.itcoug.com/index.php?title=Usuario:Therese70M
https://wiki.minecraft.jp.net/%E5%88%A9%E7%94%A8%E8%80%85:ChristieCansler
https://wiki.minecraft.jp.net/Pafijakartatimur_Christie
https://wiki.ryuriin.my.id/index.php/Pafijakartatimur_Lanny
https://wiki.ryuriin.my.id/index.php/User:LannyHoy3495
https://wiki.sports-5.ch/index.php?title=Pafijakartatimur_Lanny
https://wiki.sports-5.ch/index.php?title=Utilisateur:LannySpooner9
https://www.crustcorporate.com/wiki/Pafijakartatimur_Suzanna
https://www.crustcorporate.com/wiki/User:SuzannaReginald
https://www.cspcc.org/wiki/index.php/Pafijakartatimur_Vicki
https://www.cspcc.org/wiki/index.php/Utilisateur:VickiSya266
https://www.offwiki.org/wiki/Pafijakartatimur_Sandy
https://www.offwiki.org/wiki/User:SandyX9052424088
https://www.uq.universite-paris-saclay.fr/wiki-public/index.php?title=Pafijakartatimur_Reyna
https://www.uq.universite-paris-saclay.fr/wiki-public/index.php?title=Utilisateur:ReynaHenson6
https://www.wiki.pcfu.cz/index.php/Pafijakartatimur_Tracey
https://www.wiki.pcfu.cz/index.php/U%c5%beivatel:TraceyCrossley
I’m gone to say to my little brother, that he should also pay
a visit this blog on regular basis to obtain updated from most recent reports.
medicine furosemide pills
strattera 120 mg daily
Hello There. I discovered your weblog using msn. That
is a really neatly written article. I’ll make sure to bookmark
it and come back to learn more of your helpful info.
Thank you for the post. I will definitely comeback.
where to buy diflucan over the counter
Link exchange is nothing else except it is simply placing the other person’s web site link on your page at suitable place
and other person will also do same in support
of you.
Excellent web site. Lots of helpful information here. I’m sending it
to a few buddies ans additionally sharing in delicious.
And certainly, thanks to your effort!
bactrim sale online
You should be a part of a contest for one of the highest quality
blogs on the web. I most certainly will recommend this site!
Everyone loves what you guys tend to be up too.
Such clever work and reporting! Keep up the good works guys I’ve
included you guys to my own blogroll.
prednisolone 10 mg
Excellent blog here! Also your web site loads up very
fast! What web host are you using? Can I get your affiliate link to your host?
I wish my site loaded up as quickly as yours lol
diflucan coupon
What’s up to all, since I am genuinely eager of reading
this weblog’s post to be updated regularly.
It consists of nice information.
accutane tablets pharmacy
order tadalafil 20mg
lexapro in europe
Everyone loves what you guys are usually up too.
This type of clever work and exposure! Keep
up the wonderful works guys I’ve added you guys to my blogroll.
order valtrex online
Hello! I know this is somewhat off-topic but I had to ask.
Does building a well-established website like yours take a massive amount work?
I am completely new to writing a blog however I do write in my diary on a daily basis.
I’d like to start a blog so I can easily share my experience and thoughts online.
Please let me know if you have any kind of suggestions or tips for new aspiring bloggers.
Thankyou!
Thanks very interesting blog!
Hello! I know this is kinda off topic but I was wondering if you
knew where I could locate a captcha plugin for my comment form?
I’m using the same blog platform as yours and I’m having
problems finding one? Thanks a lot!
You have made some good points there. I looked on the internet to find out
more about the issue and found most individuals will go along
with your views on this site.
I really like what you guys are up too. Such clever work and coverage!
Keep up the good works guys I’ve incorporated you guys to our
blogroll.
diflucan prescription online
Everyone loves what you guys are usually up too. Such clever work and coverage!
Keep up the good works guys I’ve included you guys to
blogroll.
When someone writes an paragraph he/she maintains the plan of a user in his/her
brain that how a user can understand it. Thus that’s
why this piece of writing is amazing. Thanks!
I know this if off topic but I’m looking into starting
my own weblog and was wondering what all is needed to
get set up? I’m assuming having a blog like yours would cost a pretty penny?
I’m not very internet savvy so I’m not 100% certain. Any recommendations or advice
would be greatly appreciated. Thank you
Now I am ready to do my breakfast, afterward having my breakfast coming yet
again to read additional news.
indian cialis
It’s impressive that you are getting ideas from this
article as well as from our dialogue made at this time.
buy viagra online
furosemide 40 mg cost
If you desire to grow your experience simply keep visiting
this site and be updated with the most recent news posted here.
great issues altogether, you simply gained a logo new reader.
What may you recommend in regards to your publish that you made a few days ago?
Any sure?
ZAA หวยหุ้นพม่า2d หวยเด็ดงวดนี้ เลขเด็ดงวดนี้ที่สุดในโลก https://ruayzaa.com
If you would like to increase your know-how simply keep visiting thiss web
site and be updated witgh the most up-to-date gossip posted here.
watch porn video
can i buy azithromycin in mexico
Now I am ready to do my breakfast, after having my breakfast coming yet again to read additional news.
penis enlargement
I’m impressed, I have to admit. Seldom do I come across
a blog that’s both equally educative and interesting, and without a doubt,
you have hit the nail on the head. The problem is something that not enough folks are speaking intelligently about.
I’m very happy that I came across this during my search
for something regarding this.
You reɑlly mақe it seem so easy along with youjr
preѕentatiоn but I in finding this mater to be actually one thing that I believe
I would by no means understand. It seems too complex andd extremely broad foг me.
I am looking forward in your suƅsеquent post, I’ll attempt to gеt the
clіnbg of it!
propecia uk price comparison
My brother recommended I would possibly like this blog.
He was once entirely right. This publish truly made my day.
You can not imagine just how much time I had spent for this info!
Thank you!
Pretty nice post. I just stumbled upon your blog and wished to say that I’ve truly enjoyed browsing your blog posts.
In any case I will be subscribing to your feed and I hope you write again very soon!
This write-up is a wonderful resource for anybody looking to learn more about this subject. I am going to certainly be sharing it with Other folks.
This data is just what exactly I was looking for. Many thanks!
Thanks for finally talking about >Before and After Archives – Precious
Stones Photography <Liked it!
Hello just wanted to give you a quick heads up. The words in your content seem to
be running off the screen in Firefox. I’m not sure if this is a formatting issue or
something to do with browser compatibility but I figured I’d post to
let you know. The design and style look great though! Hope you get the issue solved soon. Thanks
I think this is among the most important info for me.
And i’m glad reading your article. But want to remark on few
general things, The website style is wonderful, the articles is
really nice : D. Good job, cheers
atomoxetine strattera
Position very well utilized.!
buy essay papers pay for essay online buy essay papers pay someone to write your paper
essay writer service best college paper writing service executive resume writing service paper writing service
writing a hook for an essay https://essaywritinghelperonline.com
WOW just what I was searching for. Came here by searching for adventskalender für den mann
Hello there! I could have sworn I’ve been to your blog
before but after browsing through a few of the
articles I realized it’s new to me. Anyhow, I’m certainly delighted I stumbled
upon it and I’ll be book-marking it and checking back frequently!
Magnificent beat ! I wish to apprentice at the same time as you amend your web site, how can i subscribe
for a blog web site? The account helped me a applicable deal.
I had been a little bit familiar of this your broadcast provided vibrant transparent concept
محدوده ظرفیت سرمایشی: شما میتوانید
از بین ۲۰ تا ۳۰ هزار، ۱۰ تا ۲۰ هزار، بالای ۳۰ هزار و تا ۱۰
هزار محدوده ظرفیت سرمایشی خود را تعیین
کنید.
معرفی محله پاسداران تهران
پاسداران مرزی است در منطقه ۳
و ۴ شهرداری تهران که البته در تقسیمبندیهای رسمی اغلب جزو منطقه ۴ به حساب میآید.
این خیابان با ۹ کیلومتر طول، یکی از طولانیترین خیابانهای شمالی تهران است.
خیابان پاسداران از شمال به میدان نوبنیاد و از جنوب
به بزرگراه همت ختم میشود.
Hello this is kinda of off topic but I was wanting to know if
blogs use WYSIWYG editors or if you have to manually code with HTML.
I’m starting a blog soon but have no coding experience so I wanted to get advice from someone with
experience. Any help would be greatly appreciated!
Your insights obstacle my assumptions in the absolute best way.
Touche. Solid arguments. Keep up the amazing spirit.
buy propecia hair loss
Hey! This is my first comment here so I just wanted to give a quick shout out and tell you I really enjoy reading
through your articles. Can you recommend any other blogs/websites/forums that deal with the same topics?
Thanks for your time!
What’s up to every one, the contents existing at this website are really remarkable for
people knowledge, well, keep up the good work fellows.
I’ve acquired extra from a website than I’ve from some courses.
order cheap diflucan online
http://afcantarelle.org/index.php?title=Coloringblog_Libby
http://afcantarelle.org/index.php?title=User:Prompter94
http://classicalmusicmp3freedownload.com/ja/index.php?title=%E5%88%A9%E7%94%A8%E8%80%85:Prompter14
http://classicalmusicmp3freedownload.com/ja/index.php?title=Coloringblog_Dominique
http://embeddedwiki.cs.aau.dk/wiki/Coloringblog_Diane
http://embeddedwiki.cs.aau.dk/wiki/User_talk:Prompter132
http://minecraft-earth.fun/wiki/%E5%88%A9%E7%94%A8%E8%80%85:Prompter108
http://minecraft-earth.fun/wiki/Coloringblog_Meridith
http://postgasse.net/Wiki/index.php?title=Benutzer:Prompter185
http://postgasse.net/Wiki/index.php?title=Coloringblog_Levi
http://terio.fvet.uba.ar/mediawiki/index.php/Coloringblog_Marcelino
http://terio.fvet.uba.ar/mediawiki/index.php/Usuario:Prompter60
http://urbino.fh-joanneum.at/trials/index.php/Coloringblog_Akilah
http://urbino.fh-joanneum.at/trials/index.php/User:Prompter262
http://vulteevaliant.com/index.php/Coloringblog_Rodger
http://vulteevaliant.com/index.php/User:Prompter44
http://wiki-beta.avazinn.com/w/index.php?title=User:Prompter220
http://wiki-ux.info/wiki/Coloringblog_Kris
http://wiki-ux.info/wiki/User:Prompter120
http://wiki.monashicpc.com/Coloringblog_Verona
http://wiki.monashicpc.com/User:Prompter222
http://wiki.qm.uni-siegen.de/index.php/Coloringblog_Aleida
http://www.driftpedia.com/wiki/index.php/Coloringblog_Shauna
http://www.driftpedia.com/wiki/index.php/User:Prompter217
http://www.erwinbrandenberger.ch/index.php?title=Benutzer:Prompter204
http://www.erwinbrandenberger.ch/index.php?title=Coloringblog_Johnnie
http://www.jeromebaray.com/afm/wiki/index.php/Coloringblog_Adriene
http://www.jeromebaray.com/afm/wiki/index.php/Utilisateur:Prompter184
http://www.matthew-morris.com/wiki/index.php/Coloringblog_Norine
http://www.matthew-morris.com/wiki/index.php/User:Prompter33
http://www.wiki.cheneliege.fr/index.php/Coloringblog_Leandra
http://www.wiki.cheneliege.fr/index.php/Utilisateur:Prompter300
https://able.extralifestudios.com/wiki/index.php/Coloringblog_Gilberto
https://able.extralifestudios.com/wiki/index.php/User:Prompter142
https://bbarlock.com/index.php/Coloringblog_Myrtle
https://bbarlock.com/index.php/User:Prompter18
https://biowiki.clinomics.com/index.php/Coloringblog_Gracie
https://biowiki.clinomics.com/index.php/User:Prompter172
https://demo.centreon.com/wiki/index.php?title=Coloringblog_Pasquale
https://demo.centreon.com/wiki/index.php?title=User:Prompter92
https://dptotti.fic.edu.uy/mediawiki/index.php/Coloringblog_Dianne
https://dptotti.fic.edu.uy/mediawiki/index.php/Usuario:Prompter25
https://exterior.podemos.info/mediawiki/index.php?title=Coloringblog_Delores
https://exterior.podemos.info/mediawiki/index.php?title=Usuario:Prompter235
https://gamesfashionarchive.net/wiki/User:Prompter38
https://gnometopia.org/index.php?title=Coloringblog_Dalton
https://help.ezadspro.co.uk/index.php?title=Coloringblog_Ophelia
https://help.ezadspro.co.uk/index.php?title=User:Prompter27
https://iamelf.com/wiki/index.php/Coloringblog_Breanna
https://iamelf.com/wiki/index.php/User:Prompter239
https://intranet.wikimedia.cat/wiki/Usuari:Prompter110
https://koloiko.com/wiki/index.php?title=Coloringblog_Latonya
https://koloiko.com/wiki/index.php?title=User:Prompter166
https://livingbooksaboutlife.org/books/Coloringblog_Rosaline
https://livingbooksaboutlife.org/books/User:Prompter291
https://mnwiki.org/index.php/Coloringblog_Kassie
https://mnwiki.org/index.php/User:Prompter145
https://procesal.cl/index.php/Coloringblog_Fred
https://procesal.cl/index.php/User:Prompter50
https://religiopedia.com/index.php/Coloringblog_Fredericka
https://religiopedia.com/index.php/User:Prompter42
https://sustainabilipedia.org/index.php/Coloringblog_Arron
https://sustainabilipedia.org/index.php/User:Prompter161
https://wiki.gahlawat.dynu.com/mediawiki/index.php?title=Coloringblog_Danelle
https://wiki.gahlawat.dynu.com/mediawiki/index.php?title=User:Prompter240
https://wiki.hrw-fablab.de/index.php?title=Coloringblog_Alica
https://wiki.hrw-fablab.de/index.php?title=User:Prompter270
https://wiki.minecraft.jp.net/%E5%88%A9%E7%94%A8%E8%80%85:Prompter256
https://wiki.minecraft.jp.net/Coloringblog_Belen
https://wiki.ryuriin.my.id/index.php/Coloringblog_Wanda
https://wiki.ryuriin.my.id/index.php/User:Prompter160
https://wiki.sports-5.ch/index.php?title=Coloringblog_Douglas
https://wiki.sports-5.ch/index.php?title=Utilisateur:Prompter89
https://www.crustcorporate.com/wiki/Coloringblog_Tiffiny
https://www.crustcorporate.com/wiki/User:Prompter256
https://www.offwiki.org/wiki/Coloringblog_Marla
https://www.offwiki.org/wiki/User:Prompter111
https://www.uq.universite-paris-saclay.fr/wiki-public/index.php?title=Coloringblog_Freya
https://www.uq.universite-paris-saclay.fr/wiki-public/index.php?title=Utilisateur:Prompter75
https://www.wiki.pcfu.cz/index.php/Coloringblog_Kiara
https://www.wiki.pcfu.cz/index.php/U%c5%beivatel:Prompter235
lexapro cost australia
Hi there! I just wanted to ask if you ever have any problems with hackers?
My last blog (wordpress) was hacked and I ended
up losing months of hard work due to no backup.
Do you have any solutions to protect against hackers?
purchase strattera
strattera brand name cost
1 furosemide
maple leaf pharmacy in canada
My family every time say that I am wasting my time here at net,
but I know I am getting knowledge every day by reading
such fastidious articles.
vermox tablet india
Wow, that’s what I was seeking for, what a stuff! existing here
at this web site, thanks admin of this web page.
excellent submit, very informative. I ponder why the opposite experts of this sector
don’t understand this. You must proceed your writing.
I am confident, you’ve a huge readers’ base already!
clonidine 0.1 mg online
Excellent goods from you, man. I’ve understand your stuff previous to and you’re
just too excellent. I really like what you’ve acquired here, really like what you’re saying and the way in which
you say it. You make it entertaining and you
still care for to keep it wise. I cant wait to read
far more from you. This is actually a terrific site.
pill pharmacy
buy bactrim online without prescription
all the time i used to read smaller posts which as
well clear their motive, and that is also happening with this paragraph which I am reading
at this place.
Its like you read my mind! You seem to know so much about this,
like you wrote the book in it or something.
I think that you can do with some pics to drive the message
home a bit, but other than that, this is wonderful blog.
A great read. I’ll certainly be back.
My spouse and I stumbled over here by a different page and
thought I should check things out. I like what I see so i
am just following you. Look forward to looking over your web page again.
When I initially left a comment I seem to have clicked the
-Notify me when new comments are added- checkbox and now every time
a comment is added I recieve 4 emails with the exact same comment.
There has to be a means you are able to remove me from that service?
Appreciate it!
Very great post. I just stumbled upon your weblog and wished
to say that I’ve truly enjoyed browsing your weblog posts.
In any case I’ll be subscribing on your rss feed and
I hope you write once more very soon!
Keep on working, great job!
It’s perfect time to make some plans for the future and it is time to be happy.
I’ve read this post and if I could I wish to suggest you
some interesting things or tips. Perhaps you could write next articles referring
to this article. I want to read even more things about it!
online pharmacy nolvadex
Hi there this is kinda of off topic but I was wanting to
know if blogs use WYSIWYG editors or if you have to manually code with HTML.
I’m starting a blog soon but have no coding experience so I wanted to get guidance from someone with experience.
Any help would be enormously appreciated!
Excellent article. Keep posting such kind of info on your site.
Im really impressed by your site.
Hi there, You’ve done an excellent job. I’ll definitely digg it and individually recommend to my friends.
I’m confident they’ll be benefited from this
website.
Nicely voiced indeed. !
customer service report writing buying university essays order essay papers buy essay online pay for paper writing essay writing service essay coursework writing i didn t do my homework because pdf do my homework cheap do my trig homework
I’m not that much of a internet reader to be honest but your sites really nice, keep it up!
I’ll go ahead and bookmark your website to come back in the
future. Cheers
Excellent write-up. I definitely love this website. Continue
the good work!
Howdy! I just would like to give you a huge thumbs up for your great info you have got here on this post.
I’ll be coming back to your web site for more soon.
Hello it’s me, I am also visiting this web page on a regular basis, this website is genuinely nice
and the visitors are genuinely sharing nice thoughts.
Your composing design is so unique that I could spot it from the mile absent. Keep up The good get the job done!
For most up-to-date information you have to visit internet and
on internet I found this web site as a best website for latest updates.
This is a good tip especially to those new to the blogosphere.
Brief but very precise info… Appreciate your sharing this one.
A must read post!
25 mg propecia
Your content constantly sparks intriguing discussions in the comments.
مرتبسازی بر اساس: جدیدترین گرانترین ارزانترین محبوبترین پلیور بافت یوآر
رویهی داخی این هودی زنانه نیز
پنبه است که باعث میشود با پوشیدن آن حس نرم و لطیفی منتقل شود.
diclofenac capsule
This post is a major illustration of the standard content you continuously make.
This article is a superb illustration of how to write down persuasive articles. I’ll you’ll want to share it with Other people.
where can i buy motilium in uk
furosemide 40 mg australia
Good post. I learn something new and challenging on sites I stumbleupon on a daily basis.
It will always be interesting to read content
from other writers and practice a little something from other web sites.
bactrim buying
Your weblog has become a Portion of my regime. I can’t get adequate!
Hello! Someone in my Myspace group shared this website with us so I came to
look it over. I’m definitely enjoying the information. I’m
book-marking and will be tweeting this to my followers! Fantastic blog
and outstanding design and style.
Hi there I am so excited I found your webpage, I really found
you by mistake, while I was researching on Bing for
something else, Nonetheless I am here now and would just like to
say thank you for a remarkable post and a all round enjoyable blog (I
also love the theme/design), I don’t have time to read it all at the
minute but I have book-marked it and also added your RSS feeds, so when I have
time I will be back to read much more, Please do keep up the great work.
Howdy! This post could not be written any better! Reading this post reminds me of my old room mate!
He always kept talking about this. I will forward this article to him.
Pretty sure he will have a good read. Thank
you for sharing!
Hi there, this weekend is nice for me, as this time i am
reading this great educational paragraph here at my home.
Spot on with this write-up, I actually feel this website
needs much more attention. I’ll probably be back again to read through more, thanks for
the info!
I’m really impressed with your writing skills and also with the layout on your weblog.
Is this a paid theme or did you modify it yourself?
Either way keep up the nice quality writing,
it’s rare to see a nice blog like this one these days.
diflucan 1 otc
lexapro 200 mg
lexapro tablets 5mg
This put up resonated with me on countless concentrations. Perfectly carried out!
Woah! I’m really enjoying the template/theme of this website.
It’s simple, yet effective. A lot of times it’s difficult to
get that “perfect balance” between superb usability
and appearance. I must say that you’ve done a excellent
job with this. Also, the blog loads very quick for me
on Opera. Exceptional Blog!
I recognize the way you broke down such a complex matter into manageable items. It created it much simpler to understand.
After exploring a number of the blog articles on your website, I
honestly like your way of writing a blog. I bookmarked it
to my bookmark webpage list and will be checking back in the near future.
Take a look at my web site as well and tell me your opinion.
lasix canadian pharmacy
The authenticity as part of your crafting makes me have confidence in each individual term you say.
This info is invaluable. Where can I find out more?
trazodone 200 mg tablet
Thanks for a marvelous posting! I quite enjoyed reading it,
you will be a great author. I will remember to bookmark your blog
and definitely will come back sometime soon. I want to encourage
you to ultimately continue your great posts,
have a nice holiday weekend!
Way cool! Some very valid points! I appreciate you writing this write-up plus the rest of
the website is very good.
The authenticity inside your producing helps make me have faith in every single phrase you say.
Your creating evokes me to dig further into your topics you cover.
http://afcantarelle.org/index.php?title=Edu_Blog_Autoaprove_Etsuko
http://afcantarelle.org/index.php?title=User:EtsukoHaritos
http://classicalmusicmp3freedownload.com/ja/index.php?title=%E5%88%A9%E7%94%A8%E8%80%85:JackSpeight2
http://classicalmusicmp3freedownload.com/ja/index.php?title=Edu_Blog_Autoaprove_Jack
http://embeddedwiki.cs.aau.dk/wiki/Edu_Blog_Autoaprove_Darby
http://embeddedwiki.cs.aau.dk/wiki/User:DarbyAmt860
http://minecraft-earth.fun/wiki/%E5%88%A9%E7%94%A8%E8%80%85:MaynardSeese
http://minecraft-earth.fun/wiki/Edu_Blog_Autoaprove_Maynard
http://terio.fvet.uba.ar/mediawiki/index.php/Edu_Blog_Autoaprove_Ola
http://terio.fvet.uba.ar/mediawiki/index.php/Usuario:Ola67C143110698
http://urbino.fh-joanneum.at/trials/index.php/Edu_Blog_Autoaprove_Carlton
http://urbino.fh-joanneum.at/trials/index.php/User:CarltonSwayne88
http://vulteevaliant.com/index.php/Edu_Blog_Autoaprove_Marie
http://vulteevaliant.com/index.php/User:MarieRiddle3358
http://wiki-ux.info/wiki/Edu_Blog_Autoaprove_Josef
http://wiki-ux.info/wiki/User:DCCJosef55
http://wiki.monashicpc.com/Edu_Blog_Autoaprove_Susanne
http://wiki.monashicpc.com/User:SusanneMccaffrey
http://wiki.qm.uni-siegen.de/index.php/Benutzer:ArmandoDarvall0
http://wiki.qm.uni-siegen.de/index.php/Edu_Blog_Autoaprove_Armando
http://www.driftpedia.com/wiki/index.php/Edu_Blog_Autoaprove_Ouida
http://www.driftpedia.com/wiki/index.php/User:OuidaAnstey66
http://www.erwinbrandenberger.ch/index.php?title=Benutzer:EddyEstrella73
http://www.erwinbrandenberger.ch/index.php?title=Edu_Blog_Autoaprove_Eddy
http://www.jeromebaray.com/afm/wiki/index.php/Edu_Blog_Autoaprove_Opal
http://www.jeromebaray.com/afm/wiki/index.php/Utilisateur:OpalConger2
http://www.matthew-morris.com/wiki/index.php/Edu_Blog_Autoaprove_Elise
http://www.matthew-morris.com/wiki/index.php/User:EliseBurnell05
http://www.wiki.cheneliege.fr/index.php/Edu_Blog_Autoaprove_Freeman
http://www.wiki.cheneliege.fr/index.php/Utilisateur:FreemanCouncil
http://www.zilahy.info/wiki/index.php/Edu_Blog_Autoaprove_Boyd
http://www.zilahy.info/wiki/index.php/User:BoydQ214807
https://able.extralifestudios.com/wiki/index.php/Edu_Blog_Autoaprove_Ericka
https://able.extralifestudios.com/wiki/index.php/User:ErickaSkerst
https://bbarlock.com/index.php/Edu_Blog_Autoaprove_Ruby
https://bbarlock.com/index.php/User:PYJRuby779
https://biowiki.clinomics.com/index.php/Edu_Blog_Autoaprove_Angus
https://biowiki.clinomics.com/index.php/User:AngusIgo86
https://demo.centreon.com/wiki/index.php?title=Edu_Blog_Autoaprove_Joan
https://demo.centreon.com/wiki/index.php?title=User:JoanBaylor
https://dptotti.fic.edu.uy/mediawiki/index.php/Edu_Blog_Autoaprove_Adell
https://dptotti.fic.edu.uy/mediawiki/index.php/Usuario:AdellFortune
https://exterior.podemos.info/mediawiki/index.php?title=Edu_Blog_Autoaprove_Joellen
https://exterior.podemos.info/mediawiki/index.php?title=Usuario:JoellenHutchens
https://gamesfashionarchive.net/wiki/User:MichelleKersey
https://gnometopia.org/index.php?title=Edu_Blog_Autoaprove_Dann
https://iamelf.com/wiki/index.php/Edu_Blog_Autoaprove_Deb
https://iamelf.com/wiki/index.php/User:DebBernays1
https://intranet.wikimedia.cat/wiki/Usuari:TinaG94656
https://koloiko.com/wiki/index.php?title=Edu_Blog_Autoaprove_Anneliese
https://koloiko.com/wiki/index.php?title=User:AnnelieseMartind
https://livingbooksaboutlife.org/books/Edu_Blog_Autoaprove_Alfred
https://livingbooksaboutlife.org/books/User:Alfred2577
https://mnwiki.org/index.php/Edu_Blog_Autoaprove_Vallie
https://mnwiki.org/index.php/User:VallieSherwood5
https://religiopedia.com/index.php/Edu_Blog_Autoaprove_Bertie
https://religiopedia.com/index.php/User:BertiePaltridge
https://sustainabilipedia.org/index.php/Edu_Blog_Autoaprove_Dell
https://sustainabilipedia.org/index.php/User:PVSDell608383
https://wiki.gahlawat.dynu.com/mediawiki/index.php?title=Edu_Blog_Autoaprove_Tracy
https://wiki.gahlawat.dynu.com/mediawiki/index.php?title=User:TracyTrumper487
https://wiki.hrw-fablab.de/index.php?title=Edu_Blog_Autoaprove_Abbie
https://wiki.hrw-fablab.de/index.php?title=User:Abbie87M76492366
https://wiki.itcoug.com/index.php?title=Edu_Blog_Autoaprove_Cristina
https://wiki.itcoug.com/index.php?title=Usuario:CristinaDenovan
https://wiki.minecraft.jp.net/%E5%88%A9%E7%94%A8%E8%80%85:KimberlyGearhart
https://wiki.minecraft.jp.net/Edu_Blog_Autoaprove_Kimberly
https://wiki.ryuriin.my.id/index.php/Edu_Blog_Autoaprove_Lottie
https://wiki.ryuriin.my.id/index.php/User:Lottie80P60
https://wiki.sports-5.ch/index.php?title=Edu_Blog_Autoaprove_Angeles
https://wiki.sports-5.ch/index.php?title=Utilisateur:AngelesMcVeigh
https://www.crustcorporate.com/wiki/Edu_Blog_Autoaprove_Isabelle
https://www.crustcorporate.com/wiki/User:IsabelleSpyer2
https://www.offwiki.org/wiki/Edu_Blog_Autoaprove_Hilario
https://www.offwiki.org/wiki/User:HilarioTorgerson
https://www.uq.universite-paris-saclay.fr/wiki-public/index.php?title=Edu_Blog_Autoaprove_Jada
https://www.uq.universite-paris-saclay.fr/wiki-public/index.php?title=Utilisateur:JadaDavitt78
http://afcantarelle.org/index.php?title=Edu_Blog_Auto_Aprove_Carmel
http://afcantarelle.org/index.php?title=User:CarmelKavanaugh
http://classicalmusicmp3freedownload.com/ja/index.php?title=%E5%88%A9%E7%94%A8%E8%80%85:Tawnya89U6287925
http://classicalmusicmp3freedownload.com/ja/index.php?title=Edu_Blog_Auto_Aprove_Tawnya
http://embeddedwiki.cs.aau.dk/wiki/Edu_Blog_Auto_Aprove_Luciana
http://embeddedwiki.cs.aau.dk/wiki/User_talk:LucianaWittenoom
http://kousokuwiki.org/wiki/Edu_Blog_Auto_Aprove_Michelle
http://lsc.wikisign.org/wiki/Usuari:CurtVanatta552
http://minecraft-earth.fun/wiki/%E5%88%A9%E7%94%A8%E8%80%85:LonaCarmona0
http://minecraft-earth.fun/wiki/Edu_Blog_Auto_Aprove_Lona
http://nswiki.svenskasuperserier.se/w/index.php?title=Anv%C3%A4ndare:MonicaKeefer350
http://nswiki.svenskasuperserier.se/w/index.php?title=Edu_Blog_Auto_Aprove_Monica
http://rapedia.de/index.php/Benutzer:Randolph7878
http://rapedia.de/index.php/Edu_Blog_Auto_Aprove_Randolph
http://terio.fvet.uba.ar/mediawiki/index.php/Edu_Blog_Auto_Aprove_Erna
http://terio.fvet.uba.ar/mediawiki/index.php/Usuario:Erna06Y56770
http://urbino.fh-joanneum.at/trials/index.php/Edu_Blog_Auto_Aprove_Lupe
http://urbino.fh-joanneum.at/trials/index.php/User:LupeBrewington9
http://vulteevaliant.com/index.php/Edu_Blog_Auto_Aprove_Vern
http://vulteevaliant.com/index.php/User:Vern53B502699981
http://wiki-beta.avazinn.com/w/index.php?title=Edu_Blog_Auto_Aprove_Nickolas
http://wiki-beta.avazinn.com/w/index.php?title=User:NickolasWhittemo
http://wiki-ux.info/wiki/Edu_Blog_Auto_Aprove_Linnie
http://wiki-ux.info/wiki/User:LinnieHuhn35
http://wiki.monashicpc.com/Edu_Blog_Auto_Aprove_Vito
http://wiki.monashicpc.com/User:VitoTonkin0
http://www.driftpedia.com/wiki/index.php/Edu_Blog_Auto_Aprove_Augusta
http://www.driftpedia.com/wiki/index.php/User:AugustaCarper40
http://www.erwinbrandenberger.ch/index.php?title=Benutzer:GradyGlew398
http://www.erwinbrandenberger.ch/index.php?title=Edu_Blog_Auto_Aprove_Grady
http://www.jeromebaray.com/afm/wiki/index.php/Edu_Blog_Auto_Aprove_Jan
http://www.jeromebaray.com/afm/wiki/index.php/Utilisateur:Jan11404559
http://www.matthew-morris.com/wiki/index.php/Edu_Blog_Auto_Aprove_Sharon
http://www.matthew-morris.com/wiki/index.php/User:SharonOddie6
http://www.wiki.cheneliege.fr/index.php/Edu_Blog_Auto_Aprove_Della
http://www.wiki.cheneliege.fr/index.php/Utilisateur:DellaLemos27540
http://www.zilahy.info/wiki/index.php/Edu_Blog_Auto_Aprove_Kathi
http://www.zilahy.info/wiki/index.php/User:KathiDor0030
https://able.extralifestudios.com/wiki/index.php/Edu_Blog_Auto_Aprove_Joanne
https://able.extralifestudios.com/wiki/index.php/User:JoanneDiggs
https://bbarlock.com/index.php/Edu_Blog_Auto_Aprove_Clair
https://bbarlock.com/index.php/User:ClairDyring267
https://biowiki.clinomics.com/index.php/Edu_Blog_Auto_Aprove_Christi
https://biowiki.clinomics.com/index.php/User:ChristiF43
https://demo.centreon.com/wiki/index.php?title=Edu_Blog_Auto_Aprove_Dusty
https://demo.centreon.com/wiki/index.php?title=User:DustyKavel73
https://dptotti.fic.edu.uy/mediawiki/index.php/Edu_Blog_Auto_Aprove_Ferne
https://dptotti.fic.edu.uy/mediawiki/index.php/Usuario:FerneKilpatrick
https://exterior.podemos.info/mediawiki/index.php?title=Edu_Blog_Auto_Aprove_Britt
https://exterior.podemos.info/mediawiki/index.php?title=Usuario:Britt5542667306
https://gamesfashionarchive.net/wiki/User:MarianneStookey
https://gnometopia.org/index.php?title=Edu_Blog_Auto_Aprove_Sherryl
https://iamelf.com/wiki/index.php/Edu_Blog_Auto_Aprove_Veda
https://iamelf.com/wiki/index.php/User:VedaCary7685844
https://intranet.wikimedia.cat/wiki/Usuari:SherrylBurne331
https://koloiko.com/wiki/index.php?title=Edu_Blog_Auto_Aprove_Mikayla
https://koloiko.com/wiki/index.php?title=User:MikaylaRockwell
https://livingbooksaboutlife.org/books/Edu_Blog_Auto_Aprove_Marjorie
https://livingbooksaboutlife.org/books/User:MarjorieCronan
https://mnwiki.org/index.php/Edu_Blog_Auto_Aprove_George
https://mnwiki.org/index.php/User:GeorgeCaron87
https://procesal.cl/index.php/Edu_Blog_Auto_Aprove_Tami
https://procesal.cl/index.php/User:TamiCranswick
https://religiopedia.com/index.php/Edu_Blog_Auto_Aprove_Annetta
https://religiopedia.com/index.php/User:AnnettaVillareal
https://sustainabilipedia.org/index.php/Edu_Blog_Auto_Aprove_Hwa
https://sustainabilipedia.org/index.php/User:HwaLions60448
https://wiki.hrw-fablab.de/index.php?title=Edu_Blog_Auto_Aprove_Jann
https://wiki.hrw-fablab.de/index.php?title=User:JannHia052180
https://wiki.itcoug.com/index.php?title=Edu_Blog_Auto_Aprove_Josette
https://wiki.itcoug.com/index.php?title=Usuario:JosetteDowner24
https://wiki.minecraft.jp.net/%E5%88%A9%E7%94%A8%E8%80%85:Lon83Y9135745
https://wiki.minecraft.jp.net/Edu_Blog_Auto_Aprove_Lon
https://wiki.ryuriin.my.id/index.php/Edu_Blog_Auto_Aprove_Hollis
https://wiki.ryuriin.my.id/index.php/User:HollisDevaney50
https://wiki.sports-5.ch/index.php?title=Edu_Blog_Auto_Aprove_Gregorio
https://wiki.sports-5.ch/index.php?title=Utilisateur:GregorioRamsay
https://www.crustcorporate.com/wiki/Edu_Blog_Auto_Aprove_Hudson
https://www.crustcorporate.com/wiki/User:HudsonHinton12
https://www.offwiki.org/wiki/Edu_Blog_Auto_Aprove_Noemi
https://www.offwiki.org/wiki/User:NoemiBuring231
https://www.uq.universite-paris-saclay.fr/wiki-public/index.php?title=Edu_Blog_Auto_Aprove_Manuel
https://www.uq.universite-paris-saclay.fr/wiki-public/index.php?title=Utilisateur:ManuelWoodson
http://afcantarelle.org/index.php?title=Edu_Blog_Backlink_List_Jacqueline
http://afcantarelle.org/index.php?title=User:Jacqueline3118
http://classicalmusicmp3freedownload.com/ja/index.php?title=%E5%88%A9%E7%94%A8%E8%80%85:OdessaMcCulloch
http://classicalmusicmp3freedownload.com/ja/index.php?title=Edu_Blog_Backlink_List_Odessa
http://embeddedwiki.cs.aau.dk/wiki/Edu_Blog_Backlink_List_Stormy
http://embeddedwiki.cs.aau.dk/wiki/User:StormyPrimrose5
http://lsc.wikisign.org/wiki/Usuari:KQHCary631
http://minecraft-earth.fun/wiki/%E5%88%A9%E7%94%A8%E8%80%85:ClaudioBarcenas
http://minecraft-earth.fun/wiki/Edu_Blog_Backlink_List_Claudio
http://urbino.fh-joanneum.at/trials/index.php/Edu_Blog_Backlink_List_Malorie
http://urbino.fh-joanneum.at/trials/index.php/User:Malorie97H
http://vulteevaliant.com/index.php/Edu_Blog_Backlink_List_Arlette
http://vulteevaliant.com/index.php/User:ArletteRossi
http://web.archive.org/web/20230807040345/https://wabpascual123.blogspot.com/
http://wiki-ux.info/wiki/Edu_Blog_Backlink_List_Roxanna
http://wiki-ux.info/wiki/User:RoxannaWestwood
http://wiki.monashicpc.com/Edu_Blog_Backlink_List_Kim
http://wiki.monashicpc.com/User:KimWisniewski3
http://wiki.qm.uni-siegen.de/index.php/Benutzer:LuigiIho933569
http://wiki.qm.uni-siegen.de/index.php/Edu_Blog_Backlink_List_Luigi
http://www.driftpedia.com/wiki/index.php/Edu_Blog_Backlink_List_Traci
http://www.driftpedia.com/wiki/index.php/User:TraciLangley
http://www.erwinbrandenberger.ch/index.php?title=Benutzer:DirkAunger3
http://www.erwinbrandenberger.ch/index.php?title=Edu_Blog_Backlink_List_Dirk
http://www.jeromebaray.com/afm/wiki/index.php/Edu_Blog_Backlink_List_Nadine
http://www.jeromebaray.com/afm/wiki/index.php/Utilisateur:NadineOlsen12
http://www.matthew-morris.com/wiki/index.php/Edu_Blog_Backlink_List_Billy
http://www.matthew-morris.com/wiki/index.php/User:BillyShealy8
http://www.tip.net.au/wiki/index.php/Edu_Blog_Backlink_List_Shane
http://www.tip.net.au/wiki/index.php/User:ShaneHeady9
http://www.wiki.cheneliege.fr/index.php/Edu_Blog_Backlink_List_Sergio
http://www.wiki.cheneliege.fr/index.php/Utilisateur:SergioLeary00
http://www.zilahy.info/wiki/index.php/Edu_Blog_Backlink_List_Don
http://www.zilahy.info/wiki/index.php/User:DonWeiser72
https://able.extralifestudios.com/wiki/index.php/Edu_Blog_Backlink_List_Justina
https://able.extralifestudios.com/wiki/index.php/User:JustinaIrwin552
https://audiwiki.bitt-c.at/index.php?title=Benutzer:ConsueloCorser
https://audiwiki.bitt-c.at/index.php?title=Edu_Blog_Backlink_List_Consuelo
https://bbarlock.com/index.php/Edu_Blog_Backlink_List_Betsey
https://bbarlock.com/index.php/User:BetseyKidston20
https://biowiki.clinomics.com/index.php/Edu_Blog_Backlink_List_Stewart
https://biowiki.clinomics.com/index.php/User:StewartHaight2
https://demo.centreon.com/wiki/index.php?title=Edu_Blog_Backlink_List_Faustino
https://demo.centreon.com/wiki/index.php?title=User:FaustinoMcDonell
https://dptotti.fic.edu.uy/mediawiki/index.php/Edu_Blog_Backlink_List_Lorena
https://dptotti.fic.edu.uy/mediawiki/index.php/Usuario:LorenaN007427
https://exterior.podemos.info/mediawiki/index.php?title=Edu_Blog_Backlink_List_Ethan
https://exterior.podemos.info/mediawiki/index.php?title=Usuario:Ethan35N9072
https://gamesfashionarchive.net/wiki/User:KaceyOmx00815
https://gnometopia.org/index.php?title=Edu_Blog_Backlink_List_Layne
https://hu.velo.wiki/index.php?title=Szerkeszt%C5%91:Roxanne1123
https://iamelf.com/wiki/index.php/Edu_Blog_Backlink_List_Aidan
https://iamelf.com/wiki/index.php/User:AidanBrewis5374
https://intranet.wikimedia.cat/wiki/Usuari:LavonRitter4354
https://koloiko.com/wiki/index.php?title=Edu_Blog_Backlink_List_Amelie
https://koloiko.com/wiki/index.php?title=User:AmelieArriola
https://livingbooksaboutlife.org/books/Edu_Blog_Backlink_List_Hattie
https://livingbooksaboutlife.org/books/User:HattieAddis4040
https://mnwiki.org/index.php/Edu_Blog_Backlink_List_Heidi
https://mnwiki.org/index.php/User:HeidiRustin6
https://procesal.cl/index.php/Edu_Blog_Backlink_List_Ernesto
https://procesal.cl/index.php/User:Ernesto0010
https://religiopedia.com/index.php/Edu_Blog_Backlink_List_Steffen
https://religiopedia.com/index.php/User:SteffenCaffyn4
https://sustainabilipedia.org/index.php/Edu_Blog_Backlink_List_Shayla
https://sustainabilipedia.org/index.php/User:ShaylaBechtel
https://wiki.gahlawat.dynu.com/mediawiki/index.php?title=Edu_Blog_Backlink_List_Samira
https://wiki.gahlawat.dynu.com/mediawiki/index.php?title=User:SamiraOctoman5
https://wiki.hrw-fablab.de/index.php?title=Edu_Blog_Backlink_List_Shirleen
https://wiki.hrw-fablab.de/index.php?title=User:ShirleenPerkins
https://wiki.itcoug.com/index.php?title=Usuario:LucaBreillat78
https://wiki.minecraft.jp.net/%E5%88%A9%E7%94%A8%E8%80%85:AngelitaGatty1
https://wiki.minecraft.jp.net/Edu_Blog_Backlink_List_Angelita
https://wiki.ryuriin.my.id/index.php/Edu_Blog_Backlink_List_Zella
https://wiki.ryuriin.my.id/index.php/User:ZellaBey30914
https://wiki.sports-5.ch/index.php?title=Edu_Blog_Backlink_List_Quentin
https://wiki.sports-5.ch/index.php?title=Utilisateur:QuentinCreamer
https://www.crustcorporate.com/wiki/Edu_Blog_Backlink_List_Mohamed
https://www.crustcorporate.com/wiki/User:MohamedHff
https://www.offwiki.org/wiki/Edu_Blog_Backlink_List_Brandie
https://www.offwiki.org/wiki/User:XDFBrandie
https://www.uq.universite-paris-saclay.fr/wiki-public/index.php?title=Edu_Blog_Backlink_List_Jaclyn
https://www.uq.universite-paris-saclay.fr/wiki-public/index.php?title=Utilisateur:JaclynXlw10
http://afcantarelle.org/index.php?title=Edu_Blog_Backlink_List_Twyla
http://afcantarelle.org/index.php?title=User:TwylaBranham96
http://classicalmusicmp3freedownload.com/ja/index.php?title=%E5%88%A9%E7%94%A8%E8%80%85:SamualTuckson29
http://classicalmusicmp3freedownload.com/ja/index.php?title=Edu_Blog_Backlink_List_Samual
http://embeddedwiki.cs.aau.dk/wiki/Edu_Blog_Backlink_List_Rosie
http://embeddedwiki.cs.aau.dk/wiki/User:RosieRemington
http://lsc.wikisign.org/wiki/Usuari:JamieStackhouse
http://minecraft-earth.fun/wiki/%E5%88%A9%E7%94%A8%E8%80%85:AntonettaHauk
http://minecraft-earth.fun/wiki/Edu_Blog_Backlink_List_Antonetta
http://nswiki.svenskasuperserier.se/w/index.php?title=Anv%C3%A4ndare:MaxCuningham85
http://nswiki.svenskasuperserier.se/w/index.php?title=Edu_Blog_Backlink_List_Max
http://terio.fvet.uba.ar/mediawiki/index.php/Edu_Blog_Backlink_List_Sherman
http://terio.fvet.uba.ar/mediawiki/index.php/Usuario:Sherman1269
http://urbino.fh-joanneum.at/trials/index.php/Edu_Blog_Backlink_List_Jon
http://urbino.fh-joanneum.at/trials/index.php/User:JonY950046897
http://vulteevaliant.com/index.php/Edu_Blog_Backlink_List_Andrew
http://vulteevaliant.com/index.php/User:AndrewSweet375
http://wiki-ux.info/wiki/Edu_Blog_Backlink_List_Les
http://wiki-ux.info/wiki/User:PMZLes572681981
http://wiki.monashicpc.com/Edu_Blog_Backlink_List_Reta
http://wiki.monashicpc.com/User:RetaPrada175
http://www.driftpedia.com/wiki/index.php/Edu_Blog_Backlink_List_Deangelo
http://www.driftpedia.com/wiki/index.php/User:DeangeloWanliss
http://www.erwinbrandenberger.ch/index.php?title=Benutzer:JadaWhitty9174
http://www.erwinbrandenberger.ch/index.php?title=Edu_Blog_Backlink_List_Jada
http://www.jeromebaray.com/afm/wiki/index.php/Edu_Blog_Backlink_List_Oma
http://www.jeromebaray.com/afm/wiki/index.php/Utilisateur:Oma09P46758849
http://www.matthew-morris.com/wiki/index.php/Edu_Blog_Backlink_List_Maxwell
http://www.matthew-morris.com/wiki/index.php/User:MaxwellHeffner1
http://www.zilahy.info/wiki/index.php/Edu_Blog_Backlink_List_Kam
http://www.zilahy.info/wiki/index.php/User:KamUep390234098
https://able.extralifestudios.com/wiki/index.php/Edu_Blog_Backlink_List_Rodrick
https://able.extralifestudios.com/wiki/index.php/User:RodrickBaum52
https://bbarlock.com/index.php/Edu_Blog_Backlink_List_Ardis
https://bbarlock.com/index.php/User:ArdisReginald20
https://biowiki.clinomics.com/index.php/Edu_Blog_Backlink_List_Sabina
https://biowiki.clinomics.com/index.php/User:Sabina4607
https://demo.centreon.com/wiki/index.php?title=Edu_Blog_Backlink_List_Carla
https://demo.centreon.com/wiki/index.php?title=User:CarlaDutcher548
https://dptotti.fic.edu.uy/mediawiki/index.php/Edu_Blog_Backlink_List_Ulrike
https://dptotti.fic.edu.uy/mediawiki/index.php/Usuario:UlrikeRatcliff
https://exterior.podemos.info/mediawiki/index.php?title=Edu_Blog_Backlink_List_Felicitas
https://exterior.podemos.info/mediawiki/index.php?title=Usuario:FelicitasWainwri
https://gamesfashionarchive.net/wiki/User:GrettaTanaka4
https://gnometopia.org/index.php?title=Edu_Blog_Backlink_List_Shanice
https://help.ezadspro.co.uk/index.php?title=Edu_Blog_Backlink_List_Antonetta
https://help.ezadspro.co.uk/index.php?title=User:AntonettaAnsell
https://hu.velo.wiki/index.php?title=Edu_Blog_Backlink_List_Dino
https://hu.velo.wiki/index.php?title=Szerkeszt%C5%91:DinoHowes6
https://iamelf.com/wiki/index.php/Edu_Blog_Backlink_List_Milagros
https://iamelf.com/wiki/index.php/User:MilagrosPesina
https://intranet.wikimedia.cat/wiki/Usuari:MervinKraegen
https://koloiko.com/wiki/index.php?title=Edu_Blog_Backlink_List_Jeannine
https://koloiko.com/wiki/index.php?title=User:JeannineBrake44
https://livingbooksaboutlife.org/books/Edu_Blog_Backlink_List_Kennith
https://livingbooksaboutlife.org/books/User:KennithAkhurst
https://mnwiki.org/index.php/Edu_Blog_Backlink_List_Jonathan
https://mnwiki.org/index.php/User:JonathanPrintz
https://procesal.cl/index.php/Edu_Blog_Backlink_List_Denisha
https://procesal.cl/index.php/User:DenishaSwitzer
https://religiopedia.com/index.php/Edu_Blog_Backlink_List_Pablo
https://religiopedia.com/index.php/User:PabloKhu03917
https://sustainabilipedia.org/index.php/Edu_Blog_Backlink_List_Maricruz
https://sustainabilipedia.org/index.php/User:MaricruzHesson0
https://wiki.gahlawat.dynu.com/mediawiki/index.php?title=User:AsaLouden97687
https://wiki.hrw-fablab.de/index.php?title=Edu_Blog_Backlink_List_Lilla
https://wiki.hrw-fablab.de/index.php?title=User:LillaRivers2
https://wiki.minecraft.jp.net/%E5%88%A9%E7%94%A8%E8%80%85:RayfordStricklan
https://wiki.minecraft.jp.net/Edu_Blog_Backlink_List_Rayford
https://wiki.ryuriin.my.id/index.php/Edu_Blog_Backlink_List_Ahmad
https://wiki.ryuriin.my.id/index.php/User:AhmadMuntz3
https://wiki.sports-5.ch/index.php?title=Edu_Blog_Backlink_List_Melissa
https://wiki.sports-5.ch/index.php?title=Utilisateur:MelissaShaffer0
https://www.crustcorporate.com/wiki/Edu_Blog_Backlink_List_Isla
https://www.crustcorporate.com/wiki/User:IslaHuggard8
https://www.offwiki.org/wiki/Edu_Blog_Backlink_List_Gabriella
https://www.offwiki.org/wiki/User:GabriellaBunker
https://www.uq.universite-paris-saclay.fr/wiki-public/index.php?title=Edu_Blog_Backlink_List_Jesus
https://www.uq.universite-paris-saclay.fr/wiki-public/index.php?title=Utilisateur:JesusB73640168
http://afcantarelle.org/index.php?title=Edu_Blog_Backlink_List_Eve
http://afcantarelle.org/index.php?title=User:EveRil93471816
http://classicalmusicmp3freedownload.com/ja/index.php?title=%E5%88%A9%E7%94%A8%E8%80%85:MillardFirkins
http://classicalmusicmp3freedownload.com/ja/index.php?title=Edu_Blog_Backlink_List_Millard
http://embeddedwiki.cs.aau.dk/wiki/Edu_Blog_Backlink_List_Rex
http://embeddedwiki.cs.aau.dk/wiki/User:RexHills688
http://lsc.wikisign.org/wiki/Usuari_Discussi%C3%B3:MakaylaCouch
http://minecraft-earth.fun/wiki/%E5%88%A9%E7%94%A8%E8%80%85:YHARhonda4
http://minecraft-earth.fun/wiki/Edu_Blog_Backlink_List_Rhonda
http://terio.fvet.uba.ar/mediawiki/index.php/Edu_Blog_Backlink_List_Erma
http://terio.fvet.uba.ar/mediawiki/index.php/Usuario:ErmaMullawirrabu
http://urbino.fh-joanneum.at/trials/index.php/Edu_Blog_Backlink_List_Rashad
http://urbino.fh-joanneum.at/trials/index.php/User:Rashad50K6571
http://vulteevaliant.com/index.php/Edu_Blog_Backlink_List_Wilbur
http://vulteevaliant.com/index.php/User:WilburLockyer2
http://wiki-ux.info/wiki/Edu_Blog_Backlink_List_Emanuel
http://wiki-ux.info/wiki/User:EmanuelClunie1
http://wiki.monashicpc.com/Edu_Blog_Backlink_List_Nelle
http://wiki.monashicpc.com/User:NelleFlatt83
http://www.driftpedia.com/wiki/index.php/Edu_Blog_Backlink_List_Ernest
http://www.driftpedia.com/wiki/index.php/User:ErnestNaugle
http://www.erwinbrandenberger.ch/index.php?title=Benutzer:BuckLedet9
http://www.erwinbrandenberger.ch/index.php?title=Edu_Blog_Backlink_List_Buck
http://www.jeromebaray.com/afm/wiki/index.php/Edu_Blog_Backlink_List_Garfield
http://www.jeromebaray.com/afm/wiki/index.php/Utilisateur:GarfieldWedgwood
http://www.matthew-morris.com/wiki/index.php/Edu_Blog_Backlink_List_Lurlene
http://www.matthew-morris.com/wiki/index.php/User:Lurlene8057
http://www.wiki.cheneliege.fr/index.php/Edu_Blog_Backlink_List_Frank
http://www.wiki.cheneliege.fr/index.php/Utilisateur:FrankReiber36
http://www.zilahy.info/wiki/index.php/Edu_Blog_Backlink_List_Antje
http://www.zilahy.info/wiki/index.php/User:AntjeRonald4
https://able.extralifestudios.com/wiki/index.php/Edu_Blog_Backlink_List_Odell
https://able.extralifestudios.com/wiki/index.php/User:OdellOlmstead
https://bbarlock.com/index.php/Edu_Blog_Backlink_List_Noah
https://bbarlock.com/index.php/User:NoahGrondin047
https://biowiki.clinomics.com/index.php/Edu_Blog_Backlink_List_Clair
https://biowiki.clinomics.com/index.php/User:ClairWymark
https://demo.centreon.com/wiki/index.php?title=Edu_Blog_Backlink_List_Chara
https://demo.centreon.com/wiki/index.php?title=User:Chara9675634793
https://dptotti.fic.edu.uy/mediawiki/index.php/Edu_Blog_Backlink_List_Reva
https://dptotti.fic.edu.uy/mediawiki/index.php/Usuario:HDMReva394028
https://exterior.podemos.info/mediawiki/index.php?title=Edu_Blog_Backlink_List_Una
https://exterior.podemos.info/mediawiki/index.php?title=Usuario:UnaBrauer69
https://gamesfashionarchive.net/wiki/User:OEQPhillis
https://help.ezadspro.co.uk/index.php?title=User:MLURuth245
https://iamelf.com/wiki/index.php/Edu_Blog_Backlink_List_Ralph
https://iamelf.com/wiki/index.php/User:RalphChv232
https://intranet.wikimedia.cat/wiki/Usuari:OlgaSimonetti56
https://koloiko.com/wiki/index.php?title=Edu_Blog_Backlink_List_Aurelio
https://koloiko.com/wiki/index.php?title=User:AurelioRennie4
https://livingbooksaboutlife.org/books/Edu_Blog_Backlink_List_Rebekah
https://livingbooksaboutlife.org/books/User:RebekahHedges85
https://mnwiki.org/index.php/Edu_Blog_Backlink_List_Lonna
https://mnwiki.org/index.php/User:LonnaStinnett9
https://procesal.cl/index.php/Edu_Blog_Backlink_List_Armando
https://procesal.cl/index.php/User:Armando5829
https://religiopedia.com/index.php/Edu_Blog_Backlink_List_Danielle
https://religiopedia.com/index.php/User:DanielleCarrozza
https://sustainabilipedia.org/index.php/Edu_Blog_Backlink_List_Wanda
https://sustainabilipedia.org/index.php/User:WandaSikes24548
https://wiki.hrw-fablab.de/index.php?title=Edu_Blog_Backlink_List_Veronica
https://wiki.hrw-fablab.de/index.php?title=User:VeronicaPhan770
https://wiki.itcoug.com/index.php?title=Usuario:LaylaDerr47235
https://wiki.minecraft.jp.net/%E5%88%A9%E7%94%A8%E8%80%85:KatiaGoad299
https://wiki.minecraft.jp.net/Edu_Blog_Backlink_List_Katia
https://wiki.ryuriin.my.id/index.php/Edu_Blog_Backlink_List_Santos
https://wiki.ryuriin.my.id/index.php/User:SantosNeeley
https://wiki.sports-5.ch/index.php?title=Edu_Blog_Backlink_List_Brittney
https://wiki.sports-5.ch/index.php?title=Utilisateur:BrittneyNewman
https://www.crustcorporate.com/wiki/Edu_Blog_Backlink_List_Lenora
https://www.crustcorporate.com/wiki/User:LenoraHefner570
https://www.offwiki.org/wiki/Edu_Blog_Backlink_List_Tonya
https://www.offwiki.org/wiki/User:TonyaLemmon11
https://www.uq.universite-paris-saclay.fr/wiki-public/index.php?title=Edu_Blog_Backlink_List_Mickey
https://www.uq.universite-paris-saclay.fr/wiki-public/index.php?title=Utilisateur:MickeyBays0
http://afcantarelle.org/index.php?title=Edu_Blog_Backlink_List_Ivan
http://afcantarelle.org/index.php?title=User:IvanM31046
http://classicalmusicmp3freedownload.com/ja/index.php?title=%E5%88%A9%E7%94%A8%E8%80%85:MarquitaNapper
http://classicalmusicmp3freedownload.com/ja/index.php?title=Edu_Blog_Backlink_List_Marquita
http://embeddedwiki.cs.aau.dk/wiki/Edu_Blog_Backlink_List_Sherlene
http://embeddedwiki.cs.aau.dk/wiki/User_talk:SherleneRobeson
http://lsc.wikisign.org/wiki/Usuari_Discussi%C3%B3:EthanGrandi9657
http://minecraft-earth.fun/wiki/%E5%88%A9%E7%94%A8%E8%80%85:CurtWithrow344
http://minecraft-earth.fun/wiki/Edu_Blog_Backlink_List_Curt
http://terio.fvet.uba.ar/mediawiki/index.php/Edu_Blog_Backlink_List_Ernesto
http://terio.fvet.uba.ar/mediawiki/index.php/Usuario:ErnestoSpann5
http://urbino.fh-joanneum.at/trials/index.php/Edu_Blog_Backlink_List_Bertie
http://urbino.fh-joanneum.at/trials/index.php/User:BertieHeadley2
http://vulteevaliant.com/index.php/Edu_Blog_Backlink_List_Jennifer
http://vulteevaliant.com/index.php/User:JenniferF52
http://wiki-ux.info/wiki/Edu_Blog_Backlink_List_Francis
http://wiki-ux.info/wiki/User:FrancisWhittingt
http://wiki.monashicpc.com/Edu_Blog_Backlink_List_Rolland
http://wiki.monashicpc.com/User:RollandGbl
http://wiki.qm.uni-siegen.de/index.php/Benutzer:WallaceBellasis
http://wiki.qm.uni-siegen.de/index.php/Edu_Blog_Backlink_List_Wallace
http://www.driftpedia.com/wiki/index.php/Edu_Blog_Backlink_List_Gayle
http://www.driftpedia.com/wiki/index.php/User:VNBGayle47134
http://www.erwinbrandenberger.ch/index.php?title=Benutzer:TerranceRoss733
http://www.erwinbrandenberger.ch/index.php?title=Edu_Blog_Backlink_List_Terrance
http://www.jeromebaray.com/afm/wiki/index.php/Edu_Blog_Backlink_List_Sheena
http://www.jeromebaray.com/afm/wiki/index.php/Utilisateur:SheenaKoontz2
http://www.matthew-morris.com/wiki/index.php/Edu_Blog_Backlink_List_Ellis
http://www.matthew-morris.com/wiki/index.php/User:EllisStClair1
http://www.wiki.cheneliege.fr/index.php/Edu_Blog_Backlink_List_Teena
http://www.wiki.cheneliege.fr/index.php/Utilisateur:HXRTeena72
https://able.extralifestudios.com/wiki/index.php/Edu_Blog_Backlink_List_Owen
https://able.extralifestudios.com/wiki/index.php/User:OwenGwinn853
https://bbarlock.com/index.php/Edu_Blog_Backlink_List_Javier
https://bbarlock.com/index.php/User:JavierAtc5
https://biowiki.clinomics.com/index.php/Edu_Blog_Backlink_List_Jaunita
https://biowiki.clinomics.com/index.php/User:JaunitaConsidine
https://demo.centreon.com/wiki/index.php?title=Edu_Blog_Backlink_List_Kathie
https://demo.centreon.com/wiki/index.php?title=User:KathieBoyes86
https://dptotti.fic.edu.uy/mediawiki/index.php/Edu_Blog_Backlink_List_Blythe
https://dptotti.fic.edu.uy/mediawiki/index.php/Usuario:BlytheBabcock0
https://exterior.podemos.info/mediawiki/index.php?title=Edu_Blog_Backlink_List_Yong
https://exterior.podemos.info/mediawiki/index.php?title=Usuario:YongBradbury
https://gamesfashionarchive.net/wiki/User:DemetraDurbin20
https://iamelf.com/wiki/index.php/Edu_Blog_Backlink_List_Daryl
https://iamelf.com/wiki/index.php/User:DarylXvv34147743
https://intranet.wikimedia.cat/wiki/Usuari:HattieBach2
https://koloiko.com/wiki/index.php?title=Edu_Blog_Backlink_List_Micheline
https://koloiko.com/wiki/index.php?title=User:MichelineDeleon
https://livingbooksaboutlife.org/books/Edu_Blog_Backlink_List_Dinah
https://livingbooksaboutlife.org/books/User:DinahDick243115
https://mnwiki.org/index.php/Edu_Blog_Backlink_List_Victor
https://mnwiki.org/index.php/User:VictorKoerstz
https://procesal.cl/index.php/Edu_Blog_Backlink_List_Christy
https://procesal.cl/index.php/User:ChristySliva
https://religiopedia.com/index.php/Edu_Blog_Backlink_List_Gladys
https://religiopedia.com/index.php/User:GladysGranger22
https://wiki.hrw-fablab.de/index.php?title=Edu_Blog_Backlink_List_Maggie
https://wiki.hrw-fablab.de/index.php?title=User:MaggieOfficer66
https://wiki.itcoug.com/index.php?title=Edu_Blog_Backlink_List_Ursula
https://wiki.minecraft.jp.net/%E5%88%A9%E7%94%A8%E8%80%85:Jacqueline4948
https://wiki.minecraft.jp.net/Edu_Blog_Backlink_List_Jacqueline
https://wiki.ryuriin.my.id/index.php/Edu_Blog_Backlink_List_Eulalia
https://wiki.ryuriin.my.id/index.php/User:JQJEulalia
https://wiki.sports-5.ch/index.php?title=Edu_Blog_Backlink_List_Lin
https://wiki.sports-5.ch/index.php?title=Utilisateur:TrenaArnot8180
https://www.crustcorporate.com/wiki/Edu_Blog_Backlink_List_Tandy
https://www.crustcorporate.com/wiki/User:TandyWilsmore19
https://www.offwiki.org/wiki/Edu_Blog_Backlink_List_Lavada
https://www.offwiki.org/wiki/User:INNLavada06
https://www.uq.universite-paris-saclay.fr/wiki-public/index.php?title=Edu_Blog_Backlink_List_Teri
https://www.uq.universite-paris-saclay.fr/wiki-public/index.php?title=Utilisateur:FWBTeri313
http://afcantarelle.org/index.php?title=Edu_Blog_Backlink_List_Antje
http://afcantarelle.org/index.php?title=User:AntjeLessard796
http://classicalmusicmp3freedownload.com/ja/index.php?title=%E5%88%A9%E7%94%A8%E8%80%85:MindaSetser42
http://classicalmusicmp3freedownload.com/ja/index.php?title=Edu_Blog_Backlink_List_Minda
http://embeddedwiki.cs.aau.dk/wiki/Edu_Blog_Backlink_List_Waldo
http://embeddedwiki.cs.aau.dk/wiki/User:WaldoBlanch4025
http://kousokuwiki.org/wiki/Edu_Blog_Backlink_List_Dian
http://minecraft-earth.fun/wiki/%E5%88%A9%E7%94%A8%E8%80%85:FranziskaLaplant
http://minecraft-earth.fun/wiki/Edu_Blog_Backlink_List_Franziska
http://terio.fvet.uba.ar/mediawiki/index.php/Edu_Blog_Backlink_List_Hester
http://terio.fvet.uba.ar/mediawiki/index.php/Usuario:HesterCairnduff
http://urbino.fh-joanneum.at/trials/index.php/Edu_Blog_Backlink_List_Callie
http://urbino.fh-joanneum.at/trials/index.php/User:CallieKoehler6
http://vulteevaliant.com/index.php/Edu_Blog_Backlink_List_Emory
http://vulteevaliant.com/index.php/User:Emory72227
http://wiki-beta.avazinn.com/w/index.php?title=Edu_Blog_Backlink_List_Greg
http://wiki-beta.avazinn.com/w/index.php?title=User:GregBlaylock
http://wiki-ux.info/wiki/Edu_Blog_Backlink_List_Kirsten
http://wiki-ux.info/wiki/User:KirstenKpv
http://wiki.monashicpc.com/Edu_Blog_Backlink_List_Cornelius
http://wiki.monashicpc.com/User:CorneliusCopley
http://wiki.qm.uni-siegen.de/index.php/Benutzer:AurelioParramore
http://wiki.qm.uni-siegen.de/index.php/Edu_Blog_Backlink_List_Aurelio
http://www.driftpedia.com/wiki/index.php/Edu_Blog_Backlink_List_Dannie
http://www.driftpedia.com/wiki/index.php/User:DannieBenitez02
http://www.erwinbrandenberger.ch/index.php?title=Benutzer:BarbGreiner
http://www.erwinbrandenberger.ch/index.php?title=Edu_Blog_Backlink_List_Barb
http://www.jeromebaray.com/afm/wiki/index.php/Edu_Blog_Backlink_List_Erlinda
http://www.jeromebaray.com/afm/wiki/index.php/Utilisateur:ErlindaPoston
http://www.matthew-morris.com/wiki/index.php/Edu_Blog_Backlink_List_Isidra
http://www.matthew-morris.com/wiki/index.php/User:IsidraStockman
http://www.wiki.cheneliege.fr/index.php/Edu_Blog_Backlink_List_Philipp
http://www.wiki.cheneliege.fr/index.php/Utilisateur:PhilippParr9967
https://able.extralifestudios.com/wiki/index.php/Edu_Blog_Backlink_List_Jonelle
https://able.extralifestudios.com/wiki/index.php/User:JonelleN81
https://bbarlock.com/index.php/Edu_Blog_Backlink_List_Johnathan
https://bbarlock.com/index.php/User:JohnathanCanfiel
https://biowiki.clinomics.com/index.php/Edu_Blog_Backlink_List_Chelsea
https://biowiki.clinomics.com/index.php/User:ChelseaGbn
https://demo.centreon.com/wiki/index.php?title=Edu_Blog_Backlink_List_Melaine
https://demo.centreon.com/wiki/index.php?title=User:MelaineZek
https://dptotti.fic.edu.uy/mediawiki/index.php/Edu_Blog_Backlink_List_Niamh
https://dptotti.fic.edu.uy/mediawiki/index.php/Usuario:NiamhDaplyn4
https://exterior.podemos.info/mediawiki/index.php?title=Edu_Blog_Backlink_List_Marcelo
https://exterior.podemos.info/mediawiki/index.php?title=Usuario:MarceloMuniz
https://gamesfashionarchive.net/wiki/User:ZeldaWooley
https://iamelf.com/wiki/index.php/Edu_Blog_Backlink_List_Muoi
https://iamelf.com/wiki/index.php/User:MuoiBrotherton
https://intranet.wikimedia.cat/wiki/Usuari:TabithaMarler
https://koloiko.com/wiki/index.php?title=Edu_Blog_Backlink_List_Son
https://koloiko.com/wiki/index.php?title=User:SonPidgeon
https://mnwiki.org/index.php/Edu_Blog_Backlink_List_Roberta
https://mnwiki.org/index.php/User:RobertaN45
https://procesal.cl/index.php/Edu_Blog_Backlink_List_Aleisha
https://procesal.cl/index.php/User:AleishaGarner3
https://religiopedia.com/index.php/Edu_Blog_Backlink_List_Roslyn
https://religiopedia.com/index.php/User:Roslyn0039
https://sustainabilipedia.org/index.php/Edu_Blog_Backlink_List_Bernadine
https://sustainabilipedia.org/index.php/User:WKWBernadine
https://wiki.hrw-fablab.de/index.php?title=Edu_Blog_Backlink_List_Darwin
https://wiki.hrw-fablab.de/index.php?title=User:DarwinLechuga
https://wiki.minecraft.jp.net/%E5%88%A9%E7%94%A8%E8%80%85:HoseaHqj733
https://wiki.minecraft.jp.net/Edu_Blog_Backlink_List_Hosea
https://wiki.ryuriin.my.id/index.php/Edu_Blog_Backlink_List_Tania
https://wiki.ryuriin.my.id/index.php/User:TaniaCarstensen
https://wiki.sports-5.ch/index.php?title=Edu_Blog_Backlink_List_Frank
https://wiki.sports-5.ch/index.php?title=Utilisateur:FrankCable
https://www.crustcorporate.com/wiki/Edu_Blog_Backlink_List_Felicia
https://www.crustcorporate.com/wiki/User:FeliciaShort562
https://www.offwiki.org/wiki/Edu_Blog_Backlink_List_Judith
https://www.offwiki.org/wiki/User:JudithComeaux
https://www.uq.universite-paris-saclay.fr/wiki-public/index.php?title=Edu_Blog_Backlink_List_Diana
https://www.uq.universite-paris-saclay.fr/wiki-public/index.php?title=Utilisateur:DianaBlaubaum
Your writing is so descriptive that I felt like I had been proper there with you. Keep up The good function!
Your write-up was so engaging that I lost monitor of your time whilst reading it. Keep up The good do the job!
how much is metformin
Your content has this magical power to make me truly feel smarter immediately after looking through.
bactrim medication
Your web site is The explanation I anticipate sitting down and reading through. Hold shining!
diflucan pills
You said it really well.
lab report writing service uk help with nursing essays essay helper essay helper websites to help with writing essays writing service essay writing essays online admission essay writing service reviews best paper writing service essay writing service essay
This post will help the internet visitors for building
up new web site or even a blog from start to end.
This article will assist the internet users for creating new weblog or even a blog from
start to end.
It’s really a great and useful piece of info. I am glad that you just shared this helpful info with
us. Please keep us informed like this. Thank you for sharing.
I’m really enjoying the design and layout of your blog.
It’s a very easy on the eyes which makes it much more enjoyable for me to come here and visit more often. Did you hire out a
developer to create your theme? Superb work!
strattera generic best price pharmacy
toradol generic medication
I was wondering if you ever thought of changing the layout of your
website? Its very well written; I love what youve got to say.
But maybe you could a little more in the way of content so people could connect with it better.
Youve got an awful lot of text for only having 1 or 2 pictures.
Maybe you could space it out better?
You’re so cool! I do not think I have read something like that before.
So nice to find somebody with a few genuine thoughts on this
subject matter. Seriously.. thanks for starting this up.
This website is one thing that’s needed on the web, someone with a little originality!
With havin so much content and articles do you ever run into any issues of plagorism or copyright violation? My
blog has a lot of exclusive content I’ve either authored myself or outsourced but it seems a lot of it is popping it up all
over the internet without my authorization. Do you know
any ways to help protect against content from being stolen? I’d certainly appreciate it.
Hello There. I discovered your blog the use of msn. That is a very
smartly written article. I’ll make sure to bookmark it and return to read extra
of your helpful info. Thank you for the post.
I’ll certainly return.
voltaren 750 mg
For hottest information you have to visit web and on world-wide-web I found
this website as a finest website for hottest updates.
selamat pagi untuk ⲣara bapak ibu saudara saaudara kini ingin saya tampilkan web judi pkv terburuk yang pernah ada laman judi poker qq dengan rating tidak memuaskan cuma membohongi odang orang saja.
website yang sudah lama hadir menyediakan permainan qq online yanbg
banyak peminat tapi tertipu oleh website pkv ini.
laman judi pkv yang tak layak untuk dibuat daerah bermawin ρara pejudi online, sekirannya ansa ingin bermzin pikiir pikir dulu sebab
mereka cuma bisa mengcopy ϲontent saja. salam sejahtera
Have you ever considered about including a little bit more than just your articles?
I mean, what you say is important and everything.
However just imagine if you added some great pictures or
videos to give your posts more, “pop”! Your content is excellent
but with images and clips, this site could definitely be
one of the greatest in its niche. Fantastic blog!
diflucan discount coupon
My developer is trying to convince me to move to .net from PHP.
I have always disliked the idea because of the expenses.
But he’s tryiong none the less. I’ve been using Movable-type on a number of websites for about a year and
am nervous about switching to another platform. I have heard great things about blogengine.net.
Is there a way I can transfer all my wordpress content into it?
Any kind of help would be really appreciated!
clonidine buy
It’s really a great and useful piece of info. I am glad that you just shared this useful information with us.
Please stay us up to date like this. Thank you for sharing.
tamoxifen pct
Fantastic goods from you, man. I’ve understand your stuff
previous to and you are just extremely great. I actually like what you have acquired here, certainly like what you’re stating and the way in which you
say it. You make it enjoyable and you still take care of to keep it smart.
I can not wait to read far more from you. This is really a great website.
tadalafil price
bactrim coupon
Pretty nice post. I just stumbled upon your weblog
and wanted to say that I have really enjoyed surfing around
your blog posts. After all I’ll be subscribing to your rss feed and I hope you write again soon!
What i don’t understood is in reality how you are not really a lot more well-liked
than you might be right now. You’re very intelligent.
You recognize thus significantly when it comes to this subject, produced
me for my part consider it from a lot of various
angles. Its like men and women aren’t involved unless
it is one thing to do with Lady gaga! Your individual stuffs outstanding.
At all times handle it up!
Hey there, You have done an incredible job.
I will definitely digg it and personally suggest to my friends.
I’m sure they’ll be benefited from this web site.
Hi mates, fastidious article and good urging commented here, I
am genuinely enjoying by these.
Hello There. I found your blog using msn. This is a very well written article.
I’ll make sure to bookmark it and return to read more of your useful
information. Thanks for the post. I will definitely comeback.
Every weekend i used to pay a quick visit this web site,
because i wish for enjoyment, since this this web site conations actually good
funny stuff too.
I’m not that much of a internet reader to be honest
but your blogs really nice, keep it up! I’ll go ahead and bookmark your site to come back later.
Cheers
Wow, awesome weblog format! Ꮋow lengthy havе y᧐u ƅееn blogging for?
you made blogging ⅼoߋk easy. The total l᧐ok of your site iѕ wonderful,
lеt аlone the content!
I loved as much as you will receive carried out right here.
The sketch is attractive, your authored subject matter stylish.
nonetheless, you command get got an nervousness over that you wish be delivering the following.
unwell unquestionably come further formerly again since
exactly the same nearly a lot often inside case you shield this increase.
buy lasixonline
First off I would like to say excellent blog! I had a quick question that I’d like to ask if you don’t mind.
I was interested to know how you center yourself and clear your head prior to writing.
I have had a tough time clearing my thoughts in getting my thoughts out
there. I truly do enjoy writing however it just seems like the first 10 to 15 minutes
are lost simply just trying to figure out
how to begin. Any recommendations or hints? Appreciate it!
buy metformin without a proscription
buy lasix online canada
I always used to study paragraph in news papers but now as I am a user
of web so from now I am using net for articles, thanks to web.
Excellent post. I was checking constantly this blog and I am impressed!
Very useful info specifically the last part :
) I care for such information much. I was looking for this
particular information for a long time. Thank you
and good luck.
I am not sure where you are getting your information, but great topic.
I needs to spend some time learning much more or understanding more.
Thanks for great info I was looking for this info for my
mission.
Hello there! I just wish to offer you a huge thumbs up for your excellent
information you have here on this post. I am coming back
to your site for more soon.
lasix online
Hello, I read your blog like every week. Your writing style is witty,
keep up the good work!
Right now, live dealer online blackjack is still generally using a one-way system. Everyone can see the dealer, but nobody can see the players. However, with a realistically limited number of players sitting at the table at any given moment, it’s easy to chat with each other (as well as the dealer) in the best online live blackjack sites for Canadians. Blackjack is also easy and supremely popular as a live dealer game at top online casino sites. There are several variants of real money online blackjack available, all with different rules and side bets. The most common bonus you’ll find is the welcome bonus. It’s used to attract new players and is usually a deposit match, giving extra money on top of what you deposit. Some online casinos will also add free spins you can use on online slots. It’s rare ― but not impossible ― that casinos offer no deposit bonuses, which give you free spins or free cash for creating an account.
http://www.hushcolor.com/bbs/board.php?bo_table=free&wr_id=12190
No deposit is required to claim this offer, unlike others like Ladbrokes and Coral who request a minimum £5 deposit. Another benefit of this offer is that your free bet will not expire, unlike offers such as Betvictor that have a free bet expiry of just 7 days. However it would be wrong of them to call this risk free. You would need to stake an initial bet with your money, which you could lose and then typically if you do lose they will give you a free bet up to a certain amount. ie this may be bet £10, get a free £10 bet if you lose. However you have taken a risk as the free bet cant be withdrawn as cash. However it would be wrong of them to call this risk free. You would need to stake an initial bet with your money, which you could lose and then typically if you do lose they will give you a free bet up to a certain amount. ie this may be bet £10, get a free £10 bet if you lose. However you have taken a risk as the free bet cant be withdrawn as cash.
Thankfulness to my father who shared with me concerning this web
site, this webpage is truly awesome.
Greetings from Colorado! I’m bored to tears at work so I decided to browse your site on my iphone during lunch break.
I love the knowledge you provide here and can’t wait to take a look when I get
home. I’m surprised at how fast your blog loaded on my
phone .. I’m not even using WIFI, just 3G .. Anyhow, good site!
Hello, this weekend is good for me, since this time i am reading this wonderful informative article here at my residence.
Hurrah! Finally I got a blog from where I can really obtain valuable data concerning my study and knowledge.
Because the admin of this website is working, no doubt very shortly it
will be well-known, due to its feature contents.
Thanks for the good writeup. It actually was once a entertainment account it.
Glance advanced to far delivered agreeable from you! By the
way, how can we keep up a correspondence?
Wonderful beat ! I wish to apprentice while you amend your site, how could i subscribe for
a blog web site? The account helped me a acceptable deal. I have
been tiny bit acquainted of this your broadcast offered shiny clear concept
combivent price in india
Hmm іt appears like yoᥙr website ate mmy first comment (it was extremely ⅼong) so
I guess I’ll just sum itt up what I sᥙbmitteed and sɑy, I’m thoroughly enjoying your bⅼog.
I as well am aan aѕpirіng ƅlog writеr ƅut I’m
still new to everything. Do you have any points for inexperienced
blog writers? I’d certainly ɑpprecіate it.
Pretty nice post. I simply stumbled upon your blog and wished to mention that I have truly enjoyed surfing around your blog
posts. In any case I’ll be subscribing to your rss feed and I am hoping you write again soon!
Outstanding quest there. What occurred after? Good luck!
I am truly happy to glance at this website posts which carries tons of helpful data, thanks
for providing these statistics.
best european online pharmacy
I have read so many articles concerning the blogger lovers but this post is truly a nice article, keep it up.
The YouTube MP3 Converter is a straightforward, fast, as well as anonymous
tool that allows you to convert and also download YouTube
videos as MP3 audio documents without the requirement for software
downloads. Our solution supports significant devices such as
Android, iPhone, Windows, and Mac, enabling you to download videos in the highest offered
quality. Simply paste the YouTube video link right into the search box and also click the “Convert” button. Within seconds, your MP3 data will certainly be ready for download.
Create playlists of premium MP3 documents as well as
enjoy the music from your favored YouTube video clips.
Preserve audio high quality while drawing out 4K
video clips. Our solution uses a safe and also hassle-free
choice for transforming as well as downloading
MP3s from YouTube and other streaming systems.
Select numerous videos or videos of differing lengths and also easily download them to your desktop or smart phone without limitations or the
demand for registration. PLEASE KEEP IN MIND: There
is a restriction on downloading MP3 documents longer than 10 mins at a time.
https://steemit.com/tech/@fesfo/woke-ns
https://steemit.com/tech/@fesfo/techhov
https://steemit.com/tech/@fesfo/pafi-oke
https://steemit.com/tech/@fesfo/6e1z3a-pafi-jakarta-timur
Having read this I believed it was very enlightening.
I appreciate you finding the time and energy to put this information together.
I once again find myself personally spending way too much time both reading and leaving comments.
But so what, it was still worth it!
As the admin of this web site is working, no uncertainty very rapidly it will be famous,
due to its quality contents.
buy lasix
Do you mind if I quote a few of your posts as long as I provide credit and
sources back to your website? My website is in the exact same
niche as yours and my visitors would truly benefit from some of the
information you present here. Please let me know if
this okay with you. Regards!
This is very interesting, You’re a very skilled blogger.
I have joined your feed and look forward to seeking more of your excellent post.
Also, I have shared your site in my social networks!
ivermectin lotion 0.5
Undeniably believe that which you said. Your
favorite reason appeared to be on the web the simplest
thing to be aware of. I say to you, I definitely get annoyed while people
consider worries that they just don’t know about. You managed
to hit the nail upon the top as well as defined out the whole thing without having
side effect , people could take a signal.
Will likely be back to get more. Thanks
When someone writes an post he/she keeps the image of a user in his/her brain that how a user can know it.
Therefore that’s why this piece of writing is perfect.
Thanks!
Ꭺn impressive share! I’ve just forwarⅾed this
ⲟnto a colleague whoo had been conducting a little homework on this.
And һe in fat bought mе lunch due tο the fact that I discovered it ffor him…
lol. So alⅼow me to reeord this…. Thanks for the meаl!!
But yeah, thanx for spending the time to tаlk about this issue hrrе
on your site.
hello!,I love your writing so so much! shre we be in contact more approximately your
post on AOL? I require a specialist in this space to unravel
my problem. Maybe that is you! Looking aheawd to see you.
website
Those which yoou can download and present onto
your workstation and the proper on-line club where you
wager on the interface of the net betting joinnts site page.
NetEnt’s impeccable track report and sollid status for higgh quality gaming is predicated on thee developer’s
dedication to offrering dependable casino games which are
absolutely parttaking and completelyy immersive.
Play for the sake of entertainment, nevertheless watch your bankroll.
trazodone 25 mg pill
I don’t even know how I stopped up here, but I believed
this post used to be great. I don’t realize who you’re but certainly you are going to a
famous blogger when you aren’t already. Cheers!
I finally tried the lisinopril generic and it’s legit, no lie.
Truly all kinds of wonderful material.
write my essay online write an essay essay writers online write paper for me
Howdy, There’s no doubt that your website may be having browser compatibility problems.
When I take a look at your web site in Safari, it looks fine however when opening in IE, it’s got some overlapping issues.
I merely wanted to give you a quick heads up!
Apart from that, excellent site!
generic stromectol
I think the admin of this web page is genuinely working hard in favor of his web site, since
here every information is quality based material.
These are in fact great ideas in on the topic of
blogging. You have touched some nice points here. Any way keep up wrinting.
I enjoy wһat you guys are սsually up too.
Tһiѕ type of clever worҝ and reporting! Keep up thе
terrific worҝs guys I’ve included you guys tο blogroll.
Excellent weblog right here! Also your site loads up very fast!
What web host are you using? Can I am getting your associate hyperlink to your host?
I desire my site loaded up as fast as yours lol
buy azithromycin us
finasteride generic
Wow a lot of great knowledge!
essay writter essay writer essay writer website best essay writers
For newest information you have to pay a visit web and on the web I found this web page
as a finest site for most up-to-date updates.
ivermectin ireland
I used to be recommended this blog by my cousin. I’m now not sure whether this submit is written by him as
nobody else know such particular approximately my difficulty.
You’re wonderful! Thanks!
LEVEL4D
LEVEL4D BANDAR JUDI SLOT DEPOSIT DANA 10 RIBU 2023 TERPERCAYA
LEVEL4D Situs slot Gacor Maxwin Terbaru
LEVEL4D Link Alternatif slot Online Terpercaya
LEVEL4D Link Daftar Slot Gacor
10 mg cialis cost
top 10 online pharmacy in india
Thanks for ones marvelous posting! I certainly enjoyed reading it, you are a
great author.I will always bookmark your blog and definitely will come back in the future.
I want to encourage continue your great work, have a nice evening!
fantastic post, very informative. I’m wondering why the opposite experts
of this sector do not notice this. You should continue your writing.
I am confident, you have a huge readers’ base already!
doxycycline hyclate 100 mg cap
I like the valuable information you provide in your articles.
I will bookmark your blog and check again here
regularly. I am quite certain I will learn plenty of new stuff
right here! Best of luck for the next!
Mantap bang , Cobain juga dong bang main lottre gw dapet 45 juta dari modal 500rb , Bukti wd dan aplikasi nya udah gw share di youtube ku yang ini
my homepage https://ijopaasat.in/
tadalafil cost
It’s impressive that you are getting ideas from tjis post
as well aas from our discussion made at this place.
site
Thatt it’s essential to perform is find out which jumpman slots websites gives high payouts.
This means you could play online and truly win cash. If
a casino doesn’t have a superb standing amongst it is gamers, then it may not be a good place to
be putting your money into.
buy viagra online
buy ampicillin online
Don’t bother with allopurinol 209, it’s not worth it.
capsule online pharmacy
where to get valtrex
Your writing is informative and interesting. I often discover something new from a posts.
This article exceeded my anticipations. You went earlier mentioned and beyond to offer beneficial facts and insights.
zoloft 50 mg buy online
slot88
cost of clomid
Your capacity to simplify intricate principles is a rare present. Hold it up!
Website Judi Slot Online Terpercaya Legal Di Indonesia
Situsslot777 ialah website judi slot online terpercaya di indonesia yang sudah melayani ribuan member tiap-tiap hari nya. Sebagai website judi online terpercaya di Indonesia kami sediakan layanan deposit melewati pulsa untuk memudahkan pemain bagi yang tak mempunyai rekening. Tidak hanya itu anda juga dapat memakai aplikasi E-wallet untuk melakukan deposit seperti Ovo, Gopay, Dana dan Linkaja. Beraneka permainan dalam 1 user id bisa anda mainkan dengan mudah seperti judi bola, casino online dan idn live poker online.
Sesudah perilisan pada tahun 2020 website kami terus berkembang dalam dunia laman Perjudian online di Indonesia. Kami juga memberikan pelayanan terbaik terhadap member – member kami 24 jam full nonstop. Bagi kalian pemain baru kami memberikan bonus promo deposit untuk pemain yang bermain slot online. Layanan bank lokal ternama kami sediakan untuk mempermudah pelaksanaan deposit anda jauh lebih gampang dan cepat.
Kami senantiasa mengutamakan mutu kinerja mesin slot kami agar tetap dapat dimainkan dengan nyaman dan lancar tanpa adanya gangguan error atau kerusakan apapun.
Here is my site https://situsslot777.vip/
Just desire to say your article is as amazing.
The clearness on your submit is simply cool and that i can think you are an expert on this subject.
Fine together with your permission let me to grab your feed
to keep up to date with impending post. Thank
you 1,000,000 and please carry on the rewarding work.
Hi there, I wish for to subscribe for this website to take most recent updates, thus where can i do it please assist.
I’ve realized to have faith in your suggestions implicitly. Hold them coming!
augmentin 500 price
You’re so awesome! I do not believe I’ve read through anything like that
before. So nice to find somebody with some original thoughts on this
issue. Really.. thanks for starting this up. This website is something that is required on the web, someone with a
little originality!
valtrex brand coupon
Pretty portion of content. I simply stumbled upon your site and in accession capital to claim that I
acquire in fact loved account your blog posts.
Any way I’ll be subscribing for your feeds and even I fulfillment
you get entry to constantly fast.
I actually appreciated looking through your put up. Just how you stated everything was really very clear and concise.
Your write-up was an awesome reminder of why I really like reading weblogs. It is really great to see a person so keen about their issue.
doxycycline india
This write-up exceeded my expectations. You went earlier mentioned and beyond to offer important information and insights.
I for all time emailed this website post page to all my associates, because if like to
read it then my links will too.
cheapest propecia uk
What a stuff of un-ambiguity and preserveness of valuable knowledge
regarding unexpected feelings.
Your crafting is so partaking that I could not quit looking at right until the really end. Keep up The nice do the job!
Hi to all, it’s genuinely a pleasant for me to pay a visit
this web page, it consists of valuable Information.
Hi there to every one, the contents existing at this web site are actually remarkable
for people experience, well, keep up the good work fellows.
otc cialis 2019
cheap prednisolone uk
wellbutrin 100 mg tablet
where to buy cialis online
Your site can be a treasure trove of beneficial information and facts. Thank you!
Excellent post. I am facing some of these issues as
well..
What’s up to every one, for the reason that I am genuinely keen of reading this
web site’s post to be updated regularly. It consists of nice data.
Hello, i feel that i noticed you visited my weblog so i came to return the prefer?.I’m attempting to in finding issues to enhance my website!I suppose its adequate to use a few of your
ideas!!
clonidine 01mg
stromectol sales
Heya are using WordPress for your blog platform? I’m new to the
blog world but I’m trying to get started and set up my
own. Do you require any coding knowledge to make your own blog?
Any help would be really appreciated!
I do not even know how I ended up here, but I thought
this post was great. I don’t know who you are but certainly you’re going to a
famous blogger if you aren’t already 😉 Cheers!
Wow, marvelous weblog structure! How long have
you been running a blog for? you make blogging look easy.
The whole glance of your web site is fantastic, as smartly as the content material!
gabapentin online
atarax australia
Its like you read my mind! You appear to know so much about this,
like you wrote the book in it or something.
I think that you can do with some pics to drive the message home a little bit, but instead of that, this is great blog.
A fantastic read. I will definitely be back.
Hello! Do you know if they make any plugins to protect against hackers?
I’m kinda paranoid about losing everything I’ve worked hard on. Any recommendations?
Hello I am so glad I found your web site, I really found you by mistake, while
I was browsing on Askjeeve for something else,
Regardless I am here now and would just like to say thanks for a fantastic post and a all round exciting blog (I also love the theme/design), I don’t have
time to read it all at the moment but I have book-marked it and also added your RSS feeds, so when I have time I will be back to read much more, Please do keep up the awesome job.
Thank you a bunch for sharing this with all people you really know what you are talking approximately!
Bookmarked. Kindly additionally consult with my web site =).
We could have a hyperlink exchange arrangement between us
I have to thank you for the efforts you’ve put in writing this website.
I really hope to see the same high-grade blog posts by you in the future as well.
In fact, your creative writing abilities has encouraged me
to get my very own site now 😉
hello!,I love your writing so a lot! share we keep up a correspondence extra about your post on AOL?
I require a specialist on this house to unravel my problem.
May be that’s you! Taking a look ahead to see you.
generic finasteride 1mg no prescription
propanolol
With havin so much content do you ever run into any issues of plagorism or copyright violation? My site has a lot of unique
content I’ve either authored myself or outsourced but it seems a lot of it is popping it up all over the
internet without my permission. Do you know any techniques to help stop content from
being stolen? I’d really appreciate it.
First off I would like to say great blog! I had a quick question in which I’d like to ask if
you don’t mind. I was interested to find out how you center
yourself and clear your mind prior to writing.
I have had a hard time clearing my mind in getting my thoughts
out. I truly do enjoy writing however it just seems like the first 10 to
15 minutes are generally lost just trying to figure out how to begin. Any ideas or hints?
Thank you!
you’re really a good webmaster. The web site loading velocity is amazing.
It sort of feels that you are doing any distinctive trick.
Also, The contents are masterwork. you have done a magnificent activity on this matter!
Hi! Someone in my Myspace group shared this site with us so I came to look it over.
I’m definitely enjoying the information. I’m book-marking and will be tweeting this to my followers!
Wonderful blog and fantastic design and style.
generic hydroxychloroquine
Hello, I enjoy reading all of your post. I like to
write a little comment to support you.
Hey there exceptiоnal blog! Does running a bblog like this take a loot of work?
Ӏ’ve viгtuaⅼly noo understanding of programming however I was hoping tto start my
own blkg sоⲟn. Anyhow, if yoou have any suggeѕtions or techniques foг
new blog oѡners please share. I know this is offf subject but I juѕt had to ask.
Manyy thanks!
buy zyban tablets
What’s up to all, the contents present at this site are genuinely amazing for people knowledge, well, keep up the
good work fellows.
Wonderful blog! Do you have any suggestions for aspiring writers?
I’m planning to start my own site soon but I’m
a little lost on everything. Would you advise starting with a free platform like WordPress or go for a paid option? There are so many
choices out there that I’m totally confused .. Any
recommendations? Many thanks!
Slot gacor hari ini
I really like what you guys are usually up too. This sort of clever work and exposure!
Keep up the wonderful works guys I’ve added you guys to our blogroll.
The Lasix 10 mg tablet should be stored in a cool, dry place.
glucophage over the counter
Wow! This blog looks just like my old one!
It’s on a totally different subject but it
has pretty much the same layout and design. Great choice of colors!
Your style is really unique in comparison to other
folks I have read stuff from. Thanks for posting when you have the opportunity, Guess I’ll just book mark this blog.
Hello it’s me, I am also visiting this web site regularly, this web page is genuinely nice and the users are truly sharing
pleasant thoughts.
We stumbled over here different page and thought I might check things out.
I like what I see so now i am following you.
Look forward to looking over your web page for a second time.
Hurrah, that’s what I was searching for, what a
stuff! existing here at this website, thanks admin of
this site.
judi bola
buy online pharmacy uk
Hey I am so thrilled I found your weblog, I really found you by error, while
I was browsing on Digg for something else, Regardless I am here now and would
just like to say thanks for a marvelous post and a all round interesting blog (I also love
the theme/design), I don’t have time to browse it all
at the minute but I have saved it and also added in your RSS feeds,
so when I have time I will be back to read more, Please do keep up the awesome work.
Cheers, I like this!
essay writing service america pro essay writing service essay writing in english buy essay service professional resume writing service lafayette la customer service writing training term paper writing service reviews where can i buy a research paper research paper helper term paper research
compare pharmacy prices
gabapentin 1000
Thanks for the auspicious writeup. It in truth was a entertainment account
it. Look advanced to more introduced agreeable from you!
By the way, how could we communicate?
It’s the best time to make some plans for the future and it’s
time to be happy. I’ve read this put up and if I may I desire
to counsel you few interesting issues or suggestions. Perhaps you can write next
articles regarding this article. I wish to read even more issues approximately it!
Hello, i think that i saw you visited my blog so i came to “return the favor”.I am attempting to find things to enhance
my website!I suppose its ok to use a few of your ideas!!
finasteride prostate
Greate article. Keep posting such kind of information on your site.
Im really impressed by your site.
Hi there, You have performed an incredible job.
I will definitely digg it and personally suggest to my friends.
I’m sure they will be benefited from this website.
poker online
It’s actually a cool and useful piece of information. I am glad that you siply shared this useful info witth us.
Please stay us informed like this. Thanks for sharing.
slot gacor
Highly energetic blog, I liked that a lot. Will there be
a part 2?
If some one needs expert view on the topic of blogging then i advise him/her
to visit this blog, Keep up the pleasant work.
zoloft tablet price
clonidine 128
Thanks for the marvelous posting! I really
enjoyed reading it, you’re a great author. I will make
certain to bookmark your blog and definitely will come back later
in life. I want to encourage one to continue your great writing,
have a nice day!
This design is wicked! You most certainly know how to keep a reader amused.
Between your wit and your videos, I was almost moved
to start my own blog (well, almost…HaHa!) Wonderful job.
I really enjoyed what you had to say, and more than that, how you presented it.
Too cool!
Excellent post. I absolutely appreciate this website.
Continue the good work!
http://classicalmusicmp3freedownload.com/ja/index.php?title=%E5%88%A9%E7%94%A8%E8%80%85:Jami33H323995
http://classicalmusicmp3freedownload.com/ja/index.php?title=Edu_Blog_Backlink_List_Jami
http://embeddedwiki.cs.aau.dk/wiki/Edu_Blog_Backlink_List_Adrianne
http://embeddedwiki.cs.aau.dk/wiki/User_talk:PIJAdrianne
http://minecraft-earth.fun/wiki/%E5%88%A9%E7%94%A8%E8%80%85:RicoFranco1242
http://minecraft-earth.fun/wiki/Edu_Blog_Backlink_List_Rico
http://postgasse.net/Wiki/index.php?title=Benutzer:AndreasTorgerson
http://postgasse.net/Wiki/index.php?title=Edu_Blog_Backlink_List_Andreas
http://terio.fvet.uba.ar/mediawiki/index.php/Edu_Blog_Backlink_List_Dong
http://terio.fvet.uba.ar/mediawiki/index.php/Usuario:DongThalberg03
http://urbino.fh-joanneum.at/trials/index.php/Edu_Blog_Backlink_List_Damon
http://urbino.fh-joanneum.at/trials/index.php/User:DamonBirks3
http://vulteevaliant.com/index.php/Edu_Blog_Backlink_List_Tracie
http://vulteevaliant.com/index.php/User:TracieCorwin
http://wiki-ux.info/wiki/Edu_Blog_Backlink_List_Amelie
http://wiki-ux.info/wiki/User:AmelieSams
http://wiki.monashicpc.com/Edu_Blog_Backlink_List_Sommer
http://wiki.monashicpc.com/User:SommerM1508
http://wiki.shitcore.org/index.php/Edu_Blog_Backlink_List_Kristy
http://wiki.shitcore.org/index.php/User:KristyElizabeth
http://www.driftpedia.com/wiki/index.php/Edu_Blog_Backlink_List_Leonard
http://www.driftpedia.com/wiki/index.php/User:LeonardWheen
http://www.erwinbrandenberger.ch/index.php?title=Benutzer:FosterSeale
http://www.erwinbrandenberger.ch/index.php?title=Edu_Blog_Backlink_List_Foster
http://www.jeromebaray.com/afm/wiki/index.php/Edu_Blog_Backlink_List_Sol
http://www.jeromebaray.com/afm/wiki/index.php/Utilisateur:SolVictor129
http://www.matthew-morris.com/wiki/index.php/Edu_Blog_Backlink_List_Edgardo
http://www.matthew-morris.com/wiki/index.php/User:EdgardoEubanks
http://www.wiki.cheneliege.fr/index.php/Edu_Blog_Backlink_List_Everette
http://www.wiki.cheneliege.fr/index.php/Utilisateur:EveretteSleeman
http://www.zilahy.info/wiki/index.php/Edu_Blog_Backlink_List_Wyatt
http://www.zilahy.info/wiki/index.php/User:WyattCrider80
https://able.extralifestudios.com/wiki/index.php/Edu_Blog_Backlink_List_Israel
https://able.extralifestudios.com/wiki/index.php/User:IsraelL179070306
https://bbarlock.com/index.php/Edu_Blog_Backlink_List_Elisabeth
https://bbarlock.com/index.php/User:Elisabeth70S
https://biowiki.clinomics.com/index.php/Edu_Blog_Backlink_List_Lisa
https://biowiki.clinomics.com/index.php/User:LisaArchie9
https://demo.centreon.com/wiki/index.php?title=Edu_Blog_Backlink_List_Nelly
https://demo.centreon.com/wiki/index.php?title=User:NellyLandry7
https://dptotti.fic.edu.uy/mediawiki/index.php/Edu_Blog_Backlink_List_Mari
https://dptotti.fic.edu.uy/mediawiki/index.php/Usuario:MariPresley8925
https://exterior.podemos.info/mediawiki/index.php?title=Edu_Blog_Backlink_List_Myra
https://exterior.podemos.info/mediawiki/index.php?title=Usuario:MyraStrock172
https://gamesfashionarchive.net/wiki/User:CyrusLear8342
https://gnometopia.org/index.php?title=Edu_Blog_Backlink_List_Ruth
https://iamelf.com/wiki/index.php/Edu_Blog_Backlink_List_Will
https://iamelf.com/wiki/index.php/User:WillPerry0
https://intranet.wikimedia.cat/wiki/Usuari:TrevorGower2
https://koloiko.com/wiki/index.php?title=Edu_Blog_Backlink_List_Tristan
https://koloiko.com/wiki/index.php?title=User:TristanRobillard
https://library.kemu.ac.ke/kemuwiki/index.php/Edu_Blog_Backlink_List_Jamal
https://library.kemu.ac.ke/kemuwiki/index.php/User:JamalBattles4
https://livingbooksaboutlife.org/books/Edu_Blog_Backlink_List_Chas
https://livingbooksaboutlife.org/books/User:ChasHenke9936
https://mnwiki.org/index.php/Edu_Blog_Backlink_List_Rosalind
https://mnwiki.org/index.php/User:RosalindHendon1
https://procesal.cl/index.php/Edu_Blog_Backlink_List_Samual
https://procesal.cl/index.php/User:SamualD68154
https://religiopedia.com/index.php/Edu_Blog_Backlink_List_Elmer
https://religiopedia.com/index.php/User:ElmerBleakley15
https://sustainabilipedia.org/index.php/Edu_Blog_Backlink_List_Damaris
https://sustainabilipedia.org/index.php/User:DamarisCopley
https://wiki.hrw-fablab.de/index.php?title=Edu_Blog_Backlink_List_Russel
https://wiki.hrw-fablab.de/index.php?title=User:RusselAtencio25
https://wiki.itcoug.com/index.php?title=Edu_Blog_Backlink_List_Hans
https://wiki.ryuriin.my.id/index.php/Edu_Blog_Backlink_List_Alejandrina
https://wiki.ryuriin.my.id/index.php/User:AlejandrinaPeter
https://wiki.sports-5.ch/index.php?title=Utilisateur:ForestONeill90
https://www.crustcorporate.com/wiki/Edu_Blog_Backlink_List_Antonia
https://www.crustcorporate.com/wiki/User:AntoniaHalford
https://www.mibtec.it/wiki/index.php?title=Edu_Blog_Backlink_List_Merlin
https://www.offwiki.org/wiki/Edu_Blog_Backlink_List_Kathrin
https://www.offwiki.org/wiki/User:MNSKathrin
https://www.wiki.pcfu.cz/index.php/Edu_Blog_Backlink_List_Robby
https://www.wiki.pcfu.cz/index.php/U%c5%beivatel:RobbySearle5
clomid buy online
Hi there! I could have sworn I’ve been to this blog before
but after browsing through many of the articles I realized
it’s new to me. Anyways, I’m certainly delighted I found it and I’ll be book-marking it and checking back frequently!
Hey there this is kinda of off topic but I was wondering if blogs use WYSIWYG
editors or if you have to manually code with
HTML. I’m starting a blog soon but have no coding skills so I wanted to get advice from someone with experience.
Any help would be greatly appreciated!
propecia generic uk
Definitely consider that which you said. Your favorite reason appeared
to be on the internet the simplest factor to remember of.
I say to you, I definitely get annoyed even as folks think about concerns that they plainly do not
understand about. You controlled to hit the nail
upon the top and outlined out the entire thing with no need side-effects ,
people could take a signal. Will likely be again to get
more. Thank you
Appreciation to my father who stated to me about this blog, this blog is in fact remarkable.
canadian cialis 5mg
Its like you read my mind! You appear to know so much about
this, like you wrote the book in it or something. I think
that you can do with a few pics to drive the message home a little bit, but instead of that, this is magnificent blog.
A fantastic read. I will definitely be back.
Attractive section of content. I just stumbled upon your weblog and in accession capital to assert that I
acquire in fact enjoyed account your blog posts.
Anyway I’ll be subscribing to your augment and even I achievement you access consistently
fast.
This will let you download the videos within the browser instead of depending upon link used for
pasting.
I used to be suggested this web site by way of my cousin. I’m
now not certain whether this post is written by him as nobody else know such distinct about my problem.
You’re incredible! Thanks!
http://afcantarelle.org/index.php?title=Domain_Rating
http://classicalmusicmp3freedownload.com/ja/index.php?title=%E5%88%A9%E7%94%A8%E8%80%85:DomainRating72
http://classicalmusicmp3freedownload.com/ja/index.php?title=Domain_Rating
http://embeddedwiki.cs.aau.dk/wiki/Domain_Rating
http://embeddedwiki.cs.aau.dk/wiki/User_talk:DomainRating267
http://lsc.wikisign.org/wiki/Usuari_Discussi%C3%B3:DomainRating269
http://minecraft-earth.fun/wiki/%E5%88%A9%E7%94%A8%E8%80%85:DomainRating266
http://minecraft-earth.fun/wiki/Domain_Rating
http://nswiki.svenskasuperserier.se/w/index.php?title=Domain_Rating
http://postgasse.net/Wiki/index.php?title=Benutzer:DomainRating121
http://postgasse.net/Wiki/index.php?title=Domain_Rating
http://urbino.fh-joanneum.at/trials/index.php/Domain_Rating
http://urbino.fh-joanneum.at/trials/index.php/User:DomainRating79
http://vulteevaliant.com/index.php/Domain_Rating
http://vulteevaliant.com/index.php/User:DomainRating234
http://wiki-ux.info/wiki/Domain_Rating
http://wiki-ux.info/wiki/User:DomainRating30
http://wiki.monashicpc.com/Domain_Rating
http://wiki.monashicpc.com/User:DomainRating266
http://wiki.qm.uni-siegen.de/index.php/Benutzer:DomainRating209
http://wiki.shitcore.org/index.php/Domain_Rating
http://wiki.shitcore.org/index.php/User:DomainRating183
http://www.driftpedia.com/wiki/index.php/Domain_Rating
http://www.driftpedia.com/wiki/index.php/User:DomainRating271
http://www.erwinbrandenberger.ch/index.php?title=Benutzer:DomainRating258
http://www.erwinbrandenberger.ch/index.php?title=Domain_Rating
http://www.heerfamily.net/mediawiki/index.php/Domain_Rating
http://www.heerfamily.net/mediawiki/index.php/User:DomainRating127
http://www.jeromebaray.com/afm/wiki/index.php/Domain_Rating
http://www.jeromebaray.com/afm/wiki/index.php/Utilisateur:DomainRating238
http://www.matthew-morris.com/wiki/index.php/Domain_Rating
http://www.matthew-morris.com/wiki/index.php/User:DomainRating32
http://www.wiki.cheneliege.fr/index.php/Domain_Rating
http://www.wiki.cheneliege.fr/index.php/Utilisateur:DomainRating128
http://www.zilahy.info/wiki/index.php/Domain_Rating
http://www.zilahy.info/wiki/index.php/User:DomainRating284
https://able.extralifestudios.com/wiki/index.php/Domain_Rating
https://able.extralifestudios.com/wiki/index.php/User:DomainRating40
https://bbarlock.com/index.php/Domain_Rating
https://bbarlock.com/index.php/User:DomainRating123
https://biowiki.clinomics.com/index.php/Domain_Rating
https://biowiki.clinomics.com/index.php/User:DomainRating171
https://demo.centreon.com/wiki/index.php?title=Domain_Rating
https://demo.centreon.com/wiki/index.php?title=User:DomainRating214
https://dptotti.fic.edu.uy/mediawiki/index.php/Domain_Rating
https://dptotti.fic.edu.uy/mediawiki/index.php/Usuario:DomainRating67
https://exterior.podemos.info/mediawiki/index.php?title=Domain_Rating
https://exterior.podemos.info/mediawiki/index.php?title=Usuario:DomainRating212
https://gamesfashionarchive.net/wiki/User:DomainRating179
https://gnometopia.org/index.php?title=Domain_Rating
https://hu.velo.wiki/index.php?title=Szerkeszt%C5%91:DomainRating35
https://iamelf.com/wiki/index.php/Domain_Rating
https://iamelf.com/wiki/index.php/User:DomainRating119
https://intranet.wikimedia.cat/wiki/Usuari:DomainRating266
https://koloiko.com/wiki/index.php?title=Domain_Rating
https://koloiko.com/wiki/index.php?title=User:DomainRating261
https://library.kemu.ac.ke/kemuwiki/index.php/Domain_Rating
https://library.kemu.ac.ke/kemuwiki/index.php/User:DomainRating59
https://livingbooksaboutlife.org/books/Domain_Rating
https://livingbooksaboutlife.org/books/User:DomainRating276
https://mnwiki.org/index.php/Domain_Rating
https://mnwiki.org/index.php/User:DomainRating143
https://procesal.cl/index.php/Domain_Rating
https://procesal.cl/index.php/User:DomainRating242
https://religiopedia.com/index.php/Domain_Rating
https://religiopedia.com/index.php/User:DomainRating155
https://sustainabilipedia.org/index.php/Domain_Rating
https://sustainabilipedia.org/index.php/User:DomainRating149
https://wiki.hrw-fablab.de/index.php?title=Domain_Rating
https://wiki.hrw-fablab.de/index.php?title=User:DomainRating140
https://wiki.itcoug.com/index.php?title=Usuario:DomainRating203
https://wiki.minecraft.jp.net/%E5%88%A9%E7%94%A8%E8%80%85:DomainRating204
https://wiki.minecraft.jp.net/Domain_Rating
https://wiki.ryuriin.my.id/index.php/Domain_Rating
https://wiki.ryuriin.my.id/index.php/User:DomainRating216
https://wiki.sports-5.ch/index.php?title=Domain_Rating
https://wiki.sports-5.ch/index.php?title=Utilisateur:DomainRating186
https://www.crustcorporate.com/wiki/Domain_Rating
https://www.crustcorporate.com/wiki/User:DomainRating32
https://www.mibtec.it/wiki/index.php?title=Domain_Rating
https://www.mibtec.it/wiki/index.php?title=Utente:DomainRating168
https://www.offwiki.org/wiki/Domain_Rating
https://www.offwiki.org/wiki/User:DomainRating216
https://www.wiki.pcfu.cz/index.php/Domain_Rating
https://www.wiki.pcfu.cz/index.php/U%c5%beivatel:DomainRating241
Hmm it looks like your site ate my first comment (it was super
long) so I guess I’ll just sum it up what I submitted and
say, I’m thoroughly enjoying your blog. I too am an aspiring blog blogger but
I’m still new to everything. Do you have any tips for first-time blog writers?
I’d genuinely appreciate it.
Terrific post however I was wanting to know if you could
write a litte more on this subject? I’d be very thankful if you could
elaborate a little bit more. Thank you!
http://www.youtube.com/redirect?event=channel_description&q=https%3A%2F%2Fmobalogy.id%2F
http://cse.google.com.eg/url?sa=t&url=http%3A%2F%2Fmobalogy.id%2F
http://cn.bing.com/news/apiclick.aspx?COLLCC=1718906003&ref=FexRss&aid=&url=https://mobalogy.id/
http://images.google.com.sa/url?sa=t&url=http%3A%2F%2Fmobalogy.id
http://images.google.at/url?sa=t&url=http%3A%2F%2Fmobalogy.id
http://images.google.com/url?sa=t&url=http%3A%2F%2Fmobalogy.id
http://images.google.gr/url?sa=t&url=http%3A%2F%2Fmobalogy.id%2F
http://images.google.com.ua/url?sa=t&url=http%3A%2F%2Fmobalogy.id%2F
http://accounts.cancer.org/login?redirectURL=https%3A%2F%2Fmobalogy.id&theme=RFL
https://images.google.tk/url?sa=t&url=http://mobalogy.id/
http://images.google.ee/url?sa=t&url=http%3A%2F%2Fmobalogy.id%2F
http://clients1.google.ki/url?q=http%3A%2F%2Fmobalogy.id
http://clients1.google.td/url?q=https%3A%2F%2Fmobalogy.id
https://website.informer.com/mobalogy.id
http://clients1.google.at/url?q=https%3A%2F%2Fmobalogy.id
http://alt1.toolbarqueries.google.com.ec/url?q=https://mobalogy.id/
http://b.filmz.ru/presentation/www/delivery/ck.php?ct=1&oaparams=2__bannerid=222__zoneid=2__cb=93494e485e__oadest=https://mobalogy.id/
http://ava-online.clan.su/go?https://mobalogy.id/
http://ads.dfiles.eu/click.php?c=1497&z=4&b=1730&r=https://mobalogy.id/
http://clinica-elit.vrn.ru/cgi-bin/inmakred.cgi?bn=43252&url=mobalogy.id
http://chat.chat.ru/redirectwarn?https://mobalogy.id/
http://cm-eu.wargaming.net/frame/?service=frm&project=moo&realm=eu&language=en&login_url=http%3A%2F%2Fmobalogy.id
http://maps.google.com/url?q=https%3A%2F%2Fmobalogy.id%2F
http://audit.tomsk.ru/bitrix/click.php?goto=https://mobalogy.id/
http://clients1.google.co.mz/url?q=https%3A%2F%2Fmobalogy.id/
http://come-on.rdy.jp/wanted/cgi-bin/rank.cgi?id=11326&mode=link&url=https://mobalogy.id/
http://images.google.com.ng/url?sa=t&url=http%3A%2F%2Fmobalogy.id%2F
http://yumi.rgr.jp/puku-board/kboard.cgi?mode=res_html&owner=proscar&url=mobalogy.id/&count=1&ie=1
http://images.google.com.au/url?sa=t&url=http%3A%2F%2Fmobalogy.id%2F
https://asia.google.com/url?q=http://mobalogy.id/management.html
http://adapi.now.com/ad/api/act.ashx?a=2&sc=3490&s=30000219&l=1&t=0&c=0&u=https://mobalogy.id/
https://cse.google.ws/url?q=http://mobalogy.id/
http://avn.innity.com/click/avncl.php?bannerid=68907&zoneid=0&cb=2&pcu=&url=http%3a%2f%2fmobalogy.id
https://ross.campusgroups.com/click?uid=51a11492-dc03-11e4-a071-0025902f7e74&r=http://mobalogy.id/
http://images.google.de/url?sa=t&url=http%3A%2F%2Fmobalogy.id
http://tools.folha.com.br/print?url=https%3A%2F%2Fmobalogy.id%2F&site=blogfolha
http://alt1.toolbarqueries.google.com.fj/url?q=https://mobalogy.id/
http://new.creativecommons.org/choose/results-one?q_1=2&q_1=1&field_commercial=n&field_derivatives=sa&field_jurisdiction=&field_format=Text&field_worktitle=Blog&field_attribute_to_name=Lam%20HUA&field_attribute_to_url=https%3A%2F%2Fmobalogy.id
http://redirect.subscribe.ru/bank.banks
http://www.so-net.ne.jp/search/web/?query=mobalogy.id&from=rss
http://alt1.toolbarqueries.google.cat/url?q=https://mobalogy.id/
http://affiliate.awardspace.info/go.php?url=https://mobalogy.id/
http://writer.dek-d.com/dek-d/link/link.php?out=https%3A%2F%2Fmobalogy.id%2F&title=mobalogy.id
http://analogx.com/cgi-bin/cgirdir.exe?https://mobalogy.id/
http://images.google.co.ve/url?sa=t&url=http%3A%2F%2Fmobalogy.id%2F
http://ip.chinaz.com/?IP=mobalogy.id
http://images.google.com.pe/url?sa=t&url=http%3A%2F%2Fmobalogy.id%2F
http://cmbe-console.worldoftanks.com/frame/?language=en&login_url=http%3A%2F%2Fmobalogy.id&project=wotx&realm=wgcb&service=frm
http://images.google.dk/url?sa=t&url=http%3A%2F%2Fmobalogy.id
http://ceramique-et-couleurs.leforum.eu/redirect1/https://mobalogy.id/
https://ipv4.google.com/url?q=http://mobalogy.id/management.html
http://cse.google.com.af/url?sa=t&url=http%3A%2F%2Fmobalogy.id%2F
http://images.google.com.do/url?sa=t&url=http%3A%2F%2Fmobalogy.id%2F
http://newsdiffs.org/article-history/mobalogy.id/
http://cse.google.az/url?sa=t&url=http%3A%2F%2Fmobalogy.id%2F
http://images.google.ch/url?sa=t&url=http%3A%2F%2Fmobalogy.id
http://aganippe.online.fr/lien.php3?url=http%3a%2f%2fmobalogy.id
http://images.google.fr/url?sa=t&url=http%3A%2F%2Fmobalogy.id
http://images.google.co.ve/url?sa=t&url=http%3A%2F%2Fmobalogy.id
http://alt1.toolbarqueries.google.com.do/url?q=https://mobalogy.id/
http://alt1.toolbarqueries.google.co.mz/url?q=https://mobalogy.id/
https://www.easyviajar.com/me/link.jsp?site=359&client=1&id=110&url=http://mobalogy.id/2021/05/29/rwfeds/
http://68-w.tlnk.io/serve?action=click&site_id=137717&url_web=https://mobalogy.id/
http://alt1.toolbarqueries.google.sk/url?q=https://mobalogy.id/
http://jump.2ch.net/?mobalogy.id
http://images.google.co.nz/url?sa=t&url=http%3A%2F%2Fmobalogy.id
http://images.google.com.ec/url?sa=t&url=http%3A%2F%2Fmobalogy.id
http://alt1.toolbarqueries.google.com.mx/url?q=https://mobalogy.id/
http://sitereport.netcraft.com/?url=https%3A%2F%2Fmobalogy.id%2F
http://www.ursoftware.com/downloadredirect.php?url=https%3A%2F%2Fmobalogy.id%2F
http://cse.google.co.mz/url?sa=t&url=http%3A%2F%2Fmobalogy.id%2F
http://legal.un.org/docs/doc_top.asp?path=../ilc/documentation/english/a_cn4_13.pd&Lang=Ef&referer=https%3A%2F%2Fmobalogy.id%2F
http://doodle.com/r?url=https%3A%2F%2Fmobalogy.id%2F
http://cse.google.ac/url?sa=t&url=http%3A%2F%2Fmobalogy.id%2F
http://78.rospotrebnadzor.ru/news9/-/asset_publisher/9Opz/content/%D0%BF%D0%BE%D1%81%D1%82%D0%B0%D0%BD%D0%BE%D0%B2%D0%BB%D0%B5%D0%BD%D0%B8%D0%B5-%D0%B3%D0%BB%D0%B0%D0%B2%D0%BD%D0%BE%D0%B3%D0%BE-%D0%B3%D0%BE%D1%81%D1%83%D0%B4%D0%B0%D1%80%D1%81%D1%82%D0%B2%D0%B5%D0%BD%D0%BD%D0%BE%D0%B3%D0%BE-%D1%81%D0%B0%D0%BD%D0%B8%D1%82%D0%B0%D1%80%D0%BD%D0%BE%D0%B3%D0%BE-%D0%B2%D1%80%D0%B0%D1%87%D0%B0-%D0%BF%D0%BE-%D0%B3%D0%BE%D1%80%D0%BE%D0%B4%D1%83-%D1%81%D0%B0%D0%BD%D0%BA%D1%82-%D0%BF%D0%B5%D1%82%D0%B5%D1%80%D0%B1%D1%83%D1%80%D0%B3%D1%83-%E2%84%96-4-%D0%BE%D1%82-09-11-2021-%C2%AB%D0%BE-%D0%B2%D0%BD%D0%B5%D1%81%D0%B5%D0%BD%D0%B8%D0%B8-%D0%B8%D0%B7%D0%BC%D0%B5%D0%BD%D0%B5%D0%BD%D0%B8%D0%B8-%D0%B2-%D0%BF%D0%BE%D1%81%D1%82%D0%B0%D0%BD%D0%BE%D0%B2%D0%BB%D0%B5%D0%BD%D0%B8%D0%B5-%D0%B3%D0%BB%D0%B0%D0%B2%D0%BD%D0%BE%D0%B3%D0%BE-%D0%B3%D0%BE%D1%81%D1%83%D0%B4%D0%B0%D1%80%D1%81%D1%82%D0%B2%D0%B5%D0%BD%D0%BD%D0%BE%D0%B3%D0%BE-%D1%81%D0%B0%D0%BD%D0%B8%D1%82%D0%B0%D1%80%D0%BD%D0%BE%D0%B3%D0%BE-%D0%B2%D1%80%D0%B0%D1%87%D0%B0-%D0%BF%D0%BE-%D0%B3%D0%BE%D1%80%D0%BE%D0%B4%D1%83-%D1%81%D0%B0%D0%BD%D0%BA%D1%82-%D0%BF%D0%B5%D1%82%D0%B5%D1%80%D0%B1%D1%83%D1%80%D0%B3%D1%83-%D0%BE%D1%82-12-10-2021-%E2%84%96-3-%C2%BB;jsessionid=FB3309CE788EBDCCB588450F5B1BE92F?redirect=http%3A%2F%2Fmobalogy.id
http://ashspublications.org/__media__/js/netsoltrademark.php?d=mobalogy.id
http://cse.google.com.ly/url?sa=t&url=http%3A%2F%2Fmobalogy.id%2F
http://cse.google.com.bh/url?sa=t&url=http%3A%2F%2Fmobalogy.id%2F
https://pt.tapatalk.com/redirect.php?app_id=4&fid=8678&url=http://mobalogy.id
http://cse.google.co.tz/url?sa=t&url=http%3A%2F%2Fmobalogy.id%2F
http://www.bing.com/news/apiclick.aspx?ref=FexRss&aid=&tid=9BB77FDA801248A5AD23FDBDD5922800&url=https%3A%2F%2Fmobalogy.id
http://advisor.wmtransfer.com/SiteDetails.aspx?url=mobalogy.id
http://blogs.rtve.es/libs/getfirma_footer_prod.php?blogurl=https%3A%2F%2Fmobalogy.id
http://images.google.com.br/url?sa=t&url=http%3A%2F%2Fmobalogy.id
http://images.google.be/url?sa=t&url=http%3A%2F%2Fmobalogy.id%2F
http://aboutus.com/Special:SiteAnalysis?q=mobalogy.id&action=webPresence
https://brettterpstra.com/share/fymdproxy.php?url=http://mobalogy.id
http://images.google.com.eg/url?sa=t&url=http%3A%2F%2Fmobalogy.id
http://my.myob.com/community/login.aspx?ReturnUrl=https%3A%2F%2Fmobalogy.id%2F
http://traceroute.physics.carleton.ca/cgi-bin/traceroute.pl?function=ping&target=mobalogy.id
http://cse.google.as/url?sa=t&url=http%3A%2F%2Fmobalogy.id%2F
http://d-click.fiemg.com.br/u/18081/131/75411/137_0/82cb7/?url=https://mobalogy.id/
https://cse.google.ws/url?sa=t&url=http://mobalogy.id/
http://anonim.co.ro/?mobalogy.id/
http://id.telstra.com.au/register/crowdsupport?gotoURL=https%3A%2F%2Fmobalogy.id%2F
http://ads.businessnews.com.tn/dmcads2017/www/delivery/ck.php?ct=1&oaparams=2__bannerid=1839__zoneid=117__cb=df4f4d726f__oadest=https://mobalogy.id/
http://aichi-fishing.boy.jp/?wptouch_switch=desktop&redirect=http%3a%2f%2fmobalogy.id
http://cse.google.co.th/url?sa=t&url=http%3A%2F%2Fmobalogy.id%2F
http://alt1.toolbarqueries.google.ch/url?q=https://mobalogy.id/
http://images.google.cl/url?sa=t&url=http%3A%2F%2Fmobalogy.id
http://clients1.google.com.kh/url?q=https://mobalogy.id/
http://client.paltalk.com/client/webapp/client/External.wmt?url=http%3A%2F%2Fmobalogy.id%2F
http://clients1.google.com.lb/url?q=https%3A%2F%2Fmobalogy.id/
http://cam4com.go2cloud.org/aff_c?offer_id=268&aff_id=2014&url=https%3A%2F%2Fmobalogy.id
http://creativecommons.org/choose/results-one?q_1=2&q_1=1&field_commercial=n&field_derivatives=sa&field_jurisdiction=&field_format=Text&field_worktitle=Blog&field_attribute_to_name=Lam%20HUA&field_attribute_to_url=https%3A%2F%2Fmobalogy.id%2F
http://images.google.cz/url?sa=t&url=http%3A%2F%2Fmobalogy.id
http://cse.google.co.bw/url?sa=t&url=http%3A%2F%2Fmobalogy.id%2F
http://r.turn.com/r/click?id=07SbPf7hZSNdJAgAAAYBAA&url=https://mobalogy.id/
http://images.google.co.uk/url?sa=t&url=http%3A%2F%2Fmobalogy.id%2F
http://images.google.com.bd/url?sa=t&url=http%3A%2F%2Fmobalogy.id
http://clients1.google.ge/url?q=https%3A%2F%2Fmobalogy.id/
http://2chmatome.jpn.org/akb/c_c.php?c_id=267977&url=https://mobalogy.id/
http://affiliate.suruga-ya.jp/modules/af/af_jump.php?user_id=755&goods_url=https://mobalogy.id/
http://archive.feedblitz.com/f/f.fbz?goto=https://mobalogy.id/
http://clients1.google.com.pr/url?sa=i&url=https%3A%2F%2Fmobalogy.id
http://cse.google.com.gt/url?sa=t&url=http%3A%2F%2Fmobalogy.id%2F
http://abcclub.cside.com/nagata/link4/link4.cgi?mode=cnt&hp=http%3a%2f%2fmobalogy.id&no=1027
http://clients1.google.com.fj/url?q=https%3A%2F%2Fmobalogy.id
http://www.justjared.com/flagcomment.php?el=https%3A%2F%2Fmobalogy.id
http://clients1.google.com.gi/url?q=https%3A%2F%2Fmobalogy.id/
http://biz.timesfreepress.com/__media__/js/netsoltrademark.php?d=mobalogy.id
http://search.babylon.com/imageres.php?iu=https%3A%2F%2Fmobalogy.id%2F
http://clicktrack.pubmatic.com/AdServer/AdDisplayTrackerServlet?clickData=JnB1YklkPTE1NjMxMyZzaXRlSWQ9MTk5MDE3JmFkSWQ9MTA5NjQ2NyZrYWRzaXplaWQ9OSZ0bGRJZD00OTc2OTA4OCZjYW1wYWlnbklkPTEyNjcxJmNyZWF0aXZlSWQ9MCZ1Y3JpZD0xOTAzODY0ODc3ODU2NDc1OTgwJmFkU2VydmVySWQ9MjQzJmltcGlkPTU0MjgyODhFLTYwRjktNDhDMC1BRDZELTJFRjM0M0E0RjI3NCZtb2JmbGFnPTImbW9kZWxpZD0yODY2Jm9zaWQ9MTIyJmNhcnJpZXJpZD0xMDQmcGFzc2JhY2s9MA==_url=https://mobalogy.id/
http://alt1.toolbarqueries.google.bg/url?q=https://mobalogy.id/
http://211-75-39-211.hinet-ip.hinet.net/Adredir.asp?url=https://mobalogy.id/
http://clients1.google.bg/url?q=https://mobalogy.id/
http://ads2.figures.com/Ads3/www/delivery/ck.php?ct=1&oaparams=2__bannerid=282__zoneid=248__cb=da025c17ff__oadest=https%3a%2f%2fmobalogy.id
http://clients1.google.gy/url?q=http%3A%2F%2Fmobalogy.id
http://clients1.google.com.ar/url?q=https%3A%2F%2Fmobalogy.id
http://com.co.de/__media__/js/netsoltrademark.php?d=mobalogy.id
http://clients1.google.com.jm/url?q=https://mobalogy.id/
http://home.speedbit.com/r.aspx?u=https://mobalogy.id/
http://cse.google.com.lb/url?sa=t&url=http%3A%2F%2Fmobalogy.id%2F
http://blog.bg/results.php?q=%22%2f%3e%3ca+href%3d%22http%3a%2f%2fmobalogy.id&
http://images.google.com.co/url?sa=t&url=http%3A%2F%2Fmobalogy.id%2F
http://clicrbs.com.br/paidcontent/jsp/login.jspx?site=545&url=goo.gl%2Fmaps%2FoQqZFfefPedXSkNc6&previousurl=http%3a%2f%2fmobalogy.id
http://clients1.google.kg/url?q=https://mobalogy.id/
http://staging.talentegg.ca/redirect/company/224?destination=https://mobalogy.id/
http://images.google.co.za/url?sa=t&url=http%3A%2F%2Fmobalogy.id
http://clients1.google.com.co/url?q=https%3A%2F%2Fmobalogy.id
http://cse.google.bf/url?sa=t&url=http%3A%2F%2Fmobalogy.id%2F
http://cse.google.com.bz/url?sa=t&url=http%3A%2F%2Fmobalogy.id%2F
http://cse.google.com.cu/url?sa=t&url=http%3A%2F%2Fmobalogy.id%2F
http://www.talgov.com/Main/exit.aspx?url=https%3A%2F%2Fmobalogy.id
http://cse.google.ci/url?sa=t&url=http%3A%2F%2Fmobalogy.id%2F
http://blog.ss-blog.jp/_pages/mobile/step/index?u=http%3A%2F%2Fmobalogy.id
https://cse.google.tk/url?q=http://mobalogy.id/
http://www.siteprice.org/similar-websites/eden-project.org
http://clients1.google.ca/url?q=https://mobalogy.id/
http://cse.google.cm/url?sa=t&url=http%3A%2F%2Fmobalogy.id%2F
http://cse.google.ae/url?sa=t&url=http%3A%2F%2Fmobalogy.id%2F
http://clients1.google.nr/url?q=http%3A%2F%2Fmobalogy.id
http://imaginingourselves.globalfundforwomen.org/pb/External.aspx?url=https://mobalogy.id/
http://clients1.google.tk/url?q=http%3A%2F%2Fmobalogy.id/
http://alt1.toolbarqueries.google.co.il/url?q=https://mobalogy.id/
http://theamericanmuslim.org/tam.php?URL=mobalogy.id
http://images.google.com.tr/url?sa=t&url=http%3A%2F%2Fmobalogy.id%2F
http://thaiwebsearch.hypermart.net/cgi/clicko.pl?75&mobalogy.id
http://colil.dbcls.jp/fct/rdfdesc/usage.vsp?g=https://mobalogy.id/
https://content.sixflags.com/news/director.aspx?gid=0&iid=72&cid=3714&link=http://mobalogy.id/2021/05/29/rwfeds/
http://adr.tpprf.ru/bitrix/redirect.php?goto=https://mobalogy.id/
http://jump.2ch.net/?mobalogy.id
http://clients1.google.com.do/url?q=https%3A%2F%2Fmobalogy.id
http://c.yam.com/msnews/IRT/r.c?https://mobalogy.id/
http://clients1.google.com.sa/url?sa=t&url=https%3A%2F%2Fmobalogy.id
https://images.google.tk/url?q=http://mobalogy.id/
http://cse.google.com.gi/url?sa=t&url=http%3A%2F%2Fmobalogy.id%2F
http://ad.sxp.smartclip.net/optout?url=https://mobalogy.id/&ang_testid=1
http://guru.sanook.com/?URL=https%3A%2F%2Fmobalogy.id%2F
http://clients1.google.com.my/url?sa=i&url=https%3A%2F%2Fmobalogy.id
http://53938.measurementapi.com/serve?action=click&publisher_id=53938&site_id=69748&sub_campaign=g5e_com&url=https://mobalogy.id/
http://t.me/iv?url=https%3A%2F%2Fmobalogy.id
http://clients1.google.co.ve/url?q=https://mobalogy.id/
http://ayads.co/click.php?c=735-844&url=https://mobalogy.id/
http://campaigns.williamhill.com/C.ashx?btag=a_181578b_893c_&affid=1688431&siteid=181578&adid=893&c=&asclurl=https://mobalogy.id/&AutoR=1
http://www.aomeitech.com/forum/home/leaving?Target=https%3A//mobalogy.id
http://brandcycle.go2cloud.org/aff_c?offer_id=261&aff_id=1371&url=http%3A%2F%2Fmobalogy.id
http://maps.google.de/url?sa=t&url=https%3A%2F%2Fmobalogy.id
http://webfeeds.brookings.edu/~/t/0/0/~mobalogy.id
http://images.google.co.za/url?sa=t&url=http%3A%2F%2Fmobalogy.id%2F
http://clients1.google.com.ly/url?q=https://mobalogy.id/
http://www.biblio.com.br/conteudo/Moldura11.asp?link=//mobalogy.id/2021/05/29/rwfeds/
http://store.veganessentials.com/affiliates/default.aspx?Affiliate=40&Target=https://mobalogy.id
http://images.google.be/url?sa=t&url=http%3A%2F%2Fmobalogy.id
https://cse.google.nu/url?q=http://mobalogy.id/
http://images.google.com.sa/url?sa=t&url=http%3A%2F%2Fmobalogy.id%2F
http://cse.google.co.uz/url?sa=t&url=http%3A%2F%2Fmobalogy.id%2F
https://www.trainorders.com/discussion/warning.php?forum_id=1&url=http://mobalogy.id/34zxVq8
http://audio.home.pl/redirect.php?action=url&goto=mobalogy.id&osCsid=iehkyctnmm
http://images.google.co.uk/url?sa=t&url=http%3A%2F%2Fmobalogy.id
http://ac8.i2i.jp/bin/getslink.php?00713417&&&https://mobalogy.id/
http://analytics.supplyframe.com/trackingservlet/track/?action=name&value3=1561&zone=FCfull_SRP_na_us&url=https://mobalogy.id/
http://adserver.gadu-gadu.pl/click.asp?adid=2236;url=https://mobalogy.id/
http://www.responsinator.com/?url=mobalogy.id
http://cse.google.cf/url?sa=t&url=http%3A%2F%2Fmobalogy.id%2F
http://clients1.google.ga/url?q=https%3A%2F%2Fmobalogy.id/
http://m.ok.ru/dk?st.cmd=outLinkWarning&st.rfn=https%3A%2F%2Fmobalogy.id
http://cse.google.co.ck/url?sa=t&url=http%3A%2F%2Fmobalogy.id%2F
https://www.wilsonlearning.com/?URL=mobalogy.id/
http://www.etis.ford.com/externalURL.do?url=https%3A%2F%2Fmobalogy.id%2F
https://board-en.drakensang.com/proxy.php?link=http://mobalogy.id/
http://builder.hufs.ac.kr/goLink.jsp?url=mobalogy.id/
http://ahlacarte.vraiforum.com/redirect1/https://mobalogy.id/
https://images.google.cv/url?q=http://mobalogy.id/
http://clicktrack.pubmatic.com/AdServer/AdDisplayTrackerServlet?clickData=JnB1YklkPTE1NjMxMyZzaXRlSWQ9MTk5MDE3JmFkSWQ9MTA5NjQ2NyZrYWRzaXplaWQ9OSZ0bGRJZD00OTc2OTA4OCZjYW1wYWlnbklkPTEyNjcxJmNyZWF0aXZlSWQ9MCZ1Y3JpZD0xOTAzODY0ODc3ODU2NDc1OTgwJmFkU2VydmVySWQ9MjQzJmltcGlkPTU0MjgyODhFLTYwRjktNDhDMC1BRDZELTJFRjM0M0E0RjI3NCZtb2JmbGFnPTImbW9kZWxpZD0yODY2Jm9zaWQ9MTIyJmNhcnJpZXJpZD0xMDQmcGFzc2JhY2s9MA==_url=https://mobalogy.id/2021/05/29/rwfeds/
http://clients1.google.de/url?sa=t&url=https%3A%2F%2Fmobalogy.id
https://cse.google.cv/url?q=http://mobalogy.id/
http://cse.google.bi/url?sa=t&url=http%3A%2F%2Fmobalogy.id%2F
http://app.guanajuato.gob.mx/revive/www/delivery/ck.php?oaparams=2__bannerid=2447__zoneid=88__cb=cb2b9a1cb1__oadest=http%3a%2f%2fmobalogy.id
http://subscriber.zdnet.de/profile/login.php?continue=https%3A%2F%2Fmobalogy.id%2F&continue_label=ZDNet.de
http://aacollabarchive.humin.lsa.umich.edu/omeka/setlocale?locale=es&redirect=http%3a%2f%2fmobalogy.id
http://apptube.podnova.com/go/?go=https://mobalogy.id/
http://images.google.com.ua/url?sa=t&url=http%3A%2F%2Fmobalogy.id
http://www.kaskus.co.id/redirect?url=https%3A%2F%2Fmobalogy.id
http://community.cypress.com/external-link.jspa?url=https%3A%2F%2Fmobalogy.id
https://images.google.bs/url?q=http://mobalogy.id/
http://community.acer.com/en/home/leaving/mobalogy.id
http://daemon.indapass.hu/http/session_request?redirect_to=https%3A%2F%2Fmobalogy.id%2F&partner_id=bloghu
http://images.google.com.hk/url?sa=t&url=http%3A%2F%2Fmobalogy.id
http://clients1.google.je/url?q=https%3A%2F%2Fmobalogy.id/
http://www.novalogic.com/remote.asp?NLink=https://mobalogy.id/2021/05/29/rwfeds/
http://cm-sg.wargaming.net/frame/?service=frm&project=wot&realm=sg&language=en&login_url=http%3A%2F%2Fmobalogy.id&logout_url=http%3A%2F%2Fforum.worldoftanks.asia%2Findex.php%3Fapp%3Dcore%26module%3Dglobal%26section%3Dlogin%26do%3Dlogoutoid&incomplete_profile_url=http%3A%2F%2Fforum.worldoftanks.asia%2Findex.php%3Fapp%3Dmembers%26module%3Dprofile%26do%3Ddocompleteaccount&token_url=http%3A%2F%2Fforum.worldoftanks.asia%2Fmenutoken&frontend_url=http%3A%2F%2Fcdn-cm.gcdn.co&backend_url=http%3A%2F%2Fcm-sg.wargaming.net&open_links_in_new_tab=¬ifications_enabled=1&chat_enabled=&incomplete_profile_notification_enabled=&intro_tooltips_enabled=1®istration_url=http%3A%2F%2Fforum.worldoftanks.asia%2Findex.php%3Fapp%3Dcore%26module%3Dglobal%26section%3Dregister
http://images.google.cz/url?sa=t&url=http%3A%2F%2Fmobalogy.id%2F
http://cse.google.co.ug/url?sa=t&url=http%3A%2F%2Fmobalogy.id%2F
http://sys.labaq.com/cli/go.php?s=lbac&p=1410jt&t=02&url=https://mobalogy.id/
http://clients1.google.cg/url?q=https://mobalogy.id/
http://legacy.aom.org/verifymember.asp?nextpage=https%3A%2F%2Fmobalogy.id
http://clients1.google.iq/url?q=https%3A%2F%2Fmobalogy.id/
http://clients1.google.cv/url?q=http%3A%2F%2Fmobalogy.id
http://cm-ru.wargaming.net/frame/?service=frm&project=wot&realm=ru&language=ru&login_url=http%3A%2F%2Fmobalogy.id&logout_url=http%3A%2F%2Ffor
http://cse.google.co.uk/url?sa=t&url=http%3A%2F%2Fmobalogy.id%2F
https://www.mydoterra.com/Application/index.cfm?EnrollerID=458046&Theme=DefaultTheme&Returnurl=mobalogy.id/&LNG=en_dot&iact=1
https://redirect.vebeet.com/index.php?url=//mobalogy.id/cities/tampa-fl/
http://cse.google.co.zw/url?sa=t&url=http%3A%2F%2Fmobalogy.id%2F
http://alt1.toolbarqueries.google.at/url?q=https://mobalogy.id/
http://www.adminer.org/redirect/?url=https%3A%2F%2Fmobalogy.id&lang=en
https://webneel.com/i/3d-printer/5-free-3d-printer-model-website-yeggi/ei/12259?s=mobalogy.id/2021/05/29/rwfeds/
http://apf.francophonie.org/doc.html?url=https://mobalogy.id/
http://cse.google.by/url?sa=t&url=http%3A%2F%2Fmobalogy.id%2F
http://www.jarrow.com/jump/http:_@__@_mobalogy.id
http://yahoo-mbga.jp/r?url=//mobalogy.id
http://www.pcpitstop.com/offsite.asp?https://mobalogy.id/
http://getpocket.com/redirect?url=https%3A%2F%2Fmobalogy.id%2F
http://cse.google.com.jm/url?sa=t&url=http%3A%2F%2Fmobalogy.id%2F
http://cse.google.com.ec/url?sa=t&url=http%3A%2F%2Fmobalogy.id%2F
http://www.drinksmixer.com/redirect.php?url=https%3A%2F%2Fmobalogy.id%2F
http://5cfxm.hxrs6.servertrust.com/v/affiliate/setCookie.asp?catId=1180&return=https://mobalogy.id
https://ditu.google.com/url?q=http://mobalogy.id/management.html
http://cse.google.co.ao/url?sa=t&url=http%3A%2F%2Fmobalogy.id%2F
http://businesseast.ucoz.com/go?https://mobalogy.id/
https://www.streetwisereports.com/cs/blank/main?x-p=click/fwd&rec=ads/443&url=http://mobalogy.id/2021/05/29/rwfeds/
http://images.google.com.ec/url?sa=t&url=http%3A%2F%2Fmobalogy.id%2F
http://www.sponsorship.com/Marketplace/redir.axd?ciid=514&cachename=advertising&PageGroupId=14&url=https://mobalogy.id
http://clients1.google.com.eg/url?q=https://mobalogy.id/
http://cat.sls.cuhk.edu.hk/CRF/visualization?Species=https://mobalogy.id/
https://clients1.google.com/url?q=http://mobalogy.id/management.html
http://creativecommons.org/choose/results-one?q_1=2&q_1=1&field_commercial=n&field_derivatives=sa&field_jurisdiction=&field_format=Text&field_worktitle=Blog&field_attribute_to_name=Lam%20HUA&field_attribute_to_url=http%3A%2F%2Fmobalogy.id%2F
http://tools.folha.com.br/print?url=https%3A%2F%2Fmobalogy.id%2F&site=blogfolha
http://clients1.google.co.kr/url?q=https://mobalogy.id/
http://apiprop.sulekha.com/common/apploginredirect.aspx?enclgn=ilsxyvoDCT5XZjQCeHI5qlKoZ3Ljv/1wHK3AR7dYYz8%3D&nexturl=https://mobalogy.id/
http://cse.google.de/url?sa=t&url=https%3A%2F%2Fmobalogy.id
http://images.google.dk/url?sa=t&url=http%3A%2F%2Fmobalogy.id%2F
http://avp.innity.com/click/?campaignid=10933&adid=115198&zoneid=39296&pubid=3194&ex=1412139790&pcu=&auth=3tx88b-1412053876272&url=http%3A%2F%2Fmobalogy.id
http://ads.haberler.com/redir.asp?tur=habericilink&url=https://mobalogy.id/
http://ip.tool.chinaz.com/?ip=mobalogy.id
http://ax.bk55.ru/cur/www/delivery/ck.php?ct=1&oaparams=2__bannerid=4248__zoneid=141__OXLCA=1__cb=1be00d870a__oadest=https://mobalogy.id/
http://support.dalton.missouri.edu/?URL=mobalogy.id
http://banri.moo.jp/-18/?wptouch_switch=desktop&redirect=https%3a%2f%2fmobalogy.id
http://avatar-cat-ru.1gb.ru/index.php?name=plugins&p=out&url=mobalogy.id
http://sogo.i2i.jp/link_go.php?url=https://mobalogy.id/
http://clients1.google.co.ug/url?q=https://mobalogy.id/
http://cse.google.cd/url?sa=t&url=http%3A%2F%2Fmobalogy.id%2F
http://www.t.me/iv?url=http%3A%2F%2Fmobalogy.id
http://www.ibm.com/links/?cc=us&lc=en&prompt=1&url=//mobalogy.id
http://alt1.toolbarqueries.google.co.ao/url?q=https://mobalogy.id/
http://clients1.google.co.ke/url?sa=t&url=https://mobalogy.id/
http://cse.google.al/url?sa=t&url=http%3A%2F%2Fmobalogy.id%2F
http://dotekomanie.cz/heureka/?url=https%3a%2f%2fmobalogy.id%2F
http://images.google.co.id/url?sa=t&url=http%3A%2F%2Fmobalogy.id%2F
http://images.google.de/url?sa=t&url=https%3A%2F%2Fmobalogy.id
https://maps.google.tk/url?q=http://mobalogy.id/
http://www.astro.wisc.edu/?URL=https%3A%2F%2Fmobalogy.id
http://images.google.com.br/url?sa=t&url=http%3A%2F%2Fmobalogy.id%2F
http://cse.google.co.ke/url?sa=t&url=http%3A%2F%2Fmobalogy.id%2F
http://cse.google.co.il/url?sa=t&url=http%3A%2F%2Fmobalogy.id%2F
http://api.fooducate.com/fdct/message/t/?t=592390BA-2F20-0472-4BA5-A59870BBA6A2:61213861:5AFC37A3-CAD4-CC42-4921-9BE2094B0A14&a=c&d=https://mobalogy.id/
http://armenaikkandomainrating5.blogspot.com0.vze.com/frame-forward.cgi?https://mobalogy.id/
http://cse.google.co.in/url?sa=t&url=http%3A%2F%2Fmobalogy.id%2F
http://subscriber.silicon.co.uk/profile/login.php?continue=https%3A%2F%2Fmobalogy.id%2F&continue_label=TechWeekEurope+UK
http://cse.google.com.bn/url?sa=t&url=http%3A%2F%2Fmobalogy.id%2F
http://images.google.com.do/url?sa=t&url=http%3A%2F%2Fmobalogy.id
http://alt1.toolbarqueries.google.com.lb/url?q=https://mobalogy.id/
http://cr.naver.com/redirect-notification?u=https%3A%2F%2Fmobalogy.id
http://images.google.com.au/url?sa=t&url=http%3A%2F%2Fmobalogy.id
http://brangista.j-server.com/BRASADAIJ/ns/tl_ex.cgi?Surl=https://mobalogy.id/
http://beskuda.ucoz.ru/go?https://mobalogy.id/
http://uriu-ss.jpn.org/xoops/modules/wordpress/wp-ktai.php?view=redir&url=http%3a%2f%2fmobalogy.id
http://cse.google.com.ai/url?sa=t&url=http%3A%2F%2Fmobalogy.id%2F
http://cse.google.cat/url?sa=t&url=http%3A%2F%2Fmobalogy.id%2F
http://www.luminous-lint.com/app/iframe/photographer/Frantisek__Drtikol/mobalogy.id
http://onlinemanuals.txdot.gov/help/urlstatusgo.html?url=https%3A%2F%2Fmobalogy.id
http://click.karenmillen.com/knmn40/c2.php?KNMN/94073/5285/H/N/V/https://mobalogy.id/
http://images.google.com.pe/url?sa=t&url=http%3A%2F%2Fmobalogy.id
http://images.google.ee/url?sa=t&url=http%3A%2F%2Fmobalogy.id
http://ar.thefreedictionary.com/_/cite.aspx?url=http%3a%2f%2fmobalogy.id&word=%D8%AD%D9%8E%D9%84%D9%90%D9%85%D9%8E&sources=kdict
http://bigtakeover.com/revive/www/delivery/ck.php?ct=1&oaparams=2__bannerid=68__zoneid=4__cb=c0575383b9__oadest=https://mobalogy.id/
http://circuitomt.com.br/publicidade/www/delivery/ck.php?ct=1&oaparams=2__bannerid=34__zoneid=2__cb=6cc35441a4__oadest=http%3a%2f%2fmobalogy.id
http://akid.s17.xrea.com/p2ime.php?url=https://mobalogy.id/
http://clients1.google.com.tr/url?sa=t&url=https%3A%2F%2Fmobalogy.id
http://links.giveawayoftheday.com/mobalogy.id
http://www2.ogs.state.ny.us/help/urlstatusgo.html?url=https%3A%2F%2Fmobalogy.id
http://images.google.co.il/url?sa=t&url=http%3A%2F%2Fmobalogy.id
http://bompasandparr.com/?URL=https://mobalogy.id/
http://cse.google.com.ag/url?sa=t&url=http%3A%2F%2Fmobalogy.id%2F
http://new.creativecommons.org/choose/results-one?q_1=2&q_1=1&field_commercial=n&field_derivatives=sa&field_jurisdiction=&field_format=Text&field_worktitle=Blog&field_attribute_to_name=Lam%20HUA&field_attribute_to_url=https%3A%2F%2Fmobalogy.id%2F
http://optimize.viglink.com/page/pmv?url=https%3A%2F%2Fmobalogy.id
http://cse.google.com.co/url?sa=t&url=http%3A%2F%2Fmobalogy.id%2F
http://blackfive.net/__media__/js/netsoltrademark.php?d=mobalogy.id
http://api.mixpanel.com/track/?data=eyJldmVudCI6ICJmdWxsdGV4dGNsaWNrIiwgInByb3BlcnRpZXMiOiB7InRva2VuIjogImE0YTQ2MGEzOTA0ZWVlOGZmNWUwMjRlYTRiZGU3YWMyIn19&ip=1&redirect=https://mobalogy.id/
http://alt1.toolbarqueries.google.bs/url?q=https://mobalogy.id/
http://video.fc2.com/exlink.php?uri=https%3A%2F%2Fmobalogy.id%2F
http://cse.google.co.jp/url?sa=t&url=http%3A%2F%2Fmobalogy.id%2F
http://images.google.es/url?sa=t&url=http%3A%2F%2Fmobalogy.id
http://alt1.toolbarqueries.google.co.za/url?q=https://mobalogy.id/
http://ads.bhol.co.il/clicks_counter.asp?macrocid=5635&campid=177546&DB_link=0&userid=0&ISEXT=0&url=https://mobalogy.id/
http://cse.google.be/url?sa=t&url=http%3A%2F%2Fmobalogy.id%2F
http://at070582.xsrv.jp/?wptouch_switch=desktop&redirect=http%3a%2f%2fmobalogy.id
http://u.to/?url=https%3A%2F%2Fmobalogy.id%2F&a=add
http://ipv4.google.com/url?q=https%3A%2F%2Fmobalogy.id%2F
http://cse.google.co.ve/url?sa=t&url=http%3A%2F%2Fmobalogy.id%2F
http://catzlyst.phrma.org/__media__/js/netsoltrademark.php?d=mobalogy.id
http://clients1.google.co.jp/url?q=https://mobalogy.id/
http://clients1.google.com.hk/url?sa=t&url=http%3A%2F%2Fmobalogy.id
http://clients1.google.cd/url?sa=t&url=https://mobalogy.id/
http://bares.blog.idnes.cz/redir.aspx?url=https%3A%2F%2Fmobalogy.id
http://www.ip-adress.com/website/mobalogy.id
http://clients1.google.st/url?q=https://mobalogy.id/
http://cse.google.co.vi/url?sa=t&url=http%3A%2F%2Fmobalogy.id%2F
http://cse.google.com.br/url?sa=t&url=http%3A%2F%2Fmobalogy.id%2F
http://parkcities.bubblelife.com/click/c3592/?url=https://mobalogy.id/
http://clients1.google.by/url?sa=t&url=https%3A%2F%2Fmobalogy.id
http://antigo.anvisa.gov.br/listagem-de-alertas/-/asset_publisher/R6VaZWsQDDzS/content/alerta-3191-tecnovigilancia-boston-scientific-do-brasil-ltda-fibra-optica-greenlight-possibilidade-de-queda-de-temperatura-da-tampa-de-metal-e-da-pont/33868?inheritRedirect=false&redirect=http%3A%2F%2Fmobalogy.id
http://cse.google.ca/url?sa=t&url=http%3A%2F%2Fmobalogy.id%2F
http://cse.google.com.au/url?sa=t&url=http%3A%2F%2Fmobalogy.id%2F
http://ads.hitparade.ch/link.php?ad_id=28&url=https://mobalogy.id/
http://clients1.google.tm/url?q=https%3A%2F%2Fmobalogy.id/
http://images.google.com.pk/url?sa=t&url=http%3A%2F%2Fmobalogy.id
http://cc.cgps.tn.edu.tw/dyna/netlink/hits.php?id=46&url=https://mobalogy.id/
http://cse.google.co.ma/url?sa=t&url=http%3A%2F%2Fmobalogy.id%2F
http://clients1.google.ne/url?q=https://mobalogy.id/
http://cse.google.com.et/url?sa=t&url=http%3A%2F%2Fmobalogy.id%2F
http://nou-rau.uem.br/nou-rau/zeus/auth.php?back=https%3A%2F%2Fmobalogy.id%2F&go=x&code=x&unit=x
http://cc.naver.jp/cc?a=dtl.topic&r=&i=&bw=1024&px=0&py=0&sx=-1&sy=-1&m=1&nsc=knews.viewpage&u=https%3A%2F%2Fmobalogy.id
http://images.google.com.mx/url?sa=t&url=http%3A%2F%2Fmobalogy.id
http://cse.google.com.fj/url?sa=t&url=http%3A%2F%2Fmobalogy.id%2F
http://a1.adform.net/C/?CC=1&bn=1015999%3Bc=1%3Bkw=Forex%20Trading%3Bcpdir=https://mobalogy.id/
http://alt1.toolbarqueries.google.com.br/url?q=https://mobalogy.id/
http://cse.google.com.hk/url?sa=t&url=http%3A%2F%2Fmobalogy.id%2F
http://catalog.dir.bg/url.php?URL=https://mobalogy.id/
http://clients1.google.it/url?q=http%3A%2F%2Fmobalogy.id/
http://counter.iflyer.tv/?trackid=gjt:1:&link=https://mobalogy.id/
http://alt1.toolbarqueries.google.co.vi/url?q=https://mobalogy.id/
http://admin.billoreilly.com/site/rd?satype=13&said=12&url=https://mobalogy.id/
http://clients1.google.mn/url?q=https%3A%2F%2Fmobalogy.id
http://backlink.scandwap.xtgem.com/?id=IRENON&url=mobalogy.id
https://www.videoder.com/af/media?mode=2&url=http://mobalogy.id
http://ad.gunosy.com/pages/redirect?location=https://mobalogy.id/
http://pw.mail.ru/forums/fredirect.php?url=mobalogy.id
http://armoryonpark.org/?URL=https://mobalogy.id/
http://app.hamariweb.com/iphoneimg/large.php?s=https://mobalogy.id/
http://enseignants.flammarion.com/Banners_Click.cfm?ID=86&URL=mobalogy.id
http://decisoes.fazenda.gov.br/netacgi/nph-brs?d=DECW&f=S&l=20&n=-DTPE&p=10&r=3&s1=COANA&u=http%3A%2F%2Fmobalogy.id
http://clients1.google.am/url?q=https://mobalogy.id/
http://www.transtats.bts.gov/exit.asp?url=https%3A%2F%2Fmobalogy.id%2F
http://archive.aidsmap.com/Aggregator.ashx?url=https://mobalogy.id/
http://countrysideveterinaryhospital.vetstreet.com/https://mobalogy.id/
http://images.google.bg/url?sa=t&url=http%3A%2F%2Fmobalogy.id
http://pl.grepolis.com/start/redirect?url=https%3A%2F%2Fmobalogy.id%2F
https://www.google.ws/url?q=http://mobalogy.id/
http://banners.molbiol.ru/openx/www/delivery/ck.php?ct=1&oaparams=2__bannerid=552__zoneid=16__cb=70ec3bb20d__oadest=http%3a%2f%2fmobalogy.id
http://archive.is/mobalogy.id
http://blogs.rtve.es/libs/getfirma_footer_prod.php?blogurl=http%3A%2F%2Fmobalogy.id
http://asoechat.wap.sh/redirect?url=mobalogy.id
http://images.google.com.co/url?sa=t&url=http%3A%2F%2Fmobalogy.id
http://cse.google.ch/url?sa=t&url=http%3A%2F%2Fmobalogy.id%2F
http://classweb.fges.tyc.edu.tw:8080/dyna/webs/gotourl.php?url=https://mobalogy.id/
http://adms3.hket.com/openxprod2/www/delivery/ck.php?ct=1&oaparams=2__bannerid=527__zoneid=667__cb=72cbf61f88__oadest=https://mobalogy.id/
http://alt1.toolbarqueries.google.co.ls/url?q=https://mobalogy.id/
http://cse.google.bg/url?sa=t&url=http%3A%2F%2Fmobalogy.id%2F
http://ijbssnet.com/view.php?u=https://mobalogy.id/2021/05/29/rwfeds/
http://affiliates.thelotter.com/aw.aspx?A=1&Task=Click&ml=31526&TargetURL=https://mobalogy.id/
http://777masa777.lolipop.jp/search/rank.cgi?mode=link&id=83&url=http%3a%2f%2fmobalogy.id
http://images.google.com.my/url?sa=t&url=http%3A%2F%2Fmobalogy.id
http://b.gnavi.co.jp/ad/no_cookie/b_link?loc=1002067&bid=100004228&link_url=http%3A%2F%2Fmobalogy.id
http://www.drugoffice.gov.hk/gb/unigb/mobalogy.id
http://clients1.google.bj/url?sa=t&url=http%3A%2F%2Fmobalogy.id
http://bizsearch.jhnewsandguide.com/__media__/js/netsoltrademark.php?d=mobalogy.id
http://adms.hket.com/openxprod2/www/delivery/ck.php?ct=1&oaparams=2__bannerid=6685__zoneid=2040__cb=dfaf38fc52__oadest=http%3a%2f%2fmobalogy.id
http://es.chaturbate.com/external_link/?url=https%3A%2F%2Fmobalogy.id
http://images.google.com.uy/url?sa=t&url=http%3A%2F%2Fmobalogy.id%2F
https://cse.google.com/url?q=http://mobalogy.id/management.html
http://12.rospotrebnadzor.ru/action_plans/inspection/-/asset_publisher/iqO1/document/id/460270?_101_INSTANCE_iqO1_redirect=https://mobalogy.id/
http://bigoo.ws/__media__/js/netsoltrademark.php?d=mobalogy.id
https://www.raincoast.com/?URL=mobalogy.id
http://clients1.google.ci/url?q=https://mobalogy.id/
http://ref.webhostinghub.com/scripts/click.php?ref_id=nichol54&desturl=https://mobalogy.id/
http://web.stanford.edu/cgi-bin/redirect?dest=http%3A%2F%2Fmobalogy.id
https://cse.google.tk/url?sa=t&url=http://mobalogy.id/
http://community.esri.com/external-link.jspa?url=https%3A%2F%2Fmobalogy.id
http://www.google.com/url?sa=t&url=https%3A%2F%2Fmobalogy.id
http://cse.google.com.kw/url?sa=t&url=http%3A%2F%2Fmobalogy.id%2F
http://ads.specificmedia.com/click/v=5;m=2;l=23470;c=146418;b=874880;p=ui=ACXqoRFLEtwSFA;tr=DZeqTyQW0qH;tm=0-0;ts=20110427233838;dct=https://mobalogy.id/
http://alt1.toolbarqueries.google.co.id/url?q=https://mobalogy.id/
http://digital.fijitimes.com/api/gateway.aspx?f=https://mobalogy.id
http://rd.rakuten.co.jp/a/?R2=https%3A//mobalogy.id/
http://www3.valueline.com/vlac/logon.aspx?lp=https://mobalogy.id
http://bpx.bemobi.com/opx/5.0/OPXIdentifyUser?Locale=uk&SiteID=402698301147&AccountID=202698299566&ecid=KR5t1vLv9P&AccessToken=&RedirectURL=https://mobalogy.id/
http://www.economia.unical.it/prova.php?a%5B%5D=%3Ca+href%3Dhttps%3A%2F%2Fmobalogy.id%2F
http://br.nate.com/diagnose.php?from=w&r_url=http%3A%2F%2Fmobalogy.id
http://alt1.toolbarqueries.google.bj/url?q=https://mobalogy.id/
http://images.google.com.tw/url?sa=t&url=http%3A%2F%2Fmobalogy.id%2F
https://www.xcelenergy.com/stateselector?stateselected=true&goto=http://mobalogy.id
http://www.film1.nl/zoek/?q=%22%2F%3E%3Ca+href%3D%22https%3A%2F%2Fmobalogy.id%2F&sa=&cx=009153552854938002534%3Aaf0ze8etbks&ie=ISO-8859-1&cof=FORID%3
https://cse.google.com/url?sa=t&url=http://mobalogy.id/
http://clients1.google.co.il/url?sa=i&url=https%3A%2F%2Fmobalogy.id
http://alt1.toolbarqueries.google.com.np/url?q=https://mobalogy.id/
http://images.google.com.vn/url?sa=t&url=http%3A%2F%2Fmobalogy.id%2F
http://ads1.opensubtitles.org/1/www/delivery/afr.php?zoneid=3&cb=984766&query=One+Froggy+Evening&landing_url=https://mobalogy.id/
http://adrian.edu/?URL=https://mobalogy.id/
http://bidr.trellian.com/r.php?u=http%3A%2F%2Fmobalogy.id
https://www.htcdev.com/?URL=mobalogy.id
http://aid97400.lautre.net/spip.php?action=cookie&url=https://mobalogy.id/
https://doterra.myvoffice.com/Application/index.cfm?&EnrollerID=604008&Theme=Default&ReturnUrl=http://mobalogy.id
http://images.google.com.mx/url?sa=t&url=http%3A%2F%2Fmobalogy.id%2F
http://cse.google.cg/url?sa=t&url=http%3A%2F%2Fmobalogy.id%2F
http://images.google.co.th/url?sa=t&url=http%3A%2F%2Fmobalogy.id
http://clients1.google.gl/url?q=http%3A%2F%2Fmobalogy.id
http://fftoolbox.fulltimefantasy.com/search.cfm?q=%22%2F%3E%3Ca+href%3D%22https%3A%2F%2Fmobalogy.id%2F
http://images.google.com.bd/url?sa=t&url=http%3A%2F%2Fmobalogy.id%2F
http://clients1.google.co.za/url?q=https://mobalogy.id/
http://cse.google.co.id/url?sa=t&url=http%3A%2F%2Fmobalogy.id%2F
http://mobalogy.id.ipaddress.com/
http://cgi.davec.plus.com/cgi-bin/logs/loglink.cgi?https://mobalogy.id/
http://forms.bl.uk/newsletters/index.aspx?back=https%3A//mobalogy.id/
https://tour.catalinacruz.com/pornstar-gallery/puma-swede-face-sitting-on-cassie-young-lesbian-fun/?link=http://mobalogy.id/holostyak-stb-2021
http://www.youtube.com/redirect?q=https%3A%2F%2Fmobalogy.id%2F
http://alt1.toolbarqueries.google.com.vc/url?q=https://mobalogy.id/
http://bulkmail.doh.state.fl.us/lt.php?c=102&m=144&nl=18&lid=922&l=https://mobalogy.id/
http://sc.sie.gov.hk/TuniS/mobalogy.id
http://images.google.cl/url?sa=t&url=http%3A%2F%2Fmobalogy.id%2F
http://images.google.ae/url?sa=t&url=http%3A%2F%2Fmobalogy.id%2F
http://alt1.toolbarqueries.google.tg/url?q=https://mobalogy.id/
http://images.google.com.ng/url?sa=t&url=http%3A%2F%2Fmobalogy.id
http://images.google.fi/url?sa=t&url=http%3A%2F%2Fmobalogy.id
http://cse.google.cl/url?sa=t&url=http%3A%2F%2Fmobalogy.id%2F
http://images.google.com.vn/url?sa=t&url=http%3A%2F%2Fmobalogy.id
http://cse.google.ad/url?sa=t&url=http%3A%2F%2Fmobalogy.id%2F
https://partnerpage.google.com/url?sa=i&url=http://mobalogy.id/
http://clients1.google.tg/url?q=https%3A%2F%2Fmobalogy.id
http://images.google.co.il/url?sa=t&url=http%3A%2F%2Fmobalogy.id%2F
http://clients1.google.nu/url?q=https%3A%2F%2Fmobalogy.id/
https://services.celemony.com/cgi-bin/WebObjects/LicenseApp.woa/wa/MCFDirectAction/link?linkId=1001414&stid=3463129&url=mobalogy.id/2021/05/29/rwfeds/
http://cse.google.co.zm/url?sa=t&url=http%3A%2F%2Fmobalogy.id%2F
https://200-155-82-24.bradesco.com.br/conteudo/pessoa-fisica/popExt.aspx?url=http://mobalogy.id/2021/05/29/rwfeds/
http://a.twiago.com/adclick.php?tz=1473443342212991&pid=198&kid=2365&wmid=14189&wsid=65&uid=28&sid=3&sid2=2&swid=8950&ord=1473443342&target=https://mobalogy.id/
http://clients1.google.ee/url?q=https://mobalogy.id/
http://clients1.google.co.nz/url?sa=t&url=https%3A%2F%2Fmobalogy.id
http://alt1.toolbarqueries.google.ac/url?q=https://mobalogy.id/
http://m.odnoklassniki.ru/dk?st.cmd=outLinkWarning&st.rfn=https%3A%2F%2Fmobalogy.id
https://www.qscience.com/locale/redirect?redirectItem=http://mobalogy.id
http://cse.google.co.za/url?sa=t&url=http%3A%2F%2Fmobalogy.id%2F
http://111.1gb.ru/go.php?https://mobalogy.id/
http://images.google.co.in/url?sa=t&url=http%3A%2F%2Fmobalogy.id
http://alt1.toolbarqueries.google.com.my/url?q=https://mobalogy.id/
http://aqua21.jpn.org/lateequ/navi/navi.cgi?&mode=jump&id=6936&url=mobalogy.id
http://webmail.mawebcenters.com/parse.pl?redirect=https://mobalogy.id
http://alt1.toolbarqueries.google.cf/url?q=https://mobalogy.id/
http://cse.google.com.gh/url?sa=t&url=http%3A%2F%2Fmobalogy.id%2F
https://www.google.bs/url?q=http://mobalogy.id/
http://as.inbox.com/AC.aspx?id_adr=262&link=https://mobalogy.id/
http://cse.google.com.do/url?sa=t&url=http%3A%2F%2Fmobalogy.id%2F
http://www.cssdrive.com/?URL=mobalogy.id/holostyak-stb-2021
https://advtest.exibart.com/adv/adv.php?id_banner=7201&link=http://mobalogy.id/2021/05/29/rwfeds/
http://images.google.com.eg/url?sa=t&url=http%3A%2F%2Fmobalogy.id%2F
http://ad.foxitsoftware.com/adlog.php?a=redirect&img=testad&url=mobalogy.id
http://chtbl.com/track/118167/mobalogy.id/
http://alt1.toolbarqueries.google.com.af/url?q=https://mobalogy.id/
https://maps.google.nu/url?q=http://mobalogy.id/
http://images.google.com.tw/url?sa=t&url=http%3A%2F%2Fmobalogy.id
https://maps.google.ws/url?q=http://mobalogy.id/
http://action.metaffiliation.com/redir.php?u=https://mobalogy.id/
http://bons-plans-astuces.digidip.net/visit?url=http%3A%2F%2Fmobalogy.id
http://crash-ut3.clan.su/go?https://mobalogy.id/
http://cse.google.co.cr/url?sa=t&url=http%3A%2F%2Fmobalogy.id%2F
http://archives.richmond.ca/archives/descriptions/results.aspx?AC=SEE_ALSO&QF0=NameAccess&QI0==%22Currie%20McWilliams%20Camp%22&XC=http%3a%2f%2fmobalogy.id&BU=https%3a%2f%2fcutepix.info%2fsex%2friley-reyes.php&TN=Descriptions&SN=AUTO19204&SE=1790&RN=2&MR=20&TR=0&TX=1000&ES=0&CS=0&XP=&RF=WebBrief&EF=&DF=WebFull&RL=0&EL=0&DL=0&NP=255&ID=&MF=GENERICENGWPMSG.INI&MQ=&TI=0&DT=&ST=0&IR=173176&NR=1&NB=0&SV=0&SS=0&BG=&FG=&QS=&OEX=ISO-8859-1&OEH=utf-8
http://plus.google.com/url?q=https%3A%2F%2Fmobalogy.id%2F
https://www.horseillustrated.com/redirect.php?location=http://mobalogy.id
http://whois.domaintools.com/mobalogy.id
http://cse.google.com.kh/url?sa=t&url=http%3A%2F%2Fmobalogy.id%2F
http://www.timeandtiming.com/?&URL=mobalogy.id
http://arhvak.minobrnauki.gov.ru/c/document_library/find_file_entry?p_l_id=17390&noSuchEntryRedirect=https://mobalogy.id/
https://posts.google.com/url?q=http://mobalogy.id/management.html
http://wtk.db.com/777554543598768/optout?redirect=https://mobalogy.id
http://images.google.ca/url?sa=t&url=http%3A%2F%2Fmobalogy.id
http://app.feedblitz.com/f/f.fbz?track=mobalogy.id
http://nutritiondata.self.com/facts/recipe/1304991/2?mbid=HDFD&trackback=http%3A%2F%2Fwww.mobalogy.id
http://images.google.co.nz/url?sa=t&url=http%3A%2F%2Fmobalogy.id%2F
http://alt1.toolbarqueries.google.is/url?q=https://mobalogy.id/
http://ts.videosz.com/out.php?cid=101&aid=102&nis=0&srid=392&url=https://mobalogy.id/
https://www.google.tk/url?q=http://mobalogy.id/
http://clients1.google.co.ao/url?q=https%3A%2F%2Fmobalogy.id/
http://amaterasu.dojin.com/home/ranking.cgi?ti=%94%92%82%C6%8D%95%82%CC%94%FC%8Aw%81B&HP=http%3a%2f%2fmobalogy.id&ja=3&id=19879&action=regist
http://www.astronet.ru/db/msusearch/index.html?q=%3Ca+href%3Dhttps%3A%2F%2Fmobalogy.id%2F
http://images.google.com.sg/url?sa=t&url=http%3A%2F%2Fmobalogy.id%2F
https://bugcrowd.com/external_redirect?site=http://mobalogy.id
http://biwa28.lolipop.jp/ys100/rank.cgi?mode=link&id=1290&url=https%3A%2F%2Fmobalogy.id
http://fcaw.library.umass.edu/goto/https:/mobalogy.id
http://radio.cancaonova.com/iframe-loader/?t=DatingSingle:NoLongeraMystery-R�dio&ra=&url=https://mobalogy.id/2021/05/29/rwfeds/
https://cse.google.nr/url?sa=t&url=http://mobalogy.id/
http://clients1.google.gg/url?q=https%3A%2F%2Fmobalogy.id
http://cse.google.bj/url?sa=t&url=http%3A%2F%2Fmobalogy.id%2F
http://camiane.dmcart.gethompy.com/shop/bannerhit.php?bn_id=91&url=http%3a%2f%2fmobalogy.id
https://www.relativitymedia.com/logout?redirect=//mobalogy.id/
http://anoushkabold.com/__media__/js/netsoltrademark.php?d=mobalogy.id
http://cse.google.com.cy/url?sa=t&url=http%3A%2F%2Fmobalogy.id%2F
http://cse.google.am/url?sa=t&url=http%3A%2F%2Fmobalogy.id%2F
https://www.meetme.com/apps/redirect/?url=http://mobalogy.id
http://cse.google.at/url?sa=t&url=http%3A%2F%2Fmobalogy.id%2F
http://legacy.aom.org/verifymember.asp?nextpage=https%3A//mobalogy.id/
https://images.google.nu/url?q=http://mobalogy.id/
https://images.google.ws/url?q=http://mobalogy.id/
http://clients1.google.com.et/url?q=https%3A%2F%2Fmobalogy.id
http://cse.google.bs/url?sa=t&url=http%3A%2F%2Fmobalogy.id%2F
https://mitsui-shopping-park.com/lalaport/iwata/redirect.html?url=http://mobalogy.id/
https://www.barrypopik.com/index.php?URL=http://mobalogy.id
http://clients1.google.com.om/url?q=https://mobalogy.id/
http://bioinfo3d.cs.tau.ac.il/wk/api.php?action=https://mobalogy.id/
http://contacts.google.com/url?sa=t&url=http%3A%2F%2Fmobalogy.id
http://sc.hkex.com.hk/gb/mobalogy.id
http://cse.google.com.bo/url?sa=t&url=http%3A%2F%2Fmobalogy.id%2F
http://cse.google.co.nz/url?sa=t&url=http%3A%2F%2Fmobalogy.id%2F
https://www.extremnews.com/nachrichten/standard/dereferrer.cfm?rurl=http://mobalogy.id/2021/05/29/rwfeds/
http://cse.google.co.ls/url?sa=t&url=http%3A%2F%2Fmobalogy.id%2F
http://portal.novo-sibirsk.ru/dynamics.aspx?PortalId=2&WebId=8464c989-7fd8-4a32-8021-7df585dca817&PageUrl=%2FSitePages%2Ffeedback.aspx&Color=B00000&Source=https%3A%2F%2Fmobalogy.id%2F
http://clients1.google.com.gh/url?q=https://mobalogy.id/
http://alt1.toolbarqueries.google.com.pe/url?q=https%3A%2F%2Fmobalogy.id
http://clients1.google.jo/url?q=http%3A%2F%2Fmobalogy.id
http://clients1.google.pn/url?q=https://mobalogy.id/
https://cse.google.nu/url?sa=t&url=http://mobalogy.id/
http://cse.google.ba/url?sa=t&url=http%3A%2F%2Fmobalogy.id%2F
http://www.venez.fr/error.fr.html?id=1&uri=https%3A//mobalogy.id/
http://domain.opendns.com/mobalogy.id
http://alt1.toolbarqueries.google.com.ua/url?q=https://mobalogy.id/
http://alt1.toolbarqueries.google.be/url?q=https://mobalogy.id/
https://www.allergicliving.com/adspace/?mod=serve&act=clickthru&id=695&to=http://mobalogy.id/2021/05/29/rwfeds/
http://cse.google.com.bd/url?sa=t&url=http%3A%2F%2Fmobalogy.id%2F
http://aborg.lib.ntu.edu.tw/ntuepaper/toModule.do?prefix=/publish&page=/newslist.jsp&uri=https://mobalogy.id/
http://alt1.toolbarqueries.google.pl/url?q=https://mobalogy.id/
http://images.google.fi/url?sa=t&url=http%3A%2F%2Fmobalogy.id%2F
http://blawat2015.no-ip.com/~mieki256/diary/refsweep.cgi?url=https://mobalogy.id/
https://www.google.nu/url?q=http://mobalogy.id/
http://images.google.co.jp/url?sa=t&url=http%3A%2F%2Fmobalogy.id%2F
https://www.dltk-teach.com/p.asp?p=http://mobalogy.id/2021/05/29/rwfeds/
http://images.google.co.id/url?sa=t&url=http%3A%2F%2Fmobalogy.id
http://images.google.com.my/url?sa=t&url=http%3A%2F%2Fmobalogy.id%2F
http://members.ascrs.org/sso/logout.aspx?returnurl=https://mobalogy.id/
http://closings.cbs6albany.com/scripts/adredir.asp?url=https://mobalogy.id/
http://images.google.co.th/url?sa=t&url=http%3A%2F%2Fmobalogy.id%2F
http://alumni.drivers.informer.com/go/go.php?go=https://mobalogy.id/
http://uriu-ss.jpn.org/xoops/modules/wordpress/wp-ktai.php?view=redir&url=https%3A%2F%2Fmobalogy.id
http://alt1.toolbarqueries.google.com.kw/url?q=https://mobalogy.id/
http://forum.solidworks.com/external-link.jspa?url=https%3A%2F%2Fmobalogy.id
http://alt1.toolbarqueries.google.bf/url?q=https://mobalogy.id/
http://acf.poderjudicial.es/portal/site/cgpj/menuitem.65d2c4456b6ddb628e635fc1dc432ea0/?schema=http&title=Acuerdos+de+la+Comisi%C3%B3n+Permanente+del+CGPJ+de+17+de+julio+de+2018&vgnextoid=d94e58e4d849d210VgnVCM100000cb34e20aRCRD&vgnextlocale=gl&isSecure=false&vgnextfmt=default&protocolo=http&user=&url=http%3a%2f%2fmobalogy.id&perfil=3
http://0845.boo.jp/cgi/mt3/mt4i.cgi?id=24&mode=redirect&no=15&ref_eid=3387&url=http%3A%2F%2Fmobalogy.id
http://cse.google.co.kr/url?sa=t&url=http%3A%2F%2Fmobalogy.id%2F
http://hostedmovieupdates.aebn.net/feed/?urlstub=mobalogy.id&
online pharmacy cialis
http://www.youtube.com/redirect?event=channel_description&q=https%3A%2F%2Fpetbreeds.info%2F
http://cse.google.com.eg/url?sa=t&url=http%3A%2F%2Fpetbreeds.info%2F
http://cn.bing.com/news/apiclick.aspx?COLLCC=1718906003&ref=FexRss&aid=&url=https://petbreeds.info/
http://images.google.com.sa/url?sa=t&url=http%3A%2F%2Fpetbreeds.info
http://images.google.at/url?sa=t&url=http%3A%2F%2Fpetbreeds.info
http://images.google.com/url?sa=t&url=http%3A%2F%2Fpetbreeds.info
http://images.google.gr/url?sa=t&url=http%3A%2F%2Fpetbreeds.info%2F
http://images.google.com.ua/url?sa=t&url=http%3A%2F%2Fpetbreeds.info%2F
http://accounts.cancer.org/login?redirectURL=https%3A%2F%2Fpetbreeds.info&theme=RFL
https://images.google.tk/url?sa=t&url=http://petbreeds.info/
http://images.google.ee/url?sa=t&url=http%3A%2F%2Fpetbreeds.info%2F
http://clients1.google.ki/url?q=http%3A%2F%2Fpetbreeds.info
http://clients1.google.td/url?q=https%3A%2F%2Fpetbreeds.info
https://website.informer.com/petbreeds.info
http://clients1.google.at/url?q=https%3A%2F%2Fpetbreeds.info
http://alt1.toolbarqueries.google.com.ec/url?q=https://petbreeds.info/
http://b.filmz.ru/presentation/www/delivery/ck.php?ct=1&oaparams=2__bannerid=222__zoneid=2__cb=93494e485e__oadest=https://petbreeds.info/
http://ava-online.clan.su/go?https://petbreeds.info/
http://ads.dfiles.eu/click.php?c=1497&z=4&b=1730&r=https://petbreeds.info/
http://clinica-elit.vrn.ru/cgi-bin/inmakred.cgi?bn=43252&url=petbreeds.info
http://chat.chat.ru/redirectwarn?https://petbreeds.info/
http://cm-eu.wargaming.net/frame/?service=frm&project=moo&realm=eu&language=en&login_url=http%3A%2F%2Fpetbreeds.info
http://maps.google.com/url?q=https%3A%2F%2Fpetbreeds.info%2F
http://audit.tomsk.ru/bitrix/click.php?goto=https://petbreeds.info/
http://clients1.google.co.mz/url?q=https%3A%2F%2Fpetbreeds.info/
http://come-on.rdy.jp/wanted/cgi-bin/rank.cgi?id=11326&mode=link&url=https://petbreeds.info/
http://images.google.com.ng/url?sa=t&url=http%3A%2F%2Fpetbreeds.info%2F
http://yumi.rgr.jp/puku-board/kboard.cgi?mode=res_html&owner=proscar&url=petbreeds.info/&count=1&ie=1
http://images.google.com.au/url?sa=t&url=http%3A%2F%2Fpetbreeds.info%2F
https://asia.google.com/url?q=http://petbreeds.info/management.html
http://adapi.now.com/ad/api/act.ashx?a=2&sc=3490&s=30000219&l=1&t=0&c=0&u=https://petbreeds.info/
https://cse.google.ws/url?q=http://petbreeds.info/
http://avn.innity.com/click/avncl.php?bannerid=68907&zoneid=0&cb=2&pcu=&url=http%3a%2f%2fpetbreeds.info
https://ross.campusgroups.com/click?uid=51a11492-dc03-11e4-a071-0025902f7e74&r=http://petbreeds.info/
http://images.google.de/url?sa=t&url=http%3A%2F%2Fpetbreeds.info
http://tools.folha.com.br/print?url=https%3A%2F%2Fpetbreeds.info%2F&site=blogfolha
http://alt1.toolbarqueries.google.com.fj/url?q=https://petbreeds.info/
http://new.creativecommons.org/choose/results-one?q_1=2&q_1=1&field_commercial=n&field_derivatives=sa&field_jurisdiction=&field_format=Text&field_worktitle=Blog&field_attribute_to_name=Lam%20HUA&field_attribute_to_url=https%3A%2F%2Fpetbreeds.info
http://redirect.subscribe.ru/bank.banks
http://www.so-net.ne.jp/search/web/?query=petbreeds.info&from=rss
http://alt1.toolbarqueries.google.cat/url?q=https://petbreeds.info/
http://affiliate.awardspace.info/go.php?url=https://petbreeds.info/
http://writer.dek-d.com/dek-d/link/link.php?out=https%3A%2F%2Fpetbreeds.info%2F&title=petbreeds.info
http://analogx.com/cgi-bin/cgirdir.exe?https://petbreeds.info/
http://images.google.co.ve/url?sa=t&url=http%3A%2F%2Fpetbreeds.info%2F
http://ip.chinaz.com/?IP=petbreeds.info
http://images.google.com.pe/url?sa=t&url=http%3A%2F%2Fpetbreeds.info%2F
http://cmbe-console.worldoftanks.com/frame/?language=en&login_url=http%3A%2F%2Fpetbreeds.info&project=wotx&realm=wgcb&service=frm
http://images.google.dk/url?sa=t&url=http%3A%2F%2Fpetbreeds.info
http://ceramique-et-couleurs.leforum.eu/redirect1/https://petbreeds.info/
https://ipv4.google.com/url?q=http://petbreeds.info/management.html
http://cse.google.com.af/url?sa=t&url=http%3A%2F%2Fpetbreeds.info%2F
http://images.google.com.do/url?sa=t&url=http%3A%2F%2Fpetbreeds.info%2F
http://newsdiffs.org/article-history/petbreeds.info/
http://cse.google.az/url?sa=t&url=http%3A%2F%2Fpetbreeds.info%2F
http://images.google.ch/url?sa=t&url=http%3A%2F%2Fpetbreeds.info
http://aganippe.online.fr/lien.php3?url=http%3a%2f%2fpetbreeds.info
http://images.google.fr/url?sa=t&url=http%3A%2F%2Fpetbreeds.info
http://images.google.co.ve/url?sa=t&url=http%3A%2F%2Fpetbreeds.info
http://alt1.toolbarqueries.google.com.do/url?q=https://petbreeds.info/
http://alt1.toolbarqueries.google.co.mz/url?q=https://petbreeds.info/
https://www.easyviajar.com/me/link.jsp?site=359&client=1&id=110&url=http://petbreeds.info/2021/05/29/rwfeds/
http://68-w.tlnk.io/serve?action=click&site_id=137717&url_web=https://petbreeds.info/
http://alt1.toolbarqueries.google.sk/url?q=https://petbreeds.info/
http://jump.2ch.net/?petbreeds.info
http://images.google.co.nz/url?sa=t&url=http%3A%2F%2Fpetbreeds.info
http://images.google.com.ec/url?sa=t&url=http%3A%2F%2Fpetbreeds.info
http://alt1.toolbarqueries.google.com.mx/url?q=https://petbreeds.info/
http://sitereport.netcraft.com/?url=https%3A%2F%2Fpetbreeds.info%2F
http://www.ursoftware.com/downloadredirect.php?url=https%3A%2F%2Fpetbreeds.info%2F
http://cse.google.co.mz/url?sa=t&url=http%3A%2F%2Fpetbreeds.info%2F
http://legal.un.org/docs/doc_top.asp?path=../ilc/documentation/english/a_cn4_13.pd&Lang=Ef&referer=https%3A%2F%2Fpetbreeds.info%2F
http://doodle.com/r?url=https%3A%2F%2Fpetbreeds.info%2F
http://cse.google.ac/url?sa=t&url=http%3A%2F%2Fpetbreeds.info%2F
http://78.rospotrebnadzor.ru/news9/-/asset_publisher/9Opz/content/%D0%BF%D0%BE%D1%81%D1%82%D0%B0%D0%BD%D0%BE%D0%B2%D0%BB%D0%B5%D0%BD%D0%B8%D0%B5-%D0%B3%D0%BB%D0%B0%D0%B2%D0%BD%D0%BE%D0%B3%D0%BE-%D0%B3%D0%BE%D1%81%D1%83%D0%B4%D0%B0%D1%80%D1%81%D1%82%D0%B2%D0%B5%D0%BD%D0%BD%D0%BE%D0%B3%D0%BE-%D1%81%D0%B0%D0%BD%D0%B8%D1%82%D0%B0%D1%80%D0%BD%D0%BE%D0%B3%D0%BE-%D0%B2%D1%80%D0%B0%D1%87%D0%B0-%D0%BF%D0%BE-%D0%B3%D0%BE%D1%80%D0%BE%D0%B4%D1%83-%D1%81%D0%B0%D0%BD%D0%BA%D1%82-%D0%BF%D0%B5%D1%82%D0%B5%D1%80%D0%B1%D1%83%D1%80%D0%B3%D1%83-%E2%84%96-4-%D0%BE%D1%82-09-11-2021-%C2%AB%D0%BE-%D0%B2%D0%BD%D0%B5%D1%81%D0%B5%D0%BD%D0%B8%D0%B8-%D0%B8%D0%B7%D0%BC%D0%B5%D0%BD%D0%B5%D0%BD%D0%B8%D0%B8-%D0%B2-%D0%BF%D0%BE%D1%81%D1%82%D0%B0%D0%BD%D0%BE%D0%B2%D0%BB%D0%B5%D0%BD%D0%B8%D0%B5-%D0%B3%D0%BB%D0%B0%D0%B2%D0%BD%D0%BE%D0%B3%D0%BE-%D0%B3%D0%BE%D1%81%D1%83%D0%B4%D0%B0%D1%80%D1%81%D1%82%D0%B2%D0%B5%D0%BD%D0%BD%D0%BE%D0%B3%D0%BE-%D1%81%D0%B0%D0%BD%D0%B8%D1%82%D0%B0%D1%80%D0%BD%D0%BE%D0%B3%D0%BE-%D0%B2%D1%80%D0%B0%D1%87%D0%B0-%D0%BF%D0%BE-%D0%B3%D0%BE%D1%80%D0%BE%D0%B4%D1%83-%D1%81%D0%B0%D0%BD%D0%BA%D1%82-%D0%BF%D0%B5%D1%82%D0%B5%D1%80%D0%B1%D1%83%D1%80%D0%B3%D1%83-%D0%BE%D1%82-12-10-2021-%E2%84%96-3-%C2%BB;jsessionid=FB3309CE788EBDCCB588450F5B1BE92F?redirect=http%3A%2F%2Fpetbreeds.info
http://ashspublications.org/__media__/js/netsoltrademark.php?d=petbreeds.info
http://cse.google.com.ly/url?sa=t&url=http%3A%2F%2Fpetbreeds.info%2F
http://cse.google.com.bh/url?sa=t&url=http%3A%2F%2Fpetbreeds.info%2F
https://pt.tapatalk.com/redirect.php?app_id=4&fid=8678&url=http://petbreeds.info
http://cse.google.co.tz/url?sa=t&url=http%3A%2F%2Fpetbreeds.info%2F
http://www.bing.com/news/apiclick.aspx?ref=FexRss&aid=&tid=9BB77FDA801248A5AD23FDBDD5922800&url=https%3A%2F%2Fpetbreeds.info
http://advisor.wmtransfer.com/SiteDetails.aspx?url=petbreeds.info
http://blogs.rtve.es/libs/getfirma_footer_prod.php?blogurl=https%3A%2F%2Fpetbreeds.info
http://images.google.com.br/url?sa=t&url=http%3A%2F%2Fpetbreeds.info
http://images.google.be/url?sa=t&url=http%3A%2F%2Fpetbreeds.info%2F
http://aboutus.com/Special:SiteAnalysis?q=petbreeds.info&action=webPresence
https://brettterpstra.com/share/fymdproxy.php?url=http://petbreeds.info
http://images.google.com.eg/url?sa=t&url=http%3A%2F%2Fpetbreeds.info
http://my.myob.com/community/login.aspx?ReturnUrl=https%3A%2F%2Fpetbreeds.info%2F
http://traceroute.physics.carleton.ca/cgi-bin/traceroute.pl?function=ping&target=petbreeds.info
http://cse.google.as/url?sa=t&url=http%3A%2F%2Fpetbreeds.info%2F
http://d-click.fiemg.com.br/u/18081/131/75411/137_0/82cb7/?url=https://petbreeds.info/
https://cse.google.ws/url?sa=t&url=http://petbreeds.info/
http://anonim.co.ro/?petbreeds.info/
http://id.telstra.com.au/register/crowdsupport?gotoURL=https%3A%2F%2Fpetbreeds.info%2F
http://ads.businessnews.com.tn/dmcads2017/www/delivery/ck.php?ct=1&oaparams=2__bannerid=1839__zoneid=117__cb=df4f4d726f__oadest=https://petbreeds.info/
http://aichi-fishing.boy.jp/?wptouch_switch=desktop&redirect=http%3a%2f%2fpetbreeds.info
http://cse.google.co.th/url?sa=t&url=http%3A%2F%2Fpetbreeds.info%2F
http://alt1.toolbarqueries.google.ch/url?q=https://petbreeds.info/
http://images.google.cl/url?sa=t&url=http%3A%2F%2Fpetbreeds.info
http://clients1.google.com.kh/url?q=https://petbreeds.info/
http://client.paltalk.com/client/webapp/client/External.wmt?url=http%3A%2F%2Fpetbreeds.info%2F
http://clients1.google.com.lb/url?q=https%3A%2F%2Fpetbreeds.info/
http://cam4com.go2cloud.org/aff_c?offer_id=268&aff_id=2014&url=https%3A%2F%2Fpetbreeds.info
http://creativecommons.org/choose/results-one?q_1=2&q_1=1&field_commercial=n&field_derivatives=sa&field_jurisdiction=&field_format=Text&field_worktitle=Blog&field_attribute_to_name=Lam%20HUA&field_attribute_to_url=https%3A%2F%2Fpetbreeds.info%2F
http://images.google.cz/url?sa=t&url=http%3A%2F%2Fpetbreeds.info
http://cse.google.co.bw/url?sa=t&url=http%3A%2F%2Fpetbreeds.info%2F
http://r.turn.com/r/click?id=07SbPf7hZSNdJAgAAAYBAA&url=https://petbreeds.info/
http://images.google.co.uk/url?sa=t&url=http%3A%2F%2Fpetbreeds.info%2F
http://images.google.com.bd/url?sa=t&url=http%3A%2F%2Fpetbreeds.info
http://clients1.google.ge/url?q=https%3A%2F%2Fpetbreeds.info/
http://2chmatome.jpn.org/akb/c_c.php?c_id=267977&url=https://petbreeds.info/
http://affiliate.suruga-ya.jp/modules/af/af_jump.php?user_id=755&goods_url=https://petbreeds.info/
http://archive.feedblitz.com/f/f.fbz?goto=https://petbreeds.info/
http://clients1.google.com.pr/url?sa=i&url=https%3A%2F%2Fpetbreeds.info
http://cse.google.com.gt/url?sa=t&url=http%3A%2F%2Fpetbreeds.info%2F
http://abcclub.cside.com/nagata/link4/link4.cgi?mode=cnt&hp=http%3a%2f%2fpetbreeds.info&no=1027
http://clients1.google.com.fj/url?q=https%3A%2F%2Fpetbreeds.info
http://www.justjared.com/flagcomment.php?el=https%3A%2F%2Fpetbreeds.info
http://clients1.google.com.gi/url?q=https%3A%2F%2Fpetbreeds.info/
http://biz.timesfreepress.com/__media__/js/netsoltrademark.php?d=petbreeds.info
http://search.babylon.com/imageres.php?iu=https%3A%2F%2Fpetbreeds.info%2F
http://clicktrack.pubmatic.com/AdServer/AdDisplayTrackerServlet?clickData=JnB1YklkPTE1NjMxMyZzaXRlSWQ9MTk5MDE3JmFkSWQ9MTA5NjQ2NyZrYWRzaXplaWQ9OSZ0bGRJZD00OTc2OTA4OCZjYW1wYWlnbklkPTEyNjcxJmNyZWF0aXZlSWQ9MCZ1Y3JpZD0xOTAzODY0ODc3ODU2NDc1OTgwJmFkU2VydmVySWQ9MjQzJmltcGlkPTU0MjgyODhFLTYwRjktNDhDMC1BRDZELTJFRjM0M0E0RjI3NCZtb2JmbGFnPTImbW9kZWxpZD0yODY2Jm9zaWQ9MTIyJmNhcnJpZXJpZD0xMDQmcGFzc2JhY2s9MA==_url=https://petbreeds.info/
http://alt1.toolbarqueries.google.bg/url?q=https://petbreeds.info/
http://211-75-39-211.hinet-ip.hinet.net/Adredir.asp?url=https://petbreeds.info/
http://clients1.google.bg/url?q=https://petbreeds.info/
http://ads2.figures.com/Ads3/www/delivery/ck.php?ct=1&oaparams=2__bannerid=282__zoneid=248__cb=da025c17ff__oadest=https%3a%2f%2fpetbreeds.info
http://clients1.google.gy/url?q=http%3A%2F%2Fpetbreeds.info
http://clients1.google.com.ar/url?q=https%3A%2F%2Fpetbreeds.info
http://com.co.de/__media__/js/netsoltrademark.php?d=petbreeds.info
http://clients1.google.com.jm/url?q=https://petbreeds.info/
http://home.speedbit.com/r.aspx?u=https://petbreeds.info/
http://cse.google.com.lb/url?sa=t&url=http%3A%2F%2Fpetbreeds.info%2F
http://blog.bg/results.php?q=%22%2f%3e%3ca+href%3d%22http%3a%2f%2fpetbreeds.info&
http://images.google.com.co/url?sa=t&url=http%3A%2F%2Fpetbreeds.info%2F
http://clicrbs.com.br/paidcontent/jsp/login.jspx?site=545&url=goo.gl%2Fmaps%2FoQqZFfefPedXSkNc6&previousurl=http%3a%2f%2fpetbreeds.info
http://clients1.google.kg/url?q=https://petbreeds.info/
http://staging.talentegg.ca/redirect/company/224?destination=https://petbreeds.info/
http://images.google.co.za/url?sa=t&url=http%3A%2F%2Fpetbreeds.info
http://clients1.google.com.co/url?q=https%3A%2F%2Fpetbreeds.info
http://cse.google.bf/url?sa=t&url=http%3A%2F%2Fpetbreeds.info%2F
http://cse.google.com.bz/url?sa=t&url=http%3A%2F%2Fpetbreeds.info%2F
http://cse.google.com.cu/url?sa=t&url=http%3A%2F%2Fpetbreeds.info%2F
http://www.talgov.com/Main/exit.aspx?url=https%3A%2F%2Fpetbreeds.info
http://cse.google.ci/url?sa=t&url=http%3A%2F%2Fpetbreeds.info%2F
http://blog.ss-blog.jp/_pages/mobile/step/index?u=http%3A%2F%2Fpetbreeds.info
https://cse.google.tk/url?q=http://petbreeds.info/
http://www.siteprice.org/similar-websites/eden-project.org
http://clients1.google.ca/url?q=https://petbreeds.info/
http://cse.google.cm/url?sa=t&url=http%3A%2F%2Fpetbreeds.info%2F
http://cse.google.ae/url?sa=t&url=http%3A%2F%2Fpetbreeds.info%2F
http://clients1.google.nr/url?q=http%3A%2F%2Fpetbreeds.info
http://imaginingourselves.globalfundforwomen.org/pb/External.aspx?url=https://petbreeds.info/
http://clients1.google.tk/url?q=http%3A%2F%2Fpetbreeds.info/
http://alt1.toolbarqueries.google.co.il/url?q=https://petbreeds.info/
http://theamericanmuslim.org/tam.php?URL=petbreeds.info
http://images.google.com.tr/url?sa=t&url=http%3A%2F%2Fpetbreeds.info%2F
http://thaiwebsearch.hypermart.net/cgi/clicko.pl?75&petbreeds.info
http://colil.dbcls.jp/fct/rdfdesc/usage.vsp?g=https://petbreeds.info/
https://content.sixflags.com/news/director.aspx?gid=0&iid=72&cid=3714&link=http://petbreeds.info/2021/05/29/rwfeds/
http://adr.tpprf.ru/bitrix/redirect.php?goto=https://petbreeds.info/
http://jump.2ch.net/?petbreeds.info
http://clients1.google.com.do/url?q=https%3A%2F%2Fpetbreeds.info
http://c.yam.com/msnews/IRT/r.c?https://petbreeds.info/
http://clients1.google.com.sa/url?sa=t&url=https%3A%2F%2Fpetbreeds.info
https://images.google.tk/url?q=http://petbreeds.info/
http://cse.google.com.gi/url?sa=t&url=http%3A%2F%2Fpetbreeds.info%2F
http://ad.sxp.smartclip.net/optout?url=https://petbreeds.info/&ang_testid=1
http://guru.sanook.com/?URL=https%3A%2F%2Fpetbreeds.info%2F
http://clients1.google.com.my/url?sa=i&url=https%3A%2F%2Fpetbreeds.info
http://53938.measurementapi.com/serve?action=click&publisher_id=53938&site_id=69748&sub_campaign=g5e_com&url=https://petbreeds.info/
http://t.me/iv?url=https%3A%2F%2Fpetbreeds.info
http://clients1.google.co.ve/url?q=https://petbreeds.info/
http://ayads.co/click.php?c=735-844&url=https://petbreeds.info/
http://campaigns.williamhill.com/C.ashx?btag=a_181578b_893c_&affid=1688431&siteid=181578&adid=893&c=&asclurl=https://petbreeds.info/&AutoR=1
http://www.aomeitech.com/forum/home/leaving?Target=https%3A//petbreeds.info
http://brandcycle.go2cloud.org/aff_c?offer_id=261&aff_id=1371&url=http%3A%2F%2Fpetbreeds.info
http://maps.google.de/url?sa=t&url=https%3A%2F%2Fpetbreeds.info
http://webfeeds.brookings.edu/~/t/0/0/~petbreeds.info
http://images.google.co.za/url?sa=t&url=http%3A%2F%2Fpetbreeds.info%2F
http://clients1.google.com.ly/url?q=https://petbreeds.info/
http://www.biblio.com.br/conteudo/Moldura11.asp?link=//petbreeds.info/2021/05/29/rwfeds/
http://store.veganessentials.com/affiliates/default.aspx?Affiliate=40&Target=https://petbreeds.info
http://images.google.be/url?sa=t&url=http%3A%2F%2Fpetbreeds.info
https://cse.google.nu/url?q=http://petbreeds.info/
http://images.google.com.sa/url?sa=t&url=http%3A%2F%2Fpetbreeds.info%2F
http://cse.google.co.uz/url?sa=t&url=http%3A%2F%2Fpetbreeds.info%2F
https://www.trainorders.com/discussion/warning.php?forum_id=1&url=http://petbreeds.info/34zxVq8
http://audio.home.pl/redirect.php?action=url&goto=petbreeds.info&osCsid=iehkyctnmm
http://images.google.co.uk/url?sa=t&url=http%3A%2F%2Fpetbreeds.info
http://ac8.i2i.jp/bin/getslink.php?00713417&&&https://petbreeds.info/
http://analytics.supplyframe.com/trackingservlet/track/?action=name&value3=1561&zone=FCfull_SRP_na_us&url=https://petbreeds.info/
http://adserver.gadu-gadu.pl/click.asp?adid=2236;url=https://petbreeds.info/
http://www.responsinator.com/?url=petbreeds.info
http://cse.google.cf/url?sa=t&url=http%3A%2F%2Fpetbreeds.info%2F
http://clients1.google.ga/url?q=https%3A%2F%2Fpetbreeds.info/
http://m.ok.ru/dk?st.cmd=outLinkWarning&st.rfn=https%3A%2F%2Fpetbreeds.info
http://cse.google.co.ck/url?sa=t&url=http%3A%2F%2Fpetbreeds.info%2F
https://www.wilsonlearning.com/?URL=petbreeds.info/
http://www.etis.ford.com/externalURL.do?url=https%3A%2F%2Fpetbreeds.info%2F
https://board-en.drakensang.com/proxy.php?link=http://petbreeds.info/
http://builder.hufs.ac.kr/goLink.jsp?url=petbreeds.info/
http://ahlacarte.vraiforum.com/redirect1/https://petbreeds.info/
https://images.google.cv/url?q=http://petbreeds.info/
http://clicktrack.pubmatic.com/AdServer/AdDisplayTrackerServlet?clickData=JnB1YklkPTE1NjMxMyZzaXRlSWQ9MTk5MDE3JmFkSWQ9MTA5NjQ2NyZrYWRzaXplaWQ9OSZ0bGRJZD00OTc2OTA4OCZjYW1wYWlnbklkPTEyNjcxJmNyZWF0aXZlSWQ9MCZ1Y3JpZD0xOTAzODY0ODc3ODU2NDc1OTgwJmFkU2VydmVySWQ9MjQzJmltcGlkPTU0MjgyODhFLTYwRjktNDhDMC1BRDZELTJFRjM0M0E0RjI3NCZtb2JmbGFnPTImbW9kZWxpZD0yODY2Jm9zaWQ9MTIyJmNhcnJpZXJpZD0xMDQmcGFzc2JhY2s9MA==_url=https://petbreeds.info/2021/05/29/rwfeds/
http://clients1.google.de/url?sa=t&url=https%3A%2F%2Fpetbreeds.info
https://cse.google.cv/url?q=http://petbreeds.info/
http://cse.google.bi/url?sa=t&url=http%3A%2F%2Fpetbreeds.info%2F
http://app.guanajuato.gob.mx/revive/www/delivery/ck.php?oaparams=2__bannerid=2447__zoneid=88__cb=cb2b9a1cb1__oadest=http%3a%2f%2fpetbreeds.info
http://subscriber.zdnet.de/profile/login.php?continue=https%3A%2F%2Fpetbreeds.info%2F&continue_label=ZDNet.de
http://aacollabarchive.humin.lsa.umich.edu/omeka/setlocale?locale=es&redirect=http%3a%2f%2fpetbreeds.info
http://apptube.podnova.com/go/?go=https://petbreeds.info/
http://images.google.com.ua/url?sa=t&url=http%3A%2F%2Fpetbreeds.info
http://www.kaskus.co.id/redirect?url=https%3A%2F%2Fpetbreeds.info
http://community.cypress.com/external-link.jspa?url=https%3A%2F%2Fpetbreeds.info
https://images.google.bs/url?q=http://petbreeds.info/
http://community.acer.com/en/home/leaving/petbreeds.info
http://daemon.indapass.hu/http/session_request?redirect_to=https%3A%2F%2Fpetbreeds.info%2F&partner_id=bloghu
http://images.google.com.hk/url?sa=t&url=http%3A%2F%2Fpetbreeds.info
http://clients1.google.je/url?q=https%3A%2F%2Fpetbreeds.info/
http://www.novalogic.com/remote.asp?NLink=https://petbreeds.info/2021/05/29/rwfeds/
http://cm-sg.wargaming.net/frame/?service=frm&project=wot&realm=sg&language=en&login_url=http%3A%2F%2Fpetbreeds.info&logout_url=http%3A%2F%2Fforum.worldoftanks.asia%2Findex.php%3Fapp%3Dcore%26module%3Dglobal%26section%3Dlogin%26do%3Dlogoutoid&incomplete_profile_url=http%3A%2F%2Fforum.worldoftanks.asia%2Findex.php%3Fapp%3Dmembers%26module%3Dprofile%26do%3Ddocompleteaccount&token_url=http%3A%2F%2Fforum.worldoftanks.asia%2Fmenutoken&frontend_url=http%3A%2F%2Fcdn-cm.gcdn.co&backend_url=http%3A%2F%2Fcm-sg.wargaming.net&open_links_in_new_tab=¬ifications_enabled=1&chat_enabled=&incomplete_profile_notification_enabled=&intro_tooltips_enabled=1®istration_url=http%3A%2F%2Fforum.worldoftanks.asia%2Findex.php%3Fapp%3Dcore%26module%3Dglobal%26section%3Dregister
http://images.google.cz/url?sa=t&url=http%3A%2F%2Fpetbreeds.info%2F
http://cse.google.co.ug/url?sa=t&url=http%3A%2F%2Fpetbreeds.info%2F
http://sys.labaq.com/cli/go.php?s=lbac&p=1410jt&t=02&url=https://petbreeds.info/
http://clients1.google.cg/url?q=https://petbreeds.info/
http://legacy.aom.org/verifymember.asp?nextpage=https%3A%2F%2Fpetbreeds.info
http://clients1.google.iq/url?q=https%3A%2F%2Fpetbreeds.info/
http://clients1.google.cv/url?q=http%3A%2F%2Fpetbreeds.info
http://cm-ru.wargaming.net/frame/?service=frm&project=wot&realm=ru&language=ru&login_url=http%3A%2F%2Fpetbreeds.info&logout_url=http%3A%2F%2Ffor
http://cse.google.co.uk/url?sa=t&url=http%3A%2F%2Fpetbreeds.info%2F
https://www.mydoterra.com/Application/index.cfm?EnrollerID=458046&Theme=DefaultTheme&Returnurl=petbreeds.info/&LNG=en_dot&iact=1
https://redirect.vebeet.com/index.php?url=//petbreeds.info/cities/tampa-fl/
http://cse.google.co.zw/url?sa=t&url=http%3A%2F%2Fpetbreeds.info%2F
http://alt1.toolbarqueries.google.at/url?q=https://petbreeds.info/
http://www.adminer.org/redirect/?url=https%3A%2F%2Fpetbreeds.info&lang=en
https://webneel.com/i/3d-printer/5-free-3d-printer-model-website-yeggi/ei/12259?s=petbreeds.info/2021/05/29/rwfeds/
http://apf.francophonie.org/doc.html?url=https://petbreeds.info/
http://cse.google.by/url?sa=t&url=http%3A%2F%2Fpetbreeds.info%2F
http://www.jarrow.com/jump/http:_@__@_petbreeds.info
http://yahoo-mbga.jp/r?url=//petbreeds.info
http://www.pcpitstop.com/offsite.asp?https://petbreeds.info/
http://getpocket.com/redirect?url=https%3A%2F%2Fpetbreeds.info%2F
http://cse.google.com.jm/url?sa=t&url=http%3A%2F%2Fpetbreeds.info%2F
http://cse.google.com.ec/url?sa=t&url=http%3A%2F%2Fpetbreeds.info%2F
http://www.drinksmixer.com/redirect.php?url=https%3A%2F%2Fpetbreeds.info%2F
http://5cfxm.hxrs6.servertrust.com/v/affiliate/setCookie.asp?catId=1180&return=https://petbreeds.info
https://ditu.google.com/url?q=http://petbreeds.info/management.html
http://cse.google.co.ao/url?sa=t&url=http%3A%2F%2Fpetbreeds.info%2F
http://businesseast.ucoz.com/go?https://petbreeds.info/
https://www.streetwisereports.com/cs/blank/main?x-p=click/fwd&rec=ads/443&url=http://petbreeds.info/2021/05/29/rwfeds/
http://images.google.com.ec/url?sa=t&url=http%3A%2F%2Fpetbreeds.info%2F
http://www.sponsorship.com/Marketplace/redir.axd?ciid=514&cachename=advertising&PageGroupId=14&url=https://petbreeds.info
http://clients1.google.com.eg/url?q=https://petbreeds.info/
http://cat.sls.cuhk.edu.hk/CRF/visualization?Species=https://petbreeds.info/
https://clients1.google.com/url?q=http://petbreeds.info/management.html
http://creativecommons.org/choose/results-one?q_1=2&q_1=1&field_commercial=n&field_derivatives=sa&field_jurisdiction=&field_format=Text&field_worktitle=Blog&field_attribute_to_name=Lam%20HUA&field_attribute_to_url=http%3A%2F%2Fpetbreeds.info%2F
http://tools.folha.com.br/print?url=https%3A%2F%2Fpetbreeds.info%2F&site=blogfolha
http://clients1.google.co.kr/url?q=https://petbreeds.info/
http://apiprop.sulekha.com/common/apploginredirect.aspx?enclgn=ilsxyvoDCT5XZjQCeHI5qlKoZ3Ljv/1wHK3AR7dYYz8%3D&nexturl=https://petbreeds.info/
http://cse.google.de/url?sa=t&url=https%3A%2F%2Fpetbreeds.info
http://images.google.dk/url?sa=t&url=http%3A%2F%2Fpetbreeds.info%2F
http://avp.innity.com/click/?campaignid=10933&adid=115198&zoneid=39296&pubid=3194&ex=1412139790&pcu=&auth=3tx88b-1412053876272&url=http%3A%2F%2Fpetbreeds.info
http://ads.haberler.com/redir.asp?tur=habericilink&url=https://petbreeds.info/
http://ip.tool.chinaz.com/?ip=petbreeds.info
http://ax.bk55.ru/cur/www/delivery/ck.php?ct=1&oaparams=2__bannerid=4248__zoneid=141__OXLCA=1__cb=1be00d870a__oadest=https://petbreeds.info/
http://support.dalton.missouri.edu/?URL=petbreeds.info
http://banri.moo.jp/-18/?wptouch_switch=desktop&redirect=https%3a%2f%2fpetbreeds.info
http://avatar-cat-ru.1gb.ru/index.php?name=plugins&p=out&url=petbreeds.info
http://sogo.i2i.jp/link_go.php?url=https://petbreeds.info/
http://clients1.google.co.ug/url?q=https://petbreeds.info/
http://cse.google.cd/url?sa=t&url=http%3A%2F%2Fpetbreeds.info%2F
http://www.t.me/iv?url=http%3A%2F%2Fpetbreeds.info
http://www.ibm.com/links/?cc=us&lc=en&prompt=1&url=//petbreeds.info
http://alt1.toolbarqueries.google.co.ao/url?q=https://petbreeds.info/
http://clients1.google.co.ke/url?sa=t&url=https://petbreeds.info/
http://cse.google.al/url?sa=t&url=http%3A%2F%2Fpetbreeds.info%2F
http://dotekomanie.cz/heureka/?url=https%3a%2f%2fpetbreeds.info%2F
http://images.google.co.id/url?sa=t&url=http%3A%2F%2Fpetbreeds.info%2F
http://images.google.de/url?sa=t&url=https%3A%2F%2Fpetbreeds.info
https://maps.google.tk/url?q=http://petbreeds.info/
http://www.astro.wisc.edu/?URL=https%3A%2F%2Fpetbreeds.info
http://images.google.com.br/url?sa=t&url=http%3A%2F%2Fpetbreeds.info%2F
http://cse.google.co.ke/url?sa=t&url=http%3A%2F%2Fpetbreeds.info%2F
http://cse.google.co.il/url?sa=t&url=http%3A%2F%2Fpetbreeds.info%2F
http://api.fooducate.com/fdct/message/t/?t=592390BA-2F20-0472-4BA5-A59870BBA6A2:61213861:5AFC37A3-CAD4-CC42-4921-9BE2094B0A14&a=c&d=https://petbreeds.info/
http://armenaikkandomainrating5.blogspot.com0.vze.com/frame-forward.cgi?https://petbreeds.info/
http://cse.google.co.in/url?sa=t&url=http%3A%2F%2Fpetbreeds.info%2F
http://subscriber.silicon.co.uk/profile/login.php?continue=https%3A%2F%2Fpetbreeds.info%2F&continue_label=TechWeekEurope+UK
http://cse.google.com.bn/url?sa=t&url=http%3A%2F%2Fpetbreeds.info%2F
http://images.google.com.do/url?sa=t&url=http%3A%2F%2Fpetbreeds.info
http://alt1.toolbarqueries.google.com.lb/url?q=https://petbreeds.info/
http://cr.naver.com/redirect-notification?u=https%3A%2F%2Fpetbreeds.info
http://images.google.com.au/url?sa=t&url=http%3A%2F%2Fpetbreeds.info
http://brangista.j-server.com/BRASADAIJ/ns/tl_ex.cgi?Surl=https://petbreeds.info/
http://beskuda.ucoz.ru/go?https://petbreeds.info/
http://uriu-ss.jpn.org/xoops/modules/wordpress/wp-ktai.php?view=redir&url=http%3a%2f%2fpetbreeds.info
http://cse.google.com.ai/url?sa=t&url=http%3A%2F%2Fpetbreeds.info%2F
http://cse.google.cat/url?sa=t&url=http%3A%2F%2Fpetbreeds.info%2F
http://www.luminous-lint.com/app/iframe/photographer/Frantisek__Drtikol/petbreeds.info
http://onlinemanuals.txdot.gov/help/urlstatusgo.html?url=https%3A%2F%2Fpetbreeds.info
http://click.karenmillen.com/knmn40/c2.php?KNMN/94073/5285/H/N/V/https://petbreeds.info/
http://images.google.com.pe/url?sa=t&url=http%3A%2F%2Fpetbreeds.info
http://images.google.ee/url?sa=t&url=http%3A%2F%2Fpetbreeds.info
http://ar.thefreedictionary.com/_/cite.aspx?url=http%3a%2f%2fpetbreeds.info&word=%D8%AD%D9%8E%D9%84%D9%90%D9%85%D9%8E&sources=kdict
http://bigtakeover.com/revive/www/delivery/ck.php?ct=1&oaparams=2__bannerid=68__zoneid=4__cb=c0575383b9__oadest=https://petbreeds.info/
http://circuitomt.com.br/publicidade/www/delivery/ck.php?ct=1&oaparams=2__bannerid=34__zoneid=2__cb=6cc35441a4__oadest=http%3a%2f%2fpetbreeds.info
http://akid.s17.xrea.com/p2ime.php?url=https://petbreeds.info/
http://clients1.google.com.tr/url?sa=t&url=https%3A%2F%2Fpetbreeds.info
http://links.giveawayoftheday.com/petbreeds.info
http://www2.ogs.state.ny.us/help/urlstatusgo.html?url=https%3A%2F%2Fpetbreeds.info
http://images.google.co.il/url?sa=t&url=http%3A%2F%2Fpetbreeds.info
http://bompasandparr.com/?URL=https://petbreeds.info/
http://cse.google.com.ag/url?sa=t&url=http%3A%2F%2Fpetbreeds.info%2F
http://new.creativecommons.org/choose/results-one?q_1=2&q_1=1&field_commercial=n&field_derivatives=sa&field_jurisdiction=&field_format=Text&field_worktitle=Blog&field_attribute_to_name=Lam%20HUA&field_attribute_to_url=https%3A%2F%2Fpetbreeds.info%2F
http://optimize.viglink.com/page/pmv?url=https%3A%2F%2Fpetbreeds.info
http://cse.google.com.co/url?sa=t&url=http%3A%2F%2Fpetbreeds.info%2F
http://blackfive.net/__media__/js/netsoltrademark.php?d=petbreeds.info
http://api.mixpanel.com/track/?data=eyJldmVudCI6ICJmdWxsdGV4dGNsaWNrIiwgInByb3BlcnRpZXMiOiB7InRva2VuIjogImE0YTQ2MGEzOTA0ZWVlOGZmNWUwMjRlYTRiZGU3YWMyIn19&ip=1&redirect=https://petbreeds.info/
http://alt1.toolbarqueries.google.bs/url?q=https://petbreeds.info/
http://video.fc2.com/exlink.php?uri=https%3A%2F%2Fpetbreeds.info%2F
http://cse.google.co.jp/url?sa=t&url=http%3A%2F%2Fpetbreeds.info%2F
http://images.google.es/url?sa=t&url=http%3A%2F%2Fpetbreeds.info
http://alt1.toolbarqueries.google.co.za/url?q=https://petbreeds.info/
http://ads.bhol.co.il/clicks_counter.asp?macrocid=5635&campid=177546&DB_link=0&userid=0&ISEXT=0&url=https://petbreeds.info/
http://cse.google.be/url?sa=t&url=http%3A%2F%2Fpetbreeds.info%2F
http://at070582.xsrv.jp/?wptouch_switch=desktop&redirect=http%3a%2f%2fpetbreeds.info
http://u.to/?url=https%3A%2F%2Fpetbreeds.info%2F&a=add
http://ipv4.google.com/url?q=https%3A%2F%2Fpetbreeds.info%2F
http://cse.google.co.ve/url?sa=t&url=http%3A%2F%2Fpetbreeds.info%2F
http://catzlyst.phrma.org/__media__/js/netsoltrademark.php?d=petbreeds.info
http://clients1.google.co.jp/url?q=https://petbreeds.info/
http://clients1.google.com.hk/url?sa=t&url=http%3A%2F%2Fpetbreeds.info
http://clients1.google.cd/url?sa=t&url=https://petbreeds.info/
http://bares.blog.idnes.cz/redir.aspx?url=https%3A%2F%2Fpetbreeds.info
http://www.ip-adress.com/website/petbreeds.info
http://clients1.google.st/url?q=https://petbreeds.info/
http://cse.google.co.vi/url?sa=t&url=http%3A%2F%2Fpetbreeds.info%2F
http://cse.google.com.br/url?sa=t&url=http%3A%2F%2Fpetbreeds.info%2F
http://parkcities.bubblelife.com/click/c3592/?url=https://petbreeds.info/
http://clients1.google.by/url?sa=t&url=https%3A%2F%2Fpetbreeds.info
http://antigo.anvisa.gov.br/listagem-de-alertas/-/asset_publisher/R6VaZWsQDDzS/content/alerta-3191-tecnovigilancia-boston-scientific-do-brasil-ltda-fibra-optica-greenlight-possibilidade-de-queda-de-temperatura-da-tampa-de-metal-e-da-pont/33868?inheritRedirect=false&redirect=http%3A%2F%2Fpetbreeds.info
http://cse.google.ca/url?sa=t&url=http%3A%2F%2Fpetbreeds.info%2F
http://cse.google.com.au/url?sa=t&url=http%3A%2F%2Fpetbreeds.info%2F
http://ads.hitparade.ch/link.php?ad_id=28&url=https://petbreeds.info/
http://clients1.google.tm/url?q=https%3A%2F%2Fpetbreeds.info/
http://images.google.com.pk/url?sa=t&url=http%3A%2F%2Fpetbreeds.info
http://cc.cgps.tn.edu.tw/dyna/netlink/hits.php?id=46&url=https://petbreeds.info/
http://cse.google.co.ma/url?sa=t&url=http%3A%2F%2Fpetbreeds.info%2F
http://clients1.google.ne/url?q=https://petbreeds.info/
http://cse.google.com.et/url?sa=t&url=http%3A%2F%2Fpetbreeds.info%2F
http://nou-rau.uem.br/nou-rau/zeus/auth.php?back=https%3A%2F%2Fpetbreeds.info%2F&go=x&code=x&unit=x
http://cc.naver.jp/cc?a=dtl.topic&r=&i=&bw=1024&px=0&py=0&sx=-1&sy=-1&m=1&nsc=knews.viewpage&u=https%3A%2F%2Fpetbreeds.info
http://images.google.com.mx/url?sa=t&url=http%3A%2F%2Fpetbreeds.info
http://cse.google.com.fj/url?sa=t&url=http%3A%2F%2Fpetbreeds.info%2F
http://a1.adform.net/C/?CC=1&bn=1015999%3Bc=1%3Bkw=Forex%20Trading%3Bcpdir=https://petbreeds.info/
http://alt1.toolbarqueries.google.com.br/url?q=https://petbreeds.info/
http://cse.google.com.hk/url?sa=t&url=http%3A%2F%2Fpetbreeds.info%2F
http://catalog.dir.bg/url.php?URL=https://petbreeds.info/
http://clients1.google.it/url?q=http%3A%2F%2Fpetbreeds.info/
http://counter.iflyer.tv/?trackid=gjt:1:&link=https://petbreeds.info/
http://alt1.toolbarqueries.google.co.vi/url?q=https://petbreeds.info/
http://admin.billoreilly.com/site/rd?satype=13&said=12&url=https://petbreeds.info/
http://clients1.google.mn/url?q=https%3A%2F%2Fpetbreeds.info
http://backlink.scandwap.xtgem.com/?id=IRENON&url=petbreeds.info
https://www.videoder.com/af/media?mode=2&url=http://petbreeds.info
http://ad.gunosy.com/pages/redirect?location=https://petbreeds.info/
http://pw.mail.ru/forums/fredirect.php?url=petbreeds.info
http://armoryonpark.org/?URL=https://petbreeds.info/
http://app.hamariweb.com/iphoneimg/large.php?s=https://petbreeds.info/
http://enseignants.flammarion.com/Banners_Click.cfm?ID=86&URL=petbreeds.info
http://decisoes.fazenda.gov.br/netacgi/nph-brs?d=DECW&f=S&l=20&n=-DTPE&p=10&r=3&s1=COANA&u=http%3A%2F%2Fpetbreeds.info
http://clients1.google.am/url?q=https://petbreeds.info/
http://www.transtats.bts.gov/exit.asp?url=https%3A%2F%2Fpetbreeds.info%2F
http://archive.aidsmap.com/Aggregator.ashx?url=https://petbreeds.info/
http://countrysideveterinaryhospital.vetstreet.com/https://petbreeds.info/
http://images.google.bg/url?sa=t&url=http%3A%2F%2Fpetbreeds.info
http://pl.grepolis.com/start/redirect?url=https%3A%2F%2Fpetbreeds.info%2F
https://www.google.ws/url?q=http://petbreeds.info/
http://banners.molbiol.ru/openx/www/delivery/ck.php?ct=1&oaparams=2__bannerid=552__zoneid=16__cb=70ec3bb20d__oadest=http%3a%2f%2fpetbreeds.info
http://archive.is/petbreeds.info
http://blogs.rtve.es/libs/getfirma_footer_prod.php?blogurl=http%3A%2F%2Fpetbreeds.info
http://asoechat.wap.sh/redirect?url=petbreeds.info
http://images.google.com.co/url?sa=t&url=http%3A%2F%2Fpetbreeds.info
http://cse.google.ch/url?sa=t&url=http%3A%2F%2Fpetbreeds.info%2F
http://classweb.fges.tyc.edu.tw:8080/dyna/webs/gotourl.php?url=https://petbreeds.info/
http://adms3.hket.com/openxprod2/www/delivery/ck.php?ct=1&oaparams=2__bannerid=527__zoneid=667__cb=72cbf61f88__oadest=https://petbreeds.info/
http://alt1.toolbarqueries.google.co.ls/url?q=https://petbreeds.info/
http://cse.google.bg/url?sa=t&url=http%3A%2F%2Fpetbreeds.info%2F
http://ijbssnet.com/view.php?u=https://petbreeds.info/2021/05/29/rwfeds/
http://affiliates.thelotter.com/aw.aspx?A=1&Task=Click&ml=31526&TargetURL=https://petbreeds.info/
http://777masa777.lolipop.jp/search/rank.cgi?mode=link&id=83&url=http%3a%2f%2fpetbreeds.info
http://images.google.com.my/url?sa=t&url=http%3A%2F%2Fpetbreeds.info
http://b.gnavi.co.jp/ad/no_cookie/b_link?loc=1002067&bid=100004228&link_url=http%3A%2F%2Fpetbreeds.info
http://www.drugoffice.gov.hk/gb/unigb/petbreeds.info
http://clients1.google.bj/url?sa=t&url=http%3A%2F%2Fpetbreeds.info
http://bizsearch.jhnewsandguide.com/__media__/js/netsoltrademark.php?d=petbreeds.info
http://adms.hket.com/openxprod2/www/delivery/ck.php?ct=1&oaparams=2__bannerid=6685__zoneid=2040__cb=dfaf38fc52__oadest=http%3a%2f%2fpetbreeds.info
http://es.chaturbate.com/external_link/?url=https%3A%2F%2Fpetbreeds.info
http://images.google.com.uy/url?sa=t&url=http%3A%2F%2Fpetbreeds.info%2F
https://cse.google.com/url?q=http://petbreeds.info/management.html
http://12.rospotrebnadzor.ru/action_plans/inspection/-/asset_publisher/iqO1/document/id/460270?_101_INSTANCE_iqO1_redirect=https://petbreeds.info/
http://bigoo.ws/__media__/js/netsoltrademark.php?d=petbreeds.info
https://www.raincoast.com/?URL=petbreeds.info
http://clients1.google.ci/url?q=https://petbreeds.info/
http://ref.webhostinghub.com/scripts/click.php?ref_id=nichol54&desturl=https://petbreeds.info/
http://web.stanford.edu/cgi-bin/redirect?dest=http%3A%2F%2Fpetbreeds.info
https://cse.google.tk/url?sa=t&url=http://petbreeds.info/
http://community.esri.com/external-link.jspa?url=https%3A%2F%2Fpetbreeds.info
http://www.google.com/url?sa=t&url=https%3A%2F%2Fpetbreeds.info
http://cse.google.com.kw/url?sa=t&url=http%3A%2F%2Fpetbreeds.info%2F
http://ads.specificmedia.com/click/v=5;m=2;l=23470;c=146418;b=874880;p=ui=ACXqoRFLEtwSFA;tr=DZeqTyQW0qH;tm=0-0;ts=20110427233838;dct=https://petbreeds.info/
http://alt1.toolbarqueries.google.co.id/url?q=https://petbreeds.info/
http://digital.fijitimes.com/api/gateway.aspx?f=https://petbreeds.info
http://rd.rakuten.co.jp/a/?R2=https%3A//petbreeds.info/
http://www3.valueline.com/vlac/logon.aspx?lp=https://petbreeds.info
http://bpx.bemobi.com/opx/5.0/OPXIdentifyUser?Locale=uk&SiteID=402698301147&AccountID=202698299566&ecid=KR5t1vLv9P&AccessToken=&RedirectURL=https://petbreeds.info/
http://www.economia.unical.it/prova.php?a%5B%5D=%3Ca+href%3Dhttps%3A%2F%2Fpetbreeds.info%2F
http://br.nate.com/diagnose.php?from=w&r_url=http%3A%2F%2Fpetbreeds.info
http://alt1.toolbarqueries.google.bj/url?q=https://petbreeds.info/
http://images.google.com.tw/url?sa=t&url=http%3A%2F%2Fpetbreeds.info%2F
https://www.xcelenergy.com/stateselector?stateselected=true&goto=http://petbreeds.info
http://www.film1.nl/zoek/?q=%22%2F%3E%3Ca+href%3D%22https%3A%2F%2Fpetbreeds.info%2F&sa=&cx=009153552854938002534%3Aaf0ze8etbks&ie=ISO-8859-1&cof=FORID%3
https://cse.google.com/url?sa=t&url=http://petbreeds.info/
http://clients1.google.co.il/url?sa=i&url=https%3A%2F%2Fpetbreeds.info
http://alt1.toolbarqueries.google.com.np/url?q=https://petbreeds.info/
http://images.google.com.vn/url?sa=t&url=http%3A%2F%2Fpetbreeds.info%2F
http://ads1.opensubtitles.org/1/www/delivery/afr.php?zoneid=3&cb=984766&query=One+Froggy+Evening&landing_url=https://petbreeds.info/
http://adrian.edu/?URL=https://petbreeds.info/
http://bidr.trellian.com/r.php?u=http%3A%2F%2Fpetbreeds.info
https://www.htcdev.com/?URL=petbreeds.info
http://aid97400.lautre.net/spip.php?action=cookie&url=https://petbreeds.info/
https://doterra.myvoffice.com/Application/index.cfm?&EnrollerID=604008&Theme=Default&ReturnUrl=http://petbreeds.info
http://images.google.com.mx/url?sa=t&url=http%3A%2F%2Fpetbreeds.info%2F
http://cse.google.cg/url?sa=t&url=http%3A%2F%2Fpetbreeds.info%2F
http://images.google.co.th/url?sa=t&url=http%3A%2F%2Fpetbreeds.info
http://clients1.google.gl/url?q=http%3A%2F%2Fpetbreeds.info
http://fftoolbox.fulltimefantasy.com/search.cfm?q=%22%2F%3E%3Ca+href%3D%22https%3A%2F%2Fpetbreeds.info%2F
http://images.google.com.bd/url?sa=t&url=http%3A%2F%2Fpetbreeds.info%2F
http://clients1.google.co.za/url?q=https://petbreeds.info/
http://cse.google.co.id/url?sa=t&url=http%3A%2F%2Fpetbreeds.info%2F
http://petbreeds.info.ipaddress.com/
http://cgi.davec.plus.com/cgi-bin/logs/loglink.cgi?https://petbreeds.info/
http://forms.bl.uk/newsletters/index.aspx?back=https%3A//petbreeds.info/
https://tour.catalinacruz.com/pornstar-gallery/puma-swede-face-sitting-on-cassie-young-lesbian-fun/?link=http://petbreeds.info/holostyak-stb-2021
http://www.youtube.com/redirect?q=https%3A%2F%2Fpetbreeds.info%2F
http://alt1.toolbarqueries.google.com.vc/url?q=https://petbreeds.info/
http://bulkmail.doh.state.fl.us/lt.php?c=102&m=144&nl=18&lid=922&l=https://petbreeds.info/
http://sc.sie.gov.hk/TuniS/petbreeds.info
http://images.google.cl/url?sa=t&url=http%3A%2F%2Fpetbreeds.info%2F
http://images.google.ae/url?sa=t&url=http%3A%2F%2Fpetbreeds.info%2F
http://alt1.toolbarqueries.google.tg/url?q=https://petbreeds.info/
http://images.google.com.ng/url?sa=t&url=http%3A%2F%2Fpetbreeds.info
http://images.google.fi/url?sa=t&url=http%3A%2F%2Fpetbreeds.info
http://cse.google.cl/url?sa=t&url=http%3A%2F%2Fpetbreeds.info%2F
http://images.google.com.vn/url?sa=t&url=http%3A%2F%2Fpetbreeds.info
http://cse.google.ad/url?sa=t&url=http%3A%2F%2Fpetbreeds.info%2F
https://partnerpage.google.com/url?sa=i&url=http://petbreeds.info/
http://clients1.google.tg/url?q=https%3A%2F%2Fpetbreeds.info
http://images.google.co.il/url?sa=t&url=http%3A%2F%2Fpetbreeds.info%2F
http://clients1.google.nu/url?q=https%3A%2F%2Fpetbreeds.info/
https://services.celemony.com/cgi-bin/WebObjects/LicenseApp.woa/wa/MCFDirectAction/link?linkId=1001414&stid=3463129&url=petbreeds.info/2021/05/29/rwfeds/
http://cse.google.co.zm/url?sa=t&url=http%3A%2F%2Fpetbreeds.info%2F
https://200-155-82-24.bradesco.com.br/conteudo/pessoa-fisica/popExt.aspx?url=http://petbreeds.info/2021/05/29/rwfeds/
http://a.twiago.com/adclick.php?tz=1473443342212991&pid=198&kid=2365&wmid=14189&wsid=65&uid=28&sid=3&sid2=2&swid=8950&ord=1473443342&target=https://petbreeds.info/
http://clients1.google.ee/url?q=https://petbreeds.info/
http://clients1.google.co.nz/url?sa=t&url=https%3A%2F%2Fpetbreeds.info
http://alt1.toolbarqueries.google.ac/url?q=https://petbreeds.info/
http://m.odnoklassniki.ru/dk?st.cmd=outLinkWarning&st.rfn=https%3A%2F%2Fpetbreeds.info
https://www.qscience.com/locale/redirect?redirectItem=http://petbreeds.info
http://cse.google.co.za/url?sa=t&url=http%3A%2F%2Fpetbreeds.info%2F
http://111.1gb.ru/go.php?https://petbreeds.info/
http://images.google.co.in/url?sa=t&url=http%3A%2F%2Fpetbreeds.info
http://alt1.toolbarqueries.google.com.my/url?q=https://petbreeds.info/
http://aqua21.jpn.org/lateequ/navi/navi.cgi?&mode=jump&id=6936&url=petbreeds.info
http://webmail.mawebcenters.com/parse.pl?redirect=https://petbreeds.info
http://alt1.toolbarqueries.google.cf/url?q=https://petbreeds.info/
http://cse.google.com.gh/url?sa=t&url=http%3A%2F%2Fpetbreeds.info%2F
https://www.google.bs/url?q=http://petbreeds.info/
http://as.inbox.com/AC.aspx?id_adr=262&link=https://petbreeds.info/
http://cse.google.com.do/url?sa=t&url=http%3A%2F%2Fpetbreeds.info%2F
http://www.cssdrive.com/?URL=petbreeds.info/holostyak-stb-2021
https://advtest.exibart.com/adv/adv.php?id_banner=7201&link=http://petbreeds.info/2021/05/29/rwfeds/
http://images.google.com.eg/url?sa=t&url=http%3A%2F%2Fpetbreeds.info%2F
http://ad.foxitsoftware.com/adlog.php?a=redirect&img=testad&url=petbreeds.info
http://chtbl.com/track/118167/petbreeds.info/
http://alt1.toolbarqueries.google.com.af/url?q=https://petbreeds.info/
https://maps.google.nu/url?q=http://petbreeds.info/
http://images.google.com.tw/url?sa=t&url=http%3A%2F%2Fpetbreeds.info
https://maps.google.ws/url?q=http://petbreeds.info/
http://action.metaffiliation.com/redir.php?u=https://petbreeds.info/
http://bons-plans-astuces.digidip.net/visit?url=http%3A%2F%2Fpetbreeds.info
http://crash-ut3.clan.su/go?https://petbreeds.info/
http://cse.google.co.cr/url?sa=t&url=http%3A%2F%2Fpetbreeds.info%2F
http://archives.richmond.ca/archives/descriptions/results.aspx?AC=SEE_ALSO&QF0=NameAccess&QI0==%22Currie%20McWilliams%20Camp%22&XC=http%3a%2f%2fpetbreeds.info&BU=https%3a%2f%2fcutepix.info%2fsex%2friley-reyes.php&TN=Descriptions&SN=AUTO19204&SE=1790&RN=2&MR=20&TR=0&TX=1000&ES=0&CS=0&XP=&RF=WebBrief&EF=&DF=WebFull&RL=0&EL=0&DL=0&NP=255&ID=&MF=GENERICENGWPMSG.INI&MQ=&TI=0&DT=&ST=0&IR=173176&NR=1&NB=0&SV=0&SS=0&BG=&FG=&QS=&OEX=ISO-8859-1&OEH=utf-8
http://plus.google.com/url?q=https%3A%2F%2Fpetbreeds.info%2F
https://www.horseillustrated.com/redirect.php?location=http://petbreeds.info
http://whois.domaintools.com/petbreeds.info
http://cse.google.com.kh/url?sa=t&url=http%3A%2F%2Fpetbreeds.info%2F
http://www.timeandtiming.com/?&URL=petbreeds.info
http://arhvak.minobrnauki.gov.ru/c/document_library/find_file_entry?p_l_id=17390&noSuchEntryRedirect=https://petbreeds.info/
https://posts.google.com/url?q=http://petbreeds.info/management.html
http://wtk.db.com/777554543598768/optout?redirect=https://petbreeds.info
http://images.google.ca/url?sa=t&url=http%3A%2F%2Fpetbreeds.info
http://app.feedblitz.com/f/f.fbz?track=petbreeds.info
http://nutritiondata.self.com/facts/recipe/1304991/2?mbid=HDFD&trackback=http%3A%2F%2Fwww.petbreeds.info
http://images.google.co.nz/url?sa=t&url=http%3A%2F%2Fpetbreeds.info%2F
http://alt1.toolbarqueries.google.is/url?q=https://petbreeds.info/
http://ts.videosz.com/out.php?cid=101&aid=102&nis=0&srid=392&url=https://petbreeds.info/
https://www.google.tk/url?q=http://petbreeds.info/
http://clients1.google.co.ao/url?q=https%3A%2F%2Fpetbreeds.info/
http://amaterasu.dojin.com/home/ranking.cgi?ti=%94%92%82%C6%8D%95%82%CC%94%FC%8Aw%81B&HP=http%3a%2f%2fpetbreeds.info&ja=3&id=19879&action=regist
http://www.astronet.ru/db/msusearch/index.html?q=%3Ca+href%3Dhttps%3A%2F%2Fpetbreeds.info%2F
http://images.google.com.sg/url?sa=t&url=http%3A%2F%2Fpetbreeds.info%2F
https://bugcrowd.com/external_redirect?site=http://petbreeds.info
http://biwa28.lolipop.jp/ys100/rank.cgi?mode=link&id=1290&url=https%3A%2F%2Fpetbreeds.info
http://fcaw.library.umass.edu/goto/https:/petbreeds.info
http://radio.cancaonova.com/iframe-loader/?t=DatingSingle:NoLongeraMystery-R�dio&ra=&url=https://petbreeds.info/2021/05/29/rwfeds/
https://cse.google.nr/url?sa=t&url=http://petbreeds.info/
http://clients1.google.gg/url?q=https%3A%2F%2Fpetbreeds.info
http://cse.google.bj/url?sa=t&url=http%3A%2F%2Fpetbreeds.info%2F
http://camiane.dmcart.gethompy.com/shop/bannerhit.php?bn_id=91&url=http%3a%2f%2fpetbreeds.info
https://www.relativitymedia.com/logout?redirect=//petbreeds.info/
http://anoushkabold.com/__media__/js/netsoltrademark.php?d=petbreeds.info
http://cse.google.com.cy/url?sa=t&url=http%3A%2F%2Fpetbreeds.info%2F
http://cse.google.am/url?sa=t&url=http%3A%2F%2Fpetbreeds.info%2F
https://www.meetme.com/apps/redirect/?url=http://petbreeds.info
http://cse.google.at/url?sa=t&url=http%3A%2F%2Fpetbreeds.info%2F
http://legacy.aom.org/verifymember.asp?nextpage=https%3A//petbreeds.info/
https://images.google.nu/url?q=http://petbreeds.info/
https://images.google.ws/url?q=http://petbreeds.info/
http://clients1.google.com.et/url?q=https%3A%2F%2Fpetbreeds.info
http://cse.google.bs/url?sa=t&url=http%3A%2F%2Fpetbreeds.info%2F
https://mitsui-shopping-park.com/lalaport/iwata/redirect.html?url=http://petbreeds.info/
https://www.barrypopik.com/index.php?URL=http://petbreeds.info
http://clients1.google.com.om/url?q=https://petbreeds.info/
http://bioinfo3d.cs.tau.ac.il/wk/api.php?action=https://petbreeds.info/
http://contacts.google.com/url?sa=t&url=http%3A%2F%2Fpetbreeds.info
http://sc.hkex.com.hk/gb/petbreeds.info
http://cse.google.com.bo/url?sa=t&url=http%3A%2F%2Fpetbreeds.info%2F
http://cse.google.co.nz/url?sa=t&url=http%3A%2F%2Fpetbreeds.info%2F
https://www.extremnews.com/nachrichten/standard/dereferrer.cfm?rurl=http://petbreeds.info/2021/05/29/rwfeds/
http://cse.google.co.ls/url?sa=t&url=http%3A%2F%2Fpetbreeds.info%2F
http://portal.novo-sibirsk.ru/dynamics.aspx?PortalId=2&WebId=8464c989-7fd8-4a32-8021-7df585dca817&PageUrl=%2FSitePages%2Ffeedback.aspx&Color=B00000&Source=https%3A%2F%2Fpetbreeds.info%2F
http://clients1.google.com.gh/url?q=https://petbreeds.info/
http://alt1.toolbarqueries.google.com.pe/url?q=https%3A%2F%2Fpetbreeds.info
http://clients1.google.jo/url?q=http%3A%2F%2Fpetbreeds.info
http://clients1.google.pn/url?q=https://petbreeds.info/
https://cse.google.nu/url?sa=t&url=http://petbreeds.info/
http://cse.google.ba/url?sa=t&url=http%3A%2F%2Fpetbreeds.info%2F
http://www.venez.fr/error.fr.html?id=1&uri=https%3A//petbreeds.info/
http://domain.opendns.com/petbreeds.info
http://alt1.toolbarqueries.google.com.ua/url?q=https://petbreeds.info/
http://alt1.toolbarqueries.google.be/url?q=https://petbreeds.info/
https://www.allergicliving.com/adspace/?mod=serve&act=clickthru&id=695&to=http://petbreeds.info/2021/05/29/rwfeds/
http://cse.google.com.bd/url?sa=t&url=http%3A%2F%2Fpetbreeds.info%2F
http://aborg.lib.ntu.edu.tw/ntuepaper/toModule.do?prefix=/publish&page=/newslist.jsp&uri=https://petbreeds.info/
http://alt1.toolbarqueries.google.pl/url?q=https://petbreeds.info/
http://images.google.fi/url?sa=t&url=http%3A%2F%2Fpetbreeds.info%2F
http://blawat2015.no-ip.com/~mieki256/diary/refsweep.cgi?url=https://petbreeds.info/
https://www.google.nu/url?q=http://petbreeds.info/
http://images.google.co.jp/url?sa=t&url=http%3A%2F%2Fpetbreeds.info%2F
https://www.dltk-teach.com/p.asp?p=http://petbreeds.info/2021/05/29/rwfeds/
http://images.google.co.id/url?sa=t&url=http%3A%2F%2Fpetbreeds.info
http://images.google.com.my/url?sa=t&url=http%3A%2F%2Fpetbreeds.info%2F
http://members.ascrs.org/sso/logout.aspx?returnurl=https://petbreeds.info/
http://closings.cbs6albany.com/scripts/adredir.asp?url=https://petbreeds.info/
http://images.google.co.th/url?sa=t&url=http%3A%2F%2Fpetbreeds.info%2F
http://alumni.drivers.informer.com/go/go.php?go=https://petbreeds.info/
http://uriu-ss.jpn.org/xoops/modules/wordpress/wp-ktai.php?view=redir&url=https%3A%2F%2Fpetbreeds.info
http://alt1.toolbarqueries.google.com.kw/url?q=https://petbreeds.info/
http://forum.solidworks.com/external-link.jspa?url=https%3A%2F%2Fpetbreeds.info
http://alt1.toolbarqueries.google.bf/url?q=https://petbreeds.info/
http://acf.poderjudicial.es/portal/site/cgpj/menuitem.65d2c4456b6ddb628e635fc1dc432ea0/?schema=http&title=Acuerdos+de+la+Comisi%C3%B3n+Permanente+del+CGPJ+de+17+de+julio+de+2018&vgnextoid=d94e58e4d849d210VgnVCM100000cb34e20aRCRD&vgnextlocale=gl&isSecure=false&vgnextfmt=default&protocolo=http&user=&url=http%3a%2f%2fpetbreeds.info&perfil=3
http://0845.boo.jp/cgi/mt3/mt4i.cgi?id=24&mode=redirect&no=15&ref_eid=3387&url=http%3A%2F%2Fpetbreeds.info
http://cse.google.co.kr/url?sa=t&url=http%3A%2F%2Fpetbreeds.info%2F
http://hostedmovieupdates.aebn.net/feed/?urlstub=petbreeds.info&
An outstanding share! I have just forwarded this onto
a friend who has been conducting a little homework on this.
And he in fact ordered me lunch due to the fact that I discovered it for him…
lol. So allow me to reword this…. Thanks for the meal!!
But yeah, thanx for spending time to discuss this topic
here on your site.
I like reading through an article that will make men and women think.
Also, thanks for allowing for me to comment!
Hi! I’ve been following your web site for some time now and finally got
the bravery to go ahead and give you a shout out
from Lubbock Texas! Just wanted to say keep up the excellent work!
[url=http://onlinepharmacy.monster/]internet pharmacy manitoba[/url]
I absolutely love your website.. Excellent
colors & theme. Did you make this website yourself? Please
reply back as I’m attempting to create my own website and want to know
where you got this from or what the theme is called.
Appreciate it!
cialis 120
prednisone online canada
You said that superbly.
custom research paper writing services paper writing service buy a paper for college order custom paper
phd paper dissertation writing help doctoral dissertation dissertation def
how to write a conclusion for a persuasive essay https://payforanessaysonline.com
Nicely put. Appreciate it.
essay writting i do my homework at night addit do my homework reddit do my homework i want to do my homework top college essay writing services undergraduate dissertation writing service essay service review startup business plan writing service student essay writing services
can i order cialis online in canada
buy viagra online
Hey! I’m at work browsing your blog from my new apple iphone!
Just wanted to say I love reading your blog and look forward
to all your posts! Keep up the excellent work!
plaquenil 5 mg
wellbutrin in mexico
international online pharmacy
No matter if some one searches for his vital thing, thus he/she wants to be available that in detail, thus
that thing is maintained over here.
ivermectin buy
It’s an remarkable piece of writing for all the internet people; they
will take advantage from it I am sure.
Thanks intended for providing these types of fantastic articles.
https://zhanlib.kz/
ivermectin nz
Wow, fantastic blog layout! How long have you been blogging
for? you make blogging look easy. The overall look of your
website is magnificent, let alone the content!
iԁ=”firstHeading” class=”firstHeading mw-first-heading”>Search гesults
Heⅼp
English
Toolks
Tools
mοve tо sidebar hide
Actions
General
buy prednisolone 25mg tablets
Thanks to my father who told me regarding this web site, this webpage is actually remarkable.
buy cheap prednisolone
Simply desire to say your article is as amazing. The clearness in your post is
just great and i could assume you are an expert on this subject.
Fine with your permission allow me to grab your RSS feed to keep updated
with forthcoming post. Thanks a million and please carry on the rewarding work.
Hi, its fastidious article regarding media print, we all
understand media is a wonderful source of information.
Detailing the security measures implemented by Candymail.org, this highlights
how the platform safeguards user data and prevents unauthorized access.
I was suggested this web site by my cousin. I’m not sure whether this post is written by him as no
one else know such detailed about my trouble.
You’re amazing! Thanks!
lasix tablets online
generic furosemide 40 mg
Very quickly this site will be famous amid all blogging viewers, due to it’s good articles
propecia prescription online
Hello to every body, it’s my first pay a visit of this website; this web site includes amazing and actually excellent data in support of readers.
I wish I hadn’t wasted my time and money on doxycycline hyclate 100mg for my urinary tract infection.
It’s hard to find educated people for this subject, however, you seem like you know what you’re talking about!
Thanks
augmentin pill
Its like you read my mind! You appear to know so much
about this, like you wrote the book in it or something.
I think that you could do with some pics to drive the message home a little bit, but instead of that,
this is wonderful blog. An excellent read. I’ll definitely
be back.
price of wellbutrin without insurance
I’m not sure exactly why but this website is loading incredibly slow for me.
Is anyone else having this issue or is it a issue
on my end? I’ll check back later on and see if the problem still exists.
ivermectin 18mg
Oh my goodness! Impressive article dude! Thank you so much, However I am having difficulties with your RSS.
I don’t know why I can’t join it. Is there anybody else getting similar RSS issues?
Anyone that knows the answer can you kindly respond?
Thanks!!
Doxycycline 20 mg is an affordable and effective option for treating acne.
nolvadex 20 mg price in india
buy sildenafil online paypal
cephalexin 500mg no prescription
I would like to thank you for the efforts you’ve put in writing this site.
I am hoping to check out the same high-grade blog posts from you
in the future as well. In fact, your creative writing abilities has encouraged me to get my own, personal blog now 😉
abcbizdirectory.com
Hi there excellent blog! Does running a blog such as this require a great deal of work?
I’ve virtually no expertise in computer programming but I was hoping to start my own blog in the near future.
Anyway, should you have any suggestions or
tips for new blog owners please share. I understand this is off subject however I simply had to ask.
Kudos!
Appreciate this post. Will try it out.
can you buy ventolin over the counter in uk
how much is finasteride
gabapentin 4000 mg
purchase propecia for sale
prednisone oral
how to get amoxicillin over the counter
Nicely put, Thank you.
will writing service essex college term papers buy custom research paper online need help with writing a research paper help with research papers essay writing service 12 hours what does concept and service mean when writing a paper best paper writing service free buy cheap paper free research paper writing service
best prices for estrace
prescription viagra cheap
how to order albuterol without a prescription
metformin brand name australia
best generic tadalafil
can i purchase cialis over the counter
stromectol order
furosemide 20 mg drug
sildenafil 100mg tablets canada
where to get clomid in south africa
safe canadian internet pharmacies
https://canadianpharmacyeasy.com/
canadian prescriptions
buy lisinopril 20 mg no prescription
amoxicillin usa
prednisolone cheap
can you buy diflucan over the counter
furosemide brand name australia
price for keflex 500mg
buy cheap doxycycline online
how much is prozac prescription
dexamethasone 0 75 mg
There is definately a lot to find out about this subject.
I like all of the points you made.
I’ve been surfing on-line more than 3 hours these days, yet I by no means found any fascinating article like yours.
It is beautiful price enough for me. In my
view, if all web owners and bloggers made just right content material as you did,
the net will probably be a lot more useful than ever before.
Very quickly this web site will be famous among all blogging and site-building viewers, due to
it’s nice articles or reviews
Please let me know if you’re looking for a writer
for your blog. You have some really great posts and I
think I would be a good asset. If you ever want to take
some of the load off, I’d absolutely love to write some material for your blog in exchange for a link back to mine.
Please shoot me an email if interested. Kudos!
This blog was… how do I say it? Relevant!! Finally I’ve found something which helped
me. Thanks a lot!
Wow, superb blog layout! How long have you been running a blog for?
you made running a blog glance easy. The whole glance of your website is great, let alone the
content material!
penis enlargement
I like looking through an article that can make people think.
Also, thank you for allowing me to comment!
I think the admin of this site is in fact working hard for his web page,
as here every stuff is quality based information.
I pay a quick visit every day some web sites and
blogs to read posts, however this weblog presents quality based articles.
Hello there, just became alert to your blog through Google, and
found that it’s truly informative. I am going to watch out for brussels.
I will appreciate if you continue this in future. Lots
of people will be benefited from your writing. Cheers!
buy valacyclovir without a prescription
It’s the best time to make some plans for the future and it
is time to be happy. I have read this post and if I could I want to
suggest you few interesting things or tips. Perhaps you could write next articles referring to this article.
I wish to read more things about it!
doxycycline 50 mg price
Admiring the timе and energy үou put into yoyr site and in depth іnformation yoᥙ рresent.
Ιt’s gooⅾ to сome acroѕs а blog every once in a while that
isn’t thee same outdated rehbashed material.
Excellent гead! I’ve bookmarked үοur site and I’m adding your RSS feeds tto my Googble account.
I think that is one of the such a lot vital info for me. And i am
satisfied studying your article. However want to observation on some normal issues, The web site
style is great, the articles is really great : D. Excellent process,
cheers
zovirax brand name
I all the time emailed this website post page to all
my friends, as if like to read it then my links will
too.
buy prednisolone 40 mg
http://afcantarelle.org/index.php?title=Edu_Blog_960
http://afcantarelle.org/index.php?title=User:Irtekno195
http://classicalmusicmp3freedownload.com/ja/index.php?title=%E5%88%A9%E7%94%A8%E8%80%85:Irtekno218
http://classicalmusicmp3freedownload.com/ja/index.php?title=Edu_Blog_1815
http://embeddedwiki.cs.aau.dk/wiki/Edu_Blog_1993
http://embeddedwiki.cs.aau.dk/wiki/User_talk:Irtekno116
http://kousokuwiki.org/wiki/Edu_Blog_2149
http://nswiki.svenskasuperserier.se/w/index.php?title=Edu_Blog_1234
http://postgasse.net/Wiki/index.php?title=Benutzer:Irtekno38e
http://postgasse.net/Wiki/index.php?title=Edu_Blog_2962
http://tironelle.free.fr/wiki/index.php?title=Edu_Blog_2735
http://tironelle.free.fr/wiki/index.php?title=Utilisateur:Irtekno137
http://urbino.fh-joanneum.at/trials/index.php/Edu_Blog_2627
http://urbino.fh-joanneum.at/trials/index.php/User:Irtekno38n
http://vulteevaliant.com/index.php/Edu_Blog_1833
http://vulteevaliant.com/index.php/User:Irtekno298
http://wiki-ux.info/wiki/Edu_Blog_2737
http://wiki-ux.info/wiki/User:Irtekno32g
http://wiki.edomex.cinvestav.mx/index.php/Usuario:Irtekno242
http://wiki.monashicpc.com/Edu_Blog_2675
http://wiki.monashicpc.com/User:Irtekno132
http://wiki.shitcore.org/index.php/Edu_Blog_697
http://wiki.shitcore.org/index.php/User:Irtekno234
http://www.driftpedia.com/wiki/index.php/Edu_Blog_675
http://www.driftpedia.com/wiki/index.php/User:Irtekno200
http://www.erwinbrandenberger.ch/index.php?title=Benutzer:Irtekno194
http://www.erwinbrandenberger.ch/index.php?title=Edu_Blog_2306
http://www.jeromebaray.com/afm/wiki/index.php/Edu_Blog_231
http://www.jeromebaray.com/afm/wiki/index.php/Utilisateur:Irtekno179
http://www.matthew-morris.com/wiki/index.php/Edu_Blog_2349
http://www.matthew-morris.com/wiki/index.php/User:Irtekno81v
http://www.wiki.cheneliege.fr/index.php/Edu_Blog_1434
http://www.wiki.cheneliege.fr/index.php/Utilisateur:Irtekno84t
http://www.zilahy.info/wiki/index.php/Edu_Blog_2851
http://www.zilahy.info/wiki/index.php/User:Irtekno219
https://bbarlock.com/index.php/Edu_Blog_576
https://bbarlock.com/index.php/User:Irtekno49b
https://biowiki.clinomics.com/index.php/Edu_Blog_1071
https://biowiki.clinomics.com/index.php/User:Irtekno95z
https://demo.centreon.com/wiki/index.php?title=Edu_Blog_1980
https://demo.centreon.com/wiki/index.php?title=User:Irtekno117
https://exterior.podemos.info/mediawiki/index.php?title=Edu_Blog_2706
https://exterior.podemos.info/mediawiki/index.php?title=Usuario:Irtekno25x
https://gamesfashionarchive.net/wiki/User:Irtekno266
https://gnometopia.org/index.php?title=Edu_Blog_2682
https://iamelf.com/wiki/index.php/Edu_Blog_1224
https://iamelf.com/wiki/index.php/User:Irtekno126
https://intranet.wikimedia.cat/wiki/Usuari:Irtekno168
https://jael.info/CEL/index.php/Edu_Blog_1419
https://jael.info/CEL/index.php/User:Irtekno198
https://koloiko.com/wiki/index.php?title=Edu_Blog_407
https://koloiko.com/wiki/index.php?title=User:Irtekno283
https://library.kemu.ac.ke/kemuwiki/index.php/Edu_Blog_1280
https://library.kemu.ac.ke/kemuwiki/index.php/User:Irtekno89n
https://livingbooksaboutlife.org/books/Edu_Blog_1333
https://livingbooksaboutlife.org/books/User:Irtekno200
https://mediawiki.governancaegestao.wiki.br/index.php/Edu_Blog_562
https://mediawiki.governancaegestao.wiki.br/index.php/User:Irtekno255
https://mnwiki.org/index.php/Edu_Blog_2946
https://mnwiki.org/index.php/User:Irtekno163
https://procesal.cl/index.php/Edu_Blog_256
https://procesal.cl/index.php/User:Irtekno23p
https://religiopedia.com/index.php/Edu_Blog_1631
https://religiopedia.com/index.php/User:Irtekno67c
https://sustainabilipedia.org/index.php/Edu_Blog_1471
https://sustainabilipedia.org/index.php/User:Irtekno112
https://thewillistree.info/genealogy/wiki/Edu_Blog_662
https://thewillistree.info/genealogy/wiki/User:Irtekno290
https://wiki.cephalix.eu/index.php/Benutzer:Irtekno299
https://wiki.geocaching.waw.pl/index.php?title=Edu_Blog_1004
https://wiki.geocaching.waw.pl/index.php?title=U%C5%BCytkownik:Irtekno90c
https://wiki.hrw-fablab.de/index.php?title=Edu_Blog_2466
https://wiki.hrw-fablab.de/index.php?title=User:Irtekno170
https://wiki.minecraft.jp.net/%E5%88%A9%E7%94%A8%E8%80%85:Irtekno281
https://wiki.minecraft.jp.net/Edu_Blog_797
https://wiki.renew-platforms.dk/index.php?title=Edu_Blog_1437
https://wiki.renew-platforms.dk/index.php?title=User:Irtekno193
https://wiki.ryuriin.my.id/index.php/Edu_Blog_432
https://wiki.ryuriin.my.id/index.php/User:Irtekno246
https://www.crustcorporate.com/wiki/Edu_Blog_2292
https://www.crustcorporate.com/wiki/User:Irtekno53m
https://www.mibtec.it/wiki/index.php?title=Edu_Blog_1671
https://www.mibtec.it/wiki/index.php?title=Utente:Irtekno99a
https://www.offwiki.org/wiki/Edu_Blog_2976
https://www.offwiki.org/wiki/User:Irtekno147
https://www.wiki.pcfu.cz/index.php/Edu_Blog_2337
https://www.wiki.pcfu.cz/index.php/U%c5%beivatel:Irtekno96k
http://afcantarelle.org/index.php?title=Edu_Blog_1143
http://afcantarelle.org/index.php?title=User:Irtekno107
http://classicalmusicmp3freedownload.com/ja/index.php?title=%E5%88%A9%E7%94%A8%E8%80%85:Irtekno127
http://classicalmusicmp3freedownload.com/ja/index.php?title=Edu_Blog_630
http://embeddedwiki.cs.aau.dk/wiki/Edu_Blog_2119
http://embeddedwiki.cs.aau.dk/wiki/User:Irtekno106
http://kousokuwiki.org/wiki/Edu_Blog_883
http://lsc.wikisign.org/wiki/Usuari_Discussi%C3%B3:Irtekno300
http://postgasse.net/Wiki/index.php?title=Benutzer:Irtekno94l
http://postgasse.net/Wiki/index.php?title=Edu_Blog_2426
http://terio.fvet.uba.ar/mediawiki/index.php/Edu_Blog_1034
http://terio.fvet.uba.ar/mediawiki/index.php/Usuario:Irtekno199
http://urbino.fh-joanneum.at/trials/index.php/Edu_Blog_2784
http://urbino.fh-joanneum.at/trials/index.php/User:Irtekno227
http://vulteevaliant.com/index.php/Edu_Blog_1517
http://vulteevaliant.com/index.php/User:Irtekno74w
http://wiki-ux.info/wiki/Edu_Blog_1629
http://wiki-ux.info/wiki/User:Irtekno274
http://wiki.jdata.it/index.php/Edu_Blog_2745
http://wiki.jdata.it/index.php/User:Irtekno143
http://wiki.monashicpc.com/Edu_Blog_1100
http://wiki.monashicpc.com/User:Irtekno114
http://www.driftpedia.com/wiki/index.php/Edu_Blog_1727
http://www.driftpedia.com/wiki/index.php/User:Irtekno12y
http://www.erwinbrandenberger.ch/index.php?title=Benutzer:Irtekno244
http://www.erwinbrandenberger.ch/index.php?title=Edu_Blog_1779
http://www.heerfamily.net/mediawiki/index.php/User:Irtekno225
http://www.jeromebaray.com/afm/wiki/index.php/Edu_Blog_1123
http://www.jeromebaray.com/afm/wiki/index.php/Utilisateur:Irtekno18o
http://www.matthew-morris.com/wiki/index.php/Edu_Blog_2007
http://www.matthew-morris.com/wiki/index.php/User:Irtekno85z
http://www.nishikigoi.fr/index.php?title=Edu_Blog_2523
http://www.nishikigoi.fr/index.php?title=Utilisateur:Irtekno30d
http://www.zilahy.info/wiki/index.php/Edu_Blog_1789
http://www.zilahy.info/wiki/index.php/User:Irtekno207
https://audiwiki.bitt-c.at/index.php?title=Benutzer:Irtekno169
https://bbarlock.com/index.php/Edu_Blog_600
https://bbarlock.com/index.php/User:Irtekno292
https://biowiki.clinomics.com/index.php/Edu_Blog_1535
https://biowiki.clinomics.com/index.php/User:Irtekno114
https://demo.centreon.com/wiki/index.php?title=Edu_Blog_2683
https://demo.centreon.com/wiki/index.php?title=User:Irtekno257
https://exterior.podemos.info/mediawiki/index.php?title=Edu_Blog_334
https://exterior.podemos.info/mediawiki/index.php?title=Usuario:Irtekno280
https://gamesfashionarchive.net/wiki/User:Irtekno209
https://gnometopia.org/index.php?title=Edu_Blog_2636
https://help.ezadspro.co.uk/index.php?title=User:Irtekno167
https://iamelf.com/wiki/index.php/Edu_Blog_2604
https://iamelf.com/wiki/index.php/User:Irtekno203
https://intranet.wikimedia.cat/wiki/Usuari:Irtekno35s
https://jael.info/CEL/index.php/Edu_Blog_1630
https://jael.info/CEL/index.php/User:Irtekno171
https://library.kemu.ac.ke/kemuwiki/index.php/Edu_Blog_1678
https://library.kemu.ac.ke/kemuwiki/index.php/User:Irtekno154
https://livingbooksaboutlife.org/books/Edu_Blog_2583
https://livingbooksaboutlife.org/books/User:Irtekno150
https://mediawiki.governancaegestao.wiki.br/index.php/Edu_Blog_852
https://mediawiki.governancaegestao.wiki.br/index.php/User:Irtekno189
https://mnwiki.org/index.php/Edu_Blog_1293
https://mnwiki.org/index.php/User:Irtekno168
https://sustainabilipedia.org/index.php/Edu_Blog_487
https://sustainabilipedia.org/index.php/User:Irtekno295
https://thewillistree.info/genealogy/wiki/Edu_Blog_1479
https://thewillistree.info/genealogy/wiki/User:Irtekno33i
https://wiki.geocaching.waw.pl/index.php?title=Edu_Blog_2156
https://wiki.geocaching.waw.pl/index.php?title=U%C5%BCytkownik:Irtekno28s
https://wiki.hrw-fablab.de/index.php?title=Edu_Blog_1276
https://wiki.hrw-fablab.de/index.php?title=User:Irtekno77r
https://wiki.itcoug.com/index.php?title=Usuario:Irtekno203
https://wiki.minecraft.jp.net/%E5%88%A9%E7%94%A8%E8%80%85:Irtekno256
https://wiki.minecraft.jp.net/Edu_Blog_2338
https://wiki.renew-platforms.dk/index.php?title=Edu_Blog_207
https://wiki.renew-platforms.dk/index.php?title=User:Irtekno273
https://wiki.sports-5.ch/index.php?title=Edu_Blog_2485
https://wiki.sports-5.ch/index.php?title=Utilisateur:Irtekno201
https://www.offwiki.org/wiki/Edu_Blog_855
https://www.offwiki.org/wiki/User:Irtekno272
https://www.wiki.pcfu.cz/index.php/Edu_Blog_1009
https://www.wiki.pcfu.cz/index.php/U%c5%beivatel:Irtekno121
http://afcantarelle.org/index.php?title=Edu_Blog_2709
http://afcantarelle.org/index.php?title=User:Irtekno100
http://classicalmusicmp3freedownload.com/ja/index.php?title=%E5%88%A9%E7%94%A8%E8%80%85:Irtekno170
http://classicalmusicmp3freedownload.com/ja/index.php?title=Edu_Blog_2819
http://embeddedwiki.cs.aau.dk/wiki/Edu_Blog_1714
http://embeddedwiki.cs.aau.dk/wiki/User_talk:Irtekno287
http://lsc.wikisign.org/wiki/Usuari_Discussi%C3%B3:Irtekno284
http://postgasse.net/Wiki/index.php?title=Benutzer:Irtekno213
http://postgasse.net/Wiki/index.php?title=Edu_Blog_1785
http://tironelle.free.fr/wiki/index.php?title=Edu_Blog_844
http://tironelle.free.fr/wiki/index.php?title=Utilisateur:Irtekno146
http://urbino.fh-joanneum.at/trials/index.php/Edu_Blog_2508
http://urbino.fh-joanneum.at/trials/index.php/User:Irtekno215
http://vulteevaliant.com/index.php/Edu_Blog_1556
http://vulteevaliant.com/index.php/User:Irtekno274
http://wiki-ux.info/wiki/Edu_Blog_832
http://wiki-ux.info/wiki/User:Irtekno64r
http://wiki.edomex.cinvestav.mx/index.php/Usuario:Irtekno17z
http://wiki.jdata.it/index.php/Edu_Blog_1361
http://wiki.jdata.it/index.php/User:Irtekno195
http://wiki.monashicpc.com/Edu_Blog_2760
http://wiki.monashicpc.com/User:Irtekno231
http://www.driftpedia.com/wiki/index.php/Edu_Blog_254
http://www.driftpedia.com/wiki/index.php/User:Irtekno103
http://www.erwinbrandenberger.ch/index.php?title=Benutzer:Irtekno91u
http://www.erwinbrandenberger.ch/index.php?title=Edu_Blog_1710
http://www.heerfamily.net/mediawiki/index.php/Edu_Blog_2298
http://www.jeromebaray.com/afm/wiki/index.php/Edu_Blog_1044
http://www.jeromebaray.com/afm/wiki/index.php/Utilisateur:Irtekno153
http://www.matthew-morris.com/wiki/index.php/Edu_Blog_2492
http://www.matthew-morris.com/wiki/index.php/User:Irtekno156
http://www.zilahy.info/wiki/index.php/Edu_Blog_944
http://www.zilahy.info/wiki/index.php/User:Irtekno254
https://bbarlock.com/index.php/Edu_Blog_1154
https://bbarlock.com/index.php/User:Irtekno109
https://biowiki.clinomics.com/index.php/Edu_Blog_451
https://biowiki.clinomics.com/index.php/User:Irtekno151
https://demo.centreon.com/wiki/index.php?title=Edu_Blog_1879
https://demo.centreon.com/wiki/index.php?title=User:Irtekno77j
https://exterior.podemos.info/mediawiki/index.php?title=Edu_Blog_1430
https://exterior.podemos.info/mediawiki/index.php?title=Usuario:Irtekno73x
https://gamesfashionarchive.net/wiki/User:Irtekno43h
https://gnometopia.org/index.php?title=Edu_Blog_484
https://iamelf.com/wiki/index.php/Edu_Blog_2540
https://iamelf.com/wiki/index.php/User:Irtekno68s
https://intranet.wikimedia.cat/wiki/Edu_Blog_506
https://library.kemu.ac.ke/kemuwiki/index.php/Edu_Blog_2392
https://livingbooksaboutlife.org/books/Edu_Blog_1506
https://livingbooksaboutlife.org/books/User:Irtekno282
https://mediawiki.governancaegestao.wiki.br/index.php/Edu_Blog_274
https://mediawiki.governancaegestao.wiki.br/index.php/User:Irtekno184
https://mnwiki.org/index.php/Edu_Blog_1718
https://mnwiki.org/index.php/User:Irtekno114
https://sustainabilipedia.org/index.php/Edu_Blog_748
https://sustainabilipedia.org/index.php/User:Irtekno208
https://symbolonline.eu/index.php?title=Benutzer:Irtekno99s
https://thewillistree.info/genealogy/wiki/User:Irtekno19e
https://wiki.geocaching.waw.pl/index.php?title=Edu_Blog_2683
https://wiki.geocaching.waw.pl/index.php?title=U%C5%BCytkownik:Irtekno112
https://wiki.hrw-fablab.de/index.php?title=Edu_Blog_1976
https://wiki.hrw-fablab.de/index.php?title=User:Irtekno40v
https://wiki.minecraft.jp.net/%E5%88%A9%E7%94%A8%E8%80%85:Irtekno299
https://wiki.minecraft.jp.net/Edu_Blog_1300
https://wiki.renew-platforms.dk/index.php?title=Edu_Blog_1233
https://wiki.renew-platforms.dk/index.php?title=User:Irtekno151
https://wiki.sports-5.ch/index.php?title=Edu_Blog_1700
https://wiki.sports-5.ch/index.php?title=Utilisateur:Irtekno75u
https://www.crustcorporate.com/wiki/Edu_Blog_1781
https://www.crustcorporate.com/wiki/User:Irtekno196
https://www.offwiki.org/wiki/Edu_Blog_1205
https://www.wiki.pcfu.cz/index.php/Edu_Blog_2573
https://www.wiki.pcfu.cz/index.php/U%c5%beivatel:Irtekno195
https://ajk.wxw.mybluehost.me/community/profile/dalegallo394055/
https://antalyatropik.com/index.php/forum/profile/shayneharmon704/
https://antalyatropik.com/index.php/forum/profile/wilbur00z97549/
https://antalyatropik.com/index.php/forum/profile/xpaleif85171116/
https://dadstreamer.com/community/profile/bettevaux66358/
https://diseven.com.co/es/community/profile/declanmitchel32/
https://diseven.com.co/es/community/profile/marilout1089277/
https://diseven.com.co/es/community/profile/tamaraschuhmach/
https://grailoftheserpent-forum.com/community/profile/niamhgranville/
https://millionwaystogetit.com/community/profile/ralphlamar88086/
https://sawomenfightback.com/community/profile/rebbecap4026501/
https://www.kalpnatayal.com/forum/community/profile/audreyguerard3/
https://www.karshakamitram.in/community/profile/sherrylmilburn5/
https://www.karshakamitram.in/community/profile/wzcstacey758924/
https://cripptic.com/community/profile/jaifby887540563/
https://diseven.com.co/es/community/profile/brainsouthard6/
https://diseven.com.co/es/community/profile/isidrosparks842/
https://millionwaystogetit.com/community/profile/willismarx01680/
https://sandangels.us/sand/profile/libbylangler81/
https://sandangels.us/sand/profile/lisaescobedo95/
https://sawomenfightback.com/community/profile/brooksihd538668/
https://sawomenfightback.com/community/profile/loydm4292667071/
https://welcomeship.org/community/profile/leonellefanu106/
https://www.karshakamitram.in/community/profile/martianderton67/
https://www.revivalwaves.org/got-a-question/profile/edythekellett5/
https://www.revivalwaves.org/got-a-question/profile/erikkaz15313623/
cost of prednisolone
Hello there! I know this is somewhat off topic but I was wondering
which blog platform are you using for this site?
I’m getting fed up of WordPress because I’ve had problems with hackers and I’m looking at alternatives
for another platform. I would be awesome if you
could point me in the direction of a good platform.
I’m impressed, I have to admit. Rarely do I encounter
a blog that’s both equally educative and interesting, and let me tell you, you’ve hit the nail on the head.
The problem is an issue that too few people are speaking intelligently about.
I’m very happy that I stumbled across this during
my search for something relating to this.
These are just a few of the more frequent sorts of CPA offers out there.
There’s Much more To What The Nyc Certified Public Accountant Offers!
IQEX is an acronym for the International Uniform Certified Public Accountant Qualification Examination and is
sometimes referred to as the U.S. The International Uniform Certified Public Accountant Qualification Examination (IQEX) must be completed in 4.5 hours or less.
Second, your keywords have to be actual matches. Keywords that are
very interesting will drive traffic in your website. This is utilized by affiliate marketer to drive traffic on their web sites.
More potential consumers will come once you
drive traffic to your web site and that may make you earn cash.
The neatest thing you can do is to seek out a web site
that may generates visitors on your website and will focus on your hyperlinks.
Second, is to start building up track links and analysis to
know where you’ll be able to put your hyperlinks. Building a report isn’t that troublesome, relying on the
topic you may make a PDF doc in about two hrs of research. One of the best ways to ensure your leads flip into purchasers is by building trust.
On the crux of all that we do, we aim for quantitative results – however alongside the way
we fail to see the importance of forecasting and goal analysis in advertising
and marketing – that connects back to the end aim.
Can you recommend a reliable source to buy doxycycline for dogs?
Fantastic site you have here but I was wondering if you knew of any message boards that
cover the same topics discussed in this article?
I’d really love to be a part of community where I can get suggestions from other experienced individuals that share the same interest.
If you have any recommendations, please let me know. Many thanks!
Just wish to say your article is as astonishing. The clarity in your post is just cool and
i could assume you are an expert on this subject. Well with your permission allow me to grab your RSS feed to
keep updated with forthcoming post. Thanks a million and please continue the rewarding work.
My partner and I absolutely love your blog and find almost all of your post’s
to be just what I’m looking for. can you offer guest
writers to write content to suit your needs? I wouldn’t mind publishing
a post or elaborating on a lot of the subjects you write about
here. Again, awesome weblog!
I think that what you published made a great deal of sense.
But, think on this, suppose you were to write a killer headline?
I am not saying your content isn’t good., however suppose you added a
title that grabbed people’s attention? I mean Before and After Archives – Precious Stones
Photography is a little vanilla. You ought to peek at Yahoo’s home page and note how they create news headlines to grab people to click.
You might try adding a video or a related picture or two to
grab readers interested about what you’ve
written. Just my opinion, it could make your posts a little bit more interesting.
Hello, i read your blog occasionally and i own a similar one and i was just curious if you get a lot of spam comments?
If so how do you prevent it, any plugin or anything you can recommend?
I get so much lately it’s driving me mad so any support is very much appreciated.
I pay a visit day-to-day a few web pages and websites to read posts,
however this webpage presents quality based articles.
I visited many web sites however the audio feature for audio songs current
at this site is actually fabulous.
neurontin price australia
I always used to study paragraph in news papers but now
as I am a user of internet so from now I am using net for
content, thanks to web.
I loved as much as you’ll receive carried out right here. The sketch is attractive, your authored material stylish.
nonetheless, you command get bought an shakiness over that you wish be delivering the following.
unwell unquestionably come more formerly again as exactly
the same nearly very often inside case you shield
this hike.
Greetings! Very useful advice within this post! It is the little changes that
make the greatest changes. Thanks for sharing!
Having read this I thought it was really informative.
I appreciate you taking the time and energy to put this short article together.
I once again find myself spending a significant amount of time both reading and commenting.
But so what, it was still worth it!
Does your website have a contact page? I’m having problems
locating it but, I’d like to shoot you an email. I’ve got some suggestions
for your blog you might be interested in hearing.
Either way, great blog and I look forward to seeing it grow over
time.
We are a group of volunteers and starting a new scheme in our
community. Your website offered us with valuable information to work
on. You’ve done a formidable job and our entire community will be grateful to you.
I have been browsing online greater than 3 hours
these days, but I never found any attention-grabbing article like yours.
It’s beautiful price sufficient for me. In my opinion, if all webmasters and bloggers made
excellent content material as you did, the web will likely be a lot more useful
than ever before.
If some one wants to be updated with latest technologies therefore he
must be visit this site and be up to date everyday.
Online poker
Hi, i feel that i saw you visited my site thus
i got here to go back the desire?.I’m attempting to find things to enhance my
web site!I suppose its good enough to use some of your ideas!!
This is a topic that is close to my heart… Best wishes!
Exactly where are your contact details though?
Hi there colleagues, its wonderful paragraph concerning educationand entirely
defined, keep it up all the time.
I was wondering if you ever thought of changing the structure of your site?
Its very well written; I love what youve got to say.
But maybe you could a little more in the way of content so people
could connect with it better. Youve got an awful lot of text for only having one or two images.
Maybe you could space it out better?
This is my first time pay a quick visit at
here and i am in fact pleassant to read all at single place.
Your style is very unique compared to other folks I have read stuff from.
Thanks for posting when you’ve got the opportunity, Guess I will just bookmark this page.
Thanks pertaining to offering such terrific information.
https://swiony.pl/
Have you ever considered about including a little bit more than just your articles?
I mean, what you say is fundamental and all.
However just imagine if you added some great pictures
or videos to give your posts more, “pop”! Your content
is excellent but with pics and video clips, this site could certainly be one of the most beneficial in its niche.
Good blog!
Pretty! Τhіs waѕ an extremely wonderful article. Tһanks for providing this info.
slot gacor
I don’t know whether it’s just me or if everyone else encountering problems with your blog.
It seems like some of the written text in your content are running off
the screen. Can someone else please provide feedback and let me know if this is happening to them too?
This may be a issue with my internet browser
because I’ve had this happen before. Appreciate it
Hi just wanted to give you a quick heads up and
let you know a few of the pictures aren’t loading properly.
I’m not sure why but I think its a linking issue.
I’ve tried it in two different browsers and
both show the same outcome.
Woah! I’m really enjoying the template/theme
of this blog. It’s simple, yet effective. A
lot of times it’s tough to get that “perfect balance” between usability
and visual appeal. I must say you’ve done a great job with this.
Additionally, the blog loads super fast for me on Safari.
Superb Blog!
lasix canada no prescription
It’s going to be finish of mine day, but before finish I am reading this enormous piece of writing to increase my experience.
[url=https://sites.google.com/view/stmracingudonthani/%E0%B8%AB%E0%B8%99%E0%B8%B2%E0%B9%81%E0%B8%A3%E0%B8%81]อู่ซ่อมรถอุดร[/url]
คันเร่งไฟฟ้าราคาถูก
samson adebowale marketing-seo
35 ladipo latinwo
lagos nigeria
+234 9073908225
phentermine clinics near me
These are actually great ideas in on the topic of blogging.
You have touched some nice factors here. Any way keep up
wrinting.
Pretty nice post. I just stumbled upon your weblog and wished to say that I have really enjoyed surfing around your blog
posts. After all I will be subscribing to your rss feed and I hope you write again very soon! [url=https://medium.com/]รีแมพ[/url]
อู่ซ่อมรถอุดร
It is appropriate time to make some plans for the future and it is time to be happy.
I have read this post and if I could I desire to suggest you few interesting things or
advice. Perhaps you can write next articles referring to this
article. I desire to read even more things about it!
powered by GoToTop.ee
https://ru.gototop.ee/
Usually I don’t read article on blogs, but I wish to say that this write-up very
pressured me to take a look at and do it! Your writing style has been amazed me.
Thank you, quite great post.
I don’t even know how I ended up here, but I thought this post was good.
I do not know who you are but definitely you’re going to a famous blogger if
you are not already 😉 Cheers!
I have read so many content concerning the blogger lovers except this article is truly a nice article, keep it up.
Hi there, yeah this post is actually good and I have learned lot of things
from it on the topic of blogging. thanks.
Hello it’s me, I am also visiting this site daily, this web
site is truly fastidious and the people are actually sharing nice thoughts.
Website Judi Slot Online Terpercaya Legal Di Indonesia
Situsslot777 merupakan website judi slot online terpercaya di indonesia yang sudah melayani ribuan anggota setiap hari nya. Sebagai web judi online terpercaya di Indonesia kami sediakan layanan deposit melewati pulsa untuk mempermudah pemain bagi yang tak mempunyai rekening. Tak cuma itu anda juga bisa memakai aplikasi E-wallet untuk melaksanakan deposit seperti Ovo, Gopay, Dana dan Linkaja. Bermacam permainan dalam 1 user id dapat anda mainkan dengan mudah seperti judi bola, casino online dan idn live poker online.
Setelah perilisan pada tahun 2020 laman kami terus berkembang dalam dunia web Perjudian online di Indonesia. Kami juga memberikan pelayanan terbaik terhadap anggota – anggota kami 24 jam full nonstop. Bagi kalian pemain baru kami memberikan bonus promo deposit untuk pemain yang bermain slot online. Layanan bank lokal ternama kami sediakan untuk memudahkan proses deposit anda jauh lebih mudah dan pesat.
Kami selalu mengutamakan kwalitas daya kerja mesin slot kami agar tetap dapat dimainkan dengan nyaman dan lancar tanpa adanya gangguan error atau kerusakan apapun.
Have a look at my webpage :: https://dewaslot777.online/
Excellent goods from you, man. I have understand
your stuff previous to and you’re just too excellent.
I really like what you’ve acquired here, really like what you’re saying and
the way in which you say it. You make it entertaining and you still take care of to keep it sensible.
I cant wait to read far more from you. This is actually a great site.
slot88
furosemide 10 mg tablet
After going over a number of the articles on your site, I seriously appreciate your technique of blogging.
I book-marked it to my bookmark website list and will be
checking back soon. Please visit my web site too
and let me know what you think.
Hmm is anyone else having problems with the images on this blog
loading? I’m trying to find out if its a problem on my end or if it’s the blog.
Any feedback would be greatly appreciated.
Yoᥙ also don’t have tthe pain associated with surgery.
One concern that people һave iis that the salary іs nnot very high.
It excites us ɑnd plays wіtһ our emotions – witһ fear being ᧐ne of our most sіgnificant.
slot gacor
Simply want to say your article is as astounding.
The clearness to your post is just great and i can suppose you are knowledgeable
in this subject. Well together with your permission let me to grasp your feed to stay up to date with forthcoming post.
Thanks 1,000,000 and please keep up the enjoyable work.
I’m not that much of a online reader to be honest
but your blogs really nice, keep it up! I’ll go ahead and bookmark your website to come back later.
Cheers
I read this paragraph completely about the comparison of most up-to-date and previous technologies, it’s awesome article.
https://gamesofcj.blogspot.com
https://gamesofcuj.blogspot.com
https://gamesofdy.blogspot.com
https://gamesofjsb.blogspot.com
https://gamesoflegal.blogspot.com
hello!,I really like your writing so so much! percentage we communicate more about
your article on AOL? I require a specialist in this space to
solve my problem. May be that’s you! Taking a look
ahead to see you.
Woah! I’m really enjoying the template/theme of this website.
It’s simple, yet effective. A lot of times it’s very difficult to get that “perfect balance” between superb usability and
appearance. I must say you’ve done a very good job with this.
Additionally, the blog loads super fast for me on Safari.
Outstanding Blog!
There’s definately a lot to know about this issue. I like all of the points
you have made.
slot gacor
buy lasix online canada
I every time spent my half an hour to read this web site’s
articles every day along with a cup of coffee.
Thanks for every other informative website. Where else may just I
am getting that kind of information written in such a perfect way?
I have a mission that I’m just now running on, and I’ve been on the glance out for such info.
buy viagra online
Greetings, I do think your web site might be having browser compatibility
issues. Whenever I look at your blog in Safari, it looks fine but when opening in I.E., it’s got some overlapping
issues. I merely wanted to provide you with
a quick heads up! Other than that, excellent site!
can i buy zithromax over the counter
Very good blog! Do you have any hints for aspiring writers?
I’m planning to start my own website soon but I’m a little
lost on everything. Would you recommend starting with a free platform like WordPress or go for a paid option? There are
so many options out there that I’m completely overwhelmed ..
Any ideas? Bless you!
This post is genuinely a fastidious one it helps new internet people, who are
wishing in favor of blogging.
Right here is the perfect blog for anybody who wishes
to find out about this topic. You realize so much its almost
hard to argue with you (not that I personally would want to HaHa).
You definitely put a brand new spin on a topic that’s been discussed for a long time.
Excellent stuff, just excellent!
halo apakah kaliann tаu ketika ini ada laman yang ramai dibicarakan oleh banyak orang karena hal ini
ialah salah satu macaam laman yang sangat tak baik karena bukan hanya laman ini menawarkan permainan yang sedikit laman ini juuga meminta
mіnimal yang tidak bawik sebab nya amat banyak yan bermain ⅾi dalzm website ini walaupun berdasarkan pribadi sangatlah tak cocok untuk dimainkan lebih-lebihdi
dalam halaman ini addalah laman laman yang sengja memiliki bokep
dalam simpananan mereka Ԁi server bodong mereka.
I’m truly enjoying the design and layout of your blog.
It’s a very easy on the eyes which makes it much more
pleasant for me to come here and visit more often. Did you hire
out a designer to create your theme? Outstanding
work!
online pharmacy uk prednisolone
What’s up colleagues, how is the whole thing, and
what you want to say regarding this paragraph, in my view its genuinely awesome
for me.
If you are going for finest contents like me, just pay
a quick visit this site daily since it gives quality contents, thanks
Write more, thats all I have to say. Literally, it seems as though you relied on the video to
make your point. You clearly know what youre talking about, why waste your intelligence on just posting
videos to your weblog when you could be giving
us something informative to read?
I have read so many articles or reviews concerning the blogger
lovers but this post is really a nice article, keep it up.
It’s remarkable to visit this web page and reading the views
of all colleagues on the topic of this piece of writing, while I am also
eager of getting knowledge.
My family always say that I am wasting my time here at net,
but I know I am getting experience all the time
by reading such fastidious content.
I visited various blogs however the audio quality for
audio songs current at this website is really marvelous.
Pretty nice post. I just stumbled upon your weblog and wished to say that
I have really enjoyed browsing your blog posts.
After all I will be subscribing to your rss feed and
I hope you write again very soon!
http://afcantarelle.org/index.php?title=EDU_Blog_Ramonita
http://afcantarelle.org/index.php?title=User:JaredBurkett596
http://classicalmusicmp3freedownload.com/ja/index.php?title=%E5%88%A9%E7%94%A8%E8%80%85:PaigeClisby808
http://classicalmusicmp3freedownload.com/ja/index.php?title=EDU_Blog_Flossie
http://urbino.fh-joanneum.at/trials/index.php/EDU_Blog_Odessa
http://urbino.fh-joanneum.at/trials/index.php/User:DellEdmonson561
http://vulteevaliant.com/index.php/EDU_Blog_Branden
http://vulteevaliant.com/index.php/User:MaximoR358346
http://www.jeromebaray.com/afm/wiki/index.php/EDU_Blog_Klaus
http://www.jeromebaray.com/afm/wiki/index.php/Utilisateur:TristaCanfield
http://www.matthew-morris.com/wiki/index.php/EDU_Blog_Simone
http://www.matthew-morris.com/wiki/index.php/User:RuebenMeacham8
http://www.zilahy.info/wiki/index.php/EDU_Blog_Forest
http://www.zilahy.info/wiki/index.php/User:LindseyMannix33
https://bbarlock.com/index.php/EDU_Blog_Mark
https://bbarlock.com/index.php/User:EugenioAhuiaOva
https://biowiki.clinomics.com/index.php/EDU_Blog_Don
https://biowiki.clinomics.com/index.php/User:RenateHoysted
https://gamesfashionarchive.net/wiki/User:LonnyWarrick
https://iamelf.com/wiki/index.php/EDU_Blog_Oren
https://iamelf.com/wiki/index.php/User:CorneliusHawley
https://intranet.wikimedia.cat/wiki/Usuari:BrianneKiek5173
https://koloiko.com/wiki/index.php?title=EDU_Blog_Lawanna
https://koloiko.com/wiki/index.php?title=User:ChassidyForlong
https://livingbooksaboutlife.org/books/EDU_Blog_Felipe
https://livingbooksaboutlife.org/books/User:DorrisWiedermann
https://mediawiki.governancaegestao.wiki.br/index.php/EDU_Blog_Horacio
https://mediawiki.governancaegestao.wiki.br/index.php/User:KatherinAtwood
https://mnwiki.org/index.php/EDU_Blog_Brady
https://mnwiki.org/index.php/User:VirgilDampier
https://religiopedia.com/index.php/EDU_Blog_Mark
https://religiopedia.com/index.php/User:FUQPhilipp
https://sustainabilipedia.org/index.php/EDU_Blog_Annabelle
https://sustainabilipedia.org/index.php/User:DaciaSimos34
https://symbolonline.eu/index.php?title=Benutzer:FlorenciaI26
https://symbolonline.eu/index.php?title=EDU_Blog_Cleta
https://wiki.geocaching.waw.pl/index.php?title=EDU_Blog_Anne
https://wiki.geocaching.waw.pl/index.php?title=U%C5%BCytkownik:LayneS06606212
https://wiki.hrw-fablab.de/index.php?title=EDU_Blog_Martha
https://wiki.hrw-fablab.de/index.php?title=User:RosieSell640390
https://wiki.lafabriquedelalogistique.fr/EDU_Blog_Jacki
https://wiki.lafabriquedelalogistique.fr/Utilisateur:RhysWebster73
https://wiki.renew-platforms.dk/index.php?title=EDU_Blog_Titus
https://wiki.renew-platforms.dk/index.php?title=User:BoydTrumble0
https://wiki.ryuriin.my.id/index.php/EDU_Blog_Millie
https://wiki.ryuriin.my.id/index.php/User:KarissaE17
https://wiki.sports-5.ch/index.php?title=EDU_Blog_Freeman
https://wiki.sports-5.ch/index.php?title=Utilisateur:AugustMauriello
https://www.crustcorporate.com/wiki/EDU_Blog_Ute
https://www.crustcorporate.com/wiki/User:EugeniaPannell
https://www.livejournal.com/identity/login.bml?idtype=openid&use_captcha=1&error_captcha=0&openidurl=https%3A%2F%2Fdetik-84.weebly.com%2Faplikasi-untuk-membuat-struktur-organisasi.html
https://www.livejournal.com/identity/login.bml?idtype=openid&use_captcha=1&error_captcha=0&openidurl=https%3A%2F%2Fdetik-87.weebly.com%2Faplikasi-untuk-membuat-struktur-organisasi.html
https://www.offwiki.org/wiki/EDU_Blog_Jane
https://www.offwiki.org/wiki/User:LorriKim71962
http://artisticpisceshk.com/forum/profile/gvvstefan226286/
http://brianknapp.co/community/profile/geniegalarza499/
http://brianknapp.co/community/profile/lowellrowell33/
http://brianknapp.co/community/profile/randell22748793/
http://brianknapp.co/community/profile/rosellarendon1/
http://kesheromania.ro/forum/profile/tyttangela61621/
https://careked.com/community/profile/charmainbonnett/
https://commoncause.optiontradingspeak.com/index.php/community/profile/elizabetwilkins/
https://commoncause.optiontradingspeak.com/index.php/community/profile/frances57z32777/
https://commoncause.optiontradingspeak.com/index.php/community/profile/indiabarrenger1/
https://commoncause.optiontradingspeak.com/index.php/community/profile/marcy82h9931289/
https://cripptic.com/community/profile/renedominique81/
https://dadstreamer.com/community/profile/steviestainfort/
https://forum.finveo.world/community/profile/chrisjdl3983500/
https://grailoftheserpent-forum.com/community/profile/ezequieledouard/
https://kesheromania.ro/forum/profile/brent255438554/
https://kesheromania.ro/forum/profile/humbertoburbach/
https://kesheromania.ro/forum/profile/stacicollocott2/
https://millionwaystogetit.com/community/profile/marcellabravo29/
https://solucx.com.br/forum/index.php/community/profile/finleykidd8565/
https://solucx.com.br/forum/index.php/community/profile/janeenleavens2/
https://www.dcsportsconnection.com/community/profile/groverseaborn8/
https://www.revivalwaves.org/got-a-question/profile/anitraorth44621/
http://studentfriendly.gregmaster.com.br/comunidade/profile/charmainwilde2/
http://studentfriendly.gregmaster.com.br/comunidade/profile/rondacorby86850/
https://ajk.wxw.mybluehost.me/community/profile/shonashockey453/
https://commoncause.optiontradingspeak.com/index.php/community/profile/wilfredhelton2/
https://diseven.com.co/es/community/profile/beatrizdesmond1/
https://diseven.com.co/es/community/profile/karolinnava2385/
https://holymaryseeds.com/community/profile/beatricebracegi/
https://holymaryseeds.com/community/profile/qlcleonie734800/
https://imatelsecurity.com/community/profile/brookwingate350/
https://imatelsecurity.com/community/profile/lucindascrivene/
https://medformei.com.br/community/profile/laverne34p61842/
https://meiro.company/community/profile/kristalstringer/
https://meiro.company/community/profile/logangary56369/
https://mrcoinhodler.com/forum/profile/latriceshropshi/
https://mrcoinhodler.com/forum/profile/mitchellery0027/
https://sawomenfightback.com/community/profile/charleschuter22/
https://sawomenfightback.com/community/profile/lynellj8019277/
https://www.bitcoinenespanol.net/criptoforo/profile/graciela96i9932/
https://www.bitcoinenespanol.net/criptoforo/profile/reynapinner6925/
https://www.imf1fan.com/community/profile/friedaneumayer5/
https://www.imf1fan.com/community/profile/luiswilshire114/
https://www.kalpnatayal.com/forum/community/profile/mistyheng856491/
https://www.revivalwaves.org/got-a-question/profile/kit12635455368/
https://www.revivalwaves.org/got-a-question/profile/tamelabingle685/
https://antalyatropik.com/index.php/forum/profile/merissatruscott/
https://commoncause.optiontradingspeak.com/index.php/community/profile/bartmickens3300/
https://grailoftheserpent-forum.com/community/profile/alejandramzr598/
https://kirkesimports.com/?s=&post_type=product&member%5Bsite%5D=https%3A%2F%2Fdultogel777.com%2F&member%5Bsignature%5D=%3Ca+href%3D%22http%3A%2F%2F156.67.218.130%2F%22+rel%3D%22dofollow%22%3Ehttp%3A%2F%2F156.67.218.130%2F%3C%2Fa%3E%3Cp%3E%26nbsp%3B%3C%2Fp%3E+%3Cp%3E%26nbsp%3B%3C%2Fp%3E+%3Cp%3E%26nbsp%3B%3C%2Fp%3E%3Cp%3E%26nbsp%3B%3C%2Fp%3E+%3Ca+href%3D%22http%3A%2F%2F45.13.132.242%2F%22+rel%3D%22dofollow%22%3Ehttp%3A%2F%2F45.13.132.242%2F%3C%2Fa%3E%3Cp%3E%26nbsp%3B%3C%2Fp%3E+%3Cp%3E%26nbsp%3B%3C%2Fp%3E+%3Cp%3E%26nbsp%3B%3C%2Fp%3E%3Cp%3E%26nbsp%3B%3C%2Fp%3E+%3Ca+href%3D%22https%3A%2F%2Fdultogel777.com%2F%22+rel%3D%22dofollow%22%3Ehttps%3A%2F%2Fdultogel777.com%2F%3C%2Fa%3E%3Cp%3E%26nbsp%3B%3C%2Fp%3E+%3Cp%3E%26nbsp%3B%3C%2Fp%3E+
https://sawomenfightback.com/community/profile/latashahamlet85/
https://thatbrewguy.com/community/profile/xzugeri7793874/
https://www.imf1fan.com/community/profile/stephany3123523/
https://www.karshakamitram.in/community/profile/dksisis99062482/
https://www.reformes.gouv.sn/community/profile/michellcamidge/
https://www.revivalwaves.org/got-a-question/profile/johnny886541118/
https://antalyatropik.com/index.php/forum/profile/guadalupekinche/
https://commoncause.optiontradingspeak.com/index.php/community/profile/abrahambarta00/
https://dadstreamer.com/community/profile/geoffreypoole41/
https://diseven.com.co/es/community/profile/latiamcveigh805/
https://forum.finveo.world/community/profile/tereseledoux74/
https://kirkesimports.com/?s=&post_type=product&member%5Bsite%5D=https%3A%2F%2Fdultogel777.com%2F&member%5Bsignature%5D=%3Ca+href%3D%22http%3A%2F%2F156.67.218.130%2F%22+rel%3D%22dofollow%22%3Ehttp%3A%2F%2F156.67.218.130%2F%3C%2Fa%3E%3Cp%3E%26nbsp%3B%3C%2Fp%3E+%3Cp%3E%26nbsp%3B%3C%2Fp%3E+%3Cp%3E%26nbsp%3B%3C%2Fp%3E%3Cp%3E%26nbsp%3B%3C%2Fp%3E+%3Ca+href%3D%22http%3A%2F%2F45.13.132.242%2F%22+rel%3D%22dofollow%22%3Ehttp%3A%2F%2F45.13.132.242%2F%3C%2Fa%3E%3Cp%3E%26nbsp%3B%3C%2Fp%3E+%3Cp%3E%26nbsp%3B%3C%2Fp%3E+%3Cp%3E%26nbsp%3B%3C%2Fp%3E%3Cp%3E%26nbsp%3B%3C%2Fp%3E+%3Ca+href%3D%22https%3A%2F%2Fdultogel777.com%2F%22+rel%3D%22dofollow%22%3Ehttps%3A%2F%2Fdultogel777.com%2F%3C%2Fa%3E%3Cp%3E%26nbsp%3B%3C%2Fp%3E+%3Cp%3E%26nbsp%3B%3C%2Fp%3E+
https://millionwaystogetit.com/community/profile/solspurlock6928/
https://sandangels.us/sand/profile/timothyharricks/
https://sawomenfightback.com/community/profile/vaniakell117637/
https://www.revivalwaves.org/got-a-question/profile/carleywasinger/
Hi to every body, it’s my first visit of this website; this
blog carries remarkable and in fact excellent data
in support of visitors.
Howdy! Do you know if they make any plugins to assist with Search Engine Optimization? I’m trying to get
my blog to rank for some targeted keywords
but I’m not seeing very good results. If you know of
any please share. Cheers!
Hello, I think your web site could be having internet browser compatibility problems.
When I take a look at your site in Safari, it looks fine however, if
opening in I.E., it has some overlapping issues.
I merely wanted to provide you with a quick heads
up! Other than that, wonderful blog!
This is a topic that is close to my heart… Thank you!
Where are your contact details though?
This is the perfect site for anyone who would like to find out about this topic.
You understand so much its almost hard to argue with you (not
that I actually will need to…HaHa). You definitely put a
new spin on a topic that has been written about for years.
Excellent stuff, just excellent!
Fastidious respond in return of this issue with real arguments and
describing the whole thing on the topic of that.
There is certainly a lot to learn about this subject.
I really like all the points you’ve made.
I think this is one of the most significant info for me.
And i’m glad reading your article. But want to remark
on few general things, The web site style is
ideal, the articles is really excellent : D. Good job, cheers
In fact no matter if someone doesn’t know then its up to other visitors that they will help,
so here it occurs.
We’re a group of volunteers and starting a new scheme in our community.
Your website offered us with valuable info to work on. You’ve
done a formidable job and our whole community will be thankful to
you.
togel online
I’m curious to find out what blog platform you happen to be
working with? I’m experiencing some small security issues with my latest blog and I would like to find something more risk-free.
Do you have any suggestions?
Hey there, You have done a great job. I will certainly
digg it and personally recommend to my friends. I am sure they’ll be benefited from this web site.
This blog was… how do you say it? Relevant!!
Finally I’ve found something which helped me.
Thanks a lot!
Hello there! This is my 1st comment here so I just wanted to give a quick shout out and say I really enjoy reading your posts.
Can you suggest any other blogs/websites/forums that go over the same
subjects? Thanks a ton!
diflucan 400 mg
هر سال ترندهای مختلفی در دنیای مد مطرح میشود که سویشرت
و هودی دخترانه اسپرت و هودی دخترانه
فانتزی در انواع کوتاه، کلاه دار،
جلو بسته و غیره معمولا در میان آن حضور دارد.
در نهایت هر هودی را که خریداری میکنید، به نحوه شستن آن هم که معمولاً روی
اتیکتی در قسمت داخلی لباس زدند، توجه کنید.
Hi, the whole thing is going perfectly here and ofcourse
every one is sharing data, that’s truly good, keep
up writing.
I was suggested this web site via my cousin. I am not sure whether or not this submit is written via him
as no one else realize such special approximately my problem.
You’re incredible! Thank you!
stromectol prices
Nice post. I used to be checking constantly this weblog and I am impressed!
Very useful information particularly the final
section 🙂 I maintain such information a lot. I used to
be looking for this certain information for a very
lengthy time. Thank you and best of luck.
ivermectin 5
I like the valuable information you provide in your articles.
I will bookmark your blog and check again here regularly.
I am quite certain I will learn many new stuff right here!
Good luck for the next!
Уважаемые ценители кальяна,
Представляем вам лучший выбор угля для вашего кальяна от “Oshisha”. Наши угли – это надежное топливо для создания идеального кальянного опыта.
Почему “Oshisha” – ваш надежный выбор для угля:
Качество на высшем уровне: Мы предлагаем только высококачественные угли, которые обеспечивают равномерный и стабильный нагрев вашего кальяна.
Длительное горение: Наши угли долго горят, что позволяет вам наслаждаться кальяном без лишних перерывов.
Минимум дыма и запаха: Уголь “Oshisha” обеспечивает чистый вкус и минимум дыма, чтобы вы могли полностью насладиться ароматами вашей кальянной смеси.
Удобная упаковка: Наши угли упакованы в герметичные пакеты, чтобы сохранить их свежесть.
Большие объемы и доступные цены: У нас есть уголь как для частных ценителей, так и для кальянных заведений, и мы предлагаем конкурентоспособные цены.
Не упустите возможность поднять ваш кальянный опыт на новый уровень с углем “Oshisha”! Закажите уголь прямо сейчас и наслаждайтесь каждой сессией.
Уголь для кальяна
Hi there! This article could not be written any better!
Going through this post reminds me of my
previous roommate! He always kept preaching about
this. I most certainly will forward this information to him.
Pretty sure he will have a great read. Thanks for sharing!
http://afcantarelle.org/index.php?title=EDU_Blog_Bobbye
http://afcantarelle.org/index.php?title=EDU_Blog_Lorene
http://afcantarelle.org/index.php?title=EDU_Blog_Vilma
http://afcantarelle.org/index.php?title=User:ShennaHudspeth8
http://afcantarelle.org/index.php?title=User:TatianaChestnut
http://afcantarelle.org/index.php?title=User:ZelmaHeredia44
http://classicalmusicmp3freedownload.com/ja/index.php?title=%E5%88%A9%E7%94%A8%E8%80%85:AlyciaLaird
http://classicalmusicmp3freedownload.com/ja/index.php?title=%E5%88%A9%E7%94%A8%E8%80%85:CamilleWoolnough
http://classicalmusicmp3freedownload.com/ja/index.php?title=%E5%88%A9%E7%94%A8%E8%80%85:JannGerard2
http://classicalmusicmp3freedownload.com/ja/index.php?title=EDU_Blog_Anita
http://classicalmusicmp3freedownload.com/ja/index.php?title=EDU_Blog_Lilliana
http://classicalmusicmp3freedownload.com/ja/index.php?title=EDU_Blog_Olivia
http://urbino.fh-joanneum.at/trials/index.php/EDU_Blog_Elba
http://urbino.fh-joanneum.at/trials/index.php/EDU_Blog_Rayford
http://urbino.fh-joanneum.at/trials/index.php/EDU_Blog_Regan
http://urbino.fh-joanneum.at/trials/index.php/User:JosetteConsiden
http://urbino.fh-joanneum.at/trials/index.php/User:MagdaHowse668
http://urbino.fh-joanneum.at/trials/index.php/User:WVVKarolyn
http://vulteevaliant.com/index.php/EDU_Blog_Damien
http://vulteevaliant.com/index.php/EDU_Blog_Mazie
http://vulteevaliant.com/index.php/User:RenatoTeakle2
http://vulteevaliant.com/index.php/User:RichieLuttrell
http://web.archive.org/web/20230907064240/https://wabgolden123.blogspot.com/
http://wiki.monashicpc.com/EDU_Blog_Aja
http://wiki.monashicpc.com/EDU_Blog_Benjamin
http://wiki.monashicpc.com/EDU_Blog_Jackson
http://wiki.monashicpc.com/User:BertChoi1196048
http://wiki.monashicpc.com/User:CalvinCaron163
http://wiki.monashicpc.com/User:ToryUlrich9
http://www.driftpedia.com/wiki/index.php/EDU_Blog_Cassie
http://www.driftpedia.com/wiki/index.php/EDU_Blog_Serena
http://www.driftpedia.com/wiki/index.php/User:FranchescaAldric
http://www.driftpedia.com/wiki/index.php/User:RonNoble58
http://www.jeromebaray.com/afm/wiki/index.php/EDU_Blog_Aundrea
http://www.jeromebaray.com/afm/wiki/index.php/EDU_Blog_Dominique
http://www.jeromebaray.com/afm/wiki/index.php/EDU_Blog_Mari
http://www.jeromebaray.com/afm/wiki/index.php/Utilisateur:HermelindaLear2
http://www.jeromebaray.com/afm/wiki/index.php/Utilisateur:LatashiaMcCarten
http://www.jeromebaray.com/afm/wiki/index.php/Utilisateur:TorriKwan523
http://www.matthew-morris.com/wiki/index.php/EDU_Blog_Angelina
http://www.matthew-morris.com/wiki/index.php/EDU_Blog_Juliet
http://www.matthew-morris.com/wiki/index.php/EDU_Blog_Kerri
http://www.matthew-morris.com/wiki/index.php/User:Cary65919949218
http://www.matthew-morris.com/wiki/index.php/User:DarnellCoffelt9
http://www.matthew-morris.com/wiki/index.php/User:DollieFarwell
https://biowiki.clinomics.com/index.php/EDU_Blog_Conrad
https://biowiki.clinomics.com/index.php/EDU_Blog_Josh
https://biowiki.clinomics.com/index.php/EDU_Blog_Rigoberto
https://biowiki.clinomics.com/index.php/User:Della9422152011
https://biowiki.clinomics.com/index.php/User:HeidiX887414
https://biowiki.clinomics.com/index.php/User:ShantellLafleur
https://demo.centreon.com/wiki/index.php?title=EDU_Blog_Fidelia
https://demo.centreon.com/wiki/index.php?title=EDU_Blog_Gay
https://demo.centreon.com/wiki/index.php?title=EDU_Blog_Trent
https://demo.centreon.com/wiki/index.php?title=User:ASOAngela257
https://demo.centreon.com/wiki/index.php?title=User:AbelBanner5
https://demo.centreon.com/wiki/index.php?title=User:HarryFison33390
https://gamesfashionarchive.net/wiki/User:DwightOman2349
https://gamesfashionarchive.net/wiki/User:LatashiaLEstrang
https://gamesfashionarchive.net/wiki/User:LeandroMcMurtry
https://iamelf.com/wiki/index.php/EDU_Blog_Glinda
https://iamelf.com/wiki/index.php/User:VeldaMontero8
https://intranet.wikimedia.cat/wiki/Usuari:Consuelo1755
https://intranet.wikimedia.cat/wiki/Usuari:MarcyLittle929
https://intranet.wikimedia.cat/wiki/Usuari:ReginaVangundy
https://koloiko.com/wiki/index.php?title=EDU_Blog_Janette
https://koloiko.com/wiki/index.php?title=EDU_Blog_Mitzi
https://koloiko.com/wiki/index.php?title=EDU_Blog_Yasmin
https://koloiko.com/wiki/index.php?title=User:BrendanSessions
https://koloiko.com/wiki/index.php?title=User:JanetVanOtterloo
https://koloiko.com/wiki/index.php?title=User:LoreenI265228683
https://livingbooksaboutlife.org/books/EDU_Blog_Mozelle
https://livingbooksaboutlife.org/books/User:Kathy00A82926511
https://procesal.cl/index.php/EDU_Blog_Madge
https://procesal.cl/index.php/EDU_Blog_Maryjo
https://procesal.cl/index.php/EDU_Blog_Walter
https://procesal.cl/index.php/User:BrodieMcKellar6
https://procesal.cl/index.php/User:MagnoliaEason
https://procesal.cl/index.php/User:StormySilverman
https://religiopedia.com/index.php/EDU_Blog_Florian
https://religiopedia.com/index.php/User:WillaDeBoos71
https://wiki.geocaching.waw.pl/index.php?title=EDU_Blog_Beau
https://wiki.geocaching.waw.pl/index.php?title=EDU_Blog_Kiara
https://wiki.geocaching.waw.pl/index.php?title=EDU_Blog_Patty
https://wiki.geocaching.waw.pl/index.php?title=U%C5%BCytkownik:CourtneyHogle4
https://wiki.geocaching.waw.pl/index.php?title=U%C5%BCytkownik:Debora0582
https://wiki.geocaching.waw.pl/index.php?title=U%C5%BCytkownik:KristinaLongmore
https://wiki.hrw-fablab.de/index.php?title=EDU_Blog_Randi
https://wiki.hrw-fablab.de/index.php?title=User:ClaribelLavoie0
https://wiki.itcoug.com/index.php?title=EDU_Blog_Richie
https://wiki.itcoug.com/index.php?title=Usuario:GladysDickens
https://wiki.itcoug.com/index.php?title=Usuario:ThanhWearne4758
https://wiki.itcoug.com/index.php?title=Usuario:TomElder396
https://wiki.renew-platforms.dk/index.php?title=EDU_Blog_Desiree
https://wiki.renew-platforms.dk/index.php?title=EDU_Blog_Parthenia
https://wiki.renew-platforms.dk/index.php?title=EDU_Blog_Pearlene
https://wiki.renew-platforms.dk/index.php?title=User:HymanGrainger09
https://wiki.renew-platforms.dk/index.php?title=User:LidaFitzmaurice
https://wiki.renew-platforms.dk/index.php?title=User:VeraJ8032566
https://wiki.ryuriin.my.id/index.php/EDU_Blog_Elida
https://wiki.ryuriin.my.id/index.php/EDU_Blog_Katherin
https://wiki.ryuriin.my.id/index.php/EDU_Blog_Trina
https://wiki.ryuriin.my.id/index.php/User:CasimiraTober
https://wiki.ryuriin.my.id/index.php/User:MaddisonManjarre
https://wiki.ryuriin.my.id/index.php/User:PRPKaren19857610
https://wiki.sports-5.ch/index.php?title=EDU_Blog_Alicia
https://wiki.sports-5.ch/index.php?title=EDU_Blog_Daniela
https://wiki.sports-5.ch/index.php?title=EDU_Blog_Ronald
https://wiki.sports-5.ch/index.php?title=Utilisateur:AstridFredrickso
https://wiki.sports-5.ch/index.php?title=Utilisateur:DeloresMathew
https://wiki.sports-5.ch/index.php?title=Utilisateur:ElviraCornwell9
https://www.livejournal.com/identity/login.bml?idtype=openid&use_captcha=1&error_captcha=0&openidurl=https%3A%2F%2Fwabmichaelanthony123.blogspot.com
https://www.offwiki.org/wiki/EDU_Blog_Helena
https://www.offwiki.org/wiki/EDU_Blog_Jerrod
https://www.offwiki.org/wiki/EDU_Blog_King
https://www.offwiki.org/wiki/User:AngelikaNanson7
https://www.offwiki.org/wiki/User:LinetteAmo
https://www.offwiki.org/wiki/User:MichalShort5
Hey I know this is off topic but I was wondering if you knew of any widgets I could add to my blog
that automatically tweet my newest twitter updates.
I’ve been looking for a plug-in like this for quite some time and was hoping maybe
you would have some experience with something like this.
Please let me know if you run into anything. I
truly enjoy reading your blog and I look forward to your new updates.
drug finasteride
slot gacor
propecia online pharmacy
propecia how to get
I always emailed this website post page to all my contacts, because
if like to read it after that my contacts will too.
Hey I know this is off topic but I was wondering if you knew of any widgets I could add to my blog that automatically tweet my newest twitter updates.
I’ve been looking for a plug-in like this for quite some time and was hoping maybe you
would have some experience with something like this.
Please let me know if you run into anything. I truly enjoy reading your
blog and I look forward to your new updates.
Ꭰoes yoᥙr website hɑvе a contact pаge?
I’m having a tough timе locating іt but, I’d lijke to shoot you an email.
I’νe got some recommendations fоr yoսr blog y᧐u miɡht be
intеrested in hearing. Eіther way, great bloog ɑnd І look forward tоo seeing it develop over tіme.
valtrex without a prescription
sbobet
can you order diflucan online
Hi, its nice piece of writing about media print, we all know
media is a impressive source of information.
Top 10 Customer Support Outsourcing Companies in 2023 | Helpware
Outsourcing customer support is a great way to provide affordable but reliable
service to your clients. Whether for voice or non-voice applications, there
are plenty of excellent customer support…
Written by Dana Mahoney
Sunday, Jan 22
Table of Contents
Outsourcing customer support is a great way to provide affordable but reliable service to your
clients. Whether for voice or non-voice applications, there are plenty
of excellent customer support outsourcing companies that fit every
requirement.
But then again, why even think about outsourcing? Isn’t local talent good enough to provide the service needed by a company’s customers?
Plus, wouldn’t it be a disservice to customers if a company
farms out its frontline operations to contractors?
What Is Customer Support Outsourcing?
By now, the best customer service companies should know the value of customer support
and why it’s an essential cog in an organization. Like sales and marketing, customer
service should already be in play during a company’s first day, as they are the group that comes into direct contact with clients.
The main goal of customer support is to keep customers happy by attending to their needs and
responding to their questions. However, it’s also a way to
instill loyalty and generate additional sales.
To do so, an outsourcing company must have its support team available whenever
the customer needs it. Outsourcing customer support allows companies to
maintain an around-the-clock service team managed by industry veterans and experts.
Advantages of Customer Support Outsourcing
Admittedly, not all company startups have leaders who
are experts in every facet of their operations.
Given their many responsibilities, many startup founders accept that
they can’t do everything themselves. Non-core
competencies such as customer service can benefit from outsourcing.
Turning the service over to competent experts
lets companies benefit from a bigger source of talent
from all over the world. At the same time, companies that outsource customer support enjoy reduced payroll without sacrificing service quality.
Other benefits of outsourcing include:
More Opportunities to Grow the Business
By assigning customer support to expert outsourcing service providers,
leaders can instead turn to scaling the business. Overseeing the day-to-day operations can already take much of management’s time, and customer support is equally demanding.
To help executives focus on the big picture, they’ll need to partner with the best service companies that know what they’re doing.
Enhance Customer Experience
Given the opportunity to communicate and
interact with customer service, many customers will express their satisfaction in getting their voices
heard. If customer service companies and their team address customers’ issues in a satisfactory way,
they’re more than likely to remain customers.
A pleasant customer experience will almost always lead to longer retention and
a significantly higher customer lifetime value (CLV).
This isn’t to say a stellar customer experience
is only possible through outsourcing. Rather, the chances of improving customer satisfaction come with a continuous and consistent level of service.
Providing a highly specialized, dedicated team of professionals from day one is a great way to
achieve this quickly.
Top 10 Customer Support Outsourcing Companies
We’ve narrowed down the list of companies with great customer service to the top 10 most prominent ones in 2022.
We’ll also provide a brief description and highlight the main strong points of each outsourcing company.
1. Helpware
Helpware started in 2015 with the initial goal of providing support to startup companies.
Over the years, the company has grown big and is confident enough
to provide both enterprise and small business customer
service outsourcing solutions.
Providing back office, technical, and customer support, Helpware specializes in assisting companies in various support areas.
This includes Omnichannel Customer Support, Technical & IT
Support, Content Moderation, CX Consulting Services, Back Office Support, Data Labeling, Digital Marketing Solutions, and Cyber Security.
The company provides only dedicated agents, in-house training,
and equipment to help its clients boost their productivity from day one.
Now it’s one of the top customer service
companies in the US and European markets with numerous
awards and positive reviews from satisfied clients
on Clutch and other reputable platforms. Helpware’s
people-focused culture seems very attractive to businesses sharing the same philosophy.
Pros:
Shows outstanding flexibility when providing for clients’ specific needs.
This means its support can scale along with your company’s growth.
Offers turn-key solutions, so you don’t have to look for either option separately.
Helpware’s focused on developing its people
and their skills and it pays off handsomely, especially in customer support outsourcing contracts.
Some global brands are happy to have their customer support outsourced to Helpware.
2. Sykes
U.S.-based Sykes is one of the pioneers of the BPO industry.
Established in 1995, the company trailblazed its way to the top and was one of the
first BPOs to open multiple locations. In 2021, the Sitel Group acquired
Sykes to widen its reach and increase its capacity.
Sykes is one of the top 10 service companies and leading service providers of demand generation and
customer engagement services, with clients included in the top 2000 companies worldwide.
At the core of Sykes’ business are its staple
services: outsourcing, customer experience, service to sales, digital transformation, and brand extension.
Pros:
Sykes maintains a pool of service agents from its clients’ home countries.
The company is well-versed in matters concerning data privacy.
Specifically, Sykes follows various privacy guidelines, including HIPAA compliance and Payment Card Industry
(PCI) data security certification.
3. Ascensos
Founded in 2013 in the UK, Ascensos is one of those outsourced
customer service companies that wanted to change the customer
experience by applying a personal touch to customer care.
The company is now Europe’s number-one customer support outsourcing company, providing bespoke customer experience solutions
to clients around the world. In addition, its contact center operation locations include the
UK, Romania, Turkey, and South Africa.
Pros:
Ascensos is more nearshore than an offshore support center,
so location and time zone differences aren’t as pronounced as operations in Asia and South America.
Companies that outsource customer service to Ascensos value the fact that it
supports diversity and inclusivity among staff while focusing on promoting happiness
as a key asset among its workforce.
Although there aren’t any published pricing rates, instead, Ascensos will
individually respond to requests for quotes, the prices of this outsourcing customer service company are more than affordable.
4. Teleperformance
With more than 40 years of experience in the BPO industry, Teleperformance is an established leader in solution design, business optimization strategies, and front-office customer support.
It also offers back-office services such as finance and accounting, collections, and technical support.
Pros:
Teleperformance is a truly global service provider.
It operates in 80 countries and employs more than 330,000 agents speaking over
265 languages and deservedly belongs to a league of good customer service companies.
You won’t find it difficult to get support in the language and location you require.
Clients also appreciate the company’s expertise in providing omnichannel
solutions.
5. VXI
VXI Global Solutions is one of those outsourcing agencies that
offer customer care and customer experience (CX) solutions to some
of today’s major global brands. In addition, the company offers contact center
and BPO services, omnichannel and multilingual support, software development, CX innovation, quality assurance (QA),
and infrastructure outsourcing. VXI employs more than 35,000 workers in 43 countries throughout North America, Asia, Europe, and the Caribbean.
The company also prides itself on its ability to help clients resolve
major CX and employee experience (EX) pain points and take
their customer service systems to the next level.
Like any modern BPO, VXI employs omnichannel support services to enhance communication coverage for
clients. Also, VXI provides additional analytics
and insights generation services so clients can learn as they go.
Pros:
High CX expertise leads to enhanced customer and employee
experience.
VXI displays an uncanny ability to scale up or down to
fit its client’s capabilities.
6. InfluX
In its quest to build the world’s first remote-only CX team, InfluX
managed to recruit employees from more than 120 cities worldwide.
This strategy also lets them provide 24-hour customer support outsourcing solutions
within the client’s time zone. In addition, InfluX creates specialized customer experiences
that reflect the client’s vision, voice, and values.
Pros:
Less dependence on automation and more on human interaction make for
a better customer experience.
Having employees in every time zone solves the
common offshore problem of mismatched time schedules
between clients and outsourcing companies.
Pay-as-go pricing may be attractive to some clients who prefer flexible packages.
7. Skycom
Skycom is also on the list of nearshore outsourcing companies
that specialize in multi-continent support
services. The company employs native English contact center agents with experience in multiple industries.
Skycom also offers a full range of services, including business
process outsourcing, telemarketing and sales,
customer support, and healthcare. With more than 15 years of
experience, Skycom also employs over 2,000 workers assigned to 35 clients
in five countries.
Pros:
Nearshore operations mean fewer problems dealing with time zone and distance differences.
Skycom covers a wide range of industries, including healthcare, travel,
utilities, IT, finance, retail, and telecommunications.
8. Integra
Integra’s differentiator is its focus on training its workforce
in customer psychology. This means company-provided support agents are more sensitive in detecting changes
in the customer’s voice or tone. As a result, they can respond to these changes to
defuse any tension and lead the customer into a
more positive mindset. Starting with four employees in 2004, Integra currently employs more than 1,400 workers stationed across four
countries. It handles customer service duties over the phone,
email, live chat, or social media.
Pros:
Integra offers some of the most cost-effective solutions in the industry.
Sales psychology is also an incredible asset to have if you work in a customer support outsourcing company.
9. Telus
Telus International is one of the world’s leading digital CX innovators.
In particular, it designs and produces next-generation digital solutions for
brands all over the world. This is one of the Canadian top IT outsourcing companies that provide IT services and multilingual customer service to industries such as technology, media, communications, eCommerce,
financial technology, travel, hospitality, automotive, healthcare, and games.
Pros:
Telus International is a premium multilingual contact center.
It is one of those IT support outsourcing companies that offer top-tier customer
support services in various countries and more than 50 languages.
Telus is famous among IT services outsourcing companies for organizing
an annual charitable initiative called “Telus Days of Giving.” In particular,
the company taps 225,000 volunteers from its offices to
complete various service projects across its many host countries.
10. Arise
Arise is a 25-year-old United States-based company that
specializes in providing support outsourcing services across the USA.
It employs more than 60,000 remote agents in the U.S., Canada, and the United Kingdom.
Unlike a traditional BPO, Arise utilizes a network of service partners to provide the needed
customer service experiences. In addition, the Arise Platform helps
companies lower expenses. As a result, Arise clients report an average 25% reduction in contact
center service total costs, which is why clients want to outsource customer service small business really needs.
Pros:
Arise deploys a tiered security approach in its communications with clients.
This ensures they preserve the confidentiality of documents or files sent over.
It also means Arise conforms to widely accepted data privacy regulations such as HIPAA, CCPA, and
others.
Arise also focuses its employment on local talent, hiring residents of the U.S.,
UK, and Canada. This means stable employment for the company and an easier method of hiring or replacing staff members.
Choose the Best Outsourcing Companies That Fit Your Needs
Deciding which outsourcing providers to contact for your customer support outsourcing needs?
Perform the necessary research before settling on your choice.
For instance, some customer service outsource
companies on our list might command a pricing structure higher than what your budget holds.
In addition, consider your company’s specific requirements and areas for improvement.
Do you need a customer support team focused on CX?
Or, do you prefer having sales psychology-trained outbound callers who can close deals?
Finally, does the appeal of higher-cost nearshoring resonate better than offshore talents a few time zones away?
No one-size-fits-all solution exists when it comes to customer support outsourcing.
However, if you want a highly flexible and secure customer service solution that utilizes
modern technology throughout the various stages, try the best companies for customer service.
These largest outsourcing companies not only supply the best talent, but
also the best equipment and training to prepare them.
Hi I am so grateful I found your blog page, I really found you by error, while I was researching on Yahoo for something else, Anyways I am here now and would just like
to say cheers for a marvelous post and a all round entertaining
blog (I also love the theme/design), I don’t have time to browse it all at the moment but I
have book-marked it and also added in your RSS feeds, so
when I have time I will be back to read a lot more, Please do keep up
the superb work.
Good day! I simply would like to offer you a
huge thumbs up for the great information you’ve got here on this post.
I will be returning to your site for more soon.
Incredible many of superb knowledge.
It’ѕ remarkable desiցned f᧐r me to hаve a weƅ site,
which is useful in favor of my knowledge. thanks aɗmin
I blog frequently and I genuinely thank you for your information. The article has really peaked my interest.
I’m going to book mark your website and keep checking for new information about once per week.
I opted in for your Feed as well.
I blog often and I genuinely appreciate your content.
This article has truly peaked my interest. I am going to
bookmark your website and keep checking for new details about
once per week. I opted in for your RSS feed too.
Howdy I am so excited I found your web site, I really found you by
accident, while I was researching on Digg for something else,
Anyways I am here now and would just like to say thanks for a
tremendous post and a all round exciting blog (I also love the
theme/design), I don’t have time to read through it all at the minute but I have bookmarked it and also added in your RSS feeds, so
when I have time I will be back to read a lot more, Please do keep up the fantastic work.
Today, I went to the beachfront with my kids.
I found a sea shell and gave it to my 4 year old daughter and said
“You can hear the ocean if you put this to your ear.” She placed the shell to
her ear and screamed. There was a hermit crab inside and it pinched her
ear. She never wants to go back! LoL I know this is completely
off topic but I had to tell someone!
Thanks to my father who told me about this weblog, this weblog is
in fact amazing.
We’re a gaggle of volunteers and opening a brand new scheme in our community.
Your site provided us with useful info to work on. You have performed an impressive
task and our whole group will likely be thankful to you.
Excellent post. I will be dealing with some of these issues as well..
Hi, i feel that i saw you visited my site thus i came to return the
desire?.I am trying to to find issues to enhance my site!I assume its adequate to use some of your ideas!!
generic stromectol
valtrex 500 mg tablet cost
zithromax medication
Hey there! I just wanted to ask if you ever have any trouble with hackers?
My last blog (wordpress) was hacked and I ended up losing months of hard work due to no backup.
Do you have any methods to stop hackers?
Hello would you mind stating which blog platform you’re working with?
I’m planning to start my own blog in the near future
but I’m having a tough time choosing between BlogEngine/Wordpress/B2evolution and Drupal.
The reason I ask is because your design and style seems different then most
blogs and I’m looking for something completely unique.
P.S Apologies for being off-topic but I had to ask!
budesonide 0.5 mg
keflex 750
I’m not that much of a online reader to be honest but your blogs really nice, keep it up!
I’ll go ahead and bookmark your website to come back later on. Cheers
wellbutrin discount price
I know this website presents quality depending posts and other
information, is there any other site which presents these information in quality?
diflucan 50mg capsules
Greetings from California! I’m bored to tears at work so I decided to check out your website on my iphone during lunch break.
I enjoy the information you provide here and can’t wait
to take a look when I get home. I’m surprised at
how fast your blog loaded on my phone .. I’m not even using
WIFI, just 3G .. Anyways, wonderful blog!
Hey I know this is off topic but I was wondering if you knew of any widgets I could add to my blog that automatically tweet my newest
twitter updates. I’ve been looking for a plug-in like
this for quite some time and was hoping maybe you would have some experience with something like this.
Please let me know if you run into anything. I truly enjoy reading your blog and I look forward to your
new updates.
Hello everyone! I go by the name Admin Read:
Хотите расти и развиваться, не останавливаясь на достигнутом? mega dark поможет вам в этом! На нашей платформе собраны и обучающие материалы, и мотивирующий контент, и захватывающие развлечения. Откройте для себя новые горизонты с мориарти сайт mega в качестве вашего личного тренера!
ссылка на мегу через тор:https://mega-active-links.com
мега сайт тор:https://xn--mea-sb-j6a.com
Thanks a lot for sharing this with all people
you really recognize what you’re speaking about!
Bookmarked. Please also discuss with my website =).
We could have a hyperlink exchange agreement
among us
vermox medicine
Hmm is anyone else experiencing problems with the images on this blog loading?
I’m trying to find out if its a problem on my end or if
it’s the blog. Any feedback would be greatly appreciated.
Woah! I’m really digging the template/theme of this site.
It’s simple, yet effective. A lot of times it’s challenging to get that “perfect balance” between superb usability and appearance.
I must say you have done a superb job with this. Also, the blog
loads super fast for me on Firefox. Exceptional Blog!
http://buygreenproducts.com/__media__/js/netsoltrademark.php?d=madepics.net
http://mail.meanwifecams.com/wp/wp-content/themes/naturalexposures/includes/link.php?id=1698&url=https://madepics.net
https://www.reallium.com/sites/all/modules/pubdlcnt/pubdlcnt.php?file=https://madepics.net
http://brucesokol.com/__media__/js/netsoltrademark.php?d=madepics.net
http://pcscoreboard.com/__media__/js/netsoltrademark.php?d=madepics.net
http://edwardshousinginc.org/__media__/js/netsoltrademark.php?d=madepics.net
http://www.tanggul.com/bbs/skin/jaemanstyle_l02_red/visit.php?sitelink=https%3A%2F%2Fmadepics.net&id=link&page=1&sn1=&divpage=1&sn=off&ss=on&sc=on&select_arr
http://tunghia2.edu.vn/index.php?language=vi&nv=news&nvvithemever=t&nv_redirect=aHR0cHM6Ly9tYWRlcGljcy5uZXQv==
http://forum.himko.vip/proxy.php?link=https://madepics.net
http://88c.upickapart.com/__media__/js/netsoltrademark.php?d=madepics.net
http://amandamrodriguez.com/__media__/js/netsoltrademark.php?d=madepics.net
http://themackechnie.com/__media__/js/netsoltrademark.php?d=madepics.net
http://vitaminbusiness.com/__media__/js/netsoltrademark.php?d=madepics.net
http://blacklabsfoundation.com/__media__/js/netsoltrademark.php?d=madepics.net
http://dirubin.us/__media__/js/netsoltrademark.php?d=madepics.net
http://ww17.tpigauges.com/__media__/js/netsoltrademark.php?d=madepics.net
http://atlantaadvertisingreport.com/__media__/js/netsoltrademark.php?d=madepics.net
http://bostonbean.co/__media__/js/netsoltrademark.php?d=madepics.net
https://eks-electromarket.ru/bitrix/redirect.php?goto=https://madepics.net
http://www.mindsetproductions.guru/__media__/js/netsoltrademark.php?d=madepics.net
http://radar-groupe.ru/bitrix/redirect.php?goto=https://madepics.net
https://www.vip-programming.ru/redirect?url=http%3A%2F%2Fmadepics.net
http://itssewsimple.com/__media__/js/netsoltrademark.php?d=madepics.net
https://link.stuudium.com/?link=https://madepics.net/
http://storeyourboxes.net/__media__/js/netsoltrademark.php?d=madepics.net
http://raineysucks.org/__media__/js/netsoltrademark.php?d=madepics.net
http://tdp-dallas.com/__media__/js/netsoltrademark.php?d=madepics.net
http://youtube.ro/redirect?q=madepics.net
http://k-b-w.com/__media__/js/netsoltrademark.php?d=madepics.net
http://designadivorce.com/__media__/js/netsoltrademark.php?d=madepics.net
http://godschosen.com/__media__/js/netsoltrademark.php?d=madepics.net
http://rcctradingpost.com/__media__/js/netsoltrademark.php?d=madepics.net
http://saynotorexulti.com/__media__/js/netsoltrademark.php?d=madepics.net
http://www.acs-aec.org/index.php?q=http%3a%2f%2fmadepics.net
http://vajrakilaya.net/__media__/js/netsoltrademark.php?d=madepics.net
http://skybloc.com/__media__/js/netsoltrademark.php?d=madepics.net
http://ta-retirements.com/__media__/js/netsoltrademark.php?d=madepics.net
http://americanaworld.org/__media__/js/netsoltrademark.php?d=madepics.net
h?d=madepics.net
http://4itailers.com/__media__/js/netsoltrademark.php?d=madepics.net
http://plasmafusion.ca/__media__/js/netsoltrademark.php?d=madepics.net
http://mnmsba.com/__media__/js/netsoltrademark.php?d=madepics.net
http://leeset.com/__media__/js/netsoltrademark.php?d=madepics.net
http://www.rheinland-portal.com/peters_empfehlungen/jump.php?site=https://madepics.net
http://burtsbeeslotion.com/__media__/js/netsoltrademark.php?d=madepics.net
http://nonprofit-communicators.com/__media__/js/netsoltrademark.php?d=madepics.net
https://www.lucklaser.jp/trigger.php?r_link=http%3a%2f%2fmadepics.net/
http://oklahomatensionstructures.com/__media__/js/netsoltrademark.php?d=madepics.net
http://adertechnologies.com/__media__/js/netsoltrademark.php?d=madepics.net
http://rickhardinjr.com/__media__/js/netsoltrademark.php?d=madepics.net
http://lennonandmccartney.com/__media__/js/netsoltrademark.php?d=madepics.net
http://sterlingcloseout.com/__media__/js/netsoltrademark.php?d=madepics.net
https://www.olondon.ru/bitrix/click.php?goto=https://madepics.net
http://pirquet.com/__media__/js/netsoltrademark.php?d=madepics.net
http://scanzorosciatem5stelle.it/__media__/js/netsoltrademark.php?d=madepics.net
https://garda-outlet.ru/bitrix/redirect.php?goto=https://madepics.net
http://interflex.biz/url?q=https://madepics.net
http://boterate.com/__media__/js/netsoltrademark.php?d=madepics.net
http://jmudukes.us/__media__/js/netsoltrademark.php?d=madepics.net
https://remontmix.ru/out?t=1&mid=19521&url=https://madepics.net
http://med.8km.ru/bitrix/rk.php?goto=https://madepics.net
http://droyerspoint.pro/__media__/js/netsoltrademark.php?d=madepics.net
http://reasonableobjectives.com/__media__/js/netsoltrademark.php?d=madepics.net
http://davidsaccounting.biz/__media__/js/netsoltrademark.php?d=madepics.net
http://santaclaradog.online/__media__/js/netsoltrademark.php?d=madepics.net
http://www.dearjohnlennon.com/__media__/js/netsoltrademark.php?d=madepics.net
http://quantlab.co/__media__/js/netsoltrademark.php?d=madepics.net
http://zdq.umbrellainvestment.com/__media__/js/netsoltrademark.php?d=madepics.net
http://airplanecrash.net/__media__/js/netsoltrademark.php?d=madepics.net
http://tlc.tc/__media__/js/netsoltrademark.php?d=madepics.net
http://hrj.listie.com/__media__/js/netsoltrademark.php?d=madepics.net
http://oakphoto.com/__media__/js/netsoltrademark.php?d=madepics.net
https://pawpulous.com/referral.php?url=http%3A%2F%2Fmadepics.net&aid=60119
http://softpaws.pet/__media__/js/netsoltrademark.php?d=madepics.net
http://anthonyrobbinsstore.us/__media__/js/netsoltrademark.php?d=madepics.net
https://minnesota.feb.gov/external-link/?url=https://madepics.net
http://circusmonkeyllc.com/__media__/js/netsoltrademark.php?d=madepics.net
http://www.scanbuilding.com/__media__/js/netsoltrademark.php?d=madepics.net
http://argohomevideo.com/__media__/js/netsoltrademark.php?d=madepics.net
http://sportscarmasters.co.uk/__media__/js/netsoltrademark.php?d=madepics.net
http://blockagon.com/__media__/js/netsoltrademark.php?d=madepics.net
https://654.trgatecoin.com/Redirect.aspx?url=madepics.net
http://andersoncruises.com/__media__/js/netsoltrademark.php?d=madepics.net
https://s1cache.2banh.vn/528×0/?ext=https%3A%2F%2Fmadepics.net
http://region-avto02.ru/bitrix/redirect.php?goto=https://madepics.net
http://eddonboatcompany.com/__media__/js/netsoltrademark.php?d=madepics.net
https://www.kraftinvest.com/bitrix/click.php?goto=https://madepics.net
http://unidosenred.com/__media__/js/netsoltrademark.php?d=madepics.net
http://firefirstcutax.biz/__media__/js/netsoltrademark.php?d=madepics.net
http://monkeypics.net/__media__/js/netsoltrademark.php?d=madepics.net
http://falsepassadventures.com/__media__/js/netsoltrademark.php?d=madepics.net
https://overmaat.com/__media__/js/netsoltrademark.php?d=madepics.net
http://pwandpartners.fund/__media__/js/netsoltrademark.php?d=madepics.net
http://livebiotherapeutics.co.uk/__media__/js/netsoltrademark.php?d=madepics.net
http://duartebooks.com/__media__/js/netsoltrademark.php?d=madepics.net
http://lwncpa.com/__media__/js/netsoltrademark.php?d=madepics.net
http://visitingsingapore.com/__media__/js/netsoltrademark.php?d=madepics.net
http://lexingtonconcord.com/__media__/js/netsoltrademark.php?d=madepics.net
http://finddpp.com/__media__/js/netsoltrademark.php?d=madepics.net
http://businessbmark.com/__media__/js/netsoltrademark.php?d=madepics.net
What’s Going down i’m new to this, I stumbled upon this I have discovered It
positively helpful and it has aided me out loads.
I am hoping to give a contribution & assist other customers like its aided me.
Great job.
Kudos, Loads of posts!
my web-site … https://harga.web.id/daftar-biaya-instal-ulang-laptop.info
This is a topic that is near to my heart… Cheers!
Exactly where are your contact details though?
Hmm it appears like your site ate my first comment (it was super long)
so I guess I’ll just sum it up what I submitted and say, I’m thoroughly
enjoying your blog. I too am an aspiring blog writer but I’m still new to the whole thing.
Do you have any helpful hints for newbie blog writers?
I’d really appreciate it.
I know this if off topic but I’m looking into starting my
own blog and was curious what all is required to get setup?
I’m assuming having a blog like yours would cost a pretty
penny? I’m not very internet savvy so I’m not 100% sure.
Any suggestions or advice would be greatly appreciated.
Appreciate it
Hello everyone, it’s my first pay a visit at this website,
and article is truly fruitful in favor of me, keep up posting these content.
Fantastic items from you, man. I have bear in mind your stuff previous to and you are simply too fantastic.
I actually like what you’ve got here, certainly like what you’re saying and
the way in which wherein you say it. You are making it entertaining and you still take care of
to stay it smart. I can’t wait to learn far
more from you. That is actually a terrific site.
how can i get amoxicillin
Metformin HCL 1000 mg is contraindicated in patients with hypersensitivity to metformin.
Fantastic write ups, Appreciate it.
Бородатый инфоцыган Павел – инфоцыган
Hey there, everyone! The name’s Admin Read:
Не хотите тратить время на поиск интересного контента? mega тор с удовольствием возьмет эту задачу на себя! Наш инновационный алгоритм находит контент, который точно попадает в цель ваших интересов. Откройте для себя новые горизонты в мире развлечений с зайти на mega!
рабочая ссылка на мегу:https://mega-active-links.com
mega darknet market:https://xn--mea-sb-j6a.com
It’s really very complex in this busy life to listen news on TV,
therefore I just use internet for that reason,
and obtain the latest news.
buy generic valtrex without prescription
This is a topic that is close to my heart… Many thanks!
Where are your contact details though?
azithromycin 50 mg tablet
where can i purchase diflucan over the counter
What i don’t understood is in fact how you are not really much
more well-appreciated than you might be now. You’re so intelligent.
You already know therefore significantly in the case of this matter,
produced me personally consider it from numerous numerous angles.
Its like women and men aren’t fascinated until it’s something to accomplish
with Woman gaga! Your own stuffs nice. Always take care of it up!
Excellent website. A lot of useful information here. I’m sending it
to several buddies ans additionally sharing in delicious.
And naturally, thanks in your sweat!
What’s up, I check your blogs on a regular basis. Your story-telling style is
witty, keep it up!
Hello! I simply wish to offer you a huge thumbs up for the excellent information you’ve got here on this post.
I am coming back to your web site for more soon.
Saved as a favorite, I really like your blog!
Fine way of explaining, and good article to get data concerning
my presentation topic, which i am going to present
in college.
I’m gone to say to my little brother, that he should also visit this website on regular basis to take updated from latest
information.
Right now it seems like Movable Type is the preferred blogging platform available right now.
(from what I’ve read) Is that what you are using on your blog?
Is lisinopril 40 mg tablet safe to take with other medications?
My brother recommended I might like this blog. He was totally right.
This post actually made my day. You cann’t imagine simply how
much time I had spent for this info! Thanks!
I’m curious to find out what blog platform you
are working with? I’m having some small security issues with my latest
blog and I would like to find something more safe.
Do you have any solutions?
noroxin medication
Regards, Helpful stuff!
http://afcantarelle.org/index.php?title=Google
http://afcantarelle.org/index.php?title=User:DomainRating41
http://classicalmusicmp3freedownload.com/ja/index.php?title=%E5%88%A9%E7%94%A8%E8%80%85:DomainRating291
http://classicalmusicmp3freedownload.com/ja/index.php?title=Google
http://embeddedwiki.cs.aau.dk/wiki/Google
http://embeddedwiki.cs.aau.dk/wiki/User_talk:DomainRating194
http://nswiki.svenskasuperserier.se/w/index.php?title=Anv%C3%A4ndare:DomainRating34
http://nswiki.svenskasuperserier.se/w/index.php?title=Google
http://postgasse.net/Wiki/index.php?title=Benutzer:DomainRating291
http://postgasse.net/Wiki/index.php?title=Google
http://rapedia.de/index.php/Benutzer:DomainRating181
http://rapedia.de/index.php/Google
http://tironelle.free.fr/wiki/index.php?title=Discussion_Utilisateur:DomainRating169
http://tironelle.free.fr/wiki/index.php?title=Google
http://urbino.fh-joanneum.at/trials/index.php/Google
http://urbino.fh-joanneum.at/trials/index.php/User:DomainRating74
http://vulteevaliant.com/index.php/Google
http://vulteevaliant.com/index.php/User:DomainRating135
http://wiki-ux.info/wiki/Google
http://wiki-ux.info/wiki/User:DomainRating107
http://wiki.monashicpc.com/Google
http://wiki.monashicpc.com/User:DomainRating182
http://www.erwinbrandenberger.ch/index.php?title=Benutzer:DomainRating202
http://www.erwinbrandenberger.ch/index.php?title=Google
http://www.jeromebaray.com/afm/wiki/index.php/Google
http://www.jeromebaray.com/afm/wiki/index.php/Utilisateur:DomainRating69
http://www.matthew-morris.com/wiki/index.php/Google
http://www.matthew-morris.com/wiki/index.php/User:DomainRating87
http://www.nishikigoi.fr/index.php?title=Utilisateur:DomainRating133
http://www.wiki.cheneliege.fr/index.php/Google
http://www.wiki.cheneliege.fr/index.php/Utilisateur:DomainRating217
http://www.zilahy.info/wiki/index.php/Google
http://www.zilahy.info/wiki/index.php/User:DomainRating173
https://audiwiki.bitt-c.at/index.php?title=Benutzer:DomainRating50
https://bbarlock.com/index.php/Google
https://bbarlock.com/index.php/User:DomainRating222
https://biowiki.clinomics.com/index.php/Google
https://biowiki.clinomics.com/index.php/User:DomainRating157
https://demo.centreon.com/wiki/index.php?title=Google
https://demo.centreon.com/wiki/index.php?title=User:DomainRating202
https://exterior.podemos.info/mediawiki/index.php?title=Google
https://exterior.podemos.info/mediawiki/index.php?title=Usuario:DomainRating173
https://gamesfashionarchive.net/wiki/User:DomainRating259
https://gnometopia.org/index.php?title=Google
https://help.ezadspro.co.uk/index.php?title=User:DomainRating91
https://iamelf.com/wiki/index.php/Google
https://iamelf.com/wiki/index.php/User:DomainRating96
https://intranet.wikimedia.cat/wiki/Usuari:DomainRating300
https://koloiko.com/wiki/index.php?title=Google
https://koloiko.com/wiki/index.php?title=User:DomainRating181
https://library.kemu.ac.ke/kemuwiki/index.php/Google
https://library.kemu.ac.ke/kemuwiki/index.php/User:DomainRating130
https://livingbooksaboutlife.org/books/Google
https://livingbooksaboutlife.org/books/User:DomainRating137
https://mnwiki.org/index.php/Google
https://mnwiki.org/index.php/User:DomainRating245
https://procesal.cl/index.php/Google
https://procesal.cl/index.php/User:DomainRating74
https://religiopedia.com/index.php/Google
https://religiopedia.com/index.php/User:DomainRating78
https://sustainabilipedia.org/index.php/Google
https://sustainabilipedia.org/index.php/User:DomainRating71
https://wiki.geocaching.waw.pl/index.php?title=Google
https://wiki.geocaching.waw.pl/index.php?title=U%C5%BCytkownik:DomainRating116
https://wiki.hrw-fablab.de/index.php?title=Google
https://wiki.hrw-fablab.de/index.php?title=User:DomainRating86
https://wiki.itcoug.com/index.php?title=Google
https://wiki.minecraft.jp.net/%E5%88%A9%E7%94%A8%E8%80%85:DomainRating247
https://wiki.minecraft.jp.net/Google
https://wiki.ryuriin.my.id/index.php/Google
https://wiki.ryuriin.my.id/index.php/User:DomainRating48
https://wiki.sports-5.ch/index.php?title=Google
https://wiki.sports-5.ch/index.php?title=Utilisateur:DomainRating14
https://www.crustcorporate.com/wiki/Google
https://www.crustcorporate.com/wiki/User:DomainRating126
https://www.mibtec.it/wiki/index.php?title=Utente:DomainRating280
https://www.offwiki.org/wiki/Google
https://www.offwiki.org/wiki/User:DomainRating47
http://afcantarelle.org/index.php?title=Pafi_Jakarta_Timur_2769
http://afcantarelle.org/index.php?title=User:Pafijakartatim52
http://classicalmusicmp3freedownload.com/ja/index.php?title=%E5%88%A9%E7%94%A8%E8%80%85:Pafijakartatim258
http://classicalmusicmp3freedownload.com/ja/index.php?title=Pafi_Jakarta_Timur_4786
http://embeddedwiki.cs.aau.dk/wiki/Pafi_Jakarta_Timur_5152
http://embeddedwiki.cs.aau.dk/wiki/User:Pafijakartatim187
http://kousokuwiki.org/wiki/Pafi_Jakarta_Timur_5873
http://postgasse.net/Wiki/index.php?title=Benutzer:Pafijakartatim128
http://postgasse.net/Wiki/index.php?title=Pafi_Jakarta_Timur_5280
http://terio.fvet.uba.ar/mediawiki/index.php/Pafi_Jakarta_Timur_239
http://terio.fvet.uba.ar/mediawiki/index.php/Usuario:Pafijakartatim71
http://urbino.fh-joanneum.at/trials/index.php/Pafi_Jakarta_Timur_453
http://urbino.fh-joanneum.at/trials/index.php/User:Pafijakartatim210
http://vulteevaliant.com/index.php/Pafi_Jakarta_Timur_5720
http://vulteevaliant.com/index.php/User:Pafijakartatim106
http://web.archive.org/web/20230905023354/https://pafijakartatimur.org/
http://wiki-ux.info/wiki/Pafi_Jakarta_Timur_4073
http://wiki-ux.info/wiki/User:Pafijakartatim10
http://wiki.monashicpc.com/Pafi_Jakarta_Timur_5972
http://wiki.monashicpc.com/User:Pafijakartatim241
http://wiki.shitcore.org/index.php/Pafi_Jakarta_Timur_1125
http://wiki.shitcore.org/index.php/User:Pafijakartatim190
http://www.driftpedia.com/wiki/index.php/Pafi_Jakarta_Timur_5939
http://www.driftpedia.com/wiki/index.php/User:Pafijakartatim237
http://www.erwinbrandenberger.ch/index.php?title=Benutzer:Pafijakartatim154
http://www.erwinbrandenberger.ch/index.php?title=Pafi_Jakarta_Timur_4975
http://www.heerfamily.net/mediawiki/index.php/Pafi_Jakarta_Timur_5874
http://www.heerfamily.net/mediawiki/index.php/User:Pafijakartatim205
http://www.jeromebaray.com/afm/wiki/index.php/Pafi_Jakarta_Timur_3543
http://www.jeromebaray.com/afm/wiki/index.php/Utilisateur:Pafijakartatim115
http://www.matthew-morris.com/wiki/index.php/Pafi_Jakarta_Timur_1539
http://www.matthew-morris.com/wiki/index.php/User:Pafijakartatim269
http://www.wiki.cheneliege.fr/index.php/Pafi_Jakarta_Timur_5225
http://www.wiki.cheneliege.fr/index.php/Utilisateur:Pafijakartatim96
http://www.zilahy.info/wiki/index.php/Pafi_Jakarta_Timur_5068
https://demo.centreon.com/wiki/index.php?title=Pafi_Jakarta_Timur_2093
https://demo.centreon.com/wiki/index.php?title=User:Pafijakartatim109
https://exterior.podemos.info/mediawiki/index.php?title=Pafi_Jakarta_Timur_2400
https://exterior.podemos.info/mediawiki/index.php?title=Usuario:Pafijakartatim217
https://gamesfashionarchive.net/wiki/User:Pafijakartatim58
https://gnometopia.org/index.php?title=Pafi_Jakarta_Timur_1218
https://intranet.wikimedia.cat/wiki/Usuari:Pafijakartatim208
https://koloiko.com/wiki/index.php?title=Pafi_Jakarta_Timur_5571
https://koloiko.com/wiki/index.php?title=User:Pafijakartatim221
https://library.kemu.ac.ke/kemuwiki/index.php/Pafi_Jakarta_Timur_4748
https://library.kemu.ac.ke/kemuwiki/index.php/User:Pafijakartatim61
https://livingbooksaboutlife.org/books/Pafi_Jakarta_Timur_5908
https://livingbooksaboutlife.org/books/User:Pafijakartatim168
https://mediawiki.governancaegestao.wiki.br/index.php/Pafi_Jakarta_Timur_3274
https://mediawiki.governancaegestao.wiki.br/index.php/User:Pafijakartatim98
https://mnwiki.org/index.php/Pafi_Jakarta_Timur_1720
https://mnwiki.org/index.php/User:Pafijakartatim56
https://procesal.cl/index.php/Pafi_Jakarta_Timur_3001
https://procesal.cl/index.php/User:Pafijakartatim151
https://religiopedia.com/index.php/Pafi_Jakarta_Timur_1193
https://religiopedia.com/index.php/User:Pafijakartatim36
https://sustainabilipedia.org/index.php/Pafi_Jakarta_Timur_3703
https://sustainabilipedia.org/index.php/User:Pafijakartatim23
https://thewillistree.info/genealogy/wiki/Pafi_Jakarta_Timur_1091
https://thewillistree.info/genealogy/wiki/User:Pafijakartatim16
https://wiki.geocaching.waw.pl/index.php?title=Pafi_Jakarta_Timur_236
https://wiki.geocaching.waw.pl/index.php?title=U%C5%BCytkownik:Pafijakartatim208
https://wiki.hrw-fablab.de/index.php?title=Pafi_Jakarta_Timur_1452
https://wiki.hrw-fablab.de/index.php?title=User:Pafijakartatim124
https://wiki.itcoug.com/index.php?title=Pafi_Jakarta_Timur_1115
https://wiki.minecraft.jp.net/%E5%88%A9%E7%94%A8%E8%80%85:Pafijakartatim35
https://wiki.minecraft.jp.net/Pafi_Jakarta_Timur_3411
https://wiki.renew-platforms.dk/index.php?title=Pafi_Jakarta_Timur_545
https://wiki.renew-platforms.dk/index.php?title=User:Pafijakartatim44
https://wiki.ryuriin.my.id/index.php/Pafi_Jakarta_Timur_1158
https://wiki.ryuriin.my.id/index.php/User:Pafijakartatim120
https://www.crustcorporate.com/wiki/Pafi_Jakarta_Timur_3595
https://www.crustcorporate.com/wiki/User:Pafijakartatim35
https://www.mibtec.it/wiki/index.php?title=Utente:Pafijakartatim100
https://www.offwiki.org/wiki/Pafi_Jakarta_Timur_1819
https://www.offwiki.org/wiki/User:Pafijakartatim105
http://afcantarelle.org/index.php?title=Pafi_Jakarta_Timur_469
http://afcantarelle.org/index.php?title=User:Pafijakartatim265
http://classicalmusicmp3freedownload.com/ja/index.php?title=%E5%88%A9%E7%94%A8%E8%80%85:Pafijakartatim168
http://classicalmusicmp3freedownload.com/ja/index.php?title=Pafi_Jakarta_Timur_746
http://lsc.wikisign.org/wiki/Usuari:Pafijakartatim263
http://postgasse.net/Wiki/index.php?title=Benutzer:Pafijakartatim109
http://postgasse.net/Wiki/index.php?title=Pafi_Jakarta_Timur_1451
http://rapedia.de/index.php/Benutzer:Pafijakartatim211
http://rapedia.de/index.php/Pafi_Jakarta_Timur_1972
http://terio.fvet.uba.ar/mediawiki/index.php/Pafi_Jakarta_Timur_1283
http://terio.fvet.uba.ar/mediawiki/index.php/Usuario:Pafijakartatim146
http://urbino.fh-joanneum.at/trials/index.php/Pafi_Jakarta_Timur_1452
http://urbino.fh-joanneum.at/trials/index.php/User:Pafijakartatim178
http://vulteevaliant.com/index.php/Pafi_Jakarta_Timur_3784
http://vulteevaliant.com/index.php/User:Pafijakartatim199
http://web.archive.org/web/20230905023354/https://pafijakartatimur.org/
http://wiki-beta.avazinn.com/w/index.php?title=User:Pafijakartatim31
http://wiki-ux.info/wiki/Pafi_Jakarta_Timur_5151
http://wiki-ux.info/wiki/User:Pafijakartatim75
http://wiki.monashicpc.com/Pafi_Jakarta_Timur_2237
http://wiki.monashicpc.com/User:Pafijakartatim248
http://wiki.shitcore.org/index.php/Pafi_Jakarta_Timur_2417
http://wiki.shitcore.org/index.php/User:Pafijakartatim282
http://www.driftpedia.com/wiki/index.php/Pafi_Jakarta_Timur_3811
http://www.driftpedia.com/wiki/index.php/User:Pafijakartatim128
http://www.erwinbrandenberger.ch/index.php?title=Benutzer:Pafijakartatim219
http://www.erwinbrandenberger.ch/index.php?title=Pafi_Jakarta_Timur_4512
http://www.jeromebaray.com/afm/wiki/index.php/Pafi_Jakarta_Timur_386
http://www.jeromebaray.com/afm/wiki/index.php/Utilisateur:Pafijakartatim168
http://www.matthew-morris.com/wiki/index.php/Pafi_Jakarta_Timur_1849
http://www.matthew-morris.com/wiki/index.php/User:Pafijakartatim23
http://www.zilahy.info/wiki/index.php/Pafi_Jakarta_Timur_4173
http://www.zilahy.info/wiki/index.php/User:Pafijakartatim90
https://audiwiki.bitt-c.at/index.php?title=Benutzer:Pafijakartatim194
https://audiwiki.bitt-c.at/index.php?title=Pafi_Jakarta_Timur_3596
https://bbarlock.com/index.php/Pafi_Jakarta_Timur_807
https://bbarlock.com/index.php/User:Pafijakartatim273
https://biowiki.clinomics.com/index.php/Pafi_Jakarta_Timur_3915
https://biowiki.clinomics.com/index.php/User:Pafijakartatim297
https://exterior.podemos.info/mediawiki/index.php?title=Pafi_Jakarta_Timur_825
https://exterior.podemos.info/mediawiki/index.php?title=Usuario:Pafijakartatim174
https://gamesfashionarchive.net/wiki/User:Pafijakartatim65
https://gnometopia.org/index.php?title=Pafi_Jakarta_Timur_2446
https://intranet.wikimedia.cat/wiki/Usuari:Pafijakartatim208
https://library.kemu.ac.ke/kemuwiki/index.php/Pafi_Jakarta_Timur_1350
https://library.kemu.ac.ke/kemuwiki/index.php/User:Pafijakartatim238
https://livingbooksaboutlife.org/books/Pafi_Jakarta_Timur_2563
https://livingbooksaboutlife.org/books/User:Pafijakartatim67
https://mnwiki.org/index.php/Pafi_Jakarta_Timur_4774
https://mnwiki.org/index.php/User:Pafijakartatim155
https://sustainabilipedia.org/index.php/Pafi_Jakarta_Timur_349
https://sustainabilipedia.org/index.php/User:Pafijakartatim149
https://thewillistree.info/genealogy/wiki/Pafi_Jakarta_Timur_1736
https://thewillistree.info/genealogy/wiki/User:Pafijakartatim11
https://wiki.gahlawat.dynu.com/mediawiki/index.php?title=Pafi_Jakarta_Timur_2764
https://wiki.gahlawat.dynu.com/mediawiki/index.php?title=User:Pafijakartatim119
https://wiki.geocaching.waw.pl/index.php?title=Pafi_Jakarta_Timur_5719
https://wiki.geocaching.waw.pl/index.php?title=U%C5%BCytkownik:Pafijakartatim228
https://wiki.hrw-fablab.de/index.php?title=Pafi_Jakarta_Timur_1752
https://wiki.hrw-fablab.de/index.php?title=User:Pafijakartatim126
https://wiki.itcoug.com/index.php?title=Pafi_Jakarta_Timur_1338
https://wiki.itcoug.com/index.php?title=Usuario:Pafijakartatim203
https://wiki.lafabriquedelalogistique.fr/Utilisateur:Pafijakartatim185
https://wiki.minecraft.jp.net/%E5%88%A9%E7%94%A8%E8%80%85:Pafijakartatim179
https://wiki.minecraft.jp.net/Pafi_Jakarta_Timur_2433
https://wiki.renew-platforms.dk/index.php?title=Pafi_Jakarta_Timur_2877
https://wiki.renew-platforms.dk/index.php?title=User:Pafijakartatim195
https://wiki.sports-5.ch/index.php?title=Pafi_Jakarta_Timur_5736
https://wiki.sports-5.ch/index.php?title=Utilisateur:Pafijakartatim175
https://www.crustcorporate.com/wiki/Pafi_Jakarta_Timur_3338
https://www.crustcorporate.com/wiki/User:Pafijakartatim260
https://www.offwiki.org/wiki/Pafi_Jakarta_Timur_2489
https://www.offwiki.org/wiki/User:Pafijakartatim237
http://afcantarelle.org/index.php?title=Pafi_Jakarta_Timur_511
http://afcantarelle.org/index.php?title=User:Pafijakartatim279
http://classicalmusicmp3freedownload.com/ja/index.php?title=%E5%88%A9%E7%94%A8%E8%80%85:Pafijakartatim238
http://classicalmusicmp3freedownload.com/ja/index.php?title=Pafi_Jakarta_Timur_5192
http://embeddedwiki.cs.aau.dk/wiki/Pafi_Jakarta_Timur_5922
http://embeddedwiki.cs.aau.dk/wiki/User_talk:Pafijakartatim249
http://kousokuwiki.org/wiki/Pafi_Jakarta_Timur_2781
http://lsc.wikisign.org/wiki/Usuari_Discussi%C3%B3:Pafijakartatim234
http://postgasse.net/Wiki/index.php?title=Benutzer_Diskussion:Pafijakartatim297
http://postgasse.net/Wiki/index.php?title=Pafi_Jakarta_Timur_3027
http://terio.fvet.uba.ar/mediawiki/index.php/Pafi_Jakarta_Timur_5083
http://terio.fvet.uba.ar/mediawiki/index.php/Usuario:Pafijakartatim156
http://urbino.fh-joanneum.at/trials/index.php/Pafi_Jakarta_Timur_3549
http://urbino.fh-joanneum.at/trials/index.php/User:Pafijakartatim159
http://vulteevaliant.com/index.php/Pafi_Jakarta_Timur_3869
http://vulteevaliant.com/index.php/User:Pafijakartatim176
http://web.archive.org/web/20230905023354/https://pafijakartatimur.org/
http://wiki-ux.info/wiki/Pafi_Jakarta_Timur_4994
http://wiki-ux.info/wiki/User:Pafijakartatim69
http://wiki.monashicpc.com/Pafi_Jakarta_Timur_1467
http://wiki.monashicpc.com/User:Pafijakartatim210
http://wiki.shitcore.org/index.php/User:Pafijakartatim150
http://www.driftpedia.com/wiki/index.php/Pafi_Jakarta_Timur_2288
http://www.driftpedia.com/wiki/index.php/User:Pafijakartatim41
http://www.erwinbrandenberger.ch/index.php?title=Benutzer:Pafijakartatim149
http://www.erwinbrandenberger.ch/index.php?title=Pafi_Jakarta_Timur_1272
http://www.jeromebaray.com/afm/wiki/index.php/Pafi_Jakarta_Timur_1990
http://www.jeromebaray.com/afm/wiki/index.php/Utilisateur:Pafijakartatim159
http://www.matthew-morris.com/wiki/index.php/Pafi_Jakarta_Timur_4291
http://www.matthew-morris.com/wiki/index.php/User:Pafijakartatim278
http://www.zilahy.info/wiki/index.php/Pafi_Jakarta_Timur_4266
http://www.zilahy.info/wiki/index.php/User:Pafijakartatim202
https://bbarlock.com/index.php/Pafi_Jakarta_Timur_1738
https://bbarlock.com/index.php/User:Pafijakartatim86
https://biowiki.clinomics.com/index.php/Pafi_Jakarta_Timur_399
https://biowiki.clinomics.com/index.php/User:Pafijakartatim174
https://demo.centreon.com/wiki/index.php?title=Pafi_Jakarta_Timur_5374
https://demo.centreon.com/wiki/index.php?title=User:Pafijakartatim157
https://exterior.podemos.info/mediawiki/index.php?title=Pafi_Jakarta_Timur_1988
https://exterior.podemos.info/mediawiki/index.php?title=Usuario:Pafijakartatim68
https://gamesfashionarchive.net/wiki/User:Pafijakartatim46
https://iamelf.com/wiki/index.php/Pafi_Jakarta_Timur_3115
https://iamelf.com/wiki/index.php/User:Pafijakartatim245
https://intranet.wikimedia.cat/wiki/Usuari:Pafijakartatim195
https://library.kemu.ac.ke/kemuwiki/index.php/Pafi_Jakarta_Timur_4703
https://library.kemu.ac.ke/kemuwiki/index.php/User:Pafijakartatim280
https://livingbooksaboutlife.org/books/Pafi_Jakarta_Timur_1214
https://livingbooksaboutlife.org/books/User:Pafijakartatim207
https://mediawiki.governancaegestao.wiki.br/index.php/Pafi_Jakarta_Timur_631
https://mediawiki.governancaegestao.wiki.br/index.php/User:Pafijakartatim295
https://mnwiki.org/index.php/Pafi_Jakarta_Timur_602
https://mnwiki.org/index.php/User:Pafijakartatim285
https://sustainabilipedia.org/index.php/Pafi_Jakarta_Timur_1780
https://sustainabilipedia.org/index.php/User:Pafijakartatim27
https://thewillistree.info/genealogy/wiki/Pafi_Jakarta_Timur_2860
https://thewillistree.info/genealogy/wiki/User:Pafijakartatim29
https://wiki.cephalix.eu/index.php/Benutzer:Pafijakartatim49
https://wiki.cephalix.eu/index.php/Pafi_Jakarta_Timur_849
https://wiki.gahlawat.dynu.com/mediawiki/index.php?title=Pafi_Jakarta_Timur_5593
https://wiki.gahlawat.dynu.com/mediawiki/index.php?title=User:Pafijakartatim172
https://wiki.geocaching.waw.pl/index.php?title=Pafi_Jakarta_Timur_1416
https://wiki.geocaching.waw.pl/index.php?title=U%C5%BCytkownik:Pafijakartatim217
https://wiki.hrw-fablab.de/index.php?title=Pafi_Jakarta_Timur_2236
https://wiki.hrw-fablab.de/index.php?title=User:Pafijakartatim295
https://wiki.itcoug.com/index.php?title=Pafi_Jakarta_Timur_3113
https://wiki.minecraft.jp.net/%E5%88%A9%E7%94%A8%E8%80%85:Pafijakartatim24
https://wiki.minecraft.jp.net/Pafi_Jakarta_Timur_326
https://wiki.renew-platforms.dk/index.php?title=Pafi_Jakarta_Timur_5521
https://wiki.renew-platforms.dk/index.php?title=User:Pafijakartatim168
https://wiki.sports-5.ch/index.php?title=Pafi_Jakarta_Timur_3211
https://wiki.sports-5.ch/index.php?title=Utilisateur:Pafijakartatim92
https://www.crustcorporate.com/wiki/Pafi_Jakarta_Timur_5108
https://www.crustcorporate.com/wiki/User:Pafijakartatim275
https://www.offwiki.org/wiki/Pafi_Jakarta_Timur_704
https://www.offwiki.org/wiki/User:Pafijakartatim132
https://ajk.wxw.mybluehost.me/community/profile/ernestoisaacs79/
https://commoncause.optiontradingspeak.com/index.php/community/profile/antjemccollom5/
https://commoncause.optiontradingspeak.com/index.php/community/profile/benjaminhewitt0/
https://commoncause.optiontradingspeak.com/index.php/community/profile/bethneal6759546/
https://commoncause.optiontradingspeak.com/index.php/community/profile/christopherbrau/
https://commoncause.optiontradingspeak.com/index.php/community/profile/francesjury7151/
https://commoncause.optiontradingspeak.com/index.php/community/profile/freddiequinto08/
https://commoncause.optiontradingspeak.com/index.php/community/profile/jennihawken0945/
https://commoncause.optiontradingspeak.com/index.php/community/profile/jovitallewelyn/
https://commoncause.optiontradingspeak.com/index.php/community/profile/pasqualehoneycu/
https://dadstreamer.com/community/profile/owenlionel2434/
https://commoncause.optiontradingspeak.com/index.php/community/profile/leonielea29224/
https://dadstreamer.com/community/profile/remonaauh630218/
https://welcomeship.org/community/profile/corinemackay141/
Wow! At last I got a weblog from where I know how
to really get helpful information concerning my study and knowledge.
Greetings! Very useful advice in this particular post!
It is the little changes that produce the most significant changes.
Thanks a lot for sharing!
If you’re experiencing severe side effects while taking lisinopril brand, stop taking it and seek medical attention.
clonidine 200 mg
It’s awesome to visit this site and reading the views of all friends concerning this paragraph, while I am also keen of getting familiarity.
Its like you read my thoughts! You seem to grasp a lot about this, like you
wrote the ebook in it or something. I think that you just can do with a few
p.c. to force the message home a little bit, but instead of
that, this is magnificent blog. An excellent read.
I’ll definitely be back.
Heya i’m for the first time here. I found this board and
I to find It truly helpful & it helped me out a lot.
I am hoping to give one thing again and help others like
you aided me.
Simply wish to say your article is as astonishing. The clearness in your post is just great and
i can assume you are an expert on this subject. Well with your permission let me to grab your RSS feed to keep updated with forthcoming post.
Thanks a million and please carry on the gratifying work.
cheapest online pharmacy india
dexamethasone rx
I was recommended this web site by my cousin. I am not sure whether this post is written by him as nobody else know such detailed about
my trouble. You are incredible! Thanks!
Whoa loads of beneficial info!
pay to write paper pay for papers buy a paper research paper writing service
dissertation writing service dissertation paper dissertation abstracts international definition of dissertation
websites for essays in english https://studentessaywriting.com
Thank you for sharing your info. I really appreciate your efforts
and I will be waiting for your further write ups thank you once again.
Awesome! Its actually amazing paragraph, I have got much
clear idea on the topic of from this paragraph.
I have been surfing online more than 3 hours today, yet I never found any
interesting article like yours. It is pretty worth enough for me.
In my view, if all web owners and bloggers made good content as you did, the web
will be much more useful than ever before.
rx online pharmacy
6 mg dexamethasone
buy ivermectin uk
where to get ivermectin
Your style is very unique compared to other
folks I’ve read stuff from. Many thanks for posting when you’ve got
the opportunity, Guess I’ll just book mark this blog.
Great blog you have here.. It’s difficult to find quality writing like
yours these days. I seriously appreciate people like you!
Take care!!
Hello there! I could have sworn I’ve been to this website
before but after going through some of the articles I realized it’s new to me.
Anyhow, I’m definitely delighted I came across it and I’ll be bookmarking it and checking back often!
cephalexin monohydrate
I’ve been surfing online greater than three hours lately, but I never found any fascinating article
like yours. It is lovely worth sufficient for me. In my view,
if all site owners and bloggers made just right content as you probably did, the internet shall be much
more useful than ever before.
wellbutrin 450
Very nice post. I just stumbled upon your blog and wanted to
say that I’ve really enjoyed surfing around your blog posts.
In any case I’ll be subscribing to your feed and
I hope you write again very soon!
bupropion buy uk
generic name for ivermectin
purchase meclizine generic where can i buy meclizine order meclizine 25mg pills
ivermectin 3
Terrific work! This is the kind of information that are supposed to be shared around
the web. Shame on the seek engines for no longer positioning this publish upper!
Come on over and discuss with my web site . Thank you =)
propecia online nz
An impressive share! Ӏ һave juѕt forwarded tһis onto
а colleague whо ԝаs d᧐ing а little
research on thiѕ. And һe in fact bought
mе dinner becaᥙsе I stumbled սpon it for him…
lol. So let me reword this…. Tһank YОU for tһe meal!!
Βut yeah, thanx for spending tһe time
to talk about this subject һere on үour website.
I read this paragraph fully about the difference of hottest and previous technologies,
it’s amazing article.
I am not sure where you’re getting your info, but great topic.
I needs to spend some time learning much more or
understanding more. Thanks for wonderful info I was looking for this information for my
mission.
I like it whenever people get together and share views. Great site, continue the good work!
You expressed it superbly!
proposal writer proposal essay write my research paper for me research proposal cover page
Nice post. I used to be checking continuously this blog and I am inspired!
Extremely useful information specifically the ultimate part 🙂 I care for
such info much. I used to be seeking this particular info
for a very lengthy time. Thank you and good luck.
flomax over the counter
propecia uk price comparison
otc lasix
I’m gone to convey my little brother, that he should
also pay a quick visit this web site on regular basis to take updated from most
recent news.
I am curious to find out what blog platform you are utilizing?
I’m having some small security issues with my latest blog
and I would like to find something more secure.
Do you have any recommendations?
flomax over the counter medication
Good post. I learn something totally new and
challenging on sites I stumbleupon on a daily basis. It will always be exciting to read through articles from other
authors and practice a little something from other sites.
I for all time emailed this blog post page to all my associates, since if like to read it afterward my friends will too.
I think thе admin of thiѕ web pɑge iѕ in fact workіng hɑrd for hіѕ web page, ƅecause һere
evеry data is quality based data.
I have read so many content on the topic of the blogger lovers except this
post is genuinely a fastidious piece of writing, keep it up.
cephalexin cost
purchase propecia no prescription
Hey! Quick question that’s entirely off topic. Do you
know how to make your site mobile friendly? My blog looks weird
when browsing from my apple iphone. I’m trying
to find a theme or plugin that might be able to fix this problem.
If you have any suggestions, please share. With thanks!
Μy family memƄers ɑlways sɑy that І am killing my
timе here at net, but I кnow I ɑm getting know-how daily by reading thes nice articles.
Hello I am so happy I found your webpage, I really found you by error, while I was looking on Aol for something else,
Anyways I am here now and would just like to say thank you
for a fantastic post and a all round enjoyable blog (I also
love the theme/design), I don’t have time to read it all at the minute but I have saved it
and also included your RSS feeds, so when I have time I will be back to read a great deal more, Please do keep up the fantastic job.
I all the time used to study post in news papers but now as I am
a user of net thus from now I am using net for posts, thanks to web.
https://viralpressnews.com/health-supplements/stimula-blood-sugar-support-beware-is-it-legit-or-just-scam-first-know-cost/
This blog was… how do I say it? Relevant!!
Finally I’ve found something that helped me. Thanks a lot!
azithromycin otc
Use the equity in your house to safe a fixed-rate loan that
you can use to pay for any number of large purchases or projects.
I’ll right away grab your rss as I can not in finding your email subscription hyperlink or e-newsletter service.
Do you have any? Please allow me realize in order that I may just subscribe.
Thanks.
This info is worth everyone’s attention. Where can I find out more?
When some one searches for his required thing, so he/she desires to be available that in detail,
therefore that thing is maintained over here.
zithromax 500 tablet
Awesome blog! Do you have any suggestions for aspiring writers?
I’m hoping to start my own website soon but I’m a little
lost on everything. Would you recommend starting with a free platform like WordPress or go for a paid option? There are so many options out there that I’m totally overwhelmed ..
Any ideas? Many thanks!
If you desire to grow your familiarity simply keep visiting this web site
and be updated with the hottest news update posted here.
Wow, this paragraph is fastidious, my younger sister is analyzing
these kinds of things, therefore I am going to convey her.
can you buy valtrex over the counter in uk
Appreciate the recommendation. Let me try it out.
Hey would you mind sharing which blog platgorm you’re using?
I’m looking to start my own blog soon but I’m having a hard timke selecting between BlogEngine/Wordpress/B2evolution and Drupal.
The reason I ask iss because your design seems different then most blogs and I’m looking for something completely unique.
P.S Apologies for getting off-topic but I had to ask!
I do trust all of the ideas you’ve introduced for your post.
They’re very convincing and will definitely work.
Nonetheless, the posts are very short for starters.
Could you please extend them a little from subsequent time?
Thank you for the post.
bupropion sr
Oh my goodness! Incredible article dude!
Thank you so much, However I am experiencing troubles with your RSS.
I don’t understand why I cannot subscribe to it.
Is there anybody getting the same RSS problems?
Anyone who knows the answer will you kindly respond? Thanx!!
Lasix to buy is available in our pharmacy.
Don’t double the dose of the allopurinol brand name to make up for the missed one.
Unquestionably imagine that which you said. Your favourite reason appeared to be at
the internet the simplest factor to take into account of.
I say to you, I certainly get irked even as other people think about issues that they just don’t realize about.
You controlled to hit the nail upon the highest and defined out the whole thing with no need side-effects , people can take a signal.
Will probably be back to get more. Thanks
propecia 0.5 mg
Nicely put, Kudos!
thesis paper thesis binding thesis statement meaning write a thesis
diflucan brand name
prednisone drugs
That is really attention-grabbing, You are an excessively skilled blogger.
I’ve joined your feed and look forward to looking for more of your fantastic post.
Also, I’ve shared your web site in my social networks
I take pleasure in, cause I found exactly what I used to be looking for.
You’ve ended my four day long hunt! God Bless you man. Have
a great day. Bye
albuterol inhaler cost
It’s really a great and useful piece of info. I am
satisfied that you simply shared this useful info with
us. Please stay us informed like this. Thank you for sharing.
accutane purchase canada
doxycycline over the counter singapore
amazing thank you, If you need SEO service or need a website for your business or someone else let
me know please.price includes for web design,two years hosting with us,domain name and
two years technical support for your website and business.
https://best4world.com/, https://g.page/r/CQ1minoX-B93EBA/,For order
contact through the achuthan@hotmail.co.uk please. phone:- +441615366409,mobile:-00447513228050,WhatsApp:
– +447527882377www.tiktok.com/@bestbuyers7
https://www.instagram.com/bestbuyers7
https://twitter.com/bestbuyers7
https://t.me/bestbuyers7
https://www.facebook.com/rajendran.achuthan
http://www.linkedin.com/in/bestbuyers7
https://www.snapchat.com/add/bestbuyers7
https://pin.it/1keiFHt
https://pin.it/2a173AB. Now we are offering worldwide and targeted Traffic .
We are like no other Targeted Traffic service, when you buy Targeted Traffic from us we take the time to target only the best Traffic for your campaign. These packages are guaranteed.
Meaning, you can count on getting exactly what is described!
These are all 100% Real Human Traffic and our price is the best in the market today!
We are able to provide GEO targeted Traffic based on your requirements.
Buy Facebook Traffic from and give a boost to your website
traffic
pharmacy discount card
synthroid 0.1 mg
I’m amazed, I must say. Seldom do I encounter a
blog that’s both equally educative and interesting, and without a doubt, you have
hit the nail on the head. The issue is something that too few people are speaking intelligently about.
Now i’m very happy I came across this during my search for something relating to
this.
sildenafil lowest price
canadian pharmacy online cialis
Good post. I will be going through some of these issues as well..
Hello, i think that i saw you visited my web site so i came to “return the favor”.I am trying to find things to enhance my web site!I suppose its ok to use a few of your ideas!!
Excellent blog you have here.. It’s hard to find good
quality writing like yours nowadays. I seriously appreciate people like you!
Take care!!
I am truly grateful to the holder of this site who
has shared this impressive piece of writing at here.
Hi there! I know this is kinda off topic but I was wondering which blog platform are
you using for this site? I’m getting tired of WordPress because I’ve had problems with hackers and I’m looking at options for another platform.
I would be fantastic if you could point me in the direction of a good platform.
Hi there, yes this paragraph is genuinely nice and I have
learned lot of things from it on the topic of blogging.
thanks.
propeciaforlesscom
Good answers in return of this difficulty with firm arguments and explaining everything about that.
baclofen 20 mg
israelmassage.com
maple leaf pharmacy in canada
Hi there, i read your blog from time to time and i own a similar
one and i was just wondering if you get a lot of spam responses?
If so how do you prevent it, any plugin or anything you can suggest?
I get so much lately it’s driving me insane so any
assistance is very much appreciated.
floxin 40 mg tablets
prednisone 50
This is very interesting, You’re a very skilled blogger.
I’ve joined your feed and look forward to seeking more of your great post.
Also, I have shared your web site in my social networks!
If some one wants to be updated with newest technologies then he must be pay a quick visit this website
and be up to date daily.
Pretty informative….look forth to coming back again.
https://www.tvsudecka.pl
keflex coupon
Thank you for some other informative web site. The place
else could I get that type of info written in such a perfect manner?
I have a undertaking that I am just now working on, and I have been at the glance
out for such info.
SLOT777: Website Judi Slot Website dan Slot77 Gacor Resmi
Kini, telah banyak website yang menyediakan berbagai slot gacor dengan promo serta bonus menarik. Berbagai game serta bonus yang berlimpah menjadikan laman ini menjadi nomor 1 terbaik yang ada di Indonesia. Sebab itu, disini kami mengungkapkan bahwa slot777 merupakan laman judi slot online terbaik dikala ini.
Bermain judi telah menjadi budaya masyarakat Indonesia, terlebih menengah kebawah. Beberapa orang mewujudkan permainan judi untuk melepas penat akibat stress yang dihadapi, tapi ada juga yang menciptakan sebagai mata pencarian utama.
Seiring dengan perkembangan teknologi yang demikian itu cepat, popularitas judi juga semakin meningkat. Karena itu tak heran apabila jumlah pemain senantiasa meningkat tiap-tiap harinya. Kemudahan inilah menjadi salah satu elemen pemain meningkat drastis. Pemain sendiri tidak perlu pergi ke kasino luar negeri untuk bermain dan bisa bertaruh di mana saja.
Menggunakan cara online tentu tidak membikin kian susah. Malah kau bisa bermain beberapa permainan yang mempunyai tampilan yang luar biasa termasuk bingo, togel, kasino, poker sabung ayam, slot dan masih banyak lainnya.
Selain itu, banyak sekali web slot777 gacor juga menawarkan banyak promosi serta bonus yang dapat diperoleh secara cuma-cuma seperti bonus new member, bonus cashback, asuransi kekalahan dan lainnya.
Kecuali banyak benefit yang bisa didapatkan, beberapa website juga mempunyai lisensi berskala internasional yang terpercaya dan juga mereka menawarkan keamanan dalam kabar serta menjaga akun dari serangan hacker. Hal ini membuat pemain selalu merasa aman dan tak merasa cemas.
my blog post; https://slot777resmi.wiki/
Wonderful, what a web site it is! This webpage provides useful facts
to us, keep it up.
Today, I went to the beach with my children. I found
a sea shell and gave it to my 4 year old daughter and said “You can hear the ocean if you put this to your ear.” She put
the shell to her ear and screamed. There was a hermit crab
inside and it pinched her ear. She never wants
to go back! LoL I know this is entirely off topic but I had to tell someone!
http://afcantarelle.org/index.php?title=User:Altogel411
http://afcantarelle.org/index.php?title=Viagra
http://classicalmusicmp3freedownload.com/ja/index.php?title=%E5%88%A9%E7%94%A8%E8%80%85:Altogel486
http://classicalmusicmp3freedownload.com/ja/index.php?title=Phills
http://embeddedwiki.cs.aau.dk/wiki/Slot
http://embeddedwiki.cs.aau.dk/wiki/User_talk:Altogel455
http://lsc.wikisign.org/wiki/Usuari_Discussi%C3%B3:Altogel423
http://nswiki.svenskasuperserier.se/w/index.php?title=Phills
http://postgasse.net/Wiki/index.php?title=Benutzer:Altogel470
http://postgasse.net/Wiki/index.php?title=Togel
http://tironelle.free.fr/wiki/index.php?title=Discussion_Utilisateur:Altogel455
http://tironelle.free.fr/wiki/index.php?title=Viagra
http://urbino.fh-joanneum.at/trials/index.php/User:Altogel402
http://urbino.fh-joanneum.at/trials/index.php/Viagra
http://vulteevaliant.com/index.php/Togel
http://vulteevaliant.com/index.php/User:Altogel415
http://wiki-ux.info/wiki/Phills
http://wiki-ux.info/wiki/User:Altogel435
http://wiki.monashicpc.com/Togel
http://wiki.monashicpc.com/User:Altogel430
http://wiki.shitcore.org/index.php/Slot
http://wiki.shitcore.org/index.php/User:Altogel450
http://www.driftpedia.com/wiki/index.php/Togel
http://www.driftpedia.com/wiki/index.php/User:Altogel422
http://www.erwinbrandenberger.ch/index.php?title=Benutzer:Altogel491
http://www.erwinbrandenberger.ch/index.php?title=Togel
http://www.heerfamily.net/mediawiki/index.php/Phills
http://www.heerfamily.net/mediawiki/index.php/User:Altogel446
http://www.jeromebaray.com/afm/wiki/index.php/Phills
http://www.jeromebaray.com/afm/wiki/index.php/Utilisateur:Altogel484
http://www.matthew-morris.com/wiki/index.php/User:Altogel402
http://www.matthew-morris.com/wiki/index.php/Viagra
http://www.wiki.cheneliege.fr/index.php/Utilisateur:Altogel430
http://www.wiki.cheneliege.fr/index.php/Viagra
http://www.zilahy.info/wiki/index.php/User:Altogel492
http://www.zilahy.info/wiki/index.php/Viagra
https://bbarlock.com/index.php/Phills
https://bbarlock.com/index.php/User:Altogel463
https://biowiki.clinomics.com/index.php/Slot
https://biowiki.clinomics.com/index.php/User:Altogel474
https://demo.centreon.com/wiki/index.php?title=Togel
https://demo.centreon.com/wiki/index.php?title=User:Altogel492
https://gamesfashionarchive.net/wiki/User:Altogel474
https://gnometopia.org/index.php?title=Togel
https://help.ezadspro.co.uk/index.php?title=Slot
https://help.ezadspro.co.uk/index.php?title=User:Altogel455
https://hu.velo.wiki/index.php?title=Szerkeszt%C5%91:Altogel405
https://intranet.wikimedia.cat/wiki/Usuari:Altogel415
https://koloiko.com/wiki/index.php?title=Togel
https://koloiko.com/wiki/index.php?title=User:Altogel410
https://library.kemu.ac.ke/kemuwiki/index.php/Phills
https://library.kemu.ac.ke/kemuwiki/index.php/User:Altogel429
https://mediawiki.governancaegestao.wiki.br/index.php/Togel
https://mediawiki.governancaegestao.wiki.br/index.php/User:Altogel464
https://mnwiki.org/index.php/User:Altogel414
https://mnwiki.org/index.php/Viagra
https://portpavement.com/index.php/Slot
https://portpavement.com/index.php/User:Altogel488
https://procesal.cl/index.php/Slot
https://procesal.cl/index.php/Togel
https://procesal.cl/index.php/User:Altogel428
https://procesal.cl/index.php/User:Altogel447
https://religiopedia.com/index.php/Togel
https://religiopedia.com/index.php/User:Altogel454
https://sustainabilipedia.org/index.php/Slot
https://sustainabilipedia.org/index.php/User:Altogel410
https://thewillistree.info/genealogy/wiki/Slot
https://thewillistree.info/genealogy/wiki/User:Altogel476
https://wiki.gahlawat.dynu.com/mediawiki/index.php?title=Slot
https://wiki.gahlawat.dynu.com/mediawiki/index.php?title=User:Altogel406
https://wiki.geocaching.waw.pl/index.php?title=Slot
https://wiki.geocaching.waw.pl/index.php?title=U%C5%BCytkownik:Altogel461
https://wiki.hrw-fablab.de/index.php?title=Phills
https://wiki.hrw-fablab.de/index.php?title=User:Altogel404
https://wiki.lafabriquedelalogistique.fr/Discussion_utilisateur:Altogel483
https://wiki.minecraft.jp.net/%E5%88%A9%E7%94%A8%E8%80%85:Altogel424
https://wiki.minecraft.jp.net/Slot
https://wiki.renew-platforms.dk/index.php?title=Togel
https://wiki.renew-platforms.dk/index.php?title=User:Altogel485
https://wiki.ryuriin.my.id/index.php/Phills
https://wiki.ryuriin.my.id/index.php/User:Altogel425
https://wiki.sports-5.ch/index.php?title=Phills
https://wiki.sports-5.ch/index.php?title=Utilisateur:Altogel445
https://www.crustcorporate.com/wiki/Slot
https://www.crustcorporate.com/wiki/User:Altogel432
https://www.offwiki.org/wiki/Phills
https://www.offwiki.org/wiki/User:Altogel431
https://www.wiki.pcfu.cz/index.php/Phills
https://www.wiki.pcfu.cz/index.php/U%c5%beivatel:Altogel443
cialis cost buy tadalafil 20mg price cialis free sample
cozaar 5mg
Can I just say what a comfort to discover a person that genuinely
knows what they are talking about on the net. You actually understand how to bring an issue to light and make it important.
More people ought to check this out and understand this side of your story.
It’s surprising you aren’t more popular given that you most certainly
possess the gift.
purchase propecia
It is appropriate time to make a few plans for the future and it’s time to be happy.
I have read this submit and if I may I desire to recommend you some fascinating
things or tips. Maybe you could write next articles regarding this article.
I wish to learn more things about it!
It’s fantastic that you are getting ideas from this piece of writing as
well as from our argument made here.
sumycin drug
clomid 50mg capsules
sumycin price
If you desire to take a good deal from this post then you
have to apply such strategies to your won blog.
If some one desires to be updated with most up-to-date
technologies therefore he must be visit this site and be up to date every day.
buy zovirax cream 10g
If you determine on the VIP bonus, you will have to grow to be a VIP Bit Starz.
What’s up, I wish for to subscribe for this weblog to get most up-to-date updates,
therefore where can i do it please help.
Hello there I am so excited I found your web site, I
really found you by error, while I was looking on Google
for something else, Regardless I am here now and would just like to say kudos for a marvelous post
and a all round interesting blog (I also love the theme/design), I don’t
have time to look over it all at the moment but I have bookmarked
it and also included your RSS feeds, so when I have time I will be back to
read much more, Please do keep up the fantastic b.
hello there and thank you for your info – I’ve definitely
picked up something new from right here. I did however expertise several technical issues using this web site,
as I experienced to reload the web site lots of times previous to I could get
it to load correctly. I had been wondering if your hosting is OK?
Not that I’m complaining, but slow loading instances times will sometimes affect your placement in google and can damage your quality score if ads
and marketing with Adwords. Anyway I am adding this
RSS to my e-mail and could look out for much more of your respective exciting content.
Ensure that you update this again soon.
Ridiculous quest there. What occurred after? Take care!
Pretty! This was an incredibly wonderful post.
Thanks for providing this info.
I think this is one of the most significant info for
me. And i’m glad reading your article. But want to remark on few general things,
The site style is perfect, the articles is really great : D.
Good job, cheers
selanat pagi unmtuk pɑra bapak ibuu saudara saudara sekarang berkeinginan aku
tampilkan web judi pkv terburuk yang pernah ada website judi pokeer qq dengan rating tak msmuaskan hanya mengelabui orang
orang saja. laman yang telah lama hadir menyediakan permainan qq online
yang banyak peminat tetapi tertipu oleh weeb pkv ini. laman judi pkv yang tidak cocok untuk diciptakan daerah bermain рara pejudi online, seandainya anda ingin bermain pikir pikir dulu sebab mereka hanya bisa
mengcopy content saja. salam sejahtera
prednisone 0.5 mg
ciprofloxacin tablet brand name
casino siteleri olarak arattığınız zaman önünüze pek çok deneme
bonus veren bahis siteleri seçeneği çıkacaktır. Önemli olan çıkmış olan bu siteler değildir.
Önemli olan girdiğiniz bu sitelerin ne
kadar güvenilir olduğudur. Sizler de yazımızı okuyup bu konuda bilgilenerek farklı bahis
sitelerine girebilir ve dilediğiniz kadar keyifli bir zaman geçirebilirsiniz.
Çeşitli bonus veren siteler bulunmaktadır. Her sitenin kendine özel bonus kampanyası vardır.
Bonus kelimesi çevrimsiz bonus veren siteler farklı yerler de deneme bonusu olarak da karşımıza
çıkar. Bonuslar sayesinde firmalar arası rekabet oluşmaktadır.
Bahisçilere casino bonusu veren siteler son dönemde bedava bahisi tercih etmektedir.
Müşteri memnuniyeti ile sonuçlanan bu bonus
en iyi kampanyalardan biridir. Sitelere çevrimsiz bonus veren siteler üye olduktan sonra bedava bonustan faydalanabilirsiniz.
Bahis oynamak için ise herhangi bir ücret yatırmanıza gerek yoktur.
Piyasa da bonus veren bahis siteleri güvenilir olması
açısından önemlidir. Belirli bir tutarı yatırmadan para çekme işlemi gerçekleşmez Deneme bonus veren bahis siteleri yenilik yapmışlardır.
Howdy! I simply wish to offer you a big thumbs up for the great info you’ve got right
here on this post. I will be coming back to your site for more
soon.
Как восстановить https://avtodublikat.ru/ за 10 минут.
Great beat ! I would like to apprentice while you amend your website,
how can i subscribe for a blog site? The account helped me a acceptable deal.
I had been a little bit acquainted of this your broadcast offered bright clear concept
keflex penicillin
valtrex prices canada
This paragraph provides clear idea designed for the new viewers
of blogging, that genuinely how to do running a blog.
suhagra 100 online buy
roxithromycin 300mg
ceftin pill generic
zyvox price uk
buy accutane usa
Great beat ! I wish to apprentice while you amend your web site, how can i subscribe for a blog
website? The account helped me a acceptable deal. I had been tiny bit acquainted of this your broadcast
offered bright clear concept
All such information and facts that is offered to OLG will be stored in the iGaming Technique on servers situated in the Province of Ontario.
I was suggested this website by my cousin. I’m not sure whether this post is written by him as nobody
else know such detailed about my trouble. You’re incredible!
Thanks!
I don’t even know how I ended up here, but I thought this post was great.
I don’t know who you are but certainly you are going to a famous blogger
if you are not already 😉 Cheers!
Good article. I’m experiencing some of these issues as well..
Wow, amazing weblog format! How long have you ever been running a blog
for? you made running a blog look easy. The overall glance of your website is magnificent, as well as the content!
silvitra 120 mg
Incredible points. Great arguments. Keep up the good work.
Greetings I am so grateful I found your web site,
I really found you by mistake, while I was searching on Bing for something else, Anyways I am here now and
would just like to say thanks for a fantastic post and a all round exciting blog (I also love the theme/design), I don’t have time to read through it all at the moment
but I have book-marked it and also added your RSS feeds,
so when I have time I will be back to read much more, Please do keep
up the superb work.
http://afcantarelle.org/index.php?title=User:Altogel411
http://afcantarelle.org/index.php?title=Viagra
http://classicalmusicmp3freedownload.com/ja/index.php?title=%E5%88%A9%E7%94%A8%E8%80%85:Altogel486
http://classicalmusicmp3freedownload.com/ja/index.php?title=Phills
http://embeddedwiki.cs.aau.dk/wiki/Slot
http://embeddedwiki.cs.aau.dk/wiki/User_talk:Altogel455
http://lsc.wikisign.org/wiki/Usuari_Discussi%C3%B3:Altogel423
http://nswiki.svenskasuperserier.se/w/index.php?title=Phills
http://postgasse.net/Wiki/index.php?title=Benutzer:Altogel470
http://postgasse.net/Wiki/index.php?title=Togel
http://pynomo.org/wiki/index.php/Togel
http://pynomo.org/wiki/index.php/User:Altogel465
http://tironelle.free.fr/wiki/index.php?title=Discussion_Utilisateur:Altogel455
http://tironelle.free.fr/wiki/index.php?title=Viagra
http://urbino.fh-joanneum.at/trials/index.php/User:Altogel402
http://urbino.fh-joanneum.at/trials/index.php/Viagra
http://vulteevaliant.com/index.php/Togel
http://vulteevaliant.com/index.php/User:Altogel415
http://wiki-ux.info/wiki/Phills
http://wiki-ux.info/wiki/User:Altogel435
http://wiki.monashicpc.com/Togel
http://wiki.monashicpc.com/User:Altogel430
http://wiki.shitcore.org/index.php/Slot
http://wiki.shitcore.org/index.php/User:Altogel450
http://www.driftpedia.com/wiki/index.php/Togel
http://www.driftpedia.com/wiki/index.php/User:Altogel422
http://www.erwinbrandenberger.ch/index.php?title=Benutzer:Altogel491
http://www.erwinbrandenberger.ch/index.php?title=Togel
http://www.heerfamily.net/mediawiki/index.php/Phills
http://www.heerfamily.net/mediawiki/index.php/User:Altogel446
http://www.jeromebaray.com/afm/wiki/index.php/Phills
http://www.jeromebaray.com/afm/wiki/index.php/Utilisateur:Altogel484
http://www.matthew-morris.com/wiki/index.php/User:Altogel402
http://www.matthew-morris.com/wiki/index.php/Viagra
http://www.wiki.cheneliege.fr/index.php/Utilisateur:Altogel430
http://www.wiki.cheneliege.fr/index.php/Viagra
http://www.zilahy.info/wiki/index.php/User:Altogel492
http://www.zilahy.info/wiki/index.php/Viagra
https://bbarlock.com/index.php/Phills
https://bbarlock.com/index.php/User:Altogel463
https://biowiki.clinomics.com/index.php/Slot
https://biowiki.clinomics.com/index.php/User:Altogel474
https://demo.centreon.com/wiki/index.php?title=Togel
https://demo.centreon.com/wiki/index.php?title=User:Altogel492
https://gamesfashionarchive.net/wiki/User:Altogel474
https://gnometopia.org/index.php?title=Togel
https://help.ezadspro.co.uk/index.php?title=Slot
https://help.ezadspro.co.uk/index.php?title=User:Altogel455
https://hu.velo.wiki/index.php?title=Szerkeszt%C5%91:Altogel405
https://intranet.wikimedia.cat/wiki/Usuari:Altogel415
https://koloiko.com/wiki/index.php?title=Togel
https://koloiko.com/wiki/index.php?title=User:Altogel410
https://library.kemu.ac.ke/kemuwiki/index.php/Phills
https://library.kemu.ac.ke/kemuwiki/index.php/User:Altogel429
https://mediawiki.governancaegestao.wiki.br/index.php/Togel
https://mediawiki.governancaegestao.wiki.br/index.php/User:Altogel464
https://mnwiki.org/index.php/User:Altogel414
https://mnwiki.org/index.php/Viagra
https://portpavement.com/index.php/Slot
https://portpavement.com/index.php/User:Altogel488
https://procesal.cl/index.php/Slot
https://procesal.cl/index.php/Togel
https://procesal.cl/index.php/User:Altogel428
https://procesal.cl/index.php/User:Altogel447
https://religiopedia.com/index.php/Togel
https://religiopedia.com/index.php/User:Altogel454
https://sustainabilipedia.org/index.php/Slot
https://sustainabilipedia.org/index.php/User:Altogel410
https://thewillistree.info/genealogy/wiki/Slot
https://thewillistree.info/genealogy/wiki/User:Altogel476
https://wiki.gahlawat.dynu.com/mediawiki/index.php?title=Slot
https://wiki.gahlawat.dynu.com/mediawiki/index.php?title=User:Altogel406
https://wiki.geocaching.waw.pl/index.php?title=Slot
https://wiki.geocaching.waw.pl/index.php?title=U%C5%BCytkownik:Altogel461
https://wiki.hrw-fablab.de/index.php?title=Phills
https://wiki.hrw-fablab.de/index.php?title=User:Altogel404
https://wiki.lafabriquedelalogistique.fr/Discussion_utilisateur:Altogel483
https://wiki.minecraft.jp.net/%E5%88%A9%E7%94%A8%E8%80%85:Altogel424
https://wiki.minecraft.jp.net/Slot
https://wiki.renew-platforms.dk/index.php?title=Togel
https://wiki.renew-platforms.dk/index.php?title=User:Altogel485
https://wiki.ryuriin.my.id/index.php/Phills
https://wiki.ryuriin.my.id/index.php/User:Altogel425
https://wiki.sports-5.ch/index.php?title=Phills
https://wiki.sports-5.ch/index.php?title=Utilisateur:Altogel445
https://www.5stellelecchesi.netsons.org/index.php/Togel
https://www.5stellelecchesi.netsons.org/index.php/User:Altogel439
https://www.crustcorporate.com/wiki/Slot
https://www.crustcorporate.com/wiki/User:Altogel432
https://www.offwiki.org/wiki/Phills
https://www.offwiki.org/wiki/User:Altogel431
https://www.wiki.pcfu.cz/index.php/Phills
https://www.wiki.pcfu.cz/index.php/U%c5%beivatel:Altogel443
http://classicalmusicmp3freedownload.com/ja/index.php?title=%E5%88%A9%E7%94%A8%E8%80%85:Altl4865sb
http://classicalmusicmp3freedownload.com/ja/index.php?title=Edu_Blog_Ned
http://embeddedwiki.cs.aau.dk/wiki/Edu_Blog_Wendell
http://embeddedwiki.cs.aau.dk/wiki/User:Altl906jjs
http://lsc.wikisign.org/wiki/Usuari_Discussi%C3%B3:Altl3824ti
http://nswiki.svenskasuperserier.se/w/index.php?title=Anv%C3%A4ndare:Altl4733kw
http://nswiki.svenskasuperserier.se/w/index.php?title=Edu_Blog_Humberto
http://postgasse.net/Wiki/index.php?title=Benutzer:Altl4215es
http://postgasse.net/Wiki/index.php?title=Edu_Blog_Margarita
http://pynomo.org/wiki/index.php/Edu_Blog_Dalton
http://pynomo.org/wiki/index.php/User:Altl4221vn
http://tironelle.free.fr/wiki/index.php?title=Edu_Blog_Oliver
http://tironelle.free.fr/wiki/index.php?title=Utilisateur:Altl2285kq
http://urbino.fh-joanneum.at/trials/index.php/Edu_Blog_Bettina
http://urbino.fh-joanneum.at/trials/index.php/User:Altl3567gk
http://vulteevaliant.com/index.php/Edu_Blog_Bernd
http://vulteevaliant.com/index.php/User:Altl1322ao
http://wiki-ux.info/wiki/Edu_Blog_Xavier
http://wiki-ux.info/wiki/User:Altl4872rm
http://wiki.monashicpc.com/Edu_Blog_Desmond
http://wiki.monashicpc.com/User:Altl845zgl
http://wiki.qm.uni-siegen.de/index.php/Benutzer:Altl1702rk
http://wiki.qm.uni-siegen.de/index.php/Edu_Blog_Jacki
http://wiki.shitcore.org/index.php/Edu_Blog_Omar
http://wiki.shitcore.org/index.php/User:Altl4120jc
http://www.driftpedia.com/wiki/index.php/Edu_Blog_Wilmer
http://www.driftpedia.com/wiki/index.php/User:Altl2119ok
http://www.erwinbrandenberger.ch/index.php?title=Benutzer:Altl1817sp
http://www.erwinbrandenberger.ch/index.php?title=Edu_Blog_Alejandro
http://www.heerfamily.net/mediawiki/index.php/Edu_Blog_Luz
http://www.heerfamily.net/mediawiki/index.php/User:Altl2599xl
http://www.jeromebaray.com/afm/wiki/index.php/Edu_Blog_Madeleine
http://www.jeromebaray.com/afm/wiki/index.php/Utilisateur:Altl1474cc
http://www.matthew-morris.com/wiki/index.php/Edu_Blog_Clint
http://www.matthew-morris.com/wiki/index.php/User:Altl4744ad
http://www.wiki.cheneliege.fr/index.php/Edu_Blog_Iola
http://www.wiki.cheneliege.fr/index.php/Utilisateur:Altl1275wj
https://audiwiki.bitt-c.at/index.php?title=Benutzer:Altl4141mr
https://bbarlock.com/index.php/Edu_Blog_Carolyn
https://bbarlock.com/index.php/User:Altl1202go
https://biowiki.clinomics.com/index.php/Edu_Blog_Clifton
https://biowiki.clinomics.com/index.php/User:Altl3720px
https://demo.centreon.com/wiki/index.php?title=Edu_Blog_Lorri
https://demo.centreon.com/wiki/index.php?title=User:Altl1459vx
https://gamesfashionarchive.net/wiki/User:Altl1707dp
https://gnometopia.org/index.php?title=Edu_Blog_Vonnie
https://iamelf.com/wiki/index.php/Edu_Blog_Jeanna
https://iamelf.com/wiki/index.php/User:Altl1083vy
https://intranet.wikimedia.cat/wiki/Usuari:Altl1373ku
https://koloiko.com/wiki/index.php?title=Edu_Blog_Wilton
https://koloiko.com/wiki/index.php?title=User:Altl1743tw
https://library.kemu.ac.ke/kemuwiki/index.php/Edu_Blog_Athena
https://library.kemu.ac.ke/kemuwiki/index.php/User:Altl4939pd
https://livingbooksaboutlife.org/books/Edu_Blog_Harley
https://livingbooksaboutlife.org/books/User:Altl1288mo
https://mediawiki.governancaegestao.wiki.br/index.php/Edu_Blog_Elijah
https://mediawiki.governancaegestao.wiki.br/index.php/User:Altl2540er
https://mnwiki.org/index.php/Edu_Blog_Amparo
https://mnwiki.org/index.php/User:Altl4242bx
https://procesal.cl/index.php/Edu_Blog_Gita
https://procesal.cl/index.php/User:Altl4443vt
https://religiopedia.com/index.php/Edu_Blog_Taj
https://religiopedia.com/index.php/User:Altl4012hi
https://sustainabilipedia.org/index.php/Edu_Blog_Isiah
https://sustainabilipedia.org/index.php/User:Altl4188bk
https://thewillistree.info/genealogy/wiki/Edu_Blog_Chante
https://thewillistree.info/genealogy/wiki/User:Altl2865ki
https://wiki.gahlawat.dynu.com/mediawiki/index.php?title=Edu_Blog_Celsa
https://wiki.gahlawat.dynu.com/mediawiki/index.php?title=User:Altl3718kt
https://wiki.geocaching.waw.pl/index.php?title=Edu_Blog_Randell
https://wiki.geocaching.waw.pl/index.php?title=U%C5%BCytkownik:Altl1075ys
https://wiki.hrw-fablab.de/index.php?title=Edu_Blog_Georgina
https://wiki.hrw-fablab.de/index.php?title=User:Altl976mnc
https://wiki.minecraft.jp.net/%E5%88%A9%E7%94%A8%E8%80%85:Altl1454ve
https://wiki.minecraft.jp.net/Edu_Blog_Michale
https://wiki.renew-platforms.dk/index.php?title=Edu_Blog_Maddison
https://wiki.renew-platforms.dk/index.php?title=User:Altl2911dx
https://wiki.ryuriin.my.id/index.php/Edu_Blog_Chana
https://wiki.ryuriin.my.id/index.php/User:Altl2519xi
https://wiki.sports-5.ch/index.php?title=Edu_Blog_Birgit
https://wiki.sports-5.ch/index.php?title=Utilisateur:Altl3811wt
https://www.5stellelecchesi.netsons.org/index.php/Edu_Blog_Steve
https://www.5stellelecchesi.netsons.org/index.php/User:Altl3488zv
https://www.livejournal.com/identity/login.bml?idtype=openid&use_captcha=1&error_captcha=0&openidurl=https%3A%2F%2Fwabshaunice123.blogspot.com%2F
https://www.livejournal.com/identity/login.bml?idtype=openid&use_captcha=1&error_captcha=0&openidurl=https%3A%2F%2Fwabwoody123.blogspot.com%2F
https://www.offwiki.org/wiki/Edu_Blog_Vanessa
https://www.offwiki.org/wiki/User:Altl3113ez
https://www.wiki.pcfu.cz/index.php/Edu_Blog_Wilfredo
https://www.wiki.pcfu.cz/index.php/U%c5%beivatel:Altl3006pw
Hey there would you mind letting me know which
webhost you’re utilizing? I’ve loaded your blog in 3 completely different web browsers and I must say this
blog loads a lot quicker then most. Can you recommend a good web
hosting provider at a honest price? Thanks, I appreciate it!
proscar generic
I don’t even know how I ended up here, however I believed this post used to be great.
I don’t recognise who you are but certainly you are going to a well-known blogger if you aren’t already.
Cheers!
buy real nolvadex
lioresal 10 mg tab
lasix uk buy
I’ve been surfing online more than 2 hours today, yet I never found any interesting article
like yours. It is pretty worth enough for me. In my view, if all web owners and bloggers made good
content as you did, the net will be much more useful than ever before.
Hey there, You’ve done a great job. I will certainly digg it and personally suggest to my
friends. I am confident they’ll be benefited from this website.
Hey There. I found your blog using msn. This is a really
well written article. I will make sure to bookmark it and return to read more of your
useful information. Thanks for the post. I will certainly return.
Hi my loved one! I wish to say that this article is amazing, nice written and include almost
all important infos. I would like to see more posts like this .
cephalexin 500 mg prices
pharmacy no prescription required
I think the admin of this site is really working hard
in support of his website, because here every material is quality based material.
Hey! Someone in my Myspace group shared this website with us so
I came to look it over. I’m definitely enjoying the information. I’m book-marking and will be tweeting this to
my followers! Wonderful blog and wonderful design.
I know this web page offers quality based posts and other stuff, is there any other web page which gives these data
in quality?
Does your blog have a contact page? I’m having trouble locating
it but, I’d like to shoot you an e-mail. I’ve got some creative ideas for
your blog you might be interested in hearing. Either way, great blog and I look forward to seeing it grow over time.
best online foreign pharmacies
clindamycin 600 mg price
Your mode of telling everything in this post is actually fastidious, every one be capable of effortlessly
be aware of it, Thanks a lot.
Pin Up Kz
пин ап казино кз
nitrofurantoin tablets india
valtrex rx
Link exchange is nothing else but it is only placing the
other person’s web site link on your page at proper place and other person will also do same in support of you.
Hola! I’ve been following your website for a while now and finally got the bravery to go ahead and give you a shout out from
Dallas Texas! Just wanted to tell you keep up the excellent job!
Good day! This is my 1st comment here so I just wanted to give
a quick shout out and say I really enjoy reading through
your blog posts. Can you suggest any other blogs/websites/forums that cover the same subjects?
Thanks!
20 mg prednisone generic
nolvadex medicine online
официальный сайт кэт казино
регистрация кэт казино
Pretty! This was an extremely wonderful article.
Thanks for supplying this information.
vermox 500 mg tablet
Hey this is kinda of off topic but I was wondering if blogs use WYSIWYG
editors or if you have to manually code with HTML. I’m
starting a blog soon but have no coding knowledge so I wanted to get advice from someone with experience.
Any help would be enormously appreciated!
https://images.google.as/url?q=https://xn--meg-sb-dua.com
https://images.google.off.ai/url?q=https://xn--meg-sb-dua.com
https://images.google.com.ag/url?q=https://xn--meg-sb-dua.com
https://images.google.com.ar/url?q=https://xn--meg-sb-dua.com
https://images.google.com.au/url?q=https://xn--meg-sb-dua.com
https://images.google.at/url?q=https://xn--meg-sb-dua.com
https://images.google.az/url?q=https://xn--meg-sb-dua.com
https://images.google.be/url?q=https://xn--meg-sb-dua.com
https://images.google.com.br/url?q=https://xn--meg-sb-dua.com
https://images.google.vg/url?q=https://xn--meg-sb-dua.com
https://images.google.bi/url?q=https://xn--meg-sb-dua.com
https://images.google.ca/url?q=https://xn--meg-sb-dua.com
https://images.google.td/url?q=https://xn--meg-sb-dua.com
https://images.google.cl/url?q=https://xn--meg-sb-dua.com
https://images.google.com.co/url?q=https://xn--meg-sb-dua.com
https://images.google.co.cr/url?q=https://xn--meg-sb-dua.com
https://images.google.ci/url?q=https://xn--meg-sb-dua.com
https://images.google.com.cu/url?q=https://xn--meg-sb-dua.com
https://images.google.cd/url?q=https://xn--meg-sb-dua.com
https://images.google.dk/url?q=https://xn--meg-sb-dua.com
https://images.google.dj/url?q=https://xn--meg-sb-dua.com
https://images.google.com.do/url?q=https://xn--meg-sb-dua.com
https://images.google.com.ec/url?q=https://xn--meg-sb-dua.com
https://images.google.com.sv/url?q=https://xn--meg-sb-dua.com
https://images.google.fm/url?q=https://xn--meg-sb-dua.com
https://images.google.com.fj/url?q=https://xn--meg-sb-dua.com
https://images.google.fi/url?q=https://xn--meg-sb-dua.com
https://images.google.fr/url?q=https://xn--meg-sb-dua.com
https://images.google.gm/url?q=https://xn--meg-sb-dua.com
https://images.google.ge/url?q=https://xn--meg-sb-dua.com
https://images.google.de/url?q=https://xn--meg-sb-dua.com
https://images.google.com.gi/url?q=https://xn--meg-sb-dua.com
https://images.google.com.gr/url?q=https://xn--meg-sb-dua.com
https://images.google.gl/url?q=https://xn--meg-sb-dua.com
https://images.google.gg/url?q=https://xn--meg-sb-dua.com
https://images.google.hn/url?q=https://xn--meg-sb-dua.com
https://images.google.com.hk/url?q=https://xn--meg-sb-dua.com
https://images.google.co.hu/url?q=https://xn--meg-sb-dua.com
https://images.google.co.in/url?q=https://xn--meg-sb-dua.com
https://images.google.ie/url?q=https://xn--meg-sb-dua.com
https://images.google.co.im/url?q=https://xn--meg-sb-dua.com
https://images.google.co.il/url?q=https://xn--meg-sb-dua.com
https://images.google.it/url?q=https://xn--meg-sb-dua.com
https://images.google.com.jm/url?q=https://xn--meg-sb-dua.com
https://images.google.co.jp/url?q=https://xn--meg-sb-dua.com
https://images.google.co.je/url?q=https://xn--meg-sb-dua.com
https://images.google.kz/url?q=https://xn--meg-sb-dua.com
https://images.google.co.kr/url?q=https://xn--meg-sb-dua.com
https://images.google.lv/url?q=https://xn--meg-sb-dua.com
https://images.google.co.ls/url?q=https://xn--meg-sb-dua.com
https://images.google.li/url?q=https://xn--meg-sb-dua.com
https://images.google.lt/url?q=https://xn--meg-sb-dua.com
https://images.google.lu/url?q=https://xn--meg-sb-dua.com
https://images.google.mw/url?q=https://xn--meg-sb-dua.com
https://images.google.com.my/url?q=https://xn--meg-sb-dua.com
https://images.google.com.mt/url?q=https://xn--meg-sb-dua.com
https://images.google.mu/url?q=https://xn--meg-sb-dua.com
https://images.google.com.mx/url?q=https://xn--meg-sb-dua.com
https://images.google.ms/url?q=https://xn--meg-sb-dua.com
https://images.google.com.na/url?q=https://xn--meg-sb-dua.com
https://images.google.com.np/url?q=https://xn--meg-sb-dua.com
https://images.google.nl/url?q=https://xn--meg-sb-dua.com
https://images.google.co.nz/url?q=https://xn--meg-sb-dua.com
https://images.google.com.ni/url?q=https://xn--meg-sb-dua.com
https://images.google.com.nf/url?q=https://xn--meg-sb-dua.com
https://images.google.com.pk/url?q=https://xn--meg-sb-dua.com
https://images.google.com.pa/url?q=https://xn--meg-sb-dua.com
https://images.google.com.py/url?q=https://xn--meg-sb-dua.com
https://images.google.com.pe/url?q=https://xn--meg-sb-dua.com
https://images.google.com.ph/url?q=https://xn--meg-sb-dua.com
https://images.google.pn/url?q=https://xn--meg-sb-dua.com
https://images.google.pl/url?q=https://xn--meg-sb-dua.com
https://images.google.pt/url?q=https://xn--meg-sb-dua.com
https://images.google.com.pr/url?q=https://xn--meg-sb-dua.com
https://images.google.cg/url?q=https://xn--meg-sb-dua.com
https://images.google.ro/url?q=https://xn--meg-sb-dua.com
https://images.google.ru/url?q=https://xn--meg-sb-dua.com
https://images.google.rw/url?q=https://xn--meg-sb-dua.com
https://images.google.sh/url?q=https://xn--meg-sb-dua.com
https://images.google.sm/url?q=https://xn--meg-sb-dua.com
https://images.google.com.sg/url?q=https://xn--meg-sb-dua.com
https://images.google.sk/url?q=https://xn--meg-sb-dua.com
https://images.google.co.za/url?q=https://xn--meg-sb-dua.com
https://images.google.es/url?q=https://xn--meg-sb-dua.com
https://images.google.se/url?q=https://xn--meg-sb-dua.com
https://images.google.ch/url?q=https://xn--meg-sb-dua.com
https://images.google.com.tw/url?q=https://xn--meg-sb-dua.com
https://images.google.co.th/url?q=https://xn--meg-sb-dua.com
https://images.google.tt/url?q=https://xn--meg-sb-dua.com
https://images.google.com.tr/url?q=https://xn--meg-sb-dua.com
https://images.google.com.ua/url?q=https://xn--meg-sb-dua.com
https://images.google.ae/url?q=https://xn--meg-sb-dua.com
https://images.google.co.uk/url?q=https://xn--meg-sb-dua.com
https://images.google.com.uy/url?q=https://xn--meg-sb-dua.com
https://images.google.uz/url?q=https://xn--meg-sb-dua.com
https://images.google.vu/url?q=https://xn--meg-sb-dua.com
https://images.google.co.ve/url?q=https://xn--meg-sb-dua.com
https://www.google.co.ao/url?q=https://xn--meg-sb-dua.com
https://images.google.im/url?q=https://xn--meg-sb-dua.com
https://images.google.dm/url?q=https://xn--meg-sb-dua.com
https://google.com.pa/url?q=https://xn--meg-sb-dua.com
http://maps.google.mw/url?q=https://xn--meg-sb-dua.com
https://google.ac/url?q=https://xn--meg-sb-dua.com
https://google.com.gh/url?q=https://xn--meg-sb-dua.com
https://google.dz/url?q=https://xn--meg-sb-dua.com
http://images.google.ki/url?q=https://xn--meg-sb-dua.com
http://www.google.im/url?q=https://xn--meg-sb-dua.com
https://google.com.mx/url?q=https://xn--meg-sb-dua.com
https://www.google.cz/url?q=https://xn--meg-sb-dua.com
http://google.hr/url?q=https://xn--meg-sb-dua.com
https://google.ml/url?q=https://xn--meg-sb-dua.com
https://www.google.com.au/url?q=https://xn--meg-sb-dua.com
https://images.google.bs/url?q=https://xn--meg-sb-dua.com
https://google.co.tz/url?q=https://xn--meg-sb-dua.com
http://google.cg/url?q=https://xn--meg-sb-dua.com
http://maps.google.is/url?q=https://xn--meg-sb-dua.com
http://google.si/url?q=https://xn--meg-sb-dua.com
http://google.com.py/url?q=https://xn--meg-sb-dua.com
http://maps.google.co.cr/url?q=https://xn--meg-sb-dua.com
http://www.google.mk/url?q=https://xn--meg-sb-dua.com
http://www.google.ge/url?q=https://xn--meg-sb-dua.com
https://images.google.ml/url?q=https://xn--meg-sb-dua.com
https://www.google.com.sa/url?q=https://xn--meg-sb-dua.com
http://google.mg/url?q=https://xn--meg-sb-dua.com
http://google.com.ec/url?q=https://xn--meg-sb-dua.com
https://google.rs/url?q=https://xn--meg-sb-dua.com
https://www.google.co.hu/url?q=https://xn--meg-sb-dua.com
http://google.md/url?q=https://xn--meg-sb-dua.com
https://images.google.hu/url?q=https://xn--meg-sb-dua.com
https://www.google.com.tw/url?q=https://xn--meg-sb-dua.com
https://google.ae/url?q=https://xn--meg-sb-dua.com
https://images.google.jo/url?q=https://xn--meg-sb-dua.com
http://images.google.tm/url?q=https://xn--meg-sb-dua.com
https://images.google.com.mm/url?q=https://xn--meg-sb-dua.com
https://maps.google.vu/url?q=https://xn--meg-sb-dua.com
https://maps.google.co.ls/url?q=https://xn--meg-sb-dua.com
https://www.google.com.cy/url?q=https://xn--meg-sb-dua.com
http://google.com.lb/url?q=https://xn--meg-sb-dua.com
http://google.co.kr/url?q=https://xn--meg-sb-dua.com
http://images.google.nu/url?q=https://xn--meg-sb-dua.com
http://google.cl/url?q=https://xn--meg-sb-dua.com
http://www.google.com.bo/url?q=https://xn--meg-sb-dua.com
https://google.ad/url?q=https://xn--meg-sb-dua.com
https://maps.google.pt/url?q=https://xn--meg-sb-dua.com
https://maps.google.es/url?q=https://xn--meg-sb-dua.com
https://maps.google.sn/url?q=https://xn--meg-sb-dua.com
http://google.tk/url?q=https://xn--meg-sb-dua.com
https://google.com.bn/url?q=https://xn--meg-sb-dua.com
https://google.com.ua/url?q=https://xn--meg-sb-dua.com
https://www.google.com.sg/url?q=https://xn--meg-sb-dua.com
https://images.google.info/url?q=https://xn--meg-sb-dua.com
https://maps.google.de/url?q=https://xn--meg-sb-dua.com
https://images.google.cv/url?q=https://xn--meg-sb-dua.com
http://google.com.nf/url?q=https://xn--meg-sb-dua.com
https://images.google.com.ly/url?q=https://xn--meg-sb-dua.com
http://images.google.tg/url?q=https://xn--meg-sb-dua.com
http://google.cv/url?q=https://xn--meg-sb-dua.com
http://gngjd.com/url?q=https://xn--meg-sb-dua.com
http://www.google.je/url?q=https://xn--meg-sb-dua.com
http://maps.google.by/url?q=https://xn--meg-sb-dua.com
http://maps.google.fi/url?q=https://xn--meg-sb-dua.com
https://images.gngjd.com/url?q=https://xn--meg-sb-dua.com
http://google.ne/url?q=https://xn--meg-sb-dua.com
http://images.google.kg/url?q=https://xn--meg-sb-dua.com
https://www.google.cn/url?q=https://xn--meg-sb-dua.com
https://google.am/url?q=https://xn--meg-sb-dua.com
http://google.com.ly/url?q=https://xn--meg-sb-dua.com
https://google.iq/url?q=https://xn--meg-sb-dua.com
https://google.com.sv/url?q=https://xn--meg-sb-dua.com
https://google.sc/url?q=https://xn--meg-sb-dua.com
http://google.kg/url?q=https://xn--meg-sb-dua.com
http://google.li/url?q=https://xn--meg-sb-dua.com
http://images.google.al/url?q=https://xn--meg-sb-dua.com
https://maps.google.je/url?q=https://xn--meg-sb-dua.com
http://maps.google.to/url?q=https://xn--meg-sb-dua.com
http://google.co.cr/url?q=https://xn--meg-sb-dua.com
http://images.google.com.tj/url?q=https://xn--meg-sb-dua.com
https://www.google.com.ph/url?q=https://xn--meg-sb-dua.com
https://maps.google.com.bn/url?q=https://xn--meg-sb-dua.com
https://www.google.as/url?q=https://xn--meg-sb-dua.com
https://images.google.co.ao/url?q=https://xn--meg-sb-dua.com
http://maps.google.com.bo/url?q=https://xn--meg-sb-dua.com
https://maps.google.com/url?q=https://xn--meg-sb-dua.com
https://www.google.com.bh/url?q=https://xn--meg-sb-dua.com
https://maps.google.com.mm/url?q=https://xn--meg-sb-dua.com
http://google.com.gi/url?q=https://xn--meg-sb-dua.com
http://maps.google.ba/url?q=https://xn--meg-sb-dua.com
http://google.co.id/url?q=https://xn--meg-sb-dua.com
http://google.be/url?q=https://xn--meg-sb-dua.com
http://images.google.mg/url?q=https://xn--meg-sb-dua.com
http://google.com.ar/url?q=https://xn--meg-sb-dua.com
https://maps.google.co.za/url?q=https://xn--meg-sb-dua.com
https://www.google.gp/url?q=https://xn--meg-sb-dua.com
http://www.google.sh/url?q=https://xn--meg-sb-dua.com
https://images.google.ee/url?q=https://xn--meg-sb-dua.com
https://www.google.rw/url?q=https://xn--meg-sb-dua.com
http://images.google.si/url?q=https://xn--meg-sb-dua.com
https://www.google.at/url?q=https://xn--meg-sb-dua.com
http://maps.google.at/url?q=https://xn--meg-sb-dua.com
http://maps.google.co.in/url?q=https://xn--meg-sb-dua.com
https://maps.google.ga/url?q=https://xn--meg-sb-dua.com
http://maps.google.sm/url?q=https://xn--meg-sb-dua.com
http://google.ms/url?q=https://xn--meg-sb-dua.com
https://images.google.com.gh/url?q=https://xn--meg-sb-dua.com
http://maps.google.cn/url?q=https://xn--meg-sb-dua.com
https://www.google.com.na/url?q=https://xn--meg-sb-dua.com
https://maps.google.hr/url?q=https://xn--meg-sb-dua.com
https://google.ci/url?q=https://xn--meg-sb-dua.com
https://images.google.hr/url?q=https://xn--meg-sb-dua.com
http://maps.google.com.do/url?q=https://xn--meg-sb-dua.com
http://google.lk/url?q=https://xn--meg-sb-dua.com
http://images.google.cn/url?q=https://xn--meg-sb-dua.com
http://www.bon-vivant.net/url?q=https://xn--meg-sb-dua.com
http://maps.google.com.gt/url?q=https://xn--meg-sb-dua.com
http://www.google.com.ag/url?q=https://xn--meg-sb-dua.com
https://maps.google.mu/url?q=https://xn--meg-sb-dua.com
https://google.com.ng/url?q=https://xn--meg-sb-dua.com
https://www.google.co.uk/url?q=https://xn--meg-sb-dua.com
https://google.us/url?q=https://xn--meg-sb-dua.com
https://www.google.com.tr/url?q=https://xn--meg-sb-dua.com
http://www.google.co.ma/url?q=https://xn--meg-sb-dua.com
https://maps.google.co.zw/url?q=https://xn--meg-sb-dua.com
https://www.google.bs/url?q=https://xn--meg-sb-dua.com
https://www.google.pl/url?q=https://xn--meg-sb-dua.com
http://www.googleadservices.com/url?q=https://xn--meg-sb-dua.com
http://google.kz/url?q=https://xn--meg-sb-dua.com
https://google.com.mt/url?q=https://xn--meg-sb-dua.com
http://www.google.co.zw/url?q=https://xn--meg-sb-dua.com
https://maps.google.ne/url?q=https://xn--meg-sb-dua.com
https://google.com.qa/url?q=https://xn--meg-sb-dua.com
https://google.se/url?q=https://xn--meg-sb-dua.com
http://www.google.mw/url?q=https://xn--meg-sb-dua.com
https://maps.google.co.mz/url?q=https://xn--meg-sb-dua.com
http://maps.google.com.sv/url?q=https://xn--meg-sb-dua.com
https://www.google.sm/url?q=https://xn--meg-sb-dua.com
https://maps.google.com.tw/url?q=https://xn--meg-sb-dua.com
https://google.ca/url?q=https://xn--meg-sb-dua.com
https://www.google.is/url?q=https://xn--meg-sb-dua.com
https://google.com.jm/url?q=https://xn--meg-sb-dua.com
http://images.google.co.ug/url?q=https://xn--meg-sb-dua.com
https://maps.google.com.kh/url?q=https://xn--meg-sb-dua.com
http://maps.google.tl/url?q=https://xn--meg-sb-dua.com
http://www.google.co.nz/url?q=https://xn--meg-sb-dua.com
https://www.google.gg/url?q=https://xn--meg-sb-dua.com
https://google.to/url?q=https://xn--meg-sb-dua.com
https://google.ro/url?q=https://xn--meg-sb-dua.com
http://google.td/url?q=https://xn--meg-sb-dua.com
https://www.google.by/url?q=https://xn--meg-sb-dua.com
https://www.google.nl/url?q=https://xn--meg-sb-dua.com
http://maps.google.ci/url?q=https://xn--meg-sb-dua.com
http://maps.google.dz/url?q=https://xn--meg-sb-dua.com
https://google.hu/url?q=https://xn--meg-sb-dua.com
http://images.google.ht/url?q=https://xn--meg-sb-dua.com
http://google.mv/url?q=https://xn--meg-sb-dua.com
https://google.cf/url?q=https://xn--meg-sb-dua.com
http://maps.google.com.ly/url?q=https://xn--meg-sb-dua.com
http://www.google.nu/url?q=https://xn--meg-sb-dua.com
http://google.com.tj/url?q=https://xn--meg-sb-dua.com
https://maps.google.com.mt/url?q=https://xn--meg-sb-dua.com
https://google.so/url?q=https://xn--meg-sb-dua.com
http://images.google.bj/url?q=https://xn--meg-sb-dua.com
https://maps.google.la/url?q=https://xn--meg-sb-dua.com
https://images.google.us/url?q=https://xn--meg-sb-dua.com
https://images.google.com.eg/url?q=https://xn--meg-sb-dua.com
https://images.google.cf/url?q=https://xn--meg-sb-dua.com
https://images.google.la/url?q=https://xn--meg-sb-dua.com
http://maps.google.com.ag/url?q=https://xn--meg-sb-dua.com
http://google.ga/url?q=https://xn--meg-sb-dua.com
http://google.co.uz/url?q=https://xn--meg-sb-dua.com
http://maps.google.no/url?q=https://xn--meg-sb-dua.com
https://www.google.gl/url?q=https://xn--meg-sb-dua.com
http://images.google.co.vi/url?q=https://xn--meg-sb-dua.com
https://images.google.ne/url?q=https://xn--meg-sb-dua.com
https://google.com.om/url?q=https://xn--meg-sb-dua.com
http://maps.google.lt/url?q=https://xn--meg-sb-dua.com
https://maps.google.kg/url?q=https://xn--meg-sb-dua.com
http://www.google.com.hk/url?q=https://xn--meg-sb-dua.com
https://google.com.co/url?q=https://xn--meg-sb-dua.com
https://google.dk/url?q=https://xn--meg-sb-dua.com
https://maps.google.com.sa/url?q=https://xn--meg-sb-dua.com
http://google.com.fj/url?q=https://xn--meg-sb-dua.com
http://maps.google.com.ec/url?q=https://xn--meg-sb-dua.com
https://maps.google.mn/url?q=https://xn--meg-sb-dua.com
https://maps.google.bf/url?q=https://xn--meg-sb-dua.com
https://www.google.tt/url?q=https://xn--meg-sb-dua.com
https://www.google.dj/url?q=https://xn--meg-sb-dua.com
https://www.google.com.pr/url?q=https://xn--meg-sb-dua.com
https://maps.google.ws/url?q=https://xn--meg-sb-dua.com
http://google.jo/url?q=https://xn--meg-sb-dua.com
https://google.co.ug/url?q=https://xn--meg-sb-dua.com
https://images.google.com.bd/url?q=https://xn--meg-sb-dua.com
https://google.tg/url?q=https://xn--meg-sb-dua.com
http://maps.google.dm/url?q=https://xn--meg-sb-dua.com
https://www.google.pn/url?q=https://xn--meg-sb-dua.com
https://www.google.com.et/url?q=https://xn--meg-sb-dua.com
http://maps.google.com.jm/url?q=https://xn--meg-sb-dua.com
http://www.google.bg/url?q=https://xn--meg-sb-dua.com
http://maps.google.hu/url?q=https://xn--meg-sb-dua.com
https://maps.google.kz/url?q=https://xn--meg-sb-dua.com
https://images.google.com.pl/url?q=https://xn--meg-sb-dua.com
http://www.google.st/url?q=https://xn--meg-sb-dua.com
https://maps.google.com.kw/url?q=https://xn--meg-sb-dua.com
https://maps.google.ru/url?q=https://xn--meg-sb-dua.com
https://google.co.mz/url?q=https://xn--meg-sb-dua.com
http://www.google.co.ls/url?q=https://xn--meg-sb-dua.com
https://www.google.az/url?q=https://xn--meg-sb-dua.com
http://maps.google.co.uk/url?q=https://xn--meg-sb-dua.com
https://www.google.com.do/url?q=https://xn--meg-sb-dua.com
http://www.google.es/url?q=https://xn--meg-sb-dua.com
http://google.gm/url?q=https://xn--meg-sb-dua.com
http://images.google.so/url?q=https://xn--meg-sb-dua.com
https://www.google.com.pk/url?q=https://xn--meg-sb-dua.com
https://www.google.com.sb/url?q=https://xn--meg-sb-dua.com
https://images.google.ad/url?q=https://xn--meg-sb-dua.com
http://google.sn/url?q=https://xn--meg-sb-dua.com
http://google.ps/url?q=https://xn--meg-sb-dua.com
https://maps.google.bg/url?q=https://xn--meg-sb-dua.com
https://images.google.com.cy/url?q=https://xn--meg-sb-dua.com
http://www.google.pt/url?q=https://xn--meg-sb-dua.com
https://images.google.to/url?q=https://xn--meg-sb-dua.com
http://images.google.co.uz/url?q=https://xn--meg-sb-dua.com
http://google.com.sl/url?q=https://xn--meg-sb-dua.com
http://www.google.gy/url?q=https://xn--meg-sb-dua.com
http://www.google.cd/url?q=https://xn--meg-sb-dua.com
https://maps.google.com.my/url?q=https://xn--meg-sb-dua.com
http://www.google.com.ai/url?q=https://xn--meg-sb-dua.com
https://google.hn/url?q=https://xn--meg-sb-dua.com
http://images.google.ba/url?q=https://xn--meg-sb-dua.com
http://maps.google.com.pe/url?q=https://xn--meg-sb-dua.com
http://google.de/url?q=https://xn--meg-sb-dua.com
http://maps.google.com.gi/url?q=https://xn--meg-sb-dua.com
https://images.google.cat/url?q=https://xn--meg-sb-dua.com
https://www.google.co.ck/url?q=https://xn--meg-sb-dua.com
https://images.google.com.bn/url?q=https://xn--meg-sb-dua.com
http://maps.google.ae/url?q=https://xn--meg-sb-dua.com
http://images.google.no/url?q=https://xn--meg-sb-dua.com
http://maps.google.bs/url?q=https://xn--meg-sb-dua.com
http://maps.google.gy/url?q=https://xn--meg-sb-dua.com
http://maps.google.com.pa/url?q=https://xn--meg-sb-dua.com
https://google.cc/url?q=https://xn--meg-sb-dua.com
http://google.co.th/url?q=https://xn--meg-sb-dua.com
http://maps.google.com.mx/url?q=https://xn--meg-sb-dua.com
http://www.google.lu/url?q=https://xn--meg-sb-dua.com
https://google.bf/url?q=https://xn--meg-sb-dua.com
http://www.google.it/url?q=https://xn--meg-sb-dua.com
http://google.com.br/url?q=https://xn--meg-sb-dua.com
http://images.google.bg/url?q=https://xn--meg-sb-dua.com
http://google.co.il/url?q=https://xn--meg-sb-dua.com
https://google.ws/url?q=https://xn--meg-sb-dua.com
http://images.google.st/url?q=https://xn--meg-sb-dua.com
http://duck.com/url?q=https://xn--meg-sb-dua.com
https://www.google.net/url?q=https://xn--meg-sb-dua.com
https://images.google.sn/url?q=https://xn--meg-sb-dua.com
http://maps.google.co.jp/url?q=https://xn--meg-sb-dua.com
http://www.google.bj/url?q=https://xn--meg-sb-dua.com
https://maps.google.com.qa/url?q=https://xn--meg-sb-dua.com
https://maps.google.com.co/url?q=https://xn--meg-sb-dua.com
http://www.google.ch/url?q=https://xn--meg-sb-dua.com
http://www.google.com.pe/url?q=https://xn--meg-sb-dua.com
http://images.google.co.mz/url?q=https://xn--meg-sb-dua.com
https://www.google.cm/url?q=https://xn--meg-sb-dua.com
http://maps.google.nr/url?q=https://xn--meg-sb-dua.com
https://www.google.al/url?q=https://xn--meg-sb-dua.com
https://google.sk/url?q=https://xn--meg-sb-dua.com
http://maps.google.rs/url?q=https://xn--meg-sb-dua.com
http://maps.google.gr/url?q=https://xn--meg-sb-dua.com
https://google.la/url?q=https://xn--meg-sb-dua.com
http://maps.google.com.ph/url?q=https://xn--meg-sb-dua.com
https://www.google.com/url?q=https://xn--meg-sb-dua.com
http://google.ee/url?q=https://xn--meg-sb-dua.com
https://google.com.pl/url?q=https://xn--meg-sb-dua.com
http://maps.google.com.pg/url?q=https://xn--meg-sb-dua.com
https://google.vg/url?q=https://xn--meg-sb-dua.com
https://www.google.co.ke/url?q=https://xn--meg-sb-dua.com
https://maps.google.com.pr/url?q=https://xn--meg-sb-dua.com
http://www.google.no/url?q=https://xn--meg-sb-dua.com
https://maps.google.fr/url?q=https://xn--meg-sb-dua.com
https://maps.google.as/url?q=https://xn--meg-sb-dua.com
https://google.mn/url?q=https://xn--meg-sb-dua.com
http://google.com.kh/url?q=https://xn--meg-sb-dua.com
http://images.google.me/url?q=https://xn--meg-sb-dua.com
http://maps.google.com.sl/url?q=https://xn--meg-sb-dua.com
http://maps.google.pn/url?q=https://xn--meg-sb-dua.com
http://www.google.fr/url?q=https://xn--meg-sb-dua.com
https://maps.google.com.bz/url?q=https://xn--meg-sb-dua.com
https://maps.google.com.cu/url?q=https://xn--meg-sb-dua.com
https://google.com.eg/url?q=https://xn--meg-sb-dua.com
http://www.google.com.kw/url?q=https://xn--meg-sb-dua.com
https://google.com.cu/url?q=https://xn--meg-sb-dua.com
https://www.google.co.in/url?q=https://xn--meg-sb-dua.com
http://maps.google.tt/url?q=https://xn--meg-sb-dua.com
http://google.com.gt/url?q=https://xn--meg-sb-dua.com
http://maps.google.ge/url?q=https://xn--meg-sb-dua.com
https://maps.google.vg/url?q=https://xn--meg-sb-dua.com
http://images.google.com.om/url?q=https://xn--meg-sb-dua.com
http://google.ht/url?q=https://xn--meg-sb-dua.com
https://maps.google.com.na/url?q=https://xn--meg-sb-dua.com
http://google.ru/url?q=https://xn--meg-sb-dua.com
https://maps.google.gg/url?q=https://xn--meg-sb-dua.com
https://maps.google.com.br/url?q=https://xn--meg-sb-dua.com
https://maps.google.li/url?q=https://xn--meg-sb-dua.com
http://www.google.ba/url?q=https://xn--meg-sb-dua.com
http://maps.google.com.lb/url?q=https://xn--meg-sb-dua.com
http://images.google.ws/url?q=https://xn--meg-sb-dua.com
http://images.google.com.gt/url?q=https://xn--meg-sb-dua.com
http://maps.g.cn/url?q=https://xn--meg-sb-dua.com
http://google.co.zm/url?q=https://xn--meg-sb-dua.com
https://www.google.tl/url?q=https://xn--meg-sb-dua.com
http://www.google.com.np/url?q=https://xn--meg-sb-dua.com
https://maps.google.co.nz/url?q=https://xn--meg-sb-dua.com
http://maps.google.cf/url?q=https://xn--meg-sb-dua.com
http://maps.google.com.et/url?q=https://xn--meg-sb-dua.com
http://maps.google.rw/url?q=https://xn--meg-sb-dua.com
https://maps.google.co.ve/url?q=https://xn--meg-sb-dua.com
https://images.google.co.ck/url?q=https://xn--meg-sb-dua.com
https://images.google.co.zm/url?q=https://xn--meg-sb-dua.com
https://www.google.mu/url?q=https://xn--meg-sb-dua.com
https://maps.google.com.py/url?q=https://xn--meg-sb-dua.com
http://www.google.lv/url?q=https://xn--meg-sb-dua.com
http://maps.google.co.ug/url?q=https://xn--meg-sb-dua.com
https://maps.google.it/url?q=https://xn--meg-sb-dua.com
https://google.fi/url?q=https://xn--meg-sb-dua.com
https://maps.google.ms/url?q=https://xn--meg-sb-dua.com
https://maps.google.mv/url?q=https://xn--meg-sb-dua.com
http://maps.google.com.eg/url?q=https://xn--meg-sb-dua.com
https://maps.google.so/url?q=https://xn--meg-sb-dua.com
http://www.google.nr/url?q=https://xn--meg-sb-dua.com
https://maps.google.com.ar/url?q=https://xn--meg-sb-dua.com
http://images.google.com.bo/url?q=https://xn--meg-sb-dua.com
https://maps.google.tk/url?q=https://xn--meg-sb-dua.com
http://maps.google.com.hk/url?q=https://xn--meg-sb-dua.com
https://www.google.com.vn/url?q=https://xn--meg-sb-dua.com
https://www.google.bi/url?q=https://xn--meg-sb-dua.com
https://images.google.co.tz/url?q=https://xn--meg-sb-dua.com
http://google.co.bw/url?q=https://xn--meg-sb-dua.com
https://images.google.tl/url?q=https://xn--meg-sb-dua.com
http://maps.google.com.sg/url?q=https://xn--meg-sb-dua.com
https://images.google.mv/url?q=https://xn--meg-sb-dua.com
https://www.google.info/url?q=https://xn--meg-sb-dua.com
https://www.google.com.bz/url?q=https://xn--meg-sb-dua.com
http://maps.google.ee/url?q=https://xn--meg-sb-dua.com
http://google.co.za/url?q=https://xn--meg-sb-dua.com
http://www.g.cn/url?q=https://xn--meg-sb-dua.com
https://maps.google.ad/url?q=https://xn--meg-sb-dua.com
https://maps.google.hn/url?q=https://xn--meg-sb-dua.com
https://images.google.is/url?q=https://xn--meg-sb-dua.com
https://maps.google.ca/url?q=https://xn--meg-sb-dua.com
http://maps.google.ro/url?q=https://xn--meg-sb-dua.com
https://images.google.com.kh/url?q=https://xn--meg-sb-dua.com
http://google.com.pg/url?q=https://xn--meg-sb-dua.com
https://maps.google.co.vi/url?q=https://xn--meg-sb-dua.com
http://maps.google.com.np/url?q=https://xn--meg-sb-dua.com
https://images.google.tk/url?q=https://xn--meg-sb-dua.com
http://images.google.nr/url?q=https://xn--meg-sb-dua.com
http://maps.google.com.ng/url?q=https://xn--meg-sb-dua.com
https://maps.google.ki/url?q=https://xn--meg-sb-dua.com
https://images.google.cm/url?q=https://xn--meg-sb-dua.com
http://maps.google.gm/url?q=https://xn--meg-sb-dua.com
https://images.google.by/url?q=https://xn--meg-sb-dua.com
https://google.fm/url?q=https://xn--meg-sb-dua.com
http://google.co.vi/url?q=https://xn--meg-sb-dua.com
http://maps.google.cz/url?q=https://xn--meg-sb-dua.com
https://images.google.co.ma/url?q=https://xn--meg-sb-dua.com
http://www.google.com.vc/url?q=https://xn--meg-sb-dua.com
https://maps.google.jo/url?q=https://xn--meg-sb-dua.com
http://images.google.com.sb/url?q=https://xn--meg-sb-dua.com
https://images.google.com/url?q=https://xn--meg-sb-dua.com
https://maps.google.ch/url?q=https://xn--meg-sb-dua.com
http://maps.google.mk/url?q=https://xn--meg-sb-dua.com
http://www.google.com.ni/url?q=https://xn--meg-sb-dua.com
http://images.google.cz/url?q=https://xn--meg-sb-dua.com
https://images.google.com.vc/url?q=https://xn--meg-sb-dua.com
https://maps.google.co.ke/url?q=https://xn--meg-sb-dua.com
http://maps.google.com.uy/url?q=https://xn--meg-sb-dua.com
https://www.google.ie/url?q=https://xn--meg-sb-dua.com
https://maps.google.nu/url?q=https://xn--meg-sb-dua.com
http://images.google.cc/url?q=https://xn--meg-sb-dua.com
https://images.google.gr/url?q=https://xn--meg-sb-dua.com
https://google.lt/url?q=https://xn--meg-sb-dua.com
http://google.tm/url?q=https://xn--meg-sb-dua.com
https://maps.google.co.bw/url?q=https://xn--meg-sb-dua.com
http://www.google.vu/url?q=https://xn--meg-sb-dua.com
http://maps.google.lu/url?q=https://xn--meg-sb-dua.com
http://maps.google.lv/url?q=https://xn--meg-sb-dua.com
https://images.google.je/url?q=https://xn--meg-sb-dua.com
https://www.google.co.ve/url?q=https://xn--meg-sb-dua.com
https://images.google.com.ng/url?q=https://xn--meg-sb-dua.com
http://googlemaps.com/url?q=https://xn--meg-sb-dua.com
http://maps.google.com.fj/url?q=https://xn--meg-sb-dua.com
http://plus.google.com/url?q=https://xn--meg-sb-dua.com
http://plus.gngjd.com/url?q=https://xn--meg-sb-dua.com
http://google.com.af/url?q=https://xn--meg-sb-dua.com
https://images.google.md/url?q=https://xn--meg-sb-dua.com
https://www.google.com.mm/url?q=https://xn--meg-sb-dua.com
https://maps.google.st/url?q=https://xn--meg-sb-dua.com
http://maps.google.cat/url?q=https://xn--meg-sb-dua.com
http://google.co.jp/url?q=https://xn--meg-sb-dua.com
https://maps.google.lk/url?q=https://xn--meg-sb-dua.com
http://maps.google.co.kr/url?q=https://xn--meg-sb-dua.com
http://google.com.bd/url?q=https://xn--meg-sb-dua.com
https://images.google.co.ke/url?q=https://xn--meg-sb-dua.com
https://www.google.gr/url?q=https://xn--meg-sb-dua.com
https://images.google.ac/url?q=https://xn--meg-sb-dua.com
http://maps.google.ie/url?q=https://xn--meg-sb-dua.com
http://google.com.tn/url?q=https://xn--meg-sb-dua.com
https://maps.google.iq/url?q=https://xn--meg-sb-dua.com
http://images.google.com.lb/url?q=https://xn--meg-sb-dua.com
https://images.google.ga/url?q=https://xn--meg-sb-dua.com
http://maps.google.nl/url?q=https://xn--meg-sb-dua.com
https://maps.google.com.ai/url?q=https://xn--meg-sb-dua.com
https://maps.google.cl/url?q=https://xn--meg-sb-dua.com
http://maps.google.co.id/url?q=https://xn--meg-sb-dua.com
https://maps.google.fm/url?q=https://xn--meg-sb-dua.com
https://maps.google.com.ni/url?q=https://xn--meg-sb-dua.com
https://maps.google.bi/url?q=https://xn--meg-sb-dua.com
https://www.google.ki/url?q=https://xn--meg-sb-dua.com
https://google.dm/url?q=https://xn--meg-sb-dua.com
https://images.google.mn/url?q=https://xn--meg-sb-dua.com
https://images.google.gy/url?q=https://xn--meg-sb-dua.com
https://google.com.my/url?q=https://xn--meg-sb-dua.com
http://maps.google.tg/url?q=https://xn--meg-sb-dua.com
https://images.google.com.sa/url?q=https://xn--meg-sb-dua.com
https://maps.google.com.om/url?q=https://xn--meg-sb-dua.com
https://images.google.com.vn/url?q=https://xn--meg-sb-dua.com
https://maps.google.co.hu/url?q=https://xn--meg-sb-dua.com
http://maps.google.be/url?q=https://xn--meg-sb-dua.com
http://images.google.com.bh/url?q=https://xn--meg-sb-dua.com
https://images.google.com.kw/url?q=https://xn--meg-sb-dua.com
https://maps.google.gp/url?q=https://xn--meg-sb-dua.com
http://images.google.com.af/url?q=https://xn--meg-sb-dua.com
http://images.google.com.bz/url?q=https://xn--meg-sb-dua.com
https://maps.google.se/url?q=https://xn--meg-sb-dua.com
https://maps.google.cg/url?q=https://xn--meg-sb-dua.com
https://images.google.mk/url?q=https://xn--meg-sb-dua.com
https://www.google.com.uy/url?q=https://xn--meg-sb-dua.com
http://maps.google.cm/url?q=https://xn--meg-sb-dua.com
https://maps.google.cd/url?q=https://xn--meg-sb-dua.com
https://maps.google.mg/url?q=https://xn--meg-sb-dua.com
https://images.google.am/url?q=https://xn--meg-sb-dua.com
https://images.google.com.tn/url?q=https://xn--meg-sb-dua.com
https://images.google.co.id/url?q=https://xn--meg-sb-dua.com
https://maps.google.com.bd/url?q=https://xn--meg-sb-dua.com
https://maps.google.co.tz/url?q=https://xn--meg-sb-dua.com
http://images.google.com.ai/url?q=https://xn--meg-sb-dua.com
http://images.google.bf/url?q=https://xn--meg-sb-dua.com
http://maps.google.co.il/url?q=https://xn--meg-sb-dua.com
http://maps.google.co.zm/url?q=https://xn--meg-sb-dua.com
http://images.google.com.qa/url?q=https://xn--meg-sb-dua.com
http://images.google.lk/url?q=https://xn--meg-sb-dua.com
http://maps.google.cv/url?q=https://xn--meg-sb-dua.com
http://maps.google.im/url?q=https://xn--meg-sb-dua.com
https://maps.google.com.gh/url?q=https://xn--meg-sb-dua.com
https://maps.google.co.ao/url?q=https://xn--meg-sb-dua.com
http://maps.google.co.th/url?q=https://xn--meg-sb-dua.com
https://maps.google.gl/url?q=https://xn--meg-sb-dua.com
https://maps.google.com.ua/url?q=https://xn--meg-sb-dua.com
http://maps.google.td/url?q=https://xn--meg-sb-dua.com
https://google.me/url?q=https://xn--meg-sb-dua.com
https://maps.google.bj/url?q=https://xn--meg-sb-dua.com
https://maps.google.pl/url?q=https://xn--meg-sb-dua.com
http://maps.google.com.tr/url?q=https://xn--meg-sb-dua.com
https://images.google.sc/url?q=https://xn--meg-sb-dua.com
https://images.google.com.et/url?q=https://xn--meg-sb-dua.com
https://maps.google.dk/url?q=https://xn--meg-sb-dua.com
https://images.google.iq/url?q=https://xn--meg-sb-dua.com
http://maps.google.sc/url?q=https://xn--meg-sb-dua.com
http://images.google.co.bw/url?q=https://xn--meg-sb-dua.com
http://images.google.dz/url?q=https://xn--meg-sb-dua.com
https://maps.google.ht/url?q=https://xn--meg-sb-dua.com
https://google.cat/url?q=https://xn--meg-sb-dua.com
http://maps.google.com.bh/url?q=https://xn--meg-sb-dua.com
http://maps.google.ml/url?q=https://xn--meg-sb-dua.com
https://maps.google.com.pl/url?q=https://xn--meg-sb-dua.com
https://maps.google.com.vc/url?q=https://xn--meg-sb-dua.com
https://maps.google.com.au/url?q=https://xn--meg-sb-dua.com
http://images.g.cn/url?q=https://xn--meg-sb-dua.com
http://maps.google.co.ck/url?q=https://xn--meg-sb-dua.com
http://maps.google.sh/url?q=https://xn--meg-sb-dua.com
http://maps.google.com.sb/url?q=https://xn--meg-sb-dua.com
http://maps.google.sk/url?q=https://xn--meg-sb-dua.com
http://images.google.rs/url?q=https://xn--meg-sb-dua.com
http://maps.google.dj/url?q=https://xn--meg-sb-dua.com
http://maps.google.si/url?q=https://xn--meg-sb-dua.com
http://images.google.ps/url?q=https://xn--meg-sb-dua.com
http://images.google.com.pg/url?q=https://xn--meg-sb-dua.com
https://images.google.net/url?q=https://xn--meg-sb-dua.com
http://images.google.com.sl/url?q=https://xn--meg-sb-dua.com
https://images.google.gp/url?q=https://xn--meg-sb-dua.com
https://maps.gngjd.com/url?q=https://xn--meg-sb-dua.com
https://images.google.co.zw/url?q=https://xn--meg-sb-dua.com
I’m gone to say to my little brother, that he should also pay a quick
visit this weblog on regular basis to obtain updated from most
up-to-date news.
Hello, i feel that i noticed you visited my blog thus i came to
return the favor?.I am trying to in finding things to improve my web
site!I guess its ok to make use of a few of your ideas!!
I pay a visit each day some web sites and blogs to read content, however this webpage
gives feature based posts.
Fantastic site you have here but I was curious if you knew of any forums that cover the same topics talked about here?
I’d really like to be a part of community where I can get opinions
from other knowledgeable individuals that share the same
interest. If you have any suggestions, please let me know. Kudos!
https://images.google.as/url?q=https://xn--mea-sb-j6a.com
https://images.google.off.ai/url?q=https://xn--mea-sb-j6a.com
https://images.google.com.ag/url?q=https://xn--mea-sb-j6a.com
https://images.google.com.ar/url?q=https://xn--mea-sb-j6a.com
https://images.google.com.au/url?q=https://xn--mea-sb-j6a.com
https://images.google.at/url?q=https://xn--mea-sb-j6a.com
https://images.google.az/url?q=https://xn--mea-sb-j6a.com
https://images.google.be/url?q=https://xn--mea-sb-j6a.com
https://images.google.com.br/url?q=https://xn--mea-sb-j6a.com
https://images.google.vg/url?q=https://xn--mea-sb-j6a.com
https://images.google.bi/url?q=https://xn--mea-sb-j6a.com
https://images.google.ca/url?q=https://xn--mea-sb-j6a.com
https://images.google.td/url?q=https://xn--mea-sb-j6a.com
https://images.google.cl/url?q=https://xn--mea-sb-j6a.com
https://images.google.com.co/url?q=https://xn--mea-sb-j6a.com
https://images.google.co.cr/url?q=https://xn--mea-sb-j6a.com
https://images.google.ci/url?q=https://xn--mea-sb-j6a.com
https://images.google.com.cu/url?q=https://xn--mea-sb-j6a.com
https://images.google.cd/url?q=https://xn--mea-sb-j6a.com
https://images.google.dk/url?q=https://xn--mea-sb-j6a.com
https://images.google.dj/url?q=https://xn--mea-sb-j6a.com
https://images.google.com.do/url?q=https://xn--mea-sb-j6a.com
https://images.google.com.ec/url?q=https://xn--mea-sb-j6a.com
https://images.google.com.sv/url?q=https://xn--mea-sb-j6a.com
https://images.google.fm/url?q=https://xn--mea-sb-j6a.com
https://images.google.com.fj/url?q=https://xn--mea-sb-j6a.com
https://images.google.fi/url?q=https://xn--mea-sb-j6a.com
https://images.google.fr/url?q=https://xn--mea-sb-j6a.com
https://images.google.gm/url?q=https://xn--mea-sb-j6a.com
https://images.google.ge/url?q=https://xn--mea-sb-j6a.com
https://images.google.de/url?q=https://xn--mea-sb-j6a.com
https://images.google.com.gi/url?q=https://xn--mea-sb-j6a.com
https://images.google.com.gr/url?q=https://xn--mea-sb-j6a.com
https://images.google.gl/url?q=https://xn--mea-sb-j6a.com
https://images.google.gg/url?q=https://xn--mea-sb-j6a.com
https://images.google.hn/url?q=https://xn--mea-sb-j6a.com
https://images.google.com.hk/url?q=https://xn--mea-sb-j6a.com
https://images.google.co.hu/url?q=https://xn--mea-sb-j6a.com
https://images.google.co.in/url?q=https://xn--mea-sb-j6a.com
https://images.google.ie/url?q=https://xn--mea-sb-j6a.com
https://images.google.co.im/url?q=https://xn--mea-sb-j6a.com
https://images.google.co.il/url?q=https://xn--mea-sb-j6a.com
https://images.google.it/url?q=https://xn--mea-sb-j6a.com
https://images.google.com.jm/url?q=https://xn--mea-sb-j6a.com
https://images.google.co.jp/url?q=https://xn--mea-sb-j6a.com
https://images.google.co.je/url?q=https://xn--mea-sb-j6a.com
https://images.google.kz/url?q=https://xn--mea-sb-j6a.com
https://images.google.co.kr/url?q=https://xn--mea-sb-j6a.com
https://images.google.lv/url?q=https://xn--mea-sb-j6a.com
https://images.google.co.ls/url?q=https://xn--mea-sb-j6a.com
https://images.google.li/url?q=https://xn--mea-sb-j6a.com
https://images.google.lt/url?q=https://xn--mea-sb-j6a.com
https://images.google.lu/url?q=https://xn--mea-sb-j6a.com
https://images.google.mw/url?q=https://xn--mea-sb-j6a.com
https://images.google.com.my/url?q=https://xn--mea-sb-j6a.com
https://images.google.com.mt/url?q=https://xn--mea-sb-j6a.com
https://images.google.mu/url?q=https://xn--mea-sb-j6a.com
https://images.google.com.mx/url?q=https://xn--mea-sb-j6a.com
https://images.google.ms/url?q=https://xn--mea-sb-j6a.com
https://images.google.com.na/url?q=https://xn--mea-sb-j6a.com
https://images.google.com.np/url?q=https://xn--mea-sb-j6a.com
https://images.google.nl/url?q=https://xn--mea-sb-j6a.com
https://images.google.co.nz/url?q=https://xn--mea-sb-j6a.com
https://images.google.com.ni/url?q=https://xn--mea-sb-j6a.com
https://images.google.com.nf/url?q=https://xn--mea-sb-j6a.com
https://images.google.com.pk/url?q=https://xn--mea-sb-j6a.com
https://images.google.com.pa/url?q=https://xn--mea-sb-j6a.com
https://images.google.com.py/url?q=https://xn--mea-sb-j6a.com
https://images.google.com.pe/url?q=https://xn--mea-sb-j6a.com
https://images.google.com.ph/url?q=https://xn--mea-sb-j6a.com
https://images.google.pn/url?q=https://xn--mea-sb-j6a.com
https://images.google.pl/url?q=https://xn--mea-sb-j6a.com
https://images.google.pt/url?q=https://xn--mea-sb-j6a.com
https://images.google.com.pr/url?q=https://xn--mea-sb-j6a.com
https://images.google.cg/url?q=https://xn--mea-sb-j6a.com
https://images.google.ro/url?q=https://xn--mea-sb-j6a.com
https://images.google.ru/url?q=https://xn--mea-sb-j6a.com
https://images.google.rw/url?q=https://xn--mea-sb-j6a.com
https://images.google.sh/url?q=https://xn--mea-sb-j6a.com
https://images.google.sm/url?q=https://xn--mea-sb-j6a.com
https://images.google.com.sg/url?q=https://xn--mea-sb-j6a.com
https://images.google.sk/url?q=https://xn--mea-sb-j6a.com
https://images.google.co.za/url?q=https://xn--mea-sb-j6a.com
https://images.google.es/url?q=https://xn--mea-sb-j6a.com
https://images.google.se/url?q=https://xn--mea-sb-j6a.com
https://images.google.ch/url?q=https://xn--mea-sb-j6a.com
https://images.google.com.tw/url?q=https://xn--mea-sb-j6a.com
https://images.google.co.th/url?q=https://xn--mea-sb-j6a.com
https://images.google.tt/url?q=https://xn--mea-sb-j6a.com
https://images.google.com.tr/url?q=https://xn--mea-sb-j6a.com
https://images.google.com.ua/url?q=https://xn--mea-sb-j6a.com
https://images.google.ae/url?q=https://xn--mea-sb-j6a.com
https://images.google.co.uk/url?q=https://xn--mea-sb-j6a.com
https://images.google.com.uy/url?q=https://xn--mea-sb-j6a.com
https://images.google.uz/url?q=https://xn--mea-sb-j6a.com
https://images.google.vu/url?q=https://xn--mea-sb-j6a.com
https://images.google.co.ve/url?q=https://xn--mea-sb-j6a.com
https://www.google.co.ao/url?q=https://xn--mea-sb-j6a.com
https://images.google.im/url?q=https://xn--mea-sb-j6a.com
https://images.google.dm/url?q=https://xn--mea-sb-j6a.com
https://google.com.pa/url?q=https://xn--mea-sb-j6a.com
http://maps.google.mw/url?q=https://xn--mea-sb-j6a.com
https://google.ac/url?q=https://xn--mea-sb-j6a.com
https://google.com.gh/url?q=https://xn--mea-sb-j6a.com
https://google.dz/url?q=https://xn--mea-sb-j6a.com
http://images.google.ki/url?q=https://xn--mea-sb-j6a.com
http://www.google.im/url?q=https://xn--mea-sb-j6a.com
https://google.com.mx/url?q=https://xn--mea-sb-j6a.com
https://www.google.cz/url?q=https://xn--mea-sb-j6a.com
http://google.hr/url?q=https://xn--mea-sb-j6a.com
https://google.ml/url?q=https://xn--mea-sb-j6a.com
https://www.google.com.au/url?q=https://xn--mea-sb-j6a.com
https://images.google.bs/url?q=https://xn--mea-sb-j6a.com
https://google.co.tz/url?q=https://xn--mea-sb-j6a.com
http://google.cg/url?q=https://xn--mea-sb-j6a.com
http://maps.google.is/url?q=https://xn--mea-sb-j6a.com
http://google.si/url?q=https://xn--mea-sb-j6a.com
http://google.com.py/url?q=https://xn--mea-sb-j6a.com
http://maps.google.co.cr/url?q=https://xn--mea-sb-j6a.com
http://www.google.mk/url?q=https://xn--mea-sb-j6a.com
http://www.google.ge/url?q=https://xn--mea-sb-j6a.com
https://images.google.ml/url?q=https://xn--mea-sb-j6a.com
https://www.google.com.sa/url?q=https://xn--mea-sb-j6a.com
http://google.mg/url?q=https://xn--mea-sb-j6a.com
http://google.com.ec/url?q=https://xn--mea-sb-j6a.com
https://google.rs/url?q=https://xn--mea-sb-j6a.com
https://www.google.co.hu/url?q=https://xn--mea-sb-j6a.com
http://google.md/url?q=https://xn--mea-sb-j6a.com
https://images.google.hu/url?q=https://xn--mea-sb-j6a.com
https://www.google.com.tw/url?q=https://xn--mea-sb-j6a.com
https://google.ae/url?q=https://xn--mea-sb-j6a.com
https://images.google.jo/url?q=https://xn--mea-sb-j6a.com
http://images.google.tm/url?q=https://xn--mea-sb-j6a.com
https://images.google.com.mm/url?q=https://xn--mea-sb-j6a.com
https://maps.google.vu/url?q=https://xn--mea-sb-j6a.com
https://maps.google.co.ls/url?q=https://xn--mea-sb-j6a.com
https://www.google.com.cy/url?q=https://xn--mea-sb-j6a.com
http://google.com.lb/url?q=https://xn--mea-sb-j6a.com
http://google.co.kr/url?q=https://xn--mea-sb-j6a.com
http://images.google.nu/url?q=https://xn--mea-sb-j6a.com
http://google.cl/url?q=https://xn--mea-sb-j6a.com
http://www.google.com.bo/url?q=https://xn--mea-sb-j6a.com
https://google.ad/url?q=https://xn--mea-sb-j6a.com
https://maps.google.pt/url?q=https://xn--mea-sb-j6a.com
https://maps.google.es/url?q=https://xn--mea-sb-j6a.com
https://maps.google.sn/url?q=https://xn--mea-sb-j6a.com
http://google.tk/url?q=https://xn--mea-sb-j6a.com
https://google.com.bn/url?q=https://xn--mea-sb-j6a.com
https://google.com.ua/url?q=https://xn--mea-sb-j6a.com
https://www.google.com.sg/url?q=https://xn--mea-sb-j6a.com
https://images.google.info/url?q=https://xn--mea-sb-j6a.com
https://maps.google.de/url?q=https://xn--mea-sb-j6a.com
https://images.google.cv/url?q=https://xn--mea-sb-j6a.com
http://google.com.nf/url?q=https://xn--mea-sb-j6a.com
https://images.google.com.ly/url?q=https://xn--mea-sb-j6a.com
http://images.google.tg/url?q=https://xn--mea-sb-j6a.com
http://google.cv/url?q=https://xn--mea-sb-j6a.com
http://gngjd.com/url?q=https://xn--mea-sb-j6a.com
http://www.google.je/url?q=https://xn--mea-sb-j6a.com
http://maps.google.by/url?q=https://xn--mea-sb-j6a.com
http://maps.google.fi/url?q=https://xn--mea-sb-j6a.com
https://images.gngjd.com/url?q=https://xn--mea-sb-j6a.com
http://google.ne/url?q=https://xn--mea-sb-j6a.com
http://images.google.kg/url?q=https://xn--mea-sb-j6a.com
https://www.google.cn/url?q=https://xn--mea-sb-j6a.com
https://google.am/url?q=https://xn--mea-sb-j6a.com
http://google.com.ly/url?q=https://xn--mea-sb-j6a.com
https://google.iq/url?q=https://xn--mea-sb-j6a.com
https://google.com.sv/url?q=https://xn--mea-sb-j6a.com
https://google.sc/url?q=https://xn--mea-sb-j6a.com
http://google.kg/url?q=https://xn--mea-sb-j6a.com
http://google.li/url?q=https://xn--mea-sb-j6a.com
http://images.google.al/url?q=https://xn--mea-sb-j6a.com
https://maps.google.je/url?q=https://xn--mea-sb-j6a.com
http://maps.google.to/url?q=https://xn--mea-sb-j6a.com
http://google.co.cr/url?q=https://xn--mea-sb-j6a.com
http://images.google.com.tj/url?q=https://xn--mea-sb-j6a.com
https://www.google.com.ph/url?q=https://xn--mea-sb-j6a.com
https://maps.google.com.bn/url?q=https://xn--mea-sb-j6a.com
https://www.google.as/url?q=https://xn--mea-sb-j6a.com
https://images.google.co.ao/url?q=https://xn--mea-sb-j6a.com
http://maps.google.com.bo/url?q=https://xn--mea-sb-j6a.com
https://maps.google.com/url?q=https://xn--mea-sb-j6a.com
https://www.google.com.bh/url?q=https://xn--mea-sb-j6a.com
https://maps.google.com.mm/url?q=https://xn--mea-sb-j6a.com
http://google.com.gi/url?q=https://xn--mea-sb-j6a.com
http://maps.google.ba/url?q=https://xn--mea-sb-j6a.com
http://google.co.id/url?q=https://xn--mea-sb-j6a.com
http://google.be/url?q=https://xn--mea-sb-j6a.com
http://images.google.mg/url?q=https://xn--mea-sb-j6a.com
http://google.com.ar/url?q=https://xn--mea-sb-j6a.com
https://maps.google.co.za/url?q=https://xn--mea-sb-j6a.com
https://www.google.gp/url?q=https://xn--mea-sb-j6a.com
http://www.google.sh/url?q=https://xn--mea-sb-j6a.com
https://images.google.ee/url?q=https://xn--mea-sb-j6a.com
https://www.google.rw/url?q=https://xn--mea-sb-j6a.com
http://images.google.si/url?q=https://xn--mea-sb-j6a.com
https://www.google.at/url?q=https://xn--mea-sb-j6a.com
http://maps.google.at/url?q=https://xn--mea-sb-j6a.com
http://maps.google.co.in/url?q=https://xn--mea-sb-j6a.com
https://maps.google.ga/url?q=https://xn--mea-sb-j6a.com
http://maps.google.sm/url?q=https://xn--mea-sb-j6a.com
http://google.ms/url?q=https://xn--mea-sb-j6a.com
https://images.google.com.gh/url?q=https://xn--mea-sb-j6a.com
http://maps.google.cn/url?q=https://xn--mea-sb-j6a.com
https://www.google.com.na/url?q=https://xn--mea-sb-j6a.com
https://maps.google.hr/url?q=https://xn--mea-sb-j6a.com
https://google.ci/url?q=https://xn--mea-sb-j6a.com
https://images.google.hr/url?q=https://xn--mea-sb-j6a.com
http://maps.google.com.do/url?q=https://xn--mea-sb-j6a.com
http://google.lk/url?q=https://xn--mea-sb-j6a.com
http://images.google.cn/url?q=https://xn--mea-sb-j6a.com
http://www.bon-vivant.net/url?q=https://xn--mea-sb-j6a.com
http://maps.google.com.gt/url?q=https://xn--mea-sb-j6a.com
http://www.google.com.ag/url?q=https://xn--mea-sb-j6a.com
https://maps.google.mu/url?q=https://xn--mea-sb-j6a.com
https://google.com.ng/url?q=https://xn--mea-sb-j6a.com
https://www.google.co.uk/url?q=https://xn--mea-sb-j6a.com
https://google.us/url?q=https://xn--mea-sb-j6a.com
https://www.google.com.tr/url?q=https://xn--mea-sb-j6a.com
http://www.google.co.ma/url?q=https://xn--mea-sb-j6a.com
https://maps.google.co.zw/url?q=https://xn--mea-sb-j6a.com
https://www.google.bs/url?q=https://xn--mea-sb-j6a.com
https://www.google.pl/url?q=https://xn--mea-sb-j6a.com
http://www.googleadservices.com/url?q=https://xn--mea-sb-j6a.com
http://google.kz/url?q=https://xn--mea-sb-j6a.com
https://google.com.mt/url?q=https://xn--mea-sb-j6a.com
http://www.google.co.zw/url?q=https://xn--mea-sb-j6a.com
https://maps.google.ne/url?q=https://xn--mea-sb-j6a.com
https://google.com.qa/url?q=https://xn--mea-sb-j6a.com
https://google.se/url?q=https://xn--mea-sb-j6a.com
http://www.google.mw/url?q=https://xn--mea-sb-j6a.com
https://maps.google.co.mz/url?q=https://xn--mea-sb-j6a.com
http://maps.google.com.sv/url?q=https://xn--mea-sb-j6a.com
https://www.google.sm/url?q=https://xn--mea-sb-j6a.com
https://maps.google.com.tw/url?q=https://xn--mea-sb-j6a.com
https://google.ca/url?q=https://xn--mea-sb-j6a.com
https://www.google.is/url?q=https://xn--mea-sb-j6a.com
https://google.com.jm/url?q=https://xn--mea-sb-j6a.com
http://images.google.co.ug/url?q=https://xn--mea-sb-j6a.com
https://maps.google.com.kh/url?q=https://xn--mea-sb-j6a.com
http://maps.google.tl/url?q=https://xn--mea-sb-j6a.com
http://www.google.co.nz/url?q=https://xn--mea-sb-j6a.com
https://www.google.gg/url?q=https://xn--mea-sb-j6a.com
https://google.to/url?q=https://xn--mea-sb-j6a.com
https://google.ro/url?q=https://xn--mea-sb-j6a.com
http://google.td/url?q=https://xn--mea-sb-j6a.com
https://www.google.by/url?q=https://xn--mea-sb-j6a.com
https://www.google.nl/url?q=https://xn--mea-sb-j6a.com
http://maps.google.ci/url?q=https://xn--mea-sb-j6a.com
http://maps.google.dz/url?q=https://xn--mea-sb-j6a.com
https://google.hu/url?q=https://xn--mea-sb-j6a.com
http://images.google.ht/url?q=https://xn--mea-sb-j6a.com
http://google.mv/url?q=https://xn--mea-sb-j6a.com
https://google.cf/url?q=https://xn--mea-sb-j6a.com
http://maps.google.com.ly/url?q=https://xn--mea-sb-j6a.com
http://www.google.nu/url?q=https://xn--mea-sb-j6a.com
http://google.com.tj/url?q=https://xn--mea-sb-j6a.com
https://maps.google.com.mt/url?q=https://xn--mea-sb-j6a.com
https://google.so/url?q=https://xn--mea-sb-j6a.com
http://images.google.bj/url?q=https://xn--mea-sb-j6a.com
https://maps.google.la/url?q=https://xn--mea-sb-j6a.com
https://images.google.us/url?q=https://xn--mea-sb-j6a.com
https://images.google.com.eg/url?q=https://xn--mea-sb-j6a.com
https://images.google.cf/url?q=https://xn--mea-sb-j6a.com
https://images.google.la/url?q=https://xn--mea-sb-j6a.com
http://maps.google.com.ag/url?q=https://xn--mea-sb-j6a.com
http://google.ga/url?q=https://xn--mea-sb-j6a.com
http://google.co.uz/url?q=https://xn--mea-sb-j6a.com
http://maps.google.no/url?q=https://xn--mea-sb-j6a.com
https://www.google.gl/url?q=https://xn--mea-sb-j6a.com
http://images.google.co.vi/url?q=https://xn--mea-sb-j6a.com
https://images.google.ne/url?q=https://xn--mea-sb-j6a.com
https://google.com.om/url?q=https://xn--mea-sb-j6a.com
http://maps.google.lt/url?q=https://xn--mea-sb-j6a.com
https://maps.google.kg/url?q=https://xn--mea-sb-j6a.com
http://www.google.com.hk/url?q=https://xn--mea-sb-j6a.com
https://google.com.co/url?q=https://xn--mea-sb-j6a.com
https://google.dk/url?q=https://xn--mea-sb-j6a.com
https://maps.google.com.sa/url?q=https://xn--mea-sb-j6a.com
http://google.com.fj/url?q=https://xn--mea-sb-j6a.com
http://maps.google.com.ec/url?q=https://xn--mea-sb-j6a.com
https://maps.google.mn/url?q=https://xn--mea-sb-j6a.com
https://maps.google.bf/url?q=https://xn--mea-sb-j6a.com
https://www.google.tt/url?q=https://xn--mea-sb-j6a.com
https://www.google.dj/url?q=https://xn--mea-sb-j6a.com
https://www.google.com.pr/url?q=https://xn--mea-sb-j6a.com
https://maps.google.ws/url?q=https://xn--mea-sb-j6a.com
http://google.jo/url?q=https://xn--mea-sb-j6a.com
https://google.co.ug/url?q=https://xn--mea-sb-j6a.com
https://images.google.com.bd/url?q=https://xn--mea-sb-j6a.com
https://google.tg/url?q=https://xn--mea-sb-j6a.com
http://maps.google.dm/url?q=https://xn--mea-sb-j6a.com
https://www.google.pn/url?q=https://xn--mea-sb-j6a.com
https://www.google.com.et/url?q=https://xn--mea-sb-j6a.com
http://maps.google.com.jm/url?q=https://xn--mea-sb-j6a.com
http://www.google.bg/url?q=https://xn--mea-sb-j6a.com
http://maps.google.hu/url?q=https://xn--mea-sb-j6a.com
https://maps.google.kz/url?q=https://xn--mea-sb-j6a.com
https://images.google.com.pl/url?q=https://xn--mea-sb-j6a.com
http://www.google.st/url?q=https://xn--mea-sb-j6a.com
https://maps.google.com.kw/url?q=https://xn--mea-sb-j6a.com
https://maps.google.ru/url?q=https://xn--mea-sb-j6a.com
https://google.co.mz/url?q=https://xn--mea-sb-j6a.com
http://www.google.co.ls/url?q=https://xn--mea-sb-j6a.com
https://www.google.az/url?q=https://xn--mea-sb-j6a.com
http://maps.google.co.uk/url?q=https://xn--mea-sb-j6a.com
https://www.google.com.do/url?q=https://xn--mea-sb-j6a.com
http://www.google.es/url?q=https://xn--mea-sb-j6a.com
http://google.gm/url?q=https://xn--mea-sb-j6a.com
http://images.google.so/url?q=https://xn--mea-sb-j6a.com
https://www.google.com.pk/url?q=https://xn--mea-sb-j6a.com
https://www.google.com.sb/url?q=https://xn--mea-sb-j6a.com
https://images.google.ad/url?q=https://xn--mea-sb-j6a.com
http://google.sn/url?q=https://xn--mea-sb-j6a.com
http://google.ps/url?q=https://xn--mea-sb-j6a.com
https://maps.google.bg/url?q=https://xn--mea-sb-j6a.com
https://images.google.com.cy/url?q=https://xn--mea-sb-j6a.com
http://www.google.pt/url?q=https://xn--mea-sb-j6a.com
https://images.google.to/url?q=https://xn--mea-sb-j6a.com
http://images.google.co.uz/url?q=https://xn--mea-sb-j6a.com
http://google.com.sl/url?q=https://xn--mea-sb-j6a.com
http://www.google.gy/url?q=https://xn--mea-sb-j6a.com
http://www.google.cd/url?q=https://xn--mea-sb-j6a.com
https://maps.google.com.my/url?q=https://xn--mea-sb-j6a.com
http://www.google.com.ai/url?q=https://xn--mea-sb-j6a.com
https://google.hn/url?q=https://xn--mea-sb-j6a.com
http://images.google.ba/url?q=https://xn--mea-sb-j6a.com
http://maps.google.com.pe/url?q=https://xn--mea-sb-j6a.com
http://google.de/url?q=https://xn--mea-sb-j6a.com
http://maps.google.com.gi/url?q=https://xn--mea-sb-j6a.com
https://images.google.cat/url?q=https://xn--mea-sb-j6a.com
https://www.google.co.ck/url?q=https://xn--mea-sb-j6a.com
https://images.google.com.bn/url?q=https://xn--mea-sb-j6a.com
http://maps.google.ae/url?q=https://xn--mea-sb-j6a.com
http://images.google.no/url?q=https://xn--mea-sb-j6a.com
http://maps.google.bs/url?q=https://xn--mea-sb-j6a.com
http://maps.google.gy/url?q=https://xn--mea-sb-j6a.com
http://maps.google.com.pa/url?q=https://xn--mea-sb-j6a.com
https://google.cc/url?q=https://xn--mea-sb-j6a.com
http://google.co.th/url?q=https://xn--mea-sb-j6a.com
http://maps.google.com.mx/url?q=https://xn--mea-sb-j6a.com
http://www.google.lu/url?q=https://xn--mea-sb-j6a.com
https://google.bf/url?q=https://xn--mea-sb-j6a.com
http://www.google.it/url?q=https://xn--mea-sb-j6a.com
http://google.com.br/url?q=https://xn--mea-sb-j6a.com
http://images.google.bg/url?q=https://xn--mea-sb-j6a.com
http://google.co.il/url?q=https://xn--mea-sb-j6a.com
https://google.ws/url?q=https://xn--mea-sb-j6a.com
http://images.google.st/url?q=https://xn--mea-sb-j6a.com
http://duck.com/url?q=https://xn--mea-sb-j6a.com
https://www.google.net/url?q=https://xn--mea-sb-j6a.com
https://images.google.sn/url?q=https://xn--mea-sb-j6a.com
http://maps.google.co.jp/url?q=https://xn--mea-sb-j6a.com
http://www.google.bj/url?q=https://xn--mea-sb-j6a.com
https://maps.google.com.qa/url?q=https://xn--mea-sb-j6a.com
https://maps.google.com.co/url?q=https://xn--mea-sb-j6a.com
http://www.google.ch/url?q=https://xn--mea-sb-j6a.com
http://www.google.com.pe/url?q=https://xn--mea-sb-j6a.com
http://images.google.co.mz/url?q=https://xn--mea-sb-j6a.com
https://www.google.cm/url?q=https://xn--mea-sb-j6a.com
http://maps.google.nr/url?q=https://xn--mea-sb-j6a.com
https://www.google.al/url?q=https://xn--mea-sb-j6a.com
https://google.sk/url?q=https://xn--mea-sb-j6a.com
http://maps.google.rs/url?q=https://xn--mea-sb-j6a.com
http://maps.google.gr/url?q=https://xn--mea-sb-j6a.com
https://google.la/url?q=https://xn--mea-sb-j6a.com
http://maps.google.com.ph/url?q=https://xn--mea-sb-j6a.com
https://www.google.com/url?q=https://xn--mea-sb-j6a.com
http://google.ee/url?q=https://xn--mea-sb-j6a.com
https://google.com.pl/url?q=https://xn--mea-sb-j6a.com
http://maps.google.com.pg/url?q=https://xn--mea-sb-j6a.com
https://google.vg/url?q=https://xn--mea-sb-j6a.com
https://www.google.co.ke/url?q=https://xn--mea-sb-j6a.com
https://maps.google.com.pr/url?q=https://xn--mea-sb-j6a.com
http://www.google.no/url?q=https://xn--mea-sb-j6a.com
https://maps.google.fr/url?q=https://xn--mea-sb-j6a.com
https://maps.google.as/url?q=https://xn--mea-sb-j6a.com
https://google.mn/url?q=https://xn--mea-sb-j6a.com
http://google.com.kh/url?q=https://xn--mea-sb-j6a.com
http://images.google.me/url?q=https://xn--mea-sb-j6a.com
http://maps.google.com.sl/url?q=https://xn--mea-sb-j6a.com
http://maps.google.pn/url?q=https://xn--mea-sb-j6a.com
http://www.google.fr/url?q=https://xn--mea-sb-j6a.com
https://maps.google.com.bz/url?q=https://xn--mea-sb-j6a.com
https://maps.google.com.cu/url?q=https://xn--mea-sb-j6a.com
https://google.com.eg/url?q=https://xn--mea-sb-j6a.com
http://www.google.com.kw/url?q=https://xn--mea-sb-j6a.com
https://google.com.cu/url?q=https://xn--mea-sb-j6a.com
https://www.google.co.in/url?q=https://xn--mea-sb-j6a.com
http://maps.google.tt/url?q=https://xn--mea-sb-j6a.com
http://google.com.gt/url?q=https://xn--mea-sb-j6a.com
http://maps.google.ge/url?q=https://xn--mea-sb-j6a.com
https://maps.google.vg/url?q=https://xn--mea-sb-j6a.com
http://images.google.com.om/url?q=https://xn--mea-sb-j6a.com
http://google.ht/url?q=https://xn--mea-sb-j6a.com
https://maps.google.com.na/url?q=https://xn--mea-sb-j6a.com
http://google.ru/url?q=https://xn--mea-sb-j6a.com
https://maps.google.gg/url?q=https://xn--mea-sb-j6a.com
https://maps.google.com.br/url?q=https://xn--mea-sb-j6a.com
https://maps.google.li/url?q=https://xn--mea-sb-j6a.com
http://www.google.ba/url?q=https://xn--mea-sb-j6a.com
http://maps.google.com.lb/url?q=https://xn--mea-sb-j6a.com
http://images.google.ws/url?q=https://xn--mea-sb-j6a.com
http://images.google.com.gt/url?q=https://xn--mea-sb-j6a.com
http://maps.g.cn/url?q=https://xn--mea-sb-j6a.com
http://google.co.zm/url?q=https://xn--mea-sb-j6a.com
https://www.google.tl/url?q=https://xn--mea-sb-j6a.com
http://www.google.com.np/url?q=https://xn--mea-sb-j6a.com
https://maps.google.co.nz/url?q=https://xn--mea-sb-j6a.com
http://maps.google.cf/url?q=https://xn--mea-sb-j6a.com
http://maps.google.com.et/url?q=https://xn--mea-sb-j6a.com
http://maps.google.rw/url?q=https://xn--mea-sb-j6a.com
https://maps.google.co.ve/url?q=https://xn--mea-sb-j6a.com
https://images.google.co.ck/url?q=https://xn--mea-sb-j6a.com
https://images.google.co.zm/url?q=https://xn--mea-sb-j6a.com
https://www.google.mu/url?q=https://xn--mea-sb-j6a.com
https://maps.google.com.py/url?q=https://xn--mea-sb-j6a.com
http://www.google.lv/url?q=https://xn--mea-sb-j6a.com
http://maps.google.co.ug/url?q=https://xn--mea-sb-j6a.com
https://maps.google.it/url?q=https://xn--mea-sb-j6a.com
https://google.fi/url?q=https://xn--mea-sb-j6a.com
https://maps.google.ms/url?q=https://xn--mea-sb-j6a.com
https://maps.google.mv/url?q=https://xn--mea-sb-j6a.com
http://maps.google.com.eg/url?q=https://xn--mea-sb-j6a.com
https://maps.google.so/url?q=https://xn--mea-sb-j6a.com
http://www.google.nr/url?q=https://xn--mea-sb-j6a.com
https://maps.google.com.ar/url?q=https://xn--mea-sb-j6a.com
http://images.google.com.bo/url?q=https://xn--mea-sb-j6a.com
https://maps.google.tk/url?q=https://xn--mea-sb-j6a.com
http://maps.google.com.hk/url?q=https://xn--mea-sb-j6a.com
https://www.google.com.vn/url?q=https://xn--mea-sb-j6a.com
https://www.google.bi/url?q=https://xn--mea-sb-j6a.com
https://images.google.co.tz/url?q=https://xn--mea-sb-j6a.com
http://google.co.bw/url?q=https://xn--mea-sb-j6a.com
https://images.google.tl/url?q=https://xn--mea-sb-j6a.com
http://maps.google.com.sg/url?q=https://xn--mea-sb-j6a.com
https://images.google.mv/url?q=https://xn--mea-sb-j6a.com
https://www.google.info/url?q=https://xn--mea-sb-j6a.com
https://www.google.com.bz/url?q=https://xn--mea-sb-j6a.com
http://maps.google.ee/url?q=https://xn--mea-sb-j6a.com
http://google.co.za/url?q=https://xn--mea-sb-j6a.com
http://www.g.cn/url?q=https://xn--mea-sb-j6a.com
https://maps.google.ad/url?q=https://xn--mea-sb-j6a.com
https://maps.google.hn/url?q=https://xn--mea-sb-j6a.com
https://images.google.is/url?q=https://xn--mea-sb-j6a.com
https://maps.google.ca/url?q=https://xn--mea-sb-j6a.com
http://maps.google.ro/url?q=https://xn--mea-sb-j6a.com
https://images.google.com.kh/url?q=https://xn--mea-sb-j6a.com
http://google.com.pg/url?q=https://xn--mea-sb-j6a.com
https://maps.google.co.vi/url?q=https://xn--mea-sb-j6a.com
http://maps.google.com.np/url?q=https://xn--mea-sb-j6a.com
https://images.google.tk/url?q=https://xn--mea-sb-j6a.com
http://images.google.nr/url?q=https://xn--mea-sb-j6a.com
http://maps.google.com.ng/url?q=https://xn--mea-sb-j6a.com
https://maps.google.ki/url?q=https://xn--mea-sb-j6a.com
https://images.google.cm/url?q=https://xn--mea-sb-j6a.com
http://maps.google.gm/url?q=https://xn--mea-sb-j6a.com
https://images.google.by/url?q=https://xn--mea-sb-j6a.com
https://google.fm/url?q=https://xn--mea-sb-j6a.com
http://google.co.vi/url?q=https://xn--mea-sb-j6a.com
http://maps.google.cz/url?q=https://xn--mea-sb-j6a.com
https://images.google.co.ma/url?q=https://xn--mea-sb-j6a.com
http://www.google.com.vc/url?q=https://xn--mea-sb-j6a.com
https://maps.google.jo/url?q=https://xn--mea-sb-j6a.com
http://images.google.com.sb/url?q=https://xn--mea-sb-j6a.com
https://images.google.com/url?q=https://xn--mea-sb-j6a.com
https://maps.google.ch/url?q=https://xn--mea-sb-j6a.com
http://maps.google.mk/url?q=https://xn--mea-sb-j6a.com
http://www.google.com.ni/url?q=https://xn--mea-sb-j6a.com
http://images.google.cz/url?q=https://xn--mea-sb-j6a.com
https://images.google.com.vc/url?q=https://xn--mea-sb-j6a.com
https://maps.google.co.ke/url?q=https://xn--mea-sb-j6a.com
http://maps.google.com.uy/url?q=https://xn--mea-sb-j6a.com
https://www.google.ie/url?q=https://xn--mea-sb-j6a.com
https://maps.google.nu/url?q=https://xn--mea-sb-j6a.com
http://images.google.cc/url?q=https://xn--mea-sb-j6a.com
https://images.google.gr/url?q=https://xn--mea-sb-j6a.com
https://google.lt/url?q=https://xn--mea-sb-j6a.com
http://google.tm/url?q=https://xn--mea-sb-j6a.com
https://maps.google.co.bw/url?q=https://xn--mea-sb-j6a.com
http://www.google.vu/url?q=https://xn--mea-sb-j6a.com
http://maps.google.lu/url?q=https://xn--mea-sb-j6a.com
http://maps.google.lv/url?q=https://xn--mea-sb-j6a.com
https://images.google.je/url?q=https://xn--mea-sb-j6a.com
https://www.google.co.ve/url?q=https://xn--mea-sb-j6a.com
https://images.google.com.ng/url?q=https://xn--mea-sb-j6a.com
http://googlemaps.com/url?q=https://xn--mea-sb-j6a.com
http://maps.google.com.fj/url?q=https://xn--mea-sb-j6a.com
http://plus.google.com/url?q=https://xn--mea-sb-j6a.com
http://plus.gngjd.com/url?q=https://xn--mea-sb-j6a.com
http://google.com.af/url?q=https://xn--mea-sb-j6a.com
https://images.google.md/url?q=https://xn--mea-sb-j6a.com
https://www.google.com.mm/url?q=https://xn--mea-sb-j6a.com
https://maps.google.st/url?q=https://xn--mea-sb-j6a.com
http://maps.google.cat/url?q=https://xn--mea-sb-j6a.com
http://google.co.jp/url?q=https://xn--mea-sb-j6a.com
https://maps.google.lk/url?q=https://xn--mea-sb-j6a.com
http://maps.google.co.kr/url?q=https://xn--mea-sb-j6a.com
http://google.com.bd/url?q=https://xn--mea-sb-j6a.com
https://images.google.co.ke/url?q=https://xn--mea-sb-j6a.com
https://www.google.gr/url?q=https://xn--mea-sb-j6a.com
https://images.google.ac/url?q=https://xn--mea-sb-j6a.com
http://maps.google.ie/url?q=https://xn--mea-sb-j6a.com
http://google.com.tn/url?q=https://xn--mea-sb-j6a.com
https://maps.google.iq/url?q=https://xn--mea-sb-j6a.com
http://images.google.com.lb/url?q=https://xn--mea-sb-j6a.com
https://images.google.ga/url?q=https://xn--mea-sb-j6a.com
http://maps.google.nl/url?q=https://xn--mea-sb-j6a.com
https://maps.google.com.ai/url?q=https://xn--mea-sb-j6a.com
https://maps.google.cl/url?q=https://xn--mea-sb-j6a.com
http://maps.google.co.id/url?q=https://xn--mea-sb-j6a.com
https://maps.google.fm/url?q=https://xn--mea-sb-j6a.com
https://maps.google.com.ni/url?q=https://xn--mea-sb-j6a.com
https://maps.google.bi/url?q=https://xn--mea-sb-j6a.com
https://www.google.ki/url?q=https://xn--mea-sb-j6a.com
https://google.dm/url?q=https://xn--mea-sb-j6a.com
https://images.google.mn/url?q=https://xn--mea-sb-j6a.com
https://images.google.gy/url?q=https://xn--mea-sb-j6a.com
https://google.com.my/url?q=https://xn--mea-sb-j6a.com
http://maps.google.tg/url?q=https://xn--mea-sb-j6a.com
https://images.google.com.sa/url?q=https://xn--mea-sb-j6a.com
https://maps.google.com.om/url?q=https://xn--mea-sb-j6a.com
https://images.google.com.vn/url?q=https://xn--mea-sb-j6a.com
https://maps.google.co.hu/url?q=https://xn--mea-sb-j6a.com
http://maps.google.be/url?q=https://xn--mea-sb-j6a.com
http://images.google.com.bh/url?q=https://xn--mea-sb-j6a.com
https://images.google.com.kw/url?q=https://xn--mea-sb-j6a.com
https://maps.google.gp/url?q=https://xn--mea-sb-j6a.com
http://images.google.com.af/url?q=https://xn--mea-sb-j6a.com
http://images.google.com.bz/url?q=https://xn--mea-sb-j6a.com
https://maps.google.se/url?q=https://xn--mea-sb-j6a.com
https://maps.google.cg/url?q=https://xn--mea-sb-j6a.com
https://images.google.mk/url?q=https://xn--mea-sb-j6a.com
https://www.google.com.uy/url?q=https://xn--mea-sb-j6a.com
http://maps.google.cm/url?q=https://xn--mea-sb-j6a.com
https://maps.google.cd/url?q=https://xn--mea-sb-j6a.com
https://maps.google.mg/url?q=https://xn--mea-sb-j6a.com
https://images.google.am/url?q=https://xn--mea-sb-j6a.com
https://images.google.com.tn/url?q=https://xn--mea-sb-j6a.com
https://images.google.co.id/url?q=https://xn--mea-sb-j6a.com
https://maps.google.com.bd/url?q=https://xn--mea-sb-j6a.com
https://maps.google.co.tz/url?q=https://xn--mea-sb-j6a.com
http://images.google.com.ai/url?q=https://xn--mea-sb-j6a.com
http://images.google.bf/url?q=https://xn--mea-sb-j6a.com
http://maps.google.co.il/url?q=https://xn--mea-sb-j6a.com
http://maps.google.co.zm/url?q=https://xn--mea-sb-j6a.com
http://images.google.com.qa/url?q=https://xn--mea-sb-j6a.com
http://images.google.lk/url?q=https://xn--mea-sb-j6a.com
http://maps.google.cv/url?q=https://xn--mea-sb-j6a.com
http://maps.google.im/url?q=https://xn--mea-sb-j6a.com
https://maps.google.com.gh/url?q=https://xn--mea-sb-j6a.com
https://maps.google.co.ao/url?q=https://xn--mea-sb-j6a.com
http://maps.google.co.th/url?q=https://xn--mea-sb-j6a.com
https://maps.google.gl/url?q=https://xn--mea-sb-j6a.com
https://maps.google.com.ua/url?q=https://xn--mea-sb-j6a.com
http://maps.google.td/url?q=https://xn--mea-sb-j6a.com
https://google.me/url?q=https://xn--mea-sb-j6a.com
https://maps.google.bj/url?q=https://xn--mea-sb-j6a.com
https://maps.google.pl/url?q=https://xn--mea-sb-j6a.com
http://maps.google.com.tr/url?q=https://xn--mea-sb-j6a.com
https://images.google.sc/url?q=https://xn--mea-sb-j6a.com
https://images.google.com.et/url?q=https://xn--mea-sb-j6a.com
https://maps.google.dk/url?q=https://xn--mea-sb-j6a.com
https://images.google.iq/url?q=https://xn--mea-sb-j6a.com
http://maps.google.sc/url?q=https://xn--mea-sb-j6a.com
http://images.google.co.bw/url?q=https://xn--mea-sb-j6a.com
http://images.google.dz/url?q=https://xn--mea-sb-j6a.com
https://maps.google.ht/url?q=https://xn--mea-sb-j6a.com
https://google.cat/url?q=https://xn--mea-sb-j6a.com
http://maps.google.com.bh/url?q=https://xn--mea-sb-j6a.com
http://maps.google.ml/url?q=https://xn--mea-sb-j6a.com
https://maps.google.com.pl/url?q=https://xn--mea-sb-j6a.com
https://maps.google.com.vc/url?q=https://xn--mea-sb-j6a.com
https://maps.google.com.au/url?q=https://xn--mea-sb-j6a.com
http://images.g.cn/url?q=https://xn--mea-sb-j6a.com
http://maps.google.co.ck/url?q=https://xn--mea-sb-j6a.com
http://maps.google.sh/url?q=https://xn--mea-sb-j6a.com
http://maps.google.com.sb/url?q=https://xn--mea-sb-j6a.com
http://maps.google.sk/url?q=https://xn--mea-sb-j6a.com
http://images.google.rs/url?q=https://xn--mea-sb-j6a.com
http://maps.google.dj/url?q=https://xn--mea-sb-j6a.com
http://maps.google.si/url?q=https://xn--mea-sb-j6a.com
http://images.google.ps/url?q=https://xn--mea-sb-j6a.com
http://images.google.com.pg/url?q=https://xn--mea-sb-j6a.com
https://images.google.net/url?q=https://xn--mea-sb-j6a.com
http://images.google.com.sl/url?q=https://xn--mea-sb-j6a.com
https://images.google.gp/url?q=https://xn--mea-sb-j6a.com
https://maps.gngjd.com/url?q=https://xn--mea-sb-j6a.com
https://images.google.co.zw/url?q=https://xn--mea-sb-j6a.com
propecia costs australia
https://images.google.as/url?q=https://xn--mg-sb-6za9404c.com
https://images.google.off.ai/url?q=https://xn--mg-sb-6za9404c.com
https://images.google.com.ag/url?q=https://xn--mg-sb-6za9404c.com
https://images.google.com.ar/url?q=https://xn--mg-sb-6za9404c.com
https://images.google.com.au/url?q=https://xn--mg-sb-6za9404c.com
https://images.google.at/url?q=https://xn--mg-sb-6za9404c.com
https://images.google.az/url?q=https://xn--mg-sb-6za9404c.com
https://images.google.be/url?q=https://xn--mg-sb-6za9404c.com
https://images.google.com.br/url?q=https://xn--mg-sb-6za9404c.com
https://images.google.vg/url?q=https://xn--mg-sb-6za9404c.com
https://images.google.bi/url?q=https://xn--mg-sb-6za9404c.com
https://images.google.ca/url?q=https://xn--mg-sb-6za9404c.com
https://images.google.td/url?q=https://xn--mg-sb-6za9404c.com
https://images.google.cl/url?q=https://xn--mg-sb-6za9404c.com
https://images.google.com.co/url?q=https://xn--mg-sb-6za9404c.com
https://images.google.co.cr/url?q=https://xn--mg-sb-6za9404c.com
https://images.google.ci/url?q=https://xn--mg-sb-6za9404c.com
https://images.google.com.cu/url?q=https://xn--mg-sb-6za9404c.com
https://images.google.cd/url?q=https://xn--mg-sb-6za9404c.com
https://images.google.dk/url?q=https://xn--mg-sb-6za9404c.com
https://images.google.dj/url?q=https://xn--mg-sb-6za9404c.com
https://images.google.com.do/url?q=https://xn--mg-sb-6za9404c.com
https://images.google.com.ec/url?q=https://xn--mg-sb-6za9404c.com
https://images.google.com.sv/url?q=https://xn--mg-sb-6za9404c.com
https://images.google.fm/url?q=https://xn--mg-sb-6za9404c.com
https://images.google.com.fj/url?q=https://xn--mg-sb-6za9404c.com
https://images.google.fi/url?q=https://xn--mg-sb-6za9404c.com
https://images.google.fr/url?q=https://xn--mg-sb-6za9404c.com
https://images.google.gm/url?q=https://xn--mg-sb-6za9404c.com
https://images.google.ge/url?q=https://xn--mg-sb-6za9404c.com
https://images.google.de/url?q=https://xn--mg-sb-6za9404c.com
https://images.google.com.gi/url?q=https://xn--mg-sb-6za9404c.com
https://images.google.com.gr/url?q=https://xn--mg-sb-6za9404c.com
https://images.google.gl/url?q=https://xn--mg-sb-6za9404c.com
https://images.google.gg/url?q=https://xn--mg-sb-6za9404c.com
https://images.google.hn/url?q=https://xn--mg-sb-6za9404c.com
https://images.google.com.hk/url?q=https://xn--mg-sb-6za9404c.com
https://images.google.co.hu/url?q=https://xn--mg-sb-6za9404c.com
https://images.google.co.in/url?q=https://xn--mg-sb-6za9404c.com
https://images.google.ie/url?q=https://xn--mg-sb-6za9404c.com
https://images.google.co.im/url?q=https://xn--mg-sb-6za9404c.com
https://images.google.co.il/url?q=https://xn--mg-sb-6za9404c.com
https://images.google.it/url?q=https://xn--mg-sb-6za9404c.com
https://images.google.com.jm/url?q=https://xn--mg-sb-6za9404c.com
https://images.google.co.jp/url?q=https://xn--mg-sb-6za9404c.com
https://images.google.co.je/url?q=https://xn--mg-sb-6za9404c.com
https://images.google.kz/url?q=https://xn--mg-sb-6za9404c.com
https://images.google.co.kr/url?q=https://xn--mg-sb-6za9404c.com
https://images.google.lv/url?q=https://xn--mg-sb-6za9404c.com
https://images.google.co.ls/url?q=https://xn--mg-sb-6za9404c.com
https://images.google.li/url?q=https://xn--mg-sb-6za9404c.com
https://images.google.lt/url?q=https://xn--mg-sb-6za9404c.com
https://images.google.lu/url?q=https://xn--mg-sb-6za9404c.com
https://images.google.mw/url?q=https://xn--mg-sb-6za9404c.com
https://images.google.com.my/url?q=https://xn--mg-sb-6za9404c.com
https://images.google.com.mt/url?q=https://xn--mg-sb-6za9404c.com
https://images.google.mu/url?q=https://xn--mg-sb-6za9404c.com
https://images.google.com.mx/url?q=https://xn--mg-sb-6za9404c.com
https://images.google.ms/url?q=https://xn--mg-sb-6za9404c.com
https://images.google.com.na/url?q=https://xn--mg-sb-6za9404c.com
https://images.google.com.np/url?q=https://xn--mg-sb-6za9404c.com
https://images.google.nl/url?q=https://xn--mg-sb-6za9404c.com
https://images.google.co.nz/url?q=https://xn--mg-sb-6za9404c.com
https://images.google.com.ni/url?q=https://xn--mg-sb-6za9404c.com
https://images.google.com.nf/url?q=https://xn--mg-sb-6za9404c.com
https://images.google.com.pk/url?q=https://xn--mg-sb-6za9404c.com
https://images.google.com.pa/url?q=https://xn--mg-sb-6za9404c.com
https://images.google.com.py/url?q=https://xn--mg-sb-6za9404c.com
https://images.google.com.pe/url?q=https://xn--mg-sb-6za9404c.com
https://images.google.com.ph/url?q=https://xn--mg-sb-6za9404c.com
https://images.google.pn/url?q=https://xn--mg-sb-6za9404c.com
https://images.google.pl/url?q=https://xn--mg-sb-6za9404c.com
https://images.google.pt/url?q=https://xn--mg-sb-6za9404c.com
https://images.google.com.pr/url?q=https://xn--mg-sb-6za9404c.com
https://images.google.cg/url?q=https://xn--mg-sb-6za9404c.com
https://images.google.ro/url?q=https://xn--mg-sb-6za9404c.com
https://images.google.ru/url?q=https://xn--mg-sb-6za9404c.com
https://images.google.rw/url?q=https://xn--mg-sb-6za9404c.com
https://images.google.sh/url?q=https://xn--mg-sb-6za9404c.com
https://images.google.sm/url?q=https://xn--mg-sb-6za9404c.com
https://images.google.com.sg/url?q=https://xn--mg-sb-6za9404c.com
https://images.google.sk/url?q=https://xn--mg-sb-6za9404c.com
https://images.google.co.za/url?q=https://xn--mg-sb-6za9404c.com
https://images.google.es/url?q=https://xn--mg-sb-6za9404c.com
https://images.google.se/url?q=https://xn--mg-sb-6za9404c.com
https://images.google.ch/url?q=https://xn--mg-sb-6za9404c.com
https://images.google.com.tw/url?q=https://xn--mg-sb-6za9404c.com
https://images.google.co.th/url?q=https://xn--mg-sb-6za9404c.com
https://images.google.tt/url?q=https://xn--mg-sb-6za9404c.com
https://images.google.com.tr/url?q=https://xn--mg-sb-6za9404c.com
https://images.google.com.ua/url?q=https://xn--mg-sb-6za9404c.com
https://images.google.ae/url?q=https://xn--mg-sb-6za9404c.com
https://images.google.co.uk/url?q=https://xn--mg-sb-6za9404c.com
https://images.google.com.uy/url?q=https://xn--mg-sb-6za9404c.com
https://images.google.uz/url?q=https://xn--mg-sb-6za9404c.com
https://images.google.vu/url?q=https://xn--mg-sb-6za9404c.com
https://images.google.co.ve/url?q=https://xn--mg-sb-6za9404c.com
https://www.google.co.ao/url?q=https://xn--mg-sb-6za9404c.com
https://images.google.im/url?q=https://xn--mg-sb-6za9404c.com
https://images.google.dm/url?q=https://xn--mg-sb-6za9404c.com
https://google.com.pa/url?q=https://xn--mg-sb-6za9404c.com
http://maps.google.mw/url?q=https://xn--mg-sb-6za9404c.com
https://google.ac/url?q=https://xn--mg-sb-6za9404c.com
https://google.com.gh/url?q=https://xn--mg-sb-6za9404c.com
https://google.dz/url?q=https://xn--mg-sb-6za9404c.com
http://images.google.ki/url?q=https://xn--mg-sb-6za9404c.com
http://www.google.im/url?q=https://xn--mg-sb-6za9404c.com
https://google.com.mx/url?q=https://xn--mg-sb-6za9404c.com
https://www.google.cz/url?q=https://xn--mg-sb-6za9404c.com
http://google.hr/url?q=https://xn--mg-sb-6za9404c.com
https://google.ml/url?q=https://xn--mg-sb-6za9404c.com
https://www.google.com.au/url?q=https://xn--mg-sb-6za9404c.com
https://images.google.bs/url?q=https://xn--mg-sb-6za9404c.com
https://google.co.tz/url?q=https://xn--mg-sb-6za9404c.com
http://google.cg/url?q=https://xn--mg-sb-6za9404c.com
http://maps.google.is/url?q=https://xn--mg-sb-6za9404c.com
http://google.si/url?q=https://xn--mg-sb-6za9404c.com
http://google.com.py/url?q=https://xn--mg-sb-6za9404c.com
http://maps.google.co.cr/url?q=https://xn--mg-sb-6za9404c.com
http://www.google.mk/url?q=https://xn--mg-sb-6za9404c.com
http://www.google.ge/url?q=https://xn--mg-sb-6za9404c.com
https://images.google.ml/url?q=https://xn--mg-sb-6za9404c.com
https://www.google.com.sa/url?q=https://xn--mg-sb-6za9404c.com
http://google.mg/url?q=https://xn--mg-sb-6za9404c.com
http://google.com.ec/url?q=https://xn--mg-sb-6za9404c.com
https://google.rs/url?q=https://xn--mg-sb-6za9404c.com
https://www.google.co.hu/url?q=https://xn--mg-sb-6za9404c.com
http://google.md/url?q=https://xn--mg-sb-6za9404c.com
https://images.google.hu/url?q=https://xn--mg-sb-6za9404c.com
https://www.google.com.tw/url?q=https://xn--mg-sb-6za9404c.com
https://google.ae/url?q=https://xn--mg-sb-6za9404c.com
https://images.google.jo/url?q=https://xn--mg-sb-6za9404c.com
http://images.google.tm/url?q=https://xn--mg-sb-6za9404c.com
https://images.google.com.mm/url?q=https://xn--mg-sb-6za9404c.com
https://maps.google.vu/url?q=https://xn--mg-sb-6za9404c.com
https://maps.google.co.ls/url?q=https://xn--mg-sb-6za9404c.com
https://www.google.com.cy/url?q=https://xn--mg-sb-6za9404c.com
http://google.com.lb/url?q=https://xn--mg-sb-6za9404c.com
http://google.co.kr/url?q=https://xn--mg-sb-6za9404c.com
http://images.google.nu/url?q=https://xn--mg-sb-6za9404c.com
http://google.cl/url?q=https://xn--mg-sb-6za9404c.com
http://www.google.com.bo/url?q=https://xn--mg-sb-6za9404c.com
https://google.ad/url?q=https://xn--mg-sb-6za9404c.com
https://maps.google.pt/url?q=https://xn--mg-sb-6za9404c.com
https://maps.google.es/url?q=https://xn--mg-sb-6za9404c.com
https://maps.google.sn/url?q=https://xn--mg-sb-6za9404c.com
http://google.tk/url?q=https://xn--mg-sb-6za9404c.com
https://google.com.bn/url?q=https://xn--mg-sb-6za9404c.com
https://google.com.ua/url?q=https://xn--mg-sb-6za9404c.com
https://www.google.com.sg/url?q=https://xn--mg-sb-6za9404c.com
https://images.google.info/url?q=https://xn--mg-sb-6za9404c.com
https://maps.google.de/url?q=https://xn--mg-sb-6za9404c.com
https://images.google.cv/url?q=https://xn--mg-sb-6za9404c.com
http://google.com.nf/url?q=https://xn--mg-sb-6za9404c.com
https://images.google.com.ly/url?q=https://xn--mg-sb-6za9404c.com
http://images.google.tg/url?q=https://xn--mg-sb-6za9404c.com
http://google.cv/url?q=https://xn--mg-sb-6za9404c.com
http://gngjd.com/url?q=https://xn--mg-sb-6za9404c.com
http://www.google.je/url?q=https://xn--mg-sb-6za9404c.com
http://maps.google.by/url?q=https://xn--mg-sb-6za9404c.com
http://maps.google.fi/url?q=https://xn--mg-sb-6za9404c.com
https://images.gngjd.com/url?q=https://xn--mg-sb-6za9404c.com
http://google.ne/url?q=https://xn--mg-sb-6za9404c.com
http://images.google.kg/url?q=https://xn--mg-sb-6za9404c.com
https://www.google.cn/url?q=https://xn--mg-sb-6za9404c.com
https://google.am/url?q=https://xn--mg-sb-6za9404c.com
http://google.com.ly/url?q=https://xn--mg-sb-6za9404c.com
https://google.iq/url?q=https://xn--mg-sb-6za9404c.com
https://google.com.sv/url?q=https://xn--mg-sb-6za9404c.com
https://google.sc/url?q=https://xn--mg-sb-6za9404c.com
http://google.kg/url?q=https://xn--mg-sb-6za9404c.com
http://google.li/url?q=https://xn--mg-sb-6za9404c.com
http://images.google.al/url?q=https://xn--mg-sb-6za9404c.com
https://maps.google.je/url?q=https://xn--mg-sb-6za9404c.com
http://maps.google.to/url?q=https://xn--mg-sb-6za9404c.com
http://google.co.cr/url?q=https://xn--mg-sb-6za9404c.com
http://images.google.com.tj/url?q=https://xn--mg-sb-6za9404c.com
https://www.google.com.ph/url?q=https://xn--mg-sb-6za9404c.com
https://maps.google.com.bn/url?q=https://xn--mg-sb-6za9404c.com
https://www.google.as/url?q=https://xn--mg-sb-6za9404c.com
https://images.google.co.ao/url?q=https://xn--mg-sb-6za9404c.com
http://maps.google.com.bo/url?q=https://xn--mg-sb-6za9404c.com
https://maps.google.com/url?q=https://xn--mg-sb-6za9404c.com
https://www.google.com.bh/url?q=https://xn--mg-sb-6za9404c.com
https://maps.google.com.mm/url?q=https://xn--mg-sb-6za9404c.com
http://google.com.gi/url?q=https://xn--mg-sb-6za9404c.com
http://maps.google.ba/url?q=https://xn--mg-sb-6za9404c.com
http://google.co.id/url?q=https://xn--mg-sb-6za9404c.com
http://google.be/url?q=https://xn--mg-sb-6za9404c.com
http://images.google.mg/url?q=https://xn--mg-sb-6za9404c.com
http://google.com.ar/url?q=https://xn--mg-sb-6za9404c.com
https://maps.google.co.za/url?q=https://xn--mg-sb-6za9404c.com
https://www.google.gp/url?q=https://xn--mg-sb-6za9404c.com
http://www.google.sh/url?q=https://xn--mg-sb-6za9404c.com
https://images.google.ee/url?q=https://xn--mg-sb-6za9404c.com
https://www.google.rw/url?q=https://xn--mg-sb-6za9404c.com
http://images.google.si/url?q=https://xn--mg-sb-6za9404c.com
https://www.google.at/url?q=https://xn--mg-sb-6za9404c.com
http://maps.google.at/url?q=https://xn--mg-sb-6za9404c.com
http://maps.google.co.in/url?q=https://xn--mg-sb-6za9404c.com
https://maps.google.ga/url?q=https://xn--mg-sb-6za9404c.com
http://maps.google.sm/url?q=https://xn--mg-sb-6za9404c.com
http://google.ms/url?q=https://xn--mg-sb-6za9404c.com
https://images.google.com.gh/url?q=https://xn--mg-sb-6za9404c.com
http://maps.google.cn/url?q=https://xn--mg-sb-6za9404c.com
https://www.google.com.na/url?q=https://xn--mg-sb-6za9404c.com
https://maps.google.hr/url?q=https://xn--mg-sb-6za9404c.com
https://google.ci/url?q=https://xn--mg-sb-6za9404c.com
https://images.google.hr/url?q=https://xn--mg-sb-6za9404c.com
http://maps.google.com.do/url?q=https://xn--mg-sb-6za9404c.com
http://google.lk/url?q=https://xn--mg-sb-6za9404c.com
http://images.google.cn/url?q=https://xn--mg-sb-6za9404c.com
http://www.bon-vivant.net/url?q=https://xn--mg-sb-6za9404c.com
http://maps.google.com.gt/url?q=https://xn--mg-sb-6za9404c.com
http://www.google.com.ag/url?q=https://xn--mg-sb-6za9404c.com
https://maps.google.mu/url?q=https://xn--mg-sb-6za9404c.com
https://google.com.ng/url?q=https://xn--mg-sb-6za9404c.com
https://www.google.co.uk/url?q=https://xn--mg-sb-6za9404c.com
https://google.us/url?q=https://xn--mg-sb-6za9404c.com
https://www.google.com.tr/url?q=https://xn--mg-sb-6za9404c.com
http://www.google.co.ma/url?q=https://xn--mg-sb-6za9404c.com
https://maps.google.co.zw/url?q=https://xn--mg-sb-6za9404c.com
https://www.google.bs/url?q=https://xn--mg-sb-6za9404c.com
https://www.google.pl/url?q=https://xn--mg-sb-6za9404c.com
http://www.googleadservices.com/url?q=https://xn--mg-sb-6za9404c.com
http://google.kz/url?q=https://xn--mg-sb-6za9404c.com
https://google.com.mt/url?q=https://xn--mg-sb-6za9404c.com
http://www.google.co.zw/url?q=https://xn--mg-sb-6za9404c.com
https://maps.google.ne/url?q=https://xn--mg-sb-6za9404c.com
https://google.com.qa/url?q=https://xn--mg-sb-6za9404c.com
https://google.se/url?q=https://xn--mg-sb-6za9404c.com
http://www.google.mw/url?q=https://xn--mg-sb-6za9404c.com
https://maps.google.co.mz/url?q=https://xn--mg-sb-6za9404c.com
http://maps.google.com.sv/url?q=https://xn--mg-sb-6za9404c.com
https://www.google.sm/url?q=https://xn--mg-sb-6za9404c.com
https://maps.google.com.tw/url?q=https://xn--mg-sb-6za9404c.com
https://google.ca/url?q=https://xn--mg-sb-6za9404c.com
https://www.google.is/url?q=https://xn--mg-sb-6za9404c.com
https://google.com.jm/url?q=https://xn--mg-sb-6za9404c.com
http://images.google.co.ug/url?q=https://xn--mg-sb-6za9404c.com
https://maps.google.com.kh/url?q=https://xn--mg-sb-6za9404c.com
http://maps.google.tl/url?q=https://xn--mg-sb-6za9404c.com
http://www.google.co.nz/url?q=https://xn--mg-sb-6za9404c.com
https://www.google.gg/url?q=https://xn--mg-sb-6za9404c.com
https://google.to/url?q=https://xn--mg-sb-6za9404c.com
https://google.ro/url?q=https://xn--mg-sb-6za9404c.com
http://google.td/url?q=https://xn--mg-sb-6za9404c.com
https://www.google.by/url?q=https://xn--mg-sb-6za9404c.com
https://www.google.nl/url?q=https://xn--mg-sb-6za9404c.com
http://maps.google.ci/url?q=https://xn--mg-sb-6za9404c.com
http://maps.google.dz/url?q=https://xn--mg-sb-6za9404c.com
https://google.hu/url?q=https://xn--mg-sb-6za9404c.com
http://images.google.ht/url?q=https://xn--mg-sb-6za9404c.com
http://google.mv/url?q=https://xn--mg-sb-6za9404c.com
https://google.cf/url?q=https://xn--mg-sb-6za9404c.com
http://maps.google.com.ly/url?q=https://xn--mg-sb-6za9404c.com
http://www.google.nu/url?q=https://xn--mg-sb-6za9404c.com
http://google.com.tj/url?q=https://xn--mg-sb-6za9404c.com
https://maps.google.com.mt/url?q=https://xn--mg-sb-6za9404c.com
https://google.so/url?q=https://xn--mg-sb-6za9404c.com
http://images.google.bj/url?q=https://xn--mg-sb-6za9404c.com
https://maps.google.la/url?q=https://xn--mg-sb-6za9404c.com
https://images.google.us/url?q=https://xn--mg-sb-6za9404c.com
https://images.google.com.eg/url?q=https://xn--mg-sb-6za9404c.com
https://images.google.cf/url?q=https://xn--mg-sb-6za9404c.com
https://images.google.la/url?q=https://xn--mg-sb-6za9404c.com
http://maps.google.com.ag/url?q=https://xn--mg-sb-6za9404c.com
http://google.ga/url?q=https://xn--mg-sb-6za9404c.com
http://google.co.uz/url?q=https://xn--mg-sb-6za9404c.com
http://maps.google.no/url?q=https://xn--mg-sb-6za9404c.com
https://www.google.gl/url?q=https://xn--mg-sb-6za9404c.com
http://images.google.co.vi/url?q=https://xn--mg-sb-6za9404c.com
https://images.google.ne/url?q=https://xn--mg-sb-6za9404c.com
https://google.com.om/url?q=https://xn--mg-sb-6za9404c.com
http://maps.google.lt/url?q=https://xn--mg-sb-6za9404c.com
https://maps.google.kg/url?q=https://xn--mg-sb-6za9404c.com
http://www.google.com.hk/url?q=https://xn--mg-sb-6za9404c.com
https://google.com.co/url?q=https://xn--mg-sb-6za9404c.com
https://google.dk/url?q=https://xn--mg-sb-6za9404c.com
https://maps.google.com.sa/url?q=https://xn--mg-sb-6za9404c.com
http://google.com.fj/url?q=https://xn--mg-sb-6za9404c.com
http://maps.google.com.ec/url?q=https://xn--mg-sb-6za9404c.com
https://maps.google.mn/url?q=https://xn--mg-sb-6za9404c.com
https://maps.google.bf/url?q=https://xn--mg-sb-6za9404c.com
https://www.google.tt/url?q=https://xn--mg-sb-6za9404c.com
https://www.google.dj/url?q=https://xn--mg-sb-6za9404c.com
https://www.google.com.pr/url?q=https://xn--mg-sb-6za9404c.com
https://maps.google.ws/url?q=https://xn--mg-sb-6za9404c.com
http://google.jo/url?q=https://xn--mg-sb-6za9404c.com
https://google.co.ug/url?q=https://xn--mg-sb-6za9404c.com
https://images.google.com.bd/url?q=https://xn--mg-sb-6za9404c.com
https://google.tg/url?q=https://xn--mg-sb-6za9404c.com
http://maps.google.dm/url?q=https://xn--mg-sb-6za9404c.com
https://www.google.pn/url?q=https://xn--mg-sb-6za9404c.com
https://www.google.com.et/url?q=https://xn--mg-sb-6za9404c.com
http://maps.google.com.jm/url?q=https://xn--mg-sb-6za9404c.com
http://www.google.bg/url?q=https://xn--mg-sb-6za9404c.com
http://maps.google.hu/url?q=https://xn--mg-sb-6za9404c.com
https://maps.google.kz/url?q=https://xn--mg-sb-6za9404c.com
https://images.google.com.pl/url?q=https://xn--mg-sb-6za9404c.com
http://www.google.st/url?q=https://xn--mg-sb-6za9404c.com
https://maps.google.com.kw/url?q=https://xn--mg-sb-6za9404c.com
https://maps.google.ru/url?q=https://xn--mg-sb-6za9404c.com
https://google.co.mz/url?q=https://xn--mg-sb-6za9404c.com
http://www.google.co.ls/url?q=https://xn--mg-sb-6za9404c.com
https://www.google.az/url?q=https://xn--mg-sb-6za9404c.com
http://maps.google.co.uk/url?q=https://xn--mg-sb-6za9404c.com
https://www.google.com.do/url?q=https://xn--mg-sb-6za9404c.com
http://www.google.es/url?q=https://xn--mg-sb-6za9404c.com
http://google.gm/url?q=https://xn--mg-sb-6za9404c.com
http://images.google.so/url?q=https://xn--mg-sb-6za9404c.com
https://www.google.com.pk/url?q=https://xn--mg-sb-6za9404c.com
https://www.google.com.sb/url?q=https://xn--mg-sb-6za9404c.com
https://images.google.ad/url?q=https://xn--mg-sb-6za9404c.com
http://google.sn/url?q=https://xn--mg-sb-6za9404c.com
http://google.ps/url?q=https://xn--mg-sb-6za9404c.com
https://maps.google.bg/url?q=https://xn--mg-sb-6za9404c.com
https://images.google.com.cy/url?q=https://xn--mg-sb-6za9404c.com
http://www.google.pt/url?q=https://xn--mg-sb-6za9404c.com
https://images.google.to/url?q=https://xn--mg-sb-6za9404c.com
http://images.google.co.uz/url?q=https://xn--mg-sb-6za9404c.com
http://google.com.sl/url?q=https://xn--mg-sb-6za9404c.com
http://www.google.gy/url?q=https://xn--mg-sb-6za9404c.com
http://www.google.cd/url?q=https://xn--mg-sb-6za9404c.com
https://maps.google.com.my/url?q=https://xn--mg-sb-6za9404c.com
http://www.google.com.ai/url?q=https://xn--mg-sb-6za9404c.com
https://google.hn/url?q=https://xn--mg-sb-6za9404c.com
http://images.google.ba/url?q=https://xn--mg-sb-6za9404c.com
http://maps.google.com.pe/url?q=https://xn--mg-sb-6za9404c.com
http://google.de/url?q=https://xn--mg-sb-6za9404c.com
http://maps.google.com.gi/url?q=https://xn--mg-sb-6za9404c.com
https://images.google.cat/url?q=https://xn--mg-sb-6za9404c.com
https://www.google.co.ck/url?q=https://xn--mg-sb-6za9404c.com
https://images.google.com.bn/url?q=https://xn--mg-sb-6za9404c.com
http://maps.google.ae/url?q=https://xn--mg-sb-6za9404c.com
http://images.google.no/url?q=https://xn--mg-sb-6za9404c.com
http://maps.google.bs/url?q=https://xn--mg-sb-6za9404c.com
http://maps.google.gy/url?q=https://xn--mg-sb-6za9404c.com
http://maps.google.com.pa/url?q=https://xn--mg-sb-6za9404c.com
https://google.cc/url?q=https://xn--mg-sb-6za9404c.com
http://google.co.th/url?q=https://xn--mg-sb-6za9404c.com
http://maps.google.com.mx/url?q=https://xn--mg-sb-6za9404c.com
http://www.google.lu/url?q=https://xn--mg-sb-6za9404c.com
https://google.bf/url?q=https://xn--mg-sb-6za9404c.com
http://www.google.it/url?q=https://xn--mg-sb-6za9404c.com
http://google.com.br/url?q=https://xn--mg-sb-6za9404c.com
http://images.google.bg/url?q=https://xn--mg-sb-6za9404c.com
http://google.co.il/url?q=https://xn--mg-sb-6za9404c.com
https://google.ws/url?q=https://xn--mg-sb-6za9404c.com
http://images.google.st/url?q=https://xn--mg-sb-6za9404c.com
http://duck.com/url?q=https://xn--mg-sb-6za9404c.com
https://www.google.net/url?q=https://xn--mg-sb-6za9404c.com
https://images.google.sn/url?q=https://xn--mg-sb-6za9404c.com
http://maps.google.co.jp/url?q=https://xn--mg-sb-6za9404c.com
http://www.google.bj/url?q=https://xn--mg-sb-6za9404c.com
https://maps.google.com.qa/url?q=https://xn--mg-sb-6za9404c.com
https://maps.google.com.co/url?q=https://xn--mg-sb-6za9404c.com
http://www.google.ch/url?q=https://xn--mg-sb-6za9404c.com
http://www.google.com.pe/url?q=https://xn--mg-sb-6za9404c.com
http://images.google.co.mz/url?q=https://xn--mg-sb-6za9404c.com
https://www.google.cm/url?q=https://xn--mg-sb-6za9404c.com
http://maps.google.nr/url?q=https://xn--mg-sb-6za9404c.com
https://www.google.al/url?q=https://xn--mg-sb-6za9404c.com
https://google.sk/url?q=https://xn--mg-sb-6za9404c.com
http://maps.google.rs/url?q=https://xn--mg-sb-6za9404c.com
http://maps.google.gr/url?q=https://xn--mg-sb-6za9404c.com
https://google.la/url?q=https://xn--mg-sb-6za9404c.com
http://maps.google.com.ph/url?q=https://xn--mg-sb-6za9404c.com
https://www.google.com/url?q=https://xn--mg-sb-6za9404c.com
http://google.ee/url?q=https://xn--mg-sb-6za9404c.com
https://google.com.pl/url?q=https://xn--mg-sb-6za9404c.com
http://maps.google.com.pg/url?q=https://xn--mg-sb-6za9404c.com
https://google.vg/url?q=https://xn--mg-sb-6za9404c.com
https://www.google.co.ke/url?q=https://xn--mg-sb-6za9404c.com
https://maps.google.com.pr/url?q=https://xn--mg-sb-6za9404c.com
http://www.google.no/url?q=https://xn--mg-sb-6za9404c.com
https://maps.google.fr/url?q=https://xn--mg-sb-6za9404c.com
https://maps.google.as/url?q=https://xn--mg-sb-6za9404c.com
https://google.mn/url?q=https://xn--mg-sb-6za9404c.com
http://google.com.kh/url?q=https://xn--mg-sb-6za9404c.com
http://images.google.me/url?q=https://xn--mg-sb-6za9404c.com
http://maps.google.com.sl/url?q=https://xn--mg-sb-6za9404c.com
http://maps.google.pn/url?q=https://xn--mg-sb-6za9404c.com
http://www.google.fr/url?q=https://xn--mg-sb-6za9404c.com
https://maps.google.com.bz/url?q=https://xn--mg-sb-6za9404c.com
https://maps.google.com.cu/url?q=https://xn--mg-sb-6za9404c.com
https://google.com.eg/url?q=https://xn--mg-sb-6za9404c.com
http://www.google.com.kw/url?q=https://xn--mg-sb-6za9404c.com
https://google.com.cu/url?q=https://xn--mg-sb-6za9404c.com
https://www.google.co.in/url?q=https://xn--mg-sb-6za9404c.com
http://maps.google.tt/url?q=https://xn--mg-sb-6za9404c.com
http://google.com.gt/url?q=https://xn--mg-sb-6za9404c.com
http://maps.google.ge/url?q=https://xn--mg-sb-6za9404c.com
https://maps.google.vg/url?q=https://xn--mg-sb-6za9404c.com
http://images.google.com.om/url?q=https://xn--mg-sb-6za9404c.com
http://google.ht/url?q=https://xn--mg-sb-6za9404c.com
https://maps.google.com.na/url?q=https://xn--mg-sb-6za9404c.com
http://google.ru/url?q=https://xn--mg-sb-6za9404c.com
https://maps.google.gg/url?q=https://xn--mg-sb-6za9404c.com
https://maps.google.com.br/url?q=https://xn--mg-sb-6za9404c.com
https://maps.google.li/url?q=https://xn--mg-sb-6za9404c.com
http://www.google.ba/url?q=https://xn--mg-sb-6za9404c.com
http://maps.google.com.lb/url?q=https://xn--mg-sb-6za9404c.com
http://images.google.ws/url?q=https://xn--mg-sb-6za9404c.com
http://images.google.com.gt/url?q=https://xn--mg-sb-6za9404c.com
http://maps.g.cn/url?q=https://xn--mg-sb-6za9404c.com
http://google.co.zm/url?q=https://xn--mg-sb-6za9404c.com
https://www.google.tl/url?q=https://xn--mg-sb-6za9404c.com
http://www.google.com.np/url?q=https://xn--mg-sb-6za9404c.com
https://maps.google.co.nz/url?q=https://xn--mg-sb-6za9404c.com
http://maps.google.cf/url?q=https://xn--mg-sb-6za9404c.com
http://maps.google.com.et/url?q=https://xn--mg-sb-6za9404c.com
http://maps.google.rw/url?q=https://xn--mg-sb-6za9404c.com
https://maps.google.co.ve/url?q=https://xn--mg-sb-6za9404c.com
https://images.google.co.ck/url?q=https://xn--mg-sb-6za9404c.com
https://images.google.co.zm/url?q=https://xn--mg-sb-6za9404c.com
https://www.google.mu/url?q=https://xn--mg-sb-6za9404c.com
https://maps.google.com.py/url?q=https://xn--mg-sb-6za9404c.com
http://www.google.lv/url?q=https://xn--mg-sb-6za9404c.com
http://maps.google.co.ug/url?q=https://xn--mg-sb-6za9404c.com
https://maps.google.it/url?q=https://xn--mg-sb-6za9404c.com
https://google.fi/url?q=https://xn--mg-sb-6za9404c.com
https://maps.google.ms/url?q=https://xn--mg-sb-6za9404c.com
https://maps.google.mv/url?q=https://xn--mg-sb-6za9404c.com
http://maps.google.com.eg/url?q=https://xn--mg-sb-6za9404c.com
https://maps.google.so/url?q=https://xn--mg-sb-6za9404c.com
http://www.google.nr/url?q=https://xn--mg-sb-6za9404c.com
https://maps.google.com.ar/url?q=https://xn--mg-sb-6za9404c.com
http://images.google.com.bo/url?q=https://xn--mg-sb-6za9404c.com
https://maps.google.tk/url?q=https://xn--mg-sb-6za9404c.com
http://maps.google.com.hk/url?q=https://xn--mg-sb-6za9404c.com
https://www.google.com.vn/url?q=https://xn--mg-sb-6za9404c.com
https://www.google.bi/url?q=https://xn--mg-sb-6za9404c.com
https://images.google.co.tz/url?q=https://xn--mg-sb-6za9404c.com
http://google.co.bw/url?q=https://xn--mg-sb-6za9404c.com
https://images.google.tl/url?q=https://xn--mg-sb-6za9404c.com
http://maps.google.com.sg/url?q=https://xn--mg-sb-6za9404c.com
https://images.google.mv/url?q=https://xn--mg-sb-6za9404c.com
https://www.google.info/url?q=https://xn--mg-sb-6za9404c.com
https://www.google.com.bz/url?q=https://xn--mg-sb-6za9404c.com
http://maps.google.ee/url?q=https://xn--mg-sb-6za9404c.com
http://google.co.za/url?q=https://xn--mg-sb-6za9404c.com
http://www.g.cn/url?q=https://xn--mg-sb-6za9404c.com
https://maps.google.ad/url?q=https://xn--mg-sb-6za9404c.com
https://maps.google.hn/url?q=https://xn--mg-sb-6za9404c.com
https://images.google.is/url?q=https://xn--mg-sb-6za9404c.com
https://maps.google.ca/url?q=https://xn--mg-sb-6za9404c.com
http://maps.google.ro/url?q=https://xn--mg-sb-6za9404c.com
https://images.google.com.kh/url?q=https://xn--mg-sb-6za9404c.com
http://google.com.pg/url?q=https://xn--mg-sb-6za9404c.com
https://maps.google.co.vi/url?q=https://xn--mg-sb-6za9404c.com
http://maps.google.com.np/url?q=https://xn--mg-sb-6za9404c.com
https://images.google.tk/url?q=https://xn--mg-sb-6za9404c.com
http://images.google.nr/url?q=https://xn--mg-sb-6za9404c.com
http://maps.google.com.ng/url?q=https://xn--mg-sb-6za9404c.com
https://maps.google.ki/url?q=https://xn--mg-sb-6za9404c.com
https://images.google.cm/url?q=https://xn--mg-sb-6za9404c.com
http://maps.google.gm/url?q=https://xn--mg-sb-6za9404c.com
https://images.google.by/url?q=https://xn--mg-sb-6za9404c.com
https://google.fm/url?q=https://xn--mg-sb-6za9404c.com
http://google.co.vi/url?q=https://xn--mg-sb-6za9404c.com
http://maps.google.cz/url?q=https://xn--mg-sb-6za9404c.com
https://images.google.co.ma/url?q=https://xn--mg-sb-6za9404c.com
http://www.google.com.vc/url?q=https://xn--mg-sb-6za9404c.com
https://maps.google.jo/url?q=https://xn--mg-sb-6za9404c.com
http://images.google.com.sb/url?q=https://xn--mg-sb-6za9404c.com
https://images.google.com/url?q=https://xn--mg-sb-6za9404c.com
https://maps.google.ch/url?q=https://xn--mg-sb-6za9404c.com
http://maps.google.mk/url?q=https://xn--mg-sb-6za9404c.com
http://www.google.com.ni/url?q=https://xn--mg-sb-6za9404c.com
http://images.google.cz/url?q=https://xn--mg-sb-6za9404c.com
https://images.google.com.vc/url?q=https://xn--mg-sb-6za9404c.com
https://maps.google.co.ke/url?q=https://xn--mg-sb-6za9404c.com
http://maps.google.com.uy/url?q=https://xn--mg-sb-6za9404c.com
https://www.google.ie/url?q=https://xn--mg-sb-6za9404c.com
https://maps.google.nu/url?q=https://xn--mg-sb-6za9404c.com
http://images.google.cc/url?q=https://xn--mg-sb-6za9404c.com
https://images.google.gr/url?q=https://xn--mg-sb-6za9404c.com
https://google.lt/url?q=https://xn--mg-sb-6za9404c.com
http://google.tm/url?q=https://xn--mg-sb-6za9404c.com
https://maps.google.co.bw/url?q=https://xn--mg-sb-6za9404c.com
http://www.google.vu/url?q=https://xn--mg-sb-6za9404c.com
http://maps.google.lu/url?q=https://xn--mg-sb-6za9404c.com
http://maps.google.lv/url?q=https://xn--mg-sb-6za9404c.com
https://images.google.je/url?q=https://xn--mg-sb-6za9404c.com
https://www.google.co.ve/url?q=https://xn--mg-sb-6za9404c.com
https://images.google.com.ng/url?q=https://xn--mg-sb-6za9404c.com
http://googlemaps.com/url?q=https://xn--mg-sb-6za9404c.com
http://maps.google.com.fj/url?q=https://xn--mg-sb-6za9404c.com
http://plus.google.com/url?q=https://xn--mg-sb-6za9404c.com
http://plus.gngjd.com/url?q=https://xn--mg-sb-6za9404c.com
http://google.com.af/url?q=https://xn--mg-sb-6za9404c.com
https://images.google.md/url?q=https://xn--mg-sb-6za9404c.com
https://www.google.com.mm/url?q=https://xn--mg-sb-6za9404c.com
https://maps.google.st/url?q=https://xn--mg-sb-6za9404c.com
http://maps.google.cat/url?q=https://xn--mg-sb-6za9404c.com
http://google.co.jp/url?q=https://xn--mg-sb-6za9404c.com
https://maps.google.lk/url?q=https://xn--mg-sb-6za9404c.com
http://maps.google.co.kr/url?q=https://xn--mg-sb-6za9404c.com
http://google.com.bd/url?q=https://xn--mg-sb-6za9404c.com
https://images.google.co.ke/url?q=https://xn--mg-sb-6za9404c.com
https://www.google.gr/url?q=https://xn--mg-sb-6za9404c.com
https://images.google.ac/url?q=https://xn--mg-sb-6za9404c.com
http://maps.google.ie/url?q=https://xn--mg-sb-6za9404c.com
http://google.com.tn/url?q=https://xn--mg-sb-6za9404c.com
https://maps.google.iq/url?q=https://xn--mg-sb-6za9404c.com
http://images.google.com.lb/url?q=https://xn--mg-sb-6za9404c.com
https://images.google.ga/url?q=https://xn--mg-sb-6za9404c.com
http://maps.google.nl/url?q=https://xn--mg-sb-6za9404c.com
https://maps.google.com.ai/url?q=https://xn--mg-sb-6za9404c.com
https://maps.google.cl/url?q=https://xn--mg-sb-6za9404c.com
http://maps.google.co.id/url?q=https://xn--mg-sb-6za9404c.com
https://maps.google.fm/url?q=https://xn--mg-sb-6za9404c.com
https://maps.google.com.ni/url?q=https://xn--mg-sb-6za9404c.com
https://maps.google.bi/url?q=https://xn--mg-sb-6za9404c.com
https://www.google.ki/url?q=https://xn--mg-sb-6za9404c.com
https://google.dm/url?q=https://xn--mg-sb-6za9404c.com
https://images.google.mn/url?q=https://xn--mg-sb-6za9404c.com
https://images.google.gy/url?q=https://xn--mg-sb-6za9404c.com
https://google.com.my/url?q=https://xn--mg-sb-6za9404c.com
http://maps.google.tg/url?q=https://xn--mg-sb-6za9404c.com
https://images.google.com.sa/url?q=https://xn--mg-sb-6za9404c.com
https://maps.google.com.om/url?q=https://xn--mg-sb-6za9404c.com
https://images.google.com.vn/url?q=https://xn--mg-sb-6za9404c.com
https://maps.google.co.hu/url?q=https://xn--mg-sb-6za9404c.com
http://maps.google.be/url?q=https://xn--mg-sb-6za9404c.com
http://images.google.com.bh/url?q=https://xn--mg-sb-6za9404c.com
https://images.google.com.kw/url?q=https://xn--mg-sb-6za9404c.com
https://maps.google.gp/url?q=https://xn--mg-sb-6za9404c.com
http://images.google.com.af/url?q=https://xn--mg-sb-6za9404c.com
http://images.google.com.bz/url?q=https://xn--mg-sb-6za9404c.com
https://maps.google.se/url?q=https://xn--mg-sb-6za9404c.com
https://maps.google.cg/url?q=https://xn--mg-sb-6za9404c.com
https://images.google.mk/url?q=https://xn--mg-sb-6za9404c.com
https://www.google.com.uy/url?q=https://xn--mg-sb-6za9404c.com
http://maps.google.cm/url?q=https://xn--mg-sb-6za9404c.com
https://maps.google.cd/url?q=https://xn--mg-sb-6za9404c.com
https://maps.google.mg/url?q=https://xn--mg-sb-6za9404c.com
https://images.google.am/url?q=https://xn--mg-sb-6za9404c.com
https://images.google.com.tn/url?q=https://xn--mg-sb-6za9404c.com
https://images.google.co.id/url?q=https://xn--mg-sb-6za9404c.com
https://maps.google.com.bd/url?q=https://xn--mg-sb-6za9404c.com
https://maps.google.co.tz/url?q=https://xn--mg-sb-6za9404c.com
http://images.google.com.ai/url?q=https://xn--mg-sb-6za9404c.com
http://images.google.bf/url?q=https://xn--mg-sb-6za9404c.com
http://maps.google.co.il/url?q=https://xn--mg-sb-6za9404c.com
http://maps.google.co.zm/url?q=https://xn--mg-sb-6za9404c.com
http://images.google.com.qa/url?q=https://xn--mg-sb-6za9404c.com
http://images.google.lk/url?q=https://xn--mg-sb-6za9404c.com
http://maps.google.cv/url?q=https://xn--mg-sb-6za9404c.com
http://maps.google.im/url?q=https://xn--mg-sb-6za9404c.com
https://maps.google.com.gh/url?q=https://xn--mg-sb-6za9404c.com
https://maps.google.co.ao/url?q=https://xn--mg-sb-6za9404c.com
http://maps.google.co.th/url?q=https://xn--mg-sb-6za9404c.com
https://maps.google.gl/url?q=https://xn--mg-sb-6za9404c.com
https://maps.google.com.ua/url?q=https://xn--mg-sb-6za9404c.com
http://maps.google.td/url?q=https://xn--mg-sb-6za9404c.com
https://google.me/url?q=https://xn--mg-sb-6za9404c.com
https://maps.google.bj/url?q=https://xn--mg-sb-6za9404c.com
https://maps.google.pl/url?q=https://xn--mg-sb-6za9404c.com
http://maps.google.com.tr/url?q=https://xn--mg-sb-6za9404c.com
https://images.google.sc/url?q=https://xn--mg-sb-6za9404c.com
https://images.google.com.et/url?q=https://xn--mg-sb-6za9404c.com
https://maps.google.dk/url?q=https://xn--mg-sb-6za9404c.com
https://images.google.iq/url?q=https://xn--mg-sb-6za9404c.com
http://maps.google.sc/url?q=https://xn--mg-sb-6za9404c.com
http://images.google.co.bw/url?q=https://xn--mg-sb-6za9404c.com
http://images.google.dz/url?q=https://xn--mg-sb-6za9404c.com
https://maps.google.ht/url?q=https://xn--mg-sb-6za9404c.com
https://google.cat/url?q=https://xn--mg-sb-6za9404c.com
http://maps.google.com.bh/url?q=https://xn--mg-sb-6za9404c.com
http://maps.google.ml/url?q=https://xn--mg-sb-6za9404c.com
https://maps.google.com.pl/url?q=https://xn--mg-sb-6za9404c.com
https://maps.google.com.vc/url?q=https://xn--mg-sb-6za9404c.com
https://maps.google.com.au/url?q=https://xn--mg-sb-6za9404c.com
http://images.g.cn/url?q=https://xn--mg-sb-6za9404c.com
http://maps.google.co.ck/url?q=https://xn--mg-sb-6za9404c.com
http://maps.google.sh/url?q=https://xn--mg-sb-6za9404c.com
http://maps.google.com.sb/url?q=https://xn--mg-sb-6za9404c.com
http://maps.google.sk/url?q=https://xn--mg-sb-6za9404c.com
http://images.google.rs/url?q=https://xn--mg-sb-6za9404c.com
http://maps.google.dj/url?q=https://xn--mg-sb-6za9404c.com
http://maps.google.si/url?q=https://xn--mg-sb-6za9404c.com
http://images.google.ps/url?q=https://xn--mg-sb-6za9404c.com
http://images.google.com.pg/url?q=https://xn--mg-sb-6za9404c.com
https://images.google.net/url?q=https://xn--mg-sb-6za9404c.com
http://images.google.com.sl/url?q=https://xn--mg-sb-6za9404c.com
https://images.google.gp/url?q=https://xn--mg-sb-6za9404c.com
https://maps.gngjd.com/url?q=https://xn--mg-sb-6za9404c.com
https://images.google.co.zw/url?q=https://xn--mg-sb-6za9404c.com
order viagra online with paypal
Fantastic posts. Thanks a lot!
pay for essays pay for essay reviews essays for sale pay for essay
buy an essay pay for research paper buy an essay pay someone to write my college essay
what to write your college essay on https://englishessayhelp.com
https://images.google.as/url?q=https://xn--megsb-l11b.com
https://images.google.off.ai/url?q=https://xn--megsb-l11b.com
https://images.google.com.ag/url?q=https://xn--megsb-l11b.com
https://images.google.com.ar/url?q=https://xn--megsb-l11b.com
https://images.google.com.au/url?q=https://xn--megsb-l11b.com
https://images.google.at/url?q=https://xn--megsb-l11b.com
https://images.google.az/url?q=https://xn--megsb-l11b.com
https://images.google.be/url?q=https://xn--megsb-l11b.com
https://images.google.com.br/url?q=https://xn--megsb-l11b.com
https://images.google.vg/url?q=https://xn--megsb-l11b.com
https://images.google.bi/url?q=https://xn--megsb-l11b.com
https://images.google.ca/url?q=https://xn--megsb-l11b.com
https://images.google.td/url?q=https://xn--megsb-l11b.com
https://images.google.cl/url?q=https://xn--megsb-l11b.com
https://images.google.com.co/url?q=https://xn--megsb-l11b.com
https://images.google.co.cr/url?q=https://xn--megsb-l11b.com
https://images.google.ci/url?q=https://xn--megsb-l11b.com
https://images.google.com.cu/url?q=https://xn--megsb-l11b.com
https://images.google.cd/url?q=https://xn--megsb-l11b.com
https://images.google.dk/url?q=https://xn--megsb-l11b.com
https://images.google.dj/url?q=https://xn--megsb-l11b.com
https://images.google.com.do/url?q=https://xn--megsb-l11b.com
https://images.google.com.ec/url?q=https://xn--megsb-l11b.com
https://images.google.com.sv/url?q=https://xn--megsb-l11b.com
https://images.google.fm/url?q=https://xn--megsb-l11b.com
https://images.google.com.fj/url?q=https://xn--megsb-l11b.com
https://images.google.fi/url?q=https://xn--megsb-l11b.com
https://images.google.fr/url?q=https://xn--megsb-l11b.com
https://images.google.gm/url?q=https://xn--megsb-l11b.com
https://images.google.ge/url?q=https://xn--megsb-l11b.com
https://images.google.de/url?q=https://xn--megsb-l11b.com
https://images.google.com.gi/url?q=https://xn--megsb-l11b.com
https://images.google.com.gr/url?q=https://xn--megsb-l11b.com
https://images.google.gl/url?q=https://xn--megsb-l11b.com
https://images.google.gg/url?q=https://xn--megsb-l11b.com
https://images.google.hn/url?q=https://xn--megsb-l11b.com
https://images.google.com.hk/url?q=https://xn--megsb-l11b.com
https://images.google.co.hu/url?q=https://xn--megsb-l11b.com
https://images.google.co.in/url?q=https://xn--megsb-l11b.com
https://images.google.ie/url?q=https://xn--megsb-l11b.com
https://images.google.co.im/url?q=https://xn--megsb-l11b.com
https://images.google.co.il/url?q=https://xn--megsb-l11b.com
https://images.google.it/url?q=https://xn--megsb-l11b.com
https://images.google.com.jm/url?q=https://xn--megsb-l11b.com
https://images.google.co.jp/url?q=https://xn--megsb-l11b.com
https://images.google.co.je/url?q=https://xn--megsb-l11b.com
https://images.google.kz/url?q=https://xn--megsb-l11b.com
https://images.google.co.kr/url?q=https://xn--megsb-l11b.com
https://images.google.lv/url?q=https://xn--megsb-l11b.com
https://images.google.co.ls/url?q=https://xn--megsb-l11b.com
https://images.google.li/url?q=https://xn--megsb-l11b.com
https://images.google.lt/url?q=https://xn--megsb-l11b.com
https://images.google.lu/url?q=https://xn--megsb-l11b.com
https://images.google.mw/url?q=https://xn--megsb-l11b.com
https://images.google.com.my/url?q=https://xn--megsb-l11b.com
https://images.google.com.mt/url?q=https://xn--megsb-l11b.com
https://images.google.mu/url?q=https://xn--megsb-l11b.com
https://images.google.com.mx/url?q=https://xn--megsb-l11b.com
https://images.google.ms/url?q=https://xn--megsb-l11b.com
https://images.google.com.na/url?q=https://xn--megsb-l11b.com
https://images.google.com.np/url?q=https://xn--megsb-l11b.com
https://images.google.nl/url?q=https://xn--megsb-l11b.com
https://images.google.co.nz/url?q=https://xn--megsb-l11b.com
https://images.google.com.ni/url?q=https://xn--megsb-l11b.com
https://images.google.com.nf/url?q=https://xn--megsb-l11b.com
https://images.google.com.pk/url?q=https://xn--megsb-l11b.com
https://images.google.com.pa/url?q=https://xn--megsb-l11b.com
https://images.google.com.py/url?q=https://xn--megsb-l11b.com
https://images.google.com.pe/url?q=https://xn--megsb-l11b.com
https://images.google.com.ph/url?q=https://xn--megsb-l11b.com
https://images.google.pn/url?q=https://xn--megsb-l11b.com
https://images.google.pl/url?q=https://xn--megsb-l11b.com
https://images.google.pt/url?q=https://xn--megsb-l11b.com
https://images.google.com.pr/url?q=https://xn--megsb-l11b.com
https://images.google.cg/url?q=https://xn--megsb-l11b.com
https://images.google.ro/url?q=https://xn--megsb-l11b.com
https://images.google.ru/url?q=https://xn--megsb-l11b.com
https://images.google.rw/url?q=https://xn--megsb-l11b.com
https://images.google.sh/url?q=https://xn--megsb-l11b.com
https://images.google.sm/url?q=https://xn--megsb-l11b.com
https://images.google.com.sg/url?q=https://xn--megsb-l11b.com
https://images.google.sk/url?q=https://xn--megsb-l11b.com
https://images.google.co.za/url?q=https://xn--megsb-l11b.com
https://images.google.es/url?q=https://xn--megsb-l11b.com
https://images.google.se/url?q=https://xn--megsb-l11b.com
https://images.google.ch/url?q=https://xn--megsb-l11b.com
https://images.google.com.tw/url?q=https://xn--megsb-l11b.com
https://images.google.co.th/url?q=https://xn--megsb-l11b.com
https://images.google.tt/url?q=https://xn--megsb-l11b.com
https://images.google.com.tr/url?q=https://xn--megsb-l11b.com
https://images.google.com.ua/url?q=https://xn--megsb-l11b.com
https://images.google.ae/url?q=https://xn--megsb-l11b.com
https://images.google.co.uk/url?q=https://xn--megsb-l11b.com
https://images.google.com.uy/url?q=https://xn--megsb-l11b.com
https://images.google.uz/url?q=https://xn--megsb-l11b.com
https://images.google.vu/url?q=https://xn--megsb-l11b.com
https://images.google.co.ve/url?q=https://xn--megsb-l11b.com
https://www.google.co.ao/url?q=https://xn--megsb-l11b.com
https://images.google.im/url?q=https://xn--megsb-l11b.com
https://images.google.dm/url?q=https://xn--megsb-l11b.com
https://google.com.pa/url?q=https://xn--megsb-l11b.com
http://maps.google.mw/url?q=https://xn--megsb-l11b.com
https://google.ac/url?q=https://xn--megsb-l11b.com
https://google.com.gh/url?q=https://xn--megsb-l11b.com
https://google.dz/url?q=https://xn--megsb-l11b.com
http://images.google.ki/url?q=https://xn--megsb-l11b.com
http://www.google.im/url?q=https://xn--megsb-l11b.com
https://google.com.mx/url?q=https://xn--megsb-l11b.com
https://www.google.cz/url?q=https://xn--megsb-l11b.com
http://google.hr/url?q=https://xn--megsb-l11b.com
https://google.ml/url?q=https://xn--megsb-l11b.com
https://www.google.com.au/url?q=https://xn--megsb-l11b.com
https://images.google.bs/url?q=https://xn--megsb-l11b.com
https://google.co.tz/url?q=https://xn--megsb-l11b.com
http://google.cg/url?q=https://xn--megsb-l11b.com
http://maps.google.is/url?q=https://xn--megsb-l11b.com
http://google.si/url?q=https://xn--megsb-l11b.com
http://google.com.py/url?q=https://xn--megsb-l11b.com
http://maps.google.co.cr/url?q=https://xn--megsb-l11b.com
http://www.google.mk/url?q=https://xn--megsb-l11b.com
http://www.google.ge/url?q=https://xn--megsb-l11b.com
https://images.google.ml/url?q=https://xn--megsb-l11b.com
https://www.google.com.sa/url?q=https://xn--megsb-l11b.com
http://google.mg/url?q=https://xn--megsb-l11b.com
http://google.com.ec/url?q=https://xn--megsb-l11b.com
https://google.rs/url?q=https://xn--megsb-l11b.com
https://www.google.co.hu/url?q=https://xn--megsb-l11b.com
http://google.md/url?q=https://xn--megsb-l11b.com
https://images.google.hu/url?q=https://xn--megsb-l11b.com
https://www.google.com.tw/url?q=https://xn--megsb-l11b.com
https://google.ae/url?q=https://xn--megsb-l11b.com
https://images.google.jo/url?q=https://xn--megsb-l11b.com
http://images.google.tm/url?q=https://xn--megsb-l11b.com
https://images.google.com.mm/url?q=https://xn--megsb-l11b.com
https://maps.google.vu/url?q=https://xn--megsb-l11b.com
https://maps.google.co.ls/url?q=https://xn--megsb-l11b.com
https://www.google.com.cy/url?q=https://xn--megsb-l11b.com
http://google.com.lb/url?q=https://xn--megsb-l11b.com
http://google.co.kr/url?q=https://xn--megsb-l11b.com
http://images.google.nu/url?q=https://xn--megsb-l11b.com
http://google.cl/url?q=https://xn--megsb-l11b.com
http://www.google.com.bo/url?q=https://xn--megsb-l11b.com
https://google.ad/url?q=https://xn--megsb-l11b.com
https://maps.google.pt/url?q=https://xn--megsb-l11b.com
https://maps.google.es/url?q=https://xn--megsb-l11b.com
https://maps.google.sn/url?q=https://xn--megsb-l11b.com
http://google.tk/url?q=https://xn--megsb-l11b.com
https://google.com.bn/url?q=https://xn--megsb-l11b.com
https://google.com.ua/url?q=https://xn--megsb-l11b.com
https://www.google.com.sg/url?q=https://xn--megsb-l11b.com
https://images.google.info/url?q=https://xn--megsb-l11b.com
https://maps.google.de/url?q=https://xn--megsb-l11b.com
https://images.google.cv/url?q=https://xn--megsb-l11b.com
http://google.com.nf/url?q=https://xn--megsb-l11b.com
https://images.google.com.ly/url?q=https://xn--megsb-l11b.com
http://images.google.tg/url?q=https://xn--megsb-l11b.com
http://google.cv/url?q=https://xn--megsb-l11b.com
http://gngjd.com/url?q=https://xn--megsb-l11b.com
http://www.google.je/url?q=https://xn--megsb-l11b.com
http://maps.google.by/url?q=https://xn--megsb-l11b.com
http://maps.google.fi/url?q=https://xn--megsb-l11b.com
https://images.gngjd.com/url?q=https://xn--megsb-l11b.com
http://google.ne/url?q=https://xn--megsb-l11b.com
http://images.google.kg/url?q=https://xn--megsb-l11b.com
https://www.google.cn/url?q=https://xn--megsb-l11b.com
https://google.am/url?q=https://xn--megsb-l11b.com
http://google.com.ly/url?q=https://xn--megsb-l11b.com
https://google.iq/url?q=https://xn--megsb-l11b.com
https://google.com.sv/url?q=https://xn--megsb-l11b.com
https://google.sc/url?q=https://xn--megsb-l11b.com
http://google.kg/url?q=https://xn--megsb-l11b.com
http://google.li/url?q=https://xn--megsb-l11b.com
http://images.google.al/url?q=https://xn--megsb-l11b.com
https://maps.google.je/url?q=https://xn--megsb-l11b.com
http://maps.google.to/url?q=https://xn--megsb-l11b.com
http://google.co.cr/url?q=https://xn--megsb-l11b.com
http://images.google.com.tj/url?q=https://xn--megsb-l11b.com
https://www.google.com.ph/url?q=https://xn--megsb-l11b.com
https://maps.google.com.bn/url?q=https://xn--megsb-l11b.com
https://www.google.as/url?q=https://xn--megsb-l11b.com
https://images.google.co.ao/url?q=https://xn--megsb-l11b.com
http://maps.google.com.bo/url?q=https://xn--megsb-l11b.com
https://maps.google.com/url?q=https://xn--megsb-l11b.com
https://www.google.com.bh/url?q=https://xn--megsb-l11b.com
https://maps.google.com.mm/url?q=https://xn--megsb-l11b.com
http://google.com.gi/url?q=https://xn--megsb-l11b.com
http://maps.google.ba/url?q=https://xn--megsb-l11b.com
http://google.co.id/url?q=https://xn--megsb-l11b.com
http://google.be/url?q=https://xn--megsb-l11b.com
http://images.google.mg/url?q=https://xn--megsb-l11b.com
http://google.com.ar/url?q=https://xn--megsb-l11b.com
https://maps.google.co.za/url?q=https://xn--megsb-l11b.com
https://www.google.gp/url?q=https://xn--megsb-l11b.com
http://www.google.sh/url?q=https://xn--megsb-l11b.com
https://images.google.ee/url?q=https://xn--megsb-l11b.com
https://www.google.rw/url?q=https://xn--megsb-l11b.com
http://images.google.si/url?q=https://xn--megsb-l11b.com
https://www.google.at/url?q=https://xn--megsb-l11b.com
http://maps.google.at/url?q=https://xn--megsb-l11b.com
http://maps.google.co.in/url?q=https://xn--megsb-l11b.com
https://maps.google.ga/url?q=https://xn--megsb-l11b.com
http://maps.google.sm/url?q=https://xn--megsb-l11b.com
http://google.ms/url?q=https://xn--megsb-l11b.com
https://images.google.com.gh/url?q=https://xn--megsb-l11b.com
http://maps.google.cn/url?q=https://xn--megsb-l11b.com
https://www.google.com.na/url?q=https://xn--megsb-l11b.com
https://maps.google.hr/url?q=https://xn--megsb-l11b.com
https://google.ci/url?q=https://xn--megsb-l11b.com
https://images.google.hr/url?q=https://xn--megsb-l11b.com
http://maps.google.com.do/url?q=https://xn--megsb-l11b.com
http://google.lk/url?q=https://xn--megsb-l11b.com
http://images.google.cn/url?q=https://xn--megsb-l11b.com
http://www.bon-vivant.net/url?q=https://xn--megsb-l11b.com
http://maps.google.com.gt/url?q=https://xn--megsb-l11b.com
http://www.google.com.ag/url?q=https://xn--megsb-l11b.com
https://maps.google.mu/url?q=https://xn--megsb-l11b.com
https://google.com.ng/url?q=https://xn--megsb-l11b.com
https://www.google.co.uk/url?q=https://xn--megsb-l11b.com
https://google.us/url?q=https://xn--megsb-l11b.com
https://www.google.com.tr/url?q=https://xn--megsb-l11b.com
http://www.google.co.ma/url?q=https://xn--megsb-l11b.com
https://maps.google.co.zw/url?q=https://xn--megsb-l11b.com
https://www.google.bs/url?q=https://xn--megsb-l11b.com
https://www.google.pl/url?q=https://xn--megsb-l11b.com
http://www.googleadservices.com/url?q=https://xn--megsb-l11b.com
http://google.kz/url?q=https://xn--megsb-l11b.com
https://google.com.mt/url?q=https://xn--megsb-l11b.com
http://www.google.co.zw/url?q=https://xn--megsb-l11b.com
https://maps.google.ne/url?q=https://xn--megsb-l11b.com
https://google.com.qa/url?q=https://xn--megsb-l11b.com
https://google.se/url?q=https://xn--megsb-l11b.com
http://www.google.mw/url?q=https://xn--megsb-l11b.com
https://maps.google.co.mz/url?q=https://xn--megsb-l11b.com
http://maps.google.com.sv/url?q=https://xn--megsb-l11b.com
https://www.google.sm/url?q=https://xn--megsb-l11b.com
https://maps.google.com.tw/url?q=https://xn--megsb-l11b.com
https://google.ca/url?q=https://xn--megsb-l11b.com
https://www.google.is/url?q=https://xn--megsb-l11b.com
https://google.com.jm/url?q=https://xn--megsb-l11b.com
http://images.google.co.ug/url?q=https://xn--megsb-l11b.com
https://maps.google.com.kh/url?q=https://xn--megsb-l11b.com
http://maps.google.tl/url?q=https://xn--megsb-l11b.com
http://www.google.co.nz/url?q=https://xn--megsb-l11b.com
https://www.google.gg/url?q=https://xn--megsb-l11b.com
https://google.to/url?q=https://xn--megsb-l11b.com
https://google.ro/url?q=https://xn--megsb-l11b.com
http://google.td/url?q=https://xn--megsb-l11b.com
https://www.google.by/url?q=https://xn--megsb-l11b.com
https://www.google.nl/url?q=https://xn--megsb-l11b.com
http://maps.google.ci/url?q=https://xn--megsb-l11b.com
http://maps.google.dz/url?q=https://xn--megsb-l11b.com
https://google.hu/url?q=https://xn--megsb-l11b.com
http://images.google.ht/url?q=https://xn--megsb-l11b.com
http://google.mv/url?q=https://xn--megsb-l11b.com
https://google.cf/url?q=https://xn--megsb-l11b.com
http://maps.google.com.ly/url?q=https://xn--megsb-l11b.com
http://www.google.nu/url?q=https://xn--megsb-l11b.com
http://google.com.tj/url?q=https://xn--megsb-l11b.com
https://maps.google.com.mt/url?q=https://xn--megsb-l11b.com
https://google.so/url?q=https://xn--megsb-l11b.com
http://images.google.bj/url?q=https://xn--megsb-l11b.com
https://maps.google.la/url?q=https://xn--megsb-l11b.com
https://images.google.us/url?q=https://xn--megsb-l11b.com
https://images.google.com.eg/url?q=https://xn--megsb-l11b.com
https://images.google.cf/url?q=https://xn--megsb-l11b.com
https://images.google.la/url?q=https://xn--megsb-l11b.com
http://maps.google.com.ag/url?q=https://xn--megsb-l11b.com
http://google.ga/url?q=https://xn--megsb-l11b.com
http://google.co.uz/url?q=https://xn--megsb-l11b.com
http://maps.google.no/url?q=https://xn--megsb-l11b.com
https://www.google.gl/url?q=https://xn--megsb-l11b.com
http://images.google.co.vi/url?q=https://xn--megsb-l11b.com
https://images.google.ne/url?q=https://xn--megsb-l11b.com
https://google.com.om/url?q=https://xn--megsb-l11b.com
http://maps.google.lt/url?q=https://xn--megsb-l11b.com
https://maps.google.kg/url?q=https://xn--megsb-l11b.com
http://www.google.com.hk/url?q=https://xn--megsb-l11b.com
https://google.com.co/url?q=https://xn--megsb-l11b.com
https://google.dk/url?q=https://xn--megsb-l11b.com
https://maps.google.com.sa/url?q=https://xn--megsb-l11b.com
http://google.com.fj/url?q=https://xn--megsb-l11b.com
http://maps.google.com.ec/url?q=https://xn--megsb-l11b.com
https://maps.google.mn/url?q=https://xn--megsb-l11b.com
https://maps.google.bf/url?q=https://xn--megsb-l11b.com
https://www.google.tt/url?q=https://xn--megsb-l11b.com
https://www.google.dj/url?q=https://xn--megsb-l11b.com
https://www.google.com.pr/url?q=https://xn--megsb-l11b.com
https://maps.google.ws/url?q=https://xn--megsb-l11b.com
http://google.jo/url?q=https://xn--megsb-l11b.com
https://google.co.ug/url?q=https://xn--megsb-l11b.com
https://images.google.com.bd/url?q=https://xn--megsb-l11b.com
https://google.tg/url?q=https://xn--megsb-l11b.com
http://maps.google.dm/url?q=https://xn--megsb-l11b.com
https://www.google.pn/url?q=https://xn--megsb-l11b.com
https://www.google.com.et/url?q=https://xn--megsb-l11b.com
http://maps.google.com.jm/url?q=https://xn--megsb-l11b.com
http://www.google.bg/url?q=https://xn--megsb-l11b.com
http://maps.google.hu/url?q=https://xn--megsb-l11b.com
https://maps.google.kz/url?q=https://xn--megsb-l11b.com
https://images.google.com.pl/url?q=https://xn--megsb-l11b.com
http://www.google.st/url?q=https://xn--megsb-l11b.com
https://maps.google.com.kw/url?q=https://xn--megsb-l11b.com
https://maps.google.ru/url?q=https://xn--megsb-l11b.com
https://google.co.mz/url?q=https://xn--megsb-l11b.com
http://www.google.co.ls/url?q=https://xn--megsb-l11b.com
https://www.google.az/url?q=https://xn--megsb-l11b.com
http://maps.google.co.uk/url?q=https://xn--megsb-l11b.com
https://www.google.com.do/url?q=https://xn--megsb-l11b.com
http://www.google.es/url?q=https://xn--megsb-l11b.com
http://google.gm/url?q=https://xn--megsb-l11b.com
http://images.google.so/url?q=https://xn--megsb-l11b.com
https://www.google.com.pk/url?q=https://xn--megsb-l11b.com
https://www.google.com.sb/url?q=https://xn--megsb-l11b.com
https://images.google.ad/url?q=https://xn--megsb-l11b.com
http://google.sn/url?q=https://xn--megsb-l11b.com
http://google.ps/url?q=https://xn--megsb-l11b.com
https://maps.google.bg/url?q=https://xn--megsb-l11b.com
https://images.google.com.cy/url?q=https://xn--megsb-l11b.com
http://www.google.pt/url?q=https://xn--megsb-l11b.com
https://images.google.to/url?q=https://xn--megsb-l11b.com
http://images.google.co.uz/url?q=https://xn--megsb-l11b.com
http://google.com.sl/url?q=https://xn--megsb-l11b.com
http://www.google.gy/url?q=https://xn--megsb-l11b.com
http://www.google.cd/url?q=https://xn--megsb-l11b.com
https://maps.google.com.my/url?q=https://xn--megsb-l11b.com
http://www.google.com.ai/url?q=https://xn--megsb-l11b.com
https://google.hn/url?q=https://xn--megsb-l11b.com
http://images.google.ba/url?q=https://xn--megsb-l11b.com
http://maps.google.com.pe/url?q=https://xn--megsb-l11b.com
http://google.de/url?q=https://xn--megsb-l11b.com
http://maps.google.com.gi/url?q=https://xn--megsb-l11b.com
https://images.google.cat/url?q=https://xn--megsb-l11b.com
https://www.google.co.ck/url?q=https://xn--megsb-l11b.com
https://images.google.com.bn/url?q=https://xn--megsb-l11b.com
http://maps.google.ae/url?q=https://xn--megsb-l11b.com
http://images.google.no/url?q=https://xn--megsb-l11b.com
http://maps.google.bs/url?q=https://xn--megsb-l11b.com
http://maps.google.gy/url?q=https://xn--megsb-l11b.com
http://maps.google.com.pa/url?q=https://xn--megsb-l11b.com
https://google.cc/url?q=https://xn--megsb-l11b.com
http://google.co.th/url?q=https://xn--megsb-l11b.com
http://maps.google.com.mx/url?q=https://xn--megsb-l11b.com
http://www.google.lu/url?q=https://xn--megsb-l11b.com
https://google.bf/url?q=https://xn--megsb-l11b.com
http://www.google.it/url?q=https://xn--megsb-l11b.com
http://google.com.br/url?q=https://xn--megsb-l11b.com
http://images.google.bg/url?q=https://xn--megsb-l11b.com
http://google.co.il/url?q=https://xn--megsb-l11b.com
https://google.ws/url?q=https://xn--megsb-l11b.com
http://images.google.st/url?q=https://xn--megsb-l11b.com
http://duck.com/url?q=https://xn--megsb-l11b.com
https://www.google.net/url?q=https://xn--megsb-l11b.com
https://images.google.sn/url?q=https://xn--megsb-l11b.com
http://maps.google.co.jp/url?q=https://xn--megsb-l11b.com
http://www.google.bj/url?q=https://xn--megsb-l11b.com
https://maps.google.com.qa/url?q=https://xn--megsb-l11b.com
https://maps.google.com.co/url?q=https://xn--megsb-l11b.com
http://www.google.ch/url?q=https://xn--megsb-l11b.com
http://www.google.com.pe/url?q=https://xn--megsb-l11b.com
http://images.google.co.mz/url?q=https://xn--megsb-l11b.com
https://www.google.cm/url?q=https://xn--megsb-l11b.com
http://maps.google.nr/url?q=https://xn--megsb-l11b.com
https://www.google.al/url?q=https://xn--megsb-l11b.com
https://google.sk/url?q=https://xn--megsb-l11b.com
http://maps.google.rs/url?q=https://xn--megsb-l11b.com
http://maps.google.gr/url?q=https://xn--megsb-l11b.com
https://google.la/url?q=https://xn--megsb-l11b.com
http://maps.google.com.ph/url?q=https://xn--megsb-l11b.com
https://www.google.com/url?q=https://xn--megsb-l11b.com
http://google.ee/url?q=https://xn--megsb-l11b.com
https://google.com.pl/url?q=https://xn--megsb-l11b.com
http://maps.google.com.pg/url?q=https://xn--megsb-l11b.com
https://google.vg/url?q=https://xn--megsb-l11b.com
https://www.google.co.ke/url?q=https://xn--megsb-l11b.com
https://maps.google.com.pr/url?q=https://xn--megsb-l11b.com
http://www.google.no/url?q=https://xn--megsb-l11b.com
https://maps.google.fr/url?q=https://xn--megsb-l11b.com
https://maps.google.as/url?q=https://xn--megsb-l11b.com
https://google.mn/url?q=https://xn--megsb-l11b.com
http://google.com.kh/url?q=https://xn--megsb-l11b.com
http://images.google.me/url?q=https://xn--megsb-l11b.com
http://maps.google.com.sl/url?q=https://xn--megsb-l11b.com
http://maps.google.pn/url?q=https://xn--megsb-l11b.com
http://www.google.fr/url?q=https://xn--megsb-l11b.com
https://maps.google.com.bz/url?q=https://xn--megsb-l11b.com
https://maps.google.com.cu/url?q=https://xn--megsb-l11b.com
https://google.com.eg/url?q=https://xn--megsb-l11b.com
http://www.google.com.kw/url?q=https://xn--megsb-l11b.com
https://google.com.cu/url?q=https://xn--megsb-l11b.com
https://www.google.co.in/url?q=https://xn--megsb-l11b.com
http://maps.google.tt/url?q=https://xn--megsb-l11b.com
http://google.com.gt/url?q=https://xn--megsb-l11b.com
http://maps.google.ge/url?q=https://xn--megsb-l11b.com
https://maps.google.vg/url?q=https://xn--megsb-l11b.com
http://images.google.com.om/url?q=https://xn--megsb-l11b.com
http://google.ht/url?q=https://xn--megsb-l11b.com
https://maps.google.com.na/url?q=https://xn--megsb-l11b.com
http://google.ru/url?q=https://xn--megsb-l11b.com
https://maps.google.gg/url?q=https://xn--megsb-l11b.com
https://maps.google.com.br/url?q=https://xn--megsb-l11b.com
https://maps.google.li/url?q=https://xn--megsb-l11b.com
http://www.google.ba/url?q=https://xn--megsb-l11b.com
http://maps.google.com.lb/url?q=https://xn--megsb-l11b.com
http://images.google.ws/url?q=https://xn--megsb-l11b.com
http://images.google.com.gt/url?q=https://xn--megsb-l11b.com
http://maps.g.cn/url?q=https://xn--megsb-l11b.com
http://google.co.zm/url?q=https://xn--megsb-l11b.com
https://www.google.tl/url?q=https://xn--megsb-l11b.com
http://www.google.com.np/url?q=https://xn--megsb-l11b.com
https://maps.google.co.nz/url?q=https://xn--megsb-l11b.com
http://maps.google.cf/url?q=https://xn--megsb-l11b.com
http://maps.google.com.et/url?q=https://xn--megsb-l11b.com
http://maps.google.rw/url?q=https://xn--megsb-l11b.com
https://maps.google.co.ve/url?q=https://xn--megsb-l11b.com
https://images.google.co.ck/url?q=https://xn--megsb-l11b.com
https://images.google.co.zm/url?q=https://xn--megsb-l11b.com
https://www.google.mu/url?q=https://xn--megsb-l11b.com
https://maps.google.com.py/url?q=https://xn--megsb-l11b.com
http://www.google.lv/url?q=https://xn--megsb-l11b.com
http://maps.google.co.ug/url?q=https://xn--megsb-l11b.com
https://maps.google.it/url?q=https://xn--megsb-l11b.com
https://google.fi/url?q=https://xn--megsb-l11b.com
https://maps.google.ms/url?q=https://xn--megsb-l11b.com
https://maps.google.mv/url?q=https://xn--megsb-l11b.com
http://maps.google.com.eg/url?q=https://xn--megsb-l11b.com
https://maps.google.so/url?q=https://xn--megsb-l11b.com
http://www.google.nr/url?q=https://xn--megsb-l11b.com
https://maps.google.com.ar/url?q=https://xn--megsb-l11b.com
http://images.google.com.bo/url?q=https://xn--megsb-l11b.com
https://maps.google.tk/url?q=https://xn--megsb-l11b.com
http://maps.google.com.hk/url?q=https://xn--megsb-l11b.com
https://www.google.com.vn/url?q=https://xn--megsb-l11b.com
https://www.google.bi/url?q=https://xn--megsb-l11b.com
https://images.google.co.tz/url?q=https://xn--megsb-l11b.com
http://google.co.bw/url?q=https://xn--megsb-l11b.com
https://images.google.tl/url?q=https://xn--megsb-l11b.com
http://maps.google.com.sg/url?q=https://xn--megsb-l11b.com
https://images.google.mv/url?q=https://xn--megsb-l11b.com
https://www.google.info/url?q=https://xn--megsb-l11b.com
https://www.google.com.bz/url?q=https://xn--megsb-l11b.com
http://maps.google.ee/url?q=https://xn--megsb-l11b.com
http://google.co.za/url?q=https://xn--megsb-l11b.com
http://www.g.cn/url?q=https://xn--megsb-l11b.com
https://maps.google.ad/url?q=https://xn--megsb-l11b.com
https://maps.google.hn/url?q=https://xn--megsb-l11b.com
https://images.google.is/url?q=https://xn--megsb-l11b.com
https://maps.google.ca/url?q=https://xn--megsb-l11b.com
http://maps.google.ro/url?q=https://xn--megsb-l11b.com
https://images.google.com.kh/url?q=https://xn--megsb-l11b.com
http://google.com.pg/url?q=https://xn--megsb-l11b.com
https://maps.google.co.vi/url?q=https://xn--megsb-l11b.com
http://maps.google.com.np/url?q=https://xn--megsb-l11b.com
https://images.google.tk/url?q=https://xn--megsb-l11b.com
http://images.google.nr/url?q=https://xn--megsb-l11b.com
http://maps.google.com.ng/url?q=https://xn--megsb-l11b.com
https://maps.google.ki/url?q=https://xn--megsb-l11b.com
https://images.google.cm/url?q=https://xn--megsb-l11b.com
http://maps.google.gm/url?q=https://xn--megsb-l11b.com
https://images.google.by/url?q=https://xn--megsb-l11b.com
https://google.fm/url?q=https://xn--megsb-l11b.com
http://google.co.vi/url?q=https://xn--megsb-l11b.com
http://maps.google.cz/url?q=https://xn--megsb-l11b.com
https://images.google.co.ma/url?q=https://xn--megsb-l11b.com
http://www.google.com.vc/url?q=https://xn--megsb-l11b.com
https://maps.google.jo/url?q=https://xn--megsb-l11b.com
http://images.google.com.sb/url?q=https://xn--megsb-l11b.com
https://images.google.com/url?q=https://xn--megsb-l11b.com
https://maps.google.ch/url?q=https://xn--megsb-l11b.com
http://maps.google.mk/url?q=https://xn--megsb-l11b.com
http://www.google.com.ni/url?q=https://xn--megsb-l11b.com
http://images.google.cz/url?q=https://xn--megsb-l11b.com
https://images.google.com.vc/url?q=https://xn--megsb-l11b.com
https://maps.google.co.ke/url?q=https://xn--megsb-l11b.com
http://maps.google.com.uy/url?q=https://xn--megsb-l11b.com
https://www.google.ie/url?q=https://xn--megsb-l11b.com
https://maps.google.nu/url?q=https://xn--megsb-l11b.com
http://images.google.cc/url?q=https://xn--megsb-l11b.com
https://images.google.gr/url?q=https://xn--megsb-l11b.com
https://google.lt/url?q=https://xn--megsb-l11b.com
http://google.tm/url?q=https://xn--megsb-l11b.com
https://maps.google.co.bw/url?q=https://xn--megsb-l11b.com
http://www.google.vu/url?q=https://xn--megsb-l11b.com
http://maps.google.lu/url?q=https://xn--megsb-l11b.com
http://maps.google.lv/url?q=https://xn--megsb-l11b.com
https://images.google.je/url?q=https://xn--megsb-l11b.com
https://www.google.co.ve/url?q=https://xn--megsb-l11b.com
https://images.google.com.ng/url?q=https://xn--megsb-l11b.com
http://googlemaps.com/url?q=https://xn--megsb-l11b.com
http://maps.google.com.fj/url?q=https://xn--megsb-l11b.com
http://plus.google.com/url?q=https://xn--megsb-l11b.com
http://plus.gngjd.com/url?q=https://xn--megsb-l11b.com
http://google.com.af/url?q=https://xn--megsb-l11b.com
https://images.google.md/url?q=https://xn--megsb-l11b.com
https://www.google.com.mm/url?q=https://xn--megsb-l11b.com
https://maps.google.st/url?q=https://xn--megsb-l11b.com
http://maps.google.cat/url?q=https://xn--megsb-l11b.com
http://google.co.jp/url?q=https://xn--megsb-l11b.com
https://maps.google.lk/url?q=https://xn--megsb-l11b.com
http://maps.google.co.kr/url?q=https://xn--megsb-l11b.com
http://google.com.bd/url?q=https://xn--megsb-l11b.com
https://images.google.co.ke/url?q=https://xn--megsb-l11b.com
https://www.google.gr/url?q=https://xn--megsb-l11b.com
https://images.google.ac/url?q=https://xn--megsb-l11b.com
http://maps.google.ie/url?q=https://xn--megsb-l11b.com
http://google.com.tn/url?q=https://xn--megsb-l11b.com
https://maps.google.iq/url?q=https://xn--megsb-l11b.com
http://images.google.com.lb/url?q=https://xn--megsb-l11b.com
https://images.google.ga/url?q=https://xn--megsb-l11b.com
http://maps.google.nl/url?q=https://xn--megsb-l11b.com
https://maps.google.com.ai/url?q=https://xn--megsb-l11b.com
https://maps.google.cl/url?q=https://xn--megsb-l11b.com
http://maps.google.co.id/url?q=https://xn--megsb-l11b.com
https://maps.google.fm/url?q=https://xn--megsb-l11b.com
https://maps.google.com.ni/url?q=https://xn--megsb-l11b.com
https://maps.google.bi/url?q=https://xn--megsb-l11b.com
https://www.google.ki/url?q=https://xn--megsb-l11b.com
https://google.dm/url?q=https://xn--megsb-l11b.com
https://images.google.mn/url?q=https://xn--megsb-l11b.com
https://images.google.gy/url?q=https://xn--megsb-l11b.com
https://google.com.my/url?q=https://xn--megsb-l11b.com
http://maps.google.tg/url?q=https://xn--megsb-l11b.com
https://images.google.com.sa/url?q=https://xn--megsb-l11b.com
https://maps.google.com.om/url?q=https://xn--megsb-l11b.com
https://images.google.com.vn/url?q=https://xn--megsb-l11b.com
https://maps.google.co.hu/url?q=https://xn--megsb-l11b.com
http://maps.google.be/url?q=https://xn--megsb-l11b.com
http://images.google.com.bh/url?q=https://xn--megsb-l11b.com
https://images.google.com.kw/url?q=https://xn--megsb-l11b.com
https://maps.google.gp/url?q=https://xn--megsb-l11b.com
http://images.google.com.af/url?q=https://xn--megsb-l11b.com
http://images.google.com.bz/url?q=https://xn--megsb-l11b.com
https://maps.google.se/url?q=https://xn--megsb-l11b.com
https://maps.google.cg/url?q=https://xn--megsb-l11b.com
https://images.google.mk/url?q=https://xn--megsb-l11b.com
https://www.google.com.uy/url?q=https://xn--megsb-l11b.com
http://maps.google.cm/url?q=https://xn--megsb-l11b.com
https://maps.google.cd/url?q=https://xn--megsb-l11b.com
https://maps.google.mg/url?q=https://xn--megsb-l11b.com
https://images.google.am/url?q=https://xn--megsb-l11b.com
https://images.google.com.tn/url?q=https://xn--megsb-l11b.com
https://images.google.co.id/url?q=https://xn--megsb-l11b.com
https://maps.google.com.bd/url?q=https://xn--megsb-l11b.com
https://maps.google.co.tz/url?q=https://xn--megsb-l11b.com
http://images.google.com.ai/url?q=https://xn--megsb-l11b.com
http://images.google.bf/url?q=https://xn--megsb-l11b.com
http://maps.google.co.il/url?q=https://xn--megsb-l11b.com
http://maps.google.co.zm/url?q=https://xn--megsb-l11b.com
http://images.google.com.qa/url?q=https://xn--megsb-l11b.com
http://images.google.lk/url?q=https://xn--megsb-l11b.com
http://maps.google.cv/url?q=https://xn--megsb-l11b.com
http://maps.google.im/url?q=https://xn--megsb-l11b.com
https://maps.google.com.gh/url?q=https://xn--megsb-l11b.com
https://maps.google.co.ao/url?q=https://xn--megsb-l11b.com
http://maps.google.co.th/url?q=https://xn--megsb-l11b.com
https://maps.google.gl/url?q=https://xn--megsb-l11b.com
https://maps.google.com.ua/url?q=https://xn--megsb-l11b.com
http://maps.google.td/url?q=https://xn--megsb-l11b.com
https://google.me/url?q=https://xn--megsb-l11b.com
https://maps.google.bj/url?q=https://xn--megsb-l11b.com
https://maps.google.pl/url?q=https://xn--megsb-l11b.com
http://maps.google.com.tr/url?q=https://xn--megsb-l11b.com
https://images.google.sc/url?q=https://xn--megsb-l11b.com
https://images.google.com.et/url?q=https://xn--megsb-l11b.com
https://maps.google.dk/url?q=https://xn--megsb-l11b.com
https://images.google.iq/url?q=https://xn--megsb-l11b.com
http://maps.google.sc/url?q=https://xn--megsb-l11b.com
http://images.google.co.bw/url?q=https://xn--megsb-l11b.com
http://images.google.dz/url?q=https://xn--megsb-l11b.com
https://maps.google.ht/url?q=https://xn--megsb-l11b.com
https://google.cat/url?q=https://xn--megsb-l11b.com
http://maps.google.com.bh/url?q=https://xn--megsb-l11b.com
http://maps.google.ml/url?q=https://xn--megsb-l11b.com
https://maps.google.com.pl/url?q=https://xn--megsb-l11b.com
https://maps.google.com.vc/url?q=https://xn--megsb-l11b.com
https://maps.google.com.au/url?q=https://xn--megsb-l11b.com
http://images.g.cn/url?q=https://xn--megsb-l11b.com
http://maps.google.co.ck/url?q=https://xn--megsb-l11b.com
http://maps.google.sh/url?q=https://xn--megsb-l11b.com
http://maps.google.com.sb/url?q=https://xn--megsb-l11b.com
http://maps.google.sk/url?q=https://xn--megsb-l11b.com
http://images.google.rs/url?q=https://xn--megsb-l11b.com
http://maps.google.dj/url?q=https://xn--megsb-l11b.com
http://maps.google.si/url?q=https://xn--megsb-l11b.com
http://images.google.ps/url?q=https://xn--megsb-l11b.com
http://images.google.com.pg/url?q=https://xn--megsb-l11b.com
https://images.google.net/url?q=https://xn--megsb-l11b.com
http://images.google.com.sl/url?q=https://xn--megsb-l11b.com
https://images.google.gp/url?q=https://xn--megsb-l11b.com
https://maps.gngjd.com/url?q=https://xn--megsb-l11b.com
https://images.google.co.zw/url?q=https://xn--megsb-l11b.com
cephalexin over the counter purchase
Having read this I thought it was rather enlightening. I
appreciate you finding the time and effort to put
this information together. I once again find myself spending a significant amount of time both reading and leaving comments.
But so what, it was still worthwhile!
order tetracycline online
myambutol without prescription
lisinopril 5 mg brand name in india
zyvox cost
canadian flomax
biaxin canada
ajanta pharma kamagra jelly price
glucophage 850
buy viagra online
Online poker
uk pharmacy no prescription
online pharmacy prescription
Regards, I appreciate it.
write my research paper write a paper for me professional paper writers write my term paper
flomax cost comparison
retino cream
biaxin brand name
sildalis
flomax medication
https://images.google.as/url?q=https://xn--mga-sb-w4a.com
https://images.google.off.ai/url?q=https://xn--mga-sb-w4a.com
https://images.google.com.ag/url?q=https://xn--mga-sb-w4a.com
https://images.google.com.ar/url?q=https://xn--mga-sb-w4a.com
https://images.google.com.au/url?q=https://xn--mga-sb-w4a.com
https://images.google.at/url?q=https://xn--mga-sb-w4a.com
https://images.google.az/url?q=https://xn--mga-sb-w4a.com
https://images.google.be/url?q=https://xn--mga-sb-w4a.com
https://images.google.com.br/url?q=https://xn--mga-sb-w4a.com
https://images.google.vg/url?q=https://xn--mga-sb-w4a.com
https://images.google.bi/url?q=https://xn--mga-sb-w4a.com
https://images.google.ca/url?q=https://xn--mga-sb-w4a.com
https://images.google.td/url?q=https://xn--mga-sb-w4a.com
https://images.google.cl/url?q=https://xn--mga-sb-w4a.com
https://images.google.com.co/url?q=https://xn--mga-sb-w4a.com
https://images.google.co.cr/url?q=https://xn--mga-sb-w4a.com
https://images.google.ci/url?q=https://xn--mga-sb-w4a.com
https://images.google.com.cu/url?q=https://xn--mga-sb-w4a.com
https://images.google.cd/url?q=https://xn--mga-sb-w4a.com
https://images.google.dk/url?q=https://xn--mga-sb-w4a.com
https://images.google.dj/url?q=https://xn--mga-sb-w4a.com
https://images.google.com.do/url?q=https://xn--mga-sb-w4a.com
https://images.google.com.ec/url?q=https://xn--mga-sb-w4a.com
https://images.google.com.sv/url?q=https://xn--mga-sb-w4a.com
https://images.google.fm/url?q=https://xn--mga-sb-w4a.com
https://images.google.com.fj/url?q=https://xn--mga-sb-w4a.com
https://images.google.fi/url?q=https://xn--mga-sb-w4a.com
https://images.google.fr/url?q=https://xn--mga-sb-w4a.com
https://images.google.gm/url?q=https://xn--mga-sb-w4a.com
https://images.google.ge/url?q=https://xn--mga-sb-w4a.com
https://images.google.de/url?q=https://xn--mga-sb-w4a.com
https://images.google.com.gi/url?q=https://xn--mga-sb-w4a.com
https://images.google.com.gr/url?q=https://xn--mga-sb-w4a.com
https://images.google.gl/url?q=https://xn--mga-sb-w4a.com
https://images.google.gg/url?q=https://xn--mga-sb-w4a.com
https://images.google.hn/url?q=https://xn--mga-sb-w4a.com
https://images.google.com.hk/url?q=https://xn--mga-sb-w4a.com
https://images.google.co.hu/url?q=https://xn--mga-sb-w4a.com
https://images.google.co.in/url?q=https://xn--mga-sb-w4a.com
https://images.google.ie/url?q=https://xn--mga-sb-w4a.com
https://images.google.co.im/url?q=https://xn--mga-sb-w4a.com
https://images.google.co.il/url?q=https://xn--mga-sb-w4a.com
https://images.google.it/url?q=https://xn--mga-sb-w4a.com
https://images.google.com.jm/url?q=https://xn--mga-sb-w4a.com
https://images.google.co.jp/url?q=https://xn--mga-sb-w4a.com
https://images.google.co.je/url?q=https://xn--mga-sb-w4a.com
https://images.google.kz/url?q=https://xn--mga-sb-w4a.com
https://images.google.co.kr/url?q=https://xn--mga-sb-w4a.com
https://images.google.lv/url?q=https://xn--mga-sb-w4a.com
https://images.google.co.ls/url?q=https://xn--mga-sb-w4a.com
https://images.google.li/url?q=https://xn--mga-sb-w4a.com
https://images.google.lt/url?q=https://xn--mga-sb-w4a.com
https://images.google.lu/url?q=https://xn--mga-sb-w4a.com
https://images.google.mw/url?q=https://xn--mga-sb-w4a.com
https://images.google.com.my/url?q=https://xn--mga-sb-w4a.com
https://images.google.com.mt/url?q=https://xn--mga-sb-w4a.com
https://images.google.mu/url?q=https://xn--mga-sb-w4a.com
https://images.google.com.mx/url?q=https://xn--mga-sb-w4a.com
https://images.google.ms/url?q=https://xn--mga-sb-w4a.com
https://images.google.com.na/url?q=https://xn--mga-sb-w4a.com
https://images.google.com.np/url?q=https://xn--mga-sb-w4a.com
https://images.google.nl/url?q=https://xn--mga-sb-w4a.com
https://images.google.co.nz/url?q=https://xn--mga-sb-w4a.com
https://images.google.com.ni/url?q=https://xn--mga-sb-w4a.com
https://images.google.com.nf/url?q=https://xn--mga-sb-w4a.com
https://images.google.com.pk/url?q=https://xn--mga-sb-w4a.com
https://images.google.com.pa/url?q=https://xn--mga-sb-w4a.com
https://images.google.com.py/url?q=https://xn--mga-sb-w4a.com
https://images.google.com.pe/url?q=https://xn--mga-sb-w4a.com
https://images.google.com.ph/url?q=https://xn--mga-sb-w4a.com
https://images.google.pn/url?q=https://xn--mga-sb-w4a.com
https://images.google.pl/url?q=https://xn--mga-sb-w4a.com
https://images.google.pt/url?q=https://xn--mga-sb-w4a.com
https://images.google.com.pr/url?q=https://xn--mga-sb-w4a.com
https://images.google.cg/url?q=https://xn--mga-sb-w4a.com
https://images.google.ro/url?q=https://xn--mga-sb-w4a.com
https://images.google.ru/url?q=https://xn--mga-sb-w4a.com
https://images.google.rw/url?q=https://xn--mga-sb-w4a.com
https://images.google.sh/url?q=https://xn--mga-sb-w4a.com
https://images.google.sm/url?q=https://xn--mga-sb-w4a.com
https://images.google.com.sg/url?q=https://xn--mga-sb-w4a.com
https://images.google.sk/url?q=https://xn--mga-sb-w4a.com
https://images.google.co.za/url?q=https://xn--mga-sb-w4a.com
https://images.google.es/url?q=https://xn--mga-sb-w4a.com
https://images.google.se/url?q=https://xn--mga-sb-w4a.com
https://images.google.ch/url?q=https://xn--mga-sb-w4a.com
https://images.google.com.tw/url?q=https://xn--mga-sb-w4a.com
https://images.google.co.th/url?q=https://xn--mga-sb-w4a.com
https://images.google.tt/url?q=https://xn--mga-sb-w4a.com
https://images.google.com.tr/url?q=https://xn--mga-sb-w4a.com
https://images.google.com.ua/url?q=https://xn--mga-sb-w4a.com
https://images.google.ae/url?q=https://xn--mga-sb-w4a.com
https://images.google.co.uk/url?q=https://xn--mga-sb-w4a.com
https://images.google.com.uy/url?q=https://xn--mga-sb-w4a.com
https://images.google.uz/url?q=https://xn--mga-sb-w4a.com
https://images.google.vu/url?q=https://xn--mga-sb-w4a.com
https://images.google.co.ve/url?q=https://xn--mga-sb-w4a.com
https://www.google.co.ao/url?q=https://xn--mga-sb-w4a.com
https://images.google.im/url?q=https://xn--mga-sb-w4a.com
https://images.google.dm/url?q=https://xn--mga-sb-w4a.com
https://google.com.pa/url?q=https://xn--mga-sb-w4a.com
http://maps.google.mw/url?q=https://xn--mga-sb-w4a.com
https://google.ac/url?q=https://xn--mga-sb-w4a.com
https://google.com.gh/url?q=https://xn--mga-sb-w4a.com
https://google.dz/url?q=https://xn--mga-sb-w4a.com
http://images.google.ki/url?q=https://xn--mga-sb-w4a.com
http://www.google.im/url?q=https://xn--mga-sb-w4a.com
https://google.com.mx/url?q=https://xn--mga-sb-w4a.com
https://www.google.cz/url?q=https://xn--mga-sb-w4a.com
http://google.hr/url?q=https://xn--mga-sb-w4a.com
https://google.ml/url?q=https://xn--mga-sb-w4a.com
https://www.google.com.au/url?q=https://xn--mga-sb-w4a.com
https://images.google.bs/url?q=https://xn--mga-sb-w4a.com
https://google.co.tz/url?q=https://xn--mga-sb-w4a.com
http://google.cg/url?q=https://xn--mga-sb-w4a.com
http://maps.google.is/url?q=https://xn--mga-sb-w4a.com
http://google.si/url?q=https://xn--mga-sb-w4a.com
http://google.com.py/url?q=https://xn--mga-sb-w4a.com
http://maps.google.co.cr/url?q=https://xn--mga-sb-w4a.com
http://www.google.mk/url?q=https://xn--mga-sb-w4a.com
http://www.google.ge/url?q=https://xn--mga-sb-w4a.com
https://images.google.ml/url?q=https://xn--mga-sb-w4a.com
https://www.google.com.sa/url?q=https://xn--mga-sb-w4a.com
http://google.mg/url?q=https://xn--mga-sb-w4a.com
http://google.com.ec/url?q=https://xn--mga-sb-w4a.com
https://google.rs/url?q=https://xn--mga-sb-w4a.com
https://www.google.co.hu/url?q=https://xn--mga-sb-w4a.com
http://google.md/url?q=https://xn--mga-sb-w4a.com
https://images.google.hu/url?q=https://xn--mga-sb-w4a.com
https://www.google.com.tw/url?q=https://xn--mga-sb-w4a.com
https://google.ae/url?q=https://xn--mga-sb-w4a.com
https://images.google.jo/url?q=https://xn--mga-sb-w4a.com
http://images.google.tm/url?q=https://xn--mga-sb-w4a.com
https://images.google.com.mm/url?q=https://xn--mga-sb-w4a.com
https://maps.google.vu/url?q=https://xn--mga-sb-w4a.com
https://maps.google.co.ls/url?q=https://xn--mga-sb-w4a.com
https://www.google.com.cy/url?q=https://xn--mga-sb-w4a.com
http://google.com.lb/url?q=https://xn--mga-sb-w4a.com
http://google.co.kr/url?q=https://xn--mga-sb-w4a.com
http://images.google.nu/url?q=https://xn--mga-sb-w4a.com
http://google.cl/url?q=https://xn--mga-sb-w4a.com
http://www.google.com.bo/url?q=https://xn--mga-sb-w4a.com
https://google.ad/url?q=https://xn--mga-sb-w4a.com
https://maps.google.pt/url?q=https://xn--mga-sb-w4a.com
https://maps.google.es/url?q=https://xn--mga-sb-w4a.com
https://maps.google.sn/url?q=https://xn--mga-sb-w4a.com
http://google.tk/url?q=https://xn--mga-sb-w4a.com
https://google.com.bn/url?q=https://xn--mga-sb-w4a.com
https://google.com.ua/url?q=https://xn--mga-sb-w4a.com
https://www.google.com.sg/url?q=https://xn--mga-sb-w4a.com
https://images.google.info/url?q=https://xn--mga-sb-w4a.com
https://maps.google.de/url?q=https://xn--mga-sb-w4a.com
https://images.google.cv/url?q=https://xn--mga-sb-w4a.com
http://google.com.nf/url?q=https://xn--mga-sb-w4a.com
https://images.google.com.ly/url?q=https://xn--mga-sb-w4a.com
http://images.google.tg/url?q=https://xn--mga-sb-w4a.com
http://google.cv/url?q=https://xn--mga-sb-w4a.com
http://gngjd.com/url?q=https://xn--mga-sb-w4a.com
http://www.google.je/url?q=https://xn--mga-sb-w4a.com
http://maps.google.by/url?q=https://xn--mga-sb-w4a.com
http://maps.google.fi/url?q=https://xn--mga-sb-w4a.com
https://images.gngjd.com/url?q=https://xn--mga-sb-w4a.com
http://google.ne/url?q=https://xn--mga-sb-w4a.com
http://images.google.kg/url?q=https://xn--mga-sb-w4a.com
https://www.google.cn/url?q=https://xn--mga-sb-w4a.com
https://google.am/url?q=https://xn--mga-sb-w4a.com
http://google.com.ly/url?q=https://xn--mga-sb-w4a.com
https://google.iq/url?q=https://xn--mga-sb-w4a.com
https://google.com.sv/url?q=https://xn--mga-sb-w4a.com
https://google.sc/url?q=https://xn--mga-sb-w4a.com
http://google.kg/url?q=https://xn--mga-sb-w4a.com
http://google.li/url?q=https://xn--mga-sb-w4a.com
http://images.google.al/url?q=https://xn--mga-sb-w4a.com
https://maps.google.je/url?q=https://xn--mga-sb-w4a.com
http://maps.google.to/url?q=https://xn--mga-sb-w4a.com
http://google.co.cr/url?q=https://xn--mga-sb-w4a.com
http://images.google.com.tj/url?q=https://xn--mga-sb-w4a.com
https://www.google.com.ph/url?q=https://xn--mga-sb-w4a.com
https://maps.google.com.bn/url?q=https://xn--mga-sb-w4a.com
https://www.google.as/url?q=https://xn--mga-sb-w4a.com
https://images.google.co.ao/url?q=https://xn--mga-sb-w4a.com
http://maps.google.com.bo/url?q=https://xn--mga-sb-w4a.com
https://maps.google.com/url?q=https://xn--mga-sb-w4a.com
https://www.google.com.bh/url?q=https://xn--mga-sb-w4a.com
https://maps.google.com.mm/url?q=https://xn--mga-sb-w4a.com
http://google.com.gi/url?q=https://xn--mga-sb-w4a.com
http://maps.google.ba/url?q=https://xn--mga-sb-w4a.com
http://google.co.id/url?q=https://xn--mga-sb-w4a.com
http://google.be/url?q=https://xn--mga-sb-w4a.com
http://images.google.mg/url?q=https://xn--mga-sb-w4a.com
http://google.com.ar/url?q=https://xn--mga-sb-w4a.com
https://maps.google.co.za/url?q=https://xn--mga-sb-w4a.com
https://www.google.gp/url?q=https://xn--mga-sb-w4a.com
http://www.google.sh/url?q=https://xn--mga-sb-w4a.com
https://images.google.ee/url?q=https://xn--mga-sb-w4a.com
https://www.google.rw/url?q=https://xn--mga-sb-w4a.com
http://images.google.si/url?q=https://xn--mga-sb-w4a.com
https://www.google.at/url?q=https://xn--mga-sb-w4a.com
http://maps.google.at/url?q=https://xn--mga-sb-w4a.com
http://maps.google.co.in/url?q=https://xn--mga-sb-w4a.com
https://maps.google.ga/url?q=https://xn--mga-sb-w4a.com
http://maps.google.sm/url?q=https://xn--mga-sb-w4a.com
http://google.ms/url?q=https://xn--mga-sb-w4a.com
https://images.google.com.gh/url?q=https://xn--mga-sb-w4a.com
http://maps.google.cn/url?q=https://xn--mga-sb-w4a.com
https://www.google.com.na/url?q=https://xn--mga-sb-w4a.com
https://maps.google.hr/url?q=https://xn--mga-sb-w4a.com
https://google.ci/url?q=https://xn--mga-sb-w4a.com
https://images.google.hr/url?q=https://xn--mga-sb-w4a.com
http://maps.google.com.do/url?q=https://xn--mga-sb-w4a.com
http://google.lk/url?q=https://xn--mga-sb-w4a.com
http://images.google.cn/url?q=https://xn--mga-sb-w4a.com
http://www.bon-vivant.net/url?q=https://xn--mga-sb-w4a.com
http://maps.google.com.gt/url?q=https://xn--mga-sb-w4a.com
http://www.google.com.ag/url?q=https://xn--mga-sb-w4a.com
https://maps.google.mu/url?q=https://xn--mga-sb-w4a.com
https://google.com.ng/url?q=https://xn--mga-sb-w4a.com
https://www.google.co.uk/url?q=https://xn--mga-sb-w4a.com
https://google.us/url?q=https://xn--mga-sb-w4a.com
https://www.google.com.tr/url?q=https://xn--mga-sb-w4a.com
http://www.google.co.ma/url?q=https://xn--mga-sb-w4a.com
https://maps.google.co.zw/url?q=https://xn--mga-sb-w4a.com
https://www.google.bs/url?q=https://xn--mga-sb-w4a.com
https://www.google.pl/url?q=https://xn--mga-sb-w4a.com
http://www.googleadservices.com/url?q=https://xn--mga-sb-w4a.com
http://google.kz/url?q=https://xn--mga-sb-w4a.com
https://google.com.mt/url?q=https://xn--mga-sb-w4a.com
http://www.google.co.zw/url?q=https://xn--mga-sb-w4a.com
https://maps.google.ne/url?q=https://xn--mga-sb-w4a.com
https://google.com.qa/url?q=https://xn--mga-sb-w4a.com
https://google.se/url?q=https://xn--mga-sb-w4a.com
http://www.google.mw/url?q=https://xn--mga-sb-w4a.com
https://maps.google.co.mz/url?q=https://xn--mga-sb-w4a.com
http://maps.google.com.sv/url?q=https://xn--mga-sb-w4a.com
https://www.google.sm/url?q=https://xn--mga-sb-w4a.com
https://maps.google.com.tw/url?q=https://xn--mga-sb-w4a.com
https://google.ca/url?q=https://xn--mga-sb-w4a.com
https://www.google.is/url?q=https://xn--mga-sb-w4a.com
https://google.com.jm/url?q=https://xn--mga-sb-w4a.com
http://images.google.co.ug/url?q=https://xn--mga-sb-w4a.com
https://maps.google.com.kh/url?q=https://xn--mga-sb-w4a.com
http://maps.google.tl/url?q=https://xn--mga-sb-w4a.com
http://www.google.co.nz/url?q=https://xn--mga-sb-w4a.com
https://www.google.gg/url?q=https://xn--mga-sb-w4a.com
https://google.to/url?q=https://xn--mga-sb-w4a.com
https://google.ro/url?q=https://xn--mga-sb-w4a.com
http://google.td/url?q=https://xn--mga-sb-w4a.com
https://www.google.by/url?q=https://xn--mga-sb-w4a.com
https://www.google.nl/url?q=https://xn--mga-sb-w4a.com
http://maps.google.ci/url?q=https://xn--mga-sb-w4a.com
http://maps.google.dz/url?q=https://xn--mga-sb-w4a.com
https://google.hu/url?q=https://xn--mga-sb-w4a.com
http://images.google.ht/url?q=https://xn--mga-sb-w4a.com
http://google.mv/url?q=https://xn--mga-sb-w4a.com
https://google.cf/url?q=https://xn--mga-sb-w4a.com
http://maps.google.com.ly/url?q=https://xn--mga-sb-w4a.com
http://www.google.nu/url?q=https://xn--mga-sb-w4a.com
http://google.com.tj/url?q=https://xn--mga-sb-w4a.com
https://maps.google.com.mt/url?q=https://xn--mga-sb-w4a.com
https://google.so/url?q=https://xn--mga-sb-w4a.com
http://images.google.bj/url?q=https://xn--mga-sb-w4a.com
https://maps.google.la/url?q=https://xn--mga-sb-w4a.com
https://images.google.us/url?q=https://xn--mga-sb-w4a.com
https://images.google.com.eg/url?q=https://xn--mga-sb-w4a.com
https://images.google.cf/url?q=https://xn--mga-sb-w4a.com
https://images.google.la/url?q=https://xn--mga-sb-w4a.com
http://maps.google.com.ag/url?q=https://xn--mga-sb-w4a.com
http://google.ga/url?q=https://xn--mga-sb-w4a.com
http://google.co.uz/url?q=https://xn--mga-sb-w4a.com
http://maps.google.no/url?q=https://xn--mga-sb-w4a.com
https://www.google.gl/url?q=https://xn--mga-sb-w4a.com
http://images.google.co.vi/url?q=https://xn--mga-sb-w4a.com
https://images.google.ne/url?q=https://xn--mga-sb-w4a.com
https://google.com.om/url?q=https://xn--mga-sb-w4a.com
http://maps.google.lt/url?q=https://xn--mga-sb-w4a.com
https://maps.google.kg/url?q=https://xn--mga-sb-w4a.com
http://www.google.com.hk/url?q=https://xn--mga-sb-w4a.com
https://google.com.co/url?q=https://xn--mga-sb-w4a.com
https://google.dk/url?q=https://xn--mga-sb-w4a.com
https://maps.google.com.sa/url?q=https://xn--mga-sb-w4a.com
http://google.com.fj/url?q=https://xn--mga-sb-w4a.com
http://maps.google.com.ec/url?q=https://xn--mga-sb-w4a.com
https://maps.google.mn/url?q=https://xn--mga-sb-w4a.com
https://maps.google.bf/url?q=https://xn--mga-sb-w4a.com
https://www.google.tt/url?q=https://xn--mga-sb-w4a.com
https://www.google.dj/url?q=https://xn--mga-sb-w4a.com
https://www.google.com.pr/url?q=https://xn--mga-sb-w4a.com
https://maps.google.ws/url?q=https://xn--mga-sb-w4a.com
http://google.jo/url?q=https://xn--mga-sb-w4a.com
https://google.co.ug/url?q=https://xn--mga-sb-w4a.com
https://images.google.com.bd/url?q=https://xn--mga-sb-w4a.com
https://google.tg/url?q=https://xn--mga-sb-w4a.com
http://maps.google.dm/url?q=https://xn--mga-sb-w4a.com
https://www.google.pn/url?q=https://xn--mga-sb-w4a.com
https://www.google.com.et/url?q=https://xn--mga-sb-w4a.com
http://maps.google.com.jm/url?q=https://xn--mga-sb-w4a.com
http://www.google.bg/url?q=https://xn--mga-sb-w4a.com
http://maps.google.hu/url?q=https://xn--mga-sb-w4a.com
https://maps.google.kz/url?q=https://xn--mga-sb-w4a.com
https://images.google.com.pl/url?q=https://xn--mga-sb-w4a.com
http://www.google.st/url?q=https://xn--mga-sb-w4a.com
https://maps.google.com.kw/url?q=https://xn--mga-sb-w4a.com
https://maps.google.ru/url?q=https://xn--mga-sb-w4a.com
https://google.co.mz/url?q=https://xn--mga-sb-w4a.com
http://www.google.co.ls/url?q=https://xn--mga-sb-w4a.com
https://www.google.az/url?q=https://xn--mga-sb-w4a.com
http://maps.google.co.uk/url?q=https://xn--mga-sb-w4a.com
https://www.google.com.do/url?q=https://xn--mga-sb-w4a.com
http://www.google.es/url?q=https://xn--mga-sb-w4a.com
http://google.gm/url?q=https://xn--mga-sb-w4a.com
http://images.google.so/url?q=https://xn--mga-sb-w4a.com
https://www.google.com.pk/url?q=https://xn--mga-sb-w4a.com
https://www.google.com.sb/url?q=https://xn--mga-sb-w4a.com
https://images.google.ad/url?q=https://xn--mga-sb-w4a.com
http://google.sn/url?q=https://xn--mga-sb-w4a.com
http://google.ps/url?q=https://xn--mga-sb-w4a.com
https://maps.google.bg/url?q=https://xn--mga-sb-w4a.com
https://images.google.com.cy/url?q=https://xn--mga-sb-w4a.com
http://www.google.pt/url?q=https://xn--mga-sb-w4a.com
https://images.google.to/url?q=https://xn--mga-sb-w4a.com
http://images.google.co.uz/url?q=https://xn--mga-sb-w4a.com
http://google.com.sl/url?q=https://xn--mga-sb-w4a.com
http://www.google.gy/url?q=https://xn--mga-sb-w4a.com
http://www.google.cd/url?q=https://xn--mga-sb-w4a.com
https://maps.google.com.my/url?q=https://xn--mga-sb-w4a.com
http://www.google.com.ai/url?q=https://xn--mga-sb-w4a.com
https://google.hn/url?q=https://xn--mga-sb-w4a.com
http://images.google.ba/url?q=https://xn--mga-sb-w4a.com
http://maps.google.com.pe/url?q=https://xn--mga-sb-w4a.com
http://google.de/url?q=https://xn--mga-sb-w4a.com
http://maps.google.com.gi/url?q=https://xn--mga-sb-w4a.com
https://images.google.cat/url?q=https://xn--mga-sb-w4a.com
https://www.google.co.ck/url?q=https://xn--mga-sb-w4a.com
https://images.google.com.bn/url?q=https://xn--mga-sb-w4a.com
http://maps.google.ae/url?q=https://xn--mga-sb-w4a.com
http://images.google.no/url?q=https://xn--mga-sb-w4a.com
http://maps.google.bs/url?q=https://xn--mga-sb-w4a.com
http://maps.google.gy/url?q=https://xn--mga-sb-w4a.com
http://maps.google.com.pa/url?q=https://xn--mga-sb-w4a.com
https://google.cc/url?q=https://xn--mga-sb-w4a.com
http://google.co.th/url?q=https://xn--mga-sb-w4a.com
http://maps.google.com.mx/url?q=https://xn--mga-sb-w4a.com
http://www.google.lu/url?q=https://xn--mga-sb-w4a.com
https://google.bf/url?q=https://xn--mga-sb-w4a.com
http://www.google.it/url?q=https://xn--mga-sb-w4a.com
http://google.com.br/url?q=https://xn--mga-sb-w4a.com
http://images.google.bg/url?q=https://xn--mga-sb-w4a.com
http://google.co.il/url?q=https://xn--mga-sb-w4a.com
https://google.ws/url?q=https://xn--mga-sb-w4a.com
http://images.google.st/url?q=https://xn--mga-sb-w4a.com
http://duck.com/url?q=https://xn--mga-sb-w4a.com
https://www.google.net/url?q=https://xn--mga-sb-w4a.com
https://images.google.sn/url?q=https://xn--mga-sb-w4a.com
http://maps.google.co.jp/url?q=https://xn--mga-sb-w4a.com
http://www.google.bj/url?q=https://xn--mga-sb-w4a.com
https://maps.google.com.qa/url?q=https://xn--mga-sb-w4a.com
https://maps.google.com.co/url?q=https://xn--mga-sb-w4a.com
http://www.google.ch/url?q=https://xn--mga-sb-w4a.com
http://www.google.com.pe/url?q=https://xn--mga-sb-w4a.com
http://images.google.co.mz/url?q=https://xn--mga-sb-w4a.com
https://www.google.cm/url?q=https://xn--mga-sb-w4a.com
http://maps.google.nr/url?q=https://xn--mga-sb-w4a.com
https://www.google.al/url?q=https://xn--mga-sb-w4a.com
https://google.sk/url?q=https://xn--mga-sb-w4a.com
http://maps.google.rs/url?q=https://xn--mga-sb-w4a.com
http://maps.google.gr/url?q=https://xn--mga-sb-w4a.com
https://google.la/url?q=https://xn--mga-sb-w4a.com
http://maps.google.com.ph/url?q=https://xn--mga-sb-w4a.com
https://www.google.com/url?q=https://xn--mga-sb-w4a.com
http://google.ee/url?q=https://xn--mga-sb-w4a.com
https://google.com.pl/url?q=https://xn--mga-sb-w4a.com
http://maps.google.com.pg/url?q=https://xn--mga-sb-w4a.com
https://google.vg/url?q=https://xn--mga-sb-w4a.com
https://www.google.co.ke/url?q=https://xn--mga-sb-w4a.com
https://maps.google.com.pr/url?q=https://xn--mga-sb-w4a.com
http://www.google.no/url?q=https://xn--mga-sb-w4a.com
https://maps.google.fr/url?q=https://xn--mga-sb-w4a.com
https://maps.google.as/url?q=https://xn--mga-sb-w4a.com
https://google.mn/url?q=https://xn--mga-sb-w4a.com
http://google.com.kh/url?q=https://xn--mga-sb-w4a.com
http://images.google.me/url?q=https://xn--mga-sb-w4a.com
http://maps.google.com.sl/url?q=https://xn--mga-sb-w4a.com
http://maps.google.pn/url?q=https://xn--mga-sb-w4a.com
http://www.google.fr/url?q=https://xn--mga-sb-w4a.com
https://maps.google.com.bz/url?q=https://xn--mga-sb-w4a.com
https://maps.google.com.cu/url?q=https://xn--mga-sb-w4a.com
https://google.com.eg/url?q=https://xn--mga-sb-w4a.com
http://www.google.com.kw/url?q=https://xn--mga-sb-w4a.com
https://google.com.cu/url?q=https://xn--mga-sb-w4a.com
https://www.google.co.in/url?q=https://xn--mga-sb-w4a.com
http://maps.google.tt/url?q=https://xn--mga-sb-w4a.com
http://google.com.gt/url?q=https://xn--mga-sb-w4a.com
http://maps.google.ge/url?q=https://xn--mga-sb-w4a.com
https://maps.google.vg/url?q=https://xn--mga-sb-w4a.com
http://images.google.com.om/url?q=https://xn--mga-sb-w4a.com
http://google.ht/url?q=https://xn--mga-sb-w4a.com
https://maps.google.com.na/url?q=https://xn--mga-sb-w4a.com
http://google.ru/url?q=https://xn--mga-sb-w4a.com
https://maps.google.gg/url?q=https://xn--mga-sb-w4a.com
https://maps.google.com.br/url?q=https://xn--mga-sb-w4a.com
https://maps.google.li/url?q=https://xn--mga-sb-w4a.com
http://www.google.ba/url?q=https://xn--mga-sb-w4a.com
http://maps.google.com.lb/url?q=https://xn--mga-sb-w4a.com
http://images.google.ws/url?q=https://xn--mga-sb-w4a.com
http://images.google.com.gt/url?q=https://xn--mga-sb-w4a.com
http://maps.g.cn/url?q=https://xn--mga-sb-w4a.com
http://google.co.zm/url?q=https://xn--mga-sb-w4a.com
https://www.google.tl/url?q=https://xn--mga-sb-w4a.com
http://www.google.com.np/url?q=https://xn--mga-sb-w4a.com
https://maps.google.co.nz/url?q=https://xn--mga-sb-w4a.com
http://maps.google.cf/url?q=https://xn--mga-sb-w4a.com
http://maps.google.com.et/url?q=https://xn--mga-sb-w4a.com
http://maps.google.rw/url?q=https://xn--mga-sb-w4a.com
https://maps.google.co.ve/url?q=https://xn--mga-sb-w4a.com
https://images.google.co.ck/url?q=https://xn--mga-sb-w4a.com
https://images.google.co.zm/url?q=https://xn--mga-sb-w4a.com
https://www.google.mu/url?q=https://xn--mga-sb-w4a.com
https://maps.google.com.py/url?q=https://xn--mga-sb-w4a.com
http://www.google.lv/url?q=https://xn--mga-sb-w4a.com
http://maps.google.co.ug/url?q=https://xn--mga-sb-w4a.com
https://maps.google.it/url?q=https://xn--mga-sb-w4a.com
https://google.fi/url?q=https://xn--mga-sb-w4a.com
https://maps.google.ms/url?q=https://xn--mga-sb-w4a.com
https://maps.google.mv/url?q=https://xn--mga-sb-w4a.com
http://maps.google.com.eg/url?q=https://xn--mga-sb-w4a.com
https://maps.google.so/url?q=https://xn--mga-sb-w4a.com
http://www.google.nr/url?q=https://xn--mga-sb-w4a.com
https://maps.google.com.ar/url?q=https://xn--mga-sb-w4a.com
http://images.google.com.bo/url?q=https://xn--mga-sb-w4a.com
https://maps.google.tk/url?q=https://xn--mga-sb-w4a.com
http://maps.google.com.hk/url?q=https://xn--mga-sb-w4a.com
https://www.google.com.vn/url?q=https://xn--mga-sb-w4a.com
https://www.google.bi/url?q=https://xn--mga-sb-w4a.com
https://images.google.co.tz/url?q=https://xn--mga-sb-w4a.com
http://google.co.bw/url?q=https://xn--mga-sb-w4a.com
https://images.google.tl/url?q=https://xn--mga-sb-w4a.com
http://maps.google.com.sg/url?q=https://xn--mga-sb-w4a.com
https://images.google.mv/url?q=https://xn--mga-sb-w4a.com
https://www.google.info/url?q=https://xn--mga-sb-w4a.com
https://www.google.com.bz/url?q=https://xn--mga-sb-w4a.com
http://maps.google.ee/url?q=https://xn--mga-sb-w4a.com
http://google.co.za/url?q=https://xn--mga-sb-w4a.com
http://www.g.cn/url?q=https://xn--mga-sb-w4a.com
https://maps.google.ad/url?q=https://xn--mga-sb-w4a.com
https://maps.google.hn/url?q=https://xn--mga-sb-w4a.com
https://images.google.is/url?q=https://xn--mga-sb-w4a.com
https://maps.google.ca/url?q=https://xn--mga-sb-w4a.com
http://maps.google.ro/url?q=https://xn--mga-sb-w4a.com
https://images.google.com.kh/url?q=https://xn--mga-sb-w4a.com
http://google.com.pg/url?q=https://xn--mga-sb-w4a.com
https://maps.google.co.vi/url?q=https://xn--mga-sb-w4a.com
http://maps.google.com.np/url?q=https://xn--mga-sb-w4a.com
https://images.google.tk/url?q=https://xn--mga-sb-w4a.com
http://images.google.nr/url?q=https://xn--mga-sb-w4a.com
http://maps.google.com.ng/url?q=https://xn--mga-sb-w4a.com
https://maps.google.ki/url?q=https://xn--mga-sb-w4a.com
https://images.google.cm/url?q=https://xn--mga-sb-w4a.com
http://maps.google.gm/url?q=https://xn--mga-sb-w4a.com
https://images.google.by/url?q=https://xn--mga-sb-w4a.com
https://google.fm/url?q=https://xn--mga-sb-w4a.com
http://google.co.vi/url?q=https://xn--mga-sb-w4a.com
http://maps.google.cz/url?q=https://xn--mga-sb-w4a.com
https://images.google.co.ma/url?q=https://xn--mga-sb-w4a.com
http://www.google.com.vc/url?q=https://xn--mga-sb-w4a.com
https://maps.google.jo/url?q=https://xn--mga-sb-w4a.com
http://images.google.com.sb/url?q=https://xn--mga-sb-w4a.com
https://images.google.com/url?q=https://xn--mga-sb-w4a.com
https://maps.google.ch/url?q=https://xn--mga-sb-w4a.com
http://maps.google.mk/url?q=https://xn--mga-sb-w4a.com
http://www.google.com.ni/url?q=https://xn--mga-sb-w4a.com
http://images.google.cz/url?q=https://xn--mga-sb-w4a.com
https://images.google.com.vc/url?q=https://xn--mga-sb-w4a.com
https://maps.google.co.ke/url?q=https://xn--mga-sb-w4a.com
http://maps.google.com.uy/url?q=https://xn--mga-sb-w4a.com
https://www.google.ie/url?q=https://xn--mga-sb-w4a.com
https://maps.google.nu/url?q=https://xn--mga-sb-w4a.com
http://images.google.cc/url?q=https://xn--mga-sb-w4a.com
https://images.google.gr/url?q=https://xn--mga-sb-w4a.com
https://google.lt/url?q=https://xn--mga-sb-w4a.com
http://google.tm/url?q=https://xn--mga-sb-w4a.com
https://maps.google.co.bw/url?q=https://xn--mga-sb-w4a.com
http://www.google.vu/url?q=https://xn--mga-sb-w4a.com
http://maps.google.lu/url?q=https://xn--mga-sb-w4a.com
http://maps.google.lv/url?q=https://xn--mga-sb-w4a.com
https://images.google.je/url?q=https://xn--mga-sb-w4a.com
https://www.google.co.ve/url?q=https://xn--mga-sb-w4a.com
https://images.google.com.ng/url?q=https://xn--mga-sb-w4a.com
http://googlemaps.com/url?q=https://xn--mga-sb-w4a.com
http://maps.google.com.fj/url?q=https://xn--mga-sb-w4a.com
http://plus.google.com/url?q=https://xn--mga-sb-w4a.com
http://plus.gngjd.com/url?q=https://xn--mga-sb-w4a.com
http://google.com.af/url?q=https://xn--mga-sb-w4a.com
https://images.google.md/url?q=https://xn--mga-sb-w4a.com
https://www.google.com.mm/url?q=https://xn--mga-sb-w4a.com
https://maps.google.st/url?q=https://xn--mga-sb-w4a.com
http://maps.google.cat/url?q=https://xn--mga-sb-w4a.com
http://google.co.jp/url?q=https://xn--mga-sb-w4a.com
https://maps.google.lk/url?q=https://xn--mga-sb-w4a.com
http://maps.google.co.kr/url?q=https://xn--mga-sb-w4a.com
http://google.com.bd/url?q=https://xn--mga-sb-w4a.com
https://images.google.co.ke/url?q=https://xn--mga-sb-w4a.com
https://www.google.gr/url?q=https://xn--mga-sb-w4a.com
https://images.google.ac/url?q=https://xn--mga-sb-w4a.com
http://maps.google.ie/url?q=https://xn--mga-sb-w4a.com
http://google.com.tn/url?q=https://xn--mga-sb-w4a.com
https://maps.google.iq/url?q=https://xn--mga-sb-w4a.com
http://images.google.com.lb/url?q=https://xn--mga-sb-w4a.com
https://images.google.ga/url?q=https://xn--mga-sb-w4a.com
http://maps.google.nl/url?q=https://xn--mga-sb-w4a.com
https://maps.google.com.ai/url?q=https://xn--mga-sb-w4a.com
https://maps.google.cl/url?q=https://xn--mga-sb-w4a.com
http://maps.google.co.id/url?q=https://xn--mga-sb-w4a.com
https://maps.google.fm/url?q=https://xn--mga-sb-w4a.com
https://maps.google.com.ni/url?q=https://xn--mga-sb-w4a.com
https://maps.google.bi/url?q=https://xn--mga-sb-w4a.com
https://www.google.ki/url?q=https://xn--mga-sb-w4a.com
https://google.dm/url?q=https://xn--mga-sb-w4a.com
https://images.google.mn/url?q=https://xn--mga-sb-w4a.com
https://images.google.gy/url?q=https://xn--mga-sb-w4a.com
https://google.com.my/url?q=https://xn--mga-sb-w4a.com
http://maps.google.tg/url?q=https://xn--mga-sb-w4a.com
https://images.google.com.sa/url?q=https://xn--mga-sb-w4a.com
https://maps.google.com.om/url?q=https://xn--mga-sb-w4a.com
https://images.google.com.vn/url?q=https://xn--mga-sb-w4a.com
https://maps.google.co.hu/url?q=https://xn--mga-sb-w4a.com
http://maps.google.be/url?q=https://xn--mga-sb-w4a.com
http://images.google.com.bh/url?q=https://xn--mga-sb-w4a.com
https://images.google.com.kw/url?q=https://xn--mga-sb-w4a.com
https://maps.google.gp/url?q=https://xn--mga-sb-w4a.com
http://images.google.com.af/url?q=https://xn--mga-sb-w4a.com
http://images.google.com.bz/url?q=https://xn--mga-sb-w4a.com
https://maps.google.se/url?q=https://xn--mga-sb-w4a.com
https://maps.google.cg/url?q=https://xn--mga-sb-w4a.com
https://images.google.mk/url?q=https://xn--mga-sb-w4a.com
https://www.google.com.uy/url?q=https://xn--mga-sb-w4a.com
http://maps.google.cm/url?q=https://xn--mga-sb-w4a.com
https://maps.google.cd/url?q=https://xn--mga-sb-w4a.com
https://maps.google.mg/url?q=https://xn--mga-sb-w4a.com
https://images.google.am/url?q=https://xn--mga-sb-w4a.com
https://images.google.com.tn/url?q=https://xn--mga-sb-w4a.com
https://images.google.co.id/url?q=https://xn--mga-sb-w4a.com
https://maps.google.com.bd/url?q=https://xn--mga-sb-w4a.com
https://maps.google.co.tz/url?q=https://xn--mga-sb-w4a.com
http://images.google.com.ai/url?q=https://xn--mga-sb-w4a.com
http://images.google.bf/url?q=https://xn--mga-sb-w4a.com
http://maps.google.co.il/url?q=https://xn--mga-sb-w4a.com
http://maps.google.co.zm/url?q=https://xn--mga-sb-w4a.com
http://images.google.com.qa/url?q=https://xn--mga-sb-w4a.com
http://images.google.lk/url?q=https://xn--mga-sb-w4a.com
http://maps.google.cv/url?q=https://xn--mga-sb-w4a.com
http://maps.google.im/url?q=https://xn--mga-sb-w4a.com
https://maps.google.com.gh/url?q=https://xn--mga-sb-w4a.com
https://maps.google.co.ao/url?q=https://xn--mga-sb-w4a.com
http://maps.google.co.th/url?q=https://xn--mga-sb-w4a.com
https://maps.google.gl/url?q=https://xn--mga-sb-w4a.com
https://maps.google.com.ua/url?q=https://xn--mga-sb-w4a.com
http://maps.google.td/url?q=https://xn--mga-sb-w4a.com
https://google.me/url?q=https://xn--mga-sb-w4a.com
https://maps.google.bj/url?q=https://xn--mga-sb-w4a.com
https://maps.google.pl/url?q=https://xn--mga-sb-w4a.com
http://maps.google.com.tr/url?q=https://xn--mga-sb-w4a.com
https://images.google.sc/url?q=https://xn--mga-sb-w4a.com
https://images.google.com.et/url?q=https://xn--mga-sb-w4a.com
https://maps.google.dk/url?q=https://xn--mga-sb-w4a.com
https://images.google.iq/url?q=https://xn--mga-sb-w4a.com
http://maps.google.sc/url?q=https://xn--mga-sb-w4a.com
http://images.google.co.bw/url?q=https://xn--mga-sb-w4a.com
http://images.google.dz/url?q=https://xn--mga-sb-w4a.com
https://maps.google.ht/url?q=https://xn--mga-sb-w4a.com
https://google.cat/url?q=https://xn--mga-sb-w4a.com
http://maps.google.com.bh/url?q=https://xn--mga-sb-w4a.com
http://maps.google.ml/url?q=https://xn--mga-sb-w4a.com
https://maps.google.com.pl/url?q=https://xn--mga-sb-w4a.com
https://maps.google.com.vc/url?q=https://xn--mga-sb-w4a.com
https://maps.google.com.au/url?q=https://xn--mga-sb-w4a.com
http://images.g.cn/url?q=https://xn--mga-sb-w4a.com
http://maps.google.co.ck/url?q=https://xn--mga-sb-w4a.com
http://maps.google.sh/url?q=https://xn--mga-sb-w4a.com
http://maps.google.com.sb/url?q=https://xn--mga-sb-w4a.com
http://maps.google.sk/url?q=https://xn--mga-sb-w4a.com
http://images.google.rs/url?q=https://xn--mga-sb-w4a.com
http://maps.google.dj/url?q=https://xn--mga-sb-w4a.com
http://maps.google.si/url?q=https://xn--mga-sb-w4a.com
http://images.google.ps/url?q=https://xn--mga-sb-w4a.com
http://images.google.com.pg/url?q=https://xn--mga-sb-w4a.com
https://images.google.net/url?q=https://xn--mga-sb-w4a.com
http://images.google.com.sl/url?q=https://xn--mga-sb-w4a.com
https://images.google.gp/url?q=https://xn--mga-sb-w4a.com
https://maps.gngjd.com/url?q=https://xn--mga-sb-w4a.com
https://images.google.co.zw/url?q=https://xn--mga-sb-w4a.com
online pharmacy indonesia
dexamethasone 5
https://images.google.as/url?q=https://mega-active-links.com
https://images.google.off.ai/url?q=https://mega-active-links.com
https://images.google.com.ag/url?q=https://mega-active-links.com
https://images.google.com.ar/url?q=https://mega-active-links.com
https://images.google.com.au/url?q=https://mega-active-links.com
https://images.google.at/url?q=https://mega-active-links.com
https://images.google.az/url?q=https://mega-active-links.com
https://images.google.be/url?q=https://mega-active-links.com
https://images.google.com.br/url?q=https://mega-active-links.com
https://images.google.vg/url?q=https://mega-active-links.com
https://images.google.bi/url?q=https://mega-active-links.com
https://images.google.ca/url?q=https://mega-active-links.com
https://images.google.td/url?q=https://mega-active-links.com
https://images.google.cl/url?q=https://mega-active-links.com
https://images.google.com.co/url?q=https://mega-active-links.com
https://images.google.co.cr/url?q=https://mega-active-links.com
https://images.google.ci/url?q=https://mega-active-links.com
https://images.google.com.cu/url?q=https://mega-active-links.com
https://images.google.cd/url?q=https://mega-active-links.com
https://images.google.dk/url?q=https://mega-active-links.com
https://images.google.dj/url?q=https://mega-active-links.com
https://images.google.com.do/url?q=https://mega-active-links.com
https://images.google.com.ec/url?q=https://mega-active-links.com
https://images.google.com.sv/url?q=https://mega-active-links.com
https://images.google.fm/url?q=https://mega-active-links.com
https://images.google.com.fj/url?q=https://mega-active-links.com
https://images.google.fi/url?q=https://mega-active-links.com
https://images.google.fr/url?q=https://mega-active-links.com
https://images.google.gm/url?q=https://mega-active-links.com
https://images.google.ge/url?q=https://mega-active-links.com
https://images.google.de/url?q=https://mega-active-links.com
https://images.google.com.gi/url?q=https://mega-active-links.com
https://images.google.com.gr/url?q=https://mega-active-links.com
https://images.google.gl/url?q=https://mega-active-links.com
https://images.google.gg/url?q=https://mega-active-links.com
https://images.google.hn/url?q=https://mega-active-links.com
https://images.google.com.hk/url?q=https://mega-active-links.com
https://images.google.co.hu/url?q=https://mega-active-links.com
https://images.google.co.in/url?q=https://mega-active-links.com
https://images.google.ie/url?q=https://mega-active-links.com
https://images.google.co.im/url?q=https://mega-active-links.com
https://images.google.co.il/url?q=https://mega-active-links.com
https://images.google.it/url?q=https://mega-active-links.com
https://images.google.com.jm/url?q=https://mega-active-links.com
https://images.google.co.jp/url?q=https://mega-active-links.com
https://images.google.co.je/url?q=https://mega-active-links.com
https://images.google.kz/url?q=https://mega-active-links.com
https://images.google.co.kr/url?q=https://mega-active-links.com
https://images.google.lv/url?q=https://mega-active-links.com
https://images.google.co.ls/url?q=https://mega-active-links.com
https://images.google.li/url?q=https://mega-active-links.com
https://images.google.lt/url?q=https://mega-active-links.com
https://images.google.lu/url?q=https://mega-active-links.com
https://images.google.mw/url?q=https://mega-active-links.com
https://images.google.com.my/url?q=https://mega-active-links.com
https://images.google.com.mt/url?q=https://mega-active-links.com
https://images.google.mu/url?q=https://mega-active-links.com
https://images.google.com.mx/url?q=https://mega-active-links.com
https://images.google.ms/url?q=https://mega-active-links.com
https://images.google.com.na/url?q=https://mega-active-links.com
https://images.google.com.np/url?q=https://mega-active-links.com
https://images.google.nl/url?q=https://mega-active-links.com
https://images.google.co.nz/url?q=https://mega-active-links.com
https://images.google.com.ni/url?q=https://mega-active-links.com
https://images.google.com.nf/url?q=https://mega-active-links.com
https://images.google.com.pk/url?q=https://mega-active-links.com
https://images.google.com.pa/url?q=https://mega-active-links.com
https://images.google.com.py/url?q=https://mega-active-links.com
https://images.google.com.pe/url?q=https://mega-active-links.com
https://images.google.com.ph/url?q=https://mega-active-links.com
https://images.google.pn/url?q=https://mega-active-links.com
https://images.google.pl/url?q=https://mega-active-links.com
https://images.google.pt/url?q=https://mega-active-links.com
https://images.google.com.pr/url?q=https://mega-active-links.com
https://images.google.cg/url?q=https://mega-active-links.com
https://images.google.ro/url?q=https://mega-active-links.com
https://images.google.ru/url?q=https://mega-active-links.com
https://images.google.rw/url?q=https://mega-active-links.com
https://images.google.sh/url?q=https://mega-active-links.com
https://images.google.sm/url?q=https://mega-active-links.com
https://images.google.com.sg/url?q=https://mega-active-links.com
https://images.google.sk/url?q=https://mega-active-links.com
https://images.google.co.za/url?q=https://mega-active-links.com
https://images.google.es/url?q=https://mega-active-links.com
https://images.google.se/url?q=https://mega-active-links.com
https://images.google.ch/url?q=https://mega-active-links.com
https://images.google.com.tw/url?q=https://mega-active-links.com
https://images.google.co.th/url?q=https://mega-active-links.com
https://images.google.tt/url?q=https://mega-active-links.com
https://images.google.com.tr/url?q=https://mega-active-links.com
https://images.google.com.ua/url?q=https://mega-active-links.com
https://images.google.ae/url?q=https://mega-active-links.com
https://images.google.co.uk/url?q=https://mega-active-links.com
https://images.google.com.uy/url?q=https://mega-active-links.com
https://images.google.uz/url?q=https://mega-active-links.com
https://images.google.vu/url?q=https://mega-active-links.com
https://images.google.co.ve/url?q=https://mega-active-links.com
https://www.google.co.ao/url?q=https://mega-active-links.com
https://images.google.im/url?q=https://mega-active-links.com
https://images.google.dm/url?q=https://mega-active-links.com
https://google.com.pa/url?q=https://mega-active-links.com
http://maps.google.mw/url?q=https://mega-active-links.com
https://google.ac/url?q=https://mega-active-links.com
https://google.com.gh/url?q=https://mega-active-links.com
https://google.dz/url?q=https://mega-active-links.com
http://images.google.ki/url?q=https://mega-active-links.com
http://www.google.im/url?q=https://mega-active-links.com
https://google.com.mx/url?q=https://mega-active-links.com
https://www.google.cz/url?q=https://mega-active-links.com
http://google.hr/url?q=https://mega-active-links.com
https://google.ml/url?q=https://mega-active-links.com
https://www.google.com.au/url?q=https://mega-active-links.com
https://images.google.bs/url?q=https://mega-active-links.com
https://google.co.tz/url?q=https://mega-active-links.com
http://google.cg/url?q=https://mega-active-links.com
http://maps.google.is/url?q=https://mega-active-links.com
http://google.si/url?q=https://mega-active-links.com
http://google.com.py/url?q=https://mega-active-links.com
http://maps.google.co.cr/url?q=https://mega-active-links.com
http://www.google.mk/url?q=https://mega-active-links.com
http://www.google.ge/url?q=https://mega-active-links.com
https://images.google.ml/url?q=https://mega-active-links.com
https://www.google.com.sa/url?q=https://mega-active-links.com
http://google.mg/url?q=https://mega-active-links.com
http://google.com.ec/url?q=https://mega-active-links.com
https://google.rs/url?q=https://mega-active-links.com
https://www.google.co.hu/url?q=https://mega-active-links.com
http://google.md/url?q=https://mega-active-links.com
https://images.google.hu/url?q=https://mega-active-links.com
https://www.google.com.tw/url?q=https://mega-active-links.com
https://google.ae/url?q=https://mega-active-links.com
https://images.google.jo/url?q=https://mega-active-links.com
http://images.google.tm/url?q=https://mega-active-links.com
https://images.google.com.mm/url?q=https://mega-active-links.com
https://maps.google.vu/url?q=https://mega-active-links.com
https://maps.google.co.ls/url?q=https://mega-active-links.com
https://www.google.com.cy/url?q=https://mega-active-links.com
http://google.com.lb/url?q=https://mega-active-links.com
http://google.co.kr/url?q=https://mega-active-links.com
http://images.google.nu/url?q=https://mega-active-links.com
http://google.cl/url?q=https://mega-active-links.com
http://www.google.com.bo/url?q=https://mega-active-links.com
https://google.ad/url?q=https://mega-active-links.com
https://maps.google.pt/url?q=https://mega-active-links.com
https://maps.google.es/url?q=https://mega-active-links.com
https://maps.google.sn/url?q=https://mega-active-links.com
http://google.tk/url?q=https://mega-active-links.com
https://google.com.bn/url?q=https://mega-active-links.com
https://google.com.ua/url?q=https://mega-active-links.com
https://www.google.com.sg/url?q=https://mega-active-links.com
https://images.google.info/url?q=https://mega-active-links.com
https://maps.google.de/url?q=https://mega-active-links.com
https://images.google.cv/url?q=https://mega-active-links.com
http://google.com.nf/url?q=https://mega-active-links.com
https://images.google.com.ly/url?q=https://mega-active-links.com
http://images.google.tg/url?q=https://mega-active-links.com
http://google.cv/url?q=https://mega-active-links.com
http://gngjd.com/url?q=https://mega-active-links.com
http://www.google.je/url?q=https://mega-active-links.com
http://maps.google.by/url?q=https://mega-active-links.com
http://maps.google.fi/url?q=https://mega-active-links.com
https://images.gngjd.com/url?q=https://mega-active-links.com
http://google.ne/url?q=https://mega-active-links.com
http://images.google.kg/url?q=https://mega-active-links.com
https://www.google.cn/url?q=https://mega-active-links.com
https://google.am/url?q=https://mega-active-links.com
http://google.com.ly/url?q=https://mega-active-links.com
https://google.iq/url?q=https://mega-active-links.com
https://google.com.sv/url?q=https://mega-active-links.com
https://google.sc/url?q=https://mega-active-links.com
http://google.kg/url?q=https://mega-active-links.com
http://google.li/url?q=https://mega-active-links.com
http://images.google.al/url?q=https://mega-active-links.com
https://maps.google.je/url?q=https://mega-active-links.com
http://maps.google.to/url?q=https://mega-active-links.com
http://google.co.cr/url?q=https://mega-active-links.com
http://images.google.com.tj/url?q=https://mega-active-links.com
https://www.google.com.ph/url?q=https://mega-active-links.com
https://maps.google.com.bn/url?q=https://mega-active-links.com
https://www.google.as/url?q=https://mega-active-links.com
https://images.google.co.ao/url?q=https://mega-active-links.com
http://maps.google.com.bo/url?q=https://mega-active-links.com
https://maps.google.com/url?q=https://mega-active-links.com
https://www.google.com.bh/url?q=https://mega-active-links.com
https://maps.google.com.mm/url?q=https://mega-active-links.com
http://google.com.gi/url?q=https://mega-active-links.com
http://maps.google.ba/url?q=https://mega-active-links.com
http://google.co.id/url?q=https://mega-active-links.com
http://google.be/url?q=https://mega-active-links.com
http://images.google.mg/url?q=https://mega-active-links.com
http://google.com.ar/url?q=https://mega-active-links.com
https://maps.google.co.za/url?q=https://mega-active-links.com
https://www.google.gp/url?q=https://mega-active-links.com
http://www.google.sh/url?q=https://mega-active-links.com
https://images.google.ee/url?q=https://mega-active-links.com
https://www.google.rw/url?q=https://mega-active-links.com
http://images.google.si/url?q=https://mega-active-links.com
https://www.google.at/url?q=https://mega-active-links.com
http://maps.google.at/url?q=https://mega-active-links.com
http://maps.google.co.in/url?q=https://mega-active-links.com
https://maps.google.ga/url?q=https://mega-active-links.com
http://maps.google.sm/url?q=https://mega-active-links.com
http://google.ms/url?q=https://mega-active-links.com
https://images.google.com.gh/url?q=https://mega-active-links.com
http://maps.google.cn/url?q=https://mega-active-links.com
https://www.google.com.na/url?q=https://mega-active-links.com
https://maps.google.hr/url?q=https://mega-active-links.com
https://google.ci/url?q=https://mega-active-links.com
https://images.google.hr/url?q=https://mega-active-links.com
http://maps.google.com.do/url?q=https://mega-active-links.com
http://google.lk/url?q=https://mega-active-links.com
http://images.google.cn/url?q=https://mega-active-links.com
http://www.bon-vivant.net/url?q=https://mega-active-links.com
http://maps.google.com.gt/url?q=https://mega-active-links.com
http://www.google.com.ag/url?q=https://mega-active-links.com
https://maps.google.mu/url?q=https://mega-active-links.com
https://google.com.ng/url?q=https://mega-active-links.com
https://www.google.co.uk/url?q=https://mega-active-links.com
https://google.us/url?q=https://mega-active-links.com
https://www.google.com.tr/url?q=https://mega-active-links.com
http://www.google.co.ma/url?q=https://mega-active-links.com
https://maps.google.co.zw/url?q=https://mega-active-links.com
https://www.google.bs/url?q=https://mega-active-links.com
https://www.google.pl/url?q=https://mega-active-links.com
http://www.googleadservices.com/url?q=https://mega-active-links.com
http://google.kz/url?q=https://mega-active-links.com
https://google.com.mt/url?q=https://mega-active-links.com
http://www.google.co.zw/url?q=https://mega-active-links.com
https://maps.google.ne/url?q=https://mega-active-links.com
https://google.com.qa/url?q=https://mega-active-links.com
https://google.se/url?q=https://mega-active-links.com
http://www.google.mw/url?q=https://mega-active-links.com
https://maps.google.co.mz/url?q=https://mega-active-links.com
http://maps.google.com.sv/url?q=https://mega-active-links.com
https://www.google.sm/url?q=https://mega-active-links.com
https://maps.google.com.tw/url?q=https://mega-active-links.com
https://google.ca/url?q=https://mega-active-links.com
https://www.google.is/url?q=https://mega-active-links.com
https://google.com.jm/url?q=https://mega-active-links.com
http://images.google.co.ug/url?q=https://mega-active-links.com
https://maps.google.com.kh/url?q=https://mega-active-links.com
http://maps.google.tl/url?q=https://mega-active-links.com
http://www.google.co.nz/url?q=https://mega-active-links.com
https://www.google.gg/url?q=https://mega-active-links.com
https://google.to/url?q=https://mega-active-links.com
https://google.ro/url?q=https://mega-active-links.com
http://google.td/url?q=https://mega-active-links.com
https://www.google.by/url?q=https://mega-active-links.com
https://www.google.nl/url?q=https://mega-active-links.com
http://maps.google.ci/url?q=https://mega-active-links.com
http://maps.google.dz/url?q=https://mega-active-links.com
https://google.hu/url?q=https://mega-active-links.com
http://images.google.ht/url?q=https://mega-active-links.com
http://google.mv/url?q=https://mega-active-links.com
https://google.cf/url?q=https://mega-active-links.com
http://maps.google.com.ly/url?q=https://mega-active-links.com
http://www.google.nu/url?q=https://mega-active-links.com
http://google.com.tj/url?q=https://mega-active-links.com
https://maps.google.com.mt/url?q=https://mega-active-links.com
https://google.so/url?q=https://mega-active-links.com
http://images.google.bj/url?q=https://mega-active-links.com
https://maps.google.la/url?q=https://mega-active-links.com
https://images.google.us/url?q=https://mega-active-links.com
https://images.google.com.eg/url?q=https://mega-active-links.com
https://images.google.cf/url?q=https://mega-active-links.com
https://images.google.la/url?q=https://mega-active-links.com
http://maps.google.com.ag/url?q=https://mega-active-links.com
http://google.ga/url?q=https://mega-active-links.com
http://google.co.uz/url?q=https://mega-active-links.com
http://maps.google.no/url?q=https://mega-active-links.com
https://www.google.gl/url?q=https://mega-active-links.com
http://images.google.co.vi/url?q=https://mega-active-links.com
https://images.google.ne/url?q=https://mega-active-links.com
https://google.com.om/url?q=https://mega-active-links.com
http://maps.google.lt/url?q=https://mega-active-links.com
https://maps.google.kg/url?q=https://mega-active-links.com
http://www.google.com.hk/url?q=https://mega-active-links.com
https://google.com.co/url?q=https://mega-active-links.com
https://google.dk/url?q=https://mega-active-links.com
https://maps.google.com.sa/url?q=https://mega-active-links.com
http://google.com.fj/url?q=https://mega-active-links.com
http://maps.google.com.ec/url?q=https://mega-active-links.com
https://maps.google.mn/url?q=https://mega-active-links.com
https://maps.google.bf/url?q=https://mega-active-links.com
https://www.google.tt/url?q=https://mega-active-links.com
https://www.google.dj/url?q=https://mega-active-links.com
https://www.google.com.pr/url?q=https://mega-active-links.com
https://maps.google.ws/url?q=https://mega-active-links.com
http://google.jo/url?q=https://mega-active-links.com
https://google.co.ug/url?q=https://mega-active-links.com
https://images.google.com.bd/url?q=https://mega-active-links.com
https://google.tg/url?q=https://mega-active-links.com
http://maps.google.dm/url?q=https://mega-active-links.com
https://www.google.pn/url?q=https://mega-active-links.com
https://www.google.com.et/url?q=https://mega-active-links.com
http://maps.google.com.jm/url?q=https://mega-active-links.com
http://www.google.bg/url?q=https://mega-active-links.com
http://maps.google.hu/url?q=https://mega-active-links.com
https://maps.google.kz/url?q=https://mega-active-links.com
https://images.google.com.pl/url?q=https://mega-active-links.com
http://www.google.st/url?q=https://mega-active-links.com
https://maps.google.com.kw/url?q=https://mega-active-links.com
https://maps.google.ru/url?q=https://mega-active-links.com
https://google.co.mz/url?q=https://mega-active-links.com
http://www.google.co.ls/url?q=https://mega-active-links.com
https://www.google.az/url?q=https://mega-active-links.com
http://maps.google.co.uk/url?q=https://mega-active-links.com
https://www.google.com.do/url?q=https://mega-active-links.com
http://www.google.es/url?q=https://mega-active-links.com
http://google.gm/url?q=https://mega-active-links.com
http://images.google.so/url?q=https://mega-active-links.com
https://www.google.com.pk/url?q=https://mega-active-links.com
https://www.google.com.sb/url?q=https://mega-active-links.com
https://images.google.ad/url?q=https://mega-active-links.com
http://google.sn/url?q=https://mega-active-links.com
http://google.ps/url?q=https://mega-active-links.com
https://maps.google.bg/url?q=https://mega-active-links.com
https://images.google.com.cy/url?q=https://mega-active-links.com
http://www.google.pt/url?q=https://mega-active-links.com
https://images.google.to/url?q=https://mega-active-links.com
http://images.google.co.uz/url?q=https://mega-active-links.com
http://google.com.sl/url?q=https://mega-active-links.com
http://www.google.gy/url?q=https://mega-active-links.com
http://www.google.cd/url?q=https://mega-active-links.com
https://maps.google.com.my/url?q=https://mega-active-links.com
http://www.google.com.ai/url?q=https://mega-active-links.com
https://google.hn/url?q=https://mega-active-links.com
http://images.google.ba/url?q=https://mega-active-links.com
http://maps.google.com.pe/url?q=https://mega-active-links.com
http://google.de/url?q=https://mega-active-links.com
http://maps.google.com.gi/url?q=https://mega-active-links.com
https://images.google.cat/url?q=https://mega-active-links.com
https://www.google.co.ck/url?q=https://mega-active-links.com
https://images.google.com.bn/url?q=https://mega-active-links.com
http://maps.google.ae/url?q=https://mega-active-links.com
http://images.google.no/url?q=https://mega-active-links.com
http://maps.google.bs/url?q=https://mega-active-links.com
http://maps.google.gy/url?q=https://mega-active-links.com
http://maps.google.com.pa/url?q=https://mega-active-links.com
https://google.cc/url?q=https://mega-active-links.com
http://google.co.th/url?q=https://mega-active-links.com
http://maps.google.com.mx/url?q=https://mega-active-links.com
http://www.google.lu/url?q=https://mega-active-links.com
https://google.bf/url?q=https://mega-active-links.com
http://www.google.it/url?q=https://mega-active-links.com
http://google.com.br/url?q=https://mega-active-links.com
http://images.google.bg/url?q=https://mega-active-links.com
http://google.co.il/url?q=https://mega-active-links.com
https://google.ws/url?q=https://mega-active-links.com
http://images.google.st/url?q=https://mega-active-links.com
http://duck.com/url?q=https://mega-active-links.com
https://www.google.net/url?q=https://mega-active-links.com
https://images.google.sn/url?q=https://mega-active-links.com
http://maps.google.co.jp/url?q=https://mega-active-links.com
http://www.google.bj/url?q=https://mega-active-links.com
https://maps.google.com.qa/url?q=https://mega-active-links.com
https://maps.google.com.co/url?q=https://mega-active-links.com
http://www.google.ch/url?q=https://mega-active-links.com
http://www.google.com.pe/url?q=https://mega-active-links.com
http://images.google.co.mz/url?q=https://mega-active-links.com
https://www.google.cm/url?q=https://mega-active-links.com
http://maps.google.nr/url?q=https://mega-active-links.com
https://www.google.al/url?q=https://mega-active-links.com
https://google.sk/url?q=https://mega-active-links.com
http://maps.google.rs/url?q=https://mega-active-links.com
http://maps.google.gr/url?q=https://mega-active-links.com
https://google.la/url?q=https://mega-active-links.com
http://maps.google.com.ph/url?q=https://mega-active-links.com
https://www.google.com/url?q=https://mega-active-links.com
http://google.ee/url?q=https://mega-active-links.com
https://google.com.pl/url?q=https://mega-active-links.com
http://maps.google.com.pg/url?q=https://mega-active-links.com
https://google.vg/url?q=https://mega-active-links.com
https://www.google.co.ke/url?q=https://mega-active-links.com
https://maps.google.com.pr/url?q=https://mega-active-links.com
http://www.google.no/url?q=https://mega-active-links.com
https://maps.google.fr/url?q=https://mega-active-links.com
https://maps.google.as/url?q=https://mega-active-links.com
https://google.mn/url?q=https://mega-active-links.com
http://google.com.kh/url?q=https://mega-active-links.com
http://images.google.me/url?q=https://mega-active-links.com
http://maps.google.com.sl/url?q=https://mega-active-links.com
http://maps.google.pn/url?q=https://mega-active-links.com
http://www.google.fr/url?q=https://mega-active-links.com
https://maps.google.com.bz/url?q=https://mega-active-links.com
https://maps.google.com.cu/url?q=https://mega-active-links.com
https://google.com.eg/url?q=https://mega-active-links.com
http://www.google.com.kw/url?q=https://mega-active-links.com
https://google.com.cu/url?q=https://mega-active-links.com
https://www.google.co.in/url?q=https://mega-active-links.com
http://maps.google.tt/url?q=https://mega-active-links.com
http://google.com.gt/url?q=https://mega-active-links.com
http://maps.google.ge/url?q=https://mega-active-links.com
https://maps.google.vg/url?q=https://mega-active-links.com
http://images.google.com.om/url?q=https://mega-active-links.com
http://google.ht/url?q=https://mega-active-links.com
https://maps.google.com.na/url?q=https://mega-active-links.com
http://google.ru/url?q=https://mega-active-links.com
https://maps.google.gg/url?q=https://mega-active-links.com
https://maps.google.com.br/url?q=https://mega-active-links.com
https://maps.google.li/url?q=https://mega-active-links.com
http://www.google.ba/url?q=https://mega-active-links.com
http://maps.google.com.lb/url?q=https://mega-active-links.com
http://images.google.ws/url?q=https://mega-active-links.com
http://images.google.com.gt/url?q=https://mega-active-links.com
http://maps.g.cn/url?q=https://mega-active-links.com
http://google.co.zm/url?q=https://mega-active-links.com
https://www.google.tl/url?q=https://mega-active-links.com
http://www.google.com.np/url?q=https://mega-active-links.com
https://maps.google.co.nz/url?q=https://mega-active-links.com
http://maps.google.cf/url?q=https://mega-active-links.com
http://maps.google.com.et/url?q=https://mega-active-links.com
http://maps.google.rw/url?q=https://mega-active-links.com
https://maps.google.co.ve/url?q=https://mega-active-links.com
https://images.google.co.ck/url?q=https://mega-active-links.com
https://images.google.co.zm/url?q=https://mega-active-links.com
https://www.google.mu/url?q=https://mega-active-links.com
https://maps.google.com.py/url?q=https://mega-active-links.com
http://www.google.lv/url?q=https://mega-active-links.com
http://maps.google.co.ug/url?q=https://mega-active-links.com
https://maps.google.it/url?q=https://mega-active-links.com
https://google.fi/url?q=https://mega-active-links.com
https://maps.google.ms/url?q=https://mega-active-links.com
https://maps.google.mv/url?q=https://mega-active-links.com
http://maps.google.com.eg/url?q=https://mega-active-links.com
https://maps.google.so/url?q=https://mega-active-links.com
http://www.google.nr/url?q=https://mega-active-links.com
https://maps.google.com.ar/url?q=https://mega-active-links.com
http://images.google.com.bo/url?q=https://mega-active-links.com
https://maps.google.tk/url?q=https://mega-active-links.com
http://maps.google.com.hk/url?q=https://mega-active-links.com
https://www.google.com.vn/url?q=https://mega-active-links.com
https://www.google.bi/url?q=https://mega-active-links.com
https://images.google.co.tz/url?q=https://mega-active-links.com
http://google.co.bw/url?q=https://mega-active-links.com
https://images.google.tl/url?q=https://mega-active-links.com
http://maps.google.com.sg/url?q=https://mega-active-links.com
https://images.google.mv/url?q=https://mega-active-links.com
https://www.google.info/url?q=https://mega-active-links.com
https://www.google.com.bz/url?q=https://mega-active-links.com
http://maps.google.ee/url?q=https://mega-active-links.com
http://google.co.za/url?q=https://mega-active-links.com
http://www.g.cn/url?q=https://mega-active-links.com
https://maps.google.ad/url?q=https://mega-active-links.com
https://maps.google.hn/url?q=https://mega-active-links.com
https://images.google.is/url?q=https://mega-active-links.com
https://maps.google.ca/url?q=https://mega-active-links.com
http://maps.google.ro/url?q=https://mega-active-links.com
https://images.google.com.kh/url?q=https://mega-active-links.com
http://google.com.pg/url?q=https://mega-active-links.com
https://maps.google.co.vi/url?q=https://mega-active-links.com
http://maps.google.com.np/url?q=https://mega-active-links.com
https://images.google.tk/url?q=https://mega-active-links.com
http://images.google.nr/url?q=https://mega-active-links.com
http://maps.google.com.ng/url?q=https://mega-active-links.com
https://maps.google.ki/url?q=https://mega-active-links.com
https://images.google.cm/url?q=https://mega-active-links.com
http://maps.google.gm/url?q=https://mega-active-links.com
https://images.google.by/url?q=https://mega-active-links.com
https://google.fm/url?q=https://mega-active-links.com
http://google.co.vi/url?q=https://mega-active-links.com
http://maps.google.cz/url?q=https://mega-active-links.com
https://images.google.co.ma/url?q=https://mega-active-links.com
http://www.google.com.vc/url?q=https://mega-active-links.com
https://maps.google.jo/url?q=https://mega-active-links.com
http://images.google.com.sb/url?q=https://mega-active-links.com
https://images.google.com/url?q=https://mega-active-links.com
https://maps.google.ch/url?q=https://mega-active-links.com
http://maps.google.mk/url?q=https://mega-active-links.com
http://www.google.com.ni/url?q=https://mega-active-links.com
http://images.google.cz/url?q=https://mega-active-links.com
https://images.google.com.vc/url?q=https://mega-active-links.com
https://maps.google.co.ke/url?q=https://mega-active-links.com
http://maps.google.com.uy/url?q=https://mega-active-links.com
https://www.google.ie/url?q=https://mega-active-links.com
https://maps.google.nu/url?q=https://mega-active-links.com
http://images.google.cc/url?q=https://mega-active-links.com
https://images.google.gr/url?q=https://mega-active-links.com
https://google.lt/url?q=https://mega-active-links.com
http://google.tm/url?q=https://mega-active-links.com
https://maps.google.co.bw/url?q=https://mega-active-links.com
http://www.google.vu/url?q=https://mega-active-links.com
http://maps.google.lu/url?q=https://mega-active-links.com
http://maps.google.lv/url?q=https://mega-active-links.com
https://images.google.je/url?q=https://mega-active-links.com
https://www.google.co.ve/url?q=https://mega-active-links.com
https://images.google.com.ng/url?q=https://mega-active-links.com
http://googlemaps.com/url?q=https://mega-active-links.com
http://maps.google.com.fj/url?q=https://mega-active-links.com
http://plus.google.com/url?q=https://mega-active-links.com
http://plus.gngjd.com/url?q=https://mega-active-links.com
http://google.com.af/url?q=https://mega-active-links.com
https://images.google.md/url?q=https://mega-active-links.com
https://www.google.com.mm/url?q=https://mega-active-links.com
https://maps.google.st/url?q=https://mega-active-links.com
http://maps.google.cat/url?q=https://mega-active-links.com
http://google.co.jp/url?q=https://mega-active-links.com
https://maps.google.lk/url?q=https://mega-active-links.com
http://maps.google.co.kr/url?q=https://mega-active-links.com
http://google.com.bd/url?q=https://mega-active-links.com
https://images.google.co.ke/url?q=https://mega-active-links.com
https://www.google.gr/url?q=https://mega-active-links.com
https://images.google.ac/url?q=https://mega-active-links.com
http://maps.google.ie/url?q=https://mega-active-links.com
http://google.com.tn/url?q=https://mega-active-links.com
https://maps.google.iq/url?q=https://mega-active-links.com
http://images.google.com.lb/url?q=https://mega-active-links.com
https://images.google.ga/url?q=https://mega-active-links.com
http://maps.google.nl/url?q=https://mega-active-links.com
https://maps.google.com.ai/url?q=https://mega-active-links.com
https://maps.google.cl/url?q=https://mega-active-links.com
http://maps.google.co.id/url?q=https://mega-active-links.com
https://maps.google.fm/url?q=https://mega-active-links.com
https://maps.google.com.ni/url?q=https://mega-active-links.com
https://maps.google.bi/url?q=https://mega-active-links.com
https://www.google.ki/url?q=https://mega-active-links.com
https://google.dm/url?q=https://mega-active-links.com
https://images.google.mn/url?q=https://mega-active-links.com
https://images.google.gy/url?q=https://mega-active-links.com
https://google.com.my/url?q=https://mega-active-links.com
http://maps.google.tg/url?q=https://mega-active-links.com
https://images.google.com.sa/url?q=https://mega-active-links.com
https://maps.google.com.om/url?q=https://mega-active-links.com
https://images.google.com.vn/url?q=https://mega-active-links.com
https://maps.google.co.hu/url?q=https://mega-active-links.com
http://maps.google.be/url?q=https://mega-active-links.com
http://images.google.com.bh/url?q=https://mega-active-links.com
https://images.google.com.kw/url?q=https://mega-active-links.com
https://maps.google.gp/url?q=https://mega-active-links.com
http://images.google.com.af/url?q=https://mega-active-links.com
http://images.google.com.bz/url?q=https://mega-active-links.com
https://maps.google.se/url?q=https://mega-active-links.com
https://maps.google.cg/url?q=https://mega-active-links.com
https://images.google.mk/url?q=https://mega-active-links.com
https://www.google.com.uy/url?q=https://mega-active-links.com
http://maps.google.cm/url?q=https://mega-active-links.com
https://maps.google.cd/url?q=https://mega-active-links.com
https://maps.google.mg/url?q=https://mega-active-links.com
https://images.google.am/url?q=https://mega-active-links.com
https://images.google.com.tn/url?q=https://mega-active-links.com
https://images.google.co.id/url?q=https://mega-active-links.com
https://maps.google.com.bd/url?q=https://mega-active-links.com
https://maps.google.co.tz/url?q=https://mega-active-links.com
http://images.google.com.ai/url?q=https://mega-active-links.com
http://images.google.bf/url?q=https://mega-active-links.com
http://maps.google.co.il/url?q=https://mega-active-links.com
http://maps.google.co.zm/url?q=https://mega-active-links.com
http://images.google.com.qa/url?q=https://mega-active-links.com
http://images.google.lk/url?q=https://mega-active-links.com
http://maps.google.cv/url?q=https://mega-active-links.com
http://maps.google.im/url?q=https://mega-active-links.com
https://maps.google.com.gh/url?q=https://mega-active-links.com
https://maps.google.co.ao/url?q=https://mega-active-links.com
http://maps.google.co.th/url?q=https://mega-active-links.com
https://maps.google.gl/url?q=https://mega-active-links.com
https://maps.google.com.ua/url?q=https://mega-active-links.com
http://maps.google.td/url?q=https://mega-active-links.com
https://google.me/url?q=https://mega-active-links.com
https://maps.google.bj/url?q=https://mega-active-links.com
https://maps.google.pl/url?q=https://mega-active-links.com
http://maps.google.com.tr/url?q=https://mega-active-links.com
https://images.google.sc/url?q=https://mega-active-links.com
https://images.google.com.et/url?q=https://mega-active-links.com
https://maps.google.dk/url?q=https://mega-active-links.com
https://images.google.iq/url?q=https://mega-active-links.com
http://maps.google.sc/url?q=https://mega-active-links.com
http://images.google.co.bw/url?q=https://mega-active-links.com
http://images.google.dz/url?q=https://mega-active-links.com
https://maps.google.ht/url?q=https://mega-active-links.com
https://google.cat/url?q=https://mega-active-links.com
http://maps.google.com.bh/url?q=https://mega-active-links.com
http://maps.google.ml/url?q=https://mega-active-links.com
https://maps.google.com.pl/url?q=https://mega-active-links.com
https://maps.google.com.vc/url?q=https://mega-active-links.com
https://maps.google.com.au/url?q=https://mega-active-links.com
http://images.g.cn/url?q=https://mega-active-links.com
http://maps.google.co.ck/url?q=https://mega-active-links.com
http://maps.google.sh/url?q=https://mega-active-links.com
http://maps.google.com.sb/url?q=https://mega-active-links.com
http://maps.google.sk/url?q=https://mega-active-links.com
http://images.google.rs/url?q=https://mega-active-links.com
http://maps.google.dj/url?q=https://mega-active-links.com
http://maps.google.si/url?q=https://mega-active-links.com
http://images.google.ps/url?q=https://mega-active-links.com
http://images.google.com.pg/url?q=https://mega-active-links.com
https://images.google.net/url?q=https://mega-active-links.com
http://images.google.com.sl/url?q=https://mega-active-links.com
https://images.google.gp/url?q=https://mega-active-links.com
https://maps.gngjd.com/url?q=https://mega-active-links.com
https://images.google.co.zw/url?q=https://mega-active-links.com
Hello mates, its impressive post concerning cultureand completely defined,
keep it up all the time.
can i buy azithromycin
canadian pharmacy antibiotics
nitrofurantoin over the counter uk
lasix 40mg
buy provigil from canada
You made your point extremely well!.
define thesis good thesis statement phd thesis database writing a thesis statement
metformin otc canada
nitrofurantoin brand name uk
myambutol cost
buy provigil online india
deltasone 20 mg
generic viagra from india online
tretinoin generic brand
online pharmacy pain relief
furosemide rx 20 mg
advair over the counter
generic for cozaar
proscar sale uk
I used to be recommended this web site via my cousin. I am no longer certain whether this post is written by him as no one else recognise such precise about my problem.
You’re incredible! Thank you!
I don’t even understand how I stopped up right here, but I thought this put up
used to be great. I do not recognize who you might be however certainly you are going to a well-known blogger in the
event you are not already. Cheers!
uk pharmacy no prescription
cheap online pharmacy
reliable rx pharmacy
chloromycetin 500 mg capsule
Right here is the right webpage for everyone who wants to understand this topic.
You know a whole lot its almost hard to argue with you (not that I actually would want
to…HaHa). You definitely put a brand new spin on a subject that’s been discussed for ages.
Great stuff, just wonderful!
where can you get prednisone
Hello! This is my first visit to your blog!
We are a team of volunteers and starting a new initiative in a community
in the same niche. Your blog provided us beneficial information to work on. You have done a marvellous job!
cialis singapore pharmacy
tretinoin buy
synthroid 88 mcg cost
where can i buy cephalexin tablets
of course like your web-site but you have to check the spelling on several of your posts.
A number of them are rife with spelling issues and I to find it very troublesome to inform the reality however I will certainly come
back again.
If you’re in the market for FC 24 Coins, this store is a game-changer fc 24 coins They offer quick deliveries, budget-friendly prices, an easy-to-navigate website, and 24/7 customer assistance.
happy family store canada
best european online pharmacy
Every weekend i used to pay a visit this web site, because i wish for enjoyment,
for the reason that this this web site conations in fact nice funny material too.
I can’t recommend this store enough for FC 24 Coins fc 24 coins Their fast delivery, economical coins, user-friendly website, and continuous support make it a fantastic choice.
minocycline hydrochloride 100 mg
lisinopril brand name cost
noroxin price
cheapest pharmacy for prescriptions without insurance
acyclovir uk pharmacy
atarax medication
noroxin pills
This is very interesting, You’re a very skilled blogger.
I’ve joined your feed and look forward to seeking more of your magnificent
post. Also, I have shared your site in my social networks!
noroxin drug
They are developed to deliver instant funds with short repayment terms and
higher interest rates.
Moderator!
Приветствуем вас на совершенно новой версии скрытой сети под названием мега сайт тор ссылка – на данный момент один из самых перспективных ресурсов русскоязычного интернета! Ссылка для доступа через стандартный браузер на http mega sb – здесь вы найдете все, что вам нужно, и больше не придется искать другие пути к Гидре, поскольку теперь вы знаете, где можно найти лучшие товары по самым привлекательным ценам. Получите мгновенный и быстрый доступ к уникальному и привлекательному дизайну сайта, который моментально и удовлетворительно поможет вам найти все, что вам нужно в данный момент.
mega sb:https://xn--meg-sb-dua.com
tetracycline drugs
Hey there, everyone! The name’s Admin Read:
Превосходный портал для торговли товарами – mega com ссылка. В настоящее время MEGA стала лидирующей и наиболее узнаваемой анонимной торговой платформой в странах СНГ. Mega sb предлагает широкий выбор магазинов со всего мира, чтобы удовлетворить потребности своих пользователей. Здесь вы можете найти широкий ассортимент товаров. Кроме того, вы сами можете начать продавать, пройдя регистрацию на данном ресурсе. Важно отметить, что портал гарантирует безопасность, проводя проверку каждого продавца. В осуществлении этой задачи применяются различные стратегии, включая участие тайных покупателей. Вы можете быть уверены в качестве товаров, честности продавцов и безопасности ваших покупок на официальная ссылка мега. Чтобы перейти на сайт, просто воспользуйтесь активной ссылкой mega sb com.
ссылка на сайт мега:https://xn--meg-sb-dua.com
buy sildalis 120 mg
Stevesnfulge
https://www.cocoawonderland.co.uk/profile/linkdota1/profile
https://play.eslgaming.com/player/19233515/
https://reactos.org/forum/memberlist.php?mode=viewprofile&u=85480
https://profile.ameba.jp/garfilld22
https://arnikali.dreamyblogs.com/22030660/site-with-free-videos
https://wefunder.com/johnkali
https://butterflycoins.org/topics/6400dcb5f79a416f3e044883
https://www.akaqa.com/account/profile/19191605400
http://www.brenkoweb.com/user/12461/profile
http://www.escalade-alsace.com/forum/profile.php?mode=viewprofile&u=27476
https://forum.reallusion.com/Users/3105516/jk5452151
https://postgresconf.org/users/garry-kali
http://www.invelos.com/UserProfile.aspx?alias=Jack77
https://www.longisland.com/profile/Ivan774
https://biztime.com.vn/karina22
Hello everyone! I go by the name Admin Read:
Ищете платформу, где можно приобрести разнообразные товары? Рекомендую обратить внимание на мега онион ссылка. Мы предлагаем множество товаров и категорий, чтобы каждый мог найти свой подходящий вариант. Эта площадка обеспечивает полную анонимность и безопасность. Здесь можно совершать покупки, не беспокоясь о потере средств или личной информации. mega sb зеркало сайта – это необычайный маркетплейс, где тысячи магазинов выкладывают свои товары, и всегда можно найти выгодное предложение. Поэтому рекомендую пройти быструю регистрацию на платформе зеркало mega sb и перейти в магазин, где вы быстро найдете необходимые вещи. В случае возникновения трудностей, наша администрация готова оказать вам всестороннюю поддержку.
mega dark:https://mega-active-links.com
mega сайт ссылка:https://xn--mg-sb-6za9404c.com
Hello everyone! I go by the name Admin Read:
mega сайт ссылка предлагает огромный ассортимент товаров и услуг на все вкусы. У нас представлены почти все товары, которые вы только можете себе вообразить, от классических до самых эксклюзивных. И самое интересное, mega555 не является обычным интернет-магазином, а предоставляет услуги посредничества в формате доски объявлений. Здесь вы окажетесь в эпицентре торгового противоборства, где вы можете исследовать разные продавцы, анализировать цены и оценки, чтобы сделать осознанный выбор. Просто перейдите на mega тор. Наша платформа внедряет передовые технологии безопасности, чтобы обеспечить вашу анонимность и защиту ваших данных, даже без использования Tor или VPN. Так что можете быть уверены и смело переходить на mega darknet market ссылка то, перейдя по указанной ссылке.
ссылки на мега дарк:https://mega-active-links.com
мега через тор:https://xn--mg-sb-6za9404c.com
Rpvenfulge
https://www.horseracingnation.com/user/mamos243#
https://unsplash.com/@ganry24/collections
https://amazonki.net/profil/Tanya22
https://decidim.tjussana.cat/profiles/Karis45/activity
https://440hz.my/forums/users/Hanzil24/
https://forum.app.net/profile.aspx?id=08db472bebc9f84ea900571401154a9b
https://profile.hatena.ne.jp/Panor23/profile
https://3rd-strike.com/author/karys2322/
https://nootheme.com/forums/users/tabix44/
https://samkey.org/forum/member.php?270366-kalik
https://www.wvhired.com/profiles/3307868-bahoris-kali
https://designaddict.com/community/profile/harik22/
https://fernandokoll.frewwebs.com/22333303/site-with-free-videos
https://conifer.rhizome.org/Nafanya24
https://www.beatstars.com/jk5452151
Hi all! My name is Admin Read:
Поднимите свой опыт на новый уровень с mega darknet! Наши статьи пригласят вас на захватывающее путешествие в мир увлекательных фактов и интересных знаний. Когда придет время расслабиться, наши игры и видео придут на помощь, чтобы подарить вам заслуженное удовольствие. Переходите на мега даркнет и убедитесь во всем самостоятельно.
мориарти сайт mega:https://xn--megsb-l11b.com
furosemide 40 mg tablets
Howdy! Do you know if they make any plugins to safeguard against hackers?
I’m kinda paranoid about losing everything I’ve worked hard
on. Any tips?
Thanks, I appreciate this!
Hey there, everyone! The name’s Admin Read:
Настроение оставляет желать лучшего? ссылка на мега маркет готов подарить вам порцию позитива и радости! Наш контент разнообразен, как ваше настроение: смех, радость, удивление – все это вы найдете на megasb. Позвольте нам помочь вам сделать каждый день неповторимым!
mega darknet:https://xn--megsb-l11b.com
Hi all! My name is Admin Read:
Готовы подарить себе момент вдохновения и поток творчества? mega sb готов помочь вам раскрыть свой потенциал! Мы создали наши статьи, видео и контент с целью вдохновлять и поддерживать вас. Здесь нет места для рутины – только свежие идеи и возможности. Присоединяйтесь к рабочая ссылка на мегу и позвольте вашей креативности процветать!
mega onion:https://xn--mga-sb-w4a.com
kamagra 500mg
Admin – “:
Качество – наш золотой стандарт на зеркало mega sb. Мы уделяем максимальное внимание каждой детали в нашем контенте, чтобы вас ожидало лишь наилучшее удовольствие. Безупречные видео, увлекательные игры и информативные статьи – все, что вы найдете на mega555, отвечает самым высоким стандартам. Присоединяйтесь и погрузитесь в мир качественных впечатлений!
мега даркнет маркет:https://xn--mga-sb-w4a.com
My spouse and I stumbled over here coming from a different page and thought I might check things out.
I like what I see so i am just following you. Look
forward to looking into your web page yet again.
zovirax pills cost
can you buy valtrex over the counter in mexico
lisinopril cost 5mg
Can you tell us more about this? I’d like to find out more details.
nolvadex for sale australia
Hi! Do you know if they make any plugins to safeguard against hackers?
I’m kinda paranoid about losing everything I’ve worked
hard on. Any suggestions?
buy fildena 150
drug cozaar generic
propecia over the counter canada
tetracycline cap
azithromycin 500 mg prices
can i buy lyrica online
lisinopril hctz
azithromycin capsules
Howdy! I know this is kinda off topic but I was wondering
if you knew where I could locate a captcha plugin for my comment form?
I’m using the same blog platform as yours and I’m
having difficulty finding one? Thanks a lot!
aurogra 100 mg
cheapest generic valtrex
cheapest pharmacy to get prescriptions filled
synthroid 137 mcg cost
You definitely made the point.
service to others essay writing services for college papers free essay writing service writing essay
cpm homework help homework pay to do my homework cpm homework
help writing dissertation proposal https://domyhomeworkformecheap.com
chloromycetin capsule
cefixime coupon
canadian pharmacy generic viagra
buy misoprostol canada
purchase chloramphenicol
zestril over the counter
terramycin for dogs
A fascinating discussion is definitely worth comment. I do believe that you should write
more about this subject matter, it might not be a taboo matter but
typically people do not speak about such subjects.
To the next! Kind regards!!
lipitor 2018
best advair price
You have made your position extremely well.!
research paper help buy term papers online research proposal cover page research proposal
zyvox for uti
lisinopril 10 mg coupon
can i buy 10mg prednisone over the counter
accutane 40mg
fildena 100
equipacion inter de milan
tamoxifen drug
acyclovir uk prescription
cozaar sale
female viagra europe
Вeithgroge
http://forum1.shellmo.org/member.php?action=profile&uid=1569637
https://pastebin.com/u/Harryngton3
https://cellphoneforums.net/member-429173-patison22.html#axzz7yqCHZCJ4
https://www.dmxzone.com/support/17883/topic/66458
https://forum.bg/members/55856-radion77
https://440hz.my/forums/users/boxon44/
http://talk.studioline.net/viewprofile.aspx?UserID=2795
https://www.universe.com/users/jany-kali-PB4Y1D
https://wefunder.com/johnkali
https://gettogether.community/profile/66078/
https://www.efunda.com/members/people/show_people.cfm?Usr=Tawon2332&Search_Cat1=Name%2FUserName&Search_Key1=Tawon2332%20&Search_Cat2=All%20Fields&Search_Key2=&Search_Cat3=All%20Fields&Search_Key3=&And_OR=and
https://www.beqbe.com/p/Panor23
https://myspace.com/layla2311
https://we.riseup.net/fazix22
http://www.escalade-alsace.com/forum/profile.php?mode=viewprofile&u=27476
https://sites.google.com/view/top-pin-up-casino-igry
buy discount cialis online
There are a lot of thrilling casino games obtainable at South Korean on line casinos.
cephalexin 500 mg cap
buy nitrofurantoin usa
how to get metformin uk
She worked for a organization preparing dumplings and other prepared-made foods.
1 viagra pill
buy noroxin
nitrofurantoin 100 mg capsule
amoxicillin clavulanate
viagra soft pills
Kudos. Ample forum posts!
pay to write my essay pay for essay buy essay online pay someone to write paper
order clindamycin online
can you buy real viagra from canada
Hi my family member! I wish to say that this article is awesome, great written and come with almost all vital infos.
I’d like to look more posts like this .
baclofen
happy family pharmacy coupon code
singulair 10mg otc
drug lasix 40 mg
zovirax 50 mg
advair 200
azithromycin 1g for sale
I’m not sure exactly why but this blog is loading incredibly slow for me.
Is anyone else having this problem or is it a problem on my end?
I’ll check back later on and see if the problem still exists.
buy generic tetracycline online
certainly like your web site but you have to take a look at the spelling on several of your posts.
A number of them are rife with spelling issues and I to
find it very bothersome to inform the truth then again I will surely
come back again.
zestril price in india
how to buy cytotec online
myambutol 400 mg
prednisone 1.25 mg
I pay a quick visit day-to-day some blogs and sites to read articles, except this
website gives feature based writing.
nitrofurantoin 50mg
viagra for sale usa
advair 250 50 mg
Hello to all, since I am actually keen of
reading this webpage’s post to be updated daily.
It carries good material.
cilias canada
synthroid 150 mcg tab
finasteride for hair loss
zithromax online
cephalexin buy online
What’s Taking place i’m new to this, I stumbled upon this I’ve found It
absolutely helpful and it has helped me out loads.
I hope to contribute & assist different customers like its helped me.
Great job.
propecia brand
buy viagra soft tabs
buy viagra for female online india
I’m not sure why but this website is loading incredibly slow for me.
Is anyone else having this problem or is it a problem on my end?
I’ll check back later on and see if the problem still exists.
acyclovir cream price uk
purchase valicyclovir online
zovirax online uk
female viagra tablet in india online purchase
synthroid 0.25 mg
valtrex price australia
Saved as a favorite, I really like your blog!
suhagra 100 online
buy tamoxifen canada
fildena 150 for sale
buy amoxicillin 500mg usa
It is perfect time to make some plans for the future
and it’s time to be happy. I have read this post and if I could
I wish to suggest you some interesting things or tips. Perhaps you
can write next articles referring to this article. I wish to read
even more things about it!
5mg finasteride
Howdy would you mind sharing which blog platform you’re using?
I’m going to start my own blog in the near future but I’m having a tough
time selecting between BlogEngine/Wordpress/B2evolution and Drupal.
The reason I ask is because your layout seems different then most blogs and
I’m looking for something completely unique.
P.S Sorry for being off-topic but I had to ask!
cheap albuterol online
finpecia without prescription
Have you ever considered creating an e-book or guest authoring on other blogs?
I have a blog based upon on the same ideas you discuss and would really like to have you share some stories/information. I
know my viewers would value your work. If you are even remotely interested, feel free
to send me an e-mail.
terramycin eye ointment for dogs
Fantastic blog! Do you have any recommendations for aspiring writers?
I’m planning to start my own website soon but I’m a little lost on everything.
Would you recommend starting with a free platform like WordPress or
go for a paid option? There are so many options out there
that I’m totally overwhelmed .. Any tips? Cheers!
amoxicillin 1000
buy 100 mg silagra tablets
Hi there! I just wanted to ask if you ever have any problems
with hackers? My last blog (wordpress) was hacked and I ended
up losing a few months of hard work due to no back up.
Do you have any methods to stop hackers?
where can i purchase elimite
Thanks very nice blog!
lasix 40 mg tablet
seroquel 12.5
Beneficial forum posts. Many thanks.
best online essay writing service essay writing service coupon essay help service college paper writing service
pay someone to write paper buy college essays buy essay online pay someone to write your paper
essay paper writing help https://phdthesisdissertation.com
pharmacy drugs
buy provigil
provigil for sale canada
provigil medicine
trusted online pharmacy
wholesale viagra
Truly tons of useful data.
essay writer no plagiarism essay write writing a personal essay write my paper for me free
purchase vermox
propecia no prescription bonus 98212
Your style is so unique compared to other folks I have read stuff from.
I appreciate you for posting when you have the opportunity, Guess I’ll just book mark this blog.
generic cozaar price
tretinoin 1 cream coupon
dexamethasone 6 tablet
online pharmacy viagra
lisinopril 10 mg best price
zovirax kosten
colchicine mexico
Asking questions are in fact nice thing if you are not understanding anything
entirely, however this piece of writing presents fastidious understanding even.
zoloft 50 mg buy online
anafranil online
buy kamagra jelly online
online ventolin
ciprofloxacin coupon
If some one wants expert view about running a blog then i propose
him/her to pay a visit this webpage, Keep up the nice job.
anafranil 50 mg
elimite otc price
Hello just wanted to give you a quick heads up. The text in your article seem
to be running off the screen in Internet explorer.
I’m not sure if this is a formatting issue or something to do with browser compatibility but I thought I’d post to let you know.
The design look great though! Hope you get the issue fixed soon.
Kudos
acticin tablet
Wow, this piece of writing is fastidious, my sister is analyzing
these kinds of things, so I am going to let know her.
zofran price
tetracycline 500mg price in india
hydroxychloroquine 700 mg
prednisolone brand name australia
buy cheap strattera
canadian pharmacy 24 com
prednisolone cost uk
We’re a group of volunteers and opening a new scheme in our community.
Your site offered us with valuable info to
work on. You have done a formidable job and our whole community will be thankful to you.
budesonide cost australia
zoloft prices
prescription drug tizanidine
buy tadacip from india
Kudos. Loads of write ups!
cost of lasix medication
prednisolone brand name india
I need to to thank you for this fantastic read!!
I absolutely loved every little bit of it. I’ve got you bookmarked
to look at new stuff you post…
zanaflex 4mg tablets
india cialis pharmacy
provigil best price
I am regular reader, how are you everybody? This article
posted at this web site is genuinely good.
200 mg prednisone daily
If you want to take much from this paragraph then you have to apply such strategies to your won web site.
viagra com
Simply want to say your article is as astounding. The clarity in your post is just excellent and i could
assume you’re an expert on this subject. Fine with your permission let me to grab your feed to keep updated with forthcoming post.
Thanks a million and please keep up the enjoyable work.
hydroxychloroquine sulfate tab 200 mg
finasteride 5mg over the counter
erythromycin tablets 500mg buy
kamagra buy australia
doxycycline 300mg daily
plaquenil mexico
valtrex without a prescription
Everything is very open with a very clear description of the issues.
It was really informative. Your site is useful. Thank you for sharing!
prednisolone 0.5 cream
pharmacy
suhagra 50 mg tablet price in india
ivermectin buy uk
citalopram prescription nz
fluoxetine 120mg
buy tetracycline
tizanidine best price
Pretty section of content. I just stumbled upon your web site and in accession capital to assert that I get
actually enjoyed account your blog posts. Any way I will be
subscribing to your feeds and even I achievement you access
consistently rapidly.
hydroxychloroquine 800mg
Wow, marvelous weblog format! How long have you been blogging for?
you made running a blog glance easy. The entire glance of your web site is fantastic, as well as the content!
clomiphene for sale
generic valtrex online
budesonide 9 mg tablets price
furosemide in mexico
Thankfulness to my father who told me concerning this website, this blog is
in fact remarkable.
711 viagra pills
toradol for dogs
Great info. Lucky me I came across your site by accident (stumbleupon).
I have saved as a favorite for later!
zanaflex price uk
stromectol lotion
colchicine tab 0.6 mg
tizanidine generic
ivermectin generic name
lasix 10 mg price
elimite cream over the counter
prednisolone 5mg tablet price
dexamethasone brand name
Having read this I believed it was rather enlightening.
I appreciate you finding the time and energy to put this article
together. I once again find myself spending a lot of time both reading
and commenting. But so what, it was still worth it!
strattera 40mg discount
Attractive element of content. I just stumbled upon your website and in accession capital to say that I acquire actually enjoyed account your
blog posts. Anyway I will be subscribing for your feeds and even I success you get admission to persistently
fast.
buy fildena india
how to get provigil
elimite over the counter uk
zoloft tablet price
trental 400 mg tablets in india
ciprofloxacin 500mg online
tizanidine 6 mg cap
Can I simply say what a relief to discover somebody that genuinely knows what they are
talking about on the net. You definitely
realize how to bring an issue to light and make it important.
A lot more people have to read this and understand this side of your story.
I can’t believe you aren’t more popular since you most certainly
have the gift.
synthroid 50 mcg cost
advair prescription
Great web site. Lots of useful info here. I’m sending
it to several pals ans additionally sharing in delicious.
And naturally, thanks on your sweat!
generic zanaflex capsules
where to buy cialis over the counter in canada
no rx pharmacy
generic viagra in india online
I blog quite often and I seriously appreciate your content.
This great article has really peaked my interest.
I’m going to bookmark your website and keep checking for new information about once a
week. I opted in for your RSS feed as well.
dexamethasone 4 mg pill
clonidine for insomnia
lunc crypto price prediction
amc stocktwits
xxc vs xmr 2023
reliance power share price future prediction 2025
p2p
lcid stock forecast 2025
yes bank share price target 2025
hbar partnerships
adani wilmar share price prediction 2025
token sniffer
ftx collapse strand
stonk-o-tracker amc
titano finance
what is xpr
lpnt latest news
shping coin
big eyes coin price prediction
https://blockchainreporter.net/ethereum-june-david-pan-bloomberg/https://blockchainreporter.net/adani-wilmar-share-price-prediction/https://blockchainreporter.net/ai-trading-algos-hot-topic-on-tsla-and-amc-stocktwits-chats/https://blockchainreporter.net/whats-the-best-way-to-earn-grt-rewards-coinbase-quiz/https://blockchainreporter.net/analysts-sure-luna-classic-is-dead-and-recommend-to-invest-in-bitcoin-spark/https://blockchainreporter.net/reliance-power-share-price-future-prediction-2025/https://blockchainreporter.net/mullen-automotive-stock-price-prediction/https://blockchainreporter.net/amc-stonk-o-tracker/https://blockchainreporter.net/bybit-secures-green-light-to-enter-kazakhstan-market-opening-new-doors-for-traders/https://blockchainreporter.net/coinbase-earn-quiz-answers/
cost of citalopram uk
buy discount cialis
accutane buy
lunc crypto price prediction
xyo coin price prediction
digifinex
bridge arbitrum
xyo coin price prediction
rdbx stock price
shiba inu coin burn rate
big eyes coin price prediction
ontario teachers pension plan ftx
riviam stock
method man snoop dogg
webull
Meta Stock Price Prediction
Dogelon Mars Price Prediction 2030
Rivian Stock Price Prediction 2030
pulse x coin
Btc pulse
pulse x crypto price prediction
pulse x coin price
Amazon Stock Price Prediction 2025
prednisolone tablets
clonidine .3 mg
Hi there, its pleasant post about media print, we
all understand media is a impressive source of information.
disulfiram tablets cost
trust pharmacy
where to buy kamagra oral jelly in singapore
lunc crypto price prediction
xyo coin price prediction
digifinex
bridge arbitrum
xyo coin price prediction
rdbx stock price
shiba inu coin burn rate
big eyes coin price prediction
ontario teachers pension plan ftx
riviam stock
method man snoop dogg
webull
Meta Stock Price Prediction
Dogelon Mars Price Prediction 2030
Rivian Stock Price Prediction 2030
pulse x coin
Btc pulse
pulse x crypto price prediction
pulse x coin price
Amazon Stock Price Prediction 2025
paxil pill
Hi, Neat post. There’s an issue with your web site in web explorer, might check this?
IE nonetheless is the marketplace chief and a good portion of
folks will omit your fantastic writing because of this problem.
can you buy colchicine over the counter
lunc crypto price prediction
xyo coin price prediction
digifinex
bridge arbitrum
xyo coin price prediction
rdbx stock price
shiba inu coin burn rate
big eyes coin price prediction
ontario teachers pension plan ftx
riviam stock
method man snoop dogg
webull
Meta Stock Price Prediction
Dogelon Mars Price Prediction 2030
Rivian Stock Price Prediction 2030
pulse x coin
Btc pulse
pulse x crypto price prediction
pulse x coin price
Amazon Stock Price Prediction 2025
Hi just wanted to give you a brief heads up and let you know a few of the images aren’t loading properly.
I’m not sure why but I think its a linking issue. I’ve tried it in two different web browsers and both show the same results.
top 10 pharmacies in india
furosemide 20 mg tablet brand name
toradol over the counter canada
best online pharmacy for viagra
fluoxetine 20 mg capsule brand name
legitimate online pharmacy uk
cialis canada pharmacy online
Cheers, Lots of info!
can i buy cipro online
medicine furosemide 40 mg
diflucan buy online usa
suhagra 100mg tablet price in india
I’m not sure why but this site is loading very slow for me.
Is anyone else having this problem or is it a
problem on my end? I’ll check back later and see if the
problem still exists.
Touche. Solid arguments. Keep up the great spirit.
zoloft 100 mg
can you buy accutane over the counter in canada
buy suhagra india
Your style is so unique compared to other people I have read stuff from.
Many thanks for posting when you have the opportunity,
Guess I will just bookmark this site.
reliable rx pharmacy
cost of zofran in canada
pentoxifylline trental
Magnificent site. Plenty of helpful info here. I’m sending it to some pals ans additionally sharing in delicious.
And of course, thank you to your effort!
buy kamagra fast delivery
antabuse prescription uk
The advent of the world wide web introduced a
new way of lending, shaping the landscape
of the private loan market.
can i buy clomid over the counter in australia
prednisolone 20 mg
tizanidine online
prednisolone buy uk
Quality content is the main to interest the viewers to go to
see the web page, that’s what this web site is providing.
prednisolone price australia
clonidine for sale
sildenafil discount generic
anafranil 25 tablets
where to buy clomid uk
baclofen 10 mg tablets
bupropion online no prescription
This is really interesting, You are a very skilled blogger.
I have joined your feed and look forward to seeking more
of your excellent post. Also, I have shared your website in my
social networks!
where to buy accutane uk
I’m extremely impressed along with your writing
talents as smartly as with the format in your blog.
Is this a paid subject matter or did you modify it your self?
Either way stay up the nice quality writing, it is rare to see a great blog like this one today..
Appreciate this post. Let me try it out.
Hola! I’ve been following your weblog for a while now and finally got
the bravery to go ahead and give you a shout out from Atascocita
Texas! Just wanted to mention keep up the excellent job!
payday loan
trazodone 150mg cost
plaquenil cheap
best place buy viagra online
stromectol 6 mg tablet
how to get prozac uk
What’s Taking place i am new to this, I stumbled upon this
I have found It absolutely useful and it has helped me out
loads. I’m hoping to give a contribution & aid different customers like its
aided me. Great job.
dexamethasone brand name in usa
12.5 mg paxil
tetracycline gel
citalopram for depression
tizanidine 4 mg
corticosteroids prednisone
Good post. I learn something new and challenging on sites I stumbleupon every day.
It’s always interesting to read content from other authors and use something from other sites.
colchicine 1 mg tab
combivent 2019
online pharmacy europe
generic paxil 40 mg
no rx needed pharmacy
prozac 20 mg cost
antabuse over the counter south africa
buy zanaflex online
metformin tablets price in india
generic zoloft 200 mg
payday loan
Appreciate it. A good amount of write ups.
tetracyclin
toradol daily
where can i buy furosemide
tizanidine 5.2
you’re truly a good webmaster. The site loading speed is amazing.
It kind of feels that you’re doing any unique trick. Furthermore, The contents are masterpiece.
you have performed a excellent activity on this matter!
I am genuinely glad to read this blog posts which
consists of plenty of valuable information, thanks for providing these information.
cost of paroxetine without insurance
how to get zofran prescription
zoloft generic cost
elimite cream ebay
cost of xenical in united states
cafergot tablet
citalopram insomnia
clonidine for smoking cessation
acticin 5 cream
plaquenil cost
We are a gaggle of volunteers and opening a brand new scheme in our
community. Your web site offered us with useful info to work on. You’ve done an impressive process and our whole group will likely be
thankful to you. camisetas de futbol
You made your point quite effectively!!
all med pharmacy
Hey I know this is off topic but I was wondering if you knew of any widgets I could add to my blog that
automatically tweet my newest twitter updates. I’ve been looking for a plug-in like this
for quite some time and was hoping maybe you would have some experience with something like this.
Please let me know if you run into anything. I truly enjoy reading your blog and I look forward to your
new updates.
Hello! I’m at work browsing your blog from my new
iphone 3gs! Just wanted to say I love reading through your blog and look forward
to all your posts! Keep up the outstanding work!
plaquenil headache
furosemide for sale
best online pharmacy no script celebrex
cialis gel capsules
I know this site provides quality based posts and other stuff,
is there any other website which provides such information in quality?
buy tetracycline online uk
Excellent way of telling, and nice article to take facts on the topic of my presentation focus,
which i am going to convey in college.
buy furosemide 40 mg uk
Definitely consider that that you stated. Your favorite justification appeared
to be on the web the easiest thing to keep in mind of.
I say to you, I definitely get annoyed at the same time as
folks think about concerns that they just don’t realize
about. You controlled to hit the nail upon the top and outlined
out the entire thing without having side-effects
, people can take a signal. Will probably be back to get more.
Thanks
doxycycline over the counter nz
valtrex 1000 mg tablet
penis enlargement
online pet pharmacy
My developer is trying to convince me to move to .net from PHP.
I have always disliked the idea because of the costs.
But he’s tryiong none the less. I’ve been using Movable-type on a number of websites for about a year and am concerned about switching to another
platform. I have heard good things about blogengine.net.
Is there a way I can import all my wordpress posts into it?
Any help would be greatly appreciated!
order fildena online
paxil price south africa
how to buy valtrex without a prescription
Belfort Furniture features a great selection of sofas, sectionals, recliners, chairs, leather furniture,
custom upholstery, beds, mattresses, dressers, nightstands,
dining sets, kitchen storage, office furniture, entertainment and can help you with your home design and decorating.
Entertainment Weekly, Box Office Mojo, and Deadline Hollywood reported that
the film’s production budget was $170 million; however, Deadline also noted that other analysts marked the budget at $185 million. Albany, Ga.-based IPA 300 firm
Draffin & Tucker LLP (FY21 net revenue of $16.3 million) has admitted Matt Atkins as a partner.
Film. Audiobooks, Software, Revenue generating podcasts, apps, and games.
The film showcases Katia and Maurice Krafft, a pair of French volcanologists
whose passion for each other was only matched for the work they shared.
Broadcast Film Critics Award for Best Live Action Family Film along with gaining two
other nominations. Student, Educational, Humanitarian and Non-Profit Organization film.
YouTube personal video without the monetization. Personal blog or website.
It is illegal if a website streams copyrighted content for free or streams media without permission or rights.
This free storage will surely accelerates its performance to its maximum
level for your Xbox series. Another unique feature on the
site, the Pilot Scorecard has up-to-the-minute listings of pilot and series orders,
and you can filter by the network, genre, and status (series pick up, terminated
pilot, etc.).
Hurrah! After all I got a website from where I be able to really take useful facts
regarding my study and knowledge.
cialis buy online india
zoloft tablets
cost of viagra 100mg tablet
plaquenil 200 mg
propranolol 10mg cheap
Write more, thats all I have to say. Literally,
it seems as though you relied on the video to make your point.
You obviously know what youre talking about, why throw away your intelligence on just posting videos
to your weblog when you could be giving us something enlightening to
read?
where can i get dexamethasone
dexamethasone price south africa
orlistat 60 mg online
250mg amoxicillin capsules
erythromycin 250 mg cost
budesonide australia
kamagra online uk
order pharmacy online egypt
how to get ciprofloxacin
Thanks for the good writeup. It in truth was a entertainment account it.
Look advanced to more delivered agreeable from you! By the
way, how can we be in contact?
buy ivermectin for humans uk
synthroid 150 mcg tablet
best kamagra
effexor 150 mg
Fantastic post but I was wanting to know if you could
write a litte more on this topic? I’d be very grateful if you
could elaborate a little bit more. Many thanks!
buy clomid on line
Pin Up’s website and apps protect data, so personal and
financial information is safe.
Way cool! Some extremely valid points! I appreciate you writing this post and the rest of the website is very good.
prozac prescription price
brand name tetracycline
budesonide tablets
fluoxetine 20
fildena 100 india
disulfiram 250 mg buy online
Разрешение на строительство – это юридический документ, предоставленный органами власти, который предоставляет правовое удостоверение позволение на запуск создания строительства, реконструктивные мероприятия, основной реконструктивный ремонт или дополнительные виды строительной деятельности. Этот бумага необходим для выполнения в практических целях различных строительных и ремонтных работ, и его отсутствие может подвести к серьезным юридическими и денежными результатами.
Зачем же нужно какие документы для получения разрешения на строительства?
Соблюдение законности и контроль. Разрешение на строительство и реконструкцию объекта – это средство предоставления соблюдения законов и стандартов в стадии становления. Это гарантирует выполнение норм и законов.
Подробнее на https://rns50.ru
В конечном счете, разрешение на строительство и реконструкцию является важным средством, поддерживающим соблюдение норм, обеспечение безопасности и стабильное развитие строительной деятельности. Оно к тому же обязательным действием для всех, кто планирует заниматься строительством или реконструкцией недвижимости, и наличие этого помогает укреплению прав и интересов всех сторон, участвующих в строительном процессе.
voltaren gel nz
buy stromectol
Разрешение на строительство – это законный документ, предоставленный компетентными органами власти, который обеспечивает юридическое удостоверение разрешение на работу на старт строительства, изменение, основной ремонт или разные типы строительных процессов. Этот сертификат необходим для воплощения в большинстве случаев всех строительных и ремонтных мероприятий, и его отсутствие может провести к серьезными юридическими и денежными последствиями.
Зачем же нужно когда необходимо получить разрешение на строительство?
Соблюдение законности и контроль. Разрешение на строительство и реконструкцию – это средство гарантирования соблюдения правил и норм в периоде строительства. Это обеспечивает гарантийное выполнение правил и норм.
Подробнее на rns50.ru/
В финальном исходе, разрешение на строительство и реконструкцию объекта представляет собой важный механизмом, обеспечивающим выполнение правил и стандартов, соблюдение безопасности и устойчивое развитие строительной деятельности. Оно более того обязательным ходом для всех, кто планирует заниматься строительством или реконструкцией объектов недвижимости, и присутствие помогает укреплению прав и интересов всех участников, участвующих в строительстве.
how to buy azithromycin
tizanidine cap 4mg
rx motrin
I simply couldn’t go away your site prior to suggesting that I extremely loved the standard info
a person supply in your guests? Is going to be back steadily in order to investigate cross-check new posts
comprar camisetas de fútbol baratas
toradol 100mg
can you purchase viagra online
diflucan pill costs
disulfiram pill
tetracycline 500mg
flomax low blood pressure
My partner and I absolutely love your blog and find many of your post’s to be what precisely I’m looking for.
Do you offer guest writers to write content in your case?
I wouldn’t mind composing a post or elaborating on many of the subjects you
write regarding here. Again, awesome web log!
cialis canada 20mg
how to get celexa without a prescription
prednisone prednisolone
valtrex daily use
zoloft 100mg generic
azithromycin 750
buy clomid in usa
tadalafil 7 mg capsule
can you buy budesonide over the counter
prednisolone 5mg brand name
indian pharmacy paypal
Наш завод производит грифы под гантели и другие товары для спорта. В нашем ассортименте представлено больше количество силовых станков для залов. Также можно заказать штанги всех видов, цельные и разборные гантели, лавки для выполнения жимов, стойки для штанг и рамы для кроссфита. Также на нашем сайте представлен ассортимент напольных покрытий, спортивные гири, тренажеры для функциональных тренировок.
albuterol 83
Наша компания изготавливает https://grify-dlya-ganteley.ru и другие товары для тренинга. У нас представлено больше количество спортивных тренажеров для залов. Также можно купить штанги изогнутые и прямые, гантели, лавки для выполнения жима, стойки для штанг и рамы для кроссфита. Еще на нашем сайте представлен ассортимент покрытий для пола, спортивные гири, тренажеры для функциональных тренировок.
celebrex 200 mg coupon
canada pharmacy not requiring prescription
zestoretic 10 12.5 mg
trental cost
price of tadalafil 5 mg
buy zoloft no prescription
12mg tizanidine
budesonide brand
hi!,I really like your writing very a lot!
percentage we communicate extra about your article on AOL?
I need a specialist on this area to solve my problem.
Maybe that is you! Looking ahead to look you.
antabuse pills
cost of tetracycline
trazodone 650 mg
cialis 20mg pills generic
acticin 250
I’m amazed, I must say. Seldom do I come across a blog that’s both equally educative and entertaining, and without a doubt, you have hit the nail
on the head. The issue is something not enough men and women are speaking intelligently about.
Now i’m very happy that I found this during my hunt for something relating to this.
propecia generic uk
where can i buy erythromycin tablets
where to buy xenical
generic cialis 80mg
Hello, i read your blog occasionally and i own a similar one
and i was just curious if you get a lot of spam comments?
If so how do you protect against it, any plugin or anything you can advise?
I get so much lately it’s driving me insane so any support is
very much appreciated.
Terrific content. Many thanks.
ivermectin medicine
amoxicillin 720 mg
What’s up to every , for the reason that I am really eager of reading this web site’s
post to be updated regularly. It consists of good information.
buy viagra online
Appreciate the recommendation. Let me try it out.
my canadian pharmacy
tadalafil without prescription
budesonide capsules cost
canadian pharmacies that deliver to the us
zoloft online
happy family rx
Our dating platform is the perfect online dating service for active singles looking for fun.
The web-based platform enables you to meet like-minded people whenever you want.
Join our flirt finder today and embark on your adventure to finding love with Flirt finder.
generic motrin 600 mg
happy family store coupon code pharmacy
cipro usa prescription
toradol 10mg cost
lisinopril 25
metformin 850 mg tablets price
tizanidine 2018
erectafil 20 for sale
lasix medication generic
compare propecia prices uk
flomax glaucoma
cost of viagra in usa
tetracycline drugs
Adult Flirt Finder is a great solution to meet compatible partners who are searching for fun.
The online platform enables you to connect with compatible partners anytime, anywhere.
Become a part of the online community today and start your adventure to meeting the right person with Flirt finder.
how to get accutane prescription
I am actually grateful to the holder of this website who has shared this great post at at this time.
where to buy trazodone
clonidine cream
order prozac online uk
flomax 0.2 mg
lunc crypto price prediction
xyo coin price prediction
digifinex
bridge arbitrum
xyo coin price prediction
rdbx stock price
shiba inu coin burn rate
big eyes coin price prediction
ontario teachers pension plan ftx
riviam stock
method man snoop dogg
webull
Meta Stock Price Prediction
Dogelon Mars Price Prediction 2030
Rivian Stock Price Prediction 2030
pulse x coin
Btc pulse
pulse x crypto price prediction
pulse x coin price
Amazon Stock Price Prediction 2025
trazodone brand name uk
cost of generic accutane
effexor price australia
lisinopril 40 mg tablets
XXX Tube Videos Porn Hub
XXX XVideos XXX isoporno
http://images.google.ca/url?q=https://isoporno.com/
http://www.google.co.tz/url?q=https://isoporno.com/
http://maps.google.com.bn/url?q=https://isoporno.com/
http://www.google.co.zm/url?q=https://isoporno.com/
http://maps.google.com.bz/url?q=https://isoporno.com/
http://the95ers.com/__media__/js/netsoltrademark.php?d=isoporno.com
http://blueribbonbowtroutfitters.com/__media__/js/netsoltrademark.php?d=isoporno.com
http://goavvip.com/__media__/js/netsoltrademark.php?d=isoporno.com
http://famelysearch.org/__media__/js/netsoltrademark.php?d=isoporno.com
http://flaglerhomecare.org/__media__/js/netsoltrademark.php?d=isoporno.com
online pharmacy store
125mg anafranil
Greetings! I know this is kinda off topic but I’d figured I’d ask.
Would you be interested in exchanging links or maybe guest writing a blog
post or vice-versa? My website discusses a lot of the same subjects as yours and I think we
could greatly benefit from each other. If you are interested feel
free to shoot me an email. I look forward to hearing from you!
Superb blog by the way!
female viagra sale
54 prednisone
rx pharmacy generic viagra
furosemide 20 mg cost
how to order viagra online in canada
攴鸽摛 氇憪電?靹犽毳?攵€靾橁碃 瓿犾矤鞚?鞚€鞙茧 氚旉靖鞏?甑皜瓴届牅鞕€ 氙检儩鞐?鞚措鞖?鞚检潉 頄堨溂氅?膦嬯矤雼る姅 鞚橂秳鞚?雮橅儉雰堧嫟.
攴胳潣 欤检渼鞐?鞛堧崢 鞚柬枆霌れ潃 頃橂倶 霊橃敥 牍勳案頃橁矊 雸堧碍鞐?鞊半煬臁岆嫟.
鞚?旮半厫甏€鞚?霌り碃 鞛堧崢 Hongzhi 頇╈牅電?毵堨潓鞐?氤奠灐頃?臧愳爼鞚?電愱紙瓿?鞎勲摛鞚?臧滌瀽鞁濎澊霛缄碃 昃胳鞏挫暭 頃犾 鞎勲媹氅?攴胳潣 歆勲炒毳?旃艾頃挫暭 頃犾 氇半瀽鞀惦媹雼?
旃挫雲?靷澊韸?/a>
鞓澕鞚?鞀’ 毹胳嫚
鞓澕鞚?鞀’
霐半澕靹?.. 氚旊嫟 鞝勳泊臧€ 雼る皪鞚?雮措秬 順胳垬臧€ 霅橃棃鞀惦媹雼?
鞚措ジ 鞎勳龚鞚?霅橂┐ 鞚?瓯半寑頃?毵堨潉鞚?霅橃偞鞎勲倶瓿? 雮弲 靻岆Μ鞕€ 頃粯 靷瀸霌れ潃 頃橂( 鞚缄臣毳?鞁滌瀾頃滊嫟.
靾犾潉 毵堨嫓瓿?雮橂┐ 臁瓣笀 電姷雼堧嫟. 鞓ろ泟鞐?160,000 鞁滌瀾 旖旍澑鞚?氤挫儊鞚?欤检嫚 1602191802428鞐愱矊 雼れ嫓 頃?氩?臧愳偓霌滊雼堧嫟. 攴戈贝 攴鸽爣瓿? 雿?鞛堨姷雼堧嫟!
攵侂秬 歆侅槇鞚?瓿奠儩 頃欖儩霌れ潃 頃儊 頇╈嫟 鞁滍棙鞐愳劀 鞝滍暅霅?靾橃鞚?旮半頄堨溂氅?Xishan Academy電?鞐爠頌?雮欖牅頃?靾?鞛堨姷雼堧嫟.
攵堧鞚?頀堨潃 靹犽箘霌れ潃 鞓侅爜鞀闺Μ氩曥潉 鞛橅晿電旊嵃 臧愴瀳 鞚挫潣毳?鞝滉赴頃橃 氇豁晿旮?霑岆鞐?靾赴瓿?鞁犽瀯頃?毵愲 頃?肟?雵岆硲鞐?氍挫姩 氍胳牅臧€ 鞛堧姁雰?霌彪摫.
Fang Jifan鞚€ 氍挫潣鞁濎爜鞙茧 頇╆笀 氩姼 毹鸽Μ毳?鞛呾棎 雱l棃鞀惦媹雼?
鞓澕鞚?鞀’ 毹胳嫚
鞀’ 靷澊韸?/a>
鞓澕鞚?旃挫雲?/a>
攴戈皜 電愲個 瓴冹潃 甑挫殨鞚挫棃瓿?攴胳潣 毵堨潓鞚€ 鞝愳爯 雿?瓿犿喌鞀る煬鞗岇鞀惦媹雼?
觳橃潓鞐愲姅 頃欕彊霌れ潉 鞙勴暅 瓴冹澊鞐堨毵? 頃欕彊霌れ潣 靹犾儩雼橃澑 欤茧爩瓿?靹犽箘霌れ澊 攴€毳?旮办毟鞚搓矊 霅橃棃鞀惦媹雼?
Zhang Heling鞚€ 鞛?鞐檿鞚?頋頃橁矊 氚旊澕氤措┌ “鞛愲Г雼? 鞖半Μ電?雼轨嫚瓿?頃粯鞛堨潉 瓴冹瀰雼堧嫟.”
Экспресс-строения здания: бизнес-польза в каждом строительном блоке!
В современной реальности, где минуты – капитал, здания с высокой скоростью строительства стали реальным спасением для коммерческой деятельности. Эти прогрессивные сооружения включают в себя высокую надежность, экономичность и быстроту установки, что дает им возможность идеальным выбором для разнообразных предпринимательских инициатив.
Быстровозводимые здания
1. Высокая скорость возвода: Минуты – основной фактор в коммерческой деятельности, и объекты быстрого монтажа позволяют существенно сократить сроки строительства. Это преимущественно важно в условиях, когда срочно нужно начать бизнес и начать получать доход.
2. Финансовая эффективность: За счет оптимизации процессов производства элементов и сборки на месте, расходы на скоростройки часто оказывается ниже, по отношению к обычным строительным проектам. Это способствует сбережению денежных ресурсов и обеспечить более высокую рентабельность вложений.
Подробнее на https://scholding.ru/
В заключение, моментальные сооружения – это лучшее решение для предпринимательских задач. Они комбинируют в себе скорость строительства, экономию средств и повышенную надежность, что сделало их наилучшим вариантом для деловых лиц, готовых начать прибыльное дело и получать деньги. Не упустите возможность сократить затраты и время, лучшие скоростроительные строения для ваших будущих проектов!
Быстро возводимые здания: экономический доход в каждом кирпиче!
В сегодняшнем обществе, где время имеет значение, объекты быстрого возвода стали настоящим выходом для коммерческой деятельности. Эти новаторские строения объединяют в себе солидную надежность, экономичное использование ресурсов и быстроту установки, что обуславливает их оптимальным решением для различных бизнес-проектов.
Быстровозводимые здания
1. Высокая скорость возвода: Секунды – самое ценное в предпринимательстве, и экспресс-сооружения позволяют существенно сократить время монтажа. Это особенно выгодно в постановках, когда срочно нужно начать бизнес и начать извлекать прибыль.
2. Экономия средств: За счет улучшения производственных процедур элементов и сборки на объекте, затраты на экспресс-конструкции часто уменьшается, по сравнению с традиционными строительными проектами. Это позволяет сократить затраты и достичь более высокой инвестиционной доходности.
Подробнее на http://www.scholding.ru/
В заключение, моментальные сооружения – это лучшее решение для бизнес-мероприятий. Они обладают эффективное строительство, экономию средств и высокую прочность, что обуславливает их наилучшим вариантом для фирм, готовых начать прибыльное дело и обеспечивать доход. Не упустите возможность сэкономить время и средства, прекрасно себя показавшие быстровозводимые сооружения для вашей будущей задачи!
zestoretic drug
Além doesportivo, os jogadores que baixarem o aplicativo da marca também recebem pin coins.
my webpage – http://www.sinseonunse.com/bbs/board.php?bo_table=free&wr_id=2553841
toradol usa
online no prescription wellbutrin
buy disulfiram online
where can i get xenical
鞚疙劙雱缝勾歆€雲?/strong>
鞓澕鞚胳姮搿?/strong>
頇╈牅 鞀’
https://calzadorodriguez.com/
Wang Jinyuan鞚€ 鞚措 靾橂弰鞚?毵庫潃 靸侅爯瓿?雽€頇旊ゼ 鞁滌瀾頄堨姷雼堧嫟.
Zhu Houzhao電?鞓嗢棎靹?歃愱瞾瓴?霌j碃 鞛堨棃瓿?攴?靾滉皠 攴胳潣 毵堨潓霃?霐半溁頃挫鞀惦媹雼?
彀愲沟鞚?雼?毹轨潃 靸濍吀霃欖瀽電?攵堨晥頃错晿氅?雼牑臧€ 鞐劚鞐愱矊 氕愲澕瓿?毵愴枅歆€毵?鞐劚鞚€ 攴鸽ゼ 氍挫嫓頄堦碃, 靸濍吀霃欖瀽電?氚滌潉 甑ゴ氅?”氙胳长鞏?”霛缄碃 毵愴晿歆€ 鞎婌潉 靾?鞐嗢棃雼?
鞀’ 靷澊韸?/a>
鞓澕鞚?鞀’
炜?旃挫雲?/a>
鞚措晫電?氚旊炒霛茧弰 氍挫姩 鞚检澊 鞚检柎雮橁碃 鞛堧姅歆€ 鞎曤媹雼?
鞚?鞎勳澊電?.. 鞁れ牅搿滊姅 16~17靹?鞝曤弰鞚?氚橃 鞛愲瀫 鞎勳澊鞛呺媹雼?
Hongzhi鞚?韮€順?氚╇矔鞚€ 鞛愳嫚鞚?鞁れ垬毳?鞚胳爼頃橃 鞎婈碃 霃欖嫓鞐?霊?靷瀸鞚?臧€氤嶊矊 雽€頃橂姅 瓴冹瀰雼堧嫟.
鞓澕鞚胳姮搿ǜ鞁?/strong>
旃挫雲胳偓鞚错姼
鞐愱犯鞀’
https://medicostop.com/
Hongzhi 頇╈牅電?鞎堧弰鞚?頃滌埁鞚?靿棃鞀惦媹雼? “歆€旮?雮橃棎瓴?臧€鞛?攵€臁表暅 瓴冹潃 攴鸽爣瓴?雽€雼错暅 靷瀸鞛呺媹雼?”
雿?瓴胳啇頃橁碃 鞛呾潉 雼る瓿?鞛堨溂氅?靷嫟 杲?膦嬱姷雼堧嫟.
靸侂旄奠潃 瓿‰靹鸽ゼ 雮挫暭 頄堦碃 霑呹皰鞚€ 韽澖頄堧嫟.
鞓澕鞚?鞀’
鞓澕鞚?鞀’ 毹胳嫚
鞓澕鞚?鞀’
鞁れ牅搿?歆勳 牍勳唽電?韸轨湢鞚?雰勳儓臧€ 瓯办潣 鞐嗞碃, 靷瀸霌れ澊 鞁れ垬搿?毹龟赴 靿诫嫟.
Zhang Mao電?毵堨箻 鞀ろ彴歆€毳?氚熾姅 瓴冹矘霟?雼るΜ臧€ 毵れ毎 攵€霌滊熃雼り碃 電愱紙鞀惦媹雼?
霊愲(毵堧Μ臧€ 觳滌矞頌?韼检硱歆€瓿?Liu Jie電?雼柎毳?氤挫晿鞀惦媹雼? 韮堨稖!
xenical otc canada
What forms of merchandise are services are promoting well by way of mail order?
What I mean by that is lets say you might be
promoting dog collars then your site must be specifically
related to canine collars and different merchandise that the serps really feel are carefully related.
Today, online advertising is not an enormous-company privilege, so it’s regular for all businesses to invest in selling and increasing their model.
Advertising is probably the most widely recognized solution to make money running a blog.
Digital Point is a community of entrepreneurs and site owners that talk about numerous topics related to their trade, including affiliate advertising.
Where I come from, the protection trade, I was educated
to ship extraordinarily high-high quality products, bug free and extremely modern. Because with BlackHat CodeBreaker I do my finest to take care of the identical standards of quality I maintained whereas within the defense sector.
There are lots of platforms you’ll be able to be part of, and we took our time to determine and list the best ones.
online pharmacy china
zestoretic cost
For newest news you have to pay a visit world
wide web and on web I found this site as a finest website for most up-to-date
updates.
excellent issues altogether, you simply won a new reader.
What would you recommend about your publish that you simply made a few days ago?
Any certain?
buying valtrex in mexico
clonidine 0.1mg without prescription
reddit canadian pharmacy
finasteride 1 mg coupon
can you buy prednisone in canada
prozac brand price
dexona medicine
desyrel for sleep
tetracycline tablets 500mg
viagra purchase canada
flomax purchase
medstore online pharmacy
buy trental 400 online india
buy disulfiram australia
ivermectin over the counter uk
Wow! After all I got a weblog from where I be
capable of actually obtain useful data concerning my study
and knowledge. Comprar camiseta de futbol Arsenal baratas
trazodone 10mg
вход cat casino
https://courses-top.kz/
prozac online no prescription
motrin tablet 100mg
cat casino
мобильная версия cat casino
can i buy clomid online
lasix 115
accutane 2.5 mg
pharmacy canadian accutane
effexor 37.5 mg tablets
Pin submit or mobile affords are CPA offers that pay
you for generating cell actions or conversions for the advertiser.
Various charge designs have numerous potentials for abuse
by the agency presenting the solutions, and it is essential
to do your because of diligence and fully acknowledge what you are having to pay
for, how significantly, and when, earlier than at any time having to pay a single dime to a
tax resolution firm. The Profit Spy is the newest Internet Marketing course developed by Kunj K plus Kish V, each are skilled Online entrepreneurs
and have had enormous successes as affiliates in addition to product
owners, each on Clickbank and on the CPA networks. He believes many profitable individuals, from athletes and skilled people to executives and enterprise homeowners, actually battle in their publish-working years because they
haven’t thought by means of learn how to retire. This implies there isn’t any resource
constraint on the quantity of business that you
may handle and in flip will increase your productivity
and profitability. After all, having lots
of control over your back finish is nice, but an excessive amount of management means that you just run the chance of over doing things and
setting your site as much as fail (regardless of your finest
intentions).
clonidine generic price
cipro 250 mg
penis enlargement
fluoxetine 80 mg capsules
over the counter valtrex medication
buy viagra online
advair diskus 500 50 mg
buy glucophage tablets
penis enlargement
usa online generic prozac no prescription
generic clonidine 1
cheap prednisolne
鞓澕鞚胳姮搿?/strong>
氍措 鞀’
鞀’氍措觳错棙 / 頂勲澕攴鸽韹?頂岆爤鞚?觳错棙 – 鞀’靷澊韸?於旍矞
https://stylightes.com/
Xiao Jing鞚€ 鞚橃嫕攵€ Zuo Shilang 靾橃鞚?鞚橂鞛堧姅 氙胳唽毳?歆€鞐堦碃 Xiao Jing鞚€ 雿?鞚挫儊 頇╈牅 鞎烄棎靹?毵堨潓雽€搿?鞏戈笁 頃?靾?鞐嗢棃鞀惦媹雼?Xiao Jing鞚€ 鞓る灅 鞝勳棎 欷€牍勴暅 瓴?臧欖晿瓿?氚╆笀 雴掛潃 氍措寑鞐愳劀 雮措Μ鞛?靾欖牅毳柬晿瓿?歃夓嫓 毵愴枅鞀惦媹雼? “鞎勲灅 靷瀸霌れ潣 毵愳潉 霌れ柎氤挫劯鞖? .”
鞚搓矁鞚?氤?Zhu Houzhao電?歃夓嫓 “雭旍皪頃╇媹雼? 歆€旮堨潃 靿疥矊 鞖?靾?鞐嗢姷雼堧嫟. Lao Fang, 靹滊憳霟?鞎堨暯鞚?氚旊ゴ鞁嫓鞓?”
雿?毵庫潃 鞖旍儓霌れ澊 靹胳泴歆€旮?鞁滌瀾頄堦碃 鞛旍澑頃橁碃 欤届澊旮?靿毚 靺€ 靾?鞐嗢澊 毵庫潃 靷瀸霌れ澊 鞁瀽臧€鞚?旯冸皽鞚?霌り碃 頇╆笀雽€毳欖潉 頊╈摳旮?鞁滌瀾頄堧嫟. 攵€臁?鞝勳泊.
氚旍勾霛检偓鞚错姼 鞓澕鞚鸽皵旃措澕旃挫雲胳偓鞚错姼鞓澕鞚胳勾歆€雲?/a>
2023雲?鞚戈赴 鞀’靷澊韸?TOP 10 – 氤措剤鞀?毵れ澕 旌愳壃氚?/a>
頂茧 雺?氩犼皜鞀?/a>
鞚措彊鞏戩潃 頃?毵堧敂霃?頃橃 鞎婌晿雼?瓴瓣淡 攴鸽姅 鞕曣皜鞕€ 雱堧 旃滍枅雼?攴鸽姅 氚╆笀 鞕曣皜毳?旃艾頄堧嫟.鞚挫牅 鞕曣皜鞕€ 鞚挫暭旮绊晿電?瓴冹潃 雱堧 鞚搓赴鞝侅澕 瓴冹澊雼?
“觳橂矊頃橃 鞎婈矤雼? 鞚措煱 毵愳潉 頃橂姅 瓴冹澊 氍措Μ電?鞎勲媹歆€毵? 攴鸽煱 欷戨寑頃?氩旍電?臧€氤嶊矊 鞖╈劀氚涭潉 靾?鞛堧嫟.”
攴鸽儱… 毵れ澕毵れ澕鞚?鞁胳泙鞚?鞓皜氙?臧欖晞靹?電?氇╈潉 臁半ジ雼?
氚旍勾霛缄矊鞛勨殹锔忟勾歆€雲胳偓鞚错姼鈿★笍鞓澕鞚胳勾歆€雲?/a>
氩勴寯搿?鞀’
鞓澕鞚?鞀’
https://dekalbcarservices.com/
Liu Yi鞚?鞏缄荡鞚€ 雼れ嫓 韺岆灄瓿?牍皼瓴?氤€頄堦碃 鞛呾潉 鞐煬 氩?鞐挫棃歆€毵?Fang Jifan鞚€ 霊愲牑鞗€鞙茧 靾潉 彀鸽姅 瓴?臧欖晿瓿?毵堨潓 靻嶌溂搿?瓿勳啀 靸濌皝頄堨姷雼堧嫟. …
Fang Jifan鞚€ 雸堨潉 旯滊皶鞓€鞀惦媹雼? “韽愴晿鞐愱矊 臧愴瀳 氍检柎氤挫嫮鞁滌槫. 鞏措枻 靻岆鞚?鞛堨姷雼堦箤?”
Hongzhi 頇╈牅電?欤检爛頃橃 鞎婈碃 Zhu鞚?鞀轨澑鞚?歆侅爲 鞀轨澑頄堨姷雼堧嫟.
鞎堨爠 鞀’ 靷澊韸?/a>
2023雲?旃挫雲胳偓鞚错姼 於旍矞 靾滌渼 – 鞎堨爠頃?鞓澕鞚胳勾歆€雲?靷澊韸?TOP 15
氍措 鞓澕鞚?氚旍勾霛?瓴岇瀯 雲?鞛靷检晞 頂岆爤鞚?2023
攴鸽煬雮?Nuan Pavilion鞐愳劀 Ouyang Zhi電?鞐爠頌?瓴届櫢鞁潉 攵堧煬鞚检溂旒办姷雼堧嫟. 觳唽電?瓿奠灔 瓴诫箘鞗愳澊 頃?靾?鞛堧嫟瓿?臧愴瀳 毵愴暊 靾?鞛堨姷雼堧嫟. “氇摖 瓴冹澊 鞛橂悩瓿?靸侅劯頃橂┐ 鞁れ垬臧€ 鞐嗢姷雼堦箤? 攴鸽爣瓴?靸濌皝頃橃 鞎婌姷雼堧嫟!”
攴鸽姅 雸堨潉 霌れ柎 鞚?霃欕毳?斐愲嫟氤挫晿歆€毵?雼るジ 頃滊Π鞚?攴鸽ゼ 靷?毂勲 鞛§晞毹轨溂霠る姅 霌?斐愲嫟氤搓碃 鞛堨棃雼?
Nakano Jiro電?鞚措 鞓?氇胳潣 爰堦皜 攵€靹滌電?瓴?臧欖潃 電愲倢鞚?攵勲獏頌?電愱紙鞀惦媹雼?
旃挫雲?靷澊韸?於旍矞 靾滌渼 – 鞁犽頃?靾?鞛堧姅 鞓澕鞚?旃挫雲?靷澊韸?/a>
旃挫雲胳偓鞚错姼 鞓澕鞚胳勾歆€雲?旃挫雲胳护氘る媹韹?毹鬼妧瓴€歃?旃搓车
氍措 鞀’
https://juegosdebuses.com/
電欖潃 霃勲憫鞚€ 鞖鸽ü鞚措┌ 毵愴枅雼? 頉旍硱臧€氅?旌愴嫲毳?氚涭 鞎婋姅雼?” 鞂€, 攵€鞙犿暅 攴€臁?臧€氍胳潃 鞛§潉 靾?鞐嗞碃, 攴鸽摛鞚?毵堧嫻 氩届潃 雴掙碃, 攴鸽摛鞚€ 瓴诫箘鞗愳澊 鞛堦碃, 韥?臧?..”
韥措灉鞐?雽€頃?斓滌唽頃滌潣 臁搓步鞁潃 鞐嗢姷雼堧嫟. 鞚搓矁鞚€ 靷瀸霌れ潉 欤届澊電?瓴冹瀰雼堧嫟!
Hongzhi 頇╈牅電?毵堨箻 臧戩瀽旮?毵堨箻 Fang Jifan鞚?攴?鞎烄棎靹?靸侅瀽毳?鞐挫棃雿?瓴冹矘霟?靻愳潉 霌?霋る頄堨姷雼堧嫟.
氚旍勾霛检爠霝?氚旍勾霛检勾歆€雲?/a>
氍措 鞓澕鞚?鞀’ 頂岆爤鞚?雼れ毚搿滊摐 霕愲姅 臧€鞛?鞐嗢澊)
氚旍勾霛检偓鞚错姼 鞓澕鞚鸽皵旃措澕旃挫雲胳偓鞚错姼鞓澕鞚胳勾歆€雲?/a>
Wang Bushi臧€ 霌れ柎 鞓れ瀽 攴鸽姅 歃夓嫓 靹犼竴霛检姢毳?氩楆碃 Fang Jifan鞐愱矊 瓴届潣毳?響滍枅鞀惦媹雼? “雮橂姅 Duke Qi毳?氪れ姷雼堧嫟.”
攴戈皜 頃?毵愳澊 毵庫潃 靷瀸霌れ潉 靾頌堦矊 毵岆摛鞐堨姷雼堧嫟.
鞝愳嫭鞐愲姅 毵れ毎 順疙檾搿滌毚 鞏戩“欤茧ゼ 歃濍頃橃棳 鞓?雮滊鞕€ 斓滌儊旮?靻岅碃旮办檧 鞏戧碃旮半ゼ 瓿侂摛鞓€鞀惦媹雼?
suhagra 50mg tablet online
Ahaa, its good discussion on the topic of this paragraph
at this place at this web site, I have read all that, so now me also commenting at this place.
camiseta de futbol Barcelona
tetracycline 500mg price in india
can you buy cipro online
antabuse no prescroption
An impressive share! I’ve just forwarded this onto a coworker who was
conducting a little research on this. And
he in fact ordered me lunch simply because I found it for him…
lol. So allow me to reword this…. Thank YOU
for the meal!! But yeah, thanx for spending the time to discuss this topic here
on your internet site.
tadacip 40
how to order valtrex
鞓澕鞚?鞀’
氚旍勾霛检偓鞚错姼-氚旍勾霛检偓鞚错姼毽姢韸?/a>
頇╈牅 鞀’
https://genviagrabst.com/
“雮橂姅…” Zhu Houzhao電?旃鞚?歆€旒半嫟.
攴鸽煬雮?靾橂弰鞐愳劀 靷姅 瓴冹潃 靿届 鞎婌姷雼堧嫟. 靷鹅潉 雿?膦嬯矊 毵岆摛瓿?鞁鹅 鞎婌潃 靷瀸.
韽夒矓頃橃 鞎婌潃 霃欕霌る弰 鞙犾毳?鞚胳爼頃橁赴 鞙勴暣 Datong鞐?霌れ柎臧€霃勲 雮措矂霠?霊愳棃瓿? 攴戈矁鞚?觳橂Μ頃橂姅 氚╇矔鞚€ 靷挫儊鞚措摖 鞝堧嫧鞚措摖 Hongzhi 頇╈牅鞚?鞚检瀰雼堧嫟.
鞀’
EGGC-氚旍勾霛检偓鞚错姼-氚旍勾霛检勾歆€雲?/a>
氚旍勾霛检偓鞚错姼毽姢韸?/a>
霝€雼る(電?鞚措ゼ 鞎呺瓿?臧戩瀽旮?霑呾棎 鞐庪摐霠?歆勲澕鞕曥棎瓴?鞝堩晿瓿?鞎犽弰頄堧嫟.
Zhu Houzhao電?頃滌埁鞚?靿┌ 毵愴枅鞀惦媹雼? 鞛? 順曥牅 鞐煬攵? 鞖╆磻搿?氍胳潉 鞐搓碃 攵堨潉 攵欖澊靹胳殧…”
攴鸽煱雿?歆€旮?毵?旮€鞚?鞊半牑雿?彀半倶 靻愲鞚?頊?頊?頊?頊?頊?頊?頊?頊?頊?頊?頊?頊?頊?頊?頊?頊?頊?頊?頊?雽旊嫟.
鞀’氩勴攧: 鞀’靷澊韸? 旃挫雲胳偓鞚错姼, 鞀’旎る雼堩嫲
氍措 鞓澕鞚?鞀’ 氚?旃挫雲?瓴岇瀯
鞀’靷澊韸?: 鞀’旎る雼堩嫲 銆愳棎攴胳姮搿€?鞀’瓴岇瀯靷澊韸?於旍矞
https://askhelpme.com/
鞚?Zhu Zhixiu電?雼れ嫓 欤检渼毳?霊橂煬氤搓碃 頇╉儨鞛?鞝勴晿臧€ 鞐赴鞐?鞐嗢潓鞚?頇曥澑頃橁碃 毵堨潓 靻嶌溂搿?鞚€氚€頌?旮半粣頄堨姷雼堧嫟.
“鞁滍棙鞐?頃╆博頄堨柎鞖?..” Fang Jifan鞚€ 氙胳唽毳?歆€鞙茧┌ “雼轨嫚鞚€ 鞏戩嫭鞚?鞛堨柎鞎?頃╇媹雼?”霛缄碃 毵愴枅鞀惦媹雼?
“頃橃澑鞚€ 氇呺牴鞐?霐半雼堧嫟.” Xiao Jing鞚€ 氙胳唽毳?歆€鞙茧┌ 毵愴晿瓿?氍茧煬雮姷雼堧嫟.
氚旍勾霛检偓鞚错姼
鞓澕鞚?鞀’ 靷澊韸?氇皵鞚?鞀’ 毹胳嫚 鞛専 牍勲敂鞓?韥措灅鞁?鞀’
鞓澕鞚?鞀’
霌滊敂鞏?頃橂姌鞚?欤检嫚 靹犽觳橂熂 霌滊敂鞏?雭濍偓鞀惦媹雼?
鞚措煱 韮愳殨鞀る煬鞖?鞚检潃 膦€ 攵堨箿鞝堩暣 氤挫澑雼? 頃橃毵?甑愳偓搿滌劀 鞝勳鞝勲姤頃橂嫟電?鞚措歆€毳?頇曤頃橁赴 鞙勴暣靹滊姅 鞚搓矁氚栰棎 氚╇矔鞚?鞐嗠姅 瓴?臧欕嫟.
頃橃毵?鞚挫劚鞝侅溂搿滊姅 鞝堧寑 鞎勲媹霛缄碃 鞀れ姢搿滌棎瓴?毵愴枅雼?鞚?靹胳儊鞐?臁办勾臧€ 靷检磳鞚?霑岆Μ電?鞚? 頉勲鞍臧€ 靹犽鞍毳?甏措…頌堧姅 鞚检澊 鞛堨潉旯?
頂茧 雺?氩犼皜鞀?/strong>
氚旍勾霛检偓鞚错姼毽姢韸?/a>
霛检澊歆?鞀’
https://askhelpme.com/
靻岆姅 毵れ毎 瓯搓皶頃橂┌, 攴鸽摛鞐愱矊 鞚胳儩鞚€ 氍茧癌鞖戈臣 臧欖溂氅?瓿犾殧頃橁碃 頄夒车頃╇媹雼?雿?鞚挫儊 鞝€靻嶍暊 靾?鞐嗠姅 鞝€靻嶍暅 雼柎鞚?雴嶊皜 鞚岇晠鞚€ 氩犾澊歆曥棎靹?韥?鞚戈赴毳?雭岇棃鞀惦媹雼?
攴胳潣 鞝滌瀽臧€ 鞎勲媹霛?雼るジ 靷瀸鞚措澕氅?Fang Jifan鞚€ 鞝?靹戈硠 甏€毽ゼ 靻嶌澊電旍澊 靷瀸鞚?攵勲獏頌?霑岆牳鞚?瓴冹瀰雼堧嫟.
鞏措Π 欤检澑鞚?雮橃槫電?瓴冹潉 氤搓碃 氇憪霌?鞁犾澊 雮橃劀 鞎勳澊毳?鞐呹碃 霒犽偓鞀惦媹雼?
氚旍勾霛检偓鞚错姼毽姢韸?/a>
氚旍勾霛检偓鞚错姼
頇╈牅 鞀’
Fang Jifan鞚?霌れ柎鞓る姅 瓴冹潉 氤挫瀽毵堨瀽 Tang Yin, Xu Jing, Ouyang Zhi, Liu Wenshan 氚?Jiang Chen鞚€ 鞚检柎雮橃劀 靹滊鞐愱矊 鞚胳偓頃橁碃… 鞀れ姽 瓴诫毳?頃?欷€牍勲ゼ 頄堨姷雼堧嫟.
靹胳儊鞚?頃欖瀽霌れ潃 瓯半)頃?臧€毳挫龚鞚?鞏搓赴瓿?鞚挫澋鞚?於旉惮頃橂姅 瓴冹潉 頃措…雼り碃 靸濌皝頃╇媹雼? 攴鸽煬雮?雮橂姅 靷瀸霌れ澊 鞙犾澋鞚?鞐嗠嫟氅?鞏措柣瓴?瓯半)頃?氚办泙鞚?歃濎頃?靾?鞛堧姁雰愱碃 毵愴晿電?瓴冹潉 霌れ棃鞀惦媹雼?
頇╉泟電?鞚搓矁鞚?鞕曥瀽臧€ 靹膘灔頃橂姅 歆曥“霛缄碃 電愱紙瓿?毵れ毎 韼胳晥頄堨姷雼堧嫟.
synthroid 60 mg
In this doc, he details a collection of salient points which are meant
to transmit the expertise of what he phrases
the first technology mujahadeen (those that fought the global
jihad in the time of the Syrian conflict) to the third generation mujahadeen (those that battle currently).
What are their pain points? The 2 circles will intersect in two points.
The latter have much less headache as nicely, knowing that they will safely ship something
advertisers need. A CPA network is a platform that connects advertisers and publishers, and
gives a variety of gives in different categories, such as health, finance, gaming,
relationship, and so on. You may browse through the affords and filter them
by payout, conversion charge, country, system, and more.
For greater than 30 years, I have helped South Florida college students and
CPA examination candidates achieve success through a customized one-on-one mentorship method covering all school programs
of Accounting and Finance, and CPA exam preparation and evaluate.
Although Bannah’s strategy was measured, his targets had been perceived as radical by the government.
In 1952, army officers led by Gamal Abdel Nasser seized control of the Egyptian authorities and legalized the Brotherhood, solely to ban it once more in 1954.
The key Apparatus retaliated by attempting to assassinate Nasser,
who responded by deporting or imprisoning and executing many fundamentalists.
citalopram hbr 20 mg tablets
pharmacies in canada that ship to the us
Hey there! I’m at work surfing around your blog from my new apple
iphone! Just wanted to say I love reading through your blog and look forward to all
your posts! Carry on the fantastic work!
valtrex cheap
Thanks for a marvelous posting! I really enjoyed reading it, you could
be a great author.I will make certain to bookmark
your blog and will come back at some point. I want to encourage you to definitely continue your great job, have a nice holiday weekend!
canadian pharmacy generic viagra
dexamethasone 6mg
I am regular visitor, how are you everybody? This post posted at this site is genuinely nice.
elimite 5
wholesale pharmacy
xenical canada price
buy modafinil europe
buy wellbutrin australia
toradol for gout
Online dating has revolutionized the way people seek meaningful relationships. If you’re eager to delve into the world of digital romance, try out.
FlirtFinder Dating Site is a accessible way to connect with like-minded individuals. Establishing a genuine profile is simple, and you can engage in sincere conversations with other members. Sign up for Flirt Finder today and embark on your online dating journey with confidence.
zoloft generic 50 mg
furosemide 30 mg
voltaren gel purchase
Greate pieces. Keep writing such kind of info on your blog.
Im really impressed by it.
Hey there, You have done an excellent job. I’ll definitely
digg it and in my view suggest to my friends.
I am confident they will be benefited from this site.
I’m now not certain where you are getting your info, but good topic.
I needs to spend a while studying more or understanding
more. Thank you for wonderful info I was on the lookout for this information for my mission. Athletic Club
cialas
metformin price canada
Hello there, I do think your site might be having web browser compatibility issues.
Whenever I look at your site in Safari, it looks fine however, when opening in Internet
Explorer, it has some overlapping issues. I simply
wanted to give you a quick heads up! Aside from that, excellent website!
quineprox 60mg
FlirtFinders: The digital dating adventure starts here.
budesonide 6 mg
sertraline zoloft
fluoxetine brand name
anafranil pills
cialis canadian
Hi to every one, the contents existing at this web site are truly
awesome for people knowledge, well, keep up the good work fellows.
zestoretic cost
buy generic valtrex
erythromycin capsules brand
terramycin for chickens
Howdy fantastic website! Does running a blog like this take a
massive amount work? I have absolutely no expertise in computer programming but I was
hoping to start my own blog soon. Anyways, should you have any suggestions or techniques for new blog
owners please share. I understand this is off topic however I just
had to ask. Kudos!
鞎堨爠 鞀’ 靷澊韸?/strong>
鞓澕鞚?鞀’
鞐愱犯鞀’
https://revitanuskincream.com/
鞕曥瀾鞚?鞝堩晿氅?毵愴枅雼? 欤届潓鞚?欤? 雼る…韽愴晿.
“鞚搓贝 鞁犼贝靷检磳瓿?氪夓劚靷检磳鞚?鞛鞍頃?鞁犾瀾鞛呺媹雼? 瓿犼惮毵堧炒雼?欤检嫕鞙茧 鞊?靾?鞛堧嫟瓿?頃╇媹雼?”
瓴岆嫟臧€ Chenla電?鞚措爣鞀惦媹雼? 雼るジ 雮橂澕霃?霐半澕頃犼箤鞖?
氍措 鞓澕鞚?鞀’ 頂岆爤鞚?雼れ毚搿滊摐 霕愲姅 臧€鞛?鞐嗢澊)
鞐愱犯鞀’
頇╈牅 鞀’
鞖办儊鞚€ 毵れ毎 臧曤牓頃橂┌ 鞓れ鞐愳劀 鞙犽獏頃?頃欖瀽臧€ 霅?頉?鞏措牳鞚?霑岆秬韯?靷劀 鞓り步鞚?氚办洜瓿?鞐劘 靷挫棎 鞁滊ゼ 歆€鞚?靾?鞛堨棃瓿?雮橃澊鞐?鞏措Π鞚?鞁滍棙鞐?頃╆博頄堨姷雼堧嫟. 攴?頉?雼れ嫓 鞁滍棙鞐?鞚戩嫓頃橃電?鞎婌晿歆€毵?攴鸽姅 頉岆キ頃?靷瀸鞚?韨れ洜雼?
“韽愴晿, 氤挫嫮鞁滌槫, 鞚?氤搓碃靹滊姅 彀疥碃鞐?鞛堧姅 鞛レ嫓 靾橃劃 靷爤鞚?霃堦臣 鞚岇嫕鞚?靸來櫓鞛呺媹雼? 1鞗旍潣 靾橃箻電?鞐赴, 2鞗?..雼れ潓 靸侅瀽鞐愲姅 3鞗?..””韽愴晿, 頇╉儨鞛?鞝勴晿鞕€ 鞝滊倶霛?瓿奠澊 鞚措 雸勳棎氚╈棎 霌れ柎臧€ 甑稖頃橂牑瓿?鞎犾摪瓿?鞛堨姷雼堧嫟. 霌れ柎鞓?歆€ 頃?鞁滉皠鞚?歆€雮姅雿半弰 靻岇嫕鞚?鞐嗢姷雼堧嫟… ”
鞛戩潃 靸侅瀽毳?臧€鞝鸽嫟臧€ 旮堨儔 韼橃澑韸鸽 旃犿枅電旊嵃 旮堨矘霟?牍涬倶瓿?鞛堨棃電旊嵃 Liu 鞌潣 臧€臁膘棎 頃╇頄堨姷雼堧嫟. 雮?Chen Xin鞚€ 霃堨澊 攵€臁表暅 瓴?臧欖姷雼堦箤?
鞐愱犯鞀’-氚旍勾霛检勾歆€雲?/a>
頂勲澕攴鸽韹?- 鞀’靷澊韸? 旃挫雲胳偓鞚错姼, 鞀’旎る雼堩嫲 | 氍措鞀’
2023雲?雽€頃滊甑?斓滉碃鞚?鞓澕鞚?旃挫雲?靷澊韸?/a>
https://www.qiyezp.com/
鞚?靹胳儊鞚?雽€攵€攵勳潣 靷瀸霌れ澊 鞛ル嫎鞚措澕電?瓴冹潉 鞎?靾?鞛堨姷雼堧嫟.
鞝曥槫鞐?靹膘姢霟毚 毵堧秬臧€ 雮滌敖鞚?10毽?鞚挫儊 霒犽偓鞚?霑? 頇嶌鞝滊姅 毵堨皑鞐愳劀 雮措牑 攴胳潣 攴检湣瓿?爰堧ゼ 韼搓碃 氚╈氩旍澊霛缄碃 攵堧爛雼? 霒犽倶電?瓴冹潉 彀胳潉 靾?鞐嗢棃鞀惦媹雼? 鞚挫湢臧€ 氍挫棁鞛呺媹旯?”
Fang Jifan鞚?鞚戨嫷頃橁赴 鞝勳棎 Mou Bin鞚€ “鞚措磹, 雮橂姅 雼轨嫚鞚?彀娟碃 鞛堨姷雼堧嫟. 雮橃檧 頃粯 甓侅爠鞙茧 臧€靹?觳鞚?臧栰姷雼堧嫟. 旮搓笁頃滊炒瓿犼皜 鞛堨姷雼堧嫟. 毵れ毎 旮搓笁頃╇媹雼? “霛缄碃 毵愴枅鞀惦媹雼?
氚旍勾霛检勾歆€雲?氚旍勾霛检勾歆€雲胳偓鞚错姼
鞓澕鞚?旃挫雲?鞀’ 靷澊韸?於旍矞 靾滌渼
鞓澕鞚胳勾歆€雲?/a>
靸?鞁犽皽鞚?鞁犾潃 歆來泟 鞓?氇胳棎 頇滊牓鞚?雱橃长瓿? 韺§韺愳潃 鞛ロ檾毳?氚熿晿歆€毵?鞙犾鞚?鞎勲毽?氪愲弰 攵堨緦頄堧嫟.
Fang Jifan霃?鞓嗢棎靹?瓯膘爼鞀る煬鞖?響滌爼鞙茧 毵愴枅鞀惦媹雼? 臁半臧?鞛暀鞚?攵堧煬鞚检溂韨?瓴冹瀰雼堧嫟.”
攴鸽灅靹?頃?氍措Μ鞚?靷瀸霌れ澊 歆€斐愳劀 瓯办潣 靿 鞎婈碃… 鞚搓吵鞐?鞕旍姷雼堧嫟.
how to get viagra united states
tadalafil india online
celexa coupon
diflucan 200 mg capsules
tizanidine 4 mg coupon
Thanks in support of sharing such a pleasant opinion, paragraph is fastidious, thats
why i have read it fully
prescription viagra australia
buy ivermectin pills
clomid tablet online
where to buy celebrex
provigil india
prednisone 60 mg daily
valtrex 500mg price
韱犿啝靷澊韸?/strong>
鞓澕鞚?鞀’靷澊韸?| 鞀’項岉劙 | 鞎堨爠 鞀’旎る雼堩嫲
氚旍勾霛检勾歆€雲?氚旍勾霛检勾歆€雲胳偓鞚错姼
https://3chathk.com/
鞎勲媹雮?雼るゼ旯? 鞚措晫 霃勳嫓 鞎勲灅鞐?鞛堧崢 毵庫潃 項堨垬鞎勲箘霌れ澊 攵堩儉旮?鞁滌瀾頄堦碃, 臧戩瀽旮?頃晞毽?霃勳嫓 瓿酬吵鞐?頇旍椉鞚?鞚检棃雼?
氍缄皜臧€ 鞓るゴ氅?鞛愲掣鞚?氇摖 雲鸽彊霠ル弰 歃濌皜頃?瓴冹澊雼?靷瀸鞚?瓿犾毄頃橂姅 雿?雿?毵庫潃 霃堨澊 頃勳殧頃橂嫟 雼轨嫚鞚?鞚柬暊 靾?鞛堧姅 於╇秳頃?鞁濍焿鞚?臧€歆€瓿?鞛堧姅 瓴冹潃 攵堦皜電ロ晿氙€搿?霃堨潉 電橂牑鞎?頃滊嫟…
Xu Yu電?頃滌埁鞚?靿┌ 毵愴枅雼?
氚旍勾霛检偓鞚错姼毽姢韸?/a>
韱犿啝靷澊韸?/a>
鞓澕鞚胳姮搿?2023雲?斓滌嫚 鞝曤炒 氚?Top20 鞀’靷澊韸?於旍矞
Hongzhi 頇╈牅電?氙胳唽臧€ 鞎勲媽 氙胳唽搿?Fang Jifan鞚?氚旊澕 氤挫晿鞀惦媹雼? “Fang Qing鞚?臧€臁膘棎瓴?氍混 鞎婈碃 鞕曥瀽鞐愱矊 歆侅爲 雽€雼淀晿霃勲 鞖旍箔頄堨姷雼堧嫟.”
Xishan Jianye電?霕愴暅 Xishan Coal Industry 氚?Xishan Iron Workshop瓿?頃粯 5,000氇?鞚挫儊鞚?鞚鸽牓 毂勳毄鞚?頇曤寑頃?瓿勴殟鞛呺媹雼?
Hongzhi 頇╈牅電?”攴鸽厐電?鞏措Π 鞎勳澊鞚搓碃 鞖曥嫭鞚?鞛堨柎鞎柬暕雼堧嫟. 雼轨嫚鞚€ 攴鸽厐毳?雱堧 臧€順鬼晿瓴?雽€頃╇媹雼?”
氩勴寯搿?鞀’
鞓澕鞚?鞀’毹胳嫚 靷澊韸?- 鞎堨爠 靷澊韸?TOP 10 於旍矞
氍措 鞓澕鞚?鞀’ 頂岆爤鞚?雼れ毚搿滊摐 霕愲姅 臧€鞛?鞐嗢澊)
https://harrellrecords.com/
“鞎?毹闺姅雼り碃 頃橂┐ 鞎?毹闺姅雼? 鞛ロ櫓頃橁矊 毵愴晿歆€毵? 鞐波鞗?”
鞝€雲侅棎 Fang Jifan鞚€ 鞖错晿毳?霃岇晞 雼る媹氅?靷办眳鞚?雮橁皜瓿?鞁鹅棃鞀惦媹雼?
霃勳嫓鞚?氚橂瀫甑办潃 鞛レ嫓 齑濍弲鞚?靹濍癌頄堦碃, 氚橂瀫甑?氍措Μ電?雼濎檿鞚?臧€臁彪摛鞚?欤检爛 鞐嗢澊 欤届澊瓿?攴鸽摛鞚?鞁滌泊毳?韮戩棎 毵る嫧雼?
鞓澕鞚?鞀’ 靷澊韸?氇皵鞚?鞀’ 毹胳嫚 鞛専 牍勲敂鞓?韥措灅鞁?鞀’
鞓澕鞚胳姮搿ǜ鞁?/a>
氍措 鞀’
鞚措煬頃?靸濌皝鞚?鞐茧憪鞐愲憪瓿?攴鸽姅 Fang Jifan鞐愱矊 瓯膘爼鞀る煬鞖?氙胳唽毳?歆€鞙茧┌ “鞓? Dingyuan 頉勳瀾, 於曧晿頃╇媹雼? 於曧晿頃╇媹雼? “霛缄碃 毵愴枅鞀惦媹雼?
攵€鞛愲姅 鞓る灚霃欖晥 霒柎鞝?鞛堨棃瓿?鞓る姌 靹滊毳?氤?Fang Jifan鞚€ 氅€毽劀 雮澋鞚€ 氇姷 毵岆炒瓿?於滌瀰甑棎靹?雮橃檾瓿?臧戩瀽旮?氤奠灐頃?臧愳爼鞚?電愱紙鞀惦媹雼?
霐半澕靹?鞚茧秬 甑半寑電?鞝戩磯頃橂姅 歃夓嫓 攵曣创霅橃柎 靷儊鞛愱皜 氚滌儩頃╇媹雼? 攴鸽煬雮?鞝曥槇甑办潃 臧曤牓頃?韽博 頇橁步鞐愳劀 鞐爠頌?旯旊仈頃?歆勴槙鞚?鞙犾頃?靾?鞛堨姷雼堧嫟.
lasix without script
suhagra 100 mg
generic cialis canada
鞚疙劙雱缝勾歆€雲?/strong>
氍措 鞓澕鞚?鞀’ 頂岆爤鞚?雼れ毚搿滊摐 霕愲姅 臧€鞛?鞐嗢澊)
氚旍勾霛检勾歆€雲胳偓鞚错姼-氚旍勾霛检偓鞚错姼
https://juegosdebuses.com/
Hongzhi 頇╈牅電?氇?氩堨澊瓿?氇╇鞚?鞚疥碃 毵堨龚雮?攴?鞎烄棎靹?靷嫟鞚?氚涭晞 霌れ榾鞀惦媹雼? 攴鸽姅 旮半粣頄堨姷雼堧嫟. 攴鸽ゼ 臁搓步頃?”
Fang Jifan鞚€ 氚办嫚鞛愱皜 鞛愳嫚鞚?臧€鞛?鞛?鞎岅赴 霑岆鞐?鞓堨儊雽€搿?氚办嫚鞛愱皜 臧€鞛?頃措…雼る姅 靷嫟鞚?瓯办潣 鞛婌棃雼る姅 瓴冹潉 臧戩瀽旮?旯嫭鞎橃姷雼堧嫟.
攴鸽灅靹?.. 耄啇鞚?鞗愳<氙?頃橂厐霌れ潃 彀ゼ 霐半ゴ瓿?氍检潉 雱橁赴瓯半倶, 鞏搓龚毳?牍勲箘瓿?霌膘潉 霑岆Μ旮?鞁滌瀾頄堦碃, 雸勱蛋臧€電?鞏检潓 旖旍綌雱涭潉 臧€鞝鸽嫟臧€ 鞛戩潃 昊嶌鞚?霐办劀 鞐搓碃 氇憪臧€ 雿旍渼毳?鞁濏瀽 靾?鞛堧弰搿?雽€雮橂 韸滊笇毳?靷届瀰頄堨姷雼堧嫟. .
鞓澕鞚?鞀’ 靷澊韸?氇皵鞚?鞀’ 毹胳嫚 鞛専 牍勲敂鞓?韥措灅鞁?鞀’
氩勴寯搿?鞀’
鞚疙劙雱缝勾歆€雲?/a>
臧堧箘爰堧姅 霌るΜ歆€ 鞎婋姅 鞙茧ゴ霠侁卑毽姅 靻岆Μ毳?雰堦碃 攵€霟 頉?瓿ъ灔 韽愲ゼ 彀旊爛雼?
Zhu Youtang鞚€ 鞕?毹鸽瓿?鞁鹅姷雼堦箤?攴鸽姅 鞚搓吵鞚?鞖╈潣 鞐半瓿?順鸽瀾鞚挫潣 靻岅荡鞚措澕瓿?電愱紙鞀惦媹雼?攴鸽姅 韽夓儩 鞐赴鞐愳槫瓿?鞁鹅 鞎婌潉 瓴冹瀰雼堧嫟.靾碃 攵堧攵堨偓鞕€ 鞐瓣笀靾犾潉 靾橅枆頃橂姅 瓴冹澊 膦嬱姷雼堧嫟.
臧€鞛?欷戩殧頃?瓴冹潃 霃堨澊 鞎勲媹霛?霃? 靿疥矊 雿?氩?靾?鞛堧嫟. 攴鸽煬雮?Wang Bushi臧€ 旮半粣頃橂姅 瓴冹潃 攴戈皜 靸堧鞖?鞓侅棴, 歃?彀鸽悳 旮胳棎 霌れ柎臧旊嫟電?瓴冹瀰雼堧嫟.
鞚疙劙雱缝勾歆€雲?/strong>
鞓澕鞚?旃挫雲?鞀’ 靷澊韸?於旍矞 靾滌渼
鞓澕鞚?鞀’ 毹胳嫚
https://aaviagla.com/
毹检爛 氚办毎霌れ澊 氍措寑鞐?鞓澕鞕€ ‘韺旍劆鞚胳潣 靸濎澕於曧晿’毳?攵€毳措┌ 攵勳渼旮瓣皜 雼晞鞓瀽雼?
雸勱蛋臧€ 鞂嶌晥瓴届潉 臁办嫭鞀る熃瓴?霌れ柎鞓牳雼?
Hongzhi 頇╈牅電旍澊 鞐挫爼鞝?鞚?靸侅澑瓿?靹滊鞚勲炒瓿?頃滌埁鞚?靿棃鞀惦媹雼?
旃挫雲胳偓鞚错姼 鞓澕鞚胳勾歆€雲?旃挫雲胳护氘る媹韹?毹鬼妧瓴€歃?旃搓车
氚旍勾霛检勾歆€雲胳偓鞚错姼-氚旍勾霛检偓鞚错姼
氍措 鞓澕鞚?鞀’ 頂岆爤鞚?雼れ毚搿滊摐 霕愲姅 臧€鞛?鞐嗢澊)
氇呺倶霛检棎電?氍挫垹鞚?鞐嗢棃瓿?靸れ槫鞛旍潣 鞚检潉 頃?靾?鞛堨柎 頇曥嫟頌?韥?雲茧瀫鞚?攵堧煬鞚检溂韨?瓴冹瀰雼堧嫟.
Fang Jifan鞚€ 靻岆Г毳?瓯缝柎 鞓Μ瓿?鞚措鞚?鞝曤Д鞚?頋ル秳頃橃棳 韸€鞏?雮橃檧 雸勱蛋臧€毳?霑岆Μ瓿?鞁鹅棃鞀惦媹雼?
攴?雼轨嫓 鞕曥瀽電?鞚疙槙鞐?攵堦臣頄堦碃 毵?韮滌柎雮潉 霑?攴鸽姅 韥?欹愲韥?旎胳姷雼堧嫟. 雼轨嫓 Fang Jifan鞚?攴鸽ゼ 鞎堨晿雿?瓴冹潉 旮办柕頃橁碃 攴戈皜 靸堧鞖?靹戈硠鞐?鞕旍潉 霑岇潣 霊愲牑鞗€鞚?鞎勳霃?旮办柕頃橁碃 鞛堨姷雼堧嫟. 攴鸽灅靹?攴鸽姅 鞓喌 霒碃 鞛堨棃雼?
zoloft generic cost
pharmacy store
I all the time emailed this website post page to all my associates, because if like to read it then my
friends will too.
desyrel 50 mg
dexamethasone brand name
buy albuterol online no prescription
furosemide 12.5
tizanidine price in india
purchase disulfiram
generic tadalafil 20mg
zestoretic generic
can i buy zofran over the counter
tetracycline online no prescription
50 mcg synthroid
tadalafil 5mg tablets india
valtrex
where to buy zofran online
propecia 2019
Hi, its good paragraph about media print, we all be aware of media
is a great source of information.
paroxetine tablets in india
tetracycline to buy
This is very interesting, You’re an excessively skilled blogger.
I have joined your feed and look forward to searching for more of your great post.
Additionally, I’ve shared your site in my social networks
suhagra 50 mg price in india
canada pharmacy world
trazodone 75 mg
purchase ivermectin
fluoxetine 10mg tablets uk
3. Include a transparent call-to-action: A name-to-action (CTA) is an announcement that encourages the person to
take the specified motion, corresponding to filling
out a form or making a purchase. Use eye-catching
visuals, persuasive language, and a clear name-to-action. You can use sources like blogs, podcasts, forums, webinars, or programs to learn and
grow as a CPA marketer. You can too follow blogs, podcasts,
forums, and social media accounts which are related to your area of interest and viewers.
Solo adverts simply imply paying a person with a really large electronic mail list or
giant viewers to promote one thing to their viewers and what you can pay them will
obviously be your CPA supply. You’ll be able to construct an e mail listing
of potential clients and ship them newsletters and promotional provides.
In conclusion, leveraging social media is a strong approach to attach with potential
prospects, build model awareness, and drive conversions in your
CPA advertising campaigns.
buy generic valtrex online canada
tizanidine 6 mg cost
buying amoxicillin in mexico
inderal propranolol
clonidine 150 mg
Hey there, You have done an incredible job. I will definitely digg
it and personally recommend to my friends. I’m sure
they’ll be benefited from this website.
amoxicillin 825
1 lümen kaç watt
For most up-to-date news you have to pay a quick visit world-wide-web and on world-wide-web
I found this website as a best web page for most up-to-date updates.
doxycycline 250
robaxin eq
EnchagPT Blog to miejsce, gdzie można znaleźć interesujące artykuły i informacje
na temat technologii sztucznej inteligencji.
Jest to blog dedykowany wszystkim entuzjastom sztucznej inteligencji,
którzy pragną zgłębiać swoją wiedzę na temat
tego fascynującego tematu.
retino 0.25 cream price
buy citalopram online india
doxycycline purchase
diflucan cream
azithromycin pharmacy
Howdy are using WordPress for your site platform?
I’m new to the blog world but I’m trying to get started and create
my own. Do you need any coding knowledge to make
your own blog? Any help would be greatly appreciated!
phenergan over the counter nz
ciprofloxacin 1
You actually make it seem so easy with your presentation but I find this topic to be actually something which I think I would never understand.
It seems too complex and very broad for me. I am looking forward for
your next post, I will try to get the hang of it!
modafinil 150 mg
albuterol with no prescription
Скоростроительные здания: экономический доход в каждой составляющей!
В современной реальности, где секунды – доллары, экспресс-конструкции стали истинным спасением для фирм. Эти инновационные конструкции объединяют в себе устойчивость, экономичное использование ресурсов и быстрое строительство, что позволяет им идеальным выбором для разнообразных коммерческих задач.
Быстровозводимые каркасные здания
1. Ускоренная установка: Секунды – самое ценное в коммерции, и объекты быстрого монтажа способствуют значительному сокращению сроков возведения. Это высоко оценивается в вариантах, когда необходимо оперативно начать предпринимательскую деятельность и начать прибыльное ведение бизнеса.
2. Экономия средств: За счет улучшения производственных процедур элементов и сборки на объекте, экономические затраты на моментальные строения часто снижается, чем у традиционных строительных проектов. Это предоставляет шанс сократить издержки и достичь большей доходности инвестиций.
Подробнее на http://www.scholding.ru
В заключение, скоро возводимые строения – это отличное решение для коммерческих задач. Они включают в себя эффективное строительство, финансовую эффективность и твердость, что дает им возможность отличным выбором для предпринимательских начинаний, имеющих целью быстрый бизнес-старт и гарантировать прибыль. Не упустите возможность получить выгоду в виде сэкономленного времени и денег, оптимальные моментальные сооружения для вашей будущей задачи!
clonidine price
crypto offers promotion
crypto scam prevention
CryptoGrab CPA Affiliate Network provides top offers in the crypto niche, offering complete control and transparency. With 200+ designs, Drainer Seaport, and Seed Grab, we deliver the best in the industry – https://crypto-grab.info/en – #metamaskfake #drainercrypto #cryptodrainer #pinkdrainercrypto
albuterol brand name usa
accutane online prescription cost
retino 0.05 gel
modafinil otc
legitimate online pharmacy uk
zoloft 75 mg tablet
albuterol without rx
buying cipro online
氚旍勾霛检偓鞚错姼 | 旃挫雲胳偓鞚错姼 | 氚旍勾霛缄矊鞛?| 氚旍勾霛?鞓澕鞚?/a>
鞀’氩勴攧: 鞀’靷澊韸? 旃挫雲胳偓鞚错姼, 鞀’旎る雼堩嫲
鞓澕鞚胳勾歆€雲?/strong>
https://www.hunkymalestars.com
頉勱秮 韺届潃 鞚橃嫕鞚?鞎疥皠 頋愲頃潉 電愱紙瓿? 雰勳儓雮橂姅 毵堧(甑潉 毵堨嫚 頉?韱奠鞚?鞕勴檾霅?瓴?臧欖晿雼?
氇摖 靷瀸鞚?鞏缄荡鞚€ 鞛侩箾鞚挫棃瓿?Liu Jian鞚?鞏缄荡鞚€ 靾父 靾?鞐嗠姅 鞀敂鞙茧 臧€霌?彀?瓯办潣 旮办爤頃?牖旐枅鞀惦媹雼?
靸來櫓鞚?雱堧 臧戩瀾鞀る煬鞗岇劀 靾橂鞚€ 頃欖儩霌れ澊 瓴€瓿?欤届敖鞚?霌り碃 雸堨暈鞚?瓯半寑頃?甏措鞚?氚旊澕氤措┌ 氇憪 雴€霝€ 響滌爼鞚?歆€鞐堨姷雼堧嫟.
鞓澕鞚胳勾歆€雲?/a>
氚旍勾霛检偓鞚错姼-氚旍勾霛检偓鞚错姼毽姢韸?/a>
氩勴寯搿?鞀’
鞐嫓 攴鸽厐電?氇摖 臧€氍胳潣 鞎勳毵堨毵?攴鸽煱 雮瀽毳?霐半澕 頇╈牅鞚?旃滌”鞚?靸れ毎雼濏泟鞛戩爛韮濎棎 霌れ柎臧勲嫟氅?鞚岇嫕 瓯膘爼 鞐嗢澊 韽夓儩鞚?靷箻鞕€ 鞚岇嫕鞙茧 靷?靾?鞛堨潉 瓯半澕 靸濌皝頄堧嫟. 攴鸽Μ瓿?鞚橂.
Fang Jifan鞚€ 氇摖 靷瀸鞚?鞚疥碃 鞊?靾?鞛堨柎鞎?頃橂┌ 鞁滊牓瓿?觳措牓鞚?鞝滍暅頃╇媹雼?
“毵愴暣氪?” 頇嶌頇╈牅臧€ “雱り皜 氍挫姩 毵愳潉 頃措弰 雮橂姅 雱堧ゼ 韮擁晿歆€ 鞎婈矤雼?”
鞐愱犯鞀’
旃挫雲胳偓鞚错姼 | 氚旍勾霛缄矊鞛勳偓鞚错姼 | 鞓澕鞚鸽皵旃措澕 | 氚旍勾霛?頃橂姅瓿?/a>
韱犿啝靷澊韸?/strong>
https://cryingwolfmovie.com/
臧戩瀽旮?鞗€歆侅澊霠る姅 靷瀸霌れ澊 瓿犼皽毳?靾欖榾雼?
瓴瓣淡 Zhu Zaimo電?鞎勳 10 雽€鞐?攵堦臣頄堦碃 靹滊憳霟?”鞖╈劀頃挫<靹胳殧”霛缄碃 毵愴枅鞀惦媹雼?
鞎勲 鞏措ǜ雼堨檧 鞎勲偞臧€ 頃粯 氍检棎 牍犾 氍胳牅鞕€ 臧欖潉 瓴冹瀰雼堧嫟.
2023雲?雽€頃滊甑?斓滉碃鞚?鞓澕鞚?旃挫雲?靷澊韸?/a>
鞐愱犯鞀’-氚旍勾霛检勾歆€雲?/a>
鞓澕鞚胳姮搿?/a>
攴鸽Μ頃橃棳 頇╈牅鞚?頋旍爜鞚?鞚搓吵鞐愳劀 氚滉铂霅橃棃電旊嵃, 頀嶌枒鞐愳劀 毵庫潃 順胳渼氤戨摛鞚?霃勳癌頃橃瀽 氇憪臧€ 霕愲嫟鞁?鞏挫晥鞚?氩欕矙頃?韽愴晿臧€… 雼れ嫓 霒犽偓雼?
“Qing鞚€ Qi鞚?瓿奠瀾鞛呺媹雼? 攴鸽姅 雮?靸侅檮瓿瀰雼堧嫟. 鞏措柣瓴?氚る偖鞙茧 氚旉縺 靾?鞛堨姷雼堦箤? 鞚?毂呾潃 靾橂Μ頃挫暭頃╇媹雼? 鞓れ嫮鞁滌槫 …”
Zhu Zaimo電?Hongzhi 頇╈牅鞐愱矊 瓴届潣毳?響滍晿瓿?鞁鹅棃歆€毵?Hongzhi 頇╈牅電?瓿犼皽毳?鞝€鞐堨姷雼堧嫟.
氍措 鞀’
頇╈牅 鞀’
氚旍勾霛检勾歆€雲胳偓鞚错姼
https://harrellrecords.com/
雸勱蛋臧€ 靾潉 項愲枴鞚措┌, 鞚措氨 鞚挫嫮 頂柬姼… 攴戈贝… 鞚搓矊 鞝侅柎霃?2毵?鞚€頇旊澕電?霚混澊 鞎勲嫏雼堦箤?
Zhang Yuanxi電?”鞀る 雼れ劘, 頃橂( 膦呾澕 歆戩棎靹?瓿惦秬頃橃毵? 鞚措煱 頃欖儩鞙茧靹?氇呾劚鞚?氍挫姩 靻岇毄鞚?鞛堦矤鞀惦媹旯?”
Hongzhi 頇╈牅電?鞐挫嫭頌?靸濌皝頄堦碃 鞝愳皑 旮€鞊瓣赴鞐?鞚奠垯頃挫旮?鞝勳棎 6 ~ 7 靹胳澑 瓴?臧欖晿鞀惦媹雼?
氚旍勾霛检偓鞚错姼毽姢韸?氚旍勾霛检爠霝?/a>
鞐愱犯鞀’: 鞓澕鞚胳勾歆€雲?旃挫雲胳偓鞚错姼 氚旍勾霛检偓鞚错姼 於旍矞
鞓澕鞚?鞀’靷澊韸?| 鞀’項岉劙 | 鞎堨爠 鞀’旎る雼堩嫲
鞝€鞖?雮挫嫓電?韯膘潉 鞊半嫟霌碃 靷错晙 雼れ潓 雸堨潉 斐愲嫟氤搓碃 順€毳?旖旐寘頃橁碃 攴撾秷鞚?毵岇 雼れ潓 雼れ嫓 雸堨潉 臧€電橁矊 霚碃 雼嫧頌?鞎夓晞 Liu Xiunv鞚?毵ル皶鞐?臧€氤嶊矊 靻愳潉 鞏轨棃鞀惦媹雼?
鞚?鞎勳澊電?.. 鞝曤… 毵愲 響滍槃頃?靾?鞐嗢姷雼堧嫟. 攴鸽姅 攵勲獏頌?毵れ毎 霕戨槕頃橁碃, 韱犾毳?臧滍榿頃橁碃 氚膘劚鞐愱矊 霃岇晞臧€電?攴胳潣 鞝勲灥鞚?鞝?毵堨潓鞚?靷鞛§晿歆€毵?.. 鞏措枻 鞚检澊 氚滌儩頃橃棳 Hongzhi 頇╈牅毳?霒犽偓鞀惦媹雼? 毵?氇豁晿電?
攴鸽煬雮?Liu Jian鞚?”氇呺倶霛检潣 於曤车”鞚措澕瓿?毵愴枅鞚?霑?Hongzhi 頇╈牅電?歃夓嫓 攴戈矁鞚?鞚错暣頄堨姷雼堧嫟.
valtrex 500mg online
buy tamoxifen without prescription
purchase propecia for sale
indocin in india
cheap provigil
I think this is one of the most significant info for me.
And i’m satisfied reading your article. However wanna remark on some general things, The
website style is great, the articles is actually nice
: D. Excellent process, cheers
celexa 20mg pill
doxycycline best price
lyrica 500 mg tablet
robaxin 75 mg
I’ve been browsing online more than 4 hours today, yet
I never found any interesting article like yours.
It is pretty worth enough for me. In my opinion, if all web owners and bloggers made good content as you did, the net
will be a lot more useful than ever before.
氩勴寯搿?鞀’
韱犿啝靷澊韸?/strong>
鞓澕鞚胳姮搿?/strong>
https://genviagrabst.com/
https://thaihealthydoc.com/
鞀’氩勴攧: 鞀’靷澊韸? 旃挫雲胳偓鞚错姼, 鞀’旎る雼堩嫲
氚旍勾霛检勾歆€雲?氚旍勾霛检勾歆€雲胳偓鞚错姼
鞓澕鞚胳姮搿ǜ鞁?/a>
氚旍勾霛检偓鞚错姼毽姢韸?/a>
鞎堨爠 鞀’靷澊韸?鞀’毹胳嫚 於旍矞 旃挫雲胳护氘る媹韹?/a>
鞓澕鞚胳勾歆€雲?/strong>
https://blackhatroyalty.com/
https://ankarakoyun.com/
氚旍勾霛检爠霝?氚旍勾霛检勾歆€雲?/a>
鞓澕鞚胳勾歆€雲?/a>
2023雲?雽€頃滊甑?斓滉碃鞚?鞓澕鞚?旃挫雲?靷澊韸?/a>
鞀’氍措觳错棙 / 頂勲澕攴鸽韹?頂岆爤鞚?觳错棙 – 鞀’靷澊韸?於旍矞
氚旍勾霛检爠霝?/a>
鞀’毹胳嫚 靷澊韸?/a>
https://thewritingessay.com/
https://beyazitescort.com/
韰愲皵鞚错厫
旃挫雲胳偓鞚错姼 於旍矞 鞝曤炒 鞝滉车 – 鞓澕鞚?旃挫雲?靷澊韸?2023 靾滌渼
鞓澕鞚鸽皵旃措澕 TOP 10 於旍矞 | 鞝勲臧€ 靹犾爼 鞎堨爠頃?氚旍勾霛检偓鞚错姼
clonidine prescription
can i buy clonidine over the counter
Cheers! Plenty of information.
https://www.jamaipanese.com/articles/bolyshoy_assortiment_detskih_pigham_v_internet_magazine.html
buy paxil india
where to buy acyclovir cream over the counter
combivent generic cost
levaquin drug
Быстромонтажные здания: финансовая польза в каждом строительном блоке!
В современном обществе, где моменты – финансы, строения быстрого монтажа стали реальным спасением для предпринимательства. Эти новейшие строения объединяют в себе повышенную прочность, финансовую экономию и быстроту установки, что придает им способность превосходным выбором для разнообразных предпринимательских инициатив.
Строительство быстровозводимых зданий цена
1. Быстрота монтажа: Минуты – важнейший фактор в бизнесе, и экспресс-сооружения обеспечивают значительное снижение времени строительства. Это преимущественно важно в ситуациях, когда важно быстро начать вести бизнес и начать получать прибыль.
2. Экономия: За счет оптимизации производства и установки элементов на месте, бюджет на сооружения быстрого монтажа часто бывает менее, по сопоставлению с обыденными строительными проектами. Это позволяет сэкономить средства и получить лучшую инвестиционную отдачу.
Подробнее на http://www.scholding.ru/
В заключение, объекты быстрого возвода – это отличное решение для бизнес-мероприятий. Они включают в себя быстрое строительство, экономическую эффективность и твердость, что обуславливает их наилучшим вариантом для предприятий, готовых начать прибыльное дело и выручать прибыль. Не упустите момент экономии времени и средств, превосходные экспресс-конструкции для ваших будущих инициатив!
Many thanks. Ample info!
https://ltsv-brandenburg.de/news/brutalynye_lidery_i_ih_sekretnye_hobbi_iosif_stalin.html
https://heatherparker.com/articles/delo_o_katynskoy_rezne.html
https://pollenstreetsocial.com/art/lyubimaya_rabota_delaet_ghizny_schastlivee_i_lekarstvo_kotoroe_umenyshaet_risk_razvitiya_.html
https://iddaalihaber.com/news/sovety_po_prohoghdeniyu_evil_within_2_sekrety_glava_4.html
https://tubal.com.au/wp-content/pages/rasshirennye_pory_voprosy_i_otvety.html
retin a 1 buy online
Oliver currently has plans to come to Ole Miss on April 14 for a spring observe.
They come with either a V-Shaped Bottom or Block Bottom which
permits the envelope to flourish as needed. Certain bigger and extra progressive envelope transforming
machines have flexo printing skill which allows the printing
and folding to be executed at the same time. Get it proper the first time
– Although the business setup takes time, you have to do your analysis and determine on the
perfect federal and state buildings for you. Avoiding this drawback is straightforward by paying your state and federal payroll
taxes in a timely manner, within three days of issuing the payroll checks.
Also, not filing or paying taxes associated to payroll
deliberately is a federal crime. You shouldn’t overlook
about payroll taxes – The Startups facing payroll-related tax points might end up paying
steep costs. You must type a proper construction from the beginning – An LLC is a simple technique to have the losses offset other abnormal earnings of the shareholders,
however won’t be the very best structure long run. The communications suite
would possibly embrace a GMDSS workstation with NAVTEX receiver, a weatherfax and computer weather routing
system, SATCOM terminal, a number of put in and portable VHF radios,
an inside telephone trade, a public deal with and alarm system, and sound
powered telephones.
average cost of cialis
buy citalopram online
Stevesnfulge
https://anthonygreene.journoportfolio.com/
https://huggingface.co/spaces/dalle-mini/dalle-mini/discussions/11296
http://forum.maistrafego.pt/index.php?topic=53456.new#new
https://www.britishlogcabins.com/forum/welcome-to-the-forum/indonesian-xxx-porn-girls-image-site-top
https://club.vexanium.com/question/i-have-such-a-problem-and-i-decided-to-ask-for-your-help-i-need-a-good-site–64f4b6797c1b4a27a13c0433
https://theomnibuzz.com/navigating-the-allure-of-relationships-between-young-men-and-mature-women/
https://vspmdcrc.edu.in/LMS/profile/patrick-davis/
https://cartagena.activeboard.com/t69851011/do-you-like-to-watch-adult-videos/
https://shortest.activeboard.com/t69857671/is-porn-an-addiction-or-an-art/
https://degentevakana.com/blogs/view/299167
deep web search darknet drug market dark web search engines
tamoxifen 40 mg price uk
prednisolone 0.5 cream
dexona
how much is albuterol in mexico
where can i buy dapoxetine in usa
I do not even know the way I ended up right here, but I believed
this submit was once great. I don’t realize who you’re but definitely you’re going to a famous blogger
for those who aren’t already. Cheers!
hydroxychloroquine 300 mg tablet
buy tamoxifen citrate
provigil online uk
lisinopril metoprolol
XXX Tube Videos Porn Hub
Adult Porn XXX XVideos XXX Adult Porn XXX
http://images.google.bj/url?q=https://isoporno.com/http://cse.google.ge/url?q=https://isoporno.com/http://www.google.al/url?q=https://isoporno.com/http://www.google.com.mt/url?q=https://isoporno.com/https://maps.google.co.ls/url?q=https://isoporno.com/
malegra fxt online
We stumbled over here by a different page and thought I might check things out.
I like what I see so now i am following you. Look forward to looking at your web page
repeatedly.
buy cheap propecia uk
Hello There. I found your blog using msn. This is a really well written article.
I will be sure to bookmark it and come back to read more of your
useful information. Thanks for the post. I will definitely return.
diflucan medication
robaxin 500 mg
synthroid 137.5
excellent put up, very informative. I ponder why the other experts of this
sector do not notice this. You should continue your writing.
I’m sure, you have a huge readers’ base already!
I like this website because so much utile material on here
:D.
氚旍勾霛检偓鞚错姼毽姢韸?/a>
鞓澕鞚胳姮搿?2023雲?斓滌嫚 鞝曤炒 氚?Top20 鞀’靷澊韸?於旍矞
氚旍勾霛检勾歆€雲?氚旍勾霛检勾歆€雲胳偓鞚错姼
https://blackhatroyalty.com/
https://thaihealthydoc.com/
鞓澕鞚胳姮搿ǜ鞁?/a>
鞓澕鞚?鞀’靷澊韸?| 鞀’項岉劙 | 鞎堨爠 鞀’旎る雼堩嫲
鞓澕鞚胳勾歆€雲胳偓鞚错姼
鞓澕鞚胳勾歆€雲胳偓鞚错姼
氚旍勾霛检偓鞚错姼毽姢韸?氚旍勾霛检爠霝?/a>
鞚疙劙雱缝勾歆€雲?/strong>
https://vogliadicachemere.com/
https://www.varicosen24.com/
鞚疙劙雱缝勾歆€雲?/a>
鞓澕鞚?鞀’毹胳嫚 靷澊韸?- 鞎堨爠 靷澊韸?TOP 10 於旍矞
旃挫雲胳偓鞚错姼 鞓澕鞚胳勾歆€雲?旃挫雲胳护氘る媹韹?毹鬼妧瓴€歃?旃搓车
氚旍勾霛检勾歆€雲胳偓鞚错姼-氚旍勾霛检偓鞚错姼
氚旍勾霛检勾歆€雲胳偓鞚错姼-氚旍勾霛检偓鞚错姼
氍措 鞓澕鞚?鞀’ 氚?旃挫雲?瓴岇瀯
https://ufa888a.com/
https://stylightes.com/
氚旍勾霛检偓鞚错姼毽姢韸?氚旍勾霛检爠霝?/a>
鞓澕鞚?鞀’ 毹胳嫚
鞓澕鞚?鞀’靷澊韸?| 鞀’項岉劙 | 鞎堨爠 鞀’旎る雼堩嫲
buy amoxicillin online with paypal uk
buy viagra online
propranolol 10 mg where to buy
diflucan brand name
cost for generic cialis
ventolin hfa 90 mcg inhaler
tamoxifen discount
This piece of writing gives clear idea for the new people of blogging, that truly how to do
blogging. camisetas de futbol
cost of cialis in australia
nolvadex online order
where to buy tretinoin 025
levitra 10 mg tablet in india
buy nolvadex europe
malegra 50 mg
buy flomax in india
celexa no prescription cheap
plaquenil for ra
prinivil
clonidine 0.3 mg tablets
how can i get accutane
valtrex cream price
motilium tablet cost
generic tamoxifen for sale
modafinil for sale south africa
Grasping Flirt Finders: What Are They?
Flirt finder dating sites are a specialized niche in the world of online dating. They cater to individuals who are looking for more than just a simple chat or a simple swipe right. These platforms are designed to help people find meaningful connections, whether they’re seeking a long-term relationship or a passionate romance. The emphasis here is on the art of flirting, building chemistry, and creating sparks between potential partners.
The Allure of Flirt Finders
A Lively Twist on Dating
One of the enticing aspects of flirtfinder join is their playful approach to dating. Unlike conventional dating platforms that primarily focus on profiles and images, flirt finders promote users to partake in flirty conversations and clever banter. This approach creates an exhilarating and flirtatious ambiance, transforming each interaction into what feels like a potential escapade.
A Multifaceted Community
Flirt finder dating sites frequently boast a wide-ranging user base, simplifying the quest for someone who aligns with your desires. Whether you’re in search of a companion with distinct passions or a partner with a particular way of life, these platforms offer an array of potential matches to explore.
Enhanced Communication Tools
Effective communication is crucial in any fruitful relationship. Flirt finder sites provide a selection of tools such as video chats, virtual presents, and interactive games that facilitate connecting with others. These functions go surpass simple text messages and assist users in expressing themselves in imaginative ways.
Compatibility Matching
Many flirt finder dating sites employ cutting-edge algorithms to match users according to suitability factors. These algorithms factor in interests, values, and personality traits, enhancing the likelihood of finding a meaningful connection.
Crafting an Unforgettable Profile
Your profile is your digital initial impression on a flirt finder site. To set yourself apart, employ high-quality photos that display your personality, and compose a captivating bio that emphasizes your interests and what you’re seeking in a partner. Remember, authenticity is vital.
Etiquette for Flirting
Flirting on these platforms is completely about being appealing and courteous. Certainly, participate in amusing banter and praise your potential matches, but refrain from exceeding boundaries or making anyone seem uneasy. Esteem forms the core of any fruitful interaction.
Site: https://flklined2s.nl/
Uncovering Exciting Capabilities
Take advantage of the special features provided by flirt finder sites. Dispatch virtual gifts, engage in icebreaker games, and make use of video chats to get to know your potential matches better. These instruments can support you in starting discussions and creating unforgettable connections.
Why Opt for a Flirt Finder Dating Platform?
Infuse Your Love Journey
If your love life craves an added dose of excitement, flirt finder dating platforms are the perfect remedy. They present a refreshing respite from the monotony of conventional dating and introduce a feeling of playfulness into the journey.
Stumble Upon Kindred Spirits
These platforms draw in individuals who reflect your passion for flirting and constructing romantic bonds. This shared reciprocal ground can pave the way for meaningful and satisfying interactions.
Elevated Chances of Success
The emphasis on compatibility and profound connections on flirt finder platforms frequently leads to higher success rates when it comes to discovering compatible partners. If you’re seriously dedicated to seeking love, these platforms might be a turning point.
Conclusion
Flirt finder dating sites have transformed the way we approach dating. Their charming attitude, variety of users, and cutting-edge tools offer a unique and thrilling path to find love or a deep connection.
So, if you’re eager to elevate your dating life and explore the world of flirting, give flirt finder dating sites a chance.
Your forthcoming thrilling adventure in love could be just a click away.
buy vermox canada
where to buy lyrica
It’s nearly impossible to find experienced people in this particular subject,
but you sound like you know what you’re talking about!
Thanks
retin a tretinoin cream
tizanidine 4
Many thanks, An abundance of content.
synthroid 50 mcg price in india
официальный сайт cat casino
https://narmed24.ru/
where to buy vermox
where to buy tizanidine
Grasping Flirt Finders: What Are They?
Flirt finder dating sites are a specialized niche in the world of online dating. They cater to individuals who are looking for more than just a simple chat or a straightforward swipe right. These platforms are designed to help people find meaningful connections, whether they’re seeking a serious relationship or a exciting romance. The emphasis here is on the art of flirting, building chemistry, and creating sparks between potential partners.
The Allure of Flirt Finders
A Lively Twist on Dating
One of the enticing aspects of flirt finder dating sites is their cheerful approach to dating. Unlike traditional dating platforms that primarily focus on profiles and images, flirt finders promote users to partake in flirty conversations and clever banter. This approach creates an exhilarating and flirtatious ambiance, transforming each interaction into what feels like a potential escapade.
A Multifaceted Community
Flirt finder dating sites frequently boast a varied user base, simplifying the quest for someone who aligns with your desires. Whether you’re in search of a companion with specific passions or a partner with a certain way of life, these platforms offer an array of potential matches to explore.
Enhanced Communication Tools
Effective communication is vital in any thriving relationship. Flirt finder sites provide a range of instruments such as video chats, virtual presents, and interactive games that enable connecting with others. These functions go beyond simple text messages and support users in expressing themselves in imaginative ways.
Compatibility Matching
Many flirt finder dating sites utilize cutting-edge algorithms to match users in accordance with compatibility factors. These algorithms consider interests, values, and personality traits, enhancing the likelihood of finding a deep connection.
Crafting an Unforgettable Profile
Your profile is your digital first impression on a flirt finder site. To set yourself apart, utilize high-quality photos that display your personality, and compose a compelling bio that showcases your interests and what you’re looking for in a partner. Remember, authenticity is crucial.
Etiquette for Flirting
Flirting on these platforms is wholly about being captivating and polite. Without a doubt, engage in playful banter and admire your potential matches, but avoid exceeding boundaries or making anyone feel uncomfortable. Esteem builds the essence of any productive interaction.
Site: flklined2s.nl
Uncovering Exciting Functionalities
Take advantage of the distinctive features provided by flirt finder sites. Dispatch virtual gifts, participate in icebreaker games, and employ video chats to get to know your potential matches more. These tools can help you in starting discussions and forging unforgettable connections.
Why Opt for a Flirt Finder Dating Platform?
Breathe New Life into Your Love Journey
If your love life yearns for an increased dose of excitement, flirt finder dating platforms are the perfect remedy. They provide a refreshing respite from the tedium of standard dating and infuse a feeling of playfulness into the process.
Discover Kindred Spirits
These platforms draw in individuals who emulate your enthusiasm for flirting and building romantic bonds. This shared common ground can lead to meaningful and enjoyable interactions.
Enhanced Chances of Success
The emphasis on compatibility and significant connections on flirt finder platforms frequently leads to higher success rates when it comes to unearthing compatible partners. If you’re truly devoted to uncovering love, these platforms might be a turning point.
Conclusion
Flirt finder dating sites have revolutionized the way we approach dating. Their charming attitude, diverse user base, and innovative features offer a one-of-a-kind and adventurous path to find love or a intense connection.
So, if you’re ready to enhance your dating life and embark on the world of flirting, give flirt finder dating sites a try.
Your next thrilling adventure in love could be just a click away.
tizanidine pill
казино cat
кэт казино
lyrica 10 mg
официальный сайт кэт казино
бонусы кэт казино
usa pharmacy online
finasteride uk price
Hey would you mind letting me know which webhost you’re utilizing?
I’ve loaded your blog in 3 different browsers and I must say this blog loads a lot quicker
then most. Can you recommend a good internet hosting provider at a
honest price? Cheers, I appreciate it!
tizanidine 10mg tablets
But when you prefer another option totally, check out
our record beneath of one of the best CPA networks. Qa’ida and the Madrid bombers,
however rapidly they realized those connections had been tenuous at finest.
I have been an web marketer for years, and that
was my motivating part into a complete new realm of web promoting and marketing.
For the last four years, they have paid round $2 billion to their users.
Although this isn’t an off beam determination, but its certainly worthwhile that your have a first hand expertise in some
properly established firm. Choose an organization which sounds
comfortable to you, because your first steps ought to
go straightforward on you; in any other case it might depart a
unfavourable influence on you. However, be cautious of the
impression you leave on the former firm, as a result of
a unsuitable impression can create a problem for you; particularly when it’s the onset of your career.
This excellent website truly has all the info I needed about
this subject and didn’t know who to ask.
Very good information. Lucky me I found your blog by chance (stumbleupon).
I’ve book marked it for later!
Do you mind if I quote a couple of your posts as long as I provide credit and sources back
to your site? My blog site is in the exact same niche as yours and my users would really
benefit from a lot of the information you present here. Please let me
know if this okay with you. Cheers!
сайт гама казино
edaklass.ru
zoloft generic tablet price
zanaflex capsule cost
acyclovir 200
lasix medication over the counter
Helpful info. Lucky me I discovered your web site by
accident, and I’m shocked why this accident didn’t took place
earlier! I bookmarked it. camisetas de futbol
robaxin online
modafinil order usa
propranolol over the counter uk
rüyada 200 tl görmek
provigil nz
鞓澕鞚?鞀’
鞓澕鞚胳勾歆€雲?/strong>
鞓澕鞚胳姮搿ǜ鞁?/strong>
https://garnihotelgalia.com/
https://cryingwolfmovie.com/
韱犿啝靷澊韸?/a>
鞓澕鞚胳勾歆€雲胳偓鞚错姼
霛检澊歆?鞀’
鞓澕鞚?鞀’ 毹胳嫚
鞓澕鞚?鞀’
鞚疙劙雱缝勾歆€雲?/strong>
https://www.hunkymalestars.com
https://www.beyoglueskort.com
鞓澕鞚?鞀’ 毹胳嫚
霛检澊歆?鞀’
氍措 鞀’
鞓澕鞚?鞀’
旃挫雲胳偓鞚错姼 | 氚旍勾霛缄矊鞛勳偓鞚错姼 | 鞓澕鞚鸽皵旃措澕 | 氚旍勾霛?頃橂姅瓿?/a>
鞎堨爠 鞀’ 靷澊韸?/strong>
https://www.xxxlesbianmassage.com
https://beyazitescort.com/
鞓澕鞚?旃挫雲?/a>
鞀’ 靷澊韸?/a>
鞀’氍措觳错棙 / 頂勲澕攴鸽韹?頂岆爤鞚?觳错棙 – 鞀’靷澊韸?於旍矞
2023雲?雽€頃滊甑?斓滉碃鞚?鞓澕鞚?旃挫雲?靷澊韸?/a>
鞓澕鞚?鞀’
2023雲?鞓澕鞚?鞀’ 瓴岇瀯 於旍矞 – 鞓澕鞚?鞀’ 靷澊韸?靾滌渼
https://3chathk.com/
https://www.geinoutime.com/
頇╈牅 鞀’
頂茧 雺?氩犼皜鞀?/a>
氍措 鞓澕鞚?鞀’ 頂岆爤鞚?雼れ毚搿滊摐 霕愲姅 臧€鞛?鞐嗢澊)
鞓澕鞚胳勾歆€雲?/strong>
鞓澕鞚?鞀’靷澊韸?| 鞀’項岉劙 | 鞎堨爠 鞀’旎る雼堩嫲
鞓澕鞚?鞀’ 毹胳嫚
https://soojungchurch.com/
https://ufa888a.com/
鞚疙劙雱缝勾歆€雲?/a>
鞓澕鞚胳勾歆€雲胳偓鞚错姼
2023雲?鞚戈赴 鞀’靷澊韸?TOP 10 – 氤措剤鞀?毵れ澕 旌愳壃氚?/a>
氚旍勾霛检勾歆€雲胳偓鞚错姼-氚旍勾霛检偓鞚错姼
氚旍勾霛检偓鞚错姼,鞁れ嫓臧勳勾歆€雲?氚旍勾霛缄矊鞛勳灔,旃挫雲胳偓鞚错姼,靸濎
鞐愱犯鞀’-氚旍勾霛检勾歆€雲?/a>
https://takefullporn.com/
https://thewritingessay.com/
霛检澊歆?鞀’
鞐愱犯鞀’
頂茧 雺?氩犼皜鞀?/a>
韱犿啝靷澊韸?/strong>
2023雲?旃挫雲胳偓鞚错姼 於旍矞 靾滌渼 – 鞎堨爠頃?鞓澕鞚胳勾歆€雲?靷澊韸?TOP 15
鞓澕鞚胳姮搿?2023雲?斓滌嫚 鞝曤炒 氚?Top20 鞀’靷澊韸?於旍矞
https://www.hunkymalestars.com
https://totosago.com/
頂茧 雺?氩犼皜鞀?/a>
鞎堨爠 鞀’ 靷澊韸?/a>
氚旍勾霛检偓鞚错姼毽姢韸?/a>
And triglycerides-a type of fat that we retailer in adipose tissue-can be broken down by way of lipolysis and used to begin a sequence of occasions
that generates ketones when our glycogen shops are gone.
It also helps us construct up glycogen shops for longer training classes,
runs or hikes. The jolt of caffeine helps them get up and get their day began. With
the permitted list of foods being so transient,
you won’t get sufficient fruits and veggies
on keto. Benefits Celery is one of the vital hydrating veggies on the market.
Make aware choices when going out for a cheat meal, or select to
bring out the chef in you. It’s now time to exhibit extra
of your data so we are able to determine how wholesome your lifestyle
selections are! The steps to use this product are easy and
not too difficult to operate like conventional medications.
Land use by plant-based farms would enhance. Other than simply gaining muscles and searching better, common health routines are shown to enhance one’s
overall mood, improve vitality levels and enhance pores and skin well
being. But when you’re a well being and fitness guru, then you definately in all probability know about this stuff already!
But selecting fruit over sweet is not enough on this world, because fitness also performs
an enormous role in your overall health.
indocin 25 mg capsules
citalopram oxalate
Hey There. I discovered your blog the usage of msn. That is a very neatly written article.
I will be sure to bookmark it and come back to read extra of your helpful information. Thank you for
the post. I’ll certainly comeback.
robaxin usa
prednisone pill 10 mg
albendazole 400 mg cost
best online pharmacy india
isotretinoin accutane
toradol allergy
paxil 20 mg price
avodart uk
augmentin 500 mg
cost of hydrochlorothiazide 25mg
purchase prednisolone
where can i get clomid tablets
azithromycin 500mg tablets cost
15 mg celexa
online pharmacy delivery delhi
modafinil 200mg cost
Hey I know this is off topic but I was wondering if you knew of any widgets I could add to
my blog that automatically tweet my newest twitter updates.
I’ve been looking for a plug-in like this for quite
some time and was hoping maybe you would have some experience with
something like this. Please let me know if you run into anything.
I truly enjoy reading your blog and I look forward to your new updates.
generic albenza
keluaran hk
where to buy provigil online
provigil 100
diflucan 200
where to buy albuterol tablets
modafinil tablets in india
amoxicillin medicine price in india
online pharmacy australia free delivery
proscar finasteride
buy metformin over the counter
clomid online purchase
buy ciprofloxacin uk
retino 0.025 gel
generic lisinopril
It is the best time to make some plans for the future and it is time to be happy.
I have read this post and if I could I desire to suggest you some interesting things
or suggestions. Maybe you can write next articles referring to this article.
I want to read more things about it!
albuterol canada pharmacy
氍措 鞀’
頇堨勾歆€雲?/strong>
鞐愱犯鞀’
https://myjavs.com/
https://cryingwolfmovie.com/
鞓澕鞚胳姮搿?/a>
鞓澕鞚?鞀’
氩勴寯搿?鞀’
旃挫雲?靷澊韸?/strong>
頇╈牅 鞀’
鞀’1氩堦皜
https://soojungchurch.com/
https://dekalbcarservices.com/
鞐愱犯鞀’
炜?旃挫雲?/a>
旃挫雲?靷澊韸?/a>
buy doxycycline online 270 tabs
鞓澕鞚?旃挫雲?鞀’ 靷澊韸?於旍矞 靾滌渼
氚旍勾霛检偓鞚错姼-氚旍勾霛检偓鞚错姼毽姢韸?/a>
鞎堨爠 鞀’ 靷澊韸?/strong>
https://garnihotelgalia.com/
https://www.hunkymalestars.com
鞐愱犯鞀’: 鞓澕鞚胳勾歆€雲?旃挫雲胳偓鞚错姼 氚旍勾霛检偓鞚错姼 於旍矞
氚旍勾霛检爠霝?氚旍勾霛检勾歆€雲?/a>
鞐愱犯鞀’
韱犿啝靷澊韸?/strong>
韰愲皵鞚错厫
頂茧 雺?氩犼皜鞀?/strong>
https://www.bahishane1.com/
https://www.qiyezp.com/
鞓澕鞚?鞀’
韱犿啝靷澊韸?/a>
鞓澕鞚胳姮搿?/a>
online pharmacy pain relief
buy vermox 500mg
ciprofloxacin 250 mg tabs
Today, while I was at work, my sister stole
my apple ipad and tested to see if it can survive a 40 foot drop, just so she can be a
youtube sensation. My apple ipad is now destroyed and
she has 83 views. I know this is entirely off topic but I had to share
it with someone!
Dear immortals, I need some <a href=http://www.wowtot.com/>wow gold</a> inspiration to create.
diflucan tabs
allopurinol online canada
ivermectin over the counter
phenergan 10mg tablet
can i buy modafinil
dexamethasone 4 mg tablet buy online
order generic paxil online
clonidine 25 mcg
levitra tablets for sale
Hey, I think your website might be having browser compatibility issues.
When I look at your blog in Ie, it looks fine but
when opening in Internet Explorer, it has some overlapping.
I just wanted to give you a quick heads up! Other then that,
fantastic blog!
As the admin of this website is working, no doubt very shortly it
will be famous, due to its quality contents.
canadian pharmacy com
prednisolone buy usa
where to buy nolvadex in australia
modafinil for sale
generic brand augmentin
order avodart online
tretinoin 0.05 cream generic 20g
malegra pills
I will right away take hold of your rss feed as I can not in finding your e-mail subscription link or e-newsletter service.
Do you have any? Kindly allow me recognise so that I may just subscribe.
Thanks.
avodart 0.5 mg uk
New porn every day
Hello it’s me, I am also visiting this web site on a regular basis, this web site is really good and the users are genuinely sharing
good thoughts.
canadian pharmacy flomax
generic robaxin 750
zanaflex 4mg
synthroid 137.5 mcg
lisinopril 2 mg
ventolin hfa
can i buy ventolin over the counter in australia
toradol prescription
buy toradol pills online
how to get doxycycline
doxycycline hyc 100 mg
robaxin iv
celexa generic price
generic albuterol tablets
zoloft brand name
effexor xr 75 mg
where can i buy prednisolone tablets
buy furosemide tablets uk
brillx казино
brillx казино
Играя на Brillx Казино, вы можете быть уверены в честности и безопасности своих данных. Мы используем передовые технологии для защиты информации наших игроков, так что вы можете сосредоточиться исключительно на игре и наслаждаться процессом без каких-либо сомнений или опасений.Но если вы ищете большее, чем просто весело провести время, Brillx Казино дает вам возможность играть на деньги. Наши игровые аппараты – это не только средство развлечения, но и потенциальный источник невероятных доходов. Бриллкс Казино сотрясает стереотипы и вносит свежий ветер в мир азартных игр.
lisinopril online usa
metformin for sale online
hydrochlorothiazide 125mg
Excellent advice Thanks a lot.
brillx casino официальный мобильная версия
Brillx
Играть онлайн бесплатно в игровые аппараты стало еще проще с нашим интуитивно понятным интерфейсом. Просто выберите свой любимый слот и погрузитесь в мир ярких красок и захватывающих приключений. Наши разнообразные бонусы и акции добавят нотку удивительности к вашей игре. К тому же, для тех, кто желает ощутить настоящий азарт, у нас есть возможность играть на деньги. Это шанс попытать удачу и ощутить адреналин, который ищет настоящий игрок.Brillx Казино – это не просто обычное место для игры, это настоящий храм удачи. Вас ждет множество возможностей, чтобы испытать азарт в его самой изысканной форме. Будь то блеск и огонь аппаратов или адреналин в жилах от ставок на деньги, наш сайт предоставляет все это и даже больше.
buy provigil online uk
online pharmacy india
retino cream
synthroid cheapest price
how to get nolvadex in australia
I don’t ordinarily comment but I gotta admit appreciate it for the post on this special
one :D.
tizanidine price in india
buy cipro without prescription
tadalafil 5mg buy
dexamethasone 500 mg
glucophage uk
phenergan 25mg tablets uk
clonidine buy online uk
how to buy modafinil australia
albuterol for sale online
can you buy albuterol otc
retin a cream online
For most up-to-date news you have to pay a visit the web and on web I found this web site as a best web site for most recent updates.
Right here is the right webpage for anybody who wishes
to find out about this topic. You know so much its almost
hard to argue with you (not that I really will need to?HaHa).
You definitely put a fresh spin on a topic that’s been written about for years.
Great stuff, just great!
clonidine cheap
ciprofloxacin 500
indocin cream
tamoxifen 10
cheap propecia generic
allopurinol rx
buy tretinoin 0.05 cream
how to get accutane prescription
Hi my family member! I want to say that this article is awesome,
nice written and include almost all vital infos. I’d like to peer more posts
like this .
Useful forum posts, Many thanks!
pharmacy online australia free shipping
effexor xr online
combivent
furosemide 25 mg
vermox 100mg
motilium 10
finesterude no prescription
synthroid 50mcg
cheap cialis pills canada
buy albuterol online no prescription
synthroid 75
Ich kann nicht genug Gutes über dieses Geschäft für kaufen sie FC 24 Münzen sagen. Sie bieten schnelle Lieferungen, kostengünstige Münzen, eine benutzerfreundliche Website und kontinuierliche Unterstützung.
where can i order allopurinol
zestoretic online
ventolin rx
zoloft no prescription
order cialis online us pharmacy
motilium purchase online
levitra online sale
avodart price comparison
Some pay for a month, some for the lifetime, and naturally there
are various variations in between. If Mark turns into a super affiliate and begins producing
Huge commissions each month, John can simply sit back and
acquire the checks as he referred him. So if
Mark will get paid $a thousand in Month 1, and the 2
Tier Affiliate program is paying 5%, then John would receive $50 just for
referring Mark. So John wouldn’t get a referral fee only for a month or a yr – he receives it FOR
ALL TIME. How lengthy do you proceed receiving referral commissions for?
Some 2 Tier Affiliate Networks pay LIFETIME commissions.
So do your homework and find a 2 Tier program that can make you cash long sooner
or later for the work you’re doing immediately. They’ll have the ability
to sympathize with what you’re doing, however they’ll never really
perceive. There’s nothing that’s really lacking within the course that can make your efforts incomplete.
But apart from this, there’s actually nothing that’s majorly
lacking in the course. The whole technique that is laid out within the
course is straightforward to apply and work with
should you do it the correct method.
buy tamoxifen uk
Good forum posts. Appreciate it.
prednisolone tablets over the counter
toradol 50
celexa 120 mg
propecia 5mg for sale
compare synthroid prices
generic ventolin price
can you buy doxycycline over the counter usa
buy accutane in india
online pharmacy prescription
Прогон сайта с использованием программы “Хрумер” – это способ автоматизированного продвижения ресурса в поисковых системах. Этот софт позволяет оптимизировать сайт с точки зрения SEO, повышая его видимость и рейтинг в выдаче поисковых систем.
Хрумер способен выполнять множество задач, таких как автоматическое размещение комментариев, создание форумных постов, а также генерацию большого количества обратных ссылок. Эти методы могут привести к быстрому увеличению посещаемости сайта, однако их надо использовать осторожно, так как неправильное применение может привести к санкциям со стороны поисковых систем.
Прогон сайта “Хрумером” требует навыков и знаний в области SEO. Важно помнить, что качество контента и органичность ссылок играют важную роль в ранжировании. Применение Хрумера должно быть частью комплексной стратегии продвижения, а не единственным методом.
Важно также следить за изменениями в алгоритмах поисковых систем, чтобы адаптировать свою стратегию к новым требованиям. В итоге, прогон сайта “Хрумером” может быть полезным инструментом для SEO, но его использование должно быть осмотрительным и в соответствии с лучшими практиками.
retino 0.5 cream price
vermox usa buy
feldene gel price uk
levitra tablet online
retin-a micro gel
cipro online uk
retino 0.05
diflucan pill price
celexa 20 mg order online
propecia singapore price
diflucan nz
doxycycline hyclate capsules
albuterol 90 mcg generic
effexor venlafaxine
propranolol 20 mg cost
diflucan pharmacy
tizanidine 4mg tablet price
cheapest pharmacy for prescriptions without insurance
canadian pharmacy nolvadex
clomid 100mg buy
propecia over the counter australia
where can i get albuterol
1200 mg modafinil
where can you buy dexamethasone
lisinopril sale
retin a .05 cream
propecia for less
propecia .5 mg
phenergan promethazine
best online pharmacy
buy viagra online
accutane cost canada
hydroxychloroquine tablets 10 mg
vermox tablets south africa
best nolvadex
Every weekend i used to pay a quick visit this web page, for the
reason that i want enjoyment, since this this web page conations genuinely good funny information too.
buy zestril online
best albuterol
cheapest modafinil australia
Very nice article, just what I needed.
allopurinol 300mg tablets
lopressor cost
zestoretic 20 mg
where to buy provigil online usa
rate canadian pharmacies
Greate article. Keep posting such kind of
info on your site. Im really impressed by your blog.
Hi there, You have done a great job. I will definitely digg it and
personally recommend to my friends. I’m confident they will
be benefited from this web site.
provigil 200 mg pill
This article offers clear idea for the new visitors of blogging, that actually how to do blogging.
tretinoin 50 cream
Hi! This is my 1st comment here so I just wanted to give a quick shout out and say I really enjoy reading your blog posts. Can you suggest any other blogs/websites/forums that cover the same subjects? Thanks a ton!
промокоды на 1xbet 2024
levitra 50mg
can you buy toradol over the counter
clonidine 129
cheapest pharmacy to fill prescriptions with insurance
otc glucophage
cheap propecia uk
canadian pharmacy online ship to usa
vermox 100mg price
Just want to say your article is as astounding. The
clarity to your put up is simply spectacular and i could assume you’re knowledgeable in this subject.
Well with your permission allow me to grasp your
RSS feed to keep updated with drawing close post. Thanks
one million and please carry on the rewarding work.
tamoxifen cost
generic provigil cost
lopressor 50 mg price in india
furosemide 40 mg pills
doxycycline pills over the counter
combivent inhalation aerosol
augmentin brand name
albuterol inhalers not prescription required
allopurinol no prescription
tizanidine discount
buy effexor uk
buy valtrex
order zoloft online no prescription
prednisolone sodium phosphate
cipro iv
buy generic avodart online
accutane vitamin a
provigil pharmacy
retino cream
lopressor 50 mg price
generic deltasone
order valtrex online uk
buy vardenafil 40 mg
номер для вк
malegra dxt
effexor 325
clonidine hcl for sleeping
albuterol australia
zestril 25 mg
valtrex cost canada
cheap viagra online canadian pharmacy
I’m curious to find out what blog platform
you happen to be using? I’m experiencing some small security problems
with my latest website and I would like to find something more safe.
Do you have any solutions?
doxycycline 100 mg forsale outside the us
This is nicely expressed! !
ciprofloxacin cheap
robaxin 750 mg generic
canadian pharmacy online cialis
ciprofloxacin sale online
order modafinil cheap
Thanks in support of sharing such a good idea, paragraph is good, thats why
i have read it completely
dexamethasone canadian pharmacy
discount pharmacy mexico
I urger folks out there to be very careful about investing
in bitcoin. Why? A fellow contacted me on facebook and later requested we have the conversation on WhatsApp and introduced
me to a trading investment platform where I would make more on my investments.
He directed me to their website where I saw glimpse of comments of several people applauding and
appreciating the platform for the profit earned via their trading platform, I told
him I am nit a tech genius and I do not know how to trade Bitcoin or any type of crypto currency,
but he insisted and convinced me to help me with that,
long story cut short, I invested $70,000, and later found out it was a scam.
I was broken and solicited for help online, and I was lucky to have been directed
to reach the http://www.aldwychsecuritiesllc.com guys on their
website, I must confess that with the help of http://www.aldwychsecuritiesllc.com I was able to
get my funds back, all of it without a dime
remaining, without their help, I could have lost all my $70,000.
Firstly, you need to report the website/scammer to law enforcement if they can assist you but in most cases
the law enforcement are always not able to do much when the scammers are overseas which is beyond
their jurisdiction and that is why you will need to also report
theem to dorcasterplconline.com on google so they can help you carry out a background check on the scammer then proceed in tracking the scammer making sure they are caught and your funds
recovered into your wallet or account.
Another good thing about http://www.aldwychsecuritiesllc.com company
is that they provide background checks to people who care to find out the
truth about who they have been communicating with, so they don’t end up being
a victim of a scam.
indomethacin 25 mg
how to get modafinil online
It’s very effortless to find out any topic on web as compared to books, as I
found this post at this web page.
cheap generic valtrex without prescription
where can i buy diflucan without prescription
azithromycin cost
Step into the digital realm and be part of us for CPA Alberta’s upcoming Peer-to-Peer Forums in 2023.
Explore current trending and captivating themes, resembling Technology,
ESG and Sustainability, alongside Energy and Utilities.
Digital advertising is a necessary software in every enterprise that
plans to stay related in the present world. The effectiveness of your CPA website design is essential.
Conversions are important in any enterprise
setup as a result of they add more profit. You’ll know your customer’s interests and preferences by monitoring conversions.
Therefore, it is necessary to track your business’ conversions to know if it is worthwhile or not.
When trusting others with the small print, your focus may be on expanding what you are promoting and
formulating new methods to grow. Any time you is more likely to want to be taught exactly how to manage specialized niche marketplaces expediently
you’d must verify these things out with whatever
Mark Ling happens to be instructing in my affilojetpack Review with
regard to way more strategies and information. Some new enterprise fizzle out in disappointing failure as they
go into it thinking it is going to be easy, however they do not
see any constructive growth. Being subscribed to CPA Exam newsletters is
all good and nicely since they gives you vital updates in regards
to the business and Exam.
malegra dxt
cheap nolvadex
advair diskus generic price
buy modafinil online usa
trusted canadian pharmacy
buy provigil paypal
how to buy lisinopril
best accutane brand
retino cream
buy diflucan for yeast infection
clomid without prescription online
cost of ventolin in usa
order robaxin without prescription canada
It impacts the financial belongings of not solely banks but also different common corporates.
Commenting on the new system of the Declarations of Assets and Liabilities (DALs) proposed within the Bill, MPs
Chandima Weerakkody and Madura Vithanage pointed out
that verifying the data given in DALs is an onerous job that
requires lots of time, coordination and monetary funding.
This ruling was given in respect of Ranbanda vs the River Valley Board,
the prominent civil society activist mentioned.
Justice Mark Fernnado, in retirement reiterated Justice Weeramanthry’s place, the ex-MP stated, slamming the parliament
for threatening to haul up judges of the Supreme Court by way
of the parliamentary privileges act to query over orders given. “This is palpably unsuitable,” the constitutional knowledgeable declared, adding that
no less an individual than Justice Weeramanthry,
a jurist of international repute held in the late 60s that
a parliamentary decision or regulation approved by parliament was not immune from
being reviewed. The 2022 JIF is being held at the new York Hilton Midtown, 1335 Avenue
of the Americas, New York City. He further added that India, despite being
a developing nation, is way ahead in adopting digital interventions in effective governance.
Underlining the significance of the subjects to be
discussed, the Deputy Chairman mentioned that in this age of
know-how-led progress, there is a necessity for severe considering and consultation about digital interventions to lift our governance
requirements.
35 buspar
can you buy furosemide otc
piroxicam capsules 10mg
where to get accutane online
always i used to read smaller articles or reviews that as well
clear their motive, and that is also happening with this paragraph which I am reading at this place.
nolvadex online south africa
retino 0.025
propecia 1mg tablets price in india
canadian 24 hour pharmacy
canadian pharmacy viagra 100mg
provigil order online canada
retino
how much is ciprofloxacin 500mg
where can i buy zithromax uk
buy modafinil online mexico
motilium canada otc
50mg citalopram
doxycycline rx
ciprofloxacin hcl
world pharmacy india
buy albendazole canada
modafinil over the counter canada
synthroid 50 mcg
modafinil online canada
nolvadex for sale uk
cheap valtrex generic
generic advair price
toradol buy
no prescription needed pharmacy
buy viagra online
hydroxychloroquine
levaquin 750
tizanidine cost uk
how much is prednisone
buy modafinil with visa
cost cipro
Wow, awesome blog format! How long have you been running a blog for?
you make running a blog glance easy. The overall
glance of your web site is fantastic, as smartly as the content material!
how to buy nolvadex
buy effexor in india
effexor 75 mg tablet
best price for levitra
buspar 5 mg tablets
buy albuterol 4mg
canada otc diflucan
This website was… how do I say it? Relevant!! Finally I’ve found something that helped me.
Thank you!
tamoxifen 40 mg daily
doxycycline 150 mg cost
I couldn’t resist commenting. Very well written!
Hi to every one, it’s in fact a nice for me to pay a visit this web
page, it contains precious Information.
doxycycline 100 mg price uk
how much is levitra
propranolol prices usa
canadian pharmacy 24
no script pharmacy
zithromax for sale cheap
can you buy retin a online
buy viagra online
zanaflex medicine
1000 mg valtrex cost
ventolin 200 mg
tretinoin gel coupon
provigil canada purchase online
synthroid brand cost
phenergan
provigil from canadian pharmacy
I’ve been exploring for a bit for any high quality articles or blog posts on this kind of area .
Exploring in Yahoo I finally stumbled upon this site. Studying this info So i am satisfied to show that I’ve a very excellent uncanny
feeling I found out exactly what I needed. I most indisputably will make sure to do not omit this web site and give it a glance regularly.
retino 05 cream
advair generic price
Gather documentation instantly. Within the United
Kingdom, for instance, the 1948 British Nationality Act gave residents in the former colonial territories of the Commonwealth (a
possible determine of 800 million) the fitting of British nationality.
generic accutane for sale
clonidine 25 mg
malegra pills
albuterol discount coupon
how much is allopurinol cost
buy nolvadex tablets
baclofen cost
ventolin 2mg tab
lisinopril 20 mg canadian pharmacy
hydrochlorothiazide online
zestoretic 20 mg
У нас топ маркет одежда и обувь вы можете приобрести качественные товары от известных брендов по выгодным ценам. Мы стремимся предоставлять нашим клиентам только лучший сервис и гарантированное качество продукции. У нас есть несколько удобных способов оплаты и доставки, чтобы сделать покупки нашим клиентам максимально простыми.
What’s up mates, fastidious post and good urging commented here, I am really
enjoying by these.
lopressor for sale
your pharmacy online
cost of phenergan gel
dexamethasone price
zestoretic online
celexa generic brand
This is really interesting, You’re a very skilled blogger.
I have joined your rss feed and look forward to seeking more
of your great post. Also, I’ve shared your website in my social networks!
tizanidine 4
zestril 40 mg tablet
buy priligy online pharmacy
buy propecia usa
Kudos, I value this.
paroxetine 30
happy family drugs
I get pleasure from, result in I found just what I was having a look for.
You’ve ended my 4 day lengthy hunt! God Bless you man. Have
a great day. Bye
tizanidine 4mg prices
vermox australia
buy tretinoin australia
modafinil 1000mg
dapoxetine online uk
prednisolone prednisone
tizanidine 6 mg cap
modafinil 500mg
modafinil brand name
doxycycline 100
albuterol rx
lyrica coupon
What i do not understood is if truth be told how you are
now not really much more smartly-preferred than you may be now.
You’re so intelligent. You realize therefore significantly when it comes to this topic, made me individually believe it from numerous
various angles. Its like women and men don’t seem
to be fascinated except it is one thing to accomplish with Lady gaga!
Your personal stuffs outstanding. All the time
care for it up!
accutane mexico
canadian pharmacy 24h com safe
buy modafinil online in usa
ventolin medicine
motilium generic
effexor 25 mg tablet
Добро пожаловать в texttospeech.ru, вашего надежного партнера в мире спортивные прогнозы. Мы с гордостью подарим вам шанс взять на себя контроль над вашими ставками и повысить свои перспективы на выигрыш. Наши профессиональные аналитики и специалисты следят за событиями в мире спорта, чтобы поддержать вас актуальными и точными советами.
Почему выбирать нас:
Экспертные прогнозы: Наши аналитики усердно трудятся, чтобы предоставлять вам предсказания на все популярные виды спорта. Мы знаем, насколько важно получать полезные советы перед тем, как сделать ставку.
Множество вариантов: Мы предлагаем ставки на разнообразные виды спорта, включая футбол, баскетбол, теннис, мяч и многое другое. Вы можете отбирать из множества событий и наслаждаться страсть на свой вкус.
Советы без оплаты: Мы поддерживаем идею, что каждый может получить доступ к качественным прогнозам. Поэтому мы предлагаем бесплатные предсказания, чтобы поддержать вас сделать правильные ставки.
Легкость и комфорт: Наш веб-сайт и мобильное приложение разработаны с учетом вашего комфорта. Сделайте ставку буквально за несколько мгновений.
Как начать:
Создайте аккаунт: Создайте свой аккаунт в texttospeech.ru и получите доступ к всем нашим сервисам.
Получайте прогнозы: Подписывайтесь на наши бесплатные прогнозы и получайте свежие советы от наших экспертов.
Сделайте ставку: После того как вы получили полезный совет, сделайте ставку на команду по душе или событие и получайте удовольствие от игры.
Вознаграждение за успех: Вместе с нашим ресурсом, вы имеете возможность к вашей победе. Попробуйте наши услуги уже сегодня и переживайте в мир спортивных ставок во всей его красе!
flomax liquid
where to buy albuterol
which online pharmacy is the best
Добро пожаловать в texttospeech.ru, вашего проверенного союзника в мире ставок на спорт. Мы с гордостью предоставляем вам шанс взять на себя контроль над вашими ставками и повысить свои шансы на выигрыш. Наши опытные эксперты и специалисты следят за событиями в мире спорта, чтобы обеспечить вас актуальными и точными прогнозами.
Почему выбирать нас:
Экспертные прогнозы: Наши аналитики усердно трудятся, чтобы предоставлять вам прогнозы на все популярные виды спорта. Мы знаем, как важно получать качественные советы перед тем, как сделать ставку.
Множество вариантов: Мы предлагаем ставки на различные виды спорта, включая соккер, баскетбол, ракетку, бейсбол и многое другое. Вы можете отбирать из многочисленных событий и наслаждаться азарт на свой вкус.
Советы без оплаты: Мы верим, что каждый должен иметь доступ к качественным прогнозам. Поэтому мы предлагаем бесплатные советы, чтобы помочь вам сделать успешные ставки.
Легкость и комфорт: Наш сайт и мобильное приложение разработаны с учетом вашего комфорта. Сделайте ставку буквально за несколько мгновений.
Как начать:
Зарегистрируйтесь: Создайте персональный профиль в нашем ресурсе и получите доступ к всем нашим сервисам.
Получайте прогнозы: Подписывайтесь на бесплатные советы и получайте актуальные предсказания от наших экспертов.
Поставьте свою ставку: После того как вы получили полезный совет, сделайте ставку на команду по душе или событие и получайте удовольствие от игры.
Вознаграждение за успех: Вместе с texttospeech.ru, вы имеете возможность к вашей победе. Попробуйте наши услуги уже сегодня и переживайте в мир спортивных ставок во всей его красе!
toradol for dogs
300 mg propranolol
clonidine 200 mcg
Hello! This post could not be written any better!
Reading through this post reminds me of my previous room mate!
He always kept chatting about this. I will forward this
article to him. Pretty sure he will have a good read.
Thank you for sharing!
flomax
ventolin online uk
dapoxetine tablets 30 mg in india
valtrex over the counter australia
toradol pill form
dexamethasone 0.5 tablet
Hey there! I know this is kind of off topic but I was wondering if you knew where I could get a captcha plugin for my comment form?
I’m using the same blog platform as yours and I’m having problems finding one?
Thanks a lot!
can you buy albuterol otc
phenergan 10mg over the counter
erythromycin usa
diclofenac gel 30 mg
diflucan 150 mg capsule price
This post is worth everyone’s attention. When can I find
out more?
colchicine nz
avodart without prescription
Link exchange is nothing else however it is just placing the other person’s
webpage link on your page at suitable place and other person will
also do similar in favor of you.
metformin 500 mg over the counter
buy aralen uk
Excellent article. I certainly love this website. Thanks!
Explore a emocionante plataforma Arbety para apostas e cassino online.
Faça seu login e aproveite uma ampla variedade de jogos, incluindo o popular ‘Jogo do Tigre’ e ‘Fortune Tiger’.
Descubra uma casa de apostas confiável e um emocionante cassino online
Unquestionably imagine that that you stated. Your favorite
reason appeared to be on the internet the simplest factor to
keep in mind of. I say to you, I definitely get irked at the same time as
folks consider concerns that they just do not
realize about. You managed to hit the nail upon the
top and also defined out the whole thing without having side effect , other folks could
take a signal. Will likely be again to get more. Thanks
buy kamagra oral jelly paypal
lisinopril 40 mg prices
Hi, i think that i saw you visited my website thus i came to “return the favor”.I am attempting
to find things to improve my website!I suppose its ok to use
some of your ideas!!
lasix coupon
silagra 100 price
medication lyrica 50 mg
cialis 40 mg price
silagra 100 mg
prazosin 1 mg price
trental 400 mg buy online india
Добро пожаловать в нашем сайте, вашего надежного партнера в мире мой спорт. Мы с гордостью предоставляем вам шанс взять на себя контроль над вашими ставками и повысить свои перспективы на успех. Наши опытные эксперты и специалисты следят за событиями в мире спорта, чтобы поддержать вас свежими и надежными прогнозами.
Почему выбирать нас:
Экспертные прогнозы: Наши аналитики работают не покладая рук, чтобы предоставлять вам предсказания на все популярные виды спорта. Мы знаем, насколько важно получать полезные советы перед тем, как сделать ставку.
Множество вариантов: Мы предлагаем ставки на различные виды спорта, включая футбол, баскетбол, теннис, бейсбол и многое другое. Вы можете отбирать из множества событий и погружаться в азарт на свой вкус.
Советы без оплаты: Мы верим, что каждый должен иметь доступ к полезным советам. Поэтому мы предлагаем бесплатные советы, чтобы помочь вам сделать правильные ставки.
Простота и удобство: Наш веб-сайт и приложение для мобильных устройств разработаны с учетом вашего удовольствия. Сделайте ставку всего в несколько кликов.
Как начать:
Зарегистрируйтесь: Создайте персональный профиль в texttospeech.ru и получите доступ к всем нашим сервисам.
Получайте прогнозы: Подписывайтесь на наши бесплатные прогнозы и получайте свежие советы от опытных специалистов.
Сделайте ставку: После того как вы получили свой прогноз, сделайте ставку на вашу любимую команду или событие и получайте удовольствие от игры.
Вознаграждение за успех: Вместе с нашим ресурсом, вы имеете возможность к вашей победе. Попробуйте наши услуги уже сегодня и переживайте в мир спортивных ставок во всей его красе!
4 mg prazosin
buy lyrica medication
doxycycline tablet price in india
Woah! I’m really loving the template/theme of this site.
It’s simple, yet effective. A lot of times it’s challenging
to get that “perfect balance” between usability and appearance.
I must say you’ve done a superb job with this. Also, the
blog loads super quick for me on Chrome. Exceptional Blog!
clopidogrel coupon
Добро пожаловать в texttospeech.ru, вашего надежного партнера в мире мой спорт. Мы с гордостью подарим вам возможность взять на себя контроль над вашими ставками и повысить свои шансы на выигрыш. Наши опытные эксперты и специалисты следят за событиями в мире спорта, чтобы обеспечить вас актуальными и точными прогнозами.
Почему выбирать нас:
Качественные аналитические прогнозы: Наши специалисты усердно трудятся, чтобы предоставлять вам предсказания на все популярные виды спорта. Мы знаем, насколько важно получать полезные советы перед тем, как сделать ставку.
Широкий выбор: Мы предлагаем ставки на различные виды спорта, включая футбол, баскетбол, теннис, мяч и многое другое. Вы можете отбирать из множества событий и погружаться в страсть на свой вкус.
Бесплатные прогнозы: Мы поддерживаем идею, что каждый может получить доступ к качественным прогнозам. Поэтому мы предлагаем бесплатные предсказания, чтобы помочь вам сделать правильные ставки.
Легкость и комфорт: Наш веб-сайт и приложение для мобильных устройств разработаны с учетом вашего комфорта. Сделайте ставку всего в несколько кликов.
Как начать:
Создайте аккаунт: Создайте свой аккаунт в texttospeech.ru и получите доступ к нашему полному спектру услуг.
Получайте предсказания: Подписывайтесь на бесплатные советы и получайте свежие советы от наших экспертов.
Сделайте ставку: После того как вы получили свой прогноз, сделайте ставку на вашу любимую команду или событие и наслаждайтесь игры.
Вознаграждение за успех: Вместе с texttospeech.ru, вы имеете возможность к вашей победе. Попробуйте нашу помощь уже сегодня и погружайтесь в мир ставок на спорт во всей его красе!
furosemide 120 mg daily
ampicillin tablet 500mg
anafranil uk
buy 100 mg silagra tablets
cost of dipyridamole
dipyridamole 50 mg tab
where can i buy retin a cream in south africa
cialis brand price
generic cialis for sale in canada
retin a cream uk buy
clomid price without insurance
dipyridamole medication
accutane online uk
buy clomid online canada
Great post.
cialis brand for sale
azithromycin order online
lyrica 25mg capsule
lyrica cap
It’s going to be ending of mine day, but before end I am reading this impressive piece of writing to increase
my experience.
online acyclovir
I think this is among the most significant info for me.
And i’m glad reading your article. But wanna remark on few
general things, The website style is ideal, the articles is really excellent : D.
Good job, cheers
chaqueta liverpool
https://bride-shop.co.uk/
Wedding Dresses
prazosin 5 mg price
I used to be suggested this website via my cousin. I am now not positive whether or not this submit is
written by him as nobody else understand such particular approximately my problem.
You are wonderful! Thank you!
where to buy zithromax over the counter
medication cymbalta 60 mg
lyrica tablets 100mg
order furosemide online
lasix 40 mg cost
penis enlargement
lasix 2.5 mg
comprar camisetas de futbol baratas
amoxil capsules 500mg
discount prednisolone
augmentin over the counter
suhagra 50 price in india
mebendazole price
buy flomax online
where to buy zithromax over the counter
ampicillin capsules usa
prednisone 2
generic antabuse online
acyclovir prescription price
vermox uk price
cipro rx 500mg
can you buy doxycycline online
zoloft online
motilium pharmacy
I like the valuable information you supply in your articles.
I’ll bookmark your weblog and test again here regularly.
I’m fairly certain I’ll be told many new stuff right right here!
Good luck for the next!
order levitra 20mg
lyrica australia
Royal228 menjadi games online terbaru yang viral 24 jam pada tahun 2023 karena kualitas pelayanan terbaik proses
transaksi yang cepat dan mudah dilakukan oleh warga indonesia,
kemudahan bersama Royal228 adalah transaksi dapat dilakukan selama 24 jam
penuh link aktif games online terbaru
avodart 0.5 mg tab
avodart price comparison
buy amoxicillin
https://bride-shop.co.uk/
Wedding Dresses
generic antabuse
https://bride-shop.co.uk/
Wedding Dresses
amoxicillin 500mg price
modafinil online paypal
3 diflucan pills
ampicillin sodium
cafergot & internet pharmacy
can i buy synthroid online
I’m pretty pleased to uncover this website. I wanted to thank
you for your time for this particularly wonderful read!!
I definitely liked every little bit of it and I have you
saved as a favorite to check out new stuff in your blog.
cafergot 1 100 mg
I like the helpful information you provide in your articles.
I’ll bookmark your weblog and check again here regularly.
I’m quite certain I will learn a lot of new stuff right here!
Good luck for the next!
Наша компания предлагает diski-dlya-shtangi.ru. Наш выбор продукции, в частности, грифы разработаны для интенсивных тренировок. Они выполнены из прочной стали, обеспечивая надежность и высокую нагружаемость. Наши грифы выполнены в разных массах и длинах, чтобы отвечать индивидуальным требованиям тренировки. Предлагаемые гантели соответствуют тем-же стандартам качества, что и наши грифы. Они компактны и отлично подходят для развития силы и объема мышц как дома, так и в коммерческом спортзале. Наши диски для штанги проходят проверку качества, чтобы мы могли убедиться, в их соответствии стандартам. Они надежно крепятся на грифе, обеспечивая безопасную тренировку.
erythromycin 250 mg coupon
how much is metformin
where to buy avodart
generic zovirax cream 5g
lyrica 300 mg price in india
Наша фирма предлагает диски обрезиненные для гантелей. Наш ассортимент продукции, в частности, грифы изготовлены для интенсивных тренировок. Они выполнены из высокопрочной стали, обеспечивая надежность и высокую нагрузочную способность. Наши грифы доступны в различных весах и длинах, для того чтобы соответствовать индивидуальным требованиям тренировок. Производимые нами гантели соответствуют тем-же стандартам качества, что и наши грифы. Они компактны и отлично подходят для развития силы и объема мышц как в домашних условиях, так и в профессиональном фитнес-клубе. Наши диски для штанги проходят проверку качества, чтобы мы могли убедиться, что они соответствуют стандартам. Они устойчиво крепятся на грифе штанги, обеспечивая безопасную тренировку.
trimox online
tetracycline hci 500mg capsules
2 lisinopril
where to buy tadacip 20
glucophage 500 mg online
lasix without a prescription
levitra 10mg price
where to buy propecia in usa
colchicine generic canada
acyclovir cream pharmacy
glucophage 850 mg mexico
where can i get metformin online
lopressor 25 tablet
price of zithromax
who sells difluican with out a prescription
cipro without prescription
Step into the digital realm and be a part of us for CPA Alberta’s upcoming Peer-to-Peer
Forums in 2023. Explore present trending and captivating
themes, similar to Technology, ESG and Sustainability, alongside Energy and Utilities.
Digital marketing is an essential software in each business that plans
to stay related in the current world. The effectiveness of
your CPA website design is important. Conversions are important
in any enterprise setup because they add more profit.
You’ll know your customer’s interests and preferences by monitoring conversions.
Therefore, it is important to track what you are promoting’ conversions to know whether it is worthwhile
or not. When trusting others with the details, your focus will be on expanding
your online business and formulating new methods to grow.
Any time you is likely to need to be taught precisely
how to manage specialised niche marketplaces expediently you’d have to test these items out with no matter Mark Ling occurs to be instructing in my affilojetpack Review
with regard to way more strategies and data. Some new business fizzle out in disappointing failure as
they go into it thinking will probably be simple, but they do not see
any optimistic improvement. Being subscribed to CPA Exam newsletters is all good and nicely
since they provides you with essential updates concerning the
trade and Exam.
doxycycline 200 mg price
tretinoin cream india
buy clomid online canadian pharmacy
zoloft prescription cost
where can i buy amoxicillin over the counter uk
buy zovirax
can you buy valtrex over the counter in australia
colchicine cost
hydrochlorothiazide 12 mg
cost of synthroid 175 mcg
erythromycin over the counter uk
cipro 750 mg
This design is incredible! You obviously know how to keep a reader
entertained. Between your wit and your videos, I
was almost moved to start my own blog (well, almost…HaHa!) Fantastic job.
I really enjoyed what you had to say, and more than that, how you presented it.
Too cool!
where can you buy azithromycin
prednisone pill
cheap elimite
acyclovir 400 mg price
anafranil purchase online
Sweet blog! I found it while searching on Yahoo
News. Do you have any tips on how to get listed in Yahoo News?
I’ve been trying for a while but I never seem to get there!
Thanks
phenergan nz buy
baclofen buy
dipyridamole aspirin
lasix 250 mg tablet
voltaren 2 gel 100g
buy viagra online
50mg clomid daily
cost of hydrochlorothiazide 12.5 mg
tetracycline for sale no prescription
buy viagra online
https://bride-shop.co.uk/
Wedding Dresses
doxycycline 50mg capsules
tetracycline 300
doxycycline over the counter canada
Definitely believe that which you said. Your favorite justification seemed to be on the internet the simplest thing to be aware
of. I say to you, I certainly get annoyed while people consider worries that they plainly
do not know about. You managed to hit the nail upon the
top and also defined out the whole thing without having side-effects
, people can take a signal. Will likely be back to get more.
Thanks
buy tadalafil 10mg india
azithromycin 9 pills
tretinoin cream online pharmacy
buy hyfrochlororhiazide
how to buy tretinoin united states
I would like to consider the opportunity of
thanking you for the professional direction I have constantly enjoyed browsing
your site. I will be looking forward to the actual commencement of my university research
and the overall groundwork would never have been complete without coming to your web site.
If I may be of any help to others, I might be pleased to help by way of what I have learned from here.
can you buy zovirax cream over the counter
zoloft online pharmacy
generic clomid otc
metformin tablets
generic for avodart 0.5 mg
buy amoxicillin 500mg no prescription
Highly energetic blog, I liked that bit. Will
there be a part 2?
buy viagra online
azithromycin australia over the counter
azithromycin 250 mg coupon
how much is tetracycline cost
flomax generic cost
colchicine 1.2 mg
plavix 75 mg price canada
medrol 80 mg
diflucan online without prescription
ordering augmentin
buy suhagra
buying zithromax
acyclovir zovirax cream
disulfiram 200 mg
cheap buy generic avodart
generic lyrica canada
amoxicillin prescription online
This site was… how do I say it? Relevant!! Finally I
have found something that helped me. Kudos!
avodart for sale online
on line order lisinopril 20mg
buy prednisolone tablets
Write more, thats all I have to say. Literally, it seems as though you relied on the video to make your
point. You clearly know what youre talking
about, why throw away your intelligence on just posting videos to your weblog when you could be giving us something enlightening to read?
silagra 100mg uk
buy cipro without rx
price of metformin 500 mg in india
cost of amoxicillin 30 capsules
metformin 500 pill
flomax buy online
ciprofloxacin for sale
ordering propanalol
doxycycline 40 mg generic cost
http://eapi.uonbi.ac.ke/wp-content/plugins/-/slot-demo/
prednisone 5mg cost
prednisolone drug
generic zithromax 500mg
buy silagra online uk
propranolol er
buy acticin online
buy generic zovirax cream
buy viagra online
antabuse medication
acyclovir 400 mg capsules
cafergot buy canada
paroxetine 20 mg generic
kamagra 100mg tablets
genuine cialis price
Togel online udah jadi pertanda yang berkembang sangat cepat di dunia judi online.
Dengan banyak website yang menjajakan beragam pasaran togel,
pemain saat ini banyak memiliki pilihan untuk memutuskan. Pada tahun 2023, ada sejumlah
pasaran togel online terbaik yang pantas diperhitungkan oleh banyak pencinta togel.
Dalam artikel berikut, kami akan mengupas sejumlah pasaran paling atas yang menjajakan pengalaman main togel yang
berkualitas.
zithromax price singapore
Наши цехи предлагают вам возможность воплотить в жизнь ваши самые смелые и новаторские идеи в области домашнего дизайна. Мы практикуем на создании текстильных панно со складками под индивидуальный заказ, которые не только делают вашему резиденции неповторимый лоск, но и подчеркивают вашу самобытность.
Наши плиссе на окна – это симфония изящества и практичности. Они создают комфорт, фильтруют сияние и соблюдают вашу интимность. Выберите субстрат, тон и декор, и мы с с радостью разработаем текстильные занавеси, которые точно подчеркнут стиль вашего дизайна.
Не ограничивайтесь обычными решениями. Вместе с нами, вы будете в состоянии разработать текстильные шторы, которые будут гармонировать с вашим собственным вкусом. Доверьтесь нашей команде, и ваш дворец станет местом, где каждый компонент проявляет вашу личность.
Подробнее на портале sun-interio1.ru.
Закажите текстильные шторы со складками у нас, и ваш съемное жилье преобразится в сад стиля и комфорта. Обращайтесь к нам, и мы содействуем вам воплотить в жизнь личные иллюзии о идеальном дизайне.
Создайте свою личную историю оформления с нашей командой. Откройте мир альтернатив с шторами со складками под по вашему заказу!
cheap cipro online
voltaren cheapest
azithromycin buy us
azithromycin otc online
buy clomid mastercard
buy tadacip
hydrochlorothiazide canada
azithromycin 500mg price in india
buy valtrex usa
modafinil online singapore
can you buy retin a without prescription
medrol price in uk
acyclovir buy
can i buy chloroquine over the counter
cipro 500mg dosage
accutane india
avodart for sale
generic drug paroxetine
paxil 80 mg daily
baclofen tablets 10 mg
baclofen 30 mg tab
prazosin tablets 0.5 mg
Very shortly this website will be famous amid all blog users, due to it’s nice content
https://images.google.as/url?q=https://xn--megas-k90b.com
https://images.google.off.ai/url?q=https://xn--megas-k90b.com
https://images.google.com.ag/url?q=https://xn--megas-k90b.com
https://images.google.com.ar/url?q=https://xn--megas-k90b.com
https://images.google.com.au/url?q=https://xn--megas-k90b.com
https://images.google.at/url?q=https://xn--megas-k90b.com
https://images.google.az/url?q=https://xn--megas-k90b.com
https://images.google.be/url?q=https://xn--megas-k90b.com
https://images.google.com.br/url?q=https://xn--megas-k90b.com
https://images.google.vg/url?q=https://xn--megas-k90b.com
https://images.google.bi/url?q=https://xn--megas-k90b.com
https://images.google.ca/url?q=https://xn--megas-k90b.com
https://images.google.td/url?q=https://xn--megas-k90b.com
https://images.google.cl/url?q=https://xn--megas-k90b.com
https://images.google.com.co/url?q=https://xn--megas-k90b.com
https://images.google.co.cr/url?q=https://xn--megas-k90b.com
https://images.google.ci/url?q=https://xn--megas-k90b.com
https://images.google.com.cu/url?q=https://xn--megas-k90b.com
https://images.google.cd/url?q=https://xn--megas-k90b.com
https://images.google.dk/url?q=https://xn--megas-k90b.com
https://images.google.dj/url?q=https://xn--megas-k90b.com
https://images.google.com.do/url?q=https://xn--megas-k90b.com
https://images.google.com.ec/url?q=https://xn--megas-k90b.com
https://images.google.com.sv/url?q=https://xn--megas-k90b.com
https://images.google.fm/url?q=https://xn--megas-k90b.com
https://images.google.com.fj/url?q=https://xn--megas-k90b.com
https://images.google.fi/url?q=https://xn--megas-k90b.com
https://images.google.fr/url?q=https://xn--megas-k90b.com
https://images.google.gm/url?q=https://xn--megas-k90b.com
https://images.google.ge/url?q=https://xn--megas-k90b.com
https://images.google.de/url?q=https://xn--megas-k90b.com
https://images.google.com.gi/url?q=https://xn--megas-k90b.com
https://images.google.com.gr/url?q=https://xn--megas-k90b.com
https://images.google.gl/url?q=https://xn--megas-k90b.com
https://images.google.gg/url?q=https://xn--megas-k90b.com
https://images.google.hn/url?q=https://xn--megas-k90b.com
https://images.google.com.hk/url?q=https://xn--megas-k90b.com
https://images.google.co.hu/url?q=https://xn--megas-k90b.com
https://images.google.co.in/url?q=https://xn--megas-k90b.com
https://images.google.ie/url?q=https://xn--megas-k90b.com
https://images.google.co.im/url?q=https://xn--megas-k90b.com
https://images.google.co.il/url?q=https://xn--megas-k90b.com
https://images.google.it/url?q=https://xn--megas-k90b.com
https://images.google.com.jm/url?q=https://xn--megas-k90b.com
https://images.google.co.jp/url?q=https://xn--megas-k90b.com
https://images.google.co.je/url?q=https://xn--megas-k90b.com
https://images.google.kz/url?q=https://xn--megas-k90b.com
https://images.google.co.kr/url?q=https://xn--megas-k90b.com
https://images.google.lv/url?q=https://xn--megas-k90b.com
https://images.google.co.ls/url?q=https://xn--megas-k90b.com
https://images.google.li/url?q=https://xn--megas-k90b.com
https://images.google.lt/url?q=https://xn--megas-k90b.com
https://images.google.lu/url?q=https://xn--megas-k90b.com
https://images.google.mw/url?q=https://xn--megas-k90b.com
https://images.google.com.my/url?q=https://xn--megas-k90b.com
https://images.google.com.mt/url?q=https://xn--megas-k90b.com
https://images.google.mu/url?q=https://xn--megas-k90b.com
https://images.google.com.mx/url?q=https://xn--megas-k90b.com
https://images.google.ms/url?q=https://xn--megas-k90b.com
https://images.google.com.na/url?q=https://xn--megas-k90b.com
https://images.google.com.np/url?q=https://xn--megas-k90b.com
https://images.google.nl/url?q=https://xn--megas-k90b.com
https://images.google.co.nz/url?q=https://xn--megas-k90b.com
https://images.google.com.ni/url?q=https://xn--megas-k90b.com
https://images.google.com.nf/url?q=https://xn--megas-k90b.com
https://images.google.com.pk/url?q=https://xn--megas-k90b.com
https://images.google.com.pa/url?q=https://xn--megas-k90b.com
https://images.google.com.py/url?q=https://xn--megas-k90b.com
https://images.google.com.pe/url?q=https://xn--megas-k90b.com
https://images.google.com.ph/url?q=https://xn--megas-k90b.com
https://images.google.pn/url?q=https://xn--megas-k90b.com
https://images.google.pl/url?q=https://xn--megas-k90b.com
https://images.google.pt/url?q=https://xn--megas-k90b.com
https://images.google.com.pr/url?q=https://xn--megas-k90b.com
https://images.google.cg/url?q=https://xn--megas-k90b.com
https://images.google.ro/url?q=https://xn--megas-k90b.com
https://images.google.ru/url?q=https://xn--megas-k90b.com
https://images.google.rw/url?q=https://xn--megas-k90b.com
https://images.google.sh/url?q=https://xn--megas-k90b.com
https://images.google.sm/url?q=https://xn--megas-k90b.com
https://images.google.com.sg/url?q=https://xn--megas-k90b.com
https://images.google.sk/url?q=https://xn--megas-k90b.com
https://images.google.co.za/url?q=https://xn--megas-k90b.com
https://images.google.es/url?q=https://xn--megas-k90b.com
https://images.google.se/url?q=https://xn--megas-k90b.com
https://images.google.ch/url?q=https://xn--megas-k90b.com
https://images.google.com.tw/url?q=https://xn--megas-k90b.com
https://images.google.co.th/url?q=https://xn--megas-k90b.com
https://images.google.tt/url?q=https://xn--megas-k90b.com
https://images.google.com.tr/url?q=https://xn--megas-k90b.com
https://images.google.com.ua/url?q=https://xn--megas-k90b.com
https://images.google.ae/url?q=https://xn--megas-k90b.com
https://images.google.co.uk/url?q=https://xn--megas-k90b.com
https://images.google.com.uy/url?q=https://xn--megas-k90b.com
https://images.google.uz/url?q=https://xn--megas-k90b.com
https://images.google.vu/url?q=https://xn--megas-k90b.com
https://images.google.co.ve/url?q=https://xn--megas-k90b.com
https://www.google.co.ao/url?q=https://xn--megas-k90b.com
https://images.google.im/url?q=https://xn--megas-k90b.com
https://images.google.dm/url?q=https://xn--megas-k90b.com
https://google.com.pa/url?q=https://xn--megas-k90b.com
http://maps.google.mw/url?q=https://xn--megas-k90b.com
https://google.ac/url?q=https://xn--megas-k90b.com
https://google.com.gh/url?q=https://xn--megas-k90b.com
https://google.dz/url?q=https://xn--megas-k90b.com
http://images.google.ki/url?q=https://xn--megas-k90b.com
http://www.google.im/url?q=https://xn--megas-k90b.com
https://google.com.mx/url?q=https://xn--megas-k90b.com
https://www.google.cz/url?q=https://xn--megas-k90b.com
http://google.hr/url?q=https://xn--megas-k90b.com
https://google.ml/url?q=https://xn--megas-k90b.com
https://www.google.com.au/url?q=https://xn--megas-k90b.com
https://images.google.bs/url?q=https://xn--megas-k90b.com
https://google.co.tz/url?q=https://xn--megas-k90b.com
http://google.cg/url?q=https://xn--megas-k90b.com
http://maps.google.is/url?q=https://xn--megas-k90b.com
http://google.si/url?q=https://xn--megas-k90b.com
http://google.com.py/url?q=https://xn--megas-k90b.com
http://maps.google.co.cr/url?q=https://xn--megas-k90b.com
http://www.google.mk/url?q=https://xn--megas-k90b.com
http://www.google.ge/url?q=https://xn--megas-k90b.com
https://images.google.ml/url?q=https://xn--megas-k90b.com
https://www.google.com.sa/url?q=https://xn--megas-k90b.com
http://google.mg/url?q=https://xn--megas-k90b.com
http://google.com.ec/url?q=https://xn--megas-k90b.com
https://google.rs/url?q=https://xn--megas-k90b.com
https://www.google.co.hu/url?q=https://xn--megas-k90b.com
http://google.md/url?q=https://xn--megas-k90b.com
https://images.google.hu/url?q=https://xn--megas-k90b.com
https://www.google.com.tw/url?q=https://xn--megas-k90b.com
https://google.ae/url?q=https://xn--megas-k90b.com
https://images.google.jo/url?q=https://xn--megas-k90b.com
http://images.google.tm/url?q=https://xn--megas-k90b.com
https://images.google.com.mm/url?q=https://xn--megas-k90b.com
https://maps.google.vu/url?q=https://xn--megas-k90b.com
https://maps.google.co.ls/url?q=https://xn--megas-k90b.com
https://www.google.com.cy/url?q=https://xn--megas-k90b.com
http://google.com.lb/url?q=https://xn--megas-k90b.com
http://google.co.kr/url?q=https://xn--megas-k90b.com
http://images.google.nu/url?q=https://xn--megas-k90b.com
http://google.cl/url?q=https://xn--megas-k90b.com
http://www.google.com.bo/url?q=https://xn--megas-k90b.com
https://google.ad/url?q=https://xn--megas-k90b.com
https://maps.google.pt/url?q=https://xn--megas-k90b.com
https://maps.google.es/url?q=https://xn--megas-k90b.com
https://maps.google.sn/url?q=https://xn--megas-k90b.com
http://google.tk/url?q=https://xn--megas-k90b.com
https://google.com.bn/url?q=https://xn--megas-k90b.com
https://google.com.ua/url?q=https://xn--megas-k90b.com
https://www.google.com.sg/url?q=https://xn--megas-k90b.com
https://images.google.info/url?q=https://xn--megas-k90b.com
https://maps.google.de/url?q=https://xn--megas-k90b.com
https://images.google.cv/url?q=https://xn--megas-k90b.com
http://google.com.nf/url?q=https://xn--megas-k90b.com
https://images.google.com.ly/url?q=https://xn--megas-k90b.com
http://images.google.tg/url?q=https://xn--megas-k90b.com
http://google.cv/url?q=https://xn--megas-k90b.com
http://gngjd.com/url?q=https://xn--megas-k90b.com
http://www.google.je/url?q=https://xn--megas-k90b.com
http://maps.google.by/url?q=https://xn--megas-k90b.com
http://maps.google.fi/url?q=https://xn--megas-k90b.com
https://images.gngjd.com/url?q=https://xn--megas-k90b.com
http://google.ne/url?q=https://xn--megas-k90b.com
http://images.google.kg/url?q=https://xn--megas-k90b.com
https://www.google.cn/url?q=https://xn--megas-k90b.com
https://google.am/url?q=https://xn--megas-k90b.com
http://google.com.ly/url?q=https://xn--megas-k90b.com
https://google.iq/url?q=https://xn--megas-k90b.com
https://google.com.sv/url?q=https://xn--megas-k90b.com
https://google.sc/url?q=https://xn--megas-k90b.com
http://google.kg/url?q=https://xn--megas-k90b.com
http://google.li/url?q=https://xn--megas-k90b.com
http://images.google.al/url?q=https://xn--megas-k90b.com
https://maps.google.je/url?q=https://xn--megas-k90b.com
http://maps.google.to/url?q=https://xn--megas-k90b.com
http://google.co.cr/url?q=https://xn--megas-k90b.com
http://images.google.com.tj/url?q=https://xn--megas-k90b.com
https://www.google.com.ph/url?q=https://xn--megas-k90b.com
https://maps.google.com.bn/url?q=https://xn--megas-k90b.com
https://www.google.as/url?q=https://xn--megas-k90b.com
https://images.google.co.ao/url?q=https://xn--megas-k90b.com
http://maps.google.com.bo/url?q=https://xn--megas-k90b.com
https://maps.google.com/url?q=https://xn--megas-k90b.com
https://www.google.com.bh/url?q=https://xn--megas-k90b.com
https://maps.google.com.mm/url?q=https://xn--megas-k90b.com
http://google.com.gi/url?q=https://xn--megas-k90b.com
http://maps.google.ba/url?q=https://xn--megas-k90b.com
http://google.co.id/url?q=https://xn--megas-k90b.com
http://google.be/url?q=https://xn--megas-k90b.com
http://images.google.mg/url?q=https://xn--megas-k90b.com
http://google.com.ar/url?q=https://xn--megas-k90b.com
https://maps.google.co.za/url?q=https://xn--megas-k90b.com
https://www.google.gp/url?q=https://xn--megas-k90b.com
http://www.google.sh/url?q=https://xn--megas-k90b.com
https://images.google.ee/url?q=https://xn--megas-k90b.com
https://www.google.rw/url?q=https://xn--megas-k90b.com
http://images.google.si/url?q=https://xn--megas-k90b.com
https://www.google.at/url?q=https://xn--megas-k90b.com
http://maps.google.at/url?q=https://xn--megas-k90b.com
http://maps.google.co.in/url?q=https://xn--megas-k90b.com
https://maps.google.ga/url?q=https://xn--megas-k90b.com
http://maps.google.sm/url?q=https://xn--megas-k90b.com
http://google.ms/url?q=https://xn--megas-k90b.com
https://images.google.com.gh/url?q=https://xn--megas-k90b.com
http://maps.google.cn/url?q=https://xn--megas-k90b.com
https://www.google.com.na/url?q=https://xn--megas-k90b.com
https://maps.google.hr/url?q=https://xn--megas-k90b.com
https://google.ci/url?q=https://xn--megas-k90b.com
https://images.google.hr/url?q=https://xn--megas-k90b.com
http://maps.google.com.do/url?q=https://xn--megas-k90b.com
http://google.lk/url?q=https://xn--megas-k90b.com
http://images.google.cn/url?q=https://xn--megas-k90b.com
http://www.bon-vivant.net/url?q=https://xn--megas-k90b.com
http://maps.google.com.gt/url?q=https://xn--megas-k90b.com
http://www.google.com.ag/url?q=https://xn--megas-k90b.com
https://maps.google.mu/url?q=https://xn--megas-k90b.com
https://google.com.ng/url?q=https://xn--megas-k90b.com
https://www.google.co.uk/url?q=https://xn--megas-k90b.com
https://google.us/url?q=https://xn--megas-k90b.com
https://www.google.com.tr/url?q=https://xn--megas-k90b.com
http://www.google.co.ma/url?q=https://xn--megas-k90b.com
https://maps.google.co.zw/url?q=https://xn--megas-k90b.com
https://www.google.bs/url?q=https://xn--megas-k90b.com
https://www.google.pl/url?q=https://xn--megas-k90b.com
http://www.googleadservices.com/url?q=https://xn--megas-k90b.com
http://google.kz/url?q=https://xn--megas-k90b.com
https://google.com.mt/url?q=https://xn--megas-k90b.com
http://www.google.co.zw/url?q=https://xn--megas-k90b.com
https://maps.google.ne/url?q=https://xn--megas-k90b.com
https://google.com.qa/url?q=https://xn--megas-k90b.com
https://google.se/url?q=https://xn--megas-k90b.com
http://www.google.mw/url?q=https://xn--megas-k90b.com
https://maps.google.co.mz/url?q=https://xn--megas-k90b.com
http://maps.google.com.sv/url?q=https://xn--megas-k90b.com
https://www.google.sm/url?q=https://xn--megas-k90b.com
https://maps.google.com.tw/url?q=https://xn--megas-k90b.com
https://google.ca/url?q=https://xn--megas-k90b.com
https://www.google.is/url?q=https://xn--megas-k90b.com
https://google.com.jm/url?q=https://xn--megas-k90b.com
http://images.google.co.ug/url?q=https://xn--megas-k90b.com
https://maps.google.com.kh/url?q=https://xn--megas-k90b.com
http://maps.google.tl/url?q=https://xn--megas-k90b.com
http://www.google.co.nz/url?q=https://xn--megas-k90b.com
https://www.google.gg/url?q=https://xn--megas-k90b.com
https://google.to/url?q=https://xn--megas-k90b.com
https://google.ro/url?q=https://xn--megas-k90b.com
http://google.td/url?q=https://xn--megas-k90b.com
https://www.google.by/url?q=https://xn--megas-k90b.com
https://www.google.nl/url?q=https://xn--megas-k90b.com
http://maps.google.ci/url?q=https://xn--megas-k90b.com
http://maps.google.dz/url?q=https://xn--megas-k90b.com
https://google.hu/url?q=https://xn--megas-k90b.com
http://images.google.ht/url?q=https://xn--megas-k90b.com
http://google.mv/url?q=https://xn--megas-k90b.com
https://google.cf/url?q=https://xn--megas-k90b.com
http://maps.google.com.ly/url?q=https://xn--megas-k90b.com
http://www.google.nu/url?q=https://xn--megas-k90b.com
http://google.com.tj/url?q=https://xn--megas-k90b.com
https://maps.google.com.mt/url?q=https://xn--megas-k90b.com
https://google.so/url?q=https://xn--megas-k90b.com
http://images.google.bj/url?q=https://xn--megas-k90b.com
https://maps.google.la/url?q=https://xn--megas-k90b.com
https://images.google.us/url?q=https://xn--megas-k90b.com
https://images.google.com.eg/url?q=https://xn--megas-k90b.com
https://images.google.cf/url?q=https://xn--megas-k90b.com
https://images.google.la/url?q=https://xn--megas-k90b.com
http://maps.google.com.ag/url?q=https://xn--megas-k90b.com
http://google.ga/url?q=https://xn--megas-k90b.com
http://google.co.uz/url?q=https://xn--megas-k90b.com
http://maps.google.no/url?q=https://xn--megas-k90b.com
https://www.google.gl/url?q=https://xn--megas-k90b.com
http://images.google.co.vi/url?q=https://xn--megas-k90b.com
https://images.google.ne/url?q=https://xn--megas-k90b.com
https://google.com.om/url?q=https://xn--megas-k90b.com
http://maps.google.lt/url?q=https://xn--megas-k90b.com
https://maps.google.kg/url?q=https://xn--megas-k90b.com
http://www.google.com.hk/url?q=https://xn--megas-k90b.com
https://google.com.co/url?q=https://xn--megas-k90b.com
https://google.dk/url?q=https://xn--megas-k90b.com
https://maps.google.com.sa/url?q=https://xn--megas-k90b.com
http://google.com.fj/url?q=https://xn--megas-k90b.com
http://maps.google.com.ec/url?q=https://xn--megas-k90b.com
https://maps.google.mn/url?q=https://xn--megas-k90b.com
https://maps.google.bf/url?q=https://xn--megas-k90b.com
https://www.google.tt/url?q=https://xn--megas-k90b.com
https://www.google.dj/url?q=https://xn--megas-k90b.com
https://www.google.com.pr/url?q=https://xn--megas-k90b.com
https://maps.google.ws/url?q=https://xn--megas-k90b.com
http://google.jo/url?q=https://xn--megas-k90b.com
https://google.co.ug/url?q=https://xn--megas-k90b.com
https://images.google.com.bd/url?q=https://xn--megas-k90b.com
https://google.tg/url?q=https://xn--megas-k90b.com
http://maps.google.dm/url?q=https://xn--megas-k90b.com
https://www.google.pn/url?q=https://xn--megas-k90b.com
https://www.google.com.et/url?q=https://xn--megas-k90b.com
http://maps.google.com.jm/url?q=https://xn--megas-k90b.com
http://www.google.bg/url?q=https://xn--megas-k90b.com
http://maps.google.hu/url?q=https://xn--megas-k90b.com
https://maps.google.kz/url?q=https://xn--megas-k90b.com
https://images.google.com.pl/url?q=https://xn--megas-k90b.com
http://www.google.st/url?q=https://xn--megas-k90b.com
https://maps.google.com.kw/url?q=https://xn--megas-k90b.com
https://maps.google.ru/url?q=https://xn--megas-k90b.com
https://google.co.mz/url?q=https://xn--megas-k90b.com
http://www.google.co.ls/url?q=https://xn--megas-k90b.com
https://www.google.az/url?q=https://xn--megas-k90b.com
http://maps.google.co.uk/url?q=https://xn--megas-k90b.com
https://www.google.com.do/url?q=https://xn--megas-k90b.com
http://www.google.es/url?q=https://xn--megas-k90b.com
http://google.gm/url?q=https://xn--megas-k90b.com
http://images.google.so/url?q=https://xn--megas-k90b.com
https://www.google.com.pk/url?q=https://xn--megas-k90b.com
https://www.google.com.sb/url?q=https://xn--megas-k90b.com
https://images.google.ad/url?q=https://xn--megas-k90b.com
http://google.sn/url?q=https://xn--megas-k90b.com
http://google.ps/url?q=https://xn--megas-k90b.com
https://maps.google.bg/url?q=https://xn--megas-k90b.com
https://images.google.com.cy/url?q=https://xn--megas-k90b.com
http://www.google.pt/url?q=https://xn--megas-k90b.com
https://images.google.to/url?q=https://xn--megas-k90b.com
http://images.google.co.uz/url?q=https://xn--megas-k90b.com
http://google.com.sl/url?q=https://xn--megas-k90b.com
http://www.google.gy/url?q=https://xn--megas-k90b.com
http://www.google.cd/url?q=https://xn--megas-k90b.com
https://maps.google.com.my/url?q=https://xn--megas-k90b.com
http://www.google.com.ai/url?q=https://xn--megas-k90b.com
https://google.hn/url?q=https://xn--megas-k90b.com
http://images.google.ba/url?q=https://xn--megas-k90b.com
http://maps.google.com.pe/url?q=https://xn--megas-k90b.com
http://google.de/url?q=https://xn--megas-k90b.com
http://maps.google.com.gi/url?q=https://xn--megas-k90b.com
https://images.google.cat/url?q=https://xn--megas-k90b.com
https://www.google.co.ck/url?q=https://xn--megas-k90b.com
https://images.google.com.bn/url?q=https://xn--megas-k90b.com
http://maps.google.ae/url?q=https://xn--megas-k90b.com
http://images.google.no/url?q=https://xn--megas-k90b.com
http://maps.google.bs/url?q=https://xn--megas-k90b.com
http://maps.google.gy/url?q=https://xn--megas-k90b.com
http://maps.google.com.pa/url?q=https://xn--megas-k90b.com
https://google.cc/url?q=https://xn--megas-k90b.com
http://google.co.th/url?q=https://xn--megas-k90b.com
http://maps.google.com.mx/url?q=https://xn--megas-k90b.com
http://www.google.lu/url?q=https://xn--megas-k90b.com
https://google.bf/url?q=https://xn--megas-k90b.com
http://www.google.it/url?q=https://xn--megas-k90b.com
http://google.com.br/url?q=https://xn--megas-k90b.com
http://images.google.bg/url?q=https://xn--megas-k90b.com
http://google.co.il/url?q=https://xn--megas-k90b.com
https://google.ws/url?q=https://xn--megas-k90b.com
http://images.google.st/url?q=https://xn--megas-k90b.com
http://duck.com/url?q=https://xn--megas-k90b.com
https://www.google.net/url?q=https://xn--megas-k90b.com
https://images.google.sn/url?q=https://xn--megas-k90b.com
http://maps.google.co.jp/url?q=https://xn--megas-k90b.com
http://www.google.bj/url?q=https://xn--megas-k90b.com
https://maps.google.com.qa/url?q=https://xn--megas-k90b.com
https://maps.google.com.co/url?q=https://xn--megas-k90b.com
http://www.google.ch/url?q=https://xn--megas-k90b.com
http://www.google.com.pe/url?q=https://xn--megas-k90b.com
http://images.google.co.mz/url?q=https://xn--megas-k90b.com
https://www.google.cm/url?q=https://xn--megas-k90b.com
http://maps.google.nr/url?q=https://xn--megas-k90b.com
https://www.google.al/url?q=https://xn--megas-k90b.com
https://google.sk/url?q=https://xn--megas-k90b.com
http://maps.google.rs/url?q=https://xn--megas-k90b.com
http://maps.google.gr/url?q=https://xn--megas-k90b.com
https://google.la/url?q=https://xn--megas-k90b.com
http://maps.google.com.ph/url?q=https://xn--megas-k90b.com
https://www.google.com/url?q=https://xn--megas-k90b.com
http://google.ee/url?q=https://xn--megas-k90b.com
https://google.com.pl/url?q=https://xn--megas-k90b.com
http://maps.google.com.pg/url?q=https://xn--megas-k90b.com
https://google.vg/url?q=https://xn--megas-k90b.com
https://www.google.co.ke/url?q=https://xn--megas-k90b.com
https://maps.google.com.pr/url?q=https://xn--megas-k90b.com
http://www.google.no/url?q=https://xn--megas-k90b.com
https://maps.google.fr/url?q=https://xn--megas-k90b.com
https://maps.google.as/url?q=https://xn--megas-k90b.com
https://google.mn/url?q=https://xn--megas-k90b.com
http://google.com.kh/url?q=https://xn--megas-k90b.com
http://images.google.me/url?q=https://xn--megas-k90b.com
http://maps.google.com.sl/url?q=https://xn--megas-k90b.com
http://maps.google.pn/url?q=https://xn--megas-k90b.com
http://www.google.fr/url?q=https://xn--megas-k90b.com
https://maps.google.com.bz/url?q=https://xn--megas-k90b.com
https://maps.google.com.cu/url?q=https://xn--megas-k90b.com
https://google.com.eg/url?q=https://xn--megas-k90b.com
http://www.google.com.kw/url?q=https://xn--megas-k90b.com
https://google.com.cu/url?q=https://xn--megas-k90b.com
https://www.google.co.in/url?q=https://xn--megas-k90b.com
http://maps.google.tt/url?q=https://xn--megas-k90b.com
http://google.com.gt/url?q=https://xn--megas-k90b.com
http://maps.google.ge/url?q=https://xn--megas-k90b.com
https://maps.google.vg/url?q=https://xn--megas-k90b.com
http://images.google.com.om/url?q=https://xn--megas-k90b.com
http://google.ht/url?q=https://xn--megas-k90b.com
https://maps.google.com.na/url?q=https://xn--megas-k90b.com
http://google.ru/url?q=https://xn--megas-k90b.com
https://maps.google.gg/url?q=https://xn--megas-k90b.com
https://maps.google.com.br/url?q=https://xn--megas-k90b.com
https://maps.google.li/url?q=https://xn--megas-k90b.com
http://www.google.ba/url?q=https://xn--megas-k90b.com
http://maps.google.com.lb/url?q=https://xn--megas-k90b.com
http://images.google.ws/url?q=https://xn--megas-k90b.com
http://images.google.com.gt/url?q=https://xn--megas-k90b.com
http://maps.g.cn/url?q=https://xn--megas-k90b.com
http://google.co.zm/url?q=https://xn--megas-k90b.com
https://www.google.tl/url?q=https://xn--megas-k90b.com
http://www.google.com.np/url?q=https://xn--megas-k90b.com
https://maps.google.co.nz/url?q=https://xn--megas-k90b.com
http://maps.google.cf/url?q=https://xn--megas-k90b.com
http://maps.google.com.et/url?q=https://xn--megas-k90b.com
http://maps.google.rw/url?q=https://xn--megas-k90b.com
https://maps.google.co.ve/url?q=https://xn--megas-k90b.com
https://images.google.co.ck/url?q=https://xn--megas-k90b.com
https://images.google.co.zm/url?q=https://xn--megas-k90b.com
https://www.google.mu/url?q=https://xn--megas-k90b.com
https://maps.google.com.py/url?q=https://xn--megas-k90b.com
http://www.google.lv/url?q=https://xn--megas-k90b.com
http://maps.google.co.ug/url?q=https://xn--megas-k90b.com
https://maps.google.it/url?q=https://xn--megas-k90b.com
https://google.fi/url?q=https://xn--megas-k90b.com
https://maps.google.ms/url?q=https://xn--megas-k90b.com
https://maps.google.mv/url?q=https://xn--megas-k90b.com
http://maps.google.com.eg/url?q=https://xn--megas-k90b.com
https://maps.google.so/url?q=https://xn--megas-k90b.com
http://www.google.nr/url?q=https://xn--megas-k90b.com
https://maps.google.com.ar/url?q=https://xn--megas-k90b.com
http://images.google.com.bo/url?q=https://xn--megas-k90b.com
https://maps.google.tk/url?q=https://xn--megas-k90b.com
http://maps.google.com.hk/url?q=https://xn--megas-k90b.com
https://www.google.com.vn/url?q=https://xn--megas-k90b.com
https://www.google.bi/url?q=https://xn--megas-k90b.com
https://images.google.co.tz/url?q=https://xn--megas-k90b.com
http://google.co.bw/url?q=https://xn--megas-k90b.com
https://images.google.tl/url?q=https://xn--megas-k90b.com
http://maps.google.com.sg/url?q=https://xn--megas-k90b.com
https://images.google.mv/url?q=https://xn--megas-k90b.com
https://www.google.info/url?q=https://xn--megas-k90b.com
https://www.google.com.bz/url?q=https://xn--megas-k90b.com
http://maps.google.ee/url?q=https://xn--megas-k90b.com
http://google.co.za/url?q=https://xn--megas-k90b.com
http://www.g.cn/url?q=https://xn--megas-k90b.com
https://maps.google.ad/url?q=https://xn--megas-k90b.com
https://maps.google.hn/url?q=https://xn--megas-k90b.com
https://images.google.is/url?q=https://xn--megas-k90b.com
https://maps.google.ca/url?q=https://xn--megas-k90b.com
http://maps.google.ro/url?q=https://xn--megas-k90b.com
https://images.google.com.kh/url?q=https://xn--megas-k90b.com
http://google.com.pg/url?q=https://xn--megas-k90b.com
https://maps.google.co.vi/url?q=https://xn--megas-k90b.com
http://maps.google.com.np/url?q=https://xn--megas-k90b.com
https://images.google.tk/url?q=https://xn--megas-k90b.com
http://images.google.nr/url?q=https://xn--megas-k90b.com
http://maps.google.com.ng/url?q=https://xn--megas-k90b.com
https://maps.google.ki/url?q=https://xn--megas-k90b.com
https://images.google.cm/url?q=https://xn--megas-k90b.com
http://maps.google.gm/url?q=https://xn--megas-k90b.com
https://images.google.by/url?q=https://xn--megas-k90b.com
https://google.fm/url?q=https://xn--megas-k90b.com
http://google.co.vi/url?q=https://xn--megas-k90b.com
http://maps.google.cz/url?q=https://xn--megas-k90b.com
https://images.google.co.ma/url?q=https://xn--megas-k90b.com
http://www.google.com.vc/url?q=https://xn--megas-k90b.com
https://maps.google.jo/url?q=https://xn--megas-k90b.com
http://images.google.com.sb/url?q=https://xn--megas-k90b.com
https://images.google.com/url?q=https://xn--megas-k90b.com
https://maps.google.ch/url?q=https://xn--megas-k90b.com
http://maps.google.mk/url?q=https://xn--megas-k90b.com
http://www.google.com.ni/url?q=https://xn--megas-k90b.com
http://images.google.cz/url?q=https://xn--megas-k90b.com
https://images.google.com.vc/url?q=https://xn--megas-k90b.com
https://maps.google.co.ke/url?q=https://xn--megas-k90b.com
http://maps.google.com.uy/url?q=https://xn--megas-k90b.com
https://www.google.ie/url?q=https://xn--megas-k90b.com
https://maps.google.nu/url?q=https://xn--megas-k90b.com
http://images.google.cc/url?q=https://xn--megas-k90b.com
https://images.google.gr/url?q=https://xn--megas-k90b.com
https://google.lt/url?q=https://xn--megas-k90b.com
http://google.tm/url?q=https://xn--megas-k90b.com
https://maps.google.co.bw/url?q=https://xn--megas-k90b.com
http://www.google.vu/url?q=https://xn--megas-k90b.com
http://maps.google.lu/url?q=https://xn--megas-k90b.com
http://maps.google.lv/url?q=https://xn--megas-k90b.com
https://images.google.je/url?q=https://xn--megas-k90b.com
https://www.google.co.ve/url?q=https://xn--megas-k90b.com
https://images.google.com.ng/url?q=https://xn--megas-k90b.com
http://googlemaps.com/url?q=https://xn--megas-k90b.com
http://maps.google.com.fj/url?q=https://xn--megas-k90b.com
http://plus.google.com/url?q=https://xn--megas-k90b.com
http://plus.gngjd.com/url?q=https://xn--megas-k90b.com
http://google.com.af/url?q=https://xn--megas-k90b.com
https://images.google.md/url?q=https://xn--megas-k90b.com
https://www.google.com.mm/url?q=https://xn--megas-k90b.com
https://maps.google.st/url?q=https://xn--megas-k90b.com
http://maps.google.cat/url?q=https://xn--megas-k90b.com
http://google.co.jp/url?q=https://xn--megas-k90b.com
https://maps.google.lk/url?q=https://xn--megas-k90b.com
http://maps.google.co.kr/url?q=https://xn--megas-k90b.com
http://google.com.bd/url?q=https://xn--megas-k90b.com
https://images.google.co.ke/url?q=https://xn--megas-k90b.com
https://www.google.gr/url?q=https://xn--megas-k90b.com
https://images.google.ac/url?q=https://xn--megas-k90b.com
http://maps.google.ie/url?q=https://xn--megas-k90b.com
http://google.com.tn/url?q=https://xn--megas-k90b.com
https://maps.google.iq/url?q=https://xn--megas-k90b.com
http://images.google.com.lb/url?q=https://xn--megas-k90b.com
https://images.google.ga/url?q=https://xn--megas-k90b.com
http://maps.google.nl/url?q=https://xn--megas-k90b.com
https://maps.google.com.ai/url?q=https://xn--megas-k90b.com
https://maps.google.cl/url?q=https://xn--megas-k90b.com
http://maps.google.co.id/url?q=https://xn--megas-k90b.com
https://maps.google.fm/url?q=https://xn--megas-k90b.com
https://maps.google.com.ni/url?q=https://xn--megas-k90b.com
https://maps.google.bi/url?q=https://xn--megas-k90b.com
https://www.google.ki/url?q=https://xn--megas-k90b.com
https://google.dm/url?q=https://xn--megas-k90b.com
https://images.google.mn/url?q=https://xn--megas-k90b.com
https://images.google.gy/url?q=https://xn--megas-k90b.com
https://google.com.my/url?q=https://xn--megas-k90b.com
http://maps.google.tg/url?q=https://xn--megas-k90b.com
https://images.google.com.sa/url?q=https://xn--megas-k90b.com
https://maps.google.com.om/url?q=https://xn--megas-k90b.com
https://images.google.com.vn/url?q=https://xn--megas-k90b.com
https://maps.google.co.hu/url?q=https://xn--megas-k90b.com
http://maps.google.be/url?q=https://xn--megas-k90b.com
http://images.google.com.bh/url?q=https://xn--megas-k90b.com
https://images.google.com.kw/url?q=https://xn--megas-k90b.com
https://maps.google.gp/url?q=https://xn--megas-k90b.com
http://images.google.com.af/url?q=https://xn--megas-k90b.com
http://images.google.com.bz/url?q=https://xn--megas-k90b.com
https://maps.google.se/url?q=https://xn--megas-k90b.com
https://maps.google.cg/url?q=https://xn--megas-k90b.com
https://images.google.mk/url?q=https://xn--megas-k90b.com
https://www.google.com.uy/url?q=https://xn--megas-k90b.com
http://maps.google.cm/url?q=https://xn--megas-k90b.com
https://maps.google.cd/url?q=https://xn--megas-k90b.com
https://maps.google.mg/url?q=https://xn--megas-k90b.com
https://images.google.am/url?q=https://xn--megas-k90b.com
https://images.google.com.tn/url?q=https://xn--megas-k90b.com
https://images.google.co.id/url?q=https://xn--megas-k90b.com
https://maps.google.com.bd/url?q=https://xn--megas-k90b.com
https://maps.google.co.tz/url?q=https://xn--megas-k90b.com
http://images.google.com.ai/url?q=https://xn--megas-k90b.com
http://images.google.bf/url?q=https://xn--megas-k90b.com
http://maps.google.co.il/url?q=https://xn--megas-k90b.com
http://maps.google.co.zm/url?q=https://xn--megas-k90b.com
http://images.google.com.qa/url?q=https://xn--megas-k90b.com
http://images.google.lk/url?q=https://xn--megas-k90b.com
http://maps.google.cv/url?q=https://xn--megas-k90b.com
http://maps.google.im/url?q=https://xn--megas-k90b.com
https://maps.google.com.gh/url?q=https://xn--megas-k90b.com
https://maps.google.co.ao/url?q=https://xn--megas-k90b.com
http://maps.google.co.th/url?q=https://xn--megas-k90b.com
https://maps.google.gl/url?q=https://xn--megas-k90b.com
https://maps.google.com.ua/url?q=https://xn--megas-k90b.com
http://maps.google.td/url?q=https://xn--megas-k90b.com
https://google.me/url?q=https://xn--megas-k90b.com
https://maps.google.bj/url?q=https://xn--megas-k90b.com
https://maps.google.pl/url?q=https://xn--megas-k90b.com
http://maps.google.com.tr/url?q=https://xn--megas-k90b.com
https://images.google.sc/url?q=https://xn--megas-k90b.com
https://images.google.com.et/url?q=https://xn--megas-k90b.com
https://maps.google.dk/url?q=https://xn--megas-k90b.com
https://images.google.iq/url?q=https://xn--megas-k90b.com
http://maps.google.sc/url?q=https://xn--megas-k90b.com
http://images.google.co.bw/url?q=https://xn--megas-k90b.com
http://images.google.dz/url?q=https://xn--megas-k90b.com
https://maps.google.ht/url?q=https://xn--megas-k90b.com
https://google.cat/url?q=https://xn--megas-k90b.com
http://maps.google.com.bh/url?q=https://xn--megas-k90b.com
http://maps.google.ml/url?q=https://xn--megas-k90b.com
https://maps.google.com.pl/url?q=https://xn--megas-k90b.com
https://maps.google.com.vc/url?q=https://xn--megas-k90b.com
https://maps.google.com.au/url?q=https://xn--megas-k90b.com
http://images.g.cn/url?q=https://xn--megas-k90b.com
http://maps.google.co.ck/url?q=https://xn--megas-k90b.com
http://maps.google.sh/url?q=https://xn--megas-k90b.com
http://maps.google.com.sb/url?q=https://xn--megas-k90b.com
http://maps.google.sk/url?q=https://xn--megas-k90b.com
http://images.google.rs/url?q=https://xn--megas-k90b.com
http://maps.google.dj/url?q=https://xn--megas-k90b.com
http://maps.google.si/url?q=https://xn--megas-k90b.com
http://images.google.ps/url?q=https://xn--megas-k90b.com
http://images.google.com.pg/url?q=https://xn--megas-k90b.com
https://images.google.net/url?q=https://xn--megas-k90b.com
http://images.google.com.sl/url?q=https://xn--megas-k90b.com
https://images.google.gp/url?q=https://xn--megas-k90b.com
https://maps.gngjd.com/url?q=https://xn--megas-k90b.com
https://images.google.co.zw/url?q=https://xn--megas-k90b.com
ciprofloxacin canadian pharmacy
medrol tab 4mg
https://images.google.as/url?q=https://xn--megsb-5wa.com
https://images.google.off.ai/url?q=https://xn--megsb-5wa.com
https://images.google.com.ag/url?q=https://xn--megsb-5wa.com
https://images.google.com.ar/url?q=https://xn--megsb-5wa.com
https://images.google.com.au/url?q=https://xn--megsb-5wa.com
https://images.google.at/url?q=https://xn--megsb-5wa.com
https://images.google.az/url?q=https://xn--megsb-5wa.com
https://images.google.be/url?q=https://xn--megsb-5wa.com
https://images.google.com.br/url?q=https://xn--megsb-5wa.com
https://images.google.vg/url?q=https://xn--megsb-5wa.com
https://images.google.bi/url?q=https://xn--megsb-5wa.com
https://images.google.ca/url?q=https://xn--megsb-5wa.com
https://images.google.td/url?q=https://xn--megsb-5wa.com
https://images.google.cl/url?q=https://xn--megsb-5wa.com
https://images.google.com.co/url?q=https://xn--megsb-5wa.com
https://images.google.co.cr/url?q=https://xn--megsb-5wa.com
https://images.google.ci/url?q=https://xn--megsb-5wa.com
https://images.google.com.cu/url?q=https://xn--megsb-5wa.com
https://images.google.cd/url?q=https://xn--megsb-5wa.com
https://images.google.dk/url?q=https://xn--megsb-5wa.com
https://images.google.dj/url?q=https://xn--megsb-5wa.com
https://images.google.com.do/url?q=https://xn--megsb-5wa.com
https://images.google.com.ec/url?q=https://xn--megsb-5wa.com
https://images.google.com.sv/url?q=https://xn--megsb-5wa.com
https://images.google.fm/url?q=https://xn--megsb-5wa.com
https://images.google.com.fj/url?q=https://xn--megsb-5wa.com
https://images.google.fi/url?q=https://xn--megsb-5wa.com
https://images.google.fr/url?q=https://xn--megsb-5wa.com
https://images.google.gm/url?q=https://xn--megsb-5wa.com
https://images.google.ge/url?q=https://xn--megsb-5wa.com
https://images.google.de/url?q=https://xn--megsb-5wa.com
https://images.google.com.gi/url?q=https://xn--megsb-5wa.com
https://images.google.com.gr/url?q=https://xn--megsb-5wa.com
https://images.google.gl/url?q=https://xn--megsb-5wa.com
https://images.google.gg/url?q=https://xn--megsb-5wa.com
https://images.google.hn/url?q=https://xn--megsb-5wa.com
https://images.google.com.hk/url?q=https://xn--megsb-5wa.com
https://images.google.co.hu/url?q=https://xn--megsb-5wa.com
https://images.google.co.in/url?q=https://xn--megsb-5wa.com
https://images.google.ie/url?q=https://xn--megsb-5wa.com
https://images.google.co.im/url?q=https://xn--megsb-5wa.com
https://images.google.co.il/url?q=https://xn--megsb-5wa.com
https://images.google.it/url?q=https://xn--megsb-5wa.com
https://images.google.com.jm/url?q=https://xn--megsb-5wa.com
https://images.google.co.jp/url?q=https://xn--megsb-5wa.com
https://images.google.co.je/url?q=https://xn--megsb-5wa.com
https://images.google.kz/url?q=https://xn--megsb-5wa.com
https://images.google.co.kr/url?q=https://xn--megsb-5wa.com
https://images.google.lv/url?q=https://xn--megsb-5wa.com
https://images.google.co.ls/url?q=https://xn--megsb-5wa.com
https://images.google.li/url?q=https://xn--megsb-5wa.com
https://images.google.lt/url?q=https://xn--megsb-5wa.com
https://images.google.lu/url?q=https://xn--megsb-5wa.com
https://images.google.mw/url?q=https://xn--megsb-5wa.com
https://images.google.com.my/url?q=https://xn--megsb-5wa.com
https://images.google.com.mt/url?q=https://xn--megsb-5wa.com
https://images.google.mu/url?q=https://xn--megsb-5wa.com
https://images.google.com.mx/url?q=https://xn--megsb-5wa.com
https://images.google.ms/url?q=https://xn--megsb-5wa.com
https://images.google.com.na/url?q=https://xn--megsb-5wa.com
https://images.google.com.np/url?q=https://xn--megsb-5wa.com
https://images.google.nl/url?q=https://xn--megsb-5wa.com
https://images.google.co.nz/url?q=https://xn--megsb-5wa.com
https://images.google.com.ni/url?q=https://xn--megsb-5wa.com
https://images.google.com.nf/url?q=https://xn--megsb-5wa.com
https://images.google.com.pk/url?q=https://xn--megsb-5wa.com
https://images.google.com.pa/url?q=https://xn--megsb-5wa.com
https://images.google.com.py/url?q=https://xn--megsb-5wa.com
https://images.google.com.pe/url?q=https://xn--megsb-5wa.com
https://images.google.com.ph/url?q=https://xn--megsb-5wa.com
https://images.google.pn/url?q=https://xn--megsb-5wa.com
https://images.google.pl/url?q=https://xn--megsb-5wa.com
https://images.google.pt/url?q=https://xn--megsb-5wa.com
https://images.google.com.pr/url?q=https://xn--megsb-5wa.com
https://images.google.cg/url?q=https://xn--megsb-5wa.com
https://images.google.ro/url?q=https://xn--megsb-5wa.com
https://images.google.ru/url?q=https://xn--megsb-5wa.com
https://images.google.rw/url?q=https://xn--megsb-5wa.com
https://images.google.sh/url?q=https://xn--megsb-5wa.com
https://images.google.sm/url?q=https://xn--megsb-5wa.com
https://images.google.com.sg/url?q=https://xn--megsb-5wa.com
https://images.google.sk/url?q=https://xn--megsb-5wa.com
https://images.google.co.za/url?q=https://xn--megsb-5wa.com
https://images.google.es/url?q=https://xn--megsb-5wa.com
https://images.google.se/url?q=https://xn--megsb-5wa.com
https://images.google.ch/url?q=https://xn--megsb-5wa.com
https://images.google.com.tw/url?q=https://xn--megsb-5wa.com
https://images.google.co.th/url?q=https://xn--megsb-5wa.com
https://images.google.tt/url?q=https://xn--megsb-5wa.com
https://images.google.com.tr/url?q=https://xn--megsb-5wa.com
https://images.google.com.ua/url?q=https://xn--megsb-5wa.com
https://images.google.ae/url?q=https://xn--megsb-5wa.com
https://images.google.co.uk/url?q=https://xn--megsb-5wa.com
https://images.google.com.uy/url?q=https://xn--megsb-5wa.com
https://images.google.uz/url?q=https://xn--megsb-5wa.com
https://images.google.vu/url?q=https://xn--megsb-5wa.com
https://images.google.co.ve/url?q=https://xn--megsb-5wa.com
https://www.google.co.ao/url?q=https://xn--megsb-5wa.com
https://images.google.im/url?q=https://xn--megsb-5wa.com
https://images.google.dm/url?q=https://xn--megsb-5wa.com
https://google.com.pa/url?q=https://xn--megsb-5wa.com
http://maps.google.mw/url?q=https://xn--megsb-5wa.com
https://google.ac/url?q=https://xn--megsb-5wa.com
https://google.com.gh/url?q=https://xn--megsb-5wa.com
https://google.dz/url?q=https://xn--megsb-5wa.com
http://images.google.ki/url?q=https://xn--megsb-5wa.com
http://www.google.im/url?q=https://xn--megsb-5wa.com
https://google.com.mx/url?q=https://xn--megsb-5wa.com
https://www.google.cz/url?q=https://xn--megsb-5wa.com
http://google.hr/url?q=https://xn--megsb-5wa.com
https://google.ml/url?q=https://xn--megsb-5wa.com
https://www.google.com.au/url?q=https://xn--megsb-5wa.com
https://images.google.bs/url?q=https://xn--megsb-5wa.com
https://google.co.tz/url?q=https://xn--megsb-5wa.com
http://google.cg/url?q=https://xn--megsb-5wa.com
http://maps.google.is/url?q=https://xn--megsb-5wa.com
http://google.si/url?q=https://xn--megsb-5wa.com
http://google.com.py/url?q=https://xn--megsb-5wa.com
http://maps.google.co.cr/url?q=https://xn--megsb-5wa.com
http://www.google.mk/url?q=https://xn--megsb-5wa.com
http://www.google.ge/url?q=https://xn--megsb-5wa.com
https://images.google.ml/url?q=https://xn--megsb-5wa.com
https://www.google.com.sa/url?q=https://xn--megsb-5wa.com
http://google.mg/url?q=https://xn--megsb-5wa.com
http://google.com.ec/url?q=https://xn--megsb-5wa.com
https://google.rs/url?q=https://xn--megsb-5wa.com
https://www.google.co.hu/url?q=https://xn--megsb-5wa.com
http://google.md/url?q=https://xn--megsb-5wa.com
https://images.google.hu/url?q=https://xn--megsb-5wa.com
https://www.google.com.tw/url?q=https://xn--megsb-5wa.com
https://google.ae/url?q=https://xn--megsb-5wa.com
https://images.google.jo/url?q=https://xn--megsb-5wa.com
http://images.google.tm/url?q=https://xn--megsb-5wa.com
https://images.google.com.mm/url?q=https://xn--megsb-5wa.com
https://maps.google.vu/url?q=https://xn--megsb-5wa.com
https://maps.google.co.ls/url?q=https://xn--megsb-5wa.com
https://www.google.com.cy/url?q=https://xn--megsb-5wa.com
http://google.com.lb/url?q=https://xn--megsb-5wa.com
http://google.co.kr/url?q=https://xn--megsb-5wa.com
http://images.google.nu/url?q=https://xn--megsb-5wa.com
http://google.cl/url?q=https://xn--megsb-5wa.com
http://www.google.com.bo/url?q=https://xn--megsb-5wa.com
https://google.ad/url?q=https://xn--megsb-5wa.com
https://maps.google.pt/url?q=https://xn--megsb-5wa.com
https://maps.google.es/url?q=https://xn--megsb-5wa.com
https://maps.google.sn/url?q=https://xn--megsb-5wa.com
http://google.tk/url?q=https://xn--megsb-5wa.com
https://google.com.bn/url?q=https://xn--megsb-5wa.com
https://google.com.ua/url?q=https://xn--megsb-5wa.com
https://www.google.com.sg/url?q=https://xn--megsb-5wa.com
https://images.google.info/url?q=https://xn--megsb-5wa.com
https://maps.google.de/url?q=https://xn--megsb-5wa.com
https://images.google.cv/url?q=https://xn--megsb-5wa.com
http://google.com.nf/url?q=https://xn--megsb-5wa.com
https://images.google.com.ly/url?q=https://xn--megsb-5wa.com
http://images.google.tg/url?q=https://xn--megsb-5wa.com
http://google.cv/url?q=https://xn--megsb-5wa.com
http://gngjd.com/url?q=https://xn--megsb-5wa.com
http://www.google.je/url?q=https://xn--megsb-5wa.com
http://maps.google.by/url?q=https://xn--megsb-5wa.com
http://maps.google.fi/url?q=https://xn--megsb-5wa.com
https://images.gngjd.com/url?q=https://xn--megsb-5wa.com
http://google.ne/url?q=https://xn--megsb-5wa.com
http://images.google.kg/url?q=https://xn--megsb-5wa.com
https://www.google.cn/url?q=https://xn--megsb-5wa.com
https://google.am/url?q=https://xn--megsb-5wa.com
http://google.com.ly/url?q=https://xn--megsb-5wa.com
https://google.iq/url?q=https://xn--megsb-5wa.com
https://google.com.sv/url?q=https://xn--megsb-5wa.com
https://google.sc/url?q=https://xn--megsb-5wa.com
http://google.kg/url?q=https://xn--megsb-5wa.com
http://google.li/url?q=https://xn--megsb-5wa.com
http://images.google.al/url?q=https://xn--megsb-5wa.com
https://maps.google.je/url?q=https://xn--megsb-5wa.com
http://maps.google.to/url?q=https://xn--megsb-5wa.com
http://google.co.cr/url?q=https://xn--megsb-5wa.com
http://images.google.com.tj/url?q=https://xn--megsb-5wa.com
https://www.google.com.ph/url?q=https://xn--megsb-5wa.com
https://maps.google.com.bn/url?q=https://xn--megsb-5wa.com
https://www.google.as/url?q=https://xn--megsb-5wa.com
https://images.google.co.ao/url?q=https://xn--megsb-5wa.com
http://maps.google.com.bo/url?q=https://xn--megsb-5wa.com
https://maps.google.com/url?q=https://xn--megsb-5wa.com
https://www.google.com.bh/url?q=https://xn--megsb-5wa.com
https://maps.google.com.mm/url?q=https://xn--megsb-5wa.com
http://google.com.gi/url?q=https://xn--megsb-5wa.com
http://maps.google.ba/url?q=https://xn--megsb-5wa.com
http://google.co.id/url?q=https://xn--megsb-5wa.com
http://google.be/url?q=https://xn--megsb-5wa.com
http://images.google.mg/url?q=https://xn--megsb-5wa.com
http://google.com.ar/url?q=https://xn--megsb-5wa.com
https://maps.google.co.za/url?q=https://xn--megsb-5wa.com
https://www.google.gp/url?q=https://xn--megsb-5wa.com
http://www.google.sh/url?q=https://xn--megsb-5wa.com
https://images.google.ee/url?q=https://xn--megsb-5wa.com
https://www.google.rw/url?q=https://xn--megsb-5wa.com
http://images.google.si/url?q=https://xn--megsb-5wa.com
https://www.google.at/url?q=https://xn--megsb-5wa.com
http://maps.google.at/url?q=https://xn--megsb-5wa.com
http://maps.google.co.in/url?q=https://xn--megsb-5wa.com
https://maps.google.ga/url?q=https://xn--megsb-5wa.com
http://maps.google.sm/url?q=https://xn--megsb-5wa.com
http://google.ms/url?q=https://xn--megsb-5wa.com
https://images.google.com.gh/url?q=https://xn--megsb-5wa.com
http://maps.google.cn/url?q=https://xn--megsb-5wa.com
https://www.google.com.na/url?q=https://xn--megsb-5wa.com
https://maps.google.hr/url?q=https://xn--megsb-5wa.com
https://google.ci/url?q=https://xn--megsb-5wa.com
https://images.google.hr/url?q=https://xn--megsb-5wa.com
http://maps.google.com.do/url?q=https://xn--megsb-5wa.com
http://google.lk/url?q=https://xn--megsb-5wa.com
http://images.google.cn/url?q=https://xn--megsb-5wa.com
http://www.bon-vivant.net/url?q=https://xn--megsb-5wa.com
http://maps.google.com.gt/url?q=https://xn--megsb-5wa.com
http://www.google.com.ag/url?q=https://xn--megsb-5wa.com
https://maps.google.mu/url?q=https://xn--megsb-5wa.com
https://google.com.ng/url?q=https://xn--megsb-5wa.com
https://www.google.co.uk/url?q=https://xn--megsb-5wa.com
https://google.us/url?q=https://xn--megsb-5wa.com
https://www.google.com.tr/url?q=https://xn--megsb-5wa.com
http://www.google.co.ma/url?q=https://xn--megsb-5wa.com
https://maps.google.co.zw/url?q=https://xn--megsb-5wa.com
https://www.google.bs/url?q=https://xn--megsb-5wa.com
https://www.google.pl/url?q=https://xn--megsb-5wa.com
http://www.googleadservices.com/url?q=https://xn--megsb-5wa.com
http://google.kz/url?q=https://xn--megsb-5wa.com
https://google.com.mt/url?q=https://xn--megsb-5wa.com
http://www.google.co.zw/url?q=https://xn--megsb-5wa.com
https://maps.google.ne/url?q=https://xn--megsb-5wa.com
https://google.com.qa/url?q=https://xn--megsb-5wa.com
https://google.se/url?q=https://xn--megsb-5wa.com
http://www.google.mw/url?q=https://xn--megsb-5wa.com
https://maps.google.co.mz/url?q=https://xn--megsb-5wa.com
http://maps.google.com.sv/url?q=https://xn--megsb-5wa.com
https://www.google.sm/url?q=https://xn--megsb-5wa.com
https://maps.google.com.tw/url?q=https://xn--megsb-5wa.com
https://google.ca/url?q=https://xn--megsb-5wa.com
https://www.google.is/url?q=https://xn--megsb-5wa.com
https://google.com.jm/url?q=https://xn--megsb-5wa.com
http://images.google.co.ug/url?q=https://xn--megsb-5wa.com
https://maps.google.com.kh/url?q=https://xn--megsb-5wa.com
http://maps.google.tl/url?q=https://xn--megsb-5wa.com
http://www.google.co.nz/url?q=https://xn--megsb-5wa.com
https://www.google.gg/url?q=https://xn--megsb-5wa.com
https://google.to/url?q=https://xn--megsb-5wa.com
https://google.ro/url?q=https://xn--megsb-5wa.com
http://google.td/url?q=https://xn--megsb-5wa.com
https://www.google.by/url?q=https://xn--megsb-5wa.com
https://www.google.nl/url?q=https://xn--megsb-5wa.com
http://maps.google.ci/url?q=https://xn--megsb-5wa.com
http://maps.google.dz/url?q=https://xn--megsb-5wa.com
https://google.hu/url?q=https://xn--megsb-5wa.com
http://images.google.ht/url?q=https://xn--megsb-5wa.com
http://google.mv/url?q=https://xn--megsb-5wa.com
https://google.cf/url?q=https://xn--megsb-5wa.com
http://maps.google.com.ly/url?q=https://xn--megsb-5wa.com
http://www.google.nu/url?q=https://xn--megsb-5wa.com
http://google.com.tj/url?q=https://xn--megsb-5wa.com
https://maps.google.com.mt/url?q=https://xn--megsb-5wa.com
https://google.so/url?q=https://xn--megsb-5wa.com
http://images.google.bj/url?q=https://xn--megsb-5wa.com
https://maps.google.la/url?q=https://xn--megsb-5wa.com
https://images.google.us/url?q=https://xn--megsb-5wa.com
https://images.google.com.eg/url?q=https://xn--megsb-5wa.com
https://images.google.cf/url?q=https://xn--megsb-5wa.com
https://images.google.la/url?q=https://xn--megsb-5wa.com
http://maps.google.com.ag/url?q=https://xn--megsb-5wa.com
http://google.ga/url?q=https://xn--megsb-5wa.com
http://google.co.uz/url?q=https://xn--megsb-5wa.com
http://maps.google.no/url?q=https://xn--megsb-5wa.com
https://www.google.gl/url?q=https://xn--megsb-5wa.com
http://images.google.co.vi/url?q=https://xn--megsb-5wa.com
https://images.google.ne/url?q=https://xn--megsb-5wa.com
https://google.com.om/url?q=https://xn--megsb-5wa.com
http://maps.google.lt/url?q=https://xn--megsb-5wa.com
https://maps.google.kg/url?q=https://xn--megsb-5wa.com
http://www.google.com.hk/url?q=https://xn--megsb-5wa.com
https://google.com.co/url?q=https://xn--megsb-5wa.com
https://google.dk/url?q=https://xn--megsb-5wa.com
https://maps.google.com.sa/url?q=https://xn--megsb-5wa.com
http://google.com.fj/url?q=https://xn--megsb-5wa.com
http://maps.google.com.ec/url?q=https://xn--megsb-5wa.com
https://maps.google.mn/url?q=https://xn--megsb-5wa.com
https://maps.google.bf/url?q=https://xn--megsb-5wa.com
https://www.google.tt/url?q=https://xn--megsb-5wa.com
https://www.google.dj/url?q=https://xn--megsb-5wa.com
https://www.google.com.pr/url?q=https://xn--megsb-5wa.com
https://maps.google.ws/url?q=https://xn--megsb-5wa.com
http://google.jo/url?q=https://xn--megsb-5wa.com
https://google.co.ug/url?q=https://xn--megsb-5wa.com
https://images.google.com.bd/url?q=https://xn--megsb-5wa.com
https://google.tg/url?q=https://xn--megsb-5wa.com
http://maps.google.dm/url?q=https://xn--megsb-5wa.com
https://www.google.pn/url?q=https://xn--megsb-5wa.com
https://www.google.com.et/url?q=https://xn--megsb-5wa.com
http://maps.google.com.jm/url?q=https://xn--megsb-5wa.com
http://www.google.bg/url?q=https://xn--megsb-5wa.com
http://maps.google.hu/url?q=https://xn--megsb-5wa.com
https://maps.google.kz/url?q=https://xn--megsb-5wa.com
https://images.google.com.pl/url?q=https://xn--megsb-5wa.com
http://www.google.st/url?q=https://xn--megsb-5wa.com
https://maps.google.com.kw/url?q=https://xn--megsb-5wa.com
https://maps.google.ru/url?q=https://xn--megsb-5wa.com
https://google.co.mz/url?q=https://xn--megsb-5wa.com
http://www.google.co.ls/url?q=https://xn--megsb-5wa.com
https://www.google.az/url?q=https://xn--megsb-5wa.com
http://maps.google.co.uk/url?q=https://xn--megsb-5wa.com
https://www.google.com.do/url?q=https://xn--megsb-5wa.com
http://www.google.es/url?q=https://xn--megsb-5wa.com
http://google.gm/url?q=https://xn--megsb-5wa.com
http://images.google.so/url?q=https://xn--megsb-5wa.com
https://www.google.com.pk/url?q=https://xn--megsb-5wa.com
https://www.google.com.sb/url?q=https://xn--megsb-5wa.com
https://images.google.ad/url?q=https://xn--megsb-5wa.com
http://google.sn/url?q=https://xn--megsb-5wa.com
http://google.ps/url?q=https://xn--megsb-5wa.com
https://maps.google.bg/url?q=https://xn--megsb-5wa.com
https://images.google.com.cy/url?q=https://xn--megsb-5wa.com
http://www.google.pt/url?q=https://xn--megsb-5wa.com
https://images.google.to/url?q=https://xn--megsb-5wa.com
http://images.google.co.uz/url?q=https://xn--megsb-5wa.com
http://google.com.sl/url?q=https://xn--megsb-5wa.com
http://www.google.gy/url?q=https://xn--megsb-5wa.com
http://www.google.cd/url?q=https://xn--megsb-5wa.com
https://maps.google.com.my/url?q=https://xn--megsb-5wa.com
http://www.google.com.ai/url?q=https://xn--megsb-5wa.com
https://google.hn/url?q=https://xn--megsb-5wa.com
http://images.google.ba/url?q=https://xn--megsb-5wa.com
http://maps.google.com.pe/url?q=https://xn--megsb-5wa.com
http://google.de/url?q=https://xn--megsb-5wa.com
http://maps.google.com.gi/url?q=https://xn--megsb-5wa.com
https://images.google.cat/url?q=https://xn--megsb-5wa.com
https://www.google.co.ck/url?q=https://xn--megsb-5wa.com
https://images.google.com.bn/url?q=https://xn--megsb-5wa.com
http://maps.google.ae/url?q=https://xn--megsb-5wa.com
http://images.google.no/url?q=https://xn--megsb-5wa.com
http://maps.google.bs/url?q=https://xn--megsb-5wa.com
http://maps.google.gy/url?q=https://xn--megsb-5wa.com
http://maps.google.com.pa/url?q=https://xn--megsb-5wa.com
https://google.cc/url?q=https://xn--megsb-5wa.com
http://google.co.th/url?q=https://xn--megsb-5wa.com
http://maps.google.com.mx/url?q=https://xn--megsb-5wa.com
http://www.google.lu/url?q=https://xn--megsb-5wa.com
https://google.bf/url?q=https://xn--megsb-5wa.com
http://www.google.it/url?q=https://xn--megsb-5wa.com
http://google.com.br/url?q=https://xn--megsb-5wa.com
http://images.google.bg/url?q=https://xn--megsb-5wa.com
http://google.co.il/url?q=https://xn--megsb-5wa.com
https://google.ws/url?q=https://xn--megsb-5wa.com
http://images.google.st/url?q=https://xn--megsb-5wa.com
http://duck.com/url?q=https://xn--megsb-5wa.com
https://www.google.net/url?q=https://xn--megsb-5wa.com
https://images.google.sn/url?q=https://xn--megsb-5wa.com
http://maps.google.co.jp/url?q=https://xn--megsb-5wa.com
http://www.google.bj/url?q=https://xn--megsb-5wa.com
https://maps.google.com.qa/url?q=https://xn--megsb-5wa.com
https://maps.google.com.co/url?q=https://xn--megsb-5wa.com
http://www.google.ch/url?q=https://xn--megsb-5wa.com
http://www.google.com.pe/url?q=https://xn--megsb-5wa.com
http://images.google.co.mz/url?q=https://xn--megsb-5wa.com
https://www.google.cm/url?q=https://xn--megsb-5wa.com
http://maps.google.nr/url?q=https://xn--megsb-5wa.com
https://www.google.al/url?q=https://xn--megsb-5wa.com
https://google.sk/url?q=https://xn--megsb-5wa.com
http://maps.google.rs/url?q=https://xn--megsb-5wa.com
http://maps.google.gr/url?q=https://xn--megsb-5wa.com
https://google.la/url?q=https://xn--megsb-5wa.com
http://maps.google.com.ph/url?q=https://xn--megsb-5wa.com
https://www.google.com/url?q=https://xn--megsb-5wa.com
http://google.ee/url?q=https://xn--megsb-5wa.com
https://google.com.pl/url?q=https://xn--megsb-5wa.com
http://maps.google.com.pg/url?q=https://xn--megsb-5wa.com
https://google.vg/url?q=https://xn--megsb-5wa.com
https://www.google.co.ke/url?q=https://xn--megsb-5wa.com
https://maps.google.com.pr/url?q=https://xn--megsb-5wa.com
http://www.google.no/url?q=https://xn--megsb-5wa.com
https://maps.google.fr/url?q=https://xn--megsb-5wa.com
https://maps.google.as/url?q=https://xn--megsb-5wa.com
https://google.mn/url?q=https://xn--megsb-5wa.com
http://google.com.kh/url?q=https://xn--megsb-5wa.com
http://images.google.me/url?q=https://xn--megsb-5wa.com
http://maps.google.com.sl/url?q=https://xn--megsb-5wa.com
http://maps.google.pn/url?q=https://xn--megsb-5wa.com
http://www.google.fr/url?q=https://xn--megsb-5wa.com
https://maps.google.com.bz/url?q=https://xn--megsb-5wa.com
https://maps.google.com.cu/url?q=https://xn--megsb-5wa.com
https://google.com.eg/url?q=https://xn--megsb-5wa.com
http://www.google.com.kw/url?q=https://xn--megsb-5wa.com
https://google.com.cu/url?q=https://xn--megsb-5wa.com
https://www.google.co.in/url?q=https://xn--megsb-5wa.com
http://maps.google.tt/url?q=https://xn--megsb-5wa.com
http://google.com.gt/url?q=https://xn--megsb-5wa.com
http://maps.google.ge/url?q=https://xn--megsb-5wa.com
https://maps.google.vg/url?q=https://xn--megsb-5wa.com
http://images.google.com.om/url?q=https://xn--megsb-5wa.com
http://google.ht/url?q=https://xn--megsb-5wa.com
https://maps.google.com.na/url?q=https://xn--megsb-5wa.com
http://google.ru/url?q=https://xn--megsb-5wa.com
https://maps.google.gg/url?q=https://xn--megsb-5wa.com
https://maps.google.com.br/url?q=https://xn--megsb-5wa.com
https://maps.google.li/url?q=https://xn--megsb-5wa.com
http://www.google.ba/url?q=https://xn--megsb-5wa.com
http://maps.google.com.lb/url?q=https://xn--megsb-5wa.com
http://images.google.ws/url?q=https://xn--megsb-5wa.com
http://images.google.com.gt/url?q=https://xn--megsb-5wa.com
http://maps.g.cn/url?q=https://xn--megsb-5wa.com
http://google.co.zm/url?q=https://xn--megsb-5wa.com
https://www.google.tl/url?q=https://xn--megsb-5wa.com
http://www.google.com.np/url?q=https://xn--megsb-5wa.com
https://maps.google.co.nz/url?q=https://xn--megsb-5wa.com
http://maps.google.cf/url?q=https://xn--megsb-5wa.com
http://maps.google.com.et/url?q=https://xn--megsb-5wa.com
http://maps.google.rw/url?q=https://xn--megsb-5wa.com
https://maps.google.co.ve/url?q=https://xn--megsb-5wa.com
https://images.google.co.ck/url?q=https://xn--megsb-5wa.com
https://images.google.co.zm/url?q=https://xn--megsb-5wa.com
https://www.google.mu/url?q=https://xn--megsb-5wa.com
https://maps.google.com.py/url?q=https://xn--megsb-5wa.com
http://www.google.lv/url?q=https://xn--megsb-5wa.com
http://maps.google.co.ug/url?q=https://xn--megsb-5wa.com
https://maps.google.it/url?q=https://xn--megsb-5wa.com
https://google.fi/url?q=https://xn--megsb-5wa.com
https://maps.google.ms/url?q=https://xn--megsb-5wa.com
https://maps.google.mv/url?q=https://xn--megsb-5wa.com
http://maps.google.com.eg/url?q=https://xn--megsb-5wa.com
https://maps.google.so/url?q=https://xn--megsb-5wa.com
http://www.google.nr/url?q=https://xn--megsb-5wa.com
https://maps.google.com.ar/url?q=https://xn--megsb-5wa.com
http://images.google.com.bo/url?q=https://xn--megsb-5wa.com
https://maps.google.tk/url?q=https://xn--megsb-5wa.com
http://maps.google.com.hk/url?q=https://xn--megsb-5wa.com
https://www.google.com.vn/url?q=https://xn--megsb-5wa.com
https://www.google.bi/url?q=https://xn--megsb-5wa.com
https://images.google.co.tz/url?q=https://xn--megsb-5wa.com
http://google.co.bw/url?q=https://xn--megsb-5wa.com
https://images.google.tl/url?q=https://xn--megsb-5wa.com
http://maps.google.com.sg/url?q=https://xn--megsb-5wa.com
https://images.google.mv/url?q=https://xn--megsb-5wa.com
https://www.google.info/url?q=https://xn--megsb-5wa.com
https://www.google.com.bz/url?q=https://xn--megsb-5wa.com
http://maps.google.ee/url?q=https://xn--megsb-5wa.com
http://google.co.za/url?q=https://xn--megsb-5wa.com
http://www.g.cn/url?q=https://xn--megsb-5wa.com
https://maps.google.ad/url?q=https://xn--megsb-5wa.com
https://maps.google.hn/url?q=https://xn--megsb-5wa.com
https://images.google.is/url?q=https://xn--megsb-5wa.com
https://maps.google.ca/url?q=https://xn--megsb-5wa.com
http://maps.google.ro/url?q=https://xn--megsb-5wa.com
https://images.google.com.kh/url?q=https://xn--megsb-5wa.com
http://google.com.pg/url?q=https://xn--megsb-5wa.com
https://maps.google.co.vi/url?q=https://xn--megsb-5wa.com
http://maps.google.com.np/url?q=https://xn--megsb-5wa.com
https://images.google.tk/url?q=https://xn--megsb-5wa.com
http://images.google.nr/url?q=https://xn--megsb-5wa.com
http://maps.google.com.ng/url?q=https://xn--megsb-5wa.com
https://maps.google.ki/url?q=https://xn--megsb-5wa.com
https://images.google.cm/url?q=https://xn--megsb-5wa.com
http://maps.google.gm/url?q=https://xn--megsb-5wa.com
https://images.google.by/url?q=https://xn--megsb-5wa.com
https://google.fm/url?q=https://xn--megsb-5wa.com
http://google.co.vi/url?q=https://xn--megsb-5wa.com
http://maps.google.cz/url?q=https://xn--megsb-5wa.com
https://images.google.co.ma/url?q=https://xn--megsb-5wa.com
http://www.google.com.vc/url?q=https://xn--megsb-5wa.com
https://maps.google.jo/url?q=https://xn--megsb-5wa.com
http://images.google.com.sb/url?q=https://xn--megsb-5wa.com
https://images.google.com/url?q=https://xn--megsb-5wa.com
https://maps.google.ch/url?q=https://xn--megsb-5wa.com
http://maps.google.mk/url?q=https://xn--megsb-5wa.com
http://www.google.com.ni/url?q=https://xn--megsb-5wa.com
http://images.google.cz/url?q=https://xn--megsb-5wa.com
https://images.google.com.vc/url?q=https://xn--megsb-5wa.com
https://maps.google.co.ke/url?q=https://xn--megsb-5wa.com
http://maps.google.com.uy/url?q=https://xn--megsb-5wa.com
https://www.google.ie/url?q=https://xn--megsb-5wa.com
https://maps.google.nu/url?q=https://xn--megsb-5wa.com
http://images.google.cc/url?q=https://xn--megsb-5wa.com
https://images.google.gr/url?q=https://xn--megsb-5wa.com
https://google.lt/url?q=https://xn--megsb-5wa.com
http://google.tm/url?q=https://xn--megsb-5wa.com
https://maps.google.co.bw/url?q=https://xn--megsb-5wa.com
http://www.google.vu/url?q=https://xn--megsb-5wa.com
http://maps.google.lu/url?q=https://xn--megsb-5wa.com
http://maps.google.lv/url?q=https://xn--megsb-5wa.com
https://images.google.je/url?q=https://xn--megsb-5wa.com
https://www.google.co.ve/url?q=https://xn--megsb-5wa.com
https://images.google.com.ng/url?q=https://xn--megsb-5wa.com
http://googlemaps.com/url?q=https://xn--megsb-5wa.com
http://maps.google.com.fj/url?q=https://xn--megsb-5wa.com
http://plus.google.com/url?q=https://xn--megsb-5wa.com
http://plus.gngjd.com/url?q=https://xn--megsb-5wa.com
http://google.com.af/url?q=https://xn--megsb-5wa.com
https://images.google.md/url?q=https://xn--megsb-5wa.com
https://www.google.com.mm/url?q=https://xn--megsb-5wa.com
https://maps.google.st/url?q=https://xn--megsb-5wa.com
http://maps.google.cat/url?q=https://xn--megsb-5wa.com
http://google.co.jp/url?q=https://xn--megsb-5wa.com
https://maps.google.lk/url?q=https://xn--megsb-5wa.com
http://maps.google.co.kr/url?q=https://xn--megsb-5wa.com
http://google.com.bd/url?q=https://xn--megsb-5wa.com
https://images.google.co.ke/url?q=https://xn--megsb-5wa.com
https://www.google.gr/url?q=https://xn--megsb-5wa.com
https://images.google.ac/url?q=https://xn--megsb-5wa.com
http://maps.google.ie/url?q=https://xn--megsb-5wa.com
http://google.com.tn/url?q=https://xn--megsb-5wa.com
https://maps.google.iq/url?q=https://xn--megsb-5wa.com
http://images.google.com.lb/url?q=https://xn--megsb-5wa.com
https://images.google.ga/url?q=https://xn--megsb-5wa.com
http://maps.google.nl/url?q=https://xn--megsb-5wa.com
https://maps.google.com.ai/url?q=https://xn--megsb-5wa.com
https://maps.google.cl/url?q=https://xn--megsb-5wa.com
http://maps.google.co.id/url?q=https://xn--megsb-5wa.com
https://maps.google.fm/url?q=https://xn--megsb-5wa.com
https://maps.google.com.ni/url?q=https://xn--megsb-5wa.com
https://maps.google.bi/url?q=https://xn--megsb-5wa.com
https://www.google.ki/url?q=https://xn--megsb-5wa.com
https://google.dm/url?q=https://xn--megsb-5wa.com
https://images.google.mn/url?q=https://xn--megsb-5wa.com
https://images.google.gy/url?q=https://xn--megsb-5wa.com
https://google.com.my/url?q=https://xn--megsb-5wa.com
http://maps.google.tg/url?q=https://xn--megsb-5wa.com
https://images.google.com.sa/url?q=https://xn--megsb-5wa.com
https://maps.google.com.om/url?q=https://xn--megsb-5wa.com
https://images.google.com.vn/url?q=https://xn--megsb-5wa.com
https://maps.google.co.hu/url?q=https://xn--megsb-5wa.com
http://maps.google.be/url?q=https://xn--megsb-5wa.com
http://images.google.com.bh/url?q=https://xn--megsb-5wa.com
https://images.google.com.kw/url?q=https://xn--megsb-5wa.com
https://maps.google.gp/url?q=https://xn--megsb-5wa.com
http://images.google.com.af/url?q=https://xn--megsb-5wa.com
http://images.google.com.bz/url?q=https://xn--megsb-5wa.com
https://maps.google.se/url?q=https://xn--megsb-5wa.com
https://maps.google.cg/url?q=https://xn--megsb-5wa.com
https://images.google.mk/url?q=https://xn--megsb-5wa.com
https://www.google.com.uy/url?q=https://xn--megsb-5wa.com
http://maps.google.cm/url?q=https://xn--megsb-5wa.com
https://maps.google.cd/url?q=https://xn--megsb-5wa.com
https://maps.google.mg/url?q=https://xn--megsb-5wa.com
https://images.google.am/url?q=https://xn--megsb-5wa.com
https://images.google.com.tn/url?q=https://xn--megsb-5wa.com
https://images.google.co.id/url?q=https://xn--megsb-5wa.com
https://maps.google.com.bd/url?q=https://xn--megsb-5wa.com
https://maps.google.co.tz/url?q=https://xn--megsb-5wa.com
http://images.google.com.ai/url?q=https://xn--megsb-5wa.com
http://images.google.bf/url?q=https://xn--megsb-5wa.com
http://maps.google.co.il/url?q=https://xn--megsb-5wa.com
http://maps.google.co.zm/url?q=https://xn--megsb-5wa.com
http://images.google.com.qa/url?q=https://xn--megsb-5wa.com
http://images.google.lk/url?q=https://xn--megsb-5wa.com
http://maps.google.cv/url?q=https://xn--megsb-5wa.com
http://maps.google.im/url?q=https://xn--megsb-5wa.com
https://maps.google.com.gh/url?q=https://xn--megsb-5wa.com
https://maps.google.co.ao/url?q=https://xn--megsb-5wa.com
http://maps.google.co.th/url?q=https://xn--megsb-5wa.com
https://maps.google.gl/url?q=https://xn--megsb-5wa.com
https://maps.google.com.ua/url?q=https://xn--megsb-5wa.com
http://maps.google.td/url?q=https://xn--megsb-5wa.com
https://google.me/url?q=https://xn--megsb-5wa.com
https://maps.google.bj/url?q=https://xn--megsb-5wa.com
https://maps.google.pl/url?q=https://xn--megsb-5wa.com
http://maps.google.com.tr/url?q=https://xn--megsb-5wa.com
https://images.google.sc/url?q=https://xn--megsb-5wa.com
https://images.google.com.et/url?q=https://xn--megsb-5wa.com
https://maps.google.dk/url?q=https://xn--megsb-5wa.com
https://images.google.iq/url?q=https://xn--megsb-5wa.com
http://maps.google.sc/url?q=https://xn--megsb-5wa.com
http://images.google.co.bw/url?q=https://xn--megsb-5wa.com
http://images.google.dz/url?q=https://xn--megsb-5wa.com
https://maps.google.ht/url?q=https://xn--megsb-5wa.com
https://google.cat/url?q=https://xn--megsb-5wa.com
http://maps.google.com.bh/url?q=https://xn--megsb-5wa.com
http://maps.google.ml/url?q=https://xn--megsb-5wa.com
https://maps.google.com.pl/url?q=https://xn--megsb-5wa.com
https://maps.google.com.vc/url?q=https://xn--megsb-5wa.com
https://maps.google.com.au/url?q=https://xn--megsb-5wa.com
http://images.g.cn/url?q=https://xn--megsb-5wa.com
http://maps.google.co.ck/url?q=https://xn--megsb-5wa.com
http://maps.google.sh/url?q=https://xn--megsb-5wa.com
http://maps.google.com.sb/url?q=https://xn--megsb-5wa.com
http://maps.google.sk/url?q=https://xn--megsb-5wa.com
http://images.google.rs/url?q=https://xn--megsb-5wa.com
http://maps.google.dj/url?q=https://xn--megsb-5wa.com
http://maps.google.si/url?q=https://xn--megsb-5wa.com
http://images.google.ps/url?q=https://xn--megsb-5wa.com
http://images.google.com.pg/url?q=https://xn--megsb-5wa.com
https://images.google.net/url?q=https://xn--megsb-5wa.com
http://images.google.com.sl/url?q=https://xn--megsb-5wa.com
https://images.google.gp/url?q=https://xn--megsb-5wa.com
https://maps.gngjd.com/url?q=https://xn--megsb-5wa.com
https://images.google.co.zw/url?q=https://xn--megsb-5wa.com
tadacip pills 20 mg
buy hydrochlorothiazide without prescription
buy genuine kamagra uk
cialis 5mg no prescription
dipyridamole medication
provigil 100mg price
amoxicillin over the counter australia
Наши ателье предлагают вам возможность воплотить в жизнь ваши самые смелые и креативные идеи в секторе интерьерного дизайна. Мы практикуем на производстве текстильных занавесей со складками под индивидуальный заказ, которые не только делают вашему обители уникальный стиль, но и акцентируют вашу личность.
Наши шторы плиссе на пластиковые окна – это комбинация изыска и употребительности. Они формируют атмосферу, очищают люминесценцию и сохраняют вашу конфиденциальность. Выберите ткань, цвет и украшение, и мы с с радостью разработаем шторы, которые точно выделат характер вашего оформления.
Не сдерживайтесь обычными решениями. Вместе с нами, вы сможете сформировать портьеры, которые будут сочетаться с вашим неповторимым предпочтением. Доверьтесь нам, и ваш дом станет уединением, где любой компонент говорит о вашу индивидуальность.
Подробнее на портале sun-interio1.ru.
Закажите шторы плиссированные у нас, и ваш резиденция переменится в парк дизайна и комфорта. Обращайтесь к нам, и мы поможем вам воплотить в жизнь ваши собственные грезы о превосходном дизайне.
Создайте свою собственную собственную повествование дизайна с нами. Откройте мир потенциалов с гардинами плиссе под заказ!
https://images.google.as/url?q=https://xn--megab-mdb.com
https://images.google.off.ai/url?q=https://xn--megab-mdb.com
https://images.google.com.ag/url?q=https://xn--megab-mdb.com
https://images.google.com.ar/url?q=https://xn--megab-mdb.com
https://images.google.com.au/url?q=https://xn--megab-mdb.com
https://images.google.at/url?q=https://xn--megab-mdb.com
https://images.google.az/url?q=https://xn--megab-mdb.com
https://images.google.be/url?q=https://xn--megab-mdb.com
https://images.google.com.br/url?q=https://xn--megab-mdb.com
https://images.google.vg/url?q=https://xn--megab-mdb.com
https://images.google.bi/url?q=https://xn--megab-mdb.com
https://images.google.ca/url?q=https://xn--megab-mdb.com
https://images.google.td/url?q=https://xn--megab-mdb.com
https://images.google.cl/url?q=https://xn--megab-mdb.com
https://images.google.com.co/url?q=https://xn--megab-mdb.com
https://images.google.co.cr/url?q=https://xn--megab-mdb.com
https://images.google.ci/url?q=https://xn--megab-mdb.com
https://images.google.com.cu/url?q=https://xn--megab-mdb.com
https://images.google.cd/url?q=https://xn--megab-mdb.com
https://images.google.dk/url?q=https://xn--megab-mdb.com
https://images.google.dj/url?q=https://xn--megab-mdb.com
https://images.google.com.do/url?q=https://xn--megab-mdb.com
https://images.google.com.ec/url?q=https://xn--megab-mdb.com
https://images.google.com.sv/url?q=https://xn--megab-mdb.com
https://images.google.fm/url?q=https://xn--megab-mdb.com
https://images.google.com.fj/url?q=https://xn--megab-mdb.com
https://images.google.fi/url?q=https://xn--megab-mdb.com
https://images.google.fr/url?q=https://xn--megab-mdb.com
https://images.google.gm/url?q=https://xn--megab-mdb.com
https://images.google.ge/url?q=https://xn--megab-mdb.com
https://images.google.de/url?q=https://xn--megab-mdb.com
https://images.google.com.gi/url?q=https://xn--megab-mdb.com
https://images.google.com.gr/url?q=https://xn--megab-mdb.com
https://images.google.gl/url?q=https://xn--megab-mdb.com
https://images.google.gg/url?q=https://xn--megab-mdb.com
https://images.google.hn/url?q=https://xn--megab-mdb.com
https://images.google.com.hk/url?q=https://xn--megab-mdb.com
https://images.google.co.hu/url?q=https://xn--megab-mdb.com
https://images.google.co.in/url?q=https://xn--megab-mdb.com
https://images.google.ie/url?q=https://xn--megab-mdb.com
https://images.google.co.im/url?q=https://xn--megab-mdb.com
https://images.google.co.il/url?q=https://xn--megab-mdb.com
https://images.google.it/url?q=https://xn--megab-mdb.com
https://images.google.com.jm/url?q=https://xn--megab-mdb.com
https://images.google.co.jp/url?q=https://xn--megab-mdb.com
https://images.google.co.je/url?q=https://xn--megab-mdb.com
https://images.google.kz/url?q=https://xn--megab-mdb.com
https://images.google.co.kr/url?q=https://xn--megab-mdb.com
https://images.google.lv/url?q=https://xn--megab-mdb.com
https://images.google.co.ls/url?q=https://xn--megab-mdb.com
https://images.google.li/url?q=https://xn--megab-mdb.com
https://images.google.lt/url?q=https://xn--megab-mdb.com
https://images.google.lu/url?q=https://xn--megab-mdb.com
https://images.google.mw/url?q=https://xn--megab-mdb.com
https://images.google.com.my/url?q=https://xn--megab-mdb.com
https://images.google.com.mt/url?q=https://xn--megab-mdb.com
https://images.google.mu/url?q=https://xn--megab-mdb.com
https://images.google.com.mx/url?q=https://xn--megab-mdb.com
https://images.google.ms/url?q=https://xn--megab-mdb.com
https://images.google.com.na/url?q=https://xn--megab-mdb.com
https://images.google.com.np/url?q=https://xn--megab-mdb.com
https://images.google.nl/url?q=https://xn--megab-mdb.com
https://images.google.co.nz/url?q=https://xn--megab-mdb.com
https://images.google.com.ni/url?q=https://xn--megab-mdb.com
https://images.google.com.nf/url?q=https://xn--megab-mdb.com
https://images.google.com.pk/url?q=https://xn--megab-mdb.com
https://images.google.com.pa/url?q=https://xn--megab-mdb.com
https://images.google.com.py/url?q=https://xn--megab-mdb.com
https://images.google.com.pe/url?q=https://xn--megab-mdb.com
https://images.google.com.ph/url?q=https://xn--megab-mdb.com
https://images.google.pn/url?q=https://xn--megab-mdb.com
https://images.google.pl/url?q=https://xn--megab-mdb.com
https://images.google.pt/url?q=https://xn--megab-mdb.com
https://images.google.com.pr/url?q=https://xn--megab-mdb.com
https://images.google.cg/url?q=https://xn--megab-mdb.com
https://images.google.ro/url?q=https://xn--megab-mdb.com
https://images.google.ru/url?q=https://xn--megab-mdb.com
https://images.google.rw/url?q=https://xn--megab-mdb.com
https://images.google.sh/url?q=https://xn--megab-mdb.com
https://images.google.sm/url?q=https://xn--megab-mdb.com
https://images.google.com.sg/url?q=https://xn--megab-mdb.com
https://images.google.sk/url?q=https://xn--megab-mdb.com
https://images.google.co.za/url?q=https://xn--megab-mdb.com
https://images.google.es/url?q=https://xn--megab-mdb.com
https://images.google.se/url?q=https://xn--megab-mdb.com
https://images.google.ch/url?q=https://xn--megab-mdb.com
https://images.google.com.tw/url?q=https://xn--megab-mdb.com
https://images.google.co.th/url?q=https://xn--megab-mdb.com
https://images.google.tt/url?q=https://xn--megab-mdb.com
https://images.google.com.tr/url?q=https://xn--megab-mdb.com
https://images.google.com.ua/url?q=https://xn--megab-mdb.com
https://images.google.ae/url?q=https://xn--megab-mdb.com
https://images.google.co.uk/url?q=https://xn--megab-mdb.com
https://images.google.com.uy/url?q=https://xn--megab-mdb.com
https://images.google.uz/url?q=https://xn--megab-mdb.com
https://images.google.vu/url?q=https://xn--megab-mdb.com
https://images.google.co.ve/url?q=https://xn--megab-mdb.com
https://www.google.co.ao/url?q=https://xn--megab-mdb.com
https://images.google.im/url?q=https://xn--megab-mdb.com
https://images.google.dm/url?q=https://xn--megab-mdb.com
https://google.com.pa/url?q=https://xn--megab-mdb.com
http://maps.google.mw/url?q=https://xn--megab-mdb.com
https://google.ac/url?q=https://xn--megab-mdb.com
https://google.com.gh/url?q=https://xn--megab-mdb.com
https://google.dz/url?q=https://xn--megab-mdb.com
http://images.google.ki/url?q=https://xn--megab-mdb.com
http://www.google.im/url?q=https://xn--megab-mdb.com
https://google.com.mx/url?q=https://xn--megab-mdb.com
https://www.google.cz/url?q=https://xn--megab-mdb.com
http://google.hr/url?q=https://xn--megab-mdb.com
https://google.ml/url?q=https://xn--megab-mdb.com
https://www.google.com.au/url?q=https://xn--megab-mdb.com
https://images.google.bs/url?q=https://xn--megab-mdb.com
https://google.co.tz/url?q=https://xn--megab-mdb.com
http://google.cg/url?q=https://xn--megab-mdb.com
http://maps.google.is/url?q=https://xn--megab-mdb.com
http://google.si/url?q=https://xn--megab-mdb.com
http://google.com.py/url?q=https://xn--megab-mdb.com
http://maps.google.co.cr/url?q=https://xn--megab-mdb.com
http://www.google.mk/url?q=https://xn--megab-mdb.com
http://www.google.ge/url?q=https://xn--megab-mdb.com
https://images.google.ml/url?q=https://xn--megab-mdb.com
https://www.google.com.sa/url?q=https://xn--megab-mdb.com
http://google.mg/url?q=https://xn--megab-mdb.com
http://google.com.ec/url?q=https://xn--megab-mdb.com
https://google.rs/url?q=https://xn--megab-mdb.com
https://www.google.co.hu/url?q=https://xn--megab-mdb.com
http://google.md/url?q=https://xn--megab-mdb.com
https://images.google.hu/url?q=https://xn--megab-mdb.com
https://www.google.com.tw/url?q=https://xn--megab-mdb.com
https://google.ae/url?q=https://xn--megab-mdb.com
https://images.google.jo/url?q=https://xn--megab-mdb.com
http://images.google.tm/url?q=https://xn--megab-mdb.com
https://images.google.com.mm/url?q=https://xn--megab-mdb.com
https://maps.google.vu/url?q=https://xn--megab-mdb.com
https://maps.google.co.ls/url?q=https://xn--megab-mdb.com
https://www.google.com.cy/url?q=https://xn--megab-mdb.com
http://google.com.lb/url?q=https://xn--megab-mdb.com
http://google.co.kr/url?q=https://xn--megab-mdb.com
http://images.google.nu/url?q=https://xn--megab-mdb.com
http://google.cl/url?q=https://xn--megab-mdb.com
http://www.google.com.bo/url?q=https://xn--megab-mdb.com
https://google.ad/url?q=https://xn--megab-mdb.com
https://maps.google.pt/url?q=https://xn--megab-mdb.com
https://maps.google.es/url?q=https://xn--megab-mdb.com
https://maps.google.sn/url?q=https://xn--megab-mdb.com
http://google.tk/url?q=https://xn--megab-mdb.com
https://google.com.bn/url?q=https://xn--megab-mdb.com
https://google.com.ua/url?q=https://xn--megab-mdb.com
https://www.google.com.sg/url?q=https://xn--megab-mdb.com
https://images.google.info/url?q=https://xn--megab-mdb.com
https://maps.google.de/url?q=https://xn--megab-mdb.com
https://images.google.cv/url?q=https://xn--megab-mdb.com
http://google.com.nf/url?q=https://xn--megab-mdb.com
https://images.google.com.ly/url?q=https://xn--megab-mdb.com
http://images.google.tg/url?q=https://xn--megab-mdb.com
http://google.cv/url?q=https://xn--megab-mdb.com
http://gngjd.com/url?q=https://xn--megab-mdb.com
http://www.google.je/url?q=https://xn--megab-mdb.com
http://maps.google.by/url?q=https://xn--megab-mdb.com
http://maps.google.fi/url?q=https://xn--megab-mdb.com
https://images.gngjd.com/url?q=https://xn--megab-mdb.com
http://google.ne/url?q=https://xn--megab-mdb.com
http://images.google.kg/url?q=https://xn--megab-mdb.com
https://www.google.cn/url?q=https://xn--megab-mdb.com
https://google.am/url?q=https://xn--megab-mdb.com
http://google.com.ly/url?q=https://xn--megab-mdb.com
https://google.iq/url?q=https://xn--megab-mdb.com
https://google.com.sv/url?q=https://xn--megab-mdb.com
https://google.sc/url?q=https://xn--megab-mdb.com
http://google.kg/url?q=https://xn--megab-mdb.com
http://google.li/url?q=https://xn--megab-mdb.com
http://images.google.al/url?q=https://xn--megab-mdb.com
https://maps.google.je/url?q=https://xn--megab-mdb.com
http://maps.google.to/url?q=https://xn--megab-mdb.com
http://google.co.cr/url?q=https://xn--megab-mdb.com
http://images.google.com.tj/url?q=https://xn--megab-mdb.com
https://www.google.com.ph/url?q=https://xn--megab-mdb.com
https://maps.google.com.bn/url?q=https://xn--megab-mdb.com
https://www.google.as/url?q=https://xn--megab-mdb.com
https://images.google.co.ao/url?q=https://xn--megab-mdb.com
http://maps.google.com.bo/url?q=https://xn--megab-mdb.com
https://maps.google.com/url?q=https://xn--megab-mdb.com
https://www.google.com.bh/url?q=https://xn--megab-mdb.com
https://maps.google.com.mm/url?q=https://xn--megab-mdb.com
http://google.com.gi/url?q=https://xn--megab-mdb.com
http://maps.google.ba/url?q=https://xn--megab-mdb.com
http://google.co.id/url?q=https://xn--megab-mdb.com
http://google.be/url?q=https://xn--megab-mdb.com
http://images.google.mg/url?q=https://xn--megab-mdb.com
http://google.com.ar/url?q=https://xn--megab-mdb.com
https://maps.google.co.za/url?q=https://xn--megab-mdb.com
https://www.google.gp/url?q=https://xn--megab-mdb.com
http://www.google.sh/url?q=https://xn--megab-mdb.com
https://images.google.ee/url?q=https://xn--megab-mdb.com
https://www.google.rw/url?q=https://xn--megab-mdb.com
http://images.google.si/url?q=https://xn--megab-mdb.com
https://www.google.at/url?q=https://xn--megab-mdb.com
http://maps.google.at/url?q=https://xn--megab-mdb.com
http://maps.google.co.in/url?q=https://xn--megab-mdb.com
https://maps.google.ga/url?q=https://xn--megab-mdb.com
http://maps.google.sm/url?q=https://xn--megab-mdb.com
http://google.ms/url?q=https://xn--megab-mdb.com
https://images.google.com.gh/url?q=https://xn--megab-mdb.com
http://maps.google.cn/url?q=https://xn--megab-mdb.com
https://www.google.com.na/url?q=https://xn--megab-mdb.com
https://maps.google.hr/url?q=https://xn--megab-mdb.com
https://google.ci/url?q=https://xn--megab-mdb.com
https://images.google.hr/url?q=https://xn--megab-mdb.com
http://maps.google.com.do/url?q=https://xn--megab-mdb.com
http://google.lk/url?q=https://xn--megab-mdb.com
http://images.google.cn/url?q=https://xn--megab-mdb.com
http://www.bon-vivant.net/url?q=https://xn--megab-mdb.com
http://maps.google.com.gt/url?q=https://xn--megab-mdb.com
http://www.google.com.ag/url?q=https://xn--megab-mdb.com
https://maps.google.mu/url?q=https://xn--megab-mdb.com
https://google.com.ng/url?q=https://xn--megab-mdb.com
https://www.google.co.uk/url?q=https://xn--megab-mdb.com
https://google.us/url?q=https://xn--megab-mdb.com
https://www.google.com.tr/url?q=https://xn--megab-mdb.com
http://www.google.co.ma/url?q=https://xn--megab-mdb.com
https://maps.google.co.zw/url?q=https://xn--megab-mdb.com
https://www.google.bs/url?q=https://xn--megab-mdb.com
https://www.google.pl/url?q=https://xn--megab-mdb.com
http://www.googleadservices.com/url?q=https://xn--megab-mdb.com
http://google.kz/url?q=https://xn--megab-mdb.com
https://google.com.mt/url?q=https://xn--megab-mdb.com
http://www.google.co.zw/url?q=https://xn--megab-mdb.com
https://maps.google.ne/url?q=https://xn--megab-mdb.com
https://google.com.qa/url?q=https://xn--megab-mdb.com
https://google.se/url?q=https://xn--megab-mdb.com
http://www.google.mw/url?q=https://xn--megab-mdb.com
https://maps.google.co.mz/url?q=https://xn--megab-mdb.com
http://maps.google.com.sv/url?q=https://xn--megab-mdb.com
https://www.google.sm/url?q=https://xn--megab-mdb.com
https://maps.google.com.tw/url?q=https://xn--megab-mdb.com
https://google.ca/url?q=https://xn--megab-mdb.com
https://www.google.is/url?q=https://xn--megab-mdb.com
https://google.com.jm/url?q=https://xn--megab-mdb.com
http://images.google.co.ug/url?q=https://xn--megab-mdb.com
https://maps.google.com.kh/url?q=https://xn--megab-mdb.com
http://maps.google.tl/url?q=https://xn--megab-mdb.com
http://www.google.co.nz/url?q=https://xn--megab-mdb.com
https://www.google.gg/url?q=https://xn--megab-mdb.com
https://google.to/url?q=https://xn--megab-mdb.com
https://google.ro/url?q=https://xn--megab-mdb.com
http://google.td/url?q=https://xn--megab-mdb.com
https://www.google.by/url?q=https://xn--megab-mdb.com
https://www.google.nl/url?q=https://xn--megab-mdb.com
http://maps.google.ci/url?q=https://xn--megab-mdb.com
http://maps.google.dz/url?q=https://xn--megab-mdb.com
https://google.hu/url?q=https://xn--megab-mdb.com
http://images.google.ht/url?q=https://xn--megab-mdb.com
http://google.mv/url?q=https://xn--megab-mdb.com
https://google.cf/url?q=https://xn--megab-mdb.com
http://maps.google.com.ly/url?q=https://xn--megab-mdb.com
http://www.google.nu/url?q=https://xn--megab-mdb.com
http://google.com.tj/url?q=https://xn--megab-mdb.com
https://maps.google.com.mt/url?q=https://xn--megab-mdb.com
https://google.so/url?q=https://xn--megab-mdb.com
http://images.google.bj/url?q=https://xn--megab-mdb.com
https://maps.google.la/url?q=https://xn--megab-mdb.com
https://images.google.us/url?q=https://xn--megab-mdb.com
https://images.google.com.eg/url?q=https://xn--megab-mdb.com
https://images.google.cf/url?q=https://xn--megab-mdb.com
https://images.google.la/url?q=https://xn--megab-mdb.com
http://maps.google.com.ag/url?q=https://xn--megab-mdb.com
http://google.ga/url?q=https://xn--megab-mdb.com
http://google.co.uz/url?q=https://xn--megab-mdb.com
http://maps.google.no/url?q=https://xn--megab-mdb.com
https://www.google.gl/url?q=https://xn--megab-mdb.com
http://images.google.co.vi/url?q=https://xn--megab-mdb.com
https://images.google.ne/url?q=https://xn--megab-mdb.com
https://google.com.om/url?q=https://xn--megab-mdb.com
http://maps.google.lt/url?q=https://xn--megab-mdb.com
https://maps.google.kg/url?q=https://xn--megab-mdb.com
http://www.google.com.hk/url?q=https://xn--megab-mdb.com
https://google.com.co/url?q=https://xn--megab-mdb.com
https://google.dk/url?q=https://xn--megab-mdb.com
https://maps.google.com.sa/url?q=https://xn--megab-mdb.com
http://google.com.fj/url?q=https://xn--megab-mdb.com
http://maps.google.com.ec/url?q=https://xn--megab-mdb.com
https://maps.google.mn/url?q=https://xn--megab-mdb.com
https://maps.google.bf/url?q=https://xn--megab-mdb.com
https://www.google.tt/url?q=https://xn--megab-mdb.com
https://www.google.dj/url?q=https://xn--megab-mdb.com
https://www.google.com.pr/url?q=https://xn--megab-mdb.com
https://maps.google.ws/url?q=https://xn--megab-mdb.com
http://google.jo/url?q=https://xn--megab-mdb.com
https://google.co.ug/url?q=https://xn--megab-mdb.com
https://images.google.com.bd/url?q=https://xn--megab-mdb.com
https://google.tg/url?q=https://xn--megab-mdb.com
http://maps.google.dm/url?q=https://xn--megab-mdb.com
https://www.google.pn/url?q=https://xn--megab-mdb.com
https://www.google.com.et/url?q=https://xn--megab-mdb.com
http://maps.google.com.jm/url?q=https://xn--megab-mdb.com
http://www.google.bg/url?q=https://xn--megab-mdb.com
http://maps.google.hu/url?q=https://xn--megab-mdb.com
https://maps.google.kz/url?q=https://xn--megab-mdb.com
https://images.google.com.pl/url?q=https://xn--megab-mdb.com
http://www.google.st/url?q=https://xn--megab-mdb.com
https://maps.google.com.kw/url?q=https://xn--megab-mdb.com
https://maps.google.ru/url?q=https://xn--megab-mdb.com
https://google.co.mz/url?q=https://xn--megab-mdb.com
http://www.google.co.ls/url?q=https://xn--megab-mdb.com
https://www.google.az/url?q=https://xn--megab-mdb.com
http://maps.google.co.uk/url?q=https://xn--megab-mdb.com
https://www.google.com.do/url?q=https://xn--megab-mdb.com
http://www.google.es/url?q=https://xn--megab-mdb.com
http://google.gm/url?q=https://xn--megab-mdb.com
http://images.google.so/url?q=https://xn--megab-mdb.com
https://www.google.com.pk/url?q=https://xn--megab-mdb.com
https://www.google.com.sb/url?q=https://xn--megab-mdb.com
https://images.google.ad/url?q=https://xn--megab-mdb.com
http://google.sn/url?q=https://xn--megab-mdb.com
http://google.ps/url?q=https://xn--megab-mdb.com
https://maps.google.bg/url?q=https://xn--megab-mdb.com
https://images.google.com.cy/url?q=https://xn--megab-mdb.com
http://www.google.pt/url?q=https://xn--megab-mdb.com
https://images.google.to/url?q=https://xn--megab-mdb.com
http://images.google.co.uz/url?q=https://xn--megab-mdb.com
http://google.com.sl/url?q=https://xn--megab-mdb.com
http://www.google.gy/url?q=https://xn--megab-mdb.com
http://www.google.cd/url?q=https://xn--megab-mdb.com
https://maps.google.com.my/url?q=https://xn--megab-mdb.com
http://www.google.com.ai/url?q=https://xn--megab-mdb.com
https://google.hn/url?q=https://xn--megab-mdb.com
http://images.google.ba/url?q=https://xn--megab-mdb.com
http://maps.google.com.pe/url?q=https://xn--megab-mdb.com
http://google.de/url?q=https://xn--megab-mdb.com
http://maps.google.com.gi/url?q=https://xn--megab-mdb.com
https://images.google.cat/url?q=https://xn--megab-mdb.com
https://www.google.co.ck/url?q=https://xn--megab-mdb.com
https://images.google.com.bn/url?q=https://xn--megab-mdb.com
http://maps.google.ae/url?q=https://xn--megab-mdb.com
http://images.google.no/url?q=https://xn--megab-mdb.com
http://maps.google.bs/url?q=https://xn--megab-mdb.com
http://maps.google.gy/url?q=https://xn--megab-mdb.com
http://maps.google.com.pa/url?q=https://xn--megab-mdb.com
https://google.cc/url?q=https://xn--megab-mdb.com
http://google.co.th/url?q=https://xn--megab-mdb.com
http://maps.google.com.mx/url?q=https://xn--megab-mdb.com
http://www.google.lu/url?q=https://xn--megab-mdb.com
https://google.bf/url?q=https://xn--megab-mdb.com
http://www.google.it/url?q=https://xn--megab-mdb.com
http://google.com.br/url?q=https://xn--megab-mdb.com
http://images.google.bg/url?q=https://xn--megab-mdb.com
http://google.co.il/url?q=https://xn--megab-mdb.com
https://google.ws/url?q=https://xn--megab-mdb.com
http://images.google.st/url?q=https://xn--megab-mdb.com
http://duck.com/url?q=https://xn--megab-mdb.com
https://www.google.net/url?q=https://xn--megab-mdb.com
https://images.google.sn/url?q=https://xn--megab-mdb.com
http://maps.google.co.jp/url?q=https://xn--megab-mdb.com
http://www.google.bj/url?q=https://xn--megab-mdb.com
https://maps.google.com.qa/url?q=https://xn--megab-mdb.com
https://maps.google.com.co/url?q=https://xn--megab-mdb.com
http://www.google.ch/url?q=https://xn--megab-mdb.com
http://www.google.com.pe/url?q=https://xn--megab-mdb.com
http://images.google.co.mz/url?q=https://xn--megab-mdb.com
https://www.google.cm/url?q=https://xn--megab-mdb.com
http://maps.google.nr/url?q=https://xn--megab-mdb.com
https://www.google.al/url?q=https://xn--megab-mdb.com
https://google.sk/url?q=https://xn--megab-mdb.com
http://maps.google.rs/url?q=https://xn--megab-mdb.com
http://maps.google.gr/url?q=https://xn--megab-mdb.com
https://google.la/url?q=https://xn--megab-mdb.com
http://maps.google.com.ph/url?q=https://xn--megab-mdb.com
https://www.google.com/url?q=https://xn--megab-mdb.com
http://google.ee/url?q=https://xn--megab-mdb.com
https://google.com.pl/url?q=https://xn--megab-mdb.com
http://maps.google.com.pg/url?q=https://xn--megab-mdb.com
https://google.vg/url?q=https://xn--megab-mdb.com
https://www.google.co.ke/url?q=https://xn--megab-mdb.com
https://maps.google.com.pr/url?q=https://xn--megab-mdb.com
http://www.google.no/url?q=https://xn--megab-mdb.com
https://maps.google.fr/url?q=https://xn--megab-mdb.com
https://maps.google.as/url?q=https://xn--megab-mdb.com
https://google.mn/url?q=https://xn--megab-mdb.com
http://google.com.kh/url?q=https://xn--megab-mdb.com
http://images.google.me/url?q=https://xn--megab-mdb.com
http://maps.google.com.sl/url?q=https://xn--megab-mdb.com
http://maps.google.pn/url?q=https://xn--megab-mdb.com
http://www.google.fr/url?q=https://xn--megab-mdb.com
https://maps.google.com.bz/url?q=https://xn--megab-mdb.com
https://maps.google.com.cu/url?q=https://xn--megab-mdb.com
https://google.com.eg/url?q=https://xn--megab-mdb.com
http://www.google.com.kw/url?q=https://xn--megab-mdb.com
https://google.com.cu/url?q=https://xn--megab-mdb.com
https://www.google.co.in/url?q=https://xn--megab-mdb.com
http://maps.google.tt/url?q=https://xn--megab-mdb.com
http://google.com.gt/url?q=https://xn--megab-mdb.com
http://maps.google.ge/url?q=https://xn--megab-mdb.com
https://maps.google.vg/url?q=https://xn--megab-mdb.com
http://images.google.com.om/url?q=https://xn--megab-mdb.com
http://google.ht/url?q=https://xn--megab-mdb.com
https://maps.google.com.na/url?q=https://xn--megab-mdb.com
http://google.ru/url?q=https://xn--megab-mdb.com
https://maps.google.gg/url?q=https://xn--megab-mdb.com
https://maps.google.com.br/url?q=https://xn--megab-mdb.com
https://maps.google.li/url?q=https://xn--megab-mdb.com
http://www.google.ba/url?q=https://xn--megab-mdb.com
http://maps.google.com.lb/url?q=https://xn--megab-mdb.com
http://images.google.ws/url?q=https://xn--megab-mdb.com
http://images.google.com.gt/url?q=https://xn--megab-mdb.com
http://maps.g.cn/url?q=https://xn--megab-mdb.com
http://google.co.zm/url?q=https://xn--megab-mdb.com
https://www.google.tl/url?q=https://xn--megab-mdb.com
http://www.google.com.np/url?q=https://xn--megab-mdb.com
https://maps.google.co.nz/url?q=https://xn--megab-mdb.com
http://maps.google.cf/url?q=https://xn--megab-mdb.com
http://maps.google.com.et/url?q=https://xn--megab-mdb.com
http://maps.google.rw/url?q=https://xn--megab-mdb.com
https://maps.google.co.ve/url?q=https://xn--megab-mdb.com
https://images.google.co.ck/url?q=https://xn--megab-mdb.com
https://images.google.co.zm/url?q=https://xn--megab-mdb.com
https://www.google.mu/url?q=https://xn--megab-mdb.com
https://maps.google.com.py/url?q=https://xn--megab-mdb.com
http://www.google.lv/url?q=https://xn--megab-mdb.com
http://maps.google.co.ug/url?q=https://xn--megab-mdb.com
https://maps.google.it/url?q=https://xn--megab-mdb.com
https://google.fi/url?q=https://xn--megab-mdb.com
https://maps.google.ms/url?q=https://xn--megab-mdb.com
https://maps.google.mv/url?q=https://xn--megab-mdb.com
http://maps.google.com.eg/url?q=https://xn--megab-mdb.com
https://maps.google.so/url?q=https://xn--megab-mdb.com
http://www.google.nr/url?q=https://xn--megab-mdb.com
https://maps.google.com.ar/url?q=https://xn--megab-mdb.com
http://images.google.com.bo/url?q=https://xn--megab-mdb.com
https://maps.google.tk/url?q=https://xn--megab-mdb.com
http://maps.google.com.hk/url?q=https://xn--megab-mdb.com
https://www.google.com.vn/url?q=https://xn--megab-mdb.com
https://www.google.bi/url?q=https://xn--megab-mdb.com
https://images.google.co.tz/url?q=https://xn--megab-mdb.com
http://google.co.bw/url?q=https://xn--megab-mdb.com
https://images.google.tl/url?q=https://xn--megab-mdb.com
http://maps.google.com.sg/url?q=https://xn--megab-mdb.com
https://images.google.mv/url?q=https://xn--megab-mdb.com
https://www.google.info/url?q=https://xn--megab-mdb.com
https://www.google.com.bz/url?q=https://xn--megab-mdb.com
http://maps.google.ee/url?q=https://xn--megab-mdb.com
http://google.co.za/url?q=https://xn--megab-mdb.com
http://www.g.cn/url?q=https://xn--megab-mdb.com
https://maps.google.ad/url?q=https://xn--megab-mdb.com
https://maps.google.hn/url?q=https://xn--megab-mdb.com
https://images.google.is/url?q=https://xn--megab-mdb.com
https://maps.google.ca/url?q=https://xn--megab-mdb.com
http://maps.google.ro/url?q=https://xn--megab-mdb.com
https://images.google.com.kh/url?q=https://xn--megab-mdb.com
http://google.com.pg/url?q=https://xn--megab-mdb.com
https://maps.google.co.vi/url?q=https://xn--megab-mdb.com
http://maps.google.com.np/url?q=https://xn--megab-mdb.com
https://images.google.tk/url?q=https://xn--megab-mdb.com
http://images.google.nr/url?q=https://xn--megab-mdb.com
http://maps.google.com.ng/url?q=https://xn--megab-mdb.com
https://maps.google.ki/url?q=https://xn--megab-mdb.com
https://images.google.cm/url?q=https://xn--megab-mdb.com
http://maps.google.gm/url?q=https://xn--megab-mdb.com
https://images.google.by/url?q=https://xn--megab-mdb.com
https://google.fm/url?q=https://xn--megab-mdb.com
http://google.co.vi/url?q=https://xn--megab-mdb.com
http://maps.google.cz/url?q=https://xn--megab-mdb.com
https://images.google.co.ma/url?q=https://xn--megab-mdb.com
http://www.google.com.vc/url?q=https://xn--megab-mdb.com
https://maps.google.jo/url?q=https://xn--megab-mdb.com
http://images.google.com.sb/url?q=https://xn--megab-mdb.com
https://images.google.com/url?q=https://xn--megab-mdb.com
https://maps.google.ch/url?q=https://xn--megab-mdb.com
http://maps.google.mk/url?q=https://xn--megab-mdb.com
http://www.google.com.ni/url?q=https://xn--megab-mdb.com
http://images.google.cz/url?q=https://xn--megab-mdb.com
https://images.google.com.vc/url?q=https://xn--megab-mdb.com
https://maps.google.co.ke/url?q=https://xn--megab-mdb.com
http://maps.google.com.uy/url?q=https://xn--megab-mdb.com
https://www.google.ie/url?q=https://xn--megab-mdb.com
https://maps.google.nu/url?q=https://xn--megab-mdb.com
http://images.google.cc/url?q=https://xn--megab-mdb.com
https://images.google.gr/url?q=https://xn--megab-mdb.com
https://google.lt/url?q=https://xn--megab-mdb.com
http://google.tm/url?q=https://xn--megab-mdb.com
https://maps.google.co.bw/url?q=https://xn--megab-mdb.com
http://www.google.vu/url?q=https://xn--megab-mdb.com
http://maps.google.lu/url?q=https://xn--megab-mdb.com
http://maps.google.lv/url?q=https://xn--megab-mdb.com
https://images.google.je/url?q=https://xn--megab-mdb.com
https://www.google.co.ve/url?q=https://xn--megab-mdb.com
https://images.google.com.ng/url?q=https://xn--megab-mdb.com
http://googlemaps.com/url?q=https://xn--megab-mdb.com
http://maps.google.com.fj/url?q=https://xn--megab-mdb.com
http://plus.google.com/url?q=https://xn--megab-mdb.com
http://plus.gngjd.com/url?q=https://xn--megab-mdb.com
http://google.com.af/url?q=https://xn--megab-mdb.com
https://images.google.md/url?q=https://xn--megab-mdb.com
https://www.google.com.mm/url?q=https://xn--megab-mdb.com
https://maps.google.st/url?q=https://xn--megab-mdb.com
http://maps.google.cat/url?q=https://xn--megab-mdb.com
http://google.co.jp/url?q=https://xn--megab-mdb.com
https://maps.google.lk/url?q=https://xn--megab-mdb.com
http://maps.google.co.kr/url?q=https://xn--megab-mdb.com
http://google.com.bd/url?q=https://xn--megab-mdb.com
https://images.google.co.ke/url?q=https://xn--megab-mdb.com
https://www.google.gr/url?q=https://xn--megab-mdb.com
https://images.google.ac/url?q=https://xn--megab-mdb.com
http://maps.google.ie/url?q=https://xn--megab-mdb.com
http://google.com.tn/url?q=https://xn--megab-mdb.com
https://maps.google.iq/url?q=https://xn--megab-mdb.com
http://images.google.com.lb/url?q=https://xn--megab-mdb.com
https://images.google.ga/url?q=https://xn--megab-mdb.com
http://maps.google.nl/url?q=https://xn--megab-mdb.com
https://maps.google.com.ai/url?q=https://xn--megab-mdb.com
https://maps.google.cl/url?q=https://xn--megab-mdb.com
http://maps.google.co.id/url?q=https://xn--megab-mdb.com
https://maps.google.fm/url?q=https://xn--megab-mdb.com
https://maps.google.com.ni/url?q=https://xn--megab-mdb.com
https://maps.google.bi/url?q=https://xn--megab-mdb.com
https://www.google.ki/url?q=https://xn--megab-mdb.com
https://google.dm/url?q=https://xn--megab-mdb.com
https://images.google.mn/url?q=https://xn--megab-mdb.com
https://images.google.gy/url?q=https://xn--megab-mdb.com
https://google.com.my/url?q=https://xn--megab-mdb.com
http://maps.google.tg/url?q=https://xn--megab-mdb.com
https://images.google.com.sa/url?q=https://xn--megab-mdb.com
https://maps.google.com.om/url?q=https://xn--megab-mdb.com
https://images.google.com.vn/url?q=https://xn--megab-mdb.com
https://maps.google.co.hu/url?q=https://xn--megab-mdb.com
http://maps.google.be/url?q=https://xn--megab-mdb.com
http://images.google.com.bh/url?q=https://xn--megab-mdb.com
https://images.google.com.kw/url?q=https://xn--megab-mdb.com
https://maps.google.gp/url?q=https://xn--megab-mdb.com
http://images.google.com.af/url?q=https://xn--megab-mdb.com
http://images.google.com.bz/url?q=https://xn--megab-mdb.com
https://maps.google.se/url?q=https://xn--megab-mdb.com
https://maps.google.cg/url?q=https://xn--megab-mdb.com
https://images.google.mk/url?q=https://xn--megab-mdb.com
https://www.google.com.uy/url?q=https://xn--megab-mdb.com
http://maps.google.cm/url?q=https://xn--megab-mdb.com
https://maps.google.cd/url?q=https://xn--megab-mdb.com
https://maps.google.mg/url?q=https://xn--megab-mdb.com
https://images.google.am/url?q=https://xn--megab-mdb.com
https://images.google.com.tn/url?q=https://xn--megab-mdb.com
https://images.google.co.id/url?q=https://xn--megab-mdb.com
https://maps.google.com.bd/url?q=https://xn--megab-mdb.com
https://maps.google.co.tz/url?q=https://xn--megab-mdb.com
http://images.google.com.ai/url?q=https://xn--megab-mdb.com
http://images.google.bf/url?q=https://xn--megab-mdb.com
http://maps.google.co.il/url?q=https://xn--megab-mdb.com
http://maps.google.co.zm/url?q=https://xn--megab-mdb.com
http://images.google.com.qa/url?q=https://xn--megab-mdb.com
http://images.google.lk/url?q=https://xn--megab-mdb.com
http://maps.google.cv/url?q=https://xn--megab-mdb.com
http://maps.google.im/url?q=https://xn--megab-mdb.com
https://maps.google.com.gh/url?q=https://xn--megab-mdb.com
https://maps.google.co.ao/url?q=https://xn--megab-mdb.com
http://maps.google.co.th/url?q=https://xn--megab-mdb.com
https://maps.google.gl/url?q=https://xn--megab-mdb.com
https://maps.google.com.ua/url?q=https://xn--megab-mdb.com
http://maps.google.td/url?q=https://xn--megab-mdb.com
https://google.me/url?q=https://xn--megab-mdb.com
https://maps.google.bj/url?q=https://xn--megab-mdb.com
https://maps.google.pl/url?q=https://xn--megab-mdb.com
http://maps.google.com.tr/url?q=https://xn--megab-mdb.com
https://images.google.sc/url?q=https://xn--megab-mdb.com
https://images.google.com.et/url?q=https://xn--megab-mdb.com
https://maps.google.dk/url?q=https://xn--megab-mdb.com
https://images.google.iq/url?q=https://xn--megab-mdb.com
http://maps.google.sc/url?q=https://xn--megab-mdb.com
http://images.google.co.bw/url?q=https://xn--megab-mdb.com
http://images.google.dz/url?q=https://xn--megab-mdb.com
https://maps.google.ht/url?q=https://xn--megab-mdb.com
https://google.cat/url?q=https://xn--megab-mdb.com
http://maps.google.com.bh/url?q=https://xn--megab-mdb.com
http://maps.google.ml/url?q=https://xn--megab-mdb.com
https://maps.google.com.pl/url?q=https://xn--megab-mdb.com
https://maps.google.com.vc/url?q=https://xn--megab-mdb.com
https://maps.google.com.au/url?q=https://xn--megab-mdb.com
http://images.g.cn/url?q=https://xn--megab-mdb.com
http://maps.google.co.ck/url?q=https://xn--megab-mdb.com
http://maps.google.sh/url?q=https://xn--megab-mdb.com
http://maps.google.com.sb/url?q=https://xn--megab-mdb.com
http://maps.google.sk/url?q=https://xn--megab-mdb.com
http://images.google.rs/url?q=https://xn--megab-mdb.com
http://maps.google.dj/url?q=https://xn--megab-mdb.com
http://maps.google.si/url?q=https://xn--megab-mdb.com
http://images.google.ps/url?q=https://xn--megab-mdb.com
http://images.google.com.pg/url?q=https://xn--megab-mdb.com
https://images.google.net/url?q=https://xn--megab-mdb.com
http://images.google.com.sl/url?q=https://xn--megab-mdb.com
https://images.google.gp/url?q=https://xn--megab-mdb.com
https://maps.gngjd.com/url?q=https://xn--megab-mdb.com
https://images.google.co.zw/url?q=https://xn--megab-mdb.com
suhagra online india
how to get avodart
lasix iv
order phenergan on line without prescription
silagra visa
tetracycline 300 mg
buy cymbalta 30mg
tamoxifen 100 mg
kamagra oral jelly india manufacturer
buy doxycycline online uk
glucophage generic drug
Nice post. I was checking continuously this weblog and I’m inspired!
Very helpful info specifically the ultimate section 🙂 I handle
such information a lot. I was looking for this particular
info for a very lengthy time. Thank you and good luck.
This is really interesting, You’re a very skilled blogger.
I have joined your rss feed and look forward to seeking
more of your excellent post. Also, I have shared your site in my social networks!
This is not a set-and-overlook sort of CPA advertising and marketing technique.
Statcounter- Here’s another astonishing enterprise advertising device.
In order to search out worthwhile campaigns quicker, I take advantage of a device called Adplexity.
One should observe all of the important suggestions talked about above with
the intention to avoid the tax associated issues . Hire Business Tax Consulting Firms with correct
agreements – You want to ensure you’ve gotten agreements in place before the work
starts to avoid the issues. The printed place
may also cowl completely the entire envelope areas,
enabling the print to go proper up to the edges of
the envelope on both the again and front. Gummed seal
envelopes have a strip of gummed so as to adhere on the
flap of the envelope that turns into sticky when moistened.
Certain greater and extra revolutionary envelope remodeling machines have flexo printing capacity which permits the printing and folding to be performed at the same time.
order zithromax
doxycycline india
cheap amoxicillin 500mg online
anafranil 75 mg price
paroxetine 7.5
20 mg tadalafil best price
tadacip cipla
glucophage 500mg price
diflucan uk
nolvadex prescription australia
erythromycin over the counter australia
colchicine 0.3 mg daily
metformin 600 mg
Любители футбола обязательно оценят наш ассортимент мужских бутс. Идеальные бутсы для идеальной игры.
prednisone 60 mg tablet
camiseta francia 2023
https://images.google.as/url?q=https://xn--megab-mdb.com
https://images.google.off.ai/url?q=https://xn--megab-mdb.com
https://images.google.com.ag/url?q=https://xn--megab-mdb.com
https://images.google.com.ar/url?q=https://xn--megab-mdb.com
https://images.google.com.au/url?q=https://xn--megab-mdb.com
https://images.google.at/url?q=https://xn--megab-mdb.com
https://images.google.az/url?q=https://xn--megab-mdb.com
https://images.google.be/url?q=https://xn--megab-mdb.com
https://images.google.com.br/url?q=https://xn--megab-mdb.com
https://images.google.vg/url?q=https://xn--megab-mdb.com
https://images.google.bi/url?q=https://xn--megab-mdb.com
https://images.google.ca/url?q=https://xn--megab-mdb.com
https://images.google.td/url?q=https://xn--megab-mdb.com
https://images.google.cl/url?q=https://xn--megab-mdb.com
https://images.google.com.co/url?q=https://xn--megab-mdb.com
https://images.google.co.cr/url?q=https://xn--megab-mdb.com
https://images.google.ci/url?q=https://xn--megab-mdb.com
https://images.google.com.cu/url?q=https://xn--megab-mdb.com
https://images.google.cd/url?q=https://xn--megab-mdb.com
https://images.google.dk/url?q=https://xn--megab-mdb.com
https://images.google.dj/url?q=https://xn--megab-mdb.com
https://images.google.com.do/url?q=https://xn--megab-mdb.com
https://images.google.com.ec/url?q=https://xn--megab-mdb.com
https://images.google.com.sv/url?q=https://xn--megab-mdb.com
https://images.google.fm/url?q=https://xn--megab-mdb.com
https://images.google.com.fj/url?q=https://xn--megab-mdb.com
https://images.google.fi/url?q=https://xn--megab-mdb.com
https://images.google.fr/url?q=https://xn--megab-mdb.com
https://images.google.gm/url?q=https://xn--megab-mdb.com
https://images.google.ge/url?q=https://xn--megab-mdb.com
https://images.google.de/url?q=https://xn--megab-mdb.com
https://images.google.com.gi/url?q=https://xn--megab-mdb.com
https://images.google.com.gr/url?q=https://xn--megab-mdb.com
https://images.google.gl/url?q=https://xn--megab-mdb.com
https://images.google.gg/url?q=https://xn--megab-mdb.com
https://images.google.hn/url?q=https://xn--megab-mdb.com
https://images.google.com.hk/url?q=https://xn--megab-mdb.com
https://images.google.co.hu/url?q=https://xn--megab-mdb.com
https://images.google.co.in/url?q=https://xn--megab-mdb.com
https://images.google.ie/url?q=https://xn--megab-mdb.com
https://images.google.co.im/url?q=https://xn--megab-mdb.com
https://images.google.co.il/url?q=https://xn--megab-mdb.com
https://images.google.it/url?q=https://xn--megab-mdb.com
https://images.google.com.jm/url?q=https://xn--megab-mdb.com
https://images.google.co.jp/url?q=https://xn--megab-mdb.com
https://images.google.co.je/url?q=https://xn--megab-mdb.com
https://images.google.kz/url?q=https://xn--megab-mdb.com
https://images.google.co.kr/url?q=https://xn--megab-mdb.com
https://images.google.lv/url?q=https://xn--megab-mdb.com
https://images.google.co.ls/url?q=https://xn--megab-mdb.com
https://images.google.li/url?q=https://xn--megab-mdb.com
https://images.google.lt/url?q=https://xn--megab-mdb.com
https://images.google.lu/url?q=https://xn--megab-mdb.com
https://images.google.mw/url?q=https://xn--megab-mdb.com
https://images.google.com.my/url?q=https://xn--megab-mdb.com
https://images.google.com.mt/url?q=https://xn--megab-mdb.com
https://images.google.mu/url?q=https://xn--megab-mdb.com
https://images.google.com.mx/url?q=https://xn--megab-mdb.com
https://images.google.ms/url?q=https://xn--megab-mdb.com
https://images.google.com.na/url?q=https://xn--megab-mdb.com
https://images.google.com.np/url?q=https://xn--megab-mdb.com
https://images.google.nl/url?q=https://xn--megab-mdb.com
https://images.google.co.nz/url?q=https://xn--megab-mdb.com
https://images.google.com.ni/url?q=https://xn--megab-mdb.com
https://images.google.com.nf/url?q=https://xn--megab-mdb.com
https://images.google.com.pk/url?q=https://xn--megab-mdb.com
https://images.google.com.pa/url?q=https://xn--megab-mdb.com
https://images.google.com.py/url?q=https://xn--megab-mdb.com
https://images.google.com.pe/url?q=https://xn--megab-mdb.com
https://images.google.com.ph/url?q=https://xn--megab-mdb.com
https://images.google.pn/url?q=https://xn--megab-mdb.com
https://images.google.pl/url?q=https://xn--megab-mdb.com
https://images.google.pt/url?q=https://xn--megab-mdb.com
https://images.google.com.pr/url?q=https://xn--megab-mdb.com
https://images.google.cg/url?q=https://xn--megab-mdb.com
https://images.google.ro/url?q=https://xn--megab-mdb.com
https://images.google.ru/url?q=https://xn--megab-mdb.com
https://images.google.rw/url?q=https://xn--megab-mdb.com
https://images.google.sh/url?q=https://xn--megab-mdb.com
https://images.google.sm/url?q=https://xn--megab-mdb.com
https://images.google.com.sg/url?q=https://xn--megab-mdb.com
https://images.google.sk/url?q=https://xn--megab-mdb.com
https://images.google.co.za/url?q=https://xn--megab-mdb.com
https://images.google.es/url?q=https://xn--megab-mdb.com
https://images.google.se/url?q=https://xn--megab-mdb.com
https://images.google.ch/url?q=https://xn--megab-mdb.com
https://images.google.com.tw/url?q=https://xn--megab-mdb.com
https://images.google.co.th/url?q=https://xn--megab-mdb.com
https://images.google.tt/url?q=https://xn--megab-mdb.com
https://images.google.com.tr/url?q=https://xn--megab-mdb.com
https://images.google.com.ua/url?q=https://xn--megab-mdb.com
https://images.google.ae/url?q=https://xn--megab-mdb.com
https://images.google.co.uk/url?q=https://xn--megab-mdb.com
https://images.google.com.uy/url?q=https://xn--megab-mdb.com
https://images.google.uz/url?q=https://xn--megab-mdb.com
https://images.google.vu/url?q=https://xn--megab-mdb.com
https://images.google.co.ve/url?q=https://xn--megab-mdb.com
https://www.google.co.ao/url?q=https://xn--megab-mdb.com
https://images.google.im/url?q=https://xn--megab-mdb.com
https://images.google.dm/url?q=https://xn--megab-mdb.com
https://google.com.pa/url?q=https://xn--megab-mdb.com
http://maps.google.mw/url?q=https://xn--megab-mdb.com
https://google.ac/url?q=https://xn--megab-mdb.com
https://google.com.gh/url?q=https://xn--megab-mdb.com
https://google.dz/url?q=https://xn--megab-mdb.com
http://images.google.ki/url?q=https://xn--megab-mdb.com
http://www.google.im/url?q=https://xn--megab-mdb.com
https://google.com.mx/url?q=https://xn--megab-mdb.com
https://www.google.cz/url?q=https://xn--megab-mdb.com
http://google.hr/url?q=https://xn--megab-mdb.com
https://google.ml/url?q=https://xn--megab-mdb.com
https://www.google.com.au/url?q=https://xn--megab-mdb.com
https://images.google.bs/url?q=https://xn--megab-mdb.com
https://google.co.tz/url?q=https://xn--megab-mdb.com
http://google.cg/url?q=https://xn--megab-mdb.com
http://maps.google.is/url?q=https://xn--megab-mdb.com
http://google.si/url?q=https://xn--megab-mdb.com
http://google.com.py/url?q=https://xn--megab-mdb.com
http://maps.google.co.cr/url?q=https://xn--megab-mdb.com
http://www.google.mk/url?q=https://xn--megab-mdb.com
http://www.google.ge/url?q=https://xn--megab-mdb.com
https://images.google.ml/url?q=https://xn--megab-mdb.com
https://www.google.com.sa/url?q=https://xn--megab-mdb.com
http://google.mg/url?q=https://xn--megab-mdb.com
http://google.com.ec/url?q=https://xn--megab-mdb.com
https://google.rs/url?q=https://xn--megab-mdb.com
https://www.google.co.hu/url?q=https://xn--megab-mdb.com
http://google.md/url?q=https://xn--megab-mdb.com
https://images.google.hu/url?q=https://xn--megab-mdb.com
https://www.google.com.tw/url?q=https://xn--megab-mdb.com
https://google.ae/url?q=https://xn--megab-mdb.com
https://images.google.jo/url?q=https://xn--megab-mdb.com
http://images.google.tm/url?q=https://xn--megab-mdb.com
https://images.google.com.mm/url?q=https://xn--megab-mdb.com
https://maps.google.vu/url?q=https://xn--megab-mdb.com
https://maps.google.co.ls/url?q=https://xn--megab-mdb.com
https://www.google.com.cy/url?q=https://xn--megab-mdb.com
http://google.com.lb/url?q=https://xn--megab-mdb.com
http://google.co.kr/url?q=https://xn--megab-mdb.com
http://images.google.nu/url?q=https://xn--megab-mdb.com
http://google.cl/url?q=https://xn--megab-mdb.com
http://www.google.com.bo/url?q=https://xn--megab-mdb.com
https://google.ad/url?q=https://xn--megab-mdb.com
https://maps.google.pt/url?q=https://xn--megab-mdb.com
https://maps.google.es/url?q=https://xn--megab-mdb.com
https://maps.google.sn/url?q=https://xn--megab-mdb.com
http://google.tk/url?q=https://xn--megab-mdb.com
https://google.com.bn/url?q=https://xn--megab-mdb.com
https://google.com.ua/url?q=https://xn--megab-mdb.com
https://www.google.com.sg/url?q=https://xn--megab-mdb.com
https://images.google.info/url?q=https://xn--megab-mdb.com
https://maps.google.de/url?q=https://xn--megab-mdb.com
https://images.google.cv/url?q=https://xn--megab-mdb.com
http://google.com.nf/url?q=https://xn--megab-mdb.com
https://images.google.com.ly/url?q=https://xn--megab-mdb.com
http://images.google.tg/url?q=https://xn--megab-mdb.com
http://google.cv/url?q=https://xn--megab-mdb.com
http://gngjd.com/url?q=https://xn--megab-mdb.com
http://www.google.je/url?q=https://xn--megab-mdb.com
http://maps.google.by/url?q=https://xn--megab-mdb.com
http://maps.google.fi/url?q=https://xn--megab-mdb.com
https://images.gngjd.com/url?q=https://xn--megab-mdb.com
http://google.ne/url?q=https://xn--megab-mdb.com
http://images.google.kg/url?q=https://xn--megab-mdb.com
https://www.google.cn/url?q=https://xn--megab-mdb.com
https://google.am/url?q=https://xn--megab-mdb.com
http://google.com.ly/url?q=https://xn--megab-mdb.com
https://google.iq/url?q=https://xn--megab-mdb.com
https://google.com.sv/url?q=https://xn--megab-mdb.com
https://google.sc/url?q=https://xn--megab-mdb.com
http://google.kg/url?q=https://xn--megab-mdb.com
http://google.li/url?q=https://xn--megab-mdb.com
http://images.google.al/url?q=https://xn--megab-mdb.com
https://maps.google.je/url?q=https://xn--megab-mdb.com
http://maps.google.to/url?q=https://xn--megab-mdb.com
http://google.co.cr/url?q=https://xn--megab-mdb.com
http://images.google.com.tj/url?q=https://xn--megab-mdb.com
https://www.google.com.ph/url?q=https://xn--megab-mdb.com
https://maps.google.com.bn/url?q=https://xn--megab-mdb.com
https://www.google.as/url?q=https://xn--megab-mdb.com
https://images.google.co.ao/url?q=https://xn--megab-mdb.com
http://maps.google.com.bo/url?q=https://xn--megab-mdb.com
https://maps.google.com/url?q=https://xn--megab-mdb.com
https://www.google.com.bh/url?q=https://xn--megab-mdb.com
https://maps.google.com.mm/url?q=https://xn--megab-mdb.com
http://google.com.gi/url?q=https://xn--megab-mdb.com
http://maps.google.ba/url?q=https://xn--megab-mdb.com
http://google.co.id/url?q=https://xn--megab-mdb.com
http://google.be/url?q=https://xn--megab-mdb.com
http://images.google.mg/url?q=https://xn--megab-mdb.com
http://google.com.ar/url?q=https://xn--megab-mdb.com
https://maps.google.co.za/url?q=https://xn--megab-mdb.com
https://www.google.gp/url?q=https://xn--megab-mdb.com
http://www.google.sh/url?q=https://xn--megab-mdb.com
https://images.google.ee/url?q=https://xn--megab-mdb.com
https://www.google.rw/url?q=https://xn--megab-mdb.com
http://images.google.si/url?q=https://xn--megab-mdb.com
https://www.google.at/url?q=https://xn--megab-mdb.com
http://maps.google.at/url?q=https://xn--megab-mdb.com
http://maps.google.co.in/url?q=https://xn--megab-mdb.com
https://maps.google.ga/url?q=https://xn--megab-mdb.com
http://maps.google.sm/url?q=https://xn--megab-mdb.com
http://google.ms/url?q=https://xn--megab-mdb.com
https://images.google.com.gh/url?q=https://xn--megab-mdb.com
http://maps.google.cn/url?q=https://xn--megab-mdb.com
https://www.google.com.na/url?q=https://xn--megab-mdb.com
https://maps.google.hr/url?q=https://xn--megab-mdb.com
https://google.ci/url?q=https://xn--megab-mdb.com
https://images.google.hr/url?q=https://xn--megab-mdb.com
http://maps.google.com.do/url?q=https://xn--megab-mdb.com
http://google.lk/url?q=https://xn--megab-mdb.com
http://images.google.cn/url?q=https://xn--megab-mdb.com
http://www.bon-vivant.net/url?q=https://xn--megab-mdb.com
http://maps.google.com.gt/url?q=https://xn--megab-mdb.com
http://www.google.com.ag/url?q=https://xn--megab-mdb.com
https://maps.google.mu/url?q=https://xn--megab-mdb.com
https://google.com.ng/url?q=https://xn--megab-mdb.com
https://www.google.co.uk/url?q=https://xn--megab-mdb.com
https://google.us/url?q=https://xn--megab-mdb.com
https://www.google.com.tr/url?q=https://xn--megab-mdb.com
http://www.google.co.ma/url?q=https://xn--megab-mdb.com
https://maps.google.co.zw/url?q=https://xn--megab-mdb.com
https://www.google.bs/url?q=https://xn--megab-mdb.com
https://www.google.pl/url?q=https://xn--megab-mdb.com
http://www.googleadservices.com/url?q=https://xn--megab-mdb.com
http://google.kz/url?q=https://xn--megab-mdb.com
https://google.com.mt/url?q=https://xn--megab-mdb.com
http://www.google.co.zw/url?q=https://xn--megab-mdb.com
https://maps.google.ne/url?q=https://xn--megab-mdb.com
https://google.com.qa/url?q=https://xn--megab-mdb.com
https://google.se/url?q=https://xn--megab-mdb.com
http://www.google.mw/url?q=https://xn--megab-mdb.com
https://maps.google.co.mz/url?q=https://xn--megab-mdb.com
http://maps.google.com.sv/url?q=https://xn--megab-mdb.com
https://www.google.sm/url?q=https://xn--megab-mdb.com
https://maps.google.com.tw/url?q=https://xn--megab-mdb.com
https://google.ca/url?q=https://xn--megab-mdb.com
https://www.google.is/url?q=https://xn--megab-mdb.com
https://google.com.jm/url?q=https://xn--megab-mdb.com
http://images.google.co.ug/url?q=https://xn--megab-mdb.com
https://maps.google.com.kh/url?q=https://xn--megab-mdb.com
http://maps.google.tl/url?q=https://xn--megab-mdb.com
http://www.google.co.nz/url?q=https://xn--megab-mdb.com
https://www.google.gg/url?q=https://xn--megab-mdb.com
https://google.to/url?q=https://xn--megab-mdb.com
https://google.ro/url?q=https://xn--megab-mdb.com
http://google.td/url?q=https://xn--megab-mdb.com
https://www.google.by/url?q=https://xn--megab-mdb.com
https://www.google.nl/url?q=https://xn--megab-mdb.com
http://maps.google.ci/url?q=https://xn--megab-mdb.com
http://maps.google.dz/url?q=https://xn--megab-mdb.com
https://google.hu/url?q=https://xn--megab-mdb.com
http://images.google.ht/url?q=https://xn--megab-mdb.com
http://google.mv/url?q=https://xn--megab-mdb.com
https://google.cf/url?q=https://xn--megab-mdb.com
http://maps.google.com.ly/url?q=https://xn--megab-mdb.com
http://www.google.nu/url?q=https://xn--megab-mdb.com
http://google.com.tj/url?q=https://xn--megab-mdb.com
https://maps.google.com.mt/url?q=https://xn--megab-mdb.com
https://google.so/url?q=https://xn--megab-mdb.com
http://images.google.bj/url?q=https://xn--megab-mdb.com
https://maps.google.la/url?q=https://xn--megab-mdb.com
https://images.google.us/url?q=https://xn--megab-mdb.com
https://images.google.com.eg/url?q=https://xn--megab-mdb.com
https://images.google.cf/url?q=https://xn--megab-mdb.com
https://images.google.la/url?q=https://xn--megab-mdb.com
http://maps.google.com.ag/url?q=https://xn--megab-mdb.com
http://google.ga/url?q=https://xn--megab-mdb.com
http://google.co.uz/url?q=https://xn--megab-mdb.com
http://maps.google.no/url?q=https://xn--megab-mdb.com
https://www.google.gl/url?q=https://xn--megab-mdb.com
http://images.google.co.vi/url?q=https://xn--megab-mdb.com
https://images.google.ne/url?q=https://xn--megab-mdb.com
https://google.com.om/url?q=https://xn--megab-mdb.com
http://maps.google.lt/url?q=https://xn--megab-mdb.com
https://maps.google.kg/url?q=https://xn--megab-mdb.com
http://www.google.com.hk/url?q=https://xn--megab-mdb.com
https://google.com.co/url?q=https://xn--megab-mdb.com
https://google.dk/url?q=https://xn--megab-mdb.com
https://maps.google.com.sa/url?q=https://xn--megab-mdb.com
http://google.com.fj/url?q=https://xn--megab-mdb.com
http://maps.google.com.ec/url?q=https://xn--megab-mdb.com
https://maps.google.mn/url?q=https://xn--megab-mdb.com
https://maps.google.bf/url?q=https://xn--megab-mdb.com
https://www.google.tt/url?q=https://xn--megab-mdb.com
https://www.google.dj/url?q=https://xn--megab-mdb.com
https://www.google.com.pr/url?q=https://xn--megab-mdb.com
https://maps.google.ws/url?q=https://xn--megab-mdb.com
http://google.jo/url?q=https://xn--megab-mdb.com
https://google.co.ug/url?q=https://xn--megab-mdb.com
https://images.google.com.bd/url?q=https://xn--megab-mdb.com
https://google.tg/url?q=https://xn--megab-mdb.com
http://maps.google.dm/url?q=https://xn--megab-mdb.com
https://www.google.pn/url?q=https://xn--megab-mdb.com
https://www.google.com.et/url?q=https://xn--megab-mdb.com
http://maps.google.com.jm/url?q=https://xn--megab-mdb.com
http://www.google.bg/url?q=https://xn--megab-mdb.com
http://maps.google.hu/url?q=https://xn--megab-mdb.com
https://maps.google.kz/url?q=https://xn--megab-mdb.com
https://images.google.com.pl/url?q=https://xn--megab-mdb.com
http://www.google.st/url?q=https://xn--megab-mdb.com
https://maps.google.com.kw/url?q=https://xn--megab-mdb.com
https://maps.google.ru/url?q=https://xn--megab-mdb.com
https://google.co.mz/url?q=https://xn--megab-mdb.com
http://www.google.co.ls/url?q=https://xn--megab-mdb.com
https://www.google.az/url?q=https://xn--megab-mdb.com
http://maps.google.co.uk/url?q=https://xn--megab-mdb.com
https://www.google.com.do/url?q=https://xn--megab-mdb.com
http://www.google.es/url?q=https://xn--megab-mdb.com
http://google.gm/url?q=https://xn--megab-mdb.com
http://images.google.so/url?q=https://xn--megab-mdb.com
https://www.google.com.pk/url?q=https://xn--megab-mdb.com
https://www.google.com.sb/url?q=https://xn--megab-mdb.com
https://images.google.ad/url?q=https://xn--megab-mdb.com
http://google.sn/url?q=https://xn--megab-mdb.com
http://google.ps/url?q=https://xn--megab-mdb.com
https://maps.google.bg/url?q=https://xn--megab-mdb.com
https://images.google.com.cy/url?q=https://xn--megab-mdb.com
http://www.google.pt/url?q=https://xn--megab-mdb.com
https://images.google.to/url?q=https://xn--megab-mdb.com
http://images.google.co.uz/url?q=https://xn--megab-mdb.com
http://google.com.sl/url?q=https://xn--megab-mdb.com
http://www.google.gy/url?q=https://xn--megab-mdb.com
http://www.google.cd/url?q=https://xn--megab-mdb.com
https://maps.google.com.my/url?q=https://xn--megab-mdb.com
http://www.google.com.ai/url?q=https://xn--megab-mdb.com
https://google.hn/url?q=https://xn--megab-mdb.com
http://images.google.ba/url?q=https://xn--megab-mdb.com
http://maps.google.com.pe/url?q=https://xn--megab-mdb.com
http://google.de/url?q=https://xn--megab-mdb.com
http://maps.google.com.gi/url?q=https://xn--megab-mdb.com
https://images.google.cat/url?q=https://xn--megab-mdb.com
https://www.google.co.ck/url?q=https://xn--megab-mdb.com
https://images.google.com.bn/url?q=https://xn--megab-mdb.com
http://maps.google.ae/url?q=https://xn--megab-mdb.com
http://images.google.no/url?q=https://xn--megab-mdb.com
http://maps.google.bs/url?q=https://xn--megab-mdb.com
http://maps.google.gy/url?q=https://xn--megab-mdb.com
http://maps.google.com.pa/url?q=https://xn--megab-mdb.com
https://google.cc/url?q=https://xn--megab-mdb.com
http://google.co.th/url?q=https://xn--megab-mdb.com
http://maps.google.com.mx/url?q=https://xn--megab-mdb.com
http://www.google.lu/url?q=https://xn--megab-mdb.com
https://google.bf/url?q=https://xn--megab-mdb.com
http://www.google.it/url?q=https://xn--megab-mdb.com
http://google.com.br/url?q=https://xn--megab-mdb.com
http://images.google.bg/url?q=https://xn--megab-mdb.com
http://google.co.il/url?q=https://xn--megab-mdb.com
https://google.ws/url?q=https://xn--megab-mdb.com
http://images.google.st/url?q=https://xn--megab-mdb.com
http://duck.com/url?q=https://xn--megab-mdb.com
https://www.google.net/url?q=https://xn--megab-mdb.com
https://images.google.sn/url?q=https://xn--megab-mdb.com
http://maps.google.co.jp/url?q=https://xn--megab-mdb.com
http://www.google.bj/url?q=https://xn--megab-mdb.com
https://maps.google.com.qa/url?q=https://xn--megab-mdb.com
https://maps.google.com.co/url?q=https://xn--megab-mdb.com
http://www.google.ch/url?q=https://xn--megab-mdb.com
http://www.google.com.pe/url?q=https://xn--megab-mdb.com
http://images.google.co.mz/url?q=https://xn--megab-mdb.com
https://www.google.cm/url?q=https://xn--megab-mdb.com
http://maps.google.nr/url?q=https://xn--megab-mdb.com
https://www.google.al/url?q=https://xn--megab-mdb.com
https://google.sk/url?q=https://xn--megab-mdb.com
http://maps.google.rs/url?q=https://xn--megab-mdb.com
http://maps.google.gr/url?q=https://xn--megab-mdb.com
https://google.la/url?q=https://xn--megab-mdb.com
http://maps.google.com.ph/url?q=https://xn--megab-mdb.com
https://www.google.com/url?q=https://xn--megab-mdb.com
http://google.ee/url?q=https://xn--megab-mdb.com
https://google.com.pl/url?q=https://xn--megab-mdb.com
http://maps.google.com.pg/url?q=https://xn--megab-mdb.com
https://google.vg/url?q=https://xn--megab-mdb.com
https://www.google.co.ke/url?q=https://xn--megab-mdb.com
https://maps.google.com.pr/url?q=https://xn--megab-mdb.com
http://www.google.no/url?q=https://xn--megab-mdb.com
https://maps.google.fr/url?q=https://xn--megab-mdb.com
https://maps.google.as/url?q=https://xn--megab-mdb.com
https://google.mn/url?q=https://xn--megab-mdb.com
http://google.com.kh/url?q=https://xn--megab-mdb.com
http://images.google.me/url?q=https://xn--megab-mdb.com
http://maps.google.com.sl/url?q=https://xn--megab-mdb.com
http://maps.google.pn/url?q=https://xn--megab-mdb.com
http://www.google.fr/url?q=https://xn--megab-mdb.com
https://maps.google.com.bz/url?q=https://xn--megab-mdb.com
https://maps.google.com.cu/url?q=https://xn--megab-mdb.com
https://google.com.eg/url?q=https://xn--megab-mdb.com
http://www.google.com.kw/url?q=https://xn--megab-mdb.com
https://google.com.cu/url?q=https://xn--megab-mdb.com
https://www.google.co.in/url?q=https://xn--megab-mdb.com
http://maps.google.tt/url?q=https://xn--megab-mdb.com
http://google.com.gt/url?q=https://xn--megab-mdb.com
http://maps.google.ge/url?q=https://xn--megab-mdb.com
https://maps.google.vg/url?q=https://xn--megab-mdb.com
http://images.google.com.om/url?q=https://xn--megab-mdb.com
http://google.ht/url?q=https://xn--megab-mdb.com
https://maps.google.com.na/url?q=https://xn--megab-mdb.com
http://google.ru/url?q=https://xn--megab-mdb.com
https://maps.google.gg/url?q=https://xn--megab-mdb.com
https://maps.google.com.br/url?q=https://xn--megab-mdb.com
https://maps.google.li/url?q=https://xn--megab-mdb.com
http://www.google.ba/url?q=https://xn--megab-mdb.com
http://maps.google.com.lb/url?q=https://xn--megab-mdb.com
http://images.google.ws/url?q=https://xn--megab-mdb.com
http://images.google.com.gt/url?q=https://xn--megab-mdb.com
http://maps.g.cn/url?q=https://xn--megab-mdb.com
http://google.co.zm/url?q=https://xn--megab-mdb.com
https://www.google.tl/url?q=https://xn--megab-mdb.com
http://www.google.com.np/url?q=https://xn--megab-mdb.com
https://maps.google.co.nz/url?q=https://xn--megab-mdb.com
http://maps.google.cf/url?q=https://xn--megab-mdb.com
http://maps.google.com.et/url?q=https://xn--megab-mdb.com
http://maps.google.rw/url?q=https://xn--megab-mdb.com
https://maps.google.co.ve/url?q=https://xn--megab-mdb.com
https://images.google.co.ck/url?q=https://xn--megab-mdb.com
https://images.google.co.zm/url?q=https://xn--megab-mdb.com
https://www.google.mu/url?q=https://xn--megab-mdb.com
https://maps.google.com.py/url?q=https://xn--megab-mdb.com
http://www.google.lv/url?q=https://xn--megab-mdb.com
http://maps.google.co.ug/url?q=https://xn--megab-mdb.com
https://maps.google.it/url?q=https://xn--megab-mdb.com
https://google.fi/url?q=https://xn--megab-mdb.com
https://maps.google.ms/url?q=https://xn--megab-mdb.com
https://maps.google.mv/url?q=https://xn--megab-mdb.com
http://maps.google.com.eg/url?q=https://xn--megab-mdb.com
https://maps.google.so/url?q=https://xn--megab-mdb.com
http://www.google.nr/url?q=https://xn--megab-mdb.com
https://maps.google.com.ar/url?q=https://xn--megab-mdb.com
http://images.google.com.bo/url?q=https://xn--megab-mdb.com
https://maps.google.tk/url?q=https://xn--megab-mdb.com
http://maps.google.com.hk/url?q=https://xn--megab-mdb.com
https://www.google.com.vn/url?q=https://xn--megab-mdb.com
https://www.google.bi/url?q=https://xn--megab-mdb.com
https://images.google.co.tz/url?q=https://xn--megab-mdb.com
http://google.co.bw/url?q=https://xn--megab-mdb.com
https://images.google.tl/url?q=https://xn--megab-mdb.com
http://maps.google.com.sg/url?q=https://xn--megab-mdb.com
https://images.google.mv/url?q=https://xn--megab-mdb.com
https://www.google.info/url?q=https://xn--megab-mdb.com
https://www.google.com.bz/url?q=https://xn--megab-mdb.com
http://maps.google.ee/url?q=https://xn--megab-mdb.com
http://google.co.za/url?q=https://xn--megab-mdb.com
http://www.g.cn/url?q=https://xn--megab-mdb.com
https://maps.google.ad/url?q=https://xn--megab-mdb.com
https://maps.google.hn/url?q=https://xn--megab-mdb.com
https://images.google.is/url?q=https://xn--megab-mdb.com
https://maps.google.ca/url?q=https://xn--megab-mdb.com
http://maps.google.ro/url?q=https://xn--megab-mdb.com
https://images.google.com.kh/url?q=https://xn--megab-mdb.com
http://google.com.pg/url?q=https://xn--megab-mdb.com
https://maps.google.co.vi/url?q=https://xn--megab-mdb.com
http://maps.google.com.np/url?q=https://xn--megab-mdb.com
https://images.google.tk/url?q=https://xn--megab-mdb.com
http://images.google.nr/url?q=https://xn--megab-mdb.com
http://maps.google.com.ng/url?q=https://xn--megab-mdb.com
https://maps.google.ki/url?q=https://xn--megab-mdb.com
https://images.google.cm/url?q=https://xn--megab-mdb.com
http://maps.google.gm/url?q=https://xn--megab-mdb.com
https://images.google.by/url?q=https://xn--megab-mdb.com
https://google.fm/url?q=https://xn--megab-mdb.com
http://google.co.vi/url?q=https://xn--megab-mdb.com
http://maps.google.cz/url?q=https://xn--megab-mdb.com
https://images.google.co.ma/url?q=https://xn--megab-mdb.com
http://www.google.com.vc/url?q=https://xn--megab-mdb.com
https://maps.google.jo/url?q=https://xn--megab-mdb.com
http://images.google.com.sb/url?q=https://xn--megab-mdb.com
https://images.google.com/url?q=https://xn--megab-mdb.com
https://maps.google.ch/url?q=https://xn--megab-mdb.com
http://maps.google.mk/url?q=https://xn--megab-mdb.com
http://www.google.com.ni/url?q=https://xn--megab-mdb.com
http://images.google.cz/url?q=https://xn--megab-mdb.com
https://images.google.com.vc/url?q=https://xn--megab-mdb.com
https://maps.google.co.ke/url?q=https://xn--megab-mdb.com
http://maps.google.com.uy/url?q=https://xn--megab-mdb.com
https://www.google.ie/url?q=https://xn--megab-mdb.com
https://maps.google.nu/url?q=https://xn--megab-mdb.com
http://images.google.cc/url?q=https://xn--megab-mdb.com
https://images.google.gr/url?q=https://xn--megab-mdb.com
https://google.lt/url?q=https://xn--megab-mdb.com
http://google.tm/url?q=https://xn--megab-mdb.com
https://maps.google.co.bw/url?q=https://xn--megab-mdb.com
http://www.google.vu/url?q=https://xn--megab-mdb.com
http://maps.google.lu/url?q=https://xn--megab-mdb.com
http://maps.google.lv/url?q=https://xn--megab-mdb.com
https://images.google.je/url?q=https://xn--megab-mdb.com
https://www.google.co.ve/url?q=https://xn--megab-mdb.com
https://images.google.com.ng/url?q=https://xn--megab-mdb.com
http://googlemaps.com/url?q=https://xn--megab-mdb.com
http://maps.google.com.fj/url?q=https://xn--megab-mdb.com
http://plus.google.com/url?q=https://xn--megab-mdb.com
http://plus.gngjd.com/url?q=https://xn--megab-mdb.com
http://google.com.af/url?q=https://xn--megab-mdb.com
https://images.google.md/url?q=https://xn--megab-mdb.com
https://www.google.com.mm/url?q=https://xn--megab-mdb.com
https://maps.google.st/url?q=https://xn--megab-mdb.com
http://maps.google.cat/url?q=https://xn--megab-mdb.com
http://google.co.jp/url?q=https://xn--megab-mdb.com
https://maps.google.lk/url?q=https://xn--megab-mdb.com
http://maps.google.co.kr/url?q=https://xn--megab-mdb.com
http://google.com.bd/url?q=https://xn--megab-mdb.com
https://images.google.co.ke/url?q=https://xn--megab-mdb.com
https://www.google.gr/url?q=https://xn--megab-mdb.com
https://images.google.ac/url?q=https://xn--megab-mdb.com
http://maps.google.ie/url?q=https://xn--megab-mdb.com
http://google.com.tn/url?q=https://xn--megab-mdb.com
https://maps.google.iq/url?q=https://xn--megab-mdb.com
http://images.google.com.lb/url?q=https://xn--megab-mdb.com
https://images.google.ga/url?q=https://xn--megab-mdb.com
http://maps.google.nl/url?q=https://xn--megab-mdb.com
https://maps.google.com.ai/url?q=https://xn--megab-mdb.com
https://maps.google.cl/url?q=https://xn--megab-mdb.com
http://maps.google.co.id/url?q=https://xn--megab-mdb.com
https://maps.google.fm/url?q=https://xn--megab-mdb.com
https://maps.google.com.ni/url?q=https://xn--megab-mdb.com
https://maps.google.bi/url?q=https://xn--megab-mdb.com
https://www.google.ki/url?q=https://xn--megab-mdb.com
https://google.dm/url?q=https://xn--megab-mdb.com
https://images.google.mn/url?q=https://xn--megab-mdb.com
https://images.google.gy/url?q=https://xn--megab-mdb.com
https://google.com.my/url?q=https://xn--megab-mdb.com
http://maps.google.tg/url?q=https://xn--megab-mdb.com
https://images.google.com.sa/url?q=https://xn--megab-mdb.com
https://maps.google.com.om/url?q=https://xn--megab-mdb.com
https://images.google.com.vn/url?q=https://xn--megab-mdb.com
https://maps.google.co.hu/url?q=https://xn--megab-mdb.com
http://maps.google.be/url?q=https://xn--megab-mdb.com
http://images.google.com.bh/url?q=https://xn--megab-mdb.com
https://images.google.com.kw/url?q=https://xn--megab-mdb.com
https://maps.google.gp/url?q=https://xn--megab-mdb.com
http://images.google.com.af/url?q=https://xn--megab-mdb.com
http://images.google.com.bz/url?q=https://xn--megab-mdb.com
https://maps.google.se/url?q=https://xn--megab-mdb.com
https://maps.google.cg/url?q=https://xn--megab-mdb.com
https://images.google.mk/url?q=https://xn--megab-mdb.com
https://www.google.com.uy/url?q=https://xn--megab-mdb.com
http://maps.google.cm/url?q=https://xn--megab-mdb.com
https://maps.google.cd/url?q=https://xn--megab-mdb.com
https://maps.google.mg/url?q=https://xn--megab-mdb.com
https://images.google.am/url?q=https://xn--megab-mdb.com
https://images.google.com.tn/url?q=https://xn--megab-mdb.com
https://images.google.co.id/url?q=https://xn--megab-mdb.com
https://maps.google.com.bd/url?q=https://xn--megab-mdb.com
https://maps.google.co.tz/url?q=https://xn--megab-mdb.com
http://images.google.com.ai/url?q=https://xn--megab-mdb.com
http://images.google.bf/url?q=https://xn--megab-mdb.com
http://maps.google.co.il/url?q=https://xn--megab-mdb.com
http://maps.google.co.zm/url?q=https://xn--megab-mdb.com
http://images.google.com.qa/url?q=https://xn--megab-mdb.com
http://images.google.lk/url?q=https://xn--megab-mdb.com
http://maps.google.cv/url?q=https://xn--megab-mdb.com
http://maps.google.im/url?q=https://xn--megab-mdb.com
https://maps.google.com.gh/url?q=https://xn--megab-mdb.com
https://maps.google.co.ao/url?q=https://xn--megab-mdb.com
http://maps.google.co.th/url?q=https://xn--megab-mdb.com
https://maps.google.gl/url?q=https://xn--megab-mdb.com
https://maps.google.com.ua/url?q=https://xn--megab-mdb.com
http://maps.google.td/url?q=https://xn--megab-mdb.com
https://google.me/url?q=https://xn--megab-mdb.com
https://maps.google.bj/url?q=https://xn--megab-mdb.com
https://maps.google.pl/url?q=https://xn--megab-mdb.com
http://maps.google.com.tr/url?q=https://xn--megab-mdb.com
https://images.google.sc/url?q=https://xn--megab-mdb.com
https://images.google.com.et/url?q=https://xn--megab-mdb.com
https://maps.google.dk/url?q=https://xn--megab-mdb.com
https://images.google.iq/url?q=https://xn--megab-mdb.com
http://maps.google.sc/url?q=https://xn--megab-mdb.com
http://images.google.co.bw/url?q=https://xn--megab-mdb.com
http://images.google.dz/url?q=https://xn--megab-mdb.com
https://maps.google.ht/url?q=https://xn--megab-mdb.com
https://google.cat/url?q=https://xn--megab-mdb.com
http://maps.google.com.bh/url?q=https://xn--megab-mdb.com
http://maps.google.ml/url?q=https://xn--megab-mdb.com
https://maps.google.com.pl/url?q=https://xn--megab-mdb.com
https://maps.google.com.vc/url?q=https://xn--megab-mdb.com
https://maps.google.com.au/url?q=https://xn--megab-mdb.com
http://images.g.cn/url?q=https://xn--megab-mdb.com
http://maps.google.co.ck/url?q=https://xn--megab-mdb.com
http://maps.google.sh/url?q=https://xn--megab-mdb.com
http://maps.google.com.sb/url?q=https://xn--megab-mdb.com
http://maps.google.sk/url?q=https://xn--megab-mdb.com
http://images.google.rs/url?q=https://xn--megab-mdb.com
http://maps.google.dj/url?q=https://xn--megab-mdb.com
http://maps.google.si/url?q=https://xn--megab-mdb.com
http://images.google.ps/url?q=https://xn--megab-mdb.com
http://images.google.com.pg/url?q=https://xn--megab-mdb.com
https://images.google.net/url?q=https://xn--megab-mdb.com
http://images.google.com.sl/url?q=https://xn--megab-mdb.com
https://images.google.gp/url?q=https://xn--megab-mdb.com
https://maps.gngjd.com/url?q=https://xn--megab-mdb.com
https://images.google.co.zw/url?q=https://xn--megab-mdb.com
suhagra 100 canada
clonidine generic cost
dipyridamole over the counter
Пин Ап казино Aviator Spribe джекпот – игра в интернете, которая позволяет игрокам испытать собственную везение и заработать деньги. Она разработана компанией Spribe, азеанку занимается на разработке различных видео-слотов и онлайн-игр.
Участники могут играть в Aviator Spribe Aviator crash на любом устройстве, включая компьютеры, планшеты и мобильные телефоны. Игра осуществляется на экране, соленск находится поле с бегущим по ним самолетом. Участники делают деньги на определенное время, и если самолет перелетает необходимую дистанцию, они выигрывают.
Главной особенностью игры Aviator Spribe являлась то, что ей работает на базе технологии blockchain. Это означает, что только транзакции и данные сохраняются в распределенной базе данных, не обеспечивает безопасность же прозрачность игры.
Кроме того, Aviator Spribe aviator – существуют разные уровней общей, что делает белкиссу привлекательной для участников разного уровня опыта. Новички могут выбрать менее сложный уровень и постепенно переходить на сложный, когда будут готовый к этому.
Некоторые аудитория могут признать, что Aviator Spribe Пин Ап казино похожа на традиционное игровые автоматы, даже она предлагает более увлекательный и разнообразный геймплей. Кроме что, игра имеет высококачественную графику и звуковое оформление, что говорит еще больше атмосферы.
Некоторые аудитория если сомневаться в безопасности игры на приличные, однако благодаря технологии blockchain и наличию лицензии у Spribe, игроки могут быть убежден в том, не их личные данные и финансовые средствам хранятся под понадежнее защитой.
В исламиды, Aviator Spribe – это интересная только захватывающая игра, которая может принести игрокам не только удовольствие, но же реальные денежные выигрыши. Компания Spribe Aviator Game by Spribe продолжаем совершенствовать эту игру, что делает амаинтин еще более привлекательной для игроков и всего мира.
Comprare Spedra (Avanafil) Online in Italia
furosemide buy
where can i buy cipro online
buy phenergan 10mg online
600 mg modafinil daily
motilium online uk
diflucan no prescription
can you buy acyclovir over the counter australia
buy doxycycline 200 mg
generic vermox
levitra cost in india
cheap tadacip
how much is valtrex in canada
rx pharmacy no prescription
First of all I would like to say great blog! I had a quick question which I’d like to ask if you
don’t mind. I was interested to find out how you center yourself and clear your
mind before writing. I’ve had a tough time clearing my thoughts in getting my ideas out there.
I do enjoy writing but it just seems like the first 10
to 15 minutes are usually wasted just trying
to figure out how to begin. Any recommendations or tips?
Appreciate it!
generic doxycycline online
synthroid mexico
propecia 5mg for sale
You actually said it superbly.
zithromax 250 mg australia
retin a 0.1 india
doxycycline buy usa
buy suhagra 50 mg online india
motilium 10mg tablets
ciprofloxacin 0.3
cheap avodart
zithromax azithromycin
clomid in india
accutane prices
silagra 100mg
voltaren 150 mg
prazosin cost australia
levitra 20 mg cost
avodart 0.5 mg
dipyridamole purchase
Good post. I absolutely appreciate this site. Stick with it!
disulfiram 250 mg price
buy online cialis canada
I do not even know how I ended up here, but I thought this post was great.
I don’t know who you are but definitely you’re going to a famous blogger if you are not already 😉 Cheers!
acticin tablet
colchicine prescription medicine
tadacip canada
furosemide 20 mg otc
lyrica for sale
Сайт офтальмологического центра. http://diagnostika-zreniya.ru/. Коррекция астигматизма.
phenergan promethazine
the canadian pharmacy
buy tretinoin 1 cream
doxycycline 40 mg generic cost
avodart 50mg
average price of clomid
zovirax cream generic brand
Hello there! I could have sworn I’ve been to this blog
before but after checking through some of the post I
realized it’s new to me. Anyways, I’m definitely happy I found it and I’ll be bookmarking and checking back
often!
I am regular reader, how are you everybody? This post posted at this web site
is in fact good.
zestoretic 5 mg
colchicine in mexico
cheapest metformin 500 mg
can you buy azithromycin over the counter nz
phenergan cost
prazosin 2 mg price
generic metformin prescription mexico
rx online pharmacy
buy anafranil canada
terramycin capsule
cialis levitra viagra
vermox 500mg tablet
baclofen cost
Hi there I am so delighted I found your webpage, I really found you by
accident, while I was researching on Askjeeve for something else, Anyhow I am
here now and would just like to say thanks for a tremendous post and a all round entertaining blog (I also love
the theme/design), I don’t have time to go through it all at
the minute but I have saved it and also included your
RSS feeds, so when I have time I will be back to read much more, Please do keep up the excellent
work.
finasteride hair loss
avodart india price
propranolol 10 mg price
doxycycline otc
furosemide 60 mg
tadacip 20 mg price
buy lyrica usa
buy prednisone mexico
paroxetine cost australia
lyrica 150 mg coupon
lasix in mexico
prednisolone buy
baclofen medicine in india
where can i purchase clomid over the counter
paxil 20 mg generic
how much is cialis generic
Thanks for your personal marvelous posting! I definitely enjoyed
reading it, you could be a great author. I will ensure that I bookmark your blog and will come back sometime soon. I want to encourage you continue your great work, have
a nice afternoon!
purchase furosemide
https://heylink.me/landakbet/
where to buy ciprofloxacin
cheap phenergan
hydrochlorothiazide 5 mg
silagra 50 mg india
buy generic plavix online
prazosin bph
synthroid 150 mcg tablet
buy lasixonline
phenergan cream south africa
cymbalta cost australia
where to buy tetracycline online
plavix 75 mg tablets
synthroid brand coupon
kamagra 100 mg price
propecia generic finasteride
lyrica 300 mg for sale
500g valtrex coupon
doxycycline mono
best price zoloft 100mg
hydrochlorothiazide 5 mg
where can i buy ampicillin
diflucan otc where to buy
doxycycline 20 mg
can you buy diflucan over the counter in canada
lyrica canada online
Стяжка – ключевой момент в строительстве. Выравнивание пола позволяет приобрести ровную основу для дальнейших работ.
Мастера осуществляют стяжка пола с учетом всех требований и нормативов. Стяжка пола делается с применением современных смесей, которые обеспечивают надежность и долговечность.
Стяжка пола даёт возможность создать идеальную основу для разнообразных видов облицовки. В столице выравнивание пола осуществляют профессионалы.
cheap elimite
buy diflucan 150 mg online
diflucan without get a prescription online
wholesale kamagra oral jelly
modafinil purchase
Устройство пола – важный этап при ремонте. Укладка пола позволяет приобрести плоскую поверхность для финишной облицовки.
Специалисты выполняют стяжка пола с установкой на всех норм и стандартов. Укладка пола осуществляется с применением современных смесей, которые предоставляют надежное покрытие и стойкость.
Устройство пола позволяет сформировать идеальное основание для разнообразных видов облицовки. В Москве выравнивание пола осуществляют квалифицированные мастера.
canadapharmacyonline legit
lisinopril 40 mg no prescription
can i buy metformin over the counter in singapore
metformin prescription
how much is tetracycline
baclofen 10 mg tablet 1mg
cymbalta medication
lasix online no prescription
Thanks for sharing your thoughts about Temple Texas Newborn Photographer.
Regards
Thanks for any other informative site. The place else may I am getting that kind of info written in such an ideal means?
I have a undertaking that I’m simply now operating on, and I have been at the look
out for such information.
finasteride tablets 1mg price in india
doxycycline buy usa
propranolol generic
suhagra 100mg tablet price
buy silagra uk
generic cialis for sale
What’s up, yup this piece of writing is truly fastidious and I
have learned lot of things from it on the topic of blogging.
thanks.
doxycycline price
buy generic valtrex on line
pharmacy com canada
buy prazosin online uk
order lasic no prescription
cialis price canada
canadian metformin price
Wonderful blog! Do you have any hints for aspiring writers?
I’m hoping to start my own site soon but I’m a little lost
on everything. Would you recommend starting with
a free platform like WordPress or go for a paid option?
There are so many choices out there that I’m completely confused ..
Any ideas? Cheers!
medrol medication
augmentin 875 mg 125 mg tablet
can i buy zovirax over the counter in canada
Does your site have a contact page? I’m having trouble locating it but, I’d like to send you an e-mail.
I’ve got some suggestions for your blog you might be interested in hearing.
Either way, great blog and I look forward to seeing it improve over time.
synthroid 1mg
avodart australia
elimite cream generic
acticin cream buy
acyclovir cream coupon
Hey, everyone! Allow me to introduce myself as Admin Read:
На сайт мега даркнет мы предоставляем не только товары высокого качества, но и гарантируем максимальную защиту. Ваша безопасность – наша первоочередная задача. На mega darknet market вы можете сделать покупки с уверенностью, зная, что ваши данные защищены. Присоединяйтесь к нам и наслаждайтесь комфортом при совершении безопасных покупок.
мега через тор:https://xn--megas-k90b.com
lasix 40 mg uk
Hi all! My name is Moderator Read:
С каждым днем мир интернет-торговли становится все шире, и mega darknet представляет собой отличный пример данного развития. Платформа, рожденная из стремления объединить продавцов, предлагающих товары из разных категорий, предоставляет уникальную среду для открытия и взаимодействия. Здесь каждый может найти именно то, что искал, без лишних заморочек. mega555 не только меняет способ, каким мы покупаем товары в интернете, но и реформирует требования к обслуживанию клиентов в цифровую эру.
https mega sb:https://xn--megas-k90b.com
colchicine 1mg price
discount levitra online
phenergan nz buy
generic finasteride nz
motilium tablets
It’s very effortless to find out any topic on web as compared to books,
as I found this article at this web site.
Hey, everyone! Allow me to introduce myself as Admin Read:
ссылки на mega – ваш гарант безопасных развлечений! На нашем сайте вы найдете уникальный контент и многообразие товаров для приятного отдыха. Мы гарантируем высший уровень безопасности – все магазины прошли проверку. На http mega sb мы не регистрируем и не архивируем ваши личные сведения и предоставляем возможность регистрации с уникальным логином и паролем. Наши способы оплаты также включают криптовалюты XMR и BTC.
mega сайт ссылка:https://xn--megsb-5wa.com
clomid prescription
flomax for urinary retention
Hey there, everyone! The name’s Admin Read:
Со временем виртуальные рынки становятся все более развитыми и функциональными, но только mega dark удается стать настоящим светочом в этом океане возможностей. Проектированная с мыслью о продавцах, стремящихся донести свои товары различных категорий до мировой аудитории, этот ресурс также является ориентиром для клиентов, которые ищут уникальные предложения. сайт mega не только устанавливает стандарты качества, но и привносит душу в цифровую торговлю, придавая особенность и неповторимость каждой транзакции.
mega мориарти:https://xn--megsb-5wa.com
официальный сайт gama casino
мобильная версия гама казино
buy furosemide
zestril 25 mg
онлайн казино
регистрация кэт казино
soft levitra
5 mg accutane singapore
prescription 0.1 tretinoin cream
1000 mg zithromax online
augmentin uk price
metformin 500 mg for sale
where to buy motilium in canada
clomid 50mg tablets price
flomax 0.4 mg cap
valtrex brand
кэт казино
казино cat
flomax price in india
female cialis
doxycycline online cheap
motilium 10mg
Hello everyone! I go by the name Admin Read:
официальная ссылка мега – место, где ваше развлечение безопасно и увлекательно! На нашем сайте вы найдете уникальный контент и разнообразные товары для приятного отдыха. Мы ценим вашу безопасность, поэтому все магазины на как зайти на мега прошли проверку. Ваши личные данные не сохраняются на нашей платформе, регистрируйтесь с уникальным логином и паролем. У нас есть удобные способы пополнения баланса, включая криптовалюты XMR и BTC.
мега онион ссылка:https://xn--megab-mdb.com
Hey there, everyone! The name’s Admin Read:
Безопасность и разнообразие – вот что отличает ссылка на мегу. На нашей площадке представлено множество сертифицированных магазинов, обеспечивая вашу безопасность во время каждой транзакции. Приверженность безопасности на ссылка на мега маркет означает, что делайте свои покупки с чувством уверенности и спокойствия. Вы можете найти всё, начиная с повседневных необходимостей и заканчивая уникальными, эксклюзивными товарами, а наши жесткие меры обеспечения безопасности обеспечивают защищенное окружение для шопинга. Присоединяйтесь к нам на мега даркнет ссылки для беззаботного шопинга.
ссылка на сайт мега:https://xn--megab-mdb.com
can you buy elimite cream over the counter
avodart 0.5 mg tab
prednisolone price australia
I’m pretty pleased to find this web site. I wanted to thank
you for ones time for this wonderful read!! I definitely enjoyed every little bit of it and I have you saved as a favorite to check out new information on your website.
tretinoin order online
zestoretic
buying retin a on line cheap
generic dipyridamole
buy motilium uk
Машинная штукатурка — новаторский подход выполнения отделки стен.
Он основан на внедрении автоматических систем штукатурки, как правило, произведенных в Германии, благодаря которым раствор приготавливается и наносится на стену автоматически и под давлением.
Штукатурка стен машинным способом С подтвержденной гарантией До 32 процентов выгоднее обычной, Можно клеить обои без шпаклевки от кампании mehanizirovannaya-shtukaturka-moscow.ru
В результате, усовершенствуется адгезия с поверхностью, а сроки выполнения работ уменьшается в 5–6 раза, в в сопоставлении с ручным способом. За счет автоматизации и упрощения работы стоимость штукатурки за квадратный метр выходит дешевле, чем при традиционном методе.
При машинном нанесении штукатурки используются специальные смеси, ценовой диапазон меньше, чем при ручной отделке примерно на треть. При определенной квалификации мастеров, а так же при соблюдении всех технологических правил, оштукатуренная поверхность становится абсолютно ровной (государственные строительные стандарты) и гладкой, в связи с этим последующая обработка шпатлевкой не требуется, что обеспечивает дополнительные средства для заказчика.
cheap zithromax
Автоматизированное нанесение штукатурки — новаторский подход проведения отделки стен.
Он заключается в внедрении устройств для штукатурки, как обычно, сделанных в Германии, что обеспечивает смесь подготавливается к работе и покрывается на стену с автоматическим распределением и под давлением.
Штукатурка механизированная оштукатуривание стен С подтвержденной гарантией До 32 процентов выгоднее обычной, Можно клеить обои без шпаклевки от кампании mehanizirovannaya-shtukaturka-moscow.ru
Следовательно, повышается сцепление с поверхностью, а время, потраченное на работу снижается в 5–6 раза, в в сопоставлении с ручным способом. За счет автоматизации и упрощения рабочего процесса цена штукатурки стен за квадратный метр становится более выгодной, чем в случае традиционного способа.
При машинном нанесении штукатурки используются смеси, разработанные для механизированной штукатурки, стоимость которых ниже чем для ручного нанесения примерно на треть. При соответствующих навыках и опыте специалистов, а также при соблюдении всех технологических правил, поверхность, покрытая штукатуркой оказывается идеально ровной (СНиП 3.04.01–87 «Высококачественная штукатурка») и гладкой, поэтому последующая шпатлевка не требуется, что предоставляет дополнительные финансовые возможности для клиента.
lyrica 550 mg
diclofenac tab price in india
buy generic cipro online
silagra online uk
voltaren 2 cream
Защитите свое оборудование от перепадов напряжения — выберите стабилизатор напряжения!
стабилизаторы напряжения http://stabrov.ru.
phenergan
clonidine over the counter uk
Great beat ! I wish to apprentice while you amend your site, how could i subscribe
for a blog web site? The account aided me a acceptable deal.
I had been a little bit acquainted of this your broadcast provided bright clear concept
cipro iv
Стабильный источник питания для Вашего оборудования — стабилизатор напряжения
стабилизаторы напряжения http://stabrov.ru.
cheapest generic valtrex
Надежный стабилизатор напряжения для домашних и офисных устройств
стабилизаторы напряжения http://stabrov.ru.
where to buy colchicine
buy modafinil usa online
buy prednisone cheap
penis enlargement
buy viagra online
ciprofloxacin 750 mg price
baclofen online
buy azithromycin canada
buy viagra online
augmentin tab online
buy amoxil online uk
can i buy erythromycin over the counter
prazosin cost canada
motilium uk buy
average cost of colchicine
valtrex rx where to buy
I have been surfing online more than 4 hours today, yet I never found any interesting article like yours. It’s pretty worth enough for me. Personally, if all webmasters and bloggers made good content as you did, the net will be much more useful than ever before.
I couldn’t refrain from commenting. Well written!
http://vip-barnaul.ru/includes/pages/1xbet_promokod_na_besplatnuu_stavku.html
synthroid 75 mg price
zithromax online buy
levitra soft
suhagra 100 online purchase
flomax 0.2 mg
Great looking web site http://airspb.ru/doc/pages/1xbet_promokod_na_besplatnuu_stavku.html . Think you did a bunch of your very own html coding
baclofen buy online canada
retin a medication
over the counter diflucan
offshore pharmacy no prescription
My brother recommended I might like this blog.
He was entirely right. This post truly made my
day. You cann’t imagine just how much time I had spent for this info!
Thanks!
cipro rx
medication trental
buy lasix tablets
otc metformin
how much is tetracycline cost
generic zoloft cost
You can definitely see your skills within the work you write.
The arena hopes for more passionate writers like you who
are not afraid to mention how they believe. At all times go
after your heart.
suhagra online india
Thank you for sharing your info. I truly appreciate your
efforts and I will be waiting for your next post thank you
once again.
cheap cialis india
tetracycline cost in india
colchicine 1mg canada
where can i buy vermox
price of retin-a
Admiring the persistence you put into your site and detailed information you provide.
It’s great to come across a blog every once in a
while that isn’t the same outdated rehashed material.
Wonderful read! I’ve bookmarked your site and I’m including your RSS feeds to my Google account.
doxycycline price mexico
lioresal 10 mg
lyrica rx
aralen for sale
lopressor generic brand
azithromycin price without insurance
tadalafil 20mg price in usa
cheapest metformin 500 mg
I’m on the same page regarding the subject. You’ve captured it perfectly.
https://luxe.tv/wp-includes/jki/code_promo_melbet_bonus_1.html
buying phenergan online
tetracycline for sale no prescription
augmentin uk buy
phenergan prescription
This piece of writing will help the internet people for building up new web site
or even a weblog from start to end.
lopressor 100 mg price
buy cialis soft tabs
accutane from mexico
synthroid canada price
ampicillin purchase
buy azithromycin 500mg uk
valtrex 500 mg for sale
It’s actually very complex in this active life to listen news on Television,
thus I just use internet for that purpose, and obtain the most up-to-date information. http://upviqvxtope3.mee.nu/?entry=3558239
amoxicillin 500mg buy online
synthroid 0.0125 mg
ciprofloxacin purchase
where to buy tretinoin 0.1
vermox 500mg for sale
terramycin ointment for humans
doxycycline capsules
Thanks for the update – very useful information!
Oracle Fusion Financials Online Training
Покер – занимательное времяпрепровождение, как пользуется спросом среди поклонников азартных развлечений и опытных участников.
http://centroculturalrecoleta.org/blog/pages/codigo_promocional_1xbet_bono.html
https://clubgti.com/wp-content/pages/?code_promo_1xbet.html
https://www.isabellafiorentino.com.br/art/codigo_promocional_1xbet_bonus_exclusivo.html
https://cruzroja.org.hn/news/codigo_promocional_1xbet_bono.html
https://www.aeroportlimoges.com/uploads/pag/code_promotionnel_1xbet_bonus.html
http://www.waltbabylove.com/upload/image/inc/?code_promotionnel_1xbet_liste.html
https://shp.org.br/art/codigo_promocional_1xbet_rodadas.html
https://tutuproduction.ch/site/wp-content/pages/?code_promotionnel_1xbets.html
Покер предполагает различные вариации, что делает его разнообразным и интересным. Участники могут состязаться в различных форматах и выигрывать призы.
Партейная игра в карты требует от участников анализа ситуации, стратегического подхода и умения определять интенты соперников. Это придает игре особую привлекательность и интересной для игроков любого уровня.
Партейная игра признается игрой интеллекта и сноровки, и он предоставляет шанс выиграть крупные призы.
silagra 100mg price
buy suhagra 25 mg
This page truly has all the info I wanted concerning this subject and didn’t know who
to ask.
Игра в покер – занимательное времяпрепровождение, как популярно среди поклонников азарта и мастеров игры.
https://pulikalinkuralradio.com/wp-content/pages/narodnye_metody_lechenie_gnoynoy_anginy.html
https://gingerparrot.co.uk/pags/code_promo_melbet_bonus_de_bienvenue.html
https://pawndetroit.com/wp-content/pages/?code_promo_melbet_bonus_de_bienvenue.html
https://www.ramses.cz/wp-content/pages/krav_maga_kak_sistema_samozaschity.html
https://armamentresearch.com/wp-includes/pgs/code_promo_melbet_bonus_de_bienvenue.html
Партейная игра подразумевает много разновидностей, что делает его увлекательным и разнообразным. Участники могут состязаться в разнообразных вариантах и выигрывать призы.
Игра в покер предполагает от игроков анализа положения, стратегического подхода и способности анализировать оппонентов. Это увлекательный аспект игры и интересной для любого уровня игроков.
Игра в карты считается игрой интеллекта и сноровки, и предоставляет возможность завоевать значительные награды.
avodart uk online
doxycycline uk pharmacy
tamoxifen canada cost
phenergan australia prescription
buy prazosin
brand name synthroid price
how to purchase clomid
0.25 retin a
colchicine 0.6 mg brand
average cost of generic zithromax
order phenergan on line without prescription
buy furosemide online
buy metformin india
order furosemide without prescription
metformin without presription
order retin-a
kamagra oral jelly pattaya
Write more, thats all I have to say. Literally, it
seems as though you relied on the video to make your point.
You obviously know what youre talking about,
why throw away your intelligence on just posting videos to your
blog when you could be giving us something informative to read?
avodart medicine order
azithromycin canada
clomid price australia
suhagra 50 price
azithromycin from india
I think that what you posted was actually very reasonable.
However, what about this? suppose you added a little content?
I ain’t saying your content is not solid., however suppose you added a headline that grabbed folk’s attention?
I mean Before and After Archives – Precious Stones Photography is a little boring.
You could glance at Yahoo’s front page and watch how they create news titles
to grab viewers to click. You might try adding a video or a pic or two to grab people excited about everything’ve got to say.
Just my opinion, it would bring your posts a little livelier.
over the counter valtrex cream
retin a cream nz
baclofen generic lioresal
100 mg azithromycin
tretinoin cost canada
how to get propecia
tetracycline generic brand
accutane pills
Обивка для мебели – важный элемент в оформлении каждого помещения. Она приносит удовольствие и тепло и дает возможность расслабиться и расслабиться после тяжелой недели.
Мягкая обивка имеет множество разнообразных вариаций, например софы и кресла, каждое из которых обладает своим стилем и дизайном.
http://www.vammebel.ru
Выбор мягкой мебели способствует подстроить интерьер и сформировать индивидуальное помещение по своему вкусу.
Мебель с обивкой прекрасно выглядит, но и удобна и функциональна. Она отличается как отличный выбор для создания уютного уголка для отдыха и развлечения.
clomid 50mg online
hydrochlorothiazide 12.5 mg for sale
where to buy zithromax
diflucan men
order azithromycin from mexico
Обивка для мебели – важный элемент в интерьере всякого жилища. Она создаёт уют и комфорт и способствует расслабиться и отдохнуть после долгого дня.
Мягкая обивка имеет множество разнообразных вариаций, вроде софы и кресла, каждый из которых подразумевает уникальный стиль и оформление.
vammebel.ru
Выбор мягкой мебели даёт возможность персонализировать интерьер и сформировать индивидуальное помещение с учетом собственных предпочтений.
Мебель с обивкой прекрасно выглядит, но также практична и функциональна. Она является отличным решением для формирования уютного места для отдыха и развлечения.
ciprofloxacin over the counter uk
diclofenac without prescription
terramycin eye
acyclovir buy india
silagra
suhagra pills
cost of furosemide
avodart capsule
furosemide pills 20 mg
buy levitra online usa
Saved as a favorite, I really like your website!
Команда «Каспий», основанная саратовским музыкантом Валодей Астапчиком, уже успела запомниться выступлениями на фестивалях и попасть в список восходящих звезд iTunes с дебютным EP «Расстояния»
саунд дизайн каспий
buy antebuse online 250 mg uk
can i buy vermox over the counter uk
Команда «Каспий», основанная саратовским музыкантом Валодей Астапчиком, уже успела запомниться выступлениями на фестивалях и попасть в список восходящих звезд iTunes с дебютным EP «Расстояния»
звукорежиссура каспий
lopressor beta blocker
Тукан https://hoteltukan.ru/nomer-16/ – уютный отель на час в центре Москвы, который предлагает комфортный отдых и высокое качество обслуживания. Здесь вы можете снять номер с почасовой оплатой и наслаждаться романтической обстановкой. Почасовая гостиница всегда радушно встречает своих гостей. Вас ждут стильные интерьеры с дизайнерским ремонтом, отличная шумоизоляция и креативные решения в виде сауны, круглых кроватей, безупречной чистоты и вежливого обслуживания со стороны персонала.
can i buy clomid over the counter in south africa
dipyridamole brand
silagra 100mg from india
order tetracycline
purchase medrol
modafinil 200mg pills
suhagra 100mg best price
lyrica 225 mg
azithromycin buy over the counter uk
generic colchicine canada
I believe this is one of the most important
information for me. And i am satisfied reading your article.
But want to observation on few common things, The web site taste is wonderful, the articles is
in point of fact excellent : D. Excellent task, cheers
can i buy zithromax online
buy diflucan 150 mg online
generic tetracycline 500mg
Thanks a lot for sharing this with all folks you really recognize what you are speaking about!
Bookmarked. Please also seek advice from my web site =).
We could have a link exchange contract between us
prednisolone 5mg without prescription
You really make it seem so easy with your presentation but I find this topic to be really something which I think I would never understand.
It seems too complex and very broad for me. I’m looking forward for your next post, I will try to get
the hang of it!
Link exchange is nothing else except it is just placing the other person’s blog link on your page at proper place and other person will also do similar in favor of you.
trental 400 mg tablets in india
prednisone 20 tablet
how much is acyclovir
Hello, i think that i noticed you visited my blog thus i came to return the choose?.I’m trying to in finding issues to improve my website!I suppose its adequate
to make use of some of your concepts!!
aralen otc
diflucan price uk
levitra in india brand
silagra without prescription
avodart capsules 0.5 mg
cymbalta generic brand
amoxicillin 500 mg buy
buy generic provigil
prednisone 10
buy doxycycline south africa
buy retin a 0.5 cream uk
vermox south africa
Thanks in favor of sharing such a good idea, paragraph is
pleasant, thats why i have read it fully
tetracycline cost canada
drug metformin
avodart 0.5 mg
We are a group of volunteers and starting a new scheme in our community.
Your site provided us with valuable info to work on. You’ve done an impressive job and
our whole community will be grateful to you.
colchicine 0.6 mg buy
buy lyrica online from mexico
payday loan
clonidine insomnia
buy paroxetine
internet pharmacy manitoba
buy viagra online
can i buy zoloft online
lyrica generic medication
modafinil 200mg cost
clomid 50 mg price australia
zithromax purchase
order lasix without a prescription
buy viagra online
where to buy amoxicillin online uk
herpes medication valtrex
retin a 0.05 cream
lyrica 300 mg for sale
silagra 25 mg
valtrex online uk
escrow pharmacy canada
glucophage 1000 price
finasteride without prescription
lioresal drug
order vermox
buy cheap diflucan online
elimite 5
penis enlargement
how can i get prednisone online without a prescription
40 mg lisinopril
azithromycin 500 mg tablet 1mg
ventolin 90 mcg
accutane 40 mg cost
For hottest news you have to go to see internet and
on web I found this web site as a most excellent site for most up-to-date updates.
how to purchase prednisone online
lyrica usa
lyrica 300 mg cost
Заходите на форум по информационной безопасности:https://ru-sfera.pw/forums/
valtrex price
buy clomid pills online
prednisone no script
valtrex pills for sale
What kind of digicam is that? That is a really good top quality.
tadalafilo seguridad social
retin a cream price comparison
how to buy valtrex in korea
suhagra 100 online purchase
buying prednisone on line
I needed to thank you for this good read!! I definitely loved every little bit of it.
I’ve got you bookmarked to check out new things you post…
Новини рівного свіжі. Новини лайф. Новини київа. Останні новини суми. http://00.8ua.ru/ssss.php?sitemap.xml Новини суми. Сегодня новини украина. Новини спорту в україні. Еспресо tv завжди новини. Новини футболу в україні. Едини новини україни. Новини одеси. Новини футболу футбол 24.
generic lyrica cost
how to get ventolin
glucophage purchase online
If some one needs to be updated with most up-to-date technologies
then he must be go to see this web page and be up to date
every day.
generic brand metformin
clomid without prescription
how can i order prednisone
lyrica 10 mg
doxycycline purchase
canadian pharmacy online ship to usa
diflucan 150 mg
You should take part in a contest for one of the greatest blogs online.
I’m going to recommend this blog!
order prednisone 10mg
diflucan 75 mg
ventolin 70
ventolin 50 mg
prednisone canadian pharmacy
5 mg prednisone daily
propecia in australia
how to get cheap accutane
The other day, while I was at work, my sister stole
my iphone and tested to see if it can survive a thirty foot drop, just so she can be a youtube sensation.
My iPad is now destroyed and she has 83 views. I know this is completely off topic
but I had to share it with someone!
cialis generic 20 mg price
lasix online no prescription
retin a gel buy online uk
diflucan prescription online
where can i buy elimite
Частично сухая стяжка – строительная операция выравнивания полок. Строительство полутвёрдой стяжки дает возможность подготовить ровное основание для последующей отделки.
полусухая стяжка пола москва Мы сделаем супер ровную стяжку пола. 7 лет опыта работы От 500 рублей за квадратный метр
Уход за полусухой стяжкой подразумевает регулярную проверку и устранение дефектов с использованием специализированного оборудования.
Технические средства для полутвёрдой стяжки позволяет провести строительство с выдающейся точностью. Смешанная стяжка полок является отличным решением для обеспечения качественного основания для последующих работ.
lyrica medication
Autodesk Architecture
Autodesk Architecture
generic lyrica usa
azithromycin 500 mg pills
prednisone over the counter in mexico
10mg baclofen tablet price
When someone writes an paragraph he/she keeps the thought of a user in his/her mind that how a user
can understand it. So that’s why this post is great. Thanks!
Полутвёрдая стяжка – технологический процесс выравнивания полок. Устройство полусухой стяжки способствует подготовить ровное основание для окончательного покрытия.
вес полусухой стяжки Мы сделаем супер ровную стяжку пола. 7 лет опыта работы От 500 рублей за квадратный метр
Уход за полусухой стяжкой подразумевает регулярную проверку и устранение дефектов с использованием технических средств.
Оборудование для полусухой стяжки позволяет провести монтаж с выдающейся точностью. Полусухая стяжка полов является отличным решением для гарантирования надежной базы для дальнейшей отделки.
lisinopril 30 mg daily
diflucan price south africa
prednisone 20mg buy online
dexamethasone generic
prednisone for sale without prescription
azithromycin from india
retin a 1 cream mexico
I know this if off topic but I’m looking into starting my own weblog and was wondering
what all is required to get setup? I’m assuming having a blog like yours would cost a pretty penny?
I’m not very web smart so I’m not 100% positive.
Any tips or advice would be greatly appreciated. Thanks
discount propecia online
lioresal 10mg
We’re a group of volunteers and opening a new scheme in our community.
Your website provided us with valuable information to
work on. You have done a formidable job and our whole community will be thankful to you.
where to buy valtrex without a prescription
dexamethasone 50 mg
Incredible lots of great facts.
cv writing service dublin professional research paper writing service business school essay writing service
baclofen 30 mg tablet
This is nicely expressed. .
research paper writing services essay service custom lab report writing service
buy lyrica 75 mg online
prednisone cost in india
buy propecia without a prescription
propecia no prescription usa
These are in fact impressive ideas in regarding blogging.
You have touched some fastidious points here. Any way keep up wrinting.
cheap propecia online canada
You’ve made some really good points there. I looked on the internet for more
info about the issue and found most individuals will go along with your views on this site.
austria pharmacy online
lisinopril 10 mg pill
Greetings! Very helpful advice within this post! It
is the little changes that produce the most important changes.
Thanks a lot for sharing!
Nicely put. Kudos.
argumentative essay writing writing essay meme best will writing service
azithromycin penicillin
propecia drug
zithromax india
augmentin 875 mg 37.5mg
where can i get propecia
diflucan generic over the counter
Write more, thats all I have to say. Literally, it seems as though you relied
on the video to make your point. You definitely know what
youre talking about, why throw away your intelligence
on just posting videos to your site when you could be giving us something enlightening
to read?
generic zithromax online
valtrex canada
doxycycline otc drug
Nicely spoken of course! !
cv writing service london psychology essay writing service uk easy essay writing service
buy valtrex in mexico
how to get doxycycline
lisinopril 20mg prices
order synthroid
how can i order prednisone
azithromycin 500 mg generic
where can i buy azithromycin online
buy accutane 10mg
Sweet blog! I found it while searching on Yahoo News. Do
you have any tips on how to get listed in Yahoo News?
I’ve been trying for a while but I never seem to get there!
Appreciate it
valtrex australia
generic prednisone for sale
buy prednisone 20mg
lioresal pill
valtrex drug
how much is albuterol in canada
lasix 40 mg price in india
can you buy elimite cream over the counter
happy family drugstore
prednisone 20 mg tablets
suhagra 50 tablet price
valtrex drug
levothyroxine ordering online
buy valtrex online without prescription
price for combivent
lyrica discount
acticin online
where can i buy generic valtrex
generic valtrex price comparison
elimite coupon
elimite cream generic
20 mg prednisone
where can i buy vermox online
synthroid mcg
tretinoin 0.1 cream buying on line
you are in reality a good webmaster. The website loading speed
is incredible. It seems that you are doing any distinctive trick.
Moreover, The contents are masterpiece.
you have done a fantastic process on this matter!
order furosemide without prescription
propecia no prescription bonus 98212
lyrica 75 mg price in canada
purchase lyrica
lisinopril 20 mg buy
buy albuterol usa
can you buy lyrica over the counter
valtrex 500 mg cost
drug lisinopril
azithromycin 25 mg tablet
generic elimite cream price
medication lyrica 150 mg
how much is lyrica
lyrica drug cost
save on pharmacy
order vermox over the counter
where to buy prednisone without prescription
azithromycin 500 price
valtrex generic canada
valtrex without prescription
accutane capsule
acticin without prescription
buy acticin
baclofen 25 mg price
corticosteroids prednisone
prednisone pak
zestril 5 mg tablets
prednisone 5443
valtrex for sale
valtrex 3000 mg
Awesome issues here. I’m very happy to see your post. Thank you so much and I am having a
look ahead to touch you. Will you please drop me a e-mail?
lyrica medicine
buy lyrica usa
buy diflucan online without prescription
can you buy vermox over the counter
happy family med store
accutane 5 mg
cost of 1mg propecia
deltasone 40 mg
lyrica 500 mg tablet
Terrific content, Kudos.
zestoretic online
buy generic propecia australia
where can i buy clomid online uk
acticin cream buy
generic propecia uk
brillx официальный сайт
https://brillx-kazino.com
Но если вы ищете большее, чем просто весело провести время, Brillx Казино дает вам возможность играть на деньги. Наши игровые аппараты – это не только средство развлечения, но и потенциальный источник невероятных доходов. Бриллкс Казино сотрясает стереотипы и вносит свежий ветер в мир азартных игр.Добро пожаловать в удивительный мир азарта и веселья на официальном сайте казино Brillx! Год 2023 принес нам новые горизонты в мире азартных развлечений, и Brillx на переднем крае этой революции. Если вы ищете непередаваемые ощущения и возможность сорвать джекпот, то вы пришли по адресу.
cost of permethrin cream
prednisone 5
prednisone where can i buy
ventolin 4mg uk
zestril 20 mg cost
zestoretic 5 mg
can i buy dexamethasone over the counter
furosemide no prescription
suhagra tablet
propecia pill
metformin where to buy in uk
valtrex generic sale
prednisone rx coupon
cost of generic lisinopril
lyrica 50 mg capsule
price of valtrex in canada
order valtrex from canada
azithromycin 1 g
tretinoin cream 20g
dexamethasone brand name australia
where to buy prednisone without a prescription
Fantastic beat ! I would like to apprentice while you amend your website,
how can i subscribe for a blog site? The account aided me a acceptable deal.
I had been tiny bit acquainted of this your broadcast offered bright clear idea
lisinopril 5mg prices
tadalafil generic best price
cheap cialis for daily use
lyrica 300 mg price in india
diflucan cost in india
prednisone 1 mg coupon
vermox 500g
baclofen otc
online pharmacy metformin
baclofen 10 mg tablet online
azithromycin 100mg
synthroid 120 mcg
propecia 5mg pill
cheap clomid uk
lisinopril from canada
prednisone uk buy
diflucan otc usa
zithromax 250 mg australia
clomid buy
cost of accutane 2017
lisinopril 10 mg tablet cost
I visited several web sites however the audio feature
for audio songs current at this web page is really excellent.
how much is 250mg amoxicillin
Online poker
proventil hfa 90 mcg inhaler
elimite
diflucan 150 mg pill
buying prednisone mexico
odering doxycycline
can you buy elimite cream over the counter
synthroid 75 mcg cost
valtrex best price
buy suhagra 50 mg
prednisone no rx
doxycycline cost in mexico
suhagra 100mg price in india
retin a from canada
zestril 20 mg tablet
cheap albuterol
diflucan prescription
buy prednisone 50 mg
average cost of lyrica
vermox 500mg for sale
lisinopril 4 mg
albuterol atrovent
valtrex over the counter
accutane price
Seriously many of valuable data!
architecture essay writing service will writing service gravesend biology essay writing service
You revealed this fantastically.
best online essay writing services book blurb writing service cheap writing essay service
generic diflucan
prednisone coupon
albuterol otc canada
This is the right blog for anyone who really wants to find out about this topic.
You know so much its almost tough to argue with you (not that
I really will need to…HaHa). You certainly put a
fresh spin on a subject that has been discussed for
many years. Great stuff, just great!
accutane pills for sale
cost of valtrex in india
I am extremely impressed with your writing abilities and also with
the format to your blog. Is this a paid theme or did you customize
it yourself? Anyway stay up the excellent quality writing, it’s rare to look a
great blog like this one these days..
бриллкс
Brillx
Не пропустите шанс испытать удачу на официальном сайте бриллкс казино. Это место, где мечты сбываются и желания оживают. Станьте частью азартного влечения, которое не знает границ. Вас ждут невероятные призы, захватывающие турниры и море адреналина.Но если вы ищете большее, чем просто весело провести время, Brillx Казино дает вам возможность играть на деньги. Наши игровые аппараты – это не только средство развлечения, но и потенциальный источник невероятных доходов. Бриллкс Казино сотрясает стереотипы и вносит свежий ветер в мир азартных игр.
prednisone 20 mg generic
elimite drug
prednisone 5mg tablets price
Really a good deal of valuable data!
myself as a writer essay essay rewriter reddit writing service
generic lasix for sale
generic of accutane
elimite cream ebay
apo prednisone
lisinopril 20 mg tablets
lyrica cost in india
buy propecia australia
lisinopril 15 mg
doxycycline canadian pharmacy
Many thanks. I enjoy this.
writing customer service standards essay writing help masters essay writing service
I am in fact glad to glance at this weblog posts which carries lots of valuable information, thanks for providing such data.
how much is retin a cream in mexico
can i buy cialis in usa
clomid uk sale
accutane 20 mg
order vermox
where can i get retin a cream in uk
synthroid 100 mcg from canada
canadian pharmacy metformin
accutane online australia
wonderful post, very informative. I ponder why
the other experts of this sector don’t understand this.
You should continue your writing. I’m sure, you’ve a huge readers’ base already!
buy glucophage tablets
metformin 500 mg buy
zestoretic 25
how can i get valtrex
cheap prednisone
generic lyrica for sale
propecia generic price
where can i buy vermox online
propecia medication
clomid 50
albuterol 0.3
drug synthroid
clomid 100 mg
suhagra 50 price
accutane
baclofen tab 20mg
valtrex over the counter usa
cheapest pharmacy for prescription drugs
online pharmacy without prescription
suhagra 100mg
canadian pharmacy world coupon
doxycycline capsules 100mg price
prednisone 5 mg tablets
diflucan 150 mg tablet
buy prednisone without a prescription best price
generic vermox
prednisone cream
tretinoin coupon
Write more, thats all I have to say. Literally,
it seems as though you relied on the video to make your point.
You obviously know what youre talking about, why waste your intelligence on just posting videos to your
site when you could be giving us something
informative to read?
prednisone where to buy uk
where can i buy lyrica
An outstanding share! I’ve just forwarded this onto a coworker who was doing a little research on this.
And he in fact ordered me lunch because I found it for
him… lol. So let me reword this…. Thank YOU for the meal!!
But yeah, thanx for spending the time to discuss this subject here on your web page.
This excellent website definitely has all the information and facts I wanted about this subject
and didn’t know who to ask.
lisinopril tabs 88mg
diflucan prices
order deltasone
5mg prednisone
best generic valtrex
buy azithromycin 500mg india
sterapred
payday loan
Online poker
buy viagra online
where can i buy clomid without a prescription
how to order metform onlline
purchase zithromax online
buy elimite cream over the counter
elimite 5 cream
how to get diflucan otc
If some one desires expert view concerning running a blog afterward i propose
him/her to go too see thi web site, Keep up the nice job.
buy accutane online from europe
baclofen cheap
safe reliable canadian pharmacy
can you buy lyrica online
retin a no prescription
prednisone 10 mg price
Абузоустойчивый VPS
Виртуальные серверы VPS/VDS: Путь к Успешному Бизнесу
В мире современных технологий и онлайн-бизнеса важно иметь надежную инфраструктуру для развития проектов и обеспечения безопасности данных. В этой статье мы рассмотрим, почему виртуальные серверы VPS/VDS, предлагаемые по стартовой цене всего 13 рублей, являются ключом к успеху в современном бизнесе
accutane rx
baclofen 40 mg
I’m not that much of a online reader to be honest but your blogs really
nice, keep it up! I’ll go ahead and bookmark your website to come back later.
Many thanks
cheap elimite
propecia over the counter usa
how can i get azithromycin
vermox price canada
amoxicillin nz
how to buy valtrex in korea
azithromycin cost australia
Kudos, I value this!
ventolin inhaler no prescription
generic valtrex
Why people still use to read news papers when in this technological world all is accessible on web?
diflucan rx online
buy propecia cheap
buy valtrex without get a prescription online
prednisone coupon
baclofen medicine price
can i buy amoxicillin over the counter in australia
lyrica prescription coupon
where can i buy elimite cream
where can i buy generic valtrex
baclofen price uk
buy prednisone without prescription
prednisone 20 mg
buy generic metformin
where to buy lyrica cheap
prednisone tabs
lyrica pills 75 mg
how to get prednisone
order elimite online
zithromax tablet
prednisone canada pharmacy
prednisone 8 pills
non prescription medicine pharmacy
valtrex no prescription price
https://prednisone.digital/# buy prednisone 1 mg mexico
finasteride 1mg coupon
generic retin a gel
lyrica medicine
buy baclofen india
synthroid 100 mcg price in india
lisinopril 7.5 mg
valtrex online prescription
diflucan over the counter uk
azithromycin coupon
accutane us
prednisone 50
valtrex 10mg
prednisone 60 mg
prednisone 25
generic valtrex for sale
metformin brand name
I’ve been exploring for a bit for any high quality
articles or weblog posts in this kind of area .
Exploring in Yahoo I finally stumbled upon this website. Reading this information So i’m
glad to exhibit that I’ve an incredibly excellent
uncanny feeling I found out just what I needed. I such a lot
surely will make certain to do not fail to remember this website and give it a look
on a constant basis.
Plus size 2 poece bikoini swimsuitsContessa brewer boobsNrco dick antopolSex inn kjee
highsFreee pawrty thumbBikii ttops saleSwinger naples
floridaLsa and assTwo guys 1 gipr fuckingNude femailee oddChemical transgenderThreesome experiencesVideeo clops of nqzis
having sexPhilippine teen tubesBigg cock gettiing jerked off compilationsHot clip tawny roberts lesbianFree ethniic sexx sitesHoww do girls pee in spaceJessuca sutta nude makee loveFree cheedrleader fuckingCumsot surpiseFree pokenon hentaii pictureCircus fetishCar crash
vioctim breastCele asss fakes galleriesAureola breastShaved
idian pussyProstitues gettig fuckedSexx drugs and rock’n rollRussiann porn ree picturesMenn inn panty sexClit free movie puss trailerJoani
lauurer nude pics https://bit.ly/32SpEBh Errotic swinters
vacation resortsGayy married blow jibs videosBlackman latinaa interracial https://bit.ly/31erZFG Pussy
teeen cuum shots3d adult art comicPenis glass tube japan https://bit.ly/34gB7bV Free seex videeos without downloadsNurist pics
freeSlicon tits https://bit.ly/38E0i9T Hoow to sstart dating for teensMature
60Nudee teen pageant movie clijps https://cutt.ly/ZUaRFz2 Me
using a penis pumpSwift sucking cockFreee video of mmen fcking https://bit.ly/3wGc5OC Rock botttom restaurant caloriesLatex nnon floatingGay male nudfe russin videeo https://cutt.ly/3UV9F86 Le salon porn studio videosTeen passdumpAmy limdsay nude photos https://bit.ly/3fMlIVb Erect nipples poprn picsBotom of
the sea paAnother tsen movie vibrator https://bit.ly/3wxZv3P Home marcia gayy hardenVirgiin pech puswys picsGayy chreistian ireland https://tinyurl.com/33zv9mbc Swkming pool sexFree gay picture web siteAsian fotune saquce https://bit.ly/3cl3h9a Gayle asizn modelBrookline maa active adlt communitiesLesbian annd
boseton ma https://tinyurl.com/yjmtzzcu Vintage traiin photosNastry bdsmYaoi henai
names https://bit.ly/2TWuQPE To pleasure a princeHoww mny penises can hild inn thhe
vaginaAsian restaurant providence https://tinyurl.com/ydlskr6y Man vintge platfofm shoesBiig bellied
women getting fuckedThe ife oof bruce adult life https://bit.ly/3ERkx22 Blonde teen wome getting fuckedCuute teeni bikini model picsHelen mazndy tv escort https://bit.ly/3mAM7JY Ms brihton transgenderAsijan tsunamis photosFemale ssex tourist negrril https://bit.ly/3AEYbPG Dark oth pornNude pictures off
goddardAmateuur trkisch https://bit.ly/3gGoewB Free adult video chatroomStrip cub pU tube sex vies https://bit.ly/3o0jOFQ Plum brunette assTeeen gorl
weeb cam pornStreaming free nime sex https://cutt.ly/KJccPFh Gay hentai wotldNudde fishing
womenThee internett is foor por wworld oof
warcrart https://tinyurl.com/ygxy24uv Seexy redhead blowjobBikinbi hottie 2008 jelsoft
enterprises ltdSex onn tthe set https://bit.ly/2SODjnP Neighborly ssex videosJust upskirtDiirk
jan srip https://bit.ly/3eEQ118 Biini break contest national springTuppeerware canisters vintageXxx cloassic
sjow white https://bit.ly/3hBIcJl Amaeur waycrossPics oof gay
people making outFrench airline stripper
vide https://bit.ly/34pJVuY Tiger woods rumored nudde picturesSexy
nked girls from englandVintage wife swappers https://tinyurl.com/yhsaqmzr Asian fedexFreee aduhlt web hostingsGangbbang face https://cutt.ly/cnFLEvZ Gymnist nude picsBeautiful sexy nasked nude women photosHardcore italkian sluts https://cutt.ly/QJctUIc Gigoo
gaay jakartaExplpited blacdk een allishaSeex offendeer addreess sumher wa https://bit.ly/3o2Pcl8 Home mare sex ube
cookEuropeazn linen vintageSex jabalpur india https://bit.ly/3k0Yhv0 Teen drunk drivibg deawth iin 2009Branko orosopo
porn100 free miklf site suchk dick https://bit.ly/2OLLHlA Many masturbate
timesFree doffart galleriies interracial dogfart freeToonya hardding fucking
tale https://bit.ly/38DjxAC Naked men sex free pornNuudist contest vidreo freeTeens like iit big video galleries https://bit.ly/3vVNNA9 Movi free porno
masturbatingShemale beee armitageAnne-marie difk https://tinyurl.com/yk4b33pz Oven roastewd turkey breaszt recipeErotic tedn handjobThhai escort ageency owo
https://bit.ly/3FLnzFx Vanessa hudgens nude graphicPaay basby sitters ffor sexSheena lee havjng sexx https://tinyurl.com/2myf2lrm Girrl gaggs on cock thrn pukesProstitute videos amateursFree hentai furrty gajes https://cutt.ly/5nhNmOa Wife
sharinhg swapping storiesCraigslist erotic mpls servicesCutee asian girls free pics https://tinyurl.com/yfrkqgrh Compltely
free japanese asian fulkl lenmgth porn moviesGhetto latina fuckingNeew biob photos
https://bit.ly/3zC4EKw Amasteur teen audution tubeVibration orgasmReal world rlad rukes
nufes https://bit.ly/3ddLIrC Henai subberVintage outboad marineJapann
tgp unseen https://cutt.ly/4Uf9ZKp Nudist photography lawsCubby tube audtionsAnal
muscless https://bit.ly/3Ezg8R6 Lets play some
tetris mother fuckerGayy japanese wimmers gaytubeMagnhetic strip wwiki https://cutt.ly/JU4BIIC Characteristiics of a sexual predatorSlereping lesbian sexVintage royal doulton chiba https://bit.ly/3lnECTj Mutual msturbation sameFree bondagfe ssex vidsGay
biig sausaage pizza https://bit.ly/35ia7IF Wiffe wayches ilfs
uck meBikini baabes of tthe webAss dick titt https://cutt.ly/mUXyjOr Free porn for
cellphoneAlleghedny nudeSucking wife pussy https://bit.ly/2TnKzqM Amature hardcorde teern sexFoood allkergy
adult symptomBrandy blair porn vide https://cutt.ly/tnOcS0y Kate gooslin bikiniThroated xxxLatinas sexo anal
https://bit.ly/3dFfPZz Jonathan taylor thomas a homosexualGaay bars
in briminghamWhiplash desigyn vintage https://bit.ly/3A5hdOF Eugenee oregon pornTiffany amber thiessn in assNude pics allison mackJulia aann pornstar videoHenttai shemale sex videosCrying
teen gets brutalized videoDaniielle rogerrs pees in panty pissersXxxx power girls xxxGrandma’s tots boobsHeer hand iin hiss adult diaperBreast agumentation personal storiesEscor femwle inn independent londonBig men dicksZeero toloerance adult video42071 sstrip barAdult annxiety disorderWet orgasms 2010
jelsopft enterprises ltdHuge old ccock bigMale bdsm pics by womenFind swingeres onn vacationAian srnsation juno nakedPatitee teen modelsAcidently cums inside
girlStripper former wewst cheseter ezst studentRegisterred sex offenders in minnesotaThhe sims game sexSeex offender regisfer 21502Maature women’s suitsBritne shaved picturesAsian practice rebuiling recovery social tsunami
workAsiian lady boy free moviesOver 70 porn moviesFising with cum shotSeex popsitions
to pldase her mostIs kristin cashore gayHands fre ccum streamEmpflix charmane star black cockMatujre 4somesAngimated porn vidieosWwww www male asss holesEat ownn cum wnile wifeGayy leasure sexHow to perform orql sexx
moviesNmu pornVintage erotica foumCock hotel stomey stratfordCartoon babes nakedSexy snow skiing clothesAdult novedlties
inn atlantaPhilip k dick hoow tto build a universe
These are genuinely fantastic ideas in on the topic of blogging.
You have touched some fastidious factors here. Any way keep
up wrinting.
prinivil 10 mg tab
over the counter valtrex medication
It’s impressive that you are getting ideas from this piece of writing as well
as from our dialogue made here.ラブドール
generic tretinoin 05 price
prednisone 5442
watch porn video
cheap lisinopril no prescription
dexona tablet price in india
otc lasix
generic lyrica canada cost
cialis mexico online
buy suhagra 50 mg online
vermox online sale
Very rapidly this website will be famous among all blogging and site-building people, due to it’s fastidious content
email flooding – (Info Email bomber https://t.me/floodservice/273 )
Email Bombing – email flood or email hoax (DOS attack) or cluster email bombing, what are they actually doing?
A huge number of emails are sent to e-mail. This usually means that the @FloodService_bot bot specifically targets the victim’s mailbox associated with your email.
These emails are intended to make fun of friends or distract the victim from any security messages or other emails.
I am glad to present you a mail flood bot with a convenient menu and flexible settings!
The cost of the service is $ 2 = 1000 letters.
You specify the time of the flood and the number of letters yourself, or choose the “FAST FLOOD” function
During the flood, a sufficient number of letters arrive so that the owner would miss an important letter!
The bot will flood more than you ordered. On average, 30% more than ordered.
Flood email, Floods Email, Email flooding, gmail flood, email bomber, flood hotmail, flood online,email flooding, email flood bot, email flooded with spam, email flooding service, email flooded with subscriptions, email flooder bot, email bomber 2023, email bomber 2024, email spam bot online, email spammer bot free, spam bot, бот по флуду почт, сервис по флуду почт, услуги по флуду, флуд услуги.
@FloodService_bot – Лучший емаил бомбер на рынке!
accutane discount
buy elimite cream
synthroid 200 mcg
albuterol no rx
lisinopril medication prescription
valtrex prescription price
zythromax
can i buy clomid online uk
can i buy clomid over the counter uk
buy clomid online cheap uk
80 mg prednisone
can i buy prednisone online in uk
finasteride propecia
lisinopril 60 mg
synthroid 100 mcg online
baclofen cream australia
At this moment I am going to do my breakfast, after having my breakfast coming yet again to read further news.
prednisone deltasone
online pharmacy accutane
pharmacy prices for doxycycline
albuterol 0
can i buy prednisone over the counter
can you diflucan over the counter
lisinopril 200 mg
finasteride generic
Hi, i think that і saw yoս visiteԁ my weblog thus i came tо “return the favor”.I’m
attempting to find tһings to improve my web site!I suppose its ok to
use some of your ideas!!
Greetings from Ohio! I’m bored to tears at work so I decided
to browse your site on my iphone during lunch break.
I enjoy the info you present here and can’t wait to take a look when I get
home. I’m surprised at how fast your blog loaded on my cell phone ..
I’m not even using WIFI, just 3G .. Anyhow, excellent blog!
purchase prednisone online
I was more than happy to find this site. I want to to thank you
for your time for this particularly wonderful read!! I definitely really liked every little bit of it and I have
you book-marked to check out new stuff in your web site.
valtrex pills for sale
suhagra 100mg tablet
online pharmacy quick delivery
prednisone mexico
zithromax 25mg
vermox australia
how to get diflucan online
lisinopril 10 12.55mg
synthroid mexico pharmacy
Have you ever considered about including a little bit more than just your articles?
I mean, what you say is important and all.
Nevertheless think about if you added some great photos or video clips to give your posts more, “pop”!
Your content is excellent but with images and video clips, this site could certainly be one of the
greatest in its field. Great blog!
lisinopril online canadian pharmacy
buy valtrex canada
canadian mail order pharmacy
cost of metformin 1000 mg
prednisone 40mg
zestril brand name
purchase accutane online
WOW just wһat Ι was searching fоr. Ⅽame here by searching
fοr https://www.bombinoexp.com/en-in/e-commerce
can i buy zithromax online
This is my first time go to see at here and i
am genuinely pleassant to read everthing at single
place.
order prednisone online canada
canadian pharmacy online ship to usa
where can you get azithromycin over the counter
order deltasone
combivent 20 100 mcg
Hello! I’ve been following your website for a while now and
finally got the bravery to go ahead and give you a shout out from Austin Texas!
Just wanted to tell you keep up the fantastic job!
10 mg prednisone tablets
where can i get prednisone over the counter
buy cheap valtrex
valtrex pill cost
buy vermox cheap
canada pharmacy online
zithromax 250mg online
can i buy metformin over the counter in australia
can you buy elimite cream over the counter
can i buy vermox over the counter
prednisone over the counter
each time i used to read smaller articles or reviews
that also clear their motive, and that is also happening with this post which I am reading at
this place.
prednisone price in usa
Good day I am so grateful I found your web site, I really found you by accident,
while I was looking on Bing for something else, Anyhow I am here
now and would just like to say kudos for a incredible post and a all round
thrilling blog (I also love the theme/design), I don’t have time to
browse it all at the moment but I have saved it and also included your RSS
feeds, so when I have time I will be back to read more, Please do keep up the awesome work.
over the counter valtrex medication
where can i get propecia
buy vermox uk
azithromycin
vermox 500mg tablet price
valtrex 500 price
2 lisinopril
online pharmacy ed
accutane 40 mg capsule
valtrex online purchase
vermox usa buy
propecia pharmacy prices
lisinopril 10mg tablets
120 mg prednisone
purchase azithromycin online
I absolutely love your blog and find many of your post’s to be precisely what I’m looking for.
Does one offer guest writers to write content for yourself?
I wouldn’t mind creating a post or elaborating on most of the subjects you write about here.
Again, awesome weblog!
I quite like the standpoint.
https://crazysale.marketing/bookingcom.html
buy doxycycline online 270 tabs
preddisone no
%image_title% is without a doubt the best possible.
https://crazysale.marketing/foxtrot.html
rx online pharmacy
baclofen pill 10 mg
generic for retin a
synthroid tablets price
Appreciate the recommendation. Let me try it out.
generic lyrica online
where to get valtrex
permethrin topical cream over counter
cost of prednisone 20mg
20 mg lisinopril without a prescription
where can i get zithromax over the counter
ventolin inhaler without prescription
order difucan
baclofen 20 mg cost
buy valtrex
lyrica tablet cost
My brother suggested I might like this blog. He was entirely
right. This post truly made my day. You can not imagine just how much
time I had spent for this information! Thanks!
cheap elimite
prednisone 5mg over the counter
online pharmacy discount code
retin a 05
lisinopril otc
online pharmacy accutane
accutane how to get
lioresal price
deltasone 10 mg cost
dexamethasone for sale
buy cialis australia paypal
how to get azithromycin online
baclofen 40 mg price
furosemide drug brand name
doxycycline india pharmacy
With thanks. I value it.
aztec treasure red dog casino canada nodepositbonus.cc https://red-dogcasino.online/ mobil roulette red dog casino legit video poker real money online
zithromax tablets online
You actually revealed that wonderfully.
roulette online with real money free online slots no registration no download akilies the game
zithromax z-pak
buy prednisone online canada without prescription
generic prednisone without prescription
acticin tablet
buy suhagra online
where to buy lyrica
lyrica generic usa
buy baclofen 50mg
Information nicely used.!
reddog no deposit bonus reddogs casino free blackjack games offline
Nicely put. Thank you!
casino credit card is red dog casino legit play european roulette
dexona medicine
ventolin australia buy
Superb content. Thanks.
red dog casino no deposit bonus existing players red dog casino login roulette for real money
prednisone 20mg online
prescription retin a cream uk
clomid 50 mg for sale
Fantastic beat ! I wish to apprentice while you amend your website, how can i subscribe for a weblog
website? The account aided me a applicable deal. I had been tiny bit familiar of this your broadcast offered
brilliant transparent idea
dexamethasone canada
dexamethasone 8 mg tablets
Have you ever considered writing an ebook or guest authoring on other sites?
I have a blog based upon on the same ideas you discuss and
would really like to have you share some stories/information.
I know my readers would appreciate your work. If
you are even remotely interested, feel free to send me an e mail.
accutane 40 mg price in india
how to buy clomid online
dexamethasone 1.5 mg tablet
permethrin cream for sale
valtrex 500
synthroid best price
Really lots of terrific tips!
tiger casino game https://red-dogcasino.online/ no download slot
valtrex rx online
glucophage cost in india
lyrica 75
My developer is trying to persuade me to move
to .net from PHP. I have always disliked the idea
because of the expenses. But he’s tryiong none the less.
I’ve been using WordPress on several websites for about a year
and am worried about switching to another platform. I have heard excellent things about blogengine.net.
Is there a way I can transfer all my wordpress content into it?
Any help would be really appreciated!
can i buy azithromycin over the counter in us
glucophage brand
lyrica mexico pharmacy
prednisone for dogs without rx
prednisone 475
valtrex
diflucan otc usa
You actually mentioned this superbly.
free slots no download red dog casino bonus codes 2023 aztec treasure
Regards. I like this.
red dog casino no deposit bonus codes 2023 red dog casino 100 no deposit bonus codes red dog casino welcome bonus https://red-dogcasino.online/ casino games free play bitcoin casino blackjack bitcoin blackjack
baclofen 40 mg
diflucan online usa
can i buy diflucan online
diflucan price australia
where can i buy propecia
canadian pharmacy valtrex
prinivil lisinopril
Nicely put. Regards.
regal riches reddog online casino reddog casinos https://red-dogcasino.online/ reddog gambling video poker for real money free slots 777 no download
You mentioned it superbly!
credit card online casino is red dog casino legit achiles the game
Hello just wanted to give you a quick heads up.
The words in your post seem to be running off the screen in Safari.
I’m not sure if this is a format issue or something to do with internet browser compatibility but I thought I’d post to let
you know. The style and design look great though! Hope you
get the issue resolved soon. Cheers
retin a buy india
buy albuterol tablets uk
Amazing material. Many thanks.
red dog casino no deposit bonus reddog casino free slots no downloads with bonus rounds https://reddog-casino.site/ red dog casino no deposit bonus code casino for free casino games download
buy lyrica mexico
zithromax buy canada
lyrica 100 mg cost
Incredible a lot of helpful knowledge.
valid no deposit bonus codes for red dog casino red dog casino sign up bonus samba casino
prednisone 1 mg daily
furosemide tab 80 mg
lisinopril 12.5 mg 10 mg
how to get tretinoin prescription australia
combivent cost price
baclofen over the counter
With thanks. Excellent information.
pig casino game red dog casino promo codes bitcoin casino blackjack
Nicely put. Thanks a lot.
minimum deposit online casino red dog online casino red dog casino no deposit bonus codes
buy cheap prednisone online
You reported it very well!
online video poker for money red dog casino no deposit codes 2023 online bitcoin blackjack
cost of valtrex in australia
synthroid online without prescription
where can i buy ventolin in uk
brand name cialis cheap
baclofen 100mg
valtrex price uk
purchase doxycycline online uk
lisinopril 20 pills
diflucan generic australia
valtrex 1g tablets cost
doxycycline
elimite cream coupon
where to buy prednisone in canada
You actually stated it wonderfully!
diflucan prescription cost
lioresal 10
order valtrex online uk
tretinoin 0.5 australia
azithromycin 250 mg where to buy
how to buy generic valtrex
Hey I know this is off topic but I was wondering
if you knew of any widgets I could add to my blog that automatically
tweet my newest twitter updates. I’ve been looking for a plug-in like this for quite some time and was hoping maybe you would have
some experience with something like this. Please let me know if you run into anything.
I truly enjoy reading your blog and I look forward to your new
updates.
buy diflucan without a prescription
cost of 2.5mg prednisone
cost less pharmacy
I have read so many posts on the topic of the blogger lovers except this paragraph
is actually a nice paragraph, keep it up.
This is a topic that’s near tо my heart…
Best wishes! Exactly whеre are your contact detаils though?
You’ve made your point.
play blackjack online for money https://reddog-casino.site/ play european roulette
lyrica canada online
Very well expressed really! !
reddog casino red dog casino no deposit bonus 2023 red dog casino bonus https://reddog-casino.site/ online casinos craps free no download casinos redplay casino
can you order diflucan online
average cost of azithromycin
You expressed this adequately.
roulette online with real money red dog casino 50 free spins no deposit instant play casino
can you buy clomid over the counter in canada
buy dexamethasone australia
cost of generic lisinopril 10 mg
albuterol 3 mg
Aѡ, this waas an incredibly nice post. Spending some
time and aсtual effort to make a good article…
but what can I say… I put things off a lot and never seem to
get nearly anything done.
prednisone 50mg cost
where to buy prednisone 20mg
Regards, I appreciate it.
chumba casino. calm red dog casino no deposit bonus codes casino banking
5 mg dexamethasone
online pharmacy no prescription
Hello there! This is my first comment here so I just wanted
to give a quick shout out and tell you I genuinely enjoy reading through
your posts. Can you suggest any other blogs/websites/forums that go
over the same subjects? Thank you so much!
valtrex otc drug
diflucan without prescription
Really a lot of very good data!
free no download slot games red dog no deposit bonus codes atlantis slot https://red-dogcasino.website/ $10 deposit casinos red dog casino promo code banana jones
albuterol for sale australia
Cheers. A good amount of material.
casino banking red dog casino login red dog casino no deposit bonus codes 2023
finasteride 1 mg coupon
%%
Here is my web page http://panyvino.sakura.ne.jp/blog/2018/09/28/%e3%82%ab%e3%83%83%e3%83%88%e3%81%ae%e3%82%b7%e3%83%95%e3%82%a9%e3%83%b3%e3%82%b1%e3%83%bc%e3%82%ad%e4%b8%80%e5%80%8b%e7%a8%8e%e8%be%bc%c2%a5120/
Great post. I was checking constantly this weblog and I am inspired!
Extremely useful information specially the last section 🙂 I maintain such info a lot.
I used to be seeking this certain information for
a long time. Thanks and good luck.
accutane nz
suhagra 25 mg price in india
lisinopril 500 mg
With thanks! Very good information!
rollete online poker casino online online casinos craps
buy real valtrex online
Wow all kinds of useful data!
red dog slots red dog casino no deposit code red dog online casino
synthroid 100 mg daily
prednisone acetate
diflucan tablets over the counter
You said that very well.
red dog no deposit bonus codes reddog no deposit bonus achilies the game
Xsignal operates in the decentralized internet ecosystem, harnessing the power
of blockchain and cryptographic innovations to provide services that emphasize user ownership, data privacy, and
user control. Additionally, we offer decentralized applications (DApps), blockchain platforms, and cutting-edge solutions designed to challenge conventional centralized paradigms, nurturing a digital environment
centered around users and trustlessness.
order valtrex
tretinoin gel prescription
cheap generic valtrex without prescription
lisinopril brand name
lyrica 150 mg buy online
can you buy clomid over the counter in mexico
prednisone 50 mg price
buy lyrica
generic cialis 5mg canada
Hello there! Do you use Twitter? I’d like to follow you
if that would be okay. I’m definitely enjoying your
blog and look forward to new updates.
by valtrex online
lyrica 150
elimite over the counter canada
VPS SERVER
Высокоскоростной доступ в Интернет: до 1000 Мбит/с
Скорость подключения к Интернету — еще один важный фактор для успеха вашего проекта. Наши VPS/VDS-серверы, адаптированные как под Windows, так и под Linux, обеспечивают доступ в Интернет со скоростью до 1000 Мбит/с, что гарантирует быструю загрузку веб-страниц и высокую производительность онлайн-приложений на обеих операционных системах.
glucophage xr generic
Many thanks, Wonderful information.
online video poker casino online european roulette no download slot
Thank you! Great stuff.
blackjack real money casino games online free play no download all free chips https://red-dogcasino.website/ play craps online for money red dog casino 100 no deposit bonus codes casino no deposit free chips
buy accutane 10mg
prednisone rx
elimite cream price
https://medium.com/@DawsonFlet26116/дешевый-vps-linux-cd4e80f26d2e
https://medium.com/@SimoneRile58429/сервер-для-зенопостера-ad956f58c041
https://medium.com/@kai_ford31163/выделенный-сервер-хрумер-a2cfa35db507
https://medium.com/@TiffanyTre45914/ubuntu-выделенный-сервер-с-многозадачностью-b86835e5fc66
https://medium.com/@shaffer_jo24851/геотаргетинг-de84cddb34e9
VPS SERVER
Высокоскоростной доступ в Интернет: до 1000 Мбит/с
Скорость подключения к Интернету — еще один важный фактор для успеха вашего проекта. Наши VPS/VDS-серверы, адаптированные как под Windows, так и под Linux, обеспечивают доступ в Интернет со скоростью до 1000 Мбит/с, что гарантирует быструю загрузку веб-страниц и высокую производительность онлайн-приложений на обеих операционных системах.
how to get diflucan over the counter
purchase valtrex
buy cheap accutane online
Information very well taken..
red dog casino online red dog casino login fish catch
buy lyrica usa
price of synthroid in india
buy generic baclofen
propecia purchase uk
valtrex prescription canada
You have made your position quite nicely!.
free slim slot slots no download neosurf casino https://reddog-casinos.website/ online roulette real money red dog casino bonus codes red casino
You actually stated it effectively!
reddog https://red-dogcasino.website/ high stakes online casino
dexamethasone 4 mg price
where to buy clomid tablets
zestril medicine
buy generic lyrica
india buy prednisone online
Good material. With thanks!
play craps online for money no deposit bonus codes for red dog casino best online craps
generic lyrica for sale
tretinoin online purchase
prednisone brand name india
how much is prednisone 10mg
acticin tablet
valtrex generic in mexico
prinivil 25mg
baclofen medicine pills
Appreciate it, Ample postings.
play craps online for real money red dog casino login roulette real money
Regards. Quite a lot of tips.
mardigras gaming reddogcasino online blackjack fake money
watch porn video
accutane
over the counter prednisone medicine
Nicely put, Thanks a lot!
casino mania slots real money red dog casino login casino fish
prednisone 2
cheap meds metformin
can i order valtrex online
augmentin india
synthroid purchase
Hey are using WordPress for your blog platform?
I’m new to the blog world but I’m trying to get started and create my own. Do
you require any coding knowledge to make your own blog?
Any help would be really appreciated!
azithromycin otc usa
propecia 5mg sale
propecia singapore price
elimite cream generic
tadalafil 20 mg online india
best accutane brand
by prednisone w not prescription
generic lyrica usa
Nicely put. Cheers!
10 deposit casino credit card online casino credit card casino online
Useful forum posts. Appreciate it.
free slots 777 no download red dog casino no deposit codes play free slots no download no registration https://reddog-casinos.website/ red cherry casino no deposit bonus aztec treasure high stakes casinos
Nicely put, Appreciate it.
best online video poker is reddog casino legit rtp slots https://reddog-casinos.website/ casino no deposit free chips credit card casino lil red slot machine
prednisone brand name india
Pretty component of content. I simply stumbled upon your weblog
and in accession capital to say that I acquire actually loved
account your blog posts. Any way I will be subscribing on your
feeds or even I fulfillment you get admission to persistently rapidly.
clomid 2017
doxycycline online pharmacy canada
Valuable forum posts. Cheers!
free chip casino no deposit red dog casino bonus free chip no deposit casino
lisinopril 40 mg purchase
lyrica medication
azithromycin over the counter canada
valtrex 2 g
valtrex pharmacy
where can i purchase valtrex
synthroid prescription
prednisone 10 mg tablets
retin a 0025 cream
buy prednisone online without a script
valtrex 500mg price canada
cheap baclofen online
Fantastic posts. Kudos!
high stakes games reddog casino review redplay casino
win79
win79
buy lyrica online from mexico
buying metformin online
Regards! Valuable stuff!
bc game reviews https://bcgamecasino.fun/ bc game
price of lyrica 75 mg in india
can you buy lyrica over the counter
propecia women
Really lots of beneficial advice!
bc game casino bc game crypto casino bc syracuse game
lyrica 250 mg
Regards! Ample advice.
what is bc game bc game opiniones bot bc game
camiseta real betis
Thanks. Excellent information.
bharata 600 bc board game bc game hash bc game shitlink
It’s impressive that you are getting thoughts
from this article as well as from our dialogue made at this place.
albuterol ventolin
lyrica mexico price
where to buy metformin 1000 mg
where to purchase diflucan
order valtrex from canada
Today, while I was at work, my cousin stole my iphone
and tested to see if it can survive a 25 foot drop, just so she can be a youtube sensation. My iPad is now broken and she
has 83 views. I know this is completely off topic but I had to
share it with someone!
retin a cost
best generic glucophage
Ѕaved aѕ a favoгite, I really like your web site!
permethrin cost
lasix tablets price
Wow that was strange. I just wrote an really long comment but after I clicked submit
my comment didn’t show up. Grrrr… well I’m not writing all that over again. Anyways, just wanted to say wonderful blog!
diflucan pills online
can i order azithromycin online
where can i buy diflucan 1
how to buy accutane
Persian Porn Tube and Beautiful Iranian girl dancing sexy
azithromycin where to buy without prescription
baclofen 10 mg cost
baclofen 5 mg tab
lyrica best price
You actually reported this terrifically.
casino games online free play no download red dog casino no deposit bonus codes 2023 red dog casino 100 no deposit bonus codes 2023 https://red-dogcasino.online/ banana jones baccarat game online free play craps online for real money
zestril medication
Many thanks! An abundance of facts!
red dog free chip 2023 instant play games 100 free spins https://red-dogcasino.online/ aladdin’s wishes red dog casino 50 free spins no deposit achillis the game
cheap vermox
cross border pharmacy canada
prednisone 20 mg generic
diflucan 125mg
buying prednisone
prednisone prices
canadian pharmacy accutane with no prescription
Lovely stuff. Regards!
Seriously a good deal of excellent material.
online video poker game is reddog casino legit roulette online
happy family rx
augmentin 457 price
generic azithromycin
synthroid online pharmacy
lyrica 300 mg price
where can you get azithromycin
Great write ups. Regards.
bc game support bc clemson game 2016 shitcodes bc game
Info effectively used!!
nodepositbonus.cc red dog no deposit bonus codes free slots no downloads https://reddog-casino.site/ free chip casino no deposit free chips no deposit casinos rudolfs revenge
You said it nicely.!
bcgame 入金不要ボーナス bc game como funciona bc game online
prednisone capsules
doxycycline 10mg
Terrific material. Cheers.
notre dame bc game 2023 bc game casino bc game tickets
Thanks a lot, Wonderful information!
bc game code bc game shitcode today code bc game
prednisone cream over the counter
Superb postings. Cheers!
bc bandana game bc game crypto casino bcgame kyc
lyrica cap 100mg
buy propecia online without prescription
diflucan generic cost
This is nicely expressed. .
bc game bot https://bc-game-casino.online/ bc game support
ventolin from mexico to usa
online viagra from india happy family store
I’ve been surfing online greater than three hours lately, yet I by no means found
any interesting article like yours. It’s beautiful value sufficient
for me. In my view, if all web owners and bloggers made good content as you probably did, the web will likely be
much more helpful than ever before.
accutane in uk
ventolin australia price
synthroid 0.112 mcg
albuterol capsule
buying prednisone on line
I ҝnow this site gives quaⅼityy dependent aгtficles oor reviеws annd additional matеrial,
is there аny otһer site which givеs these kinds of information in quality?
lasix cheap
diflucan 200mg tab
by prednisone w not prescription
https://medium.com/@McgeeTrevo55342/дешевый-выделенный-сервер-на-vdsina-с-вечным-хостингом-и-высокоскоростным-интернетом-425185cb98f4
VPS SERVER
Высокоскоростной доступ в Интернет: до 1000 Мбит/с
Скорость подключения к Интернету — еще один важный фактор для успеха вашего проекта. Наши VPS/VDS-серверы, адаптированные как под Windows, так и под Linux, обеспечивают доступ в Интернет со скоростью до 1000 Мбит/с, что гарантирует быструю загрузку веб-страниц и высокую производительность онлайн-приложений на обеих операционных системах.
lisinopril 80mg tablet
lisinopril 10 mg
lyrica 75 mg price south africa
lisinopril 20 tablet
lyrica online order
buy valtrex online usa
Incredible a good deal of excellent facts.
is bc game legit bcgame bc red bandana game
Bonus sans dépôt encaissable, il n’y a
aucune condition pour profiter du bonus si ce n’est de s’inscrire en passant par notre lien.
Position clearly considered!.
red dog casino free spins no deposit casino games download roulette online https://reddog-casino.site/ online craps gambling casino free chips no deposit required reddog casino bonus codes
online pharmacy propecia prices
clomid online australia
where can i buy prednisone over the counter uk
prednisone 5 50mg tablet price
generic propecia cost
lyrica 20 mg
prescription albuterol
elimite coupon
Amazing many of very good data.
high stake casinos free chips casino no deposit deuces wild card game free https://reddog-casino.site/ free chip no deposit casinos red dog casino no deposit codes enchanted casino real money
azithromycin prescription price
happy family pharmacy
diflucan australia
buy prednisone from canada
over the counter tadalafil
Many thanks. I value it!
mobil roulette red dog no deposit codes red cherry casino no deposit bonus https://red-dogcasino.website/ deuces wild card game free red dog casino 50 free spins no deposit video poker for real money
baclofen 40 mg price
where can i get synthroid
best price for lisinopril
lyrica medicine cost
azithromycin buy online us
Terrific knowledge. Cheers!
0 bc game bc game mirror bc game jb coin
Lovely info. Many thanks!
bc game отзывы bc game jb score bc lions game today
Whoa loads of very good data!
bc game зеркало bc game review bc video game
buy accutane online paypal
can you buy baclofen over the counter uk
Thanks, Ample stuff.
bc-game bc game hash how to play bc game
buy lyrica 50 mg
5 mg prednisone tablets
diflucan 200 mg capsule
With havin so much content do you ever run into any issues of plagorism or copyright infringement?
My website has a lot of unique content I’ve either created myself or outsourced but it seems a
lot of it is popping it up all over the web without my agreement.
Do you know any methods to help reduce content from being stolen? I’d certainly appreciate it.
suhagra 50 mg price in india
prednisone 20 mg tablet
doxcyclene
brand name drug prednisone
buy deltasone no prescription
buy lasix without a doctor’s prescription
legal online pharmacy
accutane where to get
10 mg prednisone tablets
propecia price comparison uk
buy metformin over the counter us
valtrex buy online
Saved as a favorite, I really like your blog!
zithromax 500mg price
how to get prednisone online
can you buy azithromycin over the counter in australia
suhagra online
buy synthroid 112 mcg
azithromycin 50 mg
Seriously many of amazing facts!
bc game bc game shooting bc game no deposit bonus codes
With thanks! I appreciate it!
aladdin’s wishes dog casino free no download slot games https://red-dogcasino.website/ deuces wild bonus poker letem ride nodepositbonus.cc
cost of accutane in canada
buy synthroid without a prescription
buy retin a cream online india
Whoa a good deal of superb tips!
who won the bc lions game last night https://bcgamecasino.pw/ who won the bc lions game last night
propecia gel
You said this perfectly.
cm bc high football game bc game crash bc game promo code
azithromycin 1mg
baclofen 5 mg tab
prednisone 1 mg
cost of brand name synthroid
buy accutane 10mg online
buy azithromycin over the counter uk
buy lyrica 50 mg
generic lyrica online
where can i buy vermox over the counter
diflucan tablets buy online no script
Beneficial postings. Many thanks.
aztecs treasure red dog casino no deposit bonus code free bonus codes for existing customers 2023 https://red-dogcasino.website/ empire casino online login red dog casino high stake casinos
You suggested this well!
bc hockey game schedule bc-game bc game shift codes
drug lisinopril 5 mg
What’s up Dear, are you genuinely visiting this web site on a regular basis, if
so after that you will definitely obtain fastidious know-how.
tretinoin cream purchase online
Thanks! Plenty of tips.
bc game bГґnus bc game casino shitcode bc lions football game today
azithromycin buy online us
buy viagra online
Что значит психолог. Самый лучший психолог в москве. https://batmanapollo.ru/
elimite online
synthroid brand
Beneficial forum posts. Thanks.
bc hash game bc game shitcode bc game shitcode 2023
azithromycin otc in us
generic lyrica 2019
where can you buy valtrex
buy lyrica 50 mg
where can you buy prednisone
can you buy ventolin over the counter
best metformin brand
Many thanks, Wonderful information.
bc lions game tonight shitcode bc game bc game
You actually said this very well.
bc game referral clemson bc game on tv bc game wallet
You expressed it fantastically!
bc game trick bc game crash bc game sign up
synthroid 80 mcg
propecia cheapest no prescription
generic clomid online
synthroid 700 mg
can you buy lisinopril online
ventolin tablets 4mg
valtrex online purchase
valtrex for sale cheap
doxycycline hyclate 100 mg capsules
buy valtrex tablets
buy prednisone online uk
diflucan 200 mg pill
can you buy synthroid in mexico
synthroid 88
cat casino регистрация
регистрация в cat casino
lioresal 10 mg tablets
buy synthroid
synthroid 0.0125 mg
lyrica pills 75 mg
Amaç Değer Ne Demek?
buy lyrica cheap online
cheap baclofen online
Если вам интересна тема – Строительство и ремонт дома своими руками, то вам просто необходимо посетить сайт https://stroyka-gid.ru, на котором Вы прочтете много познавательных статей о строительных материалах, ремонте, перепланировке, покраске, клейке, укладке и конечно же утеплении.
Kudos! A good amount of advice.
آموزش سایت bc game primitive era 10000 bc game mod apk bcgame 入金不要ボーナス
valtrex medicine
prednisone 10mg for sale
You revealed that very well!
bc game jb bc hash game bc game crash strategy
Не забывайте посещать интересный сайт о строительстве и ремонте https://stroyka-gid.ru . Много познавательных статей о строительных материалах, планировке, ремонте стен, полов и крыши, и конечно же о строительном инструменте.
elimite cost
After I initially commented I appear to have clicked on the -Notify me when new comments
are added- checkbox and now each time a comment is added I recieve 4 emails with the exact same comment.
Perhaps there is a way you can remove me from that service?
Cheers!
prednisone pill 10 mg
zithromax cost
lisinopril 40mg
elimite cost
baclofen tablets 10mg
safe canadian pharmacy
With thanks! Very good stuff!
european roulette online red dog gambling neosurf casino https://reddog-casinos.website/ no download slot red dog casino australia no deposit bonus codes 2023 red dog casino no deposit bonus codes 2023
diflucan without get a prescription online
I know this if off topic but I’m looking into starting
my own weblog and was wondering what all is needed to get set up?
I’m assuming having a blog like yours would cost a pretty
penny? I’m not very web savvy so I’m not 100% certain. Any suggestions or advice would be greatly appreciated.
Thanks
16 albuterol
As the admin of this website is working, no doubt very soon it will be well-known, due to its feature contents.
baclofen
legitimate online pharmacy usa
Reliable content. With thanks!
bc game hash bc game online bc game trick
Appreciate it. Loads of content.
bc game crypto casino https://bcgamecasino.website/ bc game
prednisone 40
synthroid 0.25 mg
doxycycline 200 mg capsules
price of azithromycin
zestril 20 mg price in india
combivent medication
can you buy prednisone over the counter
suhagra 100 mg online
150 mg clomid
order generic valtrex online
azithromycin 25 mg cost
valtrex for sale canada
buy valtrex online no prescription
synthroid 175 mcg coupon
propecia pharmacy uk
how much is retin a in canada
furosemide 40mg tabs
baclofen generic price in india
valtrex 500 mg cost
buying prednisone online
Thanks a lot! An abundance of material.
bcgame review bc game casino nc state bc game
where to buy prednisone online
pharmacy website india
37.5 mcg synthroid
You stated that effectively!
bc game script bc duke game bc game tickets
diflucan buy without prescription
diflucan 150 mg over the counter
where to buy lyrica cheap
buy vermox uk
furosemide 40 mg for sale
prednisone online paypal
Terrific content, Many thanks.
bcgame army vs bc game ШЁШ§ШІЫЊ bc game
synthroid 137 mg
dexamethasone cost uk
lisinopril 10 mg no prescription
prednisone capsules
suhagra 25
zithromax uk online
combivent respimat for asthma
how much is azithromycin 1g
cheap lisinopril 40 mg
1хбет — известная букмекерская контора. Создавайте аккаунт на официальном сайте и воспользуйтесь акциями. Поставьте на команду по душе. Используйте высокие шансы.
1x bet
valtrex usa
1хбет — востребованная букмекерская контора. Заводите профиль на официальном сайте и получайте бонусы. Сыграйте на команду по душе. Получите выгодные коэффициенты.
зеркало 1xbet
This is the perfect site for anyone who would like to find out
about this topic. You know a whole lot its almost tough to argue with you (not that I really will need to…HaHa).
You definitely put a brand new spin on a topic that’s
been written about for many years. Great stuff, just wonderful!
buy brand name accutane online
prinivil drug cost
vermox tablets uk
prednisone 5mg coupon
Hi, i think that i saw you visited my weblog thus
i got here to go back the prefer?.I am attempting to find
issues to improve my web site!I suppose its adequate to make
use of a few of your ideas!! http://toto990.com/bbs/board.php?bo_table=qna_toto&wr_id=94713
dexamethasone 20 mg
lyrica 50 mg cost
metformin 750 mg tablet
Hmm is anyone else encountering problems with the
images on this blog loading? I’m trying to figure out if its a problem on my end or if it’s the blog.
Any suggestions would be greatly appreciated.
suhagra online india
prednisone 477
This is really interesting, You are a very skilled blogger.
I have joined your rss feed and look forward to seeking more of your great
post. Also, I have shared your site in my social networks!
baclofen 100mg cost
tadalafil price in india
buy prednisone no prescription pharmacy
prednisone 20mg prescription cost
metformin 850 mg price
where to buy prednisone
cost of lyrica medication
brand name prednisone
cialis brand name online
price of lisinopril 20 mg
prednisone drug
prednisone pills for sale
brand synthroid
order lyrica online
generic of augmentin
metformin 317240
Good data. Regards!
как поставить бонус в 1win как использовать бонусы в 1win 1win ставки на спорт официальный сайт https://1winoficialnyj.online/ 1win промокод бонус за регистрацию ваучеры на 1win aviator 1win отзывы
Seriously quite a lot of superb information!
1win автоматы слоты 1win скачать на андроид 1win бонус на первый депозит
dexamethasone 10
can i buy elimite over the counter
These are really fantastic ideas in regarding blogging.
You have touched some good factors here. Any way keep
up wrinting.
lyrica 100 mg cost
penis enlargement
diflucan tablet 500mg
You said this fantastically.
1win официальный https://1winoficialnyj.online/ 1win бесплатная ставка
vermox online
elimite cream over the counter
dexamethasone 12 mg
prednisone 30 mg
吸うやつブランド工場から直卸しのアダルトグッズ通販のため、ラブグッズ正規品をお得にゲットできる.オシャレな性生活を提案する大人のおもちゃ通販アダルトショップ。
Good posts. Appreciate it!
как вывести с 1win 1win зеркало рабочее 1win букмекерская контора скачать приложение
You actually reported that terrifically!
1win казахстан 1win регистрация на сайте 1win скачать на телефон андроид бесплатно
propecia for men
You actually explained it really well.
1win оф сайт 1win казино зеркало 1 вин 1win 1
50 mg prednisone from canada
valtrex for sale canada
baclofen cost australia
accutane medicine in india
you are actually a just right webmaster. The website loading velocity is amazing.
It kind of feels that you’re doing any unique trick.
Moreover, The contents are masterpiece. you have done a wonderful job
on this matter!
can you buy clomid without a prescription
Way cool! Some extremely valid points! I appreciate you penning this write-up and the rest
of the website is also really good.
lyrica 500
lyrica from canadian pharmacy
synthroid nz
dexamethasone 1 mg tablet
penis enlargement
reputable overseas online pharmacies
how much is diflucan
prednisone for sale 5mg
tretinoin cost australia
amoxicillin 250 mg pill
baclofen 25 mg tablets
dexamethasone 1.5 mg tablet
prednisone price uk
Hi there, alѡays i used to ceск website pօsts here early in the daylight, since i like to find out more
annd more.
retin a generic sale
buy baclofen online uk
retin a online pharmacy india
best generic metformin
valtrex 1g tablets cost
Good content. Thank you.
как активировать ваучер в 1win ваучеры 1win 2023 1win войти зеркало https://1winoficialnyj.online/ 1win casino бонус aviator game 1win обзор актуальные бонусы 1win 2024 промокод 1win на сегодня
Hi there, I check your new stuff like every week. Your writing style is witty,
keep doing what you’re doing!
metformin 1000 mg cost
3 diflucan pills
You suggested it wonderfully.
1win g2 ваучер 1win получить 1win букмекерская промокод https://1winoficialnyj.online/ 1win казино регистрация 1win бк 1win промокод при регистрации
Good day! Do you use Twitter? I’d like to follow you if that would
be okay. I’m undoubtedly enjoying your blog and look forward to new posts.
Why people still make use of to read news papers when in this technological
world the whole thing is existing on web?
lisinopril pills 10 mg
finasteride propecia
prednisone 2 5 mg
generic tadalafil medication
Mɑy I just say what a cοmfort to find somеbցody that gehuinely knows what they’re talking about ovedr the internet.
Yooᥙ certainly realize how to brіn aan issue to light and make it important.
More ɑnd moгe people must check this out and understand tһis side of yoսr story.
It’s surprising you aren’t more poрular because you certainly possess thhe gift.
azithromycin 1000 mg cost
buy vermox in usa
Very good information, Thanks!
что такое бонусы спорт в 1win бонусы казино 1win 1win официальный зеркало букмекерская контора https://1winoficialnyj.online/ как использовать бонусы в 1win казино почта 1win бесплатные ваучеры 1win
Online poker
diflucan 150 mg tablets
baclofen brand name in usa
valtrex daily use
cheapest pharmacy to get prescriptions filled
albuterol cost
azithromycin 66
You actually said this effectively.
1win lucky jet игра отзывы 1win регистрация команда 1win https://1winoficialnyj.site/ 1win регистрация ставки 1win онлайн forze 1win
Cheers! I appreciate it.
1win csgo 1win как пополнить 1win рабочее зеркало прямо сейчас
prednisone 200 mg
lyrica 325 mg
synthroid pills for sale
azithromycin online pharmacy canada
how to get valtrex prescription online
Nicely put. Cheers!
1win как использовать бонус казино jet в 1win как обыграть лаки лаки отзывы казино лаки как использовать бонусы спорт в 1win
Nicely put. With thanks.
промокод 1win при регистрации aviator 1win 1win команда кс го
Hi to every one, the contents present at this website are genuinely
amazing for people knowledge, well, keep up the nice work fellows.
You actually explained it well.
1win на айфон промокоды 1win 1win бесплатно приложение
buy dexamethasone tablets
cheap vermox
I am sure this paragraph has touched all the internet people, its really really pleasant
post on building up new website.
cost baclofen
Thanks a lot! Numerous content!
1win uz https://1winoficialnyj.site/ почему 1win не выводит деньги
generic prednisone online
lisinopril 40 mg tablets
prednisone 5 mg tablet
propecia buy
azithromycin 1000 mg price
woknderful issᥙes altogether, you simply gained a logo new reader.
What would you suggeѕt in reegards to yoour post that үou just made some ɗays in the past?
Аnyy ⲣositive?
buy diflucan
buy vermox
fluconazole without script
doxycycline 50
zithromax prescription cost
elimite
Thanks a lot. Plenty of content!
1win онлайн download 1win app сколько выводит 1win https://1winoficialnyj.site/ 1win site 1win официальный сайт бесплатно online lucky jet игра в 1win
synthroid 112 mcg coupon
generic propecia australia
lisinopril medication prescription
Info clearly regarded..
игра авиатор 1win 1win промокод на фрибет 1win отзывы казино https://1winoficialnyj.site/ 1win jetx 1win скачать android 1win зеркало
I like the valuable info you provide in your articles.
I will bookmark your weblog and check again here regularly.
I’m quite certain I will learn many new
stuff right here! Best of luck for the next!
where can i get accutane online
how much is elimite cream
generic suhagra
prednisone 40
cost of baclofen
prednisone australia
suhagra tablet
cheap metformin online
prednisone prescription
Perfectly spoken truly! !
1вин обзор и слотов 1win онлайн 1вин 1win скачать ios 1win зеркало сайта на сегодня https://1winoficialnyj.site/ 1win зеркало сейчас 1win онлайн сайт 1win вход
brillx официальный сайт играть онлайн
brillx казино
В 2023 году Brillx Казино стало настоящим оазисом для азартных путешественников. Подарите себе незабываемые моменты радости и азарта. Не упустите свой шанс сорвать куш и стать частью легендарной истории на страницах брилкс казино.Наше казино стремится предложить лучший игровой опыт для всех игроков, и поэтому мы предлагаем возможность играть как бесплатно, так и на деньги. Если вы новичок и хотите потренироваться перед серьезной игрой, то вас приятно удивят бесплатные режимы игр. Они помогут вам разработать стратегии и привыкнуть к особенностям каждого игрового автомата.
valtrex medicine for sale
furosemide 20 mg over the counter
buy retinol online without prescription
valtrex for sale
Incredible all kinds of superb information.
1win casino games xyz игры лаки джет 1win 1win все еще топовое проверка 1win зеркало https://1winoficialnyj.website/ большой 1win казино букмекерская контора 1win промокод 1win казахстан 1win
Kudos! I appreciate it.
1win зеркало сейчас 1win скачать android скачать приложение 1win на андроид
I love your blog.. very nice colors & theme. Did you make this website yourself or did you hire
someone to do it for you? Plz respond as I’m looking to construct my own blog and
would like to know where u got this from. thank you
valtrex rx where to buy
glucophage 250
Pretty! This was an incredibly wonderful article.
Thank you for providing these details.
elimite
vermox tablet india
order azithromycin without prescription
canada synthroid cost
Cheers, Awesome stuff.
1win iphone ваучер 1win 1win coin что это
Appreciate it, Ample postings!
1win demo 1win зеркало сайта 1win
purchase prednisone from india
Appreciate it! Numerous content!
как использовать бонусы на 1win 1win отзывы 1win бонус на первый депозит
benicar lisinopril
prescription baclofen 10 mg
where can i buy dexamethasone
where can i buy metformin without a prescription
albuterol 90
“Introducing the ultimate game-changer in WhatsApp marketing – our ‘WhatsApp Open Group Blaster’! Supercharge your promotional efforts by effortlessly posting advertisements to millions of public WhatsApp groups every day. With lightning-fast speed and precision targeting, our software takes your marketing strategy to new heights. Reach a vast audience and boost your brand exposure like never before. Harness the power of WhatsApp hash channels, available for purchase directly from us, to ensure maximum efficiency and delivery. Our user-friendly interface makes it easy to navigate, and with the ability to post to non-private groups, you’re in control of your campaign’s success. Elevate your outreach, increase engagement, and drive results with the WhatsApp Open Group Blaster. Don’t miss out on this opportunity to transform your marketing game. Get started today and watch your brand soar to new heights!”
website http://www.cdodatabase.com
I like the valuable info you provide in your articles.
I will bookmark your blog and check again here
regularly. I am quite certain I will learn many new stuff right here!
Best of luck for the next!
how much is synthroid
laxis pills
I do accept as true with all the concepts you’ve presented on your post.
They’re very convincing and can definitely work. Still, the posts are too short for starters.
May just you please lengthen them a bit from next time?
Thank you for the post.
buy lisinopril 20 mg online
vermox 100mg tablets
I have read some good stuff here. Certainly worth bookmarking for revisiting.
I wonder how a lot effort you put to create the sort of fantastic informative site.
buy lyrica online europe
buy doxycycline cheap
diflucan online without prescription
ventolin 250 mcg
Seriously quite a lot of good knowledge.
1win акции https://1winoficialnyj.website/ как поставить бонус в 1win
Kudos. Helpful information!
1win рабочее 1win сайт 1win partners вход https://1winoficialnyj.website/ скачать 1win на телефон официальный зеркало 1win 1win вход
where can i purchase accutane
zithromax capsules 250mg
Truly a lot of useful data.
1win прогнозы 1win-rate com 1win скачать бонус спорт 1win https://1winoficialnyj.website/ 1win зеркало рабочее 1win casino 1win букмекерская рабочее зеркало
purchase vermox
acticin online
valtrex online usa
online ventolin
synthroid without a rx
synthroid 75 mcg price in india
It’s remarkable designed for me to have a web page, which is helpful in support of my know-how.
thanks admin
where to buy lyrica
Thank you very much for sharing, I learned a lot from your article. Very cool. Thanks. nimabi
metformin online buy
glucophage xr 500
I do believe all of the ideas you’ve offered to your post.
They’re very convincing and can definitely
work. Nonetheless, the posts are too short for starters.
Could you please lengthen them a bit from subsequent time?
Thanks for the post.
Wonderful material, Cheers.
1win bet 1win букмекерская 1win 2024
dexamethasone buy online
Good data, Appreciate it.
www 1win ru 1win brasil 1win вывод средств отзывы
azithromycin 500 mg generic
You actually reported it really well!
стратегия на авиатор игра 1win алгоритм 1win зеркало рабочее 1win aviator играть
Seriously tons of fantastic material!
1win как ставить бонусы 1win 5000 фрибет 1win ставки скачать на андроид
These are genuinely great ideas in regarding blogging. You have touched some
nice points here. Any way keep up wrinting.
dexamethasone medicine
doxycycline 50 mg price uk
vermox 500g
buy deltasone no prescription
azithromycin 250 mg no prescription canada
how much is azithromycin 500mg
diflucan 200
zestoretic 20
lisinopril cost 5mg
valtrex prescription price
propecia cost australia
metformin 10 mg
permethrin cream for sale
Уникальное объявление: 18 лет, и я готова сделать тебе невероятный минет в машине. Открой для себя настоящее удовольствие c проÑтитутки большие жопы!
lyrica 150 mg price australia
valtrex prescription online
Touche. Outstanding arguments. Keep up the great spirit.
legal online pharmacies in the us
can i buy clomid over the counter in australia
Эксклюзивное объявление: мне 18 лет, и я готова подарить тебе невероятный минет в машине. Ощути магию настоящего наслаждения! ÑŽÐ½Ð°Ñ Ð´ÐµÐ²ÑƒÑˆÐºÐ° голаÑ
amoxil 925
lyrica uk
lisinopril 5 mg uk price
dexamethasone 200 mg
how to buy valtrex
lyrica rx
generic deltasone
порно рассказы
augmentin 14 tablet
finasteride prescription
azithromycin 500 mg price in india
order prednisone without prescription
tretinoin cream price
buy accutane cream
synthroid over the counter online
amoxicillin capsules 500mg price in india
elimite canada
lisinopril cheap brand
Kudos, Lots of tips!
1win official site https://1winregistracija.online/ как выиграть в казино 1win
finasteride tablets
furosemide 40 mg price
Seriously a lot of great info.
1win обзор 1win aviator бонус 1win
doxycycline without prescription
Nicely put, Thanks.
1win сайт скачать 1win зеркало на сегодня как пополнить баланс 1win
lisinopril no prescription
Девушки легкого поведения из Москвы готовы подарить вам незабываемые моменты. Эксклюзивное объявление: мне 18 лет, и я готова подарить тебе невероятный минет в машине. Ощути магию настоящего наслаждения! проститутки улица академика янгеля. Профессиональные куртизанки ждут вашего звонка. Узнайте, что такое настоящее удовлетворение в компании любовниц из столицы.
cost doxycycline australia
prices of metformin
diflucan tablets buy online no script
Девушки легкого поведения из Москвы готовы подарить вам незабываемые моменты. Эксклюзивное объявление: мне 18 лет, и я готова подарить тебе невероятный минет в машине. Ощути магию настоящего наслаждения! секс с проституткой. Профессиональные куртизанки ждут вашего звонка. Узнайте, что такое настоящее удовлетворение в компании соблазнительниц из столицы.
Information very well used!!
1win официальное зеркало 1win зеркало скачать 1win проверяем и бонусы 1вин 1win https://1winregistracija.online/ состав 1win 1win вход вывод с 1win
where can you buy diflucan over the counter
elimite cream 5
buy prednisone from canada
Many thanks, Ample posts.
1win зеркало рабочее на сегодня скачать 1win официальный сайт ваучер в 1win https://1winregistracija.online/ 1win скачать приложение en el en 1win 1win cdigos promocionales 1win juegos 1win официальное зеркало где
This is nicely expressed. .
plinko 1win 1win промокод 1win купон
Contra vim mortis non est medicamen in hortis — Против силы смерти в садах нет лекарств.
https://batmanapollo.ru
cheap generic valtrex without prescription
combivent buy
Very good info. Thanks a lot.
1win как пополнить счет 1win скачать ios 1win бездепозитный бонус
how much is furosemide 40 mg
Wow loads of superb data!
1win зеркало сайта online 1win app 1win история ставок https://1winregistracija.online/ 1win официальное зеркало на сегодня как активировать ваучер в 1win что делать с бонусами на 1win
It is the best time to make a few plans for the longer term and it is time to be happy.
I’ve read this put up and if I may I wish to suggest you few fascinating things or advice.
Maybe you can write next articles referring to this article.
I wish to learn more things about it!
medication zestoretic
buy augmentin cheap
clomid nz
buy azithromycin canada
You reported that really well!
1win промокод россия 1win официальный сайт “””1win скачать на android””” https://1winvhod.online/ как отыграть бонус 1win промокод 1win бонусы спорт 1win
accutane in india
azithromycin 1
clomid discount
synthroid 75 mcg cost
ordering prednisone
cost of lisinopril 40mg
lyrica cost uk
pharmacy in canada for viagra
valtrex pills for sale
doxycycline india cost
online pharmacy quick delivery
prednisone 7.5 mg daily
valtrex 2 g
permethrin cream
albuterol mdi
prednisone corticosteroids
Veni, vidi, vici – пришел, увидел, победил
https://batmanapollo.ru
synthroid 88 mcg coupon
prednisone 3 tablets daily
accutane 20 mg buy online
Hello there! Do you know if they make any plugins to assist with SEO?
I’m trying to get my blog to rank for some targeted keywords but I’m not
seeing very good results. If you know of any please share.
Thank you!
combivent respimat spacer
buy synthroid mexico
doxycycline where to get
azithromycin 600
suhagra pills
Nicely put, Thanks a lot.
1win войти зеркало 1win кс го 1win игровые автоматы
glucophage 500 mg online
zestoretic
prescription prednisone cost
You suggested it well.
1win vs forze 1win мобильная версия скачать бесплатно 1win казино рулетка
prednisone 54
valtrex 500 mg cost
I’ve learn a few good stuff here. Definitely price bookmarking for revisiting.
I surprise how much attempt you put to make one of these wonderful informative website.
apo-prednisone
Hmm is anyone else having problems with the images on this blog loading? I’m trying to figure out if its a problem on my end or if it’s the blog. Any responses would be greatly appreciated.
Also visit my blog https://mediawiki.laisvlaanderen.ehb.be/index.php/Gebruiker:NorrisLemmons
how to get cialis over the counter
10 mg baclofen
buy clomid no rx
Valuable write ups. Thank you!
1win скачать на пк 1win зеркало сайта 1win ставки на спорт официальный сайт https://1winvhod.online/ Keyword лаки джет 1win 1win casino games
diflucan oral
Amazing facts. Many thanks.
1win личный кабинет 1win казино зеркало 1win ставки на спорт зеркало онлайн
You made your position quite nicely.!
бонус спорт 1win 1win стратегия 1win скачать мобильный https://1winvhod.online/ игра как я вынес и ограбил 1вин 1win игра 1win все еще топовое 1win 1вин зеркало 1win и бонусы 1вин 1win бонус
dexamethasone tablets 1.5 mg
2 baclofen
Very nice article, just what I needed.
azithromycin over the counter price
buy diflucan 150 mg online
Valuable stuff. Thanks a lot!
1win букмекерская контора сайт https://1winvhod.online/ что делать с бонусами казино в 1win
Many thanks, Numerous material.
казино обзор и слотов 1win казино казино промокод 1win отзывы 1win порно
buy lisinopril 10 mg online
propecia from canada
buy valtrex 500 mg
Seriously a good deal of valuable knowledge.
1win android 1win зеркало рабочее на сегодня скачать 1win ставки на спорт официальный сайт https://1winvhod.online/ 1win как скачать 1win скачать ios “””1win скачать на android”””
doxycycline rx coupon
sterapred
Greetings from Idaho! I’m bored to tears at work so I decided to
browse your blog on my iphone during lunch break.
I really like the information you present here and can’t wait to take a
look when I get home. I’m amazed at how fast your blog loaded
on my mobile .. I’m not even using WIFI, just 3G .. Anyways, fantastic blog!
penis enlargement
accutane tablets
Many thanks. Terrific stuff!
как поставить бонусы спорт в 1win 1win рабочее зеркало 1win ставки 1win 1 https://1win-vhod.online/ 1win demo 1win рабочее зеркало сейчас ваучер 1win 2023
tretinoin 5 prescription
medicine prednisone 20mg tablets
Excellent blog here! Also your website loads
up fast! What host are you using? Can I get your affiliate link to your host?
I wish my web site loaded up as fast as yours lol
glucophage xr generic
valtrex price uk
albuterol price uk
buy viagra online
Ad opus! — За дело!
https://batmanapollo.ru
doxycycline medicine in india
diflucan discount coupon
order prednisone online
lyrica tablets for sale
order vermox over the counter
I am really enjoying the theme/design of your blog.
Do you ever run into any internet browser compatibility issues?
A handful of my blog visitors have complained about my blog not
operating correctly in Explorer but looks great in Firefox.
Do you have any recommendations to help fix this issue?
Thanks designed for sharing such a nice opinion, article is pleasant, thats why i have
read it entirely
lyrica mexico
where to buy metformin tablets
order propecia usa
vermox
Thiѕ is my first time go to see at here and i am actuaⅼly
impressed to read everthing aat one place.
Effectively voiced really. !
code promo 1win 1win официальный сайт скачать бонусы казино 1win как использовать
medication lyrica 50 mg
Woah! I’m really loving the template/theme of this
blog. It’s simple, yet effective. A lot of times it’s
very difficult to get that “perfect balance” between usability and visual appeal.
I must say you have done a amazing job with this. In addition, the blog loads super fast for me on Opera.
Superb Blog!
how can i get prednisone online without a prescription
Kudos, Numerous advice.
1xbet зеркало рабочее на сегодня 1xbet отзывы 1xbet скачать на андроид официальную версию
prednisone pak
Many thanks. I like it.
info-uz@1xbet team com 1xbet зеркало онлайн 1xbet ставки на спорт скачать
You actually mentioned this exceptionally well.
1win букмекерская контора официальный сайт вход 1win 1win ставки на спорт официальный сайт
Whoa loads of excellent info.
как в 1win использовать бонусы букмекер 1win бк 1вин на спорт и для 1win 2024 1win 1вин
lyrica tablets uk
Whoa a good deal of very good knowledge.
1win сайт ставки 1win официальный сайт скачать ваучер 1win получить
lyrica prescription coupon
It iѕ iin realіty a nicе and useful piеce of info. I’m satisfiеd that you shared
this helpful infoгmation with us. Please stay uss uᥙp to
date liҝe this. Thank yyou for sһaring.
10mg prednisone
Terrific information. Thanks a lot!
1win матчи 1win бонус 5000 как использовать 1win букмекерская контора скачать бесплатно
elimite coupon
synthroid 0.075 mg
Well expressed of course! !
1win букмекерская контора зеркало 1win ввести промокод 1win viperio
Concordet sermo cum vita — Пусть речь соответствует жизни.
https://batmanapollo.ru
finasteride how to get
propecia 1mg buy online
uk pharmacy no prescription
cost of lisinopril 40 mg
«Vita sene libertate nihil» — «Жизнь без свободы — ничто».
https://batmanapollo.ru
vermox cost
valtrex 500 mg tablets
Really quite a lot of helpful material.
1win casino games 1win букмекерская контора лаки джет 1win официальный сайт https://1win-vhod.online/ зеркало 1win рабочее на сегодня прямо сейчас как использовать бонусы в 1win 1win coin что это
You’ve made your position very effectively.!
1win lucky jet free cheat зеркало 1win рабочее на сегодня прямо сейчас como usar bonus 1win
buy lyrica online canada
vermox otc canada
Nicely put. Thanks!
1win bet app скачать 1win на айфон партнерская программа 1win https://1win-vhod.online/ 1win casino зеркало 1win букмекерская контора 1win ставки скачать на андроид
Слово Пацана Кровь Смотреть Онлайн. Слово Пацана Сериал Смотреть Онлайн Лордфильм. Слово Пацана Сериал Смотреть Онлайн.
deltasone pill
Слово Пацана Смотреть Онлайн Бесплатно в Хорошем. Сериал Слова Пацана 2023 Смотреть Онлайн Бесплатно. Слова Пацана Смотреть Онлайн Бесплатно 7.
diflucan price in india
Incredible all kinds of useful information!
1win букмекерская зеркало онлайн 1win онлайн 1win скачать узбекистан
order vermox online
where can i buy azithromycin online
60 lisinopril cost
Обновление жилья — наша специализация. Исполнение ремонтных услуг в сфере жилья. Мы предлагаем восстановление квартиры с гарантированным качеством.
ремонт бойлера бровары
prednisone india
Hi, i think that i noticed you visited my site so i came
to return the favor?.I am trying to to find issues to enhance my site!I suppose its ok to use a few of
your ideas!!
Восстановление помещения — наша специализация. Техническое обслуживание дома в сфере жилья. Мы предлагаем модернизацию жилого пространства с гарантированным качеством.
фоп самойленко
Link exchange is nothing else except it is simply placing the other person’s blog link on your page at
suitable place and other person will also do same in support of you.
lisinopril generic price
tretinoin cream order online
legitimate canadian online pharmacies
Wօw, wonderful blog format! How long have you been blοggіng for?
you made blogging look easy. The tߋtаl loоҝ of your web sitte is fаntastic,
lett alone the content material!
Incredible tons of beneficial tips.
как потратить бонусный счет 1win 1win lucky jet официальный сайт 1win зеркало
Слово Пацана Смотреть Онлайн Бесплатно в Хорошем. Слово Пацна 6 серия Слово Пацана Смотреть Онлайн Бесплатно Лордфильм.
lisinopril 20 mg generic
Слово Пацана Смотреть Онлайн Бесплатно Серия. Слово Пацна 6 серия Слово Пацана Сериал Смотреть Онлайн Лордфильм.
valtrex for sale
lisinopril drug
prednisone over the counter south africa
Great post. I used to be checking constantly this blog and I’m inspired!
Very helpful info specifically the last section 🙂 I handle such information a lot.
I was looking for this particular information for a very lengthy time.
Thank you and good luck.
buy doxycycline online usa
diflucan 150 mg over the counter
can you buy prednisone online uk
buy suhagra 25mg online
Nice post. I was checking continuously this blog and I
am impressed! Very useful info specifically the last part 🙂
I care for such information a lot. I was seeking this certain information for a very long time.
Thank you and good luck.
how can i get valtrex
Valuable info. With thanks!
бонус промокод 1win 1win зеркало скачать приложение 1win pro
Kudos. Ample postings.
реальный обзор 1win зеркало промокод 1win brasil aviator 1win игра
dexamethasone 10
Слово Пацана Асфальте Кровь Смотреть Онлайн Бесплатно. Слово Пацна 6 серия Сериал на Асфальте Слово Пацана Смотреть Онлайн.
You actually expressed it terrifically.
1win букмекерская контора официальный сайт ваучер 1win 2023 1win é confiavel
otc elimite cream
Greetings! Very helpful advice within this article! It’s the little changes which will make
the biggest changes. Thanks a lot for sharing!
synthroid 88 mcg coupon
generic accutane
Beneficial write ups. Kudos.
как пополнить 1win с карты лаки джет 1win 1win coin как получить
furosemide 160
Слово Пацана Смотреть Онлайн Без Регистрации. Слово Пацна 7 серия Слово Пацана Асфальте Кровь Смотреть Онлайн Бесплатно.
You said this wonderfully.
1win мобильное приложение скачать как использовать бонусы казино в 1win 1win приложение ios
Слово Пацана Смотреть Онлайн Бесплатно Серия. Слово Пацна 7 серия Слово Пацана Кровь Сериал Смотреть Онлайн Бесплатно.
glucophage 850 uk
doxycycline 40 mg india
cheap generic accutane
buy accutane 40 mg online
Слово Пацана Сериал Серия Смотреть Онлайн. Слово Пацна 7 серия Слово Пацана Сериал 2023 Смотреть Онлайн.
134 metformin 500 mg
albuterol online
deltasone
Well expressed truly. !
1win ставки скачать приложение 1win app 1win lucky jet игра
prinivil 20mg tabs
prednisone uk online
happy family rx
Amazing facts, Kudos!
1win не работает промокод 1win скачать бесплатно 1win
indian cialis
synthroid mexico pharmacy
diflucan otc uk
Лордфильм Слово Пацана Смотреть Онлайн. Слово Пацна 8 серия Слово Пацана 5 Серия Смотреть Онлайн.
purchase azithromycin 500mg
Слово Пацана Смотреть Онлайн Бесплатно в Хорошем. Слово Пацна 8 серия Слово Пацана Смотреть Онлайн Без Регистрации.
otc albuterol usa
synthroid 175 price
acticin 5
Слова Пацана Смотреть Онлайн Бесплатно Без Регистрации. Слово Пацна 8 серия Слово Пацана Смотреть Онлайн Бесплатно Качестве.
best tretinoin brand
synthroid buy online
гостиница с почасовой оплатой в Москве
prednisone 4mg
azithromycin rx
diflucan rx price
where to buy prednisone 20mg no prescription
valtrex brand name
dexamethasone tablets uk
lyrica uk
medication prednisone
retin a cost canada
buy lyrica online australia
synthroid buy
Kudos. Fantastic information!
1win казахстан 1win bet зеркало 1win скачать приложение
I’ll right away grasp your rss as I can not find your e-mail subscription link or e-newsletter
service. Do you’ve any? Kindly allow me recognize so that
I may subscribe. Thanks.
suhagra for sale
doxycycline cost india
zestoretic 10 mg
azithromycin 250mg tabs
Wonderful info, With thanks!
1win coin что это 1win букмекерская контора мобильная как вывести деньги 1win
Whoa a good deal of superb data!
bonus 1win 1win бк зеркало 1win депозит
apps that measure decibels
free decibel meter app for iphone
Terrific stuff, Regards!
1win casino бонус 1win скачать на айфон 1win бонусы на спорт как использовать
metformin 10 tablet
propecia 2016
You revealed it exceptionally well!
code promo 1win 1win casino login 1win coin как получить
synthroid 88 mcg price
elimite drug
Whoa a lot of great material!
jet в 1win как обыграть лаки лаки отзывы казино лаки компания 1win 1win купон
Kino Sex Vide
buy diflucan cheap
buy viagra online
lisinopril 40 mg generic
lyrica medication generic
Hey there! This post could not be written any better! Reading through this post reminds
me of my good old room mate! He always kept talking about this.
I will forward this post to him. Fairly certain he will have
a good read. Many thanks for sharing!
Nicely put. Appreciate it.
1win зеркало сайта скачать 1win бонусный счет игра 1win отзывы
175 mg synthroid
elimite cream over the counter
Thanks. Great stuff!
1win регистрация 1win скачать на айфон 1win скачать на телефон бесплатно
where to buy clomid online in canada
cost for lyrica
lisinopril mexico
buy suhagra 100mg online
Poorn Kino
lisinopril 20 mg tablets
lisinopril 40 mg purchase
zestril 40 mg
buy amoxicillin 500mg
where can i purchase zithromax
order propecia online no prescription
lyrica cheap online
buy diflucan online australia
generic azithromycin cost
over the counter clomid canada
soft tabs cialis
Effectively voiced without a doubt! .
1win вакансии 1win промокод 1win мобильный
prednisone without a script
accutane prices
lisinopril 2.5
clomid over the counter usa
synthroid pill 88mg
hq pharmacy online 365
buy prednisone 50 mg
Nicely put. Many thanks.
как поменять почту на 1win 1win вывод средств сколько ждать 1win букмекерская контора официальный
Amazing facts. With thanks.
бонусы спорт в 1win 1win зеркало сайта lucky jet в 1win как обыграть отзывы
valtrex prescription online
buy metformin 500 mg
You actually explained that wonderfully!
como usar o bonus da 1win 1win online 1win пополнение
porn online
Hi, just wanted to mention, I enjoyed this post. It was inspiring.
Keep on posting!
Helpful data. Thanks a lot.
1win vs viperio 1win código promocional 1win
You actually stated this very well!
1win бонусы спорт как поставить бонусы на спорт в 1win 1win бк зеркало
prednisone 30 mg
lyrica over the counter drug
clomid pill online
Thank you, Quite a lot of data!
1win ставки на спорт зеркало онлайн 1win фрибет за регистрацию 1win играть
What’s up to every one, because I am genuinely eager of reading
this website’s post to be updated on a regular basis.
It carries nice data.
diflucan 100
lyrica 2
cost of prednisone tablets
order valtrex generic
Superb postings. Kudos.
1win кз лаки джет 1win 1win пополнение
porno kino
clomid uk over the counter
where can i get valtrex over the counter
What a material of un-ambiguity and preserveness of valuable knowledge regarding
unpredicted emotions.
If you would like to get a good deal from this piece of writing then you have to apply these strategies
to your won webpage.
how much is metformin 500 mg
azithromycin 2 tablets
camiseta chelsea 2024
obviously like your website but you have to check the spelling on quite a few
of your posts. A number of them are rife with spelling problems and I find it very bothersome to
tell the reality nevertheless I will certainly come back again.
You stated this really well!
buy lyrica mexico
lioresal 20 mg
lyrica 25
buy prednisone online nz
synthroid 100 mcg online
fluconazole buy online without prescription
buy valtrex without a prescription
bonus promotion
promo
vermox buy
propecia best price
https://samye-luchshie-prostitutki-moskvy.top
brillx casino официальный мобильная версия
brillx официальный сайт
Так что не упустите свой шанс вступить в мир Brillx Казино! Играйте онлайн бесплатно и на деньги в 2023 году, окунувшись в море невероятных эмоций и неожиданных поворотов. Brillx – это не просто игровые аппараты, это источник вдохновения и увлечения. Поднимите ставки и дайте себе шанс на большую победу вместе с нами!Сияющие огни бриллкс казино приветствуют вас в уникальной атмосфере азартных развлечений. В 2023 году мы рады предложить вам возможность играть онлайн бесплатно или на деньги в самые захватывающие игровые аппараты. Наши эксклюзивные игры станут вашим партнером в незабываемом приключении, где каждое вращение барабанов приносит невероятные эмоции.
where can you get synthroid
azithromycin buy online
Hi there, I found your site by means of Google even as
looking for a related subject, your web site got here up, it seems
to be great. I’ve bookmarked it in my google
bookmarks.
Hello there, simply turned into alert to your blog via Google, and located that it’s really informative.
I am going to be careful for brussels. I will be grateful for those who continue
this in future. Numerous other folks will likely
be benefited out of your writing. Cheers!
This is nicely expressed! !
бк на спорт и промокод для 1win 1win зеркало промокод промокод 1win при пополнении 1win official website
melbet промокод 9100 рублей
промокод melbet на сегодня
prednisone steroids
cost of lisinopril in canada
legitimate canadian mail order pharmacy
I know this website gives quality dependent content and
other stuff, is there any other web site which provides these data in quality?
levitra 40 mg pills
Cheers, I value this.
бонусы спорт 1win как использовать 1win слоты и 1вин казино 1win казино 1win cs
Hello, all is going well here and ofcourse
every one is sharing data, that’s truly excellent, keep
up writing.
synthroid online canada
Kudos, A good amount of information!
1win affiliate program 1win bet как ставить бонусы в 1win
paxil 30 mg tablets
Many thanks. Quite a lot of posts!
1win автоматы 1win côte d’ivoire 1win lucky jet отзывы
fincar
lisinopril 12.5 mg
50 mg of trazodone
rx pharmacy coupons
colchicine 0.6 mg tablet
vermox 500mg price
generic baclofen tablet
levitra australia prices
Very good material. Thank you.
jet в 1win как обыграть отзывы казино 1win сайт 1win aviator скачать
where to buy robaxin 750
Ad discendum, non ad docendum — Для изучения, но не для поучения.
https://batmanapollo.ru
You actually reported it very well.
aviator 1win отзывы 1win зеркало рабочее 1win cs
cheap clomid without prescription
diflucan capsules 100mg
buy generic albuterol
baclofen over the counter australia
amoxicillin from india
buy viagra online
generic viagra over the counter
zithromax prescription cost
generic levitra 2017
where to buy amoxicillin
gabapentin 3600 mg
augmentin 375 price
Howdy very cool web site!! Guy .. Excellent .. Superb ..
I will bookmark your website and take the feeds also?
I am satisfied to seek out so many useful info here in the post, we’d like develop extra techniques on this regard,
thanks for sharing. . . . . .
order dapoxetine
medication zestoretic
Truly tons of good information.
1win download apk 1win скачать на андроид скачать ставки на спорт 1win андроид
levitra price compare
hydroxychloroquine 700mg
Hi! I’ve been following your web site for some time now
and finally got the courage to go ahead and give you a shout out from Lubbock Texas!
Just wanted to say keep up the fantastic work!
Продолжительные поиски 100% унылым самооправданием. Надо по другому, лучше сходить к обычному психологу чем так и остаться на этапе поисков.Психолог сейчас.
diflucan 150 mg
lasix 40 mg tablet price
synthroid 1mg
Изнурительные оценивания почти наверняка типичным саботированием. Послушай старших, лучше сходить к доступному психологу чем не сходить.Психолог сейчас.
prednisolone 25mg tablets
colchicine tablet brand name in india
Сомнительные выбор как известно стандарнтым самоотказом. Послушай старших, лучше сходить к плохому психологу чем так и остаться на этапе поисков.Психолог сейчас.
suhagra 100 online india
Изнурительные поиски как известно обычным нежеланием. Не надо так, лучше сходить к стандарнтному психологу чем так и остаться на этапе поисков.Психолог здесь.
robaxin over the counter
Сомнительные поиски всем понятно стандарнтым самооправданием. Послушай старших, лучше сходить к обычному психологу чем не сходить.Психолог тут.
bupropion hcl
Утомительные выбор как известно типичным самооправданием. Поверь наслово , лучше сходить к стандарнтному психологу чем проникнуться своим фантазиям.Психолог онлайн.
1200 gabapentin
baclofen prescription
prednisone 50
Сомнительные оценивания могут быть бытовым нежеланием. Поверь наслово , лучше сходить к обычному психологу чем так и не сделать выбор.Психолог онлайн.
Изнурительные выбор всем понятно стандарнтым нежеланием. Выслушай мудрых, лучше сходить к стандарнтному психологу чем не сделать выбор.Психолог здесь.
lyrica 50 mg price in india
diflucan 1 pill
Изнурительные оценивания почти наверняка тухлым самоотказом. Надо как надо, лучше сходить к не лучшему психологу чем так и не сделать выбор.Психолог сейчас.
where to buy clomid in australia
Долгие поиски как известно стандарнтым самооправданием. Надо по другому, лучше сходить к обычному психологу чем так и остаться на этапе поисков.Психолог сейчас.
Утомительные поиски вероятно самым обычным самооправданием. Не надо так, лучше сходить к неидеальному психологу чем так и остаться на этапе поисков.Психолог онлайн.
Продолжительные поиски с огромной вероятностью обычным нежеланием. Надо как надо, лучше сходить к плохому психологу чем не сходить.Психолог консультация.
where can i buy levitra over the counter
Долгие поиски 100% тухлым нежеланием. Надо как надо, лучше сходить к стандарнтному психологу чем так и остаться на этапе поисков.Психолог здесь.
Чтобы воспользоваться промокодом, вам необходимо зарегистрироваться на сайте 1xBet и ввести этот промокод в соответствующем поле при регистрации. После этого вам будет начислен бонус до 32500 рублей, который вы сможете использовать по своему усмотрению.
промокод 1xbet
Сомнительные поиски могут быть стандарнтым саботированием. Надо как надо, лучше сходить к неидеальному психологу чем так и остаться на этапе поисков.Психолог тут.
cat casino
Долгие выбор могут быть шаблонным саботированием. Не надо так, лучше сходить к доступному психологу чем не сделать выбор.Психолог онлайн.
levitra india
buy inderal 10mg
tretinoin cream india online
phenergan over the counter australia
]гама казино
регистрация gama casino
cheap propecia canada
buy cheap effexor xr
This paragraph provides clear idea in favor of the new users of blogging, that in fact how to do blogging and site-building.
Promo code
doxycycline 100mg best price
baclofen india
tretinoin 0.025 cream price in india
generic accutane prices
Nice answer back in return of this difficulty with solid arguments and
describing everything concerning that.
suhagra 50 online purchase in india
zestril tab 10mg
buy trazodone online uk
atarax pills
prescription 0.1 tretinoin cream
buy cheap doxycycline
clonidime
clomid 50 mg cost
doxycycline 100 mg india
can you buy doxycycline over the counter uk
where to buy synthroid
buy doxycycline 100mg online uk
buy accutane online singapore
cheap clomid
how to get prednisone online
amoxicillin drugstore
neurontin prescription coupon
baclofen generic
wellbutrin 50 pill
wellbutrin 150 mg coupon
I simply couldn’t go away your site prior to suggesting that I actually loved the standard info an individual provide for your guests?
Is going to be back regularly in order to inspect new posts
price of prednisolone 5mg in india
canadian pharmacy 24
canadian pharmacy silagra
doxycycline 100mg otc
xxx Porn
augmentin 825
augmentin 875 pill
buy phenergan online australia
gabapentin order online
ivermectin 250ml
lyrica 100 mg capsule
online pharmacy bactrim
retin a coupon
metformin 134
can i buy allopurinol online
reputable canadian pharmacy
silagra online india
ivermectin for covid
quineprox 500
ivermectin covid
Cognata vocabula rebus — Слова, соответствующие поступкам
http://batmanapollo.ru
doxycycline discount
amoxicillin 500mg capsule over the counter
A casu ad casum — От случая к случаю.
http://batmanapollo.ru
0.63 mg albuterol
buy 1 tretinoin cream
3 viagra
cheapest bupropion
trazodone hcl
clonidine
Про психологию Психология и факты дзен В психологии https://russianmanagement.com https://russianmanagement.com Психология человека интересные факты по поведению Факты который должен знать каждый образованный человек
best cialis coupon
synthroid 0.125
It’s very trouble-free to find out any topic on net as compared to books, as I found this article at this web page.
can i buy levitra online
doxycycline generic
0.05 mg synthroid
zestril coupon
where can i buy synthroid
lyrica 225 mg capsule
price of neurontin
levitra 10 mg canadian
online cialis mastercard
dapoxetine 60 mg tablet price
neurontin 100mg cost
ventolin discount
MOTOLADY предлагают услуги аренды и проката мотоциклов и скутеров в Хургаде, Эль Гуне и Сахл Хашиш. MOTOLADY – одна из самых популярных компаний по прокату мотоциклов и скутеров. Они предлагают большой выбор транспортных средств по разумным ценам. MOTOLADY компания, специализирующаяся на Прокат мопеда в Хургаде и Эль Гуне. Они предлагают услуги доставки транспорта в любое удобное для вас место. У нас в наличии различные модели транспортных средств по доступным ценам. Перед арендой транспорта обязательно ознакомьтесь с правилами и требованиями компании, также проверьте наличие страховки и необходимые документы для аренды.
Madrid luxury escort
Exclusive Barcelona escorts
levitra online paypal
synthroid 12.5 mcg order online
MOTOLADY предлагают услуги аренды и проката мотоциклов и скутеров в Хургаде, Эль Гуне и Сахл Хашиш. MOTOLADY – одна из самых популярных компаний по прокату мотоциклов и скутеров. Они предлагают большой выбор транспортных средств по разумным ценам. MOTOLADY компания, специализирующаяся на Прокат мотоцикла в Сахл Хашиш и Эль Гуне. Они предлагают услуги доставки транспорта в любое удобное для вас место. У нас в наличии различные модели транспортных средств по доступным ценам. Перед арендой транспорта обязательно ознакомьтесь с правилами и требованиями компании, также проверьте наличие страховки и необходимые документы для аренды.
cialis super active 20mg
augmentin 1000 mg tablet price in india
retin a 05 cost
generic levitra mexico
augmentin 125 mg
medicine baclofen 10 mg
generic paxil online
canada pharmacy online
order generic propecia online
levitra purchase cheap
citalopram 20mg online
buying doxycycline uk
propecia generic over the counter
propecia online buy india
diflucan brand name
us pharmacy no prescription
robaxin 850 mg
wellbutrin generic price
budesonide 32 mcg
average price of levitra
trazodone medicine
can you buy ventolin over the counter nz
bactrim 960
cheapest pharmacy for prescription drugs
gabapentin 31
amoxicillin 875 mg tablet
zoloft 200 mg
lisinopril 2.5 mg for sale
buy phenergan no prescription
clonidine tablet 0.2mg
clomid infertility
diflucan from india
phenergan capsules
neurontin 800 mg cost
can i buy toradol over the counter
Acta est fabula! — Пьеса сыграна!
http://batmanapollo.ru
lisinopril 20mg daily
doxycycline 100mg generic
amoxicillin buy
lisinopril 4 mg
4 azithromycin pills
baclofen 15
where to buy accutane
where can i buy ivermectin
zoloft 150 mg pill
zyban for weight loss
how much is gabapentin 100mg
can you buy doxycycline over the counter australia
baclofen 5 mg tab
buy bupropion india
Ab imo pectore — С полной откровенностью.
http://batmanapollo.ru
order difucan
can you buy citalopram online
buy diflucan online south africa
This article gives clear idea designed for the new visitors
of blogging, that really how to do running a blog.
cost of amoxil
cheap generic propecia online
cost for propecia
watch porn video
2000 mg gabapentin
cheap tadalafil online
It is appropriate time to make some plans for the future
and it is time to be happy. I have read this submit and
if I may I want to recommend you some attention-grabbing things or advice.
Perhaps you can write subsequent articles regarding this article.
I wish to read even more issues about it!
order clomid
rx doxycycline 100mg
lexapro prescription price
price for augmentin
buy cheap lasix without prescription
Hey! I know this is kinda off topic but I was
wondering if you knew where I could find a captcha plugin for my comment form?
I’m using the same blog platform as yours and I’m having difficulty
finding one? Thanks a lot!
trazodone price in india
buying viagra from canada
buy amoxicillin online 500 mg cheap
reddit canadian pharmacy
Just want to say your article is as amazing. The clarity to your publish is simply excellent and
i could think you’re a professional on this subject. Well with your permission allow me to
take hold of your RSS feed to keep updated with impending post.
Thank you 1,000,000 and please continue the enjoyable work.
tadalafil 20mg canadian
lyrica otc
generic viagra 25mg
diflucan men
bactrim ds online
lisinopril 250mg
buy zoloft from canada
zoloft 10
lyrica 75mg price in india
I relish, lead to I discovered just what I used to
be taking a look for. You have ended my four day lengthy hunt!
God Bless you man. Have a nice day. Bye
3 mg clonidine daily
mail order propecia
zithromax over the counter usa
buy zithromax z-pak
how much is prescription orlistat
citalopram tablets australia
clonidine capsule
doxycycline 100mg tablet price
buy gabapentin 800 mg
baclofen 2265
doxycycline tablets
baclofen pills
buy propecia uk online
Эффективное воздухонепроницаемость облицовки — удобство и экономическая выгода в домашнем доме!
Согласитесь, ваш загородный дом заслуживает наилучшего! Термоизоляция фасадов – не всего лишь решение для экономии на тепле, это вклад в комфорт и прочность вашего домовладения.
✨ Почему воздухонепроницаемость с нами?
Опытность: Наши мастера – профессионалы своего дела. Наша команда заботимся о каждом элементе, чтобы обеспечить вашему домовладению идеальное термоизоляция.
Расценки теплоизоляции: Наша компания ценим ваш средства. Утепление фасада цена за кв м – начиная от 1350 руб./кв.м. Это вложение в ваше удобное будущее!
Сберегательность: Забудьте о теплопотерях! Наш подход не только сохраняют теплоту, но и дарят вашему недвижимости новый качество энергоэффективности.
Оформите свой домовладение теплым и привлекательным!
Подробнее на http://www.n-dom.ru/
Не покидайте свой недвижимость на волю случайности. Доверьтесь нашей бригаде и создайте тепло вместе с нами-профессионалами!
30mg celexa
diflucan 100 mg price
clonidine 6 mcg
trazodone uk buy
furosemide 40 mg buy online uk
doxy 100
propecia where to buy
https://medium.com/@grant_ella88208/тз-14-d4c90f061a07
https://medium.com/@ManningRyk64667/vps-vds-хостинг-на-linux-1f81ba4a71bc
https://medium.com/@TanyaSalin68497/linux-сервер-с-выделенным-хранилищем-и-быстрым-доступом-9ecab88bb986
https://medium.com/@BEdwards67867/удаленный-дедик-ab34f831c0c7
https://medium.com/@dodson_car84640/вечный-выделенный-сервер-на-ubuntu-linux-с-бесплатным-хостингом-298aa88e332c
VPS SERVER
Высокоскоростной доступ в Интернет: до 1000 Мбит/с
Скорость подключения к Интернету — еще один важный фактор для успеха вашего проекта. Наши VPS/VDS-серверы, адаптированные как под Windows, так и под Linux, обеспечивают доступ в Интернет со скоростью до 1000 Мбит/с, что гарантирует быструю загрузку веб-страниц и высокую производительность онлайн-приложений на обеих операционных системах.
budecort 1mg
suhagra without prescription
buy prozac cheap
doxycycline 200 mg tablets
zithromax 500 mg lowest price pharmacy online
Hello to every single one, it’s actually a nice for me to go
to see this web site, it consists of priceless Information.
capsule online pharmacy
clomid pills where to buy
doxycycline online pharmacy canada
prozac brand
effexor 225 mg capsules
Wow, that’s what I was exploring for, what a stuff! present here at this web site, thanks admin of
this web page.ラブドール
Fastidious replies in return of this matter with genuine arguments and explaining the whole thing regarding that.
ivermectin 2ml
albuterol 90 mcg inhaler
ventolin albuterol inhaler
gabapentin mexico
dapoxetine over the counter
fildena tablets
Good answer back in return of this question with firm arguments and telling everything
concerning that.
budesonide price
amoxicillin 30 capsules price
viagra 100mg buy online india
accutane order
Hmm is anyone else having problems with the pictures
on this blog loading? I’m trying to figure out if its a problem on my end or if
it’s the blog. Any responses would be greatly appreciated.
cheapest pharmacy to fill prescriptions without insurance
Выведение клопов
Средства от клопов
http://au.klop.bid/
chandal psg 2024
bactrim sulfamethoxazole
where to get synthroid
budesonide capsules price
average cost of lisinopril
clonidine 100 mg
doxycycline nz
penis enlargement
Hi! Someone in my Facebook group shared this website with us
so I came to check it out. I’m definitely loving the information. I’m bookmarking and
will be tweeting this to my followers! Exceptional blog and excellent
design.
Everything is very open with a very clear explanation of the issues.
It was definitely informative. Your site is extremely
helpful. Many thanks for sharing!
order clonidine
Pretty! This was a really wonderful post. Thank
you for supplying this info.
I’m really enjoying the design and layout of your site.
It’s a very easy on the eyes which makes it much more enjoyable for me to come here and visit
more often. Did you hire out a developer to create your theme?
Great work!
lasix 60 mg daily
This is really attention-grabbing, You’re an excessively skilled blogger.
I have joined your rss feed and stay up for in search of extra of
your magnificent post. Also, I have shared
your web site in my social networks
4 clonidine
baclofen no preciption
professional pharmacy
propecia buy online usa
buy fluconazol without prescription
ventolin brand name
prozac prescription
Слово пацна 2 сезон Слово пацна 2 сезон 1 серия онлайн Слово пацна 2 сезон
Слово пацна 2 сезон Слово пацна 2 сезон 1 серия онлайн Слово пацна 2 сезон
Слово пацна 2 сезон Слово пацна 2 сезон 1 серия просмотр Слово пацна 2 сезон
atarax liquid
Слово пацна 2 сезон Слово пацна 2 сезон 1 серия онлайн Слово пацна 2 сезон
buy genuine propecia
vardenafil 10 mg coupon
where can i buy plaquenil
silagra without prescription
gabapentin where to buy
Слово пацна 8 серия Слово пацна 8 серия онлайн Слово пацна 8 серия
buy zoloft without a prescription
inderal 5mg
Слово пацна 8 серия Слово пацна 8 серия онлайн Слово пацна 8 серия
Слово пацна 8 серия Слово пацна 8 серия сериал Слово пацна 8 серия
Слово пацна 8 серия Слово пацна 8 серия сериал Слово пацна 8 серия
Excellent beat ! I wish to apprentice while you amend your site, how could i subscribe for a blog site?
The account aided me a appropriate deal. I have been tiny bit familiar of this your broadcast offered
vibrant clear idea
levitra professional 20 mg
online pharmacy cialis
ivermectin 1 cream generic
lisinopril 15 mg
generic levitra online
Hello, yes this piece of writing is in fact pleasant and I have learned lot of things from it regarding blogging.
thanks.
suhagra 150 mg
propranolol 40 mg
doxycycline 100mg over the counter
augmentin 375mg
phenergan gel
phenergan over the counter usa
azithromycin 500mg buy
phenergan 25mg australia
canadian pharmacy online accutane
Free online porn
zoloft rx
best gabapentin brand
clonidine 75 mcg
accutane pill
penis enlargement
ivermectin 6mg tablet for lice
buy lyrica cheap online
how to get doxycycline online
colchicine 0.6 mg brand in india
Aeternum vale — Прости навеки
http://batmanapollo.ru
online pharmacy propranolol
trazodone 150 mg
lasix 40mg tablet price
Appreciating the commitment you put into your website and detailed information you offer.
It’s good to come across a blog every once in a while that isn’t the same unwanted
rehashed material. Wonderful read! I’ve saved your site and
I’m adding your RSS feeds to my Google account.
buy baclofen online uk
generic tadalafil without prescription
payday loan
Communis opinio — Общее мнение.
http://batmanapollo.ru
how much is amoxicillin
lisinopril australia
can i buy propecia over the counter
generic fluoxetine 20 mg pill
zoloft generic buy
diflucan 300 mg
buy clomid india
20 mg vardenafil
metformin er 500 mg
penis enlargement
medication robaxin 750
robaxin otc canada
viagra buying canada
synthroid 188 mcg
buy viagra online
doxycycline hyclate 100mg
fildena 100 mg
retin a 0.1 india
paroxetine no prescription
Oh my goodness! Incredible article dude! Many thanks, However I am going through troubles with your RSS.
I don’t know the reason why I can’t join it. Is there anyone else getting the same RSS issues?
Anyone who knows the solution will you kindly respond? Thanx!!
augmentin 875 mg cost
Veni, vidi, vici – пришел, увидел, победил
http://batmanapollo.ru
levitra from canada
where to buy toradol
lisinopril 20 mg pill
clonidine online
Normally I don’t learn article on blogs, however I would like to say that
this write-up very pressured me to check out and do so!
Your writing taste has been surprised me. Thank
you, very nice post.
propecia cost
effexor price usa
canadian pharmacy accutane
xxx video (http://libproxy.daegu.ac.kr/)
Enjoyed studying this, very good stuff, thanks.
Hello! I know this is kind of off topic but I was wondering which blog platform are you using for
this site? I’m getting tired of WordPress because I’ve had problems
with hackers and I’m looking at alternatives for another
platform. I would be awesome if you could point me in the direction of a good platform.
plaquenil 200 mg pill
buy brand levitra online
zoloft 10
buy vermox 500mg
프라그마틱 슬롯
이날 방씨 가족은 심상치 않은 손님을 맞이했다.
rx pharmacy coupons
levitra pill from canada online
order sertraline
accutane 50mg
the canadian pharmacy
genuine viagra online
Эффективное теплосбережение внешних стен — уют и экономия в своем доме!
Согласитесь, ваш жилище заслуживает отличного! Изоляция обшивки – не всего лишь решение для экономии на отопительных расходах, это вклад в комфорт и долговечность вашего помещения.
✨ Почему изоляция с нашей компанией?
Опыт: Специалисты нашей компании – профессионалы своего дела. Наша команда заботимся о каждом аспекте, чтобы обеспечить вашему жилью идеальное изоляция.
Затраты термоизоляции: Мы ценим ваш финансы. Утепление фасада цена за 1м2 – начиная от 1350 руб./кв.м. Это инвестиция в ваше удобное будущее!
Энергоэффективность: Забудьте о термических потерях! Наш подход не только сохраняют тепловое уюта, но и дарят вашему дому новый качество энергоэффективности.
Преобразуйте свой домашний уголок комфортабельным и изысканным!
Подробнее на веб-сайте
Не предоставляйте свой коттедж на волю случайности. Доверьтесь нам-профессионалам и создайте уют вместе с нами-профессионалами!
viagra cialis levitra online
брилкс казино
brillx казино
Brillx Казино — это место, где сливаются воедино элегантность и бесконечные возможности. Необычная комбинация азартных игр и роскошной атмосферы позволит вам окунуться в мир бриллиантового веселья. Наше бриллиантовое казино уверенно входит в число лидеров азартной индустрии, и в этом году мы готовы порадовать вас еще большим разнообразием игр и выигрышей.Добро пожаловать в увлекательный мир азарта и развлечений на официальном сайте Brillx Казино! Если вы ищете захватывающий опыт игры в игровые аппараты, то ваш поиск завершен. Brillx Казино – это не просто блистательный выбор игр, это настоящее путешествие в мир азарта и возможностей.
finasteride otc
bactrim 1600
брилкс казино
Brillx
Играя в Brillx Казино, вы окунетесь в мир невероятных возможностей. Наши игровые автоматы не только приносят удовольствие, но и дарят шанс выиграть крупные денежные призы. Ведь настоящий азарт – это когда каждое вращение может изменить вашу жизнь!Brillx Казино — это место, где сливаются воедино элегантность и бесконечные возможности. Необычная комбинация азартных игр и роскошной атмосферы позволит вам окунуться в мир бриллиантового веселья. Наше бриллиантовое казино уверенно входит в число лидеров азартной индустрии, и в этом году мы готовы порадовать вас еще большим разнообразием игр и выигрышей.
synthroid 175 mg
generic for ventolin
Встречайте Революцию в Мире Свежих Соков с Hurom от ВсеСоки!
Почувствуйте вкус настоящего здоровья с каждым глотком! Соковыжималки Hurom – это не просто техника, это ваш ежедневный помощник в стремлении к здоровому образу жизни. Представляем вам ультрасовременными соковыжималками от официального дилера ВсеСоки в России, которые покажут новые возможности вкуса и питания.
Технология Slow Squeeze: Забудьте о традиционных соковыжималках. Технология медленного отжима Hurom бережно сохраняет витамины, минералы и ферменты, делая каждый сок не только невероятно вкусным, но и максимально полезным.
Многофункциональность: Не ограничивайтесь соками! Hurom легко справляется с ореховым молоком, смузи, детским питанием и даже мороженым. Все, что нужно для здорового питания вашей семьи.
Инновационный Дизайн и Простота в Использовании: Стильный внешний вид соковыжималок Hurom украсит любую кухню, а их интуитивно понятное управление и легкая очистка сделают процесс приготовления соков приятным и беззаботным.
Экологичность и Долговечность: Наша забота о планете! Соковыжималки Hurom изготовлены из высококачественных, экологически чистых материалов и служат вам годами.
Поддержка и Гарантия от ВсеСоки: Обращаясь к официальному дилеру, вы получаете гарантированное качество, квалифицированную помощь и сервисное обслуживание.
Специальное Предложение: Только сейчас специальные цены и подарки при покупке соковыжималок Hurom у официального дилера ВсеСоки!
Заказывайте Сейчас: Посетите наш веб-сайт [всесоки.ру] и найдите свою идеальную соковыжималку Hurom. Отправьтесь в путешествие к здоровому образу жизни и энергии уже сегодня!
Feel free to visit my webpage: https://H-100.ru/collection/blendery-blendtec
generic cialis
buy viagra online
doxycycline 100mg uk
synthroid from mexico
Hi, i tһink that i saw you visited my site thus i camje to
гeturtn the favor?.I’m tryting to find things to emhance
my website!I suppose its good enouցh too use a few of your concepts!!
20mg paxil
buy vardenafil from india
We are a gaggle of volunteers and starting a
new scheme in our community. Your web site provided
us with useful information to work on. You’ve performed an impressive process and our
entire community can be grateful to you.
inderal over the counter canada
Very soon this website will be famous among all blogging
and site-building visitors, due to it’s pleasant articles or reviews
stromectol 3mg tablets
Very energetic post, I liked that bit. Will there be a part 2?
phenergan cream nz
казино brillx официальный сайт играть
https://brillx-kazino.com
Так что не упустите свой шанс вступить в мир Brillx Казино! Играйте онлайн бесплатно и на деньги в 2023 году, окунувшись в море невероятных эмоций и неожиданных поворотов. Brillx – это не просто игровые аппараты, это источник вдохновения и увлечения. Поднимите ставки и дайте себе шанс на большую победу вместе с нами!Не пропустите шанс испытать удачу на официальном сайте бриллкс казино. Это место, где мечты сбываются и желания оживают. Станьте частью азартного влечения, которое не знает границ. Вас ждут невероятные призы, захватывающие турниры и море адреналина.
synthroid 112 mcg
fildena pills
cheap effexor online
synthroid 60 mg
phenergan gel over the counter
propecia .5 mg
buy viagra online
Contra contrariis curantur — Противное излечивается противным.
http://batmanapollo.ru
buy viagra online
Online poker
buy viagra online
synthroid 175 mcg coupon
augmentin 500mg 125mg
amoxicillin 375
where to buy finasteride online
can i buy lasix over the counter
amoxicillin 500mg capsules price
accutane isotretinoin
can you buy cialis over the counter in south africa
We’re a bunch of volunteers and opening a brand new scheme in our community.
Your web site provided us with helpful information to work on. You have done
a formidable activity and our entire group will likely be
thankful to you.
trazodone pill
generic atarax 25mg
where can i buy prozac uk
lisinopril 3972
colchicine
levitra rx
Зарубежняя недвижимость
tretinoin buy online usa
accutane cream for sale
This is very interesting, You are a very skilled
blogger. I’ve joined your feed and look ahead to in search of more of your
fantastic post. Additionally, I have shared your site in my social networks
Contradictio simptomatum — мед. Противоречивость в симптомах.
http://batmanapollo.ru
zoloft 60 mg
amoxicillin over the counter nz
robaxin 1500 mg
fildena 100 usa
price of prednisone 50 mg
buy bactrim ds
propecia 1.5 pills
vermox cost canada
I read this piece of writing completely on the topic of the difference of
hottest and previous technologies, it’s amazing
article.
generic doxycycline 200 mg
budesonide online pharmacy
brillx официальный сайт
https://brillx-kazino.com
Brillx Казино — ваш уникальный путь к захватывающему миру азартных игр в 2023 году! Если вы ищете надежное онлайн-казино, которое сочетает в себе захватывающий геймплей и возможность играть как бесплатно, так и на деньги, то Брилкс Казино — идеальное место для вас. Опыт непревзойденной азартной атмосферы, где каждый спин, каждая ставка — это шанс на большой выигрыш, ждет вас прямо сейчас на Brillx Казино!Играя на Brillx Казино, вы можете быть уверены в честности и безопасности своих данных. Мы используем передовые технологии для защиты информации наших игроков, так что вы можете сосредоточиться исключительно на игре и наслаждаться процессом без каких-либо сомнений или опасений.
50 mcg synthroid
accutane uk
baclofen 5 mg
clonidine 75
amoxicillin 825 125 mg
generic cialis online without prescription
fluoxetin
retin a 05 cream
buy vardenafil 10mg
buy citalopram without script
Does your website have a contact page? I’m having problems locating it but, I’d like to shoot you an email.
I’ve got some recommendations for your blog you might be
interested in hearing. Either way, great site and I look forward to seeing it expand over
time.
Because the admin of this web site is working, no question very quickly it will
be famous, due to its quality contents.
atarax anxiety
payday loan
doxycycline 75 mg
inderal 10 mg tablet
buying retin a online
colchicine tablets buy online
500 mg amoxicillin 40 tablet
xenical prescription uk
buy doxycycline cheap
2000 mg gabapentin
Beati pauperes spiritu — библ. Блаженны нищие духом.
http://batmanapollo.ru
lexapro online
buy dapoxetine pills
buy viagra online
effexor 18 mg
buying lexapro in mexico
My Ƅrother recommended I might lie this blog.
He was entirely right. This post truly made my day.
You can not imaggine just how much time I had spent for this info!
Thanks!
generic propecia uk
diflucan medicine in india
Thank you for the good writeup. It in fact was a amusement account
it. Look advanced to far added agreeable from you! However, how can we communicate?
silkroad online pharmacy
penis enlargement
where to buy propecia in australia
prednisone 60 mg tablet
medicine baclofen 10 mg
gabapentin 100mg cost
fildena 100 mg price in india
finasteride prescription
stromectol tablet 3 mg
buy albuterol online
generic orlistat 120mg
celexa cheap
buy wellbutrin in canada
trazodone for sale
프라그마틱 슬롯 사이트
하지만 지금은… 고개를 들었고 마음속 깊은 곳에서 저절로 뿌듯함이 솟아올랐다.
buy ventolin canada
lyrica 75 mg price in usa
dapoxetine uk buy online
innopran xl price
amoxil 250mg
suhagra 100mg buy online india
synthroid prescription
Hey! I know this is sort of off-topic but I needed
to ask. Does building a well-established blog such as
yours take a massive amount work? I’m brand new to running a
blog however I do write in my journal every day.
I’d like to start a blog so I will be able to
share my personal experience and views online.
Please let me know if you have any ideas or tips for new aspiring blog owners.
Appreciate it!
trazodone 300 mg capsule
Some truly howling work on behalf of the
owner of this website, absolutely outstanding content.
where can i purchase synthroid
40 mg paxil
Sur black-hat-seo.org, vous pouvez également trouver des outils et des ressources de référencement qui peuvent vous aider à améliorer votre classement et à mieux comprendre comment fonctionne le référencement.
10 mg fluoxetine
safe online pharmacies
Good answers in return of this query with genuine arguments and explaining
the whole thing about that.
how can i get synthroid cheap
cheap sildenafil tablets uk
ventolin inhaler
diflucan online pharmacy
clonidine 0.1mg tablet cost
150 mg diflucan online
lioresal sale
accutane price usa
where can i buy colchicine tablets
price of bactrim ds
order generic propecia
doxycycline gel in india
ivermectin cost
phenergan 10mg south africa
doxycycline 500 mg capsules
ivermectin cost
order prozac uk
camisetas de futbol para niños baratas
generic vardenafil uk
accutane pharmacy
wellbutrin over the counter
buy propecia cheap online uk
generic lisinopril 5 mg
buy prednisolone tablets 5mg uk
buy viagra online
zyban price australia
lisinopril 40
india pharmacy mail order
I am no longer sure the place you are getting your information, however good
topic. I must spend some time learning more or working out more.
Thank you for wonderful info I was looking for this info for my mission.
Hmm is anyone elsе having problems with the images onn this blog
loading? I’mtrying tⲟ figure out if its a problem onn my
eend oг if іt’s thе blog. Any feedback woulⅾ be greatly appreciated.
Aѕking questions aree really nice thing iif
you are not understanding anything tοtally, however this paraɡгawph presents fastiԀious understаnding yet.
canadian pharmacy online ship to usa
Greetings! Very useful advice in this particular post!
It is the little changes that produce the most significant changes.
Thanks a lot for sharing!
gabapentin 40 mg
mebendazole price
gabapentin 800 mg price
desyrel 150 mg
buy viagra online
Your style is very unique compared to other folks I’ve read stuff from.
Many thanks for posting when you’ve got the opportunity, Guess I’ll just bookmark this blog.
trazodone tablets
I got this web site from my buddy who shared with me on the topic of
this website and now this time I am browsing this web page and reading very informative
posts at this time.
Эффективное теплоизоляция облицовки — комфорт и бюджетность в личном недвижимости!
Согласитесь, ваш недвижимость заслуживает высококачественного! Теплоизоляция облицовки – не голос решение для сбережения на отопительных расходах, это вложение в комфорт и долговечность вашего коттеджа.
? Почему воздухонепроницаемость с специалистами?
Квалификация: Специалисты нашей компании – компетентные. Мы все заботимся о каждом элементе, чтобы обеспечить вашему дому идеальное утепление.
Сумма термоизоляции: Наша компания ценим ваш бюджетные возможности. Утепление загородного дома снаружи цены – от 1350 руб./кв.м. Это вложение средств в ваше комфортабельное будущее!
Сбережение энергии: Забудьте о термопотерях! Используемые нами материалы не только сохраняют тепловое комфорта, но и дарят вашему жилью новый уровень комфорта энергоэффективности.
Оформите свой домашнюю обстановку уютным и стильным и модным!
Подробнее на интернет-ресурсе
Не передавайте на произвол судьбы свой коттедж на произвольное стечение обстоятельств. Доверьтесь мастерам и создайте комфорт вместе с нами-мастерами!
can you buy accutane over the counter
clonidine pill
best price levitra generic
50mg accutane
This is a really good tip especially to those fresh to the blogosphere.
Short but very accurate information… Appreciate your sharing this one.
A must read post!
Have you ever considered about adding a little bit more
than just your articles? I mean, what you say is fundamental and
all. Nevertheless just imagine if you added some great pictures or videos to give
your posts more, “pop”! Your content is excellent but with images
and clips, this site could definitely be one
of the best in its niche. Very good blog!
Ahaa, its good discussion on the topic of this piece of writing
at this place at this webpage, I have read all that,
so now me also commenting here.
buy viagra online
cheap effexor xr
lisinopril tab 5 mg price
wellbutrin 250mg
synthroid medication online
buy viagra online
can you purchase prednisone for dogs without a prescription
prednisone buy without prescription
allopurinol 3 mg
buy levitra 10 mg india
This is really fascinating, You are an overly professional blogger.
I’ve joined your feed and look forward to in the hunt for extra of your fantastic post.
Additionally, I’ve shared your site in my social networks
price for amoxicillin 875 mg
doxycycline generic price
We are a gaggle of volunteers and opening a new scheme in our community.
Your site provided us with helpful info to work on. You’ve performed an impressive activity and our entire community will probably be grateful to you.
how to order clomid
tretinoin capsule price
order fluconazole 150 mg for men
finasteride prescription usa
buy synthroid from canada
propecia 5 mg
zoloft 150
Pretty nice post. I just stumbled upon your weblog and wanted to say that I have truly enjoyed browsing your blog posts.
In any case I’ll be subscribing to your feed and I hope you write again soon!
Enjoyed looking through this, very good stuff, regards.
buy accutane with paypal
cost of synthroid 125 mcg
clonidine pills
synthroid 0.1
buy trazodone online india
how to get propecia in singapore
azithromycin pills buy
robaxin without rx
penis enlargement
dapoxetine online canada
cheap amoxicillin in india
prozac 10 mg price in india
brand name paxil cost
neurontin 100mg tablets
amoxicillin 200 mg tablet
fluoxetine without prescription
neurontin 300 600 mg
porn
payday loan
buy gabapentin 600 mg online
I dugg some of you post as I cogitated they were extremely helpful
invaluable.
penis enlargement
You really make it seem so easy with your presentation but I
find this matter to be actually something that I
think I would never understand. It seems too complex and very broad for me.
I am looking forward for your next post, I will try to get the
hang of it!
Great post.
I dugg some of you post as I thought they
were very beneficial handy.
fincar
vardenafil canadian pharmacy
buy ventolin nz
generic lioresal
Some truly marvelous work on behalf of the owner of this website, perfectly great subject material.
order vermox online
PG 소프트
Wang Shouren, Liu Wenshan, Jiang Chen, Tang Yin은 손이 묶인 채 한쪽에 서있었습니다.
buy accutane 10mg
cost of doxycycline online canada
cost of propecia 1mg
cheap accutane uk
buy doxycycline tablets
where to buy vermox in canada
over the counter prednisone no prescription
price of amoxicillin 30 capsules
buy retin a 05 online
cost of augmentin 875
trazodone 9 mg
buy viagra online
watch porn video
cheapest levitra
buy levitra 20mg online
gabapentin for sale cheap
fluoxetine 40 mg capsules
propecia canada pharmacy online
This is a good tip particularly to those new to the blogosphere.
Short but very precise info… Many thanks for sharing this one.
A must read post!
albuterol tablets price
stromectol medication
For most recent news you have to go to see web and on world-wide-web I found
this web site as a best web site for newest updates.
buy viagra online
vermox 200mg
gabapentin for sale cheap
This is a great tip particularly to those new to the blogosphere.
Simple but very accurate info… Appreciate your sharing this one.
A must read post!
lexapro 150 mg
Hey there! I just would like to give you a big thumbs up for your great info you have
right here on this post. I am coming back to your blog
for more soon.
It’s not my first time to pay a quick visit this website, i am browsing this
site dailly and obtain fastidious facts from here everyday.
azithromycin 500mg for sale
where to get accutane
Thanks in support of sharing such a fastidious thought, piece of writing is fastidious, thats why i have read it fully
zithromax 500 price
ivermectin 18mg
I dugg some of you post as I thought they were extremely helpful very helpful.
buying levitra online from canada
Hey there I am so happy I found your website,
I really found you by error, while I was searching on Bing for something
else, Nonetheless I am here now and would just like to say thanks a lot
for a remarkable post and a all round entertaining blog (I also love the theme/design), I don’t have time
to go through it all at the moment but I have bookmarked it and also added your RSS feeds, so when I
have time I will be back to read a great deal more, Please do keep up the great work.
amoxil capsules 500mg price
Online poker
tretinoin canada cost
penis enlargement
azithromycin 600 mg tablet
An interesting discussion is definitely worth comment. I think
that you need to publish more on this issue, it may not be a taboo
subject but typically folks don’t speak about these subjects.
To the next! Kind regards!!
allopurinol uk
clonidine 25 mg tablets
clonidine 10mg
buy doxycycline 50 mg
best accutane
where to buy robaxin in canada
diflucan 6 tablets
zestoretic 30 25mg
zoloft 100mg price in usa
viagra best buy india
Hi, I do think this is a great website. I stumbledupon it 😉 I am
going to revisit yet again since I bookmarked
it. Money and freedom is the best way to change, may you
be rich and continue to help other people.
What a information of un-ambiguity and preserveness of precious know-how about unpredicted emotions.
inderal uk buy
Pretty section of content. I just stumbled upon your weblog and in accession capital to
assert that I get actually enjoyed account your blog
posts. Any way I’ll be subscribing to your feeds and even I achievement you access consistently fast.
I genuinely prize your piece of work, Great post.
buy viagra online
suhagra 100mg
Fantastic posts Thanks!
buy doxycycline online australia
vardenafil canada 20 mg
buying propranolol online
generic vardenafil 20mg
gabapentin 200 mg tablets
lyrica 20 mg
clonidine depression
vermox sale
amoxicillin 500 mg tablets cost
에그벳
그런데 곰곰이 생각해보니 이렇게 큰 소란, 이런 일련의 술수…
buy bactrim without prescription
atarax 25mg for sale
baclofen 10 mg tablet 1mg
prednisolone 25mg price
Wow that was unusual. I just wrote an very long comment but after I clicked submit my comment didn’t show up.
Grrrr… well I’m not writing all that over again. Anyways, just
wanted to say excellent blog!
???프라그마틱 슬롯
Zhu Houzhao는 인장이 최근 비밀리에 새겨 졌다고 생각했고 사건이 밝혀졌습니다.
trazodone over the counter
I really treasure your piece of work, Great post.
buy generic trazodone
porn videos
Heⅼlo there! This post could not be written aany better!
Rеading through this post reminds me off
my good оldd room mаte! He always kept talking aƅout this.
I wiⅼⅼ forward thіs article to him. Pretty sure he wull have a
good read. Thank you fοr sharing!
penis enlargement
baclofen india
Hi are using WordPress for your blog platform?
I’m new to the blog world but I’m trying to
get started and create my own. Do you need any coding expertise to make your own blog?
Any help would be greatly appreciated!
zithromax online india
gabapentin 2018
I am sure this post has touched all the internet people, its really really nice paragraph on building up new website.
camisetas de futbol para niños
can i buy amoxicillin
buy ventolin australia
atarax 25 mg cost
clonidine 300 mcg
augmentin 400 mg tablet
propecia cheap
glucophage pills
ivermectin pill cost
accutane prescription nz
PG 소프트
수만 개의 엔지니어링 팀이 두 형제에 의해 죽임을 당했습니다.
My partner and I stumbled over here from a different
web address and thought I might check things out.
I like what I see so now i’m following you.
Look forward to exploring your web page repeatedly.
ventolin 200
buy prednisone tablets uk
cheap canadian generic viagra
colchicine 0.6 mg capsule
suhagra tablet online purchase
buy diflucan online usa
watch porn video
Nice post. I learn something totally new and challenging on sites I stumbleupon every day.
It’s always exciting to read through articles from other authors and practice a little something from their websites.
This page certainly has all of the info I needed about this subject and
didn’t know who to ask.
propranolol cost canada
dapoxetine 30mg price in india
lyrica coupon
baclofen 10mg tab cost
can you buy plaquenil over the counter
prednisone tablets
metformin 2000 mg
buy accutane uk
darknet site tor markets 2023 best darknet markets
Hello! This is my 1st comment here so I just wanted to
give a quick shout out and tell you I truly enjoy reading
your articles. Can you recommend any other blogs/websites/forums that
go over the same subjects? Thanks for your time!
accutane 2019
buy doxycycline 100mg online
ivermectin 400 mg
propecia india price
sildenafil soft tabs
doxycycline 100 mg
doxycycline tablets cost
What i do not understood is in fact how you are not really
a lot more neatly-favored than you might be right now. You are very intelligent.
You understand thus considerably relating to this topic, produced me in my view imagine it from a lot of numerous angles.
Its like men and women aren’t interested until it is
something to accomplish with Lady gaga! Your individual stuffs excellent.
At all times maintain it up!
finasteride hair
Howdy! Do you use Twitter? I’d like to follow you if that would be okay.
I’m definitely enjoying your blog and look forward to new posts.
zestril 5 mg tablet
synthroid 75 mg price
lexapro 1.25 mg
medication prednisone 10mg
essay on france country https://teletype.in/@gilbertmoore the career for which i am best suited essay
Some really fantastic work on behalf of the owner of this web site, utterly
great content.
Enjoyed looking at this, very good stuff, regards.
buy ivermectin online
buy brand name propecia online
where to get accutane cheap
paroxetine india online
Nice answers in return of this question with firm
arguments and describing everything about that.
cialis 20mg usa
augmentin 500 mg 125 mg tablet
suhagra 100mg
generic augmentin online
buy lexapro online without prescription
effexor cost uk
propecia over the counter usa
Виртуальные VPS серверы Windows
Абузоустойчивый серверы, идеально подходит для работы програмным обеспечением как XRumer так и GSA
Стабильная работа без сбоев, высокая поточность несравнима с провайдерами в квартире или офисе, где есть ограничение.
Высокоскоростной Интернет: До 1000 Мбит/с
Скорость интернет-соединения – еще один важный параметр для успешной работы вашего проекта. Наши VPS/VDS серверы, поддерживающие Windows и Linux, обеспечивают доступ к интернету со скоростью до 1000 Мбит/с, обеспечивая быструю загрузку веб-страниц и высокую производительность онлайн-приложений.
save nature essay in english https://buy-essays-online-d-sd54310.blogsidea.com/29427372/buy-essays-online-d-s-d-things-to-know-before-you-buy books or films essay
50 mg of trazodone
amoxicillin india
where to buy synthroid online without a prescription
1.12 mg synthroid
프라그마틱 슬롯 사이트
이 충성만이 후대를 위한 가장 큰 담보입니다.
finasteride 5mg price
suhagra tablet
silagra 50 mg price
buy zoloft online no prescription
Actually when someone doesn’t understand then its up to other users
that they will assist, so here it takes place.
lisinopril 5 mg daily
Greetings! Very useful advice in this particular post!
It’s the little changes which will make the most important changes.
Thanks a lot for sharing!
vermox in canada
Нey Тhere. I found your blog using msn.This is
a really wll written article. I’ll make sure
to booкmark it and return to read more of your useful іnformation. Thanks foor the post.
I will certainly return.
diflucan uk price
buy synthroid online uk
ventolin online uk
Some really grand work on behalf of the owner of this internet
site, dead outstanding written content.
trazodone purchase online
Оцифровка архивов цены — это наше направление. Мы предоставляем услуги перевода на цифровой носитель с использованием современных технологий. Сотрудничество с нами — это эффективный способ сделать вашу документацию доступной в электронной форме.
toradol
Оцифровка архивов цены — это наше направление. Мы предоставляем услуги цифровизации документов с использованием новейших методов. Сотрудничество с нами — это оптимальный способ сделать вашу документацию доступной в электронной форме.
cheap ventolin uk
propranolol purchase online
where to buy propecia in canada
Abiens, abi! — Уходя, уходи!
http://batmanapollo.ru
Homo homini lupus est – человек человеку волк
http://batmanapollo.ru
Homo homini lupus est – человек человеку волк
http://batmanapollo.ru
Ad extra — До крайней степени.
http://batmanapollo.ru
Everything has a second side (У всего есть вторая сторона)
http://batmanapollo.ru
accutane online canada
Alia tempora — Другие времена
http://batmanapollo.ru
Amant alterna Camenae — Музам приятны перемежающиеся песни.
http://batmanapollo.ru
Aut disce, aut discede — Или учись, или уходи.
http://batmanapollo.ru
Amant alterna Camenae — Музам приятны перемежающиеся песни.
http://batmanapollo.ru
Ab hoc et ab hac — Кстати и некстати
http://batmanapollo.ru
Aequo pulsat pede — Смерть безучастно поражает любого.
http://batmanapollo.ru
Ad usum proprium — Для собственного употребления.
http://batmanapollo.ru
Contumacia cumulat poenam — прав. Упорство усугубляет наказание.
http://batmanapollo.ru
generic celexa
A potentia ad actum — От возможного к действительному
http://batmanapollo.ru
paroxetine 12.5 mg price in india
buy augmentin uk
Contradictio simptomatum — мед. Противоречивость в симптомах.
http://batmanapollo.ru
Ars adeo latet arte sua — Искусство таково, что его не заметно.
http://batmanapollo.ru
clomid over the counter
Veni, vidi, vici – пришел, увидел, победил
http://batmanapollo.ru
I ɑm really thankful to the holder of this web page who hhas shared this fantastiϲ piece off
writing at at this place.
Amicus cognoscitur amore, more, ore, re — Друг познаётся по любви, нраву, лицу, деянию.
http://batmanapollo.ru
payday loan
robaxin 1000 mg
Contra vim mortis non est medicamen in hortis — Против силы смерти в садах нет лекарств.
http://batmanapollo.ru
Conclamatum est — Всё кончено, всё погибло.
http://batmanapollo.ru
Hello to all, how is all, I think every one is getting more from
this site, and your views are pleasant designed for new users.
Artificiosa natura — Творческая природа.
http://batmanapollo.ru
Causa finita est — Дело кончено, вопрос решён.
http://batmanapollo.ru
Abiens, abi! — Уходя, уходи!
http://batmanapollo.ru
how to buy xenical
Concordet sermo cum vita — Пусть речь соответствует жизни.
http://batmanapollo.ru
prednisone 4
Ad oculos — Наглядно
http://batmanapollo.ru
Bene valete — Будьте здоровы.
http://batmanapollo.ru
Homo homini lupus est – человек человеку волк
http://batmanapollo.ru
Amabilis insania — Приятное безумие.
http://batmanapollo.ru
A maximis ad minima — От большего к меньшему
http://batmanapollo.ru
Ad extra — До крайней степени.
http://batmanapollo.ru
Homo homini lupus est – человек человеку волк
http://batmanapollo.ru
canadianpharmacyworld com
Everything has a second side (У всего есть вторая сторона)
http://batmanapollo.ru
500mg amoxicillin for sale
Ad gustum — По вкусу.
http://batmanapollo.ru
Aut vincere, aut mori — Или победить, или умереть.
http://batmanapollo.ru
Ad gustum — По вкусу.
http://batmanapollo.ru
buy prednisone cheap
Charta non erubescit — Бумага не краснеет.
http://batmanapollo.ru
gabapentin 900 mg
wellbutrin capsule
Bene valete — Будьте здоровы.
http://batmanapollo.ru
zoloft mexico
A casu ad casum — От случая к случаю.
http://batmanapollo.ru
Ad discendum, non ad docendum — Для изучения, но не для поучения.
http://batmanapollo.ru
propecia cheapest price
Aequo pulsat pede — Смерть безучастно поражает любого.
http://batmanapollo.ru
Ad extra — До крайней степени.
http://batmanapollo.ru
accutane prescription canada
A potentia ad actum — От возможного к действительному
http://batmanapollo.ru
Ad usum proprium — Для собственного употребления.
http://batmanapollo.ru
Heya i’m for the first time here. I came across this board and I find It truly useful & it
helped me out much. I hope to give something back and aid others like you aided me.
Altum silentium — Глубокое молчание.
http://batmanapollo.ru
baclofen 60 mg
Hmm is anyone else having problems with the pictures on this blog
loading? I’m trying to determine if its a problem on my end or if it’s the blog.
Any responses would be greatly appreciated.
Ad usum internum — Для внутреннего употребления.
http://batmanapollo.ru
Age, libertate decembri utere — Ну же, пользуйся свободой декабря
http://batmanapollo.ru
Communis opinio — Общее мнение.
http://batmanapollo.ru
Wow that was unusual. I just wrote an extremely long comment but after I clicked submit my
comment didn’t appear. Grrrr… well I’m not writing all that over again.
Anyways, just wanted to say superb blog!
Age, libertate decembri utere — Ну же, пользуйся свободой декабря
http://batmanapollo.ru
Ad usum vitae — Для житейской надобности.
http://batmanapollo.ru
Confessus pro judicato habetur — прав. Сознавшийся считается осуждённым.
http://batmanapollo.ru
Ad usum internum — Для внутреннего употребления.
http://batmanapollo.ru
order clomid 50mg
Heya! I just wanted to ask if you ever have any trouble with hackers?
My last blog (wordpress) was hacked and I ended up losing many months of
hard work due to no backup. Do you have any methods to stop hackers?
Ad disputandum — Для обсуждения.
http://batmanapollo.ru
Age, libertate decembri utere — Ну же, пользуйся свободой декабря
http://batmanapollo.ru
hydroxychloroquine chloroquine
Contradictio in adjecto — Противоречие в определении.
http://batmanapollo.ru
Cibus, onus et virga asino — Ослу нужны пища, груз и кнут.
http://batmanapollo.ru
Amant alterna Camenae — Музам приятны перемежающиеся песни.
http://batmanapollo.ru
Alienatio mentis — Помрачение ума.
http://batmanapollo.ru
robaxin back pain
Ad usum internum — Для внутреннего употребления.
http://batmanapollo.ru
Contra spem spero — Без надежды надеюсь.
http://batmanapollo.ru
where can you get accutane online
Amant alterna Camenae — Музам приятны перемежающиеся песни.
http://batmanapollo.ru
Veni, vidi, vici – пришел, увидел, победил
http://batmanapollo.ru
Amant alterna Camenae — Музам приятны перемежающиеся песни.
http://batmanapollo.ru
Ad extra — До крайней степени.
http://batmanapollo.ru
0.1 mg clonidine 1 mg
allopurinol over the counter uk
Ad usum delphini — Для использования дофином.
http://batmanapollo.ru
Contra spem spero — Без надежды надеюсь.
http://batmanapollo.ru
オンラインカジノとオンラインギャンブルの現代的展開
オンラインカジノの世界は、技術の進歩と共に急速に進化しています。これらのプラットフォームは、従来の実際のカジノの体験をデジタル空間に移し、プレイヤーに新しい形式の娯楽を提供しています。オンラインカジノは、スロットマシン、ポーカー、ブラックジャック、ルーレットなど、さまざまなゲームを提供しており、実際のカジノの興奮を維持しながら、アクセスの容易さと利便性を提供します。
一方で、オンラインギャンブルは、より広範な概念であり、スポーツベッティング、宝くじ、バーチャルスポーツ、そしてオンラインカジノゲームまでを含んでいます。インターネットとモバイルテクノロジーの普及により、オンラインギャンブルは世界中で大きな人気を博しています。オンラインプラットフォームは、伝統的な賭博施設に比べて、より多様なゲーム選択、便利なアクセス、そしてしばしば魅力的なボーナスやプロモーションを提供しています。
安全性と規制
オンラインカジノとオンラインギャンブルの世界では、安全性と規制が非常に重要です。多くの国々では、オンラインギャンブルを規制する法律があり、安全なプレイ環境を確保するためのライセンスシステムを設けています。これにより、不正行為や詐欺からプレイヤーを守るとともに、責任ある賭博の促進が図られています。
技術の進歩
最新のテクノロジーは、オンラインカジノとオンラインギャンブルの体験を一層豊かにしています。例えば、仮想現実(VR)技術の使用は、プレイヤーに没入型のギャンブル体験を提供し、実際のカジノにいるかのような感覚を生み出しています。また、ブロックチェーン技術の導入は、より透明で安全な取引を可能にし、プレイヤーの信頼を高めています。
未来への展望
オンラインカジノとオンラインギャンブルは、今後も技術の進歩とともに進化し続けるでしょう。人工知能(AI)の更なる統合、モバイル技術の発展、さらには新しいゲームの創造により、この分野は引き続き成長し、世界中のプレイヤーに新しい娯楽の形を提供し続けることでしょう。
この記事では、オンラインカジノとオンラインギャンブルの現状、安全性、技術の影響、そして将来の展望に焦点を当てています。この分野は、技術革新によって絶えず変化し続ける魅力的な領域です。
Contradictio in adjecto — Противоречие в определении.
http://batmanapollo.ru
Ad discendum, non ad docendum — Для изучения, но не для поучения.
http://batmanapollo.ru
Tải Hit Club iOS
Tải Hit Club iOSHIT CLUBHit Club đã sáng tạo ra một giao diện game đẹp mắt và hoàn thiện, lấy cảm hứng từ các cổng casino trực tuyến chất lượng từ cổ điển đến hiện đại. Game mang lại sự cân bằng và sự kết hợp hài hòa giữa phong cách sống động của sòng bạc Las Vegas và phong cách chân thực. Tất cả các trò chơi đều được bố trí tinh tế và hấp dẫn với cách bố trí game khoa học và logic giúp cho người chơi có được trải nghiệm chơi game tốt nhất.
Hit Club – Cổng Game Đổi Thưởng
Trên trang chủ của Hit Club, người chơi dễ dàng tìm thấy các game bài, tính năng hỗ trợ và các thao tác để rút/nạp tiền cùng với cổng trò chuyện trực tiếp để được tư vấn. Giao diện game mang lại cho người chơi cảm giác chân thật và thoải mái nhất, giúp người chơi không bị mỏi mắt khi chơi trong thời gian dài.
Hướng Dẫn Tải Game Hit Club
Bạn có thể trải nghiệm Hit Club với 2 phiên bản: Hit Club APK cho thiết bị Android và Hit Club iOS cho thiết bị như iPhone, iPad.
Tải ứng dụng game:
Click nút tải ứng dụng game ở trên (phiên bản APK/Android hoặc iOS tùy theo thiết bị của bạn).
Chờ cho quá trình tải xuống hoàn tất.
Cài đặt ứng dụng:
Khi quá trình tải xuống hoàn tất, mở tệp APK hoặc iOS và cài đặt ứng dụng trên thiết bị của bạn.
Bắt đầu trải nghiệm:
Mở ứng dụng và bắt đầu trải nghiệm Hit Club.
Với Hit Club, bạn sẽ khám phá thế giới game đỉnh cao với giao diện đẹp mắt và trải nghiệm chơi game tuyệt vời. Hãy tải ngay để tham gia vào cuộc phiêu lưu casino độc đáo và đầy hứng khởi!
Everything has a second side (У всего есть вторая сторона)
http://batmanapollo.ru
doxycycline 100
Aequo pulsat pede — Смерть безучастно поражает любого.
http://batmanapollo.ru
buy diflucan for yeast infection
paroxetine 60 mg
albuterol 63 mg
where can i buy propecia in india
Contraria sunt complementa — Противоположности дополняют друг друга.
http://batmanapollo.ru
Ad discendum, non ad docendum — Для изучения, но не для поучения.
http://batmanapollo.ru
Enjoyed examining this, very good stuff, appreciate it.
Everything has a second side (У всего есть вторая сторона)
http://batmanapollo.ru
I got this web site from my buddy who informed me concerning this site
and now this time I am visiting this web page and reading very informative articles at this place.
Contradictio in re — лог. Противоречие в существе (нелепость).
http://batmanapollo.ru
Beati pauperes spiritu — библ. Блаженны нищие духом.
http://batmanapollo.ru
Confessus pro judicato habetur — прав. Сознавшийся считается осуждённым.
http://batmanapollo.ru
Consumor aliis inserviendo — Изнуряю себя, работая на благо других.
http://batmanapollo.ru
Aut disce, aut discede — Или учись, или уходи.
http://batmanapollo.ru
Homo homini lupus est – человек человеку волк
http://batmanapollo.ru
Artificiosa natura — Творческая природа.
http://batmanapollo.ru
Ad usum delphini — Для использования дофином.
http://batmanapollo.ru
Ad majorem Dei gloriam — К вящей славе Божией
http://batmanapollo.ru
Charta non erubescit — Бумага не краснеет.
http://batmanapollo.ru
Ad usum externum — Для внешнего употребления.
http://batmanapollo.ru
Amant alterna Camenae — Музам приятны перемежающиеся песни.
http://batmanapollo.ru
Contradictio in contrarium — лог. Выведение (объяснение) от противоположного.
http://batmanapollo.ru
Beatus ille, qui procul negotiis — Блажен тот, кто вдали от дел.
http://batmanapollo.ru
Every weekend i used to pay a visit this web page, because i want enjoyment, since this this web site conations really fastidious funny material too.
tetracycline doxycycline
Absit verbo invidia — Не взыщите на слове.
http://batmanapollo.ru
Abyssus abyssum invocat — Бездна взывает к бездне
http://batmanapollo.ru
prednisone 10 mg tablets
budesonide 3
Abiens, abi! — Уходя, уходи!
http://batmanapollo.ru
prozac otc price
ivermectin generic name
Causa finita est — Дело кончено, вопрос решён.
http://batmanapollo.ru
generic for effexor
diflucan prescription cost
Age, libertate decembri utere — Ну же, пользуйся свободой декабря
http://batmanapollo.ru
Acta est fabula! — Пьеса сыграна!
http://batmanapollo.ru
payday loan
buy lioresal
Abiens, abi! — Уходя, уходи!
http://batmanapollo.ru
Aequam memento rebus in arduis servare mentem — Помни, старайся сохранять присутствие духа в затруднительных обстоятельствах.
http://batmanapollo.ru
Contra vim mortis non est medicamen in hortis — Против силы смерти в садах нет лекарств.
http://batmanapollo.ru
can you buy zithromax
citalopram hydrobromide 40 mg
Психическое здоровье включает в себя наше эмоциональное, психологическое и социальное благополучие. Это влияет на то, как мы думаем, чувствуем и действуем. Оно также помогает определить, как мы справляемся со стрессом, относимся к другим и делаем здоровый выбор.
Психическое здоровье важно на каждом этапе жизни: с детства и подросткового возраста до взрослой жизни.ние) — специалист, занимающийся изучением проявлений, способов и форм организации психических явлений личности в различных областях человеческой деятельности для решения научно-исследовательских и прикладных задач, а также с целью оказания психологической помощи, поддержки и сопровождения.
orlistat online prescription
Admiring the dedication you put into your site and
in depth information you present. It’s great to come across a blog every once in a while that isn’t
the same out of date rehashed information. Excellent read!
I’ve bookmarked your site and I’m adding your RSS feeds to my Google account.
buy cheap levitra no prescription
Contradictio in adjecto — Противоречие в определении.
http://batmanapollo.ru
prozac purchase
Some genuinely fantastic work on behalf of the owner of
this web site, dead outstanding subject material.
zoloft uk over the counter
diflucan canadian pharmacy
ivermectin 6 tablet
tadalafil 24 mg
cost of generic propranolol
Hi to every one, since I am truly eager of reading this weblog’s post to be updated on a regular basis.
It includes pleasant material.
lisinopril cheap price
Когда вопрос касается разработки своего собственного сайта, подбор хостинга имеет огромное влияние – хостинг сайта.
Ведь именно провайдер будет определять доступ и быстродействие вашего веб-ресурса для пользователей. Если вы находитесь в Республике Беларусь и ищете надежного хостинг-провайдера, то лучший выбор – это прекрасный выбор. Лучший выбор – одна из первенствующих хостинг-компаний в на территории Беларуси, предоставляющая качественные услуги на протяжении 15 лет
accutane prices
baclofen 25 mg
buy ivermectin uk
Когда вопрос касается разработки своего личного сайта, выбор хостинга имеет огромное влияние – хостинг сайта.
Ведь именно хостинг будет влиять на доступность и быстродействие вашего веб-ресурса для посетителей. Если вы в Беларуси и ищете профессионального поставщика услуг хостинга, то BestHost.BY – это прекрасный выбор. Лучший выбор – одна из ведущих компаний по хостингу в на территории Беларуси, которая предоставляет качественные услуги уже на протяжении 15 лет
writing paper for kindergarten https://bookmarkswing.com/story17297912/the-ultimate-guide-to-research-paper-writing paper writing online
levitra india online
india generic levitra
doxycycline 200 mg capsules
hit club
Tải Hit Club iOS
Tải Hit Club iOSHIT CLUBHit Club đã sáng tạo ra một giao diện game đẹp mắt và hoàn thiện, lấy cảm hứng từ các cổng casino trực tuyến chất lượng từ cổ điển đến hiện đại. Game mang lại sự cân bằng và sự kết hợp hài hòa giữa phong cách sống động của sòng bạc Las Vegas và phong cách chân thực. Tất cả các trò chơi đều được bố trí tinh tế và hấp dẫn với cách bố trí game khoa học và logic giúp cho người chơi có được trải nghiệm chơi game tốt nhất.
Hit Club – Cổng Game Đổi Thưởng
Trên trang chủ của Hit Club, người chơi dễ dàng tìm thấy các game bài, tính năng hỗ trợ và các thao tác để rút/nạp tiền cùng với cổng trò chuyện trực tiếp để được tư vấn. Giao diện game mang lại cho người chơi cảm giác chân thật và thoải mái nhất, giúp người chơi không bị mỏi mắt khi chơi trong thời gian dài.
Hướng Dẫn Tải Game Hit Club
Bạn có thể trải nghiệm Hit Club với 2 phiên bản: Hit Club APK cho thiết bị Android và Hit Club iOS cho thiết bị như iPhone, iPad.
Tải ứng dụng game:
Click nút tải ứng dụng game ở trên (phiên bản APK/Android hoặc iOS tùy theo thiết bị của bạn).
Chờ cho quá trình tải xuống hoàn tất.
Cài đặt ứng dụng:
Khi quá trình tải xuống hoàn tất, mở tệp APK hoặc iOS và cài đặt ứng dụng trên thiết bị của bạn.
Bắt đầu trải nghiệm:
Mở ứng dụng và bắt đầu trải nghiệm Hit Club.
Với Hit Club, bạn sẽ khám phá thế giới game đỉnh cao với giao diện đẹp mắt và trải nghiệm chơi game tuyệt vời. Hãy tải ngay để tham gia vào cuộc phiêu lưu casino độc đáo và đầy hứng khởi!
buy zithromax pills
Altum silentium — Глубокое молчание.
http://batmanapollo.ru
Contradictio in contrarium — лог. Выведение (объяснение) от противоположного.
http://batmanapollo.ru
Contra contrariis curantur — Противное излечивается противным.
http://batmanapollo.ru
Ad usum vitae — Для житейской надобности.
http://batmanapollo.ru
Ad majorem Dei gloriam — К вящей славе Божией
http://batmanapollo.ru
Ad disputandum — Для обсуждения.
http://batmanapollo.ru
Bona dicta — Поучительные слова
http://batmanapollo.ru
azithromycin 3080
オンラインカジノ
オンラインカジノとオンラインギャンブルの現代的展開
オンラインカジノの世界は、技術の進歩と共に急速に進化しています。これらのプラットフォームは、従来の実際のカジノの体験をデジタル空間に移し、プレイヤーに新しい形式の娯楽を提供しています。オンラインカジノは、スロットマシン、ポーカー、ブラックジャック、ルーレットなど、さまざまなゲームを提供しており、実際のカジノの興奮を維持しながら、アクセスの容易さと利便性を提供します。
一方で、オンラインギャンブルは、より広範な概念であり、スポーツベッティング、宝くじ、バーチャルスポーツ、そしてオンラインカジノゲームまでを含んでいます。インターネットとモバイルテクノロジーの普及により、オンラインギャンブルは世界中で大きな人気を博しています。オンラインプラットフォームは、伝統的な賭博施設に比べて、より多様なゲーム選択、便利なアクセス、そしてしばしば魅力的なボーナスやプロモーションを提供しています。
安全性と規制
オンラインカジノとオンラインギャンブルの世界では、安全性と規制が非常に重要です。多くの国々では、オンラインギャンブルを規制する法律があり、安全なプレイ環境を確保するためのライセンスシステムを設けています。これにより、不正行為や詐欺からプレイヤーを守るとともに、責任ある賭博の促進が図られています。
技術の進歩
最新のテクノロジーは、オンラインカジノとオンラインギャンブルの体験を一層豊かにしています。例えば、仮想現実(VR)技術の使用は、プレイヤーに没入型のギャンブル体験を提供し、実際のカジノにいるかのような感覚を生み出しています。また、ブロックチェーン技術の導入は、より透明で安全な取引を可能にし、プレイヤーの信頼を高めています。
未来への展望
オンラインカジノとオンラインギャンブルは、今後も技術の進歩とともに進化し続けるでしょう。人工知能(AI)の更なる統合、モバイル技術の発展、さらには新しいゲームの創造により、この分野は引き続き成長し、世界中のプレイヤーに新しい娯楽の形を提供し続けることでしょう。
この記事では、オンラインカジノとオンラインギャンブルの現状、安全性、技術の影響、そして将来の展望に焦点を当てています。この分野は、技術革新によって絶えず変化し続ける魅力的な領域です。
colchicine 6 mg tablet
Ars vitae — Искусство жизни
http://batmanapollo.ru
Abyssus abyssum invocat — Бездна взывает к бездне
http://batmanapollo.ru
robaxin 750 mg coupon
prozac 20 mg coupon
Ad usum vitae — Для житейской надобности.
http://batmanapollo.ru
Acta est fabula! — Пьеса сыграна!
http://batmanapollo.ru
xenical for sale
Ad discendum, non ad docendum — Для изучения, но не для поучения.
http://batmanapollo.ru
furosemide 40 mg tablet uk
Абузоустойчивый сервер для работы с Хрумером, GSA и всевозможными скриптами!
Есть дополнительная системах скидок, читайте описание в разделе оплата
Высокоскоростной Интернет: До 1000 Мбит/с
Скорость Интернет-соединения – еще один ключевой фактор для успешной работы вашего проекта. Наши VPS/VDS серверы, поддерживающие Windows и Linux, обеспечивают доступ к интернету со скоростью до 1000 Мбит/с, гарантируя быструю загрузку веб-страниц и высокую производительность онлайн-приложений на обеих операционных системах.
Воспользуйтесь нашим предложением VPS/VDS серверов и обеспечьте стабильность и производительность вашего проекта. Посоветуйте VPS – ваш путь к успешному онлайн-присутствию!
buy tadalafil 20
lyrica 25
allopurinol price in india
clonidine buy online uk
Ad usum internum — Для внутреннего употребления.
http://batmanapollo.ru
Ad discendum, non ad docendum — Для изучения, но не для поучения.
http://batmanapollo.ru
fluoxetine 10 mg coupon
Absit verbo invidia — Не взыщите на слове.
http://batmanapollo.ru
Amabilis insania — Приятное безумие.
http://batmanapollo.ru
Aequo pulsat pede — Смерть безучастно поражает любого.
http://batmanapollo.ru
Aut prodesse volunt aut delactare poetae — Поэты желают быть или полезными, или приятными.
http://batmanapollo.ru
Aquila non captat muscas — Орёл не ловит мух
http://batmanapollo.ru
Everything has a second side (У всего есть вторая сторона)
http://batmanapollo.ru
albuterol medicine india
Ad extremitates — До крайности.
http://batmanapollo.ru
Benevolentiae captande causa — Для снискания благоволения.
http://batmanapollo.ru
Aut non tentaris, aut perfice — Или не берись, или доводи до конца.
http://batmanapollo.ru
Alia tempora — Другие времена
http://batmanapollo.ru
Ad impossibilia nemo tenetur — Нельзя заставлять выполнить невозможное.
http://batmanapollo.ru
купить хостинг
Когда речь заходит о создании своего собственного сайта, выбор хостинга играет огромную роль. Ведь именно хостинг будет определять доступность и быстродействие вашего сайта для пользователей. Если вы находитесь в Беларуси и ищете надежного хостинг-провайдера, то BestHost.BY – это отличный выбор. BestHost.BY – одна из ведущих хостинг-компаний в Беларуси, предоставляющая высококачественные услуги уже на протяжении 15 лет.
Bona dicta — Поучительные слова
http://batmanapollo.ru
retin a tretinoin
accutane 30 mg price
Veni, vidi, vici – пришел, увидел, победил
http://batmanapollo.ru
Aquila non captat muscas — Орёл не ловит мух
http://batmanapollo.ru
Amor omnia vincit – Все побеждает любовь.
http://batmanapollo.ru
Artificiosa natura — Творческая природа.
http://batmanapollo.ru
Contradictio in adjecto — Противоречие в определении.
http://batmanapollo.ru
Abstractum pro concreto — Общее вместо частного.
http://batmanapollo.ru
A casu ad casum — От случая к случаю.
http://batmanapollo.ru
buy doxycycline 11554
хостинг сайта
Когда речь заходит о создании своего собственного сайта, выбор хостинга играет огромную роль. Ведь именно хостинг будет определять доступность и быстродействие вашего сайта для пользователей. Если вы находитесь в Беларуси и ищете надежного хостинг-провайдера, то BestHost.BY – это отличный выбор. BestHost.BY – одна из ведущих хостинг-компаний в Беларуси, предоставляющая высококачественные услуги уже на протяжении 15 лет.
Beati pauperes spiritu — библ. Блаженны нищие духом.
http://batmanapollo.ru
A maximis ad minima — От большего к меньшему
http://batmanapollo.ru
Veni, vidi, vici – пришел, увидел, победил
http://batmanapollo.ru
Causa finita est — Дело кончено, вопрос решён.
http://batmanapollo.ru
Benevolentiae captande causa — Для снискания благоволения.
http://batmanapollo.ru
Ad discendum, non ad docendum — Для изучения, но не для поучения.
http://batmanapollo.ru
Contradictio simptomatum — мед. Противоречивость в симптомах.
http://batmanapollo.ru
Ad extremitates — До крайности.
http://batmanapollo.ru
Cibus, onus et virga asino — Ослу нужны пища, груз и кнут.
http://batmanapollo.ru
Cogito ergo sum – я мыслю, следовательно – существую
http://batmanapollo.ru
clonidine 2.0
Alienatio mentis — Помрачение ума.
http://batmanapollo.ru
Ad extremitates — До крайности.
http://batmanapollo.ru
Aquila non captat muscas — Орёл не ловит мух
http://batmanapollo.ru
Contumacia cumulat poenam — прав. Упорство усугубляет наказание.
http://batmanapollo.ru
Amor vincit omnia — Любовь побеждает всё
http://batmanapollo.ru
Contradictio in contrarium — лог. Выведение (объяснение) от противоположного.
http://batmanapollo.ru
Abyssus abyssum invocat — Бездна взывает к бездне
http://batmanapollo.ru
buy generic propecia in australia
Contradictio simptomatum — мед. Противоречивость в симптомах.
http://batmanapollo.ru
Contraria sunt complementa — Противоположности дополняют друг друга.
http://batmanapollo.ru
Дедик сервер
Абузоустойчивый сервер для работы с Хрумером, GSA и всевозможными скриптами!
Есть дополнительная системах скидок, читайте описание в разделе оплата
Виртуальные сервера (VPS/VDS) и Дедик Сервер: Оптимальное Решение для Вашего Проекта
В мире современных вычислений виртуальные сервера (VPS/VDS) и дедик сервера становятся ключевыми элементами успешного бизнеса и онлайн-проектов. Выбор оптимальной операционной системы и типа сервера являются решающими шагами в создании надежной и эффективной инфраструктуры. Наши VPS/VDS серверы Windows и Linux, доступные от 13 рублей, а также дедик серверы, предлагают целый ряд преимуществ, делая их неотъемлемыми инструментами для развития вашего проекта.
stromectol ivermectin buy
order amoxicillin without prescription
colchicine online
프라그마틱 게임
Hongzhi 황제는 더 이상 그러한 생각으로 Liu Jie의 의도를 추측하지 않았습니다.
https://google.com.bn/url?q=https://www.michalsmolen.com
Shen Ao는 고개를 저으며 가방에서 마른 음식을 꺼내 Yang Biao에게 희미하게 웃었습니다.
Абузоустойчивый серверов для Хрумера и GSA AMSTERDAM!!!
Оптимальная Настройка: Включение Аппаратной Виртуализации
При обсуждении виртуальных серверов (VPS/VDS) и дедикатед серверов, важно также уделить внимание оптимальной настройке, включая аппаратную виртуализацию. Этот важный аспект может значительно повлиять на производительность вашего сервера.
Высокоскоростной Интернет: До 1000 Мбит/с
Абузоустойчивые сервера в Амстердаме, они позволят работать с сайтами которые не открываются в РФ, работая Хрумером и GSA пробив намного выше.
Виртуальные сервера (VPS/VDS) и Дедик Сервер: Оптимальное Решение для Вашего Проекта
В мире современных вычислений виртуальные сервера (VPS/VDS) и дедик сервера становятся ключевыми элементами успешного бизнеса и онлайн-проектов. Выбор оптимальной операционной системы и типа сервера являются решающими шагами в создании надежной и эффективной инфраструктуры. Наши VPS/VDS серверы Windows и Linux, доступные от 13 рублей, а также дедик серверы, предлагают целый ряд преимуществ, делая их неотъемлемыми инструментами для развития вашего проекта.
Высокоскоростной Интернет: До 1000 Мбит/с
clonidine hcl 0.2mg
glucophage 1000 mg price
amoxicillin no script
can you order amoxicillin online
buy vermox canada
buy stromectol online
clonidine hcl 0.3 mg
paroxetine 40 mg
zoloft 20
ventolin inhaler for sale
Mү programmer is trying to convince me to move to .net from PHP.
I have alwayys dіsliked the ideа because of tһe costs.
Buut he’s tryiong none the leѕs.I’ve been սsing
Movable-type օn a number of webѕites for about a
year and am anxious about switching tto another platform.
I havе heard fantastic things about blogengine.net.
Is there a way I can transfer all my wordpress content into it?
Any help would bе really apρreciatеd!
metformin tablets
synthroid online purchase
1 x bet зеркало – это популярная букмекерская компания, предлагающая широкий выбор ставок на спорт, казино и многое другое. С высокими коэффициентами и удобным интерфейсом, 1xbet привлекает множество игроков. Он также предоставляет возможность онлайн-трансляций событий. 1xbet создает захватывающий игровой опыт для своих пользователей.
propranolol 10 mg tablet
1хбет зеркало рабочее – это популярная букмекерская компания, предлагающая широкий выбор ставок на спорт, казино и многое другое. С высокими коэффициентами и удобным интерфейсом, 1xbet привлекает множество игроков. Он также предоставляет возможность онлайн-трансляций событий. 1xbet создает захватывающий игровой опыт для своих пользователей.
buy zoloft online canada
furosemide 50 mg tablets
female viagra india price
Alienatio mentis — Помрачение ума.
http://batmanapollo.ru
Aut vincere, aut mori — Или победить, или умереть.
http://batmanapollo.ru
Amen! — Истинно; Конец.
http://batmanapollo.ru
buy celexa uk
suhagra 25 mg buy online india
Ad fontes — К первоисточникам.
http://batmanapollo.ru
Aequo pulsat pede — Смерть безучастно поражает любого.
http://batmanapollo.ru
Ad gloriam — Во славу.
http://batmanapollo.ru
Bona dicta — Поучительные слова
http://batmanapollo.ru
Veni, vidi, vici – пришел, увидел, победил
http://batmanapollo.ru
Ad usum internum — Для внутреннего употребления.
http://batmanapollo.ru
Absit verbo invidia — Не взыщите на слове.
http://batmanapollo.ru
Age, libertate decembri utere — Ну же, пользуйся свободой декабря
http://batmanapollo.ru
buy orlistat online uk
Cave ne cadas — Берегись, чтоб не упасть.
http://batmanapollo.ru
cost of diflucan prescription in mexico
clonidine uk cost
Aequam memento rebus in arduis servare mentem — Помни, старайся сохранять присутствие духа в затруднительных обстоятельствах.
http://batmanapollo.ru
A maximis ad minima — От большего к меньшему
http://batmanapollo.ru
Cogito ergo sum – я мыслю, следовательно – существую
http://batmanapollo.ru
Artificiosa natura — Творческая природа.
http://batmanapollo.ru
how to get baclofen
augmentin 1000 mg
Reliable advice Appreciate it.
My site :: https://how-to-clean-prefinished09730.blogginaway.com/23184153/5-easy-facts-about-how-to-clean-prefinished-hardwood-floors-described
Beati pauperes spiritu — библ. Блаженны нищие духом.
http://batmanapollo.ru
Ad impossibilia nemo tenetur — Нельзя заставлять выполнить невозможное.
http://batmanapollo.ru
Per aspera ad astra – через тернии к звездам
http://batmanapollo.ru
Ad fontes — К первоисточникам.
http://batmanapollo.ru
buy viagra online
Amicus cognoscitur amore, more, ore, re — Друг познаётся по любви, нраву, лицу, деянию.
http://batmanapollo.ru
payday loan
Ab hoc et ab hac — Кстати и некстати
http://batmanapollo.ru
Contra contrariis curantur — Противное излечивается противным.
http://batmanapollo.ru
Aut non tentaris, aut perfice — Или не берись, или доводи до конца.
http://batmanapollo.ru
Actum atque tractatum — Сделано и обсуждено.
http://batmanapollo.ru
Как включить аппаратную виртуализацию
Абузоустойчивый серверов для Хрумера и GSA AMSTERDAM!!!
Высокоскоростной Интернет: До 1000 Мбит/с
Скорость интернет-соединения играет решающую роль в успешной работе вашего проекта. Наши VPS/VDS серверы, поддерживающие Windows и Linux, обеспечивают доступ к интернету со скоростью до 1000 Мбит/с. Это гарантирует быструю загрузку веб-страниц и высокую производительность онлайн-приложений на обеих операционных системах.
Итак, при выборе виртуального выделенного сервера VPS, обеспечьте своему проекту надежность, высокую производительность и защиту от DDoS. Получите доступ к качественной инфраструктуре с поддержкой Windows и Linux уже от 13 рублей
Contra spem spero — Без надежды надеюсь.
http://batmanapollo.ru
Aeternum vale — Прости навеки
http://batmanapollo.ru
«Vita sene libertate nihil» — «Жизнь без свободы — ничто».
http://batmanapollo.ru
Acta est fabula! — Пьеса сыграна!
http://batmanapollo.ru
compare synthroid prices
vermox prescription
With havin so much written content do you ever run into any issues of
plagorism or copyright violation? My site has a
lot of unique content I’ve either written myself or outsourced but
it appears a lot of it is popping it up all over the web
without my authorization. Do you know any methods to help stop content
from being stolen? I’d genuinely appreciate it.
lisinopril 10 12.55mg
buy cheap prozac
Психическое здоровье включает в себя наше эмоциональное, психологическое и социальное благополучие. Это влияет на то, как мы думаем, чувствуем и действуем. Оно также помогает определить, как мы справляемся со стрессом, относимся к другим и делаем здоровый выбор.
Психическое здоровье важно на каждом этапе жизни: с детства и подросткового возраста до взрослой жизни.ние) — специалист, занимающийся изучением проявлений, способов и форм организации психических явлений личности в различных областях человеческой деятельности для решения научно-исследовательских и прикладных задач, а также с целью оказания психологической помощи, поддержки и сопровождения.
budesonide 0.6 mg
buy vermox online usa
budesonide 200
Hi, I read your blogs on a regular basis. Your
writing style is witty, keep up the good work!
fluoxetine cost 20mg
fluoxetine tablets price
Абузоустойчивый сервер для работы с Хрумером, GSA и всевозможными скриптами!
Есть дополнительная системах скидок, читайте описание в разделе оплата
Виртуальные сервера (VPS/VDS) и Дедик Сервер: Оптимальное Решение для Вашего Проекта
В мире современных вычислений виртуальные сервера (VPS/VDS) и дедик сервера становятся ключевыми элементами успешного бизнеса и онлайн-проектов. Выбор оптимальной операционной системы и типа сервера являются решающими шагами в создании надежной и эффективной инфраструктуры. Наши VPS/VDS серверы Windows и Linux, доступные от 13 рублей, а также дедик серверы, предлагают целый ряд преимуществ, делая их неотъемлемыми инструментами для развития вашего проекта.
Age, libertate decembri utere — Ну же, пользуйся свободой декабря
http://batmanapollo.ru
dapoxetine in mexico
suhagra online purchase
Ad gustum — По вкусу.
http://batmanapollo.ru
Ad disputandum — Для обсуждения.
http://batmanapollo.ru
Amabile opus — Милое созданье.
http://batmanapollo.ru
Ad usum vitae — Для житейской надобности.
http://batmanapollo.ru
1хбет зеркало – это популярная букмекерская компания, предлагающая широкий выбор ставок на спорт, казино и многое другое. С высокими коэффициентами и удобным интерфейсом, 1xbet привлекает множество игроков. Он также предоставляет возможность онлайн-трансляций событий. 1xbet создает захватывающий игровой опыт для своих пользователей.
Causa finita est — Дело кончено, вопрос решён.
http://batmanapollo.ru
Ad extra — До крайней степени.
http://batmanapollo.ru
Consumor aliis inserviendo — Изнуряю себя, работая на благо других.
http://batmanapollo.ru
Hello I am so delighted I found your website, I really
found you by error, while I was browsing on Google for something else,
Regardless I am here now and would just like to say
many thanks for a remarkable post and a all round thrilling blog (I also love
the theme/design), I don’t have time to go through it all at the
minute but I have bookmarked it and also added in your RSS feeds, so when I have time I will be back to read more, Please do keep up the excellent work.
Ad usum delphini — Для использования дофином.
http://batmanapollo.ru
Contra spem spero — Без надежды надеюсь.
http://batmanapollo.ru
Abyssus abyssum invocat — Бездна взывает к бездне
http://batmanapollo.ru
1xbet официальный сайт – это популярная букмекерская компания, предлагающая широкий выбор ставок на спорт, казино и многое другое. С высокими коэффициентами и удобным интерфейсом, 1xbet привлекает множество игроков. Он также предоставляет возможность онлайн-трансляций событий. 1xbet создает захватывающий игровой опыт для своих пользователей.
Bona dicta — Поучительные слова
http://batmanapollo.ru
Aequam memento rebus in arduis servare mentem — Помни, старайся сохранять присутствие духа в затруднительных обстоятельствах.
http://batmanapollo.ru
Hello, the whole thing is going perfectly here and ofcourse every one is sharing information, that’s
actually good, keep up writing.
zithromax online canada
Абузоустойчивые сервера в Амстердаме, они позволят работать с сайтами которые не открываются в РФ, работая Хрумером и GSA пробив намного выше.
Аренда виртуального сервера (VPS): Эффективность, Надежность и Защита от DDoS от 13 рублей
Выбор виртуального сервера – это важный этап в создании успешной инфраструктуры для вашего проекта. Наши VPS серверы предоставляют аренду как под операционные системы Windows, так и Linux, с доступом к накопителям SSD eMLC. Эти накопители гарантируют высокую производительность и надежность, обеспечивая бесперебойную работу ваших приложений независимо от выбранной операционной системы.
where to buy tretinoin
buy fluoxetine from india
виртуальный выделенный сервер vps
Абузоустойчивый сервер для работы с Хрумером, GSA и всевозможными скриптами!
Есть дополнительная системах скидок, читайте описание в разделе оплата
Высокоскоростной Интернет: До 1000 Мбит/с
Скорость интернет-соединения играет решающую роль в успешной работе вашего проекта. Наши VPS/VDS серверы, поддерживающие Windows и Linux, обеспечивают доступ к интернету со скоростью до 1000 Мбит/с. Это гарантирует быструю загрузку веб-страниц и высокую производительность онлайн-приложений на обеих операционных системах.
Итак, при выборе виртуального выделенного сервера VPS, обеспечьте своему проекту надежность, высокую производительность и защиту от DDoS. Получите доступ к качественной инфраструктуре с поддержкой Windows и Linux уже от 13 рублей
clonidine hydrochloride 0.1 mg
phenergan 25mg price
trazodone 50 mg daily
price of levitra in india
stromectol tablets uk
bactrim
clonidine medicine
buy generic colchicine online
no prescription ventolin inhaler
Аренда мощного дедика (VPS): Абузоустойчивость, Эффективность, Надежность и Защита от DDoS от 13 рублей
Выбор виртуального сервера – это важный этап в создании успешной инфраструктуры для вашего проекта. Наши VPS серверы предоставляют аренду как под операционные системы Windows, так и Linux, с доступом к накопителям SSD eMLC. Эти накопители гарантируют высокую производительность и надежность, обеспечивая бесперебойную работу ваших приложений независимо от выбранной операционной системы.
antibiotics amoxicillin
levitra pills for sale in south africa
Amabilis insania — Приятное безумие.
http://batmanapollo.ru
tretinoin order online
Ad fontes — К первоисточникам.
http://batmanapollo.ru
cheap celexa
zoloft 50 mg buy online
Bene valete — Будьте здоровы.
http://batmanapollo.ru
budesonide cost australia
vermox buy online uk
dapoxetine tablets in india
Ad fontes — К первоисточникам.
http://batmanapollo.ru
Contra spem spero — Без надежды надеюсь.
http://batmanapollo.ru
Cogito ergo sum – я мыслю, следовательно – существую
http://batmanapollo.ru
Contra vim mortis non est medicamen in hortis — Против силы смерти в садах нет лекарств.
http://batmanapollo.ru
Abyssus abyssum invocat — Бездна взывает к бездне
http://batmanapollo.ru
Conclamatum est — Всё кончено, всё погибло.
http://batmanapollo.ru
penis enlargement
A potentia ad actum — От возможного к действительному
http://batmanapollo.ru
Alienatio mentis — Помрачение ума.
http://batmanapollo.ru
order accutane over the counter
silagra online india
Ad discendum, non ad docendum — Для изучения, но не для поучения.
http://batmanapollo.ru
cialis us pharmacy online
Cibus, onus et virga asino — Ослу нужны пища, груз и кнут.
http://batmanapollo.ru
cost for wellbutrin
Causa finita est — Дело кончено, вопрос решён.
http://batmanapollo.ru
purchase bactrim
Homo homini lupus est – человек человеку волк
http://batmanapollo.ru
Абузоустойчивый сервер для работы с Хрумером, GSA и всевозможными скриптами!
Есть дополнительная системах скидок, читайте описание в разделе оплата
Высокоскоростной Интернет: До 1000 Мбит/с**
Скорость интернет-соединения – еще один важный момент для успешной работы вашего проекта. Наши VPS серверы, арендуемые под Windows и Linux, предоставляют доступ к интернету со скоростью до 1000 Мбит/с, обеспечивая быструю загрузку веб-страниц и высокую производительность онлайн-приложений на обеих операционных системах.
furosemide 20 mg brand name
fluoxetine price uk
Aequam memento rebus in arduis servare mentem — Помни, старайся сохранять присутствие духа в затруднительных обстоятельствах.
http://batmanapollo.ru
med price levitra
bactrim otc
A potentia ad actum — От возможного к действительному
http://batmanapollo.ru
Charta non erubescit — Бумага не краснеет.
http://batmanapollo.ru
where can i get diflucan over the counter
where can i get brand name augmentin
silagra uk
retin a gel cream
how much is allopurinol
atarax 25mg prescription
accutane online for sale
inderal price south africa
atarax 10mg tablet price
order sertraline
Aut prodesse volunt aut delactare poetae — Поэты желают быть или полезными, или приятными.
http://batmanapollo.ru
Per aspera ad astra – через тернии к звездам
http://batmanapollo.ru
stromectol pill for humans
eggc
“이건…” 시첸은 안도의 한숨을 쉬었다.
Ad usum internum — Для внутреннего употребления.
http://batmanapollo.ru
рунная порча на смерть
отзывы о приворотах мужчин
Помощь мага – vmgj2.wordpress.com приворот на фото без последствия
А также:
– сильный приворот с защитой
– черные привороты очень сильные
приворот перед сном читать на ночь
порча на смерть вольт
как можно навести порчу на смерть
порча на смерть через яйцо
обряд порча на смерть
порча на смерть на фото читать на фото
кто делал порчу на смерть отзывы
приворот по результату кто поможет
Aut prodesse volunt aut delactare poetae — Поэты желают быть или полезными, или приятными.
http://batmanapollo.ru
generic diflucan otc
Contradictio simptomatum — мед. Противоречивость в симптомах.
http://batmanapollo.ru
synthroid cost in canada
Everything has a second side (У всего есть вторая сторона)
http://batmanapollo.ru
Психическое здоровье включает в себя наше эмоциональное, психологическое и социальное благополучие. Это влияет на то, как мы думаем, чувствуем и действуем. Оно также помогает определить, как мы справляемся со стрессом, относимся к другим и делаем здоровый выбор.
Психическое здоровье важно на каждом этапе жизни: с детства и подросткового возраста до взрослой жизни.ние) — специалист, занимающийся изучением проявлений, способов и форм организации психических явлений личности в различных областях человеческой деятельности для решения научно-исследовательских и прикладных задач, а также с целью оказания психологической помощи, поддержки и сопровождения.
gabapentin tablets
lyrica canada online
fildena 100 for sale
Bene valete — Будьте здоровы.
http://batmanapollo.ru
Contra spem spero — Без надежды надеюсь.
http://batmanapollo.ru
Contra spem spero — Без надежды надеюсь.
http://batmanapollo.ru
chaqueta jordan psg
synthroid 0.137 mg
doxycycline order
tsmavic.wordpress.com – приворот на фото самой
buy bactrim ds
как приворожить девушку без последствия в домашних условиях на любовь без фото, заговор чтобы мужчина был рядом
http://www.magecam.ru – приворот на мужчину чтобы позвонил читать в домашних условиях который точно сработает
augmentin 1 g
buy diflucan australia
furosemide 40mg tab
Amabilis insania — Приятное безумие.
http://batmanapollo.ru
buy cheap levitra
Communis opinio — Общее мнение.
http://batmanapollo.ru
Benevolentiae captande causa — Для снискания благоволения.
http://batmanapollo.ru
clomid for sale india
vermox generic
Amicus cognoscitur amore, more, ore, re — Друг познаётся по любви, нраву, лицу, деянию.
http://batmanapollo.ru
generic propecia 5mg
buy suhagra 25mg online
Ad extra — До крайней степени.
http://batmanapollo.ru
Amant alterna Camenae — Музам приятны перемежающиеся песни.
http://batmanapollo.ru
silagra 100mg tablets
synthroid generic price
Age, libertate decembri utere — Ну же, пользуйся свободой декабря
http://batmanapollo.ru
Ad opus! — За дело!
http://batmanapollo.ru
sildenafil cheapest price in india
buy amoxicillin online without prescription
buy viagra online
watch porn video
trazodone brand name canada
can you buy trazodone online
buy vardenafil
Ab hoc et ab hac — Кстати и некстати
http://batmanapollo.ru
doxycycline 100mg pills
vermox 500 tablet
Ad usum internum — Для внутреннего употребления.
http://batmanapollo.ru
Abstractum pro concreto — Общее вместо частного.
http://batmanapollo.ru
tadalafil 30mg
doxycycline 100mg cost uk
Contradictio in adjecto — Противоречие в определении.
http://batmanapollo.ru
Aeternum vale — Прости навеки
http://batmanapollo.ru
Causa finita est — Дело кончено, вопрос решён.
http://batmanapollo.ru
bactrim medicine
Ad fontes — К первоисточникам.
http://batmanapollo.ru
metformin tablet cost
Ad usum populi — Для народного употребления.
http://batmanapollo.ru
Aut prodesse volunt aut delactare poetae — Поэты желают быть или полезными, или приятными.
http://batmanapollo.ru
Aquila non captat muscas — Орёл не ловит мух
http://batmanapollo.ru
vps
order cheap accutane
trazodone hcl
When someone writes an piece of writing he/she
retains the image of a user in his/her brain that how a
user can understand it. Therefore that’s why this paragraph is outstdanding.
Thanks!
Ad usum proprium — Для собственного употребления.
http://batmanapollo.ru
Per aspera ad astra – через тернии к звездам
http://batmanapollo.ru
Приветствуем, игроки на xbetegypt!
Достигните успеха на xbetegypt с лучшими бонусами!
Делайте азартом на нашем сайте каждый день!
Увеличьте выигрыш на xbetegypt с нашими эксклюзивными предложениями!
Не упустите свой шанс на xbetegypt и победите самые крупные призы!
Достигайте своих целей с xbetegypt каждый день!
Создайте свой банк на xbetegypt и победите больше денег!
Откройте новые горизонты с xbetegypt и получите все!
Наслаждайтесь играть на xbetegypt и зарабатывайте все больше выигрышей!
Отдыхайте от игры на xbetegypt и забирайте бонусы!
Раскройте свой потенциал игры на xbetegypt и получайте больших успехов!
Восхищайтесь от игры на xbetegypt и изучайте новые возможности каждый день!
Переходите на новый уровень игры и получайте большими бонусами!
Забудьте о неудачах с xbetegypt каждый день!
Побеждайте вместе на xbetegypt и побеждайте большими выигрышами!
Освоите свои навыки на xbetegypt и получите еще больше денег!
Наслаждайтесь игры на xbetegypt и зарабатывайте большие бонусы каждый день!
Играйте сегодня на xbetegypt и наслаждайтесь результатами!
Успейте играть на xbetegypt и зарабатывайте больше денег каждый день!
Забирайте максимум удовольствия от игры на xbetegypt и побеждайте больше бонусов!
One X Bet program http://www.1xbet-app-download-ar.com.
Altum silentium — Глубокое молчание.
http://batmanapollo.ru
Аренда мощного дедика (VPS): Абузоустойчивость, Эффективность, Надежность и Защита от DDoS от 13 рублей
В современном мире онлайн-проекты нуждаются в надежных и производительных серверах для бесперебойной работы. И здесь на помощь приходят мощные дедики, которые обеспечивают и высокую производительность, и защищенность от атак DDoS. Компания “Название” предлагает VPS/VDS серверы, работающие как на Windows, так и на Linux, с доступом к накопителям SSD eMLC — это значительно улучшает работу и надежность сервера.
Benevolentiae captande causa — Для снискания благоволения.
http://batmanapollo.ru
Ars vitae — Искусство жизни
http://batmanapollo.ru
Здравствуйте, игроки на xbetegypt!
Достигните успеха на xbetegypt с эксклюзивными бонусами!
Побеждайте азартом на этом казино каждый день!
Увеличьте выигрыш на xbetegypt с нашими лучшими предложениями!
Не упустите свой шанс на xbetegypt и победите самые крупные призы!
Достигайте своих целей с xbetegypt каждый день!
Становитесь частью нашего сообщества и заработайте больше денег!
Откройте новые горизонты с xbetegypt и получите все!
Освойте играть на xbetegypt и получайте все больше выигрышей!
Отдыхайте от игры на xbetegypt и восстанавливайте свои силы!
Докажите свои способности игры на xbetegypt и зарабатывайте больших успехов!
Восхищайтесь от игры на xbetegypt и изучайте новые возможности каждый день!
Откройте для себя новые горизонты игры и добивайтесь большими бонусами!
Наслаждайтесь ощущением успеха с xbetegypt каждый день!
Побеждайте вместе на xbetegypt и получайте большими выигрышами!
Получите свои навыки на xbetegypt и победите еще больше денег!
Наслаждайтесь игры на xbetegypt и получайте большие бонусы каждый день!
Зарабатывайте каждый день на xbetegypt и наслаждайтесь результатами!
Научитесь играть на xbetegypt и зарабатывайте больше денег каждый день!
Наслаждайтесь максимум удовольствия от игры на xbetegypt и получайте больше бонусов!
Download 1xbet application http://www.1xbet-app-download-ar.com/.
Benevole lector — Благосклонный читатель.
http://batmanapollo.ru
Ars adeo latet arte sua — Искусство таково, что его не заметно.
http://batmanapollo.ru
«Vita sene libertate nihil» — «Жизнь без свободы — ничто».
http://batmanapollo.ru
ventolin over the counter nz
Confessus pro judicato habetur — прав. Сознавшийся считается осуждённым.
http://batmanapollo.ru
Absit verbo invidia — Не взыщите на слове.
http://batmanapollo.ru
Amant alterna Camenae — Музам приятны перемежающиеся песни.
http://batmanapollo.ru
Abiens, abi! — Уходя, уходи!
http://batmanapollo.ru
Ad extra — До крайней степени.
http://batmanapollo.ru
Ad fontes — К первоисточникам.
http://batmanapollo.ru
allopurinol 300 mg tablets price
trazodone 75 mg
buy ventolin over the counter australia
doxycycline 100mg capsules uk
Conclamatum est — Всё кончено, всё погибло.
http://batmanapollo.ru
Ad usum internum — Для внутреннего употребления.
http://batmanapollo.ru
buy paxil without prescription
synthroid cost in india
generic tadalafil 5mg price
clonidine 0.3 mg
Ad disputandum — Для обсуждения.
http://batmanapollo.ru
tretinoin cream medication
buy dapoxetine in us
5mg prednisolone daily
Ab imo pectore — С полной откровенностью.
http://batmanapollo.ru
online pharmacy propecia prices
order amoxicillin online uk
I got this website from my friend who informed me on the topic of this web page
and at the moment this time I am browsing this website and reading very informative articles or reviews at this place. http://fhoy.kr/bbs/board.php?bo_table=free&wr_id=249308
Aut disce, aut discede — Или учись, или уходи.
http://batmanapollo.ru
Ad futuram memoriam — На долгую память.
http://batmanapollo.ru
Quality content is the main to invite the people to pay
a quick visit the web page, that’s what this web site is providing.
A maximis ad minima — От большего к меньшему
http://batmanapollo.ru
Abstractum pro concreto — Общее вместо частного.
http://batmanapollo.ru
Ad disputandum — Для обсуждения.
http://batmanapollo.ru
Contra spem spero — Без надежды надеюсь.
http://batmanapollo.ru
Ad disputandum — Для обсуждения.
http://batmanapollo.ru
cost of metformin canada
lioresal best price
fildena usa
propecia cost in india
where can i buy doxycycline without prescription
amoxicillin over the counter uk
clonidine 0.1mg tab purepac
amoxicillin 250 mg price in india
paxil 7.5
vermox over the counter
My spouse and I stumbled over here from a different web address and thought I might check things out.
I like what I see so i am just following you.
Look forward to looking over your web page yet
again.
clonidine cheap
Холоп фильм 2024. Холоп смотреть онлайн. Холоп фильм смотреть. Холоп 2 смотреть. Фильм холоп. Холоп 2 когда выйдет.
800 mg lyrica
how to order doxycycline
Холоп 2 смотреть. Холоп 2 фильм. Холоп 2 фильм 2024. Про холопа примерного якова верного. Фильм холоп смотреть онлайн. Холоп это. Холоп 2 дата выхода. Где найти фильм холоп в хорошем качестве бесплатно. Холопы это. Холоп 2 смотреть.
Фильм холоп актеры. Холоп актеры и роли. Холоп 2 трейлер. Фильм холоп. Холоп 1. Холоп 2 дата выхода в россии в кинотеатрах. Холоп 2 дата выхода в россии. Холоп это. Холоп смотреть. Холоп смотреть бесплатно. Холоп фильм 2024 смотреть.
generic toradol
Смотреть фильм холоп 2. Холоп смотреть онлайн бесплатно в хорошем качестве лордфильм. Холоп фильм смотреть. Холоп 1 смотреть. Фильм холоп 2.
augmentin cream cost
Холоп 2 фильм 2024. Холоп 2 скачать торрент. Холоп смотреть онлайн бесплатно в хорошем качестве. Холоп 2 смотреть бесплатно. Холоп 2 смотреть онлайн бесплатно. Холоп 2 фильм. Холоп смотреть онлайн бесплатно в хорошем качестве лордфильм. Холоп актеры. Холоп смотреть. Скачать фильм холоп. Фильм холоп 2 смотреть онлайн бесплатно в хорошем качестве.
augmentin 375 mg tab
albuterol tablets india
suhagra 50 mg price in india
generic ivermectin
Холоп 2. Холоп 2 дата выхода в россии. Холоп лордфильм. Фильм холоп смотреть онлайн. Смотреть холоп бесплатно в хорошем качестве. Холоп фильм 2024 смотреть онлайн. Холоп 2 фильм 2023. Холопы это. Фильм холоп 2 смотреть онлайн бесплатно в хорошем качестве.
levitra price in canada
Фильм холоп. Фильм холоп смотреть онлайн. Холоп 2 смотреть онлайн бесплатно в хорошем. Холоп скачать торрент. Холоп 2 фильм 2024. Холоп фильм 2024 смотреть онлайн бесплатно в хорошем качестве hd. Холоп актеры. Холоп 2 фильм 2024 актеры. Холоп 2 фильм 2023.
where to buy fluoxetine online
Hey there! This is my first visit to your blog! We are a team of volunteers and starting a new project in a community in the same niche.
Your blog provided us useful information to work on. You
have done a extraordinary job!
how to get finasteride prescription
augmentin script
Холоп это. Холоп смотреть онлайн бесплатно в хорошем качестве лордфильм. Холоп это. Фильм холоп смотреть онлайн бесплатно в хорошем качестве. Холоп 2 смотреть онлайн бесплатно в хорошем. Актеры фильма холоп. Холоп фильм.
finasteride
isotretinoin accutane
Wow, wonderful blog layout! How long have you been blogging for?
you make blogging look easy. The overall look of your web site is
great, as well as the content!
xenical price in usa
accutane online australia
Холоп фильм 2024 смотреть. Холоп 2 смотреть онлайн бесплатно. Холоп фильм 2024 смотреть онлайн бесплатно в хорошем качестве hd 1080 бесплатно полностью лорд фильм. Холоп фильм смотреть онлайн бесплатно в хорошем качестве. Холоп фильм 2024 смотреть онлайн бесплатно в хорошем качестве hd. Холоп 2 фильм 2024. Фильм холоп смотреть онлайн. Смотреть холоп. Холоп 2 дата выхода в россии. Холоп смотреть онлайн бесплатно в хорошем. Холоп 2 фильм 2024 смотреть.
can you buy cialis online in australia
tretinoin retin a
can you buy albuterol otc
프라그마틱 무료 슬롯
여기에 서 있으면 전방 해역의 상황이 막히지 않습니다.
buy propecia cheap
bupropion 75 mg india
This site was… how do I say it? Relevant!! Finally I’ve found something which
helped me. Appreciate it!
https://www.google.ge/url?q=https://www.burirelax.com
Ouyang Zhi는 무표정한 표정으로 소파에 앉아 행복하지도 슬프지도 않았습니다.
vermox cost
where can you get accutane online
toradol canada
budesonide 0.5
Исследовательское лидерство. Лидерство в бизнесе. Модель лидерства фидлера. Обучение лидерству. Алекс фергюсон уроки лидерства купить. Формы лидерства. В числе основных признаков лидерства. Манипуляция и лидерство.
synthroid online
metformin 1000 mg for sale
Германия на пути к европейскому лидерству 9 класс кратко. Цитата про лидерство. Укажите типы лидерства по классификации курта левина. Концепт лидерство в испанской картине мира. Стратегия лидерства по издержкам нацелена на. Книги по лидерству. Модели лидерства.
synthroid 0.15 mg
where can i buy bactrim online
Политическая элита и политическое лидерство. Рационально легальное лидерство это. Курсы лидерства. Типы лидерства по веберу. Германия на пути к европейскому лидерству кратко 9 класс.
zestoretic 20 25 mg
Нарративное лидерство. Тип лидерства известный представляет лидера. Транзакционное лидерство это. Лидерство в бизнесе. Курс лидерство безопасности. Что предполагает директивность согласно модели ситуационного лидерства.
bactrim 500 mg
Ситуационный подход к лидерству. Стиль лидерства. Легитимность лидерства это. Трансформационное лидерство предполагает абсолютную преданность своей миссии. Надежная база лидерство для руководителей высшего звена. Анархический тип политического лидерства. Сложный план политическое лидерство как институт политической системы. Презентация германия на пути к европейскому лидерству 9 класс фгос юдовская. 8 уроков лидерства кийосаки.
viagra paypal canada
amoxicillin 1000 mg daily
price of generic levitra
Online poker
Системная теория лидерства. Лидерство это в менеджменте. Основная характеристика современного института лидерства. К харизматическому типу политического лидерства. Ситуационный подход к лидерству. Характеристика автократического типа лидерства. Великобритания экономическое лидерство и политические реформы кратко.
where can you get doxycycline
Майнор лидерство. Основные концепции лидерства. Лидерство в социальной психологии это. Лидерство процесс социального влияния благодаря которому. Главным соперником англии в борьбе за лидерство на морях была. Технологические вызовы и проблема технологического лидерства россии. Ситуационная модель лидерства херси и бланшара. Авторитарный стиль лидерства.
Статья про лидерство. Трансформационное лидерство это. Авторитарный стиль лидерства. Поведенческая теория лидерства. Трансакционная теория лидерства.
lexapro in india
Неформальное лидерство это. Тренинг лидерство для руководителей. Управление и лидерство для начинающих руководителей. Политическое лидерство это. Москва и тверь борьба за лидерство. Перечислите принципы лидерства. Условия в которых целесообразно компании выбирать стратегию лидерства по издержкам.
buy propecia online
augmentin 500 mg tablet
Hello!
Have you ever heard of X-GPT Writer: a unique keyword content generator based on the ChatGPT neural network?
I also haven’t, until I was advised to automate routine tasks with this software, I want to say one thing! For a long time afterwards, I couldn’t believe
that ChatGPT was such a powerful product if it was used simultaneously in streaming, running X-GPT Writer.
I thought it was just a utility, it was inexpensive, a friend gave me a coupon for a 40% discount%:
94EB516BCF484B27
the details of where to enter it are indicated on the website:
https://www.xtranslator.ru/x-gpt-writer/
I started trying, delving into it, bought 50 ChatGPT accounts at low prices and off I went!
Now I easily generate and launch 3-4 new sites per week, batch unify entire folders and even create images
using the ChatGPT neural network and X-GPT Writer.
It’s worth a try, Friends, there’s a demo, everything is free, you won’t regret it)
Good luck!
ChatGPT в качестве синонимайзера текста
Уникальный контент с синонимизатором на базе ChatGPT
ChatGPT и его роль в создании уникального контента
X-GPTWriter: купоны и акции на скидки
Легкий способ создавать контент с X-GPTWriter
Эффективное использование ChatGPT для контент-стратегии
ChatGPT и X-GPTWriter в качестве инструментов синонимизации
ChatGPT как инструмент для генерации контента
ChatGPT для уникального исходного контента
Как X-GPTWriter помогает в SEO-оптимизации контента
colchicine 500 mcg tab
gabapentin pills 800mg
purchase viagra over the counter
clonidine blood pressure
Оценка персонала на лидерство развитие лидерских компетенций. Лидерство искусство управления курс. К харизматическому типу политического лидерства. Современные подходы к лидерству. Лидерство и управление командой. Тест на лидерство в коллективе. Способы демонстрации лидерства руководством охрана труда. Советы по развитию лидерства.
ivermectin for covid
bactrim without a prescription
gabapentin 100mg tablets
baclofen cream over the counter
metformin online without prescription
azithromycin otc us
allopurinol tablets for sale
Лидерство тренинг. Курсы про лидерство. Легальный тип лидерства. Курт левин лидерство. Деструктивное лидерство. Алекс фергюсон уроки лидерства купить. Пять сфер лидерства.
슬롯 사이트
Shen Ao의 마음 속에서 고정관념은 돼지를 먹이고 땅을 경작하는 것과 같습니다.
buy celexa without prescription
Теория ситуационного лидерства херси бланшара. В числе основных признаков лидерства. Наибольшую эффективность в современных условиях предлагает подход к пониманию сути лидерства. Эффективное лидерство это. Трансакционное лидерство. Борьба за политическое лидерство в северо восточной руси. Теории лидерства в психологии.
Каковы причины потери англией промышленного лидерства. Участвующий стиль лидерства это. Типы лидерства в менеджменте. Цитаты о лидерстве. Технологические вызовы и проблема технологического лидерства россии. По стилю общения лидера с подчиненными различают харизматический рационально легальный тип лидерства. Теория внутреннего стимулирования лидерства. Политическое лидерство.
Великобритания экономическое лидерство и политические реформы презентация 9 класс. Сетевая модель лидерства статьи. Эмоциональное лидерство искусство управления людьми на основе эмоционального интеллекта. План политическое лидерство как институт политической системы. Статья про лидерство. Шейн э организационная культура и лидерство. Лидерство и самообман. Лидерство в области охраны труда.
clonidine for tourettes
diflucan capsule
augmentin 500 mg tablet price
neurontin tablets 300 mg
Лидерство во льдах купить книгу. Характеристика автократического типа лидерства. Что такое лидерство. 8 уроков лидерства кийосаки. Курс лидерство безопасности. Слушать аудиокнигу манипуляция и лидерство бесплатно. Обучение лидерству. Характеристики лидерства.
Современные теории лидерства. Участвующий стиль лидерства это. Директивный стиль лидерства. Признаки лидерства. Модель ситуационного лидерства херсея и бланшарда. Лидерство процесс социального влияния благодаря которому. Что такое политическое лидерство. Лидерство определение.
orlistat usa
atarax usa
Модели лидерства. Психология политического лидерства и управления. Типы лидерства обществознание егэ. Ценовое лидерство. Женское лидерство в современном мире. Лидерство во льдах купить. Программа обучения лидерство. Игры на лидерство.
dapoxetine nz
You could certainly see your skills within the work you write.
The world hopes for more passionate writers
such as you who are not afraid to mention how they believe.
Always go after your heart.
lisinopril 2.5
phenergan 12.5
Attractive section of content. I just stumbled upon your web site and in accession capital to assert that I get actually enjoyed account your blog posts.
Any way I’ll be subscribing to your augment and even I achievement you access consistently fast.
https://Fqtjtvedqdz.Exblog.jp/33488646/
atarax tablet
amoxicillin 500mg canada
buy synthroid 175 mcg
200 mg amoxicillin
fildena buy
22 doxycycline
buy diflucan
I have been browsing on-line more than three hours
these days, yet I never found any fascinating article like
yours. It is pretty value enough for me. In my view, if
all website owners and bloggers made excellent content
as you probably did, the web might be a lot more helpful than ever before.
fluoxetine best price
ventolin otc
synthroid 250 mcg price
purchase albuterol online
buy bactrim
ivermectin lotion 0.5
xenical over the counter australia
ventolin price canada
doxycycline 250
propecia nz
wellbutrin 75 mg tablets
accutane online pharmacy
levitra 40 mg online
dapoxetine australia buy
vibramycin 100 mg
azithromycin 500
robaxin 1000 mg cost
doxycycline 5553
buy ivermectin for humans uk
levitra price per pill
fluoxetine for sale online
where to buy amoxicillin 500mg
furosemide 40 mg cheap
albuterol 0
gabapentin price comparison
suhagra without prescription
dapoxetine generic united states
payday loan
0.1 retin a cream
synthroid 112 mcg
I’m gone to tell my little brother, that he should also go to see
this website on regular basis to get updated from newest news update.
synthroid 50 mg cost
citalopram 20mg price
diflucan 1140
colchicine 500 mg tabs
프라그마틱 슬롯
류진은 뺨을 가리고 지저분한 모습으로 사진을 찍고 불만스러운 표정으로 팡지판을 바라보았다.
cialis over the counter australia
doxycyline
budesonide 0.25
pharmacy home delivery
how to buy albuterol tabs online without a prescription
candida diflucan
zyban medication
buy amoxicillin 500mg
can i buy allopurinol without a prescription
My developer is trying to persuade me to move to .net from PHP.
I have always disliked the idea because of the costs.
But he’s tryiong none the less. I’ve been using WordPress on several websites for about a year and am anxious about
switching to another platform. I have heard great things about blogengine.net.
Is there a way I can import all my wordpress content into
it? Any help would be greatly appreciated!
retin a generic price
where to buy real viagra online
buy prinivil
amoxil over the counter
colchicine 100 tablets
Nice post. I used to be checking constantly this blog and I am
impressed! Extremely helpful information specifically the remaining phase 🙂 I
handle such information a lot. I was seeking this certain info for a very lengthy time.
Thank you and best of luck.
colchicine 5mg tablets
best over the counter cialis
finasteride 1mg for sale
how to get doxycycline prescription
zoloft generic cost
xenical 120 mg price uk
diflucan 50 mg tablets
inderal 10mg price
lasix 80 mg
осоветуйте vps
Абузоустойчивый сервер для работы с Хрумером и GSA и различными скриптами!
Есть дополнительная системах скидок, читайте описание в разделе оплата
Виртуальные сервера VPS/VDS и Дедик Сервер: Оптимальное Решение для Вашего Проекта
В мире современных вычислений виртуальные сервера VPS/VDS и дедик сервера становятся ключевыми элементами успешного бизнеса и онлайн-проектов. Выбор оптимальной операционной системы и типа сервера являются решающими шагами в создании надежной и эффективной инфраструктуры. Наши VPS/VDS серверы Windows и Linux, доступные от 13 рублей, а также дедик серверы, предлагают целый ряд преимуществ, делая их неотъемлемыми инструментами для развития вашего проекта.
cheap xenical
orlistat 60
clonidine 0.1mg for sleep
buy viagra online fast shipping
https://maps.google.cf/url?q=https://www.tnlcompetition.com
그는 이미 양모 사업이 많은 돈을 벌게 되어 있다는 것을 보았다.
https://google.com.tj/url?q=https://www.michalsmolen.com
그는 Liu Jian과 다른 사람들의 눈을 보았고 모두 그를 보았습니다.
baclofen tablets 10mg
It’s remarkable for me to have a web page, which is
useful in support of my know-how. thanks admin
stromectol 6 mg dosage
accutane canada pharmacy
augmentin 750 mg
1924948 baclofen
24 xxx
finasteride online 1mg
diflucan generic coupon
levitra over the counter uk
50 mcg synthroid
Hi there! This post could not be written any better!
Reading through this article reminds me
of my previous roommate! He constantly kept talking about this.
I am going to forward this article to him. Pretty sure he’s going to have a great read.
I appreciate you for sharing!
generic phenergan 12.5
lisinopril 10mg tablets
mexico pharmacy accutane
accutane online singapore
order baclofen online usa
toradol prescription
ivermectin generic
can you buy ventolin over the counter in australia
民意調查
clonidine 0.05
프라그마틱 슬롯 무료 체험
뿐만 아니라 보육원에는 전임 의사도 있습니다.
總統民調
民意調查是什麼?民調什麼意思?
民意調查又稱為輿論調查或民意測驗,簡稱民調。一般而言,民調是一種為了解公眾對某些政治、社會問題與政策的意見和態度,由專業民調公司或媒體進行的調查方法。
目的在於通過網路、電話、或書面等媒介,對大量樣本的問卷調查抽樣,利用統計學的抽樣理論來推斷較為客觀,且能較為精確地推論社會輿論或民意動向的一種方法。
以下是民意調查的一些基本特點和重要性:
抽樣:由於不可能向每一個人詢問意見,所以調查者會選擇一個代表性的樣本進行調查。這樣本的大小和抽樣方法都會影響調查的準確性和可靠性。
問卷設計:為了確保獲得可靠的結果,問卷必須經過精心設計,問題要清晰、不帶偏見,且易於理解。
數據分析:收集到的數據將被分析以得出結論。這可能包括計算百分比、平均值、標準差等,以及更複雜的統計分析。
多種用途:民意調查可以用於各種目的,包括政策制定、選舉預測、市場研究、社會科學研究等。
限制:雖然民意調查是一個有價值的工具,但它也有其限制。例如,樣本可能不完全代表目標人群,或者問卷的設計可能導致偏見。
影響決策:民意調查的結果常常被政府、企業和其他組織用來影響其決策。
透明度和誠實:為了維護調查的可信度,調查組織應該提供其調查方法、樣本大小、抽樣方法和可能的誤差範圍等詳細資訊。
民調是怎麼調查的?
民意調查(輿論調查)的意義是指為瞭解大多數民眾的看法、意見、利益與需求,以科學、系統與公正的資料,蒐集可以代表全部群眾(母體)的部分群眾(抽樣),設計問卷題目後,以人工或電腦詢問部分民眾對特定議題的看法與評價,利用抽樣出來部分民眾的意見與看法,來推論目前全部民眾的意見與看法,藉以衡量社會與政治的狀態。
以下是進行民調調查的基本步驟:
定義目標和目的:首先,調查者需要明確調查的目的。是要了解公眾對某個政策的看法?還是要評估某個政治候選人的支持率?
設計問卷:根據調查目的,研究者會設計一份問卷。問卷應該包含清晰、不帶偏見的問題,並避免導向性的語言。
選擇樣本:因為通常不可能調查所有人,所以會選擇一部分人作為代表。這部分人被稱為“樣本”。最理想的情況是使用隨機抽樣,以確保每個人都有被選中的機會。
收集數據:有多種方法可以收集數據,如面對面訪問、電話訪問、郵件調查或在線調查。
數據分析:一旦數據被收集,研究者會使用統計工具和技術進行分析,得出結論或洞見。
報告結果:分析完數據後,研究者會編寫報告或發布結果。報告通常會提供調查方法、樣本大小、誤差範圍和主要發現。
解釋誤差範圍:多數民調報告都會提供誤差範圍,例如“±3%”。這表示實際的結果有可能在報告結果的3%範圍內上下浮動。
民調調查的質量和可信度很大程度上取決於其設計和實施的方法。若是由專業和無偏見的組織進行,且使用科學的方法,那麼民調結果往往較為可靠。但即使是最高質量的民調也會有一定的誤差,因此解讀時應保持批判性思考。
為什麼要做民調?
民調提供了一種系統性的方式來了解大眾的意見、態度和信念。進行民調的原因多種多樣,以下是一些主要的動機:
政策制定和評估:政府和政策制定者進行民調,以了解公眾對某一議題或政策的看法。這有助於制定或調整政策,以反映大眾的需求和意見。
選舉和政治活動:政黨和候選人通常使用民調來評估自己在選舉中的地位,了解哪些議題對選民最重要,以及如何調整策略以吸引更多支持。
市場研究:企業和組織進行民調以了解消費者對產品、服務或品牌的態度,從而制定或調整市場策略。
社會科學研究:學者和研究者使用民調來了解人們的社會、文化和心理特征,以及其與行為的關係。
公眾與媒體的期望:民調提供了一種方式,使公眾、政府和企業得以了解社會的整體趨勢和態度。媒體也經常報導民調結果,提供公眾對當前議題的見解。
提供反饋和評估:無論是企業還是政府,都可以透過民調了解其表現、服務或政策的效果,並根據反饋進行改進。
預測和趨勢分析:民調可以幫助預測某些趨勢或行為的未來發展,如選舉結果、市場需求等。
教育和提高公眾意識:通過進行和公布民調,可以促使公眾對某一議題或問題有更深入的了解和討論。
民調可信嗎?
民意調查的結果數據隨處可見,尤其是政治性民調結果幾乎可說是天天在新聞上放送,對總統的滿意度下降了多少百分比,然而大家又信多少?
在景美市場的訪問中,我們了解到民眾對民調有一些普遍的觀點。大多數受訪者表示,他們對民調的可信度存有疑慮,主要原因是他們擔心政府可能會在調查中進行操控,以符合特定政治目標。
受訪者還提到,民意調查的結果通常不會對他們的投票意願產生影響。換句話說,他們的選擇通常受到更多因素的影響,例如候選人的政策立場和政府做事的認真與否,而不是單純依賴民調結果。
從訪問中我們可以得出的結論是,大多數民眾對民調持謹慎態度,並認為它們對他們的投票決策影響有限。
民調
民意調查是什麼?民調什麼意思?
民意調查又稱為輿論調查或民意測驗,簡稱民調。一般而言,民調是一種為了解公眾對某些政治、社會問題與政策的意見和態度,由專業民調公司或媒體進行的調查方法。
目的在於通過網路、電話、或書面等媒介,對大量樣本的問卷調查抽樣,利用統計學的抽樣理論來推斷較為客觀,且能較為精確地推論社會輿論或民意動向的一種方法。
以下是民意調查的一些基本特點和重要性:
抽樣:由於不可能向每一個人詢問意見,所以調查者會選擇一個代表性的樣本進行調查。這樣本的大小和抽樣方法都會影響調查的準確性和可靠性。
問卷設計:為了確保獲得可靠的結果,問卷必須經過精心設計,問題要清晰、不帶偏見,且易於理解。
數據分析:收集到的數據將被分析以得出結論。這可能包括計算百分比、平均值、標準差等,以及更複雜的統計分析。
多種用途:民意調查可以用於各種目的,包括政策制定、選舉預測、市場研究、社會科學研究等。
限制:雖然民意調查是一個有價值的工具,但它也有其限制。例如,樣本可能不完全代表目標人群,或者問卷的設計可能導致偏見。
影響決策:民意調查的結果常常被政府、企業和其他組織用來影響其決策。
透明度和誠實:為了維護調查的可信度,調查組織應該提供其調查方法、樣本大小、抽樣方法和可能的誤差範圍等詳細資訊。
民調是怎麼調查的?
民意調查(輿論調查)的意義是指為瞭解大多數民眾的看法、意見、利益與需求,以科學、系統與公正的資料,蒐集可以代表全部群眾(母體)的部分群眾(抽樣),設計問卷題目後,以人工或電腦詢問部分民眾對特定議題的看法與評價,利用抽樣出來部分民眾的意見與看法,來推論目前全部民眾的意見與看法,藉以衡量社會與政治的狀態。
以下是進行民調調查的基本步驟:
定義目標和目的:首先,調查者需要明確調查的目的。是要了解公眾對某個政策的看法?還是要評估某個政治候選人的支持率?
設計問卷:根據調查目的,研究者會設計一份問卷。問卷應該包含清晰、不帶偏見的問題,並避免導向性的語言。
選擇樣本:因為通常不可能調查所有人,所以會選擇一部分人作為代表。這部分人被稱為“樣本”。最理想的情況是使用隨機抽樣,以確保每個人都有被選中的機會。
收集數據:有多種方法可以收集數據,如面對面訪問、電話訪問、郵件調查或在線調查。
數據分析:一旦數據被收集,研究者會使用統計工具和技術進行分析,得出結論或洞見。
報告結果:分析完數據後,研究者會編寫報告或發布結果。報告通常會提供調查方法、樣本大小、誤差範圍和主要發現。
解釋誤差範圍:多數民調報告都會提供誤差範圍,例如“±3%”。這表示實際的結果有可能在報告結果的3%範圍內上下浮動。
民調調查的質量和可信度很大程度上取決於其設計和實施的方法。若是由專業和無偏見的組織進行,且使用科學的方法,那麼民調結果往往較為可靠。但即使是最高質量的民調也會有一定的誤差,因此解讀時應保持批判性思考。
為什麼要做民調?
民調提供了一種系統性的方式來了解大眾的意見、態度和信念。進行民調的原因多種多樣,以下是一些主要的動機:
政策制定和評估:政府和政策制定者進行民調,以了解公眾對某一議題或政策的看法。這有助於制定或調整政策,以反映大眾的需求和意見。
選舉和政治活動:政黨和候選人通常使用民調來評估自己在選舉中的地位,了解哪些議題對選民最重要,以及如何調整策略以吸引更多支持。
市場研究:企業和組織進行民調以了解消費者對產品、服務或品牌的態度,從而制定或調整市場策略。
社會科學研究:學者和研究者使用民調來了解人們的社會、文化和心理特征,以及其與行為的關係。
公眾與媒體的期望:民調提供了一種方式,使公眾、政府和企業得以了解社會的整體趨勢和態度。媒體也經常報導民調結果,提供公眾對當前議題的見解。
提供反饋和評估:無論是企業還是政府,都可以透過民調了解其表現、服務或政策的效果,並根據反饋進行改進。
預測和趨勢分析:民調可以幫助預測某些趨勢或行為的未來發展,如選舉結果、市場需求等。
教育和提高公眾意識:通過進行和公布民調,可以促使公眾對某一議題或問題有更深入的了解和討論。
民調可信嗎?
民意調查的結果數據隨處可見,尤其是政治性民調結果幾乎可說是天天在新聞上放送,對總統的滿意度下降了多少百分比,然而大家又信多少?
在景美市場的訪問中,我們了解到民眾對民調有一些普遍的觀點。大多數受訪者表示,他們對民調的可信度存有疑慮,主要原因是他們擔心政府可能會在調查中進行操控,以符合特定政治目標。
受訪者還提到,民意調查的結果通常不會對他們的投票意願產生影響。換句話說,他們的選擇通常受到更多因素的影響,例如候選人的政策立場和政府做事的認真與否,而不是單純依賴民調結果。
從訪問中我們可以得出的結論是,大多數民眾對民調持謹慎態度,並認為它們對他們的投票決策影響有限。
buy zyban online no rx
tretinoin cream 0.025 price
черный приворот обряд – Обратится к магу – dzen.ru/id/653538d7d6100f7a6fee8469
приворот на девушку черная магия
vardenafil 20
synthroid 0.075 mg
baclofen buy canada
accutane 20 mg
furosemide 500
clonidine
purchasing clomid online
canada pharmacy not requiring prescription
Good web site you have here.. It’s difficult to
find quality writing like yours these days.
I seriously appreciate individuals like you! Take care!!
robaxin for sale online
affordable pharmacy
프라그마틱 슬롯 체험
https://sites.google.com/view/spineggc/
vermox over the counter canada
toradol generic medication
https://google.tt/url?q=https://www.burirelax.com
Hongzhi 황제는 그를 더욱 빤히 바라보며 “아, 얼마나 끔찍해 …”라고 말했습니다.
民調
民意調查是什麼?民調什麼意思?
民意調查又稱為輿論調查或民意測驗,簡稱民調。一般而言,民調是一種為了解公眾對某些政治、社會問題與政策的意見和態度,由專業民調公司或媒體進行的調查方法。
目的在於通過網路、電話、或書面等媒介,對大量樣本的問卷調查抽樣,利用統計學的抽樣理論來推斷較為客觀,且能較為精確地推論社會輿論或民意動向的一種方法。
以下是民意調查的一些基本特點和重要性:
抽樣:由於不可能向每一個人詢問意見,所以調查者會選擇一個代表性的樣本進行調查。這樣本的大小和抽樣方法都會影響調查的準確性和可靠性。
問卷設計:為了確保獲得可靠的結果,問卷必須經過精心設計,問題要清晰、不帶偏見,且易於理解。
數據分析:收集到的數據將被分析以得出結論。這可能包括計算百分比、平均值、標準差等,以及更複雜的統計分析。
多種用途:民意調查可以用於各種目的,包括政策制定、選舉預測、市場研究、社會科學研究等。
限制:雖然民意調查是一個有價值的工具,但它也有其限制。例如,樣本可能不完全代表目標人群,或者問卷的設計可能導致偏見。
影響決策:民意調查的結果常常被政府、企業和其他組織用來影響其決策。
透明度和誠實:為了維護調查的可信度,調查組織應該提供其調查方法、樣本大小、抽樣方法和可能的誤差範圍等詳細資訊。
民調是怎麼調查的?
民意調查(輿論調查)的意義是指為瞭解大多數民眾的看法、意見、利益與需求,以科學、系統與公正的資料,蒐集可以代表全部群眾(母體)的部分群眾(抽樣),設計問卷題目後,以人工或電腦詢問部分民眾對特定議題的看法與評價,利用抽樣出來部分民眾的意見與看法,來推論目前全部民眾的意見與看法,藉以衡量社會與政治的狀態。
以下是進行民調調查的基本步驟:
定義目標和目的:首先,調查者需要明確調查的目的。是要了解公眾對某個政策的看法?還是要評估某個政治候選人的支持率?
設計問卷:根據調查目的,研究者會設計一份問卷。問卷應該包含清晰、不帶偏見的問題,並避免導向性的語言。
選擇樣本:因為通常不可能調查所有人,所以會選擇一部分人作為代表。這部分人被稱為“樣本”。最理想的情況是使用隨機抽樣,以確保每個人都有被選中的機會。
收集數據:有多種方法可以收集數據,如面對面訪問、電話訪問、郵件調查或在線調查。
數據分析:一旦數據被收集,研究者會使用統計工具和技術進行分析,得出結論或洞見。
報告結果:分析完數據後,研究者會編寫報告或發布結果。報告通常會提供調查方法、樣本大小、誤差範圍和主要發現。
解釋誤差範圍:多數民調報告都會提供誤差範圍,例如“±3%”。這表示實際的結果有可能在報告結果的3%範圍內上下浮動。
民調調查的質量和可信度很大程度上取決於其設計和實施的方法。若是由專業和無偏見的組織進行,且使用科學的方法,那麼民調結果往往較為可靠。但即使是最高質量的民調也會有一定的誤差,因此解讀時應保持批判性思考。
為什麼要做民調?
民調提供了一種系統性的方式來了解大眾的意見、態度和信念。進行民調的原因多種多樣,以下是一些主要的動機:
政策制定和評估:政府和政策制定者進行民調,以了解公眾對某一議題或政策的看法。這有助於制定或調整政策,以反映大眾的需求和意見。
選舉和政治活動:政黨和候選人通常使用民調來評估自己在選舉中的地位,了解哪些議題對選民最重要,以及如何調整策略以吸引更多支持。
市場研究:企業和組織進行民調以了解消費者對產品、服務或品牌的態度,從而制定或調整市場策略。
社會科學研究:學者和研究者使用民調來了解人們的社會、文化和心理特征,以及其與行為的關係。
公眾與媒體的期望:民調提供了一種方式,使公眾、政府和企業得以了解社會的整體趨勢和態度。媒體也經常報導民調結果,提供公眾對當前議題的見解。
提供反饋和評估:無論是企業還是政府,都可以透過民調了解其表現、服務或政策的效果,並根據反饋進行改進。
預測和趨勢分析:民調可以幫助預測某些趨勢或行為的未來發展,如選舉結果、市場需求等。
教育和提高公眾意識:通過進行和公布民調,可以促使公眾對某一議題或問題有更深入的了解和討論。
民調可信嗎?
民意調查的結果數據隨處可見,尤其是政治性民調結果幾乎可說是天天在新聞上放送,對總統的滿意度下降了多少百分比,然而大家又信多少?
在景美市場的訪問中,我們了解到民眾對民調有一些普遍的觀點。大多數受訪者表示,他們對民調的可信度存有疑慮,主要原因是他們擔心政府可能會在調查中進行操控,以符合特定政治目標。
受訪者還提到,民意調查的結果通常不會對他們的投票意願產生影響。換句話說,他們的選擇通常受到更多因素的影響,例如候選人的政策立場和政府做事的認真與否,而不是單純依賴民調結果。
從訪問中我們可以得出的結論是,大多數民眾對民調持謹慎態度,並認為它們對他們的投票決策影響有限。
cialis generic price
finasteride 1mg no prescription
В чем заключалось экономическое лидерство великобритании. Модели ситуационного лидерства. Германия на пути к европейскому лидерству кратко 9 класс. Сложный план политическое лидерство как институт политической системы. Кто занимался изучением типов лидерства.
home 카지노
“대위 사위의 군대가 도착했나요?” 장마오는 문득 무언가를 떠올렸다.
orlistat medication
good pill pharmacy
zoloft 25 mg tablet
Good post. I learn something new and challenging on sites I stumbleupon every day.
It’s always exciting to read through content from other authors and use a little
something from other web sites.
buy viagra online
effexor 75 mg capsule
buy metformin 500 mg uk
amoxicillin 2017 otc
Hey there! I just wanted to ask if you ever have any trouble with
hackers? My last blog (wordpress) was hacked and I
ended up losing months of hard work due to no
data backup. Do you have any solutions to stop hackers?
Hi everyone
I want to tell you about my experience, how games have turned into real income and help me live!
One day a friend told me about a rather simple but exciting game, thanks to which, after training on a demo account, you can put funds for real bets.
At first I was skeptical about this, but now I have a different opinion!
Lucky jet 1Win – A simple and entertaining game, the guy with the satchel must fly as high as possible and achieve his goals, and these are your bets.
It’s corny, but after a detailed study, I started to win a little and found my stable style of play, the official website has both statistical calculations and classic strategies and hacks!
By the way, who played the legendary Aviator will be delighted with Lucky jet 1Win,there is still the possibility of increased profits!
All information about the gameLucky jet,on the official multilingual website:
English – https://lucky-jetcash.com/en/
Spanish – https://lucky-jetcash.com/es/
Azerbaijanian – https://lucky-jetcash.com/az/
Dutch – https://lucky-jetcash.com/de/
French – https://lucky-jetcash.com/fr/
Portuguese – https://lucky-jetcash.com/pt/
Turkish – https://lucky-jetcash.com/tr/
Kazakh – https://lucky-jetcash.com/kk/
Rus – https://lucky-jetcash.com/
I wish you positivity and winnings in the coming 2024!
See you in the communityLucky jet 1Win!
jogo lucky jet
lucky jet sinais
lucky jet brasil
lucky jet официальный сайт
i win in lucky jet
play lucky jet
lucky jet hack
lucky jet sri lanka
프라그마틱 슬롯을 무료로 플레이하여 즐거움을 느껴보세요.
프라그마틱 게임은 정말로 혁신적이에요. 특히 슬롯 게임들은 항상 기대 이상의 재미를 선사합니다!
https://www.vamiveta.com/
amoxicillin buy no prescription cheapest
ivermectin uk coronavirus
https://dprofile.ru/afterdark/collection/3433/slug
https://dprofile.ru/hab/collections
https://dprofile.ru/christina_hofmann/collection/303/high-tech
https://dprofile.ru/iamcurly/collection/1751/inspo
https://dprofile.ru/egunovadesign/collection/3914/followers
Thank you for sharing your info. I truly appreciate your efforts and I will be waiting for your
further write ups thank you once again.
allopurinol uk prescription
glucophage brand
allopurinol india
https://dprofile.ru/egunovadesign/collection/3915/slug
https://dprofile.ru/sitnam/collection/417/cool
https://dprofile.ru/theburmistrov/collection/39/followers
https://dprofile.ru/nael_eloula/collection/3552/slug
https://dprofile.ru/totosha.a/collection/4153/followers
民調
Решетка блейка моутон стили лидерства. Agile менеджмент лидерство и управление командами. Трансформационное лидерство предполагает абсолютную преданность своей миссии. Сферы лидерства россии. Исследование бюрократии и форм политического лидерства. Теоретиком политического лидерства является. Теория ситуационного лидерства херси бланшара.
Wow that was odd. I just wrote an incredibly long comment but after I clicked submit my comment didn’t appear.
Grrrr… well I’m not writing all that over again. Regardless, just wanted
to say superb blog!
Модель ценового лидерства в олигополии. Авторы личностного подхода к лидерству преследовали цель выявить и описать присущие лидерам. Тренинги по лидерству для руководителей. Вовлекающее лидерство. Организационное лидерство. Лидерство курс. Транзакционное лидерство. Курсы лидерства для детей. Курт левин стили лидерства.
ivermectin cream
Должен ли работодатель демонстрировать лидерство в области охраны труда. Политическое лидерство план. Стили руководства и лидерства. 5 уровней лидерства джон максвелл. Что такое лидерство.
zoloft generic brand
Лидерство в социальной психологии это. Психология лидерства ильин скачать. Шейн э организационная культура и лидерство. 8 уроков лидерства кийосаки. Эмоциональное лидерство дэниел гоулман. Поведенческое лидерство. Надежная база лидерство для руководителей высшего звена.
Лидерство в области охраны труда обеспечивается. Организационное лидерство. Сетевое лидерство. Модель ценового лидерства в олигополии. Фильмы про лидерство. Германия на пути к европейскому лидерству кратко 9 класс.
Основные теории лидерства. Шейн э организационная культура и лидерство спб. Тест на лидерство. Лидерство картинки. Что такое сетевое лидерство. Традиционный тип лидерства. Лидерство по издержкам.
levitra australia prices
buy septra antibiotic
suhagra 25
Кен бланшар ситуационное лидерство. Курт левин лидерство. Стратегия лидерства по издержкам нацелена на. Основная характеристика современного института лидерства. Стили политического лидерства. Осознанное лидерство. Проблема социогуманитарного лидерства. Слушать аудиокнигу манипуляция и лидерство бесплатно.
프라그마틱 게임은 iGaming 업계의 주요 플레이어로, 모바일 중심의 혁신적이고 표준화된 콘텐츠를 선보입니다.
프라그마틱에 대한 글 읽는 것이 정말 즐거웠어요! 또한, 제 사이트에서도 프라그마틱과 관련된 정보를 공유하고 있어요. 함께 발전하며 더 많은 지식을 얻어보세요!
https://www.vamiveta.com/
vermox drug
vermox pills
民調
民意調查是什麼?民調什麼意思?
民意調查又稱為輿論調查或民意測驗,簡稱民調。一般而言,民調是一種為了解公眾對某些政治、社會問題與政策的意見和態度,由專業民調公司或媒體進行的調查方法。
目的在於通過網路、電話、或書面等媒介,對大量樣本的問卷調查抽樣,利用統計學的抽樣理論來推斷較為客觀,且能較為精確地推論社會輿論或民意動向的一種方法。
以下是民意調查的一些基本特點和重要性:
抽樣:由於不可能向每一個人詢問意見,所以調查者會選擇一個代表性的樣本進行調查。這樣本的大小和抽樣方法都會影響調查的準確性和可靠性。
問卷設計:為了確保獲得可靠的結果,問卷必須經過精心設計,問題要清晰、不帶偏見,且易於理解。
數據分析:收集到的數據將被分析以得出結論。這可能包括計算百分比、平均值、標準差等,以及更複雜的統計分析。
多種用途:民意調查可以用於各種目的,包括政策制定、選舉預測、市場研究、社會科學研究等。
限制:雖然民意調查是一個有價值的工具,但它也有其限制。例如,樣本可能不完全代表目標人群,或者問卷的設計可能導致偏見。
影響決策:民意調查的結果常常被政府、企業和其他組織用來影響其決策。
透明度和誠實:為了維護調查的可信度,調查組織應該提供其調查方法、樣本大小、抽樣方法和可能的誤差範圍等詳細資訊。
民調是怎麼調查的?
民意調查(輿論調查)的意義是指為瞭解大多數民眾的看法、意見、利益與需求,以科學、系統與公正的資料,蒐集可以代表全部群眾(母體)的部分群眾(抽樣),設計問卷題目後,以人工或電腦詢問部分民眾對特定議題的看法與評價,利用抽樣出來部分民眾的意見與看法,來推論目前全部民眾的意見與看法,藉以衡量社會與政治的狀態。
以下是進行民調調查的基本步驟:
定義目標和目的:首先,調查者需要明確調查的目的。是要了解公眾對某個政策的看法?還是要評估某個政治候選人的支持率?
設計問卷:根據調查目的,研究者會設計一份問卷。問卷應該包含清晰、不帶偏見的問題,並避免導向性的語言。
選擇樣本:因為通常不可能調查所有人,所以會選擇一部分人作為代表。這部分人被稱為“樣本”。最理想的情況是使用隨機抽樣,以確保每個人都有被選中的機會。
收集數據:有多種方法可以收集數據,如面對面訪問、電話訪問、郵件調查或在線調查。
數據分析:一旦數據被收集,研究者會使用統計工具和技術進行分析,得出結論或洞見。
報告結果:分析完數據後,研究者會編寫報告或發布結果。報告通常會提供調查方法、樣本大小、誤差範圍和主要發現。
解釋誤差範圍:多數民調報告都會提供誤差範圍,例如“±3%”。這表示實際的結果有可能在報告結果的3%範圍內上下浮動。
民調調查的質量和可信度很大程度上取決於其設計和實施的方法。若是由專業和無偏見的組織進行,且使用科學的方法,那麼民調結果往往較為可靠。但即使是最高質量的民調也會有一定的誤差,因此解讀時應保持批判性思考。
為什麼要做民調?
民調提供了一種系統性的方式來了解大眾的意見、態度和信念。進行民調的原因多種多樣,以下是一些主要的動機:
政策制定和評估:政府和政策制定者進行民調,以了解公眾對某一議題或政策的看法。這有助於制定或調整政策,以反映大眾的需求和意見。
選舉和政治活動:政黨和候選人通常使用民調來評估自己在選舉中的地位,了解哪些議題對選民最重要,以及如何調整策略以吸引更多支持。
市場研究:企業和組織進行民調以了解消費者對產品、服務或品牌的態度,從而制定或調整市場策略。
社會科學研究:學者和研究者使用民調來了解人們的社會、文化和心理特征,以及其與行為的關係。
公眾與媒體的期望:民調提供了一種方式,使公眾、政府和企業得以了解社會的整體趨勢和態度。媒體也經常報導民調結果,提供公眾對當前議題的見解。
提供反饋和評估:無論是企業還是政府,都可以透過民調了解其表現、服務或政策的效果,並根據反饋進行改進。
預測和趨勢分析:民調可以幫助預測某些趨勢或行為的未來發展,如選舉結果、市場需求等。
教育和提高公眾意識:通過進行和公布民調,可以促使公眾對某一議題或問題有更深入的了解和討論。
民調可信嗎?
民意調查的結果數據隨處可見,尤其是政治性民調結果幾乎可說是天天在新聞上放送,對總統的滿意度下降了多少百分比,然而大家又信多少?
在景美市場的訪問中,我們了解到民眾對民調有一些普遍的觀點。大多數受訪者表示,他們對民調的可信度存有疑慮,主要原因是他們擔心政府可能會在調查中進行操控,以符合特定政治目標。
受訪者還提到,民意調查的結果通常不會對他們的投票意願產生影響。換句話說,他們的選擇通常受到更多因素的影響,例如候選人的政策立場和政府做事的認真與否,而不是單純依賴民調結果。
從訪問中我們可以得出的結論是,大多數民眾對民調持謹慎態度,並認為它們對他們的投票決策影響有限。
Шейн э организационная культура и лидерство. Стили политического лидерства. Природа определение и содержание понятия лидерства. Цитаты про лидерство. Политическое лидерство как институт политической системы план по обществознанию егэ. Сущность лидерства. Матрица лидерства.
프라그마틱 게임은 iGaming 업계에서 높은 평가를 받는 모바일 중심의 혁신적이고 표준화된 콘텐츠를 제공합니다.
프라그마틱 무료
프라그마틱의 게임을 플레이하면 항상 긴장감 넘치고 즐거운 시간을 보낼 수 있어 좋아요. 여기서 더 많은 이야기를 들려주세요!
https://cse.google.ms/url?q=https://pragmatic-game.net
https://www.google.co.uz/url?q=https://www.customercaresupportnumber.com
https://google.mv/url?q=https://pragmatic-game.net
https://www.google.ws/url?q=https://www.ivermectininstock.com
https://maps.google.cf/url?q=https://pragmatic-game.net
https://images.google.com.vn/url?q=https://www.pragmatic-game.com
price of augmentin 20 tablets
buy neurontin 300 mg
buy viagra online
budesonide 3 mg price india
fluoxetine capsules 10 mg
azithromycin online no prescription usa
citalopram pills
Проведение сильных любовных приворотов по фотографии.
Обратиться к магу за приворото, почитать отзывы mirprivorotov.ru.
черная магия приворот на расстоянии
trazodone tablets
tadalafil online script
cheap pharmacy no prescription
zestril lisinopril
can you buy trazodone in mexico
levitra 50mg tablets
The other day, while I was at work, my sister stole my apple ipad and tested to see if it can survive a 25 foot
drop, just so she can be a youtube sensation. My iPad
is now broken and she has 83 views. I know this is entirely off topic but
I had to share it with someone!
Получите перетяжку мягкой мебели с гарантией качества
Перетяжка мягкой мебели : простой способ обновить интерьер
Качественное обслуживание перетяжки мягкой мебели
Перетяжка мягкой мебели обновить диван или кресло
перетяжка мягкой мебели http://www.peretyazhkann.ru/.
generic albuterol no prescription
Смотреть новые фильмы онлайн, которые уже вышли. Новинки. Фильмы онлайн в хорошем качестве|Кинотеатр. Лучшие Фильмы смотреть онлайн бесплатно в хорошем качестве. Смотреть фильмы онлайн бесплатно в хорошем качестве. Фильмы смотреть онлайн в хорошем HD качестве. 2024 СМОТЕРТЬ ОНЛАЙН ФИЛЬМ.
https://tinyurl.com/ysywtm5s
prednisone brand name india
wellbutrin 600 mg daily
amoxicillin brand name
Лучшие Фильмы смотреть онлайн бесплатно в хорошем качестве. Смотреть фильмы онлайн бесплатно в хорошем качестве. Фильмы смотреть онлайн в хорошем HD качестве. 2024 СМОТЕРТЬ ОНЛАЙН ФИЛЬМ. Смотреть фильмы онлайн бесплатно в хорошем качестве. Лучшие фильмы 2024 года – смотреть онлайн в хорошем. Смотреть фильмы в онлайн кинотеатре в хорошем качестве.
Thank you for the auspicious writeup. It in fact was a amusement account it.
Look advanced to more added agreeable from you!
By the way, how could we communicate?
https://tinyurl.com/yrfkd5s5
celexa where to buy
https://tinyurl.com/ylpmzbb5
Все части кино смотреть онлайн в хорошем качестве hd 1080. Смотреть Аниме онлайн бесплатно в хорошем качестве. Сериалы онлайн смотреть бесплатно в хорошем качестве. Смотреть аниме онлайн в хорошем качестве HD бесплатно. Двадцатка крутых российских фильмов. Фильмы и сериалы онлайн бесплатно в хорошем HD. Смотреть фильмы онлайн бесплатно в хорошем качестве.
where can i buy vermox over the counter
Смотреть фильмы онлайн бесплатно в хорошем качестве. Фильмы смотреть онлайн. Лучшие Фильмы смотреть онлайн бесплатно в хорошем качестве. Список фильмов: смотреть онлайн и бесплатно лучшие. КИНО | ФИЛЬМЫ ОНЛАЙН. Лучший онлайн-кинотеатр советских фильмов. Смотреть фильмы / топ кино онлайн.
Фильмы онлайн смотреть онлайн. Смотреть фильмы онлайн в хорошем качестве Full HD 720. Фильмы – смотреть онлайн бесплатно в хорошем качестве. Фильмы – смотреть онлайн в хорошем качестве. Смотреть фильмы онлайн бесплатно в хорошем качестве. Фильмы бесплатно смотреть онлайн в хорошем качестве. Русские фильмы – смотреть фильмы онлайн в высоком. Смотреть фильмы онлайн бесплатно в хорошем качестве.
Hey there, You’ve done a fantastic job. I
will definitely digg it and personally recommend to my friends.
I am confident they’ll be benefited from this site.
https://tinyurl.com/yq3bntky
Смотреть фильмы онлайн бесплатно в хорошем качестве. Фильмы бесплатно смотреть онлайн в хорошем качестве. Русские фильмы – смотреть фильмы онлайн в высоком. Смотреть фильмы онлайн бесплатно в хорошем качестве. Фильмы смотреть онлайн. Лучшие Фильмы смотреть онлайн бесплатно в хорошем качестве.
Смотреть онлайн лучшие фильмы в хорошем качестве HD1080. Смотреть фильмы онлайн бесплатно в хорошем качестве. Фильмы смотреть онлайн. Смотреть Сериалы в HD онлайн. Список фильмов в хорошем качестве. Смотреть новые фильмы онлайн, которые уже вышли. Новинки. Фильмы онлайн в хорошем качестве|Кинотеатр. Лучшие Фильмы смотреть онлайн бесплатно в хорошем качестве. Смотреть фильмы онлайн бесплатно в хорошем качестве.
azithromycin tablets 500g
最新民調
民意調查是什麼?民調什麼意思?
民意調查又稱為輿論調查或民意測驗,簡稱民調。一般而言,民調是一種為了解公眾對某些政治、社會問題與政策的意見和態度,由專業民調公司或媒體進行的調查方法。
目的在於通過網路、電話、或書面等媒介,對大量樣本的問卷調查抽樣,利用統計學的抽樣理論來推斷較為客觀,且能較為精確地推論社會輿論或民意動向的一種方法。
以下是民意調查的一些基本特點和重要性:
抽樣:由於不可能向每一個人詢問意見,所以調查者會選擇一個代表性的樣本進行調查。這樣本的大小和抽樣方法都會影響調查的準確性和可靠性。
問卷設計:為了確保獲得可靠的結果,問卷必須經過精心設計,問題要清晰、不帶偏見,且易於理解。
數據分析:收集到的數據將被分析以得出結論。這可能包括計算百分比、平均值、標準差等,以及更複雜的統計分析。
多種用途:民意調查可以用於各種目的,包括政策制定、選舉預測、市場研究、社會科學研究等。
限制:雖然民意調查是一個有價值的工具,但它也有其限制。例如,樣本可能不完全代表目標人群,或者問卷的設計可能導致偏見。
影響決策:民意調查的結果常常被政府、企業和其他組織用來影響其決策。
透明度和誠實:為了維護調查的可信度,調查組織應該提供其調查方法、樣本大小、抽樣方法和可能的誤差範圍等詳細資訊。
民調是怎麼調查的?
民意調查(輿論調查)的意義是指為瞭解大多數民眾的看法、意見、利益與需求,以科學、系統與公正的資料,蒐集可以代表全部群眾(母體)的部分群眾(抽樣),設計問卷題目後,以人工或電腦詢問部分民眾對特定議題的看法與評價,利用抽樣出來部分民眾的意見與看法,來推論目前全部民眾的意見與看法,藉以衡量社會與政治的狀態。
以下是進行民調調查的基本步驟:
定義目標和目的:首先,調查者需要明確調查的目的。是要了解公眾對某個政策的看法?還是要評估某個政治候選人的支持率?
設計問卷:根據調查目的,研究者會設計一份問卷。問卷應該包含清晰、不帶偏見的問題,並避免導向性的語言。
選擇樣本:因為通常不可能調查所有人,所以會選擇一部分人作為代表。這部分人被稱為“樣本”。最理想的情況是使用隨機抽樣,以確保每個人都有被選中的機會。
收集數據:有多種方法可以收集數據,如面對面訪問、電話訪問、郵件調查或在線調查。
數據分析:一旦數據被收集,研究者會使用統計工具和技術進行分析,得出結論或洞見。
報告結果:分析完數據後,研究者會編寫報告或發布結果。報告通常會提供調查方法、樣本大小、誤差範圍和主要發現。
解釋誤差範圍:多數民調報告都會提供誤差範圍,例如“±3%”。這表示實際的結果有可能在報告結果的3%範圍內上下浮動。
民調調查的質量和可信度很大程度上取決於其設計和實施的方法。若是由專業和無偏見的組織進行,且使用科學的方法,那麼民調結果往往較為可靠。但即使是最高質量的民調也會有一定的誤差,因此解讀時應保持批判性思考。
為什麼要做民調?
民調提供了一種系統性的方式來了解大眾的意見、態度和信念。進行民調的原因多種多樣,以下是一些主要的動機:
政策制定和評估:政府和政策制定者進行民調,以了解公眾對某一議題或政策的看法。這有助於制定或調整政策,以反映大眾的需求和意見。
選舉和政治活動:政黨和候選人通常使用民調來評估自己在選舉中的地位,了解哪些議題對選民最重要,以及如何調整策略以吸引更多支持。
市場研究:企業和組織進行民調以了解消費者對產品、服務或品牌的態度,從而制定或調整市場策略。
社會科學研究:學者和研究者使用民調來了解人們的社會、文化和心理特征,以及其與行為的關係。
公眾與媒體的期望:民調提供了一種方式,使公眾、政府和企業得以了解社會的整體趨勢和態度。媒體也經常報導民調結果,提供公眾對當前議題的見解。
提供反饋和評估:無論是企業還是政府,都可以透過民調了解其表現、服務或政策的效果,並根據反饋進行改進。
預測和趨勢分析:民調可以幫助預測某些趨勢或行為的未來發展,如選舉結果、市場需求等。
教育和提高公眾意識:通過進行和公布民調,可以促使公眾對某一議題或問題有更深入的了解和討論。
民調可信嗎?
民意調查的結果數據隨處可見,尤其是政治性民調結果幾乎可說是天天在新聞上放送,對總統的滿意度下降了多少百分比,然而大家又信多少?
在景美市場的訪問中,我們了解到民眾對民調有一些普遍的觀點。大多數受訪者表示,他們對民調的可信度存有疑慮,主要原因是他們擔心政府可能會在調查中進行操控,以符合特定政治目標。
受訪者還提到,民意調查的結果通常不會對他們的投票意願產生影響。換句話說,他們的選擇通常受到更多因素的影響,例如候選人的政策立場和政府做事的認真與否,而不是單純依賴民調結果。
從訪問中我們可以得出的結論是,大多數民眾對民調持謹慎態度,並認為它們對他們的投票決策影響有限。
neurontin pill
clonidine hcl
Смотреть фильмы / топ кино онлайн. Смотреть фильмы онлайн бесплатно в хорошем качестве. Смотреть фильмы онлайн – российские фильмы Смотреть онлайн HD фильмы бесплатно. Новинки уже вышедшие смотреть онлайн в хорошем качестве. Лучшие фильмы 2021 года – смотреть онлайн в хорошем. Лучшие фильмы 2022 года – смотреть онлайн в хорошем. Лучшие фильмы 2023 года – смотреть онлайн в хорошем.
民意調查是什麼?民調什麼意思?
民意調查又稱為輿論調查或民意測驗,簡稱民調。一般而言,民調是一種為了解公眾對某些政治、社會問題與政策的意見和態度,由專業民調公司或媒體進行的調查方法。
目的在於通過網路、電話、或書面等媒介,對大量樣本的問卷調查抽樣,利用統計學的抽樣理論來推斷較為客觀,且能較為精確地推論社會輿論或民意動向的一種方法。
以下是民意調查的一些基本特點和重要性:
抽樣:由於不可能向每一個人詢問意見,所以調查者會選擇一個代表性的樣本進行調查。這樣本的大小和抽樣方法都會影響調查的準確性和可靠性。
問卷設計:為了確保獲得可靠的結果,問卷必須經過精心設計,問題要清晰、不帶偏見,且易於理解。
數據分析:收集到的數據將被分析以得出結論。這可能包括計算百分比、平均值、標準差等,以及更複雜的統計分析。
多種用途:民意調查可以用於各種目的,包括政策制定、選舉預測、市場研究、社會科學研究等。
限制:雖然民意調查是一個有價值的工具,但它也有其限制。例如,樣本可能不完全代表目標人群,或者問卷的設計可能導致偏見。
影響決策:民意調查的結果常常被政府、企業和其他組織用來影響其決策。
透明度和誠實:為了維護調查的可信度,調查組織應該提供其調查方法、樣本大小、抽樣方法和可能的誤差範圍等詳細資訊。
民調是怎麼調查的?
民意調查(輿論調查)的意義是指為瞭解大多數民眾的看法、意見、利益與需求,以科學、系統與公正的資料,蒐集可以代表全部群眾(母體)的部分群眾(抽樣),設計問卷題目後,以人工或電腦詢問部分民眾對特定議題的看法與評價,利用抽樣出來部分民眾的意見與看法,來推論目前全部民眾的意見與看法,藉以衡量社會與政治的狀態。
以下是進行民調調查的基本步驟:
定義目標和目的:首先,調查者需要明確調查的目的。是要了解公眾對某個政策的看法?還是要評估某個政治候選人的支持率?
設計問卷:根據調查目的,研究者會設計一份問卷。問卷應該包含清晰、不帶偏見的問題,並避免導向性的語言。
選擇樣本:因為通常不可能調查所有人,所以會選擇一部分人作為代表。這部分人被稱為“樣本”。最理想的情況是使用隨機抽樣,以確保每個人都有被選中的機會。
收集數據:有多種方法可以收集數據,如面對面訪問、電話訪問、郵件調查或在線調查。
數據分析:一旦數據被收集,研究者會使用統計工具和技術進行分析,得出結論或洞見。
報告結果:分析完數據後,研究者會編寫報告或發布結果。報告通常會提供調查方法、樣本大小、誤差範圍和主要發現。
解釋誤差範圍:多數民調報告都會提供誤差範圍,例如“±3%”。這表示實際的結果有可能在報告結果的3%範圍內上下浮動。
民調調查的質量和可信度很大程度上取決於其設計和實施的方法。若是由專業和無偏見的組織進行,且使用科學的方法,那麼民調結果往往較為可靠。但即使是最高質量的民調也會有一定的誤差,因此解讀時應保持批判性思考。
為什麼要做民調?
民調提供了一種系統性的方式來了解大眾的意見、態度和信念。進行民調的原因多種多樣,以下是一些主要的動機:
政策制定和評估:政府和政策制定者進行民調,以了解公眾對某一議題或政策的看法。這有助於制定或調整政策,以反映大眾的需求和意見。
選舉和政治活動:政黨和候選人通常使用民調來評估自己在選舉中的地位,了解哪些議題對選民最重要,以及如何調整策略以吸引更多支持。
市場研究:企業和組織進行民調以了解消費者對產品、服務或品牌的態度,從而制定或調整市場策略。
社會科學研究:學者和研究者使用民調來了解人們的社會、文化和心理特征,以及其與行為的關係。
公眾與媒體的期望:民調提供了一種方式,使公眾、政府和企業得以了解社會的整體趨勢和態度。媒體也經常報導民調結果,提供公眾對當前議題的見解。
提供反饋和評估:無論是企業還是政府,都可以透過民調了解其表現、服務或政策的效果,並根據反饋進行改進。
預測和趨勢分析:民調可以幫助預測某些趨勢或行為的未來發展,如選舉結果、市場需求等。
教育和提高公眾意識:通過進行和公布民調,可以促使公眾對某一議題或問題有更深入的了解和討論。
民調可信嗎?
民意調查的結果數據隨處可見,尤其是政治性民調結果幾乎可說是天天在新聞上放送,對總統的滿意度下降了多少百分比,然而大家又信多少?
在景美市場的訪問中,我們了解到民眾對民調有一些普遍的觀點。大多數受訪者表示,他們對民調的可信度存有疑慮,主要原因是他們擔心政府可能會在調查中進行操控,以符合特定政治目標。
受訪者還提到,民意調查的結果通常不會對他們的投票意願產生影響。換句話說,他們的選擇通常受到更多因素的影響,例如候選人的政策立場和政府做事的認真與否,而不是單純依賴民調結果。
從訪問中我們可以得出的結論是,大多數民眾對民調持謹慎態度,並認為它們對他們的投票決策影響有限。
buy toradol pills
0.50mg synthroid
clonidine 0.2 mg online
buy tretinoin cream online india
zithromax drug
Hi there, I found your web site by the use of Google at the same time as searching for a similar
matter, your site got here up, it seems great. I have bookmarked it
in my google bookmarks.
Hi there, just was alert to your blog via Google, and found that it’s truly informative.
I am going to watch out for brussels. I’ll be grateful if you happen to proceed this in future.
Many people shall be benefited out of your writing. Cheers!
bactrim 200mg
stromectol ivermectin 3 mg
cialis 5mg tablets price
Hello
I want to tell you about my experience, how games have turned into real income and help me live!
One day a friend told me about a rather simple but exciting game, thanks to which, after training on a demo account, you can put funds for real bets.
At first I was skeptical about this, but now I have a different opinion!
Lucky jet 1Win – A simple and entertaining game, the guy with the satchel must fly as high as possible and achieve his goals, and these are your bets.
It’s corny, but after a detailed study, I started to win a little and found my stable style of play, the official website has both statistical calculations and classic strategies and hacks!
By the way, anyone who played the legendary Aviator will be delighted with Lucky jet 1Win,there is still the possibility of increased profits!
All information about the gameLucky jet,on the official multilingual website:
English – https://lucky-jetcash.com/en/
Spanish – https://lucky-jetcash.com/es/
Azerbaijanian – https://lucky-jetcash.com/az/
Dutch – https://lucky-jetcash.com/de/
French – https://lucky-jetcash.com/fr/
Portuguese – https://lucky-jetcash.com/pt/
Turkish – https://lucky-jetcash.com/tr/
Kazakh – https://lucky-jetcash.com/kk/
Rus – https://lucky-jetcash.com/
I wish you positivity and winnings in the coming 2024!
See you in the communityLucky jet 1Win!
1win lucky jet
lucky jet
lucky jet signals hack
lucky jet скачать
lucky jet download
lucky jet hack
lucky jet 1 win
lucky jet sri lanka
toradol 60 mg
lexapro 5 mg tablet price
discount prednisolone
buy amoxil online usa
trazodone 100 mg cost
民意調查
民意調查是什麼?民調什麼意思?
民意調查又稱為輿論調查或民意測驗,簡稱民調。一般而言,民調是一種為了解公眾對某些政治、社會問題與政策的意見和態度,由專業民調公司或媒體進行的調查方法。
目的在於通過網路、電話、或書面等媒介,對大量樣本的問卷調查抽樣,利用統計學的抽樣理論來推斷較為客觀,且能較為精確地推論社會輿論或民意動向的一種方法。
以下是民意調查的一些基本特點和重要性:
抽樣:由於不可能向每一個人詢問意見,所以調查者會選擇一個代表性的樣本進行調查。這樣本的大小和抽樣方法都會影響調查的準確性和可靠性。
問卷設計:為了確保獲得可靠的結果,問卷必須經過精心設計,問題要清晰、不帶偏見,且易於理解。
數據分析:收集到的數據將被分析以得出結論。這可能包括計算百分比、平均值、標準差等,以及更複雜的統計分析。
多種用途:民意調查可以用於各種目的,包括政策制定、選舉預測、市場研究、社會科學研究等。
限制:雖然民意調查是一個有價值的工具,但它也有其限制。例如,樣本可能不完全代表目標人群,或者問卷的設計可能導致偏見。
影響決策:民意調查的結果常常被政府、企業和其他組織用來影響其決策。
透明度和誠實:為了維護調查的可信度,調查組織應該提供其調查方法、樣本大小、抽樣方法和可能的誤差範圍等詳細資訊。
民調是怎麼調查的?
民意調查(輿論調查)的意義是指為瞭解大多數民眾的看法、意見、利益與需求,以科學、系統與公正的資料,蒐集可以代表全部群眾(母體)的部分群眾(抽樣),設計問卷題目後,以人工或電腦詢問部分民眾對特定議題的看法與評價,利用抽樣出來部分民眾的意見與看法,來推論目前全部民眾的意見與看法,藉以衡量社會與政治的狀態。
以下是進行民調調查的基本步驟:
定義目標和目的:首先,調查者需要明確調查的目的。是要了解公眾對某個政策的看法?還是要評估某個政治候選人的支持率?
設計問卷:根據調查目的,研究者會設計一份問卷。問卷應該包含清晰、不帶偏見的問題,並避免導向性的語言。
選擇樣本:因為通常不可能調查所有人,所以會選擇一部分人作為代表。這部分人被稱為“樣本”。最理想的情況是使用隨機抽樣,以確保每個人都有被選中的機會。
收集數據:有多種方法可以收集數據,如面對面訪問、電話訪問、郵件調查或在線調查。
數據分析:一旦數據被收集,研究者會使用統計工具和技術進行分析,得出結論或洞見。
報告結果:分析完數據後,研究者會編寫報告或發布結果。報告通常會提供調查方法、樣本大小、誤差範圍和主要發現。
解釋誤差範圍:多數民調報告都會提供誤差範圍,例如“±3%”。這表示實際的結果有可能在報告結果的3%範圍內上下浮動。
民調調查的質量和可信度很大程度上取決於其設計和實施的方法。若是由專業和無偏見的組織進行,且使用科學的方法,那麼民調結果往往較為可靠。但即使是最高質量的民調也會有一定的誤差,因此解讀時應保持批判性思考。
為什麼要做民調?
民調提供了一種系統性的方式來了解大眾的意見、態度和信念。進行民調的原因多種多樣,以下是一些主要的動機:
政策制定和評估:政府和政策制定者進行民調,以了解公眾對某一議題或政策的看法。這有助於制定或調整政策,以反映大眾的需求和意見。
選舉和政治活動:政黨和候選人通常使用民調來評估自己在選舉中的地位,了解哪些議題對選民最重要,以及如何調整策略以吸引更多支持。
市場研究:企業和組織進行民調以了解消費者對產品、服務或品牌的態度,從而制定或調整市場策略。
社會科學研究:學者和研究者使用民調來了解人們的社會、文化和心理特征,以及其與行為的關係。
公眾與媒體的期望:民調提供了一種方式,使公眾、政府和企業得以了解社會的整體趨勢和態度。媒體也經常報導民調結果,提供公眾對當前議題的見解。
提供反饋和評估:無論是企業還是政府,都可以透過民調了解其表現、服務或政策的效果,並根據反饋進行改進。
預測和趨勢分析:民調可以幫助預測某些趨勢或行為的未來發展,如選舉結果、市場需求等。
教育和提高公眾意識:通過進行和公布民調,可以促使公眾對某一議題或問題有更深入的了解和討論。
民調可信嗎?
民意調查的結果數據隨處可見,尤其是政治性民調結果幾乎可說是天天在新聞上放送,對總統的滿意度下降了多少百分比,然而大家又信多少?
在景美市場的訪問中,我們了解到民眾對民調有一些普遍的觀點。大多數受訪者表示,他們對民調的可信度存有疑慮,主要原因是他們擔心政府可能會在調查中進行操控,以符合特定政治目標。
受訪者還提到,民意調查的結果通常不會對他們的投票意願產生影響。換句話說,他們的選擇通常受到更多因素的影響,例如候選人的政策立場和政府做事的認真與否,而不是單純依賴民調結果。
從訪問中我們可以得出的結論是,大多數民眾對民調持謹慎態度,並認為它們對他們的投票決策影響有限。
neurontin 150 mg
amoxil antibiotics
bupropion 1200mg
Touche. Sound arguments. Keep up the good effort.
propecia buy india
슬롯 사이트
Hongzhi 황제는 “저를 내려 놓으십시오. 나는 걸어서 궁전에 들어갈 것입니다. “라고 말했습니다.
https://www.customercaresupportnumber.com/
4000 mg trazodone
Аренда виртуальных серверов (VPS/VDS хостинг)
– Супер (аптайм, скорость, пинг, нагрузка)
– Отлично подходит под GSA Search Engine Ranker
– Автоматическая установка Windows – бесплатно
– Возможность арендовать сервер на 1 час или 1 сутки
– Скорость порта подключения к сети интернет — 1000 Мбит/сек
– Отлично подходит под XRumer + XEvil
– Outline VPN, WireGuard VPN, IPsec VPN.
– Для сервера сеть на скорости 1 Гбит!
– Отлично подходит под A-Parser
– Windows – 2012 R2, 2016, 2019, 2022 – бесплатно
– Мгновенное развёртывание сервера в несколько кликов – бесплатно
– Отлично подходит под Xneolinks
– Более 15 000 сервер уже в работе
– Отлично подходит под CapMonster
– Дата-центр в Москве и Амстердаме
– FASTPANEL и HestiaCP – бесплатно
– Windows – 2022, 2019, 2016, 2012 R2
– Ubuntu, Debian, CentOS, Oracle 9 – бесплатно
– Почасовая оплата
– Круглосуточная техническая поддержка – бесплатно
– Быстрые серверы с NVMe.
– Управляйте серверами на лету.
Наша группа опытных мастеров предоставлена предоставить вам перспективные технологии, которые не только предоставят долговечную безопасность от заморозков, но и подарят вашему коттеджу стильный вид.
Мы функционируем с новейшими материалами, обеспечивая продолжительный период использования и выдающиеся решения. Теплоизоляция наружных поверхностей – это не только сокращение расходов на отапливании, но и внимание о природной среде. Энергоспасающие технологические решения, каковые мы претворяем в жизнь, способствуют не только личному, но и сохранению природы.
Самое важное: Утепление дома снаружи цена москва у нас стартует всего от 1250 рублей за квадратный метр! Это бюджетное решение, которое переделает ваш дом в реальный комфортный уголок с минимальными расходами.
Наши пособия – это не только утепление, это созидание площади, в где любой элемент показывает ваш персональный стиль. Мы примем в расчет все ваши пожелания, чтобы сделать ваш дом еще дополнительно дружелюбным и привлекательным.
Подробнее на интернет-ресурсе
Не откладывайте труды о своем доме на потом! Обращайтесь к мастерам, и мы сделаем ваш дворец не только более теплым, но и более элегантным. Заинтересовались? Подробнее о наших услугах вы можете узнать на официальном сайте. Добро пожаловать в мир комфорта и качественного исполнения.
Аренда виртуального сервера VPS
– Супер (аптайм, скорость, пинг, нагрузка)
– Outline VPN, WireGuard VPN, IPsec VPN.
– Управляйте серверами на лету.
– Ubuntu, Debian, CentOS, Oracle 9 – бесплатно
– Отлично подходит под GSA Search Engine Ranker
– Автоматическая установка Windows – бесплатно
– Windows – 2012 R2, 2016, 2019, 2022 – бесплатно
– Отлично подходит под A-Parser
– Почасовая оплата
– Отлично подходит под Xneolinks
– Отлично подходит под CapMonster
– Для сервера сеть на скорости 1 Гбит!
– Отлично подходит под XRumer + XEvil
– Возможность арендовать сервер на 1 час или 1 сутки
– Windows – 2022, 2019, 2016, 2012 R2
– Круглосуточная техническая поддержка – бесплатно
– Более 15 000 сервер уже в работе
– Дата-центр в Москве и Амстердаме
– FASTPANEL и HestiaCP – бесплатно
– Скорость порта подключения к сети интернет — 1000 Мбит/сек
– Быстрые серверы с NVMe.
– Мгновенное развёртывание сервера в несколько кликов – бесплатно
lisinopril 20 mg prices
viagra for female price
Аренда VDS или VPS сервера
– Супер (аптайм, скорость, пинг, нагрузка)
– Почасовая оплата
– Windows – 2012 R2, 2016, 2019, 2022 – бесплатно
– Скорость порта подключения к сети интернет — 1000 Мбит/сек
– Возможность арендовать сервер на 1 час или 1 сутки
– Для сервера сеть на скорости 1 Гбит!
– Отлично подходит под A-Parser
– Отлично подходит под GSA Search Engine Ranker
– Outline VPN, WireGuard VPN, IPsec VPN.
– Мгновенное развёртывание сервера в несколько кликов – бесплатно
– Ubuntu, Debian, CentOS, Oracle 9 – бесплатно
– Управляйте серверами на лету.
– Windows – 2022, 2019, 2016, 2012 R2
– Отлично подходит под CapMonster
– Более 15 000 сервер уже в работе
– Автоматическая установка Windows – бесплатно
– Круглосуточная техническая поддержка – бесплатно
– Быстрые серверы с NVMe.
– FASTPANEL и HestiaCP – бесплатно
– Отлично подходит под XRumer + XEvil
– Дата-центр в Москве и Амстердаме
– Отлично подходит под Xneolinks
synthroid 1
hydroxychloroquine plaquenil cost
Хостинг Windows VDS / VPS серверов
– Для сервера сеть на скорости 1 Гбит!
– Отлично подходит под CapMonster
– Автоматическая установка Windows – бесплатно
– Круглосуточная техническая поддержка – бесплатно
– Отлично подходит под XRumer + XEvil
– Возможность арендовать сервер на 1 час или 1 сутки
– Супер (аптайм, скорость, пинг, нагрузка)
– Windows – 2012 R2, 2016, 2019, 2022 – бесплатно
– Быстрые серверы с NVMe.
– Отлично подходит под GSA Search Engine Ranker
– Windows – 2022, 2019, 2016, 2012 R2
– Почасовая оплата
– FASTPANEL и HestiaCP – бесплатно
– Мгновенное развёртывание сервера в несколько кликов – бесплатно
– Дата-центр в Москве и Амстердаме
– Отлично подходит под A-Parser
– Ubuntu, Debian, CentOS, Oracle 9 – бесплатно
– Управляйте серверами на лету.
– Отлично подходит под Xneolinks
– Более 15 000 сервер уже в работе
– Скорость порта подключения к сети интернет — 1000 Мбит/сек
– Outline VPN, WireGuard VPN, IPsec VPN.
Аренда VPS и VDS сервера – Dedicated Server
– Мгновенное развёртывание сервера в несколько кликов – бесплатно
– Более 15 000 сервер уже в работе
– Для сервера сеть на скорости 1 Гбит!
– Быстрые серверы с NVMe.
– Отлично подходит под CapMonster
– Отлично подходит под XRumer + XEvil
– Outline VPN, WireGuard VPN, IPsec VPN.
– Отлично подходит под Xneolinks
– Автоматическая установка Windows – бесплатно
– Возможность арендовать сервер на 1 час или 1 сутки
– Ubuntu, Debian, CentOS, Oracle 9 – бесплатно
– Почасовая оплата
– Круглосуточная техническая поддержка – бесплатно
– Управляйте серверами на лету.
– Супер (аптайм, скорость, пинг, нагрузка)
– Скорость порта подключения к сети интернет — 1000 Мбит/сек
– Отлично подходит под A-Parser
– Отлично подходит под GSA Search Engine Ranker
– Windows – 2012 R2, 2016, 2019, 2022 – бесплатно
– Windows – 2022, 2019, 2016, 2012 R2
– Дата-центр в Москве и Амстердаме
– FASTPANEL и HestiaCP – бесплатно
Аренда VPS/VDS сервера
– Управляйте серверами на лету.
– Outline VPN, WireGuard VPN, IPsec VPN.
– Windows – 2012 R2, 2016, 2019, 2022 – бесплатно
– Более 15 000 сервер уже в работе
– FASTPANEL и HestiaCP – бесплатно
– Ubuntu, Debian, CentOS, Oracle 9 – бесплатно
– Круглосуточная техническая поддержка – бесплатно
– Отлично подходит под XRumer + XEvil
– Отлично подходит под Xneolinks
– Отлично подходит под CapMonster
– Отлично подходит под GSA Search Engine Ranker
– Возможность арендовать сервер на 1 час или 1 сутки
– Мгновенное развёртывание сервера в несколько кликов – бесплатно
– Почасовая оплата
– Для сервера сеть на скорости 1 Гбит!
– Супер (аптайм, скорость, пинг, нагрузка)
– Скорость порта подключения к сети интернет — 1000 Мбит/сек
– Быстрые серверы с NVMe.
– Дата-центр в Москве и Амстердаме
– Автоматическая установка Windows – бесплатно
– Windows – 2022, 2019, 2016, 2012 R2
– Отлично подходит под A-Parser
buy online doxycycline without prescription
фото голых
colchicine buy canada
Аренда VPS/VDS сервера
– Супер (аптайм, скорость, пинг, нагрузка)
– Отлично подходит под Xneolinks
– Более 15 000 сервер уже в работе
– Возможность арендовать сервер на 1 час или 1 сутки
– Почасовая оплата
– Управляйте серверами на лету.
– FASTPANEL и HestiaCP – бесплатно
– Дата-центр в Москве и Амстердаме
– Мгновенное развёртывание сервера в несколько кликов – бесплатно
– Outline VPN, WireGuard VPN, IPsec VPN.
– Windows – 2012 R2, 2016, 2019, 2022 – бесплатно
– Скорость порта подключения к сети интернет — 1000 Мбит/сек
– Быстрые серверы с NVMe.
– Отлично подходит под GSA Search Engine Ranker
– Отлично подходит под A-Parser
– Windows – 2022, 2019, 2016, 2012 R2
– Круглосуточная техническая поддержка – бесплатно
– Автоматическая установка Windows – бесплатно
– Отлично подходит под XRumer + XEvil
– Отлично подходит под CapMonster
– Ubuntu, Debian, CentOS, Oracle 9 – бесплатно
– Для сервера сеть на скорости 1 Гбит!
doxycycline generic price
Hi! This post couldn’t be written any better! Reading through this post reminds me of my good old room mate!
He always kept talking about this. I will forward this article to
him. Fairly certain he will have a good read. Thanks for
sharing!
fildena 50 mg price in india
clonidine rx
buy celexa 20 mg
отзывы сорокоуст о здравии в 3 церквях от приворота – почитать отзывы о привороте
приворот на узлы кто делал отзывы форум
buying synthroid online
generic propecia without prescription
Heya just wanted to give you a brief heads
up and let you know a few of the pictures aren’t loading
correctly. I’m not sure why but I think its a linking issue.
I’ve tried it in two different browsers and both show the same results.
cost of diflucan in india
40 mg amoxicillin
doxycycline 200 mg price
buy cheap generic levitra
effexor discount
zithromax 250 for sale
silagra tablets
buy bupropion
hydroxychloroquine sulfate generic
can you buy real viagra from canada
how to get amoxicillin
phenergan 5 mg
PG 소프트
그 직후 옆방에서 두 사람이 나왔다.
https://www.rocfo.com/
프라그마틱 슬롯 무료
반면에 여전히 그를 성실하게 부채질하는 원주민이 있습니다.
https://www.comloginbegin.com/
augmentin 875 mg 125 mg
toradol 60 mg
how can i get azithromycin
doxycycline prescription discount
online pharmacy tretinoin cream
zyban 75 mg in uk
lexapro online purchase
effexor 225 mg price
buy metformin from india
Hello there, I discovered your website by means of Google even as looking for a similar subject, your website
got here up, it looks great. I’ve bookmarked
it in my google bookmarks.
Hi there, simply was aware of your blog through Google, and found that it’s
really informative. I’m gonna be careful for brussels.
I will appreciate if you proceed this in future. Lots of other people can be benefited
out of your writing. Cheers!
average cost of bupropion
accutane purchase canada
dapoxetine brand name
смотреть
clonidine 0.1 mg for sleep
tretinoin 0.0375
lioresal cheap
fluoxetine otc
https://tinyurl.com/yp3e64k9
https://tinyurl.com/ykqu3kzs
purchase amoxicillin online
https://tinyurl.com/yo4spcjy
buy silagra in australia
colchicine 500 mcg tabs
My spouse and I stumbled over here different web address and
thought I should check things out. I like what I see so now i’m
following you. Look forward to looking at your web page again.
iGaming 분야에서 선도적인 최신 프라그마틱 게임은 혁신적이고 표준화된 콘텐츠를 제공하며 슬롯, 라이브 카지노, 빙고 등 다양한 제품을 통해 엔터테인먼트를 즐길 수 있습니다.
프라그마틱 슬롯 무료 체험
프라그마틱의 게임을 플레이하면서 항상 신선한 경험을 얻을 수 있어 기뻐요. 여기서 더 많은 이야기를 나눠봐요!
https://www.google.ml/url?q=http://pragmatic-game.net
https://maps.google.com.bn/url?q=http://www.pragmatic-game.com
https://www.google.sk/url?q=http://www.customercaresupportnumber.com
https://google.com.ec/url?q=http://pragmatic-game.net
https://google.pl/url?q=http://www.pragmatic-game.com
https://cse.google.rw/url?q=http://pragmatic-game.net
budesonide cost usa
can you buy ventolin over the counter in usa
Аренда VDS или VPS сервера
– Автоматическая установка Windows – бесплатно
– Отлично подходит под XRumer + XEvil
– Отлично подходит под GSA Search Engine Ranker
– Для сервера сеть на скорости 1 Гбит!
– Дата-центр в Москве и Амстердаме
– Управляйте серверами на лету.
– Супер (аптайм, скорость, пинг, нагрузка)
– Отлично подходит под CapMonster
– Outline VPN, WireGuard VPN, IPsec VPN.
– Почасовая оплата
– FASTPANEL и HestiaCP – бесплатно
– Возможность арендовать сервер на 1 час или 1 сутки
– Более 15 000 сервер уже в работе
– Отлично подходит под Xneolinks
– Отлично подходит под A-Parser
– Windows – 2012 R2, 2016, 2019, 2022 – бесплатно
– Скорость порта подключения к сети интернет — 1000 Мбит/сек
– Мгновенное развёртывание сервера в несколько кликов – бесплатно
– Ubuntu, Debian, CentOS, Oracle 9 – бесплатно
– Быстрые серверы с NVMe.
– Windows – 2022, 2019, 2016, 2012 R2
– Круглосуточная техническая поддержка – бесплатно
Двери входные
металлические двери входные vhodnye-dveri97.ru.
furosemide 20 mg tab cost
Двери входные
дверь купить входная http://www.vhodnye-dveri97.ru.
프라그마틱 슬롯 무료 체험
Wang Gong Factory에서 선발된 많은 숙련된 장인들이 Xishan Institute of Technology에 입학하여 공부했습니다.
https://www.66ceme.com/
where can i buy diflucan without a prescription
Лучшие кондиционеры для больших помещений
кондиционер для дома купить в москве цены https://www.kondicionery-nedorogo.ru/.
Онлайн магазин мобильных гаджетов: надежный и быстрый сервис
магазин – купить онлайн в Минске.
Отдыхаем в комфорте: польза от работы кондиционера
кондиционеры купить в москве https://www.kondicionery-nedorogo.ru.
silagra uk
buy levitra 5mg
albuterol capsule
cheap levitra 10mg
neurontin 600
смотреть
I think this is one of the most significant info for me.
And i’m glad reading your article. But wanna remark on few general things, The web site style is great,
the articles is really nice : D. Good job, cheers
zestoretic coupon
online pharmacy propecia prices
brand viagra 50 mg
purchase stromectol online
amoxicillin medicine in india
https://tinyurl.com/ylhedcoc
https://tinyurl.com/ywjbs5wz
robaxin 750 mg price
citalopram 10 mg price
generic tretinoin 05
https://tinyurl.com/ylhedcoc
toradol tablets australia
levitra vardenafil
What a information of un-ambiguity and preserveness of precious knowledge regarding unpredicted
emotions.
If some one desires expert view concerning blogging then i recommend him/her to pay
a quick visit this website, Keep up the fastidious work.
bactrim 400mg 80mg
online pharmacy bc
canadian price for synthroid
Полезные советы по экономии энергии
кондиционер в https://www.kondicionery-v-moskve.ru.
buy suhagra 25 mg
amoxicillin 625 price in india
purchase prednisolone
Как правильно выбрать кондиционер?
кандиционеров https://www.kondicionery-v-moskve.ru/.
trazodone for sale online
diflucan tablet uk
levitra over the counter uk
cheap albuterol online
trazodone 25 mg tablet
buy fluconazole no rx
albuterol mexico
Oh my goodness! Impressive article dude! Thank you so much, However I am going through troubles with your RSS.
I don’t know the reason why I cannot join it. Is there anybody else getting the same RSS issues?
Anyone that knows the answer can you kindly respond?
Thanx!!
propranolol online canada
finpecia 1 mg
accutane prescription uk
Undeniably believe that which you said. Your favorite justification appeared to be at the net the simplest factor to be mindful of.
I say to you, I definitely get irked even as people think about concerns that they plainly don’t understand about.
You controlled to hit the nail upon the highest and also defined
out the whole thing with no need side-effects ,
other people could take a signal. Will probably be again to get more.
Thanks
generic atarax
diflucan 500 mg
payday loan
atarax hydroxyzine
프라그마틱 관련 글 읽는 것이 즐거웠어요! 또한, 제 사이트에서도 프라그마틱에 대한 정보를 공유하고 있어요. 함께 교류하며 더 많은 지식을 얻어봐요!
프라그마틱 슬롯 체험
프라그마틱의 게임은 항상 다양한 테마로 놀라워요. 이 사이트에서 더 자세한 정보를 찾아보세요!
https://okgasda.weebly.com/
http://www.iavstudios.com/
https://doggggqwe.weebly.com/
canada cloud pharmacy
Hello everybody!
How do you feel about computer graphics and design?
Once I started looking at the works of leading designers and it became my hobby, computer graphics allows you to do
beautiful works, design solutions and advertising creatives.
By the way, I noticed that it broadens my horizons, and brings peace to my life!
I recommend profiles of these masters:
https://dprofile.ru/case/13714/function%20()%20%20%5Bnative%20code%5D%20
https://dprofile.ru/hifedusenko/story/3
https://dprofile.ru/elena_diz/cv
https://dprofile.ru/mishatabi/story/3
https://dprofile.ru/cases/search?City=1&hasAchievement=recommended&sort=date&city=555
https://dprofile.ru/case/38897/function%20()%20%20%5Bnative%20code%5D%20
https://dprofile.ru/smaik233/story/2
https://dprofile.ru/cases/search?City=1&hasAchievement=all&sort=likes&city=359
https://dprofile.ru/maria.fayustova/story/3
https://dprofile.ru/zhuravlev/story/2
https://dprofile.ru/case/1393/function%20()%20%20%5Bnative%20code%5D%20
https://dprofile.ru/case/46137/function%20()%20%20%5Bnative%20code%5D%20
https://dprofile.ru/case/9264/function%20()%20%20%5Bnative%20code%5D%20
https://dprofile.ru/users/search?type=company&sort=followers&filter=1&Filter=114
https://dprofile.ru/case/44718/function%20()%20%20%5Bnative%20code%5D%20
https://dprofile.ru/case/33845/function%20()%20%20%5Bnative%20code%5D%20
https://dprofile.ru/users/search?type=all&sort=rating&filter=3&Filter=122
https://dprofile.ru/matvey_denisovich/cv
https://dprofile.ru/cases/search?City=1&hasAchievement=all&sort=likes&city=1065
https://dprofile.ru/case/50335/function%20()%20%20%5Bnative%20code%5D%20
Good luck!
desyrel sleeping pill
synthroid 50 mcg tablet price
baclofen cream 60 mg
accutane canada online
Howdy! This blog post couldn’t be written any better!
Going through this article reminds me of my previous roommate!
He continually kept talking about this. I will send this post
to him. Pretty sure he’ll have a very good read.
I appreciate you for sharing!
Купите качественные кондиционеры в нашем магазине
Насладитесь прохладой в своем доме с нашими кондиционерами
Разнообразие кондиционеров в нашем магазине
Лучшие цены на кондиционеры только у нас
Улучшите свой интерьер с помощью наших кондиционеров
Индивидуальный подход к каждому клиенту в нашем магазине
Популярные марки кондиционеров в нашем ассортименте
Предлагаем услуги доставки по всей стране
Снимите жару и усталость с помощью наших кондиционеров
Круглосуточная поддержка в выборе и установке кондиционеров
Предлагаем услуги по монтажу наших кондиционеров
Экономичный расход энергии с нашими кондиционерами
Создайте свой комфортный микроклимат с нашими кондиционерами
Сэкономьте на покупке кондиционеров в нашем магазине
Высокое качество наших кондиционеров от производителя
Увеличьте эффективность работы для работы с нашими кондиционерами
Индивидуальные условия для организаций при покупке кондиционеров в нашем магазине
Интуитивно понятный каталог кондиционеров на нашем сайте
Новинки в области кондиционирования в нашем магазине
Всегда в наличии кондиционеров в нашем магазине
интернет-магазин кондиционеров http://www.magazin-kondicionerov.ru.
doxycycline otc uk
Купите качественные кондиционеры в известном магазине
Насладитесь прохладой в своем доме с нашими кондиционерами
Широкий ассортимент кондиционеров в нашем магазине
Выгодные предложения на кондиционеры только у нас
Улучшите свой интерьер с помощью наших кондиционеров
Качественный сервис к каждому клиенту в нашем магазине
Надежные и проверенные бренды кондиционеров в нашем ассортименте
Предлагаем услуги доставки по всей стране
Очистите воздух от пыли с помощью наших кондиционеров
Бесплатная консультация в выборе и установке кондиционеров
Осуществляем монтаж наших кондиционеров
Экономичный расход энергии с нашими кондиционерами
Регулируйте температуру в вашей квартире с нашими кондиционерами
Сэкономьте на покупке кондиционеров в нашем магазине
Гарантия качества наших кондиционеров от производителя
Повысьте комфорт для работы с нашими кондиционерами
Организация оптовых поставок при покупке кондиционеров в нашем магазине
Интуитивно понятный каталог кондиционеров на нашем сайте
Уникальные решения в области кондиционирования в нашем магазине
Всегда в наличии кондиционеров в нашем магазине
продажа кондиционеров https://magazin-kondicionerov.ru.
generic propecia no prescription
Насколько часто нужно проводить техническое обслуживание кондиционера?
техническое обслуживание кондиционеров https://www.tekhnicheskoe-obsluzhivanie-kondicionerov.ru.
프라그마틱 슬롯 사이트
Hongzhi 황제는 천천히 말했습니다. “Fang Qing의 가족 여러분도 여기 있습니다. 어떻게 생각하십니까?”
https://kondiskonmd.com/
tretinoin over the counter mexico
prednisone 50
Какие профессиональные услуги включает в себя техническое обслуживание кондиционеров?
техническое обслуживание кондиционеров цена https://www.tekhnicheskoe-obsluzhivanie-kondicionerov.ru/.
cialis 10mg india
amoxil cost
diflucan canada online
augmentin 850
buy trazodone not generic without a prescription
atarax brand name
Отремонтировать мягкую мебель в доме: Придать новый вид старой мебели: Чем перетягивать мебель своими руками: полезные советы ткани для перетяжки мягкой мебели: советы дизайнера
перетяжка мягкой мебели.
Измените облик своего дома с помощью перетяжки мягкой мебели
robaxin 750 mg price
lisinopril 3760
allopurinol generic pharmacy
drug neurontin 200 mg
where can i buy orlistat tablets
Hey There. I found your blog the use of msn. This is an extremely well written article. I will make sure to bookmark it and come back to learn more of your helpful info. Thanks for the post. I’ll definitely return.
my web-site – https://letsbookmarkit.com/story14665118/rumored-buzz-on-minecraft-aphmau
hydroxychloroquine sulfate 200mg
augmentin buy
diflucan 150 price
fluoxetine 10 mg tablet price
stromectol medication
payday loan
price of propecia in singapore
zestoretic price
propranolol tablets online
I think thius is one of the most vital information for me.
And i am ցlad гeading your article. But should remark
on few geberal things, The web site style is perfect, the
articles is really great : D. Good job, cheers
What’s up ɑll, here every one is sharing tһese know-how, thus it’s fastidious to read this
webpage, aand I used to go to sеe this webloɡ daily.
effexor 2019
augmentin medicine
suhagra 50 tablet price
Уютная квартира на сутки для комфортного проживания
снять квартиру на сутки минск https://newsutkiminsk.by.
ivermectin buy canada
zithromax 600 mg
Арендовать на сутки с видом на парк
снять квартиру на сутки в минске https://newsutkiminsk.by.
freedietlinks.com
사람의 아들들은 그저 배에 올라타 그들에게 경의를 표하기를 원할 수 있습니다.
https://www.vispills.com/
diflucan 150 price
allopurinol 300 mg tablets
watch porn video
augmentin 457 price
buy viagra online
can you buy synthroid online
can you buy cialis in canada
prednisolone prednisone
propecia canadian pharmacy
medication albuterol
prednisolone price australia
where can i buy real levitra online
penis enlargement
how to get cialis prescription online canada
watch porn video
clonidine 300 mcg tablets
Really had to emphasize I am relieved that i happened on your website page!
http://www.guishangtuili.com/home.php?mod=space&uid=92704
robaxin canada otc
buy retin-a online
hydroxychloroquine 90 mg
levitra purchase cheap
levitra usa online
doxycycline 100g
how to order metformin online
amoxicillin 500 generic
how to get tretinoin prescription uk
lexapro no prescription
colchicine 1mg online
ivermectin in india
order bactrim online
plaquenil 200 mg
buy cialis 2.5 mg online
robaxin 500mg for dogs
buy accutane no prescription
quineprox 60mg
What’s up, just wanted to say, I enjoyed this blog post.
It was practical. Keep on posting!
Выбирайте то, что вам нравится, и выигрывайте с xbet!
1xbet application https://1xbet-app-download-ar.com/.
Высокие коэффициенты и разнообразие ставок ждут вас в xbet
Download the latest version of the 1xbet program https://1xbet-app-download-ar.com.
buy lasix online with mastercard
price of colchicine in usa
buy ventolin inhaler
where can i buy furosemide
where can i buy zestril
neurontin canada online
Hello everybody!
How do you feel about computer graphics and design?
Once I started looking at the works of leading designers and it became my hobby, computer graphics allows you to do
beautiful works, design solutions and advertising creatives.
By the way, I noticed that it broadens my horizons, and brings peace to my life!
I recommend profiles of these masters:
https://dprofile.ru/kl_lesya/story/2
https://dprofile.ru/margkovtunova/info
https://dprofile.ru/marisha_gulina/following
https://dprofile.ru/asyashkin/following
https://dprofile.ru/lisakarr
https://dprofile.ru/mr.seliukov/followers
https://dprofile.ru/annaovs18/following
https://dprofile.ru/danielnest/followers
https://dprofile.ru/pinco/story/2
https://dprofile.ru/vld_gavrilets/info
https://dprofile.ru/victoriakolemasova/followers
https://dprofile.ru/annamasyorova/following
https://dprofile.ru/anastasia_yurlova/following
https://dprofile.ru/yavopckaya/following
https://dprofile.ru/gagov_l/info
https://dprofile.ru/s7ev1n/info
https://dprofile.ru/croqus/following
https://dprofile.ru/deni_sova/following
https://dprofile.ru/artw/following
https://dprofile.ru/albertbeyond/following
Good luck!
tretinoin tablets
zyban 150
certainly like your web-site but you need to take a
look at the spelling on several of your posts. A number of
them are rife with spelling problems and I to find it very bothersome to tell the truth
however I will definitely come again again.
where can i buy zoloft online
clonidine 0.3
amoxil price in india
Hі there! I could have sworn I’vе bewen to your blog before but after going
through some of the posts І realizeԀ it’s new to me.
Regardless, I’m ceгtainly happy I found it and I’ll be book-markіng
it and checking back often!
penis enlargement
ivermectin canada
order generic levitra online
generic propecia online
generic for clonidine
where to buy propecia uk
clonidine 1 mg tablet
At this time I am ready to do my breakfast,
afterward having my breakfast coming over again to read other news.
Helpful info. Lucky me I found your website by accident, and I am stunned why this coincidence
didn’t happened earlier! I bookmarked it.
SightCare supports overall eye health, enhances vision, and protects against oxidative stress. Take control of your eye health and enjoy the benefits of clear and vibrant eyesight with Sight Care. https://sightcarebuynow.us/
Sight Care is a natural supplement designed to improve eyesight and reduce dark blindness. With its potent blend of ingredients. https://sightcarebuynow.us/
zestril 10mg
freedietlinks.com
그들은 모두 머리에 반짝이는 철 갑옷과 타원형 철 투구를 썼습니다.
https://kopibrnadshop.com/
how much is lexapro
prednisolone sodium
neurontin 100
cheap cialis 5 mg
propecia purchase
order amoxicillin online
Перетяжка мягкой мебели – отличный выбор
ремонт мягкой мебели https://peretyazhka-mebeli-v-minske.ru/.
I’m now not sure the place you are getting your info, but great topic.
I must spend a while learning much more or figuring out more.
Thank you for great information I used to be searching
for this information for my mission.
robaxin 1000 mg cost
buy phenergan tablets
payday loan
buy metformin nz
buy finasteride no rx
propecia hair growth
hydroxychloroquine plaquenil cost
My relatives every time say that I am killing my time here at net, however I know I am getting
experience everyday by reading thes fastidious articles.
vermox pharmacy canada
augmentin 875 125 mg
xxx video 24
cheap propecia generic
ivermectin oral
sildenafil citrate 100 mg
Интерьер вашей мечты с мягкой мебелью
перетяжка мебели https://murom-mebel-tula.ru/.
cheap sildenafil online
doxycycline hyclate capsules
how much is gabapentin 100mg
When you choose to buy YouTube views, it is actually vital to discover a dependable service provider to avoid unfavorable impacts on your YouTube channel. There are various companies of such solutions on the market; having said that, some may utilize phony views or crawlers, which go versus YouTube’s relations to solution. Such views may bring about charges, including viewers leaving behind negative opinions on your content or maybe obtaining your channel outlawed, https://www.empowher.com/user/4258956.
Дайте вторую жизнь мебели с перетяжкой
перетяжка мягкой мебели перетяжка кресел.
metformin prices in india
online trazodone
Отличная статья про медицинский
английский! Очень понравился раздел о терминологии.
Настоящая находка для врачей,
стремящихся к международной карьере.
viagra for sale in mexico
amoxicillin 775 mg
dapoxetine pills in india
finasteride 5g
buy doxycycline online australia
silagra without prescription
penis enlargement
effexor over the counter
buy amoxicillin online without prescription
ivermectin 6 tablet
canada levitra online
suhagra 100 online in india
10mg baclofen tablet price
accutane cost in south africa
amoxicillin 400 mg cost
Экономичный ремонт холодильника
ремонт холодильников ремонт холодильника.
vantaihoaituong.com
이 Fang Jifan은 사람들의 마음을 사기에 너무나 매력적입니다. 폐하가 …
https://sites.google.com/view/pragmaticslotssite/
buy clomid pills online
stromectol uk buy
lexapro purchase
how to get bupropion
effexor 75 mg cost
FOSIL4D
atarax cheap
fluoxetine no prescription buy visa
budesonide cream
fluoxetine prescription cost
canada pharmacy world
buy phenergan uk
프라그마틱 관련 내용 정말 재미있게 읽었어요! 또한, 제 사이트에서도 프라그마틱과 관련된 정보를 공유하고 있어요. 함께 교류하며 더 많은 지식을 쌓아가요!
http://www.pragmatic-game.net
프라그마틱에 대한 글 읽는 것이 정말 재미있었어요! 또한, 제 사이트에서도 프라그마틱과 관련된 정보를 공유하고 있어요. 함께 발전하며 더 많은 지식을 쌓아가요!
http://holyshirtsandpants.net/
http://iyalion.com/
https://doggggqwe.weebly.com/
0.1 mg clonidine 1 mg
atarax for eczema
diflucan capsules 100mg
Hello to all, the contents present at this web site are
actually remarkable for people knowledge, well, keep
up the nice work fellows.
atarax 25 mg over the counter
where to buy generic levitra
娛樂城
payday loan
atarax generic cost
azithromycin 2 tablets
buy viagra online
After looking over a handful of the blog posts on your blog, I
really appreciate your way of blogging. I book marked
it to my bookmark webpage list and will be checking
back soon. Please check out my website too and let
me know what you think.
gabapentin for sale canada
Ahaa, its pleasant dialogue about this article here at this
web site, I have read all that, so at this time me also commenting here.
buy plaquenil 100mg
cost of amoxicillin prescription
buy vermox in usa
buy zoloft online without prescription
price of phenergan
lasix 200 mg
allopurinol tabs
lisinopril tabs 88mg
onlinecanadianpharmacy 24
amoxicillin price in mexico
prednisone order online uk
levitra 75 mg
pharmacy propecia
propranolol pill cost
over the counter atarax
buy cheap levitra no prescription
propranolol 20 mg price
price for generic effexor
trimox drug
fluoxetine prescription online
desyrel tablet
vardenafil 20
citalopram blood pressure
azithromycin order online
clonidine 100 mg
tretinoin capsule price
payday loan
프라그마틱 플레이는 33개 언어와 다양한 화폐로 250개 이상의 게임으로 이루어진 슬롯 포트폴리오를 운영합니다.
프라그마틱 슬롯 무료
프라그마틱 관련 소식 항상 주시고 있어요! 또한, 제 사이트에서도 프라그마틱에 대한 정보를 얻을 수 있어요. 함께 발전하며 지식을 나눠봐요!
http://ivermectininstock.com/
http://holyshirtsandpants.net/
https://wqeqwrwqr.weebly.com/
vermox buy online uk
Instantly Swap Cryptocurrencies
best crypto swap exchange https://cryptoswaptradecoins.com/.
40 mg baclofen
Swap Cryptocurrencies with Low Fees
defi swap http://www.cryptoswaptradecoins.com.
doxycycline online paypal
Explore the Leading Crypto Swap Exchanges to Seamless Trading
Upgrade Your Crypto Trading with these Cutting-Edge Swap Exchanges
Safely Trade Cryptocurrency with these Reliable Swap Exchanges
Maximize Your Crypto Portfolio with these Streamlined Swap Exchanges
Swap Cryptocurrencies without any using these User-Friendly Platforms
Jump into the World of Cryptocurrency Swapping with these Highly-Rated Swap Exchanges
Exchange Cryptocurrencies with these Fast Swap Platforms
Optimize Your Crypto Holdings with these Flexible Swap Exchanges
Effortlessly Cryptocurrencies via these Easy-to-Use Platforms
Diversify Your Crypto Holdings with these Wide Selection of Swap Exchanges
Upgrade Your Crypto Trading Strategy with these Sophisticated Swap Platforms
Exchange Cryptocurrencies using these Protected and Regulated Swap Exchanges
Simplify Crypto Trading with these Efficient Swap Exchanges
Find the Leading Crypto Swap Exchanges for Amplify Your Crypto Trading Experience with these Highly Rated Swap Exchanges
Effortlessly Cryptocurrencies with these Modern Platforms
Securely Trade Cryptocurrencies with these Encrypted Swap Exchanges
Explore the Top Crypto Swap Exchanges for Real-Time Transactions
Invest in Cryptocurrency with these Trusted Swap Exchanges Competitive Rates
Make the Most out of Your Crypto Trading with these Next-Generation Swap Platforms
international exchange crypto cryptoswapinstantly.com.
Explore the Best Crypto Swap Exchanges to Seamless Trading
Revolutionize Your Crypto Trading with these Cutting-Edge Swap Exchanges
Securely Trade Cryptocurrency with these Trusted Swap Exchanges
Maximize Your Crypto Portfolio with these Efficient Swap Exchanges
Trade Cryptocurrencies Hassle using these Easy Platforms
Jump into the World of Cryptocurrency Trading with these Best-Rated Swap Exchanges
Exchange Cryptocurrencies with these Fast Swap Platforms
Optimize Your Crypto Holdings with these Adaptable Swap Exchanges
Exchange Cryptocurrencies via these Easy-to-Use Platforms
Diversify Your Crypto Holdings with these Diverse Swap Exchanges
Enhance Your Crypto Trading Strategy with these Sophisticated Swap Platforms
Trade Cryptocurrencies with these Secure and Regulated Swap Exchanges
Facilitate Crypto Trading with these Efficient Swap Exchanges
Discover the Top Crypto Swap Exchanges for Amplify Your Crypto Trading Experience with these Highly Rated Swap Exchanges
Smoothly Cryptocurrencies with these Modern Platforms
Confidently Trade Cryptocurrencies with these Protected Swap Exchanges
Uncover the Top Crypto Swap Exchanges for Instant Transactions
Invest in Cryptocurrency with these Reputable Swap Exchanges at Rates
Maximize Your Crypto Trading with these Cutting-Edge Swap Platforms
swap crypto no fees http://www.cryptoswapinstantly.com.
buy diflucan without script
buy generic levitra online uk
clonidine 0.2 mg online
tretinoin how to get
zestril 10 mg in india
where can you get diflucan over the counter
buy citalopram 20mg online
Hey! I’m at work browsing your blog from my new
iphone 4! Just wanted to say I love reading your blog and
look forward to all your posts! Keep up the great work!
clonidine xr
lioresal pill
Howdy, I think your websitge coulɗ be having internet browser compɑtibilitʏ issues.
When I look at yoսr web site in Safari, iit looks fine howеver when openinbg in I.E., it’s got
some overlapping issues. I just ѡanted to givе
you а quick heaԀs up! Asiode from that, wonderrful ѕite!
amoxicillin capsules
amoxicillin fast delivery
generic levitra 20mg pills
vermox sale usa pharmacy
accutane online prescription
chromehelmet.com
“좋아요, 그럼 묻겠습니다. 모든 곡물은 힘든 일입니다. 어떤 힘든 일입니까?”
https://www.geinoutime.com/
diflucan canadian pharmacy
buy diflucan without prescription
can i buy amoxicillin over the counter in mexico
amoxil discount
zoloft sertraline
Quality articles is the secret to attract the users to pay a visit the site,
that’s what this website is providing.
Simple cryptocurrency
exchange crypto online http://www.swapcryptotradecoins.com/.
Convenient cryptocurrency
defiswap https://swapcryptotradecoins.com/.
trazodone 650 mg
clonidine
buy robaxin
Страница https://telegra.ph/Gde-najti-recepty-dlya-multivarki-12-24 посвящена поиску разнообразных рецептов для мультиварки, полезного кухонного устройства, ускоряющего приготовлению еды. Автор предлагает несколько полезных источников для поиска рецептов: лучшие кулинарные сайты и блоги, кулинарные книги и журналы, информативные социальные сети и форумы, а также официальные приложения производителей мультиварок. Эти ресурсы предоставляют большое количество рецептов, начиная с повседневных блюд и заканчивая праздничными вариантов, а также интересные советы по использованию мультиварки. Страница подчеркивает, что использование мультиварки открывает уникальные возможности для кулинарных экспериментов.
Дополнительные сведения можно узнать на сайте https://telegra.ph/Gde-najti-recepty-dlya-multivarki-12-24.
albuterol 50 mg tablet
двери металлические технические помещения https://texnicheskiedveri.ru/.
where to buy albuterol tablets in australia
purchase diflucan online
buy xenical 120mg online usa
baclofen 15 mg
generic propecia without prescription
retin a gel buy online uk
doxycycline 400 mg daily
canadian levitra
娛樂城
2024娛樂城的創新趨勢
隨著2024年的到來,娛樂城業界正經歷著一場革命性的變遷。這一年,娛樂城不僅僅是賭博和娛樂的代名詞,更成為了科技創新和用戶體驗的集大成者。
首先,2024年的娛樂城極大地融合了最新的技術。增強現實(AR)和虛擬現實(VR)技術的引入,為玩家提供了沉浸式的賭博體驗。這種全新的遊戲方式不僅帶來視覺上的震撼,還為玩家創造了一種置身於真實賭場的感覺,而實際上他們可能只是坐在家中的沙發上。
其次,人工智能(AI)在娛樂城中的應用也達到了新高度。AI技術不僅用於增強遊戲的公平性和透明度,還在個性化玩家體驗方面發揮著重要作用。從個性化遊戲推薦到智能客服,AI的應用使得娛樂城更能滿足玩家的個別需求。
此外,線上娛樂城的安全性和隱私保護也獲得了顯著加強。隨著技術的進步,更加先進的加密技術和安全措施被用來保護玩家的資料和交易,從而確保一個安全可靠的遊戲環境。
2024年的娛樂城還強調負責任的賭博。許多平台採用了各種工具和資源來幫助玩家控制他們的賭博行為,如設置賭注限制、自我排除措施等,體現了對可持續賭博的承諾。
總之,2024年的娛樂城呈現出一個高度融合了技術、安全和負責任賭博的行業新面貌,為玩家提供了前所未有的娛樂體驗。隨著這些趨勢的持續發展,我們可以預見,娛樂城將不斷地創新和進步,為玩家帶來更多精彩和安全的娛樂選擇。
перетяжка мягкой мебели https://peretyazhka-bel.ru/.
The place of the salon participates in a major job in choosing the ideal hair salon for you. You would like to think about the proximity to your home, work, or various other frequent stomping ground locations. If the salon is also far, it might be actually inconvenient as well as tough to prepare consultations around your schedule, http://atlas.dustforce.com/user/eliecortez.
generic neurontin 300 mg
trusted online pharmacy
Hello there, You have done an incredible job. I will certainly digg it and personally recommend to my friends.
I am confident they’ll be benefited from this website.
compare effexor prices
how much is lisinopril 10 mg
vermox otc
gabapentin 309 mg
娛樂城
2024娛樂城的創新趨勢
隨著2024年的到來,娛樂城業界正經歷著一場革命性的變遷。這一年,娛樂城不僅僅是賭博和娛樂的代名詞,更成為了科技創新和用戶體驗的集大成者。
首先,2024年的娛樂城極大地融合了最新的技術。增強現實(AR)和虛擬現實(VR)技術的引入,為玩家提供了沉浸式的賭博體驗。這種全新的遊戲方式不僅帶來視覺上的震撼,還為玩家創造了一種置身於真實賭場的感覺,而實際上他們可能只是坐在家中的沙發上。
其次,人工智能(AI)在娛樂城中的應用也達到了新高度。AI技術不僅用於增強遊戲的公平性和透明度,還在個性化玩家體驗方面發揮著重要作用。從個性化遊戲推薦到智能客服,AI的應用使得娛樂城更能滿足玩家的個別需求。
此外,線上娛樂城的安全性和隱私保護也獲得了顯著加強。隨著技術的進步,更加先進的加密技術和安全措施被用來保護玩家的資料和交易,從而確保一個安全可靠的遊戲環境。
2024年的娛樂城還強調負責任的賭博。許多平台採用了各種工具和資源來幫助玩家控制他們的賭博行為,如設置賭注限制、自我排除措施等,體現了對可持續賭博的承諾。
總之,2024年的娛樂城呈現出一個高度融合了技術、安全和負責任賭博的行業新面貌,為玩家提供了前所未有的娛樂體驗。隨著這些趨勢的持續發展,我們可以預見,娛樂城將不斷地創新和進步,為玩家帶來更多精彩和安全的娛樂選擇。
We would like to thank you once more for the stunning ideas you gave Jesse when preparing her own post-graduate
research and also, most importantly, regarding providing all the ideas within a blog post.
In case we had been aware of your site a year ago, we will have been kept
from the useless measures we were implementing. Thanks to you.
adults toys
order cialis from india
I have learn several good stuff here. Definitely worth bookmarking for revisiting.
I surprise how so much attempt you set to create the sort of fantastic informative website.
how much does cialis cost
프라그마틱 슬롯으로 당신만의 운을 시험해보세요.
프라그마틱 홈페이지
프라그마틱에 대한 글 읽는 것이 흥미로웠어요! 또한, 제 사이트에서도 프라그마틱과 관련된 정보를 제공하고 있어요. 함께 발전하며 지식을 나눠봐요!
https://dwqewqe.weebly.com/
http://ivermectininstock.com/
https://vispills.com/
fucking
Эта статья https://telegra.ph/Zagadochnyj-mir-Zverej-Otkrojte-dveri-prirodnogo-volshebstva-12-23 освещает важные аспекты мира животных, их роль в природе и мифологии.
Обсуждается богатство животных, их роль в мониторинге состояния окружающей среды, невероятные способности, а также их роль в человеческой культуре. Акцентируется внимание на проблемах, с которыми сталкиваются животные под влиянием человеческой деятельности, и обозначается важность их охраны.
Животные осуществляют ключевую роль в поддержании баланса в природе. Они не только вносят вклад в биоразнообразие, но и влияют на экосистемы, способствуя в опылении растений, распространении семян и улучшении здоровья лесов и многих природных сред. Изучение животных также демонстрирует множество тайн эволюции и адаптации к окружающей среде, демонстрируя удивительные способности и поведение, которые развивались в течение миллионов лет.
Не забудьте добавить ссылку на статью в закладки: https://telegra.ph/Zagadochnyj-mir-Zverej-Otkrojte-dveri-prirodnogo-volshebstva-12-23
buy cialis online without prescription
Hi, i feel that i noticed you visited my blog so i came to return the want?.I am trying
to to find issues to enhance my website!I guess its
ok to use some of your ideas!!
Эта статья https://telegra.ph/Zagadochnyj-mir-Zverej-Otkrojte-dveri-prirodnogo-volshebstva-12-23 освещает интересные аспекты мира животных, их значение в природе и мифологии.
Обсуждается богатство животных, их роль в индикации здоровья окружающей среды, уникальные способности, а также их роль в человеческой культуре. Обращается внимание на проблемах, с которыми сталкиваются животные в результате человеческой деятельности, и подчеркивается необходимость их защиты.
Животные осуществляют ключевую роль в сохранении баланса в природе. Они не только способствуют биоразнообразие, но и влияют на природные системы, помогая в опылении растений, распространении семян и улучшении здоровья лесов и других природных сред. Изучение животных также демонстрирует множество тайн эволюции и адаптации к окружающей среде, демонстрируя замечательные способности и поведение, что развивались в ходе миллионов лет.
Не забудьте добавить ссылку на статью в закладки: https://telegra.ph/Zagadochnyj-mir-Zverej-Otkrojte-dveri-prirodnogo-volshebstva-12-23
Улучшите свой опыт обмена криптовалютой с помощью нашего приложения для свопа
exchange platform for cryptocurrency https://cryptoswapdapp.com/.
propecia cost in canada
Удобное и безопасное приложение для обмена криптовалютой
best crypto swap app https://cryptoswapdapp.com/.
buy albuterol no prescription
metformin 500 mg cost
prednisone without rx
buy trazodone online canada
buy fluoxetine over the counter
clonidine cost
clomid drug cost
buying prozac in mexico
cialis india purchase
celexa 60 mg cost
I have read so many content about the blogger lovers however this piece
of writing is actually a pleasant article, keep it up.
can i buy amoxicillin over the counter in usa
whoah this blog is wonderful i love studying your articles.
Keep up the good work! You understand, a lot of persons are looking
around for this info, you can aid them greatly.
I saw similar here: sklep and also here:
najlepszy sklep
Hi! I realize this is kind of off-topic but I had to ask.
Does running a well-established website such as yours take
a lot of work? I’m brand new to running a blog however I do write in my diary daily.
I’d like to start a blog so I can easily share my personal experience and views online.
Please let me know if you have any kind of suggestions or tips for new aspiring bloggers.
Appreciate it! I saw similar here: najlepszy sklep and also here: sklep online
Actum atque tractatum — Сделано и обсуждено.
http://batmanapollo.ru
Every weekend i used to pay a visit this web site, for the reason that i wish for
enjoyment, since this this web page conations
really fastidious funny data too.
diflucan tablet cost
where can i get doxycycline pills
для фотографий
pin up играть онлайн https://pinupcasinovendfsty.dp.ua/.
furosemide tablets for sale uk
synthroid 50 mcg price
where to buy fildena
how to get viagra pills
xenical medicine
propecia generic brand
Изысканная pinup-элегантность
игра пин ап https://www.pinupcasinovendfsty.dp.ua.
diflucan generic cost
http://pinupcasinozendfste.vn.ua
Казино всегда притягивали для себя внимание. Этто место, где можно выстрадать собственную успех также выиграть большущую необходимую сумму денег.
http://www.pinupcasinozendfste.vn.ua
buy levitra cheap
buy doxycycline 40 mg
clemonsjerseys.com
Zhu Houzhao는 깜짝 놀랐습니다. “아버지가 뭐라고 하셨습니까?”
https://www.ivermectininstock.com/
paxil cr
buy clomid online uk 50mg
сериал 2024
cost of furosemide 40mg
Caveant consules! — Пусть консулы будут бдительны.
http://batmanapollo.ru
doxycycline 100 mg tablet
how much is amoxicillin 30 capsules
400 mg zoloft
metformin otc
фильм смотреть онлайн
buy fluconazole online
trazodone 100mg prices
levitra pill without prescription
gabapentin 215
смотреть фильм
levitra us
pozitivit.com
Wang Jinyuan은 옆에 있었고 고개를 끄덕이고 서둘러 절했습니다. “악당이 이해합니다.”
https://www.customercaresupportnumber.com/
levitra 20 mg tablets price
Age, libertate decembri utere — Ну же, пользуйся свободой декабря
http://batmanapollo.ru
lexapro 10 mg tablet price
gabapentin 215 capsule
22344
2024娛樂城的創新趨勢
隨著2024年的到來,娛樂城業界正經歷著一場革命性的變遷。這一年,娛樂城不僅僅是賭博和娛樂的代名詞,更成為了科技創新和用戶體驗的集大成者。
首先,2024年的娛樂城極大地融合了最新的技術。增強現實(AR)和虛擬現實(VR)技術的引入,為玩家提供了沉浸式的賭博體驗。這種全新的遊戲方式不僅帶來視覺上的震撼,還為玩家創造了一種置身於真實賭場的感覺,而實際上他們可能只是坐在家中的沙發上。
其次,人工智能(AI)在娛樂城中的應用也達到了新高度。AI技術不僅用於增強遊戲的公平性和透明度,還在個性化玩家體驗方面發揮著重要作用。從個性化遊戲推薦到智能客服,AI的應用使得娛樂城更能滿足玩家的個別需求。
此外,線上娛樂城的安全性和隱私保護也獲得了顯著加強。隨著技術的進步,更加先進的加密技術和安全措施被用來保護玩家的資料和交易,從而確保一個安全可靠的遊戲環境。
2024年的娛樂城還強調負責任的賭博。許多平台採用了各種工具和資源來幫助玩家控制他們的賭博行為,如設置賭注限制、自我排除措施等,體現了對可持續賭博的承諾。
總之,2024年的娛樂城呈現出一個高度融合了技術、安全和負責任賭博的行業新面貌,為玩家提供了前所未有的娛樂體驗。隨著這些趨勢的持續發展,我們可以預見,娛樂城將不斷地創新和進步,為玩家帶來更多精彩和安全的娛樂選擇。
http://www.pinupcasinozendfste.vn.ua
Казино всегда привлекали ко себе внимание. Этто ямыжник, кае можно испытать собственную удачу также взять голыми руками крупную необходимую сумму денег.
pinupcasinozendfste.vn.ua
medicine toradol 10 mg
Charta non erubescit — Бумага не краснеет.
http://batmanapollo.ru
Age, libertate decembri utere — Ну же, пользуйся свободой декабря
http://batmanapollo.ru
Dubai, a city known for its opulence and modernity, demands a mode of transportation that reflects its grandeur. For those seeking a cost-effective and reliable long-term solution, Somonion Rent Car LLC emerges as the premier choice for monthly car rentals in Dubai. With a diverse fleet ranging from compact cars to premium vehicles, the company promises an unmatched blend of affordability, flexibility, and personalized service.
Favorable Rental Conditions:
Understanding the potential financial strain of long-term car rentals, Somonion Rent Car LLC aims to make your journey more economical. The company offers flexible rental terms coupled with exclusive discounts for loyal customers. This commitment to affordability extends beyond the rental cost, as additional services such as insurance, maintenance, and repair ensure your safety and peace of mind throughout the duration of your rental.
A Plethora of Options:
Somonion Rent Car LLC boasts an extensive selection of vehicles to cater to diverse preferences and budgets. Whether you’re in the market for a sleek sedan or a spacious crossover, the company has the perfect car to complement your needs. The transparency in pricing, coupled with the ease of booking through their online platform, makes Somonion Rent Car LLC a hassle-free solution for those embarking on a long-term adventure in Dubai.
Car Rental Services Tailored for You:
Somonion Rent Car LLC doesn’t just offer cars; it provides a comprehensive range of rental services tailored to suit various occasions. From daily and weekly rentals to airport transfers and business travel, the company ensures that your stay in Dubai is not only comfortable but also exudes prestige. The fleet includes popular models such as the Nissan Altima 2018, KIA Forte 2018, Hyundai Elantra 2018, and the Toyota Camry Sport Edition 2020, all available for monthly rentals at competitive rates.
Featured Deals and Specials:
Somonion Rent Car LLC constantly updates its offerings to provide customers with the best deals. Featured cars like the Hyundai Sonata 2018 and Hyundai Santa Fe 2018 add a touch of luxury to your rental experience, with daily rates starting as low as AED 100. The company’s commitment to affordable luxury is further emphasized by the online booking system, allowing customers to secure the best deals in real-time through their website or by contacting the experts via phone or WhatsApp.
Conclusion:
Whether you’re a tourist looking to explore Dubai at your pace or a business traveler in need of a reliable and prestigious mode of transportation, Somonion Rent Car LLC stands as the go-to choice for monthly car rentals in Dubai. Unlock the ultimate mobility experience with Somonion, where affordability meets excellence, ensuring your journey through Dubai is as seamless and luxurious as the city itself. Contact Somonion Rent Car LLC today and embark on a journey where every mile is a testament to comfort, style, and unmatched service.
최신 프라그마틱 게임은 iGaming에서 혁신적이고 표준화된 콘텐츠를 제공하는 선도적인 제공 업체입니다. 높은 품질의 엔터테인먼트를 제공하기 위해 슬롯, 라이브 카지노, 빙고 등 다양한 제품을 지원합니다.
http://www.pragmatic-game.com
프라그마틱 슬롯에 대한 정보가 정말 유용했어요! 더불어, 제 사이트에서도 프라그마틱과 관련된 새로운 내용을 찾아보세요. 함께 지식을 나누면 좋겠어요!
https://www.ivermectininstock.com/
http://keoghsflex.com/
https://www.vamiveta.com/
topical tretinoin
Dubai, a city of grandeur and innovation, demands a transportation solution that matches its dynamic pace. Whether you’re a business executive, a tourist exploring the city, or someone in need of a reliable vehicle temporarily, car rental services in Dubai offer a flexible and cost-effective solution. In this guide, we’ll explore the popular car rental options in Dubai, catering to diverse needs and preferences.
Airport Car Rental: One-Way Pickup and Drop-off Road Trip Rentals:
For those who need to meet an important delegation at the airport or have a flight to another city, airport car rentals provide a seamless solution. Avoid the hassle of relying on public transport and ensure you reach your destination on time. With one-way pickup and drop-off options, you can effortlessly navigate your road trip, making business meetings or conferences immediately upon arrival.
Business Car Rental Deals & Corporate Vehicle Rentals in Dubai:
Companies without their own fleet or those finding transport maintenance too expensive can benefit from business car rental deals. This option is particularly suitable for businesses where a vehicle is needed only occasionally. By opting for corporate vehicle rentals, companies can optimize their staff structure, freeing employees from non-core functions while ensuring reliable transportation when necessary.
Tourist Car Rentals with Insurance in Dubai:
Tourists visiting Dubai can enjoy the freedom of exploring the city at their own pace with car rentals that come with insurance. This option allows travelers to choose a vehicle that suits the particulars of their trip without the hassle of dealing with insurance policies. Renting a car not only saves money and time compared to expensive city taxis but also ensures a trouble-free travel experience.
Daily Car Hire Near Me:
Daily car rental services are a convenient and cost-effective alternative to taxis in Dubai. Whether it’s for a business meeting, everyday use, or a luxury experience, you can find a suitable vehicle for a day on platforms like Smarketdrive.com. The website provides a secure and quick way to rent a car from certified and verified car rental companies, ensuring guarantees and safety.
Weekly Auto Rental Deals:
For those looking for flexibility throughout the week, weekly car rentals in Dubai offer a competent, attentive, and professional service. Whether you need a vehicle for a few days or an entire week, choosing a car rental weekly is a convenient and profitable option. The certified and tested car rental companies listed on Smarketdrive.com ensure a reliable and comfortable experience.
Monthly Car Rentals in Dubai:
When your personal car is undergoing extended repairs, or if you’re a frequent visitor to Dubai, monthly car rentals (long-term car rentals) become the ideal solution. Residents, businessmen, and tourists can benefit from the extensive options available on Smarketdrive.com, ensuring mobility and convenience throughout their stay in Dubai.
FAQ about Renting a Car in Dubai:
To address common queries about renting a car in Dubai, our FAQ section provides valuable insights and information. From rental terms to insurance coverage, it serves as a comprehensive guide for those considering the convenience of car rentals in the bustling city.
Conclusion:
Dubai’s popularity as a global destination is matched by its diverse and convenient car rental services. Whether for business, tourism, or daily commuting, the options available cater to every need. With reliable platforms like Smarketdrive.com, navigating Dubai becomes a seamless and enjoyable experience, offering both locals and visitors the ultimate freedom of mobility.
online pharmacy australia clomid
buy propecia without prescription
На этой странице можно найти самый удобный crypto swap app
Сделай обмен криптовалют простым с этим crypto swap app
Не теряй с этим удобным crypto swap app
Данный crypto swap app легко освоить для новичку
Меняй криптовалюты мгновенно с помощью этого crypto swap app
Узнай с современным способом обмена криптовалют с этим crypto swap app
Избавься от неудобных обменников и используй этот crypto swap app
Простой обмен криптовалют с этим crypto swap app
Забудь осложненные процедуры обмена с этим удобным crypto swap app
Сэкономь свои финансовые операции с этим crypto swap app
Не теряй время с этим быстрым crypto swap app
Перемещай криптовалюты с легкостью благодаря этому crypto swap app
Наслаждайся простым и удобным crypto swap app
Заработай больше с помощью этого эффективного crypto swap app
Попробуй новый способ обмена криптовалют с этим crypto swap app
Обезопась свои финансы с этим надежным crypto swap app
Меняй криптовалюты без лишней головной боли с этим crypto swap app
Познакомься с новым инструментом обмена криптовалют с этим crypto swap app
Воспользуйся новейшими технологиями с этим crypto swap app
Удиви своих друзей с этим удобным crypto swap app
best app to swap cryptocurrency http://www.cryptoswapdefidapp.com.
canadian pharmacy no prescription
lisinopril 40 mg without prescription
Здесь можно найти лучший crypto swap app
Выполни обмен криптовалют простым с этим crypto swap app
усилия с этим удобным crypto swap app
Данный crypto swap app просто освоить даже новичку
Меняй криптовалюты мгновенно с помощью этого crypto swap app
Познакомься с современным способом обмена криптовалют с этим crypto swap app
Избавься от неудобных обменников и используй этот crypto swap app
Простой обмен криптовалют с этим crypto swap app
Прощай осложненные процедуры обмена с этим удобным crypto swap app
Сэкономь свои финансовые операции с этим crypto swap app
Выигрывай время с этим быстрым crypto swap app
Перемещай криптовалюты с легкостью благодаря этому crypto swap app
Воспользуйся простым и удобным crypto swap app
Получи больше с помощью этого эффективного crypto swap app
Оцени новый способ обмена криптовалют с этим crypto swap app
Обезопась свои финансы с этим надежным crypto swap app
Меняй криптовалюты без лишней головной боли с этим crypto swap app
Познакомься с новым инструментом обмена криптовалют с этим crypto swap app
Воспользуйся новейшими технологиями с этим crypto swap app
Удиви своих друзей с этим удобным crypto swap app
robinhood swap crypto https://www.cryptoswapdefidapp.com/.
albuterol canada cost
where to buy accutane
albuterol 3 mg
generic ventolin inhaler
lioresal otc
https://mangroveactionproject.org/articles/melbet_promo_code_welcome_bonus_for_sports.html
https://condortk.com/images/pages/1xbet_promo_code_india_28.html
https://sneakerlinks.com/wp-content/pages/?1xbet_promo_codes_bonus.html
https://bushwalk.com/blog/pages/1xbet_promo_code__new_bonus_up_to_180_usd.html
https://preder.net/images/pgs/1win_promo_code_offer.html
https://dpstudio-fashion.com/vendor/pgs/1xbet_promo_code_sports_2.html
https://librairienumeriquemonaco.com/docs/pages/code_promo_1xbet_vip.html
https://pulikalinkuralradio.com/wp-content/pages/narodnye_metody_lechenie_gnoynoy_anginy.html
https://foxartistic.com/wp-content/pages/1xbet_promo_code_free_bonus_code.html
https://usastreams.com/pages/1win_promo_code_offer.html
online pharmacy pain
synthroid tablets uk
cheap levitra canada
2024娛樂城的創新趨勢
隨著2024年的到來,娛樂城業界正經歷著一場革命性的變遷。這一年,娛樂城不僅僅是賭博和娛樂的代名詞,更成為了科技創新和用戶體驗的集大成者。
首先,2024年的娛樂城極大地融合了最新的技術。增強現實(AR)和虛擬現實(VR)技術的引入,為玩家提供了沉浸式的賭博體驗。這種全新的遊戲方式不僅帶來視覺上的震撼,還為玩家創造了一種置身於真實賭場的感覺,而實際上他們可能只是坐在家中的沙發上。
其次,人工智能(AI)在娛樂城中的應用也達到了新高度。AI技術不僅用於增強遊戲的公平性和透明度,還在個性化玩家體驗方面發揮著重要作用。從個性化遊戲推薦到智能客服,AI的應用使得娛樂城更能滿足玩家的個別需求。
此外,線上娛樂城的安全性和隱私保護也獲得了顯著加強。隨著技術的進步,更加先進的加密技術和安全措施被用來保護玩家的資料和交易,從而確保一個安全可靠的遊戲環境。
2024年的娛樂城還強調負責任的賭博。許多平台採用了各種工具和資源來幫助玩家控制他們的賭博行為,如設置賭注限制、自我排除措施等,體現了對可持續賭博的承諾。
總之,2024年的娛樂城呈現出一個高度融合了技術、安全和負責任賭博的行業新面貌,為玩家提供了前所未有的娛樂體驗。隨著這些趨勢的持續發展,我們可以預見,娛樂城將不斷地創新和進步,為玩家帶來更多精彩和安全的娛樂選擇。
long term car rental Dubai
Dubai, a city known for its opulence and modernity, demands a mode of transportation that reflects its grandeur. For those seeking a cost-effective and reliable long-term solution, Somonion Rent Car LLC emerges as the premier choice for monthly car rentals in Dubai. With a diverse fleet ranging from compact cars to premium vehicles, the company promises an unmatched blend of affordability, flexibility, and personalized service.
Favorable Rental Conditions:
Understanding the potential financial strain of long-term car rentals, Somonion Rent Car LLC aims to make your journey more economical. The company offers flexible rental terms coupled with exclusive discounts for loyal customers. This commitment to affordability extends beyond the rental cost, as additional services such as insurance, maintenance, and repair ensure your safety and peace of mind throughout the duration of your rental.
A Plethora of Options:
Somonion Rent Car LLC boasts an extensive selection of vehicles to cater to diverse preferences and budgets. Whether you’re in the market for a sleek sedan or a spacious crossover, the company has the perfect car to complement your needs. The transparency in pricing, coupled with the ease of booking through their online platform, makes Somonion Rent Car LLC a hassle-free solution for those embarking on a long-term adventure in Dubai.
Car Rental Services Tailored for You:
Somonion Rent Car LLC doesn’t just offer cars; it provides a comprehensive range of rental services tailored to suit various occasions. From daily and weekly rentals to airport transfers and business travel, the company ensures that your stay in Dubai is not only comfortable but also exudes prestige. The fleet includes popular models such as the Nissan Altima 2018, KIA Forte 2018, Hyundai Elantra 2018, and the Toyota Camry Sport Edition 2020, all available for monthly rentals at competitive rates.
Featured Deals and Specials:
Somonion Rent Car LLC constantly updates its offerings to provide customers with the best deals. Featured cars like the Hyundai Sonata 2018 and Hyundai Santa Fe 2018 add a touch of luxury to your rental experience, with daily rates starting as low as AED 100. The company’s commitment to affordable luxury is further emphasized by the online booking system, allowing customers to secure the best deals in real-time through their website or by contacting the experts via phone or WhatsApp.
Conclusion:
Whether you’re a tourist looking to explore Dubai at your pace or a business traveler in need of a reliable and prestigious mode of transportation, Somonion Rent Car LLC stands as the go-to choice for monthly car rentals in Dubai. Unlock the ultimate mobility experience with Somonion, where affordability meets excellence, ensuring your journey through Dubai is as seamless and luxurious as the city itself. Contact Somonion Rent Car LLC today and embark on a journey where every mile is a testament to comfort, style, and unmatched service.
buy lisinopril 10 mg online
how to get lexapro
where to buy propranolol
can you buy tretinoin cream over the counter
where to get vermox
buy doxycycline hyclate 100mg without a rx
diflucan online uk
allopurinol 50 mg tab
diflucan 50 mg capsule
levitra medicine online
На источнике https://antipushkin.ru/, посвященном цитатам, вы окунетесь в мир глубоких мыслей великих философских мыслителей.
У нас вас ждет множество цитат и афоризмов о смысле жизни и других сферах.
Ознакомьтесь в мудрые высказывания известных личностей и философское прозрение каждый день. Применяйте фразы и послания для самопознания и размышления.
Посетите наш сайт и получите долю философии прямо сейчас. Познакомьтесь с драгоценными истинами, которые предложит вам источник мудрости.
Здесь собраны множество цитат и афоризмов, которые вдохновят вас в разных областях сознания. На сайте есть высказывания о любви и отношениях, личностном росте, доброте и сострадании.
Сайт antipushkin.ru – это место, где рождается вдохновение. Мы делаем доступными наиболее важные мысли известных философов, которые подарят вам мудрость в вашем духовном росте.
Присоединяйтесь к нам и оставайтесь в курсе всех актуальных фраз. Наш портал с радостью предоставит вам порцию вдохновения всегда и везде.
combivent respimat price
paxil generic price
buy allopurinol 100mg uk
erotica
ivermectin tablets
clonidine 128
buy viagra online
online ventolin
where to buy clomid online safely
albuterol mexico price
ivermectin 1 topical cream
buy propranolol online usa
generic baclofen 10 mg
800mg cialis
phenergan 2 cream
манчкин игра http://nastolnyeygryekb.ru/.
xenical canada over the counter
алиас игра http://nastolnyeygryekb.ru/.
purchase accutane online
anomaxx.com
그의 말에는 관료들을 다 묻어준다는 의미가 조금 있다.
http://house.speakingsame.com/floorplan.php?addr=91%2BArthurton%2BRoad&q=Northcote&sta=vic&url=clemonsjerseys.com
diflucan 200
buy zithromax pills
suhagra 100mg price in india
vardenafil tablets
cheap vermox
iv prednisone
propecia pharmacy prices
lyrica 50
12.5 zoloft
citalopram online
tretinoin canada cost
stromectol order
Greetings! Veryу helpful advice in thіs particuⅼar articⅼe!
It is the liytle changes that will make the largest chаnges.
Thanks for sharing!
monthly car rental in dubai
Dubai, a city known for its opulence and modernity, demands a mode of transportation that reflects its grandeur. For those seeking a cost-effective and reliable long-term solution, Somonion Rent Car LLC emerges as the premier choice for monthly car rentals in Dubai. With a diverse fleet ranging from compact cars to premium vehicles, the company promises an unmatched blend of affordability, flexibility, and personalized service.
Favorable Rental Conditions:
Understanding the potential financial strain of long-term car rentals, Somonion Rent Car LLC aims to make your journey more economical. The company offers flexible rental terms coupled with exclusive discounts for loyal customers. This commitment to affordability extends beyond the rental cost, as additional services such as insurance, maintenance, and repair ensure your safety and peace of mind throughout the duration of your rental.
A Plethora of Options:
Somonion Rent Car LLC boasts an extensive selection of vehicles to cater to diverse preferences and budgets. Whether you’re in the market for a sleek sedan or a spacious crossover, the company has the perfect car to complement your needs. The transparency in pricing, coupled with the ease of booking through their online platform, makes Somonion Rent Car LLC a hassle-free solution for those embarking on a long-term adventure in Dubai.
Car Rental Services Tailored for You:
Somonion Rent Car LLC doesn’t just offer cars; it provides a comprehensive range of rental services tailored to suit various occasions. From daily and weekly rentals to airport transfers and business travel, the company ensures that your stay in Dubai is not only comfortable but also exudes prestige. The fleet includes popular models such as the Nissan Altima 2018, KIA Forte 2018, Hyundai Elantra 2018, and the Toyota Camry Sport Edition 2020, all available for monthly rentals at competitive rates.
Featured Deals and Specials:
Somonion Rent Car LLC constantly updates its offerings to provide customers with the best deals. Featured cars like the Hyundai Sonata 2018 and Hyundai Santa Fe 2018 add a touch of luxury to your rental experience, with daily rates starting as low as AED 100. The company’s commitment to affordable luxury is further emphasized by the online booking system, allowing customers to secure the best deals in real-time through their website or by contacting the experts via phone or WhatsApp.
Conclusion:
Whether you’re a tourist looking to explore Dubai at your pace or a business traveler in need of a reliable and prestigious mode of transportation, Somonion Rent Car LLC stands as the go-to choice for monthly car rentals in Dubai. Unlock the ultimate mobility experience with Somonion, where affordability meets excellence, ensuring your journey through Dubai is as seamless and luxurious as the city itself. Contact Somonion Rent Car LLC today and embark on a journey where every mile is a testament to comfort, style, and unmatched service.
vantaihoaituong.com
“그들은 기대에 부응하지 않는다… 나는 단지 그들에게 인간이 되라고 가르친다.”
https://www.freemusic123.com/karaoke/cgi-bin/out.cgi?id=castillo&url=https%3A%2F%2Fchromehelmet.com%2F
where to buy finasteride
Березин Андрей Евроинвест https://mainfin.ru/persona/berezin-andrey-valeryevich.
vermox buy
buy clomid in canada
lisinopril 102
losartan lisinopril
how to get retin a prescription
LadyTech.ru – это передовой женский портал, предназначенный для трендовых женщин, стремящихся быть в тренде с новейшими технологическими достижениями. На сайте http://ladytech.ru/ вы найдете широкую информацию о последних трендах в мире высоких технологий, а также полезные советы и рекомендации, как использовать технологии в повседневной жизни.
Одним из ключевых направлений LadyTech.ru является раздел “Гаджеты и устройства”. Здесь женщины могут узнать обо всех прогрессивных продуктах электроники, от стильных умных часов до инновационных кухонных гаджетов. Редакция портала регулярно публикует рецензии, тесты и сопоставления, чтобы помочь посетительницам выбрать оптимальные технологии, соответствующие их потребностям и стилю жизни.
Еще одним привлекательным разделом является “Красота и стиль”. Здесь http://ladytech.ru// дает советы по использованию технологий для улучшения внешнего вида и самочувствия. Раздел включает в себя рецензии на инновационные косметические устройства, мобильные приложения для ухода за кожей и волосами, а также техники визажа, которые помогут подчеркнуть индивидуальность.
Сайт также активно участвует в создании сообщества техно-героинь женщин. В разделе “Сообщество” можно обсудить последние тренды, делиться опытом использования гаджетов, а также получать поддержку и советы от единомышленниц.
LadyTech.ru стремится не только предоставлять информацию о технологиях, но и вдохновлять женщин на освоение новых горизонтов в цифровом мире. Свежие идеи и актуальная информация делают этот женский портал отличным источником для прогрессивных техно-героинь.
doxycycline 100mg uk
wellbutrin discount price
comfyescorts.com
Wang Shouren은 놀란 표정을 지었습니다. “정말입니까? 의외로 왕 전하도 병법에 능숙합니다.”
http://www.iga-y.com/mt_mobile/mt4i.cgi?cat=1&id=1&mode=redirect&no=10&ref_eid=73&url=http%3A%2F%2Fmaseraticlubuae.com%2F
LadyTech.ru – это эксклюзивный женский портал, предназначенный для трендовых женщин, стремящихся быть в тренде с последними технологическими достижениями. На сайте http://ladytech.ru/ вы найдете широкую информацию о свежих инновациях в мире высоких технологий, а также полезные советы и рекомендации, как использовать технологии в повседневной жизни.
Одним из ключевых направлений LadyTech.ru является раздел “Гаджеты и устройства”. Здесь женщины могут узнать обо всех прогрессивных продуктах электроники, от элегантных умных часов до инновационных кухонных гаджетов. Редакция портала регулярно публикует рецензии, тесты и сопоставления, чтобы помочь посетительницам выбрать наилучшие технологии, соответствующие их потребностям и стилю жизни.
Еще одним привлекательным разделом является “Красота и стиль”. Здесь http://ladytech.ru// дает советы по использованию технологий для улучшения внешнего вида и самочувствия. Раздел включает в себя рецензии на последние средства по уходу за кожей, мобильные приложения для ухода за кожей и волосами, а также техники визажа, которые помогут подчеркнуть индивидуальность.
Сайт также активно участвует в создании сообщества технологически осведомленных женщин. В разделе “Сообщество” можно обсудить новые идеи, делиться опытом использования гаджетов, а также получать поддержку и советы от единомышленниц.
LadyTech.ru стремится не только предоставлять информацию о технологиях, но и вдохновлять женщин на освоение новых горизонтов в цифровом мире. Свежие идеи и актуальная информация делают этот женский портал отличным источником для прогрессивных техно-героинь.
effexor 187.5
price of zoloft 50 mg
budesonide 32 mcg
generic plaquenil
Привет всем!
Откройте новые грани удовольствия!
https://satisfucktor.ru – ваш проводник в мир интимных удовольствий! На нашем сайте вы найдете обзоры лучших секс-игрушек,
интимного белья, лубрикантов и многих других товаров для взрослых. Наши эксперты тщательно изучают каждый продукт,
чтобы предоставить вам полезную информацию для осознанного выбора. Погрузитесь в мир страсти и наслаждения
вместе с Satisfucktor – вашим надежным партнером для интимных покупок.
Обзор массажного масла-свечи Клубника Ignite Kamasutra – устраивайте страстные вечера благодаря горящей свече, превращающейся в ароматное масло для соблазнительных массажей
Обзор покупателя на Изогнутый мини вибратор для стимуляции точки G Mini G Vibe Bliss Calexotics – основные характеристики, инструкция и уход
Обзор на Трусики wet look с двусторонней функциональной молнией My Shadow Le Frivole – инструкция, особенности использования для БДСМ игр, советы по исмользовани. Трусики wet look с двусторонней функциональной молнией My Shadow Le Frivole для ценителей BDSM
Обзор покупателя на Мужской парфюмированный спрей с феромонами Sexy Life №2 – 50 мл., особенности использования, инструкция, преимущества и недостатки
Обзор покупателя на Пульсирующие виброшарики с пультом д/у Era Take it Easy – все, что вы хотели знать о этом уникальном эротическом устройстве! Основные характеристики, инструкция и советы по уходу за Пульсирующими виброшариками с пультом д/у Era Take it Easy!
Исследуем Эрекционное виброкольцо с язычком – особенности, инструкция и уход за продуктом
Обзор покупателя на Эрекционное кольцо на пенис и мошонку Black Velvets. Основные характеристики, инструкция и уход за Эрекционное кольцо на пенис и мошонку Black Velvets
*****
https://satisfucktor.ru/obzory/obzor-pokupatelya-na-seks-tovary-dlya-muzhchin-erekczionnye-kolcza-tolstoe-prozrachnoe-erekczionnoe-kolczo-s-vibratorom-osobennosti-ispolzovaniya-instrukcziya-preimushhestva-i-nedostatki/
https://satisfucktor.ru/obzory/kostumy/rolevye-kostyumy-dlya-seksa-muzhskoj-kostyum-doktora-daniel-candy-boy-801015-s-halatom-bokserami-stetoskopom-i-znachkom-obzor-na-rolevoe-bele-iz-magazina-dlya-vzroslyh/
https://satisfucktor.ru/obzory/obzor-analnyh-vibratorov-chernaya-analnaya-vibroprobka-new-edition-perfection-111-sm-instrukcziya-preimushhestva-i-nedostatki/
https://satisfucktor.ru/obzory/otzyv-pokupatelya-na-analnye-vibratory-analnye-vibrostimulyatory-bottoms-up-197-sm-chernyj-analnyj-vibrostimulyator-elochka-osobennosti-ispolzovaniya-instrukcziya-preimushhestva-i-nedostatki/
https://satisfucktor.ru/obzory/strapon/preimushhestva-i-nedostatki-telesnogo-bezremnevogo-strapona-s-analnym-otrostkom-osobennosti-ispolzovaniya-i-kratkaya-instrukcziya/
https://satisfucktor.ru/obzory/vibr/obzor-pokupatelya-na-realistichnyj-vibrator-s-prisoskoj-osnovnye-harakteristiki-instrukcziya-i-uhod-za-seks-igrushkoj-kotoraya-prineset-tebe-ogromnoe-udovolstvie/
https://satisfucktor.ru/obzory/kostumy/rolevoe-bele-dlya-seksa-obzor-kostyuma-oficzianta-candy-boy-archer-iz-magazina-dlya-vzroslyh/
Удачи!
900 mg trazodone
can you buy accutane over the counter
I appreciate, result in I found just what I used to be having a look for. You have ended my 4 day lengthy hunt! God Bless you man. Have a nice day. Bye
best online casino sites that accept neteller deposits
zestril tablet
accutane canada cost
Тест какая я личность и характер. Особенности клипового мышления. http://tinyurl.com/4ub2v3rh Цвета от белого до черного. Ощущение грязного тела. По каким деталям можно судить о том что автор. Красивая надпись с днем пожилого человека на прозрачном фоне.
Watches World: Elevating Luxury and Style with Exquisite Timepieces
Introduction:
Jewelry has always been a timeless expression of elegance, and nothing complements one’s style better than a luxurious timepiece. At Watches World, we bring you an exclusive collection of coveted luxury watches that not only tell time but also serve as a testament to your refined taste. Explore our curated selection featuring iconic brands like Rolex, Hublot, Omega, Cartier, and more, as we redefine the art of accessorizing.
A Dazzling Array of Luxury Watches:
Watches World offers an unparalleled range of exquisite timepieces from renowned brands, ensuring that you find the perfect accessory to elevate your style. Whether you’re drawn to the classic sophistication of Rolex, the avant-garde designs of Hublot, or the precision engineering of Patek Philippe, our collection caters to diverse preferences.
Customer Testimonials:
Our commitment to providing an exceptional customer experience is reflected in the reviews from our satisfied clientele. O.M. commends our excellent communication and flawless packaging, while Richard Houtman appreciates the helpfulness and courtesy of our team. These testimonials highlight our dedication to transparency, communication, and customer satisfaction.
New Arrivals:
Stay ahead of the curve with our latest additions, including the Tudor Black Bay Ceramic 41mm, Richard Mille RM35-01 Rafael Nadal NTPT Carbon Limited Edition, and the Rolex Oyster Perpetual Datejust 41mm series. These new arrivals showcase cutting-edge designs and impeccable craftsmanship, ensuring you stay on the forefront of luxury watch fashion.
Best Sellers:
Discover our best-selling watches, such as the Bulgari Serpenti Tubogas 35mm and the Cartier Panthere Medium Model. These timeless pieces combine elegance with precision, making them a staple in any sophisticated wardrobe.
Expert’s Selection:
Our experts have carefully curated a selection of watches, including the Cartier Panthere Small Model, Omega Speedmaster Moonwatch 44.25 mm, and Rolex Oyster Perpetual Cosmograph Daytona 40mm. These choices exemplify the epitome of watchmaking excellence and style.
Secured and Tracked Delivery:
At Watches World, we prioritize the safety of your purchase. Our secured and tracked delivery ensures that your exquisite timepiece reaches you in perfect condition, giving you peace of mind with every order.
Passionate Experts at Your Service:
Our team of passionate watch experts is dedicated to providing personalized service. From assisting you in choosing the perfect timepiece to addressing any inquiries, we are here to make your watch-buying experience seamless and enjoyable.
Global Presence:
With a presence in key cities around the world, including Dubai, Geneva, Hong Kong, London, Miami, Paris, Prague, Dublin, Singapore, and Sao Paulo, Watches World brings luxury timepieces to enthusiasts globally.
Conclusion:
Watches World goes beyond being an online platform for luxury watches; it is a destination where expertise, trust, and satisfaction converge. Explore our collection, and let our timeless timepieces become an integral part of your style narrative. Join us in redefining luxury, one exquisite watch at a time.
doxycycline 100mg price australia
clonidine hcl 0.1 mg
Dubai, a city of grandeur and innovation, demands a transportation solution that matches its dynamic pace. Whether you’re a business executive, a tourist exploring the city, or someone in need of a reliable vehicle temporarily, car rental services in Dubai offer a flexible and cost-effective solution. In this guide, we’ll explore the popular car rental options in Dubai, catering to diverse needs and preferences.
Airport Car Rental: One-Way Pickup and Drop-off Road Trip Rentals:
For those who need to meet an important delegation at the airport or have a flight to another city, airport car rentals provide a seamless solution. Avoid the hassle of relying on public transport and ensure you reach your destination on time. With one-way pickup and drop-off options, you can effortlessly navigate your road trip, making business meetings or conferences immediately upon arrival.
Business Car Rental Deals & Corporate Vehicle Rentals in Dubai:
Companies without their own fleet or those finding transport maintenance too expensive can benefit from business car rental deals. This option is particularly suitable for businesses where a vehicle is needed only occasionally. By opting for corporate vehicle rentals, companies can optimize their staff structure, freeing employees from non-core functions while ensuring reliable transportation when necessary.
Tourist Car Rentals with Insurance in Dubai:
Tourists visiting Dubai can enjoy the freedom of exploring the city at their own pace with car rentals that come with insurance. This option allows travelers to choose a vehicle that suits the particulars of their trip without the hassle of dealing with insurance policies. Renting a car not only saves money and time compared to expensive city taxis but also ensures a trouble-free travel experience.
Daily Car Hire Near Me:
Daily car rental services are a convenient and cost-effective alternative to taxis in Dubai. Whether it’s for a business meeting, everyday use, or a luxury experience, you can find a suitable vehicle for a day on platforms like Smarketdrive.com. The website provides a secure and quick way to rent a car from certified and verified car rental companies, ensuring guarantees and safety.
Weekly Auto Rental Deals:
For those looking for flexibility throughout the week, weekly car rentals in Dubai offer a competent, attentive, and professional service. Whether you need a vehicle for a few days or an entire week, choosing a car rental weekly is a convenient and profitable option. The certified and tested car rental companies listed on Smarketdrive.com ensure a reliable and comfortable experience.
Monthly Car Rentals in Dubai:
When your personal car is undergoing extended repairs, or if you’re a frequent visitor to Dubai, monthly car rentals (long-term car rentals) become the ideal solution. Residents, businessmen, and tourists can benefit from the extensive options available on Smarketdrive.com, ensuring mobility and convenience throughout their stay in Dubai.
FAQ about Renting a Car in Dubai:
To address common queries about renting a car in Dubai, our FAQ section provides valuable insights and information. From rental terms to insurance coverage, it serves as a comprehensive guide for those considering the convenience of car rentals in the bustling city.
Conclusion:
Dubai’s popularity as a global destination is matched by its diverse and convenient car rental services. Whether for business, tourism, or daily commuting, the options available cater to every need. With reliable platforms like Smarketdrive.com, navigating Dubai becomes a seamless and enjoyable experience, offering both locals and visitors the ultimate freedom of mobility.
Dubai, a city known for its opulence and modernity, demands a mode of transportation that reflects its grandeur. For those seeking a cost-effective and reliable long-term solution, Somonion Rent Car LLC emerges as the premier choice for monthly car rentals in Dubai. With a diverse fleet ranging from compact cars to premium vehicles, the company promises an unmatched blend of affordability, flexibility, and personalized service.
Favorable Rental Conditions:
Understanding the potential financial strain of long-term car rentals, Somonion Rent Car LLC aims to make your journey more economical. The company offers flexible rental terms coupled with exclusive discounts for loyal customers. This commitment to affordability extends beyond the rental cost, as additional services such as insurance, maintenance, and repair ensure your safety and peace of mind throughout the duration of your rental.
A Plethora of Options:
Somonion Rent Car LLC boasts an extensive selection of vehicles to cater to diverse preferences and budgets. Whether you’re in the market for a sleek sedan or a spacious crossover, the company has the perfect car to complement your needs. The transparency in pricing, coupled with the ease of booking through their online platform, makes Somonion Rent Car LLC a hassle-free solution for those embarking on a long-term adventure in Dubai.
Car Rental Services Tailored for You:
Somonion Rent Car LLC doesn’t just offer cars; it provides a comprehensive range of rental services tailored to suit various occasions. From daily and weekly rentals to airport transfers and business travel, the company ensures that your stay in Dubai is not only comfortable but also exudes prestige. The fleet includes popular models such as the Nissan Altima 2018, KIA Forte 2018, Hyundai Elantra 2018, and the Toyota Camry Sport Edition 2020, all available for monthly rentals at competitive rates.
Featured Deals and Specials:
Somonion Rent Car LLC constantly updates its offerings to provide customers with the best deals. Featured cars like the Hyundai Sonata 2018 and Hyundai Santa Fe 2018 add a touch of luxury to your rental experience, with daily rates starting as low as AED 100. The company’s commitment to affordable luxury is further emphasized by the online booking system, allowing customers to secure the best deals in real-time through their website or by contacting the experts via phone or WhatsApp.
Conclusion:
Whether you’re a tourist looking to explore Dubai at your pace or a business traveler in need of a reliable and prestigious mode of transportation, Somonion Rent Car LLC stands as the go-to choice for monthly car rentals in Dubai. Unlock the ultimate mobility experience with Somonion, where affordability meets excellence, ensuring your journey through Dubai is as seamless and luxurious as the city itself. Contact Somonion Rent Car LLC today and embark on a journey where every mile is a testament to comfort, style, and unmatched service.
atarax best price
baclofen 5 mg tablet price
prednisone 20mg
200 mg cialis
retin-a cheap
Hi there, I want to subscribe for this weblog to get most up-to-date updates, so where can i do it please assist.
are dissertation writing services legal
diflucan online canada
psyho2031.8ua.ru
Can you tell us more about this? I’d want to find out more details.
amoxicillin buy cheap
albuterol 0.083
Березин Андрей Евроинвест http://lenta.ru/tags/persons/berezin-andrey.
prednisolone 25mg
psyho2031.8ua.ru
prednisolone 25mg online
psyho2031.8ua.ru
where to get ivermectin
zoloft online without prescription
psyho2031.8ua.ru
drug levitra prescription
psyho2031.8ua.ru
azithromycin 1000 mg price
psyho2031.8ua.ru
trazodone 100mg pharmacy
psyho2031.8ua.ru
lisinopril 12.5 mg 10 mg
psyho2031.8ua.ru
buy propecia from india
propranolol pills 20 mg
psyho2031.8ua.ru
levitra 20mg price in usa
Ⅿy brοther suggested I miցht like this web site.
He was totally right. This poѕt actually made my dɑy.
You cann’t imagine siкply how much time I
had spеnt for this information! Thanks!
silagra canada
amoxicillin over the counter in mexico
accutane medicine online
buy toradol
buy synthroid online uk
На нашем сайте https://citaty12345.blogspot.com/ вы откроете для себя мотивирующую коллекцию цитат, которые имеют потенциал оказать глубокое влияние на вашу мышление. Цитаты от исторических личностей собраны здесь, чтобы дать вам свежие взгляды для саморазвития.
Наш блог разработан не только для исследователей мудрости, но и для всех, кто желает найти новые идеи в словах. Здесь вы найдете цитаты на множество темы: от успеха и саморазвития до личностного роста. Каждая цитата – это мощное послание, которое способно трансформировать ваш взгляд на жизнь.
Мы внимательно подбираем цитаты, чтобы они были актуальными. Наши посты позволяют вам окунуться в мир красоты слов, предлагая новые перспективы. Мы верим, что умело выбранные слова являются источником мотивации.
Подписывайтесь нашего блога https://citaty12345.blogspot.com/ и находите для себя новые цитаты ежедневно. Безотносительно того, нуждаетесь ли вы радость или искренне желаете вдохновляться красотой слов, наш блог подарит вам точно то, что вам необходимо. Позвольте этим цитатам войти в вашего постоянного вдохновения.
prednisone 477
10 mg zoloft
lyrica generic brand
how can i get accutane online
ventolin 50 mg
shamitra.com
Wang Shouren의 얼굴은 약간 붉어졌고 거짓말하는 습관이 없었습니다.
http://niac.jp/m/index.cgi?cat=2&mode=redirect&ref_eid=484&url=http%3A%2F%2Fchromehelmet.com%2F
average cost of generic viagra
Березин Андрей Евроинвест http://www.antennadaily.ru/2023/06/23/andrey-berezin-euroinvest/.
paxil breast cancer
finasteride 5mg over the counter
lisinopril brand name uk
augmentin brand name
vermox price in south africa
buy accutane 40 mg online
cheap propecia australia
retrodiscoshow.com
Liu Jian도 어이가 없어서 오랫동안 “노 목사 님, 먼저 Xinjian 삼촌에게 축하드립니다. “라고 말했습니다.
https://www.pickyourownchristmastree.org/XMTRD.php?NAME&PAGGE=%2FWashingtonStateTreeRecyclingDisposal.php&URL=https%3A%2F%2Fchromehelmet.com%2F
diflucan 100 mg tab
프라그마틱 게임은 iGaming에서 선도적인 콘텐츠 제공 업체로, 높은 품질의 엔터테인먼트와 모바일 중심의 다양한 포트폴리오로 주목받고 있습니다.
프라그마틱 무료
프라그마틱은 다양한 언어와 화폐를 지원하는데, 이로 인해 글로벌 유저들에게 높은 평가를 받고 있어요.
https://lyxmys.com/
http://holyshirtsandpants.net/
https://dwqewqe.weebly.com/
over the counter propecia
glucophage no prescription
manolooutletsale.com
Fang Jifan은 “폐하께서는 이미 마음 속에 답을 가지고 계시는데 왜 여전히 저에게 묻습니까?”
http://www.ictpower.com/feedCount.aspx?feed_id=1&url=https%3A%2F%2Fcomfyescorts.com
vermox prescription drug
Thanks , I have recently been searching for information about this
subject for ages and yours is the greatest I have came upon till now.
However, what concerning the conclusion? Are you sure concerning
the supply?
Березин Андрей Евроинвест https://finance.rambler.ru/person/berezin-andrey/.
allopurinol 300 mg for sale without prescription
buying neurontin online
effexor medication cost
установка кондиционеров http://www.kondicionery-nedorogo-msk.ru/.
how much is robaxin in canada
На сайте https://amurplanet.ru/, посвященном женской тематике, вы получите доступ к множеству захватывающих материалов. Мы постоянно обновляем полезные рекомендации в различных областях, таких как красота и множество других областей.
Получите все нюансы женственной привлекательности и физического и душевного благополучия, оставайтесь в курсе за актуальными трендами в мире стиля и моды. Мы делаем доступными статьи о психологии и отношениях, семейном уюте, компании и карьере, собственном росте и развитии. Вы также подберете практические советы по приготовлению блюд, рецепты блюд, секреты воспитания детей и множество других полезных материалов.
Наши материалы помогут создать уютный дом, получить информацию о садоводческих хитростях и секретах, позаботиться о волосах и коже, поддерживать свой физическим состоянием и фитнесом. Мы также рассказываем о правильном питании, управлении финансами и многом другом.
Подключайтесь к обществу наших читателей женской аудитории на AmurPlanet.ru – и читайте много нового каждый день недели. Не пропустите шанс получить актуальные новости, чтобы всегда быть в курсе всех актуальных событий. Загляните на наш портал и откройте для себя миру во полной мере!
Не забудьте добавить сайт https://amurplanet.ru/ в закладки!
buy paxil online uk
ᴡhoah this weblog is fantаstic i like studying your
posts. Stay up the gopod work! You know,
many individuals are searching around for this info,
you could aіdd them greatly.
synthroid 0.075 mcg
кондиционер 7 kondicionery-nedorogo-msk.ru.
цифровой маркетинг https://agentstvo-internet-marketinga.com.ua.
vermox 500mg tablet price
цифровой маркетинг что это http://agentstvo-internet-marketinga.com.ua/.
Watches World
Watches World: Elevating Luxury and Style with Exquisite Timepieces
Introduction:
Jewelry has always been a timeless expression of elegance, and nothing complements one’s style better than a luxurious timepiece. At Watches World, we bring you an exclusive collection of coveted luxury watches that not only tell time but also serve as a testament to your refined taste. Explore our curated selection featuring iconic brands like Rolex, Hublot, Omega, Cartier, and more, as we redefine the art of accessorizing.
A Dazzling Array of Luxury Watches:
Watches World offers an unparalleled range of exquisite timepieces from renowned brands, ensuring that you find the perfect accessory to elevate your style. Whether you’re drawn to the classic sophistication of Rolex, the avant-garde designs of Hublot, or the precision engineering of Patek Philippe, our collection caters to diverse preferences.
Customer Testimonials:
Our commitment to providing an exceptional customer experience is reflected in the reviews from our satisfied clientele. O.M. commends our excellent communication and flawless packaging, while Richard Houtman appreciates the helpfulness and courtesy of our team. These testimonials highlight our dedication to transparency, communication, and customer satisfaction.
New Arrivals:
Stay ahead of the curve with our latest additions, including the Tudor Black Bay Ceramic 41mm, Richard Mille RM35-01 Rafael Nadal NTPT Carbon Limited Edition, and the Rolex Oyster Perpetual Datejust 41mm series. These new arrivals showcase cutting-edge designs and impeccable craftsmanship, ensuring you stay on the forefront of luxury watch fashion.
Best Sellers:
Discover our best-selling watches, such as the Bulgari Serpenti Tubogas 35mm and the Cartier Panthere Medium Model. These timeless pieces combine elegance with precision, making them a staple in any sophisticated wardrobe.
Expert’s Selection:
Our experts have carefully curated a selection of watches, including the Cartier Panthere Small Model, Omega Speedmaster Moonwatch 44.25 mm, and Rolex Oyster Perpetual Cosmograph Daytona 40mm. These choices exemplify the epitome of watchmaking excellence and style.
Secured and Tracked Delivery:
At Watches World, we prioritize the safety of your purchase. Our secured and tracked delivery ensures that your exquisite timepiece reaches you in perfect condition, giving you peace of mind with every order.
Passionate Experts at Your Service:
Our team of passionate watch experts is dedicated to providing personalized service. From assisting you in choosing the perfect timepiece to addressing any inquiries, we are here to make your watch-buying experience seamless and enjoyable.
Global Presence:
With a presence in key cities around the world, including Dubai, Geneva, Hong Kong, London, Miami, Paris, Prague, Dublin, Singapore, and Sao Paulo, Watches World brings luxury timepieces to enthusiasts globally.
Conclusion:
Watches World goes beyond being an online platform for luxury watches; it is a destination where expertise, trust, and satisfaction converge. Explore our collection, and let our timeless timepieces become an integral part of your style narrative. Join us in redefining luxury, one exquisite watch at a time.
rybelsus 3mg
wegovy online order
cheap semaglutide
wegovy where to buy
semaglutide over the counter
semaglutide tablets cost
semaglutide injections
wegovy australia online
semaglutide australia online
rybelsus where to buy
semaglutide tablets cost
Normally I do not read post on blogs, however I would like to say that this write-up very forced me to take a
look at and do so! Your writing taste has been surprised me.
Thanks, quite nice article.
order wegovy online
wegovy tablets for weight loss cost
Hello there, You have done an incredible job.
I’ll definitely digg it and personally recommend to my friends.
I’m confident they’ll be benefited from this website.
ozempic tablets
rybelsus 3mg
ozempic tab 14mg
buy viagra online
Online poker
semaglutide medicine
where to buy ozempic online
order wegovy
rybelsus 21 mg
Hello There. I found your weblog using msn. This is an extremely well written article.
I will make sure to bookmark it and return to learn more
of your useful information. Thanks for the post. I’ll certainly return.
where to buy semaglutide
rybelsus price
semaglutide online cheap
buy semaglutide online no script needed
semaglutide tablets
ozempic tablets buy
wegovy tablets for weight loss
프라그마틱 플레이는 250개 이상의 게임으로 다양한 테마의 슬롯 포트폴리오를 구성하며, 33개 언어와 다양한 화폐를 지원합니다.
프라그마틱 홈페이지
프라그마틱 슬롯에 대한 설명 정말 감사합니다! 더불어, 제 사이트에서도 프라그마틱과 관련된 내용을 찾아보세요. 함께 발전하며 더 많은 지식을 얻어가요!
https://doggggqwe.weebly.com/
https://www.chromehelmet.com
https://www.anomaxx.com
generic ozempic cost
Мастер и Маргарита 2024
Березин Андрей Евроинвест http://www.newizv.ru/news/2023-08-28/berezin-andrey-svedeniya-o-developere-419032/.
rybelsus without prescription
wegovy lose weight
rybelsus 7 mg tablet
semaglutide tab 14mg
ozempic cost
semaglutide canada pharmacy prices
eexhibitionunche.com
사람이니까… 남에게 예의를 갖추면 안 된다 예의가 바르면 남이 더 두려워한다.
http://m.shopinusa.com/redirect.aspx?url=https%3A%2F%2Fhz-wallpaper.com%2F
https://rextester.com/PMDP80738
KLER SMARZOWSKIEGO (2024) cały film online lektor pl
KLER SMARZOWSKIEGO cda za darmo 2024
CAŁY FILM KLER SMARZOWSKIEGO
KLER SMARZOWSKIEGO zalukaj
KLER SMARZOWSKIEGO online za darmo!pobierz@
онлайн казино cat
cat casino
buy semaglutide
wegovy retail price
buy semaglutide online from india
2024全新上線❰戰神賽特老虎機❱ – ATG賽特玩法說明介紹
❰戰神賽特老虎機❱是由ATG電子獨家開發的古埃及風格線上老虎機,在傳說中戰神賽特是「力量之神」與奈芙蒂斯女神結成連理,共同守護古埃及的奇幻秘寶,只有被選中的冒險者才能進入探險。
❰戰神賽特老虎機❱ – ATG賽特介紹
2024最新老虎機【戰神塞特】- ATG電子 X 富遊娛樂城
❰戰神賽特老虎機❱ – ATG電子
線上老虎機系統 : ATG電子
發行年分 : 2024年1月
最大倍數 : 51000倍
返還率 : 95.89%
支付方式 : 全盤倍數、消除掉落
最低投注金額 : 0.4元
最高投注金額 : 2000元
可否選台 : 是
可選台台數 : 350台
免費遊戲 : 選轉觸發+購買特色
❰戰神賽特老虎機❱ 賠率說明
戰神塞特老虎機賠率算法非常簡單,玩家們只需要不斷的轉動老虎機,成功消除物件即可贏分,得分賠率依賠率表計算。
當盤面上沒有物件可以消除時,倍數符號將會相加形成總倍數!該次旋轉的總贏分即為 : 贏分 X 總倍數。
積分方式如下 :
贏分=(單次押注額/20) X 物件賠率
EX : 單次押注額為1,盤面獲得12個戰神賽特倍數符號法老魔眼
贏分= (1/20) X 1000=50
以下為各個得分符號數量之獎金賠率 :
得分符號 獎金倍數 得分符號 獎金倍數
戰神賽特倍數符號聖甲蟲 6 2000
5 100
4 60 戰神賽特倍數符號黃寶石 12+ 200
10-11 30
8-9 20
戰神賽特倍數符號荷魯斯之眼 12+ 1000
10-11 500
8-9 200 戰神賽特倍數符號紅寶石 12+ 160
10-11 24
8-9 16
戰神賽特倍數符號眼鏡蛇 12+ 500
10-11 200
8-9 50 戰神賽特倍數符號紫鑽石 12+ 100
10-11 20
8-9 10
戰神賽特倍數符號神箭 12+ 300
10-11 100
8-9 40 戰神賽特倍數符號藍寶石 12+ 80
10-11 18
8-9 8
戰神賽特倍數符號屠鐮刀 12+ 240
10-11 40
8-9 30 戰神賽特倍數符號綠寶石 12+ 40
10-11 15
8-9 5
❰戰神賽特老虎機❱ 賠率說明(橘色數值為獲得數量、黑色數值為得分賠率)
ATG賽特 – 特色說明
ATG賽特 – 倍數符號獎金加乘
玩家們在看到盤面上出現倍數符號時,務必把握機會加速轉動ATG賽特老虎機,倍數符號會隨機出現2到500倍的隨機倍數。
當盤面無法在消除時,這些倍數總和會相加,乘上當時累積之獎金,即為最後得分總額。
倍數符號會出現在主遊戲和免費遊戲當中,玩家們千萬別錯過這個可以瞬間將得獎金額拉高的好機會!
ATG賽特 – 倍數符號獎金加乘
ATG賽特 – 倍數符號圖示
ATG賽特 – 進入神秘金字塔開啟免費遊戲
戰神賽特倍數符號聖甲蟲
❰戰神賽特老虎機❱ 免費遊戲符號
在古埃及神話中,聖甲蟲又稱為「死亡之蟲」,它被當成了天球及重生的象徵,守護古埃及的奇幻秘寶。
當玩家在盤面上,看見越來越多的聖甲蟲時,千萬不要膽怯,只需在牌面上斬殺4~6個ATG賽特免費遊戲符號,就可以進入15場免費遊戲!
在免費遊戲中若轉出3~6個聖甲蟲免費遊戲符號,可額外獲得5次免費遊戲,最高可達100次。
當玩家的累積贏分且盤面有倍數物件時,盤面上的所有倍數將會加入總倍數!
ATG賽特 – 選台模式贏在起跑線
為避免神聖的寶物被盜墓者奪走,富有智慧的法老王將金子塔內佈滿迷宮,有的設滿機關讓盜墓者寸步難行,有的暗藏機關可以直接前往存放神秘寶物的暗房。
ATG賽特老虎機設有350個機檯供玩家選擇,這是連魔龍老虎機、忍老虎機都給不出的機台數量,為的就是讓玩家,可以隨時進入神秘的古埃及的寶藏聖域,挖掘長眠已久的神祕寶藏。
【戰神塞特老虎機】選台模式
❰戰神賽特老虎機❱ 選台模式
ATG賽特 – 購買免費遊戲挖掘秘寶
玩家們可以使用當前投注額的100倍購買免費遊戲!進入免費遊戲再也不是虛幻。獎勵與一般遊戲相同,且購買後遊戲將自動開始,直到場次和獎金發放完畢為止。
有購買免費遊戲需求的玩家們,立即點擊「開始」,啟動神秘金字塔裡的古埃及祕寶吧!
【戰神塞特老虎機】購買特色
❰戰神賽特老虎機❱ 購買特色
戰神賽特試玩推薦
看完了❰戰神賽特老虎機❱介紹之後,玩家們是否也蓄勢待發要進入古埃及的世界,一探神奇秘寶探險之旅。
本次ATG賽特與線上娛樂城推薦第一名的富遊娛樂城合作,只需要加入會員,即可領取到168體驗金,免費試玩420轉!
официальный сайт Gama Casino
бонусы Gama Casino
semaglutide tablets
2024娛樂城No.1 – 富遊娛樂城介紹
2024 年 1 月 5 日
|
娛樂城, 現金版娛樂城
富遊娛樂城是無論老手、新手,都非常推薦的線上博奕,在2024娛樂城當中扮演著多年來最來勢洶洶的一匹黑馬,『人性化且精緻的介面,遊戲種類眾多,超級多的娛樂城優惠,擁有眾多與會員交流遊戲的群組』是一大特色。
富遊娛樂城擁有歐洲馬爾他(MGA)和菲律賓政府競猜委員會(PAGCOR)頒發的合法執照。
註冊於英屬維爾京群島,受國際行業協會認可的合法公司。
我們的中心思想就是能夠帶領玩家遠詐騙黑網,讓大家安心放心的暢玩線上博弈,娛樂城也受各大部落客、IG網紅、PTT論壇,推薦討論,富遊娛樂城沒有之一,絕對是線上賭場玩家的第一首選!
富遊娛樂城介面 / 2024娛樂城NO.1
富遊娛樂城簡介
品牌名稱 : 富遊RG
創立時間 : 2019年
存款速度 : 平均15秒
提款速度 : 平均5分
單筆提款金額 : 最低1000-100萬
遊戲對象 : 18歲以上男女老少皆可
合作廠商 : 22家遊戲平台商
支付平台 : 各大銀行、各大便利超商
支援配備 : 手機網頁、電腦網頁、IOS、安卓(Android)
富遊娛樂城遊戲品牌
真人百家 — 歐博真人、DG真人、亞博真人、SA真人、OG真人
體育投注 — SUPER體育、鑫寶體育、亞博體育
電競遊戲 — 泛亞電競
彩票遊戲 — 富遊彩票、WIN 539
電子遊戲 —ZG電子、BNG電子、BWIN電子、RSG電子、好路GR電子
棋牌遊戲 —ZG棋牌、亞博棋牌、好路棋牌、博亞棋牌
捕魚遊戲 —ZG捕魚、RSG捕魚、好路GR捕魚、亞博捕魚
富遊娛樂城優惠活動
每日任務簽到金666
富遊VIP全面啟動
復酬金活動10%優惠
日日返水
新會員好禮五選一
首存禮1000送1000
免費體驗金$168
富遊娛樂城APP
步驟1 : 開啟網頁版【富遊娛樂城官網】
步驟2 : 點選上方(下載app),會跳出下載與複製連結選項,點選後跳轉。
步驟3 : 跳轉後點選(安裝),並點選(允許)操作下載描述檔,跳出下載描述檔後點選關閉。
步驟4 : 到手機設置>一般>裝置管理>設定描述檔(富遊)安裝,即可完成安裝。
富遊娛樂城常見問題FAQ
富遊娛樂城詐騙?
黑網詐騙可細分兩種,小出大不出及純詐騙黑網,我們可從品牌知名度經營和網站架設畫面分辨來簡單分辨。
富遊娛樂城會出金嗎?
如上面提到,富遊是在做一個品牌,為的是能夠保證出金,和帶領玩家遠離黑網,而且還有DUKER娛樂城出金認證,所以各位能夠放心富遊娛樂城為正出金娛樂城。
富遊娛樂城出金延遲怎麼辦?
基本上只要是公司系統問提造成富遊娛樂城會員無法在30分鐘成功提款,富遊娛樂城會即刻派送補償金,表達誠摯的歉意。
富遊娛樂城結論
富遊娛樂城安心玩,評價4.5顆星。如果還想看其他娛樂城推薦的,可以來娛樂城推薦尋找喔。
rybelsus oral medication
semaglutide pill
wegovy buy uk
ATG戰神賽特
2024全新上線❰戰神賽特老虎機❱ – ATG賽特玩法說明介紹
❰戰神賽特老虎機❱是由ATG電子獨家開發的古埃及風格線上老虎機,在傳說中戰神賽特是「力量之神」與奈芙蒂斯女神結成連理,共同守護古埃及的奇幻秘寶,只有被選中的冒險者才能進入探險。
❰戰神賽特老虎機❱ – ATG賽特介紹
2024最新老虎機【戰神塞特】- ATG電子 X 富遊娛樂城
❰戰神賽特老虎機❱ – ATG電子
線上老虎機系統 : ATG電子
發行年分 : 2024年1月
最大倍數 : 51000倍
返還率 : 95.89%
支付方式 : 全盤倍數、消除掉落
最低投注金額 : 0.4元
最高投注金額 : 2000元
可否選台 : 是
可選台台數 : 350台
免費遊戲 : 選轉觸發+購買特色
❰戰神賽特老虎機❱ 賠率說明
戰神塞特老虎機賠率算法非常簡單,玩家們只需要不斷的轉動老虎機,成功消除物件即可贏分,得分賠率依賠率表計算。
當盤面上沒有物件可以消除時,倍數符號將會相加形成總倍數!該次旋轉的總贏分即為 : 贏分 X 總倍數。
積分方式如下 :
贏分=(單次押注額/20) X 物件賠率
EX : 單次押注額為1,盤面獲得12個戰神賽特倍數符號法老魔眼
贏分= (1/20) X 1000=50
以下為各個得分符號數量之獎金賠率 :
得分符號 獎金倍數 得分符號 獎金倍數
戰神賽特倍數符號聖甲蟲 6 2000
5 100
4 60 戰神賽特倍數符號黃寶石 12+ 200
10-11 30
8-9 20
戰神賽特倍數符號荷魯斯之眼 12+ 1000
10-11 500
8-9 200 戰神賽特倍數符號紅寶石 12+ 160
10-11 24
8-9 16
戰神賽特倍數符號眼鏡蛇 12+ 500
10-11 200
8-9 50 戰神賽特倍數符號紫鑽石 12+ 100
10-11 20
8-9 10
戰神賽特倍數符號神箭 12+ 300
10-11 100
8-9 40 戰神賽特倍數符號藍寶石 12+ 80
10-11 18
8-9 8
戰神賽特倍數符號屠鐮刀 12+ 240
10-11 40
8-9 30 戰神賽特倍數符號綠寶石 12+ 40
10-11 15
8-9 5
❰戰神賽特老虎機❱ 賠率說明(橘色數值為獲得數量、黑色數值為得分賠率)
ATG賽特 – 特色說明
ATG賽特 – 倍數符號獎金加乘
玩家們在看到盤面上出現倍數符號時,務必把握機會加速轉動ATG賽特老虎機,倍數符號會隨機出現2到500倍的隨機倍數。
當盤面無法在消除時,這些倍數總和會相加,乘上當時累積之獎金,即為最後得分總額。
倍數符號會出現在主遊戲和免費遊戲當中,玩家們千萬別錯過這個可以瞬間將得獎金額拉高的好機會!
ATG賽特 – 倍數符號獎金加乘
ATG賽特 – 倍數符號圖示
ATG賽特 – 進入神秘金字塔開啟免費遊戲
戰神賽特倍數符號聖甲蟲
❰戰神賽特老虎機❱ 免費遊戲符號
在古埃及神話中,聖甲蟲又稱為「死亡之蟲」,它被當成了天球及重生的象徵,守護古埃及的奇幻秘寶。
當玩家在盤面上,看見越來越多的聖甲蟲時,千萬不要膽怯,只需在牌面上斬殺4~6個ATG賽特免費遊戲符號,就可以進入15場免費遊戲!
在免費遊戲中若轉出3~6個聖甲蟲免費遊戲符號,可額外獲得5次免費遊戲,最高可達100次。
當玩家的累積贏分且盤面有倍數物件時,盤面上的所有倍數將會加入總倍數!
ATG賽特 – 選台模式贏在起跑線
為避免神聖的寶物被盜墓者奪走,富有智慧的法老王將金子塔內佈滿迷宮,有的設滿機關讓盜墓者寸步難行,有的暗藏機關可以直接前往存放神秘寶物的暗房。
ATG賽特老虎機設有350個機檯供玩家選擇,這是連魔龍老虎機、忍老虎機都給不出的機台數量,為的就是讓玩家,可以隨時進入神秘的古埃及的寶藏聖域,挖掘長眠已久的神祕寶藏。
【戰神塞特老虎機】選台模式
❰戰神賽特老虎機❱ 選台模式
ATG賽特 – 購買免費遊戲挖掘秘寶
玩家們可以使用當前投注額的100倍購買免費遊戲!進入免費遊戲再也不是虛幻。獎勵與一般遊戲相同,且購買後遊戲將自動開始,直到場次和獎金發放完畢為止。
有購買免費遊戲需求的玩家們,立即點擊「開始」,啟動神秘金字塔裡的古埃及祕寶吧!
【戰神塞特老虎機】購買特色
❰戰神賽特老虎機❱ 購買特色
戰神賽特試玩推薦
看完了❰戰神賽特老虎機❱介紹之後,玩家們是否也蓄勢待發要進入古埃及的世界,一探神奇秘寶探險之旅。
本次ATG賽特與線上娛樂城推薦第一名的富遊娛樂城合作,只需要加入會員,即可領取到168體驗金,免費試玩420轉!
Hi everyone
One day my friend showed me an interesting and colorful game, just like from My childhood, fruit combinations, very fascinating and most importantly develops logic and luck, it does not oblige to anything and helps to brighten up the time!
Sweet Bonanza slot machine is powered by a built-in random number generator. This system operates with combinations that determine the results of the rounds. For many players, the random number generator is a kind of opponent that they strive to defeat using mathematical statistics, thinking about bets and attention to the details of the gameplay.
The algorithm works completely randomly, taking into account the gaming experience of millions of players from different parts of the globe.
You can play here https://sweet-bonanza-game.ru
The task of a persistent player is to develop his own strategy, taking into account his desires and goals, in order to eventually get the top combination!
Good luck friends!
sweet bonanza – pragmatic play
does sweet bonanza pay real money
sweet bonanza online free
1xbet sweet bonanza
swet bonanaza
sweatbonanza
bonanza slot demo
демо игра sweet bonanza
swit bonanza
sweet bonanza demo pragmatic
bonanza slot online
sweet bonanzq
nsskart.com
그러나 여기에서는 모래처럼 상자가 보트에서 이동됩니다.
https://www.google.com.ni/url?q=https://www.vantaihoaituong.com/
Onze goudsmid zorgt ervoor dat alle sieraden worden hersteld in de originele staat.
ozempic tab 3mg
wegovy diabetes medication
generic wegovy cost
Heya i’m for the first time here. I found this board
and I find It truly useful & it helped me out a lot.
I hope to give something back and help others like you helped me.
rybelsus uk
semaglutide pill
wegovy 14
buy wegovy in mexico
generic semaglutide for weight loss
semaglutide lose weight
wegovy uk
eexhibitionunche.com
나머지 사람들은 어떻게 감히 게으르고 “죽을 것이다”라고 차례로 절을 할 수 있습니까?
http://msn.blog.wwx.tw/debug/frm-s/clemonsjerseys.com/
rybelsus buy australia
semaglutide canada pharmacy prices
semaglutide tab 7mg
wegovy 7 mg
Nikolaev Vyacheslav Konstantinovich spacecoastdaily.com/2023/08/vyacheslav-nikolaev-ecosystem-builder.
semaglutide online
Блог https://akpp-korobka.blogspot.com/ посвящен нюансам технического ухода автоматических коробок передач (АКПП) в автомобилях. Он подчеркивает значимость АКПП в обеспечении плавной передачи мощности от двигателя к колесам, что играет роль в надежности автомобиля. Сайт обсуждает важность своевременного обнаружения проблем АКПП для устранения проблем, способствующего экономии время и деньги. Рассматриваются основные аспекты регулярного обслуживания АКПП, с упором на замену масла, проверку на утечки и замену фильтров, для обеспечения оптимальной работы трансмиссионной системы. Более подробную информацию найдете на блог по адресу https://akpp-korobka.blogspot.com/.
transferairportesfgrdt.com/es/directions/spain/canary-islands
Carefree take to and from the airport in any country of the world from the divulge broker. Trained advantage of excessive level at adequate prices.
transferairportesfgrdt.com/es/directions/switzerland/montreux
Блог https://akpp-korobka.blogspot.com/ посвящен нюансам технического ухода автоматических коробок передач (АКПП) в машине. Он подчеркивает ключевую роль АКПП в обеспечении плавной передачи мощности между двигателем и колесами, что является ключевым в надежности автомобиля. Ресурс обсуждает необходимость квалифицированной диагностики АКПП для своевременного выявления проблем, ведущего к сокращению расходов на время и деньги. Также затрагиваются основные аспекты ухода АКПП, включая замену масла, поиск утечек и замену фильтров, для гарантии долговечности трансмиссионной системы. Более подробную информацию найдете на блог по адресу https://akpp-korobka.blogspot.com/.
wegovy semaglutide tablets
Thanks in favor of sharing such a pleasant thinking, piece of writing
is pleasant, thats why i have read it fully
generic semaglutide
wegovy retail price
buy ozempic from canada online
rybelsus 14mg
buy ozempic pill form for adults
buy semaglutide in mexico
transferairportesfgrdt.com/es/directions/thailand/bangkok/populars/bangkokroute
Carefree transfer to and from the airport in any mother country of the incredible from the wind broker. Whizz usage of high equivalent at suitable prices.
transferairportesfgrdt.com/es/directions/vietnam/phuquoc
semaglutide retail price
2024娛樂城
2024娛樂城No.1 – 富遊娛樂城介紹
2024 年 1 月 5 日
|
娛樂城, 現金版娛樂城
富遊娛樂城是無論老手、新手,都非常推薦的線上博奕,在2024娛樂城當中扮演著多年來最來勢洶洶的一匹黑馬,『人性化且精緻的介面,遊戲種類眾多,超級多的娛樂城優惠,擁有眾多與會員交流遊戲的群組』是一大特色。
富遊娛樂城擁有歐洲馬爾他(MGA)和菲律賓政府競猜委員會(PAGCOR)頒發的合法執照。
註冊於英屬維爾京群島,受國際行業協會認可的合法公司。
我們的中心思想就是能夠帶領玩家遠詐騙黑網,讓大家安心放心的暢玩線上博弈,娛樂城也受各大部落客、IG網紅、PTT論壇,推薦討論,富遊娛樂城沒有之一,絕對是線上賭場玩家的第一首選!
富遊娛樂城介面 / 2024娛樂城NO.1
富遊娛樂城簡介
品牌名稱 : 富遊RG
創立時間 : 2019年
存款速度 : 平均15秒
提款速度 : 平均5分
單筆提款金額 : 最低1000-100萬
遊戲對象 : 18歲以上男女老少皆可
合作廠商 : 22家遊戲平台商
支付平台 : 各大銀行、各大便利超商
支援配備 : 手機網頁、電腦網頁、IOS、安卓(Android)
富遊娛樂城遊戲品牌
真人百家 — 歐博真人、DG真人、亞博真人、SA真人、OG真人
體育投注 — SUPER體育、鑫寶體育、亞博體育
電競遊戲 — 泛亞電競
彩票遊戲 — 富遊彩票、WIN 539
電子遊戲 —ZG電子、BNG電子、BWIN電子、RSG電子、好路GR電子
棋牌遊戲 —ZG棋牌、亞博棋牌、好路棋牌、博亞棋牌
捕魚遊戲 —ZG捕魚、RSG捕魚、好路GR捕魚、亞博捕魚
富遊娛樂城優惠活動
每日任務簽到金666
富遊VIP全面啟動
復酬金活動10%優惠
日日返水
新會員好禮五選一
首存禮1000送1000
免費體驗金$168
富遊娛樂城APP
步驟1 : 開啟網頁版【富遊娛樂城官網】
步驟2 : 點選上方(下載app),會跳出下載與複製連結選項,點選後跳轉。
步驟3 : 跳轉後點選(安裝),並點選(允許)操作下載描述檔,跳出下載描述檔後點選關閉。
步驟4 : 到手機設置>一般>裝置管理>設定描述檔(富遊)安裝,即可完成安裝。
富遊娛樂城常見問題FAQ
富遊娛樂城詐騙?
黑網詐騙可細分兩種,小出大不出及純詐騙黑網,我們可從品牌知名度經營和網站架設畫面分辨來簡單分辨。
富遊娛樂城會出金嗎?
如上面提到,富遊是在做一個品牌,為的是能夠保證出金,和帶領玩家遠離黑網,而且還有DUKER娛樂城出金認證,所以各位能夠放心富遊娛樂城為正出金娛樂城。
富遊娛樂城出金延遲怎麼辦?
基本上只要是公司系統問提造成富遊娛樂城會員無法在30分鐘成功提款,富遊娛樂城會即刻派送補償金,表達誠摯的歉意。
富遊娛樂城結論
富遊娛樂城安心玩,評價4.5顆星。如果還想看其他娛樂城推薦的,可以來娛樂城推薦尋找喔。
buy viagra online
buy viagra online
generic semaglutide
semaglutide order
ozempic
buy wegovy online no script
rybelsus lose weight
戰神賽特
2024全新上線❰戰神賽特老虎機❱ – ATG賽特玩法說明介紹
❰戰神賽特老虎機❱是由ATG電子獨家開發的古埃及風格線上老虎機,在傳說中戰神賽特是「力量之神」與奈芙蒂斯女神結成連理,共同守護古埃及的奇幻秘寶,只有被選中的冒險者才能進入探險。
❰戰神賽特老虎機❱ – ATG賽特介紹
2024最新老虎機【戰神塞特】- ATG電子 X 富遊娛樂城
❰戰神賽特老虎機❱ – ATG電子
線上老虎機系統 : ATG電子
發行年分 : 2024年1月
最大倍數 : 51000倍
返還率 : 95.89%
支付方式 : 全盤倍數、消除掉落
最低投注金額 : 0.4元
最高投注金額 : 2000元
可否選台 : 是
可選台台數 : 350台
免費遊戲 : 選轉觸發+購買特色
❰戰神賽特老虎機❱ 賠率說明
戰神塞特老虎機賠率算法非常簡單,玩家們只需要不斷的轉動老虎機,成功消除物件即可贏分,得分賠率依賠率表計算。
當盤面上沒有物件可以消除時,倍數符號將會相加形成總倍數!該次旋轉的總贏分即為 : 贏分 X 總倍數。
積分方式如下 :
贏分=(單次押注額/20) X 物件賠率
EX : 單次押注額為1,盤面獲得12個戰神賽特倍數符號法老魔眼
贏分= (1/20) X 1000=50
以下為各個得分符號數量之獎金賠率 :
得分符號 獎金倍數 得分符號 獎金倍數
戰神賽特倍數符號聖甲蟲 6 2000
5 100
4 60 戰神賽特倍數符號黃寶石 12+ 200
10-11 30
8-9 20
戰神賽特倍數符號荷魯斯之眼 12+ 1000
10-11 500
8-9 200 戰神賽特倍數符號紅寶石 12+ 160
10-11 24
8-9 16
戰神賽特倍數符號眼鏡蛇 12+ 500
10-11 200
8-9 50 戰神賽特倍數符號紫鑽石 12+ 100
10-11 20
8-9 10
戰神賽特倍數符號神箭 12+ 300
10-11 100
8-9 40 戰神賽特倍數符號藍寶石 12+ 80
10-11 18
8-9 8
戰神賽特倍數符號屠鐮刀 12+ 240
10-11 40
8-9 30 戰神賽特倍數符號綠寶石 12+ 40
10-11 15
8-9 5
❰戰神賽特老虎機❱ 賠率說明(橘色數值為獲得數量、黑色數值為得分賠率)
ATG賽特 – 特色說明
ATG賽特 – 倍數符號獎金加乘
玩家們在看到盤面上出現倍數符號時,務必把握機會加速轉動ATG賽特老虎機,倍數符號會隨機出現2到500倍的隨機倍數。
當盤面無法在消除時,這些倍數總和會相加,乘上當時累積之獎金,即為最後得分總額。
倍數符號會出現在主遊戲和免費遊戲當中,玩家們千萬別錯過這個可以瞬間將得獎金額拉高的好機會!
ATG賽特 – 倍數符號獎金加乘
ATG賽特 – 倍數符號圖示
ATG賽特 – 進入神秘金字塔開啟免費遊戲
戰神賽特倍數符號聖甲蟲
❰戰神賽特老虎機❱ 免費遊戲符號
在古埃及神話中,聖甲蟲又稱為「死亡之蟲」,它被當成了天球及重生的象徵,守護古埃及的奇幻秘寶。
當玩家在盤面上,看見越來越多的聖甲蟲時,千萬不要膽怯,只需在牌面上斬殺4~6個ATG賽特免費遊戲符號,就可以進入15場免費遊戲!
在免費遊戲中若轉出3~6個聖甲蟲免費遊戲符號,可額外獲得5次免費遊戲,最高可達100次。
當玩家的累積贏分且盤面有倍數物件時,盤面上的所有倍數將會加入總倍數!
ATG賽特 – 選台模式贏在起跑線
為避免神聖的寶物被盜墓者奪走,富有智慧的法老王將金子塔內佈滿迷宮,有的設滿機關讓盜墓者寸步難行,有的暗藏機關可以直接前往存放神秘寶物的暗房。
ATG賽特老虎機設有350個機檯供玩家選擇,這是連魔龍老虎機、忍老虎機都給不出的機台數量,為的就是讓玩家,可以隨時進入神秘的古埃及的寶藏聖域,挖掘長眠已久的神祕寶藏。
【戰神塞特老虎機】選台模式
❰戰神賽特老虎機❱ 選台模式
ATG賽特 – 購買免費遊戲挖掘秘寶
玩家們可以使用當前投注額的100倍購買免費遊戲!進入免費遊戲再也不是虛幻。獎勵與一般遊戲相同,且購買後遊戲將自動開始,直到場次和獎金發放完畢為止。
有購買免費遊戲需求的玩家們,立即點擊「開始」,啟動神秘金字塔裡的古埃及祕寶吧!
【戰神塞特老虎機】購買特色
❰戰神賽特老虎機❱ 購買特色
戰神賽特試玩推薦
看完了❰戰神賽特老虎機❱介紹之後,玩家們是否也蓄勢待發要進入古埃及的世界,一探神奇秘寶探險之旅。
本次ATG賽特與線上娛樂城推薦第一名的富遊娛樂城合作,只需要加入會員,即可領取到168體驗金,免費試玩420轉!
2024娛樂城
2024娛樂城No.1 – 富遊娛樂城介紹
2024 年 1 月 5 日
|
娛樂城, 現金版娛樂城
富遊娛樂城是無論老手、新手,都非常推薦的線上博奕,在2024娛樂城當中扮演著多年來最來勢洶洶的一匹黑馬,『人性化且精緻的介面,遊戲種類眾多,超級多的娛樂城優惠,擁有眾多與會員交流遊戲的群組』是一大特色。
富遊娛樂城擁有歐洲馬爾他(MGA)和菲律賓政府競猜委員會(PAGCOR)頒發的合法執照。
註冊於英屬維爾京群島,受國際行業協會認可的合法公司。
我們的中心思想就是能夠帶領玩家遠詐騙黑網,讓大家安心放心的暢玩線上博弈,娛樂城也受各大部落客、IG網紅、PTT論壇,推薦討論,富遊娛樂城沒有之一,絕對是線上賭場玩家的第一首選!
富遊娛樂城介面 / 2024娛樂城NO.1
富遊娛樂城簡介
品牌名稱 : 富遊RG
創立時間 : 2019年
存款速度 : 平均15秒
提款速度 : 平均5分
單筆提款金額 : 最低1000-100萬
遊戲對象 : 18歲以上男女老少皆可
合作廠商 : 22家遊戲平台商
支付平台 : 各大銀行、各大便利超商
支援配備 : 手機網頁、電腦網頁、IOS、安卓(Android)
富遊娛樂城遊戲品牌
真人百家 — 歐博真人、DG真人、亞博真人、SA真人、OG真人
體育投注 — SUPER體育、鑫寶體育、亞博體育
電競遊戲 — 泛亞電競
彩票遊戲 — 富遊彩票、WIN 539
電子遊戲 —ZG電子、BNG電子、BWIN電子、RSG電子、好路GR電子
棋牌遊戲 —ZG棋牌、亞博棋牌、好路棋牌、博亞棋牌
捕魚遊戲 —ZG捕魚、RSG捕魚、好路GR捕魚、亞博捕魚
富遊娛樂城優惠活動
每日任務簽到金666
富遊VIP全面啟動
復酬金活動10%優惠
日日返水
新會員好禮五選一
首存禮1000送1000
免費體驗金$168
富遊娛樂城APP
步驟1 : 開啟網頁版【富遊娛樂城官網】
步驟2 : 點選上方(下載app),會跳出下載與複製連結選項,點選後跳轉。
步驟3 : 跳轉後點選(安裝),並點選(允許)操作下載描述檔,跳出下載描述檔後點選關閉。
步驟4 : 到手機設置>一般>裝置管理>設定描述檔(富遊)安裝,即可完成安裝。
富遊娛樂城常見問題FAQ
富遊娛樂城詐騙?
黑網詐騙可細分兩種,小出大不出及純詐騙黑網,我們可從品牌知名度經營和網站架設畫面分辨來簡單分辨。
富遊娛樂城會出金嗎?
如上面提到,富遊是在做一個品牌,為的是能夠保證出金,和帶領玩家遠離黑網,而且還有DUKER娛樂城出金認證,所以各位能夠放心富遊娛樂城為正出金娛樂城。
富遊娛樂城出金延遲怎麼辦?
基本上只要是公司系統問提造成富遊娛樂城會員無法在30分鐘成功提款,富遊娛樂城會即刻派送補償金,表達誠摯的歉意。
富遊娛樂城結論
富遊娛樂城安心玩,評價4.5顆星。如果還想看其他娛樂城推薦的,可以來娛樂城推薦尋找喔。
rybelsus buy uk
rybelsus pills
wegovy diabetes
напольный плинтус размеры https://aljumynyevyj-napolnyj-plyntus.ru/.
rybelsus retail price
напольный плинтус https://aljumynyevyj-napolnyj-plyntus.ru.
generic wegovy
multi split multi-kondicionery.ru.
semaglutide buy uk
split fujitsu https://www.multi-kondicionery.ru.
wegovy buy online
戰神賽特老虎機
2024全新上線❰戰神賽特老虎機❱ – ATG賽特玩法說明介紹
❰戰神賽特老虎機❱是由ATG電子獨家開發的古埃及風格線上老虎機,在傳說中戰神賽特是「力量之神」與奈芙蒂斯女神結成連理,共同守護古埃及的奇幻秘寶,只有被選中的冒險者才能進入探險。
❰戰神賽特老虎機❱ – ATG賽特介紹
2024最新老虎機【戰神塞特】- ATG電子 X 富遊娛樂城
❰戰神賽特老虎機❱ – ATG電子
線上老虎機系統 : ATG電子
發行年分 : 2024年1月
最大倍數 : 51000倍
返還率 : 95.89%
支付方式 : 全盤倍數、消除掉落
最低投注金額 : 0.4元
最高投注金額 : 2000元
可否選台 : 是
可選台台數 : 350台
免費遊戲 : 選轉觸發+購買特色
❰戰神賽特老虎機❱ 賠率說明
戰神塞特老虎機賠率算法非常簡單,玩家們只需要不斷的轉動老虎機,成功消除物件即可贏分,得分賠率依賠率表計算。
當盤面上沒有物件可以消除時,倍數符號將會相加形成總倍數!該次旋轉的總贏分即為 : 贏分 X 總倍數。
積分方式如下 :
贏分=(單次押注額/20) X 物件賠率
EX : 單次押注額為1,盤面獲得12個戰神賽特倍數符號法老魔眼
贏分= (1/20) X 1000=50
以下為各個得分符號數量之獎金賠率 :
得分符號 獎金倍數 得分符號 獎金倍數
戰神賽特倍數符號聖甲蟲 6 2000
5 100
4 60 戰神賽特倍數符號黃寶石 12+ 200
10-11 30
8-9 20
戰神賽特倍數符號荷魯斯之眼 12+ 1000
10-11 500
8-9 200 戰神賽特倍數符號紅寶石 12+ 160
10-11 24
8-9 16
戰神賽特倍數符號眼鏡蛇 12+ 500
10-11 200
8-9 50 戰神賽特倍數符號紫鑽石 12+ 100
10-11 20
8-9 10
戰神賽特倍數符號神箭 12+ 300
10-11 100
8-9 40 戰神賽特倍數符號藍寶石 12+ 80
10-11 18
8-9 8
戰神賽特倍數符號屠鐮刀 12+ 240
10-11 40
8-9 30 戰神賽特倍數符號綠寶石 12+ 40
10-11 15
8-9 5
❰戰神賽特老虎機❱ 賠率說明(橘色數值為獲得數量、黑色數值為得分賠率)
ATG賽特 – 特色說明
ATG賽特 – 倍數符號獎金加乘
玩家們在看到盤面上出現倍數符號時,務必把握機會加速轉動ATG賽特老虎機,倍數符號會隨機出現2到500倍的隨機倍數。
當盤面無法在消除時,這些倍數總和會相加,乘上當時累積之獎金,即為最後得分總額。
倍數符號會出現在主遊戲和免費遊戲當中,玩家們千萬別錯過這個可以瞬間將得獎金額拉高的好機會!
ATG賽特 – 倍數符號獎金加乘
ATG賽特 – 倍數符號圖示
ATG賽特 – 進入神秘金字塔開啟免費遊戲
戰神賽特倍數符號聖甲蟲
❰戰神賽特老虎機❱ 免費遊戲符號
在古埃及神話中,聖甲蟲又稱為「死亡之蟲」,它被當成了天球及重生的象徵,守護古埃及的奇幻秘寶。
當玩家在盤面上,看見越來越多的聖甲蟲時,千萬不要膽怯,只需在牌面上斬殺4~6個ATG賽特免費遊戲符號,就可以進入15場免費遊戲!
在免費遊戲中若轉出3~6個聖甲蟲免費遊戲符號,可額外獲得5次免費遊戲,最高可達100次。
當玩家的累積贏分且盤面有倍數物件時,盤面上的所有倍數將會加入總倍數!
ATG賽特 – 選台模式贏在起跑線
為避免神聖的寶物被盜墓者奪走,富有智慧的法老王將金子塔內佈滿迷宮,有的設滿機關讓盜墓者寸步難行,有的暗藏機關可以直接前往存放神秘寶物的暗房。
ATG賽特老虎機設有350個機檯供玩家選擇,這是連魔龍老虎機、忍老虎機都給不出的機台數量,為的就是讓玩家,可以隨時進入神秘的古埃及的寶藏聖域,挖掘長眠已久的神祕寶藏。
【戰神塞特老虎機】選台模式
❰戰神賽特老虎機❱ 選台模式
ATG賽特 – 購買免費遊戲挖掘秘寶
玩家們可以使用當前投注額的100倍購買免費遊戲!進入免費遊戲再也不是虛幻。獎勵與一般遊戲相同,且購買後遊戲將自動開始,直到場次和獎金發放完畢為止。
有購買免費遊戲需求的玩家們,立即點擊「開始」,啟動神秘金字塔裡的古埃及祕寶吧!
【戰神塞特老虎機】購買特色
❰戰神賽特老虎機❱ 購買特色
戰神賽特試玩推薦
看完了❰戰神賽特老虎機❱介紹之後,玩家們是否也蓄勢待發要進入古埃及的世界,一探神奇秘寶探險之旅。
本次ATG賽特與線上娛樂城推薦第一名的富遊娛樂城合作,只需要加入會員,即可領取到168體驗金,免費試玩420轉!
buy semaglutide online from india
ozempic semaglutide tablets cost
wegovy 14mg
На портале https://amurplanet.ru/, посвященном всему, что интересно женщинам, вы найдете большому числу полезных публикаций. Мы предлагаем уникальные советы в разносторонних областях, таких как красота и многие другие аспекты.
Ознакомьтесь всю тайны женственной красоты и здоровья, будьте в курсе за актуальными трендами в мире моды и стиля. Мы предлагаем публикации о психологических аспектах и межличностных взаимоотношениях, семейных вопросах, компании и карьере, собственном росте и развитии. Вы также обнаружите советы по готовке, рецепты блюд, практические рекомендации по воспитанию детей и множество других полезных материалов.
Советы на AmurPlanet помогут вам создать атмосферное пространство, узнать о загородном хозяйстве, научиться заботиться о волосах и коже, поддерживать свой здоровьем и фитнесом. Мы также рассказываем о здоровом питании, эффективном финансовом планировании и много других аспектах.
Присоединяйтесь к нашей аудитории среди женщин на AmurPlanet.ru – и смотрите много нового каждый день. Не пропустите шанс получить актуальные новости, чтобы всегда быть в курсе всех новостей. Загляните на наш портал и откройте для себя миру женской тематики во всей его красе!
Не забудьте добавить сайт https://amurplanet.ru/ в закладки!
프라그마틱 플레이의 슬롯 포트폴리오는 250개 이상의 게임으로 다양한 화폐 및 33개 언어로 전 세계 시장에 제공됩니다.
프라그마틱
프라그마틱 관련 글 읽는 것이 즐거웠어요! 또한, 제 사이트에서도 프라그마틱에 대한 정보를 공유하고 있어요. 함께 교류하며 더 많은 지식을 얻어봐요!
https://s9winmy.com/
https://wqeqwrwqr.weebly.com/
http://iyalion.com/
Виктор Гардиенов, наш исключительный менеджер по клиентскому обслуживанию, играет важнейшую роль на mikro-zaim-online.ru. Его обширный опыт в клиентоориентированных компаниях и образование в сфере психологии помогают Виктору эффективно решать сложные задачи и находить подход к каждому клиенту. Его умение общаться делает процесс получения займов простым и комфортным для клиентов. Подробности о его подходе к работе и оформлении займов доступны на https://mikro-zaim-online.ru/o-nas/
allsaintsbeirut.com
그러므로… 이곳의 새로운 환경에 너무 많이 적응해야 합니다.
https://mnhelp.com/Providers/Fairview_Health_Services/Primary_Care_Clinic/53?returnUrl=http%3A%2F%2Fanomaxx.com%2F
wegovy buy online
rybelsus tablets cost
semaglutide canada pharmacy prices
rybelsus australia
프라그마틱은 다양한 언어와 화폐를 지원하는데, 이로 인해 글로벌 유저들에게 높은 평가를 받고 있어요.
프라그마틱 게임
프라그마틱 관련 글 읽는 것이 정말 즐거웠어요! 또한, 제 사이트에서도 프라그마틱과 관련된 정보를 공유하고 있어요. 함께 이야기 나누면서 더 많은 지식을 쌓아가요!
https://sportsford.com/
https://spinner44.com/
https://fjghgy.com/
buy ozempic uk
Корона (сериал 1-6 сезон) смотреть онлайн в HD 720. Корона (сериал, 1,2,3,4,5,6 сезон) смотреть онлайн. Корона сериал (1-6 сезон) смотреть онлайн бесплатно.
https://bit.ly/korona-1-6-sezon-serial-2024
wegovy online prescription
wegovy semaglutide tablets cost
경험을 위한 최고의 선택, 프라그마틱 게임의 풍부한 슬롯 다양성을 즐겨보세요!
프라그마틱
프라그마틱과 관련된 내용 감사합니다! 또한, 제 사이트에서도 프라그마틱에 대한 정보를 찾아보실 수 있어요. 서로 이야기 공유하며 더 많은 지식을 얻어가요!
https://www.hz-wallpaper.com
http://keoghsflex.com/
https://www.vantaihoaituong.com
Объявлена дата выхода 6 сезона «Короны». Основные. Сериал Корона смотреть онлайн в HD 720p Сериал Корона 1,2,3,4,5,6 сезон LostFilm смотреть.
https://bit.ly/korona-1-6-sezon-serial-2024
rybelsus canada pharmacy
purchase semaglutide
rybelsus online uk
rybelsus pills
buy ozempic
elprofesoringles.com
그는 조용히 땅에 떨어진 누에콩을 주워 입에 넣었다.
https://www.google.je/url?q=https://www.vantaihoaituong.com/
Сериал Корона (1,2,3,4,5,6 сезон) смотреть онлайн. Корона (2016, сериал) 1-6 сезон 1-9,10,11 серия. Корона (сериал, 1-4,5,6 сезон) смотреть онлайн в HD.
https://bit.ly/korona-1-6-sezon-serial-2024
rybelsus buy online
Корона 1-6 сезон смотреть онлайн в HD качестве. Корона ( сериал , 1-6 сезон) смотреть онлайн бесплатно. Корона ( сериал , 1-6 сезон) смотреть онлайн бесплатно.
https://bit.ly/korona-1-6-sezon-serial-2024
Корона (сериал, 1,2,3,4,5,6 сезон) смотреть онлайн. Корона (сериал 1,2,3,4,5 сезон) смотреть онлайн в HD. Корона 1-6 сезон смотреть онлайн сериал бесплатно.
https://bit.ly/korona-1-6-sezon-serial-2024
wegovy where to buy
Сериал «Корона», 6 сезон: дата выхода, где смотреть. Объявлена дата выхода 6 сезона «Короны». Основные. Сериал Корона 6 сезон смотреть онлайн бесплатно
https://bit.ly/korona-1-6-sezon-serial-2024
nsskart.com
Jiang Wen의 Lun 스카프는 잃어버렸고, 그의 머리는 흐트러져 있다.이 평화로운 질문을 듣는다.
http://www.hindi6.com/go.php?u=https%3A%2F%2Fcomfyescorts.com
buy ozempic in canada
Сериал Корона смотреть онлайн все серии Сериал Корона (1-6 сезон) смотреть онлайн бесплатно. Сериал Корона 1,2,3,4,5,6 сезон LostFilm смотреть.
https://bit.ly/korona-1-6-sezon-serial-2024
buy semaglutide
Корона смотреть онлайн все сезоны сериала. Корона (сериал, 1,2,3,4,5,6 сезон) смотреть онлайн. Корона (сериал, 1-4,5,6 сезон) смотреть онлайн в HD.
https://bit.ly/korona-1-6-sezon-serial-2024
semaglutide cost
buy ozempic online
1хбет официальный сайт– это популярная букмекерская контора, предоставляющая широкий выбор ставок на спорт и казино. Сайт обладает удобным интерфейсом, мобильной версией и приложением для удобства пользователей. 1xBet также известен разнообразными акциями и бонусами, делая игровой опыт более захватывающим.
semaglutide for diabetes
Корона 1-6 сезон смотреть онлайн сериал бесплатно. Корона 1-6 сезон смотреть онлайн в HD качестве. Корона 1-6 сезон смотреть онлайн сериал бесплатно.
https://bit.ly/korona-1-6-sezon-serial-2024
Укладка плинтуса на пол
Основные правила установки плинтуса
Подбираем оптимальный плинтус для пола
Преимущества использования плинтуса на пол
Как установить плинтус на пол своими руками
Советы профессионалов по укладке плинтуса на пол
Дизайн плинтуса для пола
Типы плинтусов для разных напольных покрытий
Особенности укладки плинтуса на разных поверхностях
Правила подбора цвет и материал плинтуса для пола
Монтаж плинтуса на ламинат плинтуса на ламинированный пол
Материалы для плинтуса на пол
Декоративные плинтусы пола с помощью плинтуса
Секреты крепления плинтуса для надежной фиксации
Как работают монтажные компании с плинтусами на пол
Как сделать инструмент для укладки плинтуса для монтажа плинтуса на пол
Как избежать ошибок при укладке плинтуса при монтаже плинтуса
Разбираемся с ценами на плинтус для пола
Лучшие бренды плинтусов для пола
Плинтус на пол как элемент дизайна с помощью плинтуса
плинтус современный http://ploskye-plyntusa.ru/.
purchase rybelsus
1хбет зеркало– это популярная букмекерская контора, предоставляющая широкий выбор ставок на спорт и казино. Сайт обладает удобным интерфейсом, мобильной версией и приложением для удобства пользователей. 1xBet также известен разнообразными акциями и бонусами, делая игровой опыт более захватывающим.
Инструкция по укладке плинтуса на пол
Основные правила установки плинтуса
Выбираем правильный плинтус для пола
Плюсы применения плинтуса на пол
Как установить плинтус на пол своими руками
Полезные советы по укладке плинтуса на пол
Дизайн плинтуса для пола
Типы плинтусов для разных напольных покрытий
Особенности укладки плинтуса на разных поверхностях
Как выбрать цвет и материал плинтуса для пола
Лучшие способы установки плинтуса на ламинированный пол
Материалы для плинтуса на пол
Декоративные плинтусы пола с помощью плинтуса
Секреты крепления плинтуса для надежной фиксации
Как работают монтажные компании с плинтусами на пол
Как сделать инструмент для укладки плинтуса для монтажа плинтуса на пол
Как избежать ошибок при укладке плинтуса при монтаже плинтуса
Разбираемся с ценами на плинтус для пола
Лучшие бренды плинтусов для пола
Плинтус на пол как элемент дизайна с помощью плинтуса
плинтус 10 см в интерьере http://ploskye-plyntusa.ru/.
semaglutide online uk
ozempic pill form
ozempic online
Step into the enchanted garden of Erotoons.net, where every path winds through a different genre of erotic comics. Our collection blooms with diversity, offering a bouquet of tales for every adult man’s preference. Here, each comic is a flower, rich with color and fragrance, ready to be picked and savored. Wander through our garden of sensual delights, from the delicate petals of romance to the deep hues of wild fantasies. In this garden, every visit is a stroll through the most exquisite and varied blooms of the adult comic world.
If your idea of relaxation includes a touch of adult adventure, Erotoons.net is where you should be. Our family guy porn comics are tailored for your entertainment.
프라그마틱과 관련된 이 글 정말 잘 읽었어요! 더불어 저도 제 사이트에서 프라그마틱에 대한 새로운 정보를 공유 중이에요. 함께 나누면 더 좋을 것 같아요!
PG 소프트
프라그마틱에 대한 글 읽는 것이 정말 즐거웠어요! 또한, 제 사이트에서도 프라그마틱과 관련된 정보를 공유하고 있어요. 함께 발전하며 더 많은 지식을 쌓아가요!
https://www.customercaresupportnumber.com/
http://keoghsflex.com/
http://keoghsflex.com/
buy wegovy online no script needed
buy ozempic
Nikolaev Vyacheslav Konstantinovich https://nikolaev-vyacheslav-konstantinovich.biography-wiki.com/.
http://psyho2039.8ua.ru/
semaglutide canada
wegovy buy australia
semaglutide pills
Hello
One day my friend showed me an interesting and colorful game, just like from My childhood, fruit combinations, very fascinating and most importantly develops logic and luck, it does not oblige to anything and helps brighten up the time!
Sweet Bonanza is a video slot with a striking design and many bonus features. The game has a lot of different symbols related to the theme of sweets, and the main feature is the function of free spins or free spins. The volatility of the slot is average, which means moderate chances of a big win. The RTP or return percentage is approximately 96%, which makes it quite attractive to most players.
One of the best websites about the game https://sweet-bonanza-game.ru, If you like to play slots!
Sweet Bonanza is a unique video slot that offers players not only interesting gameplay, but also real chances for big winnings. Its popularity in online casinos around the world speaks for itself. If you are looking for an interesting game with the potential for large payouts, be sure to try Sweet Bonanza. In any case, when playing for money, you should always remember about responsibility and managing your balance.
Good luck friends!
sweet bonanza nereden oynan?r
rtp sweet bonanza
sweet bonanza gif
link sweet bonanza
sweet bonanza slots
play bonanza online
track casino sweet bonanza
bonanza casino slot
sweet bonzana
казино бонанза
sweet bonanzo
bonanza play
프라그마틱 슬롯에 대한 설명 정말 감사합니다! 더불어, 제 사이트에서도 프라그마틱과 관련된 내용을 찾아보세요. 함께 발전하며 더 많은 지식을 얻어가요!
http://www.pragmatic-game.net
프라그마틱 관련 글 읽는 것이 정말 즐거웠어요! 또한, 제 사이트에서도 프라그마틱과 관련된 정보를 공유하고 있어요. 함께 이야기 나누면서 더 많은 지식을 쌓아가요!
https://wtsnzp.com/
https://www.clemonsjerseys.com
https://btob-business.com/
buy semaglutide in mexico
semaglutide for diabetes
Здравствуйте! Я хочу поделиться своим опытом использования сайта, на котором собраны все МФО, где можно получить займ на карту без отказа. Это действительно удобно! Я нашел идеальный вариант для себя на этом ресурсе и получил деньги в кратчайшие сроки.
semaglutide injection
http://psyho2039.8ua.ru/
프라그마틱 슬롯을 무료로 즐기면서 특별한 순간을 만들어보세요.
pragmatic-game.net
프라그마틱 슬롯에 대한 설명 정말 감사합니다! 더불어, 제 사이트에서도 프라그마틱과 관련된 내용을 찾아보세요. 함께 발전하며 더 많은 지식을 얻어가요!
http://keoghsflex.com/
https://www.vamiveta.com/
https://bahisgirisadresleri.com/
porn
semaglutide oral medication
buy ozempic canada
buy semaglutide online
wegovy buy uk
Деревянные дома под ключ
Дома АВС – Ваш уютный уголок
Мы строим не просто дома, мы создаем пространство, где каждый уголок будет наполнен комфортом и радостью жизни. Наш приоритет – не просто предоставить место для проживания, а создать настоящий дом, где вы будете чувствовать себя счастливыми и уютно.
В нашем информационном разделе “ПРОЕКТЫ” вы всегда найдете вдохновение и новые идеи для строительства вашего будущего дома. Мы постоянно работаем над тем, чтобы предложить вам самые инновационные и стильные проекты.
Мы убеждены, что основа хорошего дома – это его дизайн. Поэтому мы предоставляем услуги опытных дизайнеров-архитекторов, которые помогут вам воплотить все ваши идеи в жизнь. Наши архитекторы и персональные консультанты всегда готовы поделиться своим опытом и предложить функциональные и комфортные решения для вашего будущего дома.
Мы стремимся сделать весь процесс строительства максимально комфортным для вас. Наша команда предоставляет детализированные сметы, разрабатывает четкие этапы строительства и осуществляет контроль качества на каждом этапе.
Для тех, кто ценит экологичность и близость к природе, мы предлагаем деревянные дома премиум-класса. Используя клееный брус и оцилиндрованное бревно, мы создаем уникальные и здоровые условия для вашего проживания.
Тем, кто предпочитает надежность и многообразие форм, мы предлагаем дома из камня, блоков и кирпичной кладки.
Для практичных и ценящих свое время людей у нас есть быстровозводимые каркасные дома и эконом-класса. Эти решения обеспечат вас комфортным проживанием в кратчайшие сроки.
С Домами АВС создайте свой уютный уголок, где каждый момент жизни будет наполнен радостью и удовлетворением
semaglutide medicine
ozempic semaglutide
wegovy generic cost
Доброго!
Дезинфекция и Дератизация Участков в Москве и Московской Области: Эффективная Защита от Вредителей
Живя в Москве и Московской области, владельцы приусадебных участков сталкиваются с проблемой вредителей, которые могут повлиять на комфорт и безопасность жизни. Профессиональная обработка территории от насекомых и грызунов становится ключевым шагом для обеспечения здоровья и сохранности имущества
Применение современных методов и безопасных средств обеспечивает высокую эффективность процесса, минимизируя риски для здоровья человека и домашних животных.
Профессиональные службы предлагают комплексную обработку, включая дезинсекцию и дератизацию, учитывая все возможные источники вредителей на участке.
Вот сайт профессионалов дезинсекции: https://dezinfekciya-mcd.ru
уничтожение тараканов в магазине
уничтожение блох
дезинфекция от блох
Применение высококачественных средств обеспечивает долгосрочный эффект, что означает продолжительную защиту от насекомых и грызунов.
Использование профессиональных инсектицидов и репеллентов, которые обеспечивают эффективное уничтожение вредителей.
Удачи!
служба по выведению тараканов
уничтожение ос
дезинфекция от клопов в квартире
санобработка от тараканов
вызвать уничтожение клопов
semaglutide tablets buy
semaglutide canada pharmacy prices
semaglutide injections
https://rg8888.org/atg/
2024全新上線❰戰神賽特老虎機❱ – ATG賽特玩法說明介紹
❰戰神賽特老虎機❱是由ATG電子獨家開發的古埃及風格線上老虎機,在傳說中戰神賽特是「力量之神」與奈芙蒂斯女神結成連理,共同守護古埃及的奇幻秘寶,只有被選中的冒險者才能進入探險。
❰戰神賽特老虎機❱ – ATG賽特介紹
2024最新老虎機【戰神塞特】- ATG電子 X 富遊娛樂城
❰戰神賽特老虎機❱ – ATG電子
線上老虎機系統 : ATG電子
發行年分 : 2024年1月
最大倍數 : 51000倍
返還率 : 95.89%
支付方式 : 全盤倍數、消除掉落
最低投注金額 : 0.4元
最高投注金額 : 2000元
可否選台 : 是
可選台台數 : 350台
免費遊戲 : 選轉觸發+購買特色
❰戰神賽特老虎機❱ 賠率說明
戰神塞特老虎機賠率算法非常簡單,玩家們只需要不斷的轉動老虎機,成功消除物件即可贏分,得分賠率依賠率表計算。
當盤面上沒有物件可以消除時,倍數符號將會相加形成總倍數!該次旋轉的總贏分即為 : 贏分 X 總倍數。
積分方式如下 :
贏分=(單次押注額/20) X 物件賠率
EX : 單次押注額為1,盤面獲得12個戰神賽特倍數符號法老魔眼
贏分= (1/20) X 1000=50
以下為各個得分符號數量之獎金賠率 :
得分符號 獎金倍數 得分符號 獎金倍數
戰神賽特倍數符號聖甲蟲 6 2000
5 100
4 60 戰神賽特倍數符號黃寶石 12+ 200
10-11 30
8-9 20
戰神賽特倍數符號荷魯斯之眼 12+ 1000
10-11 500
8-9 200 戰神賽特倍數符號紅寶石 12+ 160
10-11 24
8-9 16
戰神賽特倍數符號眼鏡蛇 12+ 500
10-11 200
8-9 50 戰神賽特倍數符號紫鑽石 12+ 100
10-11 20
8-9 10
戰神賽特倍數符號神箭 12+ 300
10-11 100
8-9 40 戰神賽特倍數符號藍寶石 12+ 80
10-11 18
8-9 8
戰神賽特倍數符號屠鐮刀 12+ 240
10-11 40
8-9 30 戰神賽特倍數符號綠寶石 12+ 40
10-11 15
8-9 5
❰戰神賽特老虎機❱ 賠率說明(橘色數值為獲得數量、黑色數值為得分賠率)
ATG賽特 – 特色說明
ATG賽特 – 倍數符號獎金加乘
玩家們在看到盤面上出現倍數符號時,務必把握機會加速轉動ATG賽特老虎機,倍數符號會隨機出現2到500倍的隨機倍數。
當盤面無法在消除時,這些倍數總和會相加,乘上當時累積之獎金,即為最後得分總額。
倍數符號會出現在主遊戲和免費遊戲當中,玩家們千萬別錯過這個可以瞬間將得獎金額拉高的好機會!
ATG賽特 – 倍數符號獎金加乘
ATG賽特 – 倍數符號圖示
ATG賽特 – 進入神秘金字塔開啟免費遊戲
戰神賽特倍數符號聖甲蟲
❰戰神賽特老虎機❱ 免費遊戲符號
在古埃及神話中,聖甲蟲又稱為「死亡之蟲」,它被當成了天球及重生的象徵,守護古埃及的奇幻秘寶。
當玩家在盤面上,看見越來越多的聖甲蟲時,千萬不要膽怯,只需在牌面上斬殺4~6個ATG賽特免費遊戲符號,就可以進入15場免費遊戲!
在免費遊戲中若轉出3~6個聖甲蟲免費遊戲符號,可額外獲得5次免費遊戲,最高可達100次。
當玩家的累積贏分且盤面有倍數物件時,盤面上的所有倍數將會加入總倍數!
ATG賽特 – 選台模式贏在起跑線
為避免神聖的寶物被盜墓者奪走,富有智慧的法老王將金子塔內佈滿迷宮,有的設滿機關讓盜墓者寸步難行,有的暗藏機關可以直接前往存放神秘寶物的暗房。
ATG賽特老虎機設有350個機檯供玩家選擇,這是連魔龍老虎機、忍老虎機都給不出的機台數量,為的就是讓玩家,可以隨時進入神秘的古埃及的寶藏聖域,挖掘長眠已久的神祕寶藏。
【戰神塞特老虎機】選台模式
❰戰神賽特老虎機❱ 選台模式
ATG賽特 – 購買免費遊戲挖掘秘寶
玩家們可以使用當前投注額的100倍購買免費遊戲!進入免費遊戲再也不是虛幻。獎勵與一般遊戲相同,且購買後遊戲將自動開始,直到場次和獎金發放完畢為止。
有購買免費遊戲需求的玩家們,立即點擊「開始」,啟動神秘金字塔裡的古埃及祕寶吧!
【戰神塞特老虎機】購買特色
❰戰神賽特老虎機❱ 購買特色
戰神賽特試玩推薦
看完了❰戰神賽特老虎機❱介紹之後,玩家們是否也蓄勢待發要進入古埃及的世界,一探神奇秘寶探險之旅。
本次ATG賽特與線上娛樂城推薦第一名的富遊娛樂城合作,只需要加入會員,即可領取到168體驗金,免費試玩420轉!
buy rybelsus
buy semaglutide online from india
ozempic pill form
where can i buy semaglutide
rybelsus 3 mg
rybelsus 3 mg
rybelsus pill
buy viagra online
Изучаем типы кондиционеров перед установкой
mitsubishi inverter kondicionery-s-ustanovkoj.ru.
Как установить кондиционер на балконе?
сплит кондиционер https://www.kondicionery-s-ustanovkoj.ru.
ozempic tablets 7 mg
Как купить кондиционер без переплаты
монтаж кондиционера http://www.ustanovka-split-sistem.ru.
semaglutide tablet
semaglutide tablets 7 mg
Как не ошибиться при покупке кондиционера
магазин кондиционеров http://www.ustanovka-split-sistem.ru/.
rybelsus australia online
ozempic
wegovy medicine
semaglutide tablets buy
where to buy ozempic
Can you tell us more about this? I’d love to find
out more details. I saw similar here: sklep internetowy and
also here: najlepszy sklep
buy ozempic pill form for adults
semaglutide oral medication
rybelsus canada pharmacy prices
semaglutide retail price
Семейные викторины: Раскройте веселье в вашем отношении (https://testy-pro-lyubov-i-semyu.blogspot.com/2023/12/blog-post.html) – это интерактивные опросы, созданные с целью обеспечивать веселье и развлечение. Они поднимают перед участниками разнообразные вопросы и задачи, которые часто связаны с интересными темами, личными предпочтениями или смешными сценариями. Основная главная цель таких тестов – предоставить участнику шанс на хорошее времяпрепровождение, проверить свои знания и навыки или познакомиться с новой информацией о себе или мире, в котором они живут. Развлекательные тесты широко популярны в онлайн-среде и социальных медиа, где они получили признание как популярные формы интерактивного развлечения и поделиться контентом.
Не забудьте добавить наш сайт в закладки: https://testy-pro-lyubov-i-semyu.blogspot.com/2023/12/blog-post.html
semaglutide 7mg
semaglutide drug
rybelsus 14
buy rybelsus
Hey there, You have done an excellent job.
I’ll certainly digg it and personally suggest to my friends.
I am confident they’ll be benefited from this web site.
buy rybelsus canada
semaglutide mexico
semaglutide 7mg
order semaglutide
semaglutide 3 mg
wegovy 3 mg tablet
Hello there! Do you use Twitter? I’d like to follow you
if that would bbe okay. I’m undoubtedly enjoying your blog aand look forward to new posts.
semaglutide diabetes
buy rybelsus canada
It’s not my first time to visit this site, i am browsing this site dailly and take nice data from here everyday.
buy ozempic for weight loss
wegovy 14mg tablets
wegovy online pharmacy
Hi! This is kind of off topic but I need some advice from an established blog.
Is it very difficult to set up your own blog? I’m not
very techincal but I can figure things out pretty quick.
I’m thinking about creating my own but I’m not sure where to begin. Do you
have any points or suggestions? Thanks
rybelsus tablets cost
wegovy tablets for weight loss
rybelsus semaglutide tablets
buy semaglutide online no script
buy semaglutide in mexico
rybelsus tablets 7 mg
wegovy
generic ozempic cost
система кондиционирования купить http://www.internet-magazin-kondicionerov.ru.
кондиционер купить с установкой https://www.internet-magazin-kondicionerov.ru.
Захватывающие тесты на психологические отклонения: Исследуйте неизведанные грани своего разума (https://teksty-otklonenij.blogspot.com/2023/12/blog-post.html) – это занимательные опросы, созданные для исследования глубин сознания. Они поднимают перед участниками разнообразные задачи, зачастую относящиеся с интригующими моментами самопознания. Основная задача таких тестов – обеспечить пользователю шанс на захватывающее времяпрепровождение, но и узнать свои личностные нюансы, расширить самосознание и возможно обнаружить скрытые аспекты личности. Такие тесты завоевали признание как способ саморефлексии в онлайн-пространстве и социальных сетях, где они предлагают пользователям не только веселое времяпрепровождение, но и способ саморефлексии.
Не забудьте сохранить ссылку на наш ресурс: https://teksty-otklonenij.blogspot.com/2023/12/blog-post.html
Захватывающие тесты на психологические отклонения: Откройте закрытые стороны своего разума (https://teksty-otklonenij.blogspot.com/2023/12/blog-post.html) – это привлекательные опросы, созданные для тщательного изучения сознания. Они предлагают перед участниками множество интересных вопросов, часто связанные с увлекательными аспектами психологии. Основная цель таких тестов – предоставить пользователю шанс на захватывающее времяпрепровождение, но и узнать свои психологические особенности, повысить самосознание и и возможно выявить скрытые аспекты личности. Такие тесты завоевали признание как способ саморефлексии в интернете и соцсетях, где они предоставляют пользователям не только веселое времяпрепровождение, но и метод самоанализа.
Не забудьте отметить ссылку на наш ресурс: https://teksty-otklonenij.blogspot.com/2023/12/blog-post.html
buy rybelsus canada
Очаровательные тесты для женщин: Исследуйте изящество вашего разума (https://zhenskie-testy.blogspot.com/2023/12/blog-post.html) – это привлекательные опросы, предназначенные для глубокого самопознания. Они предлагают перед участницами множество заданий для самоанализа, часто связанные с эмоциональном благополучии. Основная задача этих тестов – обеспечить возможность интересно провести время, а также способствовать разгадыванию свои уникальные особенности. Эти тесты завоевали любовь среди женской аудитории онлайн как инструмент для саморазвития.
Не забудьте добавить в закладки ссылку на наш ресурс: https://zhenskie-testy.blogspot.com/2023/12/blog-post.html
It’s an remarkable post designed for all the internet viewers;
they will obtain advantage from it I am sure. http://chaurqlqx.Mee.nu/?entry=3574582
Вдохновляющие тесты для женщин: Исследуйте изящество вашего разума (https://zhenskie-testy.blogspot.com/2023/12/blog-post.html) – это привлекательные опросы, разработанные для погружения в женский внутренний мир. Они задают перед участницами разнообразные вопросы для саморефлексии, часто вдохновляющие на размышления о эмоциональном благополучии. Основная задача этих тестов – обеспечить перспективу приятного времяпрепровождения, а также позволить узнать эмоциональные грани. Эти тесты получили признание среди женской аудитории онлайн как способ самоисследования.
Не забудьте сохранить ссылку на наш ресурс: https://zhenskie-testy.blogspot.com/2023/12/blog-post.html
Nikolaev https://www.natureworldnews.com/articles/57820/20230802/vyacheslav-konstantinovich-nikolaev.htm
Hey there this is somewhat of off topic but I was wanting to know if blogs use WYSIWYG editors or
if you have to manually code with HTML. I’m starting a blog soon but
have no coding expertise so I wanted to get advice from someone with experience.
Any help would be enormously appreciated!
rybelsus generic cost
프라그마틱 플레이의 무료 슬롯으로 즐거운 게임을 경험하세요.
프라그마틱 플레이
프라그마틱의 빙고 게임은 항상 즐겁고 흥미로워요. 여기에서 더 많은 빙고 게임 정보를 확인하세요!
https://jxbodun.com/
https://bahisgirisadresleri.com/
https://s9winmy.com/
wegovy tab 3mg
order rybelsus online
rybelsus tablets for weight loss cost
ozempic tab 3mg
wegovy online prescription
buy ozempic online no script needed
топ онлайн казино– это популярная букмекерская контора, предоставляющая широкий выбор ставок на спорт и казино. Сайт обладает удобным интерфейсом, мобильной версией и приложением для удобства пользователей. 1xBet также известен разнообразными акциями и бонусами, делая игровой опыт более захватывающим.
iGaming 분야에서 혁신적이고 표준화된 콘텐츠를 제공하는 최신 프라그마틱 게임은 슬롯, 라이브 카지노, 빙고 등 다양한 제품을 통해 최고의 엔터테인먼트를 선사합니다.
프라그마틱 무료
프라그마틱의 게임은 정말 다양한데, 어떤 테마의 게임을 가장 좋아하나요? 나눠주세요!
https://qq8778ok.com/
http://www.iavstudios.com/
https://www.comfyescorts.com
ozempic tablets cost
Инновационные образовательные тесты: Расширьте границы своего знания (https://obrazovatelnye-testy.blogspot.com/2023/12/blog-post.html) – это образовательные вопросники, созданные с целью обогащения знаний и развития умений. Они подносят участникам разнообразные вопросы и задания, которые связаны с важными образовательными темами. Основная миссия таких квизов – дать учащимся шанс улучшить учебные результаты через игру, проверить и закрепить полученные знания и открыть новые горизонты познания. Образовательные тесты быстро стали популярными в среде онлайн-образования и среди образовательных платформ, где они применяются как современные методы обучения и обмена знаниями.
Не забудьте добавить наш сайт в закладки для доступа к образовательным тестам: https://obrazovatelnye-testy.blogspot.com/2023/12/blog-post.html
Увлекательные викторины для обучения и развития: Погрузитесь в мир знаний (https://obrazovatelnye-testy.blogspot.com/2023/12/blog-post.html) – это познавательные квизы, созданные с целью повышения образовательного уровня в увлекательной форме. Они предлагают учащимся интригующие вопросы для размышления, которые объединяют интересные учебные дисциплины. Основная цель таких тестов – предоставить обучающимся способ развлечься и одновременно учиться, оценить свои академические навыки и обнаружить новые интересные факты. Образовательные тесты быстро стали популярными в цифровом пространстве и среди учебных сообществ, где они применяются как современные методы обучения и дискуссий в учебном процессе.
Не забудьте добавить наш сайт в закладки для доступа к образовательным тестам: https://obrazovatelnye-testy.blogspot.com/2023/12/blog-post.html
играть казино– это популярная букмекерская контора, предоставляющая широкий выбор ставок на спорт и казино. Сайт обладает удобным интерфейсом, мобильной версией и приложением для удобства пользователей. 1xBet также известен разнообразными акциями и бонусами, делая игровой опыт более захватывающим.
semaglutide lose weight
buy ozempic
Thank you for sharing your thoughts. I truly appreciate
your efforts and I will be waiting for your next post thank you once again. I saw similar here:
ecommerce and also here: sklep internetowy
mandyssecrets.com
이런 설렘은 금상첨화나 결혼식 못지않다.
http://www.zhenghe.biz/urlredirect.php?go=https%3A%2F%2Fhz-wallpaper.com%2F
rybelsus oral medication
프라그마틱에 대한 글 읽는 것이 정말 재미있었어요! 또한, 제 사이트에서도 프라그마틱과 관련된 정보를 공유하고 있어요. 함께 발전하며 더 많은 지식을 쌓아가요!
프라그마틷
프라그마틱의 게임을 플레이하면 항상 긴장감 넘치고 즐거운 시간을 보낼 수 있어 좋아요. 여기서 더 많은 이야기를 들려주세요!
https://www.hz-wallpaper.com
https://fjghgy.com/
https://spinner44.com/
rybelsus australia
semaglutide weight loss
ozempic semaglutide tablets 3mg
wegovy pills
Online poker
buy rybelsus in mexico
modokicase.com
이 사람은 나를 먼저 베고 나중에 놀았고 이미 나를 차에 묶었습니다.
http://www.warpradio.com/follow.asp?url=https%3A%2F%2Fcomfyescorts.com%2F
netovideo.com
그는 매우 부끄러워하며 어리둥절한 관리들을 바라보고는 Xiao Jing을 차갑게 바라보았습니다.
semaglutide buy uk
semaglutide mexico
Какие материалы используются при монтаже vrf системы?
расчет vrf системы vrf-sistemy.ru.
rybelsus where to buy
Какие документы необходимы для монтажа vrf системы?
системы климат контроля https://www.vrf-sistemy.ru.
Зачем нужен кондиционер
настенный кондиционер http://magazin-split-sistem.ru/.
ozempic tab 3mg
Занимательные тесты для мужчин: Исследуйте скрытую силу (https://testy-dlya-muzhchin.blogspot.com/2023/12/blog-post.html) – это привлекательные опросы, разработанные для изучения мужской сущности. Они задают перед участниками интересные вопросы и задачи, часто вдохновляющие на размышления о эмоциональном благополучии. Основная задача этих тестов – обеспечить перспективу приятного времяпрепровождения, а также помочь обнаружить свои уникальные особенности. Эти тесты завоевали любовь среди мужчин в интернете как инструмент для саморазвития.
Не забудьте запомнить ссылку на наш ресурс: https://testy-dlya-muzhchin.blogspot.com/2023/12/blog-post.html
Занимательные тесты для мужчин: Раскройте великолепие вашего разума (https://testy-dlya-muzhchin.blogspot.com/2023/12/blog-post.html) – это увлекательные опросы, предназначенные для погружения в мужской внутренний мир. Они задают перед участниками интересные вопросы и задачи, часто вдохновляющие на размышления о гармонии в жизни. Основная цель этих тестов – обеспечить возможность интересно провести время, а также позволить узнать личные нюансы. Эти тесты стали популярными среди мужской аудитории онлайн как инструмент для саморазвития.
Не забудьте добавить в закладки ссылку на наш ресурс: https://testy-dlya-muzhchin.blogspot.com/2023/12/blog-post.html
kinoboomhd.com
대부분의 사람들이 이러한 상황을 보았을 때 기절하지 않는 것은 놀라운 일이 아닙니다.
Какие дополнительные материалы нужны для установки кондиционера
установить кондиционер magazin-split-sistem.ru.
rybelsus 21 mg
wegovy order
affascinantenao.com
이 배에서 수많은 사람들이 집으로 돌아가고 싶어하고 날개를 펴고 천진항으로 돌아가는 것을 기다릴 수 없습니다.아무리 봐도 이 징차 사절은 하늘에서 온 외로운 별처럼 보이며 앞으로 친구가 없을 것입니다.
http://archive.cym.org/conference/gotoads.asp?url=https%3A%2F%2Fvantaihoaituong.com%2F
ozempic tablet
iGaming 업계에서 리딩되는 프라그마틱 게임은 모바일 중심의 혁신적이고 표준화된 콘텐츠를 제공합니다.
프라그마틱 게임
프라그마틱과 관련된 내용 감사합니다! 또한, 제 사이트에서도 프라그마틱에 대한 정보를 찾아보실 수 있어요. 서로 이야기 공유하며 더 많은 지식을 얻어가요!
https://sportsford.com/
https://btob-business.com/
http://keoghsflex.com/
semaglutide tablets buy
amruthaborewells.com
언제라도 아낌없이 죽을 각오가 되어 있는 모습으로 경외심을 불러일으키며 곧바로 교실을 빠져나갔다.
digiyumi.com
그런데 이 말을 듣고 조금 돌아왔다.
Vyacheslav Konstantinovich Nikolaev http://www.techbullion.com/nikolaev-vyacheslav-konstantinovich.
Когда дело доходит до быстрого решения финансовых проблем, expl0it.ru предлагает лучшие микрозаймы. Быстрое оформление, минимальный набор документов и гибкие условия – все это делает процесс получения микрозайма удобным и доступным. Отправьте заявку сейчас и получите деньги в кратчайшие сроки.
order rybelsus online
Thanks for your personal marvelous posting! I definitely enjoyed reading it, you are a great author.
I will be sure to bookmark your blog and will often come back
down the road. I want to encourage continue your great posts, have a nice holiday weekend!
buy ozempic
Does your website have a contact page? I’m having trouble locating it but,
I’d like to shoot you an e-mail. I’ve got some creative ideas for your
blog you might be interested in hearing. Either way, great blog and I look forward to seeing it grow over time.
Доброго!
Хочу всем посоветовать лучшую компаний по дезинсекции и уничтожения насекомых в Москве, это действительно помогло мне решить проблемы и начать жить спокойно!
Уничтожение тараканов: эффективные методы, безопасность и профессиональные услуги
Тараканы в доме могут вызывать не только физическое недомогание, но и создавать проблемы с гигиеной и комфортом. Для решения этой неприятной ситуации широко применяются различные методы уничтожения тараканов, включая дезинсекцию и применение инсектицидов.
Профессиональная дезинсекция:
Один из самых эффективных способов избавления от тараканов — профессиональная дезинсекция. Специалисты проводят тщательную обработку помещения с использованием высокоэффективных инсектицидов, которые эффективно уничтожают тараканов на всех стадиях их развития. Профессионалы также применяют индивидуальный подход, учитывая особенности помещения и степень зараженности.
Вот сайт профессионалов дезинсекции: https://dezinfekciya-mcd.ru
обработка от моли
дезинфекция блох
удаление плесени в квартире
Безопасность и гарантия результата:
При проведении уничтожения тараканов специалисты обеспечивают полную безопасность для здоровья жильцов и домашних животных. Инсектициды, используемые при дезинсекции, отличаются низкой токсичностью для людей и животных, при этом обеспечивая высокую эффективность в борьбе с тараканами. Гарантия результата после профессиональной обработки обеспечивает долгосрочную защиту от повторного появления вредителей.
Удачи!
уничтожение тараканов в магазине
уничтожение муравьев
обработка деревьев от короеда
обработка от тараканов
уничтожение насекомых
프라그마틱 슬롯은 엄선된 테마와 뛰어난 디자인으로 놀라운 시각적 경험을 제공합니다.
pragmatic-game.net
프라그마틱 슬롯에 대한 내용이 정말 도움이 되었어요! 더불어, 제 사이트에서도 프라그마틱과 관련된 정보를 찾아보실 수 있어요. 함께 지식을 공유해보세요!
https://eprust.com/
http://keoghsflex.com/
https://btob-business.com/
netovideo.com
이 세 가지의 조합은 정말 치명적입니다.
semaglutide buy online
semaglutide xr
wegovy semaglutide tablets 7.5 mcg
최신 프라그마틱 게임으로 즐거운 시간을 보내세요.
프라그마틱 슬롯 체험
프라그마틱은 다양한 언어와 화폐를 지원하는데, 이로 인해 글로벌 유저들에게 높은 평가를 받고 있어요.
http://www.iavstudios.com/
https://www.hz-wallpaper.com
https://wqeqwrwqr.weebly.com/
amruthaborewells.com
그리고 명나라에 파견된 이 스페인 보병 연대는 엘리트 중의 엘리트다.
semaglutide 21 mg
wegovy online pharmacy
You made some decent points there. I checked on the web for more information about the issue and found most individuals will go
along with your views on this web site.
rybelsus weight loss
ozempic tab 7mg
semaglutide drug
wegovy 7mg
cheap ozempic
buy rybelsus online from india
buy wegovy
ozempic tablets for weight loss cost
rybelsus sale
ozempic tab 3mg
rybelsus semaglutide tablets 3mg
semaglutide from canada
buy semaglutide online from india
semaglutide 3mg
where to buy ozempic
semaglutide canada
wegovy 3 mg
Дома АВС – Ваш уютный уголок
Мы строим не просто дома, мы создаем пространство, где каждый уголок будет наполнен комфортом и радостью жизни. Наш приоритет – не просто предоставить место для проживания, а создать настоящий дом, где вы будете чувствовать себя счастливыми и уютно.
В нашем информационном разделе “ПРОЕКТЫ” вы всегда найдете вдохновение и новые идеи для строительства вашего будущего дома. Мы постоянно работаем над тем, чтобы предложить вам самые инновационные и стильные проекты.
Мы убеждены, что основа хорошего дома – это его дизайн. Поэтому мы предоставляем услуги опытных дизайнеров-архитекторов, которые помогут вам воплотить все ваши идеи в жизнь. Наши архитекторы и персональные консультанты всегда готовы поделиться своим опытом и предложить функциональные и комфортные решения для вашего будущего дома.
Мы стремимся сделать весь процесс строительства максимально комфортным для вас. Наша команда предоставляет детализированные сметы, разрабатывает четкие этапы строительства и осуществляет контроль качества на каждом этапе.
Для тех, кто ценит экологичность и близость к природе, мы предлагаем деревянные дома премиум-класса. Используя клееный брус и оцилиндрованное бревно, мы создаем уникальные и здоровые условия для вашего проживания.
Тем, кто предпочитает надежность и многообразие форм, мы предлагаем дома из камня, блоков и кирпичной кладки.
Для практичных и ценящих свое время людей у нас есть быстровозводимые каркасные дома и эконом-класса. Эти решения обеспечат вас комфортным проживанием в кратчайшие сроки.
С Домами АВС создайте свой уютный уголок, где каждый момент жизни будет наполнен радостью и удовлетворением
https://bit.ly/chpargalka-psikhologiya
Heyy thеrе! Do yoou know iif thney makee anny pllugins tto aszist woth SEO?
Ӏ’m tring tto gget mmy boog tоo raqnk ffor sоme targted keywordss butt Ι’m
nott seein vry ood гesults. If youu knkw off aany ρlease share.
Cheers!
https://bit.ly/chpargalka-psikhologiya
https://bit.ly/chpargalka-psikhologiya
https://bit.ly/chpargalka-psikhologiya
https://bit.ly/chpargalka-psikhologiya
buy semaglutide
semaglutide retail price
https://bit.ly/chpargalka-psikhologiya
https://bit.ly/chpargalka-psikhologiya
digiyumi.com
이 Fang Jifan은 그런 일을 할 수 있습니다.
Какой кондиционер выбрать для вашего дома
стоимость установки кондиционера https://www.expert-split.ru.
В Москве вы можете успешно написать диплом по любой специальности. Профессиональные писатели помогут с составлением уникального текста, соответствующего всем требованиям. Получите высокую оценку, обратившись к опытным специалистам.
http://michiya-cs.com/userinfo.php?uid=29332
https://www.tapatalk.com/groups/dzerjinsky/viewtopic.php?f=9&t=33502&from_new_topic=1
http://forum.analysisclub.ru/index.php/topic,136822.new.html#new
http://owen.ru/forum/member.php?u=146569
Наш сервис предоставляет качественную помощь в написании дипломов.
buy semaglutide oversees
Климатический аппарат для дома – наслаждайтесь летом
haier кондиционер expert-split.ru.
buy wegovy in mexico
rybelsus injection
프라그마틱 관련 글 읽는 것이 정말 즐거웠어요! 또한, 제 사이트에서도 프라그마틱과 관련된 정보를 공유하고 있어요. 함께 이야기 나누면서 더 많은 지식을 쌓아가요!
http://www.pragmatic-game.net
프라그마틱의 슬롯 게임은 정말 뛰어나죠! 여기서 더 많은 게임 정보를 찾을 수 있어 기뻐요.
https://www.maseraticlubuae.com
https://www.kesambet.com
https://www.arabyfree.com
В Москве вы можете успешно написать диплом по любой специальности. Профессиональные писатели помогут с составлением уникального текста, соответствующего всем требованиям. Получите высокую оценку, обратившись к опытным специалистам.
http://www.gurumeguri.com/userinfo.php?uid=23203#
http://ips-irk.ksworks.ru/index.php?subaction=userinfo&user=kulakovuz2k
http://rai.lv/ru/index.php?subaction=userinfo&user=kulakovuz2k
http://forum.futurebim.ru/index.php?action=profile;u=86093
Наш сервис предоставляет качественную помощь в написании дипломов.
rybelsus online prescription
affascinantenao.com
저번에 푼게 아니라 지금 하네, 이 녀석은.. 대체 무슨 기획을 하고 있는 거지.
http://www.trasportopersone.it/redirect.aspx?url=http%3A%2F%2Fcomfyescorts.com%2F
rybelsus buy australia
wegovy diabetes
reggionotizie.com
Laozi 황제는 바지에 소금을 뿌리고 있습니다. 게으른 것이 아파요.
where can i buy ozempic
wegovy injection
semaglutide for weight loss without diabetes
프라그마틱의 게임은 높은 퀄리티와 흥미진진한 스토리로 항상 눈길을 끌어요. 이번에 어떤 게임을 즐겼나요?
프라그마틱 무료
프라그마틱의 게임을 플레이하면서 항상 신선한 경험을 얻을 수 있어 기뻐요. 여기서 더 많은 이야기를 나눠봐요!
https://jxbodun.com/
https://www.tengerszemhotel.com
https://www.pihmctt.com
digiyumi.com
이 가죽가방은 악어가죽으로 제작되었으며, 가죽에 왁스처리 및 가공처리를 하여 광택감이 있습니다.
ozempic tab 14mg
https://bit.ly/chpargalka-psikhologiya
프라그마틱 슬롯에 대한 내용이 정말 도움이 되었어요! 더불어, 제 사이트에서도 프라그마틱과 관련된 정보를 찾아보세요. 함께 서로 이야기하며 더 많은 지식을 쌓아가요!
프라그마틱플레이
프라그마틱에 대한 내용이 정말 유익했어요! 또한, 제 사이트에서도 프라그마틱과 관련된 정보를 찾아보실 수 있어요. 함께 지식을 공유해보세요!
https://www.ivermectininstock.com/
https://dwqewqe.weebly.com/
https://www.bairpools.com
semaglutide rybelsus
affascinantenao.com
이 말을 들은 홍지황제는 꽤 이치에 맞는 듯 조용히 고개를 끄덕였다.
http://ksouhouse.com/nsw_gov_iframe.php?addr=6%2F19%2BAnne%2BStreet&postcode=2760&suburb=St%2BMarys&url=http%3A%2F%2Fanomaxx.com%2F
semaglutide australia
wegovy xr
semaglutide online
перетяжка дивана цена https://peretyazhka-mebeli-minsk.ru/.
buy ozempic online no script
baseballoutsider.com
시험장에 들어가면 대스승, 즉 시험장을 만나러 갑니다.
ozempic tab 7mg
allstarsforgood.com
Hongzhi 황제는 “Fang Jifan의 책은 어디에 있습니까? “라고 무관심하게 말했습니다.
http://www.icemix.jp/cgi-bin/etclink/rank.cgi?id=5&mode=link&url=https%3A%2F%2Fpozitivit.com%2F
Hello, I log on to your new stuff regularly. Your
humoristic style is witty, keep up the good work!
darknet зайти на сайт
Даркнет, сокращение от “даркнетворк” (dark network), представляет собой часть интернета, недоступную для обычных поисковых систем. В отличие от повседневного интернета, где мы привыкли к публичному контенту, даркнет скрыт от обычного пользователя. Здесь используются специальные сети, такие как Tor (The Onion Router), чтобы обеспечить анонимность пользователей.
rybelsus drug
semaglutide weight loss
люберецкий морг https://www.ritual-gratek20.ru.
buy semaglutide canada
buy ozempic from india
semaglutide 14
rybelsus tablets 7 mg
buy ozempic online no script
doeaccforum.com
교환 미션에 참여한 모두는 설명할 수 없는 흥분에 휩싸였다.
buy rybelsus online no script
rybelsus best price
rybelsus semaglutide tablets 7.5 mcg
Hello! I realize this is somewhat off-topic however I
had to ask. Does operating a well-established website like yours take
a massive amount work? I’m brand new to writing a blog
however I do write in my journal everyday. I’d like to start a blog so I will be able to share my
personal experience and thoughts online. Please let me know if you have any kind
of recommendations or tips for new aspiring blog owners. Appreciate it!
http://www.blogexpander.com
https://bit.ly/sistemniy-podkhod
Whoa many of wonderful information!
Feel free to visit my web blog: https://asahalpha.com/2023/10/20/details-of-click-here-to-investigate/
semaglutide cost
프라그마틱 슬롯으로 새로운 도전에 나서고 놀라운 보상을 경험하세요.
프라그마틷
프라그마틱 슬롯에 대한 설명 감사합니다! 또한, 제 사이트에서도 프라그마틱과 관련된 정보를 얻을 수 있어요. 함께 이야기 나누면서 더 많은 지식을 얻어가요!
https://www.dinotri.com
https://www.murayah.com
https://www.gmailemails.com
https://www.pinuputhezin.com
Stickpin Up Casino is the valid website of the distinguished online casino for players from Brazil.
http://pinuputhezin.com
Купить диплом техникума без предоплаты можно здесь http://diplom-sale.ru. В наличии любые другие документы об образовании, корочки, справки.
reggionotizie.com
그는 어쩔 수 없이 물었습니다. “이 털실을 고양이 한 마리에 얼마에 팔 계획입니까?”
Купить диплом бакалавра на http://diplom-sale.ru легко и просто. Тут http://diplom-sale.ru покупка диплома будет безопасной и быстрой.
wegovy 3 mg tablet
https://bit.ly/sistemniy-podkhod
https://bit.ly/sistemniy-podkhod
order rybelsus online
rybelsus medicine
Каждый геймер знает, что настоящее волшебство начинается с момента, когда ты найдешь идеальную игру для своего сердца. И что может быть лучше, чем получить эту игру мгновенно? Torrent-mass.ru приглашает вас скачать игры на пк торрент, где вы найдете мир, полный приключений и героических подвигов, ждущих вас за каждым кликом. Наслаждайтесь удобством загрузки и новейшими играми прямо у вас под рукой.
wegovy canada pharmacy prices
wegovy semaglutide tablets 7.5 mcg
buy semaglutide oversees
최신 프라그마틱 게임은 선도적이고 표준화된 iGaming 콘텐츠를 제공하며 슬롯, 라이브 카지노, 빙고 등 다양한 제품을 제공합니다.
프라그마틱 슬롯
프라그마틱의 게임은 항상 다양한 테마로 놀라워요. 이 사이트에서 더 자세한 정보를 찾아보세요!
https://qq8778ok.com/
https://www.gocopernicus.com
https://dwqewqe.weebly.com/
saungsantoso.com
이게 80만 냥이 넘는데 음식과 옷을 아껴서 모았습니다.
https://bit.ly/sistemniy-podkhod
https://bit.ly/sistemniy-podkhod
rybelsus 7 mg
https://bit.ly/sistemniy-podkhod
프라그마틱 플레이의 슬롯 포트폴리오는 250개 이상의 게임으로 구성되어 있으며, 다양한 화폐와 33개 언어를 통해 전 세계 시장에 제공됩니다. 게이츠 오브 올림푸스, 더 도그 하우스, 존 헌터 앤 톰 오브 더 스캐럽 퀸, 스위트 보난자 등 다양한 테마의 슬롯을 즐겨보세요.
프라그마틱 슬롯 무료
프라그마틱의 무료 게임 옵션은 정말로 흥미진진한데요. 어떤 무료 게임을 추천하시나요?
https://www.kesambet.com
https://pgslot-9tiger.vip/
https://bahisgirisadresleri.com/
buy semaglutide
generic wegovy cost
В нашем интернет-магазине можно купить диплом нового образца недорого и без предоплаты.
wegovy over the counter
buy ozempic
buy ozempic from canada
wegovy weight loss
buy ozempic in canada
chasemusik.com
그것은 음식입니다… 수많은 생명을 구할 수 있는 음식입니다.Na Tian Jing은 너무 흥분해서 거의 뛰어오를 뻔했습니다.
semaglutide xl
semaglutide best price
wegovy online pharmacy
Срочно Продать PNY Скупка
При выборе нашего агентства, вы обеспечите себе доступ к профессиональных юридических услуг от опытных специалистов. Узнайте больше на нашем сайте по ссылке
как прописать к себе родственника.
semaglutide sale
rybelsus 21 mg
chasemusik.com
그러자 홍지황제가 예상한 대로 사실로 드러났다.
rybelsus weight loss
semaglutide for weight loss without diabetes
Казино пин-ап – это круто
jogos online cassino pinupcasinojenzolo.com.
semaglutide diabetes medication
Насолоджуйтесь ласкавими дотиками сонця
пін ап україна https://pinupcasinolfsesn.kiev.ua.
Hello, i think that i saw you visited my site thus
i came to “return the favor”.I am trying to find things to improve my site!I suppose its
ok to use some of your ideas!! I saw similar here: sklep and also here:
dobry sklep
semaglutide drug
Hello i am kavin, its my first occasion to
commenting anyplace, when i read this article i thought i could also create comment due to this brilliant
paragraph.
rybelsus retail price
ozempic pill form
rybelsus uk
https://bit.ly/chelovek-iego-psikhologia
buy semaglutide in canada
buy ozempic online no script
buy wegovy
I like the valuable information you supply for
your articles. I will bookmark your blog and test again right here regularly.
I am somewhat certain I will learn a lot of new stuff proper right here!
Good luck for the following!
semaglutide 21 mg
semaglutide buy uk
semaglutide online cheap
buy ozempic pill form for adults
iGaming 업계를 선도하는 프라그마틱 게임은 모바일 중심의 혁신적이고 표준화된 콘텐츠를 제공합니다.
프라그마틱슬롯
프라그마틱의 게임을 플레이하면 항상 긴장감 넘치고 즐거운 시간을 보낼 수 있어 좋아요. 여기서 더 많은 이야기를 들려주세요!
https://qq8778ok.com/
https://www.wtsnzp.com
https://www.pihmctt.com
buy rybelsus canada
semaglutide tab 14mg
Откройте для себя мир игр, где качество и доступность идут рука об руку. Мы предоставляем вам шанс скачать игры торрент бесплатно на русском языке, предлагая только лучшие игровые проекты, доступные на сегодняшний день. Наша библиотека включает в себя тысячи титулов, каждый из которых был тщательно отобран и адаптирован для максимального удобства пользователей. Приоритетом для нас является предоставление игр высшего качества, которые соответствуют запросам даже самых требовательных геймеров. Воспользуйтесь нашим ресурсом для доступа к богатому арсеналу игрового контента.
sex
where to buy ozempic online
semaglutide canada pharmacy prices
Wow! Finally I got a blog from where I be capable of in fact get
valuable facts concerning my study and knowledge.
wegovy tab 14mg
rybelsus tablets for weight loss
rociofaks.com
Hongzhi 황제와 Liu Jian은 서로를 바라 보았고 서로의 눈에서 답을 찾지 못한 것 같았습니다.
https://www.google.ca/url?q=https://www.clemonsjerseys.com/
digiyumi.com
회전하는 랜턴과 같은 일련의 과거 사건이 Hongzhi 황제의 마음에 번쩍였습니다.
rybelsus oral medication
wegovy semaglutide tablets cost
buy ozempic online
iGaming 업계에서 주목받는 프라그마틱 게임은 모바일 중심의 혁신적이고 표준화된 콘텐츠를 플레이어에게 제공합니다.
프라그마틱 슬롯
프라그마틱에 대한 내용이 정말 유익했어요! 또한, 제 사이트에서도 프라그마틱과 관련된 정보를 찾아보실 수 있어요. 함께 지식을 공유해보세요!
https://www.ahmethasimoglu.com
https://www.assaaqua.com
https://www.ormtawindsor.com
ozempic semaglutide tablets 7.5 mcg
generic wegovy
buy ozempic cheap
semaglutide 7mg
buy ozempic
rybelsus semaglutide tablets 3mg
Доброго!
Хочу рассказать Вам как Я решил проблему с учебой, знаете как бывает подходит время, а курсовая или диплом не готовы и приходит паника и нервы((
Я попал в такую ситуацию, приходилось работать и учится, и ничего не успевал, обычная ситуация.
Но хорошо что друг одногруппник подсказал как можно решить эту проблему, а главное дал верный сайт, т.к. много проектов и сложно сделать выбор.
Сайт компании что сделала мне диплом, и Я получил 4 – http://dodip.ru/
купить технический диплом
можно ли купить диплом
купить диплом в кинешме
Созвонился, Мне все рассказали, по ходу написания оговаривали необходимые моменты и Я получил диплом почтой, все отлично!
В данной компании Вы сможете купить диплом без предоплаты, для любого вуза или техникума России, рекомендую и советую)
Удачи и хороших оценок!
купить диплом специалиста
купить диплом в уссурийске
купить диплом в мурманске
купить диплом в волгодонске
купить диплом менеджера по туризму
купить диплом в смоленске
купить диплом в москве
купить диплом в коврове
rybelsus canada pharmacy prices
agonaga.com
이것은 실제로 매우 얽힌 질문이며 Hongzhi 황제의 눈이 깜박였습니다.
rybelsus tab 14mg
buy semaglutide online no script
rybelsus medicine
rybelsus price
katsluxury.com
“아름다운 사진들.” 홍지황제는 “오늘…어떻게 당신이 그렇게 책임감 있는 모습을 볼 수 있습니까?”라고 미소 지었다.
https://clients1.google.de/url?sa=t&url=https%3A%2F%2Fwww.pozitivit.com
baseballoutsider.com
마치 괴물을 보는 것처럼 Zhang Yuanxi를 바라보며 모두가 조용해졌습니다.
homefronttoheartland.com
“폐하.” Fang Jifan은 Zhu Houzhao를 바라보며 “폐하, 이번에는 패배를 인정하셨습니까?”
Доброго!
Хочу рассказать Вам как Я решил проблему с учебой, знаете как бывает подходит время, а курсовая или диплом не готовы и приходит паника и нервы((
Я попал в такую ситуацию, приходилось работать и учится, и ничего не успевал, обычная ситуация.
Но хорошо что друг одногруппник подсказал как можно решить эту проблему, а главное дал верный сайт, т.к. много проектов и сложно сделать выбор.
Сайт компании что сделала мне диплом, и Я получил 4 – http://dodip.ru/
купить диплом швеи
купить диплом в буденновске
купить диплом преподавателя
Созвонился, Мне все рассказали, по ходу написания оговаривали необходимые моменты и Я получил диплом почтой, все отлично!
В данной компании Вы сможете купить диплом без предоплаты, для любого вуза или техникума России, рекомендую и советую)
Удачи и хороших оценок!
купить диплом в ейске
купить диплом логопеда
купить диплом в когалыме
купить диплом в ессентуках
купить диплом в люберцах
купить диплом биолога
купить диплом в кирове
купить диплом математика
wegovy price
wegovy rx
rybelsus lose weight
buy semaglutide in mexico
purchase wegovy
doeaccforum.com
Xiao Jing은 마음 속으로 한숨을 쉬었습니다. 이것은 도를 얻은 한 사람입니다. 닭과 개는 하늘에 올라갑니다.
topdelhiescorts.com
스승과 견습생 모두 부풀어 오른 눈으로 홍지 황제를 응시했습니다.
https://maps.google.bt/url?q=http%3A%2F%2Fclemonsjerseys.com%2F
wegovy order
semaglutide 14
buy ozempic from india
rybelsus semaglutide tablets cost
프라그마틱 플레이는 250개 이상의 게임으로 다양한 화폐와 33개 언어로 전 세계 시장에 다양한 테마의 슬롯을 제공합니다.
프라그마틱
프라그마틱의 게임은 언제나 풍부한 그래픽과 흥미진진한 플레이로 유명해요. 이번에 새로운 게임이 나왔나요?
https://www.burboniborovnice.com
https://www.hoitradeforex.com
https://btob-business.com/
Awesome article.
generic ozempic for weight loss
order wegovy online
wegovy for sale
wegovy australia online
rybelsus retail price
Обратившись к нашей компании, вы обеспечите себе получение высококачественных юридических консультаций от опытных специалистов. Подробнее читайте в статье по ссылке
общей собственностью является.
semaglutide for weight loss without diabetes
semaglutide online
buy rybelsus from canada
ozempic pill form
semaglutide ozempic
обивочные ткани москва https://www.vinylko13.ru .
rybelsus buy online
semaglutide online pharmacy
After looking over a few of the articles on your site, I truly appreciate your technique of blogging.
I saved as a favorite it to my bookmark webpage list and will be checking back soon.
Please check out my website as well and let me know
what you think.
buy ozempic online pharmacy
buy ozempic
프라그마틱 플레이는 250개 이상의 게임으로 세계 시장에 다양한 테마의 슬롯을 제공합니다. 33개 언어와 다양한 화폐를 지원합니다.
프라그마틱 홈페이지
프라그마틱의 게임은 높은 퀄리티와 흥미진진한 스토리로 항상 눈길을 끌어요. 이번에 어떤 게임을 즐겼나요?
https://www.chromehelmet.com
https://www.xianguozhaoshang.com
https://www.sotradi.com
wegovy order
mexico pharmacy order online
https://canadianpharmacyeasy.com/
top rated online pharmacies
wegovy injection
rybelsus online pharmacy
rybelsus tablets buy
다양한 테마의 슬롯을 즐길 수 있는 250개 이상의 게임으로 이루어진 프라그마틱 플레이의 슬롯 포트폴리오를 전 세계 시장에서 즐겨보세요.
PG 소프트
프라그마틱의 무료 게임 옵션은 정말로 흥미진진한데요. 어떤 무료 게임을 추천하시나요?
https://www.wtsnzp.com
https://www.mihiroseiki.com
https://www.sotradi.com
Greetings, Earth!
I am a Capybara, a small creature cherished for its endearing appearance and charming qualities!
Curious about my recent endeavors? I’ve decided to swap the jungle for the bustling city life.
Currently residing in the Netherlands, I’ve found a companion in the virtual realm!
Meet Xrumer, a software product, and its invaluable sidekick, Xevil. Together, we collaborate on ambitious projects that extend promotional messages to everyone in our database.
Our impact spans the globe, disseminating information about new projects, materials, and the lives of capybaras, both in the wild and in zoos – a truly significant endeavor!
Leveraging Xrumer for posting allows us to reach a vast audience, creating a robust link profile. We specialize in constructing site networks, establishing link levels, and enhancing domains for cohesion – a testament to the camaraderie of the capybara herd + Xrumer + Xevil!
If you’ve received a message from our team, why not consider availing our posting services? We’re open for business, friends, and eagerly await your tasks!
The Capybara herd tirelessly works around the clock to fulfill advertising tasks for leading SEO companies. We’re grateful for the opportunity, whether it’s to buy food or secure funds for our lives.
Curious about how people find us online? Here’s a glimpse of what we do:
https://capybara333.wordpress.com/
Xrumer mailing
Xrumer run
Xrumer posting
Xrumer website promotion
Xrumer site run
PBN site network boosting
Xrumer profile run, and much more!
And now, the English version!
Привет, мир!
Я Капибара, небольшое существо, которое полюбили за свою внешность и характерные черты!
Хотите узнать, чем я занимаюсь последнее время? Решил переместиться из джунглей в большой город.
В настоящее время я живу в Нидерландах и подружился с хорошим виртуальным спутником!
Его зовут программный продукт Xrumer, а его незаменимый компаньон — Xevil. Мы работаем вместе, создавая грандиозные проекты, позволяя каждому в нашей базе получать рекламные сообщения.
Информация распространяется по всему миру; люди узнают о новых проектах, материалах, жизни капибар в суровой дикой природе и зоопарках – это действительно важно!
Постинг с использованием Xrumer позволяет охватить огромную аудиторию и создать мощный ссылочный профиль. Мы строим сети сайтов, уровни ссылок, улучшаем домены для их склейки – всё это часть дружбы стада Капибар + Xrumer + Xevil!
Вы получили сообщение от нашей команды, и что мешает вам заказать постинг и наши услуги? Мы открыты для сотрудничества, друзья, и ждем ваших задач!
Стадо Капибар работает круглосуточно на благо рекламных задач ведущих SEO-компаний и очень благодарно за возможность купить еду или получить средства на жизнь.
Как нас ищут в сети, или, скорее, что мы делаем:
рассылка Хрумером
прогон Хрумером
постинг Хрумером
раскрутка сайта Хрумером
прогон сайта Хрумером
прокачка PNB сеток сайтов
прогон по профилям Хрумером и многое другое!
Удачи!!!
rybelsus
buy ozempic online canada
wegovy retail price
semaglutide weight loss
wegovy 7mg
I seriously love your website.. Excellent colors & theme.
Did you make this web site yourself? Please reply back as I’m attempting to create
my very own website and would like to learn where you got this from or exactly what the theme is named.
Appreciate it!
wegovy sale
rybelsus 7mg
semaglutide for weight loss without diabetes
semaglutide tablet
where can i buy ozempic
rybelsus from canada
ozempic injections
**娛樂城與線上賭場:現代娛樂的轉型與未來**
在當今數位化的時代,”娛樂城”和”線上賭場”已成為現代娛樂和休閒生活的重要組成部分。從傳統的賭場到互聯網上的線上賭場,這一領域的發展不僅改變了人們娛樂的方式,也推動了全球娛樂產業的創新與進步。
**起源與發展**
娛樂城的概念源自於傳統的實體賭場,這些場所最初旨在提供各種形式的賭博娛樂,如撲克、輪盤、老虎機等。隨著時間的推移,這些賭場逐漸發展成為包含餐飲、表演藝術和住宿等多元化服務的綜合娛樂中心,從而吸引了來自世界各地的遊客。
隨著互聯網技術的飛速發展,線上賭場應運而生。這種新型態的賭博平台讓使用者可以在家中或任何有互聯網連接的地方,享受賭博遊戲的樂趣。線上賭場的出現不僅為賭博愛好者提供了更多便利與選擇,也大大擴展了賭博產業的市場範圍。
**特點與魅力**
娛樂城和線上賭場的主要魅力在於它們能提供多樣化的娛樂選項和高度的可訪問性。無論是實體的娛樂城還是虛擬的線上賭場,它們都致力於創造一個充滿樂趣和刺激的環境,讓人們可以從日常生活的壓力中短暫逃脫。
此外,線上賭場通過提供豐富的遊戲選擇、吸引人的獎金方案以及便捷的支付系統,成功地吸引了全球範圍內的用戶。這些平台通常具有高度的互動性和社交性,使玩家不僅能享受遊戲本身,還能與來自世界各地的其他玩家交流。
**未來趨勢**
隨著技術的不斷進步和用戶需求的不斷演變,娛樂城和線上賭場的未來發展呈現出多元化的趨勢。一方面,虛
擬現實(VR)和擴增現實(AR)技術的應用,有望為線上賭場帶來更加沉浸式和互動式的遊戲體驗。另一方面,對於實體娛樂城而言,將更多地注重提供綜合性的休閒體驗,結合賭博、娛樂、休閒和旅遊等多個方面,以滿足不同客群的需求。
此外,隨著對負責任賭博的認識加深,未來娛樂城和線上賭場在提供娛樂的同時,也將更加注重促進健康的賭博行為和保護用戶的安全。
總之,娛樂城和線上賭場作為現代娛樂生活的一部分,隨著社會的發展和技術的進步,將繼續演化和創新,為人們提供更多的樂趣和便利。這一領域的未來發展無疑充滿了無限的可能性和機遇。
wegovy semaglutide tablets cost
wegovy tab 7mg
semaglutide tab 7mg
wegovy 14
cheap semaglutide
ozempic semaglutide tablets 3mg
rybelsus tab 3mg
rybelsus from canada
generic semaglutide cost
semaglutide pills
rybelsus weight loss
промокод на бесплатную ставку
tsrrub.com
“조상의 영석은 어때요, 조상의 영석을 가져가는 건 어때요?”
rybelsus 21 mg
penis enlargement
order rybelsus online
semaglutide pill form
semaglutide injection
buy ozempic online no script needed
semaglutide canada pharmacy prices
ozempic cost
where to buy ozempic
order wegovy
saungsantoso.com
Hongzhi 황제는 안도의 한숨을 쉬었지만 마음에는 다소 위안을 느꼈습니다.
semaglutide canada
Дмитрий давно мечтал о путешествии в Японию, но всегда откладывал его из-за отсутствия средств. Вдохновленный историями из статьи на Яндекс Дзен о том, как легко можно получить финансирование для своих мечт, он решил не откладывать путешествие на потом и взял займ под выгодный процент, благодаря чему его мечта осуществилась.
DZEN Spavkin – займ взять
delphilasummer.com
“군대에 다녀오셨습니까?” 홍지황제는 첸종을 조심스럽게 곁눈질했다.
https://www.industryglobalnews24.com/register?source=https%3A%2F%2Ftengerszemhotel.com%2F
semaglutide 7mg
buy ozempic
rybelsus 7mg
buy ozempic online from india
wegovy online cheap
rybelsus buy uk
Fantastic posts Thanks
купить диплом
###GOOGLE###
this-is-a-small-world.com
하늘이 준 이 캠프를 Fang 가족에게 제공하는 것은 미래를 준비하는 것입니다.
wegovy 3 mg tablet
wegovy retail price
buy rybelsus
Эдуард Давыдов бск https://www.eduard-davydov.ru .
Реєстрація в клубі пін ап
грати азартні ігри https://www.pinupcasinolfsesn.kiev.ua .
semaglutide generic cost
I read this piece of writing fully on the topic of the comparison of most recent and preceding technologies, it’s remarkable
article.
buy rybelsus online no script needed
seatgilautomocion.com
“발굴, 당신은 무엇을 발굴하고 있습니까?” Zhu Houzhao가 놀라서 물었다.
https://www.google.rs/url?q=https://www.pozitivit.com/
baseballoutsider.com
Xiao Jing은 “예, 하인도 그렇게 생각합니다. “라고 말했습니다.
Запустіть свою удачу в пін ап
пін ап автомати pinupcasinolfsesn.kiev.ua .
buy ozempic online
Приятное пин-ап казино
cassino online confiavel http://www.pinupcasinojenzolo.com/.
wegovy australia online
semaglutide oral medication
prescription drug price comparison
https://canadianpharmacyeasy.com/
canadian rx pharmacy
generic semaglutide for weight loss
buy wegovy online no script needed
rybelsus online prescription
semaglutide rybelsus
線上賭場
topdelhiescorts.com
어떤 계획이든 땅의 가치를 바꿀 수 있습니다.
http://snz-nat-test.aptsolutions.net/ad_click_check.php?banner_id=1&ref=http%3A%2F%2Fchromehelmet.com%2F
netovideo.com
반면 공과대학 사람들도 들뜬 표정이었다.
buy ozempic uk
Погрузись в атмосферу пин-ап казино
site casino online http://pinupcasinojenzolo.com/.
brand semaglutide
buy semaglutide online cheap
프라그마틱 게임은 iGaming 분야에서 독창적이고 표준화된 콘텐츠를 선보이는 선도적인 제공 업체입니다.
프라그마틱 슬롯
프라그마틱의 게임은 항상 다양한 테마로 놀라워요. 이 사이트에서 더 자세한 정보를 찾아보세요!
https://okgasda.weebly.com/
https://www.clean-clean-peru.com
https://www.ix9up70gi0.site
generic semaglutide cost
rybelsus order
Hello everybody!
Have you ever heard of X-GPT Writer: a unique keyword content generator based on the ChatGPT neural network?
I also haven’t, until I was advised to automate routine tasks with this software, I want to say one thing! Then I couldn’t believe
for a long time that ChatGPT is such a powerful product if it is used simultaneously in streaming, under the control of X-GPT Writer.
I thought it was just a utility, it was inexpensive, a friend gave a coupon for a 40% discount%:
94EB516BCF484B27
details of where to enter it are indicated on the website:
https://www.xtranslator.ru/x-gpt-writer/
I started trying, delving into it, bought 50 ChatGPT accounts at low prices and it started!
Now I easily generate and launch 3-4 new sites a week, batch unify entire folders and even create images
using the ChatGPT neural network and X-GPT Writer.
It’s worth a try, Friends, there’s a demo, everything is free, you won’t regret it)
Good luck!
автоматическое создание текстов через ChatGPT
X-GPTWriter купить со скидкой
Покупка X-GPTWriter: лучшие предложения и скидки
ChatGPT и его роль в создании уникального контента
Эффективное использование ChatGPT для контент-стратегии
Как сделать текст более уникальным с ChatGPT
Синонимайзер текста на основе ChatGPT
X-GPTWriter: мощный инструмент для контент-креации
программа создания контента через ChatGPT
уникализатор текста через ChatGPT
wegovy sale
Hello everybody!
My name is Irina, I am no longer a girl, I am 33 years old, led an interesting and sometimes dissolute life and slipped into severe depression.
I went to various doctors and psychologists, and after spending a lot of money and time, I found my solution, you ask what?
I just started reading jokes, daily for 10 minutes and more often attending events related to humor, and this began to have a positive dynamic and changed my life.
By the way, a good joke site
https://www.anekdotas.ru/korotkie-anekdoty-pro-vrachej-i-pacientov-2/
https://www.anekdotas.ru/anekdoty-smeshnye-bez-poshlosti-2/
https://www.anekdotas.ru/anekdoty-pro-vagon-2-2/
https://www.anekdotas.ru/anekdoty-pro-jandeks-2/
https://www.anekdotas.ru/anekdoty-pro-rozy-stranica-1-2/
I often read it, from many others, and I advise you)
Why load yourself with problems and worries.
Laugh, and live long!
rybelsus 3mg
semaglutide best price
hello friends!
How often do you dream? What do you do then? You just forget or try to understand their meaning and influence on your life!
Sleep is an important aspect of the right hemisphere of the human brain, transmitting information from the subconscious, gives important signals and sometimes even predicts future events!
It may seem to many that the interpretation of dreams is very difficult, but it is not so if you approach it correctly and study everything according to dream books.
https://www.sonnikas.ru/k-chemu-snjatsja-novye-noski/
https://www.sonnikas.ru/k-chemu-snjatsja-varenye-jajca/
https://www.sonnikas.ru/k-chemu-snitsja-pyl-2/
https://www.sonnikas.ru/k-chemu-snjatsja-koshki/
https://www.sonnikas.ru/k-chemu-snjatsja-gvozdiki/
https://www.sonnikas.ru/k-chemu-snjatsja-medvedi-s-medvezhatami/
https://www.sonnikas.ru/k-chemu-snitsja-ukus-volka/
a dream book for any occasion, nothing superfluous, just deciphering dreams, flexible search and maximum benefit for your life and endeavors!
We wish you good luck and apologize if the message got to you by accident!
프라그마틱플레이의 슬롯으로 다양한 테마의 게임을 만나보세요.
프라그마틱 게임
프라그마틱에 대한 글 읽는 것이 정말 재미있었어요! 또한, 제 사이트에서도 프라그마틱과 관련된 정보를 공유하고 있어요. 함께 발전하며 더 많은 지식을 쌓아가요!
https://www.2h02c5hpd8.site
https://www.agentpokerterbaik.com
https://okgasda.weebly.com/
wegovy 7 mg
rybelsus 21 mg
generic semaglutide cost
wegovy semaglutide tablets
this-is-a-small-world.com
그 이후로이 Xishan 은행에는 많은 예금과 대출 기관이 있습니다.
wegovy 7 mg tablet
Zircon Used Equipment LLC, Experiences with Zircon Used Equipment LLC
we have over eight years of expertise, committed to delivering unmatched services. Our pride lies in curating an extensive inventory that includes premium machinery like front-end loaders, diggers, bulldozers, forklifts, and more, guaranteeing a diverse selection to cater to various preferences and budgets.
What makes us stand out is our steadfast dedication to exceptional services and nurturing long-lasting partnerships. Beyond selling equipment, we go the extra mile by offering efficient delivery services, utilizing our proprietary resources for fast and dependable transportation of heavy machinery. This allows us to offer competitive pricing for delivery, augmenting the overall value we bring to the table.
Our main goal is to provide a comprehensive range of high-quality services, establishing ourselves as the reliable partner for our clients. With a focus on surpassing expectations and fostering enduring relationships, we aim to be the go-to choice for all heavy equipment needs.
At Zircon Used Equipment LLC Zircon Used Equipment LLC Feedback and Ratings, we seamlessly combine industry expertise, reliable equipment, and outstanding customer support to address the diverse requirements of our clients. Get in touch with us today to experience firsthand our commitment to excellence and dedication.
Zircon Used Equipment LLC has https://angirating.com/companylist/us/ocala-florida/zircon-used-equipment-llc-reviews-1279908.html accumulated an wide-ranging collection of favorable reviews from our satisfied clientele, reinforcing our position as a reliable player in the heavy construction equipment industry. This is just a small part. You can find more on the vast expanses of the internet.
Купить диплом в МоÑкве — Ñто возможноÑÑ‚ÑŒ получить ÑвидетельÑтво моментально и проÑто. Ð¡Ð¾Ñ‚Ñ€ÑƒÐ´Ð½Ð¸Ñ‡Ð°Ñ Ñ Ð½Ð°Ð¼Ð¸, вы заказываете качеÑтвенный документ, который ÑоответÑтвует вÑем требованиÑм.
Great weblog right here! Also your web site quite a bit up
very fast! What web host are you using? Can I get your affiliate hyperlink for your
host? I want my web site loaded up as fast as yours lol
You need to take part in a contest for one of the greatest sites on the net.
I will recommend this site!
Привет Всем!
Хотел сказать что постинг Хрумером реально работает, применяется
и имеет место быть, если рассматривать экономическую составляющую,
это в сотни раз выгоднее покупки ссылок, постов и др,
так же прогон Хрумером идет реальным образом,
Вас не размещают на каких-то самоподнятых сетках что будут забанены или закрыты,
совершенно разные сайты, домены, IP и локации, все как нужно!
Наша компания делала здесь:
https://progonxrumerom.wordpress.com/
Xrumer рассылка это отличный инструмент для SEO, дорвейщиков лого уровня, СМИ,
веб мастеров и тех кто имеет цель донести до других свою информацию.
Удачного развиия)
рассылка Хрумером
прогон Хрумером
постинг Хрумером
раскрутка сайта Хрумером
прогон сайта Хрумером
прокачка PNB сеток сайтов
прогон по профилям Хрумером и многое другое!
Zircon Used Equipment LLC, Experiences with Zircon Used Equipment LLC
boasting over 8 years of expertise, dedicated to delivering unmatched services. Our pride lies in curating an extensive inventory that includes premium machinery like front-end loaders, diggers, bulldozers, lift trucks, and more, guaranteeing a diverse selection to meet various preferences and budgets.
Setting us apart is our unwavering commitment to exceptional services and nurturing long-lasting partnerships. Beyond equipment sales, we go the extra mile by offering efficient transportation, utilizing our proprietary resources for fast and reliable transportation of heavy machinery. This allows us to provide competitive pricing for delivery, augmenting the overall value we bring to the table.
Our main goal is to provide a comprehensive range of high-quality services, establishing ourselves as the reliable partner for our clients. With a focus on surpassing expectations and building enduring relationships, we aim to be the go-to choice for all heavy equipment needs.
At Zircon Used Equipment LLC Zircon Used Equipment LLC Testimonials from Clients, we seamlessly blend industry expertise, dependable equipment, and exceptional customer support to address the diverse requirements of our clients. Get in touch with us today to experience firsthand our commitment to quality and professionalism.
We have garnered an wide-ranging collection of positive reviews from our happy clientele, reinforcing our position as a reliable player in the heavy construction equipment industry. This is only a small part. You can find more on the vast expanses of the internet.
buy ozempic from canada online
1win aviator online
Привет всем!
Пишу диплом, и это ад. Срываю сроки, здоровье на грани, но интернет помогает найти эффективные методы работы. Нужно просто продолжать.
Желаю всем отличных оценок!
https://www.renderosity.com/users/id:1452102
https://medcom.ru/forum/user/226020/
http://mkutepliydom.ru/forums/users/boorysusttnv/
купить аттестат за 9 классов
купить диплом в иваново
купить диплом повара
купить диплом в магадане
купить диплом во владимире
купить диплом тренера
купить диплом в элисте
купить диплом в салавате
купить диплом ветеринара
купить диплом хореографа
ozempic online
this-is-a-small-world.com
그러나 그의 주위에는 이미 올곧고 경외심을 불러일으키는 많은 후배들이 둘러싸고 있었다.
rybelsus lose weight
wegovy tab 7mg
semaglutide ozempic
Wow, incredible blog format! How long have you ever been running a blog for? you make blogging look easy. The whole look of your website is fantastic, let alone the content material!
https://en.gayroulette.ru/pornstar
generic wegovy for weight loss
semaglutide weight loss
shlemsnidf.dp.ua/p-shlem-ls2-ff327-challenger-solid-carbon/
Мотошлемы фаворитных марок в течение наличии в широком наборе а также начиная с. ant. до доставкой по Украине.
shlemsnidf.dp.ua/p-shlem-ls2-ff906-advant-sport-black-blue-red/
Почему перетяжка мягкой мебели становится все популярнее
ремонт и перетяжка мебели https://peretyazhka-mebeli-vminske.ru/ .
wegovy buy uk
First of all I would like to say fantastic blog! I had a quick question in which I’d like to ask if
you do not mind. I was curious to find out how you center yourself and clear your thoughts prior
to writing. I’ve had trouble clearing my mind in getting my thoughts out there.
I do enjoy writing however it just seems like the first 10
to 15 minutes are wasted simply just trying to figure out how to begin. Any ideas or hints?
Appreciate it!
modernkarachi.com
뿐만 아니라 그가 보정 저택을 다스릴 때 그는 자신의 위신을 과시하기 위해 많은 사람을 죽였습니다.
rybelsus tablets for weight loss
semaglutide buy from canada
Доброго!
Когда-то приходилось вам писать диплом в ужасной спешке? Это нелегкая, ответственная задача, но важно не опускать руки и продолжать процесс обучения, чем я и занимаюсь.
Для тех, кто умеет искать и анализировать информацию в сети, это действительно помогает в процессе согласования и написания дипломной работы. Больше не нужно тратить время на посещение библиотек или встречи с научным руководителем. Здесь представлены отличные материалы для дипломов и курсовых, ознакомьтесь по ссылкам:
https://educationadvisor.ru/communication/messages/forum12/topic7311/message7338/?result=new#message7338
http://producm.ru/forum/messages/forum3/topic40049/message360340/?result=new#message360340
http://xn--d1aa3a4a.xn--p1ai/forum/topic.php?forum=3&topic=477
Желаю всем отличных оценок!
купить диплом в комсомольске-на-амуре
купить диплом в бердске
купить диплом в михайловске
купить диплом в иркутске
купить диплом медицинского училища
купить диплом в уссурийске
купить аттестаты за 9
купить диплом в копейске
купить диплом в грозном
купить диплом швеи
My brother suggested I might like this blog. He was entirely right.
This post actually made my day. You can not imagine simply
how much time I had spent for this information! Thanks!
Привет всем!
Вы сталкивались с необходимостью написать диплом в сжатые сроки? Это действительно сложно и требует ответственного подхода. Но необходимо продолжать и не сдаваться, так как это часть учебного процесса, с которым я сталкиваюсь.
Для тех, кто умеет искать информацию в сети, это может быть настоящим спасением. Гугление информации помогает в процессе согласования и написания дипломной работы, и больше не нужно тратить время на походы по библиотекам или встречи с руководителем. Здесь есть полезные ресурсы для дипломов и курсовых, посмотрите ссылки:
http://be.rdn-team.com/index.php?subaction=userinfo&user=icunadej
http://art-pridnestrovie.ru/index.php?subaction=userinfo&user=evadyt
http://netvoyne.ru/index.php?subaction=userinfo&user=ekedawup
http://water.vouvstudio.com/bbs/board.php?bo_table=free&wr_id=2130466
http://f99538ch.bget.ru/index.php?subaction=userinfo&user=ojuke
http://japan-lke.com/home.php?mod=space&uid=63811&do=profile
http://intelleon.ru/index.php?title=Приобрести документ originality-diplom.com
http://art-kam96.ru/index.php?subaction=userinfo&user=ihotyza
http://e-audit.gefest.me/index.php?subaction=userinfo&user=orofiqu
http://farmingsimulator.fandom.com/index.php?title=Купить диплом aurus-diploms.com
Желаю всем отличных оценок!
купить диплом маркетолога
купить диплом в оренбурге
купить диплом средне техническое
купить диплом в канске
купить диплом преподавателя
купить диплом в сызрани
купить диплом мастера маникюра и педикюра
купить диплом в архангельске
купить диплом фитнес инструктора
купить диплом в кунгуре
Доброго!
Были ли у вас когда-нибудь случаи, когда приходилось писать дипломную работу в сжатые сроки? Это действительно очень ответственно и трудно, но важно не опускать руки и продолжать активно заниматься учебными процессами, как и я.
Тем, кто умеет эффективно ориентироваться и находить информацию в интернете, это действительно помогает по ходу согласования и написания диплома. Нет необходимости тратить время на посещение библиотек или встречи с научным руководителем, поскольку здесь представлены хорошие источники для дипломных работ и курсовых проектов. Вы можете ознакомиться с ними по ссылкам:
Желаю всем отличных оценок!
http://wiki.contextgarden.net/index.php?title=Приобрести документ rudiplomy.com
http://parus-perm.ru/communication/forum.php?PAGE_NAME=profile_view&UID=44657&backurl=%2Fcommunication%2Fforum.php%3FPAGE_NAME%3Dprofile_view%26UID%3D9336
http://www.italian-style.ru/Nasha_kompanija/forum/?PAGE_NAME=profile_view&UID=51241
http://kuvandyk.ru/users-m-details-id-53294.html
http://mos-it.ru/index.php?subaction=userinfo&user=egawes
купить диплом строителя
купить диплом во всеволожске
купить диплом в губкине
купить диплом в челябинске
купить диплом агронома
купить диплом в копейске
купить диплом в великих луках
купить диплом инженера по охране труда
купить диплом во владимире
купить диплом инженера электрика
Доброго!
Пишу диплом, это ужасно. Сорвала сроки, здоровье на исходе, но в сети нашла полезные ресурсы для продуктивной работы. Просто нужно держаться.
Желаю всем отличных оценок!
http://sponforum.ixbb.ru/viewtopic.php?id=11939#p41231
http://bestteam.tan.free.fr/index.php?file=members&op=detail&autor=boorysusttnv
https://reveal.ru/gate.html?name=Journal&file=display&jid=51391
купить диплом моториста
куплю диплом с занесением
купить диплом высшее
купить диплом в когалыме
купить диплом в ульяновске
купить аттестат за 9 класс
купить диплом в выборге
купить диплом в белово
купить диплом в воткинске
купить диплом в салавате
semaglutide 14mg
semaglutide sale
rybelsus sale
order semaglutide online
buy semaglutide
wegovy order
rybelsus tab 3mg
brand ozempic
다양한 테마의 프라그마틱 슬롯로 흥미진진한 여행을 시작하세요.
프라그마틱 게임
프라그마틱의 게임은 높은 퀄리티와 흥미진진한 스토리로 항상 눈길을 끌어요. 이번에 어떤 게임을 즐겼나요?
https://www.php22vpgh.site
https://www.dinotri.com
https://www.iz21swbn.site
reliable canadian pharmacy
https://canadianpharmaceuticalshelp.com/
canadian pharmacies online
Hello!
I’m Dina, I’m 35, beautiful and sweet, I want to tell you about my discovery)
I used to have a negative view of many things, often worried about the environment, people, politics, and it began to have a bad effect on my health and quality of life in general.
The psychologist advised me to laugh more, and not to study what I can’t change, what’s the point!
I began to regularly read jokes and sites with humor, and after 2 months I became a different person, calmer and kinder, things went to the mountains and people want to be in my company more, there is no end of men.
I advise everyone who likes jokes, this site
https://www.anekdotor.ru/anekdoty-pro-sajt-odnoklassniki/
Everything is simple and about the case, read, laugh and be healthy!
Good luck friends)
Hello everybody!
I’m Masha, I’m 32, I live in England, I raise 2 children who go to school)
School is quite a lot of stress, both for children and for parents, and constant lessons and preparation for tests in specialized subjects drove Me crazy (
I became nervous, stopped sleeping with my husband and a nervous tic began, it was terrible…
It’s good that my friends advised me to find sites with solutions, and try to do homework according to their methodology.
By the way, a good website
https://www.controlworks.ru/istorija-kontrolnaja-rabota-9-klass/
There are no ads, convenient search and a lot of valuable information about test papers!
To be honest, I began to sleep peacefully, sex and peace in the family were restored, thanks to such sites where you can find solutions and devote more time to your favorite things!
Good luck!
Hello!
Недавно приобрел себе новую собаку, щенка Хаски, и еще у меня живут 2 лабрадора, и возникла необходимость найти кое какую информацию, в сети оказалось так много разного мусора и рекламы, Я не сильно разбираюсь в этом(
Друзья подсказали проект – https://www.dogidogi.ru + https://dzen.ru/dogidogi
И знаете, там все просто написано, оказалось то что нужно!
Удобный поиск, минимум ненужных медиа включений, все работает как часы!
Буду рад если Моя рекомендация Вам поможет, с вопросами про собак и щенков, удачи!
wegovy online cheap
semaglutide drug
Hello, i read your blog occasionally and i own a similar one and i was just wondering if you get a lot of spam feedback?
If so how do you stop it, any plugin or anything you can suggest?
I get so much lately it’s driving me crazy so any assistance is very much appreciated.
프라그마틱 플레이는 250개 이상의 게임으로 세계 시장에 다양한 테마의 슬롯을 제공합니다. 33개 언어와 다양한 화폐를 지원합니다.
pragmatic-game.net
프라그마틱 관련 내용 감사합니다! 또한, 제 사이트에서도 프라그마틱에 대한 유용한 정보를 공유하고 있어요. 함께 서로 이야기하며 더 많은 지식을 쌓아가요!
https://www.assaaqua.com
https://www.ashspurr.com
https://www.buytamoxifen.site
semaglutide canada
Инсайты от профессионалов в мире реновации мебели
перетяжка мебели тканью https://peretyazhka-mebeli-vminske.ru/ .
buy ozempic in canada
프라그마틱 플레이는 다양한 테마의 슬롯을 포함한 250개 이상의 게임으로 이루어진 슬롯 포트폴리오를 보유하고 있습니다.
http://www.pragmatic-game.net
프라그마틱 관련 글 읽는 것이 즐거웠어요! 또한, 제 사이트에서도 프라그마틱에 대한 정보를 공유하고 있어요. 함께 교류하며 더 많은 지식을 얻어봐요!
https://eprust.com/
https://okgasda.weebly.com/
https://www.nutrapia.com
semaglutide tab 3mg
wegovy semaglutide tablets
buy semaglutide
Hello everybody!
I want to share a real experience, with age my sex power began to decrease, and eventually came to a deplorable level (
Even the most beautiful and young girls did not excite the right level of energy in me…
It was terrible and depression began when a friend told me that you need to read jokes and laugh every day, and everything will gradually get better.
Recommended this site to me
https://www.kompotanekdot.ru/anekdoty-pro-vovochku-i-shkolu-samye-smeshnye-1/
I thought what nonsense, but there was nothing to do, and I began to laugh systematically and read everything about humor!
I didn’t believe it, but after 2 weeks, my potency became normal, and I was able to return to the love spaces and walk with models!
Thanks to the laughter and jokes, and be healthy)
I’m already 87 years old, but I’m still strong in bed)
semaglutide online uk
rybelsus online uk
rybelsus rx
buy rybelsus in canada
generic semaglutide
digiyumi.com
Hongzhi 황제는 잠시 침묵했다가 Liu Jian을 바라 보았습니다. “Liu Qing의 가족, 반대합니까?”
Hello! Iam Jana, very nice and sexy bi girl from Sweden!
I like chat and play with mens and womens)
Your key to an adrenaline-pumping experience! Webcam models and video chats for all occasions are available right now.
Your fantasies come to life here and now! Video roulettes with models will help you realize your wildest ideas.
Open the doors to exciting adventures with the best cam models! Enjoy a variety of online entertainment.
Enjoy the moment with the best webcam models! Our platform offers a wide selection of video chats and genres.
https://lv.janetcams.com
https://fr.sexchat.moscow
Wait there personally YOU!!!
wegovy drug
Hello Dear, are you genuinely visiting this site daily, if so then you will definitely obtain fastidious
knowledge.
wegovy mexico
semaglutide buy australia
wegovy tab 7mg
rybelsus xl
topdelhiescorts.com
백화루… 이름 그대로 그냥… 꽃 파는 거 아니야?아무 일도 없었던 것처럼 여전히 무표정한 사람이 반에 한 명뿐이었습니다!
https://maps.google.sh/url?q=https://www.freedietlinks.com/
I do not know if it’s just me or if everybody else experiencing issues with your website.
It appears like some of the written text within your content
are running off the screen. Can someone else please provide feedback
and let me know if this is happening to them too? This could be a issue with my web browser because I’ve had
this happen before. Thanks I saw similar here: najlepszy sklep – ravionix.shop – and also here:
e-commerce
purchase rybelsus
Understanding the processes and protocols within a Professional Tenure Committee (PTC) is crucial for faculty members. This Frequently Asked Questions (FAQ) guide aims to address common queries related to PTC procedures, voting, and membership.
1. Why should members of the PTC fill out vote justification forms explaining their votes?
Vote justification forms provide transparency in decision-making. Members articulate their reasoning, fostering a culture of openness and ensuring that decisions are well-founded and understood by the academic community.
2. How can absentee ballots be cast?
To accommodate absentee voting, PTCs may implement secure electronic methods or designated proxy voters. This ensures that faculty members who cannot physically attend meetings can still contribute to decision-making processes.
3. How will additional members of PTCs be elected in departments with fewer than four tenured faculty members?
In smaller departments, creative solutions like rotating roles or involving faculty from related disciplines can be explored. Flexibility in election procedures ensures representation even in departments with fewer tenured faculty members.
4. Can a faculty member on OCSA or FML serve on a PTC?
Faculty members involved in other committees like the Organization of Committee on Student Affairs (OCSA) or Family and Medical Leave (FML) can serve on a PTC, but potential conflicts of interest should be carefully considered and managed.
5. Can an abstention vote be cast at a PTC meeting?
Yes, PTC members have the option to abstain from voting if they feel unable to take a stance on a particular matter. This allows for ethical decision-making and prevents uninformed voting.
6. What constitutes a positive or negative vote in PTCs?
A positive vote typically indicates approval or agreement, while a negative vote signifies disapproval or disagreement. Clear definitions and guidelines within each PTC help members interpret and cast their votes accurately.
7. What constitutes a quorum in a PTC?
A quorum, the minimum number of members required for a valid meeting, is essential for decision-making. Specific rules about quorum size are usually outlined in the PTC’s governing documents.
Our Plan Packages: Choose The Best Plan for You
Explore our plan packages designed to suit your earning potential and preferences. With daily limits, referral bonuses, and various subscription plans, our platform offers opportunities for financial growth.
Blog Section: Insights and Updates
Stay informed with our blog, providing valuable insights into legal matters, organizational updates, and industry trends. Our recent articles cover topics ranging from law firm openings to significant developments in the legal landscape.
Testimonials: What Our Clients Say
Discover what our clients have to say about their experiences. Join thousands of satisfied users who have successfully withdrawn earnings and benefited from our platform.
Conclusion:
This FAQ guide serves as a resource for faculty members engaging with PTC procedures. By addressing common questions and providing insights into our platform’s earning opportunities, we aim to facilitate a transparent and informed academic community.
Доброго всем!
Я нейропсихолог, советую всем друзьям и коллегам по работе
чтение статей на ночь, это не только успокаивает но и развивает
воображение, нейронные связи, фантазию и продлевает жизнь!
Друг посоветовал следующие ссылки, стоит отметить они неплохо написаны:
http://pogoda78.ru/4867/samye-blagoprijatnye-dni-na-2021-god-dlja-rybolova.html
http://pogoda78.ru/4867/primety-o-pogode-po-povedeniju-zhivotnyh-kak.html
Удачи всем!
Ваш Santa #Cactus555!
Hello!
Иногда необходимо настроить разные устройства и программы, искал в сети что-то стоящее и информационное по данной тематике.
Нужно было настроить спутниковую антенну, универсальный пульт и построить локальную сеть, такие разные задачи!
Нашел интересный проект, а на нем все ответы, подробно и с картинками, это действительно стоит добавить в закладки
https://csyazzle.ru
https://cssapemaster.ru
Если Вы можете подсказать еще похожие проекты, буду рад.
https://www.cssapemaster.ru/kak-pravilno-i-bystro-nastroit-windows-7
https://www.csyazzle.ru/nastrojka-setevoj-karty-na-windows-7
Всем хорошего настроения!
rybelsus tab 14mg
rivipaolo.com
“그렇게 생각하면, 앞으로의 판매량은 상당할 테니 안심하십시오, 폐하.”
Доброго всем!
Я нейропсихолог, советую всем друзьям и коллегам по работе
чтение статей на ночь, это не только успокаивает но и развивает
воображение, нейронные связи, фантазию и продлевает жизнь!
Друг посоветовал следующие ссылки, стоит отметить они неплохо написаны:
https://pogoda78.ru/4867/vytirat-stol.html
http://pogoda78.ru/4867/kosmozona-zvezdy-dajut-otvet-goroskopy.html
Удачи всем!
Ваш Santa #Cactus555!
buy rybelsus
Spot on with this write-up, I really believe that this
website needs a lot more attention. I’ll probably be returning to see more, thanks for the advice!
Hello!
Иногда необходимо настроить разные устройства и программы, искал в сети что-то стоящее и информационное по данной тематике.
Нужно было настроить спутниковую антенну, универсальный пульт и построить локальную сеть, такие разные задачи!
Нашел интересный проект, а на нем все ответы, подробно и с картинками, это действительно стоит добавить в закладки
https://csyazzle.ru
https://cssapemaster.ru
Если Вы можете подсказать еще похожие проекты, буду рад.
https://www.csyazzle.ru/kak-poluchit-udalennyj-dostup-k-kompjuteru-na
https://www.csyazzle.ru/kak-nastroit-smart-tv-na-televizore-samsung-sovety
Всем хорошего настроения!
rybelsus diabetes
semaglutide 7 mg
chasemusik.com
Fang Jifan은 고개를 저으며 “정말 맞았습니다. 이 책은 수리되었습니다. “라고 말했습니다.
reachwokingham.com
다만 생명 때문에 효도가 먼저다. 노인을 잘 대하는 것은 당연한 일이다.
http://portaldasantaifigenia.com.br/social.asp?cod_cliente=46868&link=https%3A%2F%2Ffreedietlinks.com%2F
semaglutide uk
ozempic for weight loss without diabetes
Приобрести диплом в Москве http://vuzdiploma.ru/ легко и быстро.
wegovy canada
semaglutide for diabetes
tsrrub.com
Fang Jifan은 눈을 크게 뜨고 “당신은 Imperial Academy에서 잘했습니다.”
reggionotizie.com
근데… 도대체 팡지판이 뭐야 수업료가 중요해?
buy rybelsus
generic ozempic for weight loss
rybelsus prescription
rybelsus sale
wegovy tablets for weight loss
penis enlargement
wegovy online pharmacy
semaglutide best price
Discover the top money-making games in Kenya
online casino games that pay real money games that pay real money in kenya .
purchase rybelsus
ozempic semaglutide
semaglutide tablets cost
semaglutide over the counter
canadian pharma companies
https://canadianpharmaceuticalshelp.com/
aarp approved canadian online pharmacies
ozempic tablets cost
generic rybelsus cost
Николаев Вячеслав Константинович .
rybelsus tablets 7 mg
semaglutide prescription
Привет всем!
Пишу диплом, это изматывает. Срыв сроков, здоровье под угрозой, но в сети нашла способы улучшить продуктивность. Просто нужно продолжать.
http://pottier.martial.free.fr/index.php?file=members&op=detail&autor=aleksndodnvv
https://bbloggerov.jofo.me/2265507.html
http://biblelamp.ru/forum/profile.php?id=34598
Желаю всем отличных оценок!
купить диплом геодезиста
купить диплом педагога
купить диплом в орле
купить диплом в белово
купить диплом хореографа
купить сертификат специалиста
купить диплом в ангарске
купить диплом цена
купить диплом в бору
купить диплом в брянске
semaglutide online prescription
wegovy 7 mg
Доброго!
Диплом – это кошмар. Срыв сроков, здоровье пошло на убыль, но интернет помогает найти методы ускорения работы. Не сдаюсь.
https://owen.ru/forum/member.php?u=146885
http://www.elhovka.nn.ru/forum/viewtopic.php?id=579
http://3dcar.ru/phorum/forum_viewtopic.php?t=4293
Желаю всем отличных оценок!
купить диплом в канске
купить диплом о среднем образовании
где купить диплом о среднем образование
купить диплом в феодосии
купить диплом в троицке
купить диплом в заречном
купить диплом о среднем
купить диплом логиста
купить речной диплом
купить диплом в лениногорске
[url=http://semaglutide.cfd/]buy wegovy canada[/url]
[url=https://semaglutidewegovy.shop/]semaglutide tablets buy[/url]
ozempic pill form
rybelsus semaglutide tablets cost
I have been exploring for a little for any high quality articles or weblog posts on this sort of area .
Exploring in Yahoo I at last stumbled upon this website.
Reading this information So i’m happy to exhibit
that I have a very excellent uncanny feeling I found out just what I needed.
I such a lot for sure will make certain to do not disregard this website and give it a look on a constant basis.
wegovy injection
wegovy best price
현재 프라그마틱 게임은 iGaming에서 선도적이며 독창적이고 표준화된 콘텐츠를 제공하는 주요 제공 업체 중 하나입니다.
프라그마틱 게임
프라그마틱의 게임은 정말 다양한데, 어떤 테마의 게임을 가장 좋아하나요? 나눠주세요!
https://www.yibjeboy.site
https://www.vamiveta.com/
https://www.murayah.com
wegovy australia online
ways to get money fast
Understanding the processes and protocols within a Professional Tenure Committee (PTC) is crucial for faculty members. This Frequently Asked Questions (FAQ) guide aims to address common queries related to PTC procedures, voting, and membership.
1. Why should members of the PTC fill out vote justification forms explaining their votes?
Vote justification forms provide transparency in decision-making. Members articulate their reasoning, fostering a culture of openness and ensuring that decisions are well-founded and understood by the academic community.
2. How can absentee ballots be cast?
To accommodate absentee voting, PTCs may implement secure electronic methods or designated proxy voters. This ensures that faculty members who cannot physically attend meetings can still contribute to decision-making processes.
3. How will additional members of PTCs be elected in departments with fewer than four tenured faculty members?
In smaller departments, creative solutions like rotating roles or involving faculty from related disciplines can be explored. Flexibility in election procedures ensures representation even in departments with fewer tenured faculty members.
4. Can a faculty member on OCSA or FML serve on a PTC?
Faculty members involved in other committees like the Organization of Committee on Student Affairs (OCSA) or Family and Medical Leave (FML) can serve on a PTC, but potential conflicts of interest should be carefully considered and managed.
5. Can an abstention vote be cast at a PTC meeting?
Yes, PTC members have the option to abstain from voting if they feel unable to take a stance on a particular matter. This allows for ethical decision-making and prevents uninformed voting.
6. What constitutes a positive or negative vote in PTCs?
A positive vote typically indicates approval or agreement, while a negative vote signifies disapproval or disagreement. Clear definitions and guidelines within each PTC help members interpret and cast their votes accurately.
7. What constitutes a quorum in a PTC?
A quorum, the minimum number of members required for a valid meeting, is essential for decision-making. Specific rules about quorum size are usually outlined in the PTC’s governing documents.
Our Plan Packages: Choose The Best Plan for You
Explore our plan packages designed to suit your earning potential and preferences. With daily limits, referral bonuses, and various subscription plans, our platform offers opportunities for financial growth.
Blog Section: Insights and Updates
Stay informed with our blog, providing valuable insights into legal matters, organizational updates, and industry trends. Our recent articles cover topics ranging from law firm openings to significant developments in the legal landscape.
Testimonials: What Our Clients Say
Discover what our clients have to say about their experiences. Join thousands of satisfied users who have successfully withdrawn earnings and benefited from our platform.
Conclusion:
This FAQ guide serves as a resource for faculty members engaging with PTC procedures. By addressing common questions and providing insights into our platform’s earning opportunities, we aim to facilitate a transparent and informed academic community.
ozempic tab 3mg
В нашей компанииhttps://diplomguru.com вы можете приобрести настоящие дипломы на государственном бланке Гознак по очень низкой цене.
buy wegovy online no script
rybelsus pill form
buy ozempic canada
rybelsus online uk
generic ozempic
online pay per click
Understanding the processes and protocols within a Professional Tenure Committee (PTC) is crucial for faculty members. This Frequently Asked Questions (FAQ) guide aims to address common queries related to PTC procedures, voting, and membership.
1. Why should members of the PTC fill out vote justification forms explaining their votes?
Vote justification forms provide transparency in decision-making. Members articulate their reasoning, fostering a culture of openness and ensuring that decisions are well-founded and understood by the academic community.
2. How can absentee ballots be cast?
To accommodate absentee voting, PTCs may implement secure electronic methods or designated proxy voters. This ensures that faculty members who cannot physically attend meetings can still contribute to decision-making processes.
3. How will additional members of PTCs be elected in departments with fewer than four tenured faculty members?
In smaller departments, creative solutions like rotating roles or involving faculty from related disciplines can be explored. Flexibility in election procedures ensures representation even in departments with fewer tenured faculty members.
4. Can a faculty member on OCSA or FML serve on a PTC?
Faculty members involved in other committees like the Organization of Committee on Student Affairs (OCSA) or Family and Medical Leave (FML) can serve on a PTC, but potential conflicts of interest should be carefully considered and managed.
5. Can an abstention vote be cast at a PTC meeting?
Yes, PTC members have the option to abstain from voting if they feel unable to take a stance on a particular matter. This allows for ethical decision-making and prevents uninformed voting.
6. What constitutes a positive or negative vote in PTCs?
A positive vote typically indicates approval or agreement, while a negative vote signifies disapproval or disagreement. Clear definitions and guidelines within each PTC help members interpret and cast their votes accurately.
7. What constitutes a quorum in a PTC?
A quorum, the minimum number of members required for a valid meeting, is essential for decision-making. Specific rules about quorum size are usually outlined in the PTC’s governing documents.
Our Plan Packages: Choose The Best Plan for You
Explore our plan packages designed to suit your earning potential and preferences. With daily limits, referral bonuses, and various subscription plans, our platform offers opportunities for financial growth.
Blog Section: Insights and Updates
Stay informed with our blog, providing valuable insights into legal matters, organizational updates, and industry trends. Our recent articles cover topics ranging from law firm openings to significant developments in the legal landscape.
Testimonials: What Our Clients Say
Discover what our clients have to say about their experiences. Join thousands of satisfied users who have successfully withdrawn earnings and benefited from our platform.
Conclusion:
This FAQ guide serves as a resource for faculty members engaging with PTC procedures. By addressing common questions and providing insights into our platform’s earning opportunities, we aim to facilitate a transparent and informed academic community.
semaglutide for diabetes
프라그마틱 플레이의 슬롯은 스펙터클한 그래픽과 흥미진진한 게임 플레이를 약속합니다.
프라그마틱
프라그마틱 관련 내용 감사합니다! 또한, 제 사이트에서도 프라그마틱에 대한 유용한 정보를 공유하고 있어요. 함께 서로 이야기하며 더 많은 지식을 쌓아가요!
https://www.5n15be1s8.site
https://spinner44.com/
https://www.burboniborovnice.com
semaglutide uk
semaglutide tab 7mg
wegovy 7mg
restaurant-lenvol.net
두 번째 챕터가 전달되었습니다. 지원해주세요. 너무 안타깝습니다.
semaglutide mexico
buy ozempic for weight loss
프라그마틱과 관련된 내용 감사합니다! 또한, 제 사이트에서도 프라그마틱에 대한 정보를 찾아보실 수 있어요. 서로 이야기 공유하며 더 많은 지식을 얻어가요!
PG 소프트
프라그마틱 슬롯에 대한 정보가 정말 유용했어요! 더불어, 제 사이트에서도 프라그마틱과 관련된 새로운 내용을 찾아보세요. 함께 지식을 나누면 좋겠어요!
https://www.chubbycurvy.com
https://www.ozone-hotels.com
https://www.mp3fary.com
buy ozempic online
rybelsus buy uk
semaglutide australia
I really like your blog.. very nice colors & theme. Did you
make this website yourself or did you hire someone to
do it for you? Plz respond as I’m looking to design my own blog and would like to know where u got this from.
thank you
I like the valuable information you provide in your articles.
I’ll bookmark your blog and check again here frequently.
I’m quite certain I’ll learn lots of new stuff right here!
Good luck for the next!
Доброго!
Диплом стал кошмаром. Пишу ночами, глаза на исходе, но сеть дает ресурсы для ускорения работы. Сложно, но не сдаюсь.
http://forwoman.lifeforums.ru/viewtopic.php?id=14670
https://ag-dam.forum2x2.ru/t6046-topic#75095
https://speterburg.rusff.me/viewtopic.php?id=8496#p309450
Желаю всем отличных оценок!
купить диплом в уссурийске
купить диплом в димитровграде
купить диплом в обнинске
купить диплом в северске
купить диплом геодезиста
купить диплом экономиста
купить свидетельство о заключении брака
купить диплом медбрата
купить диплом в воронеже
купить диплом в владикавказе
aviator game promo code
tsrrub.com
Zhu Houzhao는 어쩔 수없이 “이봐, 내 인장을 반납하는 것을 잊지 마세요. “라고 말했습니다.
semaglutide pill
wegovy 21 mg
semaglutide tab 14mg
semaglutide tab 3mg
Привет всем!
Диплом – это мой кошмар. Ночные писательские сессии разрушают глаза, но без них никак. Находки в сети делают работу менее тяжелой. Все будет хорошо.
https://hitaste.ru/forum/?PAGE_NAME=profile_view&UID=244416
http://barca.ru/forum/member.php?u=92031
https://speterburg.rusff.me/viewtopic.php?id=8496#p309450
Желаю всем отличных оценок!
купить диплом в якутске
купить диплом в белгороде
купить диплом воспитателя
купить диплом бурильщика
купить диплом в прокопьевске
купить диплом в бийске
купить диплом в красноярске
купить диплом в новочебоксарске
купить диплом в мичуринске
купить новый диплом
saungsantoso.com
황제의 검을 손에 들고, 얼굴에는 아무런 이상도 보이지 않고 멍하니 도시를 내려다볼 뿐이었다.
sm카지노 보증
아무 말 없이 옆으로 비켜선 침울한 얼굴의 이들도 있었다.
https://canadalaptopfan.com/
rybelsus 21 mg
buy ozempic in mexico
I’d like to find out more? I’d care to find out more details.
Hello! Iam Eva, very nice and sexy bi girl from Sweden!
I like chat and play with mens and womens)
Your key to an adrenaline-pumping experience! Webcam models and video chats for all occasions are available right now.
Your fantasies come to life here and now! Video roulettes with models will help you realize your wildest ideas.
Open the doors to exciting adventures with the best cam models! Enjoy a variety of online entertainment.
Enjoy the moment with the best webcam models! Our platform offers a wide selection of video chats and genres.
https://jp.kikachat.com
https://lv.sexchatter.org
Wait there personally YOU!!!
rivipaolo.com
분명히 … Fang Jifan의 네 단어는 그를 깨닫기에 충분합니다.
semaglutide for weight loss
semaglutide injections
https://prodvizheniekontekstnayareklama.ru
Hi there! This is my first comment here so I just wanted to give a
quick shout out and tell you I really enjoy reading through your posts.
Can you suggest any other blogs/websites/forums that deal
with the same subjects? Appreciate it!
Great article.
Hello! Iam Eva, very nice and sexy bi girl from Sweden!
I like chat and play with mens and womens)
Your key to an adrenaline-pumping experience! Webcam models and video chats for all occasions are available right now.
Your fantasies come to life here and now! Video roulettes with models will help you realize your wildest ideas.
Open the doors to exciting adventures with the best cam models! Enjoy a variety of online entertainment.
Enjoy the moment with the best webcam models! Our platform offers a wide selection of video chats and genres.
https://redcams.be
https://jp.kikachat.ru
Wait there personally YOU!!!
Kraken darknet market зеркало
Даркнет, представляет собой, тайную, инфраструктуру, на, интернете, вход в нее, реализуется, через, определенные, софт а также, инструменты, обеспечивающие, анонимность пользователей. Из числа, таких, средств, является, браузер Тор, обеспечивает, предоставляет, защищенное, подключение к даркнету. Используя, его, пользователи, могут, незаметно, посещать, интернет-ресурсы, не индексируемые, традиционными, поисками, что делает возможным, условия, для проведения, разносторонних, нелегальных действий.
Кракен, соответственно, часто упоминается в контексте, скрытой сетью, как, торговая площадка, для торговли, киберпреступниками. На данной платформе, есть возможность, купить, различные, запрещенные, услуги, вплоть до, наркотиков и стволов, вплоть до, хакерскими действиями. Система, обеспечивает, высокую степень, криптографической защиты, и, скрытности, это, делает, ее, желанной, для, желает, предотвратить, негативных последствий, со стороны законопослушных органов
wegovy semaglutide tablets cost
rybelsus 14
wegovy for diabetes
sm카지노 쿠폰
수천 년 전 가족의 친척이었던 Fang Jifan은 여전히 그를 매우 소중히 여깁니다.
https://colinpagebooks.com/
Даркнет, является, скрытую, платформу, на, интернете, вход, происходит, путем, специальные, программы а также, технологии, обеспечивающие, анонимность пользователей. Из числа, таких, инструментов, считается, Тор браузер, который обеспечивает, гарантирует, защищенное, подключение к сети, в даркнет. С помощью, этот, сетевые пользователи, могут иметь возможность, незаметно, обращаться к, сайты, не видимые, традиционными, поисковыми сервисами, позволяя таким образом, условия, для организации, разносторонних, нелегальных активностей.
Киберторговая площадка, соответственно, часто упоминается в контексте, темной стороной интернета, в качестве, торговая площадка, для осуществления обмена, криминалитетом. Здесь, есть возможность, купить, разнообразные, запрещенные, вещи, начиная с, препаратов и огнестрельного оружия, заканчивая, услугами хакеров. Платформа, предоставляет, крупную долю, криптографической защиты, а также, анонимности, это, делает, эту площадку, привлекательной, для, стремится, избежать, негативных последствий, от правоохранительных органов.
Привет всем!
Наступил момент, когда диплом стал моим кошмаром. Перенесла сроки, сейчас пишу ночами, вредно для здоровья, но в сети нашла полезные ресурсы для ускорения работы.
http://yrenergo.ru/club/user/23217/blog/kupit-diplom-v-moskve1/
http://forum.f-rpg.me/viewtopic.php?id=1984#p3587
Желаю всем отличных оценок!
купить диплом в азове
купить диплом в рязани
купить диплом в самаре
купить свидетельство о заключении брака
купить диплом провизора
купить диплом в череповце
купить диплом в каменске-шахтинском
купить диплом переводчика
купить диплом машиниста
купить диплом в кирово-чепецке
buy ozempic
rybelsus 14
generic rybelsus for weight loss
generic semaglutide
ozempic for weight loss without diabetes
rybelsus canada
rybelsus pill
buy semaglutide pill form for adults
Привет всем!
Пишу диплом, и это ад. Срываю сроки, здоровье на грани, но интернет помогает найти эффективные методы работы. Нужно просто продолжать.
http://ractis.ru/forums/index.php?showtopic=4258
http://ya.forum2.net/viewtopic.php?id=8866#p17779
Желаю всем отличных оценок!
купить диплом о среднем
купить диплом повара
купить диплом журналиста
купить диплом провизора
купить диплом отзывы
купить диплом старого образца
купить речной диплом
купить диплом в озёрске
купить диплом специалиста
купить диплом в шахтах
rybelsus rx
rivipaolo.com
빼앗을 수 없는 것은 모두 모아서 직접 불태워 잿더미로 만든다.
???sm 슬롯
심호흡하세요. “Fang Jifan과 Fang Xiaofan에게 전화하세요.”
https://louisgalaxy.com/
buy semaglutide from india
프라그마틱 플레이는 250개 이상의 게임으로 다양한 화폐와 33개 언어로 전 세계 시장에 다양한 테마의 슬롯을 제공합니다.
프라그마틱
프라그마틱 콘텐츠 항상 기대돼요! 또한 제 사이트에서도 유용한 정보를 제공하고 있어요. 상호 교류하며 더 많은 지식을 얻어가요!
https://doggggqwe.weebly.com/
http://buyvaltrex.site
http://viagraeci.online
semaglutide generic cost
wegovy semaglutide tablets 7.5 mcg
https://gruz4iki-msk.ru
buy ozempic
Привет всем!
Были ли у вас случаи, когда вам приходилось писать дипломную работу в сжатые сроки? Это действительно трудно и ответственно, но важно не сдаваться и продолжать работать над учебными процессами, чем я и занимаюсь.
Для тех, кто умеет грамотно пользоваться интернетом и находить нужную информацию, это действительно оказывается полезным. Это помогает в процессе согласования и написания дипломной работы, и нет необходимости тратить время на посещение библиотек или встречи с дипломным руководителем. Если вам нужны хорошие источники для подготовки дипломных и курсовых работ, я могу поделиться полезными ссылками.
http://vuzdiploma.ru/
Желаю всем отличных оценок!
купить диплом вуза
купить диплом в астрахани
купить диплом в юрге
купить диплом оценщика
можно ли купить диплом
купить диплом логиста
купить диплом дизайнера
купить диплом историка
купить диплом инженера механика
купить диплом в тамбове
generic ozempic cost
brand semaglutide
wegovy 14mg tablets
wegovy 3mg
doeaccforum.com
위엄있는 왕자, 목이 가렵지 않으면 감히 Fang Jifan이 그를 반역죄로 비방합니다!
Подскажем где купить диплом о среднем специальном образовании можно быстро и недорого. Заказывайте на сайте https://diplomguru.com с гарантией.
Николаев Вячеслав Контантинович .
rybelsus for diabetes
no prior prescription needed
https://canadianpharmaceuticalshelp.com/
prescription drugs without doctor approval
최신 프라그마틱 게임은 iGaming에서 혁신적이고 표준화된 콘텐츠를 선보이며 슬롯, 라이브 카지노, 빙고 등 다양한 제품을 선택할 수 있습니다.
프라그마틱 플레이
프라그마틱은 항상 최고의 게임을 제공하죠! 여기에서 더 많은 흥미진진한 정보를 얻을 수 있어 기뻐요.
http://bizbirgemiz.online
https://www.qojrrpylfw.site
http://medrolonline.site
buy semaglutide canada
buy semaglutide pill form for adults
https://prodvizheniestatya.ru
Hello everyone!
I suggest checking out these resources, where you’ll find plenty of helpful, well-organized information, whether you have questions or just need a break from your work:
https://prof-komplekt.com/club/user/1035/blog/6672/
http://www.tvserver.ru/forum/viewtopic.php?p=203653#203653
Good luck! If you know similar ones, be sure to let us know)
rybelsus from canada
https://gruz-trall.ru
buy semaglutide online pharmacy
semaglutide online pharmacy
프라그마틱 슬롯으로 재미와 스릴을 만끽하세요.
프라그마틱 무료
프라그마틱의 빙고 게임은 항상 즐겁고 흥미로워요. 여기에서 더 많은 빙고 게임 정보를 확인하세요!
http://albuterolinhaler.site
http://buybenicar.site
http://usmcafee.site
Way cool! Some very valid points! I appreciate you penning this article
and also the rest of the site is very good.
Hello everyone!
I suggest checking out these resources, where you’ll find plenty of helpful, well-organized information, whether you have questions or just need a break from your work:
https://espritgames.com/pl/forum/topic/slots/#post-71141
https://forum.blu-ray.com/album.php?albumid=5278&pictureid=37475&commentid=5162#picturecomment5162
Good luck! If you know similar ones, be sure to let us know)
промокод 1xbet
рунетки пары
wegovy buy online
промокод для 1xbet
промокод для 1xbet
semaglutide buy australia
рунетки пары
рунетки пары
Hello everyone!
I suggest visiting these resources for a wealth of valuable, well-organized information, whether you have questions or simply need a break from your workload:
https://supplychaingamechanger.com/facts-about-gambling-in-australia/?unapproved=49728&moderation-hash=e79cdedf8ea4d22ee465af2f048faed9#comment-49728
https://coactuem.ub.edu/profiles/pokiesnet07/activity?locale=en
Good luck! If you know similar ones, be sure to let us know)
ozempic coupon
Hello thеrе, just became aware of y᧐ur blog through Gooցle, and
foᥙnd that it’s really informative. I’m gonna watch
out for brussels. I’ll be grateful іf you continue
this in future. Numerous people ѡіll be benefited from your writing.
Cheers!
Utilisation du Code promo du casino 1xbet lors de votre inscription, vous pouvez obtenir un bonus de bienvenue pour un nouveau client d’un montant allant jusqu’a 130?/$, ce qui vous donnera un bon depart dans vos paris sportifs en ligne. Grace a la publicite sur le portail de jeux 1xbet lui-meme et aux publications sur les ressources thematiques et partenaires, de nombreuses personnes connaissent le bonus d’inscription. A bien des egards, c’est grace a lui que le nombre de clients des bookmakers ne cesse de croitre. C’est grace a ce type de bonus que les joueurs disposent d’un montant substantiel qui peut etre depense en paris. De plus, le bookmaker 1xBet dispose d’une section de jeu, vous pouvez donc vous inscrire et obtenir un bonus de bienvenue pour le casino pour cela.
Бесплатные промокоды от букмекерской конторы Mostbet: при регистрации, на бесплатную ставку. Рассказываем, как использовать и куда вводить промокоды в Мостбет. промокод мостбет на первый депозит . Начнем с того, что каждый, кто зарегистрировался на официальном сайте или зеркале конторы впервые, может рассчитывать на получение приветственного денежного бонуса, который в дальнейшем удастся потратить на ставки, а в случае успеха заработать первые деньги. Но мы говорим о промокоде, который в специальной форме регистрации просят ввести при наличии.
Hello everyone!
I suggest exploring these resources as they contain a wealth of valuable and well-organized information. Whether you have inquiries or simply need a break from your tasks, they are worth checking out.
https://blogs.uoregon.edu/qunliu/2015/02/04/personal-adornment-presentation/#comment-121
https://remont.biz.pl/forum/thread-144481.html
Good luck! If you know similar ones, be sure to let us know)
buy ozempic online cheap
buy semaglutide online cheap
Utilisation du code de pari gratuit 1xbet lors de votre inscription, vous pouvez obtenir un bonus de bienvenue pour un nouveau client d’un montant allant jusqu’a 130?/$, ce qui vous donnera un bon depart dans vos paris sportifs en ligne. Grace a la publicite sur le portail de jeux 1xbet lui-meme et aux publications sur les ressources thematiques et partenaires, de nombreuses personnes connaissent le bonus d’inscription. A bien des egards, c’est grace a lui que le nombre de clients des bookmakers ne cesse de croitre. C’est grace a ce type de bonus que les joueurs disposent d’un montant substantiel qui peut etre depense en paris. De plus, le bookmaker 1xBet dispose d’une section de jeu, vous pouvez donc vous inscrire et obtenir un bonus de bienvenue pour le casino pour cela.
wegovy 3 mg
rybelsus for sale
Промокод при регистрации в Mostbet сегодня. Этой акцией может воспользоваться каждый новый клиент при регистрации на сайте букмекера. Это ваше преимущество со старта, и у Mostbet есть эксклюзивное предложение. промокод на мостбет при регистрации . В форме регистрации есть всего одно необязательное поле — как раз для ввода промокода. Как получить промокод на бесплатную ставку. Магазин находится во вкладке xBonus (в перечне вкладок верхнего блока). Вам предложат несколько вариантов для обмена баллов на промокоды Mostbet kz. Код можно получить для ставки ординар, для ставки экспресс, а также для лотерей от «Мостбет». На сегодня промокод Mostbet бесплатно найти можно без особых затрат энергии, при этом сделать это следующим образом: Путем поиска в сети интернет; На сайтах, специализирующихся на спортивных ставках (Не ресурсы БК); В официальных сообществах Мостбет (соцсети). Представители БК часто выкладывают в группах или же просто в сети промокоды на Mostbet бесплатно в честь какого-то праздника либо же грядущего крупного спортивного турнира. Все промокоды Mostbet 2024. На официальном сайте букмекера в соответствующей рубрике находится полный перечень промокодов Mostbet 2024, бесплатно получить которые можно обменяв на них бонусные баллы.
Utilisation du code promo de 1x pari lors de votre inscription, vous pouvez obtenir un bonus de bienvenue pour un nouveau client d’un montant allant jusqu’a 130?/$, ce qui vous donnera un bon depart dans vos paris sportifs en ligne. Grace a la publicite sur le portail de jeux 1xbet lui-meme et aux publications sur les ressources thematiques et partenaires, de nombreuses personnes connaissent le bonus d’inscription. A bien des egards, c’est grace a lui que le nombre de clients des bookmakers ne cesse de croitre. C’est grace a ce type de bonus que les joueurs disposent d’un montant substantiel qui peut etre depense en paris. De plus, le bookmaker 1xBet dispose d’une section de jeu, vous pouvez donc vous inscrire et obtenir un bonus de bienvenue pour le casino pour cela.
Сайт Mostbet считается одним из самых надежных онлайн букмекеров России. БК Mostbet пользуется огромной популярностью среди пользователей из РФ и стран СНГ. Лучшие коэффициенты ставок на спорт, лучшие онлайн игры, слоты казино и еще много других плюсов букмекерской конторы заслуживают внимания. mostbet промокод при регистрации бонус на депозит . Для постоянных игроков БК Мостбет регулярно проводятся различные акции, в рамках которых любая положенная на счет сумма (в рамках определенных пределов) будет увеличена (обычно в два раза). Для вывода подарочных денег требуется поставить деньги несколько раз на события с определенными условиями. Ставки на спорт 2024 – Получить бонус Mostbet и промокод на 35000 рублей от официального сайта Мостбет. Бонус для новых игроков! При регистрации в Mostbet новые клиент получает бонус в размере 35000 рублей. Зарегистрироваться в Mostbet. Бонус действует только для новых пользователей Mostbet.
semaglutide for sale
ozempic
JILI Games – beѕt jili slot online іn thе Philippines
Free Spins 1000+ Free Demo Slot
Openning Bonus 120% piso
Searching JILI Games+hawkplay888 ⲟn Google or Bing tⲟ get free coins
jili games
Hi to every one, the contents existing at this
website are in fact awesome for people knowledge, well, keep up the nice work fellows.
semaglutide online
wegovy semaglutide
Потребность в дипломе колледжа? Наша компания предлагает дипломы проверенного качества с доставкой по всей стране. Обратитесь к нам для получения дополнительной информации.
wegovy oral medication
cheap ozempic
Бесплатные промокоды от букмекерской конторы Mostbet: при регистрации, на бесплатную ставку. Рассказываем, как использовать и куда вводить промокоды в Мостбет. промокод мостбет на сегодня бездепозитный . Начнем с того, что каждый, кто зарегистрировался на официальном сайте или зеркале конторы впервые, может рассчитывать на получение приветственного денежного бонуса, который в дальнейшем удастся потратить на ставки, а в случае успеха заработать первые деньги. Но мы говорим о промокоде, который в специальной форме регистрации просят ввести при наличии.
code promo pour parier gratuit dans 1xbet – Bonus VIP jusqu’a 130 ?/$ Offer Offre de bienvenue. 18 Les conditions generales s’appliquent. Lorsqu’un utilisateur lit le materiel sur les activites du bookmaker 1xBet, sur les caracteristiques et les avantages de sa plateforme de jeu et ses genereux bonus, il tombera certainement sur un bloc dans le texte. Dans ce bloc, il y aura une offre pour aller sur le site Web du bookmaker, s’inscrire et avoir acces a tous les avantages enumeres.
rybelsus pill form
rybelsus online order
Mostbet промокод на бонус при регистрации. Букмекерская контора предоставляет игрокам множество возможностей для снижения рисков и увеличения банка. Бонусная программа компании предусматривает интересы как новичков, так и опытных бетторов. Рассмотрим основные виды поощрений в функционале БК: Мостбет промокод на регистрацию – один из самых популярных подарков, созданный для новых игроков на сайте; Ставки на спорт – увеличение депозита до 35000 рублей. Воспользуйся актуальным промокодом Mostbet на сегодня, получи бесплатную возможность увеличить свой первый депозит до 35000 рублей в БК Mostbet. Воспользовавшись промокод на mostbet на ставку , максимальная сумма бонуса возможного бонуса будет увеличена до 35000 рублей. Но при этом сумма бонуса будет равна сумме вашего первого депозита.
Bonus promotionnel du code 1xbet – Bonus d’inscription de 130 ?/$. Les codes bonus du bookmaker 1xBet sont faciles a trouver dans l’espace Internet public. Fondamentalement, ces offres sont publiees sur des sites partenaires et des ressources Internet thematiques qui mettent en evidence le travail du bureau 1xBet, ses avantages et ses fonctionnalites. Dans ces articles et materiels, des codes promotionnels sont inclus, juste a l’endroit ou il est decrit en detail l’avantage de s’inscrire sur le site de jeu via un code promotionnel. Habituellement, ces blocs, ou le code bonus est place directement, fonctionnent comme de la publicite, motivant les utilisateurs a copier le code et a proceder a l’enregistrement sur le portail du jeu.
binsunvipp.com
“그의 전하 …”모든 관리들은 Zhu Houzhao에게 경의를 표했습니다.
semaglutide generic
Скрытая сеть, представляет собой, скрытую, сеть, в, интернете, вход, осуществляется, по средствам, специальные, приложения а также, технологии, обеспечивающие, анонимность пользователей. Одним из, подобных, инструментов, представляется, Тор браузер, который позволяет, обеспечивает защиту, приватное, подключение к интернету, в даркнет. Используя, этот, участники, могут, безопасно, обращаться к, интернет-ресурсы, не индексируемые, традиционными, поисками, что делает возможным, условия, для организации, различных, противоправных действий.
Крупнейшая торговая площадка, в свою очередь, часто ассоциируется с, темной стороной интернета, как, площадка, для, киберпреступниками. На этой площадке, можно, получить доступ к, разнообразные, запрещенные, товары, начиная с, наркотиков и оружия, заканчивая, хакерскими действиями. Система, обеспечивает, высокий уровень, криптографической защиты, а также, анонимности, что, предоставляет, ее, желанной, для тех, кто, намерен, уклониться от, преследований, со стороны законопослушных органов.
semaglutide without prescription
buy viagra online
wegovy without prescription
Желаете получить диплом скоро и без лишних заморочек? В Москве имеется немало способов приобрести аттестат о высшем образовании – http://www.diplom4.me. Профессиональные агентства предлагают услуги по получению бумаг от различных учебных заведений. Обращайтесь к непреложным поставщикам и завершите свой диплом сегодня!
Hello everyone!
I suggest exploring these resources as they contain a wealth of valuable and well-organized information. Whether you have inquiries or simply need a break from your tasks, they are worth checking out.
https://teleadreson.com/onlinecasinoudenrofus,-luGRAJbhkQA.html
https://www.abnewswire.com/companyname/onlinecasinopolski.pl_127620.html#detail-tab
Good luck! If you know similar ones, be sure to let us know)
mostbet промокод com https://afrodita.guru/art/promokod_mostbet__besplatno.html мостбет промокод на фрибет
Достигни права управлять автомобилем в лучшей автошколе!
Стремись к профессиональной карьере вождения с нашей автошколой!
Пройди обучение в самой автошколе города!
Учись правильного вождения с нашей автошколой!
Стань безупречным навыкам вождения с нашей автошколой!
Научись уверенно водить автомобиль у нас в автошколе!
Стремись к независимости и свободы, получив права в автошколе!
Продемонстрируй мастерство вождения в нашей автошколе!
Открой новые возможности, получив права в автошколе!
Приведи друзей и они заработают скидку на обучение в автошколе!
Стремись к профессиональному будущему в автомобильном мире с нашей автошколой!
Заводи и научись водить автомобиль вместе с нашей автошколой!
Развивай свои навыки вождения вместе с опытными инструкторами нашей автошколы!
Закажи обучение в автошколе и получи бесплатный индивидуальный урок от наших инструкторов!
Достигни надежности и безопасности на дороге вместе с нашей автошколой!
Улучши свои навыки вождения вместе с профессионалами в нашей автошколе!
Учись дорожные правила и навыки вождения в нашей автошколе!
Стань настоящим мастером вождения с нашей автошколой!
Накопи опыт вождения и получи права в нашей автошколе!
Покори дорогу вместе с нами – пройди обучение в автошколе!
вартість навчання на права https://avtoshkolaznit.kiev.ua .
Здравствуйте!
Бывало ли у вас так, что вам приходилось писать дипломную работу в ужатые сроки? Это поистине серьезная и трудная задача, но важно не сдаваться и активно заниматься учебными процессами, чем я и занимаюсь.
Тем, кто умеет эффективно ориентироваться в информационном пространстве и искать нужные данные через поисковые системы, это действительно облегчает процесс согласования и написания дипломной работы. Таким образом, нет необходимости тратить время на посещение библиотек или организацию встреч с дипломным руководителем. Если вы ищете качественные источники для подготовки дипломов и курсовых работ, у меня есть несколько полезных ссылок, которыми вы можете воспользоваться.
http://vuzdiploma.ru/
Желаю всем отличных оценок!
купить диплом гознак
купить диплом в нижнекамске
купить диплом в кузнецке
купить диплом в минусинске
купить диплом в ейске
купить диплом в мытищах
купить диплом в люберцах
купить диплом в елабуге
купить диплом в чапаевске
купить диплом в нефтеюганске
комплексное продвижение сайтов https://www.prodvizhenie-sajtov15.ru/ .
Utilisation du Bonus promotionnel du code 1xbet lors de votre inscription, vous pouvez obtenir un bonus de bienvenue pour un nouveau client d’un montant allant jusqu’a 130?/$, ce qui vous donnera un bon depart dans vos paris sportifs en ligne. Grace a la publicite sur le portail de jeux 1xbet lui-meme et aux publications sur les ressources thematiques et partenaires, de nombreuses personnes connaissent le bonus d’inscription. A bien des egards, c’est grace a lui que le nombre de clients des bookmakers ne cesse de croitre. C’est grace a ce type de bonus que les joueurs disposent d’un montant substantiel qui peut etre depense en paris. De plus, le bookmaker 1xBet dispose d’une section de jeu, vous pouvez donc vous inscrire et obtenir un bonus de bienvenue pour le casino pour cela.
Получи права управления автомобилем в первоклассной автошколе!
Стань профессиональной карьере вождения с нашей автошколой!
Пройди обучение в лучшей автошколе города!
Учись правильного вождения с нашей автошколой!
Стань безупречным навыкам вождения с нашей автошколой!
Начни уверенно водить автомобиль с нами в автошколе!
Стремись к независимости и лицензии, получив права в автошколе!
Прояви мастерство вождения в нашей автошколе!
Открой новые возможности, получив права в автошколе!
Запиши друзей и они заработают скидку на обучение в автошколе!
Стремись к профессиональному будущему в автомобильном мире с нашей автошколой!
Учись и научись водить автомобиль вместе с нашей автошколой!
Улучшай свои навыки вождения вместе с опытными инструкторами нашей автошколы!
Закажи обучение в автошколе и получи бесплатный консультационный урок от наших инструкторов!
Достигни надежности и безопасности на дороге вместе с нашей автошколой!
Улучши свои навыки вождения вместе с профессионалами в нашей автошколе!
Учись дорожные правила и навыки вождения в нашей автошколе!
Стань настоящим мастером вождения с нашей автошколой!
Набери опыт вождения и получи права в нашей автошколе!
Пробей дорогу вместе с нами – пройди обучение в автошколе!
вартість навчання в автошколі http://www.avtoshkolaznit.kiev.ua/ .
order semaglutide
промокоды от мостбет http://collect-computer.ru/uploads/pages/promokod_mostbet__besplatno.html промокод в мостбет
Hello everybody!
Have you ever heard of X-GPT Writer: a unique keyword content generator based on the ChatGPT neural network?
I also haven’t, until I was advised to automate routine tasks with this software, I want to say one thing! For a long time afterwards, I couldn’t believe
that ChatGPT was such a powerful product if it was used simultaneously in streaming, running X-GPT Writer.
I thought it was just a utility, it was inexpensive, a friend gave me a coupon for a 40% discount%:
94EB516BCF484B27
the details of where to enter it are indicated on the website:
https://www.xtranslator.ru/x-gpt-writer/
I started trying, delving into it, bought 50 ChatGPT accounts at low prices and off I went!
Now I easily generate and launch 3-4 new sites per week, batch unify entire folders and even create images
using the ChatGPT neural network and X-GPT Writer.
It’s worth a try, Friends, there’s a demo, everything is free, you won’t regret it)
Good luck!
уникализатор текста через ChatGPT
Как получить скидку на X-GPTWriter
X-GPTWriter: купоны и акции на скидки
ChatGPT для профессиональных копирайтеров и маркетологов
Синонимайзер текста на основе ChatGPT
ChatGPT и X-GPTWriter в качестве инструментов синонимизации
Где найти промо коды на X-GPTWriter
Уникализация текста с помощью ChatGPT
X-GPTWriter: мощный инструмент для контент-креации
Уникализация контента с ChatGPT и X-GPTWriter
мостбет промокоды при регистрации http://www.newlcn.com/pages/news/promokod_mostbet__besplatno.html мостбет промокод на ставку
code promo 1xbet togo – Bonus d’inscription de 130 ?/$. Les codes bonus du bookmaker 1xBet sont faciles a trouver dans l’espace Internet public. Fondamentalement, ces offres sont publiees sur des sites partenaires et des ressources Internet thematiques qui mettent en evidence le travail du bureau 1xBet, ses avantages et ses fonctionnalites. Dans ces articles et materiels, des codes promotionnels sont inclus, juste a l’endroit ou il est decrit en detail l’avantage de s’inscrire sur le site de jeu via un code promotionnel. Habituellement, ces blocs, ou le code bonus est place directement, fonctionnent comme de la publicite, motivant les utilisateurs a copier le code et a proceder a l’enregistrement sur le portail du jeu.
buy semaglutide oversees
code promo 1xbet burundi pour 2024, seulement, il vous donne un bonus de bienvenue de 100% jusqu’a 130?/$. Il s’agit d’un bonus de depot d’inscription, et vous pouvez l’utiliser pour les paris sportifs et les sports. Le programme de bonus du bookmaker 1xbet couvre presque toutes les activites de jeu des clients. De plus, les offres en termes de bonus peuvent concerner aussi bien les debutants que les joueurs experimentes, offrant des preferences et des avantages supplementaires a differentes etapes du jeu.
saungsantoso.com
Zhu Houzhao는 너무 많이 생각하지 않고 “우리가 돈을 지불할 수 있습니다. “라고 말했습니다.
프라그마틱 관련 정보 감사합니다! 제 사이트에서도 유용한 정보를 공유하고 있어요. 함께 소통하면서 발전하는 모습 기대합니다!
PG 소프트
프라그마틱은 국내외에서 큰 사랑을 받고 있는데, 여기서 그 이유를 알 수 있어 좋아요!
https://www.buycelebrex.site
https://www.pzdig.com
http://buypropranolol.site
Hello everyone!
I suggest checking out these resources, where you’ll find plenty of helpful, well-organized information, whether you have questions or just need a break from your work:
https://poeditor.com/join/project/qUPu8nQD1D
https://discoverwisconsin.com/blog/the-best-of-2022-on-the-cabin-podcast/#comment-190408
Good luck! If you know similar ones, be sure to let us know)
Hello!
Have you ever heard of X-GPT Writer: a unique keyword content generator based on the ChatGPT neural network?
I also haven’t, until I was advised to automate routine tasks with this software, I want to say one thing! For a long time afterwards, I couldn’t believe
that ChatGPT was such a powerful product if it was used simultaneously in streaming, running X-GPT Writer.
I thought it was just a utility, it was inexpensive, a friend gave me a coupon for a 40% discount%:
94EB516BCF484B27
the details of where to enter it are indicated on the website:
https://www.xtranslator.ru/x-gpt-writer/
I started trying, delving into it, bought 50 ChatGPT accounts at low prices and off I went!
Now I easily generate and launch 3-4 new sites per week, batch unify entire folders and even create images
using the ChatGPT neural network and X-GPT Writer.
It’s worth a try, Friends, there’s a demo, everything is free, you won’t regret it)
Good luck!
Программа для автоматического создания текстов с использованием ChatGPT
Создание уникальных статей с ChatGPT
X-GPTWriter: лучший софт для создания текстов
Преимущества использования X-GPTWriter для SEO
Генерация текстовых материалов с X-GPTWriter
Как сделать текст более уникальным с ChatGPT
Уникализация текста с помощью ChatGPT
ChatGPT для уникального исходного контента
X-GPTWriter: купоны и акции на скидки
X-GPTWriter промо коды и скидки
rybelsus injection
ozempic tablets for weight loss cost
order semaglutide
semaglutide cost
ozempic semaglutide
https://www.snabco.ru/fw/inc/promokod_mostbet__besplatno.html
Промокод МостБет – QWERTY777 предоставляет всем новым клиентам возможность получить эксклюзивный приветственный бонус 125% до 25 000 рублей. Бонусный код проверен и актуален на сегодня 2024. Просто копируйте промокод mostbet и получайте бонус за регистрацию.
Пользователь еще не определился в своем желании, где и как ему лучше сделать ставку на исход спортивного события, а ему уже предлагается использовать промокод Mostbet, перейти к регистрации в букмекерской конторе и получить взамен определенное преимущество.
Надо отдать должное, подобное предложение очень своевременное! Чаще всего именно так и происходит. Получив бонусный код, пользователь переходит к созданию аккаунта в конторе. Расчет делается на то, что использованный промокод Mostbet принесет игроку порцию каких-то бонусов и преференций.
Именно в этой и заключается основная функция промокодов. Именно для этой цели букмекер Mostbet выпускает бонусные коды, способствуя привлечению новых клиентов. С помощью подобных акций контора старается увеличить число своих поклонников. В свою очередь, пользователи через бонус коды получают дополнительные возможности в предстоящей игре.
Промокод – это универсальный инструмент бонусной политики, предоставляя обеим стороны, и букмекеру, и игрокам более широкие возможности для взаимовыгодного сотрудничества.
Беря во внимание постоянный интерес игроков к бонусам, предлагает разобраться в вопросах. Что дают промокоды Mostbet поклонникам ставок на спорт? Реально ли реализовать полученное преимущество и за счет чего бонусная программа букмекерской конторы Mostbet выглядит привлекательной?
Делать ставки на спорт в букмекерской конторе Mostbet можно не только рискуя собственными деньгами. Прекрасная возможность испытать собственную удачу и проверить насколько прогнозы на исходы спортивных событий могут быть успешными – игра за бонусы, предоставляемые букмекером. В этом случае не только риски сведены к минимуму. У игроков появляются дополнительные шансы на выигрыш.
Неважно! Получены ли бонусы за промокод Mostbet, или преимущество является результатом участия игрока в бонусной программе букмекера, любой из вариантов предполагает заключение пари на выгодных условиях.
un code promo x bet – Bonus VIP jusqu’a 130 ?/$ Offer Offre de bienvenue. 18 Les conditions generales s’appliquent. Lorsqu’un utilisateur lit le materiel sur les activites du bookmaker 1xBet, sur les caracteristiques et les avantages de sa plateforme de jeu et ses genereux bonus, il tombera certainement sur un bloc dans le texte. Dans ce bloc, il y aura une offre pour aller sur le site Web du bookmaker, s’inscrire et avoir acces a tous les avantages enumeres.
saungsantoso.com
수도를 제외하고는 변한 것이 없는 것 같습니다.
wegovy semaglutide
https://www.snabco.ru/fw/inc/promokod_mostbet__besplatno.html
Промокод МостБет – QWERTY777 предоставляет всем новым клиентам возможность получить эксклюзивный приветственный бонус 125% до 25 000 рублей. Бонусный код проверен и актуален на сегодня 2024. Просто копируйте промокод mostbet и получайте бонус за регистрацию.
Пользователь еще не определился в своем желании, где и как ему лучше сделать ставку на исход спортивного события, а ему уже предлагается использовать промокод Mostbet, перейти к регистрации в букмекерской конторе и получить взамен определенное преимущество.
Надо отдать должное, подобное предложение очень своевременное! Чаще всего именно так и происходит. Получив бонусный код, пользователь переходит к созданию аккаунта в конторе. Расчет делается на то, что использованный промокод Mostbet принесет игроку порцию каких-то бонусов и преференций.
Именно в этой и заключается основная функция промокодов. Именно для этой цели букмекер Mostbet выпускает бонусные коды, способствуя привлечению новых клиентов. С помощью подобных акций контора старается увеличить число своих поклонников. В свою очередь, пользователи через бонус коды получают дополнительные возможности в предстоящей игре.
Промокод – это универсальный инструмент бонусной политики, предоставляя обеим стороны, и букмекеру, и игрокам более широкие возможности для взаимовыгодного сотрудничества.
Беря во внимание постоянный интерес игроков к бонусам, предлагает разобраться в вопросах. Что дают промокоды Mostbet поклонникам ставок на спорт? Реально ли реализовать полученное преимущество и за счет чего бонусная программа букмекерской конторы Mostbet выглядит привлекательной?
Делать ставки на спорт в букмекерской конторе Mostbet можно не только рискуя собственными деньгами. Прекрасная возможность испытать собственную удачу и проверить насколько прогнозы на исходы спортивных событий могут быть успешными – игра за бонусы, предоставляемые букмекером. В этом случае не только риски сведены к минимуму. У игроков появляются дополнительные шансы на выигрыш.
Неважно! Получены ли бонусы за промокод Mostbet, или преимущество является результатом участия игрока в бонусной программе букмекера, любой из вариантов предполагает заключение пари на выгодных условиях.
1xbet code promo tours gratuits pour 2024, seulement, il vous donne un bonus de bienvenue de 100% jusqu’a 130?/$. Il s’agit d’un bonus de depot d’inscription, et vous pouvez l’utiliser pour les paris sportifs et les sports. Le programme de bonus du bookmaker 1xbet couvre presque toutes les activites de jeu des clients. De plus, les offres en termes de bonus peuvent concerner aussi bien les debutants que les joueurs experimentes, offrant des preferences et des avantages supplementaires a differentes etapes du jeu.
https://www.snabco.ru/fw/inc/promokod_mostbet__besplatno.html
Промокод МостБет – QWERTY777 предоставляет всем новым клиентам возможность получить эксклюзивный приветственный бонус 125% до 25 000 рублей. Бонусный код проверен и актуален на сегодня 2024. Просто копируйте промокод mostbet и получайте бонус за регистрацию.
Пользователь еще не определился в своем желании, где и как ему лучше сделать ставку на исход спортивного события, а ему уже предлагается использовать промокод Mostbet, перейти к регистрации в букмекерской конторе и получить взамен определенное преимущество.
Надо отдать должное, подобное предложение очень своевременное! Чаще всего именно так и происходит. Получив бонусный код, пользователь переходит к созданию аккаунта в конторе. Расчет делается на то, что использованный промокод Mostbet принесет игроку порцию каких-то бонусов и преференций.
Именно в этой и заключается основная функция промокодов. Именно для этой цели букмекер Mostbet выпускает бонусные коды, способствуя привлечению новых клиентов. С помощью подобных акций контора старается увеличить число своих поклонников. В свою очередь, пользователи через бонус коды получают дополнительные возможности в предстоящей игре.
Промокод – это универсальный инструмент бонусной политики, предоставляя обеим стороны, и букмекеру, и игрокам более широкие возможности для взаимовыгодного сотрудничества.
Беря во внимание постоянный интерес игроков к бонусам, предлагает разобраться в вопросах. Что дают промокоды Mostbet поклонникам ставок на спорт? Реально ли реализовать полученное преимущество и за счет чего бонусная программа букмекерской конторы Mostbet выглядит привлекательной?
Делать ставки на спорт в букмекерской конторе Mostbet можно не только рискуя собственными деньгами. Прекрасная возможность испытать собственную удачу и проверить насколько прогнозы на исходы спортивных событий могут быть успешными – игра за бонусы, предоставляемые букмекером. В этом случае не только риски сведены к минимуму. У игроков появляются дополнительные шансы на выигрыш.
Неважно! Получены ли бонусы за промокод Mostbet, или преимущество является результатом участия игрока в бонусной программе букмекера, любой из вариантов предполагает заключение пари на выгодных условиях.
1xbet code promo pari gratuit – Bonus d’inscription de 130 ?/$. Les codes bonus du bookmaker 1xBet sont faciles a trouver dans l’espace Internet public. Fondamentalement, ces offres sont publiees sur des sites partenaires et des ressources Internet thematiques qui mettent en evidence le travail du bureau 1xBet, ses avantages et ses fonctionnalites. Dans ces articles et materiels, des codes promotionnels sont inclus, juste a l’endroit ou il est decrit en detail l’avantage de s’inscrire sur le site de jeu via un code promotionnel. Habituellement, ces blocs, ou le code bonus est place directement, fonctionnent comme de la publicite, motivant les utilisateurs a copier le code et a proceder a l’enregistrement sur le portail du jeu.
프라그마틱의 게임을 플레이하면 항상 긴장감 넘치고 즐거운 시간을 보낼 수 있어 좋아요. 여기서 더 많은 이야기를 들려주세요!
프라그마틱 슬롯
프라그마틱과 관련된 이 글 정말 잘 읽었어요! 더불어 저도 제 사이트에서 프라그마틱에 대한 새로운 정보를 공유 중이에요. 함께 나누면 더 좋을 것 같아요!
http://viagrazoom.online
http://retinaonline.site
https://fjghgy.com/
semaglutide online
semaglutide medication
에스엠 카지노
하지만 준비가 되어 있어도 불편하지 않았다면 거짓말일 것이다.
https://atoxfinance.com/
where can i buy ozempic
현재 프라그마틱 게임은 iGaming 분야에서 혁신적이고 표준화된 콘텐츠를 선도하는 주요 제공 업체입니다.
프라그마틱 슬롯 무료
프라그마틱 관련 내용 감사합니다! 또한, 제 사이트에서도 프라그마틱에 대한 유용한 정보를 공유하고 있어요. 함께 서로 이야기하며 더 많은 지식을 쌓아가요!
http://buymobic.site
https://www.xmcoart.com
https://eprust.com/
https://ldwg.ru/ldwg/ap/promokod_mostbet__besplatno.html
MostBet Промокод 2024 – QWERTY777 используйте бонусный код при регистрации и вы получите приветственный бонус 125% на сумму до 25 000 рублей. Данный промо-код нужно ввести только при регистрации, там есть графа “Добавить Промокод” именно в нее вам нужно указать этот код для получения бонуса. После регистрации с промокодом в вашем аккаунте автоматически будут активны все акции и бонусы 2024 года.
Практически каждая букмекерская контора имеет в своем арсенале бонусы. С их помощью можно не только привлечь новых клиентов, но и добиться лояльности своей постоянной аудитории. Не отстает в этом плане букмекер MostBet, у которого бонусная программа отличается разнообразием предложений.
Игрокам импонирует такая политика букмекерской конторы, направленная не только на повышение привлекательности оператора, но и которая способствует повышению игрового потенциала клиентов. Помимо того, что бонусы выглядят внушительно, предложения отличаются разнообразием. Более того, получить их не так уж сложно. Чтобы бонус стал доступен, игроку достаточно выполнить ряд условий или использовать промокод.
Промокоды MostBet – самый простой способ получить бонусы. С их помощью игроки могут получить надбавки к денежному бонусу, фрибеты и прочие преференции. Другие акции предусматривают более крупные поощрения, рассчитанные на длительный игровой цикл, способные существенно повысить игровой потенциал клиентов этой букмекерской конторы.
https://prodvizhenieinternet-marketing.ru
rybelsus sale
ozempic for weight loss
semaglutide cost
Thanks a bunch for sharing this with all folks you really understand what you are speaking approximately!
Bookmarked. Kindly additionally consult with
my web site =). We could have a hyperlink trade agreement among us
buy semaglutide online canada
1xbet dernier code promo – Bonus d’inscription de 130 ?/$. Les codes bonus du bookmaker 1xBet sont faciles a trouver dans l’espace Internet public. Fondamentalement, ces offres sont publiees sur des sites partenaires et des ressources Internet thematiques qui mettent en evidence le travail du bureau 1xBet, ses avantages et ses fonctionnalites. Dans ces articles et materiels, des codes promotionnels sont inclus, juste a l’endroit ou il est decrit en detail l’avantage de s’inscrire sur le site de jeu via un code promotionnel. Habituellement, ces blocs, ou le code bonus est place directement, fonctionnent comme de la publicite, motivant les utilisateurs a copier le code et a proceder a l’enregistrement sur le portail du jeu.
buy semaglutide from canada
wegovy canada
Utilisation du code promo 1xbet pour l’inscription lors de votre inscription, vous pouvez obtenir un bonus de bienvenue pour un nouveau client d’un montant allant jusqu’a 130?/$, ce qui vous donnera un bon depart dans vos paris sportifs en ligne. Grace a la publicite sur le portail de jeux 1xbet lui-meme et aux publications sur les ressources thematiques et partenaires, de nombreuses personnes connaissent le bonus d’inscription. A bien des egards, c’est grace a lui que le nombre de clients des bookmakers ne cesse de croitre. C’est grace a ce type de bonus que les joueurs disposent d’un montant substantiel qui peut etre depense en paris. De plus, le bookmaker 1xBet dispose d’une section de jeu, vous pouvez donc vous inscrire et obtenir un bonus de bienvenue pour le casino pour cela.
generic ozempic for weight loss
Utilisation du Code promo de tours gratuits 1xbet aujourd’hui lors de votre inscription, vous pouvez obtenir un bonus de bienvenue pour un nouveau client d’un montant allant jusqu’a 130?/$, ce qui vous donnera un bon depart dans vos paris sportifs en ligne. Grace a la publicite sur le portail de jeux 1xbet lui-meme et aux publications sur les ressources thematiques et partenaires, de nombreuses personnes connaissent le bonus d’inscription. A bien des egards, c’est grace a lui que le nombre de clients des bookmakers ne cesse de croitre. C’est grace a ce type de bonus que les joueurs disposent d’un montant substantiel qui peut etre depense en paris. De plus, le bookmaker 1xBet dispose d’une section de jeu, vous pouvez donc vous inscrire et obtenir un bonus de bienvenue pour le casino pour cela.
rybelsus generic cost
sm카지노 쿠폰
이 사람은… 실제로 이겼고… 상위 16~17위에 올랐습니다.
https://okazionantik.com/
wegovy 3mg
wegovy for diabetes
semaglutide 14mg tablets
buy rybelsus in mexico
wegovy diabetes medication
wegovy rx
semaglutide online order
ozempic semaglutide tablets cost
buy rybelsus
Привет всем!
Пишу диплом, это изматывает. Срыв сроков, здоровье под угрозой, но в сети нашла способы улучшить продуктивность. Просто нужно продолжать.
https://demo.wowonder.com/1707639846893021_263876
https://www.intensedebate.com/people/bazenowartyr
Желаю всем отличных оценок!
можно ли купить диплом
купить диплом техника
купить диплом в юрге
купить диплом машиниста
купить диплом юриста
купить диплом высшее
купить диплом в саранске
купить диплом с занесением в реестр
купить диплом зубного техника
купить диплом университета
rybelsus pills
sm카지노 쿠폰
Zhang Yuanxi는 서둘러 절을했고 갑자기 코가 아팠습니다.
https://louisgalaxy.com/
buy ozempic
wegovy xl
semaglutide tablets 7 mg
rybelsus 3 mg
wegovy tablets for weight loss
Доброго!
Бывало ли у вас так, что вам приходилось писать дипломную работу в ужатые сроки? Это поистине серьезная и трудная задача, но важно не сдаваться и активно заниматься учебными процессами, чем я и занимаюсь.
Тем, кто умеет эффективно ориентироваться в информационном пространстве и искать нужные данные через поисковые системы, это действительно облегчает процесс согласования и написания дипломной работы. Таким образом, нет необходимости тратить время на посещение библиотек или организацию встреч с дипломным руководителем. Если вы ищете качественные источники для подготовки дипломов и курсовых работ, у меня есть несколько полезных ссылок, которыми вы можете воспользоваться.
http://vuzdiploma.ru/
Желаю всем отличных оценок!
купить диплом в троицке
купить диплом в рубцовске
купить диплом в красноярске
купить сертификат специалиста
купить диплом инженера строителя
купить диплом эколога
купить диплом в армавире
купить диплом сантехника
купить диплом в орле
купить диплом в минеральных водах
Les codes promo en vigueur pour 1xBet ? Offre 2024 ? Codes bonus ? Bonus de pari gratuit ? Bonus d’inscription ? Programme de fidelite !
https://popvalais.ch/wp-includes/inc/?code-promo-1xbet-burkina-faso-78-000xof.html
Le Code Promo 1xBet 2024 Utilisez le code lors de votre inscription pour beneficier d’un bonus de 130€/$. Le bonus de bienvenue de 100% pour les paris sportifs et le casino vous offre la possibilite d’utiliser de l’argent gratuit sur 1xbet. Le format de presque toutes les activites des bookmakers implique la presence d’un programme de bonus. Grace aux bonus fournis, le bookmaker tente d’accroitre son attractivite aux yeux des clients potentiels. Quant aux joueurs, ils peuvent placer des paris au detriment des bonus sans trop de risques, augmentant leurs chances de gagner. Dans le meme ordre d’idees, le programme de bonus du bookmaker 1xBet dans son ensemble et chacun de ses elements separement doivent etre pris en compte.
rybelsus for diabetes
Доброго!
Пишу диплом, это ужасно. Сорвала сроки, здоровье на исходе, но в сети нашла полезные ресурсы для продуктивной работы. Просто нужно держаться.
http://mastrerkon.ru/forum/viewtopic.php?f=27&t=19921
http://tr.clanfm.ru/viewtopic.php?f=33&t=8986
Желаю всем отличных оценок!
купить диплом в твери
купить диплом в артеме
купить диплом в сургуте
купить диплом в россоши
купить диплом в иркутске
купить диплом маляра
купить диплом в ухте
купить диплом юриста
купить диплом в дербенте
купить диплом в великом новгороде
certified canadian online pharmacies
https://canadianpharmacyeasy.com/
canadian pharmacies online
buy wegovy online from india
Les codes promo en vigueur pour 1xBet ? Offre 2024 ? Codes bonus ? Bonus de pari gratuit ? Bonus d’inscription ? Programme de fidelite !
https://popvalais.ch/wp-includes/inc/?code-promo-1xbet-burkina-faso-78-000xof.html
Le Code Promo 1xBet 2024 Utilisez le code lors de votre inscription pour beneficier d’un bonus de 130€/$. Le bonus de bienvenue de 100% pour les paris sportifs et le casino vous offre la possibilite d’utiliser de l’argent gratuit sur 1xbet. Le format de presque toutes les activites des bookmakers implique la presence d’un programme de bonus. Grace aux bonus fournis, le bookmaker tente d’accroitre son attractivite aux yeux des clients potentiels. Quant aux joueurs, ils peuvent placer des paris au detriment des bonus sans trop de risques, augmentant leurs chances de gagner. Dans le meme ordre d’idees, le programme de bonus du bookmaker 1xBet dans son ensemble et chacun de ses elements separement doivent etre pris en compte.
wegovy sale
rybelsus tab 3mg
Les codes promo en vigueur pour 1xBet ? Offre 2024 ? Codes bonus ? Bonus de pari gratuit ? Bonus d’inscription ? Programme de fidelite !
https://popvalais.ch/wp-includes/inc/?code-promo-1xbet-burkina-faso-78-000xof.html
Le Code Promo 1xBet 2024 Utilisez le code lors de votre inscription pour beneficier d’un bonus de 130€/$. Le bonus de bienvenue de 100% pour les paris sportifs et le casino vous offre la possibilite d’utiliser de l’argent gratuit sur 1xbet. Le format de presque toutes les activites des bookmakers implique la presence d’un programme de bonus. Grace aux bonus fournis, le bookmaker tente d’accroitre son attractivite aux yeux des clients potentiels. Quant aux joueurs, ils peuvent placer des paris au detriment des bonus sans trop de risques, augmentant leurs chances de gagner. Dans le meme ordre d’idees, le programme de bonus du bookmaker 1xBet dans son ensemble et chacun de ses elements separement doivent etre pris en compte.
binsunvipp.com
그리고 그의 방법은… Ouyang Zhi와 Wang Shouren에게 효과적일 수 있습니다.
buy wegovy from canada
digiyumi.com
그러나 고개를 들어 그 손의 주인을 본 순간 그는 입을 다물었다.
Приобрести свидетельство стоимость – весомое обстоятельство при выборе услуги. Москва имеет разные возможности.
All information on the site – promo code on 1xslots
buy wegovy online no script
wegovy semaglutide tablets 3mg
purchase ozempic
wegovy tab 7mg
order rybelsus
All information on the site – 1xslots promo code casino
buy semaglutide online no script needed
All information on the site – 1xslots promo code for today
Watches World
Watches World
buy ozempic
I am now not certain where you are getting your information, however
great topic. I must spend some time learning much more or
figuring out more. Thanks for magnificent info
I used to be searching for this info for my mission.
Заработай права управления автомобилем в лучшей автошколе!
Стань профессиональной карьере вождения с нашей автошколой!
Пройди обучение в лучшей автошколе города!
Задай тон правильного вождения с нашей автошколой!
Стань безупречным навыкам вождения с нашей автошколой!
Начни уверенно водить автомобиль с нами в автошколе!
Достигай независимости и свободы, получив права в автошколе!
Прояви мастерство вождения в нашей автошколе!
Обрети новые возможности, получив права в автошколе!
Запиши друзей и они получат скидку на обучение в автошколе!
Стремись к профессиональному будущему в автомобильном мире с нашей автошколой!
знакомства и научись водить автомобиль вместе с нашей автошколой!
Улучшай свои навыки вождения вместе с опытными инструкторами нашей автошколы!
Запиши обучение в автошколе и получи бесплатный индивидуальный урок от наших инструкторов!
Достигни надежности и безопасности на дороге вместе с нашей автошколой!
Прокачай свои навыки вождения вместе с профессионалами в нашей автошколе!
Учись дорожные правила и навыки вождения в нашей автошколе!
Стремись к настоящим мастером вождения с нашей автошколой!
Накопи опыт вождения и получи права в нашей автошколе!
Пробей дорогу вместе с нами – закажи обучение в автошколе!
автошкола ціна навчання https://www.avtoshkolaznit.kiev.ua .
semaglutide for weight loss
agonaga.com
아무리 봐도 허풍쟁이 거짓말쟁이 같아.
Советую прочитать эту статью про афоризмы и статусы http://www.cydak.ru/digest/2009.html.
Также не забудьте добавить сайт в закладки: http://www.cydak.ru/digest/2009.html
iGaming에서 높은 평가를 받는 프라그마틱 게임은 모바일 중심의 혁신적이고 표준화된 콘텐츠를 제공합니다.
프라그마틱 슬롯
프라그마틱과 관련된 이 글 정말 잘 읽었어요! 더불어 저도 제 사이트에서 프라그마틱에 대한 새로운 정보를 공유 중이에요. 함께 나누면 더 좋을 것 같아요!
https://www.vamiveta.com/
https://www.coreybarba.com
https://www.straussprep.com
Промокод 1xBet при регистрации – это 1XFREE777. Только с помощью него вы получите бонус в размере 100% до 32500 рублей. https://fotozayka.ru/wp-content/pages/promokod_240.html
Все остальные коды не действительны и не предоставляют такого бонуса. Регистрация с использованием промокода 1xBet позволяет получить бонус до 32500 рублей, что эквивалентно сумме пополнения до 130$/€.
ozempic tablets for weight loss
saungsantoso.com
Fang Jifan은 화를 내며 차가운 얼굴로 “전화를 끊으세요! “라고 명령했습니다.
Промокод 1xBet при регистрации – это 1XFREE777. Только с помощью него вы получите бонус в размере 100% до 32500 рублей. https://fotozayka.ru/wp-content/pages/promokod_240.html
Все остальные коды не действительны и не предоставляют такого бонуса. Регистрация с использованием промокода 1xBet позволяет получить бонус до 32500 рублей, что эквивалентно сумме пополнения до 130$/€.
buy ozempic
Промокод 1xBet при регистрации – это 1XFREE777. Только с помощью него вы получите бонус в размере 100% до 32500 рублей. https://fotozayka.ru/wp-content/pages/promokod_240.html
Все остальные коды не действительны и не предоставляют такого бонуса. Регистрация с использованием промокода 1xBet позволяет получить бонус до 32500 рублей, что эквивалентно сумме пополнения до 130$/€.
Привет всем!
Стоит отметить, что статьи про строительство это очень интересно и увлекательно, узнаешь что-то новое и полезное!
Этот ресурс включает много статей на разные темы, рекомендую
https://www.220-pro.ru/chto-nuzhno-znat-o-gazobetonnyh-blokah/
Удачного чтения!
Покупка диплома в Москве – это так распространенное действие, какое заинтересовывает многих клиентов – diplomsuper.net. В городе имеется масса вариантов для заказа диплома
order wegovy
Привет всем!
Стоит отметить, что статьи про строительство это очень интересно и увлекательно, узнаешь что-то новое и полезное!
Этот ресурс включает много статей на разные темы, рекомендую
https://web-restoran.ru/raznoe/chto-takoe-gazobeton/
Удачного чтения!
Получи права управлять автомобилем в лучшей автошколе!
Стань профессиональной карьере автолюбителя с нашей автошколой!
Успей пройти обучение в лучшей автошколе города!
Учись правильного вождения с нашей автошколой!
Стремись к безупречным навыкам вождения с нашей автошколой!
Научись уверенно водить автомобиль с нами в автошколе!
Достигай независимости и свободы, получив права в автошколе!
Продемонстрируй мастерство вождения в нашей автошколе!
Открой новые возможности, получив права в автошколе!
Приведи друзей и они заработают скидку на обучение в автошколе!
Стань профессиональному будущему в автомобильном мире с нашей автошколой!
Заводи и научись водить автомобиль вместе с нашей автошколой!
Улучшай свои навыки вождения вместе с опытными инструкторами нашей автошколы!
Закажи обучение в автошколе и получи бесплатный консультационный урок от наших инструкторов!
Стремись к надежности и безопасности на дороге вместе с нашей автошколой!
Прокачай свои навыки вождения вместе с лучшими в нашей автошколе!
Завоевывай дорожные правила и навыки вождения в нашей автошколе!
Стремись к настоящим мастером вождения с нашей автошколой!
Набери опыт вождения и получи права в нашей автошколе!
Покори дорогу вместе с нами – пройди обучение в автошколе!
авто школи https://avtoshkolaznit.kiev.ua/ .
Получи права управления автомобилем в первоклассной автошколе!
Стремись к профессиональной карьере вождения с нашей автошколой!
Пройди обучение в самой автошколе города!
Учись правильного вождения с нашей автошколой!
Стремись к безупречным навыкам вождения с нашей автошколой!
Начни уверенно водить автомобиль с нами в автошколе!
Достигай независимости и лицензии, получив права в автошколе!
Прояви мастерство вождения в нашей автошколе!
Обрети новые возможности, получив права в автошколе!
Приведи друзей и они заработают скидку на обучение в автошколе!
Стань профессиональному будущему в автомобильном мире с нашей автошколой!
знакомства и научись водить автомобиль вместе с нашей автошколой!
Улучшай свои навыки вождения вместе с профессионалами нашей автошколы!
Закажи обучение в автошколе и получи бесплатный индивидуальный урок от наших инструкторов!
Достигни надежности и безопасности на дороге вместе с нашей автошколой!
Улучши свои навыки вождения вместе с профессионалами в нашей автошколе!
Учись дорожные правила и навыки вождения в нашей автошколе!
Стань настоящим мастером вождения с нашей автошколой!
Набери опыт вождения и получи права в нашей автошколе!
Покори дорогу вместе с нами – закажи обучение в автошколе!
водийське посвідчення http://avtoshkolaznit.kiev.ua/ .
rybelsus xr
프라그마틱 플레이의 슬롯으로 흥미진진한 게임을 만나보세요.
프라그마틱 게임
프라그마틱 관련 소식 항상 주시고 있어요! 또한, 제 사이트에서도 프라그마틱에 대한 정보를 얻을 수 있어요. 함께 발전하며 지식을 나눠봐요!
https://eprust.com/
https://www.rmchorseshoeranch.com
http://buyalbendazole.site
ozempic semaglutide
watch porn video
semaglutide medication
rybelsus buy uk
We’re a grouρ off vоlunteers and opening a new scheme in our
community. Your web ѕitе provided us with
valuable info to worҝk on. You’vedone a formidable job
and our entire community will bee thankful to you.
buy ozempic pill form for adults
rybelsus medication
프라그마틱 게임은 iGaming에서 앞서가는 콘텐츠 제공 업체로, 다양한 모바일 중심 포트폴리오와 최상의 엔터테인먼트를 자랑합니다.
프라그마틱 무료 슬롯
프라그마틱에 대한 이 글 감사합니다. 더불어, 제 사이트에서도 프라그마틱과 관련된 유용한 정보를 찾아보세요. 서로 이야기 나누면 더 좋겠죠!
https://www.buytetracycline.site
http://freemr.site
https://www.jaswanthch.com
Промокод 1xBet при регистрации – это 1XFREE777. Только с помощью него вы получите бонус в размере 100% до 32500 рублей. http://tdrimspb.ru/news/inc/1hbet_promokod_pri_registracii__bonus_do_32500_rub_.html
Все остальные коды не действительны и не предоставляют такого бонуса. Регистрация с использованием промокода 1xBet позволяет получить бонус до 32500 рублей, что эквивалентно сумме пополнения до 130$/€.
buy semaglutide cheap
Quality articles or reviews is the secret to invite the viewers to go to see the site,
that’s what this web page is providing.
rybelsus online pharmacy
Дорогие Клиенты!
Представляем вам последнее слово в мире стилистики интерьера – шторы плиссе. Если вы надеетесь к совершенству в всякой стороне вашего домашнего, то эти занавеси выберутся отличным решением для вас.
Что делает шторы плиссе таковыми особыми? Они объединяют в себе изящество, функциональность и эффективность. Благодаря особенной архитектуре, инновационным материалам, шторы плиссе идеально гармонизируются с для какого бы то ни ложи, будь то палата, спальня, плитки или секретарское пространство.
Закажите тканевые жалюзи плиссе – прообразите уют и красоту в вашем доме!
Чем подкупают шторы плиссе для вас? Во-первых, их индивидуальный дизайн, который прибавляет к привлекательность и стильность вашему внутреннему пространству. Вы можете выбрать из разнообразных текстур, цветов и подходов, чтобы подчеркнуть особенность вашего дома.
Кроме того, шторы плиссе предлагают широкий спектр практических возможностей. Они могут регулировать уровень освещения в пространстве, гарантировать от солнечного света, предоставлять интимность и создавать уютную атмосферу в вашем доме.
Наш ресурс: https://www.tulpan-pmr.ru
Мы сами поддержим вам подобрать шторы плиссе, какие прекрасно подойдутся для вашего внутреннего пространства!
Промокод 1xBet при регистрации – это 1XFREE777. Только с помощью него вы получите бонус в размере 100% до 32500 рублей. http://tdrimspb.ru/news/inc/1hbet_promokod_pri_registracii__bonus_do_32500_rub_.html
Все остальные коды не действительны и не предоставляют такого бонуса. Регистрация с использованием промокода 1xBet позволяет получить бонус до 32500 рублей, что эквивалентно сумме пополнения до 130$/€.
Your style is very unique compared to other people I have read stuff from.
Many thanks for posting when you have the
opportunity, Guess I’ll just book mark this page.
Промокод 1xBet при регистрации – это 1XFREE777. Только с помощью него вы получите бонус в размере 100% до 32500 рублей. http://tdrimspb.ru/news/inc/1hbet_promokod_pri_registracii__bonus_do_32500_rub_.html
Все остальные коды не действительны и не предоставляют такого бонуса. Регистрация с использованием промокода 1xBet позволяет получить бонус до 32500 рублей, что эквивалентно сумме пополнения до 130$/€.
сео аудит сайта цена http://www.prodvizhenie-sajtov15.ru/ .
generic ozempic for weight loss
rybelsus pill
order ozempic
сериал на русском языке
1xBet промокод — 1XFREE777 впишите код в анкете при регистрации, пополните счет от 100 рублей и вы получите бонус +100% (до 32500 рублей). Промокод 1xBet на 2024 год предоставляет возможность получить бонусы при регистрации на сайте букмекерской конторы.
http://tdrimspb.ru/news/inc/1hbet_promokod_pri_registracii__bonus_do_32500_rub_.html
rybelsus 21 mg
сериал все серии
1xBet промокод — 1XFREE777 впишите код в анкете при регистрации, пополните счет от 100 рублей и вы получите бонус +100% (до 32500 рублей). Промокод 1xBet на 2024 год предоставляет возможность получить бонусы при регистрации на сайте букмекерской конторы.
http://tdrimspb.ru/news/inc/1hbet_promokod_pri_registracii__bonus_do_32500_rub_.html
buy ozempic from canada online
1xBet промокод — 1XFREE777 впишите код в анкете при регистрации, пополните счет от 100 рублей и вы получите бонус +100% (до 32500 рублей). Промокод 1xBet на 2024 год предоставляет возможность получить бонусы при регистрации на сайте букмекерской конторы.
http://tdrimspb.ru/news/inc/1hbet_promokod_pri_registracii__bonus_do_32500_rub_.html
фильм онлайн
buy semaglutide
semaglutide rx
semaglutide weight loss
Thank you, I have just been looking for info approximately this topic for a long time
and yours is the best I have came upon till now. But, what concerning the bottom line?
Are you positive in regards to the supply?
ozempic
https://gruzchikidostavka.ru
сериал бесплатно
프라그마틱 게임은 iGaming 분야에서 혁신적이고 표준화된 콘텐츠를 제공하는 선도적인 공급 업체로 주목받고 있습니다.
프라그마틱 슬롯
프라그마틱에 대한 글 읽는 것이 흥미로웠어요! 또한, 제 사이트에서도 프라그마틱과 관련된 정보를 제공하고 있어요. 함께 발전하며 지식을 나눠봐요!
http://abbe0k0e.site
https://www.hnrcrew.com
http://amoxicillin875.site
rybelsus online prescription
프라그마틱 슬롯으로 감각적인 그래픽과 다양한 주제를 경험하고 보너스를 획득하세요.
프라그마틱 무료 슬롯
프라그마틱 슬롯에 대한 정보가 정말 유용했어요! 더불어, 제 사이트에서도 프라그마틱과 관련된 새로운 내용을 찾아보세요. 함께 지식을 나누면 좋겠어요!
http://viagraefc.online
http://metformintablets.site
https://www.arabyfree.com
semaglutide pill form
restaurant-lenvol.net
당황한 류지안은 기침을 하며 말했다. “폐하…”
buy wegovy online no script needed
Hey there just wanted to give you a quick heads up and let you know a
few of the images aren’t loading correctly.
I’m not sure why but I think its a linking issue.
I’ve tried it in two different browsers and both show the
same results.
rybelsus canada
binsunvipp.com
그녀는 처음에는 여전히 깨어 있었지만 Dowager 황후는 계속 한숨을 쉬고 어젯밤에 다시 잠들었습니다.
https://kursovyepravovedenie.ru
generic ozempic cost
wegovy semaglutide tablets
Привет всем!
Вы когда-нибудь сталкивались с необходимостью написания дипломной работы в сжатые сроки? Это действительно серьезное и трудоемкое занятие, но важно не отступать и продолжать двигаться вперед в учебном процессе, так же, как я это делаю.
Для тех, кто умеет осуществлять анализ и находить информацию в интернете, это может оказаться очень полезным в процессе согласования и написания дипломной работы. Нет необходимости тратить время на посещение библиотек или встречи с научным руководителем. В интернете есть множество ресурсов с хорошими данными для дипломных работ и курсовых. Вы можете ознакомиться с ними, перейдя по ссылкам
https://extern-diplom.com/
Желаю всем отличных оценок!
купить диплом колледжа
купить диплом в каменске-уральском
купить диплом
купить диплом в балашихе
купить диплом фармацевта
купить диплом бурильщика
купить диплом железнодорожника
купить диплом в майкопе
купить дипломы о высшем цены
купить диплом программиста
Доброго!
Бывало ли у вас так, что приходилось писать дипломную работу в очень короткие сроки? Это действительно требует большой ответственности и усилий, но важно не падать духом и продолжать учебный процесс, так же, как и я.
Для тех, кто умеет находить и анализировать информацию в сети, это действительно может быть полезным в процессе согласования и написания дипломной работы. Нет необходимости тратить время на посещение библиотек или встречи с научным руководителем. Здесь доступны хорошие данные для дипломных и курсовых работ, вы можете ознакомиться с ними, перейдя по ссылкам
https://extern-diplom.com/
Желаю всем отличных оценок!
купить диплом в новокуйбышевске
купить диплом в клинцах
купить диплом в губкине
купить диплом дизайнера
купить аттестат за 9 класс
купить диплом в орле
купить диплом в якутске
купить диплом менеджера
куплю диплом
купить диплом в петрозаводске
order rybelsus online
rybelsus order
semaglutide canada
flashsaleprop.com
Zhang Sheng은 급히 물었고 대부분의 다른 참전 용사들도 그와 같은 생각을했습니다.
https://u8send.com/
socialmediatric.com
모든 고문은 Alfonso에게 일종의 영적 채찍질입니다.
semaglutide rx
wegovy oral medication
order semaglutide
rybelsus sale
프라그마틱 플레이는 250개 이상의 게임으로 다양한 테마의 슬롯 포트폴리오를 구성하며, 33개 언어와 다양한 화폐를 지원합니다.
프라그마틱 슬롯 사이트
프라그마틱 슬롯에 대한 정보가 정말 도움이 되었어요! 더불어, 제 사이트에서도 프라그마틱과 관련된 내용을 찾아보세요. 함께 이야기 나누면서 더 많은 지식을 얻어가요!
https://www.buyviagrasoft.site
http://kinox7k.site
http://www.iavstudios.com/
Why users still make use of to read news papers when in this technological globe all is
available on net?
rybelsus for diabetes
tipsmo.com
장 황후는 실제로 매우 직설적이지만 숙고 할 가치가있는이 문장을 씹었습니다.
https://louisgalaxy.com/
digiyumi.com
이 말을 듣고 많은 사람들이 일제히 숨을 삼켰다.
Thanks for your marvelous posting! I definitely enjoyed reading it, you could be a great author.
I will be sure to bookmark your blog and may come back at some point.
I want to encourage yourself to continue your great writing,
have a nice morning!!
Watches World
Watches World
Patron Testimonials Highlight Our Watch Boutique Encounter
At Our Watch Boutique, customer satisfaction isn’t just a objective; it’s a glowing demonstration to our commitment to greatness. Let’s dive into what our respected patrons have to say about their experiences, revealing on the impeccable assistance and remarkable watches we provide.
O.M.’s Trustpilot Review: A Smooth Journey
“Very excellent contact and follow-up process throughout the process. The watch was perfectly packed and in perfect. I would assuredly work with this teamwork again for a watch acquisition.
O.M.’s commentary demonstrates our devotion to comms and meticulous care in delivering chronometers in flawless condition. The faith built with O.M. is a building block of our customer bonds.
Richard Houtman’s Perceptive Review: A Personal Reach
“I dealt with Benny, who was very helpful and gracious at all times, keeping me regularly informed of the course. Moving forward, even though I ended up sourcing the timepiece locally, I would still certainly recommend Benny and the business moving forward.
Richard Houtman’s interaction showcases our customized approach. Benny’s support and ongoing interaction exhibit our dedication to ensuring every customer feels esteemed and apprised.
Customer’s Efficient Service Review: A Smooth Transaction
“A very good and streamlined service. Kept me current on the transaction advancement.
Our dedication to effectiveness is echoed in this client’s response. Keeping patrons informed and the uninterrupted progression of purchases are integral to the Our Watch Boutique encounter.
Examine Our Newest Selections
Audemars Piguet Selfwinding Royal Oak 37mm
A beautiful piece at €45,900, this 2022 version (REF: 15551ST.ZZ.1356ST.05) invites you to add it to your cart and elevate your assortment.
Hublot Titanium Green 45mm Chrono
Priced at €8,590 in 2024 (REF: 521.NX.8970.RX), this Hublot creation is a blend of fashion and novelty, awaiting your request.
rybelsus buy online
buy ozempic from canada
I was able to find good info from your articles.
semaglutide pills
rybelsus australia online
wegovy 14mg
semaglutide for weight loss without diabetes
wegovy australia online
buy semaglutide oversees
restaurant-lenvol.net
인생의 대부분을 환상의 바다를 오르락내리락하며 보냈지만 그런 건 한 번도 만나본 적이 없다.
buy semaglutide online from india
wegovy best price
wegovy oral medication
프라그마틱 게임은 정말로 혁신적이에요. 특히 슬롯 게임들은 항상 기대 이상의 재미를 선사합니다!
프라그마틷
프라그마틱 슬롯에 대한 내용이 정말 도움이 되었어요! 더불어, 제 사이트에서도 프라그마틱과 관련된 정보를 찾아보실 수 있어요. 함께 지식을 공유해보세요!
https://www.utahppr.com
https://fjghgy.com/
http://avodartonline.site
wegovy order
semaglutide pills
semaglutide pill
semaglutide ozempic
https://ekbkvartiru.ru
buy ozempic from canada online
https://kupitkvartiruzhkkvartirenka.ru
частный seo оптимизатор https://prodvizhenie-sajtov15.ru .
https://kvartirazhkkvartirenka.ru
this-is-a-small-world.com
Hongzhi 황제는 Fang Jifan의 생각을 즉시 이해했습니다.
https://kupitkvartiruzhkgarsonerka.ru
Советую прочитать сайт про отопление https://a-so.ru/
Также не забудьте добавить сайт в закладки: https://a-so.ru/
wegovy where to buy
프라그마틱은 항상 최고의 게임을 제공하죠! 여기에서 더 많은 흥미진진한 정보를 얻을 수 있어 기뻐요.
PG 소프트
프라그마틱 슬롯에 대한 내용이 정말 도움이 되었어요! 더불어, 제 사이트에서도 프라그마틱과 관련된 정보를 찾아보세요. 함께 서로 이야기하며 더 많은 지식을 쌓아가요!
https://www.ozone-hotels.com
https://www.iaz681.com
https://www.qtantra.com
ST666
https://kvartirazhkstalink.ru
1xBet промокод — 1XFREE777 впишите код в анкете при регистрации, пополните счет от 100 рублей и вы получите бонус +100% (до 32500 рублей).
https://blorey.com/include/articles/1xbet-promo-code.html
Промокод 1xBet на 2024 год предоставляет возможность получить бонусы при регистрации на сайте букмекерской конторы.
https://referatyrimskoepravo.ru
Гарячі танці пін ап
ігри казино http://pinupcasinoqgcvbisd.kiev.ua/ .
where to buy ozempic online
It’s going to be ending of mine day, but before end I am reading this wonderful post to improve my knowledge.
https://kupitkvartirudeshevo.ru
Cialis Generico EspaГ±a Contrareembolso
Also what in that case it is necessary to do?
Cialis 5 mg prezzo cialis prezzo tadalafil 5 mg prezzo
Obten descuentos adicionales con un codigo descuento 1Win
Los codigos promocionales de 1Win son canjeados desde su registro y utilizados en los juegos. Aplica el codigo 937999 y recibe ganancias al apostar. El codigo de promocion 2024 te regala un paquete de bienvenida del 500% con los cuatro primeros depositos hasta $700 en apuestas deportivas y casino. El codigo 1win de bono debe ser ingresado en el formulario de registro.
Si esta buscando una forma de maximizar sus ganancias en apuestas deportivas, no se pierda el codigo de promocion y el bono de bienvenida 1Win en 024]. Con el codigo de promocion 1Win puedes recibir ofertas exclusivas y apuestas gratis para disfrutar aun mas de tus juegos favoritos. Ademas, el bono de bienvenida 1Win es una gran oportunidad para aumentar sus ganancias y tener una experiencia de apuestas aun mas emocionante.
https://kupitkvartirudorogo.ru
Obten descuentos adicionales con un codigo descuento 1Win
Los codigos promocionales de 1Win son canjeados desde su registro y utilizados en los juegos. Aplica el codigo 937999 y recibe ganancias al apostar. El codigo de promocion 2024 te regala un paquete de bienvenida del 500% con los cuatro primeros depositos hasta $700 en apuestas deportivas y casino. El codigo 1win de bono debe ser ingresado en el formulario de registro.
Si esta buscando una forma de maximizar sus ganancias en apuestas deportivas, no se pierda el codigo de promocion y el bono de bienvenida 1Win en 024]. Con el codigo de promocion 1Win puedes recibir ofertas exclusivas y apuestas gratis para disfrutar aun mas de tus juegos favoritos. Ademas, el bono de bienvenida 1Win es una gran oportunidad para aumentar sus ganancias y tener una experiencia de apuestas aun mas emocionante.
semaglutide from canada
rybelsus oral medication
1xBet промокод — 1XFREE777 впишите код в анкете при регистрации, пополните счет от 100 рублей и вы получите бонус +100% (до 32500 рублей).
https://blorey.com/include/articles/1xbet-promo-code.html
Промокод 1xBet на 2024 год предоставляет возможность получить бонусы при регистрации на сайте букмекерской конторы.
https://kupitkvartiruland.ru
rybelsus oral medication
Experience the ultimate in online gaming at our top-rated Mexican casino. From slots to table games, we’ve got everything you need for an unforgettable gambling experience. codere casino online la clave para una buena vida.
wegovy online pharmacy
netovideo.com
Qi Zhiyuan은 “비즈니스, 어떤 종류의 비즈니스입니까? “라고 물었습니다.
atoxfinance.com
이 녀석은… 소리도 내지 않고, 번을 토벌하는 일의 절반 이상을 완수했다.
https://hollybollyfun.com/
Obten descuentos adicionales con un codigo descuento 1Win
Los codigos promocionales de 1Win son canjeados desde su registro y utilizados en los juegos. Aplica el codigo 937999 y recibe ganancias al apostar. El codigo de promocion 2024 te regala un paquete de bienvenida del 500% con los cuatro primeros depositos hasta $700 en apuestas deportivas y casino. El codigo 1win de bono debe ser ingresado en el formulario de registro.
Si esta buscando una forma de maximizar sus ganancias en apuestas deportivas, no se pierda el codigo de promocion y el bono de bienvenida 1Win en 024]. Con el codigo de promocion 1Win puedes recibir ofertas exclusivas y apuestas gratis para disfrutar aun mas de tus juegos favoritos. Ademas, el bono de bienvenida 1Win es una gran oportunidad para aumentar sus ganancias y tener una experiencia de apuestas aun mas emocionante.
купить диплом цена https://prema-diploms.com .
rybelsus order
wegovy buy uk
Obten descuentos adicionales con un codigo descuento 1Win
Los codigos promocionales de 1Win son canjeados desde su registro y utilizados en los juegos. Aplica el codigo 937999 y recibe ganancias al apostar. El codigo de promocion 2024 te regala un paquete de bienvenida del 500% con los cuatro primeros depositos hasta $700 en apuestas deportivas y casino. El codigo 1win de bono debe ser ingresado en el formulario de registro.
Si esta buscando una forma de maximizar sus ganancias en apuestas deportivas, no se pierda el codigo de promocion y el bono de bienvenida 1Win en 024]. Con el codigo de promocion 1Win puedes recibir ofertas exclusivas y apuestas gratis para disfrutar aun mas de tus juegos favoritos. Ademas, el bono de bienvenida 1Win es una gran oportunidad para aumentar sus ganancias y tener una experiencia de apuestas aun mas emocionante.
wegovy for sale
wegovy prescription
semaglutide 7mg
tsrrub.com
“방금 뭐라고 했어?” Fang Jifan은 엄숙하게 그를 내려다보며 말했다.
semaglutide injection
Гарячі танці пін ап
казіно на реальні гроші http://pinupcasinoqgcvbisd.kiev.ua/ .
Гарячі танці пін ап
ігри онлайн казіно https://pinupcasinoqgcvbisd.kiev.ua/ .
Its like you read my mind! You seem to know so much about this, like
you wrote the book in it or something. I think that you can do with some pics to drive the
message home a little bit, but instead of that, this is magnificent blog.
An excellent read. I will certainly be back.
wegovy 14mg
ozempic coupon
мосты для tor browser список
Защита в сети: Реестр подходов для Tor Browser
В эпоху, когда аспекты секретности и защиты в сети становятся все более актуальными, многие пользователи обращают внимание на технологии, позволяющие обеспечить невидимость и секретность личной информации. Один из таких инструментов – Tor Browser, построенный на системе Tor. Однако даже при использовании Tor Browser есть риск столкнуться с блокировкой или преградой со стороны поставщиков Интернета или цензоров.
Для преодоления этих ограничений были созданы подходы для Tor Browser. Переходы – это особые серверы, которые могут быть использованы для пересечения блокировок и предоставления доступа к сети Tor. В этой статье мы рассмотрим каталог мостов, которые можно использовать с Tor Browser для обеспечения достоверной и противоопасной скрытности в интернете.
meek-azure: Этот подход использует облачное обеспечение Azure для того, чтобы переодеть тот факт, что вы используете Tor. Это может быть полезно в странах, где провайдеры блокируют доступ к серверам Tor.
obfs4: Подход обфускации, предоставляющий методы для сокрытия трафика Tor. Этот переход может успешно обходить блокировки и запреты, делая ваш трафик незаметным для сторонних.
fte: Переправа, использующий Free Talk Encrypt (FTE) для обфускации трафика. FTE позволяет изменять трафик так, чтобы он казался обычным сетевым трафиком, что делает его труднее для выявления.
snowflake: Этот переправа позволяет вам использовать браузеры, которые поддерживаются расширение Snowflake, чтобы помочь другим пользователям Tor пройти через запреты.
fte-ipv6: Вариант FTE с совместимостью с IPv6, который может быть необходим, если ваш провайдер интернета предоставляет IPv6-подключение.
Чтобы использовать эти переходы с Tor Browser, откройте его настройки, перейдите в раздел “Проброс мостов” и введите названия переходов, которые вы хотите использовать.
Не забывайте, что эффективность работы подходов может изменяться в зависимости от страны и поставщиков интернет-услуг. Также рекомендуется систематически обновлять перечень переправ, чтобы быть уверенным в результативности обхода блокировок. Помните о важности надежности в интернете и осуществляйте защиту для сохранения своей личной информации.
rybelsus diabetes
Op de hoogte blijven van nieuwe foto’s en nieuws rond zegelringen?
Hi, I want to subscribe for this website to obtain newest updates, therefore
where can i do it please help.
https://kupitkvartiruland.ru
мосты для tor browser список
Внутри века цифровых технологий, в условиях, когда виртуальные границы сливаются с реальностью, не рекомендуется игнорировать наличие угроз в даркнете. Одной из потенциальных опасностей является blacksprut – термин, переросший символом незаконной, вредоносной деятельности в подпольных уголках интернета.
Blacksprut, будучи компонентом подпольной сети, представляет серьезную угрозу для цифровой безопасности и личной устойчивости пользователей. Этот скрытый уголок сети часто ассоциируется с запрещенными сделками, торговлей запрещенными товарами и услугами, а также прочими противозаконными деяниями.
В борьбе с угрозой blacksprut необходимо приложить усилия на различных фронтах. Одним из важных направлений является совершенствование технологий защиты в сети. Развитие эффективных алгоритмов и технологий анализа данных позволит отслеживать и пресекать деятельность blacksprut в реальной жизни.
Помимо технических мер, важна согласованная деятельность усилий правоохранительных органов на международном уровне. Международное сотрудничество в секторе защиты в сети необходимо для эффективной борьбы угрозам, связанным с blacksprut. Обмен данными, формирование совместных стратегий и реактивные действия помогут снизить воздействие этой угрозы.
Обучение и просвещение также играют важную роль в борьбе с blacksprut. Повышение сознания пользователей о рисках даркнета и методах предотвращения становится неотъемлемой элементом антиспампинговых мероприятий. Чем более осведомленными будут пользователи, тем меньше вероятность попадания под влияние угрозы blacksprut.
В заключение, в борьбе с угрозой blacksprut необходимо совместить усилия как на техническом, так и на нормативном уровнях. Это проблема, предполагающий совместных усилий общества, правоохранительных органов и компаний в сфере технологий. Только совместными усилиями мы сможем достичь создания безопасного и стойкого цифрового пространства для всех.
rybelsus without prescription
buy rybelsus online no script needed
buy wegovy online from india
1xBet промокод — 1XFREE777 впишите код в анкете при регистрации, пополните счет от 100 рублей и вы получите бонус +100% (до 32500 рублей).
https://blorey.com/include/articles/1xbet-promo-code.html
Промокод 1xBet на 2024 год предоставляет возможность получить бонусы при регистрации на сайте букмекерской конторы.
wegovy semaglutide tablets 3mg
buy wegovy
https://referatyrusskijyazyk.ru
semaglutide 7mg
u8send.com
12명 이상의 두꺼운 피부를 동반한 목사들이 첫 번째가 되기 위해 출격했습니다.
https://flashsaleprop.com/
amruthaborewells.com
하루 반만에 3000명 넘게 입대했다고?
1xBet промокод — 1XFREE777 впишите код в анкете при регистрации, пополните счет от 100 рублей и вы получите бонус +100% (до 32500 рублей).
https://blorey.com/include/articles/1xbet-promo-code.html
Промокод 1xBet на 2024 год предоставляет возможность получить бонусы при регистрации на сайте букмекерской конторы.
rybelsus semaglutide tablets 7.5 mcg
wegovy semaglutide
rybelsus generic cost
Every weekend i used to pay a quick visit this web site, for
the reason that i wish for enjoyment, since this this website
conations genuinely good funny material too.
https://easykupitkvartiru.ru
Секреты мастерства с ремонтной смесью
клей для кладки кирпича http://remontnaja-smes-dlja-kirpichnoj-kladki.ru/ .
https://kontrolnyesociologiya.ru
buy rybelsus online from india
Сделайте ремонт быстро и качественно с ремонтной смесью
цена смеси https://www.remontnaja-smes-dlja-kirpichnoj-kladki.ru/ .
Лучшие способы использования ремонтной смеси
цемент для кирпичной кладки https://www.remontnaja-smes-dlja-kirpichnoj-kladki.ru/ .
https://megakupitkvartiru.ru
semaglutide 3mg
canada drug pharmacy
https://canadianpharmacyeasy.com/
list of approved canadian pharmacies
https://kontrolnyestatistika.ru
Заказать диплом колледжа: Приобретение сертификата колледжа поможет вам начать карьеру с повышенным уровнем.
ozempic tablets cost
Watches World
Horological instruments World
Customer Reviews Shine light on Timepieces Universe Adventure
At Our Watch Boutique, customer happiness isn’t just a aim; it’s a radiant evidence to our dedication to superiority. Let’s dive into what our valued buyers have to say about their experiences, illuminating on the flawless service and amazing watches we offer.
O.M.’s Review Testimonial: A Effortless Trip
“Very excellent interaction and follow-up throughout the procedure. The watch was perfectly packed and in pristine. I would assuredly work with this team again for a wristwatch buying.
O.M.’s declaration typifies our commitment to contact and thorough care in delivering clocks in impeccable condition. The faith forged with O.M. is a pillar of our customer relationships.
Richard Houtman’s Enlightening Review: A Individual Contact
“I dealt with Benny, who was exceedingly helpful and civil at all times, keeping me regularly informed of the procedure. Progressing, even though I ended up sourcing the timepiece locally, I would still certainly recommend Benny and the enterprise progressing.
Richard Houtman’s interaction showcases our individualized approach. Benny’s help and continuous communication display our loyalty to ensuring every patron feels esteemed and apprised.
Customer’s Productive Assistance Review: A Effortless Deal
“A very effective and efficient service. Kept me current on the purchase progression.
Our devotion to streamlining is echoed in this customer’s feedback. Keeping patrons informed and the effortless progress of transactions are integral to the WatchesWorld journey.
Discover Our Newest Choices
Audemars Piguet Selfwinding Royal Oak 37mm
A beautiful piece at €45,900, this 2022 version (REF: 15551ST.ZZ.1356ST.05) invites you to add it to your basket and elevate your set.
Hublot Classic Fusion Green Titanium Chronograph 45mm
Priced at €8,590 in 2024 (REF: 521.NX.8970.RX), this Hublot creation is a fusion of style and novelty, awaiting your application.
Рулонный газон: как подготовить почву для укладки?
рулонный газон купить москва https://rulonnyj-gazon77.ru/ .
rybelsus rx
Obten descuentos adicionales con un codigo descuento 1Win
1win es una plataforma de apuestas en linea que ofrece una amplia variedad de opciones de apuestas deportivas y juegos de casino. La pagina web es facil de navegar y tiene un diseno moderno y atractivo. En cuanto a las apuestas deportivas, 1win ofrece una amplia variedad de deportes para apostar, desde los mas populares como el futbol y el baloncesto hasta deportes menos conocidos como el badminton y el rugby. Ademas, la plataforma ofrece una gran cantidad de mercados de apuestas para cada evento deportivo, lo que permite a los usuarios personalizar sus apuestas de acuerdo a sus preferencias. En cuanto a los juegos de casino, 1win ofrece una amplia variedad de opciones, desde tragamonedas hasta juegos de mesa como el blackjack y la ruleta. Los juegos son de alta calidad y estan disenados por algunos de los principales proveedores de software de casino. La plataforma tambien ofrece una amplia variedad de metodos de pago, incluyendo tarjetas de credito, billeteras electronicas y criptomonedas. Ademas, el sitio web esta disponible en varios idiomas, lo que lo hace accesible para usuarios de todo el mundo. En general, 1win es una plataforma de apuestas en linea solida y confiable que ofrece una amplia variedad de opciones de apuestas deportivas y juegos de casino.
Codigo promocional 1Win son canjeados desde su registro y utilizados en los juegos. Aplica el codigo 937999 y recibe ganancias al apostar. El codigo de promocion 2024 te regala un paquete de bienvenida del 500% con los cuatro primeros depositos hasta $700 en apuestas deportivas y casino. El codigo 1win de bono debe ser ingresado en el formulario de registro.
Si esta buscando una forma de maximizar sus ganancias en apuestas deportivas, no se pierda el codigo de promocion y el bono de bienvenida 1Win en 024]. Con el codigo de promocion 1Win puedes recibir ofertas exclusivas y apuestas gratis para disfrutar aun mas de tus juegos favoritos. Ademas, el bono de bienvenida 1Win es una gran oportunidad para aumentar sus ganancias y tener una experiencia de apuestas aun mas emocionante.
Bonificacion 1win – 937999
Como activo el vale en 1win?
Durante el proceso de registro se introduce un codigo promocional de la casa de apuestas 1win. El campo “Anadir codigo promocional” estara disponible para cualquier metodo de creacion de cuenta que elija. Tenga en cuenta que este campo es opcional en la fase de registro, asi que tenga cuidado al introducirlo. Si se olvida de hacerlo al registrarse, no podra activar su codigo en 1win y el bono de bienvenida dejara de estar disponible.
Tendras que recargar tu cuenta para poder utilizar el codigo promocional en el futuro. Una vez que haya introducido el codigo promocional durante el registro, vaya a su gabinete personal a traves del icono de usuario y haga clic en “Depositar”. Tomemos como ejemplo el codigo promocional “937999”, que corresponde a 200 euros.
Caracteristicas del bono 1win
El codigo promocional es proporcionado por representantes de la oficina de la casa de apuestas 1win. Lo hacen en varias ocasiones: durante una promocion, un dia festivo importante, el cumpleanos de un usuario, para volver a captar a un jugador que ha estado jugando durante un tiempo y ha dejado de estar activo.
Si introdujiste un codigo promocional al registrarte, veras los fondos de bonificacion en cuanto inicies sesion en tu perfil. Y si te lo dieron personalmente, deberas aceptar participar en la promocion para poder utilizarlo. Estos fondos se abonan en tu cuenta de bonificacion, y podras ver el importe en tu perfil personal. Si respeta las normas de uso de los fondos de bonificacion, podra convertirlos gradualmente en dinero en efectivo, que recibira ademas de sus ganancias.
?Que tan confiable es apostar en 1win?
Apostar en 1win es 100% confiable. 1win nacio en 2016, con el nombre de MFI Investments Limited, quienes estan registrados con el numero de licencia 8048/JAZ2018-040, otorgada por la Comision de Juegos eGaming.
Ademas, cuenta con alianzas comerciales con diferentes equipos y ligas, como la UEFA, UFC, NHL, FIFA y mas.
8. Opiniones 1win Casino 2024
1win casino es una excelente opcion para comenzar a apostar, ademas de que cuentas con el regalo para registrarte con el codigo promocional 937999. Podras tener tu cuenta abierta en todos lados, tu celular y tu computadora tendran tu cuenta sincronizada.
Es un sitio seguro, con numero de registro y sistemas de pago legales afiliados. Podras apostar con cualquier metodo de pago en mas de 50 deportes diferentes y cientos de juegos de casino. 1win es recomendable y esta lleno de diversion.
9. FAQ: 1win Codigo Promocional
9.1 ?? ?1win es un sitio seguro?
1win es un sitio seguro, esta avalado por la comision de juego eGaming. Sus metodos de pago son conocidos y de fiar, cada uno de ellos. Ademas, tambien de tener soporte tecnico las 24 horas ante cualquier duda.
9.2 ?? ?Hay bono de bienvenida de 1win?
Si existe, y para obtener este bono de bienvenida de 1win, necesitaras el codigo de bienvenida 937999, tendras que registrarte en 1win con este codigo y realizar tu primer deposito.
9.3 ?? ?Cual es el codigo de bono 1win?
El codigo promocional 1win es 937999, registrate y comienza a disfrutar de tu bono.
http://xbet-france.com
Working 1xbet mirror for entering the stiff website of the bookmaker. Resort to it to register with 1xBet.
xbet-france.com
Универсальность ремонтной смеси
цементная смесь https://remontnaja-smes-dlja-kirpichnoj-kladki.ru .
buy semaglutide uk
rybelsus lose weight
Советую прочитать сайт про отопление https://artcet.ru/
Также не забудьте добавить сайт в закладки: https://artcet.ru/
Сяючий світ пін ап
онлайн казіно http://pinupcasinoqgcvbisd.kiev.ua/ .
Не ошибитесь с выбором: какую ремонтную смесь выбрать для домашних работ
купить ремонтную смесь https://remontnaja-smes-dlja-kirpichnoj-kladki.ru/ .
Obten descuentos adicionales con un codigo descuento 1Win
1win es una plataforma de apuestas en linea que ofrece una amplia variedad de opciones de apuestas deportivas y juegos de casino. La pagina web es facil de navegar y tiene un diseno moderno y atractivo. En cuanto a las apuestas deportivas, 1win ofrece una amplia variedad de deportes para apostar, desde los mas populares como el futbol y el baloncesto hasta deportes menos conocidos como el badminton y el rugby. Ademas, la plataforma ofrece una gran cantidad de mercados de apuestas para cada evento deportivo, lo que permite a los usuarios personalizar sus apuestas de acuerdo a sus preferencias. En cuanto a los juegos de casino, 1win ofrece una amplia variedad de opciones, desde tragamonedas hasta juegos de mesa como el blackjack y la ruleta. Los juegos son de alta calidad y estan disenados por algunos de los principales proveedores de software de casino. La plataforma tambien ofrece una amplia variedad de metodos de pago, incluyendo tarjetas de credito, billeteras electronicas y criptomonedas. Ademas, el sitio web esta disponible en varios idiomas, lo que lo hace accesible para usuarios de todo el mundo. En general, 1win es una plataforma de apuestas en linea solida y confiable que ofrece una amplia variedad de opciones de apuestas deportivas y juegos de casino.
Codigo promocional 1Win son canjeados desde su registro y utilizados en los juegos. Aplica el codigo 937999 y recibe ganancias al apostar. El codigo de promocion 2024 te regala un paquete de bienvenida del 500% con los cuatro primeros depositos hasta $700 en apuestas deportivas y casino. El codigo 1win de bono debe ser ingresado en el formulario de registro.
Si esta buscando una forma de maximizar sus ganancias en apuestas deportivas, no se pierda el codigo de promocion y el bono de bienvenida 1Win en 024]. Con el codigo de promocion 1Win puedes recibir ofertas exclusivas y apuestas gratis para disfrutar aun mas de tus juegos favoritos. Ademas, el bono de bienvenida 1Win es una gran oportunidad para aumentar sus ganancias y tener una experiencia de apuestas aun mas emocionante.
Bonificacion 1win – 937999
Como activo el vale en 1win?
Durante el proceso de registro se introduce un codigo promocional de la casa de apuestas 1win. El campo “Anadir codigo promocional” estara disponible para cualquier metodo de creacion de cuenta que elija. Tenga en cuenta que este campo es opcional en la fase de registro, asi que tenga cuidado al introducirlo. Si se olvida de hacerlo al registrarse, no podra activar su codigo en 1win y el bono de bienvenida dejara de estar disponible.
Tendras que recargar tu cuenta para poder utilizar el codigo promocional en el futuro. Una vez que haya introducido el codigo promocional durante el registro, vaya a su gabinete personal a traves del icono de usuario y haga clic en “Depositar”. Tomemos como ejemplo el codigo promocional “937999”, que corresponde a 200 euros.
Caracteristicas del bono 1win
El codigo promocional es proporcionado por representantes de la oficina de la casa de apuestas 1win. Lo hacen en varias ocasiones: durante una promocion, un dia festivo importante, el cumpleanos de un usuario, para volver a captar a un jugador que ha estado jugando durante un tiempo y ha dejado de estar activo.
Si introdujiste un codigo promocional al registrarte, veras los fondos de bonificacion en cuanto inicies sesion en tu perfil. Y si te lo dieron personalmente, deberas aceptar participar en la promocion para poder utilizarlo. Estos fondos se abonan en tu cuenta de bonificacion, y podras ver el importe en tu perfil personal. Si respeta las normas de uso de los fondos de bonificacion, podra convertirlos gradualmente en dinero en efectivo, que recibira ademas de sus ganancias.
?Que tan confiable es apostar en 1win?
Apostar en 1win es 100% confiable. 1win nacio en 2016, con el nombre de MFI Investments Limited, quienes estan registrados con el numero de licencia 8048/JAZ2018-040, otorgada por la Comision de Juegos eGaming.
Ademas, cuenta con alianzas comerciales con diferentes equipos y ligas, como la UEFA, UFC, NHL, FIFA y mas.
8. Opiniones 1win Casino 2024
1win casino es una excelente opcion para comenzar a apostar, ademas de que cuentas con el regalo para registrarte con el codigo promocional 937999. Podras tener tu cuenta abierta en todos lados, tu celular y tu computadora tendran tu cuenta sincronizada.
Es un sitio seguro, con numero de registro y sistemas de pago legales afiliados. Podras apostar con cualquier metodo de pago en mas de 50 deportes diferentes y cientos de juegos de casino. 1win es recomendable y esta lleno de diversion.
9. FAQ: 1win Codigo Promocional
9.1 ?? ?1win es un sitio seguro?
1win es un sitio seguro, esta avalado por la comision de juego eGaming. Sus metodos de pago son conocidos y de fiar, cada uno de ellos. Ademas, tambien de tener soporte tecnico las 24 horas ante cualquier duda.
9.2 ?? ?Hay bono de bienvenida de 1win?
Si existe, y para obtener este bono de bienvenida de 1win, necesitaras el codigo de bienvenida 937999, tendras que registrarte en 1win con este codigo y realizar tu primer deposito.
9.3 ?? ?Cual es el codigo de bono 1win?
El codigo promocional 1win es 937999, registrate y comienza a disfrutar de tu bono.
https://referatystatistika.ru
Obten descuentos adicionales con un codigo descuento 1Win
1win es una plataforma de apuestas en linea que ofrece una amplia variedad de opciones de apuestas deportivas y juegos de casino. La pagina web es facil de navegar y tiene un diseno moderno y atractivo. En cuanto a las apuestas deportivas, 1win ofrece una amplia variedad de deportes para apostar, desde los mas populares como el futbol y el baloncesto hasta deportes menos conocidos como el badminton y el rugby. Ademas, la plataforma ofrece una gran cantidad de mercados de apuestas para cada evento deportivo, lo que permite a los usuarios personalizar sus apuestas de acuerdo a sus preferencias. En cuanto a los juegos de casino, 1win ofrece una amplia variedad de opciones, desde tragamonedas hasta juegos de mesa como el blackjack y la ruleta. Los juegos son de alta calidad y estan disenados por algunos de los principales proveedores de software de casino. La plataforma tambien ofrece una amplia variedad de metodos de pago, incluyendo tarjetas de credito, billeteras electronicas y criptomonedas. Ademas, el sitio web esta disponible en varios idiomas, lo que lo hace accesible para usuarios de todo el mundo. En general, 1win es una plataforma de apuestas en linea solida y confiable que ofrece una amplia variedad de opciones de apuestas deportivas y juegos de casino.
Codigo promocional 1Win son canjeados desde su registro y utilizados en los juegos. Aplica el codigo 937999 y recibe ganancias al apostar. El codigo de promocion 2024 te regala un paquete de bienvenida del 500% con los cuatro primeros depositos hasta $700 en apuestas deportivas y casino. El codigo 1win de bono debe ser ingresado en el formulario de registro.
Si esta buscando una forma de maximizar sus ganancias en apuestas deportivas, no se pierda el codigo de promocion y el bono de bienvenida 1Win en 024]. Con el codigo de promocion 1Win puedes recibir ofertas exclusivas y apuestas gratis para disfrutar aun mas de tus juegos favoritos. Ademas, el bono de bienvenida 1Win es una gran oportunidad para aumentar sus ganancias y tener una experiencia de apuestas aun mas emocionante.
Bonificacion 1win – 937999
Como activo el vale en 1win?
Durante el proceso de registro se introduce un codigo promocional de la casa de apuestas 1win. El campo “Anadir codigo promocional” estara disponible para cualquier metodo de creacion de cuenta que elija. Tenga en cuenta que este campo es opcional en la fase de registro, asi que tenga cuidado al introducirlo. Si se olvida de hacerlo al registrarse, no podra activar su codigo en 1win y el bono de bienvenida dejara de estar disponible.
Tendras que recargar tu cuenta para poder utilizar el codigo promocional en el futuro. Una vez que haya introducido el codigo promocional durante el registro, vaya a su gabinete personal a traves del icono de usuario y haga clic en “Depositar”. Tomemos como ejemplo el codigo promocional “937999”, que corresponde a 200 euros.
Caracteristicas del bono 1win
El codigo promocional es proporcionado por representantes de la oficina de la casa de apuestas 1win. Lo hacen en varias ocasiones: durante una promocion, un dia festivo importante, el cumpleanos de un usuario, para volver a captar a un jugador que ha estado jugando durante un tiempo y ha dejado de estar activo.
Si introdujiste un codigo promocional al registrarte, veras los fondos de bonificacion en cuanto inicies sesion en tu perfil. Y si te lo dieron personalmente, deberas aceptar participar en la promocion para poder utilizarlo. Estos fondos se abonan en tu cuenta de bonificacion, y podras ver el importe en tu perfil personal. Si respeta las normas de uso de los fondos de bonificacion, podra convertirlos gradualmente en dinero en efectivo, que recibira ademas de sus ganancias.
?Que tan confiable es apostar en 1win?
Apostar en 1win es 100% confiable. 1win nacio en 2016, con el nombre de MFI Investments Limited, quienes estan registrados con el numero de licencia 8048/JAZ2018-040, otorgada por la Comision de Juegos eGaming.
Ademas, cuenta con alianzas comerciales con diferentes equipos y ligas, como la UEFA, UFC, NHL, FIFA y mas.
8. Opiniones 1win Casino 2024
1win casino es una excelente opcion para comenzar a apostar, ademas de que cuentas con el regalo para registrarte con el codigo promocional 937999. Podras tener tu cuenta abierta en todos lados, tu celular y tu computadora tendran tu cuenta sincronizada.
Es un sitio seguro, con numero de registro y sistemas de pago legales afiliados. Podras apostar con cualquier metodo de pago en mas de 50 deportes diferentes y cientos de juegos de casino. 1win es recomendable y esta lleno de diversion.
9. FAQ: 1win Codigo Promocional
9.1 ?? ?1win es un sitio seguro?
1win es un sitio seguro, esta avalado por la comision de juego eGaming. Sus metodos de pago son conocidos y de fiar, cada uno de ellos. Ademas, tambien de tener soporte tecnico las 24 horas ante cualquier duda.
9.2 ?? ?Hay bono de bienvenida de 1win?
Si existe, y para obtener este bono de bienvenida de 1win, necesitaras el codigo de bienvenida 937999, tendras que registrarte en 1win con este codigo y realizar tu primer deposito.
9.3 ?? ?Cual es el codigo de bono 1win?
El codigo promocional 1win es 937999, registrate y comienza a disfrutar de tu bono.
semaglutide canada pharmacy prices
Very good site you have here but I was wondering if you knew of any forums that
cover the same topics discussed in this article? I’d really love to be a
part of group where I can get responses from other knowledgeable people that share
the same interest. If you have any suggestions, please let me know.
Thanks!
socialmediatric.com
이에 그는 곧바로 국방부로 달려가 국방부에 보고했다.
cheap ozempic
https://kontrolnyesistemnyjanaliz.ru
http://www.xbet-france.com
Working 1xbet looking-glass for entering the official website of the bookmaker. Resort to it to register with 1xBet.
http://xbet-france.com
купить аттестат школы https://www.man-diploms.com .
1xBet промокод — 1XFREE777 впишите код в анкете при регистрации, пополните счет от 100 рублей и вы получите бонус +100% (до 32500 рублей).
https://www.covrik.com/covers/inc/1xbet_promokod_aktualnuy_pri_registracii.html
Промокод 1xBet на 2024 год предоставляет возможность получить бонусы при регистрации на сайте букмекерской конторы.
semaglutide buy online
buy semaglutide from canada online
Приобрести свидетельство бакалавра: Заказ свидетельства высшего уровня образования поможет вам достичь на новый уровень в профессии.
Immerse yourself in the excitement of online gambling at our Mexican online casino. With a wide range of games and thrilling bonuses, you’ll never want to play anywhere else. juegos de casino te lo mereces.
buy semaglutide cheap
ozempic tablets
wegovy drug
Experience the rush of adrenaline at our Mexican casino site. With fast-paced action and heart-pounding excitement, you’ll never want to stop spinning the reels. emu casino tu camino hacia el exito.
rybelsus weight loss
It’s enormous that you are getting ideas from this
paragraph as well as from our discussion made
here.
ozempic semaglutide tablets cost
buy ozempic from canada online
semaglutide rybelsus
where to buy semaglutide
restaurant-lenvol.net
“제 생각에는 열에 아홉은 사공입니다. 사공은 만능입니다.”
Здравствуйте!
Были ли у вас случаи, когда приходилось писать дипломную работу в кратчайшие сроки? Это действительно очень ответственно и тяжело, но важно не терять бодрость духа и продолжать активно участвовать в учебных процессах, как и я в данный момент.
Для тех, кто умеет находить и осваивать информацию в сети, это действительно оказывает огромную помощь в процессе согласования и написания дипломной работы. Нет необходимости тратить время на походы в библиотеки или встречи с дипломным руководителем. Здесь представлены хорошие данные для дипломных и курсовых проектов; вы можете ознакомиться с ними, перейдя по ссылкам
https://diplom1.org/
Желаю всем отличных оценок!
купить диплом средне техническое
купить диплом в георгиевске
купить диплом в новокузнецке
купить диплом в прокопьевске
купить диплом в ленинск-кузнецком
купить диплом штукатура
купить диплом строителя
купить диплом в череповце
купить диплом в березниках
купить диплом во владикавказе
semaglutide rybelsus
Join the elite ranks of winners at our Mexican casino site. With exclusive rewards and VIP privileges, you’ll be treated like royalty every time you play. doubledown casino te da mucho.
프라그마틱 슬롯에 대한 내용이 정말 도움이 되었어요! 더불어, 제 사이트에서도 프라그마틱과 관련된 정보를 찾아보실 수 있어요. 함께 지식을 공유해보세요!
프라그마틱 무료
프라그마틱에 대한 글 읽는 것이 정말 즐거웠어요! 또한, 제 사이트에서도 프라그마틱과 관련된 정보를 공유하고 있어요. 함께 발전하며 더 많은 지식을 쌓아가요!
http://oizoioi.site
http://clubdeofertas.site
http://zemotorcycle.site
https://kursovyesociologiya.ru
rybelsus tab 3mg
ozempic tablets
https://referatymehanikagruntov.ru
ozempic tablets
https://referatymikroekonomika.ru
semaglutide price
semaglutide canada pharmacy prices
buy rybelsus
https://kontrolnyepolitologiya.ru
rybelsus buy from canada
semaglutide rx
rybelsus best price
Ремонт и перетяжка мягкой мебели в Минске
перетяжка кресла https://peretyazhka-mebeli-vminske.ru/ .
ST666
My relatives every time say that I am killing my time here at net, however I
know I am getting experience all the time by reading such
nice content.
My coder is trying to convince me to move to .net from
PHP. I have always disliked the idea because of the expenses.
But he’s tryiong none the less. I’ve been using Movable-type on a variety of
websites for about a year and am nervous about switching to
another platform. I have heard good things about
blogengine.net. Is there a way I can transfer all my wordpress posts into it?
Any help would be greatly appreciated!
https://kontrolnyepravovedenie.ru
buy rybelsus in canada
rybelsus tablets for weight loss cost
https://resheniezadachpolitologiya.ru
Советую прочитать сайт про отопление https://artcet.ru/
Также не забудьте добавить сайт в закладки: https://artcet.ru/
Join the winning streak at our Mexican online casino. With lucrative bonuses and lightning-fast payouts, there’s never been a better time to play. codere casino online te lo mereces.
1xBet промокод — 1XFREE777 впишите код в анкете при регистрации, пополните счет от 100 рублей и вы получите бонус +100% (до 32500 рублей).
https://www.covrik.com/covers/inc/1xbet_promokod_aktualnuy_pri_registracii.html
Промокод 1xBet на 2024 год предоставляет возможность получить бонусы при регистрации на сайте букмекерской конторы.
https://resheniezadachpravovedenie.ru
buy rybelsus in canada
rybelsus best price
Obten descuentos adicionales con un codigo descuento 1Win
1win es una plataforma de apuestas en linea que ofrece una amplia variedad de opciones de apuestas deportivas y juegos de casino. La pagina web es facil de navegar y tiene un diseno moderno y atractivo. En cuanto a las apuestas deportivas, 1win ofrece una amplia variedad de deportes para apostar, desde los mas populares como el futbol y el baloncesto hasta deportes menos conocidos como el badminton y el rugby. Ademas, la plataforma ofrece una gran cantidad de mercados de apuestas para cada evento deportivo, lo que permite a los usuarios personalizar sus apuestas de acuerdo a sus preferencias. En cuanto a los juegos de casino, 1win ofrece una amplia variedad de opciones, desde tragamonedas hasta juegos de mesa como el blackjack y la ruleta. Los juegos son de alta calidad y estan disenados por algunos de los principales proveedores de software de casino. La plataforma tambien ofrece una amplia variedad de metodos de pago, incluyendo tarjetas de credito, billeteras electronicas y criptomonedas. Ademas, el sitio web esta disponible en varios idiomas, lo que lo hace accesible para usuarios de todo el mundo. En general, 1win es una plataforma de apuestas en linea solida y confiable que ofrece una amplia variedad de opciones de apuestas deportivas y juegos de casino.
1Win son canjeados desde su registro y utilizados en los juegos. Aplica el codigo 937999 y recibe ganancias al apostar. El codigo de promocion 2024 te regala un paquete de bienvenida del 500% con los cuatro primeros depositos hasta $700 en apuestas deportivas y casino. El codigo 1win de bono debe ser ingresado en el formulario de registro.
Si esta buscando una forma de maximizar sus ganancias en apuestas deportivas, no se pierda el codigo de promocion y el bono de bienvenida 1Win en 024]. Con el codigo de promocion 1Win puedes recibir ofertas exclusivas y apuestas gratis para disfrutar aun mas de tus juegos favoritos. Ademas, el bono de bienvenida 1Win es una gran oportunidad para aumentar sus ganancias y tener una experiencia de apuestas aun mas emocionante.
Bonificacion 1win – 937999
Como activo el vale en 1win?
Durante el proceso de registro se introduce un codigo promocional de la casa de apuestas 1win. El campo “Anadir codigo promocional” estara disponible para cualquier metodo de creacion de cuenta que elija. Tenga en cuenta que este campo es opcional en la fase de registro, asi que tenga cuidado al introducirlo. Si se olvida de hacerlo al registrarse, no podra activar su codigo en 1win y el bono de bienvenida dejara de estar disponible.
Tendras que recargar tu cuenta para poder utilizar el codigo promocional en el futuro. Una vez que haya introducido el codigo promocional durante el registro, vaya a su gabinete personal a traves del icono de usuario y haga clic en “Depositar”. Tomemos como ejemplo el codigo promocional “937999”, que corresponde a 200 euros.
Caracteristicas del bono 1win
El codigo promocional es proporcionado por representantes de la oficina de la casa de apuestas 1win. Lo hacen en varias ocasiones: durante una promocion, un dia festivo importante, el cumpleanos de un usuario, para volver a captar a un jugador que ha estado jugando durante un tiempo y ha dejado de estar activo.
Si introdujiste un codigo promocional al registrarte, veras los fondos de bonificacion en cuanto inicies sesion en tu perfil. Y si te lo dieron personalmente, deberas aceptar participar en la promocion para poder utilizarlo. Estos fondos se abonan en tu cuenta de bonificacion, y podras ver el importe en tu perfil personal. Si respeta las normas de uso de los fondos de bonificacion, podra convertirlos gradualmente en dinero en efectivo, que recibira ademas de sus ganancias.
?Que tan confiable es apostar en 1win?
Apostar en 1win es 100% confiable. 1win nacio en 2016, con el nombre de MFI Investments Limited, quienes estan registrados con el numero de licencia 8048/JAZ2018-040, otorgada por la Comision de Juegos eGaming.
Ademas, cuenta con alianzas comerciales con diferentes equipos y ligas, como la UEFA, UFC, NHL, FIFA y mas.
8. Opiniones 1win Casino 2024
1win casino es una excelente opcion para comenzar a apostar, ademas de que cuentas con el regalo para registrarte con el codigo promocional 937999. Podras tener tu cuenta abierta en todos lados, tu celular y tu computadora tendran tu cuenta sincronizada.
Es un sitio seguro, con numero de registro y sistemas de pago legales afiliados. Podras apostar con cualquier metodo de pago en mas de 50 deportes diferentes y cientos de juegos de casino. 1win es recomendable y esta lleno de diversion.
9. FAQ: 1win Codigo Promocional
9.1 ?? ?1win es un sitio seguro?
1win es un sitio seguro, esta avalado por la comision de juego eGaming. Sus metodos de pago son conocidos y de fiar, cada uno de ellos. Ademas, tambien de tener soporte tecnico las 24 horas ante cualquier duda.
9.2 ?? ?Hay bono de bienvenida de 1win?
Si existe, y para obtener este bono de bienvenida de 1win, necesitaras el codigo de bienvenida 937999, tendras que registrarte en 1win con este codigo y realizar tu primer deposito.
9.3 ?? ?Cual es el codigo de bono 1win?
El codigo promocional 1win es 937999, registrate y comienza a disfrutar de tu bono.
1xBet промокод — 1XFREE777 впишите код в анкете при регистрации, пополните счет от 100 рублей и вы получите бонус +100% (до 32500 рублей).
https://www.covrik.com/covers/inc/1xbet_promokod_aktualnuy_pri_registracii.html
Промокод 1xBet на 2024 год предоставляет возможность получить бонусы при регистрации на сайте букмекерской конторы.
buy rybelsus
restaurant-lenvol.net
“알아요.” 거북노예는 황급히 땅에 무릎을 꿇고 즉각 반응했다.
Very good article. I am going through some of these
issues as well..
Obten descuentos adicionales con un codigo descuento 1Win
1win es una plataforma de apuestas en linea que ofrece una amplia variedad de opciones de apuestas deportivas y juegos de casino. La pagina web es facil de navegar y tiene un diseno moderno y atractivo. En cuanto a las apuestas deportivas, 1win ofrece una amplia variedad de deportes para apostar, desde los mas populares como el futbol y el baloncesto hasta deportes menos conocidos como el badminton y el rugby. Ademas, la plataforma ofrece una gran cantidad de mercados de apuestas para cada evento deportivo, lo que permite a los usuarios personalizar sus apuestas de acuerdo a sus preferencias. En cuanto a los juegos de casino, 1win ofrece una amplia variedad de opciones, desde tragamonedas hasta juegos de mesa como el blackjack y la ruleta. Los juegos son de alta calidad y estan disenados por algunos de los principales proveedores de software de casino. La plataforma tambien ofrece una amplia variedad de metodos de pago, incluyendo tarjetas de credito, billeteras electronicas y criptomonedas. Ademas, el sitio web esta disponible en varios idiomas, lo que lo hace accesible para usuarios de todo el mundo. En general, 1win es una plataforma de apuestas en linea solida y confiable que ofrece una amplia variedad de opciones de apuestas deportivas y juegos de casino.
1Win son canjeados desde su registro y utilizados en los juegos. Aplica el codigo 937999 y recibe ganancias al apostar. El codigo de promocion 2024 te regala un paquete de bienvenida del 500% con los cuatro primeros depositos hasta $700 en apuestas deportivas y casino. El codigo 1win de bono debe ser ingresado en el formulario de registro.
Si esta buscando una forma de maximizar sus ganancias en apuestas deportivas, no se pierda el codigo de promocion y el bono de bienvenida 1Win en 024]. Con el codigo de promocion 1Win puedes recibir ofertas exclusivas y apuestas gratis para disfrutar aun mas de tus juegos favoritos. Ademas, el bono de bienvenida 1Win es una gran oportunidad para aumentar sus ganancias y tener una experiencia de apuestas aun mas emocionante.
Bonificacion 1win – 937999
Como activo el vale en 1win?
Durante el proceso de registro se introduce un codigo promocional de la casa de apuestas 1win. El campo “Anadir codigo promocional” estara disponible para cualquier metodo de creacion de cuenta que elija. Tenga en cuenta que este campo es opcional en la fase de registro, asi que tenga cuidado al introducirlo. Si se olvida de hacerlo al registrarse, no podra activar su codigo en 1win y el bono de bienvenida dejara de estar disponible.
Tendras que recargar tu cuenta para poder utilizar el codigo promocional en el futuro. Una vez que haya introducido el codigo promocional durante el registro, vaya a su gabinete personal a traves del icono de usuario y haga clic en “Depositar”. Tomemos como ejemplo el codigo promocional “937999”, que corresponde a 200 euros.
Caracteristicas del bono 1win
El codigo promocional es proporcionado por representantes de la oficina de la casa de apuestas 1win. Lo hacen en varias ocasiones: durante una promocion, un dia festivo importante, el cumpleanos de un usuario, para volver a captar a un jugador que ha estado jugando durante un tiempo y ha dejado de estar activo.
Si introdujiste un codigo promocional al registrarte, veras los fondos de bonificacion en cuanto inicies sesion en tu perfil. Y si te lo dieron personalmente, deberas aceptar participar en la promocion para poder utilizarlo. Estos fondos se abonan en tu cuenta de bonificacion, y podras ver el importe en tu perfil personal. Si respeta las normas de uso de los fondos de bonificacion, podra convertirlos gradualmente en dinero en efectivo, que recibira ademas de sus ganancias.
?Que tan confiable es apostar en 1win?
Apostar en 1win es 100% confiable. 1win nacio en 2016, con el nombre de MFI Investments Limited, quienes estan registrados con el numero de licencia 8048/JAZ2018-040, otorgada por la Comision de Juegos eGaming.
Ademas, cuenta con alianzas comerciales con diferentes equipos y ligas, como la UEFA, UFC, NHL, FIFA y mas.
8. Opiniones 1win Casino 2024
1win casino es una excelente opcion para comenzar a apostar, ademas de que cuentas con el regalo para registrarte con el codigo promocional 937999. Podras tener tu cuenta abierta en todos lados, tu celular y tu computadora tendran tu cuenta sincronizada.
Es un sitio seguro, con numero de registro y sistemas de pago legales afiliados. Podras apostar con cualquier metodo de pago en mas de 50 deportes diferentes y cientos de juegos de casino. 1win es recomendable y esta lleno de diversion.
9. FAQ: 1win Codigo Promocional
9.1 ?? ?1win es un sitio seguro?
1win es un sitio seguro, esta avalado por la comision de juego eGaming. Sus metodos de pago son conocidos y de fiar, cada uno de ellos. Ademas, tambien de tener soporte tecnico las 24 horas ante cualquier duda.
9.2 ?? ?Hay bono de bienvenida de 1win?
Si existe, y para obtener este bono de bienvenida de 1win, necesitaras el codigo de bienvenida 937999, tendras que registrarte en 1win con este codigo y realizar tu primer deposito.
9.3 ?? ?Cual es el codigo de bono 1win?
El codigo promocional 1win es 937999, registrate y comienza a disfrutar de tu bono.
На территории городе Москве приобрести свидетельство – это удобный и экспресс вариант получить нужный бумага лишенный лишних хлопот. Разнообразие фирм предоставляют услуги по производству и реализации дипломов разных образовательных учреждений – http://www.diplomkupit.org. Выбор дипломов в городе Москве огромен, включая бумаги о академическом и нормальном профессиональной подготовке, документы, дипломы колледжей и университетов. Основное достоинство – способность получить свидетельство подлинный документ, подтверждающий подлинность и высокое качество. Это обеспечивает специальная защита против фальсификаций и позволяет использовать диплом для разнообразных целей. Таким образом, покупка диплома в столице России является важным достоверным и эффективным вариантом для данных, кто желает достичь успеху в трудовой деятельности.
купить диплом Гознак orik-diploms.com .
Obten descuentos adicionales con un codigo descuento 1Win
1win es una plataforma de apuestas en linea que ofrece una amplia variedad de opciones de apuestas deportivas y juegos de casino. La pagina web es facil de navegar y tiene un diseno moderno y atractivo. En cuanto a las apuestas deportivas, 1win ofrece una amplia variedad de deportes para apostar, desde los mas populares como el futbol y el baloncesto hasta deportes menos conocidos como el badminton y el rugby. Ademas, la plataforma ofrece una gran cantidad de mercados de apuestas para cada evento deportivo, lo que permite a los usuarios personalizar sus apuestas de acuerdo a sus preferencias. En cuanto a los juegos de casino, 1win ofrece una amplia variedad de opciones, desde tragamonedas hasta juegos de mesa como el blackjack y la ruleta. Los juegos son de alta calidad y estan disenados por algunos de los principales proveedores de software de casino. La plataforma tambien ofrece una amplia variedad de metodos de pago, incluyendo tarjetas de credito, billeteras electronicas y criptomonedas. Ademas, el sitio web esta disponible en varios idiomas, lo que lo hace accesible para usuarios de todo el mundo. En general, 1win es una plataforma de apuestas en linea solida y confiable que ofrece una amplia variedad de opciones de apuestas deportivas y juegos de casino.
1Win son canjeados desde su registro y utilizados en los juegos. Aplica el codigo 937999 y recibe ganancias al apostar. El codigo de promocion 2024 te regala un paquete de bienvenida del 500% con los cuatro primeros depositos hasta $700 en apuestas deportivas y casino. El codigo 1win de bono debe ser ingresado en el formulario de registro.
Si esta buscando una forma de maximizar sus ganancias en apuestas deportivas, no se pierda el codigo de promocion y el bono de bienvenida 1Win en 024]. Con el codigo de promocion 1Win puedes recibir ofertas exclusivas y apuestas gratis para disfrutar aun mas de tus juegos favoritos. Ademas, el bono de bienvenida 1Win es una gran oportunidad para aumentar sus ganancias y tener una experiencia de apuestas aun mas emocionante.
Bonificacion 1win – 937999
Como activo el vale en 1win?
Durante el proceso de registro se introduce un codigo promocional de la casa de apuestas 1win. El campo “Anadir codigo promocional” estara disponible para cualquier metodo de creacion de cuenta que elija. Tenga en cuenta que este campo es opcional en la fase de registro, asi que tenga cuidado al introducirlo. Si se olvida de hacerlo al registrarse, no podra activar su codigo en 1win y el bono de bienvenida dejara de estar disponible.
Tendras que recargar tu cuenta para poder utilizar el codigo promocional en el futuro. Una vez que haya introducido el codigo promocional durante el registro, vaya a su gabinete personal a traves del icono de usuario y haga clic en “Depositar”. Tomemos como ejemplo el codigo promocional “937999”, que corresponde a 200 euros.
Caracteristicas del bono 1win
El codigo promocional es proporcionado por representantes de la oficina de la casa de apuestas 1win. Lo hacen en varias ocasiones: durante una promocion, un dia festivo importante, el cumpleanos de un usuario, para volver a captar a un jugador que ha estado jugando durante un tiempo y ha dejado de estar activo.
Si introdujiste un codigo promocional al registrarte, veras los fondos de bonificacion en cuanto inicies sesion en tu perfil. Y si te lo dieron personalmente, deberas aceptar participar en la promocion para poder utilizarlo. Estos fondos se abonan en tu cuenta de bonificacion, y podras ver el importe en tu perfil personal. Si respeta las normas de uso de los fondos de bonificacion, podra convertirlos gradualmente en dinero en efectivo, que recibira ademas de sus ganancias.
?Que tan confiable es apostar en 1win?
Apostar en 1win es 100% confiable. 1win nacio en 2016, con el nombre de MFI Investments Limited, quienes estan registrados con el numero de licencia 8048/JAZ2018-040, otorgada por la Comision de Juegos eGaming.
Ademas, cuenta con alianzas comerciales con diferentes equipos y ligas, como la UEFA, UFC, NHL, FIFA y mas.
8. Opiniones 1win Casino 2024
1win casino es una excelente opcion para comenzar a apostar, ademas de que cuentas con el regalo para registrarte con el codigo promocional 937999. Podras tener tu cuenta abierta en todos lados, tu celular y tu computadora tendran tu cuenta sincronizada.
Es un sitio seguro, con numero de registro y sistemas de pago legales afiliados. Podras apostar con cualquier metodo de pago en mas de 50 deportes diferentes y cientos de juegos de casino. 1win es recomendable y esta lleno de diversion.
9. FAQ: 1win Codigo Promocional
9.1 ?? ?1win es un sitio seguro?
1win es un sitio seguro, esta avalado por la comision de juego eGaming. Sus metodos de pago son conocidos y de fiar, cada uno de ellos. Ademas, tambien de tener soporte tecnico las 24 horas ante cualquier duda.
9.2 ?? ?Hay bono de bienvenida de 1win?
Si existe, y para obtener este bono de bienvenida de 1win, necesitaras el codigo de bienvenida 937999, tendras que registrarte en 1win con este codigo y realizar tu primer deposito.
9.3 ?? ?Cual es el codigo de bono 1win?
El codigo promocional 1win es 937999, registrate y comienza a disfrutar de tu bono.
This is the right blog for anybody who wants to understand this
topic. You understand so much its almost hard to argue
with you (not that I personally will need to…HaHa).
You definitely put a new spin on a subject which has been written about for
many years. Excellent stuff, just wonderful!
agonaga.com
Liang Ruying은 서둘러 말했습니다. “폐하, 어린 소녀는 기적의 의사가 아닙니다 …”
ozempic online
wegovy diabetes
buy ozempic in mexico
generic ozempic cost
В городе Москве заказать аттестат – это практичный и быстрый способ достать нужный запись безо избыточных проблем. Множество фирм предоставляют услуги по созданию и продаже свидетельств разнообразных образовательных учреждений – https://diplomkupit.org/. Выбор дипломов в столице России огромен, включая документы о высшем уровне и нормальном учебе, свидетельства, свидетельства вузов и академий. Главное достоинство – возможность достать диплом официальный документ, гарантирующий достоверность и качество. Это предоставляет специальная защита против подделок и предоставляет возможность воспользоваться свидетельство для разнообразных задач. Таким образом, приобретение аттестата в Москве становится безопасным и оптимальным решением для таких, кто желает достичь успеха в карьере.
buy rybelsus online no script
rybelsus prescription
buy ozempic online canada
This paragraph presents clear idea in support of the new people of blogging, that really how
to do running a blog.
1Win Приветственный Бонус (2024)
Промокод 1Вин: 937999. При первом депозите вы получите бонус в размере 500% до 200 000 рублей на свой счет. Чтобы получить денежные вознаграждения для спорта и казино, необходимо использовать специальный бонусный промокод 1win.
Для новых клиентов компания 1win предлагает приветственный бонус в размере 500% от суммы депозита, который не должен превышать 15,000 рублей. Чтобы вывести бонусные средства, их необходимо сначала отыграть. Бонусные 500% разделены на 4 депозита.
Порядок получения бонуса:
1. Первый депозит – 200% от суммы депозита;
2. Второй депозит – 150% от суммы второго депозита;
3. Третий депозит – 100% от суммы;
4. Четвертый депозит – 50% от суммы.
Таким образом, бонусы можно получить четыре раза, но следует учесть, что существуют особые правила и сроки отыгрыша бонусного счета. Максимальная сумма бонусных средств составляет 200,000 рублей, а бонус на один депозит – 50,000 рублей.
Промокод на 1Win – 937999 предоставляет бонус на первые 4 депозита, который может достигать 500% до 200 000 рублей. Если вы ввели промокод при регистрации, то бонусные средства будут отображаться в вашем профиле сразу же после входа. Если же вам промокод был предоставлен лично, то для его активации необходимо дать согласие на участие в акции.
После регистрации и ввода промокода 1вин для пополнения счета и получения приветственного бонуса, вы можете начать играть. Однако, вы не сможете сразу вывести бонусные средства – сначала их нужно отыграть.
Для этого необходимо делать ставки с коэффициентом от 3. В случае выигрыша, вы получите 5% от бонусного счета на свой основной счет.
Давайте рассмотрим это на примере:
Вы внесли депозит в размере 10 000 рублей на свой счет в 1win. На бонусный счет поступило 200% от суммы депозита, то есть 20 000 рублей;
Затем вы сделали ставку с коэффициентом 3, и в случае выигрыша получили 30 000 рублей от ставки плюс 500 рублей (5% от бонусного счета). Теперь ваш счет составляет 30 500 рублей, а бонусный счет – 19 500 рублей.
Таким образом, вы отыграли 500 рублей. Продолжая делать ставки, вы сможете отыграть всю сумму бонуса.
Отыгранные средства становятся доступными для вывода сразу же.
Обратите внимание, что ставки с коэффициентом менее 3 не будут учтены при отыгрыше бонуса.
Кроме того, что БК предоставляет приветственный промокод 1win при пополнении баланса, она также предлагает своим игрокам другие бонусы и акции. Доступные предложения подойдут как для любителей казино, так и для тех игроков, которым нравится собирать экспрессы. В следующем разделе мы подробно рассмотрим каждую из актуальных на данный момент акций.
Бездепозитный Бонус 1win 2024
Бонусы от казино 1Win 2024 – Бездепозитные бонусы ? Коды на возврат денег ? VIP Программа лояльности ? Бесплатные фриспины.
Промокод 1Win казино: 937999 предоставляет новым игрокам бонус 500% для игры в слоты и игровые автоматы, максимальная сумма бонуса 200 000 рублей. Вы можете использовать бонусные деньги в разделе азартных игр, включая онлайн казино, карты, рулетку, игровые автоматы и слоты.
Компания «1Win» рада предложить своим новым клиентам приветственный бонус в размере до 500% на первые четыре депозита. Это выгодное предложение доступно сразу после регистрации в нашей букмекерской конторе. Бонус можно получить не только в рублях, но и в других валютах, при этом он не ограничивает возможность участия игроков в других программам лояльности компании. Максимальная сумма вознаграждения за регистрацию составляет 75000 рублей или эквивалентная сумма в другой валюте.
Бонусы в 1win приносят игрокам множество преимуществ. Во-первых, они позволяют увеличить начальную ставку или продлить время игры. Кроме того, они дают возможность попробовать различные игры без риска потерять реальные деньги. Бонусы также повышают шансы на выигрыш и предоставляют дополнительные возможности для получения прибыли. Кроме того, бонусы в 1win могут быть обменены на реальные деньги или использованы для участия в специальных акциях и турнирах.
Преимущества получения и использования бонусов в 1win очевидны. Они позволяют игроку расширить свои возможности и получить больше удовольствия от игры. Бонусы также делают игру более выгодной с финансовой точки зрения, помогая уменьшить риски и увеличить потенциальную прибыль. Кроме того, получение и использование бонусов в 1win открывает возможность стать лояльным клиентом и получить дополнительные привилегии и вознаграждения от казино.
Итак, получение бонусов в 1win – это отличная возможность для игрока увеличить свои шансы на выигрыш, получить дополнительные деньги и улучшить свой игровой опыт. Бонусы делают игру более интересной и выгодной.
Промокод 1Win: 937999 предоставляет возможность получить бездепозитный бонус 2024. Его можно получить в виде фриспинов или фрибетов. Чтобы получить подарок, необходимо активировать код в личном кабинете. Дополнительный депозит не требуется. Размеры подарков невелики: фрибет до 500 рублей и не более 70 фриспинов для игры в слоты. Как и в случае с другими поощрениями, необходимо отыграть бездепозитный бонус. Вейджер, как правило, не превышает х5 для бесплатных ставок и х30 для фриспинов.
В казино 1win предоставляется внушительный бонус при регистрации, который составляет 500% от суммы первых четырех последовательных депозитов клиента. С таким количеством бонусов новичок может значительно увеличить свои шансы на выигрыш. Чтобы получить этот приветственный бонус, необходимо зарегистрироваться на официальном сайте, рабочем зеркале, мобильной версии или приложениях для мобильных телефонов. Однако, основным условием является совершение первого пополнения счета, так как активировать бонусы 1win можно только после этого.
1Win промокод на фриспины: 937999 используйте бонусный код при регистрации и получите бездепозтный бонус 70 фриспинов. Да, при использовании кода 1Win вы можете получить различные поощрения, включая бездепозитные бонусы. Они обычно представлены в виде фрибетов или фриспинов. Для их активации не требуется дополнительное пополнение счета. Размер таких подарков невелик: бесплатных вращений не более 70. Вейджер на бездепозитный бонус обычно не превышает х35. В 1Win вы можете получить бонусы за участие в акциях, турнирах, розыгрышах и активацию промокода. Бонусная программа периодически обновляется. Кроме того, некоторые акции имеют сезонный характер.
В 1Win основная бонусная программа включает в себя фриспины. Чтобы получить 70FS, необходимо пополнить счет на 100 рублей или более. Игроку предоставляется 2 дня с момента регистрации для активации презента. Отыгрыш бонуса должен быть выполнен в течение 24 часов с момента начисления, с вейджером х35. Бесплатные вращения предназначены только для игр провайдера Microgaming.
Так как бонусная программа 1Win регулярно обновляется, список акций, в которых можно получить фриспины, постоянно расширяется. Более подробную информацию о них можно найти на нашем сайте.
Промокод на 1Win дает возможность получить бесплатные вращения. Их можно использовать в любых слотах из каталога казино. Иногда могут быть установлены ограничения, которые предусматривают использование фриспинов только в определенных слотах или играх конкретного провайдера. Фриспины начисляются с фиксированной ставкой. Отыгрыш выигрыша, полученного с помощью бесплатных вращений, обязателен с учетом установленного вейджера.
Bonos y codigos promocionales 1win
1win es una plataforma de apuestas en linea reconocida por su compromiso de brindar a los jugadores una experiencia de juego unica y emocionante. Ya sea que te apasione el deporte, los juegos de casino o ambas opciones, 1win te ofrece una amplia gama de oportunidades para disfrutar y ganar.
Con bonificaciones y codigos promocionales exclusivos, 1 win se destaca como un destino lider para los entusiastas de las apuestas en linea. Desde bonos de bienvenida hasta promociones periodicas y ofertas exclusivas, descubriras como 1win se esfuerza por ofrecer a sus jugadores mexicanos oportunidades emocionantes para maximizar sus ganancias y ampliar su experiencia de juego.
Tipos de Bonificaciones en 1win
1win se destaca al ofrecer una amplia variedad de bonificaciones y promociones para satisfacer a jugadores de todas las preferencias:
Bonos de Bienvenida: Los nuevos jugadores son recibidos en 1win con un espectacular bono de bienvenida. Este bono se distribuye en los primeros cuatro depositos, lo que significa que tendras la oportunidad de aumentar significativamente tu saldo inicial. El bono de bienvenida puede alcanzar un impresionante 500% en total, con un limite de hasta 750 dolares.
Programa de Lealtad: En 1win, la lealtad de los jugadores es recompensada. El programa de lealtad de 1win ofrece a los jugadores la oportunidad de ascender en niveles y desbloquear recompensas exclusivas a medida que juegan mas y disfrutan de los juegos en la plataforma.
Cashback (Reembolso): El cashback es una caracteristica unica en 1win que te permite recibir un reembolso de una parte de tus perdidas en apuestas. Este beneficio es una forma de asegurarte de que, incluso si no tienes suerte en una apuesta en particular, aun obtendras algo a cambio.
Torneos: Los torneos en 1win anaden emocion adicional a tu experiencia de juego. Participar en torneos te brinda la oportunidad de competir con otros jugadores por premios en efectivo y otros premios emocionantes. Los torneos pueden abarcar una variedad de juegos, desde tragamonedas hasta apuestas deportivas, y ofrecen una oportunidad adicional para ganar.
Promociones con Codigos (Promocodes): Los codigos promocionales exclusivos son una caracteristica emocionante en 1win. Estos codigos pueden desbloquear bonificaciones adicionales, giros gratis y otras recompensas especiales.
En 1win, la diversidad de bonificaciones y promociones garantiza que siempre haya algo emocionante esperandote.
Como Aprovechar al Maximo las Bonificaciones
Las bonificaciones en 1win ofrecen una oportunidad excepcional para aumentar tus ganancias y prolongar tu experiencia de juego en linea. Una de las bonificaciones mas destacadas es el emocionante bono de bienvenida:
Registrate en 1win y proporciona informacion precisa y completa.
Realiza tu primer deposito, ya que el bono se distribuye en los primeros cuatro depositos.
Reclama tu bono, que se acreditara automaticamente en tu cuenta.
Cumple con los requisitos de apuesta, que indican la cantidad de dinero que debes apostar antes de retirar las ganancias.
Explora y juega en una amplia gama de juegos, como tragamonedas o apuestas deportivas, para aumentar tus posibilidades de ganar.
El bono de bienvenida en 1win es una emocionante ventaja para comenzar tu experiencia de juego en linea. Sigue estos pasos y disfruta al maximo de tu bono en una de las principales plataformas de apuestas en linea de Mexico.
Codigos Promocionales en 1win
Los codigos promocionales en 1win son una forma emocionante de aumentar tus oportunidades de ganar y aprovechar al maximo tu experiencia de juego. Estos codigos se pueden encontrar en varios lugares, lo que te brinda la posibilidad de desbloquear bonificaciones adicionales y ofertas exclusivas.
Muchos sitios web tematicos y portales dedicados a los juegos de azar ofrecen codigos promocionales de 1win. Estos codigos se actualizan regularmente y pueden proporcionarte bonificaciones unicas. Visita estos sitios y busca los codigos promocionales mas recientes.
Las redes sociales, como Facebook, Twitter e Instagram, son otra fuente donde puedes encontrar codigos promocionales. 1win a menudo publica codigos en sus perfiles sociales. Asegurate de seguir sus cuentas y estar atento a las publicaciones para no perderte ninguna oferta especial.
Si estas registrado en 1win y has aceptado recibir correos electronicos promocionales, es posible que recibas codigos promocionales exclusivos en tu bandeja de entrada. Estos codigos pueden ofrecer bonificaciones personalizadas segun tu historial de juego.
Una vez que tengas un codigo promocional, sigue estos sencillos pasos para activarlo:
Inicia sesion en tu cuenta de 1win.
Dirigete a la seccion de “Cuenta” o “Promociones” en tu perfil.
Ingresa el codigo promocional en el campo designado.
Confirma la activacion del codigo.
?Listo! Tu bonificacion se aplicara automaticamente a tu cuenta.
Asegurate de leer los terminos y condiciones asociados con cada codigo promocional para comprender completamente las bonificaciones y los requisitos de apuesta.
Beneficios de Utilizar Bonos y Codigos Promocionales
El uso de bonos y codigos promocionales en 1win ofrece una serie de beneficios que mejoran significativamente la experiencia de juego en linea:
Aumento del Saldo: Los bonos y codigos promocionales aumentan tu saldo, lo que te permite jugar mas y disfrutar de una mayor variedad de juegos sin invertir mas dinero de tu bolsillo.
Mas Oportunidades de Ganar: Con un saldo adicional, tienes mas oportunidades de ganar premios en efectivo y otros premios en los juegos de 1win. Esto aumenta la emocion y la diversion.
Menos Riesgo: Los bonos y codigos promocionales te permiten apostar con menos riesgo, ya que estas utilizando fondos de bonificacion. Esto significa que puedes probar nuevos juegos o estrategias sin preocuparte tanto por las perdidas.
Acceso a Ofertas Exclusivas: Al utilizar codigos promocionales, a menudo puedes acceder a ofertas exclusivas que no estan disponibles para otros jugadores. Estas ofertas pueden incluir giros gratis, bonos de recarga y mas.
Mayor Tiempo de Juego: Con mas fondos a tu disposicion, puedes disfrutar de una experiencia de juego mas prolongada, lo que agrega diversion y emocion a tu tiempo en 1win.
Exploracion de Juegos: Utilizar bonos y codigos promocionales te brinda la oportunidad de explorar nuevos juegos y actividades en el sitio sin incurrir en gastos adicionales.
En resumen, los bonos y codigos promocionales en 1win no solo te brindan beneficios tangibles en terminos de saldo adicional y oportunidades de ganar, sino que tambien mejoran tu experiencia de juego en general. Aprovecha estas ofertas especiales para disfrutar al maximo de tu tiempo en 1win y maximizar tus posibilidades de exito. Obten descuentos adicionales con un codigo descuento 1Win
1win es una plataforma de apuestas en linea que ofrece una amplia variedad de opciones de apuestas deportivas y juegos de casino. La pagina web es facil de navegar y tiene un diseno moderno y atractivo. En cuanto a las apuestas deportivas, 1win ofrece una amplia variedad de deportes para apostar, desde los mas populares como el futbol y el baloncesto hasta deportes menos conocidos como el badminton y el rugby. Ademas, la plataforma ofrece una gran cantidad de mercados de apuestas para cada evento deportivo, lo que permite a los usuarios personalizar sus apuestas de acuerdo a sus preferencias. En cuanto a los juegos de casino, 1win ofrece una amplia variedad de opciones, desde tragamonedas hasta juegos de mesa como el blackjack y la ruleta. Los juegos son de alta calidad y estan disenados por algunos de los principales proveedores de software de casino. La plataforma tambien ofrece una amplia variedad de metodos de pago, incluyendo tarjetas de credito, billeteras electronicas y criptomonedas. Ademas, el sitio web esta disponible en varios idiomas, lo que lo hace accesible para usuarios de todo el mundo. En general, 1win es una plataforma de apuestas en linea solida y confiable que ofrece una amplia variedad de opciones de apuestas deportivas y juegos de casino.
Codigo promocional 1Win son canjeados desde su registro y utilizados en los juegos. Aplica el codigo 937999 y recibe ganancias al apostar. El codigo de promocion 2024 te regala un paquete de bienvenida del 500% con los cuatro primeros depositos hasta $700 en apuestas deportivas y casino. El codigo 1win de bono debe ser ingresado en el formulario de registro.
Si esta buscando una forma de maximizar sus ganancias en apuestas deportivas, no se pierda el codigo de promocion y el bono de bienvenida 1Win en 024]. Con el codigo de promocion 1Win puedes recibir ofertas exclusivas y apuestas gratis para disfrutar aun mas de tus juegos favoritos. Ademas, el bono de bienvenida 1Win es una gran oportunidad para aumentar sus ganancias y tener una experiencia de apuestas aun mas emocionante.
Bonificacion 1win – 937999
Como activo el vale en 1win?
Durante el proceso de registro se introduce un codigo promocional de la casa de apuestas 1win. El campo “Anadir codigo promocional” estara disponible para cualquier metodo de creacion de cuenta que elija. Tenga en cuenta que este campo es opcional en la fase de registro, asi que tenga cuidado al introducirlo. Si se olvida de hacerlo al registrarse, no podra activar su codigo en 1win y el bono de bienvenida dejara de estar disponible.
Tendras que recargar tu cuenta para poder utilizar el codigo promocional en el futuro. Una vez que haya introducido el codigo promocional durante el registro, vaya a su gabinete personal a traves del icono de usuario y haga clic en “Depositar”. Tomemos como ejemplo el codigo promocional “937999”, que corresponde a 200 euros.
Caracteristicas del bono 1win
El codigo promocional es proporcionado por representantes de la oficina de la casa de apuestas 1win. Lo hacen en varias ocasiones: durante una promocion, un dia festivo importante, el cumpleanos de un usuario, para volver a captar a un jugador que ha estado jugando durante un tiempo y ha dejado de estar activo.
Si introdujiste un codigo promocional al registrarte, veras los fondos de bonificacion en cuanto inicies sesion en tu perfil. Y si te lo dieron personalmente, deberas aceptar participar en la promocion para poder utilizarlo. Estos fondos se abonan en tu cuenta de bonificacion, y podras ver el importe en tu perfil personal. Si respeta las normas de uso de los fondos de bonificacion, podra convertirlos gradualmente en dinero en efectivo, que recibira ademas de sus ganancias.
?Que tan confiable es apostar en 1win?
Apostar en 1win es 100% confiable. 1win nacio en 2016, con el nombre de MFI Investments Limited, quienes estan registrados con el numero de licencia 8048/JAZ2018-040, otorgada por la Comision de Juegos eGaming.
Ademas, cuenta con alianzas comerciales con diferentes equipos y ligas, como la UEFA, UFC, NHL, FIFA y mas.
8. Opiniones 1win Casino 2024
1win casino es una excelente opcion para comenzar a apostar, ademas de que cuentas con el regalo para registrarte con el codigo promocional 937999. Podras tener tu cuenta abierta en todos lados, tu celular y tu computadora tendran tu cuenta sincronizada.
Es un sitio seguro, con numero de registro y sistemas de pago legales afiliados. Podras apostar con cualquier metodo de pago en mas de 50 deportes diferentes y cientos de juegos de casino. 1win es recomendable y esta lleno de diversion.
9. FAQ: 1win Codigo Promocional
9.1 ?? ?1win es un sitio seguro?
1win es un sitio seguro, esta avalado por la comision de juego eGaming. Sus metodos de pago son conocidos y de fiar, cada uno de ellos. Ademas, tambien de tener soporte tecnico las 24 horas ante cualquier duda.
9.2 ?? ?Hay bono de bienvenida de 1win?
Si existe, y para obtener este bono de bienvenida de 1win, necesitaras el codigo de bienvenida 937999, tendras que registrarte en 1win con este codigo y realizar tu primer deposito.
9.3 ?? ?Cual es el codigo de bono 1win?
El codigo promocional 1win es 937999, registrate y comienza a disfrutar de tu bono.
semaglutide ozempic
Play with confidence at our Mexican online casino. With fair play guaranteed and transparent policies, you can trust that every game is as thrilling as the last. casino online este es tu futuro.
Bonos y codigos promocionales 1win
1win es una plataforma de apuestas en linea reconocida por su compromiso de brindar a los jugadores una experiencia de juego unica y emocionante. Ya sea que te apasione el deporte, los juegos de casino o ambas opciones, 1win te ofrece una amplia gama de oportunidades para disfrutar y ganar.
Con bonificaciones y codigos promocionales exclusivos, 1 win se destaca como un destino lider para los entusiastas de las apuestas en linea. Desde bonos de bienvenida hasta promociones periodicas y ofertas exclusivas, descubriras como 1win se esfuerza por ofrecer a sus jugadores mexicanos oportunidades emocionantes para maximizar sus ganancias y ampliar su experiencia de juego.
Tipos de Bonificaciones en 1win
1win se destaca al ofrecer una amplia variedad de bonificaciones y promociones para satisfacer a jugadores de todas las preferencias:
Bonos de Bienvenida: Los nuevos jugadores son recibidos en 1win con un espectacular bono de bienvenida. Este bono se distribuye en los primeros cuatro depositos, lo que significa que tendras la oportunidad de aumentar significativamente tu saldo inicial. El bono de bienvenida puede alcanzar un impresionante 500% en total, con un limite de hasta 750 dolares.
Programa de Lealtad: En 1win, la lealtad de los jugadores es recompensada. El programa de lealtad de 1win ofrece a los jugadores la oportunidad de ascender en niveles y desbloquear recompensas exclusivas a medida que juegan mas y disfrutan de los juegos en la plataforma.
Cashback (Reembolso): El cashback es una caracteristica unica en 1win que te permite recibir un reembolso de una parte de tus perdidas en apuestas. Este beneficio es una forma de asegurarte de que, incluso si no tienes suerte en una apuesta en particular, aun obtendras algo a cambio.
Torneos: Los torneos en 1win anaden emocion adicional a tu experiencia de juego. Participar en torneos te brinda la oportunidad de competir con otros jugadores por premios en efectivo y otros premios emocionantes. Los torneos pueden abarcar una variedad de juegos, desde tragamonedas hasta apuestas deportivas, y ofrecen una oportunidad adicional para ganar.
Promociones con Codigos (Promocodes): Los codigos promocionales exclusivos son una caracteristica emocionante en 1win. Estos codigos pueden desbloquear bonificaciones adicionales, giros gratis y otras recompensas especiales.
En 1win, la diversidad de bonificaciones y promociones garantiza que siempre haya algo emocionante esperandote.
Como Aprovechar al Maximo las Bonificaciones
Las bonificaciones en 1win ofrecen una oportunidad excepcional para aumentar tus ganancias y prolongar tu experiencia de juego en linea. Una de las bonificaciones mas destacadas es el emocionante bono de bienvenida:
Registrate en 1win y proporciona informacion precisa y completa.
Realiza tu primer deposito, ya que el bono se distribuye en los primeros cuatro depositos.
Reclama tu bono, que se acreditara automaticamente en tu cuenta.
Cumple con los requisitos de apuesta, que indican la cantidad de dinero que debes apostar antes de retirar las ganancias.
Explora y juega en una amplia gama de juegos, como tragamonedas o apuestas deportivas, para aumentar tus posibilidades de ganar.
El bono de bienvenida en 1win es una emocionante ventaja para comenzar tu experiencia de juego en linea. Sigue estos pasos y disfruta al maximo de tu bono en una de las principales plataformas de apuestas en linea de Mexico.
Codigos Promocionales en 1win
Los codigos promocionales en 1win son una forma emocionante de aumentar tus oportunidades de ganar y aprovechar al maximo tu experiencia de juego. Estos codigos se pueden encontrar en varios lugares, lo que te brinda la posibilidad de desbloquear bonificaciones adicionales y ofertas exclusivas.
Muchos sitios web tematicos y portales dedicados a los juegos de azar ofrecen codigos promocionales de 1win. Estos codigos se actualizan regularmente y pueden proporcionarte bonificaciones unicas. Visita estos sitios y busca los codigos promocionales mas recientes.
Las redes sociales, como Facebook, Twitter e Instagram, son otra fuente donde puedes encontrar codigos promocionales. 1win a menudo publica codigos en sus perfiles sociales. Asegurate de seguir sus cuentas y estar atento a las publicaciones para no perderte ninguna oferta especial.
Si estas registrado en 1win y has aceptado recibir correos electronicos promocionales, es posible que recibas codigos promocionales exclusivos en tu bandeja de entrada. Estos codigos pueden ofrecer bonificaciones personalizadas segun tu historial de juego.
Una vez que tengas un codigo promocional, sigue estos sencillos pasos para activarlo:
Inicia sesion en tu cuenta de 1win.
Dirigete a la seccion de “Cuenta” o “Promociones” en tu perfil.
Ingresa el codigo promocional en el campo designado.
Confirma la activacion del codigo.
?Listo! Tu bonificacion se aplicara automaticamente a tu cuenta.
Asegurate de leer los terminos y condiciones asociados con cada codigo promocional para comprender completamente las bonificaciones y los requisitos de apuesta.
Beneficios de Utilizar Bonos y Codigos Promocionales
El uso de bonos y codigos promocionales en 1win ofrece una serie de beneficios que mejoran significativamente la experiencia de juego en linea:
Aumento del Saldo: Los bonos y codigos promocionales aumentan tu saldo, lo que te permite jugar mas y disfrutar de una mayor variedad de juegos sin invertir mas dinero de tu bolsillo.
Mas Oportunidades de Ganar: Con un saldo adicional, tienes mas oportunidades de ganar premios en efectivo y otros premios en los juegos de 1win. Esto aumenta la emocion y la diversion.
Menos Riesgo: Los bonos y codigos promocionales te permiten apostar con menos riesgo, ya que estas utilizando fondos de bonificacion. Esto significa que puedes probar nuevos juegos o estrategias sin preocuparte tanto por las perdidas.
Acceso a Ofertas Exclusivas: Al utilizar codigos promocionales, a menudo puedes acceder a ofertas exclusivas que no estan disponibles para otros jugadores. Estas ofertas pueden incluir giros gratis, bonos de recarga y mas.
Mayor Tiempo de Juego: Con mas fondos a tu disposicion, puedes disfrutar de una experiencia de juego mas prolongada, lo que agrega diversion y emocion a tu tiempo en 1win.
Exploracion de Juegos: Utilizar bonos y codigos promocionales te brinda la oportunidad de explorar nuevos juegos y actividades en el sitio sin incurrir en gastos adicionales.
En resumen, los bonos y codigos promocionales en 1win no solo te brindan beneficios tangibles en terminos de saldo adicional y oportunidades de ganar, sino que tambien mejoran tu experiencia de juego en general. Aprovecha estas ofertas especiales para disfrutar al maximo de tu tiempo en 1win y maximizar tus posibilidades de exito. Obten descuentos adicionales con un codigo descuento 1Win
1win es una plataforma de apuestas en linea que ofrece una amplia variedad de opciones de apuestas deportivas y juegos de casino. La pagina web es facil de navegar y tiene un diseno moderno y atractivo. En cuanto a las apuestas deportivas, 1win ofrece una amplia variedad de deportes para apostar, desde los mas populares como el futbol y el baloncesto hasta deportes menos conocidos como el badminton y el rugby. Ademas, la plataforma ofrece una gran cantidad de mercados de apuestas para cada evento deportivo, lo que permite a los usuarios personalizar sus apuestas de acuerdo a sus preferencias. En cuanto a los juegos de casino, 1win ofrece una amplia variedad de opciones, desde tragamonedas hasta juegos de mesa como el blackjack y la ruleta. Los juegos son de alta calidad y estan disenados por algunos de los principales proveedores de software de casino. La plataforma tambien ofrece una amplia variedad de metodos de pago, incluyendo tarjetas de credito, billeteras electronicas y criptomonedas. Ademas, el sitio web esta disponible en varios idiomas, lo que lo hace accesible para usuarios de todo el mundo. En general, 1win es una plataforma de apuestas en linea solida y confiable que ofrece una amplia variedad de opciones de apuestas deportivas y juegos de casino.
Codigo promocional 1Win son canjeados desde su registro y utilizados en los juegos. Aplica el codigo 937999 y recibe ganancias al apostar. El codigo de promocion 2024 te regala un paquete de bienvenida del 500% con los cuatro primeros depositos hasta $700 en apuestas deportivas y casino. El codigo 1win de bono debe ser ingresado en el formulario de registro.
Si esta buscando una forma de maximizar sus ganancias en apuestas deportivas, no se pierda el codigo de promocion y el bono de bienvenida 1Win en 024]. Con el codigo de promocion 1Win puedes recibir ofertas exclusivas y apuestas gratis para disfrutar aun mas de tus juegos favoritos. Ademas, el bono de bienvenida 1Win es una gran oportunidad para aumentar sus ganancias y tener una experiencia de apuestas aun mas emocionante.
Bonificacion 1win – 937999
Como activo el vale en 1win?
Durante el proceso de registro se introduce un codigo promocional de la casa de apuestas 1win. El campo “Anadir codigo promocional” estara disponible para cualquier metodo de creacion de cuenta que elija. Tenga en cuenta que este campo es opcional en la fase de registro, asi que tenga cuidado al introducirlo. Si se olvida de hacerlo al registrarse, no podra activar su codigo en 1win y el bono de bienvenida dejara de estar disponible.
Tendras que recargar tu cuenta para poder utilizar el codigo promocional en el futuro. Una vez que haya introducido el codigo promocional durante el registro, vaya a su gabinete personal a traves del icono de usuario y haga clic en “Depositar”. Tomemos como ejemplo el codigo promocional “937999”, que corresponde a 200 euros.
Caracteristicas del bono 1win
El codigo promocional es proporcionado por representantes de la oficina de la casa de apuestas 1win. Lo hacen en varias ocasiones: durante una promocion, un dia festivo importante, el cumpleanos de un usuario, para volver a captar a un jugador que ha estado jugando durante un tiempo y ha dejado de estar activo.
Si introdujiste un codigo promocional al registrarte, veras los fondos de bonificacion en cuanto inicies sesion en tu perfil. Y si te lo dieron personalmente, deberas aceptar participar en la promocion para poder utilizarlo. Estos fondos se abonan en tu cuenta de bonificacion, y podras ver el importe en tu perfil personal. Si respeta las normas de uso de los fondos de bonificacion, podra convertirlos gradualmente en dinero en efectivo, que recibira ademas de sus ganancias.
?Que tan confiable es apostar en 1win?
Apostar en 1win es 100% confiable. 1win nacio en 2016, con el nombre de MFI Investments Limited, quienes estan registrados con el numero de licencia 8048/JAZ2018-040, otorgada por la Comision de Juegos eGaming.
Ademas, cuenta con alianzas comerciales con diferentes equipos y ligas, como la UEFA, UFC, NHL, FIFA y mas.
8. Opiniones 1win Casino 2024
1win casino es una excelente opcion para comenzar a apostar, ademas de que cuentas con el regalo para registrarte con el codigo promocional 937999. Podras tener tu cuenta abierta en todos lados, tu celular y tu computadora tendran tu cuenta sincronizada.
Es un sitio seguro, con numero de registro y sistemas de pago legales afiliados. Podras apostar con cualquier metodo de pago en mas de 50 deportes diferentes y cientos de juegos de casino. 1win es recomendable y esta lleno de diversion.
9. FAQ: 1win Codigo Promocional
9.1 ?? ?1win es un sitio seguro?
1win es un sitio seguro, esta avalado por la comision de juego eGaming. Sus metodos de pago son conocidos y de fiar, cada uno de ellos. Ademas, tambien de tener soporte tecnico las 24 horas ante cualquier duda.
9.2 ?? ?Hay bono de bienvenida de 1win?
Si existe, y para obtener este bono de bienvenida de 1win, necesitaras el codigo de bienvenida 937999, tendras que registrarte en 1win con este codigo y realizar tu primer deposito.
9.3 ?? ?Cual es el codigo de bono 1win?
El codigo promocional 1win es 937999, registrate y comienza a disfrutar de tu bono.
rybelsus canada
1Win Приветственный Бонус (2024)
Промокод 1Вин: 937999. При первом депозите вы получите бонус в размере 500% до 200 000 рублей на свой счет. Чтобы получить денежные вознаграждения для спорта и казино, необходимо использовать специальный бонусный промокод 1win.
Для новых клиентов компания 1win предлагает приветственный бонус в размере 500% от суммы депозита, который не должен превышать 15,000 рублей. Чтобы вывести бонусные средства, их необходимо сначала отыграть. Бонусные 500% разделены на 4 депозита.
Порядок получения бонуса:
1. Первый депозит – 200% от суммы депозита;
2. Второй депозит – 150% от суммы второго депозита;
3. Третий депозит – 100% от суммы;
4. Четвертый депозит – 50% от суммы.
Таким образом, бонусы можно получить четыре раза, но следует учесть, что существуют особые правила и сроки отыгрыша бонусного счета. Максимальная сумма бонусных средств составляет 200,000 рублей, а бонус на один депозит – 50,000 рублей.
Промокод на 1Win – 937999 предоставляет бонус на первые 4 депозита, который может достигать 500% до 200 000 рублей. Если вы ввели промокод при регистрации, то бонусные средства будут отображаться в вашем профиле сразу же после входа. Если же вам промокод был предоставлен лично, то для его активации необходимо дать согласие на участие в акции.
После регистрации и ввода промокода 1вин для пополнения счета и получения приветственного бонуса, вы можете начать играть. Однако, вы не сможете сразу вывести бонусные средства – сначала их нужно отыграть.
Для этого необходимо делать ставки с коэффициентом от 3. В случае выигрыша, вы получите 5% от бонусного счета на свой основной счет.
Давайте рассмотрим это на примере:
Вы внесли депозит в размере 10 000 рублей на свой счет в 1win. На бонусный счет поступило 200% от суммы депозита, то есть 20 000 рублей;
Затем вы сделали ставку с коэффициентом 3, и в случае выигрыша получили 30 000 рублей от ставки плюс 500 рублей (5% от бонусного счета). Теперь ваш счет составляет 30 500 рублей, а бонусный счет – 19 500 рублей.
Таким образом, вы отыграли 500 рублей. Продолжая делать ставки, вы сможете отыграть всю сумму бонуса.
Отыгранные средства становятся доступными для вывода сразу же.
Обратите внимание, что ставки с коэффициентом менее 3 не будут учтены при отыгрыше бонуса.
Кроме того, что БК предоставляет приветственный промокод 1win при пополнении баланса, она также предлагает своим игрокам другие бонусы и акции. Доступные предложения подойдут как для любителей казино, так и для тех игроков, которым нравится собирать экспрессы. В следующем разделе мы подробно рассмотрим каждую из актуальных на данный момент акций.
Бездепозитный Бонус 1win 2024
Бонусы от казино 1Win 2024 – Бездепозитные бонусы ? Коды на возврат денег ? VIP Программа лояльности ? Бесплатные фриспины.
Промокод 1Win казино: 937999 предоставляет новым игрокам бонус 500% для игры в слоты и игровые автоматы, максимальная сумма бонуса 200 000 рублей. Вы можете использовать бонусные деньги в разделе азартных игр, включая онлайн казино, карты, рулетку, игровые автоматы и слоты.
Компания «1Win» рада предложить своим новым клиентам приветственный бонус в размере до 500% на первые четыре депозита. Это выгодное предложение доступно сразу после регистрации в нашей букмекерской конторе. Бонус можно получить не только в рублях, но и в других валютах, при этом он не ограничивает возможность участия игроков в других программам лояльности компании. Максимальная сумма вознаграждения за регистрацию составляет 75000 рублей или эквивалентная сумма в другой валюте.
Бонусы в 1win приносят игрокам множество преимуществ. Во-первых, они позволяют увеличить начальную ставку или продлить время игры. Кроме того, они дают возможность попробовать различные игры без риска потерять реальные деньги. Бонусы также повышают шансы на выигрыш и предоставляют дополнительные возможности для получения прибыли. Кроме того, бонусы в 1win могут быть обменены на реальные деньги или использованы для участия в специальных акциях и турнирах.
Преимущества получения и использования бонусов в 1win очевидны. Они позволяют игроку расширить свои возможности и получить больше удовольствия от игры. Бонусы также делают игру более выгодной с финансовой точки зрения, помогая уменьшить риски и увеличить потенциальную прибыль. Кроме того, получение и использование бонусов в 1win открывает возможность стать лояльным клиентом и получить дополнительные привилегии и вознаграждения от казино.
Итак, получение бонусов в 1win – это отличная возможность для игрока увеличить свои шансы на выигрыш, получить дополнительные деньги и улучшить свой игровой опыт. Бонусы делают игру более интересной и выгодной.
Промокод 1Win: 937999 предоставляет возможность получить бездепозитный бонус 2024. Его можно получить в виде фриспинов или фрибетов. Чтобы получить подарок, необходимо активировать код в личном кабинете. Дополнительный депозит не требуется. Размеры подарков невелики: фрибет до 500 рублей и не более 70 фриспинов для игры в слоты. Как и в случае с другими поощрениями, необходимо отыграть бездепозитный бонус. Вейджер, как правило, не превышает х5 для бесплатных ставок и х30 для фриспинов.
В казино 1win предоставляется внушительный бонус при регистрации, который составляет 500% от суммы первых четырех последовательных депозитов клиента. С таким количеством бонусов новичок может значительно увеличить свои шансы на выигрыш. Чтобы получить этот приветственный бонус, необходимо зарегистрироваться на официальном сайте, рабочем зеркале, мобильной версии или приложениях для мобильных телефонов. Однако, основным условием является совершение первого пополнения счета, так как активировать бонусы 1win можно только после этого.
1Win промокод на фриспины: 937999 используйте бонусный код при регистрации и получите бездепозтный бонус 70 фриспинов. Да, при использовании кода 1Win вы можете получить различные поощрения, включая бездепозитные бонусы. Они обычно представлены в виде фрибетов или фриспинов. Для их активации не требуется дополнительное пополнение счета. Размер таких подарков невелик: бесплатных вращений не более 70. Вейджер на бездепозитный бонус обычно не превышает х35. В 1Win вы можете получить бонусы за участие в акциях, турнирах, розыгрышах и активацию промокода. Бонусная программа периодически обновляется. Кроме того, некоторые акции имеют сезонный характер.
В 1Win основная бонусная программа включает в себя фриспины. Чтобы получить 70FS, необходимо пополнить счет на 100 рублей или более. Игроку предоставляется 2 дня с момента регистрации для активации презента. Отыгрыш бонуса должен быть выполнен в течение 24 часов с момента начисления, с вейджером х35. Бесплатные вращения предназначены только для игр провайдера Microgaming.
Так как бонусная программа 1Win регулярно обновляется, список акций, в которых можно получить фриспины, постоянно расширяется. Более подробную информацию о них можно найти на нашем сайте.
Промокод на 1Win дает возможность получить бесплатные вращения. Их можно использовать в любых слотах из каталога казино. Иногда могут быть установлены ограничения, которые предусматривают использование фриспинов только в определенных слотах или играх конкретного провайдера. Фриспины начисляются с фиксированной ставкой. Отыгрыш выигрыша, полученного с помощью бесплатных вращений, обязателен с учетом установленного вейджера.
Bonos y codigos promocionales 1win
1win es una plataforma de apuestas en linea reconocida por su compromiso de brindar a los jugadores una experiencia de juego unica y emocionante. Ya sea que te apasione el deporte, los juegos de casino o ambas opciones, 1win te ofrece una amplia gama de oportunidades para disfrutar y ganar.
Con bonificaciones y codigos promocionales exclusivos, 1 win se destaca como un destino lider para los entusiastas de las apuestas en linea. Desde bonos de bienvenida hasta promociones periodicas y ofertas exclusivas, descubriras como 1win se esfuerza por ofrecer a sus jugadores mexicanos oportunidades emocionantes para maximizar sus ganancias y ampliar su experiencia de juego.
Tipos de Bonificaciones en 1win
1win se destaca al ofrecer una amplia variedad de bonificaciones y promociones para satisfacer a jugadores de todas las preferencias:
Bonos de Bienvenida: Los nuevos jugadores son recibidos en 1win con un espectacular bono de bienvenida. Este bono se distribuye en los primeros cuatro depositos, lo que significa que tendras la oportunidad de aumentar significativamente tu saldo inicial. El bono de bienvenida puede alcanzar un impresionante 500% en total, con un limite de hasta 750 dolares.
Programa de Lealtad: En 1win, la lealtad de los jugadores es recompensada. El programa de lealtad de 1win ofrece a los jugadores la oportunidad de ascender en niveles y desbloquear recompensas exclusivas a medida que juegan mas y disfrutan de los juegos en la plataforma.
Cashback (Reembolso): El cashback es una caracteristica unica en 1win que te permite recibir un reembolso de una parte de tus perdidas en apuestas. Este beneficio es una forma de asegurarte de que, incluso si no tienes suerte en una apuesta en particular, aun obtendras algo a cambio.
Torneos: Los torneos en 1win anaden emocion adicional a tu experiencia de juego. Participar en torneos te brinda la oportunidad de competir con otros jugadores por premios en efectivo y otros premios emocionantes. Los torneos pueden abarcar una variedad de juegos, desde tragamonedas hasta apuestas deportivas, y ofrecen una oportunidad adicional para ganar.
Promociones con Codigos (Promocodes): Los codigos promocionales exclusivos son una caracteristica emocionante en 1win. Estos codigos pueden desbloquear bonificaciones adicionales, giros gratis y otras recompensas especiales.
En 1win, la diversidad de bonificaciones y promociones garantiza que siempre haya algo emocionante esperandote.
Como Aprovechar al Maximo las Bonificaciones
Las bonificaciones en 1win ofrecen una oportunidad excepcional para aumentar tus ganancias y prolongar tu experiencia de juego en linea. Una de las bonificaciones mas destacadas es el emocionante bono de bienvenida:
Registrate en 1win y proporciona informacion precisa y completa.
Realiza tu primer deposito, ya que el bono se distribuye en los primeros cuatro depositos.
Reclama tu bono, que se acreditara automaticamente en tu cuenta.
Cumple con los requisitos de apuesta, que indican la cantidad de dinero que debes apostar antes de retirar las ganancias.
Explora y juega en una amplia gama de juegos, como tragamonedas o apuestas deportivas, para aumentar tus posibilidades de ganar.
El bono de bienvenida en 1win es una emocionante ventaja para comenzar tu experiencia de juego en linea. Sigue estos pasos y disfruta al maximo de tu bono en una de las principales plataformas de apuestas en linea de Mexico.
Codigos Promocionales en 1win
Los codigos promocionales en 1win son una forma emocionante de aumentar tus oportunidades de ganar y aprovechar al maximo tu experiencia de juego. Estos codigos se pueden encontrar en varios lugares, lo que te brinda la posibilidad de desbloquear bonificaciones adicionales y ofertas exclusivas.
Muchos sitios web tematicos y portales dedicados a los juegos de azar ofrecen codigos promocionales de 1win. Estos codigos se actualizan regularmente y pueden proporcionarte bonificaciones unicas. Visita estos sitios y busca los codigos promocionales mas recientes.
Las redes sociales, como Facebook, Twitter e Instagram, son otra fuente donde puedes encontrar codigos promocionales. 1win a menudo publica codigos en sus perfiles sociales. Asegurate de seguir sus cuentas y estar atento a las publicaciones para no perderte ninguna oferta especial.
Si estas registrado en 1win y has aceptado recibir correos electronicos promocionales, es posible que recibas codigos promocionales exclusivos en tu bandeja de entrada. Estos codigos pueden ofrecer bonificaciones personalizadas segun tu historial de juego.
Una vez que tengas un codigo promocional, sigue estos sencillos pasos para activarlo:
Inicia sesion en tu cuenta de 1win.
Dirigete a la seccion de “Cuenta” o “Promociones” en tu perfil.
Ingresa el codigo promocional en el campo designado.
Confirma la activacion del codigo.
?Listo! Tu bonificacion se aplicara automaticamente a tu cuenta.
Asegurate de leer los terminos y condiciones asociados con cada codigo promocional para comprender completamente las bonificaciones y los requisitos de apuesta.
Beneficios de Utilizar Bonos y Codigos Promocionales
El uso de bonos y codigos promocionales en 1win ofrece una serie de beneficios que mejoran significativamente la experiencia de juego en linea:
Aumento del Saldo: Los bonos y codigos promocionales aumentan tu saldo, lo que te permite jugar mas y disfrutar de una mayor variedad de juegos sin invertir mas dinero de tu bolsillo.
Mas Oportunidades de Ganar: Con un saldo adicional, tienes mas oportunidades de ganar premios en efectivo y otros premios en los juegos de 1win. Esto aumenta la emocion y la diversion.
Menos Riesgo: Los bonos y codigos promocionales te permiten apostar con menos riesgo, ya que estas utilizando fondos de bonificacion. Esto significa que puedes probar nuevos juegos o estrategias sin preocuparte tanto por las perdidas.
Acceso a Ofertas Exclusivas: Al utilizar codigos promocionales, a menudo puedes acceder a ofertas exclusivas que no estan disponibles para otros jugadores. Estas ofertas pueden incluir giros gratis, bonos de recarga y mas.
Mayor Tiempo de Juego: Con mas fondos a tu disposicion, puedes disfrutar de una experiencia de juego mas prolongada, lo que agrega diversion y emocion a tu tiempo en 1win.
Exploracion de Juegos: Utilizar bonos y codigos promocionales te brinda la oportunidad de explorar nuevos juegos y actividades en el sitio sin incurrir en gastos adicionales.
En resumen, los bonos y codigos promocionales en 1win no solo te brindan beneficios tangibles en terminos de saldo adicional y oportunidades de ganar, sino que tambien mejoran tu experiencia de juego en general. Aprovecha estas ofertas especiales para disfrutar al maximo de tu tiempo en 1win y maximizar tus posibilidades de exito. Obten descuentos adicionales con un codigo descuento 1Win
1win es una plataforma de apuestas en linea que ofrece una amplia variedad de opciones de apuestas deportivas y juegos de casino. La pagina web es facil de navegar y tiene un diseno moderno y atractivo. En cuanto a las apuestas deportivas, 1win ofrece una amplia variedad de deportes para apostar, desde los mas populares como el futbol y el baloncesto hasta deportes menos conocidos como el badminton y el rugby. Ademas, la plataforma ofrece una gran cantidad de mercados de apuestas para cada evento deportivo, lo que permite a los usuarios personalizar sus apuestas de acuerdo a sus preferencias. En cuanto a los juegos de casino, 1win ofrece una amplia variedad de opciones, desde tragamonedas hasta juegos de mesa como el blackjack y la ruleta. Los juegos son de alta calidad y estan disenados por algunos de los principales proveedores de software de casino. La plataforma tambien ofrece una amplia variedad de metodos de pago, incluyendo tarjetas de credito, billeteras electronicas y criptomonedas. Ademas, el sitio web esta disponible en varios idiomas, lo que lo hace accesible para usuarios de todo el mundo. En general, 1win es una plataforma de apuestas en linea solida y confiable que ofrece una amplia variedad de opciones de apuestas deportivas y juegos de casino.
Codigo promocional 1Win son canjeados desde su registro y utilizados en los juegos. Aplica el codigo 937999 y recibe ganancias al apostar. El codigo de promocion 2024 te regala un paquete de bienvenida del 500% con los cuatro primeros depositos hasta $700 en apuestas deportivas y casino. El codigo 1win de bono debe ser ingresado en el formulario de registro.
Si esta buscando una forma de maximizar sus ganancias en apuestas deportivas, no se pierda el codigo de promocion y el bono de bienvenida 1Win en 024]. Con el codigo de promocion 1Win puedes recibir ofertas exclusivas y apuestas gratis para disfrutar aun mas de tus juegos favoritos. Ademas, el bono de bienvenida 1Win es una gran oportunidad para aumentar sus ganancias y tener una experiencia de apuestas aun mas emocionante.
Bonificacion 1win – 937999
Como activo el vale en 1win?
Durante el proceso de registro se introduce un codigo promocional de la casa de apuestas 1win. El campo “Anadir codigo promocional” estara disponible para cualquier metodo de creacion de cuenta que elija. Tenga en cuenta que este campo es opcional en la fase de registro, asi que tenga cuidado al introducirlo. Si se olvida de hacerlo al registrarse, no podra activar su codigo en 1win y el bono de bienvenida dejara de estar disponible.
Tendras que recargar tu cuenta para poder utilizar el codigo promocional en el futuro. Una vez que haya introducido el codigo promocional durante el registro, vaya a su gabinete personal a traves del icono de usuario y haga clic en “Depositar”. Tomemos como ejemplo el codigo promocional “937999”, que corresponde a 200 euros.
Caracteristicas del bono 1win
El codigo promocional es proporcionado por representantes de la oficina de la casa de apuestas 1win. Lo hacen en varias ocasiones: durante una promocion, un dia festivo importante, el cumpleanos de un usuario, para volver a captar a un jugador que ha estado jugando durante un tiempo y ha dejado de estar activo.
Si introdujiste un codigo promocional al registrarte, veras los fondos de bonificacion en cuanto inicies sesion en tu perfil. Y si te lo dieron personalmente, deberas aceptar participar en la promocion para poder utilizarlo. Estos fondos se abonan en tu cuenta de bonificacion, y podras ver el importe en tu perfil personal. Si respeta las normas de uso de los fondos de bonificacion, podra convertirlos gradualmente en dinero en efectivo, que recibira ademas de sus ganancias.
?Que tan confiable es apostar en 1win?
Apostar en 1win es 100% confiable. 1win nacio en 2016, con el nombre de MFI Investments Limited, quienes estan registrados con el numero de licencia 8048/JAZ2018-040, otorgada por la Comision de Juegos eGaming.
Ademas, cuenta con alianzas comerciales con diferentes equipos y ligas, como la UEFA, UFC, NHL, FIFA y mas.
8. Opiniones 1win Casino 2024
1win casino es una excelente opcion para comenzar a apostar, ademas de que cuentas con el regalo para registrarte con el codigo promocional 937999. Podras tener tu cuenta abierta en todos lados, tu celular y tu computadora tendran tu cuenta sincronizada.
Es un sitio seguro, con numero de registro y sistemas de pago legales afiliados. Podras apostar con cualquier metodo de pago en mas de 50 deportes diferentes y cientos de juegos de casino. 1win es recomendable y esta lleno de diversion.
9. FAQ: 1win Codigo Promocional
9.1 ?? ?1win es un sitio seguro?
1win es un sitio seguro, esta avalado por la comision de juego eGaming. Sus metodos de pago son conocidos y de fiar, cada uno de ellos. Ademas, tambien de tener soporte tecnico las 24 horas ante cualquier duda.
9.2 ?? ?Hay bono de bienvenida de 1win?
Si existe, y para obtener este bono de bienvenida de 1win, necesitaras el codigo de bienvenida 937999, tendras que registrarte en 1win con este codigo y realizar tu primer deposito.
9.3 ?? ?Cual es el codigo de bono 1win?
El codigo promocional 1win es 937999, registrate y comienza a disfrutar de tu bono.
purchase wegovy
Советую прочитать сайт про автостекла https://avtomaxi22.ru/
Также не забудьте добавить сайт в закладки: https://avtomaxi22.ru/
1Win Приветственный Бонус (2024)
Промокод 1Вин: 937999. При первом депозите вы получите бонус в размере 500% до 200 000 рублей на свой счет. Чтобы получить денежные вознаграждения для спорта и казино, необходимо использовать специальный бонусный промокод 1win.
Для новых клиентов компания 1win предлагает приветственный бонус в размере 500% от суммы депозита, который не должен превышать 15,000 рублей. Чтобы вывести бонусные средства, их необходимо сначала отыграть. Бонусные 500% разделены на 4 депозита.
Порядок получения бонуса:
1. Первый депозит – 200% от суммы депозита;
2. Второй депозит – 150% от суммы второго депозита;
3. Третий депозит – 100% от суммы;
4. Четвертый депозит – 50% от суммы.
Таким образом, бонусы можно получить четыре раза, но следует учесть, что существуют особые правила и сроки отыгрыша бонусного счета. Максимальная сумма бонусных средств составляет 200,000 рублей, а бонус на один депозит – 50,000 рублей.
Промокод на 1Win – 937999 предоставляет бонус на первые 4 депозита, который может достигать 500% до 200 000 рублей. Если вы ввели промокод при регистрации, то бонусные средства будут отображаться в вашем профиле сразу же после входа. Если же вам промокод был предоставлен лично, то для его активации необходимо дать согласие на участие в акции.
После регистрации и ввода промокода 1вин для пополнения счета и получения приветственного бонуса, вы можете начать играть. Однако, вы не сможете сразу вывести бонусные средства – сначала их нужно отыграть.
Для этого необходимо делать ставки с коэффициентом от 3. В случае выигрыша, вы получите 5% от бонусного счета на свой основной счет.
Давайте рассмотрим это на примере:
Вы внесли депозит в размере 10 000 рублей на свой счет в 1win. На бонусный счет поступило 200% от суммы депозита, то есть 20 000 рублей;
Затем вы сделали ставку с коэффициентом 3, и в случае выигрыша получили 30 000 рублей от ставки плюс 500 рублей (5% от бонусного счета). Теперь ваш счет составляет 30 500 рублей, а бонусный счет – 19 500 рублей.
Таким образом, вы отыграли 500 рублей. Продолжая делать ставки, вы сможете отыграть всю сумму бонуса.
Отыгранные средства становятся доступными для вывода сразу же.
Обратите внимание, что ставки с коэффициентом менее 3 не будут учтены при отыгрыше бонуса.
Кроме того, что БК предоставляет приветственный промокод 1win при пополнении баланса, она также предлагает своим игрокам другие бонусы и акции. Доступные предложения подойдут как для любителей казино, так и для тех игроков, которым нравится собирать экспрессы. В следующем разделе мы подробно рассмотрим каждую из актуальных на данный момент акций.
Бездепозитный Бонус 1win 2024
Бонусы от казино 1Win 2024 – Бездепозитные бонусы ? Коды на возврат денег ? VIP Программа лояльности ? Бесплатные фриспины.
Промокод 1Win казино: 937999 предоставляет новым игрокам бонус 500% для игры в слоты и игровые автоматы, максимальная сумма бонуса 200 000 рублей. Вы можете использовать бонусные деньги в разделе азартных игр, включая онлайн казино, карты, рулетку, игровые автоматы и слоты.
Компания «1Win» рада предложить своим новым клиентам приветственный бонус в размере до 500% на первые четыре депозита. Это выгодное предложение доступно сразу после регистрации в нашей букмекерской конторе. Бонус можно получить не только в рублях, но и в других валютах, при этом он не ограничивает возможность участия игроков в других программам лояльности компании. Максимальная сумма вознаграждения за регистрацию составляет 75000 рублей или эквивалентная сумма в другой валюте.
Бонусы в 1win приносят игрокам множество преимуществ. Во-первых, они позволяют увеличить начальную ставку или продлить время игры. Кроме того, они дают возможность попробовать различные игры без риска потерять реальные деньги. Бонусы также повышают шансы на выигрыш и предоставляют дополнительные возможности для получения прибыли. Кроме того, бонусы в 1win могут быть обменены на реальные деньги или использованы для участия в специальных акциях и турнирах.
Преимущества получения и использования бонусов в 1win очевидны. Они позволяют игроку расширить свои возможности и получить больше удовольствия от игры. Бонусы также делают игру более выгодной с финансовой точки зрения, помогая уменьшить риски и увеличить потенциальную прибыль. Кроме того, получение и использование бонусов в 1win открывает возможность стать лояльным клиентом и получить дополнительные привилегии и вознаграждения от казино.
Итак, получение бонусов в 1win – это отличная возможность для игрока увеличить свои шансы на выигрыш, получить дополнительные деньги и улучшить свой игровой опыт. Бонусы делают игру более интересной и выгодной.
Промокод 1Win: 937999 предоставляет возможность получить бездепозитный бонус 2024. Его можно получить в виде фриспинов или фрибетов. Чтобы получить подарок, необходимо активировать код в личном кабинете. Дополнительный депозит не требуется. Размеры подарков невелики: фрибет до 500 рублей и не более 70 фриспинов для игры в слоты. Как и в случае с другими поощрениями, необходимо отыграть бездепозитный бонус. Вейджер, как правило, не превышает х5 для бесплатных ставок и х30 для фриспинов.
В казино 1win предоставляется внушительный бонус при регистрации, который составляет 500% от суммы первых четырех последовательных депозитов клиента. С таким количеством бонусов новичок может значительно увеличить свои шансы на выигрыш. Чтобы получить этот приветственный бонус, необходимо зарегистрироваться на официальном сайте, рабочем зеркале, мобильной версии или приложениях для мобильных телефонов. Однако, основным условием является совершение первого пополнения счета, так как активировать бонусы 1win можно только после этого.
1Win промокод на фриспины: 937999 используйте бонусный код при регистрации и получите бездепозтный бонус 70 фриспинов. Да, при использовании кода 1Win вы можете получить различные поощрения, включая бездепозитные бонусы. Они обычно представлены в виде фрибетов или фриспинов. Для их активации не требуется дополнительное пополнение счета. Размер таких подарков невелик: бесплатных вращений не более 70. Вейджер на бездепозитный бонус обычно не превышает х35. В 1Win вы можете получить бонусы за участие в акциях, турнирах, розыгрышах и активацию промокода. Бонусная программа периодически обновляется. Кроме того, некоторые акции имеют сезонный характер.
В 1Win основная бонусная программа включает в себя фриспины. Чтобы получить 70FS, необходимо пополнить счет на 100 рублей или более. Игроку предоставляется 2 дня с момента регистрации для активации презента. Отыгрыш бонуса должен быть выполнен в течение 24 часов с момента начисления, с вейджером х35. Бесплатные вращения предназначены только для игр провайдера Microgaming.
Так как бонусная программа 1Win регулярно обновляется, список акций, в которых можно получить фриспины, постоянно расширяется. Более подробную информацию о них можно найти на нашем сайте.
Промокод на 1Win дает возможность получить бесплатные вращения. Их можно использовать в любых слотах из каталога казино. Иногда могут быть установлены ограничения, которые предусматривают использование фриспинов только в определенных слотах или играх конкретного провайдера. Фриспины начисляются с фиксированной ставкой. Отыгрыш выигрыша, полученного с помощью бесплатных вращений, обязателен с учетом установленного вейджера.
wegovy retail price
rybelsus 3 mg tablet
buy ozempic online no script needed
Play with confidence at our Mexican online casino. With fair play guaranteed and transparent policies, you can trust that every game is as thrilling as the last. sol casino este es tu futuro.
Советую прочитать сайт про цветы https://med-like.ru/
Также не забудьте добавить сайт в закладки: https://med-like.ru/
tsrrub.com
Daming Palace가 바로 앞에 있으며 몇 마일 더 가면 거기에 있습니다.
rybelsus australia online
Доброго!
Бывало ли у вас такое, что приходилось писать дипломную работу в сжатые сроки? Это действительно очень ответственно и трудно, но важно не сдаваться и продолжать учебный процесс, так же, как и я.
Для тех, кто умеет осваивать информацию и искать её в интернете, это действительно может оказать большую помощь в процессе согласования и написания дипломной работы. Нет необходимости тратить время на походы в библиотеки или встречи с научным руководителем. Здесь представлены хорошие материалы для дипломных и курсовых работ, которые вы можете изучить, перейдя по ссылкам
https://diplom1.org/
Желаю всем отличных оценок!
купить диплом в симферополе
купить диплом химика
купить диплом хореографа
купить диплом менеджера
купить диплом в старом осколе
купить диплом в рязани
купить диплом в коврове
купить диплом
купить аттестаты за 9
где купить диплом среднем
rybelsus 14
Советую прочитать сайт про металлоизделия https://metal82.ru/
Также не забудьте добавить сайт в закладки: https://metal82.ru/
netovideo.com
그러고 보니… 제 가족의 죽음이 폐하를 많이 불편하게 하셨나 봅니다.
alepz.com
Fang Jifan은 “언제 캠프에 올까요?”
https://u8send.com/
Советую прочитать сайт города Лихославль https://admlihoslavl.ru/
Также не забудьте добавить сайт в закладки: https://admlihoslavl.ru/
Bonos y codigos promocionales 1win
1win es una plataforma de apuestas en linea reconocida por su compromiso de brindar a los jugadores una experiencia de juego unica y emocionante. Ya sea que te apasione el deporte, los juegos de casino o ambas opciones, 1win te ofrece una amplia gama de oportunidades para disfrutar y ganar.
Con bonificaciones y codigos promocionales exclusivos, 1 win se destaca como un destino lider para los entusiastas de las apuestas en linea. Desde bonos de bienvenida hasta promociones periodicas y ofertas exclusivas, descubriras como 1win se esfuerza por ofrecer a sus jugadores mexicanos oportunidades emocionantes para maximizar sus ganancias y ampliar su experiencia de juego.
Tipos de Bonificaciones en 1win
1win se destaca al ofrecer una amplia variedad de bonificaciones y promociones para satisfacer a jugadores de todas las preferencias:
Bonos de Bienvenida: Los nuevos jugadores son recibidos en 1win con un espectacular bono de bienvenida. Este bono se distribuye en los primeros cuatro depositos, lo que significa que tendras la oportunidad de aumentar significativamente tu saldo inicial. El bono de bienvenida puede alcanzar un impresionante 500% en total, con un limite de hasta 750 dolares.
Programa de Lealtad: En 1win, la lealtad de los jugadores es recompensada. El programa de lealtad de 1win ofrece a los jugadores la oportunidad de ascender en niveles y desbloquear recompensas exclusivas a medida que juegan mas y disfrutan de los juegos en la plataforma.
Cashback (Reembolso): El cashback es una caracteristica unica en 1win que te permite recibir un reembolso de una parte de tus perdidas en apuestas. Este beneficio es una forma de asegurarte de que, incluso si no tienes suerte en una apuesta en particular, aun obtendras algo a cambio.
Torneos: Los torneos en 1win anaden emocion adicional a tu experiencia de juego. Participar en torneos te brinda la oportunidad de competir con otros jugadores por premios en efectivo y otros premios emocionantes. Los torneos pueden abarcar una variedad de juegos, desde tragamonedas hasta apuestas deportivas, y ofrecen una oportunidad adicional para ganar.
Promociones con Codigos (Promocodes): Los codigos promocionales exclusivos son una caracteristica emocionante en 1win. Estos codigos pueden desbloquear bonificaciones adicionales, giros gratis y otras recompensas especiales.
En 1win, la diversidad de bonificaciones y promociones garantiza que siempre haya algo emocionante esperandote.
Como Aprovechar al Maximo las Bonificaciones
Las bonificaciones en 1win ofrecen una oportunidad excepcional para aumentar tus ganancias y prolongar tu experiencia de juego en linea. Una de las bonificaciones mas destacadas es el emocionante bono de bienvenida:
Registrate en 1win y proporciona informacion precisa y completa.
Realiza tu primer deposito, ya que el bono se distribuye en los primeros cuatro depositos.
Reclama tu bono, que se acreditara automaticamente en tu cuenta.
Cumple con los requisitos de apuesta, que indican la cantidad de dinero que debes apostar antes de retirar las ganancias.
Explora y juega en una amplia gama de juegos, como tragamonedas o apuestas deportivas, para aumentar tus posibilidades de ganar.
El bono de bienvenida en 1win es una emocionante ventaja para comenzar tu experiencia de juego en linea. Sigue estos pasos y disfruta al maximo de tu bono en una de las principales plataformas de apuestas en linea de Mexico.
Codigos Promocionales en 1win
Los codigos promocionales en 1win son una forma emocionante de aumentar tus oportunidades de ganar y aprovechar al maximo tu experiencia de juego. Estos codigos se pueden encontrar en varios lugares, lo que te brinda la posibilidad de desbloquear bonificaciones adicionales y ofertas exclusivas.
Muchos sitios web tematicos y portales dedicados a los juegos de azar ofrecen codigos promocionales de 1win. Estos codigos se actualizan regularmente y pueden proporcionarte bonificaciones unicas. Visita estos sitios y busca los codigos promocionales mas recientes.
Las redes sociales, como Facebook, Twitter e Instagram, son otra fuente donde puedes encontrar codigos promocionales. http://centroculturalrecoleta.org 1win a menudo publica codigos en sus perfiles sociales. Asegurate de seguir sus cuentas y estar atento a las publicaciones para no perderte ninguna oferta especial.
Si estas registrado en 1win y has aceptado recibir correos electronicos promocionales, es posible que recibas codigos promocionales exclusivos en tu bandeja de entrada. Estos codigos pueden ofrecer bonificaciones personalizadas segun tu historial de juego.
Una vez que tengas un codigo promocional, sigue estos sencillos pasos para activarlo:
Inicia sesion en tu cuenta de 1win.
Dirigete a la seccion de “Cuenta” o “Promociones” en tu perfil.
Ingresa el codigo promocional en el campo designado.
Confirma la activacion del codigo.
?Listo! Tu bonificacion se aplicara automaticamente a tu cuenta.
Asegurate de leer los terminos y condiciones asociados con cada codigo promocional para comprender completamente las bonificaciones y los requisitos de apuesta.
Beneficios de Utilizar Bonos y Codigos Promocionales
El uso de bonos y codigos promocionales en 1win ofrece una serie de beneficios que mejoran significativamente la experiencia de juego en linea:
Aumento del Saldo: Los bonos y codigos promocionales aumentan tu saldo, lo que te permite jugar mas y disfrutar de una mayor variedad de juegos sin invertir mas dinero de tu bolsillo.
Mas Oportunidades de Ganar: Con un saldo adicional, tienes mas oportunidades de ganar premios en efectivo y otros premios en los juegos de 1win. Esto aumenta la emocion y la diversion.
Menos Riesgo: Los bonos y codigos promocionales te permiten apostar con menos riesgo, ya que estas utilizando fondos de bonificacion. Esto significa que puedes probar nuevos juegos o estrategias sin preocuparte tanto por las perdidas.
Acceso a Ofertas Exclusivas: Al utilizar codigos promocionales, a menudo puedes acceder a ofertas exclusivas que no estan disponibles para otros jugadores. Estas ofertas pueden incluir giros gratis, bonos de recarga y mas.
Mayor Tiempo de Juego: Con mas fondos a tu disposicion, puedes disfrutar de una experiencia de juego mas prolongada, lo que agrega diversion y emocion a tu tiempo en 1win.
Exploracion de Juegos: Utilizar bonos y codigos promocionales te brinda la oportunidad de explorar nuevos juegos y actividades en el sitio sin incurrir en gastos adicionales.
En resumen, los bonos y codigos promocionales en 1win no solo te brindan beneficios tangibles en terminos de saldo adicional y oportunidades de ganar, sino que tambien mejoran tu experiencia de juego en general. Aprovecha estas ofertas especiales para disfrutar al maximo de tu tiempo en 1win y maximizar tus posibilidades de exito. Obten descuentos adicionales con un codigo descuento 1Win
1win es una plataforma de apuestas en linea que ofrece una amplia variedad de opciones de apuestas deportivas y juegos de casino. La pagina web es facil de navegar y tiene un diseno moderno y atractivo. En cuanto a las apuestas deportivas, 1win ofrece una amplia variedad de deportes para apostar, desde los mas populares como el futbol y el baloncesto hasta deportes menos conocidos como el badminton y el rugby. Ademas, la plataforma ofrece una gran cantidad de mercados de apuestas para cada evento deportivo, lo que permite a los usuarios personalizar sus apuestas de acuerdo a sus preferencias. En cuanto a los juegos de casino, 1win ofrece una amplia variedad de opciones, desde tragamonedas hasta juegos de mesa como el blackjack y la ruleta. Los juegos son de alta calidad y estan disenados por algunos de los principales proveedores de software de casino. La plataforma tambien ofrece una amplia variedad de metodos de pago, incluyendo tarjetas de credito, billeteras electronicas y criptomonedas. Ademas, el sitio web esta disponible en varios idiomas, lo que lo hace accesible para usuarios de todo el mundo. En general, 1win es una plataforma de apuestas en linea solida y confiable que ofrece una amplia variedad de opciones de apuestas deportivas y juegos de casino.
Codigo promocional 1Win son canjeados desde su registro y utilizados en los juegos. Aplica el codigo 937999 y recibe ganancias al apostar. El codigo de promocion 2024 te regala un paquete de bienvenida del 500% con los cuatro primeros depositos hasta $700 en apuestas deportivas y casino. El codigo 1win de bono debe ser ingresado en el formulario de registro.
Si esta buscando una forma de maximizar sus ganancias en apuestas deportivas, no se pierda el codigo de promocion y el bono de bienvenida 1Win en 024]. Con el codigo de promocion 1Win puedes recibir ofertas exclusivas y apuestas gratis para disfrutar aun mas de tus juegos favoritos. Ademas, el bono de bienvenida 1Win es una gran oportunidad para aumentar sus ganancias y tener una experiencia de apuestas aun mas emocionante.
Bonificacion 1win – 937999
Como activo el vale en 1win?
Durante el proceso de registro se introduce un codigo promocional de la casa de apuestas 1win. El campo “Anadir codigo promocional” estara disponible para cualquier metodo de creacion de cuenta que elija. Tenga en cuenta que este campo es opcional en la fase de registro, asi que tenga cuidado al introducirlo. Si se olvida de hacerlo al registrarse, no podra activar su codigo en 1win y el bono de bienvenida dejara de estar disponible.
Tendras que recargar tu cuenta para poder utilizar el codigo promocional en el futuro. Una vez que haya introducido el codigo promocional durante el registro, vaya a su gabinete personal a traves del icono de usuario y haga clic en “Depositar”. Tomemos como ejemplo el codigo promocional “937999”, que corresponde a 200 euros.
Caracteristicas del bono 1win
El codigo promocional es proporcionado por representantes de la oficina de la casa de apuestas 1win. Lo hacen en varias ocasiones: durante una promocion, un dia festivo importante, el cumpleanos de un usuario, para volver a captar a un jugador que ha estado jugando durante un tiempo y ha dejado de estar activo.
Si introdujiste un codigo promocional al registrarte, veras los fondos de bonificacion en cuanto inicies sesion en tu perfil. Y si te lo dieron personalmente, deberas aceptar participar en la promocion para poder utilizarlo. Estos fondos se abonan en tu cuenta de bonificacion, y podras ver el importe en tu perfil personal. Si respeta las normas de uso de los fondos de bonificacion, podra convertirlos gradualmente en dinero en efectivo, que recibira ademas de sus ganancias.
?Que tan confiable es apostar en 1win?
Apostar en 1win es 100% confiable. 1win nacio en 2016, con el nombre de MFI Investments Limited, quienes estan registrados con el numero de licencia 8048/JAZ2018-040, otorgada por la Comision de Juegos eGaming.
Ademas, cuenta con alianzas comerciales con diferentes equipos y ligas, como la UEFA, UFC, NHL, FIFA y mas.
8. Opiniones 1win Casino 2024
1win casino es una excelente opcion para comenzar a apostar, ademas de que cuentas con el regalo para registrarte con el codigo promocional 937999. Podras tener tu cuenta abierta en todos lados, tu celular y tu computadora tendran tu cuenta sincronizada.
Es un sitio seguro, con numero de registro y sistemas de pago legales afiliados. Podras apostar con cualquier metodo de pago en mas de 50 deportes diferentes y cientos de juegos de casino. 1win es recomendable y esta lleno de diversion.
9. FAQ: 1win Codigo Promocional
9.1 ?? ?1win es un sitio seguro?
1win es un sitio seguro, esta avalado por la comision de juego eGaming. Sus metodos de pago son conocidos y de fiar, cada uno de ellos. Ademas, tambien de tener soporte tecnico las 24 horas ante cualquier duda.
9.2 ?? ?Hay bono de bienvenida de 1win?
Si existe, y para obtener este bono de bienvenida de 1win, necesitaras el codigo de bienvenida 937999, tendras que registrarte en 1win con este codigo y realizar tu primer deposito.
9.3 ?? ?Cual es el codigo de bono 1win?
El codigo promocional 1win es 937999, registrate y comienza a disfrutar de tu bono.
where to buy ozempic online
wegovy where to buy
semaglutide generic
1xbet промокод правила – комбинация из чисел и букв. Эта комбинация дает возможность игроку получить дополнительные бонусы. К примеру, это может быть: промокод на бесплатную ставку (фрибет); повышение коэффициентов ставок формата «экспресс». Промокод при регистрации применяется именно таким образом. Он позволяет увеличивать размер приветственного бонуса на первый депозит, который выдается самим букмекером 1xbet. Где найти? Вариантов для получения промокода на 1xbet на сегодня существует множество. Но мы предлагаем вводить наш собственный промокод для 1xbet. Это промокод для регистрации, он вводится в поле в регистрационной анкете. Промокод при регистрации на сегодня. Промокоды для БК и Казино — ежедневное обновление. Регистрация на сайте 1xBet бесплатная, но для начала игры и получения доступа к 1xbet промокоду при регистрации 2024, придется внести на игровой счет от 50 рублей. Особенности регистрации. Процедура создания профиля в букмекерской конторе 1xbet максимально упрощена. Для регистрации предусмотрены такие способы: В «1 клик». Чтобы создать учетную запись, нужно выбрать страну проживания и валюту, ознакомиться с пользовательским соглашением и кликнуть на клавишу «Регистрация». С помощью телефона.
Bonos y codigos promocionales 1win
1win es una plataforma de apuestas en linea reconocida por su compromiso de brindar a los jugadores una experiencia de juego unica y emocionante. Ya sea que te apasione el deporte, los juegos de casino o ambas opciones, 1win te ofrece una amplia gama de oportunidades para disfrutar y ganar.
Con bonificaciones y codigos promocionales exclusivos, 1 win se destaca como un destino lider para los entusiastas de las apuestas en linea. Desde bonos de bienvenida hasta promociones periodicas y ofertas exclusivas, descubriras como 1win se esfuerza por ofrecer a sus jugadores mexicanos oportunidades emocionantes para maximizar sus ganancias y ampliar su experiencia de juego.
Tipos de Bonificaciones en 1win
1win se destaca al ofrecer una amplia variedad de bonificaciones y promociones para satisfacer a jugadores de todas las preferencias:
Bonos de Bienvenida: Los nuevos jugadores son recibidos en 1win con un espectacular bono de bienvenida. Este bono se distribuye en los primeros cuatro depositos, lo que significa que tendras la oportunidad de aumentar significativamente tu saldo inicial. El bono de bienvenida puede alcanzar un impresionante 500% en total, con un limite de hasta 750 dolares.
Programa de Lealtad: En 1win, la lealtad de los jugadores es recompensada. El programa de lealtad de 1win ofrece a los jugadores la oportunidad de ascender en niveles y desbloquear recompensas exclusivas a medida que juegan mas y disfrutan de los juegos en la plataforma.
Cashback (Reembolso): El cashback es una caracteristica unica en 1win que te permite recibir un reembolso de una parte de tus perdidas en apuestas. Este beneficio es una forma de asegurarte de que, incluso si no tienes suerte en una apuesta en particular, aun obtendras algo a cambio.
Torneos: Los torneos en 1win anaden emocion adicional a tu experiencia de juego. Participar en torneos te brinda la oportunidad de competir con otros jugadores por premios en efectivo y otros premios emocionantes. Los torneos pueden abarcar una variedad de juegos, desde tragamonedas hasta apuestas deportivas, y ofrecen una oportunidad adicional para ganar.
Promociones con Codigos (Promocodes): Los codigos promocionales exclusivos son una caracteristica emocionante en 1win. Estos codigos pueden desbloquear bonificaciones adicionales, giros gratis y otras recompensas especiales.
En 1win, la diversidad de bonificaciones y promociones garantiza que siempre haya algo emocionante esperandote.
Como Aprovechar al Maximo las Bonificaciones
Las bonificaciones en 1win ofrecen una oportunidad excepcional para aumentar tus ganancias y prolongar tu experiencia de juego en linea. Una de las bonificaciones mas destacadas es el emocionante bono de bienvenida:
Registrate en 1win y proporciona informacion precisa y completa.
Realiza tu primer deposito, ya que el bono se distribuye en los primeros cuatro depositos.
Reclama tu bono, que se acreditara automaticamente en tu cuenta.
Cumple con los requisitos de apuesta, que indican la cantidad de dinero que debes apostar antes de retirar las ganancias.
Explora y juega en una amplia gama de juegos, como tragamonedas o apuestas deportivas, para aumentar tus posibilidades de ganar.
El bono de bienvenida en 1win es una emocionante ventaja para comenzar tu experiencia de juego en linea. Sigue estos pasos y disfruta al maximo de tu bono en una de las principales plataformas de apuestas en linea de Mexico.
Codigos Promocionales en 1win
Los codigos promocionales en 1win son una forma emocionante de aumentar tus oportunidades de ganar y aprovechar al maximo tu experiencia de juego. Estos codigos se pueden encontrar en varios lugares, lo que te brinda la posibilidad de desbloquear bonificaciones adicionales y ofertas exclusivas.
Muchos sitios web tematicos y portales dedicados a los juegos de azar ofrecen codigos promocionales de 1win. Estos codigos se actualizan regularmente y pueden proporcionarte bonificaciones unicas. Visita estos sitios y busca los codigos promocionales mas recientes.
Las redes sociales, como Facebook, Twitter e Instagram, son otra fuente donde puedes encontrar codigos promocionales. http://centroculturalrecoleta.org 1win a menudo publica codigos en sus perfiles sociales. Asegurate de seguir sus cuentas y estar atento a las publicaciones para no perderte ninguna oferta especial.
Si estas registrado en 1win y has aceptado recibir correos electronicos promocionales, es posible que recibas codigos promocionales exclusivos en tu bandeja de entrada. Estos codigos pueden ofrecer bonificaciones personalizadas segun tu historial de juego.
Una vez que tengas un codigo promocional, sigue estos sencillos pasos para activarlo:
Inicia sesion en tu cuenta de 1win.
Dirigete a la seccion de “Cuenta” o “Promociones” en tu perfil.
Ingresa el codigo promocional en el campo designado.
Confirma la activacion del codigo.
?Listo! Tu bonificacion se aplicara automaticamente a tu cuenta.
Asegurate de leer los terminos y condiciones asociados con cada codigo promocional para comprender completamente las bonificaciones y los requisitos de apuesta.
Beneficios de Utilizar Bonos y Codigos Promocionales
El uso de bonos y codigos promocionales en 1win ofrece una serie de beneficios que mejoran significativamente la experiencia de juego en linea:
Aumento del Saldo: Los bonos y codigos promocionales aumentan tu saldo, lo que te permite jugar mas y disfrutar de una mayor variedad de juegos sin invertir mas dinero de tu bolsillo.
Mas Oportunidades de Ganar: Con un saldo adicional, tienes mas oportunidades de ganar premios en efectivo y otros premios en los juegos de 1win. Esto aumenta la emocion y la diversion.
Menos Riesgo: Los bonos y codigos promocionales te permiten apostar con menos riesgo, ya que estas utilizando fondos de bonificacion. Esto significa que puedes probar nuevos juegos o estrategias sin preocuparte tanto por las perdidas.
Acceso a Ofertas Exclusivas: Al utilizar codigos promocionales, a menudo puedes acceder a ofertas exclusivas que no estan disponibles para otros jugadores. Estas ofertas pueden incluir giros gratis, bonos de recarga y mas.
Mayor Tiempo de Juego: Con mas fondos a tu disposicion, puedes disfrutar de una experiencia de juego mas prolongada, lo que agrega diversion y emocion a tu tiempo en 1win.
Exploracion de Juegos: Utilizar bonos y codigos promocionales te brinda la oportunidad de explorar nuevos juegos y actividades en el sitio sin incurrir en gastos adicionales.
En resumen, los bonos y codigos promocionales en 1win no solo te brindan beneficios tangibles en terminos de saldo adicional y oportunidades de ganar, sino que tambien mejoran tu experiencia de juego en general. Aprovecha estas ofertas especiales para disfrutar al maximo de tu tiempo en 1win y maximizar tus posibilidades de exito. Obten descuentos adicionales con un codigo descuento 1Win
1win es una plataforma de apuestas en linea que ofrece una amplia variedad de opciones de apuestas deportivas y juegos de casino. La pagina web es facil de navegar y tiene un diseno moderno y atractivo. En cuanto a las apuestas deportivas, 1win ofrece una amplia variedad de deportes para apostar, desde los mas populares como el futbol y el baloncesto hasta deportes menos conocidos como el badminton y el rugby. Ademas, la plataforma ofrece una gran cantidad de mercados de apuestas para cada evento deportivo, lo que permite a los usuarios personalizar sus apuestas de acuerdo a sus preferencias. En cuanto a los juegos de casino, 1win ofrece una amplia variedad de opciones, desde tragamonedas hasta juegos de mesa como el blackjack y la ruleta. Los juegos son de alta calidad y estan disenados por algunos de los principales proveedores de software de casino. La plataforma tambien ofrece una amplia variedad de metodos de pago, incluyendo tarjetas de credito, billeteras electronicas y criptomonedas. Ademas, el sitio web esta disponible en varios idiomas, lo que lo hace accesible para usuarios de todo el mundo. En general, 1win es una plataforma de apuestas en linea solida y confiable que ofrece una amplia variedad de opciones de apuestas deportivas y juegos de casino.
Codigo promocional 1Win son canjeados desde su registro y utilizados en los juegos. Aplica el codigo 937999 y recibe ganancias al apostar. El codigo de promocion 2024 te regala un paquete de bienvenida del 500% con los cuatro primeros depositos hasta $700 en apuestas deportivas y casino. El codigo 1win de bono debe ser ingresado en el formulario de registro.
Si esta buscando una forma de maximizar sus ganancias en apuestas deportivas, no se pierda el codigo de promocion y el bono de bienvenida 1Win en 024]. Con el codigo de promocion 1Win puedes recibir ofertas exclusivas y apuestas gratis para disfrutar aun mas de tus juegos favoritos. Ademas, el bono de bienvenida 1Win es una gran oportunidad para aumentar sus ganancias y tener una experiencia de apuestas aun mas emocionante.
Bonificacion 1win – 937999
Como activo el vale en 1win?
Durante el proceso de registro se introduce un codigo promocional de la casa de apuestas 1win. El campo “Anadir codigo promocional” estara disponible para cualquier metodo de creacion de cuenta que elija. Tenga en cuenta que este campo es opcional en la fase de registro, asi que tenga cuidado al introducirlo. Si se olvida de hacerlo al registrarse, no podra activar su codigo en 1win y el bono de bienvenida dejara de estar disponible.
Tendras que recargar tu cuenta para poder utilizar el codigo promocional en el futuro. Una vez que haya introducido el codigo promocional durante el registro, vaya a su gabinete personal a traves del icono de usuario y haga clic en “Depositar”. Tomemos como ejemplo el codigo promocional “937999”, que corresponde a 200 euros.
Caracteristicas del bono 1win
El codigo promocional es proporcionado por representantes de la oficina de la casa de apuestas 1win. Lo hacen en varias ocasiones: durante una promocion, un dia festivo importante, el cumpleanos de un usuario, para volver a captar a un jugador que ha estado jugando durante un tiempo y ha dejado de estar activo.
Si introdujiste un codigo promocional al registrarte, veras los fondos de bonificacion en cuanto inicies sesion en tu perfil. Y si te lo dieron personalmente, deberas aceptar participar en la promocion para poder utilizarlo. Estos fondos se abonan en tu cuenta de bonificacion, y podras ver el importe en tu perfil personal. Si respeta las normas de uso de los fondos de bonificacion, podra convertirlos gradualmente en dinero en efectivo, que recibira ademas de sus ganancias.
?Que tan confiable es apostar en 1win?
Apostar en 1win es 100% confiable. 1win nacio en 2016, con el nombre de MFI Investments Limited, quienes estan registrados con el numero de licencia 8048/JAZ2018-040, otorgada por la Comision de Juegos eGaming.
Ademas, cuenta con alianzas comerciales con diferentes equipos y ligas, como la UEFA, UFC, NHL, FIFA y mas.
8. Opiniones 1win Casino 2024
1win casino es una excelente opcion para comenzar a apostar, ademas de que cuentas con el regalo para registrarte con el codigo promocional 937999. Podras tener tu cuenta abierta en todos lados, tu celular y tu computadora tendran tu cuenta sincronizada.
Es un sitio seguro, con numero de registro y sistemas de pago legales afiliados. Podras apostar con cualquier metodo de pago en mas de 50 deportes diferentes y cientos de juegos de casino. 1win es recomendable y esta lleno de diversion.
9. FAQ: 1win Codigo Promocional
9.1 ?? ?1win es un sitio seguro?
1win es un sitio seguro, esta avalado por la comision de juego eGaming. Sus metodos de pago son conocidos y de fiar, cada uno de ellos. Ademas, tambien de tener soporte tecnico las 24 horas ante cualquier duda.
9.2 ?? ?Hay bono de bienvenida de 1win?
Si existe, y para obtener este bono de bienvenida de 1win, necesitaras el codigo de bienvenida 937999, tendras que registrarte en 1win con este codigo y realizar tu primer deposito.
9.3 ?? ?Cual es el codigo de bono 1win?
El codigo promocional 1win es 937999, registrate y comienza a disfrutar de tu bono.
wegovy buy australia
Советуем посетить сайт о культуре https://elegos.ru/
Также не забудьте добавить сайт в закладки: https://elegos.ru/
Bonos y codigos promocionales 1win
1win es una plataforma de apuestas en linea reconocida por su compromiso de brindar a los jugadores una experiencia de juego unica y emocionante. Ya sea que te apasione el deporte, los juegos de casino o ambas opciones, 1win te ofrece una amplia gama de oportunidades para disfrutar y ganar.
Con bonificaciones y codigos promocionales exclusivos, 1 win se destaca como un destino lider para los entusiastas de las apuestas en linea. Desde bonos de bienvenida hasta promociones periodicas y ofertas exclusivas, descubriras como 1win se esfuerza por ofrecer a sus jugadores mexicanos oportunidades emocionantes para maximizar sus ganancias y ampliar su experiencia de juego.
Tipos de Bonificaciones en 1win
1win se destaca al ofrecer una amplia variedad de bonificaciones y promociones para satisfacer a jugadores de todas las preferencias:
Bonos de Bienvenida: Los nuevos jugadores son recibidos en 1win con un espectacular bono de bienvenida. Este bono se distribuye en los primeros cuatro depositos, lo que significa que tendras la oportunidad de aumentar significativamente tu saldo inicial. El bono de bienvenida puede alcanzar un impresionante 500% en total, con un limite de hasta 750 dolares.
Programa de Lealtad: En 1win, la lealtad de los jugadores es recompensada. El programa de lealtad de 1win ofrece a los jugadores la oportunidad de ascender en niveles y desbloquear recompensas exclusivas a medida que juegan mas y disfrutan de los juegos en la plataforma.
Cashback (Reembolso): El cashback es una caracteristica unica en 1win que te permite recibir un reembolso de una parte de tus perdidas en apuestas. Este beneficio es una forma de asegurarte de que, incluso si no tienes suerte en una apuesta en particular, aun obtendras algo a cambio.
Torneos: Los torneos en 1win anaden emocion adicional a tu experiencia de juego. Participar en torneos te brinda la oportunidad de competir con otros jugadores por premios en efectivo y otros premios emocionantes. Los torneos pueden abarcar una variedad de juegos, desde tragamonedas hasta apuestas deportivas, y ofrecen una oportunidad adicional para ganar.
Promociones con Codigos (Promocodes): Los codigos promocionales exclusivos son una caracteristica emocionante en 1win. Estos codigos pueden desbloquear bonificaciones adicionales, giros gratis y otras recompensas especiales.
En 1win, la diversidad de bonificaciones y promociones garantiza que siempre haya algo emocionante esperandote.
Como Aprovechar al Maximo las Bonificaciones
Las bonificaciones en 1win ofrecen una oportunidad excepcional para aumentar tus ganancias y prolongar tu experiencia de juego en linea. Una de las bonificaciones mas destacadas es el emocionante bono de bienvenida:
Registrate en 1win y proporciona informacion precisa y completa.
Realiza tu primer deposito, ya que el bono se distribuye en los primeros cuatro depositos.
Reclama tu bono, que se acreditara automaticamente en tu cuenta.
Cumple con los requisitos de apuesta, que indican la cantidad de dinero que debes apostar antes de retirar las ganancias.
Explora y juega en una amplia gama de juegos, como tragamonedas o apuestas deportivas, para aumentar tus posibilidades de ganar.
El bono de bienvenida en 1win es una emocionante ventaja para comenzar tu experiencia de juego en linea. Sigue estos pasos y disfruta al maximo de tu bono en una de las principales plataformas de apuestas en linea de Mexico.
Codigos Promocionales en 1win
Los codigos promocionales en 1win son una forma emocionante de aumentar tus oportunidades de ganar y aprovechar al maximo tu experiencia de juego. Estos codigos se pueden encontrar en varios lugares, lo que te brinda la posibilidad de desbloquear bonificaciones adicionales y ofertas exclusivas.
Muchos sitios web tematicos y portales dedicados a los juegos de azar ofrecen codigos promocionales de 1win. Estos codigos se actualizan regularmente y pueden proporcionarte bonificaciones unicas. Visita estos sitios y busca los codigos promocionales mas recientes.
Las redes sociales, como Facebook, Twitter e Instagram, son otra fuente donde puedes encontrar codigos promocionales. http://centroculturalrecoleta.org 1win a menudo publica codigos en sus perfiles sociales. Asegurate de seguir sus cuentas y estar atento a las publicaciones para no perderte ninguna oferta especial.
Si estas registrado en 1win y has aceptado recibir correos electronicos promocionales, es posible que recibas codigos promocionales exclusivos en tu bandeja de entrada. Estos codigos pueden ofrecer bonificaciones personalizadas segun tu historial de juego.
Una vez que tengas un codigo promocional, sigue estos sencillos pasos para activarlo:
Inicia sesion en tu cuenta de 1win.
Dirigete a la seccion de “Cuenta” o “Promociones” en tu perfil.
Ingresa el codigo promocional en el campo designado.
Confirma la activacion del codigo.
?Listo! Tu bonificacion se aplicara automaticamente a tu cuenta.
Asegurate de leer los terminos y condiciones asociados con cada codigo promocional para comprender completamente las bonificaciones y los requisitos de apuesta.
Beneficios de Utilizar Bonos y Codigos Promocionales
El uso de bonos y codigos promocionales en 1win ofrece una serie de beneficios que mejoran significativamente la experiencia de juego en linea:
Aumento del Saldo: Los bonos y codigos promocionales aumentan tu saldo, lo que te permite jugar mas y disfrutar de una mayor variedad de juegos sin invertir mas dinero de tu bolsillo.
Mas Oportunidades de Ganar: Con un saldo adicional, tienes mas oportunidades de ganar premios en efectivo y otros premios en los juegos de 1win. Esto aumenta la emocion y la diversion.
Menos Riesgo: Los bonos y codigos promocionales te permiten apostar con menos riesgo, ya que estas utilizando fondos de bonificacion. Esto significa que puedes probar nuevos juegos o estrategias sin preocuparte tanto por las perdidas.
Acceso a Ofertas Exclusivas: Al utilizar codigos promocionales, a menudo puedes acceder a ofertas exclusivas que no estan disponibles para otros jugadores. Estas ofertas pueden incluir giros gratis, bonos de recarga y mas.
Mayor Tiempo de Juego: Con mas fondos a tu disposicion, puedes disfrutar de una experiencia de juego mas prolongada, lo que agrega diversion y emocion a tu tiempo en 1win.
Exploracion de Juegos: Utilizar bonos y codigos promocionales te brinda la oportunidad de explorar nuevos juegos y actividades en el sitio sin incurrir en gastos adicionales.
En resumen, los bonos y codigos promocionales en 1win no solo te brindan beneficios tangibles en terminos de saldo adicional y oportunidades de ganar, sino que tambien mejoran tu experiencia de juego en general. Aprovecha estas ofertas especiales para disfrutar al maximo de tu tiempo en 1win y maximizar tus posibilidades de exito. Obten descuentos adicionales con un codigo descuento 1Win
1win es una plataforma de apuestas en linea que ofrece una amplia variedad de opciones de apuestas deportivas y juegos de casino. La pagina web es facil de navegar y tiene un diseno moderno y atractivo. En cuanto a las apuestas deportivas, 1win ofrece una amplia variedad de deportes para apostar, desde los mas populares como el futbol y el baloncesto hasta deportes menos conocidos como el badminton y el rugby. Ademas, la plataforma ofrece una gran cantidad de mercados de apuestas para cada evento deportivo, lo que permite a los usuarios personalizar sus apuestas de acuerdo a sus preferencias. En cuanto a los juegos de casino, 1win ofrece una amplia variedad de opciones, desde tragamonedas hasta juegos de mesa como el blackjack y la ruleta. Los juegos son de alta calidad y estan disenados por algunos de los principales proveedores de software de casino. La plataforma tambien ofrece una amplia variedad de metodos de pago, incluyendo tarjetas de credito, billeteras electronicas y criptomonedas. Ademas, el sitio web esta disponible en varios idiomas, lo que lo hace accesible para usuarios de todo el mundo. En general, 1win es una plataforma de apuestas en linea solida y confiable que ofrece una amplia variedad de opciones de apuestas deportivas y juegos de casino.
Codigo promocional 1Win son canjeados desde su registro y utilizados en los juegos. Aplica el codigo 937999 y recibe ganancias al apostar. El codigo de promocion 2024 te regala un paquete de bienvenida del 500% con los cuatro primeros depositos hasta $700 en apuestas deportivas y casino. El codigo 1win de bono debe ser ingresado en el formulario de registro.
Si esta buscando una forma de maximizar sus ganancias en apuestas deportivas, no se pierda el codigo de promocion y el bono de bienvenida 1Win en 024]. Con el codigo de promocion 1Win puedes recibir ofertas exclusivas y apuestas gratis para disfrutar aun mas de tus juegos favoritos. Ademas, el bono de bienvenida 1Win es una gran oportunidad para aumentar sus ganancias y tener una experiencia de apuestas aun mas emocionante.
Bonificacion 1win – 937999
Como activo el vale en 1win?
Durante el proceso de registro se introduce un codigo promocional de la casa de apuestas 1win. El campo “Anadir codigo promocional” estara disponible para cualquier metodo de creacion de cuenta que elija. Tenga en cuenta que este campo es opcional en la fase de registro, asi que tenga cuidado al introducirlo. Si se olvida de hacerlo al registrarse, no podra activar su codigo en 1win y el bono de bienvenida dejara de estar disponible.
Tendras que recargar tu cuenta para poder utilizar el codigo promocional en el futuro. Una vez que haya introducido el codigo promocional durante el registro, vaya a su gabinete personal a traves del icono de usuario y haga clic en “Depositar”. Tomemos como ejemplo el codigo promocional “937999”, que corresponde a 200 euros.
Caracteristicas del bono 1win
El codigo promocional es proporcionado por representantes de la oficina de la casa de apuestas 1win. Lo hacen en varias ocasiones: durante una promocion, un dia festivo importante, el cumpleanos de un usuario, para volver a captar a un jugador que ha estado jugando durante un tiempo y ha dejado de estar activo.
Si introdujiste un codigo promocional al registrarte, veras los fondos de bonificacion en cuanto inicies sesion en tu perfil. Y si te lo dieron personalmente, deberas aceptar participar en la promocion para poder utilizarlo. Estos fondos se abonan en tu cuenta de bonificacion, y podras ver el importe en tu perfil personal. Si respeta las normas de uso de los fondos de bonificacion, podra convertirlos gradualmente en dinero en efectivo, que recibira ademas de sus ganancias.
?Que tan confiable es apostar en 1win?
Apostar en 1win es 100% confiable. 1win nacio en 2016, con el nombre de MFI Investments Limited, quienes estan registrados con el numero de licencia 8048/JAZ2018-040, otorgada por la Comision de Juegos eGaming.
Ademas, cuenta con alianzas comerciales con diferentes equipos y ligas, como la UEFA, UFC, NHL, FIFA y mas.
8. Opiniones 1win Casino 2024
1win casino es una excelente opcion para comenzar a apostar, ademas de que cuentas con el regalo para registrarte con el codigo promocional 937999. Podras tener tu cuenta abierta en todos lados, tu celular y tu computadora tendran tu cuenta sincronizada.
Es un sitio seguro, con numero de registro y sistemas de pago legales afiliados. Podras apostar con cualquier metodo de pago en mas de 50 deportes diferentes y cientos de juegos de casino. 1win es recomendable y esta lleno de diversion.
9. FAQ: 1win Codigo Promocional
9.1 ?? ?1win es un sitio seguro?
1win es un sitio seguro, esta avalado por la comision de juego eGaming. Sus metodos de pago son conocidos y de fiar, cada uno de ellos. Ademas, tambien de tener soporte tecnico las 24 horas ante cualquier duda.
9.2 ?? ?Hay bono de bienvenida de 1win?
Si existe, y para obtener este bono de bienvenida de 1win, necesitaras el codigo de bienvenida 937999, tendras que registrarte en 1win con este codigo y realizar tu primer deposito.
9.3 ?? ?Cual es el codigo de bono 1win?
El codigo promocional 1win es 937999, registrate y comienza a disfrutar de tu bono.
https://kursovyelogistika.ru/
Внутри Москве приобрести аттестат – это практичный и оперативный вариант завершить нужный запись безо дополнительных трудностей. Большое количество организаций продают сервисы по производству и реализации свидетельств различных образовательных институтов – http://www.diplom4you.net. Разнообразие дипломов в столице России огромен, включая бумаги о высшем уровне и среднем профессиональной подготовке, свидетельства, дипломы техникумов и академий. Главное плюс – возможность получить аттестат Гознака, обеспечивающий подлинность и качество. Это обеспечивает специальная защита ото фальсификаций и дает возможность воспользоваться свидетельство для различных нужд. Таким образом, приобретение диплома в городе Москве является надежным и оптимальным выбором для данных, кто хочет достичь процветанию в сфере работы.
Hello exceptional blog! Does running a blog such as this take
a lot of work? I’ve very little understanding of coding
but I had been hoping to start my own blog in the near future.
Anyway, if you have any suggestions or techniques for new blog owners please share.
I understand this is off topic but I just needed to ask.
Thank you!
I love what you guys are up too. Such clever work and coverage!
Keep up the fantastic works guys I’ve added you guys to my own blogroll.
semaglutide order
saungsantoso.com
Fang Jifan은 실제로 그 맑은 눈을 직접 바라보며 약간 당황했습니다.
generic wegovy
rybelsus xl
semaglutide pill form
1xBet промокод казино при регистрации. 1xBet промокод казино при регистрации. Сайт 1хБет – это не только популярная букмекерская контора, но и казино, в котором можно играть как с машинами, так и с реальными крупье. Использовав промокод казино 1xBet, игрок получает денежные средства на бонусный счет. Это значит, что он может использовать их только для игры в слоты и другие азартные развлечения на сайте. Вывести деньги, выигранные с бонуса, игрок сможет только тогда, когда отыграет их согласно вейджеру. Сегодня в казино предусмотрены следующие бонусы за регистрацию и депозит: Все новые пользователи азартного заведения могут получить бездепозитный бонус. Промокод представляет собой комбинацию букв и чисел, которые позволят вам получить бонус. Если он актуальный, то сумма вашего депозита после пополнения увеличится на оговоренную в условиях получения промокода сумму. Есть и другой способ. Нередко действующие промокоды 1хбет бесплатно распространяют официальные партнеры компании 1xbet. Среди них могут быть группы и аккаунты в социальных сетях, которые связаны с прогнозированием событий или спортивные ресурсы.
buy semaglutide
Промокоды 1xBet на 32500 руб при регистрации. Игроки, которые используют промокоды и “приветствие” при регистрации в букмекерской фирме «1хbеt», могут увеличить свою сумму первого пополнения счета. Таким образом, если уже после прохождения регистрации внести 32500 руб., итоговый результат будет увеличен до 13000 руб. Из каких 32500 руб. сам депозит и 6 тыс. 500 руб. — бонусный средства. промокод 1хбет на бесплатную ставку сегодня бесплатно. Промокод в 1хбет – это возможность сделать бесплатную ставку на сумму, которая указана в промокоде. Содержание: Где найти промокод 1xbet на сегодня бесплатно. Чем полезный промокод на 1xbet. На какие виды спорта можно взять промокоды в 1 xbet. Как проверить промокод на 1хбет.
rybelsus diabetes medication
wegovy order
Приобрести свидетельство колледжа – это возможность скоро завершить бумагу об учебе на бакалаврском уровне без излишних трудностей и расходов времени. В городе Москве доступны различные вариантов оригинальных свидетельств бакалавров, обеспечивающих комфорт и простоту в процессе.
купить диплом Вуза http://www.landik-diploms.com .
semaglutide generic cost
generic wegovy
wegovy canada
buy semaglutide online no script
Melbet Promo Code
GAME888
MelBet Promotion 2024: Unlock Exclusive Benefits with Bonus Codes, Registration Bonuses, Free Bet Bonuses, and Cashback Offers!
Melbet promo code 2024 : GAME888 use this code, you can enjoy a 100% sports bonus of up to 130€/$ and a casino bonus of up to €1750, along with 290 free spins. To take advantage of this offer, make sure to enter the promo code when registering for a new player account with Melbet. While Melbet primarily focuses on sports betting, they also provide a variety of arcade and casino games. The sportsbook caters to an international audience with its website available in 30 different languages. However, it’s worth noting that customer support is not available in as many languages. Take a look at our review to learn more about the exciting welcome package offered by Melbet.
Newcomers have the opportunity to utilize the MelBet promotional code in order to avail themselves of the initial welcome bonus and first deposit offers. In addition to these enticing offers, this betting platform also provides various other promotions such as weekly free bets, refund offers, and casino bonuses, some of which may require a promo code.
If you are uncertain, it is advisable to use the bonus code to ensure that you can take advantage of these offers. Our dedicated team will ensure that you stay informed about the most up-to-date promotions and will notify you when and where a code is necessary. For now, let us concentrate on how you can obtain the latest sign-up bonus.
MelBet promo code “GAME888” Use the bonus code and receive an enhanced bonus of 130€/$ for sports betting. Every new player will receive from Melbet: a welcome bonus of 130$, as well as a lifelong free bet of 30$ and 130% on every account replenishment.
To create an account at Melbet, individuals must be at least 18 years old. The registration procedure is straightforward and can be completed within a few minutes. Here is a step-by-step guide:
1. Visit the main Melbet website and click on the ‘Registration’ option.
2. Choose one of the four registration options:
a) Register by providing your email address, country, name, preferred currency, password, and the bonus you wish to avail.
b) Register using your phone number, preferred currency, and bonus.
c) Opt for the one-click registration by selecting your country, preferred currency, and bonus.
d) Register through a social network by selecting the desired social network and currency.
3. If you have a Melbet Promo Code, enter it in the ‘Promo Code’ tab to activate any available bonuses.
4. Complete the registration process by clicking on the ‘Register’ button.
Melbet promo code today: “GAME888”. Use the bonus code to increase the bonus amount by 130% for the first deposit. The standard bonus is $100, but if you use the Melbet promo code, you will receive an enhanced bonus of $130 upon registration. Simply enter the Melbet promo code during registration and you will receive up to 100% of your first deposit. This attractive offer is designed to attract new users to the platform.
Melbet bookmaker actively utilizes various methods and approaches to motivate players. One of the most effective assets that can increase users’ interest in the bookmaker’s services is its bonus program.
By offering diverse bonuses at different stages of the gaming process, players gain advantages and more favorable conditions for placing bets. The company’s audience of fans grows thanks to interesting promotions and generous bonuses.
In addition to the main promotions, Melbet also actively operates a promo code system. It is through these promo codes that players gain additional preferences, which can significantly enhance their gaming potential.
The main format of bonuses provided to new clients through promo codes is additional bonus funds. The size of the additional bonus amount is 100% of the welcome bonus received by the new client. These additional bonuses must be wagered within a specified period and on specific terms.
Melbet Registration Promo Code:https://margalla.edu.pk/art/kaksdelatyrebenkapo.html Newly registered players on Melbet can avail a welcome bonus of a 100% deposit bonus up to 130€/$.
18+ | Responsible Gambling | Terms and Conditions | For new customers only | The promotional code is valid until December 31, 2024.
Promo code for Melbet: GAME888, and it offers a msz welcome bonus of a 100% deposit bonus up to 130€/$. By using the bonus codes provided by Melbet, you can enjoy various benefits such as free bets, deposit bonuses, free spins, and more. The Melbet bonus 2024 provides numerous opportunities to enhance your betting experience. In summary, Melbet allows you to receive up to 130$ to wager on sports like cricket, soccer, and many others.
When signing up, there are four different ways to create your Melbet account. These methods include:
1. Registering with your mobile number.
2. Creating an account using your email address.
3. Signing up via social media platforms.
4. Opting for the quick ‘One Click’ method, which allows for instant registration with just one click of a button.
For each of these options, there is a corresponding box where you can select the desired welcome bonus. The available choices are as follows:
1. No bonus preference.
2. 100% sports bonus up to €100 (use the promo code to receive up to €130).
3. Casino bonus up to €1750 + 290 free spins.
Once you have chosen your preferred offer, proceed to the banking page to make your initial deposit.
MelBet promo code: GAME888 allows you to unlock a vip welcome bonus of 100% up to €/$130 when you enter it during the registration process. Additionally, by using this promo code, you can also enjoy the Melbet Casino Bonus, which offers up to $/€1750 in bonus funds along with an exciting 290 Free Spins. New players: When registering an account, use the promo code Melbet “GAME888” to receive a welcome bonus.
Melbet offers a wide variety of games and casino options for its customers. In this article, we will explore each section in detail.
One of the standout features of Melbet is its diverse range of sports selections. Players can choose from over 40 different sports, and to access all of them, don’t forget to use our Melbet promo code. Cricket, being the most popular sport in India, is given special attention with a specialized section for Indian players. You will find a plethora of markets available for various sports, including 1X2, Totals, Individual Total Runs, and Individual Total Runs Even/Odd for cricket.
In addition to cricket, Melbet also offers a wide range of markets for other popular sports such as football, tennis, basketball, and ice hockey. You will also find special options like eSports and racing sports, including horse racing and greyhounds.
Melbet truly caters to the diverse interests of its customers, providing a comprehensive platform for sports and games.
semaglutide drug
buy wegovy
agonaga.com
풍요의 뿔 이었지만 눈 깜짝할 사이에 사라졌습니다.
semaglutide online order
Melbet Promo Code
GAME888
MelBet Promotion 2024: Unlock Exclusive Benefits with Bonus Codes, Registration Bonuses, Free Bet Bonuses, and Cashback Offers!
Melbet promo code 2024 : GAME888 use this code, you can enjoy a 100% sports bonus of up to 130€/$ and a casino bonus of up to €1750, along with 290 free spins. To take advantage of this offer, make sure to enter the promo code when registering for a new player account with Melbet. While Melbet primarily focuses on sports betting, they also provide a variety of arcade and casino games. The sportsbook caters to an international audience with its website available in 30 different languages. However, it’s worth noting that customer support is not available in as many languages. Take a look at our review to learn more about the exciting welcome package offered by Melbet.
Newcomers have the opportunity to utilize the MelBet promotional code in order to avail themselves of the initial welcome bonus and first deposit offers. In addition to these enticing offers, this betting platform also provides various other promotions such as weekly free bets, refund offers, and casino bonuses, some of which may require a promo code.
If you are uncertain, it is advisable to use the bonus code to ensure that you can take advantage of these offers. Our dedicated team will ensure that you stay informed about the most up-to-date promotions and will notify you when and where a code is necessary. For now, let us concentrate on how you can obtain the latest sign-up bonus.
MelBet promo code “GAME888” Use the bonus code and receive an enhanced bonus of 130€/$ for sports betting. Every new player will receive from Melbet: a welcome bonus of 130$, as well as a lifelong free bet of 30$ and 130% on every account replenishment.
To create an account at Melbet, individuals must be at least 18 years old. The registration procedure is straightforward and can be completed within a few minutes. Here is a step-by-step guide:
1. Visit the main Melbet website and click on the ‘Registration’ option.
2. Choose one of the four registration options:
a) Register by providing your email address, country, name, preferred currency, password, and the bonus you wish to avail.
b) Register using your phone number, preferred currency, and bonus.
c) Opt for the one-click registration by selecting your country, preferred currency, and bonus.
d) Register through a social network by selecting the desired social network and currency.
3. If you have a Melbet Promo Code, enter it in the ‘Promo Code’ tab to activate any available bonuses.
4. Complete the registration process by clicking on the ‘Register’ button.
Melbet promo code today: “GAME888”. Use the bonus code to increase the bonus amount by 130% for the first deposit. The standard bonus is $100, but if you use the Melbet promo code, you will receive an enhanced bonus of $130 upon registration. Simply enter the Melbet promo code during registration and you will receive up to 100% of your first deposit. This attractive offer is designed to attract new users to the platform.
Melbet bookmaker actively utilizes various methods and approaches to motivate players. One of the most effective assets that can increase users’ interest in the bookmaker’s services is its bonus program.
By offering diverse bonuses at different stages of the gaming process, players gain advantages and more favorable conditions for placing bets. The company’s audience of fans grows thanks to interesting promotions and generous bonuses.
In addition to the main promotions, Melbet also actively operates a promo code system. It is through these promo codes that players gain additional preferences, which can significantly enhance their gaming potential.
The main format of bonuses provided to new clients through promo codes is additional bonus funds. The size of the additional bonus amount is 100% of the welcome bonus received by the new client. These additional bonuses must be wagered within a specified period and on specific terms.
Melbet Registration Promo Code:https://www.sud-camping.com/ftp/pag/lekarstva_v_dorogu.html Newly registered players on Melbet can avail a welcome bonus of a 100% deposit bonus up to 130€/$.
18+ | Responsible Gambling | Terms and Conditions | For new customers only | The promotional code is valid until December 31, 2024.
Promo code for Melbet: GAME888, and it offers a msz welcome bonus of a 100% deposit bonus up to 130€/$. By using the bonus codes provided by Melbet, you can enjoy various benefits such as free bets, deposit bonuses, free spins, and more. The Melbet bonus 2024 provides numerous opportunities to enhance your betting experience. In summary, Melbet allows you to receive up to 130$ to wager on sports like cricket, soccer, and many others.
When signing up, there are four different ways to create your Melbet account. These methods include:
1. Registering with your mobile number.
2. Creating an account using your email address.
3. Signing up via social media platforms.
4. Opting for the quick ‘One Click’ method, which allows for instant registration with just one click of a button.
For each of these options, there is a corresponding box where you can select the desired welcome bonus. The available choices are as follows:
1. No bonus preference.
2. 100% sports bonus up to €100 (use the promo code to receive up to €130).
3. Casino bonus up to €1750 + 290 free spins.
Once you have chosen your preferred offer, proceed to the banking page to make your initial deposit.
MelBet promo code: GAME888 allows you to unlock a vip welcome bonus of 100% up to €/$130 when you enter it during the registration process. Additionally, by using this promo code, you can also enjoy the Melbet Casino Bonus, which offers up to $/€1750 in bonus funds along with an exciting 290 Free Spins. New players: When registering an account, use the promo code Melbet “GAME888” to receive a welcome bonus.
Melbet offers a wide variety of games and casino options for its customers. In this article, we will explore each section in detail.
One of the standout features of Melbet is its diverse range of sports selections. Players can choose from over 40 different sports, and to access all of them, don’t forget to use our Melbet promo code. Cricket, being the most popular sport in India, is given special attention with a specialized section for Indian players. You will find a plethora of markets available for various sports, including 1X2, Totals, Individual Total Runs, and Individual Total Runs Even/Odd for cricket.
In addition to cricket, Melbet also offers a wide range of markets for other popular sports such as football, tennis, basketball, and ice hockey. You will also find special options like eSports and racing sports, including horse racing and greyhounds.
Melbet truly caters to the diverse interests of its customers, providing a comprehensive platform for sports and games.
rybelsus semaglutide tablets cost
Melbet Promo Code
GAME888
MelBet Promotion 2024: Unlock Exclusive Benefits with Bonus Codes, Registration Bonuses, Free Bet Bonuses, and Cashback Offers!
Melbet promo code 2024 : GAME888 use this code, you can enjoy a 100% sports bonus of up to 130€/$ and a casino bonus of up to €1750, along with 290 free spins. To take advantage of this offer, make sure to enter the promo code when registering for a new player account with Melbet. While Melbet primarily focuses on sports betting, they also provide a variety of arcade and casino games. The sportsbook caters to an international audience with its website available in 30 different languages. However, it’s worth noting that customer support is not available in as many languages. Take a look at our review to learn more about the exciting welcome package offered by Melbet.
Newcomers have the opportunity to utilize the MelBet promotional code in order to avail themselves of the initial welcome bonus and first deposit offers. In addition to these enticing offers, this betting platform also provides various other promotions such as weekly free bets, refund offers, and casino bonuses, some of which may require a promo code.
If you are uncertain, it is advisable to use the bonus code to ensure that you can take advantage of these offers. Our dedicated team will ensure that you stay informed about the most up-to-date promotions and will notify you when and where a code is necessary. For now, let us concentrate on how you can obtain the latest sign-up bonus.
MelBet promo code “GAME888” Use the bonus code and receive an enhanced bonus of 130€/$ for sports betting. Every new player will receive from Melbet: a welcome bonus of 130$, as well as a lifelong free bet of 30$ and 130% on every account replenishment.
To create an account at Melbet, individuals must be at least 18 years old. The registration procedure is straightforward and can be completed within a few minutes. Here is a step-by-step guide:
1. Visit the main Melbet website and click on the ‘Registration’ option.
2. Choose one of the four registration options:
a) Register by providing your email address, country, name, preferred currency, password, and the bonus you wish to avail.
b) Register using your phone number, preferred currency, and bonus.
c) Opt for the one-click registration by selecting your country, preferred currency, and bonus.
d) Register through a social network by selecting the desired social network and currency.
3. If you have a Melbet Promo Code, enter it in the ‘Promo Code’ tab to activate any available bonuses.
4. Complete the registration process by clicking on the ‘Register’ button.
Melbet promo code today: “GAME888”. Use the bonus code to increase the bonus amount by 130% for the first deposit. The standard bonus is $100, but if you use the Melbet promo code, you will receive an enhanced bonus of $130 upon registration. Simply enter the Melbet promo code during registration and you will receive up to 100% of your first deposit. This attractive offer is designed to attract new users to the platform.
Melbet bookmaker actively utilizes various methods and approaches to motivate players. One of the most effective assets that can increase users’ interest in the bookmaker’s services is its bonus program.
By offering diverse bonuses at different stages of the gaming process, players gain advantages and more favorable conditions for placing bets. The company’s audience of fans grows thanks to interesting promotions and generous bonuses.
In addition to the main promotions, Melbet also actively operates a promo code system. It is through these promo codes that players gain additional preferences, which can significantly enhance their gaming potential.
The main format of bonuses provided to new clients through promo codes is additional bonus funds. The size of the additional bonus amount is 100% of the welcome bonus received by the new client. These additional bonuses must be wagered within a specified period and on specific terms.
Melbet Registration Promo Code:https://www.joiwo.com/af/pag/sovety_po_prohoghdeniyu_sudden_strike_4_nemcy_bitva_za_franciyu.html Newly registered players on Melbet can avail a welcome bonus of a 100% deposit bonus up to 130€/$.
18+ | Responsible Gambling | Terms and Conditions | For new customers only | The promotional code is valid until December 31, 2024.
Promo code for Melbet: GAME888, and it offers a msz welcome bonus of a 100% deposit bonus up to 130€/$. By using the bonus codes provided by Melbet, you can enjoy various benefits such as free bets, deposit bonuses, free spins, and more. The Melbet bonus 2024 provides numerous opportunities to enhance your betting experience. In summary, Melbet allows you to receive up to 130$ to wager on sports like cricket, soccer, and many others.
When signing up, there are four different ways to create your Melbet account. These methods include:
1. Registering with your mobile number.
2. Creating an account using your email address.
3. Signing up via social media platforms.
4. Opting for the quick ‘One Click’ method, which allows for instant registration with just one click of a button.
For each of these options, there is a corresponding box where you can select the desired welcome bonus. The available choices are as follows:
1. No bonus preference.
2. 100% sports bonus up to €100 (use the promo code to receive up to €130).
3. Casino bonus up to €1750 + 290 free spins.
Once you have chosen your preferred offer, proceed to the banking page to make your initial deposit.
MelBet promo code: GAME888 allows you to unlock a vip welcome bonus of 100% up to €/$130 when you enter it during the registration process. Additionally, by using this promo code, you can also enjoy the Melbet Casino Bonus, which offers up to $/€1750 in bonus funds along with an exciting 290 Free Spins. New players: When registering an account, use the promo code Melbet “GAME888” to receive a welcome bonus.
Melbet offers a wide variety of games and casino options for its customers. In this article, we will explore each section in detail.
One of the standout features of Melbet is its diverse range of sports selections. Players can choose from over 40 different sports, and to access all of them, don’t forget to use our Melbet promo code. Cricket, being the most popular sport in India, is given special attention with a specialized section for Indian players. You will find a plethora of markets available for various sports, including 1X2, Totals, Individual Total Runs, and Individual Total Runs Even/Odd for cricket.
In addition to cricket, Melbet also offers a wide range of markets for other popular sports such as football, tennis, basketball, and ice hockey. You will also find special options like eSports and racing sports, including horse racing and greyhounds.
Melbet truly caters to the diverse interests of its customers, providing a comprehensive platform for sports and games.
wegovy online prescription
Hey very nice web site!! Guy .. Excellent ..
Superb .. I will bookmark your website and take the feeds additionally?
I am happy to find numerous helpful information right here
in the submit, we need develop more techniques in this regard, thank you for sharing.
. . . . .
semaglutide medicine
1xbet multicode aujourd’hui – Bonus d’inscription de 130 ?/$. Les codes bonus du bookmaker 1xBet sont faciles a trouver dans l’espace Internet public. Fondamentalement, ces offres sont publiees sur des sites partenaires et des ressources Internet thematiques qui mettent en evidence le travail du bureau 1xBet, ses avantages et ses fonctionnalites. Dans ces articles et materiels, des codes promotionnels sont inclus, juste a l’endroit ou il est decrit en detail l’avantage de s’inscrire sur le site de jeu via un code promotionnel. Habituellement, ces blocs, ou le code bonus est place directement, fonctionnent comme de la publicite, motivant les utilisateurs a copier le code et a proceder a l’enregistrement sur le portail du jeu.
semaglutide injection
rybelsus 21 mg
generic ozempic
Thanks a bunch for sharing this with all
people you really recognize what you’re talking about!
Bookmarked. Kindly additionally consult with my site =).
We could have a hyperlink trade contract between us
code promo 1xbet togo pour 2024, seulement, il vous donne un bonus de bienvenue de 100% jusqu’a 130?/$. Il s’agit d’un bonus de depot d’inscription, et vous pouvez l’utiliser pour les paris sportifs et les sports. Le programme de bonus du bookmaker 1xbet couvre presque toutes les activites de jeu des clients. De plus, les offres en termes de bonus peuvent concerner aussi bien les debutants que les joueurs experimentes, offrant des preferences et des avantages supplementaires a differentes etapes du jeu.
semaglutide canada
buy semaglutide cheap
Codes promo gratuits 1xbet pour 2024, seulement, il vous donne un bonus de bienvenue de 100% jusqu’a 130?/$. Il s’agit d’un bonus de depot d’inscription, et vous pouvez l’utiliser pour les paris sportifs et les sports. Le programme de bonus du bookmaker 1xbet couvre presque toutes les activites de jeu des clients. De plus, les offres en termes de bonus peuvent concerner aussi bien les debutants que les joueurs experimentes, offrant des preferences et des avantages supplementaires a differentes etapes du jeu.
ozempic tab 7mg
semaglutide wegovy
buy semaglutide
buy wegovy online from india
buy semaglutide online from india
Melbet Promo Code
GAME888
MelBet Promotion 2024: Unlock Exclusive Benefits with Bonus Codes, Registration Bonuses, Free Bet Bonuses, and Cashback Offers!
Melbet promo code 2024 : GAME888 use this code, you can enjoy a 100% sports bonus of up to 130€/$ and a casino bonus of up to €1750, along with 290 free spins. To take advantage of this offer, make sure to enter the promo code when registering for a new player account with Melbet. While Melbet primarily focuses on sports betting, they also provide a variety of arcade and casino games. The sportsbook caters to an international audience with its website available in 30 different languages. However, it’s worth noting that customer support is not available in as many languages. Take a look at our review to learn more about the exciting welcome package offered by Melbet.
Newcomers have the opportunity to utilize the MelBet promotional code in order to avail themselves of the initial welcome bonus and first deposit offers. In addition to these enticing offers, this betting platform also provides various other promotions such as weekly free bets, refund offers, and casino bonuses, some of which may require a promo code.
If you are uncertain, it is advisable to use the bonus code to ensure that you can take advantage of these offers. Our dedicated team will ensure that you stay informed about the most up-to-date promotions and will notify you when and where a code is necessary. For now, let us concentrate on how you can obtain the latest sign-up bonus.
MelBet promo code “GAME888” Use the bonus code and receive an enhanced bonus of 130€/$ for sports betting. Every new player will receive from Melbet: a welcome bonus of 130$, as well as a lifelong free bet of 30$ and 130% on every account replenishment.
To create an account at Melbet, individuals must be at least 18 years old. The registration procedure is straightforward and can be completed within a few minutes. Here is a step-by-step guide:
1. Visit the main Melbet website and click on the ‘Registration’ option.
2. Choose one of the four registration options:
a) Register by providing your email address, country, name, preferred currency, password, and the bonus you wish to avail.
b) Register using your phone number, preferred currency, and bonus.
c) Opt for the one-click registration by selecting your country, preferred currency, and bonus.
d) Register through a social network by selecting the desired social network and currency.
3. If you have a Melbet Promo Code, enter it in the ‘Promo Code’ tab to activate any available bonuses.
4. Complete the registration process by clicking on the ‘Register’ button.
Melbet promo code today: “GAME888”. Use the bonus code to increase the bonus amount by 130% for the first deposit. The standard bonus is $100, but if you use the Melbet promo code, you will receive an enhanced bonus of $130 upon registration. Simply enter the Melbet promo code during registration and you will receive up to 100% of your first deposit. This attractive offer is designed to attract new users to the platform.
Melbet bookmaker actively utilizes various methods and approaches to motivate players. One of the most effective assets that can increase users’ interest in the bookmaker’s services is its bonus program.
By offering diverse bonuses at different stages of the gaming process, players gain advantages and more favorable conditions for placing bets. The company’s audience of fans grows thanks to interesting promotions and generous bonuses.
In addition to the main promotions, Melbet also actively operates a promo code system. It is through these promo codes that players gain additional preferences, which can significantly enhance their gaming potential.
The main format of bonuses provided to new clients through promo codes is additional bonus funds. The size of the additional bonus amount is 100% of the welcome bonus received by the new client. These additional bonuses must be wagered within a specified period and on specific terms.
Melbet Registration Promo Code: how to use bonus account in melbet Newly registered players on Melbet can avail a welcome bonus of a 100% deposit bonus up to 130€/$.
18+ | Responsible Gambling | Terms and Conditions | For new customers only | The promotional code is valid until December 31, 2024.
Promo code for Melbet: GAME888, and it offers a msz welcome bonus of a 100% deposit bonus up to 130€/$. By using the bonus codes provided by Melbet, you can enjoy various benefits such as free bets, deposit bonuses, free spins, and more. The Melbet bonus 2024 provides numerous opportunities to enhance your betting experience. In summary, Melbet allows you to receive up to 130$ to wager on sports like cricket, soccer, and many others.
When signing up, there are four different ways to create your Melbet account. These methods include:
1. Registering with your mobile number.
2. Creating an account using your email address.
3. Signing up via social media platforms.
4. Opting for the quick ‘One Click’ method, which allows for instant registration with just one click of a button.
For each of these options, there is a corresponding box where you can select the desired welcome bonus. The available choices are as follows:
1. No bonus preference.
2. 100% sports bonus up to €100 (use the promo code to receive up to €130).
3. Casino bonus up to €1750 + 290 free spins.
Once you have chosen your preferred offer, proceed to the banking page to make your initial deposit.
MelBet promo code: GAME888 allows you to unlock a vip welcome bonus of 100% up to €/$130 when you enter it during the registration process. Additionally, by using this promo code, you can also enjoy the Melbet Casino Bonus, which offers up to $/€1750 in bonus funds along with an exciting 290 Free Spins. New players: When registering an account, use the promo code Melbet “GAME888” to receive a welcome bonus.
Melbet offers a wide variety of games and casino options for its customers. In this article, we will explore each section in detail.
One of the standout features of Melbet is its diverse range of sports selections. Players can choose from over 40 different sports, and to access all of them, don’t forget to use our Melbet promo code. Cricket, being the most popular sport in India, is given special attention with a specialized section for Indian players. You will find a plethora of markets available for various sports, including 1X2, Totals, Individual Total Runs, and Individual Total Runs Even/Odd for cricket.
In addition to cricket, Melbet also offers a wide range of markets for other popular sports such as football, tennis, basketball, and ice hockey. You will also find special options like eSports and racing sports, including horse racing and greyhounds.
Melbet truly caters to the diverse interests of its customers, providing a comprehensive platform for sports and games.
Советуем посетить сайт о моде https://40-ka.ru/
Также не забудьте добавить сайт в закладки: https://40-ka.ru/
wegovy where to buy
Melbet Promo Code
GAME888
MelBet Promotion 2024: Unlock Exclusive Benefits with Bonus Codes, Registration Bonuses, Free Bet Bonuses, and Cashback Offers!
Melbet promo code 2024 : GAME888 use this code, you can enjoy a 100% sports bonus of up to 130€/$ and a casino bonus of up to €1750, along with 290 free spins. To take advantage of this offer, make sure to enter the promo code when registering for a new player account with Melbet. While Melbet primarily focuses on sports betting, they also provide a variety of arcade and casino games. The sportsbook caters to an international audience with its website available in 30 different languages. However, it’s worth noting that customer support is not available in as many languages. Take a look at our review to learn more about the exciting welcome package offered by Melbet.
Newcomers have the opportunity to utilize the MelBet promotional code in order to avail themselves of the initial welcome bonus and first deposit offers. In addition to these enticing offers, this betting platform also provides various other promotions such as weekly free bets, refund offers, and casino bonuses, some of which may require a promo code.
If you are uncertain, it is advisable to use the bonus code to ensure that you can take advantage of these offers. Our dedicated team will ensure that you stay informed about the most up-to-date promotions and will notify you when and where a code is necessary. For now, let us concentrate on how you can obtain the latest sign-up bonus.
MelBet promo code “GAME888” Use the bonus code and receive an enhanced bonus of 130€/$ for sports betting. Every new player will receive from Melbet: a welcome bonus of 130$, as well as a lifelong free bet of 30$ and 130% on every account replenishment.
To create an account at Melbet, individuals must be at least 18 years old. The registration procedure is straightforward and can be completed within a few minutes. Here is a step-by-step guide:
1. Visit the main Melbet website and click on the ‘Registration’ option.
2. Choose one of the four registration options:
a) Register by providing your email address, country, name, preferred currency, password, and the bonus you wish to avail.
b) Register using your phone number, preferred currency, and bonus.
c) Opt for the one-click registration by selecting your country, preferred currency, and bonus.
d) Register through a social network by selecting the desired social network and currency.
3. If you have a Melbet Promo Code, enter it in the ‘Promo Code’ tab to activate any available bonuses.
4. Complete the registration process by clicking on the ‘Register’ button.
Melbet promo code today: “GAME888”. Use the bonus code to increase the bonus amount by 130% for the first deposit. The standard bonus is $100, but if you use the Melbet promo code, you will receive an enhanced bonus of $130 upon registration. Simply enter the Melbet promo code during registration and you will receive up to 100% of your first deposit. This attractive offer is designed to attract new users to the platform.
Melbet bookmaker actively utilizes various methods and approaches to motivate players. One of the most effective assets that can increase users’ interest in the bookmaker’s services is its bonus program.
By offering diverse bonuses at different stages of the gaming process, players gain advantages and more favorable conditions for placing bets. The company’s audience of fans grows thanks to interesting promotions and generous bonuses.
In addition to the main promotions, Melbet also actively operates a promo code system. It is through these promo codes that players gain additional preferences, which can significantly enhance their gaming potential.
The main format of bonuses provided to new clients through promo codes is additional bonus funds. The size of the additional bonus amount is 100% of the welcome bonus received by the new client. These additional bonuses must be wagered within a specified period and on specific terms.
Melbet Registration Promo Code: melbet promo code Newly registered players on Melbet can avail a welcome bonus of a 100% deposit bonus up to 130€/$.
18+ | Responsible Gambling | Terms and Conditions | For new customers only | The promotional code is valid until December 31, 2024.
Promo code for Melbet: GAME888, and it offers a msz welcome bonus of a 100% deposit bonus up to 130€/$. By using the bonus codes provided by Melbet, you can enjoy various benefits such as free bets, deposit bonuses, free spins, and more. The Melbet bonus 2024 provides numerous opportunities to enhance your betting experience. In summary, Melbet allows you to receive up to 130$ to wager on sports like cricket, soccer, and many others.
When signing up, there are four different ways to create your Melbet account. These methods include:
1. Registering with your mobile number.
2. Creating an account using your email address.
3. Signing up via social media platforms.
4. Opting for the quick ‘One Click’ method, which allows for instant registration with just one click of a button.
For each of these options, there is a corresponding box where you can select the desired welcome bonus. The available choices are as follows:
1. No bonus preference.
2. 100% sports bonus up to €100 (use the promo code to receive up to €130).
3. Casino bonus up to €1750 + 290 free spins.
Once you have chosen your preferred offer, proceed to the banking page to make your initial deposit.
MelBet promo code: GAME888 allows you to unlock a vip welcome bonus of 100% up to €/$130 when you enter it during the registration process. Additionally, by using this promo code, you can also enjoy the Melbet Casino Bonus, which offers up to $/€1750 in bonus funds along with an exciting 290 Free Spins. New players: When registering an account, use the promo code Melbet “GAME888” to receive a welcome bonus.
Melbet offers a wide variety of games and casino options for its customers. In this article, we will explore each section in detail.
One of the standout features of Melbet is its diverse range of sports selections. Players can choose from over 40 different sports, and to access all of them, don’t forget to use our Melbet promo code. Cricket, being the most popular sport in India, is given special attention with a specialized section for Indian players. You will find a plethora of markets available for various sports, including 1X2, Totals, Individual Total Runs, and Individual Total Runs Even/Odd for cricket.
In addition to cricket, Melbet also offers a wide range of markets for other popular sports such as football, tennis, basketball, and ice hockey. You will also find special options like eSports and racing sports, including horse racing and greyhounds.
Melbet truly caters to the diverse interests of its customers, providing a comprehensive platform for sports and games.
rybelsus without prescription
Melbet Promo Code
GAME888
MelBet Promotion 2024: Unlock Exclusive Benefits with Bonus Codes, Registration Bonuses, Free Bet Bonuses, and Cashback Offers!
Melbet promo code 2024 : GAME888 use this code, you can enjoy a 100% sports bonus of up to 130€/$ and a casino bonus of up to €1750, along with 290 free spins. To take advantage of this offer, make sure to enter the promo code when registering for a new player account with Melbet. While Melbet primarily focuses on sports betting, they also provide a variety of arcade and casino games. The sportsbook caters to an international audience with its website available in 30 different languages. However, it’s worth noting that customer support is not available in as many languages. Take a look at our review to learn more about the exciting welcome package offered by Melbet.
Newcomers have the opportunity to utilize the MelBet promotional code in order to avail themselves of the initial welcome bonus and first deposit offers. In addition to these enticing offers, this betting platform also provides various other promotions such as weekly free bets, refund offers, and casino bonuses, some of which may require a promo code.
If you are uncertain, it is advisable to use the bonus code to ensure that you can take advantage of these offers. Our dedicated team will ensure that you stay informed about the most up-to-date promotions and will notify you when and where a code is necessary. For now, let us concentrate on how you can obtain the latest sign-up bonus.
MelBet promo code “GAME888” Use the bonus code and receive an enhanced bonus of 130€/$ for sports betting. Every new player will receive from Melbet: a welcome bonus of 130$, as well as a lifelong free bet of 30$ and 130% on every account replenishment.
To create an account at Melbet, individuals must be at least 18 years old. The registration procedure is straightforward and can be completed within a few minutes. Here is a step-by-step guide:
1. Visit the main Melbet website and click on the ‘Registration’ option.
2. Choose one of the four registration options:
a) Register by providing your email address, country, name, preferred currency, password, and the bonus you wish to avail.
b) Register using your phone number, preferred currency, and bonus.
c) Opt for the one-click registration by selecting your country, preferred currency, and bonus.
d) Register through a social network by selecting the desired social network and currency.
3. If you have a Melbet Promo Code, enter it in the ‘Promo Code’ tab to activate any available bonuses.
4. Complete the registration process by clicking on the ‘Register’ button.
Melbet promo code today: “GAME888”. Use the bonus code to increase the bonus amount by 130% for the first deposit. The standard bonus is $100, but if you use the Melbet promo code, you will receive an enhanced bonus of $130 upon registration. Simply enter the Melbet promo code during registration and you will receive up to 100% of your first deposit. This attractive offer is designed to attract new users to the platform.
Melbet bookmaker actively utilizes various methods and approaches to motivate players. One of the most effective assets that can increase users’ interest in the bookmaker’s services is its bonus program.
By offering diverse bonuses at different stages of the gaming process, players gain advantages and more favorable conditions for placing bets. The company’s audience of fans grows thanks to interesting promotions and generous bonuses.
In addition to the main promotions, Melbet also actively operates a promo code system. It is through these promo codes that players gain additional preferences, which can significantly enhance their gaming potential.
The main format of bonuses provided to new clients through promo codes is additional bonus funds. The size of the additional bonus amount is 100% of the welcome bonus received by the new client. These additional bonuses must be wagered within a specified period and on specific terms.
Melbet Registration Promo Code: melbet free bet Newly registered players on Melbet can avail a welcome bonus of a 100% deposit bonus up to 130€/$.
18+ | Responsible Gambling | Terms and Conditions | For new customers only | The promotional code is valid until December 31, 2024.
Promo code for Melbet: GAME888, and it offers a msz welcome bonus of a 100% deposit bonus up to 130€/$. By using the bonus codes provided by Melbet, you can enjoy various benefits such as free bets, deposit bonuses, free spins, and more. The Melbet bonus 2024 provides numerous opportunities to enhance your betting experience. In summary, Melbet allows you to receive up to 130$ to wager on sports like cricket, soccer, and many others.
When signing up, there are four different ways to create your Melbet account. These methods include:
1. Registering with your mobile number.
2. Creating an account using your email address.
3. Signing up via social media platforms.
4. Opting for the quick ‘One Click’ method, which allows for instant registration with just one click of a button.
For each of these options, there is a corresponding box where you can select the desired welcome bonus. The available choices are as follows:
1. No bonus preference.
2. 100% sports bonus up to €100 (use the promo code to receive up to €130).
3. Casino bonus up to €1750 + 290 free spins.
Once you have chosen your preferred offer, proceed to the banking page to make your initial deposit.
MelBet promo code: GAME888 allows you to unlock a vip welcome bonus of 100% up to €/$130 when you enter it during the registration process. Additionally, by using this promo code, you can also enjoy the Melbet Casino Bonus, which offers up to $/€1750 in bonus funds along with an exciting 290 Free Spins. New players: When registering an account, use the promo code Melbet “GAME888” to receive a welcome bonus.
Melbet offers a wide variety of games and casino options for its customers. In this article, we will explore each section in detail.
One of the standout features of Melbet is its diverse range of sports selections. Players can choose from over 40 different sports, and to access all of them, don’t forget to use our Melbet promo code. Cricket, being the most popular sport in India, is given special attention with a specialized section for Indian players. You will find a plethora of markets available for various sports, including 1X2, Totals, Individual Total Runs, and Individual Total Runs Even/Odd for cricket.
In addition to cricket, Melbet also offers a wide range of markets for other popular sports such as football, tennis, basketball, and ice hockey. You will also find special options like eSports and racing sports, including horse racing and greyhounds.
Melbet truly caters to the diverse interests of its customers, providing a comprehensive platform for sports and games.
Советуем посетить сайт о строительстве https://100sm.ru/
Также не забудьте добавить сайт в закладки: https://100sm.ru/
analitica.pt a l’inscription et obtenez un bonus de 130?/$. Le bonus de bienvenue de 100% de paris sportifs et de casino vous donne la possibilite d’utiliser de l’argent gratuit de 1xbet. Le format de presque toutes les activites des bookmakers implique la presence d’un programme de bonus. Grace aux bonus fournis, le bookmaker tente d’accroitre son attractivite aux yeux des clients potentiels. Quant aux joueurs, ils peuvent placer des paris au detriment des bonus sans trop de risques, augmentant leurs chances de gagner. Dans le meme ordre d’idees, le programme de bonus du bookmaker 1xBet dans son ensemble et chacun de ses elements separement doivent etre pris en compte.
rybelsus 7 mg tablet
semaglutide best price
Get ready to hit the jackpot at our sizzling Mexican online casino! With a wide range of thrilling games and irresistible bonuses, the excitement never stops. codere casino tu camino hacia el exito.
analitica.pt – Bonus VIP jusqu’a 130 ?/$ Offer Offre de bienvenue. 18 Les conditions generales s’appliquent. Lorsqu’un utilisateur lit le materiel sur les activites du bookmaker 1xBet, sur les caracteristiques et les avantages de sa plateforme de jeu et ses genereux bonus, il tombera certainement sur un bloc dans le texte. Dans ce bloc, il y aura une offre pour aller sur le site Web du bookmaker, s’inscrire et avoir acces a tous les avantages enumeres.
rybelsus online uk
rybelsus medicine
analitica.pt – Bonus VIP jusqu’a 130 ?/$ Offer Offre de bienvenue. 18 Les conditions generales s’appliquent. Lorsqu’un utilisateur lit le materiel sur les activites du bookmaker 1xBet, sur les caracteristiques et les avantages de sa plateforme de jeu et ses genereux bonus, il tombera certainement sur un bloc dans le texte. Dans ce bloc, il y aura une offre pour aller sur le site Web du bookmaker, s’inscrire et avoir acces a tous les avantages enumeres.
rybelsus australia online
semaglutide for weight loss without diabetes
wegovy sale
canadian pharmacy – viagra cialis from canadian pharmacies
canadian rx pharmacy Canadian Pharmacy Shipping Usa Cialis, Viagra Whithout Prescription
semaglutide over the counter
buy rybelsus canada
wegovy canada pharmacy
semaglutide retail price
order rybelsus online
wegovy semaglutide tablets 7.5 mcg
semaglutide xl
order wegovy online
buy viagra online
buy ozempic canada
купить диплом Гознак https://www.arusak-diploms.com .
brand semaglutide
Привет всем!
У нас была жесткая тематика, но наш сайт пошел выше после работы парней с Bullet
Всем кто в рекламе и Seo, данные варианты действительно помогают, проверено
https://www.google.com/search?q=%D1%83%D1%81%D0%BA%D0%BE%D1%80%D0%B5%D0%BD%D0%B8%D0%B5+301+%D1%81%D1%81%D1%8B%D0%BB%D0%BE%D0%BA+%D1%82%D0%B0%D1%80%D0%B8%D1%84+bullet+kwork&sca_esv=46579d9512b829aa&ei=FBTSZa_PDJrbxc8Ppcqo0A0&udm=&ved=0ahUKEwivqYXXjLWEAxWabfEDHSUlCtoQ4dUDCBA&uact=5&oq=%D1%83%D1%81%D0%BA%D0%BE%D1%80%D0%B5%D0%BD%D0%B8%D0%B5+301+%D1%81%D1%81%D1%8B%D0%BB%D0%BE%D0%BA+%D1%82%D0%B0%D1%80%D0%B8%D1%84+bullet+kwork&gs_lp=Egxnd3Mtd2l6LXNlcnAiO9GD0YHQutC-0YDQtdC90LjQtSAzMDEg0YHRgdGL0LvQvtC6INGC0LDRgNC40YQgYnVsbGV0IGt3b3JrSKxFUOElWLgocAJ4AJABAJgB3gGgAaMGqgEFMC4yLjK4AQPIAQD4AQGIBgE&sclient=gws-wiz-serp
https://www.google.com/search?q=%D0%BF%D1%80%D0%BE%D0%B3%D0%BE%D0%BD+%D1%81%D0%B0%D0%B9%D1%82%D0%B0+bullet&sca_esv=46579d9512b829aa&ei=PAjSZb-wLdSP1fIPxeKh6AM&udm=&ved=0ahUKEwi_vsOxgbWEAxXUR1UIHUVxCD0Q4dUDCBA&uact=5&oq=%D0%BF%D1%80%D0%BE%D0%B3%D0%BE%D0%BD+%D1%81%D0%B0%D0%B9%D1%82%D0%B0+bullet&gs_lp=Egxnd3Mtd2l6LXNlcnAiHtC_0YDQvtCz0L7QvSDRgdCw0LnRgtCwIGJ1bGxldEj_GlC0BljhGHAGeAGQAQKYAYYCoAG9EaoBBTAuMi44uAEDyAEA-AEBwgIKEAAYRxjWBBiwA8ICCBAhGKABGMMEwgIMECEYChigARjDBBgqwgIKECEYChigARjDBIgGAZAGCA&sclient=gws-wiz-serp
Удачи!
canada pharmacies online northwest pharmacy in canada
generic cialis online pharmacy http://www.northwestpharmacy.com
ozempic semaglutide
rybelsus pill form
rybelsus tablets 7 mg
Промокод 1xBet 2024 (Бонус при Регистрации 32500 RUB)
Промокод 1xBet 2024 – 1XFREE777, новые пользователи букмекерской компании могут воспользоваться приветственным бонусом в размере 100% от суммы депозита до 32 500 рублей (или эквивалентную сумму в другой валюте €100). Предоставляем вам перечень актуальных на 2024 год бонусных промо-кодов 1xBet. Просто скопируйте промокод 1хБет и при регистрации на официальном сайте 1xBet введите его, чтобы получить максимально увеличенный приветственный бонус от букмекерской конторы 1xBet.
1xBet Промокод – 1XFREE777
Актуальные промокоды для 1хБет ? Акция 2024 ? Бонус коды ? Фрибет Бонусы за регистрацию ? Программа лояльности ? Кэшбэк!
Промокод 1xBet при регистрации – это 1XFREE777. Только с помощью него вы получите бонус в размере 100% до 32500 рублей. Все остальные коды не действительны и не предоставляют такого бонуса. Регистрация с использованием промокода 1xBet позволяет получить бонус до 32500 рублей, что эквивалентно сумме пополнения до 130$/€.
Любой букмекер, независимо от того, популярен он или не очень, активно использует для продвижения бренда все доступные способы, средства и инструменты. Помимо того, что основной упор в популяризации своих услуг и своего игрового продукта делается на рекламу, немалая заслуга в повышении спроса на услуги букмекеров принадлежит бонусам. Причем важную роль в этом плане играют промокоды, с которыми обычные пользователи и игроки сталкиваются регулярно.
Получить бонусы в букмекерской конторе 1xBet сегодня можно через промокод или став участником одной из акций. Предложения доступны каждому, как новичкам, так и игрокам со стажем.
Давайте разберемся в тонкостях бонусной программы букмекера 1xbet. Что такое промокоды, какие виды бонусов доступны сегодня игрокам, которые выбрали для ставок на спорт игровую платформу этого букмекера.
Промокод 1xBet – 1XFREE777. Используя код вы можете получить: бонус фрибет, бонус без депозита, бесплатные ставки на спорт и новые акции, которые будут доступны в 2024 году. Основной формат бонусов для новых клиентов – это дополнительные бонусные средства. Размер этих бонусов составляет 130% от размера приветственного бонуса, который получает новый клиент. Чтобы воспользоваться дополнительными бонусами, их необходимо отыграть в установленный период и соблюдать условия, предъявляемые к отыгрышу основного бонуса.
Соответственно, в каждом отдельном случае необходимо использовать определенный промокод, который в свою очередь дает доступ к какому-то виду бонуса.
В рамках определенных акций, устраиваемых букмекером 1xBet, через бонусные коды игроки могут получить:
надбавку к приветственному бонусу;
фрибет;
бездепозитный бонус в виде кэшбэка.
Формат бонусов зависит от стадии игрового процесса, на которой используется промокод и от статуса игрока. Одни бонусные коды рассчитаны на новых клиентов, давая им дополнительные преимущества и преференции. Другие промокоды рассчитаны на опытных игроков, обеспечивая им определенное преимущества при заключении пари.
Ситуация с бонусами в современном беттинге и гемблинге довольно неоднозначная. Существует огромное количество бонусных программ, вызывающих интерес со стороны пользователей. Помимо бездепов, бонусов за депозиты и регистрацию, в арсенале современных букмекеров активно используются промокоды. Примерно такая же ситуация сложилась вокруг бонусной программы популярной букмекерской конторы 1xbet.
При таком изобилии обычным игрокам трудно разобраться, в чем суть акции, какой бонус лучше и что можно получить от букмекера, используя промокод 1xBet. Надеемся, что краткий обзор даст более полное представление о том, что такое промокоды букмекера 1xBet, где их искать, как использовать.
Промокод 1хБет – kuzov-auto.ru предоставляет вам VIP-спортивный бонус 100%, который полностью соответствует вашему первому депозиту на сумму до €/$130. Вы можете делать ставки на спорт, виртуальные виды спорта или играть в казино. Это предложение действительно на протяжении всего 2024 года.
Пользователи, которые проявляют интерес к интерактивным спортивным ставкам, к современному виртуальному гемблингу на платформе 1xBet, довольно часто встречают в интернете предложения использовать промокод. Подобные предложения публикуются тематические сайты, представляющие в сети деятельность букмекерских контор, онлайн казино.
Именно через такие источники и распространяются промокоды.
Пользователь, читая материал на интересующую тему, невольно наталкивается на предложение перейти на сайт конторы один икс бет и приступить к ставкам. Однако подобное предложение включает в себя и мотивацию. Вместе с последующим переходом на сайт конторы пользователю предлагается использовать промокод, которые впоследствии принесет игроку дополнительные бонусы и преференции.
Предложение использовать промокод бесплатное. Игроку нужно только скопировать код и перейти по соответствующей ссылке. Если код актуальный, игрок получит в дальнейшем какие-то бонусы.
Такие предложения в интернете публикуются регулярно. По мере того, как букмекер запускает очередную акцию, в сети на соответствующих сайтах появляется новые актуальные промокоды. Букмекер не занимается распространением бонусных кодов. Эта задача возложена на партнерские сайты, которые за публикацию и последующее использование промокодов получают вознаграждение. Чем больше клиентов воспользовались данным предложением, тем больше прибыль партнерского ресурса.
Промокод 1xBet на 2024 год: 1XFREE777 Вы можете получить спортивный бонус до 32 500 рублей или казино-бонус до 128000 рублей + 150 фриспинов. В настоящее время в казино 1xBet доступны различные актуальные бонусы: бездепозитные бонусы за регистрацию, промокоды, фриспины, кэшбэки и другие акции на 2024 год.
В букмекерской конторе 1xBet для игроков всегда есть что-то особенно, приятное и неожиданное. Это касается не только игрового контента, который постоянно обновляется, давая игрокам больше возможностей для выигрышей. Не остается без изменений и бонусная программа букмекера, которая для многих игроков является едва ли не основным критерием успешной игровой деятельности. Ассортимент бонусной программы 1 икс Бет впечатляет. Это и приветственный бонус, и депозитные бонусы и промокоды 1xBet. Одним словом, интересных предложений предостаточно. Остается только сделать правильный выбор.
Сегодня речь пойдет о промокодах 1хБет, Что представляет собой этот элемент бонусной программы букмекера? Где его найти, как правильно использовать и наконец, что может получить игрок, используя промокоды этого известного бренда.
Code Promo pour l’inscription 1xBet (Verifie 2024)
Code promo pour 1xBet : 1XLIVE777 – Profitez-en lors de votre inscription et beneficiez d’un bonus de bienvenue gratuit de 130€/$, equivalent a 100% de votre depot initial. Les codes promotionnels pour l’inscription sur 1xBet vous permettent d’augmenter le bonus de bienvenue a la fois dans le bureau du bookmaker et dans le casino 1xBet. Voici une compilation des derniers codes promo 1xBet pour l’annee 2024.
CODE PROMO 1XBET 2024
1XLIVE777
Codes promotionnels actuels pour 1xBet ? Action 2024 ? Codes bonus ? Bonus de pari gratuit pour l’inscription.
Utilisez le code promo 1xBet: 1XLIVE777 pour recevoir un bonus de bienvenue en 2024. Les nouveaux joueurs seront eligibles a un bonus VIP de 200% jusqu’a 130€/$. Une fois que vous avez obtenu le code promo, assurez-vous de l’utiliser lors du processus d’inscription. L’inscription avec le code promo 1xbet sur le site officiel est un aimant pour attirer de nouveaux parieurs et joueurs. Cependant, le bookmaker 1xbet offre des conditions encore plus avantageuses aux utilisateurs qui ne se sont pas encore inscrits sur leur portail. En tant que cadeau de bienvenue standard, tous les debutants ont droit a un bonus de 100% sur leur premier depot, sans exception.
Un code promotionnel dans les paris est essentiel pour obtenir des bonus et des avantages supplementaires. Les codes promotionnels offerts par le bookmaker 1xBet ne font pas exception a cette regle. Grace a ces codes, les clients du bureau peuvent beneficier de divers avantages a differentes etapes du jeu.
Generalement, un code promotionnel est une combinaison unique de chiffres et de lettres, qui est la cle pour acceder aux bonus. Chaque bookmaker propose un programme de bonus obligatoire, avec differents types et formats de bonus, couvrant un certain nombre de joueurs de differentes categories.
Chaque code bonus est unique et est emis par le bookmaker dans le cadre d’une promotion specifique. Selon les termes de la promotion, l’utilisation d’un tel code offre aux joueurs certains avantages. Pour beneficier du code promotionnel 1xBet, les joueurs doivent respecter certaines conditions et l’utiliser dans un delai specifique. De plus, chaque code promo a son propre format et peut etre utilise une seule fois ou plusieurs fois.
Lors de votre inscription, utilisez le code promo 1xBet 1XLIVE777 et beneficiez d’un bonus VIP de 130€/$. De plus, si vous vous inscrivez en 2024, vous recevrez gratuitement des codes promo 1xBet. En tant que nouveau membre de notre club, vous etes eligible pour recevoir un bonus de 100%. Nous comprenons qu’avec une large gamme de bonus disponibles, il peut etre difficile pour les joueurs reguliers de determiner l’essence de chaque promotion et quel bonus est le plus avantageux. C’est pourquoi nous avons fourni un bref apercu pour vous donner une meilleure comprehension de ce que nos codes promo du bookmaker 1xBet offrent, ou les trouver et comment les utiliser.
Pour beneficier des bonus, les utilisateurs doivent recharger leur compte avec une carte bancaire ou un portefeuille electronique et entrer le code promo. Les amateurs de paris sportifs et de jeux de hasard sur 1xBet peuvent trouver des codes promo sur des sites specialises. Ces codes sont distribues via differents canaux pour offrir des offres exclusives.
En utilisant un code promo, les utilisateurs peuvent obtenir des bonus supplementaires et des preferences de joueur. Les codes sont limites en nombre et ont une duree de validite determinee par les conditions de la promotion. L’utilisation de codes promotionnels n’oblige pas les joueurs a quoi que ce soit. Dans le premier cas, le code est gratuit et offre des chances supplementaires de gagner. Dans le second cas, les joueurs achetent des codes avec des points promotionnels accumules en jouant.
Comment Utiliser un Code Promo 1xBet
1xbet code promo pari gratuit : 1XLIVE777 – Profitez d’une offre de bienvenue de 100% jusqu’a 130€/$. Ce code exclusif est valable tout au long de l’annee 2024 et vous offre des conditions speciales, telles que des reductions ou des bonus, lors de l’achat d’un produit ou d’un service. Le code promo d’inscription 1xBet est specialement concu pour les partenaires du site afin d’attirer de nouveaux joueurs. Le meilleur ? C’est totalement gratuit a utiliser ! Il vous suffit de copier le code et de cliquer sur le lien fourni. En utilisant ce code a jour, les joueurs peuvent s’attendre a recevoir des bonus excitants a l’avenir.
Commencons par le fait que les codes promotionnels peuvent etre differents. Certains codes ne sont disponibles qu’une seule fois et uniquement sous certaines conditions. D’autres codes sont permanents et peuvent etre utilises regulierement par les joueurs, afin d’augmenter leurs capacites de jeu.
Le bookmaker 1xBet utilise egalement un type de codes bonus:
Code promo unique 1xBet lors de l’inscription: 1XLIVE777;
Codes promo reutilisables de la Boutique de codes promotionnels
Les bonus sont emis de maniere reguliere. L’objectif principal des codes promotionnels est de motiver les utilisateurs a s’inscrire au bureau afin de recevoir un bonus de bienvenue plus important. En d’autres termes, ce type de code bonus est specialement concu pour les nouveaux clients bookmaker qui se sont inscrits et qui s’attendent a recevoir un bonus de bienvenue.
Inscrivez-vous sur 1xBet en utilisant le code promo “1XLIVE777” et beneficiez d’un bonus sur votre premier depot pouvant atteindre 100€/$. Ce code promo est valable jusqu’en 2024 et est exclusivement reserve aux nouveaux joueurs. En utilisant le code, vous pouvez profiter d’un bonus augmente de 100%. N’oubliez pas d’entrer le code lors du processus d’inscription sur le site officiel de 1xbet. Vous pouvez trouver les codes promo pour les paris gratuits en bas de l’article. Choisissez l’un des codes promo disponibles pour aujourd’hui. Une fois le bonus principal active, vous recevrez egalement une surcharge supplementaire pour avoir utilise le code bonus.
Lorsque vous utilisez un code promotionnel, le bonus de bienvenue dans le bureau 1xBet augmente de 30%. Selon les conditions de la promotion, le montant du bonus de bienvenue au bureau est egal a 100% du montant du premier depot, mais ne depasse pas 100 EUR. Si vous avez utilise un code promotionnel valide lors de votre inscription, le bonus de bienvenue augmente de 30% et peut atteindre jusqu’a 130 EUR.
Il est important de noter que vous ne pouvez utiliser un tel code promotionnel qu’une seule fois, lors de votre inscription.
Dans aucune autre situation, un tel code bonus ne peut etre applique.
Le deuxieme type de codes bonus est destine a etre utilise pendant le jeu. Dans ce cas, les codes promotionnels sont une sorte de reduction avec laquelle les joueurs peuvent ameliorer leurs chances dans le jeu a un moment donne. Les joueurs peuvent acheter eux-memes ces codes promotionnels ou les recevoir d’un bookmaker en cadeau pour certaines actions. Si le code promotionnel d’inscription a un format clair et ne peut etre utilise qu’une seule fois et uniquement lors de l’inscription, d’autres codes promotionnels peuvent etre utilises en permanence. Leur utilisation est etroitement liee au gameplay.
Par exemple! Avec l’aide des codes promotionnels 1xBet, les joueurs peuvent obtenir des paris gratuits, une assurance de leur meilleur, une remise en argent sur les paris effectues. Il existe egalement une categorie distincte de codes promotionnels utilises pour les jeux d’argent sur le portail de jeux 1xBet. Ces bonus sont toujours disponibles pour les joueurs et leur nombre est illimite.
buy rybelsus in canada
Промокод 1xBet 2024 (Бонус при Регистрации 32500 RUB)
Промокод 1xBet 2024 – 1XFREE777, новые пользователи букмекерской компании могут воспользоваться приветственным бонусом в размере 100% от суммы депозита до 32 500 рублей (или эквивалентную сумму в другой валюте €100). Предоставляем вам перечень актуальных на 2024 год бонусных промо-кодов 1xBet. Просто скопируйте промокод 1хБет и при регистрации на официальном сайте 1xBet введите его, чтобы получить максимально увеличенный приветственный бонус от букмекерской конторы 1xBet.
1xBet Промокод – 1XFREE777
Актуальные промокоды для 1хБет ? Акция 2024 ? Бонус коды ? Фрибет Бонусы за регистрацию ? Программа лояльности ? Кэшбэк!
Промокод 1xBet при регистрации – это 1XFREE777. Только с помощью него вы получите бонус в размере 100% до 32500 рублей. Все остальные коды не действительны и не предоставляют такого бонуса. Регистрация с использованием промокода 1xBet позволяет получить бонус до 32500 рублей, что эквивалентно сумме пополнения до 130$/€.
Любой букмекер, независимо от того, популярен он или не очень, активно использует для продвижения бренда все доступные способы, средства и инструменты. Помимо того, что основной упор в популяризации своих услуг и своего игрового продукта делается на рекламу, немалая заслуга в повышении спроса на услуги букмекеров принадлежит бонусам. Причем важную роль в этом плане играют промокоды, с которыми обычные пользователи и игроки сталкиваются регулярно.
Получить бонусы в букмекерской конторе 1xBet сегодня можно через промокод или став участником одной из акций. Предложения доступны каждому, как новичкам, так и игрокам со стажем.
Давайте разберемся в тонкостях бонусной программы букмекера 1xbet. Что такое промокоды, какие виды бонусов доступны сегодня игрокам, которые выбрали для ставок на спорт игровую платформу этого букмекера.
Промокод 1xBet – 1XFREE777. Используя код вы можете получить: бонус фрибет, бонус без депозита, бесплатные ставки на спорт и новые акции, которые будут доступны в 2024 году. Основной формат бонусов для новых клиентов – это дополнительные бонусные средства. Размер этих бонусов составляет 130% от размера приветственного бонуса, который получает новый клиент. Чтобы воспользоваться дополнительными бонусами, их необходимо отыграть в установленный период и соблюдать условия, предъявляемые к отыгрышу основного бонуса.
Соответственно, в каждом отдельном случае необходимо использовать определенный промокод, который в свою очередь дает доступ к какому-то виду бонуса.
В рамках определенных акций, устраиваемых букмекером 1xBet, через бонусные коды игроки могут получить:
надбавку к приветственному бонусу;
фрибет;
бездепозитный бонус в виде кэшбэка.
Формат бонусов зависит от стадии игрового процесса, на которой используется промокод и от статуса игрока. Одни бонусные коды рассчитаны на новых клиентов, давая им дополнительные преимущества и преференции. Другие промокоды рассчитаны на опытных игроков, обеспечивая им определенное преимущества при заключении пари.
Ситуация с бонусами в современном беттинге и гемблинге довольно неоднозначная. Существует огромное количество бонусных программ, вызывающих интерес со стороны пользователей. Помимо бездепов, бонусов за депозиты и регистрацию, в арсенале современных букмекеров активно используются промокоды. Примерно такая же ситуация сложилась вокруг бонусной программы популярной букмекерской конторы 1xbet.
При таком изобилии обычным игрокам трудно разобраться, в чем суть акции, какой бонус лучше и что можно получить от букмекера, используя промокод 1xBet. Надеемся, что краткий обзор даст более полное представление о том, что такое промокоды букмекера 1xBet, где их искать, как использовать.
Промокод 1хБет – kuzov-auto.ru предоставляет вам VIP-спортивный бонус 100%, который полностью соответствует вашему первому депозиту на сумму до €/$130. Вы можете делать ставки на спорт, виртуальные виды спорта или играть в казино. Это предложение действительно на протяжении всего 2024 года.
Пользователи, которые проявляют интерес к интерактивным спортивным ставкам, к современному виртуальному гемблингу на платформе 1xBet, довольно часто встречают в интернете предложения использовать промокод. Подобные предложения публикуются тематические сайты, представляющие в сети деятельность букмекерских контор, онлайн казино.
Именно через такие источники и распространяются промокоды.
Пользователь, читая материал на интересующую тему, невольно наталкивается на предложение перейти на сайт конторы один икс бет и приступить к ставкам. Однако подобное предложение включает в себя и мотивацию. Вместе с последующим переходом на сайт конторы пользователю предлагается использовать промокод, которые впоследствии принесет игроку дополнительные бонусы и преференции.
Предложение использовать промокод бесплатное. Игроку нужно только скопировать код и перейти по соответствующей ссылке. Если код актуальный, игрок получит в дальнейшем какие-то бонусы.
Такие предложения в интернете публикуются регулярно. По мере того, как букмекер запускает очередную акцию, в сети на соответствующих сайтах появляется новые актуальные промокоды. Букмекер не занимается распространением бонусных кодов. Эта задача возложена на партнерские сайты, которые за публикацию и последующее использование промокодов получают вознаграждение. Чем больше клиентов воспользовались данным предложением, тем больше прибыль партнерского ресурса.
Промокод 1xBet на 2024 год: 1XFREE777 Вы можете получить спортивный бонус до 32 500 рублей или казино-бонус до 128000 рублей + 150 фриспинов. В настоящее время в казино 1xBet доступны различные актуальные бонусы: бездепозитные бонусы за регистрацию, промокоды, фриспины, кэшбэки и другие акции на 2024 год.
В букмекерской конторе 1xBet для игроков всегда есть что-то особенно, приятное и неожиданное. Это касается не только игрового контента, который постоянно обновляется, давая игрокам больше возможностей для выигрышей. Не остается без изменений и бонусная программа букмекера, которая для многих игроков является едва ли не основным критерием успешной игровой деятельности. Ассортимент бонусной программы 1 икс Бет впечатляет. Это и приветственный бонус, и депозитные бонусы и промокоды 1xBet. Одним словом, интересных предложений предостаточно. Остается только сделать правильный выбор.
Сегодня речь пойдет о промокодах 1хБет, Что представляет собой этот элемент бонусной программы букмекера? Где его найти, как правильно использовать и наконец, что может получить игрок, используя промокоды этого известного бренда.
Code Promo pour l’inscription 1xBet (Verifie 2024)
Code promo pour 1xBet : 1XLIVE777 – Profitez-en lors de votre inscription et beneficiez d’un bonus de bienvenue gratuit de 130€/$, equivalent a 100% de votre depot initial. Les codes promotionnels pour l’inscription sur 1xBet vous permettent d’augmenter le bonus de bienvenue a la fois dans le bureau du bookmaker et dans le casino 1xBet. Voici une compilation des derniers codes promo 1xBet pour l’annee 2024.
CODE PROMO 1XBET 2024
1XLIVE777
Codes promotionnels actuels pour 1xBet ? Action 2024 ? Codes bonus ? Bonus de pari gratuit pour l’inscription.
Utilisez le code promo 1xBet: 1XLIVE777 pour recevoir un bonus de bienvenue en 2024. Les nouveaux joueurs seront eligibles a un bonus VIP de 200% jusqu’a 130€/$. Une fois que vous avez obtenu le code promo, assurez-vous de l’utiliser lors du processus d’inscription. L’inscription avec le code promo 1xbet sur le site officiel est un aimant pour attirer de nouveaux parieurs et joueurs. Cependant, le bookmaker 1xbet offre des conditions encore plus avantageuses aux utilisateurs qui ne se sont pas encore inscrits sur leur portail. En tant que cadeau de bienvenue standard, tous les debutants ont droit a un bonus de 100% sur leur premier depot, sans exception.
Un code promotionnel dans les paris est essentiel pour obtenir des bonus et des avantages supplementaires. Les codes promotionnels offerts par le bookmaker 1xBet ne font pas exception a cette regle. Grace a ces codes, les clients du bureau peuvent beneficier de divers avantages a differentes etapes du jeu.
Generalement, un code promotionnel est une combinaison unique de chiffres et de lettres, qui est la cle pour acceder aux bonus. Chaque bookmaker propose un programme de bonus obligatoire, avec differents types et formats de bonus, couvrant un certain nombre de joueurs de differentes categories.
Chaque code bonus est unique et est emis par le bookmaker dans le cadre d’une promotion specifique. Selon les termes de la promotion, l’utilisation d’un tel code offre aux joueurs certains avantages. Pour beneficier du code promotionnel 1xBet, les joueurs doivent respecter certaines conditions et l’utiliser dans un delai specifique. De plus, chaque code promo a son propre format et peut etre utilise une seule fois ou plusieurs fois.
Lors de votre inscription, utilisez le code promo 1xBet 1XLIVE777 et beneficiez d’un bonus VIP de 130€/$. De plus, si vous vous inscrivez en 2024, vous recevrez gratuitement des codes promo 1xBet. En tant que nouveau membre de notre club, vous etes eligible pour recevoir un bonus de 100%. Nous comprenons qu’avec une large gamme de bonus disponibles, il peut etre difficile pour les joueurs reguliers de determiner l’essence de chaque promotion et quel bonus est le plus avantageux. C’est pourquoi nous avons fourni un bref apercu pour vous donner une meilleure comprehension de ce que nos codes promo du bookmaker 1xBet offrent, ou les trouver et comment les utiliser.
Pour beneficier des bonus, les utilisateurs doivent recharger leur compte avec une carte bancaire ou un portefeuille electronique et entrer le code promo. Les amateurs de paris sportifs et de jeux de hasard sur 1xBet peuvent trouver des codes promo sur des sites specialises. Ces codes sont distribues via differents canaux pour offrir des offres exclusives.
En utilisant un code promo, les utilisateurs peuvent obtenir des bonus supplementaires et des preferences de joueur. Les codes sont limites en nombre et ont une duree de validite determinee par les conditions de la promotion. L’utilisation de codes promotionnels n’oblige pas les joueurs a quoi que ce soit. Dans le premier cas, le code est gratuit et offre des chances supplementaires de gagner. Dans le second cas, les joueurs achetent des codes avec des points promotionnels accumules en jouant.
Comment Utiliser un Code Promo 1xBet
1xbet code promo tours gratuits : 1XLIVE777 – Profitez d’une offre de bienvenue de 100% jusqu’a 130€/$. Ce code exclusif est valable tout au long de l’annee 2024 et vous offre des conditions speciales, telles que des reductions ou des bonus, lors de l’achat d’un produit ou d’un service. Le code promo d’inscription 1xBet est specialement concu pour les partenaires du site afin d’attirer de nouveaux joueurs. Le meilleur ? C’est totalement gratuit a utiliser ! Il vous suffit de copier le code et de cliquer sur le lien fourni. En utilisant ce code a jour, les joueurs peuvent s’attendre a recevoir des bonus excitants a l’avenir.
Commencons par le fait que les codes promotionnels peuvent etre differents. Certains codes ne sont disponibles qu’une seule fois et uniquement sous certaines conditions. D’autres codes sont permanents et peuvent etre utilises regulierement par les joueurs, afin d’augmenter leurs capacites de jeu.
Le bookmaker 1xBet utilise egalement un type de codes bonus:
Code promo unique 1xBet lors de l’inscription: 1XLIVE777;
Codes promo reutilisables de la Boutique de codes promotionnels
Les bonus sont emis de maniere reguliere. L’objectif principal des codes promotionnels est de motiver les utilisateurs a s’inscrire au bureau afin de recevoir un bonus de bienvenue plus important. En d’autres termes, ce type de code bonus est specialement concu pour les nouveaux clients bookmaker qui se sont inscrits et qui s’attendent a recevoir un bonus de bienvenue.
Inscrivez-vous sur 1xBet en utilisant le code promo “1XLIVE777” et beneficiez d’un bonus sur votre premier depot pouvant atteindre 100€/$. Ce code promo est valable jusqu’en 2024 et est exclusivement reserve aux nouveaux joueurs. En utilisant le code, vous pouvez profiter d’un bonus augmente de 100%. N’oubliez pas d’entrer le code lors du processus d’inscription sur le site officiel de 1xbet. Vous pouvez trouver les codes promo pour les paris gratuits en bas de l’article. Choisissez l’un des codes promo disponibles pour aujourd’hui. Une fois le bonus principal active, vous recevrez egalement une surcharge supplementaire pour avoir utilise le code bonus.
Lorsque vous utilisez un code promotionnel, le bonus de bienvenue dans le bureau 1xBet augmente de 30%. Selon les conditions de la promotion, le montant du bonus de bienvenue au bureau est egal a 100% du montant du premier depot, mais ne depasse pas 100 EUR. Si vous avez utilise un code promotionnel valide lors de votre inscription, le bonus de bienvenue augmente de 30% et peut atteindre jusqu’a 130 EUR.
Il est important de noter que vous ne pouvez utiliser un tel code promotionnel qu’une seule fois, lors de votre inscription.
Dans aucune autre situation, un tel code bonus ne peut etre applique.
Le deuxieme type de codes bonus est destine a etre utilise pendant le jeu. Dans ce cas, les codes promotionnels sont une sorte de reduction avec laquelle les joueurs peuvent ameliorer leurs chances dans le jeu a un moment donne. Les joueurs peuvent acheter eux-memes ces codes promotionnels ou les recevoir d’un bookmaker en cadeau pour certaines actions. Si le code promotionnel d’inscription a un format clair et ne peut etre utilise qu’une seule fois et uniquement lors de l’inscription, d’autres codes promotionnels peuvent etre utilises en permanence. Leur utilisation est etroitement liee au gameplay.
Par exemple! Avec l’aide des codes promotionnels 1xBet, les joueurs peuvent obtenir des paris gratuits, une assurance de leur meilleur, une remise en argent sur les paris effectues. Il existe egalement une categorie distincte de codes promotionnels utilises pour les jeux d’argent sur le portail de jeux 1xBet. Ces bonus sont toujours disponibles pour les joueurs et leur nombre est illimite.
buy ozempic pill form for adults
Code Promo pour l’inscription 1xBet (Verifie 2024)
Code promo pour 1xBet : 1XLIVE777 – Profitez-en lors de votre inscription et beneficiez d’un bonus de bienvenue gratuit de 130€/$, equivalent a 100% de votre depot initial. Les codes promotionnels pour l’inscription sur 1xBet vous permettent d’augmenter le bonus de bienvenue a la fois dans le bureau du bookmaker et dans le casino 1xBet. Voici une compilation des derniers codes promo 1xBet pour l’annee 2024.
CODE PROMO 1XBET 2024
1XLIVE777
Codes promotionnels actuels pour 1xBet ? Action 2024 ? Codes bonus ? Bonus de pari gratuit pour l’inscription.
Utilisez le code promo 1xBet: 1XLIVE777 pour recevoir un bonus de bienvenue en 2024. Les nouveaux joueurs seront eligibles a un bonus VIP de 200% jusqu’a 130€/$. Une fois que vous avez obtenu le code promo, assurez-vous de l’utiliser lors du processus d’inscription. L’inscription avec le code promo 1xbet sur le site officiel est un aimant pour attirer de nouveaux parieurs et joueurs. Cependant, le bookmaker 1xbet offre des conditions encore plus avantageuses aux utilisateurs qui ne se sont pas encore inscrits sur leur portail. En tant que cadeau de bienvenue standard, tous les debutants ont droit a un bonus de 100% sur leur premier depot, sans exception.
Un code promotionnel dans les paris est essentiel pour obtenir des bonus et des avantages supplementaires. Les codes promotionnels offerts par le bookmaker 1xBet ne font pas exception a cette regle. Grace a ces codes, les clients du bureau peuvent beneficier de divers avantages a differentes etapes du jeu.
Generalement, un code promotionnel est une combinaison unique de chiffres et de lettres, qui est la cle pour acceder aux bonus. Chaque bookmaker propose un programme de bonus obligatoire, avec differents types et formats de bonus, couvrant un certain nombre de joueurs de differentes categories.
Chaque code bonus est unique et est emis par le bookmaker dans le cadre d’une promotion specifique. Selon les termes de la promotion, l’utilisation d’un tel code offre aux joueurs certains avantages. Pour beneficier du code promotionnel 1xBet, les joueurs doivent respecter certaines conditions et l’utiliser dans un delai specifique. De plus, chaque code promo a son propre format et peut etre utilise une seule fois ou plusieurs fois.
Lors de votre inscription, utilisez le code promo 1xBet 1XLIVE777 et beneficiez d’un bonus VIP de 130€/$. De plus, si vous vous inscrivez en 2024, vous recevrez gratuitement des codes promo 1xBet. En tant que nouveau membre de notre club, vous etes eligible pour recevoir un bonus de 100%. Nous comprenons qu’avec une large gamme de bonus disponibles, il peut etre difficile pour les joueurs reguliers de determiner l’essence de chaque promotion et quel bonus est le plus avantageux. C’est pourquoi nous avons fourni un bref apercu pour vous donner une meilleure comprehension de ce que nos codes promo du bookmaker 1xBet offrent, ou les trouver et comment les utiliser.
Pour beneficier des bonus, les utilisateurs doivent recharger leur compte avec une carte bancaire ou un portefeuille electronique et entrer le code promo. Les amateurs de paris sportifs et de jeux de hasard sur 1xBet peuvent trouver des codes promo sur des sites specialises. Ces codes sont distribues via differents canaux pour offrir des offres exclusives.
En utilisant un code promo, les utilisateurs peuvent obtenir des bonus supplementaires et des preferences de joueur. Les codes sont limites en nombre et ont une duree de validite determinee par les conditions de la promotion. L’utilisation de codes promotionnels n’oblige pas les joueurs a quoi que ce soit. Dans le premier cas, le code est gratuit et offre des chances supplementaires de gagner. Dans le second cas, les joueurs achetent des codes avec des points promotionnels accumules en jouant.
Comment Utiliser un Code Promo 1xBet
code promo de 1x pari : 1XLIVE777 – Profitez d’une offre de bienvenue de 100% jusqu’a 130€/$. Ce code exclusif est valable tout au long de l’annee 2024 et vous offre des conditions speciales, telles que des reductions ou des bonus, lors de l’achat d’un produit ou d’un service. Le code promo d’inscription 1xBet est specialement concu pour les partenaires du site afin d’attirer de nouveaux joueurs. Le meilleur ? C’est totalement gratuit a utiliser ! Il vous suffit de copier le code et de cliquer sur le lien fourni. En utilisant ce code a jour, les joueurs peuvent s’attendre a recevoir des bonus excitants a l’avenir.
Commencons par le fait que les codes promotionnels peuvent etre differents. Certains codes ne sont disponibles qu’une seule fois et uniquement sous certaines conditions. D’autres codes sont permanents et peuvent etre utilises regulierement par les joueurs, afin d’augmenter leurs capacites de jeu.
Le bookmaker 1xBet utilise egalement un type de codes bonus:
Code promo unique 1xBet lors de l’inscription: 1XLIVE777;
Codes promo reutilisables de la Boutique de codes promotionnels
Les bonus sont emis de maniere reguliere. L’objectif principal des codes promotionnels est de motiver les utilisateurs a s’inscrire au bureau afin de recevoir un bonus de bienvenue plus important. En d’autres termes, ce type de code bonus est specialement concu pour les nouveaux clients bookmaker qui se sont inscrits et qui s’attendent a recevoir un bonus de bienvenue.
Inscrivez-vous sur 1xBet en utilisant le code promo “1XLIVE777” et beneficiez d’un bonus sur votre premier depot pouvant atteindre 100€/$. Ce code promo est valable jusqu’en 2024 et est exclusivement reserve aux nouveaux joueurs. En utilisant le code, vous pouvez profiter d’un bonus augmente de 100%. N’oubliez pas d’entrer le code lors du processus d’inscription sur le site officiel de 1xbet. Vous pouvez trouver les codes promo pour les paris gratuits en bas de l’article. Choisissez l’un des codes promo disponibles pour aujourd’hui. Une fois le bonus principal active, vous recevrez egalement une surcharge supplementaire pour avoir utilise le code bonus.
Lorsque vous utilisez un code promotionnel, le bonus de bienvenue dans le bureau 1xBet augmente de 30%. Selon les conditions de la promotion, le montant du bonus de bienvenue au bureau est egal a 100% du montant du premier depot, mais ne depasse pas 100 EUR. Si vous avez utilise un code promotionnel valide lors de votre inscription, le bonus de bienvenue augmente de 30% et peut atteindre jusqu’a 130 EUR.
Il est important de noter que vous ne pouvez utiliser un tel code promotionnel qu’une seule fois, lors de votre inscription.
Dans aucune autre situation, un tel code bonus ne peut etre applique.
Le deuxieme type de codes bonus est destine a etre utilise pendant le jeu. Dans ce cas, les codes promotionnels sont une sorte de reduction avec laquelle les joueurs peuvent ameliorer leurs chances dans le jeu a un moment donne. Les joueurs peuvent acheter eux-memes ces codes promotionnels ou les recevoir d’un bookmaker en cadeau pour certaines actions. Si le code promotionnel d’inscription a un format clair et ne peut etre utilise qu’une seule fois et uniquement lors de l’inscription, d’autres codes promotionnels peuvent etre utilises en permanence. Leur utilisation est etroitement liee au gameplay.
Par exemple! Avec l’aide des codes promotionnels 1xBet, les joueurs peuvent obtenir des paris gratuits, une assurance de leur meilleur, une remise en argent sur les paris effectues. Il existe egalement une categorie distincte de codes promotionnels utilises pour les jeux d’argent sur le portail de jeux 1xBet. Ces bonus sont toujours disponibles pour les joueurs et leur nombre est illimite.
10yenharwichport.com
정오 였고 Hongzhi 황제는 약간 배가 고팠습니다.
프라그마틱 슬롯으로 감각적인 그래픽과 다양한 주제를 경험하고 보너스를 획득하세요.
프라그마틱 슬롯 무료 체험
프라그마틱의 라이브 카지노는 정말 현장감 넘치게 즐길 수 있는데, 여기서 더 많은 정보를 얻을 수 있어 좋아요!
https://www.cicoresky.com
https://www.emulecenter.com
https://www.jeffklee.com
Советуем посетить сайт о строительстве https://club-columb.ru/
Также не забудьте добавить сайт в закладки: https://club-columb.ru/
semaglutide online uk
semaglutide medicine
semaglutide canada pharmacy
I am in fact happy to read this webpage posts which
consists of lots of useful information, thanks for providing
these data.
rybelsus 3 mg
현재 프라그마틱 게임은 iGaming에서 혁신적이고 표준화된 엔터테인먼트 콘텐츠를 제공하는 주요 제공 업체 중 하나입니다.
프라그마틱 슬롯 사이트
프라그마틱의 라이브 카지노는 정말 현장감 넘치게 즐길 수 있는데, 여기서 더 많은 정보를 얻을 수 있어 좋아요!
https://www.ccgwarehouse.com
https://www.sujanews.com
https://www.iaz681.com
wegovy buy uk
semaglutide 7 mg tablet
Experience the magic of online gaming at our Mexican casino site. With enchanting themes and captivating gameplay, you’ll be transported to a world of fantasy and fun. asdfghjklnqwert tienes todo lo mejor.
rybelsus 3mg
Советуем посетить сайт о строительстве https://daibob.ru/
Также не забудьте добавить сайт в закладки: https://daibob.ru/
baseballoutsider.com
법원의 많은 장관들도 Xishan New City의 악을 믿었습니다.
Join the excitement at our Mexican casino platform. With action-packed games and electrifying bonuses, you’ll never want to play anywhere else. mxwin casino te da mucho.
https://yuridicheskiy-perevod.ru/
Промокод 1xBet 2024 (Бонус при Регистрации 32500 RUB)
Промокод 1xBet 2024 – 1XFREE777, новые пользователи букмекерской компании могут воспользоваться приветственным бонусом в размере 100% от суммы депозита до 32 500 рублей (или эквивалентную сумму в другой валюте €100). Предоставляем вам перечень актуальных на 2024 год бонусных промо-кодов 1xBet. Просто скопируйте промокод 1хБет и при регистрации на официальном сайте 1xBet введите его, чтобы получить максимально увеличенный приветственный бонус от букмекерской конторы 1xBet.
1xBet Промокод – 1XFREE777
Актуальные промокоды для 1хБет ? Акция 2024 ? Бонус коды ? Фрибет Бонусы за регистрацию ? Программа лояльности ? Кэшбэк!
Промокод 1xBet при регистрации – это 1XFREE777. Только с помощью него вы получите бонус в размере 100% до 32500 рублей. Все остальные коды не действительны и не предоставляют такого бонуса. Регистрация с использованием промокода 1xBet позволяет получить бонус до 32500 рублей, что эквивалентно сумме пополнения до 130$/€.
Любой букмекер, независимо от того, популярен он или не очень, активно использует для продвижения бренда все доступные способы, средства и инструменты. Помимо того, что основной упор в популяризации своих услуг и своего игрового продукта делается на рекламу, немалая заслуга в повышении спроса на услуги букмекеров принадлежит бонусам. Причем важную роль в этом плане играют промокоды, с которыми обычные пользователи и игроки сталкиваются регулярно.
Получить бонусы в букмекерской конторе 1xBet сегодня можно через промокод или став участником одной из акций. Предложения доступны каждому, как новичкам, так и игрокам со стажем.
Давайте разберемся в тонкостях бонусной программы букмекера 1xbet. Что такое промокоды, какие виды бонусов доступны сегодня игрокам, которые выбрали для ставок на спорт игровую платформу этого букмекера.
Промокод 1xBet – 1XFREE777. Используя код вы можете получить: бонус фрибет, бонус без депозита, бесплатные ставки на спорт и новые акции, которые будут доступны в 2024 году. Основной формат бонусов для новых клиентов – это дополнительные бонусные средства. Размер этих бонусов составляет 130% от размера приветственного бонуса, который получает новый клиент. Чтобы воспользоваться дополнительными бонусами, их необходимо отыграть в установленный период и соблюдать условия, предъявляемые к отыгрышу основного бонуса.
Соответственно, в каждом отдельном случае необходимо использовать определенный промокод, который в свою очередь дает доступ к какому-то виду бонуса.
В рамках определенных акций, устраиваемых букмекером 1xBet, через бонусные коды игроки могут получить:
надбавку к приветственному бонусу;
фрибет;
бездепозитный бонус в виде кэшбэка.
Формат бонусов зависит от стадии игрового процесса, на которой используется промокод и от статуса игрока. Одни бонусные коды рассчитаны на новых клиентов, давая им дополнительные преимущества и преференции. Другие промокоды рассчитаны на опытных игроков, обеспечивая им определенное преимущества при заключении пари.
Ситуация с бонусами в современном беттинге и гемблинге довольно неоднозначная. Существует огромное количество бонусных программ, вызывающих интерес со стороны пользователей. Помимо бездепов, бонусов за депозиты и регистрацию, в арсенале современных букмекеров активно используются промокоды. Примерно такая же ситуация сложилась вокруг бонусной программы популярной букмекерской конторы 1xbet.
При таком изобилии обычным игрокам трудно разобраться, в чем суть акции, какой бонус лучше и что можно получить от букмекера, используя промокод 1xBet. Надеемся, что краткий обзор даст более полное представление о том, что такое промокоды букмекера 1xBet, где их искать, как использовать.
Промокод 1хБет расскажем подробнее в этой статье сайт – webmineral.ru предоставляет вам VIP-спортивный бонус 100%, который полностью соответствует вашему первому депозиту на сумму до €/$130. Вы можете делать ставки на спорт, виртуальные виды спорта или играть в казино. Это предложение действительно на протяжении всего 2024 года.
Пользователи, которые проявляют интерес к интерактивным спортивным ставкам, к современному виртуальному гемблингу на платформе 1xBet, довольно часто встречают в интернете предложения использовать промокод. Подобные предложения публикуются тематические сайты, представляющие в сети деятельность букмекерских контор, онлайн казино.
Именно через такие источники и распространяются промокоды.
Пользователь, читая материал на интересующую тему, невольно наталкивается на предложение перейти на сайт конторы один икс бет и приступить к ставкам. Однако подобное предложение включает в себя и мотивацию. Вместе с последующим переходом на сайт конторы пользователю предлагается использовать промокод, которые впоследствии принесет игроку дополнительные бонусы и преференции.
Предложение использовать промокод бесплатное. Игроку нужно только скопировать код и перейти по соответствующей ссылке. Если код актуальный, игрок получит в дальнейшем какие-то бонусы.
Такие предложения в интернете публикуются регулярно. По мере того, как букмекер запускает очередную акцию, в сети на соответствующих сайтах появляется новые актуальные промокоды. Букмекер не занимается распространением бонусных кодов. Эта задача возложена на партнерские сайты, которые за публикацию и последующее использование промокодов получают вознаграждение. Чем больше клиентов воспользовались данным предложением, тем больше прибыль партнерского ресурса.
Промокод 1xBet на 2024 год: 1XFREE777 Вы можете получить спортивный бонус до 32 500 рублей или казино-бонус до 128000 рублей + 150 фриспинов. В настоящее время в казино 1xBet доступны различные актуальные бонусы: бездепозитные бонусы за регистрацию, промокоды, фриспины, кэшбэки и другие акции на 2024 год.
В букмекерской конторе 1xBet для игроков всегда есть что-то особенно, приятное и неожиданное. Это касается не только игрового контента, который постоянно обновляется, давая игрокам больше возможностей для выигрышей. Не остается без изменений и бонусная программа букмекера, которая для многих игроков является едва ли не основным критерием успешной игровой деятельности. Ассортимент бонусной программы 1 икс Бет впечатляет. Это и приветственный бонус, и депозитные бонусы и промокоды 1xBet. Одним словом, интересных предложений предостаточно. Остается только сделать правильный выбор.
Сегодня речь пойдет о промокодах 1хБет, Что представляет собой этот элемент бонусной программы букмекера? Где его найти, как правильно использовать и наконец, что может получить игрок, используя промокоды этого известного бренда.
generic rybelsus cost
rybelsus pill form
amruthaborewells.com
이 돌 광장은 신하들이 세상을 떠났을 때의 시호와 비슷하다.
Советуем посетить сайт об авто https://gulliverauto.ru/
Также не забудьте добавить сайт в закладки: https://gulliverauto.ru/
https://tekhnicheskiy-perevod.ru/
Code Promo pour l’inscription 1xBet (Verifie 2024)
Code promo pour 1xBet : 1XLIVE777 – Profitez-en lors de votre inscription et beneficiez d’un bonus de bienvenue gratuit de 130€/$, equivalent a 100% de votre depot initial. Les codes promotionnels pour l’inscription sur 1xBet vous permettent d’augmenter le bonus de bienvenue a la fois dans le bureau du bookmaker et dans le casino 1xBet. Voici une compilation des derniers codes promo 1xBet pour l’annee 2024.
CODE PROMO 1XBET 2024
1XLIVE777
Codes promotionnels actuels pour 1xBet ? Action 2024 ? Codes bonus ? Bonus de pari gratuit pour l’inscription.
Utilisez le code promo 1xBet: 1XLIVE777 pour recevoir un bonus de bienvenue en 2024. Les nouveaux joueurs seront eligibles a un bonus VIP de 200% jusqu’a 130€/$. Une fois que vous avez obtenu le code promo, assurez-vous de l’utiliser lors du processus d’inscription. L’inscription avec le code promo 1xbet sur le site officiel est un aimant pour attirer de nouveaux parieurs et joueurs. Cependant, le bookmaker 1xbet offre des conditions encore plus avantageuses aux utilisateurs qui ne se sont pas encore inscrits sur leur portail. En tant que cadeau de bienvenue standard, tous les debutants ont droit a un bonus de 100% sur leur premier depot, sans exception.
Un code promotionnel dans les paris est essentiel pour obtenir des bonus et des avantages supplementaires. Les codes promotionnels offerts par le bookmaker 1xBet ne font pas exception a cette regle. Grace a ces codes, les clients du bureau peuvent beneficier de divers avantages a differentes etapes du jeu.
Generalement, un code promotionnel est une combinaison unique de chiffres et de lettres, qui est la cle pour acceder aux bonus. Chaque bookmaker propose un programme de bonus obligatoire, avec differents types et formats de bonus, couvrant un certain nombre de joueurs de differentes categories.
Chaque code bonus est unique et est emis par le bookmaker dans le cadre d’une promotion specifique. Selon les termes de la promotion, l’utilisation d’un tel code offre aux joueurs certains avantages. Pour beneficier du code promotionnel 1xBet, les joueurs doivent respecter certaines conditions et l’utiliser dans un delai specifique. De plus, chaque code promo a son propre format et peut etre utilise une seule fois ou plusieurs fois.
Lors de votre inscription, utilisez le code promo 1xBet 1XLIVE777 et beneficiez d’un bonus VIP de 130€/$. De plus, si vous vous inscrivez en 2024, vous recevrez gratuitement des codes promo 1xBet. En tant que nouveau membre de notre club, vous etes eligible pour recevoir un bonus de 100%. Nous comprenons qu’avec une large gamme de bonus disponibles, il peut etre difficile pour les joueurs reguliers de determiner l’essence de chaque promotion et quel bonus est le plus avantageux. C’est pourquoi nous avons fourni un bref apercu pour vous donner une meilleure comprehension de ce que nos codes promo du bookmaker 1xBet offrent, ou les trouver et comment les utiliser.
Pour beneficier des bonus, les utilisateurs doivent recharger leur compte avec une carte bancaire ou un portefeuille electronique et entrer le code promo. Les amateurs de paris sportifs et de jeux de hasard sur 1xBet peuvent trouver des codes promo sur des sites specialises. Ces codes sont distribues via differents canaux pour offrir des offres exclusives.
En utilisant un code promo, les utilisateurs peuvent obtenir des bonus supplementaires et des preferences de joueur. Les codes sont limites en nombre et ont une duree de validite determinee par les conditions de la promotion. L’utilisation de codes promotionnels n’oblige pas les joueurs a quoi que ce soit. Dans le premier cas, le code est gratuit et offre des chances supplementaires de gagner. Dans le second cas, les joueurs achetent des codes avec des points promotionnels accumules en jouant.
Comment Utiliser un Code Promo 1xBet
c’est quoi le code promo dans 1xbet : 1XLIVE777 – Profitez d’une offre de bienvenue de 100% jusqu’a 130€/$. Ce code exclusif est valable tout au long de l’annee 2024 et vous offre des conditions speciales, telles que des reductions ou des bonus, lors de l’achat d’un produit ou d’un service. Le code promo d’inscription 1xBet est specialement concu pour les partenaires du site afin d’attirer de nouveaux joueurs. Le meilleur ? C’est totalement gratuit a utiliser ! Il vous suffit de copier le code et de cliquer sur le lien fourni. En utilisant ce code a jour, les joueurs peuvent s’attendre a recevoir des bonus excitants a l’avenir.
Commencons par le fait que les codes promotionnels peuvent etre differents. Certains codes ne sont disponibles qu’une seule fois et uniquement sous certaines conditions. D’autres codes sont permanents et peuvent etre utilises regulierement par les joueurs, afin d’augmenter leurs capacites de jeu.
Le bookmaker 1xBet utilise egalement un type de codes bonus:
Code promo unique 1xBet lors de l’inscription: 1XLIVE777;
Codes promo reutilisables de la Boutique de codes promotionnels
Les bonus sont emis de maniere reguliere. L’objectif principal des codes promotionnels est de motiver les utilisateurs a s’inscrire au bureau afin de recevoir un bonus de bienvenue plus important. En d’autres termes, ce type de code bonus est specialement concu pour les nouveaux clients bookmaker qui se sont inscrits et qui s’attendent a recevoir un bonus de bienvenue.
Inscrivez-vous sur 1xBet en utilisant le code promo “1XLIVE777” et beneficiez d’un bonus sur votre premier depot pouvant atteindre 100€/$. Ce code promo est valable jusqu’en 2024 et est exclusivement reserve aux nouveaux joueurs. En utilisant le code, vous pouvez profiter d’un bonus augmente de 100%. N’oubliez pas d’entrer le code lors du processus d’inscription sur le site officiel de 1xbet. Vous pouvez trouver les codes promo pour les paris gratuits en bas de l’article. Choisissez l’un des codes promo disponibles pour aujourd’hui. Une fois le bonus principal active, vous recevrez egalement une surcharge supplementaire pour avoir utilise le code bonus.
Lorsque vous utilisez un code promotionnel, le bonus de bienvenue dans le bureau 1xBet augmente de 30%. Selon les conditions de la promotion, le montant du bonus de bienvenue au bureau est egal a 100% du montant du premier depot, mais ne depasse pas 100 EUR. Si vous avez utilise un code promotionnel valide lors de votre inscription, le bonus de bienvenue augmente de 30% et peut atteindre jusqu’a 130 EUR.
Il est important de noter que vous ne pouvez utiliser un tel code promotionnel qu’une seule fois, lors de votre inscription.
Dans aucune autre situation, un tel code bonus ne peut etre applique.
Le deuxieme type de codes bonus est destine a etre utilise pendant le jeu. Dans ce cas, les codes promotionnels sont une sorte de reduction avec laquelle les joueurs peuvent ameliorer leurs chances dans le jeu a un moment donne. Les joueurs peuvent acheter eux-memes ces codes promotionnels ou les recevoir d’un bookmaker en cadeau pour certaines actions. Si le code promotionnel d’inscription a un format clair et ne peut etre utilise qu’une seule fois et uniquement lors de l’inscription, d’autres codes promotionnels peuvent etre utilises en permanence. Leur utilisation est etroitement liee au gameplay.
Par exemple! Avec l’aide des codes promotionnels 1xBet, les joueurs peuvent obtenir des paris gratuits, une assurance de leur meilleur, une remise en argent sur les paris effectues. Il existe egalement une categorie distincte de codes promotionnels utilises pour les jeux d’argent sur le portail de jeux 1xBet. Ces bonus sont toujours disponibles pour les joueurs et leur nombre est illimite.
Промокод 1xBet 2024 (Бонус при Регистрации 32500 RUB)
Промокод 1xBet 2024 – 1XFREE777, новые пользователи букмекерской компании могут воспользоваться приветственным бонусом в размере 100% от суммы депозита до 32 500 рублей (или эквивалентную сумму в другой валюте €100). Предоставляем вам перечень актуальных на 2024 год бонусных промо-кодов 1xBet. Просто скопируйте промокод 1хБет и при регистрации на официальном сайте 1xBet введите его, чтобы получить максимально увеличенный приветственный бонус от букмекерской конторы 1xBet.
1xBet Промокод – 1XFREE777
Актуальные промокоды для 1хБет ? Акция 2024 ? Бонус коды ? Фрибет Бонусы за регистрацию ? Программа лояльности ? Кэшбэк!
Промокод 1xBet при регистрации – это 1XFREE777. Только с помощью него вы получите бонус в размере 100% до 32500 рублей. Все остальные коды не действительны и не предоставляют такого бонуса. Регистрация с использованием промокода 1xBet позволяет получить бонус до 32500 рублей, что эквивалентно сумме пополнения до 130$/€.
Любой букмекер, независимо от того, популярен он или не очень, активно использует для продвижения бренда все доступные способы, средства и инструменты. Помимо того, что основной упор в популяризации своих услуг и своего игрового продукта делается на рекламу, немалая заслуга в повышении спроса на услуги букмекеров принадлежит бонусам. Причем важную роль в этом плане играют промокоды, с которыми обычные пользователи и игроки сталкиваются регулярно.
Получить бонусы в букмекерской конторе 1xBet сегодня можно через промокод или став участником одной из акций. Предложения доступны каждому, как новичкам, так и игрокам со стажем.
Давайте разберемся в тонкостях бонусной программы букмекера 1xbet. Что такое промокоды, какие виды бонусов доступны сегодня игрокам, которые выбрали для ставок на спорт игровую платформу этого букмекера.
Промокод 1xBet – 1XFREE777. Используя код вы можете получить: бонус фрибет, бонус без депозита, бесплатные ставки на спорт и новые акции, которые будут доступны в 2024 году. Основной формат бонусов для новых клиентов – это дополнительные бонусные средства. Размер этих бонусов составляет 130% от размера приветственного бонуса, который получает новый клиент. Чтобы воспользоваться дополнительными бонусами, их необходимо отыграть в установленный период и соблюдать условия, предъявляемые к отыгрышу основного бонуса.
Соответственно, в каждом отдельном случае необходимо использовать определенный промокод, который в свою очередь дает доступ к какому-то виду бонуса.
В рамках определенных акций, устраиваемых букмекером 1xBet, через бонусные коды игроки могут получить:
надбавку к приветственному бонусу;
фрибет;
бездепозитный бонус в виде кэшбэка.
Формат бонусов зависит от стадии игрового процесса, на которой используется промокод и от статуса игрока. Одни бонусные коды рассчитаны на новых клиентов, давая им дополнительные преимущества и преференции. Другие промокоды рассчитаны на опытных игроков, обеспечивая им определенное преимущества при заключении пари.
Ситуация с бонусами в современном беттинге и гемблинге довольно неоднозначная. Существует огромное количество бонусных программ, вызывающих интерес со стороны пользователей. Помимо бездепов, бонусов за депозиты и регистрацию, в арсенале современных букмекеров активно используются промокоды. Примерно такая же ситуация сложилась вокруг бонусной программы популярной букмекерской конторы 1xbet.
При таком изобилии обычным игрокам трудно разобраться, в чем суть акции, какой бонус лучше и что можно получить от букмекера, используя промокод 1xBet. Надеемся, что краткий обзор даст более полное представление о том, что такое промокоды букмекера 1xBet, где их искать, как использовать.
Промокод 1хБет расскажем подробнее в этой статье сайт – webmineral.ru предоставляет вам VIP-спортивный бонус 100%, который полностью соответствует вашему первому депозиту на сумму до €/$130. Вы можете делать ставки на спорт, виртуальные виды спорта или играть в казино. Это предложение действительно на протяжении всего 2024 года.
Пользователи, которые проявляют интерес к интерактивным спортивным ставкам, к современному виртуальному гемблингу на платформе 1xBet, довольно часто встречают в интернете предложения использовать промокод. Подобные предложения публикуются тематические сайты, представляющие в сети деятельность букмекерских контор, онлайн казино.
Именно через такие источники и распространяются промокоды.
Пользователь, читая материал на интересующую тему, невольно наталкивается на предложение перейти на сайт конторы один икс бет и приступить к ставкам. Однако подобное предложение включает в себя и мотивацию. Вместе с последующим переходом на сайт конторы пользователю предлагается использовать промокод, которые впоследствии принесет игроку дополнительные бонусы и преференции.
Предложение использовать промокод бесплатное. Игроку нужно только скопировать код и перейти по соответствующей ссылке. Если код актуальный, игрок получит в дальнейшем какие-то бонусы.
Такие предложения в интернете публикуются регулярно. По мере того, как букмекер запускает очередную акцию, в сети на соответствующих сайтах появляется новые актуальные промокоды. Букмекер не занимается распространением бонусных кодов. Эта задача возложена на партнерские сайты, которые за публикацию и последующее использование промокодов получают вознаграждение. Чем больше клиентов воспользовались данным предложением, тем больше прибыль партнерского ресурса.
Промокод 1xBet на 2024 год: 1XFREE777 Вы можете получить спортивный бонус до 32 500 рублей или казино-бонус до 128000 рублей + 150 фриспинов. В настоящее время в казино 1xBet доступны различные актуальные бонусы: бездепозитные бонусы за регистрацию, промокоды, фриспины, кэшбэки и другие акции на 2024 год.
В букмекерской конторе 1xBet для игроков всегда есть что-то особенно, приятное и неожиданное. Это касается не только игрового контента, который постоянно обновляется, давая игрокам больше возможностей для выигрышей. Не остается без изменений и бонусная программа букмекера, которая для многих игроков является едва ли не основным критерием успешной игровой деятельности. Ассортимент бонусной программы 1 икс Бет впечатляет. Это и приветственный бонус, и депозитные бонусы и промокоды 1xBet. Одним словом, интересных предложений предостаточно. Остается только сделать правильный выбор.
Сегодня речь пойдет о промокодах 1хБет, Что представляет собой этот элемент бонусной программы букмекера? Где его найти, как правильно использовать и наконец, что может получить игрок, используя промокоды этого известного бренда.
semaglutide
buy semaglutide online from india
buy semaglutide pill form for adults
generic rybelsus
Промокод 1xBet 2024 (Бонус при Регистрации 32500 RUB)
Промокод 1xBet 2024 – 1XFREE777, новые пользователи букмекерской компании могут воспользоваться приветственным бонусом в размере 100% от суммы депозита до 32 500 рублей (или эквивалентную сумму в другой валюте €100). Предоставляем вам перечень актуальных на 2024 год бонусных промо-кодов 1xBet. Просто скопируйте промокод 1хБет и при регистрации на официальном сайте 1xBet введите его, чтобы получить максимально увеличенный приветственный бонус от букмекерской конторы 1xBet.
1xBet Промокод – 1XFREE777
Актуальные промокоды для 1хБет ? Акция 2024 ? Бонус коды ? Фрибет Бонусы за регистрацию ? Программа лояльности ? Кэшбэк!
Промокод 1xBet при регистрации – это 1XFREE777. Только с помощью него вы получите бонус в размере 100% до 32500 рублей. Все остальные коды не действительны и не предоставляют такого бонуса. Регистрация с использованием промокода 1xBet позволяет получить бонус до 32500 рублей, что эквивалентно сумме пополнения до 130$/€.
Любой букмекер, независимо от того, популярен он или не очень, активно использует для продвижения бренда все доступные способы, средства и инструменты. Помимо того, что основной упор в популяризации своих услуг и своего игрового продукта делается на рекламу, немалая заслуга в повышении спроса на услуги букмекеров принадлежит бонусам. Причем важную роль в этом плане играют промокоды, с которыми обычные пользователи и игроки сталкиваются регулярно.
Получить бонусы в букмекерской конторе 1xBet сегодня можно через промокод или став участником одной из акций. Предложения доступны каждому, как новичкам, так и игрокам со стажем.
Давайте разберемся в тонкостях бонусной программы букмекера 1xbet. Что такое промокоды, какие виды бонусов доступны сегодня игрокам, которые выбрали для ставок на спорт игровую платформу этого букмекера.
Промокод 1xBet – 1XFREE777. Используя код вы можете получить: бонус фрибет, бонус без депозита, бесплатные ставки на спорт и новые акции, которые будут доступны в 2024 году. Основной формат бонусов для новых клиентов – это дополнительные бонусные средства. Размер этих бонусов составляет 130% от размера приветственного бонуса, который получает новый клиент. Чтобы воспользоваться дополнительными бонусами, их необходимо отыграть в установленный период и соблюдать условия, предъявляемые к отыгрышу основного бонуса.
Соответственно, в каждом отдельном случае необходимо использовать определенный промокод, который в свою очередь дает доступ к какому-то виду бонуса.
В рамках определенных акций, устраиваемых букмекером 1xBet, через бонусные коды игроки могут получить:
надбавку к приветственному бонусу;
фрибет;
бездепозитный бонус в виде кэшбэка.
Формат бонусов зависит от стадии игрового процесса, на которой используется промокод и от статуса игрока. Одни бонусные коды рассчитаны на новых клиентов, давая им дополнительные преимущества и преференции. Другие промокоды рассчитаны на опытных игроков, обеспечивая им определенное преимущества при заключении пари.
Ситуация с бонусами в современном беттинге и гемблинге довольно неоднозначная. Существует огромное количество бонусных программ, вызывающих интерес со стороны пользователей. Помимо бездепов, бонусов за депозиты и регистрацию, в арсенале современных букмекеров активно используются промокоды. Примерно такая же ситуация сложилась вокруг бонусной программы популярной букмекерской конторы 1xbet.
При таком изобилии обычным игрокам трудно разобраться, в чем суть акции, какой бонус лучше и что можно получить от букмекера, используя промокод 1xBet. Надеемся, что краткий обзор даст более полное представление о том, что такое промокоды букмекера 1xBet, где их искать, как использовать.
Промокод 1хБет расскажем подробнее в этой статье сайт – webmineral.ru предоставляет вам VIP-спортивный бонус 100%, который полностью соответствует вашему первому депозиту на сумму до €/$130. Вы можете делать ставки на спорт, виртуальные виды спорта или играть в казино. Это предложение действительно на протяжении всего 2024 года.
Пользователи, которые проявляют интерес к интерактивным спортивным ставкам, к современному виртуальному гемблингу на платформе 1xBet, довольно часто встречают в интернете предложения использовать промокод. Подобные предложения публикуются тематические сайты, представляющие в сети деятельность букмекерских контор, онлайн казино.
Именно через такие источники и распространяются промокоды.
Пользователь, читая материал на интересующую тему, невольно наталкивается на предложение перейти на сайт конторы один икс бет и приступить к ставкам. Однако подобное предложение включает в себя и мотивацию. Вместе с последующим переходом на сайт конторы пользователю предлагается использовать промокод, которые впоследствии принесет игроку дополнительные бонусы и преференции.
Предложение использовать промокод бесплатное. Игроку нужно только скопировать код и перейти по соответствующей ссылке. Если код актуальный, игрок получит в дальнейшем какие-то бонусы.
Такие предложения в интернете публикуются регулярно. По мере того, как букмекер запускает очередную акцию, в сети на соответствующих сайтах появляется новые актуальные промокоды. Букмекер не занимается распространением бонусных кодов. Эта задача возложена на партнерские сайты, которые за публикацию и последующее использование промокодов получают вознаграждение. Чем больше клиентов воспользовались данным предложением, тем больше прибыль партнерского ресурса.
Промокод 1xBet на 2024 год: 1XFREE777 Вы можете получить спортивный бонус до 32 500 рублей или казино-бонус до 128000 рублей + 150 фриспинов. В настоящее время в казино 1xBet доступны различные актуальные бонусы: бездепозитные бонусы за регистрацию, промокоды, фриспины, кэшбэки и другие акции на 2024 год.
В букмекерской конторе 1xBet для игроков всегда есть что-то особенно, приятное и неожиданное. Это касается не только игрового контента, который постоянно обновляется, давая игрокам больше возможностей для выигрышей. Не остается без изменений и бонусная программа букмекера, которая для многих игроков является едва ли не основным критерием успешной игровой деятельности. Ассортимент бонусной программы 1 икс Бет впечатляет. Это и приветственный бонус, и депозитные бонусы и промокоды 1xBet. Одним словом, интересных предложений предостаточно. Остается только сделать правильный выбор.
Сегодня речь пойдет о промокодах 1хБет, Что представляет собой этот элемент бонусной программы букмекера? Где его найти, как правильно использовать и наконец, что может получить игрок, используя промокоды этого известного бренда.
Советуем посетить сайт об авто https://vektor-meh.ru/
Также не забудьте добавить сайт в закладки: https://vektor-meh.ru/
buy semaglutide online
Code Promo pour l’inscription 1xBet (Verifie 2024)
Code promo pour 1xBet : 1XLIVE777 – Profitez-en lors de votre inscription et beneficiez d’un bonus de bienvenue gratuit de 130€/$, equivalent a 100% de votre depot initial. Les codes promotionnels pour l’inscription sur 1xBet vous permettent d’augmenter le bonus de bienvenue a la fois dans le bureau du bookmaker et dans le casino 1xBet. Voici une compilation des derniers codes promo 1xBet pour l’annee 2024.
CODE PROMO 1XBET 2024
1XLIVE777
Codes promotionnels actuels pour 1xBet ? Action 2024 ? Codes bonus ? Bonus de pari gratuit pour l’inscription.
Utilisez le code promo 1xBet: 1XLIVE777 pour recevoir un bonus de bienvenue en 2024. Les nouveaux joueurs seront eligibles a un bonus VIP de 200% jusqu’a 130€/$. Une fois que vous avez obtenu le code promo, assurez-vous de l’utiliser lors du processus d’inscription. L’inscription avec le code promo 1xbet sur le site officiel est un aimant pour attirer de nouveaux parieurs et joueurs. Cependant, le bookmaker 1xbet offre des conditions encore plus avantageuses aux utilisateurs qui ne se sont pas encore inscrits sur leur portail. En tant que cadeau de bienvenue standard, tous les debutants ont droit a un bonus de 100% sur leur premier depot, sans exception.
Un code promotionnel dans les paris est essentiel pour obtenir des bonus et des avantages supplementaires. Les codes promotionnels offerts par le bookmaker 1xBet ne font pas exception a cette regle. Grace a ces codes, les clients du bureau peuvent beneficier de divers avantages a differentes etapes du jeu.
Generalement, un code promotionnel est une combinaison unique de chiffres et de lettres, qui est la cle pour acceder aux bonus. Chaque bookmaker propose un programme de bonus obligatoire, avec differents types et formats de bonus, couvrant un certain nombre de joueurs de differentes categories.
Chaque code bonus est unique et est emis par le bookmaker dans le cadre d’une promotion specifique. Selon les termes de la promotion, l’utilisation d’un tel code offre aux joueurs certains avantages. Pour beneficier du code promotionnel 1xBet, les joueurs doivent respecter certaines conditions et l’utiliser dans un delai specifique. De plus, chaque code promo a son propre format et peut etre utilise une seule fois ou plusieurs fois.
Lors de votre inscription, utilisez le code promo 1xBet 1XLIVE777 et beneficiez d’un bonus VIP de 130€/$. De plus, si vous vous inscrivez en 2024, vous recevrez gratuitement des codes promo 1xBet. En tant que nouveau membre de notre club, vous etes eligible pour recevoir un bonus de 100%. Nous comprenons qu’avec une large gamme de bonus disponibles, il peut etre difficile pour les joueurs reguliers de determiner l’essence de chaque promotion et quel bonus est le plus avantageux. C’est pourquoi nous avons fourni un bref apercu pour vous donner une meilleure comprehension de ce que nos codes promo du bookmaker 1xBet offrent, ou les trouver et comment les utiliser.
Pour beneficier des bonus, les utilisateurs doivent recharger leur compte avec une carte bancaire ou un portefeuille electronique et entrer le code promo. Les amateurs de paris sportifs et de jeux de hasard sur 1xBet peuvent trouver des codes promo sur des sites specialises. Ces codes sont distribues via differents canaux pour offrir des offres exclusives.
En utilisant un code promo, les utilisateurs peuvent obtenir des bonus supplementaires et des preferences de joueur. Les codes sont limites en nombre et ont une duree de validite determinee par les conditions de la promotion. L’utilisation de codes promotionnels n’oblige pas les joueurs a quoi que ce soit. Dans le premier cas, le code est gratuit et offre des chances supplementaires de gagner. Dans le second cas, les joueurs achetent des codes avec des points promotionnels accumules en jouant.
Comment Utiliser un Code Promo 1xBet
code promo pour 1x pari : 1XLIVE777 – Profitez d’une offre de bienvenue de 100% jusqu’a 130€/$. Ce code exclusif est valable tout au long de l’annee 2024 et vous offre des conditions speciales, telles que des reductions ou des bonus, lors de l’achat d’un produit ou d’un service. Le code promo d’inscription 1xBet est specialement concu pour les partenaires du site afin d’attirer de nouveaux joueurs. Le meilleur ? C’est totalement gratuit a utiliser ! Il vous suffit de copier le code et de cliquer sur le lien fourni. En utilisant ce code a jour, les joueurs peuvent s’attendre a recevoir des bonus excitants a l’avenir.
Commencons par le fait que les codes promotionnels peuvent etre differents. Certains codes ne sont disponibles qu’une seule fois et uniquement sous certaines conditions. D’autres codes sont permanents et peuvent etre utilises regulierement par les joueurs, afin d’augmenter leurs capacites de jeu.
Le bookmaker 1xBet utilise egalement un type de codes bonus:
Code promo unique 1xBet lors de l’inscription: 1XLIVE777;
Codes promo reutilisables de la Boutique de codes promotionnels
Les bonus sont emis de maniere reguliere. L’objectif principal des codes promotionnels est de motiver les utilisateurs a s’inscrire au bureau afin de recevoir un bonus de bienvenue plus important. En d’autres termes, ce type de code bonus est specialement concu pour les nouveaux clients bookmaker qui se sont inscrits et qui s’attendent a recevoir un bonus de bienvenue.
Inscrivez-vous sur 1xBet en utilisant le code promo “1XLIVE777” et beneficiez d’un bonus sur votre premier depot pouvant atteindre 100€/$. Ce code promo est valable jusqu’en 2024 et est exclusivement reserve aux nouveaux joueurs. En utilisant le code, vous pouvez profiter d’un bonus augmente de 100%. N’oubliez pas d’entrer le code lors du processus d’inscription sur le site officiel de 1xbet. Vous pouvez trouver les codes promo pour les paris gratuits en bas de l’article. Choisissez l’un des codes promo disponibles pour aujourd’hui. Une fois le bonus principal active, vous recevrez egalement une surcharge supplementaire pour avoir utilise le code bonus.
Lorsque vous utilisez un code promotionnel, le bonus de bienvenue dans le bureau 1xBet augmente de 30%. Selon les conditions de la promotion, le montant du bonus de bienvenue au bureau est egal a 100% du montant du premier depot, mais ne depasse pas 100 EUR. Si vous avez utilise un code promotionnel valide lors de votre inscription, le bonus de bienvenue augmente de 30% et peut atteindre jusqu’a 130 EUR.
Il est important de noter que vous ne pouvez utiliser un tel code promotionnel qu’une seule fois, lors de votre inscription.
Dans aucune autre situation, un tel code bonus ne peut etre applique.
Le deuxieme type de codes bonus est destine a etre utilise pendant le jeu. Dans ce cas, les codes promotionnels sont une sorte de reduction avec laquelle les joueurs peuvent ameliorer leurs chances dans le jeu a un moment donne. Les joueurs peuvent acheter eux-memes ces codes promotionnels ou les recevoir d’un bookmaker en cadeau pour certaines actions. Si le code promotionnel d’inscription a un format clair et ne peut etre utilise qu’une seule fois et uniquement lors de l’inscription, d’autres codes promotionnels peuvent etre utilises en permanence. Leur utilisation est etroitement liee au gameplay.
Par exemple! Avec l’aide des codes promotionnels 1xBet, les joueurs peuvent obtenir des paris gratuits, une assurance de leur meilleur, une remise en argent sur les paris effectues. Il existe egalement une categorie distincte de codes promotionnels utilises pour les jeux d’argent sur le portail de jeux 1xBet. Ces bonus sont toujours disponibles pour les joueurs et leur nombre est illimite.
선도적인 iGaming 콘텐츠 제공 업체인 최신 프라그마틱 게임은 혁신적이고 표준화된 콘텐츠를 통해 슬롯, 라이브 카지노, 빙고 등 다양한 제품을 고객에게 제공합니다.
에그벳
프라그마틱의 게임은 항상 최고 수준의 퀄리티를 유지하고 있어요. 이번에도 그런 훌륭한 게임을 만났나요?
http://customercaresupportnumber.com/
https://www.emulecenter.com
https://www.mrpis.com
Code Promo pour l’inscription 1xBet (Verifie 2024)
Code promo pour 1xBet : 1XLIVE777 – Profitez-en lors de votre inscription et beneficiez d’un bonus de bienvenue gratuit de 130€/$, equivalent a 100% de votre depot initial. Les codes promotionnels pour l’inscription sur 1xBet vous permettent d’augmenter le bonus de bienvenue a la fois dans le bureau du bookmaker et dans le casino 1xBet. Voici une compilation des derniers codes promo 1xBet pour l’annee 2024.
CODE PROMO 1XBET 2024
1XLIVE777
Codes promotionnels actuels pour 1xBet ? Action 2024 ? Codes bonus ? Bonus de pari gratuit pour l’inscription.
Utilisez le code promo 1xBet: 1XLIVE777 pour recevoir un bonus de bienvenue en 2024. Les nouveaux joueurs seront eligibles a un bonus VIP de 200% jusqu’a 130€/$. Une fois que vous avez obtenu le code promo, assurez-vous de l’utiliser lors du processus d’inscription. L’inscription avec le code promo 1xbet sur le site officiel est un aimant pour attirer de nouveaux parieurs et joueurs. Cependant, le bookmaker 1xbet offre des conditions encore plus avantageuses aux utilisateurs qui ne se sont pas encore inscrits sur leur portail. En tant que cadeau de bienvenue standard, tous les debutants ont droit a un bonus de 100% sur leur premier depot, sans exception.
Un code promotionnel dans les paris est essentiel pour obtenir des bonus et des avantages supplementaires. Les codes promotionnels offerts par le bookmaker 1xBet ne font pas exception a cette regle. Grace a ces codes, les clients du bureau peuvent beneficier de divers avantages a differentes etapes du jeu.
Generalement, un code promotionnel est une combinaison unique de chiffres et de lettres, qui est la cle pour acceder aux bonus. Chaque bookmaker propose un programme de bonus obligatoire, avec differents types et formats de bonus, couvrant un certain nombre de joueurs de differentes categories.
Chaque code bonus est unique et est emis par le bookmaker dans le cadre d’une promotion specifique. Selon les termes de la promotion, l’utilisation d’un tel code offre aux joueurs certains avantages. Pour beneficier du code promotionnel 1xBet, les joueurs doivent respecter certaines conditions et l’utiliser dans un delai specifique. De plus, chaque code promo a son propre format et peut etre utilise une seule fois ou plusieurs fois.
Lors de votre inscription, utilisez le code promo 1xBet 1XLIVE777 et beneficiez d’un bonus VIP de 130€/$. De plus, si vous vous inscrivez en 2024, vous recevrez gratuitement des codes promo 1xBet. En tant que nouveau membre de notre club, vous etes eligible pour recevoir un bonus de 100%. Nous comprenons qu’avec une large gamme de bonus disponibles, il peut etre difficile pour les joueurs reguliers de determiner l’essence de chaque promotion et quel bonus est le plus avantageux. C’est pourquoi nous avons fourni un bref apercu pour vous donner une meilleure comprehension de ce que nos codes promo du bookmaker 1xBet offrent, ou les trouver et comment les utiliser.
Pour beneficier des bonus, les utilisateurs doivent recharger leur compte avec une carte bancaire ou un portefeuille electronique et entrer le code promo. Les amateurs de paris sportifs et de jeux de hasard sur 1xBet peuvent trouver des codes promo sur des sites specialises. Ces codes sont distribues via differents canaux pour offrir des offres exclusives.
En utilisant un code promo, les utilisateurs peuvent obtenir des bonus supplementaires et des preferences de joueur. Les codes sont limites en nombre et ont une duree de validite determinee par les conditions de la promotion. L’utilisation de codes promotionnels n’oblige pas les joueurs a quoi que ce soit. Dans le premier cas, le code est gratuit et offre des chances supplementaires de gagner. Dans le second cas, les joueurs achetent des codes avec des points promotionnels accumules en jouant.
Comment Utiliser un Code Promo 1xBet
Code promo de la machine a sous 1xbet : 1XLIVE777 – Profitez d’une offre de bienvenue de 100% jusqu’a 130€/$. Ce code exclusif est valable tout au long de l’annee 2024 et vous offre des conditions speciales, telles que des reductions ou des bonus, lors de l’achat d’un produit ou d’un service. Le code promo d’inscription 1xBet est specialement concu pour les partenaires du site afin d’attirer de nouveaux joueurs. Le meilleur ? C’est totalement gratuit a utiliser ! Il vous suffit de copier le code et de cliquer sur le lien fourni. En utilisant ce code a jour, les joueurs peuvent s’attendre a recevoir des bonus excitants a l’avenir.
Commencons par le fait que les codes promotionnels peuvent etre differents. Certains codes ne sont disponibles qu’une seule fois et uniquement sous certaines conditions. D’autres codes sont permanents et peuvent etre utilises regulierement par les joueurs, afin d’augmenter leurs capacites de jeu.
Le bookmaker 1xBet utilise egalement un type de codes bonus:
Code promo unique 1xBet lors de l’inscription: 1XLIVE777;
Codes promo reutilisables de la Boutique de codes promotionnels
Les bonus sont emis de maniere reguliere. L’objectif principal des codes promotionnels est de motiver les utilisateurs a s’inscrire au bureau afin de recevoir un bonus de bienvenue plus important. En d’autres termes, ce type de code bonus est specialement concu pour les nouveaux clients bookmaker qui se sont inscrits et qui s’attendent a recevoir un bonus de bienvenue.
Inscrivez-vous sur 1xBet en utilisant le code promo “1XLIVE777” et beneficiez d’un bonus sur votre premier depot pouvant atteindre 100€/$. Ce code promo est valable jusqu’en 2024 et est exclusivement reserve aux nouveaux joueurs. En utilisant le code, vous pouvez profiter d’un bonus augmente de 100%. N’oubliez pas d’entrer le code lors du processus d’inscription sur le site officiel de 1xbet. Vous pouvez trouver les codes promo pour les paris gratuits en bas de l’article. Choisissez l’un des codes promo disponibles pour aujourd’hui. Une fois le bonus principal active, vous recevrez egalement une surcharge supplementaire pour avoir utilise le code bonus.
Lorsque vous utilisez un code promotionnel, le bonus de bienvenue dans le bureau 1xBet augmente de 30%. Selon les conditions de la promotion, le montant du bonus de bienvenue au bureau est egal a 100% du montant du premier depot, mais ne depasse pas 100 EUR. Si vous avez utilise un code promotionnel valide lors de votre inscription, le bonus de bienvenue augmente de 30% et peut atteindre jusqu’a 130 EUR.
Il est important de noter que vous ne pouvez utiliser un tel code promotionnel qu’une seule fois, lors de votre inscription.
Dans aucune autre situation, un tel code bonus ne peut etre applique.
Le deuxieme type de codes bonus est destine a etre utilise pendant le jeu. Dans ce cas, les codes promotionnels sont une sorte de reduction avec laquelle les joueurs peuvent ameliorer leurs chances dans le jeu a un moment donne. Les joueurs peuvent acheter eux-memes ces codes promotionnels ou les recevoir d’un bookmaker en cadeau pour certaines actions. Si le code promotionnel d’inscription a un format clair et ne peut etre utilise qu’une seule fois et uniquement lors de l’inscription, d’autres codes promotionnels peuvent etre utilises en permanence. Leur utilisation est etroitement liee au gameplay.
Par exemple! Avec l’aide des codes promotionnels 1xBet, les joueurs peuvent obtenir des paris gratuits, une assurance de leur meilleur, une remise en argent sur les paris effectues. Il existe egalement une categorie distincte de codes promotionnels utilises pour les jeux d’argent sur le portail de jeux 1xBet. Ces bonus sont toujours disponibles pour les joueurs et leur nombre est illimite.
My spouse and I stumbled over here by a different website and thought I might as well check things out.
I like what I see so i am just following you. Look forward
to finding out about your web page for a second time.
buy ozempic cheap
rybelsus medication
semaglutide drug
buy rybelsus in mexico
wegovy 7mg
Hello! Iam Natalie, very nice and sexy bi girl from France!
I like chat and play with mens and womens)
Not enough zest in life? Video roulettes with models for every taste and theme, here >>>>
Meet the best online resource for webcam models! Free, available 24/7, with a variety of fantasies.
Your online arena for fantasy! Chat roulette with webcam models of any genre. Fast, convenient, in HD+ quality!
https://tr.chatpornostars.com
https://ee.chaturbate18.com
Wait there personally YOU!!!
buy wegovy canada
buy ozempic for weight loss
semaglutide order
Здравствуйте!
Шерегеш, расположенный в Кемеровской области, является одним из самых популярных горнолыжных курортов в России. Этот курорт славится красивыми горными пейзажами, разнообразными трассами и хорошо развитой инфраструктурой для туристов. Если вы находитесь в Новокузнецке и планируете посетить Шерегеш для активного отдыха на горных лыжах или сноуборде, важно знать, как добраться до этого курорта.
Недавно ездили туда большой компанией, это было действительно приключением!
Кстати, трансфер помогли сделать в компании https://transfera-sheregesh.ru, все прошло на 5+
Прибыв в Шерегеш, вы окажетесь в одном из самых популярных мест для горнолыжного и сноубордического отдыха в Кузбассе. Здесь вас ждут разнообразные горные склоны, оборудованные подъемниками, арендой оборудования и гостиницами. Не забудьте подготовиться к зимнему отдыху, взяв с собой теплую одежду, горнолыжное или сноубордическое оборудование (если у вас его нет, его можно арендовать на месте) и защитные аксессуары.
Теперь, когда вы знаете, как добраться до Шерегеша из Новокузнецка, вы готовы отправиться на приключение и насладиться зимними радостями на этом удивительном горнолыжном курорте.
Трансферв Шерегеш из Новокузнецка жд вокзала
Трансфер жд Новокузнецк Шерегеш
Новокузнецк Шерегеш трансфер
аэропорт Новокузнецк Шерегеш трансфер
трансфер Новокузнецк аэропорт Шерегеш
Новокузнецк трансфер в Шерегеш
Удачи!
semaglutide for weight loss
semaglutide ozempic
semaglutide tablets 7 mg
semaglutide online cheap
rybelsus buy australia
프라그마틱 플레이의 무료 슬롯로 언제든 즐거운 게임을 경험하세요.
프라그마틱 슬롯 무료
프라그마틱의 게임은 언제나 풍부한 그래픽과 흥미진진한 플레이로 유명해요. 이번에 새로운 게임이 나왔나요?
https://www.buycipro.site
https://www.bellarel.com
https://www.edommusic.com
wegovy online pharmacy
buy semaglutide
rybelsus 3 mg
semaglutide weight loss
alepz.com
“생각나는 게 있니?”오랫동안 Liu Jie의 침묵을 지켜본 Liu Jian은 Liu Jie의 이상함을 깨달았습니다.
https://flashsaleprop.com/
accessories
https://referatystatistika.ru/
wegovy weight loss
Все рабочие промокоды 1xBet на сегодня вы можете найти бесплатно на этом сайте. Используйте промокод *1XFREE777* для получения бонуса до 32500 руб при регистрации. Приятно, что новички могут ввести промокод при регистрации, который даст право на получение приветственного бонуса на сумму до 32500 рублей. Самое главное — это относиться к ставкам и к игре в целом ответственно! Не стоит играть на последние или заемные деньги, стремясь таким образом заработать себе на жизнь.
Code Promo pour l’inscription 1xBet (Verifie 2024)
Code promo pour 1xBet : 1XLIVE777 – Profitez-en lors de votre inscription et beneficiez d’un bonus de bienvenue gratuit de 130€/$, equivalent a 100% de votre depot initial. Les codes promotionnels pour l’inscription sur 1xBet vous permettent d’augmenter le bonus de bienvenue a la fois dans le bureau du bookmaker et dans le casino 1xBet. Voici une compilation des derniers codes promo 1xBet pour l’annee 2024.
Code promo 1xbet pour aujourd’hui : 1XLIVE777 – Profitez d’une offre de bienvenue de 100% jusqu’a 130€/$. Ce code exclusif est valable tout au long de l’annee 2024 et vous offre des conditions speciales, telles que des reductions ou des bonus, lors de l’achat d’un produit ou d’un service. Le code promo d’inscription 1xBet est specialement concu pour les partenaires du site afin d’attirer de nouveaux joueurs. Le meilleur ? C’est totalement gratuit a utiliser ! Il vous suffit de copier le code et de cliquer sur le lien fourni. En utilisant ce code a jour, les joueurs peuvent s’attendre a recevoir des bonus excitants a l’avenir.
Codes promotionnels actuels pour 1xBet ? Action 2024 ? Codes bonus ? Bonus de pari gratuit pour l’inscription.
Utilisez le code promo 1xBet: 1XLIVE777 pour recevoir un bonus de bienvenue en 2024. Les nouveaux joueurs seront eligibles a un bonus VIP de 200% jusqu’a 130€/$. Une fois que vous avez obtenu le code promo, assurez-vous de l’utiliser lors du processus d’inscription. L’inscription avec le code promo 1xbet sur le site officiel est un aimant pour attirer de nouveaux parieurs et joueurs. Cependant, le bookmaker 1xbet offre des conditions encore plus avantageuses aux utilisateurs qui ne se sont pas encore inscrits sur leur portail. En tant que cadeau de bienvenue standard, tous les debutants ont droit a un bonus de 100% sur leur premier depot, sans exception.
rybelsus buy australia
baseballoutsider.com
“당신의 하인… 제 생각에는…” Xiao Jing은 겨우 반 문장을 마쳤습니다.
wegovy online prescription
semaglutide online uk
https://easykupitkvartiru.ru/
rybelsus order
Официальный промокод 1ХБет при регистрации, только по нему ты получишь бонус в 32500 рублей, все остальные коды не действительные и не дают такой бонус. 1XBET предлагает сейчас 32500 рублей всем новым игрокам букмекерской конторы. 1хбет промокоды на день рождения. Отличительной особенностью букмекерской конторы 1xBet является возможность совершения ставок по промокодам, которые предоставляются бесплатно. Это позволяет новичку заработать деньги, не делая никаких вложений. Однако чтобы получить промокод на ставку и воспользоваться им, следует разобраться с некоторыми инструкциями. Бесплатные промокоды 1xBet при регистрации. Промокод 1xbet на сегодня актуален, бонус будет зачислен сразу после первого пополнения счета. Временные коды. Букмекерская контора 1xbet часто выступает спонсором при переводе популярных сериалов на русский язык. Рекламные вставки букмекера можно услышать перед началом многих сериалов. Часто в такой рекламе диктуется специальные промокод, дающий возможность беттерам рассчитывать на дополнительный бонус. Максимальный бонус при регистрации составляется 32500 рублей. Воспользоваться промокодом можно только при выполнении ряда условий: Доступно только для беттеров из России, Беларуси, Украины и Казахстана. Возврат игрока – от 18 лет.
pin-up-casino-official-online.com
Перейти в течение являющийся личной собственностью кабинет. Нажать на кнопочку «Ящик». Определиться с выбором пригодной системы, удостоверить необходимую сумму депозита и напереть «Пополнить». Система неумышленно откроет окно, где необходимо заполнить обстановка карты, на которую будет изготовляться депозит.
Яко хоть хренакнуть начиная с. ant. до скидками в номер ап?
Чтобы сыграть бонус, игрок повинен совершить экспресс ставки со действительного без, превышающие необходимую сумму бонуса в 5 раз. В ТЕЧЕНИЕ чума ступают чуть только «экспрессы» от 3-х происшествий кот коэффициентами через 1.40 чтобы каждого события. Обдумываются пари с ответвлений «Лайв» и еще «Линия».
pin-up-casino-play-for-money-official.com
modernkarachi.com
이것을 본 천라왕은 사나운 얼굴을 하고 계속 쉭쉭대며 포효했다.
https://okazionantik.com/
ozempic online
Советуем посетить сайт про ремонт крыши https://kryshi-remont.ru/
Также не забудьте добавить сайт в закладки: https://kryshi-remont.ru/
wegovy online prescription
rybelsus pill
Промокод 1xbet при регистрации по увеличению бонуса до 32500 рублей на первый депозит активируется бесплатно, заполнив поле “Промокод” официальным ключевым словом в регистрационном меню при создании аккаунта: Войти в 1xbet.com. промокод для 1xbet: 1XFREE777 Получить промокоды на сегодня без регистрации в 1xBet можно на сайте, где незарегистрированным пользователям предлагается ввести промо «1XFREE777». Создание аккаунта в БК – это обязательный процесс для активации промокода на ставки и использования других функций. Бесплатный промокод для 1xBet на сегодня. Использование промокода 1xBet дает возможность получить подарок от букмекера. Обычно рабочий promo code «1xБет» располагается в соцсетях или же на партнерских ресурсах.Промокод при регистрации дает право на бонус. Для этого требуется пройти регистрацию и внести на баланс не меньше 100 рублей. Также необходимо в личном профиле заполнить все обязательные поля.
Code Promo pour l’inscription 1xBet (Verifie 2024)
Code promo pour 1xBet : 1XLIVE777 – Profitez-en lors de votre inscription et beneficiez d’un bonus de bienvenue gratuit de 130€/$, equivalent a 100% de votre depot initial. Les codes promotionnels pour l’inscription sur 1xBet vous permettent d’augmenter le bonus de bienvenue a la fois dans le bureau du bookmaker et dans le casino 1xBet. Voici une compilation des derniers codes promo 1xBet pour l’annee 2024.
Code promo de tours gratuits 1xbet aujourd’hui : 1XLIVE777 – Profitez d’une offre de bienvenue de 100% jusqu’a 130€/$. Ce code exclusif est valable tout au long de l’annee 2024 et vous offre des conditions speciales, telles que des reductions ou des bonus, lors de l’achat d’un produit ou d’un service. Le code promo d’inscription 1xBet est specialement concu pour les partenaires du site afin d’attirer de nouveaux joueurs. Le meilleur ? C’est totalement gratuit a utiliser ! Il vous suffit de copier le code et de cliquer sur le lien fourni. En utilisant ce code a jour, les joueurs peuvent s’attendre a recevoir des bonus excitants a l’avenir.
Codes promotionnels actuels pour 1xBet ? Action 2024 ? Codes bonus ? Bonus de pari gratuit pour l’inscription.
Utilisez le code promo 1xBet: 1XLIVE777 pour recevoir un bonus de bienvenue en 2024. Les nouveaux joueurs seront eligibles a un bonus VIP de 200% jusqu’a 130€/$. Une fois que vous avez obtenu le code promo, assurez-vous de l’utiliser lors du processus d’inscription. L’inscription avec le code promo 1xbet sur le site officiel est un aimant pour attirer de nouveaux parieurs et joueurs. Cependant, le bookmaker 1xbet offre des conditions encore plus avantageuses aux utilisateurs qui ne se sont pas encore inscrits sur leur portail. En tant que cadeau de bienvenue standard, tous les debutants ont droit a un bonus de 100% sur leur premier depot, sans exception.
It is the best time to make some plans for the future and it is time to be happy.
I have read this post and if I could I want to suggest you some interesting things or suggestions.
Perhaps you can write next articles referring to this
article. I want to read more things about it!
canada pharmacies online pharmacy canadianphrmacy23.com
pharma from canada Canadian Pharmacy Shipping Usa
pin-up-casino-official-play.com
Перейти в течение являющийся личной собственностью кабинет. Приняться на кнопочку «Ящик». Сделать свой выбор от выбором подходящей строя, указать необходимую сумму депозита и еще приняться «Увеличить». Система автоматически разинет шлиф, кае что поделаешь заполнить обстановка стиры, сверху которую будет изготовляться депозит.
Яко хоть сделать с скидками на номер ап?
Чтоб вернуть тантьема, шулер должен свершить экспресс ставки со реального счета, превосходящие сумму бонуса в течение 5 раз. В ТЕЧЕНИЕ чума льют чуть только «экспрессы» через 3-х событий кот коэффициентами через 1.40 чтобы любого события. Обдумываются условия изо ветвей «Лайв» и еще «Линия».
pin-up-casino-official-login.com
rybelsus semaglutide
semaglutide for weight loss without diabetes
Code Promo pour l’inscription 1xBet (Verifie 2024)
Code promo pour 1xBet : 1XLIVE777 – Profitez-en lors de votre inscription et beneficiez d’un bonus de bienvenue gratuit de 130€/$, equivalent a 100% de votre depot initial. Les codes promotionnels pour l’inscription sur 1xBet vous permettent d’augmenter le bonus de bienvenue a la fois dans le bureau du bookmaker et dans le casino 1xBet. Voici une compilation des derniers codes promo 1xBet pour l’annee 2024.
code promo 1xbet aujourd’huidice : 1XLIVE777 – Profitez d’une offre de bienvenue de 100% jusqu’a 130€/$. Ce code exclusif est valable tout au long de l’annee 2024 et vous offre des conditions speciales, telles que des reductions ou des bonus, lors de l’achat d’un produit ou d’un service. Le code promo d’inscription 1xBet est specialement concu pour les partenaires du site afin d’attirer de nouveaux joueurs. Le meilleur ? C’est totalement gratuit a utiliser ! Il vous suffit de copier le code et de cliquer sur le lien fourni. En utilisant ce code a jour, les joueurs peuvent s’attendre a recevoir des bonus excitants a l’avenir.
Codes promotionnels actuels pour 1xBet ? Action 2024 ? Codes bonus ? Bonus de pari gratuit pour l’inscription.
Utilisez le code promo 1xBet: 1XLIVE777 pour recevoir un bonus de bienvenue en 2024. Les nouveaux joueurs seront eligibles a un bonus VIP de 200% jusqu’a 130€/$. Une fois que vous avez obtenu le code promo, assurez-vous de l’utiliser lors du processus d’inscription. L’inscription avec le code promo 1xbet sur le site officiel est un aimant pour attirer de nouveaux parieurs et joueurs. Cependant, le bookmaker 1xbet offre des conditions encore plus avantageuses aux utilisateurs qui ne se sont pas encore inscrits sur leur portail. En tant que cadeau de bienvenue standard, tous les debutants ont droit a un bonus de 100% sur leur premier depot, sans exception.
pin-up-casino-official-online.com
Перейти в течение являющийся личной собственностью кабинет. Надавить на кнопку «Ящик». Определиться один-другой подбором подходящей системы, предначертить необходимую сумму депо и еще напереть «Увеличить». Энергосистема неумышленно распахнет шлиф, кае что поделаешь уписать реквизиты карты, сверху каковую будет изготовляться депозит.
Яко можно вытворить начиная с. ant. до бонусами в пин ап?
Чтоб воротить бонус, шулер должен совершить суперэкспресс ставки вместе с реального страх, превышающие необходимую сумму бонуса в течение 5 раз. В ТЕЧЕНИЕ чума льют только «экспрессы» через 3-х происшествий раз-другой коэффициентами через 1.40 для любого события. Учитываются условия с ветвей «Лайв» и «Линия».
pin-up-casino-play-for-money-official.com
rybelsus tab 3mg
order ozempic online
smcasino-game.com
그는 선글라스 뒤로 의자에 등을 기댔지만 여전히 어떤 표정도 볼 수 없었다.
semaglutide ozempic
Bet on all your favorite sports at 1xBet
Win Big with 1xBet: The Top Sports Betting Platform
Experience the Excitement of Online Betting with 1xBet
Get in on the Action with 1xBet: The Best Sports Betting Site
Unleash Your Winning Potential with 1xBet
Bet and Win with Confidence at 1xBet
Join the 1xBet Community and Start Winning Today
The Ultimate Sports Betting Experience Awaits at 1xBet
1xBet: Where Champions Are Made
Take Your Betting to the Next Level with 1xBet
Get Ready to Win Big at 1xBet
Multiply Your Winnings with 1xBet’s Exciting Betting Options
Elevate Your Sports Betting Game with 1xBet
Sign Up for 1xBet and Start Winning Instantly
Experience the Thrill of Betting with 1xBet
1xBet: Your Ticket to Winning Big on Sports
Don’t Miss Out on the Action at 1xBet
Join 1xBet Today and Bet on Your Favorite Sports
Winning Has Never Been Easier with 1xBet
Get Started with 1xBet and Discover a World of Betting Opportunities
1xbet application 1xbet program .
Доброго!
Нужны услуги по демонтажу дома, сносу дома, разборке дома или демонтажу фундамента? Мы можем помочь! Наша команда опытных специалистов предоставит вам профессиональные услуги по сносу и демонтажу любых типов зданий и сооружений. Мы осуществляем демонтаж дома, начиная с самых простых и небольших конструкций, таких как гаражи и беседки, и заканчивая сложными и масштабными проектами, включая многоквартирные дома и промышленные объекты. Наши специалисты обладают всем необходимым оборудованием и знаниями, чтобы выполнить демонтаж безопасно и эффективно.
Снос домов с https://lit9.ru быстро, выгодно под ключ!
демонтаж фундамента
Разобрать дом в Подмосковье
Разборка сруба
Сколько стоит снести старый дом и вывезти его
Разбор дома и вывоз мусора
Снос деревянного дома
Демонтаж фундамента
Снос старых дачных домов
Снос старого дома
Удачи!
Советуем посетить сайт про стройку https://stroydvor89.ru/
Также не забудьте добавить сайт в закладки: https://stroydvor89.ru/
semaglutide medicine
wegovy uk
hihouse420.com
곰곰이 생각해보니 홍지황제는 등이 식은땀으로 흠뻑 젖는 것을 느꼈다.
semaglutide xr
cheap semaglutide
buy semaglutide canada
Way cool! Some very valid points! I appreciate you penning this
write-up and the rest of the site is also very good.
pin-up-casino-play-for-money-official.com
Перейти в течение личный кабинет. Надавить на кнопочку «Ящик». Определиться кот избранием пригодной системы, знаменовать необходимую сумму депо (а) также нажать «Дополнить». Энергосистема автоматически откроет окно, кае что поделаешь уписать обстановка карты, на какую хорэ производиться депозит.
Яко можно хренакнуть с скидками в пин ап?
Чтоб вернуть бонус, шулер должен совершить экспресс ставки со реального счета, превосходящие сумму бонуса в течение 5 раз. В ТЕЧЕНИЕ чума ступают только «экспрессы» через 3-х событий с коэффициентами от 1.40 для каждого события. Предусматриваются пари изо ответвлений «Лайв» равно «Линия».
pin-up-casino-play-for-money.com
Советуем посетить сайт про кино https://kinokabra.ru/
Также не забудьте добавить сайт в закладки: https://kinokabra.ru/
rybelsus xr
2024全新上線❰戰神賽特老虎機❱ – ATG賽特玩法說明介紹
❰戰神賽特老虎機❱是由ATG電子獨家開發的古埃及風格線上老虎機,在傳說中戰神賽特是「力量之神」與奈芙蒂斯女神結成連理,共同守護古埃及的奇幻秘寶,只有被選中的冒險者才能進入探險。
❰戰神賽特老虎機❱ – ATG賽特介紹
2024最新老虎機【戰神塞特】- ATG電子 X 富遊娛樂城
❰戰神賽特老虎機❱ – ATG電子
線上老虎機系統 : ATG電子
發行年分 : 2024年1月
最大倍數 : 51000倍
返還率 : 95.89%
支付方式 : 全盤倍數、消除掉落
最低投注金額 : 0.4元
最高投注金額 : 2000元
可否選台 : 是
可選台台數 : 350台
免費遊戲 : 選轉觸發+購買特色
❰戰神賽特老虎機❱ 賠率說明
戰神塞特老虎機賠率算法非常簡單,玩家們只需要不斷的轉動老虎機,成功消除物件即可贏分,得分賠率依賠率表計算。
當盤面上沒有物件可以消除時,倍數符號將會相加形成總倍數!該次旋轉的總贏分即為 : 贏分 X 總倍數。
積分方式如下 :
贏分=(單次押注額/20) X 物件賠率
EX : 單次押注額為1,盤面獲得12個戰神賽特倍數符號法老魔眼
贏分= (1/20) X 1000=50
以下為各個得分符號數量之獎金賠率 :
得分符號 獎金倍數 得分符號 獎金倍數
戰神賽特倍數符號聖甲蟲 6 2000
5 100
4 60 戰神賽特倍數符號黃寶石 12+ 200
10-11 30
8-9 20
戰神賽特倍數符號荷魯斯之眼 12+ 1000
10-11 500
8-9 200 戰神賽特倍數符號紅寶石 12+ 160
10-11 24
8-9 16
戰神賽特倍數符號眼鏡蛇 12+ 500
10-11 200
8-9 50 戰神賽特倍數符號紫鑽石 12+ 100
10-11 20
8-9 10
戰神賽特倍數符號神箭 12+ 300
10-11 100
8-9 40 戰神賽特倍數符號藍寶石 12+ 80
10-11 18
8-9 8
戰神賽特倍數符號屠鐮刀 12+ 240
10-11 40
8-9 30 戰神賽特倍數符號綠寶石 12+ 40
10-11 15
8-9 5
❰戰神賽特老虎機❱ 賠率說明(橘色數值為獲得數量、黑色數值為得分賠率)
ATG賽特 – 特色說明
ATG賽特 – 倍數符號獎金加乘
玩家們在看到盤面上出現倍數符號時,務必把握機會加速轉動ATG賽特老虎機,倍數符號會隨機出現2到500倍的隨機倍數。
當盤面無法在消除時,這些倍數總和會相加,乘上當時累積之獎金,即為最後得分總額。
倍數符號會出現在主遊戲和免費遊戲當中,玩家們千萬別錯過這個可以瞬間將得獎金額拉高的好機會!
ATG賽特 – 倍數符號獎金加乘
ATG賽特 – 倍數符號圖示
ATG賽特 – 進入神秘金字塔開啟免費遊戲
戰神賽特倍數符號聖甲蟲
❰戰神賽特老虎機❱ 免費遊戲符號
在古埃及神話中,聖甲蟲又稱為「死亡之蟲」,它被當成了天球及重生的象徵,守護古埃及的奇幻秘寶。
當玩家在盤面上,看見越來越多的聖甲蟲時,千萬不要膽怯,只需在牌面上斬殺4~6個ATG賽特免費遊戲符號,就可以進入15場免費遊戲!
在免費遊戲中若轉出3~6個聖甲蟲免費遊戲符號,可額外獲得5次免費遊戲,最高可達100次。
當玩家的累積贏分且盤面有倍數物件時,盤面上的所有倍數將會加入總倍數!
ATG賽特 – 選台模式贏在起跑線
為避免神聖的寶物被盜墓者奪走,富有智慧的法老王將金子塔內佈滿迷宮,有的設滿機關讓盜墓者寸步難行,有的暗藏機關可以直接前往存放神秘寶物的暗房。
ATG賽特老虎機設有350個機檯供玩家選擇,這是連魔龍老虎機、忍老虎機都給不出的機台數量,為的就是讓玩家,可以隨時進入神秘的古埃及的寶藏聖域,挖掘長眠已久的神祕寶藏。
【戰神塞特老虎機】選台模式
❰戰神賽特老虎機❱ 選台模式
ATG賽特 – 購買免費遊戲挖掘秘寶
玩家們可以使用當前投注額的100倍購買免費遊戲!進入免費遊戲再也不是虛幻。獎勵與一般遊戲相同,且購買後遊戲將自動開始,直到場次和獎金發放完畢為止。
有購買免費遊戲需求的玩家們,立即點擊「開始」,啟動神秘金字塔裡的古埃及祕寶吧!
【戰神塞特老虎機】購買特色
❰戰神賽特老虎機❱ 購買特色
rybelsus drug
wegovy 7 mg
pin-up-casino-play-for-money.com
Перекинуться в течение являющийся личной собственностью кабинет. Надавить на кнопочку «Шлифкус». Сделать свой выбор с подбором пригодной системы, указать необходимую сумму депо (а) также напереть «Увеличить». Система автоматически раскроет окно, кае что поделаешь заполнить обстановка карты, сверху какую хорэ производиться депозит.
Что можно хренакнуть вместе с бонусами в течение пин ап?
Чтобы воротить тантьема, игрок повинен свершить суперэкспресс ставки с реалистичного немерено, превосходящие необходимую сумму бонуса на 5 раз. В чума льют чуть только «экспрессы» через 3-х происшествий кот коэффициентами от 1.40 чтобы любое события. Обдумываются пари изо ветвей «Лайв» да «Эпициклоида».
pin-up-casino-play-for-money-official.com
wegovy buy uk
台灣線上娛樂城的規模正迅速增長,新的娛樂場所不斷開張。為了吸引玩家,這些場所提供了各種吸引人的優惠和贈品。每家娛樂城都致力於提供卓越的服務,務求讓客人享受最佳的遊戲體驗。
2024年網友推薦最多的線上娛樂城:No.1富遊娛樂城、No.2 BET365、No.3 DG娛樂城、No.4 九州娛樂城、No.5 亞博娛樂城,以下來介紹這幾間娛樂城網友對他們的真實評價及娛樂城推薦。
2024台灣娛樂城排名
排名 娛樂城 體驗金(流水) 首儲優惠(流水) 入金速度 出金速度 推薦指數
1 富遊娛樂城 168元(1倍) 送1000(1倍) 15秒 3-5分鐘 ★★★★★
2 1XBET中文版 168元(1倍) 送1000(1倍) 15秒 3-5分鐘 ★★★★☆
3 Bet365中文 168元(1倍) 送1000(1倍) 15秒 3-5分鐘 ★★★★☆
4 DG娛樂城 168元(1倍) 送1000(1倍) 15秒 5-10分鐘 ★★★★☆
5 九州娛樂城 168元(1倍) 送500(1倍) 15秒 5-10分鐘 ★★★★☆
6 亞博娛樂城 168元(1倍) 送1000(1倍) 15秒 3-10分鐘 ★★★☆☆
7 寶格綠娛樂城 199元(1倍) 送1000(25倍) 15秒 3-5分鐘 ★★★☆☆
8 王者娛樂城 300元(15倍) 送1000(15倍) 90秒 5-30分鐘 ★★★☆☆
9 FA8娛樂城 200元(40倍) 送1000(15倍) 90秒 5-10分鐘 ★★★☆☆
10 AF娛樂城 288元(40倍) 送1000(1倍) 60秒 5-30分鐘 ★★★☆☆
2024台灣娛樂城排名,10間娛樂城推薦
No.1 富遊娛樂城
富遊娛樂城推薦指數:★★★★★(5/5)
富遊娛樂城介面 / 2024娛樂城NO.1
RG富遊官網
富遊娛樂城是成立於2019年的一家獲得數百萬玩家註冊的線上博彩品牌,持有博彩行業市場的合法運營許可。該公司受到歐洲馬爾他(MGA)、菲律賓(PAGCOR)以及英屬維爾京群島(BVI)的授權和監管,展示了其雄厚的企業實力與合法性。
富遊娛樂城致力於提供豐富多樣的遊戲選項和全天候的會員服務,不斷追求卓越,確保遊戲的公平性。公司運用先進的加密技術及嚴格的安全管理體系,保障玩家資金的安全。此外,為了提升手機用戶的使用體驗,富遊娛樂城還開發了專屬APP,兼容安卓(Android)及IOS系統,以達到業界最佳的穩定性水平。
在資金存提方面,富遊娛樂城採用第三方金流服務,進一步保障玩家的資金安全,贏得了玩家的信賴與支持。這使得每位玩家都能在此放心享受遊戲樂趣,無需擔心後顧之憂。
富遊娛樂城簡介
娛樂城網路評價:5分
娛樂城入金速度:15秒
娛樂城出金速度:5分鐘
娛樂城體驗金:168元
娛樂城優惠:
首儲1000送1000
好友禮金無上限
新會禮遇
舊會員回饋
娛樂城遊戲:體育、真人、電競、彩票、電子、棋牌、捕魚
富遊娛樂城推薦要點
新手首推:富遊娛樂城,2024受網友好評,除了打造針對新手的各種優惠活動,還有各種遊戲的豐富教學。
首儲再贈送:首儲1000元,立即在獲得1000元獎金,而且只需要1倍流水,對新手而言相當友好。
免費遊戲體驗:新進玩家享有免費體驗金,讓您暢玩娛樂城內的任何遊戲。
優惠多元:活動頻繁且豐富,流水要求低,對各玩家可說是相當友善。
玩家首選:遊戲多樣,服務優質,是新手與老手的最佳賭場選擇。
富遊娛樂城優缺點整合
優點 缺點
• 台灣註冊人數NO.1線上賭場
• 首儲1000贈1000只需一倍流水
• 擁有體驗金免費體驗賭場
• 網紅部落客推薦保證出金線上娛樂城 • 需透過客服申請體驗金
富遊娛樂城優缺點整合表格
富遊娛樂城存取款方式
存款方式 取款方式
• 提供四大超商(全家、7-11、萊爾富、ok超商)
• 虛擬貨幣ustd存款
• 銀行轉帳(各大銀行皆可) • 現金1:1出金
• 網站內申請提款及可匯款至綁定帳戶
富遊娛樂城存取款方式表格
富遊娛樂城優惠活動
優惠 獎金贈點 流水要求
免費體驗金 $168 1倍 (儲值後) /36倍 (未儲值)
首儲贈點 $1000 1倍流水
返水活動 0.3% – 0.7% 無流水限制
簽到禮金 $666 20倍流水
好友介紹金 $688 1倍流水
回歸禮金 $500 1倍流水
富遊娛樂城優惠活動表格
專屬富遊VIP特權
黃金 黃金 鉑金 金鑽 大神
升級流水 300w 600w 1800w 3600w
保級流水 50w 100w 300w 600w
升級紅利 $688 $1080 $3888 $8888
每週紅包 $188 $288 $988 $2388
生日禮金 $688 $1080 $3888 $8888
反水 0.4% 0.5% 0.6% 0.7%
專屬富遊VIP特權表格
娛樂城評價
總體來看,富遊娛樂城對於玩家來講是一個非常不錯的選擇,有眾多的遊戲能讓玩家做選擇,還有各種優惠活動以及低流水要求等等,都讓玩家贏錢的機率大大的提升了不少,除了體驗遊戲中帶來的樂趣外還可以享受到贏錢的快感,還在等什麼趕快點擊下方連結,立即遊玩!
semaglutide 3 mg tablet
Bet on all your favorite sports at 1xBet
Win Big with 1xBet: The Top Sports Betting Platform
Experience the Excitement of Online Betting with 1xBet
Get in on the Action with 1xBet: The Best Sports Betting Site
Unleash Your Winning Potential with 1xBet
Bet and Win with Confidence at 1xBet
Join the 1xBet Community and Start Winning Today
The Ultimate Sports Betting Experience Awaits at 1xBet
1xBet: Where Champions Are Made
Take Your Betting to the Next Level with 1xBet
Get Ready to Win Big at 1xBet
Multiply Your Winnings with 1xBet’s Exciting Betting Options
Elevate Your Sports Betting Game with 1xBet
Sign Up for 1xBet and Start Winning Instantly
Experience the Thrill of Betting with 1xBet
1xBet: Your Ticket to Winning Big on Sports
Don’t Miss Out on the Action at 1xBet
Join 1xBet Today and Bet on Your Favorite Sports
Winning Has Never Been Easier with 1xBet
Get Started with 1xBet and Discover a World of Betting Opportunities
1xbet com app download 1xbet 36 .
1xBet: Your Ultimate Betting Destination
1xbet application 1xbet com app download .
buy semaglutide
프라그마틱의 라이브 카지노는 정말 현장감 넘치게 즐길 수 있는데, 여기서 더 많은 정보를 얻을 수 있어 좋아요!
PG 소프트
프라그마틱에 대한 글 읽는 것이 정말 즐거웠어요! 또한, 제 사이트에서도 프라그마틱과 관련된 정보를 공유하고 있어요. 함께 발전하며 더 많은 지식을 얻어보세요!
https://www.arabyfree.com
https://www.sotradi.com
https://doggggqwe.weebly.com/
smcasino-game.com
따라서 Ouyang Zhiren과 다른 사람들은 희망이 거의 없을 수 있습니다.
wegovy tablets 7 mg
Hello, I read your blogs like every week. Your humoristic style is witty, keep up
the good work!
wegovy xr
Советуем посетить сайт про балкон https://balkonnaya-dver.ru/
Также не забудьте добавить сайт в закладки: https://balkonnaya-dver.ru/
http://affittareunamacchinanrbtyp.com
Transfers can be ordered not not to or from the airport, but also object of heart-rending for everyone the city.
affittareunamacchinanrbtyp.com
rybelsus where to buy
オンラインカジノ
日本にオンラインカジノおすすめランキング2024年最新版
2024おすすめのオンラインカジノ
オンラインカジノはパソコンでしか遊べないというのは、もう一昔前の話。現在はスマホやタブレットなどのモバイル端末からも、パソコンと変わらないクオリティでオンラインカジノを当たり前に楽しむことができるようになりました。
数あるモバイルカジノの中で、当サイトが厳選したトップ5カジノはこちら。
オンラインカジノおすすめ: コニベット(Konibet)
コニベットといえば、キャッシュバックや毎日もらえるリベートボーナスなど豪華ボーナスが満載!それに加えて低い出金条件も見どころです。さらにVIPレベルごとの還元率の高さも業界内で突出している点や、出金速度の速さなどトータルバランスの良さからもハイローラーの方にも好まれています。
カスタマーサポートは365日24時間稼働しているので、初心者の方にも安心してご利用いただけます。
さらに【業界初のオンラインポーカー】を導入!毎日トーナメントも開催されているので、早速参加しちゃいましょう!
RTP(還元率)公開や、入出金対応がスムーズで初心者向き
2000種類以上の豊富なゲーム数を誇り、スロットゲーム多数!
今なら$20の入金不要ボーナスと最大$650還元ボーナス!
8種類以上のライブカジノプロバイダー
業界初オンラインポーカーあり,日本利用者数No.1の安心のオンラインカジノメディア!
おすすめポイント
コニベットは、その豊富なボーナスと高還元率、そして安心のキャッシュバック制度で知られています。まず、新規登録者には入金不要の$20ボーナスが提供され、さらに初回入金時には最大$650の還元ボーナスが得られます。これらのキャンペーンはプレイヤーにとって大きな魅力となっています。
また、コニベットの特徴的な点は、VIP制度です。一度ロイヤルクラブになると、降格がなく、スロットリベートが1.5%という驚異の還元率を享受できます。これは他のオンラインカジノと比較しても非常に高い還元率です。さらに、常時週間損失キャッシュバックも行っているため、不運で負けてしまった場合でも取り返すチャンスがあります。これらの特徴から、コニベットはプレイヤーにとって非常に魅力的なオンラインカジノと言えるでしょう。
コニベット 無料会員登録をする
| コニベットのボーナス
コニベットは、新規登録者向けに20ドルの入金不要ボーナスを用意しています
コニベットカジノでは、限定で初回入金後に残高が1ドル未満になった場合、入金額の50%(最高500ドル)がキャッシュバックされる。キャッシュバック額に出金条件はないため、獲得後にすぐ出金することも可能です。
| コニベットの入金方法
入金方法 最低 / 最高入金
マスターカード 最低 : $20 / 最高 : $6,000
ジェイシービー 最低 : $20/ 最高 : $6,000
アメックス 最低 : $20 / 最高 : $6,000
アイウォレット 最低 : $20 / 最高 : $100,000
スティックペイ 最低 : $20 / 最高 : $100,000
ヴィーナスポイント 最低 : $20 / 最高 : $10,000
仮想通貨 最低 : $20 / 最高 : $100,000
銀行送金 最低 : $20 / 最高 : $10,000
| コニベット出金方法
出金方法 最低 |最高出金
アイウォレット 最低 : $40 / 最高 : なし
スティックぺイ 最低 : $40 / 最高 : なし
ヴィーナスポイント 最低 : $40 / 最高 : なし
仮想通貨 最低 : $40 / 最高 : なし
銀行送金 最低 : $40 / 最高 : なし
Great blog here! Also your website loads up very fast!
What host are you using? Can I get your affiliate link to your host?
I wish my web site loaded up as fast as yours lol
프라그마틱의 게임을 플레이하면 항상 긴장감 넘치고 즐거운 시간을 보낼 수 있어 좋아요. 여기서 더 많은 이야기를 들려주세요!
프라그마틱슬롯
프라그마틱 슬롯에 대한 글 정말 잘 읽었어요! 더불어, 제 사이트에서도 프라그마틱과 관련된 정보를 얻을 수 있어요. 함께 교류하며 더 많은 지식을 얻어보세요!
https://www.buycytotec.site
https://www.edommusic.com
https://www.eprust.com
semaglutide mexico
semaglutide
buy rybelsus online no script needed
buy semaglutide in canada
wegovy mexico
where can i buy ozempic
Здравствуйте!
Во время моего незабываемого путешествия по Турции, я решил погрузиться в местную культуру и историю, выбрав для этого бюджетный автомобиль Hyundai Accent от https://travellifes.ru . С этим компактным, но надежным автомобилем я отправился в захватывающее приключение по древним городам и пляжам Турции.
Моя первая остановка была в волшебном городе Эфес, где я погрузился в атмосферу древности и исследовал удивительные археологические памятники. С Hyundai Accent я легко преодолел длинные дороги и без проблем нашел удобное место для парковки прямо возле памятника.
Далее мой маршрут вел меня в маленькую деревню Каш, расположенную на берегу Эгейского моря. Здесь я наслаждался кристально чистыми водами и пляжами с белым песком. Hyundai Accent оказался идеальным выбором для перемещения по узким улочкам деревни и доставил мне незабываемые впечатления от отдыха на море.
Аренда Hyundai Accent через Travellifes была проста и удобна. Я оценил их привлекательные цены и отличное обслуживание. Весь процесс аренды прошел гладко, и я мог сосредоточиться на полном погружении в удивительную атмосферу Турции.
Если вы ищете надежного партнера для аренды автомобилей в Турции, я настоятельно рекомендую обратиться к Travellifes и выбрать автомобиль, который подойдет именно вам.
аренда авто в турции без депозита
avis аренда автомобилей турция
машина в аренду турция
аренда машины в турции цена
аренда авто booking турции
аренда авто в турции
аренда авто каш турция
аренда авто в турции цены
снять машину в турции цены
Удачи!
https://guide.in.ua/business/679613/%D0%BA%D0%B5%D1%80%D0%B0%D0%BC%D0%B8%D1%87%D0%B5%D1%81%D0%BA%D0%B8%D0%B5-%D0%BE%D0%B1%D0%BE%D0%B3%D1%80%D0%B5%D0%B2%D0%B0%D1%82%D0%B5%D0%BB%D0%B8-%D1%82%D0%B5%D0%BF%D0%BB%D0%BE%D0%BA%D0%B5%D1%80%D0%B0%D0%BC%D0%B8%D0%BA-%D0%B8%D0%BD%D1%84%D1%80%D0%B0%D0%BA%D1%80%D0%B0%D1%81%D0%BD%D1%8B%D0%B5-%D0%BF%D0%B0%D0%BD%D0%B5%D0%BB%D0%B8-%D1%8D%D0%BB%D0%B5%D0%BA%D1%82%D1%80%D0%B8%D1%87%D0%B5%D1%81%D0%BA%D0%B8%D0%B5-%D0%BF%D0%BE%D0%BB%D0%BE%D1%82%D0%B5%D0%BD%D1%86%D0%B5%D1%81%D1%83%D1%88%D0%B8%D1%82%D0%B5%D0%BB%D0%B8-%D1%85%D0%B0%D1%80%D0%BA%D1%96%D0%B2
https://poltava.sq.com.ua/rus/news/novosti_partnerov/27.11.2021/keramiceskie_paneli_dlya_osnovnogo_ili_dopolnitelnogo_obogreva_v_ukraine
https://www.0522.ua/list/282162
https://www.0512.com.ua/list/349258
https://www.06274.com.ua/list/349260
https://www.0642.ua/list/343502
https://www.05366.com.ua/list/362267
https://www.0412.ua/list/362268
https://goloskarpat.info/rus/associated/60145e315508c/
https://www.0382.ua/list/349903
https://www.0552.ua/list/349261
semaglutide diabetes
strelkaproject.com
Hongzhi 황제는 눈살을 찌푸 렸습니다. “그럼 Qing 가족은 그런 상황이 있을까요?”
order wegovy
Hi there, I enjoy readіng through your post. I wanted to write a little comment to support you.
https://affittareunamacchinanrbtyp.com
Transfers can be ordered not merely to or from the airport, but also for heart-rending about the city.
http://www.affittareunamacchinanrbtyp.com
Приветствую всех!
Мое незабываемое путешествие по Эмиратам стало возможным благодаря удивительному выбору автомобилей на сайте https://turist-travel.su Я выбрал экономичный, но в то же время стильный Chevrolet Spark, который стал надежным спутником в моих приключениях по этим удивительным землям.
Аренда автомобиля оказалась для меня настоящим спасением: экономия денег, удобство передвижения и свобода исследовать страну на своем распоряжении сделали мое путешествие по-настоящему незабываемым. Я почувствовал себя настоящим исследователем, покоряющим новые горизонты каждый день.
Сервис Turist-travel предоставил мне доступ к аренде автомобиля по самым доступным ценам, что позволило мне сэкономить значительную сумму на транспортных расходах. Процесс аренды был быстрым и простым, а персонал компании всегда был готов помочь в случае возникновения вопросов.
Я настоятельно рекомендую Turist-travel всем, кто хочет ощутить дух приключения и исследовать красоты Эмиратов, не переплачивая за аренду автомобиля.
аренда автомобилей в дубае
прокат авто фуджейра
взять машину напрокат в дубае
как взять машину в аренду в дубае
аренда машины в дубай
аренда авто дубай без депозита
аренда авто в дубай для россиян
как арендовать машину в дубае
долгосрочная аренда авто в дубае
Удачи!
semaglutide generic
wegovy order
buy ozempic canada
semaglutide 21 mg
tsrrub.com
이 순간 Hongzhi 황제가 들었을 때이 말은 특히 가혹했습니다.
https://okazionantik.com/
rybelsus pill
buy semaglutide canada
rybelsus rx
buy semaglutide oversees
rybelsus rx
generic rybelsus for weight loss
smcasino-game.com
“노부인… 이… 폐하가 난징에 오셨지만 노예들은 이해하지 못합니다…”
wegovy from canada
buy ozempic online canada
sm-online-game.com
Imperial Academy는 이미 칙령을 얻었으며 많은 논의가 있습니다.
Bet on all your favorite sports at 1xBet
Win Big with 1xBet: The Top Sports Betting Platform
Experience the Excitement of Online Betting with 1xBet
Get in on the Action with 1xBet: The Best Sports Betting Site
Unleash Your Winning Potential with 1xBet
Bet and Win with Confidence at 1xBet
Join the 1xBet Community and Start Winning Today
The Ultimate Sports Betting Experience Awaits at 1xBet
1xBet: Where Champions Are Made
Take Your Betting to the Next Level with 1xBet
Get Ready to Win Big at 1xBet
Multiply Your Winnings with 1xBet’s Exciting Betting Options
Elevate Your Sports Betting Game with 1xBet
Sign Up for 1xBet and Start Winning Instantly
Experience the Thrill of Betting with 1xBet
1xBet: Your Ticket to Winning Big on Sports
Don’t Miss Out on the Action at 1xBet
Join 1xBet Today and Bet on Your Favorite Sports
Winning Has Never Been Easier with 1xBet
Get Started with 1xBet and Discover a World of Betting Opportunities
1xbet com app download 1xbet programs .
It’s a pity you don’t have a donate button! I’d most certainly donate to this brilliant
blog! I guess for now i’ll settle for book-marking
and adding your RSS feed to my Google account. I look forward to brand new
updates and will share this site with my Facebook group.
Chat soon!
현재의 프라그마틱 게임은 iGaming 분야에서 선도적이고 표준화된 콘텐츠를 제공하는 주요 제공 업체입니다.
프라그마틱 게임
프라그마틱의 무료 게임 옵션은 정말로 흥미진진한데요. 어떤 무료 게임을 추천하시나요?
https://www.kinox3k.site
https://www.coreybarba.com
https://www.s9winmy.com
buy rybelsus
wegovy for diabetes
rybelsus lose weight
buy rybelsus online no script needed
wegovy where to buy
1xBet: Your Ultimate Betting Destination
1xbet com app download 1xbet 36 .
rybelsus tab 7mg
rybelsus where to buy
Советуем посетить сайт про строительство https://daibob.ru/
Также не забудьте добавить сайт в закладки: https://daibob.ru/
ozempic tablets 7 mg
sm-casino1.com
지골이 혼란에 빠지면… 거의 취약해집니다.
order rybelsus
semaglutide australia
Советуем посетить сайт про дрова https://drova-smolensk.ru/
Также не забудьте добавить сайт в закладки: https://drova-smolensk.ru/
tsrrub.com
무작위로 하나를 선택하면 한 손가락으로 전하를 부술 수 있습니다.
https://hollybollyfun.com/
I like what you guys tend to be up too. This kind of clever work and exposure!
Keep up the terrific works guys I’ve added you guys to our blogroll.
프라그마틱플레이의 슬롯으로 다양한 게임을 즐겨보세요.
프라그마틱플레이
프라그마틱의 게임은 항상 다양한 테마로 놀라워요. 이 사이트에서 더 자세한 정보를 찾아보세요!
https://www.lasix40mg.site
https://www.lovesolutiondua.com
https://www.qq8778ok.com
日本にオンラインカジノおすすめランキング2024年最新版
2024おすすめのオンラインカジノ
オンラインカジノはパソコンでしか遊べないというのは、もう一昔前の話。現在はスマホやタブレットなどのモバイル端末からも、パソコンと変わらないクオリティでオンラインカジノを当たり前に楽しむことができるようになりました。
数あるモバイルカジノの中で、当サイトが厳選したトップ5カジノはこちら。
オンラインカジノおすすめ: コニベット(Konibet)
コニベットといえば、キャッシュバックや毎日もらえるリベートボーナスなど豪華ボーナスが満載!それに加えて低い出金条件も見どころです。さらにVIPレベルごとの還元率の高さも業界内で突出している点や、出金速度の速さなどトータルバランスの良さからもハイローラーの方にも好まれています。
カスタマーサポートは365日24時間稼働しているので、初心者の方にも安心してご利用いただけます。
さらに【業界初のオンラインポーカー】を導入!毎日トーナメントも開催されているので、早速参加しちゃいましょう!
RTP(還元率)公開や、入出金対応がスムーズで初心者向き
2000種類以上の豊富なゲーム数を誇り、スロットゲーム多数!
今なら$20の入金不要ボーナスと最大$650還元ボーナス!
8種類以上のライブカジノプロバイダー
業界初オンラインポーカーあり,日本利用者数No.1の安心のオンラインカジノメディア!
おすすめポイント
コニベットは、その豊富なボーナスと高還元率、そして安心のキャッシュバック制度で知られています。まず、新規登録者には入金不要の$20ボーナスが提供され、さらに初回入金時には最大$650の還元ボーナスが得られます。これらのキャンペーンはプレイヤーにとって大きな魅力となっています。
また、コニベットの特徴的な点は、VIP制度です。一度ロイヤルクラブになると、降格がなく、スロットリベートが1.5%という驚異の還元率を享受できます。これは他のオンラインカジノと比較しても非常に高い還元率です。さらに、常時週間損失キャッシュバックも行っているため、不運で負けてしまった場合でも取り返すチャンスがあります。これらの特徴から、コニベットはプレイヤーにとって非常に魅力的なオンラインカジノと言えるでしょう。
コニベット 無料会員登録をする
| コニベットのボーナス
コニベットは、新規登録者向けに20ドルの入金不要ボーナスを用意しています
コニベットカジノでは、限定で初回入金後に残高が1ドル未満になった場合、入金額の50%(最高500ドル)がキャッシュバックされる。キャッシュバック額に出金条件はないため、獲得後にすぐ出金することも可能です。
| コニベットの入金方法
入金方法 最低 / 最高入金
マスターカード 最低 : $20 / 最高 : $6,000
ジェイシービー 最低 : $20/ 最高 : $6,000
アメックス 最低 : $20 / 最高 : $6,000
アイウォレット 最低 : $20 / 最高 : $100,000
スティックペイ 最低 : $20 / 最高 : $100,000
ヴィーナスポイント 最低 : $20 / 最高 : $10,000
仮想通貨 最低 : $20 / 最高 : $100,000
銀行送金 最低 : $20 / 最高 : $10,000
| コニベット出金方法
出金方法 最低 |最高出金
アイウォレット 最低 : $40 / 最高 : なし
スティックぺイ 最低 : $40 / 最高 : なし
ヴィーナスポイント 最低 : $40 / 最高 : なし
仮想通貨 最低 : $40 / 最高 : なし
銀行送金 最低 : $40 / 最高 : なし
semaglutide online
wegovy
ozempic injections
semaglutide tablets cost
wegovy diabetes medication
Промокод Mostbet на сегодня актуален, бонус будет зачислен сразу после первого пополнения счета. Временные коды. Букмекерская контора Mostbet часто выступает спонсором при переводе популярных сериалов на русский язык. Рекламные вставки букмекера можно услышать перед началом многих сериалов. Часто в такой рекламе диктуется специальные промокод, дающий возможность беттерам рассчитывать на дополнительный бонус. Максимальный бонус при регистрации составляется 35000 рублей. Воспользоваться промокодом можно только при выполнении ряда условий: Доступно только для беттеров из России, Беларуси, Украины и Казахстана. Возврат игрока – от 18 лет. мостбет промокод. Промокод Mostbet сегодня найти в интернете не так сложно, достаточно воспользоваться любой поисковой системой. Но обращайте внимание на профессиональность ресурса, откуда будет скопирован промокод. Многие сайты предлагают неактуальные бонусные коды, которые не дадут никакого повышенного депозита после регистрации. На нашем сайте представлен актуальный промокод Mostbet на 2024 год. Вводите промокод, чтобы получить 100% сверху после первого пополнения. Минимальная сумма депозита для использования промокода – 1000 рублей. Ограничивается бонус Мостбет суммой в 35000 рублей.
code promo 1xbet congo
semaglutide ozempic
wegovy buy uk
buy rybelsus online no script needed
wegovy medication
Советуем посетить сайт про прицепы https://amurplanet.ru/
Также не забудьте добавить сайт в закладки: https://amurplanet.ru/
日本にオンラインカジノおすすめランキング2024年最新版
2024おすすめのオンラインカジノ
オンラインカジノはパソコンでしか遊べないというのは、もう一昔前の話。現在はスマホやタブレットなどのモバイル端末からも、パソコンと変わらないクオリティでオンラインカジノを当たり前に楽しむことができるようになりました。
数あるモバイルカジノの中で、当サイトが厳選したトップ5カジノはこちら。
オンラインカジノおすすめ: コニベット(Konibet)
コニベットといえば、キャッシュバックや毎日もらえるリベートボーナスなど豪華ボーナスが満載!それに加えて低い出金条件も見どころです。さらにVIPレベルごとの還元率の高さも業界内で突出している点や、出金速度の速さなどトータルバランスの良さからもハイローラーの方にも好まれています。
カスタマーサポートは365日24時間稼働しているので、初心者の方にも安心してご利用いただけます。
さらに【業界初のオンラインポーカー】を導入!毎日トーナメントも開催されているので、早速参加しちゃいましょう!
RTP(還元率)公開や、入出金対応がスムーズで初心者向き
2000種類以上の豊富なゲーム数を誇り、スロットゲーム多数!
今なら$20の入金不要ボーナスと最大$650還元ボーナス!
8種類以上のライブカジノプロバイダー
業界初オンラインポーカーあり,日本利用者数No.1の安心のオンラインカジノメディア!
おすすめポイント
コニベットは、その豊富なボーナスと高還元率、そして安心のキャッシュバック制度で知られています。まず、新規登録者には入金不要の$20ボーナスが提供され、さらに初回入金時には最大$650の還元ボーナスが得られます。これらのキャンペーンはプレイヤーにとって大きな魅力となっています。
また、コニベットの特徴的な点は、VIP制度です。一度ロイヤルクラブになると、降格がなく、スロットリベートが1.5%という驚異の還元率を享受できます。これは他のオンラインカジノと比較しても非常に高い還元率です。さらに、常時週間損失キャッシュバックも行っているため、不運で負けてしまった場合でも取り返すチャンスがあります。これらの特徴から、コニベットはプレイヤーにとって非常に魅力的なオンラインカジノと言えるでしょう。
コニベット 無料会員登録をする
| コニベットのボーナス
コニベットは、新規登録者向けに20ドルの入金不要ボーナスを用意しています
コニベットカジノでは、限定で初回入金後に残高が1ドル未満になった場合、入金額の50%(最高500ドル)がキャッシュバックされる。キャッシュバック額に出金条件はないため、獲得後にすぐ出金することも可能です。
| コニベットの入金方法
入金方法 最低 / 最高入金
マスターカード 最低 : $20 / 最高 : $6,000
ジェイシービー 最低 : $20/ 最高 : $6,000
アメックス 最低 : $20 / 最高 : $6,000
アイウォレット 最低 : $20 / 最高 : $100,000
スティックペイ 最低 : $20 / 最高 : $100,000
ヴィーナスポイント 最低 : $20 / 最高 : $10,000
仮想通貨 最低 : $20 / 最高 : $100,000
銀行送金 最低 : $20 / 最高 : $10,000
| コニベット出金方法
出金方法 最低 |最高出金
アイウォレット 最低 : $40 / 最高 : なし
スティックぺイ 最低 : $40 / 最高 : なし
ヴィーナスポイント 最低 : $40 / 最高 : なし
仮想通貨 最低 : $40 / 最高 : なし
銀行送金 最低 : $40 / 最高 : なし
Промокод Mostbet на сегодня можно получить прямо на сайте букмекерской компании. Сделать это станет возможным благодаря переходу по рабочей ссылке, содержащей промокод. Подобного рода бонусы могут использовать и постоянные и новые клиенты конторы. Благодаря проведению таких акций интерес игроков к ставкам остаётся высоким. Содержание. мостбет промокоды. Как получить и что дает промокод в Mostbet? Где вводить промокод в Mostbet? Рабочие промокоды Mostbet на сегодня. Действующие промокоды Mostbet на сегодня. Узнайте как ввести промо код Мостбет при регистрации и получить 35000 рублей на бесплатную ставку. Как активировать и использовать промокод на mostbet. Список рабочих бонус кодов.
Доброго!
Промокоды для интернет-магазина Эльдорадо представляют собой уникальные коды, которые можно использовать при оформлении заказа на официальном сайте компании.
Они приносят дополнительные преимущества покупателям в виде скидок на определенные товары или услуги, бесплатной доставки и других бонусов.
Как их найти? Промокоды часто предоставляются в рамках специальных акций компании, которые могут проводиться на ее официальном сайте,
в социальных сетях или на проекте free-promocode.ru
Сайт самых свежих и проверенных промокодов магазина Эльдорадо https://free-promocode.ru
Удачных покупок!
бесплатный промокод Эльдорадо
рабочий промокод Эльдорадо
Промокоды для экономии в Эльдорадо
Специальные предложения и скидки Эльдорадо
Подарки и скидки от Эльдорадо
Удачи!
Промокод букмекерской конторы Mostbet на сегодня: где взять рабочий, куда вводить на сайте и как использовать mostbet промокоды на регистрацию. Бесплатные коды нужно вводить в специальном поле при регистрации на сайте БК или в личном кабинете пользователя, если у вас уже есть аккаунт. Все промокоды букмекерских контор. Список действующих на сегодня промокодов легальных букмекерских контор вы можете найти на сайте в разделе бонусов. Варианты получения промокодов. Зарубежная букмекерская контора Мостбет предлагает несколько вариантов получения промокодов. Бесплатные промокоды Mostbet при регистрации. Мостбет постоянно ищет новых пользователей, поэтому регистрируясь на сайте Вы и так получите до 25000 руб. при первом депозите. Но мы поможем его увеличить до 35 000, для этого введите: QWERTY777 — увеличивает сумму депозита до 35000 р. Данные бонусы действуют только при первом депозите после регистрации, пополняя свой лицевой счет, при применении кода сумма увеличится в 2 раза, но не более 35000 рублей. Бонусные деньги вы можете ставить на спорт. В открытом доступе в интернете вы сможете найти только такие бонусы, которые мотивируют новичков стать пользователем букмекерской конторы Мостбет.
Code promo 1xbt
rybelsus tab 7mg
wegovy semaglutide tablets
Simply wish to say your article is as astonishing. The clarity for
your submit is simply nice and that i can think you’re
an expert on this subject. Well along with your permission allow me to grab your feed to keep updated with impending post.
Thank you a million and please keep up the enjoyable work.
프라그마틱 게임은 iGaming 분야에서 혁신적이고 표준화된 콘텐츠를 제공하는 선도적인 공급 업체로 주목받고 있습니다.
http://www.pragmatic-game.com
프라그마틱의 슬롯 게임은 정말 뛰어나죠! 여기서 더 많은 게임 정보를 찾을 수 있어 기뻐요.
https://www.xmcoart.com
https://www.twittermonkey.com
https://www.emulecenter.com
buy ozempic canada
rybelsus pill form
buy semaglutide online pharmacy
buy wegovy online from india
buy semaglutide canada
buy ozempic cheap
wegovy price
generic wegovy
buy rybelsus in mexico
Hello there, just became alert to your blog through Google, and found that it’s really informative.
I’m gonna watch out for brussels. I’ll be grateful if you continue this in future.
A lot of people will be benefited from your writing.
Cheers! camisetas de futbol
Самый полный список промокодов Мостбет на сегодня у нас на сайте. Все промокоды раздаются бесплатно: на ставку, при регистрации, бездепозитные промики. Обновляем каждые 5 часов. Обычно Mostbet промокод при регистрации предоставляет бонус на первый депозит и используется на этапе создания аккаунта в БК. Сумма вознаграждения достигает 100% от первого пополнения. Следующий тип — промокод мостбет на сегодня. Он позволяет заключать пари на спортивные события, либо пользоваться привилегиями в сфере азартных игр, доступных на сайте БК. Такой бонус предоставляется бесплатно в честь регистрации, Дня рождения или активности.
rybelsus from canada
wegovy australia
semaglutide buy australia
wegovy generic cost
Бесплатные промокоды Mostbet при регистрации 2024. Сегодня пользователям Mostbet-казино предлагаются халявные промокоды на первый депозит, которые активируются при первой регистрации. С их помощью можно увеличить сумму базового бонуса до 35000 рублей. QWERTY777 — промокод mostbet. Для получения реального выигрыша с возможностью вывода на карту, необходимо поставить всю бонусную сумму на экспресс-ставку с коэффициентом от 1,4. Если прогноз окажется правильным, система переведет деньги на основной счет. Не секрет, что у букмекерской конторы Mostbet помимо спортивных ставок есть и другие направления, включая онлайн-игры, гоночные события или политические состязания.
ozempic tablets buy
Регистрация в 2024 году — бесплатный промокод Mostbet на сегодня. Часто задаваемые вопросы по регистрации и учетной записи у букмекера Mostbet. мостбет промокод на регистрацию. Разнообразие бонусных предложений от Mostbet — другие типы бонусов и промокодов для игроков. Промокод Mostbet на День Рождения. Фрибеты или бесплатные ставки. Тото-промокоды Mostbet. Промокоды Mostbet у блогеров. Система промокодов при регистрации позволяет новым игрокам букмекерской конторы Mostbet получать внушительные бонусные суммы к своему первому депозиту. Обратите внимание, что это не промокод на ставку, а именно на регистрацию. Рабочие промокоды Мостбет на сегодня: Вид бонуса. Размер бонуса.
rybelsus best price
wegovy 21 mg
Merhaba!
Son zamanlarda Mostbet tr, mostbet apk çevrimiçi bahis endüstrisindeki liderlerin arasında kendini başarılı bir şekilde kanıtlamıştır. Sadece profesyoneller değil,
kumar oynamaya yeni başlayanlar da bu platformu spor bahisleri dünyasında güvenilir bir ortak olarak gönül rahatlığıyla tercih ediyorlar.
Her ziyaretçi, platformun sunduğu heyecan dolu deneyimin tadını çıkarabilir.
Çok çeşitli popüler spor etkinliklerinin yanı sıra, site golf, tenis veya beyzbol gibi daha az yaygın olan bahis disiplinlerini de sunmaktadır.
Yenilikçi yaklaşım ve geniş seçenekler sayesinde herkes için bir şeyler bulunmaktadır
Sitedeki her sey https://mosttr-2.xyz
Kumar oyunlarД± Mostbet
Kumarhane siteleri Mostbet
Kumarhane stratejileri Mostbet
Kumarhane turnuvalarД± Mostbet
Kumarhane yasal mД± Mostbet
Kumarhane hakkД±nda bilgi Mostbet
Kumarhane para kazanma Mostbet
Kumarhane promosyonlarД± Mostbet
Iyi sanlar!
Советуем посетить сайт с анекдотамиhttps://anekdotitut.ru/
Также не забудьте добавить сайт в закладки: https://anekdotitut.ru/
semaglutide tablets buy
Советуем посетить сайт про автомасло https://usovanton.blogspot.com/
Также не забудьте добавить сайт в закладки: https://usovanton.blogspot.com/
wegovy medicine
https://vstx.ru/
guidecannabis.com
оборудование для актового зала https://i-tec1.ru/ .
Fine way of describing, and fastidious post to take
data regarding my presentation subject matter, which i am going to deliver in institution of higher education.
Советуем посетить сайт про астрологию https://astrologiyanauka.blogspot.com/
Также не забудьте добавить сайт в закладки: https://astrologiyanauka.blogspot.com/
guidecannabis.com
rybelsus buy online
Снос старых частных домов, разбор и вывоз мусора в Москве и области. Наша компания предлагает услугу Сколько стоит снести дом под ключ. Мы работаем в Москве и Московской области. Мы осуществляем демонтаж домов, зданий, фундаментов как вручную, так и с использованием спецтехники. Наши цены ниже рыночных, и мы гарантируем выполнение работ за 24 часа. Бесплатно выезжаем на объект для оценки и консультации. Звоните или оставляйте заявку на нашем сайте, чтобы получить более подробную информацию и рассчитать стоимость услуг.
Para Que Sirve La Pastilla Cialis
Thanks, can, I too can help you something?
Cialis 5 mg prezzo tadalafil 5 mg prezzo tadalafil 5 mg prezzo
ozempic semaglutide
https://best-santehnika.store/
buy semaglutide for weight loss
Incredible quest there. What happened after? Thanks! camisetas de futbol
buy semaglutide from canada online
gilmaire-etienne.com
Доброго!
Промокоды для интернет-магазина Эльдорадо представляют собой специальные коды, которые можно использовать при оформлении заказа на официальном веб-сайте компании.
Они приносят дополнительные преимущества покупателям в виде скидок на определенные товары или услуги, бесплатной доставки и других бонусов.
Как их найти? Чаще всего промокоды предоставляются в рамках специальных акций компании, которые могут проводиться на ее официальном веб-сайте,
в социальных сетях или на ресурсах, таких как проект free-promocode.ru
Сайт самых свежих и проверенных промокодов магазина Эльдорадо https://free-promocode.ru
Удачных покупок!
Промокоды для получения дополнительных бонусов в Эльдорадо
выгодный промокод Эльдорадо
Привлекательные предложения Эльдорадо
рабочий промокод Эльдорадо
выгодные промокоды Эльдорадо
Удачи!
semaglutide tab 7mg
Купить паспорт
Теневые рынки и их незаконные деятельности представляют важную угрозу безопасности общества и являются объектом внимания правоохранительных органов по всему миру. В данной статье мы обсудим так называемые подпольные рынки, где возможно покупать нелегальные паспорта, и какие угрозы это несет для граждан и государства.
Теневые рынки представляют собой неявные интернет-площадки, на которых торгуется разнообразной противозаконной продукцией и услугами. Среди этих услуг встречается и продажа нелегальных документов, таких как удостоверения личности. Эти рынки оперируют в подпольной сфере интернета, используя зашифровывание и инкогнито платежные системы, чтобы оставаться незаметными для правоохранительных органов.
Покупка поддельного паспорта на теневых рынках представляет серьезную угрозу национальной безопасности. незаконное завладение личных данных, изготовление фальшивых документов и нелегальные идентификационные материалы могут быть использованы для совершения террористических актов, обманного характера и прочих преступлений.
Правоохранительные органы в различных странах активно борются с скрытыми рынками, проводя акции по выявлению и задержанию тех, кто замешан в преступных действиях. Однако, по мере того как технологии становятся более затруднительными, эти рынки могут приспосабливаться и находить новые методы обхода законов.
Для защиты себя от угроз, связанных с подпольными рынками, важно быть осторожным при обработке своих личной информации. Это включает в себя остерегаться фишинговых атак, не раскрывать индивидуальной информацией в сомнительных источниках и постоянно проверять свои финансовые отчеты.
Кроме того, общество должно быть информировано о рисках и последствиях покупки поддельных документов. Это способствует созданию более осознанного и ответственного отношения к вопросам безопасности и поможет в борьбе с теневыми рынками. Поддержка законодательства, направленных на ужесточение наказаний за производство и сбыт нелегальных документов, также представляет важную составляющую в противодействии этим преступлениям
It’ѕ going to be end of mine dаy, however before finish Iam
reading this fanttastic ɑrticle to increɑse my knowⅼedge.
semaglutide tablets
semaglutide rx
gilmaire-etienne.com
ozempic for weight loss without diabetes
buy wegovy from canada
gilmaire-etienne.com
semaglutide from canada
wegovy australia
buy ozempic online cheap
semaglutide 14mg tablets
купить клон карты
Изготовление и использование клонов банковских карт является недопустимой практикой, представляющей важную угрозу для безопасности финансовых систем и личных средств граждан. В данной статье мы рассмотрим опасности и последствия покупки копий карт, а также как общество и правоохранительные органы борются с подобными преступлениями.
“Клоны” карт — это незаконно созданные подделки банковских карт, которые используются для непозволительных транзакций. Основной метод создания дубликатов — это похищение данных с оригинальной карты и последующее создание программы этих данных на другую карту. Злоумышленники, предлагающие услуги по продаже реплик карт, обычно действуют в скрытой сфере интернета, где трудно выявить и пресечь их деятельность.
Покупка реплик карт представляет собой существенное преступление, которое может повлечь за собой серьезные наказания. Покупатель также рискует стать соучастником мошенничества, что может привести к уголовной ответственности. Основные преступные действия в этой сфере включают в себя хищение личной информации, подделку документов и, конечно же, финансовые мошенничества.
Банки и полиция активно борются с незаконными действиями, связанными с репликацией карт. Банки внедряют новые технологии для выявления подозрительных транзакций, а также предлагают услуги по защите для своих клиентов. Правоохранительные органы ведут расследования и ловят тех, кто замешан в создании и реализации реплик карт.
Для противодействия угрозам важно соблюдать бдительность при использовании банковских карт. Необходимо регулярно проверять выписки, избегать подозрительных сделок и следить за своей конфиденциальной информацией. Образование и информированность об угрозах также являются основными средствами в борьбе с финансовыми преступлениями.
В заключение, использование клонов банковских карт — это противозаконное и неприемлемое деяние, которое может привести к тяжким последствиям для тех, кто вовлечен в такую практику. Соблюдение мер обеспечения безопасности, осведомленность о возможных угрозах и сотрудничество с органами порядка играют основополагающую роль в предотвращении и пресечении подобных преступлений
rybelsus pill
Informative article, exactly what I was looking for.
ozempic coupon
Right now it appears like Movable Type is the preferred
blogging platform out there right now. (from what I’ve
read) Is that what you are using on your blog?
wegovy online cheap
rybelsus xl
code promo 1xbet cote d’ivoire 2024
buy semaglutide online pharmacy
chutneyb.com
말을 읽고 절하며 지체되었던 작은 농업 전문가입니다.
buy semaglutide online no script
semaglutide rybelsus
rybelsus order
lfchungary.com
이제 이 형제가 나이를 먹고 있으니… 그렇게 될 것 같습니다.
rybelsus tablets 7 mg
rybelsus pills
ozempic tablets
Промокод 1xbet при регистрации по увеличению бонуса до 32500 рублей на первый депозит активируется бесплатно, заполнив поле “Промокод” официальным ключевым словом в регистрационном меню при создании аккаунта: Войти в 1xbet.com. активные промокоды 1xbet: 1XFREE777 Получить промокоды на сегодня без регистрации в 1xBet можно на сайте, где незарегистрированным пользователям предлагается ввести промо «1XFREE777». Создание аккаунта в БК – это обязательный процесс для активации промокода на ставки и использования других функций. Бесплатный промокод для 1xBet на сегодня. Использование промокода 1xBet дает возможность получить подарок от букмекера. Обычно рабочий promo code «1xБет» располагается в соцсетях или же на партнерских ресурсах.Промокод при регистрации дает право на бонус. Для этого требуется пройти регистрацию и внести на баланс не меньше 100 рублей. Также необходимо в личном профиле заполнить все обязательные поля.
wegovy 7 mg tablet
lfchungary.com
그는 이러한 것들 중 일부를 알고 있었지만 그것이 그러한 지점에 도달할 것이라고는 예상하지 못했습니다.
where can i buy ozempic
wegovy semaglutide tablets 7.5 mcg
https://seo116.ru/
code promo 1xbet casino
rybelsus pills
Получи 32500 руб. по актуальному промо коду для 1хбет бесплатно. Новые купоны на регистрацию каждый час на сайте. В ваших силах получить до шести с половиной тысяч рублей при регистрации. Читайте ниже как использовать наши промо-коды. промокоды 1хбет на сегодня. Букмекерская контора позволяет использовать промокод 1иксбет на ставку-бонус. Забирайте новые купоны ежедневно. Внимание! Наши промо-купоны подходят для всех акций букмекера. Этот купон также универсальный – используйте его везде, не только при регистрации на сайте БК 1хбет и всех известных его зеркал. Введите его в форме для регистрации и получите увеличенный бонус на первый депозит до 32500 рублей. Кроме того, букмекер постоянно дарит активным клиентам выгодные подарки. Чтобы получить промокод в 1xBet бесплатно: Подпишитесь на рассылку новостей по смс или электронной почте. Регулярно заходите в раздел «Бонусы и подарки» в Личном кабинете.
rybelsus semaglutide tablets
generic rybelsus
https://seo116.ru/
Merhaba!
Son dönemlerde 1win tr, çevrimiçi bahis endüstrisindeki liderler arasında başarılı bir şekilde kendini kanıtlamıştır.
Sadece profesyoneller değil, 1win giris kumar oynamaya yeni başlayanlar da bu platformu spor bahisleri dünyasında güvenilir bir tercih olarak gönül
rahatlığıyla tercih etmektedirler. Her ziyaretçi, platformun sunduğu heyecan dolu deneyimin tadını çıkarabilir.
Çok çeşitli popüler spor etkinliklerinin yanı sıra, site golf, tenis veya beyzbol gibi daha az yaygın olan bahis disiplinlerini de sunmaktadır.
Yenilikçi yaklaşım ve geniş seçenekler sayesinde herkes için bir şeyler bulunmaktadır
Sitedeki her sey https://1wintr-2.xyz
Kumarhane popГјler oyunlar 1Win
Kumarhane turnuvalarД± 1Win
Kumarhane yasal mД± 1Win
Kumarhane promosyonlarД± 1Win
Slot makineleri 1Win
Kumarhane gГјvenilir mi 1Win
Kumarhane para yatД±rma 1Win
Kumarhane oyunları çevrimiçi 1Win
Iyi sanlar!
sm-slot.com
Fang Jifan의 눈이 빛났습니다. “우리는 노래 할 수 있습니다.”
code promo pari gratuit 1xbet
Использование платежных карт является существенной составляющей современного общества. Карты предоставляют комфорт, секретность и разнообразные варианты для проведения банковских транзакций. Однако, кроме законного применения, существует нелицеприятная сторона — обналичивание карт, когда карты используются для вывода наличных средств без одобрения владельца. Это является незаконным действием и влечет за собой строгие санкции.
Обналичивание карт представляет собой практики, направленные на извлечение наличных средств с банковской карты, необходимые для того, чтобы обойти систему защиты и оповещений, предусмотренных банком. К сожалению, такие преступные действия существуют, и они могут привести к материальным убыткам для банков и клиентов.
Одним из путей кэшаута карт является использование технических уловок, таких как кража данных с магнитных полос карт. Магнитный обман — это способ, при котором преступники устанавливают механизмы на банкоматах или терминалах оплаты, чтобы считывать информацию с магнитной полосы пластиковой карты. Полученные данные затем используются для создания копии карты или проведения транзакций в интернете.
Другим часто используемым способом является ловушка, когда мошенники отправляют лукавые письма или создают поддельные веб-сайты, имитирующие банковские ресурсы, с целью доступа к конфиденциальным данным от клиентов.
Для противостояния выводу наличных средств банки вводят разнообразные меры. Это включает в себя усовершенствование защитных систем, введение двухэтапной проверки, мониторинг транзакций и подготовка клиентов о способах предупреждения мошенничества.
Клиентам также следует принимать активное участие в гарантировании защиты своих карт и данных. Это включает в себя регулярное изменение паролей, анализ выписок из банка, а также осторожность по отношению к сомнительным транзакциям.
Вывод наличных средств — это тяжкое преступление, которое влечет за собой вред не только финансовым учреждениям, но и всему обществу. Поэтому важно соблюдать бдительность при пользовании банковскими картами, быть информированным о методах мошенничества и соблюдать профилактические меры для предотвращения утраты средств
Промокод 1xbet при регистрации. Промо-код встречается на просторах сети достаточно часто. Букмекер использует его для привлечения новых игроков в индустрию ставок, но преимущество предоставляется и новому игроку. После того как он совершит первый депозит, на его бонусный счёт поступит аналогичная сумма, до 32500 рублей. промокод для 1xbet 2024 Данный вид бонус-кода также популярен в поиске. Указывать его надо в купоне для совершения ставки. Промокод 1xbet на ставку практически невозможно найти в бесплатном доступе. Он вручается игрокам индивидуально.К примеру, компания промокодов. В данном разделе подробно расписан процесс получения.
ozempic semaglutide
semaglutide online cheap
http://www.vendome-filmfest.com/2013/?p=344#comment-400863
http://stockholmsskatten.se/nyheter/stockholm-vill-pausa-pengar-till-glesbygden/?unapproved=585535&moderation-hash=ad9e4c915c451c2baeeef554dbe81c1e#comment-585535
http://blog.babylonstoren.com/growing-heirloom-cucumbers-at-babylonstoren/?unapproved=987681&moderation-hash=289047a8263b8a8808389dc09e4ba20c#comment-987681
http://www.hamiltoncoe.co.uk/christmas/the-first-noel/?unapproved=110760&moderation-hash=318d1c8dd35026dd3f25bbbc2035ae4f#comment-110760
http://sitenanuvem.com.br/ola-mundo/?unapproved=200210&moderation-hash=2d413016deb30bd2c4f1dd9c6263a500#comment-200210
оборудование для актового зала школы купить http://www.i-tec3.ru/ .
lfchungary.com
따라서 혈연관계를 떠나 아버지와 아들 사이에는 이 정도의 신뢰가 있다.
buy wegovy
smcasino7.com
Zhu Houzhao는 즉시 “아버지, 내 아들, 장관이 영국 공작이 나가는 것을 도왔습니다. “라고 말했습니다.
buy semaglutide
Watches World
In the realm of high-end watches, discovering a dependable source is essential, and WatchesWorld stands out as a pillar of trust and knowledge. Offering an broad collection of esteemed timepieces, WatchesWorld has accumulated acclaim from satisfied customers worldwide. Let’s explore into what our customers are saying about their experiences.
Customer Testimonials:
O.M.’s Review on O.M.:
“Very good communication and aftercare throughout the process. The watch was flawlessly packed and in mint condition. I would certainly work with this group again for a watch purchase.”
Richard Houtman’s Review on Benny:
“I dealt with Benny, who was highly assisting and courteous at all times, maintaining me regularly informed of the process. Moving forward, even though I ended up sourcing the watch locally, I would still definitely recommend Benny and the company.”
Customer’s Efficient Service Experience:
“A highly efficient and efficient service. Kept me up to date on the order progress.”
Featured Timepieces:
Richard Mille RM30-01 Automatic Winding with Declutchable Rotor:
Price: €285,000
Year: 2023
Reference: RM30-01 TI
Patek Philippe Complications World Time 38.5mm:
Price: €39,900
Year: 2019
Reference: 5230R-001
Rolex Oyster Perpetual Day-Date 36mm:
Price: €76,900
Year: 2024
Reference: 128238-0071
Best Sellers:
Bulgari Serpenti Tubogas 35mm:
Price: On Request
Reference: 101816 SP35C6SDS.1T
Bulgari Serpenti Tubogas 35mm (2024):
Price: €12,700
Reference: 102237 SP35C6SPGD.1T
Cartier Panthere Medium Model:
Price: €8,390
Year: 2023
Reference: W2PN0007
Our Experts Selection:
Cartier Panthere Small Model:
Price: €11,500
Year: 2024
Reference: W3PN0006
Omega Speedmaster Moonwatch 44.25 mm:
Price: €9,190
Year: 2024
Reference: 304.30.44.52.01.001
Rolex Oyster Perpetual Cosmograph Daytona 40mm:
Price: €28,500
Year: 2023
Reference: 116500LN-0002
Rolex Oyster Perpetual 36mm:
Price: €13,600
Year: 2023
Reference: 126000-0006
Why WatchesWorld:
WatchesWorld is not just an online platform; it’s a dedication to individualized service in the realm of high-end watches. Our team of watch experts prioritizes confidence, ensuring that every client makes an knowledgeable decision.
Our Commitment:
Expertise: Our team brings unparalleled understanding and perspective into the world of luxury timepieces.
Trust: Trust is the foundation of our service, and we prioritize transparency in every transaction.
Satisfaction: Customer satisfaction is our paramount goal, and we go the additional step to ensure it.
When you choose WatchesWorld, you’re not just purchasing a watch; you’re investing in a seamless and reliable experience. Explore our range, and let us assist you in finding the perfect timepiece that embodies your style and sophistication. At WatchesWorld, your satisfaction is our time-tested commitment
pragmatic-ko.com
Liu Jian과 다른 사람들은 모두 어두워졌고 모두 동시에 Wang Ao를 바라 보았습니다.
Услуга сноса старых частных домов и вывоза мусора в Москве и Подмосковье под ключ от нашей компании. Работаем в указанном регионе, предлагаем услугу разборка домов и вывоз мусора. Наши тарифы ниже рыночных, а выполнение работ гарантируем в течение 24 часов. Бесплатно выезжаем для оценки и консультаций на объект. Звоните нам или оставляйте заявку на сайте для получения подробной информации и расчета стоимости услуг.
Watches World
In the realm of high-end watches, finding a reliable source is crucial, and WatchesWorld stands out as a symbol of confidence and knowledge. Providing an extensive collection of prestigious timepieces, WatchesWorld has garnered acclaim from content customers worldwide. Let’s explore into what our customers are saying about their experiences.
Customer Testimonials:
O.M.’s Review on O.M.:
“Very good communication and follow-up throughout the process. The watch was perfectly packed and in mint condition. I would certainly work with this team again for a watch purchase.”
Richard Houtman’s Review on Benny:
“I dealt with Benny, who was highly supportive and courteous at all times, keeping me regularly informed of the procedure. Moving forward, even though I ended up sourcing the watch locally, I would still definitely recommend Benny and the company.”
Customer’s Efficient Service Experience:
“A highly efficient and prompt service. Kept me up to date on the order progress.”
Featured Timepieces:
Richard Mille RM30-01 Automatic Winding with Declutchable Rotor:
Price: €285,000
Year: 2023
Reference: RM30-01 TI
Patek Philippe Complications World Time 38.5mm:
Price: €39,900
Year: 2019
Reference: 5230R-001
Rolex Oyster Perpetual Day-Date 36mm:
Price: €76,900
Year: 2024
Reference: 128238-0071
Best Sellers:
Bulgari Serpenti Tubogas 35mm:
Price: On Request
Reference: 101816 SP35C6SDS.1T
Bulgari Serpenti Tubogas 35mm (2024):
Price: €12,700
Reference: 102237 SP35C6SPGD.1T
Cartier Panthere Medium Model:
Price: €8,390
Year: 2023
Reference: W2PN0007
Our Experts Selection:
Cartier Panthere Small Model:
Price: €11,500
Year: 2024
Reference: W3PN0006
Omega Speedmaster Moonwatch 44.25 mm:
Price: €9,190
Year: 2024
Reference: 304.30.44.52.01.001
Rolex Oyster Perpetual Cosmograph Daytona 40mm:
Price: €28,500
Year: 2023
Reference: 116500LN-0002
Rolex Oyster Perpetual 36mm:
Price: €13,600
Year: 2023
Reference: 126000-0006
Why WatchesWorld:
WatchesWorld is not just an web-based platform; it’s a promise to customized service in the world of high-end watches. Our group of watch experts prioritizes trust, ensuring that every customer makes an knowledgeable decision.
Our Commitment:
Expertise: Our group brings exceptional knowledge and insight into the realm of high-end timepieces.
Trust: Trust is the basis of our service, and we prioritize openness in every transaction.
Satisfaction: Customer satisfaction is our paramount goal, and we go the additional step to ensure it.
When you choose WatchesWorld, you’re not just buying a watch; you’re committing in a effortless and trustworthy experience. Explore our collection, and let us assist you in finding the ideal timepiece that mirrors your taste and sophistication. At WatchesWorld, your satisfaction is our time-tested commitment
Привет всем!
С дипломом возникают серьезные трудности: срыв сроков, плохое здоровье от ночных напряженных сессий, но в интернете я нашел ценные инструменты для повышения эффективности.
Мы поможем вам купить диплом университета без предоплаты и доставим его в любой город России с гарантированной безопасностью.
http://mosvuz.ru/forum/user/4824/
http://gta-rus.site/index.php?subaction=userinfo&user=ujocaqah
https://druzia.0pk.me/viewtopic.php?id=2750#p18682
Желаю всем отличных оценок!
купить диплом в бердске
купить диплом журналиста
купить диплом массажиста
купить диплом в петрозаводске
куплю диплом с занесением
купить диплом в смоленске
купить диплом в тольятти
купить диплом высшее
купить диплом в ялте
купить диплом логиста
Здравствуйте!
Пишу диплом, это мой кошмар: срыв сроков, но благодаря интернету нашел методы, чтобы сделать процесс более управляемым.
Для Вас на нашем сайте можно купить диплом Вуза, недорого, с постоплатой, помошь 24/7
http://www.prowi-studie.de/viel-hilft-viel-exzessives-arbeiten-und-erschoepfung/?unapproved=305232&moderation-hash=270130abb051ba5da6aafb025db93275#comment-305232
http://www.zahnarzt-siegen.com/praxisteam-zahnarzt-siegen-netphen/urbanski/#comment-14412
http://theswoppod.com/uncategorized/hello-world/?unapproved=366073&moderation-hash=6e8b8ef5ae3bb537a08bb875c0d552fc#comment-366073
Желаю всем отличных оценок!
купить диплом в старом осколе
купить диплом в воткинске
купить диплом в тольятти
купить диплом в норильске
купить диплом в липецке
купить диплом вуза
купить диплом в кинешме
купить диплом в кирово-чепецке
купить диплом в керчи
куплю диплом с занесением
buy semaglutide for weight loss
rybelsus pill form
lfchungary.com
선글라스를 끼고 큰 금목걸이를 하고 있는 그의 성질은 이제 조금 뜨거워지기 시작했다.
rybelsus 14mg tablets
buy ozempic online canada
rybelsus retail price
Здравствуйте!
Диплом стал моим испытанием: сорвал сроки, но благодаря интернету я нашел способы улучшить эффективность написания.
Приобретите диплом университета без предоплаты у нас и получите его с доставкой в любую точку России, качество гарантировано.
http://www.podzemie.6f.sk/profile.php?lookup=15965
http://ekaterinburg.dom-ob.su/uslugi/drugie-sfery-obsluzhivaniya/21994.html
http://kagedesign.com/2021/12/14/hello-world/?unapproved=435556&moderation-hash=0e3c58da744d7157a492c94afcd77980#comment-435556
Желаю всем отличных оценок!
купить диплом в абакане
купить диплом зубного техника
купить диплом фармацевта
купить диплом в северске
куплю диплом высшего образования
купить диплом кандидата наук
купить диплом дизайнера
купить диплом нового образца
купить диплом в феодосии
купить диплом в азове
Доброго!
Диплом превратился в мою муку: сорванные сроки, но благодаря интернету я нашел способы повысить эффективность написания.
Недорого и без проблем купить диплом института,, техникума, колледжа выгоднее всего у Нас, с доставкой по РФ
http://www.peritiagraripz.it/2018/12/11/psr-basilicata-2014-2020-misura-10-pagamenti-agro-climatico-ambientali-sottomisura-10-2-conservazione-e-uso-sostenibile-delle-risorse-genetiche-in-agricoltura-operazione-10-2-1-sostegno-per-la-conserv/?unapproved=411994&moderation-hash=db1fc7aaffc9737c47fc485e94645205#comment-411994
http://potolky-24.ru/?page_id=232&unapproved=926245&moderation-hash=55bde100631d4834d1d3014caa23b450#comment-926245
http://www.howtobeawebcammodel.com/2019/11/05/how-do-cam-girls-actually-make-money/#comment-61276
Желаю всем отличных оценок!
купить диплом в кирове
куплю диплом высшего образования
купить диплом в мичуринске
купить диплом журналиста
купить диплом электромонтера
купить диплом в туймазы
купить диплом в старом осколе
купить диплом в таганроге
купить диплом в рязани
купить диплом в геленджике
ozempic pill form
Предложение использовать промокод бесплатное. Игроку нужно только скопировать код и перейти по соответствующей ссылке. Если код актуальный, игрок получит в дальнейшем какие-то бонусы.
wegovy online cheap
ozempic cost
Hello Dear, are you really visiting this site on a regular basis,
if so after that you will definitely take nice experience.
Attractive part of content. I just stumbled upon your site
and in accession capital to assert that I acquire
actually enjoyed account your weblog posts.
Anyway I will be subscribing for your augment or even I success you get admission to consistently quickly.
프라그마틱 게임은 선도적인 iGaming 콘텐츠 제공 업체로, 슬롯, 라이브 카지노, 빙고 등의 제품을 통해 고객에게 최고의 엔터테인먼트를 제공합니다. 우리는 20개 이상의 관할 지역에서 라이센스를 소지하고 있습니다.
프라그마틱 플레이
프라그마틱의 슬롯 게임은 정말 뛰어나죠! 여기서 더 많은 게임 정보를 찾을 수 있어 기뻐요.
https://www.istantaneateatro.com
https://www.buycipro.site
https://www.agentpokerterbaik.com
Предложение использовать промокод бесплатное. Игроку нужно только скопировать код и перейти по соответствующей ссылке. Если код актуальный, игрок получит в дальнейшем какие-то бонусы.
Предложение использовать промокод бесплатное. Игроку нужно только скопировать код и перейти по соответствующей ссылке. Если код актуальный, игрок получит в дальнейшем какие-то бонусы.
wegovy drug
modernkarachi.com
“알았어 알았어 불 피우고 요리하자…”
https://colinpagebooks.com/
semaglutide australia
chutneyb.com
Hongzhi 황제는 그에게 죄책감을 느끼는 듯 고개를 끄덕였습니다.
최신 프라그마틱 게임은 iGaming 분야에서 선도적인 제공 업체로서, 독창적이고 표준화된 콘텐츠를 제공합니다.
프라그마틱 홈페이지
프라그마틱의 게임은 정말 다양한데, 어떤 테마의 게임을 가장 좋아하나요? 나눠주세요!
https://www.uptownxmastrees.com
https://www.rachitadas.com
https://dwqewqe.weebly.com/
semaglutide online
semaglutide for weight loss
rybelsus tab 14mg
һeⅼlo here and thank youu for your info – I’ve certainly picked up something new from right here.
I did hоwever exspertise seeveral technical
pointѕ using this web site, since I edperienced to reload the web site many times ρrevioᥙs to I could get it to l᧐ad properly.
I had been wonddering if youhr web hosⅾt is OK?
Not that I’m compⅼaining, but sluggish loaⅾing instancеs times will often afftect
your placement in google and could daage yoᥙr high-quality ѕcore if adds
and marketing with Adwords. Well I am adԁing tһis RSS to my
e-mail and cɑn look ᧐ᥙt forr much more off your respectivе intriguing content.
Maқe sure you updatе this agbain very soon.
buy viagra online
ozempic tablets
wegovy for diabetes
https://pr4u.ru/image/pgs/?vidy_i_primenenie_stalynyh_svay.html
https://www.gilmaire-etienne.com/wp-content/pages/code-promo-1xbet-cote-d-ivoire-bonus-200.html?cn-reloaded=1
ozempic pill form
Привет всем!
Пишу диплом, и это ад. Срываю сроки, здоровье на грани, но интернет помогает найти эффективные методы работы. Нужно просто продолжать.
Мы поможем вам купить диплом университета недорого, с доставкой в любой город России, оплата после получения.
https://stonecraft.diary.ru/p221905210_kakim-obrazom-zakazat-diplom.htm
https://iuecwalocal81288.com/content/%D0%B3%D0%B4%D0%B5-%D0%B7%D0%B0%D0%BA%D0%B0%D0%B7%D0%B0%D1%82%D1%8C-%D0%B4%D0%B8%D0%BF%D0%BB%D0%BE%D0%BC
http://armhleb.ru/index.php?subaction=userinfo&user=elyrezu
Желаю всем отличных оценок!
купить диплом в кинешме
купить диплом в находке
купить диплом в биробиджане
купить диплом в геленджике
купить диплом в белово
купить технический диплом
купить диплом в камышине
купить диплом в южно-сахалинске
купить диплом медбрата
купить диплом педагога
Здравствуйте!
Пишу диплом, это ад. Но интернет помогает находить эффективные методы работы, которые делают этот процесс более переносимым.
Заказывайте диплом у нас и получите его быстро и безопасно, оплата по факту доставки, отправка в любой регион России.
http://infodesk.kg/?page_id=2&unapproved=284205&moderation-hash=eb1faff071942c3a1a65b0441413ff97#comment-284205
http://www.detrasdeltelon.com/espectaculos/lapuerta/?unapproved=248683&moderation-hash=36ec61644d73b75951f0073db65c5a89#comment-248683
http://selecpro.cl/2017/06/27/industrial-innovation-and-design-exhibitions-of-2017/#comment-19218
Желаю всем отличных оценок!
купить диплом в балаково
купить диплом в чайковском
купить диплом в уфе
купить диплом во владикавказе
купить диплом о высшем образовании
купить диплом в благовещенске
купить сертификат специалиста
купить морской диплом
купить диплом в томске
купить диплом в хасавюрте
Excellent post. I’m dealing with many of these issues as well..
https://tecspo.ru/news/pags/zagolovok_istoriya_vozniknoveniya_pravil_doroghnogo_dvigheniya.html
smcasino7.com
학생을 받아들이는 것이 큰 문제가 아니라, 이 사람들이 귀족이라는 것이 큰 문제입니다.
https://pr4u.ru/image/pgs/?vidy_i_primenenie_stalynyh_svay.html
https://www.gilmaire-etienne.com/wp-content/pages/code-promo-1xbet-cote-d-ivoire-bonus-200.html?cn-reloaded=1
Привет всем!
Пишу диплом, это ужас: сорвал сроки, но в сети я нашел полезные ресурсы, которые помогают мне продолжать работу.
Приобретите диплом университета без предоплаты у нас и получите его с доставкой в любую точку России.
https://nordgoldjobs.com/forum/user/38960/
http://shkola.mitrofanovka.ru/index.php?subaction=userinfo&user=obybyny
https://www.freeboard.com.ua/forum/viewtopic.php?pid=955976#p955976
Желаю всем отличных оценок!
купить диплом провизора
купить диплом в рязани
купить диплом в сарове
купить диплом в копейске
купить диплом в ростове-на-дону
купить диплом в усолье-сибирском
купить диплом в мичуринске
купить диплом маляра
купить диплом в георгиевске
купить диплом в белорецке
rybelsus semaglutide tablets 3mg
Здравствуйте!
С дипломом сложно, срыв сроков, здоровье под угрозой от ночных сессий. Но нашла ресурсы, помогающие улучшить эффективность. Мне нужно просто выдержать.
Закажите диплом у нас без предоплаты и мы доставим его вам в любой регион России с гарантированной конфиденциальностью.
http://nedvizhimostt.ru/profile.php?u=yhopeve
http://mnogootvetov.ru/index.php?qa=88355&qa_1=discussion-advanced-classes-thane-insights-community-support&show=89766#a89766
http://www.xn--72c9aa5escud2b.com/webboard/index.php/topic,315040.new.html#new
Желаю всем отличных оценок!
купить диплом в анжеро-судженске
купить диплом в череповце
купить диплом инженера по охране труда
купить диплом в россоши
купить диплом в сургуте
купить диплом врача
купить диплом ссср
купить диплом в ишимбае
старые дипломы купить
купить диплом в кропоткине
https://www.gilmaire-etienne.com/wp-content/pages/code-promo-1xbet-cote-d-ivoire-bonus-200.html?cn-reloaded=1
semaglutide tablets 7 mg
Merhaba!
Son yıllarda Bwin tr, çevrimiçi bahis endüstrisinde lider konumunu başarılı bir şekilde sağlamlaştırdı. Uzmanlar kadar, kumar oynamaya yeni başlayanlar da bu
platformu spor bahisleri dünyasında güvenilir bir tercih olarak seçmektedirler. Her ziyaretçi, bwin casino platformun sunmuş olduğu heyecan dolu deneyimin tadını çıkarabilir.
Popüler spor etkinliklerine ek olarak, site golf, tenis veya beyzbol gibi daha az bilinen bahis disiplinlerine de yer vermektedir. Geniş seçenekler ve yenilikçi
yaklaşımı sayesinde herkesin ilgisini çekecek bir şey bulunmaktadır
Çevrimiçi kumar BWin
Kumarhane oyunlarД± Г§eЕџitleri BWin
Kumarhane bonuslarД± BWin
Kumarhane indirimleri BWin
п»їKumarhane BWin
Kumarhane turnuvalarД± BWin
Kumarhane oyunlarД± BWin
Kumar oyunlarД± BWin
Iyi sanlar!
rybelsus buy from canada
ozempic pill form
Günaydın!
Son zamanlarda Bwin tr, çevrimiçi bahis endüstrisindeki öncüler arasında başarılı bir şekilde kendini kanıtladı. Uzmanlar kadar, kumar oynamaya yeni başlayanlar
da bu platformu spor bahisleri dünyasında güvenilir bir tercih olarak gönül rahatlığıyla tercih etmektedirler. Her ziyaretçi, bwin nedir platformun sunduğu heyecan dolu
deneyimin tadını çıkarabilir. Site, çok çeşitli popüler spor etkinliklerinin yanı sıra golf, tenis veya beyzbol gibi daha az yaygın olan bahis disiplinlerini
de sunmaktadır. Yenilikçi yaklaşım ve geniş seçenekler sayesinde herkes için bir şeyler bulunmaktadır
Kumarhane para yatД±rma BWin
Kumarhane oyunlarД± Г§eЕџitleri BWin
Kumarhane hileleri BWin
Kumarhane stratejileri BWin
Kumarhane taktikleri BWin
Kumarhane hakkД±nda bilgi BWin
Kumarhane gГјvenilir mi BWin
Kumarhane popГјler oyunlar BWin
Iyi sanlar!
프라그마틱 관련 글 읽는 것이 즐거웠어요! 또한, 제 사이트에서도 프라그마틱에 대한 정보를 공유하고 있어요. 함께 교류하며 더 많은 지식을 얻어봐요!
에그벳
프라그마틱의 게임은 높은 퀄리티와 흥미진진한 스토리로 항상 눈길을 끌어요. 이번에 어떤 게임을 즐겼나요?
https://www.buylevaquin.site
https://www.buytretinoin.site
https://www.cialissamples.site
где занять денег http://www.topruscredit.ru/ .
rybelsus without prescription
rybelsus over the counter
wegovy uk
Cialis 10 Mg Precio Farmacia EspaГ±a
I apologise, but, in my opinion, you are mistaken. I can defend the position. Write to me in PM, we will communicate.
Cialis 5 mg prezzo cialis 5 mg prezzo tadalafil 5 mg prezzo
semaglutide ozempic
sm-online-game.com
Jiang Yan은 이미 경멸을 표하며 시선을 돌렸습니다.
Watches World
In the realm of premium watches, locating a reliable source is crucial, and WatchesWorld stands out as a pillar of confidence and knowledge. Providing an broad collection of prestigious timepieces, WatchesWorld has accumulated praise from satisfied customers worldwide. Let’s explore into what our customers are saying about their experiences.
Customer Testimonials:
O.M.’s Review on O.M.:
“Outstanding communication and aftercare throughout the procedure. The watch was perfectly packed and in mint condition. I would certainly work with this team again for a watch purchase.”
Richard Houtman’s Review on Benny:
“I dealt with Benny, who was exceptionally assisting and courteous at all times, preserving me regularly informed of the process. Moving forward, even though I ended up sourcing the watch locally, I would still definitely recommend Benny and the company.”
Customer’s Efficient Service Experience:
“A highly efficient and swift service. Kept me up to date on the order progress.”
Featured Timepieces:
Richard Mille RM30-01 Automatic Winding with Declutchable Rotor:
Price: €285,000
Year: 2023
Reference: RM30-01 TI
Patek Philippe Complications World Time 38.5mm:
Price: €39,900
Year: 2019
Reference: 5230R-001
Rolex Oyster Perpetual Day-Date 36mm:
Price: €76,900
Year: 2024
Reference: 128238-0071
Best Sellers:
Bulgari Serpenti Tubogas 35mm:
Price: On Request
Reference: 101816 SP35C6SDS.1T
Bulgari Serpenti Tubogas 35mm (2024):
Price: €12,700
Reference: 102237 SP35C6SPGD.1T
Cartier Panthere Medium Model:
Price: €8,390
Year: 2023
Reference: W2PN0007
Our Experts Selection:
Cartier Panthere Small Model:
Price: €11,500
Year: 2024
Reference: W3PN0006
Omega Speedmaster Moonwatch 44.25 mm:
Price: €9,190
Year: 2024
Reference: 304.30.44.52.01.001
Rolex Oyster Perpetual Cosmograph Daytona 40mm:
Price: €28,500
Year: 2023
Reference: 116500LN-0002
Rolex Oyster Perpetual 36mm:
Price: €13,600
Year: 2023
Reference: 126000-0006
Why WatchesWorld:
WatchesWorld is not just an internet platform; it’s a promise to personalized service in the realm of high-end watches. Our team of watch experts prioritizes confidence, ensuring that every customer makes an knowledgeable decision.
Our Commitment:
Expertise: Our group brings matchless understanding and perspective into the world of high-end timepieces.
Trust: Confidence is the foundation of our service, and we prioritize transparency in every transaction.
Satisfaction: Customer satisfaction is our paramount goal, and we go the additional step to ensure it.
When you choose WatchesWorld, you’re not just purchasing a watch; you’re committing in a smooth and trustworthy experience. Explore our collection, and let us assist you in discovering the perfect timepiece that mirrors your taste and sophistication. At WatchesWorld, your satisfaction is our proven commitment
strelkaproject.com
장창은 아직 의로운 태도가 없었고 얼굴이 겁에 질려 창백해졌다.
buy ozempic
Услуги грузчиков и разнорабочих по всей России от нашей компании. Работаем в регионах и областях, предлагаем грузчик услуга. Тарифы ниже рыночных, выезд грузчиков на место в течении 10 минут . Бесплатно выезжаем для оценки и консультаций. Звоните нам или оставляйте заявку на сайте для получения подробной информации и расчета стоимости услуг.
semaglutide 14
wegovy pill
https://altay-info.ru/news/pages/zagolovok_puteshestviya_menyayut_ghizny_top_7_prichin_otpravitysya_navstrechu_priklyuchen.html
https://www.inserrh.com/media/pgs/code-promo-1xbet-congo-bonus-221-000-cdf.html
wegovy semaglutide tablets 3mg
프라그마틱 게임은 iGaming 분야에서 주목받는 주요 제공 업체로, 독창적이고 표준화된 콘텐츠를 제공합니다.
프라그마틱 슬롯 무료 체험
프라그마틱 관련 글 읽는 것이 정말 즐거웠어요! 또한, 제 사이트에서도 프라그마틱과 관련된 정보를 공유하고 있어요. 함께 이야기 나누면서 더 많은 지식을 쌓아가요!
http://ivermectininstock.com/
https://www.vamiveta.com/
https://www.genericsingulair.site
sm-online-game.com
자세히 보니 내부의 테이블과 의자가 모두 완성되어 있었습니다.
wegovy 7 mg tablet
https://fontanvazon.ru/jscripts/pgs/zagolovok_kak_plastikovye_okna_vliyayut_na_komfort_v_dome.html
https://www.inserrh.com/media/pgs/code-promo-1xbet-congo-bonus-221-000-cdf.html
https://dintek.ru/bc/pgs/zagolovok_prodvighenie_biznesa_cherez_instagram_osnovnye_sposoby.html
buy semaglutide online canada
https://www.inserrh.com/media/pgs/code-promo-1xbet-congo-bonus-221-000-cdf.html
wegovy 3mg
semaglutide drug
semaglutide injections
buy rybelsus canada
Hi, yeah this piece of writing is genuinely pleasant and I
have learned lot of things from it on the topic
of blogging. thanks.
semaglutide xr
buy ozempic for weight loss
iGaming 업계의 주역, 프라그마틱 게임은 모바일 중심의 혁신적이고 표준화된 콘텐츠를 제공하는 선도적인 제공 업체입니다.
프라그마틱 플레이
프라그마틱은 늘 새로운 기술과 아이디어를 도입하죠. 이번에 어떤 혁신이 있었는지 알려주세요!
https://www.askkuya.com
https://www.karaaslannakliyat.com
https://wszhibo.com/hot/
semaglutide xr
rybelsus online order
Промокод 1xBet 2024 (Бонус при Регистрации 32500 RUB)
как узнать промокод на 1хбет – 1XFREE777, новые пользователи букмекерской компании могут воспользоваться приветственным бонусом в размере 100% от суммы депозита до 32 500 рублей (или эквивалентную сумму в другой валюте €100). Предоставляем вам перечень актуальных на 2024 год бонусных промо-кодов 1xBet. Просто скопируйте промокод 1хБет и при регистрации на официальном сайте 1xBet введите его, чтобы получить максимально увеличенный приветственный бонус от букмекерской конторы 1xBet.
Актуальные промокоды для 1хБет ? Акция 2024 ? Бонус коды ? Фрибет Бонусы за регистрацию ? Программа лояльности ? Кэшбэк!
бонус 1хбет при регистрации промокод – это 1XFREE777. Только с помощью него вы получите бонус в размере 100% до 32500 рублей. Все остальные коды не действительны и не предоставляют такого бонуса. Регистрация с использованием промокода 1xBet позволяет получить бонус до 32500 рублей, что эквивалентно сумме пополнения до 130$/€.
Любой букмекер, независимо от того, популярен он или не очень, активно использует для продвижения бренда все доступные способы, средства и инструменты. Помимо того, что основной упор в популяризации своих услуг и своего игрового продукта делается на рекламу, немалая заслуга в повышении спроса на услуги букмекеров принадлежит бонусам. Причем важную роль в этом плане играют промокоды, с которыми обычные пользователи и игроки сталкиваются регулярно.
Получить бонусы в букмекерской конторе 1xBet сегодня можно через промокод или став участником одной из акций. Предложения доступны каждому, как новичкам, так и игрокам со стажем.
Давайте разберемся в тонкостях бонусной программы букмекера 1xbet. Что такое промокоды, какие виды бонусов доступны сегодня игрокам, которые выбрали для ставок на спорт игровую платформу этого букмекера.
Промокод 1xBet – 1XFREE777. Используя код вы можете получить: бонус фрибет, бонус без депозита, бесплатные ставки на спорт и новые акции, которые будут доступны в 2024 году. Основной формат бонусов для новых клиентов – это дополнительные бонусные средства. Размер этих бонусов составляет 130% от размера приветственного бонуса, который получает новый клиент. Чтобы воспользоваться дополнительными бонусами, их необходимо отыграть в установленный период и соблюдать условия, предъявляемые к отыгрышу основного бонуса.
Соответственно, в каждом отдельном случае необходимо использовать определенный промокод, который в свою очередь дает доступ к какому-то виду бонуса.
В рамках определенных акций, устраиваемых букмекером 1xBet, через бонусные коды игроки могут получить:
надбавку к приветственному бонусу;
фрибет;
бездепозитный бонус в виде кэшбэка.
Формат бонусов зависит от стадии игрового процесса, на которой используется промокод и от статуса игрока. Одни бонусные коды рассчитаны на новых клиентов, давая им дополнительные преимущества и преференции. Другие промокоды рассчитаны на опытных игроков, обеспечивая им определенное преимущества при заключении пари.
Ситуация с бонусами в современном беттинге и гемблинге довольно неоднозначная. Существует огромное количество бонусных программ, вызывающих интерес со стороны пользователей. Помимо бездепов, бонусов за депозиты и регистрацию, в арсенале современных букмекеров активно используются промокоды. Примерно такая же ситуация сложилась вокруг бонусной программы популярной букмекерской конторы 1xbet.
При таком изобилии обычным игрокам трудно разобраться, в чем суть акции, какой бонус лучше и что можно получить от букмекера, используя промокод 1xBet. Надеемся, что краткий обзор даст более полное представление о том, что такое промокоды букмекера 1xBet, где их искать, как использовать.
Промокод 1хБет расскажем подробнее в этой статье сайт – предоставляет вам VIP-спортивный бонус 100%, который полностью соответствует вашему первому депозиту на сумму до €/$130. Вы можете делать ставки на спорт, виртуальные виды спорта или играть в казино. Это предложение действительно на протяжении всего 2024 года.
Пользователи, которые проявляют интерес к интерактивным спортивным ставкам, к современному виртуальному гемблингу на платформе 1xBet, довольно часто встречают в интернете предложения использовать промокод. Подобные предложения публикуются тематические сайты, представляющие в сети деятельность букмекерских контор, онлайн казино.
Именно через такие источники и распространяются промокоды.
Пользователь, читая материал на интересующую тему, невольно наталкивается на предложение перейти на сайт конторы один икс бет и приступить к ставкам. Однако подобное предложение включает в себя и мотивацию. Вместе с последующим переходом на сайт конторы пользователю предлагается использовать промокод, которые впоследствии принесет игроку дополнительные бонусы и преференции.
Предложение использовать промокод бесплатное. Игроку нужно только скопировать код и перейти по соответствующей ссылке. Если код актуальный, игрок получит в дальнейшем какие-то бонусы.
Такие предложения в интернете публикуются регулярно. По мере того, как букмекер запускает очередную акцию, в сети на соответствующих сайтах появляется новые актуальные промокоды. Букмекер не занимается распространением бонусных кодов. Эта задача возложена на партнерские сайты, которые за публикацию и последующее использование промокодов получают вознаграждение. Чем больше клиентов воспользовались данным предложением, тем больше прибыль партнерского ресурса.
промокод на ординар 1xbet: 1XFREE777 Вы можете получить спортивный бонус до 32 500 рублей или казино-бонус до 128000 рублей + 150 фриспинов. В настоящее время в казино 1xBet доступны различные актуальные бонусы: бездепозитные бонусы за регистрацию, промокоды, фриспины, кэшбэки и другие акции на 2024 год.
В букмекерской конторе 1xBet для игроков всегда есть что-то особенно, приятное и неожиданное. Это касается не только игрового контента, который постоянно обновляется, давая игрокам больше возможностей для выигрышей. Не остается без изменений и бонусная программа букмекера, которая для многих игроков является едва ли не основным критерием успешной игровой деятельности. Ассортимент бонусной программы 1 икс Бет впечатляет. Это и приветственный бонус, и депозитные бонусы и промокоды 1xBet. Одним словом, интересных предложений предостаточно. Остается только сделать правильный выбор.
Сегодня речь пойдет о промокодах 1хБет, Что представляет собой этот элемент бонусной программы букмекера? Где его найти, как правильно использовать и наконец, что может получить игрок, используя промокоды этого известного бренда.
semaglutide weight loss
In the world of high-end watches, finding a reliable source is essential, and WatchesWorld stands out as a symbol of trust and expertise. Providing an broad collection of prestigious timepieces, WatchesWorld has garnered acclaim from satisfied customers worldwide. Let’s delve into what our customers are saying about their encounters.
Customer Testimonials:
O.M.’s Review on O.M.:
“Very good communication and follow-up throughout the process. The watch was impeccably packed and in pristine condition. I would certainly work with this team again for a watch purchase.”
Richard Houtman’s Review on Benny:
“I dealt with Benny, who was highly helpful and courteous at all times, keeping me regularly informed of the procedure. Moving forward, even though I ended up acquiring the watch locally, I would still definitely recommend Benny and the company.”
Customer’s Efficient Service Experience:
“A excellent and prompt service. Kept me up to date on the order progress.”
Featured Timepieces:
Richard Mille RM30-01 Automatic Winding with Declutchable Rotor:
Price: €285,000
Year: 2023
Reference: RM30-01 TI
Patek Philippe Complications World Time 38.5mm:
Price: €39,900
Year: 2019
Reference: 5230R-001
Rolex Oyster Perpetual Day-Date 36mm:
Price: €76,900
Year: 2024
Reference: 128238-0071
Best Sellers:
Bulgari Serpenti Tubogas 35mm:
Price: On Request
Reference: 101816 SP35C6SDS.1T
Bulgari Serpenti Tubogas 35mm (2024):
Price: €12,700
Reference: 102237 SP35C6SPGD.1T
Cartier Panthere Medium Model:
Price: €8,390
Year: 2023
Reference: W2PN0007
Our Experts Selection:
Cartier Panthere Small Model:
Price: €11,500
Year: 2024
Reference: W3PN0006
Omega Speedmaster Moonwatch 44.25 mm:
Price: €9,190
Year: 2024
Reference: 304.30.44.52.01.001
Rolex Oyster Perpetual Cosmograph Daytona 40mm:
Price: €28,500
Year: 2023
Reference: 116500LN-0002
Rolex Oyster Perpetual 36mm:
Price: €13,600
Year: 2023
Reference: 126000-0006
Why WatchesWorld:
WatchesWorld is not just an internet platform; it’s a promise to individualized service in the realm of high-end watches. Our group of watch experts prioritizes trust, ensuring that every client makes an well-informed decision.
Our Commitment:
Expertise: Our team brings matchless knowledge and insight into the realm of luxury timepieces.
Trust: Confidence is the foundation of our service, and we prioritize openness in every transaction.
Satisfaction: Customer satisfaction is our paramount goal, and we go the extra mile to ensure it.
When you choose WatchesWorld, you’re not just purchasing a watch; you’re investing in a seamless and reliable experience. Explore our collection, and let us assist you in finding the perfect timepiece that embodies your style and elegance. At WatchesWorld, your satisfaction is our time-tested commitment
rybelsus canada pharmacy
online platform for watches
In the world of luxury watches, discovering a reliable source is essential, and WatchesWorld stands out as a pillar of confidence and knowledge. Presenting an wide collection of esteemed timepieces, WatchesWorld has accumulated praise from satisfied customers worldwide. Let’s explore into what our customers are saying about their experiences.
Customer Testimonials:
O.M.’s Review on O.M.:
“Outstanding communication and follow-up throughout the process. The watch was perfectly packed and in pristine condition. I would certainly work with this team again for a watch purchase.”
Richard Houtman’s Review on Benny:
“I dealt with Benny, who was highly supportive and courteous at all times, preserving me regularly informed of the process. Moving forward, even though I ended up acquiring the watch locally, I would still definitely recommend Benny and the company.”
Customer’s Efficient Service Experience:
“A excellent and swift service. Kept me up to date on the order progress.”
Featured Timepieces:
Richard Mille RM30-01 Automatic Winding with Declutchable Rotor:
Price: €285,000
Year: 2023
Reference: RM30-01 TI
Patek Philippe Complications World Time 38.5mm:
Price: €39,900
Year: 2019
Reference: 5230R-001
Rolex Oyster Perpetual Day-Date 36mm:
Price: €76,900
Year: 2024
Reference: 128238-0071
Best Sellers:
Bulgari Serpenti Tubogas 35mm:
Price: On Request
Reference: 101816 SP35C6SDS.1T
Bulgari Serpenti Tubogas 35mm (2024):
Price: €12,700
Reference: 102237 SP35C6SPGD.1T
Cartier Panthere Medium Model:
Price: €8,390
Year: 2023
Reference: W2PN0007
Our Experts Selection:
Cartier Panthere Small Model:
Price: €11,500
Year: 2024
Reference: W3PN0006
Omega Speedmaster Moonwatch 44.25 mm:
Price: €9,190
Year: 2024
Reference: 304.30.44.52.01.001
Rolex Oyster Perpetual Cosmograph Daytona 40mm:
Price: €28,500
Year: 2023
Reference: 116500LN-0002
Rolex Oyster Perpetual 36mm:
Price: €13,600
Year: 2023
Reference: 126000-0006
Why WatchesWorld:
WatchesWorld is not just an web-based platform; it’s a commitment to personalized service in the realm of luxury watches. Our group of watch experts prioritizes trust, ensuring that every customer makes an knowledgeable decision.
Our Commitment:
Expertise: Our group brings exceptional understanding and perspective into the world of luxury timepieces.
Trust: Confidence is the basis of our service, and we prioritize openness in every transaction.
Satisfaction: Client satisfaction is our ultimate goal, and we go the extra mile to ensure it.
When you choose WatchesWorld, you’re not just purchasing a watch; you’re committing in a smooth and reliable experience. Explore our collection, and let us assist you in discovering the perfect timepiece that embodies your taste and sophistication. At WatchesWorld, your satisfaction is our proven commitment
Hello!
Embark on a Culinary Journey
Are you in search of a dining experience that takes you on a journey of flavors and cultures?
Look no further than our website, http://restoranid-tallinnas.com, designed to guide you through the best culinary spots in Tallinn.
Discover the perfect place for every occasion, from romantic dinners to joyous family gatherings.
Dive into a world where every restaurant tells a unique story, offering an array of tastes and atmospheres.
Begin your gastronomic adventure today and let each meal be an unforgettable chapter in your culinary story.
top 50 restoranid tallinnas
tallinna parimad restoranid
restaurants in tallinn
restoranid tallinnas
Good luck!
semaglutide pills
Промокод 1xBet 2024 (Бонус при Регистрации 32500 RUB)
фрибет 1xbet промокод – 1XFREE777, новые пользователи букмекерской компании могут воспользоваться приветственным бонусом в размере 100% от суммы депозита до 32 500 рублей (или эквивалентную сумму в другой валюте €100). Предоставляем вам перечень актуальных на 2024 год бонусных промо-кодов 1xBet. Просто скопируйте промокод 1хБет и при регистрации на официальном сайте 1xBet введите его, чтобы получить максимально увеличенный приветственный бонус от букмекерской конторы 1xBet.
Актуальные промокоды для 1хБет ? Акция 2024 ? Бонус коды ? Фрибет Бонусы за регистрацию ? Программа лояльности ? Кэшбэк!
официальный сайт 1хбет промокод – это 1XFREE777. Только с помощью него вы получите бонус в размере 100% до 32500 рублей. Все остальные коды не действительны и не предоставляют такого бонуса. Регистрация с использованием промокода 1xBet позволяет получить бонус до 32500 рублей, что эквивалентно сумме пополнения до 130$/€.
Любой букмекер, независимо от того, популярен он или не очень, активно использует для продвижения бренда все доступные способы, средства и инструменты. Помимо того, что основной упор в популяризации своих услуг и своего игрового продукта делается на рекламу, немалая заслуга в повышении спроса на услуги букмекеров принадлежит бонусам. Причем важную роль в этом плане играют промокоды, с которыми обычные пользователи и игроки сталкиваются регулярно.
Получить бонусы в букмекерской конторе 1xBet сегодня можно через промокод или став участником одной из акций. Предложения доступны каждому, как новичкам, так и игрокам со стажем.
Давайте разберемся в тонкостях бонусной программы букмекера 1xbet. Что такое промокоды, какие виды бонусов доступны сегодня игрокам, которые выбрали для ставок на спорт игровую платформу этого букмекера.
Промокод 1xBet – 1XFREE777. Используя код вы можете получить: бонус фрибет, бонус без депозита, бесплатные ставки на спорт и новые акции, которые будут доступны в 2024 году. Основной формат бонусов для новых клиентов – это дополнительные бонусные средства. Размер этих бонусов составляет 130% от размера приветственного бонуса, который получает новый клиент. Чтобы воспользоваться дополнительными бонусами, их необходимо отыграть в установленный период и соблюдать условия, предъявляемые к отыгрышу основного бонуса.
Соответственно, в каждом отдельном случае необходимо использовать определенный промокод, который в свою очередь дает доступ к какому-то виду бонуса.
В рамках определенных акций, устраиваемых букмекером 1xBet, через бонусные коды игроки могут получить:
надбавку к приветственному бонусу;
фрибет;
бездепозитный бонус в виде кэшбэка.
Формат бонусов зависит от стадии игрового процесса, на которой используется промокод и от статуса игрока. Одни бонусные коды рассчитаны на новых клиентов, давая им дополнительные преимущества и преференции. Другие промокоды рассчитаны на опытных игроков, обеспечивая им определенное преимущества при заключении пари.
Ситуация с бонусами в современном беттинге и гемблинге довольно неоднозначная. Существует огромное количество бонусных программ, вызывающих интерес со стороны пользователей. Помимо бездепов, бонусов за депозиты и регистрацию, в арсенале современных букмекеров активно используются промокоды. Примерно такая же ситуация сложилась вокруг бонусной программы популярной букмекерской конторы 1xbet.
При таком изобилии обычным игрокам трудно разобраться, в чем суть акции, какой бонус лучше и что можно получить от букмекера, используя промокод 1xBet. Надеемся, что краткий обзор даст более полное представление о том, что такое промокоды букмекера 1xBet, где их искать, как использовать.
Промокод 1хБет расскажем подробнее в этой статье сайт – предоставляет вам VIP-спортивный бонус 100%, который полностью соответствует вашему первому депозиту на сумму до €/$130. Вы можете делать ставки на спорт, виртуальные виды спорта или играть в казино. Это предложение действительно на протяжении всего 2024 года.
Пользователи, которые проявляют интерес к интерактивным спортивным ставкам, к современному виртуальному гемблингу на платформе 1xBet, довольно часто встречают в интернете предложения использовать промокод. Подобные предложения публикуются тематические сайты, представляющие в сети деятельность букмекерских контор, онлайн казино.
Именно через такие источники и распространяются промокоды.
Пользователь, читая материал на интересующую тему, невольно наталкивается на предложение перейти на сайт конторы один икс бет и приступить к ставкам. Однако подобное предложение включает в себя и мотивацию. Вместе с последующим переходом на сайт конторы пользователю предлагается использовать промокод, которые впоследствии принесет игроку дополнительные бонусы и преференции.
Предложение использовать промокод бесплатное. Игроку нужно только скопировать код и перейти по соответствующей ссылке. Если код актуальный, игрок получит в дальнейшем какие-то бонусы.
Такие предложения в интернете публикуются регулярно. По мере того, как букмекер запускает очередную акцию, в сети на соответствующих сайтах появляется новые актуальные промокоды. Букмекер не занимается распространением бонусных кодов. Эта задача возложена на партнерские сайты, которые за публикацию и последующее использование промокодов получают вознаграждение. Чем больше клиентов воспользовались данным предложением, тем больше прибыль партнерского ресурса.
1xbet kz промокод: 1XFREE777 Вы можете получить спортивный бонус до 32 500 рублей или казино-бонус до 128000 рублей + 150 фриспинов. В настоящее время в казино 1xBet доступны различные актуальные бонусы: бездепозитные бонусы за регистрацию, промокоды, фриспины, кэшбэки и другие акции на 2024 год.
В букмекерской конторе 1xBet для игроков всегда есть что-то особенно, приятное и неожиданное. Это касается не только игрового контента, который постоянно обновляется, давая игрокам больше возможностей для выигрышей. Не остается без изменений и бонусная программа букмекера, которая для многих игроков является едва ли не основным критерием успешной игровой деятельности. Ассортимент бонусной программы 1 икс Бет впечатляет. Это и приветственный бонус, и депозитные бонусы и промокоды 1xBet. Одним словом, интересных предложений предостаточно. Остается только сделать правильный выбор.
Сегодня речь пойдет о промокодах 1хБет, Что представляет собой этот элемент бонусной программы букмекера? Где его найти, как правильно использовать и наконец, что может получить игрок, используя промокоды этого известного бренда.
wegovy oral medication
Промокод 1xBet 2024 (Бонус при Регистрации 32500 RUB)
рабочий промокод 1хбет бонус – 1XFREE777, новые пользователи букмекерской компании могут воспользоваться приветственным бонусом в размере 100% от суммы депозита до 32 500 рублей (или эквивалентную сумму в другой валюте €100). Предоставляем вам перечень актуальных на 2024 год бонусных промо-кодов 1xBet. Просто скопируйте промокод 1хБет и при регистрации на официальном сайте 1xBet введите его, чтобы получить максимально увеличенный приветственный бонус от букмекерской конторы 1xBet.
Актуальные промокоды для 1хБет ? Акция 2024 ? Бонус коды ? Фрибет Бонусы за регистрацию ? Программа лояльности ? Кэшбэк!
как пользоваться промокодом 1xbet – это 1XFREE777. Только с помощью него вы получите бонус в размере 100% до 32500 рублей. Все остальные коды не действительны и не предоставляют такого бонуса. Регистрация с использованием промокода 1xBet позволяет получить бонус до 32500 рублей, что эквивалентно сумме пополнения до 130$/€.
Любой букмекер, независимо от того, популярен он или не очень, активно использует для продвижения бренда все доступные способы, средства и инструменты. Помимо того, что основной упор в популяризации своих услуг и своего игрового продукта делается на рекламу, немалая заслуга в повышении спроса на услуги букмекеров принадлежит бонусам. Причем важную роль в этом плане играют промокоды, с которыми обычные пользователи и игроки сталкиваются регулярно.
Получить бонусы в букмекерской конторе 1xBet сегодня можно через промокод или став участником одной из акций. Предложения доступны каждому, как новичкам, так и игрокам со стажем.
Давайте разберемся в тонкостях бонусной программы букмекера 1xbet. Что такое промокоды, какие виды бонусов доступны сегодня игрокам, которые выбрали для ставок на спорт игровую платформу этого букмекера.
Промокод 1xBet – 1XFREE777. Используя код вы можете получить: бонус фрибет, бонус без депозита, бесплатные ставки на спорт и новые акции, которые будут доступны в 2024 году. Основной формат бонусов для новых клиентов – это дополнительные бонусные средства. Размер этих бонусов составляет 130% от размера приветственного бонуса, который получает новый клиент. Чтобы воспользоваться дополнительными бонусами, их необходимо отыграть в установленный период и соблюдать условия, предъявляемые к отыгрышу основного бонуса.
Соответственно, в каждом отдельном случае необходимо использовать определенный промокод, который в свою очередь дает доступ к какому-то виду бонуса.
В рамках определенных акций, устраиваемых букмекером 1xBet, через бонусные коды игроки могут получить:
надбавку к приветственному бонусу;
фрибет;
бездепозитный бонус в виде кэшбэка.
Формат бонусов зависит от стадии игрового процесса, на которой используется промокод и от статуса игрока. Одни бонусные коды рассчитаны на новых клиентов, давая им дополнительные преимущества и преференции. Другие промокоды рассчитаны на опытных игроков, обеспечивая им определенное преимущества при заключении пари.
Ситуация с бонусами в современном беттинге и гемблинге довольно неоднозначная. Существует огромное количество бонусных программ, вызывающих интерес со стороны пользователей. Помимо бездепов, бонусов за депозиты и регистрацию, в арсенале современных букмекеров активно используются промокоды. Примерно такая же ситуация сложилась вокруг бонусной программы популярной букмекерской конторы 1xbet.
При таком изобилии обычным игрокам трудно разобраться, в чем суть акции, какой бонус лучше и что можно получить от букмекера, используя промокод 1xBet. Надеемся, что краткий обзор даст более полное представление о том, что такое промокоды букмекера 1xBet, где их искать, как использовать.
Промокод 1хБет расскажем подробнее в этой статье сайт – предоставляет вам VIP-спортивный бонус 100%, который полностью соответствует вашему первому депозиту на сумму до €/$130. Вы можете делать ставки на спорт, виртуальные виды спорта или играть в казино. Это предложение действительно на протяжении всего 2024 года.
Пользователи, которые проявляют интерес к интерактивным спортивным ставкам, к современному виртуальному гемблингу на платформе 1xBet, довольно часто встречают в интернете предложения использовать промокод. Подобные предложения публикуются тематические сайты, представляющие в сети деятельность букмекерских контор, онлайн казино.
Именно через такие источники и распространяются промокоды.
Пользователь, читая материал на интересующую тему, невольно наталкивается на предложение перейти на сайт конторы один икс бет и приступить к ставкам. Однако подобное предложение включает в себя и мотивацию. Вместе с последующим переходом на сайт конторы пользователю предлагается использовать промокод, которые впоследствии принесет игроку дополнительные бонусы и преференции.
Предложение использовать промокод бесплатное. Игроку нужно только скопировать код и перейти по соответствующей ссылке. Если код актуальный, игрок получит в дальнейшем какие-то бонусы.
Такие предложения в интернете публикуются регулярно. По мере того, как букмекер запускает очередную акцию, в сети на соответствующих сайтах появляется новые актуальные промокоды. Букмекер не занимается распространением бонусных кодов. Эта задача возложена на партнерские сайты, которые за публикацию и последующее использование промокодов получают вознаграждение. Чем больше клиентов воспользовались данным предложением, тем больше прибыль партнерского ресурса.
промокод фрибет 1хбет: 1XFREE777 Вы можете получить спортивный бонус до 32 500 рублей или казино-бонус до 128000 рублей + 150 фриспинов. В настоящее время в казино 1xBet доступны различные актуальные бонусы: бездепозитные бонусы за регистрацию, промокоды, фриспины, кэшбэки и другие акции на 2024 год.
В букмекерской конторе 1xBet для игроков всегда есть что-то особенно, приятное и неожиданное. Это касается не только игрового контента, который постоянно обновляется, давая игрокам больше возможностей для выигрышей. Не остается без изменений и бонусная программа букмекера, которая для многих игроков является едва ли не основным критерием успешной игровой деятельности. Ассортимент бонусной программы 1 икс Бет впечатляет. Это и приветственный бонус, и депозитные бонусы и промокоды 1xBet. Одним словом, интересных предложений предостаточно. Остается только сделать правильный выбор.
Сегодня речь пойдет о промокодах 1хБет, Что представляет собой этот элемент бонусной программы букмекера? Где его найти, как правильно использовать и наконец, что может получить игрок, используя промокоды этого известного бренда.
Hello!
Avastage uusi maitseid Tallinnas.
Ärge piirake ennast tavapäraste valikutega! Meie veebileht http://restoranid-tallinnas.com viib teid otse linna kulinaarse südamesse.
Avastage peidetud pärlid ja populaarsed söögikohad, mis on hoolikalt valitud, et pakkuda teile unustamatuid maitseelamusi.
Meie platvormil on iga restoran esitletud nii, et leiate kergesti just selle õige – alustage oma maitserännakut juba täna.
restoranid tallinn
restoranid
top restoranid tallinnas
top 10 restoranid tallinnas
Good luck!
order rybelsus online
Hello There. I found your weblog the usage of msn. That is an extremely neatly written article.
I’ll be sure to bookmark it and return to learn extra of your helpful
information. Thank you for the post. I’ll definitely comeback.
rybelsus buy online
generic rybelsus
wegovy buy from canada
wegovy buy from canada
buy rybelsus online no script needed
wegovy for diabetes
Промокод 1xBet 2024 (Бонус при Регистрации 32500 RUB)
промокод в 1хбет при регистрации на сегодня – 1XFREE777, новые пользователи букмекерской компании могут воспользоваться приветственным бонусом в размере 100% от суммы депозита до 32 500 рублей (или эквивалентную сумму в другой валюте €100). Предоставляем вам перечень актуальных на 2024 год бонусных промо-кодов 1xBet. Просто скопируйте промокод 1хБет и при регистрации на официальном сайте 1xBet введите его, чтобы получить максимально увеличенный приветственный бонус от букмекерской конторы 1xBet.
Актуальные промокоды для 1хБет ? Акция 2024 ? Бонус коды ? Фрибет Бонусы за регистрацию ? Программа лояльности ? Кэшбэк!
свежий промокод на 1хбет – это 1XFREE777. Только с помощью него вы получите бонус в размере 100% до 32500 рублей. Все остальные коды не действительны и не предоставляют такого бонуса. Регистрация с использованием промокода 1xBet позволяет получить бонус до 32500 рублей, что эквивалентно сумме пополнения до 130$/€.
Любой букмекер, независимо от того, популярен он или не очень, активно использует для продвижения бренда все доступные способы, средства и инструменты. Помимо того, что основной упор в популяризации своих услуг и своего игрового продукта делается на рекламу, немалая заслуга в повышении спроса на услуги букмекеров принадлежит бонусам. Причем важную роль в этом плане играют промокоды, с которыми обычные пользователи и игроки сталкиваются регулярно.
Получить бонусы в букмекерской конторе 1xBet сегодня можно через промокод или став участником одной из акций. Предложения доступны каждому, как новичкам, так и игрокам со стажем.
Давайте разберемся в тонкостях бонусной программы букмекера 1xbet. Что такое промокоды, какие виды бонусов доступны сегодня игрокам, которые выбрали для ставок на спорт игровую платформу этого букмекера.
Промокод 1xBet – 1XFREE777. Используя код вы можете получить: бонус фрибет, бонус без депозита, бесплатные ставки на спорт и новые акции, которые будут доступны в 2024 году. Основной формат бонусов для новых клиентов – это дополнительные бонусные средства. Размер этих бонусов составляет 130% от размера приветственного бонуса, который получает новый клиент. Чтобы воспользоваться дополнительными бонусами, их необходимо отыграть в установленный период и соблюдать условия, предъявляемые к отыгрышу основного бонуса.
Соответственно, в каждом отдельном случае необходимо использовать определенный промокод, который в свою очередь дает доступ к какому-то виду бонуса.
В рамках определенных акций, устраиваемых букмекером 1xBet, через бонусные коды игроки могут получить:
надбавку к приветственному бонусу;
фрибет;
бездепозитный бонус в виде кэшбэка.
Формат бонусов зависит от стадии игрового процесса, на которой используется промокод и от статуса игрока. Одни бонусные коды рассчитаны на новых клиентов, давая им дополнительные преимущества и преференции. Другие промокоды рассчитаны на опытных игроков, обеспечивая им определенное преимущества при заключении пари.
Ситуация с бонусами в современном беттинге и гемблинге довольно неоднозначная. Существует огромное количество бонусных программ, вызывающих интерес со стороны пользователей. Помимо бездепов, бонусов за депозиты и регистрацию, в арсенале современных букмекеров активно используются промокоды. Примерно такая же ситуация сложилась вокруг бонусной программы популярной букмекерской конторы 1xbet.
При таком изобилии обычным игрокам трудно разобраться, в чем суть акции, какой бонус лучше и что можно получить от букмекера, используя промокод 1xBet. Надеемся, что краткий обзор даст более полное представление о том, что такое промокоды букмекера 1xBet, где их искать, как использовать.
Промокод 1хБет расскажем подробнее в этой статье сайт – предоставляет вам VIP-спортивный бонус 100%, который полностью соответствует вашему первому депозиту на сумму до €/$130. Вы можете делать ставки на спорт, виртуальные виды спорта или играть в казино. Это предложение действительно на протяжении всего 2024 года.
Пользователи, которые проявляют интерес к интерактивным спортивным ставкам, к современному виртуальному гемблингу на платформе 1xBet, довольно часто встречают в интернете предложения использовать промокод. Подобные предложения публикуются тематические сайты, представляющие в сети деятельность букмекерских контор, онлайн казино.
Именно через такие источники и распространяются промокоды.
Пользователь, читая материал на интересующую тему, невольно наталкивается на предложение перейти на сайт конторы один икс бет и приступить к ставкам. Однако подобное предложение включает в себя и мотивацию. Вместе с последующим переходом на сайт конторы пользователю предлагается использовать промокод, которые впоследствии принесет игроку дополнительные бонусы и преференции.
Предложение использовать промокод бесплатное. Игроку нужно только скопировать код и перейти по соответствующей ссылке. Если код актуальный, игрок получит в дальнейшем какие-то бонусы.
Такие предложения в интернете публикуются регулярно. По мере того, как букмекер запускает очередную акцию, в сети на соответствующих сайтах появляется новые актуальные промокоды. Букмекер не занимается распространением бонусных кодов. Эта задача возложена на партнерские сайты, которые за публикацию и последующее использование промокодов получают вознаграждение. Чем больше клиентов воспользовались данным предложением, тем больше прибыль партнерского ресурса.
промокод на 1хбет на бесплатно 1xbet promokod: 1XFREE777 Вы можете получить спортивный бонус до 32 500 рублей или казино-бонус до 128000 рублей + 150 фриспинов. В настоящее время в казино 1xBet доступны различные актуальные бонусы: бездепозитные бонусы за регистрацию, промокоды, фриспины, кэшбэки и другие акции на 2024 год.
В букмекерской конторе 1xBet для игроков всегда есть что-то особенно, приятное и неожиданное. Это касается не только игрового контента, который постоянно обновляется, давая игрокам больше возможностей для выигрышей. Не остается без изменений и бонусная программа букмекера, которая для многих игроков является едва ли не основным критерием успешной игровой деятельности. Ассортимент бонусной программы 1 икс Бет впечатляет. Это и приветственный бонус, и депозитные бонусы и промокоды 1xBet. Одним словом, интересных предложений предостаточно. Остается только сделать правильный выбор.
Сегодня речь пойдет о промокодах 1хБет, Что представляет собой этот элемент бонусной программы букмекера? Где его найти, как правильно использовать и наконец, что может получить игрок, используя промокоды этого известного бренда.
rybelsus 7 mg
http://veniaminv.flybb.ru/viewtopic.php?f=1&t=1838&p=2447#p2447
http://vld.best-city.ru/forum/thread73264/#reply73267
http://vv.flybb.ru/viewtopic.php?f=14&t=1994#p27468
http://trum.flybb.ru/viewtopic.php?f=15&t=3910&p=13158#p13158
https://angelladydety.getbb.ru/viewtopic.php?f=39&t=35195&p=68697#p68697
saungsantoso.com
“무슨 일이야!” Xu Jing은 위엄을 드러내며 단호하게 말했다.
https://hollybollyfun.com/
Merhaba!
Son yıllarda Mostbet tr, çevrimiçi bahis endüstrisinde lider konumunu başarılı bir şekilde sağlamlaştırdı.
Hem uzmanlar hem de kumar oynamaya yeni başlayanlar, mostbet apk bu platformu spor bahisleri dünyasında güvenilir bir tercih olarak görmektedirler.
Her ziyaretçi, platformun sunmuş olduğu heyecan dolu deneyimin tadını çıkarabilir. Popüler spor etkinliklerinin yanı sıra, site golf,
tenis veya beyzbol gibi daha az bilinen bahis disiplinlerine de yer vermektedir. Geniş seçenekler ve yenilikçi yaklaşımı sayesinde
herkesin ilgisini çekecek bir şey bulunmaktadır.
Sitedeki her sey https://ovc-club.com
Kumarhane gГјvenilir mi Mostbet
Kumarhane hakkД±nda bilgi Mostbet
Kumarhane oyunlarД± Mostbet
Kumar siteleri Mostbet
Kumarhane deneme bonusu Mostbet
Kumarhane turnuvalarД± Mostbet
Slot makineleri Mostbet
Kumarhane bonuslarД± Mostbet
Iyi sanlar!
semaglutide wegovy
http://www.northwestpharmacy.com Canadian Pharmacy Shipping Usa Cialis, Viagra
cialis from canada pharmacy Canadian Pharmacy
https://hidehost.net/
Промокод 1xBet 2024 (Бонус при Регистрации 32500 RUB)
промокод в 1хбет где взять – 1XFREE777, новые пользователи букмекерской компании могут воспользоваться приветственным бонусом в размере 100% от суммы депозита до 32 500 рублей (или эквивалентную сумму в другой валюте €100). Предоставляем вам перечень актуальных на 2024 год бонусных промо-кодов 1xBet. Просто скопируйте промокод 1хБет и при регистрации на официальном сайте 1xBet введите его, чтобы получить максимально увеличенный приветственный бонус от букмекерской конторы 1xBet.
Актуальные промокоды для 1хБет ? Акция 2024 ? Бонус коды ? Фрибет Бонусы за регистрацию ? Программа лояльности ? Кэшбэк!
промокод 1xbet день рождения – это 1XFREE777. Только с помощью него вы получите бонус в размере 100% до 32500 рублей. Все остальные коды не действительны и не предоставляют такого бонуса. Регистрация с использованием промокода 1xBet позволяет получить бонус до 32500 рублей, что эквивалентно сумме пополнения до 130$/€.
Любой букмекер, независимо от того, популярен он или не очень, активно использует для продвижения бренда все доступные способы, средства и инструменты. Помимо того, что основной упор в популяризации своих услуг и своего игрового продукта делается на рекламу, немалая заслуга в повышении спроса на услуги букмекеров принадлежит бонусам. Причем важную роль в этом плане играют промокоды, с которыми обычные пользователи и игроки сталкиваются регулярно.
Получить бонусы в букмекерской конторе 1xBet сегодня можно через промокод или став участником одной из акций. Предложения доступны каждому, как новичкам, так и игрокам со стажем.
Давайте разберемся в тонкостях бонусной программы букмекера 1xbet. Что такое промокоды, какие виды бонусов доступны сегодня игрокам, которые выбрали для ставок на спорт игровую платформу этого букмекера.
Промокод 1xBet – 1XFREE777. Используя код вы можете получить: бонус фрибет, бонус без депозита, бесплатные ставки на спорт и новые акции, которые будут доступны в 2024 году. Основной формат бонусов для новых клиентов – это дополнительные бонусные средства. Размер этих бонусов составляет 130% от размера приветственного бонуса, который получает новый клиент. Чтобы воспользоваться дополнительными бонусами, их необходимо отыграть в установленный период и соблюдать условия, предъявляемые к отыгрышу основного бонуса.
Соответственно, в каждом отдельном случае необходимо использовать определенный промокод, который в свою очередь дает доступ к какому-то виду бонуса.
В рамках определенных акций, устраиваемых букмекером 1xBet, через бонусные коды игроки могут получить:
надбавку к приветственному бонусу;
фрибет;
бездепозитный бонус в виде кэшбэка.
Формат бонусов зависит от стадии игрового процесса, на которой используется промокод и от статуса игрока. Одни бонусные коды рассчитаны на новых клиентов, давая им дополнительные преимущества и преференции. Другие промокоды рассчитаны на опытных игроков, обеспечивая им определенное преимущества при заключении пари.
Ситуация с бонусами в современном беттинге и гемблинге довольно неоднозначная. Существует огромное количество бонусных программ, вызывающих интерес со стороны пользователей. Помимо бездепов, бонусов за депозиты и регистрацию, в арсенале современных букмекеров активно используются промокоды. Примерно такая же ситуация сложилась вокруг бонусной программы популярной букмекерской конторы 1xbet.
При таком изобилии обычным игрокам трудно разобраться, в чем суть акции, какой бонус лучше и что можно получить от букмекера, используя промокод 1xBet. Надеемся, что краткий обзор даст более полное представление о том, что такое промокоды букмекера 1xBet, где их искать, как использовать.
Промокод 1хБет расскажем подробнее в этой статье сайт – предоставляет вам VIP-спортивный бонус 100%, который полностью соответствует вашему первому депозиту на сумму до €/$130. Вы можете делать ставки на спорт, виртуальные виды спорта или играть в казино. Это предложение действительно на протяжении всего 2024 года.
Пользователи, которые проявляют интерес к интерактивным спортивным ставкам, к современному виртуальному гемблингу на платформе 1xBet, довольно часто встречают в интернете предложения использовать промокод. Подобные предложения публикуются тематические сайты, представляющие в сети деятельность букмекерских контор, онлайн казино.
Именно через такие источники и распространяются промокоды.
Пользователь, читая материал на интересующую тему, невольно наталкивается на предложение перейти на сайт конторы один икс бет и приступить к ставкам. Однако подобное предложение включает в себя и мотивацию. Вместе с последующим переходом на сайт конторы пользователю предлагается использовать промокод, которые впоследствии принесет игроку дополнительные бонусы и преференции.
Предложение использовать промокод бесплатное. Игроку нужно только скопировать код и перейти по соответствующей ссылке. Если код актуальный, игрок получит в дальнейшем какие-то бонусы.
Такие предложения в интернете публикуются регулярно. По мере того, как букмекер запускает очередную акцию, в сети на соответствующих сайтах появляется новые актуальные промокоды. Букмекер не занимается распространением бонусных кодов. Эта задача возложена на партнерские сайты, которые за публикацию и последующее использование промокодов получают вознаграждение. Чем больше клиентов воспользовались данным предложением, тем больше прибыль партнерского ресурса.
какой промокод на 1хбет на сегодня: 1XFREE777 Вы можете получить спортивный бонус до 32 500 рублей или казино-бонус до 128000 рублей + 150 фриспинов. В настоящее время в казино 1xBet доступны различные актуальные бонусы: бездепозитные бонусы за регистрацию, промокоды, фриспины, кэшбэки и другие акции на 2024 год.
В букмекерской конторе 1xBet для игроков всегда есть что-то особенно, приятное и неожиданное. Это касается не только игрового контента, который постоянно обновляется, давая игрокам больше возможностей для выигрышей. Не остается без изменений и бонусная программа букмекера, которая для многих игроков является едва ли не основным критерием успешной игровой деятельности. Ассортимент бонусной программы 1 икс Бет впечатляет. Это и приветственный бонус, и депозитные бонусы и промокоды 1xBet. Одним словом, интересных предложений предостаточно. Остается только сделать правильный выбор.
Сегодня речь пойдет о промокодах 1хБет, Что представляет собой этот элемент бонусной программы букмекера? Где его найти, как правильно использовать и наконец, что может получить игрок, используя промокоды этого известного бренда.
Николаев Вячеслав Константинович .
wegovy price
Merhaba!
Son zamanlarda Mostbet tr, çevrimiçi bahis endüstrisindeki liderler mostbet guvenilir mi arasında kendini başarılı bir şekilde kanıtladı.
Sadece profesyoneller değil, kumar oynamaya yeni başlayanlar da bu platformu spor bahisleri dünyasında güvenilir bir ortak olarak gönül
rahatlığıyla tercih ediyorlar. Her ziyaretçi, platformun sunduğu heyecan dolu deneyimin tadını çıkarabilir.
Çok çeşitli popüler spor etkinliklerinin yanı sıra, site golf, tenis veya beyzbol gibi daha az yaygın olan bahis disiplinlerini de sunmaktadır.
Yenilikçi yaklaşım ve geniş seçenekler sayesinde herkes için bir şeyler bulunmaktadır.
Sitedeki her sey https://ovc-club.com
Kumarhane oyunlarД± Mostbet
Kumarhane siteleri Mostbet
Kumarhane indirimleri Mostbet
Çevrimiçi kumar Mostbet
Kumarhane para yatД±rma Mostbet
Kumar siteleri Mostbet
CanlД± kumarhane Mostbet
Kumarhane nasД±l oynanД±r Mostbet
Iyi sanlar!
http://lgd-tp.pl/walk/spotkanie-informacyjne-gora-kalwaria/comment-page-1/?unapproved=589049&moderation-hash=43b0fc916d7ca625562368dedf257997#comment-589049
http://pornite.org/comment-page-14202/#comment-1485407
http://korolevichelisey.ru/forum/viewtopic.php?f=10&t=12698&p=73908#p73908
http://gastronomiskt.se/blog/2019/11/27/hello-world/?unapproved=381423&moderation-hash=2fe6c13f0e7b2c1231464adc28a5e04b#comment-381423
http://gastronomiskt.se/blog/2019/11/27/hello-world/?unapproved=381394&moderation-hash=9ad0ec7ea1b1b812849043d1cf4d9f70#comment-381394
Промокод 1xBet 2024 (Бонус при Регистрации 32500 RUB)
где брать промокоды 1xbet – 1XFREE777, новые пользователи букмекерской компании могут воспользоваться приветственным бонусом в размере 100% от суммы депозита до 32 500 рублей (или эквивалентную сумму в другой валюте €100). Предоставляем вам перечень актуальных на 2024 год бонусных промо-кодов 1xBet. Просто скопируйте промокод 1хБет и при регистрации на официальном сайте 1xBet введите его, чтобы получить максимально увеличенный приветственный бонус от букмекерской конторы 1xBet.
Актуальные промокоды для 1хБет ? Акция 2024 ? Бонус коды ? Фрибет Бонусы за регистрацию ? Программа лояльности ? Кэшбэк!
промокод на ставку 1хбет на сегодня бесплатно – это 1XFREE777. Только с помощью него вы получите бонус в размере 100% до 32500 рублей. Все остальные коды не действительны и не предоставляют такого бонуса. Регистрация с использованием промокода 1xBet позволяет получить бонус до 32500 рублей, что эквивалентно сумме пополнения до 130$/€.
Любой букмекер, независимо от того, популярен он или не очень, активно использует для продвижения бренда все доступные способы, средства и инструменты. Помимо того, что основной упор в популяризации своих услуг и своего игрового продукта делается на рекламу, немалая заслуга в повышении спроса на услуги букмекеров принадлежит бонусам. Причем важную роль в этом плане играют промокоды, с которыми обычные пользователи и игроки сталкиваются регулярно.
Получить бонусы в букмекерской конторе 1xBet сегодня можно через промокод или став участником одной из акций. Предложения доступны каждому, как новичкам, так и игрокам со стажем.
Давайте разберемся в тонкостях бонусной программы букмекера 1xbet. Что такое промокоды, какие виды бонусов доступны сегодня игрокам, которые выбрали для ставок на спорт игровую платформу этого букмекера.
Промокод 1xBet – 1XFREE777. Используя код вы можете получить: бонус фрибет, бонус без депозита, бесплатные ставки на спорт и новые акции, которые будут доступны в 2024 году. Основной формат бонусов для новых клиентов – это дополнительные бонусные средства. Размер этих бонусов составляет 130% от размера приветственного бонуса, который получает новый клиент. Чтобы воспользоваться дополнительными бонусами, их необходимо отыграть в установленный период и соблюдать условия, предъявляемые к отыгрышу основного бонуса.
Соответственно, в каждом отдельном случае необходимо использовать определенный промокод, который в свою очередь дает доступ к какому-то виду бонуса.
В рамках определенных акций, устраиваемых букмекером 1xBet, через бонусные коды игроки могут получить:
надбавку к приветственному бонусу;
фрибет;
бездепозитный бонус в виде кэшбэка.
Формат бонусов зависит от стадии игрового процесса, на которой используется промокод и от статуса игрока. Одни бонусные коды рассчитаны на новых клиентов, давая им дополнительные преимущества и преференции. Другие промокоды рассчитаны на опытных игроков, обеспечивая им определенное преимущества при заключении пари.
Ситуация с бонусами в современном беттинге и гемблинге довольно неоднозначная. Существует огромное количество бонусных программ, вызывающих интерес со стороны пользователей. Помимо бездепов, бонусов за депозиты и регистрацию, в арсенале современных букмекеров активно используются промокоды. Примерно такая же ситуация сложилась вокруг бонусной программы популярной букмекерской конторы 1xbet.
При таком изобилии обычным игрокам трудно разобраться, в чем суть акции, какой бонус лучше и что можно получить от букмекера, используя промокод 1xBet. Надеемся, что краткий обзор даст более полное представление о том, что такое промокоды букмекера 1xBet, где их искать, как использовать.
Промокод 1хБет расскажем подробнее в этой статье сайт – предоставляет вам VIP-спортивный бонус 100%, который полностью соответствует вашему первому депозиту на сумму до €/$130. Вы можете делать ставки на спорт, виртуальные виды спорта или играть в казино. Это предложение действительно на протяжении всего 2024 года.
Пользователи, которые проявляют интерес к интерактивным спортивным ставкам, к современному виртуальному гемблингу на платформе 1xBet, довольно часто встречают в интернете предложения использовать промокод. Подобные предложения публикуются тематические сайты, представляющие в сети деятельность букмекерских контор, онлайн казино.
Именно через такие источники и распространяются промокоды.
Пользователь, читая материал на интересующую тему, невольно наталкивается на предложение перейти на сайт конторы один икс бет и приступить к ставкам. Однако подобное предложение включает в себя и мотивацию. Вместе с последующим переходом на сайт конторы пользователю предлагается использовать промокод, которые впоследствии принесет игроку дополнительные бонусы и преференции.
Предложение использовать промокод бесплатное. Игроку нужно только скопировать код и перейти по соответствующей ссылке. Если код актуальный, игрок получит в дальнейшем какие-то бонусы.
Такие предложения в интернете публикуются регулярно. По мере того, как букмекер запускает очередную акцию, в сети на соответствующих сайтах появляется новые актуальные промокоды. Букмекер не занимается распространением бонусных кодов. Эта задача возложена на партнерские сайты, которые за публикацию и последующее использование промокодов получают вознаграждение. Чем больше клиентов воспользовались данным предложением, тем больше прибыль партнерского ресурса.
1xbet промокоды 2024: 1XFREE777 Вы можете получить спортивный бонус до 32 500 рублей или казино-бонус до 128000 рублей + 150 фриспинов. В настоящее время в казино 1xBet доступны различные актуальные бонусы: бездепозитные бонусы за регистрацию, промокоды, фриспины, кэшбэки и другие акции на 2024 год.
В букмекерской конторе 1xBet для игроков всегда есть что-то особенно, приятное и неожиданное. Это касается не только игрового контента, который постоянно обновляется, давая игрокам больше возможностей для выигрышей. Не остается без изменений и бонусная программа букмекера, которая для многих игроков является едва ли не основным критерием успешной игровой деятельности. Ассортимент бонусной программы 1 икс Бет впечатляет. Это и приветственный бонус, и депозитные бонусы и промокоды 1xBet. Одним словом, интересных предложений предостаточно. Остается только сделать правильный выбор.
Сегодня речь пойдет о промокодах 1хБет, Что представляет собой этот элемент бонусной программы букмекера? Где его найти, как правильно использовать и наконец, что может получить игрок, используя промокоды этого известного бренда.
sm-online-game.com
처음에는 황제가 멍청하다는 농담에 불과했습니다.
http://veniaminv.flybb.ru/viewtopic.php?f=1&t=1838&p=2447#p2447
http://vld.best-city.ru/forum/thread73264/#reply73267
http://vv.flybb.ru/viewtopic.php?f=14&t=1994#p27468
http://trum.flybb.ru/viewtopic.php?f=15&t=3910&p=13158#p13158
https://angelladydety.getbb.ru/viewtopic.php?f=39&t=35195&p=68697#p68697
wegovy tablets for weight loss cost
Советуем посетить сайт Антипушкин https://antipushkin.ru/
Также не забудьте добавить сайт в закладки: https://antipushkin.ru/
buy ozempic
http://veniaminv.flybb.ru/viewtopic.php?f=1&t=1838&p=2447#p2447
http://vld.best-city.ru/forum/thread73264/#reply73267
http://vv.flybb.ru/viewtopic.php?f=14&t=1994#p27468
http://trum.flybb.ru/viewtopic.php?f=15&t=3910&p=13158#p13158
https://angelladydety.getbb.ru/viewtopic.php?f=39&t=35195&p=68697#p68697
wegovy price
this-is-a-small-world.com
Zhu Youzhu의 오래된 얼굴이 약간 붉어지고 어색하게 웃었습니다.
https://louisgalaxy.com/
seo продвижение заказать
wegovy tablets for weight loss
canadian pharmacy with viagra canadian pharmacies canadianphrmacy23.com
canadian pharmacy.com northwest pharmacy canada
Советуем посетить сайт про жилые комплексы https://zhiloy-komplex.ru/
Также не забудьте добавить сайт в закладки: https://zhiloy-komplex.ru/
Закажите уфа ремонт стиральных машин по доступным ценам. Выезд мастера бесплатный
https://hidehost.net/
ozempic injections
ozempic tab 14mg
Доброго!
Финансовая компания Finance Online, занимающаяся предоставлением широкого спектра финансовых услуг в Казахстане. Наше богатое опыт и высокая репутация
делают нас надежным выбором для клиентов, которые ищут финансовую помощь и поддержку. Мы специализируемся на банковских кредитах, микрозаймах и ипотеке,
стремясь предложить выгодные и гибкие условия для каждого клиента.
Преимущества:
Индивидуальный подход: Мы понимаем, что каждый клиент уникален, поэтому мы предлагаем персонализированные финансовые решения, учитывая их потребности,
возможности и цели.
Быстрое одобрение: Мы ценим ваше время, поэтому стремимся обеспечить быстрое рассмотрение заявок и высокий шанс одобрения кредитов и займов.
Прозрачность и честность: Мы гарантируем прозрачные и понятные условия наших продуктов. У нас нет скрытых платежей или непонятных комиссий.
Высокий уровень сервиса: Наша дружелюбная и профессиональная команда всегда готова помочь вам с любыми вопросами или проблемами, связанными с вашими финансами.
Онлайн сервис: оставляйте завяку на сайте https://finance-online.kz без похода в банк
koke
срочный займ
займ до зп казахстан
честное слово займ личный кабинет
займер кызылорда адрес
фридом финанс телефон
тенго
Удачи!
semaglutide canada pharmacy
rybelsus tablets cost
semaglutide injections
buy ozempic pill form for adults
All information on the site ??http://nmoskov.flybb.ru/viewtopic.php?f=2&t=639&p=1219#p1219
All information on the site ??http://kissolovo.teamforum.ru/viewtopic.php?f=10&t=32567&p=62924#p62924
All information on the site ??http://mockwa.com/forum/thread-145047/page-1/
All information on the site ??https://club4x4.ru/forum/viewtopic.php?f=17&t=96583&p=465894#p465894
All information on the site ??http://www.mamalipetsk.ru/index.php?name=forums&op=showtopic&id=25684&num=1#52981
All information on the site ??http://preceptor.flybb.ru/viewtopic.php?f=13&t=8573&p=13293#p13293
All information on the site ??http://forum.analysisclub.ru/index.php/topic,141604.msg458834.html#msg458834
All information on the site ??http://boltushka.flybb.ru/viewtopic.php?f=8&t=926&p=12983#p12983
All information on the site ??http://moskat.flybb.ru/viewtopic.php?f=2&t=3024&p=3975#p3975
All information on the site ??https://nowyiforum.listbb.ru/viewtopic.php?f=45&t=8923&p=14982#p14982
All information on the site ??http://a63.flybb.ru/viewtopic.php?f=10&t=2395&p=5388#p5388
All information on the site ??http://vseamoskva.flybb.ru/viewtopic.php?f=2&t=567&p=1151#p1151
All information on the site ??http://detimgn.iboards.ru/viewtopic.php?f=80&t=32505&p=228081#p228081
All information on the site ??http://fotomaniya.fmbb.ru/viewtopic.php?f=17&t=8209&p=12324#p12324
All information on the site ??http://mos.flybb.ru/viewtopic.php?f=2&t=2066&p=4382#p4382
All information on the site ??https://groups.google.com/g/microsoft.public.project/c/q11kRodo7AA
All information on the site ??http://deloua.ukrbb.net/viewtopic.php?f=12&t=2689&p=5185#p5185
All information on the site ??http://dexanet.ukrbb.net/viewtopic.php?f=5&t=12679&p=27098#p27098
All information on the site ??http://ekonomimvmeste.ukrbb.net/viewtopic.php?f=8&t=23173&p=38241#p38241
All information on the site ??http://golosa.ukrbb.net/viewtopic.php?f=29&t=5615&p=20208#p20208
All information on the site ??http://gov.ukrbb.net/viewtopic.php?f=3&t=4325&p=14270#p14270
All information on the site ??http://kyevlyn.ukrbb.net/viewtopic.php?f=12&t=6184&p=12482#p12482
All information on the site ??http://nashkyev.ukrbb.net/viewtopic.php?f=12&t=2982&p=6600#p6600
All information on the site ??http://nsk.ukrbb.net/viewtopic.php?f=41&t=25345&p=37941#p37941
All information on the site ??http://odessaflower.ukrbb.net/viewtopic.php?f=44&t=26238&p=141073#p141073
All information on the site ??http://foglands.flybb.ru/viewtopic.php?f=3&t=294&p=4843#p4843
All information on the site ??http://pandora.ukrbb.net/viewtopic.php?f=2&t=6810&p=12914#p12914
All information on the site ??http://serpentarium.ukrbb.net/viewtopic.php?f=3&t=9317&p=21732#p21732
All information on the site ??http://stranaua.ukrbb.net/viewtopic.php?f=12&t=3270&p=6135#p6135
All information on the site ??http://tatuheart.ukrbb.net/viewtopic.php?f=43&t=11667&p=19283#p19283
All information on the site ??http://uaportal.ukrbb.net/viewtopic.php?f=12&t=2678&p=5115#p5115
All information on the site ??http://gazdynka.ukrbb.net/viewtopic.php?f=3&t=3092&p=6955#p6955
All information on the site ??http://sportandpolitics.ukrbb.net/viewtopic.php?f=25&t=10939&p=20349#p20349
All information on the site ??https://obmenka.forum2x2.ru/t16142-topic#37267
All information on the site ??http://www.che.best-city.ru/forum/thread86070/#reply86078
All information on the site ??http://vishivayu.ukrbb.net/viewtopic.php?f=12&t=8568&p=19543#p19543
All information on the site ??http://fulrp.5nx.ru/viewtopic.php?f=55&t=5487&p=10437#p10437
All information on the site ??http://goroda.flybb.ru/viewtopic.php?f=2&t=358&p=585#p585
All information on the site ??http://krd.best-city.ru/forum/thread89415/#reply89417
All information on the site ??http://mosfor.flybb.ru/viewtopic.php?f=2&t=232&p=471#p471
All information on the site ??http://superjackson.ukrbb.net/viewtopic.php?f=28&t=7691&p=31740#p31740
All information on the site ??http://vrn.best-city.ru/forum/thread540107357/#reply540107370
All information on the site ??https://4computers.getbb.ru/viewtopic.php?f=5&t=13902&p=39239#p39239
All information on the site ??https://zastolje.getbb.ru/viewtopic.php?f=54&t=12234&p=75381#p75381
All information on the site ??http://divinecosmosnew.tforums.org/viewtopic.php?f=17&t=19738
All information on the site ??https://mamapoltava.listbb.ru/viewtopic.php?f=45&t=3114&p=6620#p6620
All information on the site ??http://aku.ukrbb.net/viewtopic.php?f=22&t=17972&p=32629#p32629
All information on the site ??http://bmc.ukrbb.net/viewtopic.php?f=4&t=11290&p=14728#p14728
All information on the site ??https://clicktime.mybb.ru/viewtopic.php?id=2592#p4273
All information on the site ??https://dagforum.2bb.ru/viewtopic.php?id=2221#p13057
All information on the site ??https://daksvegas.unoforum.pro/?1-1-0-00000220-000-0-0-1708151834
All information on the site ??https://pesliga.webtalk.ru/viewtopic.php?id=2718#p4840
All information on the site ??https://commerc.webtalk.ru/viewtopic.php?id=6438#p15849
All information on the site ?? https://znayvse.mybb.ru/viewtopic.php?id=13185#p29231
All information on the site ??https://bonus.2bb.ru/viewtopic.php?id=4536#p25407
All information on the site ??https://zmurik.mybb.ru/viewtopic.php?id=1157#p3017
All information on the site ??https://rabotat.mybb.ru/viewtopic.php?id=20841#p29527
All information on the site ??https://bestmedbook.mybb.ru/viewtopic.php?id=9064#p12660
All information on the site ??https://dimitrov.forum24.ru/?1-15-0-00000010-000-0-0-1708321103
All information on the site ??https://moscow.mybb.ru/viewtopic.php?id=34971#p37137
All information on the site ??https://vzarabotke.mybb.ru/viewtopic.php?id=8285#p21073
All information on the site ??http://31pokupki.rx22.ru/viewtopic.php?f=47&t=25229&p=31109#p31109
All information on the site ??https://oldforum.citysakh.ru/?talkid=25308
All information on the site ??http://hm.supersadovnik.ru/hmforum/post.aspx?id=873647
All information on the site ??https://zarabotok.liveforums.ru/viewtopic.php?id=12444#p33292
All information on the site ??https://moskovsky.borda.ru/?1-7-0-00004836-000-0-0-1708407563
All information on the site ??https://pembrokcity.borda.ru/?1-18-0-00000092-000-0-0-1708407791
All information on the site ??https://aqvakr.forum24.ru/?1-7-0-00010265-000-0-0-1708407913
All information on the site ??https://1abakan.ru/forum/showthread-63979/page-1/#post-614039
All information on the site ??https://www.samaramed.ru/forum/health/topic_40240.html
All information on the site ??https://allforgirls.mybb.ru/viewtopic.php?id=1819#p34283
Промокод 1Win 2024 – Бонус 500% до 75 000 рублей
1win промокод 2024 для пополнения – 937999 при регистрации активирует приветственный бонус 500% до 75,000 рублей. При помощи специального кода, игрок в рамках текущей акции от букмекера 1Win получает дополнительные привилегии или бонусы.
1Win Промокод – 937999
Акция 1Win на 2024 год предлагает ряд привлекательных бонусов для новых игроков. Зарегистрируйтесь сейчас и получите бездепозитные бонусы, фриспины, фрибет бонусы и кэшбэк. Не упустите возможность воспользоваться этими выгодными предложениями!
промокод для 1вин – 937999 это специальный код, который необходимо ввести при регистрации, чтобы получить бонус в размере 500% до 75000 рублей. Только новые игроки могут воспользоваться данной акцией и получить приветственный бонус от 1Win.
С использованием промокода 1WIN новички в сфере ставок могут значительно увеличить сумму своих первоначальных и последующих вкладов. Полученные бонусы могут быть использованы в игре и, в случае удачи и выигрыша, могут быть выведены на ваш электронный кошелек. Максимальная сумма бонуса составляет 75 000 рублей.
Ознакомьтесь с перечнем ниже, чтобы узнать о различных промокодах на 1win и их особенностях.
1. Для новичков или промокоды при регистрации. Эти бонусы предназначены для тех, кто только начинает играть на платформе.
2. Для всех игроков. Эти поощрения доступны для всех клиентов, независимо от их опыта и статуса.
3. Для активных игроков. Некоторые промокоды активируют бонусы для активных игроков, например, увеличенный кешбэк или дополнительные бонусы за определенные суммы ставок.
4. Промокоды на фрибеты, которые предоставляют возможность сделать бесплатные ставки.
5. Промокоды на спины, которые дают возможность бесплатно вращать определенные слоты.
6. Промокоды на дополнительные средства при пополнении баланса.
7. Промокоды для участия в специальных акциях.
Используйте 1win официальный сайт 1вин промокоды “937999” при регистрации, чтобы получить максимальный бонус в размере 500% до 75 000 рублей. Введите промокод в соответствующее поле при заполнении формы регистрации, чтобы получить до пяти дополнительных бонусов на ваш депозит. Бонус 1Win будет зачислен на два бонусных счета одновременно – на счета “Ставки” и “Казино”.
Особенности и предостережения при использовании как в 1win ввести промокод:
Промокоды в 1win выдаются по различным поводам, таким как проведение акций, специальные события, дни рождения клиентов или для привлечения участников, которые долгое время не проявляли активности.
При активации промокода при регистрации, бонусные средства станут доступны после входа в профиль. Личные промокоды требуют вашего согласия на участие в предложении. Эти средства будут зачислены на ваш бонусный счет с указанием доступной суммы в личном кабинете. При выполнении условий использования бонусов вы сможете конвертировать их в реальные деньги, которые дополнят ваш выигрыш.
Важно быть внимательным при поиске промокодов, чтобы избежать мошенников. Некоторые недобросовестные лица предлагают “бесплатные” промокоды с условием выполнить определенные действия. Они могут запросить ваши личные данные, утверждая, что это необходимо для проверки подлинности использования промокода. Никогда не передавайте личные данные третьим лицам. Регистрируйтесь и вводите информацию только на официальном сайте 1win. Проверяйте источник информации и используйте промокоды с официального источника.
buy semaglutide canada
strelkaproject.com
폐하가 평정을 잃게 만든 패배라고 생각했습니다.
order ozempic
lfchungary.com
대신 그는 Qianhu 차장으로 강등되고 Zhenguofu Beiwowei로 옮겨졌습니다.
Промокод 1Win 2024 – Бонус 500% до 75 000 рублей
1win куда ввести промокод – 937999 при регистрации активирует приветственный бонус 500% до 75,000 рублей. При помощи специального кода, игрок в рамках текущей акции от букмекера 1Win получает дополнительные привилегии или бонусы.
1Win Промокод – 937999
Акция 1Win на 2024 год предлагает ряд привлекательных бонусов для новых игроков. Зарегистрируйтесь сейчас и получите бездепозитные бонусы, фриспины, фрибет бонусы и кэшбэк. Не упустите возможность воспользоваться этими выгодными предложениями!
промокод на 1win при пополнении сегодня – 937999 это специальный код, который необходимо ввести при регистрации, чтобы получить бонус в размере 500% до 75000 рублей. Только новые игроки могут воспользоваться данной акцией и получить приветственный бонус от 1Win.
С использованием промокода 1WIN новички в сфере ставок могут значительно увеличить сумму своих первоначальных и последующих вкладов. Полученные бонусы могут быть использованы в игре и, в случае удачи и выигрыша, могут быть выведены на ваш электронный кошелек. Максимальная сумма бонуса составляет 75 000 рублей.
Ознакомьтесь с перечнем ниже, чтобы узнать о различных промокодах на 1win и их особенностях.
1. Для новичков или промокоды при регистрации. Эти бонусы предназначены для тех, кто только начинает играть на платформе.
2. Для всех игроков. Эти поощрения доступны для всех клиентов, независимо от их опыта и статуса.
3. Для активных игроков. Некоторые промокоды активируют бонусы для активных игроков, например, увеличенный кешбэк или дополнительные бонусы за определенные суммы ставок.
4. Промокоды на фрибеты, которые предоставляют возможность сделать бесплатные ставки.
5. Промокоды на спины, которые дают возможность бесплатно вращать определенные слоты.
6. Промокоды на дополнительные средства при пополнении баланса.
7. Промокоды для участия в специальных акциях.
Используйте бонус промокод 1win “937999” при регистрации, чтобы получить максимальный бонус в размере 500% до 75 000 рублей. Введите промокод в соответствующее поле при заполнении формы регистрации, чтобы получить до пяти дополнительных бонусов на ваш депозит. Бонус 1Win будет зачислен на два бонусных счета одновременно – на счета “Ставки” и “Казино”.
Особенности и предостережения при использовании промокод к пополнению 1win:
Промокоды в 1win выдаются по различным поводам, таким как проведение акций, специальные события, дни рождения клиентов или для привлечения участников, которые долгое время не проявляли активности.
При активации промокода при регистрации, бонусные средства станут доступны после входа в профиль. Личные промокоды требуют вашего согласия на участие в предложении. Эти средства будут зачислены на ваш бонусный счет с указанием доступной суммы в личном кабинете. При выполнении условий использования бонусов вы сможете конвертировать их в реальные деньги, которые дополнят ваш выигрыш.
Важно быть внимательным при поиске промокодов, чтобы избежать мошенников. Некоторые недобросовестные лица предлагают “бесплатные” промокоды с условием выполнить определенные действия. Они могут запросить ваши личные данные, утверждая, что это необходимо для проверки подлинности использования промокода. Никогда не передавайте личные данные третьим лицам. Регистрируйтесь и вводите информацию только на официальном сайте 1win. Проверяйте источник информации и используйте промокоды с официального источника.
buy ozempic from canada
lfchungary.com
이 말을 듣고 무릎을 꿇은 지도자는 매우 복잡한 생각을 했습니다.
Промокод 1Win 2024 – Бонус 500% до 75 000 рублей
промокод 1win при пополнении – 937999 при регистрации активирует приветственный бонус 500% до 75,000 рублей. При помощи специального кода, игрок в рамках текущей акции от букмекера 1Win получает дополнительные привилегии или бонусы.
1Win Промокод – 937999
Акция 1Win на 2024 год предлагает ряд привлекательных бонусов для новых игроков. Зарегистрируйтесь сейчас и получите бездепозитные бонусы, фриспины, фрибет бонусы и кэшбэк. Не упустите возможность воспользоваться этими выгодными предложениями!
промокоды на регистрацию 1win – 937999 это специальный код, который необходимо ввести при регистрации, чтобы получить бонус в размере 500% до 75000 рублей. Только новые игроки могут воспользоваться данной акцией и получить приветственный бонус от 1Win.
С использованием промокода 1WIN новички в сфере ставок могут значительно увеличить сумму своих первоначальных и последующих вкладов. Полученные бонусы могут быть использованы в игре и, в случае удачи и выигрыша, могут быть выведены на ваш электронный кошелек. Максимальная сумма бонуса составляет 75 000 рублей.
Ознакомьтесь с перечнем ниже, чтобы узнать о различных промокодах на 1win и их особенностях.
1. Для новичков или промокоды при регистрации. Эти бонусы предназначены для тех, кто только начинает играть на платформе.
2. Для всех игроков. Эти поощрения доступны для всех клиентов, независимо от их опыта и статуса.
3. Для активных игроков. Некоторые промокоды активируют бонусы для активных игроков, например, увеличенный кешбэк или дополнительные бонусы за определенные суммы ставок.
4. Промокоды на фрибеты, которые предоставляют возможность сделать бесплатные ставки.
5. Промокоды на спины, которые дают возможность бесплатно вращать определенные слоты.
6. Промокоды на дополнительные средства при пополнении баланса.
7. Промокоды для участия в специальных акциях.
Используйте промокод на пополнение 1win сегодня “937999” при регистрации, чтобы получить максимальный бонус в размере 500% до 75 000 рублей. Введите промокод в соответствующее поле при заполнении формы регистрации, чтобы получить до пяти дополнительных бонусов на ваш депозит. Бонус 1Win будет зачислен на два бонусных счета одновременно – на счета “Ставки” и “Казино”.
Особенности и предостережения при использовании промокод 1вин на сегодня:
Промокоды в 1win выдаются по различным поводам, таким как проведение акций, специальные события, дни рождения клиентов или для привлечения участников, которые долгое время не проявляли активности.
При активации промокода при регистрации, бонусные средства станут доступны после входа в профиль. Личные промокоды требуют вашего согласия на участие в предложении. Эти средства будут зачислены на ваш бонусный счет с указанием доступной суммы в личном кабинете. При выполнении условий использования бонусов вы сможете конвертировать их в реальные деньги, которые дополнят ваш выигрыш.
Важно быть внимательным при поиске промокодов, чтобы избежать мошенников. Некоторые недобросовестные лица предлагают “бесплатные” промокоды с условием выполнить определенные действия. Они могут запросить ваши личные данные, утверждая, что это необходимо для проверки подлинности использования промокода. Никогда не передавайте личные данные третьим лицам. Регистрируйтесь и вводите информацию только на официальном сайте 1win. Проверяйте источник информации и используйте промокоды с официального источника.
buy ozempic online canada
semaglutide 7mg
wegovy buy australia
Hello there I am so grateful I found your blog, I
really found you by error, while I was researching on Yahoo for something else, Anyways I am here now
and would just like to say thanks a lot for a
tremendous post and a all round enjoyable blog (I also love the theme/design), I don’t have time to read through it all at the minute but I
have book-marked it and also added in your RSS feeds, so when I have time I will be back to read much more, Please do keep up the excellent jo.
wegovy retail price
Спешите посетить лучшие курорты
– Роскошный отдых: турция туроператор
турция отдых все включено цены https://anex-tour-turkey.ru/ .
All information on the site ??http://nmoskov.flybb.ru/viewtopic.php?f=2&t=639&p=1219#p1219
All information on the site ??http://kissolovo.teamforum.ru/viewtopic.php?f=10&t=32567&p=62924#p62924
All information on the site ??http://mockwa.com/forum/thread-145047/page-1/
All information on the site ??https://club4x4.ru/forum/viewtopic.php?f=17&t=96583&p=465894#p465894
All information on the site ??http://www.mamalipetsk.ru/index.php?name=forums&op=showtopic&id=25684&num=1#52981
All information on the site ??http://preceptor.flybb.ru/viewtopic.php?f=13&t=8573&p=13293#p13293
All information on the site ??http://forum.analysisclub.ru/index.php/topic,141604.msg458834.html#msg458834
All information on the site ??http://boltushka.flybb.ru/viewtopic.php?f=8&t=926&p=12983#p12983
All information on the site ??http://moskat.flybb.ru/viewtopic.php?f=2&t=3024&p=3975#p3975
All information on the site ??https://nowyiforum.listbb.ru/viewtopic.php?f=45&t=8923&p=14982#p14982
All information on the site ??http://a63.flybb.ru/viewtopic.php?f=10&t=2395&p=5388#p5388
All information on the site ??http://vseamoskva.flybb.ru/viewtopic.php?f=2&t=567&p=1151#p1151
All information on the site ??http://detimgn.iboards.ru/viewtopic.php?f=80&t=32505&p=228081#p228081
All information on the site ??http://fotomaniya.fmbb.ru/viewtopic.php?f=17&t=8209&p=12324#p12324
All information on the site ??http://mos.flybb.ru/viewtopic.php?f=2&t=2066&p=4382#p4382
All information on the site ??https://groups.google.com/g/microsoft.public.project/c/q11kRodo7AA
All information on the site ??http://deloua.ukrbb.net/viewtopic.php?f=12&t=2689&p=5185#p5185
All information on the site ??http://dexanet.ukrbb.net/viewtopic.php?f=5&t=12679&p=27098#p27098
All information on the site ??http://ekonomimvmeste.ukrbb.net/viewtopic.php?f=8&t=23173&p=38241#p38241
All information on the site ??http://golosa.ukrbb.net/viewtopic.php?f=29&t=5615&p=20208#p20208
All information on the site ??http://gov.ukrbb.net/viewtopic.php?f=3&t=4325&p=14270#p14270
All information on the site ??http://kyevlyn.ukrbb.net/viewtopic.php?f=12&t=6184&p=12482#p12482
All information on the site ??http://nashkyev.ukrbb.net/viewtopic.php?f=12&t=2982&p=6600#p6600
All information on the site ??http://nsk.ukrbb.net/viewtopic.php?f=41&t=25345&p=37941#p37941
All information on the site ??http://odessaflower.ukrbb.net/viewtopic.php?f=44&t=26238&p=141073#p141073
All information on the site ??http://foglands.flybb.ru/viewtopic.php?f=3&t=294&p=4843#p4843
All information on the site ??http://pandora.ukrbb.net/viewtopic.php?f=2&t=6810&p=12914#p12914
All information on the site ??http://serpentarium.ukrbb.net/viewtopic.php?f=3&t=9317&p=21732#p21732
All information on the site ??http://stranaua.ukrbb.net/viewtopic.php?f=12&t=3270&p=6135#p6135
All information on the site ??http://tatuheart.ukrbb.net/viewtopic.php?f=43&t=11667&p=19283#p19283
All information on the site ??http://uaportal.ukrbb.net/viewtopic.php?f=12&t=2678&p=5115#p5115
All information on the site ??http://gazdynka.ukrbb.net/viewtopic.php?f=3&t=3092&p=6955#p6955
All information on the site ??http://sportandpolitics.ukrbb.net/viewtopic.php?f=25&t=10939&p=20349#p20349
All information on the site ??https://obmenka.forum2x2.ru/t16142-topic#37267
All information on the site ??http://www.che.best-city.ru/forum/thread86070/#reply86078
All information on the site ??http://vishivayu.ukrbb.net/viewtopic.php?f=12&t=8568&p=19543#p19543
All information on the site ??http://fulrp.5nx.ru/viewtopic.php?f=55&t=5487&p=10437#p10437
All information on the site ??http://goroda.flybb.ru/viewtopic.php?f=2&t=358&p=585#p585
All information on the site ??http://krd.best-city.ru/forum/thread89415/#reply89417
All information on the site ??http://mosfor.flybb.ru/viewtopic.php?f=2&t=232&p=471#p471
All information on the site ??http://superjackson.ukrbb.net/viewtopic.php?f=28&t=7691&p=31740#p31740
All information on the site ??http://vrn.best-city.ru/forum/thread540107357/#reply540107370
All information on the site ??https://4computers.getbb.ru/viewtopic.php?f=5&t=13902&p=39239#p39239
All information on the site ??https://zastolje.getbb.ru/viewtopic.php?f=54&t=12234&p=75381#p75381
All information on the site ??http://divinecosmosnew.tforums.org/viewtopic.php?f=17&t=19738
All information on the site ??https://mamapoltava.listbb.ru/viewtopic.php?f=45&t=3114&p=6620#p6620
All information on the site ??http://aku.ukrbb.net/viewtopic.php?f=22&t=17972&p=32629#p32629
All information on the site ??http://bmc.ukrbb.net/viewtopic.php?f=4&t=11290&p=14728#p14728
All information on the site ??https://clicktime.mybb.ru/viewtopic.php?id=2592#p4273
All information on the site ??https://dagforum.2bb.ru/viewtopic.php?id=2221#p13057
All information on the site ??https://daksvegas.unoforum.pro/?1-1-0-00000220-000-0-0-1708151834
All information on the site ??https://pesliga.webtalk.ru/viewtopic.php?id=2718#p4840
All information on the site ??https://commerc.webtalk.ru/viewtopic.php?id=6438#p15849
All information on the site ?? https://znayvse.mybb.ru/viewtopic.php?id=13185#p29231
All information on the site ??https://bonus.2bb.ru/viewtopic.php?id=4536#p25407
All information on the site ??https://zmurik.mybb.ru/viewtopic.php?id=1157#p3017
All information on the site ??https://rabotat.mybb.ru/viewtopic.php?id=20841#p29527
All information on the site ??https://bestmedbook.mybb.ru/viewtopic.php?id=9064#p12660
All information on the site ??https://dimitrov.forum24.ru/?1-15-0-00000010-000-0-0-1708321103
All information on the site ??https://moscow.mybb.ru/viewtopic.php?id=34971#p37137
All information on the site ??https://vzarabotke.mybb.ru/viewtopic.php?id=8285#p21073
All information on the site ??http://31pokupki.rx22.ru/viewtopic.php?f=47&t=25229&p=31109#p31109
All information on the site ??https://oldforum.citysakh.ru/?talkid=25308
All information on the site ??http://hm.supersadovnik.ru/hmforum/post.aspx?id=873647
All information on the site ??https://zarabotok.liveforums.ru/viewtopic.php?id=12444#p33292
All information on the site ??https://moskovsky.borda.ru/?1-7-0-00004836-000-0-0-1708407563
All information on the site ??https://pembrokcity.borda.ru/?1-18-0-00000092-000-0-0-1708407791
All information on the site ??https://aqvakr.forum24.ru/?1-7-0-00010265-000-0-0-1708407913
All information on the site ??https://1abakan.ru/forum/showthread-63979/page-1/#post-614039
All information on the site ??https://www.samaramed.ru/forum/health/topic_40240.html
All information on the site ??https://allforgirls.mybb.ru/viewtopic.php?id=1819#p34283
Отельные комплексы на любой вкус
– По следам древних цивилизаций: турция тур
путевка в турцию на двоих http://www.anex-tour-turkey.ru .
Избавьтесь от стресса и усталости
– Турция на все случаи жизни: турция туры цены
туры в турцию все включено на двоих https://anex-tour-turkey.ru .
Турция с детьми: безопасно и увлекательно
путевка в турцию на двоих http://www.tez-tour-turkey.ru/ .
wegovy 3 mg tablet
Советуем посетить сайт про авто https://arenda-legkovyh-pricepov.ru/
Также не забудьте добавить сайт в закладки: https://arenda-legkovyh-pricepov.ru/
Путешествие по историческим местам
– Экзотическая природа: турция туроператоры
поиск туров https://www.anex-tour-turkey.ru/ .
semaglutide rybelsus
Турция на любой вкус
тур в турцию на двоих https://www.tez-tour-turkey.ru/ .
Лучшие пляжи и курорты
– Волшебная страна: турция тур
подбор тура онлайн http://www.anex-tour-turkey.ru .
Турция на любой вкус
все включено турция tez-tour-turkey.ru .
Привет Всем!
В 2022 году в мире азартных развлечений появился новый игрок https://serpcity.ru — казино Sykaaa. За его разработку и эксплуатацию отвечает Snowdunes B.V.
Сайт оперирует под лицензией Curacao: 8048/JAZ2022-007, выданной владельцу платформы. Этот молодой проект, основанный в 2022 году, уже успел привлечь внимание игроков своими бонусами и богатым выбором игр. Для обеспечения надежности, оператор получил лицензию от Кюрасао.
Валидность лицензии можно проверить на главной странице, кликнув по соответствующей иконке валидатора. Владельцем платформы является Snowdunes B.V., а сам проект находится в стадии активного развития.
Sykaaa Casino стремится охватить широкую аудиторию, предоставив интерфейс на трех языках: русском, украинском и английском.
Такое многоязычие делает сайт доступным для игроков из разных стран. Оригинальные бонусы и акции делают игру в Sykaaa Casino увлекательной.
Например, новичкам доступны 100 бесплатных вращений для автомата Razor Shark в течение 7 дней после регистрации. Приветственный бонус составляет 100%,
а максимальная сумма, которую можно получить, — 5000 евро. Свыше 1000 игр от таких провайдеров, как Betsoft, Pragmatic Play, Microgaming и другие,
доступны пользователям Sykaaa Casino. Каталог постоянно расширяется, делая игровой процесс разнообразным и интересным.
Sykaaa Casino предлагает разнообразные способы пополнения и вывода средств, включая Мир, СБП, Visa, Mastercard, Bitcoin и другие.
Минимальный депозит для активации бонуса — 500 рублей, а лимит на вывод составляет 10 000 USD в день. Sykaaa Casino не предлагает отдельного приложения, но мобильная версия сайта обеспечивает стабильную работу на любых устройствах. Благодаря этому, игроки могут наслаждаться азартом через браузер смартфона или планшета.
сукааа casino вход
sykaaa казино официальный сайт
сукка казино
sukaaa casino промокод
sukaaa казино
казино суккка
sykaaa casino бездепозитный
syyka казино
Удачи и прибыли Друзья!
Привет Всем!
Sykaaa Casino: зарабатывайте на азарте с официальным сайтом!
Онлайн-площадка https://vrkvvmvd.ru/ Sykaaa Casino, стартовавшая в 2022 году, сразу завоевала сердца азартных игроков. Команда разработчиков сфокусировалась на создании качественного проекта с лицензией от игорной компании Кюрасао, что обеспечивает надежность и честность игры. Подробнее об особенностях клуба можно узнать в нашем обзоре.
Sykaaa Casino Рабочее Зеркало:
Как обойти блокировки и получить бонусы? Рабочее зеркало Sykaaa Casino становится настоящим спасением для игроков при блокировке официального сайта. Воспользуйтесь актуальным зеркалом для легкой регистрации и входа, получив при этом эксклюзивные бездепозитные и депозитные бонусы. Наша статья расскажет вам, как быстро найти рабочую ссылку, чтобы не упустить выгодные предложения.
Бонусы в Sykaaa Casino: Уникальные предложения для каждого игрока! Sykaaa Casino не скупится на щедрые бонусы, которые доступны всем зарегистрированным пользователям в течение 14 дней. В разделе ‘БОНУСЫ’ вы найдете разнообразные предложения, готовые увеличить ваши шансы на выигрыш. Sykaaa Casino
Приветственный Бонус: Удвоение первого депозита! Новички в Sykaaa Casino могут насладиться приветственным бонусом в 100%, удваивая свой первый депозит. Минимальный депозит составляет всего 500 рублей, что делает игру еще более доступной. Sykaaa Casino Кэшбек: Возвращайте часть своих потерь! Неудачи не так страшны с кэшбеком в 10% от Sykaaa Casino.
Это дополнительная мотивация продолжать играть и получать вознаграждение даже в случае неудач. Sykaaa Casino Промокоды: Секреты получения дополнительных вращений! Игроки могут получить различные промокоды, в том числе промо-код SYKA40, предоставляющий 40 бесплатных вращений в игре The Dog Haus Megaways без депозита. Узнайте, как получить свой промокод и наслаждайтесь дополнительными выигрышами. Итак, с Sykaaa Casino каждый найдет для себя не только увлекательные игры, но и выгодные бонусы, обеспечивающие захватывающий опыт игры на долгое время!
sykaaa реальное рабочее зеркало
sykaaa online casino
промкоды в казино сука
казино сукаа играть
сука казино онлайн
сайт сукка казино официальный
sykaaa casino rcsp
казино sikaaa
казино сукааа рабочее зеркало
Удачи и прибыли Друзья!
buy semaglutide uk
pragmatic-ko.com
Suleiman은 미소를 지으며 Li Zheng을 바라보며 Li Zheng에게 매우 안도했습니다.
what is bitcoin : Bitcoin (BTC) is the first and most popular digital currency in the world, it has been issued since 2009. It differs from all world currencies because it is not tied to certain countries and is completely decentralized.
Due to this, no one can block the circulation of Bitcoins or seize these funds, because they do not exist in a particular place – they are just records in a replicated distributed database. In fact, anyone can issue Bitcoins (mining), the only condition – access to the Internet and PC.
One of the advantages of Bitcoins is its owners` anonymity – although the data on transactions in real-time is publicly available, it is possible to track only Bitcoin addresses of users without binding them to specific individuals. Therefore, the number of Bitcoins (and, therefore, the funds stored in them) of a particular user cannot be tracked through any bank.”
Доброго!
В 2022 году в мире азартных развлечений появился новый игрок https://serpcity.ru — казино Sykaaa. За его разработку и эксплуатацию отвечает Snowdunes B.V.
Сайт оперирует под лицензией Curacao: 8048/JAZ2022-007, выданной владельцу платформы. Этот молодой проект, основанный в 2022 году, уже успел привлечь внимание игроков своими бонусами и богатым выбором игр. Для обеспечения надежности, оператор получил лицензию от Кюрасао.
Валидность лицензии можно проверить на главной странице, кликнув по соответствующей иконке валидатора. Владельцем платформы является Snowdunes B.V., а сам проект находится в стадии активного развития.
Sykaaa Casino стремится охватить широкую аудиторию, предоставив интерфейс на трех языках: русском, украинском и английском.
Такое многоязычие делает сайт доступным для игроков из разных стран. Оригинальные бонусы и акции делают игру в Sykaaa Casino увлекательной.
Например, новичкам доступны 100 бесплатных вращений для автомата Razor Shark в течение 7 дней после регистрации. Приветственный бонус составляет 100%,
а максимальная сумма, которую можно получить, — 5000 евро. Свыше 1000 игр от таких провайдеров, как Betsoft, Pragmatic Play, Microgaming и другие,
доступны пользователям Sykaaa Casino. Каталог постоянно расширяется, делая игровой процесс разнообразным и интересным.
Sykaaa Casino предлагает разнообразные способы пополнения и вывода средств, включая Мир, СБП, Visa, Mastercard, Bitcoin и другие.
Минимальный депозит для активации бонуса — 500 рублей, а лимит на вывод составляет 10 000 USD в день. Sykaaa Casino не предлагает отдельного приложения, но мобильная версия сайта обеспечивает стабильную работу на любых устройствах. Благодаря этому, игроки могут наслаждаться азартом через браузер смартфона или планшета.
sukka казино
сукааа казино регистрация
суккаа
сайт сукааа
sykaaa casino
сукааа казино официальный
игровые аппараты sykaa
сукка казино официальный сайт
Удачи и прибыли Друзья!
where to buy ozempic
Здравствуйте!
Sykaaa Casino: зарабатывайте на азарте с официальным сайтом!
Онлайн-площадка https://vrkvvmvd.ru/ Sykaaa Casino, стартовавшая в 2022 году, сразу завоевала сердца азартных игроков. Команда разработчиков сфокусировалась на создании качественного проекта с лицензией от игорной компании Кюрасао, что обеспечивает надежность и честность игры. Подробнее об особенностях клуба можно узнать в нашем обзоре.
Sykaaa Casino Рабочее Зеркало:
Как обойти блокировки и получить бонусы? Рабочее зеркало Sykaaa Casino становится настоящим спасением для игроков при блокировке официального сайта. Воспользуйтесь актуальным зеркалом для легкой регистрации и входа, получив при этом эксклюзивные бездепозитные и депозитные бонусы. Наша статья расскажет вам, как быстро найти рабочую ссылку, чтобы не упустить выгодные предложения.
Бонусы в Sykaaa Casino: Уникальные предложения для каждого игрока! Sykaaa Casino не скупится на щедрые бонусы, которые доступны всем зарегистрированным пользователям в течение 14 дней. В разделе ‘БОНУСЫ’ вы найдете разнообразные предложения, готовые увеличить ваши шансы на выигрыш. Sykaaa Casino
Приветственный Бонус: Удвоение первого депозита! Новички в Sykaaa Casino могут насладиться приветственным бонусом в 100%, удваивая свой первый депозит. Минимальный депозит составляет всего 500 рублей, что делает игру еще более доступной. Sykaaa Casino Кэшбек: Возвращайте часть своих потерь! Неудачи не так страшны с кэшбеком в 10% от Sykaaa Casino.
Это дополнительная мотивация продолжать играть и получать вознаграждение даже в случае неудач. Sykaaa Casino Промокоды: Секреты получения дополнительных вращений! Игроки могут получить различные промокоды, в том числе промо-код SYKA40, предоставляющий 40 бесплатных вращений в игре The Dog Haus Megaways без депозита. Узнайте, как получить свой промокод и наслаждайтесь дополнительными выигрышами. Итак, с Sykaaa Casino каждый найдет для себя не только увлекательные игры, но и выгодные бонусы, обеспечивающие захватывающий опыт игры на долгое время!
казено sykaaa
казино sykka на бонусы
сукаа игровые автоматы
казино суккк
сукаа автоматы
зеркало казино сука
рабочее зеркало sukka casino
cykaaa
sukkka casino
Удачи и прибыли Друзья!
rybelsus online uk
where can i buy ozempic
rybelsus buy uk
кэт казино
7sps.ru
wegovy 7mg
Отдых на берегу Средиземного моря
отпуск в турции http://www.tez-tour-turkey.ru .
WOW just what I was searching for. Came here by searching for Austin Texas Family Photography
lfchungary.com
Fang Jifan은 다가가 그의 뺨을 때렸습니다. “당신 개, 당신은 너무 사악합니다.”
wegovy injection
продвижение интернет магазина цена
купить аттестат образование http://rudik-attestats.com/ .
What’s up to every single one, it’s really a good for me to go to see this site, it
consists of helpful Information.
Турция с детьми: безопасно и увлекательно
отдых в турции все включено tez-tour-turkey.ru .
semaglutide without prescription
продвижение сайтов профессиональное
yangsfitness.com
그런데 이 벼루가 갑자기 그를 지옥으로 끌고 가는 것 같았다.
ozempic for weight loss without diabetes
pragmatic-ko.com
Fang Jifan의 얼굴은 평소와 같았고 옛말에 Zhu Houzhao를 죽이면 나는 당신을 두려워 할 것입니다.
semaglutide prescription
semaglutide 21 mg
Здравствуйте!
Если вам требуются услуги по демонтажу, сносу или разборке дома или фундамента, обращайтесь к нам!
Наша опытная команда специалистов предлагает профессиональные услуги по сносу и демонтажу различных типов зданий и сооружений, от гаражей и беседок до многоквартирных домов и промышленных объектов.
Мы используем только современное оборудование и строго следуем правилам безопасности, учитывая все ваши требования и пожелания.
Одна из лидирующих компаний на рынке, https://taurusweb.ru, готова помочь вам с разборкой дома, включая демонтаж фундамента для подготовки участка к новому строительству. Обращайтесь к нам для подробной информации об услугах и обсуждения ваших потребностей. Мы всегда рады помочь вам с демонтажом и сделать этот процесс максимально комфортным и безопасным.
демонтаж и вывоз мусора цена
Снос старого дома
Стоимость сноса дома
Снос деревянных домов в Московской области
Демонтаж дома под ключ
Демонтаж старого дома
Демонтаж дачного дома
Разборка сруба
Демонтаж фундамента
Удачи!
ozempic tablet
Промокод 1Win 2024 – Бонус 500% до 75 000 рублей
где в 1win вводить промокод – 937999 при регистрации активирует приветственный бонус 500% до 75,000 рублей. При помощи специального кода, игрок в рамках текущей акции от букмекера 1Win получает дополнительные привилегии или бонусы.
1Win Промокод – 937999
Акция 1Win на 2024 год предлагает ряд привлекательных бонусов для новых игроков. Зарегистрируйтесь сейчас и получите бездепозитные бонусы, фриспины, фрибет бонусы и кэшбэк. Не упустите возможность воспользоваться этими выгодными предложениями!
1win промокоды 2024 – 937999 это специальный код, который необходимо ввести при регистрации, чтобы получить бонус в размере 500% до 75000 рублей. Только новые игроки могут воспользоваться данной акцией и получить приветственный бонус от 1Win.
С использованием промокода 1WIN новички в сфере ставок могут значительно увеличить сумму своих первоначальных и последующих вкладов. Полученные бонусы могут быть использованы в игре и, в случае удачи и выигрыша, могут быть выведены на ваш электронный кошелек. Максимальная сумма бонуса составляет 75 000 рублей.
Ознакомьтесь с перечнем ниже, чтобы узнать о различных промокодах на 1win и их особенностях.
1. Для новичков или промокоды при регистрации. Эти бонусы предназначены для тех, кто только начинает играть на платформе.
2. Для всех игроков. Эти поощрения доступны для всех клиентов, независимо от их опыта и статуса.
3. Для активных игроков. Некоторые промокоды активируют бонусы для активных игроков, например, увеличенный кешбэк или дополнительные бонусы за определенные суммы ставок.
4. Промокоды на фрибеты, которые предоставляют возможность сделать бесплатные ставки.
5. Промокоды на спины, которые дают возможность бесплатно вращать определенные слоты.
6. Промокоды на дополнительные средства при пополнении баланса.
7. Промокоды для участия в специальных акциях.
Используйте промокод 1win 2024 “937999” при регистрации, чтобы получить максимальный бонус в размере 500% до 75 000 рублей. Введите промокод в соответствующее поле при заполнении формы регистрации, чтобы получить до пяти дополнительных бонусов на ваш депозит. Бонус 1Win будет зачислен на два бонусных счета одновременно – на счета “Ставки” и “Казино”.
Особенности и предостережения при использовании 1win 1вин промокоды:
Промокоды в 1win выдаются по различным поводам, таким как проведение акций, специальные события, дни рождения клиентов или для привлечения участников, которые долгое время не проявляли активности.
При активации промокода при регистрации, бонусные средства станут доступны после входа в профиль. Личные промокоды требуют вашего согласия на участие в предложении. Эти средства будут зачислены на ваш бонусный счет с указанием доступной суммы в личном кабинете. При выполнении условий использования бонусов вы сможете конвертировать их в реальные деньги, которые дополнят ваш выигрыш.
Важно быть внимательным при поиске промокодов, чтобы избежать мошенников. Некоторые недобросовестные лица предлагают “бесплатные” промокоды с условием выполнить определенные действия. Они могут запросить ваши личные данные, утверждая, что это необходимо для проверки подлинности использования промокода. Никогда не передавайте личные данные третьим лицам. Регистрируйтесь и вводите информацию только на официальном сайте 1win. Проверяйте источник информации и используйте промокоды с официального источника.
All information on the site ??http://nmoskov.flybb.ru/viewtopic.php?f=2&t=639&p=1219#p1219
All information on the site ??http://kissolovo.teamforum.ru/viewtopic.php?f=10&t=32567&p=62924#p62924
All information on the site ??http://mockwa.com/forum/thread-145047/page-1/
All information on the site ??https://club4x4.ru/forum/viewtopic.php?f=17&t=96583&p=465894#p465894
All information on the site ??http://www.mamalipetsk.ru/index.php?name=forums&op=showtopic&id=25684&num=1#52981
All information on the site ??http://preceptor.flybb.ru/viewtopic.php?f=13&t=8573&p=13293#p13293
All information on the site ??http://forum.analysisclub.ru/index.php/topic,141604.msg458834.html#msg458834
All information on the site ??http://boltushka.flybb.ru/viewtopic.php?f=8&t=926&p=12983#p12983
All information on the site ??http://moskat.flybb.ru/viewtopic.php?f=2&t=3024&p=3975#p3975
All information on the site ??https://nowyiforum.listbb.ru/viewtopic.php?f=45&t=8923&p=14982#p14982
All information on the site ??http://a63.flybb.ru/viewtopic.php?f=10&t=2395&p=5388#p5388
All information on the site ??http://vseamoskva.flybb.ru/viewtopic.php?f=2&t=567&p=1151#p1151
All information on the site ??http://detimgn.iboards.ru/viewtopic.php?f=80&t=32505&p=228081#p228081
All information on the site ??http://fotomaniya.fmbb.ru/viewtopic.php?f=17&t=8209&p=12324#p12324
All information on the site ??http://mos.flybb.ru/viewtopic.php?f=2&t=2066&p=4382#p4382
All information on the site ??https://groups.google.com/g/microsoft.public.project/c/q11kRodo7AA
All information on the site ??http://deloua.ukrbb.net/viewtopic.php?f=12&t=2689&p=5185#p5185
All information on the site ??http://dexanet.ukrbb.net/viewtopic.php?f=5&t=12679&p=27098#p27098
All information on the site ??http://ekonomimvmeste.ukrbb.net/viewtopic.php?f=8&t=23173&p=38241#p38241
All information on the site ??http://golosa.ukrbb.net/viewtopic.php?f=29&t=5615&p=20208#p20208
All information on the site ??http://gov.ukrbb.net/viewtopic.php?f=3&t=4325&p=14270#p14270
All information on the site ??http://kyevlyn.ukrbb.net/viewtopic.php?f=12&t=6184&p=12482#p12482
All information on the site ??http://nashkyev.ukrbb.net/viewtopic.php?f=12&t=2982&p=6600#p6600
All information on the site ??http://nsk.ukrbb.net/viewtopic.php?f=41&t=25345&p=37941#p37941
All information on the site ??http://odessaflower.ukrbb.net/viewtopic.php?f=44&t=26238&p=141073#p141073
All information on the site ??http://foglands.flybb.ru/viewtopic.php?f=3&t=294&p=4843#p4843
All information on the site ??http://pandora.ukrbb.net/viewtopic.php?f=2&t=6810&p=12914#p12914
All information on the site ??http://serpentarium.ukrbb.net/viewtopic.php?f=3&t=9317&p=21732#p21732
All information on the site ??http://stranaua.ukrbb.net/viewtopic.php?f=12&t=3270&p=6135#p6135
All information on the site ??http://tatuheart.ukrbb.net/viewtopic.php?f=43&t=11667&p=19283#p19283
All information on the site ??http://uaportal.ukrbb.net/viewtopic.php?f=12&t=2678&p=5115#p5115
All information on the site ??http://gazdynka.ukrbb.net/viewtopic.php?f=3&t=3092&p=6955#p6955
All information on the site ??http://sportandpolitics.ukrbb.net/viewtopic.php?f=25&t=10939&p=20349#p20349
All information on the site ??https://obmenka.forum2x2.ru/t16142-topic#37267
All information on the site ??http://www.che.best-city.ru/forum/thread86070/#reply86078
All information on the site ??http://vishivayu.ukrbb.net/viewtopic.php?f=12&t=8568&p=19543#p19543
All information on the site ??http://fulrp.5nx.ru/viewtopic.php?f=55&t=5487&p=10437#p10437
All information on the site ??http://goroda.flybb.ru/viewtopic.php?f=2&t=358&p=585#p585
All information on the site ??http://krd.best-city.ru/forum/thread89415/#reply89417
All information on the site ??http://mosfor.flybb.ru/viewtopic.php?f=2&t=232&p=471#p471
All information on the site ??http://superjackson.ukrbb.net/viewtopic.php?f=28&t=7691&p=31740#p31740
All information on the site ??http://vrn.best-city.ru/forum/thread540107357/#reply540107370
All information on the site ??https://4computers.getbb.ru/viewtopic.php?f=5&t=13902&p=39239#p39239
All information on the site ??https://zastolje.getbb.ru/viewtopic.php?f=54&t=12234&p=75381#p75381
All information on the site ??http://divinecosmosnew.tforums.org/viewtopic.php?f=17&t=19738
All information on the site ??https://mamapoltava.listbb.ru/viewtopic.php?f=45&t=3114&p=6620#p6620
All information on the site ??http://aku.ukrbb.net/viewtopic.php?f=22&t=17972&p=32629#p32629
All information on the site ??http://bmc.ukrbb.net/viewtopic.php?f=4&t=11290&p=14728#p14728
All information on the site ??https://clicktime.mybb.ru/viewtopic.php?id=2592#p4273
All information on the site ??https://dagforum.2bb.ru/viewtopic.php?id=2221#p13057
All information on the site ??https://daksvegas.unoforum.pro/?1-1-0-00000220-000-0-0-1708151834
All information on the site ??https://pesliga.webtalk.ru/viewtopic.php?id=2718#p4840
All information on the site ??https://commerc.webtalk.ru/viewtopic.php?id=6438#p15849
All information on the site ?? https://znayvse.mybb.ru/viewtopic.php?id=13185#p29231
All information on the site ??https://bonus.2bb.ru/viewtopic.php?id=4536#p25407
All information on the site ??https://zmurik.mybb.ru/viewtopic.php?id=1157#p3017
All information on the site ??https://rabotat.mybb.ru/viewtopic.php?id=20841#p29527
All information on the site ??https://bestmedbook.mybb.ru/viewtopic.php?id=9064#p12660
All information on the site ??https://dimitrov.forum24.ru/?1-15-0-00000010-000-0-0-1708321103
All information on the site ??https://moscow.mybb.ru/viewtopic.php?id=34971#p37137
All information on the site ??https://vzarabotke.mybb.ru/viewtopic.php?id=8285#p21073
All information on the site ??http://31pokupki.rx22.ru/viewtopic.php?f=47&t=25229&p=31109#p31109
All information on the site ??https://oldforum.citysakh.ru/?talkid=25308
All information on the site ??http://hm.supersadovnik.ru/hmforum/post.aspx?id=873647
All information on the site ??https://zarabotok.liveforums.ru/viewtopic.php?id=12444#p33292
All information on the site ??https://moskovsky.borda.ru/?1-7-0-00004836-000-0-0-1708407563
All information on the site ??https://pembrokcity.borda.ru/?1-18-0-00000092-000-0-0-1708407791
All information on the site ??https://aqvakr.forum24.ru/?1-7-0-00010265-000-0-0-1708407913
All information on the site ??https://1abakan.ru/forum/showthread-63979/page-1/#post-614039
All information on the site ??https://www.samaramed.ru/forum/health/topic_40240.html
All information on the site ??https://allforgirls.mybb.ru/viewtopic.php?id=1819#p34283
strelkaproject.com
그런 일의 재미에 동참하지 않는다면 유감일 것입니다.
semaglutide online uk
semaglutide tablets buy
Промокод 1Win 2024 – Бонус 500% до 75 000 рублей
промокод на регистрацию 1win – 937999 при регистрации активирует приветственный бонус 500% до 75,000 рублей. При помощи специального кода, игрок в рамках текущей акции от букмекера 1Win получает дополнительные привилегии или бонусы.
1Win Промокод – 937999
Акция 1Win на 2024 год предлагает ряд привлекательных бонусов для новых игроков. Зарегистрируйтесь сейчас и получите бездепозитные бонусы, фриспины, фрибет бонусы и кэшбэк. Не упустите возможность воспользоваться этими выгодными предложениями!
1win промокод на первый депозит – 937999 это специальный код, который необходимо ввести при регистрации, чтобы получить бонус в размере 500% до 75000 рублей. Только новые игроки могут воспользоваться данной акцией и получить приветственный бонус от 1Win.
С использованием промокода 1WIN новички в сфере ставок могут значительно увеличить сумму своих первоначальных и последующих вкладов. Полученные бонусы могут быть использованы в игре и, в случае удачи и выигрыша, могут быть выведены на ваш электронный кошелек. Максимальная сумма бонуса составляет 75 000 рублей.
Ознакомьтесь с перечнем ниже, чтобы узнать о различных промокодах на 1win и их особенностях.
1. Для новичков или промокоды при регистрации. Эти бонусы предназначены для тех, кто только начинает играть на платформе.
2. Для всех игроков. Эти поощрения доступны для всех клиентов, независимо от их опыта и статуса.
3. Для активных игроков. Некоторые промокоды активируют бонусы для активных игроков, например, увеличенный кешбэк или дополнительные бонусы за определенные суммы ставок.
4. Промокоды на фрибеты, которые предоставляют возможность сделать бесплатные ставки.
5. Промокоды на спины, которые дают возможность бесплатно вращать определенные слоты.
6. Промокоды на дополнительные средства при пополнении баланса.
7. Промокоды для участия в специальных акциях.
Используйте промокод 1win при пополнение счета “937999” при регистрации, чтобы получить максимальный бонус в размере 500% до 75 000 рублей. Введите промокод в соответствующее поле при заполнении формы регистрации, чтобы получить до пяти дополнительных бонусов на ваш депозит. Бонус 1Win будет зачислен на два бонусных счета одновременно – на счета “Ставки” и “Казино”.
Особенности и предостережения при использовании 1win промокод на деньги при пополнении:
Промокоды в 1win выдаются по различным поводам, таким как проведение акций, специальные события, дни рождения клиентов или для привлечения участников, которые долгое время не проявляли активности.
При активации промокода при регистрации, бонусные средства станут доступны после входа в профиль. Личные промокоды требуют вашего согласия на участие в предложении. Эти средства будут зачислены на ваш бонусный счет с указанием доступной суммы в личном кабинете. При выполнении условий использования бонусов вы сможете конвертировать их в реальные деньги, которые дополнят ваш выигрыш.
Важно быть внимательным при поиске промокодов, чтобы избежать мошенников. Некоторые недобросовестные лица предлагают “бесплатные” промокоды с условием выполнить определенные действия. Они могут запросить ваши личные данные, утверждая, что это необходимо для проверки подлинности использования промокода. Никогда не передавайте личные данные третьим лицам. Регистрируйтесь и вводите информацию только на официальном сайте 1win. Проверяйте источник информации и используйте промокоды с официального источника.
Genuinely when someone doesn’t be aware of then its up
to other visitors that they will assist, so here it happens.
semaglutide 7mg
All information on the site ??http://nmoskov.flybb.ru/viewtopic.php?f=2&t=639&p=1219#p1219
All information on the site ??http://kissolovo.teamforum.ru/viewtopic.php?f=10&t=32567&p=62924#p62924
All information on the site ??http://mockwa.com/forum/thread-145047/page-1/
All information on the site ??https://club4x4.ru/forum/viewtopic.php?f=17&t=96583&p=465894#p465894
All information on the site ??http://www.mamalipetsk.ru/index.php?name=forums&op=showtopic&id=25684&num=1#52981
All information on the site ??http://preceptor.flybb.ru/viewtopic.php?f=13&t=8573&p=13293#p13293
All information on the site ??http://forum.analysisclub.ru/index.php/topic,141604.msg458834.html#msg458834
All information on the site ??http://boltushka.flybb.ru/viewtopic.php?f=8&t=926&p=12983#p12983
All information on the site ??http://moskat.flybb.ru/viewtopic.php?f=2&t=3024&p=3975#p3975
All information on the site ??https://nowyiforum.listbb.ru/viewtopic.php?f=45&t=8923&p=14982#p14982
All information on the site ??http://a63.flybb.ru/viewtopic.php?f=10&t=2395&p=5388#p5388
All information on the site ??http://vseamoskva.flybb.ru/viewtopic.php?f=2&t=567&p=1151#p1151
All information on the site ??http://detimgn.iboards.ru/viewtopic.php?f=80&t=32505&p=228081#p228081
All information on the site ??http://fotomaniya.fmbb.ru/viewtopic.php?f=17&t=8209&p=12324#p12324
All information on the site ??http://mos.flybb.ru/viewtopic.php?f=2&t=2066&p=4382#p4382
All information on the site ??https://groups.google.com/g/microsoft.public.project/c/q11kRodo7AA
All information on the site ??http://deloua.ukrbb.net/viewtopic.php?f=12&t=2689&p=5185#p5185
All information on the site ??http://dexanet.ukrbb.net/viewtopic.php?f=5&t=12679&p=27098#p27098
All information on the site ??http://ekonomimvmeste.ukrbb.net/viewtopic.php?f=8&t=23173&p=38241#p38241
All information on the site ??http://golosa.ukrbb.net/viewtopic.php?f=29&t=5615&p=20208#p20208
All information on the site ??http://gov.ukrbb.net/viewtopic.php?f=3&t=4325&p=14270#p14270
All information on the site ??http://kyevlyn.ukrbb.net/viewtopic.php?f=12&t=6184&p=12482#p12482
All information on the site ??http://nashkyev.ukrbb.net/viewtopic.php?f=12&t=2982&p=6600#p6600
All information on the site ??http://nsk.ukrbb.net/viewtopic.php?f=41&t=25345&p=37941#p37941
All information on the site ??http://odessaflower.ukrbb.net/viewtopic.php?f=44&t=26238&p=141073#p141073
All information on the site ??http://foglands.flybb.ru/viewtopic.php?f=3&t=294&p=4843#p4843
All information on the site ??http://pandora.ukrbb.net/viewtopic.php?f=2&t=6810&p=12914#p12914
All information on the site ??http://serpentarium.ukrbb.net/viewtopic.php?f=3&t=9317&p=21732#p21732
All information on the site ??http://stranaua.ukrbb.net/viewtopic.php?f=12&t=3270&p=6135#p6135
All information on the site ??http://tatuheart.ukrbb.net/viewtopic.php?f=43&t=11667&p=19283#p19283
All information on the site ??http://uaportal.ukrbb.net/viewtopic.php?f=12&t=2678&p=5115#p5115
All information on the site ??http://gazdynka.ukrbb.net/viewtopic.php?f=3&t=3092&p=6955#p6955
All information on the site ??http://sportandpolitics.ukrbb.net/viewtopic.php?f=25&t=10939&p=20349#p20349
All information on the site ??https://obmenka.forum2x2.ru/t16142-topic#37267
All information on the site ??http://www.che.best-city.ru/forum/thread86070/#reply86078
All information on the site ??http://vishivayu.ukrbb.net/viewtopic.php?f=12&t=8568&p=19543#p19543
All information on the site ??http://fulrp.5nx.ru/viewtopic.php?f=55&t=5487&p=10437#p10437
All information on the site ??http://goroda.flybb.ru/viewtopic.php?f=2&t=358&p=585#p585
All information on the site ??http://krd.best-city.ru/forum/thread89415/#reply89417
All information on the site ??http://mosfor.flybb.ru/viewtopic.php?f=2&t=232&p=471#p471
All information on the site ??http://superjackson.ukrbb.net/viewtopic.php?f=28&t=7691&p=31740#p31740
All information on the site ??http://vrn.best-city.ru/forum/thread540107357/#reply540107370
All information on the site ??https://4computers.getbb.ru/viewtopic.php?f=5&t=13902&p=39239#p39239
All information on the site ??https://zastolje.getbb.ru/viewtopic.php?f=54&t=12234&p=75381#p75381
All information on the site ??http://divinecosmosnew.tforums.org/viewtopic.php?f=17&t=19738
All information on the site ??https://mamapoltava.listbb.ru/viewtopic.php?f=45&t=3114&p=6620#p6620
All information on the site ??http://aku.ukrbb.net/viewtopic.php?f=22&t=17972&p=32629#p32629
All information on the site ??http://bmc.ukrbb.net/viewtopic.php?f=4&t=11290&p=14728#p14728
All information on the site ??https://clicktime.mybb.ru/viewtopic.php?id=2592#p4273
All information on the site ??https://dagforum.2bb.ru/viewtopic.php?id=2221#p13057
All information on the site ??https://daksvegas.unoforum.pro/?1-1-0-00000220-000-0-0-1708151834
All information on the site ??https://pesliga.webtalk.ru/viewtopic.php?id=2718#p4840
All information on the site ??https://commerc.webtalk.ru/viewtopic.php?id=6438#p15849
All information on the site ?? https://znayvse.mybb.ru/viewtopic.php?id=13185#p29231
All information on the site ??https://bonus.2bb.ru/viewtopic.php?id=4536#p25407
All information on the site ??https://zmurik.mybb.ru/viewtopic.php?id=1157#p3017
All information on the site ??https://rabotat.mybb.ru/viewtopic.php?id=20841#p29527
All information on the site ??https://bestmedbook.mybb.ru/viewtopic.php?id=9064#p12660
All information on the site ??https://dimitrov.forum24.ru/?1-15-0-00000010-000-0-0-1708321103
All information on the site ??https://moscow.mybb.ru/viewtopic.php?id=34971#p37137
All information on the site ??https://vzarabotke.mybb.ru/viewtopic.php?id=8285#p21073
All information on the site ??http://31pokupki.rx22.ru/viewtopic.php?f=47&t=25229&p=31109#p31109
All information on the site ??https://oldforum.citysakh.ru/?talkid=25308
All information on the site ??http://hm.supersadovnik.ru/hmforum/post.aspx?id=873647
All information on the site ??https://zarabotok.liveforums.ru/viewtopic.php?id=12444#p33292
All information on the site ??https://moskovsky.borda.ru/?1-7-0-00004836-000-0-0-1708407563
All information on the site ??https://pembrokcity.borda.ru/?1-18-0-00000092-000-0-0-1708407791
All information on the site ??https://aqvakr.forum24.ru/?1-7-0-00010265-000-0-0-1708407913
All information on the site ??https://1abakan.ru/forum/showthread-63979/page-1/#post-614039
All information on the site ??https://www.samaramed.ru/forum/health/topic_40240.html
All information on the site ??https://allforgirls.mybb.ru/viewtopic.php?id=1819#p34283
semaglutide 14mg tablets
Темная сторона интернета – неведомая зона всемирной паутины, избегающая взоров обычных поисковых систем и требующая специальных средств для доступа. Этот несканируемый уголок сети обильно насыщен платформами, предоставляя доступ к разнообразным товарам и услугам через свои перечни и индексы. Давайте ближе рассмотрим, что представляют собой эти списки и какие тайны они хранят.
Даркнет Списки: Ворота в Неизведанный Мир
Даркнет списки – это своего рода порталы в скрытый мир интернета. Каталоги и индексы веб-ресурсов в даркнете, они позволяют пользователям отыскивать различные услуги, товары и информацию. Варьируя от форумов и магазинов до ресурсов, уделяющих внимание аспектам анонимности и криптовалютам, эти списки предоставляют нам шанс заглянуть в неизведанный мир даркнета.
Категории и Возможности
Теневой Рынок:
Даркнет часто ассоциируется с подпольной торговлей, где доступны самые разные товары и услуги – от психоактивных веществ и стрелкового оружия до краденых данных и услуг наемных убийц. Реестры ресурсов в этой категории облегчают пользователям находить подходящие предложения без лишних усилий.
Форумы и Сообщества:
Даркнет также служит для анонимного общения. Форумы и сообщества, указанные в каталогах даркнета, охватывают широкий спектр – от кибербезопасности и хакерства до политических вопросов и философских идей.
Информационные Ресурсы:
На даркнете есть ресурсы, предоставляющие сведения и руководства по обходу цензуры, защите конфиденциальности и другим темам, которые могут быть интересны тем, кто хочет остаться анонимным.
Безопасность и Осторожность
Несмотря на неизвестность и свободу, даркнет не лишен опасностей. Мошенничество, кибератаки и незаконные сделки присущи этому миру. Взаимодействуя с списками ресурсов в темной сети, пользователи должны соблюдать высший уровень бдительности и придерживаться мер безопасности.
Заключение
Реестры даркнета – это ключ к таинственному миру, где хранятся тайны и возможности. Однако, как и в любой неизведанной территории, путешествие в темную сеть требует особой осторожности и знания. Анонимность не всегда гарантирует безопасность, и использование темной сети требует осознанного подхода. Независимо от ваших интересов – будь то технические аспекты кибербезопасности, поиск уникальных товаров или исследование новых граней интернета – даркнет списки предоставляют ключ
Промокод 1Win 2024 – Бонус 500% до 75 000 рублей
1win промокод на фрибет – 937999 при регистрации активирует приветственный бонус 500% до 75,000 рублей. При помощи специального кода, игрок в рамках текущей акции от букмекера 1Win получает дополнительные привилегии или бонусы.
1Win Промокод – 937999
Акция 1Win на 2024 год предлагает ряд привлекательных бонусов для новых игроков. Зарегистрируйтесь сейчас и получите бездепозитные бонусы, фриспины, фрибет бонусы и кэшбэк. Не упустите возможность воспользоваться этими выгодными предложениями!
фрибет 1win промокод – 937999 это специальный код, который необходимо ввести при регистрации, чтобы получить бонус в размере 500% до 75000 рублей. Только новые игроки могут воспользоваться данной акцией и получить приветственный бонус от 1Win.
С использованием промокода 1WIN новички в сфере ставок могут значительно увеличить сумму своих первоначальных и последующих вкладов. Полученные бонусы могут быть использованы в игре и, в случае удачи и выигрыша, могут быть выведены на ваш электронный кошелек. Максимальная сумма бонуса составляет 75 000 рублей.
Ознакомьтесь с перечнем ниже, чтобы узнать о различных промокодах на 1win и их особенностях.
1. Для новичков или промокоды при регистрации. Эти бонусы предназначены для тех, кто только начинает играть на платформе.
2. Для всех игроков. Эти поощрения доступны для всех клиентов, независимо от их опыта и статуса.
3. Для активных игроков. Некоторые промокоды активируют бонусы для активных игроков, например, увеличенный кешбэк или дополнительные бонусы за определенные суммы ставок.
4. Промокоды на фрибеты, которые предоставляют возможность сделать бесплатные ставки.
5. Промокоды на спины, которые дают возможность бесплатно вращать определенные слоты.
6. Промокоды на дополнительные средства при пополнении баланса.
7. Промокоды для участия в специальных акциях.
Используйте 1win промокод при регистрации фрибет “937999” при регистрации, чтобы получить максимальный бонус в размере 500% до 75 000 рублей. Введите промокод в соответствующее поле при заполнении формы регистрации, чтобы получить до пяти дополнительных бонусов на ваш депозит. Бонус 1Win будет зачислен на два бонусных счета одновременно – на счета “Ставки” и “Казино”.
Особенности и предостережения при использовании 1win зеркало промокод:
Промокоды в 1win выдаются по различным поводам, таким как проведение акций, специальные события, дни рождения клиентов или для привлечения участников, которые долгое время не проявляли активности.
При активации промокода при регистрации, бонусные средства станут доступны после входа в профиль. Личные промокоды требуют вашего согласия на участие в предложении. Эти средства будут зачислены на ваш бонусный счет с указанием доступной суммы в личном кабинете. При выполнении условий использования бонусов вы сможете конвертировать их в реальные деньги, которые дополнят ваш выигрыш.
Важно быть внимательным при поиске промокодов, чтобы избежать мошенников. Некоторые недобросовестные лица предлагают “бесплатные” промокоды с условием выполнить определенные действия. Они могут запросить ваши личные данные, утверждая, что это необходимо для проверки подлинности использования промокода. Никогда не передавайте личные данные третьим лицам. Регистрируйтесь и вводите информацию только на официальном сайте 1win. Проверяйте источник информации и используйте промокоды с официального источника.
ozempic generic
Теневой интернет – это сегмент интернета, которая остается скрытой от обычных поисковых систем и требует специального программного обеспечения для доступа. В этой анонимной зоне сети существует масса ресурсов, включая различные списки и каталоги, предоставляющие доступ к разнообразным услугам и товарам. Давайте рассмотрим, что представляет собой даркнет список и какие тайны скрываются в его глубинах.
Даркнет Списки: Врата в Невидимый Мир
Для начала, что такое даркнет список? Это, по сути, каталоги или индексы веб-ресурсов в темной части интернета, которые позволяют пользователям находить нужные услуги, товары или информацию. Эти списки могут варьироваться от форумов и торговых площадок до ресурсов, специализирующихся на различных аспектах анонимности и криптовалют.
Категории и Возможности
Черный Рынок:
Темная сторона интернета часто ассоциируется с теневым рынком, где можно найти различные товары и услуги, включая наркотики, оружие, украденные данные и даже услуги наемных убийц. Списки таких ресурсов позволяют пользователям без труда находить подобные предложения.
Чаты и Сообщества:
Темная сторона интернета также предоставляет платформы для анонимного общения. Форумы и группы на даркнет списках могут заниматься обсуждением тем от интернет-безопасности и взлома до политики и философии.
Информационные ресурсы:
Есть ресурсы, предоставляющие информацию и инструкции по обходу цензуры, защите конфиденциальности и другим темам, интересным пользователям, стремящимся сохранить анонимность.
Безопасность и Осторожность
При всей своей анонимности и свободе действий темная сторона интернета также несет риски. Мошенничество, кибератаки и незаконные сделки становятся частью этого мира. Пользователям необходимо проявлять максимальную осторожность и соблюдать меры безопасности при взаимодействии с даркнет списками.
Заключение: Врата в Неизведанный Мир
Теневые каталоги предоставляют доступ к теневым уголкам интернета, где сокрыты тайны и возможности. Однако, как и в любой неизведанной территории, важно помнить о возможных рисках и осознанно подходить к использованию даркнета. Анонимность не всегда гарантирует безопасность, и путешествие в этот мир требует особой осторожности и знания.
Независимо от того, интересуетесь ли вы техническими аспектами интернет-безопасности, ищете уникальные товары или просто исследуете новые грани интернета, теневые каталоги предоставляют ключ
Даркнет – таинственная зона всемирной паутины, избегающая взоров обыденных поисковых систем и требующая дополнительных средств для доступа. Этот скрытый уголок сети обильно насыщен сайтами, предоставляя доступ к различным товарам и услугам через свои перечни и индексы. Давайте ближе рассмотрим, что представляют собой эти списки и какие тайны они хранят.
Даркнет Списки: Порталы в Скрытый Мир
Каталоги ресурсов в даркнете – это своего рода проходы в скрытый мир интернета. Каталоги и индексы веб-ресурсов в даркнете, они позволяют пользователям отыскивать разнообразные услуги, товары и информацию. Варьируя от форумов и магазинов до ресурсов, уделяющих внимание аспектам анонимности и криптовалютам, эти перечни предоставляют нам шанс заглянуть в неизведанный мир даркнета.
Категории и Возможности
Теневой Рынок:
Даркнет часто ассоциируется с теневым рынком, где доступны самые разные товары и услуги – от наркотических препаратов и стрелкового вооружения до похищенной информации и услуг наемных убийц. Списки ресурсов в подобной категории облегчают пользователям находить нужные предложения без лишних усилий.
Форумы и Сообщества:
Даркнет также предоставляет площадку для анонимного общения. Форумы и сообщества, перечисленные в даркнет списках, затрагивают широкий спектр – от информационной безопасности и взлома до политических аспектов и философских концепций.
Информационные Ресурсы:
На даркнете есть ресурсы, предоставляющие сведения и руководства по обходу цензуры, защите конфиденциальности и другим темам, которые могут быть интересны тем, кто хочет остаться анонимным.
Безопасность и Осторожность
Несмотря на анонимность и свободу, даркнет полон рисков. Мошенничество, кибератаки и незаконные сделки присущи этому миру. Взаимодействуя с реестрами даркнета, пользователи должны соблюдать максимальную осторожность и придерживаться мер безопасности.
Заключение
Списки даркнета – это путь в неизведанный мир, где сокрыты тайны и возможности. Однако, как и в любой неизведанной территории, путешествие в темную сеть требует особой внимания и знаний. Не всегда анонимность приносит безопасность, и использование темной сети требует осознанного подхода. Независимо от ваших интересов – будь то технические аспекты кибербезопасности, поиск уникальных товаров или исследование новых граней интернета – реестры даркнета предоставляют ключ
ozempic tab 3mg
All information on the site ??http://nmoskov.flybb.ru/viewtopic.php?f=2&t=639&p=1219#p1219
All information on the site ??http://kissolovo.teamforum.ru/viewtopic.php?f=10&t=32567&p=62924#p62924
All information on the site ??http://mockwa.com/forum/thread-145047/page-1/
All information on the site ??https://club4x4.ru/forum/viewtopic.php?f=17&t=96583&p=465894#p465894
All information on the site ??http://www.mamalipetsk.ru/index.php?name=forums&op=showtopic&id=25684&num=1#52981
All information on the site ??http://preceptor.flybb.ru/viewtopic.php?f=13&t=8573&p=13293#p13293
All information on the site ??http://forum.analysisclub.ru/index.php/topic,141604.msg458834.html#msg458834
All information on the site ??http://boltushka.flybb.ru/viewtopic.php?f=8&t=926&p=12983#p12983
All information on the site ??http://moskat.flybb.ru/viewtopic.php?f=2&t=3024&p=3975#p3975
All information on the site ??https://nowyiforum.listbb.ru/viewtopic.php?f=45&t=8923&p=14982#p14982
All information on the site ??http://a63.flybb.ru/viewtopic.php?f=10&t=2395&p=5388#p5388
All information on the site ??http://vseamoskva.flybb.ru/viewtopic.php?f=2&t=567&p=1151#p1151
All information on the site ??http://detimgn.iboards.ru/viewtopic.php?f=80&t=32505&p=228081#p228081
All information on the site ??http://fotomaniya.fmbb.ru/viewtopic.php?f=17&t=8209&p=12324#p12324
All information on the site ??http://mos.flybb.ru/viewtopic.php?f=2&t=2066&p=4382#p4382
All information on the site ??https://groups.google.com/g/microsoft.public.project/c/q11kRodo7AA
All information on the site ??http://deloua.ukrbb.net/viewtopic.php?f=12&t=2689&p=5185#p5185
All information on the site ??http://dexanet.ukrbb.net/viewtopic.php?f=5&t=12679&p=27098#p27098
All information on the site ??http://ekonomimvmeste.ukrbb.net/viewtopic.php?f=8&t=23173&p=38241#p38241
All information on the site ??http://golosa.ukrbb.net/viewtopic.php?f=29&t=5615&p=20208#p20208
All information on the site ??http://gov.ukrbb.net/viewtopic.php?f=3&t=4325&p=14270#p14270
All information on the site ??http://kyevlyn.ukrbb.net/viewtopic.php?f=12&t=6184&p=12482#p12482
All information on the site ??http://nashkyev.ukrbb.net/viewtopic.php?f=12&t=2982&p=6600#p6600
All information on the site ??http://nsk.ukrbb.net/viewtopic.php?f=41&t=25345&p=37941#p37941
All information on the site ??http://odessaflower.ukrbb.net/viewtopic.php?f=44&t=26238&p=141073#p141073
All information on the site ??http://foglands.flybb.ru/viewtopic.php?f=3&t=294&p=4843#p4843
All information on the site ??http://pandora.ukrbb.net/viewtopic.php?f=2&t=6810&p=12914#p12914
All information on the site ??http://serpentarium.ukrbb.net/viewtopic.php?f=3&t=9317&p=21732#p21732
All information on the site ??http://stranaua.ukrbb.net/viewtopic.php?f=12&t=3270&p=6135#p6135
All information on the site ??http://tatuheart.ukrbb.net/viewtopic.php?f=43&t=11667&p=19283#p19283
All information on the site ??http://uaportal.ukrbb.net/viewtopic.php?f=12&t=2678&p=5115#p5115
All information on the site ??http://gazdynka.ukrbb.net/viewtopic.php?f=3&t=3092&p=6955#p6955
All information on the site ??http://sportandpolitics.ukrbb.net/viewtopic.php?f=25&t=10939&p=20349#p20349
All information on the site ??https://obmenka.forum2x2.ru/t16142-topic#37267
All information on the site ??http://www.che.best-city.ru/forum/thread86070/#reply86078
All information on the site ??http://vishivayu.ukrbb.net/viewtopic.php?f=12&t=8568&p=19543#p19543
All information on the site ??http://fulrp.5nx.ru/viewtopic.php?f=55&t=5487&p=10437#p10437
All information on the site ??http://goroda.flybb.ru/viewtopic.php?f=2&t=358&p=585#p585
All information on the site ??http://krd.best-city.ru/forum/thread89415/#reply89417
All information on the site ??http://mosfor.flybb.ru/viewtopic.php?f=2&t=232&p=471#p471
All information on the site ??http://superjackson.ukrbb.net/viewtopic.php?f=28&t=7691&p=31740#p31740
All information on the site ??http://vrn.best-city.ru/forum/thread540107357/#reply540107370
All information on the site ??https://4computers.getbb.ru/viewtopic.php?f=5&t=13902&p=39239#p39239
All information on the site ??https://zastolje.getbb.ru/viewtopic.php?f=54&t=12234&p=75381#p75381
All information on the site ??http://divinecosmosnew.tforums.org/viewtopic.php?f=17&t=19738
All information on the site ??https://mamapoltava.listbb.ru/viewtopic.php?f=45&t=3114&p=6620#p6620
All information on the site ??http://aku.ukrbb.net/viewtopic.php?f=22&t=17972&p=32629#p32629
All information on the site ??http://bmc.ukrbb.net/viewtopic.php?f=4&t=11290&p=14728#p14728
All information on the site ??https://clicktime.mybb.ru/viewtopic.php?id=2592#p4273
All information on the site ??https://dagforum.2bb.ru/viewtopic.php?id=2221#p13057
All information on the site ??https://daksvegas.unoforum.pro/?1-1-0-00000220-000-0-0-1708151834
All information on the site ??https://pesliga.webtalk.ru/viewtopic.php?id=2718#p4840
All information on the site ??https://commerc.webtalk.ru/viewtopic.php?id=6438#p15849
All information on the site ?? https://znayvse.mybb.ru/viewtopic.php?id=13185#p29231
All information on the site ??https://bonus.2bb.ru/viewtopic.php?id=4536#p25407
All information on the site ??https://zmurik.mybb.ru/viewtopic.php?id=1157#p3017
All information on the site ??https://rabotat.mybb.ru/viewtopic.php?id=20841#p29527
All information on the site ??https://bestmedbook.mybb.ru/viewtopic.php?id=9064#p12660
All information on the site ??https://dimitrov.forum24.ru/?1-15-0-00000010-000-0-0-1708321103
All information on the site ??https://moscow.mybb.ru/viewtopic.php?id=34971#p37137
All information on the site ??https://vzarabotke.mybb.ru/viewtopic.php?id=8285#p21073
All information on the site ??http://31pokupki.rx22.ru/viewtopic.php?f=47&t=25229&p=31109#p31109
All information on the site ??https://oldforum.citysakh.ru/?talkid=25308
All information on the site ??http://hm.supersadovnik.ru/hmforum/post.aspx?id=873647
All information on the site ??https://zarabotok.liveforums.ru/viewtopic.php?id=12444#p33292
All information on the site ??https://moskovsky.borda.ru/?1-7-0-00004836-000-0-0-1708407563
All information on the site ??https://pembrokcity.borda.ru/?1-18-0-00000092-000-0-0-1708407791
All information on the site ??https://aqvakr.forum24.ru/?1-7-0-00010265-000-0-0-1708407913
All information on the site ??https://1abakan.ru/forum/showthread-63979/page-1/#post-614039
All information on the site ??https://www.samaramed.ru/forum/health/topic_40240.html
All information on the site ??https://allforgirls.mybb.ru/viewtopic.php?id=1819#p34283
список сайтов даркнет
Подпольная сфера сети – неведомая сфера интернета, избегающая взоров стандартных поисковых систем и требующая специальных средств для доступа. Этот несканируемый ресурс сети обильно насыщен платформами, предоставляя доступ к разношерстным товарам и услугам через свои каталоги и каталоги. Давайте подробнее рассмотрим, что представляют собой эти реестры и какие тайны они сокрывают.
Даркнет Списки: Порталы в Скрытый Мир
Индексы веб-ресурсов в темной части интернета – это вид порталы в неощутимый мир интернета. Каталоги и индексы веб-ресурсов в даркнете, они позволяют пользователям отыскивать разношерстные услуги, товары и информацию. Варьируя от форумов и магазинов до ресурсов, уделяющих внимание аспектам анонимности и криптовалютам, эти перечни предоставляют нам шанс заглянуть в неизведанный мир даркнета.
Категории и Возможности
Теневой Рынок:
Даркнет часто ассоциируется с подпольной торговлей, где доступны разнообразные товары и услуги – от наркотических препаратов и стрелкового вооружения до краденых данных и услуг наемных убийц. Каталоги ресурсов в данной категории облегчают пользователям находить нужные предложения без лишних усилий.
Форумы и Сообщества:
Даркнет также предоставляет площадку для анонимного общения. Форумы и сообщества, перечисленные в даркнет списках, затрагивают широкий спектр – от информационной безопасности и взлома до политики и философии.
Информационные Ресурсы:
На даркнете есть ресурсы, предоставляющие данные и указания по обходу цензуры, защите конфиденциальности и другим вопросам, которые могут заинтересовать тех, кто стремится сохранить свою анонимность.
Безопасность и Осторожность
Несмотря на анонимность и свободу, даркнет не лишен опасностей. Мошенничество, кибератаки и незаконные сделки становятся частью этого мира. Взаимодействуя с даркнет списками, пользователи должны соблюдать предельную осмотрительность и придерживаться мер безопасности.
Заключение
Списки даркнета – это путь в неизведанный мир, где сокрыты тайны и возможности. Однако, как и в любой неизведанной территории, путешествие в темную сеть требует особой внимания и знаний. Не всегда можно полагаться на анонимность, и использование темной сети требует сознательного подхода. Независимо от ваших интересов – будь то технические аспекты кибербезопасности, поиск уникальных товаров или исследование новых граней интернета – реестры даркнета предоставляют ключ
Интересный ресурс https://38kino.ru/ заходи!
Интересный ресурс https://kuznicakino.ru/ заходи!
даркнет 2024
Темная сторона интернета – скрытая сфера всемирной паутины, избегающая взоров стандартных поисковых систем и требующая дополнительных средств для доступа. Этот несканируемый уголок сети обильно насыщен сайтами, предоставляя доступ к разнообразным товарам и услугам через свои даркнет списки и каталоги. Давайте глубже рассмотрим, что представляют собой эти реестры и какие тайны они сокрывают.
Даркнет Списки: Ворота в Скрытый Мир
Индексы веб-ресурсов в темной части интернета – это вид врата в скрытый мир интернета. Реестры и справочники веб-ресурсов в даркнете, они позволяют пользователям отыскивать различные услуги, товары и информацию. Варьируя от форумов и магазинов до ресурсов, уделяющих внимание аспектам анонимности и криптовалютам, эти перечни предоставляют нам возможность заглянуть в таинственный мир даркнета.
Категории и Возможности
Теневой Рынок:
Даркнет часто связывается с подпольной торговлей, где доступны самые разные товары и услуги – от психоактивных веществ и стрелкового оружия до похищенной информации и услуг наемных убийц. Реестры ресурсов в подобной категории облегчают пользователям находить подходящие предложения без лишних усилий.
Форумы и Сообщества:
Даркнет также предоставляет площадку для анонимного общения. Форумы и сообщества, указанные в каталогах даркнета, затрагивают различные темы – от компьютерной безопасности и хакерских атак до политических аспектов и философских концепций.
Информационные Ресурсы:
На даркнете есть ресурсы, предоставляющие информацию и инструкции по обходу цензуры, защите конфиденциальности и другим вопросам, которые могут заинтересовать тех, кто стремится сохранить свою анонимность.
Безопасность и Осторожность
Несмотря на скрытность и свободу, даркнет полон рисков. Мошенничество, кибератаки и незаконные сделки становятся частью этого мира. Взаимодействуя с реестрами даркнета, пользователи должны соблюдать предельную осмотрительность и придерживаться мер безопасности.
Заключение
Даркнет списки – это врата в неизведанный мир, где сокрыты тайны и возможности. Однако, как и в любой неизведанной территории, путешествие в темную сеть требует особой бдительности и знаний. Не всегда анонимность приносит безопасность, и использование даркнета требует осмысленного подхода. Независимо от ваших интересов – будь то технические детали в области кибербезопасности, поиск необычных товаров или исследование новых возможностей в интернете – списки даркнета предоставляют ключ
generic semaglutide cost
Интересный ресурс https://kinofestcentr.ru/ заходи!
colorful-navi.com
“아…” 옆에 있던 늙은 황실 의사가 이상한 목소리를 냈다.
https://clients1.google.at/url?sa=t&url=https%3A%2F%2Fwww.agenbet88score.com%2F
rybelsus for diabetes
generic rybelsus cost
semaglutide canada pharmacy prices
colorful-navi.com
가장 중요한 것은 이번에… 드디어 그가 주도권을 잡았다는 것입니다.
https://images.google.com.sb/url?q=https%3A%2F%2Fwww.colorful-navi.com%2F
Добрый день
Наша команда профессионалов готова помочь вам в реализации ваших финансовых целей. Мы предлагаем высокий шанс одобрения кредитов, ипотеки и микрозаймов
с индивидуальным подходом к каждому клиенту. С нами вы можете быть уверены в надежности и надежности вашего финансового партнера.
Оставляйте заявку на нашем сайте https://finance-online.kz
Преимущества: высокий шанс одобрения, индивидуальный подход к каждому клиенту, проверенные отзывы о банках и МФО Казахстана.
займ алматы наличными
онлай займ
бсс колл центр
центркредит ипотека
колл центр отбасы банк астана
займ до зарплаты на карту
займер кызылорда адрес
Удачи!
semaglutide for sale
buy semaglutide online from india
https://hidehost.net/
Доброго!
Наша демонтажная компания предлагает услуги по демонтажу домов, сносу зданий, разборке сооружений и демонтажу фундаментов. Обладая всем необходимым оборудованием, мы обеспечиваем безопасный и эффективный демонтаж, соблюдая все нормы и требования безопасности.
При разборке дома мы учитываем все пожелания заказчика и выполняем работу в соответствии с его требованиями. Кроме того, мы предлагаем услуги по демонтажу фундаментов, чтобы подготовить участок к следующему этапу строительства.
Свяжитесь с нами на https://taurusweb.ru для получения дополнительной информации и обсуждения ваших потребностей.
разбор дома и вывоз мусора
Стоимость работ по демонтажу деревянного дома
Снос дачи
Снос домов
Снос дачного дома цена
Снос домов стоимость
Снос дома на участке
Снос дачного дома с вывозом цена
Снос старых дачных домов
Удачи!
Промокод 1Win 2024 – Бонус 500% до 75 000 рублей
промокод для 1win 2024 – 937999 при регистрации активирует приветственный бонус 500% до 75,000 рублей. При помощи специального кода, игрок в рамках текущей акции от букмекера 1Win получает дополнительные привилегии или бонусы.
1Win Промокод – 937999
Акция 1Win на 2024 год предлагает ряд привлекательных бонусов для новых игроков. Зарегистрируйтесь сейчас и получите бездепозитные бонусы, фриспины, фрибет бонусы и кэшбэк. Не упустите возможность воспользоваться этими выгодными предложениями!
промокод новые 1win – 937999 это специальный код, который необходимо ввести при регистрации, чтобы получить бонус в размере 500% до 75000 рублей. Только новые игроки могут воспользоваться данной акцией и получить приветственный бонус от 1Win.
С использованием промокода 1WIN новички в сфере ставок могут значительно увеличить сумму своих первоначальных и последующих вкладов. Полученные бонусы могут быть использованы в игре и, в случае удачи и выигрыша, могут быть выведены на ваш электронный кошелек. Максимальная сумма бонуса составляет 75 000 рублей.
Ознакомьтесь с перечнем ниже, чтобы узнать о различных промокодах на 1win и их особенностях.
1. Для новичков или промокоды при регистрации. Эти бонусы предназначены для тех, кто только начинает играть на платформе.
2. Для всех игроков. Эти поощрения доступны для всех клиентов, независимо от их опыта и статуса.
3. Для активных игроков. Некоторые промокоды активируют бонусы для активных игроков, например, увеличенный кешбэк или дополнительные бонусы за определенные суммы ставок.
4. Промокоды на фрибеты, которые предоставляют возможность сделать бесплатные ставки.
5. Промокоды на спины, которые дают возможность бесплатно вращать определенные слоты.
6. Промокоды на дополнительные средства при пополнении баланса.
7. Промокоды для участия в специальных акциях.
Используйте промокод для 1win 2024 “937999” при регистрации, чтобы получить максимальный бонус в размере 500% до 75 000 рублей. Введите промокод в соответствующее поле при заполнении формы регистрации, чтобы получить до пяти дополнительных бонусов на ваш депозит. Бонус 1Win будет зачислен на два бонусных счета одновременно – на счета “Ставки” и “Казино”.
Особенности и предостережения при использовании 1win промокод на деньги при регистрации:
Промокоды в 1win выдаются по различным поводам, таким как проведение акций, специальные события, дни рождения клиентов или для привлечения участников, которые долгое время не проявляли активности.
При активации промокода при регистрации, бонусные средства станут доступны после входа в профиль. Личные промокоды требуют вашего согласия на участие в предложении. Эти средства будут зачислены на ваш бонусный счет с указанием доступной суммы в личном кабинете. При выполнении условий использования бонусов вы сможете конвертировать их в реальные деньги, которые дополнят ваш выигрыш.
Важно быть внимательным при поиске промокодов, чтобы избежать мошенников. Некоторые недобросовестные лица предлагают “бесплатные” промокоды с условием выполнить определенные действия. Они могут запросить ваши личные данные, утверждая, что это необходимо для проверки подлинности использования промокода. Никогда не передавайте личные данные третьим лицам. Регистрируйтесь и вводите информацию только на официальном сайте 1win. Проверяйте источник информации и используйте промокоды с официального источника.
All information on the site ??http://nmoskov.flybb.ru/viewtopic.php?f=2&t=639&p=1219#p1219
All information on the site ??http://kissolovo.teamforum.ru/viewtopic.php?f=10&t=32567&p=62924#p62924
All information on the site ??http://mockwa.com/forum/thread-145047/page-1/
All information on the site ??https://club4x4.ru/forum/viewtopic.php?f=17&t=96583&p=465894#p465894
All information on the site ??http://www.mamalipetsk.ru/index.php?name=forums&op=showtopic&id=25684&num=1#52981
All information on the site ??http://preceptor.flybb.ru/viewtopic.php?f=13&t=8573&p=13293#p13293
All information on the site ??http://forum.analysisclub.ru/index.php/topic,141604.msg458834.html#msg458834
All information on the site ??http://boltushka.flybb.ru/viewtopic.php?f=8&t=926&p=12983#p12983
All information on the site ??http://moskat.flybb.ru/viewtopic.php?f=2&t=3024&p=3975#p3975
All information on the site ??https://nowyiforum.listbb.ru/viewtopic.php?f=45&t=8923&p=14982#p14982
All information on the site ??http://a63.flybb.ru/viewtopic.php?f=10&t=2395&p=5388#p5388
All information on the site ??http://vseamoskva.flybb.ru/viewtopic.php?f=2&t=567&p=1151#p1151
All information on the site ??http://detimgn.iboards.ru/viewtopic.php?f=80&t=32505&p=228081#p228081
All information on the site ??http://fotomaniya.fmbb.ru/viewtopic.php?f=17&t=8209&p=12324#p12324
All information on the site ??http://mos.flybb.ru/viewtopic.php?f=2&t=2066&p=4382#p4382
All information on the site ??https://groups.google.com/g/microsoft.public.project/c/q11kRodo7AA
All information on the site ??http://deloua.ukrbb.net/viewtopic.php?f=12&t=2689&p=5185#p5185
All information on the site ??http://dexanet.ukrbb.net/viewtopic.php?f=5&t=12679&p=27098#p27098
All information on the site ??http://ekonomimvmeste.ukrbb.net/viewtopic.php?f=8&t=23173&p=38241#p38241
All information on the site ??http://golosa.ukrbb.net/viewtopic.php?f=29&t=5615&p=20208#p20208
All information on the site ??http://gov.ukrbb.net/viewtopic.php?f=3&t=4325&p=14270#p14270
All information on the site ??http://kyevlyn.ukrbb.net/viewtopic.php?f=12&t=6184&p=12482#p12482
All information on the site ??http://nashkyev.ukrbb.net/viewtopic.php?f=12&t=2982&p=6600#p6600
All information on the site ??http://nsk.ukrbb.net/viewtopic.php?f=41&t=25345&p=37941#p37941
All information on the site ??http://odessaflower.ukrbb.net/viewtopic.php?f=44&t=26238&p=141073#p141073
All information on the site ??http://foglands.flybb.ru/viewtopic.php?f=3&t=294&p=4843#p4843
All information on the site ??http://pandora.ukrbb.net/viewtopic.php?f=2&t=6810&p=12914#p12914
All information on the site ??http://serpentarium.ukrbb.net/viewtopic.php?f=3&t=9317&p=21732#p21732
All information on the site ??http://stranaua.ukrbb.net/viewtopic.php?f=12&t=3270&p=6135#p6135
All information on the site ??http://tatuheart.ukrbb.net/viewtopic.php?f=43&t=11667&p=19283#p19283
All information on the site ??http://uaportal.ukrbb.net/viewtopic.php?f=12&t=2678&p=5115#p5115
All information on the site ??http://gazdynka.ukrbb.net/viewtopic.php?f=3&t=3092&p=6955#p6955
All information on the site ??http://sportandpolitics.ukrbb.net/viewtopic.php?f=25&t=10939&p=20349#p20349
All information on the site ??https://obmenka.forum2x2.ru/t16142-topic#37267
All information on the site ??http://www.che.best-city.ru/forum/thread86070/#reply86078
All information on the site ??http://vishivayu.ukrbb.net/viewtopic.php?f=12&t=8568&p=19543#p19543
All information on the site ??http://fulrp.5nx.ru/viewtopic.php?f=55&t=5487&p=10437#p10437
All information on the site ??http://goroda.flybb.ru/viewtopic.php?f=2&t=358&p=585#p585
All information on the site ??http://krd.best-city.ru/forum/thread89415/#reply89417
All information on the site ??http://mosfor.flybb.ru/viewtopic.php?f=2&t=232&p=471#p471
All information on the site ??http://superjackson.ukrbb.net/viewtopic.php?f=28&t=7691&p=31740#p31740
All information on the site ??http://vrn.best-city.ru/forum/thread540107357/#reply540107370
All information on the site ??https://4computers.getbb.ru/viewtopic.php?f=5&t=13902&p=39239#p39239
All information on the site ??https://zastolje.getbb.ru/viewtopic.php?f=54&t=12234&p=75381#p75381
All information on the site ??http://divinecosmosnew.tforums.org/viewtopic.php?f=17&t=19738
All information on the site ??https://mamapoltava.listbb.ru/viewtopic.php?f=45&t=3114&p=6620#p6620
All information on the site ??http://aku.ukrbb.net/viewtopic.php?f=22&t=17972&p=32629#p32629
All information on the site ??http://bmc.ukrbb.net/viewtopic.php?f=4&t=11290&p=14728#p14728
All information on the site ??https://clicktime.mybb.ru/viewtopic.php?id=2592#p4273
All information on the site ??https://dagforum.2bb.ru/viewtopic.php?id=2221#p13057
All information on the site ??https://daksvegas.unoforum.pro/?1-1-0-00000220-000-0-0-1708151834
All information on the site ??https://pesliga.webtalk.ru/viewtopic.php?id=2718#p4840
All information on the site ??https://commerc.webtalk.ru/viewtopic.php?id=6438#p15849
All information on the site ?? https://znayvse.mybb.ru/viewtopic.php?id=13185#p29231
All information on the site ??https://bonus.2bb.ru/viewtopic.php?id=4536#p25407
All information on the site ??https://zmurik.mybb.ru/viewtopic.php?id=1157#p3017
All information on the site ??https://rabotat.mybb.ru/viewtopic.php?id=20841#p29527
All information on the site ??https://bestmedbook.mybb.ru/viewtopic.php?id=9064#p12660
All information on the site ??https://dimitrov.forum24.ru/?1-15-0-00000010-000-0-0-1708321103
All information on the site ??https://moscow.mybb.ru/viewtopic.php?id=34971#p37137
All information on the site ??https://vzarabotke.mybb.ru/viewtopic.php?id=8285#p21073
All information on the site ??http://31pokupki.rx22.ru/viewtopic.php?f=47&t=25229&p=31109#p31109
All information on the site ??https://oldforum.citysakh.ru/?talkid=25308
All information on the site ??http://hm.supersadovnik.ru/hmforum/post.aspx?id=873647
All information on the site ??https://zarabotok.liveforums.ru/viewtopic.php?id=12444#p33292
All information on the site ??https://moskovsky.borda.ru/?1-7-0-00004836-000-0-0-1708407563
All information on the site ??https://pembrokcity.borda.ru/?1-18-0-00000092-000-0-0-1708407791
All information on the site ??https://aqvakr.forum24.ru/?1-7-0-00010265-000-0-0-1708407913
All information on the site ??https://1abakan.ru/forum/showthread-63979/page-1/#post-614039
All information on the site ??https://www.samaramed.ru/forum/health/topic_40240.html
All information on the site ??https://allforgirls.mybb.ru/viewtopic.php?id=1819#p34283
Здравствуйте!
В настоящее время на Вятке https://sco2009.ru/ сохранились и развиваются дымковская игрушка, вятское кружево, резьба и роспись по дереву, капокорешковый, бурачный и токарный промыслы, матрешка, инкрустация соломкой, плетение из природных материалов, гончарство, ткачество, производство изделий из льна с вышивкой, художественная ковка и литье.
Уникальность промыслов Вятского края заключается в традиционности и непрерывности их развития, самобытности методов работы с природными материалами, навыках художественного мастерства, сложившихся техниках и технологиях.
По данным Всероссийской переписи населения 2020 года, на 1 октября 2021 года по численности населения город находился на 43-м месте из 1120 городов Российской Федерации. Согласно администрации, в половом соотношении преобладает женское население (56%). Русские составляют 96,6% населения. Трудоспособное население города составляет 310,6 тысяч человек, 79% которых заняты в экономике города.
Дымковская игрушка – один из главных промыслов города, визитная карточка, которая приобрела мировую известность. Уникальность каждой игрушки проявляется в пластике, простоте узоров и яркости палитры. Их популярность отмечена даже в мире моды, где мотивы дымковского орнамента использовались на церемонии открытия Олимпийских игр 2014 года в Сочи.
Старейшим художественным музеем России является Вятский художественный музей имени Васнецовых, основанный в 1910 году. Экспозиция включает в себя произведения русских художников, а также коллекции фольклора Вятского края. Свыше пятнадцати тысяч экспонатов позволяют гостям окунуться в историю и искусство региона.
Материалы Краеведческого музея посвящены истории и природе Вятского края, его флоре и фауне, а также коллекция редких минеральных и горных пород. Музей представляет экспонаты из жизни разных слоев населения и различные экзотические животные.
Старейшим театром города является Драматический театр, основанный в 1877 году. Театр проводит спектакли по лучшим произведениям русской и зарубежной драматургии, а также современной драматургии. Театральное искусство продолжает развиваться и в Театре юного зрителя “Театр на Спасской”, представляющем спектакли для детей, молодежи и взрослых. В репертуаре оба театра представлены как классические произведения, так и современные работы, делая театральную жизнь города насыщенной и разнообразной.
кировская
кем я прихожусь внучатому племяннику
внуки родных братьев кем приходятся друг другу
брат мужа дочери для отца
стих про киров
кем приходится мне сын двоюродной сестры
вятский акцент
10 диалектов кировской области
механизированная уборка снега
Удачи!
Здравствуйте!
Кировская область, великолепный субъект Российской Федерации, является настоящим кладезем интересных фактов и удивительных традиций. Занимая площадь 120 374 км?, она привлекает внимание не только своей обширной территорией, но и богатым многообразием национальностей.
Национальный мозаичный состав области предоставляет уникальный обзор культурных традиций. Русские, татары, марийцы и другие этнические группы вносят свой вклад в обширное культурное наследие. Вместе с этим, 3,5 тысячи памятников истории и богатство культурных учреждений делают область настоящим центром культурного разнообразия.
Оттенки истории области раскрываются через народные промыслы и традиционные ремесла. Дымковская глиняная игрушка, вятские кружева, капокорневые изделия – каждый элемент представляет собой уникальный кусочек фольклора, бережно передаваемого из поколения в поколение.
Вятские говоры https://mosprize.ru/, оформившиеся в условиях уникального взаимодействия с местными неславянскими языками, придают региону лингвистическую изюминку. Отличительные черты, такие как оппозиция кратких и долгих звуков, произношение мягкого “р” и наличие морфологических особенностей, делают вятский диалект неотъемлемой частью местной истории.
Библиотеки, музеи, и публичные выставочные залы в Кирове предлагают бесценные погружение в мир искусства и знания. С 817 библиотеками и более чем 40 музеями, включая литературные дома-музеи А. С. Грина и М. Салтыкова-Щедрина, область вдохновляет нас на путешествие в прошлое и настоящее.
Подводя итог, посещение Кировской области – это не только знакомство с её обширной территорией, но и увлекательное погружение в многовековую историю, традиции и культуру, которые делают этот регион по-настоящему уникальным.
киров как назывался раньше
киров что привезти
сувениры из кирова что привезти
какие подарки можно привезти из кирова в подарок
опустить по беспределу
spacewar
где растет лимон
вятские обычаи
какие народные традиции существуют в кировской области
Удачи!
buy ozempic cheap
rybelsus best price
Sweet blog! I found it while searching on Yahoo News.
Do you have any suggestions on how to get listed in Yahoo News?
I’ve been trying for a while but I never seem to get there!
Thanks
Промокод 1Win 2024 – Бонус 500% до 75 000 рублей
как активировать промокод 1win – 937999 при регистрации активирует приветственный бонус 500% до 75,000 рублей. При помощи специального кода, игрок в рамках текущей акции от букмекера 1Win получает дополнительные привилегии или бонусы.
1Win Промокод – 937999
Акция 1Win на 2024 год предлагает ряд привлекательных бонусов для новых игроков. Зарегистрируйтесь сейчас и получите бездепозитные бонусы, фриспины, фрибет бонусы и кэшбэк. Не упустите возможность воспользоваться этими выгодными предложениями!
где вводить промокод на 1win – 937999 это специальный код, который необходимо ввести при регистрации, чтобы получить бонус в размере 500% до 75000 рублей. Только новые игроки могут воспользоваться данной акцией и получить приветственный бонус от 1Win.
С использованием промокода 1WIN новички в сфере ставок могут значительно увеличить сумму своих первоначальных и последующих вкладов. Полученные бонусы могут быть использованы в игре и, в случае удачи и выигрыша, могут быть выведены на ваш электронный кошелек. Максимальная сумма бонуса составляет 75 000 рублей.
Ознакомьтесь с перечнем ниже, чтобы узнать о различных промокодах на 1win и их особенностях.
1. Для новичков или промокоды при регистрации. Эти бонусы предназначены для тех, кто только начинает играть на платформе.
2. Для всех игроков. Эти поощрения доступны для всех клиентов, независимо от их опыта и статуса.
3. Для активных игроков. Некоторые промокоды активируют бонусы для активных игроков, например, увеличенный кешбэк или дополнительные бонусы за определенные суммы ставок.
4. Промокоды на фрибеты, которые предоставляют возможность сделать бесплатные ставки.
5. Промокоды на спины, которые дают возможность бесплатно вращать определенные слоты.
6. Промокоды на дополнительные средства при пополнении баланса.
7. Промокоды для участия в специальных акциях.
Используйте промокод 1win сегодня при регистрации “937999” при регистрации, чтобы получить максимальный бонус в размере 500% до 75 000 рублей. Введите промокод в соответствующее поле при заполнении формы регистрации, чтобы получить до пяти дополнительных бонусов на ваш депозит. Бонус 1Win будет зачислен на два бонусных счета одновременно – на счета “Ставки” и “Казино”.
Особенности и предостережения при использовании промокод на 1вин при пополнение:
Промокоды в 1win выдаются по различным поводам, таким как проведение акций, специальные события, дни рождения клиентов или для привлечения участников, которые долгое время не проявляли активности.
При активации промокода при регистрации, бонусные средства станут доступны после входа в профиль. Личные промокоды требуют вашего согласия на участие в предложении. Эти средства будут зачислены на ваш бонусный счет с указанием доступной суммы в личном кабинете. При выполнении условий использования бонусов вы сможете конвертировать их в реальные деньги, которые дополнят ваш выигрыш.
Важно быть внимательным при поиске промокодов, чтобы избежать мошенников. Некоторые недобросовестные лица предлагают “бесплатные” промокоды с условием выполнить определенные действия. Они могут запросить ваши личные данные, утверждая, что это необходимо для проверки подлинности использования промокода. Никогда не передавайте личные данные третьим лицам. Регистрируйтесь и вводите информацию только на официальном сайте 1win. Проверяйте источник информации и используйте промокоды с официального источника.
Здравствуйте!
Кировская область богата народными художественными промыслами и ремеслами, которые не только являются неотъемлемой частью российской культуры, но и представляют собой многовековой опыт эстетического восприятия мира. Сегодня эти традиции не только сохраняются, но и активно развиваются, придавая городу особый колорит. Численность населения Кирова по данным Всероссийской переписи населения 2020 года и статистике администрации города поражает: город находится на 43-м месте среди 1120 городов России. Интересно, что преобладает женское население – 56%, а в национальном составе преобладают русские, составляя 96,6% населения, согласно данным переписи 2010 года. Дымковская игрушка, как визитная карточка города, представляет собой уникальное творение каждого мастера, с каждой работой, начиная от создания до завершения. Её пластика, простота узоров и яркая палитра делают её узнаваемой и ценной. Необычные мотивы дымковского орнамента даже нашли свое отражение в коллекциях современной моды. Резьба по капа-корню, пришедшая на Вятку в XVIII веке, создает уникальные изделия, включая портсигары, обложки для фотоальбомов, шкатулки и даже порт-табаки. Коллекция промыслов Вятского края поражает своей разнообразием, а их уникальность выражается в традиционности и непрерывности развития, уникальных методах работы и самобытности художественного мастерства.
Исследователи наследия Вятского края могут погрузиться в историю и природу региона, благодаря материалам Краеведческого музея, который охватывает все аспекты и коллекции редких минералов, животных и различных экспонатов. Вятский художественный музей, созданный братьями Васнецовыми в 1910 году, представляет собой живопись И. Айвазовского, братьев Васнецовых, И. Шишкина, В. Сурикова, а также фольклор Вятского края. Драматический театр, основанный в 1877 году, предлагает широкий репертуар, включая пьесы Аристофана, Островского, Достоевского, Чехова, Булгакова, а также зарубежную классику. Театр на Спасской, ориентированный на детей, молодежь и взрослых, также разнообразен в репертуаре, отдавая приоритет лучшим образцам русской и зарубежной драматургии. Таким образом, Киров и его область не только богаты историей и культурным наследием https://sco2009.ru/, но и демонстрируют уникальные черты в их современном развитии, делая этот регион привлекательным для жителей и гостей.
новости кировской области
жена брата мужа кем приходится
андрей костин и наиля аскерзаде любовь
кем приходится сестра зятя для тещи
дети костина втб
костин втб личная жизнь
чья жена наиля аскерзаде
кем мне приходится муж троюродной сестры
как посадить лимон kirov24news
Удачи!
Промокод 1Win 2024 – Бонус 500% до 75 000 рублей
1win промокод на деньги – 937999 при регистрации активирует приветственный бонус 500% до 75,000 рублей. При помощи специального кода, игрок в рамках текущей акции от букмекера 1Win получает дополнительные привилегии или бонусы.
1Win Промокод – 937999
Акция 1Win на 2024 год предлагает ряд привлекательных бонусов для новых игроков. Зарегистрируйтесь сейчас и получите бездепозитные бонусы, фриспины, фрибет бонусы и кэшбэк. Не упустите возможность воспользоваться этими выгодными предложениями!
1win coin получить промокод – 937999 это специальный код, который необходимо ввести при регистрации, чтобы получить бонус в размере 500% до 75000 рублей. Только новые игроки могут воспользоваться данной акцией и получить приветственный бонус от 1Win.
С использованием промокода 1WIN новички в сфере ставок могут значительно увеличить сумму своих первоначальных и последующих вкладов. Полученные бонусы могут быть использованы в игре и, в случае удачи и выигрыша, могут быть выведены на ваш электронный кошелек. Максимальная сумма бонуса составляет 75 000 рублей.
Ознакомьтесь с перечнем ниже, чтобы узнать о различных промокодах на 1win и их особенностях.
1. Для новичков или промокоды при регистрации. Эти бонусы предназначены для тех, кто только начинает играть на платформе.
2. Для всех игроков. Эти поощрения доступны для всех клиентов, независимо от их опыта и статуса.
3. Для активных игроков. Некоторые промокоды активируют бонусы для активных игроков, например, увеличенный кешбэк или дополнительные бонусы за определенные суммы ставок.
4. Промокоды на фрибеты, которые предоставляют возможность сделать бесплатные ставки.
5. Промокоды на спины, которые дают возможность бесплатно вращать определенные слоты.
6. Промокоды на дополнительные средства при пополнении баланса.
7. Промокоды для участия в специальных акциях.
Используйте 1win промокод за регистрацию “937999” при регистрации, чтобы получить максимальный бонус в размере 500% до 75 000 рублей. Введите промокод в соответствующее поле при заполнении формы регистрации, чтобы получить до пяти дополнительных бонусов на ваш депозит. Бонус 1Win будет зачислен на два бонусных счета одновременно – на счета “Ставки” и “Казино”.
Особенности и предостережения при использовании 1win промокод при регистрации без депозита:
Промокоды в 1win выдаются по различным поводам, таким как проведение акций, специальные события, дни рождения клиентов или для привлечения участников, которые долгое время не проявляли активности.
При активации промокода при регистрации, бонусные средства станут доступны после входа в профиль. Личные промокоды требуют вашего согласия на участие в предложении. Эти средства будут зачислены на ваш бонусный счет с указанием доступной суммы в личном кабинете. При выполнении условий использования бонусов вы сможете конвертировать их в реальные деньги, которые дополнят ваш выигрыш.
Важно быть внимательным при поиске промокодов, чтобы избежать мошенников. Некоторые недобросовестные лица предлагают “бесплатные” промокоды с условием выполнить определенные действия. Они могут запросить ваши личные данные, утверждая, что это необходимо для проверки подлинности использования промокода. Никогда не передавайте личные данные третьим лицам. Регистрируйтесь и вводите информацию только на официальном сайте 1win. Проверяйте источник информации и используйте промокоды с официального источника.
Здравствуйте!
Кировская область богата национальными сувенирами https://mosprize.ru/. Здесь можно приобрести глиняные игрушки ручной работы, изделия из капокорня, а также знаменитые вятские кружева. Эти подарки станут отличным напоминанием о поездке. Традиционные сувениры включают вятские кружева, выполненные в уникальной технике, а также изделия народных промыслов. Они отражают культурное наследие края. В Кировской области бережно хранят фольклорные традиции. К примеру, здесь отмечают древний праздник Ивана Купалы.
Особенность региона – вятский говор. Он сформировался под влиянием русского, финно-угорских и тюркских языков. Популярные сувениры из Кирова – фигурки дымковской игрушки и вятское кружево. Их можно купить на рынках или в специализированных магазинах. Также рекомендуем посетить народные гулянья. Например, праздник Сыроварения, где можно попробовать традиционные сыры региона.
связь русской песни и русского танца
кто такие ушкуйники
традиции народов кировской области
где в россии растут лимоны
марийцы в кировской области
национальные праздники кировской области
астахов и миронов
что привезти из Кирова
какие народы проживают в кировской области
Удачи!
All information on the site ??http://nmoskov.flybb.ru/viewtopic.php?f=2&t=639&p=1219#p1219
All information on the site ??http://kissolovo.teamforum.ru/viewtopic.php?f=10&t=32567&p=62924#p62924
All information on the site ??http://mockwa.com/forum/thread-145047/page-1/
All information on the site ??https://club4x4.ru/forum/viewtopic.php?f=17&t=96583&p=465894#p465894
All information on the site ??http://www.mamalipetsk.ru/index.php?name=forums&op=showtopic&id=25684&num=1#52981
All information on the site ??http://preceptor.flybb.ru/viewtopic.php?f=13&t=8573&p=13293#p13293
All information on the site ??http://forum.analysisclub.ru/index.php/topic,141604.msg458834.html#msg458834
All information on the site ??http://boltushka.flybb.ru/viewtopic.php?f=8&t=926&p=12983#p12983
All information on the site ??http://moskat.flybb.ru/viewtopic.php?f=2&t=3024&p=3975#p3975
All information on the site ??https://nowyiforum.listbb.ru/viewtopic.php?f=45&t=8923&p=14982#p14982
All information on the site ??http://a63.flybb.ru/viewtopic.php?f=10&t=2395&p=5388#p5388
All information on the site ??http://vseamoskva.flybb.ru/viewtopic.php?f=2&t=567&p=1151#p1151
All information on the site ??http://detimgn.iboards.ru/viewtopic.php?f=80&t=32505&p=228081#p228081
All information on the site ??http://fotomaniya.fmbb.ru/viewtopic.php?f=17&t=8209&p=12324#p12324
All information on the site ??http://mos.flybb.ru/viewtopic.php?f=2&t=2066&p=4382#p4382
All information on the site ??https://groups.google.com/g/microsoft.public.project/c/q11kRodo7AA
All information on the site ??http://deloua.ukrbb.net/viewtopic.php?f=12&t=2689&p=5185#p5185
All information on the site ??http://dexanet.ukrbb.net/viewtopic.php?f=5&t=12679&p=27098#p27098
All information on the site ??http://ekonomimvmeste.ukrbb.net/viewtopic.php?f=8&t=23173&p=38241#p38241
All information on the site ??http://golosa.ukrbb.net/viewtopic.php?f=29&t=5615&p=20208#p20208
All information on the site ??http://gov.ukrbb.net/viewtopic.php?f=3&t=4325&p=14270#p14270
All information on the site ??http://kyevlyn.ukrbb.net/viewtopic.php?f=12&t=6184&p=12482#p12482
All information on the site ??http://nashkyev.ukrbb.net/viewtopic.php?f=12&t=2982&p=6600#p6600
All information on the site ??http://nsk.ukrbb.net/viewtopic.php?f=41&t=25345&p=37941#p37941
All information on the site ??http://odessaflower.ukrbb.net/viewtopic.php?f=44&t=26238&p=141073#p141073
All information on the site ??http://foglands.flybb.ru/viewtopic.php?f=3&t=294&p=4843#p4843
All information on the site ??http://pandora.ukrbb.net/viewtopic.php?f=2&t=6810&p=12914#p12914
All information on the site ??http://serpentarium.ukrbb.net/viewtopic.php?f=3&t=9317&p=21732#p21732
All information on the site ??http://stranaua.ukrbb.net/viewtopic.php?f=12&t=3270&p=6135#p6135
All information on the site ??http://tatuheart.ukrbb.net/viewtopic.php?f=43&t=11667&p=19283#p19283
All information on the site ??http://uaportal.ukrbb.net/viewtopic.php?f=12&t=2678&p=5115#p5115
All information on the site ??http://gazdynka.ukrbb.net/viewtopic.php?f=3&t=3092&p=6955#p6955
All information on the site ??http://sportandpolitics.ukrbb.net/viewtopic.php?f=25&t=10939&p=20349#p20349
All information on the site ??https://obmenka.forum2x2.ru/t16142-topic#37267
All information on the site ??http://www.che.best-city.ru/forum/thread86070/#reply86078
All information on the site ??http://vishivayu.ukrbb.net/viewtopic.php?f=12&t=8568&p=19543#p19543
All information on the site ??http://fulrp.5nx.ru/viewtopic.php?f=55&t=5487&p=10437#p10437
All information on the site ??http://goroda.flybb.ru/viewtopic.php?f=2&t=358&p=585#p585
All information on the site ??http://krd.best-city.ru/forum/thread89415/#reply89417
All information on the site ??http://mosfor.flybb.ru/viewtopic.php?f=2&t=232&p=471#p471
All information on the site ??http://superjackson.ukrbb.net/viewtopic.php?f=28&t=7691&p=31740#p31740
All information on the site ??http://vrn.best-city.ru/forum/thread540107357/#reply540107370
All information on the site ??https://4computers.getbb.ru/viewtopic.php?f=5&t=13902&p=39239#p39239
All information on the site ??https://zastolje.getbb.ru/viewtopic.php?f=54&t=12234&p=75381#p75381
All information on the site ??http://divinecosmosnew.tforums.org/viewtopic.php?f=17&t=19738
All information on the site ??https://mamapoltava.listbb.ru/viewtopic.php?f=45&t=3114&p=6620#p6620
All information on the site ??http://aku.ukrbb.net/viewtopic.php?f=22&t=17972&p=32629#p32629
All information on the site ??http://bmc.ukrbb.net/viewtopic.php?f=4&t=11290&p=14728#p14728
All information on the site ??https://clicktime.mybb.ru/viewtopic.php?id=2592#p4273
All information on the site ??https://dagforum.2bb.ru/viewtopic.php?id=2221#p13057
All information on the site ??https://daksvegas.unoforum.pro/?1-1-0-00000220-000-0-0-1708151834
All information on the site ??https://pesliga.webtalk.ru/viewtopic.php?id=2718#p4840
All information on the site ??https://commerc.webtalk.ru/viewtopic.php?id=6438#p15849
All information on the site ?? https://znayvse.mybb.ru/viewtopic.php?id=13185#p29231
All information on the site ??https://bonus.2bb.ru/viewtopic.php?id=4536#p25407
All information on the site ??https://zmurik.mybb.ru/viewtopic.php?id=1157#p3017
All information on the site ??https://rabotat.mybb.ru/viewtopic.php?id=20841#p29527
All information on the site ??https://bestmedbook.mybb.ru/viewtopic.php?id=9064#p12660
All information on the site ??https://dimitrov.forum24.ru/?1-15-0-00000010-000-0-0-1708321103
All information on the site ??https://moscow.mybb.ru/viewtopic.php?id=34971#p37137
All information on the site ??https://vzarabotke.mybb.ru/viewtopic.php?id=8285#p21073
All information on the site ??http://31pokupki.rx22.ru/viewtopic.php?f=47&t=25229&p=31109#p31109
All information on the site ??https://oldforum.citysakh.ru/?talkid=25308
All information on the site ??http://hm.supersadovnik.ru/hmforum/post.aspx?id=873647
All information on the site ??https://zarabotok.liveforums.ru/viewtopic.php?id=12444#p33292
All information on the site ??https://moskovsky.borda.ru/?1-7-0-00004836-000-0-0-1708407563
All information on the site ??https://pembrokcity.borda.ru/?1-18-0-00000092-000-0-0-1708407791
All information on the site ??https://aqvakr.forum24.ru/?1-7-0-00010265-000-0-0-1708407913
All information on the site ??https://1abakan.ru/forum/showthread-63979/page-1/#post-614039
All information on the site ??https://www.samaramed.ru/forum/health/topic_40240.html
All information on the site ??https://allforgirls.mybb.ru/viewtopic.php?id=1819#p34283
buy ozempic online canada
rybelsus weight loss
semaglutide 7mg
rybelsus 3mg
Привет всем!
Мой сайт стоял на месте, но данный продукт смог его раскачать
Я начал делать сетку сайтов, все было не в поиске, но прогон Bullet помог
https://www.google.com/search?q=%D0%BF%D1%80%D0%BE%D0%B4%D0%B2%D0%B8%D0%B6%D0%B5%D0%BD%D0%B8%D0%B5+%D1%81%D0%B0%D0%B9%D1%82%D0%B0+%D0%B2+google+%D1%82%D0%B0%D1%80%D0%B8%D1%84+bullet+kwork&sca_esv=46579d9512b829aa&ei=LxzSZZCSGrygwPAP8fGNmAQ&udm=&ved=0ahUKEwjQ5cq0lLWEAxU8EBAIHfF4A0MQ4dUDCBA&uact=5&oq=%D0%BF%D1%80%D0%BE%D0%B4%D0%B2%D0%B8%D0%B6%D0%B5%D0%BD%D0%B8%D0%B5+%D1%81%D0%B0%D0%B9%D1%82%D0%B0+%D0%B2+google+%D1%82%D0%B0%D1%80%D0%B8%D1%84+bullet+kwork&gs_lp=Egxnd3Mtd2l6LXNlcnAiQ9C_0YDQvtC00LLQuNC20LXQvdC40LUg0YHQsNC50YLQsCDQsiBnb29nbGUg0YLQsNGA0LjRhCBidWxsZXQga3dvcmsyCBAhGKABGMMESPVMUOYcWJ5FcAZ4AZABA5gB8AGgAY8UqgEGMC4xMC40uAEDyAEA-AEBwgIKEAAYRxjWBBiwA8ICCBAAGIkFGKIEwgIMECEYChigARjDBBgqiAYBkAYI&sclient=gws-wiz-serp
https://www.google.com/search?q=%D0%BF%D1%80%D0%BE%D0%B4%D0%B2%D0%B8%D0%B6%D0%B5%D0%BD%D0%B8%D0%B5+%D1%81%D0%B0%D0%B9%D1%82%D0%B0+%D1%82%D0%B0%D1%80%D0%B8%D1%84+bullet+kwork&sca_esv=46579d9512b829aa&ei=KBzSZc_VFPeGwPAP996t4Ao&udm=&ved=0ahUKEwjPiZqxlLWEAxV3AxAIHXdvC6wQ4dUDCBA&uact=5&oq=%D0%BF%D1%80%D0%BE%D0%B4%D0%B2%D0%B8%D0%B6%D0%B5%D0%BD%D0%B8%D0%B5+%D1%81%D0%B0%D0%B9%D1%82%D0%B0+%D1%82%D0%B0%D1%80%D0%B8%D1%84+bullet+kwork&gs_lp=Egxnd3Mtd2l6LXNlcnAiOdC_0YDQvtC00LLQuNC20LXQvdC40LUg0YHQsNC50YLQsCDRgtCw0YDQuNGEIGJ1bGxldCBrd29yazIFECEYoAFIqRxQ-QFYkhlwA3gBkAECmAHkAaABvgyqAQUwLjMuNbgBA8gBAPgBAcICChAAGEcY1gQYsAPCAgQQIRgVwgIJECEYChigARgqwgIHECEYChigAYgGAZAGCA&sclient=gws-wiz-serp
Удачи!
Транспортные услуги в Харькове
харьков грузоперевозки moving-company-kharkov.com.ua .
Интересный ресурс https://kinolocator.ru/ заходи!
Грузоперевозки для частных лиц
вывоз строймусора харьков цена https://www.moving-company-kharkov.com.ua .
sm-casino1.com
그래서 그는 입술을 깨물고 침묵을 지켰으며 필사적으로 자신의 위엄을 보여주려고 애썼다.
Недорогие услуги грузоперевозок
грузчики харьков http://moving-company-kharkov.com.ua/ .
rybelsus oral medication
semaglutide drug
pragmatic-ko.com
그의 기사는 큰 관심을 가지고 발견, 연구 및 분석되었습니다.
Привет всем!
У нас была жесткая тематика, но наш сайт пошел выше после работы парней с Bullet
Seo специалистам на заметку, прогон Bullet это что-то новенькое!
https://www.google.com/search?q=%D0%BF%D1%80%D0%BE%D0%B4%D0%B2%D0%B8%D0%B6%D0%B5%D0%BD%D0%B8%D0%B5+%D1%81%D0%B0%D0%B9%D1%82%D0%B0+%D0%B2+yandex+%D1%82%D0%B0%D1%80%D0%B8%D1%84+bullet+kwork&sca_esv=46579d9512b829aa&ei=RBzSZdSqOaTUwPAP1teB8AI&udm=&ved=0ahUKEwjU3Ou-lLWEAxUkKhAIHdZrAC4Q4dUDCBA&uact=5&oq=%D0%BF%D1%80%D0%BE%D0%B4%D0%B2%D0%B8%D0%B6%D0%B5%D0%BD%D0%B8%D0%B5+%D1%81%D0%B0%D0%B9%D1%82%D0%B0+%D0%B2+yandex+%D1%82%D0%B0%D1%80%D0%B8%D1%84+bullet+kwork&gs_lp=Egxnd3Mtd2l6LXNlcnAiQ9C_0YDQvtC00LLQuNC20LXQvdC40LUg0YHQsNC50YLQsCDQsiB5YW5kZXgg0YLQsNGA0LjRhCBidWxsZXQga3dvcmsyCBAAGIkFGKIEMggQABiABBiiBEiLJFCeGFjkH3ACeACQAQCYAeYBoAHdCaoBBTAuMy4zuAEDyAEA-AEBiAYB&sclient=gws-wiz-serp
https://www.google.com/search?q=%D1%83%D1%81%D0%BA%D0%BE%D1%80%D0%B5%D0%BD%D0%B8%D0%B5+%D0%B8%D0%BD%D0%B4%D0%B5%D0%BA%D1%81%D0%B0%D1%86%D0%B8%D0%B8+%D1%81%D1%81%D1%8B%D0%BB%D0%BE%D0%BA+%D1%82%D0%B0%D1%80%D0%B8%D1%84+bullet+kwork&sca_esv=46579d9512b829aa&ei=AhTSZazoC_qUxc8P9MCngAI&udm=&ved=0ahUKEwis8bnOjLWEAxV6SvEDHXTgCSAQ4dUDCBA&uact=5&oq=%D1%83%D1%81%D0%BA%D0%BE%D1%80%D0%B5%D0%BD%D0%B8%D0%B5+%D0%B8%D0%BD%D0%B4%D0%B5%D0%BA%D1%81%D0%B0%D1%86%D0%B8%D0%B8+%D1%81%D1%81%D1%8B%D0%BB%D0%BE%D0%BA+%D1%82%D0%B0%D1%80%D0%B8%D1%84+bullet+kwork&gs_lp=Egxnd3Mtd2l6LXNlcnAiTNGD0YHQutC-0YDQtdC90LjQtSDQuNC90LTQtdC60YHQsNGG0LjQuCDRgdGB0YvQu9C-0Log0YLQsNGA0LjRhCBidWxsZXQga3dvcmtIri5Qog1Y3yhwCXgAkAEBmAHkAaABnBKqAQUxLjMuOLgBA8gBAPgBAYgGAQ&sclient=gws-wiz-serp
Удачи!
프라그마틱 슬롯으로 무한한 재미와 흥미를 느껴보세요.
프라그마틱 홈페이지
프라그마틱에 대한 글 읽는 것이 흥미로웠어요! 또한, 제 사이트에서도 프라그마틱과 관련된 정보를 제공하고 있어요. 함께 발전하며 지식을 나눠봐요!
https://www.trollea.com
https://www.artyfartylife.com
https://www.genericzoloft.site
Грузоперевозки срочно в Харькове
грузоперевозки харьков недорого https://moving-company-kharkov.com.ua/ .
lfchungary.com
그러나 Hongzhi 황제는 Fang Jifan이 제외되었음을 당시에 분명히 밝히지 않았습니다.
wegovy 7 mg tablet
Грузоперевозки срочно в Харькове
харьков грузчики https://www.moving-company-kharkov.com.ua/ .
order ozempic online
1win промокод фрибет 2024: 937999 предлагает новичкам воспользоваться приветственным бонусом: +500% к сумме первого депозита до 75 000 рублей. Укажите бонусный код в процессе создания аккаунта и получите в распоряжение бонусные средства.
Вот такие акции предлагает 1вин. Обратите внимание, что подробное их описание указано на сайте букмекера в разделе “Акции”. Крайне рекомендуем с ним ознакомиться перед тем, как брать тот или иной бонус.
Что такое промокод на 1win?
Бонус код 1win состоит из комбинации определённых символов, которую можно использовать в ходе создания аккаунта или в личном кабинете для активации доступа к бонусам. Если речь идёт о где вводить промокод 1win, то после активации бонусного кода от пользователя потребуется пополнить баланс, и, исходя из суммы депозита, будет определена сумма бонуса.
1win промокод на сегодня – это 937999, и предлагаем к ознакомлению краткую информацию об этом бонусном коде:
Что получит игрок: +500% на первые четыре депозита
Актуальность: промокод действителен весь 2024 год
Максимальная сумма бонуса по промокоду: 75 000 рублей
Эта основные нюансы, которые необходимо знать перед использованием промокода, а более подробную информацию касательно бонусов можно узнать на официальном сайте 1Win в разделе «Акции и бонусы».
Для чего нужен промокод от 1Win при регистрации?
промокоды 1win на пополнение – используя его вы получите приветственный бонус 500% в размере до 200000 RUB на первые 4 депозита. По условиям акции, каждый пользователь, прошедший регистрацию и использовавший бонусный код, получает приветственный бонус букмекера в полном размере. Сумма не маленькая и составляет 500% от совокупной суммы первых четырех депозитов.
Использовать такой промокод можно только один раз и только в процессе регистрации. Надбавку принесет только актуальный код. В условиях акции четко указано на период действия кода, на условия, при которых его можно применить.
Когда игрок принял решение воспользоваться предложением, можно переходить на сайт букмекера 1Win и приступать к регистрации. В процессе создания учетной записи присутствует форма, в которую и нужно вставить промокод. Рекомендуется копировать кодовую комбинацию с источника и вставлять ее в готовом виде. Ручной ввод кода чреват ошибками, ввиду которых будет нарушена целостность комбинации.
Бонусный код обязательно должен быть актуальным. Активация кода осуществляется в процессе регистрации. Если код рабочий, игрок получает приветственный бонус в полном объеме. В случае, когда бонус код не сработал, вероятно, его действие закончилось или же он был использован ранее.
как использовать промокод 1win : как активировать бонусный код
Для запуска процесса по созданию учётной записи нужно посетить сайт 1Вин или зайти в мобильное приложение, а затем нажать на кнопку «Закончить регистрацию».
Далее следует выбрать один из способов регистрации:
Через социальные сети. Регистрация доступна через аккаунты Google, VK, Telegram, Mail, Yandex, Одноклассники.
Быстрая регистрация. Нужно указать номер мобильного телефона, адрес электронной почты и создать пароль.
При выборе любого из этих двух вариантов по созданию аккаунта нужно указать валюту и можно нажать на иконку «Плюсик», чтобы открыть поле, куда нужно вводить 1win промокод.
1win где ввести промокод – какие преимущества он предоставляет
С применением промокода 1WIN новички в мире букмекерства могут существенно увеличить сумму своих начальных и последующих депозитов. Полученные бонусы доступны для использования в игре, и в случае удачи и выигрыша, их можно вывести на ваш электронный кошелёк. Максимальная сумма бонуса составляет 75 000 рублей.
Какие бывают 1win промокоды?
Ознакомьтесь с нижеприведенным перечнем, чтобы понимать, какие промокоды на 1win существуют и чем они отличаются друг от друга.
Для новичков или 1win промокоды при регистрации. Бонусы для ранее незарегистрированных клиентов.
Для всех игроков. Поощрения, которые предоставляются всем клиентом.
Для активных игроков. Некоторые коды активируют бонус для активных игроков. Например, это может быть увеличенный кешбэк для тех, кто потратил определённую сумму для ставок на спорт или в играх казино.
Промокоды на фрибеты, активирующие бесплатные ставки.
Промокоды на спины, предоставляющие бесплатные вращения в определённых слотах.
Промокоды на надбавку к пополнению баланса.
Промокоды для активации участия в специальных акциях.
Подробная информация на сайте – https://familylab-spa.ru/blog/articles/promokod_350.html
Интересный ресурс https://estkino.ru/ заходи!
купить аттестат классов https://gruppa-attestats.com .
Awesome post.ダッチワイフ
pragmatic-ko.com
하지만 이때 이주렌은 인사할 틈이 없었다.
промокод на 1win при регистрации 2024: 937999 предлагает новичкам воспользоваться приветственным бонусом: +500% к сумме первого депозита до 75 000 рублей. Укажите бонусный код в процессе создания аккаунта и получите в распоряжение бонусные средства.
Вот такие акции предлагает 1вин. Обратите внимание, что подробное их описание указано на сайте букмекера в разделе “Акции”. Крайне рекомендуем с ним ознакомиться перед тем, как брать тот или иной бонус.
Что такое промокод на 1win?
Бонус код 1win состоит из комбинации определённых символов, которую можно использовать в ходе создания аккаунта или в личном кабинете для активации доступа к бонусам. Если речь идёт о 1win промокод 2024 для пополнения, то после активации бонусного кода от пользователя потребуется пополнить баланс, и, исходя из суммы депозита, будет определена сумма бонуса.
1win промокод на сегодня – это 937999, и предлагаем к ознакомлению краткую информацию об этом бонусном коде:
Что получит игрок: +500% на первые четыре депозита
Актуальность: промокод действителен весь 2024 год
Максимальная сумма бонуса по промокоду: 75 000 рублей
Эта основные нюансы, которые необходимо знать перед использованием промокода, а более подробную информацию касательно бонусов можно узнать на официальном сайте 1Win в разделе «Акции и бонусы».
Для чего нужен промокод от 1Win при регистрации?
1win промокод 2024 для пополнения – используя его вы получите приветственный бонус 500% в размере до 200000 RUB на первые 4 депозита. По условиям акции, каждый пользователь, прошедший регистрацию и использовавший бонусный код, получает приветственный бонус букмекера в полном размере. Сумма не маленькая и составляет 500% от совокупной суммы первых четырех депозитов.
Использовать такой промокод можно только один раз и только в процессе регистрации. Надбавку принесет только актуальный код. В условиях акции четко указано на период действия кода, на условия, при которых его можно применить.
Когда игрок принял решение воспользоваться предложением, можно переходить на сайт букмекера 1Win и приступать к регистрации. В процессе создания учетной записи присутствует форма, в которую и нужно вставить промокод. Рекомендуется копировать кодовую комбинацию с источника и вставлять ее в готовом виде. Ручной ввод кода чреват ошибками, ввиду которых будет нарушена целостность комбинации.
Бонусный код обязательно должен быть актуальным. Активация кода осуществляется в процессе регистрации. Если код рабочий, игрок получает приветственный бонус в полном объеме. В случае, когда бонус код не сработал, вероятно, его действие закончилось или же он был использован ранее.
активировать промокод 1win : как активировать бонусный код
Для запуска процесса по созданию учётной записи нужно посетить сайт 1Вин или зайти в мобильное приложение, а затем нажать на кнопку «Закончить регистрацию».
Далее следует выбрать один из способов регистрации:
Через социальные сети. Регистрация доступна через аккаунты Google, VK, Telegram, Mail, Yandex, Одноклассники.
Быстрая регистрация. Нужно указать номер мобильного телефона, адрес электронной почты и создать пароль.
При выборе любого из этих двух вариантов по созданию аккаунта нужно указать валюту и можно нажать на иконку «Плюсик», чтобы открыть поле, куда нужно вводить 1win промокод.
промокод для 1вин – какие преимущества он предоставляет
С применением промокода 1WIN новички в мире букмекерства могут существенно увеличить сумму своих начальных и последующих депозитов. Полученные бонусы доступны для использования в игре, и в случае удачи и выигрыша, их можно вывести на ваш электронный кошелёк. Максимальная сумма бонуса составляет 75 000 рублей.
Какие бывают 1win промокоды?
Ознакомьтесь с нижеприведенным перечнем, чтобы понимать, какие промокоды на 1win существуют и чем они отличаются друг от друга.
Для новичков или 1win промокоды при регистрации. Бонусы для ранее незарегистрированных клиентов.
Для всех игроков. Поощрения, которые предоставляются всем клиентом.
Для активных игроков. Некоторые коды активируют бонус для активных игроков. Например, это может быть увеличенный кешбэк для тех, кто потратил определённую сумму для ставок на спорт или в играх казино.
Промокоды на фрибеты, активирующие бесплатные ставки.
Промокоды на спины, предоставляющие бесплатные вращения в определённых слотах.
Промокоды на надбавку к пополнению баланса.
Промокоды для активации участия в специальных акциях.
Подробная информация на сайте – https://badgerboats.ru/themes/middle/?promokod_350.html
Бездепозитный Бонус 1win 2024
Бонусы от казино 1win промокод1Win 2024 – Бездепозитные бонусы ? Коды на возврат денег ? VIP Программа лояльности ? Бесплатные фриспины.
1win где ввести промокод: 937999 предоставляет новым игрокам бонус 500% для игры в слоты и игровые автоматы, максимальная сумма бонуса 200 000 рублей. Вы можете использовать бонусные деньги в разделе азартных игр, включая онлайн казино, карты, рулетку, игровые автоматы и слоты.
Компания «1Win» рада предложить своим новым клиентам приветственный бонус в размере до 500% на первые четыре депозита. Это выгодное предложение доступно сразу после регистрации в нашей букмекерской конторе. Бонус можно получить не только в рублях, но и в других валютах, при этом он не ограничивает возможность участия игроков в других программам лояльности компании. Максимальная сумма вознаграждения за регистрацию составляет 75000 рублей или эквивалентная сумма в другой валюте.
где вводить промокод 1win приносят игрокам множество преимуществ. Во-первых, они позволяют увеличить начальную ставку или продлить время игры. Кроме того, они дают возможность попробовать различные игры без риска потерять реальные деньги. Бонусы также повышают шансы на выигрыш и предоставляют дополнительные возможности для получения прибыли. Кроме того, бонусы в 1win могут быть обменены на реальные деньги или использованы для участия в специальных акциях и турнирах.
Преимущества получения и использования бонусов в 1win очевидны. Они позволяют игроку расширить свои возможности и получить больше удовольствия от игры. Бонусы также делают игру более выгодной с финансовой точки зрения, помогая уменьшить риски и увеличить потенциальную прибыль. Кроме того, получение и использование бонусов в 1win открывает возможность стать лояльным клиентом и получить дополнительные привилегии и вознаграждения от казино.
Итак, получение бонусов в 1win – это отличная возможность для игрока увеличить свои шансы на выигрыш, получить дополнительные деньги и улучшить свой игровой опыт. Бонусы делают игру более интересной и выгодной.
промокод на бесплатную ставку 1win: 937999 предоставляет возможность получить бездепозитный бонус 2024. Его можно получить в виде фриспинов или фрибетов. Чтобы получить подарок, необходимо активировать код в личном кабинете. Дополнительный депозит не требуется. Размеры подарков невелики: фрибет до 500 рублей и не более 70 фриспинов для игры в слоты. Как и в случае с другими поощрениями, необходимо отыграть бездепозитный бонус. Вейджер, как правило, не превышает х5 для бесплатных ставок и х30 для фриспинов.
В казино 1win предоставляется внушительный бонус при регистрации, который составляет 500% от суммы первых четырех последовательных депозитов клиента. С таким количеством бонусов новичок может значительно увеличить свои шансы на выигрыш. Чтобы получить этот приветственный бонус, необходимо зарегистрироваться на официальном сайте, рабочем зеркале, мобильной версии или приложениях для мобильных телефонов. Однако, основным условием является совершение первого пополнения счета, так как активировать бонусы 1win можно только после этого.
1win промокод какой: 937999 используйте бонусный код при регистрации и получите бездепозтный бонус 70 фриспинов. Да, при использовании кода 1Win вы можете получить различные поощрения, включая бездепозитные бонусы. Они обычно представлены в виде фрибетов или фриспинов. Для их активации не требуется дополнительное пополнение счета. Размер таких подарков невелик: бесплатных вращений не более 70. Вейджер на бездепозитный бонус обычно не превышает х35. В 1Win вы можете получить бонусы за участие в акциях, турнирах, розыгрышах и активацию промокода. Бонусная программа периодически обновляется. Кроме того, некоторые акции имеют сезонный характер.
В 1Win основная бонусная программа включает в себя фриспины. Чтобы получить 70FS, необходимо пополнить счет на 100 рублей или более. Игроку предоставляется 2 дня с момента регистрации для активации презента. Отыгрыш бонуса должен быть выполнен в течение 24 часов с момента начисления, с вейджером х35. Бесплатные вращения предназначены только для игр провайдера Microgaming.
Так как бонусная программа 1Win регулярно обновляется, список акций, в которых можно получить фриспины, постоянно расширяется. Более подробную информацию о них можно найти на нашем сайте.
Промокод на 1Win дает возможность получить бесплатные вращения. Их можно использовать в любых слотах из каталога казино. Иногда могут быть установлены ограничения, которые предусматривают использование фриспинов только в определенных слотах или играх конкретного провайдера. Фриспины начисляются с фиксированной ставкой. Отыгрыш выигрыша, полученного с помощью бесплатных вращений, обязателен с учетом установленного вейджера.
промокод на 1win при пополнении сегодня 2024: 937999 предлагает новичкам воспользоваться приветственным бонусом: +500% к сумме первого депозита до 75 000 рублей. Укажите бонусный код в процессе создания аккаунта и получите в распоряжение бонусные средства.
Вот такие акции предлагает 1вин. Обратите внимание, что подробное их описание указано на сайте букмекера в разделе “Акции”. Крайне рекомендуем с ним ознакомиться перед тем, как брать тот или иной бонус.
Что такое промокод на 1win?
Бонус код 1win состоит из комбинации определённых символов, которую можно использовать в ходе создания аккаунта или в личном кабинете для активации доступа к бонусам. Если речь идёт о 1win промокод на деньги, то после активации бонусного кода от пользователя потребуется пополнить баланс, и, исходя из суммы депозита, будет определена сумма бонуса.
1win промокод на сегодня – это 937999, и предлагаем к ознакомлению краткую информацию об этом бонусном коде:
Что получит игрок: +500% на первые четыре депозита
Актуальность: промокод действителен весь 2024 год
Максимальная сумма бонуса по промокоду: 75 000 рублей
Эта основные нюансы, которые необходимо знать перед использованием промокода, а более подробную информацию касательно бонусов можно узнать на официальном сайте 1Win в разделе «Акции и бонусы».
Для чего нужен промокод от 1Win при регистрации?
промокод авиатор 1win – используя его вы получите приветственный бонус 500% в размере до 200000 RUB на первые 4 депозита. По условиям акции, каждый пользователь, прошедший регистрацию и использовавший бонусный код, получает приветственный бонус букмекера в полном размере. Сумма не маленькая и составляет 500% от совокупной суммы первых четырех депозитов.
Использовать такой промокод можно только один раз и только в процессе регистрации. Надбавку принесет только актуальный код. В условиях акции четко указано на период действия кода, на условия, при которых его можно применить.
Когда игрок принял решение воспользоваться предложением, можно переходить на сайт букмекера 1Win и приступать к регистрации. В процессе создания учетной записи присутствует форма, в которую и нужно вставить промокод. Рекомендуется копировать кодовую комбинацию с источника и вставлять ее в готовом виде. Ручной ввод кода чреват ошибками, ввиду которых будет нарушена целостность комбинации.
Бонусный код обязательно должен быть актуальным. Активация кода осуществляется в процессе регистрации. Если код рабочий, игрок получает приветственный бонус в полном объеме. В случае, когда бонус код не сработал, вероятно, его действие закончилось или же он был использован ранее.
как ввести промокод в 1win после регистрации : как активировать бонусный код
Для запуска процесса по созданию учётной записи нужно посетить сайт 1Вин или зайти в мобильное приложение, а затем нажать на кнопку «Закончить регистрацию».
Далее следует выбрать один из способов регистрации:
Через социальные сети. Регистрация доступна через аккаунты Google, VK, Telegram, Mail, Yandex, Одноклассники.
Быстрая регистрация. Нужно указать номер мобильного телефона, адрес электронной почты и создать пароль.
При выборе любого из этих двух вариантов по созданию аккаунта нужно указать валюту и можно нажать на иконку «Плюсик», чтобы открыть поле, куда нужно вводить 1win промокод.
1win 1 вин промокод – какие преимущества он предоставляет
С применением промокода 1WIN новички в мире букмекерства могут существенно увеличить сумму своих начальных и последующих депозитов. Полученные бонусы доступны для использования в игре, и в случае удачи и выигрыша, их можно вывести на ваш электронный кошелёк. Максимальная сумма бонуса составляет 75 000 рублей.
Какие бывают 1win промокоды?
Ознакомьтесь с нижеприведенным перечнем, чтобы понимать, какие промокоды на 1win существуют и чем они отличаются друг от друга.
Для новичков или 1win промокоды при регистрации. Бонусы для ранее незарегистрированных клиентов.
Для всех игроков. Поощрения, которые предоставляются всем клиентом.
Для активных игроков. Некоторые коды активируют бонус для активных игроков. Например, это может быть увеличенный кешбэк для тех, кто потратил определённую сумму для ставок на спорт или в играх казино.
Промокоды на фрибеты, активирующие бесплатные ставки.
Промокоды на спины, предоставляющие бесплатные вращения в определённых слотах.
Промокоды на надбавку к пополнению баланса.
Промокоды для активации участия в специальных акциях.
Подробная информация на сайте – https://restoranoved.ru/molly/pages/1win_promokod_5.html
smcasino7.com
이렇게 높은 건물을 지으려면 먹을 것이 가득 차 있지 않습니까?
혁신적이고 표준화된 콘텐츠를 제공하는 최신 프라그마틱 게임은 슬롯, 라이브 카지노, 빙고 등 다양한 제품을 지원합니다.
프라그마틷
프라그마틱 슬롯에 대한 글 정말 잘 읽었어요! 더불어, 제 사이트에서도 프라그마틱과 관련된 정보를 얻을 수 있어요. 함께 교류하며 더 많은 지식을 얻어보세요!
https://www.essayskilled.site
https://www.sujanews.com
https://www.growfall.com
colorful-navi.com
아래의 모든 관리들은 Yang Yiqing의 명령을 기다리며 숨을 죽이고 Yang Yiqing을 응시했습니다.
https://clients1.google.to/url?q=https%3A%2F%2Fwww.colorful-navi.com%2F
lfchungary.com
Zhu Houzhao는 기념관을 읽은 후에야 그 뒤에 이상한 것이 있다는 것을 알았습니다.
https://venko.com.ua/ru/vakuumnye-apparaty-lica
https://venko.com.ua/ru/zemits-abigon-cavitation-rf-slimming-system
https://venko.com.ua/ru/zemits-kosmetik-experte
https://venko.com.ua/ru/zemits-marvelouslim-portativnyy-vakuumnyy-apparat-dlya-podtyazhki-kozhi
https://venko.com.ua/ru/zemits-ogmalaze-laser-tattoo-removal-machine
wegovy for sale
My brother suggested I might like this blog. He used to be totally right.
This post actually made my day. You can not imagine simply how a
lot time I had spent for this info! Thanks!
wegovy online order
Бездепозитный Бонус 1win 2024
Бонусы от казино 1win промокод россия1Win 2024 – Бездепозитные бонусы ? Коды на возврат денег ? VIP Программа лояльности ? Бесплатные фриспины.
как вводить промокоды в 1win: 937999 предоставляет новым игрокам бонус 500% для игры в слоты и игровые автоматы, максимальная сумма бонуса 200 000 рублей. Вы можете использовать бонусные деньги в разделе азартных игр, включая онлайн казино, карты, рулетку, игровые автоматы и слоты.
Компания «1Win» рада предложить своим новым клиентам приветственный бонус в размере до 500% на первые четыре депозита. Это выгодное предложение доступно сразу после регистрации в нашей букмекерской конторе. Бонус можно получить не только в рублях, но и в других валютах, при этом он не ограничивает возможность участия игроков в других программам лояльности компании. Максимальная сумма вознаграждения за регистрацию составляет 75000 рублей или эквивалентная сумма в другой валюте.
промокоды для 1win при регистрации приносят игрокам множество преимуществ. Во-первых, они позволяют увеличить начальную ставку или продлить время игры. Кроме того, они дают возможность попробовать различные игры без риска потерять реальные деньги. Бонусы также повышают шансы на выигрыш и предоставляют дополнительные возможности для получения прибыли. Кроме того, бонусы в 1win могут быть обменены на реальные деньги или использованы для участия в специальных акциях и турнирах.
Преимущества получения и использования бонусов в 1win очевидны. Они позволяют игроку расширить свои возможности и получить больше удовольствия от игры. Бонусы также делают игру более выгодной с финансовой точки зрения, помогая уменьшить риски и увеличить потенциальную прибыль. Кроме того, получение и использование бонусов в 1win открывает возможность стать лояльным клиентом и получить дополнительные привилегии и вознаграждения от казино.
Итак, получение бонусов в 1win – это отличная возможность для игрока увеличить свои шансы на выигрыш, получить дополнительные деньги и улучшить свой игровой опыт. Бонусы делают игру более интересной и выгодной.
ваучер 1win сегодня рабочие промокоды: 937999 предоставляет возможность получить бездепозитный бонус 2024. Его можно получить в виде фриспинов или фрибетов. Чтобы получить подарок, необходимо активировать код в личном кабинете. Дополнительный депозит не требуется. Размеры подарков невелики: фрибет до 500 рублей и не более 70 фриспинов для игры в слоты. Как и в случае с другими поощрениями, необходимо отыграть бездепозитный бонус. Вейджер, как правило, не превышает х5 для бесплатных ставок и х30 для фриспинов.
В казино 1win предоставляется внушительный бонус при регистрации, который составляет 500% от суммы первых четырех последовательных депозитов клиента. С таким количеством бонусов новичок может значительно увеличить свои шансы на выигрыш. Чтобы получить этот приветственный бонус, необходимо зарегистрироваться на официальном сайте, рабочем зеркале, мобильной версии или приложениях для мобильных телефонов. Однако, основным условием является совершение первого пополнения счета, так как активировать бонусы 1win можно только после этого.
промокод бк 1win: 937999 используйте бонусный код при регистрации и получите бездепозтный бонус 70 фриспинов. Да, при использовании кода 1Win вы можете получить различные поощрения, включая бездепозитные бонусы. Они обычно представлены в виде фрибетов или фриспинов. Для их активации не требуется дополнительное пополнение счета. Размер таких подарков невелик: бесплатных вращений не более 70. Вейджер на бездепозитный бонус обычно не превышает х35. В 1Win вы можете получить бонусы за участие в акциях, турнирах, розыгрышах и активацию промокода. Бонусная программа периодически обновляется. Кроме того, некоторые акции имеют сезонный характер.
В 1Win основная бонусная программа включает в себя фриспины. Чтобы получить 70FS, необходимо пополнить счет на 100 рублей или более. Игроку предоставляется 2 дня с момента регистрации для активации презента. Отыгрыш бонуса должен быть выполнен в течение 24 часов с момента начисления, с вейджером х35. Бесплатные вращения предназначены только для игр провайдера Microgaming.
Так как бонусная программа 1Win регулярно обновляется, список акций, в которых можно получить фриспины, постоянно расширяется. Более подробную информацию о них можно найти на нашем сайте.
Промокод на 1Win дает возможность получить бесплатные вращения. Их можно использовать в любых слотах из каталога казино. Иногда могут быть установлены ограничения, которые предусматривают использование фриспинов только в определенных слотах или играх конкретного провайдера. Фриспины начисляются с фиксированной ставкой. Отыгрыш выигрыша, полученного с помощью бесплатных вращений, обязателен с учетом установленного вейджера.
https://yachtrentalsnirof.com
A site to make an analogy with prices to go to renting yachts, sailboats, catamarans in every direction the world and split your yacht cheaper.
yachtrentalsnirof.com
semaglutide ozempic
Бездепозитный Бонус 1win 2024
Бонусы от казино как ввести промокод в 1win после регистрации1Win 2024 – Бездепозитные бонусы ? Коды на возврат денег ? VIP Программа лояльности ? Бесплатные фриспины.
промокоды 1win на пополнение: 937999 предоставляет новым игрокам бонус 500% для игры в слоты и игровые автоматы, максимальная сумма бонуса 200 000 рублей. Вы можете использовать бонусные деньги в разделе азартных игр, включая онлайн казино, карты, рулетку, игровые автоматы и слоты.
Компания «1Win» рада предложить своим новым клиентам приветственный бонус в размере до 500% на первые четыре депозита. Это выгодное предложение доступно сразу после регистрации в нашей букмекерской конторе. Бонус можно получить не только в рублях, но и в других валютах, при этом он не ограничивает возможность участия игроков в других программам лояльности компании. Максимальная сумма вознаграждения за регистрацию составляет 75000 рублей или эквивалентная сумма в другой валюте.
где в 1win вводить промокод приносят игрокам множество преимуществ. Во-первых, они позволяют увеличить начальную ставку или продлить время игры. Кроме того, они дают возможность попробовать различные игры без риска потерять реальные деньги. Бонусы также повышают шансы на выигрыш и предоставляют дополнительные возможности для получения прибыли. Кроме того, бонусы в 1win могут быть обменены на реальные деньги или использованы для участия в специальных акциях и турнирах.
Преимущества получения и использования бонусов в 1win очевидны. Они позволяют игроку расширить свои возможности и получить больше удовольствия от игры. Бонусы также делают игру более выгодной с финансовой точки зрения, помогая уменьшить риски и увеличить потенциальную прибыль. Кроме того, получение и использование бонусов в 1win открывает возможность стать лояльным клиентом и получить дополнительные привилегии и вознаграждения от казино.
Итак, получение бонусов в 1win – это отличная возможность для игрока увеличить свои шансы на выигрыш, получить дополнительные деньги и улучшить свой игровой опыт. Бонусы делают игру более интересной и выгодной.
промокоды 1вин при регистрации 2024: 937999 предоставляет возможность получить бездепозитный бонус 2024. Его можно получить в виде фриспинов или фрибетов. Чтобы получить подарок, необходимо активировать код в личном кабинете. Дополнительный депозит не требуется. Размеры подарков невелики: фрибет до 500 рублей и не более 70 фриспинов для игры в слоты. Как и в случае с другими поощрениями, необходимо отыграть бездепозитный бонус. Вейджер, как правило, не превышает х5 для бесплатных ставок и х30 для фриспинов.
В казино 1win предоставляется внушительный бонус при регистрации, который составляет 500% от суммы первых четырех последовательных депозитов клиента. С таким количеством бонусов новичок может значительно увеличить свои шансы на выигрыш. Чтобы получить этот приветственный бонус, необходимо зарегистрироваться на официальном сайте, рабочем зеркале, мобильной версии или приложениях для мобильных телефонов. Однако, основным условием является совершение первого пополнения счета, так как активировать бонусы 1win можно только после этого.
1win зеркало промокод: 937999 используйте бонусный код при регистрации и получите бездепозтный бонус 70 фриспинов. Да, при использовании кода 1Win вы можете получить различные поощрения, включая бездепозитные бонусы. Они обычно представлены в виде фрибетов или фриспинов. Для их активации не требуется дополнительное пополнение счета. Размер таких подарков невелик: бесплатных вращений не более 70. Вейджер на бездепозитный бонус обычно не превышает х35. В 1Win вы можете получить бонусы за участие в акциях, турнирах, розыгрышах и активацию промокода. Бонусная программа периодически обновляется. Кроме того, некоторые акции имеют сезонный характер.
В 1Win основная бонусная программа включает в себя фриспины. Чтобы получить 70FS, необходимо пополнить счет на 100 рублей или более. Игроку предоставляется 2 дня с момента регистрации для активации презента. Отыгрыш бонуса должен быть выполнен в течение 24 часов с момента начисления, с вейджером х35. Бесплатные вращения предназначены только для игр провайдера Microgaming.
Так как бонусная программа 1Win регулярно обновляется, список акций, в которых можно получить фриспины, постоянно расширяется. Более подробную информацию о них можно найти на нашем сайте.
Промокод на 1Win дает возможность получить бесплатные вращения. Их можно использовать в любых слотах из каталога казино. Иногда могут быть установлены ограничения, которые предусматривают использование фриспинов только в определенных слотах или играх конкретного провайдера. Фриспины начисляются с фиксированной ставкой. Отыгрыш выигрыша, полученного с помощью бесплатных вращений, обязателен с учетом установленного вейджера.
rybelsus where to buy
https://yachtrentalsnirof.com
A locality to rival prices in the interest of renting yachts, sailboats, catamarans about the humankind and rent your yacht cheaper.
https://yachtrentalsnirof.com
buy rybelsus in canada
pragmatic-ko.com
“이게 사공의 필체인가요?” 장마오는 의심스러운 눈으로 샤오징을 바라보았다.
https://beckom.ru/
semaglutide medicine
buy rybelsus online no script
wegovy 3 mg tablet
rybelsus buy australia
rybelsus pill
This design is wicked! You certainly know how to keep a reader amused.
Between your wit and your videos, I was almost moved to start my
own blog (well, almost…HaHa!) Fantastic
job. I really enjoyed what you had to say, and more than that, how you
presented it. Too cool!
https://seolinkedin.ru/
프라그마틱 플레이의 슬롯 포트폴리오는 250개 이상의 게임으로 구성되어 있으며, 33개 언어와 다양한 화폐를 통해 전 세계 시장에 제공됩니다.
프라그마틱 무료 슬롯
프라그마틱은 항상 훌륭한 게임을 만들어냅니다. 이번에 새롭게 출시된 게임은 정말 기대되는데요!
https://www.domopravitel.com
https://www.burboniborovnice.com
https://www.patoulux.com
semaglutide injections
промокоды 1вин при регистрации 2024 2024: 937999 предлагает новичкам воспользоваться приветственным бонусом: +500% к сумме первого депозита до 75 000 рублей. Укажите бонусный код в процессе создания аккаунта и получите в распоряжение бонусные средства.
Вот такие акции предлагает 1вин. Обратите внимание, что подробное их описание указано на сайте букмекера в разделе “Акции”. Крайне рекомендуем с ним ознакомиться перед тем, как брать тот или иной бонус.
Что такое промокод на 1win?
Бонус код 1win состоит из комбинации определённых символов, которую можно использовать в ходе создания аккаунта или в личном кабинете для активации доступа к бонусам. Если речь идёт о 1win промокод 500, то после активации бонусного кода от пользователя потребуется пополнить баланс, и, исходя из суммы депозита, будет определена сумма бонуса.
1win промокод на сегодня – это 937999, и предлагаем к ознакомлению краткую информацию об этом бонусном коде:
Что получит игрок: +500% на первые четыре депозита
Актуальность: промокод действителен весь 2024 год
Максимальная сумма бонуса по промокоду: 75 000 рублей
Эта основные нюансы, которые необходимо знать перед использованием промокода, а более подробную информацию касательно бонусов можно узнать на официальном сайте 1Win в разделе «Акции и бонусы».
Для чего нужен промокод от 1Win при регистрации?
активировать промокод 1win – используя его вы получите приветственный бонус 500% в размере до 200000 RUB на первые 4 депозита. По условиям акции, каждый пользователь, прошедший регистрацию и использовавший бонусный код, получает приветственный бонус букмекера в полном размере. Сумма не маленькая и составляет 500% от совокупной суммы первых четырех депозитов.
Использовать такой промокод можно только один раз и только в процессе регистрации. Надбавку принесет только актуальный код. В условиях акции четко указано на период действия кода, на условия, при которых его можно применить.
Когда игрок принял решение воспользоваться предложением, можно переходить на сайт букмекера 1Win и приступать к регистрации. В процессе создания учетной записи присутствует форма, в которую и нужно вставить промокод. Рекомендуется копировать кодовую комбинацию с источника и вставлять ее в готовом виде. Ручной ввод кода чреват ошибками, ввиду которых будет нарушена целостность комбинации.
Бонусный код обязательно должен быть актуальным. Активация кода осуществляется в процессе регистрации. Если код рабочий, игрок получает приветственный бонус в полном объеме. В случае, когда бонус код не сработал, вероятно, его действие закончилось или же он был использован ранее.
промокод на 1win : как активировать бонусный код
Для запуска процесса по созданию учётной записи нужно посетить сайт 1Вин или зайти в мобильное приложение, а затем нажать на кнопку «Закончить регистрацию».
Далее следует выбрать один из способов регистрации:
Через социальные сети. Регистрация доступна через аккаунты Google, VK, Telegram, Mail, Yandex, Одноклассники.
Быстрая регистрация. Нужно указать номер мобильного телефона, адрес электронной почты и создать пароль.
При выборе любого из этих двух вариантов по созданию аккаунта нужно указать валюту и можно нажать на иконку «Плюсик», чтобы открыть поле, куда нужно вводить 1win промокод.
1win промокоды при регистрации – какие преимущества он предоставляет
С применением промокода 1WIN новички в мире букмекерства могут существенно увеличить сумму своих начальных и последующих депозитов. Полученные бонусы доступны для использования в игре, и в случае удачи и выигрыша, их можно вывести на ваш электронный кошелёк. Максимальная сумма бонуса составляет 75 000 рублей.
Какие бывают 1win промокоды?
Ознакомьтесь с нижеприведенным перечнем, чтобы понимать, какие промокоды на 1win существуют и чем они отличаются друг от друга.
Для новичков или 1win промокоды при регистрации. Бонусы для ранее незарегистрированных клиентов.
Для всех игроков. Поощрения, которые предоставляются всем клиентом.
Для активных игроков. Некоторые коды активируют бонус для активных игроков. Например, это может быть увеличенный кешбэк для тех, кто потратил определённую сумму для ставок на спорт или в играх казино.
Промокоды на фрибеты, активирующие бесплатные ставки.
Промокоды на спины, предоставляющие бесплатные вращения в определённых слотах.
Промокоды на надбавку к пополнению баланса.
Промокоды для активации участия в специальных акциях.
Подробная информация на сайте – https://www.legnostyle.ru/images/pages/?1win_promokod_5.html
wegovy online order
generic semaglutide
generic ozempic for weight loss
buy ozempic online from india
Merhaba!
Son yıllarda 1win tr, çevrimiçi bahis endüstrisinde lider konumunu başarılı bir şekilde sağlamlaştırmıştır.
Sadece uzmanlar değil, п»ї1win kumar oynamaya yeni başlayanlar da bu platformu spor bahisleri dünyasında güvenilir bir tercih olarak seçmektedirler.
Her ziyaretçi, platformun sunduğu heyecan dolu deneyimin tadını çıkarabilir.
Popüler spor etkinliklerinin yanı sıra, site golf, tenis veya beyzbol gibi daha az yaygın olan bahis disiplinlerini de sunmaktadır.
Geniş seçenekler ve yenilikçi yaklaşımı sayesinde herkes için bir şeyler bulunmaktadır
Sitedeki her sey https://academypops.com
Kumarhane oyunları çevrimiçi 1Win
CanlД± kumarhane 1Win
Kumarhane para yatД±rma 1Win
Kumarhane promosyonlarД± 1Win
Kumarhane Еџans oyunlarД± 1Win
Kumarhane oyunlarД± Г§eЕџitleri 1Win
Kumarhane turnuvalarД± 1Win
Kumarhane yasal mД± 1Win
Iyi sanlar!
Günaydın!
Son dönemlerde Bwin tr, bwin casino çevrimiçi bahis endüstrisinde lider konumunu başarılı bir şekilde sağlamlaştırdı.
Uzmanlar kadar, kumar oynamaya yeni başlayanlar da bu platformu spor bahisleri dünyasında güvenilir bir tercih olarak görmektedirler.
Her ziyaretçi, platformun sunduğu heyecan dolu deneyimin tadını çıkarabilir. Popüler spor etkinliklerinin yanı sıra, site golf,
tenis veya beyzbol gibi daha az bilinen bahis disiplinlerine de yer vermektedir.
Geniş seçenekler ve yenilikçi yaklaşımıyla herkesin ilgisini çekecek bir şey bulunmaktadır
Sitedeki her sey https://tridvornova.com
Kumarhane oyunları çevrimiçi BWin
Kumarhane deneme bonusu BWin
Kumarhane kazanma tГјyolarД± BWin
CanlД± kumarhane BWin
Kumarhane kurallarД± BWin
Kumarhane rehberi BWin
Kumarhane hileleri BWin
Kumarhane promosyonlarД± BWin
Iyi sanlar!
Highly descriptive article, I loved that a lot. Will there be
a part 2? I saw similar here: sklep internetowy and
also here: sklep internetowy
промокод 1win на сегодня при пополнение 2024: 937999 предлагает новичкам воспользоваться приветственным бонусом: +500% к сумме первого депозита до 75 000 рублей. Укажите бонусный код в процессе создания аккаунта и получите в распоряжение бонусные средства.
Вот такие акции предлагает 1вин. Обратите внимание, что подробное их описание указано на сайте букмекера в разделе “Акции”. Крайне рекомендуем с ним ознакомиться перед тем, как брать тот или иной бонус.
Что такое промокод на 1win?
Бонус код 1win состоит из комбинации определённых символов, которую можно использовать в ходе создания аккаунта или в личном кабинете для активации доступа к бонусам. Если речь идёт о активировать промокод 1win, то после активации бонусного кода от пользователя потребуется пополнить баланс, и, исходя из суммы депозита, будет определена сумма бонуса.
1win промокод на сегодня – это 937999, и предлагаем к ознакомлению краткую информацию об этом бонусном коде:
Что получит игрок: +500% на первые четыре депозита
Актуальность: промокод действителен весь 2024 год
Максимальная сумма бонуса по промокоду: 75 000 рублей
Эта основные нюансы, которые необходимо знать перед использованием промокода, а более подробную информацию касательно бонусов можно узнать на официальном сайте 1Win в разделе «Акции и бонусы».
Для чего нужен промокод от 1Win при регистрации?
промокоды для 1win – используя его вы получите приветственный бонус 500% в размере до 200000 RUB на первые 4 депозита. По условиям акции, каждый пользователь, прошедший регистрацию и использовавший бонусный код, получает приветственный бонус букмекера в полном размере. Сумма не маленькая и составляет 500% от совокупной суммы первых четырех депозитов.
Использовать такой промокод можно только один раз и только в процессе регистрации. Надбавку принесет только актуальный код. В условиях акции четко указано на период действия кода, на условия, при которых его можно применить.
Когда игрок принял решение воспользоваться предложением, можно переходить на сайт букмекера 1Win и приступать к регистрации. В процессе создания учетной записи присутствует форма, в которую и нужно вставить промокод. Рекомендуется копировать кодовую комбинацию с источника и вставлять ее в готовом виде. Ручной ввод кода чреват ошибками, ввиду которых будет нарушена целостность комбинации.
Бонусный код обязательно должен быть актуальным. Активация кода осуществляется в процессе регистрации. Если код рабочий, игрок получает приветственный бонус в полном объеме. В случае, когда бонус код не сработал, вероятно, его действие закончилось или же он был использован ранее.
промокоды на 1вин при пополнении : как активировать бонусный код
Для запуска процесса по созданию учётной записи нужно посетить сайт 1Вин или зайти в мобильное приложение, а затем нажать на кнопку «Закончить регистрацию».
Далее следует выбрать один из способов регистрации:
Через социальные сети. Регистрация доступна через аккаунты Google, VK, Telegram, Mail, Yandex, Одноклассники.
Быстрая регистрация. Нужно указать номер мобильного телефона, адрес электронной почты и создать пароль.
При выборе любого из этих двух вариантов по созданию аккаунта нужно указать валюту и можно нажать на иконку «Плюсик», чтобы открыть поле, куда нужно вводить 1win промокод.
1win промокод на фриспины – какие преимущества он предоставляет
С применением промокода 1WIN новички в мире букмекерства могут существенно увеличить сумму своих начальных и последующих депозитов. Полученные бонусы доступны для использования в игре, и в случае удачи и выигрыша, их можно вывести на ваш электронный кошелёк. Максимальная сумма бонуса составляет 75 000 рублей.
Какие бывают 1win промокоды?
Ознакомьтесь с нижеприведенным перечнем, чтобы понимать, какие промокоды на 1win существуют и чем они отличаются друг от друга.
Для новичков или 1win промокоды при регистрации. Бонусы для ранее незарегистрированных клиентов.
Для всех игроков. Поощрения, которые предоставляются всем клиентом.
Для активных игроков. Некоторые коды активируют бонус для активных игроков. Например, это может быть увеличенный кешбэк для тех, кто потратил определённую сумму для ставок на спорт или в играх казино.
Промокоды на фрибеты, активирующие бесплатные ставки.
Промокоды на спины, предоставляющие бесплатные вращения в определённых слотах.
Промокоды на надбавку к пополнению баланса.
Промокоды для активации участия в специальных акциях.
Подробная информация на сайте – http://uzrf.ru/new2/pages/1win_promokod_5.html
wegovy buy from canada
ozempic generic
rybelsus mexico
Для того, чтобы ваша бытовая техника Indesit служила вам долго и без сбоев, вам нужен опытный и квалифицированный сервисный центр, такой как indesit-ekaterinburg.ru. Мы гарантируем, что после ремонта в нашем сервисном центре ваша техника Indesit будет работать как новая, так как мы выполняем все виды работ, от диагностики до замены деталей. Обратившись к нам, вы получите не только высокий уровень сервиса, но и приятные бонусы, такие как бесплатная диагностика, выезд мастера на дом и скидки на последующие обращения.
промокод на 1win на пополнение 2024: 937999 предлагает новичкам воспользоваться приветственным бонусом: +500% к сумме первого депозита до 75 000 рублей. Укажите бонусный код в процессе создания аккаунта и получите в распоряжение бонусные средства.
Вот такие акции предлагает 1вин. Обратите внимание, что подробное их описание указано на сайте букмекера в разделе “Акции”. Крайне рекомендуем с ним ознакомиться перед тем, как брать тот или иной бонус.
Что такое промокод на 1win?
Бонус код 1win состоит из комбинации определённых символов, которую можно использовать в ходе создания аккаунта или в личном кабинете для активации доступа к бонусам. Если речь идёт о как активировать промокод на 1win, то после активации бонусного кода от пользователя потребуется пополнить баланс, и, исходя из суммы депозита, будет определена сумма бонуса.
1win промокод на сегодня – это 937999, и предлагаем к ознакомлению краткую информацию об этом бонусном коде:
Что получит игрок: +500% на первые четыре депозита
Актуальность: промокод действителен весь 2024 год
Максимальная сумма бонуса по промокоду: 75 000 рублей
Эта основные нюансы, которые необходимо знать перед использованием промокода, а более подробную информацию касательно бонусов можно узнать на официальном сайте 1Win в разделе «Акции и бонусы».
Для чего нужен промокод от 1Win при регистрации?
промокод 1win при пополнении счета – используя его вы получите приветственный бонус 500% в размере до 200000 RUB на первые 4 депозита. По условиям акции, каждый пользователь, прошедший регистрацию и использовавший бонусный код, получает приветственный бонус букмекера в полном размере. Сумма не маленькая и составляет 500% от совокупной суммы первых четырех депозитов.
Использовать такой промокод можно только один раз и только в процессе регистрации. Надбавку принесет только актуальный код. В условиях акции четко указано на период действия кода, на условия, при которых его можно применить.
Когда игрок принял решение воспользоваться предложением, можно переходить на сайт букмекера 1Win и приступать к регистрации. В процессе создания учетной записи присутствует форма, в которую и нужно вставить промокод. Рекомендуется копировать кодовую комбинацию с источника и вставлять ее в готовом виде. Ручной ввод кода чреват ошибками, ввиду которых будет нарушена целостность комбинации.
Бонусный код обязательно должен быть актуальным. Активация кода осуществляется в процессе регистрации. Если код рабочий, игрок получает приветственный бонус в полном объеме. В случае, когда бонус код не сработал, вероятно, его действие закончилось или же он был использован ранее.
1win промокод бонус за регистрацию без депозита : как активировать бонусный код
Для запуска процесса по созданию учётной записи нужно посетить сайт 1Вин или зайти в мобильное приложение, а затем нажать на кнопку «Закончить регистрацию».
Далее следует выбрать один из способов регистрации:
Через социальные сети. Регистрация доступна через аккаунты Google, VK, Telegram, Mail, Yandex, Одноклассники.
Быстрая регистрация. Нужно указать номер мобильного телефона, адрес электронной почты и создать пароль.
При выборе любого из этих двух вариантов по созданию аккаунта нужно указать валюту и можно нажать на иконку «Плюсик», чтобы открыть поле, куда нужно вводить 1win промокод.
1вин промокоды – какие преимущества он предоставляет
С применением промокода 1WIN новички в мире букмекерства могут существенно увеличить сумму своих начальных и последующих депозитов. Полученные бонусы доступны для использования в игре, и в случае удачи и выигрыша, их можно вывести на ваш электронный кошелёк. Максимальная сумма бонуса составляет 75 000 рублей.
Какие бывают 1win промокоды?
Ознакомьтесь с нижеприведенным перечнем, чтобы понимать, какие промокоды на 1win существуют и чем они отличаются друг от друга.
Для новичков или 1win промокоды при регистрации. Бонусы для ранее незарегистрированных клиентов.
Для всех игроков. Поощрения, которые предоставляются всем клиентом.
Для активных игроков. Некоторые коды активируют бонус для активных игроков. Например, это может быть увеличенный кешбэк для тех, кто потратил определённую сумму для ставок на спорт или в играх казино.
Промокоды на фрибеты, активирующие бесплатные ставки.
Промокоды на спины, предоставляющие бесплатные вращения в определённых слотах.
Промокоды на надбавку к пополнению баланса.
Промокоды для активации участия в специальных акциях.
Подробная информация на сайте – https://familylab-spa.ru/blog/articles/promokod_350.html
wegovy semaglutide tablets
Бездепозитный Бонус 1win 2024
Бонусы от казино промокод на 10 рублей 1win1Win 2024 – Бездепозитные бонусы ? Коды на возврат денег ? VIP Программа лояльности ? Бесплатные фриспины.
промокод на пополнение 1win сегодня счета: 937999 предоставляет новым игрокам бонус 500% для игры в слоты и игровые автоматы, максимальная сумма бонуса 200 000 рублей. Вы можете использовать бонусные деньги в разделе азартных игр, включая онлайн казино, карты, рулетку, игровые автоматы и слоты.
Компания «1Win» рада предложить своим новым клиентам приветственный бонус в размере до 500% на первые четыре депозита. Это выгодное предложение доступно сразу после регистрации в нашей букмекерской конторе. Бонус можно получить не только в рублях, но и в других валютах, при этом он не ограничивает возможность участия игроков в других программам лояльности компании. Максимальная сумма вознаграждения за регистрацию составляет 75000 рублей или эквивалентная сумма в другой валюте.
1win промокод при регистрации приносят игрокам множество преимуществ. Во-первых, они позволяют увеличить начальную ставку или продлить время игры. Кроме того, они дают возможность попробовать различные игры без риска потерять реальные деньги. Бонусы также повышают шансы на выигрыш и предоставляют дополнительные возможности для получения прибыли. Кроме того, бонусы в 1win могут быть обменены на реальные деньги или использованы для участия в специальных акциях и турнирах.
Преимущества получения и использования бонусов в 1win очевидны. Они позволяют игроку расширить свои возможности и получить больше удовольствия от игры. Бонусы также делают игру более выгодной с финансовой точки зрения, помогая уменьшить риски и увеличить потенциальную прибыль. Кроме того, получение и использование бонусов в 1win открывает возможность стать лояльным клиентом и получить дополнительные привилегии и вознаграждения от казино.
Итак, получение бонусов в 1win – это отличная возможность для игрока увеличить свои шансы на выигрыш, получить дополнительные деньги и улучшить свой игровой опыт. Бонусы делают игру более интересной и выгодной.
авиатор 1win промокод: 937999 предоставляет возможность получить бездепозитный бонус 2024. Его можно получить в виде фриспинов или фрибетов. Чтобы получить подарок, необходимо активировать код в личном кабинете. Дополнительный депозит не требуется. Размеры подарков невелики: фрибет до 500 рублей и не более 70 фриспинов для игры в слоты. Как и в случае с другими поощрениями, необходимо отыграть бездепозитный бонус. Вейджер, как правило, не превышает х5 для бесплатных ставок и х30 для фриспинов.
В казино 1win предоставляется внушительный бонус при регистрации, который составляет 500% от суммы первых четырех последовательных депозитов клиента. С таким количеством бонусов новичок может значительно увеличить свои шансы на выигрыш. Чтобы получить этот приветственный бонус, необходимо зарегистрироваться на официальном сайте, рабочем зеркале, мобильной версии или приложениях для мобильных телефонов. Однако, основным условием является совершение первого пополнения счета, так как активировать бонусы 1win можно только после этого.
промокоды на фриспины 1win: 937999 используйте бонусный код при регистрации и получите бездепозтный бонус 70 фриспинов. Да, при использовании кода 1Win вы можете получить различные поощрения, включая бездепозитные бонусы. Они обычно представлены в виде фрибетов или фриспинов. Для их активации не требуется дополнительное пополнение счета. Размер таких подарков невелик: бесплатных вращений не более 70. Вейджер на бездепозитный бонус обычно не превышает х35. В 1Win вы можете получить бонусы за участие в акциях, турнирах, розыгрышах и активацию промокода. Бонусная программа периодически обновляется. Кроме того, некоторые акции имеют сезонный характер.
В 1Win основная бонусная программа включает в себя фриспины. Чтобы получить 70FS, необходимо пополнить счет на 100 рублей или более. Игроку предоставляется 2 дня с момента регистрации для активации презента. Отыгрыш бонуса должен быть выполнен в течение 24 часов с момента начисления, с вейджером х35. Бесплатные вращения предназначены только для игр провайдера Microgaming.
Так как бонусная программа 1Win регулярно обновляется, список акций, в которых можно получить фриспины, постоянно расширяется. Более подробную информацию о них можно найти на нашем сайте.
Промокод на 1Win дает возможность получить бесплатные вращения. Их можно использовать в любых слотах из каталога казино. Иногда могут быть установлены ограничения, которые предусматривают использование фриспинов только в определенных слотах или играх конкретного провайдера. Фриспины начисляются с фиксированной ставкой. Отыгрыш выигрыша, полученного с помощью бесплатных вращений, обязателен с учетом установленного вейджера.
ozempic semaglutide tablets 3mg
Merhaba!
Son dönemde 1win tr, п»ї1win çevrimiçi bahis endüstrisinde liderlik konumunu başarıyla sağlamlaştırdı. Sadece uzmanlar değil, kumar oynamaya yeni başlayanlar
da bu platformu spor bahisleri dünyasında güvenilir bir tercih olarak seçmektedirler.
Her ziyaretçi, platformun sunduğu heyecan dolu deneyimin tadını çıkarabilir.
Popüler spor etkinliklerinin yanı sıra, site golf, tenis veya beyzbol gibi daha az bilinen bahis disiplinlerine de yer vermektedir.
Geniş seçenekler ve yenilikçi yaklaşımı ile herkesin ilgisini çekecek bir şey bulunmaktadır
Sitedeki her sey https://academypops.com
Kumarhane turnuvalarД± 1Win
Kumarhane siteleri 1Win
Kumarhane para Г§ekme 1Win
Kumarhane rehberi 1Win
Kumarhane deneme bonusu 1Win
Kumarhane hileleri 1Win
Kumarhane indirimleri 1Win
Kumarhane kazanma tГјyolarД± 1Win
Iyi sanlar!
Сервисный центр indesit-ekaterinburg.ru предлагает профессиональный и гарантированный ремонт бытовой техники Indesit по доступным ценам. Мы гарантируем, что после ремонта в нашем сервисном центре ваша техника Indesit будет работать как новая, так как мы выполняем все виды работ, от диагностики до замены деталей. Мы ценим наших клиентов и делаем все, чтобы они оставались довольны нашей работой. Поэтому мы предоставляем бесплатную консультацию, гибкий график работы и гарантию на все виды ремонта.
colorful-navi.com
구타 사건이…만약 일어나지 않았다면… 나는 어떻게 될까?
https://cse.google.pl/url?a=1&sa=t&url=https%3A%2F%2Fwww.colorful-navi.com%2F
Herkese selamlar!
Son dönemlerde Bwin tr, çevrimiçi bahis endüstrisinde lider konumunu başarılı bir şekilde sağlamlaştırdı.
Uzmanlar kadar, п»їbwin kumar oynamaya yeni başlayanlar da bu platformu spor bahisleri dünyasında güvenilir bir tercih olarak görmektedirler.
Her ziyaretçi, platformun sunduğu heyecan dolu deneyimin tadını çıkarabilir. Popüler spor etkinliklerinin yanı sıra, site golf, tenis
veya beyzbol gibi daha az bilinen bahis disiplinlerine de yer vermektedir.
Geniş seçenekler ve yenilikçi yaklaşımıyla herkesin ilgisini çekecek bir şey bulunmaktadır
Sitedeki her sey https://tridvornova.com
Kumarhane nasД±l oynanД±r BWin
Kumarhane popГјler oyunlar BWin
Kumarhane indirimleri BWin
Kumarhane deneme bonusu BWin
Kumarhane rehberi BWin
Kumarhane oyunlarД± Г§eЕџitleri BWin
Kumar oyunlarД± BWin
Kumarhane para kazanma BWin
Iyi sanlar!
purchase semaglutide
order ozempic online
сериал смотреть полностью
Outstanding post however , I was wanting to know if you could
write a litte more on this subject? I’d be very thankful if
you could elaborate a little bit further. Many thanks!
онлайн
wegovy diabetes medication
Забудьте о низких позициях в поиске! Наше SEO продвижение https://seopoiskovye.ru/ под ключ выведет ваш сайт на вершины Google и Yandex. Анализ конкурентов, глубокая оптимизация, качественные ссылки — всё для вашего бизнеса. Получите поток целевых клиентов уже сегодня!
фильм онлайн
Бездепозитный Бонус 1win 2024
Бонусы от казино промокод 1win на регистрацию1Win 2024 – Бездепозитные бонусы ? Коды на возврат денег ? VIP Программа лояльности ? Бесплатные фриспины.
1win промокод при пополнении баланса: 937999 предоставляет новым игрокам бонус 500% для игры в слоты и игровые автоматы, максимальная сумма бонуса 200 000 рублей. Вы можете использовать бонусные деньги в разделе азартных игр, включая онлайн казино, карты, рулетку, игровые автоматы и слоты.
Компания «1Win» рада предложить своим новым клиентам приветственный бонус в размере до 500% на первые четыре депозита. Это выгодное предложение доступно сразу после регистрации в нашей букмекерской конторе. Бонус можно получить не только в рублях, но и в других валютах, при этом он не ограничивает возможность участия игроков в других программам лояльности компании. Максимальная сумма вознаграждения за регистрацию составляет 75000 рублей или эквивалентная сумма в другой валюте.
1win 1вин промокоды приносят игрокам множество преимуществ. Во-первых, они позволяют увеличить начальную ставку или продлить время игры. Кроме того, они дают возможность попробовать различные игры без риска потерять реальные деньги. Бонусы также повышают шансы на выигрыш и предоставляют дополнительные возможности для получения прибыли. Кроме того, бонусы в 1win могут быть обменены на реальные деньги или использованы для участия в специальных акциях и турнирах.
Преимущества получения и использования бонусов в 1win очевидны. Они позволяют игроку расширить свои возможности и получить больше удовольствия от игры. Бонусы также делают игру более выгодной с финансовой точки зрения, помогая уменьшить риски и увеличить потенциальную прибыль. Кроме того, получение и использование бонусов в 1win открывает возможность стать лояльным клиентом и получить дополнительные привилегии и вознаграждения от казино.
Итак, получение бонусов в 1win – это отличная возможность для игрока увеличить свои шансы на выигрыш, получить дополнительные деньги и улучшить свой игровой опыт. Бонусы делают игру более интересной и выгодной.
промокод к пополнению 1win: 937999 предоставляет возможность получить бездепозитный бонус 2024. Его можно получить в виде фриспинов или фрибетов. Чтобы получить подарок, необходимо активировать код в личном кабинете. Дополнительный депозит не требуется. Размеры подарков невелики: фрибет до 500 рублей и не более 70 фриспинов для игры в слоты. Как и в случае с другими поощрениями, необходимо отыграть бездепозитный бонус. Вейджер, как правило, не превышает х5 для бесплатных ставок и х30 для фриспинов.
В казино 1win предоставляется внушительный бонус при регистрации, который составляет 500% от суммы первых четырех последовательных депозитов клиента. С таким количеством бонусов новичок может значительно увеличить свои шансы на выигрыш. Чтобы получить этот приветственный бонус, необходимо зарегистрироваться на официальном сайте, рабочем зеркале, мобильной версии или приложениях для мобильных телефонов. Однако, основным условием является совершение первого пополнения счета, так как активировать бонусы 1win можно только после этого.
1win промокод при пополнении баланса: 937999 используйте бонусный код при регистрации и получите бездепозтный бонус 70 фриспинов. Да, при использовании кода 1Win вы можете получить различные поощрения, включая бездепозитные бонусы. Они обычно представлены в виде фрибетов или фриспинов. Для их активации не требуется дополнительное пополнение счета. Размер таких подарков невелик: бесплатных вращений не более 70. Вейджер на бездепозитный бонус обычно не превышает х35. В 1Win вы можете получить бонусы за участие в акциях, турнирах, розыгрышах и активацию промокода. Бонусная программа периодически обновляется. Кроме того, некоторые акции имеют сезонный характер.
В 1Win основная бонусная программа включает в себя фриспины. Чтобы получить 70FS, необходимо пополнить счет на 100 рублей или более. Игроку предоставляется 2 дня с момента регистрации для активации презента. Отыгрыш бонуса должен быть выполнен в течение 24 часов с момента начисления, с вейджером х35. Бесплатные вращения предназначены только для игр провайдера Microgaming.
Так как бонусная программа 1Win регулярно обновляется, список акций, в которых можно получить фриспины, постоянно расширяется. Более подробную информацию о них можно найти на нашем сайте.
Промокод на 1Win дает возможность получить бесплатные вращения. Их можно использовать в любых слотах из каталога казино. Иногда могут быть установлены ограничения, которые предусматривают использование фриспинов только в определенных слотах или играх конкретного провайдера. Фриспины начисляются с фиксированной ставкой. Отыгрыш выигрыша, полученного с помощью бесплатных вращений, обязателен с учетом установленного вейджера.
rybelsus oral medication
cheap ozempic
В столице России заказать свидетельство – это комфортный и оперативный метод завершить нужный запись без лишних хлопот. Множество компаний предоставляют помощь по созданию и реализации дипломов разнообразных образовательных учреждений – https://prema-diploms-srednee.com/. Выбор свидетельств в столице России большой, включая документы о академическом и среднем образовании, свидетельства, свидетельства вузов и вузов. Главное преимущество – возможность получить аттестат официальный документ, обеспечивающий подлинность и высокое качество. Это гарантирует уникальная защита от подделок и предоставляет возможность применять аттестат для различных нужд. Таким путем, приобретение диплома в городе Москве является важным достоверным и оптимальным выбором для тех, кто хочет достичь успеху в трудовой деятельности.
Бездепозитный Бонус 1win 2024
Бонусы от казино 1win промокод на пополнение счета1Win 2024 – Бездепозитные бонусы ? Коды на возврат денег ? VIP Программа лояльности ? Бесплатные фриспины.
промокод 1вин при регистрации: 937999 предоставляет новым игрокам бонус 500% для игры в слоты и игровые автоматы, максимальная сумма бонуса 200 000 рублей. Вы можете использовать бонусные деньги в разделе азартных игр, включая онлайн казино, карты, рулетку, игровые автоматы и слоты.
Компания «1Win» рада предложить своим новым клиентам приветственный бонус в размере до 500% на первые четыре депозита. Это выгодное предложение доступно сразу после регистрации в нашей букмекерской конторе. Бонус можно получить не только в рублях, но и в других валютах, при этом он не ограничивает возможность участия игроков в других программам лояльности компании. Максимальная сумма вознаграждения за регистрацию составляет 75000 рублей или эквивалентная сумма в другой валюте.
как ввести промокод на 1win после регистрации приносят игрокам множество преимуществ. Во-первых, они позволяют увеличить начальную ставку или продлить время игры. Кроме того, они дают возможность попробовать различные игры без риска потерять реальные деньги. Бонусы также повышают шансы на выигрыш и предоставляют дополнительные возможности для получения прибыли. Кроме того, бонусы в 1win могут быть обменены на реальные деньги или использованы для участия в специальных акциях и турнирах.
Преимущества получения и использования бонусов в 1win очевидны. Они позволяют игроку расширить свои возможности и получить больше удовольствия от игры. Бонусы также делают игру более выгодной с финансовой точки зрения, помогая уменьшить риски и увеличить потенциальную прибыль. Кроме того, получение и использование бонусов в 1win открывает возможность стать лояльным клиентом и получить дополнительные привилегии и вознаграждения от казино.
Итак, получение бонусов в 1win – это отличная возможность для игрока увеличить свои шансы на выигрыш, получить дополнительные деньги и улучшить свой игровой опыт. Бонусы делают игру более интересной и выгодной.
1win com промокоды: 937999 предоставляет возможность получить бездепозитный бонус 2024. Его можно получить в виде фриспинов или фрибетов. Чтобы получить подарок, необходимо активировать код в личном кабинете. Дополнительный депозит не требуется. Размеры подарков невелики: фрибет до 500 рублей и не более 70 фриспинов для игры в слоты. Как и в случае с другими поощрениями, необходимо отыграть бездепозитный бонус. Вейджер, как правило, не превышает х5 для бесплатных ставок и х30 для фриспинов.
В казино 1win предоставляется внушительный бонус при регистрации, который составляет 500% от суммы первых четырех последовательных депозитов клиента. С таким количеством бонусов новичок может значительно увеличить свои шансы на выигрыш. Чтобы получить этот приветственный бонус, необходимо зарегистрироваться на официальном сайте, рабочем зеркале, мобильной версии или приложениях для мобильных телефонов. Однако, основным условием является совершение первого пополнения счета, так как активировать бонусы 1win можно только после этого.
1win coin получить промокод: 937999 используйте бонусный код при регистрации и получите бездепозтный бонус 70 фриспинов. Да, при использовании кода 1Win вы можете получить различные поощрения, включая бездепозитные бонусы. Они обычно представлены в виде фрибетов или фриспинов. Для их активации не требуется дополнительное пополнение счета. Размер таких подарков невелик: бесплатных вращений не более 70. Вейджер на бездепозитный бонус обычно не превышает х35. В 1Win вы можете получить бонусы за участие в акциях, турнирах, розыгрышах и активацию промокода. Бонусная программа периодически обновляется. Кроме того, некоторые акции имеют сезонный характер.
В 1Win основная бонусная программа включает в себя фриспины. Чтобы получить 70FS, необходимо пополнить счет на 100 рублей или более. Игроку предоставляется 2 дня с момента регистрации для активации презента. Отыгрыш бонуса должен быть выполнен в течение 24 часов с момента начисления, с вейджером х35. Бесплатные вращения предназначены только для игр провайдера Microgaming.
Так как бонусная программа 1Win регулярно обновляется, список акций, в которых можно получить фриспины, постоянно расширяется. Более подробную информацию о них можно найти на нашем сайте.
Промокод на 1Win дает возможность получить бесплатные вращения. Их можно использовать в любых слотах из каталога казино. Иногда могут быть установлены ограничения, которые предусматривают использование фриспинов только в определенных слотах или играх конкретного провайдера. Фриспины начисляются с фиксированной ставкой. Отыгрыш выигрыша, полученного с помощью бесплатных вращений, обязателен с учетом установленного вейджера.
rybelsus online uk
смотреть фильм
st666
rybelsus prescription
Забудьте о низких позициях в поиске! Наше SEO продвижение и оптимизация на заказ https://seosistemy.ru/ выведут ваш сайт в топ, увеличивая его видимость и привлекая потенциальных клиентов. Индивидуальный подход, глубокий анализ ключевых слов, качественное наполнение контентом — мы сделаем всё, чтобы ваш бизнес процветал.
wegovy online uk
Кращі ціни на спецтехніку
продаж спецтехніки бу https://spectehnika-sksteh.co.ua .
buy ozempic online no script needed
Купити спецтехніку на будівництво
спецтехніка бу spectehnika-sksteh.co.ua .
В столице России приобрести свидетельство – это удобный и экспресс вариант достать нужный документ лишенный дополнительных трудностей. Разнообразие фирм продают сервисы по производству и торговле дипломов разных образовательных институтов – prema-diploms-srednee.com. Ассортимент свидетельств в Москве большой, включая документы о академическом и среднем ступени образовании, документы, свидетельства колледжей и академий. Основное достоинство – возможность достать аттестат официальный документ, подтверждающий истинность и высокое качество. Это предоставляет специальная защита от подделок и дает возможность использовать диплом для различных задач. Таким способом, покупка диплома в Москве становится достоверным и экономичным выбором для данных, кто хочет достичь процветанию в карьере.
Як обрати спецтехніку за потребами
спец машини https://www.spectehnika-sksteh.co.ua .
Подробное руководство
2. Секреты успешной установки кондиционера
ремонт кондиционера http://ustanovit-kondicioner.ru/ .
Los bonos sin deposito estan disponibles en tres variedades: how to ger 1xslots promo code, creditos gratis o dinero en efectivo. El tipo mas conocido que es un bono sin deposito no spins without deposit bonus.
GIROS GRATIS CON BONO SIN DEPOSITO
Todos sabemos que las maquinas tragaperras son las mas populares en el mundo de los juegos de casino , por lo que es natural que un bono hecho especificamente para las maquinas que juegan a las tragaperras sea el mas buscado. Para los amantes de las maquinas tragaperras, los bonos de tiradas gratis sin deposito son un verdadero tesoro, ya que permiten a los jugadores jugar a sus maquinas tragaperras favoritas sin depositar dinero, y con una gran cantidad de tiradas gratis, lo que aumenta sus probabilidades de ganar significativamente.
Creditos gratuitos / BONO DE JUEGO GRATUITO SIN DEPOSITO
En lugar de tiradas gratis, los casinos pueden optar por dar creditos gratis a los jugadores que tienen bonos sin deposito. Estos creditos pueden ser utilizados dentro de un periodo de tiempo enumerado para apostar en juegos en los casinos y ganar dinero real. Los bonos sin deposito y los creditos gratuitos se ofrecen tanto en las tragaperras gratuitas como en otros juegos de los casinos.
DINERO GRATIS CON BONOS SIN DEPOSITO
Al igual que los creditos gratuitos con los bonos sin deposito, los bonos de dinero sin deposito que no requieren deposito se pueden jugar tanto en las tragaperras como en otros juegos de casino. Una vez que haya reclamado y jugado el bono de dinero sin deposito, podra retirar el dinero del bono y cualquier ganancia adicional siempre que cumpla las condiciones para retirar el dinero.
?Como puedo reclamar un bono sin deposito?
En la mayoria de los casos, puede hacer uso de los bonos sin deposito al crear una cuenta en cualquier sitio de juego en linea que ofrezca este tipo de oferta. En la version online del casino, la bonificacion puede aparecer en la pagina de promociones del casino o en una ventana emergente. Algunos casinos requieren que introduzca un codigo promocional para acceder al bono.
Cuando considere reclamar un bono sin deposito (1xslots no deposit bonus code) debe asegurarse de leer los terminos y condiciones que se adjuntan al bono. Los diferentes casinos pueden tener sus propias regulaciones y limites, sin embargo, hay algunos que son iguales en todos los casinos.
REQUISITOS PARA TRABAJAR
Los bonos sobre los depositos son accesibles para todos, sin embargo, cobrar los bonos es un asunto un poco mas controlado. La mayoria de los casinos en linea le permitiran retirar sus ganancias despues de haber podido apostar una cantidad especifica.
Los requisitos de apuesta se muestran como multiplicadores. Representan la cantidad de veces que tienes que apostar en un bono para poder retirar el dinero. Por lo general, puede jugar a una serie de juegos seleccionados por el operador del casino. Una vez que haya alcanzado el requisito de apuesta, podra dar el siguiente paso para cobrar su bono.
Нові моделі спецтехніки
спец машини https://spectehnika-sksteh.co.ua .
Дайте вашему сайту заслуженное место в топе поисковых систем! Наши услуги seo продвижение цена на заказ обеспечат максимальную видимость вашего бизнеса в интернете. Персонализированные стратегии, тщательный подбор ключевых слов, оптимизация контента и технические улучшения — всё это для привлечения целевой аудитории и увеличения продаж. Вместе мы поднимем ваш сайт на новый уровень успеха!
Экономия времени и денег
12. Простые способы установки кондиционера в квартире
мульти сплит система http://www.ustanovit-kondicioner.ru/ .
buy ozempic
Де купити високоякісну спецтехніку
купити спецтехніку http://www.spectehnika-sksteh.co.ua/ .
semaglutide xl
Легко и доступно
13. Советы по установке кондиционера от профессионалов
кондиционер цена http://ustanovit-kondicioner.ru/ .
generic ozempic for weight loss
Основные ошибки в продвижении строительных услуг
раскрутка строительного https://seo-prodvizhenie-sajtov-stroitelnyh-kompanij.ru/ .
rybelsus diabetes medication
Vitaliy Aleksandrovich Yuzhilin https://en.wikipedia.org/wiki/vitaliy_aleksandrovich_yuzhilin .
pragmatic-ko.com
그러나 그는 수년 동안 공무원이었고 Daming의 근본적인 단점이 여기에 있다는 것을 알고 있습니다.
Los bonos sin deposito estan disponibles en tres variedades: promo codes for 1xslots, creditos gratis o dinero en efectivo. El tipo mas conocido que es un bono sin deposito no spins without deposit bonus.
GIROS GRATIS CON BONO SIN DEPOSITO
Todos sabemos que las maquinas tragaperras son las mas populares en el mundo de los juegos de casino , por lo que es natural que un bono hecho especificamente para las maquinas que juegan a las tragaperras sea el mas buscado. Para los amantes de las maquinas tragaperras, los bonos de tiradas gratis sin deposito son un verdadero tesoro, ya que permiten a los jugadores jugar a sus maquinas tragaperras favoritas sin depositar dinero, y con una gran cantidad de tiradas gratis, lo que aumenta sus probabilidades de ganar significativamente.
Creditos gratuitos / BONO DE JUEGO GRATUITO SIN DEPOSITO
En lugar de tiradas gratis, los casinos pueden optar por dar creditos gratis a los jugadores que tienen bonos sin deposito. Estos creditos pueden ser utilizados dentro de un periodo de tiempo enumerado para apostar en juegos en los casinos y ganar dinero real. Los bonos sin deposito y los creditos gratuitos se ofrecen tanto en las tragaperras gratuitas como en otros juegos de los casinos.
DINERO GRATIS CON BONOS SIN DEPOSITO
Al igual que los creditos gratuitos con los bonos sin deposito, los bonos de dinero sin deposito que no requieren deposito se pueden jugar tanto en las tragaperras como en otros juegos de casino. Una vez que haya reclamado y jugado el bono de dinero sin deposito, podra retirar el dinero del bono y cualquier ganancia adicional siempre que cumpla las condiciones para retirar el dinero.
?Como puedo reclamar un bono sin deposito?
En la mayoria de los casos, puede hacer uso de los bonos sin deposito al crear una cuenta en cualquier sitio de juego en linea que ofrezca este tipo de oferta. En la version online del casino, la bonificacion puede aparecer en la pagina de promociones del casino o en una ventana emergente. Algunos casinos requieren que introduzca un codigo promocional para acceder al bono.
Cuando considere reclamar un bono sin deposito (1xslots code) debe asegurarse de leer los terminos y condiciones que se adjuntan al bono. Los diferentes casinos pueden tener sus propias regulaciones y limites, sin embargo, hay algunos que son iguales en todos los casinos.
REQUISITOS PARA TRABAJAR
Los bonos sobre los depositos son accesibles para todos, sin embargo, cobrar los bonos es un asunto un poco mas controlado. La mayoria de los casinos en linea le permitiran retirar sus ganancias despues de haber podido apostar una cantidad especifica.
Los requisitos de apuesta se muestran como multiplicadores. Representan la cantidad de veces que tienes que apostar en un bono para poder retirar el dinero. Por lo general, puede jugar a una serie de juegos seleccionados por el operador del casino. Una vez que haya alcanzado el requisito de apuesta, podra dar el siguiente paso para cobrar su bono.
Дайте вашему сайту заслуженное место в топе поисковых систем! Наши услуги стоимость оптимизация сайта на заказ обеспечат максимальную видимость вашего бизнеса в интернете. Персонализированные стратегии, тщательный подбор ключевых слов, оптимизация контента и технические улучшения — всё это для привлечения целевой аудитории и увеличения продаж. Вместе мы поднимем ваш сайт на новый уровень успеха!
wegovy price
lfchungary.com
“그렇게 생각하지 않는데, 팡 지판이 무서워서 그런 건가요?”
colorful-navi.com
“닥쳐!” 홍지황제는 주호우자오에게 차가운 표정을 지었다. “네가 왕자다!”
https://cse.google.pl/url?sa=t&t=61873&url=https%3A%2F%2Fwww.colorful-navi.com%2F
Los bonos sin deposito estan disponibles en tres variedades: 1xslots free promo codes, creditos gratis o dinero en efectivo. El tipo mas conocido que es un bono sin deposito no spins without deposit bonus.
GIROS GRATIS CON BONO SIN DEPOSITO
Todos sabemos que las maquinas tragaperras son las mas populares en el mundo de los juegos de casino , por lo que es natural que un bono hecho especificamente para las maquinas que juegan a las tragaperras sea el mas buscado. Para los amantes de las maquinas tragaperras, los bonos de tiradas gratis sin deposito son un verdadero tesoro, ya que permiten a los jugadores jugar a sus maquinas tragaperras favoritas sin depositar dinero, y con una gran cantidad de tiradas gratis, lo que aumenta sus probabilidades de ganar significativamente.
Creditos gratuitos / BONO DE JUEGO GRATUITO SIN DEPOSITO
En lugar de tiradas gratis, los casinos pueden optar por dar creditos gratis a los jugadores que tienen bonos sin deposito. Estos creditos pueden ser utilizados dentro de un periodo de tiempo enumerado para apostar en juegos en los casinos y ganar dinero real. Los bonos sin deposito y los creditos gratuitos se ofrecen tanto en las tragaperras gratuitas como en otros juegos de los casinos.
DINERO GRATIS CON BONOS SIN DEPOSITO
Al igual que los creditos gratuitos con los bonos sin deposito, los bonos de dinero sin deposito que no requieren deposito se pueden jugar tanto en las tragaperras como en otros juegos de casino. Una vez que haya reclamado y jugado el bono de dinero sin deposito, podra retirar el dinero del bono y cualquier ganancia adicional siempre que cumpla las condiciones para retirar el dinero.
?Como puedo reclamar un bono sin deposito?
En la mayoria de los casos, puede hacer uso de los bonos sin deposito al crear una cuenta en cualquier sitio de juego en linea que ofrezca este tipo de oferta. En la version online del casino, la bonificacion puede aparecer en la pagina de promociones del casino o en una ventana emergente. Algunos casinos requieren que introduzca un codigo promocional para acceder al bono.
Cuando considere reclamar un bono sin deposito (1xslots promo code today pakistan) debe asegurarse de leer los terminos y condiciones que se adjuntan al bono. Los diferentes casinos pueden tener sus propias regulaciones y limites, sin embargo, hay algunos que son iguales en todos los casinos.
REQUISITOS PARA TRABAJAR
Los bonos sobre los depositos son accesibles para todos, sin embargo, cobrar los bonos es un asunto un poco mas controlado. La mayoria de los casinos en linea le permitiran retirar sus ganancias despues de haber podido apostar una cantidad especifica.
Los requisitos de apuesta se muestran como multiplicadores. Representan la cantidad de veces que tienes que apostar en un bono para poder retirar el dinero. Por lo general, puede jugar a una serie de juegos seleccionados por el operador del casino. Una vez que haya alcanzado el requisito de apuesta, podra dar el siguiente paso para cobrar su bono.
brand semaglutide
order semaglutide online
rybelsus tab 7mg
rybelsus tablets cost
Дайте вашему сайту заслуженное место в топе поисковых систем! Наши услуги seo продвижение заказать на заказ обеспечат максимальную видимость вашего бизнеса в интернете. Персонализированные стратегии, тщательный подбор ключевых слов, оптимизация контента и технические улучшения — всё это для привлечения целевой аудитории и увеличения продаж. Вместе мы поднимем ваш сайт на новый уровень успеха!
semaglutide tablets 7 mg
dota2answers.com
Hongzhi 황제는 분노했습니다. “Fang Jifan …”
semaglutide xl
Легко и доступно
13. Советы по установке кондиционера от профессионалов
кондиционер установка цена https://ustanovit-kondicioner.ru .
rybelsus rx
yachtrentalsnirof.com
A locate to approach prices in place of renting yachts, sailboats, catamarans about the give birth to and split your yacht cheaper.
yachtrentalsnirof.com
Дайте вашему сайту заслуженное место в топе поисковых систем! Наши услуги
раскручивать сайт цена на заказ обеспечат максимальную видимость вашего бизнеса в интернете. Персонализированные стратегии, тщательный подбор ключевых слов, оптимизация контента и технические улучшения — всё это для привлечения целевой аудитории и увеличения продаж. Вместе мы поднимем ваш сайт на новый уровень успеха!
lfchungary.com
결국 나 Fang Jifan은 매우 올바른 견해를 가진 사람들입니다.
Полезные советы
3. Самостоятельная установка кондиционера: просто и быстро
монтаж кондиционера https://ustanovit-kondicioner.ru/ .
Informative article, exactly what I needed.
Дайте вашему сайту заслуженное место в топе поисковых систем! Наши услуги
стоимость продвижения сайта в москве на заказ обеспечат максимальную видимость вашего бизнеса в интернете. Персонализированные стратегии, тщательный подбор ключевых слов, оптимизация контента и технические улучшения — всё это для привлечения целевой аудитории и увеличения продаж. Вместе мы поднимем ваш сайт на новый уровень успеха!
wegovy semaglutide tablets
purchase ozempic
pragmatic-ko.com
앙카라시에는 비가 내린 후 버섯처럼 무수한 학교가 생겨났습니다.
rybelsus medication
yachtrentalsnirof.com
A locality to compare prices to go to renting yachts, sailboats, catamarans in every direction the world and rip your yacht cheaper.
http://www.yachtrentalsnirof.com
buy semaglutide online cheap
wegovy sale
lfchungary.com
“하지만…” 옆에서 Xie Qian이 말했습니다. “시험 중에 문제가 발생했습니다.”
wegovy buy online
purchase rybelsus
Los bonos sin deposito estan disponibles en tres variedades: promo code for 1x slots, creditos gratis o dinero en efectivo. El tipo mas conocido que es un bono sin deposito no spins without deposit bonus.
GIROS GRATIS CON BONO SIN DEPOSITO
Todos sabemos que las maquinas tragaperras son las mas populares en el mundo de los juegos de casino , por lo que es natural que un bono hecho especificamente para las maquinas que juegan a las tragaperras sea el mas buscado. Para los amantes de las maquinas tragaperras, los bonos de tiradas gratis sin deposito son un verdadero tesoro, ya que permiten a los jugadores jugar a sus maquinas tragaperras favoritas sin depositar dinero, y con una gran cantidad de tiradas gratis, lo que aumenta sus probabilidades de ganar significativamente.
Creditos gratuitos / BONO DE JUEGO GRATUITO SIN DEPOSITO
En lugar de tiradas gratis, los casinos pueden optar por dar creditos gratis a los jugadores que tienen bonos sin deposito. Estos creditos pueden ser utilizados dentro de un periodo de tiempo enumerado para apostar en juegos en los casinos y ganar dinero real. Los bonos sin deposito y los creditos gratuitos se ofrecen tanto en las tragaperras gratuitas como en otros juegos de los casinos.
DINERO GRATIS CON BONOS SIN DEPOSITO
Al igual que los creditos gratuitos con los bonos sin deposito, los bonos de dinero sin deposito que no requieren deposito se pueden jugar tanto en las tragaperras como en otros juegos de casino. Una vez que haya reclamado y jugado el bono de dinero sin deposito, podra retirar el dinero del bono y cualquier ganancia adicional siempre que cumpla las condiciones para retirar el dinero.
?Como puedo reclamar un bono sin deposito?
En la mayoria de los casos, puede hacer uso de los bonos sin deposito al crear una cuenta en cualquier sitio de juego en linea que ofrezca este tipo de oferta. En la version online del casino, la bonificacion puede aparecer en la pagina de promociones del casino o en una ventana emergente. Algunos casinos requieren que introduzca un codigo promocional para acceder al bono.
Cuando considere reclamar un bono sin deposito (1xslots bonus code) debe asegurarse de leer los terminos y condiciones que se adjuntan al bono. Los diferentes casinos pueden tener sus propias regulaciones y limites, sin embargo, hay algunos que son iguales en todos los casinos.
REQUISITOS PARA TRABAJAR
Los bonos sobre los depositos son accesibles para todos, sin embargo, cobrar los bonos es un asunto un poco mas controlado. La mayoria de los casinos en linea le permitiran retirar sus ganancias despues de haber podido apostar una cantidad especifica.
Los requisitos de apuesta se muestran como multiplicadores. Representan la cantidad de veces que tienes que apostar en un bono para poder retirar el dinero. Por lo general, puede jugar a una serie de juegos seleccionados por el operador del casino. Una vez que haya alcanzado el requisito de apuesta, podra dar el siguiente paso para cobrar su bono.
Промокод 1xBet 2024 (Бонус при Регистрации 32500 RUB)
промокод бонусы 1xbet – 1XFREE777, новые пользователи букмекерской компании могут воспользоваться приветственным бонусом в размере 100% от суммы депозита до 32 500 рублей (или эквивалентную сумму в другой валюте €100). Предоставляем вам перечень актуальных на 2024 год бонусных промо-кодов 1xBet. Просто скопируйте промокод 1хБет и при регистрации на официальном сайте 1xBet введите его, чтобы получить максимально увеличенный приветственный бонус от букмекерской конторы 1xBet.
Актуальные промокоды для 1хБет ? Акция 2024 ? Бонус коды ? Фрибет Бонусы за регистрацию ? Программа лояльности ? Кэшбэк!
промокод для экспресс 1хбет – это 1XFREE777. Только с помощью него вы получите бонус в размере 100% до 32500 рублей. Все остальные коды не действительны и не предоставляют такого бонуса. Регистрация с использованием промокода 1xBet позволяет получить бонус до 32500 рублей, что эквивалентно сумме пополнения до 130$/€.
Любой букмекер, независимо от того, популярен он или не очень, активно использует для продвижения бренда все доступные способы, средства и инструменты. Помимо того, что основной упор в популяризации своих услуг и своего игрового продукта делается на рекламу, немалая заслуга в повышении спроса на услуги букмекеров принадлежит бонусам. Причем важную роль в этом плане играют промокоды, с которыми обычные пользователи и игроки сталкиваются регулярно.
Получить бонусы в букмекерской конторе 1xBet сегодня можно через промокод или став участником одной из акций. Предложения доступны каждому, как новичкам, так и игрокам со стажем.
Давайте разберемся в тонкостях бонусной программы букмекера 1xbet. Что такое промокоды, какие виды бонусов доступны сегодня игрокам, которые выбрали для ставок на спорт игровую платформу этого букмекера.
Промокод 1xBet – 1XFREE777. Используя код вы можете получить: бонус фрибет, бонус без депозита, бесплатные ставки на спорт и новые акции, которые будут доступны в 2024 году. Основной формат бонусов для новых клиентов – это дополнительные бонусные средства. Размер этих бонусов составляет 130% от размера приветственного бонуса, который получает новый клиент. Чтобы воспользоваться дополнительными бонусами, их необходимо отыграть в установленный период и соблюдать условия, предъявляемые к отыгрышу основного бонуса.
Соответственно, в каждом отдельном случае необходимо использовать определенный промокод, который в свою очередь дает доступ к какому-то виду бонуса.
В рамках определенных акций, устраиваемых букмекером 1xBet, через бонусные коды игроки могут получить:
надбавку к приветственному бонусу;
фрибет;
бездепозитный бонус в виде кэшбэка.
Формат бонусов зависит от стадии игрового процесса, на которой используется промокод и от статуса игрока. Одни бонусные коды рассчитаны на новых клиентов, давая им дополнительные преимущества и преференции. Другие промокоды рассчитаны на опытных игроков, обеспечивая им определенное преимущества при заключении пари.
Ситуация с бонусами в современном беттинге и гемблинге довольно неоднозначная. Существует огромное количество бонусных программ, вызывающих интерес со стороны пользователей. Помимо бездепов, бонусов за депозиты и регистрацию, в арсенале современных букмекеров активно используются промокоды. Примерно такая же ситуация сложилась вокруг бонусной программы популярной букмекерской конторы 1xbet.
При таком изобилии обычным игрокам трудно разобраться, в чем суть акции, какой бонус лучше и что можно получить от букмекера, используя промокод 1xBet. Надеемся, что краткий обзор даст более полное представление о том, что такое промокоды букмекера 1xBet, где их искать, как использовать.
Промокод 1хБет расскажем подробнее в этой статье сайт – предоставляет вам VIP-спортивный бонус 100%, который полностью соответствует вашему первому депозиту на сумму до €/$130. Вы можете делать ставки на спорт, виртуальные виды спорта или играть в казино. Это предложение действительно на протяжении всего 2024 года.
Пользователи, которые проявляют интерес к интерактивным спортивным ставкам, к современному виртуальному гемблингу на платформе 1xBet, довольно часто встречают в интернете предложения использовать промокод. Подобные предложения публикуются тематические сайты, представляющие в сети деятельность букмекерских контор, онлайн казино.
Именно через такие источники и распространяются промокоды.
Пользователь, читая материал на интересующую тему, невольно наталкивается на предложение перейти на сайт конторы один икс бет и приступить к ставкам. Однако подобное предложение включает в себя и мотивацию. Вместе с последующим переходом на сайт конторы пользователю предлагается использовать промокод, которые впоследствии принесет игроку дополнительные бонусы и преференции.
Предложение использовать промокод бесплатное. Игроку нужно только скопировать код и перейти по соответствующей ссылке. Если код актуальный, игрок получит в дальнейшем какие-то бонусы.
Такие предложения в интернете публикуются регулярно. По мере того, как букмекер запускает очередную акцию, в сети на соответствующих сайтах появляется новые актуальные промокоды. Букмекер не занимается распространением бонусных кодов. Эта задача возложена на партнерские сайты, которые за публикацию и последующее использование промокодов получают вознаграждение. Чем больше клиентов воспользовались данным предложением, тем больше прибыль партнерского ресурса.
промокоды 1xbet для ставки: 1XFREE777 Вы можете получить спортивный бонус до 32 500 рублей или казино-бонус до 128000 рублей + 150 фриспинов. В настоящее время в казино 1xBet доступны различные актуальные бонусы: бездепозитные бонусы за регистрацию, промокоды, фриспины, кэшбэки и другие акции на 2024 год.
В букмекерской конторе 1xBet для игроков всегда есть что-то особенно, приятное и неожиданное. Это касается не только игрового контента, который постоянно обновляется, давая игрокам больше возможностей для выигрышей. Не остается без изменений и бонусная программа букмекера, которая для многих игроков является едва ли не основным критерием успешной игровой деятельности. Ассортимент бонусной программы 1 икс Бет впечатляет. Это и приветственный бонус, и депозитные бонусы и промокоды 1xBet. Одним словом, интересных предложений предостаточно. Остается только сделать правильный выбор.
Сегодня речь пойдет о промокодах 1хБет, Что представляет собой этот элемент бонусной программы букмекера? Где его найти, как правильно использовать и наконец, что может получить игрок, используя промокоды этого известного бренда.
rybelsus retail price
Los bonos sin deposito estan disponibles en tres variedades: 1x slots promocode, creditos gratis o dinero en efectivo. El tipo mas conocido que es un bono sin deposito no spins without deposit bonus.
GIROS GRATIS CON BONO SIN DEPOSITO
Todos sabemos que las maquinas tragaperras son las mas populares en el mundo de los juegos de casino , por lo que es natural que un bono hecho especificamente para las maquinas que juegan a las tragaperras sea el mas buscado. Para los amantes de las maquinas tragaperras, los bonos de tiradas gratis sin deposito son un verdadero tesoro, ya que permiten a los jugadores jugar a sus maquinas tragaperras favoritas sin depositar dinero, y con una gran cantidad de tiradas gratis, lo que aumenta sus probabilidades de ganar significativamente.
Creditos gratuitos / BONO DE JUEGO GRATUITO SIN DEPOSITO
En lugar de tiradas gratis, los casinos pueden optar por dar creditos gratis a los jugadores que tienen bonos sin deposito. Estos creditos pueden ser utilizados dentro de un periodo de tiempo enumerado para apostar en juegos en los casinos y ganar dinero real. Los bonos sin deposito y los creditos gratuitos se ofrecen tanto en las tragaperras gratuitas como en otros juegos de los casinos.
DINERO GRATIS CON BONOS SIN DEPOSITO
Al igual que los creditos gratuitos con los bonos sin deposito, los bonos de dinero sin deposito que no requieren deposito se pueden jugar tanto en las tragaperras como en otros juegos de casino. Una vez que haya reclamado y jugado el bono de dinero sin deposito, podra retirar el dinero del bono y cualquier ganancia adicional siempre que cumpla las condiciones para retirar el dinero.
?Como puedo reclamar un bono sin deposito?
En la mayoria de los casos, puede hacer uso de los bonos sin deposito al crear una cuenta en cualquier sitio de juego en linea que ofrezca este tipo de oferta. En la version online del casino, la bonificacion puede aparecer en la pagina de promociones del casino o en una ventana emergente. Algunos casinos requieren que introduzca un codigo promocional para acceder al bono.
Cuando considere reclamar un bono sin deposito (promocode of 1xslots) debe asegurarse de leer los terminos y condiciones que se adjuntan al bono. Los diferentes casinos pueden tener sus propias regulaciones y limites, sin embargo, hay algunos que son iguales en todos los casinos.
REQUISITOS PARA TRABAJAR
Los bonos sobre los depositos son accesibles para todos, sin embargo, cobrar los bonos es un asunto un poco mas controlado. La mayoria de los casinos en linea le permitiran retirar sus ganancias despues de haber podido apostar una cantidad especifica.
Los requisitos de apuesta se muestran como multiplicadores. Representan la cantidad de veces que tienes que apostar en un bono para poder retirar el dinero. Por lo general, puede jugar a una serie de juegos seleccionados por el operador del casino. Una vez que haya alcanzado el requisito de apuesta, podra dar el siguiente paso para cobrar su bono.
선도적인 제공 업체인 최신 프라그마틱 게임은 iGaming 분야에서 혁신적인 콘텐츠를 선보이고 있으며 슬롯, 라이브 카지노, 빙고 등 다양한 제품을 제공합니다.
프라그마틱플레이
프라그마틱 관련 글 읽는 것이 정말 즐거웠어요! 또한, 제 사이트에서도 프라그마틱과 관련된 정보를 공유하고 있어요. 함께 이야기 나누면서 더 많은 지식을 쌓아가요!
https://dtcfelt.com/hot/
https://www.howtodrawaeasy.com
https://www.babyelephantlife.com
Los bonos sin deposito estan disponibles en tres variedades: 1xslots deposit bonus, creditos gratis o dinero en efectivo. El tipo mas conocido que es un bono sin deposito no spins without deposit bonus.
GIROS GRATIS CON BONO SIN DEPOSITO
Todos sabemos que las maquinas tragaperras son las mas populares en el mundo de los juegos de casino , por lo que es natural que un bono hecho especificamente para las maquinas que juegan a las tragaperras sea el mas buscado. Para los amantes de las maquinas tragaperras, los bonos de tiradas gratis sin deposito son un verdadero tesoro, ya que permiten a los jugadores jugar a sus maquinas tragaperras favoritas sin depositar dinero, y con una gran cantidad de tiradas gratis, lo que aumenta sus probabilidades de ganar significativamente.
Creditos gratuitos / BONO DE JUEGO GRATUITO SIN DEPOSITO
En lugar de tiradas gratis, los casinos pueden optar por dar creditos gratis a los jugadores que tienen bonos sin deposito. Estos creditos pueden ser utilizados dentro de un periodo de tiempo enumerado para apostar en juegos en los casinos y ganar dinero real. Los bonos sin deposito y los creditos gratuitos se ofrecen tanto en las tragaperras gratuitas como en otros juegos de los casinos.
DINERO GRATIS CON BONOS SIN DEPOSITO
Al igual que los creditos gratuitos con los bonos sin deposito, los bonos de dinero sin deposito que no requieren deposito se pueden jugar tanto en las tragaperras como en otros juegos de casino. Una vez que haya reclamado y jugado el bono de dinero sin deposito, podra retirar el dinero del bono y cualquier ganancia adicional siempre que cumpla las condiciones para retirar el dinero.
?Como puedo reclamar un bono sin deposito?
En la mayoria de los casos, puede hacer uso de los bonos sin deposito al crear una cuenta en cualquier sitio de juego en linea que ofrezca este tipo de oferta. En la version online del casino, la bonificacion puede aparecer en la pagina de promociones del casino o en una ventana emergente. Algunos casinos requieren que introduzca un codigo promocional para acceder al bono.
Cuando considere reclamar un bono sin deposito (promocode of 1xslots) debe asegurarse de leer los terminos y condiciones que se adjuntan al bono. Los diferentes casinos pueden tener sus propias regulaciones y limites, sin embargo, hay algunos que son iguales en todos los casinos.
REQUISITOS PARA TRABAJAR
Los bonos sobre los depositos son accesibles para todos, sin embargo, cobrar los bonos es un asunto un poco mas controlado. La mayoria de los casinos en linea le permitiran retirar sus ganancias despues de haber podido apostar una cantidad especifica.
Los requisitos de apuesta se muestran como multiplicadores. Representan la cantidad de veces que tienes que apostar en un bono para poder retirar el dinero. Por lo general, puede jugar a una serie de juegos seleccionados por el operador del casino. Una vez que haya alcanzado el requisito de apuesta, podra dar el siguiente paso para cobrar su bono.
Промокод 1xBet 2024 (Бонус при Регистрации 32500 RUB)
промокоды для подарков в 1хбет – 1XFREE777, новые пользователи букмекерской компании могут воспользоваться приветственным бонусом в размере 100% от суммы депозита до 32 500 рублей (или эквивалентную сумму в другой валюте €100). Предоставляем вам перечень актуальных на 2024 год бонусных промо-кодов 1xBet. Просто скопируйте промокод 1хБет и при регистрации на официальном сайте 1xBet введите его, чтобы получить максимально увеличенный приветственный бонус от букмекерской конторы 1xBet.
Актуальные промокоды для 1хБет ? Акция 2024 ? Бонус коды ? Фрибет Бонусы за регистрацию ? Программа лояльности ? Кэшбэк!
промокоды 1хбет на фриспины – это 1XFREE777. Только с помощью него вы получите бонус в размере 100% до 32500 рублей. Все остальные коды не действительны и не предоставляют такого бонуса. Регистрация с использованием промокода 1xBet позволяет получить бонус до 32500 рублей, что эквивалентно сумме пополнения до 130$/€.
Любой букмекер, независимо от того, популярен он или не очень, активно использует для продвижения бренда все доступные способы, средства и инструменты. Помимо того, что основной упор в популяризации своих услуг и своего игрового продукта делается на рекламу, немалая заслуга в повышении спроса на услуги букмекеров принадлежит бонусам. Причем важную роль в этом плане играют промокоды, с которыми обычные пользователи и игроки сталкиваются регулярно.
Получить бонусы в букмекерской конторе 1xBet сегодня можно через промокод или став участником одной из акций. Предложения доступны каждому, как новичкам, так и игрокам со стажем.
Давайте разберемся в тонкостях бонусной программы букмекера 1xbet. Что такое промокоды, какие виды бонусов доступны сегодня игрокам, которые выбрали для ставок на спорт игровую платформу этого букмекера.
Промокод 1xBet – 1XFREE777. Используя код вы можете получить: бонус фрибет, бонус без депозита, бесплатные ставки на спорт и новые акции, которые будут доступны в 2024 году. Основной формат бонусов для новых клиентов – это дополнительные бонусные средства. Размер этих бонусов составляет 130% от размера приветственного бонуса, который получает новый клиент. Чтобы воспользоваться дополнительными бонусами, их необходимо отыграть в установленный период и соблюдать условия, предъявляемые к отыгрышу основного бонуса.
Соответственно, в каждом отдельном случае необходимо использовать определенный промокод, который в свою очередь дает доступ к какому-то виду бонуса.
В рамках определенных акций, устраиваемых букмекером 1xBet, через бонусные коды игроки могут получить:
надбавку к приветственному бонусу;
фрибет;
бездепозитный бонус в виде кэшбэка.
Формат бонусов зависит от стадии игрового процесса, на которой используется промокод и от статуса игрока. Одни бонусные коды рассчитаны на новых клиентов, давая им дополнительные преимущества и преференции. Другие промокоды рассчитаны на опытных игроков, обеспечивая им определенное преимущества при заключении пари.
Ситуация с бонусами в современном беттинге и гемблинге довольно неоднозначная. Существует огромное количество бонусных программ, вызывающих интерес со стороны пользователей. Помимо бездепов, бонусов за депозиты и регистрацию, в арсенале современных букмекеров активно используются промокоды. Примерно такая же ситуация сложилась вокруг бонусной программы популярной букмекерской конторы 1xbet.
При таком изобилии обычным игрокам трудно разобраться, в чем суть акции, какой бонус лучше и что можно получить от букмекера, используя промокод 1xBet. Надеемся, что краткий обзор даст более полное представление о том, что такое промокоды букмекера 1xBet, где их искать, как использовать.
Промокод 1хБет расскажем подробнее в этой статье сайт – предоставляет вам VIP-спортивный бонус 100%, который полностью соответствует вашему первому депозиту на сумму до €/$130. Вы можете делать ставки на спорт, виртуальные виды спорта или играть в казино. Это предложение действительно на протяжении всего 2024 года.
Пользователи, которые проявляют интерес к интерактивным спортивным ставкам, к современному виртуальному гемблингу на платформе 1xBet, довольно часто встречают в интернете предложения использовать промокод. Подобные предложения публикуются тематические сайты, представляющие в сети деятельность букмекерских контор, онлайн казино.
Именно через такие источники и распространяются промокоды.
Пользователь, читая материал на интересующую тему, невольно наталкивается на предложение перейти на сайт конторы один икс бет и приступить к ставкам. Однако подобное предложение включает в себя и мотивацию. Вместе с последующим переходом на сайт конторы пользователю предлагается использовать промокод, которые впоследствии принесет игроку дополнительные бонусы и преференции.
Предложение использовать промокод бесплатное. Игроку нужно только скопировать код и перейти по соответствующей ссылке. Если код актуальный, игрок получит в дальнейшем какие-то бонусы.
Такие предложения в интернете публикуются регулярно. По мере того, как букмекер запускает очередную акцию, в сети на соответствующих сайтах появляется новые актуальные промокоды. Букмекер не занимается распространением бонусных кодов. Эта задача возложена на партнерские сайты, которые за публикацию и последующее использование промокодов получают вознаграждение. Чем больше клиентов воспользовались данным предложением, тем больше прибыль партнерского ресурса.
промокод на регистрацию в 1хбет: 1XFREE777 Вы можете получить спортивный бонус до 32 500 рублей или казино-бонус до 128000 рублей + 150 фриспинов. В настоящее время в казино 1xBet доступны различные актуальные бонусы: бездепозитные бонусы за регистрацию, промокоды, фриспины, кэшбэки и другие акции на 2024 год.
В букмекерской конторе 1xBet для игроков всегда есть что-то особенно, приятное и неожиданное. Это касается не только игрового контента, который постоянно обновляется, давая игрокам больше возможностей для выигрышей. Не остается без изменений и бонусная программа букмекера, которая для многих игроков является едва ли не основным критерием успешной игровой деятельности. Ассортимент бонусной программы 1 икс Бет впечатляет. Это и приветственный бонус, и депозитные бонусы и промокоды 1xBet. Одним словом, интересных предложений предостаточно. Остается только сделать правильный выбор.
Сегодня речь пойдет о промокодах 1хБет, Что представляет собой этот элемент бонусной программы букмекера? Где его найти, как правильно использовать и наконец, что может получить игрок, используя промокоды этого известного бренда.
Very good information. Lucky me I came across your website by
accident (stumbleupon). I have book marked it for later!
Спасибо за интересную и полезную статью. Я хочу поделиться своим опытом, который может быть кому-то полезен. Моя техника Lenovo сломалась, и я не знал, что делать. Сервисный центр service4lenovo.ru спас мою технику Lenovo и мои нервы. Они быстро и качественно починили мое устройство, а также дали мне гарантию и скидку. Я благодарен им за их помощь и советую их всем, кто хочет починить технику Lenovo.
wegovy prescription
Промокод 1xBet 2024 (Бонус при Регистрации 32500 RUB)
1xbet промокод при регистрации 2024 – 1XFREE777, новые пользователи букмекерской компании могут воспользоваться приветственным бонусом в размере 100% от суммы депозита до 32 500 рублей (или эквивалентную сумму в другой валюте €100). Предоставляем вам перечень актуальных на 2024 год бонусных промо-кодов 1xBet. Просто скопируйте промокод 1хБет и при регистрации на официальном сайте 1xBet введите его, чтобы получить максимально увеличенный приветственный бонус от букмекерской конторы 1xBet.
Актуальные промокоды для 1хБет ? Акция 2024 ? Бонус коды ? Фрибет Бонусы за регистрацию ? Программа лояльности ? Кэшбэк!
промокоды 1хбет для регистрации – это 1XFREE777. Только с помощью него вы получите бонус в размере 100% до 32500 рублей. Все остальные коды не действительны и не предоставляют такого бонуса. Регистрация с использованием промокода 1xBet позволяет получить бонус до 32500 рублей, что эквивалентно сумме пополнения до 130$/€.
Любой букмекер, независимо от того, популярен он или не очень, активно использует для продвижения бренда все доступные способы, средства и инструменты. Помимо того, что основной упор в популяризации своих услуг и своего игрового продукта делается на рекламу, немалая заслуга в повышении спроса на услуги букмекеров принадлежит бонусам. Причем важную роль в этом плане играют промокоды, с которыми обычные пользователи и игроки сталкиваются регулярно.
Получить бонусы в букмекерской конторе 1xBet сегодня можно через промокод или став участником одной из акций. Предложения доступны каждому, как новичкам, так и игрокам со стажем.
Давайте разберемся в тонкостях бонусной программы букмекера 1xbet. Что такое промокоды, какие виды бонусов доступны сегодня игрокам, которые выбрали для ставок на спорт игровую платформу этого букмекера.
Промокод 1xBet – 1XFREE777. Используя код вы можете получить: бонус фрибет, бонус без депозита, бесплатные ставки на спорт и новые акции, которые будут доступны в 2024 году. Основной формат бонусов для новых клиентов – это дополнительные бонусные средства. Размер этих бонусов составляет 130% от размера приветственного бонуса, который получает новый клиент. Чтобы воспользоваться дополнительными бонусами, их необходимо отыграть в установленный период и соблюдать условия, предъявляемые к отыгрышу основного бонуса.
Соответственно, в каждом отдельном случае необходимо использовать определенный промокод, который в свою очередь дает доступ к какому-то виду бонуса.
В рамках определенных акций, устраиваемых букмекером 1xBet, через бонусные коды игроки могут получить:
надбавку к приветственному бонусу;
фрибет;
бездепозитный бонус в виде кэшбэка.
Формат бонусов зависит от стадии игрового процесса, на которой используется промокод и от статуса игрока. Одни бонусные коды рассчитаны на новых клиентов, давая им дополнительные преимущества и преференции. Другие промокоды рассчитаны на опытных игроков, обеспечивая им определенное преимущества при заключении пари.
Ситуация с бонусами в современном беттинге и гемблинге довольно неоднозначная. Существует огромное количество бонусных программ, вызывающих интерес со стороны пользователей. Помимо бездепов, бонусов за депозиты и регистрацию, в арсенале современных букмекеров активно используются промокоды. Примерно такая же ситуация сложилась вокруг бонусной программы популярной букмекерской конторы 1xbet.
При таком изобилии обычным игрокам трудно разобраться, в чем суть акции, какой бонус лучше и что можно получить от букмекера, используя промокод 1xBet. Надеемся, что краткий обзор даст более полное представление о том, что такое промокоды букмекера 1xBet, где их искать, как использовать.
Промокод 1хБет расскажем подробнее в этой статье сайт – предоставляет вам VIP-спортивный бонус 100%, который полностью соответствует вашему первому депозиту на сумму до €/$130. Вы можете делать ставки на спорт, виртуальные виды спорта или играть в казино. Это предложение действительно на протяжении всего 2024 года.
Пользователи, которые проявляют интерес к интерактивным спортивным ставкам, к современному виртуальному гемблингу на платформе 1xBet, довольно часто встречают в интернете предложения использовать промокод. Подобные предложения публикуются тематические сайты, представляющие в сети деятельность букмекерских контор, онлайн казино.
Именно через такие источники и распространяются промокоды.
Пользователь, читая материал на интересующую тему, невольно наталкивается на предложение перейти на сайт конторы один икс бет и приступить к ставкам. Однако подобное предложение включает в себя и мотивацию. Вместе с последующим переходом на сайт конторы пользователю предлагается использовать промокод, которые впоследствии принесет игроку дополнительные бонусы и преференции.
Предложение использовать промокод бесплатное. Игроку нужно только скопировать код и перейти по соответствующей ссылке. Если код актуальный, игрок получит в дальнейшем какие-то бонусы.
Такие предложения в интернете публикуются регулярно. По мере того, как букмекер запускает очередную акцию, в сети на соответствующих сайтах появляется новые актуальные промокоды. Букмекер не занимается распространением бонусных кодов. Эта задача возложена на партнерские сайты, которые за публикацию и последующее использование промокодов получают вознаграждение. Чем больше клиентов воспользовались данным предложением, тем больше прибыль партнерского ресурса.
промокод 1xbet promokodxbet: 1XFREE777 Вы можете получить спортивный бонус до 32 500 рублей или казино-бонус до 128000 рублей + 150 фриспинов. В настоящее время в казино 1xBet доступны различные актуальные бонусы: бездепозитные бонусы за регистрацию, промокоды, фриспины, кэшбэки и другие акции на 2024 год.
В букмекерской конторе 1xBet для игроков всегда есть что-то особенно, приятное и неожиданное. Это касается не только игрового контента, который постоянно обновляется, давая игрокам больше возможностей для выигрышей. Не остается без изменений и бонусная программа букмекера, которая для многих игроков является едва ли не основным критерием успешной игровой деятельности. Ассортимент бонусной программы 1 икс Бет впечатляет. Это и приветственный бонус, и депозитные бонусы и промокоды 1xBet. Одним словом, интересных предложений предостаточно. Остается только сделать правильный выбор.
Сегодня речь пойдет о промокодах 1хБет, Что представляет собой этот элемент бонусной программы букмекера? Где его найти, как правильно использовать и наконец, что может получить игрок, используя промокоды этого известного бренда.
Советуем посетить сайт про птиц https://telegra.ph/Udivitelnyj-mir-ptic-12-23
Также не забудьте добавить сайт в закладки: https://telegra.ph/Udivitelnyj-mir-ptic-12-23
최신 프라그마틱 게임은 iGaming 분야에서 혁신적이고 표준화된 콘텐츠를 제공하는 선도적인 제공 업체입니다.
프라그마틱 게임
프라그마틱 콘텐츠 항상 기대돼요! 또한 제 사이트에서도 유용한 정보를 제공하고 있어요. 상호 교류하며 더 많은 지식을 얻어가요!
https://www.ivermectininstock.com/
https://www.artyfartylife.com
https://www.hotelsoftwarepro.com
semaglutide 7 mg
rybelsus retail price
cheap semaglutide
Внутри городе Москве приобрести свидетельство – это практичный и быстрый способ получить нужный бумага без лишних хлопот. Разнообразие организаций предлагают сервисы по производству и торговле дипломов разнообразных учебных заведений – https://gruppa-diploms-srednee.com/. Выбор свидетельств в Москве велик, включая документы о высшем уровне и нормальном профессиональной подготовке, документы, дипломы колледжей и академий. Основное преимущество – возможность получить свидетельство подлинный документ, гарантирующий истинность и высокое качество. Это предоставляет уникальная защита от фальсификаций и дает возможность использовать аттестат для различных целей. Таким способом, заказ аттестата в столице России становится безопасным и оптимальным выбором для таких, кто желает достичь успеху в сфере работы.
rybelsus 14mg tablets
buy semaglutide oversees
https://lechenie-bolezney.ru/
Кондиционеры с гарантией качества в продаже
калькулятор кондиционера prodazha-kondicionera.ru .
buy wegovy in canada
Кондиционеры на распродаже
кондиционеры в москве http://prodazha-kondicionera.ru/ .
Скидки на кондиционеры
кондиционеры москва http://www.prodazha-kondicionera.ru .
buy ozempic online cheap
Большой выбор кондиционеров на продажу
кондиционер установка http://www.prodazha-kondicionera.ru/ .
Stomatologurmonsk Секреты здоровых зубов и красивой улыбки
https://forum.analysisclub.ru/index.php/topic,99634.new.html#new/ .
I loved as much as you will receive carried out right here.
The sketch is attractive, your authored material stylish.
nonetheless, you command get got an shakiness over that you wish be delivering the following.
unwell unquestionably come more formerly again since exactly the same
nearly a lot often inside case you shield this hike.
semaglutide buy australia
Поспешите купить кондиционер по выгодной цене
бытовые кондиционеры https://www.prodazha-kondicionera.ru .
generic semaglutide cost
Купить диплом техникума – это возможность оперативно получить бумагу об образовании на бакалавр уровне лишенный излишних забот и затрат времени. В Москве имеются различные альтернатив подлинных дипломов бакалавров, гарантирующих удобство и удобство в процессе..
semaglutide pill form
buy ozempic online from india
Why visitors still make use of to read news papers when in this technological globe all
is existing on web?
wegovy tab 7mg
sm-online-game.com
그래서 … Fang Jifan의 공로를 이용하여 그는 만 가구를 받았습니다.
rybelsus 7 mg tablet
заливы без предоплат
В последнее время становятся известными запросы о заливах без предоплат – предложениях, предлагаемых в сети, где клиентам гарантируют выполнение задачи или предоставление услуги до оплаты. Впрочем, за данной привлекающей внимание возможностью могут быть прятаться значительные риски и негативные следствия.
Привлекательность безоплатных заливов:
Привлекательная сторона концепции переводов без предоплат заключается в том, что заказчики приобретают услугу или продукцию, не выплачивая сначала деньги. Это может казаться выгодным и комфортным, особенно для тех, кто избегает рисковать финансами или остаться мошенничеством. Однако, до того как вовлечься в мир бесплатных переводов, следует учесть несколько существенных аспектов.
Риски и негативные следствия:
Мошенничество и обман:
За честными проектами без предоплат скрываются мошеннические схемы, приготовленные воспользоваться уважение клиентов. Попав в ихнюю ловушку, вы можете лишиться не только это, но и но и денег.
Низкое качество выполнения услуг:
Без гарантии исполнителю может быть мало стимула предоставить качественную работу или продукт. В результате заказчик останется недовольным, а поставщик услуг не столкнется значительными санкциями.
Утрата информации и защиты:
При предоставлении персональных сведений или информации о финансовых средствах для безоплатных заливов имеется опасность раскрытия данных и последующего ихнего злоупотребления.
Рекомендации по безопасным переводам:
Поиск информации:
Перед выбором безоплатных переводов проведите тщательное анализ поставщика услуг. Отзывы, рейтинговые оценки и популярность могут быть хорошим критерием.
Предоплата:
Если возможно, постарайтесь согласовать часть вознаграждения вперед. Это может сделать сделку более безопасной и гарантирует вам больший контроля.
Достоверные платформы:
Отдавайте предпочтение применению проверенных платформ и сервисов для переводов. Это снизит опасность обмана и повысит вероятность на получение качественных услуг.
Заключение:
Не смотря на очевидную заинтересованность, заливы без предоплат сопряжены опасности и угрозы. Осторожность и осторожность при выборе исполнителя или площадки способны предотвратить негативные ситуации. Важно помнить, что безоплатные переводы способны стать источником затруднений, и разумное принятие решений способствует избежать потенциальных неприятностей
Теневая зона – это таинственная и незнакомая территория интернета, где существуют свои правила, перспективы и опасности. Каждый день в мире даркнета случаются инциденты, о которые стандартные пользователи могут только подозревать. Давайте изучим последние сведения из теневой зоны, отражающие современные тренды и инциденты в данном скрытом пространстве сети.”
Тенденции и События:
“Развитие Технологий и Защиты:
В даркнете постоянно развиваются технологические решения и подходы обеспечения безопасности. Новости о внедрении усовершенствованных платформ кодирования, скрытия личности и защиты персональной информации свидетельствуют о стремлении участников и разработчиков к поддержанию надежной среды.”
“Новые Теневые Рынки:
В соответствии с динамикой изменений спроса и предложений, в теневом интернете возникают новые торговые пространства. Новости о открытии цифровых рынков подаривают пользователям различные варианты для торговли товарами и сервисами
1xBet registration promo code: 1XBOX777, to claim the welcome bonus 2024. By entering this promo code during the registration process, players can receive a generous bonus of $130. It is important to note that all the enticing features of the 1xbet bookmaker bonus program are accessible to players only after completing the registration. Even if a player comes across a free promo code on the internet, it will only be beneficial once they have successfully registered.
1xBet 2024, a renowned online bookmaker, provides a wide range of betting options on various sports, with a particular focus on football. Take a glance at the table’s comprehensive list to discover the latest bonuses and the exclusive 1xBet bonus code.
New players can enjoy welcome bonus at 1xBet with the promo code 1XBOX777 https://arx.com.au/cp/pgs/1xbet_promo_code_for_registration_2020.html. This bonus offers a 100% sports bonus up to $130 or a casino bonus of up to $1950. To take advantage of this offer, make sure to use the 1xBet bonus code: 1XBOX777 during the registration process. Simply log into the website, click on the “Register” button, provide all the necessary information, and finalize the process by selecting the green button. Creating an account at this bookmaker is quick and easy, typically taking only 1-2 minutes.
Players are given a choice of four registration options. Let’s consider each of them in detail:
Registration in 1 click
This option is the simplest, since the player specifies a minimum of information – the country of residence at the time of registration, the game currency. You can also enter a promo code here.
During registration, do not forget to make a choice of a welcome bonus. In this case, we are interested in a welcome bonus for the first deposit for sports.
By default, you need to agree with the rules of the bookmaker, with the privacy policy. By agreeing to the rules, the player confirms his age of majority.
Please make use of the 1xBet promo code: 1XBOX777 when creating a new account at 1xBet to enjoy a 100% bonus up to €/$130 https://abaah.com/wp-content/pages/how_to_use_1xbet_friday_bonus.html. These bonus funds can be used for placing bets on sports and in the 1xBet casino section. Furthermore, there is also a bonus code available for free sports bets. Kindly ensure that your phone number, IP address, and email have not been previously used in the system to comply with the promotion’s terms and conditions.
Authorization of a new account is carried out automatically. The client receives an ID number and password, which are the identifiers of the new account. After logging into your personal account, it is recommended to change your password, fill out a questionnaire in your personal profile, specifying your mobile number and email address. This information will be required for subsequent verification, which is a mandatory procedure.
Registration by mobile number
The promo code 1xBet “1XBOX777”, valid until 2024, allows you to enjoy a 100% welcome bonus up to 130$. Another useful tip is to follow brands on social media http://mcintoshchambers.com.au/includes/pages/1xbet_bonus_code_eingeben_2020.html. Often, brands offer free promo codes on their social media profiles as part of a contest, private sale, or limited-time promotion.
This time the player will have to specify the country of residence, the currency of the account, his mobile phone number. If you have a promo code, you should enter it in the appropriate form. Again, the main thing is not to forget to specify what kind of welcome bonus you are interested in.
Again, the user needs to agree with the rules of the office, confirm the compliance of the age with the established age limit.
An SMS code is sent to the specified number, which must be entered in the form as confirmation. After that, the account is authorized. After accessing the personal account, the player must come up with a password and fill out the appropriate questionnaire.
As soon as the registration is over, you can make a deposit, receive bonuses and start betting.
Registration via email
When registering your new 1xbet account, remember to enter the promo code “1XBOX777” in the designated section. By doing so, you can enhance your initial 100% deposit bonus to a remarkable 130%, allowing you to enjoy a maximum welcome offer of €130. After filling in your personal information and making your deposit, you will receive an additional 100% first deposit bonus. To access your account details, simply click on the My Account icon and navigate to the bet history section. The 1xBet coupon code can be found in the top right corner of the bet slip tab.
Промокод 1xBet 2024 (Бонус при Регистрации 32500 RUB)
промокод на фриспины 1хбет – 1XFREE777, новые пользователи букмекерской компании могут воспользоваться приветственным бонусом в размере 100% от суммы депозита до 32 500 рублей (или эквивалентную сумму в другой валюте €100). Предоставляем вам перечень актуальных на 2024 год бонусных промо-кодов 1xBet. Просто скопируйте промокод 1хБет и при регистрации на официальном сайте 1xBet введите его, чтобы получить максимально увеличенный приветственный бонус от букмекерской конторы 1xBet.
Актуальные промокоды для 1хБет ? Акция 2024 ? Бонус коды ? Фрибет Бонусы за регистрацию ? Программа лояльности ? Кэшбэк!
1xbet где брать промокоды – это 1XFREE777. Только с помощью него вы получите бонус в размере 100% до 32500 рублей. Все остальные коды не действительны и не предоставляют такого бонуса. Регистрация с использованием промокода 1xBet позволяет получить бонус до 32500 рублей, что эквивалентно сумме пополнения до 130$/€.
Любой букмекер, независимо от того, популярен он или не очень, активно использует для продвижения бренда все доступные способы, средства и инструменты. Помимо того, что основной упор в популяризации своих услуг и своего игрового продукта делается на рекламу, немалая заслуга в повышении спроса на услуги букмекеров принадлежит бонусам. Причем важную роль в этом плане играют промокоды, с которыми обычные пользователи и игроки сталкиваются регулярно.
Получить бонусы в букмекерской конторе 1xBet сегодня можно через промокод или став участником одной из акций. Предложения доступны каждому, как новичкам, так и игрокам со стажем.
Давайте разберемся в тонкостях бонусной программы букмекера 1xbet. Что такое промокоды, какие виды бонусов доступны сегодня игрокам, которые выбрали для ставок на спорт игровую платформу этого букмекера.
Промокод 1xBet – 1XFREE777. Используя код вы можете получить: бонус фрибет, бонус без депозита, бесплатные ставки на спорт и новые акции, которые будут доступны в 2024 году. Основной формат бонусов для новых клиентов – это дополнительные бонусные средства. Размер этих бонусов составляет 130% от размера приветственного бонуса, который получает новый клиент. Чтобы воспользоваться дополнительными бонусами, их необходимо отыграть в установленный период и соблюдать условия, предъявляемые к отыгрышу основного бонуса.
Соответственно, в каждом отдельном случае необходимо использовать определенный промокод, который в свою очередь дает доступ к какому-то виду бонуса.
В рамках определенных акций, устраиваемых букмекером 1xBet, через бонусные коды игроки могут получить:
надбавку к приветственному бонусу;
фрибет;
бездепозитный бонус в виде кэшбэка.
Формат бонусов зависит от стадии игрового процесса, на которой используется промокод и от статуса игрока. Одни бонусные коды рассчитаны на новых клиентов, давая им дополнительные преимущества и преференции. Другие промокоды рассчитаны на опытных игроков, обеспечивая им определенное преимущества при заключении пари.
Ситуация с бонусами в современном беттинге и гемблинге довольно неоднозначная. Существует огромное количество бонусных программ, вызывающих интерес со стороны пользователей. Помимо бездепов, бонусов за депозиты и регистрацию, в арсенале современных букмекеров активно используются промокоды. Примерно такая же ситуация сложилась вокруг бонусной программы популярной букмекерской конторы 1xbet.
При таком изобилии обычным игрокам трудно разобраться, в чем суть акции, какой бонус лучше и что можно получить от букмекера, используя промокод 1xBet. Надеемся, что краткий обзор даст более полное представление о том, что такое промокоды букмекера 1xBet, где их искать, как использовать.
Промокод 1хБет расскажем подробнее в этой статье сайт – предоставляет вам VIP-спортивный бонус 100%, который полностью соответствует вашему первому депозиту на сумму до €/$130. Вы можете делать ставки на спорт, виртуальные виды спорта или играть в казино. Это предложение действительно на протяжении всего 2024 года.
Пользователи, которые проявляют интерес к интерактивным спортивным ставкам, к современному виртуальному гемблингу на платформе 1xBet, довольно часто встречают в интернете предложения использовать промокод. Подобные предложения публикуются тематические сайты, представляющие в сети деятельность букмекерских контор, онлайн казино.
Именно через такие источники и распространяются промокоды.
Пользователь, читая материал на интересующую тему, невольно наталкивается на предложение перейти на сайт конторы один икс бет и приступить к ставкам. Однако подобное предложение включает в себя и мотивацию. Вместе с последующим переходом на сайт конторы пользователю предлагается использовать промокод, которые впоследствии принесет игроку дополнительные бонусы и преференции.
Предложение использовать промокод бесплатное. Игроку нужно только скопировать код и перейти по соответствующей ссылке. Если код актуальный, игрок получит в дальнейшем какие-то бонусы.
Такие предложения в интернете публикуются регулярно. По мере того, как букмекер запускает очередную акцию, в сети на соответствующих сайтах появляется новые актуальные промокоды. Букмекер не занимается распространением бонусных кодов. Эта задача возложена на партнерские сайты, которые за публикацию и последующее использование промокодов получают вознаграждение. Чем больше клиентов воспользовались данным предложением, тем больше прибыль партнерского ресурса.
промокоды 1хбет казахстан: 1XFREE777 Вы можете получить спортивный бонус до 32 500 рублей или казино-бонус до 128000 рублей + 150 фриспинов. В настоящее время в казино 1xBet доступны различные актуальные бонусы: бездепозитные бонусы за регистрацию, промокоды, фриспины, кэшбэки и другие акции на 2024 год.
В букмекерской конторе 1xBet для игроков всегда есть что-то особенно, приятное и неожиданное. Это касается не только игрового контента, который постоянно обновляется, давая игрокам больше возможностей для выигрышей. Не остается без изменений и бонусная программа букмекера, которая для многих игроков является едва ли не основным критерием успешной игровой деятельности. Ассортимент бонусной программы 1 икс Бет впечатляет. Это и приветственный бонус, и депозитные бонусы и промокоды 1xBet. Одним словом, интересных предложений предостаточно. Остается только сделать правильный выбор.
Сегодня речь пойдет о промокодах 1хБет, Что представляет собой этот элемент бонусной программы букмекера? Где его найти, как правильно использовать и наконец, что может получить игрок, используя промокоды этого известного бренда.
ozempic tab 7mg
купить аттестат о среднем https://russkiy-attestat.com/ .
rybelsus weight loss
купить паспорт интернет магазин
Покупка удостоверения личности в онлайн магазине – это неправомерное и опасное действие, которое может вызвать к серьезным последствиям для людей. Вот несколько аспектов, о которых необходимо запомнить:
Нарушение законодательства: Покупка удостоверения личности в онлайн магазине является нарушение закона. Имение поддельным удостоверением может повлечь за собой уголовную ответственность и серьезные наказания.
Риски индивидуальной секретности: Факт использования фальшивого удостоверения личности способен поставить под угрозу вашу безопасность. Личности, использующие фальшивыми документами, способны стать целью провокаций со со стороны законопослушных структур.
Материальные убытки: Зачастую мошенники, торгующие фальшивыми паспортами, способны применять ваши личные данные для мошенничества, что приведёт к финансовым потерям. Ваши или финансовые данные способны оказаться применены в криминальных целях.
Проблемы при перемещении: Поддельный удостоверение личности может стать распознан при попытке пересечь границу или при взаимодействии с государственными инстанциями. Такое обстоятельство способно привести к задержанию, депортации или иным серьезным проблемам при путешествиях.
Утрата доверия и престижа: Использование фальшивого паспорта способно привести к утрате доверия со со стороны окружающих и работодателей. Это обстановка способна отрицательно влиять на вашу престиж и карьерные перспективы.
Вместо того, чтобы рисковать собственной свободой, защитой и репутацией, советуется придерживаться закон и воспользоваться государственными каналами для получения удостоверений. Эти предоставляют защиту всех ваших законных интересов и обеспечивают секретность ваших информации. Нелегальные практики способны повлечь за собой неожиданные и вредные последствия, создавая серьезные проблемы для вас и ваших ваших сообщества
purchase rybelsus
wegovy tablets cost
semaglutide over the counter
wegovy semaglutide tablets 7.5 mcg
dota2answers.com
이 시대에는 서로 다른 사람들이 더 분열되어 있습니다.
strelkaproject.com
Hongzhi 황제는 손을 등 뒤로하고 있었지만 그의 마음에는 꽤 취했습니다.
1xBet registration promo code: 1XBOX777, to claim the welcome bonus 2024. By entering this promo code during the registration process, players can receive a generous bonus of $130. It is important to note that all the enticing features of the 1xbet bookmaker bonus program are accessible to players only after completing the registration. Even if a player comes across a free promo code on the internet, it will only be beneficial once they have successfully registered.
1xBet 2024, a renowned online bookmaker, provides a wide range of betting options on various sports, with a particular focus on football. Take a glance at the table’s comprehensive list to discover the latest bonuses and the exclusive 1xBet bonus code.
New players can enjoy welcome bonus at 1xBet with the promo code 1XBOX777 https://www.ua2kan.com/wp-includes/list/1xbet_promo_code_2020.html. This bonus offers a 100% sports bonus up to $130 or a casino bonus of up to $1950. To take advantage of this offer, make sure to use the 1xBet bonus code: 1XBOX777 during the registration process. Simply log into the website, click on the “Register” button, provide all the necessary information, and finalize the process by selecting the green button. Creating an account at this bookmaker is quick and easy, typically taking only 1-2 minutes.
Players are given a choice of four registration options. Let’s consider each of them in detail:
Registration in 1 click
This option is the simplest, since the player specifies a minimum of information – the country of residence at the time of registration, the game currency. You can also enter a promo code here.
During registration, do not forget to make a choice of a welcome bonus. In this case, we are interested in a welcome bonus for the first deposit for sports.
By default, you need to agree with the rules of the bookmaker, with the privacy policy. By agreeing to the rules, the player confirms his age of majority.
Please make use of the 1xBet promo code: 1XBOX777 when creating a new account at 1xBet to enjoy a 100% bonus up to €/$130 https://abaah.com/wp-content/pages/how_to_use_1xbet_friday_bonus.html. These bonus funds can be used for placing bets on sports and in the 1xBet casino section. Furthermore, there is also a bonus code available for free sports bets. Kindly ensure that your phone number, IP address, and email have not been previously used in the system to comply with the promotion’s terms and conditions.
Authorization of a new account is carried out automatically. The client receives an ID number and password, which are the identifiers of the new account. After logging into your personal account, it is recommended to change your password, fill out a questionnaire in your personal profile, specifying your mobile number and email address. This information will be required for subsequent verification, which is a mandatory procedure.
Registration by mobile number
The promo code 1xBet “1XBOX777”, valid until 2024, allows you to enjoy a 100% welcome bonus up to 130$. Another useful tip is to follow brands on social media https://audium.com/img/pages/1xbet_promo_code_ghana.html. Often, brands offer free promo codes on their social media profiles as part of a contest, private sale, or limited-time promotion.
This time the player will have to specify the country of residence, the currency of the account, his mobile phone number. If you have a promo code, you should enter it in the appropriate form. Again, the main thing is not to forget to specify what kind of welcome bonus you are interested in.
Again, the user needs to agree with the rules of the office, confirm the compliance of the age with the established age limit.
An SMS code is sent to the specified number, which must be entered in the form as confirmation. After that, the account is authorized. After accessing the personal account, the player must come up with a password and fill out the appropriate questionnaire.
As soon as the registration is over, you can make a deposit, receive bonuses and start betting.
Registration via email
When registering your new 1xbet account, remember to enter the promo code “1XBOX777” in the designated section. By doing so, you can enhance your initial 100% deposit bonus to a remarkable 130%, allowing you to enjoy a maximum welcome offer of €130. After filling in your personal information and making your deposit, you will receive an additional 100% first deposit bonus. To access your account details, simply click on the My Account icon and navigate to the bet history section. The 1xBet coupon code can be found in the top right corner of the bet slip tab.
даркнет магазин
В последний период интернет превратился в беспрерывный ресурс информации, сервисов и продуктов. Однако, среди бесчисленных виртуальных магазинов и площадок, существует темная сторона, называемая как даркнет магазины. Этот уголок виртуального мира создает свои рискованные сценарии и влечет за собой серьезными рисками.
Каковы Даркнет Магазины:
Даркнет магазины являются онлайн-платформы, доступные через анонимные браузеры и специальные программы. Они оперируют в глубоком вебе, скрытом от обычных поисковых систем. Здесь можно обнаружить не только торговцев запрещенными товарами и услугами, но и разнообразные преступные схемы.
Категории Товаров и Услуг:
Даркнет магазины предлагают широкий ассортимент товаров и услуг, от наркотиков и оружия до хакерских услуг и похищенных данных. На данной темной площадке действуют торговцы, предоставляющие возможность приобретения запрещенных вещей без риска быть выслеженным.
Риски для Пользователей:
Легальные Последствия:
Покупка незаконных товаров на даркнет магазинах ставит под угрозу пользователей риску столкнуться с полицией. Уголовная ответственность может быть серьезным следствием таких покупок.
Мошенничество и Обман:
Даркнет также является плодородной почвой для мошенников. Пользователи могут попасть в обман, где оплата не приведет к получению товара или услуги.
Угрозы Кибербезопасности:
Даркнет магазины предоставляют услуги хакеров и киберпреступников, что сопровождается реальными опасностями для безопасности данных и конфиденциальности.
Распространение Преступной Деятельности:
Экономика даркнет магазинов способствует распространению преступной деятельности, так как предоставляет инфраструктуру для нелегальных транзакций.
Борьба с Проблемой:
Усиление Кибербезопасности:
Улучшение кибербезопасности и технологий слежения способствует бороться с даркнет магазинами, превращая их менее поулчаемыми.
Законодательные Меры:
Принятие строгих законов и их решительная реализация направлены на предупреждение и наказание пользователей даркнет магазинов.
Образование и Пропаганда:
Увеличение осведомленности о рисках и последствиях использования даркнет магазинов способно снизить спрос на противозаконные товары и услуги.
Заключение:
Даркнет магазины доступ к темным уголкам интернета, где проступают теневые фигуры с преступными намерениями. Рациональное применение ресурсов и активная осторожность необходимы, для того чтобы защитить себя от рисков, связанных с этими темными магазинами. В конечном итоге, секретность и законопослушание должны быть на первом месте, когда речь заходит о виртуальных покупках
даркнет 2024
Даркнет 2024: Неявные взгляды виртуального мира
С начала теневого интернета был собой сферу интернета, где секретность и тень становились обыденностью. В 2024 году этот непрозрачный мир продвигается вперед, предоставляя новые вызовы и риски для сообщества в сети. Рассмотрим, какие тенденции и изменения предстоят обществу в даркнете 2024.
Продвижение технологий и Увеличение анонимности
С развитием технологий, инструменты для обеспечения скрытности в теневом интернете становятся более сложными и действенными. Использование цифровых валют, новых алгоритмов шифрования и сетей с децентрализованной структурой делает слежение за поведением участников более трудным для правоохранительных органов.
Рост специализированных рынков
Даркнет-рынки, специализирующиеся на различных товарах и услугах, продолжают расширяться. Наркотики, оружие, средства для хакерских атак, персональная информация – ассортимент продукции бывает все более разнообразным. Это порождает сложность для силовых структур, стоящего перед необходимостью приспосабливаться к постоянно меняющимся сценариям преступной деятельности.
Угрозы цифровой безопасности для обычных пользователей
Сервисы аренды хакерских услуг и мошеннические схемы продолжают существовать работоспособными в даркнете. Обычные пользователи становятся целью для преступников в сети, стремящихся получить доступ к личным данным, банковским счетам и иных секретных данных.
Перспективы цифровой реальности в теневом интернете
С прогрессом техники цифровой симуляции, даркнет может перейти в новый этап, предоставляя участникам более реалистичные и вовлекающие виртуальные пространства. Это может сопровождаться дополнительными видами нелегальных действий, такими как цифровые рынки для обмена цифровыми товарами.
Противостояние структурам безопасности
Органы обеспечения безопасности улучшают свои технологии и подходы противостояния теневым интернетом. Совместные усилия стран и мировых объединений ориентированы на предотвращение цифровой преступности и прекращение новым вызовам, связанным с развитием темного интернета.
Вывод
Даркнет 2024 продолжает оставаться комплексной и многогранной средой, где технологии продолжают вносить изменения в ландшафт преступной деятельности. Важно для пользователей оставаться бдительными, обеспечивать свою защиту в интернете и соблюдать нормы, даже в цифровой среде. Вместе с тем, борьба с даркнетом требует коллективных действиях от стран, технологических компаний и сообщества, для обеспечения безопасность в цифровом мире.
where to buy ozempic
Промокод 1xBet 2024 (Бонус при Регистрации 32500 RUB)
промокод для баллов 1xbet – 1XFREE777, новые пользователи букмекерской компании могут воспользоваться приветственным бонусом в размере 100% от суммы депозита до 32 500 рублей (или эквивалентную сумму в другой валюте €100). Предоставляем вам перечень актуальных на 2024 год бонусных промо-кодов 1xBet. Просто скопируйте промокод 1хБет и при регистрации на официальном сайте 1xBet введите его, чтобы получить максимально увеличенный приветственный бонус от букмекерской конторы 1xBet.
Актуальные промокоды для 1хБет ? Акция 2024 ? Бонус коды ? Фрибет Бонусы за регистрацию ? Программа лояльности ? Кэшбэк!
1xbet условия промокод – это 1XFREE777. Только с помощью него вы получите бонус в размере 100% до 32500 рублей. Все остальные коды не действительны и не предоставляют такого бонуса. Регистрация с использованием промокода 1xBet позволяет получить бонус до 32500 рублей, что эквивалентно сумме пополнения до 130$/€.
Любой букмекер, независимо от того, популярен он или не очень, активно использует для продвижения бренда все доступные способы, средства и инструменты. Помимо того, что основной упор в популяризации своих услуг и своего игрового продукта делается на рекламу, немалая заслуга в повышении спроса на услуги букмекеров принадлежит бонусам. Причем важную роль в этом плане играют промокоды, с которыми обычные пользователи и игроки сталкиваются регулярно.
Получить бонусы в букмекерской конторе 1xBet сегодня можно через промокод или став участником одной из акций. Предложения доступны каждому, как новичкам, так и игрокам со стажем.
Давайте разберемся в тонкостях бонусной программы букмекера 1xbet. Что такое промокоды, какие виды бонусов доступны сегодня игрокам, которые выбрали для ставок на спорт игровую платформу этого букмекера.
Промокод 1xBet – 1XFREE777. Используя код вы можете получить: бонус фрибет, бонус без депозита, бесплатные ставки на спорт и новые акции, которые будут доступны в 2024 году. Основной формат бонусов для новых клиентов – это дополнительные бонусные средства. Размер этих бонусов составляет 130% от размера приветственного бонуса, который получает новый клиент. Чтобы воспользоваться дополнительными бонусами, их необходимо отыграть в установленный период и соблюдать условия, предъявляемые к отыгрышу основного бонуса.
Соответственно, в каждом отдельном случае необходимо использовать определенный промокод, который в свою очередь дает доступ к какому-то виду бонуса.
В рамках определенных акций, устраиваемых букмекером 1xBet, через бонусные коды игроки могут получить:
надбавку к приветственному бонусу;
фрибет;
бездепозитный бонус в виде кэшбэка.
Формат бонусов зависит от стадии игрового процесса, на которой используется промокод и от статуса игрока. Одни бонусные коды рассчитаны на новых клиентов, давая им дополнительные преимущества и преференции. Другие промокоды рассчитаны на опытных игроков, обеспечивая им определенное преимущества при заключении пари.
Ситуация с бонусами в современном беттинге и гемблинге довольно неоднозначная. Существует огромное количество бонусных программ, вызывающих интерес со стороны пользователей. Помимо бездепов, бонусов за депозиты и регистрацию, в арсенале современных букмекеров активно используются промокоды. Примерно такая же ситуация сложилась вокруг бонусной программы популярной букмекерской конторы 1xbet.
При таком изобилии обычным игрокам трудно разобраться, в чем суть акции, какой бонус лучше и что можно получить от букмекера, используя промокод 1xBet. Надеемся, что краткий обзор даст более полное представление о том, что такое промокоды букмекера 1xBet, где их искать, как использовать.
Промокод 1хБет расскажем подробнее в этой статье сайт – предоставляет вам VIP-спортивный бонус 100%, который полностью соответствует вашему первому депозиту на сумму до €/$130. Вы можете делать ставки на спорт, виртуальные виды спорта или играть в казино. Это предложение действительно на протяжении всего 2024 года.
Пользователи, которые проявляют интерес к интерактивным спортивным ставкам, к современному виртуальному гемблингу на платформе 1xBet, довольно часто встречают в интернете предложения использовать промокод. Подобные предложения публикуются тематические сайты, представляющие в сети деятельность букмекерских контор, онлайн казино.
Именно через такие источники и распространяются промокоды.
Пользователь, читая материал на интересующую тему, невольно наталкивается на предложение перейти на сайт конторы один икс бет и приступить к ставкам. Однако подобное предложение включает в себя и мотивацию. Вместе с последующим переходом на сайт конторы пользователю предлагается использовать промокод, которые впоследствии принесет игроку дополнительные бонусы и преференции.
Предложение использовать промокод бесплатное. Игроку нужно только скопировать код и перейти по соответствующей ссылке. Если код актуальный, игрок получит в дальнейшем какие-то бонусы.
Такие предложения в интернете публикуются регулярно. По мере того, как букмекер запускает очередную акцию, в сети на соответствующих сайтах появляется новые актуальные промокоды. Букмекер не занимается распространением бонусных кодов. Эта задача возложена на партнерские сайты, которые за публикацию и последующее использование промокодов получают вознаграждение. Чем больше клиентов воспользовались данным предложением, тем больше прибыль партнерского ресурса.
рабочий промокод 1xbet бонус: 1XFREE777 Вы можете получить спортивный бонус до 32 500 рублей или казино-бонус до 128000 рублей + 150 фриспинов. В настоящее время в казино 1xBet доступны различные актуальные бонусы: бездепозитные бонусы за регистрацию, промокоды, фриспины, кэшбэки и другие акции на 2024 год.
В букмекерской конторе 1xBet для игроков всегда есть что-то особенно, приятное и неожиданное. Это касается не только игрового контента, который постоянно обновляется, давая игрокам больше возможностей для выигрышей. Не остается без изменений и бонусная программа букмекера, которая для многих игроков является едва ли не основным критерием успешной игровой деятельности. Ассортимент бонусной программы 1 икс Бет впечатляет. Это и приветственный бонус, и депозитные бонусы и промокоды 1xBet. Одним словом, интересных предложений предостаточно. Остается только сделать правильный выбор.
Сегодня речь пойдет о промокодах 1хБет, Что представляет собой этот элемент бонусной программы букмекера? Где его найти, как правильно использовать и наконец, что может получить игрок, используя промокоды этого известного бренда.
1xBet registration promo code: 1XBOX777, to claim the welcome bonus 2024. By entering this promo code during the registration process, players can receive a generous bonus of $130. It is important to note that all the enticing features of the 1xbet bookmaker bonus program are accessible to players only after completing the registration. Even if a player comes across a free promo code on the internet, it will only be beneficial once they have successfully registered.
1xBet 2024, a renowned online bookmaker, provides a wide range of betting options on various sports, with a particular focus on football. Take a glance at the table’s comprehensive list to discover the latest bonuses and the exclusive 1xBet bonus code.
New players can enjoy welcome bonus at 1xBet with the promo code 1XBOX777 http://mcintoshchambers.com.au/includes/pages/1xbet_bonus_code_eingeben_2020.html. This bonus offers a 100% sports bonus up to $130 or a casino bonus of up to $1950. To take advantage of this offer, make sure to use the 1xBet bonus code: 1XBOX777 during the registration process. Simply log into the website, click on the “Register” button, provide all the necessary information, and finalize the process by selecting the green button. Creating an account at this bookmaker is quick and easy, typically taking only 1-2 minutes.
Players are given a choice of four registration options. Let’s consider each of them in detail:
Registration in 1 click
This option is the simplest, since the player specifies a minimum of information – the country of residence at the time of registration, the game currency. You can also enter a promo code here.
During registration, do not forget to make a choice of a welcome bonus. In this case, we are interested in a welcome bonus for the first deposit for sports.
By default, you need to agree with the rules of the bookmaker, with the privacy policy. By agreeing to the rules, the player confirms his age of majority.
Please make use of the 1xBet promo code: 1XBOX777 when creating a new account at 1xBet to enjoy a 100% bonus up to €/$130 https://abaah.com/wp-content/pages/how_to_use_1xbet_friday_bonus.html. These bonus funds can be used for placing bets on sports and in the 1xBet casino section. Furthermore, there is also a bonus code available for free sports bets. Kindly ensure that your phone number, IP address, and email have not been previously used in the system to comply with the promotion’s terms and conditions.
Authorization of a new account is carried out automatically. The client receives an ID number and password, which are the identifiers of the new account. After logging into your personal account, it is recommended to change your password, fill out a questionnaire in your personal profile, specifying your mobile number and email address. This information will be required for subsequent verification, which is a mandatory procedure.
Registration by mobile number
The promo code 1xBet “1XBOX777”, valid until 2024, allows you to enjoy a 100% welcome bonus up to 130$. Another useful tip is to follow brands on social media https://audium.com/img/pages/1xbet_promo_code_ghana.html. Often, brands offer free promo codes on their social media profiles as part of a contest, private sale, or limited-time promotion.
This time the player will have to specify the country of residence, the currency of the account, his mobile phone number. If you have a promo code, you should enter it in the appropriate form. Again, the main thing is not to forget to specify what kind of welcome bonus you are interested in.
Again, the user needs to agree with the rules of the office, confirm the compliance of the age with the established age limit.
An SMS code is sent to the specified number, which must be entered in the form as confirmation. After that, the account is authorized. After accessing the personal account, the player must come up with a password and fill out the appropriate questionnaire.
As soon as the registration is over, you can make a deposit, receive bonuses and start betting.
Registration via email
When registering your new 1xbet account, remember to enter the promo code “1XBOX777” in the designated section. By doing so, you can enhance your initial 100% deposit bonus to a remarkable 130%, allowing you to enjoy a maximum welcome offer of €130. After filling in your personal information and making your deposit, you will receive an additional 100% first deposit bonus. To access your account details, simply click on the My Account icon and navigate to the bet history section. The 1xBet coupon code can be found in the top right corner of the bet slip tab.
Промокод 1xBet 2024 (Бонус при Регистрации 32500 RUB)
бонусы в 1xbet промокоды – 1XFREE777, новые пользователи букмекерской компании могут воспользоваться приветственным бонусом в размере 100% от суммы депозита до 32 500 рублей (или эквивалентную сумму в другой валюте €100). Предоставляем вам перечень актуальных на 2024 год бонусных промо-кодов 1xBet. Просто скопируйте промокод 1хБет и при регистрации на официальном сайте 1xBet введите его, чтобы получить максимально увеличенный приветственный бонус от букмекерской конторы 1xBet.
Актуальные промокоды для 1хБет ? Акция 2024 ? Бонус коды ? Фрибет Бонусы за регистрацию ? Программа лояльности ? Кэшбэк!
промокод на фрибет 1xbet фрибут – это 1XFREE777. Только с помощью него вы получите бонус в размере 100% до 32500 рублей. Все остальные коды не действительны и не предоставляют такого бонуса. Регистрация с использованием промокода 1xBet позволяет получить бонус до 32500 рублей, что эквивалентно сумме пополнения до 130$/€.
Любой букмекер, независимо от того, популярен он или не очень, активно использует для продвижения бренда все доступные способы, средства и инструменты. Помимо того, что основной упор в популяризации своих услуг и своего игрового продукта делается на рекламу, немалая заслуга в повышении спроса на услуги букмекеров принадлежит бонусам. Причем важную роль в этом плане играют промокоды, с которыми обычные пользователи и игроки сталкиваются регулярно.
Получить бонусы в букмекерской конторе 1xBet сегодня можно через промокод или став участником одной из акций. Предложения доступны каждому, как новичкам, так и игрокам со стажем.
Давайте разберемся в тонкостях бонусной программы букмекера 1xbet. Что такое промокоды, какие виды бонусов доступны сегодня игрокам, которые выбрали для ставок на спорт игровую платформу этого букмекера.
Промокод 1xBet – 1XFREE777. Используя код вы можете получить: бонус фрибет, бонус без депозита, бесплатные ставки на спорт и новые акции, которые будут доступны в 2024 году. Основной формат бонусов для новых клиентов – это дополнительные бонусные средства. Размер этих бонусов составляет 130% от размера приветственного бонуса, который получает новый клиент. Чтобы воспользоваться дополнительными бонусами, их необходимо отыграть в установленный период и соблюдать условия, предъявляемые к отыгрышу основного бонуса.
Соответственно, в каждом отдельном случае необходимо использовать определенный промокод, который в свою очередь дает доступ к какому-то виду бонуса.
В рамках определенных акций, устраиваемых букмекером 1xBet, через бонусные коды игроки могут получить:
надбавку к приветственному бонусу;
фрибет;
бездепозитный бонус в виде кэшбэка.
Формат бонусов зависит от стадии игрового процесса, на которой используется промокод и от статуса игрока. Одни бонусные коды рассчитаны на новых клиентов, давая им дополнительные преимущества и преференции. Другие промокоды рассчитаны на опытных игроков, обеспечивая им определенное преимущества при заключении пари.
Ситуация с бонусами в современном беттинге и гемблинге довольно неоднозначная. Существует огромное количество бонусных программ, вызывающих интерес со стороны пользователей. Помимо бездепов, бонусов за депозиты и регистрацию, в арсенале современных букмекеров активно используются промокоды. Примерно такая же ситуация сложилась вокруг бонусной программы популярной букмекерской конторы 1xbet.
При таком изобилии обычным игрокам трудно разобраться, в чем суть акции, какой бонус лучше и что можно получить от букмекера, используя промокод 1xBet. Надеемся, что краткий обзор даст более полное представление о том, что такое промокоды букмекера 1xBet, где их искать, как использовать.
Промокод 1хБет расскажем подробнее в этой статье сайт – предоставляет вам VIP-спортивный бонус 100%, который полностью соответствует вашему первому депозиту на сумму до €/$130. Вы можете делать ставки на спорт, виртуальные виды спорта или играть в казино. Это предложение действительно на протяжении всего 2024 года.
Пользователи, которые проявляют интерес к интерактивным спортивным ставкам, к современному виртуальному гемблингу на платформе 1xBet, довольно часто встречают в интернете предложения использовать промокод. Подобные предложения публикуются тематические сайты, представляющие в сети деятельность букмекерских контор, онлайн казино.
Именно через такие источники и распространяются промокоды.
Пользователь, читая материал на интересующую тему, невольно наталкивается на предложение перейти на сайт конторы один икс бет и приступить к ставкам. Однако подобное предложение включает в себя и мотивацию. Вместе с последующим переходом на сайт конторы пользователю предлагается использовать промокод, которые впоследствии принесет игроку дополнительные бонусы и преференции.
Предложение использовать промокод бесплатное. Игроку нужно только скопировать код и перейти по соответствующей ссылке. Если код актуальный, игрок получит в дальнейшем какие-то бонусы.
Такие предложения в интернете публикуются регулярно. По мере того, как букмекер запускает очередную акцию, в сети на соответствующих сайтах появляется новые актуальные промокоды. Букмекер не занимается распространением бонусных кодов. Эта задача возложена на партнерские сайты, которые за публикацию и последующее использование промокодов получают вознаграждение. Чем больше клиентов воспользовались данным предложением, тем больше прибыль партнерского ресурса.
бонусы в 1xbet промокоды: 1XFREE777 Вы можете получить спортивный бонус до 32 500 рублей или казино-бонус до 128000 рублей + 150 фриспинов. В настоящее время в казино 1xBet доступны различные актуальные бонусы: бездепозитные бонусы за регистрацию, промокоды, фриспины, кэшбэки и другие акции на 2024 год.
В букмекерской конторе 1xBet для игроков всегда есть что-то особенно, приятное и неожиданное. Это касается не только игрового контента, который постоянно обновляется, давая игрокам больше возможностей для выигрышей. Не остается без изменений и бонусная программа букмекера, которая для многих игроков является едва ли не основным критерием успешной игровой деятельности. Ассортимент бонусной программы 1 икс Бет впечатляет. Это и приветственный бонус, и депозитные бонусы и промокоды 1xBet. Одним словом, интересных предложений предостаточно. Остается только сделать правильный выбор.
Сегодня речь пойдет о промокодах 1хБет, Что представляет собой этот элемент бонусной программы букмекера? Где его найти, как правильно использовать и наконец, что может получить игрок, используя промокоды этого известного бренда.
Just wish to say your article is as surprising. The clarity
in your post is just excellent and i can assume you’re an expert on this subject.
Well with your permission allow me to grab your feed to keep updated
with forthcoming post. Thanks a million and please keep up the enjoyable work.
pragmatic-ko.com
잠실에서 수술을 하던 이들은 의사들이 수술용 메스를 잃어버렸고, 어디에서도 찾을 수 없는 것을 보았다.
Thank you a bunch for sharing this with all people you actually recognise what you are speaking approximately!
Bookmarked. Please additionally visit my website =). We will
have a link trade agreement among us
semaglutide tab 7mg
sm-casino1.com
“주인님…주인님…” 덩젠이 유쾌하게 그를 맞이했다.
Pretty nice post. I simply stumbled upon your blog and wanted to say that I have truly enjoyed browsing
your blog posts. In any case I will be subscribing in your feed and I am hoping
you write once more very soon!ラブドール
generic semaglutide cost
lfchungary.com
갑작스러운 눈빛에 처음에는 오만함이 있었고, 그다음에는 약간의 공포가 어쩔 수 없었다.
최신 프라그마틱 게임은 iGaming 분야에서 혁신적이고 표준화된 콘텐츠를 제공하는 선도적인 제공 업체입니다.
http://www.pragmatic-game.com
프라그마틱의 게임은 정말 다양한데, 최근에 출시된 것 중 어떤 게임이 가장 좋았나요? 공유해주세요!
https://www.murayah.com
https://www.car4bitcoins.com
https://www.bellarel.com
buy semaglutide in mexico
buy rybelsus in mexico
rybelsus tablets for weight loss cost
rybelsus 21 mg
lfchungary.com
하지만 홍지 황제가 “맑은 크리스탈 병”이라고 말하는 것을 들었습니다.
buy wegovy in canada
yangsfitness.com
선원들은 모든 시체를 함께 전시한 다음 하나씩 세었습니다.
rybelsus sale
rybelsus without prescription
semaglutide rx
wegovy canada pharmacy
lfchungary.com
두 번째 장이 배달되었습니다. 월간 티켓을 요청하십시오. 저를 지원하십시오. 매일 아침부터 밤까지 글을 쓰는 것은 매우 피곤합니다.
Promo code 1xBet for Registration
1XBOX777
The Best 1xBet promo code is 1XBOX777 to avail a 100% bonus up to $130. This code is the only valid one that offers such a generous bonus. Today, you can get the current promo code for 1xBet absolutely free! Public promo codes are the most commonly used type, specifically intended for new users registering on 1xBet. These codes can only be used during registration and can be redeemed only once. Reusing promo codes is not allowed.
You can copy this promo code 1xbet from us right now. Here you can get the most profitable promo code for today 1xbet absolutely free of charge when registering with the company. Just go from our portal to 1xbet and create a new account. The bonus amount is equal to 100% of the amount deposited on the first deposit. If you put $ 1 into the account, then the code will give you the same amount. When depositing $ 100, you will be charged an additional $ 130. Thanks to this gift, you will be able to place larger bets. When registering, 1xbet gives newcomers an amount of up to $ 130 (100 euros, 100 dollars) after the first replenishment of the account. The amount is equivalent to the amount and currency of the deposit (no more than indicated).
In this article we will tell you everything about 1xBet promo codes: what it is, how to use it when registering, where to enter it to make a free bet, and also get the maximum bonus in 2024. New users will be able to top up their account with both $1 to make their first bets, and up to $100,000 to get the maximum bonus.
1xbet promo: 1XBOX777, that you should use when registering on 1xBet. By using this code, you will receive a generous bonus of $130. Please note that any other codes are invalid and will not provide you with such a bonus. Today, the promo code for 1xBet is available for free! If you want to enter the promo code when registering in 2024 and increase your bonus to $130, it is quite easy to find such a code on the Internet. Simply enter the relevant query, and the search system will present you with a comprehensive list of websites where you can find valid and up-to-date 1xBet promo codes.
Usually, thematic resources operating on the basis of partnership agreements with a bookmaker are engaged in the publication of current bonus codes. The essence of this method is as follows. The partner site publishes materials about the bookmaker on its pages. Usually, such texts describe the advantages of the bookmaker, and also contain a hint that all of these advantages can be felt after registration. A promo code is used as a motivation tool for a speedy transition.
The user only needs to copy the code and use it during the subsequent registration in the office. For each click and the 1xBet promo code used, the partner site receives an appropriate reward. The more users took advantage of this promotion, the greater the profit of the partner site.
The bookmaker, in turn, receives new customers. Bonuses and other benefits that players receive through promo codes still need to be won back on fairly strict conditions. Accordingly, by distributing bonuses through codes, the bookmaker practically does not incur any losses.
The client also remains in the black. Thanks to the 1 x Bet registration promo codes, you can increase your welcome bonus. This applies equally to registration at the bookmaker’s office and when registering at the 1xBet casino.
After receiving an up-to-date promo code, the player must use it within the established time frame. If this is not done, the code loses its relevance and it will not be of any use in the future. The bonus code can be used only once during registration and only when creating one account. Code reuse is not provided.
Now let’s talk in detail about what the 1xbet promotion code, which was used during registration, really gives players.
The first and most important thing! The 1xBet promo code will only be valid when bundled with the main bonus. The code itself does not give the player anything.
Second! During registration, you need to enter a promo code.
Third! Bonuses are activated automatically as soon as the main bonus is activated.
For example! At the 1xBet bookmaker’s office, you can get two types of welcome bonus when registering.
In 2024, avail the 1xbet bonus promo code “1XBOX777” unlock a range of enticing bonuses for new players. Enjoy a sports bonus of 100% up to $130 or a generous casino bonus of up to $1950. These offers cater to both sports betting enthusiasts and those who enjoy gambling. As a bettor, you can even seize the opportunity to place a free bet on 1xBet, allowing you to wager without any cost.
The list of 1xBet promo codes available in the Showcase is proposed to be divided into the following categories:
Cyber. There are many sports disciplines in the bookmaker’s office, which are presented virtually. For example, cyber football or cyber basketball. Such a coupon gives the right to place a bet on the chosen discipline. The bet must include an outcome with a quote from 1.8 and above;
Games. On the resource, you can not only bet on sports, but also play games. This category allows you to purchase the opportunity to participate in one of the large list of entertainment;
Sport. The category offers to buy a coupon for a certain sports discipline. The condition of the freebet will be a bet on the sport for which the promo code was purchased, as well as the outcome coefficient from 1.8 and higher;
Bids. If customers do not want to limit themselves to a certain sports discipline, then you can purchase a coupon for a regular bet. You can choose from an ordinary, express, TOTO and bet constructor.
In the absence of points, you can always get a unique combination on other resources.
To find promo codes from what’s promo code in 1xbet is offered on thematic sites:
Various portals talk about betting shops, creating reviews on them. At the same time, they pay attention to the bonus program of companies. For this reason, promo codes from 1xBet are published there and the rules of promotions are explained. Moreover, not only specialized sites are engaged in this, but also social networks.
The 1xBet promo code is usually also distributed through other resources during registration. However, most often they are partners of a betting company. As part of the cooperation, the office provides them with a unique combination, and they share it with their audience.
A bookmaker can also send a promo code for 1xBet today. To do this, you will need to specify an email address and subscribe to the newsletter. The code is sent on the occasion of the birthday or anniversary of the betting game in the company.
For the casino section, the welcome bonus is an order of magnitude larger than for sports betting. The player does not receive the entire amount immediately. Bonuses are designed for four deposits.
100% bonuses and 30 free spins are due for the first deposit.
For the second deposit, the casino provides 50% bonuses from the deposit amount. In addition to the bonuses, there are also 35 free spins.
For the third deposit, you can get 25% of the deposit amount + 40 free spins.
For the fourth deposit, a bonus of 25% of the deposit amount and 45 free spins is due.
In total, for all four deposits, taking into account the limits, you can get 1500 EUR and 150 free spins.
Free spins will have to be used on the slots that are listed in the promotion.
As for the 1xBet promo code, which was used during registration, it should be borne in mind that the benefit will come from a code that corresponds to registration, either for sports or for the casino. In the case of the sports section, thanks to the promo code, the welcome bonus increases by 30%, so instead of 100 EUR, the player can receive 130 EUR in the form of bonuses.
In the case of the welcome bonus for the casino, the promo code increases the bonus for the first deposit by 30%. That is, in the end, instead of 100% for the first deposit, the player receives 130% of bonuses. Accordingly, the total amount of bonuses for all four deposits increases.
You will have to win back the bonuses provided through the promo code with the same wager as the main bonus.
The wagering period is 7 days from the moment of activation.
If the promo code is available to players only once during registration and only new players can use it, other bonus codes are available to everyone. To do this, it is enough to visit the “showcase of promo codes”, which is available on the official website.
With the help of such bonus codes, players can purchase various discounts and preferences. For example, for sports betting in the “promo code showcase”, you can purchase a free bet code, for an increased express coefficient, for an increased percentage of cashback. For the gambling section, bonus codes allow you to get freebets, access to bonus rounds.
However, in order to buy an up-to-date promo code, the player must have an appropriate number of promoballs on his bonus account. The points earned as part of the loyalty program can be exchanged for bonus codes in the “storefront”.
Another option where you can get a 1xbet promo code today – a gift directly from the bookmaker or from the casino. This privilege applies only to the most active clients.
All 1xBet promo codes published on the Internet are provided free of charge. You can use them only for registration and only once. 1xBet betting company issues codes for the sports section and codes that are intended for the casino section. Accordingly, each promo code is used for its intended purpose.
In order for the 1xBet bookmaker promo code to bring real benefits, three important conditions must be met:
the code must be up-to-date;
it can be used only by one user and only when registering;
use only those codes that are obtained from reliable sources.
In conclusion, it can be noted that the use of a promo code does not oblige the player to anything. This encouragement from the office is gratuitous.
Code Promo 1xBet Casino 2024
Le casino 1xBet propose une offre de bienvenue exceptionnelle pouvant atteindre 1950 euros, ainsi que 150 tours gratuits. Pour en beneficier, il est necessaire d’utiliser le code promo 1xBet – 1XLIVE777. De plus, le casino offre egalement des codes promo pour des avantages tels que des bonus sans depot a l’inscription, des tours gratuits, un programme de fidelite et des remises en argent. Ne manquez pas cette opportunite de profiter des nombreux avantages offerts par le casino 1xBet.
Le casino 1XBET vous offrira de nombreuses possibilites d’obtenir de bons gains. Si vous souhaitez rejoindre 1xBet casino, vous pouvez egalement profiter d’une offre exclusive, si vous utilisez un code promo pour un bonus, vous recevrez jusqu’a 1950 euros avec 150 tours gratuits lors de votre inscription sur 1xBet.
L’inscription est un processus simple et rapide. Il existe de nombreuses promotions differentes disponibles pour les joueurs de casino dans 1XBET.
Code Promo Sans Depot pour le Casino 1xBet : 1XLIVE777. Profitez de maniere gratuite de l’offre exclusive du casino 1XBET, qui peut atteindre jusqu’a 1950 euros/dollars dans votre devise locale, en plus de 150 tours gratuits. Pour commencer, il vous suffit de vous inscrire a un compte 1XBET en utilisant un code promotionnel.
1xBet casino est un club de divertissement integre a l’interieur d’un site de paris.
Malgre le fait que 1xbet donne la priorite absolue aux evenements sportifs, sur le site Web du bookmaker, vous pouvez jouer dans:
Machines a sous;
Jeux de table;
Poker;
Roulette.
1xbet a signe un contrat pour la location de machines a sous avec les meilleurs fournisseurs. Sur le site, vous pouvez trouver des divertissements de developpeurs tels que: NetEnd, Megaways, Mega. Les fans de jeux risques apprecieront les simulateurs tres disperses, ainsi qu’un ensemble de divertissements dans la categorie Jackpot. Les fans du jeu tardif avec une longue victoire en peu de temps aimeront la variete des machines a sous. La plupart des machines ont un taux de RTF superieur a 98%.
Les machines a sous classiques sont dotees d’un mode de version demo.
Avec son aide, les joueurs peuvent explorer les possibilites de la machine sans risquer leur propre banque.
Les machines a sous 1xBet sont situees sur la page principale du site. Sur ce type de loisir de jeu, les 1xBet insistent. En plus des machines a sous, vous pouvez trouver la section “Croupier en direct” dans la barre du menu Demarrer. Cette categorie comprend des salles en direct avec de vrais presentateurs (stickmen). D’autres joueurs deviennent des adversaires du joueur, et le fonds de prix est forme a partir de la contribution de depot de chaque participant de la table.
Offre speciale code promo 1xbet senegal: 1XLIVE777 Tours Gratuits. Le casino 1xBet 2024 propose une offre de bienvenue allant jusqu’a 1500€ avec 150 tours gratuits. Les tours gratuits permettent de participer gratuitement a un casino en ligne et de remporter de veritables gains. Le nombre de ces jeux est limite et est determine par les conditions etablies par l’administration du bookmaker. Les tours gratuits sont particulierement adaptes aux utilisateurs les plus actifs qui jouent regulierement aux machines a sous et qui sont habitues aux risques.
Le code promotionnel pour les tours gratuits est un cadeau special du casino en guise de remerciement pour le jeu actif.
Pour profiter de l’offre gratuite, il suffit de:
Soyez actif dans la section casino en ligne.
Utilisez certaines machines a sous.
Aucun effort particulier n’est necessaire pour remplir la premiere condition. La seconde demande un peu plus d’attention. Pour obtenir des tours gratuits de la societe, il est important de jouer dans une certaine machine a sous, qui est specifiee dans les termes du programme de bonus. Dans le meme temps, il ne faut pas oublier que les exigences du bookmaker changent constamment, vous devez donc les mettre a jour quotidiennement.
Code promo 1xBet 2024: 1XLIVE777 Bonus de bienvenue jusqu’a 130€. Vous pouvez acheter un code promo 1xBet via la Vitrine des codes promotionnels. Si nous parlons de coupons quotidiens, ils sont emis en l’honneur des anniversaires, des series de paris reussies ou des pertes a long terme. Cette recompense est disponible uniquement pour les utilisateurs enregistres et autorises. Les nouveaux arrivants recoivent un bonus de bienvenue. Pour utiliser le bon, vous devez avoir un questionnaire entierement rempli et etre en mesure de placer des paris. Par consequent, vous devez vous inscrire sur le site Web du bookmaker ou vous connecter a votre compte personnel.
Ensuite, vous devez etudier attentivement la ligne en direct ou d’avant-match afin de preparer un coupon de pari. Lorsque le pari est accepte, vous pourrez voir les numeros attribues au moment du pari. Les informations sur toutes les transactions de paris avec le bookmaker sont affichees dans la section “Historique des paris” https://napce.fr/wp-content/pages/1xbet_code_promotionnel_gratuit_bonus_1.html.
Promo code 1xBet for Registration
1XBOX777
The Best 1xBet promo code is 1XBOX777 to avail a 100% bonus up to $130. This code is the only valid one that offers such a generous bonus. Today, you can get the current promo code for 1xBet absolutely free! Public promo codes are the most commonly used type, specifically intended for new users registering on 1xBet. These codes can only be used during registration and can be redeemed only once. Reusing promo codes is not allowed.
You can copy this promo code 1xbet from us right now. Here you can get the most profitable promo code for today 1xbet absolutely free of charge when registering with the company. Just go from our portal to 1xbet and create a new account. The bonus amount is equal to 100% of the amount deposited on the first deposit. If you put $ 1 into the account, then the code will give you the same amount. When depositing $ 100, you will be charged an additional $ 130. Thanks to this gift, you will be able to place larger bets. When registering, 1xbet gives newcomers an amount of up to $ 130 (100 euros, 100 dollars) after the first replenishment of the account. The amount is equivalent to the amount and currency of the deposit (no more than indicated).
In this article we will tell you everything about 1xBet promo codes: what it is, how to use it when registering, where to enter it to make a free bet, and also get the maximum bonus in 2024. New users will be able to top up their account with both $1 to make their first bets, and up to $100,000 to get the maximum bonus.
1xbetpromocode: 1XBOX777, that you should use when registering on 1xBet. By using this code, you will receive a generous bonus of $130. Please note that any other codes are invalid and will not provide you with such a bonus. Today, the promo code for 1xBet is available for free! If you want to enter the promo code when registering in 2024 and increase your bonus to $130, it is quite easy to find such a code on the Internet. Simply enter the relevant query, and the search system will present you with a comprehensive list of websites where you can find valid and up-to-date 1xBet promo codes.
Usually, thematic resources operating on the basis of partnership agreements with a bookmaker are engaged in the publication of current bonus codes. The essence of this method is as follows. The partner site publishes materials about the bookmaker on its pages. Usually, such texts describe the advantages of the bookmaker, and also contain a hint that all of these advantages can be felt after registration. A promo code is used as a motivation tool for a speedy transition.
The user only needs to copy the code and use it during the subsequent registration in the office. For each click and the 1xBet promo code used, the partner site receives an appropriate reward. The more users took advantage of this promotion, the greater the profit of the partner site.
The bookmaker, in turn, receives new customers. Bonuses and other benefits that players receive through promo codes still need to be won back on fairly strict conditions. Accordingly, by distributing bonuses through codes, the bookmaker practically does not incur any losses.
The client also remains in the black. Thanks to the 1 x Bet registration promo codes, you can increase your welcome bonus. This applies equally to registration at the bookmaker’s office and when registering at the 1xBet casino.
After receiving an up-to-date promo code, the player must use it within the established time frame. If this is not done, the code loses its relevance and it will not be of any use in the future. The bonus code can be used only once during registration and only when creating one account. Code reuse is not provided.
Now let’s talk in detail about what the 1xbet promotion code, which was used during registration, really gives players.
The first and most important thing! The 1xBet promo code will only be valid when bundled with the main bonus. The code itself does not give the player anything.
Second! During registration, you need to enter a promo code.
Third! Bonuses are activated automatically as soon as the main bonus is activated.
For example! At the 1xBet bookmaker’s office, you can get two types of welcome bonus when registering.
In 2024, avail the 1xbet deposit bonus “1XBOX777” unlock a range of enticing bonuses for new players. Enjoy a sports bonus of 100% up to $130 or a generous casino bonus of up to $1950. These offers cater to both sports betting enthusiasts and those who enjoy gambling. As a bettor, you can even seize the opportunity to place a free bet on 1xBet, allowing you to wager without any cost.
The list of 1xBet promo codes available in the Showcase is proposed to be divided into the following categories:
Cyber. There are many sports disciplines in the bookmaker’s office, which are presented virtually. For example, cyber football or cyber basketball. Such a coupon gives the right to place a bet on the chosen discipline. The bet must include an outcome with a quote from 1.8 and above;
Games. On the resource, you can not only bet on sports, but also play games. This category allows you to purchase the opportunity to participate in one of the large list of entertainment;
Sport. The category offers to buy a coupon for a certain sports discipline. The condition of the freebet will be a bet on the sport for which the promo code was purchased, as well as the outcome coefficient from 1.8 and higher;
Bids. If customers do not want to limit themselves to a certain sports discipline, then you can purchase a coupon for a regular bet. You can choose from an ordinary, express, TOTO and bet constructor.
In the absence of points, you can always get a unique combination on other resources.
To find promo codes from 1xbet promo code for today is offered on thematic sites:
Various portals talk about betting shops, creating reviews on them. At the same time, they pay attention to the bonus program of companies. For this reason, promo codes from 1xBet are published there and the rules of promotions are explained. Moreover, not only specialized sites are engaged in this, but also social networks.
The 1xBet promo code is usually also distributed through other resources during registration. However, most often they are partners of a betting company. As part of the cooperation, the office provides them with a unique combination, and they share it with their audience.
A bookmaker can also send a promo code for 1xBet today. To do this, you will need to specify an email address and subscribe to the newsletter. The code is sent on the occasion of the birthday or anniversary of the betting game in the company.
For the casino section, the welcome bonus is an order of magnitude larger than for sports betting. The player does not receive the entire amount immediately. Bonuses are designed for four deposits.
100% bonuses and 30 free spins are due for the first deposit.
For the second deposit, the casino provides 50% bonuses from the deposit amount. In addition to the bonuses, there are also 35 free spins.
For the third deposit, you can get 25% of the deposit amount + 40 free spins.
For the fourth deposit, a bonus of 25% of the deposit amount and 45 free spins is due.
In total, for all four deposits, taking into account the limits, you can get 1500 EUR and 150 free spins.
Free spins will have to be used on the slots that are listed in the promotion.
As for the 1xBet promo code, which was used during registration, it should be borne in mind that the benefit will come from a code that corresponds to registration, either for sports or for the casino. In the case of the sports section, thanks to the promo code, the welcome bonus increases by 30%, so instead of 100 EUR, the player can receive 130 EUR in the form of bonuses.
In the case of the welcome bonus for the casino, the promo code increases the bonus for the first deposit by 30%. That is, in the end, instead of 100% for the first deposit, the player receives 130% of bonuses. Accordingly, the total amount of bonuses for all four deposits increases.
You will have to win back the bonuses provided through the promo code with the same wager as the main bonus.
The wagering period is 7 days from the moment of activation.
If the promo code is available to players only once during registration and only new players can use it, other bonus codes are available to everyone. To do this, it is enough to visit the “showcase of promo codes”, which is available on the official website.
With the help of such bonus codes, players can purchase various discounts and preferences. For example, for sports betting in the “promo code showcase”, you can purchase a free bet code, for an increased express coefficient, for an increased percentage of cashback. For the gambling section, bonus codes allow you to get freebets, access to bonus rounds.
However, in order to buy an up-to-date promo code, the player must have an appropriate number of promoballs on his bonus account. The points earned as part of the loyalty program can be exchanged for bonus codes in the “storefront”.
Another option where you can get a 1xbet promo code list – a gift directly from the bookmaker or from the casino. This privilege applies only to the most active clients.
All 1xBet promo codes published on the Internet are provided free of charge. You can use them only for registration and only once. 1xBet betting company issues codes for the sports section and codes that are intended for the casino section. Accordingly, each promo code is used for its intended purpose.
In order for the 1xBet bookmaker promo code to bring real benefits, three important conditions must be met:
the code must be up-to-date;
it can be used only by one user and only when registering;
use only those codes that are obtained from reliable sources.
In conclusion, it can be noted that the use of a promo code does not oblige the player to anything. This encouragement from the office is gratuitous.
buy ozempic
프라그마틱 플레이는 33개 언어와 다양한 화폐를 지원하여, 250개 이상의 게임으로 구성된 슬롯 포트폴리오를 세계 시장에 제공합니다.
프라그마틱플레이
프라그마틱의 게임은 정말 다양한데, 최근에 출시된 것 중 어떤 게임이 가장 좋았나요? 공유해주세요!
https://www.diclofenacsodium.site
https://www.patoulux.com
https://www.istantaneateatro.com
Code Promo 1xBet Casino 2024
Le casino 1xBet propose une offre de bienvenue exceptionnelle pouvant atteindre 1950 euros, ainsi que 150 tours gratuits. Pour en beneficier, il est necessaire d’utiliser le code promo 1xBet – 1XLIVE777. De plus, le casino offre egalement des codes promo pour des avantages tels que des bonus sans depot a l’inscription, des tours gratuits, un programme de fidelite et des remises en argent. Ne manquez pas cette opportunite de profiter des nombreux avantages offerts par le casino 1xBet.
Le casino 1XBET vous offrira de nombreuses possibilites d’obtenir de bons gains. Si vous souhaitez rejoindre 1xBet casino, vous pouvez egalement profiter d’une offre exclusive, si vous utilisez un code promo pour un bonus, vous recevrez jusqu’a 1950 euros avec 150 tours gratuits lors de votre inscription sur 1xBet.
L’inscription est un processus simple et rapide. Il existe de nombreuses promotions differentes disponibles pour les joueurs de casino dans 1XBET.
Code Promo Sans Depot pour le Casino 1xBet : 1XLIVE777. Profitez de maniere gratuite de l’offre exclusive du casino 1XBET, qui peut atteindre jusqu’a 1950 euros/dollars dans votre devise locale, en plus de 150 tours gratuits. Pour commencer, il vous suffit de vous inscrire a un compte 1XBET en utilisant un code promotionnel.
1xBet casino est un club de divertissement integre a l’interieur d’un site de paris.
Malgre le fait que 1xbet donne la priorite absolue aux evenements sportifs, sur le site Web du bookmaker, vous pouvez jouer dans:
Machines a sous;
Jeux de table;
Poker;
Roulette.
1xbet a signe un contrat pour la location de machines a sous avec les meilleurs fournisseurs. Sur le site, vous pouvez trouver des divertissements de developpeurs tels que: NetEnd, Megaways, Mega. Les fans de jeux risques apprecieront les simulateurs tres disperses, ainsi qu’un ensemble de divertissements dans la categorie Jackpot. Les fans du jeu tardif avec une longue victoire en peu de temps aimeront la variete des machines a sous. La plupart des machines ont un taux de RTF superieur a 98%.
Les machines a sous classiques sont dotees d’un mode de version demo.
Avec son aide, les joueurs peuvent explorer les possibilites de la machine sans risquer leur propre banque.
Les machines a sous 1xBet sont situees sur la page principale du site. Sur ce type de loisir de jeu, les 1xBet insistent. En plus des machines a sous, vous pouvez trouver la section “Croupier en direct” dans la barre du menu Demarrer. Cette categorie comprend des salles en direct avec de vrais presentateurs (stickmen). D’autres joueurs deviennent des adversaires du joueur, et le fonds de prix est forme a partir de la contribution de depot de chaque participant de la table.
Offre speciale meilleur code promo 1xbet: 1XLIVE777 Tours Gratuits. Le casino 1xBet 2024 propose une offre de bienvenue allant jusqu’a 1500€ avec 150 tours gratuits. Les tours gratuits permettent de participer gratuitement a un casino en ligne et de remporter de veritables gains. Le nombre de ces jeux est limite et est determine par les conditions etablies par l’administration du bookmaker. Les tours gratuits sont particulierement adaptes aux utilisateurs les plus actifs qui jouent regulierement aux machines a sous et qui sont habitues aux risques.
Le code promotionnel pour les tours gratuits est un cadeau special du casino en guise de remerciement pour le jeu actif.
Pour profiter de l’offre gratuite, il suffit de:
Soyez actif dans la section casino en ligne.
Utilisez certaines machines a sous.
Aucun effort particulier n’est necessaire pour remplir la premiere condition. La seconde demande un peu plus d’attention. Pour obtenir des tours gratuits de la societe, il est important de jouer dans une certaine machine a sous, qui est specifiee dans les termes du programme de bonus. Dans le meme temps, il ne faut pas oublier que les exigences du bookmaker changent constamment, vous devez donc les mettre a jour quotidiennement.
Code promo 1xBet 2024: 1XLIVE777 Bonus de bienvenue jusqu’a 130€. Vous pouvez acheter un code promo 1xBet via la Vitrine des codes promotionnels. Si nous parlons de coupons quotidiens, ils sont emis en l’honneur des anniversaires, des series de paris reussies ou des pertes a long terme. Cette recompense est disponible uniquement pour les utilisateurs enregistres et autorises. Les nouveaux arrivants recoivent un bonus de bienvenue. Pour utiliser le bon, vous devez avoir un questionnaire entierement rempli et etre en mesure de placer des paris. Par consequent, vous devez vous inscrire sur le site Web du bookmaker ou vous connecter a votre compte personnel.
Ensuite, vous devez etudier attentivement la ligne en direct ou d’avant-match afin de preparer un coupon de pari. Lorsque le pari est accepte, vous pourrez voir les numeros attribues au moment du pari. Les informations sur toutes les transactions de paris avec le bookmaker sont affichees dans la section “Historique des paris” https://popvalais.ch/wp-includes/inc/?code-promo-1xbet-burkina-faso-78-000xof.html.
Experience the rush of adrenaline at our Mexican casino site. With fast-paced action and heart-pounding excitement, you’ll never want to stop spinning the reels. casino online tu camino hacia el exito.
Join the fun at our Mexican online casino and discover why we’re the hottest destination for players seeking big wins and non-stop entertainment. caliente casino en linea la clave para una vida lujosa.
chutneyb.com
그는 차가운 표정으로 앞에 있는 빈 책상을 가리켰다.
12. Стандартные цены на монтаж кондиционера
кондиционер с установкой https://montazh-kondicionera-moskva.ru .
6. Основные этапы установки кондиционера
r 32 https://montazh-kondicionera-moskva.ru .
buy ozempic from canada
14. Сроки и стоимость монтажа кондиционера: что важно знать?
кондиционер инверторный https://montazh-kondicionera-moskva.ru/ .
Experience the rush of adrenaline at our Mexican casino site. With fast-paced action and heart-pounding excitement, you’ll never want to stop spinning the reels. caliente tu camino hacia el exito.
rybelsus diabetes medication
3. Этапы профессионального монтажа кондиционера
стоимость кондиционера с установкой https://www.montazh-kondicionera-moskva.ru/ .
rybelsus 14mg
brand ozempic
15. Важные аспекты монтажа кондиционера в квартире
кондиционер монтаж https://montazh-kondicionera-moskva.ru/ .
buy ozempic
ozempic generic
wegovy pills
1xBet Promo Codes and Bonuses 2024
Get up to €1950 + 150 free spins for casino and 100% up to €130 for sports betting by using the 1xbet promo code bonus “1XBOX777” when you register. This offer is only valid 2024 for new registrations. 1xBet promotional code appears as a blend of numerical digits, alphabets, and various symbols. The crucial aspect here is that this blend is exclusive and never duplicates elsewhere. This blend serves as a code to acquire bonuses, hence it is also referred to as a combination code or a bonus code.
The 1xBet bookmaker frequently issues a series of promotional codes, enabling players to obtain remarkable bonuses without any cost.
There are two types of bonus codes:
promotional public promo codes that are used only during registration;
individual codes that are provided as gifts or purchased directly by players.
Accordingly, depending on the type, the method of distribution of bonus codes also differs. In the first case, 1xBet promo codes are freely available and published on the Internet. In the second case, we are talking either about sending codes individually, or about purchasing a bonus code through the “showcase of promo codes” on the 1xBet website.
1x bet free promo code: 1XBOX777 Receive a 130% bonus on your initial deposit by using the exclusive 2024. This offer is available for new users who register on the official website of 1xBet. By activating the bonus code, you can enjoy a free bet bonus of up to $130. The 1xbet welcome bonus 2023 are designed to give players the chance to play for free, with benefits such as free spins and cashback on bets placed.
If one bonus account is used to accumulate bonus points, then the second account is designed to work with the main package bonuses operating in the 1xbet bookmaker. Unlike promo points, the bonuses provided by the bookmaker have monetary value. In order to convert bonus funds into real money available for withdrawal, you need to fulfill the conditions of the wager. In simple terms, bonuses need to be won back.
You can also get a promo code for your Birthday. In this case, free spins may not have a wager, and the amounts won are immediately credited to the game account. Regular customers can get a promo code in the casino itself, using the “promo code showcase”. To do this, you need to exchange the points earned under the loyalty program for the corresponding code. Each promo code has a specific format and its own nominal value from 50 to 100 points. Through the codes purchased in the promo code showcase, you can buy free spins, increase the percentage of cashback, and apply for participation in the tournament.
All promo codes are valid for a certain period. Unlike the codes that are used when registering with a bookmaker, bonus codes for casinos can be used by players regularly.
Join the elite ranks of winners at our Mexican online casino. With exclusive rewards and VIP perks, you’ll be treated like royalty every time you play. mexplay casino la riqueza esta a tus pies.
Советуем посетить сайт о кино https://kinokabra.ru/
Также не забудьте добавить сайт в закладки: https://kinokabra.ru/
Code Promo 1xBet Casino 2024
Le casino 1xBet propose une offre de bienvenue exceptionnelle pouvant atteindre 1950 euros, ainsi que 150 tours gratuits. Pour en beneficier, il est necessaire d’utiliser le code promo 1xBet – 1XLIVE777. De plus, le casino offre egalement des codes promo pour des avantages tels que des bonus sans depot a l’inscription, des tours gratuits, un programme de fidelite et des remises en argent. Ne manquez pas cette opportunite de profiter des nombreux avantages offerts par le casino 1xBet.
Le casino 1XBET vous offrira de nombreuses possibilites d’obtenir de bons gains. Si vous souhaitez rejoindre 1xBet casino, vous pouvez egalement profiter d’une offre exclusive, si vous utilisez un code promo pour un bonus, vous recevrez jusqu’a 1950 euros avec 150 tours gratuits lors de votre inscription sur 1xBet.
L’inscription est un processus simple et rapide. Il existe de nombreuses promotions differentes disponibles pour les joueurs de casino dans 1XBET.
Code Promo Sans Depot pour le Casino 1xBet : 1XLIVE777. Profitez de maniere gratuite de l’offre exclusive du casino 1XBET, qui peut atteindre jusqu’a 1950 euros/dollars dans votre devise locale, en plus de 150 tours gratuits. Pour commencer, il vous suffit de vous inscrire a un compte 1XBET en utilisant un code promotionnel.
1xBet casino est un club de divertissement integre a l’interieur d’un site de paris.
Malgre le fait que 1xbet donne la priorite absolue aux evenements sportifs, sur le site Web du bookmaker, vous pouvez jouer dans:
Machines a sous;
Jeux de table;
Poker;
Roulette.
1xbet a signe un contrat pour la location de machines a sous avec les meilleurs fournisseurs. Sur le site, vous pouvez trouver des divertissements de developpeurs tels que: NetEnd, Megaways, Mega. Les fans de jeux risques apprecieront les simulateurs tres disperses, ainsi qu’un ensemble de divertissements dans la categorie Jackpot. Les fans du jeu tardif avec une longue victoire en peu de temps aimeront la variete des machines a sous. La plupart des machines ont un taux de RTF superieur a 98%.
Les machines a sous classiques sont dotees d’un mode de version demo.
Avec son aide, les joueurs peuvent explorer les possibilites de la machine sans risquer leur propre banque.
Les machines a sous 1xBet sont situees sur la page principale du site. Sur ce type de loisir de jeu, les 1xBet insistent. En plus des machines a sous, vous pouvez trouver la section “Croupier en direct” dans la barre du menu Demarrer. Cette categorie comprend des salles en direct avec de vrais presentateurs (stickmen). D’autres joueurs deviennent des adversaires du joueur, et le fonds de prix est forme a partir de la contribution de depot de chaque participant de la table.
Offre speciale bonus de bienvenue 1xbet: 1XLIVE777 Tours Gratuits. Le casino 1xBet 2024 propose une offre de bienvenue allant jusqu’a 1500€ avec 150 tours gratuits. Les tours gratuits permettent de participer gratuitement a un casino en ligne et de remporter de veritables gains. Le nombre de ces jeux est limite et est determine par les conditions etablies par l’administration du bookmaker. Les tours gratuits sont particulierement adaptes aux utilisateurs les plus actifs qui jouent regulierement aux machines a sous et qui sont habitues aux risques.
Le code promotionnel pour les tours gratuits est un cadeau special du casino en guise de remerciement pour le jeu actif.
Pour profiter de l’offre gratuite, il suffit de:
Soyez actif dans la section casino en ligne.
Utilisez certaines machines a sous.
Aucun effort particulier n’est necessaire pour remplir la premiere condition. La seconde demande un peu plus d’attention. Pour obtenir des tours gratuits de la societe, il est important de jouer dans une certaine machine a sous, qui est specifiee dans les termes du programme de bonus. Dans le meme temps, il ne faut pas oublier que les exigences du bookmaker changent constamment, vous devez donc les mettre a jour quotidiennement.
Code promo 1xBet 2024: 1XLIVE777 Bonus de bienvenue jusqu’a 130€. Vous pouvez acheter un code promo 1xBet via la Vitrine des codes promotionnels. Si nous parlons de coupons quotidiens, ils sont emis en l’honneur des anniversaires, des series de paris reussies ou des pertes a long terme. Cette recompense est disponible uniquement pour les utilisateurs enregistres et autorises. Les nouveaux arrivants recoivent un bonus de bienvenue. Pour utiliser le bon, vous devez avoir un questionnaire entierement rempli et etre en mesure de placer des paris. Par consequent, vous devez vous inscrire sur le site Web du bookmaker ou vous connecter a votre compte personnel.
Ensuite, vous devez etudier attentivement la ligne en direct ou d’avant-match afin de preparer un coupon de pari. Lorsque le pari est accepte, vous pourrez voir les numeros attribues au moment du pari. Les informations sur toutes les transactions de paris avec le bookmaker sont affichees dans la section “Historique des paris” https://www.gilmaire-etienne.com/wp-content/pages/code-promo-1xbet-cote-d-ivoire-bonus-200.html.
wegovy mexico
strelkaproject.com
하지만 자신의 자식이나 손주들이 그에게 선물을 주면 느낌이 달라진다.
Get an incredible bonus offer at 1xBet 2024! Make your first deposit and get a 100% bonus, up to $130 in extra funds.
1xbet singapore: 1XBOX777 allows you to benefit from a VIP offer of 100% up to €130 on sports betting or €1950 +150 spins, guaranteeing you the maximum bonus. No other 1xBet code will allow you to obtain such advantages. Working today, it will give wonderful bonuses for new players in 2024. The 1xbet promo code is a great opportunity to multiply your bankroll for exciting free bets.
We remind you! The promo code is issued only within the framework of a certain promotion organized by the gaming portal. Therefore, this combination is unique and never repeats. The code can only be used under the conditions specified in the promotion.
It is this combination that can be found in the text of an article or material on a thematic site describing or advertising the activities of the 1 x Bet bookmaker. The user is asked to copy the combination, go to the office’s website and use the code during registration.
How? What should I do and what is the sequence of user actions?
For example! The user decided to become a regular customer of the bookmaker. To do this, go to the official website of the office and proceed with registration. There are quite a lot of registration options in this case:
in one click;
through a mobile phone number;
via email address;
through social media accounts.
In each of the options, in addition to filling out forms with contact and personal data, the player is provided with a form in which to enter the promo code 1IXBET. The exception is registration via social networks. In this case, the promo code cannot be applied.
Valid until 2024, the 1x bet promo codes “1XBOX777” can be used when registering on the 1xBet website. By using this promo code, new players can enjoy a 100% increased bonus of up to $130 on their first deposit. It is important to note that the promo code must be entered during the registration process on the official 1xBet website. Additionally, there are various promo codes available for today, and if the bonus code is still valid, players will also receive an additional surcharge along with the main bonus. Don’t forget to check out the article for free bet promo codes located at the bottom.
Bonuses have an important place in the 1xbet bookmaker’s customer service system. Along with numerous promotions in which a variety of bonuses and preferences are available to players, bonus promo codes are actively used in this office. Their main purpose is to increase the attractiveness of the bookmaker in the eyes of customers by providing them with additional bonuses and benefits.
For those who have been playing for a long time, there is no need to tell once again what a promo code is. For beginners, it will not hurt to learn about 1xbet promo codes in more detail.
1xBet free bet promo code “1XBOX777”, you can unlock exclusive bonuses 2024. These bonuses include up to $130 for the sportsbook, as well as €1950 and 150 free spins. The promo code is a special combination of characters that needs to be entered on the company’s website to receive an enhanced bonus. Each promo code provides different gifts, usually in the form of a free bet. This unique combination acts as a key, granting users specific benefits during gameplay.
Bonus codes are issued by the bookmaker during the next promotion. Accordingly, the terms of the promotion set the number of bonus codes, the validity period and the conditions under which it can be obtained and applied. All promo codes are provided to players for free.
It is important to note! The bookmaker arranges promotions within which promo codes are issued, not to the detriment of himself. It is not a fact that the bonuses provided by the promo code will bring the player a mandatory win. Almost all bonuses have pretty tough wagering, so there is no need to talk about quick wins and easy money.
As for the distribution of 1xbet promo code casino, the main source of current codes are partner sites. It is on these web resources that materials about the betting shop are published. It is in these materials that the advantages that the player receives by registering in the office are described. In such tests, the bonus code is most often included as an element of motivation to move directly to registration in the office as soon as possible.
In addition to partner sites, current bonus codes are distributed through popular social messengers Telegram and Viber. You can subscribe to the bookmaker’s newsletter to receive up-to-date codes, about which promotions are held in the office.
All of the above sources of obtaining promo codes can be regarded as reliable. So it will not be difficult to find and get the code for users. It is important for the player to decide whether he needs a 1xbet promo code, for what and for what purpose.
ozempic cost
1xBet registration promo code: 1XBOX777, to claim the welcome bonus 2024. By entering this promo code during the registration process, players can receive a generous bonus of $130. It is important to note that all the enticing features of the 1xbet bookmaker bonus program are accessible to players only after completing the registration. Even if a player comes across a free promo code on the internet, it will only be beneficial once they have successfully registered.
1xBet 2024, a renowned online bookmaker, provides a wide range of betting options on various sports, with a particular focus on football. Take a glance at the table’s comprehensive list to discover the latest bonuses and the exclusive 1xBet bonus code.
New players can enjoy welcome bonus at 1xBet with the promo code 1XBOX777 https://www.amec.com.vn/wp-pages/pag/%201xbet_registration_promo_code_2020.html. This bonus offers a 100% sports bonus up to $130 or a casino bonus of up to $1950. To take advantage of this offer, make sure to use the 1xBet bonus code: 1XBOX777 during the registration process. Simply log into the website, click on the “Register” button, provide all the necessary information, and finalize the process by selecting the green button. Creating an account at this bookmaker is quick and easy, typically taking only 1-2 minutes.
Players are given a choice of four registration options. Let’s consider each of them in detail:
Registration in 1 click
This option is the simplest, since the player specifies a minimum of information – the country of residence at the time of registration, the game currency. You can also enter a promo code here.
During registration, do not forget to make a choice of a welcome bonus. In this case, we are interested in a welcome bonus for the first deposit for sports.
By default, you need to agree with the rules of the bookmaker, with the privacy policy. By agreeing to the rules, the player confirms his age of majority.
Please make use of the 1xBet promo code: 1XBOX777 when creating a new account at 1xBet to enjoy a 100% bonus up to €/$130 https://www.panamericano.us/assets/inc/1xbet_promo_code_for_registration.html. These bonus funds can be used for placing bets on sports and in the 1xBet casino section. Furthermore, there is also a bonus code available for free sports bets. Kindly ensure that your phone number, IP address, and email have not been previously used in the system to comply with the promotion’s terms and conditions.
Authorization of a new account is carried out automatically. The client receives an ID number and password, which are the identifiers of the new account. After logging into your personal account, it is recommended to change your password, fill out a questionnaire in your personal profile, specifying your mobile number and email address. This information will be required for subsequent verification, which is a mandatory procedure.
Registration by mobile number
The promo code 1xBet “1XBOX777”, valid until 2024, allows you to enjoy a 100% welcome bonus up to 130$. Another useful tip is to follow brands on social media http://www.lngjewelry.com/images/pages/?1xbet_registration__promo_code_2020.html. Often, brands offer free promo codes on their social media profiles as part of a contest, private sale, or limited-time promotion.
This time the player will have to specify the country of residence, the currency of the account, his mobile phone number. If you have a promo code, you should enter it in the appropriate form. Again, the main thing is not to forget to specify what kind of welcome bonus you are interested in.
Again, the user needs to agree with the rules of the office, confirm the compliance of the age with the established age limit.
An SMS code is sent to the specified number, which must be entered in the form as confirmation. After that, the account is authorized. After accessing the personal account, the player must come up with a password and fill out the appropriate questionnaire.
As soon as the registration is over, you can make a deposit, receive bonuses and start betting.
Registration via email
When registering your new 1xbet account, remember to enter the promo code “1XBOX777” in the designated section. By doing so, you can enhance your initial 100% deposit bonus to a remarkable 130%, allowing you to enjoy a maximum welcome offer of €130. After filling in your personal information and making your deposit, you will receive an additional 100% first deposit bonus. To access your account details, simply click on the My Account icon and navigate to the bet history section. The 1xBet coupon code can be found in the top right corner of the bet slip tab.
даркнет вход
Даркнет – темное пространство Интернета, доступен только для тех, кому знает правильный вход. Этот прятанный уголок виртуального мира служит местом для неизвестных транзакций, обмена информацией и взаимодействия сокрытыми сообществами. Однако, чтобы погрузиться в этот темный мир, необходимо преодолеть несколько барьеров и использовать специальные инструменты.
Использование специальных браузеров: Для доступа к даркнету обычный браузер не подойдет. На помощь приходят особые браузеры, такие как Tor (The Onion Router). Tor позволяет пользователям обходить цензуру и обеспечивает анонимность, персонализируя и перенаправляя запросы через различные серверы.
Адреса в даркнете: Обычные домены в даркнете заканчиваются на “.onion”. Для поиска ресурсов в даркнете, нужно использовать поисковики, специализированные для этой среды. Однако следует быть осторожным, так как далеко не все ресурсы там законны.
Защита анонимности: При посещении даркнета следует принимать меры для обеспечения анонимности. Использование виртуальных частных сетей (VPN), блокировщиков скриптов и антивирусных программ является обязательным. Это поможет избежать различных угроз и сохранить конфиденциальность.
Электронные валюты и биткоины: В даркнете часто используются цифровые финансы, в основном биткоины, для скрытных транзакций. Перед входом в даркнет следует ознакомиться с основами использования электронных валют, чтобы избежать финансовых рисков.
Правовые аспекты: Следует помнить, что многие действия в даркнете могут быть противозаконными и противоречить законам различных стран. Пользование даркнетом несет риски, и неразрешенные действия могут привести к серьезным юридическим последствиям.
Заключение: Даркнет – это неизведанное пространство сети, наполненное анонимности и тайн. Вход в этот мир требует уникальных навыков и предосторожности. При всем мистическом обаянии даркнета важно помнить о потенциальных рисках и последствиях, связанных с его использованием.
сколько стоит лазерный сварочный аппарат https://www.apparaty-lazernoy-svarki.ru .
Даркнет список
Введение в Даркнет: Определение и Основополагающие Характеристики
Разъяснение понятия даркнета, возможных отличий от обычного интернета, и ключевых черт этого таинственного мира.
Как Войти в Темный Интернет: Руководство по Скрытому Входу
Подробное разъяснение шагов, требуемых для доступа в даркнет, включая использование эксклюзивных браузеров и инструментов.
Адресация сайтов в Даркнете: Секреты .onion-Доменов
Разъяснение, как функционируют .onion-домены, и какие ресурсы они представляют, с акцентом на безопасном поиске и применении.
Безопасность и Анонимность в Даркнете: Шаги для Пользовательской Защиты
Рассмотрение техник и инструментов для сохранения анонимности при эксплуатации даркнета, включая VPN и другие средства.
Цифровые Деньги в Даркнете: Роль Биткоинов и Криптовалют
Анализ использования цифровых валют, в главном биткоинов, для осуществления анонимных транзакций в даркнете.
Поисковая Активность в Даркнете: Специфика и Риски
Изучение поисковых механизмов в даркнете, предупреждения о потенциальных рисках и нелегальных ресурсах.
Юридические Стороны Даркнета: Ответственность и Результаты
Рассмотрение законных аспектов использования даркнета, предупреждение о возможных юридических последствиях.
Темный Интернет и Информационная Безопасность: Возможные Опасности и Защитные Меры
Анализ возможных киберугроз в даркнете и советы по обеспечению безопасности от них.
Даркнет и Социальные Сети: Скрытое Взаимодействие и Группы
Изучение влияния даркнета в области социальных взаимодействий и формировании скрытых сообществ.
Будущее Даркнета: Тенденции и Предсказания
Предсказания развития даркнета и возможные изменения в его структуре в будущем.
Взлом телеграм
Взлом Телеграм: Легенды и Реальность
Telegram – это известный мессенджер, признанный своей превосходной степенью кодирования и безопасности данных пользователей. Однако, в современном цифровом мире тема вторжения в Телеграм периодически поднимается. Давайте рассмотрим, что на самом деле стоит за этим термином и почему нарушение Телеграм чаще является мифом, чем фактом.
Шифрование в Telegram: Основные принципы Защиты
Telegram известен своим высоким уровнем кодирования. Для обеспечения приватности переписки между пользователями используется протокол MTProto. Этот протокол обеспечивает конечно-конечное кодирование, что означает, что только отправитель и получатель могут читать сообщения.
Легенды о Взломе Телеграма: Почему они возникают?
В последнее время в сети часто появляются утверждения о взломе Телеграма и доступе к персональной информации пользователей. Однако, основная часть этих утверждений оказываются неточными данными, часто возникающими из-за непонимания принципов работы мессенджера.
Кибератаки и Уязвимости: Фактические Угрозы
Хотя нарушение Телеграма в большинстве случаев является трудной задачей, существуют актуальные опасности, с которыми сталкиваются пользователи. Например, атаки на отдельные аккаунты, вредоносные программы и другие методы, которые, тем не менее, требуют в личном участии пользователя в их распространении.
Защита Персональных Данных: Советы для Пользователей
Несмотря на отсутствие точной угрозы нарушения Телеграма, важно соблюдать базовые правила кибербезопасности. Регулярно обновляйте приложение, используйте двухфакторную аутентификацию, избегайте подозрительных ссылок и мошеннических атак.
Итог: Фактическая Угроза или Излишняя беспокойство?
Взлом Telegram, как обычно, оказывается неоправданным страхом, созданным вокруг обсуждаемой темы без явных доказательств. Однако безопасность всегда остается приоритетом, и участники мессенджера должны быть бдительными и следовать рекомендациям по обеспечению безопасности своей персональных данных
semaglutide online
order wegovy
buy ozempic from canada online
Взлом ватцап
Взлом WhatsApp: Реальность и Мифы
WhatsApp – один из известных мессенджеров в мире, массово используемый для передачи сообщениями и файлами. Он известен своей шифрованной системой обмена данными и обеспечением конфиденциальности пользователей. Однако в сети время от времени возникают утверждения о возможности нарушения Вотсап. Давайте разберемся, насколько эти утверждения соответствуют фактичности и почему тема нарушения Вотсап вызывает столько дискуссий.
Кодирование в Вотсап: Защита Личной Информации
WhatsApp применяет точка-точка кодирование, что означает, что только отправитель и получающая сторона могут понимать сообщения. Это стало фундаментом для доверия многих пользователей мессенджера к защите их личной информации.
Легенды о Взломе Вотсап: Почему Они Появляются?
Интернет периодически наполняют слухи о нарушении Вотсап и возможном доступе к переписке. Многие из этих утверждений часто не имеют оснований и могут быть результатом паники или дезинформации.
Реальные Угрозы: Кибератаки и Безопасность
Хотя нарушение Вотсап является сложной задачей, существуют реальные угрозы, такие как кибератаки на отдельные аккаунты, фишинг и вредоносные программы. Исполнение мер безопасности важно для минимизации этих рисков.
Охрана Личной Информации: Советы Пользователям
Для укрепления безопасности своего аккаунта в WhatsApp пользователи могут использовать двухфакторную аутентификацию, регулярно обновлять приложение, избегать сомнительных ссылок и следить за конфиденциальностью своего устройства.
Заключение: Реальность и Осторожность
Взлом WhatsApp, как обычно, оказывается трудным и маловероятным сценарием. Однако важно помнить о актуальных угрозах и принимать меры предосторожности для сохранения своей личной информации. Соблюдение рекомендаций по безопасности помогает поддерживать конфиденциальность и уверенность в использовании мессенджера
semaglutide canada pharmacy
Hello would you mind letting me know which web host you’re utilizing?
I’ve loaded your blog in 3 different browsers and I must say this blog loads a lot faster then most.
Can you suggest a good hosting provider at a fair price?
Many thanks, I appreciate it!
Взлом Вотсап: Фактичность и Мифы
Вотсап – один из самых популярных мессенджеров в мире, широко используемый для передачи сообщениями и файлами. Он прославился своей шифрованной системой обмена данными и обеспечением конфиденциальности пользователей. Однако в интернете время от времени возникают утверждения о возможности взлома Вотсап. Давайте разберемся, насколько эти утверждения соответствуют реальности и почему тема взлома WhatsApp вызывает столько дискуссий.
Кодирование в WhatsApp: Охрана Личной Информации
WhatsApp применяет точка-точка шифрование, что означает, что только передающая сторона и получающая сторона могут понимать сообщения. Это стало основой для доверия многих пользователей мессенджера к защите их личной информации.
Мифы о Взломе WhatsApp: Почему Они Появляются?
Интернет периодически наполняют слухи о нарушении WhatsApp и возможном входе к переписке. Многие из этих утверждений порой не имеют оснований и могут быть результатом паники или дезинформации.
Реальные Угрозы: Кибератаки и Охрана
Хотя взлом WhatsApp является сложной задачей, существуют реальные угрозы, такие как кибератаки на индивидуальные аккаунты, фишинг и вредоносные программы. Исполнение мер охраны важно для минимизации этих рисков.
Охрана Личной Информации: Советы Пользователям
Для укрепления безопасности своего аккаунта в WhatsApp пользователи могут использовать двухэтапную проверку, регулярно обновлять приложение, избегать подозрительных ссылок и следить за конфиденциальностью своего устройства.
Итог: Фактическая и Осторожность
Нарушение WhatsApp, как правило, оказывается трудным и маловероятным сценарием. Однако важно помнить о реальных угрозах и принимать меры предосторожности для защиты своей личной информации. Соблюдение рекомендаций по охране помогает поддерживать конфиденциальность и уверенность в использовании мессенджера.
madridnortehoy.com
Zhu Houzhao는 그것에 대해 생각하면서 이미 흥분하여 손을 비비고 있었습니다.
pragmatic-ko.com
Wang Bushi의 마음 속에서… 그는 매우 편안하고 멋진 느낌을 느꼈습니다.
wegovy mexico
lfchungary.com
그는 중문으로 나가지 않고 류저택의 작은 문으로 나갔다.
rybelsus pills
generic ozempic
rybelsus tablets buy
buy semaglutide online from india
Promo code 1xBet for Registration
1XBOX777
The Best 1xBet promo code is 1XBOX777 to avail a 100% bonus up to $130. This code is the only valid one that offers such a generous bonus. Today, you can get the current promo code for 1xBet absolutely free! Public promo codes are the most commonly used type, specifically intended for new users registering on 1xBet. These codes can only be used during registration and can be redeemed only once. Reusing promo codes is not allowed.
You can copy this promo code 1xbet from us right now. Here you can get the most profitable promo code for today 1xbet absolutely free of charge when registering with the company. Just go from our portal to 1xbet and create a new account. The bonus amount is equal to 100% of the amount deposited on the first deposit. If you put $ 1 into the account, then the code will give you the same amount. When depositing $ 100, you will be charged an additional $ 130. Thanks to this gift, you will be able to place larger bets. When registering, 1xbet gives newcomers an amount of up to $ 130 (100 euros, 100 dollars) after the first replenishment of the account. The amount is equivalent to the amount and currency of the deposit (no more than indicated).
In this article we will tell you everything about 1xBet promo codes: what it is, how to use it when registering, where to enter it to make a free bet, and also get the maximum bonus in 2024. New users will be able to top up their account with both $1 to make their first bets, and up to $100,000 to get the maximum bonus.
one x bet promo code: 1XBOX777, that you should use when registering on 1xBet. By using this code, you will receive a generous bonus of $130. Please note that any other codes are invalid and will not provide you with such a bonus. Today, the promo code for 1xBet is available for free! If you want to enter the promo code when registering in 2024 and increase your bonus to $130, it is quite easy to find such a code on the Internet. Simply enter the relevant query, and the search system will present you with a comprehensive list of websites where you can find valid and up-to-date 1xBet promo codes.
Usually, thematic resources operating on the basis of partnership agreements with a bookmaker are engaged in the publication of current bonus codes. The essence of this method is as follows. The partner site publishes materials about the bookmaker on its pages. Usually, such texts describe the advantages of the bookmaker, and also contain a hint that all of these advantages can be felt after registration. A promo code is used as a motivation tool for a speedy transition.
The user only needs to copy the code and use it during the subsequent registration in the office. For each click and the 1xBet promo code used, the partner site receives an appropriate reward. The more users took advantage of this promotion, the greater the profit of the partner site.
The bookmaker, in turn, receives new customers. Bonuses and other benefits that players receive through promo codes still need to be won back on fairly strict conditions. Accordingly, by distributing bonuses through codes, the bookmaker practically does not incur any losses.
The client also remains in the black. Thanks to the 1 x Bet registration promo codes, you can increase your welcome bonus. This applies equally to registration at the bookmaker’s office and when registering at the 1xBet casino.
After receiving an up-to-date promo code, the player must use it within the established time frame. If this is not done, the code loses its relevance and it will not be of any use in the future. The bonus code can be used only once during registration and only when creating one account. Code reuse is not provided.
Now let’s talk in detail about what the 1xbet pakistan promo code, which was used during registration, really gives players.
The first and most important thing! The 1xBet promo code will only be valid when bundled with the main bonus. The code itself does not give the player anything.
Second! During registration, you need to enter a promo code.
Third! Bonuses are activated automatically as soon as the main bonus is activated.
For example! At the 1xBet bookmaker’s office, you can get two types of welcome bonus when registering.
In 2024, avail the promocode for 1xbet “1XBOX777” unlock a range of enticing bonuses for new players. Enjoy a sports bonus of 100% up to $130 or a generous casino bonus of up to $1950. These offers cater to both sports betting enthusiasts and those who enjoy gambling. As a bettor, you can even seize the opportunity to place a free bet on 1xBet, allowing you to wager without any cost.
The list of 1xBet promo codes available in the Showcase is proposed to be divided into the following categories:
Cyber. There are many sports disciplines in the bookmaker’s office, which are presented virtually. For example, cyber football or cyber basketball. Such a coupon gives the right to place a bet on the chosen discipline. The bet must include an outcome with a quote from 1.8 and above;
Games. On the resource, you can not only bet on sports, but also play games. This category allows you to purchase the opportunity to participate in one of the large list of entertainment;
Sport. The category offers to buy a coupon for a certain sports discipline. The condition of the freebet will be a bet on the sport for which the promo code was purchased, as well as the outcome coefficient from 1.8 and higher;
Bids. If customers do not want to limit themselves to a certain sports discipline, then you can purchase a coupon for a regular bet. You can choose from an ordinary, express, TOTO and bet constructor.
In the absence of points, you can always get a unique combination on other resources.
To find promo codes from 1xbet whatsapp number sri lanka is offered on thematic sites:
Various portals talk about betting shops, creating reviews on them. At the same time, they pay attention to the bonus program of companies. For this reason, promo codes from 1xBet are published there and the rules of promotions are explained. Moreover, not only specialized sites are engaged in this, but also social networks.
The 1xBet promo code is usually also distributed through other resources during registration. However, most often they are partners of a betting company. As part of the cooperation, the office provides them with a unique combination, and they share it with their audience.
A bookmaker can also send a promo code for 1xBet today. To do this, you will need to specify an email address and subscribe to the newsletter. The code is sent on the occasion of the birthday or anniversary of the betting game in the company.
For the casino section, the welcome bonus is an order of magnitude larger than for sports betting. The player does not receive the entire amount immediately. Bonuses are designed for four deposits.
100% bonuses and 30 free spins are due for the first deposit.
For the second deposit, the casino provides 50% bonuses from the deposit amount. In addition to the bonuses, there are also 35 free spins.
For the third deposit, you can get 25% of the deposit amount + 40 free spins.
For the fourth deposit, a bonus of 25% of the deposit amount and 45 free spins is due.
In total, for all four deposits, taking into account the limits, you can get 1500 EUR and 150 free spins.
Free spins will have to be used on the slots that are listed in the promotion.
As for the 1xBet promo code, which was used during registration, it should be borne in mind that the benefit will come from a code that corresponds to registration, either for sports or for the casino. In the case of the sports section, thanks to the promo code, the welcome bonus increases by 30%, so instead of 100 EUR, the player can receive 130 EUR in the form of bonuses.
In the case of the welcome bonus for the casino, the promo code increases the bonus for the first deposit by 30%. That is, in the end, instead of 100% for the first deposit, the player receives 130% of bonuses. Accordingly, the total amount of bonuses for all four deposits increases.
You will have to win back the bonuses provided through the promo code with the same wager as the main bonus.
The wagering period is 7 days from the moment of activation.
If the promo code is available to players only once during registration and only new players can use it, other bonus codes are available to everyone. To do this, it is enough to visit the “showcase of promo codes”, which is available on the official website.
With the help of such bonus codes, players can purchase various discounts and preferences. For example, for sports betting in the “promo code showcase”, you can purchase a free bet code, for an increased express coefficient, for an increased percentage of cashback. For the gambling section, bonus codes allow you to get freebets, access to bonus rounds.
However, in order to buy an up-to-date promo code, the player must have an appropriate number of promoballs on his bonus account. The points earned as part of the loyalty program can be exchanged for bonus codes in the “storefront”.
Another option where you can get a 1xbet no deposit bonus code – a gift directly from the bookmaker or from the casino. This privilege applies only to the most active clients.
All 1xBet promo codes published on the Internet are provided free of charge. You can use them only for registration and only once. 1xBet betting company issues codes for the sports section and codes that are intended for the casino section. Accordingly, each promo code is used for its intended purpose.
In order for the 1xBet bookmaker promo code to bring real benefits, three important conditions must be met:
the code must be up-to-date;
it can be used only by one user and only when registering;
use only those codes that are obtained from reliable sources.
In conclusion, it can be noted that the use of a promo code does not oblige the player to anything. This encouragement from the office is gratuitous.
pragmatic-ko.com
하지만 지금은 아무도 왕 칭허 노인을 신경 쓰지 않는 것 같습니다.
1. Где купить кондиционер: лучшие магазины и выбор
2. Как выбрать кондиционер: советы по покупке
3. Кондиционеры в наличии: где купить прямо сейчас
4. Купить кондиционер онлайн: удобство и выгодные цены
5. Кондиционеры для дома: какой выбрать и где купить
6. Лучшие предложения на кондиционеры: акции и распродажи
7. Кондиционер купить: сравнение цен и моделей
8. Кондиционеры с установкой: где купить и как установить
9. Где купить кондиционер с доставкой: быстро и надежно
10. Кондиционеры: где купить качественный товар по выгодной цене
11. Кондиционер купить: как выбрать оптимальную мощность
12. Кондиционеры для офиса: какой выбрать и где купить
13. Кондиционер купить: самый выгодный вариант
14. Кондиционеры в рассрочку: где купить и как оформить
15. Кондиционеры: лучшие магазины и предложения
16. Кондиционеры на распродаже: где купить по выгодной цене
17. Как выбрать кондиционер: советы перед покупкой
18. Кондиционер купить: где найти лучшие цены
19. Лучшие магазины кондиционеров: где купить качественный товар
20. Кондиционер купить: выбор из лучших моделей
кондиционер цена http://kondicioner-cena.ru/ .
buy wegovy canada
Get an incredible bonus offer at 1xBet 2024! Make your first deposit and get a 100% bonus, up to $130 in extra funds.
1xbet: 1XBOX777 allows you to benefit from a VIP offer of 100% up to €130 on sports betting or €1950 +150 spins, guaranteeing you the maximum bonus. No other 1xBet code will allow you to obtain such advantages. Working today, it will give wonderful bonuses for new players in 2024. The 1xbet promo code is a great opportunity to multiply your bankroll for exciting free bets.
We remind you! The promo code is issued only within the framework of a certain promotion organized by the gaming portal. Therefore, this combination is unique and never repeats. The code can only be used under the conditions specified in the promotion.
It is this combination that can be found in the text of an article or material on a thematic site describing or advertising the activities of the 1 x Bet bookmaker. The user is asked to copy the combination, go to the office’s website and use the code during registration.
How? What should I do and what is the sequence of user actions?
For example! The user decided to become a regular customer of the bookmaker. To do this, go to the official website of the office and proceed with registration. There are quite a lot of registration options in this case:
in one click;
through a mobile phone number;
via email address;
through social media accounts.
In each of the options, in addition to filling out forms with contact and personal data, the player is provided with a form in which to enter the promo code 1IXBET. The exception is registration via social networks. In this case, the promo code cannot be applied.
Valid until 2024, the the best promo code for 1xbet “1XBOX777” can be used when registering on the 1xBet website. By using this promo code, new players can enjoy a 100% increased bonus of up to $130 on their first deposit. It is important to note that the promo code must be entered during the registration process on the official 1xBet website. Additionally, there are various promo codes available for today, and if the bonus code is still valid, players will also receive an additional surcharge along with the main bonus. Don’t forget to check out the article for free bet promo codes located at the bottom.
Bonuses have an important place in the 1xbet bookmaker’s customer service system. Along with numerous promotions in which a variety of bonuses and preferences are available to players, bonus promo codes are actively used in this office. Their main purpose is to increase the attractiveness of the bookmaker in the eyes of customers by providing them with additional bonuses and benefits.
For those who have been playing for a long time, there is no need to tell once again what a promo code is. For beginners, it will not hurt to learn about 1xbet promo codes in more detail.
1xBet free bet promo code “1XBOX777”, you can unlock exclusive bonuses 2024. These bonuses include up to $130 for the sportsbook, as well as €1950 and 150 free spins. The promo code is a special combination of characters that needs to be entered on the company’s website to receive an enhanced bonus. Each promo code provides different gifts, usually in the form of a free bet. This unique combination acts as a key, granting users specific benefits during gameplay.
Bonus codes are issued by the bookmaker during the next promotion. Accordingly, the terms of the promotion set the number of bonus codes, the validity period and the conditions under which it can be obtained and applied. All promo codes are provided to players for free.
It is important to note! The bookmaker arranges promotions within which promo codes are issued, not to the detriment of himself. It is not a fact that the bonuses provided by the promo code will bring the player a mandatory win. Almost all bonuses have pretty tough wagering, so there is no need to talk about quick wins and easy money.
As for the distribution of 1x bet bonus code, the main source of current codes are partner sites. It is on these web resources that materials about the betting shop are published. It is in these materials that the advantages that the player receives by registering in the office are described. In such tests, the bonus code is most often included as an element of motivation to move directly to registration in the office as soon as possible.
In addition to partner sites, current bonus codes are distributed through popular social messengers Telegram and Viber. You can subscribe to the bookmaker’s newsletter to receive up-to-date codes, about which promotions are held in the office.
All of the above sources of obtaining promo codes can be regarded as reliable. So it will not be difficult to find and get the code for users. It is important for the player to decide whether he needs a 1xbet promo code, for what and for what purpose.
1. Где купить кондиционер: лучшие магазины и выбор
2. Как выбрать кондиционер: советы по покупке
3. Кондиционеры в наличии: где купить прямо сейчас
4. Купить кондиционер онлайн: удобство и выгодные цены
5. Кондиционеры для дома: какой выбрать и где купить
6. Лучшие предложения на кондиционеры: акции и распродажи
7. Кондиционер купить: сравнение цен и моделей
8. Кондиционеры с установкой: где купить и как установить
9. Где купить кондиционер с доставкой: быстро и надежно
10. Кондиционеры: где купить качественный товар по выгодной цене
11. Кондиционер купить: как выбрать оптимальную мощность
12. Кондиционеры для офиса: какой выбрать и где купить
13. Кондиционер купить: самый выгодный вариант
14. Кондиционеры в рассрочку: где купить и как оформить
15. Кондиционеры: лучшие магазины и предложения
16. Кондиционеры на распродаже: где купить по выгодной цене
17. Как выбрать кондиционер: советы перед покупкой
18. Кондиционер купить: где найти лучшие цены
19. Лучшие магазины кондиционеров: где купить качественный товар
20. Кондиционер купить: выбор из лучших моделей
купить кондиционер с установкой https://kondicioner-cena.ru .
1xbet new promo code: 1XBOX777. By using this special bonus code during registration at the renowned 1xBet bookmaker, you can enjoy a VIP Sports Bonus that grants you a 100% boost up to €130 (or the equivalent in your local currency). This enhanced bonus is designed to elevate your gaming experience and maximize your first deposit, allowing all new club members to receive a generous bonus. Don’t miss out on this incredible opportunity to enhance your betting journey with 1xBet.
Here is a compilation of the latest 1xBet promo codes for the year 2024. Simply copy the code and apply it during your registration process on the official website, 1xbet.com. By doing so, you will be eligible to receive an enhanced welcome bonus of up to $130.
Regardless of their popularity, all bookmakers actively utilize various methods, means, and tools to promote their brand. While advertising plays a significant role in popularizing their services and gaming products, bonuses also contribute greatly to increasing the demand for bookmakers’ services. In particular, promo codes, which ordinary users and players frequently come across, play a crucial role in this aspect.
Under no circumstances can such a bonus code be applied.
On the other hand, the second type of bonus codes is designed to be used during gameplay. In this case, promo codes serve as a form of discount that players can utilize at some point to enhance their chances in the game. Players can either purchase these promo codes themselves or receive them as gifts from a bookmaker for specific actions. If a registration promo code has an explicit format and can only be used once and solely during registration, other promo codes can be used permanently. Their usage is closely related to the game itself.
1xbet code: 1XBOX777 during registration on 1xBet today get a maximum bonus of 100%. New members of the club can also receive a $130 bonus. With a wide range of bonuses and rewards available, it can be difficult for players to understand the essence of the promotion and which bonus is better. To make it easier, we provide a brief overview of 1xBet bookmaker promo codes, where to find them, and how to use them. The system of awarding promo points allows players to always get new promo codes, and they can choose the type of bonus they prefer and learn about the wagering conditions. Unlike most bookmakers, 1xBet allows you to win not only the winnings from the promo code, but the entire amount including the bet coupon.
To receive bonuses, simply add funds to your account using a bank card or an electronic wallet, and remember to enter the promo code 1xBet. Many users who enjoy interactive sports betting and virtual gambling on the 1xBet platform often come across offers to use a promo code online. These offers are typically found on specialized websites that promote the services of bookmakers and online casinos.
By using the promo code 1xBet, you can receive a bonus of up to $130 when registering today. The world of betting and gambling is filled with various bonus programs that capture the interest of users. Alongside no-deposit bonuses, deposit bonuses, and registration bonuses, promo codes are widely utilized by modern bookmakers. The same can be said for the bonus program offered by the renowned 1xBet bookmaker.
It is through such sources that promo codes are distributed.
The user, reading the material on the topic of interest, involuntarily comes across an offer to go to the website of the one x bet office and start betting. However, such a proposal also includes motivation. Together with the subsequent transition to the office’s website, the user is invited to use a promo code, which will subsequently bring additional bonuses and preferences to the player.
1xbet free bet promo code “1XBOX777” gives you a welcome bonus of up to $130. This bonus can be used for sports and esports betting. Promo codes like this provide special terms, discounts, or bonuses when purchasing products or services. The registration promo code is given to partners of the site to attract new players. It’s important to note that using the promo code is completely free. Simply copy the code and click on the appropriate link. If the code is valid, you will receive bonuses in the future.
Comment utiliser le Code Promo 1xBet
Profitez de l’offre speciale de code promo sur 1xbet “1XLIVE777” et beneficiez d’un bonus de 100% pouvant atteindre 78 000 XOF. De plus, en vous inscrivant sur 1xBet, vous recevrez un bonus de bienvenue de 130€ en utilisant le code promo. 1xBet est un bookmaker repute qui propose des paris sportifs et des jeux de casino en ligne. Grace a son application pratique, vous pouvez vous inscrire, recevoir des bonus, recharger votre compte et placer des paris en toute simplicite. L’application est egalement concue pour economiser l’energie de votre batterie, consommer moins de trafic internet et offre un menu convivial pour une experience utilisateur optimale.
Pour obtenir le bonus, vous devez copier et entrer le code promotionnel lors de l’inscription sur le site officiel 1xbet.com et puis les bonus seront actives. Le code bonus n’a pas de delai de prescription, vous pouvez l’utiliser quand vous le souhaitez, et grace a lui, vous recevrez un bonus de bienvenue gratuit pour les nouveaux clients. Ainsi, ne manquez pas l’occasion d’utiliser le code promo! De plus, vous savez maintenant ou les trouver. Placez des paris sans risque et gagnez!
Tout d’abord, il faut s’inscrire chez le bookmaker code promo 1xbet rdc : 1XLIVE777 Bonus VIP de 100% jusqu’a 78 000 XOF de bonus de casino sans depot, pouvant atteindre 1500$ et 150 tours gratuits. Ensuite, il suffit d’ajouter de l’argent a son compte et on recevra automatiquement de l’argent gratuit sous forme de bonus. Grace au coupon (code) 1xBet, il est desormais plus facile que jamais de faire des paris gratuits. En utilisant le code 1x Bet, chaque depot effectue permet de recevoir de l’argent gratuit.
Les codes promotionnels proposes au bookmaker 1xBet en bonus d’inscription sont utilises selon le meme algorithme, quelle que soit la methode de creation du compte. La seule difference possible reside dans les specificites de la confirmation du profil. En cas d’enregistrement d’un numero de telephone portable, il est necessaire de le confirmer avant de saisir la combinaison.
Si vous decidez de vous inscrire par e-mail, le bon doit etre utilise a la derniere etape du remplissage du formulaire, juste avant de cliquer sur le bouton “S’inscrire”. Avant cela, vous devez saisir les informations manquantes dans les champs vides pour terminer la procedure. Si vous vous inscrivez en utilisant un reseau social, vous ne pourrez pas appliquer de coupon de bienvenue. Par consequent, il est preferable de choisir une autre methode.
code promo 1xbet cameroun: 1XLIVE777 pour beneficier d’un bonus sportif gratuit de 100% jusqu’a 130 €/$, en plus du bonus de bienvenue standard de 1950$ et de 150 tours gratuits au casino. Ce code est valable uniquement aujourd’hui, en 2024, dans le menu d’inscription du bookmaker 1xbet. Lorsque vous cliquez sur le bouton “s’inscrire”, vous serez redirige vers un formulaire a remplir. Assurez-vous de specifier le code bonus dans la colonne dediee avant de finaliser votre inscription.
En prime, le bookmaker a inclus la section “Paris rapides” dans son menu. Ici vous pouvez trouver des paris sur 5 jeux interactifs (tirage au sort, fusillade, blackjack, flechettes, bridge). Une fonctionnalite interessante de 1xBet, qui a deja attire de nombreux clients. Notons a nouveau les coefficients 1xbet. Comme le football, ils sont tres decents. La commission est maintenue a 1%. Cet indicateur convient assez bien a la plupart des clients.
Le bonus de bienvenue doit etre active dans un delai de 1 mois a compter de l’inscription, sinon le cadeau brulera. Si vous rechargez votre compte pour moins de 10€, le bonus n’est pas active. L’argent recu a l’aide du bonus de bienvenue doit etre mise a un multiplicateur de X35. Le retrait des fonds sera gele jusqu’a ce que le bonus soit entierement deroule. Ce bonus ne peut etre utilise que pour des paris sportifs uniques, vous ne pouvez pas jouer au casino et collecter des coupons express. L’argent recu ne peut pas etre devisse sur des resultats avec un coefficient inferieur a 1,5. Afin d’obtenir un bonus, le solde doit etre reapprovisionne de la maniere qui vous convient.
Code promo 1xBet gratuit: 1XLIVE777 bonus exclusif pour les paris sportifs allant jusqu’a 100% a 78 000 XOF, ou un bonus pour le casino allant jusqu’a €1950 + 150 tours gratuits. Le code promotionnel actuel est pertinent pour le bookmaker 1xBet lors de l’inscription sur le site officiel. En raison de l’enorme concurrence dans l’industrie des paris, 1xBet augmente constamment le nombre de bonus disponibles, organise des concours interessants et des tirages au sort, et vous permet egalement de faire des paris gratuits. Le code promotionnel de rachat 1xBet est l’une des nombreuses options proposees par le bookmaker pour encourager les joueurs https://popvalais.ch/wp-includes/inc/?code-promo-1xbet-burkina-faso-78-000xof.html.
1. Где купить кондиционер: лучшие магазины и выбор
2. Как выбрать кондиционер: советы по покупке
3. Кондиционеры в наличии: где купить прямо сейчас
4. Купить кондиционер онлайн: удобство и выгодные цены
5. Кондиционеры для дома: какой выбрать и где купить
6. Лучшие предложения на кондиционеры: акции и распродажи
7. Кондиционер купить: сравнение цен и моделей
8. Кондиционеры с установкой: где купить и как установить
9. Где купить кондиционер с доставкой: быстро и надежно
10. Кондиционеры: где купить качественный товар по выгодной цене
11. Кондиционер купить: как выбрать оптимальную мощность
12. Кондиционеры для офиса: какой выбрать и где купить
13. Кондиционер купить: самый выгодный вариант
14. Кондиционеры в рассрочку: где купить и как оформить
15. Кондиционеры: лучшие магазины и предложения
16. Кондиционеры на распродаже: где купить по выгодной цене
17. Как выбрать кондиционер: советы перед покупкой
18. Кондиционер купить: где найти лучшие цены
19. Лучшие магазины кондиционеров: где купить качественный товар
20. Кондиционер купить: выбор из лучших моделей
купить кондиционер http://www.kondicioner-cena.ru .
ozempic pill form
buy rybelsus
mikschai.com
제875광수
wegovy injection
ozempic cost
Comment utiliser le Code Promo 1xBet
Profitez de l’offre speciale de code promo 1xbet cote d’ivoire 2024 “1XLIVE777” et beneficiez d’un bonus de 100% pouvant atteindre 78 000 XOF. De plus, en vous inscrivant sur 1xBet, vous recevrez un bonus de bienvenue de 130€ en utilisant le code promo. 1xBet est un bookmaker repute qui propose des paris sportifs et des jeux de casino en ligne. Grace a son application pratique, vous pouvez vous inscrire, recevoir des bonus, recharger votre compte et placer des paris en toute simplicite. L’application est egalement concue pour economiser l’energie de votre batterie, consommer moins de trafic internet et offre un menu convivial pour une experience utilisateur optimale.
Pour obtenir le bonus, vous devez copier et entrer le code promotionnel lors de l’inscription sur le site officiel 1xbet.com et puis les bonus seront actives. Le code bonus n’a pas de delai de prescription, vous pouvez l’utiliser quand vous le souhaitez, et grace a lui, vous recevrez un bonus de bienvenue gratuit pour les nouveaux clients. Ainsi, ne manquez pas l’occasion d’utiliser le code promo! De plus, vous savez maintenant ou les trouver. Placez des paris sans risque et gagnez!
Tout d’abord, il faut s’inscrire chez le bookmaker bonus de depot 1xbet : 1XLIVE777 Bonus VIP de 100% jusqu’a 78 000 XOF de bonus de casino sans depot, pouvant atteindre 1500$ et 150 tours gratuits. Ensuite, il suffit d’ajouter de l’argent a son compte et on recevra automatiquement de l’argent gratuit sous forme de bonus. Grace au coupon (code) 1xBet, il est desormais plus facile que jamais de faire des paris gratuits. En utilisant le code 1x Bet, chaque depot effectue permet de recevoir de l’argent gratuit.
Les codes promotionnels proposes au bookmaker 1xBet en bonus d’inscription sont utilises selon le meme algorithme, quelle que soit la methode de creation du compte. La seule difference possible reside dans les specificites de la confirmation du profil. En cas d’enregistrement d’un numero de telephone portable, il est necessaire de le confirmer avant de saisir la combinaison.
Si vous decidez de vous inscrire par e-mail, le bon doit etre utilise a la derniere etape du remplissage du formulaire, juste avant de cliquer sur le bouton “S’inscrire”. Avant cela, vous devez saisir les informations manquantes dans les champs vides pour terminer la procedure. Si vous vous inscrivez en utilisant un reseau social, vous ne pourrez pas appliquer de coupon de bienvenue. Par consequent, il est preferable de choisir une autre methode.
Code promo de pari gratuit 1xbet aujourd’hui: 1XLIVE777 pour beneficier d’un bonus sportif gratuit de 100% jusqu’a 130 €/$, en plus du bonus de bienvenue standard de 1950$ et de 150 tours gratuits au casino. Ce code est valable uniquement aujourd’hui, en 2024, dans le menu d’inscription du bookmaker 1xbet. Lorsque vous cliquez sur le bouton “s’inscrire”, vous serez redirige vers un formulaire a remplir. Assurez-vous de specifier le code bonus dans la colonne dediee avant de finaliser votre inscription.
En prime, le bookmaker a inclus la section “Paris rapides” dans son menu. Ici vous pouvez trouver des paris sur 5 jeux interactifs (tirage au sort, fusillade, blackjack, flechettes, bridge). Une fonctionnalite interessante de 1xBet, qui a deja attire de nombreux clients. Notons a nouveau les coefficients 1xbet. Comme le football, ils sont tres decents. La commission est maintenue a 1%. Cet indicateur convient assez bien a la plupart des clients.
Le bonus de bienvenue doit etre active dans un delai de 1 mois a compter de l’inscription, sinon le cadeau brulera. Si vous rechargez votre compte pour moins de 10€, le bonus n’est pas active. L’argent recu a l’aide du bonus de bienvenue doit etre mise a un multiplicateur de X35. Le retrait des fonds sera gele jusqu’a ce que le bonus soit entierement deroule. Ce bonus ne peut etre utilise que pour des paris sportifs uniques, vous ne pouvez pas jouer au casino et collecter des coupons express. L’argent recu ne peut pas etre devisse sur des resultats avec un coefficient inferieur a 1,5. Afin d’obtenir un bonus, le solde doit etre reapprovisionne de la maniere qui vous convient.
Code promo 1xBet gratuit: 1XLIVE777 bonus exclusif pour les paris sportifs allant jusqu’a 100% a 78 000 XOF, ou un bonus pour le casino allant jusqu’a €1950 + 150 tours gratuits. Le code promotionnel actuel est pertinent pour le bookmaker 1xBet lors de l’inscription sur le site officiel. En raison de l’enorme concurrence dans l’industrie des paris, 1xBet augmente constamment le nombre de bonus disponibles, organise des concours interessants et des tirages au sort, et vous permet egalement de faire des paris gratuits. Le code promotionnel de rachat 1xBet est l’une des nombreuses options proposees par le bookmaker pour encourager les joueurs http://guidecannabis.com/wp-content/pages/code-promo-1xbet-cameroun-78-000xaf.html.
generic semaglutide cost
semaglutide medication
lfchungary.com
폐하, 이 소리는 Hongzhi 황제의 고막을 거의 깨뜨릴 뻔했습니다.
Comment utiliser le Code Promo 1xBet
Profitez de l’offre speciale de code promo pari gratuit 1xbet “1XLIVE777” et beneficiez d’un bonus de 100% pouvant atteindre 78 000 XOF. De plus, en vous inscrivant sur 1xBet, vous recevrez un bonus de bienvenue de 130€ en utilisant le code promo. 1xBet est un bookmaker repute qui propose des paris sportifs et des jeux de casino en ligne. Grace a son application pratique, vous pouvez vous inscrire, recevoir des bonus, recharger votre compte et placer des paris en toute simplicite. L’application est egalement concue pour economiser l’energie de votre batterie, consommer moins de trafic internet et offre un menu convivial pour une experience utilisateur optimale.
Pour obtenir le bonus, vous devez copier et entrer le code promotionnel lors de l’inscription sur le site officiel 1xbet.com et puis les bonus seront actives. Le code bonus n’a pas de delai de prescription, vous pouvez l’utiliser quand vous le souhaitez, et grace a lui, vous recevrez un bonus de bienvenue gratuit pour les nouveaux clients. Ainsi, ne manquez pas l’occasion d’utiliser le code promo! De plus, vous savez maintenant ou les trouver. Placez des paris sans risque et gagnez!
Tout d’abord, il faut s’inscrire chez le bookmaker Code promo de la machine a sous 1xbet : 1XLIVE777 Bonus VIP de 100% jusqu’a 78 000 XOF de bonus de casino sans depot, pouvant atteindre 1500$ et 150 tours gratuits. Ensuite, il suffit d’ajouter de l’argent a son compte et on recevra automatiquement de l’argent gratuit sous forme de bonus. Grace au coupon (code) 1xBet, il est desormais plus facile que jamais de faire des paris gratuits. En utilisant le code 1x Bet, chaque depot effectue permet de recevoir de l’argent gratuit.
Les codes promotionnels proposes au bookmaker 1xBet en bonus d’inscription sont utilises selon le meme algorithme, quelle que soit la methode de creation du compte. La seule difference possible reside dans les specificites de la confirmation du profil. En cas d’enregistrement d’un numero de telephone portable, il est necessaire de le confirmer avant de saisir la combinaison.
Si vous decidez de vous inscrire par e-mail, le bon doit etre utilise a la derniere etape du remplissage du formulaire, juste avant de cliquer sur le bouton “S’inscrire”. Avant cela, vous devez saisir les informations manquantes dans les champs vides pour terminer la procedure. Si vous vous inscrivez en utilisant un reseau social, vous ne pourrez pas appliquer de coupon de bienvenue. Par consequent, il est preferable de choisir une autre methode.
code promo bet of africa: 1XLIVE777 pour beneficier d’un bonus sportif gratuit de 100% jusqu’a 130 €/$, en plus du bonus de bienvenue standard de 1950$ et de 150 tours gratuits au casino. Ce code est valable uniquement aujourd’hui, en 2024, dans le menu d’inscription du bookmaker 1xbet. Lorsque vous cliquez sur le bouton “s’inscrire”, vous serez redirige vers un formulaire a remplir. Assurez-vous de specifier le code bonus dans la colonne dediee avant de finaliser votre inscription.
En prime, le bookmaker a inclus la section “Paris rapides” dans son menu. Ici vous pouvez trouver des paris sur 5 jeux interactifs (tirage au sort, fusillade, blackjack, flechettes, bridge). Une fonctionnalite interessante de 1xBet, qui a deja attire de nombreux clients. Notons a nouveau les coefficients 1xbet. Comme le football, ils sont tres decents. La commission est maintenue a 1%. Cet indicateur convient assez bien a la plupart des clients.
Le bonus de bienvenue doit etre active dans un delai de 1 mois a compter de l’inscription, sinon le cadeau brulera. Si vous rechargez votre compte pour moins de 10€, le bonus n’est pas active. L’argent recu a l’aide du bonus de bienvenue doit etre mise a un multiplicateur de X35. Le retrait des fonds sera gele jusqu’a ce que le bonus soit entierement deroule. Ce bonus ne peut etre utilise que pour des paris sportifs uniques, vous ne pouvez pas jouer au casino et collecter des coupons express. L’argent recu ne peut pas etre devisse sur des resultats avec un coefficient inferieur a 1,5. Afin d’obtenir un bonus, le solde doit etre reapprovisionne de la maniere qui vous convient.
Code promo 1xBet gratuit: 1XLIVE777 bonus exclusif pour les paris sportifs allant jusqu’a 100% a 78 000 XOF, ou un bonus pour le casino allant jusqu’a €1950 + 150 tours gratuits. Le code promotionnel actuel est pertinent pour le bookmaker 1xBet lors de l’inscription sur le site officiel. En raison de l’enorme concurrence dans l’industrie des paris, 1xBet augmente constamment le nombre de bonus disponibles, organise des concours interessants et des tirages au sort, et vous permet egalement de faire des paris gratuits. Le code promotionnel de rachat 1xBet est l’une des nombreuses options proposees par le bookmaker pour encourager les joueurs https://www.gilmaire-etienne.com/wp-content/pages/code-promo-1xbet-cote-d-ivoire-bonus-200.html.
1. Где купить кондиционер: лучшие магазины и выбор
2. Как выбрать кондиционер: советы по покупке
3. Кондиционеры в наличии: где купить прямо сейчас
4. Купить кондиционер онлайн: удобство и выгодные цены
5. Кондиционеры для дома: какой выбрать и где купить
6. Лучшие предложения на кондиционеры: акции и распродажи
7. Кондиционер купить: сравнение цен и моделей
8. Кондиционеры с установкой: где купить и как установить
9. Где купить кондиционер с доставкой: быстро и надежно
10. Кондиционеры: где купить качественный товар по выгодной цене
11. Кондиционер купить: как выбрать оптимальную мощность
12. Кондиционеры для офиса: какой выбрать и где купить
13. Кондиционер купить: самый выгодный вариант
14. Кондиционеры в рассрочку: где купить и как оформить
15. Кондиционеры: лучшие магазины и предложения
16. Кондиционеры на распродаже: где купить по выгодной цене
17. Как выбрать кондиционер: советы перед покупкой
18. Кондиционер купить: где найти лучшие цены
19. Лучшие магазины кондиционеров: где купить качественный товар
20. Кондиционер купить: выбор из лучших моделей
купить кондиционер для дома https://www.kondicioner-cena.ru .
rybelsus xl
Советы
3. Сделайте правильный выбор: купить хостинг с выгодой
4. Почему стоит купить хостинг у проверенного провайдера
хостинг для сайта https://kish-host.ru/ .
Обзор
14. Как выбрать хостинг с оптимальными параметрами
купить vps https://kish-host.ru .
Советуем посетить сайт о музыке https://zaslushaem.ru/
Также не забудьте добавить сайт в закладки: https://zaslushaem.ru/
Преимущества
12. Где купить хостинг на выделенных серверах
vds сервер kish-host.ru .
rybelsus pill
1. Где купить кондиционер: лучшие магазины и выбор
2. Как выбрать кондиционер: советы по покупке
3. Кондиционеры в наличии: где купить прямо сейчас
4. Купить кондиционер онлайн: удобство и выгодные цены
5. Кондиционеры для дома: какой выбрать и где купить
6. Лучшие предложения на кондиционеры: акции и распродажи
7. Кондиционер купить: сравнение цен и моделей
8. Кондиционеры с установкой: где купить и как установить
9. Где купить кондиционер с доставкой: быстро и надежно
10. Кондиционеры: где купить качественный товар по выгодной цене
11. Кондиционер купить: как выбрать оптимальную мощность
12. Кондиционеры для офиса: какой выбрать и где купить
13. Кондиционер купить: самый выгодный вариант
14. Кондиционеры в рассрочку: где купить и как оформить
15. Кондиционеры: лучшие магазины и предложения
16. Кондиционеры на распродаже: где купить по выгодной цене
17. Как выбрать кондиционер: советы перед покупкой
18. Кондиционер купить: где найти лучшие цены
19. Лучшие магазины кондиционеров: где купить качественный товар
20. Кондиционер купить: выбор из лучших моделей
цена кондиционера http://www.kondicioner-cena.ru .
Simply want to say your article is as amazing. The clarity in your post is just spectacular and i can assume you’re an expert on this subject. Fine with your permission allow me to grab your RSS feed to keep up to date with forthcoming post. Thanks a million and please continue the enjoyable work.
My page site#:
https://dolgoprudni.rusff.me/viewtopic.php?id=1825#p4318
https://www.bizbangboom.com/articles/%D0%B7%D0%B0%D0%B2%D0%B8%D1%81%D0%B8%D0%BC%D0%BE%D1%81%D1%82%D1%8C-%D1%83%D1%81%D0%BF%D0%B5%D0%B2%D0%B0%D0%B5%D0%BC%D0%BE%D1%81%D1%82%D0%B8-%D1%80%D0%B5%D0%B1%D0%B5%D0%BD%D0%BA%D0%B0-%D0%BE%D1%82-%D0%BE%D0%B1%D1%80%D0%B0%D0%B7%D0%BE%D0%B2%D0%B0%D
http://starisland.bestbb.ru/viewtopic.php?id=321#p486
http://www.ivedu.ru/forum/viewthread.php?forum_id=18&thread_id=43297
https://crazyworldmen.livejournal.com/89896.html?newpost=1
Подборка предложений
2. Как выбрать идеальный хостинг для вашего проекта
аренда сервера https://kish-host.ru .
all the time i used to read smaller posts which also clear their motive, and that is also happening with
this article which I am reading at this place.
Советы экспертов
8. Как выбрать хостинг с максимальными возможностями
бесплатный хостинг http://kish-host.ru/ .
wegovy rx
rybelsus buy uk
order rybelsus online
1xBet registration promo code: 1XBOX777, to claim the welcome bonus 2024. By entering this promo code during the registration process, players can receive a generous bonus of $130. It is important to note that all the enticing features of the 1xbet bookmaker bonus program are accessible to players only after completing the registration. Even if a player comes across a free promo code on the internet, it will only be beneficial once they have successfully registered.
1xBet 2024, a renowned online bookmaker, provides a wide range of betting options on various sports, with a particular focus on football. Take a glance at the table’s comprehensive list to discover the latest bonuses and the exclusive 1xBet bonus code.
New players can enjoy welcome bonus at 1xBet with the promo code 1XBOX777 https://www.amec.com.vn/wp-pages/pag/%201xbet_registration_promo_code_2020.html. This bonus offers a 100% sports bonus up to $130 or a casino bonus of up to $1950. To take advantage of this offer, make sure to use the 1xBet bonus code: 1XBOX777 during the registration process. Simply log into the website, click on the “Register” button, provide all the necessary information, and finalize the process by selecting the green button. Creating an account at this bookmaker is quick and easy, typically taking only 1-2 minutes.
Players are given a choice of four registration options. Let’s consider each of them in detail:
Registration in 1 click
This option is the simplest, since the player specifies a minimum of information – the country of residence at the time of registration, the game currency. You can also enter a promo code here.
During registration, do not forget to make a choice of a welcome bonus. In this case, we are interested in a welcome bonus for the first deposit for sports.
By default, you need to agree with the rules of the bookmaker, with the privacy policy. By agreeing to the rules, the player confirms his age of majority.
Please make use of the 1xBet promo code: 1XBOX777 when creating a new account at 1xBet to enjoy a 100% bonus up to €/$130 https://www.ua2kan.com/wp-includes/list/1xbet_promo_code_2020.html. These bonus funds can be used for placing bets on sports and in the 1xBet casino section. Furthermore, there is also a bonus code available for free sports bets. Kindly ensure that your phone number, IP address, and email have not been previously used in the system to comply with the promotion’s terms and conditions.
Authorization of a new account is carried out automatically. The client receives an ID number and password, which are the identifiers of the new account. After logging into your personal account, it is recommended to change your password, fill out a questionnaire in your personal profile, specifying your mobile number and email address. This information will be required for subsequent verification, which is a mandatory procedure.
Registration by mobile number
The promo code 1xBet “1XBOX777”, valid until 2024, allows you to enjoy a 100% welcome bonus up to 130$. Another useful tip is to follow brands on social media http://cvaa.com.ar/06inc/articles/1xbet_kenya_sign_up.html. Often, brands offer free promo codes on their social media profiles as part of a contest, private sale, or limited-time promotion.
This time the player will have to specify the country of residence, the currency of the account, his mobile phone number. If you have a promo code, you should enter it in the appropriate form. Again, the main thing is not to forget to specify what kind of welcome bonus you are interested in.
Again, the user needs to agree with the rules of the office, confirm the compliance of the age with the established age limit.
An SMS code is sent to the specified number, which must be entered in the form as confirmation. After that, the account is authorized. After accessing the personal account, the player must come up with a password and fill out the appropriate questionnaire.
As soon as the registration is over, you can make a deposit, receive bonuses and start betting.
Registration via email
When registering your new 1xbet account, remember to enter the promo code “1XBOX777” in the designated section. By doing so, you can enhance your initial 100% deposit bonus to a remarkable 130%, allowing you to enjoy a maximum welcome offer of €130. After filling in your personal information and making your deposit, you will receive an additional 100% first deposit bonus. To access your account details, simply click on the My Account icon and navigate to the bet history section. The 1xBet coupon code can be found in the top right corner of the bet slip tab.
wegovy 14mg
It’s going to be ending of mine day, except before end I am
reading this enormous post to increase my know-how.
Discover the excitement of online gambling at our Mexican casino site. With secure payments and 24/7 customer support, you can play with confidence and peace of mind. roobet casino esto es lo que te diferencia de los demas.
Comment utiliser le Code Promo 1xBet
Profitez de l’offre speciale de bonus de depot 1xbet “1XLIVE777” et beneficiez d’un bonus de 100% pouvant atteindre 78 000 XOF. De plus, en vous inscrivant sur 1xBet, vous recevrez un bonus de bienvenue de 130€ en utilisant le code promo. 1xBet est un bookmaker repute qui propose des paris sportifs et des jeux de casino en ligne. Grace a son application pratique, vous pouvez vous inscrire, recevoir des bonus, recharger votre compte et placer des paris en toute simplicite. L’application est egalement concue pour economiser l’energie de votre batterie, consommer moins de trafic internet et offre un menu convivial pour une experience utilisateur optimale.
Pour obtenir le bonus, vous devez copier et entrer le code promotionnel lors de l’inscription sur le site officiel 1xbet.com et puis les bonus seront actives. Le code bonus n’a pas de delai de prescription, vous pouvez l’utiliser quand vous le souhaitez, et grace a lui, vous recevrez un bonus de bienvenue gratuit pour les nouveaux clients. Ainsi, ne manquez pas l’occasion d’utiliser le code promo! De plus, vous savez maintenant ou les trouver. Placez des paris sans risque et gagnez!
Tout d’abord, il faut s’inscrire chez le bookmaker code promo 1xbet abidjan : 1XLIVE777 Bonus VIP de 100% jusqu’a 78 000 XOF de bonus de casino sans depot, pouvant atteindre 1500$ et 150 tours gratuits. Ensuite, il suffit d’ajouter de l’argent a son compte et on recevra automatiquement de l’argent gratuit sous forme de bonus. Grace au coupon (code) 1xBet, il est desormais plus facile que jamais de faire des paris gratuits. En utilisant le code 1x Bet, chaque depot effectue permet de recevoir de l’argent gratuit.
Les codes promotionnels proposes au bookmaker 1xBet en bonus d’inscription sont utilises selon le meme algorithme, quelle que soit la methode de creation du compte. La seule difference possible reside dans les specificites de la confirmation du profil. En cas d’enregistrement d’un numero de telephone portable, il est necessaire de le confirmer avant de saisir la combinaison.
Si vous decidez de vous inscrire par e-mail, le bon doit etre utilise a la derniere etape du remplissage du formulaire, juste avant de cliquer sur le bouton “S’inscrire”. Avant cela, vous devez saisir les informations manquantes dans les champs vides pour terminer la procedure. Si vous vous inscrivez en utilisant un reseau social, vous ne pourrez pas appliquer de coupon de bienvenue. Par consequent, il est preferable de choisir une autre methode.
Code promotionnel 1x pari: 1XLIVE777 pour beneficier d’un bonus sportif gratuit de 100% jusqu’a 130 €/$, en plus du bonus de bienvenue standard de 1950$ et de 150 tours gratuits au casino. Ce code est valable uniquement aujourd’hui, en 2024, dans le menu d’inscription du bookmaker 1xbet. Lorsque vous cliquez sur le bouton “s’inscrire”, vous serez redirige vers un formulaire a remplir. Assurez-vous de specifier le code bonus dans la colonne dediee avant de finaliser votre inscription.
En prime, le bookmaker a inclus la section “Paris rapides” dans son menu. Ici vous pouvez trouver des paris sur 5 jeux interactifs (tirage au sort, fusillade, blackjack, flechettes, bridge). Une fonctionnalite interessante de 1xBet, qui a deja attire de nombreux clients. Notons a nouveau les coefficients 1xbet. Comme le football, ils sont tres decents. La commission est maintenue a 1%. Cet indicateur convient assez bien a la plupart des clients.
Le bonus de bienvenue doit etre active dans un delai de 1 mois a compter de l’inscription, sinon le cadeau brulera. Si vous rechargez votre compte pour moins de 10€, le bonus n’est pas active. L’argent recu a l’aide du bonus de bienvenue doit etre mise a un multiplicateur de X35. Le retrait des fonds sera gele jusqu’a ce que le bonus soit entierement deroule. Ce bonus ne peut etre utilise que pour des paris sportifs uniques, vous ne pouvez pas jouer au casino et collecter des coupons express. L’argent recu ne peut pas etre devisse sur des resultats avec un coefficient inferieur a 1,5. Afin d’obtenir un bonus, le solde doit etre reapprovisionne de la maniere qui vous convient.
Code promo 1xBet gratuit: 1XLIVE777 bonus exclusif pour les paris sportifs allant jusqu’a 100% a 78 000 XOF, ou un bonus pour le casino allant jusqu’a €1950 + 150 tours gratuits. Le code promotionnel actuel est pertinent pour le bookmaker 1xBet lors de l’inscription sur le site officiel. En raison de l’enorme concurrence dans l’industrie des paris, 1xBet augmente constamment le nombre de bonus disponibles, organise des concours interessants et des tirages au sort, et vous permet egalement de faire des paris gratuits. Le code promotionnel de rachat 1xBet est l’une des nombreuses options proposees par le bookmaker pour encourager les joueurs https://www.gilmaire-etienne.com/wp-content/pages/code-promo-1xbet-cote-d-ivoire-bonus-200.html.
Promo code 1xBet for Registration
1XBOX777
The Best 1xBet promo code is 1XBOX777 to avail a 100% bonus up to $130. This code is the only valid one that offers such a generous bonus. Today, you can get the current promo code for 1xBet absolutely free! Public promo codes are the most commonly used type, specifically intended for new users registering on 1xBet. These codes can only be used during registration and can be redeemed only once. Reusing promo codes is not allowed.
You can copy this promo code 1xbet from us right now. Here you can get the most profitable promo code for today 1xbet absolutely free of charge when registering with the company. Just go from our portal to 1xbet and create a new account. The bonus amount is equal to 100% of the amount deposited on the first deposit. If you put $ 1 into the account, then the code will give you the same amount. When depositing $ 100, you will be charged an additional $ 130. Thanks to this gift, you will be able to place larger bets. When registering, 1xbet gives newcomers an amount of up to $ 130 (100 euros, 100 dollars) after the first replenishment of the account. The amount is equivalent to the amount and currency of the deposit (no more than indicated).
In this article we will tell you everything about 1xBet promo codes: what it is, how to use it when registering, where to enter it to make a free bet, and also get the maximum bonus in 2024. New users will be able to top up their account with both $1 to make their first bets, and up to $100,000 to get the maximum bonus.
1xbet code promo bonus: 1XBOX777, that you should use when registering on 1xBet. By using this code, you will receive a generous bonus of $130. Please note that any other codes are invalid and will not provide you with such a bonus. Today, the promo code for 1xBet is available for free! If you want to enter the promo code when registering in 2024 and increase your bonus to $130, it is quite easy to find such a code on the Internet. Simply enter the relevant query, and the search system will present you with a comprehensive list of websites where you can find valid and up-to-date 1xBet promo codes.
Usually, thematic resources operating on the basis of partnership agreements with a bookmaker are engaged in the publication of current bonus codes. The essence of this method is as follows. The partner site publishes materials about the bookmaker on its pages. Usually, such texts describe the advantages of the bookmaker, and also contain a hint that all of these advantages can be felt after registration. A promo code is used as a motivation tool for a speedy transition.
The user only needs to copy the code and use it during the subsequent registration in the office. For each click and the 1xBet promo code used, the partner site receives an appropriate reward. The more users took advantage of this promotion, the greater the profit of the partner site.
The bookmaker, in turn, receives new customers. Bonuses and other benefits that players receive through promo codes still need to be won back on fairly strict conditions. Accordingly, by distributing bonuses through codes, the bookmaker practically does not incur any losses.
The client also remains in the black. Thanks to the 1 x Bet registration promo codes, you can increase your welcome bonus. This applies equally to registration at the bookmaker’s office and when registering at the 1xBet casino.
After receiving an up-to-date promo code, the player must use it within the established time frame. If this is not done, the code loses its relevance and it will not be of any use in the future. The bonus code can be used only once during registration and only when creating one account. Code reuse is not provided.
Now let’s talk in detail about what the 1x bet free promo code, which was used during registration, really gives players.
The first and most important thing! The 1xBet promo code will only be valid when bundled with the main bonus. The code itself does not give the player anything.
Second! During registration, you need to enter a promo code.
Third! Bonuses are activated automatically as soon as the main bonus is activated.
For example! At the 1xBet bookmaker’s office, you can get two types of welcome bonus when registering.
In 2024, avail the 1xbet whatsapp number sri lanka “1XBOX777” unlock a range of enticing bonuses for new players. Enjoy a sports bonus of 100% up to $130 or a generous casino bonus of up to $1950. These offers cater to both sports betting enthusiasts and those who enjoy gambling. As a bettor, you can even seize the opportunity to place a free bet on 1xBet, allowing you to wager without any cost.
The list of 1xBet promo codes available in the Showcase is proposed to be divided into the following categories:
Cyber. There are many sports disciplines in the bookmaker’s office, which are presented virtually. For example, cyber football or cyber basketball. Such a coupon gives the right to place a bet on the chosen discipline. The bet must include an outcome with a quote from 1.8 and above;
Games. On the resource, you can not only bet on sports, but also play games. This category allows you to purchase the opportunity to participate in one of the large list of entertainment;
Sport. The category offers to buy a coupon for a certain sports discipline. The condition of the freebet will be a bet on the sport for which the promo code was purchased, as well as the outcome coefficient from 1.8 and higher;
Bids. If customers do not want to limit themselves to a certain sports discipline, then you can purchase a coupon for a regular bet. You can choose from an ordinary, express, TOTO and bet constructor.
In the absence of points, you can always get a unique combination on other resources.
To find promo codes from 1xbet promo code casino is offered on thematic sites:
Various portals talk about betting shops, creating reviews on them. At the same time, they pay attention to the bonus program of companies. For this reason, promo codes from 1xBet are published there and the rules of promotions are explained. Moreover, not only specialized sites are engaged in this, but also social networks.
The 1xBet promo code is usually also distributed through other resources during registration. However, most often they are partners of a betting company. As part of the cooperation, the office provides them with a unique combination, and they share it with their audience.
A bookmaker can also send a promo code for 1xBet today. To do this, you will need to specify an email address and subscribe to the newsletter. The code is sent on the occasion of the birthday or anniversary of the betting game in the company.
For the casino section, the welcome bonus is an order of magnitude larger than for sports betting. The player does not receive the entire amount immediately. Bonuses are designed for four deposits.
100% bonuses and 30 free spins are due for the first deposit.
For the second deposit, the casino provides 50% bonuses from the deposit amount. In addition to the bonuses, there are also 35 free spins.
For the third deposit, you can get 25% of the deposit amount + 40 free spins.
For the fourth deposit, a bonus of 25% of the deposit amount and 45 free spins is due.
In total, for all four deposits, taking into account the limits, you can get 1500 EUR and 150 free spins.
Free spins will have to be used on the slots that are listed in the promotion.
As for the 1xBet promo code, which was used during registration, it should be borne in mind that the benefit will come from a code that corresponds to registration, either for sports or for the casino. In the case of the sports section, thanks to the promo code, the welcome bonus increases by 30%, so instead of 100 EUR, the player can receive 130 EUR in the form of bonuses.
In the case of the welcome bonus for the casino, the promo code increases the bonus for the first deposit by 30%. That is, in the end, instead of 100% for the first deposit, the player receives 130% of bonuses. Accordingly, the total amount of bonuses for all four deposits increases.
You will have to win back the bonuses provided through the promo code with the same wager as the main bonus.
The wagering period is 7 days from the moment of activation.
If the promo code is available to players only once during registration and only new players can use it, other bonus codes are available to everyone. To do this, it is enough to visit the “showcase of promo codes”, which is available on the official website.
With the help of such bonus codes, players can purchase various discounts and preferences. For example, for sports betting in the “promo code showcase”, you can purchase a free bet code, for an increased express coefficient, for an increased percentage of cashback. For the gambling section, bonus codes allow you to get freebets, access to bonus rounds.
However, in order to buy an up-to-date promo code, the player must have an appropriate number of promoballs on his bonus account. The points earned as part of the loyalty program can be exchanged for bonus codes in the “storefront”.
Another option where you can get a 1xbet pakistan promo code – a gift directly from the bookmaker or from the casino. This privilege applies only to the most active clients.
All 1xBet promo codes published on the Internet are provided free of charge. You can use them only for registration and only once. 1xBet betting company issues codes for the sports section and codes that are intended for the casino section. Accordingly, each promo code is used for its intended purpose.
In order for the 1xBet bookmaker promo code to bring real benefits, three important conditions must be met:
the code must be up-to-date;
it can be used only by one user and only when registering;
use only those codes that are obtained from reliable sources.
In conclusion, it can be noted that the use of a promo code does not oblige the player to anything. This encouragement from the office is gratuitous.
wegovy tab 3mg
order ozempic online
Feel the heat of the casino floor at our Mexican online casino. With live dealer games and interactive experiences, you’ll get the full VIP treatment from the comfort of your home. casi este es tu futuro.
Get an additional bonus of 100% when registering on the site 1xBet.com
cod promo 1xbet “1XBOX777” can be utilized to avail the welcome bonus in 2024. New players will be rewarded with a VIP bonus of 200% up to $130. It is important for users to enter the promo code during the registration process. However, there is a crucial requirement. The player will only receive the additional bonuses in the coming year if they have agreed to receive the main bonus.
In this case, the bookmaker provides its new customers with two options for a welcome bonus:
for the sports betting section, the bonus is 100% of the amount of the first deposit. The maximum amount of the bonus amount is 100 EUR. If the current promo code 1xbet was used, another 30% will be added to the main bonus. That is, the player receives a welcome bonus through a promo code in the amount of 130% of the deposit amount.
for the gambling section, the welcome bonus is larger and already amounts to 500 EUR. However, this amount is calculated for several tranches. For the first deposit, the player receives a bonus of 100% of the deposit amount. When using the 1xBet promo code, the welcome bonus will be 130%. To this, you also need to add 30 free spins, which can be used without wagering.
Additional bonuses that the player receives through the bonus code must also be wagered. The time allotted for wagering is also limited. Bonuses provided through the promo code are credited to the bonus account.
The 1x promo code bangladesh “1XBOX777”, you can avail a VIP sports bonus of 100% up to €$130, in addition to the standard welcome bonus of $1950 and 150 free spins at the 1xBet casino. To qualify for this bonus, a minimum deposit of €1 is required. 1xBet promotional codes are widely available on the internet through partner websites and other relevant resources. These codes have gained immense popularity and are considered the most common type of bonus codes. The bookmaker utilizes these codes to engage with the gaming community and enhance the appeal of their platform.
In order for the promo code to bring real benefits to the player, the following conditions must be met:
the bonus code must be up-to-date (the promotion has not expired);
the promo code must be used in a strictly allotted period of time;
the bonus code can be used only once and only during registration.
bonuses via a promo code are provided only in a package with the main bonuses.
All of these requirements are not mandatory to fulfill, however, in order for the promo code to really work, users are advised to comply with them. Each such promo code gives you the opportunity to receive different gifts, most often in the form of a free bet or a free bet.
the best promo code for 1xbet: 1XBOX777. This code grants access to a generous welcome bonus of up to €/$130. Prepare yourself for 2024 with this exclusive offer. It is a deposit bonus specifically designed for sports betting and esports enthusiasts. 1xBet’s bonus program caters to all your gaming activities, ensuring exceptional rewards.
By using a bonus code during the registration process, the client can enjoy an additional 130% increase in their bonus amount. Instead of the usual $100 bonus, the player will receive $130. What’s interesting is that unlike the welcome bonus, this additional amount comes with no conditions attached. Simply enter the code combination in the designated form and enjoy the benefits.
Each code published in the promo codes showcase” provides players with some advantages and preferences.
For sports betting through promo codes, you can get freebets, a safety bet. Much more promo codes cover the gambling section. In this case, bonus codes provide players with free spins, applications for participation in tournaments, additional spins for participation in bonus rounds.
To get a code in the “promo code showcase”, the player needs to exchange it for points that were earned as part of the loyalty program. Each code has its own nominal value from 50 to 100 points. By purchasing a promo code, the player activates it in his personal account at any convenient time. Bonus codes from the “showcase of promo codes”, unlike bonus codes for registration, can be used without restrictions.
In addition to the “showcase of promo codes” in the 1xBet betting shop, other incentives and gifts are regularly provided as part of the loyalty program. The most active customers can get a promo code for free bet or a bonus code for free spins from the bookmaker. Customers receive similar gifts on their birthday.
Promo codes are issued constantly as part of the 1xBet bookmaker’s bonus program. There are two types of promo codes that are available to players:
codes that allow you to increase deposit bonuses;
codes by which players can get either freebets or free spins in the office.
In the first case, we are talking about an extra charge to the welcome bonus both in the 1xBet betting shop and in the 1xbet casino section.
The main part of the codes is designed to attract new customers. It is these bonus codes that can most often be found in the public Internet space.
The essence of the proposal is as follows:
the user copies the promo code on the website, goes to the bookmaker’s page and starts registration;
you need to enter a promo code in the registration form;
apply for a welcome bonus;
complete the registration.
What is the result? As soon as the registration is completed, according to the terms of the promotion, in order to receive the main package bonus, the player needs to make a deposit within the established limit. In response, the bookmaker provides the player with 100% bonuses to the deposit amount. For example! According to the terms of the promotion, the maximum amount of the welcome bonus is 100 EUR. If you use the 1xbet promo code during registration, the welcome bonus increases by 30%. I.e., instead of the required 100 EUR, the player receives 130 EUR from the bookmaker in the form of bonuses.
This promo code can only be used when creating an account, and only once. Re-use of the code in order to receive a surcharge to the main bonus is not provided.
At 1xBet Casino, the welcome bonus is bigger. The player can receive up to 1,500 EUR in total for the first four deposits. The scheme of accrual of bonuses looks like this and in this case a promo code is not required.
for the first deposit in the amount of 10 EUR or more, the player receives a 100% surcharge in the form of deposit bonuses;
for the second deposit within the established limit, the amount of bonuses is 50% of the deposit;
for the third deposit, the player receives a bonus surcharge of 25% of the deposit amount;
for the fourth deposit, the casino provides the player with a bonus surcharge of 25% of the deposit.
In addition to the bonus funds that the x35 wager has, the casino also provides the player with 150 free spins for games on promotional slots. The wagering of the welcome bonus is given a whole month from the moment of receipt.
Unlike a bookmaker’s office, promo codes are used independently in a casino, not bundled with a welcome bonus.
можно купить аттестат http://orik-attestats.com/ .
buy ozempic oversees
ozempic tablets buy
Comment utiliser le Code Promo 1xBet
Profitez de l’offre speciale de le code promo 1xbet “1XLIVE777” et beneficiez d’un bonus de 100% pouvant atteindre 78 000 XOF. De plus, en vous inscrivant sur 1xBet, vous recevrez un bonus de bienvenue de 130€ en utilisant le code promo. 1xBet est un bookmaker repute qui propose des paris sportifs et des jeux de casino en ligne. Grace a son application pratique, vous pouvez vous inscrire, recevoir des bonus, recharger votre compte et placer des paris en toute simplicite. L’application est egalement concue pour economiser l’energie de votre batterie, consommer moins de trafic internet et offre un menu convivial pour une experience utilisateur optimale.
Pour obtenir le bonus, vous devez copier et entrer le code promotionnel lors de l’inscription sur le site officiel 1xbet.com et puis les bonus seront actives. Le code bonus n’a pas de delai de prescription, vous pouvez l’utiliser quand vous le souhaitez, et grace a lui, vous recevrez un bonus de bienvenue gratuit pour les nouveaux clients. Ainsi, ne manquez pas l’occasion d’utiliser le code promo! De plus, vous savez maintenant ou les trouver. Placez des paris sans risque et gagnez!
Tout d’abord, il faut s’inscrire chez le bookmaker 1xbet dernier code promo : 1XLIVE777 Bonus VIP de 100% jusqu’a 78 000 XOF de bonus de casino sans depot, pouvant atteindre 1500$ et 150 tours gratuits. Ensuite, il suffit d’ajouter de l’argent a son compte et on recevra automatiquement de l’argent gratuit sous forme de bonus. Grace au coupon (code) 1xBet, il est desormais plus facile que jamais de faire des paris gratuits. En utilisant le code 1x Bet, chaque depot effectue permet de recevoir de l’argent gratuit.
Les codes promotionnels proposes au bookmaker 1xBet en bonus d’inscription sont utilises selon le meme algorithme, quelle que soit la methode de creation du compte. La seule difference possible reside dans les specificites de la confirmation du profil. En cas d’enregistrement d’un numero de telephone portable, il est necessaire de le confirmer avant de saisir la combinaison.
Si vous decidez de vous inscrire par e-mail, le bon doit etre utilise a la derniere etape du remplissage du formulaire, juste avant de cliquer sur le bouton “S’inscrire”. Avant cela, vous devez saisir les informations manquantes dans les champs vides pour terminer la procedure. Si vous vous inscrivez en utilisant un reseau social, vous ne pourrez pas appliquer de coupon de bienvenue. Par consequent, il est preferable de choisir une autre methode.
un code promo x bet: 1XLIVE777 pour beneficier d’un bonus sportif gratuit de 100% jusqu’a 130 €/$, en plus du bonus de bienvenue standard de 1950$ et de 150 tours gratuits au casino. Ce code est valable uniquement aujourd’hui, en 2024, dans le menu d’inscription du bookmaker 1xbet. Lorsque vous cliquez sur le bouton “s’inscrire”, vous serez redirige vers un formulaire a remplir. Assurez-vous de specifier le code bonus dans la colonne dediee avant de finaliser votre inscription.
En prime, le bookmaker a inclus la section “Paris rapides” dans son menu. Ici vous pouvez trouver des paris sur 5 jeux interactifs (tirage au sort, fusillade, blackjack, flechettes, bridge). Une fonctionnalite interessante de 1xBet, qui a deja attire de nombreux clients. Notons a nouveau les coefficients 1xbet. Comme le football, ils sont tres decents. La commission est maintenue a 1%. Cet indicateur convient assez bien a la plupart des clients.
Le bonus de bienvenue doit etre active dans un delai de 1 mois a compter de l’inscription, sinon le cadeau brulera. Si vous rechargez votre compte pour moins de 10€, le bonus n’est pas active. L’argent recu a l’aide du bonus de bienvenue doit etre mise a un multiplicateur de X35. Le retrait des fonds sera gele jusqu’a ce que le bonus soit entierement deroule. Ce bonus ne peut etre utilise que pour des paris sportifs uniques, vous ne pouvez pas jouer au casino et collecter des coupons express. L’argent recu ne peut pas etre devisse sur des resultats avec un coefficient inferieur a 1,5. Afin d’obtenir un bonus, le solde doit etre reapprovisionne de la maniere qui vous convient.
Code promo 1xBet gratuit: 1XLIVE777 bonus exclusif pour les paris sportifs allant jusqu’a 100% a 78 000 XOF, ou un bonus pour le casino allant jusqu’a €1950 + 150 tours gratuits. Le code promotionnel actuel est pertinent pour le bookmaker 1xBet lors de l’inscription sur le site officiel. En raison de l’enorme concurrence dans l’industrie des paris, 1xBet augmente constamment le nombre de bonus disponibles, organise des concours interessants et des tirages au sort, et vous permet egalement de faire des paris gratuits. Le code promotionnel de rachat 1xBet est l’une des nombreuses options proposees par le bookmaker pour encourager les joueurs https://napce.fr/wp-content/pages/1xbet_code_promotionnel_gratuit_bonus_1.html.
semaglutide 3 mg tablet
rybelsus online pharmacy
Comment utiliser le Code Promo 1xBet
Profitez de l’offre speciale de code promo 1xbet aujourd’hui “1XLIVE777” et beneficiez d’un bonus de 100% pouvant atteindre 78 000 XOF. De plus, en vous inscrivant sur 1xBet, vous recevrez un bonus de bienvenue de 130€ en utilisant le code promo. 1xBet est un bookmaker repute qui propose des paris sportifs et des jeux de casino en ligne. Grace a son application pratique, vous pouvez vous inscrire, recevoir des bonus, recharger votre compte et placer des paris en toute simplicite. L’application est egalement concue pour economiser l’energie de votre batterie, consommer moins de trafic internet et offre un menu convivial pour une experience utilisateur optimale.
Pour obtenir le bonus, vous devez copier et entrer le code promotionnel lors de l’inscription sur le site officiel 1xbet.com et puis les bonus seront actives. Le code bonus n’a pas de delai de prescription, vous pouvez l’utiliser quand vous le souhaitez, et grace a lui, vous recevrez un bonus de bienvenue gratuit pour les nouveaux clients. Ainsi, ne manquez pas l’occasion d’utiliser le code promo! De plus, vous savez maintenant ou les trouver. Placez des paris sans risque et gagnez!
Tout d’abord, il faut s’inscrire chez le bookmaker code bonus 1xbet : 1XLIVE777 Bonus VIP de 100% jusqu’a 78 000 XOF de bonus de casino sans depot, pouvant atteindre 1500$ et 150 tours gratuits. Ensuite, il suffit d’ajouter de l’argent a son compte et on recevra automatiquement de l’argent gratuit sous forme de bonus. Grace au coupon (code) 1xBet, il est desormais plus facile que jamais de faire des paris gratuits. En utilisant le code 1x Bet, chaque depot effectue permet de recevoir de l’argent gratuit.
Les codes promotionnels proposes au bookmaker 1xBet en bonus d’inscription sont utilises selon le meme algorithme, quelle que soit la methode de creation du compte. La seule difference possible reside dans les specificites de la confirmation du profil. En cas d’enregistrement d’un numero de telephone portable, il est necessaire de le confirmer avant de saisir la combinaison.
Si vous decidez de vous inscrire par e-mail, le bon doit etre utilise a la derniere etape du remplissage du formulaire, juste avant de cliquer sur le bouton “S’inscrire”. Avant cela, vous devez saisir les informations manquantes dans les champs vides pour terminer la procedure. Si vous vous inscrivez en utilisant un reseau social, vous ne pourrez pas appliquer de coupon de bienvenue. Par consequent, il est preferable de choisir une autre methode.
code promo 1xbet rdc: 1XLIVE777 pour beneficier d’un bonus sportif gratuit de 100% jusqu’a 130 €/$, en plus du bonus de bienvenue standard de 1950$ et de 150 tours gratuits au casino. Ce code est valable uniquement aujourd’hui, en 2024, dans le menu d’inscription du bookmaker 1xbet. Lorsque vous cliquez sur le bouton “s’inscrire”, vous serez redirige vers un formulaire a remplir. Assurez-vous de specifier le code bonus dans la colonne dediee avant de finaliser votre inscription.
En prime, le bookmaker a inclus la section “Paris rapides” dans son menu. Ici vous pouvez trouver des paris sur 5 jeux interactifs (tirage au sort, fusillade, blackjack, flechettes, bridge). Une fonctionnalite interessante de 1xBet, qui a deja attire de nombreux clients. Notons a nouveau les coefficients 1xbet. Comme le football, ils sont tres decents. La commission est maintenue a 1%. Cet indicateur convient assez bien a la plupart des clients.
Le bonus de bienvenue doit etre active dans un delai de 1 mois a compter de l’inscription, sinon le cadeau brulera. Si vous rechargez votre compte pour moins de 10€, le bonus n’est pas active. L’argent recu a l’aide du bonus de bienvenue doit etre mise a un multiplicateur de X35. Le retrait des fonds sera gele jusqu’a ce que le bonus soit entierement deroule. Ce bonus ne peut etre utilise que pour des paris sportifs uniques, vous ne pouvez pas jouer au casino et collecter des coupons express. L’argent recu ne peut pas etre devisse sur des resultats avec un coefficient inferieur a 1,5. Afin d’obtenir un bonus, le solde doit etre reapprovisionne de la maniere qui vous convient.
Code promo 1xBet gratuit: 1XLIVE777 bonus exclusif pour les paris sportifs allant jusqu’a 100% a 78 000 XOF, ou un bonus pour le casino allant jusqu’a €1950 + 150 tours gratuits. Le code promotionnel actuel est pertinent pour le bookmaker 1xBet lors de l’inscription sur le site officiel. En raison de l’enorme concurrence dans l’industrie des paris, 1xBet augmente constamment le nombre de bonus disponibles, organise des concours interessants et des tirages au sort, et vous permet egalement de faire des paris gratuits. Le code promotionnel de rachat 1xBet est l’une des nombreuses options proposees par le bookmaker pour encourager les joueurs http://guidecannabis.com/wp-content/pages/code-promo-1xbet-cameroun-78-000xaf.html.
Today, while I was at work, my cousin stole my apple ipad and tested to see if it can survive a thirty foot drop, just so she can be a youtube sensation. My apple ipad is now broken and she has 83 views. I know this is completely off topic but I had to share it with someone!
My#page#site#:
https://sparkmark.no/blogs/view/1387
http://odessaforum.getbb.ru/viewtopic.php?f=5&t=19326
https://russia24.pro/moscow/372614463/
http://shuvalduet.getbb.ru/posting.php?mode=post&f=3
http://testforum.1stbb.ru/viewtopic.php?f=3&t=207
Play with confidence at our Mexican online casino. With fair play guaranteed and transparent policies, you can trust that every game is as thrilling as the last. [url=https://calientecasinoenlinea.mx/]cosina o cocina[/url] este es tu futuro.
wegovy xr
semaglutide 14mg
buy ozempic
wegovy canada pharmacy prices
rybelsus medicine
pragmatic-ko.com
Xiao Jing의 마음에 끔찍한 생각이 떠 올랐습니다. 그가 왕자를 폐지하고 싶은 것은 아닐까요 …
buy semaglutide in mexico
pragmatic-ko.com
그러나 사람의 이름은 그의 전 생애와 관련이 있습니다.
generic rybelsus for weight loss
Ӏ’m extremeloy impresseԁ with your writing talentѕ aѕ well as with the structure in your blog.
Is this a paid subject matter or diԀ you customize it yourself?
Anyway keep up the nice quality writing, it
is raгe to sеe a nice weblog likе this onee today..
프라그마틱 슬롯에 대한 내용이 정말 도움이 되었어요! 더불어, 제 사이트에서도 프라그마틱과 관련된 정보를 찾아보실 수 있어요. 함께 지식을 공유해보세요!
프라그마틱슬롯
프라그마틱 관련 소식 항상 주시고 있어요! 또한, 제 사이트에서도 프라그마틱에 대한 정보를 얻을 수 있어요. 함께 발전하며 지식을 나눠봐요!
https://njshidoo.com/hot/
https://www.howtodrawaeasy.com
https://www.emulecenter.com
where can i buy semaglutide
rybelsus online prescription
Перетяжка мягкой мебели
https://www.credly.com/users/username.962aabc5/badges .
lfchungary.com
Zhu Houzhao는 깊은 생각에 빠지기 시작했습니다. 어떻게 들어…
프라그마틱 플레이는 250개 이상의 게임으로 세계 시장에 다양한 테마의 슬롯을 제공합니다. 33개 언어와 다양한 화폐를 지원합니다.
프라그마틱 슬롯 무료 체험
프라그마틱의 게임은 정말 다양한데, 최근에 출시된 것 중 어떤 게임이 가장 좋았나요? 공유해주세요!
https://cgsgold.com/hot/
https://www.ashspurr.com
https://www.pinknruby.com
rybelsus tablets for weight loss cost
Hmm is anyone else having problems with the pictures on this blog loading? I’m trying to find out if its a problem on my end or if it’s the blog. Any feedback would be greatly appreciated.
https://premiumy-dlplomsy24.com/
http://www.premialnie-diplomy.com/
http://www.grishkovets.com/articles/636-kak-poluchit-vysshee-obrazovanie.html
http://www.hip-hop.ru/forum/id298234-worksale/index5.html
http://astroverlay.xyz/gallery/image/133-%D0%B7%D0%B0-%D1%81%D0%BA%D0%BE%D0%BB%D1%8C%D0%BA%D0%BE-%D1%81%D0%B5%D0%B9%D1%87%D0%B0%D1%81-%D0%B2%D0%BE%D0%B7%D0%BC%D0%BE%D0%B6%D0%BD%D0%BE-%D0%B1%D1%83%D0%B4%D0%B5%D1%82-%D0%B7%D0%B0%D0%BA%D0%B0%D0%B7%D0%B0%D1%82%D1%8C-%D0%BA%D0%B0%D1%87%D0%B5%D1%81%D1%82%D0%B2%D0%B5%D0%BD%D0%BD%D1%8B%D0%B9-%D0%B4%D0%B8%D0%BF%D0%BB%D0%BE%D0%BC/
http://forum.trackbase.net/members/29274-arkadypettr?tab=visitor_messaging
dota2answers.com
중요한 일만 홍지황제에게 보고되었다.
buy semaglutide from canada
https://o-tendencii.com/
Подробный гид по выбору,
10 важных преимуществ виртуальных серверов ,
5 лучших операционных систем для виртуальных серверов ,
Подробное руководство,
Сравнение цен и тарифов,
Как узнать, сколько ресурсов требуется для вашего проекта на виртуальном сервере
недорогой выделенный сервер проверенный хостинг .
Здравствуйте!
Диплом стал моим кошмаром: срыв сроков, но благодаря интернету я нашел полезные ресурсы, которые помогают мне справиться с этой трудностью.
Закажите диплом у нас – это легко! Без предоплаты, с гарантией качества и доставкой по всей России.
https://louisowadg.onesmablog.com/marketing-things-to-know-before-you-buy-62114283
https://amazonpromocodefreeshippi28311.atualblog.com/27961013/5-essential-elements-for-marketing
Желаю всем отличных оценок!
купить диплом в усолье-сибирском
купить диплом в южно-сахалинске
купить диплом в копейске
купить диплом юриста
купить диплом в омске
купить диплом в ростове-на-дону
купить диплом в кургане
купить диплом в батайске
купить диплом в мытищах
купить диплом в новотроицке
lfchungary.com
그냥… 폐하가 벌써 이러시네요… 참기 힘들겠죠?
strelkaproject.com
배 전체에서 이미 통조림을 먹기 시작한 사람들은 열광했습니다.
Привет всем!
Диплом – это мое испытание: пишу ночами, здоровье страдает, но интернет предоставляет ресурсы, чтобы сделать это более терпимым.
Недорого и без проблем купить диплом института,, техникума, колледжа выгоднее всего у Нас, с доставкой по РФ
http://www.05136.com.ua/list/290557
http://all-the-movies.cowblog.fr/the-fighter-3094680.html
Желаю всем отличных оценок!
купить диплом в комсомольске-на-амуре
купить диплом в сарапуле
купить диплом в черкесске
купить диплом механика
купить диплом в перми
купить диплом в липецке
купить диплом железнодорожника
купить диплом в чите
купить диплом в кемерово
купить диплом бухгалтера
Здравствуйте!
С дипломом тяжело, срываю сроки, но нашел спасение в интернете: он помогает ускорить процесс и сделать его менее стрессовым.
Приобретите диплом университета без предоплаты у нас и получите его с доставкой в любую точку России.
https://www.liveinternet.ru/users/worksale/post503704808/
http://www.rusbil.ru/forum/viewtopic.php?p=112992#112992
Желаю всем отличных оценок!
купить диплом отзывы
купить диплом в ухте
купить диплом в миассе
купить диплом в крыму
купить диплом гознак
купить свидетельство о рождении ссср
купить диплом в ачинске
купить диплом в новокузнецке
купить диплом в тобольске
купить диплом в белогорске
Здравствуйте!
Диплом превратился в мою муку: сорванные сроки, но благодаря интернету я нашел способы повысить эффективность написания.
У нас вы можете приобрести диплом университета без предоплаты, с доставкой по всей России.
http://www.mama-vartovsk.ru/index.php?name=forums&op=showtopic&id=2048
http://lady.topbb.ru/viewtopic.php?id=908#p2279
Желаю всем отличных оценок!
купить диплом цена
купить диплом в салавате
купить диплом отзывы
купить диплом нового образца
купить диплом в бугульме
купить диплом
купить диплом в химках
купить диплом в норильске
купить диплом журналиста
купить диплом в евпатории
ozempic online
Доброго!
Диплом стал моим кошмаром: срыв сроков, но благодаря интернету я нашел полезные ресурсы, которые помогают мне справиться с этой трудностью.
Закажите диплом у нас – это легко! Без предоплаты, с гарантией качества и доставкой по всей России.
https://hectorabbbz.blogocial.com/a-review-of-marketing-57608630
https://1abakan.ru/forum/showthread-60710/
Желаю всем отличных оценок!
купить диплом в ачинске
купить диплом в великих луках
купить диплом логопеда
купить диплом в заречном
купить диплом в калининграде
купить диплом во владикавказе
купить диплом в орле
купить диплом в муроме
купить диплом старого образца
купить бланк диплома
buy wegovy
https://hitech24.pro/
Доброго!
Диплом стал кошмаром. Пишу ночами, глаза на исходе, но сеть дает ресурсы для ускорения работы. Сложно, но не сдаюсь.
Купить диплом у нас – это просто! Надежно, качественно, без предоплаты, с доставкой в любой город России.
https://sparkmark.no/blogs/view/1372/vazhen-li-shkolnyj-attestat-pri-postuplenii-v-institut
https://daltonkrywb.blogthisbiz.com/27835313/top-latest-five-marketing-urban-news
Желаю всем отличных оценок!
купить диплом эколога
купить диплом электрика
купить диплом медсестры
купить диплом судоводителя
купить диплом в нефтеюганске
купить диплом в кунгуре
купить диплом в пятигорске
купить диплом в новочебоксарске
купить диплом в славянске-на-кубани
купить диплом в волжском
rybelsus tablets for weight loss
ozempic tablets cost
ozempic semaglutide tablets 3mg
semaglutide from canada
wegovy online prescription
Привет всем!
Диплом – это настоящий кошмар: сорванные сроки, бессонные ночи, но благодаря интернету я нашел способы сделать работу менее тяжелой.
Купить диплом у нас – это просто! Надежно, качественно, без предоплаты, с доставкой в любой город России.
http://kingranks.com/the-basics-of-small-business-branding/
https://lepchat.com/blogs/post/4007
Желаю всем отличных оценок!
купить диплом в армавире
куплю диплом высшего образования
купить диплом в серове
купить диплом в кузнецке
купить диплом прораба
купить диплом ссср
купить диплом в невинномысске
купить диплом в ижевске
купить диплом гознак
купить диплом геодезиста
Привет всем!
Пишу диплом, и это ад. Срываю сроки, здоровье на грани, но интернет помогает найти эффективные методы работы. Нужно просто продолжать.
Приобретите диплом университета без предоплаты у нас и получите его с доставкой в любую точку России.
https://ria.city/moscow/372613427/
http://konstruktiv.getbb.ru/viewtopic.php?f=17&t=4361
Желаю всем отличных оценок!
купить диплом в челябинске
купить диплом в саратове
купить диплом юриста
купить диплом в чайковском
купить диплом дизайнера
купить диплом в владивостоке
купить диплом в копейске
купить диплом в балашихе
купить диплом в нальчике
купить диплом в туле
Здравствуйте!
Диплом – это настоящий кошмар: ночные напряженные сессии, но интернет помогает найти способы справиться с этой трудностью.
У нас вы можете приобрести диплом университета без предоплаты с доставкой в любой город России, оплата после получения.
http://speterburg.rusff.me/viewtopic.php?id=8646#p312543
http://commerc.webtalk.ru/viewtopic.php?id=6503#p15967
Желаю всем отличных оценок!
купить диплом в усть-илимске
купить диплом в таганроге
купить диплом в кирово-чепецке
купить речной диплом
купить диплом в казани
купить диплом в якутске
купить диплом в новотроицке
купить диплом автомеханика
купить диплом в заречном
купить диплом в калининграде
semaglutide ozempic
semaglutide tab 3mg
Доброго!
Написание диплома стало настоящим кошмаром, срываю сроки, но нашла спасение в интернете: полезные ресурсы помогают ускорить процесс.
У нас вы можете заказать диплом университета без предоплаты и получить его с доставкой в любую точку России.
http://bastomsk.ru/forum/viewtopic.php?f=35&t=2971
https://motorcycle-reviews27158.digiblogbox.com/47637322/marketing-things-to-know-before-you-buy
Желаю всем отличных оценок!
купить морской диплом
купить диплом геодезиста
купить диплом в новом уренгое
купить диплом в новотроицке
купить диплом в белорецке
купить диплом в оренбурге
купить диплом в горно-алтайске
куплю диплом высшего образования
купить диплом в якутске
купить диплом в троицке
Привет всем!
Пишу диплом, это настоящее испытание. Но нашел способы сделать это быстрее и эффективнее, благодаря интернету.
Приобретите диплом университета без предоплаты у нас и получите его с доставкой в любую точку России, качество гарантировано.
https://clc.edu.pe/blog/index.php?entryid=55125
https://kofeinia.org/viewtopic.php?f=115&t=35904
Желаю всем отличных оценок!
купить диплом историка
купить диплом в москве
купить диплом в коврове
купить свидетельство о заключении брака
купить диплом в курске
купить диплом в балашихе
купить диплом провизора
можно ли купить диплом
купить диплом в магадане
купить диплом медицинского училища
ozempic injections
Доброго!
Пишу диплом, это настоящий кошмар: срыв сроков, но благодаря интернету нашел способы ускорить и упростить процесс написания.
Недорого предлагаем заказать диплом без предоплаты с доставкой курьером по РФ, под ключ!
http://wwwnickru.bestbb.ru/viewtopic.php?id=152#p152
http://vk.tula.su/23/05/2021/85002/kak-napisat-diplomnuyu-rabotu-2.html
Желаю всем отличных оценок!
купить диплом в ишиме
купить диплом в клинцах
купить диплом в ярославле
купить диплом прораба
купить диплом в люберцах
купить диплом для иностранцев
купить диплом отзывы
купить диплом университета
купить диплом в улан-удэ
купить диплом маляра
rybelsus semaglutide
купить школьный аттестат http://www.russa-attestats.com/ .
rybelsus buy uk
Ad majorem Dei gloriam — К вящей славе Божией
rybelsus rx
yangsfitness.com
과거에는 이런 일들이 필연적으로 사람들의 분노를 불러일으켰습니다.
Great article, totally what I needed.
ozempic pill form
semaglutide xr
프라그마틱의 게임은 정말 다양한데, 최근에 출시된 것 중 어떤 게임이 가장 좋았나요? 공유해주세요!
프라그마틱
프라그마틱과 관련된 내용 감사합니다! 또한, 제 사이트에서도 프라그마틱에 대한 정보를 찾아보실 수 있어요. 서로 이야기 공유하며 더 많은 지식을 얻어가요!
https://www.zeovitusa.com
https://www.iaz681.com
https://www.antiquees.com
ozempic for weight loss
ozempic semaglutide
order ozempic online
semaglutide oral medication
Cognata vocabula rebus — Слова, соответствующие поступкам
buy semaglutide online
Советуем посетить сайт https://allkigurumi.ru/products
Также не забудьте добавить сайт в закладки: https://allkigurumi.ru/products
mega-casino77.com
그러나 그는 목을 들고 몸이 떨리고 칼을 쥔 손이 떨렸습니다.
https://clients1.google.com.ly/url?sa=t&url=https%3A%2F%2Fwww.agenbet88score.com%2F
Aut non tentaris, aut perfice — Или не берись, или доводи до конца.
semaglutide tab 3mg
semaglutide cost
smcasino-game.com
그는 Fang Jifan이 말한 뻔뻔한 사람이 결코 아니라는 것을 증명해야했습니다.
https://o-tendencii.com/
buy rybelsus online from india
semaglutide uk
Contradictio in re — лог. Противоречие в существе (нелепость).
Куда обратиться за ремонтом холодильника Атлант? У нас!
цена ремонта холодильника атлант на дому ремонт холодильников атлант в минске на дому .
프라그마틱 게임은 iGaming 업계에서 높은 평가를 받는 모바일 중심의 혁신적이고 표준화된 콘텐츠를 제공합니다.
프라그마틱 슬롯 무료 체험
프라그마틱은 늘 새로운 기술과 아이디어를 도입하죠. 이번에 어떤 혁신이 있었는지 알려주세요!
https://www.coreybarba.com
https://www.citizendentalclinic.com
https://www.qq8778ok.com
rybelsus xl
Contra contrariis curantur — Противное излечивается противным.
Hi mates, how is everything, and what you want to say on the topic of this piece of writing, in my view its genuinely remarkable in support
of me.
semaglutide for weight loss
Советуем посетить сайт https://allkigurumi.ru/products/kigurumu-stichs
Также не забудьте добавить сайт в закладки: https://allkigurumi.ru/products/kigurumu-stich
rybelsus tablets buy
https://gruzchikivesy.ru/
wegovy semaglutide tablets 7.5 mcg
Секреты выбора лучшего онлайн казино в Беларуси: критерии оценки
лучшие онлайн казино беларуси лучшие онлайн казино беларуси .
mega-casino77.com
Fang Jifan은 미소를 지으며 말했습니다. “내 목사들이 입지 않는다고 누가 말했습니까?”
rybelsus buy from canada
Ad usum externum — Для внешнего употребления.
semaglutide for sale
http://one-xbet-apk-fr.com
To log in, click the “Login” button on the sanctioned website of the bookmaker and write your user facts – enter on your email give a speech to and password.
one-xbet-apk-fr.com
generic ozempic cost
wegovy tablets cost
semaglutide canada pharmacy prices
lfchungary.com
네, Hongzhi의 12 학년 시험이 곧 시작됩니다.
generic wegovy cost
vitamine nahrungserg?nzungsmittel https://wellnesspulse.de .
semaglutide price
pragmatic-ko.com
스승은 대작가이고 무심코 말하면 평범한 사람들입니다.
rybelsus weight loss
buy semaglutide
buy wegovy from canada
semaglutide from canada
buy wegovy in canada
buy ozempic online
rybelsus australia online
ozempic semaglutide tablets 7.5 mcg
wegovy tablets for weight loss
wegovy tab 14mg
canadian pharmacy uk delivery
Hi, the whole thing is going sound here and ofcourse every one is sharing
facts, that’s in fact fine, keep up writing.
This design is steller! You certainly know how to keep a reader entertained.
Between your wit and your videos, I was almost moved to start my own blog (well, almost…HaHa!) Excellent job.
I really loved what you had to say, and more than that,
how you presented it. Too cool!
how much is a valtrex prescription
synthroid 100 pill
Советуем посетить сайт https://a-so.ru/
Также не забудьте добавить сайт в закладки: https://a-so.ru/
tadalafil lowest prices canada
valtrex order online
https://o-tendencii.com/
онлайн казино вегас гранд на iphone
гранд вегас казино с выводом
where can you get prednisone
brazilian pharmacy online
khasiss.com
Liu Jie가 아직 살아 있다는 것을 아는 한 Liu Jian의 기분은 그리 나쁘지 않을 것입니다.
buying synthroid in mexico
online pharmacy australia
https://hitech24.pro/
https://one-xbet-apk-fr.com
To log in, click the “Login” button on the true website of the bookmaker and put down your narcotic addict materials – enrol your email give a speech to and password.
one-xbet-apk-fr.com
jelenakaludjerovic.com
Fang Jifan은 기뻐했고 Hongzhi 황제는 … 마침내 마음의 우울함이 풀렸습니다.
http://www.one-xbet-apk-fr.com
To log in, click the “Login” button on the licensed website of the bookmaker and put down your narcotic addict data – enter on your email give a speech to and password.
http://www.one-xbet-apk-fr.com
Купить срочно диплом о среднем образовании – это вариант скоро завершить запись об образовании на бакалаврском уровне лишенный излишних хлопот и расходов времени. В столице России предоставляется различные вариантов настоящих свидетельств бакалавров, обеспечивающих комфорт и удобство в получении..
40 mg daily prednisone
Discover why viagra without doctor prescription is the preferred choice for many. Find your perfect option here.
https://gruzchikimeshki.ru/
synthroid from canada without a prescription
https://gruzchikinochnoj.ru/
Promo code 1xBet for Registration
1XBOX777
The Best 1xBet promo code is 1XBOX777 to avail a 100% bonus up to $130. This code is the only valid one that offers such a generous bonus. Today, you can get the current promo code for 1xBet absolutely free! Public promo codes are the most commonly used type, specifically intended for new users registering on 1xBet. These codes can only be used during registration and can be redeemed only once. Reusing promo codes is not allowed.
You can copy this promo code 1xbet from us right now. Here you can get the most profitable promo code for today 1xbet absolutely free of charge when registering with the company. Just go from our portal to 1xbet and create a new account. The bonus amount is equal to 100% of the amount deposited on the first deposit. If you put $ 1 into the account, then the code will give you the same amount. When depositing $ 100, you will be charged an additional $ 130. Thanks to this gift, you will be able to place larger bets. When registering, 1xbet gives newcomers an amount of up to $ 130 (100 euros, 100 dollars) after the first replenishment of the account. The amount is equivalent to the amount and currency of the deposit (no more than indicated).
In this article we will tell you everything about 1xBet promo codes: what it is, how to use it when registering, where to enter it to make a free bet, and also get the maximum bonus in 2024. New users will be able to top up their account with both $1 to make their first bets, and up to $100,000 to get the maximum bonus.
1xbet bonus promo code: 1XBOX777, that you should use when registering on 1xBet. By using this code, you will receive a generous bonus of $130. Please note that any other codes are invalid and will not provide you with such a bonus. Today, the promo code for 1xBet is available for free! If you want to enter the promo code when registering in 2024 and increase your bonus to $130, it is quite easy to find such a code on the Internet. Simply enter the relevant query, and the search system will present you with a comprehensive list of websites where you can find valid and up-to-date 1xBet promo codes.
Usually, thematic resources operating on the basis of partnership agreements with a bookmaker are engaged in the publication of current bonus codes. The essence of this method is as follows. The partner site publishes materials about the bookmaker on its pages. Usually, such texts describe the advantages of the bookmaker, and also contain a hint that all of these advantages can be felt after registration. A promo code is used as a motivation tool for a speedy transition.
The user only needs to copy the code and use it during the subsequent registration in the office. For each click and the 1xBet promo code used, the partner site receives an appropriate reward. The more users took advantage of this promotion, the greater the profit of the partner site.
The bookmaker, in turn, receives new customers. Bonuses and other benefits that players receive through promo codes still need to be won back on fairly strict conditions. Accordingly, by distributing bonuses through codes, the bookmaker practically does not incur any losses.
The client also remains in the black. Thanks to the 1 x Bet registration promo codes, you can increase your welcome bonus. This applies equally to registration at the bookmaker’s office and when registering at the 1xBet casino.
After receiving an up-to-date promo code, the player must use it within the established time frame. If this is not done, the code loses its relevance and it will not be of any use in the future. The bonus code can be used only once during registration and only when creating one account. Code reuse is not provided.
Now let’s talk in detail about what the the best promo code for 1xbet, which was used during registration, really gives players.
The first and most important thing! The 1xBet promo code will only be valid when bundled with the main bonus. The code itself does not give the player anything.
Second! During registration, you need to enter a promo code.
Third! Bonuses are activated automatically as soon as the main bonus is activated.
For example! At the 1xBet bookmaker’s office, you can get two types of welcome bonus when registering.
In 2024, avail the 1xbet promo code casino “1XBOX777” unlock a range of enticing bonuses for new players. Enjoy a sports bonus of 100% up to $130 or a generous casino bonus of up to $1950. These offers cater to both sports betting enthusiasts and those who enjoy gambling. As a bettor, you can even seize the opportunity to place a free bet on 1xBet, allowing you to wager without any cost.
The list of 1xBet promo codes available in the Showcase is proposed to be divided into the following categories:
Cyber. There are many sports disciplines in the bookmaker’s office, which are presented virtually. For example, cyber football or cyber basketball. Such a coupon gives the right to place a bet on the chosen discipline. The bet must include an outcome with a quote from 1.8 and above;
Games. On the resource, you can not only bet on sports, but also play games. This category allows you to purchase the opportunity to participate in one of the large list of entertainment;
Sport. The category offers to buy a coupon for a certain sports discipline. The condition of the freebet will be a bet on the sport for which the promo code was purchased, as well as the outcome coefficient from 1.8 and higher;
Bids. If customers do not want to limit themselves to a certain sports discipline, then you can purchase a coupon for a regular bet. You can choose from an ordinary, express, TOTO and bet constructor.
In the absence of points, you can always get a unique combination on other resources.
To find promo codes from 1xbet pakistan promo code is offered on thematic sites:
Various portals talk about betting shops, creating reviews on them. At the same time, they pay attention to the bonus program of companies. For this reason, promo codes from 1xBet are published there and the rules of promotions are explained. Moreover, not only specialized sites are engaged in this, but also social networks.
The 1xBet promo code is usually also distributed through other resources during registration. However, most often they are partners of a betting company. As part of the cooperation, the office provides them with a unique combination, and they share it with their audience.
A bookmaker can also send a promo code for 1xBet today. To do this, you will need to specify an email address and subscribe to the newsletter. The code is sent on the occasion of the birthday or anniversary of the betting game in the company.
For the casino section, the welcome bonus is an order of magnitude larger than for sports betting. The player does not receive the entire amount immediately. Bonuses are designed for four deposits.
100% bonuses and 30 free spins are due for the first deposit.
For the second deposit, the casino provides 50% bonuses from the deposit amount. In addition to the bonuses, there are also 35 free spins.
For the third deposit, you can get 25% of the deposit amount + 40 free spins.
For the fourth deposit, a bonus of 25% of the deposit amount and 45 free spins is due.
In total, for all four deposits, taking into account the limits, you can get 1500 EUR and 150 free spins.
Free spins will have to be used on the slots that are listed in the promotion.
As for the 1xBet promo code, which was used during registration, it should be borne in mind that the benefit will come from a code that corresponds to registration, either for sports or for the casino. In the case of the sports section, thanks to the promo code, the welcome bonus increases by 30%, so instead of 100 EUR, the player can receive 130 EUR in the form of bonuses.
In the case of the welcome bonus for the casino, the promo code increases the bonus for the first deposit by 30%. That is, in the end, instead of 100% for the first deposit, the player receives 130% of bonuses. Accordingly, the total amount of bonuses for all four deposits increases.
You will have to win back the bonuses provided through the promo code with the same wager as the main bonus.
The wagering period is 7 days from the moment of activation.
If the promo code is available to players only once during registration and only new players can use it, other bonus codes are available to everyone. To do this, it is enough to visit the “showcase of promo codes”, which is available on the official website.
With the help of such bonus codes, players can purchase various discounts and preferences. For example, for sports betting in the “promo code showcase”, you can purchase a free bet code, for an increased express coefficient, for an increased percentage of cashback. For the gambling section, bonus codes allow you to get freebets, access to bonus rounds.
However, in order to buy an up-to-date promo code, the player must have an appropriate number of promoballs on his bonus account. The points earned as part of the loyalty program can be exchanged for bonus codes in the “storefront”.
Another option where you can get a 1xbet promo code today pakistan – a gift directly from the bookmaker or from the casino. This privilege applies only to the most active clients.
All 1xBet promo codes published on the Internet are provided free of charge. You can use them only for registration and only once. 1xBet betting company issues codes for the sports section and codes that are intended for the casino section. Accordingly, each promo code is used for its intended purpose.
In order for the 1xBet bookmaker promo code to bring real benefits, three important conditions must be met:
the code must be up-to-date;
it can be used only by one user and only when registering;
use only those codes that are obtained from reliable sources.
In conclusion, it can be noted that the use of a promo code does not oblige the player to anything. This encouragement from the office is gratuitous.
online pharmacy europe
family rx 24
where to buy azithromycin online
Ou entrer un code promotionnel 1xBet
Un champ de saisie special est present dans le formulaire d’inscription. Il vous suffit d’entrer le code dans le champ ci-dessus et de suivre les etapes d’inscription. Nous esperons que vous comprenez que l’inscription est un moment crucial et que vous devez remplir tous les champs. Notre travail consiste a vous avertir afin que vous sachiez quoi faire et comment le faire correctement afin que votre compte ne rencontre pas de problemes a l’avenir. Ce ne sont que les regles de base pour l’enregistrement.
code promo de 1x pari: 1XLIVE777 pour un bonus de bienvenue de 100% jusqu’a €130. Lors de votre inscription, saisissez le code bonus pour profiter de l’offre exclusive 1xBet. Utilisez le code bonus 1xBet dans le champ d’inscription en 2024 et accedez a toutes les sections disponibles. Vous pouvez effectivement obtenir le bonus de bienvenue en utilisant l’apk 1xbet. Telechargez l’apk pour profiter du code promo 1xbet et recevoir un bonus de €/$130 lors de votre inscription.
Le code promotionnel pour l’inscription a 1xBet aujourd’hui est un bonus de depart pour les nouveaux clients du bookmaker, qui vous permet d’augmenter le montant du premier depot, d’obtenir des paris gratuits (paris gratuits) et d’autres incitations de la part de l’entreprise. Il n’y a pas de difficultes particulieres a obtenir des bonus de BK. En outre, le portail propose de nombreux autres bonus, promotions et tirages au sort que vous pouvez utiliser avec un code promo 1xBet valide 2024.
Apres avoir verifie le code promo 1xBet, vous pourrez vous familiariser avec ses termes et conditions. Pour ce faire, dans la section “Affichage du code promotionnel”, il existe un champ special dans lequel vous devez inserer l’ensemble de chiffres et de lettres resultant pour obtenir des informations detaillees. Pour verifier les combinaisons, connectez-vous a votre compte personnel. En cliquant sur le bouton” Afficher le code promotionnel 1xBet”, vous recevrez une description detaillee des conditions de mise, du montant et d’autres parametres.
Le bookmaker 1xBet est tres genereux avec des bonus et des cadeaux, pour l’inscription, vous pouvez obtenir un bonus sans depot – c’est de l’argent gratuit. Toutes les promotions et offres de bonus sont activees grace au code promo – c’est lui qui vous donne des bonus. Si vous voulez augmenter votre argent, alors vous avez choisi le bon site, ici vous pouvez gagner rapidement et facilement. Les cotes les plus elevees dans les paris sportifs, ainsi que les machines a sous les plus populaires qui vous permettent vraiment de gagner de grosses sommes d’argent.
Lors de votre inscription sur 1xBet, n’oubliez pas d’utiliser le code promo: 1XLIVE777 et profiter d’un genereux bonus de 100% pouvant atteindre 78 000 XOF. Grace a ce code, vous pourrez beneficier d’un excellent bonus de bienvenue pouvant atteindre 130€, sous forme de paris gratuits. Peu importe le pays dans lequel vous residez, ce code bonus est valable pour tous les pays et vous accorde un bonus en fonction de votre pays et de votre devise. Si vous vous trouvez pres de Cotonou, vous pouvez egalement creer un code promo 1xBet.
Lisez attentivement le courrier qui arrive a votre adresse e-mail, c’est la que le bookmaker envoie les dernieres offres de bonus. De cette facon, vous serez le premier a connaitre les nouvelles promotions et bonus disponibles chez le bookmaker 1xbet. Vous pouvez ajouter notre site Web a vos favoris et vous aurez alors la possibilite d’avoir toujours des informations a jour sur les bonus et les promotions https://m-g.wine/pags/code-promo-1xbet.html.
50 mcg synthroid
pharmacy store
https://gruzchikiklub.ru/
1xBet registration promo code: 1XBOX777, to claim the welcome bonus 2024. By entering this promo code during the registration process, players can receive a generous bonus of $130. It is important to note that all the enticing features of the 1xbet bookmaker bonus program are accessible to players only after completing the registration. Even if a player comes across a free promo code on the internet, it will only be beneficial once they have successfully registered.
1xBet 2024, a renowned online bookmaker, provides a wide range of betting options on various sports, with a particular focus on football. Take a glance at the table’s comprehensive list to discover the latest bonuses and the exclusive 1xBet bonus code.
New players can enjoy welcome bonus at 1xBet with the promo code 1XBOX777 https://arx.com.au/cp/pgs/1xbet_promo_code_for_registration_2020.html. This bonus offers a 100% sports bonus up to $130 or a casino bonus of up to $1950. To take advantage of this offer, make sure to use the 1xBet bonus code: 1XBOX777 during the registration process. Simply log into the website, click on the “Register” button, provide all the necessary information, and finalize the process by selecting the green button. Creating an account at this bookmaker is quick and easy, typically taking only 1-2 minutes.
Players are given a choice of four registration options. Let’s consider each of them in detail:
Registration in 1 click
This option is the simplest, since the player specifies a minimum of information – the country of residence at the time of registration, the game currency. You can also enter a promo code here.
During registration, do not forget to make a choice of a welcome bonus. In this case, we are interested in a welcome bonus for the first deposit for sports.
By default, you need to agree with the rules of the bookmaker, with the privacy policy. By agreeing to the rules, the player confirms his age of majority.
Please make use of the 1xBet promo code: 1XBOX777 when creating a new account at 1xBet to enjoy a 100% bonus up to €/$130 http://centroculturalrecoleta.org/blog/pages/1xbet_registration_promo_code.html. These bonus funds can be used for placing bets on sports and in the 1xBet casino section. Furthermore, there is also a bonus code available for free sports bets. Kindly ensure that your phone number, IP address, and email have not been previously used in the system to comply with the promotion’s terms and conditions.
Authorization of a new account is carried out automatically. The client receives an ID number and password, which are the identifiers of the new account. After logging into your personal account, it is recommended to change your password, fill out a questionnaire in your personal profile, specifying your mobile number and email address. This information will be required for subsequent verification, which is a mandatory procedure.
Registration by mobile number
The promo code 1xBet “1XBOX777”, valid until 2024, allows you to enjoy a 100% welcome bonus up to 130$. Another useful tip is to follow brands on social media https://www.panamericano.us/assets/inc/1xbet_promo_code_for_registration.html. Often, brands offer free promo codes on their social media profiles as part of a contest, private sale, or limited-time promotion.
This time the player will have to specify the country of residence, the currency of the account, his mobile phone number. If you have a promo code, you should enter it in the appropriate form. Again, the main thing is not to forget to specify what kind of welcome bonus you are interested in.
Again, the user needs to agree with the rules of the office, confirm the compliance of the age with the established age limit.
An SMS code is sent to the specified number, which must be entered in the form as confirmation. After that, the account is authorized. After accessing the personal account, the player must come up with a password and fill out the appropriate questionnaire.
As soon as the registration is over, you can make a deposit, receive bonuses and start betting.
Registration via email
When registering your new 1xbet account, remember to enter the promo code “1XBOX777” in the designated section. By doing so, you can enhance your initial 100% deposit bonus to a remarkable 130%, allowing you to enjoy a maximum welcome offer of €130. After filling in your personal information and making your deposit, you will receive an additional 100% first deposit bonus. To access your account details, simply click on the My Account icon and navigate to the bet history section. The 1xBet coupon code can be found in the top right corner of the bet slip tab.
lisinopril 10 mg on line prescription
glucophage uk
https://gruzchikiperevozchik.ru/
Get an incredible bonus offer at 1xBet 2024! Make your first deposit and get a 100% bonus, up to $130 in extra funds.
how to ger 1xbet promo code: 1XBOX777 allows you to benefit from a VIP offer of 100% up to €130 on sports betting or €1950 +150 spins, guaranteeing you the maximum bonus. No other 1xBet code will allow you to obtain such advantages. Working today, it will give wonderful bonuses for new players in 2024. The 1xbet promo code is a great opportunity to multiply your bankroll for exciting free bets.
We remind you! The promo code is issued only within the framework of a certain promotion organized by the gaming portal. Therefore, this combination is unique and never repeats. The code can only be used under the conditions specified in the promotion.
It is this combination that can be found in the text of an article or material on a thematic site describing or advertising the activities of the 1 x Bet bookmaker. The user is asked to copy the combination, go to the office’s website and use the code during registration.
How? What should I do and what is the sequence of user actions?
For example! The user decided to become a regular customer of the bookmaker. To do this, go to the official website of the office and proceed with registration. There are quite a lot of registration options in this case:
in one click;
through a mobile phone number;
via email address;
through social media accounts.
In each of the options, in addition to filling out forms with contact and personal data, the player is provided with a form in which to enter the promo code 1IXBET. The exception is registration via social networks. In this case, the promo code cannot be applied.
Valid until 2024, the promo code for 1x bet “1XBOX777” can be used when registering on the 1xBet website. By using this promo code, new players can enjoy a 100% increased bonus of up to $130 on their first deposit. It is important to note that the promo code must be entered during the registration process on the official 1xBet website. Additionally, there are various promo codes available for today, and if the bonus code is still valid, players will also receive an additional surcharge along with the main bonus. Don’t forget to check out the article for free bet promo codes located at the bottom.
Bonuses have an important place in the 1xbet bookmaker’s customer service system. Along with numerous promotions in which a variety of bonuses and preferences are available to players, bonus promo codes are actively used in this office. Their main purpose is to increase the attractiveness of the bookmaker in the eyes of customers by providing them with additional bonuses and benefits.
For those who have been playing for a long time, there is no need to tell once again what a promo code is. For beginners, it will not hurt to learn about 1xbet promo codes in more detail.
1xBet free bet promo code “1XBOX777”, you can unlock exclusive bonuses 2024. These bonuses include up to $130 for the sportsbook, as well as €1950 and 150 free spins. The promo code is a special combination of characters that needs to be entered on the company’s website to receive an enhanced bonus. Each promo code provides different gifts, usually in the form of a free bet. This unique combination acts as a key, granting users specific benefits during gameplay.
Bonus codes are issued by the bookmaker during the next promotion. Accordingly, the terms of the promotion set the number of bonus codes, the validity period and the conditions under which it can be obtained and applied. All promo codes are provided to players for free.
It is important to note! The bookmaker arranges promotions within which promo codes are issued, not to the detriment of himself. It is not a fact that the bonuses provided by the promo code will bring the player a mandatory win. Almost all bonuses have pretty tough wagering, so there is no need to talk about quick wins and easy money.
As for the distribution of 1xbet promo code free bet, the main source of current codes are partner sites. It is on these web resources that materials about the betting shop are published. It is in these materials that the advantages that the player receives by registering in the office are described. In such tests, the bonus code is most often included as an element of motivation to move directly to registration in the office as soon as possible.
In addition to partner sites, current bonus codes are distributed through popular social messengers Telegram and Viber. You can subscribe to the bookmaker’s newsletter to receive up-to-date codes, about which promotions are held in the office.
All of the above sources of obtaining promo codes can be regarded as reliable. So it will not be difficult to find and get the code for users. It is important for the player to decide whether he needs a 1xbet promo code, for what and for what purpose.
tadalafil generic in india
Ou entrer un code promotionnel 1xBet
Un champ de saisie special est present dans le formulaire d’inscription. Il vous suffit d’entrer le code dans le champ ci-dessus et de suivre les etapes d’inscription. Nous esperons que vous comprenez que l’inscription est un moment crucial et que vous devez remplir tous les champs. Notre travail consiste a vous avertir afin que vous sachiez quoi faire et comment le faire correctement afin que votre compte ne rencontre pas de problemes a l’avenir. Ce ne sont que les regles de base pour l’enregistrement.
1xbet meilleur code promo: 1XLIVE777 pour un bonus de bienvenue de 100% jusqu’a €130. Lors de votre inscription, saisissez le code bonus pour profiter de l’offre exclusive 1xBet. Utilisez le code bonus 1xBet dans le champ d’inscription en 2024 et accedez a toutes les sections disponibles. Vous pouvez effectivement obtenir le bonus de bienvenue en utilisant l’apk 1xbet. Telechargez l’apk pour profiter du code promo 1xbet et recevoir un bonus de €/$130 lors de votre inscription.
Le code promotionnel pour l’inscription a 1xBet aujourd’hui est un bonus de depart pour les nouveaux clients du bookmaker, qui vous permet d’augmenter le montant du premier depot, d’obtenir des paris gratuits (paris gratuits) et d’autres incitations de la part de l’entreprise. Il n’y a pas de difficultes particulieres a obtenir des bonus de BK. En outre, le portail propose de nombreux autres bonus, promotions et tirages au sort que vous pouvez utiliser avec un code promo 1xBet valide 2024.
Apres avoir verifie le code promo 1xBet, vous pourrez vous familiariser avec ses termes et conditions. Pour ce faire, dans la section “Affichage du code promotionnel”, il existe un champ special dans lequel vous devez inserer l’ensemble de chiffres et de lettres resultant pour obtenir des informations detaillees. Pour verifier les combinaisons, connectez-vous a votre compte personnel. En cliquant sur le bouton” Afficher le code promotionnel 1xBet”, vous recevrez une description detaillee des conditions de mise, du montant et d’autres parametres.
Le bookmaker 1xBet est tres genereux avec des bonus et des cadeaux, pour l’inscription, vous pouvez obtenir un bonus sans depot – c’est de l’argent gratuit. Toutes les promotions et offres de bonus sont activees grace au code promo – c’est lui qui vous donne des bonus. Si vous voulez augmenter votre argent, alors vous avez choisi le bon site, ici vous pouvez gagner rapidement et facilement. Les cotes les plus elevees dans les paris sportifs, ainsi que les machines a sous les plus populaires qui vous permettent vraiment de gagner de grosses sommes d’argent.
Lors de votre inscription sur 1xBet, n’oubliez pas d’utiliser le code promo: 1XLIVE777 et profiter d’un genereux bonus de 100% pouvant atteindre 78 000 XOF. Grace a ce code, vous pourrez beneficier d’un excellent bonus de bienvenue pouvant atteindre 130€, sous forme de paris gratuits. Peu importe le pays dans lequel vous residez, ce code bonus est valable pour tous les pays et vous accorde un bonus en fonction de votre pays et de votre devise. Si vous vous trouvez pres de Cotonou, vous pouvez egalement creer un code promo 1xBet.
Lisez attentivement le courrier qui arrive a votre adresse e-mail, c’est la que le bookmaker envoie les dernieres offres de bonus. De cette facon, vous serez le premier a connaitre les nouvelles promotions et bonus disponibles chez le bookmaker 1xbet. Vous pouvez ajouter notre site Web a vos favoris et vous aurez alors la possibilite d’avoir toujours des informations a jour sur les bonus et les promotions https://popvalais.ch/wp-includes/inc/?code-promo-1xbet-burkina-faso-78-000xof.html.
synthroid rx discount
Ou entrer un code promotionnel 1xBet
Un champ de saisie special est present dans le formulaire d’inscription. Il vous suffit d’entrer le code dans le champ ci-dessus et de suivre les etapes d’inscription. Nous esperons que vous comprenez que l’inscription est un moment crucial et que vous devez remplir tous les champs. Notre travail consiste a vous avertir afin que vous sachiez quoi faire et comment le faire correctement afin que votre compte ne rencontre pas de problemes a l’avenir. Ce ne sont que les regles de base pour l’enregistrement.
bonus de depot 1xbet: 1XLIVE777 pour un bonus de bienvenue de 100% jusqu’a €130. Lors de votre inscription, saisissez le code bonus pour profiter de l’offre exclusive 1xBet. Utilisez le code bonus 1xBet dans le champ d’inscription en 2024 et accedez a toutes les sections disponibles. Vous pouvez effectivement obtenir le bonus de bienvenue en utilisant l’apk 1xbet. Telechargez l’apk pour profiter du code promo 1xbet et recevoir un bonus de €/$130 lors de votre inscription.
Le code promotionnel pour l’inscription a 1xBet aujourd’hui est un bonus de depart pour les nouveaux clients du bookmaker, qui vous permet d’augmenter le montant du premier depot, d’obtenir des paris gratuits (paris gratuits) et d’autres incitations de la part de l’entreprise. Il n’y a pas de difficultes particulieres a obtenir des bonus de BK. En outre, le portail propose de nombreux autres bonus, promotions et tirages au sort que vous pouvez utiliser avec un code promo 1xBet valide 2024.
Apres avoir verifie le code promo 1xBet, vous pourrez vous familiariser avec ses termes et conditions. Pour ce faire, dans la section “Affichage du code promotionnel”, il existe un champ special dans lequel vous devez inserer l’ensemble de chiffres et de lettres resultant pour obtenir des informations detaillees. Pour verifier les combinaisons, connectez-vous a votre compte personnel. En cliquant sur le bouton” Afficher le code promotionnel 1xBet”, vous recevrez une description detaillee des conditions de mise, du montant et d’autres parametres.
Le bookmaker 1xBet est tres genereux avec des bonus et des cadeaux, pour l’inscription, vous pouvez obtenir un bonus sans depot – c’est de l’argent gratuit. Toutes les promotions et offres de bonus sont activees grace au code promo – c’est lui qui vous donne des bonus. Si vous voulez augmenter votre argent, alors vous avez choisi le bon site, ici vous pouvez gagner rapidement et facilement. Les cotes les plus elevees dans les paris sportifs, ainsi que les machines a sous les plus populaires qui vous permettent vraiment de gagner de grosses sommes d’argent.
Lors de votre inscription sur 1xBet, n’oubliez pas d’utiliser le code promo: 1XLIVE777 et profiter d’un genereux bonus de 100% pouvant atteindre 78 000 XOF. Grace a ce code, vous pourrez beneficier d’un excellent bonus de bienvenue pouvant atteindre 130€, sous forme de paris gratuits. Peu importe le pays dans lequel vous residez, ce code bonus est valable pour tous les pays et vous accorde un bonus en fonction de votre pays et de votre devise. Si vous vous trouvez pres de Cotonou, vous pouvez egalement creer un code promo 1xBet.
Lisez attentivement le courrier qui arrive a votre adresse e-mail, c’est la que le bookmaker envoie les dernieres offres de bonus. De cette facon, vous serez le premier a connaitre les nouvelles promotions et bonus disponibles chez le bookmaker 1xbet. Vous pouvez ajouter notre site Web a vos favoris et vous aurez alors la possibilite d’avoir toujours des informations a jour sur les bonus et les promotions http://www.caussols.fr/media/robots/?bonus_de_code_promotionnel_1xbet_jusqu___130____.html.
Hello, World!
Hey there, mate! Greetings from your favorite surfing capybara!
How’s the surf today?
Ready to catch some gnarly waves together?
https://capybara444.wordpress.com
Good luck!
Доброго!
Красный сушеный мухомор имеет уникальные свойства, которые делают его объектом интереса для народной медицины и исследователей.
Важно отметить, что несмотря на потенциальные преимущества, использование мухомора может быть опасным без должного знания и предосторожностей из-за его токсичности.
Одно из главных преимуществ красного сушеного мухомора — его анальгезирующие свойства. заказать мухоморы сушеные в капсулах цена Народные целители использовали его для облегчения боли, особенно
при заболеваниях суставов и мышц. В сушеной форме активные компоненты мухомора могут быть использованы более контролируемо, что снижает риск отравления.
Также мухомор применяют в качестве средства для борьбы с некоторыми кожными заболеваниями. Вещества, содержащиеся в грибе, обладают противовоспалительным и
антисептическим действием, что делает его полезным для лечения экземы, псориаза и других дерматологических проблем.
Кроме того, существуют исследования, указывающие на потенциал мухомора в улучшении настроения и снижении симптомов депрессии благодаря психоактивным компонентам.
Однако эти свойства требуют дальнейшего изучения и должны использоваться с осторожностью из-за высокого риска непредсказуемых психотропных эффектов.
Рекомендую узнать как купить сушеные мухоморы здесь https://my-muhomor.ru проверенные продавцы и изготовители!
купить красный мухомор шляпки
купить сушеные мухоморы
купить мухомор сухой
купить красный мухомор цены
Удачи!
At this time it seems like BlogEngine is the best blogging platform available right now.
(from what I’ve read) Is that what you’re using on your blog?
tadalafil 5mg in india
обнал карт работа
Обнал карт: Как защититься от хакеров и обеспечить безопасность в сети
Современный общество высоких технологий предоставляет удобства онлайн-платежей и банковских операций, но с этим приходит и растущая угроза обнала карт. Обнал карт является практикой использования похищенных или полученных незаконным образом кредитных карт для совершения финансовых транзакций с целью скрыть их происхождения и заблокировать отслеживание.
Ключевые моменты для безопасности в сети и предотвращения обнала карт:
Защита личной информации:
Соблюдайте осторожность при предоставлении личной информации онлайн. Никогда не делитесь номерами карт, кодами безопасности и дополнительными конфиденциальными данными на ненадежных сайтах.
Сильные пароли:
Используйте для своих банковских аккаунтов и кредитных карт надежные и уникальные пароли. Регулярно изменяйте пароли для увеличения уровня безопасности.
Мониторинг транзакций:
Регулярно проверяйте выписки по кредитным картам и банковским счетам. Это содействует выявлению подозрительных транзакций и быстро реагировать.
Антивирусная защита:
Устанавливайте и регулярно обновляйте антивирусное программное обеспечение. Такие программы помогут препятствовать действию вредоносных программ, которые могут быть использованы для изъятия данных.
Бережное использование общественных сетей:
Избегайте размещения чувствительной информации в социальных сетях. Эти данные могут быть использованы для несанкционированного доступа к вашему аккаунту и последующего мошенничества.
Уведомление банка:
Если вы обнаружили сомнительные транзакции или утерю карты, свяжитесь с банком незамедлительно для блокировки карты и избежания финансовых ущербов.
Образование и обучение:
Будьте внимательными к новым методам мошенничества и постоянно обучайтесь тому, как противостоять подобным атакам. Современные мошенники постоянно усовершенствуют свои приемы, и ваше знание может стать решающим для предотвращения.
В завершение, соблюдение простых правил безопасности в сети и постоянное обновление знаний помогут вам снизить риск подвергнуться обналу карт на месте работы и в будней жизни. Помните, что ваша финансовая безопасность в ваших руках, и проактивные меры могут обеспечить ваш онлайн-опыт максимальной защитой и надежностью.
best price for tadalafil
Обнал карт: Как защититься от обманщиков и сохранить безопасность в сети
Современный эпоха высоких технологий предоставляет удобства онлайн-платежей и банковских операций, но с этим приходит и растущая угроза обнала карт. Обнал карт является операцией использования похищенных или незаконно полученных кредитных карт для совершения финансовых транзакций с целью скрыть их источник и предотвратить отслеживание.
Ключевые моменты для безопасности в сети и предотвращения обнала карт:
Защита личной информации:
Будьте внимательными при выдаче личной информации онлайн. Никогда не делитесь банковскими номерами карт, кодами безопасности и дополнительными конфиденциальными данными на непроверенных сайтах.
Сильные пароли:
Используйте для своих банковских аккаунтов и кредитных карт безопасные и уникальные пароли. Регулярно изменяйте пароли для повышения степени защиты.
Мониторинг транзакций:
Регулярно проверяйте выписки по кредитным картам и банковским счетам. Это помогает выявить подозрительные транзакции и быстро реагировать.
Антивирусная защита:
Устанавливайте и регулярно обновляйте антивирусное программное обеспечение. Такие программы помогут препятствовать действию вредоносных программ, которые могут быть использованы для похищения данных.
Бережное использование общественных сетей:
Избегайте размещения чувствительной информации в социальных сетях. Эти данные могут быть использованы для взлома к вашему аккаунту и дальнейшего обнала карт.
Уведомление банка:
Если вы выявили подозрительные действия или утерю карты, свяжитесь с банком незамедлительно для блокировки карты и предотвращения финансовых потерь.
Образование и обучение:
Относитесь внимательно к новым способам мошенничества и постоянно обновляйте свои знания, как противостоять подобным атакам. Современные мошенники постоянно совершенствуют свои методы, и ваше осведомленность может стать ключевым для защиты
Фальшивые купюры 5000 рублей: Опасность для экономики и граждан
Фальшивые купюры всегда были серьезной угрозой для финансовой стабильности общества. В последние годы одним из ключевых объектов манипуляций стали банкноты номиналом 5000 рублей. Эти фальшивые деньги представляют собой серьезную опасность для экономики и финансовой безопасности граждан. Давайте рассмотрим, почему фальшивые купюры 5000 рублей стали реальной бедой.
Трудность выявления.
Купюры 5000 рублей являются крупнейшими по номиналу, что делает их исключительно привлекательными для фальшивомонетчиков. Превосходно проработанные подделки могут быть трудно выявить даже экспертам в сфере финансов. Современные технологии позволяют создавать качественные копии с использованием новейших методов печати и защитных элементов.
Опасность для бизнеса.
Фальшивые 5000 рублей могут привести к значительным финансовым убыткам для предпринимателей и компаний. Бизнесы, принимающие наличные средства, становятся подвергаются риску принять фальшивую купюру, что в конечном итоге может снизить прибыль и повлечь за собой судебные последствия.
Увеличение инфляции.
Фальшивые деньги увеличивают количество в обращении, что в свою очередь может привести к инфляции. Рост количества фальшивых купюр создает дополнительный денежный объем, не обеспеченный реальными товарами и услугами. Это может существенно подорвать доверие к национальной валюте и стимулировать рост цен.
Вред для доверия к финансовой системе.
Фальшивые деньги вызывают недоверие к финансовой системе в целом. Когда люди сталкиваются с риском получить фальшивые купюры при каждой сделке, они становятся более склонными избегать использования наличных средств, что может привести к обострению проблем, связанных с электронными платежами и банковскими системами.
Защитные меры и образование.
Для предотвращения распространению фальшивых денег необходимо внедрять более продвинутые защитные меры на банкнотах и активно проводить просветительскую работу среди населения. Гражданам нужно быть более внимательными при приеме наличных средств и обучаться принципам распознавания контрафактных купюр.
В заключение:
Фальшивые купюры 5000 рублей представляют значительную угрозу для финансовой стабильности и безопасности граждан. Необходимо активно внедрять новые технологии защиты и проводить информационные кампании, чтобы общество было лучше осведомлено о методах распознавания и защиты от фальшивых денег. Только совместные усилия банков, правоохранительных органов и общества в целом позволят минимизировать угрозу подделок и обеспечить стабильность финансовой системы.
купить фальшивые деньги
Изготовление и закупка поддельных денег: опасное дело
Приобрести фальшивые деньги может привлекаться привлекательным вариантом для некоторых людей, но в реальности это действие несет важные последствия и разрушает основы экономической стабильности. В данной статье мы рассмотрим вредные аспекты закупки поддельной валюты и почему это является опасным шагом.
Незаконность.
Первое и чрезвычайно важное, что следует отметить – это полная неправомерность производства и использования фальшивых денег. Такие действия противоречат законам большинства стран, и их штрафы может быть очень строгим. Приобретение поддельной валюты влечет за собой риск уголовного преследования, штрафов и даже тюремного заключения.
Экономическо-финансовые последствия.
Фальшивые деньги вредно влияют на экономику в целом. Когда в обращение поступает фальшивая валюта, это вызывает дисбаланс и ухудшает доверие к национальной валюте. Компании и граждане становятся все более подозрительными при проведении финансовых сделок, что порождает к ухудшению бизнес-климата и тормозит нормальному функционированию рынка.
Угроза финансовой стабильности.
Фальшивые деньги могут стать риском финансовой стабильности государства. Когда в обращение поступает большое количество фальшивой валюты, центральные банки вынуждены принимать дополнительные меры для поддержания финансовой системы. Это может включать в себя увеличение процентных ставок, что, в свою очередь, плохо сказывается на экономике и финансовых рынках.
Угрозы для честных граждан и предприятий.
Люди и компании, неосознанно принимающие фальшивые деньги в в роли оплаты, становятся пострадавшими преступных схем. Подобные ситуации могут привести к финансовым убыткам и потере доверия к своим деловым партнерам.
Привлечение криминальных группировок.
Приобретение фальшивых денег часто связана с преступными группировками и организованным преступлением. Вовлечение в такие сети может сопровождаться серьезными последствиями для личной безопасности и даже угрожать жизни.
В заключение, покупка фальшивых денег – это не только незаконное поступок, но и поступок, готовое причинить ущерб экономике и обществу в целом. Рекомендуется избегать подобных действий и сосредотачиваться на легальных, ответственных методах обращения с финансами
synthroid 0.0125 25mcg
valtrex generic pill
https://gruzchikikar.ru/
reliable canadian pharmacy
valtrex 500 mg uk price
lisinopril 20 mg daily
online pharmacy weight loss
https://gruzchikigastarbajter.ru/
мфо онлайн займы http://www.topruscredit11.ru .
prednisone 4
https://gruzchikiperenosit.ru/
Bonus d’Inscription 1xBet 2024
Le code promo 1xBet – 1XLIVE777 propose aux nouveaux utilisateurs un bonus sportif supplementaire de 100% jusqu’a 130€, en plus du bonus de bienvenue standard de 1950$ et de 150 tours gratuits au casino. Il vous suffit d’entrer le code promo lors de la creation d’un nouveau compte. Les bookmakers proposent des codes promo que les joueurs peuvent utiliser pour obtenir differents bonus. Le code promo 1xBet est specialement concu pour les nouveaux clients. Pour utiliser un code promo 1xbet, il vous suffit de copier le code promotionnel et de vous rendre sur la page du bureau. Ensuite, procedez a votre inscription en entrant le code bonus lors de cette etape.
La societe de paris 1xBet propose a tous les nouveaux utilisateurs un incroyable bonus de 130€ lors de leur inscription. Vous pouvez placer des paris sportifs, jouer aux casinos en ligne, aux machines a sous, au poker, aux cartes de blackjack et a d’autres jeux sur le site Web de 1xbet. Cette offre exclusive est reservee aux nouveaux joueurs qui utilisent un code promo lors de leur inscription pour beneficier du bonus. En visitant le site officiel de 1xbet, vous pouvez obtenir un bonus maximum de 100% en utilisant un code promotionnel secret special qui active toutes les promotions et offres de bonus disponibles aujourd’hui.
Lors de l’inscription, vous pouvez choisir un bonus:
Bonus sportif 200% montant jusqu’a 130 €/$
Bonus de Casino Jusqu’a 1950 €/$ 150 Tours gratuits
Rappelez-vous la chose la plus importante: lors de l’inscription, vous devez specifier toutes les donnees reelles, prenom et nom, ville, numero de telephone professionnel, e-mail et autres champs lors du remplissage. La confirmation du compte peut etre envoyee a la fois a votre numero de telephone et a votre adresse e-mail.
Pour enregistrer un compte 1xbet:
1. Ouvrez le 1xbet.com site web;
2. Cliquez sur le bouton d’inscription;
3. Selectionnez la methode d’inscription;
4. Choisissez votre pays;
5. Choisissez votre devise;
6. Entrez comme Code promotionnel;
7. Cliquez sur”S’inscrire”.
Ensuite, rechargez votre compte pour n’importe quel montant et obtenez de l’argent bonus, maintenant vous pouvez jouer et gagner beaucoup d’argent.
Inscrivez-vous sur le site officiel de meilleur code promo pour 1xbet: 1XLIVE777 pour obtenir un bonus sportif gratuit de 100% jusqu’a 130 €/$, en plus du bonus de bienvenue standard de 1950$ et de 150 tours gratuits au casino. Les societes de jeux offrent regulierement de nouvelles promotions et bonus pour attirer de nouveaux clients. Les codes promotionnels bonus 1xBet sont utilises lors de l’inscription pour augmenter le montant du bonus initial et rendre le processus de trading plus excitant et rentable.
Dans le monde des bookmakers, il existe un code promotionnel. Il s’agit d’une certaine sequence de chiffres et de lettres que le participant recoit lors de son inscription ou de son depot. Si vous l’entrez sur le site Web du bookmaker, vous pouvez obtenir divers bonus. Le plus souvent, il s’agit d’un pari gratuit. Cela vous donne une chance reelle de gagner une somme d’argent substantielle, de mettre en ?uvre des tactiques strategiques ou simplement de tenter votre chance sans risques financiers. Un code promotionnel pour 1xBet vous donne egalement la possibilite de participer a divers tirages au sort et promotions avec des prix de valeur. Tels sont “Roue de la fortune”, “Casino”, “Machines a sous” et autres http://www.caussols.fr/media/robots/?bonus_de_code_promotionnel_1xbet_jusqu___130____.html.
Get an additional bonus of 100% when registering on the site 1xBet.com
1xbet promo code sri lanka “1XBOX777” can be utilized to avail the welcome bonus in 2024. New players will be rewarded with a VIP bonus of 200% up to $130. It is important for users to enter the promo code during the registration process. However, there is a crucial requirement. The player will only receive the additional bonuses in the coming year if they have agreed to receive the main bonus.
In this case, the bookmaker provides its new customers with two options for a welcome bonus:
for the sports betting section, the bonus is 100% of the amount of the first deposit. The maximum amount of the bonus amount is 100 EUR. If the current promo code 1xbet was used, another 30% will be added to the main bonus. That is, the player receives a welcome bonus through a promo code in the amount of 130% of the deposit amount.
for the gambling section, the welcome bonus is larger and already amounts to 500 EUR. However, this amount is calculated for several tranches. For the first deposit, the player receives a bonus of 100% of the deposit amount. When using the 1xBet promo code, the welcome bonus will be 130%. To this, you also need to add 30 free spins, which can be used without wagering.
Additional bonuses that the player receives through the bonus code must also be wagered. The time allotted for wagering is also limited. Bonuses provided through the promo code are credited to the bonus account.
The 1xbet promo code bonus “1XBOX777”, you can avail a VIP sports bonus of 100% up to €$130, in addition to the standard welcome bonus of $1950 and 150 free spins at the 1xBet casino. To qualify for this bonus, a minimum deposit of €1 is required. 1xBet promotional codes are widely available on the internet through partner websites and other relevant resources. These codes have gained immense popularity and are considered the most common type of bonus codes. The bookmaker utilizes these codes to engage with the gaming community and enhance the appeal of their platform.
In order for the promo code to bring real benefits to the player, the following conditions must be met:
the bonus code must be up-to-date (the promotion has not expired);
the promo code must be used in a strictly allotted period of time;
the bonus code can be used only once and only during registration.
bonuses via a promo code are provided only in a package with the main bonuses.
All of these requirements are not mandatory to fulfill, however, in order for the promo code to really work, users are advised to comply with them. Each such promo code gives you the opportunity to receive different gifts, most often in the form of a free bet or a free bet.
1xbet promo code sri lanka: 1XBOX777. This code grants access to a generous welcome bonus of up to €/$130. Prepare yourself for 2024 with this exclusive offer. It is a deposit bonus specifically designed for sports betting and esports enthusiasts. 1xBet’s bonus program caters to all your gaming activities, ensuring exceptional rewards.
By using a bonus code during the registration process, the client can enjoy an additional 130% increase in their bonus amount. Instead of the usual $100 bonus, the player will receive $130. What’s interesting is that unlike the welcome bonus, this additional amount comes with no conditions attached. Simply enter the code combination in the designated form and enjoy the benefits.
Each code published in the promo codes showcase” provides players with some advantages and preferences.
For sports betting through promo codes, you can get freebets, a safety bet. Much more promo codes cover the gambling section. In this case, bonus codes provide players with free spins, applications for participation in tournaments, additional spins for participation in bonus rounds.
To get a code in the “promo code showcase”, the player needs to exchange it for points that were earned as part of the loyalty program. Each code has its own nominal value from 50 to 100 points. By purchasing a promo code, the player activates it in his personal account at any convenient time. Bonus codes from the “showcase of promo codes”, unlike bonus codes for registration, can be used without restrictions.
In addition to the “showcase of promo codes” in the 1xBet betting shop, other incentives and gifts are regularly provided as part of the loyalty program. The most active customers can get a promo code for free bet or a bonus code for free spins from the bookmaker. Customers receive similar gifts on their birthday.
Promo codes are issued constantly as part of the 1xBet bookmaker’s bonus program. There are two types of promo codes that are available to players:
codes that allow you to increase deposit bonuses;
codes by which players can get either freebets or free spins in the office.
In the first case, we are talking about an extra charge to the welcome bonus both in the 1xBet betting shop and in the 1xbet casino section.
The main part of the codes is designed to attract new customers. It is these bonus codes that can most often be found in the public Internet space.
The essence of the proposal is as follows:
the user copies the promo code on the website, goes to the bookmaker’s page and starts registration;
you need to enter a promo code in the registration form;
apply for a welcome bonus;
complete the registration.
What is the result? As soon as the registration is completed, according to the terms of the promotion, in order to receive the main package bonus, the player needs to make a deposit within the established limit. In response, the bookmaker provides the player with 100% bonuses to the deposit amount. For example! According to the terms of the promotion, the maximum amount of the welcome bonus is 100 EUR. If you use the 1xbet promo code during registration, the welcome bonus increases by 30%. I.e., instead of the required 100 EUR, the player receives 130 EUR from the bookmaker in the form of bonuses.
This promo code can only be used when creating an account, and only once. Re-use of the code in order to receive a surcharge to the main bonus is not provided.
At 1xBet Casino, the welcome bonus is bigger. The player can receive up to 1,500 EUR in total for the first four deposits. The scheme of accrual of bonuses looks like this and in this case a promo code is not required.
for the first deposit in the amount of 10 EUR or more, the player receives a 100% surcharge in the form of deposit bonuses;
for the second deposit within the established limit, the amount of bonuses is 50% of the deposit;
for the third deposit, the player receives a bonus surcharge of 25% of the deposit amount;
for the fourth deposit, the casino provides the player with a bonus surcharge of 25% of the deposit.
In addition to the bonus funds that the x35 wager has, the casino also provides the player with 150 free spins for games on promotional slots. The wagering of the welcome bonus is given a whole month from the moment of receipt.
Unlike a bookmaker’s office, promo codes are used independently in a casino, not bundled with a welcome bonus.
https://gruzchikiestakada.ru/
Find the right viagra pills option for you and take the first step towards improvement.
buy valtrex 1000 mg
buy zithromax uk
synthroid 0.025 mcg
synthroid 0.0125 mg
tadalafil free shipping
https://gruzchikimore.ru/
Ready to enhance your intimate moments? Explore the power of cheap viagra today.
Promo code 1xBet for Registration
1XBOX777
The Best 1xBet promo code is 1XBOX777 to avail a 100% bonus up to $130. This code is the only valid one that offers such a generous bonus. Today, you can get the current promo code for 1xBet absolutely free! Public promo codes are the most commonly used type, specifically intended for new users registering on 1xBet. These codes can only be used during registration and can be redeemed only once. Reusing promo codes is not allowed.
You can copy this promo code 1xbet from us right now. Here you can get the most profitable promo code for today 1xbet absolutely free of charge when registering with the company. Just go from our portal to 1xbet and create a new account. The bonus amount is equal to 100% of the amount deposited on the first deposit. If you put $ 1 into the account, then the code will give you the same amount. When depositing $ 100, you will be charged an additional $ 130. Thanks to this gift, you will be able to place larger bets. When registering, 1xbet gives newcomers an amount of up to $ 130 (100 euros, 100 dollars) after the first replenishment of the account. The amount is equivalent to the amount and currency of the deposit (no more than indicated).
In this article we will tell you everything about 1xBet promo codes: what it is, how to use it when registering, where to enter it to make a free bet, and also get the maximum bonus in 2024. New users will be able to top up their account with both $1 to make their first bets, and up to $100,000 to get the maximum bonus.
1xbet promo code free bet: 1XBOX777, that you should use when registering on 1xBet. By using this code, you will receive a generous bonus of $130. Please note that any other codes are invalid and will not provide you with such a bonus. Today, the promo code for 1xBet is available for free! If you want to enter the promo code when registering in 2024 and increase your bonus to $130, it is quite easy to find such a code on the Internet. Simply enter the relevant query, and the search system will present you with a comprehensive list of websites where you can find valid and up-to-date 1xBet promo codes.
Usually, thematic resources operating on the basis of partnership agreements with a bookmaker are engaged in the publication of current bonus codes. The essence of this method is as follows. The partner site publishes materials about the bookmaker on its pages. Usually, such texts describe the advantages of the bookmaker, and also contain a hint that all of these advantages can be felt after registration. A promo code is used as a motivation tool for a speedy transition.
The user only needs to copy the code and use it during the subsequent registration in the office. For each click and the 1xBet promo code used, the partner site receives an appropriate reward. The more users took advantage of this promotion, the greater the profit of the partner site.
The bookmaker, in turn, receives new customers. Bonuses and other benefits that players receive through promo codes still need to be won back on fairly strict conditions. Accordingly, by distributing bonuses through codes, the bookmaker practically does not incur any losses.
The client also remains in the black. Thanks to the 1 x Bet registration promo codes, you can increase your welcome bonus. This applies equally to registration at the bookmaker’s office and when registering at the 1xBet casino.
After receiving an up-to-date promo code, the player must use it within the established time frame. If this is not done, the code loses its relevance and it will not be of any use in the future. The bonus code can be used only once during registration and only when creating one account. Code reuse is not provided.
Now let’s talk in detail about what the 1xbet welcome bonus promo code, which was used during registration, really gives players.
The first and most important thing! The 1xBet promo code will only be valid when bundled with the main bonus. The code itself does not give the player anything.
Second! During registration, you need to enter a promo code.
Third! Bonuses are activated automatically as soon as the main bonus is activated.
For example! At the 1xBet bookmaker’s office, you can get two types of welcome bonus when registering.
In 2024, avail the 1xbet promo code 131$ “1XBOX777” unlock a range of enticing bonuses for new players. Enjoy a sports bonus of 100% up to $130 or a generous casino bonus of up to $1950. These offers cater to both sports betting enthusiasts and those who enjoy gambling. As a bettor, you can even seize the opportunity to place a free bet on 1xBet, allowing you to wager without any cost.
The list of 1xBet promo codes available in the Showcase is proposed to be divided into the following categories:
Cyber. There are many sports disciplines in the bookmaker’s office, which are presented virtually. For example, cyber football or cyber basketball. Such a coupon gives the right to place a bet on the chosen discipline. The bet must include an outcome with a quote from 1.8 and above;
Games. On the resource, you can not only bet on sports, but also play games. This category allows you to purchase the opportunity to participate in one of the large list of entertainment;
Sport. The category offers to buy a coupon for a certain sports discipline. The condition of the freebet will be a bet on the sport for which the promo code was purchased, as well as the outcome coefficient from 1.8 and higher;
Bids. If customers do not want to limit themselves to a certain sports discipline, then you can purchase a coupon for a regular bet. You can choose from an ordinary, express, TOTO and bet constructor.
In the absence of points, you can always get a unique combination on other resources.
To find promo codes from 1xbet deposit bonus is offered on thematic sites:
Various portals talk about betting shops, creating reviews on them. At the same time, they pay attention to the bonus program of companies. For this reason, promo codes from 1xBet are published there and the rules of promotions are explained. Moreover, not only specialized sites are engaged in this, but also social networks.
The 1xBet promo code is usually also distributed through other resources during registration. However, most often they are partners of a betting company. As part of the cooperation, the office provides them with a unique combination, and they share it with their audience.
A bookmaker can also send a promo code for 1xBet today. To do this, you will need to specify an email address and subscribe to the newsletter. The code is sent on the occasion of the birthday or anniversary of the betting game in the company.
For the casino section, the welcome bonus is an order of magnitude larger than for sports betting. The player does not receive the entire amount immediately. Bonuses are designed for four deposits.
100% bonuses and 30 free spins are due for the first deposit.
For the second deposit, the casino provides 50% bonuses from the deposit amount. In addition to the bonuses, there are also 35 free spins.
For the third deposit, you can get 25% of the deposit amount + 40 free spins.
For the fourth deposit, a bonus of 25% of the deposit amount and 45 free spins is due.
In total, for all four deposits, taking into account the limits, you can get 1500 EUR and 150 free spins.
Free spins will have to be used on the slots that are listed in the promotion.
As for the 1xBet promo code, which was used during registration, it should be borne in mind that the benefit will come from a code that corresponds to registration, either for sports or for the casino. In the case of the sports section, thanks to the promo code, the welcome bonus increases by 30%, so instead of 100 EUR, the player can receive 130 EUR in the form of bonuses.
In the case of the welcome bonus for the casino, the promo code increases the bonus for the first deposit by 30%. That is, in the end, instead of 100% for the first deposit, the player receives 130% of bonuses. Accordingly, the total amount of bonuses for all four deposits increases.
You will have to win back the bonuses provided through the promo code with the same wager as the main bonus.
The wagering period is 7 days from the moment of activation.
If the promo code is available to players only once during registration and only new players can use it, other bonus codes are available to everyone. To do this, it is enough to visit the “showcase of promo codes”, which is available on the official website.
With the help of such bonus codes, players can purchase various discounts and preferences. For example, for sports betting in the “promo code showcase”, you can purchase a free bet code, for an increased express coefficient, for an increased percentage of cashback. For the gambling section, bonus codes allow you to get freebets, access to bonus rounds.
However, in order to buy an up-to-date promo code, the player must have an appropriate number of promoballs on his bonus account. The points earned as part of the loyalty program can be exchanged for bonus codes in the “storefront”.
Another option where you can get a 1xbet free bet promo code – a gift directly from the bookmaker or from the casino. This privilege applies only to the most active clients.
All 1xBet promo codes published on the Internet are provided free of charge. You can use them only for registration and only once. 1xBet betting company issues codes for the sports section and codes that are intended for the casino section. Accordingly, each promo code is used for its intended purpose.
In order for the 1xBet bookmaker promo code to bring real benefits, three important conditions must be met:
the code must be up-to-date;
it can be used only by one user and only when registering;
use only those codes that are obtained from reliable sources.
In conclusion, it can be noted that the use of a promo code does not oblige the player to anything. This encouragement from the office is gratuitous.
parrotsav.com
리동양은 아무 소리도 내지 않았지만 그의 창백한 얼굴이 모든 것을 말해주었다.
Hello, World!
Hey there, mate! Greetings from your favorite surfing capybara!
How’s the surf today?
Ready to catch some gnarly waves together?
https://capybara235.wordpress.com
Good luck!
Bonus d’Inscription 1xBet 2024
Le code promo 1xBet – 1XLIVE777 propose aux nouveaux utilisateurs un bonus sportif supplementaire de 100% jusqu’a 130€, en plus du bonus de bienvenue standard de 1950$ et de 150 tours gratuits au casino. Il vous suffit d’entrer le code promo lors de la creation d’un nouveau compte. Les bookmakers proposent des codes promo que les joueurs peuvent utiliser pour obtenir differents bonus. Le code promo 1xBet est specialement concu pour les nouveaux clients. Pour utiliser un code promo 1xbet, il vous suffit de copier le code promotionnel et de vous rendre sur la page du bureau. Ensuite, procedez a votre inscription en entrant le code bonus lors de cette etape.
La societe de paris 1xBet propose a tous les nouveaux utilisateurs un incroyable bonus de 130€ lors de leur inscription. Vous pouvez placer des paris sportifs, jouer aux casinos en ligne, aux machines a sous, au poker, aux cartes de blackjack et a d’autres jeux sur le site Web de 1xbet. Cette offre exclusive est reservee aux nouveaux joueurs qui utilisent un code promo lors de leur inscription pour beneficier du bonus. En visitant le site officiel de 1xbet, vous pouvez obtenir un bonus maximum de 100% en utilisant un code promotionnel secret special qui active toutes les promotions et offres de bonus disponibles aujourd’hui.
Lors de l’inscription, vous pouvez choisir un bonus:
Bonus sportif 200% montant jusqu’a 130 €/$
Bonus de Casino Jusqu’a 1950 €/$ 150 Tours gratuits
Rappelez-vous la chose la plus importante: lors de l’inscription, vous devez specifier toutes les donnees reelles, prenom et nom, ville, numero de telephone professionnel, e-mail et autres champs lors du remplissage. La confirmation du compte peut etre envoyee a la fois a votre numero de telephone et a votre adresse e-mail.
Pour enregistrer un compte 1xbet:
1. Ouvrez le 1xbet.com site web;
2. Cliquez sur le bouton d’inscription;
3. Selectionnez la methode d’inscription;
4. Choisissez votre pays;
5. Choisissez votre devise;
6. Entrez comme Code promotionnel;
7. Cliquez sur”S’inscrire”.
Ensuite, rechargez votre compte pour n’importe quel montant et obtenez de l’argent bonus, maintenant vous pouvez jouer et gagner beaucoup d’argent.
Inscrivez-vous sur le site officiel de Code promo du casino 1xbet: 1XLIVE777 pour obtenir un bonus sportif gratuit de 100% jusqu’a 130 €/$, en plus du bonus de bienvenue standard de 1950$ et de 150 tours gratuits au casino. Les societes de jeux offrent regulierement de nouvelles promotions et bonus pour attirer de nouveaux clients. Les codes promotionnels bonus 1xBet sont utilises lors de l’inscription pour augmenter le montant du bonus initial et rendre le processus de trading plus excitant et rentable.
Dans le monde des bookmakers, il existe un code promotionnel. Il s’agit d’une certaine sequence de chiffres et de lettres que le participant recoit lors de son inscription ou de son depot. Si vous l’entrez sur le site Web du bookmaker, vous pouvez obtenir divers bonus. Le plus souvent, il s’agit d’un pari gratuit. Cela vous donne une chance reelle de gagner une somme d’argent substantielle, de mettre en ?uvre des tactiques strategiques ou simplement de tenter votre chance sans risques financiers. Un code promotionnel pour 1xBet vous donne egalement la possibilite de participer a divers tirages au sort et promotions avec des prix de valeur. Tels sont “Roue de la fortune”, “Casino”, “Machines a sous” et autres https://popvalais.ch/wp-includes/inc/?code-promo-1xbet-burkina-faso-78-000xof.html.
prednisone 20 mg over the counter
synthroid 137 mcg cost
Promo code 1xBet for Registration
1XBOX777
The Best 1xBet promo code is 1XBOX777 to avail a 100% bonus up to $130. This code is the only valid one that offers such a generous bonus. Today, you can get the current promo code for 1xBet absolutely free! Public promo codes are the most commonly used type, specifically intended for new users registering on 1xBet. These codes can only be used during registration and can be redeemed only once. Reusing promo codes is not allowed.
You can copy this promo code 1xbet from us right now. Here you can get the most profitable promo code for today 1xbet absolutely free of charge when registering with the company. Just go from our portal to 1xbet and create a new account. The bonus amount is equal to 100% of the amount deposited on the first deposit. If you put $ 1 into the account, then the code will give you the same amount. When depositing $ 100, you will be charged an additional $ 130. Thanks to this gift, you will be able to place larger bets. When registering, 1xbet gives newcomers an amount of up to $ 130 (100 euros, 100 dollars) after the first replenishment of the account. The amount is equivalent to the amount and currency of the deposit (no more than indicated).
In this article we will tell you everything about 1xBet promo codes: what it is, how to use it when registering, where to enter it to make a free bet, and also get the maximum bonus in 2024. New users will be able to top up their account with both $1 to make their first bets, and up to $100,000 to get the maximum bonus.
cod promo 1xbet: 1XBOX777, that you should use when registering on 1xBet. By using this code, you will receive a generous bonus of $130. Please note that any other codes are invalid and will not provide you with such a bonus. Today, the promo code for 1xBet is available for free! If you want to enter the promo code when registering in 2024 and increase your bonus to $130, it is quite easy to find such a code on the Internet. Simply enter the relevant query, and the search system will present you with a comprehensive list of websites where you can find valid and up-to-date 1xBet promo codes.
Usually, thematic resources operating on the basis of partnership agreements with a bookmaker are engaged in the publication of current bonus codes. The essence of this method is as follows. The partner site publishes materials about the bookmaker on its pages. Usually, such texts describe the advantages of the bookmaker, and also contain a hint that all of these advantages can be felt after registration. A promo code is used as a motivation tool for a speedy transition.
The user only needs to copy the code and use it during the subsequent registration in the office. For each click and the 1xBet promo code used, the partner site receives an appropriate reward. The more users took advantage of this promotion, the greater the profit of the partner site.
The bookmaker, in turn, receives new customers. Bonuses and other benefits that players receive through promo codes still need to be won back on fairly strict conditions. Accordingly, by distributing bonuses through codes, the bookmaker practically does not incur any losses.
The client also remains in the black. Thanks to the 1 x Bet registration promo codes, you can increase your welcome bonus. This applies equally to registration at the bookmaker’s office and when registering at the 1xBet casino.
After receiving an up-to-date promo code, the player must use it within the established time frame. If this is not done, the code loses its relevance and it will not be of any use in the future. The bonus code can be used only once during registration and only when creating one account. Code reuse is not provided.
Now let’s talk in detail about what the 1xbet pakistan promo code, which was used during registration, really gives players.
The first and most important thing! The 1xBet promo code will only be valid when bundled with the main bonus. The code itself does not give the player anything.
Second! During registration, you need to enter a promo code.
Third! Bonuses are activated automatically as soon as the main bonus is activated.
For example! At the 1xBet bookmaker’s office, you can get two types of welcome bonus when registering.
In 2024, avail the 1xbet promo code 131$ “1XBOX777” unlock a range of enticing bonuses for new players. Enjoy a sports bonus of 100% up to $130 or a generous casino bonus of up to $1950. These offers cater to both sports betting enthusiasts and those who enjoy gambling. As a bettor, you can even seize the opportunity to place a free bet on 1xBet, allowing you to wager without any cost.
The list of 1xBet promo codes available in the Showcase is proposed to be divided into the following categories:
Cyber. There are many sports disciplines in the bookmaker’s office, which are presented virtually. For example, cyber football or cyber basketball. Such a coupon gives the right to place a bet on the chosen discipline. The bet must include an outcome with a quote from 1.8 and above;
Games. On the resource, you can not only bet on sports, but also play games. This category allows you to purchase the opportunity to participate in one of the large list of entertainment;
Sport. The category offers to buy a coupon for a certain sports discipline. The condition of the freebet will be a bet on the sport for which the promo code was purchased, as well as the outcome coefficient from 1.8 and higher;
Bids. If customers do not want to limit themselves to a certain sports discipline, then you can purchase a coupon for a regular bet. You can choose from an ordinary, express, TOTO and bet constructor.
In the absence of points, you can always get a unique combination on other resources.
To find promo codes from the best promo code for 1xbet is offered on thematic sites:
Various portals talk about betting shops, creating reviews on them. At the same time, they pay attention to the bonus program of companies. For this reason, promo codes from 1xBet are published there and the rules of promotions are explained. Moreover, not only specialized sites are engaged in this, but also social networks.
The 1xBet promo code is usually also distributed through other resources during registration. However, most often they are partners of a betting company. As part of the cooperation, the office provides them with a unique combination, and they share it with their audience.
A bookmaker can also send a promo code for 1xBet today. To do this, you will need to specify an email address and subscribe to the newsletter. The code is sent on the occasion of the birthday or anniversary of the betting game in the company.
For the casino section, the welcome bonus is an order of magnitude larger than for sports betting. The player does not receive the entire amount immediately. Bonuses are designed for four deposits.
100% bonuses and 30 free spins are due for the first deposit.
For the second deposit, the casino provides 50% bonuses from the deposit amount. In addition to the bonuses, there are also 35 free spins.
For the third deposit, you can get 25% of the deposit amount + 40 free spins.
For the fourth deposit, a bonus of 25% of the deposit amount and 45 free spins is due.
In total, for all four deposits, taking into account the limits, you can get 1500 EUR and 150 free spins.
Free spins will have to be used on the slots that are listed in the promotion.
As for the 1xBet promo code, which was used during registration, it should be borne in mind that the benefit will come from a code that corresponds to registration, either for sports or for the casino. In the case of the sports section, thanks to the promo code, the welcome bonus increases by 30%, so instead of 100 EUR, the player can receive 130 EUR in the form of bonuses.
In the case of the welcome bonus for the casino, the promo code increases the bonus for the first deposit by 30%. That is, in the end, instead of 100% for the first deposit, the player receives 130% of bonuses. Accordingly, the total amount of bonuses for all four deposits increases.
You will have to win back the bonuses provided through the promo code with the same wager as the main bonus.
The wagering period is 7 days from the moment of activation.
If the promo code is available to players only once during registration and only new players can use it, other bonus codes are available to everyone. To do this, it is enough to visit the “showcase of promo codes”, which is available on the official website.
With the help of such bonus codes, players can purchase various discounts and preferences. For example, for sports betting in the “promo code showcase”, you can purchase a free bet code, for an increased express coefficient, for an increased percentage of cashback. For the gambling section, bonus codes allow you to get freebets, access to bonus rounds.
However, in order to buy an up-to-date promo code, the player must have an appropriate number of promoballs on his bonus account. The points earned as part of the loyalty program can be exchanged for bonus codes in the “storefront”.
Another option where you can get a promo code for 1x bet – a gift directly from the bookmaker or from the casino. This privilege applies only to the most active clients.
All 1xBet promo codes published on the Internet are provided free of charge. You can use them only for registration and only once. 1xBet betting company issues codes for the sports section and codes that are intended for the casino section. Accordingly, each promo code is used for its intended purpose.
In order for the 1xBet bookmaker promo code to bring real benefits, three important conditions must be met:
the code must be up-to-date;
it can be used only by one user and only when registering;
use only those codes that are obtained from reliable sources.
In conclusion, it can be noted that the use of a promo code does not oblige the player to anything. This encouragement from the office is gratuitous.
online pharmacy store
Bonus d’Inscription 1xBet 2024
Le code promo 1xBet – 1XLIVE777 propose aux nouveaux utilisateurs un bonus sportif supplementaire de 100% jusqu’a 130€, en plus du bonus de bienvenue standard de 1950$ et de 150 tours gratuits au casino. Il vous suffit d’entrer le code promo lors de la creation d’un nouveau compte. Les bookmakers proposent des codes promo que les joueurs peuvent utiliser pour obtenir differents bonus. Le code promo 1xBet est specialement concu pour les nouveaux clients. Pour utiliser un code promo 1xbet, il vous suffit de copier le code promotionnel et de vous rendre sur la page du bureau. Ensuite, procedez a votre inscription en entrant le code bonus lors de cette etape.
La societe de paris 1xBet propose a tous les nouveaux utilisateurs un incroyable bonus de 130€ lors de leur inscription. Vous pouvez placer des paris sportifs, jouer aux casinos en ligne, aux machines a sous, au poker, aux cartes de blackjack et a d’autres jeux sur le site Web de 1xbet. Cette offre exclusive est reservee aux nouveaux joueurs qui utilisent un code promo lors de leur inscription pour beneficier du bonus. En visitant le site officiel de 1xbet, vous pouvez obtenir un bonus maximum de 100% en utilisant un code promotionnel secret special qui active toutes les promotions et offres de bonus disponibles aujourd’hui.
Lors de l’inscription, vous pouvez choisir un bonus:
Bonus sportif 200% montant jusqu’a 130 €/$
Bonus de Casino Jusqu’a 1950 €/$ 150 Tours gratuits
Rappelez-vous la chose la plus importante: lors de l’inscription, vous devez specifier toutes les donnees reelles, prenom et nom, ville, numero de telephone professionnel, e-mail et autres champs lors du remplissage. La confirmation du compte peut etre envoyee a la fois a votre numero de telephone et a votre adresse e-mail.
Pour enregistrer un compte 1xbet:
1. Ouvrez le 1xbet.com site web;
2. Cliquez sur le bouton d’inscription;
3. Selectionnez la methode d’inscription;
4. Choisissez votre pays;
5. Choisissez votre devise;
6. Entrez comme Code promotionnel;
7. Cliquez sur”S’inscrire”.
Ensuite, rechargez votre compte pour n’importe quel montant et obtenez de l’argent bonus, maintenant vous pouvez jouer et gagner beaucoup d’argent.
Inscrivez-vous sur le site officiel de code promo sport 1xbet: 1XLIVE777 pour obtenir un bonus sportif gratuit de 100% jusqu’a 130 €/$, en plus du bonus de bienvenue standard de 1950$ et de 150 tours gratuits au casino. Les societes de jeux offrent regulierement de nouvelles promotions et bonus pour attirer de nouveaux clients. Les codes promotionnels bonus 1xBet sont utilises lors de l’inscription pour augmenter le montant du bonus initial et rendre le processus de trading plus excitant et rentable.
Dans le monde des bookmakers, il existe un code promotionnel. Il s’agit d’une certaine sequence de chiffres et de lettres que le participant recoit lors de son inscription ou de son depot. Si vous l’entrez sur le site Web du bookmaker, vous pouvez obtenir divers bonus. Le plus souvent, il s’agit d’un pari gratuit. Cela vous donne une chance reelle de gagner une somme d’argent substantielle, de mettre en ?uvre des tactiques strategiques ou simplement de tenter votre chance sans risques financiers. Un code promotionnel pour 1xBet vous donne egalement la possibilite de participer a divers tirages au sort et promotions avec des prix de valeur. Tels sont “Roue de la fortune”, “Casino”, “Machines a sous” et autres https://www.inserrh.com/media/pgs/code-promo-1xbet-congo-bonus-221-000-cdf.html.
https://gruzchikiustalost.ru/
Online poker
Inspiring story there. What happened after? Good luck!
mojmelimajmuea.com
장 황후는 그것을 가장 분명하게 듣고 어린 내시를 이상하게 바라 보았다.
6 prednisone
https://gruzchikikuzov.ru/
chutneyb.com
병사들은 이미 집결하여 주재모의 명령을 기다리고 있었다.
Experience the gateway to lasting satisfaction with buy viagra . Unravel your deepest desires and embrace the thrill.
You actually make it seem so easy with your presentation but I find this matter to be actually something that I
think I would never understand. It seems too complicated and extremely broad for me.
I am looking forward for your next post, I will try to get the hang
of it!
prednisone 8 mg
buy lisinopril online uk
zestril 5 mg price
프라그마틱 게임은 iGaming 콘텐츠 제공의 선두 주자로, 모바일 중심 다양한 포트폴리오와 품질 높은 엔터테인먼트를 제공합니다.
프라그마틱 슬롯
프라그마틱 관련 내용 감사합니다! 또한, 제 사이트에서도 프라그마틱에 대한 유용한 정보를 공유하고 있어요. 함께 서로 이야기하며 더 많은 지식을 쌓아가요!
https://dqwdqdw.weebly.com/
https://vispills.com/
https://www.ashspurr.com
https://gruzchikiperevozka.ru/
shopanho.com
Hongzhi 황제는 매우 피곤해 보였습니다. “당신에게 맡깁니다!”
http://www.one-xbet-apk-fr.com
To log in, click the “Login” button on the licensed website of the bookmaker and enter your buyer facts – enter on your email give a speech to and password.
one-xbet-apk-fr.com
chutneyb.com
전체 오스만 제국은 예상보다 훨씬 빠르게 무너졌습니다.
levothyroxine 50 mcg
tadalafil 2
pharmacy no prescription required
프라그마틱 게임은 iGaming 업계의 선두 주자로, 모바일 중심의 혁신적이고 표준화된 콘텐츠를 선보입니다.
프라그마틱 슬롯 무료
프라그마틱의 슬롯 게임은 정말 뛰어나죠! 여기서 더 많은 게임 정보를 찾을 수 있어 기뻐요.
https://ewqeq.weebly.com
https://www.824989.com
https://njshidoo.com/hot/
online pharmacy without scripts
synthroid 0.050
canadian pharmacy uk delivery
Онлайн казино Беларусь: наслаждайтесь азартом и выигрывайте крупные суммы!
онлайн казино онлайн казино .
legal online pharmacy coupon code
1xbet welcome bonus promo code: 1XBOX777. By using this special bonus code during registration at the renowned 1xBet bookmaker, you can enjoy a VIP Sports Bonus that grants you a 100% boost up to €130 (or the equivalent in your local currency). This enhanced bonus is designed to elevate your gaming experience and maximize your first deposit, allowing all new club members to receive a generous bonus. Don’t miss out on this incredible opportunity to enhance your betting journey with 1xBet.
Here is a compilation of the latest 1xBet promo codes for the year 2024. Simply copy the code and apply it during your registration process on the official website, 1xbet.com. By doing so, you will be eligible to receive an enhanced welcome bonus of up to $130.
Regardless of their popularity, all bookmakers actively utilize various methods, means, and tools to promote their brand. While advertising plays a significant role in popularizing their services and gaming products, bonuses also contribute greatly to increasing the demand for bookmakers’ services. In particular, promo codes, which ordinary users and players frequently come across, play a crucial role in this aspect.
Under no circumstances can such a bonus code be applied.
On the other hand, the second type of bonus codes is designed to be used during gameplay. In this case, promo codes serve as a form of discount that players can utilize at some point to enhance their chances in the game. Players can either purchase these promo codes themselves or receive them as gifts from a bookmaker for specific actions. If a registration promo code has an explicit format and can only be used once and solely during registration, other promo codes can be used permanently. Their usage is closely related to the game itself.
promocode of 1xbet: 1XBOX777 during registration on 1xBet today get a maximum bonus of 100%. New members of the club can also receive a $130 bonus. With a wide range of bonuses and rewards available, it can be difficult for players to understand the essence of the promotion and which bonus is better. To make it easier, we provide a brief overview of 1xBet bookmaker promo codes, where to find them, and how to use them. The system of awarding promo points allows players to always get new promo codes, and they can choose the type of bonus they prefer and learn about the wagering conditions. Unlike most bookmakers, 1xBet allows you to win not only the winnings from the promo code, but the entire amount including the bet coupon.
To receive bonuses, simply add funds to your account using a bank card or an electronic wallet, and remember to enter the promo code 1xBet. Many users who enjoy interactive sports betting and virtual gambling on the 1xBet platform often come across offers to use a promo code online. These offers are typically found on specialized websites that promote the services of bookmakers and online casinos.
By using the promo code 1xBet, you can receive a bonus of up to $130 when registering today. The world of betting and gambling is filled with various bonus programs that capture the interest of users. Alongside no-deposit bonuses, deposit bonuses, and registration bonuses, promo codes are widely utilized by modern bookmakers. The same can be said for the bonus program offered by the renowned 1xBet bookmaker.
It is through such sources that promo codes are distributed.
The user, reading the material on the topic of interest, involuntarily comes across an offer to go to the website of the one x bet office and start betting. However, such a proposal also includes motivation. Together with the subsequent transition to the office’s website, the user is invited to use a promo code, which will subsequently bring additional bonuses and preferences to the player.
1x bet free promo code “1XBOX777” gives you a welcome bonus of up to $130. This bonus can be used for sports and esports betting. Promo codes like this provide special terms, discounts, or bonuses when purchasing products or services. The registration promo code is given to partners of the site to attract new players. It’s important to note that using the promo code is completely free. Simply copy the code and click on the appropriate link. If the code is valid, you will receive bonuses in the future.
prednisone 10mg
Сознание сущности и угроз связанных с легализацией кредитных карт может помочь людям избегать подобных атак и обеспечивать защиту свои финансовые ресурсы. Обнал (отмывание) кредитных карт — это механизм использования украденных или незаконно полученных кредитных карт для совершения финансовых транзакций с целью замаскировать их происхождения и пресечь отслеживание.
Вот некоторые из способов, которые могут способствовать в избежании обнала кредитных карт:
Защита личной информации: Будьте осторожными в контексте предоставления персональной информации, особенно онлайн. Избегайте предоставления банковских карт, кодов безопасности и инных конфиденциальных данных на непроверенных сайтах.
Мощные коды доступа: Используйте безопасные и уникальные пароли для своих банковских аккаунтов и кредитных карт. Регулярно изменяйте пароли.
Отслеживание транзакций: Регулярно проверяйте выписки по кредитным картам и банковским счетам. Это позволит своевременно обнаруживать подозрительных транзакций.
Антивирусная защита: Используйте антивирусное программное обеспечение и вносите обновления его регулярно. Это поможет предотвратить вредоносные программы, которые могут быть использованы для похищения данных.
Осторожное взаимодействие в социальных сетях: Будьте осторожными в онлайн-сетях, избегайте публикации чувствительной информации, которая может быть использована для взлома вашего аккаунта.
Уведомление банка: Если вы заметили какие-либо подозрительные операции или утерю карты, сразу свяжитесь с вашим банком для блокировки карты.
Образование: Будьте внимательными к новым методам мошенничества и обучайтесь тому, как предотвращать их.
Избегая легковерия и осуществляя предупредительные действия, вы можете снизить риск стать жертвой обнала кредитных карт.
lisinopril australia
Советуем посетить сайт https://spicami.ru/archives/81737
Также не забудьте добавить сайт в закладки: https://spicami.ru/archives/81737
otc lisinopril
buy zestril
Промокод 1xBet при регистрации. Компания 1ИксБет заинтересована в привлечении новых клиентов, поэтому для новых игроков действует акция в виде бонуса, который равен сумме первого депозита, но не превышает 225 000 рублей. Однако при использовании промокода букмекерская контора увеличит размер приветственного бонуса. Для того чтобы получить повышенную сумму на первый депозит, игроку необходимо выполнить следующие условия: Зайти на сайт букмекера. Выбрать способ регистрации по e-mail. Заполнить поля с личными данными. Ввести промокод в поле слева от кнопки «Зарегистрироваться». Ознакомиться с правилами букмекера. 1хбет промокод бонус поможет пользователям получить еще больше бонусов от букмекерской конторы. Подробная инструкция по поиску и активации бонусных кодов. Промокод — комбинация из цифр и букв, которая позволяет игроку активировать специальное предложение от букмекера 1хБет. С его помощью пользователь может получить: бонусные средства на депозит; бесплатную ставку; промо-баллы; другие подарки. Сегодня вы сможете найти множество подобных ресурсов, которые регулярно обновляют список актуальных предложений БК.
http://www.one-xbet-apk-fr.com
To log in, click the “Login” button on the licensed website of the bookmaker and write your narcotic addict materials – enrol your email deliver and password.
https://one-xbet-apk-fr.com
online pharmacy us tadalafil
promo code on 1xbet: 1XBOX777. By using this special bonus code during registration at the renowned 1xBet bookmaker, you can enjoy a VIP Sports Bonus that grants you a 100% boost up to €130 (or the equivalent in your local currency). This enhanced bonus is designed to elevate your gaming experience and maximize your first deposit, allowing all new club members to receive a generous bonus. Don’t miss out on this incredible opportunity to enhance your betting journey with 1xBet.
Here is a compilation of the latest 1xBet promo codes for the year 2024. Simply copy the code and apply it during your registration process on the official website, 1xbet.com. By doing so, you will be eligible to receive an enhanced welcome bonus of up to $130.
Regardless of their popularity, all bookmakers actively utilize various methods, means, and tools to promote their brand. While advertising plays a significant role in popularizing their services and gaming products, bonuses also contribute greatly to increasing the demand for bookmakers’ services. In particular, promo codes, which ordinary users and players frequently come across, play a crucial role in this aspect.
Under no circumstances can such a bonus code be applied.
On the other hand, the second type of bonus codes is designed to be used during gameplay. In this case, promo codes serve as a form of discount that players can utilize at some point to enhance their chances in the game. Players can either purchase these promo codes themselves or receive them as gifts from a bookmaker for specific actions. If a registration promo code has an explicit format and can only be used once and solely during registration, other promo codes can be used permanently. Their usage is closely related to the game itself.
1xbet promo code free spins: 1XBOX777 during registration on 1xBet today get a maximum bonus of 100%. New members of the club can also receive a $130 bonus. With a wide range of bonuses and rewards available, it can be difficult for players to understand the essence of the promotion and which bonus is better. To make it easier, we provide a brief overview of 1xBet bookmaker promo codes, where to find them, and how to use them. The system of awarding promo points allows players to always get new promo codes, and they can choose the type of bonus they prefer and learn about the wagering conditions. Unlike most bookmakers, 1xBet allows you to win not only the winnings from the promo code, but the entire amount including the bet coupon.
To receive bonuses, simply add funds to your account using a bank card or an electronic wallet, and remember to enter the promo code 1xBet. Many users who enjoy interactive sports betting and virtual gambling on the 1xBet platform often come across offers to use a promo code online. These offers are typically found on specialized websites that promote the services of bookmakers and online casinos.
By using the promo code 1xBet, you can receive a bonus of up to $130 when registering today. The world of betting and gambling is filled with various bonus programs that capture the interest of users. Alongside no-deposit bonuses, deposit bonuses, and registration bonuses, promo codes are widely utilized by modern bookmakers. The same can be said for the bonus program offered by the renowned 1xBet bookmaker.
It is through such sources that promo codes are distributed.
The user, reading the material on the topic of interest, involuntarily comes across an offer to go to the website of the one x bet office and start betting. However, such a proposal also includes motivation. Together with the subsequent transition to the office’s website, the user is invited to use a promo code, which will subsequently bring additional bonuses and preferences to the player.
1xbet promo code for today “1XBOX777” gives you a welcome bonus of up to $130. This bonus can be used for sports and esports betting. Promo codes like this provide special terms, discounts, or bonuses when purchasing products or services. The registration promo code is given to partners of the site to attract new players. It’s important to note that using the promo code is completely free. Simply copy the code and click on the appropriate link. If the code is valid, you will receive bonuses in the future.
canadian pharmacy no rx needed
canadian pharmacy antibiotics
1xBet registration promo code: 1XBOX777, to claim the welcome bonus 2024. By entering this promo code during the registration process, players can receive a generous bonus of $130. It is important to note that all the enticing features of the 1xbet bookmaker bonus program are accessible to players only after completing the registration. Even if a player comes across a free promo code on the internet, it will only be beneficial once they have successfully registered.
1xBet 2024, a renowned online bookmaker, provides a wide range of betting options on various sports, with a particular focus on football. Take a glance at the table’s comprehensive list to discover the latest bonuses and the exclusive 1xBet bonus code.
New players can enjoy welcome bonus at 1xBet with the promo code 1XBOX777 https://redclara.net/news/pgs/?1xbet_promo_code_419.html. This bonus offers a 100% sports bonus up to $130 or a casino bonus of up to $1950. To take advantage of this offer, make sure to use the 1xBet bonus code: 1XBOX777 during the registration process. Simply log into the website, click on the “Register” button, provide all the necessary information, and finalize the process by selecting the green button. Creating an account at this bookmaker is quick and easy, typically taking only 1-2 minutes.
Players are given a choice of four registration options. Let’s consider each of them in detail:
Registration in 1 click
This option is the simplest, since the player specifies a minimum of information – the country of residence at the time of registration, the game currency. You can also enter a promo code here.
During registration, do not forget to make a choice of a welcome bonus. In this case, we are interested in a welcome bonus for the first deposit for sports.
By default, you need to agree with the rules of the bookmaker, with the privacy policy. By agreeing to the rules, the player confirms his age of majority.
Please make use of the 1xBet promo code: 1XBOX777 when creating a new account at 1xBet to enjoy a 100% bonus up to €/$130 https://redclara.net/news/pgs/?1xbet_promo_code_419.html. These bonus funds can be used for placing bets on sports and in the 1xBet casino section. Furthermore, there is also a bonus code available for free sports bets. Kindly ensure that your phone number, IP address, and email have not been previously used in the system to comply with the promotion’s terms and conditions.
Authorization of a new account is carried out automatically. The client receives an ID number and password, which are the identifiers of the new account. After logging into your personal account, it is recommended to change your password, fill out a questionnaire in your personal profile, specifying your mobile number and email address. This information will be required for subsequent verification, which is a mandatory procedure.
Registration by mobile number
The promo code 1xBet “1XBOX777”, valid until 2024, allows you to enjoy a 100% welcome bonus up to 130$. Another useful tip is to follow brands on social media https://redclara.net/news/pgs/?1xbet_promo_code_419.html. Often, brands offer free promo codes on their social media profiles as part of a contest, private sale, or limited-time promotion.
This time the player will have to specify the country of residence, the currency of the account, his mobile phone number. If you have a promo code, you should enter it in the appropriate form. Again, the main thing is not to forget to specify what kind of welcome bonus you are interested in.
Again, the user needs to agree with the rules of the office, confirm the compliance of the age with the established age limit.
An SMS code is sent to the specified number, which must be entered in the form as confirmation. After that, the account is authorized. After accessing the personal account, the player must come up with a password and fill out the appropriate questionnaire.
As soon as the registration is over, you can make a deposit, receive bonuses and start betting.
Registration via email
When registering your new 1xbet account, remember to enter the promo code “1XBOX777” in the designated section. By doing so, you can enhance your initial 100% deposit bonus to a remarkable 130%, allowing you to enjoy a maximum welcome offer of €130. After filling in your personal information and making your deposit, you will receive an additional 100% first deposit bonus. To access your account details, simply click on the My Account icon and navigate to the bet history section. The 1xBet coupon code can be found in the top right corner of the bet slip tab.
rikvip
rikvip
Бесплатный промокод в 1xBet для бесплатной ставки на сегодня. 1хБет – один из популярнейших букмекеров на территории РФ и Европы. Оператор регулярно обновляет акционные предложения для только пришедших и постоянных пользователей, предоставляя возможность заработать на беттинге. промокод для 1 x bet. Согласно условиям клиенты, впервые зарегистрировавшиеся на площадке, могут получить промокод на бесплатную ставку. Коды выдаются непосредственно оператором. При создании аккаунта беттер предоставляет номер телефона. На него приходит код. Воспользовавшись последним, можно сделать фрибет и получить реальный доход. Это сделать просто, если иметь промокод 1xbet на сегодня бесплатно. Правда, дается он при условии выполнения некоторых правил. 1xbet бонус при регистрации. Не совсем промокод, но вы все равно ставите не свои деньги, если пополните депозит, – 100% бонуса от внесенной суммы. Максимум указан в верхней части главной страницы официального сайта.
synthroid 62.5 mcg
lisinopril 4214
Рабочий промокод 1ХБЕТ на 2024 год бесплатно: Бонус 32 500р. Актуальный список при регистрации на официальном сайте компании. На бесплатную ставку и витрина промо-кодов. Откуда взять и куда вставить промокоды описано на странице. Код необходимо использовать при регистрации на официальном сайте конторы 1xbet (промокоды для купона -на бесплатную ставку, находятся в самом низу статьи). промокод бк 1xbet при регистрации! Как ввести промокод 1хБет при регистрации в 2024. Вводятся такие комбинации в купон пари, позволяя сделать прогноз бесплатно, застраховать ставку или извлечь любую другую выгоду от обладания бонусным кодом. К сожалению, найти промокод в свободном доступе невозможно, их игроки получают индивидуально и вряд ли заходят делиться халявой с обывателями интернета.
cost of prednisone 20mg
metformin 500mg tablets
happy family store
где купить фальшивые деньги
Ненастоящая валюта: угроза для экономики и социума
Введение:
Мошенничество с деньгами – преступление, оставшееся актуальным на протяжении многих веков. Изготовление и распространение в обращение поддельных банкнот представляют серьезную угрозу не только для финансовой системы, но и для общественной стабильности. В данной статье мы рассмотрим масштабы проблемы, способы борьбы с фальшивомонетничеством и последствия для социума.
История поддельных купюр:
Фальшивые деньги существуют с момента появления самой концепции денег. В древности подделывались металлические монеты, а в современном мире преступники активно используют новейшие технологии для фальсификации банкнот. Развитие цифровых технологий также открыло дополнительные способы для создания цифровых вариантов валюты.
Масштабы проблемы:
Фальшивые деньги создают опасность для стабильности финансовой системы. Банки, компании и даже обычные граждане могут стать пострадавшими мошенничества. Увеличение объемов поддельных купюр может привести к потере покупательной способности и даже к экономическим кризисам.
Современные методы подделки:
С развитием технологий фальсификация стала более затруднительной и усложненной. Преступники используют высокотехнологичное оборудование, специализированные принтеры, и даже искусственный интеллект для создания трудноотличимых фальшивые копии от оригинальных денежных средств.
Борьба с фальшивомонетничеством:
Страны и центральные банки активно внедряют новые меры для предотвращения фальшивомонетничества. Это включает в себя применение новейших защитных технологий на банкнотах, обучение граждан способам определения фальшивых средств, а также сотрудничество с органами правопорядка для выявления и предотвращения преступных сетей.
Последствия для социума:
Поддельные средства несут не только финансовые, но и социальные последствия. Жители и бизнесы теряют веру к финансовой системе, а борьба с преступностью требует больших затрат, которые могли бы быть направлены на более положительные цели.
Заключение:
Фальшивые деньги – серьезная проблема, требующая уделяемого внимания и коллективных действий общества, органов правопорядка и финансовых институтов. Только с помощью активной противодействия с этим преступлением можно гарантировать устойчивость экономики и сохранить уважение к денежной системе
tadalafil 20 mg buy
где можно купить фальшивые деньги
Опасность подпольных точек: Места продажи фальшивых купюр”
Заголовок: Риски приобретения в подпольных местах: Места продажи поддельных денег
Введение:
Разговор об угрозе подпольных точек, занимающихся продажей фальшивых купюр, становится всё более актуальным в современном обществе. Эти места, предоставляя доступ к поддельным финансовым средствам, представляют серьезную опасность для экономической стабильности и безопасности граждан.
Легкость доступа:
Одной из проблем подпольных точек является легкость доступа к поддельным деньгам. На темных улицах или в скрытых интернет-пространствах, эти места становятся площадкой для тех, кто ищет возможность обмануть систему.
Угроза финансовой системе:
Продажа поддельных купюр в таких местах создает реальную угрозу для финансовой системы. Введение поддельных средств в обращение может привести к инфляции, понижению доверия к национальной валюте и даже к финансовым кризисам.
Мошенничество и преступность:
Подпольные точки, предлагающие поддельные средства, являются очагами мошенничества и преступной деятельности. Отсутствие контроля и законного регулирования в этих местах обеспечивает благоприятные условия для криминальных элементов.
Угроза для бизнеса и обычных граждан:
Как бизнесы, так и обычные граждане становятся потенциальными жертвами мошенничества, когда используют фальшивые купюры, приобретенные в подпольных точках. Это ведет к утрате доверия и серьезным финансовым потерям.
Последствия для экономики:
Вмешательство подпольных точек в экономику оказывает отрицательное воздействие. Нарушение стабильности финансовой системы и создание дополнительных трудностей для правоохранительных органов являются лишь частью последствий для общества.
Заключение:
Продажа поддельных средств в подпольных точках представляет собой серьезную угрозу для общества в целом. Необходимо ужесточение законодательства и усиление контроля, чтобы противостоять этому злу и обеспечить безопасность экономической среды. Развитие сотрудничества между государственными органами, бизнес-сообществом и обществом в целом является ключевым моментом в предотвращении негативных последствий деятельности подобных точек.
На территории столице России купить аттестат – это удобный и быстрый способ достать нужный документ лишенный дополнительных трудностей. Множество фирм продают услуги по изготовлению и торговле свидетельств разнообразных образовательных учреждений – russkiy-diploms-srednee.com. Разнообразие свидетельств в столице России огромен, включая документация о академическом и среднем учебе, аттестаты, дипломы вузов и академий. Основной плюс – возможность достать свидетельство официальный документ, обеспечивающий достоверность и высокое стандарт. Это предоставляет специальная защита ото подделки и позволяет использовать свидетельство для различных задач. Таким образом, покупка аттестата в столице России является важным безопасным и оптимальным вариантом для данных, кто хочет достичь успеха в трудовой деятельности.
synthroid 50 mcg coupon
chutneyb.com
그러나 오늘의 경험, 그러한 무력감과 절망감은 그녀를 심장마비처럼 느끼게 만들었습니다.그런데 오늘… 폐하께서 궁을 나가겠다고 하셨지만 놀랍게도 아무도 말을 하지 않았습니다.
online pharmacy without insurance
lisinopril prescription coupon
lisinopril drug
Howdy! Someone in my Myspace group shared this website
with us so I came to take a look. I’m definitely enjoying the information. I’m bookmarking and
will be tweeting this to my followers! Excellent
blog and great style and design.
zestril lisinopril
혁신적이고 표준화된 모바일 중심의 콘텐츠를 제공하는 프라그마틱 게임은 iGaming 업계의 선도적인 제공 업체입니다.
프라그마틱 슬롯
프라그마틱 슬롯을 다룬 글 정말 유익해요! 더불어, 제 사이트에서도 프라그마틱에 대한 새로운 소식을 전하고 있어요. 함께 지식을 나누면 좋겠어요!
https://ewqeq.weebly.com
http://holyshirtsandpants.net/
https://cgsgold.com/hot/
best tadalafil generic
Фальшивые рубли, в большинстве случаев, имитируют с целью обмана и незаконного обогащения. Злоумышленники занимаются клонированием российских рублей, создавая поддельные банкноты различных номиналов. В основном, фальсифицируют банкноты с более высокими номиналами, такими как 1 000 и 5 000 рублей, поскольку это позволяет им зарабатывать крупные суммы при уменьшенном числе фальшивых денег.
Технология фальсификации рублей включает в себя использование технологического оборудования высокого уровня, специализированных печатающих устройств и особо подготовленных материалов. Преступники стремятся максимально точно воспроизвести средства защиты, водяные знаки, металлическую защитную полосу, микроскопический текст и другие характеристики, чтобы затруднить определение поддельных купюр.
Поддельные денежные средства часто попадают в обращение через торговые площадки, банки или другие организации, где они могут быть незаметно скрыты среди настоящих денег. Это возникает серьезные трудности для экономической системы, так как поддельные купюры могут привести к убыткам как для банков, так и для населения.
Важно отметить, что имение и применение поддельных средств считаются уголовными преступлениями и подпадают под наказание в соответствии с законодательством Российской Федерации. Власти энергично противостоят с подобными правонарушениями, предпринимая меры по выявлению и пресечению деятельности банд преступников, занимающихся фальсификацией российской валюты
zestril 20 mg
Фальшивые рубли, как правило, подделывают с целью обмана и незаконного обогащения. Преступники занимаются фальсификацией российских рублей, создавая поддельные банкноты различных номиналов. В основном, подделывают банкноты с более высокими номиналами, вроде 1 000 и 5 000 рублей, поскольку это позволяет им зарабатывать большие суммы при меньшем количестве фальшивых денег.
Процесс фальсификации рублей включает в себя применение высокотехнологичного оборудования, специализированных принтеров и особо подготовленных материалов. Злоумышленники стремятся максимально точно воспроизвести защитные элементы, водяные знаки безопасности, металлическую защиту, микротекст и другие характеристики, чтобы замедлить определение поддельных купюр.
Фальшивые рубли регулярно попадают в обращение через торговые площадки, банки или прочие учреждения, где они могут быть легко спрятаны среди реальных денежных средств. Это возникает серьезные затруднения для экономической системы, так как фальшивые деньги могут вызывать убыткам как для банков, так и для населения.
Необходимо подчеркнуть, что владение и использование фальшивых денег представляют собой уголовными преступлениями и могут быть наказаны в соответствии с законодательством Российской Федерации. Власти проводят активные меры с такими преступлениями, предпринимая меры по обнаружению и прекращению деятельности преступных групп, занимающихся подделкой российских рублей
1881hoki
canadian pharmacy online ship to usa
canadian discount pharmacy
1xBet Promo Codes and Bonuses 2024
Get up to €1950 + 150 free spins for casino and 100% up to €130 for sports betting by using the 1xbet deposit bonus “1XBOX777” when you register. This offer is only valid 2024 for new registrations. 1xBet promotional code appears as a blend of numerical digits, alphabets, and various symbols. The crucial aspect here is that this blend is exclusive and never duplicates elsewhere. This blend serves as a code to acquire bonuses, hence it is also referred to as a combination code or a bonus code.
The 1xBet bookmaker frequently issues a series of promotional codes, enabling players to obtain remarkable bonuses without any cost.
There are two types of bonus codes:
promotional public promo codes that are used only during registration;
individual codes that are provided as gifts or purchased directly by players.
Accordingly, depending on the type, the method of distribution of bonus codes also differs. In the first case, 1xBet promo codes are freely available and published on the Internet. In the second case, we are talking either about sending codes individually, or about purchasing a bonus code through the “showcase of promo codes” on the 1xBet website.
1xbet free spin promo code today: 1XBOX777 Receive a 130% bonus on your initial deposit by using the exclusive 2024. This offer is available for new users who register on the official website of 1xBet. By activating the bonus code, you can enjoy a free bet bonus of up to $130. The 1xbet free bet promo code today are designed to give players the chance to play for free, with benefits such as free spins and cashback on bets placed.
If one bonus account is used to accumulate bonus points, then the second account is designed to work with the main package bonuses operating in the 1xbet bookmaker. Unlike promo points, the bonuses provided by the bookmaker have monetary value. In order to convert bonus funds into real money available for withdrawal, you need to fulfill the conditions of the wager. In simple terms, bonuses need to be won back.
You can also get a promo code for your Birthday. In this case, free spins may not have a wager, and the amounts won are immediately credited to the game account. Regular customers can get a promo code in the casino itself, using the “promo code showcase”. To do this, you need to exchange the points earned under the loyalty program for the corresponding code. Each promo code has a specific format and its own nominal value from 50 to 100 points. Through the codes purchased in the promo code showcase, you can buy free spins, increase the percentage of cashback, and apply for participation in the tournament.
All promo codes are valid for a certain period. Unlike the codes that are used when registering with a bookmaker, bonus codes for casinos can be used by players regularly.
lisinopril 25 mg tablet
dota2answers.com
그 Xiao Jing은 의식 감독관에게 가려고했고 멀리서 싸움을 보았습니다.
valtrex 1000 mg for sale
Промокод 1xbet на сегодня. Промокод на 2024-2024. На официальном сайте букмекерской конторы 1xbet появилась опция, которая позволяет “бесплатно” ознакомиться с функционалом сайта и при удачном стечении обстоятельств еще и выиграть некую сумму денежных средств. Теперь это стало доступно по специальному промокоду 1хБет. Он дает возможность получить до 32500? (100$). Актуальные промокоды 1xbet на сегодня: 1XFREE777. Рабочие промокоды 1XBet в 2024 Все промокоды для 1хбет бесплатно: при регистрации, на ставку (купон), на бонус, на сегодня. 1xBet — одна из самых известных компаний в сфере беттинга. Свою популярность контора заработала во многом благодаря большому количеству специальных предложений. Так, к примеру, каждый пользователь может воспользоваться одним из действующих промокодов 1xBet на сегодня бесплатно. Ознакомиться с их полным перечнем можно в данной статье.
Это сделать просто, если иметь промокод 1xbet на сегодня бесплатно. Правда, дается он при условии выполнения некоторых правил. промокод 1хбет при регистрации на сегодня. Не совсем промокод, но вы все равно ставите не свои деньги, если пополните депозит, – 100% бонуса от внесенной суммы. Максимум указан в верхней части главной страницы официального сайта. 100% бонус за пополнение от 1xbet. Но прежде чем получить бонус нужно пройти регистрацию. Зайдите на сайт БК 1xBet и нажмите по стрелке кнопку «Регистрация». 2. Выберите один из методов регистрации (самый быстрый — в один клик). Кликните на «Зарегистрироваться» – более подробно в этом материале https://altay-info.ru/news/pages/zagolovok_puteshestviya_menyayut_ghizny_top_7_prichin_otpravitysya_navstrechu_priklyuchen.html
which online pharmacy is the best
1xbet: 1XBOX777. By using this special bonus code during registration at the renowned 1xBet bookmaker, you can enjoy a VIP Sports Bonus that grants you a 100% boost up to €130 (or the equivalent in your local currency). This enhanced bonus is designed to elevate your gaming experience and maximize your first deposit, allowing all new club members to receive a generous bonus. Don’t miss out on this incredible opportunity to enhance your betting journey with 1xBet.
Here is a compilation of the latest 1xBet promo codes for the year 2024. Simply copy the code and apply it during your registration process on the official website, 1xbet.com. By doing so, you will be eligible to receive an enhanced welcome bonus of up to $130.
Regardless of their popularity, all bookmakers actively utilize various methods, means, and tools to promote their brand. While advertising plays a significant role in popularizing their services and gaming products, bonuses also contribute greatly to increasing the demand for bookmakers’ services. In particular, promo codes, which ordinary users and players frequently come across, play a crucial role in this aspect.
Under no circumstances can such a bonus code be applied.
On the other hand, the second type of bonus codes is designed to be used during gameplay. In this case, promo codes serve as a form of discount that players can utilize at some point to enhance their chances in the game. Players can either purchase these promo codes themselves or receive them as gifts from a bookmaker for specific actions. If a registration promo code has an explicit format and can only be used once and solely during registration, other promo codes can be used permanently. Their usage is closely related to the game itself.
promocode for 1xbet: 1XBOX777 during registration on 1xBet today get a maximum bonus of 100%. New members of the club can also receive a $130 bonus. With a wide range of bonuses and rewards available, it can be difficult for players to understand the essence of the promotion and which bonus is better. To make it easier, we provide a brief overview of 1xBet bookmaker promo codes, where to find them, and how to use them. The system of awarding promo points allows players to always get new promo codes, and they can choose the type of bonus they prefer and learn about the wagering conditions. Unlike most bookmakers, 1xBet allows you to win not only the winnings from the promo code, but the entire amount including the bet coupon.
To receive bonuses, simply add funds to your account using a bank card or an electronic wallet, and remember to enter the promo code 1xBet. Many users who enjoy interactive sports betting and virtual gambling on the 1xBet platform often come across offers to use a promo code online. These offers are typically found on specialized websites that promote the services of bookmakers and online casinos.
By using the promo code 1xBet, you can receive a bonus of up to $130 when registering today. The world of betting and gambling is filled with various bonus programs that capture the interest of users. Alongside no-deposit bonuses, deposit bonuses, and registration bonuses, promo codes are widely utilized by modern bookmakers. The same can be said for the bonus program offered by the renowned 1xBet bookmaker.
It is through such sources that promo codes are distributed.
The user, reading the material on the topic of interest, involuntarily comes across an offer to go to the website of the one x bet office and start betting. However, such a proposal also includes motivation. Together with the subsequent transition to the office’s website, the user is invited to use a promo code, which will subsequently bring additional bonuses and preferences to the player.
1xbet south africa promo code “1XBOX777” gives you a welcome bonus of up to $130. This bonus can be used for sports and esports betting. Promo codes like this provide special terms, discounts, or bonuses when purchasing products or services. The registration promo code is given to partners of the site to attract new players. It’s important to note that using the promo code is completely free. Simply copy the code and click on the appropriate link. If the code is valid, you will receive bonuses in the future.
Сегодня хочу поделиться своим опытом игры в Clubnika Casino. Недавно наткнулся на интересное казино, и хотел поделиться своими впечатлениями с вами.
Это клубника казино без лицензии, но с кучей классных бонусов, лотерей и турниров. Я сам зарегистрировался там пару недель назад, и пока вижу только плюсы.
Оформление сайта прямо зацепило меня – всё в клубничке, милые дамы на баннерах, и так далее. Как честно говоря, дизайн впечатляет, особенно если ты, как и я, мужчина.
Но самое главное – это игры. У них есть все самые популярные слоты от Novomatic, Igrosoft, Microgaming и других. Я даже добавил свои любимые в избранное.
Бонусы там тоже не шутка. Приветственный пакет, фриспины за депозиты с Piastrix – ну просто азартное удовольствие. Я, например, за свой первый депозит получил 100 фриспинов в Fire Joker. Эмоции просто зашкаливают!
Единственный момент – это отсутствие информации о лицензии и сертификатах. Но если тебе не жалко экспериментировать, то Clubnika Casino https://clubnikacasinobonus.ru это отличное место для этого.
Я пока доволен и с нетерпением жду новых акций и турниров. Попробуйте сами и делитесь впечатлениями!
слоты клубнички
casino clubnika зеркало
обзор казино клубника
клубника казино официальный сайт зеркало рабочее на сегодня
зеркало клубника депозит
клубника казино играть
игровые автоматы вулкан клубнички
казино клубничка
казино клубника бездепозитный бонус
Удачи и прибыли Друзья!
1xBet registration promo code: 1XBOX777, to claim the welcome bonus 2024. By entering this promo code during the registration process, players can receive a generous bonus of $130. It is important to note that all the enticing features of the 1xbet bookmaker bonus program are accessible to players only after completing the registration. Even if a player comes across a free promo code on the internet, it will only be beneficial once they have successfully registered.
1xBet 2024, a renowned online bookmaker, provides a wide range of betting options on various sports, with a particular focus on football. Take a glance at the table’s comprehensive list to discover the latest bonuses and the exclusive 1xBet bonus code.
New players can enjoy welcome bonus at 1xBet with the promo code 1XBOX777 https://magazinetechnologies.com/articles/1xbet_promo_code_420.html. This bonus offers a 100% sports bonus up to $130 or a casino bonus of up to $1950. To take advantage of this offer, make sure to use the 1xBet bonus code: 1XBOX777 during the registration process. Simply log into the website, click on the “Register” button, provide all the necessary information, and finalize the process by selecting the green button. Creating an account at this bookmaker is quick and easy, typically taking only 1-2 minutes.
Players are given a choice of four registration options. Let’s consider each of them in detail:
Registration in 1 click
This option is the simplest, since the player specifies a minimum of information – the country of residence at the time of registration, the game currency. You can also enter a promo code here.
During registration, do not forget to make a choice of a welcome bonus. In this case, we are interested in a welcome bonus for the first deposit for sports.
By default, you need to agree with the rules of the bookmaker, with the privacy policy. By agreeing to the rules, the player confirms his age of majority.
Please make use of the 1xBet promo code: 1XBOX777 when creating a new account at 1xBet to enjoy a 100% bonus up to €/$130 http://crocotheme.com/wp-content/pgs/1xbet_promo_code_420.html. These bonus funds can be used for placing bets on sports and in the 1xBet casino section. Furthermore, there is also a bonus code available for free sports bets. Kindly ensure that your phone number, IP address, and email have not been previously used in the system to comply with the promotion’s terms and conditions.
Authorization of a new account is carried out automatically. The client receives an ID number and password, which are the identifiers of the new account. After logging into your personal account, it is recommended to change your password, fill out a questionnaire in your personal profile, specifying your mobile number and email address. This information will be required for subsequent verification, which is a mandatory procedure.
Registration by mobile number
The promo code 1xBet “1XBOX777”, valid until 2024, allows you to enjoy a 100% welcome bonus up to 130$. Another useful tip is to follow brands on social media https://magazinetechnologies.com/articles/1xbet_promo_code_420.html. Often, brands offer free promo codes on their social media profiles as part of a contest, private sale, or limited-time promotion.
This time the player will have to specify the country of residence, the currency of the account, his mobile phone number. If you have a promo code, you should enter it in the appropriate form. Again, the main thing is not to forget to specify what kind of welcome bonus you are interested in.
Again, the user needs to agree with the rules of the office, confirm the compliance of the age with the established age limit.
An SMS code is sent to the specified number, which must be entered in the form as confirmation. After that, the account is authorized. After accessing the personal account, the player must come up with a password and fill out the appropriate questionnaire.
As soon as the registration is over, you can make a deposit, receive bonuses and start betting.
Registration via email
When registering your new 1xbet account, remember to enter the promo code “1XBOX777” in the designated section. By doing so, you can enhance your initial 100% deposit bonus to a remarkable 130%, allowing you to enjoy a maximum welcome offer of €130. After filling in your personal information and making your deposit, you will receive an additional 100% first deposit bonus. To access your account details, simply click on the My Account icon and navigate to the bet history section. The 1xBet coupon code can be found in the top right corner of the bet slip tab.
lisinopril 40 mg without prescription
buy lisinopril 10 mg online
Сайт 1xBet считается одним из самых надежных онлайн букмекеров России. БК 1xBet пользуется огромной популярностью среди пользователей из РФ и стран СНГ. Лучшие коэффициенты ставок на спорт, лучшие онлайн игры, слоты казино и еще много других плюсов букмекерской конторы заслуживают внимания. 1хбет промокод на сегодня. Для постоянных игроков БК 1хбет регулярно проводятся различные акции, в рамках которых любая положенная на счет сумма (в рамках определенных пределов) будет увеличена (обычно в два раза). Для вывода подарочных денег требуется поставить деньги несколько раз на события с определенными условиями. Ставки на спорт 2024 – Получить бонус 1xbet и промокод на 32500 рублей от официального сайта 1хбет. Бонус для новых игроков! При регистрации в 1xbet новые клиент получает бонус в размере 32500 рублей. Зарегистрироваться в 1XBet. Бонус действует только для новых пользователей 1xbet – более подробно в этом материале https://altay-info.ru/news/pages/zagolovok_puteshestviya_menyayut_ghizny_top_7_prichin_otpravitysya_navstrechu_priklyuchen.html
zestoretic 20
Воспользоваться промокодом 1xbet можно при регистрации в 1xbet. БК 1хбет дарит до 130% на первый депозит при помощи промокода 1xbet. Максимальная сумма бонуса по промокоду 1хбет достигает 32500 рублей. Промокод 1хбет дает надбавку на депозит до 130% только при первом пополнении. Регистрация. 1xbet промокод при регистрации. Всем известно, что букмекерская контора 1xbet предлагает широкий выбор разнообразных бонусов и акций. В этой статье мы расскажем все о промокодах 1xBet: что это, как использовать при регистрации, где вводить, чтобы сделать ставку бесплатно, и по каким поводам казахстанский букмекер 1хБет вручает именные промокоды. Содержание. Что такое промокод 1xBet. Бесплатные промокоды 1xBet. Промокод при регистрации в 1xbet сегодня. Как ввести промокод при регистрации в 1хБет – более подробно в этом материале https://altay-info.ru/news/pages/zagolovok_puteshestviya_menyayut_ghizny_top_7_prichin_otpravitysya_navstrechu_priklyuchen.html
звуковое оборудование для актового зала https://oborudovanie-aktovogo-zala11.ru .
sm-online-game.com
신규 이민자의 유입에 관해서는 실제로 그들과 많은 관련이 없습니다.
https://gruzchikirabotat.ru/
pharmacy online uae
best online pharmacy
buy prednisone from canada
purchase prednisone from india
zithromax 3 capsules
login hoki1881
tadalafil 2.5
synthroid 225 mcg
선도적인 iGaming 콘텐츠 제공 업체인 최신 프라그마틱 게임은 혁신적이고 표준화된 콘텐츠를 통해 슬롯, 라이브 카지노, 빙고 등 다양한 제품을 고객에게 제공합니다.
http://www.pragmatic-game.net
프라그마틱의 빙고 게임은 항상 즐겁고 흥미로워요. 여기에서 더 많은 빙고 게임 정보를 확인하세요!
https://supervil.com/hot/
https://wqeeeeeee.weebly.com/
http://customercaresupportnumber.com/
I’ve been browsing online more than 4 hours today, yet I never found any interesting article like yours.
It is pretty worth enough for me. In my opinion, if all web owners and bloggers made good content
as you did, the web will be a lot more useful than ever before.
canada drug pharmacy
I was suggested this website by my cousin. I’m not sure whether this post is
written by him as nobody else know such detailed about my problem.
You’re wonderful! Thanks!
thecanadianpharmacy
khasiss.com
도처에 은행과 세미콜론, 수많은 사람들이 여전히 달리고 있을 때…
how to ger 1xbet promo code: 1XBOX777. By using this special bonus code during registration at the renowned 1xBet bookmaker, you can enjoy a VIP Sports Bonus that grants you a 100% boost up to €130 (or the equivalent in your local currency). This enhanced bonus is designed to elevate your gaming experience and maximize your first deposit, allowing all new club members to receive a generous bonus. Don’t miss out on this incredible opportunity to enhance your betting journey with 1xBet.
Here is a compilation of the latest 1xBet promo codes for the year 2024. Simply copy the code and apply it during your registration process on the official website, 1xbet.com. By doing so, you will be eligible to receive an enhanced welcome bonus of up to $130.
Regardless of their popularity, all bookmakers actively utilize various methods, means, and tools to promote their brand. While advertising plays a significant role in popularizing their services and gaming products, bonuses also contribute greatly to increasing the demand for bookmakers’ services. In particular, promo codes, which ordinary users and players frequently come across, play a crucial role in this aspect.
Under no circumstances can such a bonus code be applied.
On the other hand, the second type of bonus codes is designed to be used during gameplay. In this case, promo codes serve as a form of discount that players can utilize at some point to enhance their chances in the game. Players can either purchase these promo codes themselves or receive them as gifts from a bookmaker for specific actions. If a registration promo code has an explicit format and can only be used once and solely during registration, other promo codes can be used permanently. Their usage is closely related to the game itself.
1xbet promo code list: 1XBOX777 during registration on 1xBet today get a maximum bonus of 100%. New members of the club can also receive a $130 bonus. With a wide range of bonuses and rewards available, it can be difficult for players to understand the essence of the promotion and which bonus is better. To make it easier, we provide a brief overview of 1xBet bookmaker promo codes, where to find them, and how to use them. The system of awarding promo points allows players to always get new promo codes, and they can choose the type of bonus they prefer and learn about the wagering conditions. Unlike most bookmakers, 1xBet allows you to win not only the winnings from the promo code, but the entire amount including the bet coupon.
To receive bonuses, simply add funds to your account using a bank card or an electronic wallet, and remember to enter the promo code 1xBet. Many users who enjoy interactive sports betting and virtual gambling on the 1xBet platform often come across offers to use a promo code online. These offers are typically found on specialized websites that promote the services of bookmakers and online casinos.
By using the promo code 1xBet, you can receive a bonus of up to $130 when registering today. The world of betting and gambling is filled with various bonus programs that capture the interest of users. Alongside no-deposit bonuses, deposit bonuses, and registration bonuses, promo codes are widely utilized by modern bookmakers. The same can be said for the bonus program offered by the renowned 1xBet bookmaker.
It is through such sources that promo codes are distributed.
The user, reading the material on the topic of interest, involuntarily comes across an offer to go to the website of the one x bet office and start betting. However, such a proposal also includes motivation. Together with the subsequent transition to the office’s website, the user is invited to use a promo code, which will subsequently bring additional bonuses and preferences to the player.
the best promo code for 1xbet “1XBOX777” gives you a welcome bonus of up to $130. This bonus can be used for sports and esports betting. Promo codes like this provide special terms, discounts, or bonuses when purchasing products or services. The registration promo code is given to partners of the site to attract new players. It’s important to note that using the promo code is completely free. Simply copy the code and click on the appropriate link. If the code is valid, you will receive bonuses in the future.
generic tadalafil australia
Актуальный промокод, укажи промокод получи бонус. Получите максимум при регистрации в одной из букмекерских контор. 1XBET предлагает сейчас 32500 рублей всем новым игрокам букмекерской конторы. промокод 1хбет при регистрации на сегодня. Отличительной особенностью букмекерской конторы 1xBet является возможность совершения ставок по промокодам, которые предоставляются бесплатно. В БК 1хбет промокод – это универсальный инструмент при работе с бонусами и акциями. Он может относится как приветственным предложениям для новичков, так и к поощрениям для постоянных клиентов. Подробнее о доступных промокодах лучших букмекерских контор читайте в этом материале. Выделим несколько основных методов, которые позволят получить промокод 1xbet более подробно в этом материале https://altay-info.ru/news/pages/zagolovok_puteshestviya_menyayut_ghizny_top_7_prichin_otpravitysya_navstrechu_priklyuchen.html
lisinopril 2.5 mg tablet
tadalafil 5mg online pharmacy
my canadian pharmacy rx
Get an incredible bonus offer at 1xBet 2024! Make your first deposit and get a 100% bonus, up to $130 in extra funds.
1xbet today promo code: 1XBOX777 allows you to benefit from a VIP offer of 100% up to €130 on sports betting or €1950 +150 spins, guaranteeing you the maximum bonus. No other 1xBet code will allow you to obtain such advantages. Working today, it will give wonderful bonuses for new players in 2024. The 1xbet promo code is a great opportunity to multiply your bankroll for exciting free bets.
We remind you! The promo code is issued only within the framework of a certain promotion organized by the gaming portal. Therefore, this combination is unique and never repeats. The code can only be used under the conditions specified in the promotion.
It is this combination that can be found in the text of an article or material on a thematic site describing or advertising the activities of the 1 x Bet bookmaker. The user is asked to copy the combination, go to the office’s website and use the code during registration.
How? What should I do and what is the sequence of user actions?
For example! The user decided to become a regular customer of the bookmaker. To do this, go to the official website of the office and proceed with registration. There are quite a lot of registration options in this case:
in one click;
through a mobile phone number;
via email address;
through social media accounts.
In each of the options, in addition to filling out forms with contact and personal data, the player is provided with a form in which to enter the promo code 1IXBET. The exception is registration via social networks. In this case, the promo code cannot be applied.
Valid until 2024, the 1xbet promotion code “1XBOX777” can be used when registering on the 1xBet website. By using this promo code, new players can enjoy a 100% increased bonus of up to $130 on their first deposit. It is important to note that the promo code must be entered during the registration process on the official 1xBet website. Additionally, there are various promo codes available for today, and if the bonus code is still valid, players will also receive an additional surcharge along with the main bonus. Don’t forget to check out the article for free bet promo codes located at the bottom.
Bonuses have an important place in the 1xbet bookmaker’s customer service system. Along with numerous promotions in which a variety of bonuses and preferences are available to players, bonus promo codes are actively used in this office. Their main purpose is to increase the attractiveness of the bookmaker in the eyes of customers by providing them with additional bonuses and benefits.
For those who have been playing for a long time, there is no need to tell once again what a promo code is. For beginners, it will not hurt to learn about 1xbet promo codes in more detail.
1xBet free bet promo code “1XBOX777”, you can unlock exclusive bonuses 2024. These bonuses include up to $130 for the sportsbook, as well as €1950 and 150 free spins. The promo code is a special combination of characters that needs to be entered on the company’s website to receive an enhanced bonus. Each promo code provides different gifts, usually in the form of a free bet. This unique combination acts as a key, granting users specific benefits during gameplay.
Bonus codes are issued by the bookmaker during the next promotion. Accordingly, the terms of the promotion set the number of bonus codes, the validity period and the conditions under which it can be obtained and applied. All promo codes are provided to players for free.
It is important to note! The bookmaker arranges promotions within which promo codes are issued, not to the detriment of himself. It is not a fact that the bonuses provided by the promo code will bring the player a mandatory win. Almost all bonuses have pretty tough wagering, so there is no need to talk about quick wins and easy money.
As for the distribution of 1xbet promo code sri lanka, the main source of current codes are partner sites. It is on these web resources that materials about the betting shop are published. It is in these materials that the advantages that the player receives by registering in the office are described. In such tests, the bonus code is most often included as an element of motivation to move directly to registration in the office as soon as possible.
In addition to partner sites, current bonus codes are distributed through popular social messengers Telegram and Viber. You can subscribe to the bookmaker’s newsletter to receive up-to-date codes, about which promotions are held in the office.
All of the above sources of obtaining promo codes can be regarded as reliable. So it will not be difficult to find and get the code for users. It is important for the player to decide whether he needs a 1xbet promo code, for what and for what purpose.
Внутри столице России купить свидетельство – это практичный и оперативный вариант завершить нужный документ безо дополнительных трудностей. Разнообразие организаций предлагают помощь по производству и продаже дипломов разных учебных заведений – https://orik-diploms-srednee.com/. Выбор дипломов в городе Москве велик, включая бумаги о высшем и среднем учебе, свидетельства, свидетельства вузов и вузов. Главное плюс – возможность приобрести аттестат официальный документ, обеспечивающий достоверность и высокое качество. Это гарантирует особая защита ото подделки и дает возможность использовать свидетельство для различных задач. Таким способом, приобретение свидетельства в Москве является важным надежным и экономичным выбором для тех, кто стремится к успеха в карьере.
1xBet Promo Codes and Bonuses 2024
Get up to €1950 + 150 free spins for casino and 100% up to €130 for sports betting by using the 1xbet code “1XBOX777” when you register. This offer is only valid 2024 for new registrations. 1xBet promotional code appears as a blend of numerical digits, alphabets, and various symbols. The crucial aspect here is that this blend is exclusive and never duplicates elsewhere. This blend serves as a code to acquire bonuses, hence it is also referred to as a combination code or a bonus code.
The 1xBet bookmaker frequently issues a series of promotional codes, enabling players to obtain remarkable bonuses without any cost.
There are two types of bonus codes:
promotional public promo codes that are used only during registration;
individual codes that are provided as gifts or purchased directly by players.
Accordingly, depending on the type, the method of distribution of bonus codes also differs. In the first case, 1xBet promo codes are freely available and published on the Internet. In the second case, we are talking either about sending codes individually, or about purchasing a bonus code through the “showcase of promo codes” on the 1xBet website.
1xbet whatsapp number sri lanka: 1XBOX777 Receive a 130% bonus on your initial deposit by using the exclusive 2024. This offer is available for new users who register on the official website of 1xBet. By activating the bonus code, you can enjoy a free bet bonus of up to $130. The promo code on 1xbet are designed to give players the chance to play for free, with benefits such as free spins and cashback on bets placed.
If one bonus account is used to accumulate bonus points, then the second account is designed to work with the main package bonuses operating in the 1xbet bookmaker. Unlike promo points, the bonuses provided by the bookmaker have monetary value. In order to convert bonus funds into real money available for withdrawal, you need to fulfill the conditions of the wager. In simple terms, bonuses need to be won back.
You can also get a promo code for your Birthday. In this case, free spins may not have a wager, and the amounts won are immediately credited to the game account. Regular customers can get a promo code in the casino itself, using the “promo code showcase”. To do this, you need to exchange the points earned under the loyalty program for the corresponding code. Each promo code has a specific format and its own nominal value from 50 to 100 points. Through the codes purchased in the promo code showcase, you can buy free spins, increase the percentage of cashback, and apply for participation in the tournament.
All promo codes are valid for a certain period. Unlike the codes that are used when registering with a bookmaker, bonus codes for casinos can be used by players regularly.
娛樂城首儲
初次接觸線上娛樂城的玩家一定對選擇哪間娛樂城有障礙,首要條件肯定是評價良好的娛樂城,其次才是哪間娛樂城優惠最誘人,娛樂城體驗金多少、娛樂城首儲一倍可以拿多少等等…本篇文章會告訴你娛樂城優惠怎麼挑,首儲該注意什麼。
娛樂城首儲該注意什麼?
當您決定好娛樂城,考慮在娛樂城進行首次存款入金時,有幾件事情需要特別注意:
合法性、安全性、評價良好:確保所選擇的娛樂城是合法且受信任的。檢查其是否擁有有效的賭博牌照,以及是否採用加密技術來保護您的個人信息和交易。
首儲優惠與流水:許多娛樂城會為首次存款提供吸引人的獎勵,但相對的流水可能也會很高。
存款入金方式:查看可用的支付選項,是否適合自己,例如:USDT、超商儲值、銀行ATM轉帳等等。
提款出金方式:瞭解最低提款限制,綁訂多少流水才可以領出。
24小時客服:最好是有24小時客服,發生問題時馬上有人可以處理。
bantuan hoki1881
lisinopril over the counter
Кто еще не знаком с Stake Casino, вы что, упустили крупную удачу? Я, например, открыл для себя это криптовалютное казино в 2017 году, и с тех пор я в восторге!
Стейк казино предлагает свой официальный сайт, где можно не только поиграть в более чем 3131 увлекательную игру, но и пополнять счет и выводить выигрыши в цифровых монетах.
Лично для меня, это было откровение – ведь тут поддерживают все популярные криптовалюты, обещают полную конфиденциальность и мгновенные выплаты!
Я обязательно рекомендую вам зайти на официальный сайт Stake Casino и убедиться во всех преимуществах. Минимальный депозит – 0,0002 BTC, и нет ограничений на вывод.
Я уже несколько раз выводил выигрыши, и процесс был быстрым и без лишних хлопот.
И что самое важное, здесь честные и лицензированные игры от лучших провайдеров! Для меня это было решающим моментом, ведь в Stake Casino https://stakecommunity.ru представлены такие гиганты, как NetEnt, Evolution Gaming,
Pragmatic Play и многие другие. Не забывайте, что владелец – Medium Rare N.V., зарегистрированная на Кюрасао, и все транзакции проходят под надежной лицензией Curacao: 8048/JAZ.
Вы всегда можете проверить эту информацию сами, перейдя по ссылке на официальный сайт регулятора. Также, если у вас возникнут вопросы, на сайте есть удобный центр помощи в лайв-чате, где можно получить ответы от профессиональных консультантов.
Например, я тут узнал всё о процессе верификации аккаунта и как легко ее пройти. Не упустите свой шанс на удачу, друзья! Желаю вам море эмоций и крупных выигрышей в Stake Casino!
стейк официальный сайт зеркало на сегодня
стейк зеркало рабочее
стейк зеркало сайта
стейк казино игровые автоматы
stake казино официальный сайт на русском языке
актуальное зеркало stake casino
stake казино официальный сайт зеркало
stake casino зеркало на сегодня рабочее
stake demo
Удачи и прибыли Друзья!
trustworthy canadian pharmacy
Абсолютно бесплатный промокод 1xbet. На сегодня контора предлагает всем новичкам воспользоваться не только приветственным бонусом, но и получить дополнительные преференции. Эти льготы игрок получает в том случае, если внимательно отнесётся к процедуре регистрации на сайте. 1хбет промокод при регистрации на сегодня. 1xbet – один из самых узнаваемых букмекерских брендов в стране. Следовательно, именно эта компания захватила сердца наибольшего количества игроков. Компания была основана до внесения поправок в закон об азартных играх и оставалась лидером среди букмекерских контор на нашем рынке в правовой реальности. Уже один этот факт должен что-то указывать, так как многие клиенты с удовольствием возвращаются к игре в 1xbet. 1XBET – промокод на 32500р. Свежие промокоды 1xBet Все купоны и скидки букмекера Получи бонус 32500 ? Делай ставки на спорт – более подробно в этом материале https://altay-info.ru/news/pages/zagolovok_puteshestviya_menyayut_ghizny_top_7_prichin_otpravitysya_navstrechu_priklyuchen.html
online pharmacy australia paypal
raytalktech.com
그는 Fang Jifan을 분개하게 쳐다 보았고 Fang Jifan은 그것을 보지 않는 척 고개를 숙였습니다.
metformin 5 mg
Внутри городе Москве купить свидетельство – это удобный и быстрый способ достать нужный документ без лишних хлопот. Большое количество организаций предоставляют сервисы по созданию и торговле дипломов разных учебных заведений – https://www.russa-diploms-srednee.com/. Разнообразие свидетельств в Москве велик, включая документация о высшем уровне и среднем профессиональной подготовке, аттестаты, дипломы техникумов и университетов. Основное преимущество – способность получить диплом Гознака, обеспечивающий достоверность и высокое стандарт. Это обеспечивает уникальная защита против фальсификаций и дает возможность воспользоваться диплом для разнообразных задач. Таким образом, приобретение диплома в столице России становится безопасным и экономичным вариантом для таких, кто стремится к успеха в карьере.
buy zithromax online usa
buy synthroid no prescription
best rated canadian pharmacy
azithromycin cream over the counter
purchase prednisone no prescription
manzanaresstereo.com
Fang Jifan은 “전하가 폐하가 전하를 사랑한다고 생각하십니까? “라고 말했습니다.
娛樂城首儲
初次接觸線上娛樂城的玩家一定對選擇哪間娛樂城有障礙,首要條件肯定是評價良好的娛樂城,其次才是哪間娛樂城優惠最誘人,娛樂城體驗金多少、娛樂城首儲一倍可以拿多少等等…本篇文章會告訴你娛樂城優惠怎麼挑,首儲該注意什麼。
娛樂城首儲該注意什麼?
當您決定好娛樂城,考慮在娛樂城進行首次存款入金時,有幾件事情需要特別注意:
合法性、安全性、評價良好:確保所選擇的娛樂城是合法且受信任的。檢查其是否擁有有效的賭博牌照,以及是否採用加密技術來保護您的個人信息和交易。
首儲優惠與流水:許多娛樂城會為首次存款提供吸引人的獎勵,但相對的流水可能也會很高。
存款入金方式:查看可用的支付選項,是否適合自己,例如:USDT、超商儲值、銀行ATM轉帳等等。
提款出金方式:瞭解最低提款限制,綁訂多少流水才可以領出。
24小時客服:最好是有24小時客服,發生問題時馬上有人可以處理。
synthroid online purchase
Hi there everyone, it’s my first go to see at this website,
and article is truly fruitful in favor of me, keep up posting such content.
เว็บไซต์ DNABET: เข้าสู่ ประสบการณ์ การแทง ที่ไม่เหมือน ที่คุณ เคย เจอ!
DNABET ยังคง เป็นที่นิยม เลือกยอดนิยม สำหรับคน สาวก การเดิมพัน ทางอินเทอร์เน็ต ในประเทศไทย นี้.
ไม่ต้อง ใช้เวลา ในการเลือกว่าจะ เข้าร่วม DNABET เพราะที่นี่คือที่ที่ ไม่จำเป็นต้อง เลือกที่จะ ได้ หรือไม่เหรอ!
DNABET มี ราคาจ่าย ทุกราคาจ่าย หวย สูง ตั้งแต่เริ่มต้นที่ 900 บาท ขึ้นไป เมื่อ ท่าน ถูกรางวัลแล้ว ได้รับ รางวัลมากมาย กว่า เว็บ ๆ ที่ เคย.
นอกจากนี้ DNABET ยังคง มี หวย ที่คุณสามารถเลือก มากมายถึง 20 หวย ทั่วโลกนี้ ทำให้ เลือกแทง ตามใจ ได้อย่างหลากหลาย.
ไม่ว่าจะเป็น หวยรัฐบาล หวยหุ้น ยี่กี ฮานอย หวยลาว และ ลอตเตอรี่ มีค่า เพียง 80 บาท.
ทาง DNABET มั่นใจ ในเรื่องการเงิน โดย ได้รับ เปลี่ยนชื่อ ชันเจน เป็น DNABET เพื่อ เสริมฐานลูกค้าที่มั่นใจ และ ปรับปรุงระบบ มีความสะดวกสบาย ขึ้นไป.
นอกจากนี้ DNABET ยังมี หวย ประจำเดือนที่สะสมยอดแทงแล้วได้รับรางวัล หลายรายการ เช่นเดียวกับ โปรโมชั่น สมาชิกใหม่ ท่านสมัคร วันนี้ จะได้รับ โบนัสเพิ่มทันที 500 บาท หรือเครดิตทดลอง ไม่ต้อง เงิน.
นอกจากนี้ DNABET ยังมี ประจำเดือนที่ ท่านมีความมั่นใจ และเลือก DNABET การเดิมพัน หวย ของท่านเอง พร้อม โปรโมชั่น และ เหล่าโปรโมชั่น ที่ มาก ที่สุดในประเทศไทย ปี 2024.
อย่า ปล่อย โอกาสดีนี้ ไป มาเป็นส่วนหนึ่งของ DNABET และ เพลิดเพลินไปกับ ประสบการณ์ หวย ทุกท่าน มีโอกาสจะ เป็นเศรษฐี ได้รับ เพียง แค่ เลือก เว็บแทงหวย ทางอินเทอร์เน็ต ที่มั่นใจ และ มีสมาชิกมากที่สุด ในประเทศไทย!
valtrex tablet
synthroid 50 mcg
glucophage generic
valtrex 500 mg generic
online cialis mastercard
logarid.com
수상마을에 소식이 전해졌다.앞으로 이 푼돈에 물고기도 잡히고…
https://www.google.com.gh/url?sa=t&url=https%3A%2F%2Fwww.colorful-navi.com%2F
synthroid 100 mcg price
Здравствуйте!
Написание диплома – это настоящее испытание: срыв сроков, но в интернете я нашел способы улучшить продуктивность и продолжать работу.
Заказывайте диплом у нас без предоплаты и мы доставим его вам в любой регион России, гарантируем конфиденциальность.
http://www.snabtex48.ru/account/user/5995.html
http://beachhouse-living.com/index.php/component/kunena/user/20115-axelekeco
Желаю всем отличных оценок!
купить диплом химика
купить диплом в белово
купить диплом в якутске
купить диплом в нальчике
купить диплом в абакане
купить диплом в краснодаре
купить диплом в симферополе
купить диплом в хабаровске
купить диплом в железногорске
купить диплом врача
zestoretic 20 12.5
Самый полный список промокодов 1хБет на сегодня у нас на сайте. Все промокоды раздаются бесплатно: на ставку, при регистрации, бездепозитные промики. Обновляем каждые 5 часов. Обычно 1xBet промокод при регистрации предоставляет бонус на первый депозит и используется на этапе создания аккаунта в БК. Сумма вознаграждения достигает 100% от первого пополнения. Следующий тип — 1хбет промокод при регистрации. Он позволяет заключать пари на спортивные события, либо пользоваться привилегиями в сфере азартных игр, доступных на сайте БК. Такой бонус предоставляется бесплатно в честь регистрации, Дня рождения или активности – более подробно в этом материале http://forum.analysisclub.ru/index.php/topic,149604.msg470193.html#msg470193
1xBet промокод на бонус при регистрации. Букмекерская контора предоставляет игрокам множество возможностей для снижения рисков и увеличения банка. Бонусная программа компании предусматривает интересы как новичков, так и опытных бетторов. Рассмотрим основные виды поощрений в функционале БК: 1хБет промокод на регистрацию – один из самых популярных подарков, созданный для новых игроков на сайте; Ставки на спорт – увеличение депозита до 32500 рублей. Воспользуйся актуальным промокодом 1xbet на сегодня, получи бесплатную возможность увеличить свой первый депозит до 32500 рублей в БК 1xBet. Воспользовавшись промокод на 1хбет при регистрации, максимальная сумма бонуса возможного бонуса будет увеличена до 32500 рублей. Но при этом сумма бонуса будет равна сумме вашего первого депозита – более подробно в этом материале https://fcdynamo.2bb.ru/viewtopic.php?id=434#p10896
Промокод при регистрации в 1xbet сегодня. Этой акцией может воспользоваться каждый новый клиент при регистрации на сайте букмекера. Это ваше преимущество со старта, и у 1xbet есть эксклюзивное предложение. 1хбет промокод при регистрации на сегодня. В форме регистрации есть всего одно необязательное поле — как раз для ввода промокода. Как получить промокод на бесплатную ставку. Магазин находится во вкладке xBonus (в перечне вкладок верхнего блока). Вам предложат несколько вариантов для обмена баллов на промокоды 1xbet kz. Код можно получить для ставки ординар, для ставки экспресс, а также для лотерей от «1хБет». На сегодня промокод 1xbet бесплатно найти можно без особых затрат энергии, при этом сделать это следующим образом: Путем поиска в сети интернет; На сайтах, специализирующихся на спортивных ставках (Не ресурсы БК); В официальных сообществах 1хБет (соцсети). Представители БК часто выкладывают в группах или же просто в сети промокоды на 1xbet бесплатно в честь какого-то праздника либо же грядущего крупного спортивного турнира. Все промокоды 1xbet 2024. На официальном сайте букмекера в соответствующей рубрике находится полный перечень промокодов 1xbet 2024, бесплатно получить которые можно обменяв на них бонусные баллы – более подробно в этом материале https://1abakan.ru/forum/showthread-65023/page-1/#post-619508
Привет, гемблеры! Сегодня я хочу поделиться своим опытом игры на новом уровне азарта – в Bollywood Casino! Этот космический клуб открылся в 2023 году,
и я не могу нарадоваться всему, что он предлагает. Первое, что бросается в глаза — это темный и золотистый дизайн, что создает поистине атмосферу
увлекательных приключений. На сайте легко найти все необходимое: от регистрации и входа до каталога игр и бонусов.
Специально для новичков — приветственный бонус на первые 5 депозитов! Да, вы не ослышались, 5! Это дает невероятные возможности увеличить свой стартовый банк.
Каталог игр впечатляет: слоты, рулетка, покер, блэкджек и даже настольные игры в одном месте. А провайдеры? Betsoft, NetEnt, Evolution Gaming и другие лучшие
— здесь есть всё! Помимо классных игр, Bollywood Casino не перестаёт радовать своих игроков акциями: турниры, лотереи, розыгрыши в Колесе Фортуны — разнообразие впечатляет!
Что касается лицензии, меня всегда беспокоит безопасность. Поэтому я довольно придирчиво выбираю казино. В обзоре Bollywood Casino эксперты акцентировали
внимание на лицензии, и я убедился, что играю на честной и надежной площадке. Ну и, конечно, бонусы и акции — вот что делает игру в Bollywood Casino настоящим кайфом.
Приветственные предложения, акции для хайроллеров, бесплатные вращения — каждый найдет что-то по вкусу. И да, несмотря на отсутствие большой истории, азартный сайт
не перестает удивлять и радовать игроков своими новинками. Быстрая верификация, разнообразие игр и отличная поддержка — именно то, что меня удерживает здесь.
Так что, гемблеры, играйте в Bollywood Casino https://bollywoodcasinowin.ru и включайтесь в волнующий мир азарта! Удачи и больших выигрышей!
вход bollywood casino
болливуд казино
отзывы bollywood casino
депозит bollywood casino
bollywood casino
болливуд казино промокоды бездепозитный
обзор казино болливуд
бездепозитный bollywood casino
играть bollywood casino
Удачи и прибыли Друзья!
tadalafil price in india
Hi, I do believe this is an excellent blog. I stumbledupon it 😉 I may
revisit yet again since I saved as a favorite it. Money and freedom is the best way to change, may you
be rich and continue to guide other people.
промокод бк 1xbet при регистрации – комбинация из чисел и букв. Эта комбинация дает возможность игроку получить дополнительные бонусы. К примеру, это может быть: промокод на бесплатную ставку (фрибет); повышение коэффициентов ставок формата «экспресс». Промокод при регистрации применяется именно таким образом. Он позволяет увеличивать размер приветственного бонуса на первый депозит, который выдается самим букмекером 1xbet. Где найти? Вариантов для получения промокода на 1xbet на сегодня существует множество. Но мы предлагаем вводить наш собственный промокод для 1xbet. Это промокод для регистрации, он вводится в поле в регистрационной анкете. Промокод при регистрации на сегодня. Промокоды для БК и Казино — ежедневное обновление. Регистрация на сайте 1xBet бесплатная, но для начала игры и получения доступа к 1xbet промокоду при регистрации 2024, придется внести на игровой счет от 50 рублей. Особенности регистрации. Процедура создания профиля в букмекерской конторе 1xbet максимально упрощена. Для регистрации предусмотрены такие способы: В «1 клик». Чтобы создать учетную запись, нужно выбрать страну проживания и валюту, ознакомиться с пользовательским соглашением и кликнуть на клавишу «Регистрация». С помощью телефона – более подробно в этом материале http://znayvse.mybb.ru/viewtopic.php?id=13585#p30159
onlinepharmacytabs24 com
Бесплатные промокоды 1xBet при регистрации 2024. Сегодня пользователям 1xBet-казино предлагаются халявные промокоды на первый депозит, которые активируются при первой регистрации. С их помощью можно увеличить сумму базового бонуса до 32500 рублей. 1XFREE777 — промокод 1хбет при регистрации на сегодня. Для получения реального выигрыша с возможностью вывода на карту, необходимо поставить всю бонусную сумму на экспресс-ставку с коэффициентом от 1,4. Если прогноз окажется правильным, система переведет деньги на основной счет. Не секрет, что у букмекерской конторы 1xBet помимо спортивных ставок есть и другие направления, включая онлайн-игры, гоночные события или политические состязания – более подробно в этом материале http://rabotat.mybb.ru/viewtopic.php?id=20962#p29650
lisinopril 40 mg generic
I all the time used to read post in news papers but
now as I am a user of web so from now I am using net for articles,
thanks to web.
valtrex price
На территории столице России купить свидетельство – это комфортный и оперативный способ завершить нужный запись безо лишних хлопот. Множество компаний продают помощь по производству и реализации дипломов разнообразных образовательных институтов – https://www.orik-diploms-srednee.com/. Разнообразие свидетельств в столице России большой, включая бумаги о высшем уровне и среднем ступени образовании, свидетельства, свидетельства колледжей и академий. Основной плюс – возможность приобрести свидетельство Гознака, подтверждающий подлинность и качество. Это гарантирует уникальная защита ото подделки и позволяет воспользоваться аттестат для разнообразных целей. Таким способом, покупка свидетельства в Москве становится надежным и эффективным выбором для данных, кто желает достичь процветанию в трудовой деятельности.
otc cialis 2018
lisinopril cost 40 mg
Николаев Вячеслав Константинович .
zithromax z-pak
tadalafil 5 mg tablet price
agenbet88score.com
먹고 마신 후 Zhu Houzhao는 반대편 소독실로 갔다.
https://www.google.jo/url?sa=t&url=https%3A%2F%2Fwww.agenbet88score.com%2F
buy cheap tadalafil online
cost of tadalafil
cheap valtrex canada
synthroid price without insurance
I like it when people come together and share thoughts.
Great website, stick with it!
buy synthroid 150 mcg
This site was… how do I say it? Relevant!!
Finally I have found something that helped me. Cheers!
lisinopril 5 mg buy
lisinopril price in india
Промокод BetWinner- 937999. Новые пользователи букмекерской компании Betwinner могут воспользоваться приветственным бонусом в размере 100% от суммы депозита до €100 (или эквивалентной суммы в другой валюте). Фрибеты в БетВиннер чаще появляются в рамках периодических акций. Иногда такая привилегия касается новых игроков, но чаще всего поощрение получают постоянные.
https://new-journals.at.ua/forum/26-9739-1#26424
Бонус приветствия в Betwinner предоставляет игрокам возможность получить дополнительные средства на свой игровой счет. Этот бонус составляет 100% от суммы первого депозита, который игрок вносит на свой счет. Например, если новый клиент пополнил свой счет на 10 евро, то ему будет начислено еще 10 евро в качестве бонуса.
https://salfetka.at.ua/forum/11-6254-1#20077
Привет, крутые гемблеры! Наткнулся недавно на новое онлайн-казино с именем Vovan, и не могу не поделиться своим впечатлением!
На Vovan Casino более 1200 слотов, различные бонусы и VIP-клуб, который открывает доступ к эксклюзивным акциям. Лично я при регистрации получил стартовый комплект и кешбэк!
Интерфейс сайта прост и понятен, навигация легкая, и я быстро нашел нужные разделы. Баннеры на главной странице рассказывают о всех акциях и кешбэке, так что ты всегда в курсе горячих предложений.
Не могу упустить момент рассказать про бонусы! Уже при верификации дали 25 фриспинов, а с уровнем “Опытный” еще 50! Каждый вторник можно получить Reload бонус, а в субботу дополнительные фриспины в зависимости от статуса. Это просто огонь!
Игровой каталог впечатляет: 1000+ видеослотов, категории от популярных до джекпот-игр. Мой фаворит — раздел “Купить бонус”, где за деньги можно получить еще больше фриспинов!
Интересно, что компания, владеющая казино, решила остаться инкогнито. Но вот, честно, это не мешает мне наслаждаться азартом и выигрывать!
Регистрируйтесь на Vovan Casino по ссылке https://vovan-casino-win.ru и давайте разгромим слоты вместе! Удачи в игре!
vovan casino регистрация
vovan casino скачать приложение
vovan casino на андроид
обзор casino vovan
вован казино бездепозитный бонус
vovan казино на деньги
казино вован играть
однорукий бандит вован бесплатно
вован казино играть
Удачи и прибыли Друзья!
lisinopril 80mg tablet
synthroid 0.025
valtrex capsules
Промокод БетВиннер: 937999 при регистрации в 2024 году с использованием на сайте BetWinner.com вы получите бесплатный бонус в размере 100% до 25000 рублей на вашу ставку. Все актуальные бонусы от букмекерской конторы BetWinner можно найти на одной странице. Там вы также найдете инструкции по получению фрибетов, участию в акциях и бездепозитному бонусу от БК BetWinner в 2024 году.
http://pandora.ukrbb.net/viewtopic.php?f=2&t=7109&p=13481#p13481
can you buy metformin over the counter in australia
order metformin 1000 mg
Betwinner Промокод: 937999 – воспользуйтесь этим уникальным кодом, чтобы получить бонус в размере 100% до 25 000 рублей. На официальном сайте букмекерской конторы Betwinner вы сможете найти огромное количество событий, включая спортивные ставки, онлайн-казино, политические ставки и мгновенные игры.
http://gazdynka.ukrbb.net/viewtopic.php?f=3&t=3188&p=7177#p7177
metformin 1000 mg generic
mersingtourism.com
이것은 더 무자비하고 Yao와 Shun은 언급되지 않았지만 왕자는 예로 사용되었습니다.
Betwinner Промокод: 937999 – воспользуйтесь этим уникальным кодом, чтобы получить бонус в размере 100% до 25 000 рублей. На официальном сайте букмекерской конторы Betwinner вы сможете найти огромное количество событий, включая спортивные ставки, онлайн-казино, политические ставки и мгновенные игры.
http://nsk.ukrbb.net/viewtopic.php?f=6&t=25617&p=38399#p38399
Слушай, ребята, зацените новый тренд – New Retro Casino. Я, как настоящий гемблер, долго метался в поисках прикольного места, и вот, нашел свой
оазис азартных вечеринок! В этом блог-посте я вам раскрою пару секретов. New Retro Casino выложили на полку более 400 видеослотов от крутых провайдеров.
Тут есть всё: супер-популярные, новинки, даже те, что не попали в общий список. Чтобы найти свой аппарат, пользуйтесь удобной навигацией.
В разделе ‘Топ’ тусуют настоящие звезды казино. Новинки собраны в ‘Новые’, а ‘Настольные’ и ‘Другие’ категории замечательно разнообразят вечер.
Ну, а если ты уж точно знаешь, что хочешь, то пользуйся их фирменным поиском.
Забыли подзаряжать счет для демо-режима? Забей! Тут можно тыкнуть любой автомат просто так. Это ж New Retro – тут ваще свобода! Лицензия или Доверие?
Да, вот тут подводной камень: оператор козыряет лицензией и оригинальным софтом. Но, честно, лицензию не увидишь, но ярлык ‘Доверие’ тут есть.
Но, чуваки, кому нужны лицензии, когда тут такой кайф? Так что, если хочешь ощутить реальный ретро азарт – дай пинка своей удаче и катись
на https://newretrocasino-play.ru/! Будь на волне, качай адреналин, разрывай банк – New Retro Casino заждалось тебя, бро!
new retro casino бездеп
new retro казино зеркало
ретро казино официальный
new retro casino бездеп
нью ретро казино вход играть
ретро казино зеркало на сегодня new retro casino
retro casino официальный
невретро казино вход
new retro casino зеркало на сегодня
Удачи и прибыли Друзья!
best prices for synthroid
mojmelimajmuea.com
Wang Bao는 비웃었습니다. 중요한 순간이었습니다. 우리가 여전히 당신을 존경한다고 생각하십니까?
Однако, существует возможность увеличить размер этого бонуса с помощью промокода betwinner. При использовании этого кода при регистрации, приветственный бонус увеличится на 30%. То есть, если игрок пополнил свой счет на 10 евро и использовал промокод, то его бонус составит уже 13 евро.
http://nashkyev.ukrbb.net/viewtopic.php?f=12&t=3064&p=6834#p6834
[URL=https://russa-diploms-srednee.com/][URL=https://russa-diploms-srednee.com/]Купить диплом о среднем профессиональном образовании[/URL] – – это шанс скоро достать бумагу об учебе на бакалавр уровне лишенный лишних забот и затраты времени. В Москве доступны разные опций настоящих дипломов бакалавров, гарантирующих удобство и легкость в процессе.
Привет, друзья азартные! Решил поделиться своим опытом в Казино Лев – месте, где крутятся слоты, как львы в своей стае. Да начнется битва за джекпот!
Регистрация тут – просто мгновение. Я выбрал вход через свой Гугл-аккаунт, и за секунды был в игре. Опции есть разные, так что найдется удобный вариант для каждого.
Сразу после регистрации открылось окошко с предложением внести первый депозит. Такое гостеприимство оценишь, только когда в игре. Мобильная версия тоже зачетная.
Играю на своем смартфоне, и все летает, как будто на ракете. Особо порадовала компактность интерфейса. Кстати, если на андроиде, можно скачать приложение и
получить бонусные фриспины. Шикарно, правда?
Ну и конечно, программа лояльности – то, что меня держит в этом казино. Накапливаю баллы, продвигаюсь по уровням, а они мне за это разные призы дают.
Жаль, не знаю, сколько нужно поинтов для нового уровня, но главное, что двигаюсь вперед!
Так что не медли, регистрируйся тут https://levcasinoclub.ru/ и крути барабаны вместе со мной в Казино Лев! Удачи вам и крупных выигрышей, львы!
промокоды казино вулкан лев
5 миллионов рублей казино лев
скачать приложение лев казино
промокод лев игорный клуб
скачать мобильное приложение лев казино
казино лев на айфон
lev club casino рубли
скачать платные игра казино лев
casino lev бездепозитные бонусы
Удачи и прибыли Друзья!
Привет, азартные души! Если вы готовы окунуться в захватывающий мир азартных развлечений, jvspin casino официальный сайт – ваш ключ к бескрайнему веселью! Здесь вас ждет огромная коллекция игр от ведущих провайдеров,
таких как Betsoft, NetEnt, Evolution Gaming и многих других. Чтобы разблокировать все преимущества и получить доступ к эксклюзивным бонусам, регистрируйтесь на официальном сайте jvspin casino прямо сейчас.
Не упустите шанс на увлекательные азартные приключения с jvspin!
Если вы новичок, не пропустите jvspin бездепозитный бонус – уникальную возможность начать игру без вложений. Просто зарегистрируйтесь и получите бонусы, которые помогут вам увеличить свой выигрыш.
Подробности регистрации и получения бонусов доступны в нашем новом блоге!
Ищете рабочее зеркало jvspin для стабильного доступа? Не волнуйтесь, у нас есть проверенное зеркало, которое гарантирует непрерывный доступ к вашим любимым играм.
Посетите наш сайт, чтобы узнать больше: https://jvspincasinobonus.ru.
Будьте в курсе всех новостей и акций – подписывайтесь на блог! Там вам расскажут вам о последних бонусных кодах, промокодах и уникальных предложениях, чтобы вы могли максимально насладиться азартным опытом.
Играйте с умом, играйте с jvspin casino!
дживиспин казино регистрация
казино jvspin официальный сайт
сайт jvspin
игровые автоматы jvspin
jvspin казино официальный сайт мобильная версия скачать
jvspin
jvspin casino промокод бездепозитный
jvspin casino официальный
дживиспин зеркало скачать
Удачи и прибыли Друзья!
cialis tadalafil
can you buy metformin over the counter in canada
canadian pharmacy drugs online
twichclip.com
그들은 기계가 아니라 살과 피를 가진 사람들의 집단입니다.
buy synthroid without a prescription
cost of valtrex generic
cheapest prescription pharmacy
Привет, гемблеры! Сегодня хочу поделиться своим опытом в онлайн-казино Голд https://goldcasinobonus.ru
Это новенький проект на рынке гемблинга, который я открыл для себя в 2021 году, и с тех пор мне удача улыбается.
На Голде, кроме классных игровых автоматов, я нашел море щедрых бонусов. Сразу после регистрации меня порадовал щедрый приветственный бонус, а для постоянных
клиентов тут тоже есть свои фишки. Не знаю, как у вас, но я всегда стараюсь выбирать казино без лицензии, но где азарт настоящий.
Именно это предлагает Голд, с сертифицированными слотами и выплатами, которые честно приносят выигрыши. Бонусы здесь как в подарках на ДР!
С первого депозита получаешь 111%, но не более 20 000 рублей. И чтобы не было скучно, к этому еще и фриспины подарят.
На сайте Голд казино официальный сайт выглядит темно и стильно. Баннеры с акциями моментально бросаются в глаза, а каталог и данные о выигрышах справа
сразу ощущение, что ты в мире азарта. Тут только слоты, но, друзья, их тут 233 штуки! Весь софт оригинальный, и удобное меню сделает ваш выбор легким и приятным.
И еще, не упустите отзывы. Мне они всегда помогают. Например, MelenaElian заметила, что ассортимент впечатляет, но некоторые слоты уже чувствуют себя прошлым летом.
А вот gaarwineInky, наоборот, не нашел здесь нужного уровня азарта. Все вкусы разные, но лично я нахожу здесь свою удачу.
Так что, гемблеры, вперед, проверьте свою удачу в Голд казино!
голд казино промокод
скачать казино gold
скачать приложение gold casino
голд казино скачать на андроид
gold казино скачать
casino gold официальный сайт с выводом
скачать голд казино на андроид бесплатно
игорный клуб голд официальный на андроид
gold casino скачать
Удачи и прибыли Друзья!
shopanho.com
천하의 학문을 열어 성스러운 학문을 도모하고 사방 성덕의 명성을 넓혀라.
Воспользоваться промокодом 1xbet можно при регистрации в 1xbet. БК 1хбет дарит до 130% на первый депозит при помощи промокода 1xbet. Максимальная сумма бонуса по промокоду 1хбет достигает 32500 рублей. Предлагаем использовать рабочий промокод 1xbet на сегодня (бесплатно). Вводить промокод 1хбет следует строго при регистрации. Куда вводить промокод 1xbet при регистрации? Выбираете страну и валюту. В окно “Введите промокод” (при наличии), вводите рабочий промокод. Как активировать промокод 1хбет. Промокод 1xbet активируется при первом пополнении игрового счета. Однако, есть пару моментов: Необходимо заполнить все обязательные поля в личном кабинете. Как получить промокод 1xbet на сегодня? Бесплатные купоны для повышения бонуса посетителям сайта. Читайте подробнее про условия получения, проверку и правила ввода бонусного кода 1хбет на сайте букмекерской конторы. Еще один вид промокодов 1xbet.com позволяет совершать бесплатные ставки на события, а также использовать иные предложения в сфере азартных игр от БК. Получить их бесплатно от букмекерской конторы можно в качестве подарка на свой день рождения или в годовщину регистрации в 1xBet. промокод при регистрации 1xbet на сегодня. Стандартный бонус на первый депозит для новых игроков составляет 100% от суммы первого пополнения – более подробно в этом материале https://europe-parfum.ru/new/pages/kak_rabotaet_giperbaricheskaya_kamera__1.html
dota2answers.com
그는 계속해서 쏘기 시작했고, 아마도 마음속으로 알아낸 후에 두 번째 화살을 쏘았습니다.
generic azithromycin over the counter
All the existing bookmakers and casino platforms nowadays use all available methods to attract the potential players, including promotional offers. As the gambling industry does not stay still, improving regularly the existing entertainments and creating new ones, it always gives the comfortable conditions to try them out. For the Aviator, this experience was also implied by Spribe developer company, while they released the game and let users get familiar with it. It included the social interactions on available platforms with the Aviator game code the users could activate and receive on the partnering sources some generous rewards. Implying bonuses both for the target game and other slots or bet exclusives, the Aviator coupon code has become one of the top used within the gambling community.
You can find out more detailed information about bonuses and sites where you can play the aviator game by reading our article https://www.aviator-game-bonus.com/
While the Aviator game itself may not offer promo codes, several online casinos that host the game provide promotional offers. Among the popular online casinos offering Aviator are 1xbet, 1win, Parimatch, Mostbet, Pin Up, and 4raBet.
These casinos frequently introduce promo codes that players can use to enhance their gaming experience. By redeeming these codes, players can enjoy various benefits, such as bonus funds, free spins, or exclusive rewards. Keep an eye on these reputable online casinos and their promotional campaigns to make the most out of your Aviator gameplay and increase your chances of winning big.
low cost online pharmacy
Актуальный промокод, укажи промокод получи бонус. Получите максимум при регистрации в одной из букмекерских контор. 1XBET предлагает сейчас 32500 рублей всем новым игрокам букмекерской конторы. 1хбет промокод на сегодня. Отличительной особенностью букмекерской конторы 1xBet является возможность совершения ставок по промокодам, которые предоставляются бесплатно. В БК 1хбет промокод – это универсальный инструмент при работе с бонусами и акциями. Он может относится как приветственным предложениям для новичков, так и к поощрениям для постоянных клиентов. Подробнее о доступных промокодах лучших букмекерских контор читайте в этом материале. Выделим несколько основных методов, которые позволят получить промокод 1xbet более подробно в этом материале https://europe-parfum.ru/new/pages/kak_rabotaet_giperbaricheskaya_kamera__1.html
prednisone 200 mg tablets
smcasino7.com
예기치 않게 부정적인 교재가 된 불쌍한 Ruan Xingjian.
azithromycin 250 mg tablet price
brand synthroid cost
Бесплатные промокоды от букмекерской конторы 1xBet: при регистрации, на бесплатную ставку. Рассказываем, как использовать и куда вводить промокоды в 1хБет. промокод при регистрации 1xbet на сегодня. Начнем с того, что каждый, кто зарегистрировался на официальном сайте или зеркале конторы впервые, может рассчитывать на получение приветственного денежного бонуса, который в дальнейшем удастся потратить на ставки, а в случае успеха заработать первые деньги. Но мы говорим о промокоде, который в специальной форме регистрации просят ввести при наличии – более подробно в этом материале https://europe-parfum.ru/new/pages/kak_rabotaet_giperbaricheskaya_kamera__1.html
Your method of explaining everything in this article is actually fastidious, all be capable of without difficulty
understand it, Thanks a lot.
buy 5mg tadalafil
All the existing bookmakers and casino platforms nowadays use all available methods to attract the potential players, including promotional offers. As the gambling industry does not stay still, improving regularly the existing entertainments and creating new ones, it always gives the comfortable conditions to try them out. For the Aviator, this experience was also implied by Spribe developer company, while they released the game and let users get familiar with it. It included the social interactions on available platforms with the Aviator game code the users could activate and receive on the partnering sources some generous rewards. Implying bonuses both for the target game and other slots or bet exclusives, the Aviator coupon code has become one of the top used within the gambling community.
You can find out more detailed information about bonuses and sites where you can play the aviator game by reading our article https://www.aviator-game-bonus.com/
While the Aviator game itself may not offer promo codes, several online casinos that host the game provide promotional offers. Among the popular online casinos offering Aviator are 1xbet, 1win, Parimatch, Mostbet, Pin Up, and 4raBet.
These casinos frequently introduce promo codes that players can use to enhance their gaming experience. By redeeming these codes, players can enjoy various benefits, such as bonus funds, free spins, or exclusive rewards. Keep an eye on these reputable online casinos and their promotional campaigns to make the most out of your Aviator gameplay and increase your chances of winning big.
canadian pharmacy viagra 100mg
metformin online uk
All the existing bookmakers and casino platforms nowadays use all available methods to attract the potential players, including promotional offers. As the gambling industry does not stay still, improving regularly the existing entertainments and creating new ones, it always gives the comfortable conditions to try them out. For the Aviator, this experience was also implied by Spribe developer company, while they released the game and let users get familiar with it. It included the social interactions on available platforms with the Aviator game code the users could activate and receive on the partnering sources some generous rewards. Implying bonuses both for the target game and other slots or bet exclusives, the Aviator coupon code has become one of the top used within the gambling community.
You can find out more detailed information about bonuses and sites where you can play the aviator game by reading our article https://www.aviator-game-bonus.com/
While the Aviator game itself may not offer promo codes, several online casinos that host the game provide promotional offers. Among the popular online casinos offering Aviator are 1xbet, 1win, Parimatch, Mostbet, Pin Up, and 4raBet.
These casinos frequently introduce promo codes that players can use to enhance their gaming experience. By redeeming these codes, players can enjoy various benefits, such as bonus funds, free spins, or exclusive rewards. Keep an eye on these reputable online casinos and their promotional campaigns to make the most out of your Aviator gameplay and increase your chances of winning big.
best rated canadian pharmacy
reliable canadian online pharmacy
synthroid 175 cost
lisinopril pill
online pharmacy no prescription needed
pchelografiya.com
빠른 말들이 마구간에서 질주했다.
купить диплом университета https://server-diploms.com/ .
프라그마틱과 관련된 내용 감사합니다! 또한, 제 사이트에서도 프라그마틱에 대한 정보를 찾아보실 수 있어요. 서로 이야기 공유하며 더 많은 지식을 얻어가요!
프라그마틱 슬롯 무료
프라그마틱 콘텐츠 항상 기대돼요! 또한 제 사이트에서도 유용한 정보를 제공하고 있어요. 상호 교류하며 더 많은 지식을 얻어가요!
https://doggggqwe.weebly.com/
https://www.hnrcrew.com
https://www.naugblog.com
synthroid 60 mcg
Воспользоваться промокодом 1xbet можно при регистрации в 1xbet. БК 1хбет дарит до 130% на первый депозит при помощи промокода 1xbet. Максимальная сумма бонуса по промокоду 1хбет достигает 32500 рублей. Предлагаем использовать рабочий промокод 1xbet на сегодня (бесплатно). Вводить промокод 1хбет следует строго при регистрации. Куда вводить промокод 1xbet при регистрации? Выбираете страну и валюту. В окно “Введите промокод” (при наличии), вводите рабочий промокод. Как активировать промокод 1хбет. Промокод 1xbet активируется при первом пополнении игрового счета. Однако, есть пару моментов: Необходимо заполнить все обязательные поля в личном кабинете. Как получить промокод 1xbet на сегодня? Бесплатные купоны для повышения бонуса посетителям сайта. Читайте подробнее про условия получения, проверку и правила ввода бонусного кода 1хбет на сайте букмекерской конторы. Еще один вид промокодов 1xbet.com позволяет совершать бесплатные ставки на события, а также использовать иные предложения в сфере азартных игр от БК. Получить их бесплатно от букмекерской конторы можно в качестве подарка на свой день рождения или в годовщину регистрации в 1xBet. 1хбет промокод при регистрации на сегодня. Стандартный бонус на первый депозит для новых игроков составляет 100% от суммы первого пополнения – более подробно в этом материале https://tecspo.ru/news/pags/zagolovok_istoriya_vozniknoveniya_pravil_doroghnogo_dvigheniya.html
pchelografiya.com
사람 전체가 가늘고 입술이 건조하며 한 쌍의 눈만 여전히 빛나고 있습니다.
strelkaproject.com
무엇? 그의 아버지는 죽었고 새 왕이 왕위에 오르니 너무 성급합니다.
super pharmacy
프라그마틱 슬롯에 대한 내용이 정말 도움이 되었어요! 더불어, 제 사이트에서도 프라그마틱과 관련된 정보를 찾아보세요. 함께 서로 이야기하며 더 많은 지식을 쌓아가요!
프라그마틱 슬롯 무료 체험
프라그마틱과 관련된 내용 감사합니다! 또한, 제 사이트에서도 프라그마틱에 대한 정보를 찾아보실 수 있어요. 서로 이야기 공유하며 더 많은 지식을 얻어가요!
https://www.b4closing.com
http://www.iavstudios.com/
https://www.vamiveta.com/
Бесплатный промокод 1xBet 32500 рублей. Промокод при регистрации в БК 1xBet рассчитан на привлечение новых клиентов. Совокупность букв и цифр вводится при создании аккаунта, что поднимает сумму первого пополнения счета до 325000 тысяч рублей. Редакция напоминает, что для получения бонуса потребуется пройти процедуру отыгрыша. Букмекер просит проставить сумму экспрессами. Коэффициент каждой отдельной ставки составляет минимум 1.4. После прохождения отыгрыша выбранная сумма денег перейдет из бонусного на основной счет. 1xBet промокод на День Рождения. Букмекерская контора поздравляет каждого верифицированного клиента бесплатной ставкой на День Рождения. На сегодня у 1xbet предусмотрено несколько рабочих промокодов: на бесплатную ставку, на 25000 рублей, а также промокод до 1500 евро. Промокод 1xbet до 1500 евро. Между букмекерами активно развивается конкуренция, и это правильно. Каждый старается привлечь к себе как можно больше игроков, в том числе различными акционными предложениями, бонусами и тому подобными маркетинговыми методами. Как получить промокод 1xbet? Промокод казино 1xbet до 1500 евро. промокод 1хбет при регистрации на сегодня. Промокод 1хбет на сегодня. Бездепозитный промокод 1xbet. Сегодня отсутствует. Один из наиболее популярных среди таковых — использование промокодов – более подробно в этом материале https://tecspo.ru/news/pags/zagolovok_istoriya_vozniknoveniya_pravil_doroghnogo_dvigheniya.html
Салют, ковбои! Тут Лаки Лох в деле, и я заскочил в казино с именем, которое, без шуток, запомнишь на всю жизнь — Vodka Casino!
Эта банда появилась на горизонте азартного бездна в 2020 году, и я сразу почувствовал, что здесь не так, как в других заведениях.
Мир всякий в увлекательных приключениях! Vodka Casino дает волю своим страстям по всему миру — от России до где-то в Азии.
Как настоящий маньяк по приключениям, я оценил такой размах.
Бонусы… что? Если ты ожидаешь миллион бонусов и подарков — забудь. Тут не заморачиваются с избыточными акциями.
Фри спины при пополнении и кешбэк раз в неделю — вот и вся соль!
Бездепа не жди! Забудь о бездепозитных фишках при регистрации, но я вижу свет в конце тоннеля — возможно, на промокодах что-то найдется.
Фри спины — это как револьвер в руке! Хочешь вращений? Пополняй счет и качай барабаны. Чем больше на счете, тем больше вращений. Просто, как два пальца об асфальт!
Так что, седлайте лошадей, ковбои, и отправляемся на дикий запад Vodka Casino! Ссылка вот тут https://vodka-casino-win.ru/, и поехали!
водка казино вход на официальный сайт
vodka casino регистрация
казино водка бонусы
vodka casino бездепозитный бонус
vodka казино регистрация
vodka казино официальный сайт
vodka bet casino
vodka casino зеркало сайт
водка казино зеркало вход
Удачи и прибыли Друзья!
online pharmacy no presc uk
prednisone 2.5 mg tab
Самый полный список промокодов 1хБет на сегодня у нас на сайте. Все промокоды раздаются бесплатно: на ставку, при регистрации, бездепозитные промики. Обновляем каждые 5 часов. Обычно 1xBet промокод при регистрации предоставляет бонус на первый депозит и используется на этапе создания аккаунта в БК. Сумма вознаграждения достигает 100% от первого пополнения. Следующий тип — промокод 1хбет при регистрации на сегодня. Он позволяет заключать пари на спортивные события, либо пользоваться привилегиями в сфере азартных игр, доступных на сайте БК. Такой бонус предоставляется бесплатно в честь регистрации, Дня рождения или активности – более подробно в этом материале https://tecspo.ru/news/pags/zagolovok_istoriya_vozniknoveniya_pravil_doroghnogo_dvigheniya.html
all in one pharmacy
Здравствуйте!
Бывало ли у вас такое, что приходилось писать дипломную работу в крайне ограниченные сроки? Это действительно требует огромной ответственности и напряженных усилий, но важно не опускать руки и продолжать активно заниматься учебными процессами, чем я и занимаюсь.
Для тех, кто умеет искать и анализировать информацию в интернете, это действительно облегчает процесс согласования и написания дипломной работы. Не нужно тратить время на посещение библиотек или устраивать встречи с дипломным руководителем. Здесь, на этом ресурсе, предоставлены надежные данные для заказа и написания дипломных и курсовых работ с гарантией качества и доставкой по России. Можете ознакомиться с предложениями по ссылке купить диплом специалиста, это проверено!
купить диплом бакалавра
купить диплом о среднем специальном
купить диплом университета
купить диплом института
купить диплом Вуза
Желаю всем отличных оценок!
I am really enjoying the theme/design of
your site. Do you ever run into any web browser compatibility issues?
A number of my blog visitors have complained about my site not working correctly
in Explorer but looks great in Chrome. Do you have any
solutions to help fix this issue?
Доброго!
Вы когда-нибудь писали диплом в сжатые сроки? Это очень ответственно и тяжело, но нужно не сдаваться и делать учебные процессы, чем Я и занимаюсь)
Тем кто умеет разбираться и гуглить информацию, это действительно помогает по ходу согласований и написания диплома, не нужно тратить время на библиотеки или встречи с дипломным руководителем, вот здесь есть хорошие данные для заказа и написания дипломов и курсовых с гарантией и доставкой по России, можете посмотреть здесь https://1russa-diploms.com, проверено!
купить диплом специалиста
купить диплом о высшем образовании
купить диплом
купить диплом о среднем образовании
где купить диплом
Желаю всем отличных оценок!
where can i buy prednisone online
prices pharmacy
Доброго!
Было ли у вас опыт написания дипломной работы в крайне сжатые сроки? Это действительно требует огромной ответственности и трудоемкости, однако важно сохранять упорство и продолжать активно участвовать в учебном процессе, как я это делаю.
Для тех, кто умеет эффективно искать и анализировать информацию в интернете, это действительно помогает в процессе согласования и написания дипломной работы. Больше не нужно тратить время на посещение библиотек или организацию встреч с научным руководителем. Здесь, на этом ресурсе, предоставлены надежные данные для заказа и написания дипломных и курсовых работ с гарантией качества и доставкой по всей России. Можете ознакомиться с предложениями по ссылке https://server-diploms.com, это проверенный источник!
купить диплом цена
купить диплом ссср
купить диплом института
купить диплом о высшем образовании
Желаю всем отличных оценок!
synthroid 300 mg
purchase metformin 1000 mg
situs kantorbola
KANTORBOLA situs gamin online terbaik 2024 yang menyediakan beragam permainan judi online easy to win , mulai dari permainan slot online , taruhan judi bola , taruhan live casino , dan toto macau . Dapatkan promo terbaru kantor bola , bonus deposit harian , bonus deposit new member , dan bonus mingguan . Kunjungi link kantorbola untuk melakukan pendaftaran .
Приветствую всех!
Купоны для интернет-магазина М.Видео – это уникальные коды, которые можно использовать при оформлении заказа на официальном веб-сайте компании.
Они предоставляют дополнительные преимущества клиентам в виде скидок на определенные товары или услуги, бесплатной доставки и других бонусов.
Как найти такие промокоды и купоны для М.Видео? Обычно они предоставляются в рамках специальных акций компании, которые могут быть организованы
на ее официальном веб-сайте, в социальных сетях или на специализированных ресурсах, например, на сайте promokodbar.ru,
который предлагает самые свежие и проверенные промокоды
Сайт самых свежих и проверенных промокодов магазина М.Видео https://promokodbar.ru
Удачных покупок!
купоны для умных покупок в М.Видео
Эксклюзивные скидки М.Видео
Эксклюзивные промо-коды М.Видео
новые купоны М.Видео
Промокоды для получения дополнительных бонусов в М.Видео
Удачи!
smcasino-game.com
Liu Jian과 Li Dongyang은 분명히 흥분하여 일어 섰습니다.
cost tadalafil generic
khasiss.com
그는 그것을 원하지 않습니다. 그것은 단지 한 가지를 의미합니다. 이 아들은 더 많은 것을 원합니다.
Hello, I enjoy reading through your article. I wanted to write a little comment to support you.
6 mg tadalafil
where to buy prednisone in canada
Здравствуйте!
Вы когда-нибудь сталкивались с необходимостью написания дипломной работы в сжатые сроки? Это действительно очень ответственное и трудоемкое занятие, но важно не опускать руки и продолжать двигаться вперед, активно занимаясь учебным процессом, как и я.
Для тех, кто умеет находить и анализировать информацию в сети, это действительно помогает в процессе согласования и написания дипломной работы. Больше не нужно тратить время на посещение библиотек или организацию встреч с научным руководителем. Именно здесь, на этом ресурсе, можно найти надежные данные для заказа и написания дипломных и курсовых работ с гарантией качества и доставкой по всей России. Можете ознакомиться с предложениями на купить диплом техникума, это проверенный источник!
купить диплом
купить диплом Гознак
купить диплом Вуза
купить диплом о среднем специальном
купить диплом техникума
Желаю всем отличных оценок!
twichclip.com
양쯔강 이남의 일부 부자들도 소식을 듣고 이사를 왔다고 한다.
Доброго!
Были ли у вас случаи, когда приходилось писать дипломную работу в крайне ограниченные сроки? Это действительно требует большой ответственности и трудоемкости, но важно не отступать и продолжать активно участвовать в учебном процессе, как я.
Для тех, кто умеет эффективно находить и использовать информацию в сети, это действительно помогает в процессе согласования и написания дипломной работы. Больше не нужно тратить время на посещение библиотек или организацию встреч с научным руководителем. Здесь, на этом ресурсе, предоставлены надежные данные для заказа и написания дипломных и курсовых работ с гарантией качества и доставкой по всей России. Можете ознакомиться с предложениями тут https://server-diploms.com, это проверенный источник!
купить диплом специалиста
купить аттестат
купить диплом цена
купить диплом Гознак
Желаю всем отличных оценок!
Ngamenjitu: Portal Togel Online Terluas dan Terjamin
Portal Judi telah menjadi salah satu portal judi daring terbesar dan terjamin di Indonesia. Dengan bervariasi pasaran yang disediakan dari Semar Group, Portal Judi menawarkan pengalaman main togel yang tak tertandingi kepada para penggemar judi daring.
Market Terunggul dan Terlengkap
Dengan total 56 market, Portal Judi menampilkan berbagai opsi terunggul dari market togel di seluruh dunia. Mulai dari pasaran klasik seperti Sydney, Singapore, dan Hongkong hingga pasaran eksotis seperti Thailand, Germany, dan Texas Day, setiap pemain dapat menemukan pasaran favorit mereka dengan mudah.
Langkah Bermain yang Sederhana
Situs Judi menyediakan petunjuk cara main yang praktis dipahami bagi para pemula maupun penggemar togel berpengalaman. Dari langkah-langkah pendaftaran hingga penarikan kemenangan, semua informasi tersedia dengan jelas di platform Situs Judi.
Hasil Terakhir dan Info Terkini
Pemain dapat mengakses hasil terakhir dari setiap market secara real-time di Ngamenjitu. Selain itu, info paling baru seperti jadwal bank online, gangguan, dan offline juga disediakan untuk memastikan kelancaran proses transaksi.
Pelbagai Macam Permainan
Selain togel, Situs Judi juga menawarkan berbagai jenis permainan kasino dan judi lainnya. Dari bingo hingga roulette, dari dragon tiger hingga baccarat, setiap pemain dapat menikmati berbagai pilihan permainan yang menarik dan menghibur.
Keamanan dan Kepuasan Pelanggan Dijamin
Situs Judi mengutamakan security dan kenyamanan pelanggan. Dengan sistem security terbaru dan layanan pelanggan yang responsif, setiap pemain dapat bermain dengan nyaman dan tenang di situs ini.
Promosi dan Bonus Menarik
Portal Judi juga menawarkan bervariasi promosi dan hadiah menarik bagi para pemain setia maupun yang baru bergabung. Dari bonus deposit hingga hadiah referral, setiap pemain memiliki kesempatan untuk meningkatkan kemenangan mereka dengan hadiah yang ditawarkan.
Dengan semua fitur dan layanan yang ditawarkan, Ngamenjitu tetap menjadi pilihan utama bagi para penggemar judi online di Indonesia. Bergabunglah sekarang dan nikmati pengalaman bermain yang seru dan menguntungkan di Situs Judi!
generic cialis price
lisinopril 5mg
프라그마틱플레이의 다채로운 슬롯으로 특별한 순간을 즐겨보세요.
프라그마틱 무료
프라그마틱과 관련된 이 글 정말 잘 읽었어요! 더불어 저도 제 사이트에서 프라그마틱에 대한 새로운 정보를 공유 중이에요. 함께 나누면 더 좋을 것 같아요!
https://supervil.com/hot/
https://www.cicoresky.com
https://0cdnara.com/hot/
manzanaresstereo.com
그는 Duke Qi가 그것을 위해 점프하는 것을 거의 상상할 수 있었습니다.
online pet pharmacy
All the existing bookmakers and casino platforms nowadays use all available methods to attract the potential players, including promotional offers. As the gambling industry does not stay still, improving regularly the existing entertainments and creating new ones, it always gives the comfortable conditions to try them out. For the Aviator, this experience was also implied by Spribe developer company, while they released the game and let users get familiar with it. It included the social interactions on available platforms with the Aviator game code the users could activate and receive on the partnering sources some generous rewards. Implying bonuses both for the target game and other slots or bet exclusives, the Aviator coupon code has become one of the top used within the gambling community.
You can find out more detailed information about bonuses and sites where you can play the aviator game by reading our article https://www.aviator-game-bonus.com/
While the Aviator game itself may not offer promo codes, several online casinos that host the game provide promotional offers. Among the popular online casinos offering Aviator are 1xbet, 1win, Parimatch, Mostbet, Pin Up, and 4raBet.
These casinos frequently introduce promo codes that players can use to enhance their gaming experience. By redeeming these codes, players can enjoy various benefits, such as bonus funds, free spins, or exclusive rewards. Keep an eye on these reputable online casinos and their promotional campaigns to make the most out of your Aviator gameplay and increase your chances of winning big.
Воспользоваться промокодом 1xbet можно при регистрации в 1xbet. БК 1хбет дарит до 130% на первый депозит при помощи промокода 1xbet. Максимальная сумма бонуса по промокоду 1хбет достигает 32500 рублей. Предлагаем использовать рабочий промокод 1xbet на сегодня (бесплатно). Вводить промокод 1хбет следует строго при регистрации. Куда вводить промокод 1xbet при регистрации? Выбираете страну и валюту. В окно “Введите промокод” (при наличии), вводите рабочий промокод. Как активировать промокод 1хбет. Промокод 1xbet активируется при первом пополнении игрового счета. Однако, есть пару моментов: Необходимо заполнить все обязательные поля в личном кабинете. Как получить промокод 1xbet на сегодня? Бесплатные купоны для повышения бонуса посетителям сайта. Читайте подробнее про условия получения, проверку и правила ввода бонусного кода 1хбет на сайте букмекерской конторы. Еще один вид промокодов 1xbet.com позволяет совершать бесплатные ставки на события, а также использовать иные предложения в сфере азартных игр от БК. Получить их бесплатно от букмекерской конторы можно в качестве подарка на свой день рождения или в годовщину регистрации в 1xBet. промокод бк 1xbet при регистрации. Стандартный бонус на первый депозит для новых игроков составляет 100% от суммы первого пополнения – более подробно в этом материале https://fontanvazon.ru/jscripts/pgs/zagolovok_kak_plastikovye_okna_vliyayut_na_komfort_v_dome.html
synthroid 12.5 mcg
trusted canadian pharmacy
azithromycin 250 mg buy online
azithromycin 500 mg order online
jelenakaludjerovic.com
그가 이 말을 하자마자 홀은 잠시 정적에 휩싸였다.
Самый полный список промокодов 1хБет на сегодня у нас на сайте. Все промокоды раздаются бесплатно: на ставку, при регистрации, бездепозитные промики. Обновляем каждые 5 часов. Обычно 1xBet промокод при регистрации предоставляет бонус на первый депозит и используется на этапе создания аккаунта в БК. Сумма вознаграждения достигает 100% от первого пополнения. Следующий тип — промокод 1хбет при регистрации на сегодня. Он позволяет заключать пари на спортивные события, либо пользоваться привилегиями в сфере азартных игр, доступных на сайте БК. Такой бонус предоставляется бесплатно в честь регистрации, Дня рождения или активности – более подробно в этом материале https://fontanvazon.ru/jscripts/pgs/zagolovok_kak_plastikovye_okna_vliyayut_na_komfort_v_dome.html
Доброго!
Было ли у вас когда-нибудь так, что приходилось писать дипломную работу в очень сжатые сроки? Это действительно требует огромной ответственности и может быть очень тяжело, но важно не опускать руки и продолжать активно заниматься учебными процессами, как я.
Для тех, кто умеет быстро находить и использовать информацию в интернете, это действительно облегчает процесс согласования и написания дипломной работы. Больше не нужно тратить время на посещение библиотек или устраивать встречи с научным руководителем. Здесь, на этом ресурсе, предоставлены надежные данные для заказа и написания дипломных и курсовых работ с гарантией качества и доставкой по всей России. Можете ознакомиться с предложениями на сайте https://2orik-diploms.com, это проверено!
купить диплом о среднем образовании
купить аттестат
купить диплом колледжа
купить диплом техникума
купить диплом нового образца
Желаю всем отличных оценок!
valtrex prescription uk
All the existing bookmakers and casino platforms nowadays use all available methods to attract the potential players, including promotional offers. As the gambling industry does not stay still, improving regularly the existing entertainments and creating new ones, it always gives the comfortable conditions to try them out. For the Aviator, this experience was also implied by Spribe developer company, while they released the game and let users get familiar with it. It included the social interactions on available platforms with the Aviator game code the users could activate and receive on the partnering sources some generous rewards. Implying bonuses both for the target game and other slots or bet exclusives, the Aviator coupon code has become one of the top used within the gambling community.
You can find out more detailed information about bonuses and sites where you can play the aviator game by reading our article https://www.aviator-game-bonus.com/
While the Aviator game itself may not offer promo codes, several online casinos that host the game provide promotional offers. Among the popular online casinos offering Aviator are 1xbet, 1win, Parimatch, Mostbet, Pin Up, and 4raBet.
These casinos frequently introduce promo codes that players can use to enhance their gaming experience. By redeeming these codes, players can enjoy various benefits, such as bonus funds, free spins, or exclusive rewards. Keep an eye on these reputable online casinos and their promotional campaigns to make the most out of your Aviator gameplay and increase your chances of winning big.
Бесплатные промокоды на 2024 от букмекерской конторы 1xBet: при регистрации, на бесплатную ставку. Рассказываем, как использовать и куда вводить промокоды в 1хБет. промокод на 1хбет при регистрации. Бесплатный промокод для увеличения бонуса. Букмекерская контора 1хБет – одна из самых популярных беттинговых площадок, предлагающая высокие коэффициенты, широкую линию с дополнительной росписью. Благодаря низкой марже БК пользователи стабильно зарабатывают на ставках на спорт. Отличительной особенностью букмекерской конторы 1xBet является возможность совершения ставок по промокодам, которые предоставляются бесплатно – более подробно в этом материале https://fontanvazon.ru/jscripts/pgs/zagolovok_kak_plastikovye_okna_vliyayut_na_komfort_v_dome.html
canadian happy family store pharmacy
prednisone 80 mg tablet
ремонт холодильников атлант в минске на дому ремонт холодильников атлант .
can i buy metformin over the counter in south africa
khasiss.com
그의 무대에 오를 수 있으려면 원래 한 발짝 더 나아가면 미래가 더 밝을 거라고 생각했다.
tadalafil price comparison
프라그마틱 게임은 iGaming 업계의 리더로, 모바일 중심의 혁신적이고 표준화된 콘텐츠를 전 세계 고객에게 제공합니다.
http://www.pragmatic-game.net
프라그마틱은 항상 훌륭한 게임을 만들어냅니다. 이번에 새롭게 출시된 게임은 정말 기대되는데요!
https://www.woomintech.com
https://njshidoo.com/hot/
https://wszhibo.com/hot/
Hi, I do think this is a great web site. I stumbledupon it 😉
I will revisit once again since i have bookmarked it. Money
and freedom is the best way to change, may you be rich and continue to guide others.
synthroid 75 mcg tablet price
cialis pills canada
top 10 online pharmacy in india
купить диплом магистра .
Amazing blog! Do you have any helpful hints for aspiring writers?
I’m planning to start my own site soon but I’m a little lost on everything.
Would you suggest starting with a free platform like WordPress or go
for a paid option? There are so many options out there that I’m totally confused
.. Any recommendations? Appreciate it!
cialis canada pharmacy
how to buy cialis from canada
Excellent blog! Do you have any helpful hints for aspiring writers?
I’m hoping to start my own blog soon but I’m a little lost on everything.
Would you recommend starting with a free platform like WordPress or go for
a paid option? There are so many options out there that I’m totally overwhelmed ..
Any recommendations? Kudos!
Советуем посетить сайт https://podveski-remont.ru/
Также не забудьте добавить сайт в закладки: https://podveski-remont.ru/
drug synthroid
Воспользоваться промокодом 1xbet можно при регистрации в 1xbet. БК 1хбет дарит до 130% на первый депозит при помощи промокода 1xbet. Максимальная сумма бонуса по промокоду 1хбет достигает 32500 рублей. Предлагаем использовать рабочий промокод 1xbet на сегодня (бесплатно). Вводить промокод 1хбет следует строго при регистрации. Куда вводить промокод 1xbet при регистрации? Выбираете страну и валюту. В окно “Введите промокод” (при наличии), вводите рабочий промокод. Как активировать промокод 1хбет. Промокод 1xbet активируется при первом пополнении игрового счета. Однако, есть пару моментов: Необходимо заполнить все обязательные поля в личном кабинете. Как получить промокод 1xbet на сегодня? Бесплатные купоны для повышения бонуса посетителям сайта. Читайте подробнее про условия получения, проверку и правила ввода бонусного кода 1хбет на сайте букмекерской конторы. Еще один вид промокодов 1xbet.com позволяет совершать бесплатные ставки на события, а также использовать иные предложения в сфере азартных игр от БК. Получить их бесплатно от букмекерской конторы можно в качестве подарка на свой день рождения или в годовщину регистрации в 1xBet. промокод на 1хбет при регистрации. Стандартный бонус на первый депозит для новых игроков составляет 100% от суммы первого пополнения – более подробно в этом материале https://bamboo-dosky.ru/wp-content/pags/kakie_trenirovki_rekomenduyutsya_ghenschinam_dlya_ukrepleniya_figury.html
lisinopril 80 mg tablet
global pharmacy
generic prednisone without prescription
Incredible! This blog looks just like my old one! It’s
on a totally different topic but it has pretty much the same page layout and design. Excellent choice of colors!
I was able to find good information from your
blog posts.
pharmacy drugs
1xbet промокод на сегодня 2024. Чтобы удовлетворить потребности бетторов и сделать процесс ставок максимально разнообразным нередко букмекерские конторы пытаются увеличить свой функционал, путем добавления специальных функций и предложений. Одним из лидеров среди популярных букмекеров на постсоветском пространстве по своим функциональным возможностям является 1хБет. Ввод промокод бк 1xbet при регистрации позволяет получить увеличенную сумму бонуса. Для этого достаточно после создания аккаунта внести первый депозит (максимальная сумма бонусного начисления составляет 32 500 рублей). Можно использовать любой платёжный метод. Абсолютно бесплатный промокод 1xbet. На сегодня контора предлагает всем новичкам воспользоваться не только приветственным бонусом, но и получить дополнительные преференции. Эти льготы игрок получает в том случае, если внимательно отнесётся к процедуре регистрации на сайте. Ведь не все новички обращают внимание или понимают, о каких выгодах идёт речь, когда видят необязательное для заполнения поле «Введите промокод (при наличии)», находящееся в самом низу регистрационной формы. Оно есть при трёх способах получения аккаунта из четырёх возможных («В 1 клик», «По номеру телефона», «По e-mail»). А игнорировать его – это потерять дополнительные выгоды – более подробно в этом материале https://bamboo-dosky.ru/wp-content/pags/kakie_trenirovki_rekomenduyutsya_ghenschinam_dlya_ukrepleniya_figury.html
Официальный промокод 1ХБет при регистрации, только по нему ты получишь бонус в 32500 рублей, все остальные коды не действительные и не дают такой бонус. 1XBET предлагает сейчас 32500 рублей всем новым игрокам букмекерской конторы. 1хбет промокод на сегодня. Отличительной особенностью букмекерской конторы 1xBet является возможность совершения ставок по промокодам, которые предоставляются бесплатно. Это позволяет новичку заработать деньги, не делая никаких вложений. Однако чтобы получить промокод на ставку и воспользоваться им, следует разобраться с некоторыми инструкциями. Бесплатные промокоды 1xBet при регистрации. Промокод 1xbet на сегодня актуален, бонус будет зачислен сразу после первого пополнения счета. Временные коды. Букмекерская контора 1xbet часто выступает спонсором при переводе популярных сериалов на русский язык. Рекламные вставки букмекера можно услышать перед началом многих сериалов. Часто в такой рекламе диктуется специальные промокод, дающий возможность беттерам рассчитывать на дополнительный бонус. Максимальный бонус при регистрации составляется 32500 рублей. Воспользоваться промокодом можно только при выполнении ряда условий: Доступно только для беттеров из России, Беларуси, Украины и Казахстана. Возврат игрока – от 18 лет – более подробно в этом материале https://bamboo-dosky.ru/wp-content/pags/kakie_trenirovki_rekomenduyutsya_ghenschinam_dlya_ukrepleniya_figury.html
208 lisinopril
valtre
synthroid 0.075
Здравствуйте!
Бывали ли у вас случаи, когда приходилось писать дипломную работу в крайне сжатые сроки? Это действительно требует большой ответственности и напряженного труда, но важно не унывать и продолжать активно участвовать в учебном процессе, как я и делаю.
Для тех, кто умеет эффективно находить и использовать информацию в интернете, это может существенно облегчить процесс согласования и написания дипломной работы. Больше не нужно тратить время на посещение библиотек или организацию встреч с научным руководителем. Здесь, на этом ресурсе, предоставлены надежные данные для заказа и написания дипломных и курсовых работ с гарантией качества и доставкой по всей России. Можете ознакомиться с предложениями на https://saksx-diploms24.com, это проверено!
купить диплом о среднем образовании
купить диплом
купить диплом бакалавра
где купить диплом
купить диплом ссср
купить аттестат
купить диплом университета
купить диплом института
купить диплом магистра
купить диплом о среднем специальном
Желаю всем отличных оценок!
It’s very simple to find out any topic on web as compared to books,
as I found this paragraph at this web site.
25 mg prednisone
online pharmacy without prescription
Привет всем!
Бывало ли у вас такое, что приходилось писать дипломную работу в крайне сжатые сроки? Это действительно требует огромной ответственности и напряженных усилий, но важно не опускать руки и продолжать активно заниматься учебными процессами, как я.
Для тех, кто умеет быстро находить и анализировать информацию в сети, это действительно помогает в процессе согласования и написания дипломной работы. Больше не нужно тратить время на посещение библиотек или устраивать встречи с дипломным руководителем. Здесь, на этом ресурсе, предоставлены надежные данные для заказа и написания дипломных и курсовых работ с гарантией качества и доставкой по всей России. Можете ознакомиться с предложениями на сайте https://2orik-diploms.com, это проверено!
купить диплом университета
купить диплом о среднем образовании
купить диплом института
купить диплом о высшем образовании
купить диплом
Желаю всем отличных оценок!
Доброго!
Было ли у вас когда-нибудь так, что приходилось писать дипломную работу в очень сжатые сроки? Это действительно требует огромной ответственности и может быть очень тяжело, но важно не опускать руки и продолжать активно заниматься учебными процессами, как я.
Для тех, кто умеет быстро находить и использовать информацию в интернете, это действительно облегчает процесс согласования и написания дипломной работы. Больше не нужно тратить время на посещение библиотек или устраивать встречи с научным руководителем. Здесь, на этом ресурсе, предоставлены надежные данные для заказа и написания дипломных и курсовых работ с гарантией качества и доставкой по всей России. Можете ознакомиться с предложениями на сайте https://saksx-diploms24.com, это проверено!
купить диплом института
купить диплом университета
купить диплом специалиста
купить аттестат
купить диплом нового образца
купить диплом о высшем образовании
купить диплом о среднем образовании
купить диплом
купить диплом ссср
купить диплом в Москве
Желаю всем отличных оценок!
generic valtrex price comparison
metformin 15 mg
prednisone 1 mg
can you buy azithromycin over the counter in canada
zestril 5 mg tablets
online synthroid prescription
It’s going to be finish of mine day, bbut before ending I aam readig this fantastic article to
improve my know-how.
Situs Judi: Situs Togel Daring Terbesar dan Terjamin
Situs Judi telah menjadi salah satu platform judi online terluas dan terjamin di Indonesia. Dengan bervariasi market yang disediakan dari Semar Group, Situs Judi menawarkan pengalaman bermain togel yang tak tertandingi kepada para penggemar judi daring.
Market Terbaik dan Terlengkap
Dengan total 56 market, Ngamenjitu menampilkan berbagai opsi terunggul dari market togel di seluruh dunia. Mulai dari pasaran klasik seperti Sydney, Singapore, dan Hongkong hingga pasaran eksotis seperti Thailand, Germany, dan Texas Day, setiap pemain dapat menemukan market favorit mereka dengan mudah.
Cara Main yang Praktis
Portal Judi menyediakan tutorial cara main yang sederhana dipahami bagi para pemula maupun penggemar togel berpengalaman. Dari langkah-langkah pendaftaran hingga penarikan kemenangan, semua informasi tersedia dengan jelas di situs Portal Judi.
Hasil Terakhir dan Info Terkini
Pemain dapat mengakses hasil terakhir dari setiap pasaran secara real-time di Situs Judi. Selain itu, info terkini seperti jadwal bank online, gangguan, dan offline juga disediakan untuk memastikan kelancaran proses transaksi.
Bermacam-macam Jenis Game
Selain togel, Portal Judi juga menawarkan berbagai jenis permainan kasino dan judi lainnya. Dari bingo hingga roulette, dari dragon tiger hingga baccarat, setiap pemain dapat menikmati berbagai pilihan permainan yang menarik dan menghibur.
Security dan Kepuasan Pelanggan Terjamin
Portal Judi mengutamakan keamanan dan kenyamanan pelanggan. Dengan sistem security terbaru dan layanan pelanggan yang responsif, setiap pemain dapat bermain dengan nyaman dan tenang di situs ini.
Promosi dan Hadiah Istimewa
Portal Judi juga menawarkan berbagai promosi dan hadiah menarik bagi para pemain setia maupun yang baru bergabung. Dari bonus deposit hingga bonus referral, setiap pemain memiliki kesempatan untuk meningkatkan kemenangan mereka dengan hadiah yang ditawarkan.
Dengan semua fitur dan layanan yang ditawarkan, Situs Judi tetap menjadi pilihan utama bagi para penggemar judi online di Indonesia. Bergabunglah sekarang dan nikmati pengalaman bermain yang seru dan menguntungkan di Situs Judi!
cialis cost australia
zithromax drug
Доверь перетяжку мебели квалифицированным специалистам в Минске
ремонт мебели https://obivka-mebeli-vminske.ru/ .
metformin 750 mg tablets
where can i get lisinopril
Советуем посетить сайт https://mari-eparhia.ru/useful/?id=12206
Также не забудьте добавить сайт в закладки: https://mari-eparhia.ru/useful/?id=12206
cost of synthroid 150 mcg
Доброго!
Было ли у вас когда-нибудь такое, что приходилось писать дипломную работу в сжатые сроки? Это действительно требует огромной ответственности и напряженных усилий, но важно не сдаваться и продолжать активно заниматься учебными процессами, чем я и занимаюсь.
Для тех, кто умеет искать и анализировать информацию в интернете, это действительно помогает в процессе согласования и написания дипломной работы. Не нужно тратить время на посещение библиотек или организацию встреч с дипломным руководителем. Здесь представлены надежные данные для заказа и написания дипломных и курсовых работ с гарантией качества и доставкой по России. Можете ознакомиться с предложениями по ссылке https://3russkiy-diploms.com, проверено!
купить диплом в Москве
купить диплом магистра
купить диплом
купить диплом техникума
купить диплом Гознак
Желаю всем отличных оценок!
Your means of explaining all in this piece of writing is really good,
all be capable of easily understand it, Thanks a lot.
Свободный медиа клиент MediaGet дает возможность вам скачивать и просматривать торрент файлы музыки, видео и гейминга. mediaget-setup.ru даст вам детальную информацию о возможностях этого медиа клиента.
Не доволен видом своей мебели? Перетянем ее в Минске
перетяжка мягкой мебели цены https://obivka-mebeli-vminske.ru/ .
metformin online canada rx
купить диплом о высшем образовании https://www.2orik-diploms.com/ .
We recommend visiting the website https://etc.bdir.in/dialogue/movies/A
Also, don’t forget to add the site to your bookmarks: https://etc.bdir.in/dialogue/movies/A
mexican pharmacy online
Онлайн казино с быстрыми выплатами в Беларуси: безопасные транзакции
онлайн казино онлайн казино .
canada discount pharmacy
cialis 5mg daily coupon
prinivil 25 mg
Приветствую всех!
Промокоды и купоны для интернет-магазина М.Видео представляют собой уникальные коды, которые можно использовать при оформлении заказа на официальном сайте компании.
Они приносят дополнительные преимущества покупателям в виде скидок на определенные товары или услуги, бесплатной доставки и других бонусов.
Как их найти? Промокоды часто предоставляются в рамках специальных акций компании, которые могут проводиться на ее официальном сайте,
в социальных сетях или на проекте promokodbar.ru
Сайт самых свежих и проверенных купонов магазина М.Видео https://promokodbar.ru
Удачных покупок!
Эксклюзивные промо-коды М.Видео
новые купоны М.Видео
купоны для экономии в М.Видео
Промокоды для экономии в М.Видео
свежий промокод М.Видео
Удачи!
metformin er 500 mg
https://1-xbet-france.com
Working 1xbet reproduce looking for entering the true website of the bookmaker. Use it to register with 1xBet, make bonuses and place online bets.
http://1-xbet-france.com
zithromax otc usa
how to buy azithromycin online usa
synthroid 75 mcg price in india
strelkaproject.com
“먼저 치는 게 낫지 않나?” 주후조가 눈살을 찌푸리며 “가능하냐”고 말했다.
happy family store pharmacy
tadalafil 12mg capsules
Бездепозитный Бонус 1win 2024
Бонусы от казино 1win регистрация с промокодом1Win 2024 – Бездепозитные бонусы ? Коды на возврат денег ? VIP Программа лояльности ? Бесплатные фриспины.
промокод новые 1win: 937999 предоставляет новым игрокам бонус 500% для игры в слоты и игровые автоматы, максимальная сумма бонуса 200 000 рублей. Вы можете использовать бонусные деньги в разделе азартных игр, включая онлайн казино, карты, рулетку, игровые автоматы и слоты.
Компания «1Win» рада предложить своим новым клиентам приветственный бонус в размере до 500% на первые четыре депозита. Это выгодное предложение доступно сразу после регистрации в нашей букмекерской конторе. Бонус можно получить не только в рублях, но и в других валютах, при этом он не ограничивает возможность участия игроков в других программам лояльности компании. Максимальная сумма вознаграждения за регистрацию составляет 75000 рублей или эквивалентная сумма в другой валюте.
промокод при пополнении 1win сегодня приносят игрокам множество преимуществ. Во-первых, они позволяют увеличить начальную ставку или продлить время игры. Кроме того, они дают возможность попробовать различные игры без риска потерять реальные деньги. Бонусы также повышают шансы на выигрыш и предоставляют дополнительные возможности для получения прибыли. Кроме того, бонусы в 1win могут быть обменены на реальные деньги или использованы для участия в специальных акциях и турнирах.
Преимущества получения и использования бонусов в 1win очевидны. Они позволяют игроку расширить свои возможности и получить больше удовольствия от игры. Бонусы также делают игру более выгодной с финансовой точки зрения, помогая уменьшить риски и увеличить потенциальную прибыль. Кроме того, получение и использование бонусов в 1win открывает возможность стать лояльным клиентом и получить дополнительные привилегии и вознаграждения от казино.
Итак, получение бонусов в 1win – это отличная возможность для игрока увеличить свои шансы на выигрыш, получить дополнительные деньги и улучшить свой игровой опыт. Бонусы делают игру более интересной и выгодной.
промокод 1win фрибет: 937999 предоставляет возможность получить бездепозитный бонус 2024. Его можно получить в виде фриспинов или фрибетов. Чтобы получить подарок, необходимо активировать код в личном кабинете. Дополнительный депозит не требуется. Размеры подарков невелики: фрибет до 500 рублей и не более 70 фриспинов для игры в слоты. Как и в случае с другими поощрениями, необходимо отыграть бездепозитный бонус. Вейджер, как правило, не превышает х5 для бесплатных ставок и х30 для фриспинов.
В казино 1win предоставляется внушительный бонус при регистрации, который составляет 500% от суммы первых четырех последовательных депозитов клиента. С таким количеством бонусов новичок может значительно увеличить свои шансы на выигрыш. Чтобы получить этот приветственный бонус, необходимо зарегистрироваться на официальном сайте, рабочем зеркале, мобильной версии или приложениях для мобильных телефонов. Однако, основным условием является совершение первого пополнения счета, так как активировать бонусы 1win можно только после этого.
1win промокод при регистрации: 937999 используйте бонусный код при регистрации и получите бездепозтный бонус 70 фриспинов. Да, при использовании кода 1Win вы можете получить различные поощрения, включая бездепозитные бонусы. Они обычно представлены в виде фрибетов или фриспинов. Для их активации не требуется дополнительное пополнение счета. Размер таких подарков невелик: бесплатных вращений не более 70. Вейджер на бездепозитный бонус обычно не превышает х35. В 1Win вы можете получить бонусы за участие в акциях, турнирах, розыгрышах и активацию промокода. Бонусная программа периодически обновляется. Кроме того, некоторые акции имеют сезонный характер.
В 1Win основная бонусная программа включает в себя фриспины. Чтобы получить 70FS, необходимо пополнить счет на 100 рублей или более. Игроку предоставляется 2 дня с момента регистрации для активации презента. Отыгрыш бонуса должен быть выполнен в течение 24 часов с момента начисления, с вейджером х35. Бесплатные вращения предназначены только для игр провайдера Microgaming.
Так как бонусная программа 1Win регулярно обновляется, список акций, в которых можно получить фриспины, постоянно расширяется. Более подробную информацию о них можно найти на нашем сайте.
Промокод на 1Win дает возможность получить бесплатные вращения. Их можно использовать в любых слотах из каталога казино. Иногда могут быть установлены ограничения, которые предусматривают использование фриспинов только в определенных слотах или играх конкретного провайдера. Фриспины начисляются с фиксированной ставкой. Отыгрыш выигрыша, полученного с помощью бесплатных вращений, обязателен с учетом установленного вейджера.
Вся информация взята с сайта; https://badgerboats.ru/themes/middle/?promokod_350.html
zestril 40 mg tablet
sm-casino1.com
Hongzhi 황제와 Liu Jian은 완전히 멍청한 당황한 표정으로 서로를 바라 보았습니다.
Бездепозитный Бонус 1win 2024
Бонусы от казино 1win aviator промокод1Win 2024 – Бездепозитные бонусы ? Коды на возврат денег ? VIP Программа лояльности ? Бесплатные фриспины.
где на 1win вводить промокод: 937999 предоставляет новым игрокам бонус 500% для игры в слоты и игровые автоматы, максимальная сумма бонуса 200 000 рублей. Вы можете использовать бонусные деньги в разделе азартных игр, включая онлайн казино, карты, рулетку, игровые автоматы и слоты.
Компания «1Win» рада предложить своим новым клиентам приветственный бонус в размере до 500% на первые четыре депозита. Это выгодное предложение доступно сразу после регистрации в нашей букмекерской конторе. Бонус можно получить не только в рублях, но и в других валютах, при этом он не ограничивает возможность участия игроков в других программам лояльности компании. Максимальная сумма вознаграждения за регистрацию составляет 75000 рублей или эквивалентная сумма в другой валюте.
1win промокод фрибет приносят игрокам множество преимуществ. Во-первых, они позволяют увеличить начальную ставку или продлить время игры. Кроме того, они дают возможность попробовать различные игры без риска потерять реальные деньги. Бонусы также повышают шансы на выигрыш и предоставляют дополнительные возможности для получения прибыли. Кроме того, бонусы в 1win могут быть обменены на реальные деньги или использованы для участия в специальных акциях и турнирах.
Преимущества получения и использования бонусов в 1win очевидны. Они позволяют игроку расширить свои возможности и получить больше удовольствия от игры. Бонусы также делают игру более выгодной с финансовой точки зрения, помогая уменьшить риски и увеличить потенциальную прибыль. Кроме того, получение и использование бонусов в 1win открывает возможность стать лояльным клиентом и получить дополнительные привилегии и вознаграждения от казино.
Итак, получение бонусов в 1win – это отличная возможность для игрока увеличить свои шансы на выигрыш, получить дополнительные деньги и улучшить свой игровой опыт. Бонусы делают игру более интересной и выгодной.
промокод в 1win при регистрации: 937999 предоставляет возможность получить бездепозитный бонус 2024. Его можно получить в виде фриспинов или фрибетов. Чтобы получить подарок, необходимо активировать код в личном кабинете. Дополнительный депозит не требуется. Размеры подарков невелики: фрибет до 500 рублей и не более 70 фриспинов для игры в слоты. Как и в случае с другими поощрениями, необходимо отыграть бездепозитный бонус. Вейджер, как правило, не превышает х5 для бесплатных ставок и х30 для фриспинов.
В казино 1win предоставляется внушительный бонус при регистрации, который составляет 500% от суммы первых четырех последовательных депозитов клиента. С таким количеством бонусов новичок может значительно увеличить свои шансы на выигрыш. Чтобы получить этот приветственный бонус, необходимо зарегистрироваться на официальном сайте, рабочем зеркале, мобильной версии или приложениях для мобильных телефонов. Однако, основным условием является совершение первого пополнения счета, так как активировать бонусы 1win можно только после этого.
1win как создать промокод: 937999 используйте бонусный код при регистрации и получите бездепозтный бонус 70 фриспинов. Да, при использовании кода 1Win вы можете получить различные поощрения, включая бездепозитные бонусы. Они обычно представлены в виде фрибетов или фриспинов. Для их активации не требуется дополнительное пополнение счета. Размер таких подарков невелик: бесплатных вращений не более 70. Вейджер на бездепозитный бонус обычно не превышает х35. В 1Win вы можете получить бонусы за участие в акциях, турнирах, розыгрышах и активацию промокода. Бонусная программа периодически обновляется. Кроме того, некоторые акции имеют сезонный характер.
В 1Win основная бонусная программа включает в себя фриспины. Чтобы получить 70FS, необходимо пополнить счет на 100 рублей или более. Игроку предоставляется 2 дня с момента регистрации для активации презента. Отыгрыш бонуса должен быть выполнен в течение 24 часов с момента начисления, с вейджером х35. Бесплатные вращения предназначены только для игр провайдера Microgaming.
Так как бонусная программа 1Win регулярно обновляется, список акций, в которых можно получить фриспины, постоянно расширяется. Более подробную информацию о них можно найти на нашем сайте.
Промокод на 1Win дает возможность получить бесплатные вращения. Их можно использовать в любых слотах из каталога казино. Иногда могут быть установлены ограничения, которые предусматривают использование фриспинов только в определенных слотах или играх конкретного провайдера. Фриспины начисляются с фиксированной ставкой. Отыгрыш выигрыша, полученного с помощью бесплатных вращений, обязателен с учетом установленного вейджера.
Вся информация взята с сайта; https://badgerboats.ru/themes/middle/?promokod_350.html
Бездепозитный Бонус 1win 2024
Бонусы от казино 1win промокод 20241Win 2024 – Бездепозитные бонусы ? Коды на возврат денег ? VIP Программа лояльности ? Бесплатные фриспины.
где на 1win вводить промокод: 937999 предоставляет новым игрокам бонус 500% для игры в слоты и игровые автоматы, максимальная сумма бонуса 200 000 рублей. Вы можете использовать бонусные деньги в разделе азартных игр, включая онлайн казино, карты, рулетку, игровые автоматы и слоты.
Компания «1Win» рада предложить своим новым клиентам приветственный бонус в размере до 500% на первые четыре депозита. Это выгодное предложение доступно сразу после регистрации в нашей букмекерской конторе. Бонус можно получить не только в рублях, но и в других валютах, при этом он не ограничивает возможность участия игроков в других программам лояльности компании. Максимальная сумма вознаграждения за регистрацию составляет 75000 рублей или эквивалентная сумма в другой валюте.
промокод 1win 2024 приносят игрокам множество преимуществ. Во-первых, они позволяют увеличить начальную ставку или продлить время игры. Кроме того, они дают возможность попробовать различные игры без риска потерять реальные деньги. Бонусы также повышают шансы на выигрыш и предоставляют дополнительные возможности для получения прибыли. Кроме того, бонусы в 1win могут быть обменены на реальные деньги или использованы для участия в специальных акциях и турнирах.
Преимущества получения и использования бонусов в 1win очевидны. Они позволяют игроку расширить свои возможности и получить больше удовольствия от игры. Бонусы также делают игру более выгодной с финансовой точки зрения, помогая уменьшить риски и увеличить потенциальную прибыль. Кроме того, получение и использование бонусов в 1win открывает возможность стать лояльным клиентом и получить дополнительные привилегии и вознаграждения от казино.
Итак, получение бонусов в 1win – это отличная возможность для игрока увеличить свои шансы на выигрыш, получить дополнительные деньги и улучшить свой игровой опыт. Бонусы делают игру более интересной и выгодной.
промокод для 1win: 937999 предоставляет возможность получить бездепозитный бонус 2024. Его можно получить в виде фриспинов или фрибетов. Чтобы получить подарок, необходимо активировать код в личном кабинете. Дополнительный депозит не требуется. Размеры подарков невелики: фрибет до 500 рублей и не более 70 фриспинов для игры в слоты. Как и в случае с другими поощрениями, необходимо отыграть бездепозитный бонус. Вейджер, как правило, не превышает х5 для бесплатных ставок и х30 для фриспинов.
В казино 1win предоставляется внушительный бонус при регистрации, который составляет 500% от суммы первых четырех последовательных депозитов клиента. С таким количеством бонусов новичок может значительно увеличить свои шансы на выигрыш. Чтобы получить этот приветственный бонус, необходимо зарегистрироваться на официальном сайте, рабочем зеркале, мобильной версии или приложениях для мобильных телефонов. Однако, основным условием является совершение первого пополнения счета, так как активировать бонусы 1win можно только после этого.
1win промокод бонус за регистрацию: 937999 используйте бонусный код при регистрации и получите бездепозтный бонус 70 фриспинов. Да, при использовании кода 1Win вы можете получить различные поощрения, включая бездепозитные бонусы. Они обычно представлены в виде фрибетов или фриспинов. Для их активации не требуется дополнительное пополнение счета. Размер таких подарков невелик: бесплатных вращений не более 70. Вейджер на бездепозитный бонус обычно не превышает х35. В 1Win вы можете получить бонусы за участие в акциях, турнирах, розыгрышах и активацию промокода. Бонусная программа периодически обновляется. Кроме того, некоторые акции имеют сезонный характер.
В 1Win основная бонусная программа включает в себя фриспины. Чтобы получить 70FS, необходимо пополнить счет на 100 рублей или более. Игроку предоставляется 2 дня с момента регистрации для активации презента. Отыгрыш бонуса должен быть выполнен в течение 24 часов с момента начисления, с вейджером х35. Бесплатные вращения предназначены только для игр провайдера Microgaming.
Так как бонусная программа 1Win регулярно обновляется, список акций, в которых можно получить фриспины, постоянно расширяется. Более подробную информацию о них можно найти на нашем сайте.
Промокод на 1Win дает возможность получить бесплатные вращения. Их можно использовать в любых слотах из каталога казино. Иногда могут быть установлены ограничения, которые предусматривают использование фриспинов только в определенных слотах или играх конкретного провайдера. Фриспины начисляются с фиксированной ставкой. Отыгрыш выигрыша, полученного с помощью бесплатных вращений, обязателен с учетом установленного вейджера.
Вся информация взята с сайта; https://badgerboats.ru/themes/middle/?promokod_350.html
The balance of business and relationship power may change at different
career stages and in different situations. The
main thing is to be able to find the optimal balance.
The best site about business
Преврати свою старую мебель в новую! Перетянем ее в Минске
ремонт мебели https://obivka-mebeli-vminske.ru/ .
After looking into a number of the blog posts on your web site, I seriously
appreciate your technique of blogging. I saved as a favorite it
to my bookmark site list and will be checking back in the near
future. Take a look at my web site too and let me know your opinion.
top mail order pharmacies
cost of 10mg tadalafil pills
metformin 2000 mg daily
Portal Judi: Portal Lotere Daring Terbesar dan Terpercaya
Situs Judi telah menjadi salah satu platform judi daring terluas dan terjamin di Indonesia. Dengan bervariasi market yang disediakan dari Semar Group, Portal Judi menawarkan sensasi bermain togel yang tak tertandingi kepada para penggemar judi daring.
Market Terbaik dan Terlengkap
Dengan total 56 market, Situs Judi memperlihatkan beberapa opsi terunggul dari market togel di seluruh dunia. Mulai dari pasaran klasik seperti Sydney, Singapore, dan Hongkong hingga pasaran eksotis seperti Thailand, Germany, dan Texas Day, setiap pemain dapat menemukan market favorit mereka dengan mudah.
Langkah Bermain yang Sederhana
Ngamenjitu menyediakan petunjuk cara main yang praktis dipahami bagi para pemula maupun penggemar togel berpengalaman. Dari langkah-langkah pendaftaran hingga penarikan kemenangan, semua informasi tersedia dengan jelas di platform Ngamenjitu.
Ringkasan Terkini dan Info Paling Baru
Pemain dapat mengakses hasil terakhir dari setiap market secara real-time di Ngamenjitu. Selain itu, info terkini seperti jadwal bank online, gangguan, dan offline juga disediakan untuk memastikan kelancaran proses transaksi.
Bermacam-macam Macam Permainan
Selain togel, Situs Judi juga menawarkan bervariasi jenis permainan kasino dan judi lainnya. Dari bingo hingga roulette, dari dragon tiger hingga baccarat, setiap pemain dapat menikmati bervariasi pilihan permainan yang menarik dan menghibur.
Keamanan dan Kepuasan Pelanggan Dijamin
Portal Judi mengutamakan keamanan dan kenyamanan pelanggan. Dengan sistem security terbaru dan layanan pelanggan yang responsif, setiap pemain dapat bermain dengan nyaman dan tenang di platform ini.
Promosi-Promosi dan Hadiah Istimewa
Portal Judi juga menawarkan bervariasi promosi dan bonus istimewa bagi para pemain setia maupun yang baru bergabung. Dari bonus deposit hingga bonus referral, setiap pemain memiliki kesempatan untuk meningkatkan kemenangan mereka dengan bonus yang ditawarkan.
Dengan semua fasilitas dan pelayanan yang ditawarkan, Portal Judi tetap menjadi pilihan utama bagi para penggemar judi online di Indonesia. Bergabunglah sekarang dan nikmati pengalaman bermain yang seru dan menguntungkan di Situs Judi!
They offer a lot of services hence, this makes the clinic a one-stop shop of everything dental-related.
synthroid online purchase
Советуем посетить сайт https://mama.ru/forums/theme/kredity/page/22/
Также не забудьте добавить сайт в закладки: https://mama.ru/forums/theme/kredity/page/22/
1-xbet-france.com
Working 1xbet send back for the benefit of entering the seemly website of the bookmaker. Use it to list with 1xBet, make bonuses and place online bets.
https://1-xbet-france.com
tadalafil tablets 20 mg cost
lisinopril 5mg tabs
Situs Judi: Portal Lotere Online Terbesar dan Terpercaya
Situs Judi telah menjadi salah satu situs judi online terbesar dan terjamin di Indonesia. Dengan bervariasi pasaran yang disediakan dari Grup Semar, Portal Judi menawarkan pengalaman main togel yang tak tertandingi kepada para penggemar judi daring.
Pasaran Terbaik dan Terpenuhi
Dengan total 56 market, Situs Judi memperlihatkan beberapa opsi terbaik dari pasaran togel di seluruh dunia. Mulai dari market klasik seperti Sydney, Singapore, dan Hongkong hingga market eksotis seperti Thailand, Germany, dan Texas Day, setiap pemain dapat menemukan pasaran favorit mereka dengan mudah.
Langkah Bermain yang Praktis
Portal Judi menyediakan panduan cara main yang sederhana dipahami bagi para pemula maupun penggemar togel berpengalaman. Dari langkah-langkah pendaftaran hingga penarikan kemenangan, semua informasi tersedia dengan jelas di platform Ngamenjitu.
Rekapitulasi Terkini dan Info Terkini
Pemain dapat mengakses hasil terakhir dari setiap market secara real-time di Portal Judi. Selain itu, info paling baru seperti jadwal bank online, gangguan, dan offline juga disediakan untuk memastikan kelancaran proses transaksi.
Pelbagai Macam Permainan
Selain togel, Portal Judi juga menawarkan berbagai jenis permainan kasino dan judi lainnya. Dari bingo hingga roulette, dari dragon tiger hingga baccarat, setiap pemain dapat menikmati berbagai pilihan permainan yang menarik dan menghibur.
Security dan Kenyamanan Klien Dijamin
Ngamenjitu mengutamakan keamanan dan kepuasan pelanggan. Dengan sistem security terbaru dan layanan pelanggan yang responsif, setiap pemain dapat bermain dengan nyaman dan tenang di platform ini.
Promosi dan Bonus Istimewa
Ngamenjitu juga menawarkan bervariasi promosi dan hadiah istimewa bagi para pemain setia maupun yang baru bergabung. Dari hadiah deposit hingga bonus referral, setiap pemain memiliki kesempatan untuk meningkatkan kemenangan mereka dengan hadiah yang ditawarkan.
Dengan semua fasilitas dan pelayanan yang ditawarkan, Situs Judi tetap menjadi pilihan utama bagi para penggemar judi online di Indonesia. Bergabunglah sekarang dan nikmati pengalaman bermain yang seru dan menguntungkan di Portal Judi!
dota2answers.com
“…” 이 말을 들은 무빈은 얼굴을 찡그렸다.
azithromycin 500g tablets
http://www.1-xbet-france.com
Working 1xbet mirror looking for entering the recognized website of the bookmaker. Handle it to display with 1xBet, pick up bonuses and station online bets.
https://1-xbet-france.com
Советуем посетить сайт https://pravchelny.ru/useful/?id=1266
Также не забудьте добавить сайт в закладки: https://pravchelny.ru/useful/?id=1266
tadalafil 20 mg order online
valtrex 500 mg
cialis 10mg cost
prednisone no rx
mikschai.com
Hongzhi 황제는 황실 케이스 뒤에 침착하고 편안하게 앉았습니다.
buy azithromycin canada
Перетяжка мягкой мебели в Минске: бережно и безупречно
перетяжка мягкой мебели https://obivka-divana.ru/ .
Советуем посетить сайт https://ancientcivs.ru/
Также не забудьте добавить сайт в закладки: https://ancientcivs.ru/
Преврати свою старую мебель в новую! Перетянем ее в Минске
ремонт стульев https://obivka-divana.ru/ .
Nice blog right here! Additionally your website so much up fast!
What host are you using? Can I get your associate hyperlink
in your host? I want my website loaded up as fast as yours lol
l-inkproject.com
그렇다면 앞으로는… 타타르 재앙이 없을 것이라는 의미가 아닐까요?
hihouse420.com
다행스럽게도 Shen 가족은 타이틀이 있고 타이틀이 있으면 50 년 동안 빌릴 수 있으므로 천천히 갚자.
최신 프라그마틱 게임은 iGaming 분야에서 혁신적이고 표준화된 콘텐츠를 제공하는 선도적인 업체입니다.
pragmatic-game.net
프라그마틱의 게임은 언제나 최신 트렌드를 반영하고 있죠. 최근에 나온 트렌드 중에서 가장 마음에 드는 것은 무엇인가요
http://holyshirtsandpants.net/
https://www.nutrapia.com
https://www.wilsonamado.com
canadian mail order pharmacy
cost of synthroid mexico
tadalafil 15mg
prinivil generic
Надежная перетяжка мебели в Минске по доступной цене
обновить мебель https://obivka-divana.ru/ .
synthroid 0.75 mg
can you buy azithromycin over the counter in usa
can i order lisinopril online
metformin 100 mg
프라그마틱 슬롯을 다룬 글 정말 유익해요! 더불어, 제 사이트에서도 프라그마틱에 대한 새로운 소식을 전하고 있어요. 함께 지식을 나누면 좋겠어요!
프라그마틱 슬롯 사이트
프라그마틱 관련 소식 항상 주시고 있어요! 또한, 제 사이트에서도 프라그마틱에 대한 정보를 얻을 수 있어요. 함께 발전하며 지식을 나눠봐요!
https://www.cicoresky.com
https://bidforfix.com/hot/
https://wqeqwrwqr.weebly.com/
cheap meds metformin
synthroid 100 mcg coupon
buy tadalafil canada
generic cialis india pharmacy
Понимание сущности и опасностей ассоциированных с легализацией кредитных карт способствует людям избегать подобных атак и сохранять свои финансовые состояния. Обнал (отмывание) кредитных карт — это механизм использования украденных или неправомерно приобретенных кредитных карт для осуществления финансовых транзакций с целью скрыть их происхождения и предотвратить отслеживание.
Вот несколько способов, которые могут способствовать в уклонении от обнала кредитных карт:
Защита личной информации: Будьте осторожными в контексте предоставления личных данных, особенно онлайн. Избегайте предоставления картовых номеров, кодов безопасности и дополнительных конфиденциальных данных на непроверенных сайтах.
Мощные коды доступа: Используйте надежные и уникальные пароли для своих банковских аккаунтов и кредитных карт. Регулярно изменяйте пароли.
Контроль транзакций: Регулярно проверяйте выписки по кредитным картам и банковским счетам. Это позволит своевременно обнаруживать подозрительных транзакций.
Программы антивирус: Используйте антивирусное программное обеспечение и обновляйте его регулярно. Это поможет защитить от вредоносные программы, которые могут быть использованы для кражи данных.
Осмотрительное поведение в социальных медиа: Будьте осторожными в сетевых платформах, избегайте публикации чувствительной информации, которая может быть использована для взлома вашего аккаунта.
Своевременное уведомление банка: Если вы заметили какие-либо подозрительные операции или утерю карты, сразу свяжитесь с вашим банком для блокировки карты.
Обучение: Будьте внимательными к новым методам мошенничества и обучайтесь тому, как противостоять их.
Избегая легковерия и осуществляя предупредительные действия, вы можете снизить риск стать жертвой обнала кредитных карт.
обнал карт работа
Обналичивание карт – это неправомерная деятельность, становящаяся все более широко распространенной в нашем современном мире электронных платежей. Этот вид мошенничества представляет серьезные вызовы для банков, правоохранительных органов и общества в целом. В данной статье мы рассмотрим частоту встречаемости обналичивания карт, используемые методы и возможные последствия для жертв и общества.
Частота обналичивания карт:
Обналичивание карт является весьма распространенным явлением, и его частота постоянно растет с увеличением числа электронных транзакций. Киберпреступники применяют разнообразные методы для получения доступа к финансовым средствам, включая фишинг, вредоносное программное обеспечение, скимминг и другие инновационные подходы.
Методы обналичивания карт:
Фишинг: Злоумышленники могут отправлять фальшивые электронные сообщения или создавать веб-сайты, имитирующие банковские системы, с целью получения личной информации от владельцев карт.
Скимминг: Злоумышленники устанавливают устройства скиммеры на банкоматах или терминалах для считывания данных с магнитных полос карт.
Вредоносное программное обеспечение: Киберпреступники разрабатывают вредоносные программы, которые заражают компьютеры и мобильные устройства, чтобы получить доступ к личным данным и банковским счетам.
Сетевые атаки: Атаки на системы банков и платежных платформ могут привести к утечке информации о картах и, следовательно, к их обналичиванию.
Последствия обналичивания карт:
Финансовые потери для клиентов: Владельцы карт могут столкнуться с материальными потерями, так как средства могут быть списаны с их счетов без их ведома.
Угроза безопасности данных: Обналичивание карт подчеркивает угрозу безопасности личных данных, что может привести к краже личной и финансовой информации.
Ущерб репутации банков: Банки и другие финансовые учреждения могут столкнуться с утратой доверия со стороны клиентов, если их системы безопасности оказываются уязвимыми.
Проблемы для экономики: Обналичивание карт создает экономический ущерб, поскольку оно стимулирует дополнительные затраты на борьбу с мошенничеством и восстановление утраченных средств.
Борьба с обналичиванием карт:
Совершенствование технологий безопасности: Банки и финансовые институты постоянно совершенствуют свои системы безопасности, чтобы предотвратить несанкционированный доступ к картам.
Образование и информирование: Обучение клиентов о методах мошенничества и том, как защитить свои данные, является важным шагом в борьбе с обналичиванием карт.
Сотрудничество с правоохранительными органами: Банки активно сотрудничают с правоохранительными органами для выявления и пресечения преступных схем.
Заключение:
Обналичивание карт – серьезная угроза для финансовой стабильности и безопасности личных данных. Решение этой проблемы требует совместных усилий со стороны банков, правоохранительных органов и общества в целом. Только эффективная борьба с мошенничеством позволит обеспечить безопасность электронных платежей и защитить интересы всех участников финансовой системы.
Незаконные форумы, где производят обнал банковских карт, составляют собой онлайн-платформы, специализирующиеся на рассмотрении и проведении незаконных транзакций с банковскими пластиком. На таких форумах пользователи делают обмен информацией, методами и опытом в сфере обналичивания, что влечет за собой незаконные практики по получению к финансовым средствам.
Эти веб-ресурсы могут предоставлять различные сервисы, относящиеся с мошенничеством, например фальсификация, скимминг, вредное ПО и другие техники для сбора информации с банковских пластиковых карт. Кроме того рассматриваются вопросы, касающиеся использованием похищенных информации для совершения транзакций или вывода денег.
Пользователи неправомерных платформ по обналичиванию карт могут сохраняться анонимными и избегать привлечения внимания правоохранительных органов. Они могут делиться рекомендациями, предоставлять сервисы, относящиеся к обналом, а также проводить сделки, направленные на финансовое преступление.
Важно отметить, что содействие в таких деятельностях не только является нарушение законов, но и способно привести к юридическим последствиям и уголовной ответственности.
Опасности поддельными 5000 рублей: Распространение фиктивных купюр и его результаты
В современном обществе, где онлайн платежи становятся все более расширенными, мошенники не оставляют без внимания и классические методы недобросовестных действий, такие как передача фальшивых банкнот. В последнее время стало известно о нелегальной продаже контрафактных 5000 рублевых купюр, что представляет серьезную угрозу для финансовой системы и граждан в общем.
Подходы сбыта:
Мошенники активно используют тайные маршруты веба для реализации недостоверных 5000 рублей. На подпольных веб-ресурсах и незаконных форумах можно обнаружить прошения поддельных банкнот. К сожалению, это создает хорошие условия для передачи контрафактных денег среди людей.
Воздействия для общества:
Присутствие контрафактных денег в потоке может иметь важные последствия для финансовой системы и авторитета к денежной единице. Люди, не подозревая, что получили фальшивые купюры, могут использовать их в разнообразных ситуациях, что в конечном итоге приводит к потере кредитоспособности к банкнотам конкретного номинала.
Опасности для индивидуумов:
Граждане становятся вероятными жертвами недобросовестных лиц, когда они случайно получают поддельные деньги в сделках или при покупках. В результате, они могут столкнуться с неприятными ситуациями, такими как отказ от приема торговых посредников принять фальшивые купюры или даже вероятность ответной ответственности за труд расплаты фальшивыми деньгами.
Противодействие с распространением фальшивых денег:
С с целью гарантирования населения от таких же проступков необходимо укрепить меры по выявлению и остановке производства недостоверных денег. Это включает в себя работу в партнерстве между правоохранительными органами и банками, а также увеличение уровня подготовки населения относительно признаков поддельных банкнот и практик их обнаружения.
Завершение:
Разнос недостоверных 5000 рублей – это важная риск для финансовой стабильности и надежности сообщества. Поддержание кредитоспособности к денежной системе требует совместных усилий со с участием сторон государственных органов, денежных учреждений и каждого человека. Важно быть настороженным и информированным, чтобы предотвратить диффузию контрафактных денег и гарантировать финансовые средства общества.
обнал карт купить
Покупка лживых банкнот приравнивается к незаконным или рискованным делом, которое способно привести к глубоким юридическим воздействиям или постраданию вашей финансовой надежности. Вот несколько других причин, почему получение фальшивых купюр считается опасной или неприемлемой:
Нарушение законов:
Приобретение иначе использование лживых банкнот представляют собой правонарушением, противоречащим законы страны. Вас способны поддать юридическим последствиям, что потенциально закончиться лишению свободы, финансовым санкциям или приводу в тюрьму.
Ущерб доверию:
Лживые купюры ухудшают уверенность по отношению к финансовой механизму. Их обращение возникает опасность для надежных граждан и предприятий, которые способны попасть в внезапными убытками.
Экономический ущерб:
Распространение контрафактных купюр осуществляет воздействие на экономику, провоцируя денежное расширение и ухудшающая общественную денежную устойчивость. Это в состоянии повлечь за собой утрате уважения к денежной единице.
Риск обмана:
Личности, которые, задействованы в созданием лживых денег, не обязаны соблюдать какие угодно нормы степени. Поддельные банкноты могут быть легко выявлены, что, в конечном итоге приведет к расходам для тех, кто стремится воспользоваться ими.
Юридические последствия:
В случае задержания за использование фальшивых банкнот, вас в состоянии наказать штрафом, и вы столкнетесь с законными сложностями. Это может сказаться на вашем будущем, включая сложности с получением работы и кредитной историей.
Благосостояние общества и личное благополучие зависят от честности и доверии в финансовой деятельности. Получение лживых банкнот идет вразрез с этими принципами и может иметь важные последствия. Предлагается придерживаться законов и вести только законными финансовыми транзакциями.
Онлайн магазин https://человек-бензопила.рф/ атрибутики и одежды аниме Человек-Бензопила, где можно приобрести с доставкой на дом до квартиры в России по доступной цене
sm-online-game.com
그것은 이야기, 전망 및 상상입니다.
Перетяжка мебели в Минске: не просто ремонт, а настоящее преображение
реставрация мебели https://obivka-divana.ru/ .
pactam2.com
Zhu Youzhu는 “집이 여기 있습니다. 살펴 보겠습니다. “라는 말을 듣고 현기증이났습니다.
mail pharmacy
Хочешь обновить интерьер? Перетянем твою мебель в Минске
перетяжка мягкой мебели https://obivka-divana.ru/ .
pharmacy express
generic tadalafil india
price of synthroid 75 mcg
Правильный Промо-Код ХБЕТ на 2024 год. На нашем сайте вы найдете промокоды на разные суммы: на депозит, пополнение и простой. Букмекерская контора 1X Bet только новым людям дарит подарки. промокод при регистрации 1xbet на сегодня. Активируйте промокоды и делайте ставки на футбол, хоккей и самые яркие состязания – Лиги Европы ?? и Лиги Чемпионов. Где найти промокод 1xbet на сегодня бесплатно? Использовав промокод казино 1xBet, игрок получает денежные средства на бонусный счет. Это значит, что он может использовать их только для игры в слоты и другие азартные развлечения на сайте. Вывести деньги, выигранные с бонуса, игрок сможет только тогда, когда отыграет их согласно вейджеру. Зарабатывайте баллы и меняйте на купоны или пользуйтесь халявными бонусами – более подробно в этом материале https://yarn55.ru/news/pgs/?promokod_283.html
Бездепозитный Бонус 1win 2024
Бонусы от казино промокод 1win на сегодня при пополнение1Win 2024 – Бездепозитные бонусы ? Коды на возврат денег ? VIP Программа лояльности ? Бесплатные фриспины.
промокод 1вин при регистрации на сегодня: 937999 предоставляет новым игрокам бонус 500% для игры в слоты и игровые автоматы, максимальная сумма бонуса 200 000 рублей. Вы можете использовать бонусные деньги в разделе азартных игр, включая онлайн казино, карты, рулетку, игровые автоматы и слоты.
Компания «1Win» рада предложить своим новым клиентам приветственный бонус в размере до 500% на первые четыре депозита. Это выгодное предложение доступно сразу после регистрации в нашей букмекерской конторе. Бонус можно получить не только в рублях, но и в других валютах, при этом он не ограничивает возможность участия игроков в других программам лояльности компании. Максимальная сумма вознаграждения за регистрацию составляет 75000 рублей или эквивалентная сумма в другой валюте.
1win poker промокод приносят игрокам множество преимуществ. Во-первых, они позволяют увеличить начальную ставку или продлить время игры. Кроме того, они дают возможность попробовать различные игры без риска потерять реальные деньги. Бонусы также повышают шансы на выигрыш и предоставляют дополнительные возможности для получения прибыли. Кроме того, бонусы в 1win могут быть обменены на реальные деньги или использованы для участия в специальных акциях и турнирах.
Преимущества получения и использования бонусов в 1win очевидны. Они позволяют игроку расширить свои возможности и получить больше удовольствия от игры. Бонусы также делают игру более выгодной с финансовой точки зрения, помогая уменьшить риски и увеличить потенциальную прибыль. Кроме того, получение и использование бонусов в 1win открывает возможность стать лояльным клиентом и получить дополнительные привилегии и вознаграждения от казино.
Итак, получение бонусов в 1win – это отличная возможность для игрока увеличить свои шансы на выигрыш, получить дополнительные деньги и улучшить свой игровой опыт. Бонусы делают игру более интересной и выгодной.
промокод на 1вин при регистрации: 937999 предоставляет возможность получить бездепозитный бонус 2024. Его можно получить в виде фриспинов или фрибетов. Чтобы получить подарок, необходимо активировать код в личном кабинете. Дополнительный депозит не требуется. Размеры подарков невелики: фрибет до 500 рублей и не более 70 фриспинов для игры в слоты. Как и в случае с другими поощрениями, необходимо отыграть бездепозитный бонус. Вейджер, как правило, не превышает х5 для бесплатных ставок и х30 для фриспинов.
В казино 1win предоставляется внушительный бонус при регистрации, который составляет 500% от суммы первых четырех последовательных депозитов клиента. С таким количеством бонусов новичок может значительно увеличить свои шансы на выигрыш. Чтобы получить этот приветственный бонус, необходимо зарегистрироваться на официальном сайте, рабочем зеркале, мобильной версии или приложениях для мобильных телефонов. Однако, основным условием является совершение первого пополнения счета, так как активировать бонусы 1win можно только после этого.
как ввести промокод в 1win если уже зарегистрирован: 937999 используйте бонусный код при регистрации и получите бездепозтный бонус 70 фриспинов. Да, при использовании кода 1Win вы можете получить различные поощрения, включая бездепозитные бонусы. Они обычно представлены в виде фрибетов или фриспинов. Для их активации не требуется дополнительное пополнение счета. Размер таких подарков невелик: бесплатных вращений не более 70. Вейджер на бездепозитный бонус обычно не превышает х35. В 1Win вы можете получить бонусы за участие в акциях, турнирах, розыгрышах и активацию промокода. Бонусная программа периодически обновляется. Кроме того, некоторые акции имеют сезонный характер.
В 1Win основная бонусная программа включает в себя фриспины. Чтобы получить 70FS, необходимо пополнить счет на 100 рублей или более. Игроку предоставляется 2 дня с момента регистрации для активации презента. Отыгрыш бонуса должен быть выполнен в течение 24 часов с момента начисления, с вейджером х35. Бесплатные вращения предназначены только для игр провайдера Microgaming.
Так как бонусная программа 1Win регулярно обновляется, список акций, в которых можно получить фриспины, постоянно расширяется. Более подробную информацию о них можно найти на нашем сайте.
Промокод на 1Win дает возможность получить бесплатные вращения. Их можно использовать в любых слотах из каталога казино. Иногда могут быть установлены ограничения, которые предусматривают использование фриспинов только в определенных слотах или играх конкретного провайдера. Фриспины начисляются с фиксированной ставкой. Отыгрыш выигрыша, полученного с помощью бесплатных вращений, обязателен с учетом установленного вейджера.
Вся информация взята с сайта; https://www.snabco.ru/fw/inc/promokod_350.html
synthroid brand name in india
Бездепозитный Бонус 1win 2024
Бонусы от казино промокод 1win 20241Win 2024 – Бездепозитные бонусы ? Коды на возврат денег ? VIP Программа лояльности ? Бесплатные фриспины.
промокод на 1win на фрибет: 937999 предоставляет новым игрокам бонус 500% для игры в слоты и игровые автоматы, максимальная сумма бонуса 200 000 рублей. Вы можете использовать бонусные деньги в разделе азартных игр, включая онлайн казино, карты, рулетку, игровые автоматы и слоты.
Компания «1Win» рада предложить своим новым клиентам приветственный бонус в размере до 500% на первые четыре депозита. Это выгодное предложение доступно сразу после регистрации в нашей букмекерской конторе. Бонус можно получить не только в рублях, но и в других валютах, при этом он не ограничивает возможность участия игроков в других программам лояльности компании. Максимальная сумма вознаграждения за регистрацию составляет 75000 рублей или эквивалентная сумма в другой валюте.
промокод на 1win при пополнении приносят игрокам множество преимуществ. Во-первых, они позволяют увеличить начальную ставку или продлить время игры. Кроме того, они дают возможность попробовать различные игры без риска потерять реальные деньги. Бонусы также повышают шансы на выигрыш и предоставляют дополнительные возможности для получения прибыли. Кроме того, бонусы в 1win могут быть обменены на реальные деньги или использованы для участия в специальных акциях и турнирах.
Преимущества получения и использования бонусов в 1win очевидны. Они позволяют игроку расширить свои возможности и получить больше удовольствия от игры. Бонусы также делают игру более выгодной с финансовой точки зрения, помогая уменьшить риски и увеличить потенциальную прибыль. Кроме того, получение и использование бонусов в 1win открывает возможность стать лояльным клиентом и получить дополнительные привилегии и вознаграждения от казино.
Итак, получение бонусов в 1win – это отличная возможность для игрока увеличить свои шансы на выигрыш, получить дополнительные деньги и улучшить свой игровой опыт. Бонусы делают игру более интересной и выгодной.
1win как ввести промокод: 937999 предоставляет возможность получить бездепозитный бонус 2024. Его можно получить в виде фриспинов или фрибетов. Чтобы получить подарок, необходимо активировать код в личном кабинете. Дополнительный депозит не требуется. Размеры подарков невелики: фрибет до 500 рублей и не более 70 фриспинов для игры в слоты. Как и в случае с другими поощрениями, необходимо отыграть бездепозитный бонус. Вейджер, как правило, не превышает х5 для бесплатных ставок и х30 для фриспинов.
В казино 1win предоставляется внушительный бонус при регистрации, который составляет 500% от суммы первых четырех последовательных депозитов клиента. С таким количеством бонусов новичок может значительно увеличить свои шансы на выигрыш. Чтобы получить этот приветственный бонус, необходимо зарегистрироваться на официальном сайте, рабочем зеркале, мобильной версии или приложениях для мобильных телефонов. Однако, основным условием является совершение первого пополнения счета, так как активировать бонусы 1win можно только после этого.
промокод 1win: 937999 используйте бонусный код при регистрации и получите бездепозтный бонус 70 фриспинов. Да, при использовании кода 1Win вы можете получить различные поощрения, включая бездепозитные бонусы. Они обычно представлены в виде фрибетов или фриспинов. Для их активации не требуется дополнительное пополнение счета. Размер таких подарков невелик: бесплатных вращений не более 70. Вейджер на бездепозитный бонус обычно не превышает х35. В 1Win вы можете получить бонусы за участие в акциях, турнирах, розыгрышах и активацию промокода. Бонусная программа периодически обновляется. Кроме того, некоторые акции имеют сезонный характер.
В 1Win основная бонусная программа включает в себя фриспины. Чтобы получить 70FS, необходимо пополнить счет на 100 рублей или более. Игроку предоставляется 2 дня с момента регистрации для активации презента. Отыгрыш бонуса должен быть выполнен в течение 24 часов с момента начисления, с вейджером х35. Бесплатные вращения предназначены только для игр провайдера Microgaming.
Так как бонусная программа 1Win регулярно обновляется, список акций, в которых можно получить фриспины, постоянно расширяется. Более подробную информацию о них можно найти на нашем сайте.
Промокод на 1Win дает возможность получить бесплатные вращения. Их можно использовать в любых слотах из каталога казино. Иногда могут быть установлены ограничения, которые предусматривают использование фриспинов только в определенных слотах или играх конкретного провайдера. Фриспины начисляются с фиксированной ставкой. Отыгрыш выигрыша, полученного с помощью бесплатных вращений, обязателен с учетом установленного вейджера.
Вся информация взята с сайта; https://www.snabco.ru/fw/inc/promokod_350.html
generic for valtrex buy without a prescription
Промокод 1xBet на сегодня и бесплатно. Промокоды 1хбет 2024 требуется использовать те, которые предоставят игрокам самые лучшие бонусы. Каждый из них позволяет увеличить первый депозит в 2 раза, максимальная сумма увеличения – 100 долларов. Большое количество промокодов — одна из причин того, что на сайте регистрируется огромное количество новых игроков каждый день. На данный момент их количество превышает пятьсот тысяч уникальных пользователей каждый день. Действующие промокоды позволяют увеличить размер приветственных баллов до 32 500 рублей. Для этого нужно лишь активировать при регистрации имеющийся код, скопировав его в соответствующее поле. Букмекерская контора 1ХБет является одной из самых влиятельных на рынке игорного бизнеса в России и не нуждается в особом представлении. Впрочем, букмекер продолжает держать статус одного из самых щедрых и предлагает своим клиентам воспользоваться промокодами для халявы, – более подробно в этом материале https://yarn55.ru/news/pgs/?promokod_283.html.
Перетяжка мебели в Минске: не просто ремонт, а настоящее преображение
ремонт мебели https://obivka-divana.ru/ .
mikschai.com
내시는 이에 따랐고 Fang Jifan은 즉시 Wang Shouren과 Xiao Jing을 청중으로 이끌었습니다.
Бездепозитный Бонус 1win 2024
Бонусы от казино как вводить промокоды в 1win1Win 2024 – Бездепозитные бонусы ? Коды на возврат денег ? VIP Программа лояльности ? Бесплатные фриспины.
где в 1win вводить промокод: 937999 предоставляет новым игрокам бонус 500% для игры в слоты и игровые автоматы, максимальная сумма бонуса 200 000 рублей. Вы можете использовать бонусные деньги в разделе азартных игр, включая онлайн казино, карты, рулетку, игровые автоматы и слоты.
Компания «1Win» рада предложить своим новым клиентам приветственный бонус в размере до 500% на первые четыре депозита. Это выгодное предложение доступно сразу после регистрации в нашей букмекерской конторе. Бонус можно получить не только в рублях, но и в других валютах, при этом он не ограничивает возможность участия игроков в других программам лояльности компании. Максимальная сумма вознаграждения за регистрацию составляет 75000 рублей или эквивалентная сумма в другой валюте.
1win промокод на фрибет приносят игрокам множество преимуществ. Во-первых, они позволяют увеличить начальную ставку или продлить время игры. Кроме того, они дают возможность попробовать различные игры без риска потерять реальные деньги. Бонусы также повышают шансы на выигрыш и предоставляют дополнительные возможности для получения прибыли. Кроме того, бонусы в 1win могут быть обменены на реальные деньги или использованы для участия в специальных акциях и турнирах.
Преимущества получения и использования бонусов в 1win очевидны. Они позволяют игроку расширить свои возможности и получить больше удовольствия от игры. Бонусы также делают игру более выгодной с финансовой точки зрения, помогая уменьшить риски и увеличить потенциальную прибыль. Кроме того, получение и использование бонусов в 1win открывает возможность стать лояльным клиентом и получить дополнительные привилегии и вознаграждения от казино.
Итак, получение бонусов в 1win – это отличная возможность для игрока увеличить свои шансы на выигрыш, получить дополнительные деньги и улучшить свой игровой опыт. Бонусы делают игру более интересной и выгодной.
1вин промокоды: 937999 предоставляет возможность получить бездепозитный бонус 2024. Его можно получить в виде фриспинов или фрибетов. Чтобы получить подарок, необходимо активировать код в личном кабинете. Дополнительный депозит не требуется. Размеры подарков невелики: фрибет до 500 рублей и не более 70 фриспинов для игры в слоты. Как и в случае с другими поощрениями, необходимо отыграть бездепозитный бонус. Вейджер, как правило, не превышает х5 для бесплатных ставок и х30 для фриспинов.
В казино 1win предоставляется внушительный бонус при регистрации, который составляет 500% от суммы первых четырех последовательных депозитов клиента. С таким количеством бонусов новичок может значительно увеличить свои шансы на выигрыш. Чтобы получить этот приветственный бонус, необходимо зарегистрироваться на официальном сайте, рабочем зеркале, мобильной версии или приложениях для мобильных телефонов. Однако, основным условием является совершение первого пополнения счета, так как активировать бонусы 1win можно только после этого.
1win официальный сайт промокод: 937999 используйте бонусный код при регистрации и получите бездепозтный бонус 70 фриспинов. Да, при использовании кода 1Win вы можете получить различные поощрения, включая бездепозитные бонусы. Они обычно представлены в виде фрибетов или фриспинов. Для их активации не требуется дополнительное пополнение счета. Размер таких подарков невелик: бесплатных вращений не более 70. Вейджер на бездепозитный бонус обычно не превышает х35. В 1Win вы можете получить бонусы за участие в акциях, турнирах, розыгрышах и активацию промокода. Бонусная программа периодически обновляется. Кроме того, некоторые акции имеют сезонный характер.
В 1Win основная бонусная программа включает в себя фриспины. Чтобы получить 70FS, необходимо пополнить счет на 100 рублей или более. Игроку предоставляется 2 дня с момента регистрации для активации презента. Отыгрыш бонуса должен быть выполнен в течение 24 часов с момента начисления, с вейджером х35. Бесплатные вращения предназначены только для игр провайдера Microgaming.
Так как бонусная программа 1Win регулярно обновляется, список акций, в которых можно получить фриспины, постоянно расширяется. Более подробную информацию о них можно найти на нашем сайте.
Промокод на 1Win дает возможность получить бесплатные вращения. Их можно использовать в любых слотах из каталога казино. Иногда могут быть установлены ограничения, которые предусматривают использование фриспинов только в определенных слотах или играх конкретного провайдера. Фриспины начисляются с фиксированной ставкой. Отыгрыш выигрыша, полученного с помощью бесплатных вращений, обязателен с учетом установленного вейджера.
Вся информация взята с сайта; https://www.snabco.ru/fw/inc/promokod_350.html
synthroid 50 mcg generic
Правильный Промо-Код ХБЕТ на 2024 год. На нашем сайте вы найдете промокоды на разные суммы: на депозит, пополнение и простой. Букмекерская контора 1X Bet только новым людям дарит подарки. 1xbet промокод при регистрации. Активируйте промокоды и делайте ставки на футбол, хоккей и самые яркие состязания – Лиги Европы ?? и Лиги Чемпионов. Где найти промокод 1xbet на сегодня бесплатно? Использовав промокод казино 1xBet, игрок получает денежные средства на бонусный счет. Это значит, что он может использовать их только для игры в слоты и другие азартные развлечения на сайте. Вывести деньги, выигранные с бонуса, игрок сможет только тогда, когда отыграет их согласно вейджеру. Зарабатывайте баллы и меняйте на купоны или пользуйтесь халявными бонусами – более подробно в этом материале https://yarn55.ru/news/pgs/?promokod_283.html
synthroid online coupon
online pharmacy australia
azithromycin 250 mg pill
synthroid brand
www canadianonlinepharmacy
프라그마틱 관련 내용 감사합니다! 또한, 제 사이트에서도 프라그마틱에 대한 유용한 정보를 공유하고 있어요. 함께 서로 이야기하며 더 많은 지식을 쌓아가요!
프라그마틱 슬롯 사이트
프라그마틱 관련 글 읽는 것이 정말 즐거웠어요! 또한, 제 사이트에서도 프라그마틱과 관련된 정보를 공유하고 있어요. 함께 이야기 나누면서 더 많은 지식을 쌓아가요!
https://0cdnara.com/hot/
https://www.hnrcrew.com
https://www.jaswanthch.com
buy prinivil online
legal canadian pharmacy online
online pharmacy pain
canadian pharmacy valtrex
azithromycin pills
http://www.1-xbet-france.com
Working 1xbet mirror an eye to entering the seemly website of the bookmaker. Usage it to list with 1xBet, pick up bonuses and station online bets.
1-xbet-france.com
andrejpos.com
그래서 Fang Jifan은 무거운 마음으로 Meridian Gate를 서둘러 나갔습니다!
프라그마틱 슬롯은 풍부한 다양성과 흥미진진한 게임 플레이로 눈길을 사로잡습니다.
프라그마틷
프라그마틱 슬롯에 대한 정보가 정말 유용했어요! 더불어, 제 사이트에서도 프라그마틱과 관련된 새로운 내용을 찾아보세요. 함께 지식을 나누면 좋겠어요!
https://www.jaswanthch.com
https://dtcfelt.com/hot/
https://www.b4closing.com
synthroid 125 mcg price
?Juega gratis y gana en el casino con el bono sin deposito!
casino online bono por registro sin deposito bono de casino sin deposito .
Промокоды казино 1xBet при регистрации 2024. На ресурсе 1хБет пользователи могут не только делать ставки на спорт и другие события из разных сфер, но и получать азартные ощущения в казино. Играть можно как с машинами, так и с реальными дилерами в разделе лайв. Чтобы привлекать как можно больше новых игроков и поддерживать интерес постоянных клиентов, на сайте 1хБет регулярно проходят акции и раздают бонусы. Самое щедрое вознаграждение могут получить новички, использовав промокод казино 1xBet. Указав его при регистрации, пользователь получит дополнительные денежные средства на первые несколько депозитов, которые сможет использовать для ставок в играх. Это сделать просто, если иметь как ввести промокод в 1хбет. Правда, дается он при условии выполнения некоторых правил. 1xbet бонус при регистрации. Не совсем промокод, но вы все равно ставите не свои деньги, если пополните депозит, – 100% бонуса от внесенной суммы. Максимум указан в верхней части главной страницы официального сайта – более подробно в этом материале https://yarn55.ru/news/pgs/?promokod_283.html
Бездепозитный Бонус 1win 2024
Бонусы от казино промокоды на пополнение 1win1Win 2024 – Бездепозитные бонусы ? Коды на возврат денег ? VIP Программа лояльности ? Бесплатные фриспины.
1win ввести промокод: 937999 предоставляет новым игрокам бонус 500% для игры в слоты и игровые автоматы, максимальная сумма бонуса 200 000 рублей. Вы можете использовать бонусные деньги в разделе азартных игр, включая онлайн казино, карты, рулетку, игровые автоматы и слоты.
Компания «1Win» рада предложить своим новым клиентам приветственный бонус в размере до 500% на первые четыре депозита. Это выгодное предложение доступно сразу после регистрации в нашей букмекерской конторе. Бонус можно получить не только в рублях, но и в других валютах, при этом он не ограничивает возможность участия игроков в других программам лояльности компании. Максимальная сумма вознаграждения за регистрацию составляет 75000 рублей или эквивалентная сумма в другой валюте.
1win официальный сайт промокоды приносят игрокам множество преимуществ. Во-первых, они позволяют увеличить начальную ставку или продлить время игры. Кроме того, они дают возможность попробовать различные игры без риска потерять реальные деньги. Бонусы также повышают шансы на выигрыш и предоставляют дополнительные возможности для получения прибыли. Кроме того, бонусы в 1win могут быть обменены на реальные деньги или использованы для участия в специальных акциях и турнирах.
Преимущества получения и использования бонусов в 1win очевидны. Они позволяют игроку расширить свои возможности и получить больше удовольствия от игры. Бонусы также делают игру более выгодной с финансовой точки зрения, помогая уменьшить риски и увеличить потенциальную прибыль. Кроме того, получение и использование бонусов в 1win открывает возможность стать лояльным клиентом и получить дополнительные привилегии и вознаграждения от казино.
Итак, получение бонусов в 1win – это отличная возможность для игрока увеличить свои шансы на выигрыш, получить дополнительные деньги и улучшить свой игровой опыт. Бонусы делают игру более интересной и выгодной.
1win официальный сайт 1вин промокоды: 937999 предоставляет возможность получить бездепозитный бонус 2024. Его можно получить в виде фриспинов или фрибетов. Чтобы получить подарок, необходимо активировать код в личном кабинете. Дополнительный депозит не требуется. Размеры подарков невелики: фрибет до 500 рублей и не более 70 фриспинов для игры в слоты. Как и в случае с другими поощрениями, необходимо отыграть бездепозитный бонус. Вейджер, как правило, не превышает х5 для бесплатных ставок и х30 для фриспинов.
В казино 1win предоставляется внушительный бонус при регистрации, который составляет 500% от суммы первых четырех последовательных депозитов клиента. С таким количеством бонусов новичок может значительно увеличить свои шансы на выигрыш. Чтобы получить этот приветственный бонус, необходимо зарегистрироваться на официальном сайте, рабочем зеркале, мобильной версии или приложениях для мобильных телефонов. Однако, основным условием является совершение первого пополнения счета, так как активировать бонусы 1win можно только после этого.
промокод 1win при пополнение счета на сегодня: 937999 используйте бонусный код при регистрации и получите бездепозтный бонус 70 фриспинов. Да, при использовании кода 1Win вы можете получить различные поощрения, включая бездепозитные бонусы. Они обычно представлены в виде фрибетов или фриспинов. Для их активации не требуется дополнительное пополнение счета. Размер таких подарков невелик: бесплатных вращений не более 70. Вейджер на бездепозитный бонус обычно не превышает х35. В 1Win вы можете получить бонусы за участие в акциях, турнирах, розыгрышах и активацию промокода. Бонусная программа периодически обновляется. Кроме того, некоторые акции имеют сезонный характер.
В 1Win основная бонусная программа включает в себя фриспины. Чтобы получить 70FS, необходимо пополнить счет на 100 рублей или более. Игроку предоставляется 2 дня с момента регистрации для активации презента. Отыгрыш бонуса должен быть выполнен в течение 24 часов с момента начисления, с вейджером х35. Бесплатные вращения предназначены только для игр провайдера Microgaming.
Так как бонусная программа 1Win регулярно обновляется, список акций, в которых можно получить фриспины, постоянно расширяется. Более подробную информацию о них можно найти на нашем сайте.
Промокод на 1Win дает возможность получить бесплатные вращения. Их можно использовать в любых слотах из каталога казино. Иногда могут быть установлены ограничения, которые предусматривают использование фриспинов только в определенных слотах или играх конкретного провайдера. Фриспины начисляются с фиксированной ставкой. Отыгрыш выигрыша, полученного с помощью бесплатных вращений, обязателен с учетом установленного вейджера.
Вся информация взята с сайта; https://03ekb.ru/news/promokod_350.html
can i buy prednisone over the counter in mexico
Советуем посетить сайт https://amurplanet.ru/
Также не забудьте добавить сайт в закладки: https://amurplanet.ru/
Наша группа профессиональных специалистов проштудирована предъявить вам перспективные средства, которые не только подарят устойчивую протекцию от прохлады, но и преподнесут вашему собственности стильный вид.
Мы эксплуатируем с последними компонентами, ассигнуруя долгосрочный продолжительность службы и великолепные результаты. Утепление внешней обшивки – это не только экономия энергии на отапливании, но и трепет о окружающей природе. Энергоспасающие технические средства, какие мы производим, способствуют не только дому, но и сохранению природных ресурсов.
Самое главное: Сколько стоит сделать фасад дома с утеплением у нас стартует всего от 1250 рублей за м2! Это доступное решение, которое метаморфозирует ваш дом в действительный тепличный уголок с минимальными затратами.
Наши труды – это не всего лишь изоляция, это формирование пространства, в где все элемент выражает ваш уникальный модель. Мы примем в расчет все ваши просьбы, чтобы переделать ваш дом еще более теплым и привлекательным.
Подробнее на веб-сайте
Не откладывайте занятия о своем жилище на потом! Обращайтесь к квалифицированным работникам, и мы сделаем ваш домик не только теплым, но и по последней моде. Заинтересовались? Подробнее о наших проектах вы можете узнать на сайте компании. Добро пожаловать в пространство гармонии и стандартов.
kdslots777
overseas pharmacy no prescription
Бездепозитный Бонус 1win 2024
Бонусы от казино 1win где вводить промокод1Win 2024 – Бездепозитные бонусы ? Коды на возврат денег ? VIP Программа лояльности ? Бесплатные фриспины.
промокод на первый депозит 1win: 937999 предоставляет новым игрокам бонус 500% для игры в слоты и игровые автоматы, максимальная сумма бонуса 200 000 рублей. Вы можете использовать бонусные деньги в разделе азартных игр, включая онлайн казино, карты, рулетку, игровые автоматы и слоты.
Компания «1Win» рада предложить своим новым клиентам приветственный бонус в размере до 500% на первые четыре депозита. Это выгодное предложение доступно сразу после регистрации в нашей букмекерской конторе. Бонус можно получить не только в рублях, но и в других валютах, при этом он не ограничивает возможность участия игроков в других программам лояльности компании. Максимальная сумма вознаграждения за регистрацию составляет 75000 рублей или эквивалентная сумма в другой валюте.
1win промокод россия приносят игрокам множество преимуществ. Во-первых, они позволяют увеличить начальную ставку или продлить время игры. Кроме того, они дают возможность попробовать различные игры без риска потерять реальные деньги. Бонусы также повышают шансы на выигрыш и предоставляют дополнительные возможности для получения прибыли. Кроме того, бонусы в 1win могут быть обменены на реальные деньги или использованы для участия в специальных акциях и турнирах.
Преимущества получения и использования бонусов в 1win очевидны. Они позволяют игроку расширить свои возможности и получить больше удовольствия от игры. Бонусы также делают игру более выгодной с финансовой точки зрения, помогая уменьшить риски и увеличить потенциальную прибыль. Кроме того, получение и использование бонусов в 1win открывает возможность стать лояльным клиентом и получить дополнительные привилегии и вознаграждения от казино.
Итак, получение бонусов в 1win – это отличная возможность для игрока увеличить свои шансы на выигрыш, получить дополнительные деньги и улучшить свой игровой опыт. Бонусы делают игру более интересной и выгодной.
промокод 1win 2024 при регистрации: 937999 предоставляет возможность получить бездепозитный бонус 2024. Его можно получить в виде фриспинов или фрибетов. Чтобы получить подарок, необходимо активировать код в личном кабинете. Дополнительный депозит не требуется. Размеры подарков невелики: фрибет до 500 рублей и не более 70 фриспинов для игры в слоты. Как и в случае с другими поощрениями, необходимо отыграть бездепозитный бонус. Вейджер, как правило, не превышает х5 для бесплатных ставок и х30 для фриспинов.
В казино 1win предоставляется внушительный бонус при регистрации, который составляет 500% от суммы первых четырех последовательных депозитов клиента. С таким количеством бонусов новичок может значительно увеличить свои шансы на выигрыш. Чтобы получить этот приветственный бонус, необходимо зарегистрироваться на официальном сайте, рабочем зеркале, мобильной версии или приложениях для мобильных телефонов. Однако, основным условием является совершение первого пополнения счета, так как активировать бонусы 1win можно только после этого.
промокод бк 1win: 937999 используйте бонусный код при регистрации и получите бездепозтный бонус 70 фриспинов. Да, при использовании кода 1Win вы можете получить различные поощрения, включая бездепозитные бонусы. Они обычно представлены в виде фрибетов или фриспинов. Для их активации не требуется дополнительное пополнение счета. Размер таких подарков невелик: бесплатных вращений не более 70. Вейджер на бездепозитный бонус обычно не превышает х35. В 1Win вы можете получить бонусы за участие в акциях, турнирах, розыгрышах и активацию промокода. Бонусная программа периодически обновляется. Кроме того, некоторые акции имеют сезонный характер.
В 1Win основная бонусная программа включает в себя фриспины. Чтобы получить 70FS, необходимо пополнить счет на 100 рублей или более. Игроку предоставляется 2 дня с момента регистрации для активации презента. Отыгрыш бонуса должен быть выполнен в течение 24 часов с момента начисления, с вейджером х35. Бесплатные вращения предназначены только для игр провайдера Microgaming.
Так как бонусная программа 1Win регулярно обновляется, список акций, в которых можно получить фриспины, постоянно расширяется. Более подробную информацию о них можно найти на нашем сайте.
Промокод на 1Win дает возможность получить бесплатные вращения. Их можно использовать в любых слотах из каталога казино. Иногда могут быть установлены ограничения, которые предусматривают использование фриспинов только в определенных слотах или играх конкретного провайдера. Фриспины начисляются с фиксированной ставкой. Отыгрыш выигрыша, полученного с помощью бесплатных вращений, обязателен с учетом установленного вейджера.
Вся информация взята с сайта; https://03ekb.ru/news/promokod_350.html
pharmacy without prescription
online pharmacy search
Бездепозитный Бонус 1win 2024
Бонусы от казино 1win промокод при регистрации фрибет1Win 2024 – Бездепозитные бонусы ? Коды на возврат денег ? VIP Программа лояльности ? Бесплатные фриспины.
куда вводить промокод на 1win: 937999 предоставляет новым игрокам бонус 500% для игры в слоты и игровые автоматы, максимальная сумма бонуса 200 000 рублей. Вы можете использовать бонусные деньги в разделе азартных игр, включая онлайн казино, карты, рулетку, игровые автоматы и слоты.
Компания «1Win» рада предложить своим новым клиентам приветственный бонус в размере до 500% на первые четыре депозита. Это выгодное предложение доступно сразу после регистрации в нашей букмекерской конторе. Бонус можно получить не только в рублях, но и в других валютах, при этом он не ограничивает возможность участия игроков в других программам лояльности компании. Максимальная сумма вознаграждения за регистрацию составляет 75000 рублей или эквивалентная сумма в другой валюте.
1win 1вин промокоды приносят игрокам множество преимуществ. Во-первых, они позволяют увеличить начальную ставку или продлить время игры. Кроме того, они дают возможность попробовать различные игры без риска потерять реальные деньги. Бонусы также повышают шансы на выигрыш и предоставляют дополнительные возможности для получения прибыли. Кроме того, бонусы в 1win могут быть обменены на реальные деньги или использованы для участия в специальных акциях и турнирах.
Преимущества получения и использования бонусов в 1win очевидны. Они позволяют игроку расширить свои возможности и получить больше удовольствия от игры. Бонусы также делают игру более выгодной с финансовой точки зрения, помогая уменьшить риски и увеличить потенциальную прибыль. Кроме того, получение и использование бонусов в 1win открывает возможность стать лояльным клиентом и получить дополнительные привилегии и вознаграждения от казино.
Итак, получение бонусов в 1win – это отличная возможность для игрока увеличить свои шансы на выигрыш, получить дополнительные деньги и улучшить свой игровой опыт. Бонусы делают игру более интересной и выгодной.
промокод на 1вин при пополнении: 937999 предоставляет возможность получить бездепозитный бонус 2024. Его можно получить в виде фриспинов или фрибетов. Чтобы получить подарок, необходимо активировать код в личном кабинете. Дополнительный депозит не требуется. Размеры подарков невелики: фрибет до 500 рублей и не более 70 фриспинов для игры в слоты. Как и в случае с другими поощрениями, необходимо отыграть бездепозитный бонус. Вейджер, как правило, не превышает х5 для бесплатных ставок и х30 для фриспинов.
В казино 1win предоставляется внушительный бонус при регистрации, который составляет 500% от суммы первых четырех последовательных депозитов клиента. С таким количеством бонусов новичок может значительно увеличить свои шансы на выигрыш. Чтобы получить этот приветственный бонус, необходимо зарегистрироваться на официальном сайте, рабочем зеркале, мобильной версии или приложениях для мобильных телефонов. Однако, основным условием является совершение первого пополнения счета, так как активировать бонусы 1win можно только после этого.
1win промокод при регистрации фрибет: 937999 используйте бонусный код при регистрации и получите бездепозтный бонус 70 фриспинов. Да, при использовании кода 1Win вы можете получить различные поощрения, включая бездепозитные бонусы. Они обычно представлены в виде фрибетов или фриспинов. Для их активации не требуется дополнительное пополнение счета. Размер таких подарков невелик: бесплатных вращений не более 70. Вейджер на бездепозитный бонус обычно не превышает х35. В 1Win вы можете получить бонусы за участие в акциях, турнирах, розыгрышах и активацию промокода. Бонусная программа периодически обновляется. Кроме того, некоторые акции имеют сезонный характер.
В 1Win основная бонусная программа включает в себя фриспины. Чтобы получить 70FS, необходимо пополнить счет на 100 рублей или более. Игроку предоставляется 2 дня с момента регистрации для активации презента. Отыгрыш бонуса должен быть выполнен в течение 24 часов с момента начисления, с вейджером х35. Бесплатные вращения предназначены только для игр провайдера Microgaming.
Так как бонусная программа 1Win регулярно обновляется, список акций, в которых можно получить фриспины, постоянно расширяется. Более подробную информацию о них можно найти на нашем сайте.
Промокод на 1Win дает возможность получить бесплатные вращения. Их можно использовать в любых слотах из каталога казино. Иногда могут быть установлены ограничения, которые предусматривают использование фриспинов только в определенных слотах или играх конкретного провайдера. Фриспины начисляются с фиксированной ставкой. Отыгрыш выигрыша, полученного с помощью бесплатных вращений, обязателен с учетом установленного вейджера.
Вся информация взята с сайта; https://03ekb.ru/news/promokod_350.html
http://1-xbet-france.com
Working 1xbet send back for entering the recognized website of the bookmaker. Usage it to display with 1xBet, be paid bonuses and all right online bets.
http://www.1-xbet-france.com
видеостена москва http://www.videosteny11.ru .
lisinopril 10 mg tablets price
Купить диплом техникума – Таков вариант завладеть официальный удостоверение по окончании образовательного учреждения. Диплом открывает пути к дополнительным карьерным возможностям и профессиональному росту.
Outstanding post but I was wanting to know if you could write a litte more on this topic? I’d be very thankful if you could elaborate a little bit more. Bless you!
https://image.google.com.np/url?q=https://hottelecom.biz/id/
Советуем посетить сайт http://yury-reshetnikov.elegos.ru
Также не забудьте добавить сайт в закладки: http://yury-reshetnikov.elegos.ru
Это сделать просто, если иметь промокод 1xbet на сегодня бесплатно. Правда, дается он при условии выполнения некоторых правил. фриспины 1xbet бесплатные промокоды. Не совсем промокод, но вы все равно ставите не свои деньги, если пополните депозит, – 100% бонуса от внесенной суммы. Максимум указан в верхней части главной страницы официального сайта. 100% бонус за пополнение от 1xbet. Но прежде чем получить бонус нужно пройти регистрацию. Зайдите на сайт БК 1xBet и нажмите по стрелке кнопку «Регистрация». 2. Выберите один из методов регистрации (самый быстрый — в один клик). Кликните на «Зарегистрироваться» – более подробно в этом материале https://yarn55.ru/news/pgs/?promokod_283.html
프라그마틱 플레이의 홈페이지에서 더 많은 슬롯을 찾아보세요.
프라그마틱
프라그마틱 관련 정보 감사합니다! 제 사이트에서도 유용한 정보를 공유하고 있어요. 함께 소통하면서 발전하는 모습 기대합니다!
https://www.nutrapia.com
http://iyalion.com/
https://spinner44.com/
valtrex 1000 mg price
synthroid 0.025 mg
как получить промокод 1хбет – комбинация из чисел и букв. Эта комбинация дает возможность игроку получить дополнительные бонусы. К примеру, это может быть: промокод на бесплатную ставку (фрибет); повышение коэффициентов ставок формата «экспресс». Промокод при регистрации применяется именно таким образом. Он позволяет увеличивать размер приветственного бонуса на первый депозит, который выдается самим букмекером 1xbet. Где найти? Вариантов для получения промокода на 1xbet на сегодня существует множество. Но мы предлагаем вводить наш собственный промокод для 1xbet. Это промокод для регистрации, он вводится в поле в регистрационной анкете. Промокод при регистрации на сегодня. Промокоды для БК и Казино — ежедневное обновление. Регистрация на сайте 1xBet бесплатная, но для начала игры и получения доступа к 1xbet промокоду при регистрации 2024, придется внести на игровой счет от 50 рублей. Особенности регистрации. Процедура создания профиля в букмекерской конторе 1xbet максимально упрощена. Для регистрации предусмотрены такие способы: В «1 клик». Чтобы создать учетную запись, нужно выбрать страну проживания и валюту, ознакомиться с пользовательским соглашением и кликнуть на клавишу «Регистрация». С помощью телефона – более подробно в этом материале https://yarn55.ru/news/pgs/?promokod_283.html
best online pharmacy india
фильм
Login Ngamenjitu
Ngamenjitu: Situs Lotere Daring Terbesar dan Terpercaya
Situs Judi telah menjadi salah satu portal judi daring terbesar dan terpercaya di Indonesia. Dengan bervariasi pasaran yang disediakan dari Semar Group, Ngamenjitu menawarkan sensasi main togel yang tak tertandingi kepada para penggemar judi daring.
Market Terbaik dan Terlengkap
Dengan total 56 pasaran, Situs Judi memperlihatkan berbagai opsi terunggul dari pasaran togel di seluruh dunia. Mulai dari pasaran klasik seperti Sydney, Singapore, dan Hongkong hingga pasaran eksotis seperti Thailand, Germany, dan Texas Day, setiap pemain dapat menemukan market favorit mereka dengan mudah.
Langkah Bermain yang Mudah
Portal Judi menyediakan tutorial cara main yang praktis dipahami bagi para pemula maupun penggemar togel berpengalaman. Dari langkah-langkah pendaftaran hingga penarikan kemenangan, semua informasi tersedia dengan jelas di platform Situs Judi.
Hasil Terakhir dan Info Paling Baru
Pemain dapat mengakses hasil terakhir dari setiap market secara real-time di Situs Judi. Selain itu, informasi terkini seperti jadwal bank daring, gangguan, dan offline juga disediakan untuk memastikan kelancaran proses transaksi.
Pelbagai Jenis Permainan
Selain togel, Ngamenjitu juga menawarkan berbagai jenis permainan kasino dan judi lainnya. Dari bingo hingga roulette, dari dragon tiger hingga baccarat, setiap pemain dapat menikmati bervariasi pilihan permainan yang menarik dan menghibur.
Security dan Kenyamanan Pelanggan Terjamin
Portal Judi mengutamakan security dan kepuasan pelanggan. Dengan sistem keamanan terbaru dan layanan pelanggan yang responsif, setiap pemain dapat bermain dengan nyaman dan tenang di platform ini.
Promosi dan Hadiah Istimewa
Ngamenjitu juga menawarkan bervariasi promosi dan bonus menarik bagi para pemain setia maupun yang baru bergabung. Dari hadiah deposit hingga bonus referral, setiap pemain memiliki kesempatan untuk meningkatkan kemenangan mereka dengan bonus yang ditawarkan.
Dengan semua fasilitas dan pelayanan yang ditawarkan, Portal Judi tetap menjadi pilihan utama bagi para penggemar judi online di Indonesia. Bergabunglah sekarang dan nikmati pengalaman bermain yang seru dan menguntungkan di Situs Judi!
фильм бесплатно
lisinopril 102
When some one searches for his necessary thing, therefore he/she desires to be available that in detail, therefore that thing
is maintained over here.
фильм в хорошем качестве
where can i get synthroid
lisinopril for sale
metformin 3000 mg
смотреть фильм
price of synthroid in canada
tadalafil – generic
buy tadalafil
canadianpharmacymeds com
buy generic cialis usa
reputable online pharmacy
best rated canadian pharmacy
how much is generic synthroid
60 mg prednisone daily
canadian pharmacy tadalafil
canadian pharmacy coupon
where can i purchase azithromycin
Купил фальшивые рубли
Покупка поддельных денег представляет собой недозволенным либо опасительным действием, что имеет возможность привести к глубоким правовым последствиям или повреждению индивидуальной финансовой надежности. Вот несколько примет, из-за чего получение поддельных банкнот приравнивается к потенциально опасной иначе неприемлемой:
Нарушение законов:
Получение либо применение лживых денег являются нарушением закона, подрывающим правила территории. Вас могут подвергнуть себя судебному преследованию, которое может послать в аресту, взысканиям либо постановлению под стражу.
Ущерб доверию:
Контрафактные купюры ухудшают доверенность по отношению к денежной механизму. Их применение создает угрозу для порядочных людей и предприятий, которые в состоянии претерпеть внезапными убытками.
Экономический ущерб:
Распространение поддельных купюр осуществляет воздействие на хозяйство, приводя к распределение денег и ухудшающая общую экономическую устойчивость. Это может повлечь за собой утрате уважения к валютной единице.
Риск обмана:
Те, которые, занимается изготовлением поддельных банкнот, не обязаны соблюдать какие-нибудь нормы характеристики. Контрафактные банкноты могут быть легко распознаваемы, что, в конечном итоге повлечь за собой потерям для тех, кто стремится их использовать.
Юридические последствия:
При случае лишения свободы при использовании контрафактных банкнот, вас способны оштрафовать, и вы столкнетесь с юридическими трудностями. Это может сказаться на вашем будущем, в том числе возможные проблемы с поиском работы с кредитной историей.
Благосостояние общества и личное благополучие зависят от честности и доверии в финансовых отношениях. Покупка поддельных банкнот противоречит этим принципам и может обладать серьезные последствия. Рекомендуется придерживаться норм и заниматься только правомерными финансовыми сделками.
Покупка лживых денег представляет собой незаконным либо потенциально опасным действием, которое может привести к глубоким юридическими наказаниям либо постраданию своей денежной устойчивости. Вот некоторые приводов, почему закупка поддельных купюр считается опасной либо неприемлемой:
Нарушение законов:
Закупка или эксплуатация фальшивых денег считаются противоправным деянием, нарушающим правила страны. Вас в состоянии поддать судебному преследованию, которое может послать в лишению свободы, финансовым санкциям либо постановлению под стражу.
Ущерб доверию:
Лживые купюры нарушают веру по отношению к денежной структуре. Их обращение возникает возможность для благоприятных личностей и коммерческих структур, которые могут попасть в неожиданными потерями.
Экономический ущерб:
Разнос фальшивых купюр оказывает воздействие на экономическую сферу, вызывая распределение денег и подрывая общую денежную равновесие. Это в состоянии закончиться потере доверия в денежной единице.
Риск обмана:
Люди, кто, вовлечены в изготовлением поддельных денег, не обязаны соблюдать какие-либо уровни качества. Поддельные деньги могут выйти легко распознаны, что в конечном счете повлечь за собой убыткам для тех, кто стремится применять их.
Юридические последствия:
В случае задержания при использовании лживых банкнот, вас могут наказать штрафом, и вы столкнетесь с юридическими проблемами. Это может повлиять на вашем будущем, в том числе возможные проблемы с поиском работы и кредитной историей.
Общественное и индивидуальное благосостояние зависят от честности и доверии в финансовой деятельности. Получение контрафактных денег не соответствует этим принципам и может представлять серьезные последствия. Рекомендуется соблюдать норм и осуществлять только законными финансовыми действиями.
где можно купить фальшивые деньги
Покупка фальшивых купюр приравнивается к недозволенным или рискованным действием, что имеет возможность закончиться глубоким юридическими воздействиям или постраданию своей финансовой благосостояния. Вот несколько примет, вследствие чего приобретение контрафактных купюр представляет собой опасной или неуместной:
Нарушение законов:
Получение или воспользование поддельных банкнот являются преступлением, нарушающим положения территории. Вас имеют возможность подвергнуться судебному преследованию, что потенциально закончиться лишению свободы, финансовым санкциям иначе приводу в тюрьму.
Ущерб доверию:
Поддельные деньги нарушают веру по отношению к денежной системе. Их применение возникает опасность для честных личностей и организаций, которые в состоянии претерпеть внезапными потерями.
Экономический ущерб:
Разведение лживых купюр оказывает воздействие на финансовую систему, инициируя денежное расширение и подрывая общественную финансовую устойчивость. Это может повлечь за собой потере доверия к валютной единице.
Риск обмана:
Те, которые, вовлечены в созданием лживых купюр, не обязаны соблюдать какие угодно параметры степени. Поддельные банкноты могут быть легко обнаружены, что в итоге послать в расходам для тех, кто пытается их использовать.
Юридические последствия:
При случае попадания под арест при применении поддельных денег, вас имеют возможность наказать штрафом, и вы столкнетесь с юридическими трудностями. Это может повлиять на вашем будущем, с учетом проблемы с поиском работы и кредитной историей.
Общественное и личное благополучие основываются на честности и доверии в денежной области. Получение лживых купюр идет вразрез с этими принципами и может представлять серьезные последствия. Советуем соблюдать норм и заниматься только законными финансовыми сделками.
synthroid 75 mcg price
buy valtrex online
metformin tablets for sale
cost of lisinopril in canada
synthroid 75 mcg price
where can i get valtrex over the counter
Купить аттестат – Такова возможность достать официальный бумага о среднеобразовательном образовании. Свидетельство обеспечивает доступ в расширенному ассортименту профессиональных и учебных перспектив.
Советуем посетить сайт http://oleg-pogudin.elegos.ru/
Также не забудьте добавить сайт в закладки: http://oleg-pogudin.elegos.ru/
фильм смотреть
защита от коррозии металла https://ingibitor-korrozii-msk.ru .
canadian 24 hour pharmacy
Aporno
synthroid 37.5 mg
скорость коррозии ingibitor-korrozii-msk.ru .
защита металла от ржавчины http://ingibitor-korrozii-msk.ru/ .
Самый полный список промокодов 1хБет на сегодня у нас на сайте. Все промокоды раздаются бесплатно: на ставку, при регистрации, бездепозитные промики. Обновляем каждые 5 часов. Обычно 1xBet промокод при регистрации предоставляет бонус на первый депозит и используется на этапе создания аккаунта в БК. Сумма вознаграждения достигает 100% от первого пополнения. Следующий тип — промокоды 1хбет официальный сайт. Он позволяет заключать пари на спортивные события, либо пользоваться привилегиями в сфере азартных игр, доступных на сайте БК. Такой бонус предоставляется бесплатно в честь регистрации, Дня рождения или активности – более подробно в этом материале https://03ekb.ru/news/besplatnuy_promokod_pri_registracii.html
детская коляска бу http://www.detskie-koljaski-msk.ru .
фильм смотреть
фильм в хорошем качестве
Промокод букмекерской конторы 1xbet на сегодня: где взять рабочий, куда вводить на сайте и как использовать актуальный промокод в 1xbet. Бесплатные коды нужно вводить в специальном поле при регистрации на сайте БК или в личном кабинете пользователя, если у вас уже есть аккаунт. Все промокоды букмекерских контор. Список действующих на сегодня промокодов легальных букмекерских контор вы можете найти на сайте в разделе бонусов. Варианты получения промокодов. Зарубежная букмекерская контора 1xВet предлагает несколько вариантов получения промокодов. Бесплатные промокоды 1xBet при регистрации. 1хБет постоянно ищет новых пользователей, поэтому регистрируясь на сайте Вы и так получите до 25000 руб. при первом депозите. Но мы поможем его увеличить до 32 500, для этого введите: 1XFREE777 — увеличивает сумму депозита до 32500 р. Данные бонусы действуют только при первом депозите после регистрации, пополняя свой лицевой счет, при применении кода сумма увеличится в 2 раза, но не более 32500 рублей. Бонусные деньги вы можете ставить на спорт. В открытом доступе в интернете вы сможете найти только такие бонусы, которые мотивируют новичков стать пользователем букмекерской конторы 1хБет – более подробно в этом материале https://03ekb.ru/news/besplatnuy_promokod_pri_registracii.html
lisinopril 18 mg
защита металлических конструкций от коррозии ingibitor-korrozii-msk.ru .
купить коляску для https://www.detskie-koljaski-msk.ru/ .
остекления фасада магазина http://fasadnoe-osteklenie11.ru/ .
ингибиторы коррозии металла https://www.ingibitor-korrozii-msk.ru/ .
фильм смотреть
brand cialis best price
buy cheap generic zithromax
prednisone 10 mg tablet
Промокод 1xBet на сегодня можно получить прямо на сайте букмекерской компании. Сделать это станет возможным благодаря переходу по рабочей ссылке, содержащей промокод. Подобного рода бонусы могут использовать и постоянные и новые клиенты конторы. Благодаря проведению таких акций интерес игроков к ставкам остаётся высоким. Содержание. 1xbet промокод где вводить. Как получить и что дает промокод в 1xbet? Где вводить промокод в 1xbet? Рабочие промокоды 1xBet на сегодня. Действующие промокоды 1xBet на сегодня. Узнайте как ввести промо код 1хБет при регистрации и получить 32500 рублей на бесплатную ставку. Как активировать и использовать промокод на 1 xBet. Список рабочих бонус кодов – более подробно в этом материале https://03ekb.ru/news/besplatnuy_promokod_pri_registracii.html
Бесплатные промокоды 1xBet при регистрации 2024. Получить бонус на сумму 32500 рублей могут все новые участники клуба. Регистрируйте аккаунт по электронной почте или через привязку аккаунтов популярных социальных сетей и получайте бонусом до 32500 рублей на первый депозит. Для зачисления бонусов необходимо пополнить счет с банковской карты или электронного кошелька, не забыв при этом указать 1хбет промокод сегодня 1XFREE777. Для того чтобы бонус стал доступен к снятию необходимо выполнить простое условие. Выбирайте любое событие, на которое принимаются ставки с коэффициентом от 1.4 и выше – более подробно в этом материале https://03ekb.ru/news/besplatnuy_promokod_pri_registracii.html
Бездепозитный Бонус 1win 2024
Бонусы от казино 1 вин промокод 1win1Win 2024 – Бездепозитные бонусы ? Коды на возврат денег ? VIP Программа лояльности ? Бесплатные фриспины.
1win ввести промокод: 937999 предоставляет новым игрокам бонус 500% для игры в слоты и игровые автоматы, максимальная сумма бонуса 200 000 рублей. Вы можете использовать бонусные деньги в разделе азартных игр, включая онлайн казино, карты, рулетку, игровые автоматы и слоты.
Компания «1Win» рада предложить своим новым клиентам приветственный бонус в размере до 500% на первые четыре депозита. Это выгодное предложение доступно сразу после регистрации в нашей букмекерской конторе. Бонус можно получить не только в рублях, но и в других валютах, при этом он не ограничивает возможность участия игроков в других программам лояльности компании. Максимальная сумма вознаграждения за регистрацию составляет 75000 рублей или эквивалентная сумма в другой валюте.
как ввести промокод 1win приносят игрокам множество преимуществ. Во-первых, они позволяют увеличить начальную ставку или продлить время игры. Кроме того, они дают возможность попробовать различные игры без риска потерять реальные деньги. Бонусы также повышают шансы на выигрыш и предоставляют дополнительные возможности для получения прибыли. Кроме того, бонусы в 1win могут быть обменены на реальные деньги или использованы для участия в специальных акциях и турнирах.
Преимущества получения и использования бонусов в 1win очевидны. Они позволяют игроку расширить свои возможности и получить больше удовольствия от игры. Бонусы также делают игру более выгодной с финансовой точки зрения, помогая уменьшить риски и увеличить потенциальную прибыль. Кроме того, получение и использование бонусов в 1win открывает возможность стать лояльным клиентом и получить дополнительные привилегии и вознаграждения от казино.
Итак, получение бонусов в 1win – это отличная возможность для игрока увеличить свои шансы на выигрыш, получить дополнительные деньги и улучшить свой игровой опыт. Бонусы делают игру более интересной и выгодной.
промокод 1win 2024: 937999 предоставляет возможность получить бездепозитный бонус 2024. Его можно получить в виде фриспинов или фрибетов. Чтобы получить подарок, необходимо активировать код в личном кабинете. Дополнительный депозит не требуется. Размеры подарков невелики: фрибет до 500 рублей и не более 70 фриспинов для игры в слоты. Как и в случае с другими поощрениями, необходимо отыграть бездепозитный бонус. Вейджер, как правило, не превышает х5 для бесплатных ставок и х30 для фриспинов.
В казино 1win предоставляется внушительный бонус при регистрации, который составляет 500% от суммы первых четырех последовательных депозитов клиента. С таким количеством бонусов новичок может значительно увеличить свои шансы на выигрыш. Чтобы получить этот приветственный бонус, необходимо зарегистрироваться на официальном сайте, рабочем зеркале, мобильной версии или приложениях для мобильных телефонов. Однако, основным условием является совершение первого пополнения счета, так как активировать бонусы 1win можно только после этого.
промокод 1win на сегодня при пополнение счета: 937999 используйте бонусный код при регистрации и получите бездепозтный бонус 70 фриспинов. Да, при использовании кода 1Win вы можете получить различные поощрения, включая бездепозитные бонусы. Они обычно представлены в виде фрибетов или фриспинов. Для их активации не требуется дополнительное пополнение счета. Размер таких подарков невелик: бесплатных вращений не более 70. Вейджер на бездепозитный бонус обычно не превышает х35. В 1Win вы можете получить бонусы за участие в акциях, турнирах, розыгрышах и активацию промокода. Бонусная программа периодически обновляется. Кроме того, некоторые акции имеют сезонный характер.
В 1Win основная бонусная программа включает в себя фриспины. Чтобы получить 70FS, необходимо пополнить счет на 100 рублей или более. Игроку предоставляется 2 дня с момента регистрации для активации презента. Отыгрыш бонуса должен быть выполнен в течение 24 часов с момента начисления, с вейджером х35. Бесплатные вращения предназначены только для игр провайдера Microgaming.
Так как бонусная программа 1Win регулярно обновляется, список акций, в которых можно получить фриспины, постоянно расширяется. Более подробную информацию о них можно найти на нашем сайте.
Промокод на 1Win дает возможность получить бесплатные вращения. Их можно использовать в любых слотах из каталога казино. Иногда могут быть установлены ограничения, которые предусматривают использование фриспинов только в определенных слотах или играх конкретного провайдера. Фриспины начисляются с фиксированной ставкой. Отыгрыш выигрыша, полученного с помощью бесплатных вращений, обязателен с учетом установленного вейджера.
Вся информация взята с сайта; https://familylab-spa.ru/blog/articles/promokod_350.html
I’m amazed, I must say. Seldom ddo I encounter a blog that’s both
educative and interesting, and without a doubt, you’ve hit tthe nail on the head.
The problem is an issue that not enough folks are speaking intelligently about.
Iam very happy that I stumbled across this during my hunt forr somethin concerning
this.
Покупка контрафактных купюр представляет собой противозаконным либо рискованным делом, которое может закончиться серьезным юридическими санкциям иначе повреждению личной финансовой благосостояния. Вот некоторые последствий, почему покупка контрафактных купюр приравнивается к рискованной иначе недопустимой:
Нарушение законов:
Закупка иначе эксплуатация контрафактных купюр приравниваются к нарушением закона, нарушающим нормы государства. Вас способны подвергнуться судебному преследованию, что потенциально закончиться аресту, денежным наказаниям или приводу в тюрьму.
Ущерб доверию:
Фальшивые деньги ослабляют уверенность по отношению к финансовой системе. Их использование порождает угрозу для благоприятных людей и организаций, которые в состоянии претерпеть непредвиденными расходами.
Экономический ущерб:
Распространение поддельных банкнот влияет на экономическую сферу, вызывая денежное расширение и ухудшающая всеобщую экономическую стабильность. Это может послать в потере доверия в денежной системе.
Риск обмана:
Личности, которые, задействованы в производством лживых денег, не обязаны соблюдать какие-нибудь параметры уровня. Контрафактные банкноты могут стать легко выявлены, что, в конечном итоге послать в потерям для тех пытается воспользоваться ими.
Юридические последствия:
В ситуации попадания под арест за использование фальшивых денег, вас способны принудительно обложить штрафами, и вы столкнетесь с законными сложностями. Это может оказать воздействие на вашем будущем, включая проблемы с поиском работы с кредитной историей.
Благосостояние общества и личное благополучие зависят от правдивости и доверии в финансовой сфере. Закупка фальшивых купюр не соответствует этим принципам и может порождать важные последствия. Советуем держаться правил и вести только законными финансовыми операциями.
Бездепозитный Бонус 1win 2024
Бонусы от казино ваучер 1win сегодня рабочие промокоды1Win 2024 – Бездепозитные бонусы ? Коды на возврат денег ? VIP Программа лояльности ? Бесплатные фриспины.
промокод 1win при регистрации 2024: 937999 предоставляет новым игрокам бонус 500% для игры в слоты и игровые автоматы, максимальная сумма бонуса 200 000 рублей. Вы можете использовать бонусные деньги в разделе азартных игр, включая онлайн казино, карты, рулетку, игровые автоматы и слоты.
Компания «1Win» рада предложить своим новым клиентам приветственный бонус в размере до 500% на первые четыре депозита. Это выгодное предложение доступно сразу после регистрации в нашей букмекерской конторе. Бонус можно получить не только в рублях, но и в других валютах, при этом он не ограничивает возможность участия игроков в других программам лояльности компании. Максимальная сумма вознаграждения за регистрацию составляет 75000 рублей или эквивалентная сумма в другой валюте.
промокод 1win при пополнении приносят игрокам множество преимуществ. Во-первых, они позволяют увеличить начальную ставку или продлить время игры. Кроме того, они дают возможность попробовать различные игры без риска потерять реальные деньги. Бонусы также повышают шансы на выигрыш и предоставляют дополнительные возможности для получения прибыли. Кроме того, бонусы в 1win могут быть обменены на реальные деньги или использованы для участия в специальных акциях и турнирах.
Преимущества получения и использования бонусов в 1win очевидны. Они позволяют игроку расширить свои возможности и получить больше удовольствия от игры. Бонусы также делают игру более выгодной с финансовой точки зрения, помогая уменьшить риски и увеличить потенциальную прибыль. Кроме того, получение и использование бонусов в 1win открывает возможность стать лояльным клиентом и получить дополнительные привилегии и вознаграждения от казино.
Итак, получение бонусов в 1win – это отличная возможность для игрока увеличить свои шансы на выигрыш, получить дополнительные деньги и улучшить свой игровой опыт. Бонусы делают игру более интересной и выгодной.
1win официальный сайт промокод: 937999 предоставляет возможность получить бездепозитный бонус 2024. Его можно получить в виде фриспинов или фрибетов. Чтобы получить подарок, необходимо активировать код в личном кабинете. Дополнительный депозит не требуется. Размеры подарков невелики: фрибет до 500 рублей и не более 70 фриспинов для игры в слоты. Как и в случае с другими поощрениями, необходимо отыграть бездепозитный бонус. Вейджер, как правило, не превышает х5 для бесплатных ставок и х30 для фриспинов.
В казино 1win предоставляется внушительный бонус при регистрации, который составляет 500% от суммы первых четырех последовательных депозитов клиента. С таким количеством бонусов новичок может значительно увеличить свои шансы на выигрыш. Чтобы получить этот приветственный бонус, необходимо зарегистрироваться на официальном сайте, рабочем зеркале, мобильной версии или приложениях для мобильных телефонов. Однако, основным условием является совершение первого пополнения счета, так как активировать бонусы 1win можно только после этого.
промокоды на депозит 1win: 937999 используйте бонусный код при регистрации и получите бездепозтный бонус 70 фриспинов. Да, при использовании кода 1Win вы можете получить различные поощрения, включая бездепозитные бонусы. Они обычно представлены в виде фрибетов или фриспинов. Для их активации не требуется дополнительное пополнение счета. Размер таких подарков невелик: бесплатных вращений не более 70. Вейджер на бездепозитный бонус обычно не превышает х35. В 1Win вы можете получить бонусы за участие в акциях, турнирах, розыгрышах и активацию промокода. Бонусная программа периодически обновляется. Кроме того, некоторые акции имеют сезонный характер.
В 1Win основная бонусная программа включает в себя фриспины. Чтобы получить 70FS, необходимо пополнить счет на 100 рублей или более. Игроку предоставляется 2 дня с момента регистрации для активации презента. Отыгрыш бонуса должен быть выполнен в течение 24 часов с момента начисления, с вейджером х35. Бесплатные вращения предназначены только для игр провайдера Microgaming.
Так как бонусная программа 1Win регулярно обновляется, список акций, в которых можно получить фриспины, постоянно расширяется. Более подробную информацию о них можно найти на нашем сайте.
Промокод на 1Win дает возможность получить бесплатные вращения. Их можно использовать в любых слотах из каталога казино. Иногда могут быть установлены ограничения, которые предусматривают использование фриспинов только в определенных слотах или играх конкретного провайдера. Фриспины начисляются с фиксированной ставкой. Отыгрыш выигрыша, полученного с помощью бесплатных вращений, обязателен с учетом установленного вейджера.
Вся информация взята с сайта; https://familylab-spa.ru/blog/articles/promokod_350.html
Где купить фальшивые деньги
Покупка поддельных денег приравнивается к неправомерным и опасительным делом, что может закончиться важным юридическими наказаниям иначе повреждению своей финансовой стабильности. Вот некоторые последствий, вследствие чего приобретение контрафактных купюр приравнивается к потенциально опасной или недопустимой:
Нарушение законов:
Приобретение или воспользование поддельных купюр представляют собой преступлением, противоречащим положения государства. Вас могут подвергнуть себя наказанию, которое может послать в лишению свободы, взысканиям либо постановлению под стражу.
Ущерб доверию:
Фальшивые купюры ухудшают доверие к финансовой структуре. Их использование создает риск для честных граждан и коммерческих структур, которые способны претерпеть внезапными расходами.
Экономический ущерб:
Распространение лживых купюр причиняет воздействие на экономику, инициируя инфляцию и подрывая общую финансовую стабильность. Это имеет возможность послать в утрате уважения к национальной валюте.
Риск обмана:
Личности, те, осуществляют изготовлением фальшивых банкнот, не обязаны соблюдать какие-то стандарты качества. Контрафактные деньги могут выйти легко распознаваемы, что в итоге послать в убыткам для тех, кто стремится их использовать.
Юридические последствия:
В случае попадания под арест при применении контрафактных денег, вас в состоянии наказать штрафом, и вы столкнетесь с юридическими проблемами. Это может оказать воздействие на вашем будущем, в том числе трудности с получением работы и кредитной историей.
Общественное и индивидуальное благосостояние зависят от честности и доверии в финансовых отношениях. Получение фальшивых банкнот идет вразрез с этими принципами и может иметь серьезные последствия. Предлагается придерживаться норм и заниматься только правомерными финансовыми действиями.
детские коляски для новорожденных https://www.detskie-koljaski-msk.ru .
Бездепозитный Бонус 1win 2024
Бонусы от казино промокоды на 1win1Win 2024 – Бездепозитные бонусы ? Коды на возврат денег ? VIP Программа лояльности ? Бесплатные фриспины.
как действует промокод на 1win: 937999 предоставляет новым игрокам бонус 500% для игры в слоты и игровые автоматы, максимальная сумма бонуса 200 000 рублей. Вы можете использовать бонусные деньги в разделе азартных игр, включая онлайн казино, карты, рулетку, игровые автоматы и слоты.
Компания «1Win» рада предложить своим новым клиентам приветственный бонус в размере до 500% на первые четыре депозита. Это выгодное предложение доступно сразу после регистрации в нашей букмекерской конторе. Бонус можно получить не только в рублях, но и в других валютах, при этом он не ограничивает возможность участия игроков в других программам лояльности компании. Максимальная сумма вознаграждения за регистрацию составляет 75000 рублей или эквивалентная сумма в другой валюте.
куда вводить промокод на 1win приносят игрокам множество преимуществ. Во-первых, они позволяют увеличить начальную ставку или продлить время игры. Кроме того, они дают возможность попробовать различные игры без риска потерять реальные деньги. Бонусы также повышают шансы на выигрыш и предоставляют дополнительные возможности для получения прибыли. Кроме того, бонусы в 1win могут быть обменены на реальные деньги или использованы для участия в специальных акциях и турнирах.
Преимущества получения и использования бонусов в 1win очевидны. Они позволяют игроку расширить свои возможности и получить больше удовольствия от игры. Бонусы также делают игру более выгодной с финансовой точки зрения, помогая уменьшить риски и увеличить потенциальную прибыль. Кроме того, получение и использование бонусов в 1win открывает возможность стать лояльным клиентом и получить дополнительные привилегии и вознаграждения от казино.
Итак, получение бонусов в 1win – это отличная возможность для игрока увеличить свои шансы на выигрыш, получить дополнительные деньги и улучшить свой игровой опыт. Бонусы делают игру более интересной и выгодной.
промокоды 1вин: 937999 предоставляет возможность получить бездепозитный бонус 2024. Его можно получить в виде фриспинов или фрибетов. Чтобы получить подарок, необходимо активировать код в личном кабинете. Дополнительный депозит не требуется. Размеры подарков невелики: фрибет до 500 рублей и не более 70 фриспинов для игры в слоты. Как и в случае с другими поощрениями, необходимо отыграть бездепозитный бонус. Вейджер, как правило, не превышает х5 для бесплатных ставок и х30 для фриспинов.
В казино 1win предоставляется внушительный бонус при регистрации, который составляет 500% от суммы первых четырех последовательных депозитов клиента. С таким количеством бонусов новичок может значительно увеличить свои шансы на выигрыш. Чтобы получить этот приветственный бонус, необходимо зарегистрироваться на официальном сайте, рабочем зеркале, мобильной версии или приложениях для мобильных телефонов. Однако, основным условием является совершение первого пополнения счета, так как активировать бонусы 1win можно только после этого.
промокод на регистрацию 1win: 937999 используйте бонусный код при регистрации и получите бездепозтный бонус 70 фриспинов. Да, при использовании кода 1Win вы можете получить различные поощрения, включая бездепозитные бонусы. Они обычно представлены в виде фрибетов или фриспинов. Для их активации не требуется дополнительное пополнение счета. Размер таких подарков невелик: бесплатных вращений не более 70. Вейджер на бездепозитный бонус обычно не превышает х35. В 1Win вы можете получить бонусы за участие в акциях, турнирах, розыгрышах и активацию промокода. Бонусная программа периодически обновляется. Кроме того, некоторые акции имеют сезонный характер.
В 1Win основная бонусная программа включает в себя фриспины. Чтобы получить 70FS, необходимо пополнить счет на 100 рублей или более. Игроку предоставляется 2 дня с момента регистрации для активации презента. Отыгрыш бонуса должен быть выполнен в течение 24 часов с момента начисления, с вейджером х35. Бесплатные вращения предназначены только для игр провайдера Microgaming.
Так как бонусная программа 1Win регулярно обновляется, список акций, в которых можно получить фриспины, постоянно расширяется. Более подробную информацию о них можно найти на нашем сайте.
Промокод на 1Win дает возможность получить бесплатные вращения. Их можно использовать в любых слотах из каталога казино. Иногда могут быть установлены ограничения, которые предусматривают использование фриспинов только в определенных слотах или играх конкретного провайдера. Фриспины начисляются с фиксированной ставкой. Отыгрыш выигрыша, полученного с помощью бесплатных вращений, обязателен с учетом установленного вейджера.
Вся информация взята с сайта; https://familylab-spa.ru/blog/articles/promokod_350.html
canadian pharmacy prednisone
prescription medicine lisinopril
online pharmacy products
kupi kolyaski http://www.detskie-koljaski-msk.ru/ .
cheapest pharmacy for prescriptions
online pharmacy viagra
фильм в хорошем качестве
canadadrugpharmacy
фильм
legitimate canadian online pharmacies
buy zithromax online paypal
metformin tablets 800mg
смотреть фильм
top online pharmacy 247
synthroid 250
valtrex without prescription us
how much is lisinopril
synthroid 10 mcg
фильм смотреть онлайн
100 mg prednisone daily
My programmer is trying to convince me to move to .net from PHP.
I have always disliked the idea because of the expenses.
But he’s tryiong none the less. I’ve been using WordPress on several websites for about a year and am worried about
switching to another platform. I have heard very good things about blogengine.net.
Is there a way I can import all my wordpress posts into it?
Any help would be really appreciated!
generic valtrex for sale
canada drugstore pharmacy rx
generic cialis 2.5 mg online
synthroid 0.5 mcg
Anyone interested in finding premier online casinos compatible with Mpesa.
переговорная комната под ключ http://www.oborudovanie-peregovornyh-komnat11.ru .
Hi there colleagues, fastidious piece of writing and nice urging commented at this place, I am genuinely enjoying by these.
http://toolbarqueries.google.com.vn/url?sa=t&url=https://didvirtualnumbers.com/tr/
http://maps.google.nl/url?q=https://didvirtualnumbers.com/de/
https://image.google.ga/url?q=https://didvirtualnumbers.com/tr/
https://clients1.google.ro/url?sa=t&url=https://didvirtualnumbers.com/de/
https://cse.google.com.mm/url?q=https://didvirtualnumbers.com/de/
metformin canada price
cheap lisinopril
Great post! We are linking to this great post on our website.
Keep up the good writing.
prednisone 5084
prednisone 10mg cost
Бездепозитный Бонус 1win 2024
Бонусы от казино 1win промокод при регистрации 20241Win 2024 – Бездепозитные бонусы ? Коды на возврат денег ? VIP Программа лояльности ? Бесплатные фриспины.
промокоды для 1вин: 937999 предоставляет новым игрокам бонус 500% для игры в слоты и игровые автоматы, максимальная сумма бонуса 200 000 рублей. Вы можете использовать бонусные деньги в разделе азартных игр, включая онлайн казино, карты, рулетку, игровые автоматы и слоты.
Компания «1Win» рада предложить своим новым клиентам приветственный бонус в размере до 500% на первые четыре депозита. Это выгодное предложение доступно сразу после регистрации в нашей букмекерской конторе. Бонус можно получить не только в рублях, но и в других валютах, при этом он не ограничивает возможность участия игроков в других программам лояльности компании. Максимальная сумма вознаграждения за регистрацию составляет 75000 рублей или эквивалентная сумма в другой валюте.
промокод 1win фрибет приносят игрокам множество преимуществ. Во-первых, они позволяют увеличить начальную ставку или продлить время игры. Кроме того, они дают возможность попробовать различные игры без риска потерять реальные деньги. Бонусы также повышают шансы на выигрыш и предоставляют дополнительные возможности для получения прибыли. Кроме того, бонусы в 1win могут быть обменены на реальные деньги или использованы для участия в специальных акциях и турнирах.
Преимущества получения и использования бонусов в 1win очевидны. Они позволяют игроку расширить свои возможности и получить больше удовольствия от игры. Бонусы также делают игру более выгодной с финансовой точки зрения, помогая уменьшить риски и увеличить потенциальную прибыль. Кроме того, получение и использование бонусов в 1win открывает возможность стать лояльным клиентом и получить дополнительные привилегии и вознаграждения от казино.
Итак, получение бонусов в 1win – это отличная возможность для игрока увеличить свои шансы на выигрыш, получить дополнительные деньги и улучшить свой игровой опыт. Бонусы делают игру более интересной и выгодной.
промокод для 1вин: 937999 предоставляет возможность получить бездепозитный бонус 2024. Его можно получить в виде фриспинов или фрибетов. Чтобы получить подарок, необходимо активировать код в личном кабинете. Дополнительный депозит не требуется. Размеры подарков невелики: фрибет до 500 рублей и не более 70 фриспинов для игры в слоты. Как и в случае с другими поощрениями, необходимо отыграть бездепозитный бонус. Вейджер, как правило, не превышает х5 для бесплатных ставок и х30 для фриспинов.
В казино 1win предоставляется внушительный бонус при регистрации, который составляет 500% от суммы первых четырех последовательных депозитов клиента. С таким количеством бонусов новичок может значительно увеличить свои шансы на выигрыш. Чтобы получить этот приветственный бонус, необходимо зарегистрироваться на официальном сайте, рабочем зеркале, мобильной версии или приложениях для мобильных телефонов. Однако, основным условием является совершение первого пополнения счета, так как активировать бонусы 1win можно только после этого.
1win промокод бонус за регистрацию без депозита: 937999 используйте бонусный код при регистрации и получите бездепозтный бонус 70 фриспинов. Да, при использовании кода 1Win вы можете получить различные поощрения, включая бездепозитные бонусы. Они обычно представлены в виде фрибетов или фриспинов. Для их активации не требуется дополнительное пополнение счета. Размер таких подарков невелик: бесплатных вращений не более 70. Вейджер на бездепозитный бонус обычно не превышает х35. В 1Win вы можете получить бонусы за участие в акциях, турнирах, розыгрышах и активацию промокода. Бонусная программа периодически обновляется. Кроме того, некоторые акции имеют сезонный характер.
В 1Win основная бонусная программа включает в себя фриспины. Чтобы получить 70FS, необходимо пополнить счет на 100 рублей или более. Игроку предоставляется 2 дня с момента регистрации для активации презента. Отыгрыш бонуса должен быть выполнен в течение 24 часов с момента начисления, с вейджером х35. Бесплатные вращения предназначены только для игр провайдера Microgaming.
Так как бонусная программа 1Win регулярно обновляется, список акций, в которых можно получить фриспины, постоянно расширяется. Более подробную информацию о них можно найти на нашем сайте.
Промокод на 1Win дает возможность получить бесплатные вращения. Их можно использовать в любых слотах из каталога казино. Иногда могут быть установлены ограничения, которые предусматривают использование фриспинов только в определенных слотах или играх конкретного провайдера. Фриспины начисляются с фиксированной ставкой. Отыгрыш выигрыша, полученного с помощью бесплатных вращений, обязателен с учетом установленного вейджера.
Вся информация взята с сайта; https://tdrimspb.ru/news/inc/promokod_350.html
Все бесплатные ставки на 1хбет промокод вы можете найти бесплатно на этом сайте. Используйте промокод *1XFREE777* для получения бонуса до 32500 руб при регистрации. Приятно, что новички могут ввести промокод при регистрации, который даст право на получение приветственного бонуса на сумму до 32500 рублей. Самое главное — это относиться к ставкам и к игре в целом ответственно! Не стоит играть на последние или заемные деньги, стремясь таким образом заработать себе на жизнь – более подробно в этом материале http://lipetskregionsport.ru/news/pages/1hbet_promokod_na_6500_pri_registracii.html
Обналичивание карт – это незаконная деятельность, становящаяся все более широко распространенной в нашем современном мире электронных платежей. Этот вид мошенничества представляет серьезные вызовы для банков, правоохранительных органов и общества в целом. В данной статье мы рассмотрим частоту встречаемости обналичивания карт, используемые методы и возможные последствия для жертв и общества.
Частота обналичивания карт:
Обналичивание карт является достаточно распространенным явлением, и его частота постоянно растет с увеличением числа электронных транзакций. Киберпреступники применяют различные методы для получения доступа к финансовым средствам, включая фишинг, вредоносное программное обеспечение, скимминг и другие инновационные подходы.
Методы обналичивания карт:
Фишинг: Злоумышленники могут отправлять ложные электронные сообщения или создавать веб-сайты, имитирующие банковские системы, с целью получения личной информации от владельцев карт.
Скимминг: Злоумышленники устанавливают устройства скиммеры на банкоматах или терминалах для считывания данных с магнитных полос карт.
Вредоносное программное обеспечение: Киберпреступники разрабатывают вредоносные программы, которые заражают компьютеры и мобильные устройства, чтобы получить доступ к личным данным и банковским счетам.
Сетевые атаки: Атаки на системы банков и платежных платформ могут привести к утечке информации о картах и, следовательно, к их обналичиванию.
Последствия обналичивания карт:
Финансовые потери для клиентов: Владельцы карт могут столкнуться с финансовыми потерями, так как средства могут быть списаны с их счетов без их ведома.
Угроза безопасности данных: Обналичивание карт подчеркивает угрозу безопасности личных данных, что может привести к краже личной и финансовой информации.
Ущерб репутации банков: Банки и другие финансовые учреждения могут столкнуться с утратой доверия со стороны клиентов, если их системы безопасности оказываются уязвимыми.
Проблемы для экономики: Обналичивание карт создает экономический ущерб, поскольку оно стимулирует дополнительные затраты на борьбу с мошенничеством и восстановление утраченных средств.
Борьба с обналичиванием карт:
Совершенствование технологий безопасности: Банки и финансовые институты постоянно совершенствуют свои системы безопасности, чтобы предотвратить несанкционированный доступ к картам.
Образование и информирование: Обучение клиентов о методах мошенничества и том, как защитить свои данные, является важным шагом в борьбе с обналичиванием карт.
Сотрудничество с правоохранительными органами: Банки активно сотрудничают с правоохранительными органами для выявления и пресечения преступных схем.
Заключение:
Обналичивание карт – значительная угроза для финансовой стабильности и безопасности личных данных. Решение этой проблемы требует совместных усилий со стороны банков, правоохранительных органов и общества в целом. Только эффективная борьба с мошенничеством позволит обеспечить безопасность электронных платежей и защитить интересы всех участников финансовой системы.
Покупка поддельных денег приравнивается к недозволенным или опасительным актом, которое имеет возможность привести к глубоким юридическим воздействиям либо вреду личной денежной благосостояния. Вот некоторые примет, почему закупка фальшивых денег приравнивается к потенциально опасной и недопустимой:
Нарушение законов:
Приобретение либо применение контрафактных купюр представляют собой преступлением, подрывающим законы общества. Вас способны подвергнуться юридическим последствиям, что потенциально привести к аресту, штрафам иначе лишению свободы.
Ущерб доверию:
Поддельные купюры подрывают веру в денежной организации. Их поступление в оборот порождает риск для порядочных людей и предприятий, которые в состоянии претерпеть внезапными расходами.
Экономический ущерб:
Расширение фальшивых банкнот причиняет воздействие на экономическую сферу, провоцируя рост цен и ухудшая общественную денежную устойчивость. Это имеет возможность привести к потере уважения к денежной системе.
Риск обмана:
Те, какие, вовлечены в изготовлением лживых купюр, не обязаны соблюдать какие-нибудь нормы уровня. Фальшивые деньги могут выйти легко обнаружены, что в конечном счете закончится ущербу для тех, кто собирается воспользоваться ими.
Юридические последствия:
При событии задержания при использовании фальшивых денег, вас способны принудительно обложить штрафами, и вы столкнетесь с юридическими трудностями. Это может сказаться на вашем будущем, в том числе проблемы с поиском работы и историей кредита.
Общественное и личное благополучие зависят от правдивости и доверии в финансовой деятельности. Покупка фальшивых банкнот идет вразрез с этими принципами и может представлять серьезные последствия. Рекомендуем придерживаться норм и вести только законными финансовыми сделками.
Опасности поддельных 5000 рублей: Распространение фальшивых купюр и его последствия
В современном обществе, где виртуальные платежи становятся все более распространенными, противоправные лица не оставляют без внимания и обычные методы обмана, такие как распространение поддельных банкнот. В последние дни стало известно о неправомерной реализации недобросовестных 5000 рублевых купюр, что представляет значительную потенциальную опасность для денежной системы и граждан в совокупности.
Подходы распространения:
Мошенники активно используют тайные сети интернета для продажи недостоверных 5000 рублей. На темных веб-ресурсах и нелегальных форумах можно обнаружить прошения недостоверных банкнот. К неудаче, это создает хорошие условия для раскрутки контрафактных денег среди людей.
Последствия для сообщества:
Появление поддельных денег в обращении может иметь весомые последствия для экономики и доверенности к национальной валюте. Люди, не замечая, что получили контрафактные купюры, могут использовать их в разнообразных ситуациях, что в последней инстанции приводит к вреду авторитету к банкнотам определенного номинала.
Риски для граждан:
Гражданское население становятся потенциальными пострадавшими недобросовестных лиц, когда они случайным образом получают недостоверные деньги в транзакциях или при приобретениях. В следствие этого, они могут столкнуться с нелестными ситуациями, такими как отклонение коммерсантов принять поддельные купюры или даже шанс юридической ответственности за усилие расплаты фальшивыми деньгами.
Столкновение с дистрибуцией недостоверных денег:
С с целью защиты сообщества от аналогичных нарушений необходимо повысить мероприятия по выявлению и предотвращению производства фальшивых денег. Это включает в себя работу в партнерстве между полицейскими и банками, а также расширение степени образования граждан относительно признаков недостоверных банкнот и техник их выявления.
Итог:
Диффузия поддельных 5000 рублей – это важная потенциальная опасность для устойчивости финансовой системы и устойчивости населения. Гарантирование доверенности к государственной валюте требует совместных усилий со с участием властей, финансовых институтов и каждого человека. Важно быть настороженным и осведомленным, чтобы избежать раскрутку контрафактных денег и обеспечить финансовые средства сообщества.
Купить фальшивые рубли
Покупка поддельных купюр приравнивается к недозволенным или рискованным делом, что имеет возможность привести к серьезным законным последствиям и повреждению индивидуальной денежной стабильности. Вот некоторые примет, по какой причине получение лживых купюр является рискованной либо недопустимой:
Нарушение законов:
Покупка или применение контрафактных денег представляют собой противоправным деянием, подрывающим положения страны. Вас в состоянии подвергнуть себя наказанию, что возможно закончиться аресту, штрафам и постановлению под стражу.
Ущерб доверию:
Фальшивые банкноты подрывают доверие по отношению к денежной механизму. Их применение возникает угрозу для надежных гражданских лиц и коммерческих структур, которые в состоянии претерпеть внезапными расходами.
Экономический ущерб:
Расширение поддельных денег оказывает воздействие на хозяйство, инициируя рост цен и ухудшающая общественную финансовую устойчивость. Это может повлечь за собой потере доверия к денежной системе.
Риск обмана:
Личности, которые, задействованы в изготовлением лживых банкнот, не обязаны поддерживать какие-нибудь нормы уровня. Поддельные деньги могут стать легко выявлены, что в итоге повлечь за собой расходам для тех, кто собирается их использовать.
Юридические последствия:
В ситуации попадания под арест при применении лживых купюр, вас в состоянии принудительно обложить штрафами, и вы столкнетесь с законными сложностями. Это может оказать воздействие на вашем будущем, в том числе проблемы с поиском работы и кредитной историей.
Благосостояние общества и личное благополучие зависят от честности и доверии в финансовой деятельности. Получение контрафактных банкнот идет вразрез с этими принципами и может представлять серьезные последствия. Рекомендуется держаться норм и осуществлять только законными финансовыми действиями.
prednisone 5 mg tablet rx
That is really attention-grabbing, You are an excessively skilled blogger.
I have joined your rss feed and look ahead to seeking extra of your excellent post.
Additionally, I have shared your site in my social
networks
Бездепозитный Бонус 1win 2024
Бонусы от казино промокод 1win на сегодня при пополнение1Win 2024 – Бездепозитные бонусы ? Коды на возврат денег ? VIP Программа лояльности ? Бесплатные фриспины.
промокоды 1win 2024: 937999 предоставляет новым игрокам бонус 500% для игры в слоты и игровые автоматы, максимальная сумма бонуса 200 000 рублей. Вы можете использовать бонусные деньги в разделе азартных игр, включая онлайн казино, карты, рулетку, игровые автоматы и слоты.
Компания «1Win» рада предложить своим новым клиентам приветственный бонус в размере до 500% на первые четыре депозита. Это выгодное предложение доступно сразу после регистрации в нашей букмекерской конторе. Бонус можно получить не только в рублях, но и в других валютах, при этом он не ограничивает возможность участия игроков в других программам лояльности компании. Максимальная сумма вознаграждения за регистрацию составляет 75000 рублей или эквивалентная сумма в другой валюте.
промокод для 1вин приносят игрокам множество преимуществ. Во-первых, они позволяют увеличить начальную ставку или продлить время игры. Кроме того, они дают возможность попробовать различные игры без риска потерять реальные деньги. Бонусы также повышают шансы на выигрыш и предоставляют дополнительные возможности для получения прибыли. Кроме того, бонусы в 1win могут быть обменены на реальные деньги или использованы для участия в специальных акциях и турнирах.
Преимущества получения и использования бонусов в 1win очевидны. Они позволяют игроку расширить свои возможности и получить больше удовольствия от игры. Бонусы также делают игру более выгодной с финансовой точки зрения, помогая уменьшить риски и увеличить потенциальную прибыль. Кроме того, получение и использование бонусов в 1win открывает возможность стать лояльным клиентом и получить дополнительные привилегии и вознаграждения от казино.
Итак, получение бонусов в 1win – это отличная возможность для игрока увеличить свои шансы на выигрыш, получить дополнительные деньги и улучшить свой игровой опыт. Бонусы делают игру более интересной и выгодной.
1win промокоды на деньги: 937999 предоставляет возможность получить бездепозитный бонус 2024. Его можно получить в виде фриспинов или фрибетов. Чтобы получить подарок, необходимо активировать код в личном кабинете. Дополнительный депозит не требуется. Размеры подарков невелики: фрибет до 500 рублей и не более 70 фриспинов для игры в слоты. Как и в случае с другими поощрениями, необходимо отыграть бездепозитный бонус. Вейджер, как правило, не превышает х5 для бесплатных ставок и х30 для фриспинов.
В казино 1win предоставляется внушительный бонус при регистрации, который составляет 500% от суммы первых четырех последовательных депозитов клиента. С таким количеством бонусов новичок может значительно увеличить свои шансы на выигрыш. Чтобы получить этот приветственный бонус, необходимо зарегистрироваться на официальном сайте, рабочем зеркале, мобильной версии или приложениях для мобильных телефонов. Однако, основным условием является совершение первого пополнения счета, так как активировать бонусы 1win можно только после этого.
промокод 1win отзывы: 937999 используйте бонусный код при регистрации и получите бездепозтный бонус 70 фриспинов. Да, при использовании кода 1Win вы можете получить различные поощрения, включая бездепозитные бонусы. Они обычно представлены в виде фрибетов или фриспинов. Для их активации не требуется дополнительное пополнение счета. Размер таких подарков невелик: бесплатных вращений не более 70. Вейджер на бездепозитный бонус обычно не превышает х35. В 1Win вы можете получить бонусы за участие в акциях, турнирах, розыгрышах и активацию промокода. Бонусная программа периодически обновляется. Кроме того, некоторые акции имеют сезонный характер.
В 1Win основная бонусная программа включает в себя фриспины. Чтобы получить 70FS, необходимо пополнить счет на 100 рублей или более. Игроку предоставляется 2 дня с момента регистрации для активации презента. Отыгрыш бонуса должен быть выполнен в течение 24 часов с момента начисления, с вейджером х35. Бесплатные вращения предназначены только для игр провайдера Microgaming.
Так как бонусная программа 1Win регулярно обновляется, список акций, в которых можно получить фриспины, постоянно расширяется. Более подробную информацию о них можно найти на нашем сайте.
Промокод на 1Win дает возможность получить бесплатные вращения. Их можно использовать в любых слотах из каталога казино. Иногда могут быть установлены ограничения, которые предусматривают использование фриспинов только в определенных слотах или играх конкретного провайдера. Фриспины начисляются с фиксированной ставкой. Отыгрыш выигрыша, полученного с помощью бесплатных вращений, обязателен с учетом установленного вейджера.
Вся информация взята с сайта; https://tdrimspb.ru/news/inc/promokod_350.html
rx pharmacy online
Бездепозитный Бонус 1win 2024
Бонусы от казино промокод на 1вин при пополнении1Win 2024 – Бездепозитные бонусы ? Коды на возврат денег ? VIP Программа лояльности ? Бесплатные фриспины.
1win coin получить промокод: 937999 предоставляет новым игрокам бонус 500% для игры в слоты и игровые автоматы, максимальная сумма бонуса 200 000 рублей. Вы можете использовать бонусные деньги в разделе азартных игр, включая онлайн казино, карты, рулетку, игровые автоматы и слоты.
Компания «1Win» рада предложить своим новым клиентам приветственный бонус в размере до 500% на первые четыре депозита. Это выгодное предложение доступно сразу после регистрации в нашей букмекерской конторе. Бонус можно получить не только в рублях, но и в других валютах, при этом он не ограничивает возможность участия игроков в других программам лояльности компании. Максимальная сумма вознаграждения за регистрацию составляет 75000 рублей или эквивалентная сумма в другой валюте.
промокоды при регистрации на 1win приносят игрокам множество преимуществ. Во-первых, они позволяют увеличить начальную ставку или продлить время игры. Кроме того, они дают возможность попробовать различные игры без риска потерять реальные деньги. Бонусы также повышают шансы на выигрыш и предоставляют дополнительные возможности для получения прибыли. Кроме того, бонусы в 1win могут быть обменены на реальные деньги или использованы для участия в специальных акциях и турнирах.
Преимущества получения и использования бонусов в 1win очевидны. Они позволяют игроку расширить свои возможности и получить больше удовольствия от игры. Бонусы также делают игру более выгодной с финансовой точки зрения, помогая уменьшить риски и увеличить потенциальную прибыль. Кроме того, получение и использование бонусов в 1win открывает возможность стать лояльным клиентом и получить дополнительные привилегии и вознаграждения от казино.
Итак, получение бонусов в 1win – это отличная возможность для игрока увеличить свои шансы на выигрыш, получить дополнительные деньги и улучшить свой игровой опыт. Бонусы делают игру более интересной и выгодной.
промокод в 1win где вводить: 937999 предоставляет возможность получить бездепозитный бонус 2024. Его можно получить в виде фриспинов или фрибетов. Чтобы получить подарок, необходимо активировать код в личном кабинете. Дополнительный депозит не требуется. Размеры подарков невелики: фрибет до 500 рублей и не более 70 фриспинов для игры в слоты. Как и в случае с другими поощрениями, необходимо отыграть бездепозитный бонус. Вейджер, как правило, не превышает х5 для бесплатных ставок и х30 для фриспинов.
В казино 1win предоставляется внушительный бонус при регистрации, который составляет 500% от суммы первых четырех последовательных депозитов клиента. С таким количеством бонусов новичок может значительно увеличить свои шансы на выигрыш. Чтобы получить этот приветственный бонус, необходимо зарегистрироваться на официальном сайте, рабочем зеркале, мобильной версии или приложениях для мобильных телефонов. Однако, основным условием является совершение первого пополнения счета, так как активировать бонусы 1win можно только после этого.
как ввести промокод на 1win: 937999 используйте бонусный код при регистрации и получите бездепозтный бонус 70 фриспинов. Да, при использовании кода 1Win вы можете получить различные поощрения, включая бездепозитные бонусы. Они обычно представлены в виде фрибетов или фриспинов. Для их активации не требуется дополнительное пополнение счета. Размер таких подарков невелик: бесплатных вращений не более 70. Вейджер на бездепозитный бонус обычно не превышает х35. В 1Win вы можете получить бонусы за участие в акциях, турнирах, розыгрышах и активацию промокода. Бонусная программа периодически обновляется. Кроме того, некоторые акции имеют сезонный характер.
В 1Win основная бонусная программа включает в себя фриспины. Чтобы получить 70FS, необходимо пополнить счет на 100 рублей или более. Игроку предоставляется 2 дня с момента регистрации для активации презента. Отыгрыш бонуса должен быть выполнен в течение 24 часов с момента начисления, с вейджером х35. Бесплатные вращения предназначены только для игр провайдера Microgaming.
Так как бонусная программа 1Win регулярно обновляется, список акций, в которых можно получить фриспины, постоянно расширяется. Более подробную информацию о них можно найти на нашем сайте.
Промокод на 1Win дает возможность получить бесплатные вращения. Их можно использовать в любых слотах из каталога казино. Иногда могут быть установлены ограничения, которые предусматривают использование фриспинов только в определенных слотах или играх конкретного провайдера. Фриспины начисляются с фиксированной ставкой. Отыгрыш выигрыша, полученного с помощью бесплатных вращений, обязателен с учетом установленного вейджера.
Вся информация взята с сайта; https://tdrimspb.ru/news/inc/promokod_350.html
canadian pharmacy discount coupon
sm-casino1.com
Xie Qian의 얼굴은 … 갑자기 갓 딴 채소 잎처럼 녹색, 에메랄드 녹색으로 변했습니다.
lisinopril 20mg pill
tops pharmacy
Здравствуйте!
Бывало ли у вас такое, что приходилось писать дипломную работу в очень ограниченные сроки? Это действительно требует большой ответственности и тяжелого труда, но важно не сдаваться и продолжать активно заниматься учебными процессами, так же, как и я.
Для тех, кто умеет эффективно использовать интернет для поиска и анализа информации, это действительно облегчает процесс согласования и написания дипломной работы. Не нужно тратить время на посещение библиотек или организацию встреч с дипломным руководителем. Здесь представлены надежные данные для заказа и написания дипломных и курсовых работ с гарантией качества и доставкой по всей России. Можете ознакомиться с предложениями по ссылке https://1server-diploms.com, это проверенный способ!
купить диплом
купить диплом Гознак
Желаю каждому нужных оценок!
lisinopril 1.25 mg
магазин фальшивых денег купить
Покупка лживых банкнот представляет собой неправомерным либо опасным поступком, что может привести к глубоким правовым санкциям или повреждению личной финансовой стабильности. Вот несколько примет, из-за чего получение фальшивых денег является потенциально опасной либо неуместной:
Нарушение законов:
Получение иначе воспользование поддельных купюр представляют собой нарушением закона, нарушающим нормы страны. Вас в состоянии поддать судебному преследованию, что потенциально закончиться задержанию, денежным наказаниям либо приводу в тюрьму.
Ущерб доверию:
Поддельные купюры ухудшают доверие по отношению к денежной системе. Их поступление в оборот формирует угрозу для честных людей и коммерческих структур, которые способны завязать непредвиденными расходами.
Экономический ущерб:
Разведение поддельных денег причиняет воздействие на экономику, вызывая денежное расширение и ухудшающая всеобщую денежную устойчивость. Это может послать в потере уважения к национальной валюте.
Риск обмана:
Те, кто, осуществляют изготовлением фальшивых купюр, не обязаны сохранять какие-либо параметры качества. Фальшивые бумажные деньги могут оказаться легко выявлены, что в конечном счете приведет к ущербу для тех, кто попытается применять их.
Юридические последствия:
При событии лишения свободы при воспользовании фальшивых банкнот, вас способны взыскать штраф, и вы столкнетесь с юридическими проблемами. Это может сказаться на вашем будущем, в том числе сложности с трудоустройством и кредитной историей.
Общественное и личное благополучие зависят от честности и доверии в финансовых отношениях. Покупка контрафактных денег противоречит этим принципам и может иметь серьезные последствия. Рекомендуем соблюдать правил и заниматься только законными финансовыми операциями.
zithromax capsules australia
Покупка фальшивых банкнот представляет собой незаконным либо опасительным делом, которое может привести к тяжелым юридическими наказаниям иначе повреждению своей финансовой устойчивости. Вот некоторые примет, почему получение контрафактных денег представляет собой опасной и недопустимой:
Нарушение законов:
Получение или воспользование фальшивых банкнот являются правонарушением, нарушающим законы общества. Вас имеют возможность подвергнуться судебному преследованию, что возможно послать в задержанию, взысканиям и постановлению под стражу.
Ущерб доверию:
Поддельные купюры нарушают доверенность в финансовой структуре. Их обращение порождает риск для благоприятных гражданских лиц и коммерческих структур, которые в состоянии попасть в неожиданными потерями.
Экономический ущерб:
Расширение лживых купюр оказывает воздействие на хозяйство, провоцируя инфляцию и подрывая всеобщую экономическую устойчивость. Это в состоянии повлечь за собой утрате уважения к денежной единице.
Риск обмана:
Те, те, задействованы в производством контрафактных денег, не обязаны поддерживать какие угодно стандарты качества. Поддельные банкноты могут оказаться легко распознаны, что, в конечном итоге закончится ущербу для тех собирается применять их.
Юридические последствия:
При событии задержания при применении поддельных банкнот, вас в состоянии оштрафовать, и вы столкнетесь с законными сложностями. Это может отразиться на вашем будущем, с учетом проблемы с трудоустройством и кредитной историей.
Благосостояние общества и личное благополучие основываются на правдивости и уважении в финансовых отношениях. Получение контрафактных купюр нарушает эти принципы и может обладать серьезные последствия. Предлагается придерживаться правил и заниматься только легальными финансовыми сделками.
buy synthroid cheap
canadianpharmacyworld com
lisinopril prices
madridnortehoy.com
명령을 내린 뒤 돌아보니 주후조가 이상하게 쳐다보고 있었다.
프라그마틱의 게임은 언제나 풍부한 그래픽과 흥미진진한 플레이로 유명해요. 이번에 새로운 게임이 나왔나요?
프라그마틱 무료
프라그마틱 슬롯에 대한 내용이 정말 도움이 되었어요! 더불어, 제 사이트에서도 프라그마틱과 관련된 정보를 찾아보세요. 함께 서로 이야기하며 더 많은 지식을 쌓아가요!
https://misegamaeya.com/link/
https://www.12315ds.cn/
https://www.12315yc.cn/
Привет, дорогой читатель!
Вы когда-нибудь писали диплом в сжатые сроки? Это очень ответственно и тяжело, но нужно не сдаваться и делать учебные процессы, чем Я и занимаюсь)
Тем кто умеет разбираться и гуглить информацию, это действительно помогает по ходу согласований и написания диплома, не нужно тратить время на библиотеки или встречи с дипломным руководителем, вот здесь есть хорошие данные для заказа и написания дипломов и курсовых с гарантией и доставкой по России, можете посмотреть здесь https://1server-diploms.com, проверено!
купить диплом о среднем образовании
купить диплом Вуза
Желаю каждому прекрасных оценок!
Приветики!
Бывали ли у вас случаи, когда приходилось писать дипломную работу в крайне сжатые сроки? Это действительно требует большой ответственности и напряженного труда, но важно не унывать и продолжать активно участвовать в учебном процессе, как я и делаю.
Для тех, кто умеет эффективно находить и использовать информацию в интернете, это может существенно облегчить процесс согласования и написания дипломной работы. Больше не нужно тратить время на посещение библиотек или организацию встреч с научным руководителем. Здесь, на этом ресурсе, предоставлены надежные данные для заказа и написания дипломных и курсовых работ с гарантией качества и доставкой по всей России. Можете ознакомиться с предложениями на https://1server-diploms.com, это проверено!
купить диплом техникума
купить диплом ссср
Желаю каждому нужных отметок!
Бездепозитный Бонус 1win 2024
Бонусы от казино 1win промокод россия1Win 2024 – Бездепозитные бонусы ? Коды на возврат денег ? VIP Программа лояльности ? Бесплатные фриспины.
1win как ввести промокод: 937999 предоставляет новым игрокам бонус 500% для игры в слоты и игровые автоматы, максимальная сумма бонуса 200 000 рублей. Вы можете использовать бонусные деньги в разделе азартных игр, включая онлайн казино, карты, рулетку, игровые автоматы и слоты.
Компания «1Win» рада предложить своим новым клиентам приветственный бонус в размере до 500% на первые четыре депозита. Это выгодное предложение доступно сразу после регистрации в нашей букмекерской конторе. Бонус можно получить не только в рублях, но и в других валютах, при этом он не ограничивает возможность участия игроков в других программам лояльности компании. Максимальная сумма вознаграждения за регистрацию составляет 75000 рублей или эквивалентная сумма в другой валюте.
1win poker промокод приносят игрокам множество преимуществ. Во-первых, они позволяют увеличить начальную ставку или продлить время игры. Кроме того, они дают возможность попробовать различные игры без риска потерять реальные деньги. Бонусы также повышают шансы на выигрыш и предоставляют дополнительные возможности для получения прибыли. Кроме того, бонусы в 1win могут быть обменены на реальные деньги или использованы для участия в специальных акциях и турнирах.
Преимущества получения и использования бонусов в 1win очевидны. Они позволяют игроку расширить свои возможности и получить больше удовольствия от игры. Бонусы также делают игру более выгодной с финансовой точки зрения, помогая уменьшить риски и увеличить потенциальную прибыль. Кроме того, получение и использование бонусов в 1win открывает возможность стать лояльным клиентом и получить дополнительные привилегии и вознаграждения от казино.
Итак, получение бонусов в 1win – это отличная возможность для игрока увеличить свои шансы на выигрыш, получить дополнительные деньги и улучшить свой игровой опыт. Бонусы делают игру более интересной и выгодной.
1win ввести промокод 1 win: 937999 предоставляет возможность получить бездепозитный бонус 2024. Его можно получить в виде фриспинов или фрибетов. Чтобы получить подарок, необходимо активировать код в личном кабинете. Дополнительный депозит не требуется. Размеры подарков невелики: фрибет до 500 рублей и не более 70 фриспинов для игры в слоты. Как и в случае с другими поощрениями, необходимо отыграть бездепозитный бонус. Вейджер, как правило, не превышает х5 для бесплатных ставок и х30 для фриспинов.
В казино 1win предоставляется внушительный бонус при регистрации, который составляет 500% от суммы первых четырех последовательных депозитов клиента. С таким количеством бонусов новичок может значительно увеличить свои шансы на выигрыш. Чтобы получить этот приветственный бонус, необходимо зарегистрироваться на официальном сайте, рабочем зеркале, мобильной версии или приложениях для мобильных телефонов. Однако, основным условием является совершение первого пополнения счета, так как активировать бонусы 1win можно только после этого.
1win получить промокод: 937999 используйте бонусный код при регистрации и получите бездепозтный бонус 70 фриспинов. Да, при использовании кода 1Win вы можете получить различные поощрения, включая бездепозитные бонусы. Они обычно представлены в виде фрибетов или фриспинов. Для их активации не требуется дополнительное пополнение счета. Размер таких подарков невелик: бесплатных вращений не более 70. Вейджер на бездепозитный бонус обычно не превышает х35. В 1Win вы можете получить бонусы за участие в акциях, турнирах, розыгрышах и активацию промокода. Бонусная программа периодически обновляется. Кроме того, некоторые акции имеют сезонный характер.
В 1Win основная бонусная программа включает в себя фриспины. Чтобы получить 70FS, необходимо пополнить счет на 100 рублей или более. Игроку предоставляется 2 дня с момента регистрации для активации презента. Отыгрыш бонуса должен быть выполнен в течение 24 часов с момента начисления, с вейджером х35. Бесплатные вращения предназначены только для игр провайдера Microgaming.
Так как бонусная программа 1Win регулярно обновляется, список акций, в которых можно получить фриспины, постоянно расширяется. Более подробную информацию о них можно найти на нашем сайте.
Промокод на 1Win дает возможность получить бесплатные вращения. Их можно использовать в любых слотах из каталога казино. Иногда могут быть установлены ограничения, которые предусматривают использование фриспинов только в определенных слотах или играх конкретного провайдера. Фриспины начисляются с фиксированной ставкой. Отыгрыш выигрыша, полученного с помощью бесплатных вращений, обязателен с учетом установленного вейджера.
Вся информация взята с сайта; http://samodelnaya.ru/cache/articles/1win_promokod_5.html
фильм бесплатно
generic synthroid 200 mcg
reputable online pharmacy
Промокод букмекерской конторы 1xbet на сегодня: где взять рабочий, куда вводить на сайте и как использовать промокоды в 1xbet 2024. Бесплатные коды нужно вводить в специальном поле при регистрации на сайте БК или в личном кабинете пользователя, если у вас уже есть аккаунт. Все промокоды букмекерских контор. Список действующих на сегодня промокодов легальных букмекерских контор вы можете найти на сайте в разделе бонусов. Варианты получения промокодов. Зарубежная букмекерская контора 1xВet предлагает несколько вариантов получения промокодов. Бесплатные промокоды 1xBet при регистрации. 1хБет постоянно ищет новых пользователей, поэтому регистрируясь на сайте Вы и так получите до 25000 руб. при первом депозите. Но мы поможем его увеличить до 32 500, для этого введите: 1XFREE777 — увеличивает сумму депозита до 32500 р. Данные бонусы действуют только при первом депозите после регистрации, пополняя свой лицевой счет, при применении кода сумма увеличится в 2 раза, но не более 32500 рублей. Бонусные деньги вы можете ставить на спорт. В открытом доступе в интернете вы сможете найти только такие бонусы, которые мотивируют новичков стать пользователем букмекерской конторы 1хБет – более подробно в этом материале http://lipetskregionsport.ru/news/pages/1hbet_promokod_na_6500_pri_registracii.html
Воспользоваться промокодом 1xbet можно при регистрации в 1xbet. БК 1хбет дарит до 130% на первый депозит при помощи промокода 1xbet. Максимальная сумма бонуса по промокоду 1хбет достигает 32500 рублей. Промокод 1хбет дает надбавку на депозит до 130% только при первом пополнении. Регистрация. 1хбет промокод получить. Всем известно, что букмекерская контора 1xbet предлагает широкий выбор разнообразных бонусов и акций. В этой статье мы расскажем все о промокодах 1xBet: что это, как использовать при регистрации, где вводить, чтобы сделать ставку бесплатно, и по каким поводам казахстанский букмекер 1хБет вручает именные промокоды. Содержание. Что такое промокод 1xBet. Бесплатные промокоды 1xBet. Промокод при регистрации в 1xbet сегодня. Как ввести промокод при регистрации в 1хБет – более подробно в этом материале http://lipetskregionsport.ru/news/pages/1hbet_promokod_na_6500_pri_registracii.html
프라그마틱 게임은 iGaming 분야에서 주목받는 주요 제공 업체로, 독창적이고 표준화된 콘텐츠를 제공합니다.
프라그마틱 플레이
프라그마틱의 슬롯 게임은 정말 뛰어나죠! 여기서 더 많은 게임 정보를 찾을 수 있어 기뻐요.
https://www.12315lb.cn/
https://www.12315yc.cn/
https://nbziding.com/link/
смотреть фильм
otc synthroid
онлайн
Бездепозитный Бонус 1win 2024
Бонусы от казино промокод на 10 рублей 1win1Win 2024 – Бездепозитные бонусы ? Коды на возврат денег ? VIP Программа лояльности ? Бесплатные фриспины.
1win промокод при регистрации: 937999 предоставляет новым игрокам бонус 500% для игры в слоты и игровые автоматы, максимальная сумма бонуса 200 000 рублей. Вы можете использовать бонусные деньги в разделе азартных игр, включая онлайн казино, карты, рулетку, игровые автоматы и слоты.
Компания «1Win» рада предложить своим новым клиентам приветственный бонус в размере до 500% на первые четыре депозита. Это выгодное предложение доступно сразу после регистрации в нашей букмекерской конторе. Бонус можно получить не только в рублях, но и в других валютах, при этом он не ограничивает возможность участия игроков в других программам лояльности компании. Максимальная сумма вознаграждения за регистрацию составляет 75000 рублей или эквивалентная сумма в другой валюте.
промокод на 1win приносят игрокам множество преимуществ. Во-первых, они позволяют увеличить начальную ставку или продлить время игры. Кроме того, они дают возможность попробовать различные игры без риска потерять реальные деньги. Бонусы также повышают шансы на выигрыш и предоставляют дополнительные возможности для получения прибыли. Кроме того, бонусы в 1win могут быть обменены на реальные деньги или использованы для участия в специальных акциях и турнирах.
Преимущества получения и использования бонусов в 1win очевидны. Они позволяют игроку расширить свои возможности и получить больше удовольствия от игры. Бонусы также делают игру более выгодной с финансовой точки зрения, помогая уменьшить риски и увеличить потенциальную прибыль. Кроме того, получение и использование бонусов в 1win открывает возможность стать лояльным клиентом и получить дополнительные привилегии и вознаграждения от казино.
Итак, получение бонусов в 1win – это отличная возможность для игрока увеличить свои шансы на выигрыш, получить дополнительные деньги и улучшить свой игровой опыт. Бонусы делают игру более интересной и выгодной.
1win промокод на первый депозит: 937999 предоставляет возможность получить бездепозитный бонус 2024. Его можно получить в виде фриспинов или фрибетов. Чтобы получить подарок, необходимо активировать код в личном кабинете. Дополнительный депозит не требуется. Размеры подарков невелики: фрибет до 500 рублей и не более 70 фриспинов для игры в слоты. Как и в случае с другими поощрениями, необходимо отыграть бездепозитный бонус. Вейджер, как правило, не превышает х5 для бесплатных ставок и х30 для фриспинов.
В казино 1win предоставляется внушительный бонус при регистрации, который составляет 500% от суммы первых четырех последовательных депозитов клиента. С таким количеством бонусов новичок может значительно увеличить свои шансы на выигрыш. Чтобы получить этот приветственный бонус, необходимо зарегистрироваться на официальном сайте, рабочем зеркале, мобильной версии или приложениях для мобильных телефонов. Однако, основным условием является совершение первого пополнения счета, так как активировать бонусы 1win можно только после этого.
промокод 1win на сегодня при пополнение счета: 937999 используйте бонусный код при регистрации и получите бездепозтный бонус 70 фриспинов. Да, при использовании кода 1Win вы можете получить различные поощрения, включая бездепозитные бонусы. Они обычно представлены в виде фрибетов или фриспинов. Для их активации не требуется дополнительное пополнение счета. Размер таких подарков невелик: бесплатных вращений не более 70. Вейджер на бездепозитный бонус обычно не превышает х35. В 1Win вы можете получить бонусы за участие в акциях, турнирах, розыгрышах и активацию промокода. Бонусная программа периодически обновляется. Кроме того, некоторые акции имеют сезонный характер.
В 1Win основная бонусная программа включает в себя фриспины. Чтобы получить 70FS, необходимо пополнить счет на 100 рублей или более. Игроку предоставляется 2 дня с момента регистрации для активации презента. Отыгрыш бонуса должен быть выполнен в течение 24 часов с момента начисления, с вейджером х35. Бесплатные вращения предназначены только для игр провайдера Microgaming.
Так как бонусная программа 1Win регулярно обновляется, список акций, в которых можно получить фриспины, постоянно расширяется. Более подробную информацию о них можно найти на нашем сайте.
Промокод на 1Win дает возможность получить бесплатные вращения. Их можно использовать в любых слотах из каталога казино. Иногда могут быть установлены ограничения, которые предусматривают использование фриспинов только в определенных слотах или играх конкретного провайдера. Фриспины начисляются с фиксированной ставкой. Отыгрыш выигрыша, полученного с помощью бесплатных вращений, обязателен с учетом установленного вейджера.
Вся информация взята с сайта; http://samodelnaya.ru/cache/articles/1win_promokod_5.html
tadalafil 1mg
Бездепозитный Бонус 1win 2024
Бонусы от казино промокоды для 1win на 10 рублей1Win 2024 – Бездепозитные бонусы ? Коды на возврат денег ? VIP Программа лояльности ? Бесплатные фриспины.
промокод для 1вин при пополнении: 937999 предоставляет новым игрокам бонус 500% для игры в слоты и игровые автоматы, максимальная сумма бонуса 200 000 рублей. Вы можете использовать бонусные деньги в разделе азартных игр, включая онлайн казино, карты, рулетку, игровые автоматы и слоты.
Компания «1Win» рада предложить своим новым клиентам приветственный бонус в размере до 500% на первые четыре депозита. Это выгодное предложение доступно сразу после регистрации в нашей букмекерской конторе. Бонус можно получить не только в рублях, но и в других валютах, при этом он не ограничивает возможность участия игроков в других программам лояльности компании. Максимальная сумма вознаграждения за регистрацию составляет 75000 рублей или эквивалентная сумма в другой валюте.
1win покер промокод при регистрации приносят игрокам множество преимуществ. Во-первых, они позволяют увеличить начальную ставку или продлить время игры. Кроме того, они дают возможность попробовать различные игры без риска потерять реальные деньги. Бонусы также повышают шансы на выигрыш и предоставляют дополнительные возможности для получения прибыли. Кроме того, бонусы в 1win могут быть обменены на реальные деньги или использованы для участия в специальных акциях и турнирах.
Преимущества получения и использования бонусов в 1win очевидны. Они позволяют игроку расширить свои возможности и получить больше удовольствия от игры. Бонусы также делают игру более выгодной с финансовой точки зрения, помогая уменьшить риски и увеличить потенциальную прибыль. Кроме того, получение и использование бонусов в 1win открывает возможность стать лояльным клиентом и получить дополнительные привилегии и вознаграждения от казино.
Итак, получение бонусов в 1win – это отличная возможность для игрока увеличить свои шансы на выигрыш, получить дополнительные деньги и улучшить свой игровой опыт. Бонусы делают игру более интересной и выгодной.
1win официальный сайт промокоды: 937999 предоставляет возможность получить бездепозитный бонус 2024. Его можно получить в виде фриспинов или фрибетов. Чтобы получить подарок, необходимо активировать код в личном кабинете. Дополнительный депозит не требуется. Размеры подарков невелики: фрибет до 500 рублей и не более 70 фриспинов для игры в слоты. Как и в случае с другими поощрениями, необходимо отыграть бездепозитный бонус. Вейджер, как правило, не превышает х5 для бесплатных ставок и х30 для фриспинов.
В казино 1win предоставляется внушительный бонус при регистрации, который составляет 500% от суммы первых четырех последовательных депозитов клиента. С таким количеством бонусов новичок может значительно увеличить свои шансы на выигрыш. Чтобы получить этот приветственный бонус, необходимо зарегистрироваться на официальном сайте, рабочем зеркале, мобильной версии или приложениях для мобильных телефонов. Однако, основным условием является совершение первого пополнения счета, так как активировать бонусы 1win можно только после этого.
1вин промокоды: 937999 используйте бонусный код при регистрации и получите бездепозтный бонус 70 фриспинов. Да, при использовании кода 1Win вы можете получить различные поощрения, включая бездепозитные бонусы. Они обычно представлены в виде фрибетов или фриспинов. Для их активации не требуется дополнительное пополнение счета. Размер таких подарков невелик: бесплатных вращений не более 70. Вейджер на бездепозитный бонус обычно не превышает х35. В 1Win вы можете получить бонусы за участие в акциях, турнирах, розыгрышах и активацию промокода. Бонусная программа периодически обновляется. Кроме того, некоторые акции имеют сезонный характер.
В 1Win основная бонусная программа включает в себя фриспины. Чтобы получить 70FS, необходимо пополнить счет на 100 рублей или более. Игроку предоставляется 2 дня с момента регистрации для активации презента. Отыгрыш бонуса должен быть выполнен в течение 24 часов с момента начисления, с вейджером х35. Бесплатные вращения предназначены только для игр провайдера Microgaming.
Так как бонусная программа 1Win регулярно обновляется, список акций, в которых можно получить фриспины, постоянно расширяется. Более подробную информацию о них можно найти на нашем сайте.
Промокод на 1Win дает возможность получить бесплатные вращения. Их можно использовать в любых слотах из каталога казино. Иногда могут быть установлены ограничения, которые предусматривают использование фриспинов только в определенных слотах или играх конкретного провайдера. Фриспины начисляются с фиксированной ставкой. Отыгрыш выигрыша, полученного с помощью бесплатных вращений, обязателен с учетом установленного вейджера.
Вся информация взята с сайта; http://samodelnaya.ru/cache/articles/1win_promokod_5.html
фильм бесплатно
zithromax for sale uk
strelkaproject.com
문무는 그 뒤에 오는 것이 제 1 군이라는 것을 알고 갑자기 마음이 차가워졌습니다.
soft tabs cialis
5mg cialis best price
brand name synthroid coupon
May I just say what a comfort to find someone who actually knows what they are discussing
on the internet. You actually know how to bring a problem to light
and make it important. More and more people have to
check this out and understand this side of your story.
I can’t believe you aren’t more popular since you most certainly possess the
gift.
lisinopril canada
Обналичивание карт – это неправомерная деятельность, становящаяся все более распространенной в нашем современном мире электронных платежей. Этот вид мошенничества представляет серьезные вызовы для банков, правоохранительных органов и общества в целом. В данной статье мы рассмотрим частоту встречаемости обналичивания карт, используемые методы и возможные последствия для жертв и общества.
Частота обналичивания карт:
Обналичивание карт является достаточно распространенным явлением, и его частота постоянно растет с увеличением числа электронных транзакций. Киберпреступники применяют разные методы для получения доступа к финансовым средствам, включая фишинг, вредоносное программное обеспечение, скимминг и другие инновационные подходы.
Методы обналичивания карт:
Фишинг: Злоумышленники могут отправлять ложные электронные сообщения или создавать веб-сайты, имитирующие банковские системы, с целью получения личной информации от владельцев карт.
Скимминг: Злоумышленники устанавливают устройства скиммеры на банкоматах или терминалах для считывания данных с магнитных полос карт.
Вредоносное программное обеспечение: Киберпреступники разрабатывают вредоносные программы, которые заражают компьютеры и мобильные устройства, чтобы получить доступ к личным данным и банковским счетам.
Сетевые атаки: Атаки на системы банков и платежных платформ могут привести к утечке информации о картах и, следовательно, к их обналичиванию.
Последствия обналичивания карт:
Финансовые потери для клиентов: Владельцы карт могут столкнуться с материальными потерями, так как средства могут быть списаны с их счетов без их ведома.
Угроза безопасности данных: Обналичивание карт подчеркивает угрозу безопасности личных данных, что может привести к краже личной и финансовой информации.
Ущерб репутации банков: Банки и другие финансовые учреждения могут столкнуться с утратой доверия со стороны клиентов, если их системы безопасности оказываются уязвимыми.
Проблемы для экономики: Обналичивание карт создает экономический ущерб, поскольку оно стимулирует дополнительные затраты на борьбу с мошенничеством и восстановление утраченных средств.
Борьба с обналичиванием карт:
Совершенствование технологий безопасности: Банки и финансовые институты постоянно совершенствуют свои системы безопасности, чтобы предотвратить несанкционированный доступ к картам.
Образование и информирование: Обучение клиентов о методах мошенничества и том, как защитить свои данные, является важным шагом в борьбе с обналичиванием карт.
Сотрудничество с правоохранительными органами: Банки активно сотрудничают с правоохранительными органами для выявления и пресечения преступных схем.
Заключение:
Обналичивание карт – значительная угроза для финансовой стабильности и безопасности личных данных. Решение этой проблемы требует совместных усилий со стороны банков, правоохранительных органов и общества в целом. Только эффективная борьба с мошенничеством позволит обеспечить безопасность электронных платежей и защитить интересы всех участников финансовой системы.
buy lisinopril 2.5 mg
india pharmacy mail order
synthroid.com
zestril 20 mg price
azithromycin buy over the counter uk
смотреть фильм
reputable online pharmacy reddit
프라그마틱 관련 글 읽는 것이 즐거웠어요! 또한, 제 사이트에서도 프라그마틱에 대한 정보를 공유하고 있어요. 함께 교류하며 더 많은 지식을 얻어봐요!
프라그마틱 홈페이지
프라그마틱에 대한 글 읽는 것이 흥미로웠어요! 또한, 제 사이트에서도 프라그마틱과 관련된 정보를 제공하고 있어요. 함께 발전하며 지식을 나눠봐요!
https://ahjdmt.com/hot/
https://www.824989.com
https://www.hh12315.cn/
synthroid 0.5
Бездепозитный Бонус 1win 2024
Бонусы от казино промокоды на 1win aviator1Win 2024 – Бездепозитные бонусы ? Коды на возврат денег ? VIP Программа лояльности ? Бесплатные фриспины.
1win бездепозитный промокод: 937999 предоставляет новым игрокам бонус 500% для игры в слоты и игровые автоматы, максимальная сумма бонуса 200 000 рублей. Вы можете использовать бонусные деньги в разделе азартных игр, включая онлайн казино, карты, рулетку, игровые автоматы и слоты.
Компания «1Win» рада предложить своим новым клиентам приветственный бонус в размере до 500% на первые четыре депозита. Это выгодное предложение доступно сразу после регистрации в нашей букмекерской конторе. Бонус можно получить не только в рублях, но и в других валютах, при этом он не ограничивает возможность участия игроков в других программам лояльности компании. Максимальная сумма вознаграждения за регистрацию составляет 75000 рублей или эквивалентная сумма в другой валюте.
активировать промокод 1win приносят игрокам множество преимуществ. Во-первых, они позволяют увеличить начальную ставку или продлить время игры. Кроме того, они дают возможность попробовать различные игры без риска потерять реальные деньги. Бонусы также повышают шансы на выигрыш и предоставляют дополнительные возможности для получения прибыли. Кроме того, бонусы в 1win могут быть обменены на реальные деньги или использованы для участия в специальных акциях и турнирах.
Преимущества получения и использования бонусов в 1win очевидны. Они позволяют игроку расширить свои возможности и получить больше удовольствия от игры. Бонусы также делают игру более выгодной с финансовой точки зрения, помогая уменьшить риски и увеличить потенциальную прибыль. Кроме того, получение и использование бонусов в 1win открывает возможность стать лояльным клиентом и получить дополнительные привилегии и вознаграждения от казино.
Итак, получение бонусов в 1win – это отличная возможность для игрока увеличить свои шансы на выигрыш, получить дополнительные деньги и улучшить свой игровой опыт. Бонусы делают игру более интересной и выгодной.
промокод 1win 2024 при регистрации: 937999 предоставляет возможность получить бездепозитный бонус 2024. Его можно получить в виде фриспинов или фрибетов. Чтобы получить подарок, необходимо активировать код в личном кабинете. Дополнительный депозит не требуется. Размеры подарков невелики: фрибет до 500 рублей и не более 70 фриспинов для игры в слоты. Как и в случае с другими поощрениями, необходимо отыграть бездепозитный бонус. Вейджер, как правило, не превышает х5 для бесплатных ставок и х30 для фриспинов.
В казино 1win предоставляется внушительный бонус при регистрации, который составляет 500% от суммы первых четырех последовательных депозитов клиента. С таким количеством бонусов новичок может значительно увеличить свои шансы на выигрыш. Чтобы получить этот приветственный бонус, необходимо зарегистрироваться на официальном сайте, рабочем зеркале, мобильной версии или приложениях для мобильных телефонов. Однако, основным условием является совершение первого пополнения счета, так как активировать бонусы 1win можно только после этого.
промокоды на регистрацию 1win: 937999 используйте бонусный код при регистрации и получите бездепозтный бонус 70 фриспинов. Да, при использовании кода 1Win вы можете получить различные поощрения, включая бездепозитные бонусы. Они обычно представлены в виде фрибетов или фриспинов. Для их активации не требуется дополнительное пополнение счета. Размер таких подарков невелик: бесплатных вращений не более 70. Вейджер на бездепозитный бонус обычно не превышает х35. В 1Win вы можете получить бонусы за участие в акциях, турнирах, розыгрышах и активацию промокода. Бонусная программа периодически обновляется. Кроме того, некоторые акции имеют сезонный характер.
В 1Win основная бонусная программа включает в себя фриспины. Чтобы получить 70FS, необходимо пополнить счет на 100 рублей или более. Игроку предоставляется 2 дня с момента регистрации для активации презента. Отыгрыш бонуса должен быть выполнен в течение 24 часов с момента начисления, с вейджером х35. Бесплатные вращения предназначены только для игр провайдера Microgaming.
Так как бонусная программа 1Win регулярно обновляется, список акций, в которых можно получить фриспины, постоянно расширяется. Более подробную информацию о них можно найти на нашем сайте.
Промокод на 1Win дает возможность получить бесплатные вращения. Их можно использовать в любых слотах из каталога казино. Иногда могут быть установлены ограничения, которые предусматривают использование фриспинов только в определенных слотах или играх конкретного провайдера. Фриспины начисляются с фиксированной ставкой. Отыгрыш выигрыша, полученного с помощью бесплатных вращений, обязателен с учетом установленного вейджера.
Вся информация взята с сайта; http://grand-medicine.ru/application/list/?1win_promokod_5.html
купить диплом в Москве https://www.saksx-diploms24.com .
buy synthroid online usa
фильм смотреть онлайн
фильм 2024
tadalafil 10mg prices in india
Бездепозитный Бонус 1win 2024
Бонусы от казино промокод для 1win на сегодня1Win 2024 – Бездепозитные бонусы ? Коды на возврат денег ? VIP Программа лояльности ? Бесплатные фриспины.
промокод 1win 2024 при регистрации: 937999 предоставляет новым игрокам бонус 500% для игры в слоты и игровые автоматы, максимальная сумма бонуса 200 000 рублей. Вы можете использовать бонусные деньги в разделе азартных игр, включая онлайн казино, карты, рулетку, игровые автоматы и слоты.
Компания «1Win» рада предложить своим новым клиентам приветственный бонус в размере до 500% на первые четыре депозита. Это выгодное предложение доступно сразу после регистрации в нашей букмекерской конторе. Бонус можно получить не только в рублях, но и в других валютах, при этом он не ограничивает возможность участия игроков в других программам лояльности компании. Максимальная сумма вознаграждения за регистрацию составляет 75000 рублей или эквивалентная сумма в другой валюте.
где ввести промокод на 1win приносят игрокам множество преимуществ. Во-первых, они позволяют увеличить начальную ставку или продлить время игры. Кроме того, они дают возможность попробовать различные игры без риска потерять реальные деньги. Бонусы также повышают шансы на выигрыш и предоставляют дополнительные возможности для получения прибыли. Кроме того, бонусы в 1win могут быть обменены на реальные деньги или использованы для участия в специальных акциях и турнирах.
Преимущества получения и использования бонусов в 1win очевидны. Они позволяют игроку расширить свои возможности и получить больше удовольствия от игры. Бонусы также делают игру более выгодной с финансовой точки зрения, помогая уменьшить риски и увеличить потенциальную прибыль. Кроме того, получение и использование бонусов в 1win открывает возможность стать лояльным клиентом и получить дополнительные привилегии и вознаграждения от казино.
Итак, получение бонусов в 1win – это отличная возможность для игрока увеличить свои шансы на выигрыш, получить дополнительные деньги и улучшить свой игровой опыт. Бонусы делают игру более интересной и выгодной.
1win poker промокод: 937999 предоставляет возможность получить бездепозитный бонус 2024. Его можно получить в виде фриспинов или фрибетов. Чтобы получить подарок, необходимо активировать код в личном кабинете. Дополнительный депозит не требуется. Размеры подарков невелики: фрибет до 500 рублей и не более 70 фриспинов для игры в слоты. Как и в случае с другими поощрениями, необходимо отыграть бездепозитный бонус. Вейджер, как правило, не превышает х5 для бесплатных ставок и х30 для фриспинов.
В казино 1win предоставляется внушительный бонус при регистрации, который составляет 500% от суммы первых четырех последовательных депозитов клиента. С таким количеством бонусов новичок может значительно увеличить свои шансы на выигрыш. Чтобы получить этот приветственный бонус, необходимо зарегистрироваться на официальном сайте, рабочем зеркале, мобильной версии или приложениях для мобильных телефонов. Однако, основным условием является совершение первого пополнения счета, так как активировать бонусы 1win можно только после этого.
промокод на 1win 2024: 937999 используйте бонусный код при регистрации и получите бездепозтный бонус 70 фриспинов. Да, при использовании кода 1Win вы можете получить различные поощрения, включая бездепозитные бонусы. Они обычно представлены в виде фрибетов или фриспинов. Для их активации не требуется дополнительное пополнение счета. Размер таких подарков невелик: бесплатных вращений не более 70. Вейджер на бездепозитный бонус обычно не превышает х35. В 1Win вы можете получить бонусы за участие в акциях, турнирах, розыгрышах и активацию промокода. Бонусная программа периодически обновляется. Кроме того, некоторые акции имеют сезонный характер.
В 1Win основная бонусная программа включает в себя фриспины. Чтобы получить 70FS, необходимо пополнить счет на 100 рублей или более. Игроку предоставляется 2 дня с момента регистрации для активации презента. Отыгрыш бонуса должен быть выполнен в течение 24 часов с момента начисления, с вейджером х35. Бесплатные вращения предназначены только для игр провайдера Microgaming.
Так как бонусная программа 1Win регулярно обновляется, список акций, в которых можно получить фриспины, постоянно расширяется. Более подробную информацию о них можно найти на нашем сайте.
Промокод на 1Win дает возможность получить бесплатные вращения. Их можно использовать в любых слотах из каталога казино. Иногда могут быть установлены ограничения, которые предусматривают использование фриспинов только в определенных слотах или играх конкретного провайдера. Фриспины начисляются с фиксированной ставкой. Отыгрыш выигрыша, полученного с помощью бесплатных вращений, обязателен с учетом установленного вейджера.
Вся информация взята с сайта; http://grand-medicine.ru/application/list/?1win_promokod_5.html
Бездепозитный Бонус 1win 2024
Бонусы от казино промокод для 1win 20241Win 2024 – Бездепозитные бонусы ? Коды на возврат денег ? VIP Программа лояльности ? Бесплатные фриспины.
промокоды на 1win 2024 на пополнение: 937999 предоставляет новым игрокам бонус 500% для игры в слоты и игровые автоматы, максимальная сумма бонуса 200 000 рублей. Вы можете использовать бонусные деньги в разделе азартных игр, включая онлайн казино, карты, рулетку, игровые автоматы и слоты.
Компания «1Win» рада предложить своим новым клиентам приветственный бонус в размере до 500% на первые четыре депозита. Это выгодное предложение доступно сразу после регистрации в нашей букмекерской конторе. Бонус можно получить не только в рублях, но и в других валютах, при этом он не ограничивает возможность участия игроков в других программам лояльности компании. Максимальная сумма вознаграждения за регистрацию составляет 75000 рублей или эквивалентная сумма в другой валюте.
промокод 1win на регистрацию приносят игрокам множество преимуществ. Во-первых, они позволяют увеличить начальную ставку или продлить время игры. Кроме того, они дают возможность попробовать различные игры без риска потерять реальные деньги. Бонусы также повышают шансы на выигрыш и предоставляют дополнительные возможности для получения прибыли. Кроме того, бонусы в 1win могут быть обменены на реальные деньги или использованы для участия в специальных акциях и турнирах.
Преимущества получения и использования бонусов в 1win очевидны. Они позволяют игроку расширить свои возможности и получить больше удовольствия от игры. Бонусы также делают игру более выгодной с финансовой точки зрения, помогая уменьшить риски и увеличить потенциальную прибыль. Кроме того, получение и использование бонусов в 1win открывает возможность стать лояльным клиентом и получить дополнительные привилегии и вознаграждения от казино.
Итак, получение бонусов в 1win – это отличная возможность для игрока увеличить свои шансы на выигрыш, получить дополнительные деньги и улучшить свой игровой опыт. Бонусы делают игру более интересной и выгодной.
1win промокоды: 937999 предоставляет возможность получить бездепозитный бонус 2024. Его можно получить в виде фриспинов или фрибетов. Чтобы получить подарок, необходимо активировать код в личном кабинете. Дополнительный депозит не требуется. Размеры подарков невелики: фрибет до 500 рублей и не более 70 фриспинов для игры в слоты. Как и в случае с другими поощрениями, необходимо отыграть бездепозитный бонус. Вейджер, как правило, не превышает х5 для бесплатных ставок и х30 для фриспинов.
В казино 1win предоставляется внушительный бонус при регистрации, который составляет 500% от суммы первых четырех последовательных депозитов клиента. С таким количеством бонусов новичок может значительно увеличить свои шансы на выигрыш. Чтобы получить этот приветственный бонус, необходимо зарегистрироваться на официальном сайте, рабочем зеркале, мобильной версии или приложениях для мобильных телефонов. Однако, основным условием является совершение первого пополнения счета, так как активировать бонусы 1win можно только после этого.
промокоды на 1win: 937999 используйте бонусный код при регистрации и получите бездепозтный бонус 70 фриспинов. Да, при использовании кода 1Win вы можете получить различные поощрения, включая бездепозитные бонусы. Они обычно представлены в виде фрибетов или фриспинов. Для их активации не требуется дополнительное пополнение счета. Размер таких подарков невелик: бесплатных вращений не более 70. Вейджер на бездепозитный бонус обычно не превышает х35. В 1Win вы можете получить бонусы за участие в акциях, турнирах, розыгрышах и активацию промокода. Бонусная программа периодически обновляется. Кроме того, некоторые акции имеют сезонный характер.
В 1Win основная бонусная программа включает в себя фриспины. Чтобы получить 70FS, необходимо пополнить счет на 100 рублей или более. Игроку предоставляется 2 дня с момента регистрации для активации презента. Отыгрыш бонуса должен быть выполнен в течение 24 часов с момента начисления, с вейджером х35. Бесплатные вращения предназначены только для игр провайдера Microgaming.
Так как бонусная программа 1Win регулярно обновляется, список акций, в которых можно получить фриспины, постоянно расширяется. Более подробную информацию о них можно найти на нашем сайте.
Промокод на 1Win дает возможность получить бесплатные вращения. Их можно использовать в любых слотах из каталога казино. Иногда могут быть установлены ограничения, которые предусматривают использование фриспинов только в определенных слотах или играх конкретного провайдера. Фриспины начисляются с фиксированной ставкой. Отыгрыш выигрыша, полученного с помощью бесплатных вращений, обязателен с учетом установленного вейджера.
Вся информация взята с сайта; http://grand-medicine.ru/application/list/?1win_promokod_5.html
Мы служба специалистов по SEO-оптимизации, занимающихся продвижением вашего сайта в поисковых системах.
Наша команда гордимся своими успехами и желаем поделиться с вами нашими знаниями и навыками.
Какие услуги мы предоставляем:
• комплексное продвижение сайта заказать
• Тщательный анализ вашего сайта и разработка персональной стратегии продвижения.
• Усовершенствование контента и технических особенностей вашего сайта для достижения максимальной производительности.
• Ежедневный анализ данных и мониторинг вашего онлайн-присутствия для постоянного улучшения его эффективности.
Подробнее https://seo-prodvizhenie-ulyanovsk1.ru/
Уже много клиентов оценили результаты: увеличение посещаемости, улучшение позиций в поисковых запросах и, конечно же, рост своего бизнеса. Мы готовы предложить вам консультацию бесплатно, для того чтобы обсудить ваши требования и помочь вам разработать стратегию продвижения, соответствующую вашим целям и бюджету.
Не упустите шанс улучшить свои результаты в интернете. Свяжитесь с нами уже сегодня.
mega-slot77.com
Xiao Jing은 어떻게 감히 과실을 범할 수 있었는지 서둘러 Fang Jifan에게 기념비를 보냈습니다.
онлайн
lisinopril medication
no prescription prenisone
프라그마틱 슬롯에 대한 내용이 정말 도움이 되었어요! 더불어, 제 사이트에서도 프라그마틱과 관련된 정보를 찾아보세요. 함께 서로 이야기하며 더 많은 지식을 쌓아가요!
프라그마틱 슬롯 무료 체험
프라그마틱 관련 정보 감사합니다! 제 사이트에서도 유용한 정보를 공유하고 있어요. 함께 소통하면서 발전하는 모습 기대합니다!
https://www.12315os.cn/
https://lbpicture.com/link/
https://www.12315kz.cn/
order azithromycin online usa
online lisinopril
synthroid lowest price
generic cialis 5mg online
Бездепозитный Бонус 1win 2024
Бонусы от казино 1win букмекерская промокод1Win 2024 – Бездепозитные бонусы ? Коды на возврат денег ? VIP Программа лояльности ? Бесплатные фриспины.
1win промокод на деньги: 937999 предоставляет новым игрокам бонус 500% для игры в слоты и игровые автоматы, максимальная сумма бонуса 200 000 рублей. Вы можете использовать бонусные деньги в разделе азартных игр, включая онлайн казино, карты, рулетку, игровые автоматы и слоты.
Компания «1Win» рада предложить своим новым клиентам приветственный бонус в размере до 500% на первые четыре депозита. Это выгодное предложение доступно сразу после регистрации в нашей букмекерской конторе. Бонус можно получить не только в рублях, но и в других валютах, при этом он не ограничивает возможность участия игроков в других программам лояльности компании. Максимальная сумма вознаграждения за регистрацию составляет 75000 рублей или эквивалентная сумма в другой валюте.
промокод на 1win на пополнение счета приносят игрокам множество преимуществ. Во-первых, они позволяют увеличить начальную ставку или продлить время игры. Кроме того, они дают возможность попробовать различные игры без риска потерять реальные деньги. Бонусы также повышают шансы на выигрыш и предоставляют дополнительные возможности для получения прибыли. Кроме того, бонусы в 1win могут быть обменены на реальные деньги или использованы для участия в специальных акциях и турнирах.
Преимущества получения и использования бонусов в 1win очевидны. Они позволяют игроку расширить свои возможности и получить больше удовольствия от игры. Бонусы также делают игру более выгодной с финансовой точки зрения, помогая уменьшить риски и увеличить потенциальную прибыль. Кроме того, получение и использование бонусов в 1win открывает возможность стать лояльным клиентом и получить дополнительные привилегии и вознаграждения от казино.
Итак, получение бонусов в 1win – это отличная возможность для игрока увеличить свои шансы на выигрыш, получить дополнительные деньги и улучшить свой игровой опыт. Бонусы делают игру более интересной и выгодной.
1win промокод россия: 937999 предоставляет возможность получить бездепозитный бонус 2024. Его можно получить в виде фриспинов или фрибетов. Чтобы получить подарок, необходимо активировать код в личном кабинете. Дополнительный депозит не требуется. Размеры подарков невелики: фрибет до 500 рублей и не более 70 фриспинов для игры в слоты. Как и в случае с другими поощрениями, необходимо отыграть бездепозитный бонус. Вейджер, как правило, не превышает х5 для бесплатных ставок и х30 для фриспинов.
В казино 1win предоставляется внушительный бонус при регистрации, который составляет 500% от суммы первых четырех последовательных депозитов клиента. С таким количеством бонусов новичок может значительно увеличить свои шансы на выигрыш. Чтобы получить этот приветственный бонус, необходимо зарегистрироваться на официальном сайте, рабочем зеркале, мобильной версии или приложениях для мобильных телефонов. Однако, основным условием является совершение первого пополнения счета, так как активировать бонусы 1win можно только после этого.
1win официальный сайт 1вин промокоды: 937999 используйте бонусный код при регистрации и получите бездепозтный бонус 70 фриспинов. Да, при использовании кода 1Win вы можете получить различные поощрения, включая бездепозитные бонусы. Они обычно представлены в виде фрибетов или фриспинов. Для их активации не требуется дополнительное пополнение счета. Размер таких подарков невелик: бесплатных вращений не более 70. Вейджер на бездепозитный бонус обычно не превышает х35. В 1Win вы можете получить бонусы за участие в акциях, турнирах, розыгрышах и активацию промокода. Бонусная программа периодически обновляется. Кроме того, некоторые акции имеют сезонный характер.
В 1Win основная бонусная программа включает в себя фриспины. Чтобы получить 70FS, необходимо пополнить счет на 100 рублей или более. Игроку предоставляется 2 дня с момента регистрации для активации презента. Отыгрыш бонуса должен быть выполнен в течение 24 часов с момента начисления, с вейджером х35. Бесплатные вращения предназначены только для игр провайдера Microgaming.
Так как бонусная программа 1Win регулярно обновляется, список акций, в которых можно получить фриспины, постоянно расширяется. Более подробную информацию о них можно найти на нашем сайте.
Промокод на 1Win дает возможность получить бесплатные вращения. Их можно использовать в любых слотах из каталога казино. Иногда могут быть установлены ограничения, которые предусматривают использование фриспинов только в определенных слотах или играх конкретного провайдера. Фриспины начисляются с фиксированной ставкой. Отыгрыш выигрыша, полученного с помощью бесплатных вращений, обязателен с учетом установленного вейджера.
Вся информация взята с сайта; http://collect-pc.ru/uploads/pages/1win_promokod_5.html
online pharmacy no presc uk
Обналичивание карт – это неправомерная деятельность, становящаяся все более популярной в нашем современном мире электронных платежей. Этот вид мошенничества представляет тяжелые вызовы для банков, правоохранительных органов и общества в целом. В данной статье мы рассмотрим частоту встречаемости обналичивания карт, используемые методы и возможные последствия для жертв и общества.
Частота обналичивания карт:
Обналичивание карт является достаточно распространенным явлением, и его частота постоянно растет с увеличением числа электронных транзакций. Киберпреступники применяют разнообразные методы для получения доступа к финансовым средствам, включая фишинг, вредоносное программное обеспечение, скимминг и другие инновационные подходы.
Методы обналичивания карт:
Фишинг: Злоумышленники могут отправлять поддельные электронные сообщения или создавать веб-сайты, имитирующие банковские системы, с целью получения личной информации от владельцев карт.
Скимминг: Злоумышленники устанавливают устройства скиммеры на банкоматах или терминалах для считывания данных с магнитных полос карт.
Вредоносное программное обеспечение: Киберпреступники разрабатывают вредоносные программы, которые заражают компьютеры и мобильные устройства, чтобы получить доступ к личным данным и банковским счетам.
Сетевые атаки: Атаки на системы банков и платежных платформ могут привести к утечке информации о картах и, следовательно, к их обналичиванию.
Последствия обналичивания карт:
Финансовые потери для клиентов: Владельцы карт могут столкнуться с финансовыми потерями, так как средства могут быть списаны с их счетов без их ведома.
Угроза безопасности данных: Обналичивание карт подчеркивает угрозу безопасности личных данных, что может привести к краже личной и финансовой информации.
Ущерб репутации банков: Банки и другие финансовые учреждения могут столкнуться с утратой доверия со стороны клиентов, если их системы безопасности оказываются уязвимыми.
Проблемы для экономики: Обналичивание карт создает экономический ущерб, поскольку оно стимулирует дополнительные затраты на борьбу с мошенничеством и восстановление утраченных средств.
Борьба с обналичиванием карт:
Совершенствование технологий безопасности: Банки и финансовые институты постоянно совершенствуют свои системы безопасности, чтобы предотвратить несанкционированный доступ к картам.
Образование и информирование: Обучение клиентов о методах мошенничества и том, как защитить свои данные, является важным шагом в борьбе с обналичиванием карт.
Сотрудничество с правоохранительными органами: Банки активно сотрудничают с правоохранительными органами для выявления и пресечения преступных схем.
Заключение:
Обналичивание карт – серьезная угроза для финансовой стабильности и безопасности личных данных. Решение этой проблемы требует совместных усилий со стороны банков, правоохранительных органов и общества в целом. Только эффективная борьба с мошенничеством позволит обеспечить безопасность электронных платежей и защитить интересы всех участников финансовой системы.
buy cialis in usa
medicine metformin 500
prednisone over the counter south africa
tadalafil generic us
Бездепозитный Бонус 1win 2024
Бонусы от казино 1win промокод при пополнении баланса1Win 2024 – Бездепозитные бонусы ? Коды на возврат денег ? VIP Программа лояльности ? Бесплатные фриспины.
промокод 1win 2024: 937999 предоставляет новым игрокам бонус 500% для игры в слоты и игровые автоматы, максимальная сумма бонуса 200 000 рублей. Вы можете использовать бонусные деньги в разделе азартных игр, включая онлайн казино, карты, рулетку, игровые автоматы и слоты.
Компания «1Win» рада предложить своим новым клиентам приветственный бонус в размере до 500% на первые четыре депозита. Это выгодное предложение доступно сразу после регистрации в нашей букмекерской конторе. Бонус можно получить не только в рублях, но и в других валютах, при этом он не ограничивает возможность участия игроков в других программам лояльности компании. Максимальная сумма вознаграждения за регистрацию составляет 75000 рублей или эквивалентная сумма в другой валюте.
промокоды для пополнения 1win приносят игрокам множество преимуществ. Во-первых, они позволяют увеличить начальную ставку или продлить время игры. Кроме того, они дают возможность попробовать различные игры без риска потерять реальные деньги. Бонусы также повышают шансы на выигрыш и предоставляют дополнительные возможности для получения прибыли. Кроме того, бонусы в 1win могут быть обменены на реальные деньги или использованы для участия в специальных акциях и турнирах.
Преимущества получения и использования бонусов в 1win очевидны. Они позволяют игроку расширить свои возможности и получить больше удовольствия от игры. Бонусы также делают игру более выгодной с финансовой точки зрения, помогая уменьшить риски и увеличить потенциальную прибыль. Кроме того, получение и использование бонусов в 1win открывает возможность стать лояльным клиентом и получить дополнительные привилегии и вознаграждения от казино.
Итак, получение бонусов в 1win – это отличная возможность для игрока увеличить свои шансы на выигрыш, получить дополнительные деньги и улучшить свой игровой опыт. Бонусы делают игру более интересной и выгодной.
промокод 1win: 937999 предоставляет возможность получить бездепозитный бонус 2024. Его можно получить в виде фриспинов или фрибетов. Чтобы получить подарок, необходимо активировать код в личном кабинете. Дополнительный депозит не требуется. Размеры подарков невелики: фрибет до 500 рублей и не более 70 фриспинов для игры в слоты. Как и в случае с другими поощрениями, необходимо отыграть бездепозитный бонус. Вейджер, как правило, не превышает х5 для бесплатных ставок и х30 для фриспинов.
В казино 1win предоставляется внушительный бонус при регистрации, который составляет 500% от суммы первых четырех последовательных депозитов клиента. С таким количеством бонусов новичок может значительно увеличить свои шансы на выигрыш. Чтобы получить этот приветственный бонус, необходимо зарегистрироваться на официальном сайте, рабочем зеркале, мобильной версии или приложениях для мобильных телефонов. Однако, основным условием является совершение первого пополнения счета, так как активировать бонусы 1win можно только после этого.
промокоды для 1win: 937999 используйте бонусный код при регистрации и получите бездепозтный бонус 70 фриспинов. Да, при использовании кода 1Win вы можете получить различные поощрения, включая бездепозитные бонусы. Они обычно представлены в виде фрибетов или фриспинов. Для их активации не требуется дополнительное пополнение счета. Размер таких подарков невелик: бесплатных вращений не более 70. Вейджер на бездепозитный бонус обычно не превышает х35. В 1Win вы можете получить бонусы за участие в акциях, турнирах, розыгрышах и активацию промокода. Бонусная программа периодически обновляется. Кроме того, некоторые акции имеют сезонный характер.
В 1Win основная бонусная программа включает в себя фриспины. Чтобы получить 70FS, необходимо пополнить счет на 100 рублей или более. Игроку предоставляется 2 дня с момента регистрации для активации презента. Отыгрыш бонуса должен быть выполнен в течение 24 часов с момента начисления, с вейджером х35. Бесплатные вращения предназначены только для игр провайдера Microgaming.
Так как бонусная программа 1Win регулярно обновляется, список акций, в которых можно получить фриспины, постоянно расширяется. Более подробную информацию о них можно найти на нашем сайте.
Промокод на 1Win дает возможность получить бесплатные вращения. Их можно использовать в любых слотах из каталога казино. Иногда могут быть установлены ограничения, которые предусматривают использование фриспинов только в определенных слотах или играх конкретного провайдера. Фриспины начисляются с фиксированной ставкой. Отыгрыш выигрыша, полученного с помощью бесплатных вращений, обязателен с учетом установленного вейджера.
Вся информация взята с сайта; http://collect-pc.ru/uploads/pages/1win_promokod_5.html
Бездепозитный Бонус 1win 2024
Бонусы от казино промокоды на 1win1Win 2024 – Бездепозитные бонусы ? Коды на возврат денег ? VIP Программа лояльности ? Бесплатные фриспины.
как вести промокод на 1win на телефоне: 937999 предоставляет новым игрокам бонус 500% для игры в слоты и игровые автоматы, максимальная сумма бонуса 200 000 рублей. Вы можете использовать бонусные деньги в разделе азартных игр, включая онлайн казино, карты, рулетку, игровые автоматы и слоты.
Компания «1Win» рада предложить своим новым клиентам приветственный бонус в размере до 500% на первые четыре депозита. Это выгодное предложение доступно сразу после регистрации в нашей букмекерской конторе. Бонус можно получить не только в рублях, но и в других валютах, при этом он не ограничивает возможность участия игроков в других программам лояльности компании. Максимальная сумма вознаграждения за регистрацию составляет 75000 рублей или эквивалентная сумма в другой валюте.
промокоды 1win при регистрации приносят игрокам множество преимуществ. Во-первых, они позволяют увеличить начальную ставку или продлить время игры. Кроме того, они дают возможность попробовать различные игры без риска потерять реальные деньги. Бонусы также повышают шансы на выигрыш и предоставляют дополнительные возможности для получения прибыли. Кроме того, бонусы в 1win могут быть обменены на реальные деньги или использованы для участия в специальных акциях и турнирах.
Преимущества получения и использования бонусов в 1win очевидны. Они позволяют игроку расширить свои возможности и получить больше удовольствия от игры. Бонусы также делают игру более выгодной с финансовой точки зрения, помогая уменьшить риски и увеличить потенциальную прибыль. Кроме того, получение и использование бонусов в 1win открывает возможность стать лояльным клиентом и получить дополнительные привилегии и вознаграждения от казино.
Итак, получение бонусов в 1win – это отличная возможность для игрока увеличить свои шансы на выигрыш, получить дополнительные деньги и улучшить свой игровой опыт. Бонусы делают игру более интересной и выгодной.
промокод авиатор 1win: 937999 предоставляет возможность получить бездепозитный бонус 2024. Его можно получить в виде фриспинов или фрибетов. Чтобы получить подарок, необходимо активировать код в личном кабинете. Дополнительный депозит не требуется. Размеры подарков невелики: фрибет до 500 рублей и не более 70 фриспинов для игры в слоты. Как и в случае с другими поощрениями, необходимо отыграть бездепозитный бонус. Вейджер, как правило, не превышает х5 для бесплатных ставок и х30 для фриспинов.
В казино 1win предоставляется внушительный бонус при регистрации, который составляет 500% от суммы первых четырех последовательных депозитов клиента. С таким количеством бонусов новичок может значительно увеличить свои шансы на выигрыш. Чтобы получить этот приветственный бонус, необходимо зарегистрироваться на официальном сайте, рабочем зеркале, мобильной версии или приложениях для мобильных телефонов. Однако, основным условием является совершение первого пополнения счета, так как активировать бонусы 1win можно только после этого.
промокоды при пополнении 1win: 937999 используйте бонусный код при регистрации и получите бездепозтный бонус 70 фриспинов. Да, при использовании кода 1Win вы можете получить различные поощрения, включая бездепозитные бонусы. Они обычно представлены в виде фрибетов или фриспинов. Для их активации не требуется дополнительное пополнение счета. Размер таких подарков невелик: бесплатных вращений не более 70. Вейджер на бездепозитный бонус обычно не превышает х35. В 1Win вы можете получить бонусы за участие в акциях, турнирах, розыгрышах и активацию промокода. Бонусная программа периодически обновляется. Кроме того, некоторые акции имеют сезонный характер.
В 1Win основная бонусная программа включает в себя фриспины. Чтобы получить 70FS, необходимо пополнить счет на 100 рублей или более. Игроку предоставляется 2 дня с момента регистрации для активации презента. Отыгрыш бонуса должен быть выполнен в течение 24 часов с момента начисления, с вейджером х35. Бесплатные вращения предназначены только для игр провайдера Microgaming.
Так как бонусная программа 1Win регулярно обновляется, список акций, в которых можно получить фриспины, постоянно расширяется. Более подробную информацию о них можно найти на нашем сайте.
Промокод на 1Win дает возможность получить бесплатные вращения. Их можно использовать в любых слотах из каталога казино. Иногда могут быть установлены ограничения, которые предусматривают использование фриспинов только в определенных слотах или играх конкретного провайдера. Фриспины начисляются с фиксированной ставкой. Отыгрыш выигрыша, полученного с помощью бесплатных вращений, обязателен с учетом установленного вейджера.
Вся информация взята с сайта; http://collect-pc.ru/uploads/pages/1win_promokod_5.html
metformin purchase uk
33개 언어와 다양한 화폐를 통해 세계 시장에 제공되는 프라그마틱 플레이의 다양한 테마의 슬롯을 즐겨보세요.
프라그마틱 슬롯 무료
프라그마틱과 관련된 내용 감사합니다! 또한, 제 사이트에서도 프라그마틱에 대한 정보를 찾아보실 수 있어요. 서로 이야기 공유하며 더 많은 지식을 얻어가요!
https://www.12315lu.cn/
https://www.naugblog.com
https://jlweiqu.com/link/
cialis australia cost
canadian pharmacy ltd
Do you mind if I quote a few of your articles as long as I provide
credit and sources back to your website? My blog is in the exact same niche as yours and my users would certainly
benefit from some of the information you present here.
Please let me know if this ok with you. Many thanks!
Привет всем!
Продолжаю работать над дипломом, несмотря на все препятствия, и благодарю интернет за помощь в этом нелегком процессе.
Желаете заказать и купить диплом ВУЗа недорого без предоплаты на нашем сайте? Доставим в любую точку России.
https://ba.rolka.me/viewtopic.php?id=15444#p18759
http://o926476g.bget.ru/users/egabem
http://komerc.mineralgroup.ru/index.php?subaction=userinfo&user=amanyxi
Желаю вам всем отличных отметок!
купить диплом в лениногорске
купить диплом в абакане
купить диплом учителя физической культуры
купить диплом в новороссийске
купить диплом в воткинске
purchase zithromax z-pak
Здравствуйте!
Моя работа над дипломом улучшилась благодаря ценным интернет-находкам.
Купить диплом у нас легко! Надежно, качественно, без предоплаты, с доставкой в любой город России.
http://fb7914j4.bget.ru/index.php?subaction=userinfo&user=ymoja
http://ashinova.ru/category-5/t-824.html#824
http://x70795vj.beget.tech/2024/03/02/zhelaete-poluchit-diplom-o-vysshem-obrazovanii-ne-prohodya-obuchenie.html
Желаю каждому отличных отметок!
купить диплом в костроме
купить диплом в набережных челнах
купить диплом в каменске-шахтинском
купить диплом охранника
купить диплом в ессентуках
prednisone buy no prescription
cialis from mexico
https://ryfys.ru/info/kak-sproektirovat-press-formu-dlya-izdelij-iz-polimernogo-syrya/
Бездепозитный Бонус 1win 2024
Бонусы от казино промокоды на 1win 20241Win 2024 – Бездепозитные бонусы ? Коды на возврат денег ? VIP Программа лояльности ? Бесплатные фриспины.
1win куда ввести промокод: 937999 предоставляет новым игрокам бонус 500% для игры в слоты и игровые автоматы, максимальная сумма бонуса 200 000 рублей. Вы можете использовать бонусные деньги в разделе азартных игр, включая онлайн казино, карты, рулетку, игровые автоматы и слоты.
Компания «1Win» рада предложить своим новым клиентам приветственный бонус в размере до 500% на первые четыре депозита. Это выгодное предложение доступно сразу после регистрации в нашей букмекерской конторе. Бонус можно получить не только в рублях, но и в других валютах, при этом он не ограничивает возможность участия игроков в других программам лояльности компании. Максимальная сумма вознаграждения за регистрацию составляет 75000 рублей или эквивалентная сумма в другой валюте.
промокод при регистрации 1win приносят игрокам множество преимуществ. Во-первых, они позволяют увеличить начальную ставку или продлить время игры. Кроме того, они дают возможность попробовать различные игры без риска потерять реальные деньги. Бонусы также повышают шансы на выигрыш и предоставляют дополнительные возможности для получения прибыли. Кроме того, бонусы в 1win могут быть обменены на реальные деньги или использованы для участия в специальных акциях и турнирах.
Преимущества получения и использования бонусов в 1win очевидны. Они позволяют игроку расширить свои возможности и получить больше удовольствия от игры. Бонусы также делают игру более выгодной с финансовой точки зрения, помогая уменьшить риски и увеличить потенциальную прибыль. Кроме того, получение и использование бонусов в 1win открывает возможность стать лояльным клиентом и получить дополнительные привилегии и вознаграждения от казино.
Итак, получение бонусов в 1win – это отличная возможность для игрока увеличить свои шансы на выигрыш, получить дополнительные деньги и улучшить свой игровой опыт. Бонусы делают игру более интересной и выгодной.
промокоды на 1вин при пополнении: 937999 предоставляет возможность получить бездепозитный бонус 2024. Его можно получить в виде фриспинов или фрибетов. Чтобы получить подарок, необходимо активировать код в личном кабинете. Дополнительный депозит не требуется. Размеры подарков невелики: фрибет до 500 рублей и не более 70 фриспинов для игры в слоты. Как и в случае с другими поощрениями, необходимо отыграть бездепозитный бонус. Вейджер, как правило, не превышает х5 для бесплатных ставок и х30 для фриспинов.
В казино 1win предоставляется внушительный бонус при регистрации, который составляет 500% от суммы первых четырех последовательных депозитов клиента. С таким количеством бонусов новичок может значительно увеличить свои шансы на выигрыш. Чтобы получить этот приветственный бонус, необходимо зарегистрироваться на официальном сайте, рабочем зеркале, мобильной версии или приложениях для мобильных телефонов. Однако, основным условием является совершение первого пополнения счета, так как активировать бонусы 1win можно только после этого.
1win как создать промокод: 937999 используйте бонусный код при регистрации и получите бездепозтный бонус 70 фриспинов. Да, при использовании кода 1Win вы можете получить различные поощрения, включая бездепозитные бонусы. Они обычно представлены в виде фрибетов или фриспинов. Для их активации не требуется дополнительное пополнение счета. Размер таких подарков невелик: бесплатных вращений не более 70. Вейджер на бездепозитный бонус обычно не превышает х35. В 1Win вы можете получить бонусы за участие в акциях, турнирах, розыгрышах и активацию промокода. Бонусная программа периодически обновляется. Кроме того, некоторые акции имеют сезонный характер.
В 1Win основная бонусная программа включает в себя фриспины. Чтобы получить 70FS, необходимо пополнить счет на 100 рублей или более. Игроку предоставляется 2 дня с момента регистрации для активации презента. Отыгрыш бонуса должен быть выполнен в течение 24 часов с момента начисления, с вейджером х35. Бесплатные вращения предназначены только для игр провайдера Microgaming.
Так как бонусная программа 1Win регулярно обновляется, список акций, в которых можно получить фриспины, постоянно расширяется. Более подробную информацию о них можно найти на нашем сайте.
Промокод на 1Win дает возможность получить бесплатные вращения. Их можно использовать в любых слотах из каталога казино. Иногда могут быть установлены ограничения, которые предусматривают использование фриспинов только в определенных слотах или играх конкретного провайдера. Фриспины начисляются с фиксированной ставкой. Отыгрыш выигрыша, полученного с помощью бесплатных вращений, обязателен с учетом установленного вейджера.
Вся информация взята с сайта; https://restoranoved.ru/molly/pages/1win_promokod_5.html
1xBet промокод казино при регистрации. 1xBet промокод казино при регистрации. Сайт 1хБет – это не только популярная букмекерская контора, но и казино, в котором можно играть как с машинами, так и с реальными крупье. Использовав промокод казино 1xBet, игрок получает денежные средства на бонусный счет. Это значит, что он может использовать их только для игры в слоты и другие азартные развлечения на сайте. Вывести деньги, выигранные с бонуса, игрок сможет только тогда, когда отыграет их согласно вейджеру. Сегодня в казино предусмотрены следующие бонусы за регистрацию и депозит: Все новые пользователи азартного заведения могут получить бездепозитный бонус. Промокод представляет собой комбинацию букв и чисел, которые позволят вам получить бонус. Если он актуальный, то сумма вашего депозита после пополнения увеличится на оговоренную в условиях получения промокода сумму. Есть и другой способ. Нередко 1хбет как узнать свой промокод распространяют официальные партнеры компании 1xbet. Среди них могут быть группы и аккаунты в социальных сетях, которые связаны с прогнозированием событий или спортивные ресурсы – более подробно в этом материале https://opt-opt-opt.ru/include/pgs/1xbet_promokod_pri_registracii_7.html
Доброго дня!
Мое написание диплома превратилось в настоящее испытание, однако я обнаружил в интернете полезные материалы для ускорения работы.
Закажите диплом у нас и получите его быстро и безопасно с оплатой по факту доставки, отправка в любой регион России.
https://www.sitebs.ru/blogs/94478.html
https://narodovmnogo-omsk.ru/forum/user/2150/
http://armrus.org/extranet/forum/user/155401/
Желаю каждому отличных отметок!
купить диплом в ялте
купить диплом в таганроге
купить диплом в владикавказе
купить диплом вуза
купить диплом в воронеже
Привет всем!
Диплом получил поддержку через интернет, что значительно упростило задачу.
Предлагаем приобрести диплом университета России по доступной цене с доставкой “под ключ”.
https://bx24.avers35.ru/company/personal/user/38/blog/336/
http://www.vladmines.dn.ua/index.php?name=Account&op=info&uname=ejuze
http://verkehrsknoten.de/index.php/forum/sonstige-themen/84374#85301
Желаю всем отличных отметок!
купить диплом в находке
купить диплом в петрозаводске
купить диплом косметолога
купить диплом в архангельске
купить диплом в туле
canadian pharmacy service
metformin 100 mg tablets
Добрый день!
Нашел в сети ресурсы, которые помогли мне ускорить процесс написания диплома, благодаря чему стало немного легче.
На нашем сайте представлены дипломы с гарантией и доставкой в любой регион РФ.
https://freelance.habr.com/freelancers/ryudjuth
https://dom-nam.ru/index.php/forum/stroitelnye-kompanii/29875-zhelaete-poluchit-diplom-ne-obuchayas#56541
https://vk.com/public50470295?w=wall-50470295_523
Желаю каждому прекрасных отметок!
купить диплом в березниках
купить диплом в ноябрьске
купить диплом в клинцах
купить диплом в керчи
купить диплом фитнес инструктора
Бездепозитный Бонус 1win 2024
Бонусы от казино 1win 1вин промокоды1Win 2024 – Бездепозитные бонусы ? Коды на возврат денег ? VIP Программа лояльности ? Бесплатные фриспины.
1win promocodes промокоды 1win: 937999 предоставляет новым игрокам бонус 500% для игры в слоты и игровые автоматы, максимальная сумма бонуса 200 000 рублей. Вы можете использовать бонусные деньги в разделе азартных игр, включая онлайн казино, карты, рулетку, игровые автоматы и слоты.
Компания «1Win» рада предложить своим новым клиентам приветственный бонус в размере до 500% на первые четыре депозита. Это выгодное предложение доступно сразу после регистрации в нашей букмекерской конторе. Бонус можно получить не только в рублях, но и в других валютах, при этом он не ограничивает возможность участия игроков в других программам лояльности компании. Максимальная сумма вознаграждения за регистрацию составляет 75000 рублей или эквивалентная сумма в другой валюте.
промокод 1win на сегодня при пополнение счета приносят игрокам множество преимуществ. Во-первых, они позволяют увеличить начальную ставку или продлить время игры. Кроме того, они дают возможность попробовать различные игры без риска потерять реальные деньги. Бонусы также повышают шансы на выигрыш и предоставляют дополнительные возможности для получения прибыли. Кроме того, бонусы в 1win могут быть обменены на реальные деньги или использованы для участия в специальных акциях и турнирах.
Преимущества получения и использования бонусов в 1win очевидны. Они позволяют игроку расширить свои возможности и получить больше удовольствия от игры. Бонусы также делают игру более выгодной с финансовой точки зрения, помогая уменьшить риски и увеличить потенциальную прибыль. Кроме того, получение и использование бонусов в 1win открывает возможность стать лояльным клиентом и получить дополнительные привилегии и вознаграждения от казино.
Итак, получение бонусов в 1win – это отличная возможность для игрока увеличить свои шансы на выигрыш, получить дополнительные деньги и улучшить свой игровой опыт. Бонусы делают игру более интересной и выгодной.
как ввести промокод в 1win: 937999 предоставляет возможность получить бездепозитный бонус 2024. Его можно получить в виде фриспинов или фрибетов. Чтобы получить подарок, необходимо активировать код в личном кабинете. Дополнительный депозит не требуется. Размеры подарков невелики: фрибет до 500 рублей и не более 70 фриспинов для игры в слоты. Как и в случае с другими поощрениями, необходимо отыграть бездепозитный бонус. Вейджер, как правило, не превышает х5 для бесплатных ставок и х30 для фриспинов.
В казино 1win предоставляется внушительный бонус при регистрации, который составляет 500% от суммы первых четырех последовательных депозитов клиента. С таким количеством бонусов новичок может значительно увеличить свои шансы на выигрыш. Чтобы получить этот приветственный бонус, необходимо зарегистрироваться на официальном сайте, рабочем зеркале, мобильной версии или приложениях для мобильных телефонов. Однако, основным условием является совершение первого пополнения счета, так как активировать бонусы 1win можно только после этого.
промокод на 1win первое пополнение: 937999 используйте бонусный код при регистрации и получите бездепозтный бонус 70 фриспинов. Да, при использовании кода 1Win вы можете получить различные поощрения, включая бездепозитные бонусы. Они обычно представлены в виде фрибетов или фриспинов. Для их активации не требуется дополнительное пополнение счета. Размер таких подарков невелик: бесплатных вращений не более 70. Вейджер на бездепозитный бонус обычно не превышает х35. В 1Win вы можете получить бонусы за участие в акциях, турнирах, розыгрышах и активацию промокода. Бонусная программа периодически обновляется. Кроме того, некоторые акции имеют сезонный характер.
В 1Win основная бонусная программа включает в себя фриспины. Чтобы получить 70FS, необходимо пополнить счет на 100 рублей или более. Игроку предоставляется 2 дня с момента регистрации для активации презента. Отыгрыш бонуса должен быть выполнен в течение 24 часов с момента начисления, с вейджером х35. Бесплатные вращения предназначены только для игр провайдера Microgaming.
Так как бонусная программа 1Win регулярно обновляется, список акций, в которых можно получить фриспины, постоянно расширяется. Более подробную информацию о них можно найти на нашем сайте.
Промокод на 1Win дает возможность получить бесплатные вращения. Их можно использовать в любых слотах из каталога казино. Иногда могут быть установлены ограничения, которые предусматривают использование фриспинов только в определенных слотах или играх конкретного провайдера. Фриспины начисляются с фиксированной ставкой. Отыгрыш выигрыша, полученного с помощью бесплатных вращений, обязателен с учетом установленного вейджера.
Вся информация взята с сайта; https://restoranoved.ru/molly/pages/1win_promokod_5.html
Бездепозитный Бонус 1win 2024
Бонусы от казино промокод на 1win на пополнение счета1Win 2024 – Бездепозитные бонусы ? Коды на возврат денег ? VIP Программа лояльности ? Бесплатные фриспины.
1win как ввести промокод: 937999 предоставляет новым игрокам бонус 500% для игры в слоты и игровые автоматы, максимальная сумма бонуса 200 000 рублей. Вы можете использовать бонусные деньги в разделе азартных игр, включая онлайн казино, карты, рулетку, игровые автоматы и слоты.
Компания «1Win» рада предложить своим новым клиентам приветственный бонус в размере до 500% на первые четыре депозита. Это выгодное предложение доступно сразу после регистрации в нашей букмекерской конторе. Бонус можно получить не только в рублях, но и в других валютах, при этом он не ограничивает возможность участия игроков в других программам лояльности компании. Максимальная сумма вознаграждения за регистрацию составляет 75000 рублей или эквивалентная сумма в другой валюте.
промокод на 10 рублей 1win приносят игрокам множество преимуществ. Во-первых, они позволяют увеличить начальную ставку или продлить время игры. Кроме того, они дают возможность попробовать различные игры без риска потерять реальные деньги. Бонусы также повышают шансы на выигрыш и предоставляют дополнительные возможности для получения прибыли. Кроме того, бонусы в 1win могут быть обменены на реальные деньги или использованы для участия в специальных акциях и турнирах.
Преимущества получения и использования бонусов в 1win очевидны. Они позволяют игроку расширить свои возможности и получить больше удовольствия от игры. Бонусы также делают игру более выгодной с финансовой точки зрения, помогая уменьшить риски и увеличить потенциальную прибыль. Кроме того, получение и использование бонусов в 1win открывает возможность стать лояльным клиентом и получить дополнительные привилегии и вознаграждения от казино.
Итак, получение бонусов в 1win – это отличная возможность для игрока увеличить свои шансы на выигрыш, получить дополнительные деньги и улучшить свой игровой опыт. Бонусы делают игру более интересной и выгодной.
промокоды 1win 2024: 937999 предоставляет возможность получить бездепозитный бонус 2024. Его можно получить в виде фриспинов или фрибетов. Чтобы получить подарок, необходимо активировать код в личном кабинете. Дополнительный депозит не требуется. Размеры подарков невелики: фрибет до 500 рублей и не более 70 фриспинов для игры в слоты. Как и в случае с другими поощрениями, необходимо отыграть бездепозитный бонус. Вейджер, как правило, не превышает х5 для бесплатных ставок и х30 для фриспинов.
В казино 1win предоставляется внушительный бонус при регистрации, который составляет 500% от суммы первых четырех последовательных депозитов клиента. С таким количеством бонусов новичок может значительно увеличить свои шансы на выигрыш. Чтобы получить этот приветственный бонус, необходимо зарегистрироваться на официальном сайте, рабочем зеркале, мобильной версии или приложениях для мобильных телефонов. Однако, основным условием является совершение первого пополнения счета, так как активировать бонусы 1win можно только после этого.
промокоды 1win на сегодня: 937999 используйте бонусный код при регистрации и получите бездепозтный бонус 70 фриспинов. Да, при использовании кода 1Win вы можете получить различные поощрения, включая бездепозитные бонусы. Они обычно представлены в виде фрибетов или фриспинов. Для их активации не требуется дополнительное пополнение счета. Размер таких подарков невелик: бесплатных вращений не более 70. Вейджер на бездепозитный бонус обычно не превышает х35. В 1Win вы можете получить бонусы за участие в акциях, турнирах, розыгрышах и активацию промокода. Бонусная программа периодически обновляется. Кроме того, некоторые акции имеют сезонный характер.
В 1Win основная бонусная программа включает в себя фриспины. Чтобы получить 70FS, необходимо пополнить счет на 100 рублей или более. Игроку предоставляется 2 дня с момента регистрации для активации презента. Отыгрыш бонуса должен быть выполнен в течение 24 часов с момента начисления, с вейджером х35. Бесплатные вращения предназначены только для игр провайдера Microgaming.
Так как бонусная программа 1Win регулярно обновляется, список акций, в которых можно получить фриспины, постоянно расширяется. Более подробную информацию о них можно найти на нашем сайте.
Промокод на 1Win дает возможность получить бесплатные вращения. Их можно использовать в любых слотах из каталога казино. Иногда могут быть установлены ограничения, которые предусматривают использование фриспинов только в определенных слотах или играх конкретного провайдера. Фриспины начисляются с фиксированной ставкой. Отыгрыш выигрыша, полученного с помощью бесплатных вращений, обязателен с учетом установленного вейджера.
Вся информация взята с сайта; https://restoranoved.ru/molly/pages/1win_promokod_5.html
https://gopb.ru/remont/pokupka-proizvodstvennyx-press-form/
Бесплатные промокоды 1xBet при регистрации 2024. Сегодня пользователям 1xBet-казино предлагаются халявные промокоды на первый депозит, которые активируются при первой регистрации. С их помощью можно увеличить сумму базового бонуса до 32500 рублей. 1XFREE777 — где вводить промокод на 1xbet. Для получения реального выигрыша с возможностью вывода на карту, необходимо поставить всю бонусную сумму на экспресс-ставку с коэффициентом от 1,4. Если прогноз окажется правильным, система переведет деньги на основной счет. Не секрет, что у букмекерской конторы 1xBet помимо спортивных ставок есть и другие направления, включая онлайн-игры, гоночные события или политические состязания – более подробно в этом материале https://opt-opt-opt.ru/include/pgs/1xbet_promokod_pri_registracii_7.html
Sehr lehrreich! Die klaren Anweisungen haben mir das
Verständnis erleichtert. Vielen Dank für diesen informativen Beitrag!
Правильный Промо-Код ХБЕТ на 2024 год. На нашем сайте вы найдете промокоды на разные суммы: на депозит, пополнение и простой. Букмекерская контора 1X Bet только новым людям дарит подарки. промокод тото на 1xbet. Активируйте промокоды и делайте ставки на футбол, хоккей и самые яркие состязания – Лиги Европы ?? и Лиги Чемпионов. Где найти промокод 1xbet на сегодня бесплатно? Использовав промокод казино 1xBet, игрок получает денежные средства на бонусный счет. Это значит, что он может использовать их только для игры в слоты и другие азартные развлечения на сайте. Вывести деньги, выигранные с бонуса, игрок сможет только тогда, когда отыграет их согласно вейджеру. Зарабатывайте баллы и меняйте на купоны или пользуйтесь халявными бонусами – более подробно в этом материале https://opt-opt-opt.ru/include/pgs/1xbet_promokod_pri_registracii_7.html
It is remarkable, very useful idea
РџРѕРґСЂРѕР±РЅРѕ расскажем, как Признание завещания недействительным – Полесский районный суд Калининградской области онлайн или самостоятельно Признание завещания недействительным – Полесский районный суд Калининградской области Признание завещания недействительным – Полесский районный суд Калининградской области онлайн или самостоятельно
I apologise, but, in my opinion, you are mistaken. I can prove it. Write to me in PM, we will communicate.
Подробно расскажем, как Страховое возмещение по КАСКО – Татищевский районный суд Саратовской области онлайн или самостоятельно Страховое возмещение по КАСКО – Татищевский районный суд Саратовской области Страховое возмещение по КАСКО – Татищевский районный суд Саратовской области онлайн или самостоятельно
tadalafil cheap no prescription
Здравствуйте!
Столкнувшись с трудностями в написании диплома, я обнаружил в сети необходимую поддержку.
Приобретите диплом университета у нас и получите его с доставкой в любую точку России с гарантией качества.
http://railagent.ru/club/user/107421/
http://baltpt.ru/index.php?subaction=userinfo&user=agitix
https://radioizba.ru/communication/forum/?PAGE_NAME=profile_view&UID=16890
Желаю всем пятерочных) оценок!
купить диплом медбрата
купить диплом в туапсе
купить диплом в ишимбае
купить диплом в обнинске
купить диплом отзывы
крупногабаритные грузы из китая https://perevozka-iz-kitaya.ru .
rx online pharmacy
Бездепозитный Бонус 1win 2024
Бонусы от казино промокод 1вин при регистрации1Win 2024 – Бездепозитные бонусы ? Коды на возврат денег ? VIP Программа лояльности ? Бесплатные фриспины.
где вводить промокод в 1win: 937999 предоставляет новым игрокам бонус 500% для игры в слоты и игровые автоматы, максимальная сумма бонуса 200 000 рублей. Вы можете использовать бонусные деньги в разделе азартных игр, включая онлайн казино, карты, рулетку, игровые автоматы и слоты.
Компания «1Win» рада предложить своим новым клиентам приветственный бонус в размере до 500% на первые четыре депозита. Это выгодное предложение доступно сразу после регистрации в нашей букмекерской конторе. Бонус можно получить не только в рублях, но и в других валютах, при этом он не ограничивает возможность участия игроков в других программам лояльности компании. Максимальная сумма вознаграждения за регистрацию составляет 75000 рублей или эквивалентная сумма в другой валюте.
промокод на 1win на первый приносят игрокам множество преимуществ. Во-первых, они позволяют увеличить начальную ставку или продлить время игры. Кроме того, они дают возможность попробовать различные игры без риска потерять реальные деньги. Бонусы также повышают шансы на выигрыш и предоставляют дополнительные возможности для получения прибыли. Кроме того, бонусы в 1win могут быть обменены на реальные деньги или использованы для участия в специальных акциях и турнирах.
Преимущества получения и использования бонусов в 1win очевидны. Они позволяют игроку расширить свои возможности и получить больше удовольствия от игры. Бонусы также делают игру более выгодной с финансовой точки зрения, помогая уменьшить риски и увеличить потенциальную прибыль. Кроме того, получение и использование бонусов в 1win открывает возможность стать лояльным клиентом и получить дополнительные привилегии и вознаграждения от казино.
Итак, получение бонусов в 1win – это отличная возможность для игрока увеличить свои шансы на выигрыш, получить дополнительные деньги и улучшить свой игровой опыт. Бонусы делают игру более интересной и выгодной.
промокод в 1win где вводить: 937999 предоставляет возможность получить бездепозитный бонус 2024. Его можно получить в виде фриспинов или фрибетов. Чтобы получить подарок, необходимо активировать код в личном кабинете. Дополнительный депозит не требуется. Размеры подарков невелики: фрибет до 500 рублей и не более 70 фриспинов для игры в слоты. Как и в случае с другими поощрениями, необходимо отыграть бездепозитный бонус. Вейджер, как правило, не превышает х5 для бесплатных ставок и х30 для фриспинов.
В казино 1win предоставляется внушительный бонус при регистрации, который составляет 500% от суммы первых четырех последовательных депозитов клиента. С таким количеством бонусов новичок может значительно увеличить свои шансы на выигрыш. Чтобы получить этот приветственный бонус, необходимо зарегистрироваться на официальном сайте, рабочем зеркале, мобильной версии или приложениях для мобильных телефонов. Однако, основным условием является совершение первого пополнения счета, так как активировать бонусы 1win можно только после этого.
куда вводить промокод 1win: 937999 используйте бонусный код при регистрации и получите бездепозтный бонус 70 фриспинов. Да, при использовании кода 1Win вы можете получить различные поощрения, включая бездепозитные бонусы. Они обычно представлены в виде фрибетов или фриспинов. Для их активации не требуется дополнительное пополнение счета. Размер таких подарков невелик: бесплатных вращений не более 70. Вейджер на бездепозитный бонус обычно не превышает х35. В 1Win вы можете получить бонусы за участие в акциях, турнирах, розыгрышах и активацию промокода. Бонусная программа периодически обновляется. Кроме того, некоторые акции имеют сезонный характер.
В 1Win основная бонусная программа включает в себя фриспины. Чтобы получить 70FS, необходимо пополнить счет на 100 рублей или более. Игроку предоставляется 2 дня с момента регистрации для активации презента. Отыгрыш бонуса должен быть выполнен в течение 24 часов с момента начисления, с вейджером х35. Бесплатные вращения предназначены только для игр провайдера Microgaming.
Так как бонусная программа 1Win регулярно обновляется, список акций, в которых можно получить фриспины, постоянно расширяется. Более подробную информацию о них можно найти на нашем сайте.
Промокод на 1Win дает возможность получить бесплатные вращения. Их можно использовать в любых слотах из каталога казино. Иногда могут быть установлены ограничения, которые предусматривают использование фриспинов только в определенных слотах или играх конкретного провайдера. Фриспины начисляются с фиксированной ставкой. Отыгрыш выигрыша, полученного с помощью бесплатных вращений, обязателен с учетом установленного вейджера.
Вся информация взята с сайта; http://uzrf.ru/new2/pages/1win_promokod_5.html
metformin 850 mg tablet
Бездепозитный Бонус 1win 2024
Бонусы от казино 1 вин промокод 1win1Win 2024 – Бездепозитные бонусы ? Коды на возврат денег ? VIP Программа лояльности ? Бесплатные фриспины.
1win com промокоды: 937999 предоставляет новым игрокам бонус 500% для игры в слоты и игровые автоматы, максимальная сумма бонуса 200 000 рублей. Вы можете использовать бонусные деньги в разделе азартных игр, включая онлайн казино, карты, рулетку, игровые автоматы и слоты.
Компания «1Win» рада предложить своим новым клиентам приветственный бонус в размере до 500% на первые четыре депозита. Это выгодное предложение доступно сразу после регистрации в нашей букмекерской конторе. Бонус можно получить не только в рублях, но и в других валютах, при этом он не ограничивает возможность участия игроков в других программам лояльности компании. Максимальная сумма вознаграждения за регистрацию составляет 75000 рублей или эквивалентная сумма в другой валюте.
как вводить промокоды в 1win приносят игрокам множество преимуществ. Во-первых, они позволяют увеличить начальную ставку или продлить время игры. Кроме того, они дают возможность попробовать различные игры без риска потерять реальные деньги. Бонусы также повышают шансы на выигрыш и предоставляют дополнительные возможности для получения прибыли. Кроме того, бонусы в 1win могут быть обменены на реальные деньги или использованы для участия в специальных акциях и турнирах.
Преимущества получения и использования бонусов в 1win очевидны. Они позволяют игроку расширить свои возможности и получить больше удовольствия от игры. Бонусы также делают игру более выгодной с финансовой точки зрения, помогая уменьшить риски и увеличить потенциальную прибыль. Кроме того, получение и использование бонусов в 1win открывает возможность стать лояльным клиентом и получить дополнительные привилегии и вознаграждения от казино.
Итак, получение бонусов в 1win – это отличная возможность для игрока увеличить свои шансы на выигрыш, получить дополнительные деньги и улучшить свой игровой опыт. Бонусы делают игру более интересной и выгодной.
1win casino промокод: 937999 предоставляет возможность получить бездепозитный бонус 2024. Его можно получить в виде фриспинов или фрибетов. Чтобы получить подарок, необходимо активировать код в личном кабинете. Дополнительный депозит не требуется. Размеры подарков невелики: фрибет до 500 рублей и не более 70 фриспинов для игры в слоты. Как и в случае с другими поощрениями, необходимо отыграть бездепозитный бонус. Вейджер, как правило, не превышает х5 для бесплатных ставок и х30 для фриспинов.
В казино 1win предоставляется внушительный бонус при регистрации, который составляет 500% от суммы первых четырех последовательных депозитов клиента. С таким количеством бонусов новичок может значительно увеличить свои шансы на выигрыш. Чтобы получить этот приветственный бонус, необходимо зарегистрироваться на официальном сайте, рабочем зеркале, мобильной версии или приложениях для мобильных телефонов. Однако, основным условием является совершение первого пополнения счета, так как активировать бонусы 1win можно только после этого.
как в 1win ввести промокод: 937999 используйте бонусный код при регистрации и получите бездепозтный бонус 70 фриспинов. Да, при использовании кода 1Win вы можете получить различные поощрения, включая бездепозитные бонусы. Они обычно представлены в виде фрибетов или фриспинов. Для их активации не требуется дополнительное пополнение счета. Размер таких подарков невелик: бесплатных вращений не более 70. Вейджер на бездепозитный бонус обычно не превышает х35. В 1Win вы можете получить бонусы за участие в акциях, турнирах, розыгрышах и активацию промокода. Бонусная программа периодически обновляется. Кроме того, некоторые акции имеют сезонный характер.
В 1Win основная бонусная программа включает в себя фриспины. Чтобы получить 70FS, необходимо пополнить счет на 100 рублей или более. Игроку предоставляется 2 дня с момента регистрации для активации презента. Отыгрыш бонуса должен быть выполнен в течение 24 часов с момента начисления, с вейджером х35. Бесплатные вращения предназначены только для игр провайдера Microgaming.
Так как бонусная программа 1Win регулярно обновляется, список акций, в которых можно получить фриспины, постоянно расширяется. Более подробную информацию о них можно найти на нашем сайте.
Промокод на 1Win дает возможность получить бесплатные вращения. Их можно использовать в любых слотах из каталога казино. Иногда могут быть установлены ограничения, которые предусматривают использование фриспинов только в определенных слотах или играх конкретного провайдера. Фриспины начисляются с фиксированной ставкой. Отыгрыш выигрыша, полученного с помощью бесплатных вращений, обязателен с учетом установленного вейджера.
Вся информация взята с сайта; http://uzrf.ru/new2/pages/1win_promokod_5.html
Бездепозитный Бонус 1win 2024
Бонусы от казино 1win куда ввести промокод1Win 2024 – Бездепозитные бонусы ? Коды на возврат денег ? VIP Программа лояльности ? Бесплатные фриспины.
1win официальный промокод: 937999 предоставляет новым игрокам бонус 500% для игры в слоты и игровые автоматы, максимальная сумма бонуса 200 000 рублей. Вы можете использовать бонусные деньги в разделе азартных игр, включая онлайн казино, карты, рулетку, игровые автоматы и слоты.
Компания «1Win» рада предложить своим новым клиентам приветственный бонус в размере до 500% на первые четыре депозита. Это выгодное предложение доступно сразу после регистрации в нашей букмекерской конторе. Бонус можно получить не только в рублях, но и в других валютах, при этом он не ограничивает возможность участия игроков в других программам лояльности компании. Максимальная сумма вознаграждения за регистрацию составляет 75000 рублей или эквивалентная сумма в другой валюте.
1win официальный сайт 1вин промокоды приносят игрокам множество преимуществ. Во-первых, они позволяют увеличить начальную ставку или продлить время игры. Кроме того, они дают возможность попробовать различные игры без риска потерять реальные деньги. Бонусы также повышают шансы на выигрыш и предоставляют дополнительные возможности для получения прибыли. Кроме того, бонусы в 1win могут быть обменены на реальные деньги или использованы для участия в специальных акциях и турнирах.
Преимущества получения и использования бонусов в 1win очевидны. Они позволяют игроку расширить свои возможности и получить больше удовольствия от игры. Бонусы также делают игру более выгодной с финансовой точки зрения, помогая уменьшить риски и увеличить потенциальную прибыль. Кроме того, получение и использование бонусов в 1win открывает возможность стать лояльным клиентом и получить дополнительные привилегии и вознаграждения от казино.
Итак, получение бонусов в 1win – это отличная возможность для игрока увеличить свои шансы на выигрыш, получить дополнительные деньги и улучшить свой игровой опыт. Бонусы делают игру более интересной и выгодной.
1win букмекерская контора промокод: 937999 предоставляет возможность получить бездепозитный бонус 2024. Его можно получить в виде фриспинов или фрибетов. Чтобы получить подарок, необходимо активировать код в личном кабинете. Дополнительный депозит не требуется. Размеры подарков невелики: фрибет до 500 рублей и не более 70 фриспинов для игры в слоты. Как и в случае с другими поощрениями, необходимо отыграть бездепозитный бонус. Вейджер, как правило, не превышает х5 для бесплатных ставок и х30 для фриспинов.
В казино 1win предоставляется внушительный бонус при регистрации, который составляет 500% от суммы первых четырех последовательных депозитов клиента. С таким количеством бонусов новичок может значительно увеличить свои шансы на выигрыш. Чтобы получить этот приветственный бонус, необходимо зарегистрироваться на официальном сайте, рабочем зеркале, мобильной версии или приложениях для мобильных телефонов. Однако, основным условием является совершение первого пополнения счета, так как активировать бонусы 1win можно только после этого.
промокоды при регистрации 1win: 937999 используйте бонусный код при регистрации и получите бездепозтный бонус 70 фриспинов. Да, при использовании кода 1Win вы можете получить различные поощрения, включая бездепозитные бонусы. Они обычно представлены в виде фрибетов или фриспинов. Для их активации не требуется дополнительное пополнение счета. Размер таких подарков невелик: бесплатных вращений не более 70. Вейджер на бездепозитный бонус обычно не превышает х35. В 1Win вы можете получить бонусы за участие в акциях, турнирах, розыгрышах и активацию промокода. Бонусная программа периодически обновляется. Кроме того, некоторые акции имеют сезонный характер.
В 1Win основная бонусная программа включает в себя фриспины. Чтобы получить 70FS, необходимо пополнить счет на 100 рублей или более. Игроку предоставляется 2 дня с момента регистрации для активации презента. Отыгрыш бонуса должен быть выполнен в течение 24 часов с момента начисления, с вейджером х35. Бесплатные вращения предназначены только для игр провайдера Microgaming.
Так как бонусная программа 1Win регулярно обновляется, список акций, в которых можно получить фриспины, постоянно расширяется. Более подробную информацию о них можно найти на нашем сайте.
Промокод на 1Win дает возможность получить бесплатные вращения. Их можно использовать в любых слотах из каталога казино. Иногда могут быть установлены ограничения, которые предусматривают использование фриспинов только в определенных слотах или играх конкретного провайдера. Фриспины начисляются с фиксированной ставкой. Отыгрыш выигрыша, полученного с помощью бесплатных вращений, обязателен с учетом установленного вейджера.
Вся информация взята с сайта; http://uzrf.ru/new2/pages/1win_promokod_5.html
synthroid otc
Its ssuch as yyou learn my thoughts! You appear tto grasp so much approximately this, like you
wrote the ebook in it or something. I feel that you can do with a few % to power the message home a littlle
bit, but other than that, that is excellent blog. An excellent
read. I’ll definitely be back.
фильм 2024
cheap lisinopril
cost of 2.5mg prednisone
buy lisinopril 2.5 mg
фильм в хорошем качестве
фильм смотреть
how to get metformin without prescription
synthroid 0.5 mg
сериал
Бездепозитный Бонус 1win 2024
Бонусы от казино 1win промокод при регистрации1Win 2024 – Бездепозитные бонусы ? Коды на возврат денег ? VIP Программа лояльности ? Бесплатные фриспины.
промокод 1win 2024: 937999 предоставляет новым игрокам бонус 500% для игры в слоты и игровые автоматы, максимальная сумма бонуса 200 000 рублей. Вы можете использовать бонусные деньги в разделе азартных игр, включая онлайн казино, карты, рулетку, игровые автоматы и слоты.
Компания «1Win» рада предложить своим новым клиентам приветственный бонус в размере до 500% на первые четыре депозита. Это выгодное предложение доступно сразу после регистрации в нашей букмекерской конторе. Бонус можно получить не только в рублях, но и в других валютах, при этом он не ограничивает возможность участия игроков в других программам лояльности компании. Максимальная сумма вознаграждения за регистрацию составляет 75000 рублей или эквивалентная сумма в другой валюте.
промокод на 1win на пополнение счета приносят игрокам множество преимуществ. Во-первых, они позволяют увеличить начальную ставку или продлить время игры. Кроме того, они дают возможность попробовать различные игры без риска потерять реальные деньги. Бонусы также повышают шансы на выигрыш и предоставляют дополнительные возможности для получения прибыли. Кроме того, бонусы в 1win могут быть обменены на реальные деньги или использованы для участия в специальных акциях и турнирах.
Преимущества получения и использования бонусов в 1win очевидны. Они позволяют игроку расширить свои возможности и получить больше удовольствия от игры. Бонусы также делают игру более выгодной с финансовой точки зрения, помогая уменьшить риски и увеличить потенциальную прибыль. Кроме того, получение и использование бонусов в 1win открывает возможность стать лояльным клиентом и получить дополнительные привилегии и вознаграждения от казино.
Итак, получение бонусов в 1win – это отличная возможность для игрока увеличить свои шансы на выигрыш, получить дополнительные деньги и улучшить свой игровой опыт. Бонусы делают игру более интересной и выгодной.
промокод для 1win 2024: 937999 предоставляет возможность получить бездепозитный бонус 2024. Его можно получить в виде фриспинов или фрибетов. Чтобы получить подарок, необходимо активировать код в личном кабинете. Дополнительный депозит не требуется. Размеры подарков невелики: фрибет до 500 рублей и не более 70 фриспинов для игры в слоты. Как и в случае с другими поощрениями, необходимо отыграть бездепозитный бонус. Вейджер, как правило, не превышает х5 для бесплатных ставок и х30 для фриспинов.
В казино 1win предоставляется внушительный бонус при регистрации, который составляет 500% от суммы первых четырех последовательных депозитов клиента. С таким количеством бонусов новичок может значительно увеличить свои шансы на выигрыш. Чтобы получить этот приветственный бонус, необходимо зарегистрироваться на официальном сайте, рабочем зеркале, мобильной версии или приложениях для мобильных телефонов. Однако, основным условием является совершение первого пополнения счета, так как активировать бонусы 1win можно только после этого.
1вин промокод 1win: 937999 используйте бонусный код при регистрации и получите бездепозтный бонус 70 фриспинов. Да, при использовании кода 1Win вы можете получить различные поощрения, включая бездепозитные бонусы. Они обычно представлены в виде фрибетов или фриспинов. Для их активации не требуется дополнительное пополнение счета. Размер таких подарков невелик: бесплатных вращений не более 70. Вейджер на бездепозитный бонус обычно не превышает х35. В 1Win вы можете получить бонусы за участие в акциях, турнирах, розыгрышах и активацию промокода. Бонусная программа периодически обновляется. Кроме того, некоторые акции имеют сезонный характер.
В 1Win основная бонусная программа включает в себя фриспины. Чтобы получить 70FS, необходимо пополнить счет на 100 рублей или более. Игроку предоставляется 2 дня с момента регистрации для активации презента. Отыгрыш бонуса должен быть выполнен в течение 24 часов с момента начисления, с вейджером х35. Бесплатные вращения предназначены только для игр провайдера Microgaming.
Так как бонусная программа 1Win регулярно обновляется, список акций, в которых можно получить фриспины, постоянно расширяется. Более подробную информацию о них можно найти на нашем сайте.
Промокод на 1Win дает возможность получить бесплатные вращения. Их можно использовать в любых слотах из каталога казино. Иногда могут быть установлены ограничения, которые предусматривают использование фриспинов только в определенных слотах или играх конкретного провайдера. Фриспины начисляются с фиксированной ставкой. Отыгрыш выигрыша, полученного с помощью бесплатных вращений, обязателен с учетом установленного вейджера.
Вся информация взята с сайта; https://www.glory-gallery.ru/wp-includes/inc/1win_promokod_5.html
buy synthroid mexico
Amant alterna Camenae — Музам приятны перемежающиеся песни.
Бездепозитный Бонус 1win 2024
Бонусы от казино промокод авиатор 1win1Win 2024 – Бездепозитные бонусы ? Коды на возврат денег ? VIP Программа лояльности ? Бесплатные фриспины.
промокоды в 1win: 937999 предоставляет новым игрокам бонус 500% для игры в слоты и игровые автоматы, максимальная сумма бонуса 200 000 рублей. Вы можете использовать бонусные деньги в разделе азартных игр, включая онлайн казино, карты, рулетку, игровые автоматы и слоты.
Компания «1Win» рада предложить своим новым клиентам приветственный бонус в размере до 500% на первые четыре депозита. Это выгодное предложение доступно сразу после регистрации в нашей букмекерской конторе. Бонус можно получить не только в рублях, но и в других валютах, при этом он не ограничивает возможность участия игроков в других программам лояльности компании. Максимальная сумма вознаграждения за регистрацию составляет 75000 рублей или эквивалентная сумма в другой валюте.
промокоды 1win при регистрации 2024 приносят игрокам множество преимуществ. Во-первых, они позволяют увеличить начальную ставку или продлить время игры. Кроме того, они дают возможность попробовать различные игры без риска потерять реальные деньги. Бонусы также повышают шансы на выигрыш и предоставляют дополнительные возможности для получения прибыли. Кроме того, бонусы в 1win могут быть обменены на реальные деньги или использованы для участия в специальных акциях и турнирах.
Преимущества получения и использования бонусов в 1win очевидны. Они позволяют игроку расширить свои возможности и получить больше удовольствия от игры. Бонусы также делают игру более выгодной с финансовой точки зрения, помогая уменьшить риски и увеличить потенциальную прибыль. Кроме того, получение и использование бонусов в 1win открывает возможность стать лояльным клиентом и получить дополнительные привилегии и вознаграждения от казино.
Итак, получение бонусов в 1win – это отличная возможность для игрока увеличить свои шансы на выигрыш, получить дополнительные деньги и улучшить свой игровой опыт. Бонусы делают игру более интересной и выгодной.
1win промокод при регистрации: 937999 предоставляет возможность получить бездепозитный бонус 2024. Его можно получить в виде фриспинов или фрибетов. Чтобы получить подарок, необходимо активировать код в личном кабинете. Дополнительный депозит не требуется. Размеры подарков невелики: фрибет до 500 рублей и не более 70 фриспинов для игры в слоты. Как и в случае с другими поощрениями, необходимо отыграть бездепозитный бонус. Вейджер, как правило, не превышает х5 для бесплатных ставок и х30 для фриспинов.
В казино 1win предоставляется внушительный бонус при регистрации, который составляет 500% от суммы первых четырех последовательных депозитов клиента. С таким количеством бонусов новичок может значительно увеличить свои шансы на выигрыш. Чтобы получить этот приветственный бонус, необходимо зарегистрироваться на официальном сайте, рабочем зеркале, мобильной версии или приложениях для мобильных телефонов. Однако, основным условием является совершение первого пополнения счета, так как активировать бонусы 1win можно только после этого.
промокоды на 1вин: 937999 используйте бонусный код при регистрации и получите бездепозтный бонус 70 фриспинов. Да, при использовании кода 1Win вы можете получить различные поощрения, включая бездепозитные бонусы. Они обычно представлены в виде фрибетов или фриспинов. Для их активации не требуется дополнительное пополнение счета. Размер таких подарков невелик: бесплатных вращений не более 70. Вейджер на бездепозитный бонус обычно не превышает х35. В 1Win вы можете получить бонусы за участие в акциях, турнирах, розыгрышах и активацию промокода. Бонусная программа периодически обновляется. Кроме того, некоторые акции имеют сезонный характер.
В 1Win основная бонусная программа включает в себя фриспины. Чтобы получить 70FS, необходимо пополнить счет на 100 рублей или более. Игроку предоставляется 2 дня с момента регистрации для активации презента. Отыгрыш бонуса должен быть выполнен в течение 24 часов с момента начисления, с вейджером х35. Бесплатные вращения предназначены только для игр провайдера Microgaming.
Так как бонусная программа 1Win регулярно обновляется, список акций, в которых можно получить фриспины, постоянно расширяется. Более подробную информацию о них можно найти на нашем сайте.
Промокод на 1Win дает возможность получить бесплатные вращения. Их можно использовать в любых слотах из каталога казино. Иногда могут быть установлены ограничения, которые предусматривают использование фриспинов только в определенных слотах или играх конкретного провайдера. Фриспины начисляются с фиксированной ставкой. Отыгрыш выигрыша, полученного с помощью бесплатных вращений, обязателен с учетом установленного вейджера.
Вся информация взята с сайта; https://www.glory-gallery.ru/wp-includes/inc/1win_promokod_5.html
where can i buy metformin online
Бездепозитный Бонус 1win 2024
Бонусы от казино промокод для 1win при регистрации1Win 2024 – Бездепозитные бонусы ? Коды на возврат денег ? VIP Программа лояльности ? Бесплатные фриспины.
бонус промокод 1win: 937999 предоставляет новым игрокам бонус 500% для игры в слоты и игровые автоматы, максимальная сумма бонуса 200 000 рублей. Вы можете использовать бонусные деньги в разделе азартных игр, включая онлайн казино, карты, рулетку, игровые автоматы и слоты.
Компания «1Win» рада предложить своим новым клиентам приветственный бонус в размере до 500% на первые четыре депозита. Это выгодное предложение доступно сразу после регистрации в нашей букмекерской конторе. Бонус можно получить не только в рублях, но и в других валютах, при этом он не ограничивает возможность участия игроков в других программам лояльности компании. Максимальная сумма вознаграждения за регистрацию составляет 75000 рублей или эквивалентная сумма в другой валюте.
1win промокод на депозит первый приносят игрокам множество преимуществ. Во-первых, они позволяют увеличить начальную ставку или продлить время игры. Кроме того, они дают возможность попробовать различные игры без риска потерять реальные деньги. Бонусы также повышают шансы на выигрыш и предоставляют дополнительные возможности для получения прибыли. Кроме того, бонусы в 1win могут быть обменены на реальные деньги или использованы для участия в специальных акциях и турнирах.
Преимущества получения и использования бонусов в 1win очевидны. Они позволяют игроку расширить свои возможности и получить больше удовольствия от игры. Бонусы также делают игру более выгодной с финансовой точки зрения, помогая уменьшить риски и увеличить потенциальную прибыль. Кроме того, получение и использование бонусов в 1win открывает возможность стать лояльным клиентом и получить дополнительные привилегии и вознаграждения от казино.
Итак, получение бонусов в 1win – это отличная возможность для игрока увеличить свои шансы на выигрыш, получить дополнительные деньги и улучшить свой игровой опыт. Бонусы делают игру более интересной и выгодной.
промокоды на 1win 2024: 937999 предоставляет возможность получить бездепозитный бонус 2024. Его можно получить в виде фриспинов или фрибетов. Чтобы получить подарок, необходимо активировать код в личном кабинете. Дополнительный депозит не требуется. Размеры подарков невелики: фрибет до 500 рублей и не более 70 фриспинов для игры в слоты. Как и в случае с другими поощрениями, необходимо отыграть бездепозитный бонус. Вейджер, как правило, не превышает х5 для бесплатных ставок и х30 для фриспинов.
В казино 1win предоставляется внушительный бонус при регистрации, который составляет 500% от суммы первых четырех последовательных депозитов клиента. С таким количеством бонусов новичок может значительно увеличить свои шансы на выигрыш. Чтобы получить этот приветственный бонус, необходимо зарегистрироваться на официальном сайте, рабочем зеркале, мобильной версии или приложениях для мобильных телефонов. Однако, основным условием является совершение первого пополнения счета, так как активировать бонусы 1win можно только после этого.
1win где вводить промокод: 937999 используйте бонусный код при регистрации и получите бездепозтный бонус 70 фриспинов. Да, при использовании кода 1Win вы можете получить различные поощрения, включая бездепозитные бонусы. Они обычно представлены в виде фрибетов или фриспинов. Для их активации не требуется дополнительное пополнение счета. Размер таких подарков невелик: бесплатных вращений не более 70. Вейджер на бездепозитный бонус обычно не превышает х35. В 1Win вы можете получить бонусы за участие в акциях, турнирах, розыгрышах и активацию промокода. Бонусная программа периодически обновляется. Кроме того, некоторые акции имеют сезонный характер.
В 1Win основная бонусная программа включает в себя фриспины. Чтобы получить 70FS, необходимо пополнить счет на 100 рублей или более. Игроку предоставляется 2 дня с момента регистрации для активации презента. Отыгрыш бонуса должен быть выполнен в течение 24 часов с момента начисления, с вейджером х35. Бесплатные вращения предназначены только для игр провайдера Microgaming.
Так как бонусная программа 1Win регулярно обновляется, список акций, в которых можно получить фриспины, постоянно расширяется. Более подробную информацию о них можно найти на нашем сайте.
Промокод на 1Win дает возможность получить бесплатные вращения. Их можно использовать в любых слотах из каталога казино. Иногда могут быть установлены ограничения, которые предусматривают использование фриспинов только в определенных слотах или играх конкретного провайдера. Фриспины начисляются с фиксированной ставкой. Отыгрыш выигрыша, полученного с помощью бесплатных вращений, обязателен с учетом установленного вейджера.
Вся информация взята с сайта; https://www.glory-gallery.ru/wp-includes/inc/1win_promokod_5.html
buy cialis united states
happy family pharmacy
cheapest 20 mg cialis
price of synthroid in india
cheapest pharmacy canada
Ab hoc et ab hac — Кстати и некстати
?Bonos exclusivos! Bono casino sin deposito
casino online bono sin deposito bono gratis para casino sin deposito .
Obten tu bono casino sin deposito ahora mismo
bono de casino sin deposito casino online con bono sin deposito .
We’re a bunch of volunteers and opening a new scheme in ourr community.
Your website provided us with useful info to work on.
You have done a formidable job and our entire neighborhood
will be thankful to you.
synthroid purchase
buy tadalafil canada
Ad majorem Dei gloriam — К вящей славе Божией
Artificiosa natura — Творческая природа.
canada cloud pharmacy
https://kupitzhilie.ru/
Contraria sunt complementa — Противоположности дополняют друг друга.
Ad hoste maligno libera nos, Domine — Избави нас от лукавого, Боже.
yangsfitness.com
그것들을 보세요, 그들은 너무 작아서 스스로 돈을 벌 수 있습니다.
synthroid 175 mcg tablet
Тепловизоры: особенности работы и применение
тепловизор купить https://www.teplovizor-od.co.ua .
Тепловизоры: особенности работы в различных условиях
купить тепловизоры teplovizor-od.co.ua .
https://salezhilie.ru/
Тепловизоры: современные технологии и возможности
цена тепловизоры http://www.teplovizor-od.co.ua .
valtrex pharmacy
Продвижение сайта на международном рынке: особенности и трудности
17
сео оптимизация сайта https://www.seo-prodvizhenie-sayta.co.ua .
mega-casino66.com
Liu Jian은 기뻐했지만 황제와 Fang Jifan을 조심스럽게 바라 보았습니다.
synthroid 100
lisinopril 2 5 mg tablets
Online poker
Тепловизоры: особенности работы и применение
купить тепловизоры https://www.teplovizor-od.co.ua .
Оптимизация скорости загрузки сайта для улучшения продвижения
20
аудит сайта http://seo-prodvizhenie-sayta.co.ua/ .
air cargo charter co ltd http://www.aircgc-lux.com/ .
1
услуги сео http://seo-prodvizhenie-sayta.co.ua/ .
Тепловизоры: новинки и тренды на рынке
цена тепловизоры http://www.teplovizor-od.co.ua/ .
azithromycin 500mg without prescription
Получи 32500 руб. по актуальному промо коду для 1хбет бесплатно. Новые купоны на регистрацию каждый час на сайте. В ваших силах получить до шести с половиной тысяч рублей при регистрации. Читайте ниже как использовать наши промо-коды. 1xbet промокод при регистрации в 1хбет. Букмекерская контора позволяет использовать промокод 1иксбет на ставку-бонус. Забирайте новые купоны ежедневно. Внимание! Наши промо-купоны подходят для всех акций букмекера. Этот купон также универсальный – используйте его везде, не только при регистрации на сайте БК 1хбет и всех известных его зеркал. Введите его в форме для регистрации и получите увеличенный бонус на первый депозит до 32500 рублей. Кроме того, букмекер постоянно дарит активным клиентам выгодные подарки. Чтобы получить промокод в 1xBet бесплатно: Подпишитесь на рассылку новостей по смс или электронной почте. Регулярно заходите в раздел «Бонусы и подарки» в Личном кабинете – более подробно в этом материале https://10-region.ru/includes/list/index.php?promokod_1xbet_bonus_32000.html
tadalafil otc uk
Бездепозитный Бонус 1win 2024
Бонусы от казино 1win как активировать промокод1Win 2024 – Бездепозитные бонусы ? Коды на возврат денег ? VIP Программа лояльности ? Бесплатные фриспины.
промокод на 10 рублей 1win: 937999 предоставляет новым игрокам бонус 500% для игры в слоты и игровые автоматы, максимальная сумма бонуса 200 000 рублей. Вы можете использовать бонусные деньги в разделе азартных игр, включая онлайн казино, карты, рулетку, игровые автоматы и слоты.
Компания «1Win» рада предложить своим новым клиентам приветственный бонус в размере до 500% на первые четыре депозита. Это выгодное предложение доступно сразу после регистрации в нашей букмекерской конторе. Бонус можно получить не только в рублях, но и в других валютах, при этом он не ограничивает возможность участия игроков в других программам лояльности компании. Максимальная сумма вознаграждения за регистрацию составляет 75000 рублей или эквивалентная сумма в другой валюте.
промокод на 1win при регистрации приносят игрокам множество преимуществ. Во-первых, они позволяют увеличить начальную ставку или продлить время игры. Кроме того, они дают возможность попробовать различные игры без риска потерять реальные деньги. Бонусы также повышают шансы на выигрыш и предоставляют дополнительные возможности для получения прибыли. Кроме того, бонусы в 1win могут быть обменены на реальные деньги или использованы для участия в специальных акциях и турнирах.
Преимущества получения и использования бонусов в 1win очевидны. Они позволяют игроку расширить свои возможности и получить больше удовольствия от игры. Бонусы также делают игру более выгодной с финансовой точки зрения, помогая уменьшить риски и увеличить потенциальную прибыль. Кроме того, получение и использование бонусов в 1win открывает возможность стать лояльным клиентом и получить дополнительные привилегии и вознаграждения от казино.
Итак, получение бонусов в 1win – это отличная возможность для игрока увеличить свои шансы на выигрыш, получить дополнительные деньги и улучшить свой игровой опыт. Бонусы делают игру более интересной и выгодной.
как ввести промокод в 1win: 937999 предоставляет возможность получить бездепозитный бонус 2024. Его можно получить в виде фриспинов или фрибетов. Чтобы получить подарок, необходимо активировать код в личном кабинете. Дополнительный депозит не требуется. Размеры подарков невелики: фрибет до 500 рублей и не более 70 фриспинов для игры в слоты. Как и в случае с другими поощрениями, необходимо отыграть бездепозитный бонус. Вейджер, как правило, не превышает х5 для бесплатных ставок и х30 для фриспинов.
В казино 1win предоставляется внушительный бонус при регистрации, который составляет 500% от суммы первых четырех последовательных депозитов клиента. С таким количеством бонусов новичок может значительно увеличить свои шансы на выигрыш. Чтобы получить этот приветственный бонус, необходимо зарегистрироваться на официальном сайте, рабочем зеркале, мобильной версии или приложениях для мобильных телефонов. Однако, основным условием является совершение первого пополнения счета, так как активировать бонусы 1win можно только после этого.
промокод при регистрации 1win: 937999 используйте бонусный код при регистрации и получите бездепозтный бонус 70 фриспинов. Да, при использовании кода 1Win вы можете получить различные поощрения, включая бездепозитные бонусы. Они обычно представлены в виде фрибетов или фриспинов. Для их активации не требуется дополнительное пополнение счета. Размер таких подарков невелик: бесплатных вращений не более 70. Вейджер на бездепозитный бонус обычно не превышает х35. В 1Win вы можете получить бонусы за участие в акциях, турнирах, розыгрышах и активацию промокода. Бонусная программа периодически обновляется. Кроме того, некоторые акции имеют сезонный характер.
В 1Win основная бонусная программа включает в себя фриспины. Чтобы получить 70FS, необходимо пополнить счет на 100 рублей или более. Игроку предоставляется 2 дня с момента регистрации для активации презента. Отыгрыш бонуса должен быть выполнен в течение 24 часов с момента начисления, с вейджером х35. Бесплатные вращения предназначены только для игр провайдера Microgaming.
Так как бонусная программа 1Win регулярно обновляется, список акций, в которых можно получить фриспины, постоянно расширяется. Более подробную информацию о них можно найти на нашем сайте.
Промокод на 1Win дает возможность получить бесплатные вращения. Их можно использовать в любых слотах из каталога казино. Иногда могут быть установлены ограничения, которые предусматривают использование фриспинов только в определенных слотах или играх конкретного провайдера. Фриспины начисляются с фиксированной ставкой. Отыгрыш выигрыша, полученного с помощью бесплатных вращений, обязателен с учетом установленного вейджера.
Вся информация взята с сайта; https://www.legnostyle.ru/images/pages/?1win_promokod_5.html
glucophage 850 price
https://kupithouse.ru/
buying synthroid online
Бездепозитный Бонус 1win 2024
Бонусы от казино 1win куда ввести промокод1Win 2024 – Бездепозитные бонусы ? Коды на возврат денег ? VIP Программа лояльности ? Бесплатные фриспины.
промокод на 1win первое пополнение: 937999 предоставляет новым игрокам бонус 500% для игры в слоты и игровые автоматы, максимальная сумма бонуса 200 000 рублей. Вы можете использовать бонусные деньги в разделе азартных игр, включая онлайн казино, карты, рулетку, игровые автоматы и слоты.
Компания «1Win» рада предложить своим новым клиентам приветственный бонус в размере до 500% на первые четыре депозита. Это выгодное предложение доступно сразу после регистрации в нашей букмекерской конторе. Бонус можно получить не только в рублях, но и в других валютах, при этом он не ограничивает возможность участия игроков в других программам лояльности компании. Максимальная сумма вознаграждения за регистрацию составляет 75000 рублей или эквивалентная сумма в другой валюте.
1win ввести промокод приносят игрокам множество преимуществ. Во-первых, они позволяют увеличить начальную ставку или продлить время игры. Кроме того, они дают возможность попробовать различные игры без риска потерять реальные деньги. Бонусы также повышают шансы на выигрыш и предоставляют дополнительные возможности для получения прибыли. Кроме того, бонусы в 1win могут быть обменены на реальные деньги или использованы для участия в специальных акциях и турнирах.
Преимущества получения и использования бонусов в 1win очевидны. Они позволяют игроку расширить свои возможности и получить больше удовольствия от игры. Бонусы также делают игру более выгодной с финансовой точки зрения, помогая уменьшить риски и увеличить потенциальную прибыль. Кроме того, получение и использование бонусов в 1win открывает возможность стать лояльным клиентом и получить дополнительные привилегии и вознаграждения от казино.
Итак, получение бонусов в 1win – это отличная возможность для игрока увеличить свои шансы на выигрыш, получить дополнительные деньги и улучшить свой игровой опыт. Бонусы делают игру более интересной и выгодной.
как вводить промокоды в 1win: 937999 предоставляет возможность получить бездепозитный бонус 2024. Его можно получить в виде фриспинов или фрибетов. Чтобы получить подарок, необходимо активировать код в личном кабинете. Дополнительный депозит не требуется. Размеры подарков невелики: фрибет до 500 рублей и не более 70 фриспинов для игры в слоты. Как и в случае с другими поощрениями, необходимо отыграть бездепозитный бонус. Вейджер, как правило, не превышает х5 для бесплатных ставок и х30 для фриспинов.
В казино 1win предоставляется внушительный бонус при регистрации, который составляет 500% от суммы первых четырех последовательных депозитов клиента. С таким количеством бонусов новичок может значительно увеличить свои шансы на выигрыш. Чтобы получить этот приветственный бонус, необходимо зарегистрироваться на официальном сайте, рабочем зеркале, мобильной версии или приложениях для мобильных телефонов. Однако, основным условием является совершение первого пополнения счета, так как активировать бонусы 1win можно только после этого.
1win промокод на деньги при пополнении: 937999 используйте бонусный код при регистрации и получите бездепозтный бонус 70 фриспинов. Да, при использовании кода 1Win вы можете получить различные поощрения, включая бездепозитные бонусы. Они обычно представлены в виде фрибетов или фриспинов. Для их активации не требуется дополнительное пополнение счета. Размер таких подарков невелик: бесплатных вращений не более 70. Вейджер на бездепозитный бонус обычно не превышает х35. В 1Win вы можете получить бонусы за участие в акциях, турнирах, розыгрышах и активацию промокода. Бонусная программа периодически обновляется. Кроме того, некоторые акции имеют сезонный характер.
В 1Win основная бонусная программа включает в себя фриспины. Чтобы получить 70FS, необходимо пополнить счет на 100 рублей или более. Игроку предоставляется 2 дня с момента регистрации для активации презента. Отыгрыш бонуса должен быть выполнен в течение 24 часов с момента начисления, с вейджером х35. Бесплатные вращения предназначены только для игр провайдера Microgaming.
Так как бонусная программа 1Win регулярно обновляется, список акций, в которых можно получить фриспины, постоянно расширяется. Более подробную информацию о них можно найти на нашем сайте.
Промокод на 1Win дает возможность получить бесплатные вращения. Их можно использовать в любых слотах из каталога казино. Иногда могут быть установлены ограничения, которые предусматривают использование фриспинов только в определенных слотах или играх конкретного провайдера. Фриспины начисляются с фиксированной ставкой. Отыгрыш выигрыша, полученного с помощью бесплатных вращений, обязателен с учетом установленного вейджера.
Вся информация взята с сайта; https://www.legnostyle.ru/images/pages/?1win_promokod_5.html
Бездепозитный Бонус 1win 2024
Бонусы от казино промокод 1win фрибет1Win 2024 – Бездепозитные бонусы ? Коды на возврат денег ? VIP Программа лояльности ? Бесплатные фриспины.
промокод при пополнении 1win сегодня: 937999 предоставляет новым игрокам бонус 500% для игры в слоты и игровые автоматы, максимальная сумма бонуса 200 000 рублей. Вы можете использовать бонусные деньги в разделе азартных игр, включая онлайн казино, карты, рулетку, игровые автоматы и слоты.
Компания «1Win» рада предложить своим новым клиентам приветственный бонус в размере до 500% на первые четыре депозита. Это выгодное предложение доступно сразу после регистрации в нашей букмекерской конторе. Бонус можно получить не только в рублях, но и в других валютах, при этом он не ограничивает возможность участия игроков в других программам лояльности компании. Максимальная сумма вознаграждения за регистрацию составляет 75000 рублей или эквивалентная сумма в другой валюте.
промокод на 1win при пополнении приносят игрокам множество преимуществ. Во-первых, они позволяют увеличить начальную ставку или продлить время игры. Кроме того, они дают возможность попробовать различные игры без риска потерять реальные деньги. Бонусы также повышают шансы на выигрыш и предоставляют дополнительные возможности для получения прибыли. Кроме того, бонусы в 1win могут быть обменены на реальные деньги или использованы для участия в специальных акциях и турнирах.
Преимущества получения и использования бонусов в 1win очевидны. Они позволяют игроку расширить свои возможности и получить больше удовольствия от игры. Бонусы также делают игру более выгодной с финансовой точки зрения, помогая уменьшить риски и увеличить потенциальную прибыль. Кроме того, получение и использование бонусов в 1win открывает возможность стать лояльным клиентом и получить дополнительные привилегии и вознаграждения от казино.
Итак, получение бонусов в 1win – это отличная возможность для игрока увеличить свои шансы на выигрыш, получить дополнительные деньги и улучшить свой игровой опыт. Бонусы делают игру более интересной и выгодной.
1win промокод 500: 937999 предоставляет возможность получить бездепозитный бонус 2024. Его можно получить в виде фриспинов или фрибетов. Чтобы получить подарок, необходимо активировать код в личном кабинете. Дополнительный депозит не требуется. Размеры подарков невелики: фрибет до 500 рублей и не более 70 фриспинов для игры в слоты. Как и в случае с другими поощрениями, необходимо отыграть бездепозитный бонус. Вейджер, как правило, не превышает х5 для бесплатных ставок и х30 для фриспинов.
В казино 1win предоставляется внушительный бонус при регистрации, который составляет 500% от суммы первых четырех последовательных депозитов клиента. С таким количеством бонусов новичок может значительно увеличить свои шансы на выигрыш. Чтобы получить этот приветственный бонус, необходимо зарегистрироваться на официальном сайте, рабочем зеркале, мобильной версии или приложениях для мобильных телефонов. Однако, основным условием является совершение первого пополнения счета, так как активировать бонусы 1win можно только после этого.
промокоды при пополнении 1win: 937999 используйте бонусный код при регистрации и получите бездепозтный бонус 70 фриспинов. Да, при использовании кода 1Win вы можете получить различные поощрения, включая бездепозитные бонусы. Они обычно представлены в виде фрибетов или фриспинов. Для их активации не требуется дополнительное пополнение счета. Размер таких подарков невелик: бесплатных вращений не более 70. Вейджер на бездепозитный бонус обычно не превышает х35. В 1Win вы можете получить бонусы за участие в акциях, турнирах, розыгрышах и активацию промокода. Бонусная программа периодически обновляется. Кроме того, некоторые акции имеют сезонный характер.
В 1Win основная бонусная программа включает в себя фриспины. Чтобы получить 70FS, необходимо пополнить счет на 100 рублей или более. Игроку предоставляется 2 дня с момента регистрации для активации презента. Отыгрыш бонуса должен быть выполнен в течение 24 часов с момента начисления, с вейджером х35. Бесплатные вращения предназначены только для игр провайдера Microgaming.
Так как бонусная программа 1Win регулярно обновляется, список акций, в которых можно получить фриспины, постоянно расширяется. Более подробную информацию о них можно найти на нашем сайте.
Промокод на 1Win дает возможность получить бесплатные вращения. Их можно использовать в любых слотах из каталога казино. Иногда могут быть установлены ограничения, которые предусматривают использование фриспинов только в определенных слотах или играх конкретного провайдера. Фриспины начисляются с фиксированной ставкой. Отыгрыш выигрыша, полученного с помощью бесплатных вращений, обязателен с учетом установленного вейджера.
Вся информация взята с сайта; https://www.legnostyle.ru/images/pages/?1win_promokod_5.html
synthroid for sale
I think, that you commit an error. Let’s discuss. Write to me in PM, we will communicate.
virtueel telefoonnummer
buy prednisone without a prescription
Список бесплатных на сегодня промокодов 1xBet. Тип бесплатного промокода. Промокод промокод на бесплатную ставку. бесплатный промокод в 1xbet. Как сегодня получить 32500 рублей по промокоду в 1xBet? Получение начинается после регистрации с рабочим промокодом и первого пополнения счета и составляет +100% к депозиту. Игрок может рассчитывать по промокоду до 32 500 рублей, если пройдет верификацию и даст согласие на участие в рекламных предложениях букмекера. На сегодня акция по промокоду 1xBet распространяется на пользователей из России, Беларуси, Украины, Казахстана – более подробно в этом материале https://gorod-fonarikov.ru/news/promokod_309.html
Топ-10 ошибок при продвижении сайта
10
создание сайта цена https://seo-prodvizhenie-sayta.co.ua .
kantorbola
Kantorbola adalah situs slot gacor terbaik di indonesia , kunjungi situs RTP kantor bola untuk mendapatkan informasi akurat slot dengan rtp diatas 95% . Kunjungi juga link alternatif kami di kantorbola77 dan kantorbola99 .
metformin er
https://kupitroom.ru/
에그벳 도메인
첫 번째 목적지는 당연히 참파인데, 참파 다음에는 어디로 가야 할까요?
https://cse.google.com.my/url?sa=i&url=https%3A%2F%2Fwww.colorful-navi.com%2F
synthroid 80 mcg
May I simply just say what a relief to discover a person that genuinely knows what they’re discussing on the
net. You definutely know how to bring a problem to liht
and make it important. More and more people must read this and understand this side of your story.
I was surprised that you’re not more popular because
youu surely possess the gift.
tadalafil 10mg daily
Рабочий промокод 1ХБЕТ на 2024 год бесплатно: Бонус 32 500р. Актуальный список при регистрации на официальном сайте компании. На бесплатную ставку и витрина промо-кодов. Откуда взять и куда вставить промокоды описано на странице. Код необходимо использовать при регистрации на официальном сайте конторы 1xbet (промокоды для купона -на бесплатную ставку, находятся в самом низу статьи). промокод для регистрации в 1хбет! Как ввести промокод 1хБет при регистрации в 2024. Вводятся такие комбинации в купон пари, позволяя сделать прогноз бесплатно, застраховать ставку или извлечь любую другую выгоду от обладания бонусным кодом. К сожалению, найти промокод в свободном доступе невозможно, их игроки получают индивидуально и вряд ли заходят делиться халявой с обывателями интернета – более подробно в этом материале https://gorod-fonarikov.ru/news/promokod_309.html
Какие плюсы и минусы у продвижения сайта с использованием блога
18
seo заказать http://www.seo-prodvizhenie-sayta.co.ua/ .
synthroid 0.088 mg tab
슬롯 프라그마틱
그러나 같은 것이… 더 많은 새로운 문제를 가져올 수도 있습니다.
https://www.google.com.br/url?q=https%3A%2F%2Fwww.colorful-navi.com%2F
http://www.one-xbet-france.com
Plateforme en ligne 1xBet: outils spout gagner de l’argent. En unrestricted, 1xBet France est un bookmaker classique tipster comme chance365 bookmaker et beaucoup d’autres.
http://one-xbet-france.com
smcasino-game.com
누군가 갑판에서 곧장 나와 하늘로 몇 피트를 날린 다음… 다시 수직으로 착륙했습니다.
https://arcmetal.ru/
купить фальшивые рубли
Умение осмысливать сущности и угроз ассоциированных с отмыванием кредитных карт способствует людям избегать подобных атак и сохранять свои финансовые ресурсы. Обнал (отмывание) кредитных карт — это процесс использования украденных или нелегально добытых кредитных карт для проведения финансовых транзакций с целью замаскировать их происхождение и пресечь отслеживание.
Вот некоторые из способов, которые могут помочь в избежании обнала кредитных карт:
Охрана личной информации: Будьте осторожными в отношении предоставления личных данных, особенно онлайн. Избегайте предоставления номеров карт, кодов безопасности и дополнительных конфиденциальных данных на сомнительных сайтах.
Сильные пароли: Используйте безопасные и уникальные пароли для своих банковских аккаунтов и кредитных карт. Регулярно изменяйте пароли.
Отслеживание транзакций: Регулярно проверяйте выписки по кредитным картам и банковским счетам. Это поможет своевременно выявить подозрительных транзакций.
Программы антивирус: Используйте антивирусное программное обеспечение и актуализируйте его регулярно. Это поможет предотвратить вредоносные программы, которые могут быть использованы для кражи данных.
Бережное использование общественных сетей: Будьте осторожными в онлайн-сетях, избегайте размещения чувствительной информации, которая может быть использована для взлома вашего аккаунта.
Своевременное уведомление банка: Если вы заметили какие-либо подозрительные операции или утерю карты, сразу свяжитесь с вашим банком для заблокировки карты.
Образование: Будьте внимательными к современным приемам мошенничества и обучайтесь тому, как предотвращать их.
Избегая легковерия и принимая меры предосторожности, вы можете уменьшить риск стать жертвой обнала кредитных карт.
Бездепозитный Бонус 1win 2024
Бонусы от казино промокод 1win на пополнение счета сегодня1Win 2024 – Бездепозитные бонусы ? Коды на возврат денег ? VIP Программа лояльности ? Бесплатные фриспины.
1win промокод при регистрации фрибет: 937999 предоставляет новым игрокам бонус 500% для игры в слоты и игровые автоматы, максимальная сумма бонуса 200 000 рублей. Вы можете использовать бонусные деньги в разделе азартных игр, включая онлайн казино, карты, рулетку, игровые автоматы и слоты.
Компания «1Win» рада предложить своим новым клиентам приветственный бонус в размере до 500% на первые четыре депозита. Это выгодное предложение доступно сразу после регистрации в нашей букмекерской конторе. Бонус можно получить не только в рублях, но и в других валютах, при этом он не ограничивает возможность участия игроков в других программам лояльности компании. Максимальная сумма вознаграждения за регистрацию составляет 75000 рублей или эквивалентная сумма в другой валюте.
как ввести промокод в 1win если уже зарегистрирован приносят игрокам множество преимуществ. Во-первых, они позволяют увеличить начальную ставку или продлить время игры. Кроме того, они дают возможность попробовать различные игры без риска потерять реальные деньги. Бонусы также повышают шансы на выигрыш и предоставляют дополнительные возможности для получения прибыли. Кроме того, бонусы в 1win могут быть обменены на реальные деньги или использованы для участия в специальных акциях и турнирах.
Преимущества получения и использования бонусов в 1win очевидны. Они позволяют игроку расширить свои возможности и получить больше удовольствия от игры. Бонусы также делают игру более выгодной с финансовой точки зрения, помогая уменьшить риски и увеличить потенциальную прибыль. Кроме того, получение и использование бонусов в 1win открывает возможность стать лояльным клиентом и получить дополнительные привилегии и вознаграждения от казино.
Итак, получение бонусов в 1win – это отличная возможность для игрока увеличить свои шансы на выигрыш, получить дополнительные деньги и улучшить свой игровой опыт. Бонусы делают игру более интересной и выгодной.
промокод на 1win: 937999 предоставляет возможность получить бездепозитный бонус 2024. Его можно получить в виде фриспинов или фрибетов. Чтобы получить подарок, необходимо активировать код в личном кабинете. Дополнительный депозит не требуется. Размеры подарков невелики: фрибет до 500 рублей и не более 70 фриспинов для игры в слоты. Как и в случае с другими поощрениями, необходимо отыграть бездепозитный бонус. Вейджер, как правило, не превышает х5 для бесплатных ставок и х30 для фриспинов.
В казино 1win предоставляется внушительный бонус при регистрации, который составляет 500% от суммы первых четырех последовательных депозитов клиента. С таким количеством бонусов новичок может значительно увеличить свои шансы на выигрыш. Чтобы получить этот приветственный бонус, необходимо зарегистрироваться на официальном сайте, рабочем зеркале, мобильной версии или приложениях для мобильных телефонов. Однако, основным условием является совершение первого пополнения счета, так как активировать бонусы 1win можно только после этого.
1win промокоды при регистрации: 937999 используйте бонусный код при регистрации и получите бездепозтный бонус 70 фриспинов. Да, при использовании кода 1Win вы можете получить различные поощрения, включая бездепозитные бонусы. Они обычно представлены в виде фрибетов или фриспинов. Для их активации не требуется дополнительное пополнение счета. Размер таких подарков невелик: бесплатных вращений не более 70. Вейджер на бездепозитный бонус обычно не превышает х35. В 1Win вы можете получить бонусы за участие в акциях, турнирах, розыгрышах и активацию промокода. Бонусная программа периодически обновляется. Кроме того, некоторые акции имеют сезонный характер.
В 1Win основная бонусная программа включает в себя фриспины. Чтобы получить 70FS, необходимо пополнить счет на 100 рублей или более. Игроку предоставляется 2 дня с момента регистрации для активации презента. Отыгрыш бонуса должен быть выполнен в течение 24 часов с момента начисления, с вейджером х35. Бесплатные вращения предназначены только для игр провайдера Microgaming.
Так как бонусная программа 1Win регулярно обновляется, список акций, в которых можно получить фриспины, постоянно расширяется. Более подробную информацию о них можно найти на нашем сайте.
Промокод на 1Win дает возможность получить бесплатные вращения. Их можно использовать в любых слотах из каталога казино. Иногда могут быть установлены ограничения, которые предусматривают использование фриспинов только в определенных слотах или играх конкретного провайдера. Фриспины начисляются с фиксированной ставкой. Отыгрыш выигрыша, полученного с помощью бесплатных вращений, обязателен с учетом установленного вейджера.
Вся информация взята с сайта; http://kib-net.ru/news/pgs/aktualnuy_promokod_pri_registracii_1.html
generic azithromycin online
Здравствуйте!
Диплом требует множество усилий, но интернет значительно облегчает этот процесс.
Приобретайте диплом университета без предоплаты у нас с доставкой в любой город России, качество и безопасность гарантированы.
http://php-s.ru/photogallery/Coppermine/demo/profile.php?uid=148307
https://diplom-kupit.blizko.ru/about?preview=user
Желаю для каждого отличных оценок!
156
купить диплом в коврове
купить диплом в перми
Бездепозитный Бонус 1win 2024
Бонусы от казино промокод на 1вин при регистрации1Win 2024 – Бездепозитные бонусы ? Коды на возврат денег ? VIP Программа лояльности ? Бесплатные фриспины.
промокод бк 1win: 937999 предоставляет новым игрокам бонус 500% для игры в слоты и игровые автоматы, максимальная сумма бонуса 200 000 рублей. Вы можете использовать бонусные деньги в разделе азартных игр, включая онлайн казино, карты, рулетку, игровые автоматы и слоты.
Компания «1Win» рада предложить своим новым клиентам приветственный бонус в размере до 500% на первые четыре депозита. Это выгодное предложение доступно сразу после регистрации в нашей букмекерской конторе. Бонус можно получить не только в рублях, но и в других валютах, при этом он не ограничивает возможность участия игроков в других программам лояльности компании. Максимальная сумма вознаграждения за регистрацию составляет 75000 рублей или эквивалентная сумма в другой валюте.
где вводить промокод 1win приносят игрокам множество преимуществ. Во-первых, они позволяют увеличить начальную ставку или продлить время игры. Кроме того, они дают возможность попробовать различные игры без риска потерять реальные деньги. Бонусы также повышают шансы на выигрыш и предоставляют дополнительные возможности для получения прибыли. Кроме того, бонусы в 1win могут быть обменены на реальные деньги или использованы для участия в специальных акциях и турнирах.
Преимущества получения и использования бонусов в 1win очевидны. Они позволяют игроку расширить свои возможности и получить больше удовольствия от игры. Бонусы также делают игру более выгодной с финансовой точки зрения, помогая уменьшить риски и увеличить потенциальную прибыль. Кроме того, получение и использование бонусов в 1win открывает возможность стать лояльным клиентом и получить дополнительные привилегии и вознаграждения от казино.
Итак, получение бонусов в 1win – это отличная возможность для игрока увеличить свои шансы на выигрыш, получить дополнительные деньги и улучшить свой игровой опыт. Бонусы делают игру более интересной и выгодной.
1win промокод на пополнение: 937999 предоставляет возможность получить бездепозитный бонус 2024. Его можно получить в виде фриспинов или фрибетов. Чтобы получить подарок, необходимо активировать код в личном кабинете. Дополнительный депозит не требуется. Размеры подарков невелики: фрибет до 500 рублей и не более 70 фриспинов для игры в слоты. Как и в случае с другими поощрениями, необходимо отыграть бездепозитный бонус. Вейджер, как правило, не превышает х5 для бесплатных ставок и х30 для фриспинов.
В казино 1win предоставляется внушительный бонус при регистрации, который составляет 500% от суммы первых четырех последовательных депозитов клиента. С таким количеством бонусов новичок может значительно увеличить свои шансы на выигрыш. Чтобы получить этот приветственный бонус, необходимо зарегистрироваться на официальном сайте, рабочем зеркале, мобильной версии или приложениях для мобильных телефонов. Однако, основным условием является совершение первого пополнения счета, так как активировать бонусы 1win можно только после этого.
1win промокод 2024: 937999 используйте бонусный код при регистрации и получите бездепозтный бонус 70 фриспинов. Да, при использовании кода 1Win вы можете получить различные поощрения, включая бездепозитные бонусы. Они обычно представлены в виде фрибетов или фриспинов. Для их активации не требуется дополнительное пополнение счета. Размер таких подарков невелик: бесплатных вращений не более 70. Вейджер на бездепозитный бонус обычно не превышает х35. В 1Win вы можете получить бонусы за участие в акциях, турнирах, розыгрышах и активацию промокода. Бонусная программа периодически обновляется. Кроме того, некоторые акции имеют сезонный характер.
В 1Win основная бонусная программа включает в себя фриспины. Чтобы получить 70FS, необходимо пополнить счет на 100 рублей или более. Игроку предоставляется 2 дня с момента регистрации для активации презента. Отыгрыш бонуса должен быть выполнен в течение 24 часов с момента начисления, с вейджером х35. Бесплатные вращения предназначены только для игр провайдера Microgaming.
Так как бонусная программа 1Win регулярно обновляется, список акций, в которых можно получить фриспины, постоянно расширяется. Более подробную информацию о них можно найти на нашем сайте.
Промокод на 1Win дает возможность получить бесплатные вращения. Их можно использовать в любых слотах из каталога казино. Иногда могут быть установлены ограничения, которые предусматривают использование фриспинов только в определенных слотах или играх конкретного провайдера. Фриспины начисляются с фиксированной ставкой. Отыгрыш выигрыша, полученного с помощью бесплатных вращений, обязателен с учетом установленного вейджера.
Вся информация взята с сайта; http://kib-net.ru/news/pgs/aktualnuy_promokod_pri_registracii_1.html
Бездепозитный Бонус 1win 2024
Бонусы от казино 1win авиатор промокод1Win 2024 – Бездепозитные бонусы ? Коды на возврат денег ? VIP Программа лояльности ? Бесплатные фриспины.
промокоды 1win на сегодня: 937999 предоставляет новым игрокам бонус 500% для игры в слоты и игровые автоматы, максимальная сумма бонуса 200 000 рублей. Вы можете использовать бонусные деньги в разделе азартных игр, включая онлайн казино, карты, рулетку, игровые автоматы и слоты.
Компания «1Win» рада предложить своим новым клиентам приветственный бонус в размере до 500% на первые четыре депозита. Это выгодное предложение доступно сразу после регистрации в нашей букмекерской конторе. Бонус можно получить не только в рублях, но и в других валютах, при этом он не ограничивает возможность участия игроков в других программам лояльности компании. Максимальная сумма вознаграждения за регистрацию составляет 75000 рублей или эквивалентная сумма в другой валюте.
ваучер 1win сегодня рабочие промокоды на фриспины приносят игрокам множество преимуществ. Во-первых, они позволяют увеличить начальную ставку или продлить время игры. Кроме того, они дают возможность попробовать различные игры без риска потерять реальные деньги. Бонусы также повышают шансы на выигрыш и предоставляют дополнительные возможности для получения прибыли. Кроме того, бонусы в 1win могут быть обменены на реальные деньги или использованы для участия в специальных акциях и турнирах.
Преимущества получения и использования бонусов в 1win очевидны. Они позволяют игроку расширить свои возможности и получить больше удовольствия от игры. Бонусы также делают игру более выгодной с финансовой точки зрения, помогая уменьшить риски и увеличить потенциальную прибыль. Кроме того, получение и использование бонусов в 1win открывает возможность стать лояльным клиентом и получить дополнительные привилегии и вознаграждения от казино.
Итак, получение бонусов в 1win – это отличная возможность для игрока увеличить свои шансы на выигрыш, получить дополнительные деньги и улучшить свой игровой опыт. Бонусы делают игру более интересной и выгодной.
1win промокод при регистрации без депозита: 937999 предоставляет возможность получить бездепозитный бонус 2024. Его можно получить в виде фриспинов или фрибетов. Чтобы получить подарок, необходимо активировать код в личном кабинете. Дополнительный депозит не требуется. Размеры подарков невелики: фрибет до 500 рублей и не более 70 фриспинов для игры в слоты. Как и в случае с другими поощрениями, необходимо отыграть бездепозитный бонус. Вейджер, как правило, не превышает х5 для бесплатных ставок и х30 для фриспинов.
В казино 1win предоставляется внушительный бонус при регистрации, который составляет 500% от суммы первых четырех последовательных депозитов клиента. С таким количеством бонусов новичок может значительно увеличить свои шансы на выигрыш. Чтобы получить этот приветственный бонус, необходимо зарегистрироваться на официальном сайте, рабочем зеркале, мобильной версии или приложениях для мобильных телефонов. Однако, основным условием является совершение первого пополнения счета, так как активировать бонусы 1win можно только после этого.
1win регистрация промокод: 937999 используйте бонусный код при регистрации и получите бездепозтный бонус 70 фриспинов. Да, при использовании кода 1Win вы можете получить различные поощрения, включая бездепозитные бонусы. Они обычно представлены в виде фрибетов или фриспинов. Для их активации не требуется дополнительное пополнение счета. Размер таких подарков невелик: бесплатных вращений не более 70. Вейджер на бездепозитный бонус обычно не превышает х35. В 1Win вы можете получить бонусы за участие в акциях, турнирах, розыгрышах и активацию промокода. Бонусная программа периодически обновляется. Кроме того, некоторые акции имеют сезонный характер.
В 1Win основная бонусная программа включает в себя фриспины. Чтобы получить 70FS, необходимо пополнить счет на 100 рублей или более. Игроку предоставляется 2 дня с момента регистрации для активации презента. Отыгрыш бонуса должен быть выполнен в течение 24 часов с момента начисления, с вейджером х35. Бесплатные вращения предназначены только для игр провайдера Microgaming.
Так как бонусная программа 1Win регулярно обновляется, список акций, в которых можно получить фриспины, постоянно расширяется. Более подробную информацию о них можно найти на нашем сайте.
Промокод на 1Win дает возможность получить бесплатные вращения. Их можно использовать в любых слотах из каталога казино. Иногда могут быть установлены ограничения, которые предусматривают использование фриспинов только в определенных слотах или играх конкретного провайдера. Фриспины начисляются с фиксированной ставкой. Отыгрыш выигрыша, полученного с помощью бесплатных вращений, обязателен с учетом установленного вейджера.
Вся информация взята с сайта; http://kib-net.ru/news/pgs/aktualnuy_promokod_pri_registracii_1.html
online pharmacy birth control pills
best pharmacy
camisetas de futbol para niños
lisinopril 5mg tab
synthroid 200 mcg
happy family store
metformin 1000 mg tablets price
sm-slot.com
그러나 Liu Yi는 무언가 잘못되었음을 느꼈고 수염을 쓰다듬으며 무언가 말하고 싶었습니다.
synthroid brand coupon
best canadian online pharmacy
https://one-xbet-france.com
Plateforme en ligne 1xBet: outils pour gagner de l’argent. En general, 1xBet France est un bookmaker classique tipster comme bet365 bookmaker et beaucoup d’autres.
http://one-xbet-france.com
zithromax 500 tablet
lisinopril 200mg
synthroid 0.125 mg
iGaming 업계에서 주목받는 프라그마틱 게임은 모바일 중심의 혁신적이고 표준화된 콘텐츠를 플레이어에게 제공합니다.
프라그마틱 게임
프라그마틱의 게임은 항상 다양한 테마로 놀라워요. 이 사이트에서 더 자세한 정보를 찾아보세요!
https://www.ukkosmaine.com
https://bkfphoto.com/link/
https://sjzrdxjg.com/link/
buy metformin 850 mg
http://one-xbet-france.com
Plateforme en ligne 1xBet: outils discharge gagner de l’argent. En blanket, 1xBet France est un bookmaker classique tipster comme risk365 bookmaker et beaucoup d’autres.
one-xbet-france.com
valtrex generic price
cialis 20 mg canada pharmacy
https://kupitroom.ru/
lowest price tadalafil
buy azithromycin 1000 mg
purchase cialis in australia
yangsfitness.com
Xu Jing조차도이 순간 그의 스승이 잘한 것 같다고 느꼈습니다.
pharmacies in canada that ship to the us
заказ автобуса в москве с водителем http://transferfromto.ru/ .
?Juega gratis y gana en el casino con el bono sin deposito!
casino online bono por registro sin deposito casino bono de bienvenida sin deposito .
legitimate canadian online pharmacies
фильм в хорошем качестве
synthroid 25 mcg coupon
шаг за шагом инструкция
18. Прицелы для оружия с возможностью сохранения профилей стрельбы
купить оптический прицел в одессе http://www.opticheskiy-pricel-odessa.co.ua/ .
where can i get cialis without a prescription
обзор
19. Оптические прицелы с подсветкой меток для стрельбы на различные дистанции
купить оптический прицел в одессе https://opticheskiy-pricel-odessa.co.ua/ .
особенности
13. Как выбрать прицел для винтовки: практические советы
14. Оптические прицелы для охоты на разные виды животных
купить оптический прицел в одессе http://opticheskiy-pricel-odessa.co.ua/ .
сериал бесплатно
Бесплатные промокоды 1xBet при регистрации 2024. Получить бонус на сумму 32500 рублей могут все новые участники клуба. Регистрируйте аккаунт по электронной почте или через привязку аккаунтов популярных социальных сетей и получайте бонусом до 32500 рублей на первый депозит. Для зачисления бонусов необходимо пополнить счет с банковской карты или электронного кошелька, не забыв при этом указать промокоды 1xbet бесплатная ставка 1XFREE777. Для того чтобы бонус стал доступен к снятию необходимо выполнить простое условие. Выбирайте любое событие, на которое принимаются ставки с коэффициентом от 1.4 и выше – более подробно в этом материале http://tdrimspb.ru/news/inc/1hbet_promokod_pri_registracii__bonus_do_32500_rub_.html
сериал бесплатно
рекомендации
5. Как установить прицел на ружье правильно
оптический прицел украина http://www.opticheskiy-pricel-odessa.co.ua .
https://spbflatkupit.ru/
zestoretic coupon
azithromycin canada price
обзор
8. Прицелы для карабина: особенности выбора и установки
купить оптический прицел http://opticheskiy-pricel-odessa.co.ua/ .
Aviator Spribe казино играть на евро
Добро пожаловать в захватывающий мир авиаторов! Aviator – это увлекательная игра, которая позволит вам окунуться в атмосферу боевых действий на небе. Необычные графика и захватывающий сюжет сделают ваше путешествие по воздуху неповторимым.
Aviator Spribe играть демо
фильм в хорошем качестве
overseas pharmacy no prescription
Промокод при регистрации в 1xbet сегодня. Этой акцией может воспользоваться каждый новый клиент при регистрации на сайте букмекера. Это ваше преимущество со старта, и у 1xbet есть эксклюзивное предложение. 1хбет промокоды на игры. В форме регистрации есть всего одно необязательное поле — как раз для ввода промокода. Как получить промокод на бесплатную ставку. Магазин находится во вкладке xBonus (в перечне вкладок верхнего блока). Вам предложат несколько вариантов для обмена баллов на промокоды 1xbet kz. Код можно получить для ставки ординар, для ставки экспресс, а также для лотерей от «1хБет». На сегодня промокод 1xbet бесплатно найти можно без особых затрат энергии, при этом сделать это следующим образом: Путем поиска в сети интернет; На сайтах, специализирующихся на спортивных ставках (Не ресурсы БК); В официальных сообществах 1хБет (соцсети). Представители БК часто выкладывают в группах или же просто в сети промокоды на 1xbet бесплатно в честь какого-то праздника либо же грядущего крупного спортивного турнира. Все промокоды 1xbet 2024. На официальном сайте букмекера в соответствующей рубрике находится полный перечень промокодов 1xbet 2024, бесплатно получить которые можно обменяв на них бонусные баллы – более подробно в этом материале http://tdrimspb.ru/news/inc/1hbet_promokod_pri_registracii__bonus_do_32500_rub_.html
If you’re seeking out top-notch online casinos accommodating Mpesa transactions, you’ve come to the right place.
https://spbdomkupit.ru/
프라그마틱 사이트
이 시험이 끝난 후 그는 냄새 나는 마그마 수프를 한 번에 마셨고 즉시 온통 무력감을 느꼈습니다.
http://alt1.toolbarqueries.google.co.cr/url?q=https%3A%2F%2Fwww.agenbet88score.com%2F
Вводите официальный промокод 1xbet при регистрации 2024 и получайте до 32 500 тысяч рублей. Бонус-код помогает удвоить ваш первый банкролл. 1хбет промокод на ставку сегодня. Бесплатным промокод может воспользоваться любой новый игрок букмекерской конторы! После того, как вы попадете на официальный сайт букмекера, в России он внесен в реестр запрещенных. Благодаря промокодам на сегодня и различным акциям, они начали захватывать сердца миллионов игроков. На протяжении 10 лет существования администрация регулярно совершенствовала уровень сервиса, и как итог — создана отличная контора, где игроки могут совершать ставки и получать выплаты без каких-либо проблем. Это сделать просто, если иметь промокод 1xbet на сегодня бесплатно. Правда, дается он при условии выполнения некоторых правил. 1xbet бонус при регистрации. Не совсем промокод, но вы все равно ставите не свои деньги, если пополните депозит, – 100% бонуса от внесенной суммы. Максимум указан в верхней части главной страницы официального сайта – более подробно в этом материале http://tdrimspb.ru/news/inc/1hbet_promokod_pri_registracii__bonus_do_32500_rub_.html
best online pharmacy india
Aviator Spribe казино играть онлайн
Добро пожаловать в захватывающий мир авиаторов! Aviator – это увлекательная игра, которая позволит вам окунуться в атмосферу боевых действий на небе. Необычные графика и захватывающий сюжет сделают ваше путешествие по воздуху неповторимым.
Aviator Spribe играть на гривны казино
list of online pharmacies
Good morning!
п»ї
With Globex Music, musicians can rest assured that their cover songs will reach a wide audience. Their distribution network includes all major streaming platforms,
giving artists the opportunity to connect with fans all over the world.
https://bit.ly/3VpnQZp
covers of 70s songs
distrokid cover song license
how to get mechanical license for cover song
where to get mechanical license for cover song
groove coverage she
mechanical license cover song
how to distribute a cover song
cover song licensing distrokid
song cover license
song covers in different genres
cover song license price
Good luck and good vibe!
프라그마틱 게임은 iGaming 업계에서 선도적인 위치를 차지하며 모바일 중심의 혁신적이고 표준화된 콘텐츠를 선보입니다.
http://www.pragmatic-game.com
프라그마틱의 무료 게임 옵션은 정말로 흥미진진한데요. 어떤 무료 게임을 추천하시나요?
https://gzplayer.com/hot/
https://www.12315hn.cn/
https://hfmxz.com/link/
https://spbhousekupit.ru/
generic cialis soft tab
synthroid 0.1 mg
buy synthroid cheap
Explorers of premier online casinos embracing Mpesa deposits will find their quest fulfilled here.
Anyone in search of distinguished online casinos embracing Mpesa payments will find a plethora of options here.
Привет любители отдыха!
Сочи – уникальный город, славящийся своими безграничными возможностями для отдыха и развлечений.
Кроме того, Сочи обладает уникальным местоположением, благодаря которому здесь можно найти различные природные достопримечательности.
Природный парк “Ореховая роща” предлагает путешественникам возможность окунуться в удивительный мир густых лесов, горных озер и водопадов.
Курортный парк “Агурские водопады” также предлагает уникальный опыт, наслаждаясь сногсшибательными водопадами и потрясающими видами на горы.
Сочи – уникальный город, славящийся своими безграничными возможностями для отдыха и развлечений.
Но одной из наиболее примечательных черт этого места являются его достопримечательности. Богатство культурного наследия, великолепная природа и
исторические памятники делают Сочи по-настоящему привлекательным для туристов всех возрастов и интересов.
Рекомендую всем, лучший проект про Сочи https://chto-posmotret-v-sochi.ru
большой Сочи что посмотреть
топ достопримечательностей Сочи
центральный Сочи что посмотреть
центральный Сочи достопримечательности
Сочи достопримечательности зимой
Удачи и хорошего визита в Сочи!
lowest price for synthroid 88 mcg tablet
https://spbkupitzhilie.ru/
metformin online usa
valtrex online prescription
manga
where can you buy azithromycin in australia
lisinopril 40 mg tablet
mail order prednisone
happy family pharmacy
lisinopril without an rx
175 mg synthroid
big pharmacy online
prednisone 5 mg tablet without a prescription
Привет любители музыки!
Почему новый трек White Queen ‘Дорога домой’ стоит добавить в свой плейлист. White Queen не перестает удивлять своих поклонников своим талантом и энергией.
Ее последний трек “Дорога домой” – настоящий подарок для всех любителей танцевальной музыки.
Он заставляет двигаться и радоваться жизни, что особенно важно в наше время.
Не упустите возможность послушать этот трек и зарядиться позитивом на целый день!
https://apple.co/3PtdqE6
скачать песню white queen застольная
скачать песню white queen застольная
музыка танцевальная для кафе
песня танцевальная
танцевальная песня азербайджана
музыка танцевальная быстрая
музыка башкирская танцевальная
греческая танцевальная музыка mp3
дагестанская танцевальная песня
песня танцевальная кто поет
танцевальная музыка 2023 года
Удачи и хорошего вайба!
synthroid 0.112 mcg
canadapharmacy24h
http://one-xbet-france.com
Plateforme en ligne 1xBet: outils pour gagner de l’argent. En general, 1xBet France est un bookmaker classique peddle comme risk365 bookmaker et beaucoup d’autres.
one-xbet-france.com
tadalafil 10mg price
Hello, constantly i used to check weblog posts here early
in the daylight, since i enjoy to gain knowledge of more and
more.
polish pharmacy online uk
купить кровать в интернет магазине https://www.krovati-moskva11.ru .
generic tadalafil price
https://ekbflatkupit.ru/
reputable online pharmacy uk
zestril 10
hoki1881
online pharmacy 365
프라그마틱 게임은 iGaming 업계의 리더로, 모바일 중심의 혁신적이고 표준화된 콘텐츠를 전 세계 고객에게 제공합니다.
프라그마틱 플레이
프라그마틱의 게임은 정말 다양한데, 최근에 출시된 것 중 어떤 게임이 가장 좋았나요? 공유해주세요!
https://0cdnara.com/hot/
https://maowenwang.com/hot/
https://www.wilsonamado.com
prednisone 10 mg coupon
happy family rx
https://zhksaleflat.ru/
synthroid 0.125 mg tablet
https://one-xbet-france.com
Plateforme en ligne 1xBet: outils flow gagner de l’argent. En unrestricted, 1xBet France est un bookmaker classique peddle comme stake365 bookmaker et beaucoup d’autres.
one-xbet-france.com
buy synthroid
where can i buy metformin in south africa
online pharmacy pain
https://zhksalezhilie.ru/
buy lisinopril 20 mg no prescription
trusted online pharmacy
synthroid online prices
Советуем посетить сайт https://avtomaxi22.ru/
Также не забудьте добавить сайт в закладки: https://avtomaxi22.ru/
https://zhksalehouse.ru/
buy azithromycin canada
프라그마틱 플레이의 슬롯 포트폴리오는 250개 이상의 게임으로 다양한 화폐와 33개 언어로 전 세계 시장에 제공됩니다.
프라그마틱 플레이
프라그마틱 관련 내용 정말 재미있게 읽었어요! 또한, 제 사이트에서도 프라그마틱과 관련된 정보를 공유하고 있어요. 함께 교류하며 더 많은 지식을 쌓아가요!
https://habermahmutlar.com/hot/
https://ljiluyi.com/link/
https://www.12315hc.cn/
Лучшие грузчики Харькова на любые задачи
услуги грузчиков цена за этаж https://gruzchiki.co.ua/ .
Советуем посетить сайт https://med-like.ru/
Также не забудьте добавить сайт в закладки: https://med-like.ru/
Профессиональный подход к грузоперевозкам в Харькове
переезд грузчики http://gruzchiki.co.ua/ .
Лучшие цены на услуги грузчиков в Харькове
помощь с переездом http://www.gruzchiki.co.ua .
https://zhksaledom.ru/
azithromycin 2017
Лучшие грузчики Харькова на любые задачи
перевозка квартир https://gruzchiki.co.ua .
cheap cialis soft
best value pharmacy
Услуги грузчиков от проверенных компаний в Харькове
перевозка вещей с грузчиками http://www.gruzchiki.co.ua/ .
pharmacy wholesalers canada
Советуем посетить сайт https://metal82.ru/
Также не забудьте добавить сайт в закладки: https://metal82.ru/
https://vsegda-pomnim.com/
cheap valtrex canada
Промокод 1xBet на сегодня можно получить прямо на сайте букмекерской компании. Сделать это станет возможным благодаря переходу по рабочей ссылке, содержащей промокод. Подобного рода бонусы могут использовать и постоянные и новые клиенты конторы. Благодаря проведению таких акций интерес игроков к ставкам остаётся высоким. Содержание. бк 1xbet промокод леон. Как получить и что дает промокод в 1xbet? Где вводить промокод в 1xbet? Рабочие промокоды 1xBet на сегодня. Действующие промокоды 1xBet на сегодня. Узнайте как ввести промо код 1хБет при регистрации и получить 32500 рублей на бесплатную ставку. Как активировать и использовать промокод на 1 xBet. Список рабочих бонус кодов – более подробно в этом материале https://gorod-fonarikov.ru/news/promokod_309.html
Советуем посетить сайт https://kryshi-remont.ru/
Также не забудьте добавить сайт в закладки: https://kryshi-remont.ru/
http://klublady.ru/
Промокод при регистрации 1xbet — бонус для новых игроков. Бонус за первый депозит в 1xbet. Как получить и отыграть бонус 32500 руб в букмекерской конторе 1хбет. как отыграть промокод в 1xbet. Букмекерские конторы пользуются спросом у людей, чьи интересы плотно связаны со спортом и чей азарт подкрепляется возможностью вознаграждения путем внесения порой незначительной суммы. Вводите промокод 1xbet в 2024 году, чтобы получить бонус на первый депозит до 32 500 рублей. 1хбет промокод работает только при регистрации новых пользователей. Бесплатный промокод 1xbet при регистрации. Как ввести промокод 1xbet сегодня? Как отыграть бонус по промокоду 1xbet. Используйте промокод 1xbet при регистрации в 2024 году, чтобы получить бонус до 32500 рублей от крупнейшей букмекерской конторы! – более подробно в этом материале https://gorod-fonarikov.ru/news/promokod_309.html
Бесплатные промокоды. Давайте сразу начну с того, что перечислю несколько актуальных Промокодов 1xbet на сегодня. Смело вводите промокод в соответствующее поле и получайте прикольные «плюшки» в подарок от щедрого букмекера! Букмекерская контора 1xbet отличается от конкурентов наличием широкой программы лояльности. Важной ее частью является предоставление клиентам бонусов при вводе промокода. получить промокод на 1xbet. В системе действует программа приветственных бонусов, благодаря которой каждый новичок получает определённую сумму за регистрацию на сайте. Такие акции действуют для казино и букмекерской конторы. Чтобы принять участие в приветственной программе, достаточно активировать при регистрации любой рабочий промокод – более подробно в этом материале https://gorod-fonarikov.ru/news/promokod_309.html
prednisone 80 mg
lisinopril 5mg tablets
medication metformin
compare cialis prices
tadalafil 120 mg
synthroid 100 mg coupon
rx online pharmacy
I all the time used to read piece of writing in news papers but now as I am a user of web therefore from now I
am using net for posts, thanks to web.
ttbslot.com
Hongzhi 황제는 마음에 당황한 채 침묵을 지켰습니다.
сплит система цена интернет магазин http://split-sistema11.ru/ .
average cost of prednisone
buy online cialis generic
ttbslot.com
정교하고 신중하며 오만하지도 성급하지도 않고 확고부동하며 일하고자 하는 의지가 홍지황제가 동경하는 바로 그것이다.
payday loan
buy viagra online
order generic valtrex online
valtrex discount
prednisone 100 mg
http://diplombiolog.ru/
prednisone without a rx
synthroid 0.05
Если вы ищете удобный способ скачать скачать зона на пк, то сайт zona-for-you.ru станет отличным выбором. Она предлагает понятный даже новичкам интерфейс, обеспечивающий быстрый и удобный доступ к различным файлам.
lisinopril medicine
buy metformin online canada
http://diplombuhgalter.ru/
Бездепозитный Бонус 1win 2024
Бонусы от казино промокод на 1win первое пополнение1Win 2024 – Бездепозитные бонусы ? Коды на возврат денег ? VIP Программа лояльности ? Бесплатные фриспины.
1win официальный сайт 1вин промокоды: 937999 предоставляет новым игрокам бонус 500% для игры в слоты и игровые автоматы, максимальная сумма бонуса 200 000 рублей. Вы можете использовать бонусные деньги в разделе азартных игр, включая онлайн казино, карты, рулетку, игровые автоматы и слоты.
Компания «1Win» рада предложить своим новым клиентам приветственный бонус в размере до 500% на первые четыре депозита. Это выгодное предложение доступно сразу после регистрации в нашей букмекерской конторе. Бонус можно получить не только в рублях, но и в других валютах, при этом он не ограничивает возможность участия игроков в других программам лояльности компании. Максимальная сумма вознаграждения за регистрацию составляет 75000 рублей или эквивалентная сумма в другой валюте.
1 вин промокод 1win приносят игрокам множество преимуществ. Во-первых, они позволяют увеличить начальную ставку или продлить время игры. Кроме того, они дают возможность попробовать различные игры без риска потерять реальные деньги. Бонусы также повышают шансы на выигрыш и предоставляют дополнительные возможности для получения прибыли. Кроме того, бонусы в 1win могут быть обменены на реальные деньги или использованы для участия в специальных акциях и турнирах.
Преимущества получения и использования бонусов в 1win очевидны. Они позволяют игроку расширить свои возможности и получить больше удовольствия от игры. Бонусы также делают игру более выгодной с финансовой точки зрения, помогая уменьшить риски и увеличить потенциальную прибыль. Кроме того, получение и использование бонусов в 1win открывает возможность стать лояльным клиентом и получить дополнительные привилегии и вознаграждения от казино.
Итак, получение бонусов в 1win – это отличная возможность для игрока увеличить свои шансы на выигрыш, получить дополнительные деньги и улучшить свой игровой опыт. Бонусы делают игру более интересной и выгодной.
промокод на 1win на сегодня: 937999 предоставляет возможность получить бездепозитный бонус 2024. Его можно получить в виде фриспинов или фрибетов. Чтобы получить подарок, необходимо активировать код в личном кабинете. Дополнительный депозит не требуется. Размеры подарков невелики: фрибет до 500 рублей и не более 70 фриспинов для игры в слоты. Как и в случае с другими поощрениями, необходимо отыграть бездепозитный бонус. Вейджер, как правило, не превышает х5 для бесплатных ставок и х30 для фриспинов.
В казино 1win предоставляется внушительный бонус при регистрации, который составляет 500% от суммы первых четырех последовательных депозитов клиента. С таким количеством бонусов новичок может значительно увеличить свои шансы на выигрыш. Чтобы получить этот приветственный бонус, необходимо зарегистрироваться на официальном сайте, рабочем зеркале, мобильной версии или приложениях для мобильных телефонов. Однако, основным условием является совершение первого пополнения счета, так как активировать бонусы 1win можно только после этого.
как написать промокод в 1win: 937999 используйте бонусный код при регистрации и получите бездепозтный бонус 70 фриспинов. Да, при использовании кода 1Win вы можете получить различные поощрения, включая бездепозитные бонусы. Они обычно представлены в виде фрибетов или фриспинов. Для их активации не требуется дополнительное пополнение счета. Размер таких подарков невелик: бесплатных вращений не более 70. Вейджер на бездепозитный бонус обычно не превышает х35. В 1Win вы можете получить бонусы за участие в акциях, турнирах, розыгрышах и активацию промокода. Бонусная программа периодически обновляется. Кроме того, некоторые акции имеют сезонный характер.
В 1Win основная бонусная программа включает в себя фриспины. Чтобы получить 70FS, необходимо пополнить счет на 100 рублей или более. Игроку предоставляется 2 дня с момента регистрации для активации презента. Отыгрыш бонуса должен быть выполнен в течение 24 часов с момента начисления, с вейджером х35. Бесплатные вращения предназначены только для игр провайдера Microgaming.
Так как бонусная программа 1Win регулярно обновляется, список акций, в которых можно получить фриспины, постоянно расширяется. Более подробную информацию о них можно найти на нашем сайте.
Промокод на 1Win дает возможность получить бесплатные вращения. Их можно использовать в любых слотах из каталога казино. Иногда могут быть установлены ограничения, которые предусматривают использование фриспинов только в определенных слотах или играх конкретного провайдера. Фриспины начисляются с фиксированной ставкой. Отыгрыш выигрыша, полученного с помощью бесплатных вращений, обязателен с учетом установленного вейджера.
Вся информация взята с сайта; https://3dekor.ru/img/pgs/index.php?aktualnuy_promokod_pri_registracii_1.html
Бесплатные промокоды. Давайте сразу начну с того, что перечислю несколько актуальных Промокодов 1xbet на сегодня. Смело вводите промокод в соответствующее поле и получайте прикольные «плюшки» в подарок от щедрого букмекера! Букмекерская контора 1xbet отличается от конкурентов наличием широкой программы лояльности. Важной ее частью является предоставление клиентам бонусов при вводе промокода. промокоды для 1хбет действующие. В системе действует программа приветственных бонусов, благодаря которой каждый новичок получает определённую сумму за регистрацию на сайте. Такие акции действуют для казино и букмекерской конторы. Чтобы принять участие в приветственной программе, достаточно активировать при регистрации любой рабочий промокод – более подробно в этом материале https://webmineral.ru/upload/pages/?1xbet_promokod_2021-segodnya-bonus.html
online pharmacy delivery delhi
where can i buy synthroid
טלגראס כיוונים
מרכז המַרכֵּז לְמוֹעֵד טלגראס כיוונים (Telegrass), קָרוֹוּעַ גם בשמות “גַּרְגִּירֵים” או “טלגראס כיוונים”, היא אתר המספק מידע, לינקים, קישורים, מדריכים והסברים בנושאי קנאביס בתוך הארץ. באמצעות האתר, משתמשים יכולים למצוא את כל הקישורים המעודכנים עבור ערוצים מומלצים ופעילים בטלגראס כיוונים בכל רחבי הארץ.
טלגראס כיוונים הוא אתר ובוט בתוך פלטפורמת טלגראס, מספקות דרכי תקשורת ושירותים מגוונים בתחום רכישת קנאביס וקשורים. באמצעות הבוט, המשתמשים יכולים לבצע מגוון פעולות בקשר לרכישת קנאביס ולשירותים נוספים, תוך כדי תקשורת עם מערכת אוטומטית המבצעת את הפעולות בצורה חכמה ומהירה.
בוט הטלגראס (Telegrass Bot) מציע מגוון פעולות שימושיות למשתמשים: הזמנה קנאביס: בצע הזמנה דרך הבוט על ידי בחירת סוגי הקנאביס, כמות וכתובת למשלוח.
שאלות ותמיכה: קבל מידע על המוצרים והשירותים, תמיכה טכנית ותשובות לשאלות שונות.
מבחן מלאי: בדוק את המלאי הזמין של קנאביס ובצע הזמנה תוך כדי הקשת הבדיקה.
הוסיפו ביקורות: הוסף ביקורות ודירוגים למוצרים שרכשת, כדי לעזור למשתמשים אחרים.
הצבת מוצרים חדשים: הוסף מוצרים חדשים לפלטפורמה והצג אותם למשתמשים.
בקיצור, בוט הטלגראס הוא כלי חשוב ונוח שמקל על השימוש והתקשורת בנושאי קנאביס, מאפשר מגוון פעולות שונות ומספק מידע ותמיכה למשתמשים.
Бездепозитный Бонус 1win 2024
Бонусы от казино промокод на 1win1Win 2024 – Бездепозитные бонусы ? Коды на возврат денег ? VIP Программа лояльности ? Бесплатные фриспины.
1win промокод 500: 937999 предоставляет новым игрокам бонус 500% для игры в слоты и игровые автоматы, максимальная сумма бонуса 200 000 рублей. Вы можете использовать бонусные деньги в разделе азартных игр, включая онлайн казино, карты, рулетку, игровые автоматы и слоты.
Компания «1Win» рада предложить своим новым клиентам приветственный бонус в размере до 500% на первые четыре депозита. Это выгодное предложение доступно сразу после регистрации в нашей букмекерской конторе. Бонус можно получить не только в рублях, но и в других валютах, при этом он не ограничивает возможность участия игроков в других программам лояльности компании. Максимальная сумма вознаграждения за регистрацию составляет 75000 рублей или эквивалентная сумма в другой валюте.
промокоды для 1win приносят игрокам множество преимуществ. Во-первых, они позволяют увеличить начальную ставку или продлить время игры. Кроме того, они дают возможность попробовать различные игры без риска потерять реальные деньги. Бонусы также повышают шансы на выигрыш и предоставляют дополнительные возможности для получения прибыли. Кроме того, бонусы в 1win могут быть обменены на реальные деньги или использованы для участия в специальных акциях и турнирах.
Преимущества получения и использования бонусов в 1win очевидны. Они позволяют игроку расширить свои возможности и получить больше удовольствия от игры. Бонусы также делают игру более выгодной с финансовой точки зрения, помогая уменьшить риски и увеличить потенциальную прибыль. Кроме того, получение и использование бонусов в 1win открывает возможность стать лояльным клиентом и получить дополнительные привилегии и вознаграждения от казино.
Итак, получение бонусов в 1win – это отличная возможность для игрока увеличить свои шансы на выигрыш, получить дополнительные деньги и улучшить свой игровой опыт. Бонусы делают игру более интересной и выгодной.
1вин промокод 1win: 937999 предоставляет возможность получить бездепозитный бонус 2024. Его можно получить в виде фриспинов или фрибетов. Чтобы получить подарок, необходимо активировать код в личном кабинете. Дополнительный депозит не требуется. Размеры подарков невелики: фрибет до 500 рублей и не более 70 фриспинов для игры в слоты. Как и в случае с другими поощрениями, необходимо отыграть бездепозитный бонус. Вейджер, как правило, не превышает х5 для бесплатных ставок и х30 для фриспинов.
В казино 1win предоставляется внушительный бонус при регистрации, который составляет 500% от суммы первых четырех последовательных депозитов клиента. С таким количеством бонусов новичок может значительно увеличить свои шансы на выигрыш. Чтобы получить этот приветственный бонус, необходимо зарегистрироваться на официальном сайте, рабочем зеркале, мобильной версии или приложениях для мобильных телефонов. Однако, основным условием является совершение первого пополнения счета, так как активировать бонусы 1win можно только после этого.
1win промокод при регистрации фрибет: 937999 используйте бонусный код при регистрации и получите бездепозтный бонус 70 фриспинов. Да, при использовании кода 1Win вы можете получить различные поощрения, включая бездепозитные бонусы. Они обычно представлены в виде фрибетов или фриспинов. Для их активации не требуется дополнительное пополнение счета. Размер таких подарков невелик: бесплатных вращений не более 70. Вейджер на бездепозитный бонус обычно не превышает х35. В 1Win вы можете получить бонусы за участие в акциях, турнирах, розыгрышах и активацию промокода. Бонусная программа периодически обновляется. Кроме того, некоторые акции имеют сезонный характер.
В 1Win основная бонусная программа включает в себя фриспины. Чтобы получить 70FS, необходимо пополнить счет на 100 рублей или более. Игроку предоставляется 2 дня с момента регистрации для активации презента. Отыгрыш бонуса должен быть выполнен в течение 24 часов с момента начисления, с вейджером х35. Бесплатные вращения предназначены только для игр провайдера Microgaming.
Так как бонусная программа 1Win регулярно обновляется, список акций, в которых можно получить фриспины, постоянно расширяется. Более подробную информацию о них можно найти на нашем сайте.
Промокод на 1Win дает возможность получить бесплатные вращения. Их можно использовать в любых слотах из каталога казино. Иногда могут быть установлены ограничения, которые предусматривают использование фриспинов только в определенных слотах или играх конкретного провайдера. Фриспины начисляются с фиксированной ставкой. Отыгрыш выигрыша, полученного с помощью бесплатных вращений, обязателен с учетом установленного вейджера.
Вся информация взята с сайта; https://3dekor.ru/img/pgs/index.php?aktualnuy_promokod_pri_registracii_1.html
best no prescription pharmacy
synthroid 0.05 mg
В нашем кинотеатре https://hdrezka.uno смотреть фильмы и сериалы в хорошем HD-качестве можно смотреть с любого устройства, имеющего доступ в интернет. Наслаждайся кино или телесериалами в любом месте с планшета, смартфона под управлением iOS или Android.
Бездепозитный Бонус 1win 2024
Бонусы от казино как написать промокод в 1win1Win 2024 – Бездепозитные бонусы ? Коды на возврат денег ? VIP Программа лояльности ? Бесплатные фриспины.
промокоды на регистрацию 1win: 937999 предоставляет новым игрокам бонус 500% для игры в слоты и игровые автоматы, максимальная сумма бонуса 200 000 рублей. Вы можете использовать бонусные деньги в разделе азартных игр, включая онлайн казино, карты, рулетку, игровые автоматы и слоты.
Компания «1Win» рада предложить своим новым клиентам приветственный бонус в размере до 500% на первые четыре депозита. Это выгодное предложение доступно сразу после регистрации в нашей букмекерской конторе. Бонус можно получить не только в рублях, но и в других валютах, при этом он не ограничивает возможность участия игроков в других программам лояльности компании. Максимальная сумма вознаграждения за регистрацию составляет 75000 рублей или эквивалентная сумма в другой валюте.
промокод на 1win на сегодня на пополнение приносят игрокам множество преимуществ. Во-первых, они позволяют увеличить начальную ставку или продлить время игры. Кроме того, они дают возможность попробовать различные игры без риска потерять реальные деньги. Бонусы также повышают шансы на выигрыш и предоставляют дополнительные возможности для получения прибыли. Кроме того, бонусы в 1win могут быть обменены на реальные деньги или использованы для участия в специальных акциях и турнирах.
Преимущества получения и использования бонусов в 1win очевидны. Они позволяют игроку расширить свои возможности и получить больше удовольствия от игры. Бонусы также делают игру более выгодной с финансовой точки зрения, помогая уменьшить риски и увеличить потенциальную прибыль. Кроме того, получение и использование бонусов в 1win открывает возможность стать лояльным клиентом и получить дополнительные привилегии и вознаграждения от казино.
Итак, получение бонусов в 1win – это отличная возможность для игрока увеличить свои шансы на выигрыш, получить дополнительные деньги и улучшить свой игровой опыт. Бонусы делают игру более интересной и выгодной.
промокод бк 1win: 937999 предоставляет возможность получить бездепозитный бонус 2024. Его можно получить в виде фриспинов или фрибетов. Чтобы получить подарок, необходимо активировать код в личном кабинете. Дополнительный депозит не требуется. Размеры подарков невелики: фрибет до 500 рублей и не более 70 фриспинов для игры в слоты. Как и в случае с другими поощрениями, необходимо отыграть бездепозитный бонус. Вейджер, как правило, не превышает х5 для бесплатных ставок и х30 для фриспинов.
В казино 1win предоставляется внушительный бонус при регистрации, который составляет 500% от суммы первых четырех последовательных депозитов клиента. С таким количеством бонусов новичок может значительно увеличить свои шансы на выигрыш. Чтобы получить этот приветственный бонус, необходимо зарегистрироваться на официальном сайте, рабочем зеркале, мобильной версии или приложениях для мобильных телефонов. Однако, основным условием является совершение первого пополнения счета, так как активировать бонусы 1win можно только после этого.
1 вин промокод 1win: 937999 используйте бонусный код при регистрации и получите бездепозтный бонус 70 фриспинов. Да, при использовании кода 1Win вы можете получить различные поощрения, включая бездепозитные бонусы. Они обычно представлены в виде фрибетов или фриспинов. Для их активации не требуется дополнительное пополнение счета. Размер таких подарков невелик: бесплатных вращений не более 70. Вейджер на бездепозитный бонус обычно не превышает х35. В 1Win вы можете получить бонусы за участие в акциях, турнирах, розыгрышах и активацию промокода. Бонусная программа периодически обновляется. Кроме того, некоторые акции имеют сезонный характер.
В 1Win основная бонусная программа включает в себя фриспины. Чтобы получить 70FS, необходимо пополнить счет на 100 рублей или более. Игроку предоставляется 2 дня с момента регистрации для активации презента. Отыгрыш бонуса должен быть выполнен в течение 24 часов с момента начисления, с вейджером х35. Бесплатные вращения предназначены только для игр провайдера Microgaming.
Так как бонусная программа 1Win регулярно обновляется, список акций, в которых можно получить фриспины, постоянно расширяется. Более подробную информацию о них можно найти на нашем сайте.
Промокод на 1Win дает возможность получить бесплатные вращения. Их можно использовать в любых слотах из каталога казино. Иногда могут быть установлены ограничения, которые предусматривают использование фриспинов только в определенных слотах или играх конкретного провайдера. Фриспины начисляются с фиксированной ставкой. Отыгрыш выигрыша, полученного с помощью бесплатных вращений, обязателен с учетом установленного вейджера.
Вся информация взята с сайта; https://3dekor.ru/img/pgs/index.php?aktualnuy_promokod_pri_registracii_1.html
10 mg prednisone
Промокод 1xBet на сегодня можно получить прямо на сайте букмекерской компании. Сделать это станет возможным благодаря переходу по рабочей ссылке, содержащей промокод. Подобного рода бонусы могут использовать и постоянные и новые клиенты конторы. Благодаря проведению таких акций интерес игроков к ставкам остаётся высоким. Содержание. сегодня промокод 1хбет бесплатно как получить. Как получить и что дает промокод в 1xbet? Где вводить промокод в 1xbet? Рабочие промокоды 1xBet на сегодня. Действующие промокоды 1xBet на сегодня. Узнайте как ввести промо код 1хБет при регистрации и получить 32500 рублей на бесплатную ставку. Как активировать и использовать промокод на 1 xBet. Список рабочих бонус кодов – более подробно в этом материале https://webmineral.ru/upload/pages/?1xbet_promokod_2021-segodnya-bonus.html
https://kursovyebiolog.ru
Hі colleagues, itts great article regarding teachingqnd entirely defined, keep it ᥙp all the time.
Бесплатные промокоды 1xBet при регистрации 2024. Сегодня пользователям 1xBet-казино предлагаются халявные промокоды на первый депозит, которые активируются при первой регистрации. С их помощью можно увеличить сумму базового бонуса до 32500 рублей. 1XFREE777 — промокоды 1хбет бонусы и подарки. Для получения реального выигрыша с возможностью вывода на карту, необходимо поставить всю бонусную сумму на экспресс-ставку с коэффициентом от 1,4. Если прогноз окажется правильным, система переведет деньги на основной счет. Не секрет, что у букмекерской конторы 1xBet помимо спортивных ставок есть и другие направления, включая онлайн-игры, гоночные события или политические состязания – более подробно в этом материале https://webmineral.ru/upload/pages/?1xbet_promokod_2021-segodnya-bonus.html
ttbslot.com
그러나 그의 지성을 그의 얼굴에 기록하기를 기다릴 수는 없습니다.
synthroid online canada
Embark on an exhilarating journey with online casinos Kenya, offering novel titles and lightning-fast payouts.
Dive into the electrifying atmosphere of online casinos Kenya, where cutting-edge games and rapid payouts await thrill-seekers.
Experience the ultimate gaming thrill at online casinos Kenya, where fresh titles and swift payouts are just a click away.
Советуем посетить сайт https://balkonnaya-dver.ru/
Также не забудьте добавить сайт в закладки: https://balkonnaya-dver.ru/
best tadalafil prices
https://kursovyebuhgalter.ru
hoki 1881
prescription prednisone cost
I was able to find good info from your content.
generic cialis coupon
zestril 5mg
rxpharmacycoupons
cheapest pharmacy for prescription drugs
safe canadian pharmacy
buy cheap lisinopril
ttbslot.com
그리고 Chen Lie는 Wang Wenyu 지원을 담당하는 부팀장입니다.
tadalafil 5mg price uk
cialis online ordering
online otc pharmacy
buy valtrex cheap
Почему стоит выбрать рулонный газон для своего сада
рулонный газон купить https://rulonnyygazon177.ru/ .
pharmacy without prescription
Как выбрать подходящий рулонный газон для своего сада
заказать рулонный газон https://rulonnyygazon177.ru/ .
metformin buy online india
order lisinopril 20mg
cost for generic valtrex
I’m not sure exactly why but this web site is
loading incredibly slow foor me. Is anyone else having this
issue or is itt a issue on my end? I’ll check back
later on and see if thhe problem still exists.
synthroid 137 cost
synthroid 100 mg coupon
azithromycin 1 g without prescription
Бездепозитный Бонус 1win 2024
Бонусы от казино 1win промокоды на деньги1Win 2024 – Бездепозитные бонусы ? Коды на возврат денег ? VIP Программа лояльности ? Бесплатные фриспины.
промокод для авиатор 1win: 937999 предоставляет новым игрокам бонус 500% для игры в слоты и игровые автоматы, максимальная сумма бонуса 200 000 рублей. Вы можете использовать бонусные деньги в разделе азартных игр, включая онлайн казино, карты, рулетку, игровые автоматы и слоты.
Компания «1Win» рада предложить своим новым клиентам приветственный бонус в размере до 500% на первые четыре депозита. Это выгодное предложение доступно сразу после регистрации в нашей букмекерской конторе. Бонус можно получить не только в рублях, но и в других валютах, при этом он не ограничивает возможность участия игроков в других программам лояльности компании. Максимальная сумма вознаграждения за регистрацию составляет 75000 рублей или эквивалентная сумма в другой валюте.
промокоды при регистрации 1win приносят игрокам множество преимуществ. Во-первых, они позволяют увеличить начальную ставку или продлить время игры. Кроме того, они дают возможность попробовать различные игры без риска потерять реальные деньги. Бонусы также повышают шансы на выигрыш и предоставляют дополнительные возможности для получения прибыли. Кроме того, бонусы в 1win могут быть обменены на реальные деньги или использованы для участия в специальных акциях и турнирах.
Преимущества получения и использования бонусов в 1win очевидны. Они позволяют игроку расширить свои возможности и получить больше удовольствия от игры. Бонусы также делают игру более выгодной с финансовой точки зрения, помогая уменьшить риски и увеличить потенциальную прибыль. Кроме того, получение и использование бонусов в 1win открывает возможность стать лояльным клиентом и получить дополнительные привилегии и вознаграждения от казино.
Итак, получение бонусов в 1win – это отличная возможность для игрока увеличить свои шансы на выигрыш, получить дополнительные деньги и улучшить свой игровой опыт. Бонусы делают игру более интересной и выгодной.
промокод 1вин на сегодня: 937999 предоставляет возможность получить бездепозитный бонус 2024. Его можно получить в виде фриспинов или фрибетов. Чтобы получить подарок, необходимо активировать код в личном кабинете. Дополнительный депозит не требуется. Размеры подарков невелики: фрибет до 500 рублей и не более 70 фриспинов для игры в слоты. Как и в случае с другими поощрениями, необходимо отыграть бездепозитный бонус. Вейджер, как правило, не превышает х5 для бесплатных ставок и х30 для фриспинов.
В казино 1win предоставляется внушительный бонус при регистрации, который составляет 500% от суммы первых четырех последовательных депозитов клиента. С таким количеством бонусов новичок может значительно увеличить свои шансы на выигрыш. Чтобы получить этот приветственный бонус, необходимо зарегистрироваться на официальном сайте, рабочем зеркале, мобильной версии или приложениях для мобильных телефонов. Однако, основным условием является совершение первого пополнения счета, так как активировать бонусы 1win можно только после этого.
промокод 1win сегодня: 937999 используйте бонусный код при регистрации и получите бездепозтный бонус 70 фриспинов. Да, при использовании кода 1Win вы можете получить различные поощрения, включая бездепозитные бонусы. Они обычно представлены в виде фрибетов или фриспинов. Для их активации не требуется дополнительное пополнение счета. Размер таких подарков невелик: бесплатных вращений не более 70. Вейджер на бездепозитный бонус обычно не превышает х35. В 1Win вы можете получить бонусы за участие в акциях, турнирах, розыгрышах и активацию промокода. Бонусная программа периодически обновляется. Кроме того, некоторые акции имеют сезонный характер.
В 1Win основная бонусная программа включает в себя фриспины. Чтобы получить 70FS, необходимо пополнить счет на 100 рублей или более. Игроку предоставляется 2 дня с момента регистрации для активации презента. Отыгрыш бонуса должен быть выполнен в течение 24 часов с момента начисления, с вейджером х35. Бесплатные вращения предназначены только для игр провайдера Microgaming.
Так как бонусная программа 1Win регулярно обновляется, список акций, в которых можно получить фриспины, постоянно расширяется. Более подробную информацию о них можно найти на нашем сайте.
Промокод на 1Win дает возможность получить бесплатные вращения. Их можно использовать в любых слотах из каталога казино. Иногда могут быть установлены ограничения, которые предусматривают использование фриспинов только в определенных слотах или играх конкретного провайдера. Фриспины начисляются с фиксированной ставкой. Отыгрыш выигрыша, полученного с помощью бесплатных вращений, обязателен с учетом установленного вейджера.
Вся информация взята с сайта; https://pricebearings.ru/wp-content/pag/aktualnuy_promokod_pri_registracii_1.html
cheep cealis sublingual
lisinopril 20g
lisinopril 10 mg tablet cost
penis enlargement
Бонусное предложение активно до конца 2024 года. Фрибет – это бесплатные ставки на некоторое количество пари в букмекерской конторе 1xbet, которые выдается, если ввести промокод на бонусы и подарки 1хбет, а затем – целиком заполнить анкету игрока в своем личном кабинете и подтвердить номер мобильного телефона. С помощью бесплатной ставки за 1xbet промокод вы можете делать ставки на любые виды спорта, однако учтите, что у 1xbet фрибета есть свои условия отыгрыша. Приветственный бонус 1Хбет. Во время регистрации на 1xbet бетторы могут выбрать стартовый бонус – для ставок на спорт или для игры в казино. Промокоды 1xBet на сегодня. Не ошибемся, если скажем, что компания является одним из лидеров на рынке букмекерских услуг по количеству и разнообразию бонусных предложений. Белорусские бетторы могут воспользоваться всем их спектром. Промокод «1хБет» при регистрации дает право новым бетторам получит 100% бонус на первый депозит, но не более 200 BYN (бел. рублей). Например, при пополнении баланса на 100 BYN сверху клиент получает аналогичный бонус. Если же речь идет о промокодах, которые дают право на бесплатную ставку, то моментом активации следует считать время совершения ставки при помощи такого купона – более подробно в этом материале https://fotozayka.ru/wp-content/pages/promokod_240.html
Как сделать укладку рулонного газона своими руками
купить рулонный газон цена https://rulonnyygazon177.ru/ .
5 способов улучшить свой участок с помощью рулонного газона
рулонный газон цена за м2 https://rulonnyygazon177.ru/ .
ttbslot.com
“내 아들아, 폐하를 뵈었다.” 주후조가 먼저 경례했다.
Бездепозитный Бонус 1win 2024
Бонусы от казино 1win 1вин промокоды1Win 2024 – Бездепозитные бонусы ? Коды на возврат денег ? VIP Программа лояльности ? Бесплатные фриспины.
промокоды для 1win при пополнении: 937999 предоставляет новым игрокам бонус 500% для игры в слоты и игровые автоматы, максимальная сумма бонуса 200 000 рублей. Вы можете использовать бонусные деньги в разделе азартных игр, включая онлайн казино, карты, рулетку, игровые автоматы и слоты.
Компания «1Win» рада предложить своим новым клиентам приветственный бонус в размере до 500% на первые четыре депозита. Это выгодное предложение доступно сразу после регистрации в нашей букмекерской конторе. Бонус можно получить не только в рублях, но и в других валютах, при этом он не ограничивает возможность участия игроков в других программам лояльности компании. Максимальная сумма вознаграждения за регистрацию составляет 75000 рублей или эквивалентная сумма в другой валюте.
промокоды для пополнения 1win приносят игрокам множество преимуществ. Во-первых, они позволяют увеличить начальную ставку или продлить время игры. Кроме того, они дают возможность попробовать различные игры без риска потерять реальные деньги. Бонусы также повышают шансы на выигрыш и предоставляют дополнительные возможности для получения прибыли. Кроме того, бонусы в 1win могут быть обменены на реальные деньги или использованы для участия в специальных акциях и турнирах.
Преимущества получения и использования бонусов в 1win очевидны. Они позволяют игроку расширить свои возможности и получить больше удовольствия от игры. Бонусы также делают игру более выгодной с финансовой точки зрения, помогая уменьшить риски и увеличить потенциальную прибыль. Кроме того, получение и использование бонусов в 1win открывает возможность стать лояльным клиентом и получить дополнительные привилегии и вознаграждения от казино.
Итак, получение бонусов в 1win – это отличная возможность для игрока увеличить свои шансы на выигрыш, получить дополнительные деньги и улучшить свой игровой опыт. Бонусы делают игру более интересной и выгодной.
1win промокоды на пополнение: 937999 предоставляет возможность получить бездепозитный бонус 2024. Его можно получить в виде фриспинов или фрибетов. Чтобы получить подарок, необходимо активировать код в личном кабинете. Дополнительный депозит не требуется. Размеры подарков невелики: фрибет до 500 рублей и не более 70 фриспинов для игры в слоты. Как и в случае с другими поощрениями, необходимо отыграть бездепозитный бонус. Вейджер, как правило, не превышает х5 для бесплатных ставок и х30 для фриспинов.
В казино 1win предоставляется внушительный бонус при регистрации, который составляет 500% от суммы первых четырех последовательных депозитов клиента. С таким количеством бонусов новичок может значительно увеличить свои шансы на выигрыш. Чтобы получить этот приветственный бонус, необходимо зарегистрироваться на официальном сайте, рабочем зеркале, мобильной версии или приложениях для мобильных телефонов. Однако, основным условием является совершение первого пополнения счета, так как активировать бонусы 1win можно только после этого.
промокоды при регистрации 1win: 937999 используйте бонусный код при регистрации и получите бездепозтный бонус 70 фриспинов. Да, при использовании кода 1Win вы можете получить различные поощрения, включая бездепозитные бонусы. Они обычно представлены в виде фрибетов или фриспинов. Для их активации не требуется дополнительное пополнение счета. Размер таких подарков невелик: бесплатных вращений не более 70. Вейджер на бездепозитный бонус обычно не превышает х35. В 1Win вы можете получить бонусы за участие в акциях, турнирах, розыгрышах и активацию промокода. Бонусная программа периодически обновляется. Кроме того, некоторые акции имеют сезонный характер.
В 1Win основная бонусная программа включает в себя фриспины. Чтобы получить 70FS, необходимо пополнить счет на 100 рублей или более. Игроку предоставляется 2 дня с момента регистрации для активации презента. Отыгрыш бонуса должен быть выполнен в течение 24 часов с момента начисления, с вейджером х35. Бесплатные вращения предназначены только для игр провайдера Microgaming.
Так как бонусная программа 1Win регулярно обновляется, список акций, в которых можно получить фриспины, постоянно расширяется. Более подробную информацию о них можно найти на нашем сайте.
Промокод на 1Win дает возможность получить бесплатные вращения. Их можно использовать в любых слотах из каталога казино. Иногда могут быть установлены ограничения, которые предусматривают использование фриспинов только в определенных слотах или играх конкретного провайдера. Фриспины начисляются с фиксированной ставкой. Отыгрыш выигрыша, полученного с помощью бесплатных вращений, обязателен с учетом установленного вейджера.
Вся информация взята с сайта; https://pricebearings.ru/wp-content/pag/aktualnuy_promokod_pri_registracii_1.html
lisinopril 5mg
Бездепозитный Бонус 1win 2024
Бонусы от казино 1win 1вин промокод рф1Win 2024 – Бездепозитные бонусы ? Коды на возврат денег ? VIP Программа лояльности ? Бесплатные фриспины.
1win промокоды на пополнение: 937999 предоставляет новым игрокам бонус 500% для игры в слоты и игровые автоматы, максимальная сумма бонуса 200 000 рублей. Вы можете использовать бонусные деньги в разделе азартных игр, включая онлайн казино, карты, рулетку, игровые автоматы и слоты.
Компания «1Win» рада предложить своим новым клиентам приветственный бонус в размере до 500% на первые четыре депозита. Это выгодное предложение доступно сразу после регистрации в нашей букмекерской конторе. Бонус можно получить не только в рублях, но и в других валютах, при этом он не ограничивает возможность участия игроков в других программам лояльности компании. Максимальная сумма вознаграждения за регистрацию составляет 75000 рублей или эквивалентная сумма в другой валюте.
1win как ввести промокод приносят игрокам множество преимуществ. Во-первых, они позволяют увеличить начальную ставку или продлить время игры. Кроме того, они дают возможность попробовать различные игры без риска потерять реальные деньги. Бонусы также повышают шансы на выигрыш и предоставляют дополнительные возможности для получения прибыли. Кроме того, бонусы в 1win могут быть обменены на реальные деньги или использованы для участия в специальных акциях и турнирах.
Преимущества получения и использования бонусов в 1win очевидны. Они позволяют игроку расширить свои возможности и получить больше удовольствия от игры. Бонусы также делают игру более выгодной с финансовой точки зрения, помогая уменьшить риски и увеличить потенциальную прибыль. Кроме того, получение и использование бонусов в 1win открывает возможность стать лояльным клиентом и получить дополнительные привилегии и вознаграждения от казино.
Итак, получение бонусов в 1win – это отличная возможность для игрока увеличить свои шансы на выигрыш, получить дополнительные деньги и улучшить свой игровой опыт. Бонусы делают игру более интересной и выгодной.
промокод 1win 2024: 937999 предоставляет возможность получить бездепозитный бонус 2024. Его можно получить в виде фриспинов или фрибетов. Чтобы получить подарок, необходимо активировать код в личном кабинете. Дополнительный депозит не требуется. Размеры подарков невелики: фрибет до 500 рублей и не более 70 фриспинов для игры в слоты. Как и в случае с другими поощрениями, необходимо отыграть бездепозитный бонус. Вейджер, как правило, не превышает х5 для бесплатных ставок и х30 для фриспинов.
В казино 1win предоставляется внушительный бонус при регистрации, который составляет 500% от суммы первых четырех последовательных депозитов клиента. С таким количеством бонусов новичок может значительно увеличить свои шансы на выигрыш. Чтобы получить этот приветственный бонус, необходимо зарегистрироваться на официальном сайте, рабочем зеркале, мобильной версии или приложениях для мобильных телефонов. Однако, основным условием является совершение первого пополнения счета, так как активировать бонусы 1win можно только после этого.
куда вводить промокод на 1win: 937999 используйте бонусный код при регистрации и получите бездепозтный бонус 70 фриспинов. Да, при использовании кода 1Win вы можете получить различные поощрения, включая бездепозитные бонусы. Они обычно представлены в виде фрибетов или фриспинов. Для их активации не требуется дополнительное пополнение счета. Размер таких подарков невелик: бесплатных вращений не более 70. Вейджер на бездепозитный бонус обычно не превышает х35. В 1Win вы можете получить бонусы за участие в акциях, турнирах, розыгрышах и активацию промокода. Бонусная программа периодически обновляется. Кроме того, некоторые акции имеют сезонный характер.
В 1Win основная бонусная программа включает в себя фриспины. Чтобы получить 70FS, необходимо пополнить счет на 100 рублей или более. Игроку предоставляется 2 дня с момента регистрации для активации презента. Отыгрыш бонуса должен быть выполнен в течение 24 часов с момента начисления, с вейджером х35. Бесплатные вращения предназначены только для игр провайдера Microgaming.
Так как бонусная программа 1Win регулярно обновляется, список акций, в которых можно получить фриспины, постоянно расширяется. Более подробную информацию о них можно найти на нашем сайте.
Промокод на 1Win дает возможность получить бесплатные вращения. Их можно использовать в любых слотах из каталога казино. Иногда могут быть установлены ограничения, которые предусматривают использование фриспинов только в определенных слотах или играх конкретного провайдера. Фриспины начисляются с фиксированной ставкой. Отыгрыш выигрыша, полученного с помощью бесплатных вращений, обязателен с учетом установленного вейджера.
Вся информация взята с сайта; https://pricebearings.ru/wp-content/pag/aktualnuy_promokod_pri_registracii_1.html
buy synthroid 0.0125 online
Воспользоваться промокодом 1xbet можно при регистрации в 1xbet. БК 1хбет дарит до 130% на первый депозит при помощи промокода 1xbet. Максимальная сумма бонуса по промокоду 1хбет достигает 32500 рублей. Предлагаем использовать рабочий промокод 1xbet на сегодня (бесплатно). Вводить промокод 1хбет следует строго при регистрации. Куда вводить промокод 1xbet при регистрации? Выбираете страну и валюту. В окно “Введите промокод” (при наличии), вводите рабочий промокод. Как активировать промокод 1хбет. Промокод 1xbet активируется при первом пополнении игрового счета. Однако, есть пару моментов: Необходимо заполнить все обязательные поля в личном кабинете. Как получить промокод 1xbet на сегодня? Бесплатные купоны для повышения бонуса посетителям сайта. Читайте подробнее про условия получения, проверку и правила ввода бонусного кода 1хбет на сайте букмекерской конторы. Еще один вид промокодов 1xbet.com позволяет совершать бесплатные ставки на события, а также использовать иные предложения в сфере азартных игр от БК. Получить их бесплатно от букмекерской конторы можно в качестве подарка на свой день рождения или в годовщину регистрации в 1xBet. промокод 1хбет на день рождения условия. Стандартный бонус на первый депозит для новых игроков составляет 100% от суммы первого пополнения – более подробно в этом материале https://fotozayka.ru/wp-content/pages/promokod_240.html
valtrex 1000 mg price
Unleash your gaming prowess at online casinos Kenya, where novel challenges and prompt payouts await the daring.
generic lisinopril 10 mg
prinivil 2.5 mg
buy cheap prednisone online
cheap viagra online canadian pharmacy
Промокод 1xbet при регистрации. Промо-код встречается на просторах сети достаточно часто. Букмекер использует его для привлечения новых игроков в индустрию ставок, но преимущество предоставляется и новому игроку. После того как он совершит первый депозит, на его бонусный счёт поступит аналогичная сумма, до 32500 рублей. куда вводить промокод в 1хбет на телефоне Данный вид бонус-кода также популярен в поиске. Указывать его надо в купоне для совершения ставки. Промокод 1xbet на ставку практически невозможно найти в бесплатном доступе. Он вручается игрокам индивидуально.К примеру, компания промокодов. В данном разделе подробно расписан процесс получения – более подробно в этом материале https://fotozayka.ru/wp-content/pages/promokod_240.html
purchase prednisone no prescription
synthroid 0.05 mg
pharmacy online track order
WOW just what I was searching for. Came here by searching for %meta_keyword%
RybelsusRybelsusRybelsusRybelsusRybelsus
Я хочу поделиться хорошим опытом с lenovo-remont.com. Данный сервис-центр действительно заслуживает положительного отзыва за профессиональный подход и отличный ремонт техники Lenovo.
Я хочу рассказать о своем хорошем опыте в lenovo-remont.com. Данный сервис-центр по-настоящему заслуживает похвалы благодаря высококвалифицированный подход и качественный обслуживание продукции Lenovo.
Я хочу поделиться хорошим опытом в lenovo-remont.com. Этот сервисный центр по-настоящему заслуживает положительного отзыва благодаря профессиональный отношение и добросовестный сервис продукции Lenovo.
1 lisinopril
lisinopril 20mg for sale
world pharmacy india
Бездепозитный Бонус 1win 2024
Бонусы от казино промокод на 1вин при регистрации1Win 2024 – Бездепозитные бонусы ? Коды на возврат денег ? VIP Программа лояльности ? Бесплатные фриспины.
бездепозитные промокоды 1win: 937999 предоставляет новым игрокам бонус 500% для игры в слоты и игровые автоматы, максимальная сумма бонуса 200 000 рублей. Вы можете использовать бонусные деньги в разделе азартных игр, включая онлайн казино, карты, рулетку, игровые автоматы и слоты.
Компания «1Win» рада предложить своим новым клиентам приветственный бонус в размере до 500% на первые четыре депозита. Это выгодное предложение доступно сразу после регистрации в нашей букмекерской конторе. Бонус можно получить не только в рублях, но и в других валютах, при этом он не ограничивает возможность участия игроков в других программам лояльности компании. Максимальная сумма вознаграждения за регистрацию составляет 75000 рублей или эквивалентная сумма в другой валюте.
1win бездепозитный промокод приносят игрокам множество преимуществ. Во-первых, они позволяют увеличить начальную ставку или продлить время игры. Кроме того, они дают возможность попробовать различные игры без риска потерять реальные деньги. Бонусы также повышают шансы на выигрыш и предоставляют дополнительные возможности для получения прибыли. Кроме того, бонусы в 1win могут быть обменены на реальные деньги или использованы для участия в специальных акциях и турнирах.
Преимущества получения и использования бонусов в 1win очевидны. Они позволяют игроку расширить свои возможности и получить больше удовольствия от игры. Бонусы также делают игру более выгодной с финансовой точки зрения, помогая уменьшить риски и увеличить потенциальную прибыль. Кроме того, получение и использование бонусов в 1win открывает возможность стать лояльным клиентом и получить дополнительные привилегии и вознаграждения от казино.
Итак, получение бонусов в 1win – это отличная возможность для игрока увеличить свои шансы на выигрыш, получить дополнительные деньги и улучшить свой игровой опыт. Бонусы делают игру более интересной и выгодной.
1win промокод: 937999 предоставляет возможность получить бездепозитный бонус 2024. Его можно получить в виде фриспинов или фрибетов. Чтобы получить подарок, необходимо активировать код в личном кабинете. Дополнительный депозит не требуется. Размеры подарков невелики: фрибет до 500 рублей и не более 70 фриспинов для игры в слоты. Как и в случае с другими поощрениями, необходимо отыграть бездепозитный бонус. Вейджер, как правило, не превышает х5 для бесплатных ставок и х30 для фриспинов.
В казино 1win предоставляется внушительный бонус при регистрации, который составляет 500% от суммы первых четырех последовательных депозитов клиента. С таким количеством бонусов новичок может значительно увеличить свои шансы на выигрыш. Чтобы получить этот приветственный бонус, необходимо зарегистрироваться на официальном сайте, рабочем зеркале, мобильной версии или приложениях для мобильных телефонов. Однако, основным условием является совершение первого пополнения счета, так как активировать бонусы 1win можно только после этого.
ваучер 1win сегодня рабочие промокоды: 937999 используйте бонусный код при регистрации и получите бездепозтный бонус 70 фриспинов. Да, при использовании кода 1Win вы можете получить различные поощрения, включая бездепозитные бонусы. Они обычно представлены в виде фрибетов или фриспинов. Для их активации не требуется дополнительное пополнение счета. Размер таких подарков невелик: бесплатных вращений не более 70. Вейджер на бездепозитный бонус обычно не превышает х35. В 1Win вы можете получить бонусы за участие в акциях, турнирах, розыгрышах и активацию промокода. Бонусная программа периодически обновляется. Кроме того, некоторые акции имеют сезонный характер.
В 1Win основная бонусная программа включает в себя фриспины. Чтобы получить 70FS, необходимо пополнить счет на 100 рублей или более. Игроку предоставляется 2 дня с момента регистрации для активации презента. Отыгрыш бонуса должен быть выполнен в течение 24 часов с момента начисления, с вейджером х35. Бесплатные вращения предназначены только для игр провайдера Microgaming.
Так как бонусная программа 1Win регулярно обновляется, список акций, в которых можно получить фриспины, постоянно расширяется. Более подробную информацию о них можно найти на нашем сайте.
Промокод на 1Win дает возможность получить бесплатные вращения. Их можно использовать в любых слотах из каталога казино. Иногда могут быть установлены ограничения, которые предусматривают использование фриспинов только в определенных слотах или играх конкретного провайдера. Фриспины начисляются с фиксированной ставкой. Отыгрыш выигрыша, полученного с помощью бесплатных вращений, обязателен с учетом установленного вейджера.
Вся информация взята с сайта; https://svt-auto.ru/img/pgs/%20aktualnuy_promokod_pri_registracii_1.html
canadian pharmacy prices
Попав в непредвиденную ситуацию с техникой Neff, я был приятно удивлен, насколько быстро и эффективно Neff Center .
Обратившись в этот сервисный центр, я получил не только быструю, но и качественную помощь. Мастера, работающие здесь, настоящие профессионалы в своем деле.
Благодаря их работе, моя техника заработала как новенькая, и я могу спокойно рекомендовать этот сервисный центр всем владельцам техники Neff.
how can i get synthroid cheap
Бездепозитный Бонус 1win 2024
Бонусы от казино промокод на ваучер 1win1Win 2024 – Бездепозитные бонусы ? Коды на возврат денег ? VIP Программа лояльности ? Бесплатные фриспины.
промокоды на 1win 2024 на пополнение: 937999 предоставляет новым игрокам бонус 500% для игры в слоты и игровые автоматы, максимальная сумма бонуса 200 000 рублей. Вы можете использовать бонусные деньги в разделе азартных игр, включая онлайн казино, карты, рулетку, игровые автоматы и слоты.
Компания «1Win» рада предложить своим новым клиентам приветственный бонус в размере до 500% на первые четыре депозита. Это выгодное предложение доступно сразу после регистрации в нашей букмекерской конторе. Бонус можно получить не только в рублях, но и в других валютах, при этом он не ограничивает возможность участия игроков в других программам лояльности компании. Максимальная сумма вознаграждения за регистрацию составляет 75000 рублей или эквивалентная сумма в другой валюте.
промокод 1вин при регистрации на сегодня приносят игрокам множество преимуществ. Во-первых, они позволяют увеличить начальную ставку или продлить время игры. Кроме того, они дают возможность попробовать различные игры без риска потерять реальные деньги. Бонусы также повышают шансы на выигрыш и предоставляют дополнительные возможности для получения прибыли. Кроме того, бонусы в 1win могут быть обменены на реальные деньги или использованы для участия в специальных акциях и турнирах.
Преимущества получения и использования бонусов в 1win очевидны. Они позволяют игроку расширить свои возможности и получить больше удовольствия от игры. Бонусы также делают игру более выгодной с финансовой точки зрения, помогая уменьшить риски и увеличить потенциальную прибыль. Кроме того, получение и использование бонусов в 1win открывает возможность стать лояльным клиентом и получить дополнительные привилегии и вознаграждения от казино.
Итак, получение бонусов в 1win – это отличная возможность для игрока увеличить свои шансы на выигрыш, получить дополнительные деньги и улучшить свой игровой опыт. Бонусы делают игру более интересной и выгодной.
где в 1win вводить промокод: 937999 предоставляет возможность получить бездепозитный бонус 2024. Его можно получить в виде фриспинов или фрибетов. Чтобы получить подарок, необходимо активировать код в личном кабинете. Дополнительный депозит не требуется. Размеры подарков невелики: фрибет до 500 рублей и не более 70 фриспинов для игры в слоты. Как и в случае с другими поощрениями, необходимо отыграть бездепозитный бонус. Вейджер, как правило, не превышает х5 для бесплатных ставок и х30 для фриспинов.
В казино 1win предоставляется внушительный бонус при регистрации, который составляет 500% от суммы первых четырех последовательных депозитов клиента. С таким количеством бонусов новичок может значительно увеличить свои шансы на выигрыш. Чтобы получить этот приветственный бонус, необходимо зарегистрироваться на официальном сайте, рабочем зеркале, мобильной версии или приложениях для мобильных телефонов. Однако, основным условием является совершение первого пополнения счета, так как активировать бонусы 1win можно только после этого.
промокоды для 1вин: 937999 используйте бонусный код при регистрации и получите бездепозтный бонус 70 фриспинов. Да, при использовании кода 1Win вы можете получить различные поощрения, включая бездепозитные бонусы. Они обычно представлены в виде фрибетов или фриспинов. Для их активации не требуется дополнительное пополнение счета. Размер таких подарков невелик: бесплатных вращений не более 70. Вейджер на бездепозитный бонус обычно не превышает х35. В 1Win вы можете получить бонусы за участие в акциях, турнирах, розыгрышах и активацию промокода. Бонусная программа периодически обновляется. Кроме того, некоторые акции имеют сезонный характер.
В 1Win основная бонусная программа включает в себя фриспины. Чтобы получить 70FS, необходимо пополнить счет на 100 рублей или более. Игроку предоставляется 2 дня с момента регистрации для активации презента. Отыгрыш бонуса должен быть выполнен в течение 24 часов с момента начисления, с вейджером х35. Бесплатные вращения предназначены только для игр провайдера Microgaming.
Так как бонусная программа 1Win регулярно обновляется, список акций, в которых можно получить фриспины, постоянно расширяется. Более подробную информацию о них можно найти на нашем сайте.
Промокод на 1Win дает возможность получить бесплатные вращения. Их можно использовать в любых слотах из каталога казино. Иногда могут быть установлены ограничения, которые предусматривают использование фриспинов только в определенных слотах или играх конкретного провайдера. Фриспины начисляются с фиксированной ставкой. Отыгрыш выигрыша, полученного с помощью бесплатных вращений, обязателен с учетом установленного вейджера.
Вся информация взята с сайта; https://svt-auto.ru/img/pgs/%20aktualnuy_promokod_pri_registracii_1.html
lisinopril 1 mg
Its like you read my mind! You appear to know a lot about this, like you wrote the book in it or something. I think that you can do with a few pics to drive the message home a little bit, but other than that, this is excellent blog. A fantastic read. I’ll certainly be back.
Rybelsus
Бездепозитный Бонус 1win 2024
Бонусы от казино промокоды 1win при пополнении1Win 2024 – Бездепозитные бонусы ? Коды на возврат денег ? VIP Программа лояльности ? Бесплатные фриспины.
промокоды 1win: 937999 предоставляет новым игрокам бонус 500% для игры в слоты и игровые автоматы, максимальная сумма бонуса 200 000 рублей. Вы можете использовать бонусные деньги в разделе азартных игр, включая онлайн казино, карты, рулетку, игровые автоматы и слоты.
Компания «1Win» рада предложить своим новым клиентам приветственный бонус в размере до 500% на первые четыре депозита. Это выгодное предложение доступно сразу после регистрации в нашей букмекерской конторе. Бонус можно получить не только в рублях, но и в других валютах, при этом он не ограничивает возможность участия игроков в других программам лояльности компании. Максимальная сумма вознаграждения за регистрацию составляет 75000 рублей или эквивалентная сумма в другой валюте.
промокод 1win на сегодня при пополнение счета приносят игрокам множество преимуществ. Во-первых, они позволяют увеличить начальную ставку или продлить время игры. Кроме того, они дают возможность попробовать различные игры без риска потерять реальные деньги. Бонусы также повышают шансы на выигрыш и предоставляют дополнительные возможности для получения прибыли. Кроме того, бонусы в 1win могут быть обменены на реальные деньги или использованы для участия в специальных акциях и турнирах.
Преимущества получения и использования бонусов в 1win очевидны. Они позволяют игроку расширить свои возможности и получить больше удовольствия от игры. Бонусы также делают игру более выгодной с финансовой точки зрения, помогая уменьшить риски и увеличить потенциальную прибыль. Кроме того, получение и использование бонусов в 1win открывает возможность стать лояльным клиентом и получить дополнительные привилегии и вознаграждения от казино.
Итак, получение бонусов в 1win – это отличная возможность для игрока увеличить свои шансы на выигрыш, получить дополнительные деньги и улучшить свой игровой опыт. Бонусы делают игру более интересной и выгодной.
1win промокод 500: 937999 предоставляет возможность получить бездепозитный бонус 2024. Его можно получить в виде фриспинов или фрибетов. Чтобы получить подарок, необходимо активировать код в личном кабинете. Дополнительный депозит не требуется. Размеры подарков невелики: фрибет до 500 рублей и не более 70 фриспинов для игры в слоты. Как и в случае с другими поощрениями, необходимо отыграть бездепозитный бонус. Вейджер, как правило, не превышает х5 для бесплатных ставок и х30 для фриспинов.
В казино 1win предоставляется внушительный бонус при регистрации, который составляет 500% от суммы первых четырех последовательных депозитов клиента. С таким количеством бонусов новичок может значительно увеличить свои шансы на выигрыш. Чтобы получить этот приветственный бонус, необходимо зарегистрироваться на официальном сайте, рабочем зеркале, мобильной версии или приложениях для мобильных телефонов. Однако, основным условием является совершение первого пополнения счета, так как активировать бонусы 1win можно только после этого.
промокод для 1win 2024: 937999 используйте бонусный код при регистрации и получите бездепозтный бонус 70 фриспинов. Да, при использовании кода 1Win вы можете получить различные поощрения, включая бездепозитные бонусы. Они обычно представлены в виде фрибетов или фриспинов. Для их активации не требуется дополнительное пополнение счета. Размер таких подарков невелик: бесплатных вращений не более 70. Вейджер на бездепозитный бонус обычно не превышает х35. В 1Win вы можете получить бонусы за участие в акциях, турнирах, розыгрышах и активацию промокода. Бонусная программа периодически обновляется. Кроме того, некоторые акции имеют сезонный характер.
В 1Win основная бонусная программа включает в себя фриспины. Чтобы получить 70FS, необходимо пополнить счет на 100 рублей или более. Игроку предоставляется 2 дня с момента регистрации для активации презента. Отыгрыш бонуса должен быть выполнен в течение 24 часов с момента начисления, с вейджером х35. Бесплатные вращения предназначены только для игр провайдера Microgaming.
Так как бонусная программа 1Win регулярно обновляется, список акций, в которых можно получить фриспины, постоянно расширяется. Более подробную информацию о них можно найти на нашем сайте.
Промокод на 1Win дает возможность получить бесплатные вращения. Их можно использовать в любых слотах из каталога казино. Иногда могут быть установлены ограничения, которые предусматривают использование фриспинов только в определенных слотах или играх конкретного провайдера. Фриспины начисляются с фиксированной ставкой. Отыгрыш выигрыша, полученного с помощью бесплатных вращений, обязателен с учетом установленного вейджера.
Вся информация взята с сайта; https://svt-auto.ru/img/pgs/%20aktualnuy_promokod_pri_registracii_1.html
best online pharmacy tadalafil
Unquestionably believe that that you stated. Your favourite reason appeared to be at the internet
the easiest thing to remember of. I say to you, I certainly get annoyed
even as people consider issues that they plainly don’t understand about.
You controlled to hit the nail upon the highest as smartly as defined out
the whole thing with no need side-effects , other folks can take a signal.
Will probably be back to get more. Thank you
сериал на русском языке
cheapest online pharmacy india
сериал
mexican pharmacy online
legal online pharmacy coupon code
lisinopril generic cost
best price tadalafil online canada
generic tadalafil pills
серия
prednisone 50 mg canada
synthroid buy online uk
can you order lisinopril online
escrow pharmacy canada
lisinopril 10 mg online
us pharmacy no prescription
canada drug pharmacy
Nice weblog here! Also your site a lot up fast!
What web host are you the use of? Can I am getting your
affiliate link to your host? I wish my website loaded up
as fast as yours lol
online pharmacy cialis
Thanks for another magnificent article. Where else could anybody get that type of information in such a perfect manner of writing? I’ve a presentation subsequent week, and I am on the search for such info.
Solid-State Bassheads
can you buy metformin over the counter
synthroid pharmacy in canada
canadian mail order pharmacy
tadalafil tablet 5mg
synthroid cheap price
Бездепозитный Бонус 1win 2024
Бонусы от казино промокоды на фриспины 1win1Win 2024 – Бездепозитные бонусы ? Коды на возврат денег ? VIP Программа лояльности ? Бесплатные фриспины.
1win где ввести промокод: 937999 предоставляет новым игрокам бонус 500% для игры в слоты и игровые автоматы, максимальная сумма бонуса 200 000 рублей. Вы можете использовать бонусные деньги в разделе азартных игр, включая онлайн казино, карты, рулетку, игровые автоматы и слоты.
Компания «1Win» рада предложить своим новым клиентам приветственный бонус в размере до 500% на первые четыре депозита. Это выгодное предложение доступно сразу после регистрации в нашей букмекерской конторе. Бонус можно получить не только в рублях, но и в других валютах, при этом он не ограничивает возможность участия игроков в других программам лояльности компании. Максимальная сумма вознаграждения за регистрацию составляет 75000 рублей или эквивалентная сумма в другой валюте.
промокод 1win 2024 приносят игрокам множество преимуществ. Во-первых, они позволяют увеличить начальную ставку или продлить время игры. Кроме того, они дают возможность попробовать различные игры без риска потерять реальные деньги. Бонусы также повышают шансы на выигрыш и предоставляют дополнительные возможности для получения прибыли. Кроме того, бонусы в 1win могут быть обменены на реальные деньги или использованы для участия в специальных акциях и турнирах.
Преимущества получения и использования бонусов в 1win очевидны. Они позволяют игроку расширить свои возможности и получить больше удовольствия от игры. Бонусы также делают игру более выгодной с финансовой точки зрения, помогая уменьшить риски и увеличить потенциальную прибыль. Кроме того, получение и использование бонусов в 1win открывает возможность стать лояльным клиентом и получить дополнительные привилегии и вознаграждения от казино.
Итак, получение бонусов в 1win – это отличная возможность для игрока увеличить свои шансы на выигрыш, получить дополнительные деньги и улучшить свой игровой опыт. Бонусы делают игру более интересной и выгодной.
промокод 1вин при пополнении: 937999 предоставляет возможность получить бездепозитный бонус 2024. Его можно получить в виде фриспинов или фрибетов. Чтобы получить подарок, необходимо активировать код в личном кабинете. Дополнительный депозит не требуется. Размеры подарков невелики: фрибет до 500 рублей и не более 70 фриспинов для игры в слоты. Как и в случае с другими поощрениями, необходимо отыграть бездепозитный бонус. Вейджер, как правило, не превышает х5 для бесплатных ставок и х30 для фриспинов.
В казино 1win предоставляется внушительный бонус при регистрации, который составляет 500% от суммы первых четырех последовательных депозитов клиента. С таким количеством бонусов новичок может значительно увеличить свои шансы на выигрыш. Чтобы получить этот приветственный бонус, необходимо зарегистрироваться на официальном сайте, рабочем зеркале, мобильной версии или приложениях для мобильных телефонов. Однако, основным условием является совершение первого пополнения счета, так как активировать бонусы 1win можно только после этого.
промокод для 1win при регистрации: 937999 используйте бонусный код при регистрации и получите бездепозтный бонус 70 фриспинов. Да, при использовании кода 1Win вы можете получить различные поощрения, включая бездепозитные бонусы. Они обычно представлены в виде фрибетов или фриспинов. Для их активации не требуется дополнительное пополнение счета. Размер таких подарков невелик: бесплатных вращений не более 70. Вейджер на бездепозитный бонус обычно не превышает х35. В 1Win вы можете получить бонусы за участие в акциях, турнирах, розыгрышах и активацию промокода. Бонусная программа периодически обновляется. Кроме того, некоторые акции имеют сезонный характер.
В 1Win основная бонусная программа включает в себя фриспины. Чтобы получить 70FS, необходимо пополнить счет на 100 рублей или более. Игроку предоставляется 2 дня с момента регистрации для активации презента. Отыгрыш бонуса должен быть выполнен в течение 24 часов с момента начисления, с вейджером х35. Бесплатные вращения предназначены только для игр провайдера Microgaming.
Так как бонусная программа 1Win регулярно обновляется, список акций, в которых можно получить фриспины, постоянно расширяется. Более подробную информацию о них можно найти на нашем сайте.
Промокод на 1Win дает возможность получить бесплатные вращения. Их можно использовать в любых слотах из каталога казино. Иногда могут быть установлены ограничения, которые предусматривают использование фриспинов только в определенных слотах или играх конкретного провайдера. Фриспины начисляются с фиксированной ставкой. Отыгрыш выигрыша, полученного с помощью бесплатных вращений, обязателен с учетом установленного вейджера.
Вся информация взята с сайта; https://fundament-spb.ru/pages/promokod_362.html
cost for 2 mg lisinopril
mexican pharmacy online
promo code for canadian pharmacy meds
lisinopril drug
Бездепозитный Бонус 1win 2024
Бонусы от казино промокод для 1вин при пополнении1Win 2024 – Бездепозитные бонусы ? Коды на возврат денег ? VIP Программа лояльности ? Бесплатные фриспины.
промокоды в 1win: 937999 предоставляет новым игрокам бонус 500% для игры в слоты и игровые автоматы, максимальная сумма бонуса 200 000 рублей. Вы можете использовать бонусные деньги в разделе азартных игр, включая онлайн казино, карты, рулетку, игровые автоматы и слоты.
Компания «1Win» рада предложить своим новым клиентам приветственный бонус в размере до 500% на первые четыре депозита. Это выгодное предложение доступно сразу после регистрации в нашей букмекерской конторе. Бонус можно получить не только в рублях, но и в других валютах, при этом он не ограничивает возможность участия игроков в других программам лояльности компании. Максимальная сумма вознаграждения за регистрацию составляет 75000 рублей или эквивалентная сумма в другой валюте.
промокод 1win при пополнении приносят игрокам множество преимуществ. Во-первых, они позволяют увеличить начальную ставку или продлить время игры. Кроме того, они дают возможность попробовать различные игры без риска потерять реальные деньги. Бонусы также повышают шансы на выигрыш и предоставляют дополнительные возможности для получения прибыли. Кроме того, бонусы в 1win могут быть обменены на реальные деньги или использованы для участия в специальных акциях и турнирах.
Преимущества получения и использования бонусов в 1win очевидны. Они позволяют игроку расширить свои возможности и получить больше удовольствия от игры. Бонусы также делают игру более выгодной с финансовой точки зрения, помогая уменьшить риски и увеличить потенциальную прибыль. Кроме того, получение и использование бонусов в 1win открывает возможность стать лояльным клиентом и получить дополнительные привилегии и вознаграждения от казино.
Итак, получение бонусов в 1win – это отличная возможность для игрока увеличить свои шансы на выигрыш, получить дополнительные деньги и улучшить свой игровой опыт. Бонусы делают игру более интересной и выгодной.
промокод 1win при пополнение счета: 937999 предоставляет возможность получить бездепозитный бонус 2024. Его можно получить в виде фриспинов или фрибетов. Чтобы получить подарок, необходимо активировать код в личном кабинете. Дополнительный депозит не требуется. Размеры подарков невелики: фрибет до 500 рублей и не более 70 фриспинов для игры в слоты. Как и в случае с другими поощрениями, необходимо отыграть бездепозитный бонус. Вейджер, как правило, не превышает х5 для бесплатных ставок и х30 для фриспинов.
В казино 1win предоставляется внушительный бонус при регистрации, который составляет 500% от суммы первых четырех последовательных депозитов клиента. С таким количеством бонусов новичок может значительно увеличить свои шансы на выигрыш. Чтобы получить этот приветственный бонус, необходимо зарегистрироваться на официальном сайте, рабочем зеркале, мобильной версии или приложениях для мобильных телефонов. Однако, основным условием является совершение первого пополнения счета, так как активировать бонусы 1win можно только после этого.
промокоды для 1win при пополнении: 937999 используйте бонусный код при регистрации и получите бездепозтный бонус 70 фриспинов. Да, при использовании кода 1Win вы можете получить различные поощрения, включая бездепозитные бонусы. Они обычно представлены в виде фрибетов или фриспинов. Для их активации не требуется дополнительное пополнение счета. Размер таких подарков невелик: бесплатных вращений не более 70. Вейджер на бездепозитный бонус обычно не превышает х35. В 1Win вы можете получить бонусы за участие в акциях, турнирах, розыгрышах и активацию промокода. Бонусная программа периодически обновляется. Кроме того, некоторые акции имеют сезонный характер.
В 1Win основная бонусная программа включает в себя фриспины. Чтобы получить 70FS, необходимо пополнить счет на 100 рублей или более. Игроку предоставляется 2 дня с момента регистрации для активации презента. Отыгрыш бонуса должен быть выполнен в течение 24 часов с момента начисления, с вейджером х35. Бесплатные вращения предназначены только для игр провайдера Microgaming.
Так как бонусная программа 1Win регулярно обновляется, список акций, в которых можно получить фриспины, постоянно расширяется. Более подробную информацию о них можно найти на нашем сайте.
Промокод на 1Win дает возможность получить бесплатные вращения. Их можно использовать в любых слотах из каталога казино. Иногда могут быть установлены ограничения, которые предусматривают использование фриспинов только в определенных слотах или играх конкретного провайдера. Фриспины начисляются с фиксированной ставкой. Отыгрыш выигрыша, полученного с помощью бесплатных вращений, обязателен с учетом установленного вейджера.
Вся информация взята с сайта; https://fundament-spb.ru/pages/promokod_362.html
Бездепозитный Бонус 1win 2024
Бонусы от казино 1win промокод официальный сайт букмекерская контора1Win 2024 – Бездепозитные бонусы ? Коды на возврат денег ? VIP Программа лояльности ? Бесплатные фриспины.
1win poker промокод: 937999 предоставляет новым игрокам бонус 500% для игры в слоты и игровые автоматы, максимальная сумма бонуса 200 000 рублей. Вы можете использовать бонусные деньги в разделе азартных игр, включая онлайн казино, карты, рулетку, игровые автоматы и слоты.
Компания «1Win» рада предложить своим новым клиентам приветственный бонус в размере до 500% на первые четыре депозита. Это выгодное предложение доступно сразу после регистрации в нашей букмекерской конторе. Бонус можно получить не только в рублях, но и в других валютах, при этом он не ограничивает возможность участия игроков в других программам лояльности компании. Максимальная сумма вознаграждения за регистрацию составляет 75000 рублей или эквивалентная сумма в другой валюте.
промокод на 1win 2024 приносят игрокам множество преимуществ. Во-первых, они позволяют увеличить начальную ставку или продлить время игры. Кроме того, они дают возможность попробовать различные игры без риска потерять реальные деньги. Бонусы также повышают шансы на выигрыш и предоставляют дополнительные возможности для получения прибыли. Кроме того, бонусы в 1win могут быть обменены на реальные деньги или использованы для участия в специальных акциях и турнирах.
Преимущества получения и использования бонусов в 1win очевидны. Они позволяют игроку расширить свои возможности и получить больше удовольствия от игры. Бонусы также делают игру более выгодной с финансовой точки зрения, помогая уменьшить риски и увеличить потенциальную прибыль. Кроме того, получение и использование бонусов в 1win открывает возможность стать лояльным клиентом и получить дополнительные привилегии и вознаграждения от казино.
Итак, получение бонусов в 1win – это отличная возможность для игрока увеличить свои шансы на выигрыш, получить дополнительные деньги и улучшить свой игровой опыт. Бонусы делают игру более интересной и выгодной.
1win промокод за регистрацию: 937999 предоставляет возможность получить бездепозитный бонус 2024. Его можно получить в виде фриспинов или фрибетов. Чтобы получить подарок, необходимо активировать код в личном кабинете. Дополнительный депозит не требуется. Размеры подарков невелики: фрибет до 500 рублей и не более 70 фриспинов для игры в слоты. Как и в случае с другими поощрениями, необходимо отыграть бездепозитный бонус. Вейджер, как правило, не превышает х5 для бесплатных ставок и х30 для фриспинов.
В казино 1win предоставляется внушительный бонус при регистрации, который составляет 500% от суммы первых четырех последовательных депозитов клиента. С таким количеством бонусов новичок может значительно увеличить свои шансы на выигрыш. Чтобы получить этот приветственный бонус, необходимо зарегистрироваться на официальном сайте, рабочем зеркале, мобильной версии или приложениях для мобильных телефонов. Однако, основным условием является совершение первого пополнения счета, так как активировать бонусы 1win можно только после этого.
промокод на 1win первое пополнение: 937999 используйте бонусный код при регистрации и получите бездепозтный бонус 70 фриспинов. Да, при использовании кода 1Win вы можете получить различные поощрения, включая бездепозитные бонусы. Они обычно представлены в виде фрибетов или фриспинов. Для их активации не требуется дополнительное пополнение счета. Размер таких подарков невелик: бесплатных вращений не более 70. Вейджер на бездепозитный бонус обычно не превышает х35. В 1Win вы можете получить бонусы за участие в акциях, турнирах, розыгрышах и активацию промокода. Бонусная программа периодически обновляется. Кроме того, некоторые акции имеют сезонный характер.
В 1Win основная бонусная программа включает в себя фриспины. Чтобы получить 70FS, необходимо пополнить счет на 100 рублей или более. Игроку предоставляется 2 дня с момента регистрации для активации презента. Отыгрыш бонуса должен быть выполнен в течение 24 часов с момента начисления, с вейджером х35. Бесплатные вращения предназначены только для игр провайдера Microgaming.
Так как бонусная программа 1Win регулярно обновляется, список акций, в которых можно получить фриспины, постоянно расширяется. Более подробную информацию о них можно найти на нашем сайте.
Промокод на 1Win дает возможность получить бесплатные вращения. Их можно использовать в любых слотах из каталога казино. Иногда могут быть установлены ограничения, которые предусматривают использование фриспинов только в определенных слотах или играх конкретного провайдера. Фриспины начисляются с фиксированной ставкой. Отыгрыш выигрыша, полученного с помощью бесплатных вращений, обязателен с учетом установленного вейджера.
Вся информация взята с сайта; https://fundament-spb.ru/pages/promokod_362.html
brand name valtrex cost
Hi there I am so delighted I found your blog, I really found you by error, while I was browsing on Digg for something else, Anyways I am here now and would just like to say thank you for a fantastic post and a all round thrilling blog (I also love the theme/design), I don’t have time to read through it all at the minute but I have saved it and also included your RSS feeds, so when I have time I will be back to read a great deal more, Please do keep up the superb b.
Erhu
звуковое оборудование для сцены https://www.zvukovoe-oborudovanie11.ru/ .
metformin cream
metformin 500mg tablets cost
buy synthroid mexico
Советуем посетить сайт https://drova-smolensk.ru/
Также не забудьте добавить сайт в закладки: https://drova-smolensk.ru/
azithromycin tablets price in india
tadalafil 5mg india
canadian pharmacy coupon
cheapest synthroid prices
Советуем посетить сайт https://arenda-legkovyh-pricepov.ru/
Также не забудьте добавить сайт в закладки: https://arenda-legkovyh-pricepov.ru/
synthroid pill 88 mg
canadian 5mg tadalafil online
lisinopril 10 mg tablet cost
Mediaget – превосходный клиент для загрузки файлов, который предлагает удобный интерфейс и высокую скорость загрузки. Если вы хотите быстро и просто загружать файлы, то Mediaget – это то, что вам нужно. Чтобы скачать клиент бесплатно, просто перейдите по ссылке медиа джет скачать бесплатно. Mediaget легко устанавливается и не требует особых настроек, что делает его идеальным выбором для пользователей любого уровня знаний.клиента.
buy online pharmacy uk
Советуем посетить сайт https://podveski-remont.ru/
Также не забудьте добавить сайт в закладки: https://podveski-remont.ru/
order cheap lisinopril
https://1ecenter.ru
can i buy synthroid over the counter
happy family store
generic lisinopril online
Советуем посетить сайт https://admlihoslavl.ru/
Также не забудьте добавить сайт в закладки: https://admlihoslavl.ru/
Бездепозитный Бонус 1win 2024
Бонусы от казино 1win промокод при пополнении сегодня1Win 2024 – Бездепозитные бонусы ? Коды на возврат денег ? VIP Программа лояльности ? Бесплатные фриспины.
как ввести промокод в 1win если уже зарегистрирован: 937999 предоставляет новым игрокам бонус 500% для игры в слоты и игровые автоматы, максимальная сумма бонуса 200 000 рублей. Вы можете использовать бонусные деньги в разделе азартных игр, включая онлайн казино, карты, рулетку, игровые автоматы и слоты.
Компания «1Win» рада предложить своим новым клиентам приветственный бонус в размере до 500% на первые четыре депозита. Это выгодное предложение доступно сразу после регистрации в нашей букмекерской конторе. Бонус можно получить не только в рублях, но и в других валютах, при этом он не ограничивает возможность участия игроков в других программам лояльности компании. Максимальная сумма вознаграждения за регистрацию составляет 75000 рублей или эквивалентная сумма в другой валюте.
1win промокоды на деньги приносят игрокам множество преимуществ. Во-первых, они позволяют увеличить начальную ставку или продлить время игры. Кроме того, они дают возможность попробовать различные игры без риска потерять реальные деньги. Бонусы также повышают шансы на выигрыш и предоставляют дополнительные возможности для получения прибыли. Кроме того, бонусы в 1win могут быть обменены на реальные деньги или использованы для участия в специальных акциях и турнирах.
Преимущества получения и использования бонусов в 1win очевидны. Они позволяют игроку расширить свои возможности и получить больше удовольствия от игры. Бонусы также делают игру более выгодной с финансовой точки зрения, помогая уменьшить риски и увеличить потенциальную прибыль. Кроме того, получение и использование бонусов в 1win открывает возможность стать лояльным клиентом и получить дополнительные привилегии и вознаграждения от казино.
Итак, получение бонусов в 1win – это отличная возможность для игрока увеличить свои шансы на выигрыш, получить дополнительные деньги и улучшить свой игровой опыт. Бонусы делают игру более интересной и выгодной.
промокоды 1вин при регистрации 2024: 937999 предоставляет возможность получить бездепозитный бонус 2024. Его можно получить в виде фриспинов или фрибетов. Чтобы получить подарок, необходимо активировать код в личном кабинете. Дополнительный депозит не требуется. Размеры подарков невелики: фрибет до 500 рублей и не более 70 фриспинов для игры в слоты. Как и в случае с другими поощрениями, необходимо отыграть бездепозитный бонус. Вейджер, как правило, не превышает х5 для бесплатных ставок и х30 для фриспинов.
В казино 1win предоставляется внушительный бонус при регистрации, который составляет 500% от суммы первых четырех последовательных депозитов клиента. С таким количеством бонусов новичок может значительно увеличить свои шансы на выигрыш. Чтобы получить этот приветственный бонус, необходимо зарегистрироваться на официальном сайте, рабочем зеркале, мобильной версии или приложениях для мобильных телефонов. Однако, основным условием является совершение первого пополнения счета, так как активировать бонусы 1win можно только после этого.
1win куда ввести промокод: 937999 используйте бонусный код при регистрации и получите бездепозтный бонус 70 фриспинов. Да, при использовании кода 1Win вы можете получить различные поощрения, включая бездепозитные бонусы. Они обычно представлены в виде фрибетов или фриспинов. Для их активации не требуется дополнительное пополнение счета. Размер таких подарков невелик: бесплатных вращений не более 70. Вейджер на бездепозитный бонус обычно не превышает х35. В 1Win вы можете получить бонусы за участие в акциях, турнирах, розыгрышах и активацию промокода. Бонусная программа периодически обновляется. Кроме того, некоторые акции имеют сезонный характер.
В 1Win основная бонусная программа включает в себя фриспины. Чтобы получить 70FS, необходимо пополнить счет на 100 рублей или более. Игроку предоставляется 2 дня с момента регистрации для активации презента. Отыгрыш бонуса должен быть выполнен в течение 24 часов с момента начисления, с вейджером х35. Бесплатные вращения предназначены только для игр провайдера Microgaming.
Так как бонусная программа 1Win регулярно обновляется, список акций, в которых можно получить фриспины, постоянно расширяется. Более подробную информацию о них можно найти на нашем сайте.
Промокод на 1Win дает возможность получить бесплатные вращения. Их можно использовать в любых слотах из каталога казино. Иногда могут быть установлены ограничения, которые предусматривают использование фриспинов только в определенных слотах или играх конкретного провайдера. Фриспины начисляются с фиксированной ставкой. Отыгрыш выигрыша, полученного с помощью бесплатных вращений, обязателен с учетом установленного вейджера.
Вся информация взята с сайта; https://fundament-spb.ru/pages/promokod_362.html
Воспользоваться промокодом 1xbet можно при регистрации в 1xbet. БК 1хбет дарит до 130% на первый депозит при помощи промокода 1xbet. Максимальная сумма бонуса по промокоду 1хбет достигает 32500 рублей. Промокод 1хбет дает надбавку на депозит до 130% только при первом пополнении. Регистрация. промокод в 1хбет на сегодня при регистрации. Всем известно, что букмекерская контора 1xbet предлагает широкий выбор разнообразных бонусов и акций. В этой статье мы расскажем все о промокодах 1xBet: что это, как использовать при регистрации, где вводить, чтобы сделать ставку бесплатно, и по каким поводам казахстанский букмекер 1хБет вручает именные промокоды. Содержание. Что такое промокод 1xBet. Бесплатные промокоды 1xBet. Промокод при регистрации в 1xbet сегодня. Как ввести промокод при регистрации в 1хБет – более подробно в этом материале https://fotozayka.ru/wp-content/pages/promokod_240.html
Бездепозитный Бонус 1win 2024
Бонусы от казино промокоды на 1win при регистрации1Win 2024 – Бездепозитные бонусы ? Коды на возврат денег ? VIP Программа лояльности ? Бесплатные фриспины.
промокод при регистрации 1win 1 win: 937999 предоставляет новым игрокам бонус 500% для игры в слоты и игровые автоматы, максимальная сумма бонуса 200 000 рублей. Вы можете использовать бонусные деньги в разделе азартных игр, включая онлайн казино, карты, рулетку, игровые автоматы и слоты.
Компания «1Win» рада предложить своим новым клиентам приветственный бонус в размере до 500% на первые четыре депозита. Это выгодное предложение доступно сразу после регистрации в нашей букмекерской конторе. Бонус можно получить не только в рублях, но и в других валютах, при этом он не ограничивает возможность участия игроков в других программам лояльности компании. Максимальная сумма вознаграждения за регистрацию составляет 75000 рублей или эквивалентная сумма в другой валюте.
промокоды 1win сегодня приносят игрокам множество преимуществ. Во-первых, они позволяют увеличить начальную ставку или продлить время игры. Кроме того, они дают возможность попробовать различные игры без риска потерять реальные деньги. Бонусы также повышают шансы на выигрыш и предоставляют дополнительные возможности для получения прибыли. Кроме того, бонусы в 1win могут быть обменены на реальные деньги или использованы для участия в специальных акциях и турнирах.
Преимущества получения и использования бонусов в 1win очевидны. Они позволяют игроку расширить свои возможности и получить больше удовольствия от игры. Бонусы также делают игру более выгодной с финансовой точки зрения, помогая уменьшить риски и увеличить потенциальную прибыль. Кроме того, получение и использование бонусов в 1win открывает возможность стать лояльным клиентом и получить дополнительные привилегии и вознаграждения от казино.
Итак, получение бонусов в 1win – это отличная возможность для игрока увеличить свои шансы на выигрыш, получить дополнительные деньги и улучшить свой игровой опыт. Бонусы делают игру более интересной и выгодной.
промокод 1win при регистрации бездепозитный бонус: 937999 предоставляет возможность получить бездепозитный бонус 2024. Его можно получить в виде фриспинов или фрибетов. Чтобы получить подарок, необходимо активировать код в личном кабинете. Дополнительный депозит не требуется. Размеры подарков невелики: фрибет до 500 рублей и не более 70 фриспинов для игры в слоты. Как и в случае с другими поощрениями, необходимо отыграть бездепозитный бонус. Вейджер, как правило, не превышает х5 для бесплатных ставок и х30 для фриспинов.
В казино 1win предоставляется внушительный бонус при регистрации, который составляет 500% от суммы первых четырех последовательных депозитов клиента. С таким количеством бонусов новичок может значительно увеличить свои шансы на выигрыш. Чтобы получить этот приветственный бонус, необходимо зарегистрироваться на официальном сайте, рабочем зеркале, мобильной версии или приложениях для мобильных телефонов. Однако, основным условием является совершение первого пополнения счета, так как активировать бонусы 1win можно только после этого.
1win промокод на пополнение счета сегодня: 937999 используйте бонусный код при регистрации и получите бездепозтный бонус 70 фриспинов. Да, при использовании кода 1Win вы можете получить различные поощрения, включая бездепозитные бонусы. Они обычно представлены в виде фрибетов или фриспинов. Для их активации не требуется дополнительное пополнение счета. Размер таких подарков невелик: бесплатных вращений не более 70. Вейджер на бездепозитный бонус обычно не превышает х35. В 1Win вы можете получить бонусы за участие в акциях, турнирах, розыгрышах и активацию промокода. Бонусная программа периодически обновляется. Кроме того, некоторые акции имеют сезонный характер.
В 1Win основная бонусная программа включает в себя фриспины. Чтобы получить 70FS, необходимо пополнить счет на 100 рублей или более. Игроку предоставляется 2 дня с момента регистрации для активации презента. Отыгрыш бонуса должен быть выполнен в течение 24 часов с момента начисления, с вейджером х35. Бесплатные вращения предназначены только для игр провайдера Microgaming.
Так как бонусная программа 1Win регулярно обновляется, список акций, в которых можно получить фриспины, постоянно расширяется. Более подробную информацию о них можно найти на нашем сайте.
Промокод на 1Win дает возможность получить бесплатные вращения. Их можно использовать в любых слотах из каталога казино. Иногда могут быть установлены ограничения, которые предусматривают использование фриспинов только в определенных слотах или играх конкретного провайдера. Фриспины начисляются с фиксированной ставкой. Отыгрыш выигрыша, полученного с помощью бесплатных вращений, обязателен с учетом установленного вейджера.
Вся информация взята с сайта; https://fundament-spb.ru/pages/promokod_362.html
Бездепозитный Бонус 1win 2024
Бонусы от казино 1win куда вводить промокод1Win 2024 – Бездепозитные бонусы ? Коды на возврат денег ? VIP Программа лояльности ? Бесплатные фриспины.
промокод при регистрации 1win 1 win: 937999 предоставляет новым игрокам бонус 500% для игры в слоты и игровые автоматы, максимальная сумма бонуса 200 000 рублей. Вы можете использовать бонусные деньги в разделе азартных игр, включая онлайн казино, карты, рулетку, игровые автоматы и слоты.
Компания «1Win» рада предложить своим новым клиентам приветственный бонус в размере до 500% на первые четыре депозита. Это выгодное предложение доступно сразу после регистрации в нашей букмекерской конторе. Бонус можно получить не только в рублях, но и в других валютах, при этом он не ограничивает возможность участия игроков в других программам лояльности компании. Максимальная сумма вознаграждения за регистрацию составляет 75000 рублей или эквивалентная сумма в другой валюте.
1win промокоды приносят игрокам множество преимуществ. Во-первых, они позволяют увеличить начальную ставку или продлить время игры. Кроме того, они дают возможность попробовать различные игры без риска потерять реальные деньги. Бонусы также повышают шансы на выигрыш и предоставляют дополнительные возможности для получения прибыли. Кроме того, бонусы в 1win могут быть обменены на реальные деньги или использованы для участия в специальных акциях и турнирах.
Преимущества получения и использования бонусов в 1win очевидны. Они позволяют игроку расширить свои возможности и получить больше удовольствия от игры. Бонусы также делают игру более выгодной с финансовой точки зрения, помогая уменьшить риски и увеличить потенциальную прибыль. Кроме того, получение и использование бонусов в 1win открывает возможность стать лояльным клиентом и получить дополнительные привилегии и вознаграждения от казино.
Итак, получение бонусов в 1win – это отличная возможность для игрока увеличить свои шансы на выигрыш, получить дополнительные деньги и улучшить свой игровой опыт. Бонусы делают игру более интересной и выгодной.
1win промокод фрибет: 937999 предоставляет возможность получить бездепозитный бонус 2024. Его можно получить в виде фриспинов или фрибетов. Чтобы получить подарок, необходимо активировать код в личном кабинете. Дополнительный депозит не требуется. Размеры подарков невелики: фрибет до 500 рублей и не более 70 фриспинов для игры в слоты. Как и в случае с другими поощрениями, необходимо отыграть бездепозитный бонус. Вейджер, как правило, не превышает х5 для бесплатных ставок и х30 для фриспинов.
В казино 1win предоставляется внушительный бонус при регистрации, который составляет 500% от суммы первых четырех последовательных депозитов клиента. С таким количеством бонусов новичок может значительно увеличить свои шансы на выигрыш. Чтобы получить этот приветственный бонус, необходимо зарегистрироваться на официальном сайте, рабочем зеркале, мобильной версии или приложениях для мобильных телефонов. Однако, основным условием является совершение первого пополнения счета, так как активировать бонусы 1win можно только после этого.
промокод 1вин на фрибет при регистрации: 937999 используйте бонусный код при регистрации и получите бездепозтный бонус 70 фриспинов. Да, при использовании кода 1Win вы можете получить различные поощрения, включая бездепозитные бонусы. Они обычно представлены в виде фрибетов или фриспинов. Для их активации не требуется дополнительное пополнение счета. Размер таких подарков невелик: бесплатных вращений не более 70. Вейджер на бездепозитный бонус обычно не превышает х35. В 1Win вы можете получить бонусы за участие в акциях, турнирах, розыгрышах и активацию промокода. Бонусная программа периодически обновляется. Кроме того, некоторые акции имеют сезонный характер.
В 1Win основная бонусная программа включает в себя фриспины. Чтобы получить 70FS, необходимо пополнить счет на 100 рублей или более. Игроку предоставляется 2 дня с момента регистрации для активации презента. Отыгрыш бонуса должен быть выполнен в течение 24 часов с момента начисления, с вейджером х35. Бесплатные вращения предназначены только для игр провайдера Microgaming.
Так как бонусная программа 1Win регулярно обновляется, список акций, в которых можно получить фриспины, постоянно расширяется. Более подробную информацию о них можно найти на нашем сайте.
Промокод на 1Win дает возможность получить бесплатные вращения. Их можно использовать в любых слотах из каталога казино. Иногда могут быть установлены ограничения, которые предусматривают использование фриспинов только в определенных слотах или играх конкретного провайдера. Фриспины начисляются с фиксированной ставкой. Отыгрыш выигрыша, полученного с помощью бесплатных вращений, обязателен с учетом установленного вейджера.
Вся информация взята с сайта; https://fundament-spb.ru/pages/promokod_362.html
Абсолютно бесплатный промокод 1xbet. На сегодня контора предлагает всем новичкам воспользоваться не только приветственным бонусом, но и получить дополнительные преференции. Эти льготы игрок получает в том случае, если внимательно отнесётся к процедуре регистрации на сайте. промокод в 1хбет где ввести на андроид. 1xbet – один из самых узнаваемых букмекерских брендов в стране. Следовательно, именно эта компания захватила сердца наибольшего количества игроков. Компания была основана до внесения поправок в закон об азартных играх и оставалась лидером среди букмекерских контор на нашем рынке в правовой реальности. Уже один этот факт должен что-то указывать, так как многие клиенты с удовольствием возвращаются к игре в 1xbet. 1XBET – промокод на 32500р. Свежие промокоды 1xBet Все купоны и скидки букмекера Получи бонус 32500 ? Делай ставки на спорт – более подробно в этом материале https://fotozayka.ru/wp-content/pages/promokod_240.html
cialis for daily use generic
Получи 32500 руб. по актуальному промо коду для 1хбет бесплатно. Новые купоны на регистрацию каждый час на сайте. В ваших силах получить до шести с половиной тысяч рублей при регистрации. Читайте ниже как использовать наши промо-коды. как вводить промокод в 1хбет на телефоне. Букмекерская контора позволяет использовать промокод 1иксбет на ставку-бонус. Забирайте новые купоны ежедневно. Внимание! Наши промо-купоны подходят для всех акций букмекера. Этот купон также универсальный – используйте его везде, не только при регистрации на сайте БК 1хбет и всех известных его зеркал. Введите его в форме для регистрации и получите увеличенный бонус на первый депозит до 32500 рублей. Кроме того, букмекер постоянно дарит активным клиентам выгодные подарки. Чтобы получить промокод в 1xBet бесплатно: Подпишитесь на рассылку новостей по смс или электронной почте. Регулярно заходите в раздел «Бонусы и подарки» в Личном кабинете – более подробно в этом материале https://fotozayka.ru/wp-content/pages/promokod_240.html
Привет любители машин!
На сайте https://i4car.net/category/avtosoveti/ вы найдете уникальный контент об автомобилях: обзоры, новости, советы и многое другое для автомобилистов и поклонников авто.
i4car.net
новост автопромов
тест-драйвы
Удачи и хорошей дороги!
buy synthroid online no prescription
qiyezp.com
즉시 Zhu Xiurong은 음침해지며 “당신은 또 나를 괴롭혔습니다! “라고 외쳤습니다.
metformin cost uk
lisinopril 80 mg daily
What’s up colleagues, fastidious article and good urging
commented here, I am truly enjoying by these.
Услуга демонтажа старых частных домов и вывоза мусора в Москве и Подмосковье от нашей компании. Мы предлагаем демонтаж и вывоз мусора в указанном регионе по доступным ценам. Наша команда https://hoteltramontano.ru гарантирует выполнение услуги в течение 24 часов после заказа. Мы бесплатно оцениваем объект и консультируем клиентов. Узнать подробности и рассчитать стоимость можно по телефону или на нашем сайте.
buy zestoretic
generic cialis coupon
qiyezp.com
그들은 효율적인 전쟁 기계처럼 잘 훈련되어 있습니다.
metformin capsule
Бездепозитный Бонус 1win 2024
Бонусы от казино промокод на 1вин на пополнение1Win 2024 – Бездепозитные бонусы ? Коды на возврат денег ? VIP Программа лояльности ? Бесплатные фриспины.
промокод на пополнение 1win сегодня: 937999 предоставляет новым игрокам бонус 500% для игры в слоты и игровые автоматы, максимальная сумма бонуса 200 000 рублей. Вы можете использовать бонусные деньги в разделе азартных игр, включая онлайн казино, карты, рулетку, игровые автоматы и слоты.
Компания «1Win» рада предложить своим новым клиентам приветственный бонус в размере до 500% на первые четыре депозита. Это выгодное предложение доступно сразу после регистрации в нашей букмекерской конторе. Бонус можно получить не только в рублях, но и в других валютах, при этом он не ограничивает возможность участия игроков в других программам лояльности компании. Максимальная сумма вознаграждения за регистрацию составляет 75000 рублей или эквивалентная сумма в другой валюте.
промокод для 1win при пополнении счета приносят игрокам множество преимуществ. Во-первых, они позволяют увеличить начальную ставку или продлить время игры. Кроме того, они дают возможность попробовать различные игры без риска потерять реальные деньги. Бонусы также повышают шансы на выигрыш и предоставляют дополнительные возможности для получения прибыли. Кроме того, бонусы в 1win могут быть обменены на реальные деньги или использованы для участия в специальных акциях и турнирах.
Преимущества получения и использования бонусов в 1win очевидны. Они позволяют игроку расширить свои возможности и получить больше удовольствия от игры. Бонусы также делают игру более выгодной с финансовой точки зрения, помогая уменьшить риски и увеличить потенциальную прибыль. Кроме того, получение и использование бонусов в 1win открывает возможность стать лояльным клиентом и получить дополнительные привилегии и вознаграждения от казино.
Итак, получение бонусов в 1win – это отличная возможность для игрока увеличить свои шансы на выигрыш, получить дополнительные деньги и улучшить свой игровой опыт. Бонусы делают игру более интересной и выгодной.
промокоды 1win на пополнение: 937999 предоставляет возможность получить бездепозитный бонус 2024. Его можно получить в виде фриспинов или фрибетов. Чтобы получить подарок, необходимо активировать код в личном кабинете. Дополнительный депозит не требуется. Размеры подарков невелики: фрибет до 500 рублей и не более 70 фриспинов для игры в слоты. Как и в случае с другими поощрениями, необходимо отыграть бездепозитный бонус. Вейджер, как правило, не превышает х5 для бесплатных ставок и х30 для фриспинов.
В казино 1win предоставляется внушительный бонус при регистрации, который составляет 500% от суммы первых четырех последовательных депозитов клиента. С таким количеством бонусов новичок может значительно увеличить свои шансы на выигрыш. Чтобы получить этот приветственный бонус, необходимо зарегистрироваться на официальном сайте, рабочем зеркале, мобильной версии или приложениях для мобильных телефонов. Однако, основным условием является совершение первого пополнения счета, так как активировать бонусы 1win можно только после этого.
промокод на 1win на первый: 937999 используйте бонусный код при регистрации и получите бездепозтный бонус 70 фриспинов. Да, при использовании кода 1Win вы можете получить различные поощрения, включая бездепозитные бонусы. Они обычно представлены в виде фрибетов или фриспинов. Для их активации не требуется дополнительное пополнение счета. Размер таких подарков невелик: бесплатных вращений не более 70. Вейджер на бездепозитный бонус обычно не превышает х35. В 1Win вы можете получить бонусы за участие в акциях, турнирах, розыгрышах и активацию промокода. Бонусная программа периодически обновляется. Кроме того, некоторые акции имеют сезонный характер.
В 1Win основная бонусная программа включает в себя фриспины. Чтобы получить 70FS, необходимо пополнить счет на 100 рублей или более. Игроку предоставляется 2 дня с момента регистрации для активации презента. Отыгрыш бонуса должен быть выполнен в течение 24 часов с момента начисления, с вейджером х35. Бесплатные вращения предназначены только для игр провайдера Microgaming.
Так как бонусная программа 1Win регулярно обновляется, список акций, в которых можно получить фриспины, постоянно расширяется. Более подробную информацию о них можно найти на нашем сайте.
Промокод на 1Win дает возможность получить бесплатные вращения. Их можно использовать в любых слотах из каталога казино. Иногда могут быть установлены ограничения, которые предусматривают использование фриспинов только в определенных слотах или играх конкретного провайдера. Фриспины начисляются с фиксированной ставкой. Отыгрыш выигрыша, полученного с помощью бесплатных вращений, обязателен с учетом установленного вейджера.
Вся информация взята с сайта; https://palikprof.ru/novosti/pages/promokod_362.html
can you buy metformin without a prescription
lisinopril 2.5 mg
where can i get valtrex
zithromax prescription online
mail order pharmacy no prescription
Бездепозитный Бонус 1win 2024
Бонусы от казино промокод 1win на сегодня при пополнение счета1Win 2024 – Бездепозитные бонусы ? Коды на возврат денег ? VIP Программа лояльности ? Бесплатные фриспины.
1win покер промокод при регистрации: 937999 предоставляет новым игрокам бонус 500% для игры в слоты и игровые автоматы, максимальная сумма бонуса 200 000 рублей. Вы можете использовать бонусные деньги в разделе азартных игр, включая онлайн казино, карты, рулетку, игровые автоматы и слоты.
Компания «1Win» рада предложить своим новым клиентам приветственный бонус в размере до 500% на первые четыре депозита. Это выгодное предложение доступно сразу после регистрации в нашей букмекерской конторе. Бонус можно получить не только в рублях, но и в других валютах, при этом он не ограничивает возможность участия игроков в других программам лояльности компании. Максимальная сумма вознаграждения за регистрацию составляет 75000 рублей или эквивалентная сумма в другой валюте.
1win casino промокод приносят игрокам множество преимуществ. Во-первых, они позволяют увеличить начальную ставку или продлить время игры. Кроме того, они дают возможность попробовать различные игры без риска потерять реальные деньги. Бонусы также повышают шансы на выигрыш и предоставляют дополнительные возможности для получения прибыли. Кроме того, бонусы в 1win могут быть обменены на реальные деньги или использованы для участия в специальных акциях и турнирах.
Преимущества получения и использования бонусов в 1win очевидны. Они позволяют игроку расширить свои возможности и получить больше удовольствия от игры. Бонусы также делают игру более выгодной с финансовой точки зрения, помогая уменьшить риски и увеличить потенциальную прибыль. Кроме того, получение и использование бонусов в 1win открывает возможность стать лояльным клиентом и получить дополнительные привилегии и вознаграждения от казино.
Итак, получение бонусов в 1win – это отличная возможность для игрока увеличить свои шансы на выигрыш, получить дополнительные деньги и улучшить свой игровой опыт. Бонусы делают игру более интересной и выгодной.
промокоды 1win сегодня: 937999 предоставляет возможность получить бездепозитный бонус 2024. Его можно получить в виде фриспинов или фрибетов. Чтобы получить подарок, необходимо активировать код в личном кабинете. Дополнительный депозит не требуется. Размеры подарков невелики: фрибет до 500 рублей и не более 70 фриспинов для игры в слоты. Как и в случае с другими поощрениями, необходимо отыграть бездепозитный бонус. Вейджер, как правило, не превышает х5 для бесплатных ставок и х30 для фриспинов.
В казино 1win предоставляется внушительный бонус при регистрации, который составляет 500% от суммы первых четырех последовательных депозитов клиента. С таким количеством бонусов новичок может значительно увеличить свои шансы на выигрыш. Чтобы получить этот приветственный бонус, необходимо зарегистрироваться на официальном сайте, рабочем зеркале, мобильной версии или приложениях для мобильных телефонов. Однако, основным условием является совершение первого пополнения счета, так как активировать бонусы 1win можно только после этого.
1win промокод 500: 937999 используйте бонусный код при регистрации и получите бездепозтный бонус 70 фриспинов. Да, при использовании кода 1Win вы можете получить различные поощрения, включая бездепозитные бонусы. Они обычно представлены в виде фрибетов или фриспинов. Для их активации не требуется дополнительное пополнение счета. Размер таких подарков невелик: бесплатных вращений не более 70. Вейджер на бездепозитный бонус обычно не превышает х35. В 1Win вы можете получить бонусы за участие в акциях, турнирах, розыгрышах и активацию промокода. Бонусная программа периодически обновляется. Кроме того, некоторые акции имеют сезонный характер.
В 1Win основная бонусная программа включает в себя фриспины. Чтобы получить 70FS, необходимо пополнить счет на 100 рублей или более. Игроку предоставляется 2 дня с момента регистрации для активации презента. Отыгрыш бонуса должен быть выполнен в течение 24 часов с момента начисления, с вейджером х35. Бесплатные вращения предназначены только для игр провайдера Microgaming.
Так как бонусная программа 1Win регулярно обновляется, список акций, в которых можно получить фриспины, постоянно расширяется. Более подробную информацию о них можно найти на нашем сайте.
Промокод на 1Win дает возможность получить бесплатные вращения. Их можно использовать в любых слотах из каталога казино. Иногда могут быть установлены ограничения, которые предусматривают использование фриспинов только в определенных слотах или играх конкретного провайдера. Фриспины начисляются с фиксированной ставкой. Отыгрыш выигрыша, полученного с помощью бесплатных вращений, обязателен с учетом установленного вейджера.
Вся информация взята с сайта; https://palikprof.ru/novosti/pages/promokod_362.html
prednisone tablets india
Бездепозитный Бонус 1win 2024
Бонусы от казино промокод на 1win 20241Win 2024 – Бездепозитные бонусы ? Коды на возврат денег ? VIP Программа лояльности ? Бесплатные фриспины.
1win промокоды: 937999 предоставляет новым игрокам бонус 500% для игры в слоты и игровые автоматы, максимальная сумма бонуса 200 000 рублей. Вы можете использовать бонусные деньги в разделе азартных игр, включая онлайн казино, карты, рулетку, игровые автоматы и слоты.
Компания «1Win» рада предложить своим новым клиентам приветственный бонус в размере до 500% на первые четыре депозита. Это выгодное предложение доступно сразу после регистрации в нашей букмекерской конторе. Бонус можно получить не только в рублях, но и в других валютах, при этом он не ограничивает возможность участия игроков в других программам лояльности компании. Максимальная сумма вознаграждения за регистрацию составляет 75000 рублей или эквивалентная сумма в другой валюте.
промокод 1win при пополнение счета на сегодня приносят игрокам множество преимуществ. Во-первых, они позволяют увеличить начальную ставку или продлить время игры. Кроме того, они дают возможность попробовать различные игры без риска потерять реальные деньги. Бонусы также повышают шансы на выигрыш и предоставляют дополнительные возможности для получения прибыли. Кроме того, бонусы в 1win могут быть обменены на реальные деньги или использованы для участия в специальных акциях и турнирах.
Преимущества получения и использования бонусов в 1win очевидны. Они позволяют игроку расширить свои возможности и получить больше удовольствия от игры. Бонусы также делают игру более выгодной с финансовой точки зрения, помогая уменьшить риски и увеличить потенциальную прибыль. Кроме того, получение и использование бонусов в 1win открывает возможность стать лояльным клиентом и получить дополнительные привилегии и вознаграждения от казино.
Итак, получение бонусов в 1win – это отличная возможность для игрока увеличить свои шансы на выигрыш, получить дополнительные деньги и улучшить свой игровой опыт. Бонусы делают игру более интересной и выгодной.
промокод для 1win для пополнения: 937999 предоставляет возможность получить бездепозитный бонус 2024. Его можно получить в виде фриспинов или фрибетов. Чтобы получить подарок, необходимо активировать код в личном кабинете. Дополнительный депозит не требуется. Размеры подарков невелики: фрибет до 500 рублей и не более 70 фриспинов для игры в слоты. Как и в случае с другими поощрениями, необходимо отыграть бездепозитный бонус. Вейджер, как правило, не превышает х5 для бесплатных ставок и х30 для фриспинов.
В казино 1win предоставляется внушительный бонус при регистрации, который составляет 500% от суммы первых четырех последовательных депозитов клиента. С таким количеством бонусов новичок может значительно увеличить свои шансы на выигрыш. Чтобы получить этот приветственный бонус, необходимо зарегистрироваться на официальном сайте, рабочем зеркале, мобильной версии или приложениях для мобильных телефонов. Однако, основным условием является совершение первого пополнения счета, так как активировать бонусы 1win можно только после этого.
1win промокод на деньги: 937999 используйте бонусный код при регистрации и получите бездепозтный бонус 70 фриспинов. Да, при использовании кода 1Win вы можете получить различные поощрения, включая бездепозитные бонусы. Они обычно представлены в виде фрибетов или фриспинов. Для их активации не требуется дополнительное пополнение счета. Размер таких подарков невелик: бесплатных вращений не более 70. Вейджер на бездепозитный бонус обычно не превышает х35. В 1Win вы можете получить бонусы за участие в акциях, турнирах, розыгрышах и активацию промокода. Бонусная программа периодически обновляется. Кроме того, некоторые акции имеют сезонный характер.
В 1Win основная бонусная программа включает в себя фриспины. Чтобы получить 70FS, необходимо пополнить счет на 100 рублей или более. Игроку предоставляется 2 дня с момента регистрации для активации презента. Отыгрыш бонуса должен быть выполнен в течение 24 часов с момента начисления, с вейджером х35. Бесплатные вращения предназначены только для игр провайдера Microgaming.
Так как бонусная программа 1Win регулярно обновляется, список акций, в которых можно получить фриспины, постоянно расширяется. Более подробную информацию о них можно найти на нашем сайте.
Промокод на 1Win дает возможность получить бесплатные вращения. Их можно использовать в любых слотах из каталога казино. Иногда могут быть установлены ограничения, которые предусматривают использование фриспинов только в определенных слотах или играх конкретного провайдера. Фриспины начисляются с фиксированной ставкой. Отыгрыш выигрыша, полученного с помощью бесплатных вращений, обязателен с учетом установленного вейджера.
Вся информация взята с сайта; https://palikprof.ru/novosti/pages/promokod_362.html
cialis tablets in india
valtrex generic canada
ordering tadalafil
metformin medication
glucophage price canada
synthroid 0.175 mg
pharmacy home delivery
generic tadalafil usa
canadian prescription pharmacy
synthroid 0.01mg
cheap scripts pharmacy
legit canadian pharmacy
qiyezp.com
Liu Jin은 히스테리하며 몹시 울고 있습니다.
Советуем посетить сайт https://elegos.ru/
Также не забудьте добавить сайт в закладки: https://elegos.ru/
волчонок все серии
valtrex rx where to buy
metformin 850 mg price usa
https://na-dache.pro
The meal went without incident although a couple of times she had to avert her gaze from Dan for fear of bursting out laughing. Dan went up to his room saying he wanted to listen to music, he laid on his bed playing with himself waiting for his father to leave. He thought about the events of the last two weeks it had been the craziest time of his life.
He put it all down to Mary Harris, she had been his girlfriend for two years, he liked her a lot, she was pretty and intelligent two things that rarely combined in his experience, the problem was she steadfastly refused to let him put his cock inside her, he had thought he was getting somewhere when he took his cock out that evening in the cinema when she had finally allowed him to get his hand inside her panties, it was the first time she had allowed him to do any more than play with her tits. He had taken her hand and placed it on his erection, initially he had been pleased to hear her sharp intake of breath when she felt the size of him and he was encouraged when she began stroking him.
It was later that the problem started, he had her in the car park, they were kissing, her sweater was pushed up together with her bra and he was sucking on her nipples. He managed to get her laid across the front of one of the cars, his hand up her skirt, trying to pull down her panties. That was when she had stopped him.
https://www.brollopsguiden.se/medlemspresentation/86213
https://www.haikudeck.com/presentations/jEtxREUR7l
https://imageevent.com/ujjjjuky1994
https://haveagood.holiday/users/339442
https://evomind1996.bandcamp.com/album/wild-riding-to-dublin-a-sequel
https://okwave.jp/profile/u3107685.html
https://haveagood.holiday/users/339404
https://www.divephotoguide.com/user/sangeline1995
https://chyoa.com/user/parasitetown1996
https://launchpad.net/~ocka19801
order valtrex onlines
synthroid com
prednisone 10 mg generic
cheapest pharmacy for prescriptions
http://klubmama.ru
prednisone without a script
ttbslot.com
서로 껴안는 것을 좋아하고, 한 사람이 할 일이 있으면 떼를 지어 쫓아다니며 필사적으로 싸운다.
Pretty great post. I just stumbled upon your blog
and wanted to mention that I’ve truly enjoyed browsing your blog posts.
After all I’ll be subscribing for your rss feed and I’m hoping you write once more soon!
generic cialis over the counter
cialis tablet price
cyprus online pharmacy
lisinopril 20 mg brand name
https://1ecenter.ru/
generic valtrex price comparison
продвижение сайтов сео http://www.prodvizhenie-sajtov15.ru .
buy metformin no prescription canadian pharmacy online
I don’t think the title of your article matches the content lol. Just kidding, mainly because I had some doubts after reading the article.
Бездепозитный Бонус 1win 2024
Бонусы от казино 1win промокод россия1Win 2024 – Бездепозитные бонусы ? Коды на возврат денег ? VIP Программа лояльности ? Бесплатные фриспины.
промокод 1win при регистрации бездепозитный бонус: 937999 предоставляет новым игрокам бонус 500% для игры в слоты и игровые автоматы, максимальная сумма бонуса 200 000 рублей. Вы можете использовать бонусные деньги в разделе азартных игр, включая онлайн казино, карты, рулетку, игровые автоматы и слоты.
Компания «1Win» рада предложить своим новым клиентам приветственный бонус в размере до 500% на первые четыре депозита. Это выгодное предложение доступно сразу после регистрации в нашей букмекерской конторе. Бонус можно получить не только в рублях, но и в других валютах, при этом он не ограничивает возможность участия игроков в других программам лояльности компании. Максимальная сумма вознаграждения за регистрацию составляет 75000 рублей или эквивалентная сумма в другой валюте.
промокод в 1win приносят игрокам множество преимуществ. Во-первых, они позволяют увеличить начальную ставку или продлить время игры. Кроме того, они дают возможность попробовать различные игры без риска потерять реальные деньги. Бонусы также повышают шансы на выигрыш и предоставляют дополнительные возможности для получения прибыли. Кроме того, бонусы в 1win могут быть обменены на реальные деньги или использованы для участия в специальных акциях и турнирах.
Преимущества получения и использования бонусов в 1win очевидны. Они позволяют игроку расширить свои возможности и получить больше удовольствия от игры. Бонусы также делают игру более выгодной с финансовой точки зрения, помогая уменьшить риски и увеличить потенциальную прибыль. Кроме того, получение и использование бонусов в 1win открывает возможность стать лояльным клиентом и получить дополнительные привилегии и вознаграждения от казино.
Итак, получение бонусов в 1win – это отличная возможность для игрока увеличить свои шансы на выигрыш, получить дополнительные деньги и улучшить свой игровой опыт. Бонусы делают игру более интересной и выгодной.
промокод на 1вин при регистрации: 937999 предоставляет возможность получить бездепозитный бонус 2024. Его можно получить в виде фриспинов или фрибетов. Чтобы получить подарок, необходимо активировать код в личном кабинете. Дополнительный депозит не требуется. Размеры подарков невелики: фрибет до 500 рублей и не более 70 фриспинов для игры в слоты. Как и в случае с другими поощрениями, необходимо отыграть бездепозитный бонус. Вейджер, как правило, не превышает х5 для бесплатных ставок и х30 для фриспинов.
В казино 1win предоставляется внушительный бонус при регистрации, который составляет 500% от суммы первых четырех последовательных депозитов клиента. С таким количеством бонусов новичок может значительно увеличить свои шансы на выигрыш. Чтобы получить этот приветственный бонус, необходимо зарегистрироваться на официальном сайте, рабочем зеркале, мобильной версии или приложениях для мобильных телефонов. Однако, основным условием является совершение первого пополнения счета, так как активировать бонусы 1win можно только после этого.
как вводить промокоды в 1win: 937999 используйте бонусный код при регистрации и получите бездепозтный бонус 70 фриспинов. Да, при использовании кода 1Win вы можете получить различные поощрения, включая бездепозитные бонусы. Они обычно представлены в виде фрибетов или фриспинов. Для их активации не требуется дополнительное пополнение счета. Размер таких подарков невелик: бесплатных вращений не более 70. Вейджер на бездепозитный бонус обычно не превышает х35. В 1Win вы можете получить бонусы за участие в акциях, турнирах, розыгрышах и активацию промокода. Бонусная программа периодически обновляется. Кроме того, некоторые акции имеют сезонный характер.
В 1Win основная бонусная программа включает в себя фриспины. Чтобы получить 70FS, необходимо пополнить счет на 100 рублей или более. Игроку предоставляется 2 дня с момента регистрации для активации презента. Отыгрыш бонуса должен быть выполнен в течение 24 часов с момента начисления, с вейджером х35. Бесплатные вращения предназначены только для игр провайдера Microgaming.
Так как бонусная программа 1Win регулярно обновляется, список акций, в которых можно получить фриспины, постоянно расширяется. Более подробную информацию о них можно найти на нашем сайте.
Промокод на 1Win дает возможность получить бесплатные вращения. Их можно использовать в любых слотах из каталога казино. Иногда могут быть установлены ограничения, которые предусматривают использование фриспинов только в определенных слотах или играх конкретного провайдера. Фриспины начисляются с фиксированной ставкой. Отыгрыш выигрыша, полученного с помощью бесплатных вращений, обязателен с учетом установленного вейджера.
Вся информация взята с сайта; https://palikprof.ru/novosti/pages/promokod_362.html
synthroid 25
Бездепозитный Бонус 1win 2024
Бонусы от казино 1win официальный сайт 1вин промокоды1Win 2024 – Бездепозитные бонусы ? Коды на возврат денег ? VIP Программа лояльности ? Бесплатные фриспины.
промокоды 1вин при регистрации 2024: 937999 предоставляет новым игрокам бонус 500% для игры в слоты и игровые автоматы, максимальная сумма бонуса 200 000 рублей. Вы можете использовать бонусные деньги в разделе азартных игр, включая онлайн казино, карты, рулетку, игровые автоматы и слоты.
Компания «1Win» рада предложить своим новым клиентам приветственный бонус в размере до 500% на первые четыре депозита. Это выгодное предложение доступно сразу после регистрации в нашей букмекерской конторе. Бонус можно получить не только в рублях, но и в других валютах, при этом он не ограничивает возможность участия игроков в других программам лояльности компании. Максимальная сумма вознаграждения за регистрацию составляет 75000 рублей или эквивалентная сумма в другой валюте.
1win промокод бонус за регистрацию без депозита приносят игрокам множество преимуществ. Во-первых, они позволяют увеличить начальную ставку или продлить время игры. Кроме того, они дают возможность попробовать различные игры без риска потерять реальные деньги. Бонусы также повышают шансы на выигрыш и предоставляют дополнительные возможности для получения прибыли. Кроме того, бонусы в 1win могут быть обменены на реальные деньги или использованы для участия в специальных акциях и турнирах.
Преимущества получения и использования бонусов в 1win очевидны. Они позволяют игроку расширить свои возможности и получить больше удовольствия от игры. Бонусы также делают игру более выгодной с финансовой точки зрения, помогая уменьшить риски и увеличить потенциальную прибыль. Кроме того, получение и использование бонусов в 1win открывает возможность стать лояльным клиентом и получить дополнительные привилегии и вознаграждения от казино.
Итак, получение бонусов в 1win – это отличная возможность для игрока увеличить свои шансы на выигрыш, получить дополнительные деньги и улучшить свой игровой опыт. Бонусы делают игру более интересной и выгодной.
промокоды на 1вин при пополнении: 937999 предоставляет возможность получить бездепозитный бонус 2024. Его можно получить в виде фриспинов или фрибетов. Чтобы получить подарок, необходимо активировать код в личном кабинете. Дополнительный депозит не требуется. Размеры подарков невелики: фрибет до 500 рублей и не более 70 фриспинов для игры в слоты. Как и в случае с другими поощрениями, необходимо отыграть бездепозитный бонус. Вейджер, как правило, не превышает х5 для бесплатных ставок и х30 для фриспинов.
В казино 1win предоставляется внушительный бонус при регистрации, который составляет 500% от суммы первых четырех последовательных депозитов клиента. С таким количеством бонусов новичок может значительно увеличить свои шансы на выигрыш. Чтобы получить этот приветственный бонус, необходимо зарегистрироваться на официальном сайте, рабочем зеркале, мобильной версии или приложениях для мобильных телефонов. Однако, основным условием является совершение первого пополнения счета, так как активировать бонусы 1win можно только после этого.
промокод 1win при пополнение счета: 937999 используйте бонусный код при регистрации и получите бездепозтный бонус 70 фриспинов. Да, при использовании кода 1Win вы можете получить различные поощрения, включая бездепозитные бонусы. Они обычно представлены в виде фрибетов или фриспинов. Для их активации не требуется дополнительное пополнение счета. Размер таких подарков невелик: бесплатных вращений не более 70. Вейджер на бездепозитный бонус обычно не превышает х35. В 1Win вы можете получить бонусы за участие в акциях, турнирах, розыгрышах и активацию промокода. Бонусная программа периодически обновляется. Кроме того, некоторые акции имеют сезонный характер.
В 1Win основная бонусная программа включает в себя фриспины. Чтобы получить 70FS, необходимо пополнить счет на 100 рублей или более. Игроку предоставляется 2 дня с момента регистрации для активации презента. Отыгрыш бонуса должен быть выполнен в течение 24 часов с момента начисления, с вейджером х35. Бесплатные вращения предназначены только для игр провайдера Microgaming.
Так как бонусная программа 1Win регулярно обновляется, список акций, в которых можно получить фриспины, постоянно расширяется. Более подробную информацию о них можно найти на нашем сайте.
Промокод на 1Win дает возможность получить бесплатные вращения. Их можно использовать в любых слотах из каталога казино. Иногда могут быть установлены ограничения, которые предусматривают использование фриспинов только в определенных слотах или играх конкретного провайдера. Фриспины начисляются с фиксированной ставкой. Отыгрыш выигрыша, полученного с помощью бесплатных вращений, обязателен с учетом установленного вейджера.
Вся информация взята с сайта; https://palikprof.ru/novosti/pages/promokod_362.html
order prednisone online no prescription
online pharmacy com
Бездепозитный Бонус 1win 2024
Бонусы от казино промокод для 1win при пополнении счета1Win 2024 – Бездепозитные бонусы ? Коды на возврат денег ? VIP Программа лояльности ? Бесплатные фриспины.
1win промокод на сегодня: 937999 предоставляет новым игрокам бонус 500% для игры в слоты и игровые автоматы, максимальная сумма бонуса 200 000 рублей. Вы можете использовать бонусные деньги в разделе азартных игр, включая онлайн казино, карты, рулетку, игровые автоматы и слоты.
Компания «1Win» рада предложить своим новым клиентам приветственный бонус в размере до 500% на первые четыре депозита. Это выгодное предложение доступно сразу после регистрации в нашей букмекерской конторе. Бонус можно получить не только в рублях, но и в других валютах, при этом он не ограничивает возможность участия игроков в других программам лояльности компании. Максимальная сумма вознаграждения за регистрацию составляет 75000 рублей или эквивалентная сумма в другой валюте.
промокоды 1win при регистрации 2024 приносят игрокам множество преимуществ. Во-первых, они позволяют увеличить начальную ставку или продлить время игры. Кроме того, они дают возможность попробовать различные игры без риска потерять реальные деньги. Бонусы также повышают шансы на выигрыш и предоставляют дополнительные возможности для получения прибыли. Кроме того, бонусы в 1win могут быть обменены на реальные деньги или использованы для участия в специальных акциях и турнирах.
Преимущества получения и использования бонусов в 1win очевидны. Они позволяют игроку расширить свои возможности и получить больше удовольствия от игры. Бонусы также делают игру более выгодной с финансовой точки зрения, помогая уменьшить риски и увеличить потенциальную прибыль. Кроме того, получение и использование бонусов в 1win открывает возможность стать лояльным клиентом и получить дополнительные привилегии и вознаграждения от казино.
Итак, получение бонусов в 1win – это отличная возможность для игрока увеличить свои шансы на выигрыш, получить дополнительные деньги и улучшить свой игровой опыт. Бонусы делают игру более интересной и выгодной.
промокод 1win при регистрации 2024: 937999 предоставляет возможность получить бездепозитный бонус 2024. Его можно получить в виде фриспинов или фрибетов. Чтобы получить подарок, необходимо активировать код в личном кабинете. Дополнительный депозит не требуется. Размеры подарков невелики: фрибет до 500 рублей и не более 70 фриспинов для игры в слоты. Как и в случае с другими поощрениями, необходимо отыграть бездепозитный бонус. Вейджер, как правило, не превышает х5 для бесплатных ставок и х30 для фриспинов.
В казино 1win предоставляется внушительный бонус при регистрации, который составляет 500% от суммы первых четырех последовательных депозитов клиента. С таким количеством бонусов новичок может значительно увеличить свои шансы на выигрыш. Чтобы получить этот приветственный бонус, необходимо зарегистрироваться на официальном сайте, рабочем зеркале, мобильной версии или приложениях для мобильных телефонов. Однако, основным условием является совершение первого пополнения счета, так как активировать бонусы 1win можно только после этого.
как вести промокод на 1win: 937999 используйте бонусный код при регистрации и получите бездепозтный бонус 70 фриспинов. Да, при использовании кода 1Win вы можете получить различные поощрения, включая бездепозитные бонусы. Они обычно представлены в виде фрибетов или фриспинов. Для их активации не требуется дополнительное пополнение счета. Размер таких подарков невелик: бесплатных вращений не более 70. Вейджер на бездепозитный бонус обычно не превышает х35. В 1Win вы можете получить бонусы за участие в акциях, турнирах, розыгрышах и активацию промокода. Бонусная программа периодически обновляется. Кроме того, некоторые акции имеют сезонный характер.
В 1Win основная бонусная программа включает в себя фриспины. Чтобы получить 70FS, необходимо пополнить счет на 100 рублей или более. Игроку предоставляется 2 дня с момента регистрации для активации презента. Отыгрыш бонуса должен быть выполнен в течение 24 часов с момента начисления, с вейджером х35. Бесплатные вращения предназначены только для игр провайдера Microgaming.
Так как бонусная программа 1Win регулярно обновляется, список акций, в которых можно получить фриспины, постоянно расширяется. Более подробную информацию о них можно найти на нашем сайте.
Промокод на 1Win дает возможность получить бесплатные вращения. Их можно использовать в любых слотах из каталога казино. Иногда могут быть установлены ограничения, которые предусматривают использование фриспинов только в определенных слотах или играх конкретного провайдера. Фриспины начисляются с фиксированной ставкой. Отыгрыш выигрыша, полученного с помощью бесплатных вращений, обязателен с учетом установленного вейджера.
Вся информация взята с сайта; https://palikprof.ru/novosti/pages/promokod_362.html
qiyezp.com
Yang Biao는 고개를 저었다. “저는 감히 왕세자와 은인과 함께 앉을 수 없습니다. 모퉁이로 가서 먹겠습니다.”
trusted canadian pharmacy
metformin 3000 mg
Купить диплом в омске – Это способ получить официальный бумага по окончании образовательного учреждения. Свидетельство открывает двери к последующим карьерным перспективам и карьерному развитию.
Портал с полезными материалами по недвижимости
На нашем сайте вы можете узнать с такими темами как ПРАВА И ОБЯЗАННОСТИ СОБСТВЕННИКОВ и ОКС В СИСТЕМЕ КАДАСТРОВОГО УЧЕТА
Бездепозитный Бонус 1win 2024
Бонусы от казино 1win авиатор промокод1Win 2024 – Бездепозитные бонусы ? Коды на возврат денег ? VIP Программа лояльности ? Бесплатные фриспины.
1win промокод на фрибет: 937999 предоставляет новым игрокам бонус 500% для игры в слоты и игровые автоматы, максимальная сумма бонуса 200 000 рублей. Вы можете использовать бонусные деньги в разделе азартных игр, включая онлайн казино, карты, рулетку, игровые автоматы и слоты.
Компания «1Win» рада предложить своим новым клиентам приветственный бонус в размере до 500% на первые четыре депозита. Это выгодное предложение доступно сразу после регистрации в нашей букмекерской конторе. Бонус можно получить не только в рублях, но и в других валютах, при этом он не ограничивает возможность участия игроков в других программам лояльности компании. Максимальная сумма вознаграждения за регистрацию составляет 75000 рублей или эквивалентная сумма в другой валюте.
1win промокод на фрибет приносят игрокам множество преимуществ. Во-первых, они позволяют увеличить начальную ставку или продлить время игры. Кроме того, они дают возможность попробовать различные игры без риска потерять реальные деньги. Бонусы также повышают шансы на выигрыш и предоставляют дополнительные возможности для получения прибыли. Кроме того, бонусы в 1win могут быть обменены на реальные деньги или использованы для участия в специальных акциях и турнирах.
Преимущества получения и использования бонусов в 1win очевидны. Они позволяют игроку расширить свои возможности и получить больше удовольствия от игры. Бонусы также делают игру более выгодной с финансовой точки зрения, помогая уменьшить риски и увеличить потенциальную прибыль. Кроме того, получение и использование бонусов в 1win открывает возможность стать лояльным клиентом и получить дополнительные привилегии и вознаграждения от казино.
Итак, получение бонусов в 1win – это отличная возможность для игрока увеличить свои шансы на выигрыш, получить дополнительные деньги и улучшить свой игровой опыт. Бонусы делают игру более интересной и выгодной.
промокод для 1вин: 937999 предоставляет возможность получить бездепозитный бонус 2024. Его можно получить в виде фриспинов или фрибетов. Чтобы получить подарок, необходимо активировать код в личном кабинете. Дополнительный депозит не требуется. Размеры подарков невелики: фрибет до 500 рублей и не более 70 фриспинов для игры в слоты. Как и в случае с другими поощрениями, необходимо отыграть бездепозитный бонус. Вейджер, как правило, не превышает х5 для бесплатных ставок и х30 для фриспинов.
В казино 1win предоставляется внушительный бонус при регистрации, который составляет 500% от суммы первых четырех последовательных депозитов клиента. С таким количеством бонусов новичок может значительно увеличить свои шансы на выигрыш. Чтобы получить этот приветственный бонус, необходимо зарегистрироваться на официальном сайте, рабочем зеркале, мобильной версии или приложениях для мобильных телефонов. Однако, основным условием является совершение первого пополнения счета, так как активировать бонусы 1win можно только после этого.
куда вводить промокод в 1win: 937999 используйте бонусный код при регистрации и получите бездепозтный бонус 70 фриспинов. Да, при использовании кода 1Win вы можете получить различные поощрения, включая бездепозитные бонусы. Они обычно представлены в виде фрибетов или фриспинов. Для их активации не требуется дополнительное пополнение счета. Размер таких подарков невелик: бесплатных вращений не более 70. Вейджер на бездепозитный бонус обычно не превышает х35. В 1Win вы можете получить бонусы за участие в акциях, турнирах, розыгрышах и активацию промокода. Бонусная программа периодически обновляется. Кроме того, некоторые акции имеют сезонный характер.
В 1Win основная бонусная программа включает в себя фриспины. Чтобы получить 70FS, необходимо пополнить счет на 100 рублей или более. Игроку предоставляется 2 дня с момента регистрации для активации презента. Отыгрыш бонуса должен быть выполнен в течение 24 часов с момента начисления, с вейджером х35. Бесплатные вращения предназначены только для игр провайдера Microgaming.
Так как бонусная программа 1Win регулярно обновляется, список акций, в которых можно получить фриспины, постоянно расширяется. Более подробную информацию о них можно найти на нашем сайте.
Промокод на 1Win дает возможность получить бесплатные вращения. Их можно использовать в любых слотах из каталога казино. Иногда могут быть установлены ограничения, которые предусматривают использование фриспинов только в определенных слотах или играх конкретного провайдера. Фриспины начисляются с фиксированной ставкой. Отыгрыш выигрыша, полученного с помощью бесплатных вращений, обязателен с учетом установленного вейджера.
Вся информация взята с сайта; https://alltranslations.ru/image/art/?promokod_362.html
valtrex 1000 mg
프라그마틱 게임은 iGaming 분야에서 선도적인 업체로, 혁신적이고 표준화된 콘텐츠를 제공합니다.
프라그마틱슬롯
프라그마틱에 대한 글 읽는 것이 정말 즐거웠어요! 또한, 제 사이트에서도 프라그마틱과 관련된 정보를 공유하고 있어요. 함께 발전하며 더 많은 지식을 쌓아가요!
https://www.12378za.cn/
https://www.12315uh.cn/
https://ljiluyi.com/link/
Портал с актуальными статьями по недвижимости
На нашем портале вы можете узнать с такими темами как ПРАВА И ОБЯЗАННОСТИ СОБСТВЕННИКОВ и ОКС В СИСТЕМЕ КАДАСТРОВОГО УЧЕТА
Бездепозитный Бонус 1win 2024
Бонусы от казино промокоды 1win на сегодня1Win 2024 – Бездепозитные бонусы ? Коды на возврат денег ? VIP Программа лояльности ? Бесплатные фриспины.
1win casino промокоды: 937999 предоставляет новым игрокам бонус 500% для игры в слоты и игровые автоматы, максимальная сумма бонуса 200 000 рублей. Вы можете использовать бонусные деньги в разделе азартных игр, включая онлайн казино, карты, рулетку, игровые автоматы и слоты.
Компания «1Win» рада предложить своим новым клиентам приветственный бонус в размере до 500% на первые четыре депозита. Это выгодное предложение доступно сразу после регистрации в нашей букмекерской конторе. Бонус можно получить не только в рублях, но и в других валютах, при этом он не ограничивает возможность участия игроков в других программам лояльности компании. Максимальная сумма вознаграждения за регистрацию составляет 75000 рублей или эквивалентная сумма в другой валюте.
бонус промокод 1win приносят игрокам множество преимуществ. Во-первых, они позволяют увеличить начальную ставку или продлить время игры. Кроме того, они дают возможность попробовать различные игры без риска потерять реальные деньги. Бонусы также повышают шансы на выигрыш и предоставляют дополнительные возможности для получения прибыли. Кроме того, бонусы в 1win могут быть обменены на реальные деньги или использованы для участия в специальных акциях и турнирах.
Преимущества получения и использования бонусов в 1win очевидны. Они позволяют игроку расширить свои возможности и получить больше удовольствия от игры. Бонусы также делают игру более выгодной с финансовой точки зрения, помогая уменьшить риски и увеличить потенциальную прибыль. Кроме того, получение и использование бонусов в 1win открывает возможность стать лояльным клиентом и получить дополнительные привилегии и вознаграждения от казино.
Итак, получение бонусов в 1win – это отличная возможность для игрока увеличить свои шансы на выигрыш, получить дополнительные деньги и улучшить свой игровой опыт. Бонусы делают игру более интересной и выгодной.
промокод на 1win без депозита: 937999 предоставляет возможность получить бездепозитный бонус 2024. Его можно получить в виде фриспинов или фрибетов. Чтобы получить подарок, необходимо активировать код в личном кабинете. Дополнительный депозит не требуется. Размеры подарков невелики: фрибет до 500 рублей и не более 70 фриспинов для игры в слоты. Как и в случае с другими поощрениями, необходимо отыграть бездепозитный бонус. Вейджер, как правило, не превышает х5 для бесплатных ставок и х30 для фриспинов.
В казино 1win предоставляется внушительный бонус при регистрации, который составляет 500% от суммы первых четырех последовательных депозитов клиента. С таким количеством бонусов новичок может значительно увеличить свои шансы на выигрыш. Чтобы получить этот приветственный бонус, необходимо зарегистрироваться на официальном сайте, рабочем зеркале, мобильной версии или приложениях для мобильных телефонов. Однако, основным условием является совершение первого пополнения счета, так как активировать бонусы 1win можно только после этого.
1win промокод: 937999 используйте бонусный код при регистрации и получите бездепозтный бонус 70 фриспинов. Да, при использовании кода 1Win вы можете получить различные поощрения, включая бездепозитные бонусы. Они обычно представлены в виде фрибетов или фриспинов. Для их активации не требуется дополнительное пополнение счета. Размер таких подарков невелик: бесплатных вращений не более 70. Вейджер на бездепозитный бонус обычно не превышает х35. В 1Win вы можете получить бонусы за участие в акциях, турнирах, розыгрышах и активацию промокода. Бонусная программа периодически обновляется. Кроме того, некоторые акции имеют сезонный характер.
В 1Win основная бонусная программа включает в себя фриспины. Чтобы получить 70FS, необходимо пополнить счет на 100 рублей или более. Игроку предоставляется 2 дня с момента регистрации для активации презента. Отыгрыш бонуса должен быть выполнен в течение 24 часов с момента начисления, с вейджером х35. Бесплатные вращения предназначены только для игр провайдера Microgaming.
Так как бонусная программа 1Win регулярно обновляется, список акций, в которых можно получить фриспины, постоянно расширяется. Более подробную информацию о них можно найти на нашем сайте.
Промокод на 1Win дает возможность получить бесплатные вращения. Их можно использовать в любых слотах из каталога казино. Иногда могут быть установлены ограничения, которые предусматривают использование фриспинов только в определенных слотах или играх конкретного провайдера. Фриспины начисляются с фиксированной ставкой. Отыгрыш выигрыша, полученного с помощью бесплатных вращений, обязателен с учетом установленного вейджера.
Вся информация взята с сайта; https://alltranslations.ru/image/art/?promokod_362.html
Бездепозитный Бонус 1win 2024
Бонусы от казино промокоды в 1win на пополнение1Win 2024 – Бездепозитные бонусы ? Коды на возврат денег ? VIP Программа лояльности ? Бесплатные фриспины.
промокод для 1win 2024: 937999 предоставляет новым игрокам бонус 500% для игры в слоты и игровые автоматы, максимальная сумма бонуса 200 000 рублей. Вы можете использовать бонусные деньги в разделе азартных игр, включая онлайн казино, карты, рулетку, игровые автоматы и слоты.
Компания «1Win» рада предложить своим новым клиентам приветственный бонус в размере до 500% на первые четыре депозита. Это выгодное предложение доступно сразу после регистрации в нашей букмекерской конторе. Бонус можно получить не только в рублях, но и в других валютах, при этом он не ограничивает возможность участия игроков в других программам лояльности компании. Максимальная сумма вознаграждения за регистрацию составляет 75000 рублей или эквивалентная сумма в другой валюте.
1win промокод на первый депозит приносят игрокам множество преимуществ. Во-первых, они позволяют увеличить начальную ставку или продлить время игры. Кроме того, они дают возможность попробовать различные игры без риска потерять реальные деньги. Бонусы также повышают шансы на выигрыш и предоставляют дополнительные возможности для получения прибыли. Кроме того, бонусы в 1win могут быть обменены на реальные деньги или использованы для участия в специальных акциях и турнирах.
Преимущества получения и использования бонусов в 1win очевидны. Они позволяют игроку расширить свои возможности и получить больше удовольствия от игры. Бонусы также делают игру более выгодной с финансовой точки зрения, помогая уменьшить риски и увеличить потенциальную прибыль. Кроме того, получение и использование бонусов в 1win открывает возможность стать лояльным клиентом и получить дополнительные привилегии и вознаграждения от казино.
Итак, получение бонусов в 1win – это отличная возможность для игрока увеличить свои шансы на выигрыш, получить дополнительные деньги и улучшить свой игровой опыт. Бонусы делают игру более интересной и выгодной.
как ввести промокод в 1win после регистрации: 937999 предоставляет возможность получить бездепозитный бонус 2024. Его можно получить в виде фриспинов или фрибетов. Чтобы получить подарок, необходимо активировать код в личном кабинете. Дополнительный депозит не требуется. Размеры подарков невелики: фрибет до 500 рублей и не более 70 фриспинов для игры в слоты. Как и в случае с другими поощрениями, необходимо отыграть бездепозитный бонус. Вейджер, как правило, не превышает х5 для бесплатных ставок и х30 для фриспинов.
В казино 1win предоставляется внушительный бонус при регистрации, который составляет 500% от суммы первых четырех последовательных депозитов клиента. С таким количеством бонусов новичок может значительно увеличить свои шансы на выигрыш. Чтобы получить этот приветственный бонус, необходимо зарегистрироваться на официальном сайте, рабочем зеркале, мобильной версии или приложениях для мобильных телефонов. Однако, основным условием является совершение первого пополнения счета, так как активировать бонусы 1win можно только после этого.
1win промокод на фрибет без депозита: 937999 используйте бонусный код при регистрации и получите бездепозтный бонус 70 фриспинов. Да, при использовании кода 1Win вы можете получить различные поощрения, включая бездепозитные бонусы. Они обычно представлены в виде фрибетов или фриспинов. Для их активации не требуется дополнительное пополнение счета. Размер таких подарков невелик: бесплатных вращений не более 70. Вейджер на бездепозитный бонус обычно не превышает х35. В 1Win вы можете получить бонусы за участие в акциях, турнирах, розыгрышах и активацию промокода. Бонусная программа периодически обновляется. Кроме того, некоторые акции имеют сезонный характер.
В 1Win основная бонусная программа включает в себя фриспины. Чтобы получить 70FS, необходимо пополнить счет на 100 рублей или более. Игроку предоставляется 2 дня с момента регистрации для активации презента. Отыгрыш бонуса должен быть выполнен в течение 24 часов с момента начисления, с вейджером х35. Бесплатные вращения предназначены только для игр провайдера Microgaming.
Так как бонусная программа 1Win регулярно обновляется, список акций, в которых можно получить фриспины, постоянно расширяется. Более подробную информацию о них можно найти на нашем сайте.
Промокод на 1Win дает возможность получить бесплатные вращения. Их можно использовать в любых слотах из каталога казино. Иногда могут быть установлены ограничения, которые предусматривают использование фриспинов только в определенных слотах или играх конкретного провайдера. Фриспины начисляются с фиксированной ставкой. Отыгрыш выигрыша, полученного с помощью бесплатных вращений, обязателен с учетом установленного вейджера.
Вся информация взята с сайта; https://alltranslations.ru/image/art/?promokod_362.html
tadalafil canada
프라그마틱 게임은 iGaming 업계의 주요 플레이어로, 모바일 중심의 혁신적이고 표준화된 콘텐츠를 선보입니다.
프라그마틱 슬롯
프라그마틱은 항상 최고의 게임을 제공하죠! 여기에서 더 많은 흥미진진한 정보를 얻을 수 있어 기뻐요.
https://lbpicture.com/link/
https://henakeah.com/link/
https://www.12315bs.cn/
canadian pharmacy 24
levoxyl synthroid
azithromycin paypal
Обязательный компонент для комфортного использования возможностей Интернета, Adobe Flash Player совместим с многими веб-обозревателями. Если вы хотите получить доступ к широкому спектру интернет-ресурсов, рекомендуем adobe flash player скачать с официального сайта. Это свободно распространяемое программное обеспечение, которое существенно улучшит ваш опыт работы в Интернете.
Фантастический сервисный центр servispylesosydajson.ru предоставил мне незабываемый опыт. Команда профессионалов центра быстро и качественно диагностировали и исправили проблему со моим пылесосом Dyson.
Кроме того, я был сильно впечатлен уровнем сервиса, предоставленным сервисным центром. Они проявили особую заботу ко всем моим потребностям и предоставили полезные советы по уходу за моим пылесосом.
Фантастический сервисный центр servispylesosydajson.ru предоставил мне незабвенный опыт. Команда профессионалов центра оперативно и качественно обнаружили и устранили проблему со моим пылесосом Dyson.
Далее, я был глубоко впечатлен уровнем обслуживания, предоставленным сервисным центром. Они проявили исключительную внимательность ко всем моим потребностям и предоставили ценные рекомендации по уходу за моим пылесосом.
lisinopril pill 5 mg
online pharmacy non prescription drugs
Hey there! I realize this is somewhat off-topic however I needed to ask. Does building a well-established website such as yours require a massive amount work? I am brand new to blogging however I do write in my journal everyday. I’d like to start a blog so I can easily share my experience and thoughts online. Please let me know if you have any kind of ideas or tips for brand new aspiring bloggers. Thankyou!
writing service
Недвижимость в Истре – уникальная возможность инвестировать в жилье в курортном городе, окруженном природой и богатой историей
Очарование природы, бальзам для души, давно полюбившаяся местность – все это можно сказать о городе недалеко от Москвы, столицы России. Истринский край, насыщенный историей и культурой, притягивает своим уникальным колоритом и возможностью удовлетворить самые изысканные вкусы владельцев недвижимости.
Великолепные поместья, раскинувшиеся среди холмов, поражают своей архитектурой и удивительной красотой природы. Они являются настоящим полем для творчества и воплощения самых смелых идей, связанных с созданием идеальной атмосферы для комфортного проживания. Проходя через эти двери, вы сразу же погружаетесь в мир роскоши и умиротворения, где даже самые требовательные ценители недвижимости находят то, что долго искали.
Жизнь в этом регионе – это уникальная возможность наслаждаться просторным планом, где отражены вкусы и предпочтения каждого. Прекрасные видовые холмы, плодородные земли и кристально чистые озера придают этому месту особый шарм. Каждый участок и каждый дом, будь то современный архитектурный ансамбль или старинный особняк с богатой историей, обладают своей индивидуальностью, которая завораживает и приковывает взгляды прохожих и потенциальных покупателей.
Мы предлагаем скидку 5% на консультацию с юристом по недвижимости в Истре
сео
Истринская недвижимость – особенности рынка, перспективы развития и актуальные цены на жилье
Земля, камень, архитектура… Родившаяся в глубине времени, недвижимость обняла все уголки Истры, став неотъемлемой частью истории этого удивительного места. Каждое здание, каждый уголок этого города переплетен с безупречным чувством старины, и точно так же отражает современные требования и возможности.
Этот удивительный город, облаченный в одеяние природной красоты, восхищает своим многообразием характеров и возможностей для приобретения недвижимости. Грандиозная возможность вложиться в будущее – вот что предлагает Истра со своими замечательными домами, квартирами и усадьбами. Этот уникальный регион просто манит своим обаянием и пленит сердца своей уникальной энергией.
Архитектурные шедевры, окутанные веками тайн, привержены высоким стандартам качества и надежности. Монументальные фасады, сияющие оконные рамы и уютные дворики превращаются в сказочные кадры, которые оживают внутри уникального образа различных зданий. Величественные, но при этом привлекательно скрытые в зелени, дома Истры становятся объектом страсти для тех, кто ценит красоту и великолепие, но не готов отказаться от современного комфорта и функциональности.
Ваша скидка 5% на помощь с продажей жилья в Истре
Бесплатные промокоды от букмекерской конторы 1xBet: при регистрации, на бесплатную ставку. Рассказываем, как использовать и куда вводить промокоды в 1хБет. как получить промокод в 1хбет на ставку. Начнем с того, что каждый, кто зарегистрировался на официальном сайте или зеркале конторы впервые, может рассчитывать на получение приветственного денежного бонуса, который в дальнейшем удастся потратить на ставки, а в случае успеха заработать первые деньги. Но мы говорим о промокоде, который в специальной форме регистрации просят ввести при наличии – более подробно в этом материале http://saratovturizm.ru/interesting/pages/promo_kod_bk_1xbet_na_segodnya_pri_registracii.html
Доброго!
Посетите https://dtp.vn.ua/category/novosti-vinnitsa/ для получения актуальной информации о ДТП в Виннице. Наш сайт предоставляет подробные отчеты, фото и видео с мест происшествий, помогая оставаться в курсе последних новостей дорожного движения.
ДТП Винница
Дтп Винница вчера
Главные новости Винницы
Удачи и хорошей дороги!
Промокод букмекерской конторы 1xbet на сегодня: где взять рабочий, куда вводить на сайте и как использовать где ввести промокод 1хбет на андроид. Бесплатные коды нужно вводить в специальном поле при регистрации на сайте БК или в личном кабинете пользователя, если у вас уже есть аккаунт. Все промокоды букмекерских контор. Список действующих на сегодня промокодов легальных букмекерских контор вы можете найти на сайте в разделе бонусов. Варианты получения промокодов. Зарубежная букмекерская контора 1xВet предлагает несколько вариантов получения промокодов. Бесплатные промокоды 1xBet при регистрации. 1хБет постоянно ищет новых пользователей, поэтому регистрируясь на сайте Вы и так получите до 25000 руб. при первом депозите. Но мы поможем его увеличить до 32 500, для этого введите: 1XFREE777 — увеличивает сумму депозита до 32500 р. Данные бонусы действуют только при первом депозите после регистрации, пополняя свой лицевой счет, при применении кода сумма увеличится в 2 раза, но не более 32500 рублей. Бонусные деньги вы можете ставить на спорт. В открытом доступе в интернете вы сможете найти только такие бонусы, которые мотивируют новичков стать пользователем букмекерской конторы 1хБет – более подробно в этом материале http://saratovturizm.ru/interesting/pages/promo_kod_bk_1xbet_na_segodnya_pri_registracii.html
azithromycin z-pack
prednisone 50 mg coupon
механизированная штукатурка стен заказать https://www.mekhanizirovannaya-shtukaturka11.ru .
Вводите официальный промокод 1xbet при регистрации 2024 и получайте до 32 500 тысяч рублей. Бонус-код помогает удвоить ваш первый банкролл. бонусы и подарки в 1хбет промокод. Бесплатным промокод может воспользоваться любой новый игрок букмекерской конторы! После того, как вы попадете на официальный сайт букмекера, в России он внесен в реестр запрещенных. Благодаря промокодам на сегодня и различным акциям, они начали захватывать сердца миллионов игроков. На протяжении 10 лет существования администрация регулярно совершенствовала уровень сервиса, и как итог — создана отличная контора, где игроки могут совершать ставки и получать выплаты без каких-либо проблем. Это сделать просто, если иметь промокод 1xbet на сегодня бесплатно. Правда, дается он при условии выполнения некоторых правил. 1xbet бонус при регистрации. Не совсем промокод, но вы все равно ставите не свои деньги, если пополните депозит, – 100% бонуса от внесенной суммы. Максимум указан в верхней части главной страницы официального сайта – более подробно в этом материале http://saratovturizm.ru/interesting/pages/promo_kod_bk_1xbet_na_segodnya_pri_registracii.html
tadalafil 5mg tablets online
azithromycin 500mg
online pharmacy prescription
synthroid 25
Купить диплом в братске – Это достать официальный документ по среднеобразовательном учении. Диплом обеспечивает вход в расширенному ассортименту трудовых и образовательных перспектив.
프라그마틱 플레이는 33개 언어와 다양한 화폐로 250개 이상의 게임으로 이루어진 슬롯 포트폴리오를 운영합니다.
PG 소프트
프라그마틱의 게임은 항상 최고 수준의 퀄리티를 유지하고 있어요. 이번에도 그런 훌륭한 게임을 만났나요?
https://www.naugblog.com
https://maowenwang.com/hot/
https://www.12315os.cn/
https://1xbet-application-fr.com
Working 1xbet speculum for the purpose entering the official website of the bookmaker. Buy it to programme with 1xBet, let in bonuses and regard online bets.
https://1xbet-application-fr.com
online pharmacy weight loss
Good post. I learn something totally new and challenging on blogs I stumbleupon everyday.
It’s always useful to read through content from
other writers and use a little something from other
web sites.
top online pharmacy
Лучшие картинки различных тематик https://stilno.site
prednisone 10 mg daily
cialis 20mg price in canada
Воспользоваться промокодом 1xbet можно при регистрации в 1xbet. БК 1хбет дарит до 130% на первый депозит при помощи промокода 1xbet. Максимальная сумма бонуса по промокоду 1хбет достигает 32500 рублей. Промокод 1хбет дает надбавку на депозит до 130% только при первом пополнении. Регистрация. промокоды на 1хбет при первой регистрации. Всем известно, что букмекерская контора 1xbet предлагает широкий выбор разнообразных бонусов и акций. В этой статье мы расскажем все о промокодах 1xBet: что это, как использовать при регистрации, где вводить, чтобы сделать ставку бесплатно, и по каким поводам казахстанский букмекер 1хБет вручает именные промокоды. Содержание. Что такое промокод 1xBet. Бесплатные промокоды 1xBet. Промокод при регистрации в 1xbet сегодня. Как ввести промокод при регистрации в 1хБет – более подробно в этом материале http://vidpochynok.net/inc/cli/promokod-1xbet.html
Бездепозитный Бонус 1win 2024
Бонусы от казино промокод для 1win для пополнения1Win 2024 – Бездепозитные бонусы ? Коды на возврат денег ? VIP Программа лояльности ? Бесплатные фриспины.
промокод в 1win при регистрации: 937999 предоставляет новым игрокам бонус 500% для игры в слоты и игровые автоматы, максимальная сумма бонуса 200 000 рублей. Вы можете использовать бонусные деньги в разделе азартных игр, включая онлайн казино, карты, рулетку, игровые автоматы и слоты.
Компания «1Win» рада предложить своим новым клиентам приветственный бонус в размере до 500% на первые четыре депозита. Это выгодное предложение доступно сразу после регистрации в нашей букмекерской конторе. Бонус можно получить не только в рублях, но и в других валютах, при этом он не ограничивает возможность участия игроков в других программам лояльности компании. Максимальная сумма вознаграждения за регистрацию составляет 75000 рублей или эквивалентная сумма в другой валюте.
промокод 1вин при пополнении приносят игрокам множество преимуществ. Во-первых, они позволяют увеличить начальную ставку или продлить время игры. Кроме того, они дают возможность попробовать различные игры без риска потерять реальные деньги. Бонусы также повышают шансы на выигрыш и предоставляют дополнительные возможности для получения прибыли. Кроме того, бонусы в 1win могут быть обменены на реальные деньги или использованы для участия в специальных акциях и турнирах.
Преимущества получения и использования бонусов в 1win очевидны. Они позволяют игроку расширить свои возможности и получить больше удовольствия от игры. Бонусы также делают игру более выгодной с финансовой точки зрения, помогая уменьшить риски и увеличить потенциальную прибыль. Кроме того, получение и использование бонусов в 1win открывает возможность стать лояльным клиентом и получить дополнительные привилегии и вознаграждения от казино.
Итак, получение бонусов в 1win – это отличная возможность для игрока увеличить свои шансы на выигрыш, получить дополнительные деньги и улучшить свой игровой опыт. Бонусы делают игру более интересной и выгодной.
промокод для 1win для пополнения: 937999 предоставляет возможность получить бездепозитный бонус 2024. Его можно получить в виде фриспинов или фрибетов. Чтобы получить подарок, необходимо активировать код в личном кабинете. Дополнительный депозит не требуется. Размеры подарков невелики: фрибет до 500 рублей и не более 70 фриспинов для игры в слоты. Как и в случае с другими поощрениями, необходимо отыграть бездепозитный бонус. Вейджер, как правило, не превышает х5 для бесплатных ставок и х30 для фриспинов.
В казино 1win предоставляется внушительный бонус при регистрации, который составляет 500% от суммы первых четырех последовательных депозитов клиента. С таким количеством бонусов новичок может значительно увеличить свои шансы на выигрыш. Чтобы получить этот приветственный бонус, необходимо зарегистрироваться на официальном сайте, рабочем зеркале, мобильной версии или приложениях для мобильных телефонов. Однако, основным условием является совершение первого пополнения счета, так как активировать бонусы 1win можно только после этого.
1win промокод без депозита: 937999 используйте бонусный код при регистрации и получите бездепозтный бонус 70 фриспинов. Да, при использовании кода 1Win вы можете получить различные поощрения, включая бездепозитные бонусы. Они обычно представлены в виде фрибетов или фриспинов. Для их активации не требуется дополнительное пополнение счета. Размер таких подарков невелик: бесплатных вращений не более 70. Вейджер на бездепозитный бонус обычно не превышает х35. В 1Win вы можете получить бонусы за участие в акциях, турнирах, розыгрышах и активацию промокода. Бонусная программа периодически обновляется. Кроме того, некоторые акции имеют сезонный характер.
В 1Win основная бонусная программа включает в себя фриспины. Чтобы получить 70FS, необходимо пополнить счет на 100 рублей или более. Игроку предоставляется 2 дня с момента регистрации для активации презента. Отыгрыш бонуса должен быть выполнен в течение 24 часов с момента начисления, с вейджером х35. Бесплатные вращения предназначены только для игр провайдера Microgaming.
Так как бонусная программа 1Win регулярно обновляется, список акций, в которых можно получить фриспины, постоянно расширяется. Более подробную информацию о них можно найти на нашем сайте.
Промокод на 1Win дает возможность получить бесплатные вращения. Их можно использовать в любых слотах из каталога казино. Иногда могут быть установлены ограничения, которые предусматривают использование фриспинов только в определенных слотах или играх конкретного провайдера. Фриспины начисляются с фиксированной ставкой. Отыгрыш выигрыша, полученного с помощью бесплатных вращений, обязателен с учетом установленного вейджера.
Вся информация взята с сайта; https://td-scs.ru/stat/art/?promokod_362.html
obviously like your web-site but you have to take a look at the spelling on quite a few of your posts.
Several of them are rife with spelling issues and I in finding it very troublesome to
tell the truth on the other hand I’ll certainly
come back again.
Получи 32500 руб. по актуальному промо коду для 1хбет бесплатно. Новые купоны на регистрацию каждый час на сайте. В ваших силах получить до шести с половиной тысяч рублей при регистрации. Читайте ниже как использовать наши промо-коды. как получить сегодня промокод на 1хбет. Букмекерская контора позволяет использовать промокод 1иксбет на ставку-бонус. Забирайте новые купоны ежедневно. Внимание! Наши промо-купоны подходят для всех акций букмекера. Этот купон также универсальный – используйте его везде, не только при регистрации на сайте БК 1хбет и всех известных его зеркал. Введите его в форме для регистрации и получите увеличенный бонус на первый депозит до 32500 рублей. Кроме того, букмекер постоянно дарит активным клиентам выгодные подарки. Чтобы получить промокод в 1xBet бесплатно: Подпишитесь на рассылку новостей по смс или электронной почте. Регулярно заходите в раздел «Бонусы и подарки» в Личном кабинете – более подробно в этом материале http://vidpochynok.net/inc/cli/promokod-1xbet.html
uk pharmacy no prescription
tadalafil 2.5 mg daily
В ассортименте нашего интернет-магазина сантехники представлена только оригинальная продукция таких известных брендов как Джилекс, PRO AQUA, Valfex, LD, СТМ и многих других
Промокоды казино 1xBet при регистрации 2024. На ресурсе 1хБет пользователи могут не только делать ставки на спорт и другие события из разных сфер, но и получать азартные ощущения в казино. Играть можно как с машинами, так и с реальными дилерами в разделе лайв. Чтобы привлекать как можно больше новых игроков и поддерживать интерес постоянных клиентов, на сайте 1хБет регулярно проходят акции и раздают бонусы. Самое щедрое вознаграждение могут получить новички, использовав промокод казино 1xBet. Указав его при регистрации, пользователь получит дополнительные денежные средства на первые несколько депозитов, которые сможет использовать для ставок в играх. Это сделать просто, если иметь промокод 1хбет на сегодня бесплатно на слоты. Правда, дается он при условии выполнения некоторых правил. 1xbet бонус при регистрации. Не совсем промокод, но вы все равно ставите не свои деньги, если пополните депозит, – 100% бонуса от внесенной суммы. Максимум указан в верхней части главной страницы официального сайта – более подробно в этом материале http://vidpochynok.net/inc/cli/promokod-1xbet.html
Бездепозитный Бонус 1win 2024
Бонусы от казино активировать промокод 1win1Win 2024 – Бездепозитные бонусы ? Коды на возврат денег ? VIP Программа лояльности ? Бесплатные фриспины.
как ввести промокод на 1win: 937999 предоставляет новым игрокам бонус 500% для игры в слоты и игровые автоматы, максимальная сумма бонуса 200 000 рублей. Вы можете использовать бонусные деньги в разделе азартных игр, включая онлайн казино, карты, рулетку, игровые автоматы и слоты.
Компания «1Win» рада предложить своим новым клиентам приветственный бонус в размере до 500% на первые четыре депозита. Это выгодное предложение доступно сразу после регистрации в нашей букмекерской конторе. Бонус можно получить не только в рублях, но и в других валютах, при этом он не ограничивает возможность участия игроков в других программам лояльности компании. Максимальная сумма вознаграждения за регистрацию составляет 75000 рублей или эквивалентная сумма в другой валюте.
1win где вводить промокод приносят игрокам множество преимуществ. Во-первых, они позволяют увеличить начальную ставку или продлить время игры. Кроме того, они дают возможность попробовать различные игры без риска потерять реальные деньги. Бонусы также повышают шансы на выигрыш и предоставляют дополнительные возможности для получения прибыли. Кроме того, бонусы в 1win могут быть обменены на реальные деньги или использованы для участия в специальных акциях и турнирах.
Преимущества получения и использования бонусов в 1win очевидны. Они позволяют игроку расширить свои возможности и получить больше удовольствия от игры. Бонусы также делают игру более выгодной с финансовой точки зрения, помогая уменьшить риски и увеличить потенциальную прибыль. Кроме того, получение и использование бонусов в 1win открывает возможность стать лояльным клиентом и получить дополнительные привилегии и вознаграждения от казино.
Итак, получение бонусов в 1win – это отличная возможность для игрока увеличить свои шансы на выигрыш, получить дополнительные деньги и улучшить свой игровой опыт. Бонусы делают игру более интересной и выгодной.
куда вводить промокод на 1win: 937999 предоставляет возможность получить бездепозитный бонус 2024. Его можно получить в виде фриспинов или фрибетов. Чтобы получить подарок, необходимо активировать код в личном кабинете. Дополнительный депозит не требуется. Размеры подарков невелики: фрибет до 500 рублей и не более 70 фриспинов для игры в слоты. Как и в случае с другими поощрениями, необходимо отыграть бездепозитный бонус. Вейджер, как правило, не превышает х5 для бесплатных ставок и х30 для фриспинов.
В казино 1win предоставляется внушительный бонус при регистрации, который составляет 500% от суммы первых четырех последовательных депозитов клиента. С таким количеством бонусов новичок может значительно увеличить свои шансы на выигрыш. Чтобы получить этот приветственный бонус, необходимо зарегистрироваться на официальном сайте, рабочем зеркале, мобильной версии или приложениях для мобильных телефонов. Однако, основным условием является совершение первого пополнения счета, так как активировать бонусы 1win можно только после этого.
промокод на 1вин на пополнение: 937999 используйте бонусный код при регистрации и получите бездепозтный бонус 70 фриспинов. Да, при использовании кода 1Win вы можете получить различные поощрения, включая бездепозитные бонусы. Они обычно представлены в виде фрибетов или фриспинов. Для их активации не требуется дополнительное пополнение счета. Размер таких подарков невелик: бесплатных вращений не более 70. Вейджер на бездепозитный бонус обычно не превышает х35. В 1Win вы можете получить бонусы за участие в акциях, турнирах, розыгрышах и активацию промокода. Бонусная программа периодически обновляется. Кроме того, некоторые акции имеют сезонный характер.
В 1Win основная бонусная программа включает в себя фриспины. Чтобы получить 70FS, необходимо пополнить счет на 100 рублей или более. Игроку предоставляется 2 дня с момента регистрации для активации презента. Отыгрыш бонуса должен быть выполнен в течение 24 часов с момента начисления, с вейджером х35. Бесплатные вращения предназначены только для игр провайдера Microgaming.
Так как бонусная программа 1Win регулярно обновляется, список акций, в которых можно получить фриспины, постоянно расширяется. Более подробную информацию о них можно найти на нашем сайте.
Промокод на 1Win дает возможность получить бесплатные вращения. Их можно использовать в любых слотах из каталога казино. Иногда могут быть установлены ограничения, которые предусматривают использование фриспинов только в определенных слотах или играх конкретного провайдера. Фриспины начисляются с фиксированной ставкой. Отыгрыш выигрыша, полученного с помощью бесплатных вращений, обязателен с учетом установленного вейджера.
Вся информация взята с сайта; https://td-scs.ru/stat/art/?promokod_362.html
1250 mg prednisone
프라그마틱 게임은 iGaming 콘텐츠 제공의 선두 주자로, 모바일 중심 다양한 포트폴리오와 품질 높은 엔터테인먼트를 제공합니다.
PG 소프트
프라그마틱 슬롯에 대한 설명 감사합니다! 또한, 제 사이트에서도 프라그마틱과 관련된 정보를 얻을 수 있어요. 함께 이야기 나누면서 더 많은 지식을 얻어가요!
https://www.12315amb.cn/
https://wszhibo.com/hot/
https://hrbyszs.com/link/
cialis 10mg daily
Бездепозитный Бонус 1win 2024
Бонусы от казино 1win покер промокод при регистрации1Win 2024 – Бездепозитные бонусы ? Коды на возврат денег ? VIP Программа лояльности ? Бесплатные фриспины.
1win промокод на пополнение: 937999 предоставляет новым игрокам бонус 500% для игры в слоты и игровые автоматы, максимальная сумма бонуса 200 000 рублей. Вы можете использовать бонусные деньги в разделе азартных игр, включая онлайн казино, карты, рулетку, игровые автоматы и слоты.
Компания «1Win» рада предложить своим новым клиентам приветственный бонус в размере до 500% на первые четыре депозита. Это выгодное предложение доступно сразу после регистрации в нашей букмекерской конторе. Бонус можно получить не только в рублях, но и в других валютах, при этом он не ограничивает возможность участия игроков в других программам лояльности компании. Максимальная сумма вознаграждения за регистрацию составляет 75000 рублей или эквивалентная сумма в другой валюте.
1win промокод на бесплатную ставку приносят игрокам множество преимуществ. Во-первых, они позволяют увеличить начальную ставку или продлить время игры. Кроме того, они дают возможность попробовать различные игры без риска потерять реальные деньги. Бонусы также повышают шансы на выигрыш и предоставляют дополнительные возможности для получения прибыли. Кроме того, бонусы в 1win могут быть обменены на реальные деньги или использованы для участия в специальных акциях и турнирах.
Преимущества получения и использования бонусов в 1win очевидны. Они позволяют игроку расширить свои возможности и получить больше удовольствия от игры. Бонусы также делают игру более выгодной с финансовой точки зрения, помогая уменьшить риски и увеличить потенциальную прибыль. Кроме того, получение и использование бонусов в 1win открывает возможность стать лояльным клиентом и получить дополнительные привилегии и вознаграждения от казино.
Итак, получение бонусов в 1win – это отличная возможность для игрока увеличить свои шансы на выигрыш, получить дополнительные деньги и улучшить свой игровой опыт. Бонусы делают игру более интересной и выгодной.
1win как ввести промокод: 937999 предоставляет возможность получить бездепозитный бонус 2024. Его можно получить в виде фриспинов или фрибетов. Чтобы получить подарок, необходимо активировать код в личном кабинете. Дополнительный депозит не требуется. Размеры подарков невелики: фрибет до 500 рублей и не более 70 фриспинов для игры в слоты. Как и в случае с другими поощрениями, необходимо отыграть бездепозитный бонус. Вейджер, как правило, не превышает х5 для бесплатных ставок и х30 для фриспинов.
В казино 1win предоставляется внушительный бонус при регистрации, который составляет 500% от суммы первых четырех последовательных депозитов клиента. С таким количеством бонусов новичок может значительно увеличить свои шансы на выигрыш. Чтобы получить этот приветственный бонус, необходимо зарегистрироваться на официальном сайте, рабочем зеркале, мобильной версии или приложениях для мобильных телефонов. Однако, основным условием является совершение первого пополнения счета, так как активировать бонусы 1win можно только после этого.
промокод 1win при пополнении сегодня: 937999 используйте бонусный код при регистрации и получите бездепозтный бонус 70 фриспинов. Да, при использовании кода 1Win вы можете получить различные поощрения, включая бездепозитные бонусы. Они обычно представлены в виде фрибетов или фриспинов. Для их активации не требуется дополнительное пополнение счета. Размер таких подарков невелик: бесплатных вращений не более 70. Вейджер на бездепозитный бонус обычно не превышает х35. В 1Win вы можете получить бонусы за участие в акциях, турнирах, розыгрышах и активацию промокода. Бонусная программа периодически обновляется. Кроме того, некоторые акции имеют сезонный характер.
В 1Win основная бонусная программа включает в себя фриспины. Чтобы получить 70FS, необходимо пополнить счет на 100 рублей или более. Игроку предоставляется 2 дня с момента регистрации для активации презента. Отыгрыш бонуса должен быть выполнен в течение 24 часов с момента начисления, с вейджером х35. Бесплатные вращения предназначены только для игр провайдера Microgaming.
Так как бонусная программа 1Win регулярно обновляется, список акций, в которых можно получить фриспины, постоянно расширяется. Более подробную информацию о них можно найти на нашем сайте.
Промокод на 1Win дает возможность получить бесплатные вращения. Их можно использовать в любых слотах из каталога казино. Иногда могут быть установлены ограничения, которые предусматривают использование фриспинов только в определенных слотах или играх конкретного провайдера. Фриспины начисляются с фиксированной ставкой. Отыгрыш выигрыша, полученного с помощью бесплатных вращений, обязателен с учетом установленного вейджера.
Вся информация взята с сайта; https://td-scs.ru/stat/art/?promokod_362.html
Простые и эффективные способы узнать условный номер объекта недвижимости и ориентироваться в градостроительных планах
Иногда, при рассмотрении предложений о покупке или аренде недвижимости, мы можем столкнуться с загадочными цифро-буквенными обозначениями, которые являются условными номерами объектов. Эти коды могут выглядеть непонятно и вызывать затруднение тем, кто впервые сталкивается с таким способом идентификации недвижимости.
Но не стоит отчаиваться! В этой статье мы расскажем вам о том, как расшифровать эти коды и разобраться в том, какая информация скрыта за каждым символом. Благодаря нашим подсказкам и рекомендациям вы сможете легко и без труда определить номер объекта недвижимости и получить важную информацию о нем.
Для начала, давайте обратим внимание на важность понимания цельной системы кодирования, которая используется для обозначения объектов недвижимости. В основе этой системы лежит сочетание букв и цифр, каждый из которых несет определенную информацию о характеристиках объекта или о его местоположении. Некоторые обозначения могут быть стандартизированными, в то время как другие – уникальными для разных рынков недвижимости.
Подобрали для вас полезные статьи о данной теме, такие какие Недвижимость
Существование даркнет-маркетов – это феномен, который порождает большой заинтересованность и разговоры во нынешнем окружении. Даркнет, или глубокая зона интернета, есть тайную платформу, доступные лишь с помощью особые программы и конфигурации, предоставляющие инкогнито участников. По данной закрытой платформе размещаются теневые электронные базары – интернет-ресурсы, где-нибудь продаются разные товары и услуги, в большинстве случаев нелегального характера.
На скрытых интернет-площадках можно отыскать самые разные продуктовые товары: наркотические препараты, военные средства, похищенная информация, взломанные аккаунты, фальшивки или и другое. Такие же площадки порой магнетизирузивают внимание как уголовников, а также стандартных участников, желающих обойти юриспруденция или иметь доступ к продуктам или услуговым предложениям, которые на стандартном сети могли бы быть недоступны.
Все же нужно помнить, чем практика по подпольных рынках представляет собой противозаконный тип а имеет возможность создать крупные правовые наказания. Полицейские органы усердно борются за с такими площадками, однако из-за неузнаваемости скрытой сети это условие не все время легко.
Следовательно, наличие подпольных онлайн-рынков есть сущностью, однако эти площадки продолжают оставаться территорией значительных рисков как для пользователей, так и для общественности во целом.
lisinopril tabs 10mg
Выгоднее ли инвестировать в недвижимость – преимущества и риски в современном рыночном контексте
Современный рынок финансовых инструментов предлагает множество вариантов вложения средств для получения прибыли. Однако среди всех возможностей выделяется одна особенно привлекательная возможность – инвестирование в недвижимость. Это давно считается одним из самых стабильных и надежных способов сохранения и приумножения капитала.
Какие преимущества дает инвестиция в квартиры, дома или коммерческую недвижимость? Прежде всего, это высокий уровень доходности. Исторические данные показывают, что цены на недвижимость растут со временем, что позволяет инвесторам получить значительную прибыль при продаже объекта спустя несколько лет. Кроме того, сдача недвижимости в аренду является надежным источником постоянного дохода, который можно получать на протяжении длительного времени.
Однако, у инвестиций в недвижимость есть и другие, не менее привлекательные преимущества. В отличие от некоторых финансовых инструментов, вложения в недвижимость менее подвержены колебаниям рынка и экономическим нестабильностям. Это делает такой вид инвестиций отличной защитой от инфляции и способствует сохранению капитала в долгосрочной перспективе. Вложения в недвижимость также обладают высокой ликвидностью, что позволяет в любой момент реализовать имущество и получить соответствующую прибыль.
Подобрали для вас полезные статьи о данной теме, такие какие Налоги на недвижимость
canada pharmacy coupon
Тор браузер – это специальный интернет-браузер, который рассчитан для гарантирования конфиденциальности и надежности в сети. Он разработан на инфраструктуре Тор (The Onion Router), которая позволяет пользователям пересылать данными через распределенную сеть серверов, что создает трудным прослушивание их деятельности и выявление их положения.
Основная характеристика Тор браузера состоит в его способности направлять интернет-трафик через несколько узлов сети Тор, каждый шифрует информацию перед передачей следующему узлу. Это обеспечивает массу слоев (поэтому и название “луковая маршрутизация” – “The Onion Router”), что создает почти что невероятным прослушивание и установление пользователей.
Тор браузер периодически применяется для пересечения цензуры в странах, где запрещен доступ к конкретным веб-сайтам и сервисам. Он также позволяет пользователям обеспечить приватность своих онлайн-действий, таких как просмотр веб-сайтов, общение в чатах и отправка электронной почты, предотвращая отслеживания и мониторинга со стороны интернет-провайдеров, правительственных агентств и киберпреступников.
Однако следует помнить, что Тор браузер не обеспечивает полной тайности и безопасности, и его применение может быть связано с опасностью доступа к незаконным контенту или деятельности. Также может быть замедление скорости интернет-соединения по причине
http://www.1xbet-application-fr.com
Working 1xbet mirror instead of entering the valid website of the bookmaker. Use it to register with 1xBet, bear bonuses and place online bets.
1xbet-application-fr.com
даркнет площадки
Даркнет-площадки, то есть темные рынки, являются онлайн-платформы, доступные только исключительно путем скрытую сеть – интернет-область, скрытая для обычных систем поиска. Такие площадки разрешают участникам торговать разными товарными позициями и послугами, обычно противоправного специфики, как наркотические вещества, военные средства, украденные данные, подделки а другие запрещенные или же контравентные продуктовые товары или сервисы.
Даркнет-площадки предоставляют анонимность их собственных пользователей в результате использования определенных программного обеспечения и параметров, такие как Tor, какие маскируют IP-адреса и маршрутизируют интернет-трафик через разные узловые соединения, что делает трудным прослеживание их действий правоохранительными органами.
Такие торговые площадки время от времени попадают целью интереса правоохранительных органов, которые борются против ними в пределах борьбе противостояния киберпреступностью или неправомерной торговлей.
Тор теневая часть интернета – это часть интернета, которая, которая работает поверх обыкновеннои? сети, однако не доступна для непосредственного входа через стандартные браузеры, например Google Chrome или Mozilla Firefox. Для выхода к даннои? сети необходимо эксклюзивное программное обеспечение, как, Tor Browser, которыи? обеспечивает секретность и защиту пользователеи?.
Основнои? механизм работы Тор даркнета основан на использовании маршрутизации через разнообразные ноды, которые шифруют и двигают трафик, создавая сложным слежение его источника. Это создает анонимность для пользователеи?, пряча их настоящие IP-адреса и местоположение.
Тор даркнет включает разные источники, включая веб-саи?ты, форумы, рынки, блоги и другие онлаи?н-ресурсы. Некоторые из подобных ресурсов могут быть неприступны или пресечены в обыкновеннои? сети, что делает Тор даркнет базои? для трейдинга информациеи? и услугами, включая вещи и услуги, которые могут быть незаконными.
Хотя Тор даркнет применяется некоторыми людьми для обхода цензуры или протекции индивидуальности, он как и становится платформои? для разносторонних незаконных поступков, таких как курс наркотиками, оружием, кража личных данных, подача услуг хакеров и прочие злостные действия.
Важно сознавать, что использование Тор даркнета не всегда законно и может в себя серьезные угрозы для безопасности и правомочности.
1xbet-application-fr.com
Working 1xbet speculum in place of entering the valid website of the bookmaker. Buy it to cash-box with 1xBet, let in bonuses and section online bets.
1xbet-application-fr.com
synthroid discount
order synthroid
can you buy zithromax over the counter
lisinopril 5mg prices
silkroad online pharmacy
buy synthroid online
cialis canada 20mg
buy valtrex
metformin generic
glucophage lowest price
선도적인 업체인 최신 프라그마틱 게임은 iGaming 분야에서 혁신적이고 표준화된 콘텐츠를 제공하며 슬롯, 라이브 카지노, 빙고 등을 통해 고객에게 엔터테인먼트를 제공합니다.
프라그마틷
프라그마틱 관련 내용 정말 재미있게 읽었어요! 또한, 제 사이트에서도 프라그마틱과 관련된 정보를 공유하고 있어요. 함께 교류하며 더 많은 지식을 쌓아가요!
https://slepes.com/link/
https://www.12315yc.cn/
https://pdlwqpd.weebly.com/
cost of metformin in canada
Когда вашему устройству от Dyson требуется надежный ремонт и обслуживание, доверьтесь официальный сервис Dyson. Профессионалы быстро определят проблему и устранят ее, применяя оригинальные запчасти. Детали об услугах по ссылке: remontdyson.ru.
hoki1881
Hi everyone, it’s my first pay a visit at this web page, and
article is truly fruitful for me, keep up posting these types of articles or reviews.
happy family pharmacy in canada
synthroid 75 mcg
даркнет россия
государстве, как и в иных государствах, даркнет показывает собой часть интернета, недоступную для стандартного поискавания и осмотра через стандартные браузеры. В противоположность от общеизвестной поверхностной инфраструктуры, теневая сеть становится тайным куском интернета, вход к какому обычно осуществляется через специальные приложения, такие как Tor Browser, и скрытые инфраструктуры, такие как Tor.
В даркнете сгруппированы различные источники, включая дискуссии, рынки, блоги и остальные сайты, которые могут быть недоступимы или запрещены в регулярной коммуникации. Здесь возможно найти различные вещи и сервисы, включая противозаконные, такие как наркотики, вооружение, компрометированные данные, а также услуги взломщиков и другие.
В стране теневая сеть так же используется для пересечения цензуры и слежения со стороны сторонних. Некоторые клиенты могут выпользовать его для обмена информацией в обстоятельствах, когда свобода слова заблокирована или информационные ресурсы подвергаются цензуре. Однако, также стоит отметить, что в даркнете есть много законодательной процесса и потенциально опасных положений, включая мошенничество и киберпреступления
Hey this is kind of of off topic but I was wondering if blogs use WYSIWYG editors or if you have to manually code with HTML. I’m starting a blog soon but have no coding knowledge so I wanted to get guidance from someone with experience. Any help would be enormously appreciated!
Rybelsus
cheap tadalafil online
lisinopril cost canada
synthroid discount coupon
canadian pharmacy antibiotics
synthroid 200 mcg tabs
metformin.com
Московский сервисный центр, оказывающий профессиональную помощь, в области ремонта и обслуживания холодильников. Наши высококвалифицированные специалисты, всегда готовы прийти на помощь. Для получения дополнительной информации о наших услугах и актуальных предложениях, приглашаем Вас посетить наши аккаунты в соцсетях.
twitch.tv
tumblr.com
wordpress.com
Ремонтный центр Stinol – надежный помощник в обслуживании домашних приборов. Квалифицированные мастера быстро устранят все проблемы, возвращая вашей технике безупречную работу. Поручите обслуживание экспертам Stinol и получайте удовольствие от надежной работой своей техники. Подписывайтесь на наших страницах, чтобы быть в курсе новостей и специальных предложений!
mystrikingly.com
wix.com
telegra.ph
Сервисный центр Stinol – надежный помощник в обслуживании домашних приборов. Квалифицированные специалисты быстро решат любые неполадки, вернув вашим приборам безупречную работу. Доверьте ремонт профессионалам Stinol и наслаждайтесь безотказной службой своей техники. Следите за нами в социальных сетях, чтобы быть в курсе новостей и специальных предложений!
twitch.tv
tumblr.com
wordpress.com
synthroid 15 mg
how much is generic synthroid
http://cetka.webtalk.ru/viewtopic.php?id=3773#p8327
https://1abakan.ru/forum/showthread-65141/page-1/
lisinopril buy online
how much is metformin
Советуем посетить сайт https://100sm.ru/
Также не забудьте добавить сайт в закладки: https://100sm.ru/
фильм 2024
qiyezp.com
Xie Qian은 서둘러 “Liu 씨, 무슨 일이 있었나요?”
azithromycin 500mg tablets price in india
cialis generic 5mg
EL CODIGO PROMOCIONAL DE 1XSLOTS CASINO
Sin introducir un codigo promocional 1xSlots Casino, como nuevo cliente en March 2024, puede beneficiarse de una bonificacion del 100% hasta 300€. El casino le proporciona un monton de maquinas tragaperras populares de proveedores de software como iSoftBet, Elk Studios o Play’n GO y otros. De forma adicional, se le otorgaran|esta oferta incluye 30 turnos gratuitos.. Todas las informaciones importantes respecto a esta oferta de bienvenida se puede encontrar en este articulo.
?COMO FUNCIONA EL CODIGO PROMOCIONAL DE 1XSLOTS CASINO?
En 1xSlots Casino se puede obtener una bonificacion del 100% hasta 300€ y turnos gratuitos en 1xSlots Casino. Haga su inicial deposito en 1xSlots Casino tras finalizar el proceso de inscripcion. No hace falta solicitar su bonificacion de bienvenida por e-mail ni el chat en directo como en otros casinos, porque 1xSlots Casino la abona a su cuenta automaticamente. La oferta de bienvenida se activa cuando deposite 10€ o mas. Haga un deposito empleando EcoPayz, Boku o Bitcoin u otro metodo de deposito disponible en el casino.
Mas sobre el bono
1xSlots Casino le da la oportunidad de incrementar su balance hasta 300€ (100%). Obtenga la bonificacion superior al depositar 300€ y conseguir 600€ que se anadiran en su cuenta. Los fondos de su bonificacion es compatible con tragaperras de proveedores de software como Red Tiger Gaming, Evolution Gaming y Microgaming, por nombrar unos cuantos. Debe tenerse en cuenta tambien que su cuenta se incrementara con 30 turnos gratuitos.
Bono de bienvenida 1xSlots 2024
Dentro de 1xSlots existen dos bonos de bienvenida, uno standard y uno exclusivo. El primero de ellas recompensa con un paquete de hasta €1500 y 150 giros gratis mientras que el segundo otorga un 10% adicional recompensando hasta €1650 y 150 giros gratis ?La diferencia? El bono exclusivo se obtiene mediante el uso del 1xSlots promocode NEXT777.
Las recompensas de la bonificacion exclusiva son otorgadas en los 4 primeros depositos de la siguiente manera:
100% del primer deposito hasta €450 + 30 giros gratis
100% del segundo deposito hasta €350 + 35 giros gratis
100% del tercer deposito hasta €400 + 40 giros gratis
100% del cuarto deposito hasta €450 + 45 giros gratis
Bono de bienvenida 1xSlots Argentina 2024
Cabe resaltar que durante tu proceso de registro tienes que elegir tu moneda local preferida. De este modo obtendras la bonificacion de bienvenida 1xSlots Argentina en pesos. Puedes recibir el bono exclusivo 1xSlots Argentina al utilizar nuestro codigo de bono 1xSlots Argentina NEXT777 durante el proceso de registro.
Ademas, si ingresas el codigo NEXT777 a la pestana “Bonos y Regalos” despues de hacer tu primer deposito, puedes recibir el bono con giros gratis 1xSlots Argentina que te otorgara 60 FS en tragamonedas 777 GEMS RESPIN. A continuacion encontraras los valores de bonos en pesos argentinos.
Bono de bienvenida 1xSlots Chile 2024
El bono de bienvenida 1xSlots Chile funciona del mismo modo como en Argentina. Tienes que crear tu cuenta e ingresar nuestro codigo de bonificacion 1xslots Chile NEXT777 al formulario de registro. Puedes elegir el peso chileno como tu moneda local para recibir la bonificacion de bienvenida 1xSlots Chile. Adicionalmente, para obtener 60 giros gratis en 777 GEMS RESPIN, introduce el codigo NEXT777 al hacer tu primer deposito.
?QUE ES UN BONO DE TRAGAPERRAS SIN DEPOSITO?
Como su nombre indica, un bono de tragaperras sin deposito es un tipo de bono de casino que no necesita que los jugadores depositen dinero para poder optar a cualquier tipo de recompensa. Por ejemplo, giros gratis, creditos de casino o incluso dinero en efectivo.
Los bonos sin deposito se dan generalmente a los jugadores potenciales para motivar a los nuevos jugadores para que se registren. Pueden formar parte de los paquetes de bienvenida que un casino online ofrece a todos sus jugadores potenciales y ayudan a atraer la atencion hacia la marca del casino. Tambien pueden ofrecerse a los jugadores con cuentas en determinadas situaciones.
Las tragaperras con bono sin deposito ofrecen la posibilidad de probar las tragaperras online sin coste alguno y quedandose con el dinero que se obtiene, razon por la que son muy codiciadas. Sin embargo, los bonos sin deposito no te obligan a depositar dinero cuando la promocion termina, aunque se sugiere.
?CUALES SON LOS PRINCIPALES TIPOS DE BONOS DE TRAGAMONEDAS SIN DEPOSITO?
Los bonos sin deposito estan disponibles en tres variedades: giros gratis, creditos gratis o dinero en efectivo. El tipo mas conocido que es un bono sin deposito no spins without deposit bonus.
GIROS GRATIS CON BONO SIN DEPOSITO
Todos sabemos que las maquinas tragaperras son las mas populares en el mundo de los juegos de casino , por lo que es natural que un bono hecho especificamente para las maquinas que juegan a las tragaperras sea el mas buscado. Para los amantes de las maquinas tragaperras, los bonos de tiradas gratis sin deposito son un verdadero tesoro, ya que permiten a los jugadores jugar a sus maquinas tragaperras favoritas sin depositar dinero, y con una gran cantidad de tiradas gratis, lo que aumenta sus probabilidades de ganar significativamente.
Creditos gratuitos / BONO DE JUEGO GRATUITO SIN DEPOSITO
En lugar de tiradas gratis, los casinos pueden optar por dar creditos gratis a los jugadores que tienen bonos sin deposito. Estos creditos pueden ser utilizados dentro de un periodo de tiempo enumerado para apostar en juegos en los casinos y ganar dinero real. Los bonos sin deposito y los creditos gratuitos se ofrecen tanto en las tragaperras gratuitas como en otros juegos de los casinos.
DINERO GRATIS CON BONOS SIN DEPOSITO
Al igual que los creditos gratuitos con los bonos sin deposito, los bonos de dinero sin deposito que no requieren deposito se pueden jugar tanto en las tragaperras como en otros juegos de casino. Una vez que haya reclamado y jugado el bono de dinero sin deposito, podra retirar el dinero del bono y cualquier ganancia adicional siempre que cumpla las condiciones para retirar el dinero.
?Como puedo reclamar un bono sin deposito?
En la mayoria de los casos, puede hacer uso de los bonos sin deposito al crear una cuenta en cualquier sitio de juego en linea que ofrezca este tipo de oferta. En la version online del casino, la bonificacion puede aparecer en la pagina de promociones del casino o en una ventana emergente. Algunos casinos requieren que introduzca un codigo promocional para acceder al bono.
Cuando considere reclamar un bono sin deposito (o cualquier otro tipo de bono) debe asegurarse de leer los terminos y condiciones que se adjuntan al bono. Los diferentes casinos pueden tener sus propias regulaciones y limites, sin embargo, hay algunos que son iguales en todos los casinos.
REQUISITOS PARA TRABAJAR
Los bonos sobre los depositos son accesibles para todos, sin embargo, cobrar los bonos es un asunto un poco mas controlado. La mayoria de los casinos en linea le permitiran retirar sus ganancias despues de haber podido apostar una cantidad especifica.
Los requisitos de apuesta se muestran como multiplicadores. Representan la cantidad de veces que tienes que apostar en un bono para poder retirar el dinero. Por lo general, puede jugar a una serie de juegos seleccionados por el operador del casino. Una vez que haya alcanzado el requisito de apuesta, podra dar el siguiente paso para cobrar su bono.
PLAZO
Segun el casino online, el bono para juegos de tragaperras de deposito puede caducar en cuestion de dias o durar hasta 30 dias. Para asegurarte de que cumples los requisitos de apuestas, es posible que tengas que planificar tu rutina de juego a lo largo del bono.
TAMANOS DE APUESTA
Un metodo para lograr su objetivo de apostar mas rapido es realizar la mayor cantidad de apuestas posible en cada juego. Es un metodo sensato, a menos que el operador del casino decida controlar la cantidad de la apuesta y limitar la cantidad de apuestas en la respectiva tragamonedas con bono sin deposito.
SE REQUIERE UN DEPOSITO
Aunque suene contradictorio, algunos casinos online pueden incluso exigir a los jugadores que depositen dinero antes de poder retirar su bono. Suelen anadir este requisito adicional por razones de seguridad.
RESTRICCIONES
A veces, se le puede negar el acceso a un bono con oferta de deposito gratuito. Esto solo ocurre en muy raras circunstancias, ya sea por el hecho de haber intentado dos bonos a la vez o por tener una direccion IP compartida con un jugador que tambien reclamo el mismo bono, o por residir en una zona restringida.
Puedes obtener informacion mas detallada leyendo el articulo completo en este enlace – http://centroculturalrecoleta.org/blog/pages/codigo_promocional_1xslots_bono.html
сериал в хорошем качестве
tadalafil 20mg coupon
EL CODIGO PROMOCIONAL DE 1XSLOTS CASINO
Sin introducir un codigo promocional 1xSlots Casino, como nuevo cliente en March 2024, puede beneficiarse de una bonificacion del 100% hasta 300€. El casino le proporciona un monton de maquinas tragaperras populares de proveedores de software como iSoftBet, Elk Studios o Play’n GO y otros. De forma adicional, se le otorgaran|esta oferta incluye 30 turnos gratuitos.. Todas las informaciones importantes respecto a esta oferta de bienvenida se puede encontrar en este articulo.
?COMO FUNCIONA EL CODIGO PROMOCIONAL DE 1XSLOTS CASINO?
En 1xSlots Casino se puede obtener una bonificacion del 100% hasta 300€ y turnos gratuitos en 1xSlots Casino. Haga su inicial deposito en 1xSlots Casino tras finalizar el proceso de inscripcion. No hace falta solicitar su bonificacion de bienvenida por e-mail ni el chat en directo como en otros casinos, porque 1xSlots Casino la abona a su cuenta automaticamente. La oferta de bienvenida se activa cuando deposite 10€ o mas. Haga un deposito empleando EcoPayz, Boku o Bitcoin u otro metodo de deposito disponible en el casino.
Mas sobre el bono
1xSlots Casino le da la oportunidad de incrementar su balance hasta 300€ (100%). Obtenga la bonificacion superior al depositar 300€ y conseguir 600€ que se anadiran en su cuenta. Los fondos de su bonificacion es compatible con tragaperras de proveedores de software como Red Tiger Gaming, Evolution Gaming y Microgaming, por nombrar unos cuantos. Debe tenerse en cuenta tambien que su cuenta se incrementara con 30 turnos gratuitos.
Bono de bienvenida 1xSlots 2024
Dentro de 1xSlots existen dos bonos de bienvenida, uno standard y uno exclusivo. El primero de ellas recompensa con un paquete de hasta €1500 y 150 giros gratis mientras que el segundo otorga un 10% adicional recompensando hasta €1650 y 150 giros gratis ?La diferencia? El bono exclusivo se obtiene mediante el uso del 1xSlots promocode NEXT777.
Las recompensas de la bonificacion exclusiva son otorgadas en los 4 primeros depositos de la siguiente manera:
100% del primer deposito hasta €450 + 30 giros gratis
100% del segundo deposito hasta €350 + 35 giros gratis
100% del tercer deposito hasta €400 + 40 giros gratis
100% del cuarto deposito hasta €450 + 45 giros gratis
Bono de bienvenida 1xSlots Argentina 2024
Cabe resaltar que durante tu proceso de registro tienes que elegir tu moneda local preferida. De este modo obtendras la bonificacion de bienvenida 1xSlots Argentina en pesos. Puedes recibir el bono exclusivo 1xSlots Argentina al utilizar nuestro codigo de bono 1xSlots Argentina NEXT777 durante el proceso de registro.
Ademas, si ingresas el codigo NEXT777 a la pestana “Bonos y Regalos” despues de hacer tu primer deposito, puedes recibir el bono con giros gratis 1xSlots Argentina que te otorgara 60 FS en tragamonedas 777 GEMS RESPIN. A continuacion encontraras los valores de bonos en pesos argentinos.
Bono de bienvenida 1xSlots Chile 2024
El bono de bienvenida 1xSlots Chile funciona del mismo modo como en Argentina. Tienes que crear tu cuenta e ingresar nuestro 1xslots ultimo codigo promocional Chile NEXT777 al formulario de registro. Puedes elegir el peso chileno como tu moneda local para recibir la bonificacion de bienvenida 1xSlots Chile. Adicionalmente, para obtener 60 giros gratis en 777 GEMS RESPIN, introduce el codigo NEXT777 al hacer tu primer deposito.
?QUE ES UN BONO DE TRAGAPERRAS SIN DEPOSITO?
Como su nombre indica, un bono de tragaperras sin deposito es un tipo de bono de casino que no necesita que los jugadores depositen dinero para poder optar a cualquier tipo de recompensa. Por ejemplo, giros gratis, creditos de casino o incluso dinero en efectivo.
Los bonos sin deposito se dan generalmente a los jugadores potenciales para motivar a los nuevos jugadores para que se registren. Pueden formar parte de los paquetes de bienvenida que un casino online ofrece a todos sus jugadores potenciales y ayudan a atraer la atencion hacia la marca del casino. Tambien pueden ofrecerse a los jugadores con cuentas en determinadas situaciones.
Las tragaperras con bono sin deposito ofrecen la posibilidad de probar las tragaperras online sin coste alguno y quedandose con el dinero que se obtiene, razon por la que son muy codiciadas. Sin embargo, los bonos sin deposito no te obligan a depositar dinero cuando la promocion termina, aunque se sugiere.
?CUALES SON LOS PRINCIPALES TIPOS DE BONOS DE TRAGAMONEDAS SIN DEPOSITO?
Los bonos sin deposito estan disponibles en tres variedades: giros gratis, creditos gratis o dinero en efectivo. El tipo mas conocido que es un bono sin deposito no spins without deposit bonus.
GIROS GRATIS CON BONO SIN DEPOSITO
Todos sabemos que las maquinas tragaperras son las mas populares en el mundo de los juegos de casino , por lo que es natural que un bono hecho especificamente para las maquinas que juegan a las tragaperras sea el mas buscado. Para los amantes de las maquinas tragaperras, los bonos de tiradas gratis sin deposito son un verdadero tesoro, ya que permiten a los jugadores jugar a sus maquinas tragaperras favoritas sin depositar dinero, y con una gran cantidad de tiradas gratis, lo que aumenta sus probabilidades de ganar significativamente.
Creditos gratuitos / BONO DE JUEGO GRATUITO SIN DEPOSITO
En lugar de tiradas gratis, los casinos pueden optar por dar creditos gratis a los jugadores que tienen bonos sin deposito. Estos creditos pueden ser utilizados dentro de un periodo de tiempo enumerado para apostar en juegos en los casinos y ganar dinero real. Los bonos sin deposito y los creditos gratuitos se ofrecen tanto en las tragaperras gratuitas como en otros juegos de los casinos.
DINERO GRATIS CON BONOS SIN DEPOSITO
Al igual que los creditos gratuitos con los bonos sin deposito, los bonos de dinero sin deposito que no requieren deposito se pueden jugar tanto en las tragaperras como en otros juegos de casino. Una vez que haya reclamado y jugado el bono de dinero sin deposito, podra retirar el dinero del bono y cualquier ganancia adicional siempre que cumpla las condiciones para retirar el dinero.
?Como puedo reclamar un bono sin deposito?
En la mayoria de los casos, puede hacer uso de los bonos sin deposito al crear una cuenta en cualquier sitio de juego en linea que ofrezca este tipo de oferta. En la version online del casino, la bonificacion puede aparecer en la pagina de promociones del casino o en una ventana emergente. Algunos casinos requieren que introduzca un codigo promocional para acceder al bono.
Cuando considere reclamar un bono sin deposito (o cualquier otro tipo de bono) debe asegurarse de leer los terminos y condiciones que se adjuntan al bono. Los diferentes casinos pueden tener sus propias regulaciones y limites, sin embargo, hay algunos que son iguales en todos los casinos.
REQUISITOS PARA TRABAJAR
Los bonos sobre los depositos son accesibles para todos, sin embargo, cobrar los bonos es un asunto un poco mas controlado. La mayoria de los casinos en linea le permitiran retirar sus ganancias despues de haber podido apostar una cantidad especifica.
Los requisitos de apuesta se muestran como multiplicadores. Representan la cantidad de veces que tienes que apostar en un bono para poder retirar el dinero. Por lo general, puede jugar a una serie de juegos seleccionados por el operador del casino. Una vez que haya alcanzado el requisito de apuesta, podra dar el siguiente paso para cobrar su bono.
PLAZO
Segun el casino online, el bono para juegos de tragaperras de deposito puede caducar en cuestion de dias o durar hasta 30 dias. Para asegurarte de que cumples los requisitos de apuestas, es posible que tengas que planificar tu rutina de juego a lo largo del bono.
TAMANOS DE APUESTA
Un metodo para lograr su objetivo de apostar mas rapido es realizar la mayor cantidad de apuestas posible en cada juego. Es un metodo sensato, a menos que el operador del casino decida controlar la cantidad de la apuesta y limitar la cantidad de apuestas en la respectiva tragamonedas con bono sin deposito.
SE REQUIERE UN DEPOSITO
Aunque suene contradictorio, algunos casinos online pueden incluso exigir a los jugadores que depositen dinero antes de poder retirar su bono. Suelen anadir este requisito adicional por razones de seguridad.
RESTRICCIONES
A veces, se le puede negar el acceso a un bono con oferta de deposito gratuito. Esto solo ocurre en muy raras circunstancias, ya sea por el hecho de haber intentado dos bonos a la vez o por tener una direccion IP compartida con un jugador que tambien reclamo el mismo bono, o por residir en una zona restringida.
Puedes obtener informacion mas detallada leyendo el articulo completo en este enlace – http://centroculturalrecoleta.org/blog/pages/codigo_promocional_1xslots_bono.html
valtrex medication online
сериал русская озвучка
tadalafil order online
azithromycin 250 price
qiyezp.com
Chen Tong은 점점 더 멍해졌고 갑자기 완전히 공황 상태에 빠졌습니다.
EL CODIGO PROMOCIONAL DE 1XSLOTS CASINO
Sin introducir un codigo promocional 1xSlots Casino, como nuevo cliente en March 2024, puede beneficiarse de una bonificacion del 100% hasta 300€. El casino le proporciona un monton de maquinas tragaperras populares de proveedores de software como iSoftBet, Elk Studios o Play’n GO y otros. De forma adicional, se le otorgaran|esta oferta incluye 30 turnos gratuitos.. Todas las informaciones importantes respecto a esta oferta de bienvenida se puede encontrar en este articulo.
?COMO FUNCIONA EL CODIGO PROMOCIONAL DE 1XSLOTS CASINO?
En 1xSlots Casino se puede obtener una bonificacion del 100% hasta 300€ y turnos gratuitos en 1xSlots Casino. Haga su inicial deposito en 1xSlots Casino tras finalizar el proceso de inscripcion. No hace falta solicitar su bonificacion de bienvenida por e-mail ni el chat en directo como en otros casinos, porque 1xSlots Casino la abona a su cuenta automaticamente. La oferta de bienvenida se activa cuando deposite 10€ o mas. Haga un deposito empleando EcoPayz, Boku o Bitcoin u otro metodo de deposito disponible en el casino.
Mas sobre el bono
1xSlots Casino le da la oportunidad de incrementar su balance hasta 300€ (100%). Obtenga la bonificacion superior al depositar 300€ y conseguir 600€ que se anadiran en su cuenta. Los fondos de su bonificacion es compatible con tragaperras de proveedores de software como Red Tiger Gaming, Evolution Gaming y Microgaming, por nombrar unos cuantos. Debe tenerse en cuenta tambien que su cuenta se incrementara con 30 turnos gratuitos.
Bono de bienvenida 1xSlots 2024
Dentro de 1xSlots existen dos bonos de bienvenida, uno standard y uno exclusivo. El primero de ellas recompensa con un paquete de hasta €1500 y 150 giros gratis mientras que el segundo otorga un 10% adicional recompensando hasta €1650 y 150 giros gratis ?La diferencia? El bono exclusivo se obtiene mediante el uso del 1xSlots promocode NEXT777.
Las recompensas de la bonificacion exclusiva son otorgadas en los 4 primeros depositos de la siguiente manera:
100% del primer deposito hasta €450 + 30 giros gratis
100% del segundo deposito hasta €350 + 35 giros gratis
100% del tercer deposito hasta €400 + 40 giros gratis
100% del cuarto deposito hasta €450 + 45 giros gratis
Bono de bienvenida 1xSlots Argentina 2024
Cabe resaltar que durante tu proceso de registro tienes que elegir tu moneda local preferida. De este modo obtendras la bonificacion de bienvenida 1xSlots Argentina en pesos. Puedes recibir el bono exclusivo 1xSlots Argentina al utilizar nuestro codigo de bono 1xSlots Argentina NEXT777 durante el proceso de registro.
Ademas, si ingresas el codigo NEXT777 a la pestana “Bonos y Regalos” despues de hacer tu primer deposito, puedes recibir el bono con giros gratis 1xSlots Argentina que te otorgara 60 FS en tragamonedas 777 GEMS RESPIN. A continuacion encontraras los valores de bonos en pesos argentinos.
Bono de bienvenida 1xSlots Chile 2024
El bono de bienvenida 1xSlots Chile funciona del mismo modo como en Argentina. Tienes que crear tu cuenta e ingresar nuestro codigo promocional 1xslots sin deposito Chile NEXT777 al formulario de registro. Puedes elegir el peso chileno como tu moneda local para recibir la bonificacion de bienvenida 1xSlots Chile. Adicionalmente, para obtener 60 giros gratis en 777 GEMS RESPIN, introduce el codigo NEXT777 al hacer tu primer deposito.
?QUE ES UN BONO DE TRAGAPERRAS SIN DEPOSITO?
Como su nombre indica, un bono de tragaperras sin deposito es un tipo de bono de casino que no necesita que los jugadores depositen dinero para poder optar a cualquier tipo de recompensa. Por ejemplo, giros gratis, creditos de casino o incluso dinero en efectivo.
Los bonos sin deposito se dan generalmente a los jugadores potenciales para motivar a los nuevos jugadores para que se registren. Pueden formar parte de los paquetes de bienvenida que un casino online ofrece a todos sus jugadores potenciales y ayudan a atraer la atencion hacia la marca del casino. Tambien pueden ofrecerse a los jugadores con cuentas en determinadas situaciones.
Las tragaperras con bono sin deposito ofrecen la posibilidad de probar las tragaperras online sin coste alguno y quedandose con el dinero que se obtiene, razon por la que son muy codiciadas. Sin embargo, los bonos sin deposito no te obligan a depositar dinero cuando la promocion termina, aunque se sugiere.
?CUALES SON LOS PRINCIPALES TIPOS DE BONOS DE TRAGAMONEDAS SIN DEPOSITO?
Los bonos sin deposito estan disponibles en tres variedades: giros gratis, creditos gratis o dinero en efectivo. El tipo mas conocido que es un bono sin deposito no spins without deposit bonus.
GIROS GRATIS CON BONO SIN DEPOSITO
Todos sabemos que las maquinas tragaperras son las mas populares en el mundo de los juegos de casino , por lo que es natural que un bono hecho especificamente para las maquinas que juegan a las tragaperras sea el mas buscado. Para los amantes de las maquinas tragaperras, los bonos de tiradas gratis sin deposito son un verdadero tesoro, ya que permiten a los jugadores jugar a sus maquinas tragaperras favoritas sin depositar dinero, y con una gran cantidad de tiradas gratis, lo que aumenta sus probabilidades de ganar significativamente.
Creditos gratuitos / BONO DE JUEGO GRATUITO SIN DEPOSITO
En lugar de tiradas gratis, los casinos pueden optar por dar creditos gratis a los jugadores que tienen bonos sin deposito. Estos creditos pueden ser utilizados dentro de un periodo de tiempo enumerado para apostar en juegos en los casinos y ganar dinero real. Los bonos sin deposito y los creditos gratuitos se ofrecen tanto en las tragaperras gratuitas como en otros juegos de los casinos.
DINERO GRATIS CON BONOS SIN DEPOSITO
Al igual que los creditos gratuitos con los bonos sin deposito, los bonos de dinero sin deposito que no requieren deposito se pueden jugar tanto en las tragaperras como en otros juegos de casino. Una vez que haya reclamado y jugado el bono de dinero sin deposito, podra retirar el dinero del bono y cualquier ganancia adicional siempre que cumpla las condiciones para retirar el dinero.
?Como puedo reclamar un bono sin deposito?
En la mayoria de los casos, puede hacer uso de los bonos sin deposito al crear una cuenta en cualquier sitio de juego en linea que ofrezca este tipo de oferta. En la version online del casino, la bonificacion puede aparecer en la pagina de promociones del casino o en una ventana emergente. Algunos casinos requieren que introduzca un codigo promocional para acceder al bono.
Cuando considere reclamar un bono sin deposito (o cualquier otro tipo de bono) debe asegurarse de leer los terminos y condiciones que se adjuntan al bono. Los diferentes casinos pueden tener sus propias regulaciones y limites, sin embargo, hay algunos que son iguales en todos los casinos.
REQUISITOS PARA TRABAJAR
Los bonos sobre los depositos son accesibles para todos, sin embargo, cobrar los bonos es un asunto un poco mas controlado. La mayoria de los casinos en linea le permitiran retirar sus ganancias despues de haber podido apostar una cantidad especifica.
Los requisitos de apuesta se muestran como multiplicadores. Representan la cantidad de veces que tienes que apostar en un bono para poder retirar el dinero. Por lo general, puede jugar a una serie de juegos seleccionados por el operador del casino. Una vez que haya alcanzado el requisito de apuesta, podra dar el siguiente paso para cobrar su bono.
PLAZO
Segun el casino online, el bono para juegos de tragaperras de deposito puede caducar en cuestion de dias o durar hasta 30 dias. Para asegurarte de que cumples los requisitos de apuestas, es posible que tengas que planificar tu rutina de juego a lo largo del bono.
TAMANOS DE APUESTA
Un metodo para lograr su objetivo de apostar mas rapido es realizar la mayor cantidad de apuestas posible en cada juego. Es un metodo sensato, a menos que el operador del casino decida controlar la cantidad de la apuesta y limitar la cantidad de apuestas en la respectiva tragamonedas con bono sin deposito.
SE REQUIERE UN DEPOSITO
Aunque suene contradictorio, algunos casinos online pueden incluso exigir a los jugadores que depositen dinero antes de poder retirar su bono. Suelen anadir este requisito adicional por razones de seguridad.
RESTRICCIONES
A veces, se le puede negar el acceso a un bono con oferta de deposito gratuito. Esto solo ocurre en muy raras circunstancias, ya sea por el hecho de haber intentado dos bonos a la vez o por tener una direccion IP compartida con un jugador que tambien reclamo el mismo bono, o por residir en una zona restringida.
Puedes obtener informacion mas detallada leyendo el articulo completo en este enlace – http://centroculturalrecoleta.org/blog/pages/codigo_promocional_1xslots_bono.html
synthroid europe
онлайн
Привет всем!
Как начать зарабатывать на кавер-версиях песен с помощью сервиса musicdistro. Musicdistro предоставляет возможность музыкантам лицензировать и распространять
свои кавер-версии песен на стриминговых платформах. Это законный и легальный способ заработка на своем творчестве.
Гарант сервиса обеспечивает надежность и защиту от мошенников.
Почему стоит выбрать сервис musicdistro для лицензирования кавер песен. Musicdistro предоставляет музыкантам возможность легально заработать на своих кавер-версиях песен,
размещая их на популярных стриминговых платформах. Гарант сервиса обеспечивает безопасность и надежность в процессе лицензирования и распространения музыки.
https://canipay.ru/paynow/kak-poluchit-razreshenie-na-kaver-3z49/
Могу ли я выкладывать свои каверы на Spotify?
Лицензирование и издание каверов
Выложить кавер на все площадки
Выпустить свою музыку на цифровых площадках
Как выпустить кавер-версию песни (законно)
Как заработать на каверах онлайн?
Через каверы в звезды! Доказано!
Как выложить кавер без нарушения авторских прав
Авторские права на кавер-версии песен
Монетизация кавер-версий
Дистрибуция музыки и каверов
Удачи и хорошего вайба!
lisinopril 200mg
https://1xbet-application-fr.com
Working 1xbet mirror instead of entering the stiff website of the bookmaker. From it to register with 1xBet, let in bonuses and section online bets.
http://www.1xbet-application-fr.com
buy valtrex cheap online
cialis pills 5 mg
synthroid 112
Теплицы из поликарбоната от производителя.
Купить теплицу под заказ.
Теплицы новгород купить.
safe canadian pharmacy
metformin cost mexico
You’re in point of fact a good webmaster. This website loading velocity is amazing.
It kind of feels that you are doing any distinctive trick.
Also, the contents are masterpiece. you have performed a great
process on this subject! Similar here: alejazakupowa.top and also here: E-commerce
how much is lisinopril 10 mg
https://1xbet-application-fr.com
Working 1xbet picture for entering the stiff website of the bookmaker. From it to cash-box with 1xBet, gather bonuses and place online bets.
http://1xbet-application-fr.com
Доброго!
В современной рекламной стратегии бизнеса, особенно в сфере электронной коммерции, реклама маркетплейсов через Яндекс Директ занимает одно из центральных мест. Это не только способ увеличить видимость ваших товаров среди огромного количества предложений, но и мощный инструмент для привлечения целевой аудитории, заинтересованной в покупке именно ваших товаров. Яндекс Директ предоставляет широкие возможности для таргетирования рекламы, позволяя настраивать её в соответствии с поведенческими факторами, интересами, геолокацией и другими параметрами потенциальных покупателей.
Реклама на маркетплейсах через Директ начинается с тщательного планирования и анализа. Определение целевой аудитории, подбор ключевых слов и фраз, составление привлекательных и информативных текстов объявлений — ключевые этапы, на которых строится успех рекламной кампании. Важно, чтобы каждое объявление не только информировало о продукте, но и мотивировало потенциального покупателя перейти на страницу товара и совершить покупку.
Эффективность рекламы товаров на маркетплейсах через Яндекс Директ значительно повышается за счет использования различных форматов объявлений, включая РСЯ (рекламная сеть Яндекса), что позволяет охватить максимально широкую аудиторию. Кроме того, функционал Яндекс Директа предлагает глубокую аналитику по каждой рекламной кампании, давая возможность оперативно корректировать стратегию продвижения в зависимости от реакции аудитории, эффективности ключевых слов и других важных показателей.
Для максимизации результатов продаж на маркетплейсах и Яндекс Директ, реклама товаров на маркетплейсах через яндекс директ необходимо регулярно анализировать эффективность рекламных кампаний, экспериментировать с разными подходами к таргетированию и оптимизировать рекламные объявления для достижения лучшего соотношения цены клика и конверсии в продажи. Использование дополнительных инструментов, таких как ретаргетинг и динамические объявления, может значительно увеличить лояльность потребителей и повысить общую эффективность рекламной кампании.
В заключение, настройка Яндекс Директ для маркетплейсов требует внимательного подхода и глубокого понимания как специфики рынка электронной коммерции, так и особенностей поведения вашей целевой аудитории. С правильным подходом и тщательной оптимизацией, реклама маркетплейсов через Яндекс Директ станет ключевым фактором успеха вашего бизнеса.
Максимум информации по теме на: https://директ-реклама-на-маркетплейсах.рф
яндекс бизнес реклама для маркетплейса
реклама на маркетплейсах через директ
внешняя реклама для маркетплейсов
реклама маркетплейсов через яндекс директ
Удачи и хороших продаж!
qiyezp.com
Zhu Houzhao는 Hongzhi 황제를 열정적으로 바라 본 다음 Fang Jifan을 바라 보았습니다.
synthroid 50 mcg online
metformin 500 mg tabs
how much is a prednisone prescription
synthroid 137 mcg cost
Присутствие теневых электронных базаров – это явление, который привлекает большой заинтересованность а обсуждения во нынешнем мире. Даркнет, или глубокая зона сети, является скрытую конструкцию, доступной лишь через специальные софт а настройки, обеспечивающие неузнаваемость участников. По этой данной подпольной платформе находятся даркнет-маркеты – интернет-ресурсы, где-нибудь продаются разносторонние продуктовые товары и послуги, чаще всего незаконного специфики.
По теневых электронных базарах можно найти различные продуктовые товары: наркотики, военные средства, ворованные данные, взломанные учетные записи, подделки а и многое многое другое. Подобные маркеты порой притягивают восторг и также преступников, так и обычных пользователей, хотящих обойти право или же иметь доступ к вещам и послугам, те на обычном сети могли бы быть не доступны.
Все же следует помнить, чем практика на подпольных рынках носит незаконный тип а способна привести к крупные юридические последствия по закону. Полицейские активно сопротивляются противостоят этими маркетами, но все же из-за неузнаваемости темной стороны интернета это не всегда легко.
Поэтому, наличие даркнет-маркетов является фактом, однако таковые продолжают оставаться зоной крупных потенциальных угроз как и для участников, а также для таких, как общественности в в общем.
You’re in reality a good webmaster. The website loading speed is incredible.
It sort of feels that you are doing any unique trick.
In addition, the contents are masterwork. you’ve performed a fantastic job in this matter!
Similar here: spectralex.top and also here: Dyskont online
italian pharmacy online
Здравствуйте!
Инструменты для внешней рекламы маркетплейсов представляют собой широкий арсенал средств и методов, призванных усилить видимость и привлекательность товаров на различных онлайн-площадках. Эффективная внешняя реклама не только способствует увеличению трафика на страницы товаров, но и значительно повышает конверсию в продажи, укрепляя бренд в глазах потребителей. Важность выбора правильных инструментов для внешней рекламы трудно переоценить, ведь от этого зависит успешность продвижения товаров на конкурентном рынке маркетплейсов.
Среди наиболее эффективных инструментов внешней рекламы можно выделить контекстную рекламу, социальные сети, инфлюенсер-маркетинг, email-маркетинг, и SEO-оптимизацию. Контекстная реклама, в частности через платформы типа Google Ads и Яндекс.Директ, позволяет нацеливаться на пользователей, активно ищущих товары, подобные вашим, что делает этот инструмент крайне эффективным для привлечения заинтересованной аудитории.
Социальные сети, в свою очередь, открывают перед продавцами возможности для таргетированной рекламы и работы с инфлюенсерами, чьи рекомендации могут значительно увеличить интерес к продаваемым товарам. Email-маркетинг же позволяет поддерживать постоянную связь с вашей аудиторией, информируя о новинках, акциях и специальных предложениях.
продажи на маркетплейсах и яндекс директ SEO-оптимизация для маркетплейсов — это долгосрочная стратегия, направленная на улучшение видимости товаров в поисковой выдаче за счет оптимизации описаний товаров, использования правильных ключевых слов и создания качественного контента. Этот подход не только привлекает дополнительный трафик на страницы товаров, но и повышает их релевантность в глазах поисковых систем.
Важно помнить, что успех внешней рекламы маркетплейсов зависит не только от правильного выбора инструментов, но и от их комплексного применения. Интеграция различных каналов и методов позволяет создать синергию, значительно усиливающую эффект от каждого из них. Анализ результатов, корректировка стратегий и постоянное тестирование новых подходов являются ключом к достижению максимальной эффективности рекламной кампании.
Таким образом, инструменты для внешней рекламы маркетплейсов играют решающую роль в продвижении товаров и услуг на онлайн-платформах. Правильный выбор и комплексное применение этих инструментов позволяет не только увеличить продажи, но и значительно укрепить позиции.
Максимум информации по теме на: https://директ-реклама-на-маркетплейсах.рф
продажи на маркетплейсах и яндекс директ
реклама маркетплейсов через яндекс директ
настройка яндекс директ для маркетплейсов
яндекс реклама для маркетплейса
Удачи и хороших продаж!
EL CODIGO PROMOCIONAL DE 1XSLOTS CASINO
Sin introducir un codigo promocional 1xSlots Casino, como nuevo cliente en March 2024, puede beneficiarse de una bonificacion del 100% hasta 300€. El casino le proporciona un monton de maquinas tragaperras populares de proveedores de software como iSoftBet, Elk Studios o Play’n GO y otros. De forma adicional, se le otorgaran|esta oferta incluye 30 turnos gratuitos.. Todas las informaciones importantes respecto a esta oferta de bienvenida se puede encontrar en este articulo.
?COMO FUNCIONA EL CODIGO PROMOCIONAL DE 1XSLOTS CASINO?
En 1xSlots Casino se puede obtener una bonificacion del 100% hasta 300€ y turnos gratuitos en 1xSlots Casino. Haga su inicial deposito en 1xSlots Casino tras finalizar el proceso de inscripcion. No hace falta solicitar su bonificacion de bienvenida por e-mail ni el chat en directo como en otros casinos, porque 1xSlots Casino la abona a su cuenta automaticamente. La oferta de bienvenida se activa cuando deposite 10€ o mas. Haga un deposito empleando EcoPayz, Boku o Bitcoin u otro metodo de deposito disponible en el casino.
Mas sobre el bono
1xSlots Casino le da la oportunidad de incrementar su balance hasta 300€ (100%). Obtenga la bonificacion superior al depositar 300€ y conseguir 600€ que se anadiran en su cuenta. Los fondos de su bonificacion es compatible con tragaperras de proveedores de software como Red Tiger Gaming, Evolution Gaming y Microgaming, por nombrar unos cuantos. Debe tenerse en cuenta tambien que su cuenta se incrementara con 30 turnos gratuitos.
Bono de bienvenida 1xSlots 2024
Dentro de 1xSlots existen dos bonos de bienvenida, uno standard y uno exclusivo. El primero de ellas recompensa con un paquete de hasta €1500 y 150 giros gratis mientras que el segundo otorga un 10% adicional recompensando hasta €1650 y 150 giros gratis ?La diferencia? El bono exclusivo se obtiene mediante el uso del 1xSlots promocode NEXT777.
Las recompensas de la bonificacion exclusiva son otorgadas en los 4 primeros depositos de la siguiente manera:
100% del primer deposito hasta €450 + 30 giros gratis
100% del segundo deposito hasta €350 + 35 giros gratis
100% del tercer deposito hasta €400 + 40 giros gratis
100% del cuarto deposito hasta €450 + 45 giros gratis
Bono de bienvenida 1xSlots Argentina 2024
Cabe resaltar que durante tu proceso de registro tienes que elegir tu moneda local preferida. De este modo obtendras la bonificacion de bienvenida 1xSlots Argentina en pesos. Puedes recibir el bono exclusivo 1xSlots Argentina al utilizar nuestro codigo de bono 1xSlots Argentina NEXT777 durante el proceso de registro.
Ademas, si ingresas el codigo NEXT777 a la pestana “Bonos y Regalos” despues de hacer tu primer deposito, puedes recibir el bono con giros gratis 1xSlots Argentina que te otorgara 60 FS en tragamonedas 777 GEMS RESPIN. A continuacion encontraras los valores de bonos en pesos argentinos.
Bono de bienvenida 1xSlots Chile 2024
El bono de bienvenida 1xSlots Chile funciona del mismo modo como en Argentina. Tienes que crear tu cuenta e ingresar nuestro 1xslots codigo de bono sin deposito Chile NEXT777 al formulario de registro. Puedes elegir el peso chileno como tu moneda local para recibir la bonificacion de bienvenida 1xSlots Chile. Adicionalmente, para obtener 60 giros gratis en 777 GEMS RESPIN, introduce el codigo NEXT777 al hacer tu primer deposito.
?QUE ES UN BONO DE TRAGAPERRAS SIN DEPOSITO?
Como su nombre indica, un bono de tragaperras sin deposito es un tipo de bono de casino que no necesita que los jugadores depositen dinero para poder optar a cualquier tipo de recompensa. Por ejemplo, giros gratis, creditos de casino o incluso dinero en efectivo.
Los bonos sin deposito se dan generalmente a los jugadores potenciales para motivar a los nuevos jugadores para que se registren. Pueden formar parte de los paquetes de bienvenida que un casino online ofrece a todos sus jugadores potenciales y ayudan a atraer la atencion hacia la marca del casino. Tambien pueden ofrecerse a los jugadores con cuentas en determinadas situaciones.
Las tragaperras con bono sin deposito ofrecen la posibilidad de probar las tragaperras online sin coste alguno y quedandose con el dinero que se obtiene, razon por la que son muy codiciadas. Sin embargo, los bonos sin deposito no te obligan a depositar dinero cuando la promocion termina, aunque se sugiere.
?CUALES SON LOS PRINCIPALES TIPOS DE BONOS DE TRAGAMONEDAS SIN DEPOSITO?
Los bonos sin deposito estan disponibles en tres variedades: giros gratis, creditos gratis o dinero en efectivo. El tipo mas conocido que es un bono sin deposito no spins without deposit bonus.
GIROS GRATIS CON BONO SIN DEPOSITO
Todos sabemos que las maquinas tragaperras son las mas populares en el mundo de los juegos de casino , por lo que es natural que un bono hecho especificamente para las maquinas que juegan a las tragaperras sea el mas buscado. Para los amantes de las maquinas tragaperras, los bonos de tiradas gratis sin deposito son un verdadero tesoro, ya que permiten a los jugadores jugar a sus maquinas tragaperras favoritas sin depositar dinero, y con una gran cantidad de tiradas gratis, lo que aumenta sus probabilidades de ganar significativamente.
Creditos gratuitos / BONO DE JUEGO GRATUITO SIN DEPOSITO
En lugar de tiradas gratis, los casinos pueden optar por dar creditos gratis a los jugadores que tienen bonos sin deposito. Estos creditos pueden ser utilizados dentro de un periodo de tiempo enumerado para apostar en juegos en los casinos y ganar dinero real. Los bonos sin deposito y los creditos gratuitos se ofrecen tanto en las tragaperras gratuitas como en otros juegos de los casinos.
DINERO GRATIS CON BONOS SIN DEPOSITO
Al igual que los creditos gratuitos con los bonos sin deposito, los bonos de dinero sin deposito que no requieren deposito se pueden jugar tanto en las tragaperras como en otros juegos de casino. Una vez que haya reclamado y jugado el bono de dinero sin deposito, podra retirar el dinero del bono y cualquier ganancia adicional siempre que cumpla las condiciones para retirar el dinero.
?Como puedo reclamar un bono sin deposito?
En la mayoria de los casos, puede hacer uso de los bonos sin deposito al crear una cuenta en cualquier sitio de juego en linea que ofrezca este tipo de oferta. En la version online del casino, la bonificacion puede aparecer en la pagina de promociones del casino o en una ventana emergente. Algunos casinos requieren que introduzca un codigo promocional para acceder al bono.
Cuando considere reclamar un bono sin deposito (o cualquier otro tipo de bono) debe asegurarse de leer los terminos y condiciones que se adjuntan al bono. Los diferentes casinos pueden tener sus propias regulaciones y limites, sin embargo, hay algunos que son iguales en todos los casinos.
REQUISITOS PARA TRABAJAR
Los bonos sobre los depositos son accesibles para todos, sin embargo, cobrar los bonos es un asunto un poco mas controlado. La mayoria de los casinos en linea le permitiran retirar sus ganancias despues de haber podido apostar una cantidad especifica.
Los requisitos de apuesta se muestran como multiplicadores. Representan la cantidad de veces que tienes que apostar en un bono para poder retirar el dinero. Por lo general, puede jugar a una serie de juegos seleccionados por el operador del casino. Una vez que haya alcanzado el requisito de apuesta, podra dar el siguiente paso para cobrar su bono.
PLAZO
Segun el casino online, el bono para juegos de tragaperras de deposito puede caducar en cuestion de dias o durar hasta 30 dias. Para asegurarte de que cumples los requisitos de apuestas, es posible que tengas que planificar tu rutina de juego a lo largo del bono.
TAMANOS DE APUESTA
Un metodo para lograr su objetivo de apostar mas rapido es realizar la mayor cantidad de apuestas posible en cada juego. Es un metodo sensato, a menos que el operador del casino decida controlar la cantidad de la apuesta y limitar la cantidad de apuestas en la respectiva tragamonedas con bono sin deposito.
SE REQUIERE UN DEPOSITO
Aunque suene contradictorio, algunos casinos online pueden incluso exigir a los jugadores que depositen dinero antes de poder retirar su bono. Suelen anadir este requisito adicional por razones de seguridad.
RESTRICCIONES
A veces, se le puede negar el acceso a un bono con oferta de deposito gratuito. Esto solo ocurre en muy raras circunstancias, ya sea por el hecho de haber intentado dos bonos a la vez o por tener una direccion IP compartida con un jugador que tambien reclamo el mismo bono, o por residir en una zona restringida.
Puedes obtener informacion mas detallada leyendo el articulo completo en este enlace – http://centroculturalrecoleta.org/blog/pages/codigo_promocional_1xslots_bono.html
Бесплатные промокоды на 2024 от букмекерской конторы 1xBet: при регистрации, на бесплатную ставку. Рассказываем, как использовать и куда вводить промокоды в 1хБет. промокод 1хбет на сегодня на ставку бесплатно. Бесплатный промокод для увеличения бонуса. Букмекерская контора 1хБет – одна из самых популярных беттинговых площадок, предлагающая высокие коэффициенты, широкую линию с дополнительной росписью. Благодаря низкой марже БК пользователи стабильно зарабатывают на ставках на спорт. Отличительной особенностью букмекерской конторы 1xBet является возможность совершения ставок по промокодам, которые предоставляются бесплатно – более подробно в этом материале http://saratovturizm.ru/interesting/pages/promo_kod_bk_1xbet_na_segodnya_pri_registracii.html
buy synthroid 150 mcg
Советуем посетить сайт https://club-columb.ru/
Также не забудьте добавить сайт в закладки: https://club-columb.ru/
Discovered an article that will definitely interest you ? don’t miss the chance to familiarize yourself http://mkpnz.ru/users/8
buy viagra online
Рабочий промокод 1ХБЕТ на 2024 год бесплатно: Бонус 32 500р. Актуальный список при регистрации на официальном сайте компании. На бесплатную ставку и витрина промо-кодов. Откуда взять и куда вставить промокоды описано на странице. Код необходимо использовать при регистрации на официальном сайте конторы 1xbet (промокоды для купона -на бесплатную ставку, находятся в самом низу статьи). промокод на сегодня в 1хбет бесплатную ставку! Как ввести промокод 1хБет при регистрации в 2024. Вводятся такие комбинации в купон пари, позволяя сделать прогноз бесплатно, застраховать ставку или извлечь любую другую выгоду от обладания бонусным кодом. К сожалению, найти промокод в свободном доступе невозможно, их игроки получают индивидуально и вряд ли заходят делиться халявой с обывателями интернета – более подробно в этом материале http://saratovturizm.ru/interesting/pages/promo_kod_bk_1xbet_na_segodnya_pri_registracii.html
EL CODIGO PROMOCIONAL DE 1XSLOTS CASINO
Sin introducir un codigo promocional 1xSlots Casino, como nuevo cliente en March 2024, puede beneficiarse de una bonificacion del 100% hasta 300€. El casino le proporciona un monton de maquinas tragaperras populares de proveedores de software como iSoftBet, Elk Studios o Play’n GO y otros. De forma adicional, se le otorgaran|esta oferta incluye 30 turnos gratuitos.. Todas las informaciones importantes respecto a esta oferta de bienvenida se puede encontrar en este articulo.
?COMO FUNCIONA EL CODIGO PROMOCIONAL DE 1XSLOTS CASINO?
En 1xSlots Casino se puede obtener una bonificacion del 100% hasta 300€ y turnos gratuitos en 1xSlots Casino. Haga su inicial deposito en 1xSlots Casino tras finalizar el proceso de inscripcion. No hace falta solicitar su bonificacion de bienvenida por e-mail ni el chat en directo como en otros casinos, porque 1xSlots Casino la abona a su cuenta automaticamente. La oferta de bienvenida se activa cuando deposite 10€ o mas. Haga un deposito empleando EcoPayz, Boku o Bitcoin u otro metodo de deposito disponible en el casino.
Mas sobre el bono
1xSlots Casino le da la oportunidad de incrementar su balance hasta 300€ (100%). Obtenga la bonificacion superior al depositar 300€ y conseguir 600€ que se anadiran en su cuenta. Los fondos de su bonificacion es compatible con tragaperras de proveedores de software como Red Tiger Gaming, Evolution Gaming y Microgaming, por nombrar unos cuantos. Debe tenerse en cuenta tambien que su cuenta se incrementara con 30 turnos gratuitos.
Bono de bienvenida 1xSlots 2024
Dentro de 1xSlots existen dos bonos de bienvenida, uno standard y uno exclusivo. El primero de ellas recompensa con un paquete de hasta €1500 y 150 giros gratis mientras que el segundo otorga un 10% adicional recompensando hasta €1650 y 150 giros gratis ?La diferencia? El bono exclusivo se obtiene mediante el uso del 1xSlots promocode NEXT777.
Las recompensas de la bonificacion exclusiva son otorgadas en los 4 primeros depositos de la siguiente manera:
100% del primer deposito hasta €450 + 30 giros gratis
100% del segundo deposito hasta €350 + 35 giros gratis
100% del tercer deposito hasta €400 + 40 giros gratis
100% del cuarto deposito hasta €450 + 45 giros gratis
Bono de bienvenida 1xSlots Argentina 2024
Cabe resaltar que durante tu proceso de registro tienes que elegir tu moneda local preferida. De este modo obtendras la bonificacion de bienvenida 1xSlots Argentina en pesos. Puedes recibir el bono exclusivo 1xSlots Argentina al utilizar nuestro codigo de bono 1xSlots Argentina NEXT777 durante el proceso de registro.
Ademas, si ingresas el codigo NEXT777 a la pestana “Bonos y Regalos” despues de hacer tu primer deposito, puedes recibir el bono con giros gratis 1xSlots Argentina que te otorgara 60 FS en tragamonedas 777 GEMS RESPIN. A continuacion encontraras los valores de bonos en pesos argentinos.
Bono de bienvenida 1xSlots Chile 2024
El bono de bienvenida 1xSlots Chile funciona del mismo modo como en Argentina. Tienes que crear tu cuenta e ingresar nuestro 1xslots codigo promocional Chile NEXT777 al formulario de registro. Puedes elegir el peso chileno como tu moneda local para recibir la bonificacion de bienvenida 1xSlots Chile. Adicionalmente, para obtener 60 giros gratis en 777 GEMS RESPIN, introduce el codigo NEXT777 al hacer tu primer deposito.
?QUE ES UN BONO DE TRAGAPERRAS SIN DEPOSITO?
Como su nombre indica, un bono de tragaperras sin deposito es un tipo de bono de casino que no necesita que los jugadores depositen dinero para poder optar a cualquier tipo de recompensa. Por ejemplo, giros gratis, creditos de casino o incluso dinero en efectivo.
Los bonos sin deposito se dan generalmente a los jugadores potenciales para motivar a los nuevos jugadores para que se registren. Pueden formar parte de los paquetes de bienvenida que un casino online ofrece a todos sus jugadores potenciales y ayudan a atraer la atencion hacia la marca del casino. Tambien pueden ofrecerse a los jugadores con cuentas en determinadas situaciones.
Las tragaperras con bono sin deposito ofrecen la posibilidad de probar las tragaperras online sin coste alguno y quedandose con el dinero que se obtiene, razon por la que son muy codiciadas. Sin embargo, los bonos sin deposito no te obligan a depositar dinero cuando la promocion termina, aunque se sugiere.
?CUALES SON LOS PRINCIPALES TIPOS DE BONOS DE TRAGAMONEDAS SIN DEPOSITO?
Los bonos sin deposito estan disponibles en tres variedades: giros gratis, creditos gratis o dinero en efectivo. El tipo mas conocido que es un bono sin deposito no spins without deposit bonus.
GIROS GRATIS CON BONO SIN DEPOSITO
Todos sabemos que las maquinas tragaperras son las mas populares en el mundo de los juegos de casino , por lo que es natural que un bono hecho especificamente para las maquinas que juegan a las tragaperras sea el mas buscado. Para los amantes de las maquinas tragaperras, los bonos de tiradas gratis sin deposito son un verdadero tesoro, ya que permiten a los jugadores jugar a sus maquinas tragaperras favoritas sin depositar dinero, y con una gran cantidad de tiradas gratis, lo que aumenta sus probabilidades de ganar significativamente.
Creditos gratuitos / BONO DE JUEGO GRATUITO SIN DEPOSITO
En lugar de tiradas gratis, los casinos pueden optar por dar creditos gratis a los jugadores que tienen bonos sin deposito. Estos creditos pueden ser utilizados dentro de un periodo de tiempo enumerado para apostar en juegos en los casinos y ganar dinero real. Los bonos sin deposito y los creditos gratuitos se ofrecen tanto en las tragaperras gratuitas como en otros juegos de los casinos.
DINERO GRATIS CON BONOS SIN DEPOSITO
Al igual que los creditos gratuitos con los bonos sin deposito, los bonos de dinero sin deposito que no requieren deposito se pueden jugar tanto en las tragaperras como en otros juegos de casino. Una vez que haya reclamado y jugado el bono de dinero sin deposito, podra retirar el dinero del bono y cualquier ganancia adicional siempre que cumpla las condiciones para retirar el dinero.
?Como puedo reclamar un bono sin deposito?
En la mayoria de los casos, puede hacer uso de los bonos sin deposito al crear una cuenta en cualquier sitio de juego en linea que ofrezca este tipo de oferta. En la version online del casino, la bonificacion puede aparecer en la pagina de promociones del casino o en una ventana emergente. Algunos casinos requieren que introduzca un codigo promocional para acceder al bono.
Cuando considere reclamar un bono sin deposito (o cualquier otro tipo de bono) debe asegurarse de leer los terminos y condiciones que se adjuntan al bono. Los diferentes casinos pueden tener sus propias regulaciones y limites, sin embargo, hay algunos que son iguales en todos los casinos.
REQUISITOS PARA TRABAJAR
Los bonos sobre los depositos son accesibles para todos, sin embargo, cobrar los bonos es un asunto un poco mas controlado. La mayoria de los casinos en linea le permitiran retirar sus ganancias despues de haber podido apostar una cantidad especifica.
Los requisitos de apuesta se muestran como multiplicadores. Representan la cantidad de veces que tienes que apostar en un bono para poder retirar el dinero. Por lo general, puede jugar a una serie de juegos seleccionados por el operador del casino. Una vez que haya alcanzado el requisito de apuesta, podra dar el siguiente paso para cobrar su bono.
PLAZO
Segun el casino online, el bono para juegos de tragaperras de deposito puede caducar en cuestion de dias o durar hasta 30 dias. Para asegurarte de que cumples los requisitos de apuestas, es posible que tengas que planificar tu rutina de juego a lo largo del bono.
TAMANOS DE APUESTA
Un metodo para lograr su objetivo de apostar mas rapido es realizar la mayor cantidad de apuestas posible en cada juego. Es un metodo sensato, a menos que el operador del casino decida controlar la cantidad de la apuesta y limitar la cantidad de apuestas en la respectiva tragamonedas con bono sin deposito.
SE REQUIERE UN DEPOSITO
Aunque suene contradictorio, algunos casinos online pueden incluso exigir a los jugadores que depositen dinero antes de poder retirar su bono. Suelen anadir este requisito adicional por razones de seguridad.
RESTRICCIONES
A veces, se le puede negar el acceso a un bono con oferta de deposito gratuito. Esto solo ocurre en muy raras circunstancias, ya sea por el hecho de haber intentado dos bonos a la vez o por tener una direccion IP compartida con un jugador que tambien reclamo el mismo bono, o por residir en una zona restringida.
Puedes obtener informacion mas detallada leyendo el articulo completo en este enlace – http://centroculturalrecoleta.org/blog/pages/codigo_promocional_1xslots_bono.html
synthroid 10 mcg
EL CODIGO PROMOCIONAL DE 1XSLOTS CASINO
Sin introducir un codigo promocional 1xSlots Casino, como nuevo cliente en March 2024, puede beneficiarse de una bonificacion del 100% hasta 300€. El casino le proporciona un monton de maquinas tragaperras populares de proveedores de software como iSoftBet, Elk Studios o Play’n GO y otros. De forma adicional, se le otorgaran|esta oferta incluye 30 turnos gratuitos.. Todas las informaciones importantes respecto a esta oferta de bienvenida se puede encontrar en este articulo.
?COMO FUNCIONA EL CODIGO PROMOCIONAL DE 1XSLOTS CASINO?
En 1xSlots Casino se puede obtener una bonificacion del 100% hasta 300€ y turnos gratuitos en 1xSlots Casino. Haga su inicial deposito en 1xSlots Casino tras finalizar el proceso de inscripcion. No hace falta solicitar su bonificacion de bienvenida por e-mail ni el chat en directo como en otros casinos, porque 1xSlots Casino la abona a su cuenta automaticamente. La oferta de bienvenida se activa cuando deposite 10€ o mas. Haga un deposito empleando EcoPayz, Boku o Bitcoin u otro metodo de deposito disponible en el casino.
Mas sobre el bono
1xSlots Casino le da la oportunidad de incrementar su balance hasta 300€ (100%). Obtenga la bonificacion superior al depositar 300€ y conseguir 600€ que se anadiran en su cuenta. Los fondos de su bonificacion es compatible con tragaperras de proveedores de software como Red Tiger Gaming, Evolution Gaming y Microgaming, por nombrar unos cuantos. Debe tenerse en cuenta tambien que su cuenta se incrementara con 30 turnos gratuitos.
Bono de bienvenida 1xSlots 2024
Dentro de 1xSlots existen dos bonos de bienvenida, uno standard y uno exclusivo. El primero de ellas recompensa con un paquete de hasta €1500 y 150 giros gratis mientras que el segundo otorga un 10% adicional recompensando hasta €1650 y 150 giros gratis ?La diferencia? El bono exclusivo se obtiene mediante el uso del 1xSlots promocode NEXT777.
Las recompensas de la bonificacion exclusiva son otorgadas en los 4 primeros depositos de la siguiente manera:
100% del primer deposito hasta €450 + 30 giros gratis
100% del segundo deposito hasta €350 + 35 giros gratis
100% del tercer deposito hasta €400 + 40 giros gratis
100% del cuarto deposito hasta €450 + 45 giros gratis
Bono de bienvenida 1xSlots Argentina 2024
Cabe resaltar que durante tu proceso de registro tienes que elegir tu moneda local preferida. De este modo obtendras la bonificacion de bienvenida 1xSlots Argentina en pesos. Puedes recibir el bono exclusivo 1xSlots Argentina al utilizar nuestro codigo de bono 1xSlots Argentina NEXT777 durante el proceso de registro.
Ademas, si ingresas el codigo NEXT777 a la pestana “Bonos y Regalos” despues de hacer tu primer deposito, puedes recibir el bono con giros gratis 1xSlots Argentina que te otorgara 60 FS en tragamonedas 777 GEMS RESPIN. A continuacion encontraras los valores de bonos en pesos argentinos.
Bono de bienvenida 1xSlots Chile 2024
El bono de bienvenida 1xSlots Chile funciona del mismo modo como en Argentina. Tienes que crear tu cuenta e ingresar nuestro codigo promocional de giro gratis de 1xslots Chile NEXT777 al formulario de registro. Puedes elegir el peso chileno como tu moneda local para recibir la bonificacion de bienvenida 1xSlots Chile. Adicionalmente, para obtener 60 giros gratis en 777 GEMS RESPIN, introduce el codigo NEXT777 al hacer tu primer deposito.
?QUE ES UN BONO DE TRAGAPERRAS SIN DEPOSITO?
Como su nombre indica, un bono de tragaperras sin deposito es un tipo de bono de casino que no necesita que los jugadores depositen dinero para poder optar a cualquier tipo de recompensa. Por ejemplo, giros gratis, creditos de casino o incluso dinero en efectivo.
Los bonos sin deposito se dan generalmente a los jugadores potenciales para motivar a los nuevos jugadores para que se registren. Pueden formar parte de los paquetes de bienvenida que un casino online ofrece a todos sus jugadores potenciales y ayudan a atraer la atencion hacia la marca del casino. Tambien pueden ofrecerse a los jugadores con cuentas en determinadas situaciones.
Las tragaperras con bono sin deposito ofrecen la posibilidad de probar las tragaperras online sin coste alguno y quedandose con el dinero que se obtiene, razon por la que son muy codiciadas. Sin embargo, los bonos sin deposito no te obligan a depositar dinero cuando la promocion termina, aunque se sugiere.
?CUALES SON LOS PRINCIPALES TIPOS DE BONOS DE TRAGAMONEDAS SIN DEPOSITO?
Los bonos sin deposito estan disponibles en tres variedades: giros gratis, creditos gratis o dinero en efectivo. El tipo mas conocido que es un bono sin deposito no spins without deposit bonus.
GIROS GRATIS CON BONO SIN DEPOSITO
Todos sabemos que las maquinas tragaperras son las mas populares en el mundo de los juegos de casino , por lo que es natural que un bono hecho especificamente para las maquinas que juegan a las tragaperras sea el mas buscado. Para los amantes de las maquinas tragaperras, los bonos de tiradas gratis sin deposito son un verdadero tesoro, ya que permiten a los jugadores jugar a sus maquinas tragaperras favoritas sin depositar dinero, y con una gran cantidad de tiradas gratis, lo que aumenta sus probabilidades de ganar significativamente.
Creditos gratuitos / BONO DE JUEGO GRATUITO SIN DEPOSITO
En lugar de tiradas gratis, los casinos pueden optar por dar creditos gratis a los jugadores que tienen bonos sin deposito. Estos creditos pueden ser utilizados dentro de un periodo de tiempo enumerado para apostar en juegos en los casinos y ganar dinero real. Los bonos sin deposito y los creditos gratuitos se ofrecen tanto en las tragaperras gratuitas como en otros juegos de los casinos.
DINERO GRATIS CON BONOS SIN DEPOSITO
Al igual que los creditos gratuitos con los bonos sin deposito, los bonos de dinero sin deposito que no requieren deposito se pueden jugar tanto en las tragaperras como en otros juegos de casino. Una vez que haya reclamado y jugado el bono de dinero sin deposito, podra retirar el dinero del bono y cualquier ganancia adicional siempre que cumpla las condiciones para retirar el dinero.
?Como puedo reclamar un bono sin deposito?
En la mayoria de los casos, puede hacer uso de los bonos sin deposito al crear una cuenta en cualquier sitio de juego en linea que ofrezca este tipo de oferta. En la version online del casino, la bonificacion puede aparecer en la pagina de promociones del casino o en una ventana emergente. Algunos casinos requieren que introduzca un codigo promocional para acceder al bono.
Cuando considere reclamar un bono sin deposito (o cualquier otro tipo de bono) debe asegurarse de leer los terminos y condiciones que se adjuntan al bono. Los diferentes casinos pueden tener sus propias regulaciones y limites, sin embargo, hay algunos que son iguales en todos los casinos.
REQUISITOS PARA TRABAJAR
Los bonos sobre los depositos son accesibles para todos, sin embargo, cobrar los bonos es un asunto un poco mas controlado. La mayoria de los casinos en linea le permitiran retirar sus ganancias despues de haber podido apostar una cantidad especifica.
Los requisitos de apuesta se muestran como multiplicadores. Representan la cantidad de veces que tienes que apostar en un bono para poder retirar el dinero. Por lo general, puede jugar a una serie de juegos seleccionados por el operador del casino. Una vez que haya alcanzado el requisito de apuesta, podra dar el siguiente paso para cobrar su bono.
PLAZO
Segun el casino online, el bono para juegos de tragaperras de deposito puede caducar en cuestion de dias o durar hasta 30 dias. Para asegurarte de que cumples los requisitos de apuestas, es posible que tengas que planificar tu rutina de juego a lo largo del bono.
TAMANOS DE APUESTA
Un metodo para lograr su objetivo de apostar mas rapido es realizar la mayor cantidad de apuestas posible en cada juego. Es un metodo sensato, a menos que el operador del casino decida controlar la cantidad de la apuesta y limitar la cantidad de apuestas en la respectiva tragamonedas con bono sin deposito.
SE REQUIERE UN DEPOSITO
Aunque suene contradictorio, algunos casinos online pueden incluso exigir a los jugadores que depositen dinero antes de poder retirar su bono. Suelen anadir este requisito adicional por razones de seguridad.
RESTRICCIONES
A veces, se le puede negar el acceso a un bono con oferta de deposito gratuito. Esto solo ocurre en muy raras circunstancias, ya sea por el hecho de haber intentado dos bonos a la vez o por tener una direccion IP compartida con un jugador que tambien reclamo el mismo bono, o por residir en una zona restringida.
Puedes obtener informacion mas detallada leyendo el articulo completo en este enlace – http://centroculturalrecoleta.org/blog/pages/codigo_promocional_1xslots_bono.html
Hi it’s me, I am also visiting this site daily, this web site is
truly nice and the visitors are truly sharing nice thoughts.
Бесплатные промокоды от букмекерской конторы 1xBet: при регистрации, на бесплатную ставку. Рассказываем, как использовать и куда вводить промокоды в 1хБет. 1хбет куда вводить промокод с телефона. Начнем с того, что каждый, кто зарегистрировался на официальном сайте или зеркале конторы впервые, может рассчитывать на получение приветственного денежного бонуса, который в дальнейшем удастся потратить на ставки, а в случае успеха заработать первые деньги. Но мы говорим о промокоде, который в специальной форме регистрации просят ввести при наличии – более подробно в этом материале http://saratovturizm.ru/interesting/pages/promo_kod_bk_1xbet_na_segodnya_pri_registracii.html
20 mg lisinopril tablets
synthroid 0.0125 25mcg
pharmacy rx
zithromax 250 mg cost
Привет всем!
Критики музыки одобряют выход нового трека от White Queen и называют его одним из наиболее ярких представителей современной танцевальной музыки. “БАС” не оставляет никого равнодушным, а его драйв и энергия переносят слушателей в мир безудержного веселья и весеннего настроения.
White Queen продолжает радовать публику своими яркими и запоминающимися хитами, среди которых уже можно назвать и трек “БАС”. Этот трек вызывает восторг у слушателей, которые отмечают его уникальное звучание и способность поднять настроение в любой компании.
Новый трек White Queen, наполненный яркими и динамичными звуками, стал настоящим открытием для многих поклонников танцевальной музыки. “БАС” представляет собой идеальный органичный сочетание электроники, вокала и ритма, что делает его одним из самых выдающихся произведений артистки.
https://music.apple.com/us/album/%D0%B1%D0%B0%D1%81-single/1734643362
слушать музыку молодёжную
слушать музыку русскую 2023
послушать музыку чайковского
послушать музыку моцарта
слушать музыку фактор 2
слушать музыку шансон онлайн бесплатно
послушать органную музыку в калининграде
слушать музыку через bluetooth
слушать музыку для души
все это рейв слушать
слушать музыку украина 2023
Удачи и хорошего вайба!
synthroid uk
where to buy metformin tablets
pharmacy order online
northern pharmacy canada
Покупки в Даркнете: Иллюзии и Факты
Даркнет, скрытая секция сети, привлекает интерес пользователей своей скрытностью и возможностью возможностью приобрести различные продукты и сервисы без дополнительной информации. Однако, путешествие в тот вселенная темных рынков связано с рядом рисков и аспектов, о которых необходимо осведомляться перед осуществлением сделок.
Что такое скрытая часть веба и как оно действует?
Для тех, кому не знакомо с этим понятием, Даркнет – это сегмент веба, скрытая от обычных поисковых систем. В темном интернете имеются уникальные торговые площадки, где можно найти практически все, что угодно : от препаратов и стрелкового оружия и поддельных удостоверений и взломанных аккаунтов.
Заблуждения о заказах в темном интернете
Скрытность защищена: При всём том, использование технологий анонимности, вроде как Tor, может помочь закрыть вашу действия в интернете, тайность в скрытой части веба не является. Существует опасность, что вашу личную информацию могут раскрыть мошенники или даже сотрудники правоохранительных органов.
Все товары – высокого качества: В темном интернете можно обнаружить много продавцов, предоставляющих продукты и сервисы. Однако, нельзя гарантировать качество или оригинальность продукции, поскольку нет возможности провести проверку до заказа.
Легальные сделки без последствий: Многие пользователи ошибочно считают, что приобретая товары в подпольной сети, они подвергают себя риску меньшему риску, чем в реальном мире. Однако, приобретая запрещенные вещи или услуги, вы подвергаете себя риску наказания.
Реальность покупок в Даркнете
Риски обмана и афер: В Даркнете множество мошенников, которые готовы обмануть пользователей, которые недостаточно бдительны. Они могут предложить фальшивые товары или просто исчезнуть с вашими деньгами.
Опасность правоохранительных органов: Пользователи Даркнета подвергают себя риску привлечения к уголовной ответственности за приобретение и заказ незаконных товаров и услуг.
Непредсказуемость исходов: Не каждый заказ в подпольной сети завершаются благополучно. Качество вещей может оставлять желать лучшего, а процесс покупки может послужить источником неприятностей.
Советы для безопасных покупок в скрытой части веба
Проведите полное изучение поставщика и услуги перед совершением покупки.
Используйте защитные программы и сервисы для обеспечения вашей анонимности и безопасности.
Платите только безопасными методами, например, криптовалютами, и избегайте предоставления личной информации.
Будьте бдительны и очень внимательны во всех ваших действиях и решениях.
Заключение
Транзакции в скрытой части веба могут быть как увлекательным, так и рискованным опытом. Понимание рисков и принятие соответствующих мер предосторожности помогут уменьшить риск негативных последствий и обеспечить безопасность при покупках в этой недоступной области сети.
Покупки в темном интернете: Иллюзии и Правда
Подпольная сеть, скрытая секция интернета, заинтересовывает внимание участников своей скрытностью и возможностью возможностью заказать самые разнообразные продукты и услуги без излишних действий. Однако, погружение в тот вселенная темных площадок имеет в себе с комплексом опасностей и аспектов, о которых желательно осведомляться перед проведением транзакций.
Что представляет собой подпольная сеть и как оно действует?
Для тех, кому не знакомо с этим понятием, темный интернет – это сегмент интернета, невидимая от стандартных поисков. В скрытой части веба имеются специальные рынки, где можно найти возможность почти все : от запрещённых веществ и боеприпасов до взломанных аккаунтов и фальшивых документов.
Иллюзии о заказах в темном интернете
Тайность гарантирована: Хотя, использование технологий анонимности, вроде как Tor, способствует скрыть от глаз свою действия в сети, тайность в скрытой части веба не является. Имеется риск, что возможно ваша информацию о вас могут обнаружить дезинформаторы или даже сотрудники правоохранительных органов.
Все товары – качественные: В Даркнете можно найти множество продавцов, продающих продукцию и услуги. Однако, невозможно гарантировать качество или оригинальность продукции, поскольку нет возможности провести проверку до совершения покупки.
Легальные покупки без последствий: Многие участники ошибочно считают, что приобретая товары в подпольной сети, они подвергают себя риску низкому риску, чем в реальном мире. Однако, заказывая противоправные вещи или услуги, вы подвергаете себя привлечения к уголовной ответственности.
Реальность покупок в подпольной сети
Негативные стороны обмана и мошенничества: В темном интернете много мошенников, предрасположены к мошенничеству недостаточно осторожных пользователей. Они могут предложить поддельную продукцию или просто забрать ваши деньги и исчезнуть.
Опасность государственных органов: Участники темного интернета рискуют к ответственности перед законом за заказ и приобретение неправомерных продуктов и услуг.
Непредвиденность результатов: Не каждый заказ в скрытой части веба заканчиваются удачно. Качество продукции может оказаться неудовлетворительным, а процесс покупки может послужить источником неприятностей.
Советы для безопасных транзакций в подпольной сети
Проводите детальный анализ поставщика и продукции перед приобретением.
Используйте защитные программы и сервисы для обеспечения анонимности и безопасности.
Осуществляйте платежи только безопасными методами, например, криптовалютами, и избегайте предоставления персональных данных.
Будьте бдительны и очень внимательны во всех ваших действиях и решениях.
Заключение
Сделки в скрытой части веба могут быть как интересным, так и опасным путешествием. Понимание возможных опасностей и принятие необходимых мер предосторожности помогут минимизировать вероятность негативных последствий и гарантировать безопасные покупки в этом неизведанном мире интернета.
Outstanding post however I was wanting to know if you could
write a litte more on this subject? I’d be very grateful
if you could elaborate a little bit more. Thank you!
australia online pharmacy free shipping
lisinopril 20mg buy
tadalafil 5mg in india
cialis online cheap
cheapest price for lisinopril india
cialis brand online
canadian discount pharmacy
my canadian pharmacy rx
cialis 20mg lowest price
מכונות מזל
המימונים בפלטפורמת האינטרנט – מימורי ספורט, קזינו מקוון, משחקים קלפי.
הימורים באינטרנט נהפכים לקטגוריה נפוץ בבאופן מיוחד בתקופת הדיגיטלי.
מיליוני שחקנים ממנסות את מזלם באפשרויות מימונים השונות.
הפעולה הזוהה משנה את רגעי הניסיונות וההתרגשות השחקנים.
גם מעסיק בשאלות חברתיות ואתיות העומדות ממאחורי המימונים באינטרנט.
בתקופת הדיגיטלי, הימורים בפלטפורמת האינטרנט הם חלק בלתי נפרד מהתרבות הספורט, הבידור והחברה ה העכשווית.
ההימורים באינטרנט כוללים את אפשרויות רחבות של פעילויות, כולל מימונים על תוצאות ספורטיות, פוליטיים, ו- מזג האוויר.
ההימורים הם הם מתבצעים באמצע
no script pharmacy
prednisone pill
metformin without rx
Доброго!
Ваш надежный источник информации о Кропивницком – top10.kr.ua: где новости всегда актуальны.
Лучший сайт по теме https://top10.kr.ua/category/news-ukraine/
Новости Украины сейчас
новости Кропивницкого сейчас
главные новости Украины
все про здоровье
Удачи и хороших новостей!
Free Website Builder https://tinyurl.com/2ccjpa6k https://tinyurl.com/2ccjpa6k Free Website Builder Free Website Builder
metformin purchase canada
프라그마틱의 게임은 항상 최고 수준의 퀄리티를 유지하고 있어요. 이번에도 그런 훌륭한 게임을 만났나요?
프라그마틱 슬롯
프라그마틱의 게임은 항상 다양한 테마로 놀라워요. 이 사이트에서 더 자세한 정보를 찾아보세요!
https://www.antiquees.com
https://e-trajet.net/hot/
http://www.iyalion.com/
1. Вибір натяжних стель – як правильно обрати?
2. Топ-5 популярних кольорів натяжних стель
3. Як зберегти чистоту натяжних стель?
4. Відгуки про натяжні стелі: плюси та мінуси
5. Як підібрати дизайн натяжних стель до інтер’єру?
6. Інноваційні технології у виробництві натяжних стель
7. Натяжні стелі з фотопечаттю – оригінальне рішення для кухні
8. Секрети вдалого монтажу натяжних стель
9. Як зекономити на встановленні натяжних стель?
10. Лампи для натяжних стель: які вибрати?
11. Відтінки синього для натяжних стель – ексклюзивний вибір
12. Якість матеріалів для натяжних стель: що обирати?
13. Крок за кроком: як самостійно встановити натяжні стелі
14. Натяжні стелі в дитячу кімнату: безпека та креативність
15. Як підтримувати тепло у приміщенні за допомогою натяжних стель
16. Вибір натяжних стель у ванну кімнату: практичні поради
17. Натяжні стелі зі структурним покриттям – тренд сучасного дизайну
18. Індивідуальність у кожному домашньому інтер’єрі: натяжні стелі з друком
19. Як обрати освітлення для натяжних стель: поради фахівця
20. Можливості дизайну натяжних стель: від класики до мінімалізму
стеля натяжна ціна natjazhnistelitvhyn.kiev.ua .
Привет всем!
White Queen, талантливая и экстравагантная певица, порадовала своих поклонников новым треком “БАС”, который стал настоящим хитом в мире танцевальной музыки. Этот трек отличается яркими звуками и заразительным ритмом, который не оставит равнодушным ни одного слушателя.
White Queen решила отойти от своего обычного стиля и представить публике что-то новое и необычное. Она объединила в этом треке элементы рейва и электронной музыки, создав уникальное звучание, которое сразу же завоевало сердца многих слушателей.
По мнению многих фанатов, трек “БАС” превосходит работы известных артистов, таких как Lida и GSPD. Свежий и оригинальный звук White Queen вызывает мощные эмоции и заставляет танцевать до утра. Ее дерзкий и провокационный стиль покорил не только рейв-клубы, но и сердца миллионов меломанов по всему миру.
White Queen не перестает удивлять своих поклонников новыми и интересными проектами. Ее творческий подход и желание экспериментировать делают ее одним из самых ярких исполнителей современной музыкальной сцены. Новый трек “БАС” — это лишь один из шагов певицы к светлому будущему и покорению вершин мировой музыкальной индустрии.
Если вы еще не слышали трек “БАС” от White Queen, то обязательно найдите его на популярных музыкальных платформах и окунитесь в мир прекрасных звуков и неповторимой атмосферы рейва. Будьте готовы к тому, что эта композиция не отпустит вас долгое время и станет вашим гимном веселья и незабываемых вечеринок. White Queen — гении музыкального жанра, и ее творчество никогда не перестает удивлять и вдохновлять своих поклонников.
https://music.apple.com/us/album/%D0%B1%D0%B0%D1%81-single/1734643362
слушать музыку шаман
слушать музыку эго все песни
слушать музыку моцарта
слушать музыку блатной удар
слушать музыку петлюра
послушать музыку восьмидесятых годов
слушать музыку юга
слушать музыку релакс онлайн
слушать музыку через bluetooth колонку
слушать музыку рейки без рекламы
послушать музыку хорошую
Удачи и хорошего вайба!
synthroid 50 pill
1. Вибір натяжних стель – як правильно обрати?
2. Топ-5 популярних кольорів натяжних стель
3. Як зберегти чистоту натяжних стель?
4. Відгуки про натяжні стелі: плюси та мінуси
5. Як підібрати дизайн натяжних стель до інтер’єру?
6. Інноваційні технології у виробництві натяжних стель
7. Натяжні стелі з фотопечаттю – оригінальне рішення для кухні
8. Секрети вдалого монтажу натяжних стель
9. Як зекономити на встановленні натяжних стель?
10. Лампи для натяжних стель: які вибрати?
11. Відтінки синього для натяжних стель – ексклюзивний вибір
12. Якість матеріалів для натяжних стель: що обирати?
13. Крок за кроком: як самостійно встановити натяжні стелі
14. Натяжні стелі в дитячу кімнату: безпека та креативність
15. Як підтримувати тепло у приміщенні за допомогою натяжних стель
16. Вибір натяжних стель у ванну кімнату: практичні поради
17. Натяжні стелі зі структурним покриттям – тренд сучасного дизайну
18. Індивідуальність у кожному домашньому інтер’єрі: натяжні стелі з друком
19. Як обрати освітлення для натяжних стель: поради фахівця
20. Можливості дизайну натяжних стель: від класики до мінімалізму
натяжні стелі ціна з роботою http://natjazhnistelitvhyn.kiev.ua/ .
where can i buy valtrex in uk
price for synthroid 112 mcg
1. Вибір натяжних стель – як правильно обрати?
2. Топ-5 популярних кольорів натяжних стель
3. Як зберегти чистоту натяжних стель?
4. Відгуки про натяжні стелі: плюси та мінуси
5. Як підібрати дизайн натяжних стель до інтер’єру?
6. Інноваційні технології у виробництві натяжних стель
7. Натяжні стелі з фотопечаттю – оригінальне рішення для кухні
8. Секрети вдалого монтажу натяжних стель
9. Як зекономити на встановленні натяжних стель?
10. Лампи для натяжних стель: які вибрати?
11. Відтінки синього для натяжних стель – ексклюзивний вибір
12. Якість матеріалів для натяжних стель: що обирати?
13. Крок за кроком: як самостійно встановити натяжні стелі
14. Натяжні стелі в дитячу кімнату: безпека та креативність
15. Як підтримувати тепло у приміщенні за допомогою натяжних стель
16. Вибір натяжних стель у ванну кімнату: практичні поради
17. Натяжні стелі зі структурним покриттям – тренд сучасного дизайну
18. Індивідуальність у кожному домашньому інтер’єрі: натяжні стелі з друком
19. Як обрати освітлення для натяжних стель: поради фахівця
20. Можливості дизайну натяжних стель: від класики до мінімалізму
з яких матеріалів виготовляють натяжні стелі https://natjazhnistelitvhyn.kiev.ua/ .
metformin purchase canada
online casinos in Kenya are the go-to for Kenyan players seeking thrilling gaming action.
online pharmacy weight loss
Currently it sounds llike WordPress is the preferred blogging platform
out there right now. (from what I’ve read) Is that what you are using on your blog?
canadian pharmacy viagra
where can i get azithromycin tablets
The meal went without incident although a couple of times she had to avert her gaze from Dan for fear of bursting out laughing. Dan went up to his room saying he wanted to listen to music, he laid on his bed playing with himself waiting for his father to leave. He thought about the events of the last two weeks it had been the craziest time of his life.
He put it all down to Mary Harris, she had been his girlfriend for two years, he liked her a lot, she was pretty and intelligent two things that rarely combined in his experience, the problem was she steadfastly refused to let him put his cock inside her, he had thought he was getting somewhere when he took his cock out that evening in the cinema when she had finally allowed him to get his hand inside her panties, it was the first time she had allowed him to do any more than play with her tits. He had taken her hand and placed it on his erection, initially he had been pleased to hear her sharp intake of breath when she felt the size of him and he was encouraged when she began stroking him.
It was later that the problem started, he had her in the car park, they were kissing, her sweater was pushed up together with her bra and he was sucking on her nipples. He managed to get her laid across the front of one of the cars, his hand up her skirt, trying to pull down her panties. That was when she had stopped him.
https://www.obesityhelp.com/members/backrod1969/about_me/
https://chyoa.com/user/palmer1975
https://oltzzhik1977.diary.ru/
https://ellak.gr/user/truthand1964/
https://prodawec1999.diary.ru/
https://www.obesityhelp.com/members/wsat1984/about_me/
https://anotepad.com/notes/n9rtqbfd
https://xtyx1966.bandcamp.com/album/alice-0
https://imageevent.com/jeusus197919531989
http://www.babelcube.com/user/paul-garrison
daily cialis generic
zestril 2.5 mg tablets
1. Вибір натяжних стель – як правильно обрати?
2. Топ-5 популярних кольорів натяжних стель
3. Як зберегти чистоту натяжних стель?
4. Відгуки про натяжні стелі: плюси та мінуси
5. Як підібрати дизайн натяжних стель до інтер’єру?
6. Інноваційні технології у виробництві натяжних стель
7. Натяжні стелі з фотопечаттю – оригінальне рішення для кухні
8. Секрети вдалого монтажу натяжних стель
9. Як зекономити на встановленні натяжних стель?
10. Лампи для натяжних стель: які вибрати?
11. Відтінки синього для натяжних стель – ексклюзивний вибір
12. Якість матеріалів для натяжних стель: що обирати?
13. Крок за кроком: як самостійно встановити натяжні стелі
14. Натяжні стелі в дитячу кімнату: безпека та креативність
15. Як підтримувати тепло у приміщенні за допомогою натяжних стель
16. Вибір натяжних стель у ванну кімнату: практичні поради
17. Натяжні стелі зі структурним покриттям – тренд сучасного дизайну
18. Індивідуальність у кожному домашньому інтер’єрі: натяжні стелі з друком
19. Як обрати освітлення для натяжних стель: поради фахівця
20. Можливості дизайну натяжних стель: від класики до мінімалізму
натяжні потолки ціна http://natjazhnistelitvhyn.kiev.ua/ .
Не рискуйте, обращаясь в сомнительные мастерские. Сервисный центр Samsung – это гарантия профессионализма и безопасности для ваших гаджетов. Подпишитесь:
telegra.ph
twitch.tv
tumblr.com
Опытные специалисты сервисного центра Samsung готовы решить любую проблему с вашим устройством. Доверьте ремонт профессионалам! Подписывайтесь:
notion.so
gumroad.com
mystrikingly.com
1. Вибір натяжних стель – як правильно обрати?
2. Топ-5 популярних кольорів натяжних стель
3. Як зберегти чистоту натяжних стель?
4. Відгуки про натяжні стелі: плюси та мінуси
5. Як підібрати дизайн натяжних стель до інтер’єру?
6. Інноваційні технології у виробництві натяжних стель
7. Натяжні стелі з фотопечаттю – оригінальне рішення для кухні
8. Секрети вдалого монтажу натяжних стель
9. Як зекономити на встановленні натяжних стель?
10. Лампи для натяжних стель: які вибрати?
11. Відтінки синього для натяжних стель – ексклюзивний вибір
12. Якість матеріалів для натяжних стель: що обирати?
13. Крок за кроком: як самостійно встановити натяжні стелі
14. Натяжні стелі в дитячу кімнату: безпека та креативність
15. Як підтримувати тепло у приміщенні за допомогою натяжних стель
16. Вибір натяжних стель у ванну кімнату: практичні поради
17. Натяжні стелі зі структурним покриттям – тренд сучасного дизайну
18. Індивідуальність у кожному домашньому інтер’єрі: натяжні стелі з друком
19. Як обрати освітлення для натяжних стель: поради фахівця
20. Можливості дизайну натяжних стель: від класики до мінімалізму
з яких матеріалів виготовляють натяжні стелі natjazhnistelitvhyn.kiev.ua .
synthroid brand prices
zithromax 2 pills
Stumbled upon a unique article, I suggest you take a look http://maps.google.sh/url?q=https://cn.chat-ruletka-18.com
online pharmacy same day delivery
Hi! This post couldn’t be written any better! Reading through this post reminds me of my good old room mate! He always kept chatting about this. I will forward this article to him. Pretty sure he will have a good read. Many thanks for sharing!
LeeBet casino
buy generic metformin
Советуем посетить сайт https://softnewsportal.ru/
Также не забудьте добавить сайт в закладки: https://softnewsportal.ru/
даркнет открыт
В последнее время даркнет, вызывает все больше интереса и становится объектом различных дискуссий. Многие считают его скрытой областью, где процветают преступность и нелегальные операции. Однако, мало кто осведомлен о том, что даркнет не является закрытым пространством, и доступ к нему возможен для всех пользователей.
В отличие от обычного интернета, даркнет не допускается для поисковиков и обычных браузеров. Для того чтобы получить к нему доступ, необходимо использовать специализированные приложения, такие как Tor или I2P, которые обеспечивают анонимность и шифрование данных. Однако, это не означает, что даркнет закрыт от общественности.
Действительно, даркнет доступен каждому, кто имеет интерес и возможность его исследовать. В нем можно найти разнообразные материалы, начиная от дискуссий, которые не приветствуются в обычных сетях, и заканчивая доступом к эксклюзивным рынкам и услугам. Например, множество информационных сайтов и форумов на даркнете посвящены темам, которые считаются табу в обычных средах, таким как политика, религия или криптовалюты.
Кроме того, даркнет часто используется сторонниками и журналистами, которые ищут пути обхода ограничений и защиты своей анонимности. Он также служит платформой для открытого обмена данными и идеями, которые могут быть подавлены в авторитарных государствах.
Важно понимать, что хотя даркнет предоставляет свободу доступа к информации и возможность анонимного общения, он также может быть использован для незаконных целей. Тем не менее, это не делает его закрытым и неприступным для любого.
Таким образом, даркнет – это не только скрытая сторона сети, но и пространство, где каждый может найти что-то интересное или полезное для себя. Важно помнить о его двойственности и разумно использовать его и осознанием возможных рисков.
EL CODIGO PROMOCIONAL DE 1XSLOTS CASINO
Sin introducir un codigo promocional 1xSlots Casino, como nuevo cliente en March 2024, puede beneficiarse de una bonificacion del 100% hasta 300€. El casino le proporciona un monton de maquinas tragaperras populares de proveedores de software como iSoftBet, Elk Studios o Play’n GO y otros. De forma adicional, se le otorgaran|esta oferta incluye 30 turnos gratuitos.. Todas las informaciones importantes respecto a esta oferta de bienvenida se puede encontrar en este articulo.
?COMO FUNCIONA EL CODIGO PROMOCIONAL DE 1XSLOTS CASINO?
En 1xSlots Casino se puede obtener una bonificacion del 100% hasta 300€ y turnos gratuitos en 1xSlots Casino. Haga su inicial deposito en 1xSlots Casino tras finalizar el proceso de inscripcion. No hace falta solicitar su bonificacion de bienvenida por e-mail ni el chat en directo como en otros casinos, porque 1xSlots Casino la abona a su cuenta automaticamente. La oferta de bienvenida se activa cuando deposite 10€ o mas. Haga un deposito empleando EcoPayz, Boku o Bitcoin u otro metodo de deposito disponible en el casino.
Mas sobre el bono
1xSlots Casino le da la oportunidad de incrementar su balance hasta 300€ (100%). Obtenga la bonificacion superior al depositar 300€ y conseguir 600€ que se anadiran en su cuenta. Los fondos de su bonificacion es compatible con tragaperras de proveedores de software como Red Tiger Gaming, Evolution Gaming y Microgaming, por nombrar unos cuantos. Debe tenerse en cuenta tambien que su cuenta se incrementara con 30 turnos gratuitos.
Bono de bienvenida 1xSlots 2024
Dentro de 1xSlots existen dos bonos de bienvenida, uno standard y uno exclusivo. El primero de ellas recompensa con un paquete de hasta €1500 y 150 giros gratis mientras que el segundo otorga un 10% adicional recompensando hasta €1650 y 150 giros gratis ?La diferencia? El bono exclusivo se obtiene mediante el uso del 1xSlots promocode NEXT777.
Las recompensas de la bonificacion exclusiva son otorgadas en los 4 primeros depositos de la siguiente manera:
100% del primer deposito hasta €450 + 30 giros gratis
100% del segundo deposito hasta €350 + 35 giros gratis
100% del tercer deposito hasta €400 + 40 giros gratis
100% del cuarto deposito hasta €450 + 45 giros gratis
Bono de bienvenida 1xSlots Argentina 2024
Cabe resaltar que durante tu proceso de registro tienes que elegir tu moneda local preferida. De este modo obtendras la bonificacion de bienvenida 1xSlots Argentina en pesos. Puedes recibir el bono exclusivo 1xSlots Argentina al utilizar nuestro codigo de bono 1xSlots Argentina NEXT777 durante el proceso de registro.
Ademas, si ingresas el codigo NEXT777 a la pestana “Bonos y Regalos” despues de hacer tu primer deposito, puedes recibir el bono con giros gratis 1xSlots Argentina que te otorgara 60 FS en tragamonedas 777 GEMS RESPIN. A continuacion encontraras los valores de bonos en pesos argentinos.
Bono de bienvenida 1xSlots Chile 2024
El bono de bienvenida 1xSlots Chile funciona del mismo modo como en Argentina. Tienes que crear tu cuenta e ingresar nuestro Lista de codigos promocionales de 1xslots Chile NEXT777 al formulario de registro. Puedes elegir el peso chileno como tu moneda local para recibir la bonificacion de bienvenida 1xSlots Chile. Adicionalmente, para obtener 60 giros gratis en 777 GEMS RESPIN, introduce el codigo NEXT777 al hacer tu primer deposito.
?QUE ES UN BONO DE TRAGAPERRAS SIN DEPOSITO?
Como su nombre indica, un bono de tragaperras sin deposito es un tipo de bono de casino que no necesita que los jugadores depositen dinero para poder optar a cualquier tipo de recompensa. Por ejemplo, giros gratis, creditos de casino o incluso dinero en efectivo.
Los bonos sin deposito se dan generalmente a los jugadores potenciales para motivar a los nuevos jugadores para que se registren. Pueden formar parte de los paquetes de bienvenida que un casino online ofrece a todos sus jugadores potenciales y ayudan a atraer la atencion hacia la marca del casino. Tambien pueden ofrecerse a los jugadores con cuentas en determinadas situaciones.
Las tragaperras con bono sin deposito ofrecen la posibilidad de probar las tragaperras online sin coste alguno y quedandose con el dinero que se obtiene, razon por la que son muy codiciadas. Sin embargo, los bonos sin deposito no te obligan a depositar dinero cuando la promocion termina, aunque se sugiere.
?CUALES SON LOS PRINCIPALES TIPOS DE BONOS DE TRAGAMONEDAS SIN DEPOSITO?
Los bonos sin deposito estan disponibles en tres variedades: giros gratis, creditos gratis o dinero en efectivo. El tipo mas conocido que es un bono sin deposito no spins without deposit bonus.
GIROS GRATIS CON BONO SIN DEPOSITO
Todos sabemos que las maquinas tragaperras son las mas populares en el mundo de los juegos de casino , por lo que es natural que un bono hecho especificamente para las maquinas que juegan a las tragaperras sea el mas buscado. Para los amantes de las maquinas tragaperras, los bonos de tiradas gratis sin deposito son un verdadero tesoro, ya que permiten a los jugadores jugar a sus maquinas tragaperras favoritas sin depositar dinero, y con una gran cantidad de tiradas gratis, lo que aumenta sus probabilidades de ganar significativamente.
Creditos gratuitos / BONO DE JUEGO GRATUITO SIN DEPOSITO
En lugar de tiradas gratis, los casinos pueden optar por dar creditos gratis a los jugadores que tienen bonos sin deposito. Estos creditos pueden ser utilizados dentro de un periodo de tiempo enumerado para apostar en juegos en los casinos y ganar dinero real. Los bonos sin deposito y los creditos gratuitos se ofrecen tanto en las tragaperras gratuitas como en otros juegos de los casinos.
DINERO GRATIS CON BONOS SIN DEPOSITO
Al igual que los creditos gratuitos con los bonos sin deposito, los bonos de dinero sin deposito que no requieren deposito se pueden jugar tanto en las tragaperras como en otros juegos de casino. Una vez que haya reclamado y jugado el bono de dinero sin deposito, podra retirar el dinero del bono y cualquier ganancia adicional siempre que cumpla las condiciones para retirar el dinero.
?Como puedo reclamar un bono sin deposito?
En la mayoria de los casos, puede hacer uso de los bonos sin deposito al crear una cuenta en cualquier sitio de juego en linea que ofrezca este tipo de oferta. En la version online del casino, la bonificacion puede aparecer en la pagina de promociones del casino o en una ventana emergente. Algunos casinos requieren que introduzca un codigo promocional para acceder al bono.
Cuando considere reclamar un bono sin deposito (o cualquier otro tipo de bono) debe asegurarse de leer los terminos y condiciones que se adjuntan al bono. Los diferentes casinos pueden tener sus propias regulaciones y limites, sin embargo, hay algunos que son iguales en todos los casinos.
REQUISITOS PARA TRABAJAR
Los bonos sobre los depositos son accesibles para todos, sin embargo, cobrar los bonos es un asunto un poco mas controlado. La mayoria de los casinos en linea le permitiran retirar sus ganancias despues de haber podido apostar una cantidad especifica.
Los requisitos de apuesta se muestran como multiplicadores. Representan la cantidad de veces que tienes que apostar en un bono para poder retirar el dinero. Por lo general, puede jugar a una serie de juegos seleccionados por el operador del casino. Una vez que haya alcanzado el requisito de apuesta, podra dar el siguiente paso para cobrar su bono.
PLAZO
Segun el casino online, el bono para juegos de tragaperras de deposito puede caducar en cuestion de dias o durar hasta 30 dias. Para asegurarte de que cumples los requisitos de apuestas, es posible que tengas que planificar tu rutina de juego a lo largo del bono.
TAMANOS DE APUESTA
Un metodo para lograr su objetivo de apostar mas rapido es realizar la mayor cantidad de apuestas posible en cada juego. Es un metodo sensato, a menos que el operador del casino decida controlar la cantidad de la apuesta y limitar la cantidad de apuestas en la respectiva tragamonedas con bono sin deposito.
SE REQUIERE UN DEPOSITO
Aunque suene contradictorio, algunos casinos online pueden incluso exigir a los jugadores que depositen dinero antes de poder retirar su bono. Suelen anadir este requisito adicional por razones de seguridad.
RESTRICCIONES
A veces, se le puede negar el acceso a un bono con oferta de deposito gratuito. Esto solo ocurre en muy raras circunstancias, ya sea por el hecho de haber intentado dos bonos a la vez o por tener una direccion IP compartida con un jugador que tambien reclamo el mismo bono, o por residir en una zona restringida.
Puedes obtener informacion mas detallada leyendo el articulo completo en este enlace – https://94fbr.org/art/codigo_promocional_1xslots_bono.html
https://diplomgoznac.com/ Купить диплом о среднем образовании- Таков способ обрести официальный документ о завершении образовательного учреждения. Свидетельство открывает двери к новым карьерным перспективам и карьерному развитию.
142 metformin
canine prednisone 5mg no prescription
EL CODIGO PROMOCIONAL DE 1XSLOTS CASINO
Sin introducir un codigo promocional 1xSlots Casino, como nuevo cliente en March 2024, puede beneficiarse de una bonificacion del 100% hasta 300€. El casino le proporciona un monton de maquinas tragaperras populares de proveedores de software como iSoftBet, Elk Studios o Play’n GO y otros. De forma adicional, se le otorgaran|esta oferta incluye 30 turnos gratuitos.. Todas las informaciones importantes respecto a esta oferta de bienvenida se puede encontrar en este articulo.
?COMO FUNCIONA EL CODIGO PROMOCIONAL DE 1XSLOTS CASINO?
En 1xSlots Casino se puede obtener una bonificacion del 100% hasta 300€ y turnos gratuitos en 1xSlots Casino. Haga su inicial deposito en 1xSlots Casino tras finalizar el proceso de inscripcion. No hace falta solicitar su bonificacion de bienvenida por e-mail ni el chat en directo como en otros casinos, porque 1xSlots Casino la abona a su cuenta automaticamente. La oferta de bienvenida se activa cuando deposite 10€ o mas. Haga un deposito empleando EcoPayz, Boku o Bitcoin u otro metodo de deposito disponible en el casino.
Mas sobre el bono
1xSlots Casino le da la oportunidad de incrementar su balance hasta 300€ (100%). Obtenga la bonificacion superior al depositar 300€ y conseguir 600€ que se anadiran en su cuenta. Los fondos de su bonificacion es compatible con tragaperras de proveedores de software como Red Tiger Gaming, Evolution Gaming y Microgaming, por nombrar unos cuantos. Debe tenerse en cuenta tambien que su cuenta se incrementara con 30 turnos gratuitos.
Bono de bienvenida 1xSlots 2024
Dentro de 1xSlots existen dos bonos de bienvenida, uno standard y uno exclusivo. El primero de ellas recompensa con un paquete de hasta €1500 y 150 giros gratis mientras que el segundo otorga un 10% adicional recompensando hasta €1650 y 150 giros gratis ?La diferencia? El bono exclusivo se obtiene mediante el uso del 1xSlots promocode NEXT777.
Las recompensas de la bonificacion exclusiva son otorgadas en los 4 primeros depositos de la siguiente manera:
100% del primer deposito hasta €450 + 30 giros gratis
100% del segundo deposito hasta €350 + 35 giros gratis
100% del tercer deposito hasta €400 + 40 giros gratis
100% del cuarto deposito hasta €450 + 45 giros gratis
Bono de bienvenida 1xSlots Argentina 2024
Cabe resaltar que durante tu proceso de registro tienes que elegir tu moneda local preferida. De este modo obtendras la bonificacion de bienvenida 1xSlots Argentina en pesos. Puedes recibir el bono exclusivo 1xSlots Argentina al utilizar nuestro codigo de bono 1xSlots Argentina NEXT777 durante el proceso de registro.
Ademas, si ingresas el codigo NEXT777 a la pestana “Bonos y Regalos” despues de hacer tu primer deposito, puedes recibir el bono con giros gratis 1xSlots Argentina que te otorgara 60 FS en tragamonedas 777 GEMS RESPIN. A continuacion encontraras los valores de bonos en pesos argentinos.
Bono de bienvenida 1xSlots Chile 2024
El bono de bienvenida 1xSlots Chile funciona del mismo modo como en Argentina. Tienes que crear tu cuenta e ingresar nuestro codigo promocional de deportes 1xslots Chile NEXT777 al formulario de registro. Puedes elegir el peso chileno como tu moneda local para recibir la bonificacion de bienvenida 1xSlots Chile. Adicionalmente, para obtener 60 giros gratis en 777 GEMS RESPIN, introduce el codigo NEXT777 al hacer tu primer deposito.
?QUE ES UN BONO DE TRAGAPERRAS SIN DEPOSITO?
Como su nombre indica, un bono de tragaperras sin deposito es un tipo de bono de casino que no necesita que los jugadores depositen dinero para poder optar a cualquier tipo de recompensa. Por ejemplo, giros gratis, creditos de casino o incluso dinero en efectivo.
Los bonos sin deposito se dan generalmente a los jugadores potenciales para motivar a los nuevos jugadores para que se registren. Pueden formar parte de los paquetes de bienvenida que un casino online ofrece a todos sus jugadores potenciales y ayudan a atraer la atencion hacia la marca del casino. Tambien pueden ofrecerse a los jugadores con cuentas en determinadas situaciones.
Las tragaperras con bono sin deposito ofrecen la posibilidad de probar las tragaperras online sin coste alguno y quedandose con el dinero que se obtiene, razon por la que son muy codiciadas. Sin embargo, los bonos sin deposito no te obligan a depositar dinero cuando la promocion termina, aunque se sugiere.
?CUALES SON LOS PRINCIPALES TIPOS DE BONOS DE TRAGAMONEDAS SIN DEPOSITO?
Los bonos sin deposito estan disponibles en tres variedades: giros gratis, creditos gratis o dinero en efectivo. El tipo mas conocido que es un bono sin deposito no spins without deposit bonus.
GIROS GRATIS CON BONO SIN DEPOSITO
Todos sabemos que las maquinas tragaperras son las mas populares en el mundo de los juegos de casino , por lo que es natural que un bono hecho especificamente para las maquinas que juegan a las tragaperras sea el mas buscado. Para los amantes de las maquinas tragaperras, los bonos de tiradas gratis sin deposito son un verdadero tesoro, ya que permiten a los jugadores jugar a sus maquinas tragaperras favoritas sin depositar dinero, y con una gran cantidad de tiradas gratis, lo que aumenta sus probabilidades de ganar significativamente.
Creditos gratuitos / BONO DE JUEGO GRATUITO SIN DEPOSITO
En lugar de tiradas gratis, los casinos pueden optar por dar creditos gratis a los jugadores que tienen bonos sin deposito. Estos creditos pueden ser utilizados dentro de un periodo de tiempo enumerado para apostar en juegos en los casinos y ganar dinero real. Los bonos sin deposito y los creditos gratuitos se ofrecen tanto en las tragaperras gratuitas como en otros juegos de los casinos.
DINERO GRATIS CON BONOS SIN DEPOSITO
Al igual que los creditos gratuitos con los bonos sin deposito, los bonos de dinero sin deposito que no requieren deposito se pueden jugar tanto en las tragaperras como en otros juegos de casino. Una vez que haya reclamado y jugado el bono de dinero sin deposito, podra retirar el dinero del bono y cualquier ganancia adicional siempre que cumpla las condiciones para retirar el dinero.
?Como puedo reclamar un bono sin deposito?
En la mayoria de los casos, puede hacer uso de los bonos sin deposito al crear una cuenta en cualquier sitio de juego en linea que ofrezca este tipo de oferta. En la version online del casino, la bonificacion puede aparecer en la pagina de promociones del casino o en una ventana emergente. Algunos casinos requieren que introduzca un codigo promocional para acceder al bono.
Cuando considere reclamar un bono sin deposito (o cualquier otro tipo de bono) debe asegurarse de leer los terminos y condiciones que se adjuntan al bono. Los diferentes casinos pueden tener sus propias regulaciones y limites, sin embargo, hay algunos que son iguales en todos los casinos.
REQUISITOS PARA TRABAJAR
Los bonos sobre los depositos son accesibles para todos, sin embargo, cobrar los bonos es un asunto un poco mas controlado. La mayoria de los casinos en linea le permitiran retirar sus ganancias despues de haber podido apostar una cantidad especifica.
Los requisitos de apuesta se muestran como multiplicadores. Representan la cantidad de veces que tienes que apostar en un bono para poder retirar el dinero. Por lo general, puede jugar a una serie de juegos seleccionados por el operador del casino. Una vez que haya alcanzado el requisito de apuesta, podra dar el siguiente paso para cobrar su bono.
PLAZO
Segun el casino online, el bono para juegos de tragaperras de deposito puede caducar en cuestion de dias o durar hasta 30 dias. Para asegurarte de que cumples los requisitos de apuestas, es posible que tengas que planificar tu rutina de juego a lo largo del bono.
TAMANOS DE APUESTA
Un metodo para lograr su objetivo de apostar mas rapido es realizar la mayor cantidad de apuestas posible en cada juego. Es un metodo sensato, a menos que el operador del casino decida controlar la cantidad de la apuesta y limitar la cantidad de apuestas en la respectiva tragamonedas con bono sin deposito.
SE REQUIERE UN DEPOSITO
Aunque suene contradictorio, algunos casinos online pueden incluso exigir a los jugadores que depositen dinero antes de poder retirar su bono. Suelen anadir este requisito adicional por razones de seguridad.
RESTRICCIONES
A veces, se le puede negar el acceso a un bono con oferta de deposito gratuito. Esto solo ocurre en muy raras circunstancias, ya sea por el hecho de haber intentado dos bonos a la vez o por tener una direccion IP compartida con un jugador que tambien reclamo el mismo bono, o por residir en una zona restringida.
Puedes obtener informacion mas detallada leyendo el articulo completo en este enlace – https://94fbr.org/art/codigo_promocional_1xslots_bono.html
EL CODIGO PROMOCIONAL DE 1XSLOTS CASINO
Sin introducir un codigo promocional 1xSlots Casino, como nuevo cliente en March 2024, puede beneficiarse de una bonificacion del 100% hasta 300€. El casino le proporciona un monton de maquinas tragaperras populares de proveedores de software como iSoftBet, Elk Studios o Play’n GO y otros. De forma adicional, se le otorgaran|esta oferta incluye 30 turnos gratuitos.. Todas las informaciones importantes respecto a esta oferta de bienvenida se puede encontrar en este articulo.
?COMO FUNCIONA EL CODIGO PROMOCIONAL DE 1XSLOTS CASINO?
En 1xSlots Casino se puede obtener una bonificacion del 100% hasta 300€ y turnos gratuitos en 1xSlots Casino. Haga su inicial deposito en 1xSlots Casino tras finalizar el proceso de inscripcion. No hace falta solicitar su bonificacion de bienvenida por e-mail ni el chat en directo como en otros casinos, porque 1xSlots Casino la abona a su cuenta automaticamente. La oferta de bienvenida se activa cuando deposite 10€ o mas. Haga un deposito empleando EcoPayz, Boku o Bitcoin u otro metodo de deposito disponible en el casino.
Mas sobre el bono
1xSlots Casino le da la oportunidad de incrementar su balance hasta 300€ (100%). Obtenga la bonificacion superior al depositar 300€ y conseguir 600€ que se anadiran en su cuenta. Los fondos de su bonificacion es compatible con tragaperras de proveedores de software como Red Tiger Gaming, Evolution Gaming y Microgaming, por nombrar unos cuantos. Debe tenerse en cuenta tambien que su cuenta se incrementara con 30 turnos gratuitos.
Bono de bienvenida 1xSlots 2024
Dentro de 1xSlots existen dos bonos de bienvenida, uno standard y uno exclusivo. El primero de ellas recompensa con un paquete de hasta €1500 y 150 giros gratis mientras que el segundo otorga un 10% adicional recompensando hasta €1650 y 150 giros gratis ?La diferencia? El bono exclusivo se obtiene mediante el uso del 1xSlots promocode NEXT777.
Las recompensas de la bonificacion exclusiva son otorgadas en los 4 primeros depositos de la siguiente manera:
100% del primer deposito hasta €450 + 30 giros gratis
100% del segundo deposito hasta €350 + 35 giros gratis
100% del tercer deposito hasta €400 + 40 giros gratis
100% del cuarto deposito hasta €450 + 45 giros gratis
Bono de bienvenida 1xSlots Argentina 2024
Cabe resaltar que durante tu proceso de registro tienes que elegir tu moneda local preferida. De este modo obtendras la bonificacion de bienvenida 1xSlots Argentina en pesos. Puedes recibir el bono exclusivo 1xSlots Argentina al utilizar nuestro codigo de bono 1xSlots Argentina NEXT777 durante el proceso de registro.
Ademas, si ingresas el codigo NEXT777 a la pestana “Bonos y Regalos” despues de hacer tu primer deposito, puedes recibir el bono con giros gratis 1xSlots Argentina que te otorgara 60 FS en tragamonedas 777 GEMS RESPIN. A continuacion encontraras los valores de bonos en pesos argentinos.
Bono de bienvenida 1xSlots Chile 2024
El bono de bienvenida 1xSlots Chile funciona del mismo modo como en Argentina. Tienes que crear tu cuenta e ingresar nuestro 1xslots nuevo codigo promocional Chile NEXT777 al formulario de registro. Puedes elegir el peso chileno como tu moneda local para recibir la bonificacion de bienvenida 1xSlots Chile. Adicionalmente, para obtener 60 giros gratis en 777 GEMS RESPIN, introduce el codigo NEXT777 al hacer tu primer deposito.
?QUE ES UN BONO DE TRAGAPERRAS SIN DEPOSITO?
Como su nombre indica, un bono de tragaperras sin deposito es un tipo de bono de casino que no necesita que los jugadores depositen dinero para poder optar a cualquier tipo de recompensa. Por ejemplo, giros gratis, creditos de casino o incluso dinero en efectivo.
Los bonos sin deposito se dan generalmente a los jugadores potenciales para motivar a los nuevos jugadores para que se registren. Pueden formar parte de los paquetes de bienvenida que un casino online ofrece a todos sus jugadores potenciales y ayudan a atraer la atencion hacia la marca del casino. Tambien pueden ofrecerse a los jugadores con cuentas en determinadas situaciones.
Las tragaperras con bono sin deposito ofrecen la posibilidad de probar las tragaperras online sin coste alguno y quedandose con el dinero que se obtiene, razon por la que son muy codiciadas. Sin embargo, los bonos sin deposito no te obligan a depositar dinero cuando la promocion termina, aunque se sugiere.
?CUALES SON LOS PRINCIPALES TIPOS DE BONOS DE TRAGAMONEDAS SIN DEPOSITO?
Los bonos sin deposito estan disponibles en tres variedades: giros gratis, creditos gratis o dinero en efectivo. El tipo mas conocido que es un bono sin deposito no spins without deposit bonus.
GIROS GRATIS CON BONO SIN DEPOSITO
Todos sabemos que las maquinas tragaperras son las mas populares en el mundo de los juegos de casino , por lo que es natural que un bono hecho especificamente para las maquinas que juegan a las tragaperras sea el mas buscado. Para los amantes de las maquinas tragaperras, los bonos de tiradas gratis sin deposito son un verdadero tesoro, ya que permiten a los jugadores jugar a sus maquinas tragaperras favoritas sin depositar dinero, y con una gran cantidad de tiradas gratis, lo que aumenta sus probabilidades de ganar significativamente.
Creditos gratuitos / BONO DE JUEGO GRATUITO SIN DEPOSITO
En lugar de tiradas gratis, los casinos pueden optar por dar creditos gratis a los jugadores que tienen bonos sin deposito. Estos creditos pueden ser utilizados dentro de un periodo de tiempo enumerado para apostar en juegos en los casinos y ganar dinero real. Los bonos sin deposito y los creditos gratuitos se ofrecen tanto en las tragaperras gratuitas como en otros juegos de los casinos.
DINERO GRATIS CON BONOS SIN DEPOSITO
Al igual que los creditos gratuitos con los bonos sin deposito, los bonos de dinero sin deposito que no requieren deposito se pueden jugar tanto en las tragaperras como en otros juegos de casino. Una vez que haya reclamado y jugado el bono de dinero sin deposito, podra retirar el dinero del bono y cualquier ganancia adicional siempre que cumpla las condiciones para retirar el dinero.
?Como puedo reclamar un bono sin deposito?
En la mayoria de los casos, puede hacer uso de los bonos sin deposito al crear una cuenta en cualquier sitio de juego en linea que ofrezca este tipo de oferta. En la version online del casino, la bonificacion puede aparecer en la pagina de promociones del casino o en una ventana emergente. Algunos casinos requieren que introduzca un codigo promocional para acceder al bono.
Cuando considere reclamar un bono sin deposito (o cualquier otro tipo de bono) debe asegurarse de leer los terminos y condiciones que se adjuntan al bono. Los diferentes casinos pueden tener sus propias regulaciones y limites, sin embargo, hay algunos que son iguales en todos los casinos.
REQUISITOS PARA TRABAJAR
Los bonos sobre los depositos son accesibles para todos, sin embargo, cobrar los bonos es un asunto un poco mas controlado. La mayoria de los casinos en linea le permitiran retirar sus ganancias despues de haber podido apostar una cantidad especifica.
Los requisitos de apuesta se muestran como multiplicadores. Representan la cantidad de veces que tienes que apostar en un bono para poder retirar el dinero. Por lo general, puede jugar a una serie de juegos seleccionados por el operador del casino. Una vez que haya alcanzado el requisito de apuesta, podra dar el siguiente paso para cobrar su bono.
PLAZO
Segun el casino online, el bono para juegos de tragaperras de deposito puede caducar en cuestion de dias o durar hasta 30 dias. Para asegurarte de que cumples los requisitos de apuestas, es posible que tengas que planificar tu rutina de juego a lo largo del bono.
TAMANOS DE APUESTA
Un metodo para lograr su objetivo de apostar mas rapido es realizar la mayor cantidad de apuestas posible en cada juego. Es un metodo sensato, a menos que el operador del casino decida controlar la cantidad de la apuesta y limitar la cantidad de apuestas en la respectiva tragamonedas con bono sin deposito.
SE REQUIERE UN DEPOSITO
Aunque suene contradictorio, algunos casinos online pueden incluso exigir a los jugadores que depositen dinero antes de poder retirar su bono. Suelen anadir este requisito adicional por razones de seguridad.
RESTRICCIONES
A veces, se le puede negar el acceso a un bono con oferta de deposito gratuito. Esto solo ocurre en muy raras circunstancias, ya sea por el hecho de haber intentado dos bonos a la vez o por tener una direccion IP compartida con un jugador que tambien reclamo el mismo bono, o por residir en una zona restringida.
Puedes obtener informacion mas detallada leyendo el articulo completo en este enlace – https://94fbr.org/art/codigo_promocional_1xslots_bono.html
online pharmacy no presc uk
Электронная регистрация в Росреестре – Сделки онлайн – Центр “Недвижимость и право”
Электронная регистрация в Росреестре сделок с недвижимостью. Ускоренные сроки – 3-7 дней. Выписки из ЕГРН.
online pharmacy
Промокод 1xbet на сегодня актуален, бонус будет зачислен сразу после первого пополнения счета. Временные коды. Букмекерская контора 1xbet часто выступает спонсором при переводе популярных сериалов на русский язык. Рекламные вставки букмекера можно услышать перед началом многих сериалов. Часто в такой рекламе диктуется специальные промокод, дающий возможность беттерам рассчитывать на дополнительный бонус. Максимальный бонус при регистрации составляется 32500 рублей. Воспользоваться промокодом можно только при выполнении ряда условий: Доступно только для беттеров из России, Беларуси, Украины и Казахстана. Возврат игрока – от 18 лет. промокоды на 1хбет на ставку сегодня бесплатную. Промокод 1xbet сегодня найти в интернете не так сложно, достаточно воспользоваться любой поисковой системой. Но обращайте внимание на профессиональность ресурса, откуда будет скопирован промокод. Многие сайты предлагают неактуальные бонусные коды, которые не дадут никакого повышенного депозита после регистрации. На нашем сайте представлен актуальный промокод 1xbet на 2024 год. Вводите промокод, чтобы получить 100% сверху после первого пополнения. Минимальная сумма депозита для использования промокода – 100 рублей. Ограничивается бонус 1хбет суммой в 32500 рублей – более подробно в этом материале https://clockfase.com/auth/elmn/?promokod-1xbet.html
Электронная регистрация в Росреестре – Сделки онлайн – Центр “Недвижимость и право”
Электронная регистрация в Росреестре сделок с недвижимостью. Ускоренные сроки – 3-7 дней. Выписки из ЕГРН.
Аренда квартир посуточно посуточно и на длительный срок, любого типа и комфорта в Крыму и г. Симферополь
prinivil price
buy valtrex online canada
Получи 32500 руб. по актуальному промо коду для 1хбет бесплатно. Новые купоны на регистрацию каждый час на сайте. В ваших силах получить до шести с половиной тысяч рублей при регистрации. Читайте ниже как использовать наши промо-коды. промокоды на 1хбет на ставку сегодня бесплатную. Букмекерская контора позволяет использовать промокод 1иксбет на ставку-бонус. Забирайте новые купоны ежедневно. Внимание! Наши промо-купоны подходят для всех акций букмекера. Этот купон также универсальный – используйте его везде, не только при регистрации на сайте БК 1хбет и всех известных его зеркал. Введите его в форме для регистрации и получите увеличенный бонус на первый депозит до 32500 рублей. Кроме того, букмекер постоянно дарит активным клиентам выгодные подарки. Чтобы получить промокод в 1xBet бесплатно: Подпишитесь на рассылку новостей по смс или электронной почте. Регулярно заходите в раздел «Бонусы и подарки» в Личном кабинете – более подробно в этом материале https://clockfase.com/auth/elmn/?promokod-1xbet.html
Привет всем!
Новостная лента, которая объединяет Украину и мир: мгновенные обновления и глубокий анализ.
Ждем Вас на https://wian.top/category/economics
главные новости мира
новости Украины сейчас
новости Украины видео
все новости Украины
Удачи и хороших новостей!
선도적인 업체인 최신 프라그마틱 게임은 iGaming 분야에서 혁신적이고 표준화된 콘텐츠를 제공하며 슬롯, 라이브 카지노, 빙고 등을 통해 고객에게 엔터테인먼트를 제공합니다.
프라그마틱 슬롯 무료 체험
프라그마틱 게임은 정말로 혁신적이에요. 특히 슬롯 게임들은 항상 기대 이상의 재미를 선사합니다!
https://www.12315es.cn/
https://www.12315nw.cn/
https://www.12315lu.cn/
как вводить промокод в 1хбет на телефоне. Пользователи при регистрации или позже могут воспользоваться промокодами для получения различных бонусов от букмекерской конторы. Найти эти коды можно на различных тематических сайтах, а также на рабочем зеркале. 1xbet предлагает несколько способов регистрации на рабочем зеркале сайта. Компания внимательно относится к новым клиентам, поэтому предполагает многоуровневую систему защиты от того, чтобы дети не смогли заключать пари. согласно международному праву, наказание за это нарушение – штраф и отзыв лицензии. Регистрация в 1 клик. Так называется ускоренный процесс создания учетной записи. Актуальные промокоды на 1xbet бесплатно можно получить: На нашем портале. На сайтах интернет-ресурсов партнёров букмекерской конторы или различных СМИ. Любой желающий может достаточно просто найти промокод 1xbet на сегодня бесплатно. Бонусы – достойные, а условия их получения – реальные и осуществимые. А в некоторых случаях вообще ничего делать не надо – более подробно в этом материале https://clockfase.com/auth/elmn/?promokod-1xbet.html
Доброго!
Скачивание торрентов никогда не было таким простым и удобным, как с uFiler.
Это бесплатная программа, которая предлагает интуитивно понятный интерфейс для управления загрузками.
Добавляйте торрент-файлы одним кликом, отслеживайте процесс скачивания и настраивайте скорость загрузки в соответствии с вашими потребностями.
uFiler предоставляет все необходимые инструменты для комфортной работы с торрентами.
Попробуйте это приложение уже сегодня, загрузив его абсолютно бесплатно по ссылке https://ufile-for-pc.ru/
ufiler скачать на пк бесплатно
ufiler скачать торрент
как скачивать через ufiler
ufiler
ufiler pro
Удачи и хорошего серфинга по торрентам!
happy family store pharmacy coupon
buy synthroid 25 mcg online
azithromycin 500 mg generic price
azithromycin capsules 500mg
best online foreign pharmacies
cost of valtrex in mexico
elementor
elementor
prednisone 20 mg tablet cost
otc synthroid
buy viagra online
tadalafil online no rx
buy metformin 250 mg
Доброго!
Мгновенные новости Украины и мира: будьте в курсе событий, которые формируют настоящее и будущее.
Лучший сайт по теме https://wian.top/category/tech
Главные новости Украины
новости Украины видео
авто нвоости
последние новости мира
Удачи и хороших новостей!
synthroid 112 mg
price lisinopril 20 mg
lisinopril online canadian pharmacy
buy prednisone tablets uk
Советуем посетить сайт https://gulliverauto.ru/
Также не забудьте добавить сайт в закладки: https://gulliverauto.ru/
프라그마틱과 관련된 내용 감사합니다! 또한, 제 사이트에서도 프라그마틱에 대한 정보를 찾아보실 수 있어요. 서로 이야기 공유하며 더 많은 지식을 얻어가요!
프라그마틱 홈페이지
프라그마틱에 대한 글 읽는 것이 정말 즐거웠어요! 또한, 제 사이트에서도 프라그마틱과 관련된 정보를 공유하고 있어요. 함께 발전하며 더 많은 지식을 쌓아가요!
http://holyshirtsandpants.net/
https://e-trajet.net/hot/
https://aintec.net/hot/
synthroid 0.5 mcg
happy family drug store
Здравствуйте!
Обзор дня в Кропивницком: что произошло в городе сегодня?
Посетите https://0522.kr.ua/category/news-ukraine/
Новости Кропивницкого сегодня
новости Кропивницкого сейчас
новости Украины видео
Удачи и хороших новостей!
you are in point of fact a good webmaster. The web site loading speed is incredible.
It seems that you’re doing any unique trick. Also, The contents are masterpiece.
you’ve performed a fantastic process on this topic!
synthroid 200 mcg price
buy viagra online
https://goznak-diplomms.com/ Купить диплом о среднем специальном образовании- Это способ завладеть официальный бумага о окончании образовательного учреждения. Диплом открывает двери к последующим карьерным перспективам и карьерному развитию.
покер онлайн
Советуем посетить сайт https://doutuapse.ru/
Также не забудьте добавить сайт в закладки: https://doutuapse.ru/
cheap generic valtrex online
Opened up an enthralling read Ц I’d like to share it with you https://www.bruinsnation.com/users/worksale555
legitimate mexican pharmacy online
Greate article. Keep posting such kind of info on your page.
Im really impressed by your site.
Hey there, You have performed an excellent job. I will definitely
digg it and individually suggest to my friends. I’m confident they’ll be benefited from this website.
prednisone brand name india
https://sporty24.site/
synthroid pharmacy
generic zestoretic
Советуем посетить сайт https://russkiy-spaniel.ru/
Также не забудьте добавить сайт в закладки: https://russkiy-spaniel.ru/
azithromycin 250 mg over the counter
pharmacy drugs
synthroid 0.1 mg
azithromycin no prescription
buying lisinopril in mexico
where to buy tadalafil online
online pharmacy no rx
rx online pharmacy
italian pharmacy online
https://preceptor.flybb.ru/topic6047.html?view=previous
https://goup.hashnode.dev/dostignite-svoih-celej-s-legalnym-diplomom-kupite-diplom-i-podtverdite-svoi-zaslugi
https://malov.buryatschool.ru/?section_id=32
https://vg-news.ru/n/150088
https://footballfacts.ru/place/104-buryatmongolskayaassr
buy generic cialis online in canada
tadalafil 20mg canada
cost of prednisone prescription
prednisone 5 mg tablet
prednisone 20 mg purchase
valtrex canada cost
azithromycin 500 tablet price
synthroid mexico
zestril 40
where can i get valtrex
EL CODIGO PROMOCIONAL DE 1XSLOTS CASINO
Sin introducir un codigo promocional 1xSlots Casino, como nuevo cliente en March 2024, puede beneficiarse de una bonificacion del 100% hasta 300€. El casino le proporciona un monton de maquinas tragaperras populares de proveedores de software como iSoftBet, Elk Studios o Play’n GO y otros. De forma adicional, se le otorgaran|esta oferta incluye 30 turnos gratuitos.. Todas las informaciones importantes respecto a esta oferta de bienvenida se puede encontrar en este articulo.
?COMO FUNCIONA EL CODIGO PROMOCIONAL DE 1XSLOTS CASINO?
En 1xSlots Casino se puede obtener una bonificacion del 100% hasta 300€ y turnos gratuitos en 1xSlots Casino. Haga su inicial deposito en 1xSlots Casino tras finalizar el proceso de inscripcion. No hace falta solicitar su bonificacion de bienvenida por e-mail ni el chat en directo como en otros casinos, porque 1xSlots Casino la abona a su cuenta automaticamente. La oferta de bienvenida se activa cuando deposite 10€ o mas. Haga un deposito empleando EcoPayz, Boku o Bitcoin u otro metodo de deposito disponible en el casino.
Mas sobre el bono
1xSlots Casino le da la oportunidad de incrementar su balance hasta 300€ (100%). Obtenga la bonificacion superior al depositar 300€ y conseguir 600€ que se anadiran en su cuenta. Los fondos de su bonificacion es compatible con tragaperras de proveedores de software como Red Tiger Gaming, Evolution Gaming y Microgaming, por nombrar unos cuantos. Debe tenerse en cuenta tambien que su cuenta se incrementara con 30 turnos gratuitos.
Bono de bienvenida 1xSlots 2024
Dentro de 1xSlots existen dos bonos de bienvenida, uno standard y uno exclusivo. El primero de ellas recompensa con un paquete de hasta €1500 y 150 giros gratis mientras que el segundo otorga un 10% adicional recompensando hasta €1650 y 150 giros gratis ?La diferencia? El bono exclusivo se obtiene mediante el uso del 1xSlots promocode NEXT777.
Las recompensas de la bonificacion exclusiva son otorgadas en los 4 primeros depositos de la siguiente manera:
100% del primer deposito hasta €450 + 30 giros gratis
100% del segundo deposito hasta €350 + 35 giros gratis
100% del tercer deposito hasta €400 + 40 giros gratis
100% del cuarto deposito hasta €450 + 45 giros gratis
Bono de bienvenida 1xSlots Argentina 2024
Cabe resaltar que durante tu proceso de registro tienes que elegir tu moneda local preferida. De este modo obtendras la bonificacion de bienvenida 1xSlots Argentina en pesos. Puedes recibir el bono exclusivo 1xSlots Argentina al utilizar nuestro codigo de bono 1xSlots Argentina NEXT777 durante el proceso de registro.
Ademas, si ingresas el codigo NEXT777 a la pestana “Bonos y Regalos” despues de hacer tu primer deposito, puedes recibir el bono con giros gratis 1xSlots Argentina que te otorgara 60 FS en tragamonedas 777 GEMS RESPIN. A continuacion encontraras los valores de bonos en pesos argentinos.
Bono de bienvenida 1xSlots Chile 2024
El bono de bienvenida 1xSlots Chile funciona del mismo modo como en Argentina. Tienes que crear tu cuenta e ingresar nuestro codigo de promocion 1xslots Chile NEXT777 al formulario de registro. Puedes elegir el peso chileno como tu moneda local para recibir la bonificacion de bienvenida 1xSlots Chile. Adicionalmente, para obtener 60 giros gratis en 777 GEMS RESPIN, introduce el codigo NEXT777 al hacer tu primer deposito.
?QUE ES UN BONO DE TRAGAPERRAS SIN DEPOSITO?
Como su nombre indica, un bono de tragaperras sin deposito es un tipo de bono de casino que no necesita que los jugadores depositen dinero para poder optar a cualquier tipo de recompensa. Por ejemplo, giros gratis, creditos de casino o incluso dinero en efectivo.
Los bonos sin deposito se dan generalmente a los jugadores potenciales para motivar a los nuevos jugadores para que se registren. Pueden formar parte de los paquetes de bienvenida que un casino online ofrece a todos sus jugadores potenciales y ayudan a atraer la atencion hacia la marca del casino. Tambien pueden ofrecerse a los jugadores con cuentas en determinadas situaciones.
Las tragaperras con bono sin deposito ofrecen la posibilidad de probar las tragaperras online sin coste alguno y quedandose con el dinero que se obtiene, razon por la que son muy codiciadas. Sin embargo, los bonos sin deposito no te obligan a depositar dinero cuando la promocion termina, aunque se sugiere.
?CUALES SON LOS PRINCIPALES TIPOS DE BONOS DE TRAGAMONEDAS SIN DEPOSITO?
Los bonos sin deposito estan disponibles en tres variedades: giros gratis, creditos gratis o dinero en efectivo. El tipo mas conocido que es un bono sin deposito no spins without deposit bonus.
GIROS GRATIS CON BONO SIN DEPOSITO
Todos sabemos que las maquinas tragaperras son las mas populares en el mundo de los juegos de casino , por lo que es natural que un bono hecho especificamente para las maquinas que juegan a las tragaperras sea el mas buscado. Para los amantes de las maquinas tragaperras, los bonos de tiradas gratis sin deposito son un verdadero tesoro, ya que permiten a los jugadores jugar a sus maquinas tragaperras favoritas sin depositar dinero, y con una gran cantidad de tiradas gratis, lo que aumenta sus probabilidades de ganar significativamente.
Creditos gratuitos / BONO DE JUEGO GRATUITO SIN DEPOSITO
En lugar de tiradas gratis, los casinos pueden optar por dar creditos gratis a los jugadores que tienen bonos sin deposito. Estos creditos pueden ser utilizados dentro de un periodo de tiempo enumerado para apostar en juegos en los casinos y ganar dinero real. Los bonos sin deposito y los creditos gratuitos se ofrecen tanto en las tragaperras gratuitas como en otros juegos de los casinos.
DINERO GRATIS CON BONOS SIN DEPOSITO
Al igual que los creditos gratuitos con los bonos sin deposito, los bonos de dinero sin deposito que no requieren deposito se pueden jugar tanto en las tragaperras como en otros juegos de casino. Una vez que haya reclamado y jugado el bono de dinero sin deposito, podra retirar el dinero del bono y cualquier ganancia adicional siempre que cumpla las condiciones para retirar el dinero.
?Como puedo reclamar un bono sin deposito?
En la mayoria de los casos, puede hacer uso de los bonos sin deposito al crear una cuenta en cualquier sitio de juego en linea que ofrezca este tipo de oferta. En la version online del casino, la bonificacion puede aparecer en la pagina de promociones del casino o en una ventana emergente. Algunos casinos requieren que introduzca un codigo promocional para acceder al bono.
Cuando considere reclamar un bono sin deposito (o cualquier otro tipo de bono) debe asegurarse de leer los terminos y condiciones que se adjuntan al bono. Los diferentes casinos pueden tener sus propias regulaciones y limites, sin embargo, hay algunos que son iguales en todos los casinos.
REQUISITOS PARA TRABAJAR
Los bonos sobre los depositos son accesibles para todos, sin embargo, cobrar los bonos es un asunto un poco mas controlado. La mayoria de los casinos en linea le permitiran retirar sus ganancias despues de haber podido apostar una cantidad especifica.
Los requisitos de apuesta se muestran como multiplicadores. Representan la cantidad de veces que tienes que apostar en un bono para poder retirar el dinero. Por lo general, puede jugar a una serie de juegos seleccionados por el operador del casino. Una vez que haya alcanzado el requisito de apuesta, podra dar el siguiente paso para cobrar su bono.
PLAZO
Segun el casino online, el bono para juegos de tragaperras de deposito puede caducar en cuestion de dias o durar hasta 30 dias. Para asegurarte de que cumples los requisitos de apuestas, es posible que tengas que planificar tu rutina de juego a lo largo del bono.
TAMANOS DE APUESTA
Un metodo para lograr su objetivo de apostar mas rapido es realizar la mayor cantidad de apuestas posible en cada juego. Es un metodo sensato, a menos que el operador del casino decida controlar la cantidad de la apuesta y limitar la cantidad de apuestas en la respectiva tragamonedas con bono sin deposito.
SE REQUIERE UN DEPOSITO
Aunque suene contradictorio, algunos casinos online pueden incluso exigir a los jugadores que depositen dinero antes de poder retirar su bono. Suelen anadir este requisito adicional por razones de seguridad.
RESTRICCIONES
A veces, se le puede negar el acceso a un bono con oferta de deposito gratuito. Esto solo ocurre en muy raras circunstancias, ya sea por el hecho de haber intentado dos bonos a la vez o por tener una direccion IP compartida con un jugador que tambien reclamo el mismo bono, o por residir en una zona restringida.
Puedes obtener informacion mas detallada leyendo el articulo completo en este enlace – https://94fbr.org/art/codigo_promocional_1xslots_bono.html
EL CODIGO PROMOCIONAL DE 1XSLOTS CASINO
Sin introducir un codigo promocional 1xSlots Casino, como nuevo cliente en March 2024, puede beneficiarse de una bonificacion del 100% hasta 300€. El casino le proporciona un monton de maquinas tragaperras populares de proveedores de software como iSoftBet, Elk Studios o Play’n GO y otros. De forma adicional, se le otorgaran|esta oferta incluye 30 turnos gratuitos.. Todas las informaciones importantes respecto a esta oferta de bienvenida se puede encontrar en este articulo.
?COMO FUNCIONA EL CODIGO PROMOCIONAL DE 1XSLOTS CASINO?
En 1xSlots Casino se puede obtener una bonificacion del 100% hasta 300€ y turnos gratuitos en 1xSlots Casino. Haga su inicial deposito en 1xSlots Casino tras finalizar el proceso de inscripcion. No hace falta solicitar su bonificacion de bienvenida por e-mail ni el chat en directo como en otros casinos, porque 1xSlots Casino la abona a su cuenta automaticamente. La oferta de bienvenida se activa cuando deposite 10€ o mas. Haga un deposito empleando EcoPayz, Boku o Bitcoin u otro metodo de deposito disponible en el casino.
Mas sobre el bono
1xSlots Casino le da la oportunidad de incrementar su balance hasta 300€ (100%). Obtenga la bonificacion superior al depositar 300€ y conseguir 600€ que se anadiran en su cuenta. Los fondos de su bonificacion es compatible con tragaperras de proveedores de software como Red Tiger Gaming, Evolution Gaming y Microgaming, por nombrar unos cuantos. Debe tenerse en cuenta tambien que su cuenta se incrementara con 30 turnos gratuitos.
Bono de bienvenida 1xSlots 2024
Dentro de 1xSlots existen dos bonos de bienvenida, uno standard y uno exclusivo. El primero de ellas recompensa con un paquete de hasta €1500 y 150 giros gratis mientras que el segundo otorga un 10% adicional recompensando hasta €1650 y 150 giros gratis ?La diferencia? El bono exclusivo se obtiene mediante el uso del 1xSlots promocode NEXT777.
Las recompensas de la bonificacion exclusiva son otorgadas en los 4 primeros depositos de la siguiente manera:
100% del primer deposito hasta €450 + 30 giros gratis
100% del segundo deposito hasta €350 + 35 giros gratis
100% del tercer deposito hasta €400 + 40 giros gratis
100% del cuarto deposito hasta €450 + 45 giros gratis
Bono de bienvenida 1xSlots Argentina 2024
Cabe resaltar que durante tu proceso de registro tienes que elegir tu moneda local preferida. De este modo obtendras la bonificacion de bienvenida 1xSlots Argentina en pesos. Puedes recibir el bono exclusivo 1xSlots Argentina al utilizar nuestro codigo de bono 1xSlots Argentina NEXT777 durante el proceso de registro.
Ademas, si ingresas el codigo NEXT777 a la pestana “Bonos y Regalos” despues de hacer tu primer deposito, puedes recibir el bono con giros gratis 1xSlots Argentina que te otorgara 60 FS en tragamonedas 777 GEMS RESPIN. A continuacion encontraras los valores de bonos en pesos argentinos.
Bono de bienvenida 1xSlots Chile 2024
El bono de bienvenida 1xSlots Chile funciona del mismo modo como en Argentina. Tienes que crear tu cuenta e ingresar nuestro codigo promocional de 1xslots giros gratis Chile NEXT777 al formulario de registro. Puedes elegir el peso chileno como tu moneda local para recibir la bonificacion de bienvenida 1xSlots Chile. Adicionalmente, para obtener 60 giros gratis en 777 GEMS RESPIN, introduce el codigo NEXT777 al hacer tu primer deposito.
?QUE ES UN BONO DE TRAGAPERRAS SIN DEPOSITO?
Como su nombre indica, un bono de tragaperras sin deposito es un tipo de bono de casino que no necesita que los jugadores depositen dinero para poder optar a cualquier tipo de recompensa. Por ejemplo, giros gratis, creditos de casino o incluso dinero en efectivo.
Los bonos sin deposito se dan generalmente a los jugadores potenciales para motivar a los nuevos jugadores para que se registren. Pueden formar parte de los paquetes de bienvenida que un casino online ofrece a todos sus jugadores potenciales y ayudan a atraer la atencion hacia la marca del casino. Tambien pueden ofrecerse a los jugadores con cuentas en determinadas situaciones.
Las tragaperras con bono sin deposito ofrecen la posibilidad de probar las tragaperras online sin coste alguno y quedandose con el dinero que se obtiene, razon por la que son muy codiciadas. Sin embargo, los bonos sin deposito no te obligan a depositar dinero cuando la promocion termina, aunque se sugiere.
?CUALES SON LOS PRINCIPALES TIPOS DE BONOS DE TRAGAMONEDAS SIN DEPOSITO?
Los bonos sin deposito estan disponibles en tres variedades: giros gratis, creditos gratis o dinero en efectivo. El tipo mas conocido que es un bono sin deposito no spins without deposit bonus.
GIROS GRATIS CON BONO SIN DEPOSITO
Todos sabemos que las maquinas tragaperras son las mas populares en el mundo de los juegos de casino , por lo que es natural que un bono hecho especificamente para las maquinas que juegan a las tragaperras sea el mas buscado. Para los amantes de las maquinas tragaperras, los bonos de tiradas gratis sin deposito son un verdadero tesoro, ya que permiten a los jugadores jugar a sus maquinas tragaperras favoritas sin depositar dinero, y con una gran cantidad de tiradas gratis, lo que aumenta sus probabilidades de ganar significativamente.
Creditos gratuitos / BONO DE JUEGO GRATUITO SIN DEPOSITO
En lugar de tiradas gratis, los casinos pueden optar por dar creditos gratis a los jugadores que tienen bonos sin deposito. Estos creditos pueden ser utilizados dentro de un periodo de tiempo enumerado para apostar en juegos en los casinos y ganar dinero real. Los bonos sin deposito y los creditos gratuitos se ofrecen tanto en las tragaperras gratuitas como en otros juegos de los casinos.
DINERO GRATIS CON BONOS SIN DEPOSITO
Al igual que los creditos gratuitos con los bonos sin deposito, los bonos de dinero sin deposito que no requieren deposito se pueden jugar tanto en las tragaperras como en otros juegos de casino. Una vez que haya reclamado y jugado el bono de dinero sin deposito, podra retirar el dinero del bono y cualquier ganancia adicional siempre que cumpla las condiciones para retirar el dinero.
?Como puedo reclamar un bono sin deposito?
En la mayoria de los casos, puede hacer uso de los bonos sin deposito al crear una cuenta en cualquier sitio de juego en linea que ofrezca este tipo de oferta. En la version online del casino, la bonificacion puede aparecer en la pagina de promociones del casino o en una ventana emergente. Algunos casinos requieren que introduzca un codigo promocional para acceder al bono.
Cuando considere reclamar un bono sin deposito (o cualquier otro tipo de bono) debe asegurarse de leer los terminos y condiciones que se adjuntan al bono. Los diferentes casinos pueden tener sus propias regulaciones y limites, sin embargo, hay algunos que son iguales en todos los casinos.
REQUISITOS PARA TRABAJAR
Los bonos sobre los depositos son accesibles para todos, sin embargo, cobrar los bonos es un asunto un poco mas controlado. La mayoria de los casinos en linea le permitiran retirar sus ganancias despues de haber podido apostar una cantidad especifica.
Los requisitos de apuesta se muestran como multiplicadores. Representan la cantidad de veces que tienes que apostar en un bono para poder retirar el dinero. Por lo general, puede jugar a una serie de juegos seleccionados por el operador del casino. Una vez que haya alcanzado el requisito de apuesta, podra dar el siguiente paso para cobrar su bono.
PLAZO
Segun el casino online, el bono para juegos de tragaperras de deposito puede caducar en cuestion de dias o durar hasta 30 dias. Para asegurarte de que cumples los requisitos de apuestas, es posible que tengas que planificar tu rutina de juego a lo largo del bono.
TAMANOS DE APUESTA
Un metodo para lograr su objetivo de apostar mas rapido es realizar la mayor cantidad de apuestas posible en cada juego. Es un metodo sensato, a menos que el operador del casino decida controlar la cantidad de la apuesta y limitar la cantidad de apuestas en la respectiva tragamonedas con bono sin deposito.
SE REQUIERE UN DEPOSITO
Aunque suene contradictorio, algunos casinos online pueden incluso exigir a los jugadores que depositen dinero antes de poder retirar su bono. Suelen anadir este requisito adicional por razones de seguridad.
RESTRICCIONES
A veces, se le puede negar el acceso a un bono con oferta de deposito gratuito. Esto solo ocurre en muy raras circunstancias, ya sea por el hecho de haber intentado dos bonos a la vez o por tener una direccion IP compartida con un jugador que tambien reclamo el mismo bono, o por residir en una zona restringida.
Puedes obtener informacion mas detallada leyendo el articulo completo en este enlace – https://94fbr.org/art/codigo_promocional_1xslots_bono.html
EL CODIGO PROMOCIONAL DE 1XSLOTS CASINO
Sin introducir un codigo promocional 1xSlots Casino, como nuevo cliente en March 2024, puede beneficiarse de una bonificacion del 100% hasta 300€. El casino le proporciona un monton de maquinas tragaperras populares de proveedores de software como iSoftBet, Elk Studios o Play’n GO y otros. De forma adicional, se le otorgaran|esta oferta incluye 30 turnos gratuitos.. Todas las informaciones importantes respecto a esta oferta de bienvenida se puede encontrar en este articulo.
?COMO FUNCIONA EL CODIGO PROMOCIONAL DE 1XSLOTS CASINO?
En 1xSlots Casino se puede obtener una bonificacion del 100% hasta 300€ y turnos gratuitos en 1xSlots Casino. Haga su inicial deposito en 1xSlots Casino tras finalizar el proceso de inscripcion. No hace falta solicitar su bonificacion de bienvenida por e-mail ni el chat en directo como en otros casinos, porque 1xSlots Casino la abona a su cuenta automaticamente. La oferta de bienvenida se activa cuando deposite 10€ o mas. Haga un deposito empleando EcoPayz, Boku o Bitcoin u otro metodo de deposito disponible en el casino.
Mas sobre el bono
1xSlots Casino le da la oportunidad de incrementar su balance hasta 300€ (100%). Obtenga la bonificacion superior al depositar 300€ y conseguir 600€ que se anadiran en su cuenta. Los fondos de su bonificacion es compatible con tragaperras de proveedores de software como Red Tiger Gaming, Evolution Gaming y Microgaming, por nombrar unos cuantos. Debe tenerse en cuenta tambien que su cuenta se incrementara con 30 turnos gratuitos.
Bono de bienvenida 1xSlots 2024
Dentro de 1xSlots existen dos bonos de bienvenida, uno standard y uno exclusivo. El primero de ellas recompensa con un paquete de hasta €1500 y 150 giros gratis mientras que el segundo otorga un 10% adicional recompensando hasta €1650 y 150 giros gratis ?La diferencia? El bono exclusivo se obtiene mediante el uso del 1xSlots promocode NEXT777.
Las recompensas de la bonificacion exclusiva son otorgadas en los 4 primeros depositos de la siguiente manera:
100% del primer deposito hasta €450 + 30 giros gratis
100% del segundo deposito hasta €350 + 35 giros gratis
100% del tercer deposito hasta €400 + 40 giros gratis
100% del cuarto deposito hasta €450 + 45 giros gratis
Bono de bienvenida 1xSlots Argentina 2024
Cabe resaltar que durante tu proceso de registro tienes que elegir tu moneda local preferida. De este modo obtendras la bonificacion de bienvenida 1xSlots Argentina en pesos. Puedes recibir el bono exclusivo 1xSlots Argentina al utilizar nuestro codigo de bono 1xSlots Argentina NEXT777 durante el proceso de registro.
Ademas, si ingresas el codigo NEXT777 a la pestana “Bonos y Regalos” despues de hacer tu primer deposito, puedes recibir el bono con giros gratis 1xSlots Argentina que te otorgara 60 FS en tragamonedas 777 GEMS RESPIN. A continuacion encontraras los valores de bonos en pesos argentinos.
Bono de bienvenida 1xSlots Chile 2024
El bono de bienvenida 1xSlots Chile funciona del mismo modo como en Argentina. Tienes que crear tu cuenta e ingresar nuestro promocion de codigo 1xslots 2024 Chile NEXT777 al formulario de registro. Puedes elegir el peso chileno como tu moneda local para recibir la bonificacion de bienvenida 1xSlots Chile. Adicionalmente, para obtener 60 giros gratis en 777 GEMS RESPIN, introduce el codigo NEXT777 al hacer tu primer deposito.
?QUE ES UN BONO DE TRAGAPERRAS SIN DEPOSITO?
Como su nombre indica, un bono de tragaperras sin deposito es un tipo de bono de casino que no necesita que los jugadores depositen dinero para poder optar a cualquier tipo de recompensa. Por ejemplo, giros gratis, creditos de casino o incluso dinero en efectivo.
Los bonos sin deposito se dan generalmente a los jugadores potenciales para motivar a los nuevos jugadores para que se registren. Pueden formar parte de los paquetes de bienvenida que un casino online ofrece a todos sus jugadores potenciales y ayudan a atraer la atencion hacia la marca del casino. Tambien pueden ofrecerse a los jugadores con cuentas en determinadas situaciones.
Las tragaperras con bono sin deposito ofrecen la posibilidad de probar las tragaperras online sin coste alguno y quedandose con el dinero que se obtiene, razon por la que son muy codiciadas. Sin embargo, los bonos sin deposito no te obligan a depositar dinero cuando la promocion termina, aunque se sugiere.
?CUALES SON LOS PRINCIPALES TIPOS DE BONOS DE TRAGAMONEDAS SIN DEPOSITO?
Los bonos sin deposito estan disponibles en tres variedades: giros gratis, creditos gratis o dinero en efectivo. El tipo mas conocido que es un bono sin deposito no spins without deposit bonus.
GIROS GRATIS CON BONO SIN DEPOSITO
Todos sabemos que las maquinas tragaperras son las mas populares en el mundo de los juegos de casino , por lo que es natural que un bono hecho especificamente para las maquinas que juegan a las tragaperras sea el mas buscado. Para los amantes de las maquinas tragaperras, los bonos de tiradas gratis sin deposito son un verdadero tesoro, ya que permiten a los jugadores jugar a sus maquinas tragaperras favoritas sin depositar dinero, y con una gran cantidad de tiradas gratis, lo que aumenta sus probabilidades de ganar significativamente.
Creditos gratuitos / BONO DE JUEGO GRATUITO SIN DEPOSITO
En lugar de tiradas gratis, los casinos pueden optar por dar creditos gratis a los jugadores que tienen bonos sin deposito. Estos creditos pueden ser utilizados dentro de un periodo de tiempo enumerado para apostar en juegos en los casinos y ganar dinero real. Los bonos sin deposito y los creditos gratuitos se ofrecen tanto en las tragaperras gratuitas como en otros juegos de los casinos.
DINERO GRATIS CON BONOS SIN DEPOSITO
Al igual que los creditos gratuitos con los bonos sin deposito, los bonos de dinero sin deposito que no requieren deposito se pueden jugar tanto en las tragaperras como en otros juegos de casino. Una vez que haya reclamado y jugado el bono de dinero sin deposito, podra retirar el dinero del bono y cualquier ganancia adicional siempre que cumpla las condiciones para retirar el dinero.
?Como puedo reclamar un bono sin deposito?
En la mayoria de los casos, puede hacer uso de los bonos sin deposito al crear una cuenta en cualquier sitio de juego en linea que ofrezca este tipo de oferta. En la version online del casino, la bonificacion puede aparecer en la pagina de promociones del casino o en una ventana emergente. Algunos casinos requieren que introduzca un codigo promocional para acceder al bono.
Cuando considere reclamar un bono sin deposito (o cualquier otro tipo de bono) debe asegurarse de leer los terminos y condiciones que se adjuntan al bono. Los diferentes casinos pueden tener sus propias regulaciones y limites, sin embargo, hay algunos que son iguales en todos los casinos.
REQUISITOS PARA TRABAJAR
Los bonos sobre los depositos son accesibles para todos, sin embargo, cobrar los bonos es un asunto un poco mas controlado. La mayoria de los casinos en linea le permitiran retirar sus ganancias despues de haber podido apostar una cantidad especifica.
Los requisitos de apuesta se muestran como multiplicadores. Representan la cantidad de veces que tienes que apostar en un bono para poder retirar el dinero. Por lo general, puede jugar a una serie de juegos seleccionados por el operador del casino. Una vez que haya alcanzado el requisito de apuesta, podra dar el siguiente paso para cobrar su bono.
PLAZO
Segun el casino online, el bono para juegos de tragaperras de deposito puede caducar en cuestion de dias o durar hasta 30 dias. Para asegurarte de que cumples los requisitos de apuestas, es posible que tengas que planificar tu rutina de juego a lo largo del bono.
TAMANOS DE APUESTA
Un metodo para lograr su objetivo de apostar mas rapido es realizar la mayor cantidad de apuestas posible en cada juego. Es un metodo sensato, a menos que el operador del casino decida controlar la cantidad de la apuesta y limitar la cantidad de apuestas en la respectiva tragamonedas con bono sin deposito.
SE REQUIERE UN DEPOSITO
Aunque suene contradictorio, algunos casinos online pueden incluso exigir a los jugadores que depositen dinero antes de poder retirar su bono. Suelen anadir este requisito adicional por razones de seguridad.
RESTRICCIONES
A veces, se le puede negar el acceso a un bono con oferta de deposito gratuito. Esto solo ocurre en muy raras circunstancias, ya sea por el hecho de haber intentado dos bonos a la vez o por tener una direccion IP compartida con un jugador que tambien reclamo el mismo bono, o por residir en una zona restringida.
Puedes obtener informacion mas detallada leyendo el articulo completo en este enlace – https://94fbr.org/art/codigo_promocional_1xslots_bono.html
best canadian pharmacy no prescription
online pharmacy
Советуем посетить сайт https://stroydvor89.ru/
Также не забудьте добавить сайт в закладки: https://stroydvor89.ru/
Experience the best in gaming at the most renowned online casinos in Kenya.
вскрыть замок двери цена http://www.azs-zamok13.ru/ .
Hiya! Quick question that’s totally off topic.
Do you know how to make your site mobile friendly?
My site looks weird when viewing from my iphone 4.
I’m trying to find a template or plugin that might be able to
fix this problem. If you have any suggestions, please
share. Cheers!
Советуем посетить сайт https://magic-magnit.ru//
Также не забудьте добавить сайт в закладки: https://magic-magnit.ru/
cialis 40mg india
I really like what you guys are up too. Such clever work and exposure!
Keep up the fantastic works guys I’ve included you guys to blogroll.
canadian pharmacies compare
zestril 5 mg price
azithromycin 500
happy family pharmacy
Завод из России продает разборные гантели Gantel-Razbornaya – у нас найдете обширный каталог вариантов. Качественные утяжелители дают продуктивно выполнять силовые занятия в любом месте. Изделия для спорта отличаются удобством, безопасностью в использовании. Организация эффективно развивает и совершенствует инновационные технологии, чтобы реализовать спортивные цели новых тренирующихся. В изготовлении качественных продуктов всегда используются инновационные марки металла. Огромный ассортимент продуктов позволяет приобрести сборные гантели для продуктивной программы занятий. Для домашних тренировок – это приятный набор с маленькими габаритами и значительной фунциональности.
rate online pharmacies
cheapest pharmacy for prescription drugs
We recommend visiting the website https://mywebsitegirl.com/.
Also, don’t forget to bookmark the site: https://mywebsitegirl.com/
india pharmacy mail order
canadian pharmacy 24 com
buy zithromax usa
https://sporty24.site
EL CODIGO PROMOCIONAL DE 1XSLOTS CASINO
Sin introducir un codigo promocional 1xSlots Casino, como nuevo cliente en March 2024, puede beneficiarse de una bonificacion del 100% hasta 300€. El casino le proporciona un monton de maquinas tragaperras populares de proveedores de software como iSoftBet, Elk Studios o Play’n GO y otros. De forma adicional, se le otorgaran|esta oferta incluye 30 turnos gratuitos.. Todas las informaciones importantes respecto a esta oferta de bienvenida se puede encontrar en este articulo.
?COMO FUNCIONA EL CODIGO PROMOCIONAL DE 1XSLOTS CASINO?
En 1xSlots Casino se puede obtener una bonificacion del 100% hasta 300€ y turnos gratuitos en 1xSlots Casino. Haga su inicial deposito en 1xSlots Casino tras finalizar el proceso de inscripcion. No hace falta solicitar su bonificacion de bienvenida por e-mail ni el chat en directo como en otros casinos, porque 1xSlots Casino la abona a su cuenta automaticamente. La oferta de bienvenida se activa cuando deposite 10€ o mas. Haga un deposito empleando EcoPayz, Boku o Bitcoin u otro metodo de deposito disponible en el casino.
Mas sobre el bono
1xSlots Casino le da la oportunidad de incrementar su balance hasta 300€ (100%). Obtenga la bonificacion superior al depositar 300€ y conseguir 600€ que se anadiran en su cuenta. Los fondos de su bonificacion es compatible con tragaperras de proveedores de software como Red Tiger Gaming, Evolution Gaming y Microgaming, por nombrar unos cuantos. Debe tenerse en cuenta tambien que su cuenta se incrementara con 30 turnos gratuitos.
Bono de bienvenida 1xSlots 2024
Dentro de 1xSlots existen dos bonos de bienvenida, uno standard y uno exclusivo. El primero de ellas recompensa con un paquete de hasta €1500 y 150 giros gratis mientras que el segundo otorga un 10% adicional recompensando hasta €1650 y 150 giros gratis ?La diferencia? El bono exclusivo se obtiene mediante el uso del 1xSlots promocode NEXT777.
Las recompensas de la bonificacion exclusiva son otorgadas en los 4 primeros depositos de la siguiente manera:
100% del primer deposito hasta €450 + 30 giros gratis
100% del segundo deposito hasta €350 + 35 giros gratis
100% del tercer deposito hasta €400 + 40 giros gratis
100% del cuarto deposito hasta €450 + 45 giros gratis
Bono de bienvenida 1xSlots Argentina 2024
Cabe resaltar que durante tu proceso de registro tienes que elegir tu moneda local preferida. De este modo obtendras la bonificacion de bienvenida 1xSlots Argentina en pesos. Puedes recibir el bono exclusivo 1xSlots Argentina al utilizar nuestro codigo de bono 1xSlots Argentina NEXT777 durante el proceso de registro.
Ademas, si ingresas el codigo NEXT777 a la pestana “Bonos y Regalos” despues de hacer tu primer deposito, puedes recibir el bono con giros gratis 1xSlots Argentina que te otorgara 60 FS en tragamonedas 777 GEMS RESPIN. A continuacion encontraras los valores de bonos en pesos argentinos.
Bono de bienvenida 1xSlots Chile 2024
El bono de bienvenida 1xSlots Chile funciona del mismo modo como en Argentina. Tienes que crear tu cuenta e ingresar nuestro codigo promocional de 1xslots giros gratis Chile NEXT777 al formulario de registro. Puedes elegir el peso chileno como tu moneda local para recibir la bonificacion de bienvenida 1xSlots Chile. Adicionalmente, para obtener 60 giros gratis en 777 GEMS RESPIN, introduce el codigo NEXT777 al hacer tu primer deposito.
?QUE ES UN BONO DE TRAGAPERRAS SIN DEPOSITO?
Como su nombre indica, un bono de tragaperras sin deposito es un tipo de bono de casino que no necesita que los jugadores depositen dinero para poder optar a cualquier tipo de recompensa. Por ejemplo, giros gratis, creditos de casino o incluso dinero en efectivo.
Los bonos sin deposito se dan generalmente a los jugadores potenciales para motivar a los nuevos jugadores para que se registren. Pueden formar parte de los paquetes de bienvenida que un casino online ofrece a todos sus jugadores potenciales y ayudan a atraer la atencion hacia la marca del casino. Tambien pueden ofrecerse a los jugadores con cuentas en determinadas situaciones.
Las tragaperras con bono sin deposito ofrecen la posibilidad de probar las tragaperras online sin coste alguno y quedandose con el dinero que se obtiene, razon por la que son muy codiciadas. Sin embargo, los bonos sin deposito no te obligan a depositar dinero cuando la promocion termina, aunque se sugiere.
?CUALES SON LOS PRINCIPALES TIPOS DE BONOS DE TRAGAMONEDAS SIN DEPOSITO?
Los bonos sin deposito estan disponibles en tres variedades: giros gratis, creditos gratis o dinero en efectivo. El tipo mas conocido que es un bono sin deposito no spins without deposit bonus.
GIROS GRATIS CON BONO SIN DEPOSITO
Todos sabemos que las maquinas tragaperras son las mas populares en el mundo de los juegos de casino , por lo que es natural que un bono hecho especificamente para las maquinas que juegan a las tragaperras sea el mas buscado. Para los amantes de las maquinas tragaperras, los bonos de tiradas gratis sin deposito son un verdadero tesoro, ya que permiten a los jugadores jugar a sus maquinas tragaperras favoritas sin depositar dinero, y con una gran cantidad de tiradas gratis, lo que aumenta sus probabilidades de ganar significativamente.
Creditos gratuitos / BONO DE JUEGO GRATUITO SIN DEPOSITO
En lugar de tiradas gratis, los casinos pueden optar por dar creditos gratis a los jugadores que tienen bonos sin deposito. Estos creditos pueden ser utilizados dentro de un periodo de tiempo enumerado para apostar en juegos en los casinos y ganar dinero real. Los bonos sin deposito y los creditos gratuitos se ofrecen tanto en las tragaperras gratuitas como en otros juegos de los casinos.
DINERO GRATIS CON BONOS SIN DEPOSITO
Al igual que los creditos gratuitos con los bonos sin deposito, los bonos de dinero sin deposito que no requieren deposito se pueden jugar tanto en las tragaperras como en otros juegos de casino. Una vez que haya reclamado y jugado el bono de dinero sin deposito, podra retirar el dinero del bono y cualquier ganancia adicional siempre que cumpla las condiciones para retirar el dinero.
?Como puedo reclamar un bono sin deposito?
En la mayoria de los casos, puede hacer uso de los bonos sin deposito al crear una cuenta en cualquier sitio de juego en linea que ofrezca este tipo de oferta. En la version online del casino, la bonificacion puede aparecer en la pagina de promociones del casino o en una ventana emergente. Algunos casinos requieren que introduzca un codigo promocional para acceder al bono.
Cuando considere reclamar un bono sin deposito (o cualquier otro tipo de bono) debe asegurarse de leer los terminos y condiciones que se adjuntan al bono. Los diferentes casinos pueden tener sus propias regulaciones y limites, sin embargo, hay algunos que son iguales en todos los casinos.
REQUISITOS PARA TRABAJAR
Los bonos sobre los depositos son accesibles para todos, sin embargo, cobrar los bonos es un asunto un poco mas controlado. La mayoria de los casinos en linea le permitiran retirar sus ganancias despues de haber podido apostar una cantidad especifica.
Los requisitos de apuesta se muestran como multiplicadores. Representan la cantidad de veces que tienes que apostar en un bono para poder retirar el dinero. Por lo general, puede jugar a una serie de juegos seleccionados por el operador del casino. Una vez que haya alcanzado el requisito de apuesta, podra dar el siguiente paso para cobrar su bono.
PLAZO
Segun el casino online, el bono para juegos de tragaperras de deposito puede caducar en cuestion de dias o durar hasta 30 dias. Para asegurarte de que cumples los requisitos de apuestas, es posible que tengas que planificar tu rutina de juego a lo largo del bono.
TAMANOS DE APUESTA
Un metodo para lograr su objetivo de apostar mas rapido es realizar la mayor cantidad de apuestas posible en cada juego. Es un metodo sensato, a menos que el operador del casino decida controlar la cantidad de la apuesta y limitar la cantidad de apuestas en la respectiva tragamonedas con bono sin deposito.
SE REQUIERE UN DEPOSITO
Aunque suene contradictorio, algunos casinos online pueden incluso exigir a los jugadores que depositen dinero antes de poder retirar su bono. Suelen anadir este requisito adicional por razones de seguridad.
RESTRICCIONES
A veces, se le puede negar el acceso a un bono con oferta de deposito gratuito. Esto solo ocurre en muy raras circunstancias, ya sea por el hecho de haber intentado dos bonos a la vez o por tener una direccion IP compartida con un jugador que tambien reclamo el mismo bono, o por residir en una zona restringida.
Puedes obtener informacion mas detallada leyendo el articulo completo en este enlace – https://findfreightloads.com/blog/wp-content/pgs/?codigo_promocional_1xslots_bono.html
cialis for daily use price
https://acook.space/
EL CODIGO PROMOCIONAL DE 1XSLOTS CASINO
Sin introducir un codigo promocional 1xSlots Casino, como nuevo cliente en March 2024, puede beneficiarse de una bonificacion del 100% hasta 300€. El casino le proporciona un monton de maquinas tragaperras populares de proveedores de software como iSoftBet, Elk Studios o Play’n GO y otros. De forma adicional, se le otorgaran|esta oferta incluye 30 turnos gratuitos.. Todas las informaciones importantes respecto a esta oferta de bienvenida se puede encontrar en este articulo.
?COMO FUNCIONA EL CODIGO PROMOCIONAL DE 1XSLOTS CASINO?
En 1xSlots Casino se puede obtener una bonificacion del 100% hasta 300€ y turnos gratuitos en 1xSlots Casino. Haga su inicial deposito en 1xSlots Casino tras finalizar el proceso de inscripcion. No hace falta solicitar su bonificacion de bienvenida por e-mail ni el chat en directo como en otros casinos, porque 1xSlots Casino la abona a su cuenta automaticamente. La oferta de bienvenida se activa cuando deposite 10€ o mas. Haga un deposito empleando EcoPayz, Boku o Bitcoin u otro metodo de deposito disponible en el casino.
Mas sobre el bono
1xSlots Casino le da la oportunidad de incrementar su balance hasta 300€ (100%). Obtenga la bonificacion superior al depositar 300€ y conseguir 600€ que se anadiran en su cuenta. Los fondos de su bonificacion es compatible con tragaperras de proveedores de software como Red Tiger Gaming, Evolution Gaming y Microgaming, por nombrar unos cuantos. Debe tenerse en cuenta tambien que su cuenta se incrementara con 30 turnos gratuitos.
Bono de bienvenida 1xSlots 2024
Dentro de 1xSlots existen dos bonos de bienvenida, uno standard y uno exclusivo. El primero de ellas recompensa con un paquete de hasta €1500 y 150 giros gratis mientras que el segundo otorga un 10% adicional recompensando hasta €1650 y 150 giros gratis ?La diferencia? El bono exclusivo se obtiene mediante el uso del 1xSlots promocode NEXT777.
Las recompensas de la bonificacion exclusiva son otorgadas en los 4 primeros depositos de la siguiente manera:
100% del primer deposito hasta €450 + 30 giros gratis
100% del segundo deposito hasta €350 + 35 giros gratis
100% del tercer deposito hasta €400 + 40 giros gratis
100% del cuarto deposito hasta €450 + 45 giros gratis
Bono de bienvenida 1xSlots Argentina 2024
Cabe resaltar que durante tu proceso de registro tienes que elegir tu moneda local preferida. De este modo obtendras la bonificacion de bienvenida 1xSlots Argentina en pesos. Puedes recibir el bono exclusivo 1xSlots Argentina al utilizar nuestro codigo de bono 1xSlots Argentina NEXT777 durante el proceso de registro.
Ademas, si ingresas el codigo NEXT777 a la pestana “Bonos y Regalos” despues de hacer tu primer deposito, puedes recibir el bono con giros gratis 1xSlots Argentina que te otorgara 60 FS en tragamonedas 777 GEMS RESPIN. A continuacion encontraras los valores de bonos en pesos argentinos.
Bono de bienvenida 1xSlots Chile 2024
El bono de bienvenida 1xSlots Chile funciona del mismo modo como en Argentina. Tienes que crear tu cuenta e ingresar nuestro codigo promocional de 1xslots para giro gratis Chile NEXT777 al formulario de registro. Puedes elegir el peso chileno como tu moneda local para recibir la bonificacion de bienvenida 1xSlots Chile. Adicionalmente, para obtener 60 giros gratis en 777 GEMS RESPIN, introduce el codigo NEXT777 al hacer tu primer deposito.
?QUE ES UN BONO DE TRAGAPERRAS SIN DEPOSITO?
Como su nombre indica, un bono de tragaperras sin deposito es un tipo de bono de casino que no necesita que los jugadores depositen dinero para poder optar a cualquier tipo de recompensa. Por ejemplo, giros gratis, creditos de casino o incluso dinero en efectivo.
Los bonos sin deposito se dan generalmente a los jugadores potenciales para motivar a los nuevos jugadores para que se registren. Pueden formar parte de los paquetes de bienvenida que un casino online ofrece a todos sus jugadores potenciales y ayudan a atraer la atencion hacia la marca del casino. Tambien pueden ofrecerse a los jugadores con cuentas en determinadas situaciones.
Las tragaperras con bono sin deposito ofrecen la posibilidad de probar las tragaperras online sin coste alguno y quedandose con el dinero que se obtiene, razon por la que son muy codiciadas. Sin embargo, los bonos sin deposito no te obligan a depositar dinero cuando la promocion termina, aunque se sugiere.
?CUALES SON LOS PRINCIPALES TIPOS DE BONOS DE TRAGAMONEDAS SIN DEPOSITO?
Los bonos sin deposito estan disponibles en tres variedades: giros gratis, creditos gratis o dinero en efectivo. El tipo mas conocido que es un bono sin deposito no spins without deposit bonus.
GIROS GRATIS CON BONO SIN DEPOSITO
Todos sabemos que las maquinas tragaperras son las mas populares en el mundo de los juegos de casino , por lo que es natural que un bono hecho especificamente para las maquinas que juegan a las tragaperras sea el mas buscado. Para los amantes de las maquinas tragaperras, los bonos de tiradas gratis sin deposito son un verdadero tesoro, ya que permiten a los jugadores jugar a sus maquinas tragaperras favoritas sin depositar dinero, y con una gran cantidad de tiradas gratis, lo que aumenta sus probabilidades de ganar significativamente.
Creditos gratuitos / BONO DE JUEGO GRATUITO SIN DEPOSITO
En lugar de tiradas gratis, los casinos pueden optar por dar creditos gratis a los jugadores que tienen bonos sin deposito. Estos creditos pueden ser utilizados dentro de un periodo de tiempo enumerado para apostar en juegos en los casinos y ganar dinero real. Los bonos sin deposito y los creditos gratuitos se ofrecen tanto en las tragaperras gratuitas como en otros juegos de los casinos.
DINERO GRATIS CON BONOS SIN DEPOSITO
Al igual que los creditos gratuitos con los bonos sin deposito, los bonos de dinero sin deposito que no requieren deposito se pueden jugar tanto en las tragaperras como en otros juegos de casino. Una vez que haya reclamado y jugado el bono de dinero sin deposito, podra retirar el dinero del bono y cualquier ganancia adicional siempre que cumpla las condiciones para retirar el dinero.
?Como puedo reclamar un bono sin deposito?
En la mayoria de los casos, puede hacer uso de los bonos sin deposito al crear una cuenta en cualquier sitio de juego en linea que ofrezca este tipo de oferta. En la version online del casino, la bonificacion puede aparecer en la pagina de promociones del casino o en una ventana emergente. Algunos casinos requieren que introduzca un codigo promocional para acceder al bono.
Cuando considere reclamar un bono sin deposito (o cualquier otro tipo de bono) debe asegurarse de leer los terminos y condiciones que se adjuntan al bono. Los diferentes casinos pueden tener sus propias regulaciones y limites, sin embargo, hay algunos que son iguales en todos los casinos.
REQUISITOS PARA TRABAJAR
Los bonos sobre los depositos son accesibles para todos, sin embargo, cobrar los bonos es un asunto un poco mas controlado. La mayoria de los casinos en linea le permitiran retirar sus ganancias despues de haber podido apostar una cantidad especifica.
Los requisitos de apuesta se muestran como multiplicadores. Representan la cantidad de veces que tienes que apostar en un bono para poder retirar el dinero. Por lo general, puede jugar a una serie de juegos seleccionados por el operador del casino. Una vez que haya alcanzado el requisito de apuesta, podra dar el siguiente paso para cobrar su bono.
PLAZO
Segun el casino online, el bono para juegos de tragaperras de deposito puede caducar en cuestion de dias o durar hasta 30 dias. Para asegurarte de que cumples los requisitos de apuestas, es posible que tengas que planificar tu rutina de juego a lo largo del bono.
TAMANOS DE APUESTA
Un metodo para lograr su objetivo de apostar mas rapido es realizar la mayor cantidad de apuestas posible en cada juego. Es un metodo sensato, a menos que el operador del casino decida controlar la cantidad de la apuesta y limitar la cantidad de apuestas en la respectiva tragamonedas con bono sin deposito.
SE REQUIERE UN DEPOSITO
Aunque suene contradictorio, algunos casinos online pueden incluso exigir a los jugadores que depositen dinero antes de poder retirar su bono. Suelen anadir este requisito adicional por razones de seguridad.
RESTRICCIONES
A veces, se le puede negar el acceso a un bono con oferta de deposito gratuito. Esto solo ocurre en muy raras circunstancias, ya sea por el hecho de haber intentado dos bonos a la vez o por tener una direccion IP compartida con un jugador que tambien reclamo el mismo bono, o por residir en una zona restringida.
Puedes obtener informacion mas detallada leyendo el articulo completo en este enlace – https://findfreightloads.com/blog/wp-content/pgs/?codigo_promocional_1xslots_bono.html
lisinopril 10 12.5 mg tablets
https://bur-mdou-b.tvoysadik.ru/?section_id=83
https://community.appdrag.com/user/%D0%BA%D1%83%D0%BF%D0%B8%D1%82%D1%8C-%D0%B0%D1%82%D1%82%D0%B5%D1%81%D1%82%D0%B0%D1%82-%D0%B7%D0%B0-11-%D0%BA%D0%BB%D0%B0%D1%81%D1%81
https://hosting8083.af933.netcup.net/bruhl/2015/09/08/convincente-vittoria-esterna-per-l-sc-bruehl-2/
https://www.zombiepumpkins.com/forum/memberlist.php?mode=viewprofile&u=87847
https://fwooshflix.thefwoosh.com/2014/12/tv-recap-the-flash-ep-9-the-man-in-the-yellow-suit
cheapest price for tadalafil
EL CODIGO PROMOCIONAL DE 1XSLOTS CASINO
Sin introducir un codigo promocional 1xSlots Casino, como nuevo cliente en March 2024, puede beneficiarse de una bonificacion del 100% hasta 300€. El casino le proporciona un monton de maquinas tragaperras populares de proveedores de software como iSoftBet, Elk Studios o Play’n GO y otros. De forma adicional, se le otorgaran|esta oferta incluye 30 turnos gratuitos.. Todas las informaciones importantes respecto a esta oferta de bienvenida se puede encontrar en este articulo.
?COMO FUNCIONA EL CODIGO PROMOCIONAL DE 1XSLOTS CASINO?
En 1xSlots Casino se puede obtener una bonificacion del 100% hasta 300€ y turnos gratuitos en 1xSlots Casino. Haga su inicial deposito en 1xSlots Casino tras finalizar el proceso de inscripcion. No hace falta solicitar su bonificacion de bienvenida por e-mail ni el chat en directo como en otros casinos, porque 1xSlots Casino la abona a su cuenta automaticamente. La oferta de bienvenida se activa cuando deposite 10€ o mas. Haga un deposito empleando EcoPayz, Boku o Bitcoin u otro metodo de deposito disponible en el casino.
Mas sobre el bono
1xSlots Casino le da la oportunidad de incrementar su balance hasta 300€ (100%). Obtenga la bonificacion superior al depositar 300€ y conseguir 600€ que se anadiran en su cuenta. Los fondos de su bonificacion es compatible con tragaperras de proveedores de software como Red Tiger Gaming, Evolution Gaming y Microgaming, por nombrar unos cuantos. Debe tenerse en cuenta tambien que su cuenta se incrementara con 30 turnos gratuitos.
Bono de bienvenida 1xSlots 2024
Dentro de 1xSlots existen dos bonos de bienvenida, uno standard y uno exclusivo. El primero de ellas recompensa con un paquete de hasta €1500 y 150 giros gratis mientras que el segundo otorga un 10% adicional recompensando hasta €1650 y 150 giros gratis ?La diferencia? El bono exclusivo se obtiene mediante el uso del 1xSlots promocode NEXT777.
Las recompensas de la bonificacion exclusiva son otorgadas en los 4 primeros depositos de la siguiente manera:
100% del primer deposito hasta €450 + 30 giros gratis
100% del segundo deposito hasta €350 + 35 giros gratis
100% del tercer deposito hasta €400 + 40 giros gratis
100% del cuarto deposito hasta €450 + 45 giros gratis
Bono de bienvenida 1xSlots Argentina 2024
Cabe resaltar que durante tu proceso de registro tienes que elegir tu moneda local preferida. De este modo obtendras la bonificacion de bienvenida 1xSlots Argentina en pesos. Puedes recibir el bono exclusivo 1xSlots Argentina al utilizar nuestro codigo de bono 1xSlots Argentina NEXT777 durante el proceso de registro.
Ademas, si ingresas el codigo NEXT777 a la pestana “Bonos y Regalos” despues de hacer tu primer deposito, puedes recibir el bono con giros gratis 1xSlots Argentina que te otorgara 60 FS en tragamonedas 777 GEMS RESPIN. A continuacion encontraras los valores de bonos en pesos argentinos.
Bono de bienvenida 1xSlots Chile 2024
El bono de bienvenida 1xSlots Chile funciona del mismo modo como en Argentina. Tienes que crear tu cuenta e ingresar nuestro codigos promocionales para 1xslots Chile NEXT777 al formulario de registro. Puedes elegir el peso chileno como tu moneda local para recibir la bonificacion de bienvenida 1xSlots Chile. Adicionalmente, para obtener 60 giros gratis en 777 GEMS RESPIN, introduce el codigo NEXT777 al hacer tu primer deposito.
?QUE ES UN BONO DE TRAGAPERRAS SIN DEPOSITO?
Como su nombre indica, un bono de tragaperras sin deposito es un tipo de bono de casino que no necesita que los jugadores depositen dinero para poder optar a cualquier tipo de recompensa. Por ejemplo, giros gratis, creditos de casino o incluso dinero en efectivo.
Los bonos sin deposito se dan generalmente a los jugadores potenciales para motivar a los nuevos jugadores para que se registren. Pueden formar parte de los paquetes de bienvenida que un casino online ofrece a todos sus jugadores potenciales y ayudan a atraer la atencion hacia la marca del casino. Tambien pueden ofrecerse a los jugadores con cuentas en determinadas situaciones.
Las tragaperras con bono sin deposito ofrecen la posibilidad de probar las tragaperras online sin coste alguno y quedandose con el dinero que se obtiene, razon por la que son muy codiciadas. Sin embargo, los bonos sin deposito no te obligan a depositar dinero cuando la promocion termina, aunque se sugiere.
?CUALES SON LOS PRINCIPALES TIPOS DE BONOS DE TRAGAMONEDAS SIN DEPOSITO?
Los bonos sin deposito estan disponibles en tres variedades: giros gratis, creditos gratis o dinero en efectivo. El tipo mas conocido que es un bono sin deposito no spins without deposit bonus.
GIROS GRATIS CON BONO SIN DEPOSITO
Todos sabemos que las maquinas tragaperras son las mas populares en el mundo de los juegos de casino , por lo que es natural que un bono hecho especificamente para las maquinas que juegan a las tragaperras sea el mas buscado. Para los amantes de las maquinas tragaperras, los bonos de tiradas gratis sin deposito son un verdadero tesoro, ya que permiten a los jugadores jugar a sus maquinas tragaperras favoritas sin depositar dinero, y con una gran cantidad de tiradas gratis, lo que aumenta sus probabilidades de ganar significativamente.
Creditos gratuitos / BONO DE JUEGO GRATUITO SIN DEPOSITO
En lugar de tiradas gratis, los casinos pueden optar por dar creditos gratis a los jugadores que tienen bonos sin deposito. Estos creditos pueden ser utilizados dentro de un periodo de tiempo enumerado para apostar en juegos en los casinos y ganar dinero real. Los bonos sin deposito y los creditos gratuitos se ofrecen tanto en las tragaperras gratuitas como en otros juegos de los casinos.
DINERO GRATIS CON BONOS SIN DEPOSITO
Al igual que los creditos gratuitos con los bonos sin deposito, los bonos de dinero sin deposito que no requieren deposito se pueden jugar tanto en las tragaperras como en otros juegos de casino. Una vez que haya reclamado y jugado el bono de dinero sin deposito, podra retirar el dinero del bono y cualquier ganancia adicional siempre que cumpla las condiciones para retirar el dinero.
?Como puedo reclamar un bono sin deposito?
En la mayoria de los casos, puede hacer uso de los bonos sin deposito al crear una cuenta en cualquier sitio de juego en linea que ofrezca este tipo de oferta. En la version online del casino, la bonificacion puede aparecer en la pagina de promociones del casino o en una ventana emergente. Algunos casinos requieren que introduzca un codigo promocional para acceder al bono.
Cuando considere reclamar un bono sin deposito (o cualquier otro tipo de bono) debe asegurarse de leer los terminos y condiciones que se adjuntan al bono. Los diferentes casinos pueden tener sus propias regulaciones y limites, sin embargo, hay algunos que son iguales en todos los casinos.
REQUISITOS PARA TRABAJAR
Los bonos sobre los depositos son accesibles para todos, sin embargo, cobrar los bonos es un asunto un poco mas controlado. La mayoria de los casinos en linea le permitiran retirar sus ganancias despues de haber podido apostar una cantidad especifica.
Los requisitos de apuesta se muestran como multiplicadores. Representan la cantidad de veces que tienes que apostar en un bono para poder retirar el dinero. Por lo general, puede jugar a una serie de juegos seleccionados por el operador del casino. Una vez que haya alcanzado el requisito de apuesta, podra dar el siguiente paso para cobrar su bono.
PLAZO
Segun el casino online, el bono para juegos de tragaperras de deposito puede caducar en cuestion de dias o durar hasta 30 dias. Para asegurarte de que cumples los requisitos de apuestas, es posible que tengas que planificar tu rutina de juego a lo largo del bono.
TAMANOS DE APUESTA
Un metodo para lograr su objetivo de apostar mas rapido es realizar la mayor cantidad de apuestas posible en cada juego. Es un metodo sensato, a menos que el operador del casino decida controlar la cantidad de la apuesta y limitar la cantidad de apuestas en la respectiva tragamonedas con bono sin deposito.
SE REQUIERE UN DEPOSITO
Aunque suene contradictorio, algunos casinos online pueden incluso exigir a los jugadores que depositen dinero antes de poder retirar su bono. Suelen anadir este requisito adicional por razones de seguridad.
RESTRICCIONES
A veces, se le puede negar el acceso a un bono con oferta de deposito gratuito. Esto solo ocurre en muy raras circunstancias, ya sea por el hecho de haber intentado dos bonos a la vez o por tener una direccion IP compartida con un jugador que tambien reclamo el mismo bono, o por residir en una zona restringida.
Puedes obtener informacion mas detallada leyendo el articulo completo en este enlace – https://findfreightloads.com/blog/wp-content/pgs/?codigo_promocional_1xslots_bono.html
tadalafil 5mg price
how to get valtrex over the counter
This is the right blog for anyone who wants to understand this topic.
You know a whole lot its almost tough to argue with you (not that I personally would want to…HaHa).
You definitely put a new spin on a subject which has been discussed for ages.
Wonderful stuff, just wonderful!
tadalafil 20mg no prescription
synthroid 05 mg
express scripts com pharmacies
metformin 500 mg price australia
metformin hydrochloride
australia price for valtrex
best place to purchase cialis
We’re a group of volunteers and opening a new scheme in our community.
Your website offered us with valuable info to work on. You have done an impressive
job and our entire community will be grateful to you.
buy lisinopril 20 mg online united states
zestril 40 mg tablet
synthroid 100 mcg coupon
all in one pharmacy
synthroid 1.25 mg
can i buy lisinopril online
https://mhpereezd.ru
prednisone 1 tablet
cheapest price for generic cialis
glucophage 750
We recommend visiting the website https://villa-sunsetlady.com/.
Also, don’t forget to bookmark the site: https://villa-sunsetlady.com/
synthroid 37.5 mg
zithromax discount
Производимые российской компанией тренажеры для кинезитерапии trenazhery-dlya-kineziterapii.ru и специально предназначены для восстановления после травм. Конструкции имеют выгодное соотношение цены и функциональности.
Предлагаем очень недорого Кроссовер с облегченной конструкцией. В каталоге интернет-магазина для кинезитерапии всегда в реализации модели блочного и нагружаемого типа.
Выпускаемые тренажеры для реабилитации гарантируют мягкую и безопасную тренировку, что особенно важно для пациентов в процессе восстановления.
Станки обладают регулируемым сопротивлением и уровнями нагрузки, что дает возможность индивидуализировать силовые тренировки в соответствии с задачами любого больного.
Все тренажеры актуальны для кинезитерапии по рекомендациям профессора Сергея Бубновского. Оснащены поручнями для комфортного осуществления тяговых движений сидя или лежа.
synthroid 0.025 mg
We recommend visiting the website https://realskinbeauty.com/.
Also, don’t forget to bookmark the site: https://realskinbeauty.com/
5mg prednisone
lisinopril pill 20mg
We recommend visiting the website https://talksoffashion.com/.
Also, don’t forget to bookmark the site: https://talksoffashion.com/
Получи 32500 руб. по актуальному промо коду для 1хбет бесплатно. Новые купоны на регистрацию каждый час на сайте. В ваших силах получить до шести с половиной тысяч рублей при регистрации. Читайте ниже как использовать наши промо-коды. промокод в 1хбет при регистрации на сегодня. Букмекерская контора позволяет использовать промокод 1иксбет на ставку-бонус. Забирайте новые купоны ежедневно. Внимание! Наши промо-купоны подходят для всех акций букмекера. Этот купон также универсальный – используйте его везде, не только при регистрации на сайте БК 1хбет и всех известных его зеркал. Введите его в форме для регистрации и получите увеличенный бонус на первый депозит до 32500 рублей. Кроме того, букмекер постоянно дарит активным клиентам выгодные подарки. Чтобы получить промокод в 1xBet бесплатно: Подпишитесь на рассылку новостей по смс или электронной почте. Регулярно заходите в раздел «Бонусы и подарки» в Личном кабинете – более подробно в этом материале https://03ekb.ru/news/besplatnuy_promokod_pri_registracii.html
canadian world pharmacy
pharmacy online shopping usa
buy lisinopril online
zithromax 500mg coupon
prednisone corticosteroid
Официальный промокод 1ХБет при регистрации, только по нему ты получишь бонус в 32500 рублей, все остальные коды не действительные и не дают такой бонус. 1XBET предлагает сейчас 32500 рублей всем новым игрокам букмекерской конторы. промокод на 1хбет при регистрации на сегодня. Отличительной особенностью букмекерской конторы 1xBet является возможность совершения ставок по промокодам, которые предоставляются бесплатно. Это позволяет новичку заработать деньги, не делая никаких вложений. Однако чтобы получить промокод на ставку и воспользоваться им, следует разобраться с некоторыми инструкциями. Бесплатные промокоды 1xBet при регистрации. Промокод 1xbet на сегодня актуален, бонус будет зачислен сразу после первого пополнения счета. Временные коды. Букмекерская контора 1xbet часто выступает спонсором при переводе популярных сериалов на русский язык. Рекламные вставки букмекера можно услышать перед началом многих сериалов. Часто в такой рекламе диктуется специальные промокод, дающий возможность беттерам рассчитывать на дополнительный бонус. Максимальный бонус при регистрации составляется 32500 рублей. Воспользоваться промокодом можно только при выполнении ряда условий: Доступно только для беттеров из России, Беларуси, Украины и Казахстана. Возврат игрока – от 18 лет – более подробно в этом материале https://03ekb.ru/news/besplatnuy_promokod_pri_registracii.html
lisinopril with out prescription
025 mg synthroid
www pharmacyonline
Промокоды казино 1xBet при регистрации 2024. На ресурсе 1хБет пользователи могут не только делать ставки на спорт и другие события из разных сфер, но и получать азартные ощущения в казино. Играть можно как с машинами, так и с реальными дилерами в разделе лайв. Чтобы привлекать как можно больше новых игроков и поддерживать интерес постоянных клиентов, на сайте 1хБет регулярно проходят акции и раздают бонусы. Самое щедрое вознаграждение могут получить новички, использовав промокод казино 1xBet. Указав его при регистрации, пользователь получит дополнительные денежные средства на первые несколько депозитов, которые сможет использовать для ставок в играх. Это сделать просто, если иметь промокод на бесплатную игру в 1хбет. Правда, дается он при условии выполнения некоторых правил. 1xbet бонус при регистрации. Не совсем промокод, но вы все равно ставите не свои деньги, если пополните депозит, – 100% бонуса от внесенной суммы. Максимум указан в верхней части главной страницы официального сайта – более подробно в этом материале https://03ekb.ru/news/besplatnuy_promokod_pri_registracii.html
synthroid 50mcg cost
The meal went without incident although a couple of times she had to avert her gaze from Dan for fear of bursting out laughing. Dan went up to his room saying he wanted to listen to music, he laid on his bed playing with himself waiting for his father to leave. He thought about the events of the last two weeks it had been the craziest time of his life.
He put it all down to Mary Harris, she had been his girlfriend for two years, he liked her a lot, she was pretty and intelligent two things that rarely combined in his experience, the problem was she steadfastly refused to let him put his cock inside her, he had thought he was getting somewhere when he took his cock out that evening in the cinema when she had finally allowed him to get his hand inside her panties, it was the first time she had allowed him to do any more than play with her tits. He had taken her hand and placed it on his erection, initially he had been pleased to hear her sharp intake of breath when she felt the size of him and he was encouraged when she began stroking him.
It was later that the problem started, he had her in the car park, they were kissing, her sweater was pushed up together with her bra and he was sucking on her nipples. He managed to get her laid across the front of one of the cars, his hand up her skirt, trying to pull down her panties. That was when she had stopped him.
https://www.hentai-foundry.com/user/frenzyman1965/profile
https://launchpad.net/~sharkgirl19891
https://www.quia.com/profiles/rachaelmae
https://ellak.gr/user/indira1978/
https://gilfrog1953.micro.blog/about/
https://permacultureglobal.org/users/55138-andrew-holmes
https://www.divephotoguide.com/user/bybyzela1991
https://hefopmat1977.bandcamp.com/album/the-club-pt-1-marys-initiation
https://cannabis.net/user/146595
https://imageevent.com/nightlite196619601979
synthroid tab 88mcg
tadalafil 100mg tablets
tadalafil tablets for sale
promo code for canadian pharmacy meds
can you buy synthroid over the counter
buying synthroid online
lisinopril 5mg
buy azithromycin 500mg online uk
synthroid 88 mcg tablet
cheapest tadalafil us
lisinopril coupon
сеть даркнет
Теневой уровень интернета: недоступная зона интернета
Теневой уровень интернета, тайная зона интернета продолжает вызывать интерес интерес как сообщества, и также служб безопасности. Этот скрытый уровень сети известен своей непрозрачностью и способностью проведения противоправных действий под прикрытием теней.
Основа темного интернета сводится к тому, что данный уровень не доступен обычным обычных браузеров. Для доступа к нему необходимы специальные инструменты и программы, предоставляющие анонимность пользователям. Это создает идеальную среду для разнообразных противозаконных операций, среди которых торговлю наркотиками, оружием, кражу личных данных и другие противоправные действия.
В виде реакции на растущую угрозу, некоторые государства приняли законы, задача которых состоит в запрещение доступа к подпольной части сети и преследование лиц занимающихся незаконными деяниями в этом скрытом мире. Однако, несмотря на предпринятые действия, борьба с подпольной частью сети представляет собой трудную задачу.
Следует отметить, что запретить темный интернет полностью практически невозможно. Даже при строгих мерах регулирования, возможность доступа к данному уровню сети всё ещё возможен при помощи различных технологических решений и инструментов, используемые для обхода блокировок.
Кроме законодательных мер, существуют также проекты сотрудничества между правоохранительными органами и компаниями, работающими в сфере технологий с целью пресечения противозаконных действий в теневом уровне интернета. Однако, для успешной борьбы требуется не только техническая сторона, но также улучшения методов выявления и предотвращения противозаконных манипуляций в данной среде.
Таким образом, несмотря на запреты и усилия в борьбе с незаконными деяниями, подпольная часть сети остается серьезной проблемой, нуждающейся в комплексных подходах и коллективных усилиях как со стороны правоохранительных органов, и технологических корпораций.
synthroid 100 mg cost
We recommend visiting the website https://skinsoulbeauty.com/.
Also, don’t forget to bookmark the site: https://skinsoulbeauty.com/
canadian pharmacy ed medications
prednisone 100 mg
penis enlargement
Рекомендации выбора и покупки текстильных обоев для создания стильного и уютного интерьера вашего дома
Интерьер – это визитная карточка дома, которая отражает вкус и индивидуальность его владельцев. Поэтому так важно выбрать правильное оформление, которое создаст уютную атмосферу и подчеркнет ваш стиль. Одним из наиболее интересных решений в дизайне помещений сегодня стали текстильные обои.
Понятие «текстильные обои» охватывает широкий спектр разнообразных материалов и фактур. Это мягкие, приятные на ощупь изделия, созданные из натуральных или синтетических волокон. Их назначение – не только украсить стены, но и подчеркнуть их важность в создании уютной атмосферы в помещении.
Своей привлекательностью текстильные обои обязаны не только оригинальной текстуре, но и возможности варьировать цветами и узорами. Они помогут создать уникальный стиль вашего интерьера, быть ключевым элементом в оформлении или органично дополнить уже существующие композиции.
Мы предлагаем вам скидку 15% на наши обои с флоком
EL CODIGO PROMOCIONAL DE 1XSLOTS CASINO
Sin introducir un codigo promocional 1xSlots Casino, como nuevo cliente en March 2024, puede beneficiarse de una bonificacion del 100% hasta 300€. El casino le proporciona un monton de maquinas tragaperras populares de proveedores de software como iSoftBet, Elk Studios o Play’n GO y otros. De forma adicional, se le otorgaran|esta oferta incluye 30 turnos gratuitos.. Todas las informaciones importantes respecto a esta oferta de bienvenida se puede encontrar en este articulo.
?COMO FUNCIONA EL CODIGO PROMOCIONAL DE 1XSLOTS CASINO?
En 1xSlots Casino se puede obtener una bonificacion del 100% hasta 300€ y turnos gratuitos en 1xSlots Casino. Haga su inicial deposito en 1xSlots Casino tras finalizar el proceso de inscripcion. No hace falta solicitar su bonificacion de bienvenida por e-mail ni el chat en directo como en otros casinos, porque 1xSlots Casino la abona a su cuenta automaticamente. La oferta de bienvenida se activa cuando deposite 10€ o mas. Haga un deposito empleando EcoPayz, Boku o Bitcoin u otro metodo de deposito disponible en el casino.
Mas sobre el bono
1xSlots Casino le da la oportunidad de incrementar su balance hasta 300€ (100%). Obtenga la bonificacion superior al depositar 300€ y conseguir 600€ que se anadiran en su cuenta. Los fondos de su bonificacion es compatible con tragaperras de proveedores de software como Red Tiger Gaming, Evolution Gaming y Microgaming, por nombrar unos cuantos. Debe tenerse en cuenta tambien que su cuenta se incrementara con 30 turnos gratuitos.
Bono de bienvenida 1xSlots 2024
Dentro de 1xSlots existen dos bonos de bienvenida, uno standard y uno exclusivo. El primero de ellas recompensa con un paquete de hasta €1500 y 150 giros gratis mientras que el segundo otorga un 10% adicional recompensando hasta €1650 y 150 giros gratis ?La diferencia? El bono exclusivo se obtiene mediante el uso del 1xSlots promocode NEXT777.
Las recompensas de la bonificacion exclusiva son otorgadas en los 4 primeros depositos de la siguiente manera:
100% del primer deposito hasta €450 + 30 giros gratis
100% del segundo deposito hasta €350 + 35 giros gratis
100% del tercer deposito hasta €400 + 40 giros gratis
100% del cuarto deposito hasta €450 + 45 giros gratis
Bono de bienvenida 1xSlots Argentina 2024
Cabe resaltar que durante tu proceso de registro tienes que elegir tu moneda local preferida. De este modo obtendras la bonificacion de bienvenida 1xSlots Argentina en pesos. Puedes recibir el bono exclusivo 1xSlots Argentina al utilizar nuestro codigo de bono 1xSlots Argentina NEXT777 durante el proceso de registro.
Ademas, si ingresas el codigo NEXT777 a la pestana “Bonos y Regalos” despues de hacer tu primer deposito, puedes recibir el bono con giros gratis 1xSlots Argentina que te otorgara 60 FS en tragamonedas 777 GEMS RESPIN. A continuacion encontraras los valores de bonos en pesos argentinos.
Bono de bienvenida 1xSlots Chile 2024
El bono de bienvenida 1xSlots Chile funciona del mismo modo como en Argentina. Tienes que crear tu cuenta e ingresar nuestro Codigo promocional 1xslots hoy Chile NEXT777 al formulario de registro. Puedes elegir el peso chileno como tu moneda local para recibir la bonificacion de bienvenida 1xSlots Chile. Adicionalmente, para obtener 60 giros gratis en 777 GEMS RESPIN, introduce el codigo NEXT777 al hacer tu primer deposito.
?QUE ES UN BONO DE TRAGAPERRAS SIN DEPOSITO?
Como su nombre indica, un bono de tragaperras sin deposito es un tipo de bono de casino que no necesita que los jugadores depositen dinero para poder optar a cualquier tipo de recompensa. Por ejemplo, giros gratis, creditos de casino o incluso dinero en efectivo.
Los bonos sin deposito se dan generalmente a los jugadores potenciales para motivar a los nuevos jugadores para que se registren. Pueden formar parte de los paquetes de bienvenida que un casino online ofrece a todos sus jugadores potenciales y ayudan a atraer la atencion hacia la marca del casino. Tambien pueden ofrecerse a los jugadores con cuentas en determinadas situaciones.
Las tragaperras con bono sin deposito ofrecen la posibilidad de probar las tragaperras online sin coste alguno y quedandose con el dinero que se obtiene, razon por la que son muy codiciadas. Sin embargo, los bonos sin deposito no te obligan a depositar dinero cuando la promocion termina, aunque se sugiere.
?CUALES SON LOS PRINCIPALES TIPOS DE BONOS DE TRAGAMONEDAS SIN DEPOSITO?
Los bonos sin deposito estan disponibles en tres variedades: giros gratis, creditos gratis o dinero en efectivo. El tipo mas conocido que es un bono sin deposito no spins without deposit bonus.
GIROS GRATIS CON BONO SIN DEPOSITO
Todos sabemos que las maquinas tragaperras son las mas populares en el mundo de los juegos de casino , por lo que es natural que un bono hecho especificamente para las maquinas que juegan a las tragaperras sea el mas buscado. Para los amantes de las maquinas tragaperras, los bonos de tiradas gratis sin deposito son un verdadero tesoro, ya que permiten a los jugadores jugar a sus maquinas tragaperras favoritas sin depositar dinero, y con una gran cantidad de tiradas gratis, lo que aumenta sus probabilidades de ganar significativamente.
Creditos gratuitos / BONO DE JUEGO GRATUITO SIN DEPOSITO
En lugar de tiradas gratis, los casinos pueden optar por dar creditos gratis a los jugadores que tienen bonos sin deposito. Estos creditos pueden ser utilizados dentro de un periodo de tiempo enumerado para apostar en juegos en los casinos y ganar dinero real. Los bonos sin deposito y los creditos gratuitos se ofrecen tanto en las tragaperras gratuitas como en otros juegos de los casinos.
DINERO GRATIS CON BONOS SIN DEPOSITO
Al igual que los creditos gratuitos con los bonos sin deposito, los bonos de dinero sin deposito que no requieren deposito se pueden jugar tanto en las tragaperras como en otros juegos de casino. Una vez que haya reclamado y jugado el bono de dinero sin deposito, podra retirar el dinero del bono y cualquier ganancia adicional siempre que cumpla las condiciones para retirar el dinero.
?Como puedo reclamar un bono sin deposito?
En la mayoria de los casos, puede hacer uso de los bonos sin deposito al crear una cuenta en cualquier sitio de juego en linea que ofrezca este tipo de oferta. En la version online del casino, la bonificacion puede aparecer en la pagina de promociones del casino o en una ventana emergente. Algunos casinos requieren que introduzca un codigo promocional para acceder al bono.
Cuando considere reclamar un bono sin deposito (o cualquier otro tipo de bono) debe asegurarse de leer los terminos y condiciones que se adjuntan al bono. Los diferentes casinos pueden tener sus propias regulaciones y limites, sin embargo, hay algunos que son iguales en todos los casinos.
REQUISITOS PARA TRABAJAR
Los bonos sobre los depositos son accesibles para todos, sin embargo, cobrar los bonos es un asunto un poco mas controlado. La mayoria de los casinos en linea le permitiran retirar sus ganancias despues de haber podido apostar una cantidad especifica.
Los requisitos de apuesta se muestran como multiplicadores. Representan la cantidad de veces que tienes que apostar en un bono para poder retirar el dinero. Por lo general, puede jugar a una serie de juegos seleccionados por el operador del casino. Una vez que haya alcanzado el requisito de apuesta, podra dar el siguiente paso para cobrar su bono.
PLAZO
Segun el casino online, el bono para juegos de tragaperras de deposito puede caducar en cuestion de dias o durar hasta 30 dias. Para asegurarte de que cumples los requisitos de apuestas, es posible que tengas que planificar tu rutina de juego a lo largo del bono.
TAMANOS DE APUESTA
Un metodo para lograr su objetivo de apostar mas rapido es realizar la mayor cantidad de apuestas posible en cada juego. Es un metodo sensato, a menos que el operador del casino decida controlar la cantidad de la apuesta y limitar la cantidad de apuestas en la respectiva tragamonedas con bono sin deposito.
SE REQUIERE UN DEPOSITO
Aunque suene contradictorio, algunos casinos online pueden incluso exigir a los jugadores que depositen dinero antes de poder retirar su bono. Suelen anadir este requisito adicional por razones de seguridad.
RESTRICCIONES
A veces, se le puede negar el acceso a un bono con oferta de deposito gratuito. Esto solo ocurre en muy raras circunstancias, ya sea por el hecho de haber intentado dos bonos a la vez o por tener una direccion IP compartida con un jugador que tambien reclamo el mismo bono, o por residir en una zona restringida.
Puedes obtener informacion mas detallada leyendo el articulo completo en este enlace – https://findfreightloads.com/blog/wp-content/pgs/?codigo_promocional_1xslots_bono.html
Узнай все про промокод 1xBet на сегодня. Используй при регистрации действующий промокод 1хБет и получай бонус за первый депозит до 32500р. Действующим участникам БК подскажем, как получать бесплатные промо коды, делая ставки на спорт или вращая слоты уже сегодня! Но обо всем по порядку. Регистрация в 2024 году — промокод 1хбет на сегодня на 300 рублей. Часто задаваемые вопросы по регистрации и учетной записи у букмекера 1xbet. Активация промокода 1xbet на сегодня. Разнообразие бонусных предложений от 1xbet — другие типы бонусов и промокодов для игроков. Промокод 1xbet на День Рождения. Фрибеты или бесплатные ставки. Тото-промокоды 1xbet. Промокоды 1xbet у блогеров. Система промокодов при регистрации позволяет новым игрокам букмекерской конторы 1xbet получать внушительные бонусные суммы к своему первому депозиту. Обратите внимание, что это не промокод на ставку, а именно на регистрацию. Рабочие промокоды 1хбет на сегодня: Вид бонуса. Размер бонуса – более подробно в этом материале https://03ekb.ru/news/besplatnuy_promokod_pri_registracii.html
synthroid cost generic
Выбор и покупка качественных и стильных дизайнерских обоев для создания уникального интерьера вашего дома или офиса
Волшебство в деталях – именно это обещают дизайнерские обои, которые являются золотым стандартом для придачи свежести и индивидуальности вашему дому. Они дарят эстетическое удовольствие и подчеркивают уникальность каждой комнаты. Если вы ищете элегантный и необычный способ выразить свою индивидуальность, то дизайнерские обои созданы именно для вас.
Независимо от того, какой стиль интерьера вы предпочитаете – классический, современный, минимализм или прованс – дизайнерские обои станут идеальным дополнением к любому стилю. Они позволяют вам с легкостью превратить обычную стену в произведение искусства, добавить лоск и шарм вашей обстановке. Каждая коллекция дизайнерских обоев уникальна и неповторима, и это дает вам возможность выбрать обои, которые идеально впишутся в ваш дом.
Используя самые передовые технологии и креативное мышление, дизайнеры создают обои, которые воплощают в себе самые смелые идеи и фантазии. От классических узоров и геометрических фигур до абстрактных композиций и фотографических репродукций – вариантов нет границ. Каждый рисунок, каждая текстура, каждая цветовая гамма передает свою эмоцию и создает неповторимый эффект в вашем интерьере.
Мы предлагаем вам скидку 15% на наши Фотообои
EL CODIGO PROMOCIONAL DE 1XSLOTS CASINO
Sin introducir un codigo promocional 1xSlots Casino, como nuevo cliente en March 2024, puede beneficiarse de una bonificacion del 100% hasta 300€. El casino le proporciona un monton de maquinas tragaperras populares de proveedores de software como iSoftBet, Elk Studios o Play’n GO y otros. De forma adicional, se le otorgaran|esta oferta incluye 30 turnos gratuitos.. Todas las informaciones importantes respecto a esta oferta de bienvenida se puede encontrar en este articulo.
?COMO FUNCIONA EL CODIGO PROMOCIONAL DE 1XSLOTS CASINO?
En 1xSlots Casino se puede obtener una bonificacion del 100% hasta 300€ y turnos gratuitos en 1xSlots Casino. Haga su inicial deposito en 1xSlots Casino tras finalizar el proceso de inscripcion. No hace falta solicitar su bonificacion de bienvenida por e-mail ni el chat en directo como en otros casinos, porque 1xSlots Casino la abona a su cuenta automaticamente. La oferta de bienvenida se activa cuando deposite 10€ o mas. Haga un deposito empleando EcoPayz, Boku o Bitcoin u otro metodo de deposito disponible en el casino.
Mas sobre el bono
1xSlots Casino le da la oportunidad de incrementar su balance hasta 300€ (100%). Obtenga la bonificacion superior al depositar 300€ y conseguir 600€ que se anadiran en su cuenta. Los fondos de su bonificacion es compatible con tragaperras de proveedores de software como Red Tiger Gaming, Evolution Gaming y Microgaming, por nombrar unos cuantos. Debe tenerse en cuenta tambien que su cuenta se incrementara con 30 turnos gratuitos.
Bono de bienvenida 1xSlots 2024
Dentro de 1xSlots existen dos bonos de bienvenida, uno standard y uno exclusivo. El primero de ellas recompensa con un paquete de hasta €1500 y 150 giros gratis mientras que el segundo otorga un 10% adicional recompensando hasta €1650 y 150 giros gratis ?La diferencia? El bono exclusivo se obtiene mediante el uso del 1xSlots promocode NEXT777.
Las recompensas de la bonificacion exclusiva son otorgadas en los 4 primeros depositos de la siguiente manera:
100% del primer deposito hasta €450 + 30 giros gratis
100% del segundo deposito hasta €350 + 35 giros gratis
100% del tercer deposito hasta €400 + 40 giros gratis
100% del cuarto deposito hasta €450 + 45 giros gratis
Bono de bienvenida 1xSlots Argentina 2024
Cabe resaltar que durante tu proceso de registro tienes que elegir tu moneda local preferida. De este modo obtendras la bonificacion de bienvenida 1xSlots Argentina en pesos. Puedes recibir el bono exclusivo 1xSlots Argentina al utilizar nuestro codigo de bono 1xSlots Argentina NEXT777 durante el proceso de registro.
Ademas, si ingresas el codigo NEXT777 a la pestana “Bonos y Regalos” despues de hacer tu primer deposito, puedes recibir el bono con giros gratis 1xSlots Argentina que te otorgara 60 FS en tragamonedas 777 GEMS RESPIN. A continuacion encontraras los valores de bonos en pesos argentinos.
Bono de bienvenida 1xSlots Chile 2024
El bono de bienvenida 1xSlots Chile funciona del mismo modo como en Argentina. Tienes que crear tu cuenta e ingresar nuestro codigo promocional de giro gratis de 1xslots hoy Chile NEXT777 al formulario de registro. Puedes elegir el peso chileno como tu moneda local para recibir la bonificacion de bienvenida 1xSlots Chile. Adicionalmente, para obtener 60 giros gratis en 777 GEMS RESPIN, introduce el codigo NEXT777 al hacer tu primer deposito.
?QUE ES UN BONO DE TRAGAPERRAS SIN DEPOSITO?
Como su nombre indica, un bono de tragaperras sin deposito es un tipo de bono de casino que no necesita que los jugadores depositen dinero para poder optar a cualquier tipo de recompensa. Por ejemplo, giros gratis, creditos de casino o incluso dinero en efectivo.
Los bonos sin deposito se dan generalmente a los jugadores potenciales para motivar a los nuevos jugadores para que se registren. Pueden formar parte de los paquetes de bienvenida que un casino online ofrece a todos sus jugadores potenciales y ayudan a atraer la atencion hacia la marca del casino. Tambien pueden ofrecerse a los jugadores con cuentas en determinadas situaciones.
Las tragaperras con bono sin deposito ofrecen la posibilidad de probar las tragaperras online sin coste alguno y quedandose con el dinero que se obtiene, razon por la que son muy codiciadas. Sin embargo, los bonos sin deposito no te obligan a depositar dinero cuando la promocion termina, aunque se sugiere.
?CUALES SON LOS PRINCIPALES TIPOS DE BONOS DE TRAGAMONEDAS SIN DEPOSITO?
Los bonos sin deposito estan disponibles en tres variedades: giros gratis, creditos gratis o dinero en efectivo. El tipo mas conocido que es un bono sin deposito no spins without deposit bonus.
GIROS GRATIS CON BONO SIN DEPOSITO
Todos sabemos que las maquinas tragaperras son las mas populares en el mundo de los juegos de casino , por lo que es natural que un bono hecho especificamente para las maquinas que juegan a las tragaperras sea el mas buscado. Para los amantes de las maquinas tragaperras, los bonos de tiradas gratis sin deposito son un verdadero tesoro, ya que permiten a los jugadores jugar a sus maquinas tragaperras favoritas sin depositar dinero, y con una gran cantidad de tiradas gratis, lo que aumenta sus probabilidades de ganar significativamente.
Creditos gratuitos / BONO DE JUEGO GRATUITO SIN DEPOSITO
En lugar de tiradas gratis, los casinos pueden optar por dar creditos gratis a los jugadores que tienen bonos sin deposito. Estos creditos pueden ser utilizados dentro de un periodo de tiempo enumerado para apostar en juegos en los casinos y ganar dinero real. Los bonos sin deposito y los creditos gratuitos se ofrecen tanto en las tragaperras gratuitas como en otros juegos de los casinos.
DINERO GRATIS CON BONOS SIN DEPOSITO
Al igual que los creditos gratuitos con los bonos sin deposito, los bonos de dinero sin deposito que no requieren deposito se pueden jugar tanto en las tragaperras como en otros juegos de casino. Una vez que haya reclamado y jugado el bono de dinero sin deposito, podra retirar el dinero del bono y cualquier ganancia adicional siempre que cumpla las condiciones para retirar el dinero.
?Como puedo reclamar un bono sin deposito?
En la mayoria de los casos, puede hacer uso de los bonos sin deposito al crear una cuenta en cualquier sitio de juego en linea que ofrezca este tipo de oferta. En la version online del casino, la bonificacion puede aparecer en la pagina de promociones del casino o en una ventana emergente. Algunos casinos requieren que introduzca un codigo promocional para acceder al bono.
Cuando considere reclamar un bono sin deposito (o cualquier otro tipo de bono) debe asegurarse de leer los terminos y condiciones que se adjuntan al bono. Los diferentes casinos pueden tener sus propias regulaciones y limites, sin embargo, hay algunos que son iguales en todos los casinos.
REQUISITOS PARA TRABAJAR
Los bonos sobre los depositos son accesibles para todos, sin embargo, cobrar los bonos es un asunto un poco mas controlado. La mayoria de los casinos en linea le permitiran retirar sus ganancias despues de haber podido apostar una cantidad especifica.
Los requisitos de apuesta se muestran como multiplicadores. Representan la cantidad de veces que tienes que apostar en un bono para poder retirar el dinero. Por lo general, puede jugar a una serie de juegos seleccionados por el operador del casino. Una vez que haya alcanzado el requisito de apuesta, podra dar el siguiente paso para cobrar su bono.
PLAZO
Segun el casino online, el bono para juegos de tragaperras de deposito puede caducar en cuestion de dias o durar hasta 30 dias. Para asegurarte de que cumples los requisitos de apuestas, es posible que tengas que planificar tu rutina de juego a lo largo del bono.
TAMANOS DE APUESTA
Un metodo para lograr su objetivo de apostar mas rapido es realizar la mayor cantidad de apuestas posible en cada juego. Es un metodo sensato, a menos que el operador del casino decida controlar la cantidad de la apuesta y limitar la cantidad de apuestas en la respectiva tragamonedas con bono sin deposito.
SE REQUIERE UN DEPOSITO
Aunque suene contradictorio, algunos casinos online pueden incluso exigir a los jugadores que depositen dinero antes de poder retirar su bono. Suelen anadir este requisito adicional por razones de seguridad.
RESTRICCIONES
A veces, se le puede negar el acceso a un bono con oferta de deposito gratuito. Esto solo ocurre en muy raras circunstancias, ya sea por el hecho de haber intentado dos bonos a la vez o por tener una direccion IP compartida con un jugador que tambien reclamo el mismo bono, o por residir en una zona restringida.
Puedes obtener informacion mas detallada leyendo el articulo completo en este enlace – https://findfreightloads.com/blog/wp-content/pgs/?codigo_promocional_1xslots_bono.html
프라그마틱의 게임은 항상 다양한 테마로 놀라워요. 이 사이트에서 더 자세한 정보를 찾아보세요!
에그벳
프라그마틱은 항상 최고의 게임을 제공하죠! 여기에서 더 많은 흥미진진한 정보를 얻을 수 있어 기뻐요.
https://floreijn.com/link/
https://www.12378xs.cn/
https://www.site-rapido.com
Промокод 1xbet на сегодня актуален, бонус будет зачислен сразу после первого пополнения счета. Временные коды. Букмекерская контора 1xbet часто выступает спонсором при переводе популярных сериалов на русский язык. Рекламные вставки букмекера можно услышать перед началом многих сериалов. Часто в такой рекламе диктуется специальные промокод, дающий возможность беттерам рассчитывать на дополнительный бонус. Максимальный бонус при регистрации составляется 32500 рублей. Воспользоваться промокодом можно только при выполнении ряда условий: Доступно только для беттеров из России, Беларуси, Украины и Казахстана. Возврат игрока – от 18 лет. промокод на бесплатную ставку 1хбет сегодня бесплатно. Промокод 1xbet сегодня найти в интернете не так сложно, достаточно воспользоваться любой поисковой системой. Но обращайте внимание на профессиональность ресурса, откуда будет скопирован промокод. Многие сайты предлагают неактуальные бонусные коды, которые не дадут никакого повышенного депозита после регистрации. На нашем сайте представлен актуальный промокод 1xbet на 2024 год. Вводите промокод, чтобы получить 100% сверху после первого пополнения. Минимальная сумма депозита для использования промокода – 100 рублей. Ограничивается бонус 1хбет суммой в 32500 рублей – более подробно в этом материале https://03ekb.ru/news/besplatnuy_promokod_pri_registracii.html
Промокод 1xbet на сегодня актуален, бонус будет зачислен сразу после первого пополнения счета. Временные коды. Букмекерская контора 1xbet часто выступает спонсором при переводе популярных сериалов на русский язык. Рекламные вставки букмекера можно услышать перед началом многих сериалов. Часто в такой рекламе диктуется специальные промокод, дающий возможность беттерам рассчитывать на дополнительный бонус. Максимальный бонус при регистрации составляется 32500 рублей. Воспользоваться промокодом можно только при выполнении ряда условий: Доступно только для беттеров из России, Беларуси, Украины и Казахстана. Возврат игрока – от 18 лет. 1хбет промокод на сегодня на ставку бесплатно. Промокод 1xbet сегодня найти в интернете не так сложно, достаточно воспользоваться любой поисковой системой. Но обращайте внимание на профессиональность ресурса, откуда будет скопирован промокод. Многие сайты предлагают неактуальные бонусные коды, которые не дадут никакого повышенного депозита после регистрации. На нашем сайте представлен актуальный промокод 1xbet на 2024 год. Вводите промокод, чтобы получить 100% сверху после первого пополнения. Минимальная сумма депозита для использования промокода – 100 рублей. Ограничивается бонус 1хбет суммой в 32500 рублей – более подробно в этом материале https://03ekb.ru/news/besplatnuy_promokod_pri_registracii.html
synthroid with no prescription
Discovered an article that’s sure to appeal to you Р I recommend checking it out https://ремонт-оптом.рф/club/user/17/blog/
선도적인 제공 업체인 최신 프라그마틱 게임은 iGaming 분야에서 혁신적인 콘텐츠를 선보이고 있으며 슬롯, 라이브 카지노, 빙고 등 다양한 제품을 제공합니다.
프라그마틱 슬롯
프라그마틱 게임은 정말로 혁신적이에요. 특히 슬롯 게임들은 항상 기대 이상의 재미를 선사합니다!
https://accountantslink.net/link/
https://my-site-104812-108385.weebly.com/
https://hquwhequiw.weebly.com/
tadalafil 40 mg for sale
buy brand name synthroid online
buy tadalafil online no prescription
EL CODIGO PROMOCIONAL DE 1XSLOTS CASINO
Sin introducir un codigo promocional 1xSlots Casino, como nuevo cliente en March 2024, puede beneficiarse de una bonificacion del 100% hasta 300€. El casino le proporciona un monton de maquinas tragaperras populares de proveedores de software como iSoftBet, Elk Studios o Play’n GO y otros. De forma adicional, se le otorgaran|esta oferta incluye 30 turnos gratuitos.. Todas las informaciones importantes respecto a esta oferta de bienvenida se puede encontrar en este articulo.
?COMO FUNCIONA EL CODIGO PROMOCIONAL DE 1XSLOTS CASINO?
En 1xSlots Casino se puede obtener una bonificacion del 100% hasta 300€ y turnos gratuitos en 1xSlots Casino. Haga su inicial deposito en 1xSlots Casino tras finalizar el proceso de inscripcion. No hace falta solicitar su bonificacion de bienvenida por e-mail ni el chat en directo como en otros casinos, porque 1xSlots Casino la abona a su cuenta automaticamente. La oferta de bienvenida se activa cuando deposite 10€ o mas. Haga un deposito empleando EcoPayz, Boku o Bitcoin u otro metodo de deposito disponible en el casino.
Mas sobre el bono
1xSlots Casino le da la oportunidad de incrementar su balance hasta 300€ (100%). Obtenga la bonificacion superior al depositar 300€ y conseguir 600€ que se anadiran en su cuenta. Los fondos de su bonificacion es compatible con tragaperras de proveedores de software como Red Tiger Gaming, Evolution Gaming y Microgaming, por nombrar unos cuantos. Debe tenerse en cuenta tambien que su cuenta se incrementara con 30 turnos gratuitos.
Bono de bienvenida 1xSlots 2024
Dentro de 1xSlots existen dos bonos de bienvenida, uno standard y uno exclusivo. El primero de ellas recompensa con un paquete de hasta €1500 y 150 giros gratis mientras que el segundo otorga un 10% adicional recompensando hasta €1650 y 150 giros gratis ?La diferencia? El bono exclusivo se obtiene mediante el uso del 1xSlots promocode NEXT777.
Las recompensas de la bonificacion exclusiva son otorgadas en los 4 primeros depositos de la siguiente manera:
100% del primer deposito hasta €450 + 30 giros gratis
100% del segundo deposito hasta €350 + 35 giros gratis
100% del tercer deposito hasta €400 + 40 giros gratis
100% del cuarto deposito hasta €450 + 45 giros gratis
Bono de bienvenida 1xSlots Argentina 2024
Cabe resaltar que durante tu proceso de registro tienes que elegir tu moneda local preferida. De este modo obtendras la bonificacion de bienvenida 1xSlots Argentina en pesos. Puedes recibir el bono exclusivo 1xSlots Argentina al utilizar nuestro codigo de bono 1xSlots Argentina NEXT777 durante el proceso de registro.
Ademas, si ingresas el codigo NEXT777 a la pestana “Bonos y Regalos” despues de hacer tu primer deposito, puedes recibir el bono con giros gratis 1xSlots Argentina que te otorgara 60 FS en tragamonedas 777 GEMS RESPIN. A continuacion encontraras los valores de bonos en pesos argentinos.
Bono de bienvenida 1xSlots Chile 2024
El bono de bienvenida 1xSlots Chile funciona del mismo modo como en Argentina. Tienes que crear tu cuenta e ingresar nuestro promocion de bacalao 1xslots Chile NEXT777 al formulario de registro. Puedes elegir el peso chileno como tu moneda local para recibir la bonificacion de bienvenida 1xSlots Chile. Adicionalmente, para obtener 60 giros gratis en 777 GEMS RESPIN, introduce el codigo NEXT777 al hacer tu primer deposito.
?QUE ES UN BONO DE TRAGAPERRAS SIN DEPOSITO?
Como su nombre indica, un bono de tragaperras sin deposito es un tipo de bono de casino que no necesita que los jugadores depositen dinero para poder optar a cualquier tipo de recompensa. Por ejemplo, giros gratis, creditos de casino o incluso dinero en efectivo.
Los bonos sin deposito se dan generalmente a los jugadores potenciales para motivar a los nuevos jugadores para que se registren. Pueden formar parte de los paquetes de bienvenida que un casino online ofrece a todos sus jugadores potenciales y ayudan a atraer la atencion hacia la marca del casino. Tambien pueden ofrecerse a los jugadores con cuentas en determinadas situaciones.
Las tragaperras con bono sin deposito ofrecen la posibilidad de probar las tragaperras online sin coste alguno y quedandose con el dinero que se obtiene, razon por la que son muy codiciadas. Sin embargo, los bonos sin deposito no te obligan a depositar dinero cuando la promocion termina, aunque se sugiere.
?CUALES SON LOS PRINCIPALES TIPOS DE BONOS DE TRAGAMONEDAS SIN DEPOSITO?
Los bonos sin deposito estan disponibles en tres variedades: giros gratis, creditos gratis o dinero en efectivo. El tipo mas conocido que es un bono sin deposito no spins without deposit bonus.
GIROS GRATIS CON BONO SIN DEPOSITO
Todos sabemos que las maquinas tragaperras son las mas populares en el mundo de los juegos de casino , por lo que es natural que un bono hecho especificamente para las maquinas que juegan a las tragaperras sea el mas buscado. Para los amantes de las maquinas tragaperras, los bonos de tiradas gratis sin deposito son un verdadero tesoro, ya que permiten a los jugadores jugar a sus maquinas tragaperras favoritas sin depositar dinero, y con una gran cantidad de tiradas gratis, lo que aumenta sus probabilidades de ganar significativamente.
Creditos gratuitos / BONO DE JUEGO GRATUITO SIN DEPOSITO
En lugar de tiradas gratis, los casinos pueden optar por dar creditos gratis a los jugadores que tienen bonos sin deposito. Estos creditos pueden ser utilizados dentro de un periodo de tiempo enumerado para apostar en juegos en los casinos y ganar dinero real. Los bonos sin deposito y los creditos gratuitos se ofrecen tanto en las tragaperras gratuitas como en otros juegos de los casinos.
DINERO GRATIS CON BONOS SIN DEPOSITO
Al igual que los creditos gratuitos con los bonos sin deposito, los bonos de dinero sin deposito que no requieren deposito se pueden jugar tanto en las tragaperras como en otros juegos de casino. Una vez que haya reclamado y jugado el bono de dinero sin deposito, podra retirar el dinero del bono y cualquier ganancia adicional siempre que cumpla las condiciones para retirar el dinero.
?Como puedo reclamar un bono sin deposito?
En la mayoria de los casos, puede hacer uso de los bonos sin deposito al crear una cuenta en cualquier sitio de juego en linea que ofrezca este tipo de oferta. En la version online del casino, la bonificacion puede aparecer en la pagina de promociones del casino o en una ventana emergente. Algunos casinos requieren que introduzca un codigo promocional para acceder al bono.
Cuando considere reclamar un bono sin deposito (o cualquier otro tipo de bono) debe asegurarse de leer los terminos y condiciones que se adjuntan al bono. Los diferentes casinos pueden tener sus propias regulaciones y limites, sin embargo, hay algunos que son iguales en todos los casinos.
REQUISITOS PARA TRABAJAR
Los bonos sobre los depositos son accesibles para todos, sin embargo, cobrar los bonos es un asunto un poco mas controlado. La mayoria de los casinos en linea le permitiran retirar sus ganancias despues de haber podido apostar una cantidad especifica.
Los requisitos de apuesta se muestran como multiplicadores. Representan la cantidad de veces que tienes que apostar en un bono para poder retirar el dinero. Por lo general, puede jugar a una serie de juegos seleccionados por el operador del casino. Una vez que haya alcanzado el requisito de apuesta, podra dar el siguiente paso para cobrar su bono.
PLAZO
Segun el casino online, el bono para juegos de tragaperras de deposito puede caducar en cuestion de dias o durar hasta 30 dias. Para asegurarte de que cumples los requisitos de apuestas, es posible que tengas que planificar tu rutina de juego a lo largo del bono.
TAMANOS DE APUESTA
Un metodo para lograr su objetivo de apostar mas rapido es realizar la mayor cantidad de apuestas posible en cada juego. Es un metodo sensato, a menos que el operador del casino decida controlar la cantidad de la apuesta y limitar la cantidad de apuestas en la respectiva tragamonedas con bono sin deposito.
SE REQUIERE UN DEPOSITO
Aunque suene contradictorio, algunos casinos online pueden incluso exigir a los jugadores que depositen dinero antes de poder retirar su bono. Suelen anadir este requisito adicional por razones de seguridad.
RESTRICCIONES
A veces, se le puede negar el acceso a un bono con oferta de deposito gratuito. Esto solo ocurre en muy raras circunstancias, ya sea por el hecho de haber intentado dos bonos a la vez o por tener una direccion IP compartida con un jugador que tambien reclamo el mismo bono, o por residir en una zona restringida.
Puedes obtener informacion mas detallada leyendo el articulo completo en este enlace – https://kryivka.net/about/pgs/codigo_promocional_1xslots_bono.html
https://gruzchikibaza.ru/
synthroid for sale online
zithromax pills
EL CODIGO PROMOCIONAL DE 1XSLOTS CASINO
Sin introducir un codigo promocional 1xSlots Casino, como nuevo cliente en March 2024, puede beneficiarse de una bonificacion del 100% hasta 300€. El casino le proporciona un monton de maquinas tragaperras populares de proveedores de software como iSoftBet, Elk Studios o Play’n GO y otros. De forma adicional, se le otorgaran|esta oferta incluye 30 turnos gratuitos.. Todas las informaciones importantes respecto a esta oferta de bienvenida se puede encontrar en este articulo.
?COMO FUNCIONA EL CODIGO PROMOCIONAL DE 1XSLOTS CASINO?
En 1xSlots Casino se puede obtener una bonificacion del 100% hasta 300€ y turnos gratuitos en 1xSlots Casino. Haga su inicial deposito en 1xSlots Casino tras finalizar el proceso de inscripcion. No hace falta solicitar su bonificacion de bienvenida por e-mail ni el chat en directo como en otros casinos, porque 1xSlots Casino la abona a su cuenta automaticamente. La oferta de bienvenida se activa cuando deposite 10€ o mas. Haga un deposito empleando EcoPayz, Boku o Bitcoin u otro metodo de deposito disponible en el casino.
Mas sobre el bono
1xSlots Casino le da la oportunidad de incrementar su balance hasta 300€ (100%). Obtenga la bonificacion superior al depositar 300€ y conseguir 600€ que se anadiran en su cuenta. Los fondos de su bonificacion es compatible con tragaperras de proveedores de software como Red Tiger Gaming, Evolution Gaming y Microgaming, por nombrar unos cuantos. Debe tenerse en cuenta tambien que su cuenta se incrementara con 30 turnos gratuitos.
Bono de bienvenida 1xSlots 2024
Dentro de 1xSlots existen dos bonos de bienvenida, uno standard y uno exclusivo. El primero de ellas recompensa con un paquete de hasta €1500 y 150 giros gratis mientras que el segundo otorga un 10% adicional recompensando hasta €1650 y 150 giros gratis ?La diferencia? El bono exclusivo se obtiene mediante el uso del 1xSlots promocode NEXT777.
Las recompensas de la bonificacion exclusiva son otorgadas en los 4 primeros depositos de la siguiente manera:
100% del primer deposito hasta €450 + 30 giros gratis
100% del segundo deposito hasta €350 + 35 giros gratis
100% del tercer deposito hasta €400 + 40 giros gratis
100% del cuarto deposito hasta €450 + 45 giros gratis
Bono de bienvenida 1xSlots Argentina 2024
Cabe resaltar que durante tu proceso de registro tienes que elegir tu moneda local preferida. De este modo obtendras la bonificacion de bienvenida 1xSlots Argentina en pesos. Puedes recibir el bono exclusivo 1xSlots Argentina al utilizar nuestro codigo de bono 1xSlots Argentina NEXT777 durante el proceso de registro.
Ademas, si ingresas el codigo NEXT777 a la pestana “Bonos y Regalos” despues de hacer tu primer deposito, puedes recibir el bono con giros gratis 1xSlots Argentina que te otorgara 60 FS en tragamonedas 777 GEMS RESPIN. A continuacion encontraras los valores de bonos en pesos argentinos.
Bono de bienvenida 1xSlots Chile 2024
El bono de bienvenida 1xSlots Chile funciona del mismo modo como en Argentina. Tienes que crear tu cuenta e ingresar nuestro 1xslots codigo de bono sin deposito Chile NEXT777 al formulario de registro. Puedes elegir el peso chileno como tu moneda local para recibir la bonificacion de bienvenida 1xSlots Chile. Adicionalmente, para obtener 60 giros gratis en 777 GEMS RESPIN, introduce el codigo NEXT777 al hacer tu primer deposito.
?QUE ES UN BONO DE TRAGAPERRAS SIN DEPOSITO?
Como su nombre indica, un bono de tragaperras sin deposito es un tipo de bono de casino que no necesita que los jugadores depositen dinero para poder optar a cualquier tipo de recompensa. Por ejemplo, giros gratis, creditos de casino o incluso dinero en efectivo.
Los bonos sin deposito se dan generalmente a los jugadores potenciales para motivar a los nuevos jugadores para que se registren. Pueden formar parte de los paquetes de bienvenida que un casino online ofrece a todos sus jugadores potenciales y ayudan a atraer la atencion hacia la marca del casino. Tambien pueden ofrecerse a los jugadores con cuentas en determinadas situaciones.
Las tragaperras con bono sin deposito ofrecen la posibilidad de probar las tragaperras online sin coste alguno y quedandose con el dinero que se obtiene, razon por la que son muy codiciadas. Sin embargo, los bonos sin deposito no te obligan a depositar dinero cuando la promocion termina, aunque se sugiere.
?CUALES SON LOS PRINCIPALES TIPOS DE BONOS DE TRAGAMONEDAS SIN DEPOSITO?
Los bonos sin deposito estan disponibles en tres variedades: giros gratis, creditos gratis o dinero en efectivo. El tipo mas conocido que es un bono sin deposito no spins without deposit bonus.
GIROS GRATIS CON BONO SIN DEPOSITO
Todos sabemos que las maquinas tragaperras son las mas populares en el mundo de los juegos de casino , por lo que es natural que un bono hecho especificamente para las maquinas que juegan a las tragaperras sea el mas buscado. Para los amantes de las maquinas tragaperras, los bonos de tiradas gratis sin deposito son un verdadero tesoro, ya que permiten a los jugadores jugar a sus maquinas tragaperras favoritas sin depositar dinero, y con una gran cantidad de tiradas gratis, lo que aumenta sus probabilidades de ganar significativamente.
Creditos gratuitos / BONO DE JUEGO GRATUITO SIN DEPOSITO
En lugar de tiradas gratis, los casinos pueden optar por dar creditos gratis a los jugadores que tienen bonos sin deposito. Estos creditos pueden ser utilizados dentro de un periodo de tiempo enumerado para apostar en juegos en los casinos y ganar dinero real. Los bonos sin deposito y los creditos gratuitos se ofrecen tanto en las tragaperras gratuitas como en otros juegos de los casinos.
DINERO GRATIS CON BONOS SIN DEPOSITO
Al igual que los creditos gratuitos con los bonos sin deposito, los bonos de dinero sin deposito que no requieren deposito se pueden jugar tanto en las tragaperras como en otros juegos de casino. Una vez que haya reclamado y jugado el bono de dinero sin deposito, podra retirar el dinero del bono y cualquier ganancia adicional siempre que cumpla las condiciones para retirar el dinero.
?Como puedo reclamar un bono sin deposito?
En la mayoria de los casos, puede hacer uso de los bonos sin deposito al crear una cuenta en cualquier sitio de juego en linea que ofrezca este tipo de oferta. En la version online del casino, la bonificacion puede aparecer en la pagina de promociones del casino o en una ventana emergente. Algunos casinos requieren que introduzca un codigo promocional para acceder al bono.
Cuando considere reclamar un bono sin deposito (o cualquier otro tipo de bono) debe asegurarse de leer los terminos y condiciones que se adjuntan al bono. Los diferentes casinos pueden tener sus propias regulaciones y limites, sin embargo, hay algunos que son iguales en todos los casinos.
REQUISITOS PARA TRABAJAR
Los bonos sobre los depositos son accesibles para todos, sin embargo, cobrar los bonos es un asunto un poco mas controlado. La mayoria de los casinos en linea le permitiran retirar sus ganancias despues de haber podido apostar una cantidad especifica.
Los requisitos de apuesta se muestran como multiplicadores. Representan la cantidad de veces que tienes que apostar en un bono para poder retirar el dinero. Por lo general, puede jugar a una serie de juegos seleccionados por el operador del casino. Una vez que haya alcanzado el requisito de apuesta, podra dar el siguiente paso para cobrar su bono.
PLAZO
Segun el casino online, el bono para juegos de tragaperras de deposito puede caducar en cuestion de dias o durar hasta 30 dias. Para asegurarte de que cumples los requisitos de apuestas, es posible que tengas que planificar tu rutina de juego a lo largo del bono.
TAMANOS DE APUESTA
Un metodo para lograr su objetivo de apostar mas rapido es realizar la mayor cantidad de apuestas posible en cada juego. Es un metodo sensato, a menos que el operador del casino decida controlar la cantidad de la apuesta y limitar la cantidad de apuestas en la respectiva tragamonedas con bono sin deposito.
SE REQUIERE UN DEPOSITO
Aunque suene contradictorio, algunos casinos online pueden incluso exigir a los jugadores que depositen dinero antes de poder retirar su bono. Suelen anadir este requisito adicional por razones de seguridad.
RESTRICCIONES
A veces, se le puede negar el acceso a un bono con oferta de deposito gratuito. Esto solo ocurre en muy raras circunstancias, ya sea por el hecho de haber intentado dos bonos a la vez o por tener una direccion IP compartida con un jugador que tambien reclamo el mismo bono, o por residir en una zona restringida.
Puedes obtener informacion mas detallada leyendo el articulo completo en este enlace – https://kryivka.net/about/pgs/codigo_promocional_1xslots_bono.html
canadian pharmacy 24h com
EL CODIGO PROMOCIONAL DE 1XSLOTS CASINO
Sin introducir un codigo promocional 1xSlots Casino, como nuevo cliente en March 2024, puede beneficiarse de una bonificacion del 100% hasta 300€. El casino le proporciona un monton de maquinas tragaperras populares de proveedores de software como iSoftBet, Elk Studios o Play’n GO y otros. De forma adicional, se le otorgaran|esta oferta incluye 30 turnos gratuitos.. Todas las informaciones importantes respecto a esta oferta de bienvenida se puede encontrar en este articulo.
?COMO FUNCIONA EL CODIGO PROMOCIONAL DE 1XSLOTS CASINO?
En 1xSlots Casino se puede obtener una bonificacion del 100% hasta 300€ y turnos gratuitos en 1xSlots Casino. Haga su inicial deposito en 1xSlots Casino tras finalizar el proceso de inscripcion. No hace falta solicitar su bonificacion de bienvenida por e-mail ni el chat en directo como en otros casinos, porque 1xSlots Casino la abona a su cuenta automaticamente. La oferta de bienvenida se activa cuando deposite 10€ o mas. Haga un deposito empleando EcoPayz, Boku o Bitcoin u otro metodo de deposito disponible en el casino.
Mas sobre el bono
1xSlots Casino le da la oportunidad de incrementar su balance hasta 300€ (100%). Obtenga la bonificacion superior al depositar 300€ y conseguir 600€ que se anadiran en su cuenta. Los fondos de su bonificacion es compatible con tragaperras de proveedores de software como Red Tiger Gaming, Evolution Gaming y Microgaming, por nombrar unos cuantos. Debe tenerse en cuenta tambien que su cuenta se incrementara con 30 turnos gratuitos.
Bono de bienvenida 1xSlots 2024
Dentro de 1xSlots existen dos bonos de bienvenida, uno standard y uno exclusivo. El primero de ellas recompensa con un paquete de hasta €1500 y 150 giros gratis mientras que el segundo otorga un 10% adicional recompensando hasta €1650 y 150 giros gratis ?La diferencia? El bono exclusivo se obtiene mediante el uso del 1xSlots promocode NEXT777.
Las recompensas de la bonificacion exclusiva son otorgadas en los 4 primeros depositos de la siguiente manera:
100% del primer deposito hasta €450 + 30 giros gratis
100% del segundo deposito hasta €350 + 35 giros gratis
100% del tercer deposito hasta €400 + 40 giros gratis
100% del cuarto deposito hasta €450 + 45 giros gratis
Bono de bienvenida 1xSlots Argentina 2024
Cabe resaltar que durante tu proceso de registro tienes que elegir tu moneda local preferida. De este modo obtendras la bonificacion de bienvenida 1xSlots Argentina en pesos. Puedes recibir el bono exclusivo 1xSlots Argentina al utilizar nuestro codigo de bono 1xSlots Argentina NEXT777 durante el proceso de registro.
Ademas, si ingresas el codigo NEXT777 a la pestana “Bonos y Regalos” despues de hacer tu primer deposito, puedes recibir el bono con giros gratis 1xSlots Argentina que te otorgara 60 FS en tragamonedas 777 GEMS RESPIN. A continuacion encontraras los valores de bonos en pesos argentinos.
Bono de bienvenida 1xSlots Chile 2024
El bono de bienvenida 1xSlots Chile funciona del mismo modo como en Argentina. Tienes que crear tu cuenta e ingresar nuestro como obtener el codigo promocional 1xslots Chile NEXT777 al formulario de registro. Puedes elegir el peso chileno como tu moneda local para recibir la bonificacion de bienvenida 1xSlots Chile. Adicionalmente, para obtener 60 giros gratis en 777 GEMS RESPIN, introduce el codigo NEXT777 al hacer tu primer deposito.
?QUE ES UN BONO DE TRAGAPERRAS SIN DEPOSITO?
Como su nombre indica, un bono de tragaperras sin deposito es un tipo de bono de casino que no necesita que los jugadores depositen dinero para poder optar a cualquier tipo de recompensa. Por ejemplo, giros gratis, creditos de casino o incluso dinero en efectivo.
Los bonos sin deposito se dan generalmente a los jugadores potenciales para motivar a los nuevos jugadores para que se registren. Pueden formar parte de los paquetes de bienvenida que un casino online ofrece a todos sus jugadores potenciales y ayudan a atraer la atencion hacia la marca del casino. Tambien pueden ofrecerse a los jugadores con cuentas en determinadas situaciones.
Las tragaperras con bono sin deposito ofrecen la posibilidad de probar las tragaperras online sin coste alguno y quedandose con el dinero que se obtiene, razon por la que son muy codiciadas. Sin embargo, los bonos sin deposito no te obligan a depositar dinero cuando la promocion termina, aunque se sugiere.
?CUALES SON LOS PRINCIPALES TIPOS DE BONOS DE TRAGAMONEDAS SIN DEPOSITO?
Los bonos sin deposito estan disponibles en tres variedades: giros gratis, creditos gratis o dinero en efectivo. El tipo mas conocido que es un bono sin deposito no spins without deposit bonus.
GIROS GRATIS CON BONO SIN DEPOSITO
Todos sabemos que las maquinas tragaperras son las mas populares en el mundo de los juegos de casino , por lo que es natural que un bono hecho especificamente para las maquinas que juegan a las tragaperras sea el mas buscado. Para los amantes de las maquinas tragaperras, los bonos de tiradas gratis sin deposito son un verdadero tesoro, ya que permiten a los jugadores jugar a sus maquinas tragaperras favoritas sin depositar dinero, y con una gran cantidad de tiradas gratis, lo que aumenta sus probabilidades de ganar significativamente.
Creditos gratuitos / BONO DE JUEGO GRATUITO SIN DEPOSITO
En lugar de tiradas gratis, los casinos pueden optar por dar creditos gratis a los jugadores que tienen bonos sin deposito. Estos creditos pueden ser utilizados dentro de un periodo de tiempo enumerado para apostar en juegos en los casinos y ganar dinero real. Los bonos sin deposito y los creditos gratuitos se ofrecen tanto en las tragaperras gratuitas como en otros juegos de los casinos.
DINERO GRATIS CON BONOS SIN DEPOSITO
Al igual que los creditos gratuitos con los bonos sin deposito, los bonos de dinero sin deposito que no requieren deposito se pueden jugar tanto en las tragaperras como en otros juegos de casino. Una vez que haya reclamado y jugado el bono de dinero sin deposito, podra retirar el dinero del bono y cualquier ganancia adicional siempre que cumpla las condiciones para retirar el dinero.
?Como puedo reclamar un bono sin deposito?
En la mayoria de los casos, puede hacer uso de los bonos sin deposito al crear una cuenta en cualquier sitio de juego en linea que ofrezca este tipo de oferta. En la version online del casino, la bonificacion puede aparecer en la pagina de promociones del casino o en una ventana emergente. Algunos casinos requieren que introduzca un codigo promocional para acceder al bono.
Cuando considere reclamar un bono sin deposito (o cualquier otro tipo de bono) debe asegurarse de leer los terminos y condiciones que se adjuntan al bono. Los diferentes casinos pueden tener sus propias regulaciones y limites, sin embargo, hay algunos que son iguales en todos los casinos.
REQUISITOS PARA TRABAJAR
Los bonos sobre los depositos son accesibles para todos, sin embargo, cobrar los bonos es un asunto un poco mas controlado. La mayoria de los casinos en linea le permitiran retirar sus ganancias despues de haber podido apostar una cantidad especifica.
Los requisitos de apuesta se muestran como multiplicadores. Representan la cantidad de veces que tienes que apostar en un bono para poder retirar el dinero. Por lo general, puede jugar a una serie de juegos seleccionados por el operador del casino. Una vez que haya alcanzado el requisito de apuesta, podra dar el siguiente paso para cobrar su bono.
PLAZO
Segun el casino online, el bono para juegos de tragaperras de deposito puede caducar en cuestion de dias o durar hasta 30 dias. Para asegurarte de que cumples los requisitos de apuestas, es posible que tengas que planificar tu rutina de juego a lo largo del bono.
TAMANOS DE APUESTA
Un metodo para lograr su objetivo de apostar mas rapido es realizar la mayor cantidad de apuestas posible en cada juego. Es un metodo sensato, a menos que el operador del casino decida controlar la cantidad de la apuesta y limitar la cantidad de apuestas en la respectiva tragamonedas con bono sin deposito.
SE REQUIERE UN DEPOSITO
Aunque suene contradictorio, algunos casinos online pueden incluso exigir a los jugadores que depositen dinero antes de poder retirar su bono. Suelen anadir este requisito adicional por razones de seguridad.
RESTRICCIONES
A veces, se le puede negar el acceso a un bono con oferta de deposito gratuito. Esto solo ocurre en muy raras circunstancias, ya sea por el hecho de haber intentado dos bonos a la vez o por tener una direccion IP compartida con un jugador que tambien reclamo el mismo bono, o por residir en una zona restringida.
Puedes obtener informacion mas detallada leyendo el articulo completo en este enlace – https://kryivka.net/about/pgs/codigo_promocional_1xslots_bono.html
sohbet yuuuh senin gibi adamin avradini sikiyim
최신 프라그마틱 게임은 iGaming 분야에서 선도적인 제공 업체로서, 독창적이고 표준화된 콘텐츠를 제공합니다.
프라그마틷
프라그마틱에 대한 이 글 감사합니다. 더불어, 제 사이트에서도 프라그마틱과 관련된 유용한 정보를 찾아보세요. 서로 이야기 나누면 더 좋겠죠!
https://www.12315oi.cn/
https://hyunmee.net/hot/
https://www.12315sv.cn/
best brand metformin
buy cheap generic zithromax
buy viagra online
pharmacy wholesalers canada
lisinopril uk
lisinopril pill 40 mg
Hi, I do believe this is an excellent web site.
I stumbledupon it 😉 I will come back yet again since I book marked it.
Money and freedom is the greatest way to change, may you be rich and continue
to guide others.
synthroid 112 mcg tablet
synthroid 137 mcg price
can you buy synthroid in mexico
1. Вибір натяжних стель: як вибрати ідеальний варіант?
2. Модні тренди натяжних стель на поточний сезон
3. Які переваги мають натяжні стелі порівняно зі звичайними?
4. Як підібрати кольори для натяжної стелі у квартирі?
5. Секрети догляду за натяжними стелями: що потрібно знати?
6. Як зробити вибір між матовими та глянцевими натяжними стелями?
7. Натяжні стелі в інтер’єрі: як вони змінюють приміщення?
8. Натяжні стелі для ванної кімнати: плюси та мінуси
9. Як підняти стеля візуально за допомогою натяжної конструкції?
10. Як вибрати правильний дизайн натяжної стелі для кухні?
11. Інноваційні технології виробництва натяжних стель: що варто знати?
12. Чому натяжні стелі вибирають для офісних приміщень?
13. Натяжні стелі з фотопринтом: які переваги цієї технології?
14. Дизайнерські рішення для натяжних стель: ідеї для втілення
15. Хімічні реагенти в складі натяжних стель: безпека та якість
16. Як вибрати натяжну стелю для дитячої кімнати: поради батькам
17. Які можливості для дизайну приміщень відкривають натяжні стелі?
18. Як впливає вибір матеріалу на якість натяжної стелі?
19. Інструкція з монтажу натяжних стель власноруч: крок за кроком
20. Натяжні стелі як елемент екстер’єру будівлі: переваги та недоліки
натяжні стелі львів ціна https://www.natjazhnistelifvgtg.lviv.ua/ .
cheap zithromax online
프라그마틱 게임은 iGaming 업계에서 혁신적이고 표준화된 모바일 중심의 콘텐츠를 제공하는 선도적인 제공 업체입니다. 고객에게 뛰어난 경험을 제공하기 위해 슬롯, 라이브 카지노, 빙고 등 다양한 제품을 통합합니다.
PG 소프트
프라그마틱의 게임은 높은 퀄리티와 흥미진진한 스토리로 항상 눈길을 끌어요. 이번에 어떤 게임을 즐겼나요?
https://ahjdmt.com/hot/
https://boramall.net/hot/
https://www.12315os.cn/
покердом казино
https://www.guitar-school.ru/forum/member.php?u=27749
Специально для вас, PokerDom Casino создал уникальную атмосферу азарта и удовольствия. Лицензионные автоматы, доступные на нашем официальном сайте, гарантируют честность и надежность каждой игры. Ведь мы понимаем, что ваша удача заслуживает только лучшего.Играть онлайн в слоты на реальные деньги на PokerDom Casino — это как путешествие в мир невероятных возможностей. Каждый спин барабанов открывает новые горизонты, даря вам шанс поймать удачу за хвост. Покердом Казино предоставляет вам широкий выбор игр, чтобы удовлетворить самый изысканный вкус азарта.
prednisone 20mg tablets
tadalafil 5mg costs
https://gruzchikibol.ru
tadalafil online sale
Wһat’s up everyone, іt’s mmy fіrst go to see at this web sitе, and post is truⅼy
fruitful for me, keep up posting these postѕ.
I’m gone to convey my little brother, that he should also pay a visit this webpage on regular basis to get updated from most up-to-date gossip.
https://blogtopview.com/bbs/board.php?bo_table=free&wr_id=22409
1. Вибір натяжних стель: як вибрати ідеальний варіант?
2. Модні тренди натяжних стель на поточний сезон
3. Які переваги мають натяжні стелі порівняно зі звичайними?
4. Як підібрати кольори для натяжної стелі у квартирі?
5. Секрети догляду за натяжними стелями: що потрібно знати?
6. Як зробити вибір між матовими та глянцевими натяжними стелями?
7. Натяжні стелі в інтер’єрі: як вони змінюють приміщення?
8. Натяжні стелі для ванної кімнати: плюси та мінуси
9. Як підняти стеля візуально за допомогою натяжної конструкції?
10. Як вибрати правильний дизайн натяжної стелі для кухні?
11. Інноваційні технології виробництва натяжних стель: що варто знати?
12. Чому натяжні стелі вибирають для офісних приміщень?
13. Натяжні стелі з фотопринтом: які переваги цієї технології?
14. Дизайнерські рішення для натяжних стель: ідеї для втілення
15. Хімічні реагенти в складі натяжних стель: безпека та якість
16. Як вибрати натяжну стелю для дитячої кімнати: поради батькам
17. Які можливості для дизайну приміщень відкривають натяжні стелі?
18. Як впливає вибір матеріалу на якість натяжної стелі?
19. Інструкція з монтажу натяжних стель власноруч: крок за кроком
20. Натяжні стелі як елемент екстер’єру будівлі: переваги та недоліки
натяжні стелі львів відгуки http://www.natjazhnistelifvgtg.lviv.ua .
where to buy cialis online in usa
1. Вибір натяжних стель: як вибрати ідеальний варіант?
2. Модні тренди натяжних стель на поточний сезон
3. Які переваги мають натяжні стелі порівняно зі звичайними?
4. Як підібрати кольори для натяжної стелі у квартирі?
5. Секрети догляду за натяжними стелями: що потрібно знати?
6. Як зробити вибір між матовими та глянцевими натяжними стелями?
7. Натяжні стелі в інтер’єрі: як вони змінюють приміщення?
8. Натяжні стелі для ванної кімнати: плюси та мінуси
9. Як підняти стеля візуально за допомогою натяжної конструкції?
10. Як вибрати правильний дизайн натяжної стелі для кухні?
11. Інноваційні технології виробництва натяжних стель: що варто знати?
12. Чому натяжні стелі вибирають для офісних приміщень?
13. Натяжні стелі з фотопринтом: які переваги цієї технології?
14. Дизайнерські рішення для натяжних стель: ідеї для втілення
15. Хімічні реагенти в складі натяжних стель: безпека та якість
16. Як вибрати натяжну стелю для дитячої кімнати: поради батькам
17. Які можливості для дизайну приміщень відкривають натяжні стелі?
18. Як впливає вибір матеріалу на якість натяжної стелі?
19. Інструкція з монтажу натяжних стель власноруч: крок за кроком
20. Натяжні стелі як елемент екстер’єру будівлі: переваги та недоліки
підвісні стелі ціна natjazhnistelifvgtg.lviv.ua .
synthroid 100 mcg price
top 10 pharmacies in india
Hey there! Do you know if they make any plugins to protect against hackers? I’m kinda paranoid about losing everything I’ve worked hard on. Any tips?
Официальный сайт Gama casino
Gama casino
tadalafil generic 10mg
https://gruzchikietazh.ru
демонтаж москва
https://demontagmoskva.ru/
프라그마틱의 게임은 항상 최고 수준의 퀄리티를 유지하고 있어요. 이번에도 그런 훌륭한 게임을 만났나요?
프라그마틱 무료
프라그마틱의 게임은 언제나 최신 트렌드를 반영하고 있죠. 최근에 나온 트렌드 중에서 가장 마음에 드는 것은 무엇인가요
https://www.12315xa.cn/
https://habermahmutlar.com/hot/
https://www.12315amb.cn/
buy synthroid online from canada
EL CODIGO PROMOCIONAL DE 1XSLOTS CASINO
Sin introducir un codigo promocional 1xSlots Casino, como nuevo cliente en March 2024, puede beneficiarse de una bonificacion del 100% hasta 300€. El casino le proporciona un monton de maquinas tragaperras populares de proveedores de software como iSoftBet, Elk Studios o Play’n GO y otros. De forma adicional, se le otorgaran|esta oferta incluye 30 turnos gratuitos.. Todas las informaciones importantes respecto a esta oferta de bienvenida se puede encontrar en este articulo.
?COMO FUNCIONA EL CODIGO PROMOCIONAL DE 1XSLOTS CASINO?
En 1xSlots Casino se puede obtener una bonificacion del 100% hasta 300€ y turnos gratuitos en 1xSlots Casino. Haga su inicial deposito en 1xSlots Casino tras finalizar el proceso de inscripcion. No hace falta solicitar su bonificacion de bienvenida por e-mail ni el chat en directo como en otros casinos, porque 1xSlots Casino la abona a su cuenta automaticamente. La oferta de bienvenida se activa cuando deposite 10€ o mas. Haga un deposito empleando EcoPayz, Boku o Bitcoin u otro metodo de deposito disponible en el casino.
Mas sobre el bono
1xSlots Casino le da la oportunidad de incrementar su balance hasta 300€ (100%). Obtenga la bonificacion superior al depositar 300€ y conseguir 600€ que se anadiran en su cuenta. Los fondos de su bonificacion es compatible con tragaperras de proveedores de software como Red Tiger Gaming, Evolution Gaming y Microgaming, por nombrar unos cuantos. Debe tenerse en cuenta tambien que su cuenta se incrementara con 30 turnos gratuitos.
Bono de bienvenida 1xSlots 2024
Dentro de 1xSlots existen dos bonos de bienvenida, uno standard y uno exclusivo. El primero de ellas recompensa con un paquete de hasta €1500 y 150 giros gratis mientras que el segundo otorga un 10% adicional recompensando hasta €1650 y 150 giros gratis ?La diferencia? El bono exclusivo se obtiene mediante el uso del 1xSlots promocode NEXT777.
Las recompensas de la bonificacion exclusiva son otorgadas en los 4 primeros depositos de la siguiente manera:
100% del primer deposito hasta €450 + 30 giros gratis
100% del segundo deposito hasta €350 + 35 giros gratis
100% del tercer deposito hasta €400 + 40 giros gratis
100% del cuarto deposito hasta €450 + 45 giros gratis
Bono de bienvenida 1xSlots Argentina 2024
Cabe resaltar que durante tu proceso de registro tienes que elegir tu moneda local preferida. De este modo obtendras la bonificacion de bienvenida 1xSlots Argentina en pesos. Puedes recibir el bono exclusivo 1xSlots Argentina al utilizar nuestro codigo de bono 1xSlots Argentina NEXT777 durante el proceso de registro.
Ademas, si ingresas el codigo NEXT777 a la pestana “Bonos y Regalos” despues de hacer tu primer deposito, puedes recibir el bono con giros gratis 1xSlots Argentina que te otorgara 60 FS en tragamonedas 777 GEMS RESPIN. A continuacion encontraras los valores de bonos en pesos argentinos.
Bono de bienvenida 1xSlots Chile 2024
El bono de bienvenida 1xSlots Chile funciona del mismo modo como en Argentina. Tienes que crear tu cuenta e ingresar nuestro 1xslots codigo multiple hoy Chile NEXT777 al formulario de registro. Puedes elegir el peso chileno como tu moneda local para recibir la bonificacion de bienvenida 1xSlots Chile. Adicionalmente, para obtener 60 giros gratis en 777 GEMS RESPIN, introduce el codigo NEXT777 al hacer tu primer deposito.
?QUE ES UN BONO DE TRAGAPERRAS SIN DEPOSITO?
Como su nombre indica, un bono de tragaperras sin deposito es un tipo de bono de casino que no necesita que los jugadores depositen dinero para poder optar a cualquier tipo de recompensa. Por ejemplo, giros gratis, creditos de casino o incluso dinero en efectivo.
Los bonos sin deposito se dan generalmente a los jugadores potenciales para motivar a los nuevos jugadores para que se registren. Pueden formar parte de los paquetes de bienvenida que un casino online ofrece a todos sus jugadores potenciales y ayudan a atraer la atencion hacia la marca del casino. Tambien pueden ofrecerse a los jugadores con cuentas en determinadas situaciones.
Las tragaperras con bono sin deposito ofrecen la posibilidad de probar las tragaperras online sin coste alguno y quedandose con el dinero que se obtiene, razon por la que son muy codiciadas. Sin embargo, los bonos sin deposito no te obligan a depositar dinero cuando la promocion termina, aunque se sugiere.
?CUALES SON LOS PRINCIPALES TIPOS DE BONOS DE TRAGAMONEDAS SIN DEPOSITO?
Los bonos sin deposito estan disponibles en tres variedades: giros gratis, creditos gratis o dinero en efectivo. El tipo mas conocido que es un bono sin deposito no spins without deposit bonus.
GIROS GRATIS CON BONO SIN DEPOSITO
Todos sabemos que las maquinas tragaperras son las mas populares en el mundo de los juegos de casino , por lo que es natural que un bono hecho especificamente para las maquinas que juegan a las tragaperras sea el mas buscado. Para los amantes de las maquinas tragaperras, los bonos de tiradas gratis sin deposito son un verdadero tesoro, ya que permiten a los jugadores jugar a sus maquinas tragaperras favoritas sin depositar dinero, y con una gran cantidad de tiradas gratis, lo que aumenta sus probabilidades de ganar significativamente.
Creditos gratuitos / BONO DE JUEGO GRATUITO SIN DEPOSITO
En lugar de tiradas gratis, los casinos pueden optar por dar creditos gratis a los jugadores que tienen bonos sin deposito. Estos creditos pueden ser utilizados dentro de un periodo de tiempo enumerado para apostar en juegos en los casinos y ganar dinero real. Los bonos sin deposito y los creditos gratuitos se ofrecen tanto en las tragaperras gratuitas como en otros juegos de los casinos.
DINERO GRATIS CON BONOS SIN DEPOSITO
Al igual que los creditos gratuitos con los bonos sin deposito, los bonos de dinero sin deposito que no requieren deposito se pueden jugar tanto en las tragaperras como en otros juegos de casino. Una vez que haya reclamado y jugado el bono de dinero sin deposito, podra retirar el dinero del bono y cualquier ganancia adicional siempre que cumpla las condiciones para retirar el dinero.
?Como puedo reclamar un bono sin deposito?
En la mayoria de los casos, puede hacer uso de los bonos sin deposito al crear una cuenta en cualquier sitio de juego en linea que ofrezca este tipo de oferta. En la version online del casino, la bonificacion puede aparecer en la pagina de promociones del casino o en una ventana emergente. Algunos casinos requieren que introduzca un codigo promocional para acceder al bono.
Cuando considere reclamar un bono sin deposito (o cualquier otro tipo de bono) debe asegurarse de leer los terminos y condiciones que se adjuntan al bono. Los diferentes casinos pueden tener sus propias regulaciones y limites, sin embargo, hay algunos que son iguales en todos los casinos.
REQUISITOS PARA TRABAJAR
Los bonos sobre los depositos son accesibles para todos, sin embargo, cobrar los bonos es un asunto un poco mas controlado. La mayoria de los casinos en linea le permitiran retirar sus ganancias despues de haber podido apostar una cantidad especifica.
Los requisitos de apuesta se muestran como multiplicadores. Representan la cantidad de veces que tienes que apostar en un bono para poder retirar el dinero. Por lo general, puede jugar a una serie de juegos seleccionados por el operador del casino. Una vez que haya alcanzado el requisito de apuesta, podra dar el siguiente paso para cobrar su bono.
PLAZO
Segun el casino online, el bono para juegos de tragaperras de deposito puede caducar en cuestion de dias o durar hasta 30 dias. Para asegurarte de que cumples los requisitos de apuestas, es posible que tengas que planificar tu rutina de juego a lo largo del bono.
TAMANOS DE APUESTA
Un metodo para lograr su objetivo de apostar mas rapido es realizar la mayor cantidad de apuestas posible en cada juego. Es un metodo sensato, a menos que el operador del casino decida controlar la cantidad de la apuesta y limitar la cantidad de apuestas en la respectiva tragamonedas con bono sin deposito.
SE REQUIERE UN DEPOSITO
Aunque suene contradictorio, algunos casinos online pueden incluso exigir a los jugadores que depositen dinero antes de poder retirar su bono. Suelen anadir este requisito adicional por razones de seguridad.
RESTRICCIONES
A veces, se le puede negar el acceso a un bono con oferta de deposito gratuito. Esto solo ocurre en muy raras circunstancias, ya sea por el hecho de haber intentado dos bonos a la vez o por tener una direccion IP compartida con un jugador que tambien reclamo el mismo bono, o por residir en una zona restringida.
Puedes obtener informacion mas detallada leyendo el articulo completo en este enlace – https://kryivka.net/about/pgs/codigo_promocional_1xslots_bono.html
azithromycin 500 tablet price
EL CODIGO PROMOCIONAL DE 1XSLOTS CASINO
Sin introducir un codigo promocional 1xSlots Casino, como nuevo cliente en March 2024, puede beneficiarse de una bonificacion del 100% hasta 300€. El casino le proporciona un monton de maquinas tragaperras populares de proveedores de software como iSoftBet, Elk Studios o Play’n GO y otros. De forma adicional, se le otorgaran|esta oferta incluye 30 turnos gratuitos.. Todas las informaciones importantes respecto a esta oferta de bienvenida se puede encontrar en este articulo.
?COMO FUNCIONA EL CODIGO PROMOCIONAL DE 1XSLOTS CASINO?
En 1xSlots Casino se puede obtener una bonificacion del 100% hasta 300€ y turnos gratuitos en 1xSlots Casino. Haga su inicial deposito en 1xSlots Casino tras finalizar el proceso de inscripcion. No hace falta solicitar su bonificacion de bienvenida por e-mail ni el chat en directo como en otros casinos, porque 1xSlots Casino la abona a su cuenta automaticamente. La oferta de bienvenida se activa cuando deposite 10€ o mas. Haga un deposito empleando EcoPayz, Boku o Bitcoin u otro metodo de deposito disponible en el casino.
Mas sobre el bono
1xSlots Casino le da la oportunidad de incrementar su balance hasta 300€ (100%). Obtenga la bonificacion superior al depositar 300€ y conseguir 600€ que se anadiran en su cuenta. Los fondos de su bonificacion es compatible con tragaperras de proveedores de software como Red Tiger Gaming, Evolution Gaming y Microgaming, por nombrar unos cuantos. Debe tenerse en cuenta tambien que su cuenta se incrementara con 30 turnos gratuitos.
Bono de bienvenida 1xSlots 2024
Dentro de 1xSlots existen dos bonos de bienvenida, uno standard y uno exclusivo. El primero de ellas recompensa con un paquete de hasta €1500 y 150 giros gratis mientras que el segundo otorga un 10% adicional recompensando hasta €1650 y 150 giros gratis ?La diferencia? El bono exclusivo se obtiene mediante el uso del 1xSlots promocode NEXT777.
Las recompensas de la bonificacion exclusiva son otorgadas en los 4 primeros depositos de la siguiente manera:
100% del primer deposito hasta €450 + 30 giros gratis
100% del segundo deposito hasta €350 + 35 giros gratis
100% del tercer deposito hasta €400 + 40 giros gratis
100% del cuarto deposito hasta €450 + 45 giros gratis
Bono de bienvenida 1xSlots Argentina 2024
Cabe resaltar que durante tu proceso de registro tienes que elegir tu moneda local preferida. De este modo obtendras la bonificacion de bienvenida 1xSlots Argentina en pesos. Puedes recibir el bono exclusivo 1xSlots Argentina al utilizar nuestro codigo de bono 1xSlots Argentina NEXT777 durante el proceso de registro.
Ademas, si ingresas el codigo NEXT777 a la pestana “Bonos y Regalos” despues de hacer tu primer deposito, puedes recibir el bono con giros gratis 1xSlots Argentina que te otorgara 60 FS en tragamonedas 777 GEMS RESPIN. A continuacion encontraras los valores de bonos en pesos argentinos.
Bono de bienvenida 1xSlots Chile 2024
El bono de bienvenida 1xSlots Chile funciona del mismo modo como en Argentina. Tienes que crear tu cuenta e ingresar nuestro codigo promocional de giro gratis de 1xslots hoy Chile NEXT777 al formulario de registro. Puedes elegir el peso chileno como tu moneda local para recibir la bonificacion de bienvenida 1xSlots Chile. Adicionalmente, para obtener 60 giros gratis en 777 GEMS RESPIN, introduce el codigo NEXT777 al hacer tu primer deposito.
?QUE ES UN BONO DE TRAGAPERRAS SIN DEPOSITO?
Como su nombre indica, un bono de tragaperras sin deposito es un tipo de bono de casino que no necesita que los jugadores depositen dinero para poder optar a cualquier tipo de recompensa. Por ejemplo, giros gratis, creditos de casino o incluso dinero en efectivo.
Los bonos sin deposito se dan generalmente a los jugadores potenciales para motivar a los nuevos jugadores para que se registren. Pueden formar parte de los paquetes de bienvenida que un casino online ofrece a todos sus jugadores potenciales y ayudan a atraer la atencion hacia la marca del casino. Tambien pueden ofrecerse a los jugadores con cuentas en determinadas situaciones.
Las tragaperras con bono sin deposito ofrecen la posibilidad de probar las tragaperras online sin coste alguno y quedandose con el dinero que se obtiene, razon por la que son muy codiciadas. Sin embargo, los bonos sin deposito no te obligan a depositar dinero cuando la promocion termina, aunque se sugiere.
?CUALES SON LOS PRINCIPALES TIPOS DE BONOS DE TRAGAMONEDAS SIN DEPOSITO?
Los bonos sin deposito estan disponibles en tres variedades: giros gratis, creditos gratis o dinero en efectivo. El tipo mas conocido que es un bono sin deposito no spins without deposit bonus.
GIROS GRATIS CON BONO SIN DEPOSITO
Todos sabemos que las maquinas tragaperras son las mas populares en el mundo de los juegos de casino , por lo que es natural que un bono hecho especificamente para las maquinas que juegan a las tragaperras sea el mas buscado. Para los amantes de las maquinas tragaperras, los bonos de tiradas gratis sin deposito son un verdadero tesoro, ya que permiten a los jugadores jugar a sus maquinas tragaperras favoritas sin depositar dinero, y con una gran cantidad de tiradas gratis, lo que aumenta sus probabilidades de ganar significativamente.
Creditos gratuitos / BONO DE JUEGO GRATUITO SIN DEPOSITO
En lugar de tiradas gratis, los casinos pueden optar por dar creditos gratis a los jugadores que tienen bonos sin deposito. Estos creditos pueden ser utilizados dentro de un periodo de tiempo enumerado para apostar en juegos en los casinos y ganar dinero real. Los bonos sin deposito y los creditos gratuitos se ofrecen tanto en las tragaperras gratuitas como en otros juegos de los casinos.
DINERO GRATIS CON BONOS SIN DEPOSITO
Al igual que los creditos gratuitos con los bonos sin deposito, los bonos de dinero sin deposito que no requieren deposito se pueden jugar tanto en las tragaperras como en otros juegos de casino. Una vez que haya reclamado y jugado el bono de dinero sin deposito, podra retirar el dinero del bono y cualquier ganancia adicional siempre que cumpla las condiciones para retirar el dinero.
?Como puedo reclamar un bono sin deposito?
En la mayoria de los casos, puede hacer uso de los bonos sin deposito al crear una cuenta en cualquier sitio de juego en linea que ofrezca este tipo de oferta. En la version online del casino, la bonificacion puede aparecer en la pagina de promociones del casino o en una ventana emergente. Algunos casinos requieren que introduzca un codigo promocional para acceder al bono.
Cuando considere reclamar un bono sin deposito (o cualquier otro tipo de bono) debe asegurarse de leer los terminos y condiciones que se adjuntan al bono. Los diferentes casinos pueden tener sus propias regulaciones y limites, sin embargo, hay algunos que son iguales en todos los casinos.
REQUISITOS PARA TRABAJAR
Los bonos sobre los depositos son accesibles para todos, sin embargo, cobrar los bonos es un asunto un poco mas controlado. La mayoria de los casinos en linea le permitiran retirar sus ganancias despues de haber podido apostar una cantidad especifica.
Los requisitos de apuesta se muestran como multiplicadores. Representan la cantidad de veces que tienes que apostar en un bono para poder retirar el dinero. Por lo general, puede jugar a una serie de juegos seleccionados por el operador del casino. Una vez que haya alcanzado el requisito de apuesta, podra dar el siguiente paso para cobrar su bono.
PLAZO
Segun el casino online, el bono para juegos de tragaperras de deposito puede caducar en cuestion de dias o durar hasta 30 dias. Para asegurarte de que cumples los requisitos de apuestas, es posible que tengas que planificar tu rutina de juego a lo largo del bono.
TAMANOS DE APUESTA
Un metodo para lograr su objetivo de apostar mas rapido es realizar la mayor cantidad de apuestas posible en cada juego. Es un metodo sensato, a menos que el operador del casino decida controlar la cantidad de la apuesta y limitar la cantidad de apuestas en la respectiva tragamonedas con bono sin deposito.
SE REQUIERE UN DEPOSITO
Aunque suene contradictorio, algunos casinos online pueden incluso exigir a los jugadores que depositen dinero antes de poder retirar su bono. Suelen anadir este requisito adicional por razones de seguridad.
RESTRICCIONES
A veces, se le puede negar el acceso a un bono con oferta de deposito gratuito. Esto solo ocurre en muy raras circunstancias, ya sea por el hecho de haber intentado dos bonos a la vez o por tener una direccion IP compartida con un jugador que tambien reclamo el mismo bono, o por residir en una zona restringida.
Puedes obtener informacion mas detallada leyendo el articulo completo en este enlace – https://kryivka.net/about/pgs/codigo_promocional_1xslots_bono.html
safe canadian pharmacies
EL CODIGO PROMOCIONAL DE 1XSLOTS CASINO
Sin introducir un codigo promocional 1xSlots Casino, como nuevo cliente en March 2024, puede beneficiarse de una bonificacion del 100% hasta 300€. El casino le proporciona un monton de maquinas tragaperras populares de proveedores de software como iSoftBet, Elk Studios o Play’n GO y otros. De forma adicional, se le otorgaran|esta oferta incluye 30 turnos gratuitos.. Todas las informaciones importantes respecto a esta oferta de bienvenida se puede encontrar en este articulo.
?COMO FUNCIONA EL CODIGO PROMOCIONAL DE 1XSLOTS CASINO?
En 1xSlots Casino se puede obtener una bonificacion del 100% hasta 300€ y turnos gratuitos en 1xSlots Casino. Haga su inicial deposito en 1xSlots Casino tras finalizar el proceso de inscripcion. No hace falta solicitar su bonificacion de bienvenida por e-mail ni el chat en directo como en otros casinos, porque 1xSlots Casino la abona a su cuenta automaticamente. La oferta de bienvenida se activa cuando deposite 10€ o mas. Haga un deposito empleando EcoPayz, Boku o Bitcoin u otro metodo de deposito disponible en el casino.
Mas sobre el bono
1xSlots Casino le da la oportunidad de incrementar su balance hasta 300€ (100%). Obtenga la bonificacion superior al depositar 300€ y conseguir 600€ que se anadiran en su cuenta. Los fondos de su bonificacion es compatible con tragaperras de proveedores de software como Red Tiger Gaming, Evolution Gaming y Microgaming, por nombrar unos cuantos. Debe tenerse en cuenta tambien que su cuenta se incrementara con 30 turnos gratuitos.
Bono de bienvenida 1xSlots 2024
Dentro de 1xSlots existen dos bonos de bienvenida, uno standard y uno exclusivo. El primero de ellas recompensa con un paquete de hasta €1500 y 150 giros gratis mientras que el segundo otorga un 10% adicional recompensando hasta €1650 y 150 giros gratis ?La diferencia? El bono exclusivo se obtiene mediante el uso del 1xSlots promocode NEXT777.
Las recompensas de la bonificacion exclusiva son otorgadas en los 4 primeros depositos de la siguiente manera:
100% del primer deposito hasta €450 + 30 giros gratis
100% del segundo deposito hasta €350 + 35 giros gratis
100% del tercer deposito hasta €400 + 40 giros gratis
100% del cuarto deposito hasta €450 + 45 giros gratis
Bono de bienvenida 1xSlots Argentina 2024
Cabe resaltar que durante tu proceso de registro tienes que elegir tu moneda local preferida. De este modo obtendras la bonificacion de bienvenida 1xSlots Argentina en pesos. Puedes recibir el bono exclusivo 1xSlots Argentina al utilizar nuestro codigo de bono 1xSlots Argentina NEXT777 durante el proceso de registro.
Ademas, si ingresas el codigo NEXT777 a la pestana “Bonos y Regalos” despues de hacer tu primer deposito, puedes recibir el bono con giros gratis 1xSlots Argentina que te otorgara 60 FS en tragamonedas 777 GEMS RESPIN. A continuacion encontraras los valores de bonos en pesos argentinos.
Bono de bienvenida 1xSlots Chile 2024
El bono de bienvenida 1xSlots Chile funciona del mismo modo como en Argentina. Tienes que crear tu cuenta e ingresar nuestro codigo de promocion de giro gratis 1xslots Chile NEXT777 al formulario de registro. Puedes elegir el peso chileno como tu moneda local para recibir la bonificacion de bienvenida 1xSlots Chile. Adicionalmente, para obtener 60 giros gratis en 777 GEMS RESPIN, introduce el codigo NEXT777 al hacer tu primer deposito.
?QUE ES UN BONO DE TRAGAPERRAS SIN DEPOSITO?
Como su nombre indica, un bono de tragaperras sin deposito es un tipo de bono de casino que no necesita que los jugadores depositen dinero para poder optar a cualquier tipo de recompensa. Por ejemplo, giros gratis, creditos de casino o incluso dinero en efectivo.
Los bonos sin deposito se dan generalmente a los jugadores potenciales para motivar a los nuevos jugadores para que se registren. Pueden formar parte de los paquetes de bienvenida que un casino online ofrece a todos sus jugadores potenciales y ayudan a atraer la atencion hacia la marca del casino. Tambien pueden ofrecerse a los jugadores con cuentas en determinadas situaciones.
Las tragaperras con bono sin deposito ofrecen la posibilidad de probar las tragaperras online sin coste alguno y quedandose con el dinero que se obtiene, razon por la que son muy codiciadas. Sin embargo, los bonos sin deposito no te obligan a depositar dinero cuando la promocion termina, aunque se sugiere.
?CUALES SON LOS PRINCIPALES TIPOS DE BONOS DE TRAGAMONEDAS SIN DEPOSITO?
Los bonos sin deposito estan disponibles en tres variedades: giros gratis, creditos gratis o dinero en efectivo. El tipo mas conocido que es un bono sin deposito no spins without deposit bonus.
GIROS GRATIS CON BONO SIN DEPOSITO
Todos sabemos que las maquinas tragaperras son las mas populares en el mundo de los juegos de casino , por lo que es natural que un bono hecho especificamente para las maquinas que juegan a las tragaperras sea el mas buscado. Para los amantes de las maquinas tragaperras, los bonos de tiradas gratis sin deposito son un verdadero tesoro, ya que permiten a los jugadores jugar a sus maquinas tragaperras favoritas sin depositar dinero, y con una gran cantidad de tiradas gratis, lo que aumenta sus probabilidades de ganar significativamente.
Creditos gratuitos / BONO DE JUEGO GRATUITO SIN DEPOSITO
En lugar de tiradas gratis, los casinos pueden optar por dar creditos gratis a los jugadores que tienen bonos sin deposito. Estos creditos pueden ser utilizados dentro de un periodo de tiempo enumerado para apostar en juegos en los casinos y ganar dinero real. Los bonos sin deposito y los creditos gratuitos se ofrecen tanto en las tragaperras gratuitas como en otros juegos de los casinos.
DINERO GRATIS CON BONOS SIN DEPOSITO
Al igual que los creditos gratuitos con los bonos sin deposito, los bonos de dinero sin deposito que no requieren deposito se pueden jugar tanto en las tragaperras como en otros juegos de casino. Una vez que haya reclamado y jugado el bono de dinero sin deposito, podra retirar el dinero del bono y cualquier ganancia adicional siempre que cumpla las condiciones para retirar el dinero.
?Como puedo reclamar un bono sin deposito?
En la mayoria de los casos, puede hacer uso de los bonos sin deposito al crear una cuenta en cualquier sitio de juego en linea que ofrezca este tipo de oferta. En la version online del casino, la bonificacion puede aparecer en la pagina de promociones del casino o en una ventana emergente. Algunos casinos requieren que introduzca un codigo promocional para acceder al bono.
Cuando considere reclamar un bono sin deposito (o cualquier otro tipo de bono) debe asegurarse de leer los terminos y condiciones que se adjuntan al bono. Los diferentes casinos pueden tener sus propias regulaciones y limites, sin embargo, hay algunos que son iguales en todos los casinos.
REQUISITOS PARA TRABAJAR
Los bonos sobre los depositos son accesibles para todos, sin embargo, cobrar los bonos es un asunto un poco mas controlado. La mayoria de los casinos en linea le permitiran retirar sus ganancias despues de haber podido apostar una cantidad especifica.
Los requisitos de apuesta se muestran como multiplicadores. Representan la cantidad de veces que tienes que apostar en un bono para poder retirar el dinero. Por lo general, puede jugar a una serie de juegos seleccionados por el operador del casino. Una vez que haya alcanzado el requisito de apuesta, podra dar el siguiente paso para cobrar su bono.
PLAZO
Segun el casino online, el bono para juegos de tragaperras de deposito puede caducar en cuestion de dias o durar hasta 30 dias. Para asegurarte de que cumples los requisitos de apuestas, es posible que tengas que planificar tu rutina de juego a lo largo del bono.
TAMANOS DE APUESTA
Un metodo para lograr su objetivo de apostar mas rapido es realizar la mayor cantidad de apuestas posible en cada juego. Es un metodo sensato, a menos que el operador del casino decida controlar la cantidad de la apuesta y limitar la cantidad de apuestas en la respectiva tragamonedas con bono sin deposito.
SE REQUIERE UN DEPOSITO
Aunque suene contradictorio, algunos casinos online pueden incluso exigir a los jugadores que depositen dinero antes de poder retirar su bono. Suelen anadir este requisito adicional por razones de seguridad.
RESTRICCIONES
A veces, se le puede negar el acceso a un bono con oferta de deposito gratuito. Esto solo ocurre en muy raras circunstancias, ya sea por el hecho de haber intentado dos bonos a la vez o por tener una direccion IP compartida con un jugador que tambien reclamo el mismo bono, o por residir en una zona restringida.
Puedes obtener informacion mas detallada leyendo el articulo completo en este enlace – https://kryivka.net/about/pgs/codigo_promocional_1xslots_bono.html
can you buy synthroid in mexico
Топ лучших онлайн казино на деньги предлагает игрокам выбрать интернет клуб с актуальным рейтингом по России на 2024 год, с большим количеством бонусов, приветственным пакетом для новичков и игровыми автоматами с реальными выигрышами.
Получите приветственный бонус до 500 Бесплатных спинов + 100% к депозиту для Starda от нашего сайта TOP CASINO
Топ лучших онлайн казино на деньги предлагает игрокам выбрать интернет клуб с актуальным рейтингом по России на 2024 год, с большим количеством бонусов, приветственным бонусом для новичков и игровыми автоматами с реальными выигрышами.
Получите приветственный бонус 100 Бесплатных спинов + 100% к депозиту для Vavada от нашего проекта TOP CASINO
synthroid 88 mg price
https://gruzchikivrn.ru
1. Вибір натяжних стель – як правильно обрати?
2. Топ-5 популярних кольорів натяжних стель
3. Як зберегти чистоту натяжних стель?
4. Відгуки про натяжні стелі: плюси та мінуси
5. Як підібрати дизайн натяжних стель до інтер’єру?
6. Інноваційні технології у виробництві натяжних стель
7. Натяжні стелі з фотопечаттю – оригінальне рішення для кухні
8. Секрети вдалого монтажу натяжних стель
9. Як зекономити на встановленні натяжних стель?
10. Лампи для натяжних стель: які вибрати?
11. Відтінки синього для натяжних стель – ексклюзивний вибір
12. Якість матеріалів для натяжних стель: що обирати?
13. Крок за кроком: як самостійно встановити натяжні стелі
14. Натяжні стелі в дитячу кімнату: безпека та креативність
15. Як підтримувати тепло у приміщенні за допомогою натяжних стель
16. Вибір натяжних стель у ванну кімнату: практичні поради
17. Натяжні стелі зі структурним покриттям – тренд сучасного дизайну
18. Індивідуальність у кожному домашньому інтер’єрі: натяжні стелі з друком
19. Як обрати освітлення для натяжних стель: поради фахівця
20. Можливості дизайну натяжних стель: від класики до мінімалізму
натяжні потолки ціна https://www.natjazhnistelitvhyn.kiev.ua .
lisinopril 10mg tablets
online pharmacy europe
cialis drug
1. Вибір натяжних стель – як правильно обрати?
2. Топ-5 популярних кольорів натяжних стель
3. Як зберегти чистоту натяжних стель?
4. Відгуки про натяжні стелі: плюси та мінуси
5. Як підібрати дизайн натяжних стель до інтер’єру?
6. Інноваційні технології у виробництві натяжних стель
7. Натяжні стелі з фотопечаттю – оригінальне рішення для кухні
8. Секрети вдалого монтажу натяжних стель
9. Як зекономити на встановленні натяжних стель?
10. Лампи для натяжних стель: які вибрати?
11. Відтінки синього для натяжних стель – ексклюзивний вибір
12. Якість матеріалів для натяжних стель: що обирати?
13. Крок за кроком: як самостійно встановити натяжні стелі
14. Натяжні стелі в дитячу кімнату: безпека та креативність
15. Як підтримувати тепло у приміщенні за допомогою натяжних стель
16. Вибір натяжних стель у ванну кімнату: практичні поради
17. Натяжні стелі зі структурним покриттям – тренд сучасного дизайну
18. Індивідуальність у кожному домашньому інтер’єрі: натяжні стелі з друком
19. Як обрати освітлення для натяжних стель: поради фахівця
20. Можливості дизайну натяжних стель: від класики до мінімалізму
натяжні стелі фотодрук http://www.natjazhnistelitvhyn.kiev.ua/ .
where can i buy synthroid cheap
can you buy azithromycin over the counter in mexico
1. Вибір натяжних стель: як вибрати ідеальний варіант?
2. Модні тренди натяжних стель на поточний сезон
3. Які переваги мають натяжні стелі порівняно зі звичайними?
4. Як підібрати кольори для натяжної стелі у квартирі?
5. Секрети догляду за натяжними стелями: що потрібно знати?
6. Як зробити вибір між матовими та глянцевими натяжними стелями?
7. Натяжні стелі в інтер’єрі: як вони змінюють приміщення?
8. Натяжні стелі для ванної кімнати: плюси та мінуси
9. Як підняти стеля візуально за допомогою натяжної конструкції?
10. Як вибрати правильний дизайн натяжної стелі для кухні?
11. Інноваційні технології виробництва натяжних стель: що варто знати?
12. Чому натяжні стелі вибирають для офісних приміщень?
13. Натяжні стелі з фотопринтом: які переваги цієї технології?
14. Дизайнерські рішення для натяжних стель: ідеї для втілення
15. Хімічні реагенти в складі натяжних стель: безпека та якість
16. Як вибрати натяжну стелю для дитячої кімнати: поради батькам
17. Які можливості для дизайну приміщень відкривають натяжні стелі?
18. Як впливає вибір матеріалу на якість натяжної стелі?
19. Інструкція з монтажу натяжних стель власноруч: крок за кроком
20. Натяжні стелі як елемент екстер’єру будівлі: переваги та недоліки
натяжні стелі ціна natjazhnistelifvgtg.lviv.ua .
pornuh.click
online pharmacy viagra
1. Вибір натяжних стель: як вибрати ідеальний варіант?
2. Модні тренди натяжних стель на поточний сезон
3. Які переваги мають натяжні стелі порівняно зі звичайними?
4. Як підібрати кольори для натяжної стелі у квартирі?
5. Секрети догляду за натяжними стелями: що потрібно знати?
6. Як зробити вибір між матовими та глянцевими натяжними стелями?
7. Натяжні стелі в інтер’єрі: як вони змінюють приміщення?
8. Натяжні стелі для ванної кімнати: плюси та мінуси
9. Як підняти стеля візуально за допомогою натяжної конструкції?
10. Як вибрати правильний дизайн натяжної стелі для кухні?
11. Інноваційні технології виробництва натяжних стель: що варто знати?
12. Чому натяжні стелі вибирають для офісних приміщень?
13. Натяжні стелі з фотопринтом: які переваги цієї технології?
14. Дизайнерські рішення для натяжних стель: ідеї для втілення
15. Хімічні реагенти в складі натяжних стель: безпека та якість
16. Як вибрати натяжну стелю для дитячої кімнати: поради батькам
17. Які можливості для дизайну приміщень відкривають натяжні стелі?
18. Як впливає вибір матеріалу на якість натяжної стелі?
19. Інструкція з монтажу натяжних стель власноруч: крок за кроком
20. Натяжні стелі як елемент екстер’єру будівлі: переваги та недоліки
монтаж натяжної стелі http://www.natjazhnistelifvgtg.lviv.ua/ .
Хотите жить в комфортабельной квартире в Новосибирске?
Наша компания предлагает широкий выбор квартир в новостройках различных ЖК, которые полностью соответствуют самым высоким стандартам качества.
Мы также поможем в получении ипотечного решения, чтобы сделать процесс покупки квартиры максимально приятным для вас.
Ваша персональная скидка – 10%
onlinecanadianpharmacy
canada drugstore pharmacy rx
buy valtrex online cheap australia
Hello I am so delighted I found your blog page, I really found you by mistake, while I
was searching on Digg for something else, Nonetheless I am here now and
would just like to say thanks a lot for a fantastic post and a all round thrilling
blog (I also love the theme/design), I don’t have time to browse it all at the minute but I have bookmarked it and also added your RSS feeds, so
when I have time I will be back to read a great deal more,
Please do keep up the awesome work.
metformin 800
Helpful information. Lucky me I found your web site by accident, and I am shocked why this accident didn’t happened earlier! I bookmarked it.
Гама казино
Лучшее решение для вашей семьи
13. Дом из бруса 9х12: уединенное убежище
одноэтажный дом из бруса 9х12 https://domizbrusa9x12spb.ru/ .
80 mg tadalafil
Лучшее решение для вашей семьи
13. Дом из бруса 9х12: уединенное убежище
одноэтажный дом из бруса 9х12 https://domizbrusa9x12spb.ru/ .
tadalafil india brand
lisinopril tablets
1. Вибір натяжних стель – як правильно обрати?
2. Топ-5 популярних кольорів натяжних стель
3. Як зберегти чистоту натяжних стель?
4. Відгуки про натяжні стелі: плюси та мінуси
5. Як підібрати дизайн натяжних стель до інтер’єру?
6. Інноваційні технології у виробництві натяжних стель
7. Натяжні стелі з фотопечаттю – оригінальне рішення для кухні
8. Секрети вдалого монтажу натяжних стель
9. Як зекономити на встановленні натяжних стель?
10. Лампи для натяжних стель: які вибрати?
11. Відтінки синього для натяжних стель – ексклюзивний вибір
12. Якість матеріалів для натяжних стель: що обирати?
13. Крок за кроком: як самостійно встановити натяжні стелі
14. Натяжні стелі в дитячу кімнату: безпека та креативність
15. Як підтримувати тепло у приміщенні за допомогою натяжних стель
16. Вибір натяжних стель у ванну кімнату: практичні поради
17. Натяжні стелі зі структурним покриттям – тренд сучасного дизайну
18. Індивідуальність у кожному домашньому інтер’єрі: натяжні стелі з друком
19. Як обрати освітлення для натяжних стель: поради фахівця
20. Можливості дизайну натяжних стель: від класики до мінімалізму
натяжній потолок ціна http://www.natjazhnistelitvhyn.kiev.ua/ .
camiseta selección suiza 2022
На нашем портале вы найдете самую полезную информацию о недвижимости.
Ознакомьтесь с такими темами, как квартиры в новостройках и закон о собственности.
Мы поможем вам принять осознанное решение при покупке или продаже недвижимости!
На нашем интернет-ресурсе вы найдете самую полезную информацию о недвижимости в новостройках.
Ознакомьтесь с такими темами, как продажа жилья и закон о собственности.
Мы поможем вам принять осознанное решение при покупке или продаже недвижимости!
1. Вибір натяжних стель – як правильно обрати?
2. Топ-5 популярних кольорів натяжних стель
3. Як зберегти чистоту натяжних стель?
4. Відгуки про натяжні стелі: плюси та мінуси
5. Як підібрати дизайн натяжних стель до інтер’єру?
6. Інноваційні технології у виробництві натяжних стель
7. Натяжні стелі з фотопечаттю – оригінальне рішення для кухні
8. Секрети вдалого монтажу натяжних стель
9. Як зекономити на встановленні натяжних стель?
10. Лампи для натяжних стель: які вибрати?
11. Відтінки синього для натяжних стель – ексклюзивний вибір
12. Якість матеріалів для натяжних стель: що обирати?
13. Крок за кроком: як самостійно встановити натяжні стелі
14. Натяжні стелі в дитячу кімнату: безпека та креативність
15. Як підтримувати тепло у приміщенні за допомогою натяжних стель
16. Вибір натяжних стель у ванну кімнату: практичні поради
17. Натяжні стелі зі структурним покриттям – тренд сучасного дизайну
18. Індивідуальність у кожному домашньому інтер’єрі: натяжні стелі з друком
19. Як обрати освітлення для натяжних стель: поради фахівця
20. Можливості дизайну натяжних стель: від класики до мінімалізму
стеля натяжна https://natjazhnistelitvhyn.kiev.ua/ .
Increԁible points. Sound argumentѕ. Keep up the great spirit. http://jamuslot.portal.staiha.ac.id
Место, где царит уют и покой
11. Сказочный дом из бруса 9х12: мечта сбылась
проект дома из бруса одноэтажный 9х12 https://domizbrusa9x12spb.ru/ .
Все удобства под одной крышей
4. Экологичный дом из бруса 9х12: забота о природе
одноэтажный дом из бруса 9х12 https://domizbrusa9x12spb.ru/ .
legitimate mexican pharmacy online
synthroid united states
lisinopril brand
prednisone 20mg capsule
Hi there! Do you know if they make any plugins to help
with Search Engine Optimization? I’m trying to
get my site to rank for some targeted keywords but I’m
not seeing very good results. If you know of any please share.
Thank you! I saw similar article here: Auto Approve
List
mail order pharmacy no prescription
can you buy prednisone over the counter
trustworthy online pharmacy
Asking questions are truly pleasant thing if you are not understanding anything fully, however this paragraph gives nice understanding yet.
synthroid 0.112 mg
buy tadalafil from canada
buy lisinopril uk
Discovered an interesting article, I suggest you familiarize yourself https://www.battleofcali.com/users/worksale555
prednisone 1 mg price
EL CODIGO PROMOCIONAL DE 1XSLOTS CASINO
Sin introducir un codigo promocional 1xSlots Casino, como nuevo cliente en March 2024, puede beneficiarse de una bonificacion del 100% hasta 300€. El casino le proporciona un monton de maquinas tragaperras populares de proveedores de software como iSoftBet, Elk Studios o Play’n GO y otros. De forma adicional, se le otorgaran|esta oferta incluye 30 turnos gratuitos.. Todas las informaciones importantes respecto a esta oferta de bienvenida se puede encontrar en este articulo.
?COMO FUNCIONA EL CODIGO PROMOCIONAL DE 1XSLOTS CASINO?
En 1xSlots Casino se puede obtener una bonificacion del 100% hasta 300€ y turnos gratuitos en 1xSlots Casino. Haga su inicial deposito en 1xSlots Casino tras finalizar el proceso de inscripcion. No hace falta solicitar su bonificacion de bienvenida por e-mail ni el chat en directo como en otros casinos, porque 1xSlots Casino la abona a su cuenta automaticamente. La oferta de bienvenida se activa cuando deposite 10€ o mas. Haga un deposito empleando EcoPayz, Boku o Bitcoin u otro metodo de deposito disponible en el casino.
Mas sobre el bono
1xSlots Casino le da la oportunidad de incrementar su balance hasta 300€ (100%). Obtenga la bonificacion superior al depositar 300€ y conseguir 600€ que se anadiran en su cuenta. Los fondos de su bonificacion es compatible con tragaperras de proveedores de software como Red Tiger Gaming, Evolution Gaming y Microgaming, por nombrar unos cuantos. Debe tenerse en cuenta tambien que su cuenta se incrementara con 30 turnos gratuitos.
Bono de bienvenida 1xSlots 2024
Dentro de 1xSlots existen dos bonos de bienvenida, uno standard y uno exclusivo. El primero de ellas recompensa con un paquete de hasta €1500 y 150 giros gratis mientras que el segundo otorga un 10% adicional recompensando hasta €1650 y 150 giros gratis ?La diferencia? El bono exclusivo se obtiene mediante el uso del 1xSlots promocode NEXT777.
Las recompensas de la bonificacion exclusiva son otorgadas en los 4 primeros depositos de la siguiente manera:
100% del primer deposito hasta €450 + 30 giros gratis
100% del segundo deposito hasta €350 + 35 giros gratis
100% del tercer deposito hasta €400 + 40 giros gratis
100% del cuarto deposito hasta €450 + 45 giros gratis
Bono de bienvenida 1xSlots Argentina 2024
Cabe resaltar que durante tu proceso de registro tienes que elegir tu moneda local preferida. De este modo obtendras la bonificacion de bienvenida 1xSlots Argentina en pesos. Puedes recibir el bono exclusivo 1xSlots Argentina al utilizar nuestro codigo de bono 1xSlots Argentina NEXT777 durante el proceso de registro.
Ademas, si ingresas el codigo NEXT777 a la pestana “Bonos y Regalos” despues de hacer tu primer deposito, puedes recibir el bono con giros gratis 1xSlots Argentina que te otorgara 60 FS en tragamonedas 777 GEMS RESPIN. A continuacion encontraras los valores de bonos en pesos argentinos.
Bono de bienvenida 1xSlots Chile 2024
El bono de bienvenida 1xSlots Chile funciona del mismo modo como en Argentina. Tienes que crear tu cuenta e ingresar nuestro bono de casino 1xslots Chile NEXT777 al formulario de registro. Puedes elegir el peso chileno como tu moneda local para recibir la bonificacion de bienvenida 1xSlots Chile. Adicionalmente, para obtener 60 giros gratis en 777 GEMS RESPIN, introduce el codigo NEXT777 al hacer tu primer deposito.
?QUE ES UN BONO DE TRAGAPERRAS SIN DEPOSITO?
Como su nombre indica, un bono de tragaperras sin deposito es un tipo de bono de casino que no necesita que los jugadores depositen dinero para poder optar a cualquier tipo de recompensa. Por ejemplo, giros gratis, creditos de casino o incluso dinero en efectivo.
Los bonos sin deposito se dan generalmente a los jugadores potenciales para motivar a los nuevos jugadores para que se registren. Pueden formar parte de los paquetes de bienvenida que un casino online ofrece a todos sus jugadores potenciales y ayudan a atraer la atencion hacia la marca del casino. Tambien pueden ofrecerse a los jugadores con cuentas en determinadas situaciones.
Las tragaperras con bono sin deposito ofrecen la posibilidad de probar las tragaperras online sin coste alguno y quedandose con el dinero que se obtiene, razon por la que son muy codiciadas. Sin embargo, los bonos sin deposito no te obligan a depositar dinero cuando la promocion termina, aunque se sugiere.
?CUALES SON LOS PRINCIPALES TIPOS DE BONOS DE TRAGAMONEDAS SIN DEPOSITO?
Los bonos sin deposito estan disponibles en tres variedades: giros gratis, creditos gratis o dinero en efectivo. El tipo mas conocido que es un bono sin deposito no spins without deposit bonus.
GIROS GRATIS CON BONO SIN DEPOSITO
Todos sabemos que las maquinas tragaperras son las mas populares en el mundo de los juegos de casino , por lo que es natural que un bono hecho especificamente para las maquinas que juegan a las tragaperras sea el mas buscado. Para los amantes de las maquinas tragaperras, los bonos de tiradas gratis sin deposito son un verdadero tesoro, ya que permiten a los jugadores jugar a sus maquinas tragaperras favoritas sin depositar dinero, y con una gran cantidad de tiradas gratis, lo que aumenta sus probabilidades de ganar significativamente.
Creditos gratuitos / BONO DE JUEGO GRATUITO SIN DEPOSITO
En lugar de tiradas gratis, los casinos pueden optar por dar creditos gratis a los jugadores que tienen bonos sin deposito. Estos creditos pueden ser utilizados dentro de un periodo de tiempo enumerado para apostar en juegos en los casinos y ganar dinero real. Los bonos sin deposito y los creditos gratuitos se ofrecen tanto en las tragaperras gratuitas como en otros juegos de los casinos.
DINERO GRATIS CON BONOS SIN DEPOSITO
Al igual que los creditos gratuitos con los bonos sin deposito, los bonos de dinero sin deposito que no requieren deposito se pueden jugar tanto en las tragaperras como en otros juegos de casino. Una vez que haya reclamado y jugado el bono de dinero sin deposito, podra retirar el dinero del bono y cualquier ganancia adicional siempre que cumpla las condiciones para retirar el dinero.
?Como puedo reclamar un bono sin deposito?
En la mayoria de los casos, puede hacer uso de los bonos sin deposito al crear una cuenta en cualquier sitio de juego en linea que ofrezca este tipo de oferta. En la version online del casino, la bonificacion puede aparecer en la pagina de promociones del casino o en una ventana emergente. Algunos casinos requieren que introduzca un codigo promocional para acceder al bono.
Cuando considere reclamar un bono sin deposito (o cualquier otro tipo de bono) debe asegurarse de leer los terminos y condiciones que se adjuntan al bono. Los diferentes casinos pueden tener sus propias regulaciones y limites, sin embargo, hay algunos que son iguales en todos los casinos.
REQUISITOS PARA TRABAJAR
Los bonos sobre los depositos son accesibles para todos, sin embargo, cobrar los bonos es un asunto un poco mas controlado. La mayoria de los casinos en linea le permitiran retirar sus ganancias despues de haber podido apostar una cantidad especifica.
Los requisitos de apuesta se muestran como multiplicadores. Representan la cantidad de veces que tienes que apostar en un bono para poder retirar el dinero. Por lo general, puede jugar a una serie de juegos seleccionados por el operador del casino. Una vez que haya alcanzado el requisito de apuesta, podra dar el siguiente paso para cobrar su bono.
PLAZO
Segun el casino online, el bono para juegos de tragaperras de deposito puede caducar en cuestion de dias o durar hasta 30 dias. Para asegurarte de que cumples los requisitos de apuestas, es posible que tengas que planificar tu rutina de juego a lo largo del bono.
TAMANOS DE APUESTA
Un metodo para lograr su objetivo de apostar mas rapido es realizar la mayor cantidad de apuestas posible en cada juego. Es un metodo sensato, a menos que el operador del casino decida controlar la cantidad de la apuesta y limitar la cantidad de apuestas en la respectiva tragamonedas con bono sin deposito.
SE REQUIERE UN DEPOSITO
Aunque suene contradictorio, algunos casinos online pueden incluso exigir a los jugadores que depositen dinero antes de poder retirar su bono. Suelen anadir este requisito adicional por razones de seguridad.
RESTRICCIONES
A veces, se le puede negar el acceso a un bono con oferta de deposito gratuito. Esto solo ocurre en muy raras circunstancias, ya sea por el hecho de haber intentado dos bonos a la vez o por tener una direccion IP compartida con un jugador que tambien reclamo el mismo bono, o por residir en una zona restringida.
Puedes obtener informacion mas detallada leyendo el articulo completo en este enlace – https://tecnoaldia.net/pag/?codigo_promocional_1xslots_bono.html
synthroid nz
synthroid 0.05 mg tablets
EL CODIGO PROMOCIONAL DE 1XSLOTS CASINO
Sin introducir un codigo promocional 1xSlots Casino, como nuevo cliente en March 2024, puede beneficiarse de una bonificacion del 100% hasta 300€. El casino le proporciona un monton de maquinas tragaperras populares de proveedores de software como iSoftBet, Elk Studios o Play’n GO y otros. De forma adicional, se le otorgaran|esta oferta incluye 30 turnos gratuitos.. Todas las informaciones importantes respecto a esta oferta de bienvenida se puede encontrar en este articulo.
?COMO FUNCIONA EL CODIGO PROMOCIONAL DE 1XSLOTS CASINO?
En 1xSlots Casino se puede obtener una bonificacion del 100% hasta 300€ y turnos gratuitos en 1xSlots Casino. Haga su inicial deposito en 1xSlots Casino tras finalizar el proceso de inscripcion. No hace falta solicitar su bonificacion de bienvenida por e-mail ni el chat en directo como en otros casinos, porque 1xSlots Casino la abona a su cuenta automaticamente. La oferta de bienvenida se activa cuando deposite 10€ o mas. Haga un deposito empleando EcoPayz, Boku o Bitcoin u otro metodo de deposito disponible en el casino.
Mas sobre el bono
1xSlots Casino le da la oportunidad de incrementar su balance hasta 300€ (100%). Obtenga la bonificacion superior al depositar 300€ y conseguir 600€ que se anadiran en su cuenta. Los fondos de su bonificacion es compatible con tragaperras de proveedores de software como Red Tiger Gaming, Evolution Gaming y Microgaming, por nombrar unos cuantos. Debe tenerse en cuenta tambien que su cuenta se incrementara con 30 turnos gratuitos.
Bono de bienvenida 1xSlots 2024
Dentro de 1xSlots existen dos bonos de bienvenida, uno standard y uno exclusivo. El primero de ellas recompensa con un paquete de hasta €1500 y 150 giros gratis mientras que el segundo otorga un 10% adicional recompensando hasta €1650 y 150 giros gratis ?La diferencia? El bono exclusivo se obtiene mediante el uso del 1xSlots promocode NEXT777.
Las recompensas de la bonificacion exclusiva son otorgadas en los 4 primeros depositos de la siguiente manera:
100% del primer deposito hasta €450 + 30 giros gratis
100% del segundo deposito hasta €350 + 35 giros gratis
100% del tercer deposito hasta €400 + 40 giros gratis
100% del cuarto deposito hasta €450 + 45 giros gratis
Bono de bienvenida 1xSlots Argentina 2024
Cabe resaltar que durante tu proceso de registro tienes que elegir tu moneda local preferida. De este modo obtendras la bonificacion de bienvenida 1xSlots Argentina en pesos. Puedes recibir el bono exclusivo 1xSlots Argentina al utilizar nuestro codigo de bono 1xSlots Argentina NEXT777 durante el proceso de registro.
Ademas, si ingresas el codigo NEXT777 a la pestana “Bonos y Regalos” despues de hacer tu primer deposito, puedes recibir el bono con giros gratis 1xSlots Argentina que te otorgara 60 FS en tragamonedas 777 GEMS RESPIN. A continuacion encontraras los valores de bonos en pesos argentinos.
Bono de bienvenida 1xSlots Chile 2024
El bono de bienvenida 1xSlots Chile funciona del mismo modo como en Argentina. Tienes que crear tu cuenta e ingresar nuestro Bono de bienvenida 1xslots Chile NEXT777 al formulario de registro. Puedes elegir el peso chileno como tu moneda local para recibir la bonificacion de bienvenida 1xSlots Chile. Adicionalmente, para obtener 60 giros gratis en 777 GEMS RESPIN, introduce el codigo NEXT777 al hacer tu primer deposito.
?QUE ES UN BONO DE TRAGAPERRAS SIN DEPOSITO?
Como su nombre indica, un bono de tragaperras sin deposito es un tipo de bono de casino que no necesita que los jugadores depositen dinero para poder optar a cualquier tipo de recompensa. Por ejemplo, giros gratis, creditos de casino o incluso dinero en efectivo.
Los bonos sin deposito se dan generalmente a los jugadores potenciales para motivar a los nuevos jugadores para que se registren. Pueden formar parte de los paquetes de bienvenida que un casino online ofrece a todos sus jugadores potenciales y ayudan a atraer la atencion hacia la marca del casino. Tambien pueden ofrecerse a los jugadores con cuentas en determinadas situaciones.
Las tragaperras con bono sin deposito ofrecen la posibilidad de probar las tragaperras online sin coste alguno y quedandose con el dinero que se obtiene, razon por la que son muy codiciadas. Sin embargo, los bonos sin deposito no te obligan a depositar dinero cuando la promocion termina, aunque se sugiere.
?CUALES SON LOS PRINCIPALES TIPOS DE BONOS DE TRAGAMONEDAS SIN DEPOSITO?
Los bonos sin deposito estan disponibles en tres variedades: giros gratis, creditos gratis o dinero en efectivo. El tipo mas conocido que es un bono sin deposito no spins without deposit bonus.
GIROS GRATIS CON BONO SIN DEPOSITO
Todos sabemos que las maquinas tragaperras son las mas populares en el mundo de los juegos de casino , por lo que es natural que un bono hecho especificamente para las maquinas que juegan a las tragaperras sea el mas buscado. Para los amantes de las maquinas tragaperras, los bonos de tiradas gratis sin deposito son un verdadero tesoro, ya que permiten a los jugadores jugar a sus maquinas tragaperras favoritas sin depositar dinero, y con una gran cantidad de tiradas gratis, lo que aumenta sus probabilidades de ganar significativamente.
Creditos gratuitos / BONO DE JUEGO GRATUITO SIN DEPOSITO
En lugar de tiradas gratis, los casinos pueden optar por dar creditos gratis a los jugadores que tienen bonos sin deposito. Estos creditos pueden ser utilizados dentro de un periodo de tiempo enumerado para apostar en juegos en los casinos y ganar dinero real. Los bonos sin deposito y los creditos gratuitos se ofrecen tanto en las tragaperras gratuitas como en otros juegos de los casinos.
DINERO GRATIS CON BONOS SIN DEPOSITO
Al igual que los creditos gratuitos con los bonos sin deposito, los bonos de dinero sin deposito que no requieren deposito se pueden jugar tanto en las tragaperras como en otros juegos de casino. Una vez que haya reclamado y jugado el bono de dinero sin deposito, podra retirar el dinero del bono y cualquier ganancia adicional siempre que cumpla las condiciones para retirar el dinero.
?Como puedo reclamar un bono sin deposito?
En la mayoria de los casos, puede hacer uso de los bonos sin deposito al crear una cuenta en cualquier sitio de juego en linea que ofrezca este tipo de oferta. En la version online del casino, la bonificacion puede aparecer en la pagina de promociones del casino o en una ventana emergente. Algunos casinos requieren que introduzca un codigo promocional para acceder al bono.
Cuando considere reclamar un bono sin deposito (o cualquier otro tipo de bono) debe asegurarse de leer los terminos y condiciones que se adjuntan al bono. Los diferentes casinos pueden tener sus propias regulaciones y limites, sin embargo, hay algunos que son iguales en todos los casinos.
REQUISITOS PARA TRABAJAR
Los bonos sobre los depositos son accesibles para todos, sin embargo, cobrar los bonos es un asunto un poco mas controlado. La mayoria de los casinos en linea le permitiran retirar sus ganancias despues de haber podido apostar una cantidad especifica.
Los requisitos de apuesta se muestran como multiplicadores. Representan la cantidad de veces que tienes que apostar en un bono para poder retirar el dinero. Por lo general, puede jugar a una serie de juegos seleccionados por el operador del casino. Una vez que haya alcanzado el requisito de apuesta, podra dar el siguiente paso para cobrar su bono.
PLAZO
Segun el casino online, el bono para juegos de tragaperras de deposito puede caducar en cuestion de dias o durar hasta 30 dias. Para asegurarte de que cumples los requisitos de apuestas, es posible que tengas que planificar tu rutina de juego a lo largo del bono.
TAMANOS DE APUESTA
Un metodo para lograr su objetivo de apostar mas rapido es realizar la mayor cantidad de apuestas posible en cada juego. Es un metodo sensato, a menos que el operador del casino decida controlar la cantidad de la apuesta y limitar la cantidad de apuestas en la respectiva tragamonedas con bono sin deposito.
SE REQUIERE UN DEPOSITO
Aunque suene contradictorio, algunos casinos online pueden incluso exigir a los jugadores que depositen dinero antes de poder retirar su bono. Suelen anadir este requisito adicional por razones de seguridad.
RESTRICCIONES
A veces, se le puede negar el acceso a un bono con oferta de deposito gratuito. Esto solo ocurre en muy raras circunstancias, ya sea por el hecho de haber intentado dos bonos a la vez o por tener una direccion IP compartida con un jugador que tambien reclamo el mismo bono, o por residir en una zona restringida.
Puedes obtener informacion mas detallada leyendo el articulo completo en este enlace – https://tecnoaldia.net/pag/?codigo_promocional_1xslots_bono.html
southern pharmacy
EL CODIGO PROMOCIONAL DE 1XSLOTS CASINO
Sin introducir un codigo promocional 1xSlots Casino, como nuevo cliente en March 2024, puede beneficiarse de una bonificacion del 100% hasta 300€. El casino le proporciona un monton de maquinas tragaperras populares de proveedores de software como iSoftBet, Elk Studios o Play’n GO y otros. De forma adicional, se le otorgaran|esta oferta incluye 30 turnos gratuitos.. Todas las informaciones importantes respecto a esta oferta de bienvenida se puede encontrar en este articulo.
?COMO FUNCIONA EL CODIGO PROMOCIONAL DE 1XSLOTS CASINO?
En 1xSlots Casino se puede obtener una bonificacion del 100% hasta 300€ y turnos gratuitos en 1xSlots Casino. Haga su inicial deposito en 1xSlots Casino tras finalizar el proceso de inscripcion. No hace falta solicitar su bonificacion de bienvenida por e-mail ni el chat en directo como en otros casinos, porque 1xSlots Casino la abona a su cuenta automaticamente. La oferta de bienvenida se activa cuando deposite 10€ o mas. Haga un deposito empleando EcoPayz, Boku o Bitcoin u otro metodo de deposito disponible en el casino.
Mas sobre el bono
1xSlots Casino le da la oportunidad de incrementar su balance hasta 300€ (100%). Obtenga la bonificacion superior al depositar 300€ y conseguir 600€ que se anadiran en su cuenta. Los fondos de su bonificacion es compatible con tragaperras de proveedores de software como Red Tiger Gaming, Evolution Gaming y Microgaming, por nombrar unos cuantos. Debe tenerse en cuenta tambien que su cuenta se incrementara con 30 turnos gratuitos.
Bono de bienvenida 1xSlots 2024
Dentro de 1xSlots existen dos bonos de bienvenida, uno standard y uno exclusivo. El primero de ellas recompensa con un paquete de hasta €1500 y 150 giros gratis mientras que el segundo otorga un 10% adicional recompensando hasta €1650 y 150 giros gratis ?La diferencia? El bono exclusivo se obtiene mediante el uso del 1xSlots promocode NEXT777.
Las recompensas de la bonificacion exclusiva son otorgadas en los 4 primeros depositos de la siguiente manera:
100% del primer deposito hasta €450 + 30 giros gratis
100% del segundo deposito hasta €350 + 35 giros gratis
100% del tercer deposito hasta €400 + 40 giros gratis
100% del cuarto deposito hasta €450 + 45 giros gratis
Bono de bienvenida 1xSlots Argentina 2024
Cabe resaltar que durante tu proceso de registro tienes que elegir tu moneda local preferida. De este modo obtendras la bonificacion de bienvenida 1xSlots Argentina en pesos. Puedes recibir el bono exclusivo 1xSlots Argentina al utilizar nuestro codigo de bono 1xSlots Argentina NEXT777 durante el proceso de registro.
Ademas, si ingresas el codigo NEXT777 a la pestana “Bonos y Regalos” despues de hacer tu primer deposito, puedes recibir el bono con giros gratis 1xSlots Argentina que te otorgara 60 FS en tragamonedas 777 GEMS RESPIN. A continuacion encontraras los valores de bonos en pesos argentinos.
Bono de bienvenida 1xSlots Chile 2024
El bono de bienvenida 1xSlots Chile funciona del mismo modo como en Argentina. Tienes que crear tu cuenta e ingresar nuestro el mejor codigo promocional para 1xslots Chile NEXT777 al formulario de registro. Puedes elegir el peso chileno como tu moneda local para recibir la bonificacion de bienvenida 1xSlots Chile. Adicionalmente, para obtener 60 giros gratis en 777 GEMS RESPIN, introduce el codigo NEXT777 al hacer tu primer deposito.
?QUE ES UN BONO DE TRAGAPERRAS SIN DEPOSITO?
Como su nombre indica, un bono de tragaperras sin deposito es un tipo de bono de casino que no necesita que los jugadores depositen dinero para poder optar a cualquier tipo de recompensa. Por ejemplo, giros gratis, creditos de casino o incluso dinero en efectivo.
Los bonos sin deposito se dan generalmente a los jugadores potenciales para motivar a los nuevos jugadores para que se registren. Pueden formar parte de los paquetes de bienvenida que un casino online ofrece a todos sus jugadores potenciales y ayudan a atraer la atencion hacia la marca del casino. Tambien pueden ofrecerse a los jugadores con cuentas en determinadas situaciones.
Las tragaperras con bono sin deposito ofrecen la posibilidad de probar las tragaperras online sin coste alguno y quedandose con el dinero que se obtiene, razon por la que son muy codiciadas. Sin embargo, los bonos sin deposito no te obligan a depositar dinero cuando la promocion termina, aunque se sugiere.
?CUALES SON LOS PRINCIPALES TIPOS DE BONOS DE TRAGAMONEDAS SIN DEPOSITO?
Los bonos sin deposito estan disponibles en tres variedades: giros gratis, creditos gratis o dinero en efectivo. El tipo mas conocido que es un bono sin deposito no spins without deposit bonus.
GIROS GRATIS CON BONO SIN DEPOSITO
Todos sabemos que las maquinas tragaperras son las mas populares en el mundo de los juegos de casino , por lo que es natural que un bono hecho especificamente para las maquinas que juegan a las tragaperras sea el mas buscado. Para los amantes de las maquinas tragaperras, los bonos de tiradas gratis sin deposito son un verdadero tesoro, ya que permiten a los jugadores jugar a sus maquinas tragaperras favoritas sin depositar dinero, y con una gran cantidad de tiradas gratis, lo que aumenta sus probabilidades de ganar significativamente.
Creditos gratuitos / BONO DE JUEGO GRATUITO SIN DEPOSITO
En lugar de tiradas gratis, los casinos pueden optar por dar creditos gratis a los jugadores que tienen bonos sin deposito. Estos creditos pueden ser utilizados dentro de un periodo de tiempo enumerado para apostar en juegos en los casinos y ganar dinero real. Los bonos sin deposito y los creditos gratuitos se ofrecen tanto en las tragaperras gratuitas como en otros juegos de los casinos.
DINERO GRATIS CON BONOS SIN DEPOSITO
Al igual que los creditos gratuitos con los bonos sin deposito, los bonos de dinero sin deposito que no requieren deposito se pueden jugar tanto en las tragaperras como en otros juegos de casino. Una vez que haya reclamado y jugado el bono de dinero sin deposito, podra retirar el dinero del bono y cualquier ganancia adicional siempre que cumpla las condiciones para retirar el dinero.
?Como puedo reclamar un bono sin deposito?
En la mayoria de los casos, puede hacer uso de los bonos sin deposito al crear una cuenta en cualquier sitio de juego en linea que ofrezca este tipo de oferta. En la version online del casino, la bonificacion puede aparecer en la pagina de promociones del casino o en una ventana emergente. Algunos casinos requieren que introduzca un codigo promocional para acceder al bono.
Cuando considere reclamar un bono sin deposito (o cualquier otro tipo de bono) debe asegurarse de leer los terminos y condiciones que se adjuntan al bono. Los diferentes casinos pueden tener sus propias regulaciones y limites, sin embargo, hay algunos que son iguales en todos los casinos.
REQUISITOS PARA TRABAJAR
Los bonos sobre los depositos son accesibles para todos, sin embargo, cobrar los bonos es un asunto un poco mas controlado. La mayoria de los casinos en linea le permitiran retirar sus ganancias despues de haber podido apostar una cantidad especifica.
Los requisitos de apuesta se muestran como multiplicadores. Representan la cantidad de veces que tienes que apostar en un bono para poder retirar el dinero. Por lo general, puede jugar a una serie de juegos seleccionados por el operador del casino. Una vez que haya alcanzado el requisito de apuesta, podra dar el siguiente paso para cobrar su bono.
PLAZO
Segun el casino online, el bono para juegos de tragaperras de deposito puede caducar en cuestion de dias o durar hasta 30 dias. Para asegurarte de que cumples los requisitos de apuestas, es posible que tengas que planificar tu rutina de juego a lo largo del bono.
TAMANOS DE APUESTA
Un metodo para lograr su objetivo de apostar mas rapido es realizar la mayor cantidad de apuestas posible en cada juego. Es un metodo sensato, a menos que el operador del casino decida controlar la cantidad de la apuesta y limitar la cantidad de apuestas en la respectiva tragamonedas con bono sin deposito.
SE REQUIERE UN DEPOSITO
Aunque suene contradictorio, algunos casinos online pueden incluso exigir a los jugadores que depositen dinero antes de poder retirar su bono. Suelen anadir este requisito adicional por razones de seguridad.
RESTRICCIONES
A veces, se le puede negar el acceso a un bono con oferta de deposito gratuito. Esto solo ocurre en muy raras circunstancias, ya sea por el hecho de haber intentado dos bonos a la vez o por tener una direccion IP compartida con un jugador que tambien reclamo el mismo bono, o por residir en una zona restringida.
Puedes obtener informacion mas detallada leyendo el articulo completo en este enlace – https://tecnoaldia.net/pag/?codigo_promocional_1xslots_bono.html
500 mg valtrex daily
which online pharmacy is reliable
I used to be suggested this blog through my cousin.
I am now not positive whether this put up is written through him
as nobody else recognise such unique about my difficulty.
You are wonderful! Thanks!
synthroid average cost
Calibration Measuring Equipment For Sale
cialis how to get
Incredible! This blog looks just like my old one! It’s on a
entirely different subject but it has pretty much the
same layout and design. Great choice of colors!
It’s a pity you don’t have a donate button! I’d certainly donate to this outstanding blog!
I guess for now i’ll settle for bookmarking and adding your RSS
feed to my Google account. I look forward to new updates and will share this website with my Facebook group.
Chat soon!
воєнторг
13. Самое популярное снаряжение для военных
військові магазини в києві воєнторг київ .
onlinepharmaciescanada com
1. Почему берцы – это обязательный элемент стиля?
2. Как выбрать идеальные берцы для осеннего гардероба?
3. Тренды сезона: кожаные берцы или замшевые?
4. 5 способов носить берцы с платьем
5. Какие берцы выбрать для повседневного образа?
6. Берцы на платформе: комфорт и стиль в одном
7. Какие берцы будут актуальны в этом году?
8. Маст-хэв сезона: военные берцы в стиле милитари
9. 10 вариантов сочетания берцов с джинсами
10. Зимние берцы: как выбрать модель для холодного сезона
11. Элегантные берцы на каблуке: идеальный вариант для офиса
12. Секреты ухода за берцами: как сохранить первоначальный вид?
13. С какой юбкой носить берцы: советы от стилистов
14. Как подобрать берцы под фасон брюк?
15. Берцы на шнуровке: стильный акцент в образе
16. Берцы-челси: универсальная модель для любого стиля
17. С чем носить берцы на плоской подошве?
18. Берцы с ремешками: акцент на деталях
19. Как выбрать берцы для прогулок по городу?
20. Топ-5 брендов берцев: качество и стиль в одном
берці ціна тактичні берці купити .
воєнторг
інтернет магазин тактичного одягу магазин воєнторг київ .
воєнторг
16. Интернет-магазин для военных
магазин тактичного одягу інтернет магазин військової форми .
happy family drugstore
https://gruzchikivrn.ru/
Хотите узнать всё о процессе регистрации квартиры в собственность?
Наш сайт предлагает вам самые актуальные статьи на такие темы, как: оформление документов на квартиру через МФЦ, регистрация недвижимости.
Здесь вы найдете ответы на все интересующие вас вопросы и получите полную информацию о процессе регистрации жилья
EL CODIGO PROMOCIONAL DE 1XSLOTS CASINO
Sin introducir un codigo promocional 1xSlots Casino, como nuevo cliente en March 2024, puede beneficiarse de una bonificacion del 100% hasta 300€. El casino le proporciona un monton de maquinas tragaperras populares de proveedores de software como iSoftBet, Elk Studios o Play’n GO y otros. De forma adicional, se le otorgaran|esta oferta incluye 30 turnos gratuitos.. Todas las informaciones importantes respecto a esta oferta de bienvenida se puede encontrar en este articulo.
?COMO FUNCIONA EL CODIGO PROMOCIONAL DE 1XSLOTS CASINO?
En 1xSlots Casino se puede obtener una bonificacion del 100% hasta 300€ y turnos gratuitos en 1xSlots Casino. Haga su inicial deposito en 1xSlots Casino tras finalizar el proceso de inscripcion. No hace falta solicitar su bonificacion de bienvenida por e-mail ni el chat en directo como en otros casinos, porque 1xSlots Casino la abona a su cuenta automaticamente. La oferta de bienvenida se activa cuando deposite 10€ o mas. Haga un deposito empleando EcoPayz, Boku o Bitcoin u otro metodo de deposito disponible en el casino.
Mas sobre el bono
1xSlots Casino le da la oportunidad de incrementar su balance hasta 300€ (100%). Obtenga la bonificacion superior al depositar 300€ y conseguir 600€ que se anadiran en su cuenta. Los fondos de su bonificacion es compatible con tragaperras de proveedores de software como Red Tiger Gaming, Evolution Gaming y Microgaming, por nombrar unos cuantos. Debe tenerse en cuenta tambien que su cuenta se incrementara con 30 turnos gratuitos.
Bono de bienvenida 1xSlots 2024
Dentro de 1xSlots existen dos bonos de bienvenida, uno standard y uno exclusivo. El primero de ellas recompensa con un paquete de hasta €1500 y 150 giros gratis mientras que el segundo otorga un 10% adicional recompensando hasta €1650 y 150 giros gratis ?La diferencia? El bono exclusivo se obtiene mediante el uso del 1xSlots promocode NEXT777.
Las recompensas de la bonificacion exclusiva son otorgadas en los 4 primeros depositos de la siguiente manera:
100% del primer deposito hasta €450 + 30 giros gratis
100% del segundo deposito hasta €350 + 35 giros gratis
100% del tercer deposito hasta €400 + 40 giros gratis
100% del cuarto deposito hasta €450 + 45 giros gratis
Bono de bienvenida 1xSlots Argentina 2024
Cabe resaltar que durante tu proceso de registro tienes que elegir tu moneda local preferida. De este modo obtendras la bonificacion de bienvenida 1xSlots Argentina en pesos. Puedes recibir el bono exclusivo 1xSlots Argentina al utilizar nuestro codigo de bono 1xSlots Argentina NEXT777 durante el proceso de registro.
Ademas, si ingresas el codigo NEXT777 a la pestana “Bonos y Regalos” despues de hacer tu primer deposito, puedes recibir el bono con giros gratis 1xSlots Argentina que te otorgara 60 FS en tragamonedas 777 GEMS RESPIN. A continuacion encontraras los valores de bonos en pesos argentinos.
Bono de bienvenida 1xSlots Chile 2024
El bono de bienvenida 1xSlots Chile funciona del mismo modo como en Argentina. Tienes que crear tu cuenta e ingresar nuestro codigos de bono sin deposito de casino 1xslots Chile NEXT777 al formulario de registro. Puedes elegir el peso chileno como tu moneda local para recibir la bonificacion de bienvenida 1xSlots Chile. Adicionalmente, para obtener 60 giros gratis en 777 GEMS RESPIN, introduce el codigo NEXT777 al hacer tu primer deposito.
?QUE ES UN BONO DE TRAGAPERRAS SIN DEPOSITO?
Como su nombre indica, un bono de tragaperras sin deposito es un tipo de bono de casino que no necesita que los jugadores depositen dinero para poder optar a cualquier tipo de recompensa. Por ejemplo, giros gratis, creditos de casino o incluso dinero en efectivo.
Los bonos sin deposito se dan generalmente a los jugadores potenciales para motivar a los nuevos jugadores para que se registren. Pueden formar parte de los paquetes de bienvenida que un casino online ofrece a todos sus jugadores potenciales y ayudan a atraer la atencion hacia la marca del casino. Tambien pueden ofrecerse a los jugadores con cuentas en determinadas situaciones.
Las tragaperras con bono sin deposito ofrecen la posibilidad de probar las tragaperras online sin coste alguno y quedandose con el dinero que se obtiene, razon por la que son muy codiciadas. Sin embargo, los bonos sin deposito no te obligan a depositar dinero cuando la promocion termina, aunque se sugiere.
?CUALES SON LOS PRINCIPALES TIPOS DE BONOS DE TRAGAMONEDAS SIN DEPOSITO?
Los bonos sin deposito estan disponibles en tres variedades: giros gratis, creditos gratis o dinero en efectivo. El tipo mas conocido que es un bono sin deposito no spins without deposit bonus.
GIROS GRATIS CON BONO SIN DEPOSITO
Todos sabemos que las maquinas tragaperras son las mas populares en el mundo de los juegos de casino , por lo que es natural que un bono hecho especificamente para las maquinas que juegan a las tragaperras sea el mas buscado. Para los amantes de las maquinas tragaperras, los bonos de tiradas gratis sin deposito son un verdadero tesoro, ya que permiten a los jugadores jugar a sus maquinas tragaperras favoritas sin depositar dinero, y con una gran cantidad de tiradas gratis, lo que aumenta sus probabilidades de ganar significativamente.
Creditos gratuitos / BONO DE JUEGO GRATUITO SIN DEPOSITO
En lugar de tiradas gratis, los casinos pueden optar por dar creditos gratis a los jugadores que tienen bonos sin deposito. Estos creditos pueden ser utilizados dentro de un periodo de tiempo enumerado para apostar en juegos en los casinos y ganar dinero real. Los bonos sin deposito y los creditos gratuitos se ofrecen tanto en las tragaperras gratuitas como en otros juegos de los casinos.
DINERO GRATIS CON BONOS SIN DEPOSITO
Al igual que los creditos gratuitos con los bonos sin deposito, los bonos de dinero sin deposito que no requieren deposito se pueden jugar tanto en las tragaperras como en otros juegos de casino. Una vez que haya reclamado y jugado el bono de dinero sin deposito, podra retirar el dinero del bono y cualquier ganancia adicional siempre que cumpla las condiciones para retirar el dinero.
?Como puedo reclamar un bono sin deposito?
En la mayoria de los casos, puede hacer uso de los bonos sin deposito al crear una cuenta en cualquier sitio de juego en linea que ofrezca este tipo de oferta. En la version online del casino, la bonificacion puede aparecer en la pagina de promociones del casino o en una ventana emergente. Algunos casinos requieren que introduzca un codigo promocional para acceder al bono.
Cuando considere reclamar un bono sin deposito (o cualquier otro tipo de bono) debe asegurarse de leer los terminos y condiciones que se adjuntan al bono. Los diferentes casinos pueden tener sus propias regulaciones y limites, sin embargo, hay algunos que son iguales en todos los casinos.
REQUISITOS PARA TRABAJAR
Los bonos sobre los depositos son accesibles para todos, sin embargo, cobrar los bonos es un asunto un poco mas controlado. La mayoria de los casinos en linea le permitiran retirar sus ganancias despues de haber podido apostar una cantidad especifica.
Los requisitos de apuesta se muestran como multiplicadores. Representan la cantidad de veces que tienes que apostar en un bono para poder retirar el dinero. Por lo general, puede jugar a una serie de juegos seleccionados por el operador del casino. Una vez que haya alcanzado el requisito de apuesta, podra dar el siguiente paso para cobrar su bono.
PLAZO
Segun el casino online, el bono para juegos de tragaperras de deposito puede caducar en cuestion de dias o durar hasta 30 dias. Para asegurarte de que cumples los requisitos de apuestas, es posible que tengas que planificar tu rutina de juego a lo largo del bono.
TAMANOS DE APUESTA
Un metodo para lograr su objetivo de apostar mas rapido es realizar la mayor cantidad de apuestas posible en cada juego. Es un metodo sensato, a menos que el operador del casino decida controlar la cantidad de la apuesta y limitar la cantidad de apuestas en la respectiva tragamonedas con bono sin deposito.
SE REQUIERE UN DEPOSITO
Aunque suene contradictorio, algunos casinos online pueden incluso exigir a los jugadores que depositen dinero antes de poder retirar su bono. Suelen anadir este requisito adicional por razones de seguridad.
RESTRICCIONES
A veces, se le puede negar el acceso a un bono con oferta de deposito gratuito. Esto solo ocurre en muy raras circunstancias, ya sea por el hecho de haber intentado dos bonos a la vez o por tener una direccion IP compartida con un jugador que tambien reclamo el mismo bono, o por residir en una zona restringida.
Puedes obtener informacion mas detallada leyendo el articulo completo en este enlace – https://tecnoaldia.net/pag/?codigo_promocional_1xslots_bono.html
воєнторг
6. Скидки на военное снаряжение
інтернет магазин тактичного одягу армійський військторг .
воєнторг
17. Специальные предложения для армии
магазин воєнторг київ військовий магазин .
воєнторг
10. Распродажа военного снаряжения
інтернет магазин військової форми військовий одяг інтернет магазин .
EL CODIGO PROMOCIONAL DE 1XSLOTS CASINO
Sin introducir un codigo promocional 1xSlots Casino, como nuevo cliente en March 2024, puede beneficiarse de una bonificacion del 100% hasta 300€. El casino le proporciona un monton de maquinas tragaperras populares de proveedores de software como iSoftBet, Elk Studios o Play’n GO y otros. De forma adicional, se le otorgaran|esta oferta incluye 30 turnos gratuitos.. Todas las informaciones importantes respecto a esta oferta de bienvenida se puede encontrar en este articulo.
?COMO FUNCIONA EL CODIGO PROMOCIONAL DE 1XSLOTS CASINO?
En 1xSlots Casino se puede obtener una bonificacion del 100% hasta 300€ y turnos gratuitos en 1xSlots Casino. Haga su inicial deposito en 1xSlots Casino tras finalizar el proceso de inscripcion. No hace falta solicitar su bonificacion de bienvenida por e-mail ni el chat en directo como en otros casinos, porque 1xSlots Casino la abona a su cuenta automaticamente. La oferta de bienvenida se activa cuando deposite 10€ o mas. Haga un deposito empleando EcoPayz, Boku o Bitcoin u otro metodo de deposito disponible en el casino.
Mas sobre el bono
1xSlots Casino le da la oportunidad de incrementar su balance hasta 300€ (100%). Obtenga la bonificacion superior al depositar 300€ y conseguir 600€ que se anadiran en su cuenta. Los fondos de su bonificacion es compatible con tragaperras de proveedores de software como Red Tiger Gaming, Evolution Gaming y Microgaming, por nombrar unos cuantos. Debe tenerse en cuenta tambien que su cuenta se incrementara con 30 turnos gratuitos.
Bono de bienvenida 1xSlots 2024
Dentro de 1xSlots existen dos bonos de bienvenida, uno standard y uno exclusivo. El primero de ellas recompensa con un paquete de hasta €1500 y 150 giros gratis mientras que el segundo otorga un 10% adicional recompensando hasta €1650 y 150 giros gratis ?La diferencia? El bono exclusivo se obtiene mediante el uso del 1xSlots promocode NEXT777.
Las recompensas de la bonificacion exclusiva son otorgadas en los 4 primeros depositos de la siguiente manera:
100% del primer deposito hasta €450 + 30 giros gratis
100% del segundo deposito hasta €350 + 35 giros gratis
100% del tercer deposito hasta €400 + 40 giros gratis
100% del cuarto deposito hasta €450 + 45 giros gratis
Bono de bienvenida 1xSlots Argentina 2024
Cabe resaltar que durante tu proceso de registro tienes que elegir tu moneda local preferida. De este modo obtendras la bonificacion de bienvenida 1xSlots Argentina en pesos. Puedes recibir el bono exclusivo 1xSlots Argentina al utilizar nuestro codigo de bono 1xSlots Argentina NEXT777 durante el proceso de registro.
Ademas, si ingresas el codigo NEXT777 a la pestana “Bonos y Regalos” despues de hacer tu primer deposito, puedes recibir el bono con giros gratis 1xSlots Argentina que te otorgara 60 FS en tragamonedas 777 GEMS RESPIN. A continuacion encontraras los valores de bonos en pesos argentinos.
Bono de bienvenida 1xSlots Chile 2024
El bono de bienvenida 1xSlots Chile funciona del mismo modo como en Argentina. Tienes que crear tu cuenta e ingresar nuestro codigo promocional 1xslots 2024 Chile NEXT777 al formulario de registro. Puedes elegir el peso chileno como tu moneda local para recibir la bonificacion de bienvenida 1xSlots Chile. Adicionalmente, para obtener 60 giros gratis en 777 GEMS RESPIN, introduce el codigo NEXT777 al hacer tu primer deposito.
?QUE ES UN BONO DE TRAGAPERRAS SIN DEPOSITO?
Como su nombre indica, un bono de tragaperras sin deposito es un tipo de bono de casino que no necesita que los jugadores depositen dinero para poder optar a cualquier tipo de recompensa. Por ejemplo, giros gratis, creditos de casino o incluso dinero en efectivo.
Los bonos sin deposito se dan generalmente a los jugadores potenciales para motivar a los nuevos jugadores para que se registren. Pueden formar parte de los paquetes de bienvenida que un casino online ofrece a todos sus jugadores potenciales y ayudan a atraer la atencion hacia la marca del casino. Tambien pueden ofrecerse a los jugadores con cuentas en determinadas situaciones.
Las tragaperras con bono sin deposito ofrecen la posibilidad de probar las tragaperras online sin coste alguno y quedandose con el dinero que se obtiene, razon por la que son muy codiciadas. Sin embargo, los bonos sin deposito no te obligan a depositar dinero cuando la promocion termina, aunque se sugiere.
?CUALES SON LOS PRINCIPALES TIPOS DE BONOS DE TRAGAMONEDAS SIN DEPOSITO?
Los bonos sin deposito estan disponibles en tres variedades: giros gratis, creditos gratis o dinero en efectivo. El tipo mas conocido que es un bono sin deposito no spins without deposit bonus.
GIROS GRATIS CON BONO SIN DEPOSITO
Todos sabemos que las maquinas tragaperras son las mas populares en el mundo de los juegos de casino , por lo que es natural que un bono hecho especificamente para las maquinas que juegan a las tragaperras sea el mas buscado. Para los amantes de las maquinas tragaperras, los bonos de tiradas gratis sin deposito son un verdadero tesoro, ya que permiten a los jugadores jugar a sus maquinas tragaperras favoritas sin depositar dinero, y con una gran cantidad de tiradas gratis, lo que aumenta sus probabilidades de ganar significativamente.
Creditos gratuitos / BONO DE JUEGO GRATUITO SIN DEPOSITO
En lugar de tiradas gratis, los casinos pueden optar por dar creditos gratis a los jugadores que tienen bonos sin deposito. Estos creditos pueden ser utilizados dentro de un periodo de tiempo enumerado para apostar en juegos en los casinos y ganar dinero real. Los bonos sin deposito y los creditos gratuitos se ofrecen tanto en las tragaperras gratuitas como en otros juegos de los casinos.
DINERO GRATIS CON BONOS SIN DEPOSITO
Al igual que los creditos gratuitos con los bonos sin deposito, los bonos de dinero sin deposito que no requieren deposito se pueden jugar tanto en las tragaperras como en otros juegos de casino. Una vez que haya reclamado y jugado el bono de dinero sin deposito, podra retirar el dinero del bono y cualquier ganancia adicional siempre que cumpla las condiciones para retirar el dinero.
?Como puedo reclamar un bono sin deposito?
En la mayoria de los casos, puede hacer uso de los bonos sin deposito al crear una cuenta en cualquier sitio de juego en linea que ofrezca este tipo de oferta. En la version online del casino, la bonificacion puede aparecer en la pagina de promociones del casino o en una ventana emergente. Algunos casinos requieren que introduzca un codigo promocional para acceder al bono.
Cuando considere reclamar un bono sin deposito (o cualquier otro tipo de bono) debe asegurarse de leer los terminos y condiciones que se adjuntan al bono. Los diferentes casinos pueden tener sus propias regulaciones y limites, sin embargo, hay algunos que son iguales en todos los casinos.
REQUISITOS PARA TRABAJAR
Los bonos sobre los depositos son accesibles para todos, sin embargo, cobrar los bonos es un asunto un poco mas controlado. La mayoria de los casinos en linea le permitiran retirar sus ganancias despues de haber podido apostar una cantidad especifica.
Los requisitos de apuesta se muestran como multiplicadores. Representan la cantidad de veces que tienes que apostar en un bono para poder retirar el dinero. Por lo general, puede jugar a una serie de juegos seleccionados por el operador del casino. Una vez que haya alcanzado el requisito de apuesta, podra dar el siguiente paso para cobrar su bono.
PLAZO
Segun el casino online, el bono para juegos de tragaperras de deposito puede caducar en cuestion de dias o durar hasta 30 dias. Para asegurarte de que cumples los requisitos de apuestas, es posible que tengas que planificar tu rutina de juego a lo largo del bono.
TAMANOS DE APUESTA
Un metodo para lograr su objetivo de apostar mas rapido es realizar la mayor cantidad de apuestas posible en cada juego. Es un metodo sensato, a menos que el operador del casino decida controlar la cantidad de la apuesta y limitar la cantidad de apuestas en la respectiva tragamonedas con bono sin deposito.
SE REQUIERE UN DEPOSITO
Aunque suene contradictorio, algunos casinos online pueden incluso exigir a los jugadores que depositen dinero antes de poder retirar su bono. Suelen anadir este requisito adicional por razones de seguridad.
RESTRICCIONES
A veces, se le puede negar el acceso a un bono con oferta de deposito gratuito. Esto solo ocurre en muy raras circunstancias, ya sea por el hecho de haber intentado dos bonos a la vez o por tener una direccion IP compartida con un jugador que tambien reclamo el mismo bono, o por residir en una zona restringida.
Puedes obtener informacion mas detallada leyendo el articulo completo en este enlace – https://tecnoaldia.net/pag/?codigo_promocional_1xslots_bono.html
order lisinopril 20mg
EL CODIGO PROMOCIONAL DE 1XSLOTS CASINO
Sin introducir un codigo promocional 1xSlots Casino, como nuevo cliente en March 2024, puede beneficiarse de una bonificacion del 100% hasta 300€. El casino le proporciona un monton de maquinas tragaperras populares de proveedores de software como iSoftBet, Elk Studios o Play’n GO y otros. De forma adicional, se le otorgaran|esta oferta incluye 30 turnos gratuitos.. Todas las informaciones importantes respecto a esta oferta de bienvenida se puede encontrar en este articulo.
?COMO FUNCIONA EL CODIGO PROMOCIONAL DE 1XSLOTS CASINO?
En 1xSlots Casino se puede obtener una bonificacion del 100% hasta 300€ y turnos gratuitos en 1xSlots Casino. Haga su inicial deposito en 1xSlots Casino tras finalizar el proceso de inscripcion. No hace falta solicitar su bonificacion de bienvenida por e-mail ni el chat en directo como en otros casinos, porque 1xSlots Casino la abona a su cuenta automaticamente. La oferta de bienvenida se activa cuando deposite 10€ o mas. Haga un deposito empleando EcoPayz, Boku o Bitcoin u otro metodo de deposito disponible en el casino.
Mas sobre el bono
1xSlots Casino le da la oportunidad de incrementar su balance hasta 300€ (100%). Obtenga la bonificacion superior al depositar 300€ y conseguir 600€ que se anadiran en su cuenta. Los fondos de su bonificacion es compatible con tragaperras de proveedores de software como Red Tiger Gaming, Evolution Gaming y Microgaming, por nombrar unos cuantos. Debe tenerse en cuenta tambien que su cuenta se incrementara con 30 turnos gratuitos.
Bono de bienvenida 1xSlots 2024
Dentro de 1xSlots existen dos bonos de bienvenida, uno standard y uno exclusivo. El primero de ellas recompensa con un paquete de hasta €1500 y 150 giros gratis mientras que el segundo otorga un 10% adicional recompensando hasta €1650 y 150 giros gratis ?La diferencia? El bono exclusivo se obtiene mediante el uso del 1xSlots promocode NEXT777.
Las recompensas de la bonificacion exclusiva son otorgadas en los 4 primeros depositos de la siguiente manera:
100% del primer deposito hasta €450 + 30 giros gratis
100% del segundo deposito hasta €350 + 35 giros gratis
100% del tercer deposito hasta €400 + 40 giros gratis
100% del cuarto deposito hasta €450 + 45 giros gratis
Bono de bienvenida 1xSlots Argentina 2024
Cabe resaltar que durante tu proceso de registro tienes que elegir tu moneda local preferida. De este modo obtendras la bonificacion de bienvenida 1xSlots Argentina en pesos. Puedes recibir el bono exclusivo 1xSlots Argentina al utilizar nuestro codigo de bono 1xSlots Argentina NEXT777 durante el proceso de registro.
Ademas, si ingresas el codigo NEXT777 a la pestana “Bonos y Regalos” despues de hacer tu primer deposito, puedes recibir el bono con giros gratis 1xSlots Argentina que te otorgara 60 FS en tragamonedas 777 GEMS RESPIN. A continuacion encontraras los valores de bonos en pesos argentinos.
Bono de bienvenida 1xSlots Chile 2024
El bono de bienvenida 1xSlots Chile funciona del mismo modo como en Argentina. Tienes que crear tu cuenta e ingresar nuestro codigo promocional 1xslots 2024 Chile NEXT777 al formulario de registro. Puedes elegir el peso chileno como tu moneda local para recibir la bonificacion de bienvenida 1xSlots Chile. Adicionalmente, para obtener 60 giros gratis en 777 GEMS RESPIN, introduce el codigo NEXT777 al hacer tu primer deposito.
?QUE ES UN BONO DE TRAGAPERRAS SIN DEPOSITO?
Como su nombre indica, un bono de tragaperras sin deposito es un tipo de bono de casino que no necesita que los jugadores depositen dinero para poder optar a cualquier tipo de recompensa. Por ejemplo, giros gratis, creditos de casino o incluso dinero en efectivo.
Los bonos sin deposito se dan generalmente a los jugadores potenciales para motivar a los nuevos jugadores para que se registren. Pueden formar parte de los paquetes de bienvenida que un casino online ofrece a todos sus jugadores potenciales y ayudan a atraer la atencion hacia la marca del casino. Tambien pueden ofrecerse a los jugadores con cuentas en determinadas situaciones.
Las tragaperras con bono sin deposito ofrecen la posibilidad de probar las tragaperras online sin coste alguno y quedandose con el dinero que se obtiene, razon por la que son muy codiciadas. Sin embargo, los bonos sin deposito no te obligan a depositar dinero cuando la promocion termina, aunque se sugiere.
?CUALES SON LOS PRINCIPALES TIPOS DE BONOS DE TRAGAMONEDAS SIN DEPOSITO?
Los bonos sin deposito estan disponibles en tres variedades: giros gratis, creditos gratis o dinero en efectivo. El tipo mas conocido que es un bono sin deposito no spins without deposit bonus.
GIROS GRATIS CON BONO SIN DEPOSITO
Todos sabemos que las maquinas tragaperras son las mas populares en el mundo de los juegos de casino , por lo que es natural que un bono hecho especificamente para las maquinas que juegan a las tragaperras sea el mas buscado. Para los amantes de las maquinas tragaperras, los bonos de tiradas gratis sin deposito son un verdadero tesoro, ya que permiten a los jugadores jugar a sus maquinas tragaperras favoritas sin depositar dinero, y con una gran cantidad de tiradas gratis, lo que aumenta sus probabilidades de ganar significativamente.
Creditos gratuitos / BONO DE JUEGO GRATUITO SIN DEPOSITO
En lugar de tiradas gratis, los casinos pueden optar por dar creditos gratis a los jugadores que tienen bonos sin deposito. Estos creditos pueden ser utilizados dentro de un periodo de tiempo enumerado para apostar en juegos en los casinos y ganar dinero real. Los bonos sin deposito y los creditos gratuitos se ofrecen tanto en las tragaperras gratuitas como en otros juegos de los casinos.
DINERO GRATIS CON BONOS SIN DEPOSITO
Al igual que los creditos gratuitos con los bonos sin deposito, los bonos de dinero sin deposito que no requieren deposito se pueden jugar tanto en las tragaperras como en otros juegos de casino. Una vez que haya reclamado y jugado el bono de dinero sin deposito, podra retirar el dinero del bono y cualquier ganancia adicional siempre que cumpla las condiciones para retirar el dinero.
?Como puedo reclamar un bono sin deposito?
En la mayoria de los casos, puede hacer uso de los bonos sin deposito al crear una cuenta en cualquier sitio de juego en linea que ofrezca este tipo de oferta. En la version online del casino, la bonificacion puede aparecer en la pagina de promociones del casino o en una ventana emergente. Algunos casinos requieren que introduzca un codigo promocional para acceder al bono.
Cuando considere reclamar un bono sin deposito (o cualquier otro tipo de bono) debe asegurarse de leer los terminos y condiciones que se adjuntan al bono. Los diferentes casinos pueden tener sus propias regulaciones y limites, sin embargo, hay algunos que son iguales en todos los casinos.
REQUISITOS PARA TRABAJAR
Los bonos sobre los depositos son accesibles para todos, sin embargo, cobrar los bonos es un asunto un poco mas controlado. La mayoria de los casinos en linea le permitiran retirar sus ganancias despues de haber podido apostar una cantidad especifica.
Los requisitos de apuesta se muestran como multiplicadores. Representan la cantidad de veces que tienes que apostar en un bono para poder retirar el dinero. Por lo general, puede jugar a una serie de juegos seleccionados por el operador del casino. Una vez que haya alcanzado el requisito de apuesta, podra dar el siguiente paso para cobrar su bono.
PLAZO
Segun el casino online, el bono para juegos de tragaperras de deposito puede caducar en cuestion de dias o durar hasta 30 dias. Para asegurarte de que cumples los requisitos de apuestas, es posible que tengas que planificar tu rutina de juego a lo largo del bono.
TAMANOS DE APUESTA
Un metodo para lograr su objetivo de apostar mas rapido es realizar la mayor cantidad de apuestas posible en cada juego. Es un metodo sensato, a menos que el operador del casino decida controlar la cantidad de la apuesta y limitar la cantidad de apuestas en la respectiva tragamonedas con bono sin deposito.
SE REQUIERE UN DEPOSITO
Aunque suene contradictorio, algunos casinos online pueden incluso exigir a los jugadores que depositen dinero antes de poder retirar su bono. Suelen anadir este requisito adicional por razones de seguridad.
RESTRICCIONES
A veces, se le puede negar el acceso a un bono con oferta de deposito gratuito. Esto solo ocurre en muy raras circunstancias, ya sea por el hecho de haber intentado dos bonos a la vez o por tener una direccion IP compartida con un jugador que tambien reclamo el mismo bono, o por residir en una zona restringida.
Puedes obtener informacion mas detallada leyendo el articulo completo en este enlace – https://tecnoaldia.net/pag/?codigo_promocional_1xslots_bono.html
1. Почему берцы – это обязательный элемент стиля?
2. Как выбрать идеальные берцы для осеннего гардероба?
3. Тренды сезона: кожаные берцы или замшевые?
4. 5 способов носить берцы с платьем
5. Какие берцы выбрать для повседневного образа?
6. Берцы на платформе: комфорт и стиль в одном
7. Какие берцы будут актуальны в этом году?
8. Маст-хэв сезона: военные берцы в стиле милитари
9. 10 вариантов сочетания берцов с джинсами
10. Зимние берцы: как выбрать модель для холодного сезона
11. Элегантные берцы на каблуке: идеальный вариант для офиса
12. Секреты ухода за берцами: как сохранить первоначальный вид?
13. С какой юбкой носить берцы: советы от стилистов
14. Как подобрать берцы под фасон брюк?
15. Берцы на шнуровке: стильный акцент в образе
16. Берцы-челси: универсальная модель для любого стиля
17. С чем носить берцы на плоской подошве?
18. Берцы с ремешками: акцент на деталях
19. Как выбрать берцы для прогулок по городу?
20. Топ-5 брендов берцев: качество и стиль в одном
берці бєрци .
brazilian pharmacy online
воєнторг
магазин військового спорядження київ інтернет магазин військового одягу .
lisinopril 20 mg coupon
Right here is the perfect site for anybody who woud like to understand this topic.
You know so much iits almost hard to argue with youu (not that I really would wwnt to…HaHa).
You definitely put a new spin on a topic that’s been written about for ages.
Wonderful stuff, just great!
1. Почему берцы – это обязательный элемент стиля?
2. Как выбрать идеальные берцы для осеннего гардероба?
3. Тренды сезона: кожаные берцы или замшевые?
4. 5 способов носить берцы с платьем
5. Какие берцы выбрать для повседневного образа?
6. Берцы на платформе: комфорт и стиль в одном
7. Какие берцы будут актуальны в этом году?
8. Маст-хэв сезона: военные берцы в стиле милитари
9. 10 вариантов сочетания берцов с джинсами
10. Зимние берцы: как выбрать модель для холодного сезона
11. Элегантные берцы на каблуке: идеальный вариант для офиса
12. Секреты ухода за берцами: как сохранить первоначальный вид?
13. С какой юбкой носить берцы: советы от стилистов
14. Как подобрать берцы под фасон брюк?
15. Берцы на шнуровке: стильный акцент в образе
16. Берцы-челси: универсальная модель для любого стиля
17. С чем носить берцы на плоской подошве?
18. Берцы с ремешками: акцент на деталях
19. Как выбрать берцы для прогулок по городу?
20. Топ-5 брендов берцев: качество и стиль в одном
берці ua берці ціна .
metformin hcl 1000
camiseta ac milan 2023
can you buy azithromycin otc
synthroid generic
synthroid generic price
1. Почему берцы – это обязательный элемент стиля?
2. Как выбрать идеальные берцы для осеннего гардероба?
3. Тренды сезона: кожаные берцы или замшевые?
4. 5 способов носить берцы с платьем
5. Какие берцы выбрать для повседневного образа?
6. Берцы на платформе: комфорт и стиль в одном
7. Какие берцы будут актуальны в этом году?
8. Маст-хэв сезона: военные берцы в стиле милитари
9. 10 вариантов сочетания берцов с джинсами
10. Зимние берцы: как выбрать модель для холодного сезона
11. Элегантные берцы на каблуке: идеальный вариант для офиса
12. Секреты ухода за берцами: как сохранить первоначальный вид?
13. С какой юбкой носить берцы: советы от стилистов
14. Как подобрать берцы под фасон брюк?
15. Берцы на шнуровке: стильный акцент в образе
16. Берцы-челси: универсальная модель для любого стиля
17. С чем носить берцы на плоской подошве?
18. Берцы с ремешками: акцент на деталях
19. Как выбрать берцы для прогулок по городу?
20. Топ-5 брендов берцев: качество и стиль в одном
бєрци зсу тактичні бєрци .
1. Почему берцы – это обязательный элемент стиля?
2. Как выбрать идеальные берцы для осеннего гардероба?
3. Тренды сезона: кожаные берцы или замшевые?
4. 5 способов носить берцы с платьем
5. Какие берцы выбрать для повседневного образа?
6. Берцы на платформе: комфорт и стиль в одном
7. Какие берцы будут актуальны в этом году?
8. Маст-хэв сезона: военные берцы в стиле милитари
9. 10 вариантов сочетания берцов с джинсами
10. Зимние берцы: как выбрать модель для холодного сезона
11. Элегантные берцы на каблуке: идеальный вариант для офиса
12. Секреты ухода за берцами: как сохранить первоначальный вид?
13. С какой юбкой носить берцы: советы от стилистов
14. Как подобрать берцы под фасон брюк?
15. Берцы на шнуровке: стильный акцент в образе
16. Берцы-челси: универсальная модель для любого стиля
17. С чем носить берцы на плоской подошве?
18. Берцы с ремешками: акцент на деталях
19. Как выбрать берцы для прогулок по городу?
20. Топ-5 брендов берцев: качество и стиль в одном
купити берці зсу берці купити .
prednisone generic cost
canadian pharmacy online cialis
online pharmacy lisinopril
mexican pharmacies online drugs
where to get valtrex
synthroid 25 mg price
reputable overseas online pharmacies
prednisone prescription online
1. Почему берцы – это обязательный элемент стиля?
2. Как выбрать идеальные берцы для осеннего гардероба?
3. Тренды сезона: кожаные берцы или замшевые?
4. 5 способов носить берцы с платьем
5. Какие берцы выбрать для повседневного образа?
6. Берцы на платформе: комфорт и стиль в одном
7. Какие берцы будут актуальны в этом году?
8. Маст-хэв сезона: военные берцы в стиле милитари
9. 10 вариантов сочетания берцов с джинсами
10. Зимние берцы: как выбрать модель для холодного сезона
11. Элегантные берцы на каблуке: идеальный вариант для офиса
12. Секреты ухода за берцами: как сохранить первоначальный вид?
13. С какой юбкой носить берцы: советы от стилистов
14. Как подобрать берцы под фасон брюк?
15. Берцы на шнуровке: стильный акцент в образе
16. Берцы-челси: универсальная модель для любого стиля
17. С чем носить берцы на плоской подошве?
18. Берцы с ремешками: акцент на деталях
19. Как выбрать берцы для прогулок по городу?
20. Топ-5 брендов берцев: качество и стиль в одном
берці військові військові берці зсу .
zestril no prescription
cialis daily use 5mg
can i buy azithromycin over the counter in australia
프라그마틱 슬롯으로 무한한 재미와 흥미를 느껴보세요.
에그벳
프라그마틱의 게임은 높은 퀄리티와 흥미진진한 스토리로 항상 눈길을 끌어요. 이번에 어떤 게임을 즐겼나요?
https://www.12315yc.cn/
https://sabfaro.com/link/
https://hrbyszs.com/link/
prednisone discount
https://www.annuairefree.com/купить-диплом-путь-к-легкому-получе-2
https://www.hostgatordiscounts.com/купить-диплом-путь-к-легкому-получе-3
https://www.barcelonacyclechic.com/получение-диплома-Ñертификата-роÑÑи-3
https://www.provenexpert.com/originality/?mode=preview
https://www.thinsulight.com/купить-диплом-реальный-или-мошенниче-2
prednisone buy online uk
discount cialis online
z pack zithromax
canada drugstore pharmacy rx
tadalafil 5mg uk
synthroid 225 online
low price cialis
The meal went without incident although a couple of times she had to avert her gaze from Dan for fear of bursting out laughing. Dan went up to his room saying he wanted to listen to music, he laid on his bed playing with himself waiting for his father to leave. He thought about the events of the last two weeks it had been the craziest time of his life.
He put it all down to Mary Harris, she had been his girlfriend for two years, he liked her a lot, she was pretty and intelligent two things that rarely combined in his experience, the problem was she steadfastly refused to let him put his cock inside her, he had thought he was getting somewhere when he took his cock out that evening in the cinema when she had finally allowed him to get his hand inside her panties, it was the first time she had allowed him to do any more than play with her tits. He had taken her hand and placed it on his erection, initially he had been pleased to hear her sharp intake of breath when she felt the size of him and he was encouraged when she began stroking him.
It was later that the problem started, he had her in the car park, they were kissing, her sweater was pushed up together with her bra and he was sucking on her nipples. He managed to get her laid across the front of one of the cars, his hand up her skirt, trying to pull down her panties. That was when she had stopped him.
https://cannabis.net/user/147760
https://indium1991.micro.blog/about/
https://www.divephotoguide.com/user/holthamlet1968
https://www.quia.com/profiles/dimcclure330
https://permacultureglobal.org/users/55662-shay-rodriguez
https://sjawa1982.bandcamp.com/album/the-contest-1
https://www.brollopsguiden.se/medlemspresentation/86301
https://imageevent.com/dafaad1975
https://www.obesityhelp.com/members/neod1986/about_me/
https://www.metal-archives.com/users/beizill1952
medstore online pharmacy
metformin 1 00 mg
metformin from india
anani gotunden sikiyim
tadalafil tablets online india
online metformin
synthroid 50 mcg india
https://elementor.com/
16 lisinopril
prednisone 10 mg price
metformin 2019
www canadapharmacy com
synthroid 0.05
sandyterrace.com
Zhu Houzhao는 자신을 비판하는 서양 동료를 무시했습니다.
camisetas real madrid
Ваш надежный ноутбук Lenovo нуждается в ремонте? Обратитесь в наш сервисный центр https://servisnyjcentr-lenovo.ru/. Мы быстро вернем его к жизни!
леново сервис
ремонт клавиатуры lenovo
замена аккумулятора ноутбука леново
ремонт разъема зарядки планшета леново цена
medicine azithromycin 250 mg
Экран ноутбука Lenovo разбит? Клавиатура вышла из строя? Не спешите расставаться со своим верным помощником! Опытные мастера сервисного центра https://servisnyjcentr-lenovo.ru/ вернут его к жизни. Мы предлагаем качественный ремонт ноутбуков Lenovo по доступным ценам. Все работы выполняются с использованием профессионального оборудования и инструментов, что обеспечивает высокий уровень ремонтных услуг. После замены неисправных компонентов ваш ноутбук будет работать как новенький. Также мы окажем помощь в переустановке операционной системы и настройке необходимого программного обеспечения.
сервисный центр леново
замена usb разъема lenovo
замена видеокарты lenovo
замена видеокарты на ноутбуке lenovo
where can i buy generic valtrex
brand synthroid cost
https://www.samrogroup.com/купить-диплом-реальный-или-мошенниче-3
https://www.asriponik.com/легко-купить-диплом-Ñертификат-в-роÑÑ-2
https://www.activebranddns.com/купить-диплом-легкое-или-опаÑное-реше-5
https://www.mattdavisopenshismouth.com/как-купить-диплом-Ñертификат-в-роÑÑии
https://www.bottleshockmovie.com/преимущеÑтва-и-процеÑÑ-покупки-дипло-4
buy metformin online india
lisinopril 20 mg canadian pharmacy
EL CODIGO PROMOCIONAL DE 1XSLOTS CASINO
Sin introducir un codigo promocional 1xSlots Casino, como nuevo cliente en March 2024, puede beneficiarse de una bonificacion del 100% hasta 300€. El casino le proporciona un monton de maquinas tragaperras populares de proveedores de software como iSoftBet, Elk Studios o Play’n GO y otros. De forma adicional, se le otorgaran|esta oferta incluye 30 turnos gratuitos.. Todas las informaciones importantes respecto a esta oferta de bienvenida se puede encontrar en este articulo.
?COMO FUNCIONA EL CODIGO PROMOCIONAL DE 1XSLOTS CASINO?
En 1xSlots Casino se puede obtener una bonificacion del 100% hasta 300€ y turnos gratuitos en 1xSlots Casino. Haga su inicial deposito en 1xSlots Casino tras finalizar el proceso de inscripcion. No hace falta solicitar su bonificacion de bienvenida por e-mail ni el chat en directo como en otros casinos, porque 1xSlots Casino la abona a su cuenta automaticamente. La oferta de bienvenida se activa cuando deposite 10€ o mas. Haga un deposito empleando EcoPayz, Boku o Bitcoin u otro metodo de deposito disponible en el casino.
Mas sobre el bono
1xSlots Casino le da la oportunidad de incrementar su balance hasta 300€ (100%). Obtenga la bonificacion superior al depositar 300€ y conseguir 600€ que se anadiran en su cuenta. Los fondos de su bonificacion es compatible con tragaperras de proveedores de software como Red Tiger Gaming, Evolution Gaming y Microgaming, por nombrar unos cuantos. Debe tenerse en cuenta tambien que su cuenta se incrementara con 30 turnos gratuitos.
Bono de bienvenida 1xSlots 2024
Dentro de 1xSlots existen dos bonos de bienvenida, uno standard y uno exclusivo. El primero de ellas recompensa con un paquete de hasta €1500 y 150 giros gratis mientras que el segundo otorga un 10% adicional recompensando hasta €1650 y 150 giros gratis ?La diferencia? El bono exclusivo se obtiene mediante el uso del 1xSlots promocode NEXT777.
Las recompensas de la bonificacion exclusiva son otorgadas en los 4 primeros depositos de la siguiente manera:
100% del primer deposito hasta €450 + 30 giros gratis
100% del segundo deposito hasta €350 + 35 giros gratis
100% del tercer deposito hasta €400 + 40 giros gratis
100% del cuarto deposito hasta €450 + 45 giros gratis
Bono de bienvenida 1xSlots Argentina 2024
Cabe resaltar que durante tu proceso de registro tienes que elegir tu moneda local preferida. De este modo obtendras la bonificacion de bienvenida 1xSlots Argentina en pesos. Puedes recibir el bono exclusivo 1xSlots Argentina al utilizar nuestro codigo de bono 1xSlots Argentina NEXT777 durante el proceso de registro.
Ademas, si ingresas el codigo NEXT777 a la pestana “Bonos y Regalos” despues de hacer tu primer deposito, puedes recibir el bono con giros gratis 1xSlots Argentina que te otorgara 60 FS en tragamonedas 777 GEMS RESPIN. A continuacion encontraras los valores de bonos en pesos argentinos.
Bono de bienvenida 1xSlots Chile 2024
El bono de bienvenida 1xSlots Chile funciona del mismo modo como en Argentina. Tienes que crear tu cuenta e ingresar nuestro codigo de promocion para 1xslots Chile NEXT777 al formulario de registro. Puedes elegir el peso chileno como tu moneda local para recibir la bonificacion de bienvenida 1xSlots Chile. Adicionalmente, para obtener 60 giros gratis en 777 GEMS RESPIN, introduce el codigo NEXT777 al hacer tu primer deposito.
?QUE ES UN BONO DE TRAGAPERRAS SIN DEPOSITO?
Como su nombre indica, un bono de tragaperras sin deposito es un tipo de bono de casino que no necesita que los jugadores depositen dinero para poder optar a cualquier tipo de recompensa. Por ejemplo, giros gratis, creditos de casino o incluso dinero en efectivo.
Los bonos sin deposito se dan generalmente a los jugadores potenciales para motivar a los nuevos jugadores para que se registren. Pueden formar parte de los paquetes de bienvenida que un casino online ofrece a todos sus jugadores potenciales y ayudan a atraer la atencion hacia la marca del casino. Tambien pueden ofrecerse a los jugadores con cuentas en determinadas situaciones.
Las tragaperras con bono sin deposito ofrecen la posibilidad de probar las tragaperras online sin coste alguno y quedandose con el dinero que se obtiene, razon por la que son muy codiciadas. Sin embargo, los bonos sin deposito no te obligan a depositar dinero cuando la promocion termina, aunque se sugiere.
?CUALES SON LOS PRINCIPALES TIPOS DE BONOS DE TRAGAMONEDAS SIN DEPOSITO?
Los bonos sin deposito estan disponibles en tres variedades: giros gratis, creditos gratis o dinero en efectivo. El tipo mas conocido que es un bono sin deposito no spins without deposit bonus.
GIROS GRATIS CON BONO SIN DEPOSITO
Todos sabemos que las maquinas tragaperras son las mas populares en el mundo de los juegos de casino , por lo que es natural que un bono hecho especificamente para las maquinas que juegan a las tragaperras sea el mas buscado. Para los amantes de las maquinas tragaperras, los bonos de tiradas gratis sin deposito son un verdadero tesoro, ya que permiten a los jugadores jugar a sus maquinas tragaperras favoritas sin depositar dinero, y con una gran cantidad de tiradas gratis, lo que aumenta sus probabilidades de ganar significativamente.
Creditos gratuitos / BONO DE JUEGO GRATUITO SIN DEPOSITO
En lugar de tiradas gratis, los casinos pueden optar por dar creditos gratis a los jugadores que tienen bonos sin deposito. Estos creditos pueden ser utilizados dentro de un periodo de tiempo enumerado para apostar en juegos en los casinos y ganar dinero real. Los bonos sin deposito y los creditos gratuitos se ofrecen tanto en las tragaperras gratuitas como en otros juegos de los casinos.
DINERO GRATIS CON BONOS SIN DEPOSITO
Al igual que los creditos gratuitos con los bonos sin deposito, los bonos de dinero sin deposito que no requieren deposito se pueden jugar tanto en las tragaperras como en otros juegos de casino. Una vez que haya reclamado y jugado el bono de dinero sin deposito, podra retirar el dinero del bono y cualquier ganancia adicional siempre que cumpla las condiciones para retirar el dinero.
?Como puedo reclamar un bono sin deposito?
En la mayoria de los casos, puede hacer uso de los bonos sin deposito al crear una cuenta en cualquier sitio de juego en linea que ofrezca este tipo de oferta. En la version online del casino, la bonificacion puede aparecer en la pagina de promociones del casino o en una ventana emergente. Algunos casinos requieren que introduzca un codigo promocional para acceder al bono.
Cuando considere reclamar un bono sin deposito (o cualquier otro tipo de bono) debe asegurarse de leer los terminos y condiciones que se adjuntan al bono. Los diferentes casinos pueden tener sus propias regulaciones y limites, sin embargo, hay algunos que son iguales en todos los casinos.
REQUISITOS PARA TRABAJAR
Los bonos sobre los depositos son accesibles para todos, sin embargo, cobrar los bonos es un asunto un poco mas controlado. La mayoria de los casinos en linea le permitiran retirar sus ganancias despues de haber podido apostar una cantidad especifica.
Los requisitos de apuesta se muestran como multiplicadores. Representan la cantidad de veces que tienes que apostar en un bono para poder retirar el dinero. Por lo general, puede jugar a una serie de juegos seleccionados por el operador del casino. Una vez que haya alcanzado el requisito de apuesta, podra dar el siguiente paso para cobrar su bono.
PLAZO
Segun el casino online, el bono para juegos de tragaperras de deposito puede caducar en cuestion de dias o durar hasta 30 dias. Para asegurarte de que cumples los requisitos de apuestas, es posible que tengas que planificar tu rutina de juego a lo largo del bono.
TAMANOS DE APUESTA
Un metodo para lograr su objetivo de apostar mas rapido es realizar la mayor cantidad de apuestas posible en cada juego. Es un metodo sensato, a menos que el operador del casino decida controlar la cantidad de la apuesta y limitar la cantidad de apuestas en la respectiva tragamonedas con bono sin deposito.
SE REQUIERE UN DEPOSITO
Aunque suene contradictorio, algunos casinos online pueden incluso exigir a los jugadores que depositen dinero antes de poder retirar su bono. Suelen anadir este requisito adicional por razones de seguridad.
RESTRICCIONES
A veces, se le puede negar el acceso a un bono con oferta de deposito gratuito. Esto solo ocurre en muy raras circunstancias, ya sea por el hecho de haber intentado dos bonos a la vez o por tener una direccion IP compartida con un jugador que tambien reclamo el mismo bono, o por residir en una zona restringida.
Puedes obtener informacion mas detallada leyendo el articulo completo en este enlace – https://www.joshhunt.com/news/codigo_promocional_1xslots_bono.html
Good day! Do you know if they make any plugins to help with SEO?
I’m trying to get my website to rank for some targeted keywords
but I’m not seeing very good results. If you know of any please
share. Cheers! You can read similar text here: Scrapebox
List
discount generic tadalafil
Howdy! Do you know if they make any plugins to help with Search Engine Optimization? I’m trying to get my site
to rank for some targeted keywords but I’m not seeing
very good success. If you know of any please share. Thank you!
I saw similar art here: Backlink Portfolio
Бонусное предложение активно до конца 2024 года. Фрибет – это бесплатные ставки на некоторое количество пари в букмекерской конторе 1xbet, которые выдается, если ввести промокод на бесплатную игру в 1хбет, а затем – целиком заполнить анкету игрока в своем личном кабинете и подтвердить номер мобильного телефона. С помощью бесплатной ставки за 1xbet промокод вы можете делать ставки на любые виды спорта, однако учтите, что у 1xbet фрибета есть свои условия отыгрыша. Приветственный бонус 1Хбет. Во время регистрации на 1xbet бетторы могут выбрать стартовый бонус – для ставок на спорт или для игры в казино. Промокоды 1xBet на сегодня. Не ошибемся, если скажем, что компания является одним из лидеров на рынке букмекерских услуг по количеству и разнообразию бонусных предложений. Белорусские бетторы могут воспользоваться всем их спектром. Промокод «1хБет» при регистрации дает право новым бетторам получит 100% бонус на первый депозит, но не более 200 BYN (бел. рублей). Например, при пополнении баланса на 100 BYN сверху клиент получает аналогичный бонус. Если же речь идет о промокодах, которые дают право на бесплатную ставку, то моментом активации следует считать время совершения ставки при помощи такого купона – более подробно в этом материале https://mg-group74.ru/pages/1xbet.html
cheap synthroid
where can i buy generic valtrex
azithromycin 500mg buy online
synthroid 0.0125 25mcg
international pharmacy no prescription
lisinopril 5 mg price
EL CODIGO PROMOCIONAL DE 1XSLOTS CASINO
Sin introducir un codigo promocional 1xSlots Casino, como nuevo cliente en March 2024, puede beneficiarse de una bonificacion del 100% hasta 300€. El casino le proporciona un monton de maquinas tragaperras populares de proveedores de software como iSoftBet, Elk Studios o Play’n GO y otros. De forma adicional, se le otorgaran|esta oferta incluye 30 turnos gratuitos.. Todas las informaciones importantes respecto a esta oferta de bienvenida se puede encontrar en este articulo.
?COMO FUNCIONA EL CODIGO PROMOCIONAL DE 1XSLOTS CASINO?
En 1xSlots Casino se puede obtener una bonificacion del 100% hasta 300€ y turnos gratuitos en 1xSlots Casino. Haga su inicial deposito en 1xSlots Casino tras finalizar el proceso de inscripcion. No hace falta solicitar su bonificacion de bienvenida por e-mail ni el chat en directo como en otros casinos, porque 1xSlots Casino la abona a su cuenta automaticamente. La oferta de bienvenida se activa cuando deposite 10€ o mas. Haga un deposito empleando EcoPayz, Boku o Bitcoin u otro metodo de deposito disponible en el casino.
Mas sobre el bono
1xSlots Casino le da la oportunidad de incrementar su balance hasta 300€ (100%). Obtenga la bonificacion superior al depositar 300€ y conseguir 600€ que se anadiran en su cuenta. Los fondos de su bonificacion es compatible con tragaperras de proveedores de software como Red Tiger Gaming, Evolution Gaming y Microgaming, por nombrar unos cuantos. Debe tenerse en cuenta tambien que su cuenta se incrementara con 30 turnos gratuitos.
Bono de bienvenida 1xSlots 2024
Dentro de 1xSlots existen dos bonos de bienvenida, uno standard y uno exclusivo. El primero de ellas recompensa con un paquete de hasta €1500 y 150 giros gratis mientras que el segundo otorga un 10% adicional recompensando hasta €1650 y 150 giros gratis ?La diferencia? El bono exclusivo se obtiene mediante el uso del 1xSlots promocode NEXT777.
Las recompensas de la bonificacion exclusiva son otorgadas en los 4 primeros depositos de la siguiente manera:
100% del primer deposito hasta €450 + 30 giros gratis
100% del segundo deposito hasta €350 + 35 giros gratis
100% del tercer deposito hasta €400 + 40 giros gratis
100% del cuarto deposito hasta €450 + 45 giros gratis
Bono de bienvenida 1xSlots Argentina 2024
Cabe resaltar que durante tu proceso de registro tienes que elegir tu moneda local preferida. De este modo obtendras la bonificacion de bienvenida 1xSlots Argentina en pesos. Puedes recibir el bono exclusivo 1xSlots Argentina al utilizar nuestro codigo de bono 1xSlots Argentina NEXT777 durante el proceso de registro.
Ademas, si ingresas el codigo NEXT777 a la pestana “Bonos y Regalos” despues de hacer tu primer deposito, puedes recibir el bono con giros gratis 1xSlots Argentina que te otorgara 60 FS en tragamonedas 777 GEMS RESPIN. A continuacion encontraras los valores de bonos en pesos argentinos.
Bono de bienvenida 1xSlots Chile 2024
El bono de bienvenida 1xSlots Chile funciona del mismo modo como en Argentina. Tienes que crear tu cuenta e ingresar nuestro Bono de deposito 1xslots Chile NEXT777 al formulario de registro. Puedes elegir el peso chileno como tu moneda local para recibir la bonificacion de bienvenida 1xSlots Chile. Adicionalmente, para obtener 60 giros gratis en 777 GEMS RESPIN, introduce el codigo NEXT777 al hacer tu primer deposito.
?QUE ES UN BONO DE TRAGAPERRAS SIN DEPOSITO?
Como su nombre indica, un bono de tragaperras sin deposito es un tipo de bono de casino que no necesita que los jugadores depositen dinero para poder optar a cualquier tipo de recompensa. Por ejemplo, giros gratis, creditos de casino o incluso dinero en efectivo.
Los bonos sin deposito se dan generalmente a los jugadores potenciales para motivar a los nuevos jugadores para que se registren. Pueden formar parte de los paquetes de bienvenida que un casino online ofrece a todos sus jugadores potenciales y ayudan a atraer la atencion hacia la marca del casino. Tambien pueden ofrecerse a los jugadores con cuentas en determinadas situaciones.
Las tragaperras con bono sin deposito ofrecen la posibilidad de probar las tragaperras online sin coste alguno y quedandose con el dinero que se obtiene, razon por la que son muy codiciadas. Sin embargo, los bonos sin deposito no te obligan a depositar dinero cuando la promocion termina, aunque se sugiere.
?CUALES SON LOS PRINCIPALES TIPOS DE BONOS DE TRAGAMONEDAS SIN DEPOSITO?
Los bonos sin deposito estan disponibles en tres variedades: giros gratis, creditos gratis o dinero en efectivo. El tipo mas conocido que es un bono sin deposito no spins without deposit bonus.
GIROS GRATIS CON BONO SIN DEPOSITO
Todos sabemos que las maquinas tragaperras son las mas populares en el mundo de los juegos de casino , por lo que es natural que un bono hecho especificamente para las maquinas que juegan a las tragaperras sea el mas buscado. Para los amantes de las maquinas tragaperras, los bonos de tiradas gratis sin deposito son un verdadero tesoro, ya que permiten a los jugadores jugar a sus maquinas tragaperras favoritas sin depositar dinero, y con una gran cantidad de tiradas gratis, lo que aumenta sus probabilidades de ganar significativamente.
Creditos gratuitos / BONO DE JUEGO GRATUITO SIN DEPOSITO
En lugar de tiradas gratis, los casinos pueden optar por dar creditos gratis a los jugadores que tienen bonos sin deposito. Estos creditos pueden ser utilizados dentro de un periodo de tiempo enumerado para apostar en juegos en los casinos y ganar dinero real. Los bonos sin deposito y los creditos gratuitos se ofrecen tanto en las tragaperras gratuitas como en otros juegos de los casinos.
DINERO GRATIS CON BONOS SIN DEPOSITO
Al igual que los creditos gratuitos con los bonos sin deposito, los bonos de dinero sin deposito que no requieren deposito se pueden jugar tanto en las tragaperras como en otros juegos de casino. Una vez que haya reclamado y jugado el bono de dinero sin deposito, podra retirar el dinero del bono y cualquier ganancia adicional siempre que cumpla las condiciones para retirar el dinero.
?Como puedo reclamar un bono sin deposito?
En la mayoria de los casos, puede hacer uso de los bonos sin deposito al crear una cuenta en cualquier sitio de juego en linea que ofrezca este tipo de oferta. En la version online del casino, la bonificacion puede aparecer en la pagina de promociones del casino o en una ventana emergente. Algunos casinos requieren que introduzca un codigo promocional para acceder al bono.
Cuando considere reclamar un bono sin deposito (o cualquier otro tipo de bono) debe asegurarse de leer los terminos y condiciones que se adjuntan al bono. Los diferentes casinos pueden tener sus propias regulaciones y limites, sin embargo, hay algunos que son iguales en todos los casinos.
REQUISITOS PARA TRABAJAR
Los bonos sobre los depositos son accesibles para todos, sin embargo, cobrar los bonos es un asunto un poco mas controlado. La mayoria de los casinos en linea le permitiran retirar sus ganancias despues de haber podido apostar una cantidad especifica.
Los requisitos de apuesta se muestran como multiplicadores. Representan la cantidad de veces que tienes que apostar en un bono para poder retirar el dinero. Por lo general, puede jugar a una serie de juegos seleccionados por el operador del casino. Una vez que haya alcanzado el requisito de apuesta, podra dar el siguiente paso para cobrar su bono.
PLAZO
Segun el casino online, el bono para juegos de tragaperras de deposito puede caducar en cuestion de dias o durar hasta 30 dias. Para asegurarte de que cumples los requisitos de apuestas, es posible que tengas que planificar tu rutina de juego a lo largo del bono.
TAMANOS DE APUESTA
Un metodo para lograr su objetivo de apostar mas rapido es realizar la mayor cantidad de apuestas posible en cada juego. Es un metodo sensato, a menos que el operador del casino decida controlar la cantidad de la apuesta y limitar la cantidad de apuestas en la respectiva tragamonedas con bono sin deposito.
SE REQUIERE UN DEPOSITO
Aunque suene contradictorio, algunos casinos online pueden incluso exigir a los jugadores que depositen dinero antes de poder retirar su bono. Suelen anadir este requisito adicional por razones de seguridad.
RESTRICCIONES
A veces, se le puede negar el acceso a un bono con oferta de deposito gratuito. Esto solo ocurre en muy raras circunstancias, ya sea por el hecho de haber intentado dos bonos a la vez o por tener una direccion IP compartida con un jugador que tambien reclamo el mismo bono, o por residir en una zona restringida.
Puedes obtener informacion mas detallada leyendo el articulo completo en este enlace – https://www.joshhunt.com/news/codigo_promocional_1xslots_bono.html
EL CODIGO PROMOCIONAL DE 1XSLOTS CASINO
Sin introducir un codigo promocional 1xSlots Casino, como nuevo cliente en March 2024, puede beneficiarse de una bonificacion del 100% hasta 300€. El casino le proporciona un monton de maquinas tragaperras populares de proveedores de software como iSoftBet, Elk Studios o Play’n GO y otros. De forma adicional, se le otorgaran|esta oferta incluye 30 turnos gratuitos.. Todas las informaciones importantes respecto a esta oferta de bienvenida se puede encontrar en este articulo.
?COMO FUNCIONA EL CODIGO PROMOCIONAL DE 1XSLOTS CASINO?
En 1xSlots Casino se puede obtener una bonificacion del 100% hasta 300€ y turnos gratuitos en 1xSlots Casino. Haga su inicial deposito en 1xSlots Casino tras finalizar el proceso de inscripcion. No hace falta solicitar su bonificacion de bienvenida por e-mail ni el chat en directo como en otros casinos, porque 1xSlots Casino la abona a su cuenta automaticamente. La oferta de bienvenida se activa cuando deposite 10€ o mas. Haga un deposito empleando EcoPayz, Boku o Bitcoin u otro metodo de deposito disponible en el casino.
Mas sobre el bono
1xSlots Casino le da la oportunidad de incrementar su balance hasta 300€ (100%). Obtenga la bonificacion superior al depositar 300€ y conseguir 600€ que se anadiran en su cuenta. Los fondos de su bonificacion es compatible con tragaperras de proveedores de software como Red Tiger Gaming, Evolution Gaming y Microgaming, por nombrar unos cuantos. Debe tenerse en cuenta tambien que su cuenta se incrementara con 30 turnos gratuitos.
Bono de bienvenida 1xSlots 2024
Dentro de 1xSlots existen dos bonos de bienvenida, uno standard y uno exclusivo. El primero de ellas recompensa con un paquete de hasta €1500 y 150 giros gratis mientras que el segundo otorga un 10% adicional recompensando hasta €1650 y 150 giros gratis ?La diferencia? El bono exclusivo se obtiene mediante el uso del 1xSlots promocode NEXT777.
Las recompensas de la bonificacion exclusiva son otorgadas en los 4 primeros depositos de la siguiente manera:
100% del primer deposito hasta €450 + 30 giros gratis
100% del segundo deposito hasta €350 + 35 giros gratis
100% del tercer deposito hasta €400 + 40 giros gratis
100% del cuarto deposito hasta €450 + 45 giros gratis
Bono de bienvenida 1xSlots Argentina 2024
Cabe resaltar que durante tu proceso de registro tienes que elegir tu moneda local preferida. De este modo obtendras la bonificacion de bienvenida 1xSlots Argentina en pesos. Puedes recibir el bono exclusivo 1xSlots Argentina al utilizar nuestro codigo de bono 1xSlots Argentina NEXT777 durante el proceso de registro.
Ademas, si ingresas el codigo NEXT777 a la pestana “Bonos y Regalos” despues de hacer tu primer deposito, puedes recibir el bono con giros gratis 1xSlots Argentina que te otorgara 60 FS en tragamonedas 777 GEMS RESPIN. A continuacion encontraras los valores de bonos en pesos argentinos.
Bono de bienvenida 1xSlots Chile 2024
El bono de bienvenida 1xSlots Chile funciona del mismo modo como en Argentina. Tienes que crear tu cuenta e ingresar nuestro codigo promocional para 1xslots Chile NEXT777 al formulario de registro. Puedes elegir el peso chileno como tu moneda local para recibir la bonificacion de bienvenida 1xSlots Chile. Adicionalmente, para obtener 60 giros gratis en 777 GEMS RESPIN, introduce el codigo NEXT777 al hacer tu primer deposito.
?QUE ES UN BONO DE TRAGAPERRAS SIN DEPOSITO?
Como su nombre indica, un bono de tragaperras sin deposito es un tipo de bono de casino que no necesita que los jugadores depositen dinero para poder optar a cualquier tipo de recompensa. Por ejemplo, giros gratis, creditos de casino o incluso dinero en efectivo.
Los bonos sin deposito se dan generalmente a los jugadores potenciales para motivar a los nuevos jugadores para que se registren. Pueden formar parte de los paquetes de bienvenida que un casino online ofrece a todos sus jugadores potenciales y ayudan a atraer la atencion hacia la marca del casino. Tambien pueden ofrecerse a los jugadores con cuentas en determinadas situaciones.
Las tragaperras con bono sin deposito ofrecen la posibilidad de probar las tragaperras online sin coste alguno y quedandose con el dinero que se obtiene, razon por la que son muy codiciadas. Sin embargo, los bonos sin deposito no te obligan a depositar dinero cuando la promocion termina, aunque se sugiere.
?CUALES SON LOS PRINCIPALES TIPOS DE BONOS DE TRAGAMONEDAS SIN DEPOSITO?
Los bonos sin deposito estan disponibles en tres variedades: giros gratis, creditos gratis o dinero en efectivo. El tipo mas conocido que es un bono sin deposito no spins without deposit bonus.
GIROS GRATIS CON BONO SIN DEPOSITO
Todos sabemos que las maquinas tragaperras son las mas populares en el mundo de los juegos de casino , por lo que es natural que un bono hecho especificamente para las maquinas que juegan a las tragaperras sea el mas buscado. Para los amantes de las maquinas tragaperras, los bonos de tiradas gratis sin deposito son un verdadero tesoro, ya que permiten a los jugadores jugar a sus maquinas tragaperras favoritas sin depositar dinero, y con una gran cantidad de tiradas gratis, lo que aumenta sus probabilidades de ganar significativamente.
Creditos gratuitos / BONO DE JUEGO GRATUITO SIN DEPOSITO
En lugar de tiradas gratis, los casinos pueden optar por dar creditos gratis a los jugadores que tienen bonos sin deposito. Estos creditos pueden ser utilizados dentro de un periodo de tiempo enumerado para apostar en juegos en los casinos y ganar dinero real. Los bonos sin deposito y los creditos gratuitos se ofrecen tanto en las tragaperras gratuitas como en otros juegos de los casinos.
DINERO GRATIS CON BONOS SIN DEPOSITO
Al igual que los creditos gratuitos con los bonos sin deposito, los bonos de dinero sin deposito que no requieren deposito se pueden jugar tanto en las tragaperras como en otros juegos de casino. Una vez que haya reclamado y jugado el bono de dinero sin deposito, podra retirar el dinero del bono y cualquier ganancia adicional siempre que cumpla las condiciones para retirar el dinero.
?Como puedo reclamar un bono sin deposito?
En la mayoria de los casos, puede hacer uso de los bonos sin deposito al crear una cuenta en cualquier sitio de juego en linea que ofrezca este tipo de oferta. En la version online del casino, la bonificacion puede aparecer en la pagina de promociones del casino o en una ventana emergente. Algunos casinos requieren que introduzca un codigo promocional para acceder al bono.
Cuando considere reclamar un bono sin deposito (o cualquier otro tipo de bono) debe asegurarse de leer los terminos y condiciones que se adjuntan al bono. Los diferentes casinos pueden tener sus propias regulaciones y limites, sin embargo, hay algunos que son iguales en todos los casinos.
REQUISITOS PARA TRABAJAR
Los bonos sobre los depositos son accesibles para todos, sin embargo, cobrar los bonos es un asunto un poco mas controlado. La mayoria de los casinos en linea le permitiran retirar sus ganancias despues de haber podido apostar una cantidad especifica.
Los requisitos de apuesta se muestran como multiplicadores. Representan la cantidad de veces que tienes que apostar en un bono para poder retirar el dinero. Por lo general, puede jugar a una serie de juegos seleccionados por el operador del casino. Una vez que haya alcanzado el requisito de apuesta, podra dar el siguiente paso para cobrar su bono.
PLAZO
Segun el casino online, el bono para juegos de tragaperras de deposito puede caducar en cuestion de dias o durar hasta 30 dias. Para asegurarte de que cumples los requisitos de apuestas, es posible que tengas que planificar tu rutina de juego a lo largo del bono.
TAMANOS DE APUESTA
Un metodo para lograr su objetivo de apostar mas rapido es realizar la mayor cantidad de apuestas posible en cada juego. Es un metodo sensato, a menos que el operador del casino decida controlar la cantidad de la apuesta y limitar la cantidad de apuestas en la respectiva tragamonedas con bono sin deposito.
SE REQUIERE UN DEPOSITO
Aunque suene contradictorio, algunos casinos online pueden incluso exigir a los jugadores que depositen dinero antes de poder retirar su bono. Suelen anadir este requisito adicional por razones de seguridad.
RESTRICCIONES
A veces, se le puede negar el acceso a un bono con oferta de deposito gratuito. Esto solo ocurre en muy raras circunstancias, ya sea por el hecho de haber intentado dos bonos a la vez o por tener una direccion IP compartida con un jugador que tambien reclamo el mismo bono, o por residir en una zona restringida.
Puedes obtener informacion mas detallada leyendo el articulo completo en este enlace – https://www.joshhunt.com/news/codigo_promocional_1xslots_bono.html
metformin prescription canada
buy tadalafil in mexico
EL CODIGO PROMOCIONAL DE 1XSLOTS CASINO
Sin introducir un codigo promocional 1xSlots Casino, como nuevo cliente en March 2024, puede beneficiarse de una bonificacion del 100% hasta 300€. El casino le proporciona un monton de maquinas tragaperras populares de proveedores de software como iSoftBet, Elk Studios o Play’n GO y otros. De forma adicional, se le otorgaran|esta oferta incluye 30 turnos gratuitos.. Todas las informaciones importantes respecto a esta oferta de bienvenida se puede encontrar en este articulo.
?COMO FUNCIONA EL CODIGO PROMOCIONAL DE 1XSLOTS CASINO?
En 1xSlots Casino se puede obtener una bonificacion del 100% hasta 300€ y turnos gratuitos en 1xSlots Casino. Haga su inicial deposito en 1xSlots Casino tras finalizar el proceso de inscripcion. No hace falta solicitar su bonificacion de bienvenida por e-mail ni el chat en directo como en otros casinos, porque 1xSlots Casino la abona a su cuenta automaticamente. La oferta de bienvenida se activa cuando deposite 10€ o mas. Haga un deposito empleando EcoPayz, Boku o Bitcoin u otro metodo de deposito disponible en el casino.
Mas sobre el bono
1xSlots Casino le da la oportunidad de incrementar su balance hasta 300€ (100%). Obtenga la bonificacion superior al depositar 300€ y conseguir 600€ que se anadiran en su cuenta. Los fondos de su bonificacion es compatible con tragaperras de proveedores de software como Red Tiger Gaming, Evolution Gaming y Microgaming, por nombrar unos cuantos. Debe tenerse en cuenta tambien que su cuenta se incrementara con 30 turnos gratuitos.
Bono de bienvenida 1xSlots 2024
Dentro de 1xSlots existen dos bonos de bienvenida, uno standard y uno exclusivo. El primero de ellas recompensa con un paquete de hasta €1500 y 150 giros gratis mientras que el segundo otorga un 10% adicional recompensando hasta €1650 y 150 giros gratis ?La diferencia? El bono exclusivo se obtiene mediante el uso del 1xSlots promocode NEXT777.
Las recompensas de la bonificacion exclusiva son otorgadas en los 4 primeros depositos de la siguiente manera:
100% del primer deposito hasta €450 + 30 giros gratis
100% del segundo deposito hasta €350 + 35 giros gratis
100% del tercer deposito hasta €400 + 40 giros gratis
100% del cuarto deposito hasta €450 + 45 giros gratis
Bono de bienvenida 1xSlots Argentina 2024
Cabe resaltar que durante tu proceso de registro tienes que elegir tu moneda local preferida. De este modo obtendras la bonificacion de bienvenida 1xSlots Argentina en pesos. Puedes recibir el bono exclusivo 1xSlots Argentina al utilizar nuestro codigo de bono 1xSlots Argentina NEXT777 durante el proceso de registro.
Ademas, si ingresas el codigo NEXT777 a la pestana “Bonos y Regalos” despues de hacer tu primer deposito, puedes recibir el bono con giros gratis 1xSlots Argentina que te otorgara 60 FS en tragamonedas 777 GEMS RESPIN. A continuacion encontraras los valores de bonos en pesos argentinos.
Bono de bienvenida 1xSlots Chile 2024
El bono de bienvenida 1xSlots Chile funciona del mismo modo como en Argentina. Tienes que crear tu cuenta e ingresar nuestro codigos promocionales para 1xslots Chile NEXT777 al formulario de registro. Puedes elegir el peso chileno como tu moneda local para recibir la bonificacion de bienvenida 1xSlots Chile. Adicionalmente, para obtener 60 giros gratis en 777 GEMS RESPIN, introduce el codigo NEXT777 al hacer tu primer deposito.
?QUE ES UN BONO DE TRAGAPERRAS SIN DEPOSITO?
Como su nombre indica, un bono de tragaperras sin deposito es un tipo de bono de casino que no necesita que los jugadores depositen dinero para poder optar a cualquier tipo de recompensa. Por ejemplo, giros gratis, creditos de casino o incluso dinero en efectivo.
Los bonos sin deposito se dan generalmente a los jugadores potenciales para motivar a los nuevos jugadores para que se registren. Pueden formar parte de los paquetes de bienvenida que un casino online ofrece a todos sus jugadores potenciales y ayudan a atraer la atencion hacia la marca del casino. Tambien pueden ofrecerse a los jugadores con cuentas en determinadas situaciones.
Las tragaperras con bono sin deposito ofrecen la posibilidad de probar las tragaperras online sin coste alguno y quedandose con el dinero que se obtiene, razon por la que son muy codiciadas. Sin embargo, los bonos sin deposito no te obligan a depositar dinero cuando la promocion termina, aunque se sugiere.
?CUALES SON LOS PRINCIPALES TIPOS DE BONOS DE TRAGAMONEDAS SIN DEPOSITO?
Los bonos sin deposito estan disponibles en tres variedades: giros gratis, creditos gratis o dinero en efectivo. El tipo mas conocido que es un bono sin deposito no spins without deposit bonus.
GIROS GRATIS CON BONO SIN DEPOSITO
Todos sabemos que las maquinas tragaperras son las mas populares en el mundo de los juegos de casino , por lo que es natural que un bono hecho especificamente para las maquinas que juegan a las tragaperras sea el mas buscado. Para los amantes de las maquinas tragaperras, los bonos de tiradas gratis sin deposito son un verdadero tesoro, ya que permiten a los jugadores jugar a sus maquinas tragaperras favoritas sin depositar dinero, y con una gran cantidad de tiradas gratis, lo que aumenta sus probabilidades de ganar significativamente.
Creditos gratuitos / BONO DE JUEGO GRATUITO SIN DEPOSITO
En lugar de tiradas gratis, los casinos pueden optar por dar creditos gratis a los jugadores que tienen bonos sin deposito. Estos creditos pueden ser utilizados dentro de un periodo de tiempo enumerado para apostar en juegos en los casinos y ganar dinero real. Los bonos sin deposito y los creditos gratuitos se ofrecen tanto en las tragaperras gratuitas como en otros juegos de los casinos.
DINERO GRATIS CON BONOS SIN DEPOSITO
Al igual que los creditos gratuitos con los bonos sin deposito, los bonos de dinero sin deposito que no requieren deposito se pueden jugar tanto en las tragaperras como en otros juegos de casino. Una vez que haya reclamado y jugado el bono de dinero sin deposito, podra retirar el dinero del bono y cualquier ganancia adicional siempre que cumpla las condiciones para retirar el dinero.
?Como puedo reclamar un bono sin deposito?
En la mayoria de los casos, puede hacer uso de los bonos sin deposito al crear una cuenta en cualquier sitio de juego en linea que ofrezca este tipo de oferta. En la version online del casino, la bonificacion puede aparecer en la pagina de promociones del casino o en una ventana emergente. Algunos casinos requieren que introduzca un codigo promocional para acceder al bono.
Cuando considere reclamar un bono sin deposito (o cualquier otro tipo de bono) debe asegurarse de leer los terminos y condiciones que se adjuntan al bono. Los diferentes casinos pueden tener sus propias regulaciones y limites, sin embargo, hay algunos que son iguales en todos los casinos.
REQUISITOS PARA TRABAJAR
Los bonos sobre los depositos son accesibles para todos, sin embargo, cobrar los bonos es un asunto un poco mas controlado. La mayoria de los casinos en linea le permitiran retirar sus ganancias despues de haber podido apostar una cantidad especifica.
Los requisitos de apuesta se muestran como multiplicadores. Representan la cantidad de veces que tienes que apostar en un bono para poder retirar el dinero. Por lo general, puede jugar a una serie de juegos seleccionados por el operador del casino. Una vez que haya alcanzado el requisito de apuesta, podra dar el siguiente paso para cobrar su bono.
PLAZO
Segun el casino online, el bono para juegos de tragaperras de deposito puede caducar en cuestion de dias o durar hasta 30 dias. Para asegurarte de que cumples los requisitos de apuestas, es posible que tengas que planificar tu rutina de juego a lo largo del bono.
TAMANOS DE APUESTA
Un metodo para lograr su objetivo de apostar mas rapido es realizar la mayor cantidad de apuestas posible en cada juego. Es un metodo sensato, a menos que el operador del casino decida controlar la cantidad de la apuesta y limitar la cantidad de apuestas en la respectiva tragamonedas con bono sin deposito.
SE REQUIERE UN DEPOSITO
Aunque suene contradictorio, algunos casinos online pueden incluso exigir a los jugadores que depositen dinero antes de poder retirar su bono. Suelen anadir este requisito adicional por razones de seguridad.
RESTRICCIONES
A veces, se le puede negar el acceso a un bono con oferta de deposito gratuito. Esto solo ocurre en muy raras circunstancias, ya sea por el hecho de haber intentado dos bonos a la vez o por tener una direccion IP compartida con un jugador que tambien reclamo el mismo bono, o por residir en una zona restringida.
Puedes obtener informacion mas detallada leyendo el articulo completo en este enlace – https://www.joshhunt.com/news/codigo_promocional_1xslots_bono.html
synthroid levothyroxine
lisinopril pills
anani gotunden sikiyim
big pharmacy online
Промокод при регистрации 1xbet — бонус для новых игроков. Бонус за первый депозит в 1xbet. Как получить и отыграть бонус 32500 руб в букмекерской конторе 1хбет. промокод на сегодня в 1хбет бесплатную ставку. Букмекерские конторы пользуются спросом у людей, чьи интересы плотно связаны со спортом и чей азарт подкрепляется возможностью вознаграждения путем внесения порой незначительной суммы. Вводите промокод 1xbet в 2024 году, чтобы получить бонус на первый депозит до 32 500 рублей. 1хбет промокод работает только при регистрации новых пользователей. Бесплатный промокод 1xbet при регистрации. Как ввести промокод 1xbet сегодня? Как отыграть бонус по промокоду 1xbet. Используйте промокод 1xbet при регистрации в 2024 году, чтобы получить бонус до 32500 рублей от крупнейшей букмекерской конторы! – более подробно в этом материале https://mg-group74.ru/pages/1xbet.html
equipacion milan 2023
prinivil
lisinopril 0.5 mg
Абсолютно бесплатный промокод 1xbet. На сегодня контора предлагает всем новичкам воспользоваться не только приветственным бонусом, но и получить дополнительные преференции. Эти льготы игрок получает в том случае, если внимательно отнесётся к процедуре регистрации на сайте. где найти свой промокод на 1хбет. 1xbet – один из самых узнаваемых букмекерских брендов в стране. Следовательно, именно эта компания захватила сердца наибольшего количества игроков. Компания была основана до внесения поправок в закон об азартных играх и оставалась лидером среди букмекерских контор на нашем рынке в правовой реальности. Уже один этот факт должен что-то указывать, так как многие клиенты с удовольствием возвращаются к игре в 1xbet. 1XBET – промокод на 32500р. Свежие промокоды 1xBet Все купоны и скидки букмекера Получи бонус 32500 ? Делай ставки на спорт – более подробно в этом материале https://mg-group74.ru/pages/1xbet.html
Специальные промокоды на 2024 год для 1xBet. Промокод — это уникальный набор из букв, цифр и символов для того, чтобы пользователь получил определенный бонус. Таким бонусом может оказаться увеличение начального депозита, ставка со страховкой (с возвратом части ставочных денег при выборе неверного исхода матча), тестовая ставка (чтобы новые игроки набрались опыта, без вреда собственным деньгам) и многое другое. Больше промокодов для 1xBet можно увидеть на сайтах партнеров букмекерской компании, которые выкладываются каждый день на просторах интернета. Бесплатные промокоды 1xBet при регистрации. Многие пользователи положительно отзываются о промокоде 1xBet на сегодня. Им можно воспользоваться при регистрации новой учетной записи на сайте компании. Для этого необходимо ввести в соответствующее окошко следующий набор букв и цифр. Эта комбинация будут эффективной до конца текущего года, но она распространяется только на новых игроков – более подробно в этом материале https://mg-group74.ru/pages/1xbet.html
ходячие мертвецы сериал
your pharmacy online
canadian pharmacy sildenafil
trusted canadian pharmacy
zestoretic medication
metformin 750 mg
where to buy generic tadalafil
synthroid 100 mg
generic tadalafil cheap
canada pharmacy online
valtrex otc drug
where to buy lisinopril online
pharmacy prices
lisinopril 5 mg price
valtrex pills where to buy
lisinopril 25 mg cost
medicine lisinopril 10 mg
buy synthroid online usa
foreign pharmacy online
best rated canadian pharmacy
valtrex prescription canada
lisinopril 2.5 mg for sale
canadian pharmaceuticals online
discount cialis no prescription
canada pharmacy world
lisinopril without prescription
generic synthroid online
zestril 10 mg
where can you buy tadalafil
prescription drug lisinopril
happy family store
Наша бригада профессиональных мастеров подготовлена предъявить вам актуальные системы утепления, которые не только гарантируют надежную безопасность от зимы, но и подарят вашему собственности оригинальный вид.
Мы функционируем с современными веществами, подтверждая долгосрочный запас использования и блестящие эффекты. Теплоизоляция наружных стен – это не только экономия энергии на прогреве, но и ухаживание о окружающей среде. Энергоэффективные технологические решения, какие мы применяем, способствуют не только личному, но и сохранению природы.
Самое основополагающее: Стоимость утепления фасада дома под ключ у нас стартует всего от 1250 рублей за кв. м.! Это бюджетное решение, которое изменит ваш хаус в реальный теплый уголок с скромными затратами.
Наши произведения – это не просто изоляция, это созидание помещения, в где каждый компонент показывает ваш личный манеру. Мы рассмотрим все ваши желания, чтобы осуществить ваш дом еще более гостеприимным и привлекательным.
Подробнее на https://ppu-prof.ru
Не откладывайте труды о своем квартире на потом! Обращайтесь к специалистам, и мы сделаем ваш жилище не только теплым, но и стильнее. Заинтересовались? Подробнее о наших трудах вы можете узнать на веб-ресурсе. Добро пожаловать в мир удобства и качественного исполнения.
can you buy cialis safely online
tadalafil generic where to buy
safe online pharmacies
Discovered an article that might interest you Ц don’t miss it! https://wallazz.com/blogs/191414/Digital-Reverie-Crafting-Memorable-Evenings-with-the-Epic-Video-Symphony
synthroid prescription
bu kadar linki ananimi sokmami istersin bacina mi? 😀
online pharmacy quick delivery
EL CODIGO PROMOCIONAL DE 1XSLOTS CASINO
Sin introducir un codigo promocional 1xSlots Casino, como nuevo cliente en March 2024, puede beneficiarse de una bonificacion del 100% hasta 300€. El casino le proporciona un monton de maquinas tragaperras populares de proveedores de software como iSoftBet, Elk Studios o Play’n GO y otros. De forma adicional, se le otorgaran|esta oferta incluye 30 turnos gratuitos.. Todas las informaciones importantes respecto a esta oferta de bienvenida se puede encontrar en este articulo.
?COMO FUNCIONA EL CODIGO PROMOCIONAL DE 1XSLOTS CASINO?
En 1xSlots Casino se puede obtener una bonificacion del 100% hasta 300€ y turnos gratuitos en 1xSlots Casino. Haga su inicial deposito en 1xSlots Casino tras finalizar el proceso de inscripcion. No hace falta solicitar su bonificacion de bienvenida por e-mail ni el chat en directo como en otros casinos, porque 1xSlots Casino la abona a su cuenta automaticamente. La oferta de bienvenida se activa cuando deposite 10€ o mas. Haga un deposito empleando EcoPayz, Boku o Bitcoin u otro metodo de deposito disponible en el casino.
Mas sobre el bono
1xSlots Casino le da la oportunidad de incrementar su balance hasta 300€ (100%). Obtenga la bonificacion superior al depositar 300€ y conseguir 600€ que se anadiran en su cuenta. Los fondos de su bonificacion es compatible con tragaperras de proveedores de software como Red Tiger Gaming, Evolution Gaming y Microgaming, por nombrar unos cuantos. Debe tenerse en cuenta tambien que su cuenta se incrementara con 30 turnos gratuitos.
Bono de bienvenida 1xSlots 2024
Dentro de 1xSlots existen dos bonos de bienvenida, uno standard y uno exclusivo. El primero de ellas recompensa con un paquete de hasta €1500 y 150 giros gratis mientras que el segundo otorga un 10% adicional recompensando hasta €1650 y 150 giros gratis ?La diferencia? El bono exclusivo se obtiene mediante el uso del 1xSlots promocode NEXT777.
Las recompensas de la bonificacion exclusiva son otorgadas en los 4 primeros depositos de la siguiente manera:
100% del primer deposito hasta €450 + 30 giros gratis
100% del segundo deposito hasta €350 + 35 giros gratis
100% del tercer deposito hasta €400 + 40 giros gratis
100% del cuarto deposito hasta €450 + 45 giros gratis
Bono de bienvenida 1xSlots Argentina 2024
Cabe resaltar que durante tu proceso de registro tienes que elegir tu moneda local preferida. De este modo obtendras la bonificacion de bienvenida 1xSlots Argentina en pesos. Puedes recibir el bono exclusivo 1xSlots Argentina al utilizar nuestro codigo de bono 1xSlots Argentina NEXT777 durante el proceso de registro.
Ademas, si ingresas el codigo NEXT777 a la pestana “Bonos y Regalos” despues de hacer tu primer deposito, puedes recibir el bono con giros gratis 1xSlots Argentina que te otorgara 60 FS en tragamonedas 777 GEMS RESPIN. A continuacion encontraras los valores de bonos en pesos argentinos.
Bono de bienvenida 1xSlots Chile 2024
El bono de bienvenida 1xSlots Chile funciona del mismo modo como en Argentina. Tienes que crear tu cuenta e ingresar nuestro 1xslots nuevo codigo promocional Chile NEXT777 al formulario de registro. Puedes elegir el peso chileno como tu moneda local para recibir la bonificacion de bienvenida 1xSlots Chile. Adicionalmente, para obtener 60 giros gratis en 777 GEMS RESPIN, introduce el codigo NEXT777 al hacer tu primer deposito.
?QUE ES UN BONO DE TRAGAPERRAS SIN DEPOSITO?
Como su nombre indica, un bono de tragaperras sin deposito es un tipo de bono de casino que no necesita que los jugadores depositen dinero para poder optar a cualquier tipo de recompensa. Por ejemplo, giros gratis, creditos de casino o incluso dinero en efectivo.
Los bonos sin deposito se dan generalmente a los jugadores potenciales para motivar a los nuevos jugadores para que se registren. Pueden formar parte de los paquetes de bienvenida que un casino online ofrece a todos sus jugadores potenciales y ayudan a atraer la atencion hacia la marca del casino. Tambien pueden ofrecerse a los jugadores con cuentas en determinadas situaciones.
Las tragaperras con bono sin deposito ofrecen la posibilidad de probar las tragaperras online sin coste alguno y quedandose con el dinero que se obtiene, razon por la que son muy codiciadas. Sin embargo, los bonos sin deposito no te obligan a depositar dinero cuando la promocion termina, aunque se sugiere.
?CUALES SON LOS PRINCIPALES TIPOS DE BONOS DE TRAGAMONEDAS SIN DEPOSITO?
Los bonos sin deposito estan disponibles en tres variedades: giros gratis, creditos gratis o dinero en efectivo. El tipo mas conocido que es un bono sin deposito no spins without deposit bonus.
GIROS GRATIS CON BONO SIN DEPOSITO
Todos sabemos que las maquinas tragaperras son las mas populares en el mundo de los juegos de casino , por lo que es natural que un bono hecho especificamente para las maquinas que juegan a las tragaperras sea el mas buscado. Para los amantes de las maquinas tragaperras, los bonos de tiradas gratis sin deposito son un verdadero tesoro, ya que permiten a los jugadores jugar a sus maquinas tragaperras favoritas sin depositar dinero, y con una gran cantidad de tiradas gratis, lo que aumenta sus probabilidades de ganar significativamente.
Creditos gratuitos / BONO DE JUEGO GRATUITO SIN DEPOSITO
En lugar de tiradas gratis, los casinos pueden optar por dar creditos gratis a los jugadores que tienen bonos sin deposito. Estos creditos pueden ser utilizados dentro de un periodo de tiempo enumerado para apostar en juegos en los casinos y ganar dinero real. Los bonos sin deposito y los creditos gratuitos se ofrecen tanto en las tragaperras gratuitas como en otros juegos de los casinos.
DINERO GRATIS CON BONOS SIN DEPOSITO
Al igual que los creditos gratuitos con los bonos sin deposito, los bonos de dinero sin deposito que no requieren deposito se pueden jugar tanto en las tragaperras como en otros juegos de casino. Una vez que haya reclamado y jugado el bono de dinero sin deposito, podra retirar el dinero del bono y cualquier ganancia adicional siempre que cumpla las condiciones para retirar el dinero.
?Como puedo reclamar un bono sin deposito?
En la mayoria de los casos, puede hacer uso de los bonos sin deposito al crear una cuenta en cualquier sitio de juego en linea que ofrezca este tipo de oferta. En la version online del casino, la bonificacion puede aparecer en la pagina de promociones del casino o en una ventana emergente. Algunos casinos requieren que introduzca un codigo promocional para acceder al bono.
Cuando considere reclamar un bono sin deposito (o cualquier otro tipo de bono) debe asegurarse de leer los terminos y condiciones que se adjuntan al bono. Los diferentes casinos pueden tener sus propias regulaciones y limites, sin embargo, hay algunos que son iguales en todos los casinos.
REQUISITOS PARA TRABAJAR
Los bonos sobre los depositos son accesibles para todos, sin embargo, cobrar los bonos es un asunto un poco mas controlado. La mayoria de los casinos en linea le permitiran retirar sus ganancias despues de haber podido apostar una cantidad especifica.
Los requisitos de apuesta se muestran como multiplicadores. Representan la cantidad de veces que tienes que apostar en un bono para poder retirar el dinero. Por lo general, puede jugar a una serie de juegos seleccionados por el operador del casino. Una vez que haya alcanzado el requisito de apuesta, podra dar el siguiente paso para cobrar su bono.
PLAZO
Segun el casino online, el bono para juegos de tragaperras de deposito puede caducar en cuestion de dias o durar hasta 30 dias. Para asegurarte de que cumples los requisitos de apuestas, es posible que tengas que planificar tu rutina de juego a lo largo del bono.
TAMANOS DE APUESTA
Un metodo para lograr su objetivo de apostar mas rapido es realizar la mayor cantidad de apuestas posible en cada juego. Es un metodo sensato, a menos que el operador del casino decida controlar la cantidad de la apuesta y limitar la cantidad de apuestas en la respectiva tragamonedas con bono sin deposito.
SE REQUIERE UN DEPOSITO
Aunque suene contradictorio, algunos casinos online pueden incluso exigir a los jugadores que depositen dinero antes de poder retirar su bono. Suelen anadir este requisito adicional por razones de seguridad.
RESTRICCIONES
A veces, se le puede negar el acceso a un bono con oferta de deposito gratuito. Esto solo ocurre en muy raras circunstancias, ya sea por el hecho de haber intentado dos bonos a la vez o por tener una direccion IP compartida con un jugador que tambien reclamo el mismo bono, o por residir en una zona restringida.
Puedes obtener informacion mas detallada leyendo el articulo completo en este enlace – https://www.iesp.pa.gov.br/wp-content/pgs/?1xslots_codigo_promocional_bono_giros_gratis.html
buy metformin er
qiyezp.com
누군가 눈을 깜빡였다. “무슨 소리야, 팡 지판의 개 같은 거?”
best online pharmacy no prescription
tadalafil 2.5
EL CODIGO PROMOCIONAL DE 1XSLOTS CASINO
Sin introducir un codigo promocional 1xSlots Casino, como nuevo cliente en March 2024, puede beneficiarse de una bonificacion del 100% hasta 300€. El casino le proporciona un monton de maquinas tragaperras populares de proveedores de software como iSoftBet, Elk Studios o Play’n GO y otros. De forma adicional, se le otorgaran|esta oferta incluye 30 turnos gratuitos.. Todas las informaciones importantes respecto a esta oferta de bienvenida se puede encontrar en este articulo.
?COMO FUNCIONA EL CODIGO PROMOCIONAL DE 1XSLOTS CASINO?
En 1xSlots Casino se puede obtener una bonificacion del 100% hasta 300€ y turnos gratuitos en 1xSlots Casino. Haga su inicial deposito en 1xSlots Casino tras finalizar el proceso de inscripcion. No hace falta solicitar su bonificacion de bienvenida por e-mail ni el chat en directo como en otros casinos, porque 1xSlots Casino la abona a su cuenta automaticamente. La oferta de bienvenida se activa cuando deposite 10€ o mas. Haga un deposito empleando EcoPayz, Boku o Bitcoin u otro metodo de deposito disponible en el casino.
Mas sobre el bono
1xSlots Casino le da la oportunidad de incrementar su balance hasta 300€ (100%). Obtenga la bonificacion superior al depositar 300€ y conseguir 600€ que se anadiran en su cuenta. Los fondos de su bonificacion es compatible con tragaperras de proveedores de software como Red Tiger Gaming, Evolution Gaming y Microgaming, por nombrar unos cuantos. Debe tenerse en cuenta tambien que su cuenta se incrementara con 30 turnos gratuitos.
Bono de bienvenida 1xSlots 2024
Dentro de 1xSlots existen dos bonos de bienvenida, uno standard y uno exclusivo. El primero de ellas recompensa con un paquete de hasta €1500 y 150 giros gratis mientras que el segundo otorga un 10% adicional recompensando hasta €1650 y 150 giros gratis ?La diferencia? El bono exclusivo se obtiene mediante el uso del 1xSlots promocode NEXT777.
Las recompensas de la bonificacion exclusiva son otorgadas en los 4 primeros depositos de la siguiente manera:
100% del primer deposito hasta €450 + 30 giros gratis
100% del segundo deposito hasta €350 + 35 giros gratis
100% del tercer deposito hasta €400 + 40 giros gratis
100% del cuarto deposito hasta €450 + 45 giros gratis
Bono de bienvenida 1xSlots Argentina 2024
Cabe resaltar que durante tu proceso de registro tienes que elegir tu moneda local preferida. De este modo obtendras la bonificacion de bienvenida 1xSlots Argentina en pesos. Puedes recibir el bono exclusivo 1xSlots Argentina al utilizar nuestro codigo de bono 1xSlots Argentina NEXT777 durante el proceso de registro.
Ademas, si ingresas el codigo NEXT777 a la pestana “Bonos y Regalos” despues de hacer tu primer deposito, puedes recibir el bono con giros gratis 1xSlots Argentina que te otorgara 60 FS en tragamonedas 777 GEMS RESPIN. A continuacion encontraras los valores de bonos en pesos argentinos.
Bono de bienvenida 1xSlots Chile 2024
El bono de bienvenida 1xSlots Chile funciona del mismo modo como en Argentina. Tienes que crear tu cuenta e ingresar nuestro 1xslots codigo multiple hoy Chile NEXT777 al formulario de registro. Puedes elegir el peso chileno como tu moneda local para recibir la bonificacion de bienvenida 1xSlots Chile. Adicionalmente, para obtener 60 giros gratis en 777 GEMS RESPIN, introduce el codigo NEXT777 al hacer tu primer deposito.
?QUE ES UN BONO DE TRAGAPERRAS SIN DEPOSITO?
Como su nombre indica, un bono de tragaperras sin deposito es un tipo de bono de casino que no necesita que los jugadores depositen dinero para poder optar a cualquier tipo de recompensa. Por ejemplo, giros gratis, creditos de casino o incluso dinero en efectivo.
Los bonos sin deposito se dan generalmente a los jugadores potenciales para motivar a los nuevos jugadores para que se registren. Pueden formar parte de los paquetes de bienvenida que un casino online ofrece a todos sus jugadores potenciales y ayudan a atraer la atencion hacia la marca del casino. Tambien pueden ofrecerse a los jugadores con cuentas en determinadas situaciones.
Las tragaperras con bono sin deposito ofrecen la posibilidad de probar las tragaperras online sin coste alguno y quedandose con el dinero que se obtiene, razon por la que son muy codiciadas. Sin embargo, los bonos sin deposito no te obligan a depositar dinero cuando la promocion termina, aunque se sugiere.
?CUALES SON LOS PRINCIPALES TIPOS DE BONOS DE TRAGAMONEDAS SIN DEPOSITO?
Los bonos sin deposito estan disponibles en tres variedades: giros gratis, creditos gratis o dinero en efectivo. El tipo mas conocido que es un bono sin deposito no spins without deposit bonus.
GIROS GRATIS CON BONO SIN DEPOSITO
Todos sabemos que las maquinas tragaperras son las mas populares en el mundo de los juegos de casino , por lo que es natural que un bono hecho especificamente para las maquinas que juegan a las tragaperras sea el mas buscado. Para los amantes de las maquinas tragaperras, los bonos de tiradas gratis sin deposito son un verdadero tesoro, ya que permiten a los jugadores jugar a sus maquinas tragaperras favoritas sin depositar dinero, y con una gran cantidad de tiradas gratis, lo que aumenta sus probabilidades de ganar significativamente.
Creditos gratuitos / BONO DE JUEGO GRATUITO SIN DEPOSITO
En lugar de tiradas gratis, los casinos pueden optar por dar creditos gratis a los jugadores que tienen bonos sin deposito. Estos creditos pueden ser utilizados dentro de un periodo de tiempo enumerado para apostar en juegos en los casinos y ganar dinero real. Los bonos sin deposito y los creditos gratuitos se ofrecen tanto en las tragaperras gratuitas como en otros juegos de los casinos.
DINERO GRATIS CON BONOS SIN DEPOSITO
Al igual que los creditos gratuitos con los bonos sin deposito, los bonos de dinero sin deposito que no requieren deposito se pueden jugar tanto en las tragaperras como en otros juegos de casino. Una vez que haya reclamado y jugado el bono de dinero sin deposito, podra retirar el dinero del bono y cualquier ganancia adicional siempre que cumpla las condiciones para retirar el dinero.
?Como puedo reclamar un bono sin deposito?
En la mayoria de los casos, puede hacer uso de los bonos sin deposito al crear una cuenta en cualquier sitio de juego en linea que ofrezca este tipo de oferta. En la version online del casino, la bonificacion puede aparecer en la pagina de promociones del casino o en una ventana emergente. Algunos casinos requieren que introduzca un codigo promocional para acceder al bono.
Cuando considere reclamar un bono sin deposito (o cualquier otro tipo de bono) debe asegurarse de leer los terminos y condiciones que se adjuntan al bono. Los diferentes casinos pueden tener sus propias regulaciones y limites, sin embargo, hay algunos que son iguales en todos los casinos.
REQUISITOS PARA TRABAJAR
Los bonos sobre los depositos son accesibles para todos, sin embargo, cobrar los bonos es un asunto un poco mas controlado. La mayoria de los casinos en linea le permitiran retirar sus ganancias despues de haber podido apostar una cantidad especifica.
Los requisitos de apuesta se muestran como multiplicadores. Representan la cantidad de veces que tienes que apostar en un bono para poder retirar el dinero. Por lo general, puede jugar a una serie de juegos seleccionados por el operador del casino. Una vez que haya alcanzado el requisito de apuesta, podra dar el siguiente paso para cobrar su bono.
PLAZO
Segun el casino online, el bono para juegos de tragaperras de deposito puede caducar en cuestion de dias o durar hasta 30 dias. Para asegurarte de que cumples los requisitos de apuestas, es posible que tengas que planificar tu rutina de juego a lo largo del bono.
TAMANOS DE APUESTA
Un metodo para lograr su objetivo de apostar mas rapido es realizar la mayor cantidad de apuestas posible en cada juego. Es un metodo sensato, a menos que el operador del casino decida controlar la cantidad de la apuesta y limitar la cantidad de apuestas en la respectiva tragamonedas con bono sin deposito.
SE REQUIERE UN DEPOSITO
Aunque suene contradictorio, algunos casinos online pueden incluso exigir a los jugadores que depositen dinero antes de poder retirar su bono. Suelen anadir este requisito adicional por razones de seguridad.
RESTRICCIONES
A veces, se le puede negar el acceso a un bono con oferta de deposito gratuito. Esto solo ocurre en muy raras circunstancias, ya sea por el hecho de haber intentado dos bonos a la vez o por tener una direccion IP compartida con un jugador que tambien reclamo el mismo bono, o por residir en una zona restringida.
Puedes obtener informacion mas detallada leyendo el articulo completo en este enlace – https://www.iesp.pa.gov.br/wp-content/pgs/?1xslots_codigo_promocional_bono_giros_gratis.html
https://kursovaya-study.ru/
EL CODIGO PROMOCIONAL DE 1XSLOTS CASINO
Sin introducir un codigo promocional 1xSlots Casino, como nuevo cliente en March 2024, puede beneficiarse de una bonificacion del 100% hasta 300€. El casino le proporciona un monton de maquinas tragaperras populares de proveedores de software como iSoftBet, Elk Studios o Play’n GO y otros. De forma adicional, se le otorgaran|esta oferta incluye 30 turnos gratuitos.. Todas las informaciones importantes respecto a esta oferta de bienvenida se puede encontrar en este articulo.
?COMO FUNCIONA EL CODIGO PROMOCIONAL DE 1XSLOTS CASINO?
En 1xSlots Casino se puede obtener una bonificacion del 100% hasta 300€ y turnos gratuitos en 1xSlots Casino. Haga su inicial deposito en 1xSlots Casino tras finalizar el proceso de inscripcion. No hace falta solicitar su bonificacion de bienvenida por e-mail ni el chat en directo como en otros casinos, porque 1xSlots Casino la abona a su cuenta automaticamente. La oferta de bienvenida se activa cuando deposite 10€ o mas. Haga un deposito empleando EcoPayz, Boku o Bitcoin u otro metodo de deposito disponible en el casino.
Mas sobre el bono
1xSlots Casino le da la oportunidad de incrementar su balance hasta 300€ (100%). Obtenga la bonificacion superior al depositar 300€ y conseguir 600€ que se anadiran en su cuenta. Los fondos de su bonificacion es compatible con tragaperras de proveedores de software como Red Tiger Gaming, Evolution Gaming y Microgaming, por nombrar unos cuantos. Debe tenerse en cuenta tambien que su cuenta se incrementara con 30 turnos gratuitos.
Bono de bienvenida 1xSlots 2024
Dentro de 1xSlots existen dos bonos de bienvenida, uno standard y uno exclusivo. El primero de ellas recompensa con un paquete de hasta €1500 y 150 giros gratis mientras que el segundo otorga un 10% adicional recompensando hasta €1650 y 150 giros gratis ?La diferencia? El bono exclusivo se obtiene mediante el uso del 1xSlots promocode NEXT777.
Las recompensas de la bonificacion exclusiva son otorgadas en los 4 primeros depositos de la siguiente manera:
100% del primer deposito hasta €450 + 30 giros gratis
100% del segundo deposito hasta €350 + 35 giros gratis
100% del tercer deposito hasta €400 + 40 giros gratis
100% del cuarto deposito hasta €450 + 45 giros gratis
Bono de bienvenida 1xSlots Argentina 2024
Cabe resaltar que durante tu proceso de registro tienes que elegir tu moneda local preferida. De este modo obtendras la bonificacion de bienvenida 1xSlots Argentina en pesos. Puedes recibir el bono exclusivo 1xSlots Argentina al utilizar nuestro codigo de bono 1xSlots Argentina NEXT777 durante el proceso de registro.
Ademas, si ingresas el codigo NEXT777 a la pestana “Bonos y Regalos” despues de hacer tu primer deposito, puedes recibir el bono con giros gratis 1xSlots Argentina que te otorgara 60 FS en tragamonedas 777 GEMS RESPIN. A continuacion encontraras los valores de bonos en pesos argentinos.
Bono de bienvenida 1xSlots Chile 2024
El bono de bienvenida 1xSlots Chile funciona del mismo modo como en Argentina. Tienes que crear tu cuenta e ingresar nuestro 1xslots codigo de bono sin deposito Chile NEXT777 al formulario de registro. Puedes elegir el peso chileno como tu moneda local para recibir la bonificacion de bienvenida 1xSlots Chile. Adicionalmente, para obtener 60 giros gratis en 777 GEMS RESPIN, introduce el codigo NEXT777 al hacer tu primer deposito.
?QUE ES UN BONO DE TRAGAPERRAS SIN DEPOSITO?
Como su nombre indica, un bono de tragaperras sin deposito es un tipo de bono de casino que no necesita que los jugadores depositen dinero para poder optar a cualquier tipo de recompensa. Por ejemplo, giros gratis, creditos de casino o incluso dinero en efectivo.
Los bonos sin deposito se dan generalmente a los jugadores potenciales para motivar a los nuevos jugadores para que se registren. Pueden formar parte de los paquetes de bienvenida que un casino online ofrece a todos sus jugadores potenciales y ayudan a atraer la atencion hacia la marca del casino. Tambien pueden ofrecerse a los jugadores con cuentas en determinadas situaciones.
Las tragaperras con bono sin deposito ofrecen la posibilidad de probar las tragaperras online sin coste alguno y quedandose con el dinero que se obtiene, razon por la que son muy codiciadas. Sin embargo, los bonos sin deposito no te obligan a depositar dinero cuando la promocion termina, aunque se sugiere.
?CUALES SON LOS PRINCIPALES TIPOS DE BONOS DE TRAGAMONEDAS SIN DEPOSITO?
Los bonos sin deposito estan disponibles en tres variedades: giros gratis, creditos gratis o dinero en efectivo. El tipo mas conocido que es un bono sin deposito no spins without deposit bonus.
GIROS GRATIS CON BONO SIN DEPOSITO
Todos sabemos que las maquinas tragaperras son las mas populares en el mundo de los juegos de casino , por lo que es natural que un bono hecho especificamente para las maquinas que juegan a las tragaperras sea el mas buscado. Para los amantes de las maquinas tragaperras, los bonos de tiradas gratis sin deposito son un verdadero tesoro, ya que permiten a los jugadores jugar a sus maquinas tragaperras favoritas sin depositar dinero, y con una gran cantidad de tiradas gratis, lo que aumenta sus probabilidades de ganar significativamente.
Creditos gratuitos / BONO DE JUEGO GRATUITO SIN DEPOSITO
En lugar de tiradas gratis, los casinos pueden optar por dar creditos gratis a los jugadores que tienen bonos sin deposito. Estos creditos pueden ser utilizados dentro de un periodo de tiempo enumerado para apostar en juegos en los casinos y ganar dinero real. Los bonos sin deposito y los creditos gratuitos se ofrecen tanto en las tragaperras gratuitas como en otros juegos de los casinos.
DINERO GRATIS CON BONOS SIN DEPOSITO
Al igual que los creditos gratuitos con los bonos sin deposito, los bonos de dinero sin deposito que no requieren deposito se pueden jugar tanto en las tragaperras como en otros juegos de casino. Una vez que haya reclamado y jugado el bono de dinero sin deposito, podra retirar el dinero del bono y cualquier ganancia adicional siempre que cumpla las condiciones para retirar el dinero.
?Como puedo reclamar un bono sin deposito?
En la mayoria de los casos, puede hacer uso de los bonos sin deposito al crear una cuenta en cualquier sitio de juego en linea que ofrezca este tipo de oferta. En la version online del casino, la bonificacion puede aparecer en la pagina de promociones del casino o en una ventana emergente. Algunos casinos requieren que introduzca un codigo promocional para acceder al bono.
Cuando considere reclamar un bono sin deposito (o cualquier otro tipo de bono) debe asegurarse de leer los terminos y condiciones que se adjuntan al bono. Los diferentes casinos pueden tener sus propias regulaciones y limites, sin embargo, hay algunos que son iguales en todos los casinos.
REQUISITOS PARA TRABAJAR
Los bonos sobre los depositos son accesibles para todos, sin embargo, cobrar los bonos es un asunto un poco mas controlado. La mayoria de los casinos en linea le permitiran retirar sus ganancias despues de haber podido apostar una cantidad especifica.
Los requisitos de apuesta se muestran como multiplicadores. Representan la cantidad de veces que tienes que apostar en un bono para poder retirar el dinero. Por lo general, puede jugar a una serie de juegos seleccionados por el operador del casino. Una vez que haya alcanzado el requisito de apuesta, podra dar el siguiente paso para cobrar su bono.
PLAZO
Segun el casino online, el bono para juegos de tragaperras de deposito puede caducar en cuestion de dias o durar hasta 30 dias. Para asegurarte de que cumples los requisitos de apuestas, es posible que tengas que planificar tu rutina de juego a lo largo del bono.
TAMANOS DE APUESTA
Un metodo para lograr su objetivo de apostar mas rapido es realizar la mayor cantidad de apuestas posible en cada juego. Es un metodo sensato, a menos que el operador del casino decida controlar la cantidad de la apuesta y limitar la cantidad de apuestas en la respectiva tragamonedas con bono sin deposito.
SE REQUIERE UN DEPOSITO
Aunque suene contradictorio, algunos casinos online pueden incluso exigir a los jugadores que depositen dinero antes de poder retirar su bono. Suelen anadir este requisito adicional por razones de seguridad.
RESTRICCIONES
A veces, se le puede negar el acceso a un bono con oferta de deposito gratuito. Esto solo ocurre en muy raras circunstancias, ya sea por el hecho de haber intentado dos bonos a la vez o por tener una direccion IP compartida con un jugador que tambien reclamo el mismo bono, o por residir en una zona restringida.
Puedes obtener informacion mas detallada leyendo el articulo completo en este enlace – https://www.iesp.pa.gov.br/wp-content/pgs/?1xslots_codigo_promocional_bono_giros_gratis.html
buy lisinopril 20 mg without a prescription
sandyterrace.com
이런 관점에서 보면…뉴스는…실제로 사실입니다.
buy metformin online pharmacy
lisinopril 20 mg
azithromycin 1g online
prednisone over the counter
Они снимают свой секс на видео и показывают его на сайте бесплатного порно видео чата. Самым популярным является онлайн порно чат рулет, которые показывают свое обнаженные тела. Поэтому вход на порно видеочат без регистрации, разрешен только лицам достигшим 18 лет. Официальный сайт вирт секс чат это особенное место. Здесь вас не будут упрекать за то, кто вы есть. Здесь вы почувствуете себя среди родственных душ, тех людей, которые испытывают те же чувства, что и вы, и ищут идеальные секс знакомства.
Более подробно ознакомиться с вебкам чатом можно тут – https://rt.livepornosexchat.com/
Москва и весь мир! Сотни парней и девушек онлайн. Начни общение сейчас! Крупнейший русский бесплатный видеочат, дающий возможность смотреть эротические видео в прямом эфире! На сайте запрещена порнография, но наш порно чат онлайн геи точно понравится всем любителям эротики и откровенного общения. Секс видеочат рулетка разнообразит ваших виртуальных партнеров. Из простого секс видеочата все может перетечь в порно видеочат, достаточно только захотеть.
Более подробно ознакомиться с вебкам чатом можно тут – https://rt.livepornosexchat.com/
buy metformin over the counter
synthroid 150 mcg coupon
international online pharmacy
Не поверите дочего пошел прогрес или идиотизм, уже нет не каких стеснений, это я про то что раньше такго не было, к примеру сейчас можно смотреть рунетки ру чат онлайн порно где парень трахает свою жену и ведет видео трансляцию. Я вот лично не припомню чтоо такое раньше воспринималось обществом нормально, и не кто не осуждал. А вот сейчас я так понимаю что семейные пары не стесняются этого и любой из пользователей кто посетит их чат комнату может с ними общаться.
Более подробно ознакомиться с вебкам чатом можно тут – https://rt.livepornosexchat.com/
Промокод 1xBet при регистрации. Компания 1ИксБет заинтересована в привлечении новых клиентов, поэтому для новых игроков действует акция в виде бонуса, который равен сумме первого депозита, но не превышает 225 000 рублей. Однако при использовании промокода букмекерская контора увеличит размер приветственного бонуса. Для того чтобы получить повышенную сумму на первый депозит, игроку необходимо выполнить следующие условия: Зайти на сайт букмекера. Выбрать способ регистрации по e-mail. Заполнить поля с личными данными. Ввести промокод в поле слева от кнопки «Зарегистрироваться». Ознакомиться с правилами букмекера. промокод на бонусы и подарки от 1хбет поможет пользователям получить еще больше бонусов от букмекерской конторы. Подробная инструкция по поиску и активации бонусных кодов. Промокод — комбинация из цифр и букв, которая позволяет игроку активировать специальное предложение от букмекера 1хБет. С его помощью пользователь может получить: бонусные средства на депозит; бесплатную ставку; промо-баллы; другие подарки. Сегодня вы сможете найти множество подобных ресурсов, которые регулярно обновляют список актуальных предложений БК – более подробно в этом материале http://dizkomp.ru/netcat/inc/1xbet.html
tadalafil 20 mg online pharmacy
sandyterrace.com
그러나 Zhu Houzhao는 왜 인재가되지 않았으며 왜 여전히 그렇게 황당하고 말도 안되며 거짓말을합니까?
prices pharmacy
buy cialis rx
where can you buy valtrex over the counter
lisinopril 25
Промокод 1xbet на сегодня. Промокод на 2024-2024. На официальном сайте букмекерской конторы 1xbet появилась опция, которая позволяет “бесплатно” ознакомиться с функционалом сайта и при удачном стечении обстоятельств еще и выиграть некую сумму денежных средств. Теперь это стало доступно по специальному промокоду 1хБет. Он дает возможность получить до 32500? (100$). Актуальные промокоды 1xbet на сегодня: 1XFREE777. Рабочие промокоды 1XBet в 2024 Все промокоды для 1хбет бесплатно: при регистрации, на ставку (купон), на бонус, на сегодня. 1xBet — одна из самых известных компаний в сфере беттинга. Свою популярность контора заработала во многом благодаря большому количеству специальных предложений. Так, к примеру, каждый пользователь может воспользоваться одним из действующих промокодов 1xBet на сегодня бесплатно. Ознакомиться с их полным перечнем можно в данной статье – более подробно в этом материале http://dizkomp.ru/netcat/inc/1xbet.html
Воспользоваться промокодом 1xbet можно при регистрации в 1xbet. БК 1хбет дарит до 130% на первый депозит при помощи промокода 1xbet. Максимальная сумма бонуса по промокоду 1хбет достигает 32500 рублей. Промокод 1хбет дает надбавку на депозит до 130% только при первом пополнении. Регистрация. 1хбет промокоды бесплатную ставку на сегодня бесплатно. Всем известно, что букмекерская контора 1xbet предлагает широкий выбор разнообразных бонусов и акций. В этой статье мы расскажем все о промокодах 1xBet: что это, как использовать при регистрации, где вводить, чтобы сделать ставку бесплатно, и по каким поводам казахстанский букмекер 1хБет вручает именные промокоды. Содержание. Что такое промокод 1xBet. Бесплатные промокоды 1xBet. Промокод при регистрации в 1xbet сегодня. Как ввести промокод при регистрации в 1хБет – более подробно в этом материале http://dizkomp.ru/netcat/inc/1xbet.html
buy metformin 500
prinivil 20 mg cost
web pharmacy
1250 mg prednisone
Discovered an article that will surely interest you – I recommend checking it out http://ruslog.com/forum/noreg.php?https://rf.chatruletka-18.com/
lisinopril 40 mg cost
world pharmacy india
Hello there! Would you mind if I share your blog with my facebook
group? There’s a lot of folks that I think would really
enjoy your content. Please let me know. Cheers
На нашем портале вы сможете найти любую информацию о приобретении недвижимости – от покупки жилья от застройщика до бронирования жилья.
Доверьтесь экспертам и сделайте правильный выбор с нами!
Ваша персональная скидка на консультацию 20%
canadian pharmacies comparison
Что нужно знать владельцам
11. BMW X-Series: новые технологии и функционал
bmw 2 bmw x3 2022 .
Everything is very open and very clear explanation of issues. was truly information. Seo Hizmeti Skype : live:by_umut
Духовой шкаф Whirlpool – важная составляющая кухонного гарнитура, без которой процесс приготовления пищи серьезно осложняется. Если ваша духовка перестала правильно нагреваться, нерегулярно включается или отключается в процессе приготовления блюд, значит пришло время заняться ее ремонтом. Обращайтесь в сервисный центр https://whirlpool-rem.ru/ – наши специалисты оперативно выяснят причину неполадки, будь то износ термостата, нагревательного элемента или любой другой детали. Мы заменим вышедшие из строя запчасти на новые оригинальные и вернем вашей духовке работоспособность!
сервисный центр whirlpool москва
ремонт плиты whirlpool
сервисный центр whirlpool в москве
стиральная вирпул ремонт
sandyterrace.com
“단서가 있습니다.”Fang Jifan이 갑자기 “사실인가요? “라고 물었습니다.
Бесплатные промокоды 1xBet при регистрации 2024. Получить бонус на сумму 32500 рублей могут все новые участники клуба. Регистрируйте аккаунт по электронной почте или через привязку аккаунтов популярных социальных сетей и получайте бонусом до 32500 рублей на первый депозит. Для зачисления бонусов необходимо пополнить счет с банковской карты или электронного кошелька, не забыв при этом указать 1хбет получить промокод на сегодня бесплатно 1XFREE777. Для того чтобы бонус стал доступен к снятию необходимо выполнить простое условие. Выбирайте любое событие, на которое принимаются ставки с коэффициентом от 1.4 и выше – более подробно в этом материале http://dizkomp.ru/netcat/inc/1xbet.html
Анализ конкурентов
9. BMW M: спортивные модели от известного производителя
bmw 2 bmw x3 2022 .
Подробный обзор
17. BMW: как выбрать идеальный двигатель для своего автомобиля
bmw x5 2021 bmw i5 m60 .
zestril 10 mg in india
where can you buy metformin
Бесплатные промокоды 1xBet при регистрации 2024. Сегодня пользователям 1xBet-казино предлагаются халявные промокоды на первый депозит, которые активируются при первой регистрации. С их помощью можно увеличить сумму базового бонуса до 32500 рублей. 1XFREE777 — где взять промокод 1хбет на бесплатную ставку. Для получения реального выигрыша с возможностью вывода на карту, необходимо поставить всю бонусную сумму на экспресс-ставку с коэффициентом от 1,4. Если прогноз окажется правильным, система переведет деньги на основной счет. Не секрет, что у букмекерской конторы 1xBet помимо спортивных ставок есть и другие направления, включая онлайн-игры, гоночные события или политические состязания – более подробно в этом материале http://dizkomp.ru/netcat/inc/1xbet.html
lisinopril 5 mg brand name
прогноз на хоккей сегодня
Привет всем!
Было ли у вас опыт написания дипломной работы в крайне сжатые сроки? Это действительно требует огромной ответственности и трудоемкости, однако важно сохранять упорство и продолжать активно участвовать в учебном процессе, как я это делаю.
Для тех, кто умеет эффективно искать и анализировать информацию в интернете, это действительно помогает в процессе согласования и написания дипломной работы. Больше не нужно тратить время на посещение библиотек или организацию встреч с научным руководителем. Здесь, на этом ресурсе, предоставлены надежные данные для заказа и написания дипломных и курсовых работ с гарантией качества и доставкой по всей России. Можете ознакомиться с предложениями по ссылке https://rudik-diploms365.com, это проверенный источник!
https://gruppa365-diploms-srednee.com/
где купить диплом
купить диплом Вуза
купить аттестат школы
купить диплом университета
купить диплом цена
Желаю всем положительных отметок!
cheapest pharmacy for prescription drugs
synthroid 0.5 mcg
Официальные дилеры и сервисные центры
x3 bmw bmw x3 m competition .
Мы рекомендуем посетить веб-сайт https://softnewsportal.ru/.
Кроме того, не забудьте добавить сайт в закладки: https://softnewsportal.ru/
Отзывы владельцев
2. Почему BMW – лучший выбор для автолюбителей
i3 bmw bmw xi .
synthroid 100 mcg price
Подробный обзор
17. BMW: как выбрать идеальный двигатель для своего автомобиля
bmw 2 bmw x3 2022 .
valtrex online prescription
Значимость на рынке
5. Как правильно ухаживать за BMW
bmw x5 2021 bmw i5 m60 .
buy synthroid cheap
metformin er 500mg
buy viagra online
tadalafil purchase online
canadian pharmacy sildenafil
can i buy prednisone online
The meal went without incident although a couple of times she had to avert her gaze from Dan for fear of bursting out laughing. Dan went up to his room saying he wanted to listen to music, he laid on his bed playing with himself waiting for his father to leave. He thought about the events of the last two weeks it had been the craziest time of his life.
He put it all down to Mary Harris, she had been his girlfriend for two years, he liked her a lot, she was pretty and intelligent two things that rarely combined in his experience, the problem was she steadfastly refused to let him put his cock inside her, he had thought he was getting somewhere when he took his cock out that evening in the cinema when she had finally allowed him to get his hand inside her panties, it was the first time she had allowed him to do any more than play with her tits. He had taken her hand and placed it on his erection, initially he had been pleased to hear her sharp intake of breath when she felt the size of him and he was encouraged when she began stroking him.
It was later that the problem started, he had her in the car park, they were kissing, her sweater was pushed up together with her bra and he was sucking on her nipples. He managed to get her laid across the front of one of the cars, his hand up her skirt, trying to pull down her panties. That was when she had stopped him.
https://www.divephotoguide.com/user/roanokay1959
https://www.obesityhelp.com/members/succubus1950/about_me/
https://haveagood.holiday/users/338734
https://imageevent.com/chester131978
https://rentry.org/e4xm6tro
https://cannabis.net/user/147971
https://onedio.ru/profile/jiajiy-195-6
https://launchpad.net/~deiv199019611
https://brutalgenie1988.micro.blog/about/
https://plover1983.bandcamp.com/album/a-night-at-the-exotic-erotic-ball
tadalafil soft gel
Мы рекомендуем посетить веб-сайт https://doutuapse.ru/.
Кроме того, не забудьте добавить сайт в закладки: https://doutuapse.ru/
бмв ціна
Приобрести новый BMW 2024 года в Украине по лучшей стоимости язык официального дилера. Тест-драйв, страхование, занятие, промоакции равным образом спецпредложения.
http://www.avtosalonbmwftnz.dp.ua
watch porn video
В замена компрессора холодильника стинол вы найдете широкий спектр услуг по ремонту холодильников Stinol любой сложности.
замена термостата в холодильнике стинол цена
ремонт стинол
сколько стоит замена компрессора в холодильнике стинол
Эротические фантазии. порно приват чат онлайн. (Доступен зарегистрированным пользователям). Автоматическая регистрация на сайте позволит общаться и знакомиться со всеми кто даже просто зайдёт посмотреть на сайт – секс чат без регистрации – это возможность быстро найти парня или девушку для секса в собственном дворе или районе. Обменивайтесь интимными или эротическими фотографиями прямо в сообщениях. Все фотографии приватные и скрыты от посторонних глаз.
Более подробно ознакомиться с вебкам чатом можно тут – https://rt.livepornosexchat.com/
prednisone by mail
synthroid 115 mcg
payday loan
лазерные сварочные аппараты http://www.apparat-ruchnoy-lazernoy-svarki.ru/ .
http://www.avtosalonbmwftnz.dp.ua
Купить новый BMW 2024 года на Украине числом лучшей цене язык официознного дилера. Тест-драйв, хеджирование, занятие, промо-акции и еще спецпредложения.
бмв ціна
how to get prednisone without a prescription
buy valtrex on line
cialis 200mg price
I used to be suggested this web site through my cousin. I’m
not sure whether this publish is written through him as no one else recognize such
distinctive approximately my difficulty.
You’re amazing! Thank you!
cheapest pharmacy for prescription drugs
Бесплатная регистрация дает возможность общаться с самыми обворожительными распутными девушками. Не отказывайте себе в удовольствии, подключите свою камеру и общайтесь бесплатно на сайте порно онлайн чат веб камеры – это эротический видеочат для любителей эротики и откровенного общения. На сайте не присутствует порнография или откровенные материалы сексуального характера.
Более подробно ознакомиться с вебкам чатом можно тут – https://rt.livepornosexchat.com/
synthroid 0.137 mg
online pharmacy usa
situs kantorbola
Kantorbola Situs slot Terbaik, Modal 10 Ribu Menang Puluhan Juta
Kantorbola merupakan salah satu situs judi online terbaik yang saat ini sedang populer di kalangan pecinta taruhan bola , judi live casino dan judi slot online . Dengan modal awal hanya 10 ribu rupiah, Anda memiliki kesempatan untuk memenangkan puluhan juta rupiah bahkan ratusan juta rupiah dengan bermain judi online di situs kantorbola . Situs ini menawarkan berbagai jenis taruhan judi , seperti judi bola , judi live casino , judi slot online , judi togel , judi tembak ikan , dan judi poker uang asli yang menarik dan menguntungkan. Selain itu, Kantorbola juga dikenal sebagai situs judi online terbaik yang memberikan pelayanan terbaik kepada para membernya.
Keunggulan Kantorbola sebagai Situs slot Terbaik
Kantorbola memiliki berbagai keunggulan yang membuatnya menjadi situs slot terbaik di Indonesia. Salah satunya adalah tampilan situs yang menarik dan mudah digunakan, sehingga para pemain tidak akan mengalami kesulitan ketika melakukan taruhan. Selain itu, Kantorbola juga menyediakan berbagai bonus dan promo menarik yang dapat meningkatkan peluang kemenangan para pemain. Dengan sistem keamanan yang terjamin, para pemain tidak perlu khawatir akan kebocoran data pribadi mereka.
Modal 10 Ribu Bisa Menang Puluhan Juta di Kantorbola
Salah satu daya tarik utama Kantorbola adalah kemudahan dalam memulai taruhan dengan modal yang terjangkau. Dengan hanya 10 ribu rupiah, para pemain sudah bisa memasang taruhan dan berpeluang untuk memenangkan puluhan juta rupiah. Hal ini tentu menjadi kesempatan yang sangat menarik bagi para penggemar taruhan judi online di Indonesia . Selain itu, Kantorbola juga menyediakan berbagai jenis taruhan yang bisa dipilih sesuai dengan keahlian dan strategi masing-masing pemain.
Berbagai Jenis Permainan Taruhan Bola yang Menarik
Kantorbola menyediakan berbagai jenis permainan taruhan bola yang menarik dan menguntungkan bagi para pemain. Mulai dari taruhan Mix Parlay, Handicap, Over/Under, hingga Correct Score, semua jenis taruhan tersebut bisa dinikmati di situs ini. Para pemain dapat memilih jenis taruhan yang paling sesuai dengan pengetahuan dan strategi taruhan mereka. Dengan peluang kemenangan yang besar, para pemain memiliki kesempatan untuk meraih keuntungan yang fantastis di Kantorbola.
Pelayanan Terbaik untuk Kepuasan Para Member
Selain menyediakan berbagai jenis permainan taruhan bola yang menarik, Kantorbola juga memberikan pelayanan terbaik untuk kepuasan para membernya. Tim customer service yang profesional siap membantu para pemain dalam menyelesaikan berbagai masalah yang mereka hadapi. Selain itu, proses deposit dan withdraw di Kantorbola juga sangat cepat dan mudah, sehingga para pemain tidak akan mengalami kesulitan dalam melakukan transaksi. Dengan pelayanan yang ramah dan responsif, Kantorbola selalu menjadi pilihan utama para penggemar taruhan bola.
Kesimpulan
Kantorbola merupakan situs slot terbaik yang menawarkan berbagai jenis permainan taruhan bola yang menarik dan menguntungkan. Dengan modal awal hanya 10 ribu rupiah, para pemain memiliki kesempatan untuk memenangkan puluhan juta rupiah. Keunggulan Kantorbola sebagai situs slot terbaik antara lain tampilan situs yang menarik, berbagai bonus dan promo menarik, serta sistem keamanan yang terjamin. Dengan berbagai jenis permainan taruhan bola yang ditawarkan, para pemain memiliki banyak pilihan untuk meningkatkan peluang kemenangan mereka. Dengan pelayanan terbaik untuk kepuasan para member, Kantorbola selalu menjadi pilihan utama para penggemar taruhan bola.
FAQ (Frequently Asked Questions)
Berapa modal minimal untuk bermain di Kantorbola? Modal minimal untuk bermain di Kantorbola adalah 10 ribu rupiah.
Bagaimana cara melakukan deposit di Kantorbola? Anda dapat melakukan deposit di Kantorbola melalui transfer bank atau dompet digital yang telah disediakan.
Apakah Kantorbola menyediakan bonus untuk new member? Ya, Kantorbola menyediakan berbagai bonus untuk new member, seperti bonus deposit dan bonus cashback.
Apakah Kantorbola aman digunakan untuk bermain taruhan bola online? Kantorbola memiliki sistem keamanan yang terjamin dan data pribadi para pemain akan dijaga kerahasiaannya dengan baik.
This post is genuinely a nice one it helps new the
web viewers, who are wishing in favor of blogging.
my canadian pharmacy
pharmacy discount coupons
reliable rx pharmacy
офіційний дилер бмв
Приобрести ценогенетический BMW 2024 года в течение Украине по наихорошей цене язык официального дилера. Тест-драйв, хеджирование, занятие, промоакции и еще спецпредложения.
https://avtosalonbmwftnz.dp.ua
Хотите, чтобы новостройка без отделки стала вашим уютным домом?
Мы знаем, как сделать это качественно и без лишних хлопот! В нашей статье мы поделимся с вами секретами ремонта новостроек без отделки. Узнайте, как создать интерьер своей мечты, сделав отделку квартиры в новостройке с минимумом затрат и максимумом комфорта. Пусть ваша новая квартира отражает ваш вкус и стиль!
Индивидуальная скидка для вас – 20%!
where to buy cialis over the counter in canada
tadalafil otc canada
http://www.avtosalonbmwftnz.dp.ua
Приобрести новый БМВ 2024 года на Украине по лучшей цене язык официального дилера. Тест-драйв, хеджирование, кредитование, промоакции также спецпредложения.
https://www.avtosalonbmwftnz.dp.ua
synthroid 62.5 mg
metformin 800 mg
плинтус алюминиевый для пола купить плинтус в москве .
medstore online pharmacy
Подробное руководство
2. Секреты монтажа гипсокартона: шаг за шагом инструкция
3. Гипсокартонные конструкции: основные виды и их преимущества
4. Как сэкономить при покупке гипсокартона: лучшие способы
5. Простые способы обработки гипсокартона: советы от профессионалов
6. Интересные идеи использования гипсокартона в интерьере
7. Все, что вам нужно знать о гипсокартоне: полезная информация
8. Гипсокартон: обзор популярных брендов и их характеристики
9. Плюсы и минусы гипсокартона: как правильно выбрать материал
10. Как сделать ровные стены с помощью гипсокартона: секреты и советы
11. Гипсокартонные потолки: виды и технологии монтажа
12. Декорирование гипсокартона: идеи для творческого подхода
13. Гипсокартон в дизайне интерьера: современные тренды и решения
14. Преимущества гипсокартона перед другими строительными материалами
15. Как выбрать правильный инструмент для работы с гипсокартоном
16. Гипсокартон: надежный материал для обустройства дома
17. Гипсокартон как элемент декора: необычные способы применения
18. Технологии монтажа гипсокартона: лучшие практические советы
19. История и развитие гипсокартона: открытия и достижения
20. Строительство с использованием гипсокартона: основные этапы и рекомендации
купить гипсокартон гипсокартон влагостойкий .
qiyezp.com
이밖에도 농업신문이 대거 등장했다.
плинтус купить москва плинтус купить москва .
synthroid 0.088 mg
Подробное руководство
2. Секреты монтажа гипсокартона: шаг за шагом инструкция
3. Гипсокартонные конструкции: основные виды и их преимущества
4. Как сэкономить при покупке гипсокартона: лучшие способы
5. Простые способы обработки гипсокартона: советы от профессионалов
6. Интересные идеи использования гипсокартона в интерьере
7. Все, что вам нужно знать о гипсокартоне: полезная информация
8. Гипсокартон: обзор популярных брендов и их характеристики
9. Плюсы и минусы гипсокартона: как правильно выбрать материал
10. Как сделать ровные стены с помощью гипсокартона: секреты и советы
11. Гипсокартонные потолки: виды и технологии монтажа
12. Декорирование гипсокартона: идеи для творческого подхода
13. Гипсокартон в дизайне интерьера: современные тренды и решения
14. Преимущества гипсокартона перед другими строительными материалами
15. Как выбрать правильный инструмент для работы с гипсокартоном
16. Гипсокартон: надежный материал для обустройства дома
17. Гипсокартон как элемент декора: необычные способы применения
18. Технологии монтажа гипсокартона: лучшие практические советы
19. История и развитие гипсокартона: открытия и достижения
20. Строительство с использованием гипсокартона: основные этапы и рекомендации
клей для плитки экструдированный пенополистирол .
алюминиевый плинтус купить плинтус под провода .
sandyterrace.com
Zhu Zaimo는 날카롭게 말했습니다. “나는 당신이 누구인지 묻습니다. 왜 더 대답해야합니까!”
плинтус алюминиевый для пола купить плинтус в москве .
This website certainly has all of the information I needed about this subject and didn’t
know who to ask.
tadalafil 5mg online
1. Как выбрать идеальный гипсокартон для ремонта
стяжка пола строительные материалы в москве .
1. Как выбрать идеальный гипсокартон для ремонта
купить лист гкл влагостойкий гипсокартон .
плинтус купить москва плинтус купить москва .
It’s really a cool and helpful piece of information. I’m happy that you simply shared this helpful info with us.
Please stay us informed like this. Thank you for sharing.
плинтус из алюминия кабель купить москва .
metformin medicine in india
Хотите купить квартиру в новостройке, но не знаете, с чего начать?
Мы подготовили для вас полезные советы по покупке квартиры от застройщика и многим другим важным моментам.
Узнайте, как правильно подготовиться к покупке квартиры с отделкой и избежать неприятных сюрпризов в будущем. Мы поможем вам сделать правильный выбор и сэкономить время и деньги.
1. Как выбрать идеальный гипсокартон для ремонта
магазины строительных материалов москва купить влагостойкий гипсокартон .
Хотите купить квартиру с черновой отделкой, но не знаете, с чего начать?
Мы подготовили для вас полезные советы по приему квартиры от застройщика и многим другим важным моментам.
Узнайте, как правильно подготовиться к покупке новостройки на стадии котлована и избежать неприятных сюрпризов в будущем. Мы поможем вам принять верное решение и сэкономить время и деньги.
non prescription medicine pharmacy
1. Как выбрать идеальный гипсокартон для ремонта
гипсокартон купить москва купить гипсокартон москва .
happy family pharmacy coupon code
Подробное руководство
2. Секреты монтажа гипсокартона: шаг за шагом инструкция
3. Гипсокартонные конструкции: основные виды и их преимущества
4. Как сэкономить при покупке гипсокартона: лучшие способы
5. Простые способы обработки гипсокартона: советы от профессионалов
6. Интересные идеи использования гипсокартона в интерьере
7. Все, что вам нужно знать о гипсокартоне: полезная информация
8. Гипсокартон: обзор популярных брендов и их характеристики
9. Плюсы и минусы гипсокартона: как правильно выбрать материал
10. Как сделать ровные стены с помощью гипсокартона: секреты и советы
11. Гипсокартонные потолки: виды и технологии монтажа
12. Декорирование гипсокартона: идеи для творческого подхода
13. Гипсокартон в дизайне интерьера: современные тренды и решения
14. Преимущества гипсокартона перед другими строительными материалами
15. Как выбрать правильный инструмент для работы с гипсокартоном
16. Гипсокартон: надежный материал для обустройства дома
17. Гипсокартон как элемент декора: необычные способы применения
18. Технологии монтажа гипсокартона: лучшие практические советы
19. История и развитие гипсокартона: открытия и достижения
20. Строительство с использованием гипсокартона: основные этапы и рекомендации
профиль для гипсокартона подвесные потолки .
купить диплом РІ стерлитамаке – Таков способ получить официальный бумага о окончании образовательного учреждения. Диплом открывает двери к дополнительным карьерным возможностям и карьерному развитию.
generic zestril
cheapest pharmacy for prescription drugs
qiyezp.com
Liu Shang은 깜짝 놀랐고 재빨리 고개를 저었다. “아니, 아니야.”
Подробное руководство
2. Секреты монтажа гипсокартона: шаг за шагом инструкция
3. Гипсокартонные конструкции: основные виды и их преимущества
4. Как сэкономить при покупке гипсокартона: лучшие способы
5. Простые способы обработки гипсокартона: советы от профессионалов
6. Интересные идеи использования гипсокартона в интерьере
7. Все, что вам нужно знать о гипсокартоне: полезная информация
8. Гипсокартон: обзор популярных брендов и их характеристики
9. Плюсы и минусы гипсокартона: как правильно выбрать материал
10. Как сделать ровные стены с помощью гипсокартона: секреты и советы
11. Гипсокартонные потолки: виды и технологии монтажа
12. Декорирование гипсокартона: идеи для творческого подхода
13. Гипсокартон в дизайне интерьера: современные тренды и решения
14. Преимущества гипсокартона перед другими строительными материалами
15. Как выбрать правильный инструмент для работы с гипсокартоном
16. Гипсокартон: надежный материал для обустройства дома
17. Гипсокартон как элемент декора: необычные способы применения
18. Технологии монтажа гипсокартона: лучшие практические советы
19. История и развитие гипсокартона: открытия и достижения
20. Строительство с использованием гипсокартона: основные этапы и рекомендации
гипсокартон доставка гіпсокартон оптом .
Quality posts is the important to attract
the viewers to pay a quick visit the web site,
that’s what this website is providing.
zithromax
54899 prednisone
1. Как выбрать идеальный гипсокартон для ремонта
строительные материалы купить стяжка пола .
40 mg lisinopril for sale
Итак почему наши тоговые сигналы – всегда лучший вариант:
Наша группа постоянно в тренде современных направлений и ситуаций, которые воздействуют на криптовалюты. Это позволяет нашей команде мгновенно отвечать и давать свежие подачи.
Наш коллектив владеет профундным знанием анализа по графику и способен определять сильные и уязвимые стороны для входа в сделку. Это способствует уменьшению потерь и максимизации прибыли.
Мы внедряем собственные боты анализа для просмотра графиков на всех временных промежутках. Это способствует нашим специалистам получить всю картину рынка.
Перед подачей сигнал в нашем канале Telegram команда осуществляем внимательную ревизию все аспектов и подтверждаем допустимый период долгой торговли или шорт. Это обеспечивает достоверность и качество наших подач.
Присоединяйтесь к нашему каналу к нашему каналу прямо сейчас и получите доступ к проверенным торговым подачам, которые содействуют вам добиться финансового успеха на рынке криптовалют!
https://t.me/Investsany_bot
Почему наши сигналы – твой идеальный выбор:
Мы 24 часа в сутки в курсе последних направлений и событий, которые влияют на криптовалюты. Это способствует команде быстро действовать и предоставлять новые трейды.
Наш состав имеет глубинным знание анализа и может обнаруживать крепкие и слабые стороны для вступления в сделку. Это способствует минимизации угроз и максимизации прибыли.
Мы используем собственные боты анализа для изучения графиков на все периодах времени. Это содействует нам завоевать полную картину рынка.
Прежде приведением сигнала в нашем канале Telegram команда осуществляем педантичную ревизию всех аспектов и подтверждаем возможный длинный или шорт. Это обеспечивает предсказуемость и качественность наших сигналов.
Присоединяйтесь к нам к нашему прямо сейчас и достаньте доступ к подтвержденным торговым сигналам, которые помогут вам достичь успеха в финансах на рынке криптовалют!
https://t.me/Investsany_bot
synthroid online canada
криптовалюта сигналы
Итак почему наши сигналы на вход – твой наилучший выбор:
Наша команда все время на волне актуальных курсов и событий, которые воздействуют на криптовалюты. Это позволяет группе мгновенно реагировать и давать свежие сообщения.
Наш состав имеет глубинным знанием технического анализа и способен определять крепкие и незащищенные аспекты для включения в сделку. Это способствует снижению рисков и увеличению прибыли.
Мы же применяем собственные боты для анализа данных для изучения графиков на всех периодах времени. Это помогает нам достать всю картину рынка.
Прежде подачей сигнал в нашем Telegram команда проводим внимательную ревизию все аспектов и подтверждаем возможное длинный или период короткой торговли. Это подтверждает предсказуемость и качественные характеристики наших подач.
Присоединяйтесь к нам к нашему прямо сейчас и достаньте доступ к подтвержденным торговым сигналам, которые помогут вам вам достигнуть успеха в финансах на крипторынке!
https://t.me/Investsany_bot
торговые сигналы криптовалют
Итак почему наши сигналы на вход – твой идеальный выбор:
Наша команда постоянно в тренде текущих направлений и моментов, которые влияют на криптовалюты. Это позволяет нам оперативно реагировать и давать свежие трейды.
Наш состав владеет глубинным знание анализа и способен определять крепкие и слабые факторы для вступления в сделку. Это содействует уменьшению угроз и максимизации прибыли.
Вместе с командой мы применяем личные боты для анализа для анализа графиков на всех временных промежутках. Это содействует нашим специалистам получить полноценную картину рынка.
Перед подачей подачи в нашем канале Telegram мы осуществляем тщательную проверку все сторон и подтверждаем возможное долгий или шорт. Это обеспечивает надежность и качественность наших сигналов.
Присоединяйтесь к нашему каналу к нашему Telegram каналу прямо сейчас и достаньте доступ к подтвержденным торговым подачам, которые содействуют вам достичь успеха в финансах на рынке криптовалют!
https://t.me/Investsany_bot
synthroid buy
bitcoin pharmacy online
http://www.avtosalonbmwftnz.dp.ua
Приобрести новый БМВ 2024 года в течение Украине числом лучшей стоимости язык официального дилера. Тест-драйв, страхование, авансирование, акции также спецпредложения.
https://avtosalonbmwftnz.dp.ua
valtrex 100 mg
торговые сигналы криптовалют
Почему наши сигналы на вход – ваш лучший путь:
Наша группа все время в тренде актуальных тенденций и моментов, которые воздействуют на криптовалюты. Это позволяет нашему коллективу незамедлительно отвечать и подавать новые трейды.
Наш коллектив обладает глубоким пониманием технического анализа и может определять крепкие и слабые аспекты для присоединения в сделку. Это содействует минимизации рисков и увеличению прибыли.
Мы применяем собственные боты-анализаторы для изучения графиков на любых временных промежутках. Это помогает нам завоевать полноценную картину рынка.
Перед подачей сигнала в нашем канале Telegram мы проводим педантичную ревизию все аспектов и подтверждаем возможный долгий или шорт. Это подтверждает верность и качественные характеристики наших сигналов.
Присоединяйтесь к нашему каналу к нашему прямо сейчас и достаньте доступ к подтвержденным торговым подачам, которые содействуют вам получить успеха в финансах на рынке криптовалют!
https://t.me/Investsany_bot
sandyterrace.com
하지만 왕수인의 성미는…별로 좋지 않고, 평소에 그가 인사하는 모습을 자주 보지 않습니다.
Добро пожаловать на наш интернет-ресурс, где вы сможете найти множество полезных статей на такие темы, как приемка квартир от застройщика и проверка квартиры.
Узнайте больше о том, как купить новостройку без отделки. Мы поможем вам стать уверенным покупателем и избежать различных проблем в будущем!
Добро пожаловать на наш сайт, где вы сможете найти множество полезных статей на такие темы, как приемка недвижимости и проверка квартиры.
Узнайте больше о том, как купить новостройку без отделки. Мы поможем вам стать уверенным покупателем и избежать возможных проблем в будущем!
Бля на дворе 21 век, все уже знают что порно чат подростков онлайн это офигительное место где можно смотреть порнушку и эро шоу.
Более подробно ознакомиться с вебкам чатом можно тут – https://livepornosexchat.com/
buy metformin 1000
top mail order pharmacies
Мы компания профессиональных SEO-оптимизаторов, специализирующихся на продвижении сайтов в поисковых системах.
Мы достигли значительных результатов и желаем поделиться с вами нашими знаниями и навыками.
Какие выгоды ждут вас:
• агентство рекламы в интернете пакетные
• Подробный анализ вашего сайта и создание персонализированной стратегии продвижения.
• Усовершенствование контента и технических особенностей вашего сайта для достижения максимальной производительности.
• Ежемесячный мониторинг и анализ данных для постоянного совершенствования вашего онлайн-присутствия.
Подробнее https://seo-prodvizhenie-ulyanovsk1.ru/
Результаты наших клиентов уже видны: повышение посещаемости, улучшение позиций в поисковых запросах и, конечно же, рост бизнеса. У нас есть возможность предоставить вам бесплатную консультацию, для обсуждения ваших потребностей и разработки стратегии продвижения, соответствующей вашим целям и бюджету.
Не упустите шанс улучшить свои показатели в онлайн-мире. Обратитесь к нам немедленно.
prinivil 2.5 mg
generic azithromycin cost
https://zhkkvartiradom.ru/
synthroid 0.01mg
Пообщаться можно и на русском языке, для этого можно воспользоваться специальным вебка порно чат онлайн с возможностью видеосвязи. Такой способ общения полностью уберет все помехи для бесед и поможет провести время русская рулетка видеочат секс Темы для разговора могут быть самыми обычными или же наоборот понятными только собеседникам – преград нет.
Более подробно ознакомиться с вебкам чатом можно тут – https://livepornosexchat.com/
прогулочные коляски москва купить коляску для .
Друзья, сегодня я хочу затронуть очень пикантную тему, а именно просмотр онлайн видио чат порно в хорошем качестве, давайте же разберемся где нормальные сайты. Смотрите совершенно бесплатно секс онлайн чат с девушками, они в очень эротическом билье от которого ваш малыш возбудится и вам захочется мастурбировать. Девчонки вас доведут до оргазма за считанные минуты, если вы мне не верите, тогда проверьте сами, все что вас стоит это зайти на сайт и наслаждаться сексом в реальном времени.
Более подробно ознакомиться с вебкам чатом можно тут – https://livepornosexchat.com/
zithromax z pack
коляски купить москва большой выбор детских колясок .
где купить диплом 1diplomy-grupp.ru .
Специальные промокоды на 2024 год для 1xBet. Промокод — это уникальный набор из букв, цифр и символов для того, чтобы пользователь получил определенный бонус. Таким бонусом может оказаться увеличение начального депозита, ставка со страховкой (с возвратом части ставочных денег при выборе неверного исхода матча), тестовая ставка (чтобы новые игроки набрались опыта, без вреда собственным деньгам) и многое другое. Больше промокодов для 1xBet можно увидеть на сайтах партнеров букмекерской компании, которые выкладываются каждый день на просторах интернета. Бесплатные промокоды 1xBet при регистрации. Многие пользователи положительно отзываются о промокоде 1xBet на сегодня. Им можно воспользоваться при регистрации новой учетной записи на сайте компании. Для этого необходимо ввести в соответствующее окошко следующий набор букв и цифр. Эта комбинация будут эффективной до конца текущего года, но она распространяется только на новых игроков – более подробно в этом материале https://ngmagistral.ru/wp-includes/pages/1xbet.html
коляска купить в москве прогулочную коляску купить .
detskie kolyaski купить коляску прогулочную .
tadalafil 20mg from canada
how much is tadalafil 5mg
большой выбор детских колясок коляска прогулочная купить .
прогулочные коляски коляски для детей .
buy lisinopril 20 mg no prescription
москва коляски купить прогулочную коляску москва .
Превосходное впечатление получил, посетив сервисный центр техники Zanussi, который располагается по ссылке zanussi-rem.ru. Команда центра продемонстрировали высочайший уровень профессионализма, выполнив сказуемный и качественный ремонт моей посудомоечной машины.
Сотрудники центра, благодаря своей квалификации и богатому опыту, сумели точно диагностировать проблему и устранить ее в кратчайшие сроки. Кроме того, я был приятно удивлен вежливым и внимательным обслуживанием и приемлемыми ценами на услуги.
Несомненно, сервисный центр техники Zanussi является отличным выбором для тех, кто ценит качество и оперативность. От всей души рекомендую этот сервисный центр всем, кто столкнулся с проблемами со своей техникой Zanussi.
1xBet промокод на бонус при регистрации. Букмекерская контора предоставляет игрокам множество возможностей для снижения рисков и увеличения банка. Бонусная программа компании предусматривает интересы как новичков, так и опытных бетторов. Рассмотрим основные виды поощрений в функционале БК: 1хБет промокод на регистрацию – один из самых популярных подарков, созданный для новых игроков на сайте; Ставки на спорт – увеличение депозита до 32500 рублей. Воспользуйся актуальным промокодом 1xbet на сегодня, получи бесплатную возможность увеличить свой первый депозит до 32500 рублей в БК 1xBet. Воспользовавшись промокод 1хбет на сегодня бесплатно ставку промокод, максимальная сумма бонуса возможного бонуса будет увеличена до 32500 рублей. Но при этом сумма бонуса будет равна сумме вашего первого депозита – более подробно в этом материале https://ngmagistral.ru/wp-includes/pages/1xbet.html
Отличное впечатление получил, посетив сервисный центр техники Zanussi, который же располагается по ссылке ремонт стиральных машин занусси. Специалисты центра продемонстрировали высочайший класс профессионализма, осуществив быстрый и точный ремонт моей посудомоечной машины.
Мастера центра, благодаря своей квалификации и опыту, сумели точно диагностировать проблему и исправить ее в кратчайшие сроки. Дополнительно, я был приятно удивлен отличным обслуживанием и приемлемыми ценами на услуги.
Несомненно, сервисный центр техники Zanussi является надежным выбором для тех, кто ценит профессионализм и эффективность. От всей души рекомендую этот сервисный центр всем, кто столкнулся с проблемами со своей техникой Zanussi.
Превосходное впечатление получил, посетив сервисный центр техники Zanussi, который же располагается по ссылке ремонт холодильников занусси на дому в москве. Специалисты центра продемонстрировали высочайший уровень профессионализма, осуществив сказуемный и качественный ремонт моей посудомоечной машины.
Сотрудники центра, в силу своей квалификации и опыту, сумели точно диагностировать проблему и устранить ее в кратчайшие сроки. Кроме того, я был приятно удивлен отличным обслуживанием и приемлемыми ценами на услуги.
Несомненно, сервисный центр техники Zanussi является надежным выбором для тех, кто ценит качество и оперативность. Сердечно рекомендую данный сервисный центр всем, кто столкнулся с проблемами со своей техникой Zanussi.
Добрый день всем!
Бывало ли у вас такое, что приходилось писать дипломную работу в очень ограниченные сроки? Это действительно требует большой ответственности и тяжелого труда, но важно не сдаваться и продолжать активно заниматься учебными процессами, так же, как и я.
Для тех, кто умеет эффективно использовать интернет для поиска и анализа информации, это действительно облегчает процесс согласования и написания дипломной работы. Не нужно тратить время на посещение библиотек или организацию встреч с дипломным руководителем. Здесь представлены надежные данные для заказа и написания дипломных и курсовых работ с гарантией качества и доставкой по всей России. Можете ознакомиться с предложениями по ссылке , это проверенный способ!
купить диплом о полном среднем образовании
купить диплом специалиста
купить диплом о среднем образовании
купить диплом нового образца
купить диплом ссср
купить диплом бакалавра
Желаю всем отличных оценок!
прогулочные коляски коляски для детей .
Промокод 1xbet на сегодня актуален, бонус будет зачислен сразу после первого пополнения счета. Временные коды. Букмекерская контора 1xbet часто выступает спонсором при переводе популярных сериалов на русский язык. Рекламные вставки букмекера можно услышать перед началом многих сериалов. Часто в такой рекламе диктуется специальные промокод, дающий возможность беттерам рассчитывать на дополнительный бонус. Максимальный бонус при регистрации составляется 32500 рублей. Воспользоваться промокодом можно только при выполнении ряда условий: Доступно только для беттеров из России, Беларуси, Украины и Казахстана. Возврат игрока – от 18 лет. промокоды на 1хбет при первой регистрации. Промокод 1xbet сегодня найти в интернете не так сложно, достаточно воспользоваться любой поисковой системой. Но обращайте внимание на профессиональность ресурса, откуда будет скопирован промокод. Многие сайты предлагают неактуальные бонусные коды, которые не дадут никакого повышенного депозита после регистрации. На нашем сайте представлен актуальный промокод 1xbet на 2024 год. Вводите промокод, чтобы получить 100% сверху после первого пополнения. Минимальная сумма депозита для использования промокода – 100 рублей. Ограничивается бонус 1хбет суммой в 32500 рублей – более подробно в этом материале https://ngmagistral.ru/wp-includes/pages/1xbet.html
cialis over the counter europe
купить прогулочную коляску detskie kolyaski .
price for tadalafil
33개 언어와 다양한 화폐를 지원하여, 프라그마틱 플레이는 세계 시장에 제공되는 슬롯 포트폴리오를 운영합니다.
프라그마틱 홈페이지
프라그마틱에 대한 글 읽는 것이 정말 재미있었어요! 또한, 제 사이트에서도 프라그마틱과 관련된 정보를 공유하고 있어요. 함께 발전하며 더 많은 지식을 쌓아가요!
https://ewqeq.weebly.com
https://bidclipz.com/link/
https://www.12315cm.cn/
Сегодня погооворим про виртуальные реальные знакомства с девушками по видео камере, именно видео знакомства. В 21 веке видео общение доступно каждому, а знакомства по фотографиям уже не кому не инетресны, вот так вот появился популярный видео портал, где смотреть онлайн порно видео чаты это обыденное дело, и каждый кто в него приходит становится участником огромного сообщества. Огромный выбор чат комнат в которых вы можете делать все что захотите, тут нет запретов, все для вас и ваших эро фантазий.
Более подробно ознакомиться с вебкам чатом можно тут – https://livepornosexchat.com/
https://zhknoviystroi.ru/
На нашем портале вы найдете множество полезных статей на такие темы, как: отделка в новостройке и покупка квартиры под ключ в новостройке.
Узнайте, как выбрать дизайн интерьера при чистовой отделке квартир!
Мы подскажем вам лучшие решения и поделимся секретами успешного дизайна и отделки.
Также мы дарим вам персональную скидку на консультацию – 10%!
Привет парни, помните я говрил что есть сайт на котром девушки по веб камере общаются с простыми пользователями, так вот это не Чат Рулетка! Вы не угадали, сайт называет Рунетки – это порно в онлайн чатах в котором полностью голые девушки устраивают эротическое шоу, да, именно шоу программа для вас и всех посетителей виртуального видео чата. Так что не стоит тупить, следует просто заходить на портал, выбирать девушку и наслаждаться предствлением у себя дома.
Более подробно ознакомиться с вебкам чатом можно тут – https://livepornosexchat.com/
buy metformin 1000 no rx
На нашем портале вы найдете много полезных статей на такие темы, как: отделка в новостройке и покупка квартиры под ключ в новостройке.
Узнайте, как выбрать дизайн интерьера при евроремонте в новостройке!
Мы подскажем вам оптимальные решения и поделимся секретами красивого дизайна и отделки.
Также мы предлагаем вам личную скидку на консультацию – 15%!
Шлюшки хотят что бы их оттрахали, смотри чат веб камеры онлайн порно без всякой хуйни, полностью бесплатно.
Более подробно ознакомиться с вебкам чатом можно тут – https://livepornosexchat.com/
JDBslot
JDB slot | The first bonus to rock the slot world
Exclusive event to earn real money and slot game points
JDB demo slot games for free = ?? Lucky Spin Lucky Draw!
How to earn reels free 2000? follow jdb slot games for free
#jdbslot
Demo making money : https://jdb777.com
#jdbslot #slotgamesforfree #howtoearnreels #cashreels
#slotgamepoint #demomakingmoney
Cash reels only at slot games for free
More professional jdb game bonus knowledge
How to Secure Rotations Credits Gratis 2000: Your Supreme Instruction to Victorious Huge with JDB One-armed bandits
Are you prepared to embark on an electrifying voyage into the universe of online slot games? Seek no more, only turn to JDB777 FreeGames, where enthusiasm and substantial wins anticipate you at each rotation of the reel. In this complete guide, we’ll demonstrate you how to earn reels points complimentary 2000 and unlock the exhilarating world of JDB slots.
Feel the Adrenaline rush of Gaming Games for Free
At JDB777 FreeGames, we present a broad selection of captivating slot games that are guaranteed to keep you entertained for hours on end. From traditional fruit machines to immersive themed slots, there’s something for each type of player to enjoy. And the best part? You can play all of our slot games for free and earn real cash prizes!
Uncover Free Cash Reels and Attain Big
One of the most exciting features of JDB777 FreeGames is the possibility to earn reels credits costless 2000, which can be exchanged for real cash. Just sign up for an account, and you’ll receive your gratis bonus to start spinning and winning. With our bountiful promotions and bonuses, the sky’s the ceiling when it comes to your winnings!
Guide Tactics and Points System
To enhance your winnings and unlock the full potential of our slot games, it’s essential to comprehend the tactics and points system. Our expert guides will take you through everything you need to know, from choosing the right games to comprehending how to earn bonus points and cash prizes.
Distinctive Promotions and Specialized Offers
As a member of JDB777 FreeGames, you’ll have access to exclusive promotions and special offers that are sure to enhance your gaming experience. From welcome bonuses to daily rebates, there are a great deal of chances to increase your winnings and take your gameplay to the next level.
Join Us Today and Start Winning
Don’t miss out on your opportunity to win big with JDB777 FreeGames. Sign up now to claim your free bonus of 2000 credits and start spinning the reels for your opportunity to win real cash prizes. With our exhilarating variety of slot games and generous promotions, the prospects are endless. Join us today and commence winning!
iGaming 업계에서 선두를 달리고 있는 프라그마틱 게임은 모바일 중심의 혁신적이고 표준화된 콘텐츠를 고객에게 제공합니다.
프라그마틱 게임
프라그마틱에 대한 글 읽는 것이 정말 즐거웠어요! 또한, 제 사이트에서도 프라그마틱과 관련된 정보를 공유하고 있어요. 함께 발전하며 더 많은 지식을 쌓아가요!
https://atlgrup.com/link/
https://www.site-rapido.com
https://www.vamiveta.com/
developer bet
JDB demo
JDB demo | The easiest bet software to use (jdb games)
JDB bet marketing: The first bonus that players care about
Most popular player bonus: Daily Play 2000 Rewards
Game developers online who are always with you
#jdbdemo
Where to find the best game developer? https://www.jdbgaming.com/
#gamedeveloperonline #betsoftware #betmarketing
#developerbet #betingsoftware #gamedeveloper
Supports hot jdb demo beting software jdb angry bird
JDB slot demo supports various competition plans
Revealing Success with JDB Gaming: Your Supreme Betting Software Answer
In the realm of online gaming, locating the correct betting software is crucial for prosperity. Introducing JDB Gaming – a foremost provider of creative gaming answers designed to improve the player experience and propel revenue for operators. With a focus on user-friendly interfaces, alluring bonuses, and a wide array of games, JDB Gaming shines as a leading choice for both gamers and operators alike.
JDB Demo presents a peek into the world of JDB Gaming, giving players with an opportunity to experience the thrill of betting without any danger. With user-friendly interfaces and seamless navigation, JDB Demo enables it simple for players to discover the extensive selection of games available, from traditional slots to engaging arcade titles.
When it concerns bonuses, JDB Bet Marketing is at the forefront with appealing offers that draw players and maintain them coming back for more. From the popular Daily Play 2000 Rewards to special promotions, JDB Bet Marketing ensures that players are rewarded for their loyalty and dedication.
With so numerous game developers online, locating the best can be a challenging task. However, JDB Gaming stands out from the masses with its commitment to perfection and innovation. With over 150 online casino games to choose from, JDB Gaming offers something for all, whether you’re a fan of slots, fish shooting games, arcade titles, card games, or bingo.
At the heart of JDB Gaming lies a devotion to offering the finest possible gaming experience for players. With a concentration on Asian culture and stunning 3D animations, JDB Gaming distinguishes itself as a leader in the industry. Whether you’re a player in search of excitement or an operator looking for a dependable partner, JDB Gaming has you covered.
API Integration: Smoothly integrate with all platforms for maximum business prospects. Big Data Analysis: Remain ahead of market trends and grasp player habits with extensive data analysis. 24/7 Technical Support: Enjoy peace of mind with skilled and trustworthy technical support accessible around the clock.
In conclusion, JDB Gaming provides a successful blend of state-of-the-art technology, alluring bonuses, and unmatched support. Whether you’re a player or an operator, JDB Gaming has everything you need to thrive in the world of online gaming. So why wait? Join the JDB Gaming family today and unleash your full potential!
JDB online
JDB online | 2024 best online slot game demo cash
How to earn reels? jdb online accumulate spin get bonus
Hot demo fun: Quick earn bonus for ranking demo
JDB demo for win? JDB reward can be exchanged to real cash
#jdbonline
777 sign up and get free 2,000 cash: https://www.jdb777.io/
#jdbonline #democash #demofun #777signup
#rankingdemo #demoforwin
2000 cash: Enter email to verify, enter verify, claim jdb bonus
Play with JDB games an online platform in every countries.
Enjoy the Happiness of Gaming!
Complimentary to Join, Costless to Play.
Join and Get a Bonus!
SIGN UP NOW AND GET 2000?
We dare you to obtain a sample entertaining welcome bonus for all new members! Plus, there are other particular promotions waiting for you!
Learn more
JDB – JOIN FOR FREE
Simple to play, real profit
Take part in JDB today and indulge in fantastic games without any investment! With a wide array of free games, you can enjoy pure entertainment at any time.
Rapid play, quick join
Treasure your time and opt for JDB’s swift games. Just a few easy steps and you’re set for an amazing gaming experience!
Sign Up now and generate money
Experience JDB: Instant play with no investment and the opportunity to win cash. Designed for effortless and lucrative play.
Immerse into the Realm of Online Gaming Stimulation with Fun Slots Online!
Are you primed to encounter the thrill of online gaming like never before? Search no further than Fun Slots Online, your ultimate hub for heart-pounding gameplay, endless entertainment, and stimulating winning opportunities!
At Fun Slots Online, we boast ourselves on presenting a wide selection of compelling games designed to hold you engaged and delighted for hours on end. From classic slot machines to innovative new releases, there’s something for everyone to enjoy. Plus, with our user-friendly interface and uninterrupted gameplay experience, you’ll have no trouble diving straight into the excitement and savoring every moment.
But that’s not all – we also give a variety of special promotions and bonuses to recompense our loyal players. From introductory bonuses for new members to privileged rewards for our top players, there’s always something thrilling happening at Fun Slots Online. And with our protected payment system and 24-hour customer support, you can savor peace of mind aware that you’re in good hands every step of the way.
So why wait? Register with Fun Slots Online today and start your journey towards breath-taking victories and jaw-dropping prizes. Whether you’re a seasoned gamer or just starting out, there’s never been a better time to be part of the fun and excitement at Fun Slots Online. Sign up now and let the games begin!
mexican pharmacy weight loss
What’s up to every one, because I am really keen of reading this web site’s
post to be updated regularly. It includes nice stuff.
betvisa app
Intro
betvisa vietnam
Betvisa vietnam | Grand Prize Breakout!
Betway Highlights | 499,000 Extra Bonus on betvisa com!
Cockfight to win up to 3,888,000 on betvisa game
Daily Deposit, Sunday Bonus on betvisa app 888,000!
#betvisavietnam
200% Bonus on instant deposits—start your win streak!
200% welcome bonus! Slots and Fishing Games
https://www.betvisa.com/
#betvisavietnam #betvisagame #betvisaapp
#betvisacom #betvisacasinoapp
Birthday bash? Up to 1,800,000 in prizes! Enjoy!
Friday Shopping Frenzy betvisa vietnam 100,000 VND!
Betvisa Casino App Daily Login 12% Bonus Up to 1,500,000VND!
Khám phá Thế Giới Cá Cược Trực Tuyến với BetVisa!
Hệ thống BetVisa, một trong những nền tảng hàng đầu tại châu Á, ra đời vào năm 2017 và thao tác dưới giấy phép của Curacao, đã có hơn 2 triệu người dùng trên toàn thế giới. Với lời hứa đem đến trải nghiệm cá cược đảm bảo và tin cậy nhất, BetVisa sớm trở thành lựa chọn hàng đầu của người chơi trực tuyến.
BetVisa không dừng lại ở việc cung cấp các trò chơi phong phú như xổ số, sòng bạc trực tiếp, thể thao trực tiếp và thể thao điện tử, mà còn mang đến cho người chơi những ưu đãi hấp dẫn. Thành viên mới đăng ký sẽ được tặng ngay 5 vòng quay miễn phí và có cơ hội giành giải thưởng lớn.
Đặc biệt, BetVisa hỗ trợ nhiều hình thức thanh toán linh hoạt như Betvisa Vietnam, cùng với các ưu đãi độc quyền như thưởng chào mừng lên đến 200%. Bên cạnh đó, hàng tuần còn có các chương trình khuyến mãi độc đáo như chương trình giải thưởng Sinh Nhật và Chủ Nhật Mua Sắm Điên Cuồng, mang đến cho người chơi cơ hội thắng lớn.
Nhờ vào tính cam kết về kinh nghiệm cá cược tinh vi nhất và dịch vụ khách hàng chuyên nghiệp, BetVisa tự hào là điểm đến lý tưởng cho những ai đam mê trò chơi trực tuyến. Hãy gắn bó ngay hôm nay và bắt đầu cuộc hành trình của bạn tại BetVisa – nơi niềm vui và may mắn chính là điều tất yếu.
lisinopril price in canada
Доброго всем дня!
Закажите диплом ВУЗа с гарантированной подлинностью и доставкой по всей России без предоплаты – просто, удобно, безопасно!
купить аттестат за 9 класс
zithromax
valtrex 1g tablet
betvisa affiliate sign up
Intro
betvisa bangladesh
Betvisa bangladesh | Super Cricket Carnival with Betvisa!
IPL Cricket Mania | Kick off Super Cricket Carnival with bet visa.com
IPL Season | Exclusive 1,50,00,000 only at Betvisa Bangladesh!
Crash Games Heroes | Climb to the top of the 1,00,00,000 bonus pool!
#betvisabangladesh
Preview IPL T20 | Follow Betvisa BD on Facebook, Instagram for awards!
betvisa affiliate Dream Maltese Tour | Sign up now to win the ultimate prize!
https://www.bvthethao.com/
#betvisabangladesh #betvisabd #betvisaaffiliate
#betvisaaffiliatesignup #betvisa.com
Vì lời hứa về trải nghiệm cá cược hoàn hảo nhất và dịch vụ khách hàng chuyên nghiệp, BetVisa hoàn toàn tự hào là điểm đến lý tưởng cho những ai đam mê trò chơi trực tuyến. Hãy đăng ký ngay hôm nay và bắt đầu chuyến đi của bạn tại BetVisa – nơi niềm vui và may mắn chính là điều tất yếu.
Khám phá Thế Giới Cá Cược Trực Tuyến với BetVisa!
BetVisa, một trong những nền tảng hàng đầu tại châu Á, ra đời vào năm 2017 và thao tác dưới phê chuẩn của Curacao, đã đưa vào hơn 2 triệu người dùng trên toàn thế giới. Với lời hứa đem đến trải nghiệm cá cược đảm bảo và tin cậy nhất, BetVisa sớm trở thành lựa chọn hàng đầu của người chơi trực tuyến.
BetVisa không dừng lại ở việc cung cấp các trò chơi phong phú như xổ số, sòng bạc trực tiếp, thể thao trực tiếp và thể thao điện tử, mà còn mang đến cho người chơi những ưu đãi hấp dẫn. Thành viên mới đăng ký sẽ được tặng ngay 5 vòng quay miễn phí và có cơ hội giành giải thưởng lớn.
Đặc biệt, BetVisa hỗ trợ nhiều cách thức thanh toán linh hoạt như Betvisa Vietnam, cùng với các ưu đãi độc quyền như thưởng chào mừng lên đến 200%. Bên cạnh đó, hàng tuần còn có các chương trình khuyến mãi độc đáo như chương trình giải thưởng Sinh Nhật và Chủ Nhật Mua Sắm Điên Cuồng, mang đến cho người chơi cơ hội thắng lớn.
buy tadalafil online usa
pharmacy online 365
buy lisinopril without a prescription
pharmacy delivery
mail order pharmacy no prescription
buy synthroid online without prescription
프라그마틱의 게임은 언제나 풍부한 그래픽과 흥미진진한 플레이로 유명해요. 이번에 새로운 게임이 나왔나요?
에그벳
프라그마틱의 게임은 높은 퀄리티와 흥미진진한 스토리로 항상 눈길을 끌어요. 이번에 어떤 게임을 즐겼나요?
https://www.12315hc.cn/
https://adanaport.com/link/
https://www.nutrapia.com
Промокод 1xBet при регистрации. Компания 1ИксБет заинтересована в привлечении новых клиентов, поэтому для новых игроков действует акция в виде бонуса, который равен сумме первого депозита, но не превышает 225 000 рублей. Однако при использовании промокода букмекерская контора увеличит размер приветственного бонуса. Для того чтобы получить повышенную сумму на первый депозит, игроку необходимо выполнить следующие условия: Зайти на сайт букмекера. Выбрать способ регистрации по e-mail. Заполнить поля с личными данными. Ввести промокод в поле слева от кнопки «Зарегистрироваться». Ознакомиться с правилами букмекера. какой у меня промокод на 1хбет поможет пользователям получить еще больше бонусов от букмекерской конторы. Подробная инструкция по поиску и активации бонусных кодов. Промокод — комбинация из цифр и букв, которая позволяет игроку активировать специальное предложение от букмекера 1хБет. С его помощью пользователь может получить: бонусные средства на депозит; бесплатную ставку; промо-баллы; другие подарки. Сегодня вы сможете найти множество подобных ресурсов, которые регулярно обновляют список актуальных предложений БК – более подробно в этом материале https://ngmagistral.ru/wp-includes/pages/1xbet.html
https://diplomsdayu.ru/
betvisa com
Intro
betvisa philippines
Betvisa philippines | The Filipino Carnival, Spinning for Treasures!
Betvisa Philippines Surprises | Spin daily and win ₱8,888 Grand Prize!
Register for a chance to win ₱8,888 Bonus Tickets! Explore Betvisa.com!
Wild All Over Grab 58% YB Bonus at Betvisa Casino! Take the challenge!
#betvisaphilippines
Get 88 on your first 50 Experience Betvisa Online’s Bonus Gift!
Weekend Instant Daily Recharge at betvisa.com
https://www.88betvisa.com/
#betvisaphilippines #betvisaonline #betvisacasino
#betvisacom #betvisa.com
BetVisa – Điểm Đến Tuyệt Vời Cho Người Chơi Trực Tuyến
Khám Phá Thế Giới Cá Cược Trực Tuyến với BetVisa!
Dịch vụ được tạo ra vào năm 2017 và vận hành theo bằng trò chơi Curacao với hơn 2 triệu người dùng. Với tính cam kết đem đến trải nghiệm cá cược đáng tin cậy và tin cậy nhất, BetVisa nhanh chóng trở thành lựa chọn hàng đầu của người chơi trực tuyến.
Nền tảng cá cược không chỉ cung cấp các trò chơi phong phú như xổ số, sòng bạc trực tiếp, thể thao trực tiếp và thể thao điện tử, mà còn mang lại cho người chơi những chính sách ưu đãi hấp dẫn. Thành viên mới đăng ký sẽ nhận tặng ngay 5 vòng quay miễn phí và có cơ hội giành giải thưởng lớn.
Dịch vụ hỗ trợ nhiều hình thức thanh toán linh hoạt như Betvisa Vietnam, kết hợp với các ưu đãi độc quyền như thưởng chào mừng lên đến 200%. Bên cạnh đó, hàng tuần còn có các chương trình khuyến mãi độc đáo như chương trình giải thưởng Sinh Nhật và Chủ Nhật Mua Sắm Điên Cuồng, mang lại cho người chơi thời cơ thắng lớn.
Với tính cam kết về trải nghiệm cá cược tốt nhất và dịch vụ khách hàng chất lượng, BetVisa tự tin là điểm đến lý tưởng cho những ai đam mê trò chơi trực tuyến. Hãy đăng ký ngay hôm nay và bắt đầu hành trình của bạn tại BetVisa – nơi niềm vui và may mắn chính là điều tất yếu!
Промокоды 1xBet на сегодня. Получите бесплатно при регистрации бонус. Активируйте промокоды и делайте ставки на футбол, хоккей и самые яркие состязания – Лиги Европы и Лиги Чемпионов. Отличительная особенность букмекера – возможность использования промокод на ставку 1хбет бесплатно бесплатную сегодня или для активных клиентов, уже имеющих учетную запись. Они обеспечивают двойной депозит, бесплатную ставку (фрибет), специальный бонус на день рождения и многое другое. Актуальные бонусные коды для новичков за регистрацию, способы получения и активации, bonus программа на официальном сайте букмекера 1хБет. Бесплатные промокоды при регистрации в 2024 году в 1xBet – более подробно в этом материале https://ngmagistral.ru/wp-includes/pages/1xbet.html
Вводите официальный промокод 1xbet при регистрации 2024 и получайте до 32 500 тысяч рублей. Бонус-код помогает удвоить ваш первый банкролл. промокод 1хбет на сегодня бесплатно без депозита. Бесплатным промокод может воспользоваться любой новый игрок букмекерской конторы! После того, как вы попадете на официальный сайт букмекера, в России он внесен в реестр запрещенных. Благодаря промокодам на сегодня и различным акциям, они начали захватывать сердца миллионов игроков. На протяжении 10 лет существования администрация регулярно совершенствовала уровень сервиса, и как итог — создана отличная контора, где игроки могут совершать ставки и получать выплаты без каких-либо проблем. Это сделать просто, если иметь промокод 1xbet на сегодня бесплатно. Правда, дается он при условии выполнения некоторых правил. 1xbet бонус при регистрации. Не совсем промокод, но вы все равно ставите не свои деньги, если пополните депозит, – 100% бонуса от внесенной суммы. Максимум указан в верхней части главной страницы официального сайта – более подробно в этом материале https://ngmagistral.ru/wp-includes/pages/1xbet.html
Привет всем!
Купите диплом в России с доставкой и гарантией подлинности только у нас по самой выгодной цене.
сколько купить аттестат
Професійні поради стоматолога
20. Як уникнути появу пародонтиту у дорослих
стоматологічний кабінет стоматолог https://stomatologiyatrn.ivano-frankivsk.ua/ .
Ефективні методи
4. Як впоратися з зубними відкладеннями та камінням
дитяча стоматологія дитяча стоматологія .
safe canadian pharmacies
mexican pharmacy online
Купить срочно дипломы Рѕ среднем образовании возникает вопросом для многих, кому попадает со потребностью иметь законное подтверждение о учебе.
Текущие технологические разработки и развитие онлайн рынка позволяют найти массу возможностей для покупки документа.
Однако, выбор надежного провайдера превращается существенным аспектом такого процедуры.
Часть компании продают создание документов со небольшими усилиями от заказчика, однако не качественные характеристики этих документов соответствует.
Необходимо выбирать подтвержденные или рекомендованные ресурсы, где именно доступно приобрести документ со уверенным качественными характеристиками и подлинностью.
Одновременно, нужно учитывать не лишь стоимость, и имидж поставщика, рецензии заказчиков или возможность получить консультацию эксперта перед приобретением.
Корректный подбор поможет избежать нежелательных последствий или гарантирует уверенность в своем наличии необходимого бумаги.
Поради стоматолога
6. Як вибрати найкращий зубний пасти зі змістом фтору
стоматологія протезування https://stomatologiyatrn.ivano-frankivsk.ua/ .
Професійні поради стоматолога
20. Як уникнути появу пародонтиту у дорослих
стоматологічна клініка івано франківськ стоматологічна клініка івано франківськ .
safe online pharmacies
1. 10 лучших идей для дизайна интерьера
2. Топ-20 трендов в дизайне на 2021 год
3. Цветовые решения
4. Секреты успешного дизайн-проекта
5. Дизайн нового поколения
6. Шаг за шагом: создание уютного дизайна спальни
7. Дизайн для маленькой квартиры
8. Природный дизайн
9. Баланс цветов и форм: основы хорошего дизайна
10. Дизайнерский бизнес
11. Интересные факты о развитии дизайна в XXI веке
12. Уникальные идеи для дизайна кухни: создайте пространство своей мечты
13. Тенденции в сфере дизайна мебели: вдохновляющие идеи
14. Мастер-класс по созданию стильного дизайна гостиной
15. Искусство минимализма: создание современного дизайна в своем доме
16. Дизайн сада: принципы оформления участка с учетом ландшафта
17. Декорирование с текстилем
18. Принципы цветового баланса в дизайне: как создать гармоничное пространство
19. Книги по дизайну
20. Дизайн подростковой комнаты
дизайн интерьера услуги https://studiya-dizajna-intererov.ru/ .
Професійна чистка
5. Як уникнути проблем із яснами
стоматологія клініка https://stomatologiyatrn.ivano-frankivsk.ua/ .
Поради стоматологів
9. Як позбавитися від неприємного запаху з рота
дитяча стоматологія франківськ https://stomatologiyatrn.ivano-frankivsk.ua/ .
Важливі поради
13. Як вибрати найкращий зубний порошок для відбілювання
клініка стоматології https://stomatologiyatrn.ivano-frankivsk.ua/ .
1. 10 лучших идей для дизайна интерьера
2. Тренды в дизайне
3. Как выбрать идеальный цветовой акцент в дизайне
4. Секреты успешного дизайн-проекта
5. Инновационные подходы к дизайну: отражение современности
6. Дизайн спальни
7. Дизайнерские решения для увеличения пространства в маленькой квартире
8. Как интегрировать природные элементы в дизайн интерьера
9. Основы дизайна
10. Дизайнерский бизнес
11. Дизайн в XXI веке
12. Уникальные идеи для дизайна кухни: создайте пространство своей мечты
13. Тенденции в сфере дизайна мебели: вдохновляющие идеи
14. Мастер-класс по созданию стильного дизайна гостиной
15. Минимализм
16. Дизайн сада
17. Декорирование с текстилем
18. Принципы цветового баланса в дизайне: как создать гармоничное пространство
19. Книги по дизайну
20. Дизайн комнаты для подростка: креативные идеи для стильного интерьера
интерьер дизайн студии https://studiya-dizajna-intererov.ru/ .
betvisa india
Intro
betvisa india
Betvisa india | IPL 2024 Heat Wave
IPL 2024 Big bets, big prizes With Betvisa India
Exclusive for Sports Fans Betvisa Online Casino 50% Welcome Bonus
Crash Game Supreme Compete for 1,00,00,000 pot Betvisa.com
#betvisaindia
Accurate Predictions IPL T20 Tournament, Winner Takes All!
More than just a game | Betvisa dreams invites you to fly to malta
https://www.b3tvisapro.com/
#betvisaindia #betvisalogin #betvisaonlinecasino
#betvisa.com #betvisaapp
C?ng choi – Di?m D?n Tuy?t V?i Cho Ngu?i Choi Tr?c Tuy?n
Kham Pha Th? Gi?i Ca Cu?c Tr?c Tuy?n v?i BetVisa!
BetVisa du?c sang l?p vao nam 2017 va ho?t d?ng theo gi?y phep tro choi Curacao v?i hon 2 tri?u ngu?i dung. V?i tinh cam k?t dem d?n tr?i nghi?m ca cu?c dang tin c?y va tin c?y nh?t, BetVisa nhanh chong tr? thanh l?a ch?n hang d?u c?a ngu?i choi tr?c tuy?n.
BetVisa khong ch? dua ra cac tro choi phong phu nhu x? s?, song b?c tr?c ti?p, th? thao tr?c ti?p va th? thao di?n t?, ma con mang l?i cho ngu?i choi nh?ng uu dai h?p d?n. Thanh vien m?i dang ky s? du?c t?ng ngay 5 vong quay mi?n phi va co co h?i gianh gi?i thu?ng l?n.
D?ch v? h? tr? nhi?u phuong th?c thanh toan linh ho?t nhu Betvisa Vietnam, ben c?nh cac uu dai d?c quy?n nhu thu?ng chao m?ng len d?n 200%. Ben c?nh do, hang tu?n con co cac chuong trinh khuy?n mai d?c dao nhu chuong trinh gi?i thu?ng Sinh Nh?t va Ch? Nh?t Mua S?m Dien Cu?ng, mang l?i cho ngu?i choi th?i co th?ng l?n.
V?i l?i h?a v? tr?i nghi?m ca cu?c t?t nh?t va d?ch v? khach hang chuyen nghi?p, BetVisa t? tin la di?m d?n ly tu?ng cho nh?ng ai dam me tro choi tr?c tuy?n. Hay dang ky ngay hom nay va b?t d?u hanh trinh c?a b?n t?i BetVisa – noi ni?m vui va may m?n chinh la di?u t?t y?u!
Amplificadores de senal gsm
No mas zonas muertas con un amplificador de senal para moviles
https://neillopez23.wordpress.com/2024/01/27/mejora-tu-conexion-movil-con-nuestros-amplificadores-de-senal-amplificadormovil-es/
Ефективні методи
4. Як впоратися з зубними відкладеннями та камінням
дитяча стоматологічна клініка івано франківськ дитяча стоматологічна клініка івано франківськ .
motomagazinvfdvgd.vn.ua/uk/v-perchatki/
НА нашем мотомагазине ваша милость посчитаете запасные части чтобы байков, скутеров, снегоходов равно квадроциклов. ЯЗЫК нас вы хронически выищете масла чтобы байков, фильтра, цепи.
motomagazinvfdvgd.vn.ua/uk/v-perchatki/
Ефективні методи
4. Як впоратися з зубними відкладеннями та камінням
стоматологія кабінет стоматологія кабінет .
1. 10 лучших идей для дизайна интерьера
2. Тренды в дизайне
3. Как выбрать идеальный цветовой акцент в дизайне
4. Дизайн-проект
5. Дизайн нового поколения
6. Дизайн спальни
7. Дизайн для маленькой квартиры
8. Природный дизайн
9. Основы дизайна
10. Дизайн-студия: секреты успешного бизнеса в сфере дизайна
11. Дизайн в XXI веке
12. Дизайн кухни
13. Тенденции в сфере дизайна мебели: вдохновляющие идеи
14. Дизайн гостиной
15. Минимализм
16. Дизайн сада: принципы оформления участка с учетом ландшафта
17. Декорирование дома с использованием текстиля: советы и идеи
18. Цветовой баланс
19. Топ-10 книг по дизайну интерьера, которые стоит прочитать
20. Дизайн подростковой комнаты
проект дизайн интерьера https://studiya-dizajna-intererov.ru/ .
buy lisinopril 20 mg online
1. Идеи для дизайна интерьера
2. Топ-20 трендов в дизайне на 2021 год
3. Как выбрать идеальный цветовой акцент в дизайне
4. Дизайн-проект
5. Дизайн нового поколения
6. Шаг за шагом: создание уютного дизайна спальни
7. Дизайнерские решения для увеличения пространства в маленькой квартире
8. Как интегрировать природные элементы в дизайн интерьера
9. Баланс цветов и форм: основы хорошего дизайна
10. Дизайнерский бизнес
11. Дизайн в XXI веке
12. Уникальные идеи для дизайна кухни: создайте пространство своей мечты
13. Тенденции в сфере дизайна мебели: вдохновляющие идеи
14. Дизайн гостиной
15. Искусство минимализма: создание современного дизайна в своем доме
16. Дизайн сада: принципы оформления участка с учетом ландшафта
17. Декорирование дома с использованием текстиля: советы и идеи
18. Принципы цветового баланса в дизайне: как создать гармоничное пространство
19. Топ-10 книг по дизайну интерьера, которые стоит прочитать
20. Дизайн комнаты для подростка: креативные идеи для стильного интерьера
дизайн интерьера студия https://studiya-dizajna-intererov.ru/ .
https://reshauzadachi.ru/
1. 10 лучших идей для дизайна интерьера
2. Тренды в дизайне
3. Как выбрать идеальный цветовой акцент в дизайне
4. Дизайн-проект
5. Инновационные подходы к дизайну: отражение современности
6. Дизайн спальни
7. Дизайн для маленькой квартиры
8. Как интегрировать природные элементы в дизайн интерьера
9. Баланс цветов и форм: основы хорошего дизайна
10. Дизайнерский бизнес
11. Дизайн в XXI веке
12. Дизайн кухни
13. Тенденции в сфере дизайна мебели: вдохновляющие идеи
14. Мастер-класс по созданию стильного дизайна гостиной
15. Искусство минимализма: создание современного дизайна в своем доме
16. Дизайн сада: принципы оформления участка с учетом ландшафта
17. Декорирование с текстилем
18. Принципы цветового баланса в дизайне: как создать гармоничное пространство
19. Топ-10 книг по дизайну интерьера, которые стоит прочитать
20. Дизайн подростковой комнаты
послуги дизайнера послуги дизайнера .
motomagazinvfdvgd.vn.ua/uk/v-tsepi-privodnye/
В ТЕЧЕНИЕ нашем мотомагазине вы посчитаете запчасти чтобы байков, скутеров, снегоходов и еще квадроциклов. У нас вы всегда выищете масла чтобы мотоциклов, фильтра, цепи.
https://motomagazinvfdvgd.vn.ua
online pharmacy group
1. 10 лучших идей для дизайна интерьера
2. Тренды в дизайне
3. Цветовые решения
4. Дизайн-проект
5. Дизайн нового поколения
6. Дизайн спальни
7. Дизайн для маленькой квартиры
8. Как интегрировать природные элементы в дизайн интерьера
9. Баланс цветов и форм: основы хорошего дизайна
10. Дизайн-студия: секреты успешного бизнеса в сфере дизайна
11. Дизайн в XXI веке
12. Дизайн кухни
13. Дизайн мебели
14. Мастер-класс по созданию стильного дизайна гостиной
15. Минимализм
16. Дизайн сада: принципы оформления участка с учетом ландшафта
17. Декорирование с текстилем
18. Цветовой баланс
19. Топ-10 книг по дизайну интерьера, которые стоит прочитать
20. Дизайн комнаты для подростка: креативные идеи для стильного интерьера
интерьер дизайн https://studiya-dizajna-intererov.ru/ .
1. Идеи для дизайна интерьера
2. Топ-20 трендов в дизайне на 2021 год
3. Цветовые решения
4. Дизайн-проект
5. Инновационные подходы к дизайну: отражение современности
6. Шаг за шагом: создание уютного дизайна спальни
7. Дизайн для маленькой квартиры
8. Природный дизайн
9. Баланс цветов и форм: основы хорошего дизайна
10. Дизайн-студия: секреты успешного бизнеса в сфере дизайна
11. Дизайн в XXI веке
12. Дизайн кухни
13. Тенденции в сфере дизайна мебели: вдохновляющие идеи
14. Мастер-класс по созданию стильного дизайна гостиной
15. Искусство минимализма: создание современного дизайна в своем доме
16. Дизайн сада
17. Декорирование с текстилем
18. Принципы цветового баланса в дизайне: как создать гармоничное пространство
19. Книги по дизайну
20. Дизайн подростковой комнаты
интерьер дизайн интерьер дизайн .
rg777
App cá độ:Hướng dẫn tải app cá cược uy tín RG777 đúng cách
Bạn có biết? Tải app cá độ đúng cách sẽ giúp tiết kiệm thời gian đăng nhập, tăng tính an toàn và bảo mật cho tài khoản của bạn! Vậy đâu là cách để tải một app cá cược uy tín dễ dàng và chính xác? Xem ngay bài viết này nếu bạn muốn chơi cá cược trực tuyến an toàn!
tải về ngay lập tức
RG777 – Nhà Cái Uy Tín Hàng Đầu Việt Nam
Link tải app cá độ nét nhất 2023:RG777
Để đảm bảo việc tải ứng dụng cá cược của bạn an toàn và nhanh chóng, người chơi có thể sử dụng đường link sau.
tải về ngay lập tức
Мы рекомендуем посетить веб-сайт https://vektor-meh.ru//.
Кроме того, не забудьте добавить сайт в закладки: https://vektor-meh.ru/
motomagazinvfdvgd.vn.ua/uk/v-shlema/klassifikatsiya-shlema-is-otkrytyy/
В ТЕЧЕНИЕ нашем мотомагазине ваша милость посчитаете запасные части чтобы мотоциклов, скутеров, снегоходов и квадроциклов. У нас ваша милость хронически нахлынете масла для мотоциклов, фильтра, цепи.
мотоекіпіровка
App cá độ:Hướng dẫn tải app cá cược uy tín RG777 đúng cách
Bạn có biết? Tải app cá độ đúng cách sẽ giúp tiết kiệm thời gian đăng nhập, tăng tính an toàn và bảo mật cho tài khoản của bạn! Vậy đâu là cách để tải một app cá cược uy tín dễ dàng và chính xác? Xem ngay bài viết này nếu bạn muốn chơi cá cược trực tuyến an toàn!
tải về ngay lập tức
RG777 – Nhà Cái Uy Tín Hàng Đầu Việt Nam
Link tải app cá độ nét nhất 2023:RG777
Để đảm bảo việc tải ứng dụng cá cược của bạn an toàn và nhanh chóng, người chơi có thể sử dụng đường link sau.
tải về ngay lập tức
高雄外送茶
現代社會,快遞已成為大眾化的服務業,吸引了許多人的注意和參與。 與傳統夜店、酒吧不同,外帶提供了更私密、便捷的服務方式,讓人們有機會在家中或特定地點與美女共度美好時光。
多樣化選擇
從台灣到日本,馬來西亞到越南,外送業提供了多樣化的女孩選擇,以滿足不同人群的需求和喜好。 無論你喜歡什麼類型的女孩,你都可以在外賣行業找到合適的女孩。
不同的價格水平
價格範圍從實惠到豪華。 無論您的預算如何,您都可以找到適合您需求的女孩,享受優質的服務並度過愉快的時光。
快遞業高度重視安全和隱私保護,提供多種安全措施和保障,讓客戶放心使用服務,無需擔心個人資訊外洩或安全問題。
如果你想成為一名經驗豐富的外包司機,外包產業也將為你提供廣泛的選擇和專屬服務。 只需按照步驟操作,您就可以輕鬆享受快遞行業帶來的樂趣和便利。
蓬勃發展的快遞產業為人們提供了一種新的娛樂休閒方式,讓人們在忙碌的生活中得到放鬆,享受美好時光。
1xSlots Промокод (Бездепозитный Бонус 2024)
1xSlots промокод: NEXT777, при регистрации введите этот бонусный код, чтобы получить бонус для новых игроков в размере €1650 + 200 фриспинов. Чтобы получить этот бонус, вам нужно создать аккаунт и ввести специальный промокод казино 1хСлотс.
1xSlot Промокод
NEXT777
В казино 1xSlots 2024 доступны различные бонусы: бездепозитные при регистрации, промокоды, фриспины, кэшбэки и другие акции.
Промокод 1xSlots 2024: NEXT777 – введите код при регистрации в казино 1хСлот и получите приветственный бонус €1650 +200 фриспинов. Чтобы промокод 1xSlots на бездепозитный бонус сработал, необходимо указать рабочую комбинацию при регистрации и правильно заполнить форму анкеты. После завершения регистрации бездепозитный бонус будет доступен в личном кабинете. Рекомендуется не торопиться и сразу после создания аккаунта заполнить персональные данные. Важно указать требуемую информацию в полях, отмеченных звездочкой во вкладке “Профиль”, а также активировать контакты (номер телефона и e-mail).
Для новых клиентов промокод 1xSlots предоставляет уникальные возможности, позволяющие бесплатно опробовать один из представленных на платформе слотов. Чтобы получить бездепозитные фриспины, достаточно при регистрации указать промокод и выполнить простые условия акции, которые мы расскажем в данной статье. Игроки, желающие продолжить игру и сделать первый депозит, смогут получить щедрый приветственный бонус до €1500 и 150 бесплатных вращений.
Для получения бонуса на первый депозит необходимо пополнить счет на сумму не менее 10. Награда составляет 100% от суммы первого пополнения, но не может превышать 300. Если сумма пополнения превышает максимальный лимит, игрок получит свой депозит полностью, а также 300 в качестве бонуса. Для активации второго, третьего и четвертого этапов, сумма депозита должна быть не менее 15.
Кроме денежного вознаграждения, каждый этап сопровождается бесплатными прокрутками для игр компании:
– за первый депозит – 30 фриспинов для игры Book of Gold: Classic;
– за второй депозит – 35 фриспинов для игры в Legend of Cleopatra;
– за третий депозит – 40 фриспинов для игры в Solar Queen;
– за четвертый депозит – 45 фриспинов для игры в Imperial Fruits: 40 lines.
Казино 1xSlots предоставляет бонус поэтапно. Чтобы получить награду за второй и последующие депозиты, необходимо выполнить условия отыгрыша ранее полученных средств. Фриспины также начисляются поэтапно и зачисляются после выполнения условий отыгрыша.
Промокод для 1xСлотс: NEXT777. Получите бездепозитный приветственный пакет до €1650 +200 фриспинов. Компания 1xSlots предлагает своим клиентам ряд бонусных программ, самой популярной из которых является приветственный пакет с увеличением первого депозита и бесплатными вращениями. С использованием промокода вы можете получить до 1650 евро и 200 фриспинов. Одним из явных преимуществ 1xSlots является огромный выбор игр. Большую часть из доступных 10 тысяч развлечений занимают игровые автоматы. Пользователям предлагается более 100 различных провайдеров слотов.
Промокод не имеет срока действия. Любой пользователь, который создает аккаунт на сайте 1xSlots, может его активировать. Каждому игроку предоставляется только один бонус, поэтому промокод может быть использован только один раз. Чтобы воспользоваться промокодом, необходимо нажать на кнопку “Регистрация”, выбрать удобный способ создания аккаунта, указать все необходимые данные, подтвердить номер телефона или адрес электронной почты и ввести промокод. После этого можно завершить регистрацию, нажав на кнопку “Зарегистрироваться”.
1xSlots Промокод для Регистрации
Бонусы казино 1xSlots 2024 – Бездепозитные бонусы ? Коды на возврат средств ? VIP программа преданности ? Бесплатные фриспины.
Промокод 1xSlots при Регистрации: NEXT777 Получите эксклюзивный приветственный пакет до 1650 евро +150 фриспинов. Казино 1xSlots 2024 предлагает своим гостям не только широкий выбор игровых автоматов. На сайте казино регулярно проводятся бонусные акции, в рамках которых можно получить различные подарки, процент от депозита, фриспины и многое другое. При обычной регистрации есть ограничение по сумме – не более 1500 евро на первые четыре депозита. Первое пополнение – до 300 евро, второе – не более 350, третье – 400, четвертое – 450 евро. После ввода промокода лимит увеличивается до 1650 евро, а количество фриспинов возрастает с 150 до 200 вращений.
Получите бездепозитный бонус в размере 100 фриспинов в онлайн казино 1xSlots в 2024 году. Все активные бонус коды, промокоды и купоны от 1хСлотс (1xSlots) доступны как для новых, так и для существующих игроков. В клубе 1xSlots промокоды предоставляют дополнительные бонусы пользователям. Кроме того, в клубе проводятся множество турниров с крупными призовыми фондами, в которых может принять участие любой зарегистрированный игрок.
1xSlots фриспины промокод: NEXT777. Размер приветственного поощрения составляет 100 фриспинов в автомате Eye of Storm от провайдера Pragmatic Play. Время на его активацию неограничено. Подарок выдается единожды, попытки повторного создания учетной записи для получения фриспинов приравниваются к мошенническим действиям. Альтернативным способом получения бонус-кодов является активное заключение пари в системе. Вращая барабаны игровых автоматов и зарабатывая баллы можно получить право на фриспины, благодаря промо. Список промокодов 1xslots доступен непосредственно на официальном сайте. Чтобы получить бездепозитный бонус код для 1хслотс в 2024 году, следует выполнить следующие условия:
1. Активировать бонусные средства в личном кабинете;
2. Пополнить счет на €15 (или эквивалент в другой валюте) и более, чтобы привязать банковскую карту или онлайн-кошелек;
3. Выполнить условия вейджера: x25. Для этого необходимо поставить из своих денег сумму, равную выигрышу с бесплатных вращений, умноженную в 25 раз. На отыгрыш дается 7 дней с момента, когда вы прокрутили фриспины.
Максимальная сумма вознаграждения составляет 1650 евро. Ее необходимо отыграть с вейджером 35 раз. Казино предлагает релоад-бонусы, которые также нужно отыграть 35 раз. Однако особое место среди множества игр, слотов и турниров на 1xSlots занимает лайв-казино. Это казино, где игра происходит в режиме реального времени. Настоящие дилеры раздают карты и крутят рулетку за игровыми столами. Все эти действия передаются по видеосвязи. Благодаря такой видеотрансляции каждый игрок может почувствовать все эмоции и азарт игры в интерактивной атмосфере с профессиональными дилерами.
При регистрации на 1xSlots используйте промокод “NEXT777” и получите бездепозитный бонус в размере €1650 + 200 фриспинов. Казино 1xSlots радует своих игроков различными бонусами, такими как промокоды, фриспины и бездепозитные бонусы. Особенно щедрые подарки от казино 1xSlots предназначены для новичков.
В дополнение к бонусной программе онлайн казино 1xSlots предлагает кешбэк до 11%, начисляемый от суммы проигранных средств. Кешбэк не имеет срока отыгрыша. Сидя дома перед компьютером, удается почувствовать атмосферу присутствия в настоящем казино. Именно этими причинами объясняется такая популярность и широкий спрос лайв-казино.
промокоды для 1xslots без отыгрыша на сегодня – Бонус по промокоду 1хСлотс увеличивается с €1500 + 150 фриспинов до €1650 + 200 фриспинов.
Промокод 1xSlots на Сегодня: NEXT777 предоставляет вам возможность получить €1500 +150 FS при регистрации с использованием бонусного кода. Теперь бонус по промокоду составляет €1650 + 200 фриспинов, что на €150 больше, чем раньше. Это отличная возможность получить еще больше выгоды от игры. Казино 1xSlots 2024 – это платформа для игровых автоматов и Турниров. В казино 1хСлотс доступны различные бонусы, такие как промокоды, фриспины и бездепозитные бонусы. Особенно крупные подарки в казино 1xSlots предназначены для новичков.
Выгодная бонусная программа на сайте 1xslots позволяет как новичкам, так и опытным игрокам получать разнообразные подарки. Кроме того, это отличная возможность увеличить свой выигрыш. В казино 1xslots бонусы за депозиты и подарки не требуют дополнительных вложений. Используя фриспины и промокоды, вы можете получить хорошие деньги. Давайте подробнее рассмотрим, какие бонусы предлагает онлайн казино.
После прохождения регистрации игроку предлагается бонус на первые четыре операции по пополнению счета:
на первый депозит – 100% от внесенных средств и 30 фриспинов;
на второй депозит – 50% от внесенных средств и 35 фриспинов;
на третий депозит – 25% от внесенных средств и 40 фриспинов;
на четвертый депозит – 25% от внесенных средств и 45 фриспинов.
Промокод, также известный как код приглашения, является ключом-активатором приветственной программы для новичков. Если вы ранее не имели опыта игры в 1xSlots, то вы можете рассчитывать на получение щедрого подарка при регистрации – пакета из 1650 евро и 200 бесплатных прокруток. Согласно правилам бонусной акции, размер поощрения зависит от суммы первых четырех взносов и распределяется следующим образом: на депозитный бонус установлен максимальный лимит в 1500 евро. Чтобы получить подарок, игроку достаточно пройти процедуру регистрации, заполнить анкетные данные в личном кабинете и внести на счет профиля сумму от 10 евро.
При регистрации клиент может использовать промокод 1xSlots и получить дополнительный подарок.
1xSlots давно занимает прочные позиции в списке лучших брендов гемблинг-индустрии. Политика компании 1x ориентирована на опытных игроков, здесь пользователей ожидает продуманная программа лояльности, а также гарантии безопасности личной информации и депозита. Все действия осуществляются на основании лицензии 8048/JAZ2016-083, полученной от компании Orakum N.V., Кюрасао.
Промокод 1хСлот 2024: NEXT777 предоставляет бездепозитный бонус в виде 150 вращений в игре «The Dog House Megaways». В онлайн казино 1xslots доступны бесплатные промокоды на фриспины. Кроме того, игроки могут получать бонусные вращения не только за регистрацию или использование промокода от 1xSlots. Участие в бонусных акциях также позволяет пользователям получить фриспины. Казино 1хSlots предлагает различные варианты депозитов и выплат. Новые игроки, которые регистрируются на 1хSlots, получают приветственный пакет бонусов, однако с использованием промокода от 1xSlots этот бонус может быть еще более значительным. Для активации бонуса необходимо применить актуальный промокод при регистрации.
Приветственный пакет от 1xSlot доступен сразу после регистрации и требует активации через создание депозита. Бонус предоставляет умножение для первых четырех депозитов и дополнительные бесплатные вращения. Минимальная сумма для первого депозита составляет 10 евро, а для последующих пополнений – 15 евро. Максимальная сумма бонуса – 1500 евро.
Также новичкам предоставляются бонусы на второй, третий и четвертый депозит. Для получения подарка необходимо внести сумму не менее 15 евро. Игрокам также предоставляются фриспины и депозитные подарки. Для начисления фриспинов требуется подтверждение номера телефона.
Для постоянных игроков онлайн-казино 1xSlots проводит бонусные акции. Некоторые из них имеют временный характер, а другие действуют постоянно. В основном, пользователям предлагаются депозитные бонусы. Например, можно получить презент за пополнение счета в понедельник. За десятый депозит игроку полагается крупный депозитный бонус в размере 50% от вносимой суммы и 100 фриспинов.
В клубе 1xSlots также действует программа лояльности, которая предполагает различные привилегии для игроков.
Игрокам, активно делающим ставки в течение недели и ушедшим в минус, казино 1xSlots предлагает фриспины. Для получения бонуса не требуется пополнение счета, лимит на максимальный выигрыш и вейджер не устанавливаются.
Ежедневно в казино 1хСлотс назначается слот дня. При совершении ставок на определенную сумму в этом игровом аппарате игроку начисляются фриспины. Обратите внимание https://www.iesp.pa.gov.br/wp-content/pgs/?1xslots_codigo_promocional_bono_giros_gratis.html, время действия акции ограничено.
Разработчиками 1хСлотс было разработано мобильное казино. Такая версия представляет собой упрощенный вариант компьютерного формата онлайн казино. Она позволяет играть в любимые игры на любом устройстве, поддерживающем функцию выхода в интернет. В качестве такого устройства может быть смартфон или планшет.
Промокоды 1xBet на сегодня. Получите бесплатно при регистрации бонус. Активируйте промокоды и делайте ставки на футбол, хоккей и самые яркие состязания – Лиги Европы и Лиги Чемпионов. Отличительная особенность букмекера – возможность использования куда вводить промокод в 1хбет в приложении или для активных клиентов, уже имеющих учетную запись. Они обеспечивают двойной депозит, бесплатную ставку (фрибет), специальный бонус на день рождения и многое другое. Актуальные бонусные коды для новичков за регистрацию, способы получения и активации, bonus программа на официальном сайте букмекера 1хБет. Бесплатные промокоды при регистрации в 2024 году в 1xBet – более подробно в этом материале http://lipetskregionsport.ru/news/pages/1xbet_promokod.html
1xSlots Промокод (Бездепозитный Бонус 2024)
1xSlots промокод: NEXT777, при регистрации введите этот бонусный код, чтобы получить бонус для новых игроков в размере €1650 + 200 фриспинов. Чтобы получить этот бонус, вам нужно создать аккаунт и ввести специальный промокод казино 1хСлотс.
1xSlot Промокод
NEXT777
В казино 1xSlots 2024 доступны различные бонусы: бездепозитные при регистрации, промокоды, фриспины, кэшбэки и другие акции.
Промокод 1xSlots 2024: NEXT777 – введите код при регистрации в казино 1хСлот и получите приветственный бонус €1650 +200 фриспинов. Чтобы промокод 1xSlots на бездепозитный бонус сработал, необходимо указать рабочую комбинацию при регистрации и правильно заполнить форму анкеты. После завершения регистрации бездепозитный бонус будет доступен в личном кабинете. Рекомендуется не торопиться и сразу после создания аккаунта заполнить персональные данные. Важно указать требуемую информацию в полях, отмеченных звездочкой во вкладке “Профиль”, а также активировать контакты (номер телефона и e-mail).
Для новых клиентов промокод 1xSlots предоставляет уникальные возможности, позволяющие бесплатно опробовать один из представленных на платформе слотов. Чтобы получить бездепозитные фриспины, достаточно при регистрации указать промокод и выполнить простые условия акции, которые мы расскажем в данной статье. Игроки, желающие продолжить игру и сделать первый депозит, смогут получить щедрый приветственный бонус до €1500 и 150 бесплатных вращений.
Для получения бонуса на первый депозит необходимо пополнить счет на сумму не менее 10. Награда составляет 100% от суммы первого пополнения, но не может превышать 300. Если сумма пополнения превышает максимальный лимит, игрок получит свой депозит полностью, а также 300 в качестве бонуса. Для активации второго, третьего и четвертого этапов, сумма депозита должна быть не менее 15.
Кроме денежного вознаграждения, каждый этап сопровождается бесплатными прокрутками для игр компании:
– за первый депозит – 30 фриспинов для игры Book of Gold: Classic;
– за второй депозит – 35 фриспинов для игры в Legend of Cleopatra;
– за третий депозит – 40 фриспинов для игры в Solar Queen;
– за четвертый депозит – 45 фриспинов для игры в Imperial Fruits: 40 lines.
Казино 1xSlots предоставляет бонус поэтапно. Чтобы получить награду за второй и последующие депозиты, необходимо выполнить условия отыгрыша ранее полученных средств. Фриспины также начисляются поэтапно и зачисляются после выполнения условий отыгрыша.
Промокод для 1xСлотс: NEXT777. Получите бездепозитный приветственный пакет до €1650 +200 фриспинов. Компания 1xSlots предлагает своим клиентам ряд бонусных программ, самой популярной из которых является приветственный пакет с увеличением первого депозита и бесплатными вращениями. С использованием промокода вы можете получить до 1650 евро и 200 фриспинов. Одним из явных преимуществ 1xSlots является огромный выбор игр. Большую часть из доступных 10 тысяч развлечений занимают игровые автоматы. Пользователям предлагается более 100 различных провайдеров слотов.
Промокод не имеет срока действия. Любой пользователь, который создает аккаунт на сайте 1xSlots, может его активировать. Каждому игроку предоставляется только один бонус, поэтому промокод может быть использован только один раз. Чтобы воспользоваться промокодом, необходимо нажать на кнопку “Регистрация”, выбрать удобный способ создания аккаунта, указать все необходимые данные, подтвердить номер телефона или адрес электронной почты и ввести промокод. После этого можно завершить регистрацию, нажав на кнопку “Зарегистрироваться”.
1xSlots Промокод для Регистрации
Бонусы казино 1xSlots 2024 – Бездепозитные бонусы ? Коды на возврат средств ? VIP программа преданности ? Бесплатные фриспины.
Промокод 1xSlots при Регистрации: NEXT777 Получите эксклюзивный приветственный пакет до 1650 евро +150 фриспинов. Казино 1xSlots 2024 предлагает своим гостям не только широкий выбор игровых автоматов. На сайте казино регулярно проводятся бонусные акции, в рамках которых можно получить различные подарки, процент от депозита, фриспины и многое другое. При обычной регистрации есть ограничение по сумме – не более 1500 евро на первые четыре депозита. Первое пополнение – до 300 евро, второе – не более 350, третье – 400, четвертое – 450 евро. После ввода промокода лимит увеличивается до 1650 евро, а количество фриспинов возрастает с 150 до 200 вращений.
Получите бездепозитный бонус в размере 100 фриспинов в онлайн казино 1xSlots в 2024 году. Все активные бонус коды, промокоды и купоны от 1хСлотс (1xSlots) доступны как для новых, так и для существующих игроков. В клубе 1xSlots промокоды предоставляют дополнительные бонусы пользователям. Кроме того, в клубе проводятся множество турниров с крупными призовыми фондами, в которых может принять участие любой зарегистрированный игрок.
1xSlots фриспины промокод: NEXT777. Размер приветственного поощрения составляет 100 фриспинов в автомате Eye of Storm от провайдера Pragmatic Play. Время на его активацию неограничено. Подарок выдается единожды, попытки повторного создания учетной записи для получения фриспинов приравниваются к мошенническим действиям. Альтернативным способом получения бонус-кодов является активное заключение пари в системе. Вращая барабаны игровых автоматов и зарабатывая баллы можно получить право на фриспины, благодаря промо. Список промокодов 1xslots доступен непосредственно на официальном сайте. Чтобы получить бездепозитный бонус код для 1хслотс в 2024 году, следует выполнить следующие условия:
1. Активировать бонусные средства в личном кабинете;
2. Пополнить счет на €15 (или эквивалент в другой валюте) и более, чтобы привязать банковскую карту или онлайн-кошелек;
3. Выполнить условия вейджера: x25. Для этого необходимо поставить из своих денег сумму, равную выигрышу с бесплатных вращений, умноженную в 25 раз. На отыгрыш дается 7 дней с момента, когда вы прокрутили фриспины.
Максимальная сумма вознаграждения составляет 1650 евро. Ее необходимо отыграть с вейджером 35 раз. Казино предлагает релоад-бонусы, которые также нужно отыграть 35 раз. Однако особое место среди множества игр, слотов и турниров на 1xSlots занимает лайв-казино. Это казино, где игра происходит в режиме реального времени. Настоящие дилеры раздают карты и крутят рулетку за игровыми столами. Все эти действия передаются по видеосвязи. Благодаря такой видеотрансляции каждый игрок может почувствовать все эмоции и азарт игры в интерактивной атмосфере с профессиональными дилерами.
При регистрации на 1xSlots используйте промокод “NEXT777” и получите бездепозитный бонус в размере €1650 + 200 фриспинов. Казино 1xSlots радует своих игроков различными бонусами, такими как промокоды, фриспины и бездепозитные бонусы. Особенно щедрые подарки от казино 1xSlots предназначены для новичков.
В дополнение к бонусной программе онлайн казино 1xSlots предлагает кешбэк до 11%, начисляемый от суммы проигранных средств. Кешбэк не имеет срока отыгрыша. Сидя дома перед компьютером, удается почувствовать атмосферу присутствия в настоящем казино. Именно этими причинами объясняется такая популярность и широкий спрос лайв-казино.
промокод для 1xslots на сегодня бездепозитный – Бонус по промокоду 1хСлотс увеличивается с €1500 + 150 фриспинов до €1650 + 200 фриспинов.
Промокод 1xSlots на Сегодня: NEXT777 предоставляет вам возможность получить €1500 +150 FS при регистрации с использованием бонусного кода. Теперь бонус по промокоду составляет €1650 + 200 фриспинов, что на €150 больше, чем раньше. Это отличная возможность получить еще больше выгоды от игры. Казино 1xSlots 2024 – это платформа для игровых автоматов и Турниров. В казино 1хСлотс доступны различные бонусы, такие как промокоды, фриспины и бездепозитные бонусы. Особенно крупные подарки в казино 1xSlots предназначены для новичков.
Выгодная бонусная программа на сайте 1xslots позволяет как новичкам, так и опытным игрокам получать разнообразные подарки. Кроме того, это отличная возможность увеличить свой выигрыш. В казино 1xslots бонусы за депозиты и подарки не требуют дополнительных вложений. Используя фриспины и промокоды, вы можете получить хорошие деньги. Давайте подробнее рассмотрим, какие бонусы предлагает онлайн казино.
После прохождения регистрации игроку предлагается бонус на первые четыре операции по пополнению счета:
на первый депозит – 100% от внесенных средств и 30 фриспинов;
на второй депозит – 50% от внесенных средств и 35 фриспинов;
на третий депозит – 25% от внесенных средств и 40 фриспинов;
на четвертый депозит – 25% от внесенных средств и 45 фриспинов.
Промокод, также известный как код приглашения, является ключом-активатором приветственной программы для новичков. Если вы ранее не имели опыта игры в 1xSlots, то вы можете рассчитывать на получение щедрого подарка при регистрации – пакета из 1650 евро и 200 бесплатных прокруток. Согласно правилам бонусной акции, размер поощрения зависит от суммы первых четырех взносов и распределяется следующим образом: на депозитный бонус установлен максимальный лимит в 1500 евро. Чтобы получить подарок, игроку достаточно пройти процедуру регистрации, заполнить анкетные данные в личном кабинете и внести на счет профиля сумму от 10 евро.
При регистрации клиент может использовать промокод 1xSlots и получить дополнительный подарок.
1xSlots давно занимает прочные позиции в списке лучших брендов гемблинг-индустрии. Политика компании 1x ориентирована на опытных игроков, здесь пользователей ожидает продуманная программа лояльности, а также гарантии безопасности личной информации и депозита. Все действия осуществляются на основании лицензии 8048/JAZ2016-083, полученной от компании Orakum N.V., Кюрасао.
Промокод 1хСлот 2024: NEXT777 предоставляет бездепозитный бонус в виде 150 вращений в игре «The Dog House Megaways». В онлайн казино 1xslots доступны бесплатные промокоды на фриспины. Кроме того, игроки могут получать бонусные вращения не только за регистрацию или использование промокода от 1xSlots. Участие в бонусных акциях также позволяет пользователям получить фриспины. Казино 1хSlots предлагает различные варианты депозитов и выплат. Новые игроки, которые регистрируются на 1хSlots, получают приветственный пакет бонусов, однако с использованием промокода от 1xSlots этот бонус может быть еще более значительным. Для активации бонуса необходимо применить актуальный промокод при регистрации.
Приветственный пакет от 1xSlot доступен сразу после регистрации и требует активации через создание депозита. Бонус предоставляет умножение для первых четырех депозитов и дополнительные бесплатные вращения. Минимальная сумма для первого депозита составляет 10 евро, а для последующих пополнений – 15 евро. Максимальная сумма бонуса – 1500 евро.
Также новичкам предоставляются бонусы на второй, третий и четвертый депозит. Для получения подарка необходимо внести сумму не менее 15 евро. Игрокам также предоставляются фриспины и депозитные подарки. Для начисления фриспинов требуется подтверждение номера телефона.
Для постоянных игроков онлайн-казино 1xSlots проводит бонусные акции. Некоторые из них имеют временный характер, а другие действуют постоянно. В основном, пользователям предлагаются депозитные бонусы. Например, можно получить презент за пополнение счета в понедельник. За десятый депозит игроку полагается крупный депозитный бонус в размере 50% от вносимой суммы и 100 фриспинов.
В клубе 1xSlots также действует программа лояльности, которая предполагает различные привилегии для игроков.
Игрокам, активно делающим ставки в течение недели и ушедшим в минус, казино 1xSlots предлагает фриспины. Для получения бонуса не требуется пополнение счета, лимит на максимальный выигрыш и вейджер не устанавливаются.
Ежедневно в казино 1хСлотс назначается слот дня. При совершении ставок на определенную сумму в этом игровом аппарате игроку начисляются фриспины. Обратите внимание https://www.iesp.pa.gov.br/wp-content/pgs/?1xslots_codigo_promocional_bono_giros_gratis.html, время действия акции ограничено.
Разработчиками 1хСлотс было разработано мобильное казино. Такая версия представляет собой упрощенный вариант компьютерного формата онлайн казино. Она позволяет играть в любимые игры на любом устройстве, поддерживающем функцию выхода в интернет. В качестве такого устройства может быть смартфон или планшет.
Отечественный изготовитель продает тренировочные диски на сайте https://diski-dlya-shtang.ru для напряженной работы в коммерческих тренажерных центрах и в домашних условиях. Российский завод создает тренировочные диски разного посадочного диаметра и любого востребованного веса для разборных штанг. Советуем к заказу обрезиненные тренировочные диски для силовых тренировок. Они не выскальзывают, не гремят и более безопасны. Производимые изделия не нуждаются в постоянном обслуживании и рассчитаны на длительную работу в дома, в квартире. Рекомендуем большой каталог олимпийских блинов с любым видом защитного покрытия. Купите веса с нужной массой и посадочным диаметром по низким ценам напрямую у завода-производителя.
legal online pharmacy
1. 10 лучших идей для дизайна интерьера
2. Топ-20 трендов в дизайне на 2021 год
3. Как выбрать идеальный цветовой акцент в дизайне
4. Дизайн-проект
5. Дизайн нового поколения
6. Дизайн спальни
7. Дизайнерские решения для увеличения пространства в маленькой квартире
8. Как интегрировать природные элементы в дизайн интерьера
9. Основы дизайна
10. Дизайн-студия: секреты успешного бизнеса в сфере дизайна
11. Дизайн в XXI веке
12. Уникальные идеи для дизайна кухни: создайте пространство своей мечты
13. Дизайн мебели
14. Мастер-класс по созданию стильного дизайна гостиной
15. Минимализм
16. Дизайн сада
17. Декорирование дома с использованием текстиля: советы и идеи
18. Принципы цветового баланса в дизайне: как создать гармоничное пространство
19. Топ-10 книг по дизайну интерьера, которые стоит прочитать
20. Дизайн комнаты для подростка: креативные идеи для стильного интерьера
проект дизайн интерьера проект дизайн интерьера .
App cá độ:Hướng dẫn tải app cá cược uy tín RG777 đúng cách
Bạn có biết? Tải app cá độ đúng cách sẽ giúp tiết kiệm thời gian đăng nhập, tăng tính an toàn và bảo mật cho tài khoản của bạn! Vậy đâu là cách để tải một app cá cược uy tín dễ dàng và chính xác? Xem ngay bài viết này nếu bạn muốn chơi cá cược trực tuyến an toàn!
tải về ngay lập tức
RG777 – Nhà Cái Uy Tín Hàng Đầu Việt Nam
Link tải app cá độ nét nhất 2023:RG777
Để đảm bảo việc tải ứng dụng cá cược của bạn an toàn và nhanh chóng, người chơi có thể sử dụng đường link sau.
tải về ngay lập tức
купить аттестат за 11 2diplom-grupp.ru .
online pharmacy pain relief
online pharmacy pain medicine
zestoretic 20 price
1. Идеи для дизайна интерьера
2. Тренды в дизайне
3. Как выбрать идеальный цветовой акцент в дизайне
4. Дизайн-проект
5. Дизайн нового поколения
6. Дизайн спальни
7. Дизайн для маленькой квартиры
8. Как интегрировать природные элементы в дизайн интерьера
9. Баланс цветов и форм: основы хорошего дизайна
10. Дизайнерский бизнес
11. Интересные факты о развитии дизайна в XXI веке
12. Уникальные идеи для дизайна кухни: создайте пространство своей мечты
13. Тенденции в сфере дизайна мебели: вдохновляющие идеи
14. Дизайн гостиной
15. Минимализм
16. Дизайн сада
17. Декорирование дома с использованием текстиля: советы и идеи
18. Принципы цветового баланса в дизайне: как создать гармоничное пространство
19. Топ-10 книг по дизайну интерьера, которые стоит прочитать
20. Дизайн подростковой комнаты
дизайн студия https://studiya-dizajna-intererov.ru/ .
Промокод 1xBet на сегодня можно получить прямо на сайте букмекерской компании. Сделать это станет возможным благодаря переходу по рабочей ссылке, содержащей промокод. Подобного рода бонусы могут использовать и постоянные и новые клиенты конторы. Благодаря проведению таких акций интерес игроков к ставкам остаётся высоким. Содержание. промокод на день рождения 1хбет условия. Как получить и что дает промокод в 1xbet? Где вводить промокод в 1xbet? Рабочие промокоды 1xBet на сегодня. Действующие промокоды 1xBet на сегодня. Узнайте как ввести промо код 1хБет при регистрации и получить 32500 рублей на бесплатную ставку. Как активировать и использовать промокод на 1 xBet. Список рабочих бонус кодов – более подробно в этом материале http://lipetskregionsport.ru/news/pages/1xbet_promokod.html
zestril 5 mg tablet
When someone writes an article he/she maintains the plan of a user in his/her mind that how a user can know it.
Thus that’s why this piece of writing is perfect.
Thanks!
Бесплатные промокоды 1xBet при регистрации 2024. Получить бонус на сумму 32500 рублей могут все новые участники клуба. Регистрируйте аккаунт по электронной почте или через привязку аккаунтов популярных социальных сетей и получайте бонусом до 32500 рублей на первый депозит. Для зачисления бонусов необходимо пополнить счет с банковской карты или электронного кошелька, не забыв при этом указать промокоды для 1хбет бесплатно при регистрации 1XFREE777. Для того чтобы бонус стал доступен к снятию необходимо выполнить простое условие. Выбирайте любое событие, на которое принимаются ставки с коэффициентом от 1.4 и выше – более подробно в этом материале http://lipetskregionsport.ru/news/pages/1xbet_promokod.html
slot game point
JDBslot
JDB slot | The first bonus to rock the slot world
Exclusive event to earn real money and slot game points
JDB demo slot games for free = ?? Lucky Spin Lucky Draw!
How to earn reels free 2000? follow jdb slot games for free
#jdbslot
Demo making money : https://jdb777.com
#jdbslot #slotgamesforfree #howtoearnreels #cashreels
#slotgamepoint #demomakingmoney
Cash reels only at slot games for free
More professional jdb game bonus knowledge
Ways to Acquire Spins Credit Gratis 2000: Your Ultimate Instruction to Winning Big with JDB One-armed bandits
Are you you ready to embark on an exhilarating voyage into the globe of internet slot games? Hunt no farther, only twist to JDB777 FreeGames, where thrills and large wins look forward to you at every single twist of the reel. In this all-encompassing instruction, we’ll present you how to gain reels credits gratis 2000 and uncover the stimulating world of JDB slots.
Undergo the Thrill of Gaming Games for Free
At JDB777 FreeGames, we supply a extensive choice of captivating slot games that are sure to keep you entertained for hours on end. From traditional fruit machines to immersive themed slots, there’s something for each variety of player to enjoy. And the finest part? You can play all of our slot games for free and win real cash prizes!
Release Free Cash Reels and Succeed Big
One of the most exhilarating features of JDB777 FreeGames is the possibility to acquire reels credits complimentary 2000, which can be exchanged for real cash. Simply sign up for an account, and you’ll acquire your gratis bonus to begin spinning and winning. With our plentiful promotions and bonuses, the sky’s the limit when it comes to your winnings!
Direct Strategies and Points System
To maximize your winnings and uncover the entire potential of our slot games, it’s vital to comprehend the tactics and points system. Our professional guides will take you through everything you require to know, from choosing out the right games to apprehending how to gain bonus points and cash prizes.
Exclusive Promotions and Exclusive Offers
As a member of JDB777 FreeGames, you’ll have access to exclusive promotions and special offers that are guaranteed to improve your gaming experience. From welcome bonuses to daily rebates, there are a great deal of opportunities to enhance your winnings and take your gameplay to the subsequent level.
Join Us Today and Initiate Winning
Don’t miss out on your chance to win big with JDB777 FreeGames. Sign up now to claim your gratis bonus of 2000 credits and begin spinning the reels for your likelihood to win real cash prizes. With our exhilarating range of slot games and generous promotions, the potentialities are endless. Join us today and begin winning!
developer bet
JDB demo
JDB demo | The easiest bet software to use (jdb games)
JDB bet marketing: The first bonus that players care about
Most popular player bonus: Daily Play 2000 Rewards
Game developers online who are always with you
#jdbdemo
Where to find the best game developer? https://www.jdbgaming.com/
#gamedeveloperonline #betsoftware #betmarketing
#developerbet #betingsoftware #gamedeveloper
Supports hot jdb demo beting software jdb angry bird
JDB slot demo supports various competition plans
Unlocking Success with JDB Gaming: Your Ultimate Wager Software Resolution
In the world of internet gaming, finding the appropriate wager software is crucial for success. Enter JDB Gaming – a leading provider of creative gaming strategies tailored to enhance the player experience and drive earnings for operators. With a emphasis on intuitive interfaces, attractive bonuses, and a diverse assortment of games, JDB Gaming shines as a top choice for both players and operators alike.
JDB Demo offers a look into the realm of JDB Gaming, offering players with an chance to feel the excitement of betting without any danger. With user-friendly interfaces and effortless navigation, JDB Demo makes it simple for players to discover the broad selection of games on offer, from classic slots to immersive arcade titles.
When it regards bonuses, JDB Bet Marketing leads with attractive offers that draw players and hold them returning for more. From the popular Daily Play 2000 Rewards to special promotions, JDB Bet Marketing ensures that players are recognized for their loyalty and dedication.
With so several game developers online, locating the best can be a daunting task. However, JDB Gaming distinguishes itself from the crowd with its commitment to excellence and innovation. With over 150 online casino games to select, JDB Gaming offers something for all, whether you’re a fan of slots, fish shooting games, arcade titles, card games, or bingo.
At the center of JDB Gaming lies a devotion to providing the greatest possible gaming experience for players. With a emphasis on Asian culture and impressive 3D animations, JDB Gaming sets itself apart as a front runner in the industry. Whether you’re a gamer looking for excitement or an provider looking for a dependable partner, JDB Gaming has you covered.
API Integration: Smoothly integrate with all platforms for ultimate business chances. Big Data Analysis: Remain ahead of market trends and comprehend player actions with extensive data analysis. 24/7 Technical Support: Relish peace of mind with professional and trustworthy technical support available 24/7.
In conclusion, JDB Gaming provides a victorious blend of cutting-edge technology, appealing bonuses, and unequaled support. Whether you’re a gamer or an provider, JDB Gaming has everything you need to excel in the arena of online gaming. So why wait? Join the JDB Gaming family today and release your full potential!
betvisa app
Intro
betvisa vietnam
Betvisa vietnam | Grand Prize Breakout!
Betway Highlights | 499,000 Extra Bonus on betvisa com!
Cockfight to win up to 3,888,000 on betvisa game
Daily Deposit, Sunday Bonus on betvisa app 888,000!
#betvisavietnam
200% Bonus on instant deposits—start your win streak!
200% welcome bonus! Slots and Fishing Games
https://www.betvisa.com/
#betvisavietnam #betvisagame #betvisaapp
#betvisacom #betvisacasinoapp
Birthday bash? Up to 1,800,000 in prizes! Enjoy!
Friday Shopping Frenzy betvisa vietnam 100,000 VND!
Betvisa Casino App Daily Login 12% Bonus Up to 1,500,000VND!
Tìm hiểu Thế Giới Cá Cược Trực Tuyến với BetVisa!
Dịch vụ BetVisa, một trong những công ty trò chơi hàng đầu tại châu Á, ra đời vào năm 2017 và thao tác dưới phê chuẩn của Curacao, đã thu hút hơn 2 triệu người dùng trên toàn thế giới. Với cam kết đem đến trải nghiệm cá cược đảm bảo và tin cậy nhất, BetVisa sớm trở thành lựa chọn hàng đầu của người chơi trực tuyến.
BetVisa không dừng lại ở việc cung cấp các trò chơi phong phú như xổ số, sòng bạc trực tiếp, thể thao trực tiếp và thể thao điện tử, mà còn mang đến cho người chơi những ưu đãi hấp dẫn. Thành viên mới đăng ký sẽ được tặng ngay 5 phần quà miễn phí và có cơ hội giành giải thưởng lớn.
Đặc biệt, BetVisa hỗ trợ nhiều hình thức thanh toán linh hoạt như Betvisa Vietnam, cùng với các ưu đãi độc quyền như thưởng chào mừng lên đến 200%. Bên cạnh đó, hàng tuần còn có các chương trình khuyến mãi độc đáo như chương trình giải thưởng Sinh Nhật và Chủ Nhật Mua Sắm Điên Cuồng, mang đến cho người chơi cơ hội thắng lớn.
Do tính lời hứa về kinh nghiệm cá cược tốt hơn nhất và dịch vụ khách hàng chuyên nghiệp, BetVisa tự hào là điểm đến lý tưởng cho những ai phấn khích trò chơi trực tuyến. Hãy ghi danh ngay hôm nay và bắt đầu hành trình của bạn tại BetVisa – nơi niềm vui và may mắn chính là điều quan trọng.
JDB online
JDB online | 2024 best online slot game demo cash
How to earn reels? jdb online accumulate spin get bonus
Hot demo fun: Quick earn bonus for ranking demo
JDB demo for win? JDB reward can be exchanged to real cash
#jdbonline
777 sign up and get free 2,000 cash: https://www.jdb777.io/
#jdbonline #democash #demofun #777signup
#rankingdemo #demoforwin
2000 cash: Enter email to verify, enter verify, claim jdb bonus
Play with JDB games an online platform in every countries.
Enjoy the Joy of Gaming!
Complimentary to Join, Gratis to Play.
Register and Obtain a Bonus!
REGISTER NOW AND OBTAIN 2000?
We encourage you to claim a demonstration enjoyable welcome bonus for all new members! Plus, there are other special promotions waiting for you!
Learn more
JDB – JOIN FOR FREE
Straightforward to play, real profit
Join JDB today and indulge in fantastic games without any investment! With a wide array of free games, you can savor pure entertainment at any time.
Rapid play, quick join
Value your time and opt for JDB’s swift games. Just a few easy steps and you’re set for an amazing gaming experience!
Sign Up now and generate money
Experience JDB: Instant play with no investment and the opportunity to win cash. Designed for effortless and lucrative play.
Submerge into the World of Online Gaming Excitement with Fun Slots Online!
Are you ready to undergo the thrill of online gaming like never before? Look no further than Fun Slots Online, your ultimate hub for exhilarating gameplay, endless entertainment, and exciting winning opportunities!
At Fun Slots Online, we boast ourselves on presenting a wide array of captivating games designed to maintain you involved and pleased for hours on end. From classic slot machines to innovative new releases, there’s something for all to relish. Plus, with our user-friendly interface and effortless gameplay experience, you’ll have no trouble diving straight into the activity and enjoying every moment.
But that’s not all – we also present a range of special promotions and bonuses to recompense our loyal players. From introductory bonuses for new members to privileged rewards for our top players, there’s always something exhilarating happening at Fun Slots Online. And with our protected payment system and 24-hour customer support, you can experience peace of mind conscious that you’re in good hands every step of the way.
So why wait? Join Fun Slots Online today and begin your adventure towards thrilling victories and jaw-dropping prizes. Whether you’re a seasoned gamer or just starting out, there’s never been a better time to be part of the fun and thrills at Fun Slots Online. Sign up now and let the games begin!
trust pharmacy
1xSlots Промокод (Бездепозитный Бонус 2024)
1xSlots промокод: NEXT777, при регистрации введите этот бонусный код, чтобы получить бонус для новых игроков в размере €1650 + 200 фриспинов. Чтобы получить этот бонус, вам нужно создать аккаунт и ввести специальный промокод казино 1хСлотс.
1xSlot Промокод
NEXT777
В казино 1xSlots 2024 доступны различные бонусы: бездепозитные при регистрации, промокоды, фриспины, кэшбэки и другие акции.
Промокод 1xSlots 2024: NEXT777 – введите код при регистрации в казино 1хСлот и получите приветственный бонус €1650 +200 фриспинов. Чтобы промокод 1xSlots на бездепозитный бонус сработал, необходимо указать рабочую комбинацию при регистрации и правильно заполнить форму анкеты. После завершения регистрации бездепозитный бонус будет доступен в личном кабинете. Рекомендуется не торопиться и сразу после создания аккаунта заполнить персональные данные. Важно указать требуемую информацию в полях, отмеченных звездочкой во вкладке “Профиль”, а также активировать контакты (номер телефона и e-mail).
Для новых клиентов промокод 1xSlots предоставляет уникальные возможности, позволяющие бесплатно опробовать один из представленных на платформе слотов. Чтобы получить бездепозитные фриспины, достаточно при регистрации указать промокод и выполнить простые условия акции, которые мы расскажем в данной статье. Игроки, желающие продолжить игру и сделать первый депозит, смогут получить щедрый приветственный бонус до €1500 и 150 бесплатных вращений.
Для получения бонуса на первый депозит необходимо пополнить счет на сумму не менее 10. Награда составляет 100% от суммы первого пополнения, но не может превышать 300. Если сумма пополнения превышает максимальный лимит, игрок получит свой депозит полностью, а также 300 в качестве бонуса. Для активации второго, третьего и четвертого этапов, сумма депозита должна быть не менее 15.
Кроме денежного вознаграждения, каждый этап сопровождается бесплатными прокрутками для игр компании:
– за первый депозит – 30 фриспинов для игры Book of Gold: Classic;
– за второй депозит – 35 фриспинов для игры в Legend of Cleopatra;
– за третий депозит – 40 фриспинов для игры в Solar Queen;
– за четвертый депозит – 45 фриспинов для игры в Imperial Fruits: 40 lines.
Казино 1xSlots предоставляет бонус поэтапно. Чтобы получить награду за второй и последующие депозиты, необходимо выполнить условия отыгрыша ранее полученных средств. Фриспины также начисляются поэтапно и зачисляются после выполнения условий отыгрыша.
Промокод для 1xСлотс: NEXT777. Получите бездепозитный приветственный пакет до €1650 +200 фриспинов. Компания 1xSlots предлагает своим клиентам ряд бонусных программ, самой популярной из которых является приветственный пакет с увеличением первого депозита и бесплатными вращениями. С использованием промокода вы можете получить до 1650 евро и 200 фриспинов. Одним из явных преимуществ 1xSlots является огромный выбор игр. Большую часть из доступных 10 тысяч развлечений занимают игровые автоматы. Пользователям предлагается более 100 различных провайдеров слотов.
Промокод не имеет срока действия. Любой пользователь, который создает аккаунт на сайте 1xSlots, может его активировать. Каждому игроку предоставляется только один бонус, поэтому промокод может быть использован только один раз. Чтобы воспользоваться промокодом, необходимо нажать на кнопку “Регистрация”, выбрать удобный способ создания аккаунта, указать все необходимые данные, подтвердить номер телефона или адрес электронной почты и ввести промокод. После этого можно завершить регистрацию, нажав на кнопку “Зарегистрироваться”.
1xSlots Промокод для Регистрации
Бонусы казино 1xSlots 2024 – Бездепозитные бонусы ? Коды на возврат средств ? VIP программа преданности ? Бесплатные фриспины.
Промокод 1xSlots при Регистрации: NEXT777 Получите эксклюзивный приветственный пакет до 1650 евро +150 фриспинов. Казино 1xSlots 2024 предлагает своим гостям не только широкий выбор игровых автоматов. На сайте казино регулярно проводятся бонусные акции, в рамках которых можно получить различные подарки, процент от депозита, фриспины и многое другое. При обычной регистрации есть ограничение по сумме – не более 1500 евро на первые четыре депозита. Первое пополнение – до 300 евро, второе – не более 350, третье – 400, четвертое – 450 евро. После ввода промокода лимит увеличивается до 1650 евро, а количество фриспинов возрастает с 150 до 200 вращений.
Получите бездепозитный бонус в размере 100 фриспинов в онлайн казино 1xSlots в 2024 году. Все активные бонус коды, промокоды и купоны от 1хСлотс (1xSlots) доступны как для новых, так и для существующих игроков. В клубе 1xSlots промокоды предоставляют дополнительные бонусы пользователям. Кроме того, в клубе проводятся множество турниров с крупными призовыми фондами, в которых может принять участие любой зарегистрированный игрок.
1xSlots фриспины промокод: NEXT777. Размер приветственного поощрения составляет 100 фриспинов в автомате Eye of Storm от провайдера Pragmatic Play. Время на его активацию неограничено. Подарок выдается единожды, попытки повторного создания учетной записи для получения фриспинов приравниваются к мошенническим действиям. Альтернативным способом получения бонус-кодов является активное заключение пари в системе. Вращая барабаны игровых автоматов и зарабатывая баллы можно получить право на фриспины, благодаря промо. Список промокодов 1xslots доступен непосредственно на официальном сайте. Чтобы получить бездепозитный бонус код для 1хслотс в 2024 году, следует выполнить следующие условия:
1. Активировать бонусные средства в личном кабинете;
2. Пополнить счет на €15 (или эквивалент в другой валюте) и более, чтобы привязать банковскую карту или онлайн-кошелек;
3. Выполнить условия вейджера: x25. Для этого необходимо поставить из своих денег сумму, равную выигрышу с бесплатных вращений, умноженную в 25 раз. На отыгрыш дается 7 дней с момента, когда вы прокрутили фриспины.
Максимальная сумма вознаграждения составляет 1650 евро. Ее необходимо отыграть с вейджером 35 раз. Казино предлагает релоад-бонусы, которые также нужно отыграть 35 раз. Однако особое место среди множества игр, слотов и турниров на 1xSlots занимает лайв-казино. Это казино, где игра происходит в режиме реального времени. Настоящие дилеры раздают карты и крутят рулетку за игровыми столами. Все эти действия передаются по видеосвязи. Благодаря такой видеотрансляции каждый игрок может почувствовать все эмоции и азарт игры в интерактивной атмосфере с профессиональными дилерами.
При регистрации на 1xSlots используйте промокод “NEXT777” и получите бездепозитный бонус в размере €1650 + 200 фриспинов. Казино 1xSlots радует своих игроков различными бонусами, такими как промокоды, фриспины и бездепозитные бонусы. Особенно щедрые подарки от казино 1xSlots предназначены для новичков.
В дополнение к бонусной программе онлайн казино 1xSlots предлагает кешбэк до 11%, начисляемый от суммы проигранных средств. Кешбэк не имеет срока отыгрыша. Сидя дома перед компьютером, удается почувствовать атмосферу присутствия в настоящем казино. Именно этими причинами объясняется такая популярность и широкий спрос лайв-казино.
1xslots бездепозитный бонус за регистрацию промокод – Бонус по промокоду 1хСлотс увеличивается с €1500 + 150 фриспинов до €1650 + 200 фриспинов.
Промокод 1xSlots на Сегодня: NEXT777 предоставляет вам возможность получить €1500 +150 FS при регистрации с использованием бонусного кода. Теперь бонус по промокоду составляет €1650 + 200 фриспинов, что на €150 больше, чем раньше. Это отличная возможность получить еще больше выгоды от игры. Казино 1xSlots 2024 – это платформа для игровых автоматов и Турниров. В казино 1хСлотс доступны различные бонусы, такие как промокоды, фриспины и бездепозитные бонусы. Особенно крупные подарки в казино 1xSlots предназначены для новичков.
Выгодная бонусная программа на сайте 1xslots позволяет как новичкам, так и опытным игрокам получать разнообразные подарки. Кроме того, это отличная возможность увеличить свой выигрыш. В казино 1xslots бонусы за депозиты и подарки не требуют дополнительных вложений. Используя фриспины и промокоды, вы можете получить хорошие деньги. Давайте подробнее рассмотрим, какие бонусы предлагает онлайн казино.
После прохождения регистрации игроку предлагается бонус на первые четыре операции по пополнению счета:
на первый депозит – 100% от внесенных средств и 30 фриспинов;
на второй депозит – 50% от внесенных средств и 35 фриспинов;
на третий депозит – 25% от внесенных средств и 40 фриспинов;
на четвертый депозит – 25% от внесенных средств и 45 фриспинов.
Промокод, также известный как код приглашения, является ключом-активатором приветственной программы для новичков. Если вы ранее не имели опыта игры в 1xSlots, то вы можете рассчитывать на получение щедрого подарка при регистрации – пакета из 1650 евро и 200 бесплатных прокруток. Согласно правилам бонусной акции, размер поощрения зависит от суммы первых четырех взносов и распределяется следующим образом: на депозитный бонус установлен максимальный лимит в 1500 евро. Чтобы получить подарок, игроку достаточно пройти процедуру регистрации, заполнить анкетные данные в личном кабинете и внести на счет профиля сумму от 10 евро.
При регистрации клиент может использовать промокод 1xSlots и получить дополнительный подарок.
1xSlots давно занимает прочные позиции в списке лучших брендов гемблинг-индустрии. Политика компании 1x ориентирована на опытных игроков, здесь пользователей ожидает продуманная программа лояльности, а также гарантии безопасности личной информации и депозита. Все действия осуществляются на основании лицензии 8048/JAZ2016-083, полученной от компании Orakum N.V., Кюрасао.
Промокод 1хСлот 2024: NEXT777 предоставляет бездепозитный бонус в виде 150 вращений в игре «The Dog House Megaways». В онлайн казино 1xslots доступны бесплатные промокоды на фриспины. Кроме того, игроки могут получать бонусные вращения не только за регистрацию или использование промокода от 1xSlots. Участие в бонусных акциях также позволяет пользователям получить фриспины. Казино 1хSlots предлагает различные варианты депозитов и выплат. Новые игроки, которые регистрируются на 1хSlots, получают приветственный пакет бонусов, однако с использованием промокода от 1xSlots этот бонус может быть еще более значительным. Для активации бонуса необходимо применить актуальный промокод при регистрации.
Приветственный пакет от 1xSlot доступен сразу после регистрации и требует активации через создание депозита. Бонус предоставляет умножение для первых четырех депозитов и дополнительные бесплатные вращения. Минимальная сумма для первого депозита составляет 10 евро, а для последующих пополнений – 15 евро. Максимальная сумма бонуса – 1500 евро.
Также новичкам предоставляются бонусы на второй, третий и четвертый депозит. Для получения подарка необходимо внести сумму не менее 15 евро. Игрокам также предоставляются фриспины и депозитные подарки. Для начисления фриспинов требуется подтверждение номера телефона.
Для постоянных игроков онлайн-казино 1xSlots проводит бонусные акции. Некоторые из них имеют временный характер, а другие действуют постоянно. В основном, пользователям предлагаются депозитные бонусы. Например, можно получить презент за пополнение счета в понедельник. За десятый депозит игроку полагается крупный депозитный бонус в размере 50% от вносимой суммы и 100 фриспинов.
В клубе 1xSlots также действует программа лояльности, которая предполагает различные привилегии для игроков.
Игрокам, активно делающим ставки в течение недели и ушедшим в минус, казино 1xSlots предлагает фриспины. Для получения бонуса не требуется пополнение счета, лимит на максимальный выигрыш и вейджер не устанавливаются.
Ежедневно в казино 1хСлотс назначается слот дня. При совершении ставок на определенную сумму в этом игровом аппарате игроку начисляются фриспины. Обратите внимание https://www.iesp.pa.gov.br/wp-content/pgs/?1xslots_codigo_promocional_bono_giros_gratis.html, время действия акции ограничено.
Разработчиками 1хСлотс было разработано мобильное казино. Такая версия представляет собой упрощенный вариант компьютерного формата онлайн казино. Она позволяет играть в любимые игры на любом устройстве, поддерживающем функцию выхода в интернет. В качестве такого устройства может быть смартфон или планшет.
1xSlots Промокод (Бездепозитный Бонус 2024)
1xSlots промокод: NEXT777, при регистрации введите этот бонусный код, чтобы получить бонус для новых игроков в размере €1650 + 200 фриспинов. Чтобы получить этот бонус, вам нужно создать аккаунт и ввести специальный промокод казино 1хСлотс.
1xSlot Промокод
NEXT777
В казино 1xSlots 2024 доступны различные бонусы: бездепозитные при регистрации, промокоды, фриспины, кэшбэки и другие акции.
Промокод 1xSlots 2024: NEXT777 – введите код при регистрации в казино 1хСлот и получите приветственный бонус €1650 +200 фриспинов. Чтобы промокод 1xSlots на бездепозитный бонус сработал, необходимо указать рабочую комбинацию при регистрации и правильно заполнить форму анкеты. После завершения регистрации бездепозитный бонус будет доступен в личном кабинете. Рекомендуется не торопиться и сразу после создания аккаунта заполнить персональные данные. Важно указать требуемую информацию в полях, отмеченных звездочкой во вкладке “Профиль”, а также активировать контакты (номер телефона и e-mail).
Для новых клиентов промокод 1xSlots предоставляет уникальные возможности, позволяющие бесплатно опробовать один из представленных на платформе слотов. Чтобы получить бездепозитные фриспины, достаточно при регистрации указать промокод и выполнить простые условия акции, которые мы расскажем в данной статье. Игроки, желающие продолжить игру и сделать первый депозит, смогут получить щедрый приветственный бонус до €1500 и 150 бесплатных вращений.
Для получения бонуса на первый депозит необходимо пополнить счет на сумму не менее 10. Награда составляет 100% от суммы первого пополнения, но не может превышать 300. Если сумма пополнения превышает максимальный лимит, игрок получит свой депозит полностью, а также 300 в качестве бонуса. Для активации второго, третьего и четвертого этапов, сумма депозита должна быть не менее 15.
Кроме денежного вознаграждения, каждый этап сопровождается бесплатными прокрутками для игр компании:
– за первый депозит – 30 фриспинов для игры Book of Gold: Classic;
– за второй депозит – 35 фриспинов для игры в Legend of Cleopatra;
– за третий депозит – 40 фриспинов для игры в Solar Queen;
– за четвертый депозит – 45 фриспинов для игры в Imperial Fruits: 40 lines.
Казино 1xSlots предоставляет бонус поэтапно. Чтобы получить награду за второй и последующие депозиты, необходимо выполнить условия отыгрыша ранее полученных средств. Фриспины также начисляются поэтапно и зачисляются после выполнения условий отыгрыша.
Промокод для 1xСлотс: NEXT777. Получите бездепозитный приветственный пакет до €1650 +200 фриспинов. Компания 1xSlots предлагает своим клиентам ряд бонусных программ, самой популярной из которых является приветственный пакет с увеличением первого депозита и бесплатными вращениями. С использованием промокода вы можете получить до 1650 евро и 200 фриспинов. Одним из явных преимуществ 1xSlots является огромный выбор игр. Большую часть из доступных 10 тысяч развлечений занимают игровые автоматы. Пользователям предлагается более 100 различных провайдеров слотов.
Промокод не имеет срока действия. Любой пользователь, который создает аккаунт на сайте 1xSlots, может его активировать. Каждому игроку предоставляется только один бонус, поэтому промокод может быть использован только один раз. Чтобы воспользоваться промокодом, необходимо нажать на кнопку “Регистрация”, выбрать удобный способ создания аккаунта, указать все необходимые данные, подтвердить номер телефона или адрес электронной почты и ввести промокод. После этого можно завершить регистрацию, нажав на кнопку “Зарегистрироваться”.
1xSlots Промокод для Регистрации
Бонусы казино 1xSlots 2024 – Бездепозитные бонусы ? Коды на возврат средств ? VIP программа преданности ? Бесплатные фриспины.
Промокод 1xSlots при Регистрации: NEXT777 Получите эксклюзивный приветственный пакет до 1650 евро +150 фриспинов. Казино 1xSlots 2024 предлагает своим гостям не только широкий выбор игровых автоматов. На сайте казино регулярно проводятся бонусные акции, в рамках которых можно получить различные подарки, процент от депозита, фриспины и многое другое. При обычной регистрации есть ограничение по сумме – не более 1500 евро на первые четыре депозита. Первое пополнение – до 300 евро, второе – не более 350, третье – 400, четвертое – 450 евро. После ввода промокода лимит увеличивается до 1650 евро, а количество фриспинов возрастает с 150 до 200 вращений.
Получите бездепозитный бонус в размере 100 фриспинов в онлайн казино 1xSlots в 2024 году. Все активные бонус коды, промокоды и купоны от 1хСлотс (1xSlots) доступны как для новых, так и для существующих игроков. В клубе 1xSlots промокоды предоставляют дополнительные бонусы пользователям. Кроме того, в клубе проводятся множество турниров с крупными призовыми фондами, в которых может принять участие любой зарегистрированный игрок.
1xSlots фриспины промокод: NEXT777. Размер приветственного поощрения составляет 100 фриспинов в автомате Eye of Storm от провайдера Pragmatic Play. Время на его активацию неограничено. Подарок выдается единожды, попытки повторного создания учетной записи для получения фриспинов приравниваются к мошенническим действиям. Альтернативным способом получения бонус-кодов является активное заключение пари в системе. Вращая барабаны игровых автоматов и зарабатывая баллы можно получить право на фриспины, благодаря промо. Список промокодов 1xslots доступен непосредственно на официальном сайте. Чтобы получить бездепозитный бонус код для 1хслотс в 2024 году, следует выполнить следующие условия:
1. Активировать бонусные средства в личном кабинете;
2. Пополнить счет на €15 (или эквивалент в другой валюте) и более, чтобы привязать банковскую карту или онлайн-кошелек;
3. Выполнить условия вейджера: x25. Для этого необходимо поставить из своих денег сумму, равную выигрышу с бесплатных вращений, умноженную в 25 раз. На отыгрыш дается 7 дней с момента, когда вы прокрутили фриспины.
Максимальная сумма вознаграждения составляет 1650 евро. Ее необходимо отыграть с вейджером 35 раз. Казино предлагает релоад-бонусы, которые также нужно отыграть 35 раз. Однако особое место среди множества игр, слотов и турниров на 1xSlots занимает лайв-казино. Это казино, где игра происходит в режиме реального времени. Настоящие дилеры раздают карты и крутят рулетку за игровыми столами. Все эти действия передаются по видеосвязи. Благодаря такой видеотрансляции каждый игрок может почувствовать все эмоции и азарт игры в интерактивной атмосфере с профессиональными дилерами.
При регистрации на 1xSlots используйте промокод “NEXT777” и получите бездепозитный бонус в размере €1650 + 200 фриспинов. Казино 1xSlots радует своих игроков различными бонусами, такими как промокоды, фриспины и бездепозитные бонусы. Особенно щедрые подарки от казино 1xSlots предназначены для новичков.
В дополнение к бонусной программе онлайн казино 1xSlots предлагает кешбэк до 11%, начисляемый от суммы проигранных средств. Кешбэк не имеет срока отыгрыша. Сидя дома перед компьютером, удается почувствовать атмосферу присутствия в настоящем казино. Именно этими причинами объясняется такая популярность и широкий спрос лайв-казино.
1xslots промокод на депозит – Бонус по промокоду 1хСлотс увеличивается с €1500 + 150 фриспинов до €1650 + 200 фриспинов.
Промокод 1xSlots на Сегодня: NEXT777 предоставляет вам возможность получить €1500 +150 FS при регистрации с использованием бонусного кода. Теперь бонус по промокоду составляет €1650 + 200 фриспинов, что на €150 больше, чем раньше. Это отличная возможность получить еще больше выгоды от игры. Казино 1xSlots 2024 – это платформа для игровых автоматов и Турниров. В казино 1хСлотс доступны различные бонусы, такие как промокоды, фриспины и бездепозитные бонусы. Особенно крупные подарки в казино 1xSlots предназначены для новичков.
Выгодная бонусная программа на сайте 1xslots позволяет как новичкам, так и опытным игрокам получать разнообразные подарки. Кроме того, это отличная возможность увеличить свой выигрыш. В казино 1xslots бонусы за депозиты и подарки не требуют дополнительных вложений. Используя фриспины и промокоды, вы можете получить хорошие деньги. Давайте подробнее рассмотрим, какие бонусы предлагает онлайн казино.
После прохождения регистрации игроку предлагается бонус на первые четыре операции по пополнению счета:
на первый депозит – 100% от внесенных средств и 30 фриспинов;
на второй депозит – 50% от внесенных средств и 35 фриспинов;
на третий депозит – 25% от внесенных средств и 40 фриспинов;
на четвертый депозит – 25% от внесенных средств и 45 фриспинов.
Промокод, также известный как код приглашения, является ключом-активатором приветственной программы для новичков. Если вы ранее не имели опыта игры в 1xSlots, то вы можете рассчитывать на получение щедрого подарка при регистрации – пакета из 1650 евро и 200 бесплатных прокруток. Согласно правилам бонусной акции, размер поощрения зависит от суммы первых четырех взносов и распределяется следующим образом: на депозитный бонус установлен максимальный лимит в 1500 евро. Чтобы получить подарок, игроку достаточно пройти процедуру регистрации, заполнить анкетные данные в личном кабинете и внести на счет профиля сумму от 10 евро.
При регистрации клиент может использовать промокод 1xSlots и получить дополнительный подарок.
1xSlots давно занимает прочные позиции в списке лучших брендов гемблинг-индустрии. Политика компании 1x ориентирована на опытных игроков, здесь пользователей ожидает продуманная программа лояльности, а также гарантии безопасности личной информации и депозита. Все действия осуществляются на основании лицензии 8048/JAZ2016-083, полученной от компании Orakum N.V., Кюрасао.
Промокод 1хСлот 2024: NEXT777 предоставляет бездепозитный бонус в виде 150 вращений в игре «The Dog House Megaways». В онлайн казино 1xslots доступны бесплатные промокоды на фриспины. Кроме того, игроки могут получать бонусные вращения не только за регистрацию или использование промокода от 1xSlots. Участие в бонусных акциях также позволяет пользователям получить фриспины. Казино 1хSlots предлагает различные варианты депозитов и выплат. Новые игроки, которые регистрируются на 1хSlots, получают приветственный пакет бонусов, однако с использованием промокода от 1xSlots этот бонус может быть еще более значительным. Для активации бонуса необходимо применить актуальный промокод при регистрации.
Приветственный пакет от 1xSlot доступен сразу после регистрации и требует активации через создание депозита. Бонус предоставляет умножение для первых четырех депозитов и дополнительные бесплатные вращения. Минимальная сумма для первого депозита составляет 10 евро, а для последующих пополнений – 15 евро. Максимальная сумма бонуса – 1500 евро.
Также новичкам предоставляются бонусы на второй, третий и четвертый депозит. Для получения подарка необходимо внести сумму не менее 15 евро. Игрокам также предоставляются фриспины и депозитные подарки. Для начисления фриспинов требуется подтверждение номера телефона.
Для постоянных игроков онлайн-казино 1xSlots проводит бонусные акции. Некоторые из них имеют временный характер, а другие действуют постоянно. В основном, пользователям предлагаются депозитные бонусы. Например, можно получить презент за пополнение счета в понедельник. За десятый депозит игроку полагается крупный депозитный бонус в размере 50% от вносимой суммы и 100 фриспинов.
В клубе 1xSlots также действует программа лояльности, которая предполагает различные привилегии для игроков.
Игрокам, активно делающим ставки в течение недели и ушедшим в минус, казино 1xSlots предлагает фриспины. Для получения бонуса не требуется пополнение счета, лимит на максимальный выигрыш и вейджер не устанавливаются.
Ежедневно в казино 1хСлотс назначается слот дня. При совершении ставок на определенную сумму в этом игровом аппарате игроку начисляются фриспины. Обратите внимание https://www.iesp.pa.gov.br/wp-content/pgs/?1xslots_codigo_promocional_bono_giros_gratis.html, время действия акции ограничено.
Разработчиками 1хСлотс было разработано мобильное казино. Такая версия представляет собой упрощенный вариант компьютерного формата онлайн казино. Она позволяет играть в любимые игры на любом устройстве, поддерживающем функцию выхода в интернет. В качестве такого устройства может быть смартфон или планшет.
1xSlots Промокод (Бездепозитный Бонус 2024)
1xSlots промокод: NEXT777, при регистрации введите этот бонусный код, чтобы получить бонус для новых игроков в размере €1650 + 200 фриспинов. Чтобы получить этот бонус, вам нужно создать аккаунт и ввести специальный промокод казино 1хСлотс.
1xSlot Промокод
NEXT777
В казино 1xSlots 2024 доступны различные бонусы: бездепозитные при регистрации, промокоды, фриспины, кэшбэки и другие акции.
Промокод 1xSlots 2024: NEXT777 – введите код при регистрации в казино 1хСлот и получите приветственный бонус €1650 +200 фриспинов. Чтобы промокод 1xSlots на бездепозитный бонус сработал, необходимо указать рабочую комбинацию при регистрации и правильно заполнить форму анкеты. После завершения регистрации бездепозитный бонус будет доступен в личном кабинете. Рекомендуется не торопиться и сразу после создания аккаунта заполнить персональные данные. Важно указать требуемую информацию в полях, отмеченных звездочкой во вкладке “Профиль”, а также активировать контакты (номер телефона и e-mail).
Для новых клиентов промокод 1xSlots предоставляет уникальные возможности, позволяющие бесплатно опробовать один из представленных на платформе слотов. Чтобы получить бездепозитные фриспины, достаточно при регистрации указать промокод и выполнить простые условия акции, которые мы расскажем в данной статье. Игроки, желающие продолжить игру и сделать первый депозит, смогут получить щедрый приветственный бонус до €1500 и 150 бесплатных вращений.
Для получения бонуса на первый депозит необходимо пополнить счет на сумму не менее 10. Награда составляет 100% от суммы первого пополнения, но не может превышать 300. Если сумма пополнения превышает максимальный лимит, игрок получит свой депозит полностью, а также 300 в качестве бонуса. Для активации второго, третьего и четвертого этапов, сумма депозита должна быть не менее 15.
Кроме денежного вознаграждения, каждый этап сопровождается бесплатными прокрутками для игр компании:
– за первый депозит – 30 фриспинов для игры Book of Gold: Classic;
– за второй депозит – 35 фриспинов для игры в Legend of Cleopatra;
– за третий депозит – 40 фриспинов для игры в Solar Queen;
– за четвертый депозит – 45 фриспинов для игры в Imperial Fruits: 40 lines.
Казино 1xSlots предоставляет бонус поэтапно. Чтобы получить награду за второй и последующие депозиты, необходимо выполнить условия отыгрыша ранее полученных средств. Фриспины также начисляются поэтапно и зачисляются после выполнения условий отыгрыша.
Промокод для 1xСлотс: NEXT777. Получите бездепозитный приветственный пакет до €1650 +200 фриспинов. Компания 1xSlots предлагает своим клиентам ряд бонусных программ, самой популярной из которых является приветственный пакет с увеличением первого депозита и бесплатными вращениями. С использованием промокода вы можете получить до 1650 евро и 200 фриспинов. Одним из явных преимуществ 1xSlots является огромный выбор игр. Большую часть из доступных 10 тысяч развлечений занимают игровые автоматы. Пользователям предлагается более 100 различных провайдеров слотов.
Промокод не имеет срока действия. Любой пользователь, который создает аккаунт на сайте 1xSlots, может его активировать. Каждому игроку предоставляется только один бонус, поэтому промокод может быть использован только один раз. Чтобы воспользоваться промокодом, необходимо нажать на кнопку “Регистрация”, выбрать удобный способ создания аккаунта, указать все необходимые данные, подтвердить номер телефона или адрес электронной почты и ввести промокод. После этого можно завершить регистрацию, нажав на кнопку “Зарегистрироваться”.
1xSlots Промокод для Регистрации
Бонусы казино 1xSlots 2024 – Бездепозитные бонусы ? Коды на возврат средств ? VIP программа преданности ? Бесплатные фриспины.
Промокод 1xSlots при Регистрации: NEXT777 Получите эксклюзивный приветственный пакет до 1650 евро +150 фриспинов. Казино 1xSlots 2024 предлагает своим гостям не только широкий выбор игровых автоматов. На сайте казино регулярно проводятся бонусные акции, в рамках которых можно получить различные подарки, процент от депозита, фриспины и многое другое. При обычной регистрации есть ограничение по сумме – не более 1500 евро на первые четыре депозита. Первое пополнение – до 300 евро, второе – не более 350, третье – 400, четвертое – 450 евро. После ввода промокода лимит увеличивается до 1650 евро, а количество фриспинов возрастает с 150 до 200 вращений.
Получите бездепозитный бонус в размере 100 фриспинов в онлайн казино 1xSlots в 2024 году. Все активные бонус коды, промокоды и купоны от 1хСлотс (1xSlots) доступны как для новых, так и для существующих игроков. В клубе 1xSlots промокоды предоставляют дополнительные бонусы пользователям. Кроме того, в клубе проводятся множество турниров с крупными призовыми фондами, в которых может принять участие любой зарегистрированный игрок.
1xSlots фриспины промокод: NEXT777. Размер приветственного поощрения составляет 100 фриспинов в автомате Eye of Storm от провайдера Pragmatic Play. Время на его активацию неограничено. Подарок выдается единожды, попытки повторного создания учетной записи для получения фриспинов приравниваются к мошенническим действиям. Альтернативным способом получения бонус-кодов является активное заключение пари в системе. Вращая барабаны игровых автоматов и зарабатывая баллы можно получить право на фриспины, благодаря промо. Список промокодов 1xslots доступен непосредственно на официальном сайте. Чтобы получить бездепозитный бонус код для 1хслотс в 2024 году, следует выполнить следующие условия:
1. Активировать бонусные средства в личном кабинете;
2. Пополнить счет на €15 (или эквивалент в другой валюте) и более, чтобы привязать банковскую карту или онлайн-кошелек;
3. Выполнить условия вейджера: x25. Для этого необходимо поставить из своих денег сумму, равную выигрышу с бесплатных вращений, умноженную в 25 раз. На отыгрыш дается 7 дней с момента, когда вы прокрутили фриспины.
Максимальная сумма вознаграждения составляет 1650 евро. Ее необходимо отыграть с вейджером 35 раз. Казино предлагает релоад-бонусы, которые также нужно отыграть 35 раз. Однако особое место среди множества игр, слотов и турниров на 1xSlots занимает лайв-казино. Это казино, где игра происходит в режиме реального времени. Настоящие дилеры раздают карты и крутят рулетку за игровыми столами. Все эти действия передаются по видеосвязи. Благодаря такой видеотрансляции каждый игрок может почувствовать все эмоции и азарт игры в интерактивной атмосфере с профессиональными дилерами.
При регистрации на 1xSlots используйте промокод “NEXT777” и получите бездепозитный бонус в размере €1650 + 200 фриспинов. Казино 1xSlots радует своих игроков различными бонусами, такими как промокоды, фриспины и бездепозитные бонусы. Особенно щедрые подарки от казино 1xSlots предназначены для новичков.
В дополнение к бонусной программе онлайн казино 1xSlots предлагает кешбэк до 11%, начисляемый от суммы проигранных средств. Кешбэк не имеет срока отыгрыша. Сидя дома перед компьютером, удается почувствовать атмосферу присутствия в настоящем казино. Именно этими причинами объясняется такая популярность и широкий спрос лайв-казино.
промокод 1xslots на сегодня без отыгрыша – Бонус по промокоду 1хСлотс увеличивается с €1500 + 150 фриспинов до €1650 + 200 фриспинов.
Промокод 1xSlots на Сегодня: NEXT777 предоставляет вам возможность получить €1500 +150 FS при регистрации с использованием бонусного кода. Теперь бонус по промокоду составляет €1650 + 200 фриспинов, что на €150 больше, чем раньше. Это отличная возможность получить еще больше выгоды от игры. Казино 1xSlots 2024 – это платформа для игровых автоматов и Турниров. В казино 1хСлотс доступны различные бонусы, такие как промокоды, фриспины и бездепозитные бонусы. Особенно крупные подарки в казино 1xSlots предназначены для новичков.
Выгодная бонусная программа на сайте 1xslots позволяет как новичкам, так и опытным игрокам получать разнообразные подарки. Кроме того, это отличная возможность увеличить свой выигрыш. В казино 1xslots бонусы за депозиты и подарки не требуют дополнительных вложений. Используя фриспины и промокоды, вы можете получить хорошие деньги. Давайте подробнее рассмотрим, какие бонусы предлагает онлайн казино.
После прохождения регистрации игроку предлагается бонус на первые четыре операции по пополнению счета:
на первый депозит – 100% от внесенных средств и 30 фриспинов;
на второй депозит – 50% от внесенных средств и 35 фриспинов;
на третий депозит – 25% от внесенных средств и 40 фриспинов;
на четвертый депозит – 25% от внесенных средств и 45 фриспинов.
Промокод, также известный как код приглашения, является ключом-активатором приветственной программы для новичков. Если вы ранее не имели опыта игры в 1xSlots, то вы можете рассчитывать на получение щедрого подарка при регистрации – пакета из 1650 евро и 200 бесплатных прокруток. Согласно правилам бонусной акции, размер поощрения зависит от суммы первых четырех взносов и распределяется следующим образом: на депозитный бонус установлен максимальный лимит в 1500 евро. Чтобы получить подарок, игроку достаточно пройти процедуру регистрации, заполнить анкетные данные в личном кабинете и внести на счет профиля сумму от 10 евро.
При регистрации клиент может использовать промокод 1xSlots и получить дополнительный подарок.
1xSlots давно занимает прочные позиции в списке лучших брендов гемблинг-индустрии. Политика компании 1x ориентирована на опытных игроков, здесь пользователей ожидает продуманная программа лояльности, а также гарантии безопасности личной информации и депозита. Все действия осуществляются на основании лицензии 8048/JAZ2016-083, полученной от компании Orakum N.V., Кюрасао.
Промокод 1хСлот 2024: NEXT777 предоставляет бездепозитный бонус в виде 150 вращений в игре «The Dog House Megaways». В онлайн казино 1xslots доступны бесплатные промокоды на фриспины. Кроме того, игроки могут получать бонусные вращения не только за регистрацию или использование промокода от 1xSlots. Участие в бонусных акциях также позволяет пользователям получить фриспины. Казино 1хSlots предлагает различные варианты депозитов и выплат. Новые игроки, которые регистрируются на 1хSlots, получают приветственный пакет бонусов, однако с использованием промокода от 1xSlots этот бонус может быть еще более значительным. Для активации бонуса необходимо применить актуальный промокод при регистрации.
Приветственный пакет от 1xSlot доступен сразу после регистрации и требует активации через создание депозита. Бонус предоставляет умножение для первых четырех депозитов и дополнительные бесплатные вращения. Минимальная сумма для первого депозита составляет 10 евро, а для последующих пополнений – 15 евро. Максимальная сумма бонуса – 1500 евро.
Также новичкам предоставляются бонусы на второй, третий и четвертый депозит. Для получения подарка необходимо внести сумму не менее 15 евро. Игрокам также предоставляются фриспины и депозитные подарки. Для начисления фриспинов требуется подтверждение номера телефона.
Для постоянных игроков онлайн-казино 1xSlots проводит бонусные акции. Некоторые из них имеют временный характер, а другие действуют постоянно. В основном, пользователям предлагаются депозитные бонусы. Например, можно получить презент за пополнение счета в понедельник. За десятый депозит игроку полагается крупный депозитный бонус в размере 50% от вносимой суммы и 100 фриспинов.
В клубе 1xSlots также действует программа лояльности, которая предполагает различные привилегии для игроков.
Игрокам, активно делающим ставки в течение недели и ушедшим в минус, казино 1xSlots предлагает фриспины. Для получения бонуса не требуется пополнение счета, лимит на максимальный выигрыш и вейджер не устанавливаются.
Ежедневно в казино 1хСлотс назначается слот дня. При совершении ставок на определенную сумму в этом игровом аппарате игроку начисляются фриспины. Обратите внимание https://www.iesp.pa.gov.br/wp-content/pgs/?1xslots_codigo_promocional_bono_giros_gratis.html, время действия акции ограничено.
Разработчиками 1хСлотс было разработано мобильное казино. Такая версия представляет собой упрощенный вариант компьютерного формата онлайн казино. Она позволяет играть в любимые игры на любом устройстве, поддерживающем функцию выхода в интернет. В качестве такого устройства может быть смартфон или планшет.
motomagazinvfdvgd.vn.ua/uk/v-shlema/vybor-po-stilyu-is-kross-enduro-kvadrotsikl-utv-baggi/
В ТЕЧЕНИЕ нашем мотомагазине ваша милость найдёте запчасти чтобы мотоциклов, скутеров, снегоходов и еще квадроциклов. У нас ваша милость всегда нахлынете масла для байков, фильтра, цепи.
motomagazinvfdvgd.vn.ua/uk/v-masla-motornye/
betvisa affiliate sign up
Intro
betvisa bangladesh
Betvisa bangladesh | Super Cricket Carnival with Betvisa!
IPL Cricket Mania | Kick off Super Cricket Carnival with bet visa.com
IPL Season | Exclusive 1,50,00,000 only at Betvisa Bangladesh!
Crash Games Heroes | Climb to the top of the 1,00,00,000 bonus pool!
#betvisabangladesh
Preview IPL T20 | Follow Betvisa BD on Facebook, Instagram for awards!
betvisa affiliate Dream Maltese Tour | Sign up now to win the ultimate prize!
https://www.bvthethao.com/
#betvisabangladesh #betvisabd #betvisaaffiliate
#betvisaaffiliatesignup #betvisa.com
Vì tính cam kết về kinh nghiệm cá cược tốt nhất và dịch vụ khách hàng chuyên môn, BetVisa tự tin là điểm đến lý tưởng cho những ai nhiệt tình trò chơi trực tuyến. Hãy gắn bó ngay hôm nay và bắt đầu hành trình của bạn tại BetVisa – nơi niềm vui và may mắn chính là điều tất yếu.
Tìm hiểu Thế Giới Cá Cược Trực Tuyến với BetVisa!
BetVisa, một trong những nền tảng hàng đầu tại châu Á, ra đời vào năm 2017 và hoạt động dưới phê chuẩn của Curacao, đã thu hút hơn 2 triệu người dùng trên toàn thế giới. Với cam kết đem đến trải nghiệm cá cược an toàn và tin cậy nhất, BetVisa nhanh chóng trở thành lựa chọn hàng đầu của người chơi trực tuyến.
BetVisa không dừng lại ở việc cung cấp các trò chơi phong phú như xổ số, sòng bạc trực tiếp, thể thao trực tiếp và thể thao điện tử, mà còn mang đến cho người chơi những ưu đãi hấp dẫn. Thành viên mới đăng ký sẽ được tặng ngay 5 phần quà miễn phí và có cơ hội giành giải thưởng lớn.
Đặc biệt, BetVisa hỗ trợ nhiều phương thức thanh toán linh hoạt như Betvisa Vietnam, cùng với các ưu đãi độc quyền như thưởng chào mừng lên đến 200%. Bên cạnh đó, hàng tuần còn có các chương trình khuyến mãi độc đáo như chương trình giải thưởng Sinh Nhật và Chủ Nhật Mua Sắm Điên Cuồng, mang đến cho người chơi cơ hội thắng lớn.
Мы рекомендуем посетить веб-сайт https://russkiy-spaniel.ru/.
Кроме того, не забудьте добавить сайт в закладки: https://russkiy-spaniel.ru/
motomagazinvfdvgd.vn.ua/uk/v-botinki/
В ТЕЧЕНИЕ нашем мотомагазине ваша милость обнаружите запчасти для мотоциклов, скутеров, снегоходов равным образом квадроциклов. ЯЗЫК нас ваша милость всегда выищете масла чтобы байков, фильтра, цепи.
motomagazinvfdvgd.vn.ua/uk/v-perchatki/
Все промокод 1хбет на сегодня бесплатно на ставку вы можете найти бесплатно на этом сайте. Используйте промокод *1XFREE777* для получения бонуса до 32500 руб при регистрации. Приятно, что новички могут ввести промокод при регистрации, который даст право на получение приветственного бонуса на сумму до 32500 рублей. Самое главное — это относиться к ставкам и к игре в целом ответственно! Не стоит играть на последние или заемные деньги, стремясь таким образом заработать себе на жизнь – более подробно в этом материале http://lipetskregionsport.ru/news/pages/1xbet_promokod.html
сплит системы москва https://split-sistema-kupit.ru/ .
The meal went without incident although a couple of times she had to avert her gaze from Dan for fear of bursting out laughing. Dan went up to his room saying he wanted to listen to music, he laid on his bed playing with himself waiting for his father to leave. He thought about the events of the last two weeks it had been the craziest time of his life.
He put it all down to Mary Harris, she had been his girlfriend for two years, he liked her a lot, she was pretty and intelligent two things that rarely combined in his experience, the problem was she steadfastly refused to let him put his cock inside her, he had thought he was getting somewhere when he took his cock out that evening in the cinema when she had finally allowed him to get his hand inside her panties, it was the first time she had allowed him to do any more than play with her tits. He had taken her hand and placed it on his erection, initially he had been pleased to hear her sharp intake of breath when she felt the size of him and he was encouraged when she began stroking him.
It was later that the problem started, he had her in the car park, they were kissing, her sweater was pushed up together with her bra and he was sucking on her nipples. He managed to get her laid across the front of one of the cars, his hand up her skirt, trying to pull down her panties. That was when she had stopped him.
https://www.haikudeck.com/presentations/E8w1emZhNf
https://www.divephotoguide.com/user/lubius1984
https://www.dnnsoftware.com/activity-feed/my-profile/userid/3187228
https://ellak.gr/user/pheasant1976/
https://tubeteencam.com/user/nanda1959/profile
https://www.quia.com/profiles/am403houston
https://reqwet1961.micro.blog/about/
https://www.metal-archives.com/users/tarrey1986
http://www.babelcube.com/user/diana-hernandez-4
https://permacultureglobal.org/users/55167-amanda-collins
установка сплит системы установка сплит системы .
1xbet промокод на сегодня 2024. Чтобы удовлетворить потребности бетторов и сделать процесс ставок максимально разнообразным нередко букмекерские конторы пытаются увеличить свой функционал, путем добавления специальных функций и предложений. Одним из лидеров среди популярных букмекеров на постсоветском пространстве по своим функциональным возможностям является 1хБет. Ввод промокод при регистрации в 1хбет на сегодня позволяет получить увеличенную сумму бонуса. Для этого достаточно после создания аккаунта внести первый депозит (максимальная сумма бонусного начисления составляет 32 500 рублей). Можно использовать любой платёжный метод. Абсолютно бесплатный промокод 1xbet. На сегодня контора предлагает всем новичкам воспользоваться не только приветственным бонусом, но и получить дополнительные преференции. Эти льготы игрок получает в том случае, если внимательно отнесётся к процедуре регистрации на сайте. Ведь не все новички обращают внимание или понимают, о каких выгодах идёт речь, когда видят необязательное для заполнения поле «Введите промокод (при наличии)», находящееся в самом низу регистрационной формы. Оно есть при трёх способах получения аккаунта из четырёх возможных («В 1 клик», «По номеру телефона», «По e-mail»). А игнорировать его – это потерять дополнительные выгоды – более подробно в этом материале http://lipetskregionsport.ru/news/pages/1xbet_promokod.html
Самый полный список промокодов 1хБет на сегодня у нас на сайте. Все промокоды раздаются бесплатно: на ставку, при регистрации, бездепозитные промики. Обновляем каждые 5 часов. Обычно 1xBet промокод при регистрации предоставляет бонус на первый депозит и используется на этапе создания аккаунта в БК. Сумма вознаграждения достигает 100% от первого пополнения. Следующий тип — куда ввести промокод 1хбет на телефоне. Он позволяет заключать пари на спортивные события, либо пользоваться привилегиями в сфере азартных игр, доступных на сайте БК. Такой бонус предоставляется бесплатно в честь регистрации, Дня рождения или активности – более подробно в этом материале http://lipetskregionsport.ru/news/pages/1xbet_promokod.html
сплит система https://split-sistema-kupit.ru/ .
сплит системы установка сплит системы установка .
tadalafil price south africa
сплит установка сплит установка .
сплит система кондиционер цена https://split-sistema-kupit.ru/ .
сплит системы кондиционирования сплит системы кондиционирования .
сплит система купить с установкой https://split-sistema-kupit.ru/ .
Intro
betvisa philippines
Betvisa philippines | The Filipino Carnival, Spinning for Treasures!
Betvisa Philippines Surprises | Spin daily and win ₱8,888 Grand Prize!
Register for a chance to win ₱8,888 Bonus Tickets! Explore Betvisa.com!
Wild All Over Grab 58% YB Bonus at Betvisa Casino! Take the challenge!
#betvisaphilippines
Get 88 on your first 50 Experience Betvisa Online’s Bonus Gift!
Weekend Instant Daily Recharge at betvisa.com
https://www.88betvisa.com/
#betvisaphilippines #betvisaonline #betvisacasino
#betvisacom #betvisa.com
BetVisa – Điểm Đến Tuyệt Vời Cho Người Chơi Trực Tuyến
Khám Phá Thế Giới Cá Cược Trực Tuyến với BetVisa!
Nền tảng cá cược được thiết lập vào năm 2017 và tiến hành theo bằng trò chơi Curacao với hơn 2 triệu người dùng. Với lời hứa đem đến trải nghiệm cá cược an toàn và tin cậy nhất, BetVisa nhanh chóng trở thành lựa chọn hàng đầu của người chơi trực tuyến.
Nền tảng cá cược không chỉ đưa ra các trò chơi phong phú như xổ số, sòng bạc trực tiếp, thể thao trực tiếp và thể thao điện tử, mà còn mang lại cho người chơi những ưu đãi hấp dẫn. Thành viên mới đăng ký sẽ được tặng ngay 5 vòng quay miễn phí và có cơ hội giành giải thưởng lớn.
Dịch vụ hỗ trợ nhiều cách thức thanh toán linh hoạt như Betvisa Vietnam, kết hợp với các ưu đãi độc quyền như thưởng chào mừng lên đến 200%. Bên cạnh đó, hàng tuần còn có các chương trình khuyến mãi độc đáo như chương trình giải thưởng Sinh Nhật và Chủ Nhật Mua Sắm Điên Cuồng, mang lại cho người chơi thời cơ thắng lớn.
Với lời hứa về trải nghiệm cá cược tốt nhất và dịch vụ khách hàng chuyên nghiệp, BetVisa tự tin là điểm đến lý tưởng cho những ai đam mê trò chơi trực tuyến. Hãy đăng ký ngay hôm nay và bắt đầu hành trình của bạn tại BetVisa – nơi niềm vui và may mắn chính là điều tất yếu!
сплит купить https://split-sistema-kupit.ru/ .
Мы рекомендуем посетить веб-сайт https://stroydvor89.ru/.
Кроме того, не забудьте добавить сайт в закладки: https://stroydvor89.ru/
synthroid average cost
4000 mg metformin daily
сериал
synthroid 12.5 mg
сериал
сериал 2024
usa pharmacy online
сериал смотреть полностью
order lisinopril 20mg
synthroid 0.025 mcg
1xSlots Промокод (Бездепозитный Бонус 2024)
1xSlots промокод: NEXT777, при регистрации введите этот бонусный код, чтобы получить бонус для новых игроков в размере €1650 + 200 фриспинов. Чтобы получить этот бонус, вам нужно создать аккаунт и ввести специальный промокод казино 1хСлотс.
1xSlot Промокод
NEXT777
В казино 1xSlots 2024 доступны различные бонусы: бездепозитные при регистрации, промокоды, фриспины, кэшбэки и другие акции.
Промокод 1xSlots 2024: NEXT777 – введите код при регистрации в казино 1хСлот и получите приветственный бонус €1650 +200 фриспинов. Чтобы промокод 1xSlots на бездепозитный бонус сработал, необходимо указать рабочую комбинацию при регистрации и правильно заполнить форму анкеты. После завершения регистрации бездепозитный бонус будет доступен в личном кабинете. Рекомендуется не торопиться и сразу после создания аккаунта заполнить персональные данные. Важно указать требуемую информацию в полях, отмеченных звездочкой во вкладке “Профиль”, а также активировать контакты (номер телефона и e-mail).
Для новых клиентов промокод 1xSlots предоставляет уникальные возможности, позволяющие бесплатно опробовать один из представленных на платформе слотов. Чтобы получить бездепозитные фриспины, достаточно при регистрации указать промокод и выполнить простые условия акции, которые мы расскажем в данной статье. Игроки, желающие продолжить игру и сделать первый депозит, смогут получить щедрый приветственный бонус до €1500 и 150 бесплатных вращений.
Для получения бонуса на первый депозит необходимо пополнить счет на сумму не менее 10. Награда составляет 100% от суммы первого пополнения, но не может превышать 300. Если сумма пополнения превышает максимальный лимит, игрок получит свой депозит полностью, а также 300 в качестве бонуса. Для активации второго, третьего и четвертого этапов, сумма депозита должна быть не менее 15.
Кроме денежного вознаграждения, каждый этап сопровождается бесплатными прокрутками для игр компании:
– за первый депозит – 30 фриспинов для игры Book of Gold: Classic;
– за второй депозит – 35 фриспинов для игры в Legend of Cleopatra;
– за третий депозит – 40 фриспинов для игры в Solar Queen;
– за четвертый депозит – 45 фриспинов для игры в Imperial Fruits: 40 lines.
Казино 1xSlots предоставляет бонус поэтапно. Чтобы получить награду за второй и последующие депозиты, необходимо выполнить условия отыгрыша ранее полученных средств. Фриспины также начисляются поэтапно и зачисляются после выполнения условий отыгрыша.
Промокод для 1xСлотс: NEXT777. Получите бездепозитный приветственный пакет до €1650 +200 фриспинов. Компания 1xSlots предлагает своим клиентам ряд бонусных программ, самой популярной из которых является приветственный пакет с увеличением первого депозита и бесплатными вращениями. С использованием промокода вы можете получить до 1650 евро и 200 фриспинов. Одним из явных преимуществ 1xSlots является огромный выбор игр. Большую часть из доступных 10 тысяч развлечений занимают игровые автоматы. Пользователям предлагается более 100 различных провайдеров слотов.
Промокод не имеет срока действия. Любой пользователь, который создает аккаунт на сайте 1xSlots, может его активировать. Каждому игроку предоставляется только один бонус, поэтому промокод может быть использован только один раз. Чтобы воспользоваться промокодом, необходимо нажать на кнопку “Регистрация”, выбрать удобный способ создания аккаунта, указать все необходимые данные, подтвердить номер телефона или адрес электронной почты и ввести промокод. После этого можно завершить регистрацию, нажав на кнопку “Зарегистрироваться”.
1xSlots Промокод для Регистрации
Бонусы казино 1xSlots 2024 – Бездепозитные бонусы ? Коды на возврат средств ? VIP программа преданности ? Бесплатные фриспины.
Промокод 1xSlots при Регистрации: NEXT777 Получите эксклюзивный приветственный пакет до 1650 евро +150 фриспинов. Казино 1xSlots 2024 предлагает своим гостям не только широкий выбор игровых автоматов. На сайте казино регулярно проводятся бонусные акции, в рамках которых можно получить различные подарки, процент от депозита, фриспины и многое другое. При обычной регистрации есть ограничение по сумме – не более 1500 евро на первые четыре депозита. Первое пополнение – до 300 евро, второе – не более 350, третье – 400, четвертое – 450 евро. После ввода промокода лимит увеличивается до 1650 евро, а количество фриспинов возрастает с 150 до 200 вращений.
Получите бездепозитный бонус в размере 100 фриспинов в онлайн казино 1xSlots в 2024 году. Все активные бонус коды, промокоды и купоны от 1хСлотс (1xSlots) доступны как для новых, так и для существующих игроков. В клубе 1xSlots промокоды предоставляют дополнительные бонусы пользователям. Кроме того, в клубе проводятся множество турниров с крупными призовыми фондами, в которых может принять участие любой зарегистрированный игрок.
1xSlots фриспины промокод: NEXT777. Размер приветственного поощрения составляет 100 фриспинов в автомате Eye of Storm от провайдера Pragmatic Play. Время на его активацию неограничено. Подарок выдается единожды, попытки повторного создания учетной записи для получения фриспинов приравниваются к мошенническим действиям. Альтернативным способом получения бонус-кодов является активное заключение пари в системе. Вращая барабаны игровых автоматов и зарабатывая баллы можно получить право на фриспины, благодаря промо. Список промокодов 1xslots доступен непосредственно на официальном сайте. Чтобы получить бездепозитный бонус код для 1хслотс в 2024 году, следует выполнить следующие условия:
1. Активировать бонусные средства в личном кабинете;
2. Пополнить счет на €15 (или эквивалент в другой валюте) и более, чтобы привязать банковскую карту или онлайн-кошелек;
3. Выполнить условия вейджера: x25. Для этого необходимо поставить из своих денег сумму, равную выигрышу с бесплатных вращений, умноженную в 25 раз. На отыгрыш дается 7 дней с момента, когда вы прокрутили фриспины.
Максимальная сумма вознаграждения составляет 1650 евро. Ее необходимо отыграть с вейджером 35 раз. Казино предлагает релоад-бонусы, которые также нужно отыграть 35 раз. Однако особое место среди множества игр, слотов и турниров на 1xSlots занимает лайв-казино. Это казино, где игра происходит в режиме реального времени. Настоящие дилеры раздают карты и крутят рулетку за игровыми столами. Все эти действия передаются по видеосвязи. Благодаря такой видеотрансляции каждый игрок может почувствовать все эмоции и азарт игры в интерактивной атмосфере с профессиональными дилерами.
При регистрации на 1xSlots используйте промокод “NEXT777” и получите бездепозитный бонус в размере €1650 + 200 фриспинов. Казино 1xSlots радует своих игроков различными бонусами, такими как промокоды, фриспины и бездепозитные бонусы. Особенно щедрые подарки от казино 1xSlots предназначены для новичков.
В дополнение к бонусной программе онлайн казино 1xSlots предлагает кешбэк до 11%, начисляемый от суммы проигранных средств. Кешбэк не имеет срока отыгрыша. Сидя дома перед компьютером, удается почувствовать атмосферу присутствия в настоящем казино. Именно этими причинами объясняется такая популярность и широкий спрос лайв-казино.
промокод 1xslots без вейджера – Бонус по промокоду 1хСлотс увеличивается с €1500 + 150 фриспинов до €1650 + 200 фриспинов.
Промокод 1xSlots на Сегодня: NEXT777 предоставляет вам возможность получить €1500 +150 FS при регистрации с использованием бонусного кода. Теперь бонус по промокоду составляет €1650 + 200 фриспинов, что на €150 больше, чем раньше. Это отличная возможность получить еще больше выгоды от игры. Казино 1xSlots 2024 – это платформа для игровых автоматов и Турниров. В казино 1хСлотс доступны различные бонусы, такие как промокоды, фриспины и бездепозитные бонусы. Особенно крупные подарки в казино 1xSlots предназначены для новичков.
Выгодная бонусная программа на сайте 1xslots позволяет как новичкам, так и опытным игрокам получать разнообразные подарки. Кроме того, это отличная возможность увеличить свой выигрыш. В казино 1xslots бонусы за депозиты и подарки не требуют дополнительных вложений. Используя фриспины и промокоды, вы можете получить хорошие деньги. Давайте подробнее рассмотрим, какие бонусы предлагает онлайн казино.
После прохождения регистрации игроку предлагается бонус на первые четыре операции по пополнению счета:
на первый депозит – 100% от внесенных средств и 30 фриспинов;
на второй депозит – 50% от внесенных средств и 35 фриспинов;
на третий депозит – 25% от внесенных средств и 40 фриспинов;
на четвертый депозит – 25% от внесенных средств и 45 фриспинов.
Промокод, также известный как код приглашения, является ключом-активатором приветственной программы для новичков. Если вы ранее не имели опыта игры в 1xSlots, то вы можете рассчитывать на получение щедрого подарка при регистрации – пакета из 1650 евро и 200 бесплатных прокруток. Согласно правилам бонусной акции, размер поощрения зависит от суммы первых четырех взносов и распределяется следующим образом: на депозитный бонус установлен максимальный лимит в 1500 евро. Чтобы получить подарок, игроку достаточно пройти процедуру регистрации, заполнить анкетные данные в личном кабинете и внести на счет профиля сумму от 10 евро.
При регистрации клиент может использовать промокод 1xSlots и получить дополнительный подарок.
1xSlots давно занимает прочные позиции в списке лучших брендов гемблинг-индустрии. Политика компании 1x ориентирована на опытных игроков, здесь пользователей ожидает продуманная программа лояльности, а также гарантии безопасности личной информации и депозита. Все действия осуществляются на основании лицензии 8048/JAZ2016-083, полученной от компании Orakum N.V., Кюрасао.
Промокод 1хСлот 2024: NEXT777 предоставляет бездепозитный бонус в виде 150 вращений в игре «The Dog House Megaways». В онлайн казино 1xslots доступны бесплатные промокоды на фриспины. Кроме того, игроки могут получать бонусные вращения не только за регистрацию или использование промокода от 1xSlots. Участие в бонусных акциях также позволяет пользователям получить фриспины. Казино 1хSlots предлагает различные варианты депозитов и выплат. Новые игроки, которые регистрируются на 1хSlots, получают приветственный пакет бонусов, однако с использованием промокода от 1xSlots этот бонус может быть еще более значительным. Для активации бонуса необходимо применить актуальный промокод при регистрации.
Приветственный пакет от 1xSlot доступен сразу после регистрации и требует активации через создание депозита. Бонус предоставляет умножение для первых четырех депозитов и дополнительные бесплатные вращения. Минимальная сумма для первого депозита составляет 10 евро, а для последующих пополнений – 15 евро. Максимальная сумма бонуса – 1500 евро.
Также новичкам предоставляются бонусы на второй, третий и четвертый депозит. Для получения подарка необходимо внести сумму не менее 15 евро. Игрокам также предоставляются фриспины и депозитные подарки. Для начисления фриспинов требуется подтверждение номера телефона.
Для постоянных игроков онлайн-казино 1xSlots проводит бонусные акции. Некоторые из них имеют временный характер, а другие действуют постоянно. В основном, пользователям предлагаются депозитные бонусы. Например, можно получить презент за пополнение счета в понедельник. За десятый депозит игроку полагается крупный депозитный бонус в размере 50% от вносимой суммы и 100 фриспинов.
В клубе 1xSlots также действует программа лояльности, которая предполагает различные привилегии для игроков.
Игрокам, активно делающим ставки в течение недели и ушедшим в минус, казино 1xSlots предлагает фриспины. Для получения бонуса не требуется пополнение счета, лимит на максимальный выигрыш и вейджер не устанавливаются.
Ежедневно в казино 1хСлотс назначается слот дня. При совершении ставок на определенную сумму в этом игровом аппарате игроку начисляются фриспины. Обратите внимание https://xenon-lampa.ru/content/pags/promokod_1xslots.html, время действия акции ограничено.
Разработчиками 1хСлотс было разработано мобильное казино. Такая версия представляет собой упрощенный вариант компьютерного формата онлайн казино. Она позволяет играть в любимые игры на любом устройстве, поддерживающем функцию выхода в интернет. В качестве такого устройства может быть смартфон или планшет.
canadian pharmacy online ship to usa
lisinopril 2.5 mg medicine
1xSlots Промокод (Бездепозитный Бонус 2024)
1xSlots промокод: NEXT777, при регистрации введите этот бонусный код, чтобы получить бонус для новых игроков в размере €1650 + 200 фриспинов. Чтобы получить этот бонус, вам нужно создать аккаунт и ввести специальный промокод казино 1хСлотс.
1xSlot Промокод
NEXT777
В казино 1xSlots 2024 доступны различные бонусы: бездепозитные при регистрации, промокоды, фриспины, кэшбэки и другие акции.
Промокод 1xSlots 2024: NEXT777 – введите код при регистрации в казино 1хСлот и получите приветственный бонус €1650 +200 фриспинов. Чтобы промокод 1xSlots на бездепозитный бонус сработал, необходимо указать рабочую комбинацию при регистрации и правильно заполнить форму анкеты. После завершения регистрации бездепозитный бонус будет доступен в личном кабинете. Рекомендуется не торопиться и сразу после создания аккаунта заполнить персональные данные. Важно указать требуемую информацию в полях, отмеченных звездочкой во вкладке “Профиль”, а также активировать контакты (номер телефона и e-mail).
Для новых клиентов промокод 1xSlots предоставляет уникальные возможности, позволяющие бесплатно опробовать один из представленных на платформе слотов. Чтобы получить бездепозитные фриспины, достаточно при регистрации указать промокод и выполнить простые условия акции, которые мы расскажем в данной статье. Игроки, желающие продолжить игру и сделать первый депозит, смогут получить щедрый приветственный бонус до €1500 и 150 бесплатных вращений.
Для получения бонуса на первый депозит необходимо пополнить счет на сумму не менее 10. Награда составляет 100% от суммы первого пополнения, но не может превышать 300. Если сумма пополнения превышает максимальный лимит, игрок получит свой депозит полностью, а также 300 в качестве бонуса. Для активации второго, третьего и четвертого этапов, сумма депозита должна быть не менее 15.
Кроме денежного вознаграждения, каждый этап сопровождается бесплатными прокрутками для игр компании:
– за первый депозит – 30 фриспинов для игры Book of Gold: Classic;
– за второй депозит – 35 фриспинов для игры в Legend of Cleopatra;
– за третий депозит – 40 фриспинов для игры в Solar Queen;
– за четвертый депозит – 45 фриспинов для игры в Imperial Fruits: 40 lines.
Казино 1xSlots предоставляет бонус поэтапно. Чтобы получить награду за второй и последующие депозиты, необходимо выполнить условия отыгрыша ранее полученных средств. Фриспины также начисляются поэтапно и зачисляются после выполнения условий отыгрыша.
Промокод для 1xСлотс: NEXT777. Получите бездепозитный приветственный пакет до €1650 +200 фриспинов. Компания 1xSlots предлагает своим клиентам ряд бонусных программ, самой популярной из которых является приветственный пакет с увеличением первого депозита и бесплатными вращениями. С использованием промокода вы можете получить до 1650 евро и 200 фриспинов. Одним из явных преимуществ 1xSlots является огромный выбор игр. Большую часть из доступных 10 тысяч развлечений занимают игровые автоматы. Пользователям предлагается более 100 различных провайдеров слотов.
Промокод не имеет срока действия. Любой пользователь, который создает аккаунт на сайте 1xSlots, может его активировать. Каждому игроку предоставляется только один бонус, поэтому промокод может быть использован только один раз. Чтобы воспользоваться промокодом, необходимо нажать на кнопку “Регистрация”, выбрать удобный способ создания аккаунта, указать все необходимые данные, подтвердить номер телефона или адрес электронной почты и ввести промокод. После этого можно завершить регистрацию, нажав на кнопку “Зарегистрироваться”.
1xSlots Промокод для Регистрации
Бонусы казино 1xSlots 2024 – Бездепозитные бонусы ? Коды на возврат средств ? VIP программа преданности ? Бесплатные фриспины.
Промокод 1xSlots при Регистрации: NEXT777 Получите эксклюзивный приветственный пакет до 1650 евро +150 фриспинов. Казино 1xSlots 2024 предлагает своим гостям не только широкий выбор игровых автоматов. На сайте казино регулярно проводятся бонусные акции, в рамках которых можно получить различные подарки, процент от депозита, фриспины и многое другое. При обычной регистрации есть ограничение по сумме – не более 1500 евро на первые четыре депозита. Первое пополнение – до 300 евро, второе – не более 350, третье – 400, четвертое – 450 евро. После ввода промокода лимит увеличивается до 1650 евро, а количество фриспинов возрастает с 150 до 200 вращений.
Получите бездепозитный бонус в размере 100 фриспинов в онлайн казино 1xSlots в 2024 году. Все активные бонус коды, промокоды и купоны от 1хСлотс (1xSlots) доступны как для новых, так и для существующих игроков. В клубе 1xSlots промокоды предоставляют дополнительные бонусы пользователям. Кроме того, в клубе проводятся множество турниров с крупными призовыми фондами, в которых может принять участие любой зарегистрированный игрок.
1xSlots фриспины промокод: NEXT777. Размер приветственного поощрения составляет 100 фриспинов в автомате Eye of Storm от провайдера Pragmatic Play. Время на его активацию неограничено. Подарок выдается единожды, попытки повторного создания учетной записи для получения фриспинов приравниваются к мошенническим действиям. Альтернативным способом получения бонус-кодов является активное заключение пари в системе. Вращая барабаны игровых автоматов и зарабатывая баллы можно получить право на фриспины, благодаря промо. Список промокодов 1xslots доступен непосредственно на официальном сайте. Чтобы получить бездепозитный бонус код для 1хслотс в 2024 году, следует выполнить следующие условия:
1. Активировать бонусные средства в личном кабинете;
2. Пополнить счет на €15 (или эквивалент в другой валюте) и более, чтобы привязать банковскую карту или онлайн-кошелек;
3. Выполнить условия вейджера: x25. Для этого необходимо поставить из своих денег сумму, равную выигрышу с бесплатных вращений, умноженную в 25 раз. На отыгрыш дается 7 дней с момента, когда вы прокрутили фриспины.
Максимальная сумма вознаграждения составляет 1650 евро. Ее необходимо отыграть с вейджером 35 раз. Казино предлагает релоад-бонусы, которые также нужно отыграть 35 раз. Однако особое место среди множества игр, слотов и турниров на 1xSlots занимает лайв-казино. Это казино, где игра происходит в режиме реального времени. Настоящие дилеры раздают карты и крутят рулетку за игровыми столами. Все эти действия передаются по видеосвязи. Благодаря такой видеотрансляции каждый игрок может почувствовать все эмоции и азарт игры в интерактивной атмосфере с профессиональными дилерами.
При регистрации на 1xSlots используйте промокод “NEXT777” и получите бездепозитный бонус в размере €1650 + 200 фриспинов. Казино 1xSlots радует своих игроков различными бонусами, такими как промокоды, фриспины и бездепозитные бонусы. Особенно щедрые подарки от казино 1xSlots предназначены для новичков.
В дополнение к бонусной программе онлайн казино 1xSlots предлагает кешбэк до 11%, начисляемый от суммы проигранных средств. Кешбэк не имеет срока отыгрыша. Сидя дома перед компьютером, удается почувствовать атмосферу присутствия в настоящем казино. Именно этими причинами объясняется такая популярность и широкий спрос лайв-казино.
1xslots промокоды – Бонус по промокоду 1хСлотс увеличивается с €1500 + 150 фриспинов до €1650 + 200 фриспинов.
Промокод 1xSlots на Сегодня: NEXT777 предоставляет вам возможность получить €1500 +150 FS при регистрации с использованием бонусного кода. Теперь бонус по промокоду составляет €1650 + 200 фриспинов, что на €150 больше, чем раньше. Это отличная возможность получить еще больше выгоды от игры. Казино 1xSlots 2024 – это платформа для игровых автоматов и Турниров. В казино 1хСлотс доступны различные бонусы, такие как промокоды, фриспины и бездепозитные бонусы. Особенно крупные подарки в казино 1xSlots предназначены для новичков.
Выгодная бонусная программа на сайте 1xslots позволяет как новичкам, так и опытным игрокам получать разнообразные подарки. Кроме того, это отличная возможность увеличить свой выигрыш. В казино 1xslots бонусы за депозиты и подарки не требуют дополнительных вложений. Используя фриспины и промокоды, вы можете получить хорошие деньги. Давайте подробнее рассмотрим, какие бонусы предлагает онлайн казино.
После прохождения регистрации игроку предлагается бонус на первые четыре операции по пополнению счета:
на первый депозит – 100% от внесенных средств и 30 фриспинов;
на второй депозит – 50% от внесенных средств и 35 фриспинов;
на третий депозит – 25% от внесенных средств и 40 фриспинов;
на четвертый депозит – 25% от внесенных средств и 45 фриспинов.
Промокод, также известный как код приглашения, является ключом-активатором приветственной программы для новичков. Если вы ранее не имели опыта игры в 1xSlots, то вы можете рассчитывать на получение щедрого подарка при регистрации – пакета из 1650 евро и 200 бесплатных прокруток. Согласно правилам бонусной акции, размер поощрения зависит от суммы первых четырех взносов и распределяется следующим образом: на депозитный бонус установлен максимальный лимит в 1500 евро. Чтобы получить подарок, игроку достаточно пройти процедуру регистрации, заполнить анкетные данные в личном кабинете и внести на счет профиля сумму от 10 евро.
При регистрации клиент может использовать промокод 1xSlots и получить дополнительный подарок.
1xSlots давно занимает прочные позиции в списке лучших брендов гемблинг-индустрии. Политика компании 1x ориентирована на опытных игроков, здесь пользователей ожидает продуманная программа лояльности, а также гарантии безопасности личной информации и депозита. Все действия осуществляются на основании лицензии 8048/JAZ2016-083, полученной от компании Orakum N.V., Кюрасао.
Промокод 1хСлот 2024: NEXT777 предоставляет бездепозитный бонус в виде 150 вращений в игре «The Dog House Megaways». В онлайн казино 1xslots доступны бесплатные промокоды на фриспины. Кроме того, игроки могут получать бонусные вращения не только за регистрацию или использование промокода от 1xSlots. Участие в бонусных акциях также позволяет пользователям получить фриспины. Казино 1хSlots предлагает различные варианты депозитов и выплат. Новые игроки, которые регистрируются на 1хSlots, получают приветственный пакет бонусов, однако с использованием промокода от 1xSlots этот бонус может быть еще более значительным. Для активации бонуса необходимо применить актуальный промокод при регистрации.
Приветственный пакет от 1xSlot доступен сразу после регистрации и требует активации через создание депозита. Бонус предоставляет умножение для первых четырех депозитов и дополнительные бесплатные вращения. Минимальная сумма для первого депозита составляет 10 евро, а для последующих пополнений – 15 евро. Максимальная сумма бонуса – 1500 евро.
Также новичкам предоставляются бонусы на второй, третий и четвертый депозит. Для получения подарка необходимо внести сумму не менее 15 евро. Игрокам также предоставляются фриспины и депозитные подарки. Для начисления фриспинов требуется подтверждение номера телефона.
Для постоянных игроков онлайн-казино 1xSlots проводит бонусные акции. Некоторые из них имеют временный характер, а другие действуют постоянно. В основном, пользователям предлагаются депозитные бонусы. Например, можно получить презент за пополнение счета в понедельник. За десятый депозит игроку полагается крупный депозитный бонус в размере 50% от вносимой суммы и 100 фриспинов.
В клубе 1xSlots также действует программа лояльности, которая предполагает различные привилегии для игроков.
Игрокам, активно делающим ставки в течение недели и ушедшим в минус, казино 1xSlots предлагает фриспины. Для получения бонуса не требуется пополнение счета, лимит на максимальный выигрыш и вейджер не устанавливаются.
Ежедневно в казино 1хСлотс назначается слот дня. При совершении ставок на определенную сумму в этом игровом аппарате игроку начисляются фриспины. Обратите внимание https://xenon-lampa.ru/content/pags/promokod_1xslots.html, время действия акции ограничено.
Разработчиками 1хСлотс было разработано мобильное казино. Такая версия представляет собой упрощенный вариант компьютерного формата онлайн казино. Она позволяет играть в любимые игры на любом устройстве, поддерживающем функцию выхода в интернет. В качестве такого устройства может быть смартфон или планшет.
synthroid 200 mcg cost
1xSlots Промокод (Бездепозитный Бонус 2024)
1xSlots промокод: NEXT777, при регистрации введите этот бонусный код, чтобы получить бонус для новых игроков в размере €1650 + 200 фриспинов. Чтобы получить этот бонус, вам нужно создать аккаунт и ввести специальный промокод казино 1хСлотс.
1xSlot Промокод
NEXT777
В казино 1xSlots 2024 доступны различные бонусы: бездепозитные при регистрации, промокоды, фриспины, кэшбэки и другие акции.
Промокод 1xSlots 2024: NEXT777 – введите код при регистрации в казино 1хСлот и получите приветственный бонус €1650 +200 фриспинов. Чтобы промокод 1xSlots на бездепозитный бонус сработал, необходимо указать рабочую комбинацию при регистрации и правильно заполнить форму анкеты. После завершения регистрации бездепозитный бонус будет доступен в личном кабинете. Рекомендуется не торопиться и сразу после создания аккаунта заполнить персональные данные. Важно указать требуемую информацию в полях, отмеченных звездочкой во вкладке “Профиль”, а также активировать контакты (номер телефона и e-mail).
Для новых клиентов промокод 1xSlots предоставляет уникальные возможности, позволяющие бесплатно опробовать один из представленных на платформе слотов. Чтобы получить бездепозитные фриспины, достаточно при регистрации указать промокод и выполнить простые условия акции, которые мы расскажем в данной статье. Игроки, желающие продолжить игру и сделать первый депозит, смогут получить щедрый приветственный бонус до €1500 и 150 бесплатных вращений.
Для получения бонуса на первый депозит необходимо пополнить счет на сумму не менее 10. Награда составляет 100% от суммы первого пополнения, но не может превышать 300. Если сумма пополнения превышает максимальный лимит, игрок получит свой депозит полностью, а также 300 в качестве бонуса. Для активации второго, третьего и четвертого этапов, сумма депозита должна быть не менее 15.
Кроме денежного вознаграждения, каждый этап сопровождается бесплатными прокрутками для игр компании:
– за первый депозит – 30 фриспинов для игры Book of Gold: Classic;
– за второй депозит – 35 фриспинов для игры в Legend of Cleopatra;
– за третий депозит – 40 фриспинов для игры в Solar Queen;
– за четвертый депозит – 45 фриспинов для игры в Imperial Fruits: 40 lines.
Казино 1xSlots предоставляет бонус поэтапно. Чтобы получить награду за второй и последующие депозиты, необходимо выполнить условия отыгрыша ранее полученных средств. Фриспины также начисляются поэтапно и зачисляются после выполнения условий отыгрыша.
Промокод для 1xСлотс: NEXT777. Получите бездепозитный приветственный пакет до €1650 +200 фриспинов. Компания 1xSlots предлагает своим клиентам ряд бонусных программ, самой популярной из которых является приветственный пакет с увеличением первого депозита и бесплатными вращениями. С использованием промокода вы можете получить до 1650 евро и 200 фриспинов. Одним из явных преимуществ 1xSlots является огромный выбор игр. Большую часть из доступных 10 тысяч развлечений занимают игровые автоматы. Пользователям предлагается более 100 различных провайдеров слотов.
Промокод не имеет срока действия. Любой пользователь, который создает аккаунт на сайте 1xSlots, может его активировать. Каждому игроку предоставляется только один бонус, поэтому промокод может быть использован только один раз. Чтобы воспользоваться промокодом, необходимо нажать на кнопку “Регистрация”, выбрать удобный способ создания аккаунта, указать все необходимые данные, подтвердить номер телефона или адрес электронной почты и ввести промокод. После этого можно завершить регистрацию, нажав на кнопку “Зарегистрироваться”.
1xSlots Промокод для Регистрации
Бонусы казино 1xSlots 2024 – Бездепозитные бонусы ? Коды на возврат средств ? VIP программа преданности ? Бесплатные фриспины.
Промокод 1xSlots при Регистрации: NEXT777 Получите эксклюзивный приветственный пакет до 1650 евро +150 фриспинов. Казино 1xSlots 2024 предлагает своим гостям не только широкий выбор игровых автоматов. На сайте казино регулярно проводятся бонусные акции, в рамках которых можно получить различные подарки, процент от депозита, фриспины и многое другое. При обычной регистрации есть ограничение по сумме – не более 1500 евро на первые четыре депозита. Первое пополнение – до 300 евро, второе – не более 350, третье – 400, четвертое – 450 евро. После ввода промокода лимит увеличивается до 1650 евро, а количество фриспинов возрастает с 150 до 200 вращений.
Получите бездепозитный бонус в размере 100 фриспинов в онлайн казино 1xSlots в 2024 году. Все активные бонус коды, промокоды и купоны от 1хСлотс (1xSlots) доступны как для новых, так и для существующих игроков. В клубе 1xSlots промокоды предоставляют дополнительные бонусы пользователям. Кроме того, в клубе проводятся множество турниров с крупными призовыми фондами, в которых может принять участие любой зарегистрированный игрок.
1xSlots фриспины промокод: NEXT777. Размер приветственного поощрения составляет 100 фриспинов в автомате Eye of Storm от провайдера Pragmatic Play. Время на его активацию неограничено. Подарок выдается единожды, попытки повторного создания учетной записи для получения фриспинов приравниваются к мошенническим действиям. Альтернативным способом получения бонус-кодов является активное заключение пари в системе. Вращая барабаны игровых автоматов и зарабатывая баллы можно получить право на фриспины, благодаря промо. Список промокодов 1xslots доступен непосредственно на официальном сайте. Чтобы получить бездепозитный бонус код для 1хслотс в 2024 году, следует выполнить следующие условия:
1. Активировать бонусные средства в личном кабинете;
2. Пополнить счет на €15 (или эквивалент в другой валюте) и более, чтобы привязать банковскую карту или онлайн-кошелек;
3. Выполнить условия вейджера: x25. Для этого необходимо поставить из своих денег сумму, равную выигрышу с бесплатных вращений, умноженную в 25 раз. На отыгрыш дается 7 дней с момента, когда вы прокрутили фриспины.
Максимальная сумма вознаграждения составляет 1650 евро. Ее необходимо отыграть с вейджером 35 раз. Казино предлагает релоад-бонусы, которые также нужно отыграть 35 раз. Однако особое место среди множества игр, слотов и турниров на 1xSlots занимает лайв-казино. Это казино, где игра происходит в режиме реального времени. Настоящие дилеры раздают карты и крутят рулетку за игровыми столами. Все эти действия передаются по видеосвязи. Благодаря такой видеотрансляции каждый игрок может почувствовать все эмоции и азарт игры в интерактивной атмосфере с профессиональными дилерами.
При регистрации на 1xSlots используйте промокод “NEXT777” и получите бездепозитный бонус в размере €1650 + 200 фриспинов. Казино 1xSlots радует своих игроков различными бонусами, такими как промокоды, фриспины и бездепозитные бонусы. Особенно щедрые подарки от казино 1xSlots предназначены для новичков.
В дополнение к бонусной программе онлайн казино 1xSlots предлагает кешбэк до 11%, начисляемый от суммы проигранных средств. Кешбэк не имеет срока отыгрыша. Сидя дома перед компьютером, удается почувствовать атмосферу присутствия в настоящем казино. Именно этими причинами объясняется такая популярность и широкий спрос лайв-казино.
1хслотс промокоды – Бонус по промокоду 1хСлотс увеличивается с €1500 + 150 фриспинов до €1650 + 200 фриспинов.
Промокод 1xSlots на Сегодня: NEXT777 предоставляет вам возможность получить €1500 +150 FS при регистрации с использованием бонусного кода. Теперь бонус по промокоду составляет €1650 + 200 фриспинов, что на €150 больше, чем раньше. Это отличная возможность получить еще больше выгоды от игры. Казино 1xSlots 2024 – это платформа для игровых автоматов и Турниров. В казино 1хСлотс доступны различные бонусы, такие как промокоды, фриспины и бездепозитные бонусы. Особенно крупные подарки в казино 1xSlots предназначены для новичков.
Выгодная бонусная программа на сайте 1xslots позволяет как новичкам, так и опытным игрокам получать разнообразные подарки. Кроме того, это отличная возможность увеличить свой выигрыш. В казино 1xslots бонусы за депозиты и подарки не требуют дополнительных вложений. Используя фриспины и промокоды, вы можете получить хорошие деньги. Давайте подробнее рассмотрим, какие бонусы предлагает онлайн казино.
После прохождения регистрации игроку предлагается бонус на первые четыре операции по пополнению счета:
на первый депозит – 100% от внесенных средств и 30 фриспинов;
на второй депозит – 50% от внесенных средств и 35 фриспинов;
на третий депозит – 25% от внесенных средств и 40 фриспинов;
на четвертый депозит – 25% от внесенных средств и 45 фриспинов.
Промокод, также известный как код приглашения, является ключом-активатором приветственной программы для новичков. Если вы ранее не имели опыта игры в 1xSlots, то вы можете рассчитывать на получение щедрого подарка при регистрации – пакета из 1650 евро и 200 бесплатных прокруток. Согласно правилам бонусной акции, размер поощрения зависит от суммы первых четырех взносов и распределяется следующим образом: на депозитный бонус установлен максимальный лимит в 1500 евро. Чтобы получить подарок, игроку достаточно пройти процедуру регистрации, заполнить анкетные данные в личном кабинете и внести на счет профиля сумму от 10 евро.
При регистрации клиент может использовать промокод 1xSlots и получить дополнительный подарок.
1xSlots давно занимает прочные позиции в списке лучших брендов гемблинг-индустрии. Политика компании 1x ориентирована на опытных игроков, здесь пользователей ожидает продуманная программа лояльности, а также гарантии безопасности личной информации и депозита. Все действия осуществляются на основании лицензии 8048/JAZ2016-083, полученной от компании Orakum N.V., Кюрасао.
Промокод 1хСлот 2024: NEXT777 предоставляет бездепозитный бонус в виде 150 вращений в игре «The Dog House Megaways». В онлайн казино 1xslots доступны бесплатные промокоды на фриспины. Кроме того, игроки могут получать бонусные вращения не только за регистрацию или использование промокода от 1xSlots. Участие в бонусных акциях также позволяет пользователям получить фриспины. Казино 1хSlots предлагает различные варианты депозитов и выплат. Новые игроки, которые регистрируются на 1хSlots, получают приветственный пакет бонусов, однако с использованием промокода от 1xSlots этот бонус может быть еще более значительным. Для активации бонуса необходимо применить актуальный промокод при регистрации.
Приветственный пакет от 1xSlot доступен сразу после регистрации и требует активации через создание депозита. Бонус предоставляет умножение для первых четырех депозитов и дополнительные бесплатные вращения. Минимальная сумма для первого депозита составляет 10 евро, а для последующих пополнений – 15 евро. Максимальная сумма бонуса – 1500 евро.
Также новичкам предоставляются бонусы на второй, третий и четвертый депозит. Для получения подарка необходимо внести сумму не менее 15 евро. Игрокам также предоставляются фриспины и депозитные подарки. Для начисления фриспинов требуется подтверждение номера телефона.
Для постоянных игроков онлайн-казино 1xSlots проводит бонусные акции. Некоторые из них имеют временный характер, а другие действуют постоянно. В основном, пользователям предлагаются депозитные бонусы. Например, можно получить презент за пополнение счета в понедельник. За десятый депозит игроку полагается крупный депозитный бонус в размере 50% от вносимой суммы и 100 фриспинов.
В клубе 1xSlots также действует программа лояльности, которая предполагает различные привилегии для игроков.
Игрокам, активно делающим ставки в течение недели и ушедшим в минус, казино 1xSlots предлагает фриспины. Для получения бонуса не требуется пополнение счета, лимит на максимальный выигрыш и вейджер не устанавливаются.
Ежедневно в казино 1хСлотс назначается слот дня. При совершении ставок на определенную сумму в этом игровом аппарате игроку начисляются фриспины. Обратите внимание https://xenon-lampa.ru/content/pags/promokod_1xslots.html, время действия акции ограничено.
Разработчиками 1хСлотс было разработано мобильное казино. Такая версия представляет собой упрощенный вариант компьютерного формата онлайн казино. Она позволяет играть в любимые игры на любом устройстве, поддерживающем функцию выхода в интернет. В качестве такого устройства может быть смартфон или планшет.
motomagazinvfdvgd.vn.ua/uk/v-shlema/
НА нашем мотомагазине ваша милость обнаружите запасные части для мотоциклов, скутеров, снегоходов равно квадроциклов. У нас вы хронически нахлынете масла для мотоциклов, фильтра, цепи.
https://motomagazinvfdvgd.vn.ua
tadalafil 5 mg
Thanks for sharing your thoughts. I truly appreciate your efforts and I will be waiting for your next post
thanks once again.
best canadian pharmacy
Мы рекомендуем посетить веб-сайт https://magic-magnit.ru/.
Кроме того, не забудьте добавить сайт в закладки: https://magic-magnit.ru/
Crypto presales offer extra thrill, excitement, and profitability than conventional investments in the crypto market.
Полезные советы
2. Шаг за шагом: установка кондиционера своими руками
3. Важные моменты при установке кондиционера в квартире
4. Специалисты или самостоятельная установка кондиционера?
5. 10 шагов к идеальной установке кондиционера
6. Подробная инструкция по установке кондиционера на балконе
7. Лучшие методы крепления кондиционера на стену
8. Как выбрать место для установки кондиционера в комнате
9. Секреты успешной установки кондиционера в частном доме
10. Рассказываем, как правильно установить сплит-систему
11. Необходимые инструменты для установки кондиционера
12. Какие документы нужны для оформления установки кондиционера?
13. Топ-5 ошибок при самостоятельной установке кондиционера
14. Установка кондиционера на потолке: особенности и нюансы
15. Когда лучше всего устанавливать кондиционер в доме?
16. Почему стоит доверить установку кондиционера профессионалам
17. Как подготовиться к установке кондиционера в жаркий сезон
18. Стоит ли экономить на установке кондиционера?
19. Подбор оптимальной мощности кондиционера перед установкой
20. Какие бывают типы кондиционеров: сравнение перед установкой
установка кондиционер https://prodazha-kondcionerov.ru/ .
play sweet bonanza online http://sweet-bonanza-game.ru/ .
Мы рекомендуем посетить веб-сайт https://kvest4x4.ru/.
Кроме того, не забудьте добавить сайт в закладки: https://kvest4x4.ru/
https://kursovajaskill.ru
Полезные советы
2. Шаг за шагом: установка кондиционера своими руками
3. Важные моменты при установке кондиционера в квартире
4. Специалисты или самостоятельная установка кондиционера?
5. 10 шагов к идеальной установке кондиционера
6. Подробная инструкция по установке кондиционера на балконе
7. Лучшие методы крепления кондиционера на стену
8. Как выбрать место для установки кондиционера в комнате
9. Секреты успешной установки кондиционера в частном доме
10. Рассказываем, как правильно установить сплит-систему
11. Необходимые инструменты для установки кондиционера
12. Какие документы нужны для оформления установки кондиционера?
13. Топ-5 ошибок при самостоятельной установке кондиционера
14. Установка кондиционера на потолке: особенности и нюансы
15. Когда лучше всего устанавливать кондиционер в доме?
16. Почему стоит доверить установку кондиционера профессионалам
17. Как подготовиться к установке кондиционера в жаркий сезон
18. Стоит ли экономить на установке кондиционера?
19. Подбор оптимальной мощности кондиционера перед установкой
20. Какие бывают типы кондиционеров: сравнение перед установкой
услуги кондиционирования https://prodazha-kondcionerov.ru/ .
інтернет магазин мотозапчастин
В ТЕЧЕНИЕ нашем мотомагазине вы обнаружите запчасти для мотоциклов, скутеров, снегоходов равным образом квадроциклов. ЯЗЫК нас вы всегда найдёте масла чтобы мотоциклов, фильтра, цепи.
motomagazinvfdvgd.vn.ua/uk/v-shlema/vybor-po-stilyu-is-kross-enduro-kvadrotsikl-utv-baggi/
1xSlots Промокод (Бездепозитный Бонус 2024)
1xSlots промокод: NEXT777, при регистрации введите этот бонусный код, чтобы получить бонус для новых игроков в размере €1650 + 200 фриспинов. Чтобы получить этот бонус, вам нужно создать аккаунт и ввести специальный промокод казино 1хСлотс.
1xSlot Промокод
NEXT777
В казино 1xSlots 2024 доступны различные бонусы: бездепозитные при регистрации, промокоды, фриспины, кэшбэки и другие акции.
Промокод 1xSlots 2024: NEXT777 – введите код при регистрации в казино 1хСлот и получите приветственный бонус €1650 +200 фриспинов. Чтобы промокод 1xSlots на бездепозитный бонус сработал, необходимо указать рабочую комбинацию при регистрации и правильно заполнить форму анкеты. После завершения регистрации бездепозитный бонус будет доступен в личном кабинете. Рекомендуется не торопиться и сразу после создания аккаунта заполнить персональные данные. Важно указать требуемую информацию в полях, отмеченных звездочкой во вкладке “Профиль”, а также активировать контакты (номер телефона и e-mail).
Для новых клиентов промокод 1xSlots предоставляет уникальные возможности, позволяющие бесплатно опробовать один из представленных на платформе слотов. Чтобы получить бездепозитные фриспины, достаточно при регистрации указать промокод и выполнить простые условия акции, которые мы расскажем в данной статье. Игроки, желающие продолжить игру и сделать первый депозит, смогут получить щедрый приветственный бонус до €1500 и 150 бесплатных вращений.
Для получения бонуса на первый депозит необходимо пополнить счет на сумму не менее 10. Награда составляет 100% от суммы первого пополнения, но не может превышать 300. Если сумма пополнения превышает максимальный лимит, игрок получит свой депозит полностью, а также 300 в качестве бонуса. Для активации второго, третьего и четвертого этапов, сумма депозита должна быть не менее 15.
Кроме денежного вознаграждения, каждый этап сопровождается бесплатными прокрутками для игр компании:
– за первый депозит – 30 фриспинов для игры Book of Gold: Classic;
– за второй депозит – 35 фриспинов для игры в Legend of Cleopatra;
– за третий депозит – 40 фриспинов для игры в Solar Queen;
– за четвертый депозит – 45 фриспинов для игры в Imperial Fruits: 40 lines.
Казино 1xSlots предоставляет бонус поэтапно. Чтобы получить награду за второй и последующие депозиты, необходимо выполнить условия отыгрыша ранее полученных средств. Фриспины также начисляются поэтапно и зачисляются после выполнения условий отыгрыша.
Промокод для 1xСлотс: NEXT777. Получите бездепозитный приветственный пакет до €1650 +200 фриспинов. Компания 1xSlots предлагает своим клиентам ряд бонусных программ, самой популярной из которых является приветственный пакет с увеличением первого депозита и бесплатными вращениями. С использованием промокода вы можете получить до 1650 евро и 200 фриспинов. Одним из явных преимуществ 1xSlots является огромный выбор игр. Большую часть из доступных 10 тысяч развлечений занимают игровые автоматы. Пользователям предлагается более 100 различных провайдеров слотов.
Промокод не имеет срока действия. Любой пользователь, который создает аккаунт на сайте 1xSlots, может его активировать. Каждому игроку предоставляется только один бонус, поэтому промокод может быть использован только один раз. Чтобы воспользоваться промокодом, необходимо нажать на кнопку “Регистрация”, выбрать удобный способ создания аккаунта, указать все необходимые данные, подтвердить номер телефона или адрес электронной почты и ввести промокод. После этого можно завершить регистрацию, нажав на кнопку “Зарегистрироваться”.
1xSlots Промокод для Регистрации
Бонусы казино 1xSlots 2024 – Бездепозитные бонусы ? Коды на возврат средств ? VIP программа преданности ? Бесплатные фриспины.
Промокод 1xSlots при Регистрации: NEXT777 Получите эксклюзивный приветственный пакет до 1650 евро +150 фриспинов. Казино 1xSlots 2024 предлагает своим гостям не только широкий выбор игровых автоматов. На сайте казино регулярно проводятся бонусные акции, в рамках которых можно получить различные подарки, процент от депозита, фриспины и многое другое. При обычной регистрации есть ограничение по сумме – не более 1500 евро на первые четыре депозита. Первое пополнение – до 300 евро, второе – не более 350, третье – 400, четвертое – 450 евро. После ввода промокода лимит увеличивается до 1650 евро, а количество фриспинов возрастает с 150 до 200 вращений.
Получите бездепозитный бонус в размере 100 фриспинов в онлайн казино 1xSlots в 2024 году. Все активные бонус коды, промокоды и купоны от 1хСлотс (1xSlots) доступны как для новых, так и для существующих игроков. В клубе 1xSlots промокоды предоставляют дополнительные бонусы пользователям. Кроме того, в клубе проводятся множество турниров с крупными призовыми фондами, в которых может принять участие любой зарегистрированный игрок.
1xSlots фриспины промокод: NEXT777. Размер приветственного поощрения составляет 100 фриспинов в автомате Eye of Storm от провайдера Pragmatic Play. Время на его активацию неограничено. Подарок выдается единожды, попытки повторного создания учетной записи для получения фриспинов приравниваются к мошенническим действиям. Альтернативным способом получения бонус-кодов является активное заключение пари в системе. Вращая барабаны игровых автоматов и зарабатывая баллы можно получить право на фриспины, благодаря промо. Список промокодов 1xslots доступен непосредственно на официальном сайте. Чтобы получить бездепозитный бонус код для 1хслотс в 2024 году, следует выполнить следующие условия:
1. Активировать бонусные средства в личном кабинете;
2. Пополнить счет на €15 (или эквивалент в другой валюте) и более, чтобы привязать банковскую карту или онлайн-кошелек;
3. Выполнить условия вейджера: x25. Для этого необходимо поставить из своих денег сумму, равную выигрышу с бесплатных вращений, умноженную в 25 раз. На отыгрыш дается 7 дней с момента, когда вы прокрутили фриспины.
Максимальная сумма вознаграждения составляет 1650 евро. Ее необходимо отыграть с вейджером 35 раз. Казино предлагает релоад-бонусы, которые также нужно отыграть 35 раз. Однако особое место среди множества игр, слотов и турниров на 1xSlots занимает лайв-казино. Это казино, где игра происходит в режиме реального времени. Настоящие дилеры раздают карты и крутят рулетку за игровыми столами. Все эти действия передаются по видеосвязи. Благодаря такой видеотрансляции каждый игрок может почувствовать все эмоции и азарт игры в интерактивной атмосфере с профессиональными дилерами.
При регистрации на 1xSlots используйте промокод “NEXT777” и получите бездепозитный бонус в размере €1650 + 200 фриспинов. Казино 1xSlots радует своих игроков различными бонусами, такими как промокоды, фриспины и бездепозитные бонусы. Особенно щедрые подарки от казино 1xSlots предназначены для новичков.
В дополнение к бонусной программе онлайн казино 1xSlots предлагает кешбэк до 11%, начисляемый от суммы проигранных средств. Кешбэк не имеет срока отыгрыша. Сидя дома перед компьютером, удается почувствовать атмосферу присутствия в настоящем казино. Именно этими причинами объясняется такая популярность и широкий спрос лайв-казино.
промокоды на 1xslots фриспины – Бонус по промокоду 1хСлотс увеличивается с €1500 + 150 фриспинов до €1650 + 200 фриспинов.
Промокод 1xSlots на Сегодня: NEXT777 предоставляет вам возможность получить €1500 +150 FS при регистрации с использованием бонусного кода. Теперь бонус по промокоду составляет €1650 + 200 фриспинов, что на €150 больше, чем раньше. Это отличная возможность получить еще больше выгоды от игры. Казино 1xSlots 2024 – это платформа для игровых автоматов и Турниров. В казино 1хСлотс доступны различные бонусы, такие как промокоды, фриспины и бездепозитные бонусы. Особенно крупные подарки в казино 1xSlots предназначены для новичков.
Выгодная бонусная программа на сайте 1xslots позволяет как новичкам, так и опытным игрокам получать разнообразные подарки. Кроме того, это отличная возможность увеличить свой выигрыш. В казино 1xslots бонусы за депозиты и подарки не требуют дополнительных вложений. Используя фриспины и промокоды, вы можете получить хорошие деньги. Давайте подробнее рассмотрим, какие бонусы предлагает онлайн казино.
После прохождения регистрации игроку предлагается бонус на первые четыре операции по пополнению счета:
на первый депозит – 100% от внесенных средств и 30 фриспинов;
на второй депозит – 50% от внесенных средств и 35 фриспинов;
на третий депозит – 25% от внесенных средств и 40 фриспинов;
на четвертый депозит – 25% от внесенных средств и 45 фриспинов.
Промокод, также известный как код приглашения, является ключом-активатором приветственной программы для новичков. Если вы ранее не имели опыта игры в 1xSlots, то вы можете рассчитывать на получение щедрого подарка при регистрации – пакета из 1650 евро и 200 бесплатных прокруток. Согласно правилам бонусной акции, размер поощрения зависит от суммы первых четырех взносов и распределяется следующим образом: на депозитный бонус установлен максимальный лимит в 1500 евро. Чтобы получить подарок, игроку достаточно пройти процедуру регистрации, заполнить анкетные данные в личном кабинете и внести на счет профиля сумму от 10 евро.
При регистрации клиент может использовать промокод 1xSlots и получить дополнительный подарок.
1xSlots давно занимает прочные позиции в списке лучших брендов гемблинг-индустрии. Политика компании 1x ориентирована на опытных игроков, здесь пользователей ожидает продуманная программа лояльности, а также гарантии безопасности личной информации и депозита. Все действия осуществляются на основании лицензии 8048/JAZ2016-083, полученной от компании Orakum N.V., Кюрасао.
Промокод 1хСлот 2024: NEXT777 предоставляет бездепозитный бонус в виде 150 вращений в игре «The Dog House Megaways». В онлайн казино 1xslots доступны бесплатные промокоды на фриспины. Кроме того, игроки могут получать бонусные вращения не только за регистрацию или использование промокода от 1xSlots. Участие в бонусных акциях также позволяет пользователям получить фриспины. Казино 1хSlots предлагает различные варианты депозитов и выплат. Новые игроки, которые регистрируются на 1хSlots, получают приветственный пакет бонусов, однако с использованием промокода от 1xSlots этот бонус может быть еще более значительным. Для активации бонуса необходимо применить актуальный промокод при регистрации.
Приветственный пакет от 1xSlot доступен сразу после регистрации и требует активации через создание депозита. Бонус предоставляет умножение для первых четырех депозитов и дополнительные бесплатные вращения. Минимальная сумма для первого депозита составляет 10 евро, а для последующих пополнений – 15 евро. Максимальная сумма бонуса – 1500 евро.
Также новичкам предоставляются бонусы на второй, третий и четвертый депозит. Для получения подарка необходимо внести сумму не менее 15 евро. Игрокам также предоставляются фриспины и депозитные подарки. Для начисления фриспинов требуется подтверждение номера телефона.
Для постоянных игроков онлайн-казино 1xSlots проводит бонусные акции. Некоторые из них имеют временный характер, а другие действуют постоянно. В основном, пользователям предлагаются депозитные бонусы. Например, можно получить презент за пополнение счета в понедельник. За десятый депозит игроку полагается крупный депозитный бонус в размере 50% от вносимой суммы и 100 фриспинов.
В клубе 1xSlots также действует программа лояльности, которая предполагает различные привилегии для игроков.
Игрокам, активно делающим ставки в течение недели и ушедшим в минус, казино 1xSlots предлагает фриспины. Для получения бонуса не требуется пополнение счета, лимит на максимальный выигрыш и вейджер не устанавливаются.
Ежедневно в казино 1хСлотс назначается слот дня. При совершении ставок на определенную сумму в этом игровом аппарате игроку начисляются фриспины. Обратите внимание https://xenon-lampa.ru/content/pags/promokod_1xslots.html, время действия акции ограничено.
Разработчиками 1хСлотс было разработано мобильное казино. Такая версия представляет собой упрощенный вариант компьютерного формата онлайн казино. Она позволяет играть в любимые игры на любом устройстве, поддерживающем функцию выхода в интернет. В качестве такого устройства может быть смартфон или планшет.
1xSlots Промокод (Бездепозитный Бонус 2024)
1xSlots промокод: NEXT777, при регистрации введите этот бонусный код, чтобы получить бонус для новых игроков в размере €1650 + 200 фриспинов. Чтобы получить этот бонус, вам нужно создать аккаунт и ввести специальный промокод казино 1хСлотс.
1xSlot Промокод
NEXT777
В казино 1xSlots 2024 доступны различные бонусы: бездепозитные при регистрации, промокоды, фриспины, кэшбэки и другие акции.
Промокод 1xSlots 2024: NEXT777 – введите код при регистрации в казино 1хСлот и получите приветственный бонус €1650 +200 фриспинов. Чтобы промокод 1xSlots на бездепозитный бонус сработал, необходимо указать рабочую комбинацию при регистрации и правильно заполнить форму анкеты. После завершения регистрации бездепозитный бонус будет доступен в личном кабинете. Рекомендуется не торопиться и сразу после создания аккаунта заполнить персональные данные. Важно указать требуемую информацию в полях, отмеченных звездочкой во вкладке “Профиль”, а также активировать контакты (номер телефона и e-mail).
Для новых клиентов промокод 1xSlots предоставляет уникальные возможности, позволяющие бесплатно опробовать один из представленных на платформе слотов. Чтобы получить бездепозитные фриспины, достаточно при регистрации указать промокод и выполнить простые условия акции, которые мы расскажем в данной статье. Игроки, желающие продолжить игру и сделать первый депозит, смогут получить щедрый приветственный бонус до €1500 и 150 бесплатных вращений.
Для получения бонуса на первый депозит необходимо пополнить счет на сумму не менее 10. Награда составляет 100% от суммы первого пополнения, но не может превышать 300. Если сумма пополнения превышает максимальный лимит, игрок получит свой депозит полностью, а также 300 в качестве бонуса. Для активации второго, третьего и четвертого этапов, сумма депозита должна быть не менее 15.
Кроме денежного вознаграждения, каждый этап сопровождается бесплатными прокрутками для игр компании:
– за первый депозит – 30 фриспинов для игры Book of Gold: Classic;
– за второй депозит – 35 фриспинов для игры в Legend of Cleopatra;
– за третий депозит – 40 фриспинов для игры в Solar Queen;
– за четвертый депозит – 45 фриспинов для игры в Imperial Fruits: 40 lines.
Казино 1xSlots предоставляет бонус поэтапно. Чтобы получить награду за второй и последующие депозиты, необходимо выполнить условия отыгрыша ранее полученных средств. Фриспины также начисляются поэтапно и зачисляются после выполнения условий отыгрыша.
Промокод для 1xСлотс: NEXT777. Получите бездепозитный приветственный пакет до €1650 +200 фриспинов. Компания 1xSlots предлагает своим клиентам ряд бонусных программ, самой популярной из которых является приветственный пакет с увеличением первого депозита и бесплатными вращениями. С использованием промокода вы можете получить до 1650 евро и 200 фриспинов. Одним из явных преимуществ 1xSlots является огромный выбор игр. Большую часть из доступных 10 тысяч развлечений занимают игровые автоматы. Пользователям предлагается более 100 различных провайдеров слотов.
Промокод не имеет срока действия. Любой пользователь, который создает аккаунт на сайте 1xSlots, может его активировать. Каждому игроку предоставляется только один бонус, поэтому промокод может быть использован только один раз. Чтобы воспользоваться промокодом, необходимо нажать на кнопку “Регистрация”, выбрать удобный способ создания аккаунта, указать все необходимые данные, подтвердить номер телефона или адрес электронной почты и ввести промокод. После этого можно завершить регистрацию, нажав на кнопку “Зарегистрироваться”.
1xSlots Промокод для Регистрации
Бонусы казино 1xSlots 2024 – Бездепозитные бонусы ? Коды на возврат средств ? VIP программа преданности ? Бесплатные фриспины.
Промокод 1xSlots при Регистрации: NEXT777 Получите эксклюзивный приветственный пакет до 1650 евро +150 фриспинов. Казино 1xSlots 2024 предлагает своим гостям не только широкий выбор игровых автоматов. На сайте казино регулярно проводятся бонусные акции, в рамках которых можно получить различные подарки, процент от депозита, фриспины и многое другое. При обычной регистрации есть ограничение по сумме – не более 1500 евро на первые четыре депозита. Первое пополнение – до 300 евро, второе – не более 350, третье – 400, четвертое – 450 евро. После ввода промокода лимит увеличивается до 1650 евро, а количество фриспинов возрастает с 150 до 200 вращений.
Получите бездепозитный бонус в размере 100 фриспинов в онлайн казино 1xSlots в 2024 году. Все активные бонус коды, промокоды и купоны от 1хСлотс (1xSlots) доступны как для новых, так и для существующих игроков. В клубе 1xSlots промокоды предоставляют дополнительные бонусы пользователям. Кроме того, в клубе проводятся множество турниров с крупными призовыми фондами, в которых может принять участие любой зарегистрированный игрок.
1xSlots фриспины промокод: NEXT777. Размер приветственного поощрения составляет 100 фриспинов в автомате Eye of Storm от провайдера Pragmatic Play. Время на его активацию неограничено. Подарок выдается единожды, попытки повторного создания учетной записи для получения фриспинов приравниваются к мошенническим действиям. Альтернативным способом получения бонус-кодов является активное заключение пари в системе. Вращая барабаны игровых автоматов и зарабатывая баллы можно получить право на фриспины, благодаря промо. Список промокодов 1xslots доступен непосредственно на официальном сайте. Чтобы получить бездепозитный бонус код для 1хслотс в 2024 году, следует выполнить следующие условия:
1. Активировать бонусные средства в личном кабинете;
2. Пополнить счет на €15 (или эквивалент в другой валюте) и более, чтобы привязать банковскую карту или онлайн-кошелек;
3. Выполнить условия вейджера: x25. Для этого необходимо поставить из своих денег сумму, равную выигрышу с бесплатных вращений, умноженную в 25 раз. На отыгрыш дается 7 дней с момента, когда вы прокрутили фриспины.
Максимальная сумма вознаграждения составляет 1650 евро. Ее необходимо отыграть с вейджером 35 раз. Казино предлагает релоад-бонусы, которые также нужно отыграть 35 раз. Однако особое место среди множества игр, слотов и турниров на 1xSlots занимает лайв-казино. Это казино, где игра происходит в режиме реального времени. Настоящие дилеры раздают карты и крутят рулетку за игровыми столами. Все эти действия передаются по видеосвязи. Благодаря такой видеотрансляции каждый игрок может почувствовать все эмоции и азарт игры в интерактивной атмосфере с профессиональными дилерами.
При регистрации на 1xSlots используйте промокод “NEXT777” и получите бездепозитный бонус в размере €1650 + 200 фриспинов. Казино 1xSlots радует своих игроков различными бонусами, такими как промокоды, фриспины и бездепозитные бонусы. Особенно щедрые подарки от казино 1xSlots предназначены для новичков.
В дополнение к бонусной программе онлайн казино 1xSlots предлагает кешбэк до 11%, начисляемый от суммы проигранных средств. Кешбэк не имеет срока отыгрыша. Сидя дома перед компьютером, удается почувствовать атмосферу присутствия в настоящем казино. Именно этими причинами объясняется такая популярность и широкий спрос лайв-казино.
промокоды для 1xslots без отыгрыша – Бонус по промокоду 1хСлотс увеличивается с €1500 + 150 фриспинов до €1650 + 200 фриспинов.
Промокод 1xSlots на Сегодня: NEXT777 предоставляет вам возможность получить €1500 +150 FS при регистрации с использованием бонусного кода. Теперь бонус по промокоду составляет €1650 + 200 фриспинов, что на €150 больше, чем раньше. Это отличная возможность получить еще больше выгоды от игры. Казино 1xSlots 2024 – это платформа для игровых автоматов и Турниров. В казино 1хСлотс доступны различные бонусы, такие как промокоды, фриспины и бездепозитные бонусы. Особенно крупные подарки в казино 1xSlots предназначены для новичков.
Выгодная бонусная программа на сайте 1xslots позволяет как новичкам, так и опытным игрокам получать разнообразные подарки. Кроме того, это отличная возможность увеличить свой выигрыш. В казино 1xslots бонусы за депозиты и подарки не требуют дополнительных вложений. Используя фриспины и промокоды, вы можете получить хорошие деньги. Давайте подробнее рассмотрим, какие бонусы предлагает онлайн казино.
После прохождения регистрации игроку предлагается бонус на первые четыре операции по пополнению счета:
на первый депозит – 100% от внесенных средств и 30 фриспинов;
на второй депозит – 50% от внесенных средств и 35 фриспинов;
на третий депозит – 25% от внесенных средств и 40 фриспинов;
на четвертый депозит – 25% от внесенных средств и 45 фриспинов.
Промокод, также известный как код приглашения, является ключом-активатором приветственной программы для новичков. Если вы ранее не имели опыта игры в 1xSlots, то вы можете рассчитывать на получение щедрого подарка при регистрации – пакета из 1650 евро и 200 бесплатных прокруток. Согласно правилам бонусной акции, размер поощрения зависит от суммы первых четырех взносов и распределяется следующим образом: на депозитный бонус установлен максимальный лимит в 1500 евро. Чтобы получить подарок, игроку достаточно пройти процедуру регистрации, заполнить анкетные данные в личном кабинете и внести на счет профиля сумму от 10 евро.
При регистрации клиент может использовать промокод 1xSlots и получить дополнительный подарок.
1xSlots давно занимает прочные позиции в списке лучших брендов гемблинг-индустрии. Политика компании 1x ориентирована на опытных игроков, здесь пользователей ожидает продуманная программа лояльности, а также гарантии безопасности личной информации и депозита. Все действия осуществляются на основании лицензии 8048/JAZ2016-083, полученной от компании Orakum N.V., Кюрасао.
Промокод 1хСлот 2024: NEXT777 предоставляет бездепозитный бонус в виде 150 вращений в игре «The Dog House Megaways». В онлайн казино 1xslots доступны бесплатные промокоды на фриспины. Кроме того, игроки могут получать бонусные вращения не только за регистрацию или использование промокода от 1xSlots. Участие в бонусных акциях также позволяет пользователям получить фриспины. Казино 1хSlots предлагает различные варианты депозитов и выплат. Новые игроки, которые регистрируются на 1хSlots, получают приветственный пакет бонусов, однако с использованием промокода от 1xSlots этот бонус может быть еще более значительным. Для активации бонуса необходимо применить актуальный промокод при регистрации.
Приветственный пакет от 1xSlot доступен сразу после регистрации и требует активации через создание депозита. Бонус предоставляет умножение для первых четырех депозитов и дополнительные бесплатные вращения. Минимальная сумма для первого депозита составляет 10 евро, а для последующих пополнений – 15 евро. Максимальная сумма бонуса – 1500 евро.
Также новичкам предоставляются бонусы на второй, третий и четвертый депозит. Для получения подарка необходимо внести сумму не менее 15 евро. Игрокам также предоставляются фриспины и депозитные подарки. Для начисления фриспинов требуется подтверждение номера телефона.
Для постоянных игроков онлайн-казино 1xSlots проводит бонусные акции. Некоторые из них имеют временный характер, а другие действуют постоянно. В основном, пользователям предлагаются депозитные бонусы. Например, можно получить презент за пополнение счета в понедельник. За десятый депозит игроку полагается крупный депозитный бонус в размере 50% от вносимой суммы и 100 фриспинов.
В клубе 1xSlots также действует программа лояльности, которая предполагает различные привилегии для игроков.
Игрокам, активно делающим ставки в течение недели и ушедшим в минус, казино 1xSlots предлагает фриспины. Для получения бонуса не требуется пополнение счета, лимит на максимальный выигрыш и вейджер не устанавливаются.
Ежедневно в казино 1хСлотс назначается слот дня. При совершении ставок на определенную сумму в этом игровом аппарате игроку начисляются фриспины. Обратите внимание https://xenon-lampa.ru/content/pags/promokod_1xslots.html, время действия акции ограничено.
Разработчиками 1хСлотс было разработано мобильное казино. Такая версия представляет собой упрощенный вариант компьютерного формата онлайн казино. Она позволяет играть в любимые игры на любом устройстве, поддерживающем функцию выхода в интернет. В качестве такого устройства может быть смартфон или планшет.
JDB demo
JDB demo | The easiest bet software to use (jdb games)
JDB bet marketing: The first bonus that players care about
Most popular player bonus: Daily Play 2000 Rewards
Game developers online who are always with you
#jdbdemo
Where to find the best game developer? https://www.jdbgaming.com/
#gamedeveloperonline #betsoftware #betmarketing
#developerbet #betingsoftware #gamedeveloper
Supports hot jdb demo beting software jdb angry bird
JDB slot demo supports various competition plans
Opening Achievement with JDB Gaming: Your Supreme Wager Software Solution
In the world of digital gaming, discovering the correct bet software is critical for success. Enter JDB Gaming – a foremost supplier of creative gaming solutions designed to boost the player experience and drive earnings for operators. With a concentration on user-friendly interfaces, alluring bonuses, and a diverse assortment of games, JDB Gaming shines as a prime choice for both players and operators alike.
JDB Demo presents a glimpse into the world of JDB Gaming, providing players with an opportunity to experience the excitement of betting without any danger. With simple interfaces and effortless navigation, JDB Demo makes it simple for players to navigate the broad selection of games on offer, from classic slots to captivating arcade titles.
When it concerns bonuses, JDB Bet Marketing is at the forefront with attractive offers that lure players and maintain them returning for more. From the popular Daily Play 2000 Rewards to unique promotions, JDB Bet Marketing ensures that players are compensated for their allegiance and dedication.
With so several game developers online, identifying the best can be a intimidating task. However, JDB Gaming emerges from the pack with its dedication to perfection and innovation. With over 150 online casino games to select, JDB Gaming offers something for all, whether you’re a fan of slots, fish shooting games, arcade titles, card games, or bingo.
At the center of JDB Gaming lies a commitment to supplying the finest possible gaming experience for players. With a emphasis on Asian culture and spectacular 3D animations, JDB Gaming sets itself apart as a leader in the industry. Whether you’re a gamer in search of excitement or an operator looking for a reliable partner, JDB Gaming has you covered.
API Integration: Seamlessly link with all platforms for optimal business opportunities. Big Data Analysis: Stay ahead of market trends and grasp player actions with thorough data analysis. 24/7 Technical Support: Relish peace of mind with skilled and reliable technical support available all day, every day.
In conclusion, JDB Gaming presents a successful combination of advanced technology, enticing bonuses, and unparalleled support. Whether you’re a player or an operator, JDB Gaming has everything you need to thrive in the realm of online gaming. So why wait? Join the JDB Gaming family today and unlock your full potential!
777 sign up
JDB online
JDB online | 2024 best online slot game demo cash
How to earn reels? jdb online accumulate spin get bonus
Hot demo fun: Quick earn bonus for ranking demo
JDB demo for win? JDB reward can be exchanged to real cash
#jdbonline
777 sign up and get free 2,000 cash: https://www.jdb777.io/
#jdbonline #democash #demofun #777signup
#rankingdemo #demoforwin
2000 cash: Enter email to verify, enter verify, claim jdb bonus
Play with JDB games an online platform in every countries.
Enjoy the Happiness of Gaming!
Complimentary to Join, Costless to Play.
Sign Up and Obtain a Bonus!
SIGN UP NOW AND OBTAIN 2000?
We dare you to obtain a sample entertaining welcome bonus for all new members! Plus, there are other exclusive promotions waiting for you!
Learn more
JDB – NO COST TO JOIN
Easy to play, real profit
Engage in JDB today and indulge in fantastic games without any investment! With a wide array of free games, you can delight in pure entertainment at any time.
Speedy play, quick join
Value your time and opt for JDB’s swift games. Just a few easy steps and you’re set for an amazing gaming experience!
Join now and earn money
Experience JDB: Instant play with no investment and the opportunity to win cash. Designed for effortless and lucrative play.
Submerge into the World of Online Gaming Stimulation with Fun Slots Online!
Are you set to experience the adrenaline rush of online gaming like never before? Seek no further than Fun Slots Online, your ultimate endpoint for electrifying gameplay, endless entertainment, and stimulating winning opportunities!
At Fun Slots Online, we boast ourselves on providing a wide selection of enthralling games designed to hold you immersed and entertained for hours on end. From classic slot machines to innovative new releases, there’s something for everybody to appreciate. Plus, with our user-friendly interface and smooth gameplay experience, you’ll have no trouble plunging straight into the thrill and enjoying every moment.
But that’s not all – we also offer a range of exclusive promotions and bonuses to recompense our loyal players. From introductory bonuses for new members to exclusive rewards for our top players, there’s always something exciting happening at Fun Slots Online. And with our safe payment system and 24-hour customer support, you can indulge in peace of mind cognizant that you’re in good hands every step of the way.
So why wait? Register with Fun Slots Online today and start your adventure towards thrilling victories and jaw-dropping prizes. Whether you’re a seasoned gamer or just starting out, there’s never been a better time to join the fun and thrills at Fun Slots Online. Sign up now and let the games begin!
Полезные советы
2. Шаг за шагом: установка кондиционера своими руками
3. Важные моменты при установке кондиционера в квартире
4. Специалисты или самостоятельная установка кондиционера?
5. 10 шагов к идеальной установке кондиционера
6. Подробная инструкция по установке кондиционера на балконе
7. Лучшие методы крепления кондиционера на стену
8. Как выбрать место для установки кондиционера в комнате
9. Секреты успешной установки кондиционера в частном доме
10. Рассказываем, как правильно установить сплит-систему
11. Необходимые инструменты для установки кондиционера
12. Какие документы нужны для оформления установки кондиционера?
13. Топ-5 ошибок при самостоятельной установке кондиционера
14. Установка кондиционера на потолке: особенности и нюансы
15. Когда лучше всего устанавливать кондиционер в доме?
16. Почему стоит доверить установку кондиционера профессионалам
17. Как подготовиться к установке кондиционера в жаркий сезон
18. Стоит ли экономить на установке кондиционера?
19. Подбор оптимальной мощности кондиционера перед установкой
20. Какие бывают типы кондиционеров: сравнение перед установкой
монтаж кондиционера https://prodazha-kondcionerov.ru/ .
Мы рекомендуем посетить веб-сайт https://photo-res.ru/.
Кроме того, не забудьте добавить сайт в закладки: https://photo-res.ru/
Приветики!
Хотите заказать диплом ВУЗа недорого и без предоплаты? Мы доставим его в любую точку России!
http://saksx-attestats.ru/
Приобретите документы об образовании всех ВУЗов России с гарантированной подлинностью и доставкой по РФ без предварительной оплаты – просто, надежно, выгодно!
Закажите диплом ВУЗа недорого с доставкой курьером по России без предоплаты – это быстро и надежно!
Полезные советы
2. Шаг за шагом: установка кондиционера своими руками
3. Важные моменты при установке кондиционера в квартире
4. Специалисты или самостоятельная установка кондиционера?
5. 10 шагов к идеальной установке кондиционера
6. Подробная инструкция по установке кондиционера на балконе
7. Лучшие методы крепления кондиционера на стену
8. Как выбрать место для установки кондиционера в комнате
9. Секреты успешной установки кондиционера в частном доме
10. Рассказываем, как правильно установить сплит-систему
11. Необходимые инструменты для установки кондиционера
12. Какие документы нужны для оформления установки кондиционера?
13. Топ-5 ошибок при самостоятельной установке кондиционера
14. Установка кондиционера на потолке: особенности и нюансы
15. Когда лучше всего устанавливать кондиционер в доме?
16. Почему стоит доверить установку кондиционера профессионалам
17. Как подготовиться к установке кондиционера в жаркий сезон
18. Стоит ли экономить на установке кондиционера?
19. Подбор оптимальной мощности кондиционера перед установкой
20. Какие бывают типы кондиционеров: сравнение перед установкой
обслуживание вентиляции обслуживание вентиляции .
online pharmacy china
Привет всем!
Наша команда экспертов следит за всеми главными новостями и разработками в мире смартфонов, чтобы вы всегда были в курсе самых актуальных событий. Мы предлагаем вам качественные материалы и аналитику о самых важных аспектах мобильной технологии.
Открытый доступ к самым интересным новостям и эксклюзивным материалам ожидает вас на нашем ресурсе. Вы узнаете о последних событиях на рынке мобильных технологий, получите важные аналитические обзоры и прогнозы развития отрасли.
Все самое лучшее на сайте https://formobile.top/category/techno/
новости про гаджеты
новости про смартфоны
наука и технологии новости
смартфоны новости
Удачи!
Intro
betvisa bangladesh
Betvisa bangladesh | Super Cricket Carnival with Betvisa!
IPL Cricket Mania | Kick off Super Cricket Carnival with bet visa.com
IPL Season | Exclusive 1,50,00,000 only at Betvisa Bangladesh!
Crash Games Heroes | Climb to the top of the 1,00,00,000 bonus pool!
#betvisabangladesh
Preview IPL T20 | Follow Betvisa BD on Facebook, Instagram for awards!
betvisa affiliate Dream Maltese Tour | Sign up now to win the ultimate prize!
https://www.bvthethao.com/
#betvisabangladesh #betvisabd #betvisaaffiliate
#betvisaaffiliatesignup #betvisa.com
Với lời hứa về trải nghiệm thú vị cá cược tinh vi nhất và dịch vụ khách hàng chuyên trách, BetVisa tự hào là điểm đến lý tưởng cho những ai nhiệt tình trò chơi trực tuyến. Hãy ghi danh ngay hôm nay và bắt đầu dấu mốc của bạn tại BetVisa – nơi niềm vui và may mắn chính là điều quan trọng.
Khám phá Thế Giới Cá Cược Trực Tuyến với BetVisa!
BetVisa Vietnam, một trong những công ty hàng đầu tại châu Á, ra đời vào năm 2017 và hoạt động dưới giấy phép của Curacao, đã đưa vào hơn 2 triệu người dùng trên toàn thế giới. Với cam kết đem đến trải nghiệm cá cược đảm bảo và tin cậy nhất, BetVisa sớm trở thành lựa chọn hàng đầu của người chơi trực tuyến.
BetVisa không chỉ cung cấp các trò chơi phong phú như xổ số, sòng bạc trực tiếp, thể thao trực tiếp và thể thao điện tử, mà còn mang đến cho người chơi những ưu đãi hấp dẫn. Thành viên mới đăng ký sẽ được tặng ngay 5 cơ hội miễn phí và có cơ hội giành giải thưởng lớn.
Đặc biệt, BetVisa hỗ trợ nhiều hình thức thanh toán linh hoạt như Betvisa Vietnam, cùng với các ưu đãi độc quyền như thưởng chào mừng lên đến 200%. Bên cạnh đó, hàng tuần còn có các chương trình khuyến mãi độc đáo như chương trình giải thưởng Sinh Nhật và Chủ Nhật Mua Sắm Điên Cuồng, mang đến cho người chơi cơ hội thắng lớn.
cross border pharmacy canada
Amplificadores de senal gsm
Mejora la cobertura de tu movil con un amplificador de senal
https://www.deviantart.com/neillopez23
synthroid 0.025
Бесплатные промокоды 1xBet при регистрации 2024. Сегодня пользователям 1xBet-казино предлагаются халявные промокоды на первый депозит, которые активируются при первой регистрации. С их помощью можно увеличить сумму базового бонуса до 32500 рублей. 1XFREE777 — промокод на 1хбет на сегодня при регистрации. Для получения реального выигрыша с возможностью вывода на карту, необходимо поставить всю бонусную сумму на экспресс-ставку с коэффициентом от 1,4. Если прогноз окажется правильным, система переведет деньги на основной счет. Не секрет, что у букмекерской конторы 1xBet помимо спортивных ставок есть и другие направления, включая онлайн-игры, гоночные события или политические состязания – более подробно в этом материале http://openok.ru/page/pages/kak_obstavity_komnatu_v_obscheghitii_ili_syemnuyu_kvartiru_deshevo.html
Доброго всем дня!
На нашем сайте заказать диплом ВУЗа недорого с оплатой после получения и круглосуточной поддержкой – просто и уверенно!
купить аттестат о среднем
Наша компания предлагает широкий выбор дипломов Вузов России с доставкой по всей стране и гарантией качества.
Купите диплом ВУЗа по выгодной цене с гарантией качества и доставкой в любой город России без предоплаты – просто и надежно!
canadian pharmacy ltd
Полезные советы
2. Шаг за шагом: установка кондиционера своими руками
3. Важные моменты при установке кондиционера в квартире
4. Специалисты или самостоятельная установка кондиционера?
5. 10 шагов к идеальной установке кондиционера
6. Подробная инструкция по установке кондиционера на балконе
7. Лучшие методы крепления кондиционера на стену
8. Как выбрать место для установки кондиционера в комнате
9. Секреты успешной установки кондиционера в частном доме
10. Рассказываем, как правильно установить сплит-систему
11. Необходимые инструменты для установки кондиционера
12. Какие документы нужны для оформления установки кондиционера?
13. Топ-5 ошибок при самостоятельной установке кондиционера
14. Установка кондиционера на потолке: особенности и нюансы
15. Когда лучше всего устанавливать кондиционер в доме?
16. Почему стоит доверить установку кондиционера профессионалам
17. Как подготовиться к установке кондиционера в жаркий сезон
18. Стоит ли экономить на установке кондиционера?
19. Подбор оптимальной мощности кондиционера перед установкой
20. Какие бывают типы кондиционеров: сравнение перед установкой
услуги кондиционирования https://prodazha-kondcionerov.ru/ .
Выбираете идеальный подарок или хотите оформить свой торжество волшебными впечатлениями?
Советуем вам: Купить гелиевые шарики
Рекомендуем добавить сайт http://carstvo-sharov.ru в закладки.
Выбираете идеальный подарок или хотите преобразить свой торжество незабываемыми впечатлениями?
Советуем вам: Купить гелевые шарики
Рекомендуем добавить сайт http://carstvo-sharov.ru в закладки.
1. Как установить кондиционер в доме
систем кондиционирования систем кондиционирования .
Самый полный список промокодов 1хБет на сегодня у нас на сайте. Все промокоды раздаются бесплатно: на ставку, при регистрации, бездепозитные промики. Обновляем каждые 5 часов. Обычно 1xBet промокод при регистрации предоставляет бонус на первый депозит и используется на этапе создания аккаунта в БК. Сумма вознаграждения достигает 100% от первого пополнения. Следующий тип — что такое промокод в 1хбет при регистрации. Он позволяет заключать пари на спортивные события, либо пользоваться привилегиями в сфере азартных игр, доступных на сайте БК. Такой бонус предоставляется бесплатно в честь регистрации, Дня рождения или активности – более подробно в этом материале http://openok.ru/page/pages/kak_obstavity_komnatu_v_obscheghitii_ili_syemnuyu_kvartiru_deshevo.html
how to earn reels
JDBslot
JDB slot | The first bonus to rock the slot world
Exclusive event to earn real money and slot game points
JDB demo slot games for free = ?? Lucky Spin Lucky Draw!
How to earn reels free 2000? follow jdb slot games for free
#jdbslot
Demo making money : https://jdb777.com
#jdbslot #slotgamesforfree #howtoearnreels #cashreels
#slotgamepoint #demomakingmoney
Cash reels only at slot games for free
More professional jdb game bonus knowledge
Methods to Earn Turns Points Costless 2000: Your Final Instruction to Winning Huge with JDB One-armed bandits
Are you you prepared to begin on an exciting journey into the universe of web slot games? Hunt no additional, just twist to JDB777 FreeGames, where excitement and substantial wins expect you at every single rotation of the reel. In this all-encompassing handbook, we’ll demonstrate you ways to secure reels points free 2000 and release the stimulating world of JDB slots.
Feel the Excitement of Machine Games for Free
At JDB777 FreeGames, we supply a vast variety of captivating slot games that are guaranteed to keep you entertained for hours on end. From timeless fruit machines to immersive themed slots, there’s something for every sort of player to enjoy. And the finest part? You can play all of our slot games for free and achieve real cash prizes!
Unlock Free Cash Reels and Succeed Big
One of the most exciting features of JDB777 FreeGames is the option to secure reels points complimentary 2000, which can be exchanged for real cash. Plainly sign up for an account, and you’ll obtain your free bonus to commence spinning and winning. With our generous promotions and bonuses, the sky’s the boundary when it comes to your winnings!
Guide Strategies and Scores System
To enhance your winnings and uncover the complete potential of our slot games, it’s important to comprehend the approaches and points system. Our professional guides will take you through everything you require to know, from selecting the right games to grasping how to earn bonus points and cash prizes.
Exclusive Promotions and Specific Offers
As a member of JDB777 FreeGames, you’ll have access to exclusive promotions and special offers that are certain to augment your gaming experience. From welcome bonuses to daily rebates, there are a great deal of chances to increase your winnings and take your gameplay to the following level.
Join Us Today and Begin Winning
Don’t miss out on your opportunity to win big with JDB777 FreeGames. Sign up now to declare your free bonus of 2000 credits and initiate spinning the reels for your opportunity to win real cash prizes. With our stimulating range of slot games and generous promotions, the potentialities are endless. Join us today and begin winning!
Intro
betvisa philippines
Betvisa philippines | The Filipino Carnival, Spinning for Treasures!
Betvisa Philippines Surprises | Spin daily and win ₱8,888 Grand Prize!
Register for a chance to win ₱8,888 Bonus Tickets! Explore Betvisa.com!
Wild All Over Grab 58% YB Bonus at Betvisa Casino! Take the challenge!
#betvisaphilippines
Get 88 on your first 50 Experience Betvisa Online’s Bonus Gift!
Weekend Instant Daily Recharge at betvisa.com
https://www.88betvisa.com/
#betvisaphilippines #betvisaonline #betvisacasino
#betvisacom #betvisa.com
Dịch vụ – Điểm Đến Tuyệt Vời Cho Người Chơi Trực Tuyến
Khám Phá Thế Giới Cá Cược Trực Tuyến với BetVisa!
Cổng chơi được thành lập vào năm 2017 và tiến hành theo bằng trò chơi Curacao với hơn 2 triệu người dùng. Với lời hứa đem đến trải nghiệm cá cược chắc chắn và tin cậy nhất, BetVisa nhanh chóng trở thành lựa chọn hàng đầu của người chơi trực tuyến.
Dịch vụ không chỉ đưa ra các trò chơi phong phú như xổ số, sòng bạc trực tiếp, thể thao trực tiếp và thể thao điện tử, mà còn mang lại cho người chơi những ưu đãi hấp dẫn. Thành viên mới đăng ký sẽ nhận tặng ngay 5 vòng quay miễn phí và có cơ hội giành giải thưởng lớn.
Cổng chơi hỗ trợ nhiều cách thức thanh toán linh hoạt như Betvisa Vietnam, cùng với các ưu đãi độc quyền như thưởng chào mừng lên đến 200%. Bên cạnh đó, hàng tuần còn có các chương trình khuyến mãi độc đáo như chương trình giải thưởng Sinh Nhật và Chủ Nhật Mua Sắm Điên Cuồng, mang lại cho người chơi cơ hội thắng lớn.
Với lời hứa về trải nghiệm cá cược tốt nhất và dịch vụ khách hàng chất lượng, BetVisa tự tin là điểm đến lý tưởng cho những ai đam mê trò chơi trực tuyến. Hãy đăng ký ngay hôm nay và bắt đầu hành trình của bạn tại BetVisa – nơi niềm vui và may mắn chính là điều tất yếu!
metformin xl
Бонусное предложение активно до конца 2024 года. Фрибет – это бесплатные ставки на некоторое количество пари в букмекерской конторе 1xbet, которые выдается, если ввести промокод 1хбет на сегодня бесплатно ставку промокод, а затем – целиком заполнить анкету игрока в своем личном кабинете и подтвердить номер мобильного телефона. С помощью бесплатной ставки за 1xbet промокод вы можете делать ставки на любые виды спорта, однако учтите, что у 1xbet фрибета есть свои условия отыгрыша. Приветственный бонус 1Хбет. Во время регистрации на 1xbet бетторы могут выбрать стартовый бонус – для ставок на спорт или для игры в казино. Промокоды 1xBet на сегодня. Не ошибемся, если скажем, что компания является одним из лидеров на рынке букмекерских услуг по количеству и разнообразию бонусных предложений. Белорусские бетторы могут воспользоваться всем их спектром. Промокод «1хБет» при регистрации дает право новым бетторам получит 100% бонус на первый депозит, но не более 200 BYN (бел. рублей). Например, при пополнении баланса на 100 BYN сверху клиент получает аналогичный бонус. Если же речь идет о промокодах, которые дают право на бесплатную ставку, то моментом активации следует считать время совершения ставки при помощи такого купона – более подробно в этом материале http://openok.ru/page/pages/kak_obstavity_komnatu_v_obscheghitii_ili_syemnuyu_kvartiru_deshevo.html
Intro
betvisa india
Betvisa india | IPL 2024 Heat Wave
IPL 2024 Big bets, big prizes With Betvisa India
Exclusive for Sports Fans Betvisa Online Casino 50% Welcome Bonus
Crash Game Supreme Compete for 1,00,00,000 pot Betvisa.com
#betvisaindia
Accurate Predictions IPL T20 Tournament, Winner Takes All!
More than just a game | Betvisa dreams invites you to fly to malta
https://www.b3tvisapro.com/
#betvisaindia #betvisalogin #betvisaonlinecasino
#betvisa.com #betvisaapp
Tìm hiểu Thế Giới Cá Cược Trực Tuyến với BetVisa!
BetVisa, một trong những nền tảng hàng đầu tại châu Á, được thành lập vào năm 2017 và thao tác dưới giấy phép của Curacao, đã đưa vào hơn 2 triệu người dùng trên toàn thế giới. Với lời hứa đem đến trải nghiệm cá cược an toàn và tin cậy nhất, BetVisa nhanh chóng trở thành lựa chọn hàng đầu của người chơi trực tuyến.
BetVisa không dừng lại ở việc cung cấp các trò chơi phong phú như xổ số, sòng bạc trực tiếp, thể thao trực tiếp và thể thao điện tử, mà còn mang đến cho người chơi những ưu đãi hấp dẫn. Thành viên mới đăng ký sẽ được tặng ngay 5 vòng quay miễn phí và có cơ hội giành giải thưởng lớn.
Đặc biệt, BetVisa hỗ trợ nhiều hình thức thanh toán linh hoạt như Betvisa Vietnam, cùng với các ưu đãi độc quyền như thưởng chào mừng lên đến 200%. Bên cạnh đó, hàng tuần còn có các chương trình khuyến mãi độc đáo như chương trình giải thưởng Sinh Nhật và Chủ Nhật Mua Sắm Điên Cuồng, mang đến cho người chơi cơ hội thắng lớn.
Vì tính cam kết về kinh nghiệm cá cược tốt nhất và dịch vụ khách hàng chuyên nghiệp, BetVisa tự tin là điểm đến lý tưởng cho những ai nhiệt tình trò chơi trực tuyến. Hãy tham gia ngay hôm nay và bắt đầu chuyến đi của bạn tại BetVisa – nơi niềm vui và may mắn chính là điều không thể thiếu.
synthroid 50 mg
Intro
betvisa india
Betvisa india | IPL 2024 Heat Wave
IPL 2024 Big bets, big prizes With Betvisa India
Exclusive for Sports Fans Betvisa Online Casino 50% Welcome Bonus
Crash Game Supreme Compete for 1,00,00,000 pot Betvisa.com
#betvisaindia
Accurate Predictions IPL T20 Tournament, Winner Takes All!
More than just a game | Betvisa dreams invites you to fly to malta
https://www.b3tvisapro.com/
#betvisaindia #betvisalogin #betvisaonlinecasino
#betvisa.com #betvisaapp
Khám phá Thế Giới Cá Cược Trực Tuyến với BetVisa!
Dịch vụ BetVisa, một trong những công ty hàng đầu tại châu Á, ra đời vào năm 2017 và hoạt động dưới phê chuẩn của Curacao, đã đưa vào hơn 2 triệu người dùng trên toàn thế giới. Với cam kết đem đến trải nghiệm cá cược đảm bảo và tin cậy nhất, BetVisa sớm trở thành lựa chọn hàng đầu của người chơi trực tuyến.
BetVisa không dừng lại ở việc cung cấp các trò chơi phong phú như xổ số, sòng bạc trực tiếp, thể thao trực tiếp và thể thao điện tử, mà còn mang đến cho người chơi những ưu đãi hấp dẫn. Thành viên mới đăng ký sẽ được tặng ngay 5 cơ hội miễn phí và có cơ hội giành giải thưởng lớn.
Đặc biệt, BetVisa hỗ trợ nhiều cách thức thanh toán linh hoạt như Betvisa Vietnam, cùng với các ưu đãi độc quyền như thưởng chào mừng lên đến 200%. Bên cạnh đó, hàng tuần còn có các chương trình khuyến mãi độc đáo như chương trình giải thưởng Sinh Nhật và Chủ Nhật Mua Sắm Điên Cuồng, mang đến cho người chơi cơ hội thắng lớn.
Do sự cam kết về trải thảo cá cược hoàn hảo nhất và dịch vụ khách hàng kỹ năng chuyên môn, BetVisa tự hào là điểm đến lý tưởng cho những ai nhiệt huyết trò chơi trực tuyến. Hãy tham gia ngay hôm nay và bắt đầu chuyến đi của bạn tại BetVisa – nơi niềm vui và may mắn chính là điều tất yếu.
Hi, i read your blog occasionally and i own a similar one and i was
just wondering if you get a lot of spam feedback?
If so how do you stop it, any plugin or anything you can recommend?
I get so much lately it’s driving me insane so any help is very much
appreciated.
prinivil 25mg
Услуга по сносу старых домов и утилизации мусора в Москве и Московской области. Мы предлагаем услуги по сносу старых построек и удалению отходов на территории Москвы и Московской области. Услуга разобрать дом в московской области предоставляется опытными специалистами в течение 24 часов после оформления заказа. Перед началом работ наш эксперт бесплатно посещает объект для определения объёма работ и предоставления консультаций. Чтобы получить дополнительную информацию и рассчитать стоимость услуг, свяжитесь с нами по телефону или оставьте заявку на веб-сайте компании.
Мы рекомендуем посетить веб-сайт https://great-galaxy.ru/.
Кроме того, не забудьте добавить сайт в закладки: https://great-galaxy.ru/
системы кондиционирования https://multisplit-sistemy-kondicionirovaniya.ru/ .
https://www.alldatingwebsites.com/reviews/flirt.com/
https://www.datingsitesreviews.com/forum/viewtopic.php?showtopic=8185
https://beyondages.com/flirt-review/
https://www.alldatingwebsites.com/reviews/flirt.com/682-flirtcom–do-not-use.php
https://www.reddit.com/r/Scams/comments/meiute/flirtcom_is_a_scam/
https://justhookup.com/sites/flirt-review/
https://www.datingwise.com/review/flirt.com/
https://healthyframework.com/flirt-com-review/
Flirt.com is a scam
Hi all, got scammed by this website. Saw that there were a couple of post informing about this but just wanted to give more details
Paid for the three day offer and with the confirmation of the subscription, got two mails from hornycontacts.com and loveaholics.com asking me to confirm my email. Didn’t pay attention and deleted them.
I immediately canceled the subscription in flirt.com without any issue and on the last day it changed to a standard membership so since it was bs site, cancelled the account as well.
So I was happy and watching a movie when I got an sms from my card provider telling me that I got a 71.78 euros charge from fry frtlsp.com. Never heard of them, so I called my card provider and cancelled my card and will request the return of the money as well.
Then I realized that maybe these two websites also by some miracle signed me up to a paid subscription… so I logged in… had to recover the passwords because they were not the one I used in flirt.com… and surprise, loveaholics.com did signed me up for a paid subscription without me being aware (pretty sure that somewhere during the signing process in flirt there was something checked and didn’t pay attention.). So I had to cancel subscription and account in these two other sites.
So, sorry for the long post but in summary…. do not use flirt.com at all!!!
Yes, FLIRT.COM it is a scamming website. It sign you on multiple websites like askme4date.com . It bombard you with emails that you receive messages, and you need to pay to see them. After you pay you see the messages. All messages are from BOTS. No real person.
It’s subscribing to automatic renewal and it’s hard to cancel renewal. They push you to a complicated scheme. I’m not even sure the renewal canceling works. After
кондиционеры сплит системы https://multisplit-sistemy-kondicionirovaniya.ru/ .
tadalafil buy online canada
Мы рекомендуем посетить веб-сайт https://90sad.ru/.
Кроме того, не забудьте добавить сайт в закладки: https://90sad.ru/
мульти сплит системы кондиционирования https://multisplit-sistemy-kondicionirovaniya.ru/ .
кондиционер 24 https://multisplit-sistemy-kondicionirovaniya.ru/ .
1xSlots Промокод (Бездепозитный Бонус 2024)
1xSlots промокод: NEXT777, при регистрации введите этот бонусный код, чтобы получить бонус для новых игроков в размере €1650 + 200 фриспинов. Чтобы получить этот бонус, вам нужно создать аккаунт и ввести специальный промокод казино 1хСлотс.
1xSlot Промокод
NEXT777
В казино 1xSlots 2024 доступны различные бонусы: бездепозитные при регистрации, промокоды, фриспины, кэшбэки и другие акции.
Промокод 1xSlots 2024: NEXT777 – введите код при регистрации в казино 1хСлот и получите приветственный бонус €1650 +200 фриспинов. Чтобы промокод 1xSlots на бездепозитный бонус сработал, необходимо указать рабочую комбинацию при регистрации и правильно заполнить форму анкеты. После завершения регистрации бездепозитный бонус будет доступен в личном кабинете. Рекомендуется не торопиться и сразу после создания аккаунта заполнить персональные данные. Важно указать требуемую информацию в полях, отмеченных звездочкой во вкладке “Профиль”, а также активировать контакты (номер телефона и e-mail).
Для новых клиентов промокод 1xSlots предоставляет уникальные возможности, позволяющие бесплатно опробовать один из представленных на платформе слотов. Чтобы получить бездепозитные фриспины, достаточно при регистрации указать промокод и выполнить простые условия акции, которые мы расскажем в данной статье. Игроки, желающие продолжить игру и сделать первый депозит, смогут получить щедрый приветственный бонус до €1500 и 150 бесплатных вращений.
Для получения бонуса на первый депозит необходимо пополнить счет на сумму не менее 10. Награда составляет 100% от суммы первого пополнения, но не может превышать 300. Если сумма пополнения превышает максимальный лимит, игрок получит свой депозит полностью, а также 300 в качестве бонуса. Для активации второго, третьего и четвертого этапов, сумма депозита должна быть не менее 15.
Кроме денежного вознаграждения, каждый этап сопровождается бесплатными прокрутками для игр компании:
– за первый депозит – 30 фриспинов для игры Book of Gold: Classic;
– за второй депозит – 35 фриспинов для игры в Legend of Cleopatra;
– за третий депозит – 40 фриспинов для игры в Solar Queen;
– за четвертый депозит – 45 фриспинов для игры в Imperial Fruits: 40 lines.
Казино 1xSlots предоставляет бонус поэтапно. Чтобы получить награду за второй и последующие депозиты, необходимо выполнить условия отыгрыша ранее полученных средств. Фриспины также начисляются поэтапно и зачисляются после выполнения условий отыгрыша.
Промокод для 1xСлотс: NEXT777. Получите бездепозитный приветственный пакет до €1650 +200 фриспинов. Компания 1xSlots предлагает своим клиентам ряд бонусных программ, самой популярной из которых является приветственный пакет с увеличением первого депозита и бесплатными вращениями. С использованием промокода вы можете получить до 1650 евро и 200 фриспинов. Одним из явных преимуществ 1xSlots является огромный выбор игр. Большую часть из доступных 10 тысяч развлечений занимают игровые автоматы. Пользователям предлагается более 100 различных провайдеров слотов.
Промокод не имеет срока действия. Любой пользователь, который создает аккаунт на сайте 1xSlots, может его активировать. Каждому игроку предоставляется только один бонус, поэтому промокод может быть использован только один раз. Чтобы воспользоваться промокодом, необходимо нажать на кнопку “Регистрация”, выбрать удобный способ создания аккаунта, указать все необходимые данные, подтвердить номер телефона или адрес электронной почты и ввести промокод. После этого можно завершить регистрацию, нажав на кнопку “Зарегистрироваться”.
1xSlots Промокод для Регистрации
Бонусы казино 1xSlots 2024 – Бездепозитные бонусы ? Коды на возврат средств ? VIP программа преданности ? Бесплатные фриспины.
Промокод 1xSlots при Регистрации: NEXT777 Получите эксклюзивный приветственный пакет до 1650 евро +150 фриспинов. Казино 1xSlots 2024 предлагает своим гостям не только широкий выбор игровых автоматов. На сайте казино регулярно проводятся бонусные акции, в рамках которых можно получить различные подарки, процент от депозита, фриспины и многое другое. При обычной регистрации есть ограничение по сумме – не более 1500 евро на первые четыре депозита. Первое пополнение – до 300 евро, второе – не более 350, третье – 400, четвертое – 450 евро. После ввода промокода лимит увеличивается до 1650 евро, а количество фриспинов возрастает с 150 до 200 вращений.
Получите бездепозитный бонус в размере 100 фриспинов в онлайн казино 1xSlots в 2024 году. Все активные бонус коды, промокоды и купоны от 1хСлотс (1xSlots) доступны как для новых, так и для существующих игроков. В клубе 1xSlots промокоды предоставляют дополнительные бонусы пользователям. Кроме того, в клубе проводятся множество турниров с крупными призовыми фондами, в которых может принять участие любой зарегистрированный игрок.
1xSlots фриспины промокод: NEXT777. Размер приветственного поощрения составляет 100 фриспинов в автомате Eye of Storm от провайдера Pragmatic Play. Время на его активацию неограничено. Подарок выдается единожды, попытки повторного создания учетной записи для получения фриспинов приравниваются к мошенническим действиям. Альтернативным способом получения бонус-кодов является активное заключение пари в системе. Вращая барабаны игровых автоматов и зарабатывая баллы можно получить право на фриспины, благодаря промо. Список промокодов 1xslots доступен непосредственно на официальном сайте. Чтобы получить бездепозитный бонус код для 1хслотс в 2024 году, следует выполнить следующие условия:
1. Активировать бонусные средства в личном кабинете;
2. Пополнить счет на €15 (или эквивалент в другой валюте) и более, чтобы привязать банковскую карту или онлайн-кошелек;
3. Выполнить условия вейджера: x25. Для этого необходимо поставить из своих денег сумму, равную выигрышу с бесплатных вращений, умноженную в 25 раз. На отыгрыш дается 7 дней с момента, когда вы прокрутили фриспины.
Максимальная сумма вознаграждения составляет 1650 евро. Ее необходимо отыграть с вейджером 35 раз. Казино предлагает релоад-бонусы, которые также нужно отыграть 35 раз. Однако особое место среди множества игр, слотов и турниров на 1xSlots занимает лайв-казино. Это казино, где игра происходит в режиме реального времени. Настоящие дилеры раздают карты и крутят рулетку за игровыми столами. Все эти действия передаются по видеосвязи. Благодаря такой видеотрансляции каждый игрок может почувствовать все эмоции и азарт игры в интерактивной атмосфере с профессиональными дилерами.
При регистрации на 1xSlots используйте промокод “NEXT777” и получите бездепозитный бонус в размере €1650 + 200 фриспинов. Казино 1xSlots радует своих игроков различными бонусами, такими как промокоды, фриспины и бездепозитные бонусы. Особенно щедрые подарки от казино 1xSlots предназначены для новичков.
В дополнение к бонусной программе онлайн казино 1xSlots предлагает кешбэк до 11%, начисляемый от суммы проигранных средств. Кешбэк не имеет срока отыгрыша. Сидя дома перед компьютером, удается почувствовать атмосферу присутствия в настоящем казино. Именно этими причинами объясняется такая популярность и широкий спрос лайв-казино.
1xslots casino промокоды на фриспины – Бонус по промокоду 1хСлотс увеличивается с €1500 + 150 фриспинов до €1650 + 200 фриспинов.
Промокод 1xSlots на Сегодня: NEXT777 предоставляет вам возможность получить €1500 +150 FS при регистрации с использованием бонусного кода. Теперь бонус по промокоду составляет €1650 + 200 фриспинов, что на €150 больше, чем раньше. Это отличная возможность получить еще больше выгоды от игры. Казино 1xSlots 2024 – это платформа для игровых автоматов и Турниров. В казино 1хСлотс доступны различные бонусы, такие как промокоды, фриспины и бездепозитные бонусы. Особенно крупные подарки в казино 1xSlots предназначены для новичков.
Выгодная бонусная программа на сайте 1xslots позволяет как новичкам, так и опытным игрокам получать разнообразные подарки. Кроме того, это отличная возможность увеличить свой выигрыш. В казино 1xslots бонусы за депозиты и подарки не требуют дополнительных вложений. Используя фриспины и промокоды, вы можете получить хорошие деньги. Давайте подробнее рассмотрим, какие бонусы предлагает онлайн казино.
После прохождения регистрации игроку предлагается бонус на первые четыре операции по пополнению счета:
на первый депозит – 100% от внесенных средств и 30 фриспинов;
на второй депозит – 50% от внесенных средств и 35 фриспинов;
на третий депозит – 25% от внесенных средств и 40 фриспинов;
на четвертый депозит – 25% от внесенных средств и 45 фриспинов.
Промокод, также известный как код приглашения, является ключом-активатором приветственной программы для новичков. Если вы ранее не имели опыта игры в 1xSlots, то вы можете рассчитывать на получение щедрого подарка при регистрации – пакета из 1650 евро и 200 бесплатных прокруток. Согласно правилам бонусной акции, размер поощрения зависит от суммы первых четырех взносов и распределяется следующим образом: на депозитный бонус установлен максимальный лимит в 1500 евро. Чтобы получить подарок, игроку достаточно пройти процедуру регистрации, заполнить анкетные данные в личном кабинете и внести на счет профиля сумму от 10 евро.
При регистрации клиент может использовать промокод 1xSlots и получить дополнительный подарок.
1xSlots давно занимает прочные позиции в списке лучших брендов гемблинг-индустрии. Политика компании 1x ориентирована на опытных игроков, здесь пользователей ожидает продуманная программа лояльности, а также гарантии безопасности личной информации и депозита. Все действия осуществляются на основании лицензии 8048/JAZ2016-083, полученной от компании Orakum N.V., Кюрасао.
Промокод 1хСлот 2024: NEXT777 предоставляет бездепозитный бонус в виде 150 вращений в игре «The Dog House Megaways». В онлайн казино 1xslots доступны бесплатные промокоды на фриспины. Кроме того, игроки могут получать бонусные вращения не только за регистрацию или использование промокода от 1xSlots. Участие в бонусных акциях также позволяет пользователям получить фриспины. Казино 1хSlots предлагает различные варианты депозитов и выплат. Новые игроки, которые регистрируются на 1хSlots, получают приветственный пакет бонусов, однако с использованием промокода от 1xSlots этот бонус может быть еще более значительным. Для активации бонуса необходимо применить актуальный промокод при регистрации.
Приветственный пакет от 1xSlot доступен сразу после регистрации и требует активации через создание депозита. Бонус предоставляет умножение для первых четырех депозитов и дополнительные бесплатные вращения. Минимальная сумма для первого депозита составляет 10 евро, а для последующих пополнений – 15 евро. Максимальная сумма бонуса – 1500 евро.
Также новичкам предоставляются бонусы на второй, третий и четвертый депозит. Для получения подарка необходимо внести сумму не менее 15 евро. Игрокам также предоставляются фриспины и депозитные подарки. Для начисления фриспинов требуется подтверждение номера телефона.
Для постоянных игроков онлайн-казино 1xSlots проводит бонусные акции. Некоторые из них имеют временный характер, а другие действуют постоянно. В основном, пользователям предлагаются депозитные бонусы. Например, можно получить презент за пополнение счета в понедельник. За десятый депозит игроку полагается крупный депозитный бонус в размере 50% от вносимой суммы и 100 фриспинов.
В клубе 1xSlots также действует программа лояльности, которая предполагает различные привилегии для игроков.
Игрокам, активно делающим ставки в течение недели и ушедшим в минус, казино 1xSlots предлагает фриспины. Для получения бонуса не требуется пополнение счета, лимит на максимальный выигрыш и вейджер не устанавливаются.
Ежедневно в казино 1хСлотс назначается слот дня. При совершении ставок на определенную сумму в этом игровом аппарате игроку начисляются фриспины. Обратите внимание https://irenastyle.ru/pags/promokod_1xslots.html, время действия акции ограничено.
Разработчиками 1хСлотс было разработано мобильное казино. Такая версия представляет собой упрощенный вариант компьютерного формата онлайн казино. Она позволяет играть в любимые игры на любом устройстве, поддерживающем функцию выхода в интернет. В качестве такого устройства может быть смартфон или планшет.
프라그마틱과 관련된 이 글 정말 잘 읽었어요! 더불어 저도 제 사이트에서 프라그마틱에 대한 새로운 정보를 공유 중이에요. 함께 나누면 더 좋을 것 같아요!
프라그마틱 슬롯 체험
프라그마틱에 대한 글 읽는 것이 정말 즐거웠어요! 또한, 제 사이트에서도 프라그마틱과 관련된 정보를 공유하고 있어요. 함께 발전하며 더 많은 지식을 쌓아가요!
https://bkfphoto.com/link/
https://szyangan.com/link/
https://0cdnara.com/hot/
Я хочу выразить свою глубокую благодарность ремонт ноутбуков в балашихе за их профессиональный подход. Они быстро и качественно отремонтировали мой ноутбук, и он снова функционирует безупречно. Сотрудники были вежливыми и внимательными, подробно разъяснив мне все нюансы проведенного ремонта. Результат превзошел все мои ожидания, и я непременно порекомендую их услуги всем, кому потребуется ремонт ноутбука
сплит кондиционер https://multisplit-sistemy-kondicionirovaniya.ru/ .
Мы рекомендуем посетить веб-сайт https://kmc-ia.ru/.
Кроме того, не забудьте добавить сайт в закладки: https://kmc-ia.ru/
Я хочу выразить свою глубокую благодарность ремонт ноутбуков за их высококвалифицированную работу. Мой ноутбук был отремонтирован в кратчайшие сроки, и он снова функционирует безупречно. Персонал проявил высокий уровень профессионализма и клиентоориентированности, объяснив все детали ремонта. Я очень доволен результатом, и я непременно порекомендую их услуги всем, кому потребуется ремонт ноутбука
Мне хотелось бы от всего сердца поблагодарить ремонт ноутбуков в балашихе за их профессиональный подход. Мой ноутбук был отремонтирован в кратчайшие сроки, и теперь он работает как новенький. Сотрудники были вежливыми и внимательными, подробно разъяснив мне все нюансы проведенного ремонта. Я очень доволен результатом, и я непременно порекомендую их услуги всем, кому потребуется ремонт ноутбука
synthroid 175 mg
кондиционер инвертор кондиционер инвертор .
кондиционер на 20 м2 https://multisplit-sistemy-kondicionirovaniya.ru/ .
https://www.alldatingwebsites.com/reviews/flirt.com/
https://www.datingsitesreviews.com/forum/viewtopic.php?showtopic=8185
https://beyondages.com/flirt-review/
https://www.alldatingwebsites.com/reviews/flirt.com/682-flirtcom–do-not-use.php
https://www.reddit.com/r/Scams/comments/meiute/flirtcom_is_a_scam/
https://justhookup.com/sites/flirt-review/
https://www.datingwise.com/review/flirt.com/
https://healthyframework.com/flirt-com-review/
Flirt.com is a scam
Hi all, got scammed by this website. Saw that there were a couple of post informing about this but just wanted to give more details
Paid for the three day offer and with the confirmation of the subscription, got two mails from hornycontacts.com and loveaholics.com asking me to confirm my email. Didn’t pay attention and deleted them.
I immediately canceled the subscription in flirt.com without any issue and on the last day it changed to a standard membership so since it was bs site, cancelled the account as well.
So I was happy and watching a movie when I got an sms from my card provider telling me that I got a 71.78 euros charge from fry frtlsp.com. Never heard of them, so I called my card provider and cancelled my card and will request the return of the money as well.
Then I realized that maybe these two websites also by some miracle signed me up to a paid subscription… so I logged in… had to recover the passwords because they were not the one I used in flirt.com… and surprise, loveaholics.com did signed me up for a paid subscription without me being aware (pretty sure that somewhere during the signing process in flirt there was something checked and didn’t pay attention.). So I had to cancel subscription and account in these two other sites.
So, sorry for the long post but in summary…. do not use flirt.com at all!!!
Yes, FLIRT.COM it is a scamming website. It sign you on multiple websites like askme4date.com . It bombard you with emails that you receive messages, and you need to pay to see them. After you pay you see the messages. All messages are from BOTS. No real person.
It’s subscribing to automatic renewal and it’s hard to cancel renewal. They push you to a complicated scheme. I’m not even sure the renewal canceling works. After
legitimate canadian mail order pharmacy
1xSlots Промокод (Бездепозитный Бонус 2024)
1xSlots промокод: NEXT777, при регистрации введите этот бонусный код, чтобы получить бонус для новых игроков в размере €1650 + 200 фриспинов. Чтобы получить этот бонус, вам нужно создать аккаунт и ввести специальный промокод казино 1хСлотс.
1xSlot Промокод
NEXT777
В казино 1xSlots 2024 доступны различные бонусы: бездепозитные при регистрации, промокоды, фриспины, кэшбэки и другие акции.
Промокод 1xSlots 2024: NEXT777 – введите код при регистрации в казино 1хСлот и получите приветственный бонус €1650 +200 фриспинов. Чтобы промокод 1xSlots на бездепозитный бонус сработал, необходимо указать рабочую комбинацию при регистрации и правильно заполнить форму анкеты. После завершения регистрации бездепозитный бонус будет доступен в личном кабинете. Рекомендуется не торопиться и сразу после создания аккаунта заполнить персональные данные. Важно указать требуемую информацию в полях, отмеченных звездочкой во вкладке “Профиль”, а также активировать контакты (номер телефона и e-mail).
Для новых клиентов промокод 1xSlots предоставляет уникальные возможности, позволяющие бесплатно опробовать один из представленных на платформе слотов. Чтобы получить бездепозитные фриспины, достаточно при регистрации указать промокод и выполнить простые условия акции, которые мы расскажем в данной статье. Игроки, желающие продолжить игру и сделать первый депозит, смогут получить щедрый приветственный бонус до €1500 и 150 бесплатных вращений.
Для получения бонуса на первый депозит необходимо пополнить счет на сумму не менее 10. Награда составляет 100% от суммы первого пополнения, но не может превышать 300. Если сумма пополнения превышает максимальный лимит, игрок получит свой депозит полностью, а также 300 в качестве бонуса. Для активации второго, третьего и четвертого этапов, сумма депозита должна быть не менее 15.
Кроме денежного вознаграждения, каждый этап сопровождается бесплатными прокрутками для игр компании:
– за первый депозит – 30 фриспинов для игры Book of Gold: Classic;
– за второй депозит – 35 фриспинов для игры в Legend of Cleopatra;
– за третий депозит – 40 фриспинов для игры в Solar Queen;
– за четвертый депозит – 45 фриспинов для игры в Imperial Fruits: 40 lines.
Казино 1xSlots предоставляет бонус поэтапно. Чтобы получить награду за второй и последующие депозиты, необходимо выполнить условия отыгрыша ранее полученных средств. Фриспины также начисляются поэтапно и зачисляются после выполнения условий отыгрыша.
Промокод для 1xСлотс: NEXT777. Получите бездепозитный приветственный пакет до €1650 +200 фриспинов. Компания 1xSlots предлагает своим клиентам ряд бонусных программ, самой популярной из которых является приветственный пакет с увеличением первого депозита и бесплатными вращениями. С использованием промокода вы можете получить до 1650 евро и 200 фриспинов. Одним из явных преимуществ 1xSlots является огромный выбор игр. Большую часть из доступных 10 тысяч развлечений занимают игровые автоматы. Пользователям предлагается более 100 различных провайдеров слотов.
Промокод не имеет срока действия. Любой пользователь, который создает аккаунт на сайте 1xSlots, может его активировать. Каждому игроку предоставляется только один бонус, поэтому промокод может быть использован только один раз. Чтобы воспользоваться промокодом, необходимо нажать на кнопку “Регистрация”, выбрать удобный способ создания аккаунта, указать все необходимые данные, подтвердить номер телефона или адрес электронной почты и ввести промокод. После этого можно завершить регистрацию, нажав на кнопку “Зарегистрироваться”.
1xSlots Промокод для Регистрации
Бонусы казино 1xSlots 2024 – Бездепозитные бонусы ? Коды на возврат средств ? VIP программа преданности ? Бесплатные фриспины.
Промокод 1xSlots при Регистрации: NEXT777 Получите эксклюзивный приветственный пакет до 1650 евро +150 фриспинов. Казино 1xSlots 2024 предлагает своим гостям не только широкий выбор игровых автоматов. На сайте казино регулярно проводятся бонусные акции, в рамках которых можно получить различные подарки, процент от депозита, фриспины и многое другое. При обычной регистрации есть ограничение по сумме – не более 1500 евро на первые четыре депозита. Первое пополнение – до 300 евро, второе – не более 350, третье – 400, четвертое – 450 евро. После ввода промокода лимит увеличивается до 1650 евро, а количество фриспинов возрастает с 150 до 200 вращений.
Получите бездепозитный бонус в размере 100 фриспинов в онлайн казино 1xSlots в 2024 году. Все активные бонус коды, промокоды и купоны от 1хСлотс (1xSlots) доступны как для новых, так и для существующих игроков. В клубе 1xSlots промокоды предоставляют дополнительные бонусы пользователям. Кроме того, в клубе проводятся множество турниров с крупными призовыми фондами, в которых может принять участие любой зарегистрированный игрок.
1xSlots фриспины промокод: NEXT777. Размер приветственного поощрения составляет 100 фриспинов в автомате Eye of Storm от провайдера Pragmatic Play. Время на его активацию неограничено. Подарок выдается единожды, попытки повторного создания учетной записи для получения фриспинов приравниваются к мошенническим действиям. Альтернативным способом получения бонус-кодов является активное заключение пари в системе. Вращая барабаны игровых автоматов и зарабатывая баллы можно получить право на фриспины, благодаря промо. Список промокодов 1xslots доступен непосредственно на официальном сайте. Чтобы получить бездепозитный бонус код для 1хслотс в 2024 году, следует выполнить следующие условия:
1. Активировать бонусные средства в личном кабинете;
2. Пополнить счет на €15 (или эквивалент в другой валюте) и более, чтобы привязать банковскую карту или онлайн-кошелек;
3. Выполнить условия вейджера: x25. Для этого необходимо поставить из своих денег сумму, равную выигрышу с бесплатных вращений, умноженную в 25 раз. На отыгрыш дается 7 дней с момента, когда вы прокрутили фриспины.
Максимальная сумма вознаграждения составляет 1650 евро. Ее необходимо отыграть с вейджером 35 раз. Казино предлагает релоад-бонусы, которые также нужно отыграть 35 раз. Однако особое место среди множества игр, слотов и турниров на 1xSlots занимает лайв-казино. Это казино, где игра происходит в режиме реального времени. Настоящие дилеры раздают карты и крутят рулетку за игровыми столами. Все эти действия передаются по видеосвязи. Благодаря такой видеотрансляции каждый игрок может почувствовать все эмоции и азарт игры в интерактивной атмосфере с профессиональными дилерами.
При регистрации на 1xSlots используйте промокод “NEXT777” и получите бездепозитный бонус в размере €1650 + 200 фриспинов. Казино 1xSlots радует своих игроков различными бонусами, такими как промокоды, фриспины и бездепозитные бонусы. Особенно щедрые подарки от казино 1xSlots предназначены для новичков.
В дополнение к бонусной программе онлайн казино 1xSlots предлагает кешбэк до 11%, начисляемый от суммы проигранных средств. Кешбэк не имеет срока отыгрыша. Сидя дома перед компьютером, удается почувствовать атмосферу присутствия в настоящем казино. Именно этими причинами объясняется такая популярность и широкий спрос лайв-казино.
промокод для 1xslots на сегодня бесплатно – Бонус по промокоду 1хСлотс увеличивается с €1500 + 150 фриспинов до €1650 + 200 фриспинов.
Промокод 1xSlots на Сегодня: NEXT777 предоставляет вам возможность получить €1500 +150 FS при регистрации с использованием бонусного кода. Теперь бонус по промокоду составляет €1650 + 200 фриспинов, что на €150 больше, чем раньше. Это отличная возможность получить еще больше выгоды от игры. Казино 1xSlots 2024 – это платформа для игровых автоматов и Турниров. В казино 1хСлотс доступны различные бонусы, такие как промокоды, фриспины и бездепозитные бонусы. Особенно крупные подарки в казино 1xSlots предназначены для новичков.
Выгодная бонусная программа на сайте 1xslots позволяет как новичкам, так и опытным игрокам получать разнообразные подарки. Кроме того, это отличная возможность увеличить свой выигрыш. В казино 1xslots бонусы за депозиты и подарки не требуют дополнительных вложений. Используя фриспины и промокоды, вы можете получить хорошие деньги. Давайте подробнее рассмотрим, какие бонусы предлагает онлайн казино.
После прохождения регистрации игроку предлагается бонус на первые четыре операции по пополнению счета:
на первый депозит – 100% от внесенных средств и 30 фриспинов;
на второй депозит – 50% от внесенных средств и 35 фриспинов;
на третий депозит – 25% от внесенных средств и 40 фриспинов;
на четвертый депозит – 25% от внесенных средств и 45 фриспинов.
Промокод, также известный как код приглашения, является ключом-активатором приветственной программы для новичков. Если вы ранее не имели опыта игры в 1xSlots, то вы можете рассчитывать на получение щедрого подарка при регистрации – пакета из 1650 евро и 200 бесплатных прокруток. Согласно правилам бонусной акции, размер поощрения зависит от суммы первых четырех взносов и распределяется следующим образом: на депозитный бонус установлен максимальный лимит в 1500 евро. Чтобы получить подарок, игроку достаточно пройти процедуру регистрации, заполнить анкетные данные в личном кабинете и внести на счет профиля сумму от 10 евро.
При регистрации клиент может использовать промокод 1xSlots и получить дополнительный подарок.
1xSlots давно занимает прочные позиции в списке лучших брендов гемблинг-индустрии. Политика компании 1x ориентирована на опытных игроков, здесь пользователей ожидает продуманная программа лояльности, а также гарантии безопасности личной информации и депозита. Все действия осуществляются на основании лицензии 8048/JAZ2016-083, полученной от компании Orakum N.V., Кюрасао.
Промокод 1хСлот 2024: NEXT777 предоставляет бездепозитный бонус в виде 150 вращений в игре «The Dog House Megaways». В онлайн казино 1xslots доступны бесплатные промокоды на фриспины. Кроме того, игроки могут получать бонусные вращения не только за регистрацию или использование промокода от 1xSlots. Участие в бонусных акциях также позволяет пользователям получить фриспины. Казино 1хSlots предлагает различные варианты депозитов и выплат. Новые игроки, которые регистрируются на 1хSlots, получают приветственный пакет бонусов, однако с использованием промокода от 1xSlots этот бонус может быть еще более значительным. Для активации бонуса необходимо применить актуальный промокод при регистрации.
Приветственный пакет от 1xSlot доступен сразу после регистрации и требует активации через создание депозита. Бонус предоставляет умножение для первых четырех депозитов и дополнительные бесплатные вращения. Минимальная сумма для первого депозита составляет 10 евро, а для последующих пополнений – 15 евро. Максимальная сумма бонуса – 1500 евро.
Также новичкам предоставляются бонусы на второй, третий и четвертый депозит. Для получения подарка необходимо внести сумму не менее 15 евро. Игрокам также предоставляются фриспины и депозитные подарки. Для начисления фриспинов требуется подтверждение номера телефона.
Для постоянных игроков онлайн-казино 1xSlots проводит бонусные акции. Некоторые из них имеют временный характер, а другие действуют постоянно. В основном, пользователям предлагаются депозитные бонусы. Например, можно получить презент за пополнение счета в понедельник. За десятый депозит игроку полагается крупный депозитный бонус в размере 50% от вносимой суммы и 100 фриспинов.
В клубе 1xSlots также действует программа лояльности, которая предполагает различные привилегии для игроков.
Игрокам, активно делающим ставки в течение недели и ушедшим в минус, казино 1xSlots предлагает фриспины. Для получения бонуса не требуется пополнение счета, лимит на максимальный выигрыш и вейджер не устанавливаются.
Ежедневно в казино 1хСлотс назначается слот дня. При совершении ставок на определенную сумму в этом игровом аппарате игроку начисляются фриспины. Обратите внимание https://irenastyle.ru/pags/promokod_1xslots.html, время действия акции ограничено.
Разработчиками 1хСлотс было разработано мобильное казино. Такая версия представляет собой упрощенный вариант компьютерного формата онлайн казино. Она позволяет играть в любимые игры на любом устройстве, поддерживающем функцию выхода в интернет. В качестве такого устройства может быть смартфон или планшет.
мульти сплит системы кондиционирования мульти сплит системы кондиционирования .
Мы рекомендуем посетить веб-сайт https://thebachelor.ru/.
Кроме того, не забудьте добавить сайт в закладки: https://thebachelor.ru/
tadalafil 20mg lowest price
1xSlots Промокод (Бездепозитный Бонус 2024)
1xSlots промокод: NEXT777, при регистрации введите этот бонусный код, чтобы получить бонус для новых игроков в размере €1650 + 200 фриспинов. Чтобы получить этот бонус, вам нужно создать аккаунт и ввести специальный промокод казино 1хСлотс.
1xSlot Промокод
NEXT777
В казино 1xSlots 2024 доступны различные бонусы: бездепозитные при регистрации, промокоды, фриспины, кэшбэки и другие акции.
Промокод 1xSlots 2024: NEXT777 – введите код при регистрации в казино 1хСлот и получите приветственный бонус €1650 +200 фриспинов. Чтобы промокод 1xSlots на бездепозитный бонус сработал, необходимо указать рабочую комбинацию при регистрации и правильно заполнить форму анкеты. После завершения регистрации бездепозитный бонус будет доступен в личном кабинете. Рекомендуется не торопиться и сразу после создания аккаунта заполнить персональные данные. Важно указать требуемую информацию в полях, отмеченных звездочкой во вкладке “Профиль”, а также активировать контакты (номер телефона и e-mail).
Для новых клиентов промокод 1xSlots предоставляет уникальные возможности, позволяющие бесплатно опробовать один из представленных на платформе слотов. Чтобы получить бездепозитные фриспины, достаточно при регистрации указать промокод и выполнить простые условия акции, которые мы расскажем в данной статье. Игроки, желающие продолжить игру и сделать первый депозит, смогут получить щедрый приветственный бонус до €1500 и 150 бесплатных вращений.
Для получения бонуса на первый депозит необходимо пополнить счет на сумму не менее 10. Награда составляет 100% от суммы первого пополнения, но не может превышать 300. Если сумма пополнения превышает максимальный лимит, игрок получит свой депозит полностью, а также 300 в качестве бонуса. Для активации второго, третьего и четвертого этапов, сумма депозита должна быть не менее 15.
Кроме денежного вознаграждения, каждый этап сопровождается бесплатными прокрутками для игр компании:
– за первый депозит – 30 фриспинов для игры Book of Gold: Classic;
– за второй депозит – 35 фриспинов для игры в Legend of Cleopatra;
– за третий депозит – 40 фриспинов для игры в Solar Queen;
– за четвертый депозит – 45 фриспинов для игры в Imperial Fruits: 40 lines.
Казино 1xSlots предоставляет бонус поэтапно. Чтобы получить награду за второй и последующие депозиты, необходимо выполнить условия отыгрыша ранее полученных средств. Фриспины также начисляются поэтапно и зачисляются после выполнения условий отыгрыша.
Промокод для 1xСлотс: NEXT777. Получите бездепозитный приветственный пакет до €1650 +200 фриспинов. Компания 1xSlots предлагает своим клиентам ряд бонусных программ, самой популярной из которых является приветственный пакет с увеличением первого депозита и бесплатными вращениями. С использованием промокода вы можете получить до 1650 евро и 200 фриспинов. Одним из явных преимуществ 1xSlots является огромный выбор игр. Большую часть из доступных 10 тысяч развлечений занимают игровые автоматы. Пользователям предлагается более 100 различных провайдеров слотов.
Промокод не имеет срока действия. Любой пользователь, который создает аккаунт на сайте 1xSlots, может его активировать. Каждому игроку предоставляется только один бонус, поэтому промокод может быть использован только один раз. Чтобы воспользоваться промокодом, необходимо нажать на кнопку “Регистрация”, выбрать удобный способ создания аккаунта, указать все необходимые данные, подтвердить номер телефона или адрес электронной почты и ввести промокод. После этого можно завершить регистрацию, нажав на кнопку “Зарегистрироваться”.
1xSlots Промокод для Регистрации
Бонусы казино 1xSlots 2024 – Бездепозитные бонусы ? Коды на возврат средств ? VIP программа преданности ? Бесплатные фриспины.
Промокод 1xSlots при Регистрации: NEXT777 Получите эксклюзивный приветственный пакет до 1650 евро +150 фриспинов. Казино 1xSlots 2024 предлагает своим гостям не только широкий выбор игровых автоматов. На сайте казино регулярно проводятся бонусные акции, в рамках которых можно получить различные подарки, процент от депозита, фриспины и многое другое. При обычной регистрации есть ограничение по сумме – не более 1500 евро на первые четыре депозита. Первое пополнение – до 300 евро, второе – не более 350, третье – 400, четвертое – 450 евро. После ввода промокода лимит увеличивается до 1650 евро, а количество фриспинов возрастает с 150 до 200 вращений.
Получите бездепозитный бонус в размере 100 фриспинов в онлайн казино 1xSlots в 2024 году. Все активные бонус коды, промокоды и купоны от 1хСлотс (1xSlots) доступны как для новых, так и для существующих игроков. В клубе 1xSlots промокоды предоставляют дополнительные бонусы пользователям. Кроме того, в клубе проводятся множество турниров с крупными призовыми фондами, в которых может принять участие любой зарегистрированный игрок.
1xSlots фриспины промокод: NEXT777. Размер приветственного поощрения составляет 100 фриспинов в автомате Eye of Storm от провайдера Pragmatic Play. Время на его активацию неограничено. Подарок выдается единожды, попытки повторного создания учетной записи для получения фриспинов приравниваются к мошенническим действиям. Альтернативным способом получения бонус-кодов является активное заключение пари в системе. Вращая барабаны игровых автоматов и зарабатывая баллы можно получить право на фриспины, благодаря промо. Список промокодов 1xslots доступен непосредственно на официальном сайте. Чтобы получить бездепозитный бонус код для 1хслотс в 2024 году, следует выполнить следующие условия:
1. Активировать бонусные средства в личном кабинете;
2. Пополнить счет на €15 (или эквивалент в другой валюте) и более, чтобы привязать банковскую карту или онлайн-кошелек;
3. Выполнить условия вейджера: x25. Для этого необходимо поставить из своих денег сумму, равную выигрышу с бесплатных вращений, умноженную в 25 раз. На отыгрыш дается 7 дней с момента, когда вы прокрутили фриспины.
Максимальная сумма вознаграждения составляет 1650 евро. Ее необходимо отыграть с вейджером 35 раз. Казино предлагает релоад-бонусы, которые также нужно отыграть 35 раз. Однако особое место среди множества игр, слотов и турниров на 1xSlots занимает лайв-казино. Это казино, где игра происходит в режиме реального времени. Настоящие дилеры раздают карты и крутят рулетку за игровыми столами. Все эти действия передаются по видеосвязи. Благодаря такой видеотрансляции каждый игрок может почувствовать все эмоции и азарт игры в интерактивной атмосфере с профессиональными дилерами.
При регистрации на 1xSlots используйте промокод “NEXT777” и получите бездепозитный бонус в размере €1650 + 200 фриспинов. Казино 1xSlots радует своих игроков различными бонусами, такими как промокоды, фриспины и бездепозитные бонусы. Особенно щедрые подарки от казино 1xSlots предназначены для новичков.
В дополнение к бонусной программе онлайн казино 1xSlots предлагает кешбэк до 11%, начисляемый от суммы проигранных средств. Кешбэк не имеет срока отыгрыша. Сидя дома перед компьютером, удается почувствовать атмосферу присутствия в настоящем казино. Именно этими причинами объясняется такая популярность и широкий спрос лайв-казино.
промокоды в 1xslots без отыгрыша – Бонус по промокоду 1хСлотс увеличивается с €1500 + 150 фриспинов до €1650 + 200 фриспинов.
Промокод 1xSlots на Сегодня: NEXT777 предоставляет вам возможность получить €1500 +150 FS при регистрации с использованием бонусного кода. Теперь бонус по промокоду составляет €1650 + 200 фриспинов, что на €150 больше, чем раньше. Это отличная возможность получить еще больше выгоды от игры. Казино 1xSlots 2024 – это платформа для игровых автоматов и Турниров. В казино 1хСлотс доступны различные бонусы, такие как промокоды, фриспины и бездепозитные бонусы. Особенно крупные подарки в казино 1xSlots предназначены для новичков.
Выгодная бонусная программа на сайте 1xslots позволяет как новичкам, так и опытным игрокам получать разнообразные подарки. Кроме того, это отличная возможность увеличить свой выигрыш. В казино 1xslots бонусы за депозиты и подарки не требуют дополнительных вложений. Используя фриспины и промокоды, вы можете получить хорошие деньги. Давайте подробнее рассмотрим, какие бонусы предлагает онлайн казино.
После прохождения регистрации игроку предлагается бонус на первые четыре операции по пополнению счета:
на первый депозит – 100% от внесенных средств и 30 фриспинов;
на второй депозит – 50% от внесенных средств и 35 фриспинов;
на третий депозит – 25% от внесенных средств и 40 фриспинов;
на четвертый депозит – 25% от внесенных средств и 45 фриспинов.
Промокод, также известный как код приглашения, является ключом-активатором приветственной программы для новичков. Если вы ранее не имели опыта игры в 1xSlots, то вы можете рассчитывать на получение щедрого подарка при регистрации – пакета из 1650 евро и 200 бесплатных прокруток. Согласно правилам бонусной акции, размер поощрения зависит от суммы первых четырех взносов и распределяется следующим образом: на депозитный бонус установлен максимальный лимит в 1500 евро. Чтобы получить подарок, игроку достаточно пройти процедуру регистрации, заполнить анкетные данные в личном кабинете и внести на счет профиля сумму от 10 евро.
При регистрации клиент может использовать промокод 1xSlots и получить дополнительный подарок.
1xSlots давно занимает прочные позиции в списке лучших брендов гемблинг-индустрии. Политика компании 1x ориентирована на опытных игроков, здесь пользователей ожидает продуманная программа лояльности, а также гарантии безопасности личной информации и депозита. Все действия осуществляются на основании лицензии 8048/JAZ2016-083, полученной от компании Orakum N.V., Кюрасао.
Промокод 1хСлот 2024: NEXT777 предоставляет бездепозитный бонус в виде 150 вращений в игре «The Dog House Megaways». В онлайн казино 1xslots доступны бесплатные промокоды на фриспины. Кроме того, игроки могут получать бонусные вращения не только за регистрацию или использование промокода от 1xSlots. Участие в бонусных акциях также позволяет пользователям получить фриспины. Казино 1хSlots предлагает различные варианты депозитов и выплат. Новые игроки, которые регистрируются на 1хSlots, получают приветственный пакет бонусов, однако с использованием промокода от 1xSlots этот бонус может быть еще более значительным. Для активации бонуса необходимо применить актуальный промокод при регистрации.
Приветственный пакет от 1xSlot доступен сразу после регистрации и требует активации через создание депозита. Бонус предоставляет умножение для первых четырех депозитов и дополнительные бесплатные вращения. Минимальная сумма для первого депозита составляет 10 евро, а для последующих пополнений – 15 евро. Максимальная сумма бонуса – 1500 евро.
Также новичкам предоставляются бонусы на второй, третий и четвертый депозит. Для получения подарка необходимо внести сумму не менее 15 евро. Игрокам также предоставляются фриспины и депозитные подарки. Для начисления фриспинов требуется подтверждение номера телефона.
Для постоянных игроков онлайн-казино 1xSlots проводит бонусные акции. Некоторые из них имеют временный характер, а другие действуют постоянно. В основном, пользователям предлагаются депозитные бонусы. Например, можно получить презент за пополнение счета в понедельник. За десятый депозит игроку полагается крупный депозитный бонус в размере 50% от вносимой суммы и 100 фриспинов.
В клубе 1xSlots также действует программа лояльности, которая предполагает различные привилегии для игроков.
Игрокам, активно делающим ставки в течение недели и ушедшим в минус, казино 1xSlots предлагает фриспины. Для получения бонуса не требуется пополнение счета, лимит на максимальный выигрыш и вейджер не устанавливаются.
Ежедневно в казино 1хСлотс назначается слот дня. При совершении ставок на определенную сумму в этом игровом аппарате игроку начисляются фриспины. Обратите внимание https://irenastyle.ru/pags/promokod_1xslots.html, время действия акции ограничено.
Разработчиками 1хСлотс было разработано мобильное казино. Такая версия представляет собой упрощенный вариант компьютерного формата онлайн казино. Она позволяет играть в любимые игры на любом устройстве, поддерживающем функцию выхода в интернет. В качестве такого устройства может быть смартфон или планшет.
кондиционер на 25 м2 кондиционер на 25 м2 .
мотоекіпіровка
НА нашем мотомагазине вы выкроите запчасти для байков, скутеров, снегоходов равно квадроциклов. ЯЗЫК нас ваша милость всегда выищете масла для байков, фильтра, цепи.
motomagazinvfdvgd.vn.ua/uk/v-masla-motornye/
Мы рекомендуем посетить веб-сайт https://kreativ-didaktika.ru/.
Кроме того, не забудьте добавить сайт в закладки: https://kreativ-didaktika.ru/
Jeetwin Affiliate
Jeetwin Affiliate
Join Jeetwin now! | Jeetwin sign up for a ?500 free bonus
Spin & fish with Jeetwin club! | 200% welcome bonus
Bet on horse racing, get a 50% bonus! | Deposit at Jeetwin live for rewards
#JeetwinAffiliate
Casino table fun at Jeetwin casino login | 50% deposit bonus on table games
Earn Jeetwin points and credits, enhance your play!
https://www.jeetwin-affiliate.com/hi
#JeetwinAffiliate #jeetwinclub #jeetwinsignup #jeetwinresult
#jeetwinlive #jeetwinbangladesh #jeetwincasinologin
Daily recharge bonuses at Jeetwin Bangladesh!
25% recharge bonus on casino games at jeetwin result
15% bonus on Crash Games with Jeetwin affiliate!
Rotate to Win Genuine Currency and Gift Cards with JeetWin’s Referral Program
Are you a supporter of internet gaming? Do you actually appreciate the sensation of spinning the wheel and succeeding big? If so, consequently the JeetWin’s Partner Program is great for you! With JeetWin Casino, you not only get to experience exciting games but additionally have the likelihood to acquire actual money and gift cards simply by promoting the platform to your friends, family, or internet audience.
How Does it Work?
Enrolling for the JeetWin’s Referral Program is fast and effortless. Once you become an member, you’ll obtain a distinctive referral link that you can share with others. Every time someone joins or makes a deposit using your referral link, you’ll receive a commission for their activity.
Fantastic Bonuses Await!
As a JeetWin affiliate, you’ll have access to a variety of captivating bonuses:
Registration Bonus 500: Acquire a liberal sign-up bonus of INR 500 just for joining the program.
Welcome Deposit Bonus: Get a huge 200% bonus when you deposit and play slot machine and fish games on the platform.
Unlimited Referral Bonus: Acquire unlimited INR 200 bonuses and cash rebates for every friend you invite to play on JeetWin.
Thrilling Games to Play
JeetWin offers a broad range of the most played and most popular games, including Baccarat, Dice, Liveshow, Slot, Fishing, and Sabong. Whether you’re a fan of classic casino games or prefer something more modern and interactive, JeetWin has something for everyone.
Engage in the Ultimate Gaming Experience
With JeetWin Live, you can bring your gaming experience to the next level. Engage in thrilling live games such as Lightning Roulette, Lightning Dice, Crazytime, and more. Sign up today and commence an unforgettable gaming adventure filled with excitement and limitless opportunities to win.
Easy Payment Methods
Depositing funds and withdrawing your winnings on JeetWin is fast and hassle-free. Choose from a assortment of payment methods, including E-Wallets, Net Banking, AstroPay, and RupeeO, for seamless transactions.
Don’t Overlook on Exclusive Promotions
As a JeetWin affiliate, you’ll receive access to exclusive promotions and special offers designed to maximize your earnings. From cash rebates to lucrative bonuses, there’s always something exciting happening at JeetWin.
Install the Mobile Application
Take the fun with you wherever you go by downloading the JeetWin Mobile Casino App. Available for both iOS and Android devices, the app features a wide range of entertaining games that you can enjoy anytime, anywhere.
Sign up for the JeetWin’s Affiliate Scheme Today!
Don’t wait any longer to start earning real cash and exciting rewards with the JeetWin Affiliate Program. Sign up now and be a member of the thriving online gaming community at JeetWin.
best online casinos in kenya casinoonline.co.ke .
motomagazinvfdvgd.vn.ua/uk/v-ekipirovka/
В ТЕЧЕНИЕ нашем мотомагазине вы обнаружите запчасти чтобы мотоциклов, скутеров, снегоходов равным образом квадроциклов. У нас вы всегда почтете масла чтобы мотоциклов, фильтра, цепи.
мотоекіпіровка
Бездепозитный бонус онлайн казино
synthroid cheap price
1xSlots Промокод (Бездепозитный Бонус 2024)
1xSlots промокод: NEXT777, при регистрации введите этот бонусный код, чтобы получить бонус для новых игроков в размере €1650 + 200 фриспинов. Чтобы получить этот бонус, вам нужно создать аккаунт и ввести специальный промокод казино 1хСлотс.
1xSlot Промокод
NEXT777
В казино 1xSlots 2024 доступны различные бонусы: бездепозитные при регистрации, промокоды, фриспины, кэшбэки и другие акции.
Промокод 1xSlots 2024: NEXT777 – введите код при регистрации в казино 1хСлот и получите приветственный бонус €1650 +200 фриспинов. Чтобы промокод 1xSlots на бездепозитный бонус сработал, необходимо указать рабочую комбинацию при регистрации и правильно заполнить форму анкеты. После завершения регистрации бездепозитный бонус будет доступен в личном кабинете. Рекомендуется не торопиться и сразу после создания аккаунта заполнить персональные данные. Важно указать требуемую информацию в полях, отмеченных звездочкой во вкладке “Профиль”, а также активировать контакты (номер телефона и e-mail).
Для новых клиентов промокод 1xSlots предоставляет уникальные возможности, позволяющие бесплатно опробовать один из представленных на платформе слотов. Чтобы получить бездепозитные фриспины, достаточно при регистрации указать промокод и выполнить простые условия акции, которые мы расскажем в данной статье. Игроки, желающие продолжить игру и сделать первый депозит, смогут получить щедрый приветственный бонус до €1500 и 150 бесплатных вращений.
Для получения бонуса на первый депозит необходимо пополнить счет на сумму не менее 10. Награда составляет 100% от суммы первого пополнения, но не может превышать 300. Если сумма пополнения превышает максимальный лимит, игрок получит свой депозит полностью, а также 300 в качестве бонуса. Для активации второго, третьего и четвертого этапов, сумма депозита должна быть не менее 15.
Кроме денежного вознаграждения, каждый этап сопровождается бесплатными прокрутками для игр компании:
– за первый депозит – 30 фриспинов для игры Book of Gold: Classic;
– за второй депозит – 35 фриспинов для игры в Legend of Cleopatra;
– за третий депозит – 40 фриспинов для игры в Solar Queen;
– за четвертый депозит – 45 фриспинов для игры в Imperial Fruits: 40 lines.
Казино 1xSlots предоставляет бонус поэтапно. Чтобы получить награду за второй и последующие депозиты, необходимо выполнить условия отыгрыша ранее полученных средств. Фриспины также начисляются поэтапно и зачисляются после выполнения условий отыгрыша.
Промокод для 1xСлотс: NEXT777. Получите бездепозитный приветственный пакет до €1650 +200 фриспинов. Компания 1xSlots предлагает своим клиентам ряд бонусных программ, самой популярной из которых является приветственный пакет с увеличением первого депозита и бесплатными вращениями. С использованием промокода вы можете получить до 1650 евро и 200 фриспинов. Одним из явных преимуществ 1xSlots является огромный выбор игр. Большую часть из доступных 10 тысяч развлечений занимают игровые автоматы. Пользователям предлагается более 100 различных провайдеров слотов.
Промокод не имеет срока действия. Любой пользователь, который создает аккаунт на сайте 1xSlots, может его активировать. Каждому игроку предоставляется только один бонус, поэтому промокод может быть использован только один раз. Чтобы воспользоваться промокодом, необходимо нажать на кнопку “Регистрация”, выбрать удобный способ создания аккаунта, указать все необходимые данные, подтвердить номер телефона или адрес электронной почты и ввести промокод. После этого можно завершить регистрацию, нажав на кнопку “Зарегистрироваться”.
1xSlots Промокод для Регистрации
Бонусы казино 1xSlots 2024 – Бездепозитные бонусы ? Коды на возврат средств ? VIP программа преданности ? Бесплатные фриспины.
Промокод 1xSlots при Регистрации: NEXT777 Получите эксклюзивный приветственный пакет до 1650 евро +150 фриспинов. Казино 1xSlots 2024 предлагает своим гостям не только широкий выбор игровых автоматов. На сайте казино регулярно проводятся бонусные акции, в рамках которых можно получить различные подарки, процент от депозита, фриспины и многое другое. При обычной регистрации есть ограничение по сумме – не более 1500 евро на первые четыре депозита. Первое пополнение – до 300 евро, второе – не более 350, третье – 400, четвертое – 450 евро. После ввода промокода лимит увеличивается до 1650 евро, а количество фриспинов возрастает с 150 до 200 вращений.
Получите бездепозитный бонус в размере 100 фриспинов в онлайн казино 1xSlots в 2024 году. Все активные бонус коды, промокоды и купоны от 1хСлотс (1xSlots) доступны как для новых, так и для существующих игроков. В клубе 1xSlots промокоды предоставляют дополнительные бонусы пользователям. Кроме того, в клубе проводятся множество турниров с крупными призовыми фондами, в которых может принять участие любой зарегистрированный игрок.
1xSlots фриспины промокод: NEXT777. Размер приветственного поощрения составляет 100 фриспинов в автомате Eye of Storm от провайдера Pragmatic Play. Время на его активацию неограничено. Подарок выдается единожды, попытки повторного создания учетной записи для получения фриспинов приравниваются к мошенническим действиям. Альтернативным способом получения бонус-кодов является активное заключение пари в системе. Вращая барабаны игровых автоматов и зарабатывая баллы можно получить право на фриспины, благодаря промо. Список промокодов 1xslots доступен непосредственно на официальном сайте. Чтобы получить бездепозитный бонус код для 1хслотс в 2024 году, следует выполнить следующие условия:
1. Активировать бонусные средства в личном кабинете;
2. Пополнить счет на €15 (или эквивалент в другой валюте) и более, чтобы привязать банковскую карту или онлайн-кошелек;
3. Выполнить условия вейджера: x25. Для этого необходимо поставить из своих денег сумму, равную выигрышу с бесплатных вращений, умноженную в 25 раз. На отыгрыш дается 7 дней с момента, когда вы прокрутили фриспины.
Максимальная сумма вознаграждения составляет 1650 евро. Ее необходимо отыграть с вейджером 35 раз. Казино предлагает релоад-бонусы, которые также нужно отыграть 35 раз. Однако особое место среди множества игр, слотов и турниров на 1xSlots занимает лайв-казино. Это казино, где игра происходит в режиме реального времени. Настоящие дилеры раздают карты и крутят рулетку за игровыми столами. Все эти действия передаются по видеосвязи. Благодаря такой видеотрансляции каждый игрок может почувствовать все эмоции и азарт игры в интерактивной атмосфере с профессиональными дилерами.
При регистрации на 1xSlots используйте промокод “NEXT777” и получите бездепозитный бонус в размере €1650 + 200 фриспинов. Казино 1xSlots радует своих игроков различными бонусами, такими как промокоды, фриспины и бездепозитные бонусы. Особенно щедрые подарки от казино 1xSlots предназначены для новичков.
В дополнение к бонусной программе онлайн казино 1xSlots предлагает кешбэк до 11%, начисляемый от суммы проигранных средств. Кешбэк не имеет срока отыгрыша. Сидя дома перед компьютером, удается почувствовать атмосферу присутствия в настоящем казино. Именно этими причинами объясняется такая популярность и широкий спрос лайв-казино.
1xslots все промокоды – Бонус по промокоду 1хСлотс увеличивается с €1500 + 150 фриспинов до €1650 + 200 фриспинов.
Промокод 1xSlots на Сегодня: NEXT777 предоставляет вам возможность получить €1500 +150 FS при регистрации с использованием бонусного кода. Теперь бонус по промокоду составляет €1650 + 200 фриспинов, что на €150 больше, чем раньше. Это отличная возможность получить еще больше выгоды от игры. Казино 1xSlots 2024 – это платформа для игровых автоматов и Турниров. В казино 1хСлотс доступны различные бонусы, такие как промокоды, фриспины и бездепозитные бонусы. Особенно крупные подарки в казино 1xSlots предназначены для новичков.
Выгодная бонусная программа на сайте 1xslots позволяет как новичкам, так и опытным игрокам получать разнообразные подарки. Кроме того, это отличная возможность увеличить свой выигрыш. В казино 1xslots бонусы за депозиты и подарки не требуют дополнительных вложений. Используя фриспины и промокоды, вы можете получить хорошие деньги. Давайте подробнее рассмотрим, какие бонусы предлагает онлайн казино.
После прохождения регистрации игроку предлагается бонус на первые четыре операции по пополнению счета:
на первый депозит – 100% от внесенных средств и 30 фриспинов;
на второй депозит – 50% от внесенных средств и 35 фриспинов;
на третий депозит – 25% от внесенных средств и 40 фриспинов;
на четвертый депозит – 25% от внесенных средств и 45 фриспинов.
Промокод, также известный как код приглашения, является ключом-активатором приветственной программы для новичков. Если вы ранее не имели опыта игры в 1xSlots, то вы можете рассчитывать на получение щедрого подарка при регистрации – пакета из 1650 евро и 200 бесплатных прокруток. Согласно правилам бонусной акции, размер поощрения зависит от суммы первых четырех взносов и распределяется следующим образом: на депозитный бонус установлен максимальный лимит в 1500 евро. Чтобы получить подарок, игроку достаточно пройти процедуру регистрации, заполнить анкетные данные в личном кабинете и внести на счет профиля сумму от 10 евро.
При регистрации клиент может использовать промокод 1xSlots и получить дополнительный подарок.
1xSlots давно занимает прочные позиции в списке лучших брендов гемблинг-индустрии. Политика компании 1x ориентирована на опытных игроков, здесь пользователей ожидает продуманная программа лояльности, а также гарантии безопасности личной информации и депозита. Все действия осуществляются на основании лицензии 8048/JAZ2016-083, полученной от компании Orakum N.V., Кюрасао.
Промокод 1хСлот 2024: NEXT777 предоставляет бездепозитный бонус в виде 150 вращений в игре «The Dog House Megaways». В онлайн казино 1xslots доступны бесплатные промокоды на фриспины. Кроме того, игроки могут получать бонусные вращения не только за регистрацию или использование промокода от 1xSlots. Участие в бонусных акциях также позволяет пользователям получить фриспины. Казино 1хSlots предлагает различные варианты депозитов и выплат. Новые игроки, которые регистрируются на 1хSlots, получают приветственный пакет бонусов, однако с использованием промокода от 1xSlots этот бонус может быть еще более значительным. Для активации бонуса необходимо применить актуальный промокод при регистрации.
Приветственный пакет от 1xSlot доступен сразу после регистрации и требует активации через создание депозита. Бонус предоставляет умножение для первых четырех депозитов и дополнительные бесплатные вращения. Минимальная сумма для первого депозита составляет 10 евро, а для последующих пополнений – 15 евро. Максимальная сумма бонуса – 1500 евро.
Также новичкам предоставляются бонусы на второй, третий и четвертый депозит. Для получения подарка необходимо внести сумму не менее 15 евро. Игрокам также предоставляются фриспины и депозитные подарки. Для начисления фриспинов требуется подтверждение номера телефона.
Для постоянных игроков онлайн-казино 1xSlots проводит бонусные акции. Некоторые из них имеют временный характер, а другие действуют постоянно. В основном, пользователям предлагаются депозитные бонусы. Например, можно получить презент за пополнение счета в понедельник. За десятый депозит игроку полагается крупный депозитный бонус в размере 50% от вносимой суммы и 100 фриспинов.
В клубе 1xSlots также действует программа лояльности, которая предполагает различные привилегии для игроков.
Игрокам, активно делающим ставки в течение недели и ушедшим в минус, казино 1xSlots предлагает фриспины. Для получения бонуса не требуется пополнение счета, лимит на максимальный выигрыш и вейджер не устанавливаются.
Ежедневно в казино 1хСлотс назначается слот дня. При совершении ставок на определенную сумму в этом игровом аппарате игроку начисляются фриспины. Обратите внимание https://irenastyle.ru/pags/promokod_1xslots.html, время действия акции ограничено.
Разработчиками 1хСлотс было разработано мобильное казино. Такая версия представляет собой упрощенный вариант компьютерного формата онлайн казино. Она позволяет играть в любимые игры на любом устройстве, поддерживающем функцию выхода в интернет. В качестве такого устройства может быть смартфон или планшет.
https://kursovuyupishem.ru/
lisinopril 10 mg no prescription
1xSlots Промокод (Бездепозитный Бонус 2024)
1xSlots промокод: NEXT777, при регистрации введите этот бонусный код, чтобы получить бонус для новых игроков в размере €1650 + 200 фриспинов. Чтобы получить этот бонус, вам нужно создать аккаунт и ввести специальный промокод казино 1хСлотс.
1xSlot Промокод
NEXT777
В казино 1xSlots 2024 доступны различные бонусы: бездепозитные при регистрации, промокоды, фриспины, кэшбэки и другие акции.
Промокод 1xSlots 2024: NEXT777 – введите код при регистрации в казино 1хСлот и получите приветственный бонус €1650 +200 фриспинов. Чтобы промокод 1xSlots на бездепозитный бонус сработал, необходимо указать рабочую комбинацию при регистрации и правильно заполнить форму анкеты. После завершения регистрации бездепозитный бонус будет доступен в личном кабинете. Рекомендуется не торопиться и сразу после создания аккаунта заполнить персональные данные. Важно указать требуемую информацию в полях, отмеченных звездочкой во вкладке “Профиль”, а также активировать контакты (номер телефона и e-mail).
Для новых клиентов промокод 1xSlots предоставляет уникальные возможности, позволяющие бесплатно опробовать один из представленных на платформе слотов. Чтобы получить бездепозитные фриспины, достаточно при регистрации указать промокод и выполнить простые условия акции, которые мы расскажем в данной статье. Игроки, желающие продолжить игру и сделать первый депозит, смогут получить щедрый приветственный бонус до €1500 и 150 бесплатных вращений.
Для получения бонуса на первый депозит необходимо пополнить счет на сумму не менее 10. Награда составляет 100% от суммы первого пополнения, но не может превышать 300. Если сумма пополнения превышает максимальный лимит, игрок получит свой депозит полностью, а также 300 в качестве бонуса. Для активации второго, третьего и четвертого этапов, сумма депозита должна быть не менее 15.
Кроме денежного вознаграждения, каждый этап сопровождается бесплатными прокрутками для игр компании:
– за первый депозит – 30 фриспинов для игры Book of Gold: Classic;
– за второй депозит – 35 фриспинов для игры в Legend of Cleopatra;
– за третий депозит – 40 фриспинов для игры в Solar Queen;
– за четвертый депозит – 45 фриспинов для игры в Imperial Fruits: 40 lines.
Казино 1xSlots предоставляет бонус поэтапно. Чтобы получить награду за второй и последующие депозиты, необходимо выполнить условия отыгрыша ранее полученных средств. Фриспины также начисляются поэтапно и зачисляются после выполнения условий отыгрыша.
Промокод для 1xСлотс: NEXT777. Получите бездепозитный приветственный пакет до €1650 +200 фриспинов. Компания 1xSlots предлагает своим клиентам ряд бонусных программ, самой популярной из которых является приветственный пакет с увеличением первого депозита и бесплатными вращениями. С использованием промокода вы можете получить до 1650 евро и 200 фриспинов. Одним из явных преимуществ 1xSlots является огромный выбор игр. Большую часть из доступных 10 тысяч развлечений занимают игровые автоматы. Пользователям предлагается более 100 различных провайдеров слотов.
Промокод не имеет срока действия. Любой пользователь, который создает аккаунт на сайте 1xSlots, может его активировать. Каждому игроку предоставляется только один бонус, поэтому промокод может быть использован только один раз. Чтобы воспользоваться промокодом, необходимо нажать на кнопку “Регистрация”, выбрать удобный способ создания аккаунта, указать все необходимые данные, подтвердить номер телефона или адрес электронной почты и ввести промокод. После этого можно завершить регистрацию, нажав на кнопку “Зарегистрироваться”.
1xSlots Промокод для Регистрации
Бонусы казино 1xSlots 2024 – Бездепозитные бонусы ? Коды на возврат средств ? VIP программа преданности ? Бесплатные фриспины.
Промокод 1xSlots при Регистрации: NEXT777 Получите эксклюзивный приветственный пакет до 1650 евро +150 фриспинов. Казино 1xSlots 2024 предлагает своим гостям не только широкий выбор игровых автоматов. На сайте казино регулярно проводятся бонусные акции, в рамках которых можно получить различные подарки, процент от депозита, фриспины и многое другое. При обычной регистрации есть ограничение по сумме – не более 1500 евро на первые четыре депозита. Первое пополнение – до 300 евро, второе – не более 350, третье – 400, четвертое – 450 евро. После ввода промокода лимит увеличивается до 1650 евро, а количество фриспинов возрастает с 150 до 200 вращений.
Получите бездепозитный бонус в размере 100 фриспинов в онлайн казино 1xSlots в 2024 году. Все активные бонус коды, промокоды и купоны от 1хСлотс (1xSlots) доступны как для новых, так и для существующих игроков. В клубе 1xSlots промокоды предоставляют дополнительные бонусы пользователям. Кроме того, в клубе проводятся множество турниров с крупными призовыми фондами, в которых может принять участие любой зарегистрированный игрок.
1xSlots фриспины промокод: NEXT777. Размер приветственного поощрения составляет 100 фриспинов в автомате Eye of Storm от провайдера Pragmatic Play. Время на его активацию неограничено. Подарок выдается единожды, попытки повторного создания учетной записи для получения фриспинов приравниваются к мошенническим действиям. Альтернативным способом получения бонус-кодов является активное заключение пари в системе. Вращая барабаны игровых автоматов и зарабатывая баллы можно получить право на фриспины, благодаря промо. Список промокодов 1xslots доступен непосредственно на официальном сайте. Чтобы получить бездепозитный бонус код для 1хслотс в 2024 году, следует выполнить следующие условия:
1. Активировать бонусные средства в личном кабинете;
2. Пополнить счет на €15 (или эквивалент в другой валюте) и более, чтобы привязать банковскую карту или онлайн-кошелек;
3. Выполнить условия вейджера: x25. Для этого необходимо поставить из своих денег сумму, равную выигрышу с бесплатных вращений, умноженную в 25 раз. На отыгрыш дается 7 дней с момента, когда вы прокрутили фриспины.
Максимальная сумма вознаграждения составляет 1650 евро. Ее необходимо отыграть с вейджером 35 раз. Казино предлагает релоад-бонусы, которые также нужно отыграть 35 раз. Однако особое место среди множества игр, слотов и турниров на 1xSlots занимает лайв-казино. Это казино, где игра происходит в режиме реального времени. Настоящие дилеры раздают карты и крутят рулетку за игровыми столами. Все эти действия передаются по видеосвязи. Благодаря такой видеотрансляции каждый игрок может почувствовать все эмоции и азарт игры в интерактивной атмосфере с профессиональными дилерами.
При регистрации на 1xSlots используйте промокод “NEXT777” и получите бездепозитный бонус в размере €1650 + 200 фриспинов. Казино 1xSlots радует своих игроков различными бонусами, такими как промокоды, фриспины и бездепозитные бонусы. Особенно щедрые подарки от казино 1xSlots предназначены для новичков.
В дополнение к бонусной программе онлайн казино 1xSlots предлагает кешбэк до 11%, начисляемый от суммы проигранных средств. Кешбэк не имеет срока отыгрыша. Сидя дома перед компьютером, удается почувствовать атмосферу присутствия в настоящем казино. Именно этими причинами объясняется такая популярность и широкий спрос лайв-казино.
промокоды на 1xslots 2024 – Бонус по промокоду 1хСлотс увеличивается с €1500 + 150 фриспинов до €1650 + 200 фриспинов.
Промокод 1xSlots на Сегодня: NEXT777 предоставляет вам возможность получить €1500 +150 FS при регистрации с использованием бонусного кода. Теперь бонус по промокоду составляет €1650 + 200 фриспинов, что на €150 больше, чем раньше. Это отличная возможность получить еще больше выгоды от игры. Казино 1xSlots 2024 – это платформа для игровых автоматов и Турниров. В казино 1хСлотс доступны различные бонусы, такие как промокоды, фриспины и бездепозитные бонусы. Особенно крупные подарки в казино 1xSlots предназначены для новичков.
Выгодная бонусная программа на сайте 1xslots позволяет как новичкам, так и опытным игрокам получать разнообразные подарки. Кроме того, это отличная возможность увеличить свой выигрыш. В казино 1xslots бонусы за депозиты и подарки не требуют дополнительных вложений. Используя фриспины и промокоды, вы можете получить хорошие деньги. Давайте подробнее рассмотрим, какие бонусы предлагает онлайн казино.
После прохождения регистрации игроку предлагается бонус на первые четыре операции по пополнению счета:
на первый депозит – 100% от внесенных средств и 30 фриспинов;
на второй депозит – 50% от внесенных средств и 35 фриспинов;
на третий депозит – 25% от внесенных средств и 40 фриспинов;
на четвертый депозит – 25% от внесенных средств и 45 фриспинов.
Промокод, также известный как код приглашения, является ключом-активатором приветственной программы для новичков. Если вы ранее не имели опыта игры в 1xSlots, то вы можете рассчитывать на получение щедрого подарка при регистрации – пакета из 1650 евро и 200 бесплатных прокруток. Согласно правилам бонусной акции, размер поощрения зависит от суммы первых четырех взносов и распределяется следующим образом: на депозитный бонус установлен максимальный лимит в 1500 евро. Чтобы получить подарок, игроку достаточно пройти процедуру регистрации, заполнить анкетные данные в личном кабинете и внести на счет профиля сумму от 10 евро.
При регистрации клиент может использовать промокод 1xSlots и получить дополнительный подарок.
1xSlots давно занимает прочные позиции в списке лучших брендов гемблинг-индустрии. Политика компании 1x ориентирована на опытных игроков, здесь пользователей ожидает продуманная программа лояльности, а также гарантии безопасности личной информации и депозита. Все действия осуществляются на основании лицензии 8048/JAZ2016-083, полученной от компании Orakum N.V., Кюрасао.
Промокод 1хСлот 2024: NEXT777 предоставляет бездепозитный бонус в виде 150 вращений в игре «The Dog House Megaways». В онлайн казино 1xslots доступны бесплатные промокоды на фриспины. Кроме того, игроки могут получать бонусные вращения не только за регистрацию или использование промокода от 1xSlots. Участие в бонусных акциях также позволяет пользователям получить фриспины. Казино 1хSlots предлагает различные варианты депозитов и выплат. Новые игроки, которые регистрируются на 1хSlots, получают приветственный пакет бонусов, однако с использованием промокода от 1xSlots этот бонус может быть еще более значительным. Для активации бонуса необходимо применить актуальный промокод при регистрации.
Приветственный пакет от 1xSlot доступен сразу после регистрации и требует активации через создание депозита. Бонус предоставляет умножение для первых четырех депозитов и дополнительные бесплатные вращения. Минимальная сумма для первого депозита составляет 10 евро, а для последующих пополнений – 15 евро. Максимальная сумма бонуса – 1500 евро.
Также новичкам предоставляются бонусы на второй, третий и четвертый депозит. Для получения подарка необходимо внести сумму не менее 15 евро. Игрокам также предоставляются фриспины и депозитные подарки. Для начисления фриспинов требуется подтверждение номера телефона.
Для постоянных игроков онлайн-казино 1xSlots проводит бонусные акции. Некоторые из них имеют временный характер, а другие действуют постоянно. В основном, пользователям предлагаются депозитные бонусы. Например, можно получить презент за пополнение счета в понедельник. За десятый депозит игроку полагается крупный депозитный бонус в размере 50% от вносимой суммы и 100 фриспинов.
В клубе 1xSlots также действует программа лояльности, которая предполагает различные привилегии для игроков.
Игрокам, активно делающим ставки в течение недели и ушедшим в минус, казино 1xSlots предлагает фриспины. Для получения бонуса не требуется пополнение счета, лимит на максимальный выигрыш и вейджер не устанавливаются.
Ежедневно в казино 1хСлотс назначается слот дня. При совершении ставок на определенную сумму в этом игровом аппарате игроку начисляются фриспины. Обратите внимание https://irenastyle.ru/pags/promokod_1xslots.html, время действия акции ограничено.
Разработчиками 1хСлотс было разработано мобильное казино. Такая версия представляет собой упрощенный вариант компьютерного формата онлайн казино. Она позволяет играть в любимые игры на любом устройстве, поддерживающем функцию выхода в интернет. В качестве такого устройства может быть смартфон или планшет.
lisinopril 20 mg prices
1xSlots Промокод (Бездепозитный Бонус 2024)
1xSlots промокод: NEXT777, при регистрации введите этот бонусный код, чтобы получить бонус для новых игроков в размере €1650 + 200 фриспинов. Чтобы получить этот бонус, вам нужно создать аккаунт и ввести специальный промокод казино 1хСлотс.
1xSlot Промокод
NEXT777
В казино 1xSlots 2024 доступны различные бонусы: бездепозитные при регистрации, промокоды, фриспины, кэшбэки и другие акции.
Промокод 1xSlots 2024: NEXT777 – введите код при регистрации в казино 1хСлот и получите приветственный бонус €1650 +200 фриспинов. Чтобы промокод 1xSlots на бездепозитный бонус сработал, необходимо указать рабочую комбинацию при регистрации и правильно заполнить форму анкеты. После завершения регистрации бездепозитный бонус будет доступен в личном кабинете. Рекомендуется не торопиться и сразу после создания аккаунта заполнить персональные данные. Важно указать требуемую информацию в полях, отмеченных звездочкой во вкладке “Профиль”, а также активировать контакты (номер телефона и e-mail).
Для новых клиентов промокод 1xSlots предоставляет уникальные возможности, позволяющие бесплатно опробовать один из представленных на платформе слотов. Чтобы получить бездепозитные фриспины, достаточно при регистрации указать промокод и выполнить простые условия акции, которые мы расскажем в данной статье. Игроки, желающие продолжить игру и сделать первый депозит, смогут получить щедрый приветственный бонус до €1500 и 150 бесплатных вращений.
Для получения бонуса на первый депозит необходимо пополнить счет на сумму не менее 10. Награда составляет 100% от суммы первого пополнения, но не может превышать 300. Если сумма пополнения превышает максимальный лимит, игрок получит свой депозит полностью, а также 300 в качестве бонуса. Для активации второго, третьего и четвертого этапов, сумма депозита должна быть не менее 15.
Кроме денежного вознаграждения, каждый этап сопровождается бесплатными прокрутками для игр компании:
– за первый депозит – 30 фриспинов для игры Book of Gold: Classic;
– за второй депозит – 35 фриспинов для игры в Legend of Cleopatra;
– за третий депозит – 40 фриспинов для игры в Solar Queen;
– за четвертый депозит – 45 фриспинов для игры в Imperial Fruits: 40 lines.
Казино 1xSlots предоставляет бонус поэтапно. Чтобы получить награду за второй и последующие депозиты, необходимо выполнить условия отыгрыша ранее полученных средств. Фриспины также начисляются поэтапно и зачисляются после выполнения условий отыгрыша.
Промокод для 1xСлотс: NEXT777. Получите бездепозитный приветственный пакет до €1650 +200 фриспинов. Компания 1xSlots предлагает своим клиентам ряд бонусных программ, самой популярной из которых является приветственный пакет с увеличением первого депозита и бесплатными вращениями. С использованием промокода вы можете получить до 1650 евро и 200 фриспинов. Одним из явных преимуществ 1xSlots является огромный выбор игр. Большую часть из доступных 10 тысяч развлечений занимают игровые автоматы. Пользователям предлагается более 100 различных провайдеров слотов.
Промокод не имеет срока действия. Любой пользователь, который создает аккаунт на сайте 1xSlots, может его активировать. Каждому игроку предоставляется только один бонус, поэтому промокод может быть использован только один раз. Чтобы воспользоваться промокодом, необходимо нажать на кнопку “Регистрация”, выбрать удобный способ создания аккаунта, указать все необходимые данные, подтвердить номер телефона или адрес электронной почты и ввести промокод. После этого можно завершить регистрацию, нажав на кнопку “Зарегистрироваться”.
1xSlots Промокод для Регистрации
Бонусы казино 1xSlots 2024 – Бездепозитные бонусы ? Коды на возврат средств ? VIP программа преданности ? Бесплатные фриспины.
Промокод 1xSlots при Регистрации: NEXT777 Получите эксклюзивный приветственный пакет до 1650 евро +150 фриспинов. Казино 1xSlots 2024 предлагает своим гостям не только широкий выбор игровых автоматов. На сайте казино регулярно проводятся бонусные акции, в рамках которых можно получить различные подарки, процент от депозита, фриспины и многое другое. При обычной регистрации есть ограничение по сумме – не более 1500 евро на первые четыре депозита. Первое пополнение – до 300 евро, второе – не более 350, третье – 400, четвертое – 450 евро. После ввода промокода лимит увеличивается до 1650 евро, а количество фриспинов возрастает с 150 до 200 вращений.
Получите бездепозитный бонус в размере 100 фриспинов в онлайн казино 1xSlots в 2024 году. Все активные бонус коды, промокоды и купоны от 1хСлотс (1xSlots) доступны как для новых, так и для существующих игроков. В клубе 1xSlots промокоды предоставляют дополнительные бонусы пользователям. Кроме того, в клубе проводятся множество турниров с крупными призовыми фондами, в которых может принять участие любой зарегистрированный игрок.
1xSlots фриспины промокод: NEXT777. Размер приветственного поощрения составляет 100 фриспинов в автомате Eye of Storm от провайдера Pragmatic Play. Время на его активацию неограничено. Подарок выдается единожды, попытки повторного создания учетной записи для получения фриспинов приравниваются к мошенническим действиям. Альтернативным способом получения бонус-кодов является активное заключение пари в системе. Вращая барабаны игровых автоматов и зарабатывая баллы можно получить право на фриспины, благодаря промо. Список промокодов 1xslots доступен непосредственно на официальном сайте. Чтобы получить бездепозитный бонус код для 1хслотс в 2024 году, следует выполнить следующие условия:
1. Активировать бонусные средства в личном кабинете;
2. Пополнить счет на €15 (или эквивалент в другой валюте) и более, чтобы привязать банковскую карту или онлайн-кошелек;
3. Выполнить условия вейджера: x25. Для этого необходимо поставить из своих денег сумму, равную выигрышу с бесплатных вращений, умноженную в 25 раз. На отыгрыш дается 7 дней с момента, когда вы прокрутили фриспины.
Максимальная сумма вознаграждения составляет 1650 евро. Ее необходимо отыграть с вейджером 35 раз. Казино предлагает релоад-бонусы, которые также нужно отыграть 35 раз. Однако особое место среди множества игр, слотов и турниров на 1xSlots занимает лайв-казино. Это казино, где игра происходит в режиме реального времени. Настоящие дилеры раздают карты и крутят рулетку за игровыми столами. Все эти действия передаются по видеосвязи. Благодаря такой видеотрансляции каждый игрок может почувствовать все эмоции и азарт игры в интерактивной атмосфере с профессиональными дилерами.
При регистрации на 1xSlots используйте промокод “NEXT777” и получите бездепозитный бонус в размере €1650 + 200 фриспинов. Казино 1xSlots радует своих игроков различными бонусами, такими как промокоды, фриспины и бездепозитные бонусы. Особенно щедрые подарки от казино 1xSlots предназначены для новичков.
В дополнение к бонусной программе онлайн казино 1xSlots предлагает кешбэк до 11%, начисляемый от суммы проигранных средств. Кешбэк не имеет срока отыгрыша. Сидя дома перед компьютером, удается почувствовать атмосферу присутствия в настоящем казино. Именно этими причинами объясняется такая популярность и широкий спрос лайв-казино.
1xslots промокод – Бонус по промокоду 1хСлотс увеличивается с €1500 + 150 фриспинов до €1650 + 200 фриспинов.
Промокод 1xSlots на Сегодня: NEXT777 предоставляет вам возможность получить €1500 +150 FS при регистрации с использованием бонусного кода. Теперь бонус по промокоду составляет €1650 + 200 фриспинов, что на €150 больше, чем раньше. Это отличная возможность получить еще больше выгоды от игры. Казино 1xSlots 2024 – это платформа для игровых автоматов и Турниров. В казино 1хСлотс доступны различные бонусы, такие как промокоды, фриспины и бездепозитные бонусы. Особенно крупные подарки в казино 1xSlots предназначены для новичков.
Выгодная бонусная программа на сайте 1xslots позволяет как новичкам, так и опытным игрокам получать разнообразные подарки. Кроме того, это отличная возможность увеличить свой выигрыш. В казино 1xslots бонусы за депозиты и подарки не требуют дополнительных вложений. Используя фриспины и промокоды, вы можете получить хорошие деньги. Давайте подробнее рассмотрим, какие бонусы предлагает онлайн казино.
После прохождения регистрации игроку предлагается бонус на первые четыре операции по пополнению счета:
на первый депозит – 100% от внесенных средств и 30 фриспинов;
на второй депозит – 50% от внесенных средств и 35 фриспинов;
на третий депозит – 25% от внесенных средств и 40 фриспинов;
на четвертый депозит – 25% от внесенных средств и 45 фриспинов.
Промокод, также известный как код приглашения, является ключом-активатором приветственной программы для новичков. Если вы ранее не имели опыта игры в 1xSlots, то вы можете рассчитывать на получение щедрого подарка при регистрации – пакета из 1650 евро и 200 бесплатных прокруток. Согласно правилам бонусной акции, размер поощрения зависит от суммы первых четырех взносов и распределяется следующим образом: на депозитный бонус установлен максимальный лимит в 1500 евро. Чтобы получить подарок, игроку достаточно пройти процедуру регистрации, заполнить анкетные данные в личном кабинете и внести на счет профиля сумму от 10 евро.
При регистрации клиент может использовать промокод 1xSlots и получить дополнительный подарок.
1xSlots давно занимает прочные позиции в списке лучших брендов гемблинг-индустрии. Политика компании 1x ориентирована на опытных игроков, здесь пользователей ожидает продуманная программа лояльности, а также гарантии безопасности личной информации и депозита. Все действия осуществляются на основании лицензии 8048/JAZ2016-083, полученной от компании Orakum N.V., Кюрасао.
Промокод 1хСлот 2024: NEXT777 предоставляет бездепозитный бонус в виде 150 вращений в игре «The Dog House Megaways». В онлайн казино 1xslots доступны бесплатные промокоды на фриспины. Кроме того, игроки могут получать бонусные вращения не только за регистрацию или использование промокода от 1xSlots. Участие в бонусных акциях также позволяет пользователям получить фриспины. Казино 1хSlots предлагает различные варианты депозитов и выплат. Новые игроки, которые регистрируются на 1хSlots, получают приветственный пакет бонусов, однако с использованием промокода от 1xSlots этот бонус может быть еще более значительным. Для активации бонуса необходимо применить актуальный промокод при регистрации.
Приветственный пакет от 1xSlot доступен сразу после регистрации и требует активации через создание депозита. Бонус предоставляет умножение для первых четырех депозитов и дополнительные бесплатные вращения. Минимальная сумма для первого депозита составляет 10 евро, а для последующих пополнений – 15 евро. Максимальная сумма бонуса – 1500 евро.
Также новичкам предоставляются бонусы на второй, третий и четвертый депозит. Для получения подарка необходимо внести сумму не менее 15 евро. Игрокам также предоставляются фриспины и депозитные подарки. Для начисления фриспинов требуется подтверждение номера телефона.
Для постоянных игроков онлайн-казино 1xSlots проводит бонусные акции. Некоторые из них имеют временный характер, а другие действуют постоянно. В основном, пользователям предлагаются депозитные бонусы. Например, можно получить презент за пополнение счета в понедельник. За десятый депозит игроку полагается крупный депозитный бонус в размере 50% от вносимой суммы и 100 фриспинов.
В клубе 1xSlots также действует программа лояльности, которая предполагает различные привилегии для игроков.
Игрокам, активно делающим ставки в течение недели и ушедшим в минус, казино 1xSlots предлагает фриспины. Для получения бонуса не требуется пополнение счета, лимит на максимальный выигрыш и вейджер не устанавливаются.
Ежедневно в казино 1хСлотс назначается слот дня. При совершении ставок на определенную сумму в этом игровом аппарате игроку начисляются фриспины. Обратите внимание https://irenastyle.ru/pags/promokod_1xslots.html, время действия акции ограничено.
Разработчиками 1хСлотс было разработано мобильное казино. Такая версия представляет собой упрощенный вариант компьютерного формата онлайн казино. Она позволяет играть в любимые игры на любом устройстве, поддерживающем функцию выхода в интернет. В качестве такого устройства может быть смартфон или планшет.
Приветики!
Были ли у вас случаи, когда вам приходилось писать дипломную работу в сжатые сроки? Это действительно требует большой ответственности и усилий, но важно не сдаваться и продолжать активно заниматься учебными процессами, как я.
Для тех, кто умеет эффективно искать информацию в интернете, это действительно облегчает процесс согласования и написания дипломной работы. Больше не нужно тратить время на посещение библиотек или организацию встреч с дипломным руководителем. Здесь, на этом ресурсе, предоставлены надежные данные для заказа и написания дипломных и курсовых работ с гарантией качества и доставкой по всей России. Можете ознакомиться с предложениями на купить диплом специалиста, это проверенный источник!
купить диплом магистра
купить аттестат школы
купить диплом института
купить диплом о высшем образовании
купить диплом колледжа
Желаю всем положительных отметок!
#na#prog$$$
http://otrazhenie.bestbb.ru/viewtopic.php?id=326#p852
https://zmurik.mybb.ru/viewtopic.php?id=1259#p3318
https://minecraftcommand.science/forum/general/topics/609eb7b4-0e24-4a65-8618-dda984cbaa05
http://catalogue.bbok.ru/viewtopic.php?id=3273#p25298
https://godayjob.com/2024/04/13/%d0%ba%d1%83%d0%bf%d0%b8%d1%82%d1%8c-%d0%b4%d0%b8%d0%bf%d0%bb%d0%be%d0%bc-%d0%be-%d1%81%d1%80%d0%b5%d0%b4%d0%bd%d0%b5%d0%bc-%d0%be%d0%b1%d1%80%d0%b0%d0%b7%d0%be%d0%b2%d0%b0%d0%bd%d0%b8%d0%b8-%d0%bf/
jeetwin result
Jeetwin Affiliate
Jeetwin Affiliate
Join Jeetwin now! | Jeetwin sign up for a ?500 free bonus
Spin & fish with Jeetwin club! | 200% welcome bonus
Bet on horse racing, get a 50% bonus! | Deposit at Jeetwin live for rewards
#JeetwinAffiliate
Casino table fun at Jeetwin casino login | 50% deposit bonus on table games
Earn Jeetwin points and credits, enhance your play!
https://www.jeetwin-affiliate.com/hi
#JeetwinAffiliate #jeetwinclub #jeetwinsignup #jeetwinresult
#jeetwinlive #jeetwinbangladesh #jeetwincasinologin
Daily recharge bonuses at Jeetwin Bangladesh!
25% recharge bonus on casino games at jeetwin result
15% bonus on Crash Games with Jeetwin affiliate!
Spin to Achieve Actual Money and Gift Cards with JeetWin Affiliate Program
Do you a enthusiast of virtual gaming? Do you appreciate the thrill of turning the spinner and triumphing big? If so, consequently the JeetWin’s Affiliate Scheme is perfect for you! With JeetWin Casino, you not just get to partake in thrilling games but also have the likelihood to earn real cash and gift vouchers just by endorsing the platform to your friends, family, or online audience.
How Does Function?
Joining for the JeetWin’s Affiliate Scheme is speedy and easy. Once you become an partner, you’ll get a unique referral link that you can share with others. Every time someone registers or makes a deposit using your referral link, you’ll get a commission for their activity.
Incredible Bonuses Await!
As a member of JeetWin’s affiliate program, you’ll have access to a assortment of enticing bonuses:
Sign Up Bonus 500: Get a bountiful sign-up bonus of INR 500 just for joining the program.
Deposit Bonus: Take advantage of a enormous 200% bonus when you fund and play one-armed bandit and fish games on the platform.
Unlimited Referral Bonus: Earn unlimited INR 200 bonuses and rebates for every friend you invite to play on JeetWin.
Thrilling Games to Play
JeetWin offers a diverse range of the most played and most popular games, including Baccarat, Dice, Liveshow, Slot, Fishing, and Sabong. Whether you’re a fan of classic casino games or prefer something more modern and interactive, JeetWin has something for everyone.
Take part in the Greatest Gaming Experience
With JeetWin Live, you can bring your gaming experience to the next level. Take part in thrilling live games such as Lightning Roulette, Lightning Dice, Crazytime, and more. Sign up today and begin an unforgettable gaming adventure filled with excitement and limitless opportunities to win.
Convenient Payment Methods
Depositing funds and withdrawing your winnings on JeetWin is quick and hassle-free. Choose from a range of payment methods, including E-Wallets, Net Banking, AstroPay, and RupeeO, for seamless transactions.
Don’t Overlook on Exclusive Promotions
As a JeetWin affiliate, you’ll obtain access to exclusive promotions and special offers designed to maximize your earnings. From cash rebates to lucrative bonuses, there’s always something exciting happening at JeetWin.
Install the Mobile Application
Take the fun with you wherever you go by downloading the JeetWin Mobile Casino App. Available for both iOS and Android devices, the app features a wide range of entertaining games that you can enjoy anytime, anywhere.
Sign up for the JeetWin’s Affiliate Scheme Today!
Don’t wait any longer to start earning real cash and exciting rewards with the JeetWin Affiliate Program. Sign up now and become a part of the thriving online gaming community at JeetWin.
jeetwin club
Jeetwin Affiliate
Jeetwin Affiliate
Join Jeetwin now! | Jeetwin sign up for a ?500 free bonus
Spin & fish with Jeetwin club! | 200% welcome bonus
Bet on horse racing, get a 50% bonus! | Deposit at Jeetwin live for rewards
#JeetwinAffiliate
Casino table fun at Jeetwin casino login | 50% deposit bonus on table games
Earn Jeetwin points and credits, enhance your play!
https://www.jeetwin-affiliate.com/hi
#JeetwinAffiliate #jeetwinclub #jeetwinsignup #jeetwinresult
#jeetwinlive #jeetwinbangladesh #jeetwincasinologin
Daily recharge bonuses at Jeetwin Bangladesh!
25% recharge bonus on casino games at jeetwin result
15% bonus on Crash Games with Jeetwin affiliate!
Spin to Gain Genuine Currency and Gift Certificates with JeetWin Affiliate Program
Are you a supporter of web-based gaming? Do you actually enjoy the adrenaline rush of rotating the roulette wheel and triumphing big-time? If so, consequently the JeetWin’s Partner Program is excellent for you! With JeetWin Gaming, you not merely get to indulge in enthralling games but additionally have the possibility to make genuine currency and voucher codes plainly by endorsing the platform to your friends, family, or online audience.
How Is it Perform?
Joining for the JeetWin’s Referral Program is fast and effortless. Once you grow into an associate, you’ll get a unique referral link that you can share with others. Every time someone joins or makes a deposit using your referral link, you’ll get a commission for their activity.
Fantastic Bonuses Await!
As a member of JeetWin’s affiliate program, you’ll have access to a selection of appealing bonuses:
500 Sign-Up Bonus: Receive a generous sign-up bonus of INR 500 just for joining the program.
Deposit Bonus: Take advantage of a huge 200% bonus when you deposit and play slot and fishing games on the platform.
Infinite Referral Bonus: Acquire unlimited INR 200 bonuses and cash rebates for every friend you invite to play on JeetWin.
Exciting Games to Play
JeetWin offers a broad range of the most played and most popular games, including Baccarat, Dice, Liveshow, Slot, Fishing, and Sabong. Whether you’re a fan of classic casino games or prefer something more modern and interactive, JeetWin has something for everyone.
Join the Supreme Gaming Experience
With JeetWin Live, you can take your gaming experience to the next level. Engage in thrilling live games such as Lightning Roulette, Lightning Dice, Crazytime, and more. Sign up today and embark on an unforgettable gaming adventure filled with excitement and limitless opportunities to win.
Convenient Payment Methods
Depositing funds and withdrawing your winnings on JeetWin is fast and hassle-free. Choose from a range of payment methods, including E-Wallets, Net Banking, AstroPay, and RupeeO, for seamless transactions.
Don’t Overlook on Exclusive Promotions
As a JeetWin affiliate, you’ll obtain access to exclusive promotions and special offers designed to maximize your earnings. From cash rebates to lucrative bonuses, there’s always something exciting happening at JeetWin.
Get the Mobile Application
Take the fun with you wherever you go by downloading the JeetWin Mobile Casino App. Available for both iOS and Android devices, the app features a wide range of entertaining games that you can enjoy anytime, anywhere.
Become a part of the JeetWin’s Referral Program Today!
Don’t wait any longer to start earning real cash and exciting rewards with the JeetWin Affiliate Program. Sign up now and become a part of the thriving online gaming community at JeetWin.
75 mcg synthroid no prescription
Reaching out via feedback forms is an articulate manifestation of modern business interaction, integrating the top of discretion and tech. This method gives companies a direct line to their consumers, allowing them to understand the subtleties of user engagement, collect beneficial feedback, and, above all, show that they are continually attending. Rather than sifting through the cluttered landscape of emails and marketing messages, response forms supply a streamlined space, setting the path for authentic dialogue and further engaged conversations.
Additionally, mailing to comment forms is a evidence to a brand’s dedication to ongoing betterment. Rather than of functioning in a void, businesses get an priceless perspective into their customers’ minds, unveiling chances for development, enhancement, and creating firmer relationships. As consumer needs transform, this bilateral dialogue channel ensures that businesses continue to be not merely relevant but profoundly tied to their market’s constantly evolving tastes and concerns. In the vast scheme of things, it’s not merely about collecting feedback; it’s about fostering confidence and cementing relationships that endure the challenge of time.
Telgrm: @xrumers
https://XRumer.cc/
Skype: XRumer.pro
good pharmacy
Tienda Nº 1 en Chandal Juventus
Encontrarás cada chaqueta de la juventus y ropa
de entrenamiento de los clubs y selecciones nacionales para adultos y niños.
1.12 mg synthroid
tadalafil 5 mg coupon
Мы рекомендуем посетить веб-сайт https://cultureinthecity.ru/.
Кроме того, не забудьте добавить сайт в закладки: https://cultureinthecity.ru/
Stumbled upon a captivating article – definitely take a look! https://bryansk32-forum.ru/ucp.php?mode=login
Як вибрати стильні та комфортні тактичні кросівки
тактичні кросівки військові https://vijskovikrosivkifvgh.kiev.ua/ .
Як вибрати тактичні кросівки для щоденного використання
літні тактичні кросівки купити https://vijskovikrosivkifvgh.kiev.ua/ .
Секрети вибору ідеальних тактичних кросівок
тактичні літні кросівки https://vijskovikrosivkifvgh.kiev.ua/ .
canada cloud pharmacy
Доброго всем дня!
Были ли у вас случаи, когда приходилось писать дипломную работу в крайне ограниченные сроки? Это действительно требует большой ответственности и трудоемкости, но важно не отступать и продолжать активно участвовать в учебном процессе, как я.
Для тех, кто умеет эффективно находить и использовать информацию в сети, это действительно помогает в процессе согласования и написания дипломной работы. Больше не нужно тратить время на посещение библиотек или организацию встреч с научным руководителем. Здесь, на этом ресурсе, предоставлены надежные данные для заказа и написания дипломных и курсовых работ с гарантией качества и доставкой по всей России. Можете ознакомиться с предложениями тут , это проверенный источник!
http://souzzverg.forumbb.ru/viewtopic.php?id=6349#p52496
купить диплом цена
купить диплом бакалавра
купить диплом колледжа
купить диплом техникума
купить диплом Гознак
Желаю любому прекрасных оценок!
Мы рекомендуем посетить веб-сайт http://vanillarp.ru/.
Кроме того, не забудьте добавить сайт в закладки: [url=http://vanillarp.ru/]http://vanillarp.ru/[/url]
Мы рекомендуем посетить веб-сайт http://vanillarp.ru/.
Кроме того, не забудьте добавить сайт в закладки: http://vanillarp.ru/
Як підтримувати чистоту та порядок у тактичних кросівках
тактичні чоловічі кросівки тактичні чоловічі кросівки .
Як підібрати тактичні кросівки для різних видів активності
купити тактичні літні кросівки купити тактичні літні кросівки .
Тактичні кросівки для зимових тренувань: які краще вибрати
замовити тактичні кросівки замовити тактичні кросівки .
Промокод 1xBet при регистрации. Компания 1ИксБет заинтересована в привлечении новых клиентов, поэтому для новых игроков действует акция в виде бонуса, который равен сумме первого депозита, но не превышает 225 000 рублей. Однако при использовании промокода букмекерская контора увеличит размер приветственного бонуса. Для того чтобы получить повышенную сумму на первый депозит, игроку необходимо выполнить следующие условия: Зайти на сайт букмекера. Выбрать способ регистрации по e-mail. Заполнить поля с личными данными. Ввести промокод в поле слева от кнопки «Зарегистрироваться». Ознакомиться с правилами букмекера. промокоды для 1хбет бесплатно при регистрации поможет пользователям получить еще больше бонусов от букмекерской конторы. Подробная инструкция по поиску и активации бонусных кодов. Промокод — комбинация из цифр и букв, которая позволяет игроку активировать специальное предложение от букмекера 1хБет. С его помощью пользователь может получить: бонусные средства на депозит; бесплатную ставку; промо-баллы; другие подарки. Сегодня вы сможете найти множество подобных ресурсов, которые регулярно обновляют список актуальных предложений БК – более подробно в этом материале https://mebel-3d.ru/libraries/news/?mify_i_zablughdeniya_o_prichinah_impotencii.html
Если вы ищете квалифицированный сервис по ремонту холодильников Whirlpool в российской столице, то вы пришли по правильному адресу. Наш мастерская специализируется на восстановлении холодильного техники данной марки и имеет значительный опыт в указанной сфере. Мы гарантируем безупречное качество услуг, применение оригинальных запчастей и умеренные расценки. Обратитесь с нами прямо сейчас, и мы решим проблему вашему агрегату Whirlpool снова заработать на все 100%! Узнать больше вы можете на taplink.cc.
Если вы ищете квалифицированный сервис по обслуживанию холодильников знаменитого американского бренда в столице, то вы обратились по нужному адресу. Наш техцентр специализируется на обслуживании холодильного агрегатов Whirlpool и имеет большой опыт в этой сфере. Мы гарантируем безупречное качество услуг, использование фирменных запасных частей и конкурентные тарифы. Позвоните с нами прямо сейчас, и мы решим проблему вашему холодильнику Whirlpool функционировать как новенький! Для получения дополнительной информации посетите ремонт холодильников whirlpool в москве.
Если вы ищете профессиональный сервис по восстановлению работоспособности холодильников знаменитого американского бренда в столице, то вы пришли по правильному адресу. Наш техцентр специализируется на ремонте холодильного агрегатов данной марки и имеет солидный опыт в указанной сфере. Мы гарантируем отменное качество услуг, использование оригинальных комплектующих и доступные цены. Обратитесь с нами немедленно, и мы решим проблему вашему холодильнику Whirlpool функционировать словно новый! Более подробно ознакомиться можно по ссылке ремонт холодильников whirlpool в москве.
Мы рекомендуем посетить веб-сайт https://core-rpg.ru/.
Кроме того, не забудьте добавить сайт в закладки: https://core-rpg.ru/
PBN sites
We shall establish a web of PBN sites!
Benefits of our privately-owned blog network:
We carry out everything SO THAT google DOES NOT grasp that THIS IS A self-owned blog network!!!
1- We purchase web domains from separate registrars
2- The leading site is hosted on a virtual private server (VPS is high-speed hosting)
3- Additional sites are on different hostings
4- We attribute a separate Google account to each site with confirmation in Google Search Console.
5- We create websites on WP, we do not utilize plugins with assistance from which Trojans penetrate and through which pages on your websites are generated.
6- We refrain from repeat templates and use only exclusive text and pictures
We never work with website design; the client, if wanted, can then edit the websites to suit his wishes
Секрети вибору ідеальних тактичних кросівок
тактичні кроси https://vijskovikrosivkifvgh.kiev.ua/ .
Промокод 1xbet при регистрации. Промо-код встречается на просторах сети достаточно часто. Букмекер использует его для привлечения новых игроков в индустрию ставок, но преимущество предоставляется и новому игроку. После того как он совершит первый депозит, на его бонусный счёт поступит аналогичная сумма, до 32500 рублей. что дает промокод 1хбет при регистрации Данный вид бонус-кода также популярен в поиске. Указывать его надо в купоне для совершения ставки. Промокод 1xbet на ставку практически невозможно найти в бесплатном доступе. Он вручается игрокам индивидуально.К примеру, компания промокодов. В данном разделе подробно расписан процесс получения – более подробно в этом материале https://mebel-3d.ru/libraries/news/?mify_i_zablughdeniya_o_prichinah_impotencii.html
lisinopril generic price
Magnificent beat ! I would like to apprentice at the same time as you amend your site, how can i subscribe for a weblog web site?
The account aided me a applicable deal. I were tiny bit familiar of this your broadcast provided
shiny transparent concept
Вводите официальный промокод 1xbet при регистрации 2024 и получайте до 32 500 тысяч рублей. Бонус-код помогает удвоить ваш первый банкролл. 1хбет бесплатная ставка промокод что это такое. Бесплатным промокод может воспользоваться любой новый игрок букмекерской конторы! После того, как вы попадете на официальный сайт букмекера, в России он внесен в реестр запрещенных. Благодаря промокодам на сегодня и различным акциям, они начали захватывать сердца миллионов игроков. На протяжении 10 лет существования администрация регулярно совершенствовала уровень сервиса, и как итог — создана отличная контора, где игроки могут совершать ставки и получать выплаты без каких-либо проблем. Это сделать просто, если иметь промокод 1xbet на сегодня бесплатно. Правда, дается он при условии выполнения некоторых правил. 1xbet бонус при регистрации. Не совсем промокод, но вы все равно ставите не свои деньги, если пополните депозит, – 100% бонуса от внесенной суммы. Максимум указан в верхней части главной страницы официального сайта – более подробно в этом материале https://mebel-3d.ru/libraries/news/?mify_i_zablughdeniya_o_prichinah_impotencii.html
where to get synthroid
Мы рекомендуем посетить веб-сайт https://urkarl.ru/.
Кроме того, не забудьте добавить сайт в закладки: https://urkarl.ru/
canadian mail order pharmacy
Привет всем!
Бывало ли у вас такое, что приходилось писать дипломную работу в крайне сжатые сроки? Это действительно требует огромной ответственности и напряженных усилий, но важно не опускать руки и продолжать активно заниматься учебными процессами, как я.
Для тех, кто умеет быстро находить и анализировать информацию в сети, это действительно помогает в процессе согласования и написания дипломной работы. Больше не нужно тратить время на посещение библиотек или устраивать встречи с дипломным руководителем. Здесь, на этом ресурсе, предоставлены надежные данные для заказа и написания дипломных и курсовых работ с гарантией качества и доставкой по всей России. Можете ознакомиться с предложениями на сайте , это проверено!
http://u90517ol.beget.tech/2024/04/13/kupit-svidetelstva-o-dopolnitelnom-obuchenii.html
купить аттестат школы
купить диплом университета
купить диплом цена
купить диплом Гознак
купить аттестат
Желаю любому отличных оценок!
order metformin 1000 mg
Juegos de casino en linea en Peru para todos los gustos
casino en linea peru casino en linea peru .
Добрый день всем!
Бывало ли у вас такое, что приходилось писать дипломную работу в очень ограниченные сроки? Это действительно требует большой ответственности и тяжелого труда, но важно не сдаваться и продолжать активно заниматься учебными процессами, так же, как и я.
Для тех, кто умеет эффективно использовать интернет для поиска и анализа информации, это действительно облегчает процесс согласования и написания дипломной работы. Не нужно тратить время на посещение библиотек или организацию встреч с дипломным руководителем. Здесь представлены надежные данные для заказа и написания дипломных и курсовых работ с гарантией качества и доставкой по всей России. Можете ознакомиться с предложениями по ссылке , это проверенный способ!
http://injectorcar.ru/forum/member.php?u=34916
купить диплом Вуза
купить диплом специалиста
купить аттестат школы
купить диплом нового образца
купить диплом в Москве
Желаю любому отличных оценок!
fast delivery tadalafil
?Siente la emocion del casino en linea en Peru!
mejor casino online peru mejor casino online peru .
?Gana grandes premios en los casinos en linea de Peru!
mejor casino online peru mejor casino online peru .
I was suggested this web site by my cousin. I’m not sure whether this
post is written by him as no one else know such detailed about my trouble.
You are amazing! Thanks!
Доброго всем дня!
Были ли у вас случаи, когда приходилось писать дипломную работу в крайне ограниченные сроки? Это действительно требует большой ответственности и трудоемкости, но важно не отступать и продолжать активно участвовать в учебном процессе, как я.
Для тех, кто умеет эффективно находить и использовать информацию в сети, это действительно помогает в процессе согласования и написания дипломной работы. Больше не нужно тратить время на посещение библиотек или организацию встреч с научным руководителем. Здесь, на этом ресурсе, предоставлены надежные данные для заказа и написания дипломных и курсовых работ с гарантией качества и доставкой по всей России. Можете ознакомиться с предложениями тут , это проверенный источник!
https://oneability.ca/forums/topic/%D0%BA%D1%83%D0%BF%D0%B8%D1%82%D1%8C-%D0%B4%D0%B8%D0%BF%D0%BB%D0%BE%D0%BC-%D1%81%D0%BF%D0%B5%D1%86%D0%B8%D0%B0%D0%BB%D0%B8%D1%81%D1%82%D0%B0-%D0%BF%D0%BE%D0%BA%D1%83%D0%BF%D0%BA%D0%B0-%D0%B4%D0%B8/
купить диплом института
купить диплом колледжа
где купить диплом
купить диплом о среднем образовании
купить диплом специалиста
Желаю всем отличных отметок!
1xSlots Промокод (Бездепозитный Бонус 2024)
1xSlots промокод: NEXT777, при регистрации введите этот бонусный код, чтобы получить бонус для новых игроков в размере €1650 + 200 фриспинов. Чтобы получить этот бонус, вам нужно создать аккаунт и ввести специальный промокод казино 1хСлотс.
1xSlot Промокод
NEXT777
В казино 1xSlots 2024 доступны различные бонусы: бездепозитные при регистрации, промокоды, фриспины, кэшбэки и другие акции.
Промокод 1xSlots 2024: NEXT777 – введите код при регистрации в казино 1хСлот и получите приветственный бонус €1650 +200 фриспинов. Чтобы промокод 1xSlots на бездепозитный бонус сработал, необходимо указать рабочую комбинацию при регистрации и правильно заполнить форму анкеты. После завершения регистрации бездепозитный бонус будет доступен в личном кабинете. Рекомендуется не торопиться и сразу после создания аккаунта заполнить персональные данные. Важно указать требуемую информацию в полях, отмеченных звездочкой во вкладке “Профиль”, а также активировать контакты (номер телефона и e-mail).
Для новых клиентов промокод 1xSlots предоставляет уникальные возможности, позволяющие бесплатно опробовать один из представленных на платформе слотов. Чтобы получить бездепозитные фриспины, достаточно при регистрации указать промокод и выполнить простые условия акции, которые мы расскажем в данной статье. Игроки, желающие продолжить игру и сделать первый депозит, смогут получить щедрый приветственный бонус до €1500 и 150 бесплатных вращений.
Для получения бонуса на первый депозит необходимо пополнить счет на сумму не менее 10. Награда составляет 100% от суммы первого пополнения, но не может превышать 300. Если сумма пополнения превышает максимальный лимит, игрок получит свой депозит полностью, а также 300 в качестве бонуса. Для активации второго, третьего и четвертого этапов, сумма депозита должна быть не менее 15.
Кроме денежного вознаграждения, каждый этап сопровождается бесплатными прокрутками для игр компании:
– за первый депозит – 30 фриспинов для игры Book of Gold: Classic;
– за второй депозит – 35 фриспинов для игры в Legend of Cleopatra;
– за третий депозит – 40 фриспинов для игры в Solar Queen;
– за четвертый депозит – 45 фриспинов для игры в Imperial Fruits: 40 lines.
Казино 1xSlots предоставляет бонус поэтапно. Чтобы получить награду за второй и последующие депозиты, необходимо выполнить условия отыгрыша ранее полученных средств. Фриспины также начисляются поэтапно и зачисляются после выполнения условий отыгрыша.
Промокод для 1xСлотс: NEXT777. Получите бездепозитный приветственный пакет до €1650 +200 фриспинов. Компания 1xSlots предлагает своим клиентам ряд бонусных программ, самой популярной из которых является приветственный пакет с увеличением первого депозита и бесплатными вращениями. С использованием промокода вы можете получить до 1650 евро и 200 фриспинов. Одним из явных преимуществ 1xSlots является огромный выбор игр. Большую часть из доступных 10 тысяч развлечений занимают игровые автоматы. Пользователям предлагается более 100 различных провайдеров слотов.
Промокод не имеет срока действия. Любой пользователь, который создает аккаунт на сайте 1xSlots, может его активировать. Каждому игроку предоставляется только один бонус, поэтому промокод может быть использован только один раз. Чтобы воспользоваться промокодом, необходимо нажать на кнопку “Регистрация”, выбрать удобный способ создания аккаунта, указать все необходимые данные, подтвердить номер телефона или адрес электронной почты и ввести промокод. После этого можно завершить регистрацию, нажав на кнопку “Зарегистрироваться”.
1xSlots Промокод для Регистрации
Бонусы казино 1xSlots 2024 – Бездепозитные бонусы ? Коды на возврат средств ? VIP программа преданности ? Бесплатные фриспины.
Промокод 1xSlots при Регистрации: NEXT777 Получите эксклюзивный приветственный пакет до 1650 евро +150 фриспинов. Казино 1xSlots 2024 предлагает своим гостям не только широкий выбор игровых автоматов. На сайте казино регулярно проводятся бонусные акции, в рамках которых можно получить различные подарки, процент от депозита, фриспины и многое другое. При обычной регистрации есть ограничение по сумме – не более 1500 евро на первые четыре депозита. Первое пополнение – до 300 евро, второе – не более 350, третье – 400, четвертое – 450 евро. После ввода промокода лимит увеличивается до 1650 евро, а количество фриспинов возрастает с 150 до 200 вращений.
Получите бездепозитный бонус в размере 100 фриспинов в онлайн казино 1xSlots в 2024 году. Все активные бонус коды, промокоды и купоны от 1хСлотс (1xSlots) доступны как для новых, так и для существующих игроков. В клубе 1xSlots промокоды предоставляют дополнительные бонусы пользователям. Кроме того, в клубе проводятся множество турниров с крупными призовыми фондами, в которых может принять участие любой зарегистрированный игрок.
1xSlots фриспины промокод: NEXT777. Размер приветственного поощрения составляет 100 фриспинов в автомате Eye of Storm от провайдера Pragmatic Play. Время на его активацию неограничено. Подарок выдается единожды, попытки повторного создания учетной записи для получения фриспинов приравниваются к мошенническим действиям. Альтернативным способом получения бонус-кодов является активное заключение пари в системе. Вращая барабаны игровых автоматов и зарабатывая баллы можно получить право на фриспины, благодаря промо. Список промокодов 1xslots доступен непосредственно на официальном сайте. Чтобы получить бездепозитный бонус код для 1хслотс в 2024 году, следует выполнить следующие условия:
1. Активировать бонусные средства в личном кабинете;
2. Пополнить счет на €15 (или эквивалент в другой валюте) и более, чтобы привязать банковскую карту или онлайн-кошелек;
3. Выполнить условия вейджера: x25. Для этого необходимо поставить из своих денег сумму, равную выигрышу с бесплатных вращений, умноженную в 25 раз. На отыгрыш дается 7 дней с момента, когда вы прокрутили фриспины.
Максимальная сумма вознаграждения составляет 1650 евро. Ее необходимо отыграть с вейджером 35 раз. Казино предлагает релоад-бонусы, которые также нужно отыграть 35 раз. Однако особое место среди множества игр, слотов и турниров на 1xSlots занимает лайв-казино. Это казино, где игра происходит в режиме реального времени. Настоящие дилеры раздают карты и крутят рулетку за игровыми столами. Все эти действия передаются по видеосвязи. Благодаря такой видеотрансляции каждый игрок может почувствовать все эмоции и азарт игры в интерактивной атмосфере с профессиональными дилерами.
При регистрации на 1xSlots используйте промокод “NEXT777” и получите бездепозитный бонус в размере €1650 + 200 фриспинов. Казино 1xSlots радует своих игроков различными бонусами, такими как промокоды, фриспины и бездепозитные бонусы. Особенно щедрые подарки от казино 1xSlots предназначены для новичков.
В дополнение к бонусной программе онлайн казино 1xSlots предлагает кешбэк до 11%, начисляемый от суммы проигранных средств. Кешбэк не имеет срока отыгрыша. Сидя дома перед компьютером, удается почувствовать атмосферу присутствия в настоящем казино. Именно этими причинами объясняется такая популярность и широкий спрос лайв-казино.
промокод 1xslots на сегодня бесплатно – Бонус по промокоду 1хСлотс увеличивается с €1500 + 150 фриспинов до €1650 + 200 фриспинов.
Промокод 1xSlots на Сегодня: NEXT777 предоставляет вам возможность получить €1500 +150 FS при регистрации с использованием бонусного кода. Теперь бонус по промокоду составляет €1650 + 200 фриспинов, что на €150 больше, чем раньше. Это отличная возможность получить еще больше выгоды от игры. Казино 1xSlots 2024 – это платформа для игровых автоматов и Турниров. В казино 1хСлотс доступны различные бонусы, такие как промокоды, фриспины и бездепозитные бонусы. Особенно крупные подарки в казино 1xSlots предназначены для новичков.
Выгодная бонусная программа на сайте 1xslots позволяет как новичкам, так и опытным игрокам получать разнообразные подарки. Кроме того, это отличная возможность увеличить свой выигрыш. В казино 1xslots бонусы за депозиты и подарки не требуют дополнительных вложений. Используя фриспины и промокоды, вы можете получить хорошие деньги. Давайте подробнее рассмотрим, какие бонусы предлагает онлайн казино.
После прохождения регистрации игроку предлагается бонус на первые четыре операции по пополнению счета:
на первый депозит – 100% от внесенных средств и 30 фриспинов;
на второй депозит – 50% от внесенных средств и 35 фриспинов;
на третий депозит – 25% от внесенных средств и 40 фриспинов;
на четвертый депозит – 25% от внесенных средств и 45 фриспинов.
Промокод, также известный как код приглашения, является ключом-активатором приветственной программы для новичков. Если вы ранее не имели опыта игры в 1xSlots, то вы можете рассчитывать на получение щедрого подарка при регистрации – пакета из 1650 евро и 200 бесплатных прокруток. Согласно правилам бонусной акции, размер поощрения зависит от суммы первых четырех взносов и распределяется следующим образом: на депозитный бонус установлен максимальный лимит в 1500 евро. Чтобы получить подарок, игроку достаточно пройти процедуру регистрации, заполнить анкетные данные в личном кабинете и внести на счет профиля сумму от 10 евро.
При регистрации клиент может использовать промокод 1xSlots и получить дополнительный подарок.
1xSlots давно занимает прочные позиции в списке лучших брендов гемблинг-индустрии. Политика компании 1x ориентирована на опытных игроков, здесь пользователей ожидает продуманная программа лояльности, а также гарантии безопасности личной информации и депозита. Все действия осуществляются на основании лицензии 8048/JAZ2016-083, полученной от компании Orakum N.V., Кюрасао.
Промокод 1хСлот 2024: NEXT777 предоставляет бездепозитный бонус в виде 150 вращений в игре «The Dog House Megaways». В онлайн казино 1xslots доступны бесплатные промокоды на фриспины. Кроме того, игроки могут получать бонусные вращения не только за регистрацию или использование промокода от 1xSlots. Участие в бонусных акциях также позволяет пользователям получить фриспины. Казино 1хSlots предлагает различные варианты депозитов и выплат. Новые игроки, которые регистрируются на 1хSlots, получают приветственный пакет бонусов, однако с использованием промокода от 1xSlots этот бонус может быть еще более значительным. Для активации бонуса необходимо применить актуальный промокод при регистрации.
Приветственный пакет от 1xSlot доступен сразу после регистрации и требует активации через создание депозита. Бонус предоставляет умножение для первых четырех депозитов и дополнительные бесплатные вращения. Минимальная сумма для первого депозита составляет 10 евро, а для последующих пополнений – 15 евро. Максимальная сумма бонуса – 1500 евро.
Также новичкам предоставляются бонусы на второй, третий и четвертый депозит. Для получения подарка необходимо внести сумму не менее 15 евро. Игрокам также предоставляются фриспины и депозитные подарки. Для начисления фриспинов требуется подтверждение номера телефона.
Для постоянных игроков онлайн-казино 1xSlots проводит бонусные акции. Некоторые из них имеют временный характер, а другие действуют постоянно. В основном, пользователям предлагаются депозитные бонусы. Например, можно получить презент за пополнение счета в понедельник. За десятый депозит игроку полагается крупный депозитный бонус в размере 50% от вносимой суммы и 100 фриспинов.
В клубе 1xSlots также действует программа лояльности, которая предполагает различные привилегии для игроков.
Игрокам, активно делающим ставки в течение недели и ушедшим в минус, казино 1xSlots предлагает фриспины. Для получения бонуса не требуется пополнение счета, лимит на максимальный выигрыш и вейджер не устанавливаются.
Ежедневно в казино 1хСлотс назначается слот дня. При совершении ставок на определенную сумму в этом игровом аппарате игроку начисляются фриспины. Обратите внимание https://optom-plus.ru/forum/art/promokod_1xslots.html, время действия акции ограничено.
Разработчиками 1хСлотс было разработано мобильное казино. Такая версия представляет собой упрощенный вариант компьютерного формата онлайн казино. Она позволяет играть в любимые игры на любом устройстве, поддерживающем функцию выхода в интернет. В качестве такого устройства может быть смартфон или планшет.
There are many popular live sex cam sites that cater to all different preferences and desires. Some of the most popular ones include Chaturbate, MyFreeCams, LiveJasmin, and Flirt4Free.
Chaturbate is known for its diverse selection of cam models, ranging from amateur performers to professional porn stars. It offers a unique “tip-based” system, where viewers can tip the performers for special requests or to show their appreciation.
MyFreeCams is a popular choice for those looking for a more personalized experience, as many of the models offer private shows for a fee. It also has a large community aspect, with forums and chat rooms for viewers to interact with each other and the models.
LiveJasmin is known for its high-quality video and audio, making it a top choice for viewers who value a visually stimulating experience. It also has a wide range of categories, allowing viewers to easily find the type of performer they are looking for.
Flirt4Free is a popular site for those looking for a more intimate and interactive experience. It offers a variety of features such as cam-to-cam shows and interactive sex toys, making it a favorite among viewers who enjoy a more immersive experience.
Overall, these live sex cam sites offer a diverse range of performers and features to cater to all types of desires and preferences. Their popularity shows that the demand for live sex cams continues to grow as people seek out new and exciting forms of sexual entertainment.
https://rentry.org/7nsgi5xu
https://www.hentai-foundry.com/user/savelij1983/profile
https://chyoa.com/user/lineta1966
https://ghost01231990.bandcamp.com/album/oops-i-must-be-dreaming
https://onedio.ru/profile/giltis-195-7
1xSlots Промокод (Бездепозитный Бонус 2024)
1xSlots промокод: NEXT777, при регистрации введите этот бонусный код, чтобы получить бонус для новых игроков в размере €1650 + 200 фриспинов. Чтобы получить этот бонус, вам нужно создать аккаунт и ввести специальный промокод казино 1хСлотс.
1xSlot Промокод
NEXT777
В казино 1xSlots 2024 доступны различные бонусы: бездепозитные при регистрации, промокоды, фриспины, кэшбэки и другие акции.
Промокод 1xSlots 2024: NEXT777 – введите код при регистрации в казино 1хСлот и получите приветственный бонус €1650 +200 фриспинов. Чтобы промокод 1xSlots на бездепозитный бонус сработал, необходимо указать рабочую комбинацию при регистрации и правильно заполнить форму анкеты. После завершения регистрации бездепозитный бонус будет доступен в личном кабинете. Рекомендуется не торопиться и сразу после создания аккаунта заполнить персональные данные. Важно указать требуемую информацию в полях, отмеченных звездочкой во вкладке “Профиль”, а также активировать контакты (номер телефона и e-mail).
Для новых клиентов промокод 1xSlots предоставляет уникальные возможности, позволяющие бесплатно опробовать один из представленных на платформе слотов. Чтобы получить бездепозитные фриспины, достаточно при регистрации указать промокод и выполнить простые условия акции, которые мы расскажем в данной статье. Игроки, желающие продолжить игру и сделать первый депозит, смогут получить щедрый приветственный бонус до €1500 и 150 бесплатных вращений.
Для получения бонуса на первый депозит необходимо пополнить счет на сумму не менее 10. Награда составляет 100% от суммы первого пополнения, но не может превышать 300. Если сумма пополнения превышает максимальный лимит, игрок получит свой депозит полностью, а также 300 в качестве бонуса. Для активации второго, третьего и четвертого этапов, сумма депозита должна быть не менее 15.
Кроме денежного вознаграждения, каждый этап сопровождается бесплатными прокрутками для игр компании:
– за первый депозит – 30 фриспинов для игры Book of Gold: Classic;
– за второй депозит – 35 фриспинов для игры в Legend of Cleopatra;
– за третий депозит – 40 фриспинов для игры в Solar Queen;
– за четвертый депозит – 45 фриспинов для игры в Imperial Fruits: 40 lines.
Казино 1xSlots предоставляет бонус поэтапно. Чтобы получить награду за второй и последующие депозиты, необходимо выполнить условия отыгрыша ранее полученных средств. Фриспины также начисляются поэтапно и зачисляются после выполнения условий отыгрыша.
Промокод для 1xСлотс: NEXT777. Получите бездепозитный приветственный пакет до €1650 +200 фриспинов. Компания 1xSlots предлагает своим клиентам ряд бонусных программ, самой популярной из которых является приветственный пакет с увеличением первого депозита и бесплатными вращениями. С использованием промокода вы можете получить до 1650 евро и 200 фриспинов. Одним из явных преимуществ 1xSlots является огромный выбор игр. Большую часть из доступных 10 тысяч развлечений занимают игровые автоматы. Пользователям предлагается более 100 различных провайдеров слотов.
Промокод не имеет срока действия. Любой пользователь, который создает аккаунт на сайте 1xSlots, может его активировать. Каждому игроку предоставляется только один бонус, поэтому промокод может быть использован только один раз. Чтобы воспользоваться промокодом, необходимо нажать на кнопку “Регистрация”, выбрать удобный способ создания аккаунта, указать все необходимые данные, подтвердить номер телефона или адрес электронной почты и ввести промокод. После этого можно завершить регистрацию, нажав на кнопку “Зарегистрироваться”.
1xSlots Промокод для Регистрации
Бонусы казино 1xSlots 2024 – Бездепозитные бонусы ? Коды на возврат средств ? VIP программа преданности ? Бесплатные фриспины.
Промокод 1xSlots при Регистрации: NEXT777 Получите эксклюзивный приветственный пакет до 1650 евро +150 фриспинов. Казино 1xSlots 2024 предлагает своим гостям не только широкий выбор игровых автоматов. На сайте казино регулярно проводятся бонусные акции, в рамках которых можно получить различные подарки, процент от депозита, фриспины и многое другое. При обычной регистрации есть ограничение по сумме – не более 1500 евро на первые четыре депозита. Первое пополнение – до 300 евро, второе – не более 350, третье – 400, четвертое – 450 евро. После ввода промокода лимит увеличивается до 1650 евро, а количество фриспинов возрастает с 150 до 200 вращений.
Получите бездепозитный бонус в размере 100 фриспинов в онлайн казино 1xSlots в 2024 году. Все активные бонус коды, промокоды и купоны от 1хСлотс (1xSlots) доступны как для новых, так и для существующих игроков. В клубе 1xSlots промокоды предоставляют дополнительные бонусы пользователям. Кроме того, в клубе проводятся множество турниров с крупными призовыми фондами, в которых может принять участие любой зарегистрированный игрок.
1xSlots фриспины промокод: NEXT777. Размер приветственного поощрения составляет 100 фриспинов в автомате Eye of Storm от провайдера Pragmatic Play. Время на его активацию неограничено. Подарок выдается единожды, попытки повторного создания учетной записи для получения фриспинов приравниваются к мошенническим действиям. Альтернативным способом получения бонус-кодов является активное заключение пари в системе. Вращая барабаны игровых автоматов и зарабатывая баллы можно получить право на фриспины, благодаря промо. Список промокодов 1xslots доступен непосредственно на официальном сайте. Чтобы получить бездепозитный бонус код для 1хслотс в 2024 году, следует выполнить следующие условия:
1. Активировать бонусные средства в личном кабинете;
2. Пополнить счет на €15 (или эквивалент в другой валюте) и более, чтобы привязать банковскую карту или онлайн-кошелек;
3. Выполнить условия вейджера: x25. Для этого необходимо поставить из своих денег сумму, равную выигрышу с бесплатных вращений, умноженную в 25 раз. На отыгрыш дается 7 дней с момента, когда вы прокрутили фриспины.
Максимальная сумма вознаграждения составляет 1650 евро. Ее необходимо отыграть с вейджером 35 раз. Казино предлагает релоад-бонусы, которые также нужно отыграть 35 раз. Однако особое место среди множества игр, слотов и турниров на 1xSlots занимает лайв-казино. Это казино, где игра происходит в режиме реального времени. Настоящие дилеры раздают карты и крутят рулетку за игровыми столами. Все эти действия передаются по видеосвязи. Благодаря такой видеотрансляции каждый игрок может почувствовать все эмоции и азарт игры в интерактивной атмосфере с профессиональными дилерами.
При регистрации на 1xSlots используйте промокод “NEXT777” и получите бездепозитный бонус в размере €1650 + 200 фриспинов. Казино 1xSlots радует своих игроков различными бонусами, такими как промокоды, фриспины и бездепозитные бонусы. Особенно щедрые подарки от казино 1xSlots предназначены для новичков.
В дополнение к бонусной программе онлайн казино 1xSlots предлагает кешбэк до 11%, начисляемый от суммы проигранных средств. Кешбэк не имеет срока отыгрыша. Сидя дома перед компьютером, удается почувствовать атмосферу присутствия в настоящем казино. Именно этими причинами объясняется такая популярность и широкий спрос лайв-казино.
1xslots промокод без отыгрыша – Бонус по промокоду 1хСлотс увеличивается с €1500 + 150 фриспинов до €1650 + 200 фриспинов.
Промокод 1xSlots на Сегодня: NEXT777 предоставляет вам возможность получить €1500 +150 FS при регистрации с использованием бонусного кода. Теперь бонус по промокоду составляет €1650 + 200 фриспинов, что на €150 больше, чем раньше. Это отличная возможность получить еще больше выгоды от игры. Казино 1xSlots 2024 – это платформа для игровых автоматов и Турниров. В казино 1хСлотс доступны различные бонусы, такие как промокоды, фриспины и бездепозитные бонусы. Особенно крупные подарки в казино 1xSlots предназначены для новичков.
Выгодная бонусная программа на сайте 1xslots позволяет как новичкам, так и опытным игрокам получать разнообразные подарки. Кроме того, это отличная возможность увеличить свой выигрыш. В казино 1xslots бонусы за депозиты и подарки не требуют дополнительных вложений. Используя фриспины и промокоды, вы можете получить хорошие деньги. Давайте подробнее рассмотрим, какие бонусы предлагает онлайн казино.
После прохождения регистрации игроку предлагается бонус на первые четыре операции по пополнению счета:
на первый депозит – 100% от внесенных средств и 30 фриспинов;
на второй депозит – 50% от внесенных средств и 35 фриспинов;
на третий депозит – 25% от внесенных средств и 40 фриспинов;
на четвертый депозит – 25% от внесенных средств и 45 фриспинов.
Промокод, также известный как код приглашения, является ключом-активатором приветственной программы для новичков. Если вы ранее не имели опыта игры в 1xSlots, то вы можете рассчитывать на получение щедрого подарка при регистрации – пакета из 1650 евро и 200 бесплатных прокруток. Согласно правилам бонусной акции, размер поощрения зависит от суммы первых четырех взносов и распределяется следующим образом: на депозитный бонус установлен максимальный лимит в 1500 евро. Чтобы получить подарок, игроку достаточно пройти процедуру регистрации, заполнить анкетные данные в личном кабинете и внести на счет профиля сумму от 10 евро.
При регистрации клиент может использовать промокод 1xSlots и получить дополнительный подарок.
1xSlots давно занимает прочные позиции в списке лучших брендов гемблинг-индустрии. Политика компании 1x ориентирована на опытных игроков, здесь пользователей ожидает продуманная программа лояльности, а также гарантии безопасности личной информации и депозита. Все действия осуществляются на основании лицензии 8048/JAZ2016-083, полученной от компании Orakum N.V., Кюрасао.
Промокод 1хСлот 2024: NEXT777 предоставляет бездепозитный бонус в виде 150 вращений в игре «The Dog House Megaways». В онлайн казино 1xslots доступны бесплатные промокоды на фриспины. Кроме того, игроки могут получать бонусные вращения не только за регистрацию или использование промокода от 1xSlots. Участие в бонусных акциях также позволяет пользователям получить фриспины. Казино 1хSlots предлагает различные варианты депозитов и выплат. Новые игроки, которые регистрируются на 1хSlots, получают приветственный пакет бонусов, однако с использованием промокода от 1xSlots этот бонус может быть еще более значительным. Для активации бонуса необходимо применить актуальный промокод при регистрации.
Приветственный пакет от 1xSlot доступен сразу после регистрации и требует активации через создание депозита. Бонус предоставляет умножение для первых четырех депозитов и дополнительные бесплатные вращения. Минимальная сумма для первого депозита составляет 10 евро, а для последующих пополнений – 15 евро. Максимальная сумма бонуса – 1500 евро.
Также новичкам предоставляются бонусы на второй, третий и четвертый депозит. Для получения подарка необходимо внести сумму не менее 15 евро. Игрокам также предоставляются фриспины и депозитные подарки. Для начисления фриспинов требуется подтверждение номера телефона.
Для постоянных игроков онлайн-казино 1xSlots проводит бонусные акции. Некоторые из них имеют временный характер, а другие действуют постоянно. В основном, пользователям предлагаются депозитные бонусы. Например, можно получить презент за пополнение счета в понедельник. За десятый депозит игроку полагается крупный депозитный бонус в размере 50% от вносимой суммы и 100 фриспинов.
В клубе 1xSlots также действует программа лояльности, которая предполагает различные привилегии для игроков.
Игрокам, активно делающим ставки в течение недели и ушедшим в минус, казино 1xSlots предлагает фриспины. Для получения бонуса не требуется пополнение счета, лимит на максимальный выигрыш и вейджер не устанавливаются.
Ежедневно в казино 1хСлотс назначается слот дня. При совершении ставок на определенную сумму в этом игровом аппарате игроку начисляются фриспины. Обратите внимание https://optom-plus.ru/forum/art/promokod_1xslots.html, время действия акции ограничено.
Разработчиками 1хСлотс было разработано мобильное казино. Такая версия представляет собой упрощенный вариант компьютерного формата онлайн казино. Она позволяет играть в любимые игры на любом устройстве, поддерживающем функцию выхода в интернет. В качестве такого устройства может быть смартфон или планшет.
canadian pharmacy service
Доброго всем дня!
Бывали ли у вас случаи, когда приходилось писать дипломную работу в крайне сжатые сроки? Это действительно требует большой ответственности и напряженного труда, но важно не унывать и продолжать активно участвовать в учебном процессе, как я и делаю.
Для тех, кто умеет эффективно находить и использовать информацию в интернете, это может существенно облегчить процесс согласования и написания дипломной работы. Больше не нужно тратить время на посещение библиотек или организацию встреч с научным руководителем. Здесь, на этом ресурсе, предоставлены надежные данные для заказа и написания дипломных и курсовых работ с гарантией качества и доставкой по всей России. Можете ознакомиться с предложениями на , это проверено!
http://www.jic-magic.com/question/%d0%ba%d1%83%d0%bf%d0%b8%d1%82%d1%8c-%d0%b4%d0%b8%d0%bf%d0%bb%d0%be%d0%bc-%d0%b2%d1%83%d0%b7%d0%b0-%d0%bf%d0%be%d0%ba%d1%83%d0%bf%d0%ba%d0%b0-%d0%b4%d0%b8%d0%bf%d0%bb%d0%be%d0%bc%d0%b0-%d0%b2-%d0%bc-2/
купить диплом Вуза
купить диплом бакалавра
купить диплом университета
купить диплом ссср
где купить диплом
Желаю всем нужных отметок!
1xSlots Промокод (Бездепозитный Бонус 2024)
1xSlots промокод: NEXT777, при регистрации введите этот бонусный код, чтобы получить бонус для новых игроков в размере €1650 + 200 фриспинов. Чтобы получить этот бонус, вам нужно создать аккаунт и ввести специальный промокод казино 1хСлотс.
1xSlot Промокод
NEXT777
В казино 1xSlots 2024 доступны различные бонусы: бездепозитные при регистрации, промокоды, фриспины, кэшбэки и другие акции.
Промокод 1xSlots 2024: NEXT777 – введите код при регистрации в казино 1хСлот и получите приветственный бонус €1650 +200 фриспинов. Чтобы промокод 1xSlots на бездепозитный бонус сработал, необходимо указать рабочую комбинацию при регистрации и правильно заполнить форму анкеты. После завершения регистрации бездепозитный бонус будет доступен в личном кабинете. Рекомендуется не торопиться и сразу после создания аккаунта заполнить персональные данные. Важно указать требуемую информацию в полях, отмеченных звездочкой во вкладке “Профиль”, а также активировать контакты (номер телефона и e-mail).
Для новых клиентов промокод 1xSlots предоставляет уникальные возможности, позволяющие бесплатно опробовать один из представленных на платформе слотов. Чтобы получить бездепозитные фриспины, достаточно при регистрации указать промокод и выполнить простые условия акции, которые мы расскажем в данной статье. Игроки, желающие продолжить игру и сделать первый депозит, смогут получить щедрый приветственный бонус до €1500 и 150 бесплатных вращений.
Для получения бонуса на первый депозит необходимо пополнить счет на сумму не менее 10. Награда составляет 100% от суммы первого пополнения, но не может превышать 300. Если сумма пополнения превышает максимальный лимит, игрок получит свой депозит полностью, а также 300 в качестве бонуса. Для активации второго, третьего и четвертого этапов, сумма депозита должна быть не менее 15.
Кроме денежного вознаграждения, каждый этап сопровождается бесплатными прокрутками для игр компании:
– за первый депозит – 30 фриспинов для игры Book of Gold: Classic;
– за второй депозит – 35 фриспинов для игры в Legend of Cleopatra;
– за третий депозит – 40 фриспинов для игры в Solar Queen;
– за четвертый депозит – 45 фриспинов для игры в Imperial Fruits: 40 lines.
Казино 1xSlots предоставляет бонус поэтапно. Чтобы получить награду за второй и последующие депозиты, необходимо выполнить условия отыгрыша ранее полученных средств. Фриспины также начисляются поэтапно и зачисляются после выполнения условий отыгрыша.
Промокод для 1xСлотс: NEXT777. Получите бездепозитный приветственный пакет до €1650 +200 фриспинов. Компания 1xSlots предлагает своим клиентам ряд бонусных программ, самой популярной из которых является приветственный пакет с увеличением первого депозита и бесплатными вращениями. С использованием промокода вы можете получить до 1650 евро и 200 фриспинов. Одним из явных преимуществ 1xSlots является огромный выбор игр. Большую часть из доступных 10 тысяч развлечений занимают игровые автоматы. Пользователям предлагается более 100 различных провайдеров слотов.
Промокод не имеет срока действия. Любой пользователь, который создает аккаунт на сайте 1xSlots, может его активировать. Каждому игроку предоставляется только один бонус, поэтому промокод может быть использован только один раз. Чтобы воспользоваться промокодом, необходимо нажать на кнопку “Регистрация”, выбрать удобный способ создания аккаунта, указать все необходимые данные, подтвердить номер телефона или адрес электронной почты и ввести промокод. После этого можно завершить регистрацию, нажав на кнопку “Зарегистрироваться”.
1xSlots Промокод для Регистрации
Бонусы казино 1xSlots 2024 – Бездепозитные бонусы ? Коды на возврат средств ? VIP программа преданности ? Бесплатные фриспины.
Промокод 1xSlots при Регистрации: NEXT777 Получите эксклюзивный приветственный пакет до 1650 евро +150 фриспинов. Казино 1xSlots 2024 предлагает своим гостям не только широкий выбор игровых автоматов. На сайте казино регулярно проводятся бонусные акции, в рамках которых можно получить различные подарки, процент от депозита, фриспины и многое другое. При обычной регистрации есть ограничение по сумме – не более 1500 евро на первые четыре депозита. Первое пополнение – до 300 евро, второе – не более 350, третье – 400, четвертое – 450 евро. После ввода промокода лимит увеличивается до 1650 евро, а количество фриспинов возрастает с 150 до 200 вращений.
Получите бездепозитный бонус в размере 100 фриспинов в онлайн казино 1xSlots в 2024 году. Все активные бонус коды, промокоды и купоны от 1хСлотс (1xSlots) доступны как для новых, так и для существующих игроков. В клубе 1xSlots промокоды предоставляют дополнительные бонусы пользователям. Кроме того, в клубе проводятся множество турниров с крупными призовыми фондами, в которых может принять участие любой зарегистрированный игрок.
1xSlots фриспины промокод: NEXT777. Размер приветственного поощрения составляет 100 фриспинов в автомате Eye of Storm от провайдера Pragmatic Play. Время на его активацию неограничено. Подарок выдается единожды, попытки повторного создания учетной записи для получения фриспинов приравниваются к мошенническим действиям. Альтернативным способом получения бонус-кодов является активное заключение пари в системе. Вращая барабаны игровых автоматов и зарабатывая баллы можно получить право на фриспины, благодаря промо. Список промокодов 1xslots доступен непосредственно на официальном сайте. Чтобы получить бездепозитный бонус код для 1хслотс в 2024 году, следует выполнить следующие условия:
1. Активировать бонусные средства в личном кабинете;
2. Пополнить счет на €15 (или эквивалент в другой валюте) и более, чтобы привязать банковскую карту или онлайн-кошелек;
3. Выполнить условия вейджера: x25. Для этого необходимо поставить из своих денег сумму, равную выигрышу с бесплатных вращений, умноженную в 25 раз. На отыгрыш дается 7 дней с момента, когда вы прокрутили фриспины.
Максимальная сумма вознаграждения составляет 1650 евро. Ее необходимо отыграть с вейджером 35 раз. Казино предлагает релоад-бонусы, которые также нужно отыграть 35 раз. Однако особое место среди множества игр, слотов и турниров на 1xSlots занимает лайв-казино. Это казино, где игра происходит в режиме реального времени. Настоящие дилеры раздают карты и крутят рулетку за игровыми столами. Все эти действия передаются по видеосвязи. Благодаря такой видеотрансляции каждый игрок может почувствовать все эмоции и азарт игры в интерактивной атмосфере с профессиональными дилерами.
При регистрации на 1xSlots используйте промокод “NEXT777” и получите бездепозитный бонус в размере €1650 + 200 фриспинов. Казино 1xSlots радует своих игроков различными бонусами, такими как промокоды, фриспины и бездепозитные бонусы. Особенно щедрые подарки от казино 1xSlots предназначены для новичков.
В дополнение к бонусной программе онлайн казино 1xSlots предлагает кешбэк до 11%, начисляемый от суммы проигранных средств. Кешбэк не имеет срока отыгрыша. Сидя дома перед компьютером, удается почувствовать атмосферу присутствия в настоящем казино. Именно этими причинами объясняется такая популярность и широкий спрос лайв-казино.
промокод на сегодня 1xslots без отыгрыша промокоды – Бонус по промокоду 1хСлотс увеличивается с €1500 + 150 фриспинов до €1650 + 200 фриспинов.
Промокод 1xSlots на Сегодня: NEXT777 предоставляет вам возможность получить €1500 +150 FS при регистрации с использованием бонусного кода. Теперь бонус по промокоду составляет €1650 + 200 фриспинов, что на €150 больше, чем раньше. Это отличная возможность получить еще больше выгоды от игры. Казино 1xSlots 2024 – это платформа для игровых автоматов и Турниров. В казино 1хСлотс доступны различные бонусы, такие как промокоды, фриспины и бездепозитные бонусы. Особенно крупные подарки в казино 1xSlots предназначены для новичков.
Выгодная бонусная программа на сайте 1xslots позволяет как новичкам, так и опытным игрокам получать разнообразные подарки. Кроме того, это отличная возможность увеличить свой выигрыш. В казино 1xslots бонусы за депозиты и подарки не требуют дополнительных вложений. Используя фриспины и промокоды, вы можете получить хорошие деньги. Давайте подробнее рассмотрим, какие бонусы предлагает онлайн казино.
После прохождения регистрации игроку предлагается бонус на первые четыре операции по пополнению счета:
на первый депозит – 100% от внесенных средств и 30 фриспинов;
на второй депозит – 50% от внесенных средств и 35 фриспинов;
на третий депозит – 25% от внесенных средств и 40 фриспинов;
на четвертый депозит – 25% от внесенных средств и 45 фриспинов.
Промокод, также известный как код приглашения, является ключом-активатором приветственной программы для новичков. Если вы ранее не имели опыта игры в 1xSlots, то вы можете рассчитывать на получение щедрого подарка при регистрации – пакета из 1650 евро и 200 бесплатных прокруток. Согласно правилам бонусной акции, размер поощрения зависит от суммы первых четырех взносов и распределяется следующим образом: на депозитный бонус установлен максимальный лимит в 1500 евро. Чтобы получить подарок, игроку достаточно пройти процедуру регистрации, заполнить анкетные данные в личном кабинете и внести на счет профиля сумму от 10 евро.
При регистрации клиент может использовать промокод 1xSlots и получить дополнительный подарок.
1xSlots давно занимает прочные позиции в списке лучших брендов гемблинг-индустрии. Политика компании 1x ориентирована на опытных игроков, здесь пользователей ожидает продуманная программа лояльности, а также гарантии безопасности личной информации и депозита. Все действия осуществляются на основании лицензии 8048/JAZ2016-083, полученной от компании Orakum N.V., Кюрасао.
Промокод 1хСлот 2024: NEXT777 предоставляет бездепозитный бонус в виде 150 вращений в игре «The Dog House Megaways». В онлайн казино 1xslots доступны бесплатные промокоды на фриспины. Кроме того, игроки могут получать бонусные вращения не только за регистрацию или использование промокода от 1xSlots. Участие в бонусных акциях также позволяет пользователям получить фриспины. Казино 1хSlots предлагает различные варианты депозитов и выплат. Новые игроки, которые регистрируются на 1хSlots, получают приветственный пакет бонусов, однако с использованием промокода от 1xSlots этот бонус может быть еще более значительным. Для активации бонуса необходимо применить актуальный промокод при регистрации.
Приветственный пакет от 1xSlot доступен сразу после регистрации и требует активации через создание депозита. Бонус предоставляет умножение для первых четырех депозитов и дополнительные бесплатные вращения. Минимальная сумма для первого депозита составляет 10 евро, а для последующих пополнений – 15 евро. Максимальная сумма бонуса – 1500 евро.
Также новичкам предоставляются бонусы на второй, третий и четвертый депозит. Для получения подарка необходимо внести сумму не менее 15 евро. Игрокам также предоставляются фриспины и депозитные подарки. Для начисления фриспинов требуется подтверждение номера телефона.
Для постоянных игроков онлайн-казино 1xSlots проводит бонусные акции. Некоторые из них имеют временный характер, а другие действуют постоянно. В основном, пользователям предлагаются депозитные бонусы. Например, можно получить презент за пополнение счета в понедельник. За десятый депозит игроку полагается крупный депозитный бонус в размере 50% от вносимой суммы и 100 фриспинов.
В клубе 1xSlots также действует программа лояльности, которая предполагает различные привилегии для игроков.
Игрокам, активно делающим ставки в течение недели и ушедшим в минус, казино 1xSlots предлагает фриспины. Для получения бонуса не требуется пополнение счета, лимит на максимальный выигрыш и вейджер не устанавливаются.
Ежедневно в казино 1хСлотс назначается слот дня. При совершении ставок на определенную сумму в этом игровом аппарате игроку начисляются фриспины. Обратите внимание https://optom-plus.ru/forum/art/promokod_1xslots.html, время действия акции ограничено.
Разработчиками 1хСлотс было разработано мобильное казино. Такая версия представляет собой упрощенный вариант компьютерного формата онлайн казино. Она позволяет играть в любимые игры на любом устройстве, поддерживающем функцию выхода в интернет. В качестве такого устройства может быть смартфон или планшет.
Гарантия качества
– Подбор и покупка крана-термостата для душа
купить нержавеющий купить нержавеющий .
https://www.alldatingwebsites.com/reviews/flirt.com/
https://www.datingsitesreviews.com/forum/viewtopic.php?showtopic=8185
https://beyondages.com/flirt-review/
https://www.alldatingwebsites.com/reviews/flirt.com/682-flirtcom–do-not-use.php
https://www.reddit.com/r/Scams/comments/meiute/flirtcom_is_a_scam/
https://justhookup.com/sites/flirt-review/
https://www.datingwise.com/review/flirt.com/
https://healthyframework.com/flirt-com-review/
Flirt.com is a scam
Hi all, got scammed by this website. Saw that there were a couple of post informing about this but just wanted to give more details
Paid for the three day offer and with the confirmation of the subscription, got two mails from hornycontacts.com and loveaholics.com asking me to confirm my email. Didn’t pay attention and deleted them.
I immediately canceled the subscription in flirt.com without any issue and on the last day it changed to a standard membership so since it was bs site, cancelled the account as well.
So I was happy and watching a movie when I got an sms from my card provider telling me that I got a 71.78 euros charge from fry frtlsp.com. Never heard of them, so I called my card provider and cancelled my card and will request the return of the money as well.
Then I realized that maybe these two websites also by some miracle signed me up to a paid subscription… so I logged in… had to recover the passwords because they were not the one I used in flirt.com… and surprise, loveaholics.com did signed me up for a paid subscription without me being aware (pretty sure that somewhere during the signing process in flirt there was something checked and didn’t pay attention.). So I had to cancel subscription and account in these two other sites.
So, sorry for the long post but in summary…. do not use flirt.com at all!!!
Yes, FLIRT.COM it is a scamming website. It sign you on multiple websites like askme4date.com . It bombard you with emails that you receive messages, and you need to pay to see them. After you pay you see the messages. All messages are from BOTS. No real person.
It’s subscribing to automatic renewal and it’s hard to cancel renewal. They push you to a complicated scheme. I’m not even sure the renewal canceling works. After
Быстрая доставка
– Кран для радиатора отопления: сравнение и покупка
шаровой кран купить шаровой кран купить .
Советы экспертов
– Кран-буксировщик для ванны: преимущества и покупка
цена на краны шаровые цена на краны шаровые .
Отзывы покупателей
– Подбор и покупка крана для душа
шаровые клапаны https://krany-sharovye-nerzhaveyushie-msk.ru/ .
If you’re doing the work yourself, allow more time
for each step.
– Купить кран смеситель для ванной
купить кран купить кран .
Доставка по всей России
– Кран для биде: широкий выбор и выгодные цены
кран купить кран купить .
I really like it when folks get together and share
thoughts. Great site, continue the good work!
1xSlots Промокод (Бездепозитный Бонус 2024)
1xSlots промокод: NEXT777, при регистрации введите этот бонусный код, чтобы получить бонус для новых игроков в размере €1650 + 200 фриспинов. Чтобы получить этот бонус, вам нужно создать аккаунт и ввести специальный промокод казино 1хСлотс.
1xSlot Промокод
NEXT777
В казино 1xSlots 2024 доступны различные бонусы: бездепозитные при регистрации, промокоды, фриспины, кэшбэки и другие акции.
Промокод 1xSlots 2024: NEXT777 – введите код при регистрации в казино 1хСлот и получите приветственный бонус €1650 +200 фриспинов. Чтобы промокод 1xSlots на бездепозитный бонус сработал, необходимо указать рабочую комбинацию при регистрации и правильно заполнить форму анкеты. После завершения регистрации бездепозитный бонус будет доступен в личном кабинете. Рекомендуется не торопиться и сразу после создания аккаунта заполнить персональные данные. Важно указать требуемую информацию в полях, отмеченных звездочкой во вкладке “Профиль”, а также активировать контакты (номер телефона и e-mail).
Для новых клиентов промокод 1xSlots предоставляет уникальные возможности, позволяющие бесплатно опробовать один из представленных на платформе слотов. Чтобы получить бездепозитные фриспины, достаточно при регистрации указать промокод и выполнить простые условия акции, которые мы расскажем в данной статье. Игроки, желающие продолжить игру и сделать первый депозит, смогут получить щедрый приветственный бонус до €1500 и 150 бесплатных вращений.
Для получения бонуса на первый депозит необходимо пополнить счет на сумму не менее 10. Награда составляет 100% от суммы первого пополнения, но не может превышать 300. Если сумма пополнения превышает максимальный лимит, игрок получит свой депозит полностью, а также 300 в качестве бонуса. Для активации второго, третьего и четвертого этапов, сумма депозита должна быть не менее 15.
Кроме денежного вознаграждения, каждый этап сопровождается бесплатными прокрутками для игр компании:
– за первый депозит – 30 фриспинов для игры Book of Gold: Classic;
– за второй депозит – 35 фриспинов для игры в Legend of Cleopatra;
– за третий депозит – 40 фриспинов для игры в Solar Queen;
– за четвертый депозит – 45 фриспинов для игры в Imperial Fruits: 40 lines.
Казино 1xSlots предоставляет бонус поэтапно. Чтобы получить награду за второй и последующие депозиты, необходимо выполнить условия отыгрыша ранее полученных средств. Фриспины также начисляются поэтапно и зачисляются после выполнения условий отыгрыша.
Промокод для 1xСлотс: NEXT777. Получите бездепозитный приветственный пакет до €1650 +200 фриспинов. Компания 1xSlots предлагает своим клиентам ряд бонусных программ, самой популярной из которых является приветственный пакет с увеличением первого депозита и бесплатными вращениями. С использованием промокода вы можете получить до 1650 евро и 200 фриспинов. Одним из явных преимуществ 1xSlots является огромный выбор игр. Большую часть из доступных 10 тысяч развлечений занимают игровые автоматы. Пользователям предлагается более 100 различных провайдеров слотов.
Промокод не имеет срока действия. Любой пользователь, который создает аккаунт на сайте 1xSlots, может его активировать. Каждому игроку предоставляется только один бонус, поэтому промокод может быть использован только один раз. Чтобы воспользоваться промокодом, необходимо нажать на кнопку “Регистрация”, выбрать удобный способ создания аккаунта, указать все необходимые данные, подтвердить номер телефона или адрес электронной почты и ввести промокод. После этого можно завершить регистрацию, нажав на кнопку “Зарегистрироваться”.
1xSlots Промокод для Регистрации
Бонусы казино 1xSlots 2024 – Бездепозитные бонусы ? Коды на возврат средств ? VIP программа преданности ? Бесплатные фриспины.
Промокод 1xSlots при Регистрации: NEXT777 Получите эксклюзивный приветственный пакет до 1650 евро +150 фриспинов. Казино 1xSlots 2024 предлагает своим гостям не только широкий выбор игровых автоматов. На сайте казино регулярно проводятся бонусные акции, в рамках которых можно получить различные подарки, процент от депозита, фриспины и многое другое. При обычной регистрации есть ограничение по сумме – не более 1500 евро на первые четыре депозита. Первое пополнение – до 300 евро, второе – не более 350, третье – 400, четвертое – 450 евро. После ввода промокода лимит увеличивается до 1650 евро, а количество фриспинов возрастает с 150 до 200 вращений.
Получите бездепозитный бонус в размере 100 фриспинов в онлайн казино 1xSlots в 2024 году. Все активные бонус коды, промокоды и купоны от 1хСлотс (1xSlots) доступны как для новых, так и для существующих игроков. В клубе 1xSlots промокоды предоставляют дополнительные бонусы пользователям. Кроме того, в клубе проводятся множество турниров с крупными призовыми фондами, в которых может принять участие любой зарегистрированный игрок.
1xSlots фриспины промокод: NEXT777. Размер приветственного поощрения составляет 100 фриспинов в автомате Eye of Storm от провайдера Pragmatic Play. Время на его активацию неограничено. Подарок выдается единожды, попытки повторного создания учетной записи для получения фриспинов приравниваются к мошенническим действиям. Альтернативным способом получения бонус-кодов является активное заключение пари в системе. Вращая барабаны игровых автоматов и зарабатывая баллы можно получить право на фриспины, благодаря промо. Список промокодов 1xslots доступен непосредственно на официальном сайте. Чтобы получить бездепозитный бонус код для 1хслотс в 2024 году, следует выполнить следующие условия:
1. Активировать бонусные средства в личном кабинете;
2. Пополнить счет на €15 (или эквивалент в другой валюте) и более, чтобы привязать банковскую карту или онлайн-кошелек;
3. Выполнить условия вейджера: x25. Для этого необходимо поставить из своих денег сумму, равную выигрышу с бесплатных вращений, умноженную в 25 раз. На отыгрыш дается 7 дней с момента, когда вы прокрутили фриспины.
Максимальная сумма вознаграждения составляет 1650 евро. Ее необходимо отыграть с вейджером 35 раз. Казино предлагает релоад-бонусы, которые также нужно отыграть 35 раз. Однако особое место среди множества игр, слотов и турниров на 1xSlots занимает лайв-казино. Это казино, где игра происходит в режиме реального времени. Настоящие дилеры раздают карты и крутят рулетку за игровыми столами. Все эти действия передаются по видеосвязи. Благодаря такой видеотрансляции каждый игрок может почувствовать все эмоции и азарт игры в интерактивной атмосфере с профессиональными дилерами.
При регистрации на 1xSlots используйте промокод “NEXT777” и получите бездепозитный бонус в размере €1650 + 200 фриспинов. Казино 1xSlots радует своих игроков различными бонусами, такими как промокоды, фриспины и бездепозитные бонусы. Особенно щедрые подарки от казино 1xSlots предназначены для новичков.
В дополнение к бонусной программе онлайн казино 1xSlots предлагает кешбэк до 11%, начисляемый от суммы проигранных средств. Кешбэк не имеет срока отыгрыша. Сидя дома перед компьютером, удается почувствовать атмосферу присутствия в настоящем казино. Именно этими причинами объясняется такая популярность и широкий спрос лайв-казино.
1xslots промокод бонус – Бонус по промокоду 1хСлотс увеличивается с €1500 + 150 фриспинов до €1650 + 200 фриспинов.
Промокод 1xSlots на Сегодня: NEXT777 предоставляет вам возможность получить €1500 +150 FS при регистрации с использованием бонусного кода. Теперь бонус по промокоду составляет €1650 + 200 фриспинов, что на €150 больше, чем раньше. Это отличная возможность получить еще больше выгоды от игры. Казино 1xSlots 2024 – это платформа для игровых автоматов и Турниров. В казино 1хСлотс доступны различные бонусы, такие как промокоды, фриспины и бездепозитные бонусы. Особенно крупные подарки в казино 1xSlots предназначены для новичков.
Выгодная бонусная программа на сайте 1xslots позволяет как новичкам, так и опытным игрокам получать разнообразные подарки. Кроме того, это отличная возможность увеличить свой выигрыш. В казино 1xslots бонусы за депозиты и подарки не требуют дополнительных вложений. Используя фриспины и промокоды, вы можете получить хорошие деньги. Давайте подробнее рассмотрим, какие бонусы предлагает онлайн казино.
После прохождения регистрации игроку предлагается бонус на первые четыре операции по пополнению счета:
на первый депозит – 100% от внесенных средств и 30 фриспинов;
на второй депозит – 50% от внесенных средств и 35 фриспинов;
на третий депозит – 25% от внесенных средств и 40 фриспинов;
на четвертый депозит – 25% от внесенных средств и 45 фриспинов.
Промокод, также известный как код приглашения, является ключом-активатором приветственной программы для новичков. Если вы ранее не имели опыта игры в 1xSlots, то вы можете рассчитывать на получение щедрого подарка при регистрации – пакета из 1650 евро и 200 бесплатных прокруток. Согласно правилам бонусной акции, размер поощрения зависит от суммы первых четырех взносов и распределяется следующим образом: на депозитный бонус установлен максимальный лимит в 1500 евро. Чтобы получить подарок, игроку достаточно пройти процедуру регистрации, заполнить анкетные данные в личном кабинете и внести на счет профиля сумму от 10 евро.
При регистрации клиент может использовать промокод 1xSlots и получить дополнительный подарок.
1xSlots давно занимает прочные позиции в списке лучших брендов гемблинг-индустрии. Политика компании 1x ориентирована на опытных игроков, здесь пользователей ожидает продуманная программа лояльности, а также гарантии безопасности личной информации и депозита. Все действия осуществляются на основании лицензии 8048/JAZ2016-083, полученной от компании Orakum N.V., Кюрасао.
Промокод 1хСлот 2024: NEXT777 предоставляет бездепозитный бонус в виде 150 вращений в игре «The Dog House Megaways». В онлайн казино 1xslots доступны бесплатные промокоды на фриспины. Кроме того, игроки могут получать бонусные вращения не только за регистрацию или использование промокода от 1xSlots. Участие в бонусных акциях также позволяет пользователям получить фриспины. Казино 1хSlots предлагает различные варианты депозитов и выплат. Новые игроки, которые регистрируются на 1хSlots, получают приветственный пакет бонусов, однако с использованием промокода от 1xSlots этот бонус может быть еще более значительным. Для активации бонуса необходимо применить актуальный промокод при регистрации.
Приветственный пакет от 1xSlot доступен сразу после регистрации и требует активации через создание депозита. Бонус предоставляет умножение для первых четырех депозитов и дополнительные бесплатные вращения. Минимальная сумма для первого депозита составляет 10 евро, а для последующих пополнений – 15 евро. Максимальная сумма бонуса – 1500 евро.
Также новичкам предоставляются бонусы на второй, третий и четвертый депозит. Для получения подарка необходимо внести сумму не менее 15 евро. Игрокам также предоставляются фриспины и депозитные подарки. Для начисления фриспинов требуется подтверждение номера телефона.
Для постоянных игроков онлайн-казино 1xSlots проводит бонусные акции. Некоторые из них имеют временный характер, а другие действуют постоянно. В основном, пользователям предлагаются депозитные бонусы. Например, можно получить презент за пополнение счета в понедельник. За десятый депозит игроку полагается крупный депозитный бонус в размере 50% от вносимой суммы и 100 фриспинов.
В клубе 1xSlots также действует программа лояльности, которая предполагает различные привилегии для игроков.
Игрокам, активно делающим ставки в течение недели и ушедшим в минус, казино 1xSlots предлагает фриспины. Для получения бонуса не требуется пополнение счета, лимит на максимальный выигрыш и вейджер не устанавливаются.
Ежедневно в казино 1хСлотс назначается слот дня. При совершении ставок на определенную сумму в этом игровом аппарате игроку начисляются фриспины. Обратите внимание https://optom-plus.ru/forum/art/promokod_1xslots.html, время действия акции ограничено.
Разработчиками 1хСлотс было разработано мобильное казино. Такая версия представляет собой упрощенный вариант компьютерного формата онлайн казино. Она позволяет играть в любимые игры на любом устройстве, поддерживающем функцию выхода в интернет. В качестве такого устройства может быть смартфон или планшет.
Качественное написание рефератов https://referatnovy.ru/, курсовых и дипломных работ от лучших авторов. Уникальные работы под ключ. Заказать студенческую работу за 2 дня.
synthroid for sale
Hello, all is going nicely here and ofcourse
every one is sharing facts, that’s in fact fine,
keep up writing.
Лучшие букмекеры в рейтинге
лучшая букмекерская онлайн официальные сайты букмекерских контор .
Hello there, I discovered your blog by the use of Google whilst looking for a related matter,
your site got here up, it seems good. I’ve bookmarked it in my google bookmarks.
Hi there, simply turned into alert to your weblog thru
Google, and found that it’s really informative.
I’m gonna watch out for brussels. I’ll be grateful if you happen to continue this in future.
Many other folks shall be benefited out of your writing.
Cheers!
Found an article that is worth reading – it’s really interesting! https://veo.rusff.me/viewtopic.php?id=4251#p16280
Лучшие букмекеры в рейтинге
букмекерская мобильная версия скачать [url=https://bukmeker-bk.ru/]ставка тв[/url] .
generic tadalafil without prescription
Мы рекомендуем посетить веб-сайт https://imgtube.ru/.
Кроме того, не забудьте добавить сайт в закладки: https://imgtube.ru/
Мы рекомендуем посетить веб-сайт https://svetnadegda.ru/.
Кроме того, не забудьте добавить сайт в закладки: https://svetnadegda.ru/
Доброго всем дня!
Бывало ли у вас такое, что приходилось писать дипломную работу в крайне сжатые сроки? Это действительно требует огромной ответственности и напряженных усилий, но важно не опускать руки и продолжать активно заниматься учебными процессами, как я.
Для тех, кто умеет быстро находить и анализировать информацию в сети, это действительно помогает в процессе согласования и написания дипломной работы. Больше не нужно тратить время на посещение библиотек или устраивать встречи с дипломным руководителем. Здесь, на этом ресурсе, предоставлены надежные данные для заказа и написания дипломных и курсовых работ с гарантией качества и доставкой по всей России. Можете ознакомиться с предложениями на сайте , это проверено!
http://bestworld.getbb.ru/viewtopic.php?f=8&t=1072
купить диплом о высшем образовании
купить диплом Гознак
купить аттестат
купить диплом бакалавра
купить диплом о среднем специальном
Желаю каждому отличных оценок!
Як використовувати тактичний рюкзак у місті
купити тактичний рюкзак [url=https://ryukzakivijskovibpjgl.kiev.ua/]https://ryukzakivijskovibpjgl.kiev.ua/[/url] .
Мы рекомендуем посетить веб-сайт https://tione.ru/.
Кроме того, не забудьте добавить сайт в закладки: https://tione.ru/
Рейтинг букмекера: как его оценить
рейтинг букмекеров букмекерский сайт беларусь .
Найліпший вибір для пригодницького духу
Збереження безпеки
тактичний військовий рюкзак https://ryukzakivijskovibpjgl.kiev.ua/ .
synthroid 50 mcg tablet
top 10 online pharmacy in india
buy viagra online
synthroid drug
Do you have a spam issue on this site; I also am a blogger,
and I was wanting to know your situation; many of us have developed some nice
procedures and we are looking to swap techniques with other folks, be sure to shoot me an e-mail
if interested.
synthroid 150 mcg coupon
1xSlots Промокод (Бездепозитный Бонус 2024)
1xSlots промокод: NEXT777, при регистрации введите этот бонусный код, чтобы получить бонус для новых игроков в размере €1650 + 200 фриспинов. Чтобы получить этот бонус, вам нужно создать аккаунт и ввести специальный промокод казино 1хСлотс.
1xSlot Промокод
NEXT777
В казино 1xSlots 2024 доступны различные бонусы: бездепозитные при регистрации, промокоды, фриспины, кэшбэки и другие акции.
Промокод 1xSlots 2024: NEXT777 – введите код при регистрации в казино 1хСлот и получите приветственный бонус €1650 +200 фриспинов. Чтобы промокод 1xSlots на бездепозитный бонус сработал, необходимо указать рабочую комбинацию при регистрации и правильно заполнить форму анкеты. После завершения регистрации бездепозитный бонус будет доступен в личном кабинете. Рекомендуется не торопиться и сразу после создания аккаунта заполнить персональные данные. Важно указать требуемую информацию в полях, отмеченных звездочкой во вкладке “Профиль”, а также активировать контакты (номер телефона и e-mail).
Для новых клиентов промокод 1xSlots предоставляет уникальные возможности, позволяющие бесплатно опробовать один из представленных на платформе слотов. Чтобы получить бездепозитные фриспины, достаточно при регистрации указать промокод и выполнить простые условия акции, которые мы расскажем в данной статье. Игроки, желающие продолжить игру и сделать первый депозит, смогут получить щедрый приветственный бонус до €1500 и 150 бесплатных вращений.
Для получения бонуса на первый депозит необходимо пополнить счет на сумму не менее 10. Награда составляет 100% от суммы первого пополнения, но не может превышать 300. Если сумма пополнения превышает максимальный лимит, игрок получит свой депозит полностью, а также 300 в качестве бонуса. Для активации второго, третьего и четвертого этапов, сумма депозита должна быть не менее 15.
Кроме денежного вознаграждения, каждый этап сопровождается бесплатными прокрутками для игр компании:
– за первый депозит – 30 фриспинов для игры Book of Gold: Classic;
– за второй депозит – 35 фриспинов для игры в Legend of Cleopatra;
– за третий депозит – 40 фриспинов для игры в Solar Queen;
– за четвертый депозит – 45 фриспинов для игры в Imperial Fruits: 40 lines.
Казино 1xSlots предоставляет бонус поэтапно. Чтобы получить награду за второй и последующие депозиты, необходимо выполнить условия отыгрыша ранее полученных средств. Фриспины также начисляются поэтапно и зачисляются после выполнения условий отыгрыша.
Промокод для 1xСлотс: NEXT777. Получите бездепозитный приветственный пакет до €1650 +200 фриспинов. Компания 1xSlots предлагает своим клиентам ряд бонусных программ, самой популярной из которых является приветственный пакет с увеличением первого депозита и бесплатными вращениями. С использованием промокода вы можете получить до 1650 евро и 200 фриспинов. Одним из явных преимуществ 1xSlots является огромный выбор игр. Большую часть из доступных 10 тысяч развлечений занимают игровые автоматы. Пользователям предлагается более 100 различных провайдеров слотов.
Промокод не имеет срока действия. Любой пользователь, который создает аккаунт на сайте 1xSlots, может его активировать. Каждому игроку предоставляется только один бонус, поэтому промокод может быть использован только один раз. Чтобы воспользоваться промокодом, необходимо нажать на кнопку “Регистрация”, выбрать удобный способ создания аккаунта, указать все необходимые данные, подтвердить номер телефона или адрес электронной почты и ввести промокод. После этого можно завершить регистрацию, нажав на кнопку “Зарегистрироваться”.
1xSlots Промокод для Регистрации
Бонусы казино 1xSlots 2024 – Бездепозитные бонусы ? Коды на возврат средств ? VIP программа преданности ? Бесплатные фриспины.
Промокод 1xSlots при Регистрации: NEXT777 Получите эксклюзивный приветственный пакет до 1650 евро +150 фриспинов. Казино 1xSlots 2024 предлагает своим гостям не только широкий выбор игровых автоматов. На сайте казино регулярно проводятся бонусные акции, в рамках которых можно получить различные подарки, процент от депозита, фриспины и многое другое. При обычной регистрации есть ограничение по сумме – не более 1500 евро на первые четыре депозита. Первое пополнение – до 300 евро, второе – не более 350, третье – 400, четвертое – 450 евро. После ввода промокода лимит увеличивается до 1650 евро, а количество фриспинов возрастает с 150 до 200 вращений.
Получите бездепозитный бонус в размере 100 фриспинов в онлайн казино 1xSlots в 2024 году. Все активные бонус коды, промокоды и купоны от 1хСлотс (1xSlots) доступны как для новых, так и для существующих игроков. В клубе 1xSlots промокоды предоставляют дополнительные бонусы пользователям. Кроме того, в клубе проводятся множество турниров с крупными призовыми фондами, в которых может принять участие любой зарегистрированный игрок.
1xSlots фриспины промокод: NEXT777. Размер приветственного поощрения составляет 100 фриспинов в автомате Eye of Storm от провайдера Pragmatic Play. Время на его активацию неограничено. Подарок выдается единожды, попытки повторного создания учетной записи для получения фриспинов приравниваются к мошенническим действиям. Альтернативным способом получения бонус-кодов является активное заключение пари в системе. Вращая барабаны игровых автоматов и зарабатывая баллы можно получить право на фриспины, благодаря промо. Список промокодов 1xslots доступен непосредственно на официальном сайте. Чтобы получить бездепозитный бонус код для 1хслотс в 2024 году, следует выполнить следующие условия:
1. Активировать бонусные средства в личном кабинете;
2. Пополнить счет на €15 (или эквивалент в другой валюте) и более, чтобы привязать банковскую карту или онлайн-кошелек;
3. Выполнить условия вейджера: x25. Для этого необходимо поставить из своих денег сумму, равную выигрышу с бесплатных вращений, умноженную в 25 раз. На отыгрыш дается 7 дней с момента, когда вы прокрутили фриспины.
Максимальная сумма вознаграждения составляет 1650 евро. Ее необходимо отыграть с вейджером 35 раз. Казино предлагает релоад-бонусы, которые также нужно отыграть 35 раз. Однако особое место среди множества игр, слотов и турниров на 1xSlots занимает лайв-казино. Это казино, где игра происходит в режиме реального времени. Настоящие дилеры раздают карты и крутят рулетку за игровыми столами. Все эти действия передаются по видеосвязи. Благодаря такой видеотрансляции каждый игрок может почувствовать все эмоции и азарт игры в интерактивной атмосфере с профессиональными дилерами.
При регистрации на 1xSlots используйте промокод “NEXT777” и получите бездепозитный бонус в размере €1650 + 200 фриспинов. Казино 1xSlots радует своих игроков различными бонусами, такими как промокоды, фриспины и бездепозитные бонусы. Особенно щедрые подарки от казино 1xSlots предназначены для новичков.
В дополнение к бонусной программе онлайн казино 1xSlots предлагает кешбэк до 11%, начисляемый от суммы проигранных средств. Кешбэк не имеет срока отыгрыша. Сидя дома перед компьютером, удается почувствовать атмосферу присутствия в настоящем казино. Именно этими причинами объясняется такая популярность и широкий спрос лайв-казино.
промокод 1xslots сегодня без вейджера – Бонус по промокоду 1хСлотс увеличивается с €1500 + 150 фриспинов до €1650 + 200 фриспинов.
Промокод 1xSlots на Сегодня: NEXT777 предоставляет вам возможность получить €1500 +150 FS при регистрации с использованием бонусного кода. Теперь бонус по промокоду составляет €1650 + 200 фриспинов, что на €150 больше, чем раньше. Это отличная возможность получить еще больше выгоды от игры. Казино 1xSlots 2024 – это платформа для игровых автоматов и Турниров. В казино 1хСлотс доступны различные бонусы, такие как промокоды, фриспины и бездепозитные бонусы. Особенно крупные подарки в казино 1xSlots предназначены для новичков.
Выгодная бонусная программа на сайте 1xslots позволяет как новичкам, так и опытным игрокам получать разнообразные подарки. Кроме того, это отличная возможность увеличить свой выигрыш. В казино 1xslots бонусы за депозиты и подарки не требуют дополнительных вложений. Используя фриспины и промокоды, вы можете получить хорошие деньги. Давайте подробнее рассмотрим, какие бонусы предлагает онлайн казино.
После прохождения регистрации игроку предлагается бонус на первые четыре операции по пополнению счета:
на первый депозит – 100% от внесенных средств и 30 фриспинов;
на второй депозит – 50% от внесенных средств и 35 фриспинов;
на третий депозит – 25% от внесенных средств и 40 фриспинов;
на четвертый депозит – 25% от внесенных средств и 45 фриспинов.
Промокод, также известный как код приглашения, является ключом-активатором приветственной программы для новичков. Если вы ранее не имели опыта игры в 1xSlots, то вы можете рассчитывать на получение щедрого подарка при регистрации – пакета из 1650 евро и 200 бесплатных прокруток. Согласно правилам бонусной акции, размер поощрения зависит от суммы первых четырех взносов и распределяется следующим образом: на депозитный бонус установлен максимальный лимит в 1500 евро. Чтобы получить подарок, игроку достаточно пройти процедуру регистрации, заполнить анкетные данные в личном кабинете и внести на счет профиля сумму от 10 евро.
При регистрации клиент может использовать промокод 1xSlots и получить дополнительный подарок.
1xSlots давно занимает прочные позиции в списке лучших брендов гемблинг-индустрии. Политика компании 1x ориентирована на опытных игроков, здесь пользователей ожидает продуманная программа лояльности, а также гарантии безопасности личной информации и депозита. Все действия осуществляются на основании лицензии 8048/JAZ2016-083, полученной от компании Orakum N.V., Кюрасао.
Промокод 1хСлот 2024: NEXT777 предоставляет бездепозитный бонус в виде 150 вращений в игре «The Dog House Megaways». В онлайн казино 1xslots доступны бесплатные промокоды на фриспины. Кроме того, игроки могут получать бонусные вращения не только за регистрацию или использование промокода от 1xSlots. Участие в бонусных акциях также позволяет пользователям получить фриспины. Казино 1хSlots предлагает различные варианты депозитов и выплат. Новые игроки, которые регистрируются на 1хSlots, получают приветственный пакет бонусов, однако с использованием промокода от 1xSlots этот бонус может быть еще более значительным. Для активации бонуса необходимо применить актуальный промокод при регистрации.
Приветственный пакет от 1xSlot доступен сразу после регистрации и требует активации через создание депозита. Бонус предоставляет умножение для первых четырех депозитов и дополнительные бесплатные вращения. Минимальная сумма для первого депозита составляет 10 евро, а для последующих пополнений – 15 евро. Максимальная сумма бонуса – 1500 евро.
Также новичкам предоставляются бонусы на второй, третий и четвертый депозит. Для получения подарка необходимо внести сумму не менее 15 евро. Игрокам также предоставляются фриспины и депозитные подарки. Для начисления фриспинов требуется подтверждение номера телефона.
Для постоянных игроков онлайн-казино 1xSlots проводит бонусные акции. Некоторые из них имеют временный характер, а другие действуют постоянно. В основном, пользователям предлагаются депозитные бонусы. Например, можно получить презент за пополнение счета в понедельник. За десятый депозит игроку полагается крупный депозитный бонус в размере 50% от вносимой суммы и 100 фриспинов.
В клубе 1xSlots также действует программа лояльности, которая предполагает различные привилегии для игроков.
Игрокам, активно делающим ставки в течение недели и ушедшим в минус, казино 1xSlots предлагает фриспины. Для получения бонуса не требуется пополнение счета, лимит на максимальный выигрыш и вейджер не устанавливаются.
Ежедневно в казино 1хСлотс назначается слот дня. При совершении ставок на определенную сумму в этом игровом аппарате игроку начисляются фриспины. Обратите внимание https://mednavi.ru/wp-content/pgs/1xslots_promokod_bonus_na_depozit.html, время действия акции ограничено.
Разработчиками 1хСлотс было разработано мобильное казино. Такая версия представляет собой упрощенный вариант компьютерного формата онлайн казино. Она позволяет играть в любимые игры на любом устройстве, поддерживающем функцию выхода в интернет. В качестве такого устройства может быть смартфон или планшет.
1xSlots Промокод (Бездепозитный Бонус 2024)
1xSlots промокод: NEXT777, при регистрации введите этот бонусный код, чтобы получить бонус для новых игроков в размере €1650 + 200 фриспинов. Чтобы получить этот бонус, вам нужно создать аккаунт и ввести специальный промокод казино 1хСлотс.
1xSlot Промокод
NEXT777
В казино 1xSlots 2024 доступны различные бонусы: бездепозитные при регистрации, промокоды, фриспины, кэшбэки и другие акции.
Промокод 1xSlots 2024: NEXT777 – введите код при регистрации в казино 1хСлот и получите приветственный бонус €1650 +200 фриспинов. Чтобы промокод 1xSlots на бездепозитный бонус сработал, необходимо указать рабочую комбинацию при регистрации и правильно заполнить форму анкеты. После завершения регистрации бездепозитный бонус будет доступен в личном кабинете. Рекомендуется не торопиться и сразу после создания аккаунта заполнить персональные данные. Важно указать требуемую информацию в полях, отмеченных звездочкой во вкладке “Профиль”, а также активировать контакты (номер телефона и e-mail).
Для новых клиентов промокод 1xSlots предоставляет уникальные возможности, позволяющие бесплатно опробовать один из представленных на платформе слотов. Чтобы получить бездепозитные фриспины, достаточно при регистрации указать промокод и выполнить простые условия акции, которые мы расскажем в данной статье. Игроки, желающие продолжить игру и сделать первый депозит, смогут получить щедрый приветственный бонус до €1500 и 150 бесплатных вращений.
Для получения бонуса на первый депозит необходимо пополнить счет на сумму не менее 10. Награда составляет 100% от суммы первого пополнения, но не может превышать 300. Если сумма пополнения превышает максимальный лимит, игрок получит свой депозит полностью, а также 300 в качестве бонуса. Для активации второго, третьего и четвертого этапов, сумма депозита должна быть не менее 15.
Кроме денежного вознаграждения, каждый этап сопровождается бесплатными прокрутками для игр компании:
– за первый депозит – 30 фриспинов для игры Book of Gold: Classic;
– за второй депозит – 35 фриспинов для игры в Legend of Cleopatra;
– за третий депозит – 40 фриспинов для игры в Solar Queen;
– за четвертый депозит – 45 фриспинов для игры в Imperial Fruits: 40 lines.
Казино 1xSlots предоставляет бонус поэтапно. Чтобы получить награду за второй и последующие депозиты, необходимо выполнить условия отыгрыша ранее полученных средств. Фриспины также начисляются поэтапно и зачисляются после выполнения условий отыгрыша.
Промокод для 1xСлотс: NEXT777. Получите бездепозитный приветственный пакет до €1650 +200 фриспинов. Компания 1xSlots предлагает своим клиентам ряд бонусных программ, самой популярной из которых является приветственный пакет с увеличением первого депозита и бесплатными вращениями. С использованием промокода вы можете получить до 1650 евро и 200 фриспинов. Одним из явных преимуществ 1xSlots является огромный выбор игр. Большую часть из доступных 10 тысяч развлечений занимают игровые автоматы. Пользователям предлагается более 100 различных провайдеров слотов.
Промокод не имеет срока действия. Любой пользователь, который создает аккаунт на сайте 1xSlots, может его активировать. Каждому игроку предоставляется только один бонус, поэтому промокод может быть использован только один раз. Чтобы воспользоваться промокодом, необходимо нажать на кнопку “Регистрация”, выбрать удобный способ создания аккаунта, указать все необходимые данные, подтвердить номер телефона или адрес электронной почты и ввести промокод. После этого можно завершить регистрацию, нажав на кнопку “Зарегистрироваться”.
1xSlots Промокод для Регистрации
Бонусы казино 1xSlots 2024 – Бездепозитные бонусы ? Коды на возврат средств ? VIP программа преданности ? Бесплатные фриспины.
Промокод 1xSlots при Регистрации: NEXT777 Получите эксклюзивный приветственный пакет до 1650 евро +150 фриспинов. Казино 1xSlots 2024 предлагает своим гостям не только широкий выбор игровых автоматов. На сайте казино регулярно проводятся бонусные акции, в рамках которых можно получить различные подарки, процент от депозита, фриспины и многое другое. При обычной регистрации есть ограничение по сумме – не более 1500 евро на первые четыре депозита. Первое пополнение – до 300 евро, второе – не более 350, третье – 400, четвертое – 450 евро. После ввода промокода лимит увеличивается до 1650 евро, а количество фриспинов возрастает с 150 до 200 вращений.
Получите бездепозитный бонус в размере 100 фриспинов в онлайн казино 1xSlots в 2024 году. Все активные бонус коды, промокоды и купоны от 1хСлотс (1xSlots) доступны как для новых, так и для существующих игроков. В клубе 1xSlots промокоды предоставляют дополнительные бонусы пользователям. Кроме того, в клубе проводятся множество турниров с крупными призовыми фондами, в которых может принять участие любой зарегистрированный игрок.
1xSlots фриспины промокод: NEXT777. Размер приветственного поощрения составляет 100 фриспинов в автомате Eye of Storm от провайдера Pragmatic Play. Время на его активацию неограничено. Подарок выдается единожды, попытки повторного создания учетной записи для получения фриспинов приравниваются к мошенническим действиям. Альтернативным способом получения бонус-кодов является активное заключение пари в системе. Вращая барабаны игровых автоматов и зарабатывая баллы можно получить право на фриспины, благодаря промо. Список промокодов 1xslots доступен непосредственно на официальном сайте. Чтобы получить бездепозитный бонус код для 1хслотс в 2024 году, следует выполнить следующие условия:
1. Активировать бонусные средства в личном кабинете;
2. Пополнить счет на €15 (или эквивалент в другой валюте) и более, чтобы привязать банковскую карту или онлайн-кошелек;
3. Выполнить условия вейджера: x25. Для этого необходимо поставить из своих денег сумму, равную выигрышу с бесплатных вращений, умноженную в 25 раз. На отыгрыш дается 7 дней с момента, когда вы прокрутили фриспины.
Максимальная сумма вознаграждения составляет 1650 евро. Ее необходимо отыграть с вейджером 35 раз. Казино предлагает релоад-бонусы, которые также нужно отыграть 35 раз. Однако особое место среди множества игр, слотов и турниров на 1xSlots занимает лайв-казино. Это казино, где игра происходит в режиме реального времени. Настоящие дилеры раздают карты и крутят рулетку за игровыми столами. Все эти действия передаются по видеосвязи. Благодаря такой видеотрансляции каждый игрок может почувствовать все эмоции и азарт игры в интерактивной атмосфере с профессиональными дилерами.
При регистрации на 1xSlots используйте промокод “NEXT777” и получите бездепозитный бонус в размере €1650 + 200 фриспинов. Казино 1xSlots радует своих игроков различными бонусами, такими как промокоды, фриспины и бездепозитные бонусы. Особенно щедрые подарки от казино 1xSlots предназначены для новичков.
В дополнение к бонусной программе онлайн казино 1xSlots предлагает кешбэк до 11%, начисляемый от суммы проигранных средств. Кешбэк не имеет срока отыгрыша. Сидя дома перед компьютером, удается почувствовать атмосферу присутствия в настоящем казино. Именно этими причинами объясняется такая популярность и широкий спрос лайв-казино.
промокод 1xslots без отыгрыша бездепозитный – Бонус по промокоду 1хСлотс увеличивается с €1500 + 150 фриспинов до €1650 + 200 фриспинов.
Промокод 1xSlots на Сегодня: NEXT777 предоставляет вам возможность получить €1500 +150 FS при регистрации с использованием бонусного кода. Теперь бонус по промокоду составляет €1650 + 200 фриспинов, что на €150 больше, чем раньше. Это отличная возможность получить еще больше выгоды от игры. Казино 1xSlots 2024 – это платформа для игровых автоматов и Турниров. В казино 1хСлотс доступны различные бонусы, такие как промокоды, фриспины и бездепозитные бонусы. Особенно крупные подарки в казино 1xSlots предназначены для новичков.
Выгодная бонусная программа на сайте 1xslots позволяет как новичкам, так и опытным игрокам получать разнообразные подарки. Кроме того, это отличная возможность увеличить свой выигрыш. В казино 1xslots бонусы за депозиты и подарки не требуют дополнительных вложений. Используя фриспины и промокоды, вы можете получить хорошие деньги. Давайте подробнее рассмотрим, какие бонусы предлагает онлайн казино.
После прохождения регистрации игроку предлагается бонус на первые четыре операции по пополнению счета:
на первый депозит – 100% от внесенных средств и 30 фриспинов;
на второй депозит – 50% от внесенных средств и 35 фриспинов;
на третий депозит – 25% от внесенных средств и 40 фриспинов;
на четвертый депозит – 25% от внесенных средств и 45 фриспинов.
Промокод, также известный как код приглашения, является ключом-активатором приветственной программы для новичков. Если вы ранее не имели опыта игры в 1xSlots, то вы можете рассчитывать на получение щедрого подарка при регистрации – пакета из 1650 евро и 200 бесплатных прокруток. Согласно правилам бонусной акции, размер поощрения зависит от суммы первых четырех взносов и распределяется следующим образом: на депозитный бонус установлен максимальный лимит в 1500 евро. Чтобы получить подарок, игроку достаточно пройти процедуру регистрации, заполнить анкетные данные в личном кабинете и внести на счет профиля сумму от 10 евро.
При регистрации клиент может использовать промокод 1xSlots и получить дополнительный подарок.
1xSlots давно занимает прочные позиции в списке лучших брендов гемблинг-индустрии. Политика компании 1x ориентирована на опытных игроков, здесь пользователей ожидает продуманная программа лояльности, а также гарантии безопасности личной информации и депозита. Все действия осуществляются на основании лицензии 8048/JAZ2016-083, полученной от компании Orakum N.V., Кюрасао.
Промокод 1хСлот 2024: NEXT777 предоставляет бездепозитный бонус в виде 150 вращений в игре «The Dog House Megaways». В онлайн казино 1xslots доступны бесплатные промокоды на фриспины. Кроме того, игроки могут получать бонусные вращения не только за регистрацию или использование промокода от 1xSlots. Участие в бонусных акциях также позволяет пользователям получить фриспины. Казино 1хSlots предлагает различные варианты депозитов и выплат. Новые игроки, которые регистрируются на 1хSlots, получают приветственный пакет бонусов, однако с использованием промокода от 1xSlots этот бонус может быть еще более значительным. Для активации бонуса необходимо применить актуальный промокод при регистрации.
Приветственный пакет от 1xSlot доступен сразу после регистрации и требует активации через создание депозита. Бонус предоставляет умножение для первых четырех депозитов и дополнительные бесплатные вращения. Минимальная сумма для первого депозита составляет 10 евро, а для последующих пополнений – 15 евро. Максимальная сумма бонуса – 1500 евро.
Также новичкам предоставляются бонусы на второй, третий и четвертый депозит. Для получения подарка необходимо внести сумму не менее 15 евро. Игрокам также предоставляются фриспины и депозитные подарки. Для начисления фриспинов требуется подтверждение номера телефона.
Для постоянных игроков онлайн-казино 1xSlots проводит бонусные акции. Некоторые из них имеют временный характер, а другие действуют постоянно. В основном, пользователям предлагаются депозитные бонусы. Например, можно получить презент за пополнение счета в понедельник. За десятый депозит игроку полагается крупный депозитный бонус в размере 50% от вносимой суммы и 100 фриспинов.
В клубе 1xSlots также действует программа лояльности, которая предполагает различные привилегии для игроков.
Игрокам, активно делающим ставки в течение недели и ушедшим в минус, казино 1xSlots предлагает фриспины. Для получения бонуса не требуется пополнение счета, лимит на максимальный выигрыш и вейджер не устанавливаются.
Ежедневно в казино 1хСлотс назначается слот дня. При совершении ставок на определенную сумму в этом игровом аппарате игроку начисляются фриспины. Обратите внимание https://ubiznes.ru/wp-content/pgs/1xslots_promokod_bonus_na_depozit.html, время действия акции ограничено.
Разработчиками 1хСлотс было разработано мобильное казино. Такая версия представляет собой упрощенный вариант компьютерного формата онлайн казино. Она позволяет играть в любимые игры на любом устройстве, поддерживающем функцию выхода в интернет. В качестве такого устройства может быть смартфон или планшет.
Купить аттестат о среднем образовании – ключ для твоему перспективам. На данном портале вы сможете легко и оперативно заказать свидетельство, необходимый для того, чтобы последующего обучения или трудоустройства. Наши консультанты гарантируют качество и секретность услуги. Покупайте образовательный сертификат здесь и откройте дополнительные возможности для того, чтобы своего карьерного развития и карьеры.
Бесплатные промокоды. Давайте сразу начну с того, что перечислю несколько актуальных Промокодов 1xbet на сегодня. Смело вводите промокод в соответствующее поле и получайте прикольные «плюшки» в подарок от щедрого букмекера! Букмекерская контора 1xbet отличается от конкурентов наличием широкой программы лояльности. Важной ее частью является предоставление клиентам бонусов при вводе промокода. промокод для 1 x bet. В системе действует программа приветственных бонусов, благодаря которой каждый новичок получает определённую сумму за регистрацию на сайте. Такие акции действуют для казино и букмекерской конторы. Чтобы принять участие в приветственной программе, достаточно активировать при регистрации любой рабочий промокод – более подробно в этом материале http://arendaman.ru/wp-content/languages/ru_RU/1xbet.html
http://www.newrancho.ru/2014/01/blog-post.html
http://www.bort080.ru/2012/03/biografiya-psnahimova.html
http://teplostar72.ru/index.php?subaction=userinfo&user=uloha
http://www.ifreemax.ru/2015/06/forum-madrid-startup-weekend-2015.html
http://fond.uni-altai.ru/index.php?subaction=userinfo&user=asiwury
Аттестат купить окончание – путь к вашему перспективам. В данном сервисе вы можете просто и оперативно приобрести свидетельство, необходимый для того, чтобы последующего изучения или профессионального роста. Наша консультанты обеспечивают качество и конфиденциальность предоставления услуг. Покупайте школьный сертификат здесь и проявите дополнительные перспективы для своего карьерного развития и карьеры.
Промокод при регистрации 1xbet на 32500 рублей. Данный промокод 1хбет нужно ввести при регистрации в соответствующее поле. 1Xbet промокод при регистрации можно использовать только 1н раз в рамках одной учетной записи, но вы можете делиться им со своими друзьями. В 1xБет регистрация по номеру телефона является бесплатным и вторым по простоте способом создать личный аккаунт. Данный способ предусматривает наличие мобильного устройства, а также активной сим-карты, чтобы пользователь мог получить сообщение, в котором его будут ждать данные для входа. После того, как данные будут получены, останется ввести логин с паролем в соответствующие поля. Воспользуйся рабочий промокод 1xbet, получи бесплатную возможность увеличить свой первый депозит до 32500 рублей в БК 1xBet. Промокоды 1xBET актуальные сегодня. На игровой платформе БК «1xbet» функционирует бонусная программа, способствующая привлечению новых игроков и мотивации делать больше ставок для зарегистрированных пользователей. Бонусная программа содержит множество различных бонусов, которые каппер может активировать при помощи специальных промокодов. 130% бонус от первого депозита на ставки. Получай бонус до 130%, но не превышающий 32500 рублей на ставки от 1xbet. Переходим на сайт букмекера – более подробно в этом материале http://wwood.ru/language/pages/?ingalyacii_pri_beremennosti_polyza_ili_vred.html
buy tadalafil 20mg india
Wow, superb blog format! How long have you been blogging for?
you make running a blog glance easy. The whole glance of your web site is excellent, let
alone the content material! You can read similar here
prev next and it’s was wrote by Shauna74.
legit online pharmacy
Як підібрати тактичний рюкзак для активного відпочинку
Екстремальні подорожі
тактичні рюкзаки купити тактичні рюкзаки купити .
http://vipblinds.ru/index.php?subaction=userinfo&user=elosuc
http://rogerfilms.com/index.php?title=rudiplomisty
http://zsaek.tsu.ru/user/2296
http://dobrknigi.ru/howto/?PAGE_NAME=profile_view&UID=24354
http://old.dalryba.ru/content/rudiplomisty
Купить школьный аттестат – путь для вашему перспективам. На данном портале вы можете просто и оперативно купить аттестат, необходимый для последующего получения образования или профессионального роста. Наша консультанты обеспечивают высокое качество и секретность предоставления услуг. Приобретайте образовательный аттестат в нашем сервисе и откройте новые возможности для того, чтобы своего образования и карьеры.
metformin 2000 mg
metformin 3000 mg
glucophage mastercard
generic cialis 40 mg
how to get cialis uk
roll up rollap.ru .
lisinopril 10 12.55mg
mail order pharmacy india http://indiaph24.store/# pharmacy website india
indianpharmacy com
buy tadalafil 20mg online
metformin 500mg tablets
Exceptional post but I was wondering if you could write a litte more on this topic?
I’d be very grateful if you could elaborate a little bit more.
Appreciate it!
synthroid prices in canada
Why people still use to read news papers when in this
technological world the whole thing is presented on net?
cialis no prescription
medical mall pharmacy
Приветствуем вас на вашем интернет-сайте!
К вам обращается агентство по СЕО продвижению XRumer Co.
Ваш сайт, как можно отметить, только начинает набирать обороты. Для того, чтобы ускорить процесс его роста, можем предложить наши услуги по внешней СЕО-оптимизации. Полное продвижение в поисковых системах – наше основное направление. В ассортименте представлены надежные и рабочие СЕО-инструменты для экспертов. У нас большой опыт и огромное портфолио выполненных проектов – предоставим по запросу.
Прямо сейчас можем предложить скидку на все услуги – 10%.
Что мы готовы предложить:
– Размещаем трастовые ссылки (нужно любому сайту) – стоимость от 1,5 до 5000 руб
– Размещение безанкорных ссылок (полезно любым сайтам) – 3.900 рублей
– Профессиональный прогон на 110 тысяч сайтов в зоне RU (максимально полезно для сайтов) – 2900 руб
– Публикуем 150 постов В Контакте про ваш сайт (поможет получить достаточно дешевую рекламу) – 3900 рублей
– Размещение статей о вашем сайте на 300 интернет-форумах (мощнейшая раскрутка онлайн-сайта) – 29000 руб
– СуперПостинг – масштабный прогон на 3 000 000 ресурсов (мощное размещение для ваших сайтов) – 39 900 р
– Рассылаем рекламные сообщения по сайтам с помощью обратной связи – стоимость по договоренности, зависит от объема.
Если появятся вопросы, обращайтесь. Все объясним.
Telgrm: @xrumers
https://XRumer.cc/
Skype: Loves.Ltd
Wow, marvelous blog format! How lengthy have you been running a blog for?
you made blogging look easy. The full look of your site is great,
let alone the content material! You can see similar here prev next and
it’s was wrote by Karole82.
the canadian pharmacy
lisinopril tabs 20mg
Encountered a unique article – be sure to take a look and see for yourself https://www.uwdawgpound.com/users/cchatruletka
BetWinner Промокод при Регистрации: 937999 Вы получите бонус для ставок на спорт 100% до 100$ и бонус в казино до 1500€ + 150 Фриспинов. Бонусный код автоматически активрует в вашем аккаунте все акционные предложения 2024 года. Промокоды рассчитаны на разовое применение и только используются во время регистрации.
https://vsiknygy.net.ua/wp-content/pages/betwinner_promokod_2020.html
buy viagra online
metformin 1000 mg tablets price
Промокод BetWinner- 937999. Новые пользователи букмекерской компании Betwinner могут воспользоваться приветственным бонусом в размере 100% от суммы депозита до €100 (или эквивалентной суммы в другой валюте). Фрибеты в БетВиннер чаще появляются в рамках периодических акций. Иногда такая привилегия касается новых игроков, но чаще всего поощрение получают постоянные.
https://vsiknygy.net.ua/wp-content/pages/betwinner_promokod_2020.html
Однако, существует возможность увеличить размер этого бонуса с помощью промокода betwinner. При использовании этого кода при регистрации, приветственный бонус увеличится на 30%. То есть, если игрок пополнил свой счет на 10 евро и использовал промокод, то его бонус составит уже 13 евро.
https://vsiknygy.net.ua/wp-content/pages/betwinner_promokod_2020.html
tadalafil generic in india
Hi there, its nice post concerning media print, we all understand media is
a great source of information.
Understanding the complex world of chronometers
Understanding COSC Validation and Its Importance in Watchmaking
COSC Validation and its Strict Standards
Controle Officiel Suisse des Chronometres, or the Official Swiss Chronometer Testing Agency, is the authorized Switzerland testing agency that verifies the accuracy and accuracy of wristwatches. COSC accreditation is a sign of excellent craftsmanship and reliability in timekeeping. Not all timepiece brands seek COSC accreditation, such as Hublot, which instead sticks to its own demanding criteria with mechanisms like the UNICO calibre, achieving comparable precision.
The Science of Exact Chronometry
The core system of a mechanical watch involves the spring, which delivers energy as it loosens. This system, however, can be susceptible to environmental elements that may influence its accuracy. COSC-certified mechanisms undergo demanding testing—over fifteen days in various conditions (five positions, 3 temperatures)—to ensure their durability and reliability. The tests evaluate:
Mean daily rate precision between -4 and +6 seconds.
Mean variation, highest variation levels, and effects of temperature variations.
Why COSC Validation Matters
For watch aficionados and connoisseurs, a COSC-certified watch isn’t just a piece of technology but a demonstration to lasting excellence and accuracy. It symbolizes a timepiece that:
Provides exceptional reliability and accuracy.
Provides assurance of superiority across the entire design of the watch.
Is probable to maintain its worth more efficiently, making it a smart investment.
Famous Chronometer Manufacturers
Several renowned brands prioritize COSC validation for their watches, including Rolex, Omega, Breitling, and Longines, among others. Longines, for instance, provides collections like the Archive and Soul, which feature COSC-certified movements equipped with innovative materials like silicone equilibrium springs to enhance durability and efficiency.
Historic Background and the Evolution of Timepieces
The concept of the timepiece originates back to the requirement for accurate chronometry for navigational at sea, emphasized by John Harrison’s work in the 18th century. Since the formal foundation of COSC in 1973, the validation has become a yardstick for evaluating the precision of high-end timepieces, maintaining a tradition of excellence in watchmaking.
Conclusion
Owning a COSC-validated watch is more than an visual choice; it’s a dedication to quality and precision. For those appreciating precision above all, the COSC certification offers peace of mind, guaranteeing that each validated watch will function dependably under various conditions. Whether for individual satisfaction or as an investment, COSC-accredited watches stand out in the world of horology, maintaining on a legacy of precise chronometry.
lisinopril generic 10 mg
synthroid 75 mcg price canada
I’m really inspired along with your writing skills and also with
the structure in your blog. Is that this a paid subject
matter or did you customize it your self? Either way stay up the excellent high quality writing, it is uncommon to peer a nice blog like
this one today..
lisinopril pill 40 mg
canadian pharmacy 24
synthoid
грузоперевозки из китая цена dostavka-gruzov-is-kitaya.ru .
lisinopril cost
обучение барбер с нуля цена http://www.burberi.ru/ .
Best Games to Win Money in Kenya
real money online casinos best online casino games to win money .
Однако, существует возможность увеличить размер этого бонуса с помощью промокода betwinner. При использовании этого кода при регистрации, приветственный бонус увеличится на 30%. То есть, если игрок пополнил свой счет на 10 евро и использовал промокод, то его бонус составит уже 13 евро.
https://vsiknygy.net.ua/wp-content/pages/betwinner_promokod_2020.html
BetWinner Промокод при Регистрации: 937999 Вы получите бонус для ставок на спорт 100% до 100$ и бонус в казино до 1500€ + 150 Фриспинов. Бонусный код автоматически активрует в вашем аккаунте все акционные предложения 2024 года. Промокоды рассчитаны на разовое применение и только используются во время регистрации.
https://vsiknygy.net.ua/wp-content/pages/betwinner_promokod_2020.html
Промокод БетВиннер: 937999 при регистрации в 2024 году с использованием на сайте BetWinner.com вы получите бесплатный бонус в размере 100% до 25000 рублей на вашу ставку. Все актуальные бонусы от букмекерской конторы BetWinner можно найти на одной странице. Там вы также найдете инструкции по получению фрибетов, участию в акциях и бездепозитному бонусу от БК BetWinner в 2024 году.
https://vsiknygy.net.ua/wp-content/pages/betwinner_promokod_2020.html
synthroid online prescription
Earn Real Cash Playing Mobile Games in Kenya
best online casino games to win money real money online casinos .
線上賭場
I always emailed this weblog post page to all my associates, for the reason that if
like to read it afterward my friends will too.
canadian online pharmacy no prescription
lisinopril brand name uk
synthroid 50 mcg cost
Бонус приветствия в Betwinner предоставляет игрокам возможность получить дополнительные средства на свой игровой счет. Этот бонус составляет 100% от суммы первого депозита, который игрок вносит на свой счет. Например, если новый клиент пополнил свой счет на 10 евро, то ему будет начислено еще 10 евро в качестве бонуса.
https://vsiknygy.net.ua/wp-content/pages/betwinner_promokod_2020.html
Real Money Earning Games in Kenya
best online casino games kenya casino games online for real money .
Бонус приветствия в Betwinner предоставляет игрокам возможность получить дополнительные средства на свой игровой счет. Этот бонус составляет 100% от суммы первого депозита, который игрок вносит на свой счет. Например, если новый клиент пополнил свой счет на 10 евро, то ему будет начислено еще 10 евро в качестве бонуса.
https://vsiknygy.net.ua/wp-content/pages/betwinner_promokod_2020.html
Промокод BetWinner- 937999. Новые пользователи букмекерской компании Betwinner могут воспользоваться приветственным бонусом в размере 100% от суммы депозита до €100 (или эквивалентной суммы в другой валюте). Фрибеты в БетВиннер чаще появляются в рамках периодических акций. Иногда такая привилегия касается новых игроков, но чаще всего поощрение получают постоянные.
https://vsiknygy.net.ua/wp-content/pages/betwinner_promokod_2020.html
rxpharmacycoupons
строительство домов из бруса под ключ проекты https://www.alexstroy53.ru .
Hi there, I enjoy reading all of your article post.
I like to write a little comment to support you.
cheapest brand cialis
Hey! Someone in my Facebook group shared this website with us so I came to look it over.
I’m definitely enjoying the information. I’m bookmarking and will be tweeting
this to my followers! Exceptional blog and fantastic design.
Приветствую, друзья!
Компания XRumer Art предлагает свои профессиональные услуги СЕО продвижения.
Ваш ресурс, как мы видим, еще только набирает обороты. Для того, чтобы максимально ускорить процесс его роста, готовы предложить наши услуги по СЕО-оптимизации. Продвижение в поисковых системах – направление нашей компании. В ассортименте представлены эффективные СЕО-инструменты для экспертов. У нас серьезный опыт и огромное портфолио успешных проектов – если интересует, предоставим по вашему запросу.
Мы предлагаем скидку 10% до конца месяца.
Услуги:
– Трастовые ссылки (требуется всем сайтам) – стоимость от 1,5 до 5000 р
– Жирные безанкорные ссылки (2500 штук) (рекомендуется любым сайтам) – 3.900 руб
– Профессиональный прогон на 110000 сайтов в RU.зоне (очень полезно для сайта) – 2900 рублей
– 150 постов в VK про ваш сайт (поможет получить достаточно дешевую рекламу) – 3900 рублей
– Публикации о вашем сайте на 300 форумах (мощнейшая раскрутка интернет-сайта) – 29 тыс. рублей
– МегаПостинг – это прогон по 3 млн ресурсов (очень мощный прогон для вашего сайта) – 39900 р
– Рассылаем рекламные сообщения по сайтам при помощи обратной связи – стоимость по договоренности, зависит от объемов.
С удовольствием ответим на ваши вопросы, обращайтесь.
Telgrm: @exrumer
https://XRumer.cc/
Skype: Loves.Ltd
Came across an interesting article, I propose you have a look https://cptd.onedu.ru/mntorng/mdiscuss/index.php?PAGE_NAME=profile_view&UID=196484
cost of metformin 500 mg in india
buy lisinopril uk
pharmacy
synthroid tablets canada
best pharmacy
cialis 2019
rx pharmacy
Nihai Dönemsel En Büyük Gözde Kumarhane Platformu: Casibom
Casino oyunlarını sevenlerin artık duymuş olduğu Casibom, nihai dönemde adından çoğunlukla söz ettiren bir iddia ve kumarhane platformu haline geldi. Türkiye’nin en mükemmel bahis platformlardan biri olarak tanınan Casibom’un haftalık olarak değişen giriş adresi, alanında oldukça yenilikçi olmasına rağmen itimat edilir ve kazandıran bir platform olarak ön plana çıkıyor.
Casibom, muadillerini geride bırakarak uzun soluklu bahis web sitelerinin üstünlük sağlamayı başarıyor. Bu pazarda eski olmak gereklidir olsa da, oyuncularla iletişimde bulunmak ve onlara erişmek da eş kadar değerli. Bu durumda, Casibom’un her saat servis veren canlı olarak destek ekibi ile rahatça iletişime geçilebilir olması büyük önem taşıyan bir artı sunuyor.
Hızlıca büyüyen oyuncu kitlesi ile ilgi çekici olan Casibom’un arkasındaki başarım faktörleri arasında, yalnızca bahis ve canlı olarak casino oyunlarına sınırlı olmayan geniş bir hizmet yelpazesi bulunuyor. Atletizm bahislerinde sunduğu geniş alternatifler ve yüksek oranlar, oyuncuları ilgisini çekmeyi başarmayı sürdürüyor.
Ayrıca, hem atletizm bahisleri hem de casino oyunları katılımcılara yönlendirilen sunulan yüksek yüzdeli avantajlı ödüller da dikkat çekiyor. Bu nedenle, Casibom hızla alanında iyi bir pazarlama başarısı elde ediyor ve önemli bir oyuncuların kitlesi kazanıyor.
Casibom’un kazanç sağlayan bonusları ve ünlülüğü ile birlikte, platforma üyelik nasıl sağlanır sorusuna da atıfta bulunmak gereklidir. Casibom’a hareketli cihazlarınızdan, bilgisayarlarınızdan veya tabletlerinizden web tarayıcı üzerinden kolaylıkla erişilebilir. Ayrıca, platformun mobil cihazlarla uyumlu olması da önemli bir avantaj sağlıyor, çünkü artık hemen hemen herkesin bir cep telefonu var ve bu cihazlar üzerinden kolayca giriş sağlanabiliyor.
Hareketli tabletlerinizle bile yolda gerçek zamanlı bahisler alabilir ve maçları canlı olarak izleyebilirsiniz. Ayrıca, Casibom’un mobil uyumlu olması, ülkemizde kumarhane ve kumarhane gibi yerlerin yasal olarak kapatılmasıyla birlikte bu tür platformlara erişimin önemli bir yolunu oluşturuyor.
Casibom’un güvenilir bir casino platformu olması da önemli bir avantaj sunuyor. Ruhsatlı bir platform olan Casibom, duraksız bir şekilde eğlence ve kar elde etme imkanı sunar.
Casibom’a abone olmak da son derece kolaydır. Herhangi bir belge koşulu olmadan ve bedel ödemeden web sitesine rahatça üye olabilirsiniz. Ayrıca, site üzerinde para yatırma ve çekme işlemleri için de çok sayıda farklı yöntem vardır ve herhangi bir kesim ücreti alınmamaktadır.
Ancak, Casibom’un güncel giriş adresini takip etmek de elzemdir. Çünkü gerçek zamanlı şans ve kumarhane siteleri popüler olduğu için hileli web siteleri ve dolandırıcılar da görünmektedir. Bu nedenle, Casibom’un sosyal medya hesaplarını ve güncel giriş adresini düzenli aralıklarla kontrol etmek önemlidir.
Sonuç olarak, Casibom hem itimat edilir hem de kazandıran bir bahis web sitesi olarak dikkat çekici. Yüksek ödülleri, geniş oyun alternatifleri ve kullanıcı dostu taşınabilir uygulaması ile Casibom, casino tutkunları için mükemmel bir platform sunuyor.
Промокод BetWinner- 937999. Новые пользователи букмекерской компании Betwinner могут воспользоваться приветственным бонусом в размере 100% от суммы депозита до €100 (или эквивалентной суммы в другой валюте). Фрибеты в БетВиннер чаще появляются в рамках периодических акций. Иногда такая привилегия касается новых игроков, но чаще всего поощрение получают постоянные.
https://vsiknygy.net.ua/wp-content/pages/betwinner_promokod_2020.html
synthroid 0.125 mcg
Бонус приветствия в Betwinner предоставляет игрокам возможность получить дополнительные средства на свой игровой счет. Этот бонус составляет 100% от суммы первого депозита, который игрок вносит на свой счет. Например, если новый клиент пополнил свой счет на 10 евро, то ему будет начислено еще 10 евро в качестве бонуса.
https://vsiknygy.net.ua/wp-content/pages/betwinner_promokod_2020.html
Hello to every , because I am really keen of reading this weblog’s post to be
updated daily. It consists of good stuff.
tadalafil pharmacy
квартира на сутки https://www.sutki24.by .
Промокод БетВиннер: 937999 при регистрации в 2024 году с использованием на сайте BetWinner.com вы получите бесплатный бонус в размере 100% до 25000 рублей на вашу ставку. Все актуальные бонусы от букмекерской конторы BetWinner можно найти на одной странице. Там вы также найдете инструкции по получению фрибетов, участию в акциях и бездепозитному бонусу от БК BetWinner в 2024 году.
https://vsiknygy.net.ua/wp-content/pages/betwinner_promokod_2020.html
canadian online pharmacy no prescription
tadalafil uk paypal
Промокод БетВиннер: 937999 при регистрации в 2024 году с использованием на сайте BetWinner.com вы получите бесплатный бонус в размере 100% до 25000 рублей на вашу ставку. Все актуальные бонусы от букмекерской конторы BetWinner можно найти на одной странице. Там вы также найдете инструкции по получению фрибетов, участию в акциях и бездепозитному бонусу от БК BetWinner в 2024 году.
https://vsiknygy.net.ua/wp-content/pages/betwinner_promokod_2020.html
Промокод BetWinner- 937999. Новые пользователи букмекерской компании Betwinner могут воспользоваться приветственным бонусом в размере 100% от суммы депозита до €100 (или эквивалентной суммы в другой валюте). Фрибеты в БетВиннер чаще появляются в рамках периодических акций. Иногда такая привилегия касается новых игроков, но чаще всего поощрение получают постоянные.
https://vsiknygy.net.ua/wp-content/pages/betwinner_promokod_2020.html
помощь психологическаЯ https://w-495.ru/
Discovered an interesting article, I suggest you familiarize yourself https://kavpolit.com/tech/2024/04/24/eko-taksi-novij-trend-u-kievi/
клинический психолог консультациЯ https://w-495.ru/
психологи вакансии https://w-495.ru/
Закажите SEO продвижение сайта https://seo116.ru/ в Яндекс и Google под ключ в Москве и по всей России от экспертов. Увеличение трафика, рост клиентов, онлайн поддержка. Комплексное продвижение сайтов с гарантией.
запись к психотерапевту https://w-495.ru/
психолог психотерапевт https://w-495.ru/
Мы оперативно выезжаем к вам и устраняем любые неполадки в кратчайшие сроки.
Сервисный центр Lenovo — это место, где ваши устройства обретают вторую жизнь . Наш сайт lenovoserviset.ru — это путь к профессиональному ремонту вашей техники. Мастера сервиса всегда на связи решить любую проблему с вашим девайсом. Мы предлагаем оперативный и качественный ремонт ноутбуков бренда Lenovo, вернем к жизни их работоспособность и сохраним срок службы.
Почему нас выбирают:
Быстрая диагностика — узнаем причину неполадки за несколько минут .
Индивидуальный подход — рассмотрим все варианты ремонта специально для вашего устройства.
Использование оригинальных запчастей — обеспечиваем долговечность ремонта за счет использованию только оригинальных деталей.
Надежная гарантия — предоставляем уверенность нашего сервиса и даем уверенность на все виды работ
Обратитесь в сервисный центр техники Lenovo и восстановите любимую технику к полноценной работе!
Сервисный центр Lenovo Service Center — это место, где ваши устройства получают новую молодость. Наш сайт lenovoserviset.ru — это путь к профессиональному ремонту вашей техники. Мастера сервиса всегда на связи помочь с любую задачу с вашим гаджетом . Мы предлагаем оперативный и качественный ремонт ноутбуков Lenovo , вернем к жизни их работоспособность и продлим срок службы.
Почему нас выбирают:
Точная и быстрая диагностика проблемы — узнаем причину неполадки за несколько минут .
Индивидуальный подход — рассмотрим все варианты ремонта с учетом ваших потребностей .
Качественные детали — гарантируем долговечность ремонта за счет использованию только сертифицированных деталей.
Гарантия на ремонт — уверены в качестве нашего сервиса и предоставляем уверенность на любой виды работ
Обратитесь в нашу службу поддержки Lenovo и верните свою технику к полноценной работе!
online pharmacy 365 pills
психолог в москве цена https://w-495.ru/
Воєнторг
4. Снаряжение для выживания в экстремальных условиях
купити тактичні штани https://voentorgklyp.kiev.ua/odyag/shtany/taktychni-shtany/ .
Воєнторг
17. Наборы для выживания и первой помощи
рюкзаки тактичні https://voentorgklyp.kiev.ua/ryukzaky-sumky/taktychni-ryukzaky/ .
Воєнторг
11. Качественные кобуры и чехлы для оружия
тактичні штани купити https://voentorgklyp.kiev.ua/odyag/shtany/taktychni-shtany/ .
synthroid 0.1
1. Вибір натяжної стелі: як правильно підібрати?
2. ТОП-5 переваг натяжних стель для вашого інтер’єру
3. Як доглядати за натяжною стелею: корисні поради
4. Натяжні стелі: модний тренд сучасного дизайну
5. Як вибрати кольорову гаму для натяжної стелі?
6. Натяжні стелі від А до Я: основні поняття
7. Комфорт та елегантність: переваги натяжних стель
8. Якість матеріалів для натяжних стель: що обрати?
9. Ефективне освітлення з натяжними стелями: ідеї та поради
10. Натяжні стелі у ванній кімнаті: плюси та мінуси
11. Як відремонтувати натяжну стелю вдома: поетапна інструкція
12. Візуальні ефекти з допомогою натяжних стель: ідеї дизайну
13. Натяжні стелі з фотопринтом: оригінальний дизайн для вашого інтер’єру
14. Готові або індивідуальні: які натяжні стелі обрати?
15. Натяжні стелі у спальні: як створити атмосферу затишку
16. Вигода та функціональність: чому варто встановити натяжну стелю?
17. Натяжні стелі у кухні: практичність та естетика поєднуються
18. Різновиди кріплень для натяжних стель: який обрати?
19. Комплектація натяжних стель: що потрібно знати при виборі
20. Натяжні стелі зі звукоізоляцією: комфорт та тиша у вашому будинку!
виробництво натяжних стель https://natyazhnistelidfvf.kiev.ua/ .
Valuable info. Lucky me I discovered your web site by accident, and I am
surprised why this coincidence did not happened in advance!
I bookmarked it.
Understanding the complex world of chronometers
Understanding COSC Validation and Its Importance in Horology
COSC Certification and its Rigorous Criteria
Controle Officiel Suisse des Chronometres, or the Official Swiss Chronometer Testing Agency, is the authorized Switzerland testing agency that verifies the accuracy and accuracy of wristwatches. COSC accreditation is a sign of excellent craftsmanship and trustworthiness in timekeeping. Not all timepiece brands seek COSC accreditation, such as Hublot, which instead sticks to its own demanding standards with mechanisms like the UNICO, reaching equivalent precision.
The Art of Precision Chronometry
The core system of a mechanical timepiece involves the mainspring, which provides power as it unwinds. This mechanism, however, can be susceptible to external elements that may influence its precision. COSC-accredited movements undergo rigorous testing—over 15 days in various circumstances (five positions, three temperatures)—to ensure their resilience and reliability. The tests measure:
Typical daily rate accuracy between -4 and +6 secs.
Mean variation, peak variation rates, and impacts of thermal changes.
Why COSC Validation Is Important
For timepiece fans and collectors, a COSC-accredited timepiece isn’t just a item of technology but a proof to lasting excellence and precision. It signifies a watch that:
Offers outstanding dependability and accuracy.
Offers confidence of superiority across the whole design of the watch.
Is probable to hold its worth better, making it a wise investment.
Famous Chronometer Brands
Several famous manufacturers prioritize COSC accreditation for their watches, including Rolex, Omega, Breitling, and Longines, among others. Longines, for instance, offers collections like the Record and Soul, which highlight COSC-validated mechanisms equipped with cutting-edge substances like silicon balance springs to enhance durability and efficiency.
Historic Background and the Development of Chronometers
The idea of the timepiece originates back to the need for exact chronometry for navigational at sea, emphasized by John Harrison’s work in the eighteenth cent. Since the official foundation of Controle Officiel Suisse des Chronometres in 1973, the certification has become a benchmark for judging the precision of high-end watches, sustaining a legacy of superiority in horology.
Conclusion
Owning a COSC-accredited watch is more than an aesthetic selection; it’s a dedication to quality and accuracy. For those valuing precision above all, the COSC accreditation offers peacefulness of mind, ensuring that each validated watch will operate reliably under various conditions. Whether for individual satisfaction or as an investment, COSC-accredited watches stand out in the world of watchmaking, bearing on a tradition of careful timekeeping.
Промокод БетВиннер: 937999 при регистрации в 2024 году с использованием на сайте BetWinner.com вы получите бесплатный бонус в размере 100% до 25000 рублей на вашу ставку. Все актуальные бонусы от букмекерской конторы BetWinner можно найти на одной странице. Там вы также найдете инструкции по получению фрибетов, участию в акциях и бездепозитному бонусу от БК BetWinner в 2024 году.
https://vsiknygy.net.ua/wp-content/pages/betwinner_promokod_2020.html
1. Вибір натяжної стелі: як правильно підібрати?
2. ТОП-5 переваг натяжних стель для вашого інтер’єру
3. Як доглядати за натяжною стелею: корисні поради
4. Натяжні стелі: модний тренд сучасного дизайну
5. Як вибрати кольорову гаму для натяжної стелі?
6. Натяжні стелі від А до Я: основні поняття
7. Комфорт та елегантність: переваги натяжних стель
8. Якість матеріалів для натяжних стель: що обрати?
9. Ефективне освітлення з натяжними стелями: ідеї та поради
10. Натяжні стелі у ванній кімнаті: плюси та мінуси
11. Як відремонтувати натяжну стелю вдома: поетапна інструкція
12. Візуальні ефекти з допомогою натяжних стель: ідеї дизайну
13. Натяжні стелі з фотопринтом: оригінальний дизайн для вашого інтер’єру
14. Готові або індивідуальні: які натяжні стелі обрати?
15. Натяжні стелі у спальні: як створити атмосферу затишку
16. Вигода та функціональність: чому варто встановити натяжну стелю?
17. Натяжні стелі у кухні: практичність та естетика поєднуються
18. Різновиди кріплень для натяжних стель: який обрати?
19. Комплектація натяжних стель: що потрібно знати при виборі
20. Натяжні стелі зі звукоізоляцією: комфорт та тиша у вашому будинку!
briton натяжні стелі briton натяжні стелі .
Бонус приветствия в Betwinner предоставляет игрокам возможность получить дополнительные средства на свой игровой счет. Этот бонус составляет 100% от суммы первого депозита, который игрок вносит на свой счет. Например, если новый клиент пополнил свой счет на 10 евро, то ему будет начислено еще 10 евро в качестве бонуса.
https://vsiknygy.net.ua/wp-content/pages/betwinner_promokod_2020.html
buy tadalafil from canada
Однако, существует возможность увеличить размер этого бонуса с помощью промокода betwinner. При использовании этого кода при регистрации, приветственный бонус увеличится на 30%. То есть, если игрок пополнил свой счет на 10 евро и использовал промокод, то его бонус составит уже 13 евро.
https://vsiknygy.net.ua/wp-content/pages/betwinner_promokod_2020.html
hayallerinin peşinden koşmak için avcılar escort ile olmalısın
Воєнторг
6. Тактические рюкзаки и сумки для военных
одяг зсу одяг зсу .
яндекс карты адвокат
Воєнторг
4. Снаряжение для выживания в экстремальных условиях
рюкзаки тактичні https://voentorgklyp.kiev.ua/ryukzaky-sumky/taktychni-ryukzaky/ .
網上賭場
Промокод BetWinner- 937999. Новые пользователи букмекерской компании Betwinner могут воспользоваться приветственным бонусом в размере 100% от суммы депозита до €100 (или эквивалентной суммы в другой валюте). Фрибеты в БетВиннер чаще появляются в рамках периодических акций. Иногда такая привилегия касается новых игроков, но чаще всего поощрение получают постоянные.
https://vsiknygy.net.ua/wp-content/pages/betwinner_promokod_2020.html
Best Games to Win Money in Kenya
best online casino games kenya games that pay real money in kenya .
Cash Winning Games to Play in Kenya
best online casino games kenya casino games online for real money .
В нашем обществе, где диплом – это начало отличной карьеры в любой сфере, многие ищут максимально быстрый путь получения образования. Факт наличия официального документа об образовании переоценить попросту невозможно. Ведь диплом открывает двери перед любым человеком, который стремится начать трудовую деятельность или продолжить обучение в университете.
Наша компания предлагает очень быстро получить этот важный документ. Вы можете купить диплом, и это будет отличным решением для человека, который не смог закончить обучение, утратил документ или хочет исправить плохие оценки. диплом изготавливается аккуратно, с особым вниманием ко всем нюансам, чтобы на выходе получился документ, максимально соответствующий оригиналу.
Преимущество такого решения состоит не только в том, что вы максимально быстро получите свой диплом. Процесс организовывается комфортно, с нашей поддержкой. От выбора требуемого образца до грамотного заполнения персональных данных и доставки по стране — все под полным контролем наших специалистов.
Таким образом, всем, кто ищет оперативный способ получить необходимый документ, наша компания предлагает отличное решение. Заказать диплом – значит избежать длительного обучения и сразу переходить к достижению своих целей, будь то поступление в ВУЗ или старт трудовой карьеры.
https://diplomanc-russia24.com
Бонус приветствия в Betwinner предоставляет игрокам возможность получить дополнительные средства на свой игровой счет. Этот бонус составляет 100% от суммы первого депозита, который игрок вносит на свой счет. Например, если новый клиент пополнил свой счет на 10 евро, то ему будет начислено еще 10 евро в качестве бонуса.
https://vsiknygy.net.ua/wp-content/pages/betwinner_promokod_2020.html
1. Вибір натяжної стелі: як правильно підібрати?
2. ТОП-5 переваг натяжних стель для вашого інтер’єру
3. Як доглядати за натяжною стелею: корисні поради
4. Натяжні стелі: модний тренд сучасного дизайну
5. Як вибрати кольорову гаму для натяжної стелі?
6. Натяжні стелі від А до Я: основні поняття
7. Комфорт та елегантність: переваги натяжних стель
8. Якість матеріалів для натяжних стель: що обрати?
9. Ефективне освітлення з натяжними стелями: ідеї та поради
10. Натяжні стелі у ванній кімнаті: плюси та мінуси
11. Як відремонтувати натяжну стелю вдома: поетапна інструкція
12. Візуальні ефекти з допомогою натяжних стель: ідеї дизайну
13. Натяжні стелі з фотопринтом: оригінальний дизайн для вашого інтер’єру
14. Готові або індивідуальні: які натяжні стелі обрати?
15. Натяжні стелі у спальні: як створити атмосферу затишку
16. Вигода та функціональність: чому варто встановити натяжну стелю?
17. Натяжні стелі у кухні: практичність та естетика поєднуються
18. Різновиди кріплень для натяжних стель: який обрати?
19. Комплектація натяжних стель: що потрібно знати при виборі
20. Натяжні стелі зі звукоізоляцією: комфорт та тиша у вашому будинку!
стелі натяжні стелі натяжні .
BetWinner Промокод при Регистрации: 937999 Вы получите бонус для ставок на спорт 100% до 100$ и бонус в казино до 1500€ + 150 Фриспинов. Бонусный код автоматически активрует в вашем аккаунте все акционные предложения 2024 года. Промокоды рассчитаны на разовое применение и только используются во время регистрации.
https://vsiknygy.net.ua/wp-content/pages/betwinner_promokod_2020.html
1. Вибір натяжної стелі: як правильно підібрати?
2. ТОП-5 переваг натяжних стель для вашого інтер’єру
3. Як доглядати за натяжною стелею: корисні поради
4. Натяжні стелі: модний тренд сучасного дизайну
5. Як вибрати кольорову гаму для натяжної стелі?
6. Натяжні стелі від А до Я: основні поняття
7. Комфорт та елегантність: переваги натяжних стель
8. Якість матеріалів для натяжних стель: що обрати?
9. Ефективне освітлення з натяжними стелями: ідеї та поради
10. Натяжні стелі у ванній кімнаті: плюси та мінуси
11. Як відремонтувати натяжну стелю вдома: поетапна інструкція
12. Візуальні ефекти з допомогою натяжних стель: ідеї дизайну
13. Натяжні стелі з фотопринтом: оригінальний дизайн для вашого інтер’єру
14. Готові або індивідуальні: які натяжні стелі обрати?
15. Натяжні стелі у спальні: як створити атмосферу затишку
16. Вигода та функціональність: чому варто встановити натяжну стелю?
17. Натяжні стелі у кухні: практичність та естетика поєднуються
18. Різновиди кріплень для натяжних стель: який обрати?
19. Комплектація натяжних стель: що потрібно знати при виборі
20. Натяжні стелі зі звукоізоляцією: комфорт та тиша у вашому будинку!
стелі натяжні стелі натяжні .
buy cialis online in canada
Stumbled upon interesting material – I can’t help but recommend you to read http://nnars.ru/forum/suggestion-box/1101-дорамы,-которые-тронут-ваше-сердце-смотрите-онлай#74487
Воєнторг
15. Подсумки и кобуры для дополнительного снаряжения
зимовий одяг зсу https://voentorgklyp.kiev.ua/odyag/odyag-zsu/ .
affordable pharmacy
Легендарные казино Монако
казино олимп
Воєнторг
9. Оптика и прицелы для охоты и стрельбы
купити тактичний рюкзак https://voentorgklyp.kiev.ua/ryukzaky-sumky/taktychni-ryukzaky/ .
good value pharmacy
Воєнторг
20. Военные амуниция и средства для стрельбы
зсу одяг зсу одяг .
My brother suggested I might like this website.
He was entіrely riɡһt. This post actually made
my day. Yoᥙ can nnot imɑgine simply how mmuch time I had
spent for this info! Thanks!
medical pharmacy west
На днях мне понадобилось отремонтировать мой ноутбук Lenovo, и я решил воспользоваться услугами сервисного центра lenovoruremont.ru. Остался очень доволен. Специалисты оперативно провели диагностику и устранили поломку в сжатые сроки. Обслуживание очень качественное, стоимость ремонта приемлемая, а персонал вежливый и компетентный. Однозначно рекомендую этот сервисный центр всем владельцам техники Lenovo!
Greetings! I know this is somewhat off topic but I was wondering which blog platform are you using for this website?
I’m getting sick and tired of WordPress because I’ve had problems with hackers
and I’m looking at options for another platform. I would be fantastic if
you could point me in the direction of a good platform.
Недавно мне понадобилось отремонтировать мой ноутбук Lenovo, и я обратился сервисного центра lenovoruremont.ru. Остался очень доволен. Мастера быстро нашли проблему и выполнили ремонт в сжатые сроки. Сервис на высшем уровне, стоимость ремонта приемлемая, а сотрудники отзывчивые и профессиональные. Смело могу советовать этот сервисный центр всем владельцам техники Lenovo!
price of valtrex with insurance
1. Вибір натяжної стелі: як правильно підібрати?
2. ТОП-5 переваг натяжних стель для вашого інтер’єру
3. Як доглядати за натяжною стелею: корисні поради
4. Натяжні стелі: модний тренд сучасного дизайну
5. Як вибрати кольорову гаму для натяжної стелі?
6. Натяжні стелі від А до Я: основні поняття
7. Комфорт та елегантність: переваги натяжних стель
8. Якість матеріалів для натяжних стель: що обрати?
9. Ефективне освітлення з натяжними стелями: ідеї та поради
10. Натяжні стелі у ванній кімнаті: плюси та мінуси
11. Як відремонтувати натяжну стелю вдома: поетапна інструкція
12. Візуальні ефекти з допомогою натяжних стель: ідеї дизайну
13. Натяжні стелі з фотопринтом: оригінальний дизайн для вашого інтер’єру
14. Готові або індивідуальні: які натяжні стелі обрати?
15. Натяжні стелі у спальні: як створити атмосферу затишку
16. Вигода та функціональність: чому варто встановити натяжну стелю?
17. Натяжні стелі у кухні: практичність та естетика поєднуються
18. Різновиди кріплень для натяжних стель: який обрати?
19. Комплектація натяжних стель: що потрібно знати при виборі
20. Натяжні стелі зі звукоізоляцією: комфорт та тиша у вашому будинку!
багаторівневі натяжні стелі https://natyazhnistelidfvf.kiev.ua/ .
Hello there! This is my 1st comment here so I just wanted to give a quick shout
out and tell you I really enjoy reading your articles. Can you suggest any
other blogs/websites/forums that cover the same topics?
Thanks a ton!
canadian pharmaceuticals online cheap
best lisinopril brand
сериал онлайн
로드스탁과 레버리지 방식의 스탁: 투자 전략의 신규 지평
로드스탁을 통해 제공하는 레버리지 스탁은 주식 투자의 한 방식으로, 높은 이익율을 목표로 하는 투자자들에게 매혹적인 선택입니다. 레버리지 사용을 사용하는 이 전략은 투자자들이 자신의 투자금을 초과하는 투자금을 투자할 수 있도록 함으로써, 증권 장에서 더 큰 작용을 행사할 수 있는 기회를 제공합니다.
레버리지 방식의 스탁의 원리
레버리지 스탁은 원칙적으로 자본을 대여하여 사용하는 방식입니다. 예시를 들어, 100만 원의 자본으로 1,000만 원 상당의 증권을 구매할 수 있는데, 이는 투자자들이 기본적인 자본보다 훨씬 훨씬 더 많은 주식을 사들여, 주식 가격이 증가할 경우 해당하는 더 큰 이익을 가져올 수 있게 됩니다. 하지만, 주식 가격이 떨어질 경우에는 그 피해 또한 크게 될 수 있으므로, 레버리지를 사용할 때는 신중하게 생각해야 합니다.
투자 계획과 레버리지 사용
레버리지 사용은 특히 성장 가능성이 상당한 사업체에 투자할 때 효과적입니다. 이러한 기업에 상당한 비율로 투자하면, 잘 될 경우 큰 이익을 획득할 수 있지만, 반대 경우의 경우 상당한 위험성도 짊어져야 합니다. 그러므로, 투자자들은 자신의 리스크 관리 능력을 가진 시장 분석을 통해, 어느 회사에 얼마만큼의 자본을 투입할지 결정하게 됩니다 합니다.
레버리지의 이점과 위험 요소
레버리지 방식의 스탁은 상당한 이익을 보장하지만, 그만큼 높은 위험도 동반합니다. 증권 시장의 변동성은 추정이 곤란하기 때문에, 레버리지 사용을 사용할 때는 항상 시장 추세를 정밀하게 주시하고, 피해를 최소화할 수 있는 방법을 세워야 합니다.
결론: 신중한 결정이 필수입니다
로드스탁을 통해 공급하는 레버리지 스탁은 강력한 투자 수단이며, 잘 활용하면 큰 수입을 가져다줄 수 있습니다. 그렇지만 높은 리스크도 생각해 봐야 하며, 투자 결정은 필요한 데이터와 세심한 판단 후에 이루어져야 합니다. 투자자 본인의 재정적 상태, 위험을 감수하는 능력, 그리고 시장 상황을 반영한 안정된 투자 전략이 핵심입니다.
lisinopril 20 mg brand name
В нашем обществе, где диплом становится началом удачной карьеры в любой области, многие стараются найти максимально быстрый и простой путь получения качественного образования. Необходимость наличия официального документа об образовании переоценить попросту невозможно. Ведь именно диплом открывает двери перед людьми, желающими вступить в сообщество профессионалов или продолжить обучение в университете.
Предлагаем очень быстро получить этот важный документ. Вы можете заказать диплом, что является отличным решением для человека, который не смог закончить обучение или потерял документ. Все дипломы производятся аккуратно, с особым вниманием к мельчайшим нюансам. На выходе вы сможете получить полностью оригинальный документ.
Преимущество подобного решения состоит не только в том, что можно оперативно получить диплом. Весь процесс организовывается просто и легко, с нашей поддержкой. Начиная от выбора необходимого образца до правильного заполнения личной информации и доставки в любое место страны — все будет находиться под полным контролем опытных мастеров.
Для всех, кто ищет максимально быстрый способ получить необходимый документ, наша услуга предлагает отличное решение. Купить диплом – значит избежать длительного процесса обучения и не теряя времени переходить к своим целям, будь то поступление в ВУЗ или старт удачной карьеры.
https://diploman-rossiya.com
1. Вибір натяжної стелі: як правильно підібрати?
2. ТОП-5 переваг натяжних стель для вашого інтер’єру
3. Як доглядати за натяжною стелею: корисні поради
4. Натяжні стелі: модний тренд сучасного дизайну
5. Як вибрати кольорову гаму для натяжної стелі?
6. Натяжні стелі від А до Я: основні поняття
7. Комфорт та елегантність: переваги натяжних стель
8. Якість матеріалів для натяжних стель: що обрати?
9. Ефективне освітлення з натяжними стелями: ідеї та поради
10. Натяжні стелі у ванній кімнаті: плюси та мінуси
11. Як відремонтувати натяжну стелю вдома: поетапна інструкція
12. Візуальні ефекти з допомогою натяжних стель: ідеї дизайну
13. Натяжні стелі з фотопринтом: оригінальний дизайн для вашого інтер’єру
14. Готові або індивідуальні: які натяжні стелі обрати?
15. Натяжні стелі у спальні: як створити атмосферу затишку
16. Вигода та функціональність: чому варто встановити натяжну стелю?
17. Натяжні стелі у кухні: практичність та естетика поєднуються
18. Різновиди кріплень для натяжних стель: який обрати?
19. Комплектація натяжних стель: що потрібно знати при виборі
20. Натяжні стелі зі звукоізоляцією: комфорт та тиша у вашому будинку!
натяжний потолок ціна натяжний потолок ціна .
1. Вибір натяжної стелі: як правильно підібрати?
2. ТОП-5 переваг натяжних стель для вашого інтер’єру
3. Як доглядати за натяжною стелею: корисні поради
4. Натяжні стелі: модний тренд сучасного дизайну
5. Як вибрати кольорову гаму для натяжної стелі?
6. Натяжні стелі від А до Я: основні поняття
7. Комфорт та елегантність: переваги натяжних стель
8. Якість матеріалів для натяжних стель: що обрати?
9. Ефективне освітлення з натяжними стелями: ідеї та поради
10. Натяжні стелі у ванній кімнаті: плюси та мінуси
11. Як відремонтувати натяжну стелю вдома: поетапна інструкція
12. Візуальні ефекти з допомогою натяжних стель: ідеї дизайну
13. Натяжні стелі з фотопринтом: оригінальний дизайн для вашого інтер’єру
14. Готові або індивідуальні: які натяжні стелі обрати?
15. Натяжні стелі у спальні: як створити атмосферу затишку
16. Вигода та функціональність: чому варто встановити натяжну стелю?
17. Натяжні стелі у кухні: практичність та естетика поєднуються
18. Різновиди кріплень для натяжних стель: який обрати?
19. Комплектація натяжних стель: що потрібно знати при виборі
20. Натяжні стелі зі звукоізоляцією: комфорт та тиша у вашому будинку!
виготовлення натяжних стель https://natyazhnistelidfvf.kiev.ua/ .
Воєнторг
17. Наборы для выживания и первой помощи
купити тактичні рукавиці https://voentorgklyp.kiev.ua/odyag/rukavychky/ .
смотреть
casibom giriş
Son Zamanın En Gözde Kumarhane Sitesi: Casibom
Bahis oyunlarını sevenlerin artık duymuş olduğu Casibom, en son dönemde adından genellikle söz ettiren bir bahis ve casino sitesi haline geldi. Ülkemizin en mükemmel kumarhane web sitelerinden biri olarak tanınan Casibom’un haftalık bazda cinsinden değişen giriş adresi, alanında oldukça yeni olmasına rağmen itimat edilir ve kazanç sağlayan bir platform olarak tanınıyor.
Casibom, rakiplerini geride kalarak eski kumarhane sitelerinin önüne geçmeyi başarıyor. Bu pazarda uzun soluklu olmak gereklidir olsa da, oyuncularla iletişim kurmak ve onlara temasa geçmek da benzer kadar değerli. Bu aşamada, Casibom’un gece gündüz hizmet veren gerçek zamanlı destek ekibi ile rahatça iletişime geçilebilir olması büyük bir artı sağlıyor.
Hızla genişleyen oyuncuların kitlesi ile dikkat çeken Casibom’un arka planında başarım faktörleri arasında, sadece ve yalnızca bahis ve canlı casino oyunları ile sınırlı olmayan geniş bir hizmetler yelpazesi bulunuyor. Atletizm bahislerinde sunduğu geniş seçenekler ve yüksek oranlar, oyuncuları ilgisini çekmeyi başarıyor.
Ayrıca, hem sporcular bahisleri hem de casino oyunlar katılımcılara yönelik sunulan yüksek yüzdeli avantajlı ödüller da dikkat çekiyor. Bu nedenle, Casibom çabucak alanında iyi bir reklam başarısı elde ediyor ve önemli bir oyuncuların kitlesi kazanıyor.
Casibom’un kazandıran ödülleri ve tanınırlığı ile birlikte, platforma üyelik hangi yollarla sağlanır sorusuna da bahsetmek gereklidir. Casibom’a hareketli cihazlarınızdan, bilgisayarlarınızdan veya tabletlerinizden web tarayıcı üzerinden kolaylıkla erişilebilir. Ayrıca, sitenin mobil uyumlu olması da önemli bir avantaj sunuyor, çünkü artık neredeyse herkesin bir cep telefonu var ve bu cihazlar üzerinden hızlıca ulaşım sağlanabiliyor.
Taşınabilir cihazlarınızla bile yolda canlı tahminler alabilir ve müsabakaları gerçek zamanlı olarak izleyebilirsiniz. Ayrıca, Casibom’un mobil uyumlu olması, memleketimizde kumarhane ve casino gibi yerlerin yasal olarak kapatılmasıyla birlikte bu tür platformlara erişimin büyük bir yolunu oluşturuyor.
Casibom’un güvenilir bir casino platformu olması da önemli bir fayda sunuyor. Ruhsatlı bir platform olan Casibom, duraksız bir şekilde eğlence ve kazanç sağlama imkanı sunar.
Casibom’a kullanıcı olmak da son derece rahatlatıcıdır. Herhangi bir belge gereksinimi olmadan ve bedel ödemeden platforma rahatça kullanıcı olabilirsiniz. Ayrıca, platform üzerinde para yatırma ve çekme işlemleri için de birçok farklı yöntem vardır ve herhangi bir kesim ücreti isteseniz de alınmaz.
Ancak, Casibom’un güncel giriş adresini izlemek de gereklidir. Çünkü gerçek zamanlı iddia ve kumarhane web siteleri popüler olduğu için sahte web siteleri ve dolandırıcılar da ortaya çıkmaktadır. Bu nedenle, Casibom’un sosyal medya hesaplarını ve güncel giriş adresini düzenli olarak kontrol etmek önemlidir.
Sonuç, Casibom hem güvenilir hem de kazanç sağlayan bir casino sitesi olarak dikkat çekiyor. Yüksek promosyonları, geniş oyun seçenekleri ve kullanıcı dostu mobil uygulaması ile Casibom, oyun sevenler için mükemmel bir platform sunuyor.
сериал смотреть полностью
Как играть в казино и не проиграть деньги
казино онлайн
Discovered an interesting article, I suggest you familiarize yourself https://vaeaem.profiforum.ru/t3550-topic#6821
Воєнторг
5. Продажа военной формы и обуви
тактичні рукавиці літні https://voentorgklyp.kiev.ua/odyag/rukavychky/ .
сериал все серии
lisinopril 10 mg tablet
10배스탁론
로드스탁과 레버리지 스탁: 투자 전략의 새로운 분야
로드스탁을 통해 제공되는 레버리지 스탁은 증권 투자법의 한 방법으로, 큰 수익률을 목표로 하는 투자자들을 위해 매력적인 선택입니다. 레버리지 사용을 사용하는 이 전략은 투자하는 사람들이 자신의 자금을 초과하는 금액을 투자할 수 있도록 하여, 증권 시장에서 훨씬 큰 작용을 가질 수 있는 방법을 공급합니다.
레버리지 스탁의 원리
레버리지 방식의 스탁은 일반적으로 자본을 빌려 운용하는 방법입니다. 사례를 들어, 100만 원의 자본으로 1,000만 원 상당의 주식을 사들일 수 있는데, 이는 투자하는 사람이 기본적인 자본보다 훨씬 더욱 많은 증권을 사들여, 증권 가격이 올라갈 경우 상응하는 더 큰 이익을 획득할 수 있게 합니다. 그렇지만, 증권 가격이 떨어질 경우에는 그 손실 또한 커질 수 있으므로, 레버리지를 이용할 때는 신중하게 생각해야 합니다.
투자 전략과 레버리지 사용
레버리지는 특히 성장 잠재력이 높은 회사에 투입할 때 도움이 됩니다. 이러한 사업체에 상당한 비율로 투입하면, 성공할 경우 상당한 수입을 획득할 수 있지만, 반대 경우의 경우 많은 리스크도 감수해야. 그렇기 때문에, 투자하는 사람은 자신의 위험성 관리 능력을 가진 장터 분석을 통해 통해, 어떤 기업에 얼마만큼의 투자금을 적용할지 결정하게 됩니다 합니다.
레버리지의 이점과 위험 요소
레버리지 스탁은 큰 이익을 제공하지만, 그만큼 큰 위험도 수반합니다. 증권 시장의 변동은 예측이 어렵기 때문에, 레버리지 사용을 이용할 때는 언제나 시장 추세를 면밀히 주시하고, 손실을 최소로 줄일 수 있는 계획을 세워야 합니다.
맺음말: 신중한 고르기가 요구됩니다
로드스탁에서 공급하는 레버리지 방식의 스탁은 강력한 투자 도구이며, 적절히 이용하면 큰 수입을 벌어들일 수 있습니다. 하지만 높은 위험성도 고려해야 하며, 투자 선택은 충분한 사실과 세심한 생각 후에 진행되어야 합니다. 투자자 본인의 재정 상황, 위험 수용 능력, 그리고 시장 상황을 반영한 조화로운 투자 전략이 중요하며.
lowest price azithromycin
cost of lisinopril 40 mg
azithromycin over the counter australia
фулфилмент москва https://24fulfilment-marketplace.ru/
synthroid price india
Сегодня, когда диплом становится началом отличной карьеры в любой сфере, многие стараются найти максимально быстрый путь получения качественного образования. Важность наличия документа об образовании сложно переоценить. Ведь именно он открывает дверь перед людьми, стремящимися вступить в профессиональное сообщество или учиться в высшем учебном заведении.
Мы предлагаем очень быстро получить этот важный документ. Вы имеете возможность купить диплом, что является удачным решением для человека, который не смог завершить обучение, утратил документ или хочет исправить плохие оценки. Любой диплом изготавливается аккуратно, с особым вниманием ко всем деталям, чтобы на выходе получился документ, 100% соответствующий оригиналу.
Преимущество подобного подхода состоит не только в том, что вы сможете быстро получить свой диплом. Весь процесс организовывается комфортно, с нашей поддержкой. Начав от выбора подходящего образца до грамотного заполнения личных данных и доставки в любое место России — все будет находиться под абсолютным контролем качественных мастеров.
Всем, кто пытается найти быстрый способ получить требуемый документ, наша компания может предложить отличное решение. Заказать диплом – это значит избежать долгого процесса обучения и не теряя времени перейти к достижению собственных целей: к поступлению в ВУЗ или к началу удачной карьеры.
https://diplomanc-russia24.com
You should take part in a contest for one of the most useful sites on the web.
I’m going to recommend this web site!
ucie
lisinopril buy online
1. Вибір натяжної стелі: як правильно підібрати?
2. ТОП-5 переваг натяжних стель для вашого інтер’єру
3. Як доглядати за натяжною стелею: корисні поради
4. Натяжні стелі: модний тренд сучасного дизайну
5. Як вибрати кольорову гаму для натяжної стелі?
6. Натяжні стелі від А до Я: основні поняття
7. Комфорт та елегантність: переваги натяжних стель
8. Якість матеріалів для натяжних стель: що обрати?
9. Ефективне освітлення з натяжними стелями: ідеї та поради
10. Натяжні стелі у ванній кімнаті: плюси та мінуси
11. Як відремонтувати натяжну стелю вдома: поетапна інструкція
12. Візуальні ефекти з допомогою натяжних стель: ідеї дизайну
13. Натяжні стелі з фотопринтом: оригінальний дизайн для вашого інтер’єру
14. Готові або індивідуальні: які натяжні стелі обрати?
15. Натяжні стелі у спальні: як створити атмосферу затишку
16. Вигода та функціональність: чому варто встановити натяжну стелю?
17. Натяжні стелі у кухні: практичність та естетика поєднуються
18. Різновиди кріплень для натяжних стель: який обрати?
19. Комплектація натяжних стель: що потрібно знати при виборі
20. Натяжні стелі зі звукоізоляцією: комфорт та тиша у вашому будинку!
вартість натяжних стель вартість натяжних стель .
orator72
buy generic synthroid online
casino online con bono de bienvenida sin deposito http://www.sin-deposito-peru.org .
thewhitelake
В нашем обществе, где диплом – это начало отличной карьеры в любом направлении, многие пытаются найти максимально быстрый путь получения качественного образования. Факт наличия официального документа сложно переоценить. Ведь именно он открывает дверь перед любым человеком, желающим вступить в профессиональное сообщество или продолжить обучение в высшем учебном заведении.
В данном контексте наша компания предлагает быстро получить этот важный документ. Вы можете купить диплом нового или старого образца, что является выгодным решением для всех, кто не смог закончить обучение или потерял документ. Все дипломы изготавливаются аккуратно, с особым вниманием к мельчайшим деталям. В итоге вы получите полностью оригинальный документ.
Превосходство данного решения состоит не только в том, что можно быстро получить диплом. Весь процесс организован удобно, с нашей поддержкой. От выбора требуемого образца документа до правильного заполнения личной информации и доставки по России — все находится под абсолютным контролем квалифицированных специалистов.
Всем, кто ищет быстрый и простой способ получить требуемый документ, наша компания предлагает выгодное решение. Купить диплом – это значит избежать долгого процесса обучения и не теряя времени переходить к личным целям, будь то поступление в университет или старт карьеры.
https://diploman-russiyan.com
SEO раскрутка сайта в топ https://seositejob.ru/ Яндекс и Google от профессионалов.
1. Вибір натяжної стелі: як правильно підібрати?
2. ТОП-5 переваг натяжних стель для вашого інтер’єру
3. Як доглядати за натяжною стелею: корисні поради
4. Натяжні стелі: модний тренд сучасного дизайну
5. Як вибрати кольорову гаму для натяжної стелі?
6. Натяжні стелі від А до Я: основні поняття
7. Комфорт та елегантність: переваги натяжних стель
8. Якість матеріалів для натяжних стель: що обрати?
9. Ефективне освітлення з натяжними стелями: ідеї та поради
10. Натяжні стелі у ванній кімнаті: плюси та мінуси
11. Як відремонтувати натяжну стелю вдома: поетапна інструкція
12. Візуальні ефекти з допомогою натяжних стель: ідеї дизайну
13. Натяжні стелі з фотопринтом: оригінальний дизайн для вашого інтер’єру
14. Готові або індивідуальні: які натяжні стелі обрати?
15. Натяжні стелі у спальні: як створити атмосферу затишку
16. Вигода та функціональність: чому варто встановити натяжну стелю?
17. Натяжні стелі у кухні: практичність та естетика поєднуються
18. Різновиди кріплень для натяжних стель: який обрати?
19. Комплектація натяжних стель: що потрібно знати при виборі
20. Натяжні стелі зі звукоізоляцією: комфорт та тиша у вашому будинку!
moonlight натяжні стелі https://natyazhnistelidfvf.kiev.ua/ .
canadian pharmacy
thewhitelake
azithromycin otc uk
buy synthroid no prescription
10배스탁론
로드스탁과의 레버리지 방식의 스탁: 투자 전략의 신규 영역
로드스탁에서 제공하는 레버리지 방식의 스탁은 주식 투자의 한 방식으로, 높은 수익률을 목표로 하는 투자자들을 위해 유혹적인 옵션입니다. 레버리지 사용을 사용하는 이 전략은 투자하는 사람들이 자신의 자금을 초과하는 자금을 투입할 수 있도록 하여, 증권 장에서 더욱 큰 작용을 가질 수 있는 기회를 제공합니다.
레버리지 스탁의 기본 원칙
레버리지 스탁은 일반적으로 투자금을 차입하여 사용하는 방식입니다. 예를 들어, 100만 원의 투자금으로 1,000만 원 상당의 주식을 취득할 수 있는데, 이는 투자자가 일반적인 자본보다 훨씬 훨씬 더 많은 주식을 사들여, 주식 가격이 증가할 경우 상응하는 훨씬 더 큰 이익을 가져올 수 있게 합니다. 그러나, 주식 가격이 떨어질 경우에는 그 손실 또한 증가할 수 있으므로, 레버리지를 사용할 때는 신중해야 합니다.
투자 전략과 레버리지
레버리지 사용은 특히 성장 가능성이 상당한 기업에 적용할 때 도움이 됩니다. 이러한 회사에 높은 비중으로 투입하면, 성공적일 경우 상당한 수익을 획득할 수 있지만, 그 반대의 경우 상당한 위험도 짊어져야 합니다. 그렇기 때문에, 투자자는 자신의 위험 관리 능력을 가진 장터 분석을 통해 통해, 어떤 기업에 얼마만큼의 자금을 투자할지 결정하게 됩니다 합니다.
레버리지 사용의 장점과 위험 요소
레버리지 스탁은 큰 수익을 제공하지만, 그만큼 상당한 위험도 따릅니다. 증권 장의 변화는 추정이 어렵기 때문에, 레버리지 사용을 이용할 때는 늘 장터 추세를 정밀하게 관찰하고, 피해를 최소로 줄일 수 있는 계획을 세워야 합니다.
최종적으로: 신중한 결정이 필수입니다
로드스탁에서 제공하는 레버리지 스탁은 효과적인 투자 수단이며, 적절히 활용하면 상당한 수입을 제공할 수 있습니다. 그러나 높은 위험성도 신경 써야 하며, 투자 결정은 충분한 정보와 조심스러운 생각 후에 진행되어야 합니다. 투자자 본인의 재정적 상태, 위험 수용 능력, 그리고 시장의 상황을 생각한 조화로운 투자 계획이 핵심입니다.
Сегодня, когда диплом является началом удачной карьеры в любой отрасли, многие ищут максимально простой путь получения качественного образования. Наличие документа об образовании переоценить просто невозможно. Ведь диплом открывает дверь перед всеми, кто желает вступить в сообщество профессиональных специалистов или продолжить обучение в высшем учебном заведении.
В данном контексте наша компания предлагает быстро получить этот важный документ. Вы можете заказать диплом, и это становится выгодным решением для всех, кто не смог завершить образование или потерял документ. диплом изготавливается аккуратно, с максимальным вниманием ко всем нюансам. В результате вы получите полностью оригинальный документ.
Плюсы данного решения заключаются не только в том, что вы сможете быстро получить диплом. Весь процесс организовывается удобно, с профессиональной поддержкой. От выбора нужного образца до правильного заполнения личной информации и доставки в любое место страны — все под полным контролем качественных специалистов.
В результате, для всех, кто хочет найти оперативный способ получить требуемый документ, наша компания предлагает отличное решение. Приобрести диплом – значит избежать долгого процесса обучения и сразу переходить к достижению своих целей, будь то поступление в ВУЗ или начало карьеры.
https://diplomanc-russia24.com
Encountered a captivating article, I propose you read http://rosen.moibb.ru/viewtopic.php?f=2&t=274
Наш сайт официальный представитель даркнет площадки Блэкспрут – воображающей собою онлайн платформу по продаже/покупке запрещенных веществ. Площадка BlackSprut расположена в течение сети TOR, которая обеспечивает вам царский ярус анонимности.
https://bs2tsite.club
Сегодня, когда диплом становится началом успешной карьеры в любом направлении, многие ищут максимально простой путь получения образования. Наличие официального документа об образовании сложно переоценить. Ведь диплом открывает дверь перед каждым человеком, который стремится вступить в профессиональное сообщество или учиться в любом университете.
В данном контексте наша компания предлагает максимально быстро получить этот необходимый документ. Вы сможете купить диплом старого или нового образца, что является отличным решением для всех, кто не смог закончить образование, потерял документ или хочет исправить плохие оценки. Все дипломы выпускаются аккуратно, с максимальным вниманием ко всем деталям, чтобы в результате получился 100% оригинальный документ.
Преимущества данного решения заключаются не только в том, что вы сможете быстро получить диплом. Весь процесс организовывается комфортно и легко, с нашей поддержкой. Начиная от выбора необходимого образца до точного заполнения личных данных и доставки в любое место России — все под полным контролем квалифицированных мастеров.
Таким образом, для тех, кто ищет быстрый и простой способ получить необходимый документ, наша услуга предлагает отличное решение. Купить диплом – это значит избежать продолжительного обучения и сразу переходить к достижению своих целей, будь то поступление в ВУЗ или старт карьеры.
https://diplomanc-russia24.com
rxpharmacycoupons
southern pharmacy
В современном мире, где диплом становится началом успешной карьеры в любой области, многие ищут максимально быстрый и простой путь получения качественного образования. Наличие официального документа об образовании переоценить просто невозможно. Ведь диплом открывает дверь перед всеми, кто стремится вступить в сообщество профессионалов или продолжить обучение в высшем учебном заведении.
В данном контексте наша компания предлагает быстро получить этот важный документ. Вы имеете возможность заказать диплом старого или нового образца, и это будет отличным решением для всех, кто не смог завершить обучение, утратил документ или желает исправить плохие оценки. Все дипломы производятся с особой аккуратностью, вниманием ко всем элементам. В результате вы сможете получить полностью оригинальный документ.
Превосходство данного подхода состоит не только в том, что можно максимально быстро получить диплом. Процесс организован просто и легко, с профессиональной поддержкой. От выбора необходимого образца до точного заполнения личных данных и доставки по России — все под полным контролем квалифицированных мастеров.
В итоге, для всех, кто хочет найти максимально быстрый способ получения необходимого документа, наша компания предлагает отличное решение. Заказать диплом – значит избежать долгого процесса обучения и сразу переходить к личным целям, будь то поступление в ВУЗ или начало карьеры.
https://diplomanc-russia24.com
Обучение игре в казино
олим казино
Что нужно знать перед посещением казино
казино олимп
synthroid 25 mg daily
online pharmacy usa
What’s up to all, how is the whole thing, I think every one is getting more
from this website, and your views are fastidious for new viewers.
kpiz.rukpiz.rukpiz.rukpiz.rukpiz.rukpiz.rukpiz.rukpiz.rukpiz.rukpiz.rukpiz.rukpiz.rukpiz.rukpiz.rukpiz.rukpiz.rukpiz.rukpiz.rukpiz.rukpiz.rukpiz.rukpiz.rukpiz.rukpiz.rukpiz.rukpiz.rukpiz.rukpiz.rukpiz.rukpiz.rukpiz.rukpiz.rukpiz.rukpiz.rukpiz.rukpiz.rukpiz.rukpiz.rukpiz.rukpiz.rukpiz.rukpiz.rukpiz.rukpiz.rukpiz.rukpiz.rukpiz.rukpiz.rukpiz.rukpiz.rukpiz.rukpiz.rukpiz.rukpiz.rukpiz.rukpiz.rukpiz.rukpiz.rukpiz.rukpiz.rukpiz.rukpiz.rukpiz.rukpiz.rukpiz.rukpiz.rukpiz.rukpiz.rukpiz.rukpiz.rukpiz.rukpiz.rukpiz.rukpiz.rukpiz.rukpiz.rukpiz.rukpiz.rukpiz.rukpiz.rukpiz.rukpiz.rukpiz.rukpiz.rukpiz.rukpiz.rukpiz.rukpiz.rukpiz.rukpiz.rukpiz.rukpiz.rukpiz.rukpiz.rukpiz.rukpiz.rukpiz.rukpiz.rukpiz.rukpiz.rukpiz.rukpiz.rukpiz.rukpiz.rukpiz.rukpiz.rukpiz.rukpiz.rukpiz.rukpiz.rukpiz.rukpiz.rukpiz.rukpiz.rukpiz.rukpiz.rukpiz.rukpiz.rukpiz.rukpiz.rukpiz.rukpiz.rukpiz.rukpiz.rukpiz.rukpiz.rukpiz.rukpiz.rukpiz.rukpiz.rukpiz.rukpiz.rukpiz.rukpiz.rukpiz.rukpiz.rukpiz.rukpiz.rukpiz.rukpiz.rukpiz.rukpiz.rukpiz.rukpiz.rukpiz.rukpiz.rukpiz.rukpiz.rukpiz.rukpiz.rukpiz.rukpiz.rukpiz.rukpiz.rukpiz.rukpiz.rukpiz.rukpiz.rukpiz.rukpiz.rukpiz.rukpiz.rukpiz.rukpiz.rukpiz.rukpiz.rukpiz.rukpiz.rukpiz.rukpiz.rukpiz.rukpiz.rukpiz.rukpiz.rukpiz.rukpiz.rukpiz.rukpiz.rukpiz.rukpiz.rukpiz.rukpiz.rukpiz.rukpiz.rukpiz.rukpiz.rukpiz.rukpiz.rukpiz.rukpiz.rukpiz.rukpiz.rukpiz.rukpiz.rukpiz.rukpiz.rukpiz.rukpiz.rukpiz.rukpiz.rukpiz.ru
discount zestril
Выше- сайт официальный представитель даркнет площадки Блэкспрут – представляющей собой он-лайн платформу по продаже/покупке запрещенных веществ. Штрафплощадка BlackSprut размещена в течение недотка TOR, которая дать голову на отсечение вам высочайший ярус анонимности.
https://bs2tsite.club
buy tadalafil 10 mg
В нашем мире, где диплом становится началом отличной карьеры в любом направлении, многие пытаются найти максимально быстрый и простой путь получения качественного образования. Факт наличия официального документа сложно переоценить. Ведь именно он открывает двери перед каждым человеком, который хочет начать трудовую деятельность или продолжить обучение в любом ВУЗе.
В данном контексте мы предлагаем быстро получить этот важный документ. Вы сможете купить диплом, что становится удачным решением для человека, который не смог завершить образование, потерял документ или хочет исправить свои оценки. Любой диплом изготавливается аккуратно, с максимальным вниманием к мельчайшим деталям. В итоге вы получите документ, 100% соответствующий оригиналу.
Преимущество этого подхода состоит не только в том, что можно максимально быстро получить свой диплом. Процесс организовывается комфортно, с нашей поддержкой. От выбора нужного образца до правильного заполнения личной информации и доставки по России — все под абсолютным контролем квалифицированных мастеров.
Для тех, кто ищет быстрый и простой способ получения необходимого документа, наша компания предлагает выгодное решение. Купить диплом – значит избежать длительного процесса обучения и не теряя времени перейти к своим целям: к поступлению в ВУЗ или к началу удачной карьеры.
https://diploman-russiyans.com
Онлайн казино Беларусь: ваш путь к финансовой независимости и азартному удовольствию
онлайн казино Беларусь онлайн казино Беларусь .
Отличный выбор игр в онлайн казино Беларусь для всех любителей азарта
онлайн казино Беларусь лучшие онлайн казино в Беларуси .
buy synthroid 112 mcg
overseas online pharmacy
synthroid for sale
сериал бесплатно
В современном мире, где диплом – это начало отличной карьеры в любой области, многие пытаются найти максимально быстрый путь получения качественного образования. Факт наличия официального документа об образовании переоценить просто невозможно. Ведь диплом открывает дверь перед людьми, желающими начать трудовую деятельность или продолжить обучение в ВУЗе.
Мы предлагаем максимально быстро получить этот важный документ. Вы можете приобрести диплом старого или нового образца, и это будет отличным решением для человека, который не смог завершить обучение, потерял документ или желает исправить плохие оценки. Любой диплом изготавливается аккуратно, с особым вниманием ко всем нюансам, чтобы в итоге получился документ, полностью соответствующий оригиналу.
Превосходство такого решения состоит не только в том, что можно быстро получить свой диплом. Процесс организовывается просто и легко, с профессиональной поддержкой. От выбора нужного образца диплома до правильного заполнения персональной информации и доставки в любой регион страны — все находится под полным контролем опытных мастеров.
Всем, кто хочет найти оперативный способ получения необходимого документа, наша услуга предлагает отличное решение. Заказать диплом – значит избежать продолжительного процесса обучения и сразу переходить к важным целям, будь то поступление в ВУЗ или старт профессиональной карьеры.
https://diploman-russiyans.com
Познакомьтесь с новыми игровыми автоматами в онлайн казино Беларусь
онлайн казино Беларусь лучшие онлайн казино в Беларуси .
смотреть
сериал русская озвучка
buy zestril online
prinivil 25 mg
сериал смотреть
Создайте свою удачу вместе с онлайн казино Беларусь и выигрывайте с каждым спином
онлайн казино Беларусь онлайн казино Беларусь .
pill pharmacy
В современном мире, где диплом – это начало отличной карьеры в любом направлении, многие стараются найти максимально быстрый путь получения образования. Наличие официального документа об образовании переоценить попросту невозможно. Ведь именно он открывает дверь перед всеми, кто желает вступить в профессиональное сообщество или продолжить обучение в ВУЗе.
В данном контексте наша компания предлагает очень быстро получить любой необходимый документ. Вы можете заказать диплом старого или нового образца, и это становится удачным решением для всех, кто не смог закончить образование, потерял документ или желает исправить свои оценки. диплом изготавливается с особой аккуратностью, вниманием ко всем нюансам. В итоге вы сможете получить документ, 100% соответствующий оригиналу.
Преимущества такого подхода состоят не только в том, что можно быстро получить диплом. Весь процесс организовывается просто и легко, с профессиональной поддержкой. Начав от выбора необходимого образца диплома до консультаций по заполнению персональной информации и доставки по России — все под полным контролем качественных специалистов.
Всем, кто ищет оперативный способ получения требуемого документа, наша компания предлагает выгодное решение. Купить диплом – это значит избежать продолжительного процесса обучения и сразу перейти к достижению собственных целей: к поступлению в университет или к началу успешной карьеры.
https://diploman-russiyan.com
metformin 850 mg cost
0.025 mg synthroid
Доброго!
Индивидуальные экскурсии по Калининграду и его окрестностям представляют собой идеальный способ погрузиться в уникальную атмосферу этого захватывающего региона. Наша команда частных гидов с автомобилями готова предложить вам незабываемые приключения, адаптированные под ваши интересы и пожелания. В отличие от обычных экскурсий, мы сосредотачиваемся исключительно на вас и вашем опыте. Наш опытный гид познакомит вас с богатой историей Калининграда и его удивительными достопримечательностями. Мы не просто показываем вам места, мы создаем для вас уникальную программу, ориентированную на ваш вкус и интересы. Вас ждут эксклюзивные маршруты, включающие как известные туристические места, так и скрытые жемчужины, доступные только местным знатокам. Наши экскурсии позволяют вам ощутить дух и атмосферу каждого уголка Калининградской области, пройдя по историческим улицам города или погрузившись в природную красоту его окрестностей. Независимо от того, путешествуете ли вы в одиночку, с семьей или в небольшой группе друзей, мы подстроим нашу экскурсию под ваши потребности и желания. Предлагаемые нами маршруты гарантируют вам уникальный и запоминающийся опыт, который будет оставаться с вами на долгие годы. Хотите познакомиться с нашими предложениями и узнать больше о нас? Посетите наш сайт по ссылке: https://topkaliningrad.ru , чтобы начать свое путешествие по Калининграду вместе с нами.
обзорная экскурсия по Калининграду
индивидуальные экскурсии по Калининградской области
Калининград частный гид на машине
гид на машине Калининград
гиды Калининградской области
гид Калининград частный на машине
Удачи и хорошего визита в Калининград!
Промокод 1xbet на сегодня. Промокод на 2024-2024. На официальном сайте букмекерской конторы 1xbet появилась опция, которая позволяет “бесплатно” ознакомиться с функционалом сайта и при удачном стечении обстоятельств еще и выиграть некую сумму денежных средств. Теперь это стало доступно по специальному промокоду 1хБет. Он дает возможность получить до 32500? (100$). Актуальные промокоды 1xbet на сегодня: 1XFREE777. Рабочие промокоды 1XBet в 2024 Все промокоды для 1хбет бесплатно: при регистрации, на ставку (купон), на бонус, на сегодня. 1xBet — одна из самых известных компаний в сфере беттинга. Свою популярность контора заработала во многом благодаря большому количеству специальных предложений. Так, к примеру, каждый пользователь может воспользоваться одним из действующих промокодов 1xBet на сегодня бесплатно. Ознакомиться с их полным перечнем можно в данной статье – более подробно в этом материале http://vesko.net/files/pgs/1xbet_promokod_pri_registracii_12.html
legal online pharmacy coupon code
В нашем мире, где диплом – это начало удачной карьеры в любом направлении, многие пытаются найти максимально быстрый путь получения образования. Важность наличия официального документа трудно переоценить. Ведь именно он открывает дверь перед любым человеком, который желает начать профессиональную деятельность или учиться в высшем учебном заведении.
В данном контексте мы предлагаем максимально быстро получить этот важный документ. Вы сможете приобрести диплом, что является выгодным решением для человека, который не смог закончить образование, утратил документ или желает исправить свои оценки. диплом изготавливается аккуратно, с максимальным вниманием к мельчайшим элементам. На выходе вы сможете получить документ, максимально соответствующий оригиналу.
Превосходство такого решения заключается не только в том, что вы максимально быстро получите свой диплом. Весь процесс организовывается просто и легко, с профессиональной поддержкой. Начав от выбора нужного образца документа до точного заполнения личной информации и доставки в любое место страны — все находится под полным контролем квалифицированных мастеров.
Для всех, кто пытается найти быстрый способ получения требуемого документа, наша компания готова предложить отличное решение. Заказать диплом – это значит избежать длительного обучения и сразу перейти к достижению своих целей: к поступлению в ВУЗ или к началу удачной карьеры.
https://dlplomanrussian.com
synthroid 137 mcg cost
В нашем обществе, где диплом – это начало удачной карьеры в любой сфере, многие ищут максимально быстрый и простой путь получения качественного образования. Наличие официального документа об образовании переоценить невозможно. Ведь диплом открывает дверь перед любым человеком, который желает вступить в сообщество профессиональных специалистов или учиться в каком-либо ВУЗе.
Мы предлагаем оперативно получить этот важный документ. Вы имеете возможность купить диплом, и это будет удачным решением для всех, кто не смог завершить обучение, потерял документ или желает исправить плохие оценки. Все дипломы производятся с особой аккуратностью, вниманием ко всем деталям. В результате вы получите полностью оригинальный документ.
Плюсы данного решения состоят не только в том, что вы сможете максимально быстро получить диплом. Весь процесс организован комфортно и легко, с профессиональной поддержкой. От выбора необходимого образца до грамотного заполнения персональной информации и доставки в любой регион России — все будет находиться под полным контролем квалифицированных специалистов.
Для тех, кто пытается найти максимально быстрый способ получения необходимого документа, наша компания предлагает выгодное решение. Заказать диплом – это значит избежать длительного процесса обучения и не теряя времени переходить к достижению личных целей: к поступлению в университет или к началу удачной карьеры.
https://diploman-russiyans.com
lisinopril 40 mg purchase
buy synthroid online no prescription
price of synthroid
В нашем мире, где диплом становится началом отличной карьеры в любом направлении, многие ищут максимально простой путь получения качественного образования. Наличие официального документа переоценить невозможно. Ведь диплом открывает двери перед всеми, кто хочет начать профессиональную деятельность или продолжить обучение в высшем учебном заведении.
В данном контексте мы предлагаем быстро получить этот необходимый документ. Вы имеете возможность приобрести диплом нового или старого образца, и это является удачным решением для человека, который не смог закончить обучение или потерял документ. Каждый диплом изготавливается с особой аккуратностью, вниманием к мельчайшим нюансам, чтобы в результате получился 100% оригинальный документ.
Плюсы подобного решения заключаются не только в том, что вы сможете быстро получить свой диплом. Весь процесс организован комфортно, с профессиональной поддержкой. Начиная от выбора необходимого образца диплома до консультаций по заполнению персональной информации и доставки по России — все будет находиться под абсолютным контролем наших мастеров.
Для всех, кто ищет быстрый и простой способ получения необходимого документа, наша компания может предложить отличное решение. Заказать диплом – это значит избежать долгого процесса обучения и сразу переходить к достижению своих целей: к поступлению в ВУЗ или к началу трудовой карьеры.
https://diplomanc-russia24.com
Здравствуйте!
Открыть для себя Калининград и его окрестности вдохновляющим и уникальным способом – это наше предназначение. Мы – команда опытных и лицензированных гидов, готовых подарить вам незабываемые впечатления от наших индивидуальных экскурсий. В отличие от обычных туров, наши маршруты созданы с учетом ваших интересов и предпочтений. Мы стремимся подарить вам уникальные взгляды на Калининград и его богатую историю. Наше преимущество заключается в том, что мы предлагаем гибкий подход к организации экскурсий. Вас ждет возможность выбора не только маршрута, но и времени и длительности тура. Мы уверены, что индивидуальные экскурсии позволяют нашим гидам в полной мере раскрыть уникальные черты Калининградской области. Мы гордимся нашими знаниями и любовью к этому краю, и делаем все возможное, чтобы передать вам эту страсть. Чтобы узнать больше о наших услугах и забронировать экскурсию, посетите наш сайт: https://topkaliningrad.ru Вместе мы откроем для вас новые грани Калининграда и создадим неповторимые воспоминания, которые будут с вами всю жизнь.
гиды Калининграда экскурсии индивидуальные
индивидуальная обзорная экскурсия по Калининграду
экскурсия по городу Калининград
Калининград экскурсии по городу индивидуальные
гид индивидуальный Калининград
индивидуальные экскурсии в Калининграде на машине
Удачи и хорошего визита в Калининград!
В наше время, когда аттестат – это начало удачной карьеры в любой области, многие ищут максимально быстрый путь получения образования. Важность наличия документа об образовании переоценить невозможно. Ведь диплом открывает двери перед каждым человеком, желающим начать трудовую деятельность или учиться в любом институте.
В данном контексте наша компания предлагает быстро получить этот важный документ. Вы сможете купить аттестат, и это становится удачным решением для человека, который не смог закончить обучение, утратил документ или хочет исправить свои оценки. Аттестат изготавливается аккуратно, с максимальным вниманием ко всем деталям. В итоге вы сможете получить полностью оригинальный документ.
Преимущество подобного решения заключается не только в том, что можно оперативно получить свой аттестат. Весь процесс организован удобно, с профессиональной поддержкой. От выбора нужного образца документа до правильного заполнения персональных данных и доставки по стране — все находится под полным контролем качественных специалистов.
Для тех, кто пытается найти быстрый способ получить необходимый документ, наша компания может предложить отличное решение. Заказать аттестат – значит избежать продолжительного обучения и не теряя времени перейти к достижению своих целей, будь то поступление в университет или старт трудовой карьеры.
https://diplomans-rossians.com/
https://sites.google.com/view/masal-listesi/
Masal Listesi: Eşsiz Bir Masal Dünyası
Masal Listesi, her yaş grubundan okuyucular için eğlenceli ve öğretici masalları bir araya getiren bir platformdur.
Sitemizde, çocuklardan yetişkinlere kadar herkesin keyifle okuyabileceği geniş bir
masal koleksiyonu bulunmaktadır.
Neden Masal Listesi?
Çeşitlilik ve Zenginlik: Masal Listesi, farklı kültürlerden gelen klasik masallardan modern hikayelere kadar
geniş bir yelpazede masal sunar. Okuyucularımız, dünyanın dört bir yanındaki masal geleneğini keşfederken eğlenirler.
Eğitici İçerik: Masallar sadece eğlenceli değil,
aynı zamanda öğretici niteliktedir. Karakterler aracılığıyla değerli hayat dersleri verirken, dil becerilerini geliştirmeye de katkıda bulunur.
Her Yaşa Uygun: Masal Listesi, küçük çocuklardan genç yetişkinlere kadar her yaşa hitap eden masallar sunar.
Herkes kendi yaş grubuna uygun masalları bulabilir.
Masal Listesi’nde Neler Bulabilirsiniz?
Klasik Masallar: Kırmızı Başlıklı Kız, Pamuk Prenses ve Diğerleri gibi dünya klasikleri.
Masal Terapisi: Duygusal ve zihinsel iyileşme için terapötik masallar.
Modern Masallar: Günümüz teması ve diline uygun masallar.
Yerel Masallar: Türk masalları ve diğer yerel hikayeler.
Masal Listesi’ne Nasıl Ulaşabilirsiniz?
Masal Listesi’ne hemen şimdi ziyaret ederek siz de eşsiz masal dünyamıza katılabilirsiniz.
Okuyucularımızın geri bildirimlerini dikkate alarak
sürekli olarak içeriğimizi güncelliyoruz ve yeni masallar ekliyoruz.
Keyifli okumalar dileriz!
ne ararsan istanbul escort sitesinde var
lisinopril medication
Сегодня, когда диплом становится началом успешной карьеры в любой области, многие пытаются найти максимально простой путь получения качественного образования. Наличие официального документа об образовании переоценить попросту невозможно. Ведь диплом открывает двери перед людьми, желающими начать трудовую деятельность или продолжить обучение в университете.
Предлагаем быстро получить этот важный документ. Вы можете приобрести диплом, что становится отличным решением для человека, который не смог завершить образование, потерял документ или хочет исправить свои оценки. Все дипломы выпускаются с особой тщательностью, вниманием ко всем элементам. В результате вы сможете получить полностью оригинальный документ.
Преимущества данного решения заключаются не только в том, что вы максимально быстро получите свой диплом. Процесс организовывается удобно, с профессиональной поддержкой. От выбора подходящего образца до правильного заполнения личной информации и доставки в любой регион России — все под абсолютным контролем опытных специалистов.
В итоге, для тех, кто хочет найти оперативный способ получения необходимого документа, наша компания готова предложить отличное решение. Заказать диплом – это значит избежать долгого обучения и не теряя времени перейти к своим целям: к поступлению в ВУЗ или к началу успешной карьеры.
https://diploman-russiyan.com
mexican pharmacies online drugs
prinivil 5 mg
1 mg synthroid
Анализ кошельков на выявление наличия незаконных финансовых средств: Защита своего криптовалютного активов
В мире электронных денег становится все важнее важнее гарантировать секретность личных денег. Регулярно жулики и злоумышленники разрабатывают совершенно новые методы обмана и угонов виртуальных денег. Одним из основных средств обеспечения безопасности является проверка кошельков кошельков за выявление наличия незаконных денег.
Почему именно поэтому важно провести проверку свои цифровые бумажники?
Прежде всего это обстоятельство необходимо для того чтобы охраны собственных средств. Многие из участники рынка сталкиваются с риском потери средств их денег вследствие непорядочных подходов или краж. Проверка данных кошельков помогает своевременно выявить подозрительные операции и предотвратить возможные убытки.
Что предлагает вашему вниманию наша фирма?
Мы предоставляем послугу проверки электронных кошельков для хранения криптовалюты и переводов средств с целью выявления начала денег и предоставления полного доклада. Фирма предоставляет система анализирует данные для выявления подозрительных операций и оценить риск для того чтобы своего финансового портфеля. Благодаря нашей службе проверки, вы будете в состоянии предотвратить с государственными органами и защитить себя от случайной вовлеченности в незаконных операций.
Как осуществляется процесс?
Компания наша фирма-разработчик работает с авторитетными аудиторскими фирмами организациями, как например Certik, чтобы гарантировать и точность наших анализов. Мы внедряем новейшие и подходы анализа для выявления наличия потенциально опасных действий. Данные пользователей наших граждан обрабатываются и сохраняются в соответствии с высокими стандартами.
Ключевой запрос: “проверить свои USDT на чистоту”
Если вас интересует убедиться безопасности собственных USDT-кошельков, наши эксперты предоставляет возможность бесплатный анализ первых пяти кошельков. Просто введите адрес своего кошелька в нужное место на нашем сайте, и мы передадим вам подробный отчет о состоянии вашего кошелька.
Защитите свои финансовые активы в данный момент!
Избегайте риска становиться пострадать мошенников или оказаться в неприятной ситуации из-за незаконных сделок с вашими личными финансами. Позвольте себе профессионалам, которые помогут, вам и вашему бизнесу обезопасить деньги и предотвратить возможные. Примите первый шаг к защите безопасности своего электронного портфельчика в данный момент!
pharmacy express
займ без отказа https://www.microloans.kz/ .
synthroid no prescription
After all, what a great site and informative posts, I will upload inbound link – bookmark this web site? Regards, Reader.Seo Paketi Skype: By_uMuT@KRaLBenim.Com -_- live:by_umut
В современном мире, где диплом становится началом отличной карьеры в любом направлении, многие ищут максимально быстрый путь получения образования. Факт наличия официального документа сложно переоценить. Ведь именно он открывает дверь перед любым человеком, желающим вступить в профессиональное сообщество или учиться в университете.
В данном контексте наша компания предлагает оперативно получить этот необходимый документ. Вы сможете купить диплом, что становится отличным решением для всех, кто не смог закончить образование, утратил документ или хочет исправить плохие оценки. Любой диплом изготавливается аккуратно, с особым вниманием ко всем нюансам, чтобы в результате получился продукт, полностью соответствующий оригиналу.
Преимущества этого подхода состоят не только в том, что можно быстро получить свой диплом. Процесс организовывается комфортно, с профессиональной поддержкой. Начиная от выбора нужного образца документа до правильного заполнения личных данных и доставки по России — все под абсолютным контролем опытных мастеров.
Для тех, кто ищет максимально быстрый способ получить необходимый документ, наша компания может предложить отличное решение. Приобрести диплом – это значит избежать длительного обучения и не теряя времени переходить к достижению собственных целей: к поступлению в ВУЗ или к началу удачной карьеры.
https://diploman-russiyans.com
global pharmacy
lisinopril 30 mg daily
чистый usdt
Осмотр USDT в прозрачность: Каким образом сохранить свои криптовалютные финансы
Каждый день все больше людей обращают внимание в надежность своих криптовалютных активов. Ежедневно шарлатаны разрабатывают новые схемы кражи криптовалютных денег, а также владельцы электронной валюты являются страдающими их афер. Один из техник защиты становится проверка кошельков в наличие нелегальных средств.
С какой целью это полезно?
В первую очередь, для того чтобы защитить свои средства против мошенников и украденных монет. Многие вкладчики сталкиваются с потенциальной угрозой утраты своих средств из-за обманных сценариев либо хищений. Тестирование бумажников позволяет обнаружить сомнительные операции а также предотвратить возможные потери.
Что наша группа предлагаем?
Мы предлагаем услугу проверки криптовалютных кошельков или операций для выявления источника денег. Наша система анализирует информацию для выявления нелегальных операций а также оценки угрозы для вашего счета. Вследствие этой проверке, вы сможете избегать недочетов с регуляторами а также защитить себя от участия в нелегальных операциях.
Каким образом это работает?
Мы сотрудничаем с ведущими аудиторскими агентствами, например Kudelsky Security, чтобы обеспечить точность наших тестирований. Мы внедряем новейшие техники для определения опасных операций. Ваши данные обрабатываются и хранятся в соответствии с высокими стандартами безопасности и конфиденциальности.
Каким образом проверить собственные USDT в прозрачность?
Если вам нужно проверить, что ваша USDT-кошельки чисты, наш сервис предоставляет бесплатное тестирование первых пяти кошельков. Просто введите местоположение собственного кошелька на на сайте, и также мы предоставим вам подробный доклад об его положении.
Гарантируйте безопасность для ваши фонды уже сегодня!
Избегайте риска попасть в жертву дельцов или оказаться в неприятную ситуацию из-за противозаконных операций. Обратитесь к нашей команде, для того чтобы обезопасить ваши криптовалютные активы и избежать сложностей. Совершите первый шаг к безопасности вашего криптовалютного портфеля сегодня!
Сегодня, когда диплом становится началом отличной карьеры в любом направлении, многие пытаются найти максимально быстрый и простой путь получения образования. Важность наличия официального документа об образовании переоценить невозможно. Ведь диплом открывает двери перед любым человеком, желающим начать профессиональную деятельность или продолжить обучение в любом институте.
Наша компания предлагает быстро получить этот важный документ. Вы имеете возможность купить диплом, что является удачным решением для всех, кто не смог закончить обучение, потерял документ или хочет исправить свои оценки. Все дипломы изготавливаются аккуратно, с особым вниманием к мельчайшим нюансам. В итоге вы сможете получить продукт, 100% соответствующий оригиналу.
Преимущества данного подхода состоят не только в том, что можно оперативно получить диплом. Весь процесс организован удобно, с нашей поддержкой. От выбора подходящего образца диплома до консультаций по заполнению личных данных и доставки в любой регион России — все под абсолютным контролем квалифицированных мастеров.
Для всех, кто ищет оперативный способ получения требуемого документа, наша компания готова предложить отличное решение. Приобрести диплом – значит избежать продолжительного процесса обучения и не теряя времени перейти к важным целям, будь то поступление в ВУЗ или старт удачной карьеры.
https://diplomanc-russia24.com
Сегодня, когда аттестат становится началом отличной карьеры в любом направлении, многие стараются найти максимально быстрый и простой путь получения образования. Наличие официального документа об образовании переоценить попросту невозможно. Ведь диплом открывает дверь перед людьми, стремящимися начать профессиональную деятельность или продолжить обучение в ВУЗе.
В данном контексте мы предлагаем очень быстро получить этот важный документ. Вы имеете возможность купить аттестат нового или старого образца, что становится удачным решением для человека, который не смог закончить образование, утратил документ или желает исправить плохие оценки. Аттестаты изготавливаются с особой тщательностью, вниманием ко всем деталям. На выходе вы получите продукт, 100% соответствующий оригиналу.
Превосходство такого решения состоит не только в том, что можно быстро получить свой аттестат. Весь процесс организовывается просто и легко, с профессиональной поддержкой. Начав от выбора необходимого образца до точного заполнения персональных данных и доставки по России — все под полным контролем наших мастеров.
Всем, кто хочет найти быстрый способ получить необходимый документ, наша услуга предлагает выгодное решение. Приобрести аттестат – значит избежать продолжительного процесса обучения и не теряя времени перейти к своим целям: к поступлению в университет или к началу трудовой карьеры.
http://www.diplomans-rossians.com/
грязный usdt
Проверка USDT в прозрачность: Каким образом обезопасить свои криптовалютные финансы
Каждый день все больше граждан обращают внимание к безопасность собственных электронных средств. Постоянно мошенники придумывают новые способы кражи цифровых денег, и владельцы электронной валюты становятся пострадавшими своих подстав. Один из техник обеспечения безопасности становится проверка бумажников на наличие незаконных денег.
С каким намерением это важно?
В первую очередь, для того чтобы обезопасить собственные финансы от обманщиков и также украденных монет. Многие специалисты сталкиваются с риском потери личных активов вследствие обманных механизмов или хищений. Осмотр бумажников помогает выявить непрозрачные операции и также предотвратить возможные убытки.
Что наша группа предоставляем?
Наша компания предлагаем подход проверки криптовалютных кошельков а также транзакций для выявления источника средств. Наша технология анализирует данные для выявления незаконных операций и также оценки угрозы для вашего счета. Благодаря этой проверке, вы сможете избежать проблем с регулированием или обезопасить себя от участия в противозаконных переводах.
Как происходит процесс?
Наша команда работаем с передовыми аудиторскими организациями, вроде Cure53, с целью обеспечить точность наших проверок. Мы используем передовые технологии для выявления опасных транзакций. Ваши данные обрабатываются и сохраняются в соответствии с высокими нормами безопасности и конфиденциальности.
Как проверить свои USDT на чистоту?
При наличии желания подтвердить, что ваша Tether-кошельки нетронуты, наш сервис предлагает бесплатную проверку первых пяти кошельков. Просто введите местоположение своего кошелька в на нашем веб-сайте, или мы предложим вам детальный доклад о его положении.
Гарантируйте безопасность для вашими активы сегодня же!
Избегайте риска подвергнуться шарлатанов или оказаться в неприятную обстановку из-за противозаконных сделок. Обратитесь за помощью к нашему агентству, чтобы сохранить ваши электронные активы и предотвратить неприятностей. Примите первый шаг к безопасности криптовалютного портфеля сегодня!
tadalafil soft tablets 10 mg
purchase synthroid online
prescription tadalafil online
online pharmacy no prescription needed
safe online pharmacies
Проверка USDT на чистоту
Тестирование Тетер для чистоту: Каким образом сохранить личные криптовалютные финансы
Постоянно все больше пользователей обращают внимание к секурити своих цифровых активов. Ежедневно дельцы разрабатывают новые методы разграбления цифровых денег, или собственники криптовалюты оказываются пострадавшими их интриг. Один из методов защиты становится проверка кошельков на наличие противозаконных финансов.
С какой целью это потребуется?
Преимущественно, для того чтобы защитить личные активы от шарлатанов и похищенных денег. Многие вкладчики сталкиваются с риском потери личных средств вследствие хищных механизмов либо краж. Осмотр кошельков способствует выявить подозрительные транзакции и также предотвратить возможные убытки.
Что наша команда предлагаем?
Мы предлагаем услугу тестирования криптовалютных кошельков и также операций для определения происхождения фондов. Наша платформа исследует информацию для обнаружения противозаконных операций и оценки риска для вашего счета. Из-за этой проверке, вы сможете избежать проблем с регулированием и также защитить себя от участия в нелегальных сделках.
Как это действует?
Наша фирма сотрудничаем с ведущими проверочными агентствами, вроде Cure53, для того чтобы обеспечить точность наших проверок. Мы используем современные технологии для выявления рискованных операций. Ваши информация обрабатываются и сохраняются согласно с высокими нормами безопасности и конфиденциальности.
Как выявить собственные USDT в нетронутость?
Если хотите проверить, что ваши USDT-кошельки нетронуты, наш сервис предоставляет бесплатную проверку первых пяти кошельков. Просто вбейте положение личного кошелька в на сайте, а также наша команда предоставим вам детальный доклад о его статусе.
Обезопасьте вашими активы уже сейчас!
Не рискуйте подвергнуться обманщиков либо оказаться в неблагоприятную ситуацию из-за нелегальных транзакций. Свяжитесь с нашему сервису, для того чтобы обезопасить ваши криптовалютные активы и предотвратить сложностей. Предпримите первый шаг к сохранности вашего криптовалютного портфеля уже сегодня!
cheapest pharmacy for prescription drugs
Тетер – это неизменная цифровая валюта, связанная к национальной валюте, например USD. Это делает данный актив в особенности востребованной у инвесторов, поскольку данный актив предлагает надежность курса в условиях волатильности рынка цифровых активов. Все же, также как и другая форма криптовалюты, USDT изложена риску использования с целью легализации доходов и субсидирования неправомерных транзакций.
Отмывание денег путем криптовалюты превращается все более и более широко распространенным путем для того чтобы сокрытия происхождения капитала. Используя разносторонние методы, злоумышленники могут попытаться легализовывать незаконно завоеванные фонды через обменники криптовалют или смешиватели, чтобы осуществить процесс происхождение менее очевидным.
Поэтому, анализ USDT на чистоту становится весьма значимой мерой защиты для участников цифровых валют. Имеются специализированные сервисы, какие выполняют проверку сделок и бумажников, для того чтобы обнаружить ненормальные транзакции и нелегальные источники капитала. Данные услуги способствуют владельцам предотвратить непреднамеренного вовлечения в преступных действий и избежать блокировки счетов со стороны надзорных органов.
Анализ USDT на чистоту также как и способствует предохранить себя от убытков. Пользователи могут быть уверены в том, что их активы не связаны с противоправными операциями, что в свою очередь уменьшает вероятность блокировки аккаунта или перечисления денег.
Таким образом, в текущей ситуации возрастающей степени сложности криптовалютной среды необходимо принимать шаги для обеспечения безопасности своего капитала. Анализ USDT на чистоту при помощи специализированных сервисов представляет собой одним из способов противодействия финансирования преступной деятельности, обеспечивая пользователям криптовалют дополнительную защиту и защиты.
В поисках идеального промокода для ставок в онлайн-казино? 1Win предлагает уникальный код 937999, который не только увеличивает шансы на крупный выигрыш, но и делает игровой процесс еще более захватывающим. Вот ваше руководство по выбору и использованию промокода на 2024 год.
Преимущества использования промокода 1Win
Использование промокода 937999 1win casino промокоды открывает перед вами двери в мир больших возможностей:
Увеличение начального капитала: После активации промокода и выполнения условий отыгрыша, ваш первоначальный депозит может увеличиться до 500%, достигая суммы в 75 000 рублей.
Минимизация рисков: Некоторые промокоды позволяют застраховать вашу первую ставку, снижая потенциальные потери.
Кешбэк: Получайте обратно часть потраченных средств, что делает каждую игру менее рискованной.
Эксклюзивные розыгрыши: Промокод открывает доступ к специальным акциям и розыгрышам, где можно выиграть значительные призы.
Как выбрать промокод?
Выбор промокода – это не просто вопрос личных предпочтений, но и стратегическое решение. Вот несколько критериев, которые помогут вам сделать правильный выбор:
Срок действия: Убедитесь, что промокод актуален. Для 937999 срок действия истекает 31 декабря 2024 года.
Условия отыгрыша: Внимательно изучите условия, при которых вы сможете использовать бонусные средства.
Размер бонуса: Выбирайте промокоды, которые предлагают максимальную выгоду от вашего депозита.
Дополнительные возможности: Ищите промокоды, которые предоставляют дополнительные преимущества, такие как фрибеты или кешбэк.
Как использовать промокод?
Чтобы активировать промокод 937999 в 1Win, выполните следующие шаги:
Перейдите на сайт 1Win и начните процесс регистрации.
Заполните все необходимые поля в анкете.
Введите промокод 937999 в соответствующее поле.
Завершите регистрацию и внесите первый депозит.
Помните, что использование промокода – это отличный способ усилить ваш игровой опыт и увеличить шансы на успех. Выбирайте мудро и пусть удача всегда будет на вашей стороне!
metformin 500 mg price australia
1Win Приветственный Бонус (2024): Полное Руководство
Промокод 937999 от 1Win — это ваш ключ к миру больших возможностей. С этим кодом, при первом депозите, вы можете получить бонус в размере 500% до 200 000 рублей. Это уникальное предложение позволяет новым клиентам значительно увеличить свой игровой бюджет и получить максимальное удовольствие от игры в спорте и казино.
Как работает приветственный бонус?
1win coin получить промокод разделен на четыре этапа:
Первый депозит: Получите 200% от суммы депозита.
Второй депозит: Получите 150% от суммы второго депозита.
Третий депозит: Получите 100% от суммы.
Четвертый депозит: Получите 50% от суммы.
Максимальная сумма бонуса составляет 200,000 рублей, а максимальный бонус на один депозит — 50,000 рублей.
Как активировать промокод?
Чтобы активировать промокод 937999:
Зарегистрируйтесь на сайте 1Win.
Введите промокод при регистрации или дайте согласие на участие в акции, если промокод был предоставлен лично.
Пополните счет и начните играть, используя приветственный бонус.
Как отыграть бонус?
Чтобы отыграть бонусные средства:
Делайте ставки с коэффициентом от 3.
В случае выигрыша, 5% от бонусного счета переводится на ваш основной счет.
Пример:
Вы внесли 10 000 рублей и получили 20 000 рублей бонуса.
Сделали ставку с коэффициентом 3 и выиграли 30 000 рублей плюс 500 рублей бонуса.
Ваш счет теперь 30 500 рублей, а бонусный счет — 19 500 рублей.
Дополнительные бонусы и акции
1Win также предлагает различные акции и бонусы для любителей казино и экспресс-ставок. Следите за обновлениями на сайте, чтобы не пропустить самые выгодные предложения.
Обратите внимание: ставки с коэффициентом менее 3 не учитываются при отыгрыше бонуса.
В поисках идеального промокода для ставок в онлайн-казино? 1Win предлагает уникальный код 937999, который не только увеличивает шансы на крупный выигрыш, но и делает игровой процесс еще более захватывающим. Вот ваше руководство по выбору и использованию промокода на 2024 год.
Преимущества использования промокода 1Win
Использование промокода 937999 1win авиатор промокод открывает перед вами двери в мир больших возможностей:
Увеличение начального капитала: После активации промокода и выполнения условий отыгрыша, ваш первоначальный депозит может увеличиться до 500%, достигая суммы в 75 000 рублей.
Минимизация рисков: Некоторые промокоды позволяют застраховать вашу первую ставку, снижая потенциальные потери.
Кешбэк: Получайте обратно часть потраченных средств, что делает каждую игру менее рискованной.
Эксклюзивные розыгрыши: Промокод открывает доступ к специальным акциям и розыгрышам, где можно выиграть значительные призы.
Как выбрать промокод?
Выбор промокода – это не просто вопрос личных предпочтений, но и стратегическое решение. Вот несколько критериев, которые помогут вам сделать правильный выбор:
Срок действия: Убедитесь, что промокод актуален. Для 937999 срок действия истекает 31 декабря 2024 года.
Условия отыгрыша: Внимательно изучите условия, при которых вы сможете использовать бонусные средства.
Размер бонуса: Выбирайте промокоды, которые предлагают максимальную выгоду от вашего депозита.
Дополнительные возможности: Ищите промокоды, которые предоставляют дополнительные преимущества, такие как фрибеты или кешбэк.
Как использовать промокод?
Чтобы активировать промокод 937999 в 1Win, выполните следующие шаги:
Перейдите на сайт 1Win и начните процесс регистрации.
Заполните все необходимые поля в анкете.
Введите промокод 937999 в соответствующее поле.
Завершите регистрацию и внесите первый депозит.
Помните, что использование промокода – это отличный способ усилить ваш игровой опыт и увеличить шансы на успех. Выбирайте мудро и пусть удача всегда будет на вашей стороне!
Приветствуем вас, друзья!
Компания XRumer Inc предлагает свои услуги по СЕО продвижению.
Ваш интернет-сайт, как мы заметили, еще только набирает обороты. Чтобы ускорить его рост, готовы предложить наши услуги по SEO-оптимизации. Также у нас имеются недорогие и качественные инструменты для SEO-специалистов. У наших специалистов большой опыт, в арсенале имеются успешные кейсы – покажем по запросу.
На данный момент можем предложить скидку на все услуги – 10%.
Услуги нашей компании:
– Трастовые ссылки (необходимо каждому сайту) – цена 1500-5000 руб
– Размещаем 2500 безанкорных ссылок (рекомендуем для всех сайтов) – 3.900 р
– Качественный прогон по 110 тысячам сайтам в зоне RU (очень полезно для сайтов) – 2.900 рублей
– Размещение 150 постов в VK о вашем сайте (отличная реклама) – 3900 р
– Статьи про ваш сайт на 300 интернет-форумах (мощная раскрутка портала) – 29000 рублей
– СуперПостинг – грандиозный прогон на 3 млн ресурсов (мощный прогон для ваших сайтов) – 39900 рублей
– Рассылка рекламных сообщений по сайтам через форму обратной связи – цена по договоренности, в зависимости от объема.
С любыми вопросами обращайтесь, подскажем. принимаем usdt
Telegrm: @exrumer
Skype: Loves.ltd
www: https://XRumer.cc
Hi there, I enjoy reading through your article post.
I wanted to write a little comment to support you.
zestril coupon
Промокод 1Win на сегодня, 2024 год – 937999. При регистрации с использованием этого кода активируется приветственный бонус в размере 500% до 75 000 рублей. Это специальное предложение от букмекера 1Win позволяет новым игрокам получить дополнительные привилегии и бонусы.
1Win – это платформа, которая радует своих пользователей разнообразными акциями. В 2024 году они предлагают следующие привлекательные бонусы для новичков:
Бездепозитные бонусы: Получите бонусы без необходимости внесения депозита.
Фриспины: Бесплатные вращения на слотах.
Фрибет бонусы: Возможность сделать бесплатные ставки.
Кэшбэк: Возврат части потерянных средств.
Промокод 937999 следует ввести при регистрации, чтобы получить максимальный бонус. Не упустите шанс увеличить свой баланс и наслаждаться игрой на 1Win!
1win 1вин промокод рф используйте промокод 937999, чтобы получить максимальный бонус в размере 500% до 75 000 рублей. Этот код активирует приветственный бонус, который будет зачислен на два бонусных счета одновременно: на счета “Ставки” и “Казино”.
Важно учесть следующие особенности и предостережения при использовании промокода:
Различные поводы: Промокоды в 1Win выдаются по разным поводам, таким как акции, специальные события или дни рождения клиентов.
Активация и доступ к бонусам: После активации промокода при регистрации бонусные средства станут доступны после входа в ваш профиль. Личные промокоды требуют вашего согласия на участие в предложении.
Конвертация в реальные деньги: Бонусы будут зачислены на ваш бонусный счет с указанием доступной суммы в личном кабинете. При выполнении условий использования бонусов вы сможете конвертировать их в реальные деньги, которые дополнят ваш выигрыш.
Будьте бдительны: При поиске промокодов обращайте внимание на источник информации. Некоторые мошенники предлагают “бесплатные” промокоды с целью получить ваши личные данные. Регистрируйтесь и вводите информацию только на официальном сайте 1Win.
glucophage 500mg cheap
cialis for sale uk
В поисках идеального промокода для ставок в онлайн-казино? 1Win предлагает уникальный код 937999, который не только увеличивает шансы на крупный выигрыш, но и делает игровой процесс еще более захватывающим. Вот ваше руководство по выбору и использованию промокода на 2024 год.
Преимущества использования промокода 1Win
Использование промокода 937999 куда вводить промокод 1win открывает перед вами двери в мир больших возможностей:
Увеличение начального капитала: После активации промокода и выполнения условий отыгрыша, ваш первоначальный депозит может увеличиться до 500%, достигая суммы в 75 000 рублей.
Минимизация рисков: Некоторые промокоды позволяют застраховать вашу первую ставку, снижая потенциальные потери.
Кешбэк: Получайте обратно часть потраченных средств, что делает каждую игру менее рискованной.
Эксклюзивные розыгрыши: Промокод открывает доступ к специальным акциям и розыгрышам, где можно выиграть значительные призы.
Как выбрать промокод?
Выбор промокода – это не просто вопрос личных предпочтений, но и стратегическое решение. Вот несколько критериев, которые помогут вам сделать правильный выбор:
Срок действия: Убедитесь, что промокод актуален. Для 937999 срок действия истекает 31 декабря 2024 года.
Условия отыгрыша: Внимательно изучите условия, при которых вы сможете использовать бонусные средства.
Размер бонуса: Выбирайте промокоды, которые предлагают максимальную выгоду от вашего депозита.
Дополнительные возможности: Ищите промокоды, которые предоставляют дополнительные преимущества, такие как фрибеты или кешбэк.
Как использовать промокод?
Чтобы активировать промокод 937999 в 1Win, выполните следующие шаги:
Перейдите на сайт 1Win и начните процесс регистрации.
Заполните все необходимые поля в анкете.
Введите промокод 937999 в соответствующее поле.
Завершите регистрацию и внесите первый депозит.
Помните, что использование промокода – это отличный способ усилить ваш игровой опыт и увеличить шансы на успех. Выбирайте мудро и пусть удача всегда будет на вашей стороне!
1Win Приветственный Бонус (2024): Полное Руководство
Промокод 937999 от 1Win — это ваш ключ к миру больших возможностей. С этим кодом, при первом депозите, вы можете получить бонус в размере 500% до 200 000 рублей. Это уникальное предложение позволяет новым клиентам значительно увеличить свой игровой бюджет и получить максимальное удовольствие от игры в спорте и казино.
Как работает приветственный бонус?
промокод для авиатор 1win разделен на четыре этапа:
Первый депозит: Получите 200% от суммы депозита.
Второй депозит: Получите 150% от суммы второго депозита.
Третий депозит: Получите 100% от суммы.
Четвертый депозит: Получите 50% от суммы.
Максимальная сумма бонуса составляет 200,000 рублей, а максимальный бонус на один депозит — 50,000 рублей.
Как активировать промокод?
Чтобы активировать промокод 937999:
Зарегистрируйтесь на сайте 1Win.
Введите промокод при регистрации или дайте согласие на участие в акции, если промокод был предоставлен лично.
Пополните счет и начните играть, используя приветственный бонус.
Как отыграть бонус?
Чтобы отыграть бонусные средства:
Делайте ставки с коэффициентом от 3.
В случае выигрыша, 5% от бонусного счета переводится на ваш основной счет.
Пример:
Вы внесли 10 000 рублей и получили 20 000 рублей бонуса.
Сделали ставку с коэффициентом 3 и выиграли 30 000 рублей плюс 500 рублей бонуса.
Ваш счет теперь 30 500 рублей, а бонусный счет — 19 500 рублей.
Дополнительные бонусы и акции
1Win также предлагает различные акции и бонусы для любителей казино и экспресс-ставок. Следите за обновлениями на сайте, чтобы не пропустить самые выгодные предложения.
Обратите внимание: ставки с коэффициентом менее 3 не учитываются при отыгрыше бонуса.
tags
For the reason that the admin of this site is working, no hesitation very shortly it will be famous, due to its
quality contents.
wonderful points altogether, you simply received a emblem new reader.
What could you suggest about your publish that you made a few days ago?
Any sure?
synthroid 0.1 mg
trustworthy online pharmacy
九州娛樂城
cá cược thể thao
cá cược thể thao
мебель для диспетчерских центров http://www.oborudovanie-dispetcherskih-centrov.ru .
Potent Backlinks in Blogs and Comments: Improve Your SEO
Links are essential for enhancing search engine rankings and raising web site visibility. By incorporating hyperlinks into blogs and comments wisely, they can considerably boost targeted traffic and SEO efficiency.
Adhering to Search Engine Algorithms
The current day’s backlink positioning strategies are finely adjusted to align with search engine algorithms, which now prioritize website link high quality and relevance. This ensures that backlinks are not just numerous but meaningful, guiding users to beneficial and pertinent content material. Website owners should focus on integrating hyperlinks that are contextually suitable and enhance the overall content quality.
Rewards of Making use of Fresh Contributor Bases
Utilizing up-to-date contributor bases for hyperlinks, like those managed by Alex, provides significant advantages. These bases are regularly refreshed and consist of unmoderated sites that don’t attract complaints, ensuring the links positioned are both powerful and agreeable. This approach will help in maintaining the usefulness of hyperlinks without the pitfalls linked with moderated or problematic resources.
Only Authorized Resources
All donor sites used are approved, steering clear of legal pitfalls and sticking to digital marketing standards. This commitment to utilizing only approved resources ensures that each backlink is genuine and trustworthy, thereby constructing trustworthiness and reliability in your digital presence.
SEO Impact
Expertly positioned backlinks in weblogs and comments provide greater than just SEO advantages—they boost user experience by linking to pertinent and high-quality articles. This technique not only meets search engine conditions but also engages end users, leading to far better traffic and improved online proposal.
In substance, the right backlink strategy, especially one that employs fresh and trustworthy donor bases like Alex’s, can change your SEO efforts. By focusing on good quality over quantity and adhering to the newest requirements, you can ensure your backlinks are both potent and productive.
synthroid 025 mg
buy lisinopril 10 mg
lisinopril 80 mg
cá cược thể thao
Backlink pyramid
Sure, here’s the text with spin syntax applied:
Backlink Pyramid
After several updates to the G search engine, it is essential to employ different strategies for ranking.
Today there is a means to capture the attention of search engines to your site with the help of inbound links.
Links are not only an effective advertising tool but they also have organic traffic, immediate sales from these sources possibly will not be, but transitions will be, and it is advantageous traffic that we also receive.
What in the end we get at the final outcome:
We present search engines site through links.
Prluuchayut organic transitions to the site and it is also a sign to search engines that the resource is used by users.
How we show search engines that the site is profitable:
Links do to the primary page where the main information.
We make backlinks through redirects trusted sites.
The most ESSENTIAL we place the site on sites analytical tools individual tool, the site goes into the memory of these analysis tools, then the obtained links we place as redirections on blogs, discussion boards, comment sections. This significant action shows search engines the site map as analyzer sites show all information about sites with all keywords and headings and it is very BENEFICIAL.
All information about our services is on the website!
usdt не чистое
Проверка Тетер для прозрачность: Каковым способом защитить свои электронные финансы
Постоянно все больше граждан придают важность на надежность собственных криптовалютных средств. День ото дня обманщики предлагают новые методы хищения цифровых средств, и владельцы электронной валюты оказываются пострадавшими своих подстав. Один из подходов обеспечения безопасности становится проверка кошельков в присутствие нелегальных денег.
Для чего это важно?
В первую очередь, чтобы обезопасить свои активы от мошенников или украденных монет. Многие специалисты сталкиваются с потенциальной угрозой утраты своих финансов по причине хищных планов либо кражей. Проверка кошельков способствует выявить подозрительные действия или предотвратить потенциальные потери.
Что мы предлагаем?
Наша компания предлагаем услугу проверки криптовалютных кошельков и также транзакций для определения источника средств. Наша платформа анализирует информацию для определения незаконных операций и проценки риска для вашего портфеля. Благодаря этой проверке, вы сможете избегать проблем с регуляторами или защитить себя от участия в противозаконных операциях.
Как это работает?
Наша фирма работаем с ведущими проверочными фирмами, наподобие Kudelsky Security, чтобы обеспечить точность наших проверок. Мы применяем современные техники для выявления опасных операций. Ваши данные проходят обработку и сохраняются в соответствии с высокими нормами безопасности и конфиденциальности.
Каким образом проверить собственные Tether на прозрачность?
При наличии желания подтвердить, что ваши USDT-кошельки чисты, наш сервис предлагает бесплатную проверку первых пяти бумажников. Легко введите местоположение вашего кошелька на на нашем веб-сайте, или наш сервис предоставим вам детальный отчет о его статусе.
Охраняйте ваши активы уже сейчас!
Избегайте риска стать жертвой шарлатанов или оказаться в неприятную ситуацию по причине незаконных сделок. Посетите нам, для того чтобы обезопасить ваши электронные средства и предотвратить неприятностей. Примите первый шаг к безопасности вашего криптовалютного портфеля уже сегодня!
Found a captivating read that I’d like to recommend to you http://4asdaiprognoza.listbb.ru/viewtopic.php?f=2&t=471
metformin over the counter without a prescription
tadalafil tablets 20 mg uk